Deploy Firewall Threat Defense Container in Docker Environment

Prerequisites to Deploy Firewall Threat Defense Container in Docker Environment

Following are the prerequisites to deploy Firewall Threat Defense container in a Docker environment:

  • Operating System: Ubuntu, Version - 20.04 LTS (minimum), 22.04 LTS (maximum)

  • Docker Version: 26.1.3 or later

  • Storage Requirements: Use high-performance storage (SSD/NVMe) for the Docker host.

    Note: HDD-based storage is not supported, as slower disks may cause lina process failures during startup, particularly when using SR-IOV.

  • Network Configuration: Configure a Docker network with macvlan driver for container deployment.

  • Network Interfaces: Allocate at least three virtual interfaces on the Docker host for FTD container operations.

  • Host Management Access: Configure a management interface on the Docker host to allow SSH access.

  • Memory Configuration: Enable Hugepages on the Docker host. Allocate minimum of 2048 hugepages on the host.

For more information on general Docker operations mentioned in these prerequisites, refer to Docker documentation.
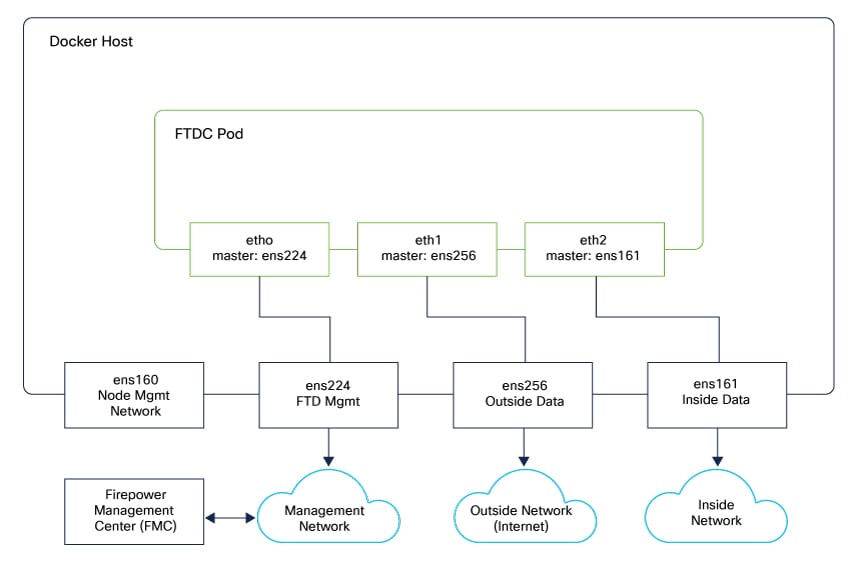
Sample Topology to Deploy Firewall Threat Defense Container in Docker Environment

The diagram shows an FTD container deployed on an Ubuntu-based Docker host, connected to multiple network segments.

  • The management interface is used to communicate with the Management Center.

  • The inside interface connects to the inside endpoint network.

  • The outside interface connects to the outside endpoint network.

Deploy Firewall Threat Defense Container in Docker Environment

Perform this procedure to deploy Firewall Threat Defense container (FTDc) in Docker environment.

Procedure


Step 1

Set up the requirements mentioned in the Prerequisites.

Step 2

Use the ifconfig command to verify the network interface configuration. In this example, ens160 is the node’s management interface. The interfaces ens192, ens224, and ens256, are mapped to the FTDc interfaces.

Note


The outputs shown are sample outputs.

Make sure that one interface is used for management and a minimum of two interfaces are available for data traffic.

$ ifconfig
ens160: flags=4163<UP,BROADCAST,RUNNING,MULTICAST> mtu 1500
        inet6 fe80::250:56ff:fe9d:6125 prefixlen 64 scopeid 0x20<link> 
        ether 00:50:56:9d:61:25 txqueuelen 1000 (Ethernet)
        RX packets 317297807 bytes 447854277676 (447.8 GB)
        RX errors 0 dropped 2100 overruns 0 frame 0
        TX packets 5517880 bytes 378756756 (378.7 MB)
        TX errors 0 dropped 0 overruns 0 carrier 0 collisions 0

ens192: flags=4163<UP,BROADCAST,RUNNING,MULTICAST> mtu 1500
        inet 10.10.3.4 netmask 255.255.255.224 broadcast 10.10.3.31 
        inet6 fe80::250:56ff:fe9d:fa1c prefixlen 64 scopeid 0x20<link> ether 00:50:56:9d:fa:1c txqueuelen 1000 (Ethernet)
        RX packets 70324790 bytes 30189381762 (30.1 GB)
        RX errors 0 dropped 2437 overruns 0 frame 0
        TX packets 60676399 bytes 16108954006 (16.1 GB)
        TX errors 0 dropped 0 overruns 0 carrier 0 collisions 0

ens224: flags=4163<UP,BROADCAST,RUNNING,MULTICAST> mtu 1500
        inet6 fe80::250:56ff:fe9d:2cbe prefixlen 64 scopeid 0x20<link> 
        ether 00:50:56:9d:2c:be txqueuelen 1000 (Ethernet)
        RX packets 489699 bytes 41669463 (41.6 MB)
        RX errors 0 dropped 1969 overruns 0 frame 0
        TX packets 285031 bytes 23421780 (23.4 MB)
        TX errors 0 dropped 0 overruns 0 carrier 0 collisions 0

ens256: flags=4163<UP,BROADCAST,RUNNING,MULTICAST> mtu 1500
        inet6 fe80::250:56ff:fe9d:92ba prefixlen 64 scopeid 0x20<link> 
        ether 00:50:56:9d:92:ba txqueuelen 1000 (Ethernet)
        RX packets 7023252 bytes 8223100366 (8.2 GB)
        RX errors 0 dropped 2145 overruns 0 frame 0
        TX packets 31481074 bytes 44913129384 (44.9 GB)
        TX errors 0 dropped 0 overruns 0 carrier 0 collisions 0

Step 3

Use the cat command to verify that hugepages are configured correctly.

$ cat /proc/meminfo | grep -E 'HugePages_Total|HugePages_Free'

Expected output (example):

HugePages_Total: 2048
HugePages_Free: 2048

Ensure HugePages_Total is equal to the value configured (for example: 2048).

Ensure HugePages_Free is less than or equal to HugePages_Total, as per your configuration.

Step 4

Download the Threat Defense docker tar bundle that includes the Threat Defense container image from software.cisco.com.

Step 5

Load the docker tar bundle on the host. Verify that the FTDc image is successfully loaded.

$ docker load -i ftdc-<version>.tar
$ docker images

Step 6

Download the templates and other files from the Docker folder in the FTDc GitHub repository.

Step 7

Copy the deploy-FTDc folder to the Docker host.

Edit interface mapping: ftdc_shared/interface-config

  • Edit ftdc_shared/interface-config for SR-IOV mode.

    Set iface_id to the PCI ID of the desired VF and uio_driver to vfio-pci:

    [interface0]
    iface_id = 0b:0a.0;
    uio_driver = vfio-pci;
    [interface1]
    iface_id = 0b:0a.1;
    uio_driver = vfio-pci;
  • Edit ftdc_shared/interface-config for macvlan mode.

    [interface0]
    iface_id = eth1;
    uio_driver = afpacket;
    [interface1]
    iface_id = eth2;
    uio_driver = afpacket

Step 8

Configure Day-0 parameters.

ftdc_shared/day0.json

The day0.json file provides initial bootstrap configuration for FTDc.

Default Configuration (day0.json):

{ 
"EULA": "accept", 
"Hostname": "cisco-ftdc", 
"AdminPassword": "<PASSWORD>", 
"FirewallMode": "routed", 
"DNS1": "208.67.222.222", 
"Diagnostic": "OFF", 
"IPv4Mode": "DHCP", 
"IPv4Addr": "", 
"IPv4Mask": "", 
"IPv4Gw": "", 
"FmcIp": "DONTRESOLVE", 
"FmcRegKey": "docker",  
"FmcNatId": "docker"
}

Step 9

Deploy FTDc.

FTDc supports two deployment modes:

  • Deploy using host network.

    Ensure eth0 (management) and at least two additional interfaces for data are available in the host.

    Use the following command:

    ./deploy_ftdc_host_network.sh --version <version> [--cpus <num>] [--memory <mb>]

    Or

    ./deploy_ftdc_host_network.sh -v <version> [-C <num>] [-M <mb>]

    Examples:

    Use defaults (4 CPUs, 8192 MB)

    ./deploy_ftdc_host_network.sh --version latest

    ./deploy_ftdc_host_network.sh -v latest

    Custom resources (8 CPUs, 16 GB)

    ./deploy_ftdc_host_network.sh --version latest --cpus 8 --memory 16384

    ./deploy_ftdc_host_network.sh -v latest -C 8 -M 16384

  • Deploy using Docker network

    • Create Docker networks

      Management network (mandatory)

      docker network create -d macvlan \
      --subnet=10.10.4.0/24 \
      -o parent=eth0 \
      mgmt0

      Data networks (minimum 2 interfaces required)

      docker network create -d macvlan \
        --subnet=10.10.10.0/24 \
        --ipv4=false \
        -o parent=ens192 \
        data0
      docker network create -d macvlan \
        --subnet=10.10.20.0/24 \
        --ipv4=false \
        -o parent=ens224 \
        data1

      Note

       
      • Minimum: 2 data networks

      • Maximum: 9 data networks

      • Ensure MTU 9000 is configured on all parent interfaces before creating Docker networks.

      • Data interfaces do not receive IP addresses from Docker. IP addresses are assigned through Management Center after deployment.

    • Deploy container

      ./deploy_ftdc_docker_network.sh \
      --version <version> \
      --mgmt-net <network> \
      --mgmt-ip <ip> \
      --data-net <network> \
      --data-net <network> \
      [--cpus <num>] \
      [--memory <mb>]

      Example:

      Minimum networks (2 data), default resources (4 CPUs, 8192 MB)

      ./deploy_ftdc_docker_network.sh --version latest --mgmt-net mgmt0 --mgmt-ip 192.168.1.100 --data-net data0 --data-net data1

      ./deploy_ftdc_docker_network.sh -v latest -m mgmt0 -i 192.168.1.100 -d data0 -d data1

      Maximum networks (9 data), custom resources (8 CPUs, 16 GB)

      ./deploy_ftdc_docker_network.sh --version latest --mgmt-net mgmt0 --mgmt-ip 192.168.1.100 --data-net data0 --data-net data1 [--data-net ... up to 7 more] --cpus 8 --memory 16384

      ./deploy_ftdc_docker_network.sh -v latest -m mgmt0 -i 192.168.1.100 -d data0 -d data1 [-d ... up to 7 more] -C 8 -M 16384

      Note


      Default resources: 4 CPUs, 8192 MB RAM

      Minimum number of interfaces: 1 management interface, minimum of 2 data interfaces

      Maximum number of interfaces: 1 management and 9 data interfaces

    • Deploy using SR-IOV network

      Edit ftdc_shared/interface-config for SR-IOV mode.

      Set iface_id to the PCI ID of the desired VF and uio_driver to vfio-pci:

      [interface0]
      iface_id = 0b:0a.0;
      uio_driver = vfio-pci;
      [interface1]
      iface_id = 0b:0a.1;
      uio_driver = vfio-pci;

      Use the following command to deploy FTDc with SR-IOV interfaces.

      ./deploy_ftdc_docker_network.sh \
      --version <version> \
      --mgmt-net <network> \
      --mgmt-ip <ip> \
      [--cpus <num>] \
      [--memory <mb>] \
      -sriov

      Example:

      ./deploy_ftdc_docker_network.sh --version 10.0.0-14 -C 8 -M 16384 --mgmt-net ftdc-mgmt --mgmt-ip 192.168.123.100 -sriov


Verify and Access Firewall Threat Defense Container in Docker Environment

Verify deployment status:

Verify and access the FTD container.

Verify that the FTD container is successfully deployed and running by using the following command:

$ docker ps -a

Ensure that the FTD container is in the running state.

Access the FTD container using the following command:

docker attach ftdc

This will provide you with access to the FTDc CLI (clish).