Deploy the ASA Virtual on AWS

You can deploy the ASA Virtual on the Amazon Web Services (AWS) cloud.


Important


Beginning with 9.13(1), any ASA Virtual license now can be used on any supported ASA Virtual vCPU/memory configuration. This allows the ASA Virtual customers to run on a wide variety of VM resource footprints. This also increases the number of supported AWS instances types.


Overview

The ASA Virtual runs the same software as physical ASAs to deliver proven security functionality in a virtual form factor. The ASA Virtual can be deployed in the public AWS cloud. It can then be configured to protect virtual and physical data center workloads that expand, contract, or shift their location over time.

The ASA Virtual support the following AWS instance types.

Table 1. AWS Supported Instance Types and ASA Virtual Versions

AWS Instance type

Attributes

Maximum Number of Interfaces

ASA Virtual Version

vCPUs

Memory (GB)

c3.large

2

3.75

3

9.12 and earlier

c3.xlarge

4

7.5

4

9.12 and earlier

c3.2xlarge

8

15

4

9.13 and later

c4.large

2

3.75

3

9.12 and earlier

c4.xlarge

4

7.5

4

9.12 and earlier

c4.2xlarge

8

15

4

9.13 and later

c5.large

2

4

3

9.13 and later

c5.xlarge

4

8

4

9.13 and later

c5.2xlarge

8

16

4

9.13 and later

c5.4xlarge

16

32

8

9.14 and later

c5a.large

2

4

3

9.17 and later

c5a.xlarge

4

8

4

9.17 and later

c5a.2xlarge

8

16

4

9.17 and later

c5a.4xlarge

16

32

8

9.17 and later

c5ad.large

2

4

3

9.17 and later

c5ad.xlarge

4

8

4

9.17 and later

c5ad.2xlarge

8

16

4

9.17 and later

c5ad.4xlarge

16

32

8

9.17 and later

c5d.large

2

4

3

9.17 and later

c5d.xlarge

4

8

4

9.17 and later

c5d.2xlarge

8

16

4

9.17 and later

c5d.4xlarge

16

32

8

9.17 and later

c5n.large

2

5.3

3

9.13 and later

c5n.xlarge

4

10.5

4

9.13 and later

c5n.2xlarge

8

21

4

9.13 and later

c5n.4xlarge

16

42

8

9.13 and later

m4.large

2

8

2

9.12 and later

m4.xlarge

4

16

4

9.12 and later

m4.2xlarge

8

32

4

9.13 and later

m5n.large

2

8

3

9.17 and later

m5n.xlarge

4

16

4

9.17 and later

m5n.2xlarge

8

32

4

9.17 and later

m5n.4xlarge

16

64

8

9.17 and later

m5zn.large

2

8

3

9.17 and later

m5zn.xlarge

4

16

4

9.17 and later

m5zn.2xlarge

8

32

4

9.17 and later


Tip


If you are using M4 or C4 instance type, then we recommend that you migrate to M5 or C5 instance type that uses Nitro hypervisor and Elastic Network Adapter (ENA) interface drivers for improved performance.


Tip


If you are using C4 instance type, then we recommend that you migrate to C5 instance type that uses Nitro hypervisor and Elastic Network Adapter (ENA) interface drivers for improved performance.


Note


  • By default, ASA Virtual instances are deployed with Secure Boot enabled.

  • If the selected instance type supports only the BIOS mode, then the ASA Virtual instance will boot up with BIOS mode.


Table 2. ASA Virtual Licensed Feature Limits Based on Entitlement

Performance Tier

Instance type (Core/RAM)

Rate Limit

RA VPN Session Limit

ASAv5

c5.large

2 core/4 GB

100 Mbps

50

ASAv10

c5.large

2 core/4 GB

1 Gbps

250

ASAv30

c5.xlarge

4 core/8 GB

2 Gbps

750

ASAv50

c5.2xlarge

8 core/16 GB

10 Gbps

10,000

ASAv100

c5n.4xlarge

16 core/42 GB

16 Gbps

20,000

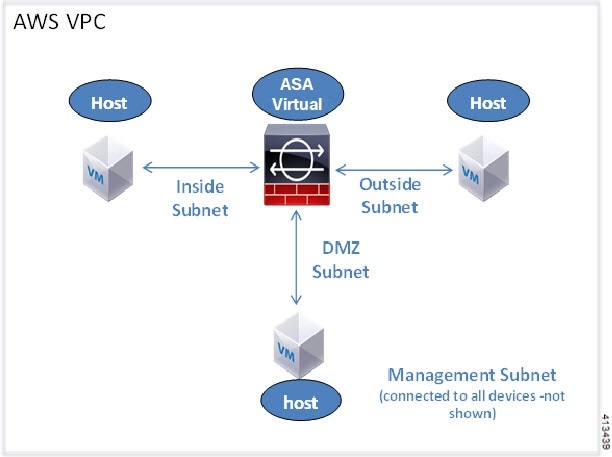
You create an account on AWS, set up the ASA Virtual using the AWS Wizard, and chose an Amazon Machine Image (AMI). The AMI is a template that contains the software configuration needed to launch your instance.


Important


The AMI images are not available for download outside of the AWS environment.


Prerequisites

  • Create an account on aws.amazon.com.

  • License the ASA Virtual. Until you license the ASA Virtual, it will run in degraded mode, which allows only 100 connections and throughput of 100 Kbps. See Licensing for the ASA Virtual.


    Note


    All the default License entitlements offered by Cisco, previously for ASA Virtual, will have the IPv6 configuration support.


  • Interface requirements:

    • Management interface

    • Inside and outside interfaces

    • (Optional) Additional subnet (DMZ)

  • Communications paths:

    • Management interface—Used to connect the ASA Virtual to the ASDM; can’t be used for through traffic.

    • Inside interface (required)—Used to connect the ASA Virtual to inside hosts.

    • Outside interface (required)—Used to connect the ASA Virtual to the public network.

    • DMZ interface (optional)—Used to connect the ASA Virtual to the DMZ network when using the c3.xlarge interface.

  • For ASA Virtual system requirements, see Cisco Secure Firewall ASA Compatibility.

Guidelines and Limitations

Supported Features

The ASA Virtual on AWS supports the following features:

  • Support for Amazon EC2 C5 instances, the next generation of the Amazon EC2 Compute Optimized instance family.

  • Deployment in the Virtual Private Cloud (VPC)

  • Enhanced networking (SR-IOV) where available

  • Deployment from Amazon Marketplace

  • User deployment of L3 networks

  • Routed mode (default)

  • IPv6

  • Amazon CloudWatch

  • Clustering

Unsupported Features

The ASA Virtual on AWS does not support the following:

  • Console access (management is performed using SSH or ASDM over network interfaces)

  • VLAN

  • Promiscuous mode (no sniffing or transparent mode firewall support)

  • Multiple context mode

  • ASA Virtual native HA

  • EtherChannel is only supported on direct physical interfaces

  • VM import/export

  • Hypervisor agnostic packaging

  • VMware ESXi

  • Broadcast/multicast messages

    These messages are not propagated within AWS so routing protocols that require broadcast/multicast do not function as expected in AWS. VXLAN can operate only with static peers.

  • Gratuitous/unsolicited ARPs

    These ARPS are not accepted within AWS so NAT configurations that require gratuitous ARPs or unsolicited ARPs do not function as expected.

Upgrade Restrictions and Limitations

Revert upgrade restrictions


Caution


Revert upgrades are blocked.
  • Once upgraded to ASA Virtual 9.24 or later, downgrading to versions earlier than 9.24 is not supported.

  • The users using the ASA Virtual older than 9.24 must upgrade to 9.24 before they further upgrade to the future releases (9.25 and above).

Configuration Migration and SSH Authentication

Upgrade impact when using SSH public key authentication—Due to updates to SSH authentication, additional configuration is required to enable SSH public key authentication; as a result, existing SSH configurations using public key authentication no longer work after upgrading. Public key authentication is the default for the ASA Virtual on Amazon Web Services (AWS), so AWS users will see this issue. To avoid loss of SSH connectivity, you can update your configuration before you upgrade. Or you can use ASDM after you upgrade (if you enabled ASDM access) to fix the configuration.

The following is a sample original configuration for a username "admin":


username admin nopassword privilege 15
username admin attributes
  ssh authentication publickey 55:06:47:eb:13:75:fc:5c:a8:c1:2c:bb:
  07:80:3a:fc:d9:08:a9:1f:34:76:31:ed:ab:bd:3a:9e:03:14:1e:1b hashed

To use the ssh authentication command, before you upgrade, enter the following commands:


aaa authentication ssh console LOCAL
username admin password <password> privilege 15

We recommend setting a password for the username as opposed to keeping the nopassword keyword, if present. The nopassword keyword means that any password can be entered, not that no password can be entered. Prior to 9.6(2), the aaa command was not required for SSH public key authentication, so the nopassword keyword was not triggered. Now that the aaa command is required, it automatically also allows regular password authentication for a username if the password (or nopassword) keyword is present.

After you upgrade, the username command no longer requires the password or nopassword keyword; you can require that a user cannot enter a password. Therefore, to force public key authentication only, re-enter the username command:


username admin privilege 15

Sample Network Topology

The following figure shows the recommended topology for the ASA Virtual in Routed Firewall Mode with four subnets configured in AWS for the ASA Virtual (management, inside, outside, and DMZ).

Figure 1. Sample ASA Virtual on AWS Deployment

IPv6 Topology

Deploy ASA Virtual

The following procedure provides a top-level list of steps to set up AWS on ASA Virtual. For detailed steps, see Getting Started with AWS.

Procedure


Step 1

Log in to aws.amazon.com and choose your region.

Note


AWS is divided into multiple regions that are isolated from each other. The regions are displayed on the upper-right corner of your page. Resources available in one region do not appear in another region. Check periodically to make sure you are in the intended region.

Step 2

Click My Account > AWS Management Console, and under Networking, click VPC > Start VPC Wizard, and create your VPC by choosing a single private subnet, and set up the following (use the default settings unless otherwise specified):

  • Inside and Outside subnet—Enter a name for the VPC and the subnets.

  • Internet Gateway—Enter the name of the Internet gateway. It enables direct connectivity over the internet.

  • Outside table—Add an entry to enable outbound traffic to the internet (add 0.0.0.0/0 to the internet gateway).

Note


Virtual Networks, Subnets, Interface, etc., cannot be created by using IPv6 alone. The IPv4 is used by default, and IPv6 can be enabled along with it. For more information on IPv6, see AWS IPv6 Overview and AWS VPC Migration.

Step 3

Click My Account > AWS Management Console > EC2, and then click Create an Instance.

  • Select your AMI, for example, Ubuntu Server 14.04 LTS.

    Use the AMI identified in the your image delivery notification.

  • Choose the instance type supported by ASA Virtual, for example, c3.large.

  • Configure the instance (CPUs and memory are fixed).

  • Expand the Advanced Details section, and in the optional User data field you can enter the Day 0 configuration, which is the text input containing the ASA Virtual configuration applied when the ASA Virtual is launched. For more information on Day 0 configuration with more information, such as Smart Licensing, see Prepare the Day 0 Configuration File.

    • Management interface: If you choose to provide the Day 0 configuration details, you must provide management interface details, which should be configured to use DHCP.

    • Data interfaces: IP addresses for the data interfaces will be assigned and configured only if you provide that information as part of the Day 0 configuration. Data interfaces can be configured to use DHCP, or if the network interfaces to be attached are already created and the IP addresses that are known, you can provide the IP address details in the Day 0 configuration.

    • Without Day 0 Configuration: If you deploy the ASA Virtual without providing the Day 0 configuration, ASA Virtual applies the default ASA Virtual configuration where it fetches the IP addresses of the attached interfaces from the AWS metadata server and allocates the IP addresses (the data interfaces get the IP addresses assigned but the ENIs will be down). The Management0/0 interface will be up and gets the IP address configured with the DHCP address. See IP Addressing in your VPC for information about Amazon EC2 and Amazon VPC IP addressing.

      Sample Day 0 Configuration -

      
      ! ASA Version 9.x.1.200
      !
      interface management0/0
      management-only
      nameif management
      security-level 100
      ip address dhcp setroute
      ipv6 enable
      ipv6 address dhcp default
      no shutdown
      !
      !
      GWLB facing VTEP interface
      interface TenGigabitEthernet0/0
      nameif data-interface-in
      security-level 100
      ip address dhcp
      no shut
      
      !
      Internet-facing outside interface 
      interface TenGigabitEthernet0/1
      nameif data-interface-out
      security-level 0
      ip address dhcp
      no shut
      
      nve 1
      encapsulation geneve
      source-interface data-interface-in
      interface vni1
      proxy dual-arm
      nameif vni-in
      security-level 0
      vtep-nve 1
      ! NAT for internet-bound traffic
      nat (vni-in, data-interface-out) source dynamic any interface
      !Default route to internet gateway= 10.1.200.1 (Outside gateway)
      !Route East-West traffic (Application subnet CIDR) back to vni interface (U-turn)
      route data-interface-out 0.0.0.0 0.0.0.0 10.1.200.1 
      route vni-in 192.168.1.0 255.255.255.0 10.1.100.1 1
      !
      mtu data-interface-in 1826
      jumbo-frame reservation
      same-security-traffic permit inter-interface
      same-security-traffic permit intra-interface
      
      
      crypto key generate rsa modulus 2048
      ssh 0 0 management
      ssh ::/0 management
      ssh timeout 60
      ssh version 2
      username admin password Q1w2e3r4 privilege 15
      username admin attributes
      service-type admin
      aaa authentication ssh console LOCAL
      !
      same-security-traffic permit inter-interface
      same-security-traffic permit intra-interface
      access-list allow-all extended permit ip any any
      access-list allow-all extended permit ip any6 any6
      access-group allow-all global
      !
      interface G0/0
      nameif outside
      ip address dhcp setroute
      ipv6 enable
      ipv6 address dhcp default
      no shutdown
      !
      interface G0/1
      nameif inside
      ip address dhcp
      ipv6 enable
      ipv6 address dhcp default
      no shutdown
      !
  • Storage: Retain the default values.

  • Tag Instance: You can create a lot of tags to classify your devices. Giving a name to your devices helps you locate them easily.

  • Security Group: Create a security group and name it. The security group is a virtual firewall for an instance to control inbound and outbound traffic.

    By default the Security Group is open to all addresses. Change the rules to only allow SSH in from addresses used to access your ASA Virtual.

    For information on how the security group controls the traffic, refer to AWS documentation - Control traffic to your AWS resources using security groups.

  • Expand the Advanced Details section and in the User data field you can optionally enter a Day 0 configuration, which is text input that contains the ASA Virtual configuration applied when the ASA Virtual is launched. For more information on how to configure the Day 0 configuration with more information, such as Smart Licensing, see Prepare the Day 0 Configuration File.

    • Management interface - If you choose to provide a Day 0 configuration, you must provide management interface details, which should be configured to use DHCP.

    • Data interfaces - IP addresses for the data interfaces will be assigned and configured only if you provide that information as part of the Day 0 configuration. Data interfaces can be configured to use DHCP or, if the network interfaces to be attached are already created and the IP addresses are known, you can provide the IP details in the Day 0 configuration.

    • Without Day 0 Configuration - If you deploy the ASA Virtual without providing the Day 0 configuration, the ASA Virtual applies the default ASA Virtual configuration where it fetches the IPs of the attached interfaces from the AWS metadata server and allocates the IP addresses (the data interfaces will get the IPs assigned but the ENIs will be down). Management0/0 interface will be up and gets the IP configured with DHCP address. See IP Addressing in your VPC for information about Amazon EC2 and Amazon VPC IP addressing.

  • Review your configuration and then click Launch.

Step 4

Create a Key Pair.

Caution


Give the key pair a name you will recognize and download the key to a safe place; the key can never be downloaded again. If you lose the key pair, you must destroy your instances and redeploy them again.

Step 5

Click Launch Instance to deploy your ASA Virtual.

Step 6

Click My Account > AWS Management Console > EC2 > Launch an Instance > My AMIs.

Step 7

Make sure that the Source/Destination Check is disabled per interface for the ASA Virtual.

AWS default settings only allow an instance to receive traffic for its IP address (IPv4 and IPv6) and only allow an instance to send traffic from its own IP address (IPv4 and IPv6) . To enable the ASA Virtual to act as a routed hop, you must disable the Source/Destination Check on each of the ASA Virtual's traffic interfaces (inside, outside, and DMZ).


Performance Tuning

VPN Optimization

The AWS c5 instances offer much higher performance than the older c3, c4, and m4 instances. The approximate RA VPN throughput (DTLS using 450B TCP traffic with AES-CBC encryption) on the c5 instance family should be:

  • 0.5Gbps on c5.large

  • 1Gbps on c5.xlarge

  • 2Gbps on c5.2xlarge

Console Logging Consideration

Enabling console logging at informational or debugging levels in AWS environments can increase CPU load on the vCPU that handles serial interrupts. This additional overhead may lead to reduced throughput or, in some cases, overall system instability. For this reason, it is recommended to enable such logging only during active troubleshooting and during a scheduled maintenance window.