Contents
- Implementing the Dynamic Host Configuration Protocol
- Prerequisites for Configuring DHCP Relay Agent
- Information About DHCP Relay Agent
- How to Configure and Enable DHCP Relay Agent
- Configuring and Enabling the DHCP Relay Agent
- Configuring a DHCP Relay Profile
- Configuring the DHCPv6 (Stateless) Relay Agent
- Enabling DHCP Relay Agent on an Interface
- Disabling DHCP Relay on an Interface
- Enabling DHCP Relay on a VRF
- Configuring the Relay Agent Information Feature
- Configuring Relay Agent Giaddr Policy
- Configuring the Broadcast Flag Policy
- Information About Configuring DHCP IPv6 Information Pools
- How to Configure DHCP IPv6 Information Pools
- Configuring Cisco IOS XR DHCP IPv6 Information Pool Option
- Configuration Examples for the DHCP Relay Agent
- DHCP Relay Profile: Example
- DHCP Relay on an Interface: Example
- DHCP Relay on a VRF: Example
- Relay Agent Information Option Support: Example
- Relay Agent Giaddr Policy: Example
- Cisco IOS XR Broadcast Flag Policy: Example
- Additional References
Implementing the Dynamic Host Configuration Protocol
This module describes the concepts and tasks you will use to configure Dynamic Host Configuration Protocol (DHCP).
- Prerequisites for Configuring DHCP Relay Agent
- Information About DHCP Relay Agent
- How to Configure and Enable DHCP Relay Agent
- Information About Configuring DHCP IPv6 Information Pools
- How to Configure DHCP IPv6 Information Pools
- Configuration Examples for the DHCP Relay Agent
- Additional References
Prerequisites for Configuring DHCP Relay Agent
The following prerequisites are required to configure a DHCP relay agent:
You must be in a user group associated with a task group that includes the proper task IDs. The command reference guides include the task IDs required for each command. If you suspect user group assignment is preventing you from using a command, contact your AAA administrator for assistance.
A configured and running DHCP client and DHCP server
Connectivity between the relay agent and DCHP server
Information About DHCP Relay Agent
A DHCP relay agent is a host that forwards DHCP packets between clients and servers that do not reside on a shared physical subnet. Relay agent forwarding is distinct from the normal forwarding of an IP router where IP datagrams are switched between networks transparently.
DHCP clients use User Datagram Protocol (UDP) broadcasts to send DHCPDISCOVER messages when they lack information about the network to which they belong.
If a client is on a network segment that does not include a server, a relay agent is needed on that network segment to ensure that DHCP packets reach the servers on another network segment. UDP broadcast packets are not forwarded, because most routers are not configured to forward broadcast traffic. You can configure a DHCP relay profile and configure one or more helper addresses in it. You can assign the profile to an interface or a VRF.
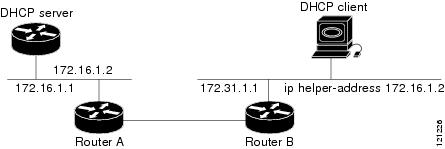
Figure 1 demonstrates the process. The DHCP client broadcasts a request for an IP address and additional configuration parameters on its local LAN. Acting as a DHCP relay agent, Router B picks up the broadcast, changes the destination address to the DHCP server's address and sends the message out on another interface. The relay agent inserts the IP address of the interface, on which the relay profile into the gateway address (giaddr) field of the DHCP packet, which enables the DHCP server to determine which subnet should receive the offer and identify the appropriate IP address range. The relay agent unicasts the messages to the server address, in this case 172.16.1.2 (which is specified by the helper address in the relay profile).
How to Configure and Enable DHCP Relay Agent
This section contains the following tasks:
- Configuring and Enabling the DHCP Relay Agent
- Configuring the DHCPv6 (Stateless) Relay Agent
- Enabling DHCP Relay Agent on an Interface
- Disabling DHCP Relay on an Interface
- Enabling DHCP Relay on a VRF
- Configuring the Relay Agent Information Feature
- Configuring Relay Agent Giaddr Policy
- Configuring the Broadcast Flag Policy
Configuring and Enabling the DHCP Relay Agent
Configuring a DHCP Relay Profile
SUMMARY STEPS4. helper-address [vrf vrf- name ] address
5. Use one of the following commands:
DETAILED STEPSConfiguring the DHCPv6 (Stateless) Relay Agent
SUMMARY STEPSPerform this task to specify a destination address to which client messages are forwarded and to enable Dynamic Host Configuration Protocol (DHCP) for IPv6 relay service on the interface.
3. interface type interface-path-id relay
5. Use one of the following commands:
DETAILED STEPSEnabling DHCP Relay Agent on an Interface
SUMMARY STEPSThis task describes how to enable the Cisco IOS XR DHCP relay agent on an interface.
Note
On Cisco IOS XR software, the DHCP relay agent is disabled by default.
3. interface type name relay profile profile-name
4. Use one of the following commands:
DETAILED STEPSDisabling DHCP Relay on an Interface
SUMMARY STEPSThis task describes how to disable the DHCP relay on an interface by assigning the none profile to the interface.
4. Use one of the following commands:
DETAILED STEPSEnabling DHCP Relay on a VRF
SUMMARY STEPS3. vrf vrf-name relay profile profile-name
4. Use one of the following commands:
DETAILED STEPSConfiguring the Relay Agent Information Feature
SUMMARY STEPSThis task describes how to configure the DHCP relay agent information option processing capabilities.
A DHCP relay agent may receive a message from another DHCP relay agent that already contains relay information. By default, the relay information from the previous relay agent is replaced (using the replace option).
6. relay information policy {drop | keep}
7. relay information option allow-untrusted
8. Use one of the following commands:
DETAILED STEPSConfiguring Relay Agent Giaddr Policy
SUMMARY STEPSThis task describes how to configure BOOTPREQUEST packets for Dynamic Host Configuration Protocol (DHCP) IPv4 Relay processes, that already contain a nonzero giaddr attribute.
4. giaddr policy {replace | drop}
5. Use one of the following commands:
DETAILED STEPS
Command or Action Purpose Step 1 configure
Example:RP/0/0/CPU0:router# configureEnters global configuration mode.
Step 2 dhcp ipv4
Example:RP/0/0/CPU0:router(config)# dhcp ipv4Enables the DHCP IPv4 configuration submode.
Step 3 profile profile-name relay
Example:RP/0/0/CPU0:router(config-dhcpv4)# profile client relayEnables profile relay submode.
Step 4 giaddr policy {replace | drop}
Example:RP/0/0/CPU0:router(config-dhcpv4-relay-profile)# giaddr policy dropSpecifies the giaddr policy.
replace—Replaces the existing giaddr value with a value that it generates.
drop—Drops the packet that has an existing nonzero giaddr value.
Step 5 Use one of the following commands:
Example:RP/0/0/CPU0:router(config)# endor
RP/0/0/CPU0:router(config)# commitSaves configuration changes.
When you issue the end command, the system prompts you to commit changes:
Uncommitted changes found, commit them
before exiting(yes/no/cancel)? [cancel]:
Entering yes saves configuration changes to the running configuration file, exits the configuration session, and returns the router to EXEC mode.
Entering no exits the configuration session and returns the router to EXEC mode without committing the configuration changes.
Entering cancel leaves the router in the current configuration session without exiting or committing the configuration changes.
Use the commit command to save the configuration changes to the running configuration file and remain within the configuration session.
Configuring the Broadcast Flag Policy
SUMMARY STEPSThis task describes how to configure DHCP IPv4 Relay to broadcast BOOTPREPLY packets only if the DHCP IPv4 broadcast flag is set in the DHCP IPv4 header.
Note
By default, the DHCP IPv4 Relay always broadcasts BOOTPREPLY packets.
4. broadcast-flag policy check
5. Use one of the following commands:
DETAILED STEPS
Command or Action Purpose Step 1 configure
Example:RP/0/0/CPU0:router# configureEnters global configuration mode.
Step 2 dhcp ipv4
Example:RP/0/0/CPU0:router(config)# dhcp ipv4Configures DHCP IPv4 mode.
Step 3 profile profile-name relay
Example:RP/0/0/CPU0:router(config-dhcpv4)# profile client relayEnables profile relay mode.
Step 4 broadcast-flag policy check
Example:RP/0/0/CPU0:router(config-dhcpv4-relay-profile)# broadcast-flag policy checkEnables checking of the broadcast flag in packets.
Step 5 Use one of the following commands:
Example:RP/0/0/CPU0:router(config)# endor
RP/0/0/CPU0:router(config)# commitSaves configuration changes.
When you issue the end command, the system prompts you to commit changes:
Uncommitted changes found, commit them
before exiting(yes/no/cancel)? [cancel]:
Entering yes saves configuration changes to the running configuration file, exits the configuration session, and returns the router to EXEC mode.
Entering no exits the configuration session and returns the router to EXEC mode without committing the configuration changes.
Entering cancel leaves the router in the current configuration session without exiting or committing the configuration changes.
Use the commit command to save the configuration changes to the running configuration file and remain within the configuration session.
Information About Configuring DHCP IPv6 Information Pools
A DHCP IPv6 configuration information pool is a named entity that includes information about available configuration parameters and policies that control assignment of the parameters to clients from the pool. A pool is configured independently of the DHCP service and is associated with the DHCP service through the command line interface.
Each configuration pool can contain the following configuration parameters and operational information:
Prefix delegation information, which could include a list of available prefixes for a particular client and associated preferred and valid lifetimes
Domain name service (DNS) servers—List of IPv6 addresses of DNS servers
Domain search list—String containing domain names for DNS resolution
SIP server address—List of IPv6 addresses of SIP server
SIP server domain list—String containing domain names for SIP server
How to Configure DHCP IPv6 Information Pools
This section contains the following task:
Configuring Cisco IOS XR DHCP IPv6 Information Pool Option
SUMMARY STEPSThis task describes how to enable support for the DHCP IPv6 information pool option with the name pool1.
4. Use one of the following commands:
5. show dhcp ipv6 pool [ pool-name ]
DETAILED STEPS
Command or Action Purpose Step 1 configure
Example:RP/0/0/CPU0:router# configureEnters global configuration mode.
Step 2 dhcp ipv6
Example:RP/0/0/CPU0:router (config)# dhcp ipv6Enables the DHCP IPv6 configuration mode.
Step 3 pool pool-name
Example:RP/0/0/CPU0:router (config-dhcp ipv6)# pool pool1Creates a DHCP pool specified by the pool-name argument for the prefix delegation and the other configurations on the interface.
Step 4 Use one of the following commands:
Example:RP/0/0/CPU0:router(config)# endor
RP/0/0/CPU0:router(config)# commitSaves configuration changes.
When you issue the end command, the system prompts you to commit changes:
Uncommitted changes found, commit them
before exiting(yes/no/cancel)? [cancel]:
Entering yes saves configuration changes to the running configuration file, exits the configuration session, and returns the router to EXEC mode.
Entering no exits the configuration session and returns the router to EXEC mode without committing the configuration changes.
Entering cancel leaves the router in the current configuration session without exiting or committing the configuration changes.
Use the commit command to save the configuration changes to the running configuration file and remain within the configuration session.
Step 5 show dhcp ipv6 pool [ pool-name ]
Example:RP/0/0/CPU0:router# show dhcp ipv6 pool pool1(Optional) Displays the DHCP IPv6 pool name.
Configuration Examples for the DHCP Relay Agent
- DHCP Relay Profile: Example
- DHCP Relay on an Interface: Example
- DHCP Relay on a VRF: Example
- Relay Agent Information Option Support: Example
- Relay Agent Giaddr Policy: Example
- Cisco IOS XR Broadcast Flag Policy: Example
Cisco IOS XR Broadcast Flag Policy: Example
SUMMARY STEPSThis task describes how to configure DHCP IPv4 Relay to broadcast BOOTPREPLY packets only if the DHCP IPv4 broadcast flag is set in the DHCP IPv4 header.
Note
By default, the DHCP IPv4 Relay always broadcasts BOOTPREPLY packets.
4. broadcast-flag policy check
5. Use one of the following commands:
DETAILED STEPS
Command or Action Purpose Step 1 configure
Example:RP/0/0/CPU0:router# configureEnters global configuration mode.
Step 2 dhcp ipv4
Example:RP/0/0/CPU0:router(config)# dhcp ipv4Configures DHCP IPv4 mode.
Step 3 profile profile name relay
Example:RP/0/0/CPU0:router(config-dhcpv4)# profile client relayEnables profile relay mode.
Step 4 broadcast-flag policy check
Example:RP/0/0/CPU0:router(config-dhcpv4-relay-profile)# broadcast-flag policy checkEnables checking of the broadcast flag in packets.
Step 5 Use one of the following commands:
Example:RP/0/0/CPU0:router(config)# endor
RP/0/0/CPU0:router(config)# commitSaves configuration changes.
When you issue the end command, the system prompts you to commit changes:
Uncommitted changes found, commit them
before exiting(yes/no/cancel)? [cancel]:
Entering yes saves configuration changes to the running configuration file, exits the configuration session, and returns the router to EXEC mode.
Entering no exits the configuration session and returns the router to EXEC mode without committing the configuration changes.
Entering cancel leaves the router in the current configuration session without exiting or committing the configuration changes.
Use the commit command to save the configuration changes to the running configuration file and remain within the configuration session.
Additional References
The following sections provide references related to implementing the Cisco IOS XR DHCP relay agent.
Related Documents
Related Topic
Document Title
Cisco IOS XR
DHCP commands
DHCP Commands module in the Cisco IOS XR IP Addresses and Services Command Reference for the Cisco XR 12000 Series Router
Getting started material
Cisco IOS XR Getting Started Guide for the Cisco XR 12000 Series Router
Information about user groups and task IDs
Configuring AAA Services module in the Cisco IOS XR System Security Configuration Guide for the Cisco XR 12000 Series Router
MIBs
MIBs
MIBs Link
— To locate and download MIBs, use the Cisco MIB Locator found at the following URL and choose a platform under the Cisco Access Products menu: http://cisco.com/public/sw-center/netmgmt/cmtk/mibs.shtml