Install and deploy standalone Cisco Optical Network Controller

Installation requirements

This topic lists the requirements that you must review before you install Cisco Optical Network Controller.

VMware platform requirements

The VMware platform requirements are:

  • VMware vCenter Server version 7.0 or later.

  • VMware vSphere server and client version 7.0 or later.

  • ESXi host version 7.0 or later on the servers that host the virtual machines.


Attention


Upgrade to VMware vCenter Server 8.0 U2 if you are using VMware vCenter Server 8.0.2 or VMware vCenter Server 8.0.1.


Cisco Optical Network Controller is deployed on rack or blade servers within vSphere.


Note


For more details on VMware vSphere, see VMware vSphere.


Supporting service requirements

The supporting service requirements are:

  • DNS server: The DNS server can be an internal DNS server if the Cisco Optical Network Controller instance is not exposed to the internet.

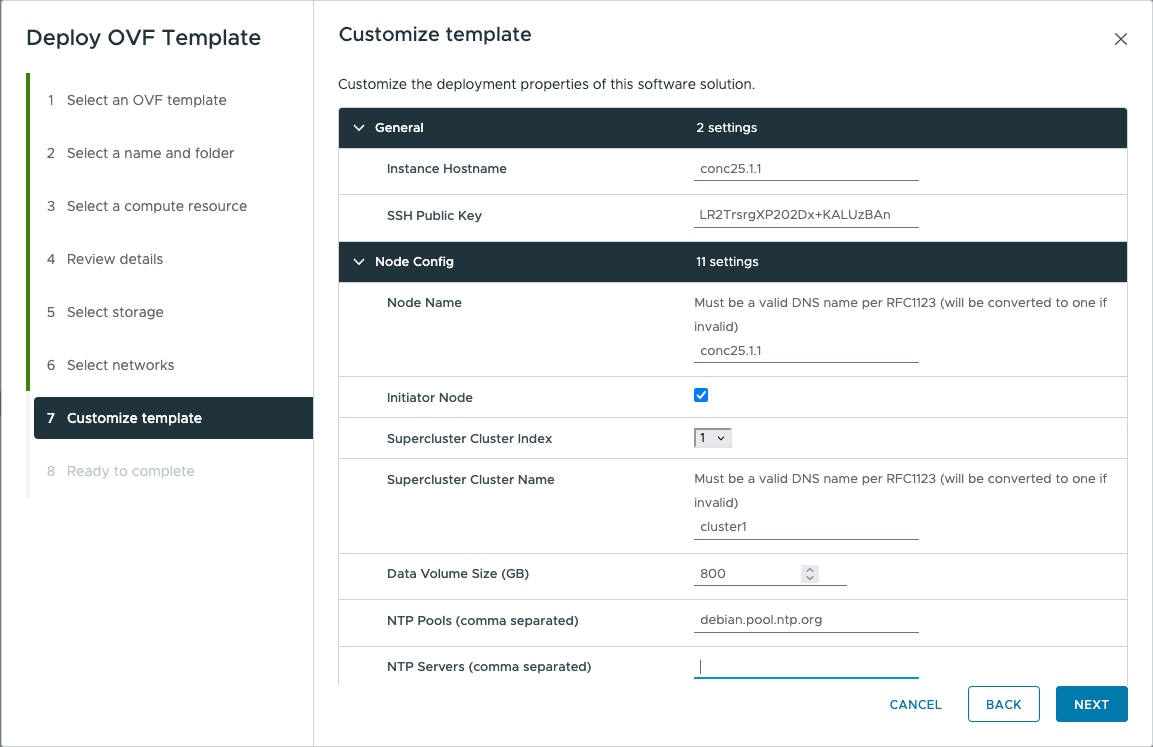
  • NTP server or NTP pool: Use the same NTP source on Cisco Optical Network Controller, the client PC or VM, and the ESXi host.

Network requirements

The network requirements are:

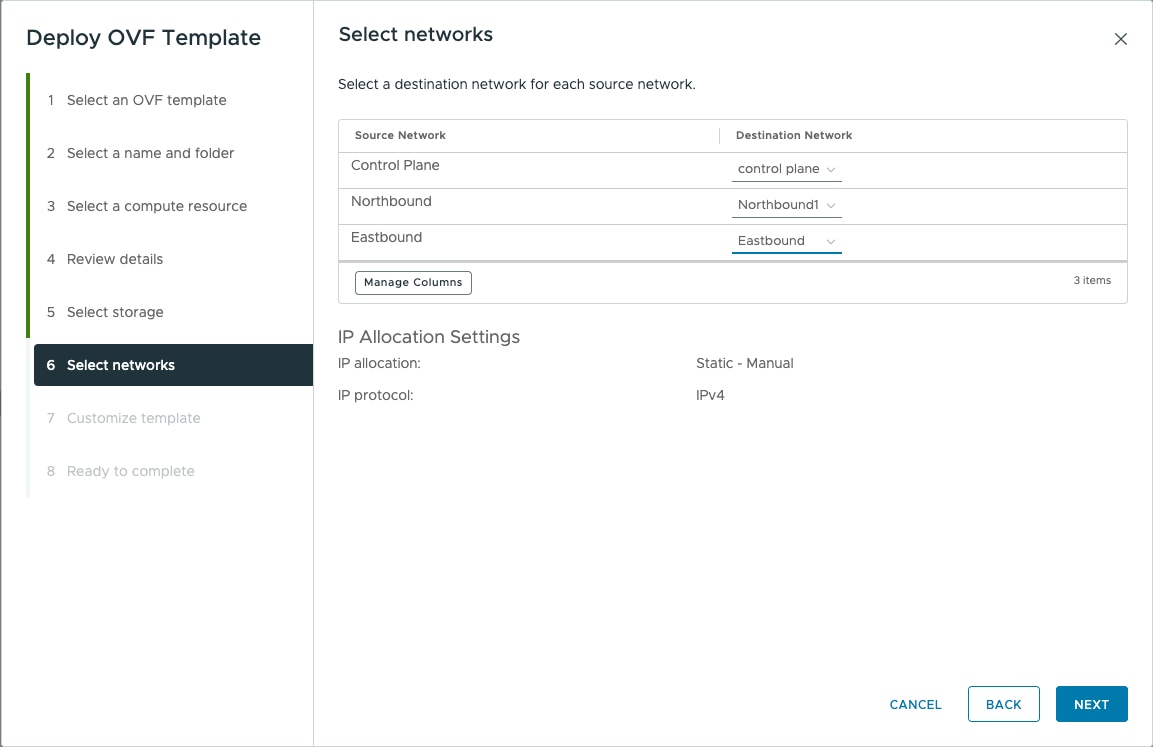
  • Before installation, three networks must be created.

  • Control Plane Network: Used for internal communication between deployed virtual machines within a cluster. In a standalone deployment, this network can be a private network. In a high availability cluster, create this network between the servers where each HA node is deployed.

  • VM Network or Northbound Network: Used for communication between users and the cluster. This network carries public traffic and hosts the UI.

  • Eastbound Network: Used for internal communication between deployed virtual machines within a cluster. In a standalone deployment, this network can be a private network.

Preparation task

ESXi hosts use a self-signed certificate by default. Before deployment, ensure that browser certificate warnings are accepted and the required VMware networks are prepared.

For the procedure, see Prepare VMware networking and ESXi access.

Hardware requirements and sizing notes

This table lists the minimum hardware requirements for the base profile with daily retention only.

Table 1. Hardware requirements for base profile with daily retention only

Sizing

CPU

Memory

Solid State Drive (SSD)

Extra Small (XS)

16 vCPU

64 GB

1 TB

Small (S)

32 vCPU

128 GB

2.5 TB

Medium (M)

48 vCPU

256 GB

6 TB

This table lists the minimum hardware requirements for the extended profile with weekly and monthly retention.

Table 2. Hardware requirements for extended profile with weekly and monthly retention

Sizing

CPU

Memory

Solid State Drive (SSD)

Extra Small (XS)

16 vCPU

64 GB

1.5 TB

Small (S)

32 vCPU

128 GB

5 TB

Medium (M)

48 vCPU

256 GB

12 TB

Use SSDs that meet the disk write latency requirement of 100 ms or lower.


Attention


Cisco Optical Network Controller supports only SSDs for storage.


The hardware sizing notes are:

  • Configure vCPU and memory according to the VM profile before you power on the VM in vCenter. XS uses 16 vCPU and 64 GB. S uses 32 vCPU and 128 GB.

  • The supported vCPU-to-physical-core ratio is 2:1 if hyperthreading is enabled and supported by the hardware. Otherwise, the ratio is 1:1.

Deployment-specific requirements

This table lists the deployment-specific requirements.

Table 3. Deployment requirements

Deployment type

Requirements

Standalone (SA)

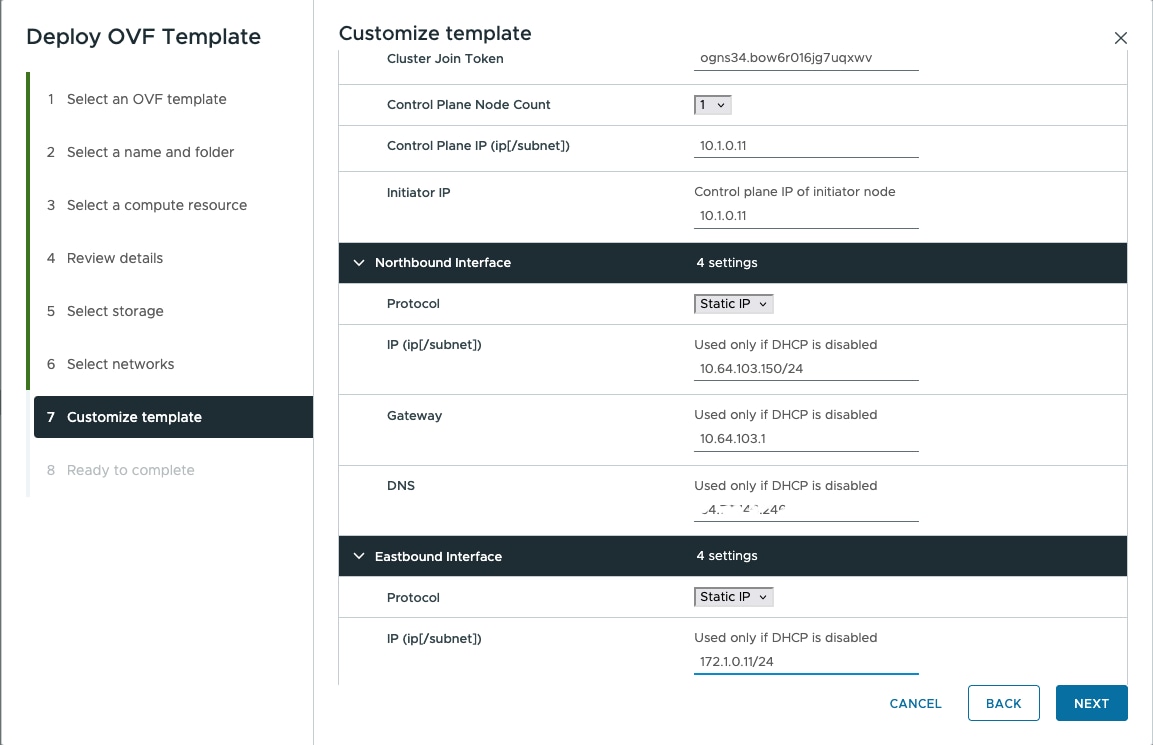
Control Plane Network: Can be a private network. Requires one IP address. Gateway required. DNS server required.

Northbound Network (VM Network): Must be a public network. Requires one public IP address. Gateway required. DNS server required.

Eastbound Network: Can be a private network. Requires one private IP address. Gateway required. DNS server required.

Highly Available (HA)

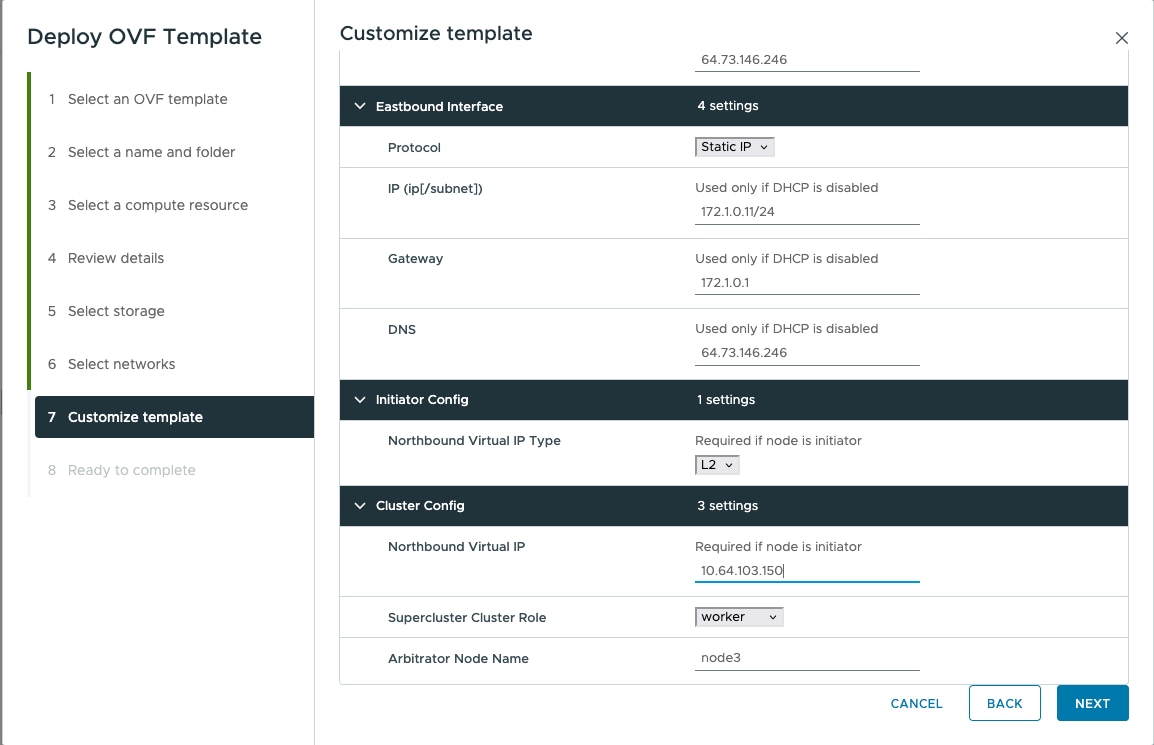
Control Plane: Three IP addresses for the individual nodes. This can be a private network.

VM Network: Four IP addresses. This must be a public network, with three IP addresses for node management and one virtual IP for northbound communication and UI access.


Note


For a high availability deployment, nodes on different ESXi hosts should have a minimum link bandwidth of 10G between them to ensure efficient data communication and synchronization.


Communications matrix

This table lists the default port assignments.

Table 4. Communications matrix

Traffic type

Port

Description

Inbound

TCP 22

SSH remote management

TCP 8443

HTTPS for UI access

Outbound

TCP 22

NETCONF to routers

TCP 389

LDAP if using Active Directory

TCP 636

LDAPS if using Active Directory

Customer specific

HTTP for access to an SDN controller

User specific

HTTPS for access to an SDN controller

TCP 3082, 3083, 2361, 6251

TL1 to optical devices

Eastbound

TCP 10443

Supercluster join requests

UDP 8472

VxLAN

Prepare VMware networking and ESXi access

Prepare the VMware environment for installation by accepting ESXi browser certificate warnings and creating the required VMware networks.

Complete this task before you start the Cisco Optical Network Controller deployment on VMware vSphere.

Procedure


Step 1

Access the ESXi host by using a web browser.

Step 2

If the browser displays a security warning that the connection is not private or the certificate is not trusted, accept the risk or bypass the warning so that you can continue.

ESXi hosts use a self-signed certificate by default. Accepting the certificate allows you to continue with template customization, VM deployment, and login during the Cisco Optical Network Controller installation process.

Step 3

From the vSphere client, select the datacenter where you want to add the ESXi host.

Step 4

Right-click the server from the vCenter inventory and click Add Networking.

Step 5

To create a private network for the Control Plane and Eastbound Networks, follow the Standard Switch wizard for each network.

  1. In Select connection type, choose Virtual Machine Port Group for a Standard Switch and click Next.

  2. In Select target device, select New Standard Switch (MTU 1500) and click Next.

  3. In Create a Standard Switch, click Next and confirm that there are no active physical network adapters for the switch.

  4. In Connection settings, choose a network label such as Control Plane or Eastbound, select VLAN ID as None (0), and click Next.

  5. In Ready to complete, review the configuration and click Finish.

Step 6

Create the Control Plane, Northbound, and Eastbound Networks before deployment.


The ESXi host is accessible, and the required VMware networks are prepared for the Cisco Optical Network Controller deployment.

Installation considerations

Based on your choice and availability of disk space, select the data source.

OVA template supports pem key authentication.

The initiator node is the initiator parameter that needs to be set to true on only the primary node, which initializes the creation of a cluster as a primary node while the other nodes can join the network as secondary or tertiary.

In the HA environment, Cisco Optical Network Controller creates two NETCONF sessions, one after another immediately. Since by default NCS 1010 only allows one session per second, for the HA onboarding to be successful for NCS 1010 the CLI ssh server rate-limit 600 must be added in the NCS 1010 configuration.

Generate an SSH ed25519 key

Generate an SSH ed25519 key pair for Cisco Optical Network Controller access.

Cisco Optical Network Controller requires an ed25519 key for SSH access. The ed25519 key is different from an RSA key.

Before you begin

Ensure that the system where you generate the key has the ssh-keygen utility available.

Follow these steps to generate an SSH ed25519 key.

Procedure


Step 1

Run the ssh-keygen -t ed25519 command.

Example:

ssh-keygen -t ed25519

Step 2

When prompted, enter the filename for the key and the passphrase.

Example:

Enter file in which to save the key (/Users/xyz/.ssh/id_ed25519): ./<file-name-of-your-key>.pem
Enter passphrase (empty for no passphrase):
Enter same passphrase again:

Step 3

Verify that the private key and public key files are created.

Example:

Your identification has been saved in ./<file-name-of-your-key>.pem
Your public key has been saved in ./<file-name-of-your-key>.pem.pub

Step 4

Display the public key and copy it for use in the deployment template.

Example:

cat <file-name-of-your-key>.pem.pub

Use the displayed public key in the SSH Public Key field during deployment.


The SSH ed25519 key pair is generated, and the public key is ready to use in the deployment template.

Select the OVF template and prepare the VMware deployment

Start the OVF deployment in VMware vSphere and select the initial deployment resources.

Before you begin


Note


During the OVF deployment, the deployment gets aborted if there is an internet disconnection.


Procedure


Step 1

Right-click the ESXi host in the vSphere client screen and click Deploy OVF Template.

Step 2

In the Select an OVF template screen, select the URL radio button for specifying the URL to download and install the OVF package from the Internet or select the Local file radio button to upload the downloaded OVA files from your local system, and click Next.

Figure 1. Select an OVF Template
screenshot

Step 3

In the Select a name and folder screen, specify a unique name for the virtual machine instance. Cisco Optical Network Controller can be deployed as standalone or high availability. Select the location of the VM from the list of options for standalone or high availability (primary, secondary, or tertiary) and click Next.

Figure 2. Select a name and folder
screenshot

Step 4

In the Select a compute resource screen, select the destination compute resource on which you want to deploy the VM and click Next.

Figure 3. Select a Compute Resource
screenshot

Note


While selecting the compute resource the compatibility check proceeds till it completes successfully.

Step 5

In the Review details screen, verify the template details and click Next.

Figure 4. Review Details
Figure 5. Review Details

The Publisher field shows the trusted publisher information. For example, DigiCert Trusted G4 Code Signing RSA4096 SHA384 2021 CA1 (Trusted certificate).


The initial OVF deployment setup is complete, and you can continue with storage, network, and template customization.

Customize the template and finish the VMware deployment

Complete the remaining VMware deployment configuration, customize the template values, and finish the OVF deployment.

Procedure


Step 1

In the Select storage screen, select the virtual disk format based on provision type requirement, set VM Storage Policy as Datastore Default, select the virtual disk format as Thin Provision, and click Next.

You must select "Thin provision" as the virtual disk format.

Figure 6. Select Storage
screenshot

Step 2

In the Select networks screen, select the control and management networks as Control Plane, Eastbound, and Northbound from the networks created earlier and click Next.

Figure 7. Select Networks
screenshot

Step 3

In the Customize template screen, set the values using the Table 1 table as a guideline for deployment.

Figure 8. Customize Template
screenshot
screenshot
screenshot
Table 5. Customize template parameters

Key

Values

Instance Hostname <instance hostname>
SSH Public Key Paste the public key generated using the ed25519 algorithm
Node Name

<node-name>

Must start with an alphanumeric character. Can contain alphanumeric characters and hyphens. End with an alphanumeric character. Standalone: primary

Note


If you have other instances of Cisco Optical Network Controller, ensure that the node name is unique across instances.

Data Volume Size (GB)

<recommended-size>

Configure data volume according to the VM profile. 800 GB and 1.5 TB for XS and S profiles respectively.

NTP Pools (comma separated) (Optional) A comma-separated list of the NTP pools. For example, debian.pool.ntp.org
NTP Servers (comma separated) (Optional) A comma-separated list of the NTP servers.
Cluster Join Token Can be left with the default value
Control Plane Node Count 1
Control Plane IP (ip[/subnet]) <Private IP for the Instance> Control Plane Network
Initiator IP <Same IP as Control Plane> Control Plane Network
Protocol Static IP
IP (ip[/subnet]) - if not using DHCP <Public IP for the Instance> Northbound Network
Gateway - if not using DHCP <Gateway IP for the Instance> Northbound Network
DNS DNS Server IP
Protocol Static IP

Step 4

In Review the details, review all your selections and click Finish. To check or change any properties before clicking Finish, click Back to return to Customize template.

Figure 9. Ready to Complete
screenshot

Step 5

Using the steps above from step 1 to 8, you can create one VM for standalone and three VMs for high availability. In case of high availability, it is recommended to create all three VMs (primary, secondary, and tertiary) before they are turned ON.


The VMware deployment is complete, and the required virtual machines are ready to be powered on.

Power on the VM and connect through SSH

Procedure


Step 1

After creating the VM, power it on and verify that the IP addresses appear in vSphere.

Step 2

Connect to the VM using the pem key generated earlier.

Attention

 
  • For more details on the pem key, see Generate an SSH ed25519 key.

  • Use the private key that is generated along with the public key during customizing the public key options.

  • Upon activation of the virtual machine (VM), it is designed not to respond to ping requests. However, you can log in using SSH if the installation has been completed successfully.

Step 3

Log in to the VM using the private key.

Note

 
  • After the nodes are deployed, the deployment of OVA progress can be checked in the Tasks console of vSphere Client. After successful deployment Cisco Optical Network Controller takes around 30 minutes to boot.

  • By default, use the username admin to log in to the Web UI. Only the password must be configured. To access the device through SSH, use the username nxf.

Step 4

Set read permissions on the .pem file.

chmod 400 <file-name-of-your-key>.pem

Step 5

SSH to the node and execute the following CLI command.

Example:

ssh -i [ed25519 Private key] nxf@<northbound-vip>
Enter passphrase for key '<file-name-of-your-key>.pem':

Note


Private key is created as part of the key generation with just the .pem extension, and it must be set with the least permission level before using it.


The VM is powered on, and you are connected to the node through SSH.

Verify the system and configure initial credentials

Procedure


Step 1

After you SSH into the node, use the sedo system status command to check the status of all the pods.

Example:

sedo system status

Note

 
  • The different pods along with their statuses including active and standby modes are all displayed in the different terminal sessions for each pod.

  • All the services with owner onc must display the status as Running.

Step 2

(Optional) Change the password policy settings using the sedo security password-policy set command.

Example:

sedo security password-policy set --expiration-days <number> --reuse-limit <number> --min-complexity-score <number>
Table 6. Password policy parameters
Parameter Description
expiration-days

Default password expiration used when creating new users, in days.

Default: 180 days

min-complexity-score

Minimum password complexity score required.

Default: 3

reuse-limit

Number of historical passwords retained and blocked from reuse when changing a password.

Default: 12

Step 3

You can check the current version using the sedo version command.

Example:

sedo version

Step 4

Use the following CLI command to check and verify which node is active.

Example:

kubectl describe project onc | head

Step 5

Use the following CLI command to check and verify whether all nodes have joined the cluster.

Example:

kubectl get nodes

Note


These cluster verification steps apply to high availability installation.

Step 6

SSH to the node and set the initial UI password for the admin user.

Example:

sedo security user set admin --password

Note


The password policy for the system includes both configurable settings and non-configurable hard requirements to ensure security.

Password requirements

  • The password must contain at least:

    • 1 uppercase letter

    • 1 lowercase letter

    • 1 number

    • 1 special character

  • Must have a minimum length of 8 characters

Configurable requirements

You can change the password policy settings using the sedo security password-policy set command. Specify the desired parameters to adjust the configuration.


The system status and credentials are verified and configured.

Configure NTP and access the Cisco Optical Network Controller Web UI

Procedure


Step 1

To check the default admin user ID, use the command sedo security user list. To change the default password, use the command sedo security user admin set --password on the CLI console of the VM or through the Web UI.

Step 2

Use a web browser to access https://<virtual ip>:8443/ to access the Cisco Optical Network Controller Web UI.

Use the admin ID and the password you set to log in to Cisco Optical Network Controller.

Note


Access the Web UI only after all the onc services are running. Use the sedo system status command to verify that all services are running.


Time synchronization and Web UI access are configured, and Cisco Optical Network Controller is ready for use.

Upgrade a standalone deployment of Cisco Optical Network Controller to a new version

Upgrade a standalone deployment of Cisco Optical Network Controller to a new version while ensuring seamless communication between nodes.

The following sections provide instructions for upgrading a standalone deployment of Cisco Optical Network Controller from Release 24.3.1 to 25.1.x and configuring the necessary networks to ensure seamless communication between nodes in a geo-redundant supercluster.

Cisco Optical Network Controller supports upgrades to 25.1.1 from previous releases except 24.3.2. This table lists the upgrade paths you must follow.

Table 7. Upgrade paths
Current version Upgrade path to 25.1.1
24.3.2 Unsupported
24.3.1 24.3.1 > 25.1.1

Restriction


  • Cisco Optical Network Controller does not support direct downgrades to older releases.

  • To revert to a previous version, you must first create a database backup using the SWIMU application before upgrading. Then, install the desired older version using its OVA file, and finally, restore the database.

  • For details about backup and restore database, see Backup and Restore Database.


Before you begin

Before you begin, ensure that you have:

  • Backup creation: Ensure that a full system backup is created using the command sedo backup create full and exported for recovery if needed.

    Example:

    sedo backup create full
    sedo backup list
    cd /data
    sedo backup download base_0000000E000000010000009E
    scp /data/nxf-backup-3.0-1736872559.tar.gz <remote location>
  • Network configuration: Before the Cisco Optical Network Controller upgrade, three networks must be created.

    • Control plane network: The control plane network helps in the internal communication between the deployed VMs within a cluster.

    • VM network or northbound network: The VM network is used for communication between the user and the cluster. It handles all the traffic to and from the VMs running on your ESXi hosts. This network is your public network through which the UI is hosted. Cisco Optical Network Controller uses this network to connect to Cisco Optical Site Manager devices using Netconf/gRPC.

    • Eastbound network: The Eastbound Network helps in the internal communication between the deployed VMs within a cluster. If you are setting up a standalone system, this can refer to any private network.

  • VMware setup: Ensure that the vCenter has the required networks configured and attached correctly. Verify that physical adapters are correctly mapped for Northbound and Eastbound networks.

  • Access and permissions: Ensure you have the necessary permissions to execute commands and modify network settings on the nodes.

  • Verify a system pack image package before use. Each package contains all required files for verification. For detailed steps, see Verify a signed qcow2 or system pack image.

Follow these steps to upgrade a standalone deployment.

Procedure


Step 1

Log in to the standalone node CLI using the private key.

Example:

ssh -i <private-key_file> nxf@<node_ip>

Step 2

Download or copy the 25.1.1 system pack system-pack-file.tar.gz to the NxF system running 24.3.1 and place it in the /tmp directory using curl or scp.

Example:

scp user@remote_server:/path/to/system-pack-file.tar.gz /tmp/

Or use curl:

curl -o /tmp/system-pack-file.tar.gz http://example.com/path/to/system-pack-file.tar.gz

Step 3

Upgrade the SA VM from 24.3.1 to 25.1.1 using the sedo system upgrade commands.

Note

 
When you run the sedo system upgrade pull command, the pulled image may take a few moments to appear in the output of sedo system upgrade list command.

Example:

sedo system upgrade upload /tmp/system-pack-file.tar.gz
sedo system upgrade apply
reboot

The system reboots and upgrades. The system takes approximately 30 minutes to complete this.

Step 4

After the system reboots, verify the NxF version and system status.

Use the sedo version and sedo system status commands.

Example:

sedo version
sedo system status

Step 5

Verify onboarded sites and services by accessing the Cisco Optical Network Controller UI.

Example:

Use a web browser to access https://<virtual ip>:8443/ to access the Cisco Optical Network Controller Web UI.


The standalone deployment of Cisco Optical Network Controller is successfully upgraded to version 25.1.1. All services are running, and you can access the Web UI.

Update time zone configuration in a standalone deployment

Update the timezone configuration for each VM in a standalone deployment and restart the VM to ensure a seamless change into the new timezone configuration.

From Cisco Optical Network Controller Release 25.1.2, you can update the timezone configuration. Previously, only the UTC timezone was supported. Now you can configure Cisco Optical Network Controller in your preferred timezone.

For standalone deployments, you must use the command to update the timezone in the CLI for each VM and then restart the VM according to the steps in this procedure to ensure a seamless change into the new timezone configuration.

Limitations

  • Alarms and logs are saved in UTC in the database, which minimizes impact during time zone transitions, although during the transition period, for example, during a switchover, you might briefly see alarms with different time zone stamps in the UI before the system converges to the final setting.

  • Do not make timezone changes frequently as they might cause inconsistencies and require reboots of VMs/services.

  • When cross-launching from Cisco Optical Network Controller, the time zone offset will remain the same, but the IANA time zone name displayed in the cross-launched application might differ from the one configured in Cisco Optical Network Controller. This discrepancy occurs because the same timezone offset can have multiple IANA timezone names.

  • TAPI data and notifications continue to use UTC +0000.

  • SNMP traps use epoch time without any time zone offset calculated on the epoch.

  • Developer logs and techdump data uses UTC.

Before you begin

You must perform these pre-checks on each VM before changing the timezone.

  • Make sure all the pods are running by running the sedo system status -w command.

    This example shows a sample output where all pods are running. Verify status of every pod is Running.

    root@vm1-cluster1-node1:~# sedo system status -w
    ┌──────────────────────────────────────────────────────────────────────────────────────────────────────────┐
    │ System Status (Thu, 20 Nov 2025 09:55:35 UTC)                                                            │
    ├────────┬──────────────────────────────┬──────────────────┬─────────┬───────────────────────┬─────────────┤
    │ OWNER  │ NAME                         │ NODE             │ STATUS  │ RESTARTS              │ STARTED     │
    ├────────┼──────────────────────────────┼──────────────────┼─────────┼───────────────────────┼─────────────┤
    │ onc    │ monitoring                   │ concgha2-clb-vm1 │ Running │ 0                     │ 5 days ago  │
    │ onc    │ onc-alarm-service            │ concgha2-clb-vm1 │ Running │ 3 (Latest 5 days ago) │ 1 week ago  │
    │ onc    │ onc-apps-ui-service          │ concgha2-clb-vm1 │ Running │ 3 (Latest 5 days ago) │ 1 week ago  │
    │ onc    │ onc-circuit-service          │ concgha2-clb-vm1 │ Running │ 3 (Latest 5 days ago) │ 1 week ago  │
    │ onc    │ onc-collector-service        │ concgha2-clb-vm1 │ Running │ 3 (Latest 5 days ago) │ 1 week ago  │
    │ onc    │ onc-config-service           │ concgha2-clb-vm1 │ Running │ 3 (Latest 5 days ago) │ 1 week ago  │
    │ onc    │ onc-devicemanager-service    │ concgha2-clb-vm1 │ Running │ 3 (Latest 5 days ago) │ 1 week ago  │
    │ onc    │ onc-inventory-service        │ concgha2-clb-vm1 │ Running │ 3 (Latest 5 days ago) │ 1 week ago  │
    │ onc    │ onc-nbi-service              │ concgha2-clb-vm1 │ Running │ 3 (Latest 5 days ago) │ 1 week ago  │
    │ onc    │ onc-netconfcollector-service │ concgha2-clb-vm1 │ Running │ 0                     │ 5 days ago  │
    │ onc    │ onc-osapi-gw-service         │ concgha2-clb-vm1 │ Running │ 3 (Latest 5 days ago) │ 1 week ago  │
    │ onc    │ onc-pce-service              │ concgha2-clb-vm1 │ Running │ 3 (Latest 5 days ago) │ 1 week ago  │
    │ onc    │ onc-pm-service               │ concgha2-clb-vm1 │ Running │ 3 (Latest 5 days ago) │ 1 week ago  │
    │ onc    │ onc-pmcollector-service      │ concgha2-clb-vm1 │ Running │ 0                     │ 5 days ago  │
    │ onc    │ onc-topology-service         │ concgha2-clb-vm1 │ Running │ 3 (Latest 5 days ago) │ 1 week ago  │
    │ onc    │ onc-torch-service            │ concgha2-clb-vm1 │ Running │ 3 (Latest 5 days ago) │ 1 week ago  │
    │ system │ authenticator                │ concgha2-clb-vm1 │ Running │ 0                     │ 5 days ago  │
    │ system │ bgp                          │ concgha2-clb-vm1 │ Running │ 0                     │ 5 days ago  │
    │ system │ controller                   │ concgha2-clb-vm1 │ Running │ 3 (Latest 5 days ago) │ 2 weeks ago │
    │ system │ flannel                      │ concgha2-clb-vm1 │ Running │ 1 (Latest 5 days ago) │ 2 weeks ago │
    │ system │ ingress-proxy                │ concgha2-clb-vm1 │ Running │ 3 (Latest 5 days ago) │ 1 week ago  │
    │ system │ kafka                        │ concgha2-clb-vm1 │ Running │ 1 (Latest 5 days ago) │ 2 weeks ago │
    │ system │ loki                         │ concgha2-clb-vm1 │ Running │ 4 (Latest 5 days ago) │ 2 weeks ago │
    │ system │ metrics                      │ concgha2-clb-vm1 │ Running │ 3 (Latest 5 days ago) │ 2 weeks ago │
    │ system │ minio                        │ concgha2-clb-vm1 │ Running │ 3 (Latest 5 days ago) │ 2 weeks ago │
    │ system │ postgres                     │ concgha2-clb-vm1 │ Running │ 3 (Latest 5 days ago) │ 2 weeks ago │
    │ system │ promtail-vff8n               │ concgha2-clb-vm1 │ Running │ 1 (Latest 5 days ago) │ 2 weeks ago │
    └────────┴──────────────────────────────┴──────────────────┴─────────┴───────────────────────┴─────────────┘

Procedure


Step 1

SSH into the VM and run the sudo timedatectl set-timezone command with your preferred timezone name.

Command syntax: sudo timedatectl set-timezone timezone-name

Example:

In the following example, we set the timezone to JST.

root@vm1-cluster1-node1:~# sudo timedatectl set-timezone Asia/Tokyo 

root@vm1-cluster1-node1:~# timedatectl 

               Local time: Mon 2025-06-09 15:01:26 JST 

           Universal time: Mon 2025-06-09 06:01:26 UTC 

                 RTC time: Mon 2025-06-09 06:01:26 

                Time zone: Japan (JST, +0900) 

System clock synchronized: yes 

              NTP service: active 

          RTC in local TZ: no

A few valid timezones are:

Asia/Kolkata
Asia/Dubai
Europe/Amsterdam
Africa/Bujumbura

Step 2

Reboot the node using the sudo reboot command.

Step 3

Verify the node is up and running using the sedo system status -w command.

Verify the timezone in one of the pods using these commands. See the offset after the time.

root@vm1-cluster1-node1:~# sedo shell onc-torch-service
Entering into following pod:
┌───────────┬──────────────────────────────────────────────────────────┐
│ Name      │ onc-torch-service-0                                      │
│ Node      │ achitrad-nxf                                             │
│ IP        │ 10.241.0.186                                             │
│ Namespace │ onc                                                      │
│ Labels    │ statefulset.kubernetes.io/pod-name="onc-torch-service-0" │
│           │ app="onc-torch-service"                                  │
│           │ apps.kubernetes.io/pod-index="0"                         │
│           │ controller-revision-hash="onc-torch-service-74947495fc"  │
│           │ nxf="customer"                                           │
│           │ profile="ActiveStandby"                                  │
│           │ role="Active"                                            │
│           │                                                          │
└───────────┴──────────────────────────────────────────────────────────┘
/ $ date -R
Fri, 30 Jan 2026 06:21:50 +0000
/ $ 

Timezone configuration has been updated and Cisco Optical Network Controller webUI now displays time in the newly configured timezone.

The following screenshots show the difference between the behaviour in 25.1.1 and 25.1.2. Note that the timestamps are displayed differently with the timezone name and offset included in the timestamp in Release 25.1.2.

Figure 10. PM History in Release 25.1.2
Screenshot
Figure 11. PM History in Release 25.1.1
Screenshot
Figure 12. Nodes in Release 25.1.2
Screenshot
Figure 13. Nodes in Release 25.1.1
Screenshot

Revert to a previous version of Cisco Optical Network Controller

Revert Cisco Optical Network Controller to the earlier version by reinstalling the previous release and restoring the backup.

This section describes how to revert to the previous version of Cisco Optical Network Controller after installation for standalone and geo-redundant deployments. This is a manual process. Automatic rollback is not supported, and you cannot perform the revert from within Cisco Optical Network Controller.


Restriction


  • Cisco Optical Network Controller does not support direct downgrades to older releases.

  • To revert to a previous version, you must first create a database backup using the SWIMU application before upgrading. Then install the desired older version by using its OVA file, and finally restore the database.

  • For detailed instructions, see Backup and Restore Database.


Before you begin

Before you begin, ensure that you have:

  • A backup created from the earlier Cisco Optical Network Controller version.

  • The installation package for the version you want to restore.

  • Access to the database restore procedure documented in Backup and Restore Database.

Follow these steps to revert to a previous version.

Procedure


Step 1

For standalone deployments:

  1. Reinstall the previous version of Cisco Optical Network Controller, which is the version from which you created the backup. See Install Cisco Optical Network Controller using VMware vSphere.

  2. Perform the database restore by using Backup and Restore Database.

Step 2

For geo-redundant deployments:

  1. Reinstall the previous version of Cisco Optical Network Controller, which is the version from which you created the backup.

  2. Perform the database restore by using Backup and Restore Database.


Cisco Optical Network Controller runs the earlier software version and the system state is restored from the backup.

Install a Cisco Optical Network Controller service pack

Install a service pack to update your Cisco Optical Network Controller with bug fixes and enhancements. Transfer the Service Pack file, install the service pack, and verify that the new image is active.

Apply service packs to keep the controller up to date. In GeoHA deployments, install the service pack only on the active node.

Before you begin

Follow these steps to install a Cisco Optical Network Controller Service Pack:

Download the .tar.gz file for your service pack from the Cisco Software Download page.

Procedure


Step 1

Use the scp command to copy the file to the /data directory on the active node.

Example:

scp 25.1.2-MSMU-2.tar.gz -i <pem_file> nxf@<CONC_HOST_IP>:/data

Note


You can download the SHA-256 checksum from the Cisco Software Download page and compare the checksum with the service pack file to verify the integrity of the file. Use the following command to get the checksum of the downloaded file.

openssl sha256 <service-pack-file>.tar.gz

Step 2

Use the sedo supercluster status command to identify the active Cisco Optical Network Controller instance.

Look for the rows labeled Cluster Name and Current Active.

Example:

This sample output shows the Cluster Name and Current Active as the active Cisco Optical Network Controller instance in bold.

concgha2-clb-vm1:~# sedo supercluster status
┌─────────────────────────────────────────────────────────────────────────────────────┐
│ Supercluster Status                                                                 │
├──────────────────┬──────────────────────────────────────────────────────────────────┤
│ Cluster ID       │ INVetOV3DZKTSR5kmTFrE1PmDj954yyoBO6F4GbjlM8                      │
│ Cluster Name     │ cluster2                                                         │
│ Cluster Role     │ worker                                                           │
│ Peers            │ cluster1 (worker, ej60l6x1PZtRdmAj9sEd07Vk201duytRUaPttJnXwk8)   │
│                  │ cluster3 (arbitrator, lSK7K7xavBTjaNDou6mTVGKR15bRZeOPRmC6fwgX8) │
│ Mode             │ Running                                                          │
│ Current Active   │ cluster2                                                         │
│ Previous Active  │ cluster1                                                         │
│ Standby Clusters │ cluster1                                                         │
│ Last Switchover  │ 2025-11-13 14:32:40.801 +0000 UTC                                │
│ Last Failover    │ 2025-11-14 10:22:02.158 +0000 UTC                                │
│ Last Seen        │ controller-0.cluster2: 2025-11-20 10:28:26.17 +0000 UTC          │
│                  │ controller-0.cluster3: 2025-11-20 10:28:26.17 +0000 UTC          │
│                  │ controller-0.cluster1: 2025-11-20 10:28:26.165 +0000 UTC         │
│ Last Peer Error  │                                                                  │
│ Server Error     │                                                                  │
│ DB Replication   │ streaming                                                        │
│ DB Lag           │ 0 bytes                                                          │
└──────────────────┴──────────────────────────────────────────────────────────────────┘

Step 3

Use the sedo service install command to install the Service Pack on the active node.

Example:

root@superman-c1-n1:/data# sedo service install 25.1.2-MSMU-2.tar.gz 
Importing images...
The Cisco Optical Network Controller service is restarted with the new image. Images are automatically synced to the standby node, and services restart on standby.

Step 4

Use the sedo system status -w command to verify that all services are running.

In a GeoHA setup, verify the system status on both the active and standby virtual machines.

Example:

This sample output shows all the services as Running under the STATUS column.

concgha2-clb-vm1:~# sedo system status -w
┌──────────────────────────────────────────────────────────────────────────────────────────────────────────┐
│ System Status (Thu, 20 Nov 2025 09:55:35 UTC)                                                            │
├────────┬──────────────────────────────┬──────────────────┬─────────┬───────────────────────┬─────────────┤
│ OWNER  │ NAME                         │ NODE             │ STATUS  │ RESTARTS              │ STARTED     │
├────────┼──────────────────────────────┼──────────────────┼─────────┼───────────────────────┼─────────────┤
│ onc    │ monitoring                   │ concgha2-clb-vm1 │ Running │ 0                     │ 5 days ago  │
│ onc    │ onc-alarm-service            │ concgha2-clb-vm1 │ Running │ 3 (Latest 5 days ago) │ 1 week ago  │
│ onc    │ onc-apps-ui-service          │ concgha2-clb-vm1 │ Running │ 3 (Latest 5 days ago) │ 1 week ago  │
│ onc    │ onc-circuit-service          │ concgha2-clb-vm1 │ Running │ 3 (Latest 5 days ago) │ 1 week ago  │
│ onc    │ onc-collector-service        │ concgha2-clb-vm1 │ Running │ 3 (Latest 5 days ago) │ 1 week ago  │
│ onc    │ onc-config-service           │ concgha2-clb-vm1 │ Running │ 3 (Latest 5 days ago) │ 1 week ago  │
│ onc    │ onc-devicemanager-service    │ concgha2-clb-vm1 │ Running │ 3 (Latest 5 days ago) │ 1 week ago  │
│ onc    │ onc-inventory-service        │ concgha2-clb-vm1 │ Running │ 3 (Latest 5 days ago) │ 1 week ago  │
│ onc    │ onc-nbi-service              │ concgha2-clb-vm1 │ Running │ 3 (Latest 5 days ago) │ 1 week ago  │
│ onc    │ onc-netconfcollector-service │ concgha2-clb-vm1 │ Running │ 0                     │ 5 days ago  │
│ onc    │ onc-osapi-gw-service         │ concgha2-clb-vm1 │ Running │ 3 (Latest 5 days ago) │ 1 week ago  │
│ onc    │ onc-pce-service              │ concgha2-clb-vm1 │ Running │ 3 (Latest 5 days ago) │ 1 week ago  │
│ onc    │ onc-pm-service               │ concgha2-clb-vm1 │ Running │ 3 (Latest 5 days ago) │ 1 week ago  │
│ onc    │ onc-pmcollector-service      │ concgha2-clb-vm1 │ Running │ 0                     │ 5 days ago  │
│ onc    │ onc-topology-service         │ concgha2-clb-vm1 │ Running │ 3 (Latest 5 days ago) │ 1 week ago  │
│ onc    │ onc-torch-service            │ concgha2-clb-vm1 │ Running │ 3 (Latest 5 days ago) │ 1 week ago  │
│ system │ authenticator                │ concgha2-clb-vm1 │ Running │ 0                     │ 5 days ago  │
│ system │ bgp                          │ concgha2-clb-vm1 │ Running │ 0                     │ 5 days ago  │
│ system │ controller                   │ concgha2-clb-vm1 │ Running │ 3 (Latest 5 days ago) │ 2 weeks ago │
│ system │ flannel                      │ concgha2-clb-vm1 │ Running │ 1 (Latest 5 days ago) │ 2 weeks ago │
│ system │ ingress-proxy                │ concgha2-clb-vm1 │ Running │ 3 (Latest 5 days ago) │ 1 week ago  │
│ system │ kafka                        │ concgha2-clb-vm1 │ Running │ 1 (Latest 5 days ago) │ 2 weeks ago │
│ system │ loki                         │ concgha2-clb-vm1 │ Running │ 4 (Latest 5 days ago) │ 2 weeks ago │
│ system │ metrics                      │ concgha2-clb-vm1 │ Running │ 3 (Latest 5 days ago) │ 2 weeks ago │
│ system │ minio                        │ concgha2-clb-vm1 │ Running │ 3 (Latest 5 days ago) │ 2 weeks ago │
│ system │ postgres                     │ concgha2-clb-vm1 │ Running │ 3 (Latest 5 days ago) │ 2 weeks ago │
│ system │ promtail-vff8n               │ concgha2-clb-vm1 │ Running │ 1 (Latest 5 days ago) │ 2 weeks ago │
└────────┴──────────────────────────────┴──────────────────┴─────────┴───────────────────────┴─────────────┘

Step 5

Use the sedo version command to verify the Service Pack image is installed on both active and standby nodes.

Example:

This sample output shows the 25.1.2-13-MSMU-2-5 as the installed service pack.

concgha2-clb-vm1:~# sedo version
┌──────────────────────────────────────────────────────────────────────────────────────────────────────────┐
│ Installer: 25.1.2                                                                                        │
├──────────────────┬──────────────────────────────────────────────────────────┬────────────────────────────┤
│ NODE NAME        │ OS VERSION                                               │ KERNEL VERSION             │
├──────────────────┼──────────────────────────────────────────────────────────┼────────────────────────────┤
│ concgha2-clb-vm1 │ NxFOS 3.2-580 (00d31aecf87d877b8638ea4d295189852b4164e9) │ 6.1.0-35-cisco-cloud-amd64 │
└──────────────────┴──────────────────────────────────────────────────────────┴────────────────────────────┘
┌────────────────────────────────────────────────────────────────────────────┬────────────────────┬──────────────────┐
│ IMAGE NAME                                                                 │ VERSION            │ NODES            │
├────────────────────────────────────────────────────────────────────────────┼────────────────────┼──────────────────┤
│ docker.io/library/alpine                                                   │ 3.20.3             │ concgha2-clb-vm1 │
│ docker.io/rancher/local-path-provisioner                                   │ v0.0.30            │ concgha2-clb-vm1 │
│ quay.io/coreos/etcd                                                        │ v3.5.15            │ concgha2-clb-vm1 │
│ registry.k8s.io/pause                                                      │ 3.10               │ concgha2-clb-vm1 │
│ registry.nxf-system.svc:8443/cisco-onc-docker/dev/alarmservice             │ 25.1.2-13-MSMU-2-5 │ concgha2-clb-vm1 │
│ registry.nxf-system.svc:8443/cisco-onc-docker/dev/alarmservice             │ 25.1.2-13          │ concgha2-clb-vm1 │
│ registry.nxf-system.svc:8443/cisco-onc-docker/dev/circuit-service          │ 25.1.2-13          │ concgha2-clb-vm1 │
│ registry.nxf-system.svc:8443/cisco-onc-docker/dev/circuit-service          │ 25.1.2-13-MSMU-2-5 │ concgha2-clb-vm1 │
│ registry.nxf-system.svc:8443/cisco-onc-docker/dev/collector-service        │ 25.1.2-13          │ concgha2-clb-vm1 │
│ registry.nxf-system.svc:8443/cisco-onc-docker/dev/collector-service        │ 25.1.2-13-MSMU-2-5 │ concgha2-clb-vm1 │
│ registry.nxf-system.svc:8443/cisco-onc-docker/dev/config-service           │ 25.1.2-13          │ concgha2-clb-vm1 │
│ registry.nxf-system.svc:8443/cisco-onc-docker/dev/config-service           │ 25.1.2-13-MSMU-2-5 │ concgha2-clb-vm1 │
│ registry.nxf-system.svc:8443/cisco-onc-docker/dev/devicemanager-service    │ 25.1.2-13-MSMU-2-5 │ concgha2-clb-vm1 │
│ registry.nxf-system.svc:8443/cisco-onc-docker/dev/devicemanager-service    │ 25.1.2-13          │ concgha2-clb-vm1 │
│ registry.nxf-system.svc:8443/cisco-onc-docker/dev/inventory-service        │ 25.1.2-13-MSMU-2-5 │ concgha2-clb-vm1 │
│ registry.nxf-system.svc:8443/cisco-onc-docker/dev/inventory-service        │ 25.1.2-13          │ concgha2-clb-vm1 │
│ registry.nxf-system.svc:8443/cisco-onc-docker/dev/monitoring               │ 25.1.2-13          │ concgha2-clb-vm1 │
│ registry.nxf-system.svc:8443/cisco-onc-docker/dev/nbi-service              │ 25.1.2-13-MSMU-2-5 │ concgha2-clb-vm1 │
│ registry.nxf-system.svc:8443/cisco-onc-docker/dev/nbi-service              │ 25.1.2-13          │ concgha2-clb-vm1 │
│ registry.nxf-system.svc:8443/cisco-onc-docker/dev/netconfcollector-service │ 25.1.2-13-MSMU-2-5 │ concgha2-clb-vm1 │
│ registry.nxf-system.svc:8443/cisco-onc-docker/dev/netconfcollector-service │ 25.1.2-13          │ concgha2-clb-vm1 │
│ registry.nxf-system.svc:8443/cisco-onc-docker/dev/onc-apps-ui-service      │ 25.1.2-13-MSMU-2-5 │ concgha2-clb-vm1 │
│ registry.nxf-system.svc:8443/cisco-onc-docker/dev/onc-apps-ui-service      │ 25.1.2-13          │ concgha2-clb-vm1 │
│ registry.nxf-system.svc:8443/cisco-onc-docker/dev/osapi-gw-service         │ 25.1.2-13-MSMU-2-5 │ concgha2-clb-vm1 │
│ registry.nxf-system.svc:8443/cisco-onc-docker/dev/osapi-gw-service         │ 25.1.2-13          │ concgha2-clb-vm1 │
│ registry.nxf-system.svc:8443/cisco-onc-docker/dev/pce_service              │ 25.1.2-13-MSMU-2-5 │ concgha2-clb-vm1 │
│ registry.nxf-system.svc:8443/cisco-onc-docker/dev/pce_service              │ 25.1.2-13          │ concgha2-clb-vm1 │
│ registry.nxf-system.svc:8443/cisco-onc-docker/dev/pm-service               │ 25.1.2-13-MSMU-2-5 │ concgha2-clb-vm1 │
│ registry.nxf-system.svc:8443/cisco-onc-docker/dev/pm-service               │ 25.1.2-13          │ concgha2-clb-vm1 │
│ registry.nxf-system.svc:8443/cisco-onc-docker/dev/pmcollector-service      │ 25.1.2-13          │ concgha2-clb-vm1 │
│ registry.nxf-system.svc:8443/cisco-onc-docker/dev/topology-service         │ 25.1.2-13          │ concgha2-clb-vm1 │
│ registry.nxf-system.svc:8443/cisco-onc-docker/dev/topology-service         │ 25.1.2-13-MSMU-2-5 │ concgha2-clb-vm1 │
│ registry.nxf-system.svc:8443/cisco-onc-docker/dev/torch                    │ 25.1.2-13          │ concgha2-clb-vm1 │
│ registry.nxf-system.svc:8443/cisco-onc-docker/dev/torch                    │ 25.1.2-13-MSMU-2-5 │ concgha2-clb-vm1 │
│ registry.sedona.ciscolabs.com/nxf/authenticator                            │ 3.2-509            │ concgha2-clb-vm1 │
│ registry.sedona.ciscolabs.com/nxf/bgp                                      │ 3.2-507            │ concgha2-clb-vm1 │
│ registry.sedona.ciscolabs.com/nxf/controller                               │ 3.2-542            │ concgha2-clb-vm1 │
│ registry.sedona.ciscolabs.com/nxf/firewalld                                │ 3.2-507            │ concgha2-clb-vm1 │
│ registry.sedona.ciscolabs.com/nxf/flannel                                  │ 3.2-507            │ concgha2-clb-vm1 │
│ registry.sedona.ciscolabs.com/nxf/ingress-proxy                            │ 3.2-510            │ concgha2-clb-vm1 │
│ registry.sedona.ciscolabs.com/nxf/iptables                                 │ 3.2-510            │ concgha2-clb-vm1 │
│ registry.sedona.ciscolabs.com/nxf/kafka                                    │ 3.2-507            │ concgha2-clb-vm1 │
│ registry.sedona.ciscolabs.com/nxf/kubernetes                               │ 3.2-507            │ concgha2-clb-vm1 │
│ registry.sedona.ciscolabs.com/nxf/loki                                     │ 3.2-507            │ concgha2-clb-vm1 │
│ registry.sedona.ciscolabs.com/nxf/metrics-exporter                         │ 3.2-507            │ concgha2-clb-vm1 │
│ registry.sedona.ciscolabs.com/nxf/minio                                    │ 3.2-507            │ concgha2-clb-vm1 │
│ registry.sedona.ciscolabs.com/nxf/service-proxy                            │ 3.2-510            │ concgha2-clb-vm1 │
│ registry.sedona.ciscolabs.com/nxf/syslog-forwarder                         │ 3.2-503            │ concgha2-clb-vm1 │
│ registry.sedona.ciscolabs.com/nxf/timescale                                │ 3.2-516            │ concgha2-clb-vm1 │
└────────────────────────────────────────────────────────────────────────────┴────────────────────┴──────────────────┘
All Cisco Optical Network Controller services display the installer service pack number in the Version column. For example 25.1.2-13.

The Cisco Optical Network Controller Service Pack is installed, and all services are running the updated version.

KVM deployment for Cisco Optical Network Controller standalone mode

A KVM-based standalone installation deploys Cisco Optical Network Controller as a single KVM virtual machine by using a QCOW2 image and a cloud-init ISO that contains the node configuration.

  • The deployment uses one VM with control-plane, northbound, and eastbound network interfaces.

  • The cloud-init ISO provides the meta-data, network-config, and user-data files that initialize the system.

  • The standalone deployment does not require Geo-HA node joining or BGP-based multi-site routing.

Although the control-plane network is not used for standalone service traffic, it must still be defined during KVM deployment.

What to prepare before you start

Before you begin the standalone installation workflow, gather the values and files required to create the VM configuration.

  • QCOW2 image, VM sizing values, deployment directory, and KVM bridge names for the standalone VM.

  • Host name, control-plane, northbound, and eastbound IP addresses, DNS values, and the northbound virtual IP.

  • SSH key pair and the cloud-init values required for the standalone node definition and local users.

Use the standalone installation topics to create the cloud-init files, deploy the VM, verify system status, secure the admin account, and continue with post-installation setup.

KVM deployment requirements

This section lists the software requirements, hardware requirements, and network information for deploying Cisco Optical Network Controller on a KVM host.

Software requirements

This table lists the software and access requirements for the KVM deployment.

Table 8. KVM software requirements

Requirement

Description

libvirt-client and qemu-kvm

Install these packages on the KVM host.

cloud-utils

Use this package to create the cloud-init ISO.

wget or curl

Use one of these utilities to download the OS image.

SSH key pair

Use the SSH key pair to access the virtual machine.

Hardware requirements

This table lists the host infrastructure requirements for the KVM deployment.

Table 9. KVM hardware requirements

Requirement

Description

KVM host

Use RHEL 8.x or later with KVM and libvirt installed.

UEFI support

Install the OVMF firmware packages on the host.

Storage

Provide at least 100 GB of available disk space.

Memory

Provide at least 16 GB of available RAM.

CPU

Provide at least 8 vCPUs.

Configure networks for standalone deployment

Create the libvirt network definitions required Cisco Optical Network Controller standalone deployment on a KVM host.

Before you begin

  • Log in to the KVM host with privileges to create libvirt network definitions.

  • Choose a working directory to store the network XML files.

In a standalone deployment, one eastbound network and one control-plane network are required.

Procedure


Step 1

Create the control-plane network definition in a file.

The control plane network can be a private network.

Example:

Example for control.xml
<network>
<name>control</name>
<forward mode='none'/>
<bridge name='virbr-control'/>
<ip address='192.168.1.1' netmask='255.255.255.0'/>
</network>

Step 2

Create the eastbound network definitions in file named eastbound.xml.

The eastbound network can be a private network.

Example:

Example for eastbound1.xml.
<network>
  <name>eastbound1</name>
  <forward mode='none'/>
  <bridge name='virbr-east1'/>
  <ip address='172.10.10.1' netmask='255.255.255.0'/>
</network>

Step 3

Specify the default northbound interface using the <NORTHBOUND_BRIDGE> parameter for northbound connectivity when running the virt-install command.

For example, use bridge0 as the value for <NORTHBOUND_BRIDGE> to assign the northbound interface during deployment.

Step 4

Define, start, and enable each network at boot.

Example:

virsh net-define <network-file.xml>
virsh net-start <network-name>
virsh net-autostart <network-name>

Step 5

Verify that all required networks are available.

Example:

virsh net-list --all

The network list shows the defined networks and their current state.


The control-plane and eastbound networks are configured and available for KVM deployment.

Install Cisco Optical Network Controller using KVM in standalone mode

Use this supertask to complete the full KVM-based standalone installation workflow for Cisco Optical Network Controller.

Before you begin

Prepare KVM configuration files for standalone deployment.

Procedure


Step 1

Create the KVM virtual machine.

See Create a KVM virtual machine for standalone deployment.

Step 2

Verify the deployment and access the web UI.

See Verify and access the standalone deployment.


Cisco Optical Network Controller is installed on KVM in standalone mode.

Prepare KVM configuration files for standalone deployment

Prepare the cloud-init configuration used to deploy Cisco Optical Network Controller on KVM as a standalone instance.

Before you begin

  • Perform this procedure for one VM.

  • Have the host name, IP addresses, virtual IP, DNS values, and SSH public key available before you create the files.

Procedure

Step 1

Create the SSH public-key file by following Create the meta-data file for a standalone node.

Step 2

Create the network definition by following Create the network-config file for a standalone node.

Step 3

Create the cluster and user settings by following Create the user-data file for a standalone node.


The cidata.iso file is created and is ready to be attached when you deploy the standalone Cisco Optical Network Controller VM.

What to do next

Create a KVM virtual machine for standalone deployment.

Create the meta-data file for a standalone node

Create the meta-data cloud-init file for a standalone Cisco Optical Network Controller node.

Procedure

Step 1

Create a file named meta-data.

Step 2

Add the instance ID, local host name, and SSH public key.

Meta-data file syntax:

instance-id: <instance_id>
local-hostname: <node_name>
public-keys:
  - <ssh_public_key>

The meta-data file is ready to be included in the cloud-init ISO.

Meta-data file example
instance-id: iid-conc-sa-kvm-1
local-hostname: conc-sa-kvm-1
public-keys:
  - ssh-ed25519 AAAAC3NzaC1lZDI1NTE5AAAAIKAn33NZjrMWyMJpf7QvrD4vCvEAg4PPdpb3UFXXXXXX
Create the network-config file for a standalone node

Create the network-config file that defines the standalone node IP addresses, default gateway, and DNS settings.

Procedure

Step 1

Create a file named network-config.

Step 2

Define the control-plane, northbound, and eastbound interfaces.

network-config file syntax.

version: 2
ethernets:
  enp1s0:
    dhcp4: <false-or-true>
    addresses:
      - <control_plane_ip/subnet_mask>
  enp2s0:
    dhcp4: <false-or-true>
    addresses:
      - <northbound_ip/subnet_mask>
    gateway4: <gateway_ip>
    nameservers:
      addresses:
        - <dns_server_ip>
  enp3s0:
    dhcp4: <false-or-true>
    addresses:
      - <eastbound_ip/subnet_mask>

The network-config file is ready for use by the standalone node.

network-config file example
version: 2
ethernets:
  enp1s0:
    dhcp4: false
    dhcp6: false
    addresses:
      - 192.168.119.10/24
  enp2s0:
    dhcp4: false
    dhcp6: false
    addresses:
      - 10.58.231.119/22
    gateway4: 10.58.228.1
    nameservers:
      addresses:
        - 144.254.71.184
  enp3s0:
    dhcp4: false
    dhcp6: false
    addresses:
      - 172.10.10.10/24
Create the user-data file for a standalone node

Create the user-data cloud-init file for a standalone Cisco Optical Network Controller node.

Procedure

Step 1

Create a file named user-data.

Step 2

Add the base cloud-init content for the data disk, optional NTP servers, and the standalone cluster configuration for the node.

user-data file syntax

fs_setup:
  - label: data
    device: /dev/vdb
    filesystem: ext4
mounts:
  - ["/dev/vdb", "/data"]
ntp:
  enabled: true
  ntp_client: chrony
  servers:
    - <ntp_server>
nxf:
  minControlPlaneCount: 1
  clusterIndex: <cluster_index>
  clusterName: <cluster_name>
  node:
    name: <node_name>
    initiator: <control_plane_ip>
    joinToken: <join_token>
    controlPlaneInterface: enp1s0
    eastboundInterface: enp3s0
    vip:
      northbound:
        interface: enp2s0
  initiator:
    vip:
      northbound:
        ip: <vip>
        type: L3
    kafka:
      enabled: true
    joinToken: <join_token>
    arbitratorNode: my-node3
    clusterRole: <worker-or-arbitrator>
    security:
      localUsers:
        - username: admin
          displayName: NxF Admin
          description: NextFusion Default Administrator
          locked: true
          mustChangePassword: false
          expiresInDays: 0
          access:
            - permission/admin

Use a valid DNS name for both clusterName and node_name.


The user-data file is ready to be included in the cloud-init ISO for the standalone node.

user-data file example
#cloud-config
#NxF User Data
fs_setup:
- label: data
  device: /dev/vdb
  filesystem: ext4

mounts:
- ["/dev/vdb", "/data"]
ntp:
  enabled: true
  ntp_client: chrony
  servers:
  - ntp.esl.cisco.com,10.58.228.1

nxf:
  minControlPlaneCount: 1
  clusterIndex: 1
  clusterName: cluster1
  node:
    name: node1
    #Should be same as control plane 
    initiator: 192.168.119.10
    joinToken: z9wfwl.ye6pmu6pr27aogjk
    controlPlaneInterface: enp1s0
    eastboundInterface: enp3s0
    vip:
      northbound:
        interface: enp2s0
  initiator:
    vip:
      northbound:
        ip: 10.58.231.119
        type: L3
    kafka:
      enabled: true
    joinToken: z9wfwl.ye6pmu6pr27aogjk
    arbitratorNode: node3
    #should be arbitrator for cluster3
    clusterRole: worker
    security:
      localUsers:
      - username: admin
        displayName: NxF Admin
        description: NextFusion Default Administrator
        locked: true
        mustChangePassword: false
        expiresInDays: 0
        access:
        - permission/admin

Create a KVM virtual machine for standalone deployment

Deploy a KVM virtual machine that hosts a standalone Cisco Optical Network Controller instance.

Run this task on the KVM host after you create the cidata.iso file for the standalone node.

Before you begin

Use a unique QCOW2 filename for the VM.

Procedure

Step 1

Copy the three configuration files to a designated folder and generate the ISO.

Example:
cp network-config user-data meta-data <PATH_TO_DEPLOY_DIR>/vmConfig/cloud-config/
mkisofs -o "<PATH_TO_DEPLOY_DIR>/vmConfig/cidata.iso" -r -J -V cidata "<PATH_TO_DEPLOY_DIR>/vmConfig/cloud-config/"

Step 2

Deploy the standalone node by running the virt-install command with the values for that VM.

For the standalone and geo-ha deployment, specify bridge0 as the <NORTHBOUND_BRIDGE> bridge interface to connect to the northbound interface using the north bridge interface.

virt-install command syntax

virt-install \
--name <HOST_NAME> \
--vcpus <CPUs> \
--memory <MEMORY> \
--disk path=<PATH_TO_DEPLOY_DIR>/<QCOW2_FILE_NAME>.qcow2,format=qcow2 \
--disk path=<PATH_TO_DEPLOY_DIR>/<QCOW2_FILE_NAME>-data.qcow2,size=<SIZE>,device=disk,bus=virtio,format=qcow2 \
--disk path=<PATH_TO_DEPLOY_DIR>/vmConfig/cidata.iso,device=cdrom \
--osinfo debian12 \
--network bridge=<CONTROL_PLANE_BRIDGE>,model=virtio \
--network bridge=<NORTHBOUND_BRIDGE>,model=virtio \
--network bridge=<EASTBOUND_BRIDGE>,model=virtio \
--boot loader=/usr/share/edk2/ovmf/OVMF_CODE.fd,loader.readonly=yes,loader_secure=no,nvram.template=/usr/share/edk2/ovmf/OVMF_VARS.fd,hd,uefi \
--serial pty \
--console pty,target_type=serial \
--noautoconsole

Wait for the VM to finish booting. SSH access is available after the VM is started.


The standalone VM is created with the QCOW2 system disk, the data disk, the cloud-init ISO, and the required control-plane, northbound, and eastbound interfaces.

virt-install command example
virt-install   \
  --name conc-sa-kvm-1   \
  --vcpus 32   \
  --memory 131072   \
  --disk path=/var/lib/libvirt/images/VMs/conc-sa-kvm-1/CONC-26.1.1.qcow2,format=qcow2   \
  --disk path=/var/lib/libvirt/images/VMs/conc-sa-kvm-1/CONC-26.1.1-data.qcow2,size=2500,device=disk,bus=virtio,format=qcow2   \
  --disk path=/var/lib/libvirt/images/VMs/conc-sa-kvm-1/cidata.iso,device=cdrom   \
  --osinfo debian12   \
  --network bridge=virbr-control,model=virtio   \
  --network bridge=bridge0,model=virtio   \
  --network bridge=virbr-east1,model=virtio   \
  --boot loader=/usr/share/edk2/ovmf/OVMF_CODE.fd,loader.readonly=yes,loader_secure=no,nvram.template=/usr/share/edk2/ovmf/OVMF_VARS.fd,hd,uefi   \
  --serial pty   \
  --console pty,target_type=serial   \
  --autostart \
  --noautoconsole

What to do next

Verify and access the standalone deployment.

Verify and access the standalone deployment

Confirm that the standalone Cisco Optical Network Controller VM is operational and complete the initial access and security tasks.

Before you begin

Deploy the VM by following Create a KVM virtual machine for standalone deployment.

Procedure

Step 1

Verify SSH access to the standalone VM.

Example:
ssh -i <private-key_file> nxf@<hco_management_ip>

If you are not prompted for a password, there is probably a problem with the key. If the command times out, verify the IP setting.

Step 2

Check the system status.

Example:
sedo system status

Step 3

Change the default password and access string of the admin user.

Example:
sedo security user set --access role/admin --password admin

You are prompted to enter the new password.

Step 4

Configure additional local users if required.

For more information, see Add local users to Cisco Optical Network Controller.

Step 5

Open the Cisco Optical Network Controller web UI by browsing to the northbound virtual IP on port 8443.

Example:
https://<northbound-virtual-ip>:8443/

Cisco Optical Network Controller is installed on KVM as a standalone instance.

Restore DB replication on standby cluster

Restore DB replication on the standby cluster when replication does not automatically recover after a cluster failover and switchover.

When a cluster restarts after a prolonged outage or failover, DB replication may remain disconnected. If replication does not automatically recover within 10 minutes after boot, use this manual recovery procedure.

This procedure is not supported for restart scenarios. Use this procedure only after a failover.

Before you begin

Ensure that you perform this procedure during an appropriate maintenance window and that you create a full backup before you modify the standby cluster database.

Follow these steps to restore DB replication.

Procedure


Step 1

Use the sedo supercluster status to verify the supercluster status on the active cluster.

Example:

root@vm1-cluster1-node1:~# sedo supercluster status 
┌───────────────────────────────────────────────────────────────────────────────────────┐
│ Supercluster Status                                                                   │
├──────────────────┬────────────────────────────────────────────────────────────────────┤
│ Cluster ID       │ k_Z8em3rUhM5AYDBlnZM2R2MSzQBI0AoJCMQYamjI                          │
│ Cluster Name     │ cluster1                                                           │
│ Cluster Role     │ worker                                                             │
│ Peers            │ cluster2 (worker, QYCMqsFrx5flQi5kg0bgocuD8ZglAqi0VWHvMwP4zPo)     │
│                  │ cluster3 (arbitrator, zW6eASGfeyMXUUzKJ7dLTF8Zx7bh3MIUtXy1Yjf8pF4) │
│ Mode             │ Running                                                            │
│ Current Active   │ cluster1                                                           │
│ Previous Active  │ cluster2                                                           │
│ Standby Clusters │ cluster2                                                           │
│ Last Switchover  │ 2026-04-20 13:20:44.506 +0000 UTC                                  │
│ Last Failover    │                                                                    │
│ Last Seen        │ controller-0.cluster1: 2026-03-20 13:59:49.403 +0000 UTC           │
│                  │ controller-0.cluster2: 2026-03-20 13:59:49.403 +0000 UTC           │
│                  │ controller-0.cluster3: 2026-03-20 13:59:49.403 +0000 UTC           │
│ Last Peer Error  │                                                                    │
│ Server Error     │                                                                    │
│ DB Replicationdisconnected                                                       │
│ DB Lag           │                                                                    │ 
└──────────────────┴────────────────────────────────────────────────────────────────────┘

Step 2

Use the sedo system status command to verify that all services are running on the active cluster.

Example:

sedo system status
┌───────────────────────────────────────────────────────────────────────────────────┐
│ System Status (Fri, 20 Sep 2024 08:21:27 UTC)         │
├────────┬──────────────────────────────┬───────┬─────────┬──────────┬──────────────┤
│ OWNER  │ NAME                         │ NODE  │ STATUS  │ RESTARTS │ STARTED      │
├────────┼──────────────────────────────┼───────┼─────────┼──────────┼──────────────┤
│ onc    │ monitoring                   │ node1 │ Running │ 0        │ 3 hours ago  │
│ onc    │ onc-alarm-service            │ node1 │ Running │ 0        │ 3 hours ago  │
│ onc    │ onc-apps-ui-service          │ node1 │ Running │ 0        │ 3 hours ago  │
│ onc    │ onc-circuit-service          │ node1 │ Running │ 0        │ 3 hours ago  │
│ onc    │ onc-collector-service        │ node1 │ Running │ 0        │ 3 hours ago  │
│ onc    │ onc-config-service           │ node1 │ Running │ 0        │ 3 hours ago  │
│ onc    │ onc-devicemanager-service    │ node1 │ Running │ 0        │ 3 hours ago  │
│ onc    │ onc-inventory-service        │ node1 │ Running │ 0        │ 3 hours ago  │
│ onc    │ onc-nbi-service              │ node1 │ Running │ 0        │ 3 hours ago  │
│ onc    │ onc-netconfcollector-service │ node1 │ Running │ 0        │ 3 hours ago  │
│ onc    │ onc-osapi-gw-service         │ node1 │ Running │ 0        │ 3 hours ago  │
│ onc    │ onc-pce-service              │ node1 │ Running │ 0        │ 3 hours ago  │
│ onc    │ onc-pm-service               │ node1 │ Running │ 0        │ 3 hours ago  │
│ onc    │ onc-pmcollector-service      │ node1 │ Running │ 0        │ 3 hours ago  │
│ onc    │ onc-topology-service         │ node1 │ Running │ 0        │ 3 hours ago  │
│ onc    │ onc-torch-service            │ node1 │ Running │ 0        │ 3 hours ago  │
│ system │ authenticator                │ node1 │ Running │ 0        │ 12 hours ago │
│ system │ controller                   │ node1 │ Running │ 0        │ 12 hours ago │
│ system │ flannel                      │ node1 │ Running │ 0        │ 12 hours ago │
│ system │ ingress-proxy                │ node1 │ Running │ 0        │ 12 hours ago │
│ system │ kafka                        │ node1 │ Running │ 0        │ 12 hours ago │
│ system │ loki                         │ node1 │ Running │ 0        │ 12 hours ago │
│ system │ metrics                      │ node1 │ Running │ 0        │ 12 hours ago │
│ system │ minio                        │ node1 │ Running │ 0        │ 12 hours ago │
│ system │ postgres                     │ node1 │ Running │ 0        │ 12 hours ago │
│ system │ promtail-cltmk               │ node1 │ Running │ 0        │ 12 hours ago │
│ system │ vip-add                      │ node1 │ Running │ 0        │ 12 hours ago │
└────────┴──────────────────────────────┴───────┴─────────┴──────────┴──────────────┘

Step 3

Select an appropriate maintenance window.

Step 4

Create a full backup of the CONC database. To create a backup:

  • Follow the steps outlined at this topic Backup and Restore Database.
  • Use the sedo backup create full command and export the backup for recovery if needed.

Step 5

To clean up the DB on the standby cluster and trigger a resync, perform these steps in order.

  1. Scale down the PostgreSQL stateful set on the standby cluster.

    Example:

    sudo kubectl --kubeconfig /etc/kubernetes/admin.conf -n nxf-system scale --replicas 0 statefulset/postgres
  2. Delete the PostgreSQL persistent volumes and persistent volume claims.

    Example:

    sudo kubectl --kubeconfig /etc/kubernetes/admin.conf -n nxf-system get pv,pvc | grep postgres | awk '{print $1}' | xargs sudo kubectl --kubeconfig /etc/kubernetes/admin.conf -n nxf-system delete
  3. Delete the PostgreSQL config maps.

    Example:

    sudo kubectl --kubeconfig /etc/kubernetes/admin.conf -n nxf-system delete configmap -l app=postgres -l cluster-name=postgres
  4. Retrieve the remote worker cluster name.

    Example:

    remote=$(kubectl -n nxf-system get cm nxf-supercluster-config -o jsonpath='{.data.config\.json}' | yq '.peers[] | select(.role == "worker") | .clusterName')
  5. Patch the PostgreSQL stateful set with the standby cluster target.

    Example:

    kubectl -n nxf-system patch statefulset postgres -p '{"spec":{"template":{"spec":{"containers":[{"name":"postgres","env":[{"name":"STANDBY_CLUSTER","value":"postgres-0.patroni.nxf-system.svc.'${remote}'.local"}]}]}}}}'
  6. Scale the PostgreSQL stateful set back up.

    Example:

    sudo kubectl --kubeconfig /etc/kubernetes/admin.conf -n nxf-system scale --replicas 1 statefulset/postgres

The standby cluster starts a full PostgreSQL resynchronization and DB replication is restored.

Step 6

Use the sedo supercluster status to verify the supercluster status on the active cluster is streaming.

root@vm1-cluster1-node1:~# sedo supercluster status 
┌───────────────────────────────────────────────────────────────────────────────────────┐
│ Supercluster Status                                                                   │
├──────────────────┬────────────────────────────────────────────────────────────────────┤
│ Cluster ID       │ k_Z8em3rUhM5AYDBlnZM2R2MSzQBI0AoJCMQYamjI                          │
│ Cluster Name     │ cluster1                                                           │
│ Cluster Role     │ worker                                                             │
│ Peers            │ cluster2 (worker, QYCMqsFrx5flQi5kg0bgocuD8ZglAqi0VWHvMwP4zPo)     │
│                  │ cluster3 (arbitrator, zW6eASGfeyMXUUzKJ7dLTF8Zx7bh3MIUtXy1Yjf8pF4) │
│ Mode             │ Running                                                            │
│ Current Active   │ cluster1                                                           │
│ Previous Active  │ cluster2                                                           │
│ Standby Clusters │ cluster2                                                           │
│ Last Switchover  │ 2026-04-20 13:20:44.506 +0000 UTC                                  │
│ Last Failover    │                                                                    │
│ Last Seen        │ controller-0.cluster1: 2026-03-20 13:59:49.403 +0000 UTC           │
│                  │ controller-0.cluster2: 2026-03-20 13:59:49.403 +0000 UTC           │
│                  │ controller-0.cluster3: 2026-03-20 13:59:49.403 +0000 UTC           │
│ Last Peer Error  │                                                                    │
│ Server Error     │                                                                    │
│ DB Replicationstreaming                                                          │
│ DB Lag           │                                                                    │ 
└──────────────────┴────────────────────────────────────────────────────────────────────┘

DB replication is restored on the standby cluster.