Frequency synchronization

A frequency synchronization is a timing method that

  • distributes precision frequency across a network

  • enables circuit emulation by maintaining precise timing between endpoints, and

  • supports compliance with standards such as International Telecommunication Union Telecommunication Standardization Sector (ITU-T) G.8262.

Frequency synchronization provides precise frequency—rather than time of day—enabling next-generation network services. The feature is crucial for applications like circuit emulation, where each circuit endpoint requires synchronization with a known, common precision frequency reference.

Table 1. Feature History Table

Feature name

Release Information

Feature Description

Frequency Synchronization

Release 7.3.1

Based on the ITU-T G.8262 recommendations, timing devices provide precision frequency to support frequency synchronization for bandwidth, frequency accuracy, holdover, and noise generation measurement. These actions ensure correct network operations when synchronous equipment receives timing from another synchronous equipment clock or a higher-quality clock.

Source and Selection Points

Source and selection points are frequency synchronization elements that

  • identify the input timing source for a network device

  • serve as the decision points for selecting among multiple synchronization signals, and

  • ensure devices maintain accurate timing by choosing the most reliable source.

Frequency synchronization in telecommunications networks depends on obtaining timing information from a high-quality source. Selection points evaluate potential sources such as Global Navigation Satellite System (GNSS), master clocks, or peer devices, and determine which to use based on reliability, signal quality, and predefined priority.

Source

A source is a frequency signal input/output interface that

  • provides timing or frequency signals to a system or receives them from it

  • maintains an associated Quality Level (QL) to indicate clock accuracy, and

  • accepts assigned priority values to define synchronization preference and prevent timing loops.

Four types of sources exist:

  1. Line interfaces—these include interfaces such as SyncE, used for synchronizing network equipment.

  2. Clock interfaces—external connectors for timing signals, such as BITS and GPS sources.

  3. PTP clock—these are IEEE 1588 v2-based clocks that supply time-of-day and frequency information.

  4. Internal oscillator—a free running oscillator chip for independent timekeeping.

Each source has a Quality Level (QL) that shows clock accuracy. The Quality Level helps you determine which source devices in the system to synchronize with. Assign priority values to each router’s source. These priorities define the network synchronization flow and help prevent timing loops. QL information and the priority levels you assign allow each router to select a source for SyncE interface synchronization according to ITU standard G.781.

Selection points

A selection point is a timing signal node in a network device that

  • enables choices to be made between multiple incoming frequency signals

  • forms interconnected graphs representing the flow of timing across different cards in a router, and

  • may select one or many signals as outputs for further distribution within the system.

Inputs to selection points include:

  • signals received directly from timing sources

  • outputs from other selection points on the same card, or

  • outputs from selection points on other cards.

Outputs of selection points may:

  • drive signals sent out of a set of interfaces

  • serve as input to another selection point on the same card, or

  • serve as input to a selection point on another card.

Use the show frequency synchronization selection command to view selection point details in the system.
Synchronous Ethernet (SyncE)

A Synchronous Ethernet (SyncE) technology is an ITU-T standard for computer networking that

  • distributes frequency synchronization across Ethernet networks using the physical layer

  • enables accurate transfer of clock signals from a primary reference clock (PRC) to downstream devices, and

  • supports hop-by-hop frequency synchronization to maintain consistent timing across devices.

SyncE is designed to address the need for precise frequency synchronization in modern Ethernet networks. This is especially important as Synchronous Digital Hierarchy (SDH) equipment is replaced by Ethernet devices. Unlike traditional Ethernet, which does not inherently provide frequency synchronization, SyncE leverages existing Ethernet interfaces. This enables the propagation of a common, high-precision clock signal across the network. Devices connected via Ethernet ports operate with synchronized timing. Synchronized timing is essential for many applications in telecommunications and data communications.

To operate SyncE links reliably, networks use operational messages. These messages determine the most reliable timing source for each node and communicate timing source quality information. In SDH environments, these are called Synchronization Status Messages (SSMs). SyncE uses the Ethernet Synchronization Message Channel (ESMC) to transport Synchronization Status Messages (SSMs), maintaining high-quality timing information throughout the network.

How syncE works

Summary

Use SyncE (Synchronous Ethernet) to synchronize clocks across your network. It extracts, distributes, and recovers clock frequency through Ethernet data signals.

The key components in this process are:

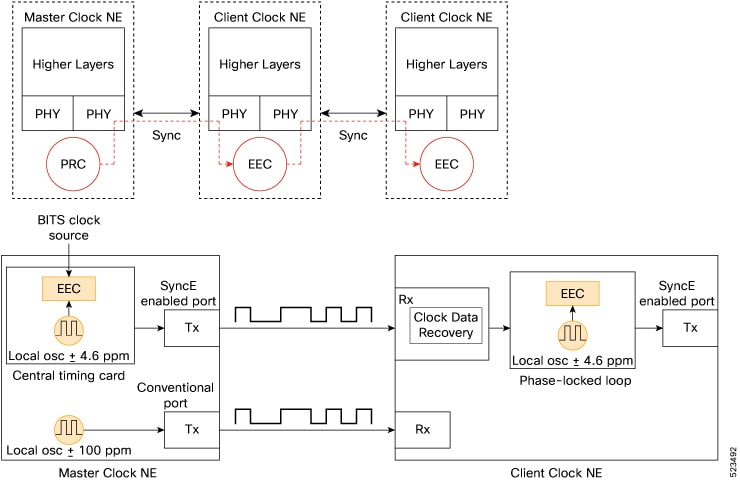
  • Primary reference clock (PRC): Generates traceable network timing for synchronization across all nodes.

  • Network element (NE): Includes Primary and Client Clock NEs, which distribute and recover clock signals.

  • Synchronous Ethernet equipment clock (EEC): Adopted in every NE to maintain synchronization within the chain.

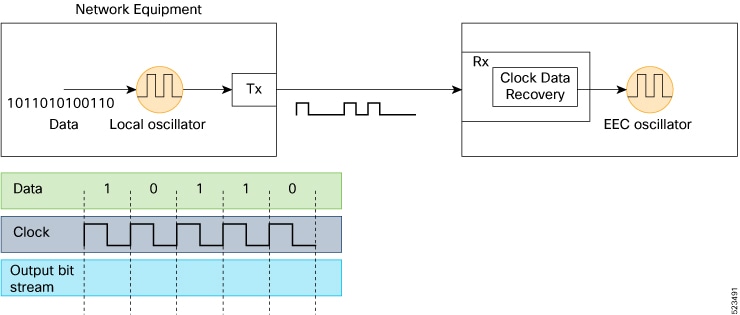
  • Clock data recovery (CDR): Recovers clock signal at the transceiver or via an external module.

  • Transmit and receive (Tx and Rx) ports: These ports transmit and receive data signals containing clock frequency information.

Workflow

Figure 1. Clock Frequency Extraction for SyncE
Figure 2. Clock Deployment for SyncE

The process involves these stages:

  1. The PRC distributes the master clock across network elements in the chain.
  2. Each NE uses an EEC to adopt the synchronized clock, ensuring the timing is traceable to the PRC.
  3. The Tx port transmits data signals embedded with clock frequency.
  4. The Rx port at the receiving NE extracts and recovers the clock frequency from the incoming signal using CDR (either integrated or external).
  5. The recovered clock is sent to the central timing card of the NE, which provides reference timing for further distribution.
  6. The Client Clock NE becomes the Primary Clock NE for the next downstream NE, perpetuating node-to-node clock synchronization.

Result

With SyncE, you achieve robust network-wide synchronization of timing signals, even when network load varies or specific packet traffic changes. Use SyncE when you need precise timing and reliable data transfer for your applications.

SyncE profiles support matrix

Use this matrix to quickly identify which SyncE profiles are available for each Cisco 8000 series hardware module or router and under which Cisco IOS XR release.
Table 2. SyncE profiles support matrix

Hardware Module

Supported SyncE profiles

Cisco IOS XR Release

Cisco 8712 Router

G.8262

G.8264

Release 24.4.1

8711-32FH-M router

G.8262

G.8262.1

Release 24.3.1

86-MPA-14H2FH-M

G.8262

G.8264

Release 24.1.1

86-MPA-24Z-M

G.8262

G.8264

Release 24.1.1

86-MPA-4FH-M

G.8262

G.8264

Release 24.1.1

Cisco 8608 Router

G.8262

G.8264

Release 24.1.1

8608-RP Route Processor

1588 Port (1G/10G)

G.8262

G.8264

Release 24.1.1

8000-RP2 Route Processor

G8275.1

G8273.2

Release 7.11.1

88-LC0-36FH-M

G8275.1

G8273.2

Release 7.11.1

8800-LC-36FH

G8275.1

G8273.2

Release 7.11.1

8800-RP2 Route Processor

1588 Port(1G/10G)

G.8262

G.8264

Release 7.10.1

  • 88-LC0-36FH-M line card

  • 8202-32FH-M router

G.8262

Release 7.5.2

G.8264

  • 8201-32FH router

  • 88-LC-34H14FH line card

  • 88-LC0-36FH line card

G.8262

Release 7.3.3

G.8264

  • 8201 router

  • 8202 router

  • 8800-LC-36FH line card

  • 8800-LC-48FH line card

G.8262

Release 7.3.1

G.8264

SyncE restrictions

  • SyncE is not supported on 8800-RP 1588 ports.

  • Enable Frequency Synchronization selection input on two interfaces on each line card.

  • Enable Frequency Synchronization selection input on only one bundle member for link aggregation.

Enhanced ESMC and Enhanced SyncE

An enhanced Ethernet Synchronization Message Channel (ESMC) protocol is a network synchronization protocol that

  • enables frequency synchronization across Ethernet networks by using enhanced quality levels

  • distributes synchronization status messages with improved precision using updated Type Length Value (TLV) fields, and

  • supports clock synchronization across modern Ethernet devices with greater accuracy and reliability.

Enhanced SyncE (eSyncE) is an updated implementation of Synchronous Ethernet that uses the enhanced Quality Level (QL) TLV defined in ITU-T G.8264 to support a greater range of quality levels and more accurate synchronization.
  • As part of the ESMC protocol, Synchronization Status Messages (SSMs) distribute the quality level (QL) of timing signals.

  • The enhanced QL in TLV format enables networks to select and communicate improved clock quality standards, contributing to higher bandwidth, frequency accuracy, and reduced noise.

  • Configure the router to send or receive enhanced TLV for precise synchronization. Set a local clock identifier, usually based on the device MAC address, to enable this feature.

Table 3. Feature History Table

Feature name

Release information

Feature description

Ethernet Synchronization Message Channel (ESMC)

Release 7.3.1

The ITU-T G.8264 performance compliance standard defines the ESMC protocol. Use this standard to synchronize clock frequency across a network using an Ethernet port and select the desired quality level. The G.8264 standard includes an extended Quality Level (QL) represented as a Type Length Value (TLV). If you use Ethernet equipment instead of SONET or SDH devices, you achieve high-quality clock synchronization over Ethernet ports through improved frequency synchronization.


Note


The default clock ID is based on the MAC address of the chassis.


Restriction for ESMC

Enable enhanced ESMC only on routers that support eSyncE. Routers without eSyncE support ignore enhanced TLVs, do not provide accurate clock quality, and drop QL TLVs at ingress nodes. Devices with enhanced ESMC support use extended QL TLVs.

Configure frequency synchronization

Configure frequency synchronization on the router using your preferred source (Synchronous Ethernet [SyncE], GPS, BITS, or Precision Time Protocol [PTP]).

Use this procedure to set up frequency synchronization, which is essential for accurate timing across your network devices.

Before you begin

To begin, ensure you have administrator access to the router.

Procedure


Step 1

Enable frequency synchronization on the router.

For detailed steps, see the Enable Frequency Synchronization on the Router section.

Step 2

Choose the frequency source for your configuration, and select from the options listed.

  • If you use SyncE as the source, refer to the configuration steps in the Configure Frequency Synchronization on an Interface section.

  • If you use an external clock interface (GPS or BITS) on Cisco 8000 hardware,

    • To configure frequency synchronization using GPS, refer to Configure GPS, an external Clock Interface for Frequency Synchronization.

    • For BITS, refer to Configure BITS, an external Clock Interface for Frequency Synchronization.

  • If you use PTP, refer to G.8265.1 in the Precision Time Protocol (PTP) chapter.

Use your chosen source to configure frequency synchronization on the router.

Enable frequency synchronization on the router

Configure the router to use frequency synchronization for accurate timing across interfaces.

Perform this task when you need to synchronize frequency across router interfaces using specified timing sources.

Before you begin

Access the router CLI with appropriate administrative privileges.

To enable frequency synchronization on the router, complete these steps:

Procedure


Step 1

Configure the timing sources to drive the output from a clock interface:

Enter configuration mode and enable frequency synchronization:

Router# config
Router(config)# frequency synchronization
Router(config-freqsync)# clock-interface timing-mode system

Note


If you do not configure timing mode system, the router raises the major alarm T4 PLL is in FREERUN mode. This alarm has no functional impact.

Step 2

(Optional) Configure the ITU-T quality level (QL) options if needed:

Router(config-freqsync)# quality itu-t option 2 generation 1

Note


The quality option here must match the option that is specified in the quality receive and quality transmit commands in the interface frequency synchronization configuration mode.

Step 3

Enable logging of changes and errors:

Router(config-freqsync)# log selection changes
Router(config-freqsync)# commit

Your router now uses frequency synchronization, and the system logs any relevant changes or errors.

What to do next

Configure frequency synchronization on all interfaces that must participate.

Configure frequency synchronization on the route processor

Enable frequency synchronization for the 1588 port on the route processor.

Use this task to configure frequency synchronization at the route processor for supported routers. This task ensures accurate time and frequency distribution.

Before you begin

Verify that your router and line card support the 1588 port for frequency synchronization. To view supported models, see the SyncE profiles support matrix.

Complete the steps to configure frequency synchronization on your route processor:

Procedure


Step 1

Access the router CLI and enter configuration mode.

Step 2

Configure the 1588 port for frequency synchronization.

Enter the following commands:

Router# config
Router(config)# int PTP0/RP0/CPU0/0 
Router(config-if)# frequency synchronization
Router(config-if-freqsync)#selection input
Router(config-if-freqsync)#wait-to-restore 0
Router(config-if-freqsync)#no shutdown
Router(config-if)# commit
Router(config-if)# end

Step 3

Verify the 1588 port configuration details by using the show run interface command.

Router# show running-config interface PTP0/RP0/CPU0/0
interface PTP0/RP0/CPU0/0
frequency synchronization
  selection input
  wait-to-restore 0
!
!

Review the output to confirm frequency synchronization settings are applied.


You have configured frequency synchronization on the 1588 port of your route processor.

What to do next

Configure frequency synchronization on interfaces that need to participate.

Configure frequency synchronization on an interface

Configure SyncE on an interface

Enable frequency synchronization on your router interface to maintain stable network timing.

After you configure the parameters, your interface participates in frequency synchronization.

Before you begin

Enable frequency synchronization globally on your router to ensure accurate timing for all interfaces.

To configure SyncE on your interface, follow each step in order.

Procedure


Step 1

Enter configuration mode on the router.

Router# config

Step 2

Select the interface you want to enable for frequency synchronization.

Router(config)# interface HundredGigE 0/1/1/0

Step 3

Enable frequency synchronization mode on the selected interface.

Router(config-if)# frequency synchronization
Router(config-if-freqsync)# 

Step 4

(Optional) Define parameters for frequency synchronization. Specify selection input, priority, wait-to-restore value, and time-of-day priority.

Router(config-if-freqsync)# selection input
Router(config-if-freqsync)# priority 100
Router(config-if-freqsync)# wait-to-restore 10

Router(config-if-freqsync)# time-of-day-priority 50

Step 5

(Optional) Configure the Synchronization Status Message (SSM) quality levels for the frequency source on the receiving interface.

Router(config-if-freqsync)# quality receive highest itu-t option 1 prc

Step 6

Commit your configuration.

Router(config-if-freqsync)# commit

Note


For interfaces that do not support SSM, only the lowest QL can be specified. In these cases, the output signal is squelched, and no signal is sent.

The quality option specified must match the globally configured quality option.


Based on the configured parameters, the interface participates in frequency synchronization.

Configure enhanced Synchronous Ethernet (eSyncE)

Configure eSyncE to enable enhanced Synchronous Ethernet (eSyncE) timing distribution using the device clock.

Use this task when you must enable eSyncE on a device to allow enhanced-quality-level signaling across the network.

Before you begin

  • Ensure you have administrator access to the device.

  • Confirm the device runs a compatible OS version.

Follow these steps to configure eSyncE:

Procedure


Step 1

Set the MAC address for your device clock to transmit the Quality Level (QL) Type-Length-Value (TLV) in the network.

Router# configure
Router(config)# frequency synchronization
Router(config-freqsync)# clock-id mac-address aaaa.bbbb.cccc
Router(config-freqsync)# commit
Router(config-freqsync)# exit

Step 2

Specify which quality level options your device clock will transmit.

For example, use the following configuration:

Router(config)# interface HundredGigE 0/1/0/0
Router(config-if)# frequency synchronization
Router(config-if-freqsync)# quality transmit exact itu-t option 1 ePRTC
Router(config-if-freqsync)# end

Step 3

Verify the eSyncE configuration.

Router# show frequency synchronization interfaces
Interface HundredGigE 0/11/0/1 (up)
  Assigned as input for selection
  Wait-to-restore time 0 minutes
  SSM Enabled
    Peer Up for 00:00:54, last SSM received 0.741s ago
    Peer has come up 1 times and timed out 0 times
    ESMC SSMs        Total  Information     Event    DNU/DUS
      Sent:             55           53         2         45
      Received:         55           55         0          0
  Input:
    Up
    Last received QL: Opt-I/ePRTC
    Effective QL: Opt-I/ePRTC, Priority: 30, Time-of-day Priority 100
    Originator clock ID: aaaabbfffebbcccc
    SyncE steps: 1, eSyncE steps: 1
    All steps run eSyncE; Chain of extended ESMC data is complete
    Supports frequency
  Output:
    Selected source: HundredGigE 0/11/0/1
    Selected source QL: Opt-I/ePRTC
    Effective QL: DNU
    Originator clock ID: aaaabbfffebbcccc
    SyncE steps: 2, eSyncE steps: 2
    All steps run eSyncE; Chain of extended ESMC data is complete
  Next selection points: ETH_RXMUX

Review the output to confirm that eSyncE steps and QL values are correct.


You have configured eSyncE for the chosen interface and synchronization quality. Your device now broadcasts the correct QL level. If verification output matches, eSyncE is operational.

What to do next

Monitor the synchronization status when needed, and adjust the configuration to meet your network needs.

Configure GPS, an external clock interface for frequency synchronization

Setting GPS

Use the router’s GPS interface to receive external timing signals for synchronization and operational monitoring. This section explains which inputs are supported and how to interpret the indicator states.

Supported GPS interface inputs

The router GPS Sync-2 interface receives three main types of external synchronization signals. All three inputs must be present (up) for GPS input to start.

  • 1PPS: The interface receives a pulse per second signal and accepts an RS422 or DIN connector as input.

  • 10MHz: The interface receives a reference frequency signal and accepts a DIN connector as input.

  • ToD: Time-of-Day signal. Accepts RS422 format as input.


Note


Unlike the Ethernet interface, the Sync-2 interface cannot receive or transmit QL. Assign a QL value manually to the Sync-2 interface.


By default, 1PPS and 10MHz operate in output mode. You cannot configure ToD output mode.

On the 8800-RP variant, 10MHz and 1PPS operate in output mode only when you configure PTP Slave or boundary clock (BC) mode.

LED Indicators and behaviors

The GPS module provides multiple indicators for different operational statuses.

Timing GPS LED states

  • Off: No GPS is configured or the GPS port is down.

  • Green: GPS port is up. When lit, GPS is configured and 1PPS, ToD, and 10M inputs are valid.

Sync LED states

  • Green: The time core is synchronized to an external source such as SyncE or 1588.

  • Amber: The system is in the holdover state or the acquiring state.

  • Off: Synchronization is disabled or in a free run state.

This table describes the meaning of GPS, BITS port, and SYNC LED states:

Table 4. LED Light States

LED Type

LED State

Description

GPS

Green

The GPS interface is provisioned, and frequency, time of day, and phase input are operating accurately.

Off

The system has not provisioned the GPS interface, or the GPS input is not operating accurately.

BITS port

Green

The BITS interface is provisioned and the frequency is operating accurately.

Off

The BITS interface isn’t provisioned or the BITS input isn’t operating accurately.

SYNC

Green

The frequency, time, and phase are synchronized to an external interface, which can be the building integrated timing supply (BITS), GPS, or a recovered RX clock.

Amber

The router operates in holdover or free-run mode. Based on user configuration, the router does not synchronize to an external interface.

Off

The system has not enabled centralized frequency, time, and phase distribution. As a result, the router uses the local oscillator on the RSP for all clocking.

Configure GPS settings for the grandmaster clock

Set up the grandmaster clock to synchronize time with GPS for precise frequency and timing.

Perform this task on a router to configure the clock interface for GPS synchronization. Define synchronization parameters and verify that the GPS input is active.

Before you begin

  • Ensure you have administrative access to the device CLI.

  • Confirm that the grandmaster-clock hardware is installed and GPS connectivity is established.

To configure GPS settings for the grandmaster clock, perform the steps in this section.

Procedure


Step 1

Configure the clock interface to synchronize with a GPS.

Example:

Router# config
Router(config)# clock-interface sync 2 location 0/RP0/CPU0
Router(config-clock-if)# port-parameters
Router(config-clk-parms)# gps-input tod-format cisco pps-input ttl
Router(config-clk-parms)# exit

Step 2

Define the frequency synchronization parameters.

Example:

Router(config-clock-if)# frequency synchronization
Router(config-clk-freqsync)# selection input
Router(config-clk-freqsync)# wait-to-restore 0
Router(config-clk-freqsync)# quality receive exact itu-t option 1 PRC
Router(config-clk-freqsync)# exit

Step 3

Configure timing sources to drive the output from your clock interface.

Example:

Router(config-clock-if)# frequency synchronization
Router(config-clk-freqsync)# quality itu-t option 1
Router(config-clk-freqsync)# clock-interface timing-mode system
Router(config-clk-freqsync)# end

Step 4

Verify that GPS input is valid to confirm your configuration.

Example:

Router# show controllers timing controller clock

SYNCC Clock-Setting: -1 -1 6 -1
             Port 0    Port 1    Port 2    Port 3
Config :     No        No        Yes       No
Mode :       -         -         GPS       -
Submode1 :   -         -         CISCO     -
Submode2 :   -         -         UTC       -
Submode3 :   0         0         0         0
Shutdown :   0         0         0         0
Direction :  RX/TX     RX/TX     RX        RX/TX
Baud-Rate :  -         -         9600      -
QL Option :  O1        O1        -         -
RX_ssm(raw): -         -         -         -
TX_ssm :     -         -         -         -
If_state :   DOWN      DOWN      UP        DOWN  << Port 2 is UP when GPS input is valid.

When synchronization is complete, the grandmaster clock uses the GPS source and Port 2 displays UP to indicate valid GPS input.

What to do next

Monitor synchronization status regularly to keep the system operating. If Port 2 does not show UP, troubleshoot your GPS connection.

Configure a BITS external clock interface for frequency synchronization

Enable frequency synchronization on your router using the Building-Integrated Timing Supply (BITS) interface.

Perform this configuration if your network requires external frequency synchronization via a BITS source.

Before you begin

Complete these requirements before you configure the device.

  • Verify that your device supports BITS interfaces.

  • Confirm that the BITS cable is connected to the appropriate port.

Begin configuring BITS for frequency synchronization with these steps:

Procedure


Step 1

Access the router CLI.

Step 2

Enter global configuration mode.

Step 3

Configure the clock interface for BITS:

  • Enter clock-interface bits 0 to select the first BITS port.

  • Set the mode to receive or transmit, as needed.

    • For receive mode, enter mode rx.

    • For transmit mode, enter mode tx.

Step 4

Assign BITS as the synchronization source using the synchronization command.

Step 5

Save the configuration.


The router uses the external BITS signal for frequency synchronization.

What to do next

Monitor router synchronization status. Confirm that the router operates correctly.

Configure BITS interfaces

Set up and verify BITS-IN and BITS-OUT interfaces to help you meet phase transient response standards and maintain proper frequency synchronization.

Use this task to configure BITS interfaces on both RP0 and RP1. This configuration helps ensure frequency synchronization and maintain quality standards during redundancy or failover.

Before you begin

  • Frequency synchronization must be configured with the required quality level option at the global level.

  • Make sure RP0 and RP1 have identical configurations and connect both to the same external reference for sync 0 and sync 2, so the system meets phase transient response compliance standards during RP failover.

  • BITS-IN and BITS-OUT on the peer nodes must be configured with the same mode and format.

  • Depending on the quality level you choose in the global configuration, change E1 or T1 modes as needed. Make sure TX and RX modes and submodes are identical.

  • If SSM is not present in BITS for non-CRC-4 or D4 modes, configure the manual receive quality level.

To configure and verify BITS interfaces, perform these actions:

Procedure

Step 1

Configure BITS-IN.

Example:

Router# config
Router(config)# clock-interface sync 0 location 0/RP0/CPU0
Router(config-clock-if)# port-parameters
Router(config-clk-parms)# bits-input e1 crc-4 sa4 ami
Router(config-clk-parms)# exit
Router(config-clock-if)# frequency synchronization
Router(config-clk-freqsync)# selection input
Router(config-clk-freqsync)# wait-to-restore 0
Router(config-clk-freqsync)# priority 1
Router(config-clk-freqsync)# end

Step 2

Verify the BITS-IN configuration.

Example:

Router# show running-config clock-interface sync 0 location 0/RP0/CPU0
Wed Aug 21 12:31:43.350 UTC
clock-interface sync 0 location 0/RP0/CPU0
 port-parameters
  bits-input e1 crc-4 sa4 ami
 !
 frequency synchronization
  selection input
  priority 1
  wait-to-restore 0
 !
!
Router# show controllers timing controller clock 
Wed Aug 21 12:38:20.394 UTC

SYNCC Clock-Setting: 1 -1 -1 -1

          Port 0          Port 1          Port 2          Port 3
Config     : Yes            No             No             No             
Mode       : E1             -              -              -              
Submode1   : CRC-4          -              -              -              
Submode2   : AMI            -              -              -              
Submode3   : 0              0              0              0              
Shutdown   : 0              0              0              0              
Direction  : RX             RX/TX          RX/TX          RX/TX          
Baud-Rate  : -              -              -              -              
QL Option  : O1             O1             -              -              
RX_ssm(raw): 99             -              -              -              
TX_ssm     : -              -              -              -              
If_state   : UP           DOWN           DOWN           DOWN  

Step 3

Configure BITS-OUT.

Example:

Router# config
Router(config)# clock-interface sync 0 location 0/RP0/CPU0
Router(config-clock-if)# port-parameters
Router(config-clk-parms)# bits-output e1 crc-4 sa4 ami
Router(config-clk-parms)# end

Step 4

Verify the BITS-OUT configuration.

Example:

Router# show running-config clock-interface sync 0 location 0/RP0/CPU0
Wed Aug 21 12:54:02.853 UTC
clock-interface sync 0 location 0/RP0/CPU0
 port-parameters
  bits-output e1 crc-4 sa4 ami
 !
!
Router# show controllers timing controller clock 
Wed Aug 21 12:49:32.923 UTC
SYNCC Clock-Setting: 1 -1 -1 -1

          Port 0          Port 1          Port 2          Port 3
Config     : Yes            No             No             No             
Mode       : E1             -              -              -              
Submode1   : CRC-4          -              -              -              
Submode2   : AMI            -              -              -              
Submode3   : 0              0              0              0              
Shutdown   : 0              0              0              0              
Direction  : TX             RX/TX          RX/TX          RX/TX          
Baud-Rate  : -              -              -              -              
QL Option  : O1             O1             -              -              
RX_ssm(raw): -              -              -              -              
TX_ssm     : 22             -              -              -              
If_state   : UP             DOWN           DOWN           DOWN   

Step 5

Verify quality level received and clock interfaces.

Example:

Router# show frequency synchronization clock-interfaces brief 
Tue Feb 23 23:42:22.654 UTC
Flags: > - Up               D - Down                          S - Assigned for selection
d - SSM Disabled            s - Output squelched              L - Looped back
Node 0/RP0/CPU0:
==============
Fl      Clock Interface       QLrcv    QLuse    Pri   QLsnd    Output driven by
=====   ===================   ======   ======   ===   ======   ========================
D       Sync0                 n/a      n/a      n/a   n/a      n/a
D       Sync1                 n/a      n/a      n/a   n/a      n/a
>S      Sync2                 None     PRC      100   n/a      n/a
>S      Internal0             n/a      SEC      255   n/a      n/a
Node 0/RP1/CPU0:
==============
Fl      Clock Interface       QLrcv    QLuse    Pri   QLsnd     Output driven by
=====   ===================   ======   ======   ===   ======    ========================
D       Sync0                 n/a      n/a      n/a   n/a       n/a
D       Sync1                 n/a      n/a      n/a   n/a       n/a
D       Sync2                 n/a      n/a      n/a   n/a       n/a
>S      Internal0             n/a      SEC      255   n/a       n/a

When you finish these steps, the system is prepared for frequency synchronization and quality level compliance across BITS interfaces.

What to do next

  • Confirm system sync status and stability after configuration.

  • If any interface does not meet the expected standards, repeat the configuration steps.

Verify the frequency synchronization configuration

Verify that your frequency synchronization settings are accurate and intact after configuration.

Use this task after you perform frequency synchronization configuration to detect and resolve common configuration errors.

Before you begin

  • Complete all frequency synchronization configuration steps.

  • Access the router CLI.

Follow these steps to verify the frequency synchronization configuration:

Procedure


Step 1

Use the show frequency synchronization configuration-errors command to display any configuration errors related to frequency synchronization.

Router# show frequency synchronization configuration-errors

Node 0/2/CPU0:
==============
  interface HundredGigE 0/2/0/0 frequency synchronization
    * Frequency synchronization is enabled on this interface, but isn't enabled globally.

  interface HundredGigE 0/2/0/0 frequency synchronization quality transmit exact itu-t option 2 generation 1 PRS
    * The QL that is configured is from a different QL option set than is configured globally.

Displays any errors that are caused by inconsistencies between shared-plane (global) and local-plane (interface) configurations. There are two possible errors that can be displayed:

  • Frequency Synchronization is configured on an interface (line interface or clock-interface), but is not configured globally. See Enable frequency synchronization on the router.

  • The QL option configured on some interfaces does not match the global QL option. Under an interface (line interface or clock interface), the QL option is specified using the quality transmit and quality receive commands. The value you specify must match the value in the global quality itu-t option command. If the global quality itu-t option command is not configured, use the default (option 1).

After you resolve all errors and the command produces no output, proceed to the next step.

Step 2

Check the configuration using both the show frequency synchronization interfaces brief command and the show frequency synchronization clock-interfaces brief command.

Router# show frequency synchronization interfaces brief

Flags:  > - Up                D - Down              S - Assigned for selection
        d - SSM Disabled      x - Peer timed out    i - Init state

Fl  Interface                QLrcv QLuse Pri QLsnt Source
=== ======================== ===== ===== === ===== ========================
>Sx HundredGigE 0/2/0/0   Fail  Fail  100 DNU   None                    
Dd  HundredGigE 0/2/0/1   n/a   Fail  100 n/a   None  

Router# show frequency synchronization clock-interfaces brief

Flags:  > - Up                D - Down              S - Assigned for selection
        d - SSM Disabled      s - Output squelched  L - Looped back

Node 0/0/CPU0:
==============
  Fl    Clock Interface     QLrcv  QLuse  Pri QLsnd  Source
  ===== =================== ====== ====== === ====== ========================
  >S    Sync0               PRC    Fail   100 SSU-B  Internal0 [0/0/CPU0]    
  
  >S    Internal0           n/a    SSU-B  255 n/a    None                    

Node 0/1/CPU0:
==============
  Fl    Clock Interface     QLrcv  QLuse  Pri QLsnd  Source
  ===== =================== ====== ====== === ====== ========================
  D     Sync0               None   Fail   100 SSU-B  Internal0 [0/1/CPU0]    
  
  >S    Internal0           n/a    SSU-B  255 n/a    None                    

Note these points:

  • All line interfaces that have frequency synchronization configured are displayed.

  • All clock interfaces and internal oscillators are displayed.

  • Sources configured as inputs (those using selection input display ‘S’ in the Flags column. Sources not configured as inputs do not display ‘S’

    Note


    Internal oscillators can always serve as input sources.

  • ‘>’ or ‘D’ is displayed in the flags field as appropriate.

If any of these items are not true, continue to the next step.

Step 3

Investigate issues within individual interfaces using show frequency synchronization interfaces and show frequency synchronization clock-interfaces commands.

Router# show frequency synchronization interfaces HundredGigE 0/2/0/2

Interface HundredGigE 0/2/0/2 (shutdown)
  Assigned as input for selection
  SSM Enabled
  Input:
    Down
    Last received QL: Failed
    Effective QL:     Failed, Priority: 100
  Output:
    Selected source:    Sync0 [0/0/CPU0]
    Selected source QL: Opt-I/PRC
    Effective QL:       Opt-I/PRC
  Next selection points: LC_INGRESS
  
Router# show frequency synchronization clock-interfaces location 0/1/CPU0

Node 0/1/CPU0:
==============
  Clock interface Sync0 (Down: mode not configured)
    SSM supported and enabled
    Input:
      Down
      Last received QL: Opt-I/PRC
      Effective QL:     Failed, Priority: 100
    Output:
      Selected source:    Internal0 [0/1/CPU0]
      Selected source QL: Opt-I/SSU-B
      Effective QL:       Opt-I/SSU-B
  Next selection points: RP_SYSTEM


  Clock interface Internal0 (Up)
    Assigned as input for selection
    Input:
      Default QL:   Opt-I/SSU-B
      Effective QL: Opt-I/SSU-B, Priority: 255
  Next selection points: RP_SYSTEM RP_CLOCK_INTF

If the clock interface is down, a reason is displayed. This may occur because the clock interface configuration is missing or conflicting.

Step 4

Verify that the fsyncmgr process is running on the appropriate nodes using show processes fsyncmgr location command.

Router# show processes fsyncmgr location 0/0/CPU0

                  Job Id: 134
                     PID: 30202
         Executable path: /pkg/bin/fsyncmgr
              Instance #: 1
              Version ID: 00.00.0000
                 Respawn: ON
           Respawn count: 1
  Max. spawns per minute: 12
            Last started: Mon Mar  9 16:30:43 2009
           Process state: Run
           Package state: Normal
       Started on config: cfg/gl/freqsync/g/a/enable
                    core: MAINMEM 
               Max. core: 0
               Placement: None
            startup_path: /pkg/startup/fsyncmgr.startup
                   Ready: 0.133s
        Process cpu time: 1730768.741 user, -133848.-361 kernel, 1596920.380 total
  --------------------------------------------------------------------------------

You resolve all configuration errors, and all frequency synchronization interfaces and processes work as intended.

What to do next

After making configuration changes, monitor the interfaces periodically for synchronization issues, and then verify the interfaces again.

SyncE preference for PTP receiver interfaces

A SyncE preference for PTP receiver interfaces is a synchronization configuration feature that

  • prioritizes the SyncE source on the same interface as the selected PTP receiver

  • enables automatic SyncE source selection when sources have equal Quality Levels (QL) and user priority, and

  • provides seamless switching of SyncE sources when the PTP receiver interface changes, maintaining synchronization integrity.

In network deployments using redundant clock sources for synchronization, issues may arise when SyncE and PTP sources come from different origins. This may lead to synchronization failures. The synchronous-ethernet prefer-interface ptp-receiver command mitigates this by aligning SyncE selection with the PTP receiver interface.

Table 5. Feature History Table

Feature Name

Release Information

Feature Description

SyncE preference for PTP receiver interface

Release 24.4.1

You can now mitigate synchronization issues when SyncE and PTP sources come from different, non-traceable origins. This feature ensures that SyncE selection among sources with equal Quality Levels (QL) and user priority prefers the interface on which the PTP receiver is selected. If the PTP source fails or its quality degrades, causing the system to switch to another PTP source, SyncE switches to the new PTP source, provided the new interface has the same SyncE QL and priority as the previously selected interface.

This feature introduces the synchronous-ethernet prefer-interface ptp-receiver command.

Benefits of SyncE preference for PTP receiver interface

These are the benefits of SyncE preference for the PTP receiver interface.

  • Enhanced synchronization: Ensures synchronous Ethernet (SyncE) and Precision Time Protocol (PTP) traceability to the same clock source.

  • Improved reliability: Reduces risks of synchronization failures due to rapid clock drifts.

  • Simplified configuration: Performs synchronous Ethernet (SyncE) source selection to match the PTP receiver, which simplifies network management.

Requirement: Configure SyncE preference correctly for PTP receiver interface

Synchronous Ethernet (SyncE) auto-selection occurs only when the Precision Time Protocol (PTP) receiver interface is included in the interface selection list.

If more than two Synchronous Ethernet (SyncE) interfaces are configured, automatic switching might not occur because the Precision Time Protocol (PTP) receiver interface may not be auto-selected.

Configure SyncE to prefer the PTP receiver interface

Set the Synchronous Ethernet (SyncE) preference to prioritize the PTP receiver interface for frequency synchronization.

This task explains how to configure a router so that it uses the PTP receiver interface as the preferred source for SyncE frequency synchronization.

Before you begin

  • Verify that your device supports the features that are for Synchronous Ethernet (SyncE) and Precision Time Protocol (PTP).

  • Make sure you have configuration permissions.

To configure SyncE to prefer the PTP receiver interface, perform these steps:

Procedure


Step 1

Use the CLI to enter frequency synchronization configuration mode.

Example:

Router#configure
Router(config)#frequency synchronization 

Step 2

Set the SyncE preference so the router uses the PTP receiver interface.

Example:

Router(config-freqsync)#synchronous-ethernet prefer-interface ptp-receiver 
Router(config-freqsync)#commit

Step 3

Check that SyncE prefers the PTP receiver interface.

Example:

Router#show ptp interfaces brief 
Intf              Port         Port                  Line
Name              Number       State        Encap    State         Mechanism
--------------------------------------------------------------------------------
Te0/0/0/18        2            Passive      Ethernet up            -          
Te0/0/0/19        1            Slave        Ethernet up            -          

The show ptp interfaces breif command provides information about the ptp interfaces. You can then verify that the PTP receiver (Slave) interface is selected for frequency synchronization by using the show frequency synchronization interfaces brief command.

Router#show frequency synchronization interfaces brief 

Flags:  > - Up                D - Down              S - Assigned for selection
        d - SSM Disabled      x - Peer timed out    i - Init state
        s - Output squelched
Fl   Interface                QLrcv QLuse Pri QLsnd Output driven by
==== ======================== ===== ===== === ===== ========================
>S   TenGigE0/0/0/18          PRC   PRC   100 DNU   TenGigE0/0/0/19 
>S   TenGigE0/0/0/19          PRC   PRC   100 PRC   TenGigE0/0/0/19 

Make sure the PTP receiver (Slave) interface is selected for frequency synchronization.


SyncE now uses the PTP receiver interface for frequency synchronization.

What to do next

  • Monitor synchronization status to confirm that clocking remains stable.

  • If necessary, repeat the configuration for each additional interface.