Contents
- Open Plug-n-Play Agent
- Finding Feature Information
- Prerequisites for Open Plug-n-Play Agent
- Restrictions for Open Plug-n-Play Agent
- Information About Open Plug-n-Play Agent
- Open Plug-n-Play Deployment Solution
- Plug-n-Play Features
- Plug-n-Play Agent Services and Capabilities
- Plug-n-Play Agent
- Plug-n-Play Server
- Plug-n-Play Agent Deployment
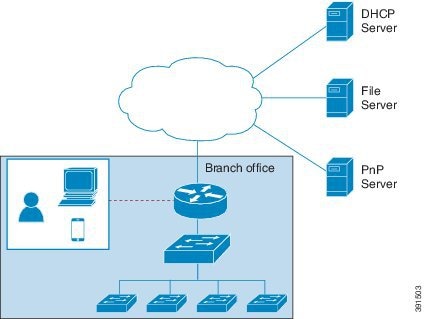
- Plug-n-Play Agent Network Topology
- Plug-n-Play Agent Initialization
- Absence of Startup Configuration
- CLI Configuration for Open Plug-n-Play Agent
- Open Plug-n-Play Agent Deployment Solutions
- Plug-n-Play Agent Discovery Process
- Plug-n-Play Discovery through DHCP Server
- Plug-n-Play Discovery through DHCP Snooping
- Plug-n-Play Discovery through DNS Lookup
- Plug-n-Play Proxy Server for Layer 3 and Layer 2 Devices
- Plug-n-Play Agent Deployment Application
- Plug-n-Play Agent Deployment Protocol
- Plug-n-Play Agent Application Protocol
- Plug-n-Play Transport over Ethernet
- Plug-n-Play Transport over IP
- Plug-n-Play Agent Security
- Plug-n-Play Transport Layer 3 Security
- Plug-n-Play Application Level Security
- Authentication and Authorization between Plug-n-Play Agent and Server
- How to Configure Open Plug-n-Play Agent
- Configuring Open Plug-n-Play Agent Profile
- Configuring Open Plug-n-Play Agent Device
- Configuring Open Plug-n-Play Reconnect Factor
- Configuring Open Plug-n-Play HTTP Transport Profile
- Configuring Open Plug-n-Play HTTPS Transport Profile
- Configuring Open Plug-n-Play XMPP Transport Profile
- Configuring Backup Open Plug-n-Play Device
- Configuring Backup Open Plug-n-Play Reconnect Factor
- Configuring Backup Open Plug-n-Play HTTP Transport Profile
- Configuring Backup Open Plug-n-Play HTTPS Transport Profile
- Configuring Backup Open Plug-n-Play XMPP Transport Profile
- Configuring Open Plug-n-Play Agent Tag
- Configuration Examples for Open Plug-n-Play Agent
- Configuring Open Plug-n-Play Agent
- Trouble Shooting and Debugging
- Glossary
- Additional References for Open Plug-n-Play Agent
- Feature Information for Open Plug-n-Play Agent
Open Plug-n-Play Agent
Cisco Open Plug-n-Play agent is a software application running on a Cisco IOS or IOS-XE device. When a device is powered on for the first time, the Open Plug-n-Play agent discovery process, which is embedded in the device, wakes up in the absence of the startup configuration file and attempts to discover the address of the Open Plug-n-Play server. The Open Plug-n-Play agent uses methods like DHCP, Domain Name System (DNS), and others to acquire the desired IP address of the Open Plug-n-Play server.
The Open Plug-n-Play agent converges existing solutions into a unified agent and adds functionality to enhance the current deployment solutions.
Finding Feature Information
Your software release may not support all the features documented in this module. For the latest caveats and feature information, see Bug Search Tool and the release notes for your platform and software release. To find information about the features documented in this module, and to see a list of the releases in which each feature is supported, see the feature information table at the end of this module.
Use Cisco Feature Navigator to find information about platform support and Cisco software image support. To access Cisco Feature Navigator, go to www.cisco.com/go/cfn. An account on Cisco.com is not required.
Prerequisites for Open Plug-n-Play Agent
Cisco Open Plug-n-Play (PnP) deployment method depends on the type of discovery process as required by the customer.
Deploy the discovery mechanism, either a DHCP server discovery process or a Domain Name Server (DNS) discovery process, before launching the PnP.
Configure the DHCP server or the DNS server before deploying the PnP.
Ensure that the PnP server talks to the PnP agent.
The PnP agent enforces the PnP server to send user credentials for every request. Cisco recommends the usage of HTTP secure (HTTPS) protocol.
Restrictions for Open Plug-n-Play Agent
- Cisco Open Plug-n-Play (PnP) agent facilitates HTTP, Extensible Messaging and Presence Protocol (XMPP) and HTTP secure (HTTPS) transport based communication with the server.
HTTPS cannot be used on platforms where crypto-enabled images are not supported (also, do not use Secure Sockets Layer [SSL] or Transport Layer Security [TLS] protocols if crypto-enabled images are used).
Information About Open Plug-n-Play Agent
Open Plug-n-Play Deployment Solution
The Cisco initiated Open Plug-n-Play (PnP) deployment solution supports the concept of redirection and includes a PnP agent, a PnP server, and other components. Simplified deployment process of any Cisco device automates the following deployment related operational tasks:
Establishing initial network connectivity for the device
Delivering device configuration
Delivering software and firmware images
Delivering licenses
Delivering deployment script files
Provisioning local credentials
Notifying other management systems about deployment related events
Simplified deployment reduces the cost and complexity and increases the speed and security of deployments.
Cisco Open Plug-n-Play (PnP) agent is a software application that is running on a Cisco IOS or IOS-XE device. The PnP agent together with the PnP deployment server provides effortless deployment services. When a device is powered on for the first time, the PnP agent process wakes up in the absence of the startup config and attempts to discover the address of the PnP server. The PnP agent uses methods like DHCP, Domain Name System (DNS), and others to acquire the desired IP address of the PnP server. When the PnP agent successfully acquires the IP address, it initiates a long lived, bidirectional layer 3 connection with the server and waits for a message from the server. The PnP server application sends messages to the agent requesting for information and services to be performed on the device.
The PnP agent converges existing solutions into a unified agent and adds functionality to enhance the current solutions. The main objectives of PnP agent are:
Plug-n-Play Features
Some of the features that the Cisco Open Plug-n-Play (PnP) agent provides today are:
Day 0 boot strapping—Configuration, image, licenses, and other files
Day 2 management—Configuration and image upgrades and on-going monitoring of Simple Network Management Protocol (SNMP) and syslog messages.
Open communication protocol—Enables customers and partners to write applications
XML based payload over HTTP and Extensible Messaging and Presence Protocol (XMPP) between the server and the agent
Security—Authentication and encrypted communication channel between the management app and the agent
Deployment and management of devices behind firewall and Network Address Translation (NAT).
Support for one-to-one and one-to-many communication
Support for policy based deployment (product ID or location of the device)
Deployment based on unique ID (Unique Device Identifier [UDI] or MAC)
Unified solution across Cisco platforms (including IOS classic)
Support for various deployment scenarios and use cases
Zero-touch when possible, low-touch when needed
Plug-n-Play Agent Services and Capabilities
The services and capabilities of the Cisco Open Plug-n-Play (PnP) agent are as follows:
Backoff
CLI execution
Configuration upgrade
Device information
File transfer
Image install
License install
PnP tagging
Script execution
Topology information
Note
The PnP server provides an optional checksum tag to be used in the image installation and config upgrade service requests by the PnP agent. When the checksum is provided in the request, the image install process compares the checksum against the current running image checksum.
If the checksums are same, the image being installed or upgraded is the same as the current image running on the device. The image install process will not perform any other operation in this scenario.
If the checksums are not same, then the new image will be copied to the local file system, and checksum will again be calculated and compared against the checksum provided in the request. If same, the process will continue to install the new image or upgrade the device to new image. If now, the checksums are not same, the process will exit with error.
Backoff
A Cisco IOS device that supports PnP protocol (that uses HTTP transport), requires the PnP agent to send the work request to the PnP server continuously. In case the PnP server does not have any scheduled or outstanding PnP service for the PnP agent to execute, the continuous no operation work requests exhausts both network bandwidth and device resource. This PnP backoff service allows the PnP server to inform the PnP agent to rest for the specified time and call back later.
CLI Execution
Cisco IOS supports two modes of command execution—EXEC mode and global configuration mode. Most of the EXEC commands are one-time commands, such as show commands, which show the current configuration status, and clear commands, which clear counters or interfaces. The EXEC commands are not saved when a device reboots. Configuration modes allow user to make changes to the running configuration. If you save the configuration, these commands are saved when a device reboots.
Note
For show command request and response details and for all PnP configuration commands, see Cisco Open Plug-n-Play Agent Command Reference.
Configuration Upgrade
There are two types of configuration upgrades that can happen in a Cisco device—copying a new configuration files to startup configuration and copying new configuration files to running configuration.
Copying a new configuration files to startup configuration— The new configuration file is copied from the file server to the device through copy command and file check is performed to check the validity of the file. If the file is valid, then the file is copied to startup configuration. Backing up the previous configuration file will be done if there is enough disk space available. The new configuration is seen when the device reloads again.
Copying new configuration files to running configuration— The new configuration file is copied from the file server to the device through copy command or configure replace command. Configuration file replace and rollback may leave the system in an unstable state if rollback is performed efficiently. So configuration upgrade by copying the files is preferred.
Device Information
The PnP agent provides capability to extract device inventory and other important information to the PnP server on request. The following five types of device-profile requests are supported:
all—returns complete inventory information, which includes unique device identifier (UDI), image, hardware and file system inventory data.
filesystem— returns file system inventory information, which includes file system name and type, local size in bytes, free size in bytes, read flag, and write flag.
hardware— returns hardware inventory information, which includes hostname, vendor string, platform name, processor type, hardware revision, main memory size, I/O memory size, board ID, board rework ID, processor revision, midplane revision, and location.
image—returns image inventory information, which includes version string, image name, boot variable, return to rommon reason, bootloader variable, configuration register, configuration register on next boot, and configuration variable.
UDI— returns device UDI.
File Transfer
The PnP file server hosts files that can be copied over by the deploying devices in the network. The file server can be a dedicated server hosting files or a part of the device hosting the PnP server. The PnP agent uses standard file transfer protocols to copy files from the remote file server to the device. If the device is running a crypto image then secured file transfer protocols such as SFTP, SCP, HTTPS are supported. For devices running non-crypto images, the PnP agent supports unsecured copy protocols such as FTP, TFTP, HTTP.
Image Install
Image installation service enables a PnP-enabled device to perform image upgrade on receiving a request from the PnP server.
An Image Install request can be classified for the following types of devices:
Standalone DevicesWhen the PnP agent on a standalone device receives a request from the PnP server, the agent parses the XML payload and identifies the request as an Image Upgrade request. The agent then creates an ImageInstall process, which identifies the request as a standalone image install request. The PnP agent populates the data structure defined by the ImageInstall service and passes it to the ImageInstall service.
The ImageInstall service then performs the following operations to successfully load the device with the new image:
High-Availability DevicesWhen the PnP agent is installed on a high-availability device, once ImageInstall service gets the data structure, the agent determines that the request is for a high-availability device. The active route processor (RP) which is running the PnP agent performs all the operations needed to install the image on both active and standby devices.
The ImageInstall service then performs the following operations to successfully load the devices with the new image:
Copies the image from the file server to a local disk of the device that is running the active RP. Information about the file server, image location, and destination is populated in the data structure.
To reload the standby device with the same new image, the PnP agent running on the active device copies the image to the local disk on the standby device.
Configures the active device to load the new image on next reload by executing the boot system command.
This causes the startup configuration to be synchronized with the standby device. Now, both active and standby devices have the same new image configured.
Sends a message to the PnP server that the active device is reloading the standby device.
When the standby device comes up and reaches stateful switchover (SSO) state, the active device sends a message to the PnP server that it is going to reload itself, and then undergoes a reload.
This causes a switchover to the standby device, which becomes the new active device.
Both active and standby devices are now running the new image.
Stackable devices
Cisco Catalyst 6000 devices
License Install
Cisco IOS automates installation of new licenses on PnP enabled Cisco devices. The PnP server sends work request to install new licenses on the Cisco device. When the PnP agent receives license install work request, it installs the new license on the device, configures the boot level, and reloads the device. The new license is applied when the device reloads. Once the service is completed, PnP agent sends success or failure work response to the PnP server.
PnP Tagging
Cisco IOS provides capability to assign tags to the devices for better grouping and tracking of all Cisco devices. The PnP agent provides XML service for configuring the tag information on the device and for propagating the tag information within the network using Cisco Discovery Protocol (CDP). The purpose of this service is for the PnP agents to get to know their tag information and to pass on this information to the PnP server upon request.
Script Execution
Cisco IOS provides capability to execute IOS shell scripts on all Cisco devices. Scripts can be executed by the PnP agent to perform post–install activities on the device. The script is copied from the file server by the agent and is executed on the running system. The post–install activities performed by these scripts consists of crypto key generation and other runtime configuration on the device.
Topology Information
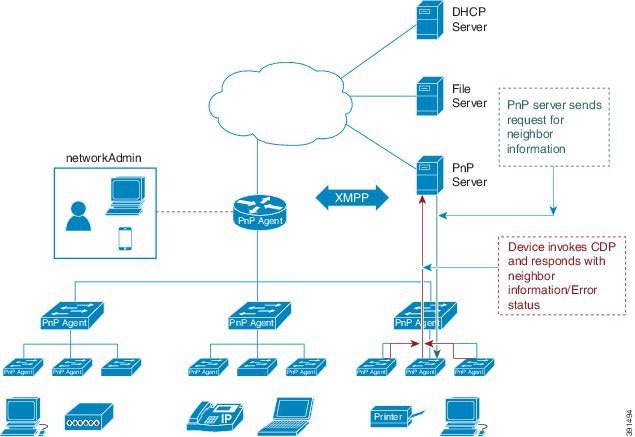
By default, every Cisco device on the network runs Cisco Discovery Protocol (CDP). Through CDP, devices in the network discover their immediate neighbors and populate their databases with the attributes learnt or derived through the protocol. This neighbor information is stored in the database and is available on demand by the device to the PNP server. Typical neighbor information comprises neighboring device ID, software version, hardware platform, interface ip, and the port on which CDP messages are sent or received.
Plug-n-Play Agent
The Cisco Open Plug-n-Play (PnP) agent is an embedded software component that is present in all Cisco network devices that support simplified deployment architecture. The PnP agent understands and interacts only with a PnP server. The PnP agent first tries to discover a PnP server, with which it can communicate. Once a server is found and connection established, the agent performs deployment related activities like configuration, image, license, and file updates by communicating with the server. It also notifies the server of all interesting deployment related events like out-of-band configuration changes and a new device connection on an interface.
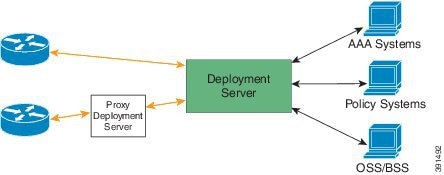
Plug-n-Play Server
The Cisco Open Plug-n-Play (PnP) server is a central server that encodes the logic of managing and distributing deployment information (images, configurations, files, and licenses) for the devices being deployed. The server communicates with the agent on the device that supports the simplified deployment process using a specific deployment protocol.
The PnP server also communicates with proxy servers like deployment applications on smart phones and PCs, or other PnP agents acting as Neighbor Assisted Provisioning Protocol (NAPP) servers, and other types of proxy deployment servers like VPN gateways.
The PnP server can redirect the agent to another deployment server. A common example of redirection is a PnP server redirecting a device to communicate with it directly after sending the bootstrap configuration through a NAPP server. A PnP server can be hosted by an enterprise. This solution allows for a cloud based deployment service provided by Cisco. In this case, a device discovers and communicates with Cisco’s cloud based deployment service for initial deployment. After that, it can be redirected to the customer’s deployment server.
In addition to communicating with the devices, the server interfaces with a variety of external systems like Authentication, Authorizing, and Accounting ( AAA) systems, provisioning systems, and other management applications.
Plug-n-Play Agent Deployment
The following steps indicate the Cisco Open Plug-n-Play (PnP) agent deployment on Cisco devices:
The Cisco device, having PnP agent contacts the PnP server requesting for a task, that is, the PnP Agent sends its unique device identifier (UDI) along with a request for work.
The PnP server if it has any task for the device, sends a work request. For example, image install, config upgrade, and so on.
When the PnP agent receives the work request, executes the task and sends back a reply to the PnP server about the task status, whether it is a success or error, and the corresponding information requested.
Plug-n-Play Agent Initialization
The Cisco Open Plug-n-Play (PnP) agent software is currently available on all Cisco IOS and IOS XE platforms, and is enabled by default. The PnP agent can be initiated on a device by the following ways:
Absence of Startup Configuration
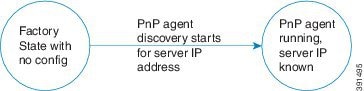
New Cisco devices are shipped to customers with no startup configuration file in the NVRAM of the devices. When a new device is connected to a network and powered on, the absence of a startup configuration file on the device will automatically trigger the Open Plug-n-Play (PnP) agent to discover the PnP server IP address.
CLI Configuration for Open Plug-n-Play Agent
Network administrators may use CLI configuration mode to initiate the Open Plug-n-Play (PnP) agent process at any time. By configuring a PnP profile through CLI, a network administrator can start and stop the PnP agent on a device. When the PnP profile is configured with CLI, the device starts the PnP agent process which, in turn, initiates a connection with the PnP server using the IP address in the PnP profile.
Open Plug-n-Play Agent Deployment Solutions
This section discusses the functionality of the Cisco Open Plug-n-Play (PnP) agent, exposed to the PnP server, for device deployment and management. The PnP agent deployment solution comprises the discovery process initiated by the agent, communication between the device, agent, and the server, and the PnP agent services. The PnP solution is described in detail in the following sections:
Plug-n-Play Agent Discovery Process
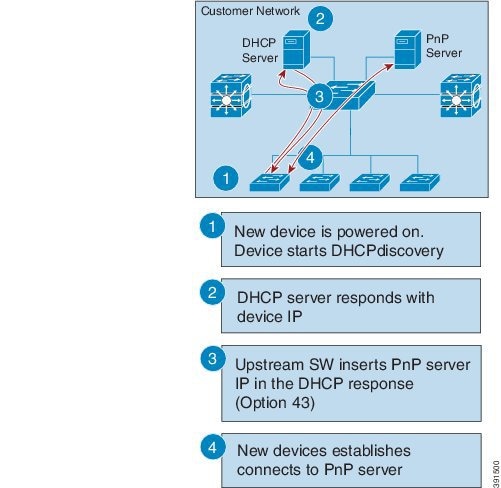
The Cisco Open Plug-n-Play (PnP) agent discovery phase results in acquiring the IP address of the PnP server. When a system boots up without a startup configuration file, the device will not have the IP configuration required to connect to the IP network. In such a scenario, DHCP discovery process is used to obtain the IP parameters needed for the device to have IP connectivity.
When the device boots up, the absence of any startup config on the NVRAM triggers the PnP discovery agent to acquire the IP address of the PnP server. In order to acquire the IP address of the PnP server, the PnP agent goes through one of the following discovery mechanisms:
Plug-n-Play Discovery through DHCP Server
Device with no startup configuration in the NVRAM triggers the Cisco Open Plug-n-Play (PnP) agent to initiate a DHCP discovery process which acquires the IP configuration from the DHCP server required for the device. The DHCP server can be configured to insert additional information using vendor specific option 43 upon receiving option 60 from the device with the string ‘cisco pnp’, to pass on the IP address or hostname of the PnP server to the requesting device. When the DHCP response is received by the device, the PnP agent extracts the option 43 from the response to get the IP address or the hostname of the PnP server. PnP agent then uses this IP address or hostname to communicate with the PnP server.
Assumptions:
Plug-n-Play Discovery through DHCP Snooping
If a third party DHCP server cannot be configured to insert any vendor specific options, an existing Cisco Open Plug-n-Play (PnP) enabled device can be configured to snoop in to the DHCP response and insert PnP specific option 43 with the PnP server IP address.
Before inserting the option 43, the snooping agent verifies if the DHCP message is from a Cisco device in the network. The remaining DHCP discovery process is same as described in the previous section.
Assumptions:
Plug-n-Play Discovery through DNS Lookup
When the DHCP discovery fails to get the IP address of the Cisco Open Plug-n-Play (PnP) server, the agent falls back on Domain Name System (DNS) lookup method. PnP agent then uses a preset deployment server name. The agent obtains the domain name of the customer network from the DHCP response and constructs the fully qualified domain name (FQDN). The following FQDN is constructed by the PnP agent using a preset deployment server name and the domain name information for the DHCP response, deployment.customer.com. The agent then looks up the local name server and tries to resolve the IP address for the above FQDN.
Assumptions:
Plug-n-Play Proxy Server for Layer 3 and Layer 2 Devices
In the absence of DHCP or Domain Name System (DNS) servers, an existing up and running Cisco Open Plug-n-Play (PnP) enabled device in the neighborhood network can be configured to act as a PnP Neighbor Assisted Provisioning Protocol (NAPP) server.
The NAPP server is part of PnP discovery phase. This server is invoked when the PnP autonomic networking based discovery, DHCP, DNS, Cisco cloud service discovery mechanisms fail to connect to the PnP server.
This device listens to a specific port for any incoming PnP messages. The Cisco device which is trying to come up as a PnP device sends a UDP broadcast message to its network every 30 min for ten times. Hence, if the device does not receive a response, the broadcasts stop after 300 min.
When the device hosting the proxy server process receives the incoming broadcasts, it verifies the version field in the request and forwards the request to the PnP server if version validation is successful. The proxy server process also caches the unique device identifier (UDI) of the requesting client coming in via incoming datagram before forwarding the request to PnP server.
Upon receiving the configlet datagram from PnP server, the proxy server validates UDI in the incoming datagram with the entries in the UDI cache. If validation is successful, proxy server process broadcasts the datagram to a specific port number reserved for the proxy client processes to receive datagrams.
Upon receiving the datagrams, devices running proxy client processes, parse the incoming datagram for the target UDI. If the target UDI in the datagram matches the UDI of the device, proxy client process proceeds with framing, error control and configuring the configlet.
If the target UDI in the datagram fails to match UDI of the device, the packet is dropped.
Plug-n-Play Agent Deployment Protocol
The Cisco Open Plug-n-Play (PnP) agent deployment protocol is based on Extensible Messaging and Presence Protocol (XMPP). The following are the main features of an XMPP based deployment protocol:
Simplicity and extensibility: XMPP offers a simple and light–weight messaging infrastructure based on XML. XMPP is also highly extensible to add any additional messaging semantics as needed for different capabilities.
Rich set of existing services: XMPP already has a rich set of services defined like capabilities exchange, file transfers, and so on.
Support for workflow: In addition to a simple request and response mechanism, XMPP offers the capability to execute a messaging workflow. This is useful when there is a need to implement features like certificate enrollments.
Suitability for future capabilities: XMPP provides an extensible messaging framework for simplified deployment infrastructure. In future, messaging between two or more devices or between a device and a management application behind the deployment server can be easily accomplished with XMPP.
Though the deployment application protocol is based on XMPP, it can be run over different transports. These transports include Ethernet and IP with Transport Layer Security (TLS). Layer 2 transport is typically used between a deployment agent and a proxy deployment server like a deployment application or as a deployment agent acting as a proxy. Transport between an agent and a server is over an IP connection with TLS for security. Transport between a proxy deployment server and a deployment server is also over IP with TLS.
Plug-n-Play Agent Application Protocol
The Cisco Open Plug-n-Play (PnP) agent application protocol is an XML-based protocol that defines a mechanism that allows network devices to be monitored and controlled by a remote application. The PnP agent is a software module running on a Cisco device. The PnP server is an application running as the network manager that remotely manages the network devices. The main features of the PnP protocol are as follows:
Supports both HTTP and Extensible Messaging and Presence Protocol (XMPP) protocols
Supports Transport Level Security (TLS) based encryption for both HTTP and XMPP
Uses HTTP secure (HTTPS) certificate for TLS handshake
Enables long lived bi-directional connection using XMPP
Supports presence capabilities to know up and down events using XMPP
Supports one-to-one and one-to-many messaging using XMPP
Plug-n-Play Transport over Ethernet
Cisco Open Plug-n-Play (PnP) agent uses the Ethernet based transport in the following two scenarios:
Deployment agent communicating with a deployment application on a PC: In this case, the PC is connected to the device being deployed using an Ethernet cable. The deployment application advertises itself as a deployment server supporting Ethernet transport.
Deployment agent communicating with an already deployed device acting as a proxy deployment server: In this case, the new device being deployed has an Ethernet connection to an already deployed device. The deployment agent on the deployed device responds to the discovery requests and acts as a proxy deployment server for the new device.
Once discovery is complete, the deployment agent starts an unsecured XML stream with the deployment server over Ethernet. This protocol reserves an Ethertype (0xXX TBD) for this purpose. The deployment agent and the server then negotiate to use Extensible Authentication Protocol–Transport Layer Security (EAP-TLS) to protect the communication and complete the EAP-TLS session establishment. The deployment server then authenticates the device with the HTTP secure (HTTPS) certificate or some other supported mechanism.
Plug-n-Play Transport over IP
In Cisco Open Plug-n-Play (PnP) agent, the transport over IP is identical to standard Extensible Messaging and Presence Protocol (XMPP) transport between an XMPP client and an XMPP server. The deployment agent opens TCP connection to the deployment server and starts an XML stream of messages. The server can request the use of Transport Layer Security (TLS) at this time. The agent closes the existing XML stream, initiates a TLS connection to the server, and then restarts the XML stream. The server can request agent authentication over the TLS connection. Refer to RFC 3920 for the transport details for XMPP connections over IP.
Plug-n-Play Agent Security
Security to all Cisco Open Plug-n-Play (PnP) devices is provided at both transport level as well as the application level. The following sections describe the security mechanisms in detail:
Plug-n-Play Transport Layer 3 Security
Pre-XMPP-handshake TLS connection on port 5223
The Extensible Messaging and Presence Protocol (XMPP) has port 5223 reserved for explicit Secure Socket Layer (SSL) based connections that can be used for the pre-XMPP-handshake Transport Layer Security (TLS) connection establishment in Cisco Open Plug-n-Play (PnP) solution network. This requires that the crypto-enabled image is running on the Cisco devices.
For non-crypto or non-crypto-enabled images, TLS security choice is not possible. One alternative minimum security is to have the PnP agent initiate the connection to the specified trusted PnP server on port 5222.
Plug-n-Play Application Level Security
XMPP SASL
All new Cisco Open Plug-n-Play (PnP) agents and servers uses Extensible Messaging and Presence Protocol (XMPP) as the application protocol for all PnP operations. The XMPP provides two in-band application-level securities—Transport Layer Security (TLS) and Simple Authentic and Security Layer (SASL).
The in-band TLS handshake requires significant infrastructure changes in OS system architecture level which might not be needed if the pre-XMPP-handshake TLS connection is secure enough. In-band TLS is not possible for non-crypto enabled images.
The in-band SASL validation can be used to validate some customized security exchange. The content of the SASL should be configurable. Some constant XMPP jabber–id related information should be avoided during the SASL validation to avoid presence leaking or resource leaking.
Authentication and Authorization between Plug-n-Play Agent and Server
Once the Cisco Open Plug-n-Play (PnP) deployment agent discovers the PnP server, the agent engages the server in a Transport Layer Security (TLS) handshake. In order to authenticate itself to the server, the agent presents its HTTP secure (HTTPS) certificate. The administrator for the PnP server sets device authentication mechanisms which are acceptable for a particular deployment.
The deployment server presents its certificate to the deployment agent so that the agent can authenticate the server. Irrespective of whether the agent is able to verify the server certificate, the agent engages the deployment server in a post-TLS authorization exchange. In this exchange the agent requests the server to present its server authorization token. In response to this request the server presents the authorization token it had obtained from Cisco. The agent verifies the signature on the authorization token. If the authorization token is specific to a Unique Device Identifier (UDI), the agent also ensures its UDI is listed in the authorization-token. At the end of this step, a secure communication channel is established between the deployment agent and the server. This secure communication channel is leveraged by the server to send deployment information to the agent.
How to Configure Open Plug-n-Play Agent
Configuring Open Plug-n-Play Agent Profile
ProcedureConfiguring Open Plug-n-Play Agent Device
ProcedureConfiguring Open Plug-n-Play Reconnect Factor
ProcedurePerform the following task to configure the time to wait before attempting to reconnect a session in either fixed-interval-backoff, exponential-backoff, or random-exponential-backoff mode:
Configuring Open Plug-n-Play HTTP Transport Profile
ProcedurePerform the following task to create a HTTP transport profile of the Open Plug-n-Play (PnP) agent manually on a device.
Both IPv4 and IPv6 addresses can be used for PnP server IP configuration. Alternately, a hostname can also be used in the configuration to connect to the PnP server. Every profile can have one primary server and a backup server configuration. The PnP agent attempts to initiate a connection with the primary server first and if it fails, it will try the backup server. If the backup server fails, the PnP agent will attempt to connect to the primary server again. This will continue until a connection is established with one of the servers.
Configuring Open Plug-n-Play HTTPS Transport Profile
Perform the following task to create a HTTP Secure (HTTPS) transport profile of the Open Plug-n-Play (PnP) agent manually on a device.ProcedureConfiguring Open Plug-n-Play XMPP Transport Profile
ProcedurePerform the following task to create a Extensible Messaging and Presence Protocol (XMPP) transport profile of the Open Plug-n-Play (PnP) agent manually on a device.
Command or Action Purpose
Step 1 enable
Example:Device> enableEnables privileged EXEC mode.
Step 2 configure terminal
Example:Device# configure terminalEnters global configuration mode.
Step 3 pnp profile profile-name
Example:Device(config)# pnp profile test-profile-1Creates a PnP agent profile and enters the PnP profile initialization mode.
Step 4 transport xmpp socket {host host-name | ipv4 ipv4-address| ipv6 ipv6-address} {port port-number } {source interface-type interface-number } {sasl plain server-jid xmpp-jabber-id}
Example:Device(config-pnp-init)# transport xmpp socket host example.com port 231 sasl plain server-jid cisco123Creates an XMPP transport configuration for the PnP agent profile based on the hostname of the server on which the PnP agent is deployed.
Step 5 transport xmpp starttls {host host-name | ipv4 ipv4-address| ipv6 ipv6-address} {port port-number } {source interface-type interface-number } {localcert trustpoint-name } {remotecert trustpoint-name } {sasl plain server-jid xmpp-jabber-id}
Example:Device(config-pnp-init)# transport xmpp starttls ipv4 10.0.1.0 port 221 source gigabitEthernet 0/0/0 localcert abc remotecert xyzCreates an XMPP transport configuration for the PnP agent profile based on the IPv4 address of the server on which the PnP agent is deployed.
Step 6 transport xmpp tls {host host-name | ipv4 ipv4-address| ipv6 ipv6-address} {port port-number } {source interface-type interface-number } {localcert trustpoint-name } {remotecert trustpoint-name } {sasl plain server-jid xmpp-jabber-id}
Example:Device(config-pnp-init)# transport xmpp tls ipv6 2001:DB8:1::1 port 221 source gigabitEthernet 0/0/0 localcert abc remotecert xyzCreates an XMPP transport configuration for the PnP agent profile based on the IPv6 address of the server on which the PnP agent is deployed.
Step 7 end
Example:Device(config-pnp-init)# endExits the PnP profile initialization mode and returns to privileged EXEC mode.
Configuring Backup Open Plug-n-Play Device
ProcedurePerform the following task to create a backup profile and to enable or disable Open Plug-n-Play agent manually on a device:
Command or Action Purpose
Step 1 enable
Example:Device> enableEnables privileged EXEC mode.
Step 2 configure terminal
Example:Device# configure terminalEnters global configuration mode.
Step 3 pnp profile profile-name
Example:Device(config)# pnp profile test-profile-1Creates a PnP agent profile and enters the PnP profile initialization mode.
Step 4 backup device {username username } {password {0 | 7} password}
Example:Device(config-pnp-init)# backup device username sjohn password 0 Tan123Configures the PnP agent backup profile on the device.
Step 5 end
Example:Device(config-pnp-init)# endExits the PnP profile initialization mode and returns to privileged EXEC mode.
Configuring Backup Open Plug-n-Play Reconnect Factor
ProcedurePerform the following task to configure backup reconnection of the Open Plug-n-Play (PnP) agent to the server in either fixed-interval-backoff, exponential-backoff, or random-exponential-backoff manner :
Command or Action Purpose
Step 1 enable
Example:Device> enableEnables privileged EXEC mode.
Step 2 configure terminal
Example:Device# configure terminalEnters global configuration mode.
Step 3 pnp profile profile-name
Example:Device(config)# pnp profile test-profile-1Creates a PnP agent profile and enters the PnP profile initialization mode.
Step 4 backup reconnect [pause-time [exponential-backoff-factor [random] ] ]
Example:Device(config-pnp-init)# backup reconnect 100 2 randomSpecifies the time for the PnP agent initiator profile to wait before attempting to reconnect a session.
Step 5 end
Example:Device(config-pnp-init)# endExits the PnP profile initialization mode and returns to privileged EXEC mode.
Configuring Backup Open Plug-n-Play HTTP Transport Profile
ProcedurePerform the following task to create a backup HTTP transport profile of the Open Plug-n-Play (PnP) agent manually on a device.
Command or Action Purpose
Step 1 enable
Example:Device> enableEnables privileged EXEC mode.
Step 2 configure terminal
Example:Device# configure terminalEnters global configuration mode.
Step 3 pnp profile profile-name
Example:Device(config)# pnp profile test-profile-1Creates a PnP agent profile and enters the PnP profile initialization mode.
Step 4 backup transport http host host-name [port port-number ] [source interface-type]
Example:Device(config-pnp-init)# backup transport http host hostname-1 port 1 source gigabitEthernet 0/0/0Creates a backup HTTP transport configuration for the PnP agent profile based on the hostname of the server on which the PnP agent is deployed.
Step 5 backup transport http ipv4 ipv4-address [port port-number ] [source interface-type]
Example:Device(config-pnp-init)# backup transport http ipv4 10.0.1.0 port 221 source gigabitEthernet 0/0/0Creates a backup HTTP transport configuration for the PnP agent profile based on the IPv4 address of the server on which the PnP agent is deployed.
Step 6 backup transport http ipv6 ipv6-address [port port-number ] [source interface-type interface-number ]
Example:Device(config-pnp-init)# backup transport http ipv6 2001:DB8:1::1 port 331 source gigabitEthernet 0/0/1Creates a backup HTTP transport configuration for the PnP agent profile based on the IPv6 address of the server on which the PnP agent is deployed.
Step 7 end
Example:Device(config-pnp-init)# endExits the PnP profile initialization mode and returns to privileged EXEC mode.
Configuring Backup Open Plug-n-Play HTTPS Transport Profile
Perform the following task to create a backup HTTPS transport profile of the Open Plug-n-Play (PnP) agent manually on a device.Procedure
Command or Action Purpose
Step 1 enable
Example:Device> enableEnables privileged EXEC mode.
Step 2 configure terminal
Example:Device# configure terminalEnters global configuration mode.
Step 3 pnp profile profile-name
Example:Device(config)# pnp profile test-profile-1Creates a PnP agent profile and enters the PnP profile initialization mode.
Step 4 backup transport https host host-name [port port-number ][source interface-type ][localcert trustpoint-name ][remotecert trustpoint-name ]
Example:Device(config-pnp-init)# backup transport https host example.com port 231 source gigabitEthernet 0/0/0 localcert abc remotecert xyzCreates a HTTPS backup transport configuration for the PnP agent profile based on the hostname of the server on which the PnP agent is deployed.
Step 5 backup transport https ipv4 ipv4-address [port port-number ][source interface-type ][localcert trustpoint-name ][remotecert trustpoint-name ]
Example:Device(config-pnp-init)# backup transport https ipv4 10.0.1.0 port 221 source gigabitEthernet 0/0/0 localcert abc remotecert xyzCreates a HTTPS backup transport configuration for the PnP agent profile based on the IPv4 address of the server on which the PnP agent is deployed.
Step 6 backup transport https ipv6 ipv6-address [port port-number ][source interface-type interface-number ][localcert trustpoint-name ][remotecert trustpoint-name ]
Example:Device(config-pnp-init)# backup transport https ipv6 2001:DB8:1::1 port 331 source gigabitEthernet 0/0/1 localcert abc remotecert xyzCreates a HTTPS backup transport configuration for the PnP agent profile based on the IPv6 address of the server on which the PnP agent is deployed.
Step 7 end
Example:Device(config-pnp-init)# endExits the PnP profile initialization mode and returns to privileged EXEC mode.
Configuring Backup Open Plug-n-Play XMPP Transport Profile
ProcedurePerform the following task to create a backup Extensible Messaging and Presence Protocol (XMPP) transport profile of the Open Plug-n-Play (PnP) agent manually on a device.
Command or Action Purpose
Step 1 enable
Example:Device> enableEnables privileged EXEC mode.
Step 2 configure terminal
Example:Device# configure terminalEnters global configuration mode.
Step 3 pnp profile profile-name
Example:Device(config)# pnp profile test-profile-1Creates a PnP agent profile and enters the PnP profile initialization mode.
Step 4 backup transport xmpp socket {host host-name | ipv4 ipv4-address| ipv6 ipv6-address} {port port-number } {source interface-type interface-number } {sasl plain server-jid xmpp-jabber-id}
Example:Device(config-pnp-init)# backup transport xmpp socket host example.com port 231 sasl plain server-jid cisco123Creates an XMPP transport configuration for the PnP agent profile based on the hostname of the server on which the PnP agent is deployed.
Step 5 backup transport xmpp starttls {host host-name | ipv4 ipv4-address| ipv6 ipv6-address} {port port-number } {source interface-type interface-number } {localcert trustpoint-name } {remotecert trustpoint-name } {sasl plain server-jid xmpp-jabber-id}
Example:Device(config-pnp-init)# backup transport xmpp starttls ipv4 10.0.1.0 port 221 source gigabitEthernet 0/0/0 localcert abc remotecert xyzCreates an XMPP transport configuration for the PnP agent profile based on the IPv4 address of the server on which the PnP agent is deployed.
Step 6 backup transport xmpp tls {host host-name | ipv4 ipv4-address| ipv6 ipv6-address} {port port-number } {source interface-type interface-number } {localcert trustpoint-name } {remotecert trustpoint-name } {sasl plain server-jid xmpp-jabber-id}
Example:Device(config-pnp-init)# backup transport xmpp tls ipv6 2001:DB8:1::1 port 221 source gigabitEthernet 0/0/0 localcert abc remotecert xyzCreates an XMPP transport configuration for the PnP agent profile based on the IPv6 address of the server on which the PnP agent is deployed.
Step 7 end
Example:Device(config-pnp-init)# endExits the PnP profile initialization mode and returns to privileged EXEC mode.
Configuring Open Plug-n-Play Agent Tag
Procedure
Command or Action Purpose
Step 1 enable
Example:Device> enableEnables privileged EXEC mode.
Step 2 configure terminal
Example:Device# configure terminalEnters global configuration mode.
Step 3 pnp tag tag-name
Example:Device(config)# pnp tag xyzUse the pnp tag command to configure the tag for the device. The neighboring Cisco devices will receive this tag information through Cisco Discovery Protocol (CDP).
Note If there is an existing tag for the device, the tag name can be only changed when the xml schema is sent by the PnP server to change the tag name. The tag name cannot be overwritten.
Step 4 end
Example:Device(config)# endExits the global configuration mode and returns to privileged EXEC mode.
Configuration Examples for Open Plug-n-Play Agent
Configuring Open Plug-n-Play Agent
The following example shows how to configure Cisco Open Plug-n-Play (PnP) agent and the output of the show pnp profile command:
Device> enable
Device# configure terminal
Device(config)# pnp profile test
Device(config-pnp-init)# device user pnpagent2@ejabberd.test password 0 cisco
Device(config-pnp-init)# transport xmpp socket ipv4 172.19.193.60 port 5222 sasl plain server-jid pnpserver2.ejabberd.test
Device(config-pnp-init)# end
Device# show pnp profile

Initiator Profile test: 0 open connections: 0 closing connections
        Encap: xmpp11
        WSSE header is not required. Configured authorization level is 1
        Countdown: Security Unlock 0, Service Lock: 0, Service Req Wait: 0, Proxy Req Wait 0, Service Resp Ack: 0
        Max message (RX) is 50 Kbytes
        XEP Faults are sent
        Idle timeout infinite
        Keepalive not configured
        Reconnect time 60 seconds
        Primary transport: xmpp socket to host 172.19.193.60, port 5222
  Not connected, next reconnect attempt in 52 seconds

Device#
Trouble Shooting and Debugging
To run the debugging on the Open Plug-n-Play (PnP) server, start the server, configure the PnP profile and PnP transport. That is, start the service interaction between PnP agent and PnP server.
Capture the debugs by executing the debug pnp service command.
Glossary
NAPP Server: The Cisco Open Plug-n-Play (PnP) Neighbor Assisted Provisioning Protocol (NAPP) server that is part of PnP discovery phase. This is a PnP enabled device in the neighborhood that can be configured to act as a PnP proxy server.
PnP Agent: An embedded agent on the device to automate deployment process
PnP Helper Applications: Applications on smart phones and personal computers that facilitate deployment. PnP helper applications are not specific to a customer or device and can be used in any deployment scenario. May be needed in limited scenarios
PnP Protocol: Protocol between the PnP agent and PnP server. This is an open protocol allowing third-party development of PnP servers
PnP Server: A central server that manages and distributes deployment information (images, configurations, files, and licenses) for the devices being deployed. Open Plug-n-Play (PnP) server provides a north bound interface for management applications and communicates with the PnP agents on the devices using the PnP protocol.
Additional References for Open Plug-n-Play Agent
Related Documents
MIBs
MIB
MIBs Link
To locate and download MIBs for selected platforms, Cisco software releases, and feature sets, use Cisco MIB Locator found at the following URL:
http://www.cisco.com/go/mibsTechnical Assistance
Description
Link
The Cisco Support and Documentation website provides online resources to download documentation, software, and tools. Use these resources to install and configure the software and to troubleshoot and resolve technical issues with Cisco products and technologies. Access to most tools on the Cisco Support and Documentation website requires a Cisco.com user ID and password.
Feature Information for Open Plug-n-Play Agent
The following table provides release information about the feature or features described in this module. This table lists only the software release that introduced support for a given feature in a given software release train. Unless noted otherwise, subsequent releases of that software release train also support that feature.
Use Cisco Feature Navigator to find information about platform support and Cisco software image support. To access Cisco Feature Navigator, go to www.cisco.com/go/cfn. An account on Cisco.com is not required.
Table 1 Feature Information for Open Plug-n-Play Agent Feature Name
Releases
Feature Information
Open Plug-n-Play Agent
Cisco IOS Release 15.2(1)SY
The Cisco Open Plug-n-Play agent converges existing solutions into a unified agent and adds functionality to enhance the current deployment solutions.
The following commands were introduced or modified by this feature:
backup device, backup profile, backup reconnect, backup transport http, backup transport https, backup transport xmpp socket, backup transport xmpp starttls, backup transport xmpp tls, device, pnp, profile, reconnect (pnp), transport http, transport https, transport xmpp socket, transport xmpp starttls, and transport xmpp tls.
THE SPECIFICATIONS AND INFORMATION REGARDING THE PRODUCTS IN THIS MANUAL ARE SUBJECT TO CHANGE WITHOUT NOTICE. ALL STATEMENTS, INFORMATION, AND RECOMMENDATIONS IN THIS MANUAL ARE BELIEVED TO BE ACCURATE BUT ARE PRESENTED WITHOUT WARRANTY OF ANY KIND, EXPRESS OR IMPLIED. USERS MUST TAKE FULL RESPONSIBILITY FOR THEIR APPLICATION OF ANY PRODUCTS.
THE SOFTWARE LICENSE AND LIMITED WARRANTY FOR THE ACCOMPANYING PRODUCT ARE SET FORTH IN THE INFORMATION PACKET THAT SHIPPED WITH THE PRODUCT AND ARE INCORPORATED HEREIN BY THIS REFERENCE. IF YOU ARE UNABLE TO LOCATE THE SOFTWARE LICENSE OR LIMITED WARRANTY, CONTACT YOUR CISCO REPRESENTATIVE FOR A COPY.
The Cisco implementation of TCP header compression is an adaptation of a program developed by the University of California, Berkeley (UCB) as part of UCB's public domain version of the UNIX operating system. All rights reserved. Copyright © 1981, Regents of the University of California.
NOTWITHSTANDING ANY OTHER WARRANTY HEREIN, ALL DOCUMENT FILES AND SOFTWARE OF THESE SUPPLIERS ARE PROVIDED “AS IS" WITH ALL FAULTS. CISCO AND THE ABOVE-NAMED SUPPLIERS DISCLAIM ALL WARRANTIES, EXPRESSED OR IMPLIED, INCLUDING, WITHOUT LIMITATION, THOSE OF MERCHANTABILITY, FITNESS FOR A PARTICULAR PURPOSE AND NONINFRINGEMENT OR ARISING FROM A COURSE OF DEALING, USAGE, OR TRADE PRACTICE.
IN NO EVENT SHALL CISCO OR ITS SUPPLIERS BE LIABLE FOR ANY INDIRECT, SPECIAL, CONSEQUENTIAL, OR INCIDENTAL DAMAGES, INCLUDING, WITHOUT LIMITATION, LOST PROFITS OR LOSS OR DAMAGE TO DATA ARISING OUT OF THE USE OR INABILITY TO USE THIS MANUAL, EVEN IF CISCO OR ITS SUPPLIERS HAVE BEEN ADVISED OF THE POSSIBILITY OF SUCH DAMAGES.
Any Internet Protocol (IP) addresses and phone numbers used in this document are not intended to be actual addresses and phone numbers. Any examples, command display output, network topology diagrams, and other figures included in the document are shown for illustrative purposes only. Any use of actual IP addresses or phone numbers in illustrative content is unintentional and coincidental.
Cisco and the Cisco logo are trademarks or registered trademarks of Cisco and/or its affiliates in the U.S. and other countries. To view a list of Cisco trademarks, go to this URL: http://www.cisco.com/go/trademarks. Third-party trademarks mentioned are the property of their respective owners. The use of the word partner does not imply a partnership relationship between Cisco and any other company. (1110R)
Copyright © , Cisco Systems, Inc. All rights reserved.