How to Upgrade from DCNM to NDFC for SAN Deployments
Available Languages
Bias-Free Language
The documentation set for this product strives to use bias-free language. For the purposes of this documentation set, bias-free is defined as language that does not imply discrimination based on age, disability, gender, racial identity, ethnic identity, sexual orientation, socioeconomic status, and intersectionality. Exceptions may be present in the documentation due to language that is hardcoded in the user interfaces of the product software, language used based on RFP documentation, or language that is used by a referenced third-party product. Learn more about how Cisco is using Inclusive Language.
- US/Canada 800-553-2447
- Worldwide Support Phone Numbers
- All Tools
 Feedback
 Feedback
This document provides step-by-step guidance to upgrade from Cisco Data Center Network Manager (DCNM) to Cisco Nexus Dashboard Fabric Controller (NDFC).
Note: The documentation set for this product strives to use bias-free language. For the purposes of this documentation set, bias-free is defined as language that does not imply discrimination based on age, disability, gender, racial identity, ethnic identity, sexual orientation, socioeconomic status, and intersectionality. Exceptions may be present in the documentation due to language that is hardcoded in the user interfaces of the product software, language used based on RFP documentation, or language that is used by a referenced third-party product.
The command outputs, screenshots, and capabilities are provided in this document are based on Cisco Data Center Network Manager 11.5(4), Cisco Nexus Dashboard (ND) 2.3(1c), and Nexus Dashboard Fabric Controller (NDFC) 12.1.2e. Although the procedures and recommendations outlined in this document also apply to other DCNM and NDFC versions, we recommend referring to the Release Notes and the Configuration Guides for up-to-date information.
The scope of this document is limited to SAN environments.
What is Cisco Nexus Dashboard and Cisco Nexus Dashboard Fabric Controller?
Cisco Nexus Dashboard (ND) is a hosting platform that provides a unified operational view across all sites and services. Cisco Nexus Dashboard Fabric Controller (NDFC) is an application service that runs on ND.
NDFC provides runtime feature management where users can select any one of the personas of SAN Controller, Fabric Controller, or Fabric Discovery and their respective capabilities. And you are not required to select a mode for LAN, SAN, or IP Fabric for Media (IPFM) at the time of installation.
ND and NDFC SAN Controller provides benefits such as active-active clustering, higher scale, anomaly detection, event analytics, and many more, because of which we recommend upgrading from DCNM to NDFC.
For more details on ND and NDFC, please refer to the references section.
DCNM and NDFC SAN Controller in parallel
Because NDFC is a new application, users can have their DCNM servers run in parallel for a duration along with NDFC to get familiar with the new application. Both DCNM and NDFC use SNMP, CLI, and Rest APIs to discover, manage, and configure the switches. This simultaneous discovery and management of Cisco SAN switches on DCNM and NDFC will not have any impact on the Cisco MDS switches performance or resource utilization. Once the users are comfortable with the new GUI, and feature layout in NDFC SAN Controller, the DCNM server can be shut down.
Upgrade Paths and NDFC SAN Controller Requirements
This section lists the supported upgrade paths from DCNM to NDFC along with the license requirement for NDFC. The IP requirements for Cisco Nexus Dashboard and Cisco NDFC SAN Controller are also discussed.
Upgrade Paths
This section provides the list of the upgrade paths from specific DCNM versions to the NDFC version. Table 1 lists the various supported upgrade paths from DCNM to NDFC. For more details, please refer to the references section to access the Cisco Nexus Dashboard Fabric Controller Software Upgrade Matrix.
Table 1. DCNM to NDFC Migration Paths
| DCNM Release Version |
DCNM Deployment Type |
Supported Upgrade to NDFC Release Version |
| 11.5(4) |
Windows, Linux, OVA/ISO/SE |
12.1.3b/12.1.2e |
| 11.5(2) |
Windows, Linux, OVA/ISO/SE |
12.1.1e/12.0.2f/12.0.1a |
| 11.5(1) |
Windows, Linux, OVA/ISO/SE |
12.1.1e/12.0.2f/12.0.1a |
DCNM and NDFC Licensing
In terms of licensing, customers with DCNM Advanced License can upgrade to NDFC without any new license. No extra license is required to upgrade to NDFC.
Server-based DCNM License
NDFC does not support file-based server licenses. So, all server-based DCNM licenses need to be converted to smart licenses before upgrading to NDFC. There are two ways to convert them to smart license. This can be done by either using the Product License Registration portal or by using the Cisco Smart Software Manager (CSSM). Please refer to the references section to access the Converting Classic Licenses to Smart Licenses guide.
Switch-based DCNM License
In case of switch-based DCNM license and an NX-OS release without smart licensing enabled, customers can simply use their existing switch-based DCNM license after upgrading to NDFC. Once the user upgrades the switch to an NX-OS release that supports Smart Licensing using Policy (SLP), the license conversion happens automatically. For more details on the Smart Licensing using Policy, refer to the references section to access the Cisco MDS 9000 Series Licensing Guide.
Also, refer to the references section to access the Cisco Nexus Dashboard Fabric Controller Licensing FAQ.
Cisco ND and NDFC IP Requirements
Cisco ND requires two IP addresses, which can be from the same subnet or from two different subnets:
· One IP address is for accessing the ND/NDFC GUI and is called the Management IP
· The other IP address is for communication with the switches and is called the Data IP
NDFC SAN Controller requires three Persistent IP addresses for SNMP Trap, POAP/Image Management, and as SAN Insights receiver. These services (or pods) are respawned with the same Persistent IPs on the same node or on a different node in case a node goes down.
If you are using two different subnets for Management and Data, then these three Persistent IP addresses should be part of the Data subnet. The single subnet flexibility is only supported from ND 3.x and NDFC 12.1.3 release onwards.
The following table summarizes the IP requirements for a single ND node hosting NDFC SAN Controller persona with SAN Insights.
Table 2. IP address Requirement
| ND/NDFC SAN Controller |
Count |
Used for |
| Nexus Dashboard |
2 |
One each for Mgmt and for Data/Fabric |
| NDFC SAN Controller |
3 |
One each for: ● SNMP Trap ● Image Mgmt/POAP ● SAN Insights Receiver Should belong in the Data subnet |
To simplify the upgrade of DCNM to NDFC, please use the Cisco provided NDFC Upgrade Tool with migration script that runs on the DCNM deployment. A separate tool is provided for DCNM deployed on RHEL/Windows and for ISO/OVA deployments. Please refer to the references section to access the Cisco Software Download page to get the DCNM_To_NDFC Upgrade Tool.
This upgrade tool collects all required data and creates a backup file (tar.gz) for the restore process in NDFC. Among the collected data, there is the Postgres/Oracle database (DB) data; all required tables and sequences are processed, and their data exported into CSV files. The Postgres tables in DCNM contain data like inventory, switch, and module details, etc. When NDFC restores the backup, it will import this data in the CSV files into its CockroachDB.
DCNM also uses ElasticSearch (ES), primarily for operational data like Performance Monitoring (PM) statistics along with some configuration. Selected ES statistics are exported while running the upgrade tool and then imported into ElasticSearch/OpenSearch while restoring in NDFC. Most of the configuration stored in ES in DCNM is now stored in CockroachDB in NDFC, hence that gets exported again as CSV files to be imported later into CockroachDB.
As CockroachDB and ElasticSearch/OpenSearch are integrated within the ND platform itself, there is no dependency on Oracle or Postgres databases anymore. Customers need not worry about maintaining an external Oracle RAC anymore with NDFC.
Migrated and non-migrated features
The following table lists the features that are restored from DCNM to NDFC SAN Controller. For more details, please refer to the references section to access the Cisco Nexus Dashboard Fabric Controller Installation and Upgrade Guide.
Table 3. Features restored after NDFC 12.x Upgrade
| Feature in DCNM 11.5(x) |
Restored after NDFC 12.x Upgrade |
| Discovered fabrics |
Restored |
| Discovered vCenter |
Restored |
| Alarm policies |
Restored |
| Server settings |
Restored |
| Slow Drain data |
Not restored |
| VMM Visibility with vCenter |
Supported |
| Alarm Policy configuration |
Not restored |
| Performance Management data |
CPU/Memory/Interface statistics up to 90 days is restored post upgrade. |
| SAN CLI templates |
Not restored |
| Switch images/Image Management data |
Not restored |
| Switch images/Image Management policies |
Not restored |
| Report Definitions and Reports |
Not restored |
| Fabric Backups |
Not restored |
| LAN switches in SAN installations |
Not restored |
| Switches discovered over IPv6 |
Not restored |
| Preview features configured |
Not restored |
DCNM to NDFC Upgrade – A High-Level View
This section provides a high-level overview to upgrade from DCNM to NDFC.
High-level upgrade procedure
1. Deploy a vND (virtual Nexus Dashboard on ESXi) or pND (physical Nexus Dashboard Appliance) node. A user also has the option to deploy ND on specific RHEL versions (called rND).
2. In the ND Cluster Configuration:
a. Add appropriate static routes.
b. Add External Service IPs in ND Data Pool.
3. Install the NDFC app on the ND node.
4. Enable the NDFC app.
Do not enable any feature sets yet.
5. Take a backup from the DCNM 11.5(x) server using the Upgrade tool/script.
Copy the backup file out and shut down the DCNM server.
6. In the NDFC 12.x Backup/Restore workflow, select the Restore tab and provide the backup file.
NDFC SAN Controller ready for use.
DCNM to NDFC Upgrade – A Detailed Procedure
This section provides a detailed step-by-step procedure of how to use the upgrade tool to take a backup in DCNM 11.5(x) and then how to restore it in NDFC.
Step 1. Installing Cisco Nexus Dashboard
As a first step, the required form factor of Cisco Nexus Dashboard (ND) must be deployed – a virtual ND or physical ND. Cisco Nexus Dashboard can be installed on ESXi or RHEL. For using the SAN Insights along with NDFC SAN Controller, the Data deployment type should be selected while deploying the OVA in ESXi or the Large Installation profile while deploying ND on Red Hat Enterprise Linux (RHEL). For SAN management without SAN Insights, the app deployment type should be selected while deploying the OVA in ESXi or the Default Installation profile while deploying ND on RHEL. A physical ND will always support SAN Insights so its deployment profile will be Data.
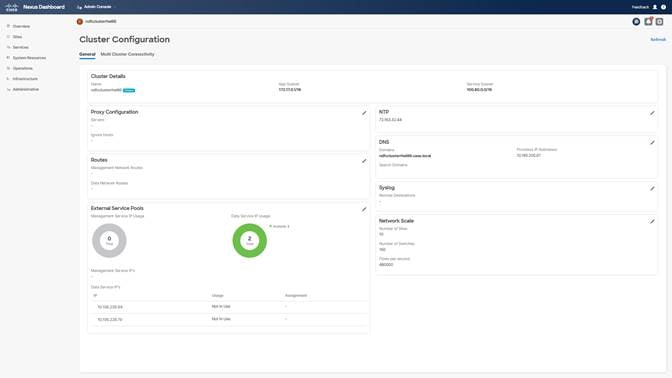
Step 2. Configuring External Service IPs
To configure the Persistent IPs, navigate to ND Admin Console > Infrastructure > Cluster Configuration. Here, edit the External Service IPs and add the IPs under the Data Service IPs. For more details, see References to access the Cisco Nexus Dashboard Deployment Guide.
Keep in mind to enable specific firewall ports so that Cisco Nexus Dashboard and NDFC SAN Controller have IP reachability and can communicate with various services like SCP, HTTP, HTTPS, SNMP Trap, gRPC, etc.
For a complete list of the required communication ports, refer to References to access the Cisco Nexus Dashboard Deployment Guide.
Best Practice
Enable required firewall ports for communication.
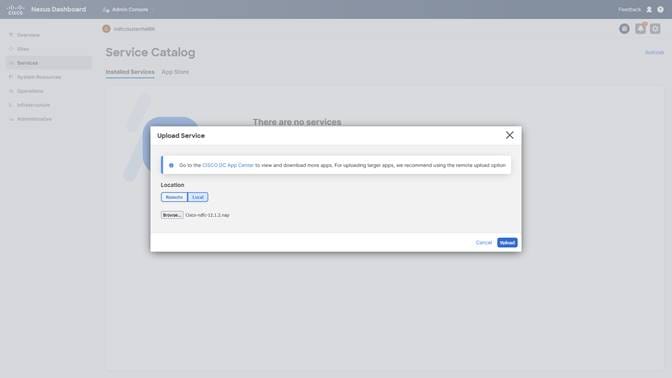
Step 3. Installing Cisco NDFC App on Cisco Nexus Dashboard
After the External Service IPs are configured, Nexus Dashboard (ND) is now ready to host the NDFC application. This can be done either manually by downloading the NDFC App to the local server and then installing it or by directly installing the App from the App Store.

Step 4. Enabling NDFC App
After the NDFC App is installed, enable it. Once the NDFC App is enabled, do not select any of the personas under Feature Management. The Restore action fails if used after selecting a persona in the Feature Management. The restore workflow will be used later with the encrypted backup file which will be created after using the DCNM_to_NDFC_upgrade tool/script on the DCNM server.
Step 5. Taking Backup using the Upgrade Tool
The downloaded upgrade tool should be copied to the DCNM 11.5(x) server using sysadmin credentials in an SSH session.
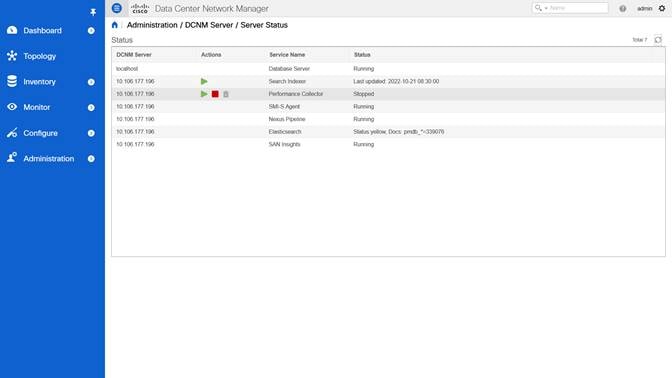
Before running the tool, log in to the DCNM GUI and make sure to stop the Performance Management collection as this will cause delay in taking the backup. To do that, navigate to Administration > DCNM Server > Server Status and click the Stop Service of Performance Collector. After few seconds, click the Refresh icon and make sure the service has stopped.
Best Practice
Stop Performance Management collector service before running the Upgrade tool.
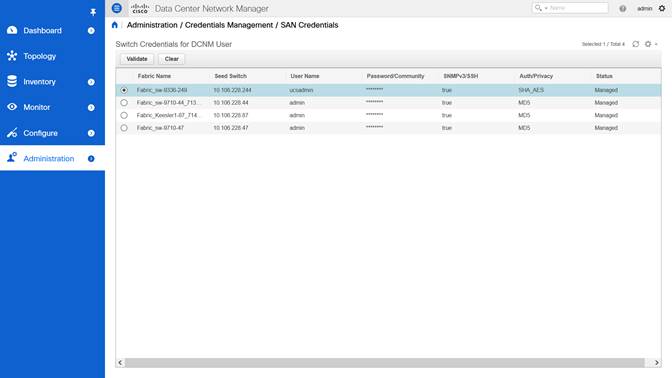
It is always a best practice to validate the credentials of all your SAN fabrics before running the upgrade tool. To do that, navigate to Web UI > Administration > Credentials Management > SAN Credentials. Here, select each fabric and click the Validate button to validate the credentials.
In case the validation fails, take corrective actions based on the error seen on the screen and the corresponding logs under Monitor > Switch > Events. Correcting the SSH credentials in case of a “SSH Validation failed” is one of the resolutions.
Best Practice
Validate SAN credentials for each fabric before running the Upgrade tool.
As a first step for running the upgrade tool, from the SSH session, provide executable permissions to the tool using # chmod +x DCNM12UpgradeToolOVAISO command.
Next, execute the upgrade tool using # ./DCNM12UpgradeToolOVAISO command, as shown in the following snippet. Along with taking a backup, the upgrade tool will also analyze the DCNM appliance data and determine if you can upgrade to Cisco Nexus Dashboard Fabric Controller Release 12.1.2e. For example, if you run the tool on a DCNM 11.4.1 server, it will display an error stating that it cannot proceed because DCNM 11.4.x to 12.x migration is not supported.
The upgrade tool will prompt for collecting operational data like Performance Management data and if the DCNM Tracker feature is enabled on any switch on any fabric. The user is also required to enter an encryption key which will be used to encrypt any sensitive data like credentials. Make sure to save this encryption key safely as without it, it would not be possible to restore the backup file.
The script will complete and generate an encrypted backup file which should be securely saved. After this, the DCNM application and server can be shut down.
For detailed steps to stop DCNM services on a Windows or RHEL server, please refer to the references section to access the Starting and Stopping Cisco DCNM Servers guide.
Best Practice
Make sure to save the Encryption key at a secure location.
The following code snippet illustrates providing executable permissions to the upgrade Tool and executing it on a DCNM 11.5(4) Linux deployment.
[root@dcnm]# chmod +x DCNM_To_NDFC_Upgrade_Tool_LIN_WIN
[root@rhel DCNM_To_NDFC_Upgrade_Tool_LIN_WIN]# ./DCNMBackup.sh
Enter DCNM root directory [/usr/local/cisco/dcm]:
Initializing, please wait...
Note: ./jar/DCNMBackup.java uses unchecked or unsafe operations.
Note: Recompile with -Xlint:unchecked for details.
*******************************************************************************
Welcome to DCNM-to-NDFC Upgrade Tool for Linux/Windows.
This tool will analyze this system and determine whether you can move to NDFC 12.1.2e or not.
If upgrade to NDFC 12.1.2e is possible, this tool will create files to be used for performing the upgrade.
Thank you!
*******************************************************************************
This tool will backup config data. Exporting Operational data like Performance(PM) might take some time.
Do you want to export operational data also? [y/N]: y
*******************************************************************************
Sensitive information will be encrypted using an encryption key.
This encryption key will have to be provided when restoring
the backup file generated by this tool.
Please enter the encryption key:
Enter it again for verification:
...
...
Creating backup file
Done.
Backup file: backup11_localhost.localdomain_20221208-512213.tar.gz
[root@rhel DCNM_To_NDFC_Upgrade_Tool_LIN_WIN]#
Step 6. Restoring Backup in NDFC
From the Nexus Dashboard GUI, open the NDFC App from under the Services tab. Note that none of the personas are selected in the Feature Management.
1. Click the Restore button to open the Backup & Restore window.
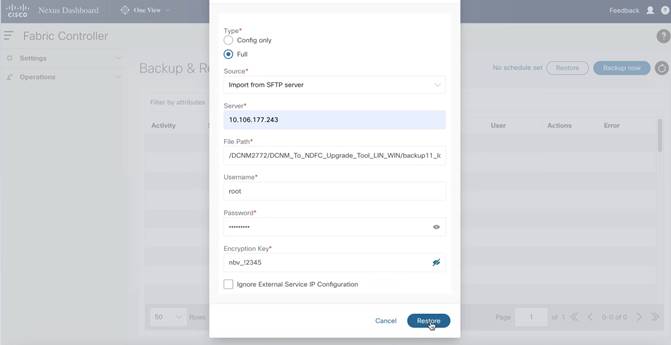
2. Click the Restore button to open the RestoreNow pop-up.
3. Select the restore type as Full.
4. Point to the location where the backup file is saved, the file name, and the credentials for the SCP/SFTP server.
5. Also enter the encryption key which was given when the upgrade tool was used to create the backup.
6. Next, click Restore to start the restore process. A progress bar will appear showing the restore progression.
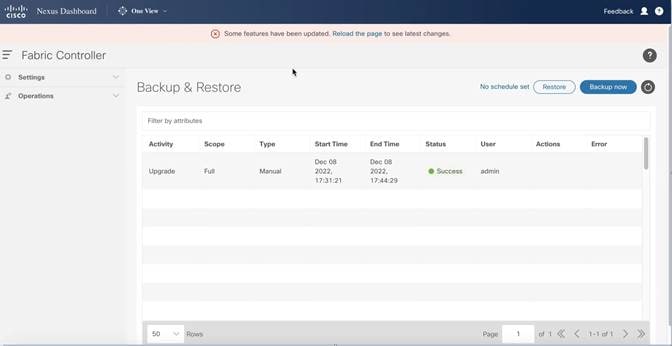
Once the restore is complete, a message prompting you to reload the browser is displayed. Reload the browser page and the relevant SAN-specific menus are displayed indicating a successful restore operation.
The fabrics which were being managed with DCNM 11.5.4 should now appear under the NDFC SAN Controller. This can be verified either from the Topology or SAN > Fabrics pages. Along with managing the SAN fabrics, you can configure monitoring and alerting for all the switches and fabrics using NDFC. For more details, please refer to the references section to access the whitepaper on how to set up monitoring and alerting in a Cisco SAN Fabric using NDFC SAN Controller.
Now you have learned the step-by-step guidance and best-practices to upgrade from Cisco Data Center Network Manager (DCNM) to Cisco Nexus Dashboard Fabric Controller (NDFC) SAN Controller. In addition, Cisco Nexus Dashboard and NDFC requirements and deployment are briefly discussed.
More for information, refer to:
● Cisco Nexus Dashboard Deployment Guide
● Cisco Nexus Dashboard Fabric Controller Software Upgrade Matrix
● Converting Classic Licenses to Smart Licenses
● Cisco MDS 9000 Series Licensing Guide
● Cisco Nexus Dashboard Fabric Controller Licensing FAQ
● Cisco Nexus Dashboard Fabric Controller Software Download
● Cisco Nexus Dashboard Fabric Controller Installation and Upgrade Guide
● Starting and Stopping Cisco DCNM Servers guide
● Monitoring and Alerting in SAN Fabric with Cisco MDS 9000 Series Switches and NDFC
● Cisco Nexus Dashboard Fabric Controller 12 Release notes
● Cisco NDFC-SAN Controller 12 Configuration Guide
Legal Information
Cisco and the Cisco logo are trademarks or registered trademarks of Cisco and/or its affiliates in the U.S. and other countries. To view a list of Cisco trademarks, go to this URL: https://www.cisco.com/c/en/us/about/legal/trademarks.html. Third-party trademarks mentioned are the property of their respective owners. The use of the word partner does not imply a partnership relationship between Cisco and any other company. (1721R)
Any Internet Protocol (IP) addresses and phone numbers used in this document are not intended to be actual addresses and phone numbers. Any examples, command display output, network topology diagrams, and other figures included in the document are shown for illustrative purposes only. Any use of actual IP addresses or phone numbers in illustrative content is unintentional and coincidental.
© 2023 Cisco Systems, Inc. All rights reserved.