Configure VXLAN Cross Connect

VXLAN cross connect

VXLAN cross connect is a tunneling mechanism used on VXLAN fabric that

  • provides point-to-point data tunneling,

  • transports control packets (such as CDP, LLDP, LACP, STP, BFD, and PAGP) between VTEPs, and

  • preserves all customer dot1q tags by encapsulating them within the provider VNI.

VXLAN cross connect is often referred to as xConnect.

BGP EVPN signaling identifies endpoints based on how the provider VNI is stretched in the fabric. Each attachment circuit is associated with a unique provider VNI. When packets are sent, all inner customer tags are preserved and packets are encapsulated in the provider VNI using dot1q-tunnel. Upon decapsulation, the provider VNI forwards the packet to its attachment circuit and preserves all customer tags.

Supported xConnect tunnel combinations

The supported tunnel combinations for VXLAN cross connect are

  • physical interface to physical interface,

  • port-channel to port-channel,

  • mixed combinations of physical interface and port-channel, and

  • additionally, this is supported over both underlay types (ingress replication and multicast) or a combination of both.
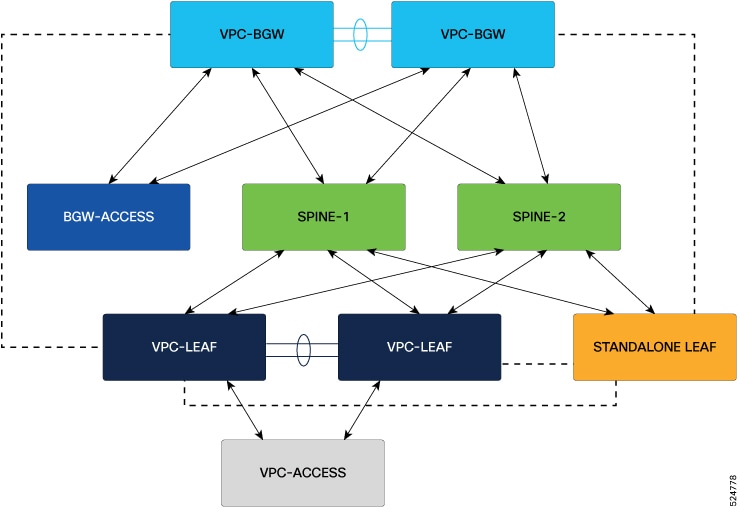
How VXLAN cross connect work

Summary

VXLAN cross connect (NGOAM xConnect) provides proactive failure detection and end-to-end monitoring across a VXLAN fabric by establishing pseudo-wire tunnels between VTEPs. This process ensures robust connectivity and rapid identification of faults within network fabrics.

The key components involved in the process are:

  • VXLAN fabric: The underlying network infrastructure that transports VXLAN encapsulated data between endpoints.

  • VTEPs: Devices that encapsulate and decapsulate traffic, forming the endpoints of VXLAN tunnels.

  • NGOAM xConnect: The mechanism that establishes and maintains the pseudo-wire tunnels for monitoring and failure detection.

Workflow

Figure 1. Topology of VXLAN cross connect

The dashed line in the diagram represents the NGOAM xConnect pseudo-wire, which is implemented between specific nodes to detect and react to failures.

These stages describe the VXLAN cross connect workflow:

  1. Configuration of NGOAM xConnect: Network operators configure NGOAM xConnect to define which VTEPs should establish pseudo-wire tunnels across the VXLAN fabric.
  2. Establishment of pseudo-wire tunnels: The defined VTEPs initiate and set up pseudo-wire tunnels, enabling dedicated monitoring paths across the fabric.
  3. Activation of monitoring and failure detection: NGOAM xConnect actively monitors the health and connectivity of these tunnels, performing real-time checks for failures or faults.
  4. Fault detection and notification: If a pseudo-wire tunnel fails, the system identifies the affected nodes and can trigger alerts or automated recovery.

Result

By implementing VXLAN cross connect, the network ensures early detection of issues, enhanced visibility into tunnel connectivity, and improved overall reliability within the VXLAN fabric.

Best practice for configuring VXLAN cross connect

Follow these best practices and heed the limitations when configuring VXLAN cross connect to ensure optimal operation and prevent common issues:

Generic guidelines and limitations

  • Do not enable MAC learning on xConnect VNIs; tunnel access ports will not learn host MAC addresses.

  • Configure only one attachment circuit for each provider VNI on a given VTEP.

  • Stretch a VNI only in a point-to-point topology; do not use point-to-multipoint.

  • Verify that the scale of xConnect VLANs is supported by your switch port count; each xConnect VLAN can tunnel up to 4000 customer VLANs.

  • On vPC VTEP, always configure a backup SVI as the native VLAN on the vPC peer-link.

  • On vPC VTEP, disable spanning tree on both vPC peers for all xConnect VLANs.

ISSU and patch guidelines and limitations

  • When performing a non-disruptive upgrade from Cisco NX-OS 7.0(3)I7(4) to 9.2(x), if you create and configure a VLAN as xConnect, enter the copy running-config startup-config command and reload the switch. If you upgrade disruptively, a reload is not required after configuring a VLAN as xConnect.

  • Ensure you set the ngoam xconnect hb-interval to 5000 milliseconds on all VTEPs before starting ISSU or patch activation to avoid link flaps.

  • Always set the NGOAM xConnect hb-interval to the maximum value of 5000 milliseconds before activating the patch for the CFS process to prevent interface flaps.

Configuration and port guidelines and limitations

  • If ARP suppression is enabled on a VLAN, enabling xConnect will take precedence.

  • Use xConnect-enabled VLANs only through switch port access mode.

  • Do not configure a static MAC on xConnect tunnel interfaces.

  • Place the vPC orphan tunneled port per VNI on either the vPC primary switch or the secondary switch, but never on both.

  • Do not enable xConnect on FEX ports.

  • After disabling NGOAM on all VTEPs, always flap xConnect access ports.

  • After deleting or adding a VLAN, or removing xConnect from a VLAN, always flap the physical ports with NGOAM.

Supported features and unsupported options

  • Use VXLAN cross connect only on BGP EVPN topologies.

  • Deploy VXLAN cross connect on vPC fabric peering when needed.

  • Do not use LACP bundling of attachment circuits with VXLAN cross connect.

  • Do not configure SVI on an xConnect VLAN.

  • Do not use VXLAN cross connect for multi-site solutions.

Supported platform and release of VXLAN cross connect

Table 1. Supported platform and release of VXLAN cross connect
Supported Release Supported Platform
9.3(3) and later Cisco Nexus 9300-FX/FX2/GX Series switches
9.3(5) and later Cisco Nexus 9300-FX3 Series switches
10.2(3)F and later Cisco Nexus 9300-GX2 Series switches
10.4(1)F and later Cisco Nexus 9332D-H2R switches
10.4(2)F and later Cisco Nexus 93400LD-H1 switches
10.4(3)F and later Cisco Nexus 9364C-H1 switches

Features required for cross connect configuration

Before cross connect configuration, you must enable these features and parameters:

  • NGOAM feature: Use the feature ngoam command to enable the ngoam feature before configuring cross connect.

    Example:
    switch# configure terminal
    switch(config)# feature ngoam
  • Custom heartbeat interval (optional): Use the ngoam xconnect hb-interval interval command to configure a custom heartbeat interval if desired.

    Range:150 to 5000. Default: 190.

    Example:
    switch(config)# ngoam xconnect hb-interval 200

Configure VXLAN cross connect

VXLAN cross connect allows you to associate VLANs with VXLAN Network Identifiers (VNIDs) and attach them to access ports for extended L2 connectivity in a data center environment.

Follow these steps to enable and verify VXLAN cross connect on Cisco Nexus 9000 devices.

Procedure


Step 1

Create and configure the xConnect on VLAN.

  1. Create a VLAN.

    Use the vlan session-num command in global configuration mode.

    Example:

    switch(config)# vlan 550
    switch(config-vlan)#
  2. Assign a VNID for the VLAN.

    Use the vn-segment segment-num command in VLAN configuration mode.

    Example:

    switch(config-vlan)# vn-segment 5555
  3. Enable cross connect for the VLAN.

    Use the xconnect command.

    Example:

    switch(config-vlan)# xconnect
  4. Exit VLAN configuration mode.

    Use the exit command.

    Example:

    switch(config-vlan)# exit
    switch(config)#

Step 2

Configure xConnect on interface access ports.

  1. Create a physical interface or port channel.

    Use the interface [physical-interface | port-channel ] command in global configuration mode.

    Example:

    For a physical interface:
    switch(config)# interface Ethernet1/30/3
    For a port-channel:
    switch(config)# interface port-channel 550
  2. Enable switchport mode.

    Use the switchport command.

    Example:

    switch(config-if)# switchport
  3. Set the interface to dot1q tunnel mode.

    Use the switchport mode dot1q-tunnel command.

    Example:

    switch(config-if)# switchport mode dot1q-tunnel
  4. Assign the interface to the appropriate xConnect VLAN.

    Use the switchport access vlan vlan-id command.

    Example:

    switch(config-if)# switchport access vlan 660
  5. Exit interface configuration mode.

    Use the exit command.

    Example:

    switch(config-if)# exit
    switch(config)#

Step 3

Verify the VLAN configuration.

Use the show running-config vlan session-num command.

Example:

switch# show running-config vlan 550

!Command: show running-config vlan 550
!Running configuration last done at: Sun Feb 23 16:34:03 2025
!Time: Mon Feb 24 13:53:01 2025

version 10.5(2) Bios:version 05.51 
vlan 550
vlan 550
  vn-segment 5555
  xconnect

Step 4

Verify interface port-channel configuration.

Use the show running-config interface port-channel pc-num command.

Example:

switch# show running-config interface port-channel 550

!Command: show running-config interface port-channel550
!Running configuration last done at: Sun Feb 23 16:34:03 2025
!Time: Mon Feb 24 13:53:30 2025

version 10.5(2) Bios:version 05.51 

interface port-channel550
  switchport
  switchport mode dot1q-tunnel
  switchport access vlan 550
  spanning-tree bpdufilter enable
switch#

Step 5

Verify physical interface configuration.

Use the show running-config interface Ethernet port-num command.

Example:

switch# show running-config interface Ethernet1/30/3

!Command: show running-config interface port-channel550
!Running configuration last done at: Sun Feb 23 16:34:03 2025
!Time: Mon Feb 24 13:53:30 2025

version 10.5(2) Bios:version 05.51 

interface port-channel550
  switchport
  switchport mode dot1q-tunnel
  switchport access vlan 550
  spanning-tree bpdufilter enable
switch#

Commands for verifying VXLAN cross connect configuration

Use these commands to verify the status and details of your VXLAN cross connect configuration.

Command Purpose
show nve vni Displays the list of all VXLAN VNIs and their status values.
show nve vni vlan-id Displays the status for the specified VNI.
show ngoam xconnect session all Displays all xConnect sessions and their status values.
show ngoam xconnect session vlan-id Displays details for the specified xConnect session.
  • show nve vni

    When xConnect-enabled VLANs are tagged on the NVE interface, the Conn flag appears for those VLANs.

    switch# show nve vni 
    Codes: CP - Control Plane        DP - Data Plane          
           UC - Unconfigured         SA - Suppress ARP        
           S-ND - Suppress ND        
           SU - Suppress Unknown Unicast 
           Xconn - Crossconnect      
           MS-IR - Multisite Ingress Replication 
           HYB - Hybrid IRB mode
        
    Interface VNI      Multicast-group   State Mode Type [BD/VRF]      Flags
    --------- -------- ----------------- ----- ---- ------------------ -----
    nve1      5555     225.5.5.5         Up    CP   L2 [550]           Xconn 
    nve1      6666     225.6.6.6         Up    CP   L2 [660]           Xconn 
    nve1      7777     225.7.7.7         Up    CP   L2 [770]           Xconn 
    nve1      10101    225.1.1.1         Up    CP   L2 [101]           SA   
    nve1      10102    225.1.1.2         Up    CP   L2 [102]           SA   
    nve1      10103    225.1.1.3         Up    CP   L2 [103]           SA   
    nve1      10104    225.1.1.4         Up    CP   L2 [104]           SA   
    nve1      10105    225.1.1.5         Up    CP   L2 [105]           SA   
    nve1      10106    225.1.1.6         Up    CP   L2 [106]           SA   
    nve1      10107    225.1.1.7         Up    CP   L2 [107]           SA   
    nve1      10108    225.1.1.8         Up    CP   L2 [108]           SA   
    nve1      10109    225.1.1.9         Up    CP   L2 [109]           SA   
    nve1      10110    225.1.1.10        Up    CP   L2 [110]           SA   
    nve1      20201    225.1.1.1         Up    CP   L2 [201]           SA   
    nve1      20202    225.1.1.2         Up    CP   L2 [202]           SA   
    nve1      20203    225.1.1.3         Up    CP   L2 [203]           SA   
    nve1      20204    225.1.1.4         Up    CP   L2 [204]           SA   
    nve1      20205    225.1.1.5         Up    CP   L2 [205]           SA   
    nve1      20206    225.1.1.6         Up    CP   L2 [206]           SA   
    nve1      20207    225.1.1.7         Up    CP   L2 [207]           SA   
    nve1      20208    225.1.1.8         Up    CP   L2 [208]           SA   
    nve1      20209    225.1.1.9         Up    CP   L2 [209]           SA   
    nve1      20210    225.1.1.10        Up    CP   L2 [210]           SA   
    nve1      202020   UnicastBGP        Up    CP   L2 [20]            Xconn 
    nve1      1001001  225.1.1.1         Up    CP   L2 [1001]          SA   
    nve1      1001002  225.1.1.2         Up    CP   L2 [1002]          SA   
    nve1      1001003  225.1.1.3         Up    CP   L2 [1003]          SA   
    nve1      1001004  225.1.1.4         Up    CP   L2 [1004]          SA   
    nve1      1001005  225.1.1.5         Up    CP   L2 [1005]          SA   
    nve1      1001006  225.1.1.6         Up    CP   L2 [1006]          SA   
    nve1      1001007  225.1.1.7         Up    CP   L2 [1007]          SA   
    nve1      1001008  225.1.1.8         Up    CP   L2 [1008]          SA   
    nve1      1001009  225.1.1.9         Up    CP   L2 [1009]          SA   
    nve1      1001010  225.1.1.10        Up    CP   L2 [1010]          SA   
    nve1      2002001  225.1.1.1         Up    CP   L2 [2001]          SA   
    nve1      2002002  225.1.1.2         Up    CP   L2 [2002]          SA   
    nve1      2002003  225.1.1.3         Up    CP   L2 [2003]          SA   
    nve1      2002004  225.1.1.4         Up    CP   L2 [2004]          SA   
    nve1      2002005  225.1.1.5         Up    CP   L2 [2005]          SA   
    nve1      2002006  225.1.1.6         Up    CP   L2 [2006]          SA   
    nve1      2002007  225.1.1.7         Up    CP   L2 [2007]          SA   
    nve1      2002008  225.1.1.8         Up    CP   L2 [2008]          SA   
    nve1      2002009  225.1.1.9         Up    CP   L2 [2009]          SA   
    nve1      2002010  225.1.1.10        Up    CP   L2 [2010]          SA   
    nve1      5005001  n/a               Up    CP   L3 [vxlan-5001]         
    nve1      5005002  n/a               Up    CP   L3 [vxlan-5002]         
    nve1      5005003  n/a               Up    CP   L3 [vxlan-5003]         
    nve1      5005004  n/a               Up    CP   L3 [vxlan-5004]         
    nve1      5005005  n/a               Up    CP   L3 [vxlan-5005]         
    nve1      5005006  n/a               Up    CP   L3 [vxlan-5006]         
    nve1      5005007  n/a               Up    CP   L3 [vxlan-5007]         
    nve1      5005008  n/a               Up    CP   L3 [vxlan-5008]         
    nve1      5005009  n/a               Up    CP   L3 [vxlan-5009]         
    nve1      5005010  n/a               Up    CP   L3 [vxlan-5010]         
    switch# 
  • show ngoam xconnect session all

    Use this command to view all NGOAM xConnect sessions on the switch.
    switch# show ngoam xconnect session all 
    
    States: LD = Local interface down, RD = Remote interface Down
              HB = Heartbeat lost, DB = Database/Routes not present
              * - Showing Vpc-peer interface info
    Vlan           Peer-ip/vni        XC-State      Local-if/State        Rmt-if/State
    ==================================================================================
    20      100.100.100.8 / 202020      Active      Eth1/7/1 / UP       Eth1/50 / UP
    550   200.200.200.200 / 5555       Active         Po550 / UP     Eth1/63/4 / UP
    660     100.100.100.8 / 6666       Active     Eth1/30/3 / UP       Eth1/48 / UP
    770   200.200.200.200 / 7777       Active         Po770 / UP         Po770 / UP
    switch#
    
  • show ngoam xconnect session vlan-id

    Examples for checking the details of a specific NGOAM xConnect session:

    • vPC pairs as local and remote interfaces:
      switch# sh ngoam xconnect session 550  
      Vlan ID: 550
      Peer IP: 200.200.200.200  VNI : 5555
      State: Active
      Last state update: 02/23/2025 22:21:01.958
      Local interface: Po550  State:  UP
      Local vpc interface: Po550  State:  UP
      Remote interface: Eth1/63/4  State:  UP
      Remote vpc interface: Eth1/63/2  State:  UP
      
    • Local interface as vPC and remote interface as non-vPC:
      switch# sh ngoam xconnect session 660
      Vlan ID: 660
      Peer IP: 100.100.100.8  VNI : 6666
      State: Active
      Last state update: 02/23/2025 15:58:14.735
      Local interface: Eth1/30/3  State:  UP
      Local vpc interface: Eth1/30/3  State:  UP
      Remote interface: Eth1/48  State:  UP
      Remote vpc interface: Unknown  State:  DOWN
      switch#

Remove a cross connect VNI

You can remove the cross connect tag and associated VNI and VLAN configuration from a Cisco Nexus switch.

Follow these steps to remove a cross connect VNI:

Procedure


Step 1

Remove the VNI under NVE.

Use the vlan session-num command in global configurtion mode.

Example:

switch# configure terminal
switch(config)# vlan 550
switch(config-vlan)#

Step 2

Remove the xconnect tag from the VLAN configuration.

Use the no xconnect command in VLAN configurtion mode.

Example:

switch(config-vlan)# no xconnect

Note

 
You must remove the xconnect tag before you remove the vn-segment from the xconnect-enabled VLANs. Otherwise, the system displays a syslog message with instructions for the procedure.

xconnect is enabled on vlan 550, please disable xconnect before removing vn-segment Cannot run commands in the mode at this moment. Please try again.

Step 3

Remove the VNI.

Use the no vn-segment segment-num command.

Example:

switch(config-vlan)# no vn-segment

Step 4

Remove the VLAN.

Use the no vlan session-num command.

Example:

switch(config-vlan)# no vlan 550