
Tenants Overview
A tenant is a logical container for application policies that enable an administrator to exercise domain-based access control. A tenant represents a unit of isolation from a policy perspective, but it does not represent a private network. Tenants can represent a customer in a service provider setting, an organization or domain in an enterprise setting, or just a convenient grouping of policies.

To manage tenants, you must have either Power User or Site and Tenant Manager read-write role.
Three default tenants are pre-configured for you:
-
common-A special tenant with the purpose of providing "common" services to other tenants in ACI fabrics. Global reuse is a core principle in the common tenant. Some examples of common services include shared L3Outs, DNS, DHCP, Active Directory, and shared private networks or bridge domains. -
dcnm-default-tn-A special tenant with the purpose of providing configuration for Cisco NDFC fabrics.When using Nexus Dashboard Orchestrator to manage Cisco DCNM fabrics, you will use the default
dcnm-default-tnthat is preconfigured for you and allows you to create and manage the following objects:-
VRFs
-
Networks
-
-
infra-The Infrastructure tenant that is used for all internal fabric communications, such as tunnels and policy deployment. This includes switch to switch and switch to APIC communications. Theinfratenant does not get exposed to the user space (tenants) and it has its own private network space and bridge domains. Fabric discovery, image management, and DHCP for fabric functions are all handled within this tenant.When using Nexus Dashboard Orchestrator to manage Cisco NDFC fabrics, you will always use the default
dcnm-default-tntenant.
Tenant Policies Templates
This section provides a number of tenant templates that are supported for on-premises ACI fabrics managed by Cisco APIC. For additional information, see the Cisco Nexus Dashbaord Orchestrator Configuration Guide for ACI Fabrics.
Add Users to NDFC Tenant
You must have a user with either Power User or Site Manager read-write role to manage tenants.
This section describes how to add users to the existing default dcnm-default-tn tenant which you will use when creating schema templates for your NDFC configurations.
-
Log in to your Nexus Dashboard and open the Nexus Dashboard Orchestrator service.
-
Select the
dcnm-default-tntenant.-
From the left navigation pane, choose Application Management > Tenants.
-
In the main pane, click
dcnm-default-tntenant name.The Update Tenant screen opens.
-
-
Provide tenant details.
The tenant’s Display Name is used throughout the Orchestrator’s GUI whenever the tenant is shown. However, due to object naming requirements on the APIC, any invalid characters are removed and the resulting Internal Name is used when pushing the tenant to sites. The Internal Name that will be used when creating the tenant is displayed below the Display Name textbox.
You can change the Display Name of the tenant at any time, but the Internal Name cannot be changed after the tenant is created.
-
In the Associated Sites section, check all the sites you want to associate with this tenant.
Only the selected sites will be available for any templates using this tenant.
-
In the Associated Users section, select the Nexus Dashboard Orchestrator users that are allowed to access the tenant.
Only the selected users will be able to use this tenant when creating templates.
-
-
Click Save to finish adding the tenant.
Schemas and Templates
A schema is a collection of templates, which are used for defining networking configuration, with each template assigned to a specific tenant. A template is a set of configuration objects and their properties that you deploy all at once to one or more sites. There are multiple approaches you can take when it comes to creating schema and template configurations specific to your deployment use case. The following sections describe a few simple design directions you can take when deciding how to define the schemas, templates, and policies in your Multi-Site environment.
Keep in mind that when designing schemas, you must consider the supported scalability limits for the number of schemas, templates, and objects per schema. Detailed information on verified scalability limits is available in the Cisco Multi-Site Verified Scalability Guides for your release.
Single Schema Deployment
The simplest schema design approach is a single schema deployment. You can create a single schema with all VRFs and Networks in that schema. You can then create a single application profile or multiple application profiles within the templates and deploy it to one or more sites.
This simplest approach to Multi-Site schema creation is to create all objects within the same schema and template. However, the supported number of schemas or templates per schema scalability limit may make this approach unsuitable for large scale deployments, which could exceed those limits.
Multiple Schemas Based On Object Relationships
When configuring multiple schemas with shared object references, it is important to be careful when making changes to those objects. For instance, making changes to or deleting a shared networking object can impact applications in one or more sites. Because of that, you may choose to create a template around each individual site that contains only the objects used by that site and its applications. And create different templates containing the shared objects.
For example, you can use the following templates for a configuration that you plan to deploy to 3 different sites:
-
Site 1 template
-
Site 2 template
-
Site 3 template
-
Site 1 and 2 shared template
-
Site 1 and 3 shared template
-
Site 2 and 3 shared template
-
All shared template
Similarly, rather than separating objects based on which site they are deployed to, you can also choose to create schemas and templates based on individual applications instead. This would allow you to easily identify each application profile and map them to schemas and sites as well as easily configure each application as local or stretched across sites.
However, as this could quickly exceed the templates per schema limit (listed in the Verified Scalability Guide for your release), you would have to create additional schemas to accommodate the multiple combinations. While this creates additional complexity with multiple additional schemas and templates, it provides true separation of objects based on site or application.
Template Design
In this release, we recommend creating separate templates for VRFs and Networks within each schema and then deploying the VRF templates first, followed by the templates that contain Networks. This way any VRFs required by the networks will be already created when you push Network configuration to the sites.
Similarly, when undeploying multiple networks and VRFs, we recommend undeploying the Networks template first, followed by the VRF templates. This will ensure that when VRFs are undeployed, there will be no conflicts with any existing Networks still using them.
Template Types
There are 3 types of templates available in Nexus Dashboard Orchestrator, each designed for a specific purpose:
-
ACI Multi-Cloud-Templates used for Cisco ACI on-premises and cloud sites, which allow template and object stretching between multiple sites. This template supports two deployment types:
-
Multi-Site- The template can be associated to a single site (site-local policies) or to multiple sites (stretched policies) and the option should be selected for Multi-Site Network (ISN) or VXLAN intersite communication. -
Autonomous- The template can be associated to one or more sites that are operated independently and are not connected through an Inter-Site Network (no intersite VXLAN communication).
This guide described Nexus Dashboard Orchestrator configurations for on-premises Cisco NDFC fabrics. For information on working with Cisco ACI sites, see the Cisco Nexus Dashboard Orchestrator Configuration Guide for ACI Fabrics instead.
-
-
NDFC-Templates designed for Cisco Nexus Dashboard Fabric Controller (formerly Data Center Network Manager) sites.
The following sections focus primarily on this type of template.
-
Cloud Local-Templates designed for specific Cloud Network Controller use cases, such as Google Cloud site connectivity, and cannot be stretched between multiple sites.
This guide described Nexus Dashboard Orchestrator configurations for on-premises Cisco NDFC fabrics. For information on working with Cloud Network Controller fabrics, see the Nexus Dashboard Orchestrator use case library instead.
Concurrent Configuration Updates
The Nexus Dashboard Orchestrator GUI will ensure that any concurrent updates on the same site or schema object cannot unintentionally overwrite each other. If you attempt to make changes to a site or template that was updated by another user since you opened it, the GUI will reject any subsequent changes you try to make and present a warning requesting you to refresh the object before making additional changes; refreshing the template will lose any edits you made up to that point and you will have to make those changes again:

However, the default REST API functionality was left unchanged in order to preserve backward compatibility with existing applications. In other words, while the UI is always enabled for this protection, you must explicitly enable it for your API calls for NDO to keep track of configuration changes.
When enabling this feature, note the following:
-
This release supports detection of conflicting configuration changes for Site and Schema objects only.
-
Only
PUTandPATCHAPI calls support the version check feature. -
If you do not explicitly enable the version check parameter in your API calls, NDO will not track any updates internally. And as a result, any configuration updates can be potentially overwritten by both subsequent API calls or GUI users.
To enable the configuration version check, you can pass the enableVersionCheck=true parameter to the API call by appending it to the end of the API endpoint you are using, for example:
https://__<mso-ip-address>__/mso/api/v1/schemas/__<schema-id>__?*enableVersionCheck=true*Example
We will use a simple example of updating the display name of a template in a schema to show how to use the version check attribute with PUT or PATCH calls.
First, you would GET the schema you want to modify, which will return the current latest version of the schema in the call’s response:
{
    "id": "601acfed38000070a4ee9ec0",
    "displayName": "Schema1",
    "description": "",
    "templates": [
        {
            "name": "Template1",
            *"displayName": "current name",*
            [...]
        }
    ],
    *"_updateVersion": 12,*
    "sites": [...]
}
Then you can modify the schema in one of two ways appending enableVersionCheck=true to the request URL:
You must ensure that the value of the "_updateVersion" field in the payload is the same as the value you got in the original schema.
-
Using the
PUTAPI with the entire updated schema as payload:PUT /v1/schemas/601acfed38000070a4ee9ec0*?enableVersionCheck=true*{ "id": "601acfed38000070a4ee9ec0", "displayName": "Schema1", "description": "", "templates": [ { "name": "Template1", *"displayName": "new name",* [...] } ], *"_updateVersion": 12,* "sites": [...] } -
Using any of the
PATCHAPI operations to make a specific change to one of the objects in the schema:PATCH /v1/schemas/601acfed38000070a4ee9ec0*?enableVersionCheck=true*[ { "op": "replace", "path": "/templates/Template1/displayName", *"value": "new name",**"_updateVersion": 12* } ]
When the request is made, the API will increment the current schema version by 1 (from 12 to 13) and attempt to create the new version of the schema. If the new version does not yet exist, the operation will succeed and the schema will be updated; if another API call (with enableVersionCheck enabled) or the UI have modified the schema in the meantime, the operation fails and the API call will return the following response:
{
    "code": 400,
    "message": "Update failed, object version in the DB has changed, refresh your client and retry"
}
Creating Schemas and Templates
-
You must have the user accounts which you will use to create and modify schemas already associated with the Tenant that those schemas will use, as described in Add Users to NDFC Tenant
-
Log in to your Nexus Dashboard and open the Nexus Dashboard Orchestrator service.
-
Create a new schema.
-
From the left navigation pane, choose Application Management > Schemas.
-
On the Schemas page, click Add Schema.
-
In the schema creation dialog, provide the Name and optional description for the schema and click Add.
By default, the new schema is empty, so you need to add one or more templates.
-
-
Create a template.
-
In the schema page, click View > Overview and choose Add New Template.
-
In the Select a Template type window, choose
NDFCand click Add.-
ACI Multi-Cloud-Templates used for Cisco ACI on-premises and cloud sites, which allow template and object stretching between multiple sites. This template supports two deployment types:
-
Multi-Site- The template can be associated to a single site (site-local policies) or to multiple sites (stretched policies) and the option should be selected for Multi-Site Network (ISN) or VXLAN intersite communication. -
Autonomous- The template can be associated to one or more sites that are operated independently and are not connected through an Inter-Site Network (no intersite VXLAN communication).
This guide described Nexus Dashboard Orchestrator configurations for on-premises Cisco NDFC fabrics. For information on working with Cisco ACI sites, see the Cisco Nexus Dashboard Orchestrator Configuration Guide for ACI Fabrics instead.
-
-
NDFC-Templates designed for Cisco Nexus Dashboard Fabric Controller (formerly Data Center Network Manager) sites.
The following sections focus primarily on this type of template.
-
Cloud Local-Templates designed for specific Cloud Network Controller use cases, such as Google Cloud site connectivity, and cannot be stretched between multiple sites.
This guide described Nexus Dashboard Orchestrator configurations for on-premises Cisco NDFC fabrics. For information on working with Cloud Network Controller fabrics, see the Nexus Dashboard Orchestrator use case library instead.
-
-
In the right sidebar, provide the Display Name for the template.
-
(Optional) Provide a Description.
-
From the Select a Tenant dropdown, select the
dcnm-default-tntenant. -
In the template view page, click Save.
You must save the template after this initial configuration for additional options (such as site association) to become available.
-
Repeat this step to create any additional templates.
For more information on schema and template design, see Schemas and Templates.
-
-
Assign the templates to sites.
You deploy fabric configuration by deploying one template at a time to one or more sites. So you need to associate the template with at least one site where you want to deploy the configuration.
-
In the template view page, click Actions and choose Sites Association.
-
In the Add Sites to <template> dialog, select one or more sites where you want to deploy the template and click Ok.
-
-
After you have created a schema and one or more templates, you can proceed with editing the templates as described in the following sections of this document based on your specific use cases. After you finish defining configurations, you can deploy the templates as described in Deploying Templates.
Importing Schema Elements From NDFC Sites
You can create new objects and push them out to one or more sites or you can import existing site-local objects and manage them using the Nexus Dashboard Orchestrator. This section describes how to import one or more existing objects, while creating new objects is described later on in this document.
-
Open the Schema where you want to import objects.
-
In the left sidebar, select the Template where you want to import objects.
-
In the main pane click the Import button and select the Site from which you want to import.
-
In the Import from <site-name> window that opens, select one or more objects.
The names of the objects imported into the Nexus Dashboard Orchestrator must be unique across all sites. Importing different objects with duplicate names will cause a schema validation error and the import to fail. If you want to import objects that have the same name, you must first rename them.
Creating VRFs
You must have the schema and template created and a tenant assigned to the template, as described in Creating Schemas and Templates.
This section describes how to create a VRF.
-
Select the schema and template where you want to create VRF.
-
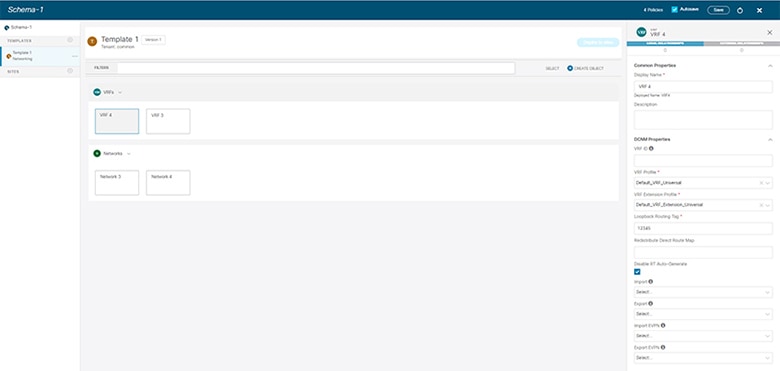
Create a VRF.
-
In the schema edit view, choose Create Object > VRF.
-
In the properties pane on the right, provide Display Name for the VRF.
-
(Optional) Provide the VRF ID.
You can choose to specify the VNI of the VRF or leave the field empty and the VNI will be automatically allocated by the NDO from the ranges you specified in Configuring Infra: General Settings.
-
From the VRF Profile dropdown, select the VRF profile.
You can assign the
Default_VRF_Universalprofile or choose any available VRF Profile that had been previously created in NDFC. Any profiles created in NDFC are automatically imported into the NDO and are available for selection here. -
From the VRF Extension Profile dropdown, select the extension profile.
You can assign the
Default_VRF_Extension_Universalprofile or choose any available VRF Extension Profile that had been previously created in the NDFC. Any profiles created in NDFC are automatically imported into the NDO and are available for selection here. -
Provide the Loopback Routing Tag.
If a VLAN is associated with multiple subnets, then this tag is associated with the IP prefix of each subnet. Note that this routing tag is associated with overlay network creation too.
-
Provide the Redistribute Direct Route Map.
Specifies the route map name for redistribution of routes in the VRF.
-
(Optional) Check Disable RT Auto-Generate to disable automatic generation of route targets.
This feature is supported in Nexus Dashboard Orchestrator, Release 3.5(2) and later.
By default when this option is unchecked, the route targets (RTs) are generated by the switches and you can choose to generate custom RTs in addition to the existing auto-generated ones. If you enable this option, the automatic generation of RTs will be disabled and you can use only the custom RTs.
-
(Optional) Provide any custom route targets.
This feature is supported in Nexus Dashboard, Release 3.5(2) and later.
To provide custom RTs, enter one or more values for the following fields:
-
Import-for VPN routes import
-
Export-for VPN routes export
-
Import EVPN-for EVPN routes import
-
Export EVPN-for EVPN routes export
You must enter a valid value, for example
12.2.3.4:2200. As you type in a value, the UI will validate it and once the format is correct, you will see aCreate "<value>"option in the dropdown.You can provide up to 10 custom route target values in total.
-
-
-
Configure the VRF’s site-local properties.
In addition to the network’s general properties that apply to every site where the VRF is deployed, you can configure site-specific properties for this VRF individually for each site.
-
From the Template Properties dropdown, select the site with which this template is associated..
-
In the main pane, select the network.
-
In the right Properties sidebar, provide the site-specific settings.
You can configure the following site-local properties:
-
Enable Tenant Routed Multicast-Tenant Routed Multicast (TRM) enables multicast forwarding on the VXLAN fabric that uses a BGP-based EVPN control plane. TRM provides multi-tenancy aware multicast forwarding between senders and receivers within the same or different subnets local or across VTEPs.
If you enable TRM, you must also provide the RP Address and Overlay Multicast Group.
-
Enable RP External if the Rendezvous Point (RP) is external to the fabric.
-
Click Add Static Leaf to select one or more leaf switches where the VRF will be configured.
In the Add Static Leaf window that opens, choose the leaf node and provide the VLAN ID for the VRF.
-
-
Creating Networks
-
You must have the schema and template created and a tenant assigned to the template, as described in Creating Schemas and Templates.
-
You must have the VRF created as described in Creating VRFs.
This section describes how to configure a NDFC network from Nexus Dashboard Orchestrator.
-
Select the schema and template where you want to create the application profile.
-
Create a Network.
-
In the template edit view, choose Create Object > Network.
-
In the properties pane on the right, provide Display Name for the network.
-
(Optional) Provide the Network ID.
You can choose to specify the network ID or leave the field empty and the ID will be automatically allocated by the NDO when you save the schema.
-
Choose whether or not this is a Layer2 Only network.
-
From the Virtual Routing & Forwarding dropdown, select the VRF you created for this network.
This option will be unavailable if you enabled Layer2 Only.
-
From the Network Profile dropdown, select the network profile.
You can assign the
Default_Network_Universalprofile or choose any available Network Profile that had been previously created in NDFC. Any profiles created in NDFC are automatically imported into the NDO and are available for selection here. -
From the Network Extension Profile dropdown, select the network extension profile.
You can assign the
Default_Network_Extension_Universalprofile or choose any available Network Extension Profile that had been previously created in the NDFC. Any profiles created in NDFC are automatically imported into the NDO and are available for selection here. -
Provide the VLAN ID for the network.
-
Provide the VLAN Name.
-
Add one or more Subnets.
This option will be unavailable if you enabled Layer2 Only.
-
Click +Add Subnet.
An Add Subnet window opens.
-
Click +Add Gateway IP and enter the subnet’s Gateway IP address.
You can configure up to four gateway IPs.
-
Choose
Primaryfor the first gateway you add. -
Click the checkmark to save the gateway information.
-
Repeat the previous substeps to provide additional gateways.
-
Click Add to finish adding the subnet.
-
-
Choose whether you want to Suppress ARP.
-
Provide the MTU for this network.
-
Provide the Routing Tag.
-
-
Configure the network’s site-local properties.
In addition to the network’s general properties that apply to every site where the network is deployed, you can configure site-specific properties for this network individually for each site.
-
In the left sidebar under SITES, select the template where the VRF is defined.
-
In the main pane, select the VRF.
-
In the right Properties sidebar, provide the site-specific settings.
You can configure the following site-local properties:
-
Enable Tenant Routed Multicast-Tenant Routed Multicast (TRM) enables multicast forwarding on the VXLAN fabric that uses a BGP-based EVPN control plane. TRM provides multi-tenancy aware multicast forwarding between senders and receivers within the same or different subnets local or across VTEPs.
-
Check Enable L3 Gateway Border to enable Layer 3 SVI on the border gateways to allow connecting dual-attached hosts to it.
-
Provide the DHCP Loopback ID.
The value must be in the
0-1023range. -
Click +Add DHCP Server to add one or more DHCP relay servers.
In the Add DHCP Server window that opens, provide the IP address of the DHCP relay and the VRF to which it belongs.
-
Click +Add Static Port to add one or more ports to which the network’s VLAN will be attached.
In the Add Static Port window that opens, select the leaf switch that contains the port, provide the VLAN ID, and finally click Add Port to specify one or more ports for the network.
Note that if you want to add multiple static ports from different leaf switches, you will need to repeat the process for each leaf switch separately.
-
-
Bulk Update of Template Objects
The bulk update feature allows you to update multiple properties on multiple different objects of the same type within a template at once. When using this workflow, all selected objects must be of the same type otherwise the update feature won’t work. For example, in the case of Cisco NDFC you cannot choose to update a VRF and Network simultaneously.
You can use "Select" on a type of object then update the properties of those objects. If the selected objects already have different property values configured on them, the update will overwrite those properties with the values you provide.
This feature is supported for Cisco APIC and Cisco NDFC fabrics only; it is not supported for Cisco Cloud Network Controller sites.
The following example will walk you through the process.
-
Navigate to the schema and template that contains the objects you want to update.
-
The following figure shows all the objects belonging to a single template.
Choose "Select". It will allow you select multiple objects at once.
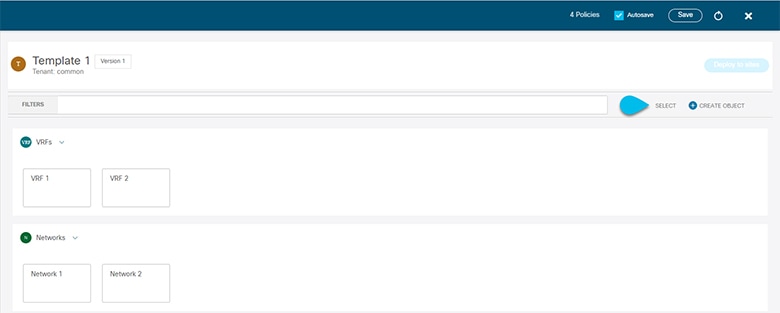 Figure 2.
 -
After selecting all the objects that you want to update.
-
Choose "…" right next to the cancel option.
-
From the dropdown Choose "Edit".
If you choose objects of different type, you won’t see the Edit option in the dropdown.
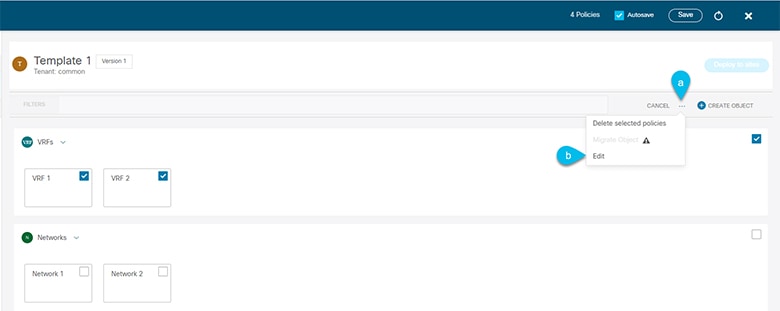 Figure 3.
-
-
After choosing "Edit", a pop-up will show up.
You can update the following properties based on the type of objects you selected.
-
VRF: VRF Profile, VRF Extension Profile, Loopback Routing Tag, Redistribute Direct Route Map, Disable RT Auto-Generate.
-
Network: Layer2 Only, Network Profile, Network Extension Profile.
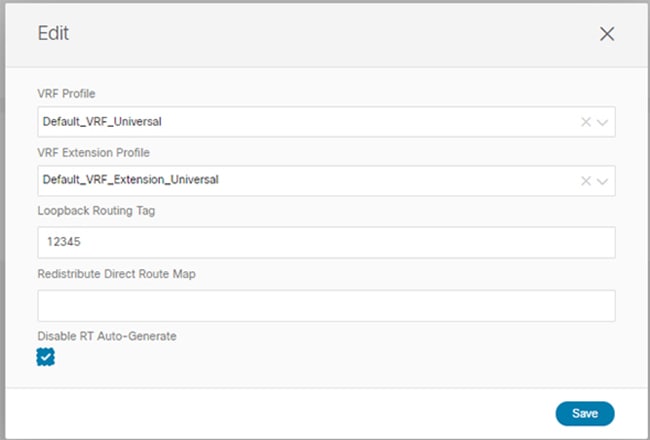 Figure 4.
-
-
Choose "Save", it will implement the updates you’ve made.
-
As you save the updates, you can see the changes you made.
Template Versioning
A new version of the template is created every time it is saved. From within the NDO UI, you can view the history of all configuration changes for any template along with information about who made the changes and when. You can also compare any of the previous versions to the current version.
New versions are created at the template level, not schema level, which allows you to configure, compare, and roll back each template individually.
Template versions are created and maintained according to the following rules:
-
All template versions are either
DeployedorIntermediate.Deployed-versions of the template that have been deployed to sites.Intermediate-versions of the template that have been modified and saved, but not deployed to sites. -
A maximum of 20
Deployedand 20Intermediateversions per template can be stored at any given time. -
When a new
Intermediateversion is created that would exceed the 20 version limit, the earliest existingIntermediateversion is deleted. -
When a template is deployed and a new
Deployedversion is created, allIntermediateversions are deleted. If the newDeployedversion exceeds the 20 version limit, the earliest existingDeployedversion is deleted. -
Tagging a version
Goldendoes not affect the number of stored template versions. -
A template that is tagged
Goldencannot be deleted.You must untag the template first before you can delete it.
-
When a template is modified and saved or deployed, any versions that exceed the 20
Deployedand 20Intermediatescale are removed according to the above rules. -
When upgrading from a release prior to 4.0(1) to release 4.0(1) or later, only the latest versions of templates are preserved.
Tagging Templates
At any point you can choose to tag the current version of the template as "golden", for example for future references to indicate a version that was reviewed, approved, and deployed with a fully validated configuration.
-
Log in to your Nexus Dashboard Orchestrator GUI.
-
From the left navigation menu, select Configure > Schemas.
-
Click the schema that contains the template you want to view.
-
In the Schema view, select the template you want to review.
-
From the template’s actions (…) menu, select Set as Golden.
If the template is already tagged, the option will change to Remove Golden and allows you to remove the tag from the current version.
Any version that was tagged will be indicated by a star icon in the template’s version history screen.
Viewing History and Comparing Previous Versions
This section describes how to view previous versions for a template and compare them to the current version.
-
Log in to your Nexus Dashboard Orchestrator GUI.
-
From the left navigation menu, select Application Management > Schemas.
-
Click the schema that contains the template you want to view.
-
In the Schema view, select the template you want to review.
-
From the template’s actions (…) menu, select View History.
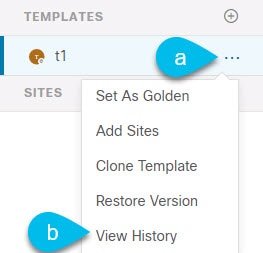 Figure 5.
 -
In the Version History window, make the appropriate selections.
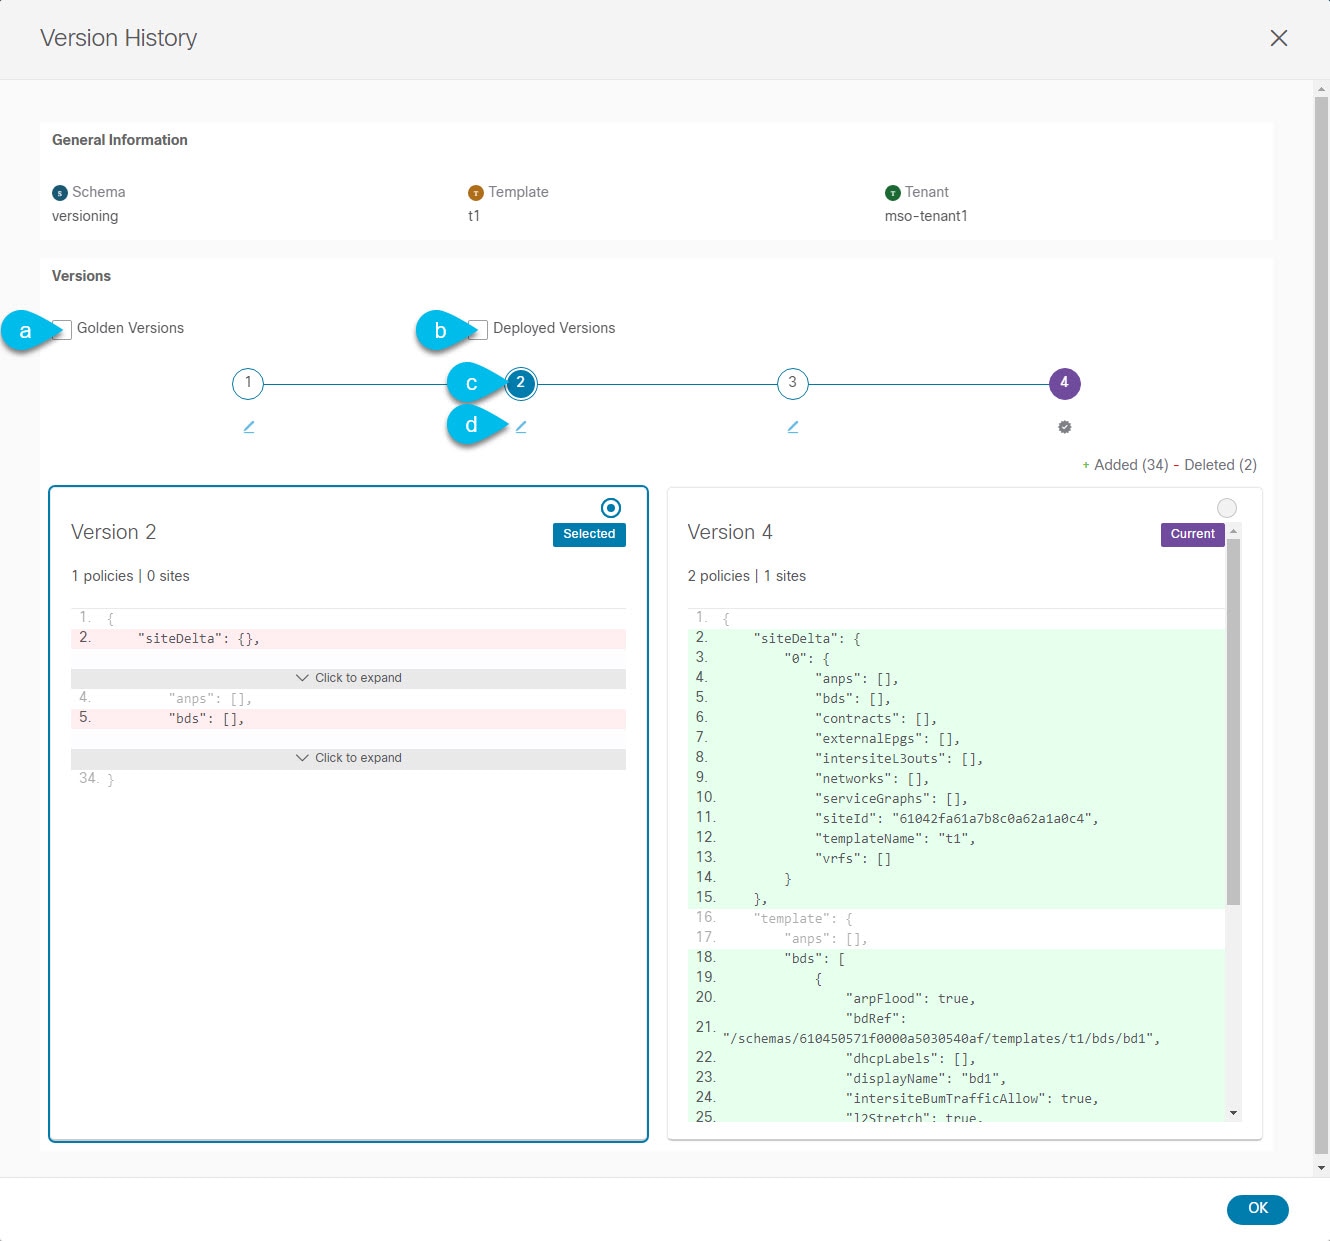 Figure 6.
-
Enable the Golden Versions checkbox to filter the list of previous versions to display only the versions of this template that had been marked as
Golden.Tagging a template as "Golden" is described in Tagging Templates.
-
Enable the Deployed Versions checkbox to filter the list of previous versions to display only the versions of this template that had been deployed to sites.
A new template version is created every time the template is changed and the schema is saved. You can choose to only show the versions of the template that were actually deployed to sites at some point.
-
Click on a specific version to compare it to the current version.
The version you select is always compared to the current version of the template. Even if you filter the list using the Golden Versions or Deployed Versions filters, the current version will always be displayed even if it was never deployed or tagged as golden.
-
Mouse over the Edit icon to see information about who created the version and when.
-
-
Click OK to close the version history window.
Reverting Template to Earlier Version
This section describes how to restore a previous version of the template. When reverting a template, the following rules apply:
-
If the target version references objects that are no longer present, restore operation will not be allowed.
-
If the target version references sites that are no longer managed by NDO, restore operation will not be allowed.
-
If the current version is deployed to one or more sites to which the target version was not deployed, restore operation will not be allowed.
You must first undeploy the current version from those sites before reverting the template.
-
If the target version was deployed to one or more sites to which the current version is not deployed, restore operation is allowed.
-
Log in to your Nexus Dashboard Orchestrator GUI.
-
From the left navigation menu, select Application Management > Schemas.
-
Click the schema that contains the template you want to view.
-
In the Schema view, select the template you want to review.
-
From the Actions (…) menu, select Rollback.
-
In the Rollback window, select one of the earlier versions to which you want to restore.
You can filter the list of versions using the Golden Versions and Deployed Versions checkboxes.
When you select a version, you can compare the template configuration of that version to the current version of the template.
-
Click Restore to restore the selected version.
When you restore a previous version, a new version of the template is created with the same configuration as the version you selected in the previous step.
For example, if the latest template version is
3and you restore version2, then version4is created that is identical to the version2configuration. You can verify the restore by browsing to the template version history and comparing the current latest version to the version you had selected during restore, which should be identical.If template review and approval (change control) is disabled and your account has the correct privileges to deploy templates, you can deploy the version to which you reverted.
However, if change control is enabled, then:
-
If you revert to a version that had been previously deployed and your account has the correct privileges to deploy templates, you can immediately deploy the template.
-
If you revert to a version that had not been previously deployed or your account does not have the correct privileges to deploy templates, you will need to request template approval before the reverted version can be deployed.
Additional information about review and approval process is available in the Template Review and Approval sections.
-
-
Template Review and Approval
Template review and approval (change control) workflow which allows you to set up designated roles for template designers, reviewers and approvers, and template deployers to ensure that the configuration deployments go through a validation process.
From within the NDO UI, a template designer can request review on the template they create. Then reviewers can view the history of all configuration changes for the template along with information about who made the changes and when, at which point they can approve or deny the current version of the template. If the template configuration is denied, the template designer can make any required changes and re-request review; if the template is approved, it can be deployed to the sites by a user with Deployer role. Finally, the deployer themselves can deny deployment of an approved template and restart the review process from the beginning.
The workflow is done at the template level, not schema level, which allows you to configure, review, and approve each template individually.
Enabling Template Approval Requirement
Before you can use the review and approval workflow for template configuration and deployment, you must enable the feature in the Nexus Dashboard Orchestrator’s system settings.
-
Log in to your Nexus Dashboard Orchestrator GUI.
-
From the left navigation menu, select Infrastructure > System Configuration.
-
On the Change Control tile, click the Edit icon.
-
In the Change Control window, check the Change Control Workflow checkbox to enable the feature.
-
In the Approvers field, enter the number of unique approvals required before the templates can be deployed.
-
Click Save to save the changes.
Create Users with Required Roles
Before you can use the review and approval workflow for template configuration and deployment, you must create the users with the necessary privileges in the Nexus Dashboard where the NDO service is deployed.
-
Log in to your Nexus Dashboard GUI.
Users cannot be created or edited in the NDO GUI, you must log in directly to the Nexus Dashboard cluster where the service is deployed.
-
From the left navigation menu, select Administrative > Users.
-
Create the required users.
The workflow depends on three distinct user roles: template designer, approver, and deployer. You can assign each role to a different user or combine the roles for the same user; users with
adminprivileges can perform all 3 actions.Detailed information about configuring users and their privileges for local or remote Nexus Dashboard users is described in the Nexus Dashboard User Guide.
You must have at least as many unique users with
Approverrole as the minimum number of approvals required, which you configured in Enabling Template Approval Requirement.
If you disable the Change Control Workflow feature, any
ApproverandDeployerusers will have read-only access to the Nexus Dashboard Orchestrator.
Requesting Template Review and Approval
You must have:
-
Enabled the global settings for approval requirement, as described in Enabling Template Approval Requirement.
-
Created or updated users in Nexus Dashboard with
approveranddeployerroles, as described in Create Users with Required Roles. -
Created a template with one or more policy configurations and assigned it to one or more sites.
This section describes how to request template review and approval.
-
Log in to your Nexus Dashboard Orchestrator GUI as a user with
Tenant Manager,Site Manager, oradminrole. -
From the left navigation menu, select Configure > Schemas.
-
Click the schema that contains the template for which you want to request approval.
-
In the schema view, select the template.
-
In the main pane, click Send for Approval.
Note that the Send for Approval button will not be available in the following cases:+
-
The global change control option is not enabled
-
The template has no policy configurations or is not assigned to any sites
-
Your user does not have the right permissions to edit templates
-
The template has already been sent for approval
-
The template was denied by the approver user
-
Reviewing and Approving Templates
You must have:
-
Enabled the global settings for approval requirement, as described in Enabling Template Approval Requirement.
-
Created or updated users in Nexus Dashboard with
approveranddeployerroles, as described in Create Users with Required Roles. -
Created a template with one or more policy configurations and assigned it to one or more sites.
-
Had the template approval requested by a schema editor, as described in Requesting Template Review and Approval.
This section describes how to request template review and approval.
-
Log in to your Nexus Dashboard Orchestrator GUI as a user with
Approveroradminrole. -
From the left navigation menu, select Application Management > Schemas.
-
Click the schema that contains the template you want to review and approve.
-
In the schema view, select the template.
-
In the main pane, click Approve.
If you have already approved or denied the template, you will not see the option until the template designer makes changes and re-sends the template for review again.
-
In the Approving template window, review the template and click Approve.
The approval screen will display all the changes which the template would deploy to the sites.
You can click View Version History to view the complete version history and incremental changes made between versions. Additional information about version history is available in Viewing History and Comparing Previous Versions.
You can also click Deployment Plan to see a visualization and a JSON of the configuration that would be deployed from this template. The functionality of the "Deployment Plan" view is similar to the "Deployed View" for already-deployed templates, which is described in Viewing Currently Deployed Configuration.
After the template is reviewed and approved by the required number of approvers, you can deploy the template as described in Deploying Templates.
Deploying Templates
-
You must have the schema, template, and any objects you want to deploy to sites already created and the templates assigned to one or more sites, as described in previous sections of this document.
-
If template review and approval is enabled, the template must also be already approved by the required number of approvers as described in Template Review and Approval.
This section describes how to deploy new or updated configuration to NDFC fabrics.
-
Navigate to the schema that contains the template that you want to deploy.
-
From the View dropdown menu, select the template you want to deploy.
-
In the template view, click Deploy to sites.
The Deploy to sites window opens that shows the summary of the objects to be deployed.
-
If you have made changes to your template, review the Deployment Plan to verify the new configuration.
If you have previously deployed this template but made no changes to it since, the Deploy summary will indicate that there are no changes and you can choose to re-deploy the entire template. In this case, you can skip this step.
The Deploy to sites window will show you a summary of the configuration differences that will be deployed to sites.
You can also filter the view using the
Created,Modified, andDeletedcheckboxes for informational purposes, but keep in mind that all of the changes are still deployed when you click Deploy.Here you can also choose to:
-
View Version History, which shows the complete version history and incremental changes made between versions. Additional information about version history is available in Viewing History and Comparing Previous Versions.
-
Check the Deployment Plan to see a visualization and an XML payload of the configuration that will be deployed from this template.
This feature provides better visibility into configuration changes that the Orchestrator will provision to the different fabrics that are part of your Multi-Site domain after you make a change to the template and deploy it to one or more sites.
Unlike earlier releases of the Nexus Dashboard Orchestrator, which still provided a list of specific changes made to the template and site configuration, the Deployment Plan provides full visibility into all the objects that the deployment of the template would provision across the different fabrics. For example, depending on what change you make, shadow objects may be created in multiple sites even if the specific change is applied to only a single site.
We recommend verifying your changes using the Deployment Plan as described in this step before deploying the template. The visual representation of the configuration changes can help you reduce potential errors from deploying unintended configuration changes.
-
Click the Deployment Plan button.
-
Verify your changes in the first listed site.
-
Repeat the previous substep to verify the changes in other sites
-
(Optional) Click View Payload to see the XML payload for each site.
In addition to the visual representation of the new and modified objects, you can also choose to View Payload for the changes in each site.
-
After you are done verifying the changes, click the
Xicon to close the Deployment Plan screen.
-
-
-
In the Deploy to sites window, click Deploy to deploy the template.
Disassociating Template from Sites
-
The template and its configuration must already be deployed to a site.
-
The template must be deployed to a single site only and not stretched across sites.
-
The objects defined in the template must not be deployed as shadow objects in other sites.
You can choose to disassociate a template from a site without undeploying it. This allows you to preserve any configuration deployed to the site from NDO while removing the template-site association in the schema. The managed object and policy ownership is transferred from NDO to the site’s controller.
-
Log in to your Nexus Dashboard Orchestrator GUI.
-
From the left navigation menu, select Application Management > Schemas.
-
Click the schema that contains the template you want to disassociate.
-
In the Schema view, select the template under the specific site from which you want to disassociate it.
-
From the Actions menu, select Disassociate Template.
-
In the confirmation window, click Confirm Action.
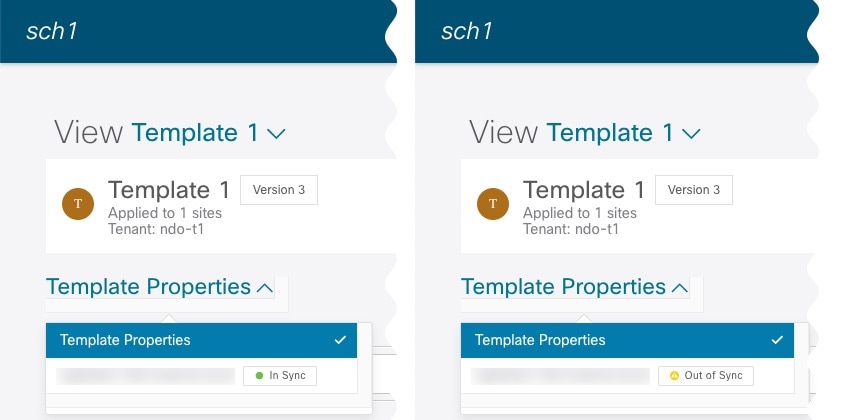
Configuration Drifts
Occasionally, you may run into a situation where the configuration actually deployed in a NDFC domain is different from the configuration defined for that domain in the Nexus Dashboard Orchestrator. These configuration discrepancies are referred to as Configuration Drifts and are indicated by a yellow warning sign next to the template name in the schema view as shown in the following figure:
Configuration drifts can manifest due to a number of different reasons. Specific steps required to resolve a configuration drift depends on its cause. Most common scenarios and their resolutions are outlined below:
-
Configuration is modified in NDO-when you modify a template in NDO GUI, it will show as configuration drift until you deploy the changes to the sites.
To resolve this type of configuration drift, either deploy the template to apply the changes to the sites or revert the changes in the schema.
-
Configuration is modified directly in the site’s controller-while the objects deployed from NDO are indicated by a warning icon and text in the site’s NDFC, an admin user can still make changes to them causing the configuration drift.
-
NDO configuration is restored from backup-restoring configuration from a backup in NDO restores only the objects and their state as they were when the backup was created, it does not automatically re-deploy the restored configuration. As such, if there were changes made to the configuration and deployed on NDFC since the backup was created, restoring the backup would create a configuration drift.
-
NDO configuration is restored from a backup created on an older release-if the newer release added support for object properties which were not supported by the earlier release, these properties may cause configuration drift warning. Typically, this happens if the new properties were modified directly in the site’s NDFC GUI and the values are different from the defaults assumed by the Nexus Dashboard Orchestrator
-
NDO is upgraded from an earlier release-this scenario is similar to the previous one where if new object properties are added in the new release, existing configuration may indicate a drift.
We recommend running the "Reconcile Drift" workflow for the template, to have more visibility into the causes of the drift and be able to reconcile it. This recommendation applies to all the drift scenarios previously described in this section. For more information on the drift reconciliation workflow, see the "Reconciling Configuration Drifts" section below.
Reconciling Configuration Drifts
NDO release 3.6(1) introduced support for a drift reconciliation workflow that can be run to compare the template configuration defined on Nexus Dashboard Orchestrator and the configuration rendered in the NDFC controllers of the sites part of the Multi-Site domain. This allows to provide more visibility into what causes the configuration drift (i.e. changes that have been made on Nexus Dashboard Orchestrator or on NDFC directly) and give the user the choice on how to reconcile the drift, as described in the steps below.
If you do not want the configurations you chose, you can close the schema and re-open. This will show the original configurations. You can re-trigger "Reconcile Drift" flow again if needed. The schema will get saved only after you choose Save or Deploy button.
-
Navigate to the schema that contains the template you want to check for configuration drifts.
-
From the template’s Actions menu, select Reconcile Drift.
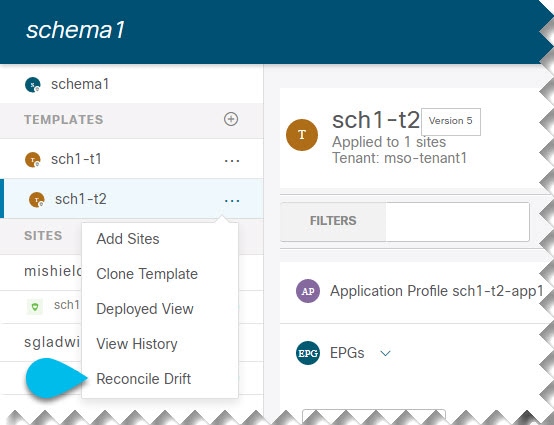 Figure 8.
The Drift Reconciliation wizard opens.
-
In the Drift Reconciliation screen, compare the template-level configurations for each site and choose the one you want.
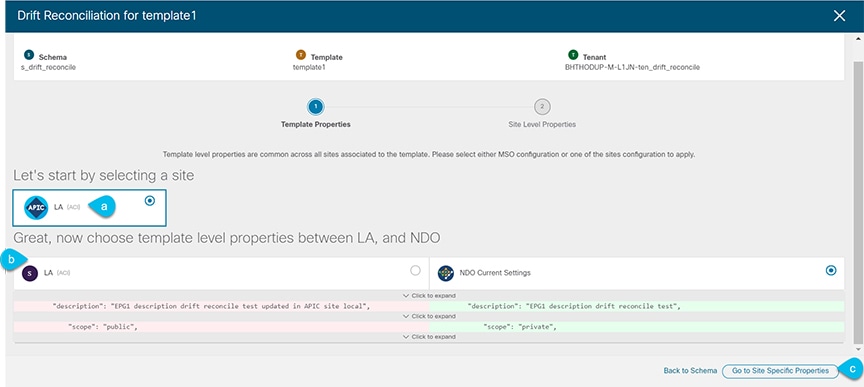 Figure 9.
Template-level properties are common across all sites associated to the template. You can compare the template level properties defined on Nexus Dashboard Orchestrator with the configuration rendered in each site and decide what should become the new configuration in the Nexus Dashboard Orchestrator template. Selecting the site configuration will modify those properties in the existing Nexus Dashboard Orchestrator template, whereas selecting the Nexus Dashboard Orchestrator configuration will keep the existing Nexus Dashboard Orchestrator template settings as is
-
Click Go to Site Specific Properties to switch to site-level configuration.
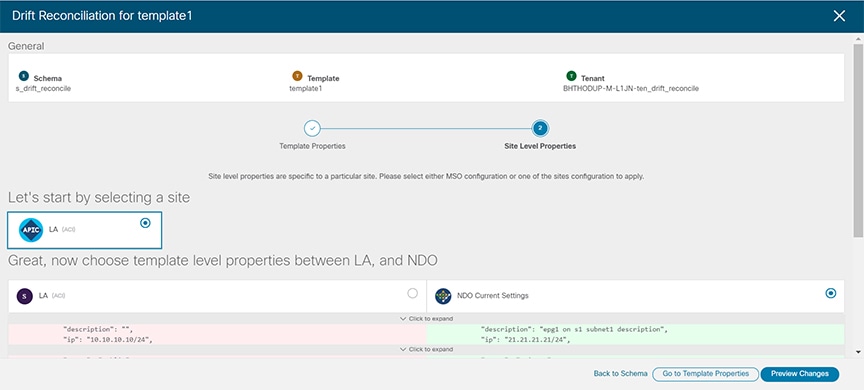 Figure 10.
You can choose a site to compare that specific site’s configuration. Unlike template-level configurations, you can choose either the Nexus Dashboard Orchestrator-defined or actual existing configurations for each site individually to be retained as the template’s site-local properties for that site.
Even though in most scenarios you will make the same choice for both template-level and site-level configuration, the drift reconciliation wizard allows you to choose the configuration defined in the site’s controller at the "Template Properties" level and the configuration defined in Nexus Dashboard Orchestrator at the "Site Local Properties" level or vice versa.
-
Click Preview Changes to verify your choices.
The preview will display full template configuration adjusted based on the choices picked in the Drift Reconciliation wizard. You can then click Deploy to sites to deploy the configuration and reconcile the drift for that template.
Viewing Currently Deployed Configuration
You can view all objects currently deployed to sites from a specific template. Even though any given template can be deployed, undeployed, updated, and re-deployed any number of times, this feature will show only the final state that resulted from all of those actions. For example, if Template1 contains only VRF1 object and is deployed to Site1, the API will return only VRF1 for the template; if you then add VRF2 and redeploy, the API will return both objects, VRF1 and VRF2, from this point on.
This information comes from the Orchestrator database, so it does not account for any potential configuration drifts caused by changes done directly in the site’s controller.
-
Log in to your Nexus Dashboard Orchestrator GUI.
-
From the left navigation menu, select Application Management > Schemas.
-
Click the schema that contains the template you want to view.
-
In the left sidebar, select the template.
-
Open the Deployed View for the template.

-
Click the Actions menu next to the template’s name.
-
Click Deployed View.
-
-
In the Deployed View screen, select the site for which you want to view the information.
You will see a graphical representation of the template configuration comparison between what’s already deployed to the site and what’s defined in the template.
-
The color-coded legend indicates which objects would be created, deleted, or modified if you were to deploy the template at this time.
If the latest version of the template is already deployed, the view will not contain any color-coded objects and will simply display the currently deployed configuration.
-
You can click on a site name to show configuration for that specific site.
-
You can click View JSON to see the config of all the objects that are deployed to the selected site.
-
Schema Overview and Deployment Visualizer
When you open a schema with one or more objects defined and deployed to one or more fabrics, the schema Overview page will provide you with a summary of the deployment.
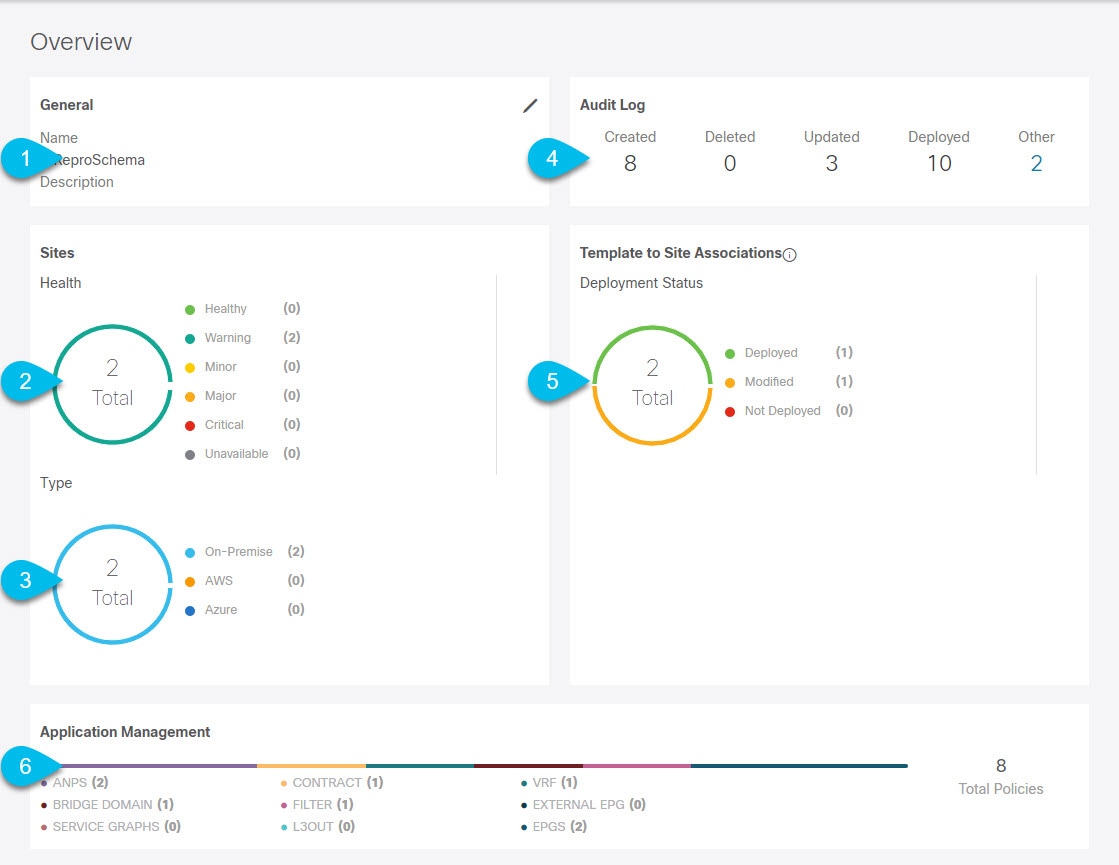
The following details are provided on this page:
-
General-Provides general information of the schema, such the name and description.
-
Audit Log-Provides audit log summary of the actions performed on the schema.
-
Sites > Health-Provides the number of sites associated with the templates in this schema sorted by the site’s health status.
-
Sites > Type-Provides the number of sites associated with the templates in this schema sorted by the site’s type.
-
Template to Site Associations > Deployment Status-Provides the number of templates in this schema that are associated with one or more sites and their deployment status.
-
Application Management-Provides a summary of individual objects contained by the templates in this schema.
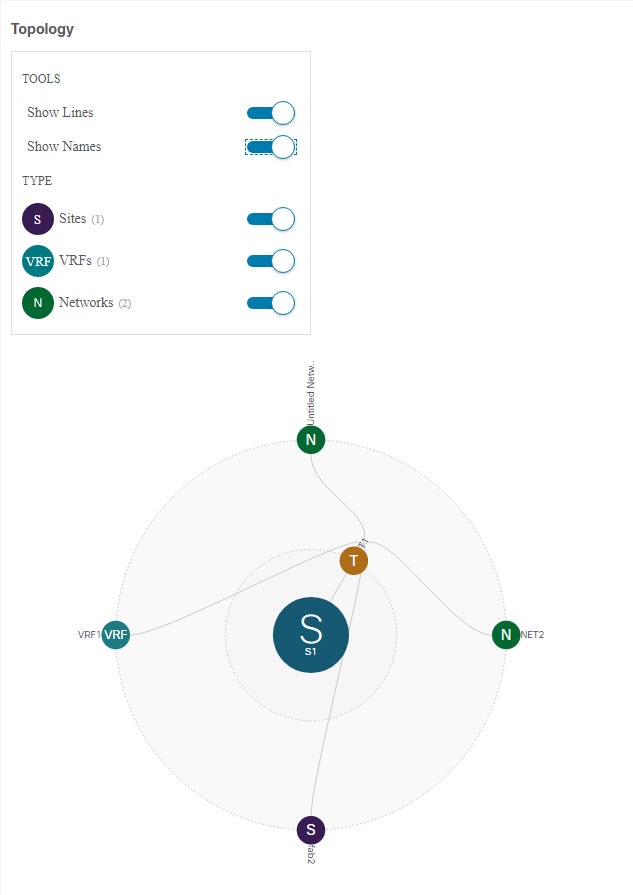
The Topology tile allows you to create a topology visualizer by selecting one or more objects to be displayed by the diagram as shown in the following figure.
-
Configuration Options-Allows you to choose which policy objects to display in the topology diagram below.
-
Topology Diagram-Provides visual representation of the policies configured in all of the Schema’s templates that are assigned to sites.
You can choose which objects you want to display using the Configuration Options above.
You can also mouse over an objects to highlight all of its dependencies.
First Published: 2024-03-11
Last Modified: 2024-03-11
Americas Headquarters
Cisco Systems, Inc.
170 West Tasman Drive
San Jose, CA 95134-1706
USA
http://www.cisco.com
Tel: 408 526-4000
800 553-NETS (6387)
Fax: 408 527-0883