
Cisco Catalyst Center 3.x Upgrade
Upgrade to Catalyst Center 3.x
Catalyst Center 3.1.5 and later use an architecture that provides
- improved network automation and monitoring
- optimized resource utilization, and
- increased security.
To upgrade Catalyst Center, you'll need to:
- Ensure that the requirements and tasks described in Upgrade requirements have been completed.
- Complete the appropriate upgrade scenario.
Refer to this article for a description of how to complete these steps.
Upgrade requirements
Before you start the upgrade, ensure that the requirements and tasks described in these sections have been completed:
- General
- Supported Catalyst Center versions
- Back up and restore
- Cisco IMC
- Hardware
- Required upgrade wizard information
Also review the information provided in these sections:
General
- Confirm that no critical operations (such as backups or upgrades) are currently running.
- Ensure that NTP is configured on your system.
- For three-node HA clusters, confirm that each cluster node is healthy and HA is active.
- Install the Catalyst Center 3.x upgrade package.
Supported Catalyst Center versions
Ensure that one of these Catalyst Center versions is installed on the appliance you'll be upgrading from:
- 2.3.7.7.70047
- 2.3.7.7-70047.10
- 2.3.7.9.70301
- 2.3.7.9.70301.10
- 2.3.7.10.70209
- 2.3.7.10.70209.10
- 2.3.7.11.70047
If not, upgrade to version 2.3.7.11. Complete the steps described in the Cisco Catalyst Center Upgrade Guide.
Back up and restore
- Confirm that Catalyst Center backups are configured correctly for both automation and Assurance.
-
Configure NFS for Assurance backups, even if you don't plan to take full backups for both automation and Assurance.
In the Cisco Catalyst Center Administrator Guide, complete the steps described in the topic relevant to your deployment:
- Example of NFS server configuration—Ubuntu
- Example of NFS server configuration—Red Hat
 Note
Note- For Catalyst Center 3.1.6-75524.200 SMU and later, you can use either NFS or remote sync (rsync)/SSH for automation data backups.
- Make sure you have enough NFS storage for future backups.
- Catalyst Center also supports Windows-based NFS servers, as well an NFS provided by a storage vendor (such as NetApp or Isilon).
- Verify that the settings for your NFS and remote servers, such as IP addresses and directory paths, are correct.
- Verify that the NFS shared directory has adequate space (at least twice the size of the latest automation backup) for data conversion during backup.
- Ensure that a backup taken within the past five days is available. See Back up your appliance.
Cisco IMC
- Verify the Cisco IMC settings for your deployment.
- To determine your appliance's part number, view the Product Name field in Cisco IMC's Summary page.
-
Although Cisco IMC firmware versions 4.1 and later are supported, we recommend that you install these versions:
- DN2 appliances: 4.3(2.260007)
- DN3 appliances: 4.3(6.260017)
- Confirm that the Cisco IMC interface is properly configured for your appliances and is accessible.
- Review and resolve any critical hardware alerts detected by Cisco IMC.
- Enable the Cisco Redfish API on all cluster nodes to perform necessary hardware configuration. See Step 4 in Verify Cisco IMC settings.
Hardware
-
Ensure you are upgrading a second or third-generation Catalyst Center appliance.
Note
The Catalyst Center 3.x upgrade does not support first-generation Catalyst Center appliances. In the Cisco Catalyst Center Data Migration article, see the migration procedure for Scenario 14.
Required upgrade wizard information
Have this information ready before starting the Catalyst Center 3.x upgrade wizard:
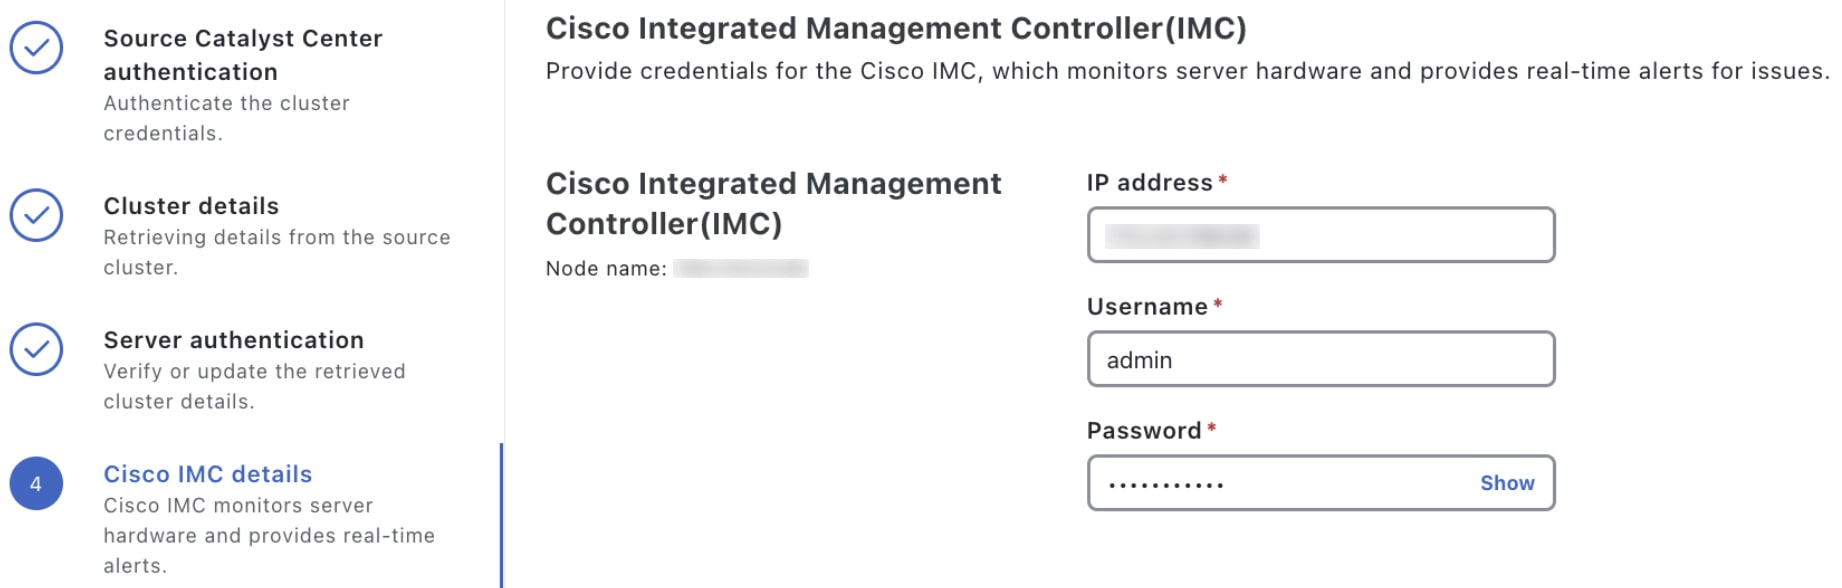
- Catalyst Center admin superuser login credentials, as only users configured with the SUPER-ADMIN-ROLE can perform the upgrade
- Cisco IMC login credentials
-
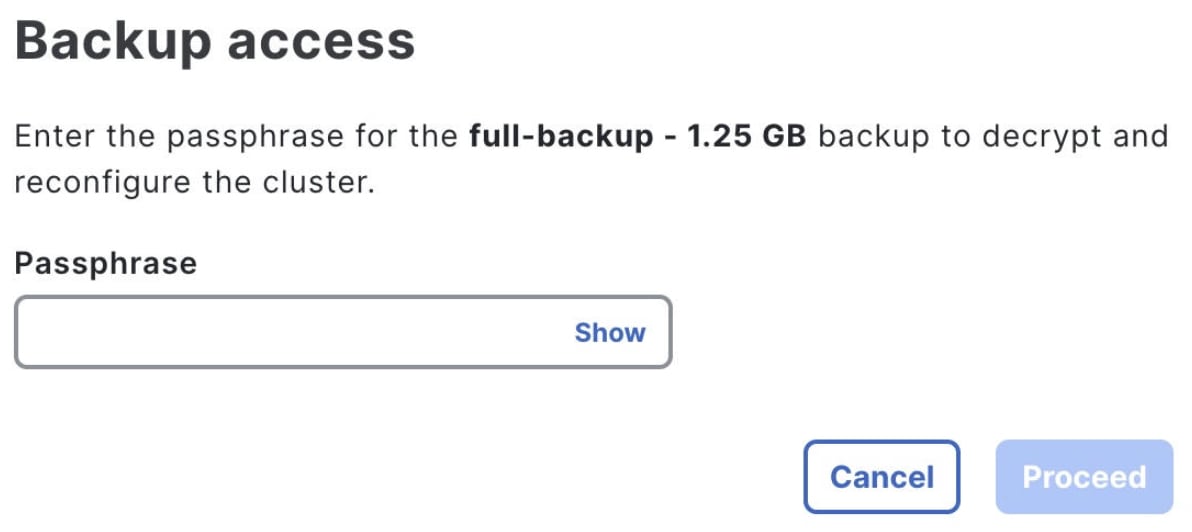
Backup encryption passphrase
Note
If you do not know this passphrase, you will need to update it and then perform another backup for the upgrade.
Upgrade considerations
- Do not create a full backup after you have started the upgrade.
- Your current backup schedule is not migrated. You must configure the backup schedule after the upgrade completes.
- CLI-based tuning changes, such as disabling older ciphers and TLS versions, are not captured and carried forward.
- Complete the Catalyst Center upgrade in one sitting to prevent the loss of configuration changes that are not picked up in a backup.
Unsupported Catalyst Center appliances and features
- DN1 (first-generation) Catalyst Center appliances
- IPv6
- Clusters enabled with intercluster (ICL) IPsec
Install the Catalyst Center 3.x upgrade package
To upgrade to the new Catalyst Center architecture, first install the Catalyst Center 3.x upgrade package.
Step 1 | From the main menu, choose to open the Software Management page. |
Step 2 | Confirm that the Release UpgradeWizard-X is available heading is displayed at the top of page. |
Step 3 | Click Download now. |
Step 4 | After the download prechecks complete successfully, click Download. You can click the More details link to open a slide-in pane that indicates the progress of the applications that are being downloaded. |
Step 5 | Click Install now. |
Step 6 | After the installation prechecks complete successfully, click Install. You can click the More details link to open a slide-in pane that indicates the progress of the applications that are being installed. After installation of the Catalyst Center 3.x upgrade package finishes, the upgrade wizard should start automatically. |
Back up your appliance
Complete these steps to back up your Catalyst Center appliance.
NoteAny backup files you created before installing the Catalyst Center 3.x upgrade package may be marked as incompatible after this package is installed.
Step 1 | From the main menu, choose and then click the Configure Settings tab. |
Step 2 | Confirm that both a remote host and NFS server are already configured for backup and restore operations. Note
|
Step 3 | Back up your appliance:
|
Verify Cisco IMC settings
Step 1 | Log in to Cisco IMC. The Summary page opens. | ||||||||||||||||||||||||
Step 2 | Confirm that the part number for your Catalyst Center appliance (listed in the Product Name field) matches one of part numbers listed in the Prerequisites topic's Hardware table. | ||||||||||||||||||||||||
Step 3 | Confirm that a supported Cisco IMC version is installed:
| ||||||||||||||||||||||||
Step 4 | Verify that the Redfish API is enabled:
| ||||||||||||||||||||||||
Step 5 | Confirm that your appliance's virtual drives are named correctly:
| ||||||||||||||||||||||||
Upgrade scenarios
Review and complete the upgrade scenario that applies to your deployment.
Scenario 1: Upgrade a single or three-node Catalyst Center cluster
In this scenario, you are upgrading a single or three-node deployment to Catalyst Center 3.x. To upgrade to this new architecture and migrate your existing network data, complete this procedure.
NoteThe upgrade procedure is essentially the same for both single-node and three-node Catalyst Center clusters. The differences are minor and described where necessary.
Before you begin
- Review the upgrade requirements and confirm that they have been met.
- Install the Catalyst Center 3.x upgrade package.
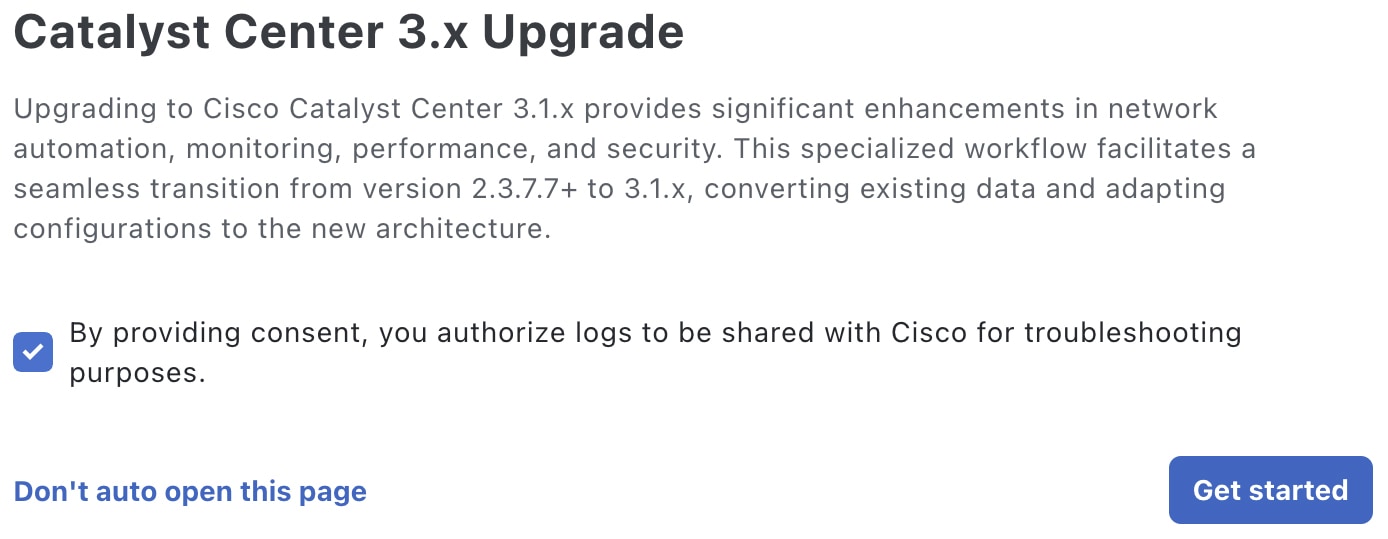
Step 1 | The Catalyst Center 3.x Upgrade window should open automatically after you install the upgrade package.
| ||||||||||||||||||||
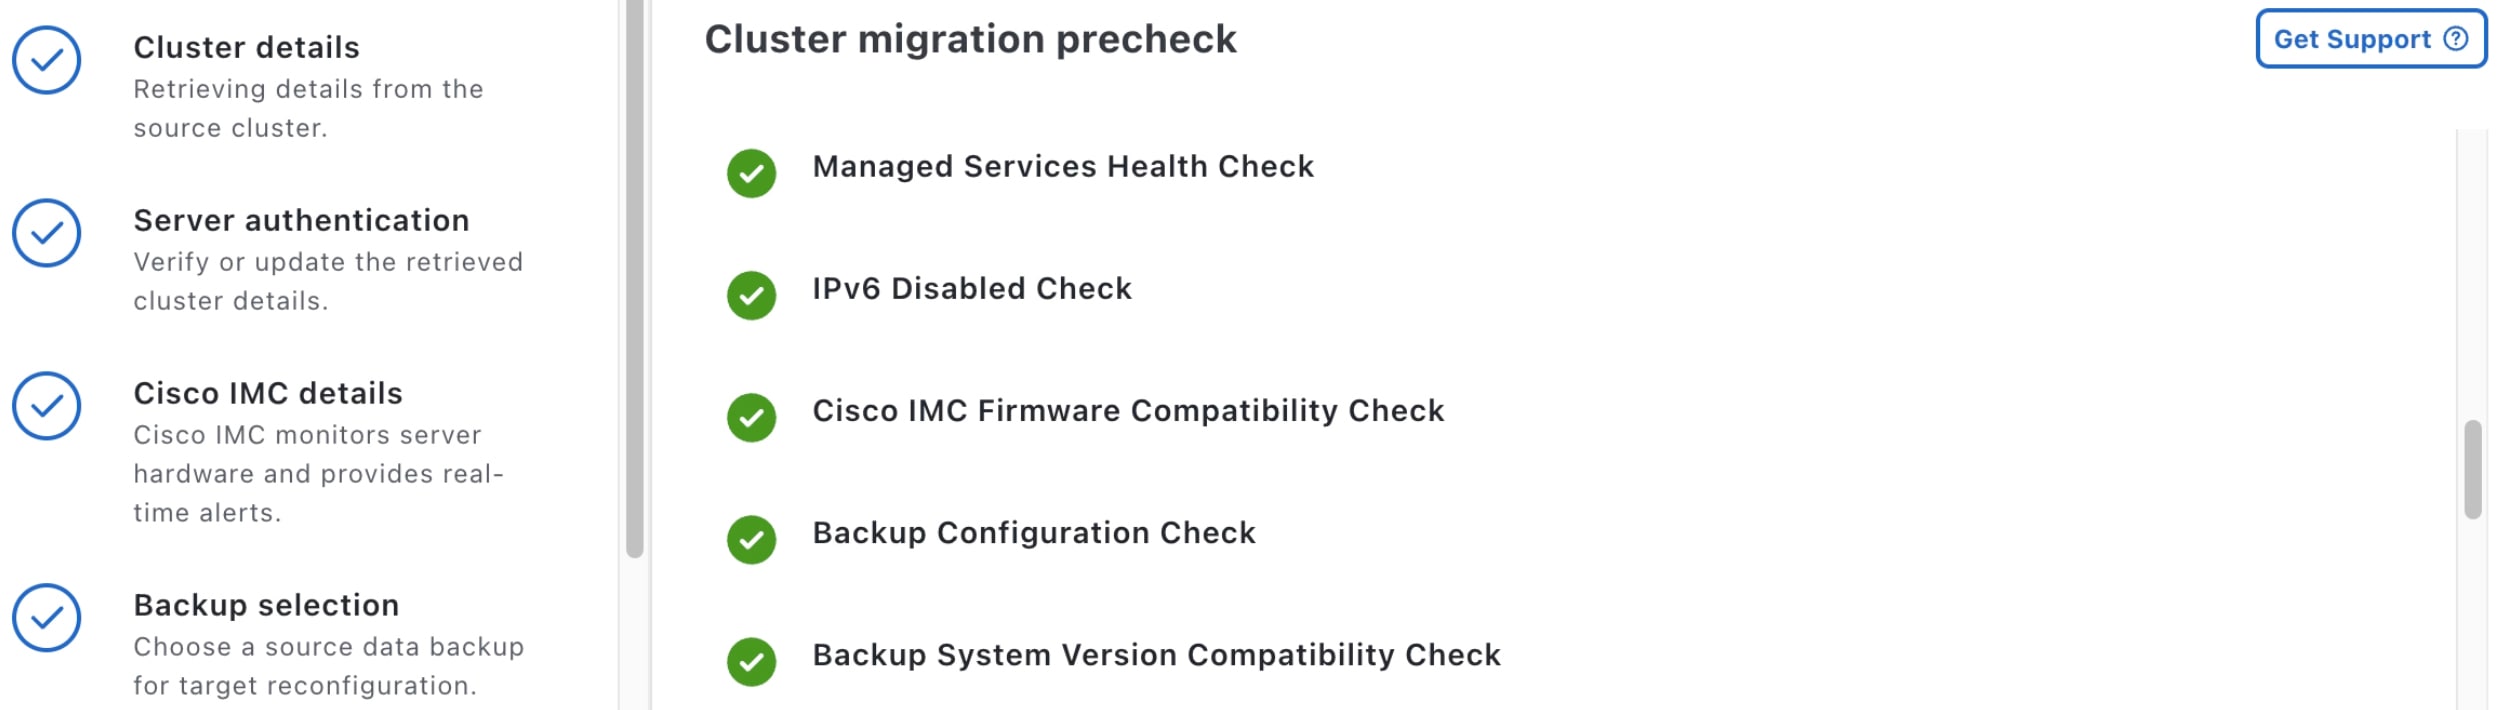
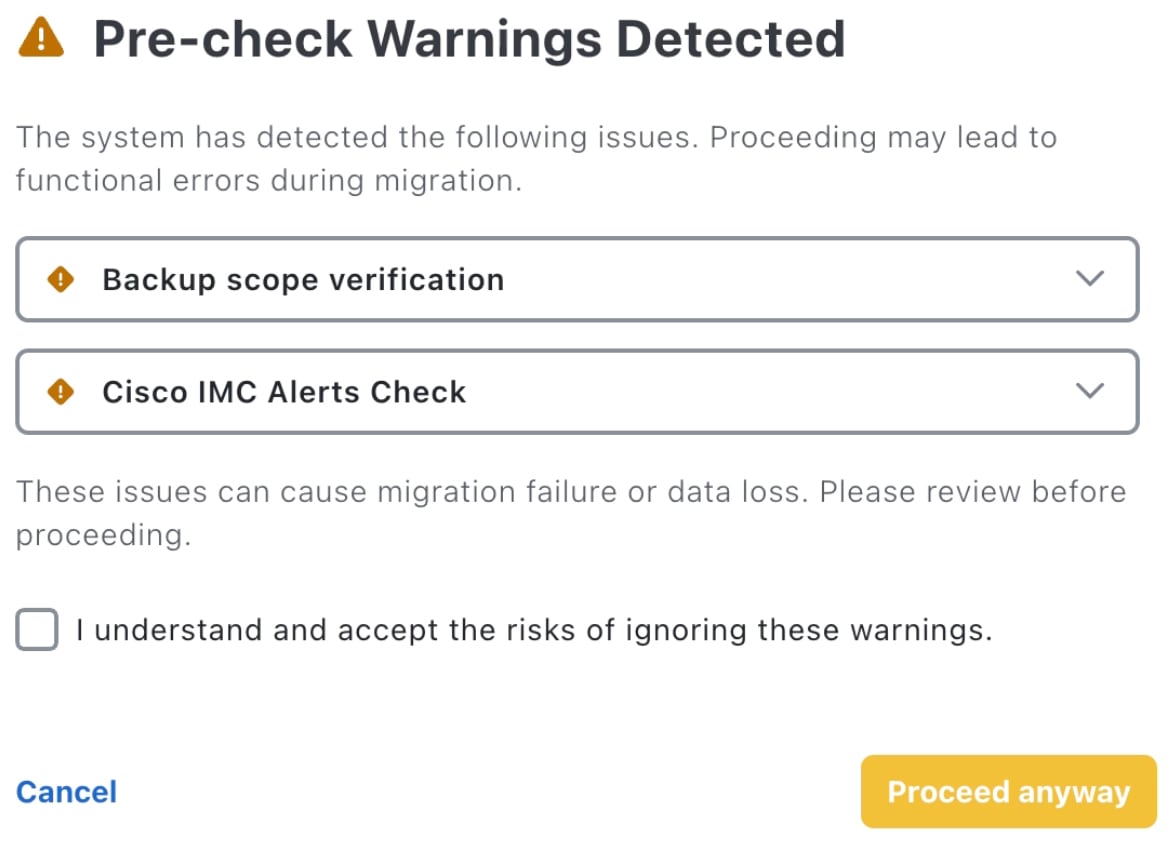
Step 2 | You are prompted to run a check that ensures these requirements are in place:
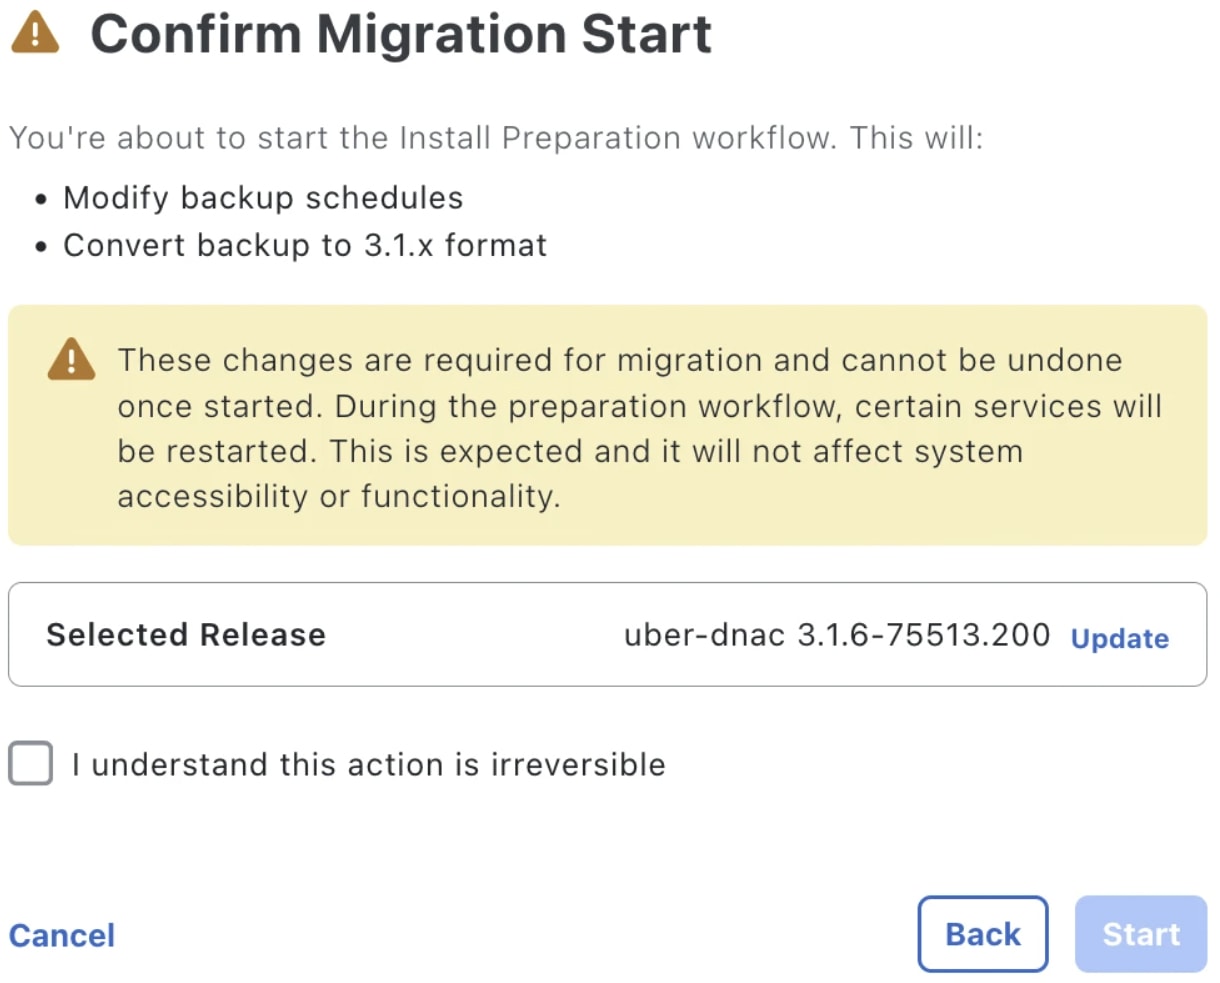
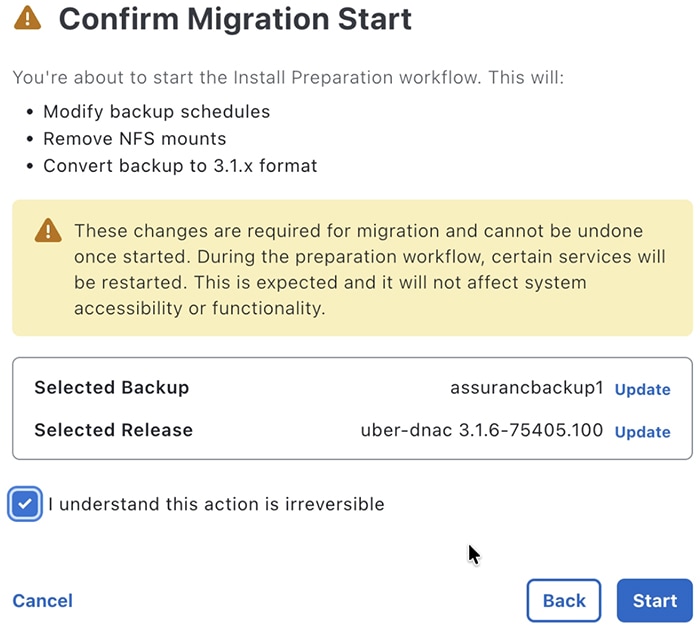
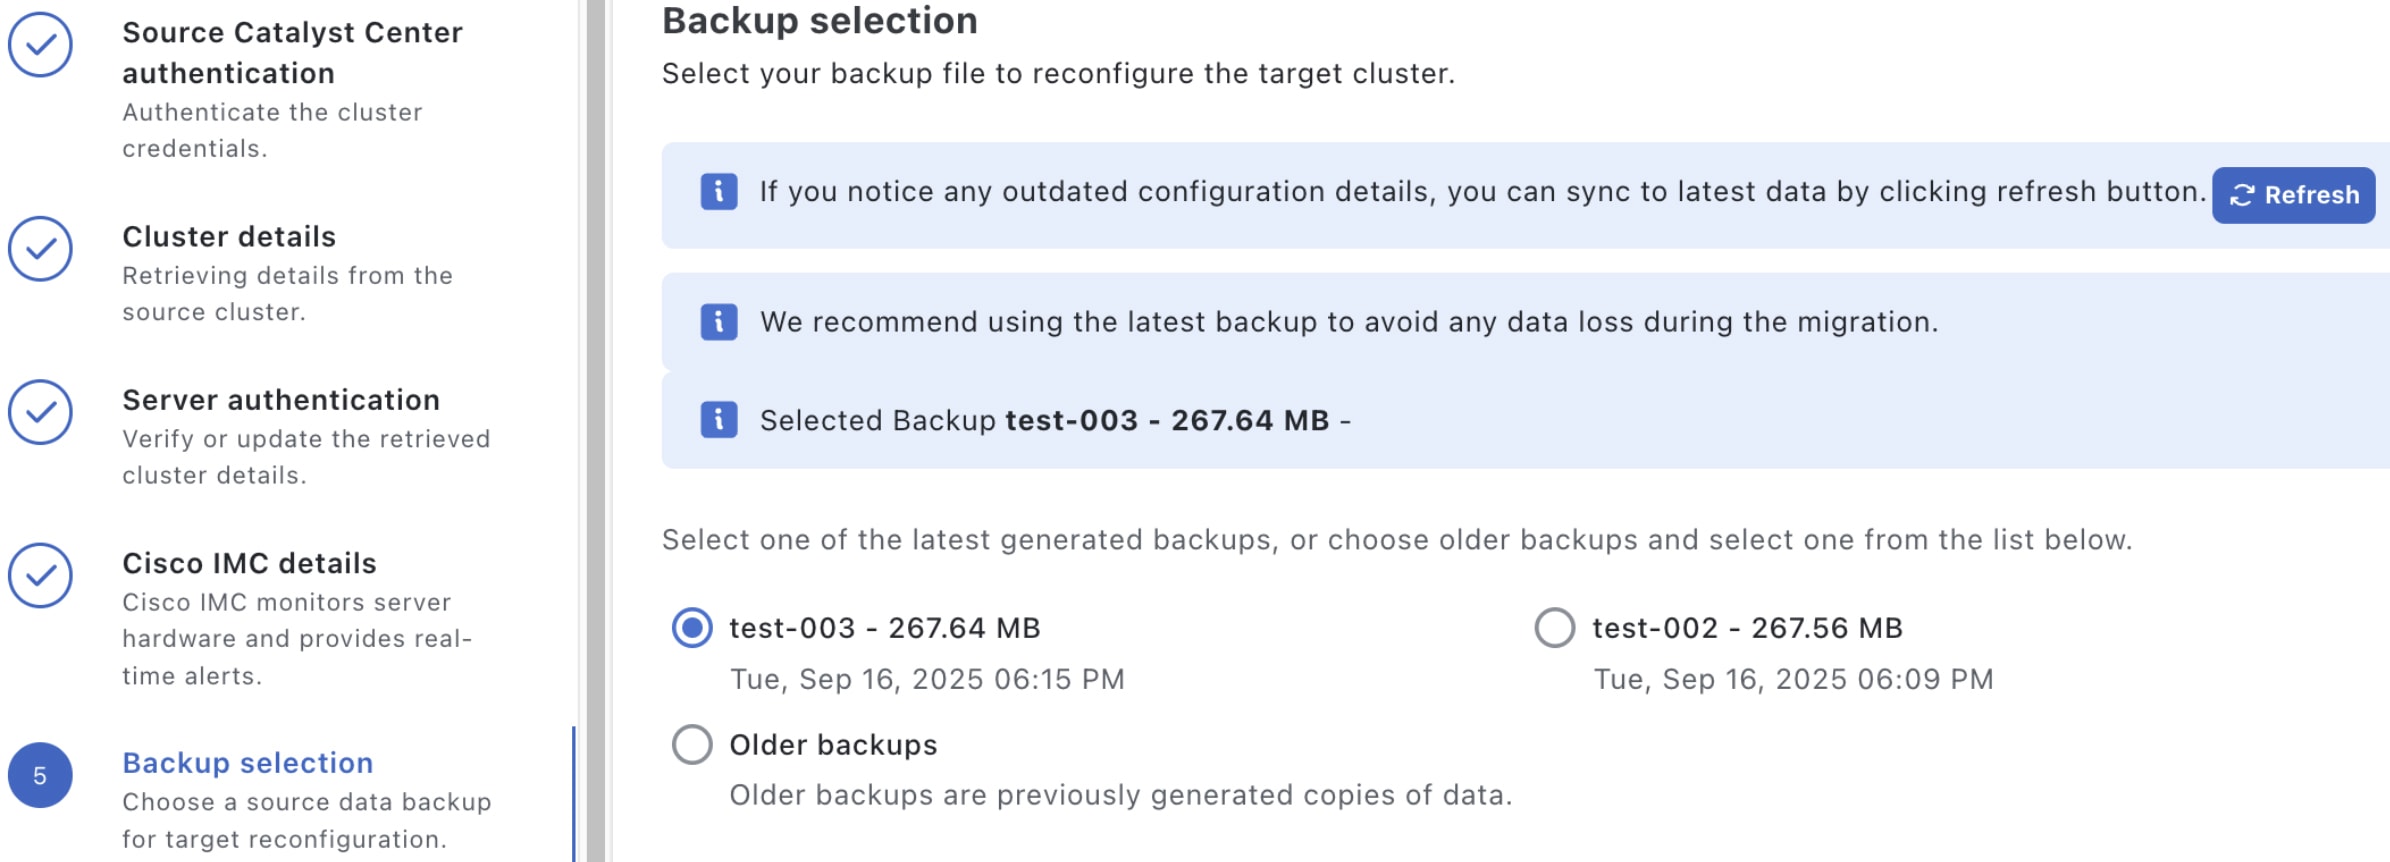
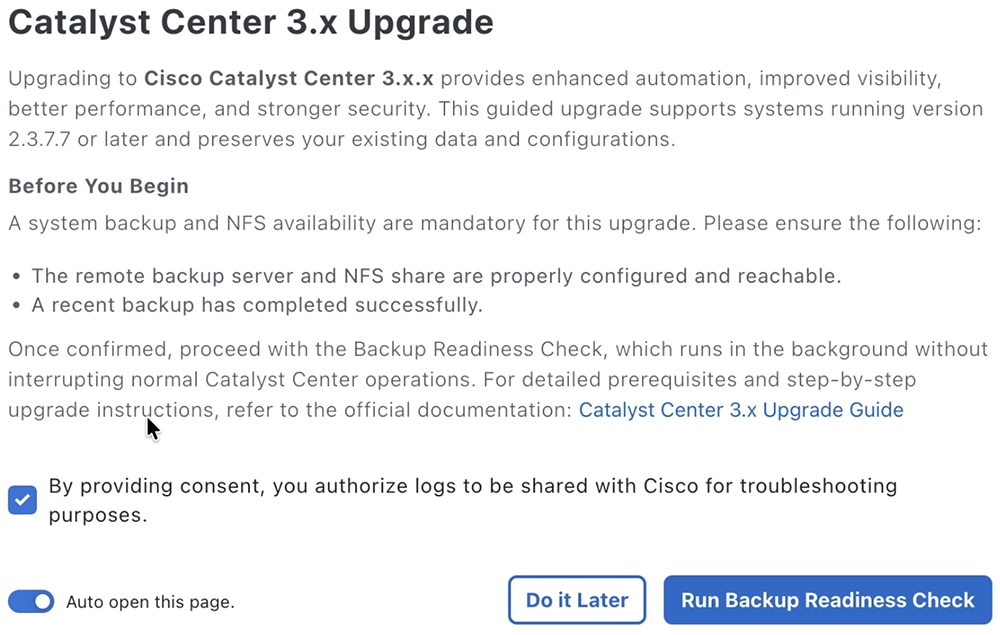 Click Run Backup Readiness Check. One of these checks determines whether your upgrade workflow will include the automatic creation of a full local backup by checking these conditions:
If all of these conditions are true, a full local backup will automatically be created. You will see this:  Note NoteBefore you initiate a local backup, ensure that you complete these tasks:
If any of these conditions are not true, you will see this instead. In this case, you will need to complete the standard upgrade workflow. NoteIf the size of you backup exceeds 1 TB, you will need to configure an NFS server. 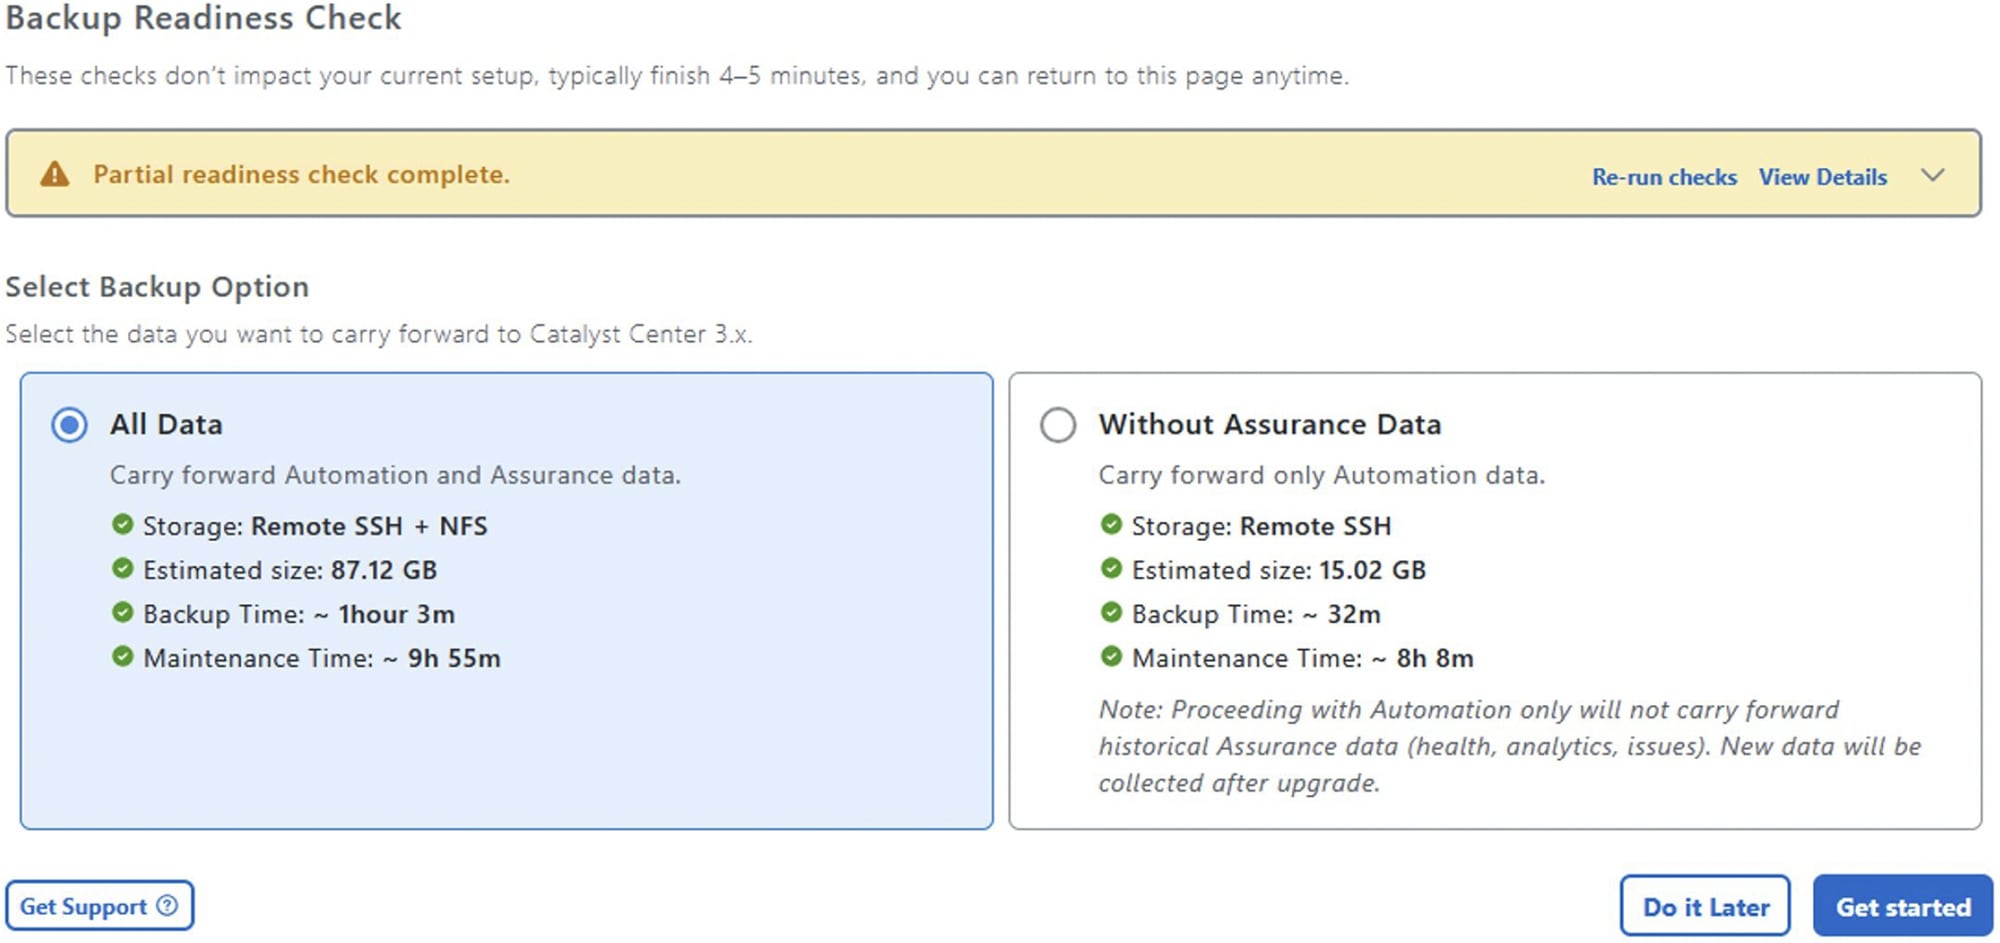 | ||||||||||||||||||||
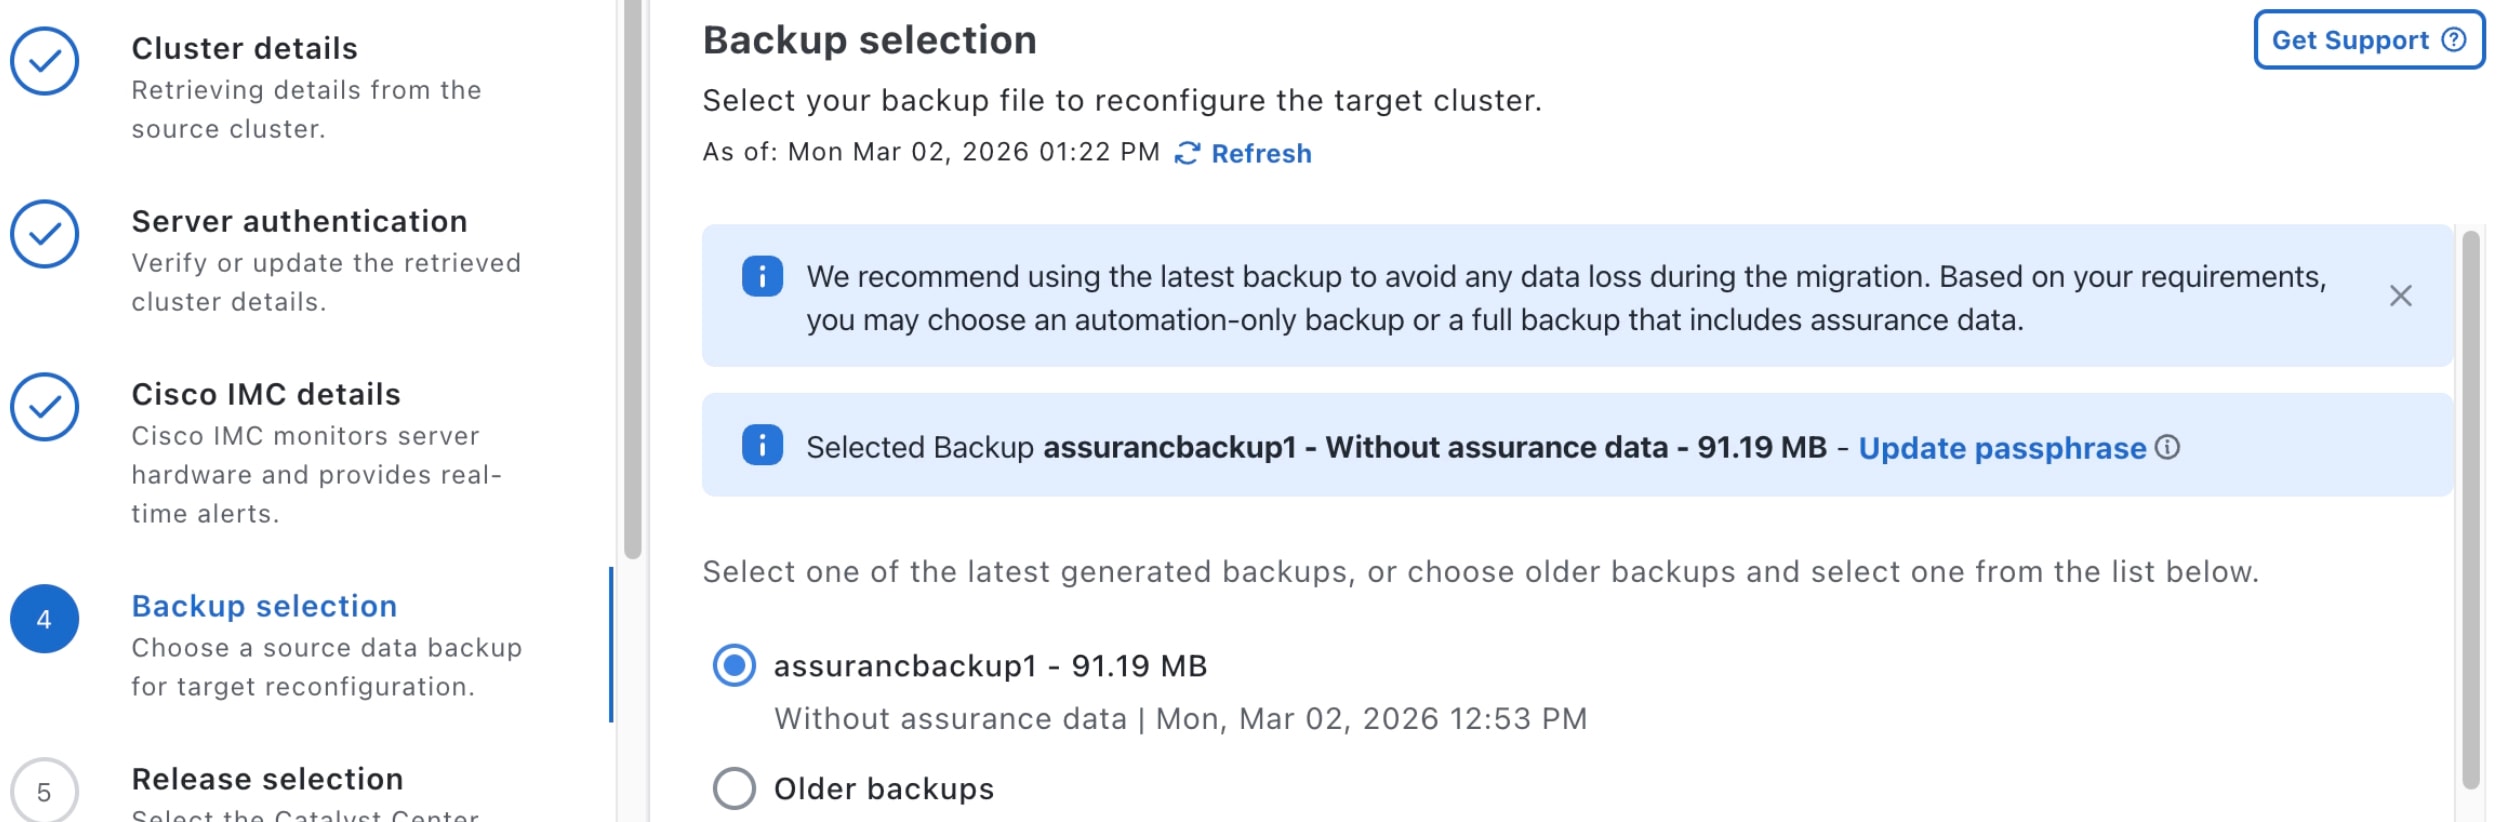
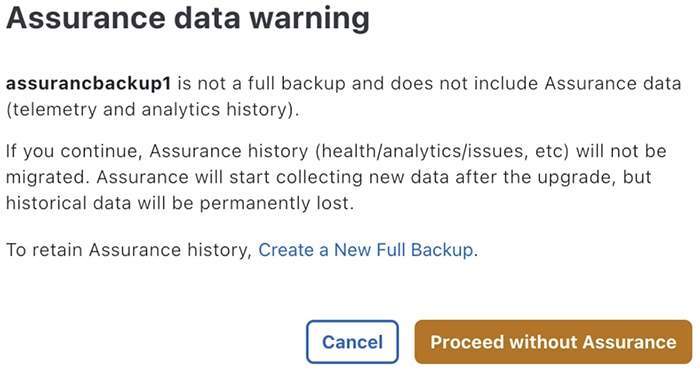
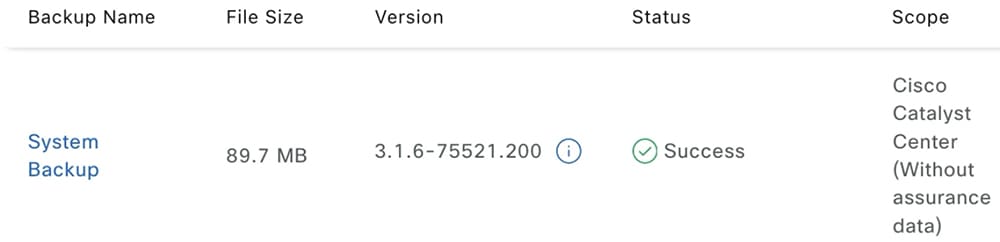
Step 3 | Select the backup option you want to use:
| ||||||||||||||||||||
Step 4 | After the check completes, click Get started. | ||||||||||||||||||||
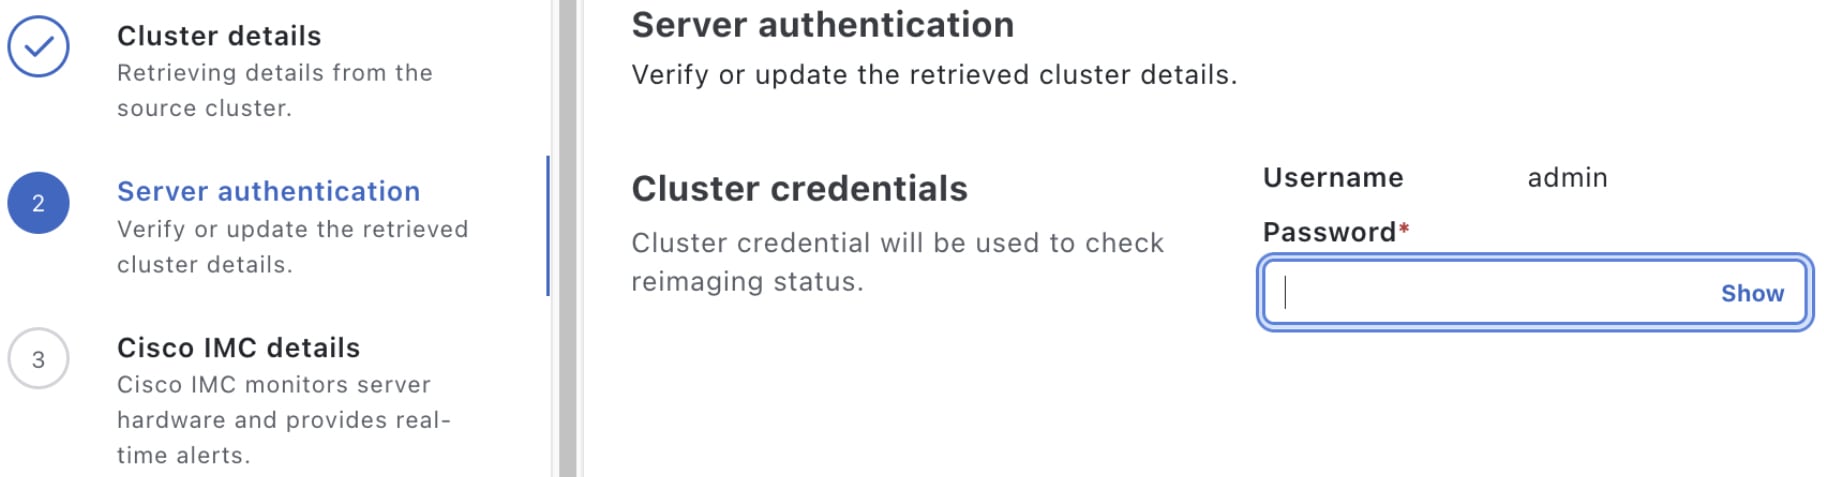
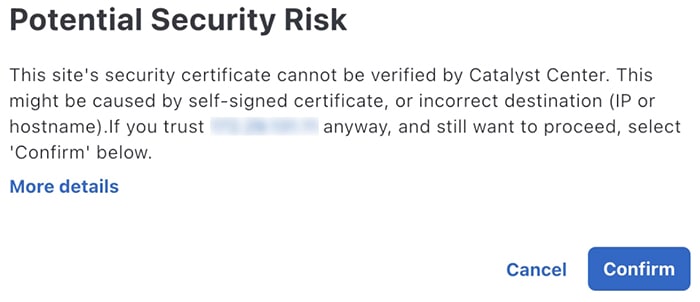
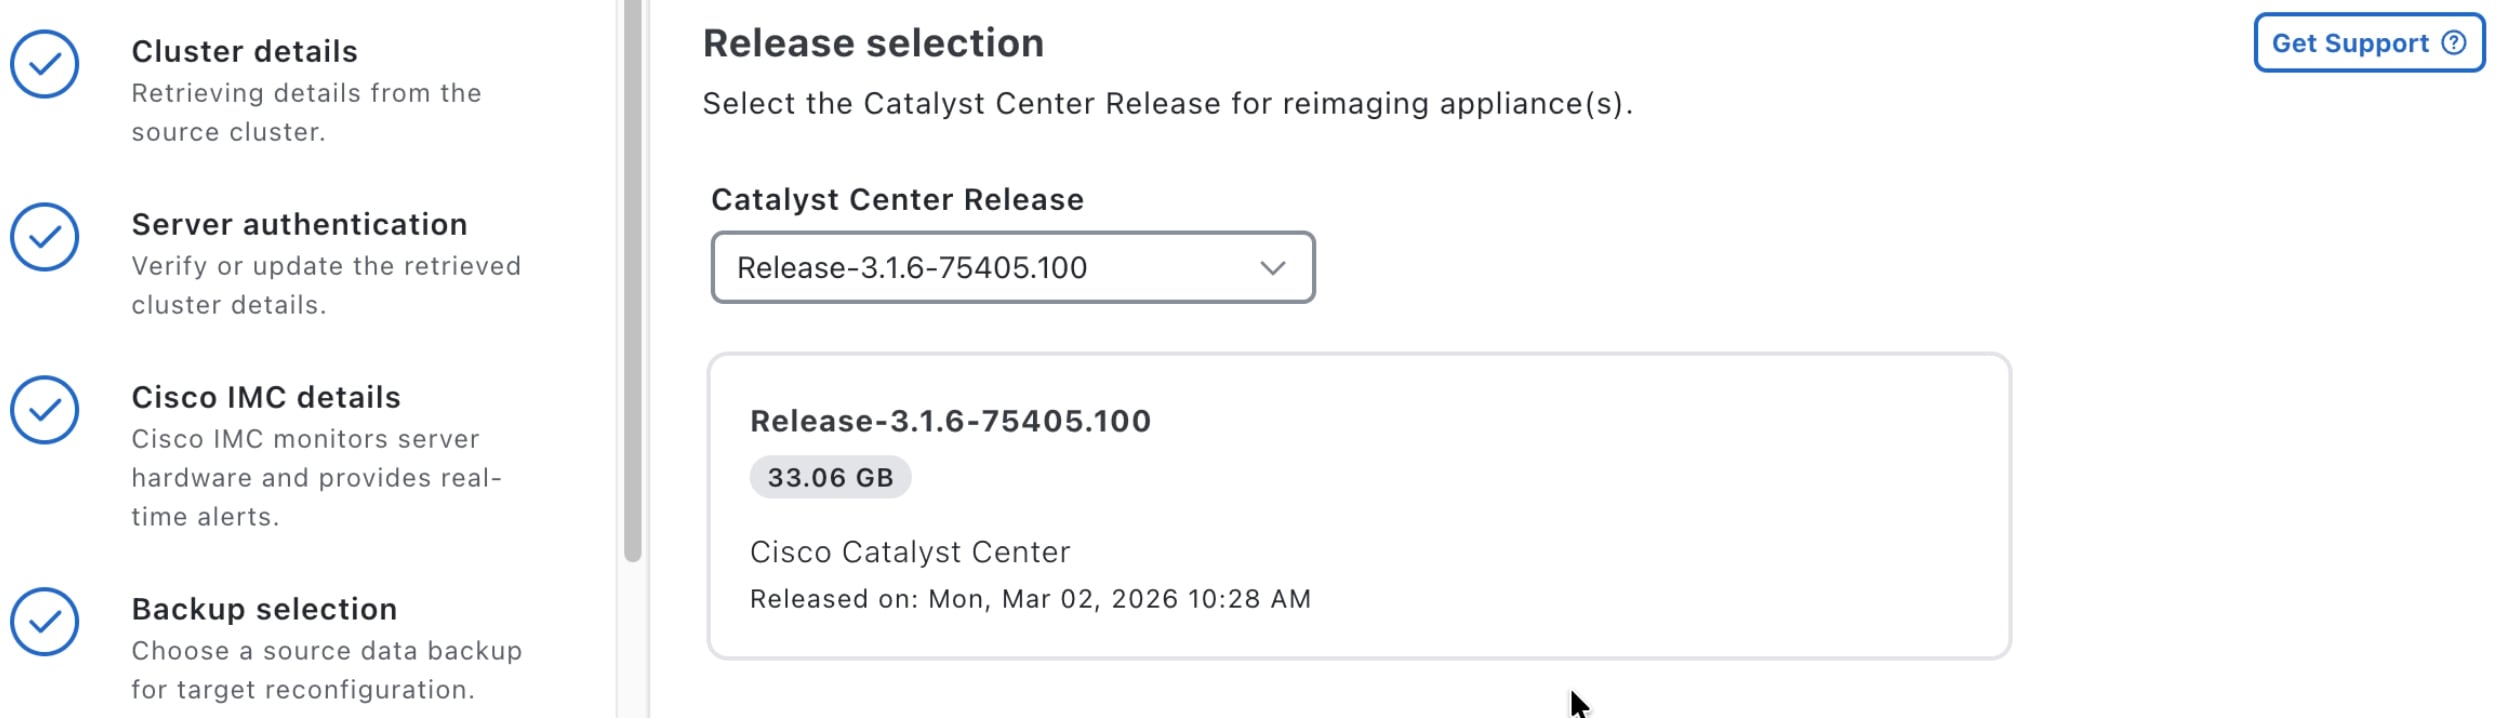
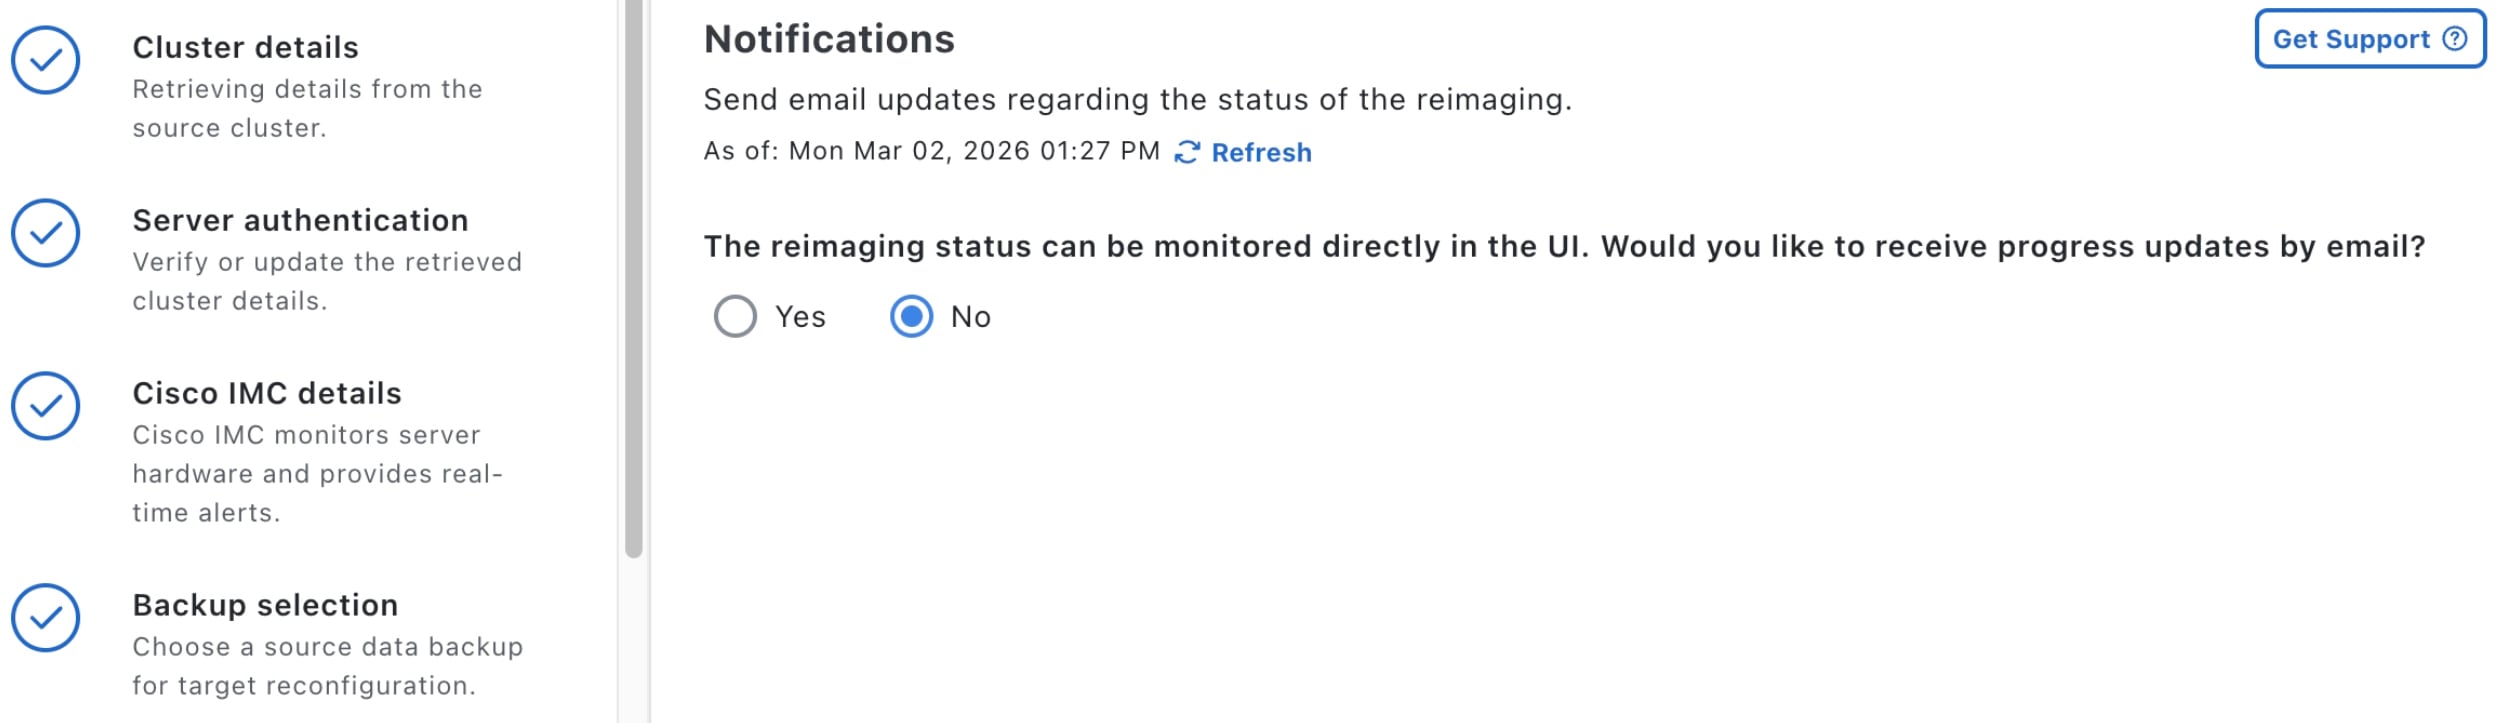
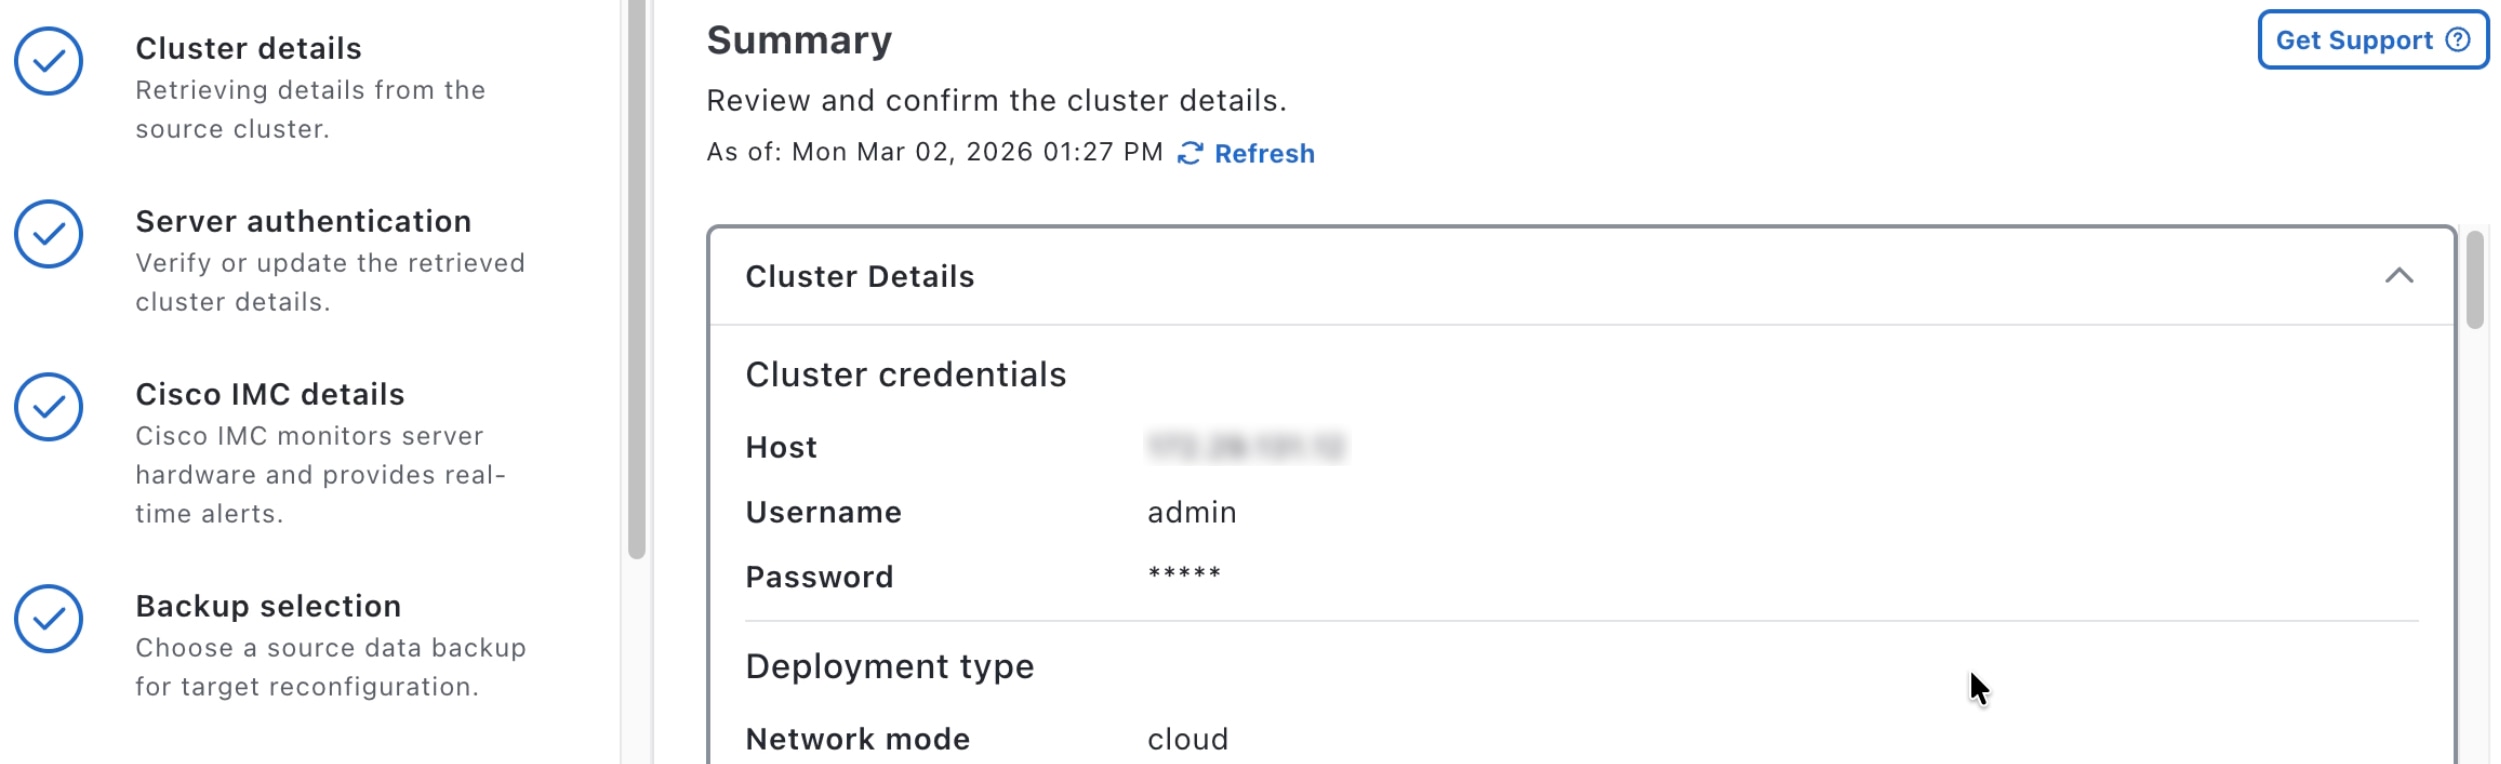
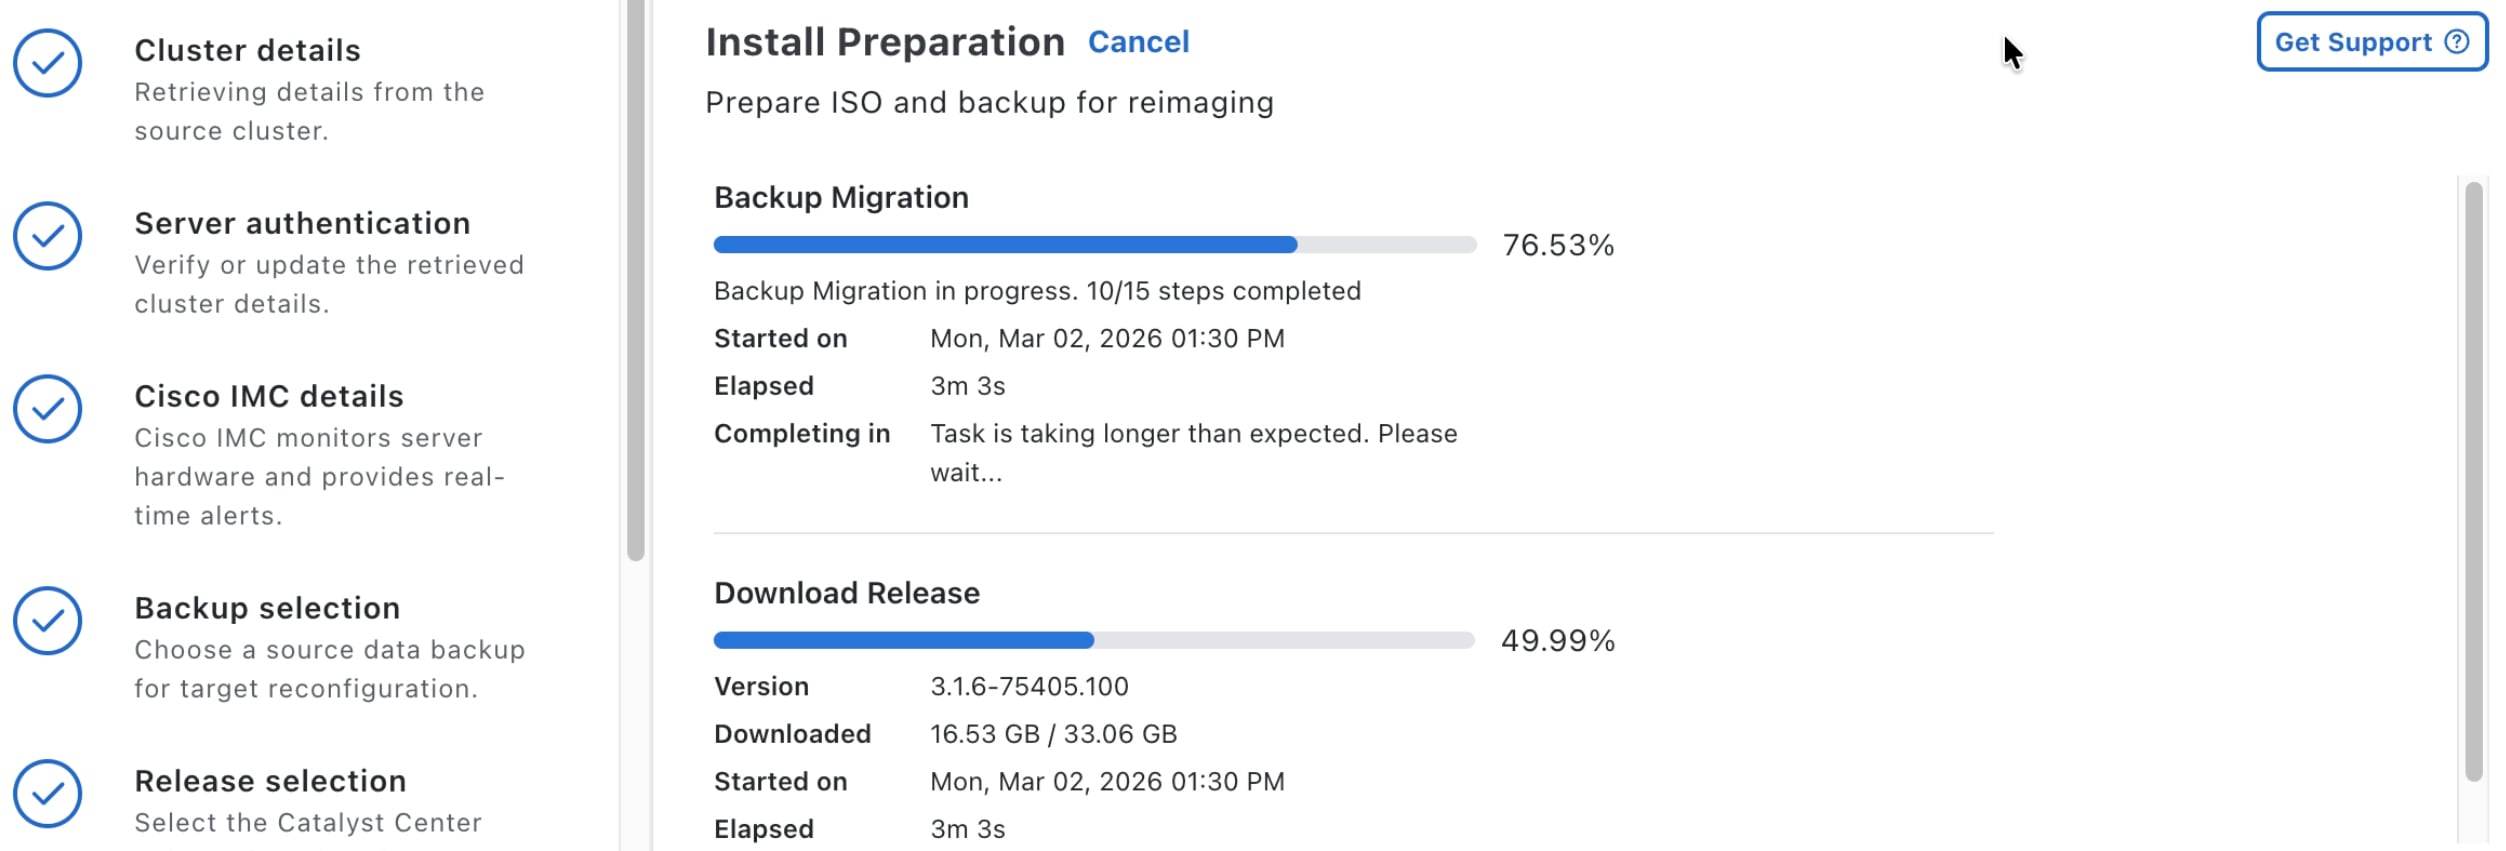
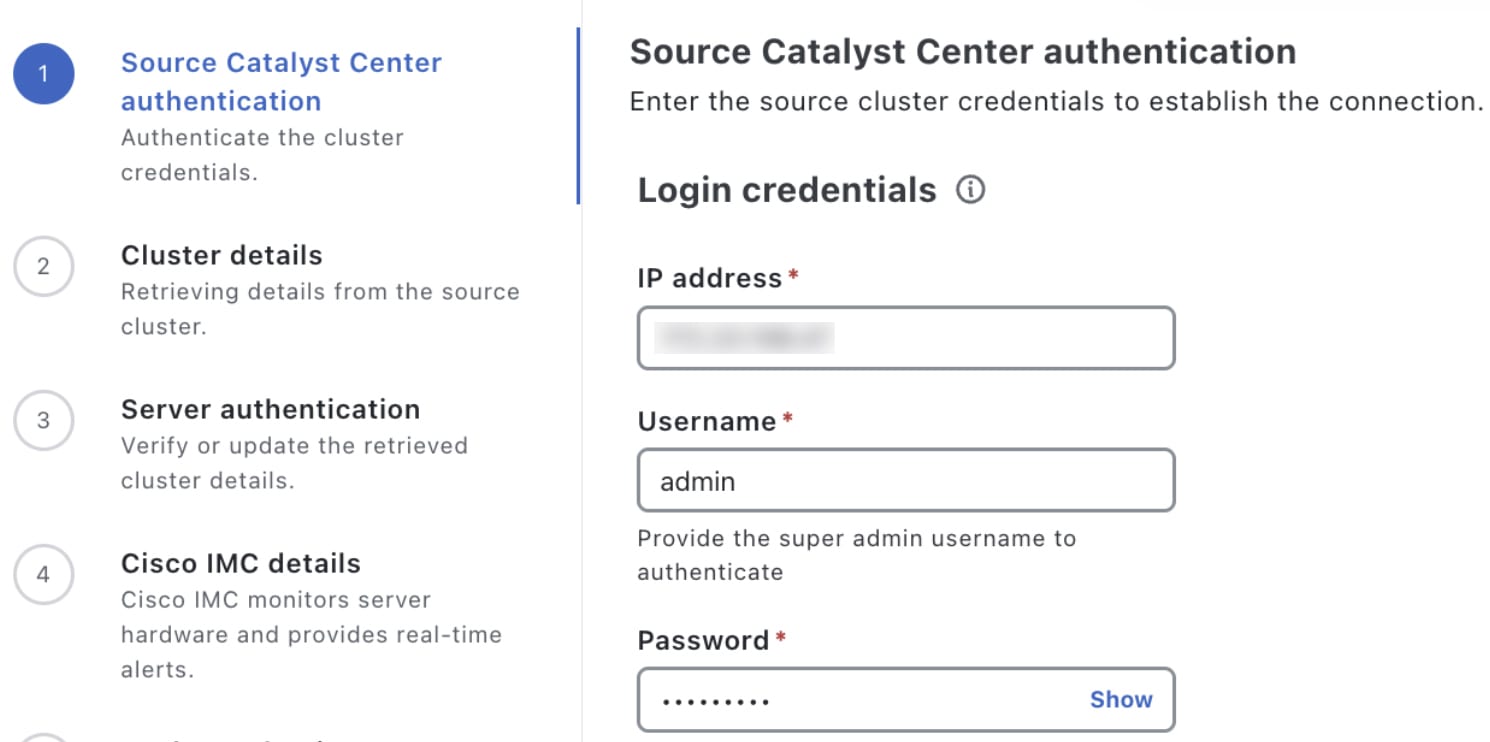
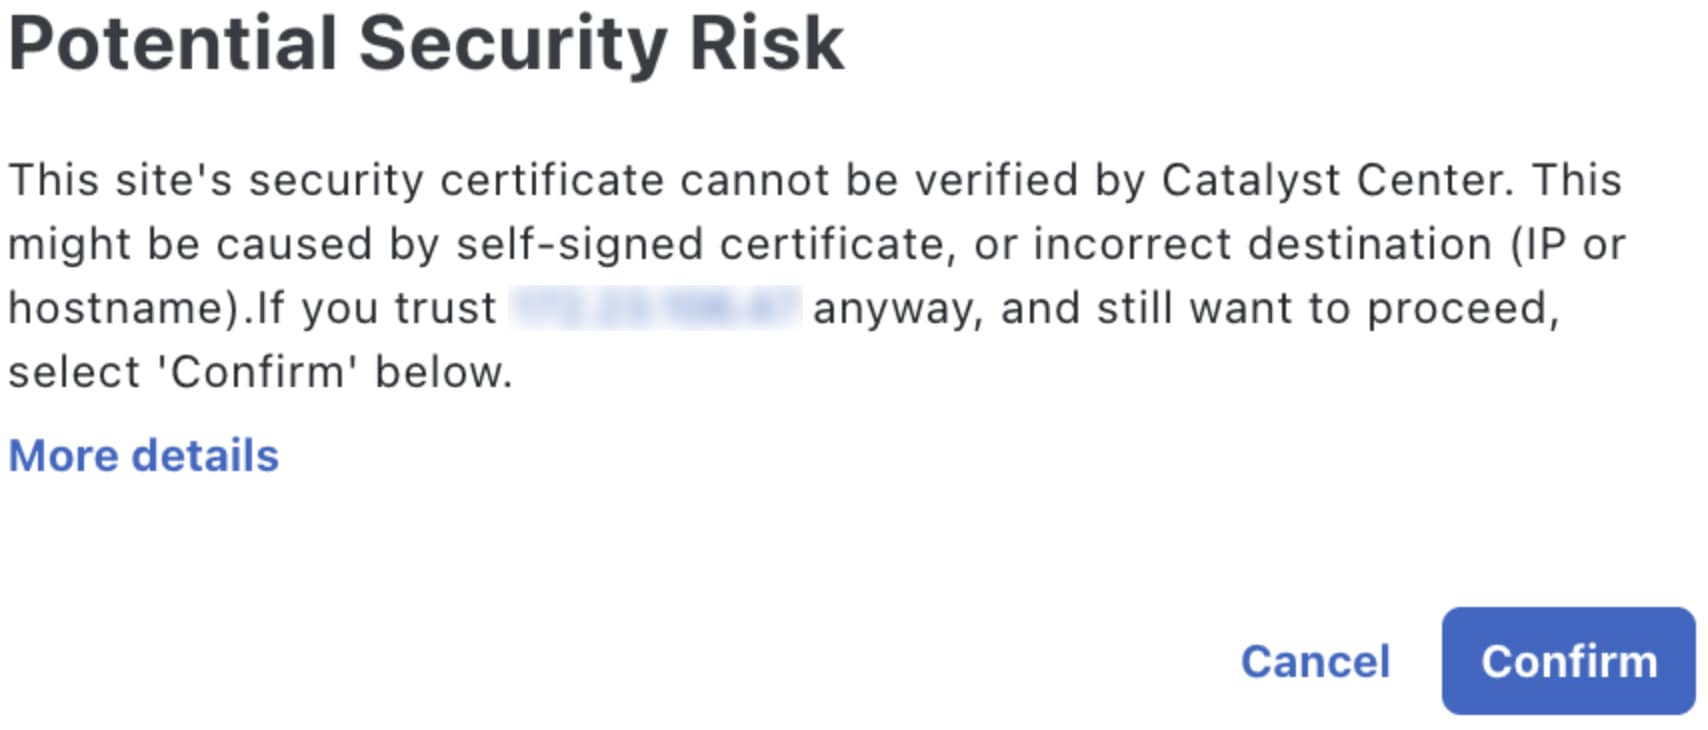
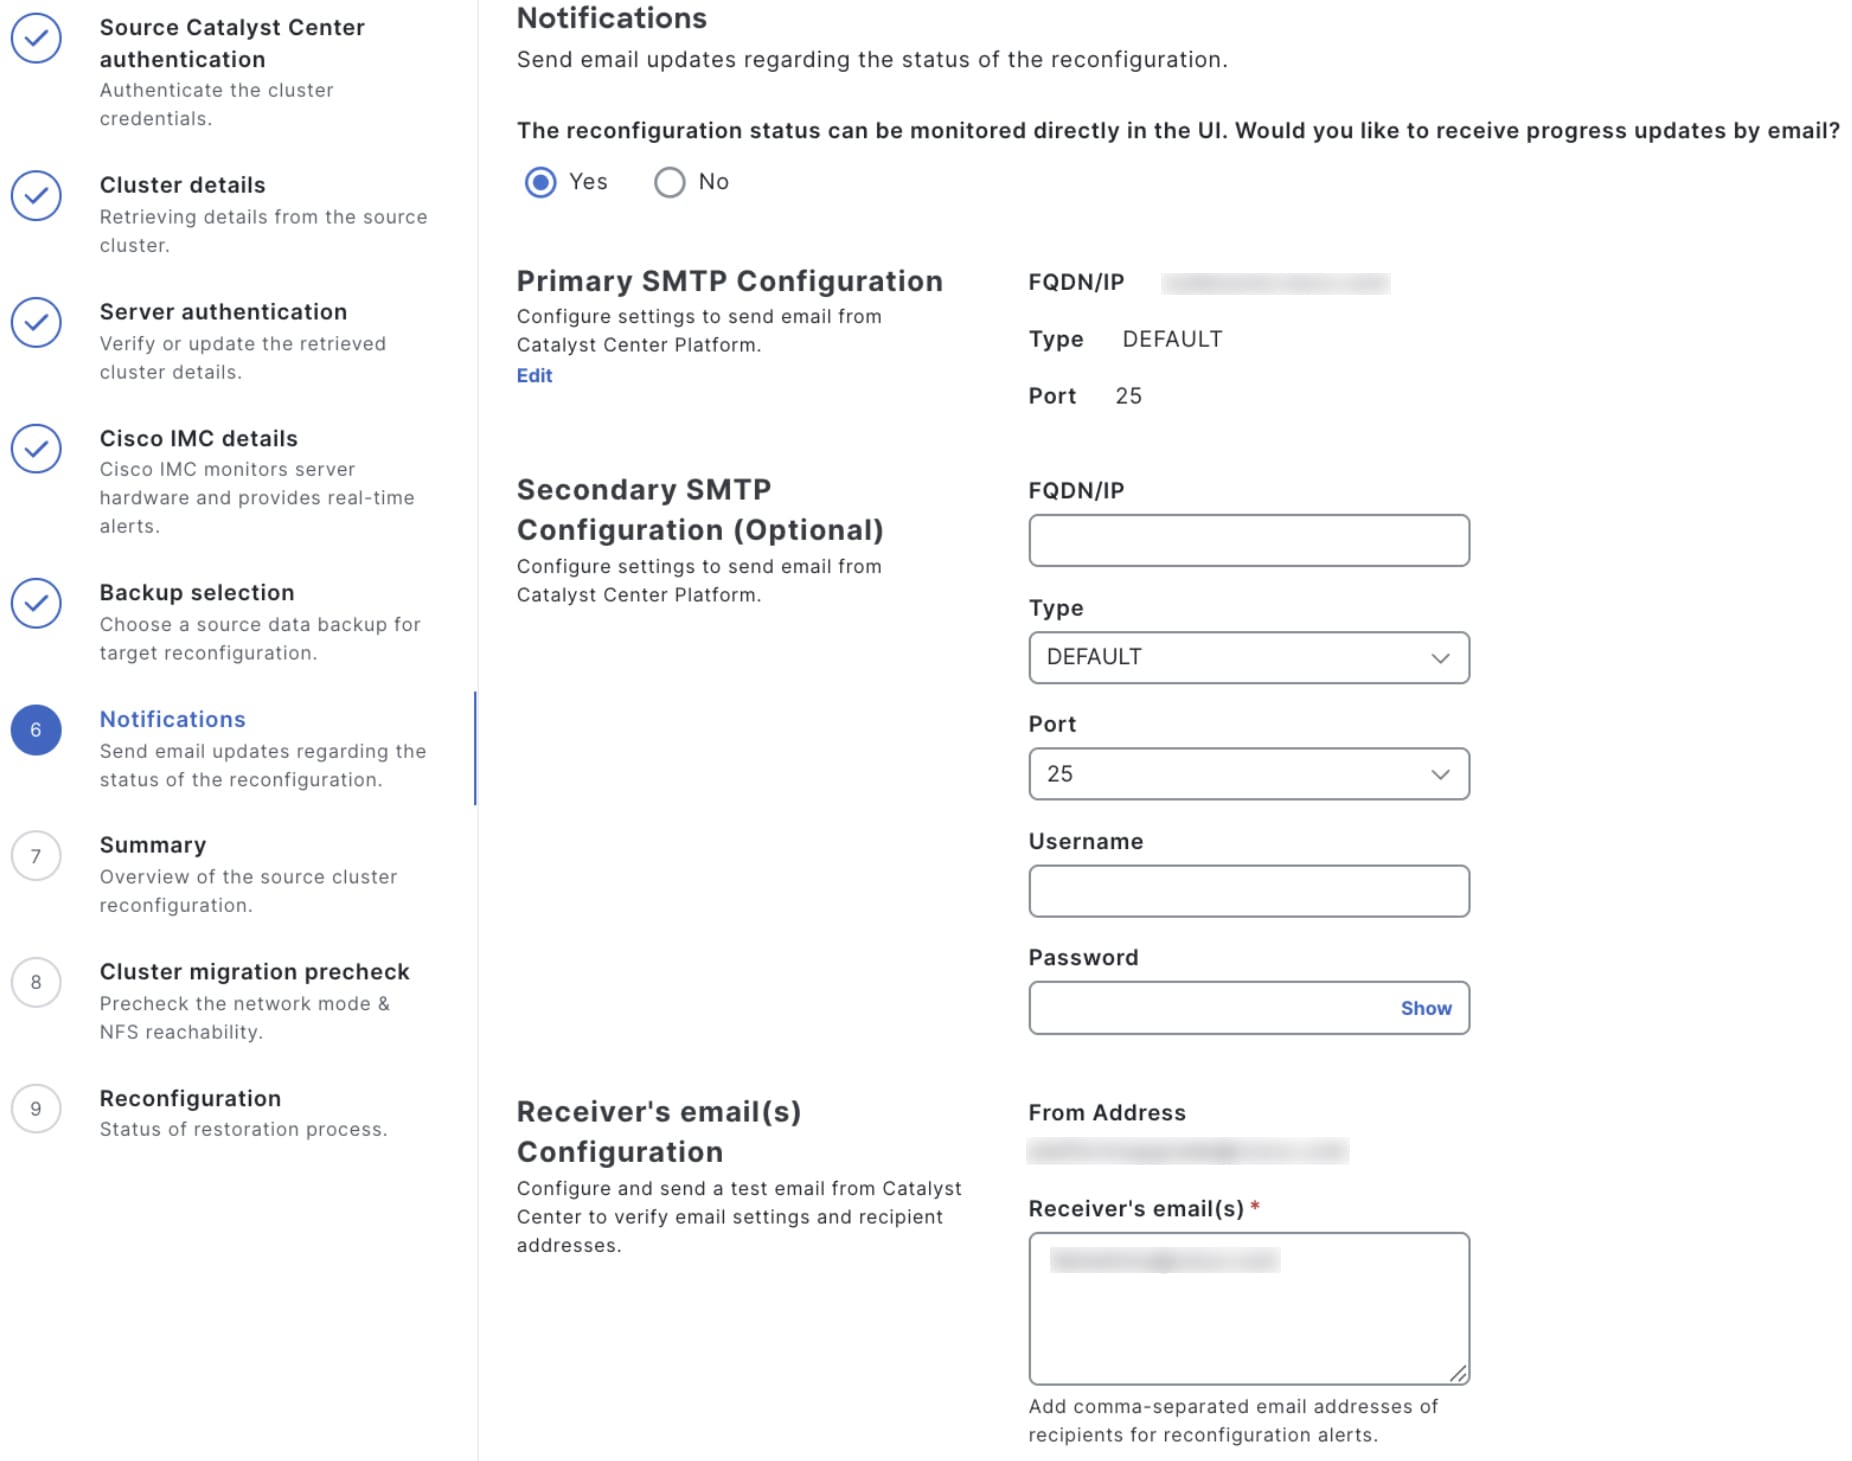
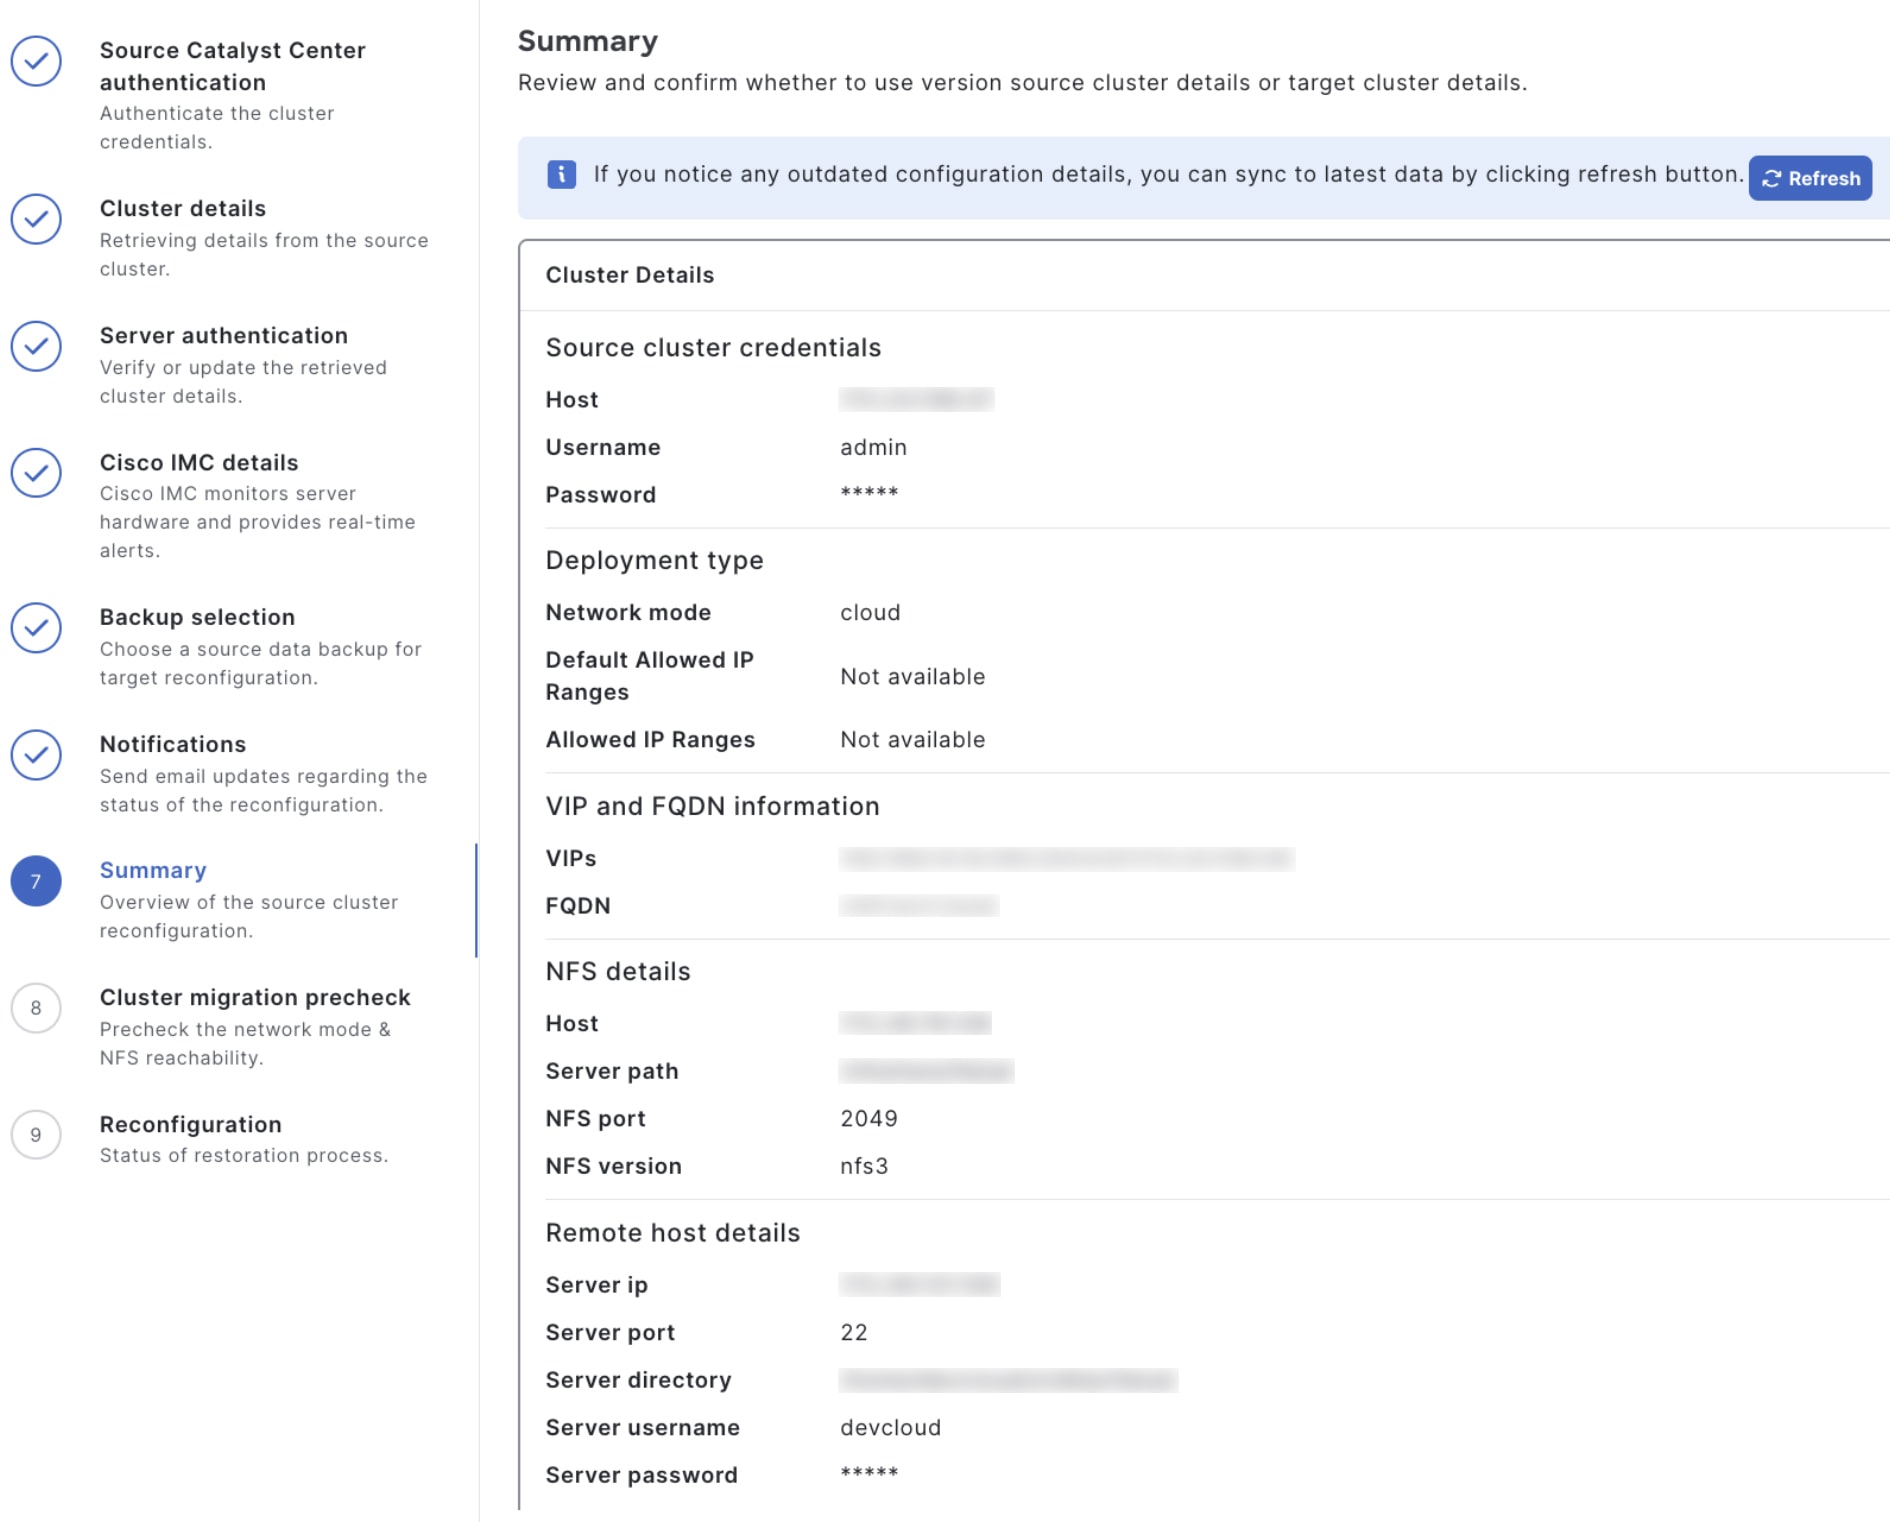
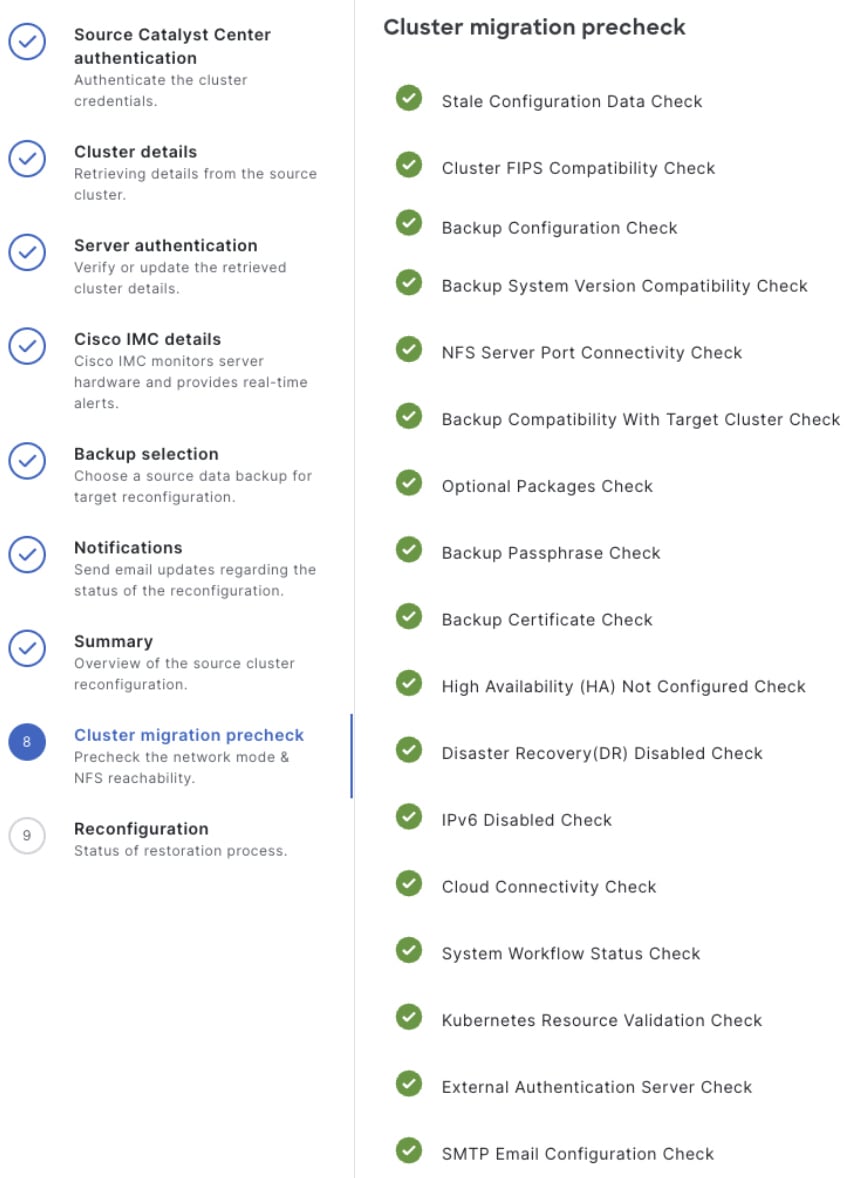
Step 5 | Complete the Catalyst Center 3.x upgrade wizard. NoteIn any of the wizard's pages:
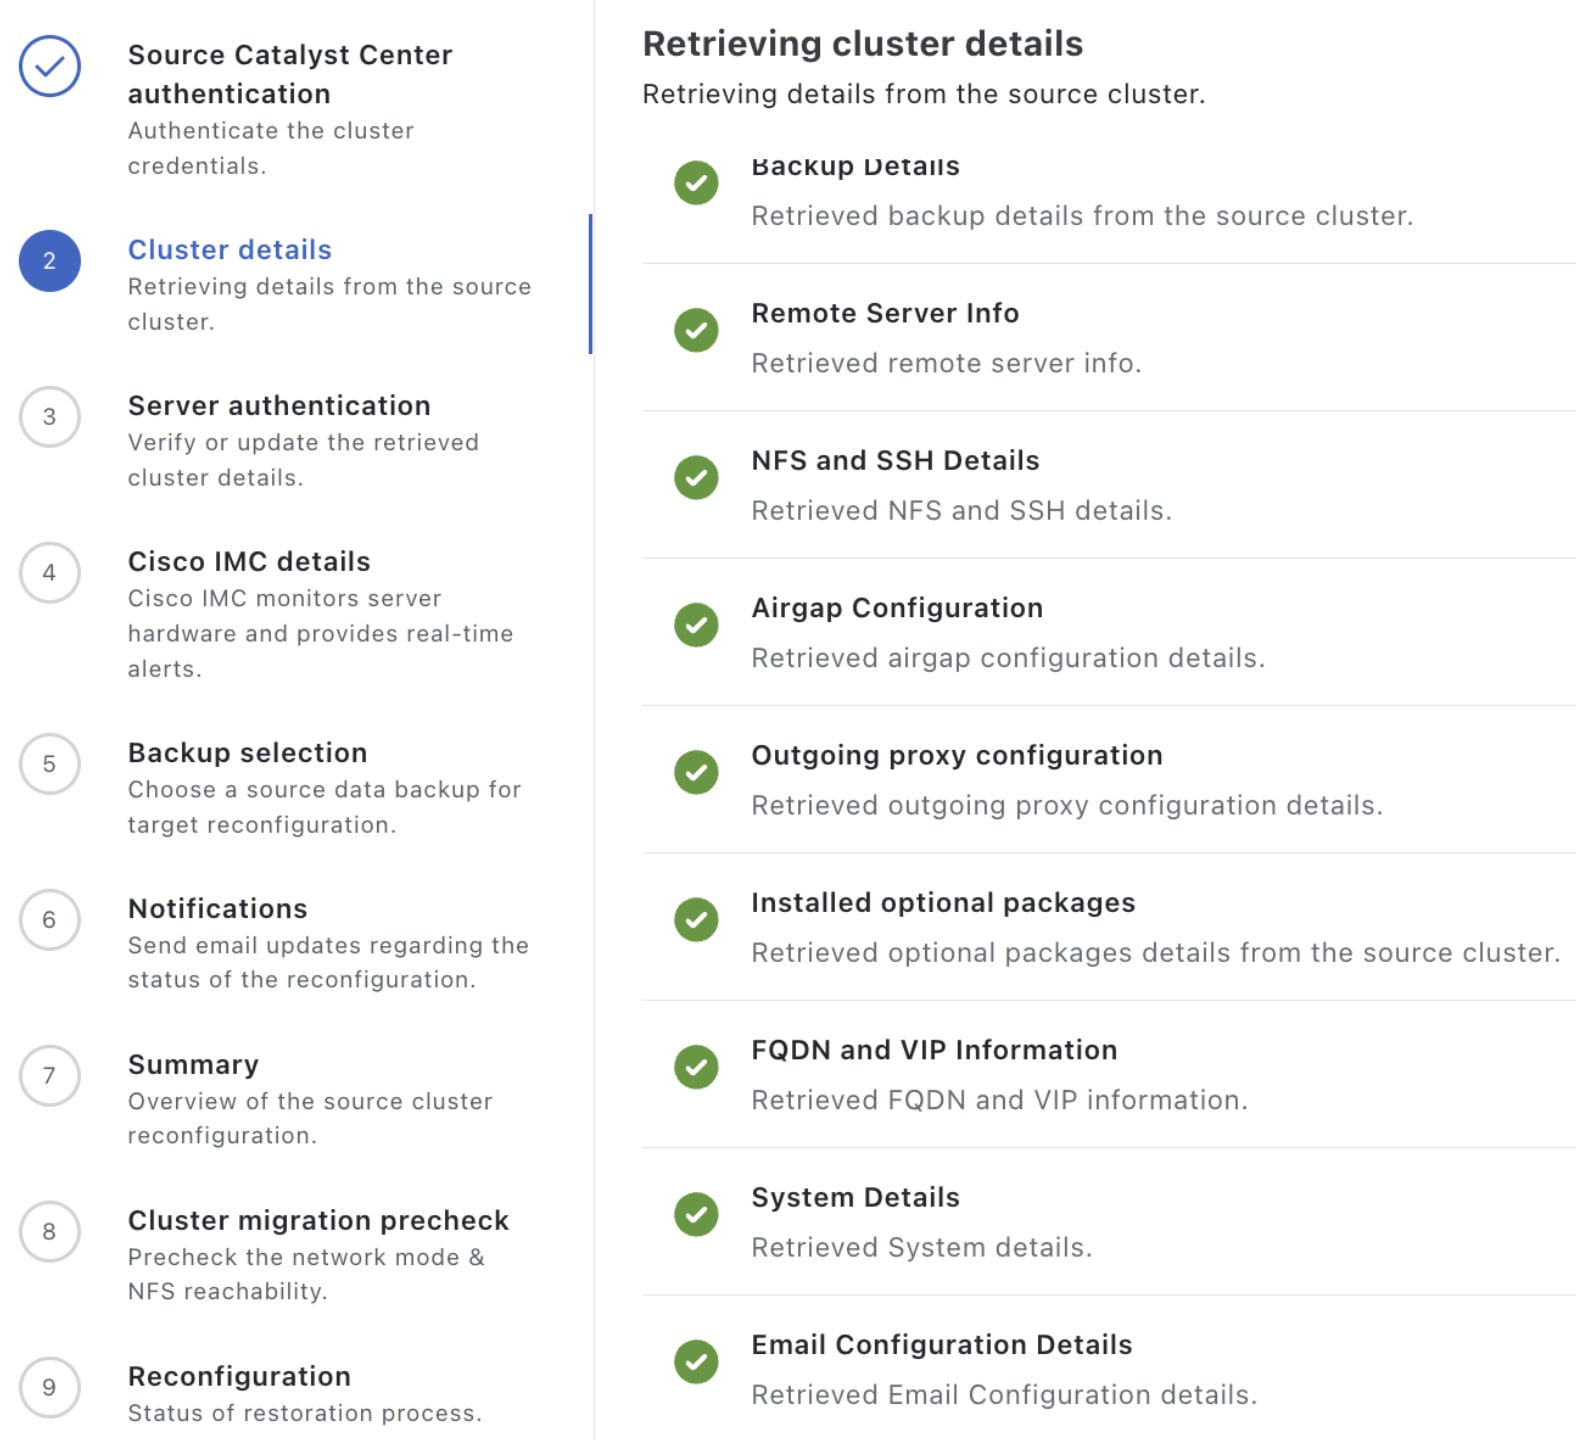
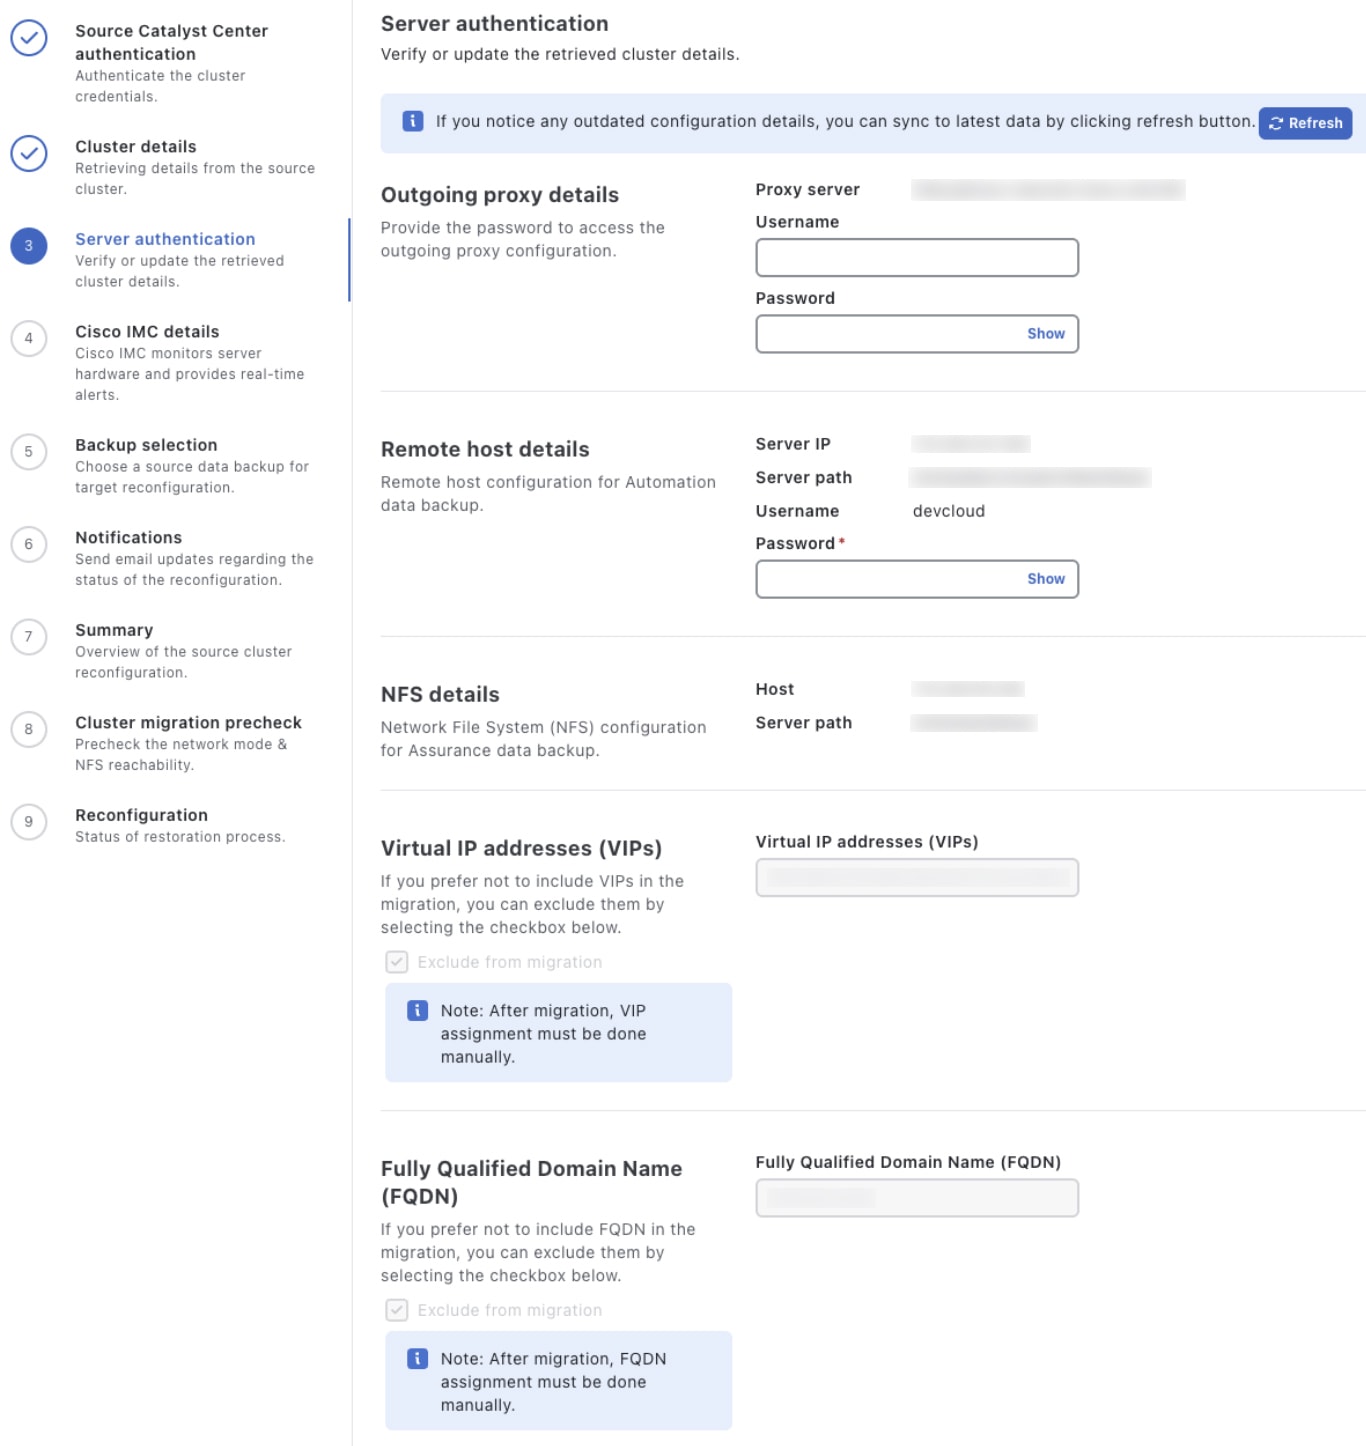
The wizard begins by retrieving information from your source Catalyst Center cluster, such as its configured NFS server and FQDN. 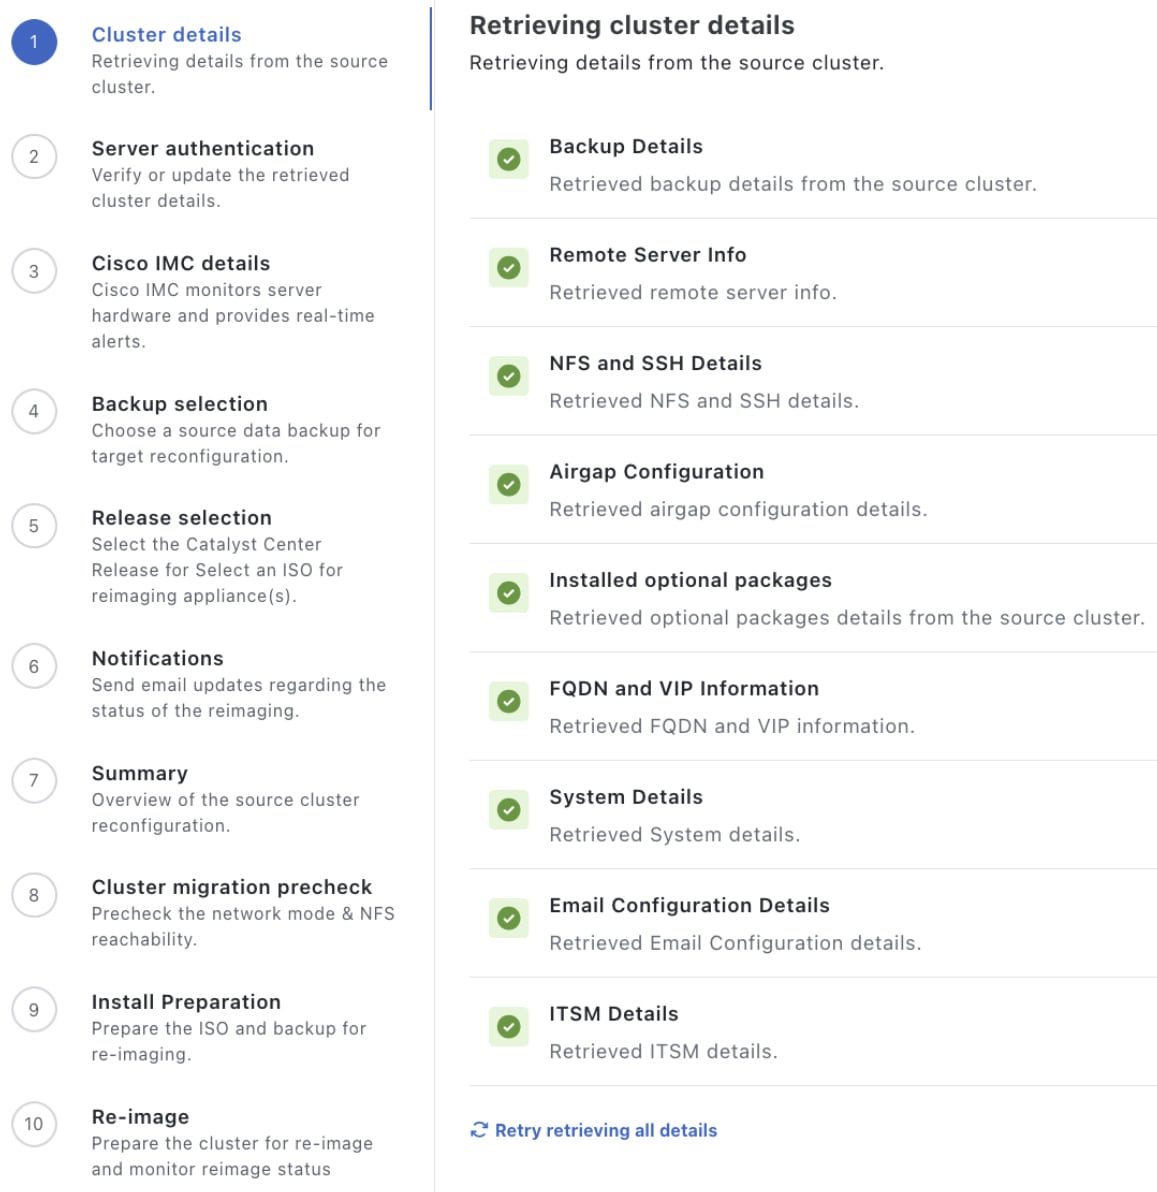
| ||||||||||||||||||||
Step 6 | Take one of these actions:
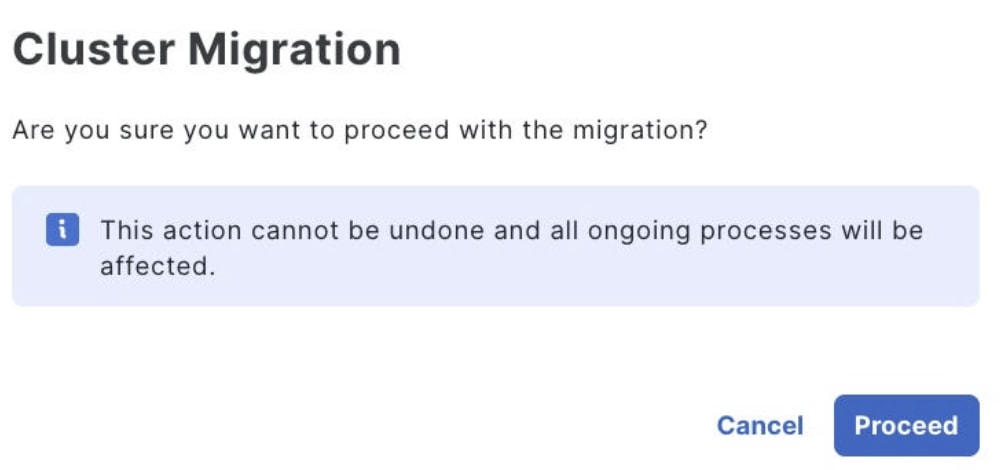
NoteTo stop the upgrade and open the Catalyst Center home page, click Do it Later. | ||||||||||||||||||||
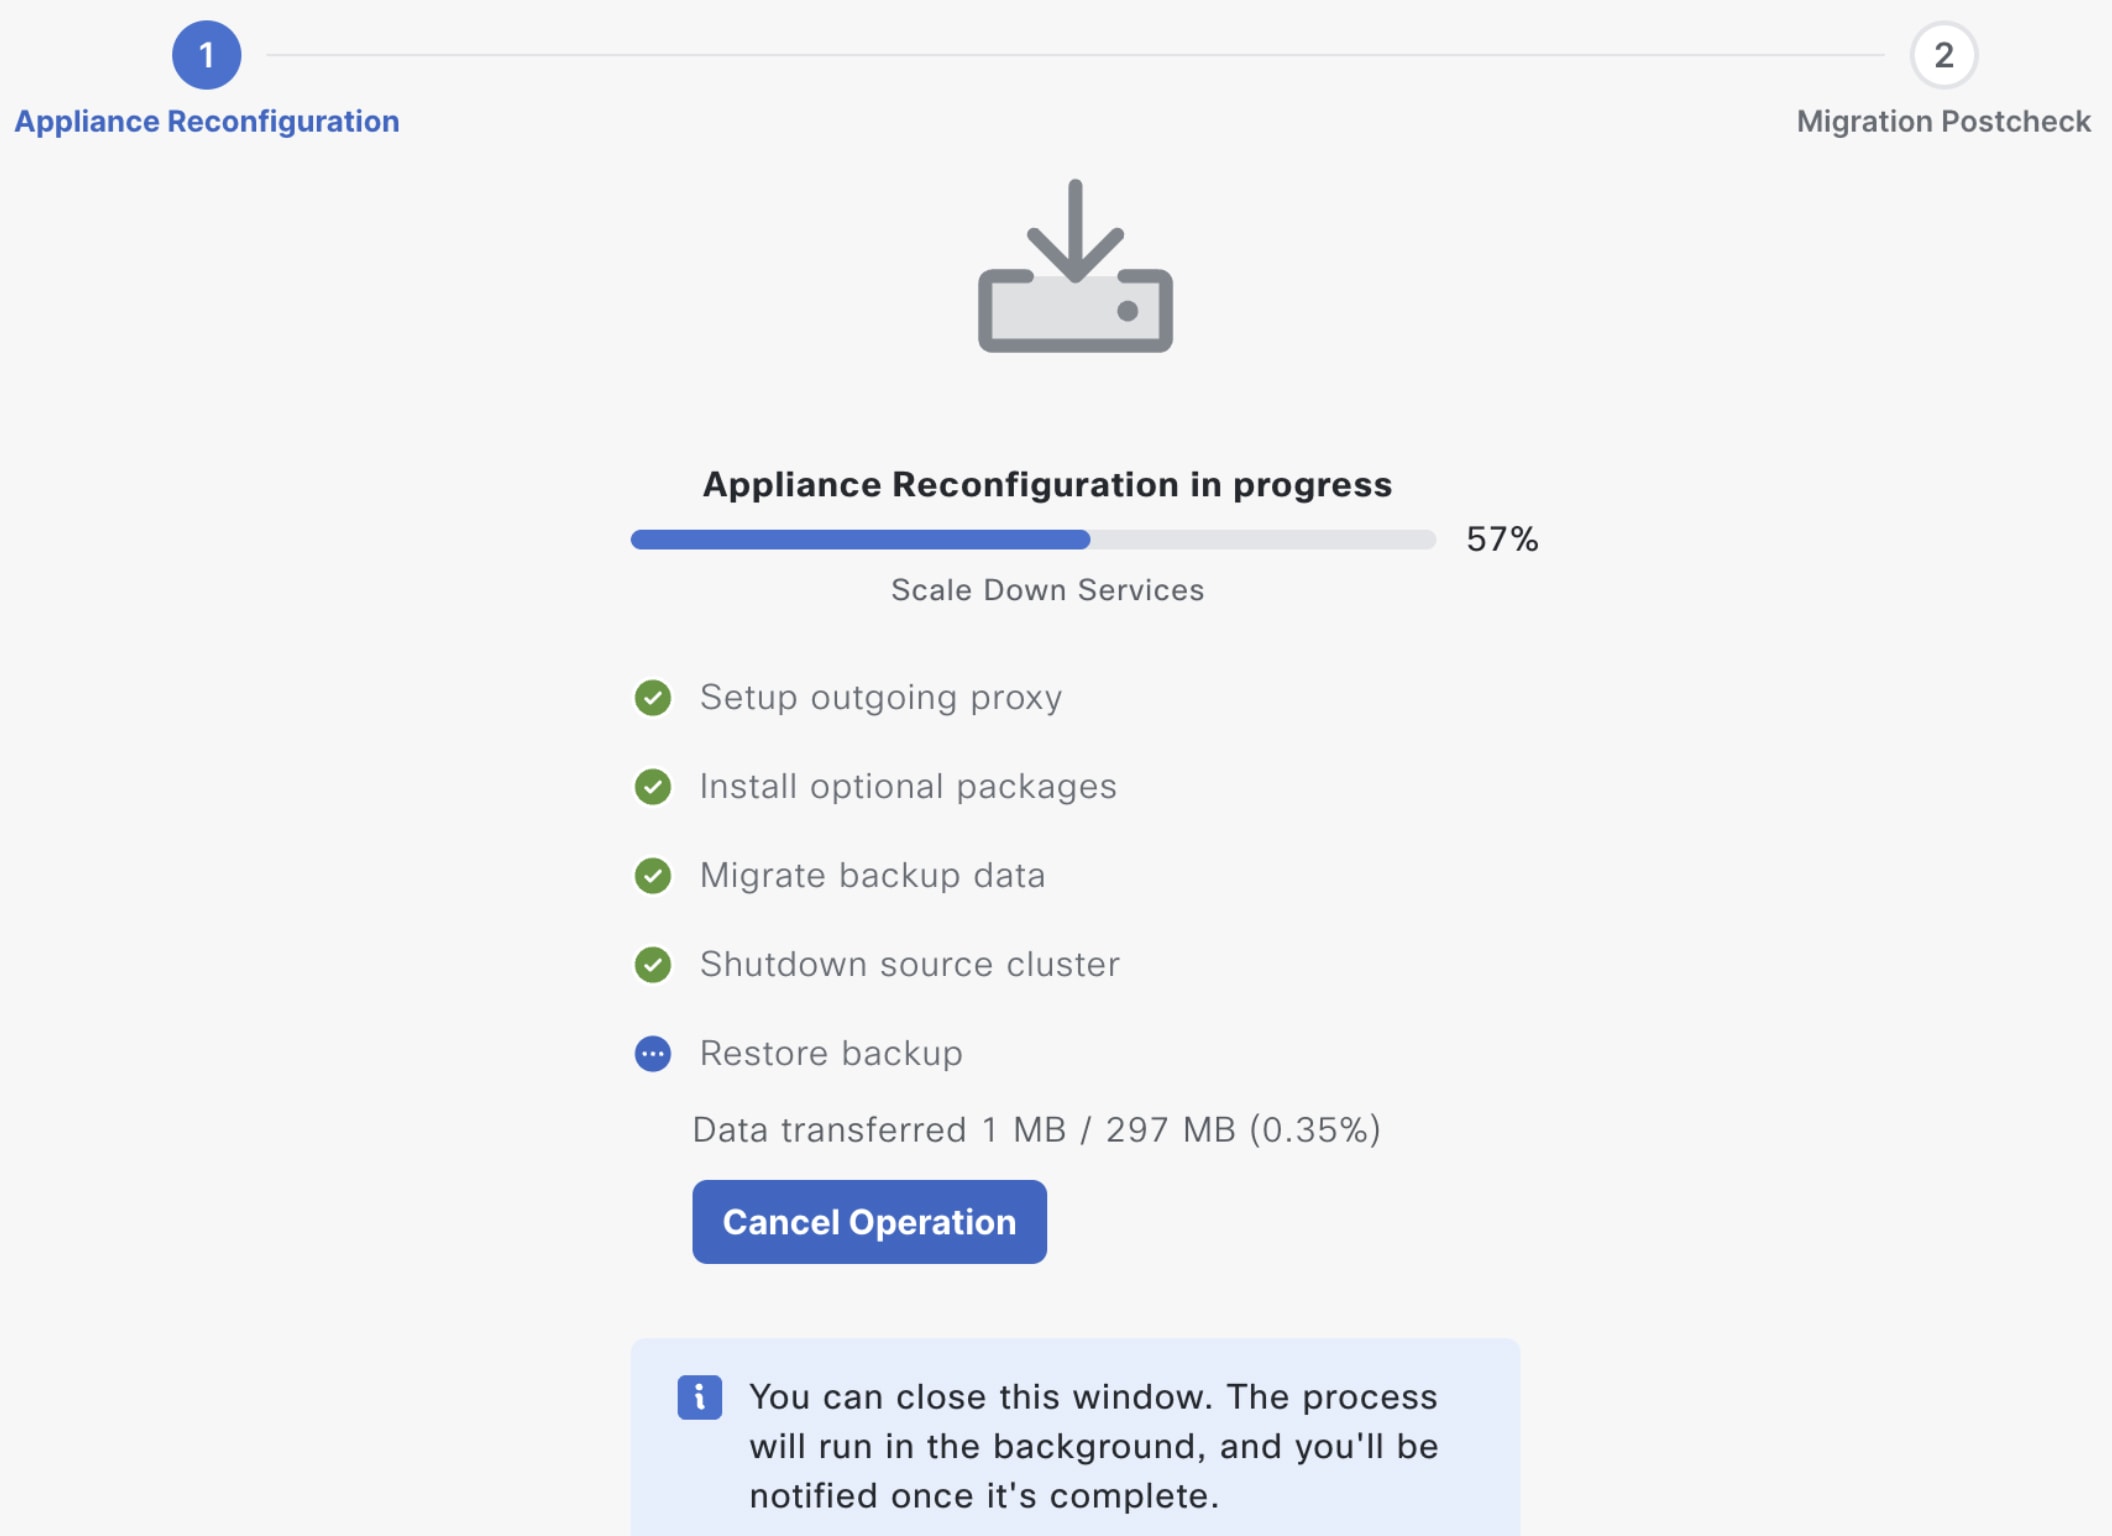
Step 7 | Start the Catalyst Center 3.x upgrade.
|

Scenario 2: Upgrade an air-gapped deployment to Catalyst Center 3.x
In this scenario, you are upgrading an air-gapped deployment to Catalyst Center 3.x.
Step 1 | Raise a request with the Cisco TAC. A representative gives you access and instructions for downloading the binary image for your Catalyst Center version from a Cisco file server. The air gap binary image includes the Catalyst Center 3.x upgrade package and ISO image for the 3.x version you're upgrading to. For example, if you are upgrading from Catalyst Center 2.3.7.10, you would download CatC-SW-23710-316.200rev7-Upgrade-AIRGAP.bin from the Software Download page. |
Step 2 | Deploy the air gap binary image by entering the maglev catalog airgap install binary-image-filename command. binary-image-filename is the binary image specific to your Catalyst Center version. The Catalyst Center 3.x upgrade package and ISO image for the 3.x version you're upgrading to are installed. |
Step 3 |
Scenario 3: Upgrade a disaster recovery deployment to Catalyst Center 3.x
In this scenario, you are upgrading your disaster recovery deployment to Catalyst Center 3.x.
Before you begin
- Verify the Cisco IMC settings for your appliances.
- Install the Catalyst Center 3.x upgrade package on both your disaster recovery system's main and recovery sites.
- Back up your appliance.
When reenabling your disaster recovery system after the upgrade, ensure that you set the correct Catalyst Center cluster as the main site. Otherwise, you will lose all data.
Note- Ensure that your disaster recovery system's main site is the current active site. This requirement is critical for a successful upgrade.
- Ensure that you have your disaster recovery configuration information available, such as VIPs and BGP routers. You’ll need this information to form a disaster recovery system after the 3.x upgrade.
Step 1 | Pause your disaster recovery system:
|
Step 2 | Note
|
Step 3 | Reenable disaster recovery:
|
Scenario 4: Restore Catalyst Center 3.1.3 data
In this scenario, you are migrating your Catalyst Center 3.1.3 data to an appliance that has Catalyst Center 3.1.5 or later installed.
Step 1 | Confirm that you have enough space to store your backups after upgrading to Catalyst Center 3.1.5 or later. In the Cisco Catalyst Center Administrator Guide, see the "Backup storage requirements" topic. |
Step 2 | Back up your Catalyst Center 3.1.3 deployment. In the Cisco Catalyst Center Administrator Guide, complete the steps described in the "Create a backup" topic. |
Step 3 | Install Catalyst Center 3.1.5 or later on your appliance. |
Step 4 | Add the NFS server using the same location that was configured for Catalyst Center 3.1.3. In the Cisco Catalyst Center Administrator Guide, complete the steps described in the "Add the NFS server" topic. |
Step 5 | Restore the backup you created in Step 2. In the Cisco Catalyst Center Administrator Guide, complete the steps described in the "Restore data from backups" topic. |
Scenario 5: Migrate data from one Catalyst Center appliance to another
Complete these steps to migrate data from an appliance (running Catalyst Center 2.3.7.x) to another Catalyst Center appliance (running Catalyst Center version 3.x).
Note- You cannot migrate data from one DN1 appliance to another DN1 appliance.
- If you are using the same IP addressing scheme on your Catalyst Center 3.x appliance, shut down the Catalyst Center 2.3.7.x appliance before you start up the Catalyst Center 3.x appliance to prevent IP conflicts.
- Ensure that you have a DN2 or DN3 appliance running Catalyst Center 3.x with the same packages that are installed on your current 2.3.7.x appliance.
- You can migrate data to an appliance with either the same or bigger profile. For example, you can migrate data from a medium appliance to another medium appliance or a large appliance.
- Don't migrate data to an appliance with a smaller profile. For example, don't migrate data from an extra large appliance to a large appliance.
Step 1 | Ensure that Catalyst Center 2.3.7.x (version 2.3.7.7 or later) is installed on your appliance. |
Step 2 | Back up your appliance's Assurance (optional) and automation data. In the Cisco Catalyst Center Administrator Guide, complete the steps described in these topics:
|
Step 3 | From the Cisco software download site, download the relevant CatC_2.3.7.x-VA_MigrationScript_v3.tar.gz (which includes the CatC-2.3.7.x-VA_MigrationScript_v3.sh script) to your NFS server. |
Step 4 | Extract the .tar file and then copy CatC-2.3.7.x-VA_MigrationScript_v3.sh to your NFS server. |
Step 5 | Grant execute permission to the script by entering the chmod +x CatC-2.3.7.x-VA_MigrationScript_v3.sh command. (Replace 2.3.7.x with your specific version.) |
Step 6 | After the backup completes successfully, open an SSH console on your NFS server and enter these commands:
|
Step 7 | Start the script by entering the ./CatC-2.3.7.x-VA_MigrationScript_v3.sh command. (Replace 2.3.7.x with your specific version.) The script does two things:
|
Step 8 | After the script runs successfully, enter this command: unset REMOTE_SERVER_PASSWORD |
Step 9 | Configure the NFS server that the Catalyst Center 3.x appliance will use:
|
Step 10 | Restore the backup file that you created in Step 2. In the Cisco Catalyst Center Administrator Guide, complete the steps described in the "Restore data from backups" topic. Enter the same encryption passphrase that you entered when completing Step 2. After the restore operation completes, the automation and Assurance data from the physical appliance (first, second, or third-generation) migrate to the virtual appliance. |
Scenario 6: Upgrade from a physical appliance to a virtual appliance
In this scenario, you are migrating your existing network data from a physical Catalyst Center appliance to a virtual appliance running Catalyst Center 3.1.5 or later on ESXi.
Note- Catalyst Center only supports the migration of data from a single-node medium appliance to a Catalyst Center on ESXi virtual appliance.
- The Catalyst Center on ESXi virtual appliance must have a different IP address than its source physical appliance.
Before you begin
- Configure a virtual appliance running Catalyst Center 3.1.5 or later on ESXi. See the Cisco Catalyst Center 3.1.x on ESXi Deployment Guide.
-
Confirm you are upgrading from a medium appliance that's running one of these Catalyst Center versions:
- 2.3.7.7.70047
- 2.3.7.7-70047-CSCwn89323.SMU
- 2.3.7.9.70301
- 2.3.7.9.70301.10
- 2.3.7.10.70209
- 2.3.7.10.70209.10
- Ensure that a backup server is configured for automation data, and that an NFS server is configured for Assurance data. NFS is mandatory for the migration of backup files from physical Catalyst Center appliances.
Step 1 | Start the Catalyst Center 3.x upgrade wizard:
| ||||||||||||||
Step 2 | Complete the Catalyst Center 3.x upgrade wizard:
| ||||||||||||||
Step 3 | Start the Catalyst Center 3.x upgrade.
|
Scenario 7: Upgrade Catalyst Center on ESXi
In this scenario, you are upgrading your Catalyst Center 2.3.7.x on ESXi deployment to Catalyst Center on ESXi version 3.1.5 or later.
Step 1 | Back up your Catalyst Center 2.3.7.x on ESXi deployment. In the Cisco Catalyst Center Administrator Guide, complete the steps described in the "Back up data now" topic. | ||||||
Step 2 | Shut down Catalyst Center 2.3.7.x on ESXi. | ||||||
Step 3 | Configure a new Catalyst Center on ESXi virtual appliance (version 3.1.5 or later) with the same network settings as your previous virtual appliance. | ||||||
Step 4 | Configure the physical disk or NFS server that will be used for backup and restore operations.
| ||||||
Step 5 | Restore the backup you created in Step 1. In the Cisco Catalyst Center Administrator Guide, complete the steps described in the "Restore data from backups" topic. |
Scenario 8: Upgrade Catalyst Center on AWS
In this scenario, you are upgrading your Catalyst Center 2.3.7.x on AWS deployment to Catalyst Center on AWS version 3.1.5 or later.
Before you begin
-
Confirm you are upgrading from a medium appliance that's running one of these Catalyst Center versions:
- 2.3.7.7.70047
- 2.3.7.7-70047-CSCwn89323.SMU
- 2.3.7.9.70301
- 2.3.7.9.70301.10
- 2.3.7.10.70209
- 2.3.7.11.70047
- Ensure that a backup server is configured for automation data, and that an NFS server is configured for Assurance data. NFS is mandatory for the migration of backup files from physical Catalyst Center appliances.
- If you are using the same IP addressing scheme on your Catalyst Center 3.x appliance, shut down the Catalyst Center 2.3.7.x appliance before you start up the Catalyst Center 3.x appliance to prevent IP conflicts.
Step 1 | Ensure that Catalyst Center 2.3.7.x (version 2.3.7.7 or later) is installed on your Catalyst Center on AWS deployment. |
Step 2 | Back up your appliance's Assurance (optional) and automation data. In the Cisco Catalyst Center Administrator Guide, complete the steps described in these topics:
|
Step 3 | From the Cisco software download site, download the relevant CatC_2.3.7.x-VA_MigrationScript_v3.tar.gz (which includes the CatC-2.3.7.x-VA_MigrationScript_v3.sh script) to your NFS server. |
Step 4 | Extract the .tar file and then copy CatC-2.3.7.x-VA_MigrationScript_v3.sh to your NFS server. |
Step 5 | Grant execute permission to the script by entering the chmod +x CatC-2.3.7.x-VA_MigrationScript_v3.sh command. (Replace 2.3.7.x with your specific version.) |
Step 6 | After the backup completes successfully, open an SSH console on your NFS server and enter these commands:
|
Step 7 | Start the script by entering the ./CatC-2.3.7.x-VA_MigrationScript_v3.sh command. (Replace 2.3.7.x with your specific version.) The script does two things:
NoteAfter starting the script, you may see an error indicating that some items are missing. Install these items, and then restart the script. |
Step 8 | From the list of available backups, select the backup you want to migrate. |
Step 9 | After the script runs successfully, enter this command: unset REMOTE_SERVER_PASSWORD |
Step 10 | Configure the NFS server that the Catalyst Center 3.x appliance will use:
|
Step 11 | Restore the backup file that you created in Step 2. In the Cisco Catalyst Center Administrator Guide, complete the steps described in the "Restore data from backups" topic. Enter the same encryption passphrase that you entered when completing Step 2. After the restore operation completes, verify that your system is functioning properly. Also confirm that all services are running in the System 360 page (). |
Scenario 9: Upgrade Catalyst Center on Azure
In this scenario, you are upgrading Catalyst Center 2.3.7.x to Catalyst Center on Azure version 3.1.5 or later.
Before you begin
-
Confirm you are upgrading from a medium appliance that's running one of these Catalyst Center versions:
- 2.3.7.7.70047
- 2.3.7.7-70047-CSCwn89323.SMU
- 2.3.7.9.70301
- 2.3.7.9.70301.10
- 2.3.7.10.70209
- Ensure that a backup server is configured for automation data, and that an NFS server is configured for Assurance data. NFS is mandatory for the migration of backup files from physical Catalyst Center appliances.
- If you are using the same IP addressing scheme on your Catalyst Center 3.x appliance, shut down the Catalyst Center 2.3.7.x appliance before you start up the Catalyst Center 3.x appliance to prevent IP conflicts.
Step 1 | Ensure that Catalyst Center 3.x (version 3.1.5 or later) is installed on your Catalyst Center on Azure deployment. |
Step 2 | Back up your appliance's Assurance (optional) and automation data. In the Cisco Catalyst Center Administrator Guide, complete the steps described in these topics:
|
Step 3 | From the Cisco software download site, download the relevant CatC_2.3.7.x-VA_MigrationScript_v3.tar.gz (which includes the CatC-2.3.7.x-VA_MigrationScript_v3.sh script) to your NFS server. |
Step 4 | Extract the .tar file and then copy CatC-2.3.7.x-VA_MigrationScript_v3.sh to your NFS server. |
Step 5 | Grant execute permission to the script by entering the chmod +x CatC-2.3.7.x-VA_MigrationScript_v3.sh command. (Replace 2.3.7.x with your specific version.) |
Step 6 | After the backup completes successfully, open an SSH console on your NFS server and enter these commands:
|
Step 7 | Start the script by entering the ./CatC-2.3.7.x-VA_MigrationScript_v3.sh command. (Replace 2.3.7.x with your specific version.) The script does two things:
After starting the script, you may see an error indicating that some items are missing. Install these items, and then restart the script. |
Step 8 | After the script runs successfully, enter this command: unset REMOTE_SERVER_PASSWORD |
Step 9 | Configure the NFS server that the Catalyst Center 3.x appliance will use:
|
Step 10 | Restore the backup file that you created in Step 2. In the Cisco Catalyst Center Administrator Guide, complete the steps described in the "Restore data from backups" topic. Enter the same encryption passphrase that you entered when completing Step 2. After the restore operation completes, verify that your system is functioning properly. Also confirm that all services are running in the System 360 page (). |
Fallback options
This topic describes the options that are available if you completed the Catalyst Center 3.x upgrade and find yourself in one of these situations:
- You need to delay your deployment's upgrade to Catalyst Center 3.x.
- You experienced a catastrophic failure that requires a reimage of your Catalyst Center appliance.
Option 1 (recommended): Proceed with the Catalyst Center 3.x upgrade
To continue using the new platform, complete these steps:
- Install Catalyst Center 3.1.5 or later.
- Restore the transformed backup file. Specify the NFS directory location in its NFS backup configuration.
Option 2: Revert back to Catalyst Center 2.3.7.x
To revert back to Catalyst Center 2.3.7.x, which runs on the previous platform, you'll need to complete these tasks:
- Reimage your appliance, installing the Catalyst Center 2.3.7.x version that was installed previously.
- Revert your backup file to the same Catalyst Center 2.3.7.x version.
For assistance, contact the Cisco TAC.