Backup and Restore

About backup and restore

The backup and restore functions enable you to create backup files and restore them on a different appliance if necessary for your network configuration.

Backup

  • You can back up automation data only or both automation and Assurance data.


    Important


    NetFlow data is not backed up when you back up Catalyst Center's automation and Assurance data.


  • Automation data consists of Catalyst Center databases, credentials, file systems, and files. The automation backup is a full backup.

  • The Assurance data consists of network assurance and analytics data. The first backup of Assurance data is a full backup. After that, backups are incremental.


    Important


    • Do not modify or delete the backup files. If you do, you might not be able to restore the backup files to Catalyst Center.

    • A backup can only be restored on a Catalyst Center cluster that has the same FIPS mode setting configured as the source cluster. Backup and restore operations involving clusters with different FIPS mode settings will fail (since Catalyst Center will label backups as incompatible).


  • Catalyst Center creates the backup files and posts them to a remote server. Each backup is uniquely stored using the UUID as the directory name. For information about the remote server requirements, see Backup server requirements.

  • Only a single backup can be performed at a time. Performing multiple backups at once is not supported.

  • When a backup is being performed, you cannot delete the files that have been uploaded to the file service, and changes that you make to these files might not be captured by the backup process.

  • We recommend:

    • Perform a daily backup to maintain a current version of your database and files.

    • Perform a backup after making changes to your configuration. For example, when changing or creating a new policy on a device.

    • Perform a backup only during a low-impact or maintenance period.

  • You can schedule weekly backups on a specific day of the week and time.

Restore

  • You can restore the backup files from the remote server using Catalyst Center.

  • When you restore the backup files, Catalyst Center removes and replaces the existing database and files with the backup database and files. While a restore is being performed, Catalyst Center is unavailable.

  • You cannot do a backup from one version of Catalyst Center and restore it to another version of Catalyst Center. You can only restore a backup to an appliance that is running the same Catalyst Center software release with the same first four digits and the same application versions as the appliance from which the backup was taken. To view the current applications and versions, choose System > Software Management and click Currently Installed Applications.

  • You can restore a backup to a Catalyst Center appliance with a different IP address. This situation could happen if the IP address is changed on Catalyst Center and you need to restore from an older system.


    Important


    After a backup and restore of Catalyst Center:

    • You must access the Integration Settings window and update (if necessary) the Callback URL Host Name or IP Address. For more information, see Configure Integration Settings.


  • You can restore a backup file to an appliance with the same machine profile, such as restoring a backup from a medium appliance to another medium appliance.

  • You can restore a backup file from a lower-end appliance to a higher-end appliance. For example, you can restore the backup file from a medium appliance to a large or extra-large appliance.

  • You cannot restore a backup file from a higher-end appliance to a lower-end appliance. So, these scenarios are not supported:

    • Restoring a large appliance's backup file to a medium appliance.

    • Restoring an extra-large appliance's backup file to either a large or medium appliance.

  • You can restore a standalone node's backup file to a three-node cluster or vice versa, provided that the target appliance has the same machine profile or is a higher-end appliance. The one exception is that you can't restore the backup file from a three-node cluster consisting of extra-large appliances to a standalone extra-large appliance.

Backup and restore event notifications

You can receive a notification whenever a backup or restore event takes place. To configure and subscribe to these notifications, complete the steps described in the "Work with Event Notifications" topic of the Cisco Catalyst Center Platform User Guide. When completing this procedure, ensure that you select and subscribe to the SYSTEM-BACKUP-v2 and SYSTEM-RESTORE-v2 events.

A notification is generated and sent whenever an event listed in this table occurs:

Operation Event

Backup

The process to create a backup file for your system has started.

A backup file could not be created for your system. This event typically happens because:

  • The necessary disk space is not available on remote storage.

  • You can't retrieve the status of your system's server, which is a precheck for the backup operation.

  • You encountered connectivity issues or latency while creating a backup file on your system.

Restore

The process to restore a backup file has started.

The restoration of a backup file failed. This event typically happens because:

  • The backup file is corrupted.

  • You encountered connectivity issues or latency while creating a backup file from your system.

Backup server requirements

The backup server must run one of the supported operating systems:

  • Red Hat Enterprise 8 or later

  • Ubuntu 16.04 (or Mint, etc) or later

Server requirements for automation data backup

To support automation data backups, the server must meet these requirements:

  • Must use SSH (port22)/remote sync (rsync). Catalyst Center does not support using FTP (port 21) when performing a backup.

  • The Linux rsync utility must be installed.

  • The C.UTF-8 locale must be installed. To confirm whether C.UTF-8 is installed, enter:

    # localectl  list-locales | grep -i c.utf
    C.utf8
    en_SC.utf8
    
  • The backup user must own the destination folder for the backup or have read-write permissions for the user's group. For example, assuming the backup user is backup and the user's group is staff, this sample outputs show the required permissions for the backup directory:

    • Example 1: Backup directory is owned by backup user:

      $ ls -l  /srv/ 
      drwxr-xr-x  4 backup     root  4096 Apr 10 15:57 acme
      
    • Example 2: backup user's group has required permissions:

      $ ls -l  /srv/ 
      drwxrwxr-x. 7 root   staff  4096 Jul 24  2017 acme
      
  • SFTP subsystem must be enabled. The SFTP subsystem path depends on which Ubuntu or Red Hat release is installed. For the latest release, the following line must be uncommented and present in the SSHD configuration:

    • Ubuntu-based Linux: Subsystem sftp /usr/lib/openssh/sftp-server

    • Red Hat-based Linux: Subsystem sftp /usr/libexec/openssh/sftp-server

    The file where you need to uncomment the preceding line is usually located in /etc/ssh/sshd_config.


Note


You cannot use an NFS-mounted directory as the Catalyst Center backup server directory. A cascaded NFS mount adds a layer of latency and is therefore not supported.


Server requirements for assurance backup

To support Assurance data backups, the server must be a Linux-based NFS server that meets these requirements:

  • Support NFS v4 and NFS v3. (To verify this support, from the server, enter nfsstat -s.)

  • Have read and write permissions on the NFS export directory.

  • Have a stable network connection between Catalyst Center and the NFS server.

  • Have sufficient network speed between Catalyst Center and the NFS server.

  • Have the C.UTF-8 locale installed. To confirm whether C.UTF-8 is installed, enter:

    # localectl  list-locales | grep -i c.utf
    C.utf8
    en_SC.utf8
    

Note


You cannot use an NFS-mounted directory as the Catalyst Center backup server directory. A cascaded NFS mount adds a layer of latency and is therefore not supported.


Requirements for multiple Catalyst Center deployments

If your network includes multiple Catalyst Center clusters, you cannot use the same backup location for automation and Assurance backups. For multiple Catalyst Center deployments, the best practice is to separate the backup directory structure for each Catalyst Center cluster. This example configuration shows how to separate your backup directory structure.

Resource Example configuration

Catalyst Center clusters

  1. cluster1

  2. cluster2

Backup server hosting automation and Assurance backups

The example directory is /data/, which has ample space to host both types of backups.

Directory ownership and permissions

Earlier in this section, see "Server Requirements for Automation Data Backup."

Directory ownership and permissions

Earlier in this section, see "Server Requirements for Assurance Backup."

NFS export configuration

The content of the /etc/exports file:

/data/assurance/cluster1 *(rw,sync,no_subtree_check,all_squash)
/data/assurance/cluster2 *(rw,sync,no_subtree_check,all_squash)

Backup server directory layout

To simplify backups, we recommend that you use this directory layout for your backup server:

Single Catalyst Center cluster deployment

  • Full backup (Automation and Assurance):

    • cluster1: /data/automation/cluster1

    • cluster1: /data/assurance/cluster1

  • Automation-only backup:

    cluster1: /data/automation/cluster1

Multiple Catalyst Center cluster deployment

  • Full backup (Automation and Assurance):

    • cluster1: /data/automation/cluster1

    • cluster1: /data/assurance/cluster1

    • cluster2: /data/automation/cluster2

    • cluster2: /data/assurance/cluster2

  • Automation-only backup:

    • cluster1: /data/automation/cluster1

    • cluster2: /data/automation/cluster2

Backup storage requirements

Catalyst Center stores backup copies of Assurance data on an external NFS device and automation data on an external remote sync (rsync) target location. You must allocate enough external storage for your backups to cover the required retention. We recommend this storage:

Machine profile

Machine profile alias

Cisco part number NFS storage (14 days incremental) Rsync storage (daily full)

medium

medium

Second-generation appliance:

  • DN2-HW-APL

  • DN2-HW-APL-U (promotional)

1.7 TB

50 GB

Third-generation appliance: DN3-HW-APL

t2_large

large

Second-generation appliance:

  • DN2-HW-APL-L

  • DN2-HW-APL-L-U (promotional)

3 TB

100 GB

Third-generation appliance: DN3-HW-APL-L

t2_2xlarge

extra large

Second-generation appliance:

  • DN2-HW-APL-XL

  • DN2-HW-APL-XL-U (promotional)

8.4 TB

300 GB

Third-generation appliance: DN3-HW-APL-XL

Example of NFS server configuration—Ubuntu

The remote share for backing up an Assurance database (NDP) must be an NFS share. If you need to configure an NFS server, use this procedure (Ubuntu distribution) as an example.

Procedure


Step 1

Enter the sudo apt-get update command to access and update the advanced packaging tool (APT) for the NFS server.

For example, enter a similar command:
$ sudo apt-get update 

Step 2

Enter the sudo apt-get install command to install the advanced packaging tool for NFS.

For example, enter a similar command:
$ sudo apt-get install -y nfs-kernel-server 

Step 3

Enter the sudo mkdir -p command to create nested directories for the NFS server.

For example, enter a similar command:
$ sudo mkdir -p /var/nfsshare/ 

Step 4

Enter the sudo chown nobody:nogroup command to change the ownership of the group to nobody and nogroup.

For example, enter a similar command:
$ sudo chown nobody:nogroup /var/nfsshare 

Step 5

Enter the sudo vi /etc/exports command to add the following line to the end of /etc/exports:

$ sudo vi /etc/exports 
/var/nfsshare *(rw,all_squash,sync,no_subtree_check) 

Step 6

Enter the sudo exportfs -a command to export the file systems for the NFS server.

For example, enter a similar command:
$ sudo exportfs -a 

Step 7

Enter the sudo systemctl start nfs-server command to restart the NFS server.

For example, enter a similar command:
$ sudo systemctl start nfs-server 

Example of NFS server configuration—Red Hat

This procedure shows an example NFS server configuration for Red Hat.

Procedure


Step 1

Enter the sudo yum check-update command to access and update the Yellowdog Updater Modified (YUM) for the NFS server.

For example, enter a similar command:
$ sudo yum check-update 

Step 2

Enter the sudo apt-get install command to install the advanced packaging tool for NFS.

For example, enter a similar command:
$ sudo yum install -y nfs-utils 

Step 3

Enable and start the NFS server.

$ sudo systemctl enable nfs-server 
$ sudo systemctl start nfs-server 

Step 4

Enter the sudo mkdir -p command to create nested directories for the NFS server.

For example, enter a similar command:
$ sudo mkdir -p <your_NFS_directory> 

Step 5

Enter the sudo chown nobody:nogroup command to change the ownership of the group to nobody and nogroup.

For example, enter a similar command:
$ sudo chown nobody:nogroup /var/nfsshare 

Step 6

Enter the sudo vi /etc/exports command to add this line to the end of /etc/exports:

$ sudo vi /etc/exports 
/var/nfsshare *(rw,all_squash,sync,no_subtree_check) 

Step 7

Enter the sudo exportfs -a command to export the file systems for the NFS server.

For example, enter a similar command:
$ sudo exportfs -a 

Step 8

Enter the sudo systemctl start nfs-server command to restart the NFS server.

For example, enter a similar command:
$ sudo systemctl start nfs-server 

Configure firewall rules to allow NFS

By default, the firewall is disabled on Debian/Ubuntu distributions but enabled on Red Hat distributions. Check whether firewall is enabled on Debian/Ubuntu distributions and if it is, add firewall rules.

Configure firewall rules—Debian/Ubuntu

For Debian/Ubuntu, use this sample configuration as an example. Refer to your Linux vendor and version for details.

Procedure


Step 1

Enter this command to check whether the firewall is enabled or disabled:

$ sudo ufw status

If the firewall is disabled, the output shows:

Status: inactive

If the firewall is enabled, the output shows:

Status: active

Step 2

If the firewall is enabled, set the static port for the mountd process to allow for easy firewall rule creation. To set the static port for mountd, change this line to add --port 32767 to /etc/default/nfs-kernel-server:

RPCMOUNTDOPTS="--manage-gids  --port 32767"

Step 3

Enter these commands to add firewall rules to allow NFS:

sudo ufw allow portmapper
sudo ufw allow nfs
sudo ufw allow mountd

Configure firewall rules—Red Hat

For Red Hat, use this sample configuration as an example. Refer to your Linux vendor and version for details.

Procedure


Step 1

Add the mountd port to services and to nfs.conf.

Note


Red Hat-based distributions use a different port for mountd than Debian-based distributions. Red Hat distributions use port 20048 for mountd in the /etc/service file.

Add these lines to /etc/nfs.conf if they don't exist:

[mountd]
manage-gids = 1
port = 20048

Step 2

Enter this command to restart the NFS services and firewall:

sudo systemctl restart nfs-server rpcbind nfs-mountd

Step 3

Enter these commands to add firewall rules to allow NFS:

sudo firewall-cmd --permanent --add-service={nfs,rpc-bind,mountd}
sudo firewall-cmd --reload

Configure backup servers

If you plan to back up automation data only, you need to configure the Catalyst Center automation backup server. If you plan to back up both automation and Assurance data, you need to configure the Catalyst Center automation backup server and the NFS backup server.

This procedure shows you how to set up both servers.

Before you begin

Make sure these requirements have been met:

  • Only a user with SUPER-ADMIN-ROLE permissions can perform this procedure. For more information, see About user roles.

  • The server that you plan to use for data backups must meet the requirements described in Backup server requirements.

Procedure


Step 1

From the main menu, choose System > Backup & Restore > Configure.

Step 2

To configure the automation backup server:

  1. Define these settings:

    Field

    Description

    SSH IP Address

    IP address of the remote server that you can SSH into.

    SSH Port

    Port address of the remote server that you can SSH into.

    Server Path

    Path to the folder on the server where the backup files are saved.

    Username

    Username used to protect the encrypted backup.

    Password

    Password used to protect the encrypted backup.

    Encryption Passphrase

    Passphrase used to encrypt the security-sensitive components of the backup. These security-sensitive components include certificates and credentials.

    This passphrase is required and you will be prompted to enter this passphrase when restoring the backup files. Without this passphrase, backup files are not restored.

  2. Click Apply.

Step 3

To configure the NFS backup server, click the NFS tab then:

  1. Define these settings:

    Field

    Description

    Host

    IP address or host name of the remote server that you can SSH into.

    Server Path

    Path to the folder on the server where the backup files are saved.

  2. Click Apply.


Back up data now

You can choose to back up one of these data sets:

  • Automation data only

  • Both automation and Assurance data

When you perform a backup, Catalyst Center copies and exports the data to the location on the remote server that you configured.


Note


Data is backed up using SSH/rsync. Catalyst Center does not support using FTP (port 21) when performing a backup.


Before you begin

Make sure that these requirements are met:

Procedure


Step 1

From the main menu, choose System > Backup & Restore > Backups.

Note


If you have not yet configured a backup server, Catalyst Center requires that you configure one before continuing. Click Configure Settings and see Configure backup servers.

Step 2

Click Add.

The Create Backup pane opens.

Step 3

In the Backup Name field, enter a unique name for the backup.

Step 4

Click Create now to perform the backup immediately.

Step 5

Define the scope of the backup:

  • Click Cisco Catalyst Center (All data) to back up automation and Assurance data.
  • Click Cisco Catalyst Center (without Assurance data) to back up only automation data.

Step 6

Click Create.

Note


You can view the current backup status and the history of previous backups in the Activity tab.

You can create a new backup only when there is no backup job in progress.

You can view the successfully completed backup jobs in the Backup tab.

During the backup process, Catalyst Center creates the backup database and files. The backup files are saved to the specified location on the remote server. You are not limited to a single set of backup files, but can create multiple backup files that are identified with their unique names. You receive a Backup done! notification when the process is finished.

Note


If the backup process fails, there is no impact to the appliance or its database. Catalyst Center displays an error message stating the cause of the backup failure. The most common reason for a failed backup is insufficient disk space. If your backup process fails, make sure that there is sufficient disk space on the remote server and attempt another backup.


Schedule data backups

You can schedule recurring backups and define the day of the week and the time of day when they will occur.

Before you begin

Make sure these requirements have been met:

Procedure


Step 1

From the main menu, choose System > Backup & Restore > Schedule.

Step 2

Click Add.

Step 3

In the Backup Name field, enter a unique name for the backup.

Step 4

Click Schedule weekly.

Choose the days and time for scheduling the backup.

Step 5

Define the scope of the backup:

  • Click Cisco Catalyst Center (All data) to back up automation and Assurance data.
  • Click Cisco Catalyst Center (without Assurance data) to back up automation data only.

Step 6

Click Schedule.

Note


You can view the scheduled backup jobs in the Schedule tab. After the backup starts, you can view backup status in the Activity tab.

You can create a new backup only when there is no backup job in progress.

You can view the successfully completed backup jobs in the Backup tab.

During the backup process, Catalyst Center creates the backup database and files. The backup files are saved to the specified location on the remote server. You are not limited to a single set of backup files, but can create multiple backup files that are identified with their unique names. You receive a Backup done! notification when the process is finished.

Note


If the backup process fails, there is no impact to the appliance or its database. Catalyst Center displays an error message stating the cause of the backup failure. The most common reason for a failed backup is insufficient disk space. If your backup process fails, make sure that there is sufficient disk space on the remote server and attempt another backup.


Restore data from backups

When you restore data from a backup file, Catalyst Center removes and replaces the existing database and files with the backup database and files. The data that is restored depends on what is on the backup:

  • Automation data backup: Catalyst Center restores the full automation data.

  • Automation and Assurance data backup: Catalyst Center restores the full automation data and the Assurance data as far back as the date that you choose.


Caution


The Catalyst Center restore process only restores the database and files. The restore process does not restore your network state and any changes made since the last backup, including any new or updated network policies, passwords, certificates, or trusted certificates bundle.


Note


  • You cannot do a backup from one version of Catalyst Center and restore it to another version of Catalyst Center. You can only restore a backup to an appliance that is running the same Catalyst Center software release with the same first four digits and the same application versions as the appliance from which the backup was taken. To view the current applications and versions, choose System > Software Management and click Currently Installed Applications.

  • If multiple clusters share the same Cisco AI Network Analytics configuration and are active at the same time, restoring a backup that includes the AI Network Analytics configuration on a different Catalyst Center cluster might result in data inconsistency and service disruption.

    Therefore, the AI Network Analytics configuration must be active on a single cluster. To uninstall the AI Network Analytics package from any inactive cluster, choose System > Software Management > Currently Installed Applications > AI Network Analytics > Uninstall.


Before you begin

Make sure these requirements have been met:

  • Only a user with SUPER-ADMIN-ROLE permissions can perform this procedure. For more information, see About user roles.

  • You have backups from which to restore data.

When you restore data, Catalyst Center enters maintenance mode and is unavailable until the restore process is done. Make sure you restore data at a time when Catalyst Center can be unavailable.

If you restore from a backup (on either the Cisco ISE or Catalyst Center side), Group-Based Access Control policy data does not synchronize automatically. You must run the policy migration operation manually to ensure that Cisco ISE and Catalyst Center are synchronized.

Procedure


Step 1

From the main menu, choose System > Backup & Restore.

The Backup & Restore window displays the following tabs: Backups, Schedule, Activity, and Configure.

If you already successfully created a backup on a remote server, it appears in the Backups tab.

Step 2

In the Backup Name column, locate the backup that you want to restore.

Step 3

In the Actions column, choose Restore.

During the restore process, Catalyst Center goes into maintenance mode. Wait until Catalyst Center exits maintenance mode before proceeding.

Step 4

Click the Backups tab to view the results of a successful restore.


Set up a file share

There are a few use cases that require the use of a file share, such as

  • completing backup and restore operations

  • installing Catalyst Center remotely, and

  • creating a repository to store RCA log bundles.

The topics in this section describe the steps you need to complete set up NFS, Microsoft Windows, and HTTP-based file shares.


Note


Catalyst Center backup and restore operations only support Linux-based NFS.


Configure an NFS file share

This section describes how to configure an NFS file share in Ubuntu and Red Hat Linux distributions.


Note


If you are configuring a VMware VM, we recommend that you use the vmxnet driver, which provides 10G support and low overhead.


Configure a file share in an Ubuntu distribution

To configure a file share in an Ubuntu distribution, complete the steps that are detailed here.
Procedure

Step 1

Install the NFS package: apt-get install -y nfs-kernel-server

Step 2

Enable and start the NFS service:

  • systemctl enable nfs-server

  • systemctl start nfs-server

Step 3

Verify that the NFS service is enabled and has started (this should happen by default): systemctl status nfs-kernel-server

The resulting output should resemble this example:

nfs-server.service - NFS server and services
Loaded: loaded (/lib/systemd/system/nfs-server.service; enabled; vendor preset: enabled)
Active: active (exited) since Sun 2020-03-22 15:35:12 UTC; 18min ago
Main PID: 19253 (code=exited, status=0/SUCCESS)
Tasks: 0 (limit: 4915)
CGroup: /system.slice/nfs-server.service
Mar 22 15:35:12 k8smaster systemd[1]: Starting NFS server and services...
Mar 22 15:35:12 k8smaster systemd[1]: Started NFS server and services.

Step 4

Configure NFS export by completing these tasks.

  1. Set up the NFS file share directory:

    • sudo mkdir -p /srv/nfs/iso

    • sudo chown -R nobody:nobody /srv/nfs/

  2. Add the NFS file share entry to the /etc/exports file.

    • Open the file: sudo vim /etc/exports

    • Add this line: /srv/nfs *(ro,sync,no_subtree_check,all_squash)

  3. Export the NFS file share: sudo exportfs -rv

    You should see this message: exporting *:/srv/nfs

  4. Verify the NFS export.

    To check the availability of NFS file share, run the showmount -e NFS-server-IP-address command from a different Linux machine. The resulting output should resemble this example.

    Export list for NFS-server-IP-address:
    /srv/nfs *

Step 5

Configure the firewall rules to allow NFS.

  1. Confirm whether a firewall is enabled (i.e. its status is active): sudo ufw status

    By default, a firewall is disabled in Ubuntu/Debian distributions. If necessary, enable a firewall before completing Step 4e.

  2. Set the static port for mountd:

    • Open the /etc/default/nfs-kernel-server file.

    • Find the RPCMOUNTDOPTS="--manage-gids line.

    • Add a space and --port 32767 to the end of this line.

  3. Add the mountd port by adding these lines to the /etc/services file:

    • mountd 32767/tcp

    • mountd 32767/udp

  4. Restart NFS services: sudo systemctl restart nfs-kernel-server nfs-mountd portmap

  5. Add the firewall rules to allow NFS:

    • sudo ufw allow portmapper

    • sudo ufw allow nfs

    • sudo ufw allow mountd


Configure a file share in a Red Hat or CentOS distribution

To configure a file share in Red Hat or CentOS distribution, complete the steps that are detailed here.
Procedure

Step 1

Install the NFS package: yum install -y nfs-utils

Step 2

Enable and start the NFS service:

  • systemctl enable nfs-server

  • systemctl start nfs-server

Step 3

Check the service's status: systemctl status nfs-server

The resulting output will resemble this example.

nfs-server.service - NFS server and services
Loaded: loaded (/usr/lib/systemd/system/nfs-server.service; enabled; vendor preset: disabled)
Active: active (exited) since Sun 2020-03-22 12:14:30 EDT; 2s ago
Process: 10418 ExecStart=/bin/sh -c if systemctl -q is-active gssproxy; then systemctl reload gssproxy ; fi (code=exited, status=0/SUCCESS)
Process: 10404 ExecStart=/usr/sbin/rpc.nfsd (code=exited, status=0/SUCCESS)
Process: 10402 ExecStartPre=/usr/sbin/exportfs -r (code=exited, status=0/SUCCESS)
Main PID: 10418 (code=exited, status=0/SUCCESS)
Mar 22 12:14:30 cene8.ecrt.local systemd[1]: Starting NFS server and services...
Mar 22 12:14:30 cene8.ecrt.local systemd[1]: Started NFS server and services.

Step 4

Configure the NFS export by completing these tasks.

  1. Set up the NFS file share directory:

    • sudo mkdir -p /srv/nfs/iso

    • sudo chown -R nobody:nobody /srv/nfs/

  2. Add the NFS file share entry to the /etc/exports file.

    • Open the file: sudo vim /etc/exports

    • Add this line: /srv/nfs *(ro,sync,no_subtree_check,all_squash)

  3. Export the NFS file share: sudo exportfs -rv

    You should see this message: exporting *:/srv/nfs

  4. Verify the NFS export.

    To check the availability of NFS file share, run the showmount -e NFS-server-IP-address command from a different Linux machine. The resulting output should resemble this example.

    Export list for NFS-server-IP-address:
    /srv/nfs *
  5. Check whether a mountd port has been configured in the nfs.conf file: grep -A2 mountd /etc/nfs.conf

    If the resulting output looks like this, it indicates that you need to configure the mountd port.

    #[mountd]
    # debug=0
    # manage-gids=n 

    In this is the case, add these lines to the nfs.conf file:

    • [mountd]

    • manage-gids = 1

    • port = 20048

  6. Restart NFS services: sudo systemctl restart nfs-server rpcbind nfs-mountd

    By default, a firewall (managed by the firewalld service) is enabled in Red Hat/CentOS version 7 and later (older versions use iptables). When NFS is running on the server, this will prevent file share access. From an external client, run the showmount -e NFS-server-IP-address command. The resulting output should resemble this example.

    clnt_create: RPC: Port mapper failure - Unable to receive: errno 113 (No route to host)

Step 5

Add the firewall rules to allow NFS:

  • firewall-cmd --permanent --add-service={nfs,rpc-bind,mountd}

  • firewall-cmd --reload

Step 6

Configure SELinux for NFS.

Note


SELinux is enabled by default in Red Hat and CentOS distributions.

  1. Enable NFS read/write boolean options.

    If you want to ... Then ...

    enable read-only NFS exports,

    run the setsebool -P nfs_export_all_ro 1 command.

    enable read/write NFS exports,

    run these commands:

    • setsebool nfsd_anon_write on

    • setsebool -P nfs_export_all_rw 0

  2. Verify booleans are set:

    getsebool -a |grep nfs_expo

    nfs_export_all_ro --> on

    nfs_export_all_rw --> off

  3. Set the SELinux context on the NFS directory:

    • semanage fcontext -a -t public_content_rw_t "/srv/nfs(/.*)?"

    • restorecon -Rv /srv/nfs/


Configure a Windows file share

Procedure


Step 1

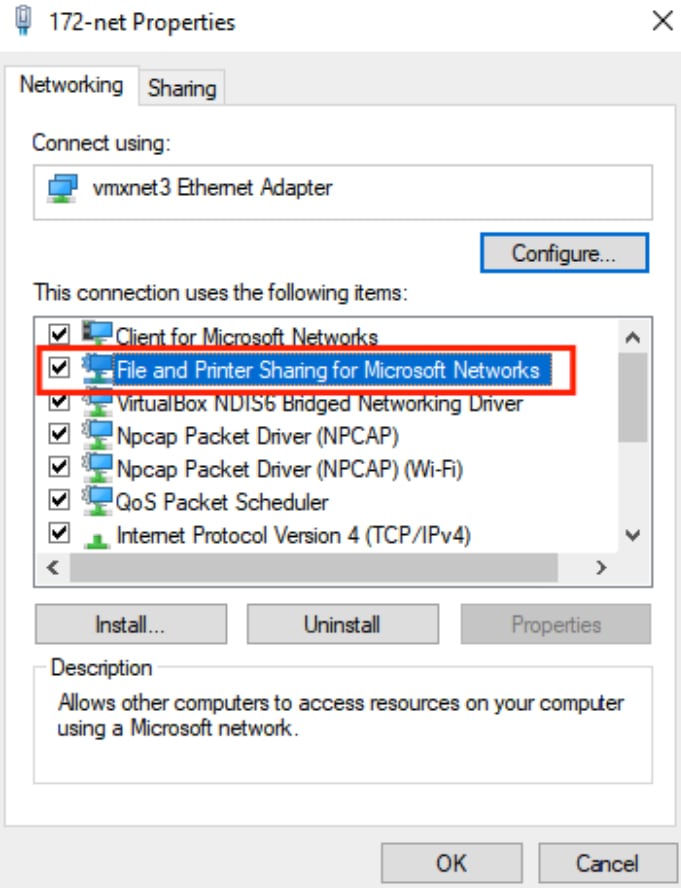
Confirm that the File and Printer Sharing for Microsoft Networks option is enabled for your network adaptor.

Step 2

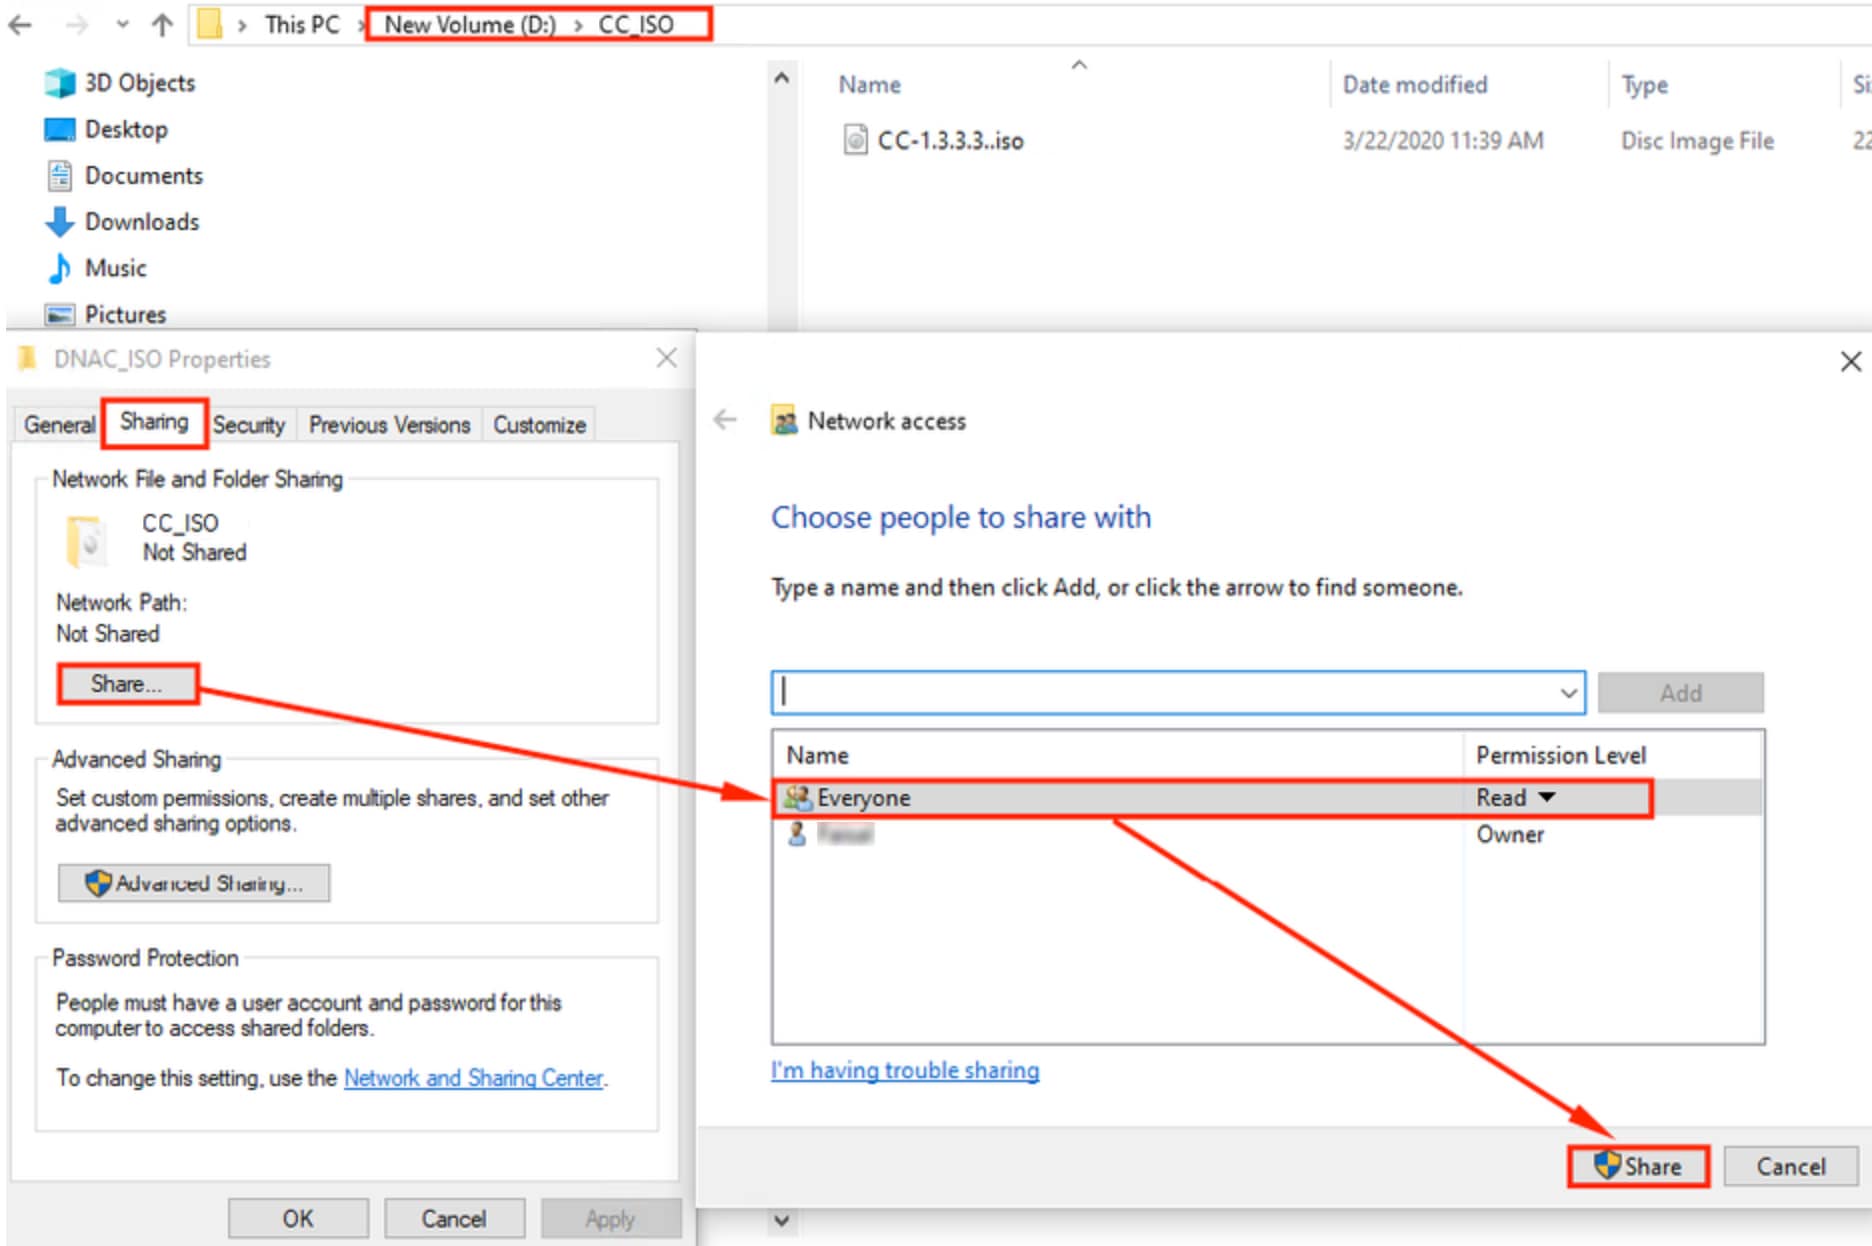
Share the folder you copied the Catalyst Center ISO image to.

  1. In File Explorer, right-click the folder that the Catalyst Center ISO image resides in, then choose Properties.

  2. Click the Sharing tab, then click Share.

  3. Click Everyone, assign Read permission, and then click Share.


Configure an Apache HTTP server

Complete these steps to configure an Apache HTTP server.

Procedure


Step 1

Install the Apache package.

  • Red Hat/CentOS: yum -y install httpd

  • Ubntu/Debian: sudo apt-get -y install apache2

Step 2

Enable and start the Apache service.

  • Red Hat/CentOS:

    • systemctl enable httpd

    • systemctl start httpd

  • Ubuntu/Debian:

    • sudo systemctl enable apache2

    • sudo systemctl start apache2

Step 3

Enable the HTTP file share.

These steps are applicable to both Red Hat/CentOS and Ubuntu/Debian-based distributions.

  1. Create the folder in which you want to place the Catalyst Center ISO image: sudo mkdir /var/www/html/iso

  2. Copy the Catalyst Center ISO image to the folder you just created: sudo cp ISO-image-location-and-filename /var/www/html/iso/

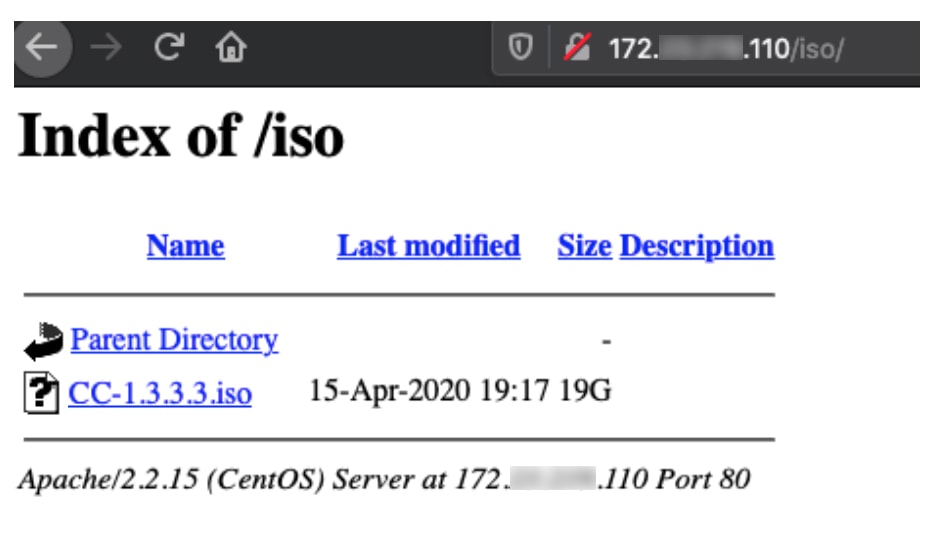
  3. Verify that a file share was created. Open your Apache server's IP address and confirm that the ISO image is available in the folder you copied it to.