Event handling overview
The event handling mechanism enables CWM to interact with external brokers for handling outbound and inbound events. Workflows can act as either consumers or producers of events which can be used to initiate a new workflow, or signal an existing workflow. For each event type that you define, you can add correlation attributes for filtering events and routing them to the workflow waiting for the event containing specific attribute values.
Event messages need to be defined according to Cloud Events specification. See Event message format for more details.
Brokers and protocols
CWM supports the Kafka broker and the AMQP and HTTP protocols for handling events. Events can be either consumed by a workflow running inside CWM (incoming events forwarded by a broker) or produced by a running workflow and forwarded to an external system (outgoing events received by a broker).
 Note |
It is important to remember that CWM doesn't act as an event broker itself. It provides a means to connect to external brokers to forward messages and events. |
Kafka broker
For the consume event type, CWM connects to a Kafka broker and listens for a specific event type on a topic. Once an event of the specific type registers to the right topic, CWM retrieves the event data and forwards it to the running workflow. The workflow then executes actions defined inside the Event State and/or runs another workflow execution (if selected).
For the produce event type, a running workflow produces a single event or a set of events which CWM then forwards to the broker and they get published in the right topic.
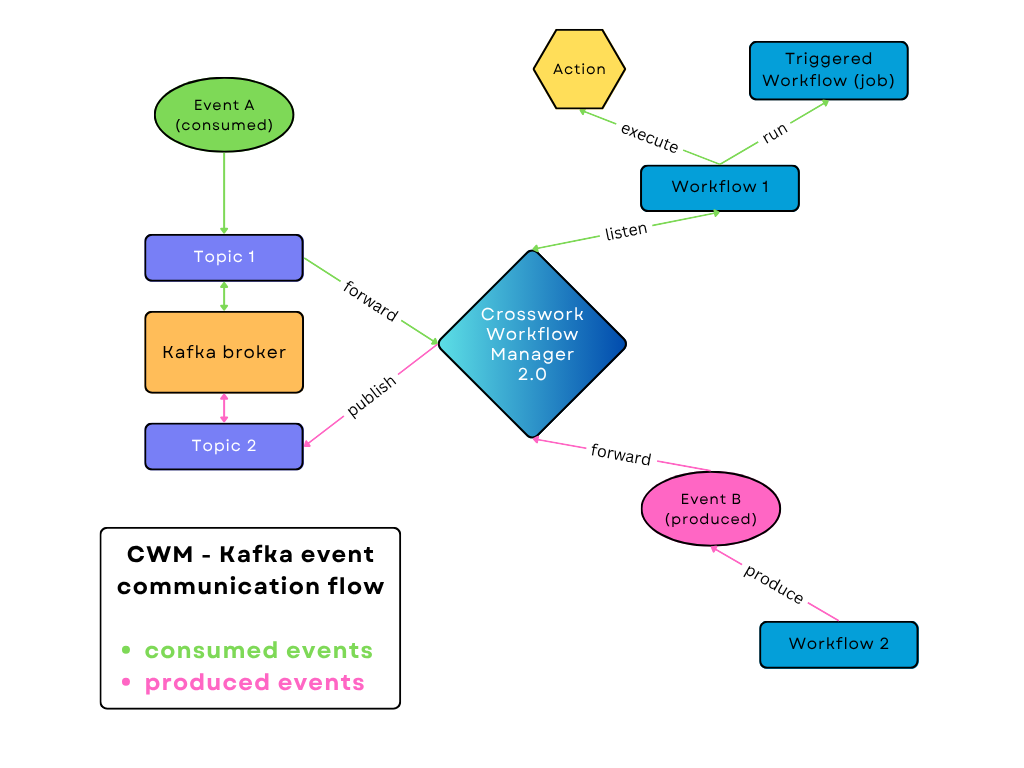
The Kafka broker will accept every event message format supported by the language-specific SDK as long as a valid content-type is sent. See this Github link for lists of supported formats: https://github.com/cloudevents/spec?tab=readme-ov-file.
AMQP protocol (such as the RabbitMQ broker)
For the consume event type, CWM connects to an AMQP broker and listens for a specific event type on a queue. Similarly to the Kafka broker, when an event of the specific type registers to the right queue, CWM retrieves the event data and forwards it to the running workflow. The workflow then executes actions defined inside the Event State and/or runs another workflow execution (if selected).
For the produce event type, a running workflow produces a single event or a set of events which CWM then forwards to the broker and they get published in the right queue.
AMQP brokers will accept every event message format supported by the specific SDK as long as a valid content-type is sent. The lists of supported event formats are available here: https://github.com/cloudevents/spec?tab=readme-ov-file.
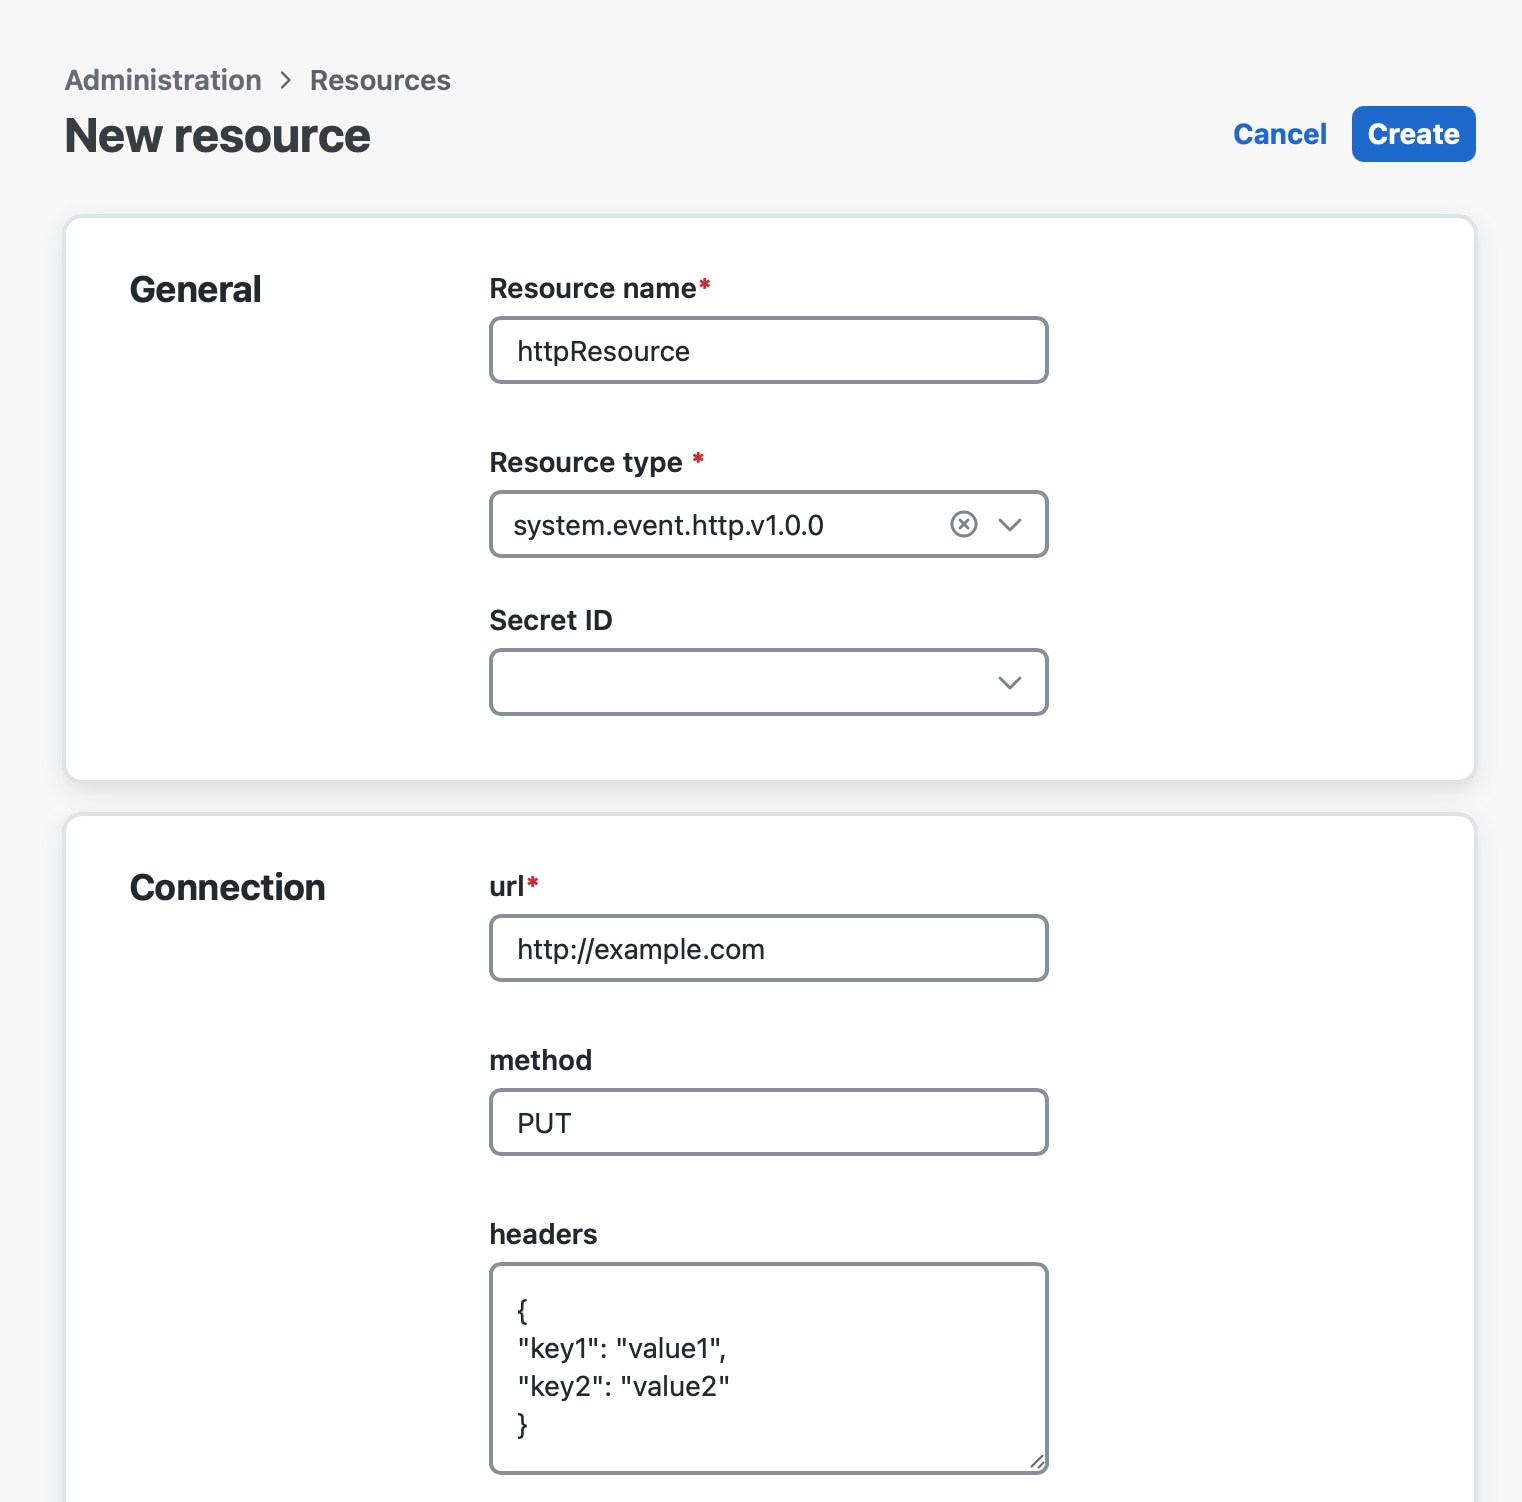
HTTP protocol
For the consume event type, CWM exposes an HTTP endpoint that listens for any incoming events. If an event of a specific type comes, it is forwarded to the running workflow that waits for this event type.
Note |
When events are consumed, CWM functions as the destination HTTP server. Therefore, the URL of the CWM server is what you effectively provide as the resource for the given HTTP event type. |
Event messages need to be HTTP POST requests, and the message body needs to be in JSON format representing a Cloud Event:
 { "specversion": "1.0",
"id": "2763482-4-324-32-4",
"type": "com.github.pull_request.opened",
"source": "/sensors/tn-1234567/alerts",
"datacontenttype": "text/xml",
"data": "<test=\"xml\"/>",
"contextAttrName": "contextAttrValue" }
For produce events, a workflow produces an event in the Cloud Event format and CWM forwards it as an HTTP POST request to an HTTP endpoint exposed by an external system. The HTTP endpoint address is a concatenation of the host URL defined in the Resource configuration in CWM and the End point field of the Event definition inside the workflow definition. Inside the resource configuration, you can change the request
method to PUT or other, and add key and value pairs as header (in JSON format):
Event system configuration
The following topics cover the details of event configuration.
Event system configuration: secrets
In event configuration, secrets store credentials needed to enable connection to a broker or endpoint exposed by a third-party service that sends or receives events. This includes basic authentication: username and password. The Secret ID that you provide when creating a secret will be referenced when creating a resource, so you need to add a secret beforehand. For details, see Step 1: Create a Kafka secret.
Event system configuration: resources
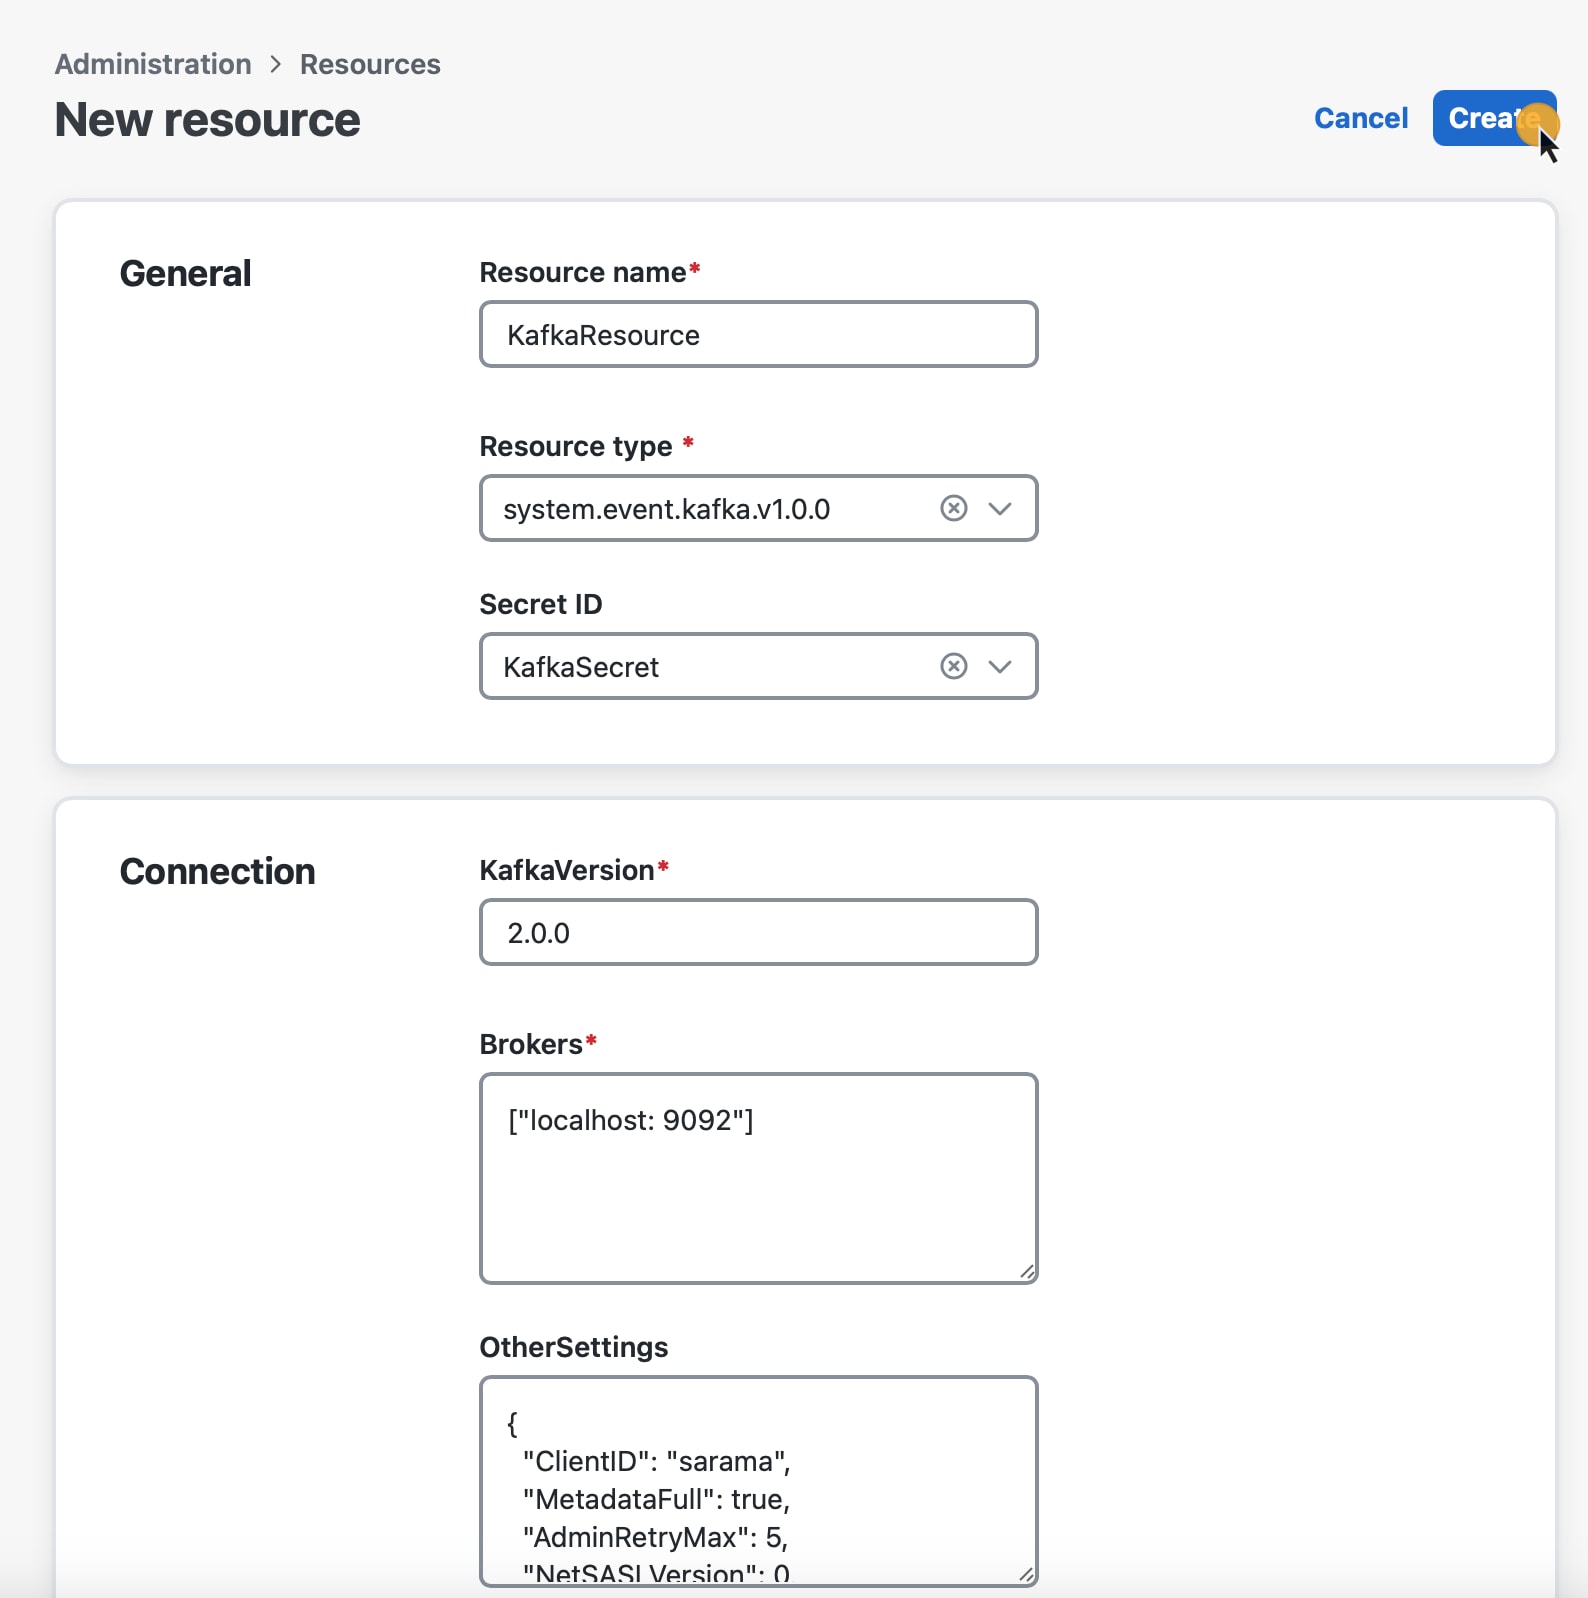
The resource is where you provide all the connection details (including the secret) needed to reach an event broker or endpoint exposed by a third party service. Depending on the broker/protocol you want to use, you can choose among three default event resource types
-
system.event.amqp.v1.0.0 -
system.event.kafka.v1.0.0 -
system.event.http.v1.0.0
Notice that there is a different set of configuration fields for each of them
-
For AMQP, provide the ServerDSN in the following format
amqp //localhost 5723. -
For Kafka:
-
KafkaVersion: Enter your Kafka version. The standard way to check the Kafka version is to run
bin/kafka topics.sh versionin a terminal. -
Brokers: Enter your Kafka broker addresses in the following format
["localhost 9092", "192.168.10.9 9092"]. -
OtherSettings: An editable list with default Kafka setting values. You can modify the values as needed. For details, see the "Kafka Other Settings" table below.
-
-
For HTTP:
-
Produce event types: Fill in the URL field and optionally, Method and Headers (for example, Client ID header name and value as a JSON object).
Note
The URL needs to be the address of the destination HTTP server, but without the URL path. You will enter the URL path as the End point when configuring the event type.
-
Consume event types: Fill in the URL field with the server URL of your CWM instance, for example,
192.168.10.9 9092.Note
Remember to provide the URL of your CWM instance without the URL path (
/event/http). You will enter the URL path as the End point when configuring the event type.
-
|
Field |
Description |
|---|---|
|
ClientID |
The identifier used by Kafka brokers to track the source of requests |
|
KafkaVersion |
Specifies the version of Kafka the client is compatible with (e.g., "2.0.0") |
|
MetadataFull |
When True, fetches metadata for all topics, not just those needed |
|
AdminRetryMax |
Maximum number of retries for admin requests (e.g., creating/deleting topics) |
|
NetSASLVersion |
Version of the SASL (Simple Authentication and Security Layer) protocol |
|
AdminTimeoutSecs |
Timeout in seconds for admin requests (e.g., topic creation) |
|
ConsumerFetchMin |
Minimum amount of data in bytes the broker should return to the consumer |
|
MetadataRetryMax |
Maximum number of retries to fetch metadata (e.g., topic and partition info) |
|
NetSASLHandshake |
When True, enables the SASL handshake mechanism |
|
NetDialTimeoutSecs |
Timeout in seconds for establishing a connection to Kafka |
|
NetReadTimeoutSecs |
Timeout in seconds for reading data from Kafka |
|
NetWriteTimeoutSecs |
Timeout in seconds for writing data to Kafka |
|
ProducerTimeoutSecs |
Timeout in seconds for producing messages to Kafka |
|
ConsumerFetchDefault |
Default size in bytes for the consumer fetch request (e.g., 1MB) |
|
ProducerRequiredAcks |
Specifies the required number of acknowledgments from brokers for a message to be considered successful (e.g., "WaitForLocal") |
|
ProducerReturnErrors |
When True, enables error reporting for failed produce requests |
|
ConsumerIsolationLevel |
Specifies whether the consumer reads uncommitted or committed messages ("ReadUncommitted" allows reading in-progress transactions) |
|
ConsumerOffsetsInitial |
Initial offset when there is no committed offset (-1 for the latest) |
|
NetMaxOpenRequestsSecs |
Maximum time for open requests over the network |
Event type
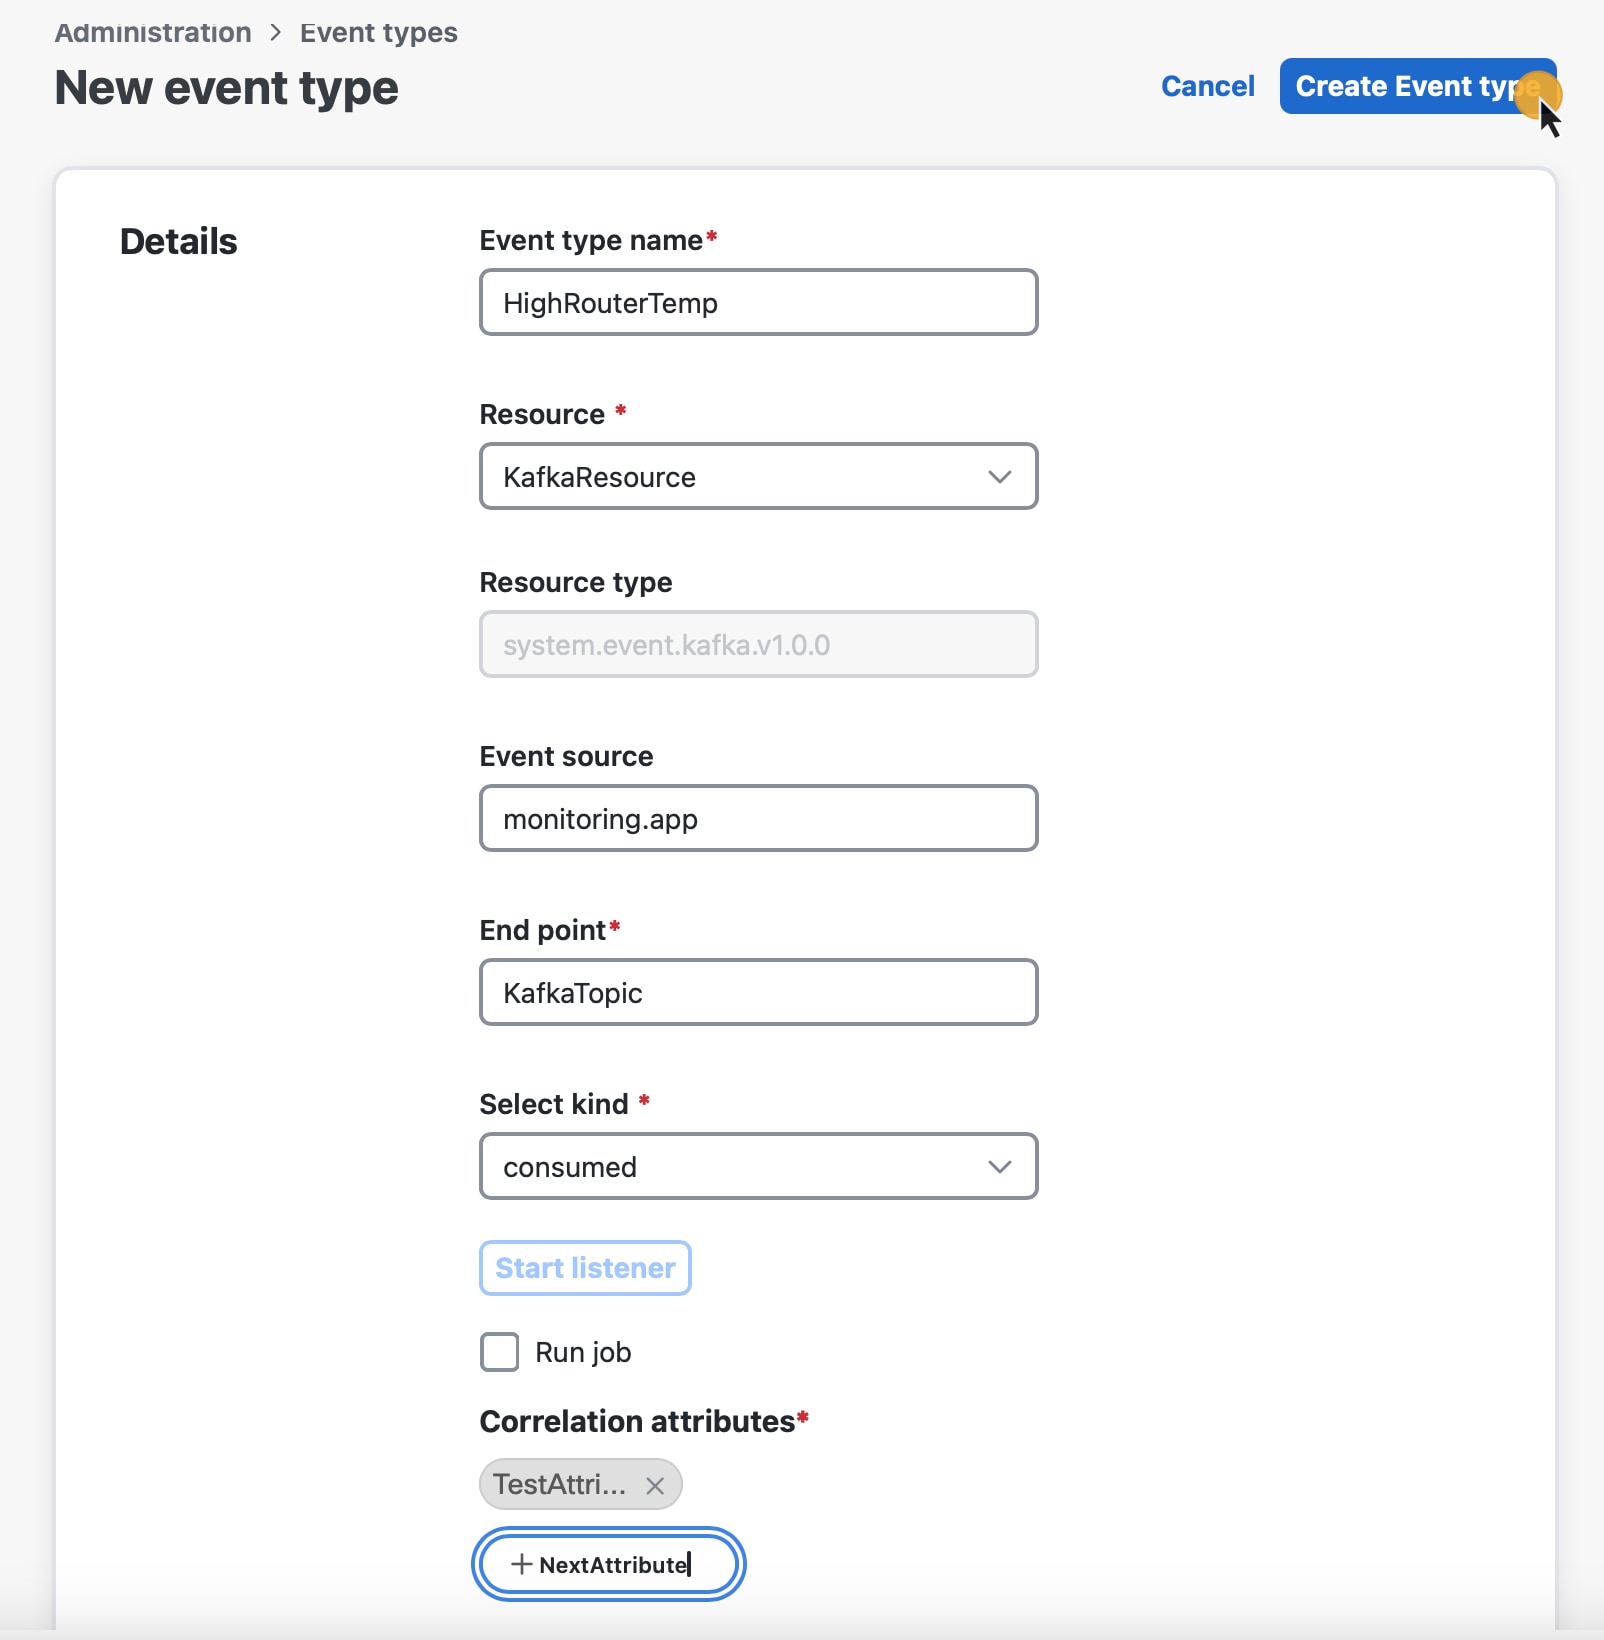
To create a new event type, you need to have a resource and secret added to CWM.
The following fields are available when adding an event type:
-
Event type name: the name of your event type. It's later referred to inside the workflow definition.
-
Resource: a list of resources previously added to CWM.
-
Event source: a fully user-defined entry that will be referenced in the workflow definition. Required for
produceevent kind. -
End point: the name of Kafka topic (event stream), AMQP endpoint (terminus), or HTTP URL (Host) path.
Note
For the HTTP consume event type, provide
/event/httpas your End point.
-
Select kind: a list consisting of two options:
consumeorproduceevent kind.Note
The
bothoption is not yet supported for CWM.
-
Start listener (only for
consumekind): check it to start listening for the defined event type. -
Run job (only for
consumekind): tick this checkbox if you want to trigger a workflow upon receiving the event. Then select the desired workflow from the list.
-
Correlation attributes
Optionally, you can set context attributes for your event. They apply only to the consume event kind and are used to trigger workflows selectively. You can view them as a kind of custom filters that refine the inbound
event data and route them to the right workflows that listen on event types with specific values of correlation attributes.
To add an attribute to your event type, click Add attribute, and provide an attribute name.
Note |
Correlation attributes are fully user-defined. They need to match the JSON key and value pair stated inside the Cloud event message that is to be routed to a given workflow. |
Event message format
Event messages must follow the Cloud Events specification format. A minimum viable event message following the specification will contain the following parameters:
{
  "specversion": "1.0",
  "id": "00001",
  "type": "com.github.pull_request.opened",
  "source": "/sensors/tn-1234567/alerts"
}
The message can carry additional parameters, such as "datacontenttype", "data", and a correlation context attribute name (contextAttrName in this example) :
  {
  "specversion": "1.0",
  "id": "2763482-4-324-32-4",
  "type": "com.github.pull_request.opened",
  "source": "/sensors/tn-1234567/alerts",
  "datacontenttype": "text/xml",
  "data": "<test data=\"xml\"/>",
  "contextAttrName": "contextAttrValue"
}
Workflow event definition and state
In the workflow definition, there are two major syntactical elements that you use to handle the events for which the workflow will be waiting. These are:
-
The Event definition: Used to define the event type and its properties. For example:
{
   "name": "applicant-info",
   "type": "org.application.info",
   "source": "applicationssource",
   "correlation": [
    {
      "contextAttrName": "applicantId"
    }
   ]
}-
The Event state: Used to define actions to be taken when the event occurs. For example:
{
"name": "MonitorVitals",
"type": "event",
"onEvents": [
        {
          "actions": [
            {
              "functionRef": {
                "refName": "uppercase",
                "arguments": {
                  "input": {
                    "in": "patient ${ .patient } has high temperature"
                  }
                }
              }
            }
          ],
          "eventRefs": [
            "HighBodyTemperature"
          ]
        }
      ]
}
 Feedback