Manage Administrative Tasks

Certificates

A certificate is an electronic document that

  • identifies an individual, a server, a company, or an entity

  • associates the entity with a unique key, and

  • is digitally signed by an issuer (Certificate Authority or self-signed) to enable secure communication.

When a certificate is created with a public key, a matching private key is also generated. In TLS, the public key is used to encrypt data being sent to the entity and the private key is used to decrypt.

In a TLS exchange, a hierarchy of certificates is used to verify the validity of the certificate's issuer. This hierarchy is called a trust-chain and consists of three types of entities: a root CA certificate (self-signed), possibly multiple levels of intermediate CA certificates, and a server (or client) certificate (end-entity). The intermediate certificates act as a “link of trust” linking the server certificates to the CA’s root certificate and providing additional layers of security. The root certificate's private key signs and issues the next certificate in the chain. Subsequently, the private key for each certificate in the trust chain signs and issues the following certificate, continuing until the end-entity certificate is signed. The end-entity certificate is the last certificate in the chain. It is used as a client or server certificate.

How are certificates used in Cisco Crosswork Planning

Cisco Crosswork Planning uses the TLS protocol for secure communication between devices and components. TLS uses X.509 certificates to securely authenticate devices and encrypt data to ensure its integrity from source to destination. Cisco Crosswork Planning uses both generated certificates and certificates uploaded by clients. Uploaded certificates can be purchased from Certificate Authorities (CA) or be self-signed. For example, the system's VM-hosted web server and the client browser-based user interface communicate with each other using the system-generated X.509 certificates exchanged over TLS.

The Certificate Management page (Administration > Certificate Management) allows you to view, upload, and modify certificates. Certificate management page displays the default certificates provided by Cisco Crosswork Planning.

Figure 1. Certificate management page
Certificate management page

Certificate types and usage

Certificates in Cisco Crosswork Planning are classified into various roles with different properties depending on their use case as shown in this table.

Role

UI name

Description

Server

Client

Allowed operations

Default expiry

Allowed expiry

Crosswork Internal TLS

Crosswork-Internal- Communication

  • Generated and provided by Crosswork.

  • This trust-chain is available in the UI (including the server and client leaf certificates) and is created by Crosswork during initialization.

  • Allows mutual and server authentication.

Crosswork

Crosswork

Download

5 years

Crosswork Web Server

Crosswork-Web-Cert

Server Authentication

  • Generated and provided by Crosswork.

  • Provides communication between the user browser and Crosswork.

  • Allows server authentication.

Crosswork Web Server

User Browser or API Client

  • Upload

  • Download

5 years

30 days to 5 years

Crosswork Device Syslog

Crosswork-Device-Syslog
  • Generated and provided by Crosswork.

  • Allows server authentication.

Device

Download

5 years

There are two category roles in Crosswork:

  • Roles that allow you to upload or download trust chains only

  • Roles that allow you to upload or download both the trust chain and an intermediate certificate and key

Add a new certificate

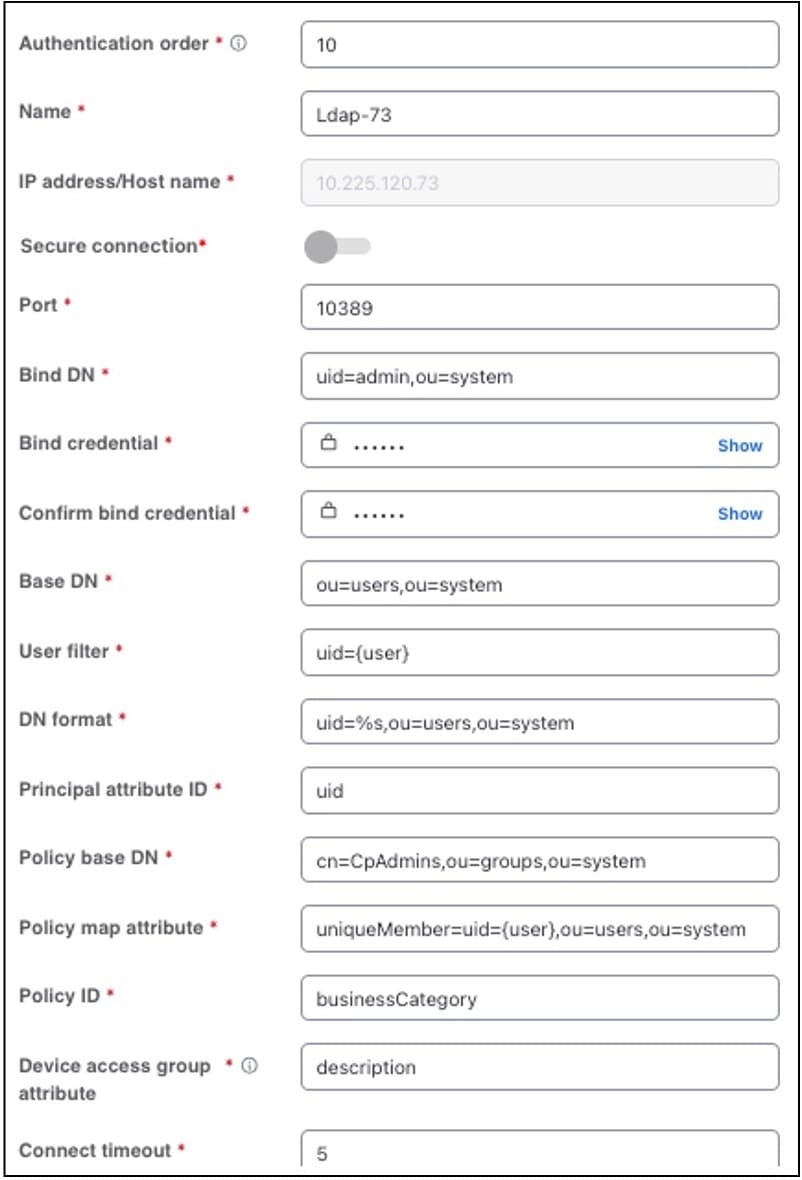
This topic describes how to add a new certificate for the Secure LDAP communication role.

In this process, you upload the trust chain of the secure LDAP certificate. This trust chain is used by Crosswork to authenticate the secure LDAP server. Once this trust chain is uploaded and propagated within Crosswork, you can add the LDAP server (see Configure LDAP servers) and associate the certificate.


Note


Cisco Crosswork does not receive a web certificate directly. It accepts an intermediate CA and intermediate key to create a new web certificate, and apply it to the Web Gateway.


Before you begin

  • Ensure that the certificate file is in Privacy Enhanced Mail (PEM) format and easily accessible.

  • Uploaded Trust chain files may contain the entire hierarchy (root CA and intermediate certificates) in the same file. In some cases, multiple chains are also allowed in the same file..

  • Ensure the intermediate keys are either in the PKCS1 or PKCS8 format.

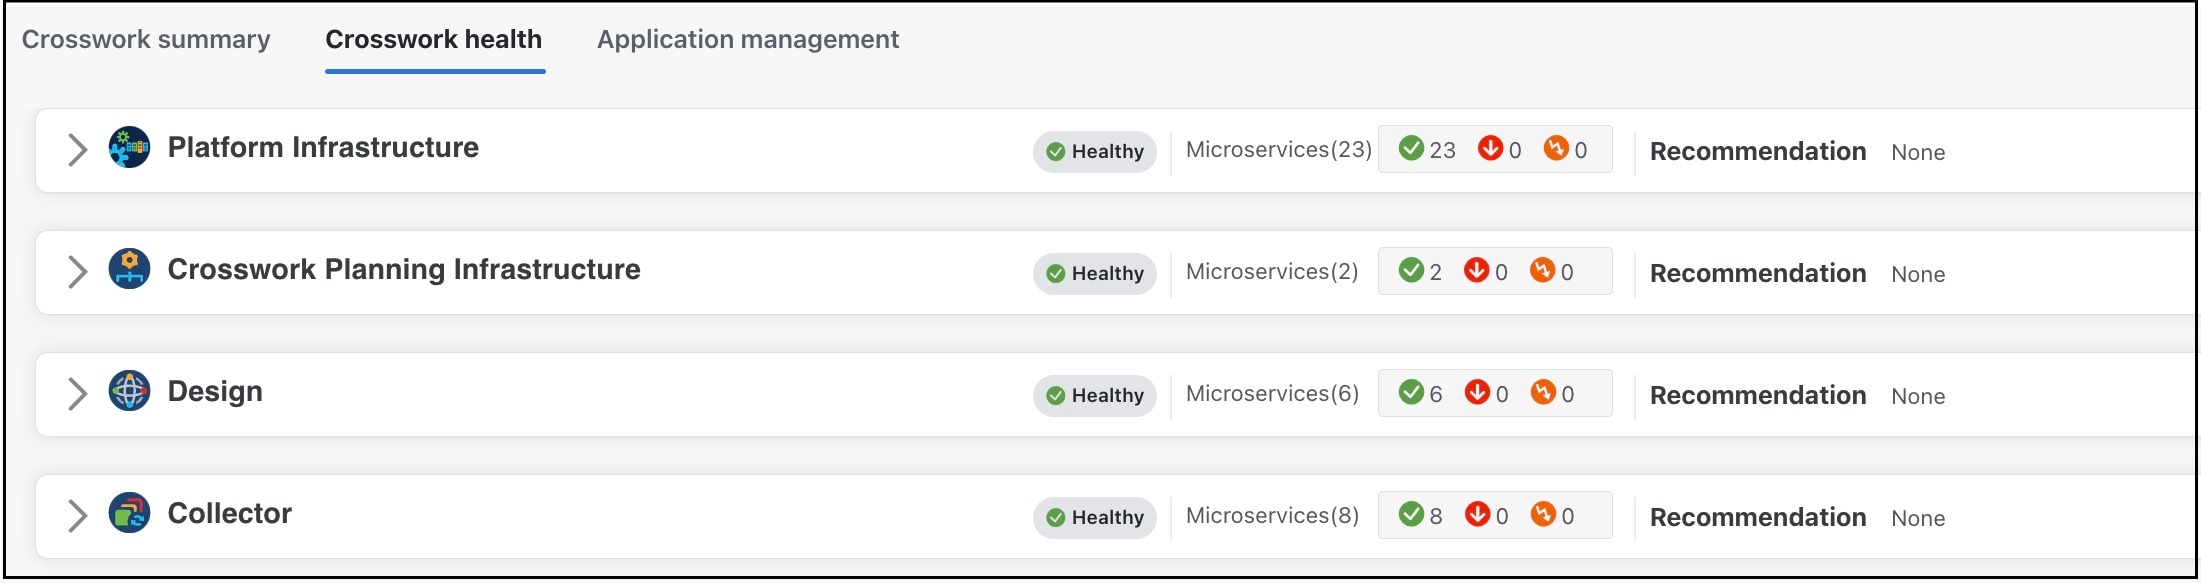
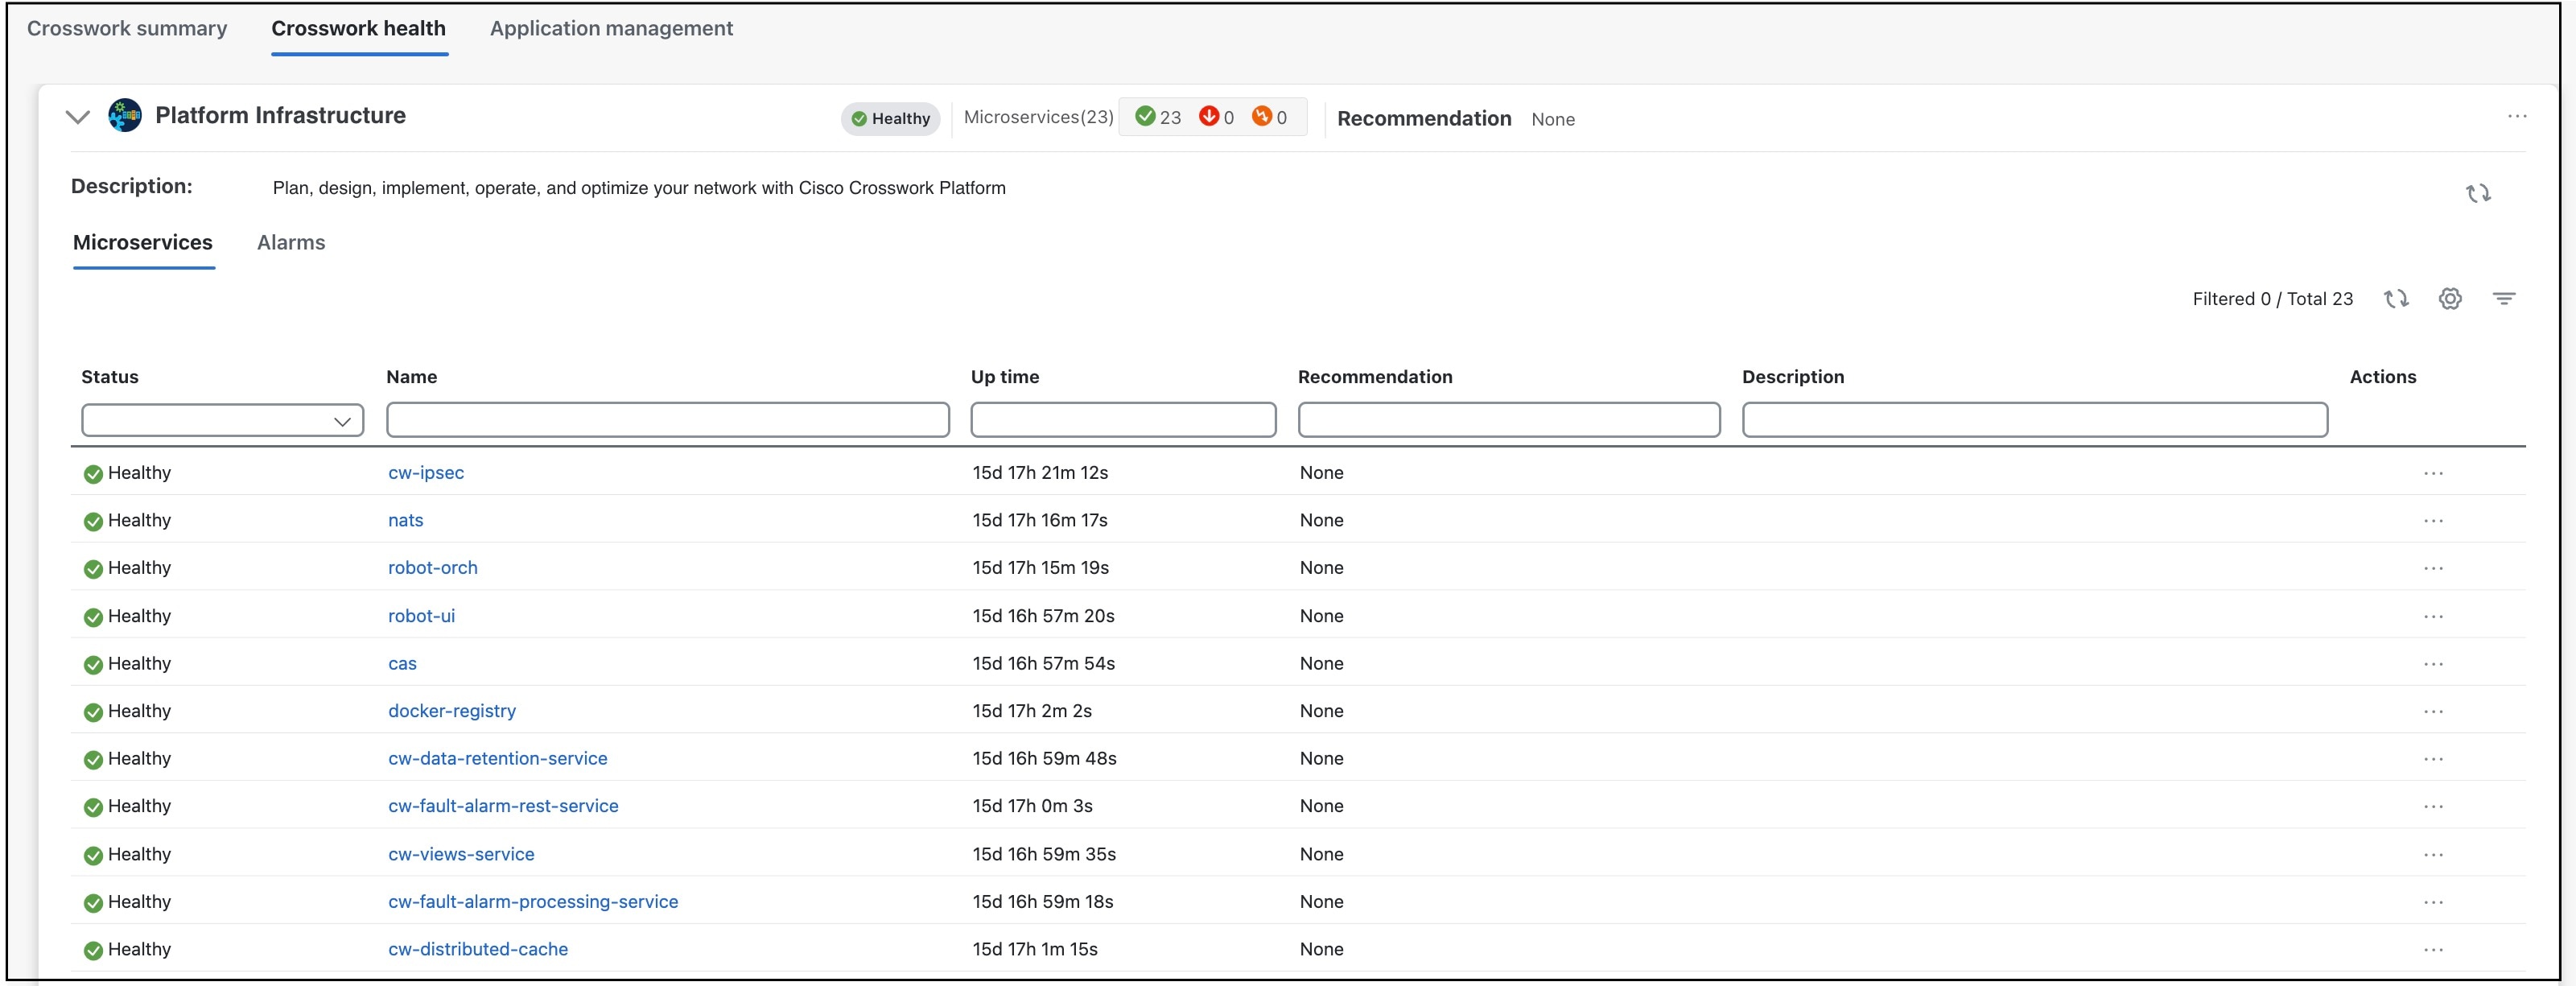
  • Ensure that the tyk service is in a healthy state.

  • For information on certificate types and usage, see Certificate types and usage.

Procedure


Step 1

From the main menu, choose Administration > Certificate Management and click Add icon.

Step 2

In the Certificate name field, enter a unique name for the certificate.

Step 3

From the Certificate role drop-down list, select Secure LDAP communication..

Note


Even though UI displays several other options, only Secure LDAP communication is applicable for Cisco Crosswork Planning.

Step 4

Click Browse and navigate to the certificate trustchain.

Step 5

Click Save.


After you upload the certificate, the Crosswork Cert manager accepts, validates, and generates the server certificate. Upon successful validation, an alarm ("Crosswork Web Server Restart") indicates that the certificate will be applied. The Certificate Management UI then logs out automatically and applies the certificate to the Web Gateway. The new certificate can be checked by clicking the lock <Not Secure>/<secure> icon next to https://<crosswork_ip>:30603 in the URL.

Edit a certificate

This topic describes how to edit a certificate in Cisco Crosswork Planning.

You can edit a certificate to

  • add or remove connection destinations

  • upload certificates, or

  • replace expired or misconfigured certificates.

You can edit only the user-provided certificates and web certificates. You cannot modify the other system certificates provided by Cisco Crosswork, and they will not be available for selection.

Before you begin

  • Updating the certificate can disrupt the existing trust chain of certificates used for client authentication if enabled, so proceed with caution.

  • Restart the Crosswork server during this process. The restart will take several minutes to complete.

  • Set the AAA mode to Local to enable client authentication.

Procedure


Step 1

From the main menu, choose Administration > Certificate Management.

The Certificate Management page opens.

Step 2

To update a certificate:

  1. In the Actions column, click on the certificate you want to modify, and select Update certificate.

  2. Enter the appropriate values in the fields based on the certificate you wish to update. Click the icon next to the field for more information.

  3. Click Save to save the changes.

Step 3

To enable the client certificate authentication of a web certificate:

  1. In the Actions column, click on the Crosswork web certificate you want to modify, and select Configure client certificate authentication.

    The Configure Client Authentication page opens.

  2. Check the Enable check box.

    The Certificate schema and OCSP settings appear.

    The OCSP settings are enabled by default, but you can disable it if required. If enabled, you can check the certificate revocation status using the Online Certificate Status Protocol (OCSP).

  3. Select the Certificate schema value.

    • Automatic: Searches for the user principal name (UPN) in the alternate subject name area. If a UPN is not found, the system will use the common name value. This is the default selection.

    • Manual: Searches for the username in the subject area based on the user identity source and the specified regular expression.

  4. (Optional) Select the OCSP value:

    • Automatic: Extracts the responder URL from the certificate and uses it to perform OCSP validation.

    • Manual: You must provide the OCSP responder URL.

  5. Click Save to save the changes.

Step 4

To update certificate and configure client authentication in a single step:

  1. In the Actions column, click on the Crosswork web certificate you want to modify, and select Update certificate & configure client certificate authentication.

    The Update Certificate and Configure Client Authentication page opens.

    Note


    Choosing the combined option to update the certificate and configure client authentication minimizes downtime during the Crosswork server restart, as it occurs only once instead of twice if these actions are performed separately.

  2. Provide the required data according to the instructions in step 2 and step 3.

  3. Click Save to save the changes.


The selected certificate is updated or reconfigured as specified.

Download a certificate

This topic describes how to download a certificate to your local system.

Procedure


Step 1

From the main menu, choose Administration > Certificate Management.

The Certificate Management page opens.

Step 2

Click for the certificate you want to download.

Step 3

To download the root certificate or the intermediate certificate separately, click next to the certificate.

Step 4

To download all the certificates at once, click Export all.


The selected certificate is downloaded to your local system.

Update a web certificate using Certificate Signing Request (CSR)

Starting with version 7.0.1, Cisco Crosswork Planning enables updating web certificates via a Certificate Signing Request (CSR) to enhance trust and security. This approach allows you to obtain a certificate signed by an Enterprise or Commercial CA without exposing the private key outside of Cisco Crosswork Planning.

Before you begin

  • Updating the certificate may disrupt the existing trust chain of certificates used for client authentication if enabled.

  • As part of this process, you need to restart the Crosswork server, which can take several minutes to complete.

  • Set the AAA mode to Local to enable client authentication.

Procedure


Step 1

From the main menu, choose Administration > Certificate Management.

Step 2

Click on the web certificate (Crosswork-Web-Cert) and select Update certificate.

Step 3

Create a CSR to submit to the CA.

  1. Select Create a certificate signing request (CSR) and click Update certificate.

  2. Click Create CSR.

  3. Enter relevant values in the fields. Click next to the field for more information.

    These are the mandatory fields.

    • Common name (CN): By default, this is the Fully Qualified Domain Name (FQDN) of the server, but it can be any unique name that identifies the server. The length should not exceed 64 characters.

    • IP address: This is the Crosswork VIP address utilized in this deployment. Additional IP addresses should only be added if necessary for certificate validation.

    • Key Type: The options are RSA and ECDSA. By default, RSA is selected.

    • Key Size (in bits): The options are 2048, 3072, and 4096. By default, 2048 is selected.

    • Key Digest: The options are SHA-256, SHA-384, SHA-224, and SHA-512. By default, SHA-256 is selected.

  4. Click Create CSR to complete the action.

Step 4

After generating the CSR, click Download to download it. Then, use the CSR to get a signed certificate from your CA.
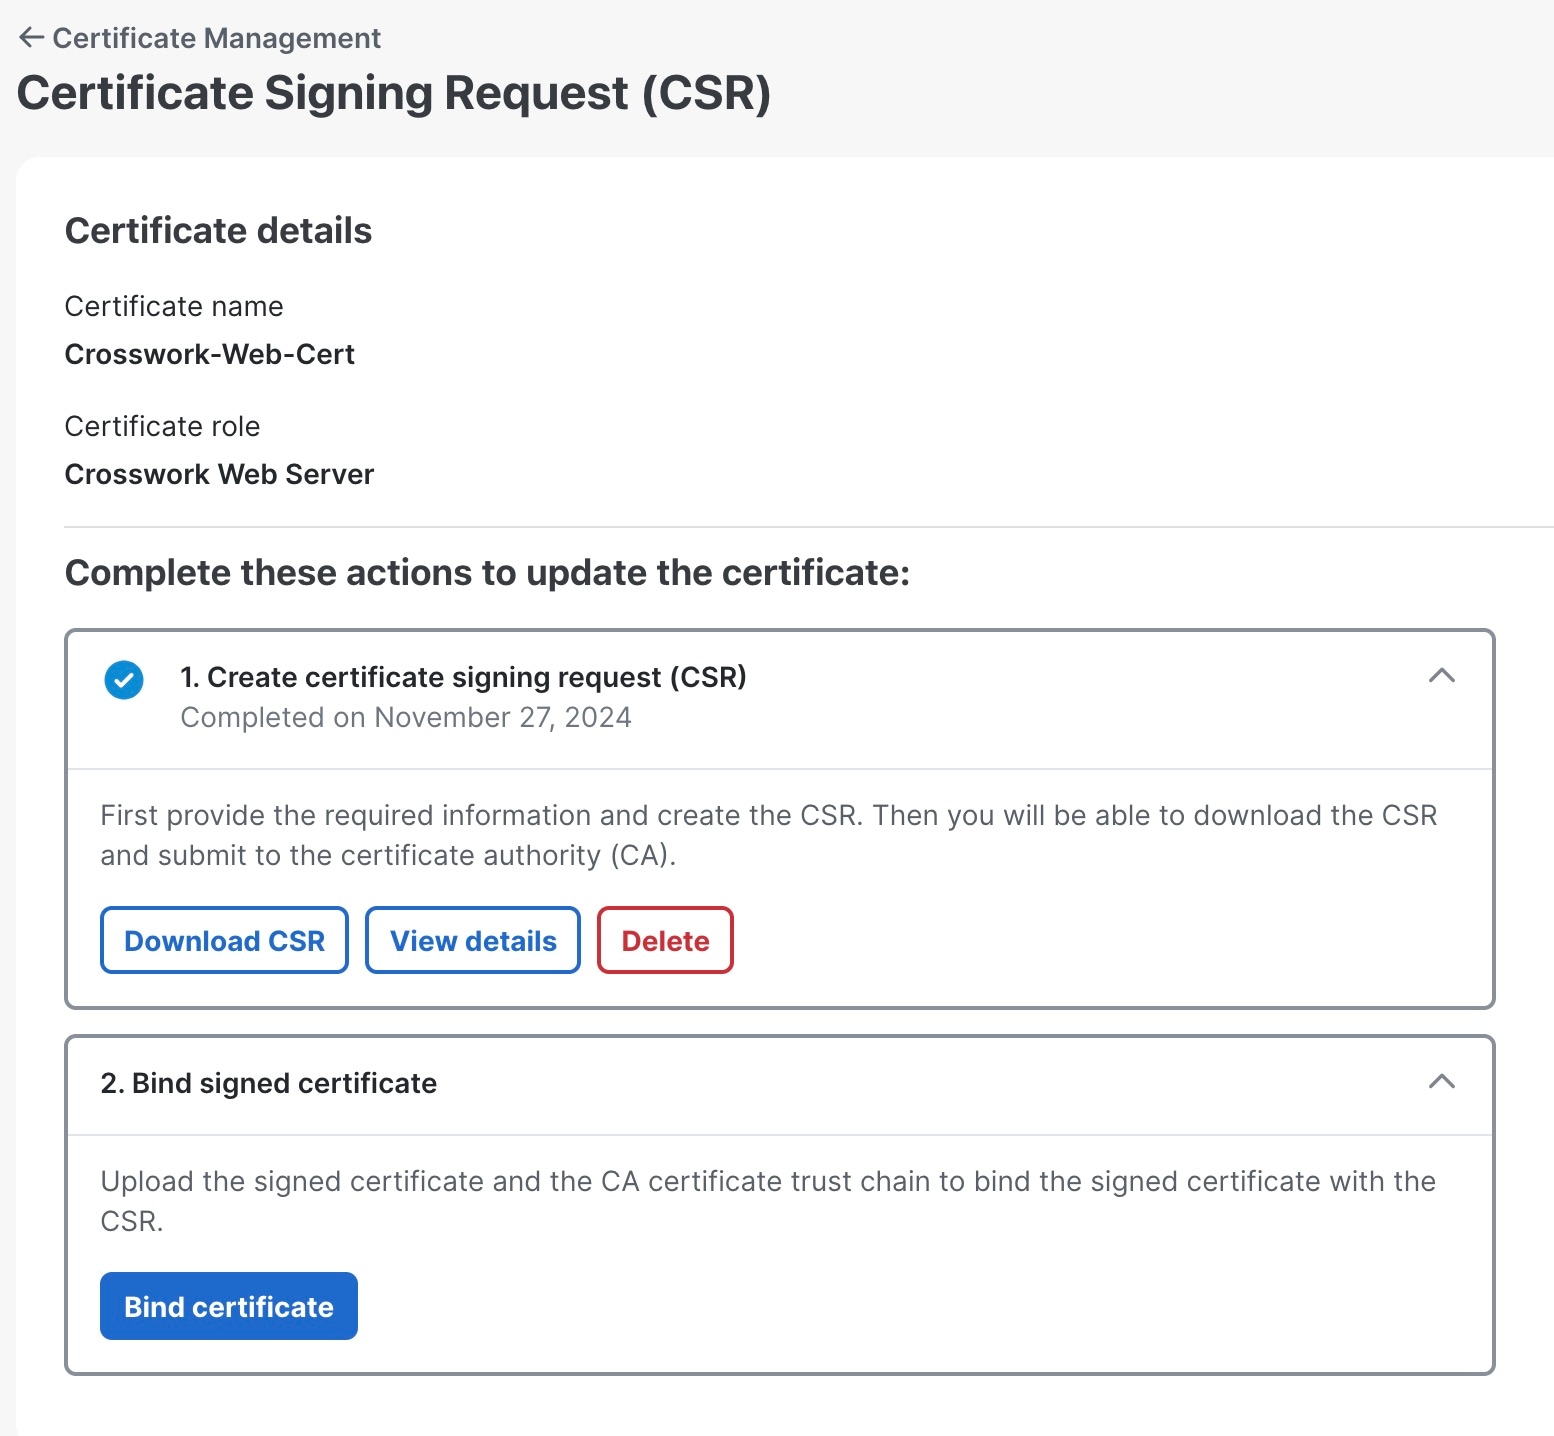
Figure 2. Certificate Signing Request (CSR) page
Certificate Signing Request (CSR) page

Step 5

Upload the CA-signed certificate and the CA certificate trust chain to bind the certificate.

  1. In the Certificate Signing Request (CSR) page, click Bind certificate.

    Figure 3. Bind signed certificate
    Bind signed certificate page
  2. Upload the relevant data in the fields provided. Click next to the field for more information.

    • CA certificate trust chain: This is the certificate trust chain for the web server certificate obtained from the CA.

    • CA signed certificate: This is the final signed certificate for the web server obtained from the CA.

  3. (Optional) Check the Enable check box to configure client certificate authentication.

  4. Click Bind certificate to complete the operation.

    After the bind action is completed, the web certificate is updated. Tyk will then restart with the new web certificate.


The Cisco Crosswork Planning's web certificate is updated with the CA-signed certificate and trust chain after server restart.

Manage users

As a best practice, administrators should create separate accounts for all users. During the creation of a user account, you assign a user role to determine which functionality the user can access. If you are using user roles other than "admin", create the user roles before you add your users (see Create a user role).

Before you begin

Prepare a list of people who will use Cisco Crosswork Planning. Decide on their usernames and preliminary passwords.

Procedure


Step 1

From the main menu, choose Administration > Users and Roles > Users tab. From this page, you can add a new user, edit the settings for an existing user, or delete a user.

Step 2

To add a new user:

  1. Click Add icon and enter the required user details.

  2. Click Save.

Step 3

To edit a user:

  1. Select the check box next to the user name and click Edit icon.

  2. After making changes, click Save.

Step 4

To delete a user:

  1. Select the check box next to the user name and click Delete icon.

  2. In the confirmation dialog box, click Delete.

Step 5

To view the audit log for a user:

  1. Click under the Actions column, and select Audit log.

    The Audit Log page appears for the selected user name. For more information, see View the audit log.


User accounts are created, updated, or deleted as required.

Administrative users created during installation

During installation, Cisco Crosswork Planning creates two special administrative user IDs:

  • The virtual machine administrator , with the username cw-admin, and the default password admin. Data center administrators use this ID to log in to and troubleshoot the VM hosting the Crosswork server.

  • The Cisco Crosswork administrator , with the username admin and the default password admin. Product administrators use this ID to log in to the UI, configure the UI, and perform special operations, such as creating new user IDs.

You must change the default password for both administrative user IDs the first time you use them.

User roles, functional categories, and permissions

In Cisco Crosswork Planning, each user account is assigned a user role. This user role controls what the user can do when using the platform and its applications. A user role defines access by combining named functional categories and permissions assigned to each category.

User roles

The Roles page lets users with the appropriate privileges define custom user roles.

As with the default admin role, a custom user role consists of

  • a unique name, such as “Operator” or “admin”

  • one or more selected, named functional categories, which control whether a user with that role has access to the APIs needed to perform specific Cisco Crosswork functions controlled by that API, and

  • one or more selected permissions, which control the scope of what a user with that role can do in the functional category.

For a user role to have access to a functional category, you must select both the category and its underlying API on the Roles page for that role. If a functional category is not selected for a user role, users assigned to that role will not have access to that functional area.

Functional categories

Some functional categories group multiple APIs under one category name. For example, the “AAA” category controls access to the Password Change, Remote Authentication Servers Integration, and Users and Role Management APIs. With this type of category, you can deny access to some of the APIs by leaving them unselected and provide access to others by selecting them. For example, to create an “Operator” role with permission to change their own password, but not to view or change the settings for your installation’s integration with remote AAA servers, or to create new users and roles, select the “AAA” category name. Then, uncheck the “Remote Authentication Server Integration API” and “Users and Role Management API” check boxes.

Permissions

For each role with a selected category, you can define permissions to each underlying functional API on the Roles page.

There are three permission types available per API.

  • Read: lets the user view and interact with the objects controlled by that API, but not change or delete them.

  • Write: lets the user view and change the objects controlled by that API, but not delete them.

  • Delete: lets the user role delete privileges over the objects controlled by that API. Note that the delete permission does not override basic limitations set by the Cisco Crosswork platform and its applications.

Rules for permissions

Although you can mix permissions as you wish, note these rules for permissions.

  • If you select an API for user access, you must provide at least “Read” permission to that API.

  • When you select an API for user access, Cisco Crosswork assumes you want the user to have all permissions on that API and selects all three permissions automatically.

  • If you uncheck all the permissions, including “Read”, Cisco Crosswork assumes that you want to deny access to the API, and unselect it for you.

Recommendations

Cisco recommends these best practices when creating custom user roles.

  • Restrict "Delete" permissions to admin users who have explicit administrative responsibility for maintaining and managing the Cisco Crosswork deployment as a whole.

  • Roles for developers working with all Cisco Crosswork APIs need the same permissions as admin users.

  • Assign at least "Read" and "Write" permissions to roles for users who are actively engaged in managing the network using Cisco Crosswork.

  • Assign read-only access to roles for users who only need to see the data to support their work as system architects or planners.

This table describes some sample custom user roles you should consider creating.

Table 1. Sample custom user roles

Role

Description

Categories/API

Privileges

Operator

Active network manager

All

Read, Write

Monitor

Monitors alerts only

Cisco Crosswork Planning Design and Collector

Read only

API Integrator

All

All

All


Note


Admin role must include permissions for Read, Write, and Delete. Read-write roles need to include both Read and Write permissions.


Create a user role

This topic describes how to create new user roles.

The local "admin" role enables access to all functionality. The system creates this role during installation and you cannot change or delete it. However, you can assign its privileges to new local users. Local users with administrator privileges can create new users as needed (see Manage users). New users created this way can perform only the tasks associated with their assigned user role.

Only local users can create or update user roles. External users authenticated by TACACS, RADIUS, or LDAP cannot modify user roles.

Procedure

Step 1

From the main menu, choose Administration > Users and Roles > Roles.

The Roles page has a Roles pane on the left side and a corresponding Global API permissions tab on the right side. This tab shows the grouping of user permissions for the selected role.

Step 2

In the Roles pane, click Add icon to display a new role entry.

Step 3

Enter a unique name for the new role.

Step 4

To define the user role's privilege settings, click the Global API permissions tab and follow these steps:

  1. Select the check box for every API that users with this role can access.

    The APIs are grouped logically based on their corresponding application.

  2. For each API, define whether the role has Read, Write, or Delete permission by checking the appropriate check boxes. You can also select an entire API group, such as AAA. All the APIs under the group will be selected with Read,Write, and Delete permissions preselected.

Step 5

Click Save to create the new role.


The new user role is now available in the Roles list and can be assigned to user IDs.

What to do next

To assign the new user role to one or more user IDs, edit the Role setting for the user IDs (see Edit a user role).

Clone a user role

Cloning an existing user role is the same as creating a new user role, except that you need not set privileges for it. If you like, you can let the cloned user role inherit all the privileges of the original user role.

Cloning user roles is a handy way to create and assign many new user roles quickly. You can

  • clone an existing role multiple times

  • let the cloned user role inherit all the privileges of the original user role

  • assign a name that indicates the role you want a group of users to perform, and

  • edit user IDs of the group of users to assign their new role (see Manage users). Later, edit the roles themselves to give users specific privileges (see Edit a user role).


Note


Some API permissions are predefined in the system admin role and remain unchanged in the cloned role. For example, the system admin role includes the default Read and Write permissions for the Alarms & Events API. These permissions are not configurable for either the original or cloned admin roles.


Procedure

Step 1

From the main menu, choose Administration > Users and Roles > Roles.

Step 2

Click an existing role.

Step 3

Click to create a new duplicate entry in the Roles pane with all the permissions of the original role.

Step 4

Enter a unique name for the cloned role.

Step 5

(Optional) Define the role's settings:

  1. Select the check box for every API that the cloned role can access.

  2. For each API, define whether the clone role has Read, Write, and Delete permission by checking the appropriate check boxes. You can also select an entire API group, such as AAA. All APIs under the group will be selected with Read, Write, and Delete permissions preselected.

Step 6

Click Save to create the newly cloned role.


The newly cloned role is now available in the Roles pane.

Edit a user role

This topic describes how to change the permissions associated with a user role.

Users with administrator privileges can quickly change the privileges of any user role other than the default "admin" role.

Before you begin

Confirm you have administrator privileges.

Procedure

Step 1

From the main menu, choose Administration > Users and Roles > Roles.

Step 2

Select an existing role from the left side. The Global API Permissions page on the right side displays the permission settings for the selected role.

Step 3

Define the role's settings:

  1. Select the check box for every API that users with this role can access.

  2. For each API, define whether the role has Read, Write, or Delete permission by checking the appropriate check boxes. You can also select an entire API group, such as AAA. All the APIs under the group will be selected with Read, Write, and Delete permissions preselected.

Step 4

Click Save to save the changes.


The selected user role is updated with the new permissions.

Delete a user role

This topic describes how to delete a user role that is no longer needed.

Users with administrator privileges can delete any user role that is not the default "admin" user role or that is not currently assigned to a user ID. To delete a role that is currently assigned to any users, you must first reassign those users to a different user role.

Before you begin

Confirm you have administrator privileges.

Procedure

Step 1

From the main menu, choose Administration > Users and Roles > Roles.

Step 2

Select the user role you want to delete.

Step 3

Click Delete icon.

Step 4

Click Delete in the confirmation dialog box.


The selected user role is deleted and is no longer available for assignment.

Global API permissions

This table describes the various global API permissions in Cisco Crosswork Planning.

Table 2. Global API permission categories

Category

Global API permissions

Description

AAA

Password Change

Provides permission to manage passwords. The Read and Write permissions are automatically enabled by default. The Delete permission is not applicable to the password change operation. You cannot delete a password, you can only change it.

Remote Authentication Servers Integration

Provides permission to manage remote authentication server configurations in Cisco Crosswork Planning. You must have Read permission to view/read configuration, and Write permission to add/update the configuration of any external authentication server (for example, LDAP, TACACS+) into Cisco Crosswork Planning. The Delete permissions are not applicable for these APIs.

Users and Roles Management

Provides permission to manage users, roles, sessions, and password policies. Supported operations include

  • creating a new user or role

  • updating a user or role

  • deleting a user or role

  • updating task details for a user or role

  • managing sessions (idle-timeout, max session)

  • updating password policy

  • retrieving password tooltip help text

  • retrieving active sessions, and so on

The Read permission allows you to view the content, the Write permission allows you to create and update, and the Delete permission allows you to delete a user or role.

Know my role - Read only

Enables the logged in users to view their permissions or get new permissions.

Write and Delete permissions are not applicable for these APIs.

User Preferences

Allows you to manage the dashlets in the homepage.

The Read permission allows you to view dashboards, the Write permission allows you to edit dashboards, and the Delete permission allows you to delete dashboards.

Administrative Operations

Diagnostic Information

Alarms and Events

Alarms and Events

Allows you to manage system alarms.

Note


The alarms and events associated with the Cisco Crosswork Planning applications are not supported.

Crosswork Planning

Platform

Platform APIs

The Read permission allows you to fetch the server status, node information, application health status, collection job status, certificate information, backup and restore job status, and so on.

The Write permission allows you to

  • enable or disable the xFTP server

  • manage node information (set the login banner, restart a microservice, and so on)

  • manage certificates (export trust store and intermediate key store, create or update certificate, configure the web server, and so on)

  • perform normal/data-only backup and restore operations, and

  • manage applications (activate, deactivate, uninstall, add package, and so on).

The Delete permission allows you to delete a VM (identified by an ID) and remove applications from the software repository.

Views

Manages views in Cisco Crosswork Planning Design.

The Read permission allows you to see views, the Write permission allows you to create or update views, and the Delete permission will enable delete capabilities.

Manage active sessions

This topic describes how to monitor and end sessions of the currently logged-in users.

As an administrator, you can

  • monitor and manage active sessions in the Cisco Crosswork Planning UI

  • terminate a user session, and

  • view the user audit log.


Attention


  • Non-admin users with permission to terminate can terminate their own sessions.

  • Non-admin users with read-only permission can only collect the audit log for their sessions.

  • Non-admin users without read permissions cannot view the Active sessions page.


Before you begin

Confirm you have administrator privileges.

Procedure


Step 1

From the main menu, choose the Administration > Users and Roles > Active sessions tab.

The Active sessions tab displays all currently active sessions with details such as user name, login time, and login method.

Note


The Source IP column appears only when you check the Enable source IP for auditing check box and log in again to Cisco Crosswork Planning. This option is available in the Source IP section of the Administration > AAA > Settings page.

Step 2

To terminate a user session:

  1. In the Actions column, click and select Terminate.

  2. Click Terminate in the confirmation dialog box.

    Attention

     
    • We recommend to use caution while terminating a session. A user whose session is terminated will not receive any prior warning and will lose any unsaved work.

    • Any user whose session is terminated will see this message:

      "Your session has ended. Log into the system again to continue."

Step 3

To view the audit log for a user, in the Actions column, click and select Audit log.

The Audit Log page appears for the selected user. For more information on Audit Logs, see View the audit log.


Setting up user authentication through external servers

Summary

In addition to supporting local users, Cisco Crosswork Planning supports external authentication through integration with the TACACS+, LDAP, and RADIUS servers.

The key components involved in the process are:

  • TACACS+, LDAP, and RADIUS servers: External servers that provide user authentication.

  • User roles: Access privileges assigned to users authenticated via TACACS+, LDAP, or RADIUS.

  • Single Sign-on (SSO): An authentication method that allows logging in with a single ID and password to multiple related but independent software systems.

Workflow

These are the stages of setting up user authentication through external servers.

  1. Configure the TACACS+, LDAP, and RADIUS servers.
  2. Create the roles that are referenced by the TACACS+, LDAP, and RADIUS users.
  3. Configure AAA settings.
  4. Enable SSO for authentication of TACACS+, LDAP, and RADIUS users. For more information, see Enable SSO authentication.

Caution: Authentication changes interrupt all new logins

Any operations performed according to the instructions in subsequent sections on external authentication servers affect all new logins to the Crosswork UI. To minimize session interruption, perform and submit all your external server authentication changes in a single session.

Note: Permissions for the AAA server page

  • The AAA server page operates in bulk update mode, updating all the servers are updated in a single request. Grant write permission for "Remote Authentication Servers Integration API" only to users authorized to delete servers.

  • A user with only Read and Write permissions (without "Delete" permission) can still delete the AAA server details from Cisco Crosswork because delete operations are part of "Write" permissions. For more information, see Create a user role.

  • While adding, editing, or deleting AAA servers, wait a few minutes between changes. Making frequent AAA changes without adequate intervals may cause external login failures.

Configure TACACS+ servers

This topic describes how to add, update, or remove TACACS+ authentication servers to control user and device authentication in Cisco Crosswork Planning.

Cisco Crosswork Planning supports authentication of users via TACACS+ servers. You can integrate Crosswork with a standalone server (such as Open TACACS+) or with an application like Cisco ISE (Identity Services Engine). Integrating with TACACS+ servers helps centralize and control access to network resources.

Before you begin

In the TACACS+ server (standalone or Cisco ISE), configure relevant parameters such as user role, device access group attribute, shared secret format, shared secret value before adding the server to Cisco Crosswork Planning. For more information on Cisco ISE procedures, see the latest Cisco Identity Services Engine Administrator Guide.

Procedure


Step 1

From the main menu, choose Administration AAA Servers TACACS+ .

Step 2

To add a TACACS+ server:

  1. Click Add icon.

  2. Enter the required TACACS+ server details. For a description of the fields, see TACACS+ server configuration options.

  3. Click Add.

  4. Click Save.

    A warning message prompts you to restart the server to update the changes. Click Save changes to confirm.

Step 3

To edit a TACACS+ server:

  1. Select the TACACS+ server and click Edit icon.

  2. After making the desired changes, click Update.

Step 4

To delete a TACACS+ server:

  1. Select the TACACS+ server and click Delete icon.

    The Delete server-IP-address dialog box opens.

  2. Click Delete to confirm.


The TACACS+ server settings are saved and authentication via TACACS+ is enabled.

TACACS+ server configuration options

This section describes TACACS+ server configuration fields.

Table 3. Field descriptions

Field

Description

Authentication order

Specify a unique priority value to set precedence in the authentication request. The order can be any number from 10 to 99. Numbers below 10 are system reserved.

By default, 10 is selected.

IP address

Enter the IP address of the TACACS+ server (if IP address is selected).

DNS name

Enter the DNS name (if DNS name is selected). Only IPv4 DNS names are supported.

Port

The default TACACS+ port number is 49.

Shared secret format

Shared secret for the active TACACS+ server. Select ASCII or Hexadecimal.

Shared secret and

Confirm shared secret

Enter the plain text shared secret for the active TACACS+ server. The format of the text you enter must match the selected format (ASCII or Hexadecimal).

For Crosswork to communicate with the external authentication server, ensure the Shared Secret parameter you enter on this page matches the shared secret value configured on the TACACS+ server.

Service

Enter the value of the service you are attempting to gain access to. For example, "raccess".

This field is verified only for standalone TACACS+. In case of Cisco ISE, you can enter a junk value. Do not leave the field blank.

Policy ID

Enter the user role that you created in the TACACS+ server.

Note


If you try to log in to Cisco Crosswork Planning as a TACACS+ user before creating the required user role, you will get the error message: "Key not authorized: no matching policy".

If this occurs, follow these steps.

  1. Close the browser.

  2. Log in as a local admin user and create the missing user roles in the TACACS+ server.

  3. Log back in to Cisco Crosswork Planning using the TACACS+ user credentials.

Device access group attribute

Enter the device access group attribute value based on the key used for the device access group in the (ISE/Standalone) TACACS+ server attributes. These values can be one or more comma-separated entries.

In the TACACS+ context, the Device Access Group attribute is typically a custom or authorization attribute that the TACACS+ server sends back to the network device. This attribute specifies which group of network devices or which level of device access policy applies to the authenticated user. The Device Access Group attribute works in sync with the policy ID to define user permissions across devices.

Retransmit timeout

Enter the timeout value. The maximum timeout is 30 seconds.

Retries

Specify the number of authentication retries allowed.

Authentication type

Select the authentication type for TACACS+:

  • PAP: Password Authentication Protocol, a protocol where two entities share a password in advance and use the password as the basis of authentication.

  • CHAP: Challenge-Handshake Authentication Protocol, which requires both the client and server to know the plain text of the secret, although it is never sent over the network. CHAP provides greater security than PAP.

Configure LDAP servers

This topic describes how to configure the LDAP server settings in Cisco Crosswork Planning to enable user authentication via LDAP servers.

LDAP servers, including OpenLDAP, Active Directory, and secure LDAP, are used to authenticate users for network management. Cisco Crosswork Planning can use these servers to centralize directory management and enforce access policies. Secure LDAP requires a certificate to enable encrypted communication.

Before you begin

  • Configure relevant parameters, such as Bind DN, Policy baseDN, Policy ID, and so on in the LDAP server.

  • For secure LDAP, you must add a "Secure LDAP Communication "certificate before adding the LDAP server. For more details on adding certificates, see Add a new certificate.

Procedure


Step 1

From the main menu, choose Administration > AAA > Servers > LDAP.

Step 2

To add an LDAP server:

  1. Click Add icon.

  2. Enter the required LDAP server details. For a description of the fields, see LDAP server configuration options.

  3. Click Add.

  4. Click Save.

    A warning message prompts you to restart the server to update the changes. Click Save changes to confirm.

Step 3

To edit an LDAP server:

  1. Select the LDAP server and click Edit icon.

  2. After making the desired changes, click Update.

Step 4

To delete an LDAP server:

  1. Select the LDAP server and click Delete icon.

  2. Click Delete to confirm.


The LDAP server settings are saved and authentication via LDAP is enabled.

LDAP server configuration options

This section describes LDAP server configuration fields.

Table 4. Field descriptions

Field

Description

Authentication order

Specify a unique priority value to assign precedence in the authentication request. The order can be any number from 10 to 99. Values below 10 are reserved for system use.

By default, 10 is selected.

Name

Enter the name of the LDAP handler.

IP address/Host name

Enter the LDAP server IP address or host name.

Secure connection

Enable this if you want to connect to the LDAP server via the SSL communication. When enabled, select the secure LDAP certificate from the Certificate drop-down list.

Note


You must add the secure LDAP certificate in the Certificate Management screen before configuring the secure LDAP server.

This field is disabled by default.

Port

The default LDAP port number is 389. If Secure Connection SSL is enabled, the default LDAP port number is 636.

Bind DN

Enter the database login access details. Bind DN allows users to log in to the LDAP server.

Bind credential and

Confirm bind credential

Enter the username and password to login to the LDAP server.

Base DN

Base DN is the starting point used by the LDAP server to search for user authentication within your directory.

User filter

This filter is used for searching users.

DN format

Enter the format used to identify the user in base DN.

Principal attribute ID

This value represents the UID attribute in the LDAP server user profile under which a particular username is organized.

Policy baseDN

This value represents the role mapping for user roles within your directory.

Policy map attribute

This identifies the user under the policy base DN.

This value maps to the userFilter parameter in your LDAP server attributes.

Policy ID

Specify the user role you created in the LDAP server. The Policy ID is a unique key that the LDAP server uses to identify and retrieve the user role assigned to an authenticated user. This value must match the user role configured on the LDAP server.

In Cisco Crosswork Planning, this field corresponds to the policy_id.

Note


If you try to log in to Cisco Crosswork Planning as a LDAP user before creating the required user role, you will get the error message: "Login failed, policy not found. Please contact the Network Administrator for assistance.". To avoid this error, ensure to create the relevant user roles in the LDAP server, before setting up a new LDAP server in Cisco Crosswork Planning.

Device access group attribute

Enter the device access group attribute value based on the key used for the device access group in the LDAP server attributes. These values can be one or more comma-separated entries.

In the LDAP context, the Device Access Group attribute is typically a custom or authorization attribute that the LDAP server sends back to the network device. This attribute specifies which group of network devices or which level of device access policy applies to the authenticated user. The Device Access Group attribute works in sync with the policy ID to define user permissions across devices.

Connection timeout

Enter the timeout value. The maximum timeout is 30 seconds.

Example

This example shows the parameters that are entered for secure LDAP configuration in Cisco Crosswork Planning. The relevant parameters are configured in the LDAP server.

These are some of the key points:

User settings in the Cisco Crosswork Planning UI

In this example, the existing default user role admin is used. You can find this setting on the Administration > Users and Roles > Users page.

  • The user name, user role, first name, and last name are set to admin.

  • The device access group is configured in the LDAP server as description=’ALL-ACCESS’.

User settings
LDAP server details

This section describes the user's LDAP server configuration details.

  1. System base DN: ou=system

  2. The admin user ‘admin’ has these attributes:

    1. DN: uid=admin,ou=system

    2. password: secret

  3. Users group with DN: ou=users,ou=system

  4. The admin user John belongs to the ‘users’ group and has these attributes:

    1. DN: uid=john,ou=users,ou=system

    2. password: john

    3. mail: John@test.com

    4. display name: John

    5. description: ALL-ACCESS


      Important


      The description must be equal to the Device access groups value for the 'admin' user in Cisco Crosswork Planning (see User settings in the Cisco Crosswork Planning UI).


  5. The group ‘CpAdmins’ has these attributes:

    1. DN: cn=CpAdmins,ou=groups,ou=system

    2. uniqueMember=uid=john,ou=users,ou=system

      This indicates the user’s group membership. This value must match with admin user’s DN (see Section 4(a)).

    3. businessCategory: admin

      This indicates the role that needs to be assigned to all users belonging to this group. This value must match with the Role value for the admin user in Cisco Crosswork Planning (see User settings in the Cisco Crosswork Planning UI).

Corresponding LDAP configuration in the UI

This section describes the corresponding LDAP configuration in the Cisco Crosswork Planning UI.

Figure 4. LDAP configuration in the Cisco Crosswork Planning UI
LDAP configuration in UI

Parameter

Value

Authentication order

10 (default)

Name

Ldap-73

Custom name for the LDAP configuration of a server.

IP Address/Host name

10.225.120.73

LDAP server IP address.

Port

10389

LDAP server port.

Bind DN

uid=admin,ou=system

Admin user DN, as described in Section 2(a).

Bind credential

secret

Admin user password, as described in Section 2(b).

Confirm bind credential

secret

Admin user password, as described in Section 2(b).

Base DN

ou=users,ou=system

The user’s group DN for authentication from where the users must be searched, as described in Section 3.

User filter

uid={user}

User search filter attribute ‘uid’, as described in Section 4.

DN format

uid=%s,ou=users,ou=system

User’s DN format, as described in Section 4.

Principal attribute ID

uid

As described in Section 4.

Policy base DN

cn=CpAdmins,ou=groups,ou=system

The group that has the role mapping attribute (admin) and under which the users will have group membership, as described in Section 5(a).

Policy map attribute

uniqueMember=uid={user},ou=users,ou=system

The user’s group membership attribute under the ‘CpAdmins’ user group (Policy base DN), as described in Section 5(b).

Policy ID

businessCategory

The user role attribute (admin) under the ‘CpAdmins’ group (Policy base DN), as described in Section 5(c). This value must match with the CpAdmins group’s attribute having ‘admin’ value.

Device access group attribute

description

The device group attribute under the user DN, as described in Section 4(e). This value must match with the user DN attribute having value ‘ALL-ACCESS’.

Configure RADIUS servers

This topic describes how to configure the RADIUS server settings in Cisco Crosswork Planning to enable user authentication via RADIUS servers.

Crosswork supports the use of RADIUS servers to authenticate users. You can also integrate Crosswork with an application such as Cisco ISE (Identity Service Engine) to authenticate using the RADIUS protocols.

Before you begin

In the RADIUS server (standalone or Cisco ISE), configure relevant parameters, such as user role, device access group attribute, shared secret format, shared secret value in the RADIUS server before adding the server to Cisco Crosswork Planning. For more information on Cisco ISE procedures, see the latest Cisco Identity Services Engine Administrator Guide.

Procedure


Step 1

From the main menu, choose Administration AAA Servers RADIUS .

Step 2

To add a RADIUS server:

  1. Click Add icon.

  2. Enter the required RADIUS server details. For a description of the fields, see RADIUS server configuration options.

  3. Click Add.

  4. Click Save.

    A warning message prompts you to restart the server to update the changes. Click Save changes to confirm.

Step 3

To edit a RADIUS server:

  1. Select the RADIUS server and click Edit icon.

  2. After making the desired changes, click Update.

Step 4

To delete a RADIUS server:

  1. Select the RADIUS server and click Delete icon.

    The Delete server-IP-address dialog box opens.

  2. Click Delete to confirm.


The RADIUS server settings are saved and authentication via RADIUS is enabled.

RADIUS server configuration options

This section describes RADIUS server configuration fields.

Table 5. Field descriptions

Field

Description

Authentication order

Specify a unique priority value to assign precedence in the authentication request. The order can be any number from 10 to 99. Numbers below 10 are system reserved.

By default, 10 is selected.

IP address

Enter the IP address of the RADIUS server (if IP address is selected).

DNS name

Enter the DNS name (if DNS name is selected). Only IPv4 DNS names are supported.

Port

The default RADIUS port number is 1645.

Shared secret format

Shared secret for the active RADIUS server. Select ASCII or Hexadecimal.

Shared secret and

Confirm shared secret

Enter the plain text shared secret for the active RADIUS server. The format of the text you enter must match the selected format (ASCII or Hexadecimal).

For Crosswork to communicate with the external authentication server, ensure the Shared Secret you enter on this page matches the shared secret value configured on the RADIUS server.

Service

Enter the value of the service you are attempting to gain access to. For example, "raccess".

Policy ID

Enter the user role that you created in the RADIUS server.

Note


If you try to log in to Cisco Crosswork Planning as a RADIUS user before creating the required user role, you will get the error message: "Key not authorized: no matching policy".

If this occurs, follow these steps.

  1. Close the browser.

  2. Log in as a local admin user and create the missing user roles in the RADIUS server.

  3. Log back in to Cisco Crosswork Planning using the RADIUS user credentials.

Device access group attribute

Enter the device access group attribute value based on the key used for the device access group in the RADIUS server attributes. These values can be one or more comma-separated entries.

In the RADIUS context, the Device Access Group attribute is typically a custom or authorization attribute that the RADIUS server sends back to the network device. This attribute specifies which group of network devices or which level of device access policy applies to the authenticated user. The Device Access Group attribute works in sync with the policy ID to define user permissions across devices.

Retransmit timeout

Enter the timeout value. The maximum timeout is 30 seconds.

Retries

Specify the number of authentication retries allowed.

Authentication type

Select the authentication type for RADIUS:

  • PAP: Password Authentication Protocol, a protocol where two entities share a password in advance and use the password as the basis of authentication.

  • CHAP: Challenge-Handshake Authentication Protocol, which requires both the client and server to know the plain text of the secret, although it is never sent over the network. CHAP provides greater security than PAP.

Single Sign-on (SSO)

Single Sign-on (SSO) is an authentication method that
  • enables you to log in with a single ID and password to any of several related, yet independent, software systems.

  • allows you to log in once and access the services without reentering authentication factors.

  • allows Cisco Crosswork to act as Identity Provider (IDP) and provides authentication support for the relying service providers.

You can also enable SSO for authentication of TACACS+, LDAP, and RADIUS users.

Crosswork supports SSO cross-launch to enable easier navigation with the service provider. Once configured, the URL can be launched using the launch icon () located at the top right corner of the window.

Enable SSO authentication

This topic describes how to enable SSO in Cisco Crosswork Planning so you can access the integrated service provider applications using a single set of credentials, streamlining authentication and simplifying navigation between service providers.

Single sign-on (SSO) is an authentication method that lets users log in once and access multiple independent systems without reentering credentials. Cisco Crosswork Planning acts as an Identity Provider (IdP) and supports SSO integration for service provider applications. You can enable SSO for users authenticated via TACACS+, LDAP, and RADIUS. When SSO is configured, users benefit from seamless access and improved security management.


Attention


  • When Cisco Crosswork Planning’s CAS pod is restarting or not running, the login page is not available.

  • The SSO URL from the Identity Provider (IdP) is https://<IP>:30603/crosswork/sso/idp/profile/SAML2/Redirect/SSO, where <IP> represents the Cisco Crosswork Planning's IP address or hostname.


Before you begin

  • Check the Enable source IP for auditing check box on the Administration > AAA > Settings page.

  • Ensure you have the latest service provider metadata to integrate with Cisco Crosswork Planning SSO.

  • Confirm that network connectivity exists between Cisco Crosswork Planning (IdP) and each service provider application.

  • Verify the CAS pod is running and stable.

Procedure

Step 1

From the main menu, choose Administration > AAA > SSO.

The Identity Provider page opens. On this page, you can add service providers, edit their settings, or delete them.

Step 2

To add a new service provider:

  1. Click Add icon.

  2. On the Service Provider page, enter the values in these fields:

    • Name: Enter the name of the service provider entity.

      Note


      If you provide a URL, the Service name entry in the Identity Provider page becomes a hyperlink.

    • Evaluation order: Enter a unique number indicating the order in which the service definition should be considered.

    • Metadata: Click the field or click Browse to navigate to the metadata XML document that describes a SAML client deployment. You can also enter the service provider URL here for cross-launch.

  3. Click Add to finish adding the service provider.

Step 3

Click Save all changes. When prompted, confirm by clicking Save changes.

After you save the settings and log in to the integrated service provider application for the first time, the application redirects to the Cisco Crosswork server. After providing the Crosswork credentials, the service provider application logs in automatically. For all the subsequent application logins, you do not have to enter any authentication details.

Step 4

To edit a service provider:

  1. Select the service provider and click Edit icon.

  2. Update the Evaluation order or Metadata as required.

  3. Click Update to apply the changes.

Step 5

To delete a service provider:

  1. Select the check box next to the service provider and click Delete icon.

  2. Click Delete to confirm.


Single sign-on is enabled for selected service provider applications. Users can authenticate once via Cisco Crosswork Planning and seamlessly access associated applications without reentering authentication factors.

What to do next

  • If Cisco Crosswork Planning is reinstalled or migrated, update the Identity Provider (IdP) metadata in all service provider applications to avoid authentication errors due to metadata mismatch.

  • For first-time users, ensure password change is completed before attempting to log in with a different username. To reset an incomplete session, an administrator must terminate it.

Warning: SSO configuration and login requirements

  • When Crosswork is re-installed or migrated, update the latest IDP metadata from Crosswork to the service provider applications. Otherwise, authentication will fail due to mismatched metadata information.

  • Users logging in for the first time must change their password before switching to a different username. The only workaround is for the administrator to terminate the session.

  • The Cisco Crosswork Planning login page is not rendered when the Central Authentication Service (CAS) pod is restarting or not running.

Configure AAA settings

This topic describes how to control user authentication, authorization, and accounting on the system by configuring AAA settings to enforce security policies and manage user sessions.

Users with relevant AAA permissions can configure the AAA settings. Configure these settings when you need to establish or update how users are authenticated, what resources they can access, and how their activities are tracked. Proper AAA settings help safeguard network resources and ensure compliance with organizational access policies.

Before you begin

  • Ensure you have the relevant AAA permissions to configure the AAA settings.

  • Review your organization's authentication and password policy requirements.

  • Gather information about external authentication servers (if applicable).

  • Gather information about external authentication servers (if applicable).

Procedure


Step 1

From the main menu, choose Administration > AAA > Settings.

Step 2

Select the relevant setting for Fallback to local. By default, Cisco Crosswork Planning prefers external authentication servers over local database authentication.

Note


Admin users are always authenticated locally.

Step 3

Under Browser session timeout, select the relevant value for the Log out inactive users after field. Any user who remains idle beyond the specified limit will be automatically logged out.

This timeout is enforced by the system and applies even if the user closes the browser tab without explicitly logging out. If no activity (token usage) is detected after the tab is closed, the session expires after the configured timeout. For example, with a 10-minute timeout, if a user closes the browser tab after five minutes of activity, the user must log in again if they return after 10 minutes.

Note

 
  • The default timeout value is 30 minutes.

  • Changes to the timeout value take effect immediately, including for active sessions.

  • Session termination can take upto a minute more than the configured timeout due to backend scheduling.

  • This setting applies only to browser-based UI sessions. API-based sessions continue to follow the existing 8-hour validity behavior.

Step 4

Under Parallel session, enter relevant values for the Number of parallel sessions and Number of parallel sessions per user fields.

Note

 
  • The system supports between 5 and 400 parallel sessions for concurrent users. If the number of parallel sessions is exceeded, an error is displayed during login to Cisco Crosswork Planning.

  • Cisco Crosswork Planning supports 50 simultaneous NBI sessions up to 400 sessions..

Step 5

Under Source IP, enable auditing of user source IP addresses.

  1. Check the Enable source IP for auditing check box to log the IP address of the user (source IP) for auditing and accounting. This check box is disabled by default.

  2. Log out, wait a few minutes, then log back in. This pause ensures the change is applied and the actual client IP address is accurately captured.

    During this transition, audit logs may temporarily display the Cisco Crosswork Planning node IP instead of the client IP. The correct client IP will appear in new audit log entries created after you log in again. Previous log entries will continue to show the node IP. Once enabled and you have logged in again, the Source IP column will appear on both the Audit Log and Active sessions pages.

Step 6

Select the relevant settings for the Local password policy. Certain password settings are enabled by default and cannot be disabled (for example, Change password on first login).

Note

 
  • Local password policy allows administrators to configure the number of unsuccessful login attempts a user can make before they are locked out of Cisco Crosswork Planning, and the lockout duration. Users can attempt to login with the correct credentials once the wait time is over.

  • Any changes to the password policy are enforced only the next time when the users change their password. Existing passwords are not checked for compliance during login.


System and application health monitoring

The Cisco Crosswork Platform is built on an architecture consisting of microservices. Due to the nature of these microservices, there are dependencies across various services within the Crosswork system.

The system and its applications are considered

  • Healthy if all services are up and running.

  • Degraded if one or more services are down.

  • Down if all services are down.

The Crosswork summary and Crosswork health pages provide various views to monitor system and application health. These pages also supply tools and information that, with support and guidance from the Cisco Customer Experience team, help you identify, diagnose, and fix issues with the Cisco Crosswork, Platform Infrastructure, and installed applications. While both pages can give you access to the same type of information, the purpose of each summary and view is different.

Check platform infrastructure and application health

This topic describes how to view health summaries for Cisco Crosswork Platform Infrastructure and installed applications, including microservice and alarm details.

Procedure


Step 1

From the main menu, choose Administration > Crosswork Manager > Crosswork health.

Figure 5. Crosswork health tab
Crosswork health tab

Step 2

Expand an application row to view microservice and alarm information.

Step 3

Click the Microservices tab to view the list of microservices.

Figure 6. Microservices tab
Microservices tab
  • To view associated microservices, click the microservice name.

  • To restart or obtain Showtech data and logs per microservice, click .

    Note


    You must collect the Showtech logs separately for each application.

Step 4

Click the Alarms tab to view the alarm details.

From this tab, you can

  • filter the list of active alarms

  • click the alarm description to view detailed information about the alarm

  • change the status of the alarms (Acknowledge, Unacknowledge, Clear)

  • add notes to alarms

  • view list of events in the product, or

  • view the correlated alarm for each event.


Check system health example

In this example, we explain which pages to navigate through and which areas to check to ensure a healthy Crosswork system.

Procedure


Step 1

Check the overall system health.

  1. From the main menu, choose the Administration > Crosswork Manager > Crosswork summary tab.

  2. Check that all the nodes are in Operational state (Up) and that the System Summary, Platform Infrastructure, and Crosswork Planning Infrastructure are Healthy.

    Figure 7. Crosswork summary tab
    Crosswork summary tab

Step 2

Check and view detailed information about the microservices that are running as part of the Crosswork Platform Infrastructure.

  1. Click the Crosswork health tab.

  2. Expand the Crosswork Platform Infrastructure row, click , and select View application details.

    Figure 8. Crosswork health tab
    Crosswork health tab

    The Application Details page opens.

  3. From the Showtech options drop-down list, you can check microservice details, restart microservices, and collect showtech information. You can also perform installation-related tasks from the Application actions drop-down list.

    Figure 9. Application Details page
    Application Details page

Step 3

Check and view the alarms and events related to the microservices.

  1. Click the Alarms tab. The list only displays Crosswork Platform Infrastructure alarms.

  2. Filter the list further by viewing only active alarms.

    Figure 10. Alarms tab
    Alarms tab
  3. Click the Events tab to view all Crosswork Platform Infrastructure events and their correlated alarms.

Step 4

View which Crosswork applications are installed.

  1. From the main menu, choose Administration > Crosswork Manager > Application management tab and click Applications.

    This page displays all applications that have been installed.

    Figure 11. Application management page
    Application management window
  2. To install more applications by uploading another application bundle or an auto-install file, click Add new file.

Step 5

View the status of jobs.

  1. Click the Job History tab.

    This page provides information about job statuses and the sequence of events executed as part of the job process.


Backup and restore

Cisco Crosswork Planning's backup and restore features are system functions that

  • provide options to migrate or recover data in case of system failure or upgrade

  • preserve your installed applications and settings, and

  • help prevent data loss.

Backup and restore options

Cisco Crosswork Planning offers multiple menu options to back up and restore your data.

Table 6. Backup and restore options

Menu option

Description

Reference link

Actions > Data backup

This option preserves the Cisco Crosswork Planning configuration data. You can use the backup file with the data disaster restore (Restore Cisco Crosswork Planning after a disaster) to recover from a serious outage.

Actions > Data disaster restore

This option restores the Cisco Crosswork Planning configuration data after a natural or human-caused disaster has required you to rebuild a Cisco Crosswork Planning server.

Restore Cisco Crosswork Planning after a disaster

Actions > Data migration

This option migrates data from an older version of Cisco Crosswork Planning to a newer version.

Migrate data using backup and restore

Requirements for backup and restore

These items define the mandatory conditions and limitations that must be met for successful backup and restore operations in Cisco Crosswork Planning:

  • Configure a destination SCP server to store backup files during your first login. Complete this one-time setup before taking backups or starting restore operations.

  • Use the same platform image for disaster restore as was used for creating the backup. Different software versions are not compatible for disaster restores.

  • Only one backup or restore operation can run at a time.

  • Ensure both Cisco Crosswork Planning and the SCP server are in the same IP environment (for example, both using IPv4).

  • By default, backups are not allowed if the system is not considered healthy, but this can be overridden for troubleshooting purposes.

Best practices for backup and restore

These items outline suggested actions that help ensure smoother, safer, and more efficient backup and restore processes for Cisco Crosswork Planning:

  • Perform backup or restore operations during a scheduled maintenance window. You should not access the system during these operations. Backups will take the system offline for about 10 minutes, while restore operations can be lengthy and pause other applications, affecting data collection jobs.

  • Use the dashboard to monitor the progress of backup or restore processes. Avoid using the system during these processes to prevent errors or incorrect content.

  • Operators are responsible for periodically deleting older backups from the target server to ensure adequate storage for new backups, as Cisco Crosswork Planning does not manage them. Deleted backups may still appear in the job list.

  • Operators making frequent changes should back up more often, possibly daily. Others might back up weekly or before major system upgrades.

  • If using collector agents, manually restart them, as they may remain in a stopped state after the backup and restore operation.

Back up data

This topic describes how to perform a data backup operation from the Cisco Crosswork Planning UI.

Use this task to safeguard your application data in the event of failure or during planned upgrades.

The backup process depends on having SCP access to a server with sufficient amount of storage space. The storage required for each backup depends on the applications installed on the Cisco Crosswork Planning server and the scale requirements. The time taken for the backup process depends on the type of backup and the applications installed on the Cisco Crosswork Planning server.


Attention


Building a target machine for the backup is outside the scope of this document. The operator must have the server ready, know the credentials for the server, and have a backup directory with sufficient space.


Before you begin

  • Ensure you have a secure SCP server in place, with adequate space for backups. Building the target machine is out of scope for this document.

  • Obtain the host name (or IP address) and the port number of the secure SCP server. Verify that the server has sufficient storage available.

  • Note the file path on the SCP server, to use as the destination for your backup files.

  • Ensure you have user credentials for an account with read and write permissions to the remote path on the destination SCP server.

  • Note the build version of the installed applications. Before performing the data restore, you must install the exact versions of those applications. Any mismatch in application build versions can result in data loss or failure of the data restore job.

  • Review the requirements and best practices in Requirements for backup and restore and Best practices for backup and restore.

Procedure


Step 1

From the main menu, choose Administration > Backup and Restore.

Step 2

Configure the SCP backup server destination.

  1. Click Destination.

  2. In the Edit Destination dialog box, enter the hostname, port, destination path, and credentials for the SCP server.

  3. Click Save to confirm the configuration.

Step 3

Create a backup job.

  1. Click Actions > Data backup.

  2. In the Data Backup dialog box, provide a relevant name in the Job Name field.

  3. If the VM or any application is not healthy and you still want to create the backup, check the Force check box.

    Note


    You must use the Force option only after consultation with the Cisco Customer Experience team.

  4. Complete the remaining fields as needed.

    To specify a different remote server upload destination, edit the pre-filled Host name, Port, Username, Password, and Server path/Location to specify a different destination.
  5. (Optional) Click Verify backup readiness to verify that Cisco Crosswork Planning has enough free resources to complete the backup.

    If the check is successful, Cisco Crosswork Planning displays a warning about the time-consuming nature of the operation. Click OK to continue.

    If the verification fails, contact the Cisco Customer Experience team for assistance.

  6. Click Start Backup to start the backup operation.

    Cisco Crosswork Planning creates the corresponding backup job set and adds it to the Backup and Restore Job Sets table. The Job Details panel reports the status of each backup step as it is completed.

    Note


    If you do not see your backup job in the list, refresh the Backup and Restore Job Sets table.

Step 4

Navigate to the destination SCP server directory and confirm that the backup file was created. You will need this backup file during later stages of the upgrade process.


The system configuration backup is created and available on the specified SCP server.

Restore data

This topic describes how to perform a data restore operation from the Cisco Crosswork Planning UI.

The time taken for the restore process depends on the type of backup and the applications installed on the Cisco Crosswork Planning server.

Before you begin

  • Ensure you have a backup file available for restore.

  • Install the exact build versions of the applications that were present when the backup was created. Any mismatch can result in data loss and failure of the data restore job.

Procedure


Step 1

From the main menu, choose Administration > Backup and Restore.

Step 2

Select the backup file for restore.

  1. In the Backup and Restore Job Sets table, select the data backup file to be used for the restore. The Job Details panel displays information about the selected backup file.

  2. With the backup file selected, click Data Restore to start the restore operation.

Step 3

Monitor the restore progress. Cisco Crosswork Planning creates the corresponding restore job set and adds it to the job list. To view the progress of the restore operation, click the link to the progress dashboard.


The system initiates the restore operation from the selected backup file. The restore job appears in the job list with status detail.

Recommendation: Post-restore actions

Editing collections

After restoring the backup, navigate to the Collector > Collections page and perform the Edit collection operation on each listed collection. Save the collections without making any changes. This ensures that the configuration data is properly updated.

Restarting agents

The restore process only copies the database and file system data. Once the restore process completes, all agents will be in a stopped state, and you must restart them manually from the Cisco Crosswork Planning UI.

  • Restart the NetFlow and SR-PCE agents using the Start option for the respective agent in the Setup Agent page (Collector > Agents). For more information, see Edit agent settings.

  • Restart the traffic poller agent by disabling and then enabling the Traffic collection option on the Traffic collector configuration page. For more information, see Collect traffic statistics.

Executing schedulers

  • If using a "Run now" scheduler, execute the scheduler manually.

  • If the scheduler has a CRON job configured, then the scheduler triggers automatically based on the CRON job configuration.

Restore Cisco Crosswork Planning after a disaster

This topic describes how to restore operations after a natural or human-caused disaster has destroyed a Cisco Crosswork Planning server.

Before you begin

  • Deploy a new server first, following the instructions in Cisco Crosswork Planning 7.2 Installation Guide.

  • Obtain the full name of the backup file you want to use in your disaster recovery from the SCP backup server. Typically, this will be the most recent backup file you have created. Cisco Crosswork Planning backup file names typically follow this format:

    backup_JobName_CWVersion_TimeStamp.tar.gz

    where:

    • JobName is the user-entered name of the backup job.

    • CWVersion is the Cisco Crosswork Planning platform version of the backed-up system.

    • TimeStamp is the date and time when Cisco Crosswork Planning created the backup file.

    For example, backup_Wednesday_4-0_2021-02-31-12-00.tar.gz.

  • Install the exact versions of the applications that were present in your old Cisco Crosswork Planning server when the data backup was made. Any version mismatch can lead to data loss and restore job failure.

  • Use the same Cisco Crosswork Planning software image that was used when creating the backup. You cannot restore the cluster using a backup created with a different software version.

  • Keep your backups up to date to ensure you can recover the system's true state as it existed before the disaster. If you have installed new applications or patches since your last backup, take another backup.

Procedure


Step 1

From the main menu of the newly deployed Cisco Crosswork Planning server, choose Administration > Backup and Restore.

Step 2

Click Actions > Data disaster restore to display the Data Disaster Restore page with the remote server details prefilled.

Step 3

In Backup file name, enter the file name of the backup from which you want to restore.

Step 4

Click Start restore to initiate the recovery operation.

To view the progress of the operation, click the link to the progress dashboard.


The system restores server data and configuration from the specified backup file. Once complete, Cisco Crosswork Planning resumes operation with recovered settings and data.


Note


  • If the disaster recovery fails, contact the Cisco Customer Experience team.

  • Smart Licensing registration for Cisco Crosswork Planning applications is not restored during a disaster restore operation. You must register the applications again.


Migrate data using backup and restore

You must use data migration backup and restore when upgrading your Cisco Crosswork Planning installation to a new software version, or moving your existing data to a new installation.

Before you begin

  • Configure a destination SCP server to store the data migration files. You only need to do this once.

  • Ensure that both the Cisco Crosswork Planning and SCP server are in the same IP environment. For example, if Cisco Crosswork Planning is communicating over IPv6, the backup server must also use IPv6.

  • Create a data migration backup only when upgrading your Cisco Crosswork Planning installation. Perform the backup only during a scheduled upgrade window.

  • Do not attempt to access Cisco Crosswork Planning while the data migration backup or restore operations are running.

  • Ensure that you have

    • the hostname or IP address and the port number of a secure destination SCP server

    • a file path on the SCP server to use as the destination for your data migration backup files, and

    • user credentials with file read and write permissions for the remote path on the destination SCP server

Procedure


Step 1

Configure an SCP backup server.

  1. From the main menu, choose Administration > Backup and Restore.

  2. Click Destination to display the Add Destination page.

  3. Make the relevant entries in the fields provided.

  4. Click Save to confirm the backup server details.

Step 2

Create a backup.

  1. Log in as an administrator to the Cisco Crosswork Planning installation whose data you want to migrate to another installation.

  2. From the main menu, choose Administration > Backup and Restore.

  3. Click Actions > Data backup to display the Data Backup page with the destination server details prefilled.

  4. In Job Name, provide a relevant name for the backup.

  5. To create the backup even if there are microservice issues, check the Force check box.

  6. Fill in any additional required fields.

    To specify a different remote server upload destination, edit the prefilled Host name, Port, Username, Password, and Server path/Location fields to specify a different destination.
  7. Click Backup to start the backup operation.

    Cisco Crosswork Planning creates the corresponding backup job set and adds it to the Backup and Restore Job Sets table. The Job Details panel displays the status as each backup step completes.

  8. To view the progress of a backup job, enter the job details (such as Status or Job Type) in the search fields in the Backup and Restore Job Sets table. Then, click on the job set you want.

    The Job Details panel displays information about the selected job set, such as the job Status, Job Type, and Start Time. If a job fails, hover over the icon next to the Status column to view the error details.

  9. If the backup fails during upload to the remote server, in the Job Details panel, click Upload backup under the Status icon to retry the upload.

    If the upload fails due to problems with the remote server, click Destination to specify a different remote server path before clicking Upload backup.

Step 3

Migrate the backup to the new installation.

  1. Log in as an administrator on the Cisco Crosswork Planning installation to which you want to migrate data from the backup.

  2. From the main menu, choose Administration > Backup and Restore.

  3. Click Actions > Data migration to display the Data Migration page with the remote server details pre-filled.

  4. In Backup file name, enter the file name of the backup from which you want to restore.

  5. Click Start migration to initiate the data migration. Cisco Crosswork Planning creates the corresponding migration job set and adds it to the job list.

    To view the progress of the data migration operation, click the link to the progress dashboard.


Data is migrated from the source installation to the new software version or installation. The migration status appears in the job progress dashboard.

What to do next

Validate that the migrated data is present and ensure all services are functioning on the new installation.

View system and network alarms

This topic describes how to view current system and network alarms, including their details and status.

Procedure


Step 1

To view all current alarms, go to Alerts > Alarms and Events.

Step 2

To view application-specific alarms:

  1. From the main menu, choose the Administration > Crosswork Manager > Crosswork Health tab.

  2. Expand an application and click the Alarms tab.

Step 3

To view alarm details, click the alarm description.

Step 4

To change the status of the alarm, follow these steps:

  1. Select the alarm.

  2. Select the required status from the Change status drop-down list. Available options are Acknowledge, Unacknowledge, or Clear.

Step 5

To add notes to an alarm, follow these steps:

  1. Select the alarm.

  2. Click Notes and enter your comments.


View the audit log

This topic describes how to use the Audit Log page to view the AAA events.

The Audit Log page tracks these events:

  • Create, update, and delete users

  • Create, update, and delete roles

  • User login activities: login, logout, login failure due to maximum active session limit, and account locked due to maximum login failures.

  • Source IP: The IP address of the machine from where the action was performed. This column appears only if you check the Enable source IP for auditing check box and then log in to Cisco Crosswork Planning. You can find this check box in the Source IP section of the Administration > AAA > Settings page.

  • Password modification by user

Procedure


Step 1

From the main menu, choose Administration > Audit Log.

The Audit Log page opens.

Step 2

Click Show/Hide Floating Filters icon to filter the results based on your query.

Step 3

(Optional) Click to export the log in CSV format.

When exporting, you can use the default file name or enter a unique name.


The filtered or exported audit log is available for review.

Set the pre-login disclaimer message

This topic describes how to enable the pre-login disclaimer message and customize the message as needed.

Many organizations require that their systems display a disclaimer message in a banner before users log in. The banner reminds authorized users of their obligations when using the system, or provides warnings to unauthorized users.

Procedure


Step 1

From the main menu, choose Administration > Settings.

Step 2

Under Notifications, click Pre-login disclaimer.

The Pre-login disclaimer page opens.

Step 3

Follow these steps to enable the disclaimer and customize the banner:

  1. Check the Enable check box.

  2. Customize the banner by editing the Title, Icon, and Disclaimer text as needed.

  3. (Optional) Check the Enable check box under Require user consent to prompt the user to agree to the disclaimer before they log in.

  4. (Optional) While editing the disclaimer, you may:

    • Click Preview to see how your changes look when displayed before the login prompt.

    • Click Discard changes to revert to the last saved version of the banner.

    • Click Reset to default to revert to the original, default version of the banner.

  5. Click Save to apply the changes and enable the custom disclaimer to all users.

Step 4

To turn off the disclaimer display, return to the Pre-login disclaimer page and uncheck the Enable check box.


Enable maintenance mode

This topic describes how to place the system in maintenance mode.

Maintenance mode provides a means for shutting down the Cisco Crosswork Planning system temporarily. Cisco Crosswork Planning synchronizes all application data before shutdown. It can take several minutes for the system to enter maintenance mode and to restart when maintenance mode is turned off. During these periods, you should not attempt to log in or use the Cisco Crosswork Planning applications.

Before you begin


Caution


  • Make a backup of your Cisco Crosswork Planning system before enabling maintenance mode.

  • Notify other users about your intention to put the system in maintenance mode. Give them a deadline to log out. Once you initiate the maintenance mode operation, it cannot be canceled.


Procedure


Step 1

From the main menu, choose Administration > Settings > System Settings > Maintenance mode.

Step 2

Drag the Turn on/off maintenance slider to the right to set it to the On position.

You will receive a warning message that the system is about to enter maintenance mode.

Step 3

Click Continue to confirm your choice.

Note


If you are rebooting the system, wait for 5 minutes after the system has entered maintenance mode. This allows the Cisco Crosswork database to synchronize before you proceed.


The system synchronizes data, shuts down temporarily, and enters maintenance mode.

What to do next

To return the system to normal operation after maintenance, drag the Turn on/off maintenance slider to the left to set it to the Off position.

  • If a reboot or restore was performed when the system was previously put in maintenance mode, the system will boot up in the maintenance mode and you will be prompted with a pop-up window to toggle the maintenance mode off.

  • If you do not see a prompt, even when the system was rebooted while in maintenance mode, toggle the maintenance mode on and off to allow the applications to function normally.

Update the network access configuration

This topic describes how to update the global network access settings to meet your requirements.

The Network access configuration section specifies the parameters used for network access through SNMP, Login, and the SAM interface. You can update these parameters to meet your specific requirements. For example, you can update the SNMP timeout value according to your needs.

Before you begin


Caution


Before you edit, be aware that your changes will be applied globally and will affect all collections, jobs, and plan files.


Procedure


Step 1

From the main menu, choose Administration > Settings > System settings > Collection settings > Network access configuration.

Step 2

Click Edit at the bottom of the page. An alert appears, notifying you that modifying the configuration to disable the required service will result in collection failure. If you intend to change only the timeout or other parameters, click Confirm.

The page becomes editable.

Step 3

Edit the file to meet your requirements.

Step 4

After making your changes, save them.

Step 5

(Optional) Click to download the file to your local machine.


The updated network access configuration is applied globally.

Update collector capability settings

You can view each collector’s data source, as well as the tables and columns into which they populate the data, on the Collector capability page. This topic describes how to update these configurations according to your requirements.

Before you begin


Caution


Before you update, be aware that your changes will be applied globally and will affect all collections, jobs, and plan files.


Procedure


Step 1

From the main menu, choose Administration > Settings > System settings > Collection settings > Collector capability.

Step 2

Click Edit at the bottom of the page.

The page becomes editable.

Step 3

Edit the collector table and column configurations as needed.

The details use the Collector.table.table-name=ALL/Column list format, where ALL indicates that the collector populates all columns in that table. If the collector populates only a subset of columns, then it is specified as a list of column names separated by commas.

Step 4

After making your changes, save them.

Step 5

(Optional) To download the collector capability configurations to your local machine, click .

Step 6

(Optional) To reset the configurations to their default values, click Reset default config at the upper right.


The system applies your updated collector capability configuration globally across all collections, jobs, and plan files.

Configure the aging settings

This topic describes how to configure the retention period for inactive network elements before they are permanently removed from the network.

By default, when a circuit, port, node, or link disappears from the network, it is permanently removed and must be rediscovered. You can configure how long Cisco Crosswork Planning retains these elements before permanent removal.

Before you begin


Caution


Before you configure, be aware that your changes will be applied globally and will affect all collections, jobs, and plan files.


Procedure


Step 1

From the main menu, choose Administration > Settings > System Settings > Collection Settings > Purge delay.

Step 2

Enable aging by selecting Enable.

Step 3

Enter the retention duration in the relevant fields.

  • L3 port: Specify how long an inactive L3 port must be kept in the network.

  • L3 node: Specify how long an inactive L3 node must be kept in the network.

  • L3 circuit: Specify how long an inactive L3 circuit must be kept in the network.

Note


The L3 node value must be greater than or equal to the L3 port value, which in turn must be greater than or equal to the L3 circuit value.

Step 4

After making your changes, save them.


Cisco Crosswork Planning uses these settings to determine how long to retain inactive network elements before permanent removal.

Set the retention period for archived plan files

This topic describes how to configure the retention period for archived plan files before they are deleted.

The archived plan files are periodically deleted in Cisco Crosswork Planning to conserve storage space. By default, the files are retained for 30 days.

Procedure


Step 1

From the main menu, choose Administration > Settings > System settings > Collection settings > Archive purge.

Step 2

In the Archive retention field, enter the number of days after which the files can be deleted.

For example, if you enter 40 in this field, the plan files older than 40 days are deleted.

Step 3

Save the changes.


The system will automatically delete archived plan files older than the retention period you specify.


Note


To disable purging of archived plan files, uncheck the Enable check box. Be aware that if you disable it, storage space will eventually run out.


Add static routes

Static routes are used to reach the devices in a different subset. Use this procedure to add static routes in Cisco Crosswork Planning.


Note


After static routes are applied, their corresponding entries will appear when you run the ip rule list command at the Crosswork shell prompt.

Procedure


Step 1

From the main menu, choose Administration > Settings > System settings > Device connectivity management > Routes.

Step 2

Click + Add. The Add Route IP page appears.

Step 3

Enter a valid IPv4 or IPv6 subnet in CIDR format.

Step 4

Click Add.


Delete static routes

Follow these steps to delete static routes.

Procedure


Step 1

From the main menu, choose Administration > Settings > System settings > Device connectivity management > Routes.

Step 2

Select the static route you want to delete and click Delete icon.

Step 3

Click Delete on the confirmation page.