Customize Fleet Upgrade

This document covers the following topics:

Use Parallel Upgrades with Acceptable Failures

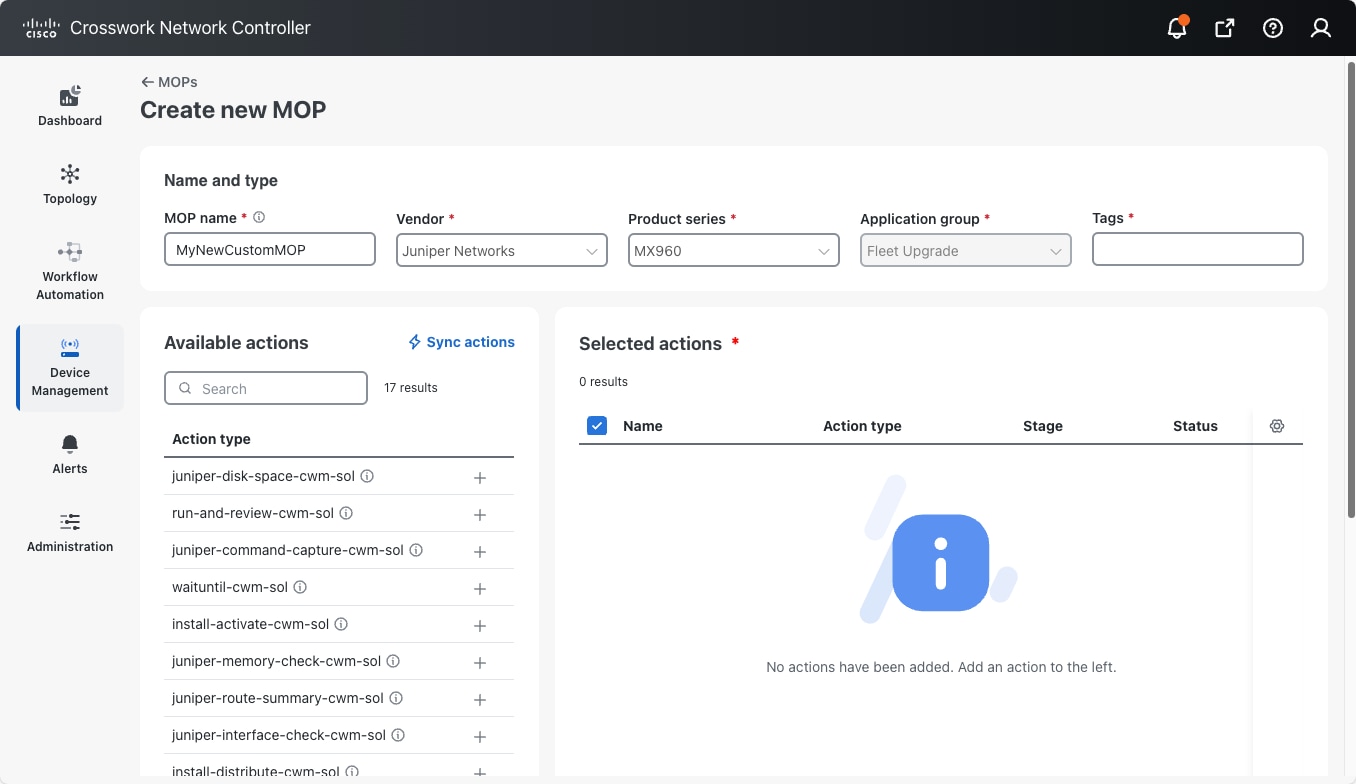
Fleet Upgrade provides the Parallel upgrades and Acceptable failures fields to help you both speed up and control long upgrade runs with many devices.

As explained in Run a Fleet Upgrade job, whenever you create a Fleet Upgrade job, you can select up to 50 devices to be upgraded during that job. Depending on the number and size of each device upgrade, this can result in jobs lasting hours. This would be worse if you had to upgrade each device one at a time, in series. It would be still worse if you couldn't cancel the run if you started experiencing upgrade failures.

To help with these issues, you can use the Parallel upgrades field to specify how many upgrades you want performed at the same time, in parallel. If you enter a Parallel upgrades value equal to the total number of devices to be upgraded (up to the maximum of 50), all the upgrades will take place at the same time. If you leave Parallel upgrades set to the default value of 1, Fleet Upgrade performs each of them one at a time.

Most users specify a lower Parallel upgrades value, such as 5 or 10. Doing so helps conserve processing resources and ensures that only a few of the network devices in a 50-device job set will be offline at one time.

With a lower Parallel upgrades value, Fleet Upgrade performs the upgrades in batches. For a 50-device upgrade group with a Parallel upgrades value of 5, this means 10 batches of five upgrades each. In this case, Fleet Upgrade performs all five of the upgrades in batch #1 at the same time, in parallel, and doesn't initiate any of the upgrades in batch #2 until all of the upgrades in batch #1 are finished.

How can you cancel a job that's failing too often? Fleet Upgrade will automatically cancel the remaining upgrades in a job depending on the number of Acceptable failures you set. The value you specify in this field acts as a failure "budget" that, when exceeded, triggers automatic cancellation of all of the remaining upgrades in the run. If you want to avoid automatic cancellation entirely, specify an Acceptable failures value equal to the total number of devices to be upgraded (up to the maximum of 50). Set it to the default value of 1 if you want the system to cancel remaining upgrades after the very first failure.

Bear in mind that a batch will run to completion once started. The error budget defined in Acceptable failures will block additional batches from starting if it has been exceeded. Sometimes, this means the total number of actual failures will exceed the failure budget, and it will take longer for cancellation to kick in than you might expect.

For example: Let's assume that our job set is 50 devices. Our Parallel upgrades setting is 5 and our Acceptable failures setting is 5. That means we have 10 batches of 5 devices for Fleet Upgrade to perform. Let's further suppose that, during execution of batch #1, we encounter 4 failures. The 5-failures budget is not yet exceeded, so Fleet Upgrade will begin to execute all the upgrades in batch #2 in parallel. We then encounter 4 more failures in batch #2. The 5-failure budget is now exceeded, so Fleet Upgrade will automatically cancel execution of batch #3 and the remaining 7 other batches. However, we've actually encountered 8 failures, not 5. Similarly, we might encounter only 1 failure each in batches #1, #2, #3, and #4, then encounter 1 more failure in batch #5. We now have a total of 5 failures, but this does not exceed the failure budget, only equals it. So Fleet Upgrade then goes on to the next batch. Then, in batch #6, every upgrade fails, exceeding the failure budget and triggering cancellation of the run. In this case, we've actually encountered 10 failures, twice the number we specified. Also, cancellation wasn't triggered until batch #7 and device #35, some 70 percent of the way through the entire run.

Download software upgrades using a proxy server

You can download Cisco SMUs to your local image repository using a proxy server, but you must configure the proxy first, using the following steps.

Procedure


Step 1

From the main menu, choose Device Management > Fleet Upgrade > Image Repository.

Image Repository window

Step 2

With the contents of the Image Repository displayed, click the Cisco.com tab to display the catalog of all SMUs available from the Cisco.com software image download site, as shown below.

SMU Catalog

Step 3

Click Configure proxy server tab to display the popup shown below.

Configure proxy server

Step 4

Complete the proxy server fields as required. The Server URL or IP address and port are always required. A valid Username and Password are also required if you specify a server using a secure protocol, such as HTTPS. When you are finished, click Save.


Troubleshoot Fleet Upgrade failures

The following table summarizes common Fleet Upgrade issues and their remedies.

Table 1. Common Fleet Upgrade Issues and Remedies

Issue

Description

Remedy

Upgrade fails; unable to transition state

Upgrade fails due to inability to transition state during image distribution

Increase timeouts to at least 3600 seconds for Action, Event, State, and Workflow. System Activity timeout should be at least 10 seconds.

FPD causes activation failure

The failure message will include a recommendation that you "Please reconfigure your settings and create a new job." Upgrade fails during "Activate" stage, with the following message: "Performing FPDs upgrade on the device. FPDs upgrade success except for the following FPDs: PO-PrimMCU, PO-PrimMCU". This occurs on VXR devices.

Add the following to the Activate Action configuration input:

"fpd": 
"false","isISSUUpgrade": "false" }

Fleet Upgrade GUI drop downs are not working

The Vendor, Product series and other GUI drop down selection lists don't appear when clicked on.

The issue occurs when NSO packages are not updated. Please install the correct packages when installing Fleet Upgrade.

Software Image Policy has no Vendor or Device drop down

The Vendor and Product series drop down selection lists don't appear when clicked on.

Check that at least one software image has been downloaded to the local image repository. Fleet Upgrade is designed to display Vendor and Product series selections only when software images are available in the local repository.

Upgrade fails due to failure to find FTP services

Upgrade fails with a message indicating that a Distribute action failed due to the FTP server not being found.

From the main menu, select Administration > File servers and ensure that Enable FTP and Enable SFTP server upload are both checked. Also ensure that your organization's FTP and SFTP servers are active on TCP Ports 30621 and 30622, respectively.

Use the default MOPs

Fleet Upgrade comes installed with default (or "pre-built") MOPs. These MOPs are provided by Cisco, cannot be modified directly (although they can be copied and the copies modified), and are intended for use in performing upgrades for specific supported vendors and device families:

  • Default Juniper Upgrade: For upgrading Juniper MX960 series devices running JunOS

  • Default XE Upgrade: For upgrading Cisco Systems ASR 900 series devices running Cisco IOS-XE

  • Default XR Upgrade: For upgrading Cisco Systems 8000 series devices running Cisco IOS-XR

In most cases, you will want to select one of these default MOPs when a conformance report indicates that it is time to upgrade a suppported device in the series. They are usually your safest choice when upgrading devices from these manufacturers. Each of the default MOPs is customized for the supported vendor and product series, and the customizations are extensive. Each MOP varies significantly in the number of action types it makes available, the selected actions it performs during an upgrade, and the stages it goes through as it performs these actions. For example:

  • Default Juniper Upgrade: Offers 17 action types. The majority of these Actions are Juniper-specific. It performs 19 Actions during an upgrade: nine during the Pre check stage, three during the Distribute stage, one during the Activate stage, and six during the Post stage.

  • Default XE Upgrade: Offers 15 Action Types. It performs 17 Actions during an upgrade: seven during the Pre check stage, two during the Distribute stage, one during the Activate stage, and seven during the Post stage.

  • Default XR Upgrade: Offers 22 Action Types. It performs 25 Actions during an upgrade: 11 during the Pre check stage, three during the Distribute stage, three during the Activate stage, one during its unique Commit stage, and seven during the Post stage.

However, running a default MOP may not always be your best choice for an efficient, targeted upgrade. You may find it useful to view each default MOP as a comprehensive library of all the Fleet Upgrade Actions relevant to a particular vendor and product series, arranged as a useful workflow.

You don't have to stick with the default MOP. You can copy a default MOP, and then manipulate and customize the copy to suit your needs. For example, you may decide that a MOP step that checks existing disk space is not necessary when you are upgrading software on a set of devices that are all factory-fresh. Similarly, you may that find running sanity checks against devices that you know are up and running is a waste of time and don't belong in the MOP you want to run.

Before trying to create a custom MOP, you will want to become familiar with the default MOP and its actions. To see what any default MOP is doing during each step of its execution, select from the main menu Device Management > Fleet Upgrade > MOPs to display the list of MOPs. If necessary, use the Search field to find the MOP, then click the MOP name to see a list of the Available actions for that MOP.

Selected vs. Available Actions for a MOP

The Selected actions list at the right shows you which stages of the MOP use each of these action types. In the Available actions list, next to each listed Action type is an "i" icon. Hover your mouse cursor over the "i" icon to see a detailed text description of the action, as shown in the figure for the "command-capture" sanity-check Action being executed during the Pre stage.

Once you know more about the default MOP, you can decide on the kinds of changes you want to make. The easiest way to get started creating a custom MOP from the default MOP is to then follow the steps in Clone and edit MOPs, removing and adding Actions as you require.


Note


When working with default MOPs and custom, user-defined MOPs, please bear in mind:

  • You cannot edit or delete the default MOPs.

  • You can edit or delete clones of the default MOPs, or custom MOPs you defined from scratch.

  • You will find the Edit and Delete options for your user-defined MOPs at the far right, in the same row as the custom MOP you want to work on, under the More icon (…).


Export and import MOPs

Fleet Upgrade lets you export MOPs as JSON files. This is a handy way to keep backups of MOPs you create. You can also use this with the Import function to share custom MOPs with other locations in your organization that are using Fleet Upgrade.

Note that, although the exported MOP file is editable, you cannot edit and import it again. The edited MOP will be non-functional.

Procedure


Step 1

To export a MOP:

  1. From the main menu, choose Device Management > Fleet Upgrade > MOPs. Crosswork displays the MOPs window, listing all existing Fleet Upgrade MOPs.

  2. In the search field under the MOPs list title, enter a search phrase. For example: enter XR to move the Default XR Upgrade MOP name to the top of the MOPs list.

  3. At the far right, in the same row as the MOP you want to export, click the More icon (…). Crosswork displays a drop down menu like the one at right in the following figure.

    Export MOP Menu
  4. From the drop-down menu, choose Export (JSON) . Fleet Upgrade displays a message indicating that the MOP has been exported to a JSON file. Check your local default download folder for a file with a filename that matches the name of the exported MOP, with a JSON filename extension.

    Store or transmit the exported MOP file as needed.

Step 2

To import a MOP JSON file:

  1. From the main menu, choose Device Management > Fleet Upgrade > MOPs.

  2. Click Import MOP (JSON).

  3. Browse to and select the exported file, then click Import MOP. When the import is finished, the file appears in the MOPs window list.


Clone and edit MOPs

The easiest and quickest way to create a MOP is to clone one of the default (or "pre-built") MOPs supplied with Fleet Upgrade and then modify it as needed. You'll be required to give the cloned MOP a new unique name, but you can then add and remove MOP Actions as you wish.

You can create Fleet Upgrade MOPs using other means, such as:

It's also useful to remember when you're creating a new MOP that:

  • You can always use the "i" icon shown next to each Action type in the Fleet Upgrade Available actions list to research what each Action type does. Hover your mouse cursor over the "i" icon to see a detailed text description of that Action type and what it does.

    Action Type help

  • You can use the JMESPath query language to filter, sort, or transform the JSON data for any of Action type that permits configuration in the new MOP.

  • Whenever new MOP action types have been added that do not appear in the Available actions list, click the Sync actions button.

Procedure


Step 1

From the main menu, choose Device Management > Fleet Upgrade > MOPs. Fleet Upgrade displays the MOPs window, listing all existing Fleet Upgrade MOPs.

Step 2

At the far right, in the same row as the MOP you want to clone, click the More icon (…). Fleet Upgrade displays a drop down menu like the one at right in the following figure.

Clone MOP menu

Step 3

From the drop-down menu, choose Clone. Fleet Upgrade displays an edit window for the MOP you are cloning, like the one shown in the following illustration.

Cloning the Default XR Upgrade MOP

As you can see in the figure, the MOP name field at the top of the window is empty, but all the other fields are filled with the information contained in the original MOP that you are cloning. The Available actions list on the left shows all the Action Types that are appropriate for the selected Vendor and Product series. The Selected actions list on the right shows each Action Type selected for use in this MOP, along with the custom Name that each Action Type was assigned when it was selected for use in the MOP, as well as the execution Stage the action will be performed in. For instance, in this example, the Action Type cisco-disk-space-cwm-sol was selected for use in the MOP. It was assigned the custom Name check disk space, and will be performed during the distribute Stage.

Step 4

Edit the five identification fields at the top of the window as shown in the table below:

In this field...

Enter or select...

MOP name

A new name for the cloned MOP. You must enter a unique name.

Vendor

Choose the name of the supported vendor.

Product series

An appropriate product series for the Vendor you selected.

Application group

Fleet Upgrade is automatically selected.

Tags

A comma-separated list of tags to be applied to the job whenever a user runs this MOP.

Step 5

To add one of the Available actions on the left to the Selected actions on the right:

  1. In the Action type list on the left, click the + icon next to the Action type you want to add. An Add Action window for the new Action Type appears, like the one shown below.

    Add Action window
  2. Enter a Custom name for the newly selected Action, and select the Stage at which you want it to be performed.

  3. Click Add. The newly added Action appears in the Selected actions list, at the end of the Actions in the Stage you selected for it.

Step 6

To remove one of the Selected actions on the right:

  1. Click the Delete icon shown to the right of the Action you want to delete.

  2. You will be prompted to verify that you want to delete the Action. Click Delete to remove it.

Step 7

To edit the Custom name, Stage, Position, or Configuration details for one of the Selected actions on the right:

  1. Click the Edit icon shown to the right of the Action you want to edit. A Configuration window for the Action appears, with Details and Configuration tabs, like the one shown below.

    Device Snapshot Configuration Details
  2. To change the selected Action's Custom name, Stage, or Position, edit the respective fields on the Details tab.

  3. To change the Action's Configuration (for Actions that permit configuration), click the Configuration tab to display the Input Schema tools as shown below. Then use the Text/View toggle to shift between JSON and Javascript views, and format the text in the JSON. You can also use the + icons to format JMEScript queries and sorts.

    Device Snapshot Configuration Input Schema

Step 8

When you are finished, click Save changes.


Create custom MOPs

You can use the Fleet Upgrade graphic user interface to create MOPs from scratch, in free-form fashion, using the MOP action types that you choose. The steps below show how to do this.

You can also create Fleet Upgrade MOPs using other means, such as:

It's also useful to remember when you're creating a new MOP that:

  • You can always use the "i" icon shown next to each Action type in the Fleet Upgrade Available actions list to research what each Action type does. Hover your mouse cursor over the "i" icon to see a detailed text description of that Action type and what it does.

    Action Type help

  • You can use the JMESPath query language to filter, sort, or transform the JSON data for any action type that permits configuration in the new MOP.

  • Whenever new MOP action types have been added that do not appear in the Available actions list, click the Sync actions button.

Procedure


Step 1

From the main menu, choose Device Management > Fleet Upgrade > MOPsto display the MOPs window, listing all existing Fleet Upgrade MOPs.

Step 2

Click + Create MOP. Fleet Upgrade displays the Create new MOP window, with most of the first five required identification fields blank.

Create new MOP window

Step 3

Edit the first three of the five identification fields at the top of the window as shown in the table below:

In this field...

Enter or select...

MOP name

A new name for the cloned MOP. You must enter a unique name.

Vendor

Choose the name of the supported vendor.

Product series

An appropriate product series for the Vendor you selected.

Step 4

As soon as you select the Product series, the Create new MOP window populates the Available actions list with Action Types appropriate for the Vendor and Product series you selected, as shown in the following figure.

Available actions list

Step 5

You can now edit the remaining two identification fields:

In this field...

Enter or select...

Application group

Fleet Upgrade is automatically selected.

Tags

A comma-separated list of tags to be applied to the job whenever a user runs this MOP.

Step 6

To add one of the Available actions on the left to the Selected actions list on the right:

  1. In the Action type list on the left, click the + icon next to the Action type you want to add. An Add Action window for the new Action Type appears, like the one shown below.

    Add Action window
  2. Enter a Custom name for the newly selected Action, and select the Stage at which you want it to be performed.

  3. Click Add. The newly added Action appears in the Selected actions list, at the end of the Actions in the Stage you selected for it.

Step 7

To remove one of the Selected actions on the right:

  1. Click the Delete icon shown to the right of the Action you want to delete.

  2. You will be prompted to verify that you want to delete the Action. Click Delete to remove it.

Step 8

To edit the Custom name, Stage, Position, or Configuration details for one of the Selected actions on the right:

  1. Click the Edit icon shown to the right of the Action you want to edit. A Configuration window for the Action appears, with Details and Configuration tabs, like the one shown below.

    Device Snapshot Configuration
  2. To change the selected Action's Custom name, Stage, or Position, edit the respective fields on the Details tab.

  3. To change the Action's Configuration (for Actions that permit configuration), click the Configuration tab to display the Input Schema tools as shown below.

    Use the Text/View icons to toggle between JSON and Javascript views, and format JSON text. You can also use the + icons to format JMEScript queries and sorts.

    JMEScript Configuration

Step 9

When you are finished, click Save changes.


Create custom MOP action types

You can create custom MOP actions that you can then use whenever you create a custom MOP from scratch or clone and edit an existing MOP.

Your custom MOP action is a workflow, with outputs, inputs, logic, name and tags. Making the most of this MOP action customization capability, you can extend Fleet Upgrade pre- and post-check functionality for supported devices in any way you wish: providing device health snapshots, making configuration changes to divert traffic while you perform upgrades, and so on.

Creating a custom workflow from scratch is covered in depth in the Cisco Crosswork Network Controller 7.1 Workflow Automation Workflow Creator Guide. But it is important to remember that MOP actions, default or custom, are not standalone workflows. They are intended to integrate smoothly with other MOP actions into a Fleet Upgrade MOP, and therefore must follow the constraints and guidelines set by Fleet Upgrade and the workflow platform.

Those constraints are explained in the next section, Guidelines for Fleet Upgrade MOP actions, followed by additional sections with examples showing how you can follow these guidelines. The examples come from the MOP actions supplied with Fleet Upgrade's default MOPs. If you have Fleet Upgrade installed, you can see many similar examples by selecting Workflow Automation > Workflows from the main menu. Click on any of the Fleet Upgrade workflows in the Workflow name list and then click Designer to explore the MOP action code.

Guidelines for Fleet Upgrade MOP actions

In addition to the normal features that all Fleet Upgrade workflows must have, such as a unique name, Fleet Upgrade MOP actions must also incorporate features that allow them to integrate smoothly with Fleet Upgrade and complete successfully:

  • Version: Each MOP action must be assigned a version number consisting of three digits separated by periods. This standard follows the Semantic Versioning v1.0.0 Specification for major, minor and patch versioning; for details, see the link.

  • Tags: Each MOP action must have tags assigned that will identify it as a type of Fleet Upgrade MOP action. The tags also identify other MOP action characteristics, such as the vendor and device types with which you want the MOP action to work. Tags allow Fleet Upgrade to control how it processes the MOP action and to display it properly in the user interface's list of available MOP action types. For a list of the tags you can use and examples of ways to combine them, see the section Tags for Fleet Upgrade MOP Actions.

  • Data I/O: The MOP action must be designed to accept data input from multiple sources. The MOP action should also generate a response in a pre-defined format for Fleet Upgrade to parse and process the workflow outcome. For more information and examples, see the section Data I/O for Fleet Upgrade MOP actions.

Tags for Fleet Upgrade MOP actions

You can assign any of the tags shown in the table below to a MOP action by entering them in the Tags field when creating or editing a MOP action workflow. Only the app:Fleet Upgrade and mopActivity tags are required. How you use the optional tags will depend on your purpose and the level of generalization you want to achieve using it. For example: The vendor tag is optional, so you do not need to assign a vendor tag value if the MOP action can be used any of the devices of any vendor. However, you may want to assign vendor:Cisco and vendor:Juniper tags if you want to restrict use of the MOP action to just those two vendors.

Table 2. MOP Action Tags

This Tag...

Indicates

Required?

Case Sensitive?

mopActivity This workflow is a MOP activity (aka as a MOP action). CWM Solutions uses the mopActivity tag to distinguish MOP activities from general workflows. Yes Yes
app:<application group name> The Crosswork Workflow Manager Solutions Application Group to which this MOP action belongs (such as Fleet Upgrade or Golden Configuration) Yes No
vendor:<vendor name> This MOP action is vendor-specific (for example, it is intended for use only with Cisco Systems, Juniper Networks, etc.) If you do not specify a vendor, you are specifying that the MOP action can be used with any supported vendor. No No

productSeries:<product series>

This MOP action is specific to the vendor's product series. You can only specify a value for productSeries if you specify a vendor value. If you do not specify a productSeries, you are specifying that the MOP action can be used with any supported productSeries of the specified vendor. No No
stage:<stage> The Fleet Upgrade MOP is logically organized into multiple stages. The stage tag specifies at which stage a particular workflow action can be used. The supported stages, in order, are: pre, distribute, activate, commit, and post. If you do not specify a stage, you are specifying that the MOP action can be used at any stage. No No
noExport The MOP action cannot be exported. No No
The following table shows some typical combinations of MOP action tag values and describes what they mean.
Table 3. Example MOP Action Tag Value Entries

Example Tag Entries

Description

mopActivity, app:Fleet Upgrade This is a Fleet Upgrade MOP action. It is not specific to any vendor. It can be executed during any MOP stage.
mopActivity, app:Fleet Upgrade, vendor:Cisco Systems, stage:pre This is a Fleet Upgrade MOP action. It is intended for Cisco Systems devices only, but is not specific to any product series. It can be executed during the MOP pre stage.
mopActivity, app:Fleet Upgrade, vendor:Cisco Systems, productSeries:NCS5500, stage:pre, stage:post This is a Fleet Upgrade MOP action. It is intended for use only with the Cisco Systems NCS 5500 product series. It can be executed during the MOP pre and post stages.
mopActivity, app:Fleet Upgrade, vendor:Cisco Systems, productSeries:NCS5500, productSeries:NCS540, stage:post This is a Fleet Upgrade MOP action. It is intended for use only with the Cisco Systems NCS 5500 and NCS 540 product series. It can be executed only during the MOP post stage.
mopActivity, app:Fleet Upgrade, vendor:Juniper Networks, productSeries:MX960, stage:pre, noExport This is a Fleet Upgrade MOP action. It is intended for use only with the Juniper Networks product series MX960. It can be executed during any workflow phase, but only during the MOP pre stage. It cannot be exported.

Your tag entries can be as simple or as complex as needed. Figure 1, below, shows the internal wftags entry from the installed-summary-xr-cwm-sol Fleet Upgrade MOP action, supplied with the Default XR Upgrade MOP and executed under the name "Capture Package Summary Configuration" during the Default XR Upgrade MOP's post stage. Figure 2 shows the same MOP action's tags when edited in the Tags field in the user interface.

Figure 1. wfTags entry from installed-summary-xr-cwm-sol
  "wfTags": [
    "noExport",
    "stage:pre",
    "productSeries:Cisco 8000 Series Routers",
    "productSeries:Cisco ASR 9000 Series Aggregation Services Routers",
    "productSeries:Cisco XRv 9000 Series Virtual Routers",
    "productSeries:Cisco Network Convergence System 5500 Series",
    "productSeries:Cisco Network Convergence System 540 Series Routers",
    "productSeries:Cisco Network Convergence System 540L Series Routers",
    "productSeries:Cisco Network Convergence System 5700 Series Routers",
    "app:Fleet Upgrade",
    "mopActivity",
    "vendor:Cisco Systems",
    "stage:post",
    "default"
  ]
Figure 2. Tag Entries in Workflow UI
Workflow tag entries

Data I/O for Fleet Upgrade MOP actions

MOP actions must be prepared to accept data from three sources:

  1. Data from the product framework itself, in the form of the parent Fleet Upgrade MOP that will perform the device upgrade, and the device and software image selections the user made.

  2. Data in the form of commands, configured by the user, to be performed during the MOP action.

  3. Data from previous MOP actions and any dependencies they create. These include the results of commands performed in previous-stage execution of the MOP action that resulted in a stash of data that the current execution of the MOP action will need to complete its work.

Accordingly, the input data for a MOP action is organized into three sections:

  1. Fleet Upgrade Job Data: Contains details specific to the Fleet Upgrade job, such as the software image being used, the target device for the upgrade, and other relevant job metadata.

  2. MOP Action-Specific Data (User Input): Includes any additional information required by the MOP action. The workflow prompts the user to provide this data during the creation of the MOP job.

  3. Stash: Used when a MOP action is executed in multiple stages (for example, pre and post stages). The output from the pre stage is stored as a "stash" and is automatically included in the input data for the post stage, allowing the later post stage MOP action to use results from the earlier pre stage MOP action.

In Figure 2, below, the MOP action is a disk-space pre stage check. There is no workflow-specific input data required beyond data injected directly by the product framework itself: the image and device information, the name of the resource, and the MOP stage. All of this is either specified by the user when setting up the MOP job, or specified in the MOP action itself.

Figure 3. Example MOP Action with framework-only data
{
  "app-data": {
    "data": {
      "imageSize": 1095680,
      "imageVersion": "7.8.2",
      "softwareImages": [
        "ncs540l-7.8.2.CSCwe80628.tar"
      ]
    },
    "device": {
      "host": "NCS540-RON-TSDN.cisco.com",
      "ip": "172.22.141.249",
      "name": "NCS540-RON-TSDN",
      "productSeries": "Cisco Network Convergence System 540L Series Routers",
      "productType": "Cisco NCS 540-24Q8L2DD-SYS-A Router",
      "softwareType": "IOS XR",
      "softwareVersion": "7.8.2",
      "uuid": "fde8fd5d-98cf-4326-bf83-ef319c82223b",
      "vendor": "Cisco Systems"
    },
    "resource": "nso-217"
  },
  "phase": "",
  "stage": "pre"
}

In Figure 3, the MOP action is a pre stage check on the operational status of the router, which requires as input a couple of commands specified by the user: show version and show ip interface brief. All other the details about the device on which these two commands are to be executed came from the product framework, as in Figure 2.

Figure 4. Example MOP Action with user commands
{
  "app-data": {
    "data": {
      "imageSize": 1095680,
      "imageVersion": "7.8.2",
      "softwareImages": [
        "ncs540l-7.8.2.CSCwe80628.tar"
      ]
    },
    "device": {
      "host": "NCS540-RON-TSDN.cisco.com",
      "ip": "172.22.141.249",
      "name": "NCS540-RON-TSDN",
      "productSeries": "Cisco Network Convergence System 540L Series Routers",
      "productType": "Cisco NCS 540-24Q8L2DD-SYS-A Router",
      "softwareType": "IOS XR",
      "softwareVersion": "7.8.2",
      "uuid": "fde8fd5d-98cf-4326-bf83-ef319c82223b",
      "vendor": "Cisco Systems"
    },
    "resource": "nso-217"
},  
"commandCapture": [
    "show version",
    "show ip interface brief"
 ], 
  "phase": "",
  "stage": "pre"
}

Figure 4 shows a MOP action executed in the pre stage, with the idea that the stash data saved during the pre stage will be provided to the workflow job of the post stage. In this example, command-capture is run in both the pre and post stages, and the details stored during the pre stage for the device are injected as stash data by the product framework.

Figure 5. Example MOP Action with stashed pre phase output
{
  "app-data": {
    "data": {
      "imageSize": 1504059392,
      "imageVersion": "7.9.2",
      "softwareImages": [
        "8000-x64-7.9.2.iso"
      ]
    },
    "device": {
      "host": "PE1-UI",
      "ip": "172.20.221.183",
      "name": "PE1-UI",
      "productSeries": "Cisco 8000 Series Routers",
      "productType": "Cisco 8201 Router",
      "softwareType": "IOS XR",
      "softwareVersion": "7.9.2",
      "uuid": "a068190e-31cb-4b21-95fe-306768921a62",
      "vendor": "Cisco Systems"
    },
    "resource": "nso_resource"
  },
  "commandCapture": [
    {
      "command": "show version"
    },
    {
      "command": "show ip interface brief"
    }
  ],
  "phase": "",
  "stage": "post",
  "stash" : [
      "\r\n\rMon Aug  4 10:39:38.489 UTC\r\nCisco IOS XR Software, Version 7.9.2 LNT
\r\nCopyright (c) 2013-2023 by Cisco Systems, Inc.
\r\n\r\nBuild Information:\r\n Built By     : xxxxxxxxx
\r\n Built On     : Thu Jun 29 03:07:05 UTC 2023
\r\n Build Host   : bdb7eb8f4e82\r\n Workspace    : /auto/srcarchive16/prod/7.9.2/8000/ws
\r\n Version      : 7.9.2
\r\n Label        : 7.9.2
\r\n\r\ncisco 8000 (VXR)\r\ncisco 8201-SYS (VXR) processor with 32GB of memory
\r\nPE1-UI uptime is 16 weeks, 4 days, 35 minutes
\r\nCisco 8201 1RU Chassis\r\n\r\nRP/0/RP0/CPU0:PE1-UI#; 
command: show version",
      "\r\n\rMon Aug  4 10:39:38.473 UTC\r\n
\r\nInterface                      IP-Address      Status          Protocol Vrf-Name
\r\nLoopback0                      150.1.1.1       Up              Up       default 
\r\nFourHundredGigE0/0/0/0         10.1.13.1       Up              Up       paris   
\r\nFourHundredGigE0/0/0/1         150.1.12.1      Up              Up       default 
\r\nFourHundredGigE0/0/0/2         unassigned      Shutdown        Down     default 
\r\nFourHundredGigE0/0/0/3         unassigned      Shutdown        Down     default 
...
\r\nFourHundredGigE0/0/0/23        unassigned      Shutdown        Down     default 
\r\nHundredGigE0/0/0/24            unassigned      Shutdown        Down     default 
\r\nHundredGigE0/0/0/25            unassigned      Shutdown        Down     default 
\r\nHundredGigE0/0/0/26            unassigned      Shutdown        Down     default 
...
\r\nHundredGigE0/0/0/35            unassigned      Shutdown        Down     default 
\r\nMgmtEth0/RP0/CPU0/0            192.168.122.58  Up              Up       MGMT    
\r\nRP/0/RP0/CPU0:PE1-UI#; command: show ip interface brief"
    ],
}

In Figure 5, when the MOP action is executed in the pre and post stages, the stash data saved during the pre stage will be provided to the workflow job of the post stage. In this example, a package summary check is run in both the pre and post stages, and the details stored during the pre stage for the device are injected as stash data by the product framework.

Figure 6. Example MOP Action with package summary
{
  "app-data": {
    "data": {
      "imageSize": 1504059392,
      "imageVersion": "7.9.2",
      "softwareImages": [
        "8000-x64-7.9.2.iso"
      ]
    },
    "device": {
      "host": "PE1-UI",
      "ip": "172.20.221.183",
      "name": "PE1-UI",
      "productSeries": "Cisco 8000 Series Routers",
      "productType": "Cisco 8201 Router",
      "softwareType": "IOS XR",
      "softwareVersion": "7.9.2",
      "uuid": "a068190e-31cb-4b21-95fe-306768921a62",
      "vendor": "Cisco Systems"
    },
    "resource": "nso_resource"
  },
  "phase": "",
  "stage": "post",
  "stash": {
    "activated": [
      {
        "Package": "xr-8000-l2mcast",
        "Version": "7.9.2v1.0.0-1"
      },
      {
        "Package": "xr-8000-mcast",
        "Version": "7.9.2v1.0.0-1"
      },
...
      {
        "Package": "xr-track",
        "Version": "7.9.2v1.0.0-1"
      },
      {
        "Package": "xr-8000-fpd",
        "Version": "7.9.2v1.0.1-1"
      }
    ],
    "committed": [
      {
        "Package": "xr-8000-l2mcast",
        "Version": "7.9.2v1.0.0-1"
      },
      {
        "Package": "xr-8000-mcast",
        "Version": "7.9.2v1.0.0-1"
      },
...
      {
        "Package": "xr-track",
        "Version": "7.9.2v1.0.0-1"
      },
      {
        "Package": "xr-8000-fpd",
        "Version": "7.9.2v1.0.1-1"
      }
    ]
  },
}

For Figures 6 and 7: Consider a simple MOP action that performs only a validation check on a device and appears to have no "stash" data output, only a status message:

Figure 7. Example output without stash data
{
  "Data": {
    "message": "Device disk check passed.",
    "status": "success"
  }
}

The stash data is useful in two ways. First, it lets users see detailed information about each MOP action that ran during the Fleet Upgrade job. In the job execution view, when someone clicks on a specific MOP action, the stash shows the actual device configuration or any relevant data used at that step. This gives more context than just a message or status, so users can see exactly what data was involved in the decision.

Second, if that same MOP action is run again in a later stage (such as the post stage), the workflow automatically passes the pre stash data as input for the post stage. This means the workflow can re-use earlier results for post-processing, keeping things connected and efficient:

Figure 8. Example output with stash data
{
  "Data": {
    "message": "Interface pre-upgrade check is successful.",
    "stash": [
      {
        "AdminDown": "0",
        "Down": "0",
        "InterfaceType": "IFT_ETHERNET",
        "Total": "1",
        "Up": "1"
      },
      {
        "AdminDown": "0",
        "Down": "0",
        "InterfaceType": "IFT_LOOPBACK",
        "Total": "1",
        "Up": "1"
      },
      {
        "AdminDown": "0",
        "Down": "0",
        "InterfaceType": "IFT_NULL",
        "Total": "1",
        "Up": "1"
      },
      {
        "AdminDown": "12",
        "Down": "0",
        "InterfaceType": "IFT_HUNDREDGE",
        "Total": "12",
        "Up": "0"
      },
      {
        "AdminDown": "22",
        "Down": "0",
        "InterfaceType": "IFT_FOURHUNDREDGE",
        "Total": "24",
        "Up": "2"
      },
      {
        "AdminDown": "34",
        "Down": "0",
        "InterfaceType": "ALL TYPES",
        "Total": "39",
        "Up": "5"
      }
    ],
    "status": "success"
  }
}

A MOP action should return output using the following JSON schema (the stash element is optional):

{
"status": "string",
"message": "string",
"stash": {output stash}
}