Bypass Traffic in Secure Web Appliance
Available Languages
Contents
Introduction
This document describes the steps to bypass traffic in Secure Web Appliance (SWA).
Prerequisites
Requirements
Cisco recommends that you have knowledge of these topics:
- SWA administration.
- Basic Networking and Proxy protocols
Cisco recommends that you have these tools installed:
- Physical or Virtual SWA
- Administrative Access to the SWA Graphical User Interface (GUI)
Components Used
This document is not restricted to specific software and hardware versions.
The information in this document was created from the devices in a specific lab environment. All of the devices used in this document started with a cleared (default) configuration. If your network is live, ensure that you understand the potential impact of any command.
Different Types of Bypass
In SWA, there are three different concepts of bypassing a traffic from reaching the SWA which depends on your Proxy deployment (Explicit or Transparent Deployment), or from being analyzed and scanned by the SWA. Here are a brief over view of these three concepts:
- Bypass: A setting that prevents traffic from reaching the SWA, which lowers Network Interface Card (NIC) utilization and removes the need for a session between the user and the appliance.
- Pass Through: This configuration prevents the SWA from decrypting HTTPS traffic. Despite this, the SWA continues to facilitate two distinct sessions: one between the client and the SWA, and a second between the SWA and the web server.
- Allow: A setting within the Access Policy where HTTP or decrypted traffic skips inspection by internal SWA engines, such as AMP, Sophos, WebRoot, and the Application Filter. In this case, still there are two sessions in use in the SWA.
 Image - Comparison Chart
SWA Bypass Procedures by Deployment Type
Bypass procedures vary depending on your proxy deployment model. Here is a brief overview of each type:
- Explicit Deployment: Clients are manually configured to direct traffic to the proxy.
- Transparent Deployment: Network infrastructure redirects traffic to the proxy automatically, requiring no client-side configuration.
Bypass Traffic in Explicit Deployment
To Bypass the Traffic in the Explicit Deployment, you must configure the Client to not forward the web request for the desired URLs to the SWA. As shown in this network diagram, some of the traffic are directly going to the Firewall or the Default Gateway to bypass the SWA (Path number 2).
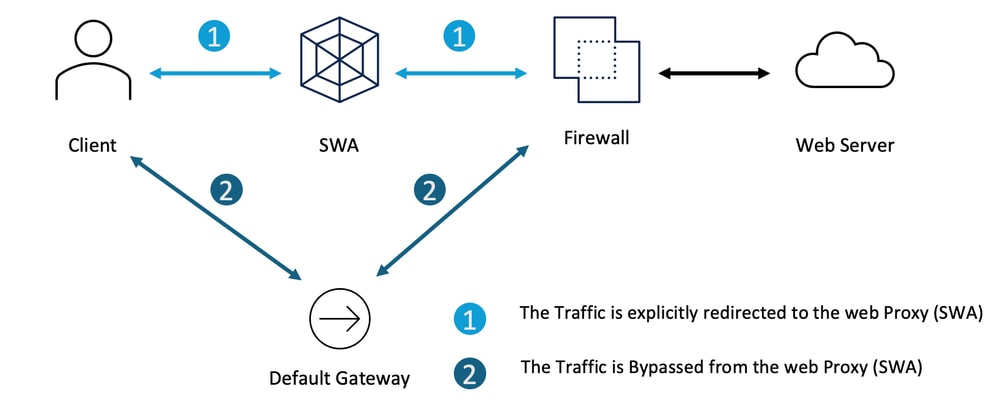 Image - Bypass the Traffic in Explicit Deployment
Depends on your explicit proxy deployment, you can exempt some URLs to redirected to the SWA.
| Explicit Proxy Configuration |
Steps to exclude URLs from reaching the SWA |
PAC File Configuration |
Depends on how you configured your PAC file, you can define the exception list and set the action to DIRECT. Here are some samples to bypass the private IP address from reaching the SWA This is an Example to Bypass the traffic to www.cisco.com from redirecting the SWA This example is to bypass all the sub-domains of cisco.com from redirecting the SWA |
Browser Configuration ( Microsoft Edge, Internet Explorer, Google Chrome) |
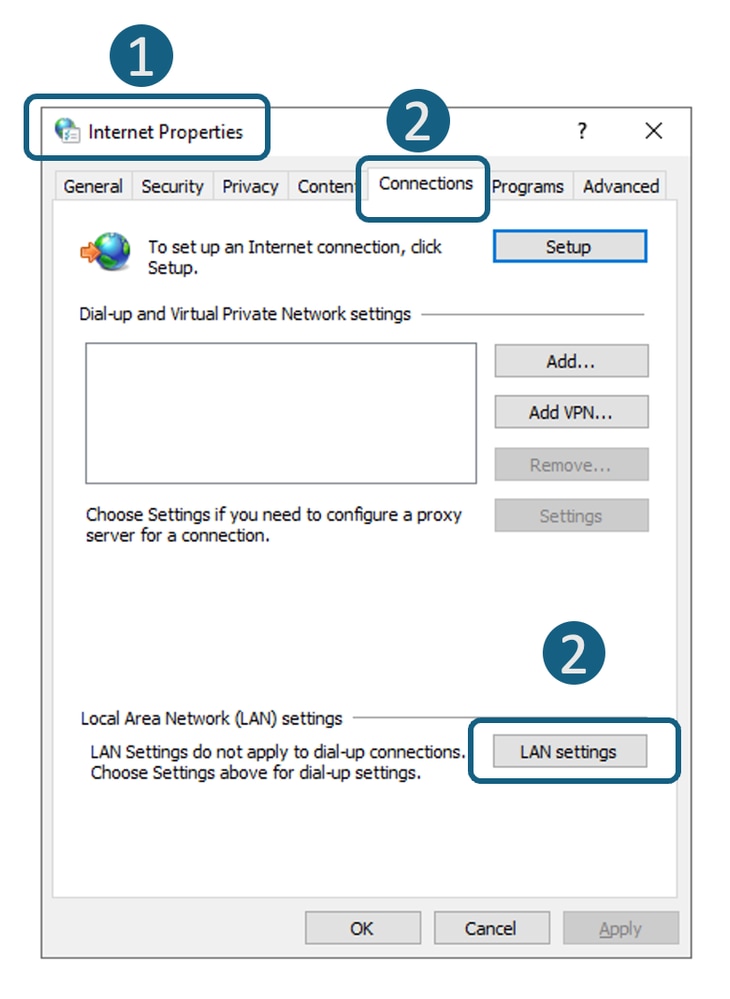
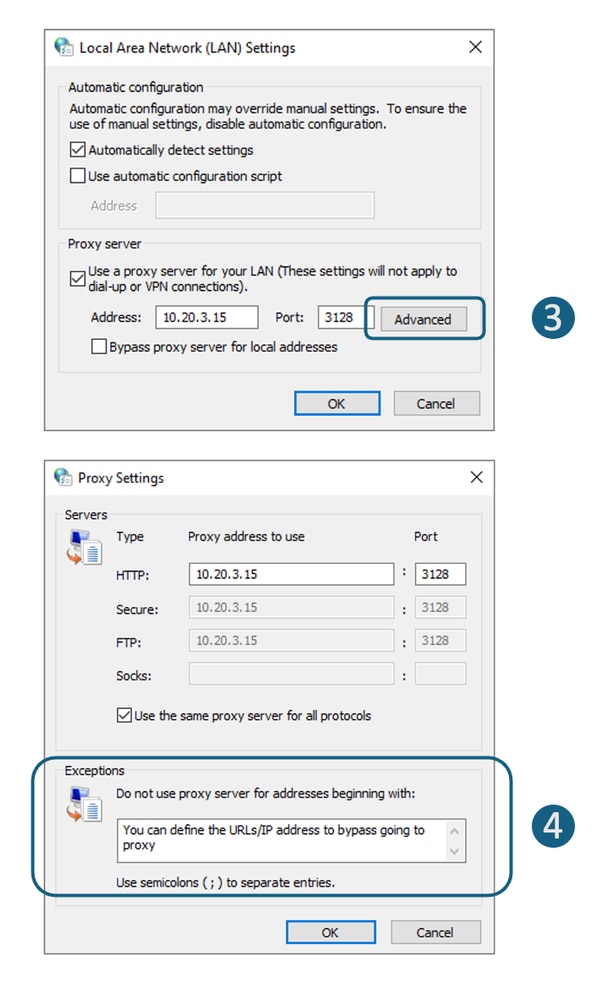
Step 1. In the Start Menu, type "Internet Options" and press enter Step 2. Navigate to Connections tab and click LAN Settings Step 3. Click on the Advanced Step 4. Define your desired URLs in the Exceptions section.
|
Browser Configuration (Mozila FireFox) |
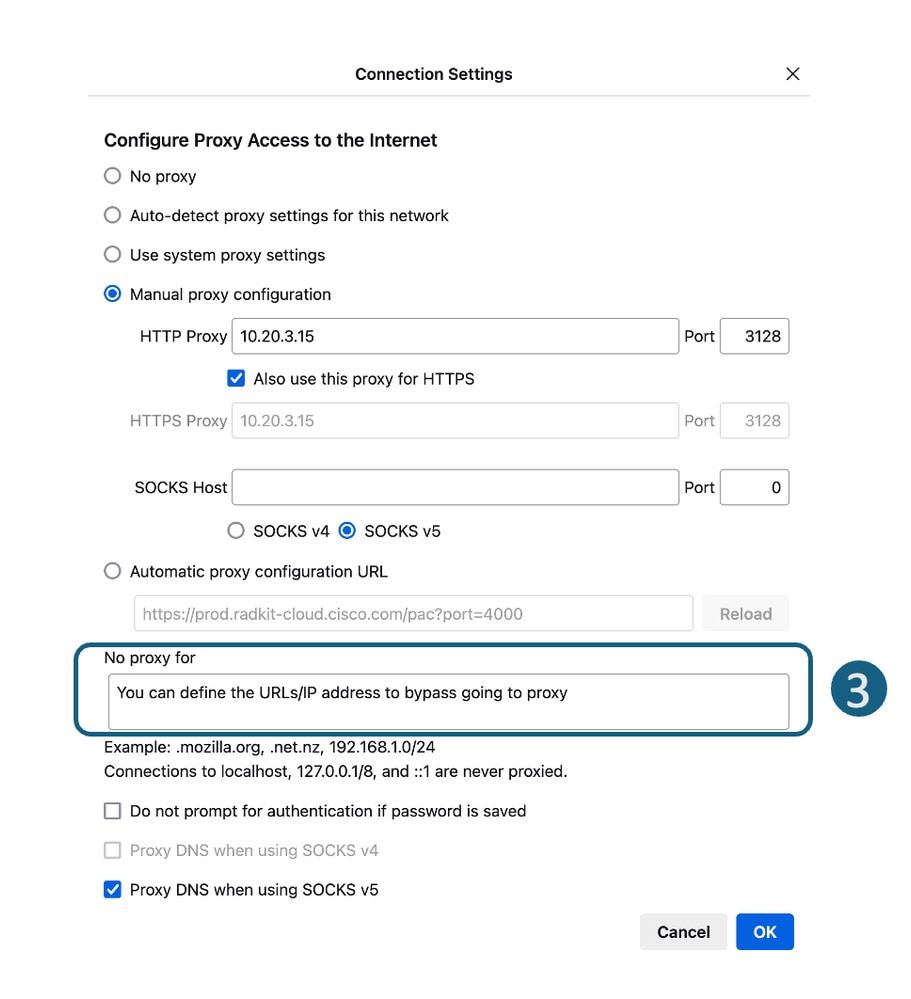
Step 1. On the top right corner, click on the three bar menu and select Settings. Step 2. In the search bar, type proxy. Step 3. Define your desired URLs in the No Proxy for section.
|
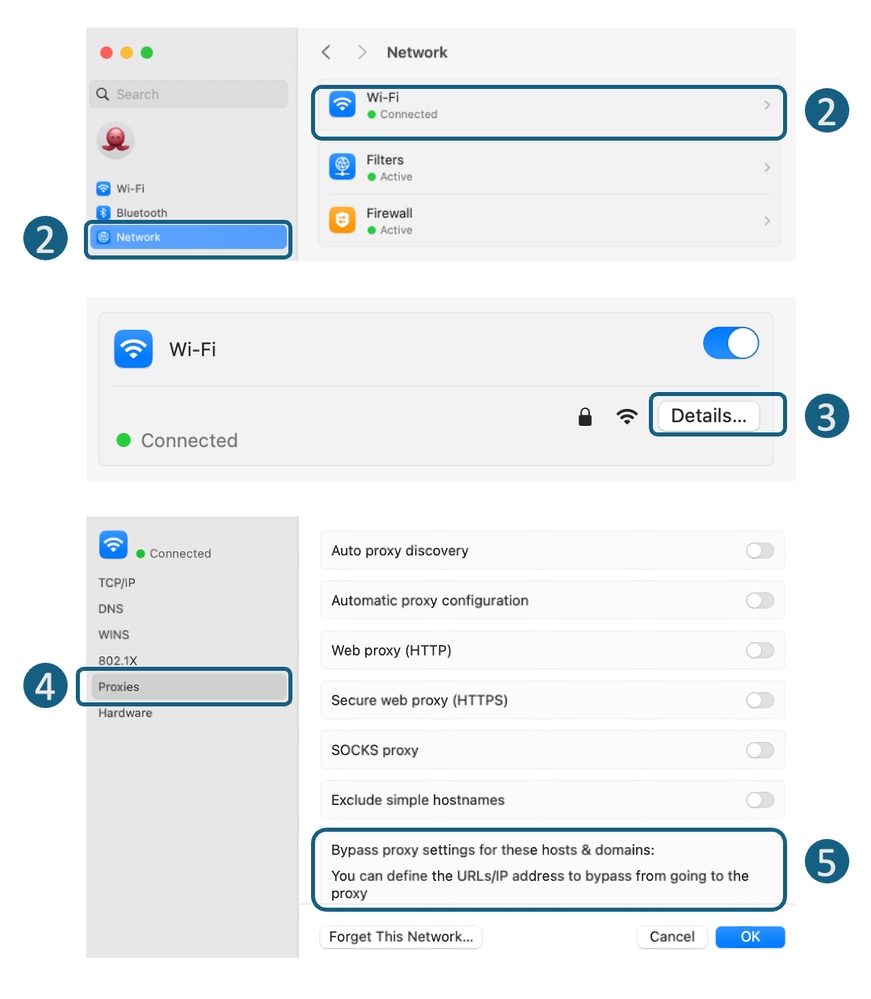
Browser Configuration (Apple Safari) |
Step 1. On the top-left corner, click on the Apple icon and choose System Settings. Step 2. From the left panel navigate to Network and select the Network Interface you are using to access the Internet. Step 3. Click on the Details. Step 4. From the left panel, select Proxies. Step 5. Define your desired URLs in the Bypass Proxy Settings section.
|
Group Policy Configuration |
Depends on how you configured the Group Policy to push the proxy settings, you can define the exception list. |
Bypass Traffic in Transparent Deployment
You can bypass traffic in a transparent deployment using either the WCCP router or SWA Bypass settings. SWA Bypass acts at Layer 3, routing traffic to the default gateway and bypassing the appliance entirely, which prevents processing and the creation of separate sessions.
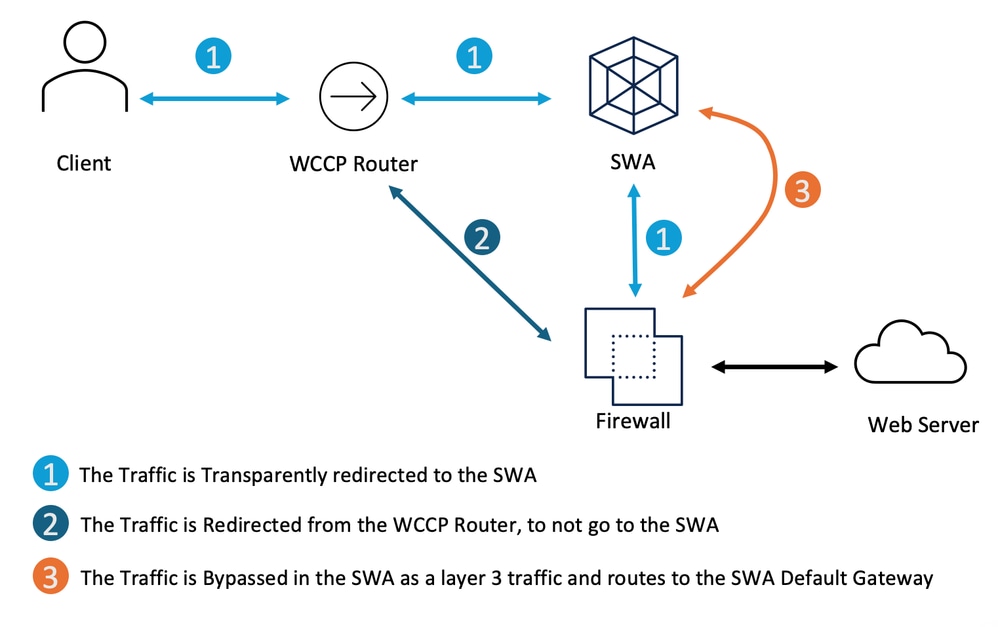 Image - Bypass the Traffic in Transparent Deployment
| Bypassing traffic Transparent Proxy Deployment |
Steps to bypass the traffic from reaching the SWA |
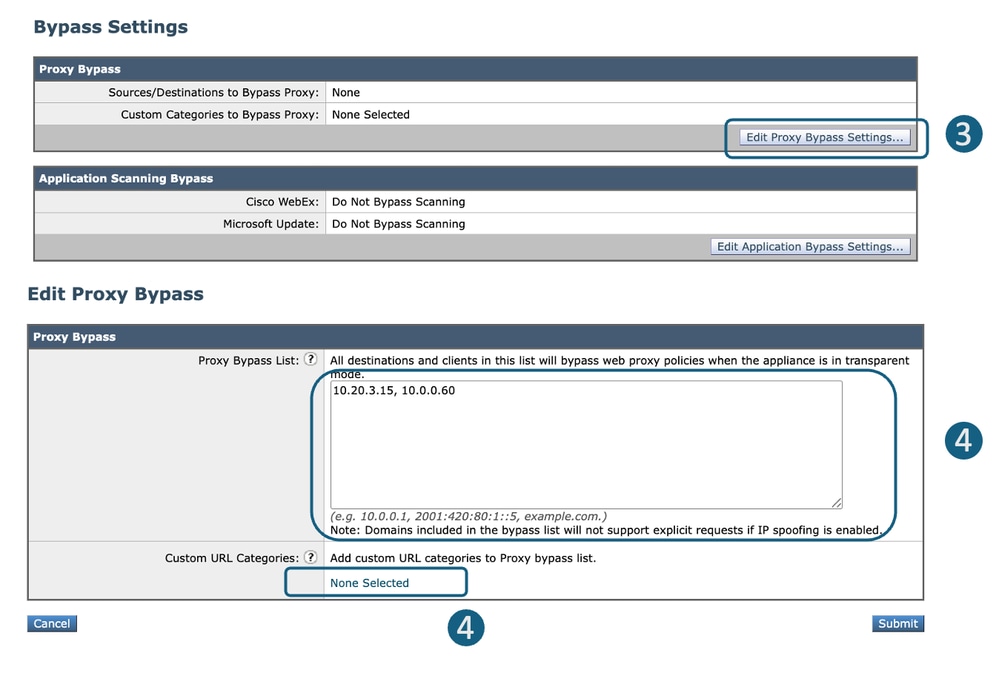
SWA Bypass Setting |
Step 1. From GUI, Choose Web Security Manager. Step 2. Select Bypass Settings. Step 3. Click Edit Proxy Bypass Settings. Step 4. You can enter the URL, IP address or adding a Custom URL Category to the list. Step 5. Submit and Commit the changes.
|
Redirect the Traffic From WCCP/PBR Router |
You can configure source or destination IP address in your WCCP or Policy Based Router (PBR) to not redirect some traffics to the SWA. |
Configuring Pass Through and Allowing Traffic in SWA
If the traffic is hitting the SWA and in order to reduce the load on the SWA to due to the privacy concerns you do not want the traffic for some URLs being inspected by the SWA, use these steps.
| Steps |
Steps |
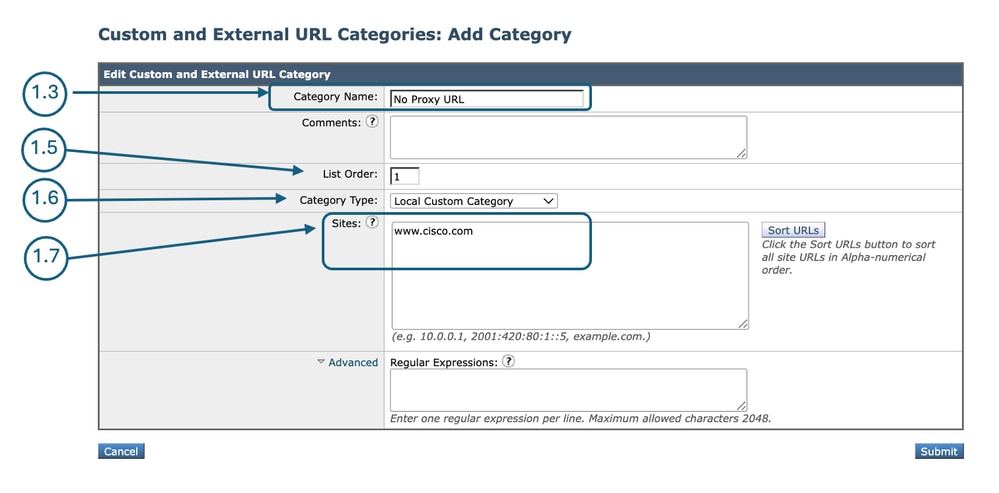
| Step 1. Create a Custom URL Category for the URLs. |
Step 1.1.FromGUI, ChooseWeb Security Manager and then click Custom and External URL Categories. Step 1.5. From List Order, choose the first category to position on top. Step 1.6. From Category Typedrop-down list, choose Local Custom Category. Step 1.7. Add desiered URLs in the Sites Section. Step 1.8. Submit.
|
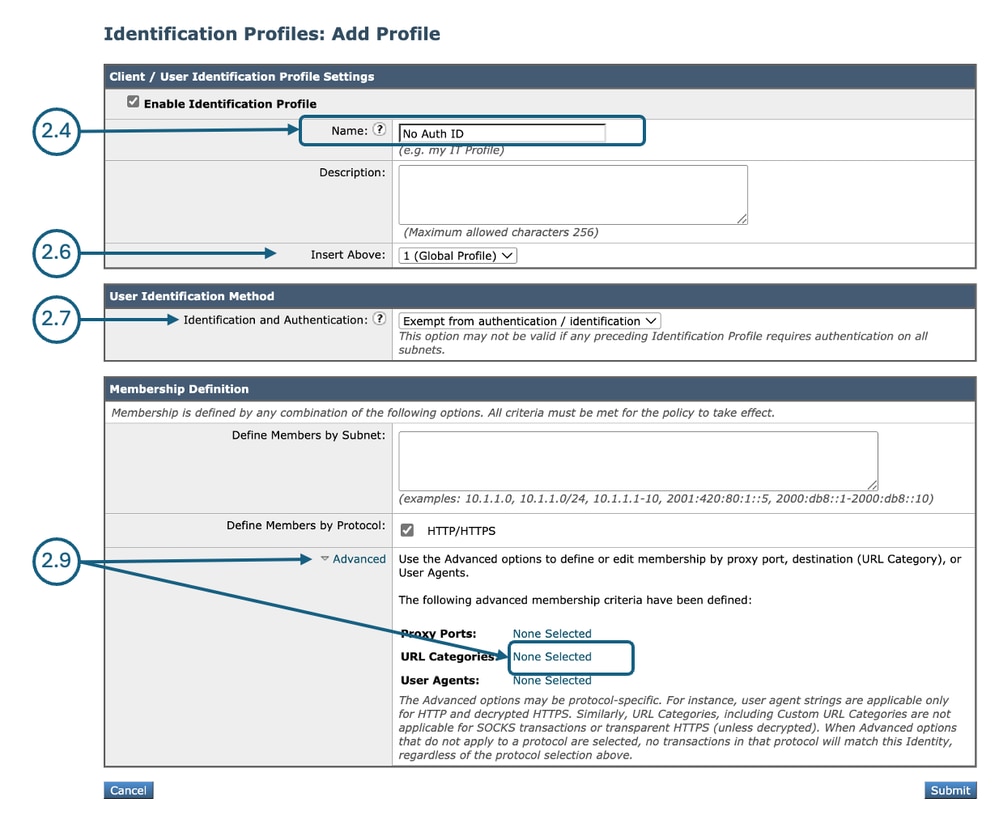
| Step 2. Create an Identification Profile to exempt traffic from Authentication. |
Step 2.1.FromGUI, ChooseWeb Security Manager and then click Identification Profiles. Step 2.7. In theUser Identification Methodsection, chooseExempt from authentication/ identification. Step 2.8.In the Define Members by Subnet, leave this field blank to include all Client IP address unless you would like to Pass Through the traffic for a certain IP addresses. Step 2.9. From Advanced section, choose Custom URL Categories.
Step 2.10. Add the Custom URL Category that was created on Step 1. Step 2.11. Click Done. Step 2.12. Submit. |
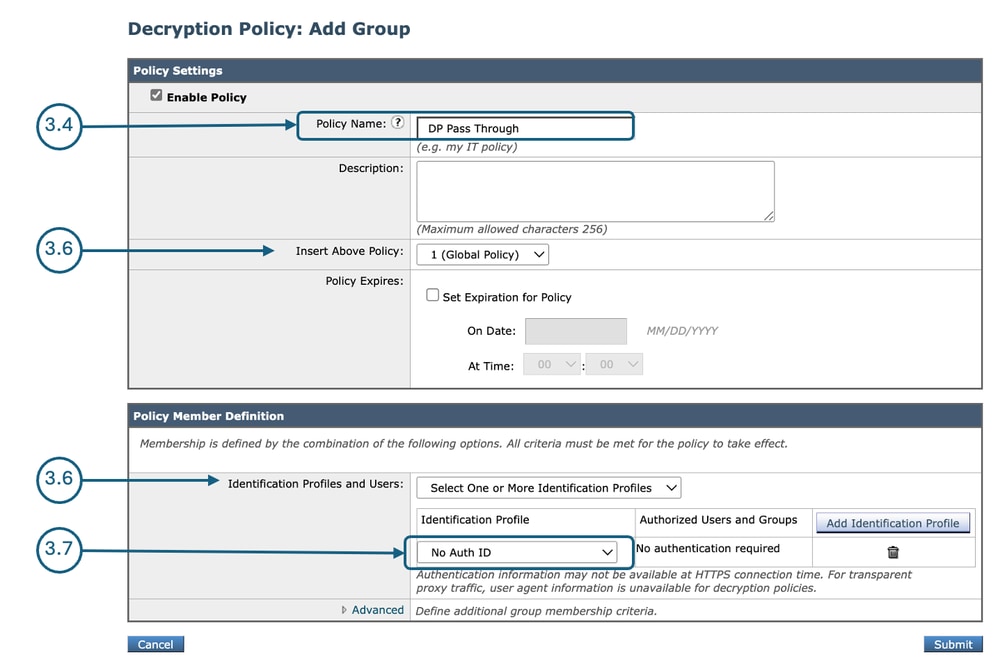
| Step 3. Create a Decryption Policy to pass through traffic. |
Step 3.1.FromGUI, ChooseWeb Security Manager and then clickDecryption Policy. Step 3.2. ClickAdd Policyto add a Decryption Policy. Step 3.3.Use theEnable Policy check box to enable this policy. Step 3.7.From theIdentification Profiles and Users, choose the Identification Profile that you created in Step 2. Step 3.8. Submit.
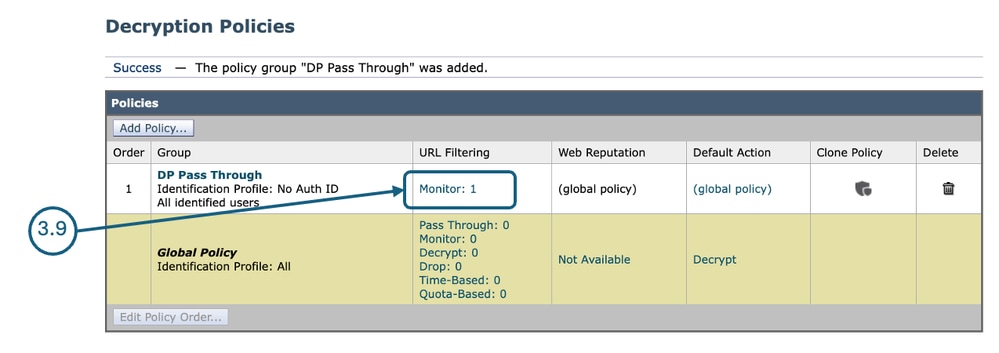
Step 3.9.In theDecryption Policiespage, underURL Filtering, click on the link associated with this new Decryption Policy.
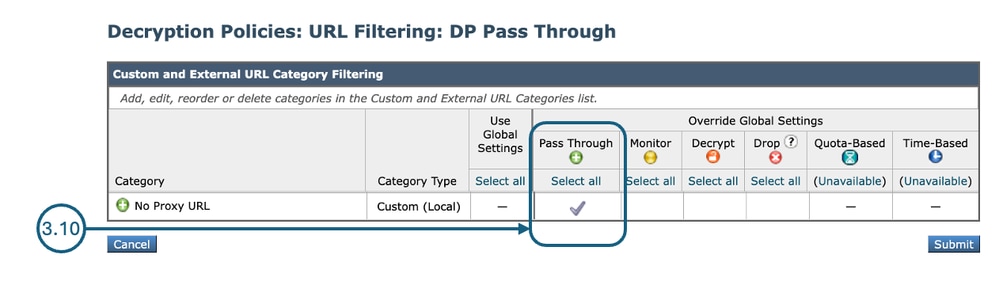
Step 3.10.SelectPass Throughas the action for the URL Category created on Step 1.
Step 3.11. Submit. |
| Step 4. Create an Access Policy to allow Microsoft Updates traffic. |
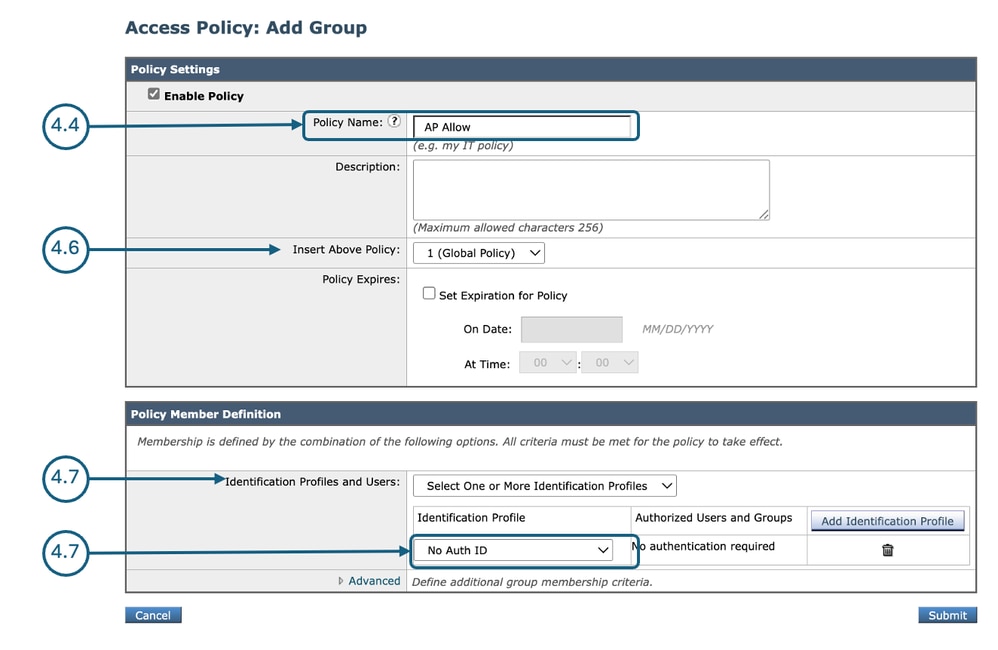
Step 4.1.FromGUI, ChooseWeb Security Manager and then clickAccess Policy. Step 4.2. ClickAdd Policyto add an Access Policy. Step 4.3.Use theEnable Policy check box to enable this policy. Step 4.7.From theIdentification Profiles and Users, choose the Identification Profile that you created in Step 2. Step 4.8. Submit.
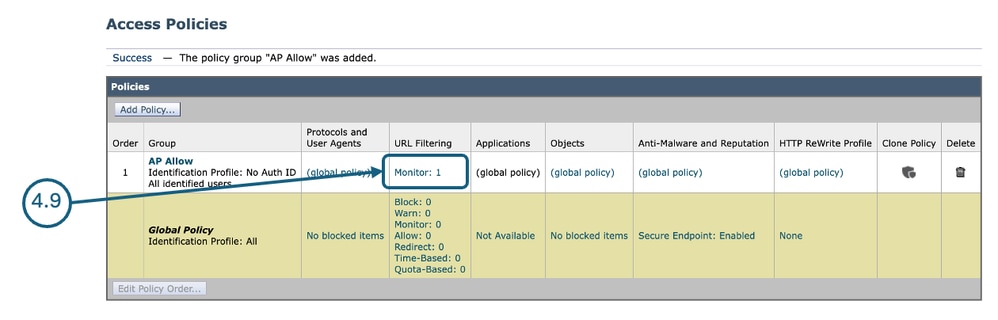
Step 4.9. On the Access Policies page, under URL Filtering, click on the link associated with this new Access Policy.
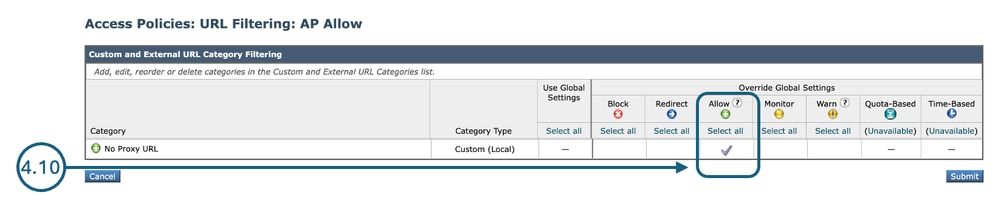
Step 4.10.Select Allowas the action for the Custom URL category created for the URL Category created on Step 1.
Step 4.11. Submit. Step 4.12. Commit changes. |
Related Information
- Bypass Microsoft Updates Traffic in Secure Web Appliance
- Bypass Authentication in Secure Web Appliance - Cisco
- User Guide for AsyncOS 15.0 for Cisco Secure Web Appliance - GD(General Deployment) - Classify End-Users for Policy Application [Cisco Secure Web Appliance] - Cisco
- Configure Custom URL Categories in Secure Web Appliance - Cisco
- How To Exempt Office 365 Traffic From Authentication and Decryption on Cisco Web Security Appliance (WSA) - Cisco
- Use Secure Web Appliance Best Practices - Cisco
- Block Traffic in Secure Web Appliance
- Block Upload Traffic in Secure Web Appliance
- Block Executable File Download in SWA
Revision History
| Revision | Publish Date | Comments |
|---|---|---|
1.0 |
24-Apr-2026
|
Initial Release |
 Feedback