Install and Renew Certificates on FTD Managed by FMC
Available Languages
Contents
Introduction
This document describes how to install, trust, and renew certificates on an FTD managed by FMC.
Prerequisites
Requirements
Cisco recommends that you have knowledge of these topics:
- Manual certificate enrollment requires access to a trusted third-party CA.
- Examples of third-party CA vendors include, but are not limited to, Entrust, Geotrust, GoDaddy, Thawte, and VeriSign.
- Verify that the FTD has the correct clock time, date, and time zone. With certificate authentication, it is recommended to use a Network Time Protocol (NTP) server to synchronize the time on the FTD.
Components Used
The information in this document is based on these software and hardware versions:
- FMCv running 6.5
- FTDv running 6.5
- For PKCS12 creation, OpenSSL is used
The information in this document was created from the devices in a specific lab environment. All of the devices used in this document started with a cleared (default) configuration. If your network is live, ensure that you understand the potential impact of any command.
Background Information
This document describes how to install, trust, and renew self-signed certificates and certificates signed by a 3rd party Certificate Authority (CA) or internal CA on a Firepower Threat Defense (FTD) managed by Firepower Management Center (FMC).
Configure
Certificate Installation
Self-Signed Enrollment
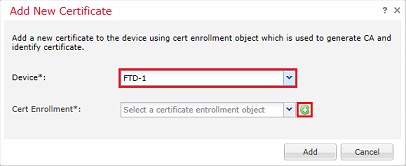
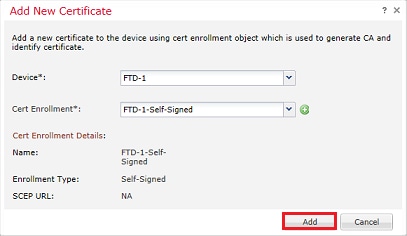
1. Navigate to Devices > Certificates, then click Add as shown in the image.

2. Select the device and the certificate is added to in the Device* dropdown. Then click the green + symbol as shown in the image.
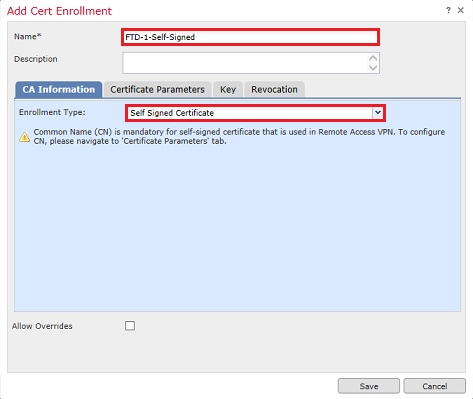
3. Specify a Name for the trustpoint and under the CA Information tab, select Enrollment Type: Self Signed Certificate as shown in the image.
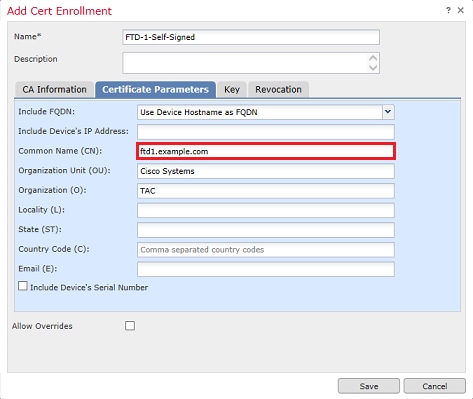
4. Under the Certificate Parameters tab, enter a Common Name for the certificate. This must match the FQDN or IP address of the service for which the certificate is used as shown in the image.
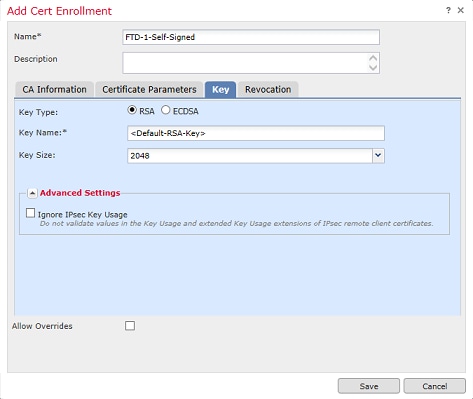
5. (Optional) Under the Key tab, the type, name and size of the private key used for the certificate can be specified. By default, the key uses an RSA key with the name of <Default-RSA-Key> and a size of 2048; however, it is recommended to use a unique name for each certificate, so that they do not use the same private/public keypair as shown in the image.
6. Once done, click Save then click Add as shown in the image.
7. Once complete, the self-signed certificate is shown in the image.

Manual Enrollment
1. Navigate to Devices > Certificates then click Add as shown in the image.

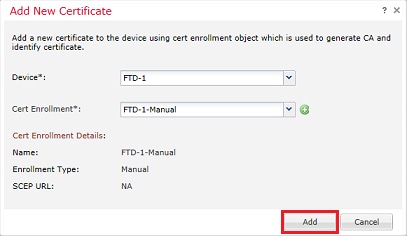
2. Select the device the certificate is added to in the Device* dropdown then click the green + symbol as shown in the image.

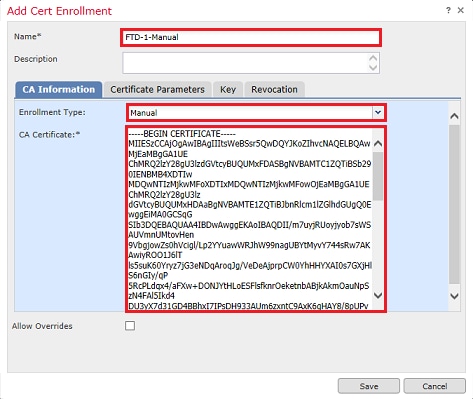
3. Specify a Name for the trustpoint and under the CA Information tab, select Enrollment Type: Manual. Enter the pem format certificate of the CA that is used to sign the Identity Certificate. If this certificate is not available or known at this time, add any CA certificate as a placeholder, and once the identity certificate is issued repeat this step to add the real issuing CA as shown in the image.
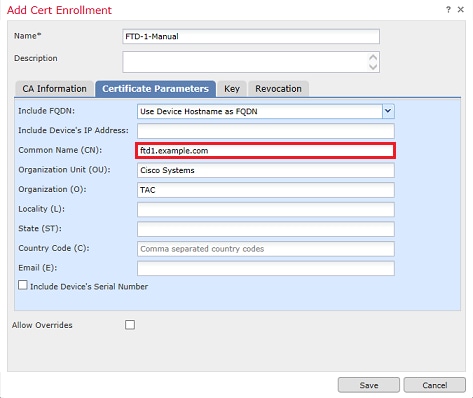
4. Under the Certificate Parameters tab, enter a Common Name for the certificate. This must match the fqdn or IP address of the service for which the certificate is used as shown in the image.
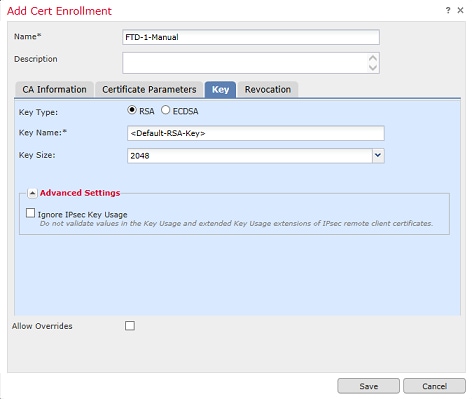
5. (Optional) Under the Key tab, the type, name, and size of the private key used for the certificate can optionally be specified. By default, the key uses an RSA key with the name of <Default-RSA-Key> and a size of 2048; however, it is recommended to use a unique name for each certificate so that they do not use the same private/public keypair as shown in the image.
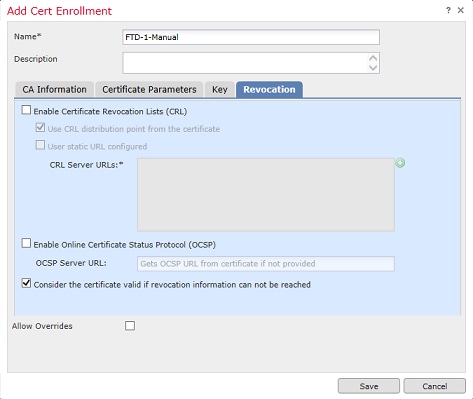
6. (Optional) Under the Revocation tab, Certificate Revocation List (CRL) or Online Certificate Status Protocol (OCSP) revocation is checked and can be configured. By default, neither is checked as shown in the image.
7. Once done, click Save then click Add as shown in the image.
8. After you process the request, FMC presents the option to add an identity certificate. Click the ID button as shown in the image.

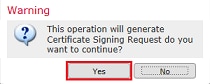
9. A window pops up that informs that a CSR is generated. Click Yes as shown in the image.
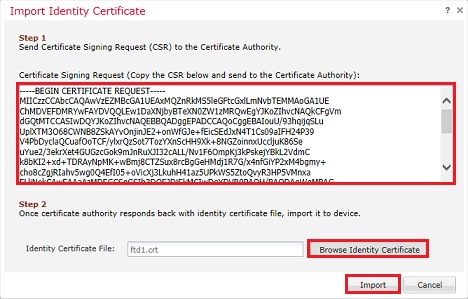
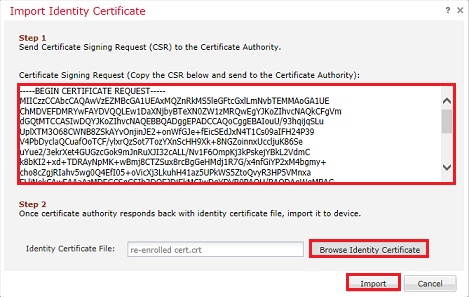
10. Next, a CSR is generated that can be copied and sent to a CA. Once the CSR has been signed, an identity certificate is provided. Browse to the provided identity certificate and select it, then click Import as shown in the image.
11. Once complete, the manual certificate is shown as in the image.

PKCS12 Enrollment
1. In order to install a received or created PKCS12 file, navigate to Devices > Certificates then click Add as shown in the image.

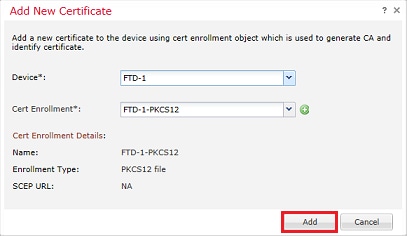
2. Select the device the certificate is added to in the Device* dropdown then click the green + symbol as shown in the image.

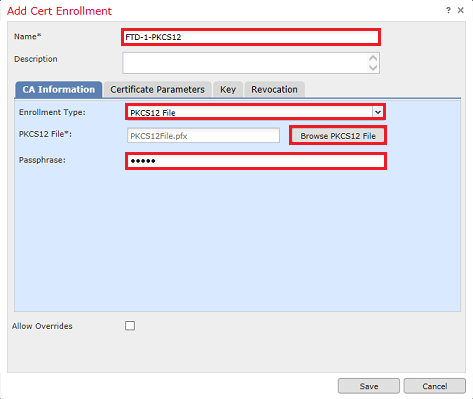
3. Specify a Name for the trustpoint and under the CA Information tab, select Enrollment Type: PKCS12 File. Browse to the created PKCS12 file and select it. Enter the passcode used when you create the PKCS12 as shown in the image.
4. (Optional) The Certificate Parameters and Key tabs are grayed out as these are already created with the PKCS12, however, the Revocation tab ito enable CRL and/or OCSP revocation checking can be modified. By default, neither are checked as shown in the image.

5. Once done, click Save then click Add on this window as shown in the image.
6. Once complete, the PKCS12 certificate looks as shown in the image.

Certificate Renewal
Self-Signed Certificate Renewal
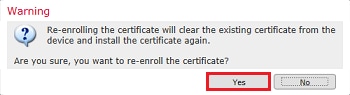
1. Press the Re-enroll certificate button as shown in the image.

2. A window prompts that the self-signed certificate is removed and replaced. Click Yes as shown in the image.
3. A renewed self-signed is pushed to the FTD. This can be verified when you click the ID button and check the Valid time.
Manual Certificate Renewal
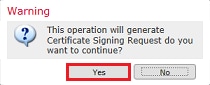
1. Press the Re-enroll certificate button as shown in the image.

2. A window prompts that a certificate signing request is generated. Click Yes as shown in the image.
3. In this window, a CSR is generated that can be copied and sent to the same CA that signed the identity certificate previously. Once the CSR has been signed, the renewed identity certificate is provided. Browse to the provided identity certificate and select it, then click Import as shown in the image.
4. A renewed manual certificate is pushed to the FTD. This can be verified when you click the ID button and check the Valid time.
PKCS12 Renewal
If you click the re-enroll certificate button, it does not renew the certificate. In order to renew a PKCS12, a new PKCS12 file needs to be created and uploaded with the use of the methods mentioned earlier.
PKCS12 Creation with OpenSSL
1. With the use of OpenSSL or a similar application, generate a private key and Certificate Signing Request (CSR). This example shows a 2048 bit RSA key named private.key and a CSR named ftd1.csr that is created in OpenSSL:
openssl req -new -newkey rsa:2048 -nodes -keyout private.key -out ftd1.csr
Generating a 2048 bit RSA private key
..........................................+++
..................................................................................+++
written to a new private key to 'private.key'
-----
You are about to be asked to enter information that is incorporated
into your certificate request.
What you are about to enter is what is called a Distinguished Name or a DN.
There are quite a few fields but you can leave some blank
For some fields there is be a default value,
If you enter '.', the field is left blank.
-----
Country Name (2 letter code) [AU]:.
State or Province Name (full name) [Some-State]:.
Locality Name (eg, city) []:.
Organization Name (eg, company) [Internet Widgits Pty Ltd]:Cisco Systems
Organizational Unit Name (eg, section) []:TAC
Common Name (e.g. server FQDN or YOUR name) []:ftd1.example.com
Email Address []:.

Please enter these'extra'attributes
to be sent with your certificate request
A challenge password []:
An optional company name []:
2. Copy the generated CSR and send it to a CA. Once the CSR has been signed, an identity certificate is provided. Typically, the CA certificate(s) is provided as well. In order to create a PKCS12, run one of these commands in OpenSSL:
In order to only include the CA certificate issued within the PKCS12, use this command:
openssl pkcs12 -export -out ftd.pfx -in ftd.crt -inkey private.key -certfile ca.crt
Enter Export Password: *****
Verifying - Enter Export Password: *****
- ftd.pfx is the name of the pkcs12 file (in der format) that is exported by openssl.
- ftd.crt is the name of the signed identity certificate issued by the CA in pem format.
- private.key is the keypair created in Step 1.
- ca.crt is the issuing Certificate Authority's certificate in pem format.
If the certificate is a part of a chain with a root CA and 1 or more intermediate CAs, this command can be used to add the complete chain in the PKCS12:
openssl pkcs12 -export -out ftd.pfx -in ftd.crt -inkey private.key -chain -CAfile cachain.pem
Enter Export Password: *****
Verifying - Enter Export Password: *****
- ftd.pfx is the name of the pkcs12 file (in der format) that is exported by OpenSSL.
- ftd.crt is the name of the signed identity certificate issued by the CA in pem format.
- private.key is the keypair created in Step 1.
- cachain.pem is a file that contains the CA certificates in the chain that start with the issuing intermediate CA and ends with the root CA in pem format.
If a PKCS7 file (.p7b, .p7c) is returned, these commands can also be used to create the PKCS12. If the p7b is in der format, ensure to add -inform der to the arguments, otherwise do not include it:
openssl pkcs7 -in ftd.p7b -inform der -print_certs -out ftdpem.crt

openssl pkcs12 -export -in ftdpem.crt -inkey private.key -out ftd.pfx
Enter Export Password: *****
Verifying - Enter Export Password: *****
- ftd.p7b is the PKCS7 returned by the CA containing the signed identity certificate and the CA chain.
- ftdpem.crt is the converted p7b file.
- ftd.pfx is the name of the pkcs12 file (in der format) that is exported by OpenSSL.
- private.key is the keypair created in Step 1.
Verify
Use this section in order to confirm that your configuration works properly.
View Installed Certificates in FMC
In FMC, navigate to Devices > Certificates. For the relevant trustpoint, click the CA or ID to view more details about the certificate as shown in the image.

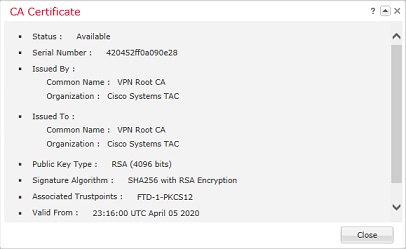
Verify the CA Certificate as shown in the image.
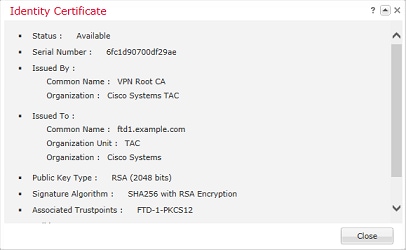
Verify the Identity Certificate as shown in the image.
View Installed Certificates in CLI
SSH to the FTD and enter the command show crypto ca certificate.
> show crypto ca certificates
Certificate
  Status: Available
  Certificate Serial Number: 6fc1d90700df29ae
  Certificate Usage: General Purpose
  Public Key Type: RSA (2048 bits)
  Signature Algorithm: SHA256 with RSA Encryption
  Issuer Name:
    cn=VPN Root CA
    o=Cisco Systems TAC
  Subject Name:
    cn=ftd1.example.com
    ou=TAC
    o=Cisco Systems
  Validity Date:
    start date: 15:47:00 UTC Apr 8 2020
    end   date: 15:47:00 UTC Apr 8 2021
  Storage: config
  Associated Trustpoints: FTD-1-PKCS12

CA Certificate
  Status: Available
  Certificate Serial Number: 420452ff0a090e28
  Certificate Usage: General Purpose
  Public Key Type: RSA (4096 bits)
  Signature Algorithm: SHA256 with RSA Encryption
  Issuer Name:
    cn=VPN Root CA
    o=Cisco Systems TAC
  Subject Name:
    cn=VPN Root CA
    o=Cisco Systems TAC
  Validity Date:
    start date: 23:16:00 UTC Apr 5 2020
    end   date: 23:16:00 UTC Apr 5 2030
  Storage: config
  Associated Trustpoints: FTD-1-PKCS12
Troubleshoot
This section provides information you can use to troubleshoot your configuration.
Debug Commands
Debugs can be run from the diagnostic CLI after the FTD is connected via SSH in the case of an SSL Certificate Installation failure:
debug crypto ca 14
In older versions of FTD, these debugs are available and recommended for troubleshooting:
debug crypto ca 255
debug crypto ca message 255
debug crypto ca transaction 255
Common Issues
Still see the message "Identity certificate import required" after you import issued identity certificate.
This can occur due to two separate issues:
1. The issuing CA certificate was not added at Manual enrollment
When the identity certificate is imported, it is checked against the CA certificate added under the CA Information tab at manual enrollment. Sometimes network administrators do not have the CA certificate for the CA that is used to sign their identity certificate. In this situation, it is necessary to add a placeholder CA certificate when you do manual enrollment. Once the Identity certificate has been issued and CA certificate has been provided, a new Manual enrollment can be done with the correct CA certificate. When you goi through the manual enrollment wizard again, make sure to specify the same name and size for the keypair as was done in the original manual enrollment. Once done, instead of the CSR forwarded to the CA again, the previously issued identity certificate can be imported into the newly created trustpoint with the correct CA certificate.
To check if the same CA certificate was applied at manual enrollment, either click the CA button as specified on the Verify section or check the output of show crypto ca certificates. Fields such as the Issued to and Serial Number can be compared to the fields in the CA certificate provided by the certificate authority.
2. The keypair in the created trustpoint is different than the keypair used when the CSR is created for the issued certificate.
With manual enrollment, when the keypair and CSR are generated, the public key is added to the CSR so that it can be included in the issued identity certificate. If for some reason the keypair on the FTD is modified or the identity certificate issued includes a different public key, the FTD does not install the issued identity certificate. To check if this has occurred, there are two different tests:
In OpenSSL, these commands can be issued to compare the public key in the CSR to the public key in the issued certificate:
openssl req -noout -modulus -in ftd.csr
Modulus=8A2E53FF7786A8A3A922EE5299574CCDCEEBC096341F194A4018BCE9E38A7244DBEA2759F1897BE7C489C484749C4DE13D42B34F5A2051F6E
0FDFD5783DB0F27256900AE69F3A84C217FCA5C6B4334A8B7B4E8CD85E749C1C7F5793EF0D199A229E7C5471C963B8AF3A49EB98B9EDBFDDE92B5DEB7
81941B3706A24F6626746E5C9237D9C00B2FF36FD45E8E9A92A3DE43EC91E8D80642F655D98293C6CA236FB177E4C3440C8DA4C2BEC019A3F024D94AE
C7CADC06019E1CC763D51EC6FF1E277C68983F6C4CE1B826CBE721A3C7198234486A1BF9C20D10E047C8D39FA85627178F72E4BA11F8D5ACF950F9164
B966DA10BF24771CFE55327C5A14B96235E9

openssl x509 -noout -modulus -in id.crt
Modulus=8A2E53FF7786A8A3A922EE5299574CCDCEEBC096341F194A4018BCE9E38A7244DBEA2759F1897BE7C489C484749C4DE13D42B34F5A2051F6E
0FDFD5783DB0F27256900AE69F3A84C217FCA5C6B4334A8B7B4E8CD85E749C1C7F5793EF0D199A229E7C5471C963B8AF3A49EB98B9EDBFDDE92B5DEB7
81941B3706A24F6626746E5C9237D9C00B2FF36FD45E8E9A92A3DE43EC91E8D80642F655D98293C6CA236FB177E4C3440C8DA4C2BEC019A3F024D94AE
C7CADC06019E1CC763D51EC6FF1E277C68983F6C4CE1B826CBE721A3C7198234486A1BF9C20D10E047C8D39FA85627178F72E4BA11F8D5ACF950F9164
B966DA10BF24771CFE55327C5A14B96235E9
- ftd.csr is the CSR copied from FMC at manual enrollment.
- id.crt is the identity certificate signed by the CA.
Alternatively, the public key value on the FTD can also be compared against the public key within the issued identity certificate. The first characters in the certificate do not match those in the FTD output due to padding:
Issued Identity certificate opened on Windows PC:

Extracted Public key output from identity certificate:
3082010a02820101008a2e53ff7786a8a3a922ee5299574ccdceebc096341f194a4018bce9e38a7244dbea2759f1897be7c489c484749c4de13d42b34f5a2051
f6e0fdfd5783db0f27256900ae69f3a84c217fca5c6b4334a8b7b4e8cd85e749c1c7f5793ef0d199a229e7c5471c963b8af3a49eb98b9edbfdde92b5deb78194
1b3706a24f6626746e5c9237d9c00b2ff36fd45e8e9a92a3de43ec91e8d80642f655d98293c6ca236fb177e4c3440c8da4c2bec019a3f024d94aec7cadc06019
e1cc763d51ec6ff1e277c68983f6c4ce1b826cbe721a3c7198234486a1bf9c20d10e047c8d39fa85627178f72e4ba11f8d5acf950f9164b966da10bf24771cfe
55327c5a14b96235e90203010001
Show crypto key mypubkey rsa output from the FTD. When manual enrollment was done, the <Default-RSA-Key> was used to create the CSR. The bolded section matches the extracted public key output from the identity certificate.
> show crypto key mypubkey rsa
Key pair was generated at: 16:58:44 UTC Jan 25 2019
 Key name: <Default-RSA-Key>
 Usage: General Purpose Key
 Modulus Size (bits): 2048
 Storage: config
 Key Data:

  30820122 300d0609 2a864886 f70d0101 01050003 82010f00 3082010a 02820101
  008a2e53 ff7786a8 a3a922ee 5299574c cdceebc0 96341f19 4a4018bc e9e38a72
  44dbea27 59f1897b e7c489c4 84749c4d e13d42b3 4f5a2051 f6e0fdfd 5783db0f
  27256900 ae69f3a8 4c217fca 5c6b4334 a8b7b4e8 cd85e749 c1c7f579 3ef0d199
  a229e7c5 471c963b 8af3a49e b98b9edb fdde92b5 deb78194 1b3706a2 4f662674
  6e5c9237 d9c00b2f f36fd45e 8e9a92a3 de43ec91 e8d80642 f655d982 93c6ca23
  6fb177e4 c3440c8d a4c2bec0 19a3f024 d94aec7c adc06019 e1cc763d 51ec6ff1
  e277c689 83f6c4ce 1b826cbe 721a3c71 98234486 a1bf9c20 d10e047c 8d39fa85
  627178f7 2e4ba11f 8d5acf95 0f9164b9 66da10bf 24771cfe 55327c5a 14b96235
  e9020301 0001
Red X next to CA in FMC.
This can occur with PKCS12 enrollment because the CA certificate is not included in the PKCS12 package.

To fix this, the PKCS12 needs the CA certificate added.
Issue these commands in order to extract the identity certificate and private key. The password that is used at the time of the creation of PKCS12 and the secured private key are needed:
openssl pkcs12 -info -in test.p12
Enter Import Password: [pkcs12 pass phrase here]
MAC Iteration 1
MAC verified OK
PKCS7 Encrypted data: pbeWithSHA1And40BitRC2-CBC, Iteration 2048
Certificate bag
Bag Attributes
    friendlyName: Test
    localKeyID: 76 8F D1 75 F0 69 FA E6 2F CF D3 A6 83 48 01 C4 63 F4 9B F2
subject=/CN=ftd1.example.com
issuer=/O=Cisco Systems TAC/CN=VPN Intermediate CA
-----BEGIN CERTIFICATE-----
MIIC+TCCAeGgAwIBAgIIAUIM3+3IMhIwDQYJKoZIhvcNAQELBQAwOjEaMBgGA1UE
ChMRQ2lzY28gU3lzdGVtcyBUQUMxHDAaBgNVBAMTE1ZQTiBJbnRlcm1lZGlhdGUg
Q0EwHhcNMjAwNDA4MTY1ODAwWhcNMjEwNDA1MjMyOTAwWjAbMRkwFwYDVQQDExBm
dGQxLmV4YW1wbGUuY29tMIIBIjANBgkqhkiG9w0BAQEFAAOCAQ8AMIIBCgKCAQEA
043eLVPl8K0jnYfHCBZuFUYrXTTB28Z1ouIJ5yyrDzCN781GFrHb/wCczRx/jW4n
pF9q2z7FHr5bQCI4oSUSX40UQfr0/u0K5riI1uZumPUx1Vp1zVkYuqDd/i1r0+0j
PyS7BmyGfV7aebYWZnr8R9ebDsnC2U3nKjP5RaE/wNdVGTS/180HlrIjMpcFMXps
LwxdxiEz0hCMnDm9RC+7uWZQdlwZ9oNANCbQC0px/Zikj9Dz7ORhhbzBTeUNKD3p
sN3VqdDPvGZHFGlPCnhKYyZ79+6p+CHC8X8BFjuTJYoo1l6uGgiB4Jz2Y9ZeFSQz
Q11IH3v+xKMJnv6IkZLuvwIDAQABoyIwIDAeBglghkgBhvhCAQ0EERYPeGNhIGNl
cnRpZmljYXRlMA0GCSqGSIb3DQEBCwUAA4IBAQCV/MgshWxXtwpwmMF/6KqEj8nB
SljbfzlzNuPV/LLMSnxMLDo6+LB8tizNR+ao9dGATRyY54taRI27W+gLneCbQAux
9amxXuhpxP5EOhnk+tsYS9eriAKpHuS1Y/2uwN92fHIbh3HEXPO1HBJueI8PH3ZK
4lrPKA9oIQPUW/uueHEF+xCbG4xCLi5HOGeHX+FTigGNqazaX5GM4RBUa4bk8jks
Ig53twvop71wE53COTH0EkSRCsVCw5mdJsd9BUZHjguhpw8Giv7Z36qWv18I/Owf
RhLhtsgenc25udglvv9Sy5xK53a5Ieg8biRpWL9tIjgUgjxYZwtyVeHi32S7
-----END CERTIFICATE-----
PKCS7 Data
Shrouded Keybag: pbeWithSHA1And3-KeyTripleDES-CBC, Iteration 2048
Bag Attributes
    friendlyName: Test
    localKeyID: 76 8F D1 75 F0 69 FA E6 2F CF D3 A6 83 48 01 C4 63 F4 9B F2
Key Attributes: <No Attributes>
Enter PEM pass phrase: [private-key pass phrase here]
Verifying - Enter PEM pass phrase: [private-key pass phrase here]
-----BEGIN ENCRYPTED PRIVATE KEY-----
MIIFDjBABgkqhkiG9w0BBQ0wMzAbBgkqhkiG9w0BBQwwDgQIlKyWXk8cgTMCAggA
MBQGCCqGSIb3DQMHBAgGmOqRXh/dcwSCBMiF7BpgJNIpHdU5Zorn1jm3pmsI/XkJ
MRHc1Reel0ziSLCZ0STr84JFQxNpbThXLhsHC9WhpPy5sNXIvXS7Gu+U10/VlNSA
rWlX6SPftAYiFq5QXyEutSHdZZwgQIqpj97seu3Px0agvIObW1Lo8or5lSydnMjp
Ptv5OKo95BShWWYcqkTAia4ZKxytyIc/mIu5m72LucOFmoRBO5JZu1avWXjbCAA+
k2ebkblFT0YRQT1Z4tZHSqX1LFPZe170NZEUg7rIcWAk1Yw7XNUPhOn6FHL/ieIZ
IhvIfj+1gQKeovHkSKuwzb24Zx0exkhafPsgp0PMAPxBnQ/Cxh7Dq2dh1FD8P15E
Gnh8r3l903AlkPMBkMdxOqlpzo2naIy2KGrUnOSHajVWcLr9dTPWIDyjdn95YoeS
IUE7Ma00pjJcO2FNBwyNxRrYt+4hp3aJt0ZW83FHiSlB5UIzGrBMAgKJc2Hb2RTV
9gxZGve1cRcolLeJRYoK9+PeZ7t17xzLSg5wad4R/ZPKUwTBUaShn0wHzridF8Zn
FO6XvBDSyuXVSpkxwAdlTwxq62tUnLIkyRXo2CSz8z8W29UXmFO4o3G67n28//LJ
Ku8wj1jeqlvFgXSQiWLADNhIY772RNwzCMeobfxGlBprF9DPT8yvyBdQviUIuFpJ
nNs5FYbLTv9ygZ1S9xwQpTcqEu+y4F5BJuYLmHqcZ+VpFA4nM0YHhZ5M3sceRSR4
1L+a3BPJJshlTIJQg0TIxDaveCfpDcpS+ydUgS6YWY8xW17v0+1f7y5zlt4TkZRt
ItBHHA6yDzR0Cn0/ZH3y88a/asDcukw6bsRaY5iT8nAWgTQVed3xXj+EgeRs25HB
dIBBX5gTvqN7qDanhkaPUcEawj1/38M0pAYULei3elfKKrhwAySBFaV/BeUMWuNW
BmKprkKKQv/JdWnoJl49KcS4bfa3GHG9XXnyvbg8HxopcYFMTEjao+wLZH9agqKe
YOjyoHFN6ccBBC7vn7u12tmXOM5RcnPLmaDaBFDSBBFS8Y8VkeHn3P0q7+sEQ26d
vL8O7WdgLH/wKqovoJRyxwzz+TryRq9cd5BNyyLaABESalsWRhk81C2P+B+Jdg9w
d6RsvJ2dt3pdl/+pUR3CdC0b8qRZOoLO3+onUIUoEsCCNdp0x8Yj/mvc6ReXtOKB
2qVmhVMYseiUlrOAQGt7XMe1UuiJ+dRnqcfAfbdGeOp+6epm1TK1BJL2mAlQWx5l
73Qo4M7rR7laeq/dqob3olPhcoMLa5z/Lo5vDe7S+LZMuAWjRkSfsoOKQOY3kAP1
eZ2Eh2go4eJ7hHf5VFqBLL8Ci3rd3EOijRkNm3fAQmFJlaFmooBM3Y2Ba+U8cMTH
lgjSFkl1FAWpfwx9aSEECNCvEMm1Ghm6/tJDLV1jyTqwajHnWIZCc+P2AXgnlLzG
HVVfxsOc8FGUJPQHatXYd7worWCxszauhfJ99E4PaoZnAOYUFw2jaZEwo0NBPbD1
AjQ8aciuosv0FKpp/jXDI78/aYAEk662tPsfGmxvAWB+UMFarA9ZTiihK3x/tDPy
GZ6ByGWJYp/0tNNmJRCFhcAYY83EtzHK9h+8LatFA6WrJ4j3dhceUPzrPXjMffNN
0Yg=
-----END ENCRYPTED PRIVATE KEY-----
Once completed, the identity certificate and the private key can be put into separate files and the CA certificate can be imported into a new PKCS12 file with the use of the steps mentioned in Step 2. of the PKCS12 creation with OpenSSL.
Revision History
| Revision | Publish Date | Comments |
|---|---|---|
5.0 |
01-May-2026
|
Recertification |
4.0 |
15-Aug-2024
|
Updated Alt Text, Heading Names, and Formatting. |
3.0 |
03-Aug-2023
|
Updated description and directional language for machine translation |
2.0 |
07-Jul-2022
|
Updates made for style requirements, machine translation, gerunds, title, etc. to comply with Cisco guidelines. |
1.0 |
23-Jul-2020
|
Initial Release |
 Feedback
Contact Cisco
- Open a Support Case

- (Requires a Cisco Service Contract)