Configure LSC on IP Phone with CUCM
Available Languages
Introduction
This document describes how to install a Locally Significant Certificate (LSC) on a Cisco Internet Protocol Phone (Cisco IP Phone).
Prerequisites
Requirements
Cisco recommends that you have knowledge of these topics:
- Cisco Unified Communications Manager (CUCM) Cluster Security Mode options
- X.509 certificates
- Manufacturing Installed Certificates (MICs)
- LSCs
- Certificate Authority Proxy Function (CAPF) certificate operations
- Security By Default (SBD)
- Initial Trust List (ITL) files
Components Used
The information in this document is based on CUCM versions that support SBD, namely CUCM 8.0(1) and above.
The information in this document was created from the devices in a specific lab environment. All of the devices used in this document started with a cleared (default) configuration. If your network is live, ensure that you understand the potential impact of any command.
Background Information
Cisco Authority Proxy Function (CAPF) Service runs only on the publisher node. The publisher acts as the Certificate Authority (CA) or signer of the LSC.
MICs versus LSCs
If you use certificate based authentication for 802.1X or AnyConnect Phone VPN, it is important to understand the difference between MICs and LSCs.
Every Cisco phone comes with a MIC pre-installed at the factory. This certificate is signed by one of the Cisco Manufacturing CA certificates, either by the Cisco Manufacturing CA, Cisco Manufacturing CA SHA2, CAP-RTP-001 or CAP-RTP-002 certificate. When the phone presents this certificate, it proves that it is a valid Cisco phone, but this does not validate that the phone belongs to a specific user or CUCM cluster. It could potentially be a rogue phone purchased on the open market or brought over from a different site.
LSCs, on the other hand, are intentionally installed on phones by an administrator, and are signed by the CUCM Publisher's CAPF certificate. You would configure 802.1X or AnyConnect VPN to only trust LSCs issued by known CAPF certificate authorities. Basing certificate authentication on LSCs instead of MICs provides you with a much more granular control over which phone devices are trusted.
Configure
Network Topology
These CUCM lab servers were used for this document:
- CUCM Publisher and TFTP server
- CUCM Subscriber and TFTP server
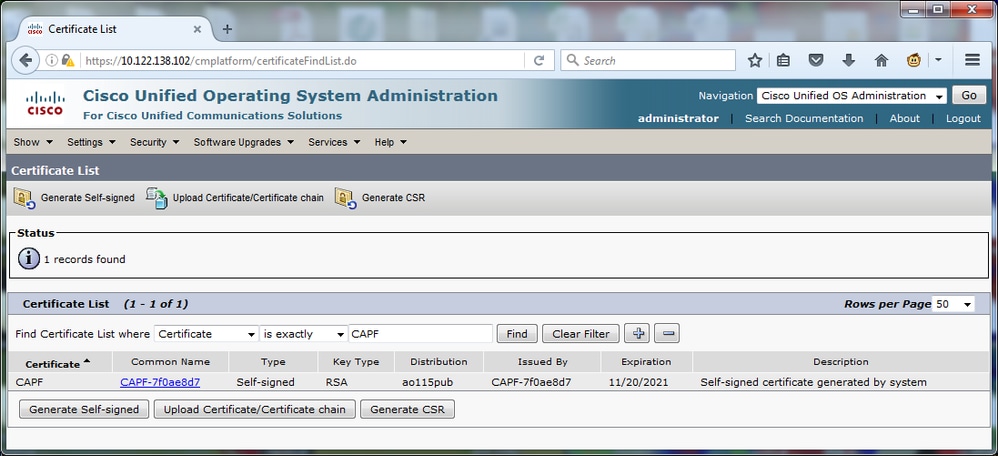
Verify that the CAPF certificate has not expired, nor is about to expire in the near future. Navigate to Cisco Unified OS Administration > Security > Certificate Management, then Find Certificate List where Certificate is exactly CAPF as shown in the image.
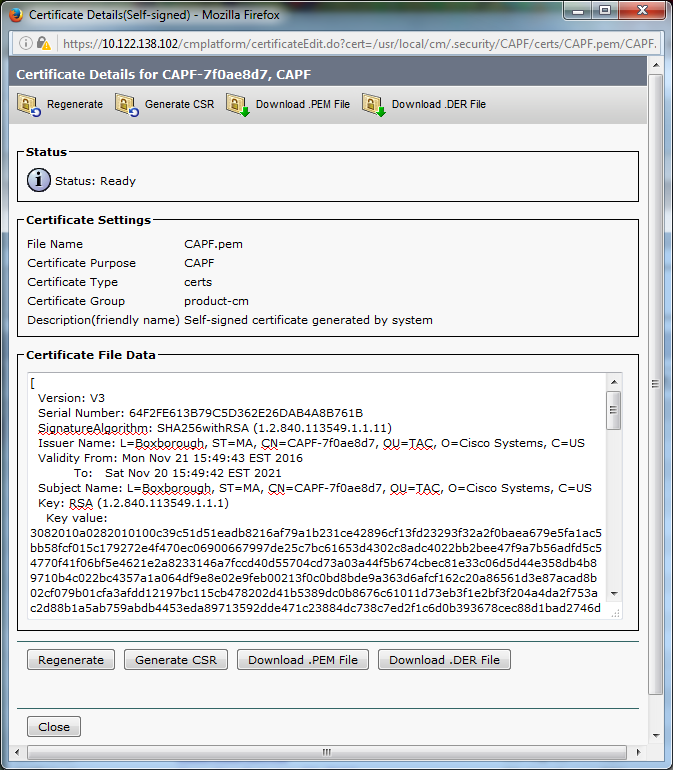
Click Common Name in order to open the Certificate Details page. Inspect the Validity From: and To: dates in the Certificate File Data pane in order to determine when the certificate expires, as shown in the image.
If the CAPF certificate has expired, or is soon to expire, regenerate that certificate. Do not move forward with the LSC install process with an expired or soon to expire CAPF certificate. This avoids the need to reissue LSCs in the near future due to CAPF certificate expiration. For information about how to regenerate the CAPF certificate, refer to the CUCM Certificate Regeneration/Renewal Process article.
Similarly, if you need to have your CAPF certificate signed by a third party Certificate Authority, you have a choice to make at this stage. Either complete the Certificate Signing Request (CSR) file generation and importation of the signed CAPF certificate now, or continue the configuration with a self-signed LSC for a preliminary test. If you need a third party signed CAPF certificate, it is generally sensible to configure this feature first with a self-signed CAPF certificate, test and verify, and then redeploy LSCs that are signed by a third party signed CAPF certificate. This simplifies later troubleshooting, if tests with the third party signed CAPF certificate fail.
Run the show itl command on all TFTP servers in the CUCM cluster. Observe that the ITL file does contains a CAPF certificate.
For example, here is an excerpt of the show itl output from the lab CUCM Subscriber ao115sub.
 ITL Record #:1
 ----
BYTEPOS TAG LENGTH VALUE
------- --- ------ -----
1 RECORDLENGTH 2 727
2 DNSNAME 2
3 SUBJECTNAME 64 CN=CAPF-7f0ae8d7;OU=TAC;O=Cisco Systems;L=Boxborough;ST=MA;C=US
4 FUNCTION 2 CAPF
5 ISSUERNAME 64 CN=CAPF-7f0ae8d7;OU=TAC;O=Cisco Systems;L=Boxborough;ST=MA;C=US
6 SERIALNUMBER 16 64:F2:FE:61:3B:79:C5:D3:62:E2:6D:AB:4A:8B:76:1B
7 PUBLICKEY 270
8 SIGNATURE 256
11 CERTHASH 20 C3 E6 97 D0 8A E1 0B F2 31 EC ED 20 EC C5 BC 0F 83 BC BC 5E
12 HASH ALGORITHM 1 null

 ITL Record #:2
 ----
BYTEPOS TAG LENGTH VALUE
------- --- ------ -----
1 RECORDLENGTH 2 717
2 DNSNAME 2
3 SUBJECTNAME 59 CN=ao115pub;OU=TAC;O=Cisco Systems;L=Boxborough;ST=MA;C=US
4 FUNCTION 2 TVS
5 ISSUERNAME 59 CN=ao115pub;OU=TAC;O=Cisco Systems;L=Boxborough;ST=MA;C=US
6 SERIALNUMBER 16 6B:99:31:15:D1:55:5E:75:9C:42:8A:CE:F2:7E:EA:E8
7 PUBLICKEY 270
8 SIGNATURE 256
11 CERTHASH 20 05 9A DE 20 14 55 23 2D 08 20 31 4E B5 9C E9 FE BD 2D 55 87
12 HASH ALGORITHM 1 null

 ITL Record #:3
 ----
BYTEPOS TAG LENGTH VALUE
------- --- ------ -----
1 RECORDLENGTH 2 1680
2 DNSNAME 2
3 SUBJECTNAME 71 CN=ITLRECOVERY_ao115pub;OU=TAC;O=Cisco Systems;L=Boxborough;ST=MA;C=US
4 FUNCTION 2 System Administrator Security Token
5 ISSUERNAME 71 CN=ITLRECOVERY_ao115pub;OU=TAC;O=Cisco Systems;L=Boxborough;ST=MA;C=US
6 SERIALNUMBER 16 51:BB:2F:1C:EE:80:02:16:62:69:51:9A:14:F6:03:7E
7 PUBLICKEY 270
8 SIGNATURE 256
9 CERTIFICATE 963 DF 98 C1 DB E0 61 02 1C 10 18 D8 BA F7 1B 2C AB 4C F8 C9 D5 (SHA1 Hash HEX)
This etoken was not used to sign the ITL file.

 ITL Record #:4
 ----
BYTEPOS TAG LENGTH VALUE
------- --- ------ -----
1 RECORDLENGTH 2 717
2 DNSNAME 2
3 SUBJECTNAME 59 CN=ao115sub;OU=TAC;O=Cisco Systems;L=Boxborough;ST=MA;C=US
4 FUNCTION 2 TVS
5 ISSUERNAME 59 CN=ao115sub;OU=TAC;O=Cisco Systems;L=Boxborough;ST=MA;C=US
6 SERIALNUMBER 16 65:E5:10:72:E7:F8:77:DA:F1:34:D5:E3:5A:E0:17:41
7 PUBLICKEY 270
8 SIGNATURE 256
11 CERTHASH 20 00 44 54 42 B4 8B 26 24 F3 64 3E 57 8D 0E 5F B0 8B 79 3B BF
12 HASH ALGORITHM 1 null

 ITL Record #:5
 ----
BYTEPOS TAG LENGTH VALUE
------- --- ------ -----
1 RECORDLENGTH 2 1652
2 DNSNAME 2
3 SUBJECTNAME 59 CN=ao115sub;OU=TAC;O=Cisco Systems;L=Boxborough;ST=MA;C=US
4 FUNCTION 2 System Administrator Security Token
5 ISSUERNAME 59 CN=ao115sub;OU=TAC;O=Cisco Systems;L=Boxborough;ST=MA;C=US
6 SERIALNUMBER 16 48:F7:D2:F3:A2:66:37:F2:DD:DF:C4:7C:E6:B9:CD:44
7 PUBLICKEY 270
8 SIGNATURE 256
9 CERTIFICATE 959 20 BD 40 75 51 C0 61 5C 14 0D 6C DB 79 E5 9E 5A DF DC 6D 8B (SHA1 Hash HEX)
This etoken was used to sign the ITL file.

 ITL Record #:6
 ----
BYTEPOS TAG LENGTH VALUE
------- --- ------ -----
1 RECORDLENGTH 2 1652
2 DNSNAME 2
3 SUBJECTNAME 59 CN=ao115sub;OU=TAC;O=Cisco Systems;L=Boxborough;ST=MA;C=US
4 FUNCTION 2 TFTP
5 ISSUERNAME 59 CN=ao115sub;OU=TAC;O=Cisco Systems;L=Boxborough;ST=MA;C=US
6 SERIALNUMBER 16 48:F7:D2:F3:A2:66:37:F2:DD:DF:C4:7C:E6:B9:CD:44
7 PUBLICKEY 270
8 SIGNATURE 256
9 CERTIFICATE 959 20 BD 40 75 51 C0 61 5C 14 0D 6C DB 79 E5 9E 5A DF DC 6D 8B (SHA1 Hash HEX)

 ITL Record #:7
 ----
BYTEPOS TAG LENGTH VALUE
------- --- ------ -----
1 RECORDLENGTH 2 1031
2 DNSNAME 9 ao115sub
3 SUBJECTNAME 62 CN=ao115sub-EC;OU=TAC;O=Cisco Systems;L=Boxborough;ST=MA;C=US
4 FUNCTION 2 TFTP
5 ISSUERNAME 62 CN=ao115sub-EC;OU=TAC;O=Cisco Systems;L=Boxborough;ST=MA;C=US
6 SERIALNUMBER 16 53:CC:1D:87:BA:6A:28:BD:DA:22:B2:49:56:8B:51:6C
7 PUBLICKEY 97
8 SIGNATURE 103
9 CERTIFICATE 651 E0 CF 8A B3 4F 79 CE 93 03 72 C3 7A 3F CF AE C3 3E DE 64 C5 (SHA1 Hash HEX)

The ITL file was verified successfully.
With the CAPF entry confirmed as an entry in the ITL, you can complete a certificate operation on a phone. In this example, a 2048 bit RSA certificate is installed by use of Null String authentication.
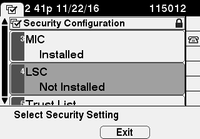
On the phone, verify that an LSC is not yet installed as shown in the image. For example, on a 79XX series phone, navigate to Settings > 4 - Security Configuration > 4 - LSC.
Open the phone configuration page for your phone. Navigate to Cisco Unified CM Administration > Device > Phone.
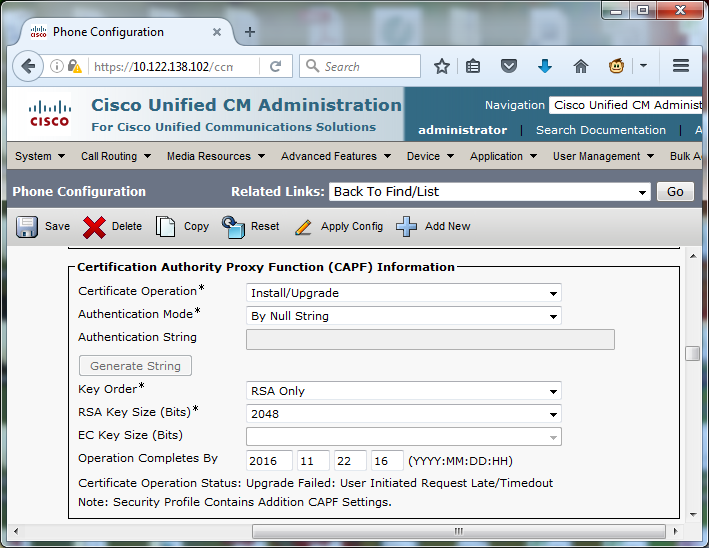
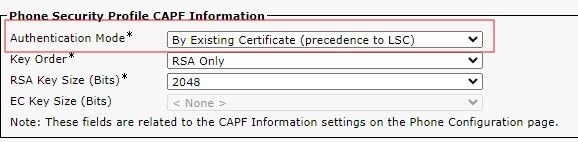
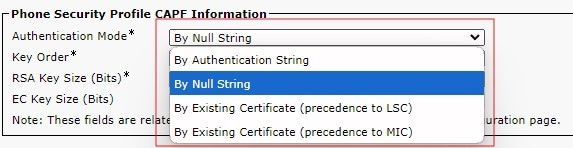
Enter these details to the CAPF Information section of the phone’s configuration, as shown in the image:
- For Certificate Operation, choose Install/Upgrade.
- For Authentication Mode, choose By Null String.
- For this example, leave the Key Order, RSA Key Size (Bits) and EC Key Size (Bits) set to the system defaults.
- For Operation Completes By, enter a date and time that is at least one hour in the future.
Save your configuration changes, then Apply Config.
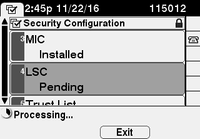
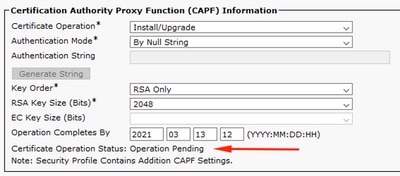
The LSC status on the phone changes to Pending as shown in the image.
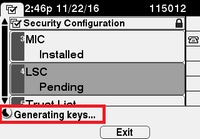
The phone generates keys as shown in the image.
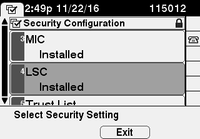
The phone resets, and when the reset completes, the phone LSC status changes to Installed as shown in the image.
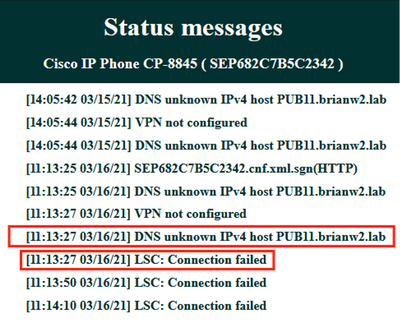
This is also visible under Status Messages in the phone as shown in the image.

Verify
Use this section in order to confirm that your configuration works properly.
In order to verify LSC certificate installation on multiple phones, refer to the Generate CAPF Report section of Security Guide for Cisco Unified Communications Manager, Release 11.0(1). Alternatively, you can view the same data within the CUCM Administration web interface by use of the Find Phones by LSC Status or Authentication String procedure.
In order to obtain copies of the LSC certificates installed in phones, refer to the How to Retrieve Certificates from Cisco IP Phonesarticle.
Bulk LSC Install
Use this section to upload LCS in bulk to same model phones.
- Navigate to Bulk Administration > Phones > Update Phones > Query.
- Find phones where Device Type contains <enter four digit model number> select Find, then Next.
- Scroll to the section Certification Authority Proxy Function (CAPF) Information.
- In the drop down section, choose Install/Upgrade.
When using Bulk Administration and selecting the Authentication Mode, the Authentication Mode must match the phone security profile's operation. If there is a mismatch, for example, By Null String in Bulk, and By Existing Certificate (precedence to LSC) in Phone Security Profile, the operation cannot complete.
Check the Phone Security Profile, and the Authentication mode to endure you are using the correct mode.
 LSC by LSC Precedence
To set bulk configuration, in the drop down, select the Authentication Mode that matches the Phone Security Profile.
 Bulk Selection
If you change the Phone Security Profile Authentication Mode, you need to Save, then Apply the configuration. This can cause those devices using the specific Phone Security Profile to restart.
 Authentication Selection
Troubleshoot
This section provides information you can use in order to troubleshoot your configuration.
No Valid CAPF Server
The LSC fails to install. The phone’s Status Messages show "No valid CAPF server". This indicates that there is no CAPF entry in the ITL file. Verify that the CAPF service was activated, and then restart the TFTP Service. Verify that the ITL file contains a CAPF certificate after the restart, reset the phone to pick up the latest ITL file, and then retry your certificate operation. If the CAPF server entry in the phone's security settings menu displays as hostname or fully qualified domain name, confirm the phone is able to resolve the entry to an IP address.
LSC: Connection Failed
The LSC fails to install. The phone’s Status Messages show "LSC: Connection Failed". This can indicate one of these conditions:
- A mismatch between the CAPF certificate in ITL file and the current certificate, the CAPF service is in use.
- The CAPF service is stopped or deactivated.
- The phone cannot reach the CAPF service over the network.
Verify the CAPF service is activated, restart the CAPF service, restart TFTP services where started, reset the phone to pick up the latest ITL file, and then retry your certificate operation. If the problem persists, take a packet capture from the phone and the CUCM Publisher, and analyze in order to see if there is bidirectional communication on port 3804, the default CAPF service port. If not, there can be a network issue.
LSC: Failed
The LSC fails to install. The phone’s Status Messages show "LSC: Failed". The Phone Configuration web page shows "Certificate Operation Status: Upgrade Failed: User Initiated Request Late/Timedout". This indicates that the Operation Completes By time and date have expired or are in the past. Enter a date and time that is at least one hour into the future, and then retry your certificate operation.
LSC: Operation Pending
The LSC fails to install. The phone's Status Messages show "LSC: Connection Failed". The phone Configuration page shows "Certificate Operation Status: Operation Pending". There are different reasons that one can see the Certificate Operation Status: Operation Pending status. Some of them include:
- ITL on the phone is different than the one currently used on the configured TFTP servers.
- Issues with corrupt ITL's. When this happens, devices lose their trusted status and the command utils itl reset localkey needs to be run from the CUCM Publisher to force the phones to now use the ITLRecovery certificate. If the cluster is in mixed-mode, you need to use the command utils ctl reset localkey. Next, you see an example of what you can see when you attempt to view a corrupt ITL from the CLI of CUCM. If there is an error when you try to view the ITL and attempt to run the utils itl reset localkey command, but you see the second error, this can be a defect Cisco bug ID CSCus33755. Confirm if the version of the CUCM is affected.
- Phone fails to authenticate the new LSC due to TVS failure.
- Phone uses the MIC certificate but the Certificate Authority Proxy Function (CAPF) Information section on the phones configuration page has the Authentication Mode set to by Existing Certificate (Precedence to LSC).
- Phone is not able to resolve the FQDN of CUCM.
For the last scenario, a lab environment is setup to simulate what you would see in the logs if a phone was not able to resolve the FQDN of CUCM. Currently, the lab is setup with these servers:
- CUCM Publisher and Subscriber running version 11.5.1.15038-2
- Windows 2016 Server setup as my DNS server
For the test, there is not a DNS entry for the PUB11 CUCM server configured.

Attempted to push an LSC to one of the phones (8845) in the lab. See that it still shows Certificate Operation Status: Operation Pending.

In the phone console logs, see that the phone attempts to query its local cache (127.0.0.1), prior to forwarding the query to the configured DNS server address.
0475 INF Mar 12 15:07:53.686410 dnsmasq[12864]: query[A] PUB11.brianw2.lab from 127.0.0.1
0476 INF Mar 12 15:07:53.686450 dnsmasq[12864]: forwarded PUB11.brianw2.lab to X.X.X.X
0477 INF Mar 12 15:07:53.694909 dnsmasq[12864]: forwarded PUB11.brianw2.lab to X.X.X.X
0478 INF Mar 12 15:07:53.695263 dnsmasq[12864]: reply PUB11.brianw2.lab is NXDOMAIN-IPv4
0479 INF Mar 12 15:07:53.695833 dnsmasq[12864]: query[A] PUB11.brianw2.lab from 127.0.0.1
0480 INF Mar 12 15:07:53.695865 dnsmasq[12864]: cached PUB11.brianw2.lab is NXDOMAIN-IPv4
0481 WRN Mar 12 15:07:53.697091 (12905:13036) JAVA-configmgr MQThread|NetUtil.traceIPv4DNSErrors:? - DNS unknown IPv4 host PUB11.brianw2.lab

++ However, we see that the phone is not able to resolve the FQDN of the CUCM Publisher. This is because we need to configure the DNS entry for PUB11 on our DNS server.

0482 ERR Mar 12 15:07:53.697267 (12905:13036) JAVA-configmgr MQThread|cip.sec.TvsProperty:? - Failed to resolve Tvs Ipv4 Address with hostname PUB11.brianw2.lab

++ Afterwards, we see the CAPF operation fail. This is expected because we do not have a DNS mapping for PUB11.

0632 NOT Mar 12 15:07:55.760715 (12905:13036) JAVA-configmgr MQThread|cip.sec.CertificateProperty:? - CertificateProperty.setCertificate() authMode=CAPF_AUTH_MODE_NULL_STR authorizationString=null theReason=CAPF_REASON_AUTO
0633 NOT Mar 12 15:07:55.761649 (322:17812) SECUREAPP-RCAPF_START_MODE: Start CAPF - mode:[1]([NULL_STR]), reason:[1]([AUTO]) no auth-str
0634 NOT Mar 12 15:07:55.761749 (322:17812) SECUREAPP-CAPF_CLNT_INIT:CAPF clnt initialized
0635 NOT Mar 12 15:07:55.761808 (322:17812) SECUREAPP-CAPFClnt: SetDelayTimer - set with value <0>
0636 ERR Mar 12 15:07:55.761903 (322:17812) SECUREAPP-Sec create BIO - invalid parameter.
0637 ERR Mar 12 15:07:55.761984 (322:17812) SECUREAPP-SEC_CAPF_BIO_F: CAPF create bio failed
0638 ERR Mar 12 15:07:55.762040 (322:17812) SECUREAPP-SEC_CAPF_OP_F: CAPF operation failed, ret -7
0639 CRT Mar 12 15:07:55.863826 (12905:13036) JAVA-configmgr MQThread|cip.sec.CertificateProperty$1:? - LSC: Connection failed

++ What we would expect to see is something similar to the following where DNS replies with the IP address that is associated with the FQDN of CUCM. After configuring a AAAA record in DNS for PUB11, we now see the below result in the console logs.

4288 INF Mar 12 16:34:06.162666 dnsmasq[12864]: query[A] PUB11.brianw2.lab from 127.0.0.1
4289 INF Mar 12 16:34:06.162826 dnsmasq[12864]: forwarded PUB11.brianw2.lab to X.X.X.X
4290 INF Mar 12 16:34:06.164908 dnsmasq[12864]: reply PUB11.brianw2.lab is X.X.X.X
4291 NOT Mar 12 16:34:06.165024 (12905:13036) JAVA-configmgr MQThread|cip.sec.TvsProperty:? - Resolve Tvs Ipv4 Address to X.X.X.X from hostname PUB11.brianw2.lab
See in the phone status messages that the phone is not able to resolve PUB11.brianw2.lab. Afterwards see the "LSC: Connection" failed message.

Defects to Consider:
Cisco bug ID CSCub62243 - LSC install fails intermittently and thereafter it freezes the CAPF Srvr.
Enhancement Defect to Consider:
Cisco bug ID CSCuz18034 - Need reporting for LSC installed endpoints along with expiry status.
Related Information
These documents provide more information on the use of LSCs in the context for AnyConnect VPN client authentication and 802.1X authentication.
- AnyConnect VPN Phone - IP Phones, ASA, and CUCM Troubleshooting
- Identity-Based Networking Services: IP Telephony In IEEE 802.1X-Enabled Networks Deployment and Configuration Guide
There is also an advanced type of LSC configuration, in which the LSC certificates are signed directly by a third party Certificate Authority, not the CAPF certificate.
For details, refer: CUCM Third-Party CA-Signed LSCs Generation and Import Configuration Example
Revision History
| Revision | Publish Date | Comments |
|---|---|---|
5.0 |
09-Jul-2026
|
Updated SEO and Style Requirements. |
4.0 |
15-Jul-2025
|
Recertification |
3.0 |
28-Oct-2024
|
Updated SEO, Style Requirements, Machine Translation, and Formatting. |
2.0 |
17-Mar-2023
|
Updated Title, Introduction, Alt Text, SEO, Style Requirements, Machine Translation, Gerunds and Formatting.
Corrected Spelling. |
1.0 |
03-May-2018
|
Initial Release |
 Feedback