BPA User Guide v5.1
Available Languages
- Introduction
- Getting Started
- Classic and Portal UI Permissions
- Asset Groups
- Asset Manager
- Asset Filters
- Asset List
- Device Actions
- Ping
- Connect
- Fetch Host Keys
- Check Sync
- Compare Config
- View Config
- Sync From
- Sync To
- Interactive CLI
- Sync Inventory
- Discover Device
- Backup Config
- View Backups
- View Backup Config
- Compare with Current Config
- Restore Backup Device Configuration
- Other Operations
- Export CSV
- Add Assets Completed
- Update Assets
- Remove Assets
- Show/Hide Columns
- SCP-To-Device
- SCP-From-Device
- Device Actions
- Managing NDFC Devices
- Managing vManage Devices
- Admin Configuration
- BPA Applications
- Service Center
- Form Builder
- Device Manager
- OS Upgrade Classic
- Process Templates
- Golden Config Templates
- Config Validator
- Workflows
- Working with the Topology Application
- Market Variance
- Device Activation
- Service Catalog
- Commit Manager
- Script Runner
- Ansible Templates
- Configuration Compliance and Remediation
- Scheduler
- OS Upgrade
- CI/CD-CT
- Backup and Restore
- Reference Data Management
- BPA Classic User Interface Portal
- System Configuration
- Admin Settings
- Managing Users
- Managing Groups and Permissions
- Managing Zones
- Managing Settings
- NSO Settings
- Add Custom Settings
- Data Purging
- Network Topology Templates
- Tag Management
- Controller Data- Sync
- Managing the Service Catalog
- Sync Users
- Sync Groups
- Adapter Builder
- Ansible Settings
- Event Handler
- Backup and Restore
- Backup Throttling
- Preferences
- Admin Settings
- Working with Business
Applications
- Working with the Form Builder Application
- Working with the Device Manager Application
- Working with the OS Upgrade Application
- Working with Config Validator Application
- Working with the Workflows Application
- Working with Topologies
- Working with Market
Variances
- Adding a Market or Global Variance
- Editing Market and Global Variances
- Cloning a Market Variance
- Downloading or Deleting a Variance
- Adding a Device Type
- Editing and Deleting Device Types
- Adding and Editing a Region
- Adding and Editing a Market
- Adding Mapping to Variances
- Controller Template Variable Mapping
- Adding vManage Controller for SD-WAN Use Cases
- Working with Adapter Builder
- Build Your Own Adapter
- Working with the Commit Manager
- Working with the Script Runner Application
- Element Templates
- UI Performance Improvements
- Persistent Filters Applied for Workflow and Service Catalog
- Working with the Scheduler
- Troubleshooting
- BPA Use Cases
Introduction
About Business Process Automation
Business Process Automation (BPA) is a Customer Experience (CX) built multi-domain network automation and orchestration solution that works with various domain controllers from Cisco and third-party domain controllers. BPA includes:
- Cross-domain orchestration for end-to-end service integration
- Combined network and firewall automation and automation of processes such as IT Service Management (ITSM) change management, external integrations (e.g., inventory, IP Address Management (IPAM), etc.), and human intervention
- Southbound integration with controllers such as Cisco Network Services Orchestrator (NSO), Cisco Digital Network Architecture Controller, and vManage
- Cisco Data Center Network Manager (DCNM) and Ansible
- A containerized application layer for BPA use cases (e.g., OS upgrade, service provisioning, migration, etc.)
- Customizable process templates for Method of Procedure automation
- Adapters for East-West integrations (e.g., IPAM, ITSM, inventory)
- Common integration APIs for using the services and workflows developed through the platform
Scope
The User Guide provides information for the following:
This document does not include the explanation and operational details of NSO and Yet Another Next Generation (YANG) model or the creation of Business Process Model and Notation (BPMN) workflows.
For details about specific Use Cases, refer to BPA User Guide Use Cases.
Prerequisites
Users should have the following:
- Knowledge of the basic concepts of computer networks
- Fair knowledge about domain controllers such as NSO, Cisco Catalyst Center, vManage, etc.
Supported Browsers
Cisco BPA is fully functional with the following browser versions:
- Chrome: Version 135
- Firefox: Version 135
- Safari: Version 18.3.1
User Interface Disclaimer
This guide contains images for illustrative purposes only. In some scenarios, this document’s images may not accurately reflect the actual User Interface (UI).
The BPA UI has been revised in v4.0. While some applications have been introduced with the v4.0 framework, other pre-v4.0 applications still use the classic pre-v4.0 UI.
Getting Started
This section provides information on application access and provides an overview of the application and its components.
BPA Access
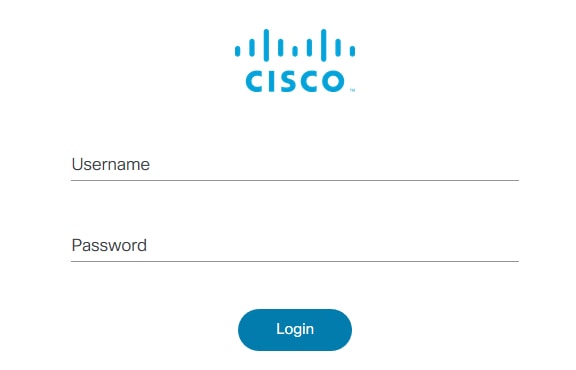
To access the BPA portal:
- Enter the host name or network IP address in the browser.
- Enter the BPA username and password assigned to the user by the System Administrator.
- Click Login. The BPA Home page displays.
The Assets application launches giving users a view into the unified list of assets managed by all domain controllers.
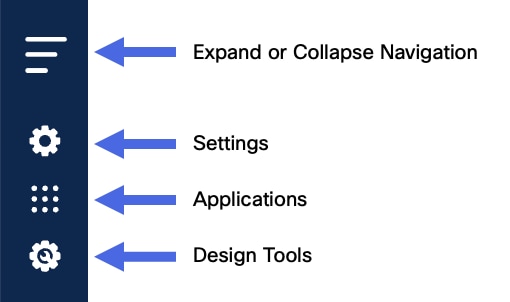
Left Navigation Menu
The following applications and tools are accessible from the left navigation menu on the left:
- Settings: Contains applications for managing users, resource groups, asset groups, and Administrators
- Applications: Contains applications for managing network assets such as Operating System (OS) Upgrade, Device Activation, and Service Catalog
- Design Tools: Contains design tools that aid in defining use configuration and workflows
Some of the applications in the menu are only available in the classic portal and are opened in a new tab to launch that application. All cross-launch applications are shown in the menu with a rectangle icon and an arrow.
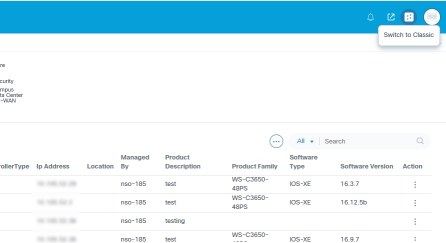
Switch to Classic View
Users can launch the classic portal directly by selecting the Switch-to-Classic icon at the top right of BPA application.

To switch back to the new landing page, select the same icon from the classic portal.
Configuring Domain Controllers
BPA must be configured with one or more domain controllers to manage network assets. BPA supports many Cisco domain controllers (e.g., Cisco Catalyst Center, vManage, Cisco Crosswork, NSO, Cisco Nexus Dashboard Fabric Controller (NDFC), etc.) and can work with third -party devices and use controllers, such as NSO or Ansible.
Refer to the Controller Settings section for details about configuring controllers.
BPA supports Role-Based Access Control (RBAC) with v4.0. In the RBAC model, a role encapsulates a set of permissions (i.e., actions) that a user can perform. For access control, Administrators can either assign predefined roles or create new roles with permissions to user groups.
Users can belong to one or more user groups and each user group can be assigned one or more roles. Roles assign specific access permissions to the users in that group.
User Management
This section covers managing users using the local authentication method. Other methods require an external authentication provider (e.g., Active Directory (AD), Open Lightweight Directory Access Protocol (LDAP), Terminal Access Controller Access-Control System (TACACS) etc.) and are outside the scope of this document. Local authentication uses BPA’s internal authentication service and is available by default. User access is managed by adding users to BPA via the User Management application.
BPA must be configured with one of the following authentication providers before users can log in.
- Local Authentication (default)
- LDAP/AD
- TACACS
Adding Users
To add users in the BPA Portal:
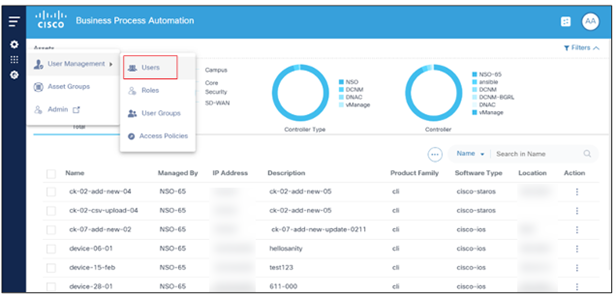

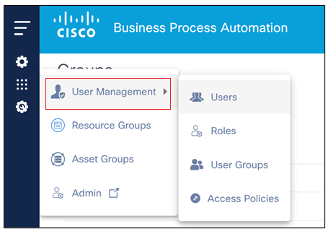
- Select Settings > User Management > Users. The Users page displays with a list of current users.
- Click Add User. The New User window opens.
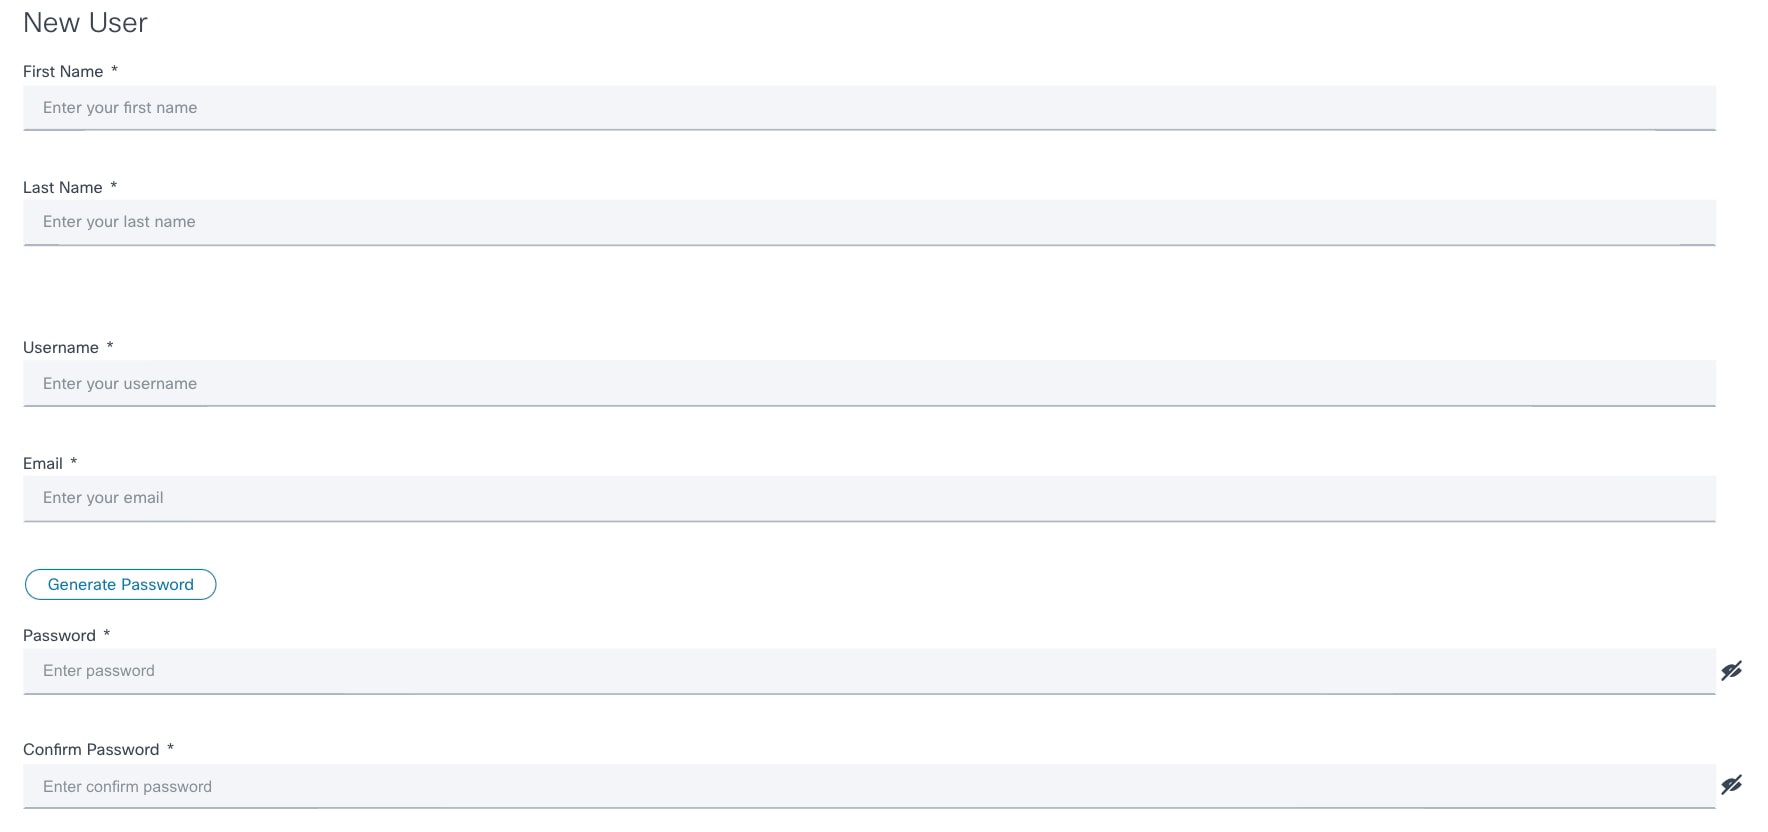
- Complete the required fields.
- Optionally, select the check box of one or more user groups for the user. The user group selection defines the set of actions that the user can perform (based on roles assigned to the groups).
- Click Submit to create the user. The user is added to the BPA Portal.
Editing Users
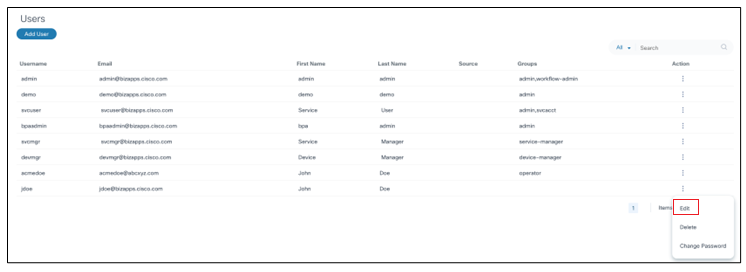
- From the Users page, select the More Options icon > Edit in the Action column of the desired user. The Edit User window opens.
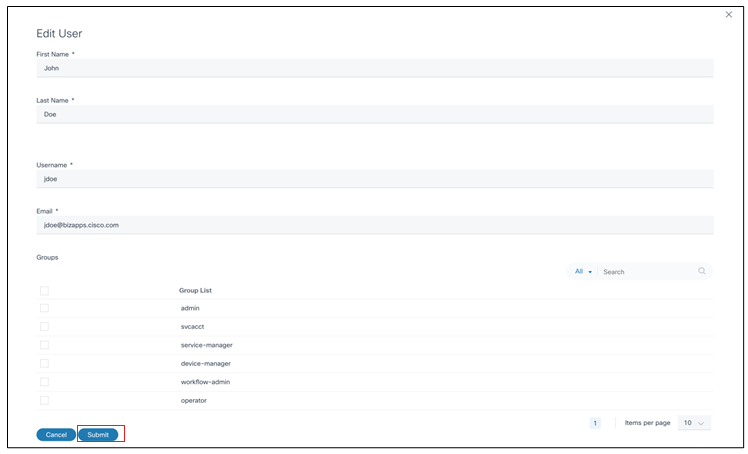
- Make the required changes and click Submit.
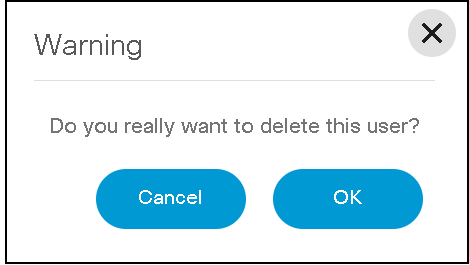
Deleting Users
To delete a user:
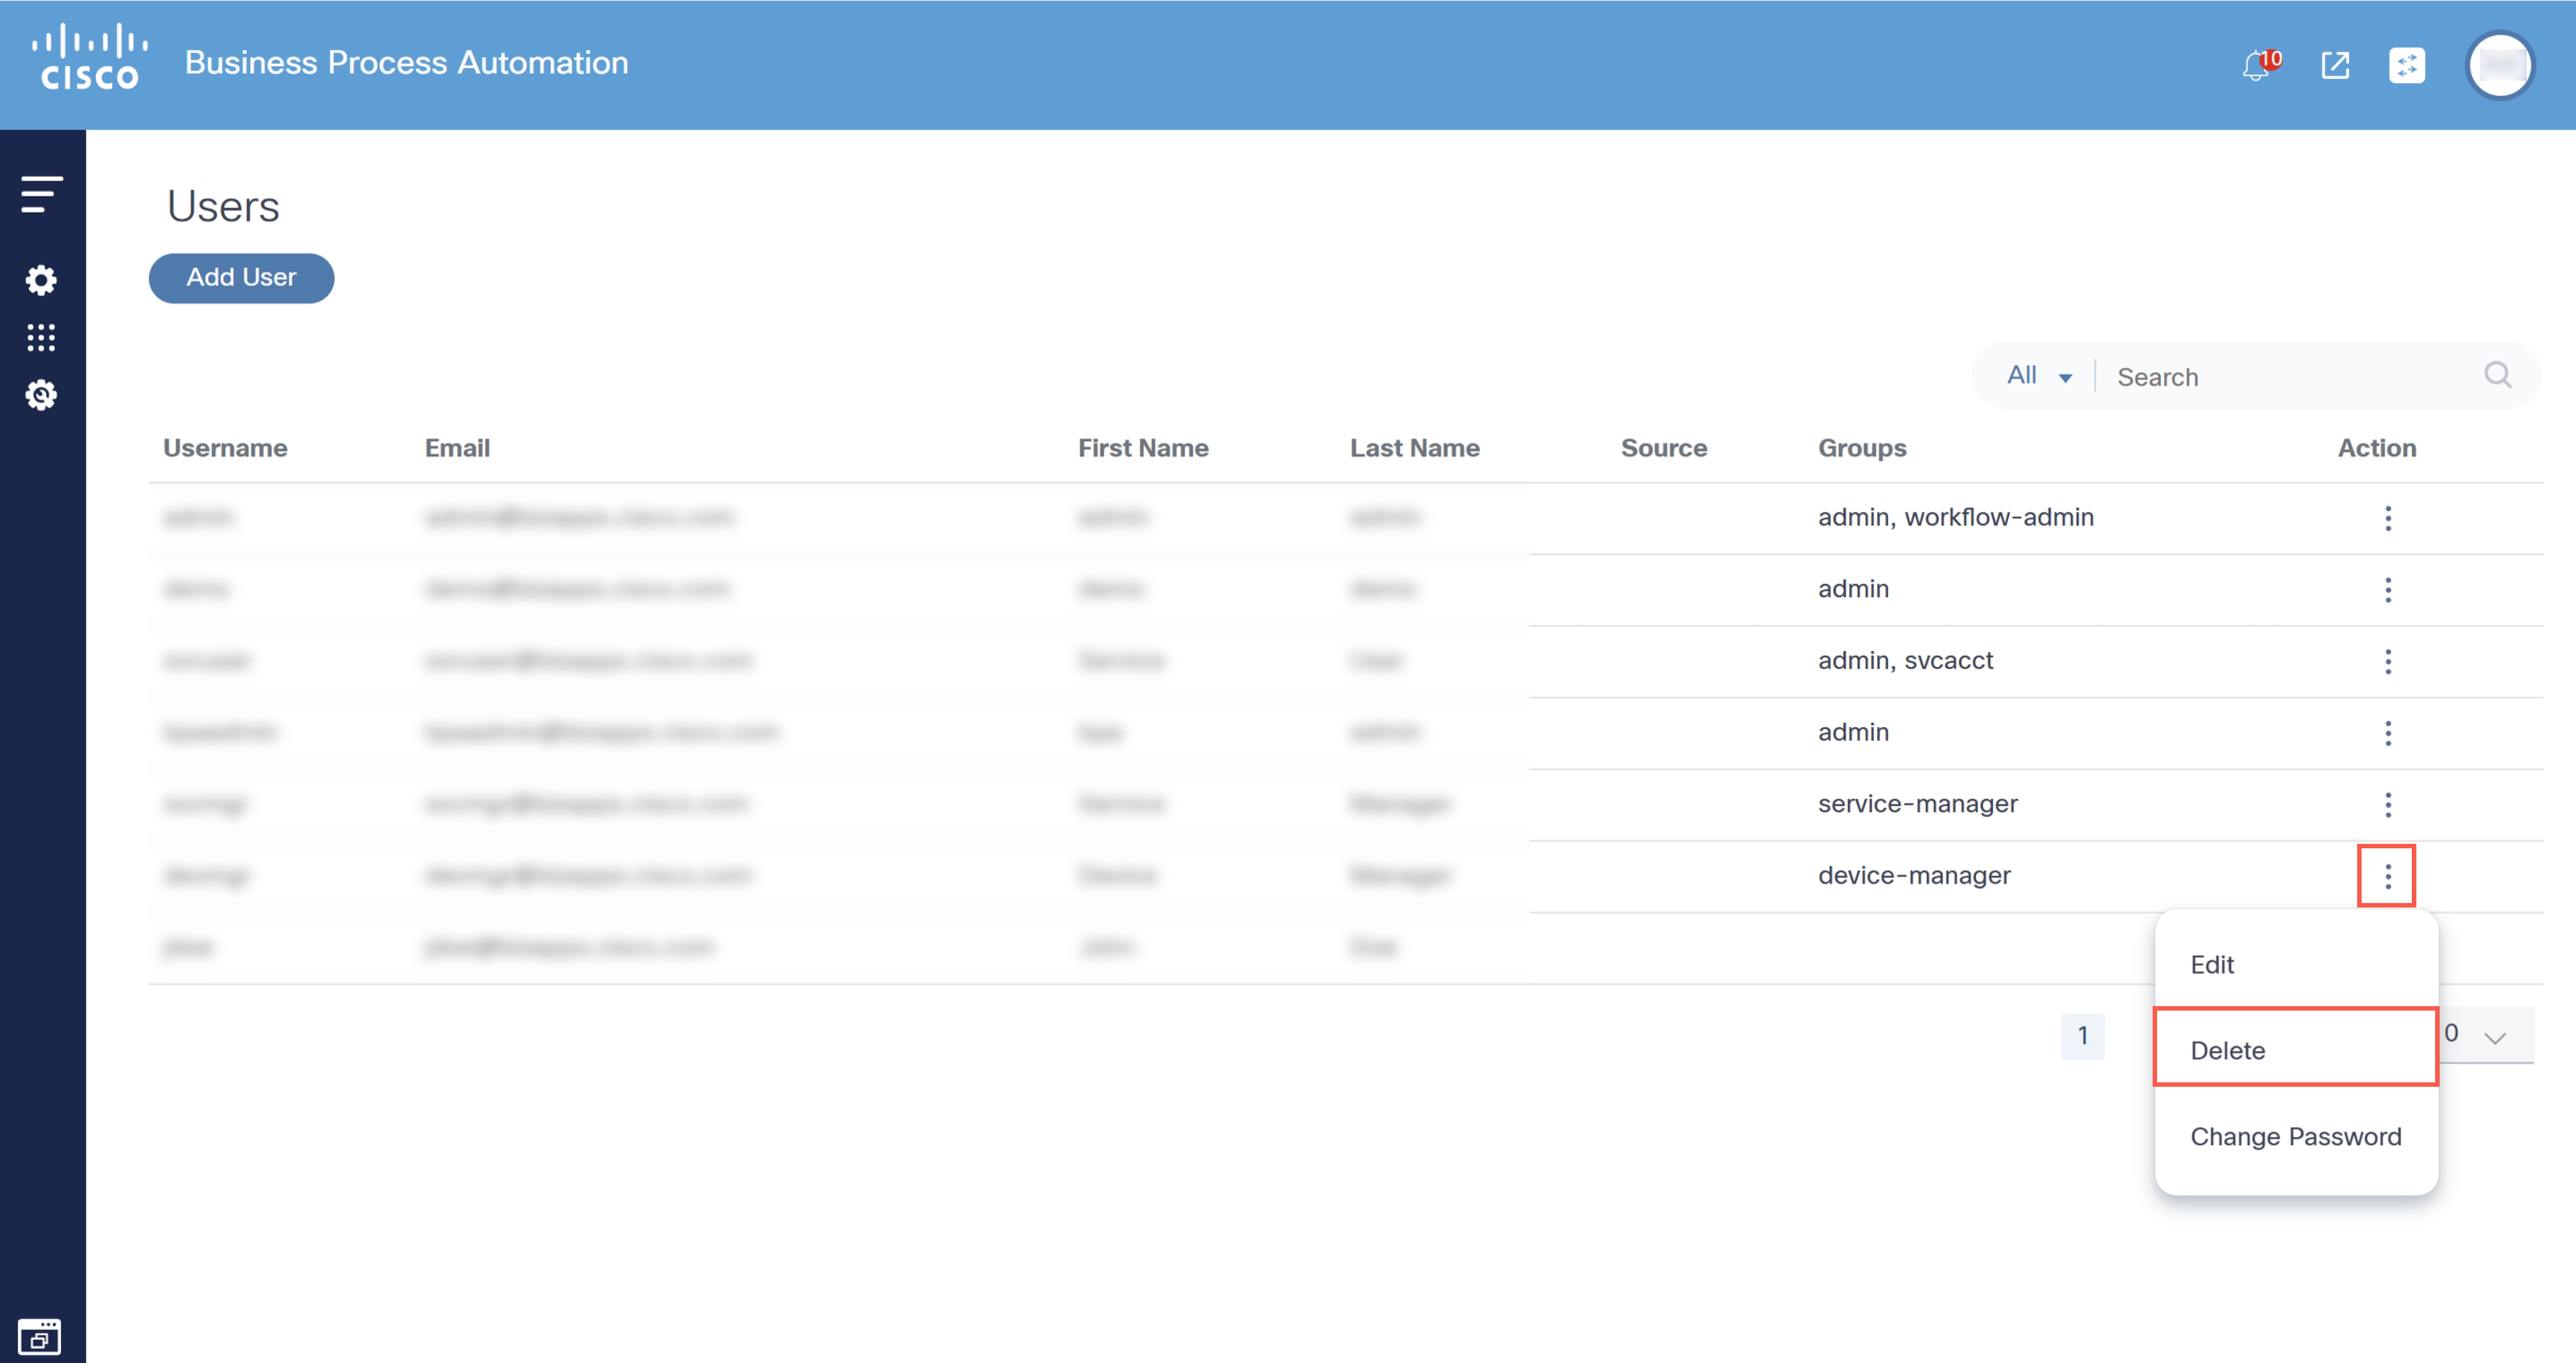
- From the Users page, select the More Options icon > Delete from the Action column of the desired user. A confirmation window opens.

- Click Delete.
User Roles and Role Management
The BPA v4.0 platform now supports RBAC with user roles. A role defines the set of permissions (i.e., actions) that a user is allowed to perform.
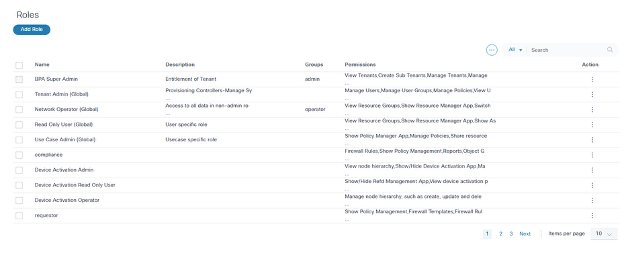
Available Roles
| Role | Description |
|---|---|
| Super Administrator | An Administrator role with access to the entire system |
| Use Case Administrator | A role that manages applications and associated permissions |
| Network Operator | A role that uses BPA applications to manage their network |
| Read Only | A role that has read only access to BPA |
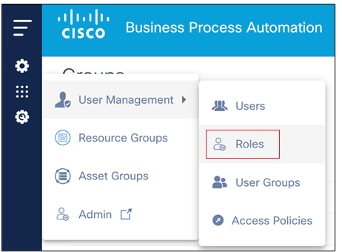
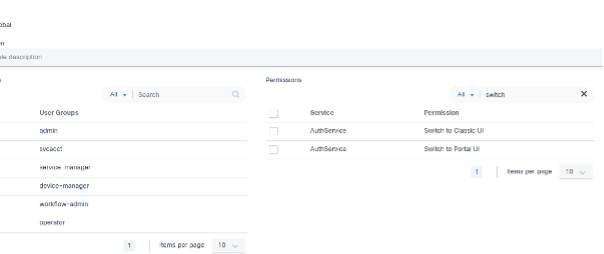
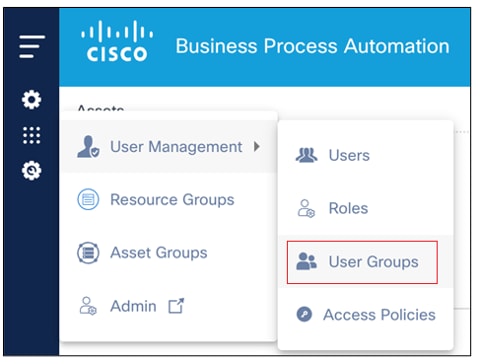
While BPA provides a few out-of-the-box roles, Administrators can create additional roles. To manage roles, select Settings > User Management > Roles from the left navigation menu. The Roles page displays with a list of roles.
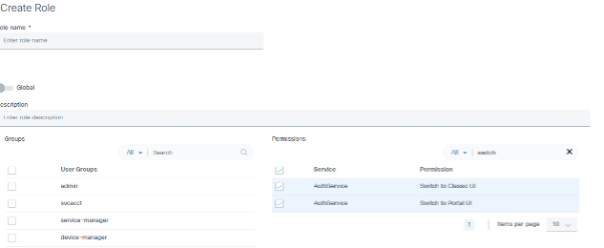
Adding New Roles
To add a new role in the BPA portal:
- From the Roles page, click Add Role. The Create Role window opens.
- Enter a Role Name and Description.
- Select the check box of the applicable User Groups for the role.
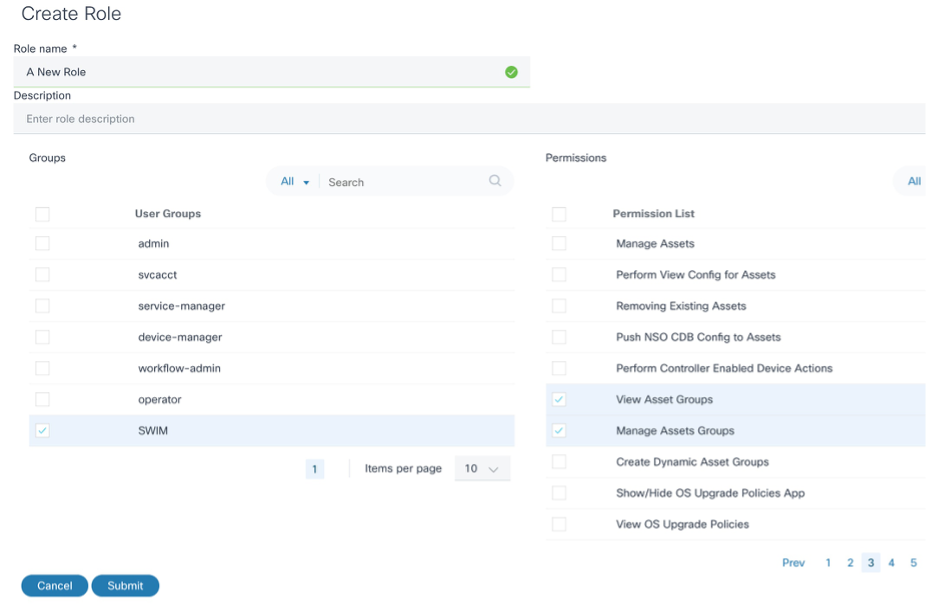
- Select the check box of one or more permissions that this role can perform.
- Click Submit.
Editing a Role
To edit a role in the BPA portal:
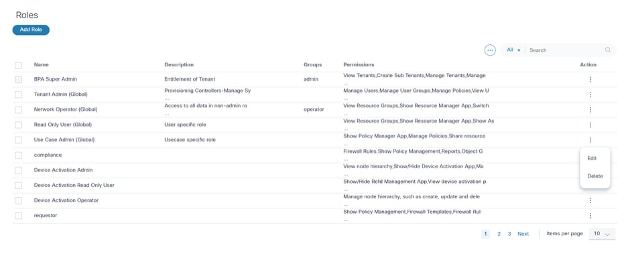
- From the Roles page, select the More Options icon > Edit from the Action column of the desired role. The Edit Role window opens.
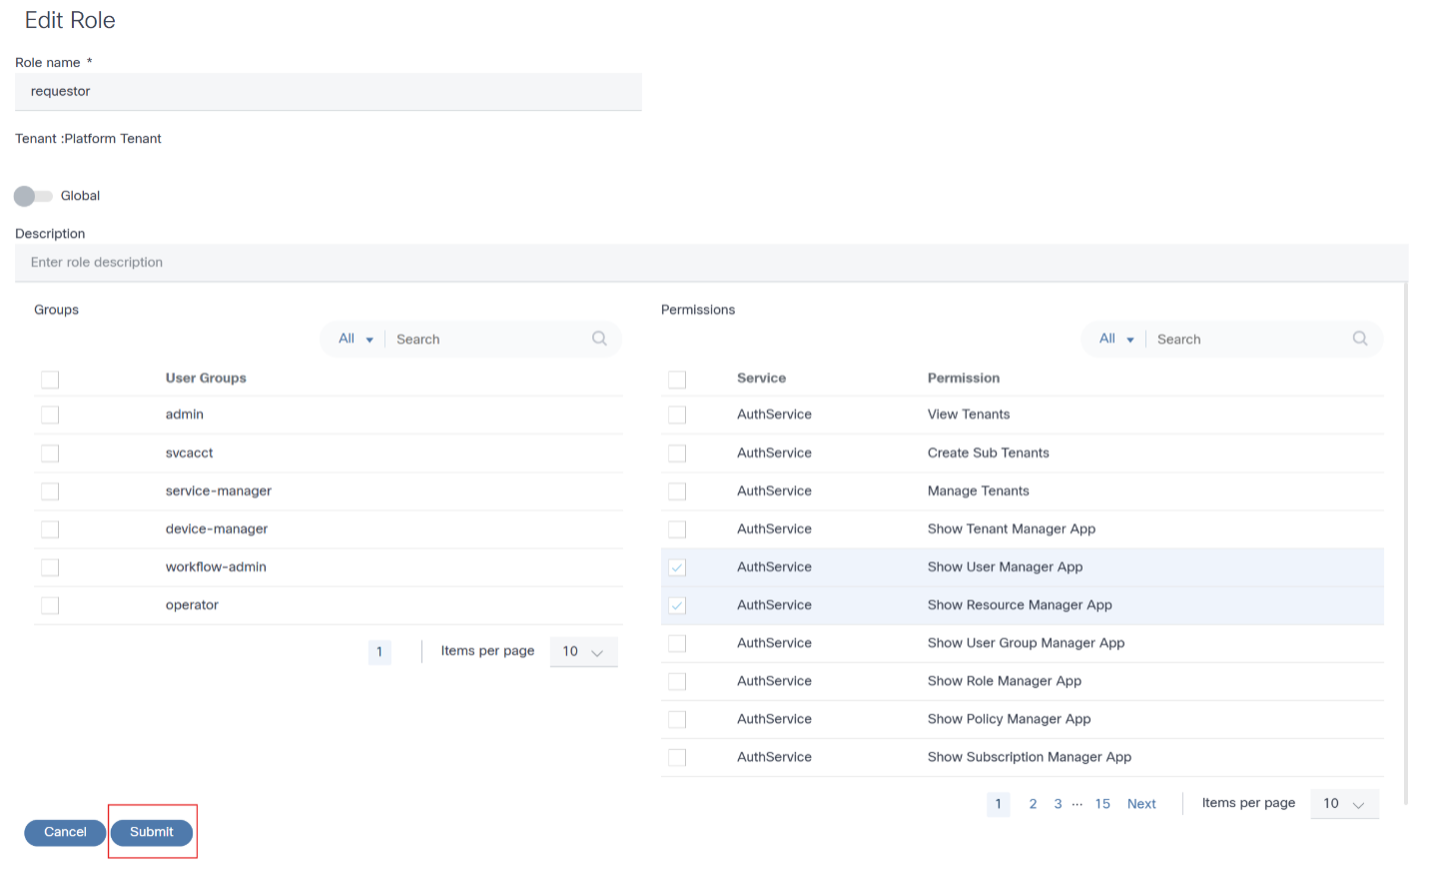
- Revise the required data.
- Click Submit.
Deleting a Role
To delete a role:

- From the Roles page, select the More Options icon > Delete from the Action column of the desired role. A confirmation window displays.

- Click Delete.
Exporting Roles
To export one or more roles in the BPA portal:
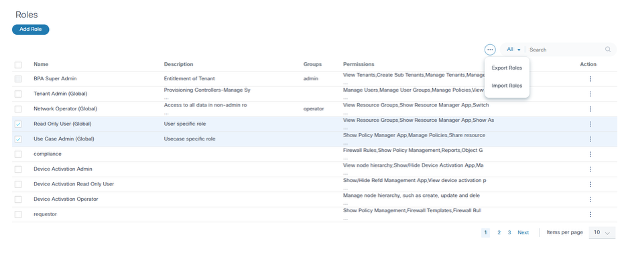
- From the Roles page, select the Roles to be exported.
- Select the More Options icon > Export Roles. The Export Roles window opens and displays the Roles that are selected for export.
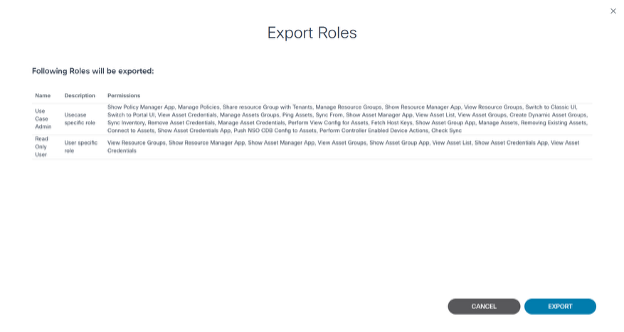
- Click Export. A JSON file is downloaded.
Importing Roles
To import roles in the BPA Portal:
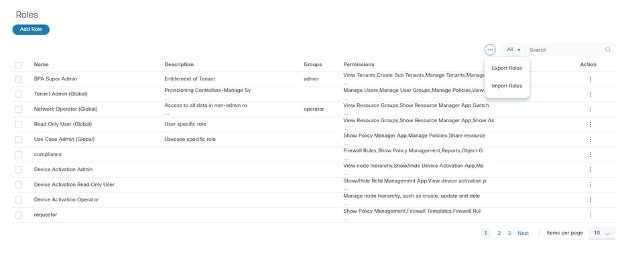
- Select the More Options icon > Import
Roles. The Import Roles window opens.
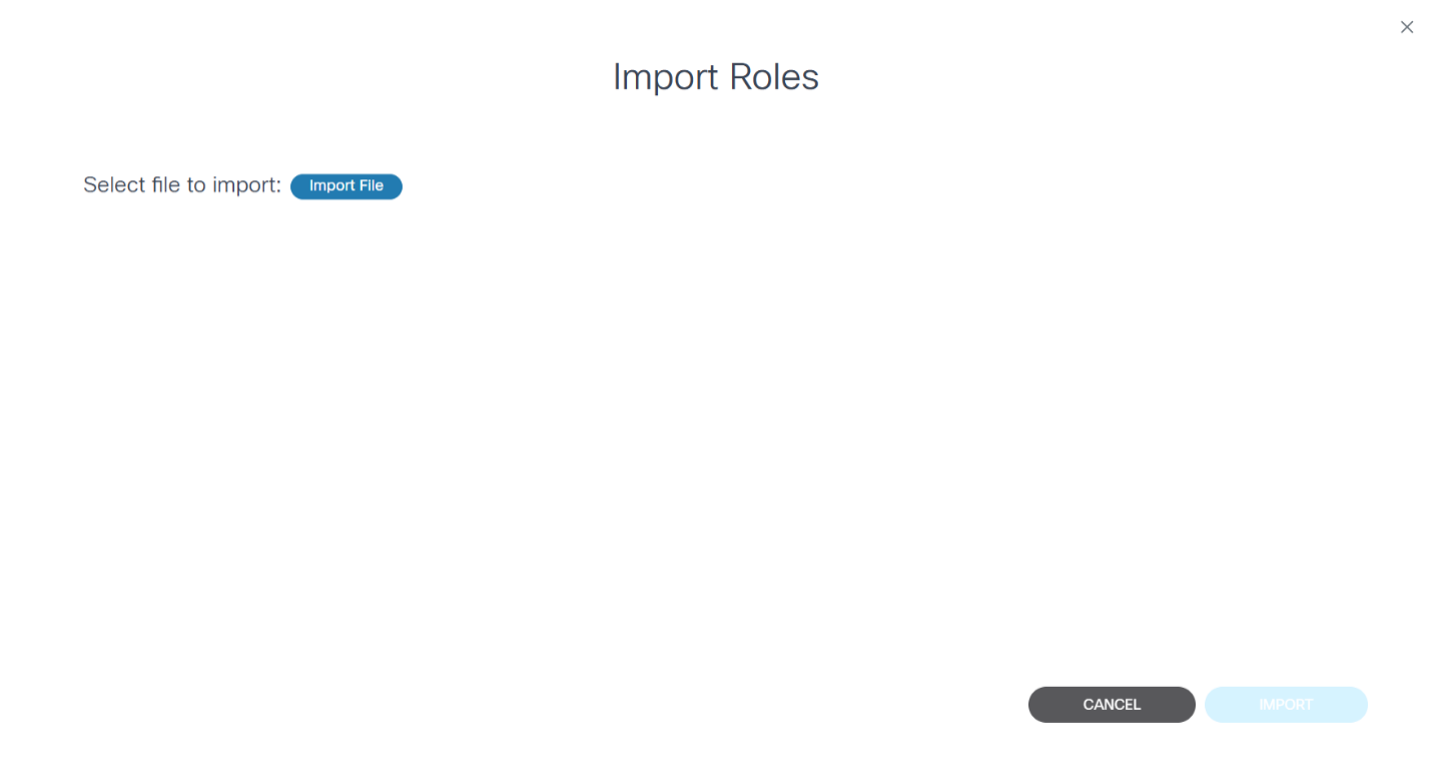
- Click Import File and select the file to be
imported. All Roles from the file are loaded and displayed.
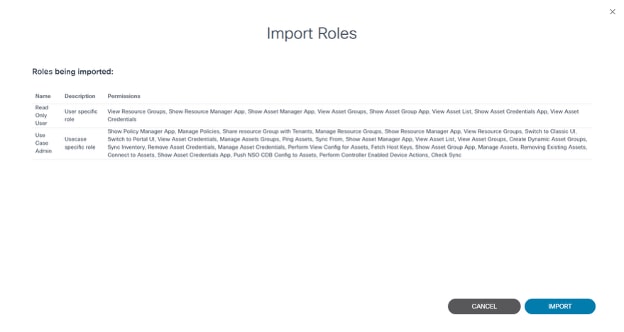
- Click Import. The Roles and their permissions are imported and a final confirmation displays.
Classic and Portal UI Permissions
Use Case 1
Administrators can grant permissions for both the Classic and Portal UI.
After providing permissions, the Switch to Classic icon is enabled for non-administrator users upon login.
The Switch to Portal icon is also enabled to navigate to the Portal UI from the Classic UI.
Use Case 2
Administrators can grant permission to switch to the portal UI only.
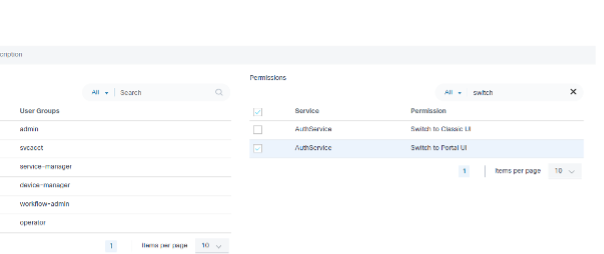
After only providing permissions for the Portal UI, the Switch to Classic icon is disabled for non-administrative users upon login.
Use Case 3
Administrators can grant permission to switch to the Classic UI only.
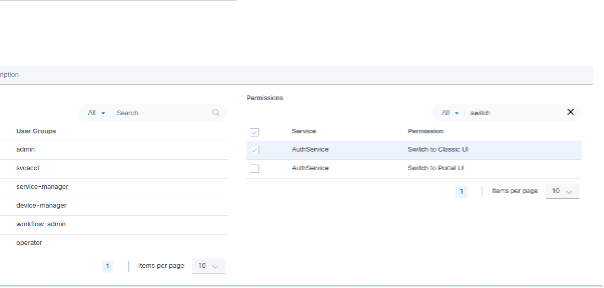
After only providing permissions for the Classic UI, the landing page redirects to the Classic UI and the Switch to Portal icon is not visible for non-administrator users upon login.
Use Case 4
Administrators can deny both Classic and Portal UI permissions.
After denying both Classic and Portal UI permissions, non-administrative users can not log in using the Classic or Portal UI.

User Groups
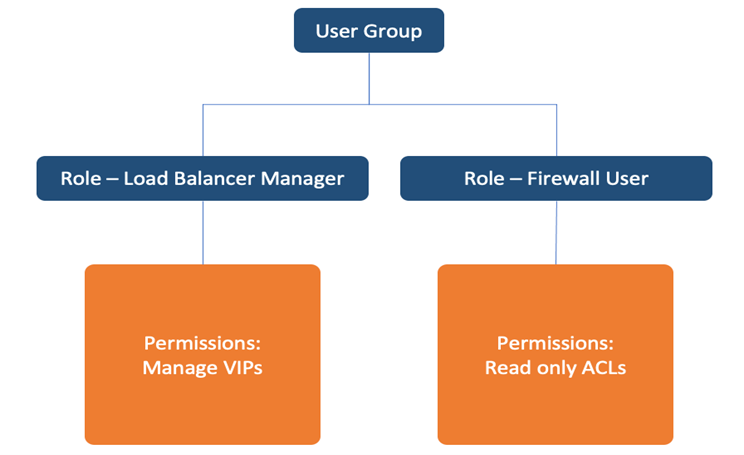
BPA user groups provide the ability to organize users into various groups based on the function they provide. Each user group is associated with roles that define what the users in the groups can or cannot do.
BPA provides several out-of-the-box user groups. BPA Administrators can also create and manage additional user groups.
| User Group | Roles |
|---|---|
| Admin | Super Administrator |
| Operator | Network Operator |
The example below shows a user group associated with two roles. The firewall user role provides users in this user group read only access to the Firewall Access Control Lists (ACL). The load balancer manager role gives full edit access.
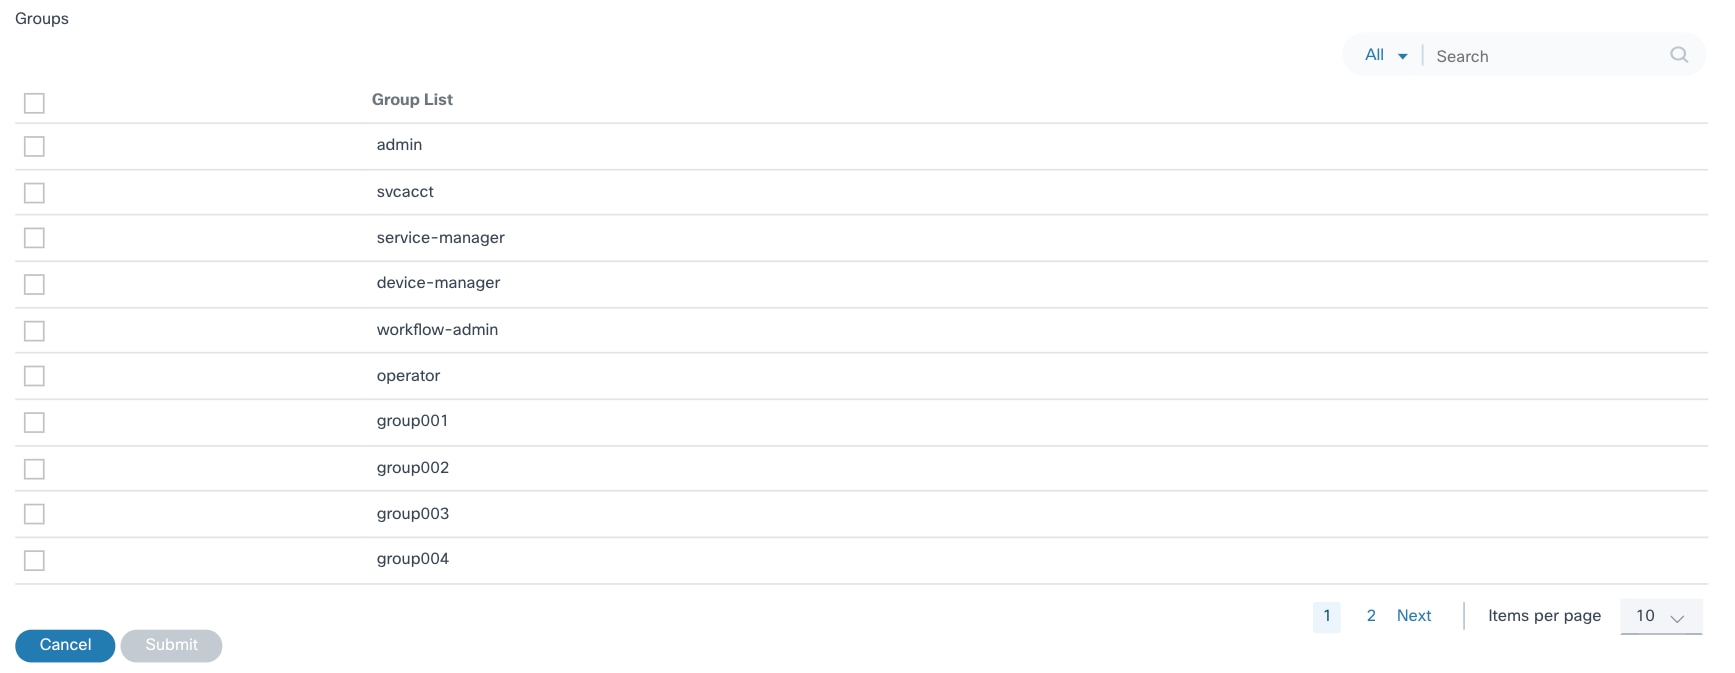
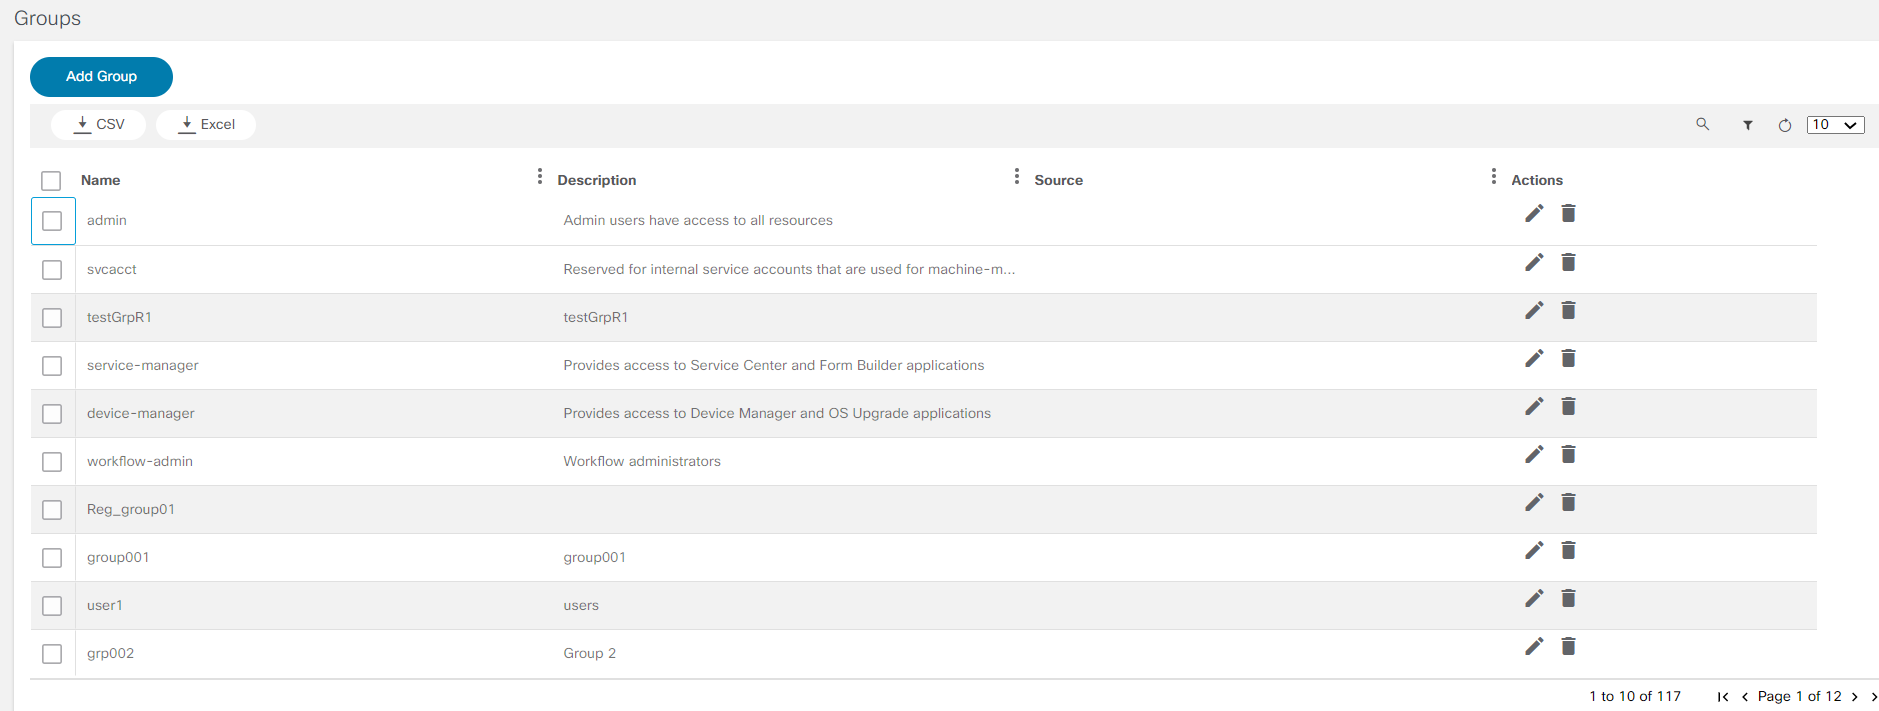
To access the User Groups Management application, select Settings > User Management > User Groups from left navigation menu. The Groups page displays with a list of groups.
Creating User Groups
- From the Groups page, click Add Group. The Add Group window opens.
- Enter the Group Name and Description..
- Click Submit.
Editing User Groups
- From the Groups page, select the More Options icon > Edit from the Action column of the desired Group. The Edit Group window opens.
- Make the required changes.
- Click Submit.
Deleting User Groups
- From the Groups page, select the More Options icon > Delete from the Action column of the desired group. A confirmation displays.

- Click Confirm.
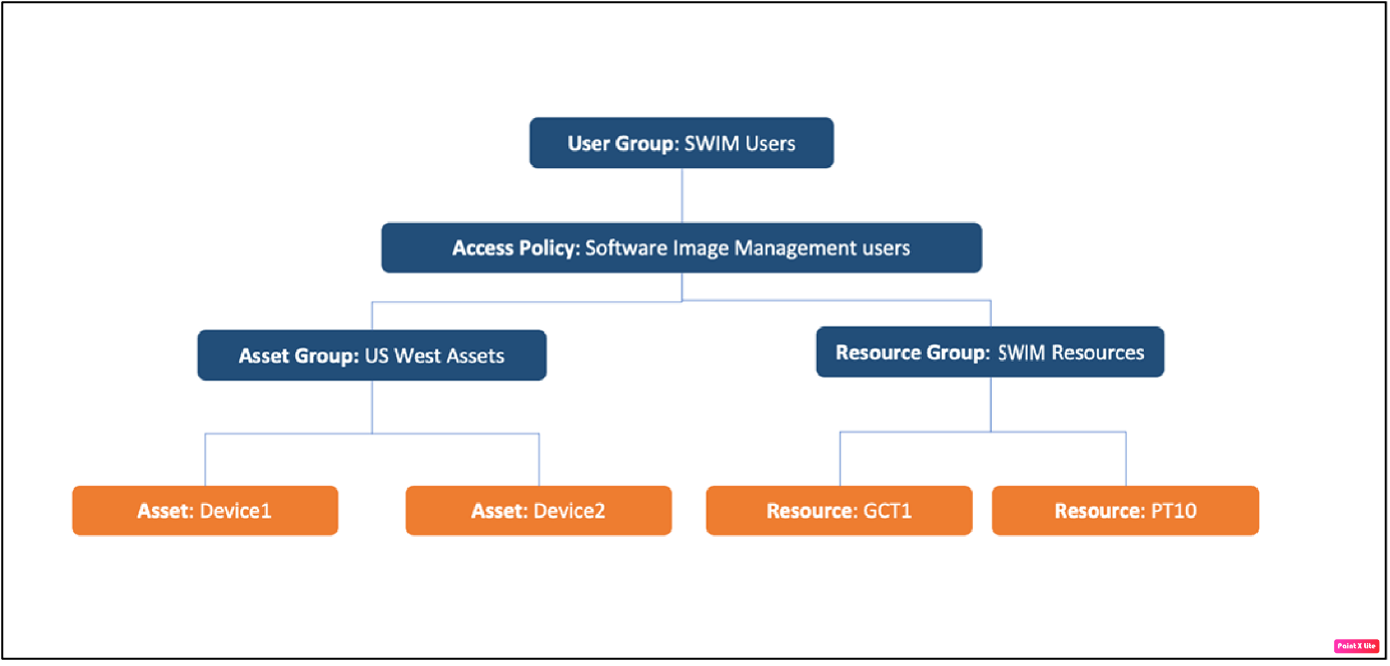
Access Policies
Access policies provide strict access control by limiting a user’s accessible resources.
While a role defines a set of actions (i.e., permissions) that a user can perform, access policies further limit the resources on which these actions can be performed.
An access policy is defined to a user group and can restrict user access to asset groups, resource groups, or a combination of both.
- Asset Groups: A grouping of network assets (static or dynamic)
- Resource Groups: A grouping of BPA artifacts such as Golden Configuration Templates (GCT), Process Templates, etc.
For example, consider that a new access policy defined for the Software Image Management (SWIM) Users user group (which allows users to update software on devices) and the US-West Assets group (assets that belong to US West region) limits the users in the group to performing upgrades on devices in US-West Assets only. The following figure shows how user groups, access policies, assets, and resource groups come together.
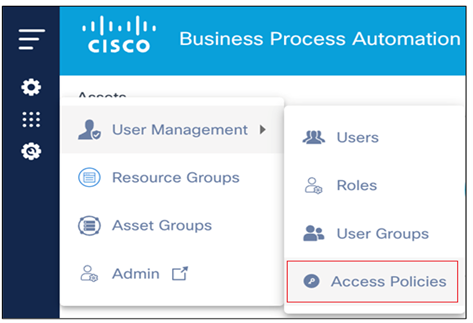
To manage access policies, select Settings > User Management > Access Policies from the left navigation menu. The Policies page displays with a list of policies.

Creating an Access Policy
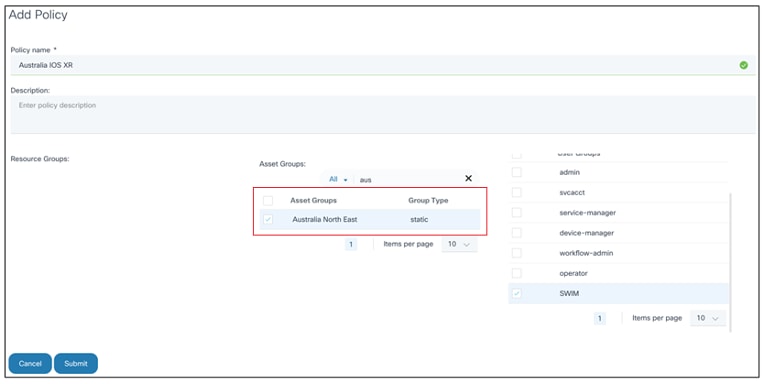
- From the Policies page, click Add Policy. The Add Policy window opens.
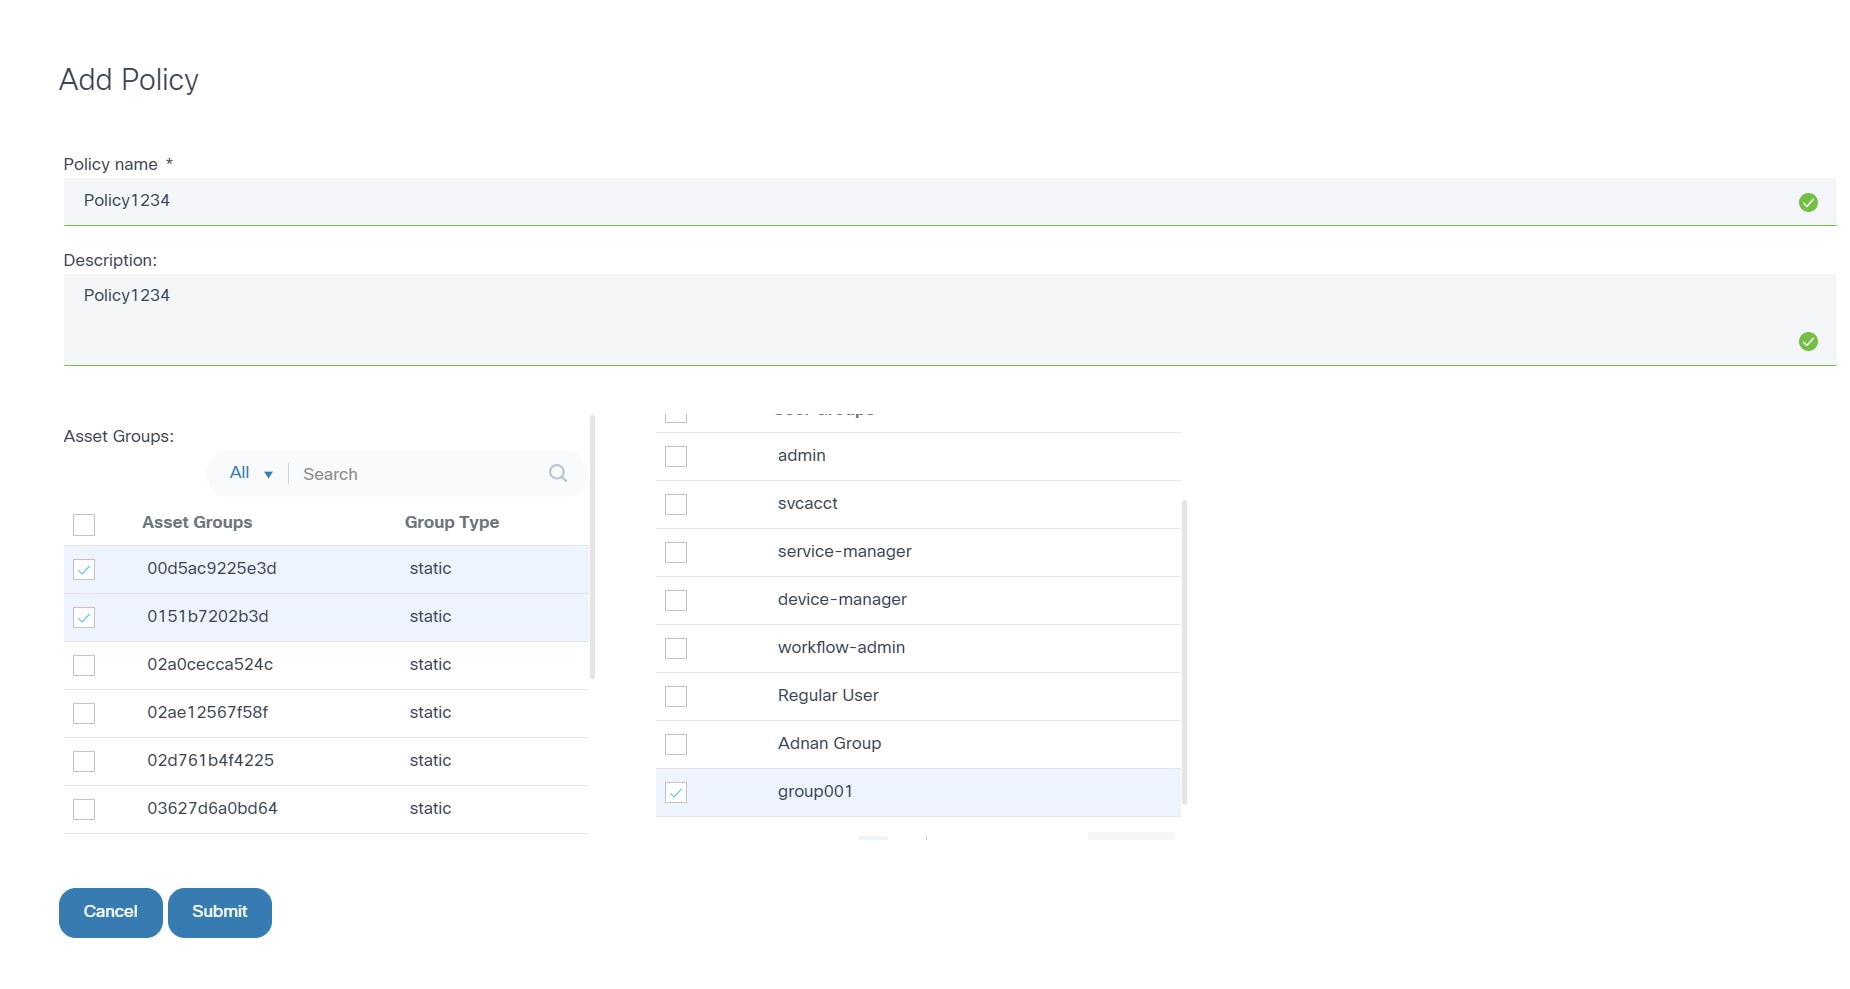
- Enter the Policy name and Description.
- Select the applicable Resource Groups, Asset Groups, and User Groups check boxes.
- Click Submit.
Editing an Access Policy
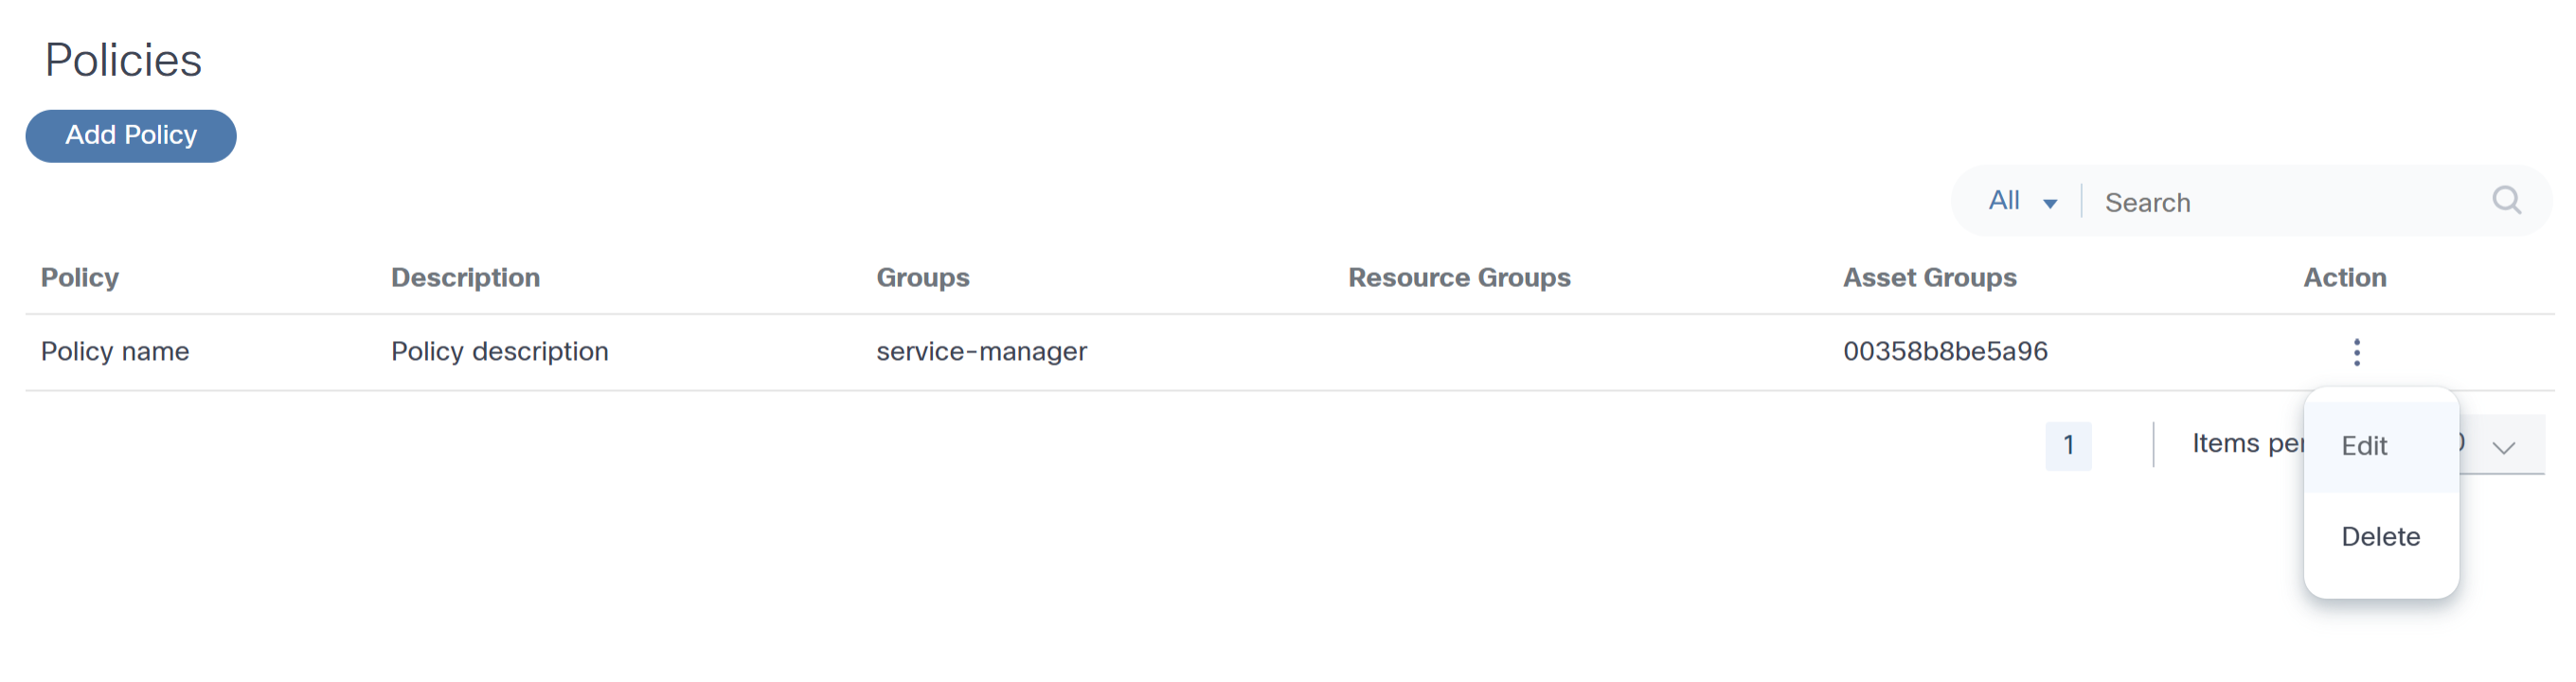
- From the Policies page, select the More Options icon > Edit from the Action column of the desired policy.
- Revise the required data.
- Click Submit.
Deleting a Policy
To delete a policy:
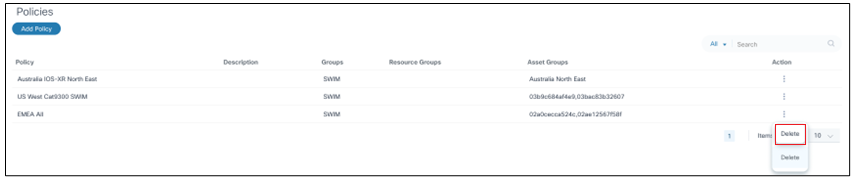
- From the Policies page, select the More Options icon > Delete from the Action column of the desired policy. A confirmation window opens.

- Click Delete.
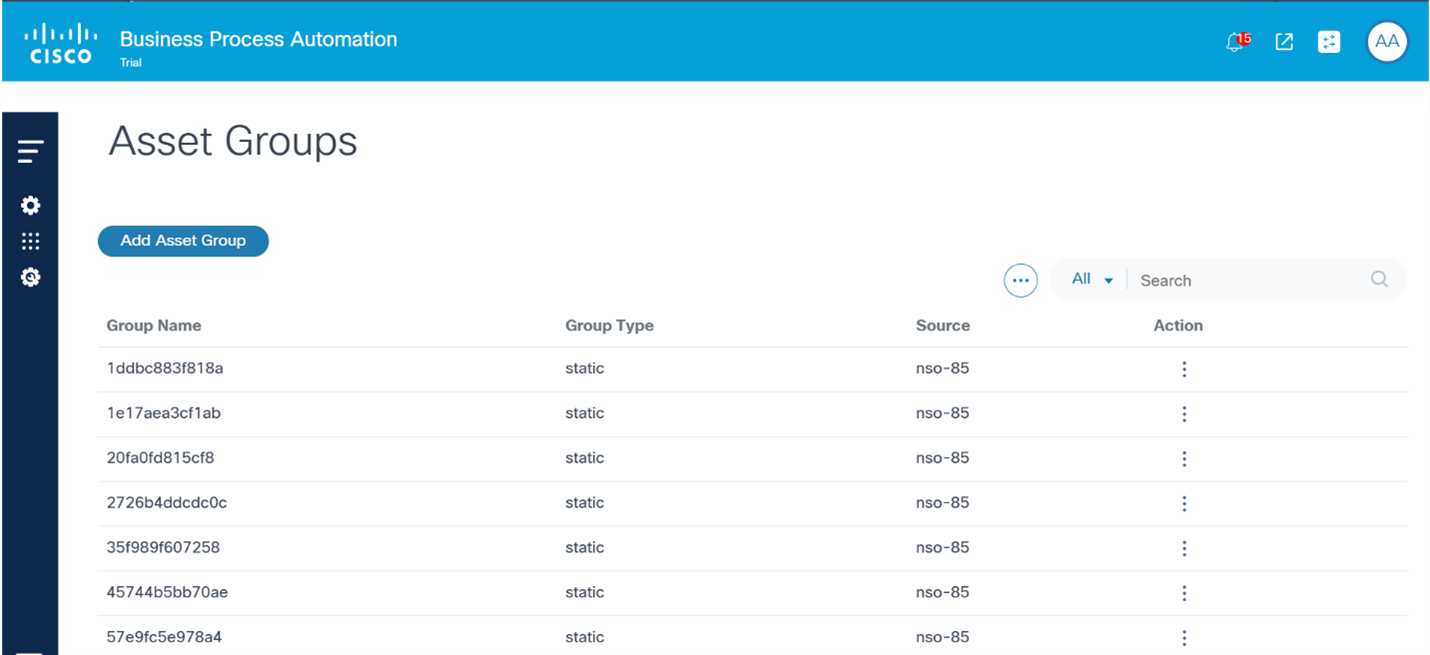
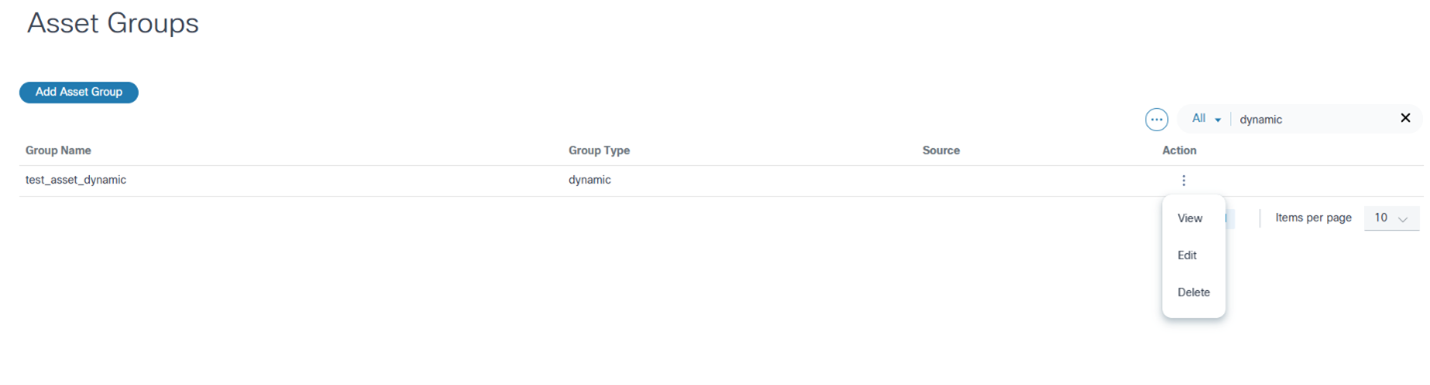
Asset Groups
Assets (i.e., devices) in BPA can be grouped with the Asset Groups feature. Where applicable, BPA applications present Asset Group fields which enable users to quickly select desired assets or to perform group-level operations. Administrators can also limit access to assets by defining access policies.
To access Asset Groups:
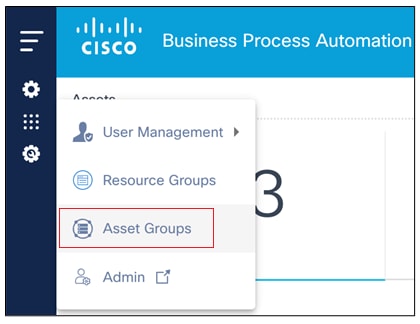
Select Settings > Asset Groups. The Asset Groups page displays.
BPA includes three types of asset groups: static, dynamic and discovered.
Static Asset Groups
Static asset groups are created and managed by BPA users. Any device discovered by BPA (from domain controllers) can be added to a static asset group. These asset groups are available only in BPA and are not propagated to domain controllers.

Creating a Static Asset Group

- From the Asset Groups page, click Add Asset Group. The Create Asset Group window opens.
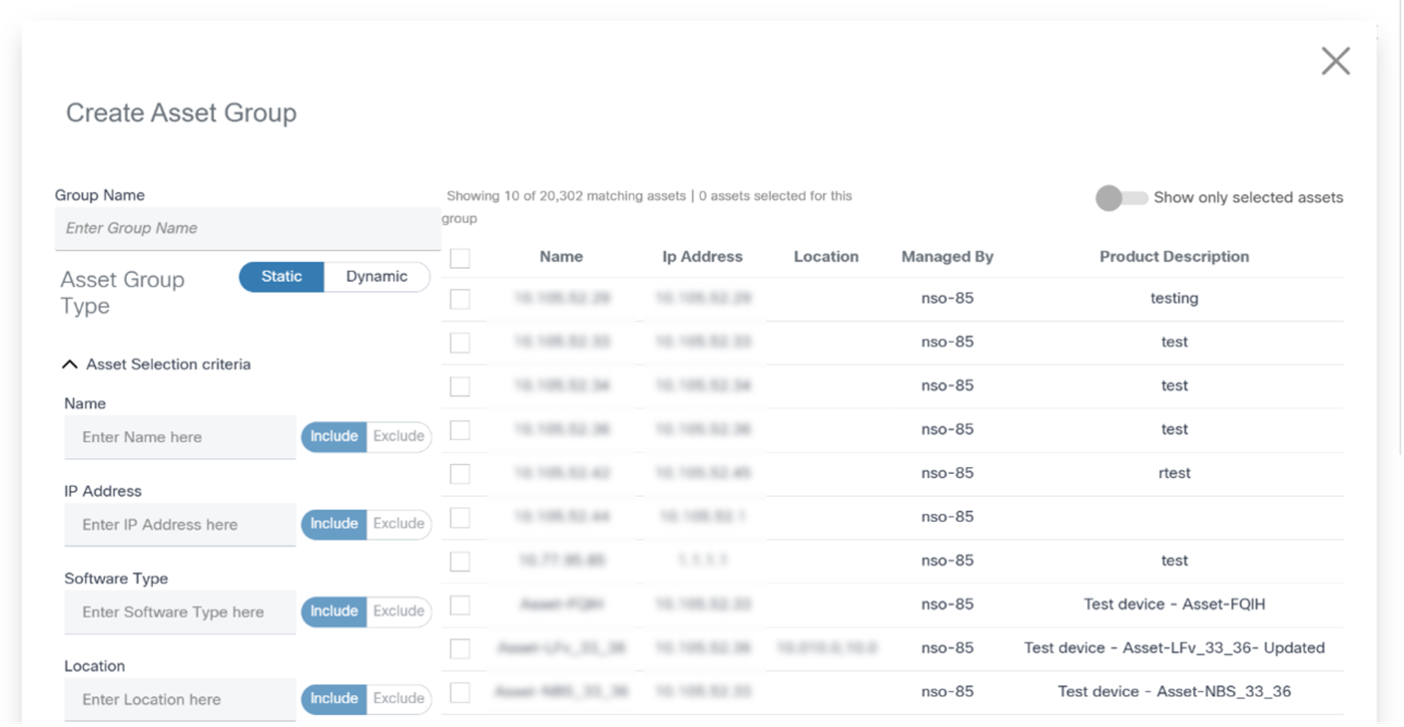
- Enter the Group Name and select the Static option.
- Select the devices from the list.
- Search for assets using the fields in the Asset Selection Criteria section if necessary.
- Select the check boxes of desired assets.
- Click Save.
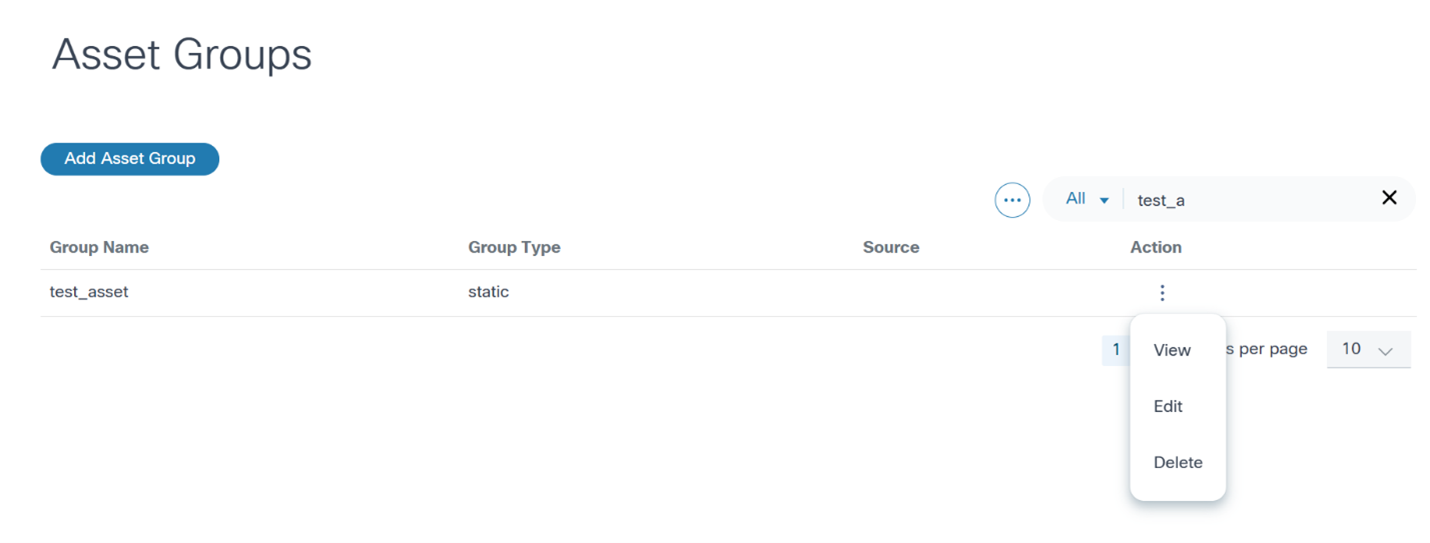
Editing Static Asset Groups
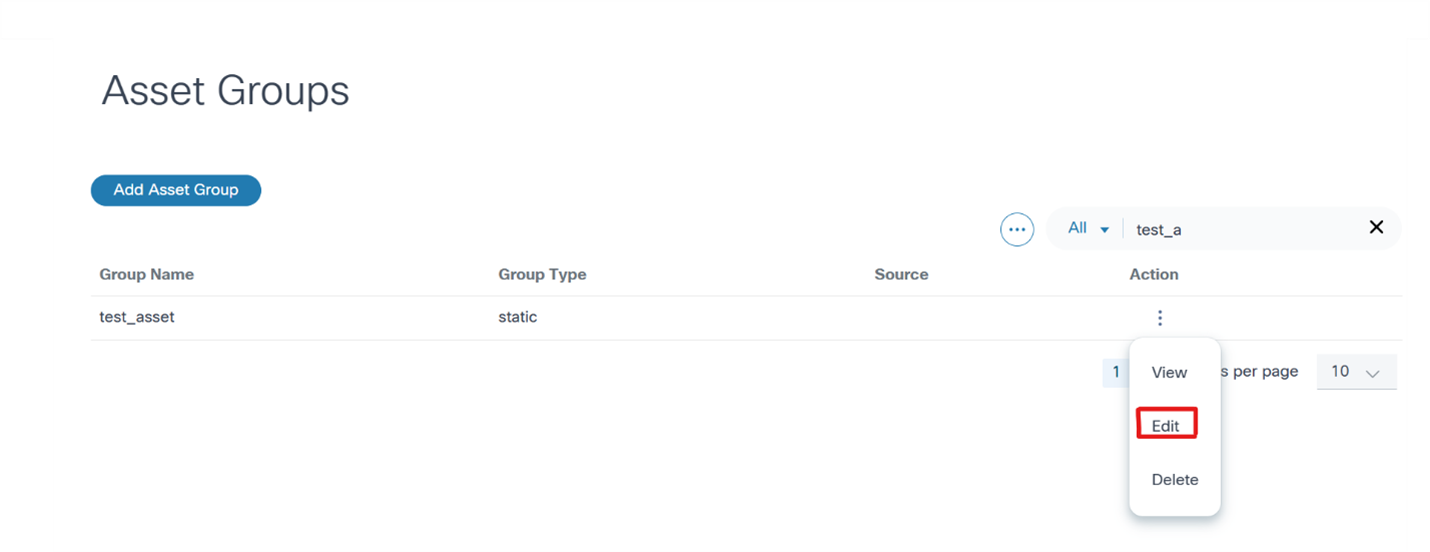
- From the Asset Groups page, select the More Options icon > Edit from the Action column of the desired asset group. The Edit Asset Group window opens.
- Select or clear the check boxes of desired assets.
- Click Save.
Deleting Static Asset Groups
- From the Asset Groups page, select the More Options icon > Delete from the Action column of the desired asset group. A confirmation window opens.
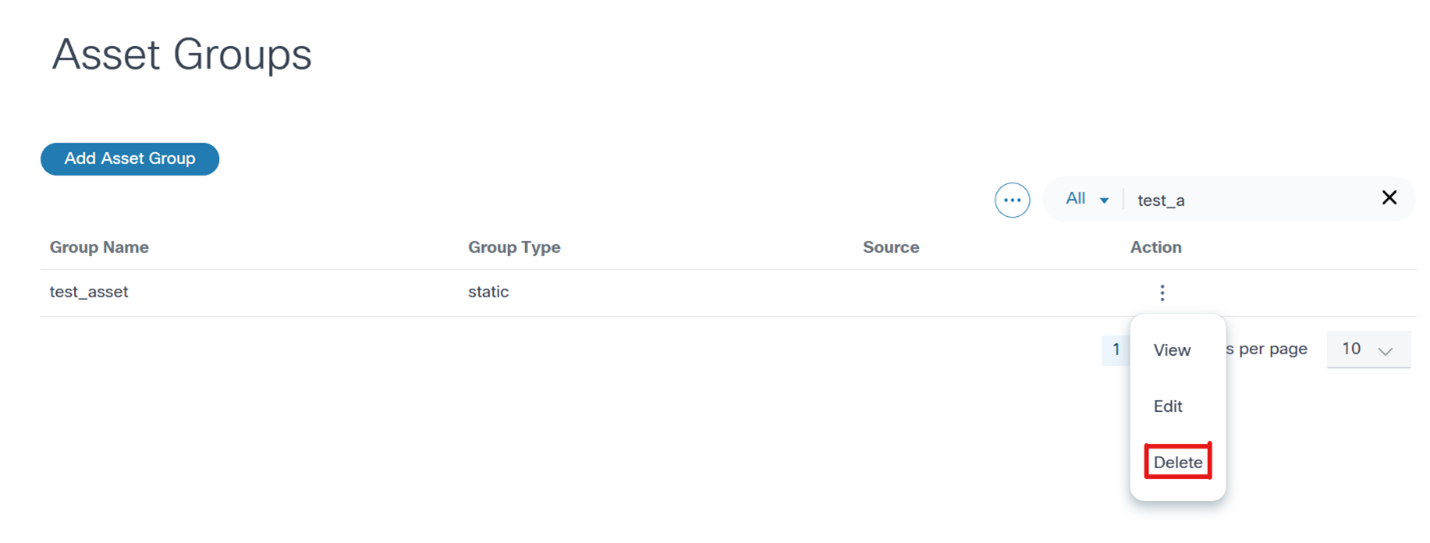

- Click Confirm.
Dynamic Asset Groups
Dynamic asset groups are defined based on one or more asset selection criteria. The selection criteria can be based on device metadata such as name, model, controller, etc. BPA determines which assets belong to the asset group at run-time by querying for assets that match the selection criteria.
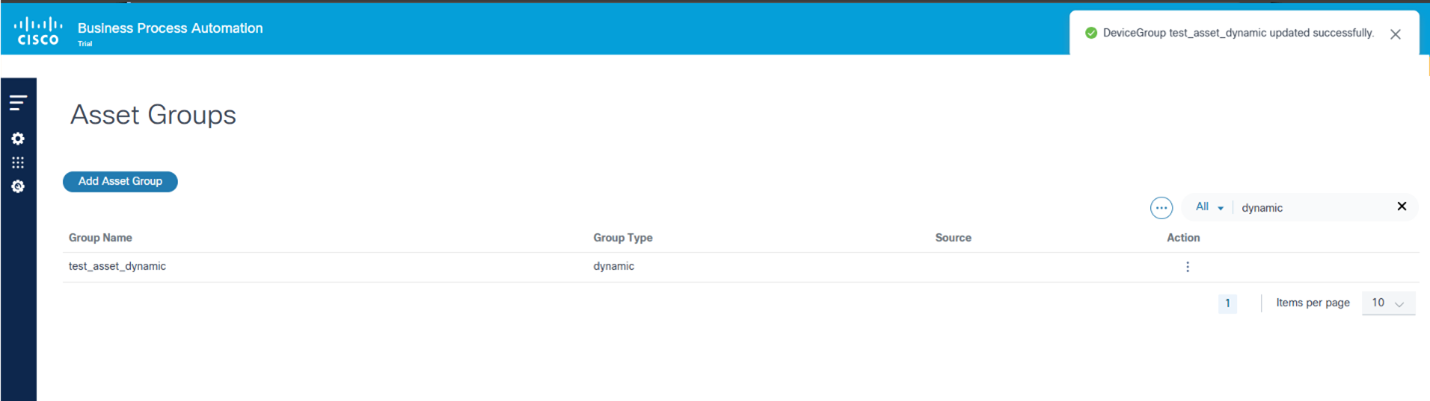
Creating a Dynamic Asset Group
- From the Asset Groups page, click Add Asset Group. The Create Asset Group window opens.

- Enter the Group Name and set the Asset Group Type field to “Dynamic”. By default, all assets authorized for the user are added to the group.
- Use the selection criteria in the Asset Selection Criteria section to refine the asset list. As the data is entered, the asset list is revised to include and exclude assets that match the criteria.
- Click Save.
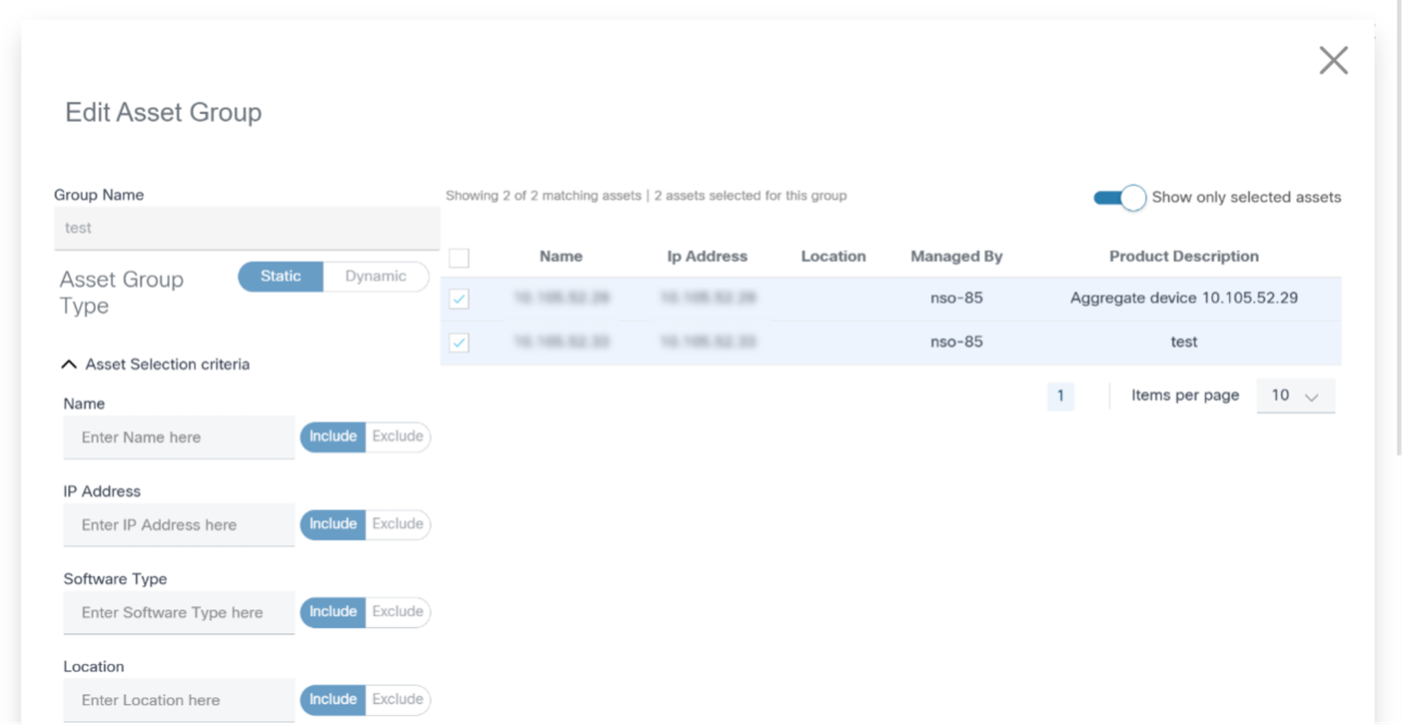
Editing Dynamic Static Asset Groups

- From the Asset Groups page, select the More Options icon > Edit from the Action column of the desired asset group. The Edit Asset Group window opens.
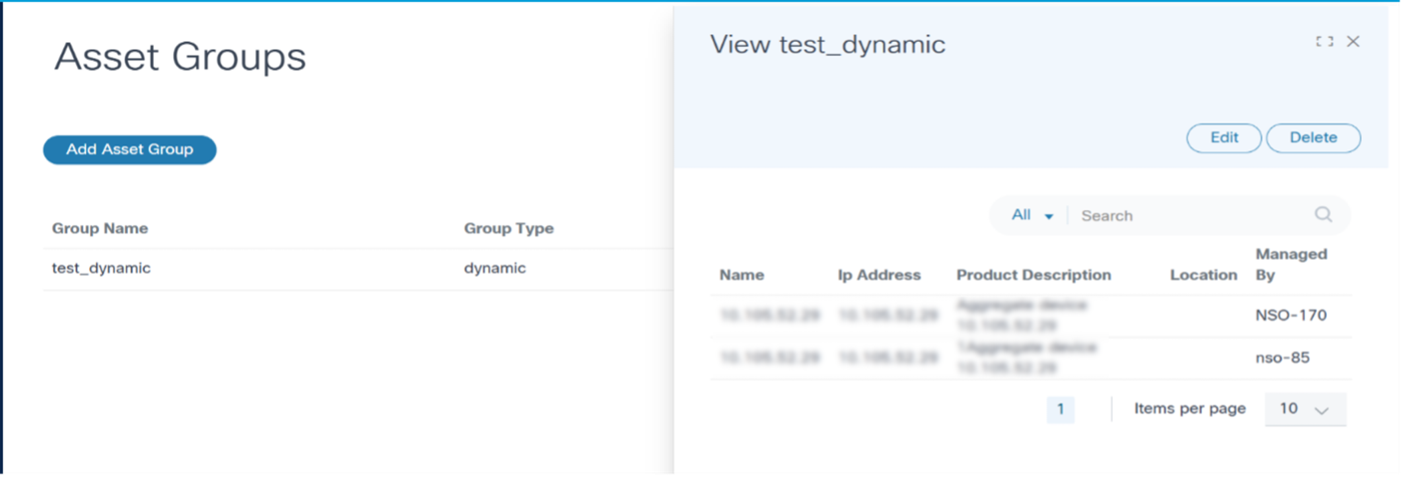
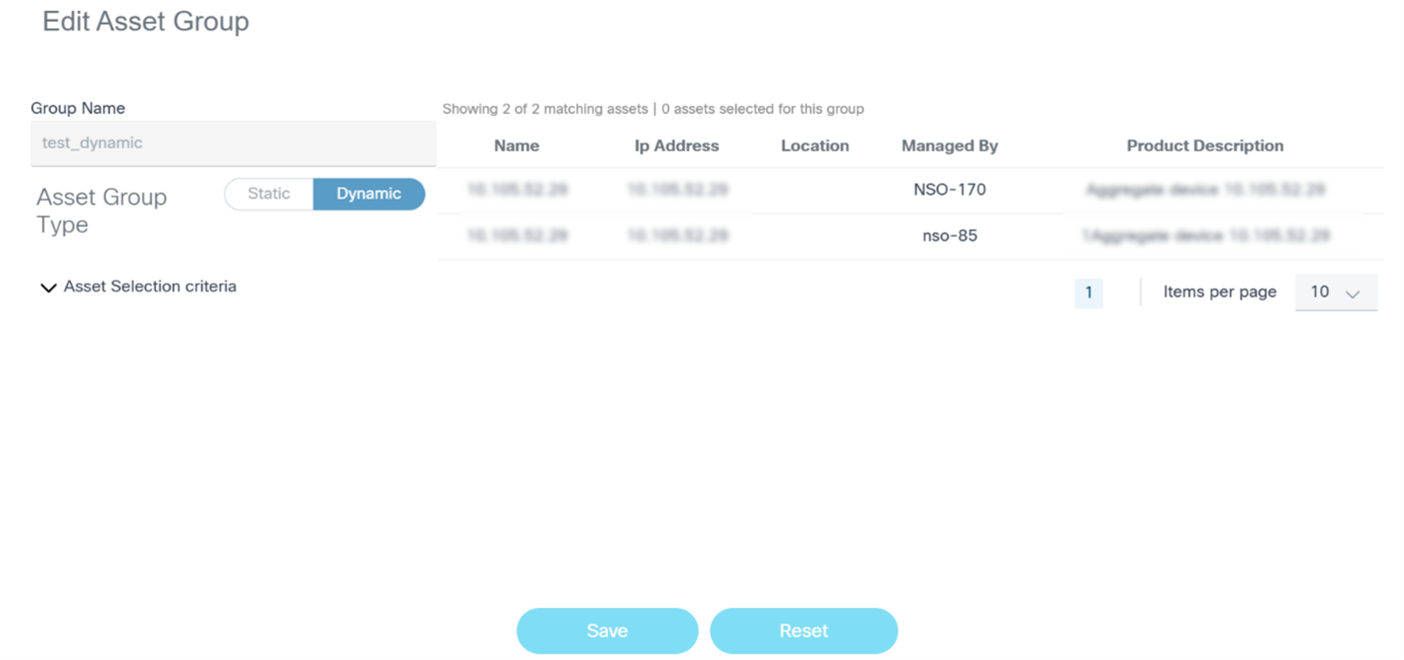
- Change the Asset Selection Criteria as desired to add or remove assets to the asset group.
- Click Save.
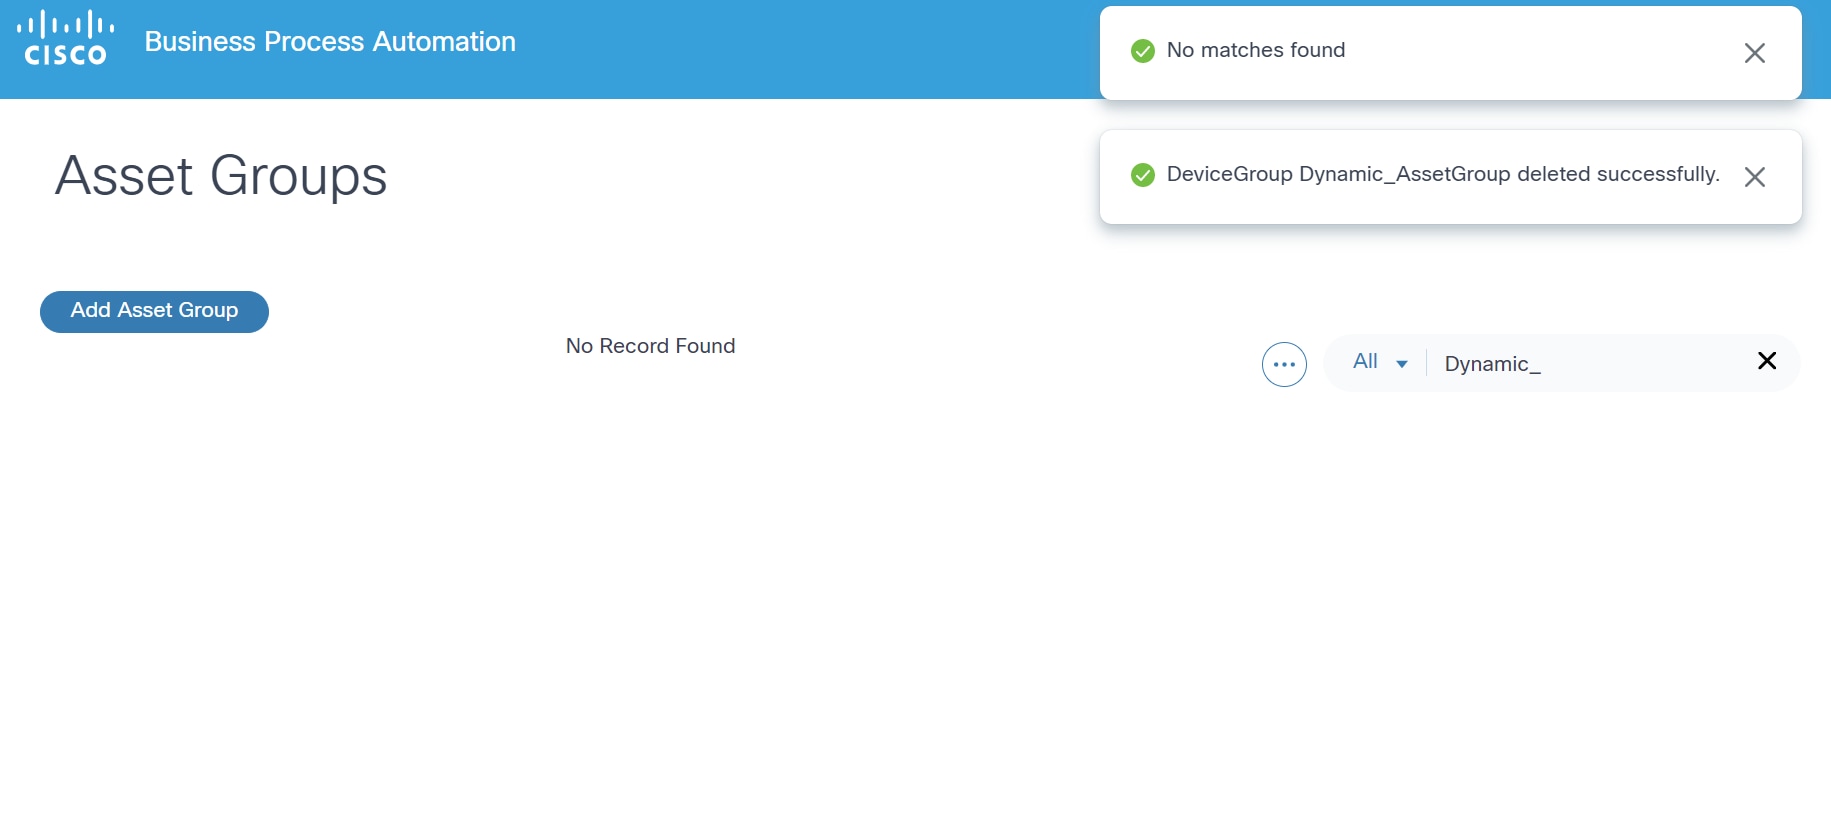
Deleting Dynamic Asset Groups
- From the Asset Groups page, select the More Options icon > Delete from the Action column of the desired asset group.
- Click Delete.
Discovered Asset Groups
Discovered asset groups are asset groups that are managed by domain controllers and are discovered by BPA. These asset groups are typically created with domain controller tools such as Web Portal. These asset groups cannot be modified using the BPA portal. BPA discovers these asset groups when an authorized user chooses to synchronize the controller state.
Asset Manager
The Asset Manager application presents a consolidated view of all assets managed by BPA. BPA maintains a cache of assets collected from various domain controllers that are configured in the system. Asset Manager also allows users to perform certain operations on the devices.
To access Asset Manager:
- Log into BPA.

- Select the Application Icon > Assets.
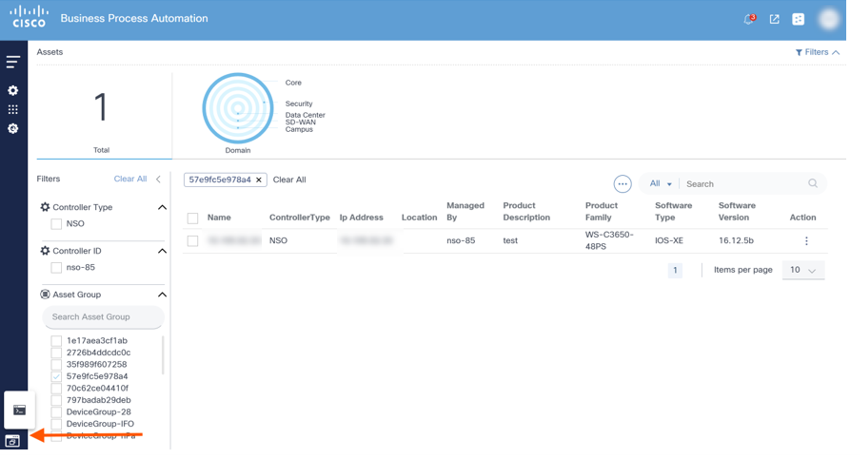
The Asset Manager page is divided into asset filters and a list of assets that can be managed with BPA. To view specific controller assets, select the desired Controller Type filter. For specific assets, select the Controller ID filter
Asset Filters
This section of the Asset Manager shows a count of assets displayed along with a list of filters for asset selection.
The asset count shows the total number of assets that are being displayed to the user and does not reflect the actual number of assets managed by BPA. The total number of assets shown depends on how many assets are visible to the user (based on configured access policies) and the selected filters.
BPA provides the following filters:
- Domain: Filters by network domain (e.g., Core, Data Center, Software-Defined Wide Area Network (SD-WAN) etc.)
- Controller Type: Filters by controller type (e.g., NSO, DCNM, vManage etc.)
- Controller: Filters by a controller instance
- Asset Group: Filter by asset group
BPA also provides the ability to filter the asset list using search criterion in the Search field.
Selected filters display above the asset list. To remove individual filters, select the Remove icon on the desired filter or click Clear All to remove all filters. A search field is available in the filter panel under each category if there are more than 10 available values to filter.
- Filters are available in the Asset dashboard
- Controller Type filter data by specific controller type
- Controller ID filter data by specific controller type
- Asset Group filters data by specific asset group Filter data by Asset Group
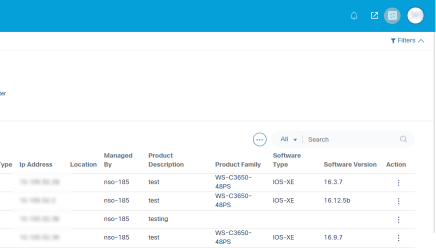
Asset List
The bottom section of Asset Manager displays a consolidated list of assets for the user.
Device Actions
From the Asset List view, users can perform various device operations (i.e., device actions) such as Ping, View Config, Connect, etc. Access to some operations, especially those that change device states, is access controlled. Users unable to perform specific actions should contact the BPA Administrator.
There are two ways to run actions on the devices:

- One device at a time: Select the More Options icon next to the desired device. A drop-down list displays with available operations.
- Multiple devices: This method allows users to perform the desired action on multiple devices. Select the check boxes of the desired devices and click the More Options icon > Device Actions.
Ping
Ping is used for troubleshooting, testing device connectivity, and determining response time.
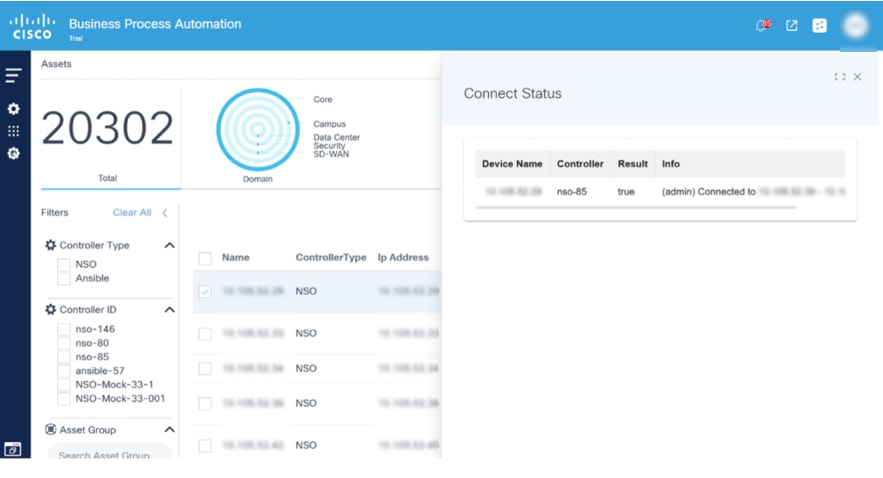
Connect
Connect is used to establish connection to selected devices and returns the connection status.
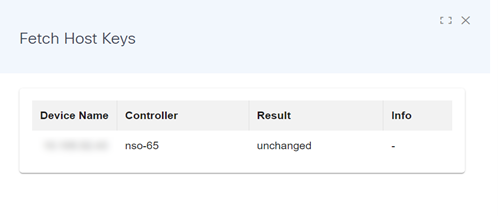
Fetch Host Keys
The Fetch Host Keys operation directs the NSO controller to retrieve host key information from the selected devices and store it in the local database.
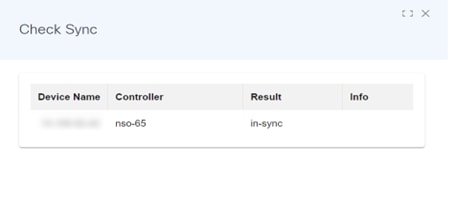
Check Sync
The Check Sync operation checks if the device configuration in the NSO Configuration Database (CDB) is in sync with the device configuration.
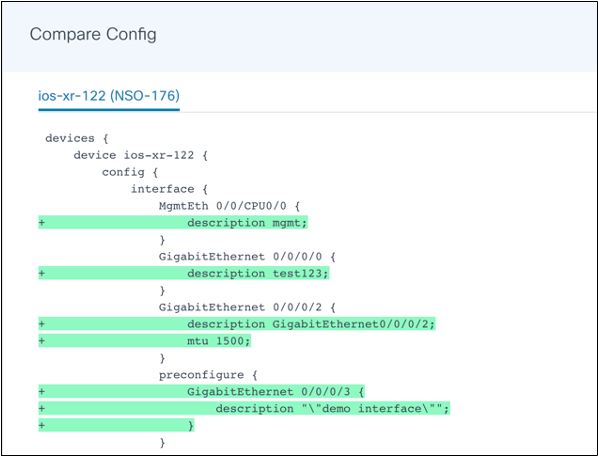
Compare Config
The Compare Config operation compares the configuration in the NSO CDB against the running configuration on the selected device. Select the devices from the list and select Device Actions > Compare Config.
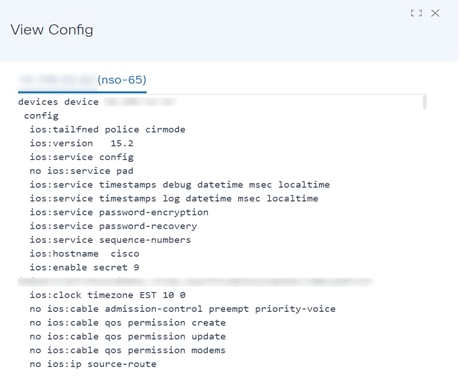
View Config
View Config shows the configuration of one or more selected devices. To select more than one device on the list, click the device name in the View Config window.
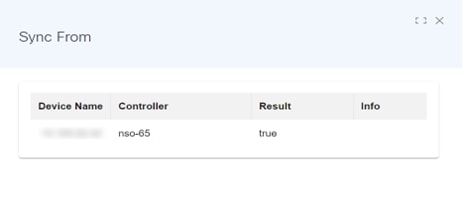
Sync From
The Sync From operation synchronizes the configuration state in the NSO CDB with the running configuration from a device. This is also applicable for the Cisco Crosswork Network Controller (CNC) controller.
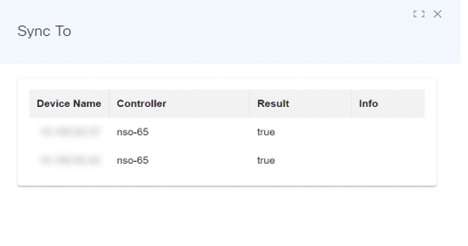
Sync To
The Sync To operation synchronizes the configuration stored in the NSO CDB to the device running the configuration. If any differences are found, then it updates the device configuration to match the state in CDB.
Interactive CLI
Interactive Command-Line Interface (CLI) is used for user input, particularly for commands (e.g., device show) and the configuration of devices managed by Direct-To-Device. Users can effortlessly execute commands, access device information, and apply real-time configuration changes, resulting in a seamless and interactive experience.
To access the Interactive CLI feature for Direct-To-Device:
- On the Assets page, search for a device that has Direct-to-Device in the Managed By column.
- Select a device from the available options.
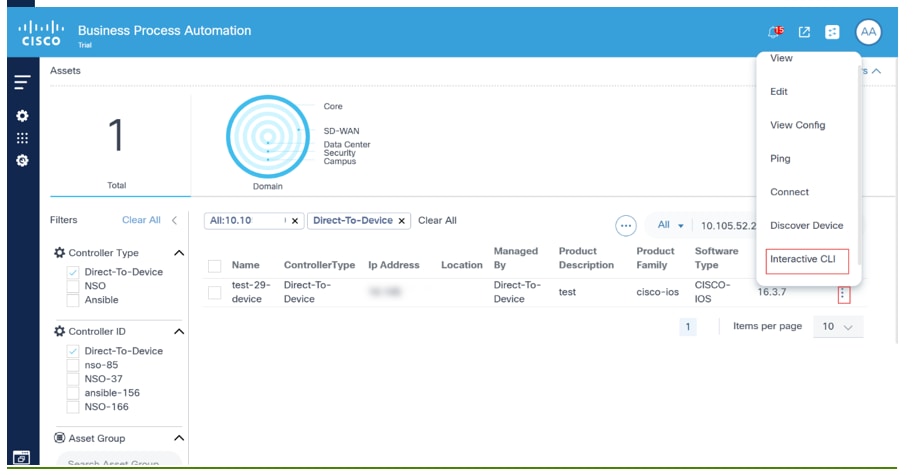
- Select the More Options icon > Interactive CLI from the Action column of the desired device. An Interactive CLI panel displays.
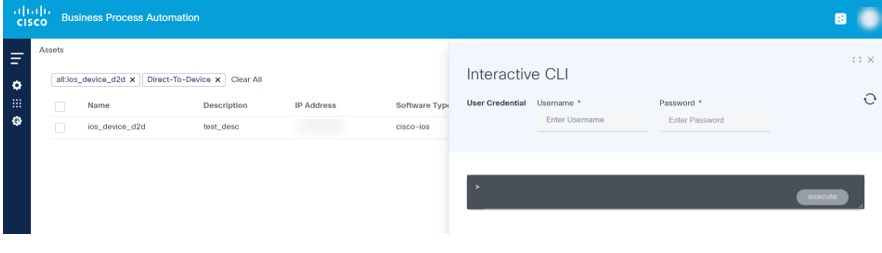
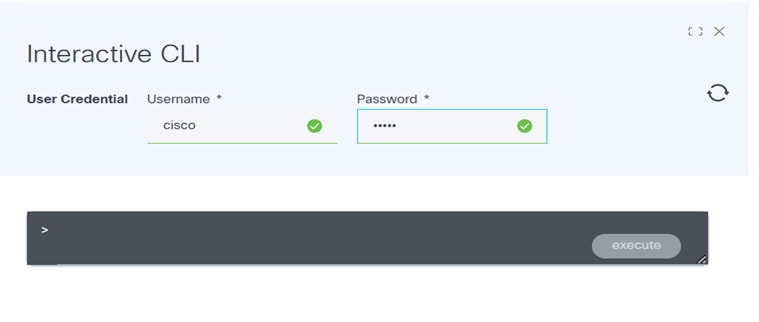
- Enter a username and password.
- Enter the show or config command and click execute. A progress notification displays.
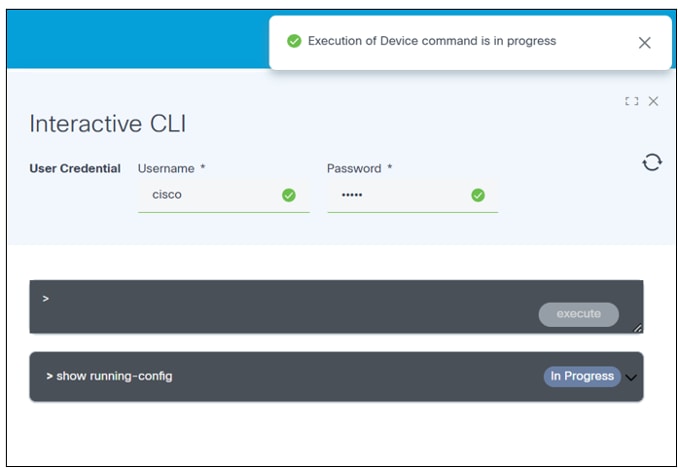
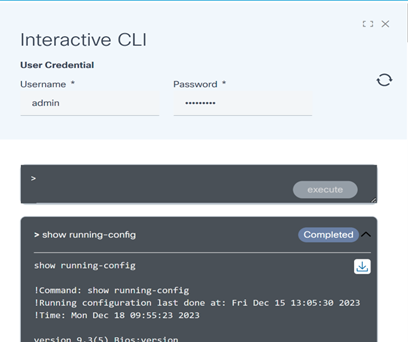
- Select the Refresh icon to update the command execution status. The button status changes to Completed once the execution is complete.
- Click the arrow next to the command to view the command output.
- Select the Download icon to save the output response as a text file. Any sensitive data within the response will be masked for privacy. Users can close the interactive window if a command takes too long to execute. A user notification is received when the execution is complete.

- Select the View Output of Long-Running Tasks icon to view the specific device execution command output. A window opens showcasing a list of devices for which command output is available (but not yet viewed by the user).

- Select the Device icon to access details of the executed device command.
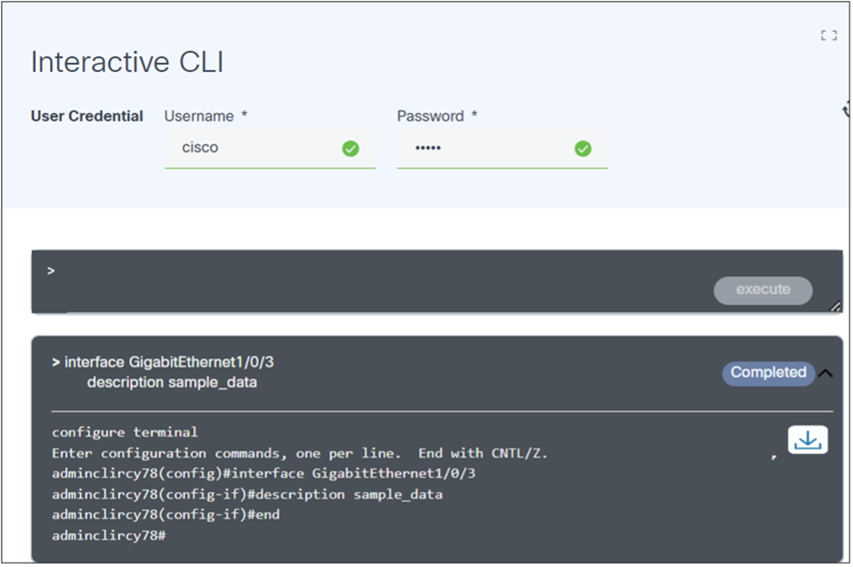
- Optionally, execute configuration commands to update the device configuration, as shown below:
- Optionally, adjust the retention period (retained 24 hours by default and then automatically deleted) of a device command response by modifying the environment variable “EXPIRES_INTERACTIVE_CLI” according to use case needs. This creates a user-friendly and efficient interface for using the Interactive CLI, allowing for seamless execution of commands and easy access to their output.
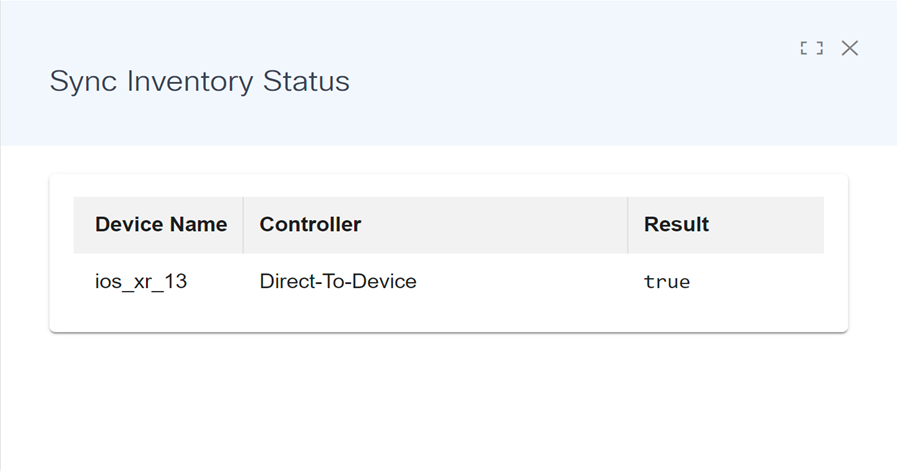
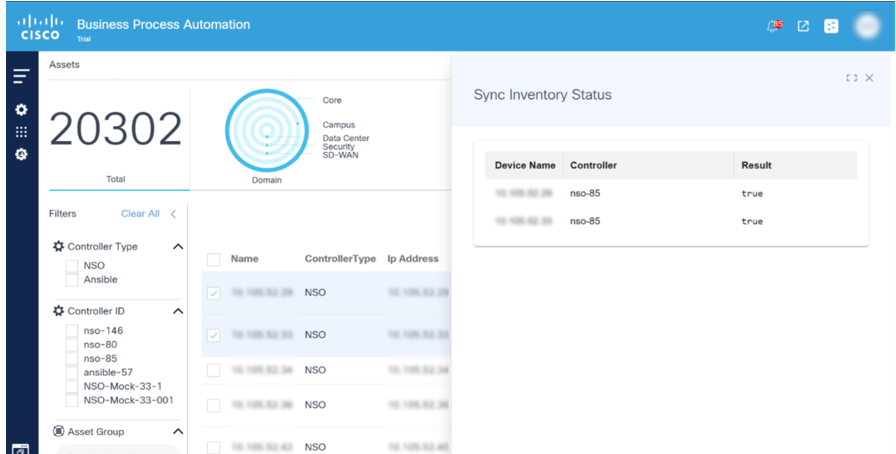
Sync Inventory
A Sync Inventory capability has been added to all controller agents. This provides the flexibility to fetch the latest information from controllers and devices like serial numbers, software-conformance models, and software versions for a selected list of devices. This allows use cases to use this lightweight feature instead of performing the complete controller device sync.
Discover Device
The Discover Device feature identifies neighboring devices, a functionality relevant in scenarios such as Cisco Internetworking Operating System (IOS) environments where Cisco Discovery Protocol (CDP) can be used. Only devices that can be successfully pinged from the BPA server and accessed via the same credentials are displayed in the results of discovered devices. Users can explore details of the discovered devices by viewing the details displayed in the pop-up window, as well as onboard these discovered devices. Currently this feature is supported only for Cisco’s family of devices.
To perform the Discover Device action:
- Select a device from the available options in the Asset Manager.
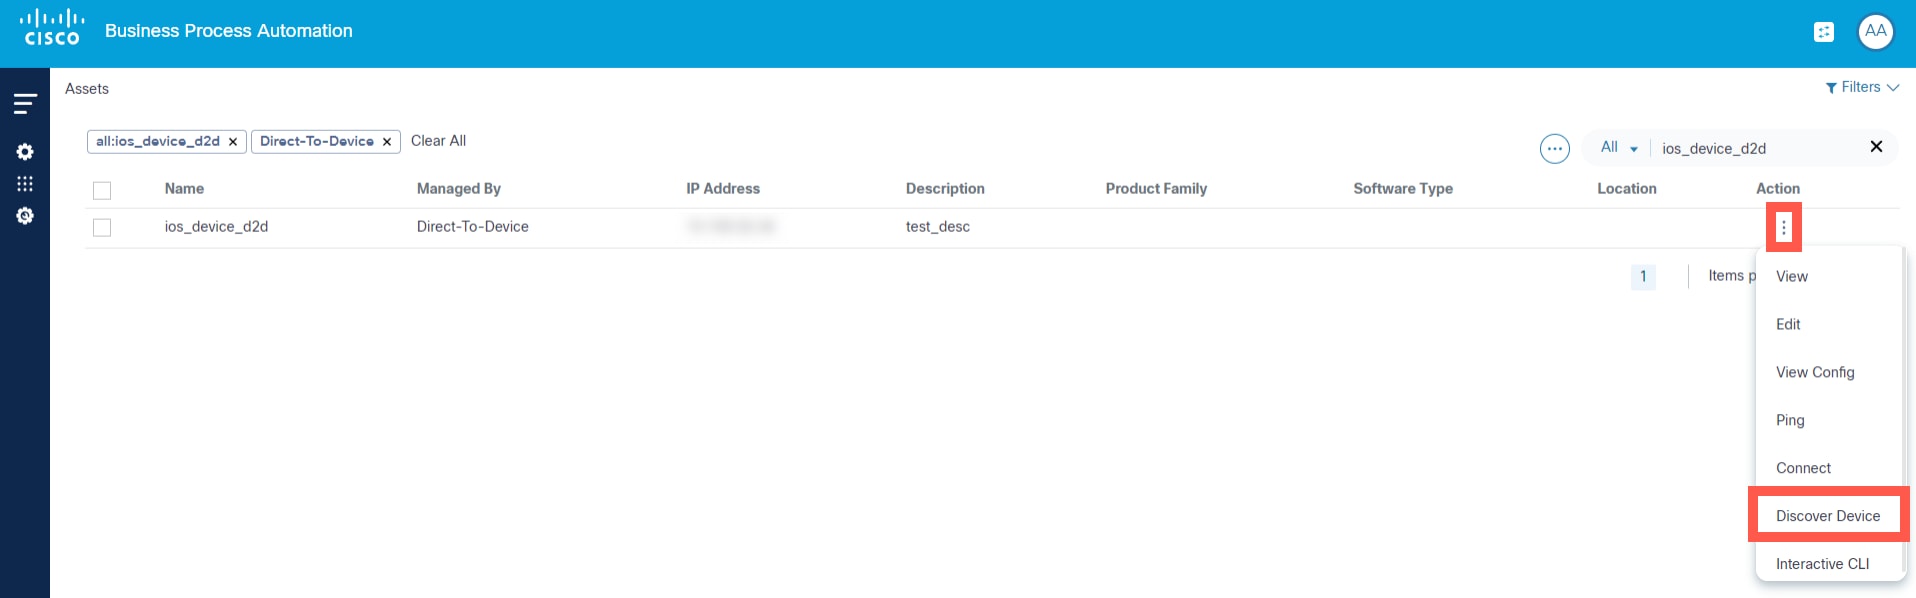
- From the Assets page, select the More Options icon > Discover Device from the Action column of the desired device.
A list of discovered devices is generated, which displays devices that can be pinged from the BPA server. Each device listed provides relevant information like device ID, IP address, platform, and version.
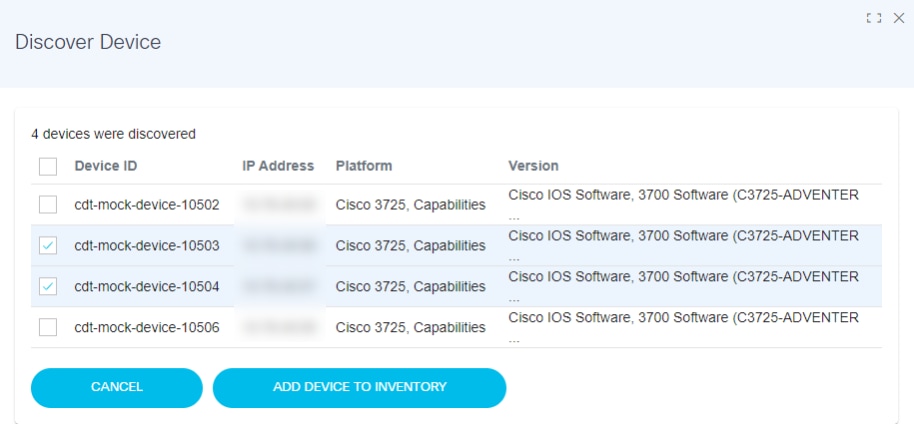
- Select one or more devices and click ADD DEVICE TO INVENTORY.
Backup Config
Users can trigger on-demand backups in the backup config device action. Access backup config by completing the following steps:
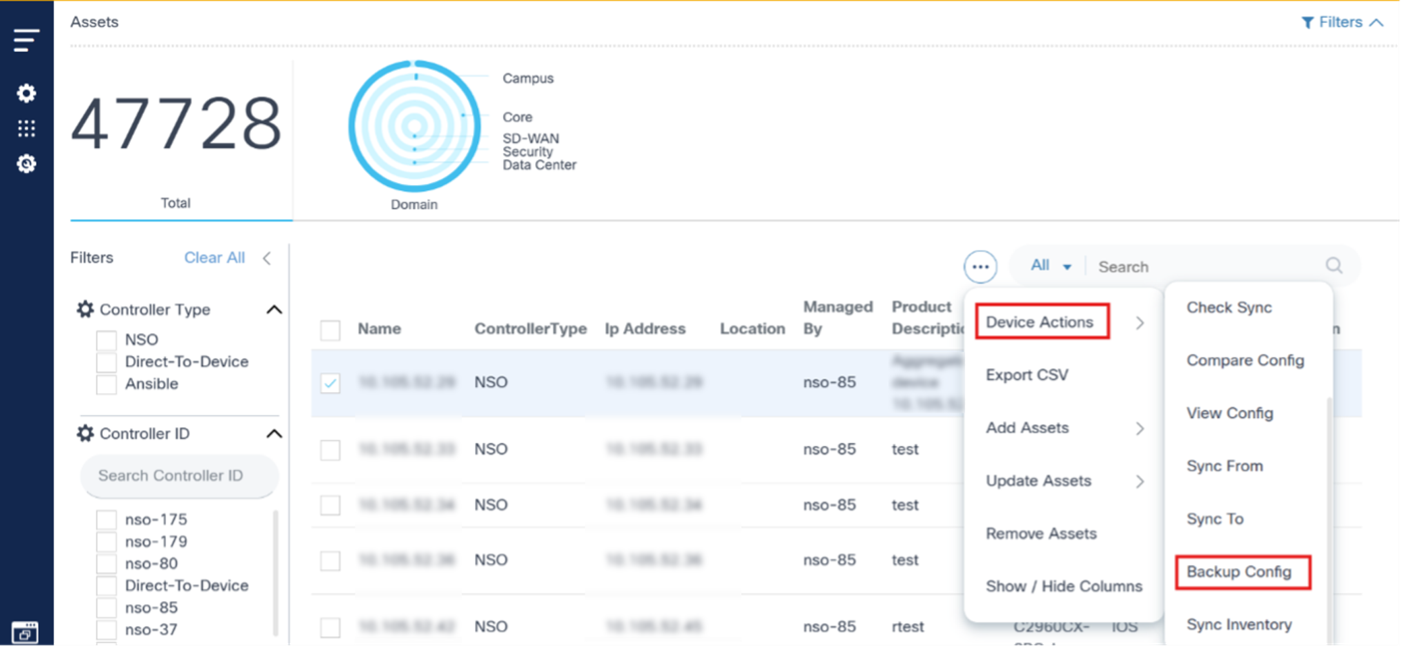
- Select one or more devices and select the More Options icon > Backup Config. The Backup Configuration window opens with all the selected devices listed.
- Select the policy, assign a custom label to the backup process, and take the backups of selected devices. Multiple devices can be selected at once.
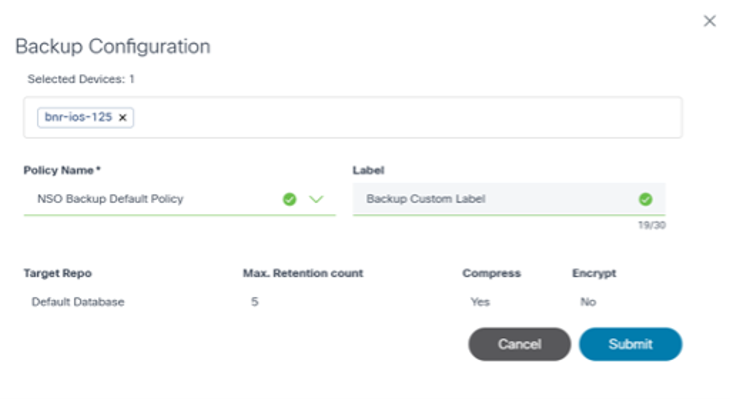
- Click Submit. The backup process through the Asset Manager application can now be initiated.
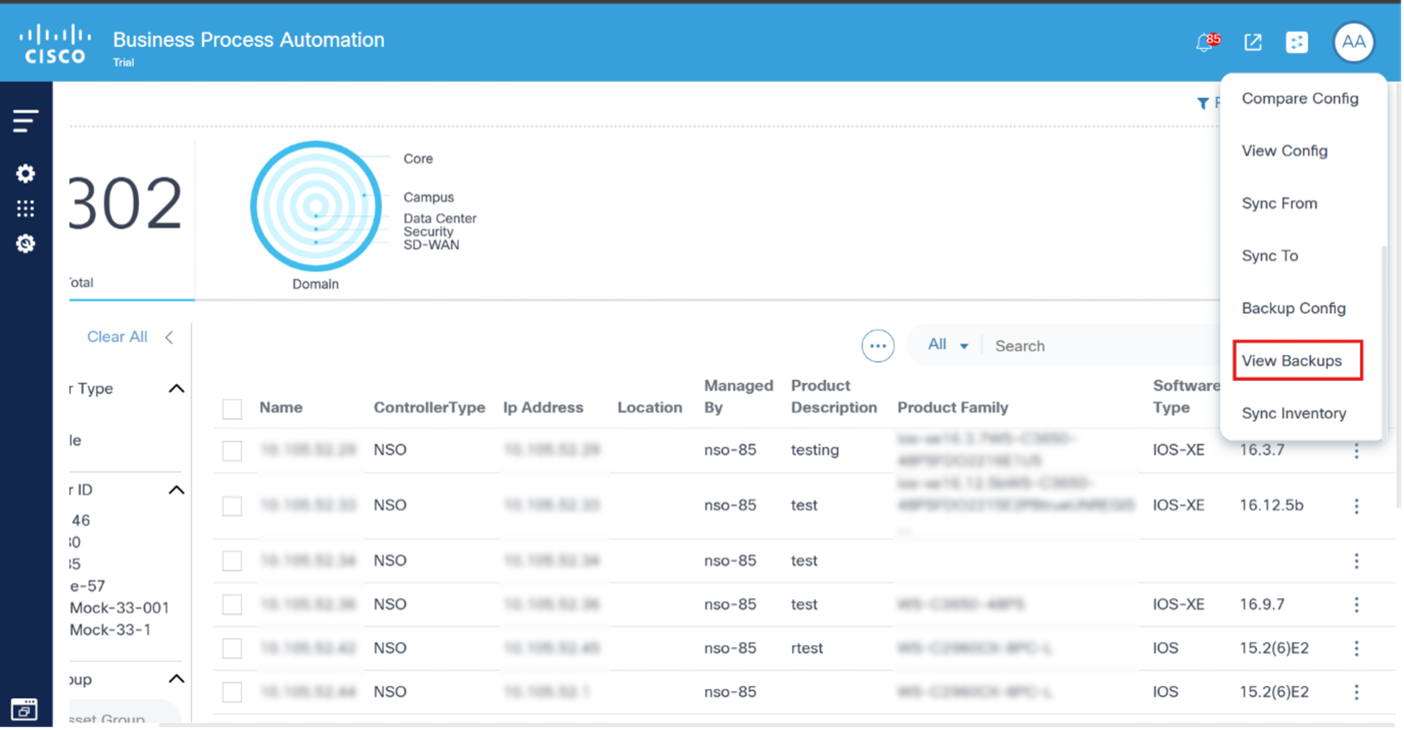
View Backups
The view backups device action displays the history of the backups taken. Select the More Options icon > View Backups to view the backup history of a selected device. A details panel opens under the Backups tab that displays available backup histories.
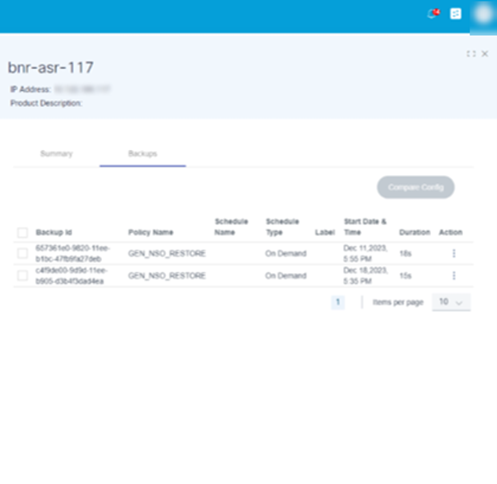
In the Backups tab, available backup histories display their respective details. Users can perform the following actions in each backup history:
| Backup History Actions | Description |
|---|---|
| View Backup Config | View the backup config available at the selected backup date |
| Compare with Current Config | Compare the backup config with the running or device current config |
View Backup Config
Under this section, users can view the backup config on a selected date.
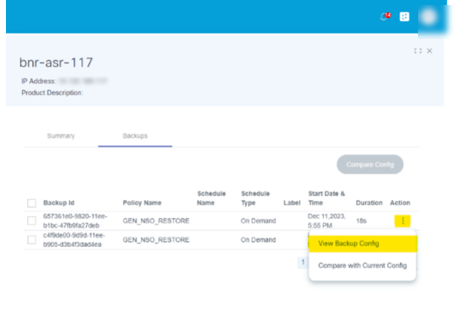
To access it, select the More Options icon > View Backup Config. A window opens where the user can see the backup configuration.
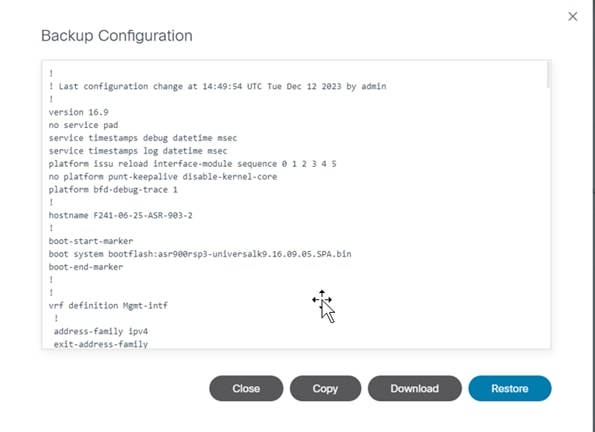
The following options are available in the Backup Configuration window:
| Backup Configuration Actions | Description |
|---|---|
| Copy | Copy the backup configuration to the clipboard. |
| Download | Download the backup configuration in text format |
| Restore | Initiates restore backup configuration action |
Compare with Current Config
Under this section, compare the backup config with device’s current running configuration.
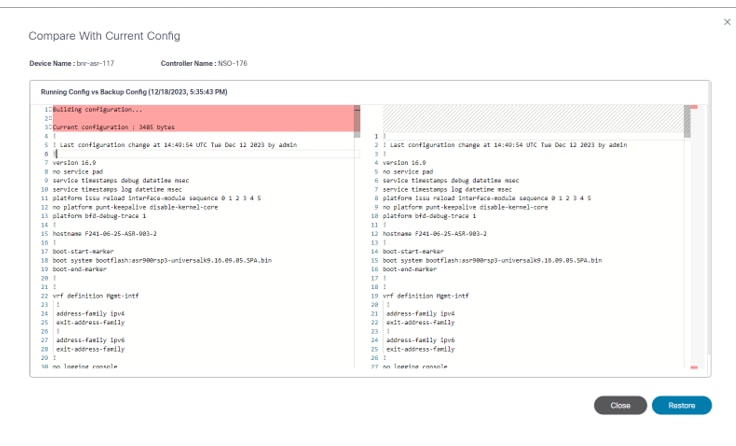
The Compare with Current Config window has the following options:
| Compare with Current Config Actions | Description |
|---|---|
| Restore | Initiates restore backup configuration action. |
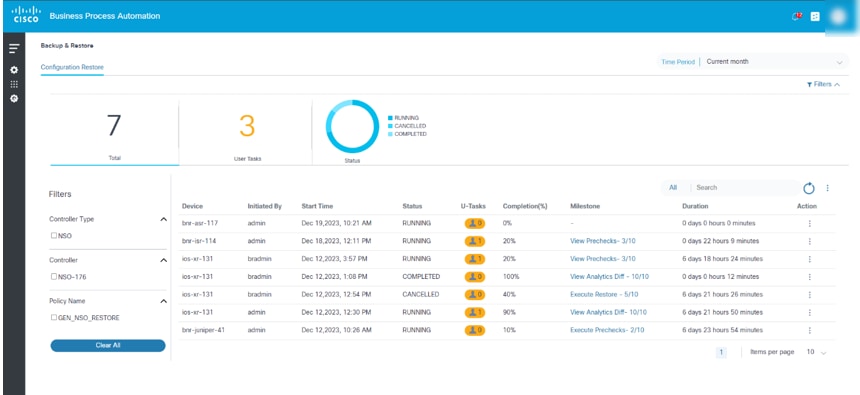
Restore Backup Device Configuration
Initiate the restore backup configuration process by clicking Restore. The assigned restore workflow (mentioned in Backup Restore Policy) starts the restore process and the user is redirected to the Configuration Restore page.

Other Operations
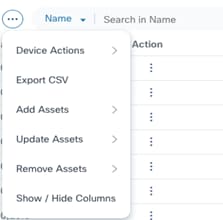
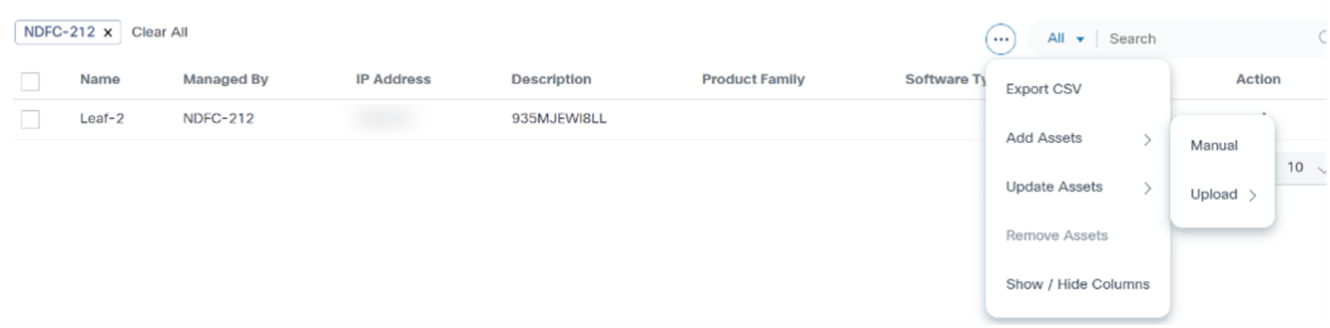
BPA provides additional asset management operations from the More Options icon including export asset list, add, update, or remove assets, and asset list column customization.
Export CSV
The Export CSV option exports assets in Comma Separated Value (CSV) format. By default, the operation exports assets in the current page.
To export all assets, click the Select All check box and perform the export operation.
Add Assets Completed
The Add Assets operation adds assets to a domain controller.
- Select the More Options icon in the bottom section of Asset Manager.
- Select Add Assets to open the following
options:
- Manual Option
- Upload Option
Manual Option
The Manual option allows users to add a device by entering device data manually.
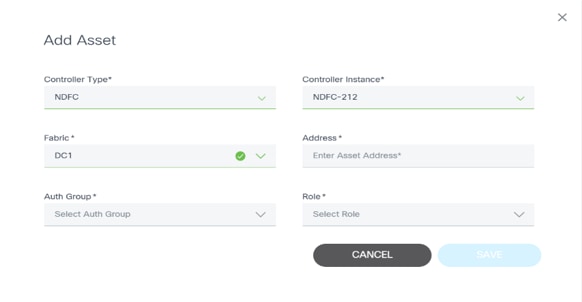
- From the sub-menu, click Manual. The Add Asset page opens where users choose the controller to which the device will be added.

- Select the type of the controller (e.g., NSO) and an instance of that controller type from the drop-down lists. Once a Controller Instance is selected, another window opens where users enter device details.
- Enter required data and click Save to add the device.
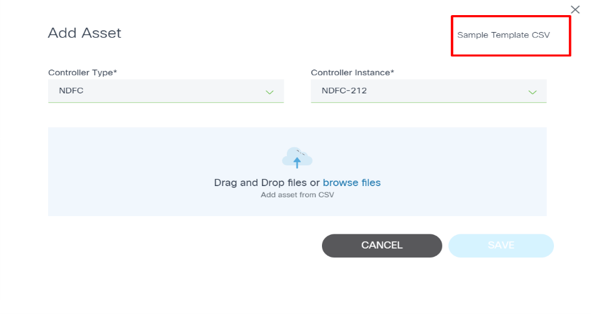
Upload Option
The Upload option allows users to add one or more devices by uploading a file. Currently, only the CSV file format is supported.
- Select the More Options icon > Add Assets > Upload > CSV. A new Add Asset page displays where users can choose the controller the device is added to.
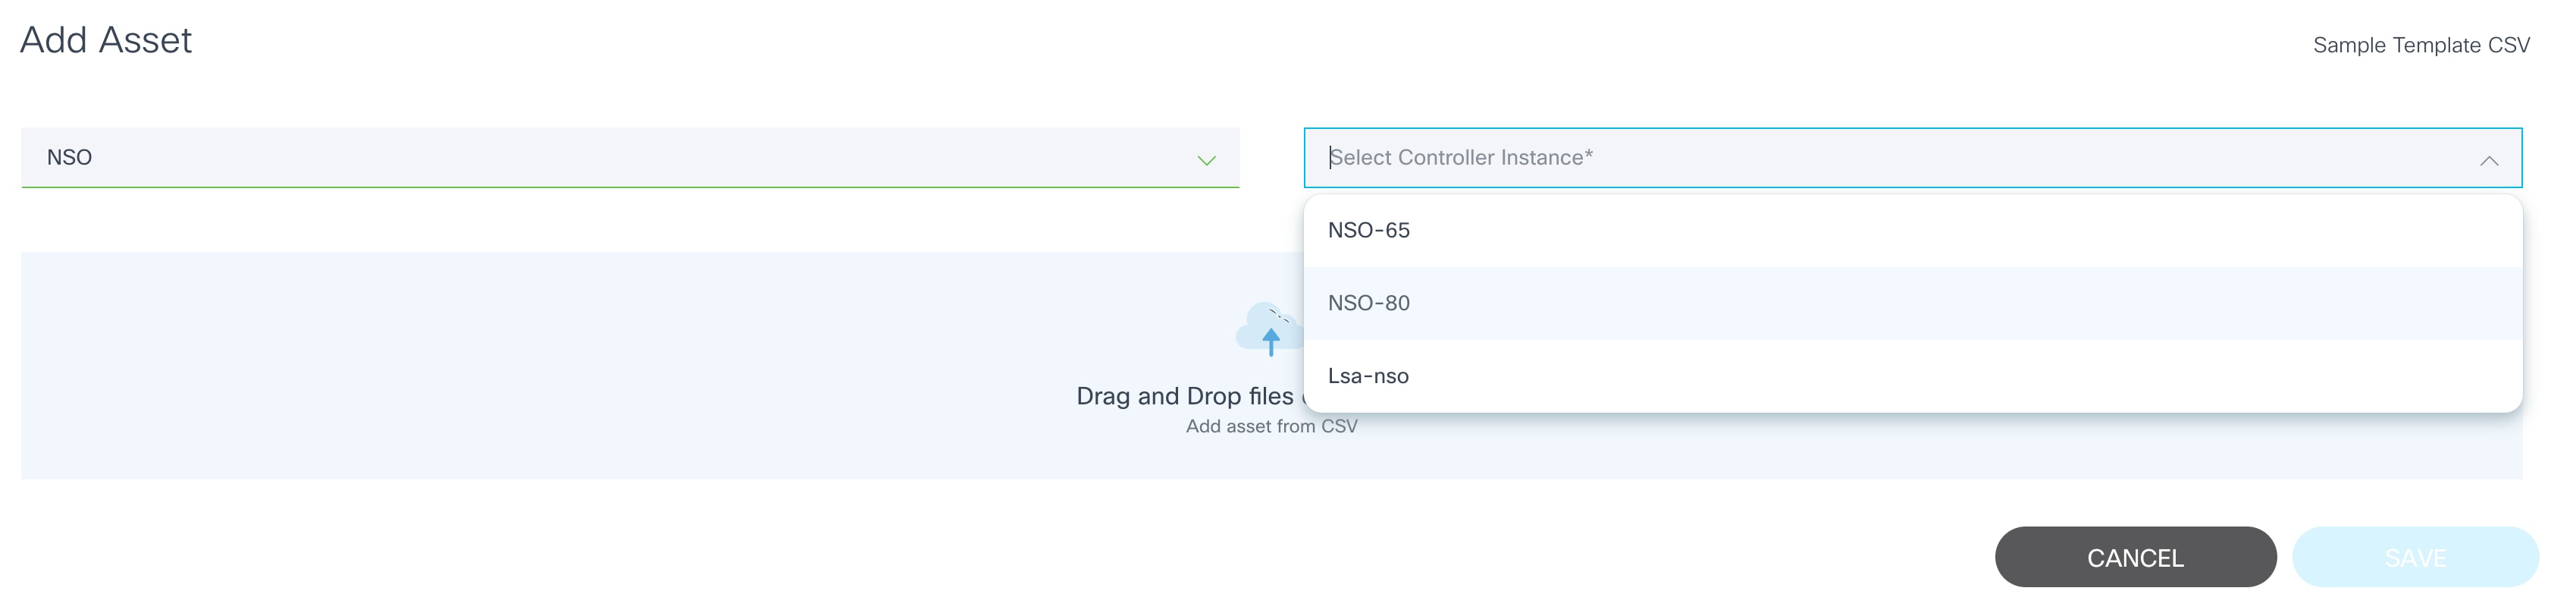
- Select the type of the controller (e.g., NSO) and an instance of that controller type.
- Drag-and-drop the CSV file.
- Click Save to add devices from the CSV file to the controller.
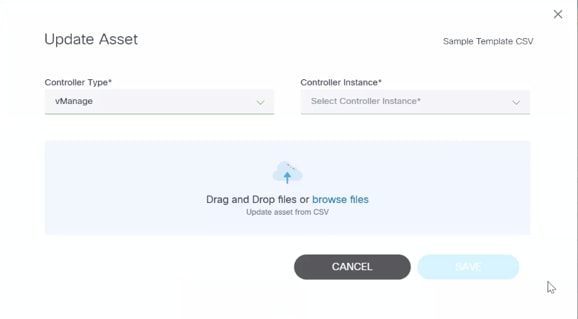
Update Assets
This operation allows users to update asset information such as IP address, description, port number etc. Devices can be updated From Selection or From CSV.
From Selection
From Selection allows users to edit one or more selected devices.
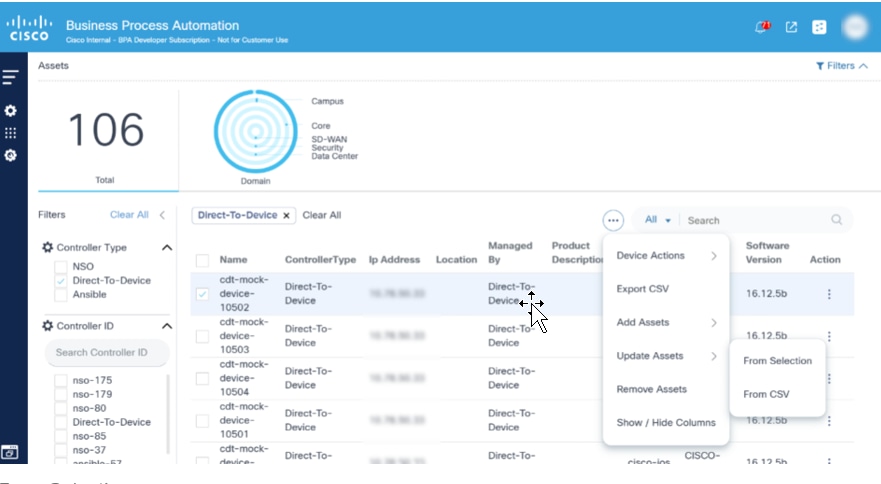
- From the asset list, select one or more devices to edit and select the More Options icon > Update Assets > From Selection. The Update Asset Information page displays with selected devices.

- Change device attributes as required and click Update to update device information in controller.
From CSV
This option allows users to update one or more devices by uploading a file.
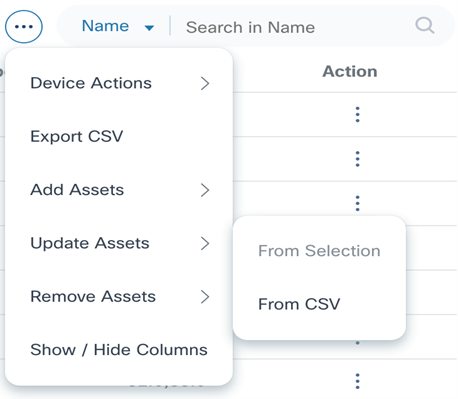
- Select the More Options icon > Update Assets > From CSV. The Update Asset Information page displays.

- Use the drag-and-drop function to upload the CSV file with a list of devices to be updated.
- Click Save to add devices from CSV file to the controller.
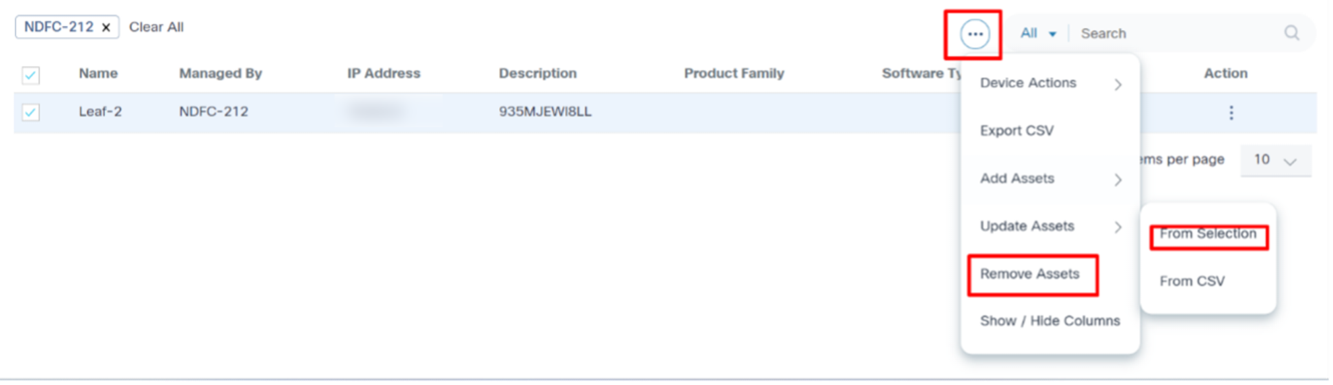
Remove Assets
This operation allows users to remove assets from the domain controller. Assets can be removed From Selection or From CSV.
From Selection
From Selection allows users to remove one or more selected devices from domain controller.

- From the asset list, select one or more devices to edit and select the More Options icon > Remove Assets > From Selection. The Remove Assets page displays with the selected devices.

- Click Remove to remove the assets.
From CSV
From CSV allows users to update one or more devices by uploading a file. Currently, only the CSV file format is supported.
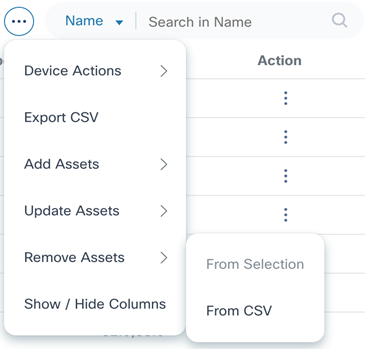
- Select the More Options icon > Remove Assets > From CSV. The Remove Assets page displays.

- Use the drag-and-drop function to upload the CSV file containing a list of devices to be deleted.
- Click Save to remove the devices from the controller.
Show/Hide Columns
The Asset List view can be changed to display additional fields. The Edit Column window opens.
- Select the More Options icon > Show/Hide Columns.
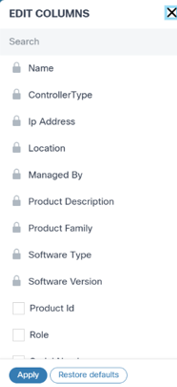
- Add or remove the desired columns by selecting or clearing the checkboxes.
- Click Apply.
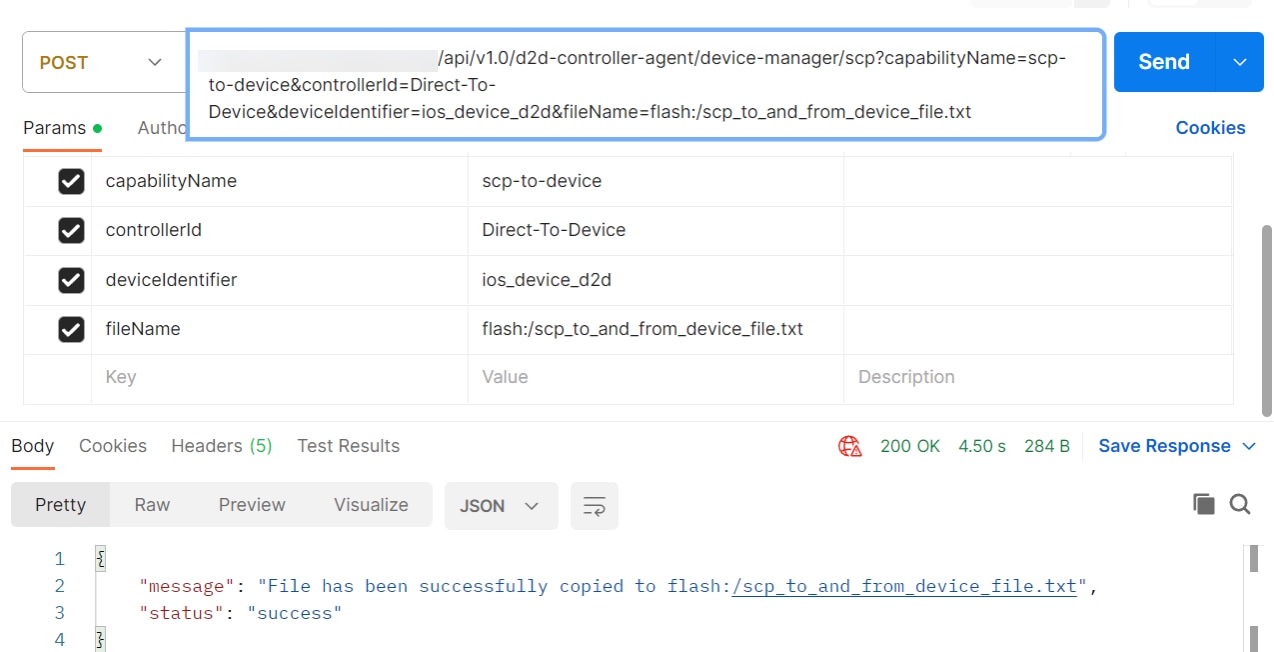
SCP-To-Device
Secure Copy Protocol (SCP)-to-device helps transfer data from a local user’s machine to a remote networking device via an API call. Currently, this feature is supported for cisco-ios, cisco-iosxr, cisco-asa, NX-OS, arista-eos, and juniper-junos device os-type.
To perform SCP-to-device:
- Create a new request in the Postman application and select POST as the Request Type. Alternatively, the same API call can be created from the use case workflow or a custom microservice.
- Enter the URL for SCP-to-device as noted below and update the BPA
server IP address and file name based on the device type.
Sample directory name and file name based on device types:
- Cisco-ios: flash:/sample_file.txt
- Cisco-iosxr: flash:/sample_file.txt
- Cisco-asa: bootflash:/sample_file.txt
- Arista-eos: /mnt/flash/sample_file.txt
- Juniper-junos: /var/tmp/sample_file.txt
- Select raw > text and enter the required contents of the file into the body section in text format.
- Click Send and wait for the response to display in the response area of Postman with status code 200.
| Request Type | Post |
|---|---|
| URL | https://d2d-agent-service:5010/api/v1.0/d2d-controller-agent/device-manager/scp?capabilityName=scp-to-device&controllerId=Direct-To-Device&deviceIdentifier=ios_device_d2d&fileName=<file_name> |
| Sample Body | File content to be copied to device |
| Sample Response | { “message”: “File has been successfully copied to flash:/scp_to_and_from_device_file.txt”, “status”: “success” } |
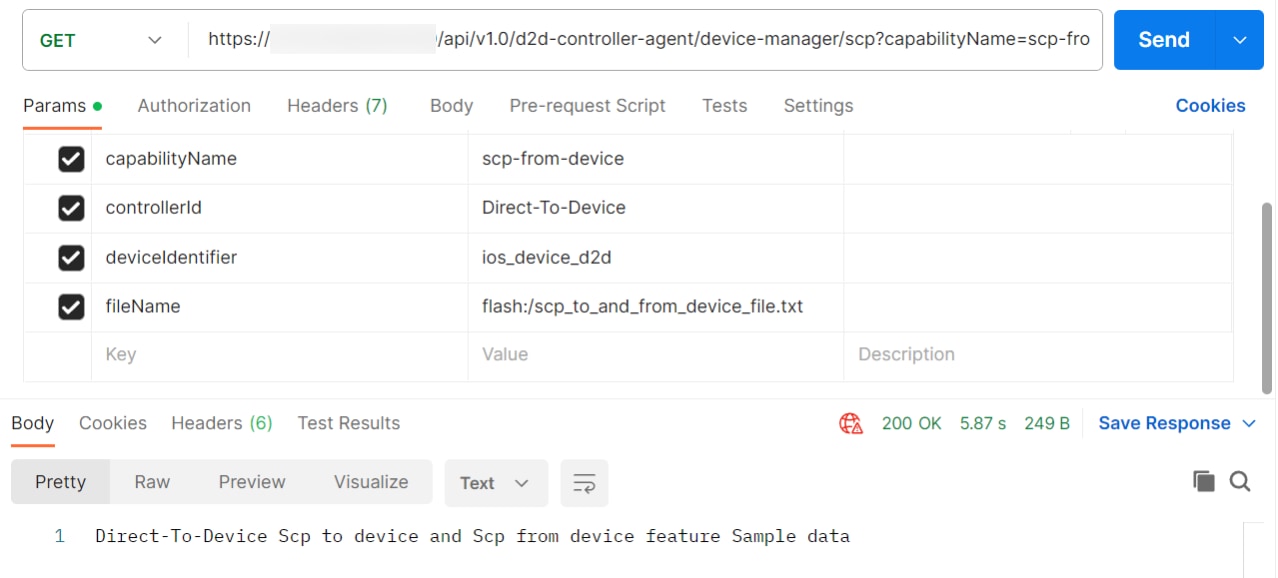
SCP-From-Device
SCP-from-device helps to transfer data from a remote networking device to a user’s local machine via API call. This feature is currently supported for cisco-ios, cisco-iosxr, cisco-asa, arista-eos, and juniper-junos device os-type.
To perform SCP-from-device:
- Create a new request in Postman and select GET as the Request Type. Alternatively, the same API call is created from the Use Case workflow or a custom microservice.
- Enter the URL for the SCP-From-Device as mentioned below and
update the BPA server IP address and file name based on the device
type.
Sample directory name and file name based on device types:
- Cisco-ios: flash:/sample_file.txt
- Cisco-iosxr: flash:/sample_file.txt
- Cisco-asa: flash:/sample_file.txt
- Arista-eos: /mnt/flash:/sample_file.txt
- Juniper-junos: /bin/flash:/sample_file.txt
- Click Send and wait for the response to display in the response area of Postman with the status code 200.
| REQUEST TYPE | GET |
|---|---|
| URL | https://d2d-agent-service:5010/api/v1.0/d2d-controller-agent/device-manager/scp?capabilityName=scp-from-device&controllerId=Direct-To-Device&deviceIdentifier=ios_device_d2d&fileName=flash:/ |
| SAMPLE RESPONSE | File content to be copied from device |
Managing NDFC Devices
This section provides information about managing Cisco NDFC devices.
Adding an Asset
To add an asset:
- Click the More Options icon > Add Assets > Manual from the Action column of the desired asset.
- Enter details in the Add Asset window and click Save.
Deleting Assets
- On the Assets page, select the asset(s) to be deleted and select the More Options icon > Remove Assets > From Selection. The Remove Assets for NDFC window opens.
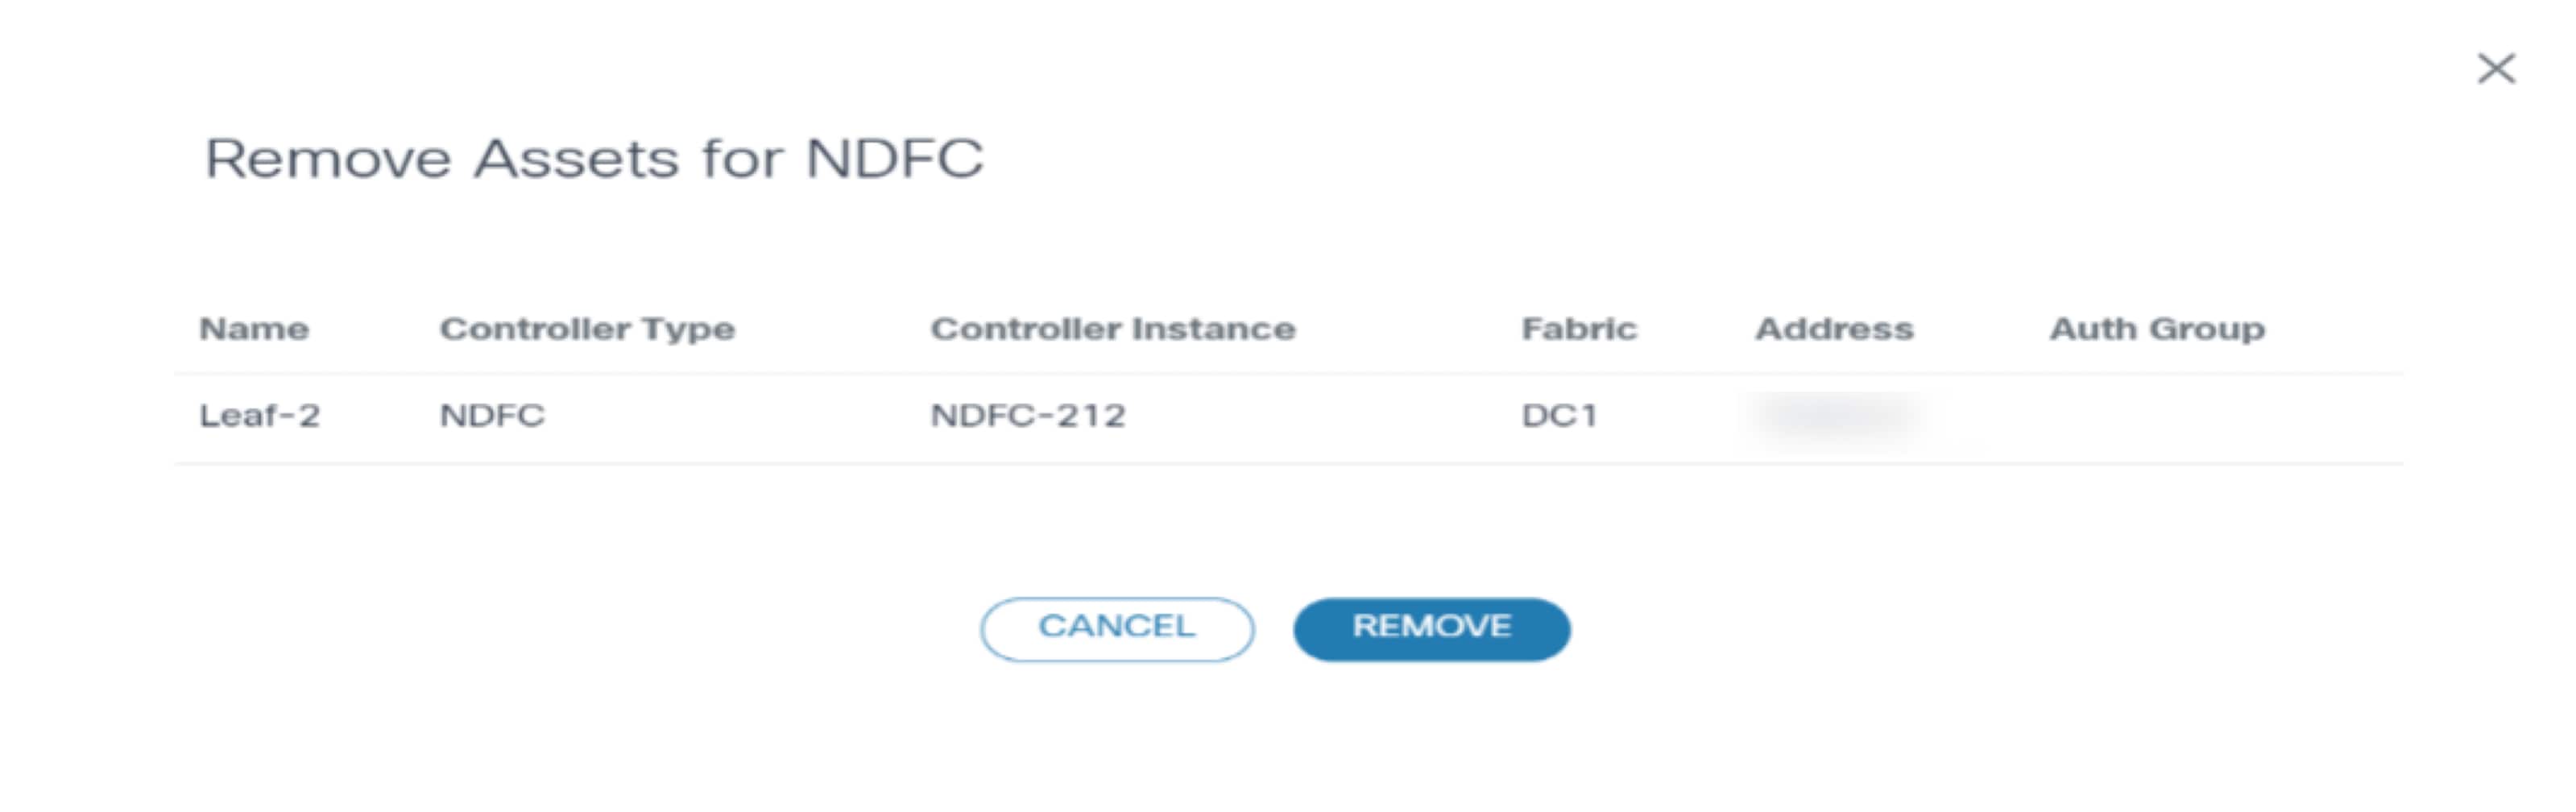
- Click Remove.
Uploading in Bulk
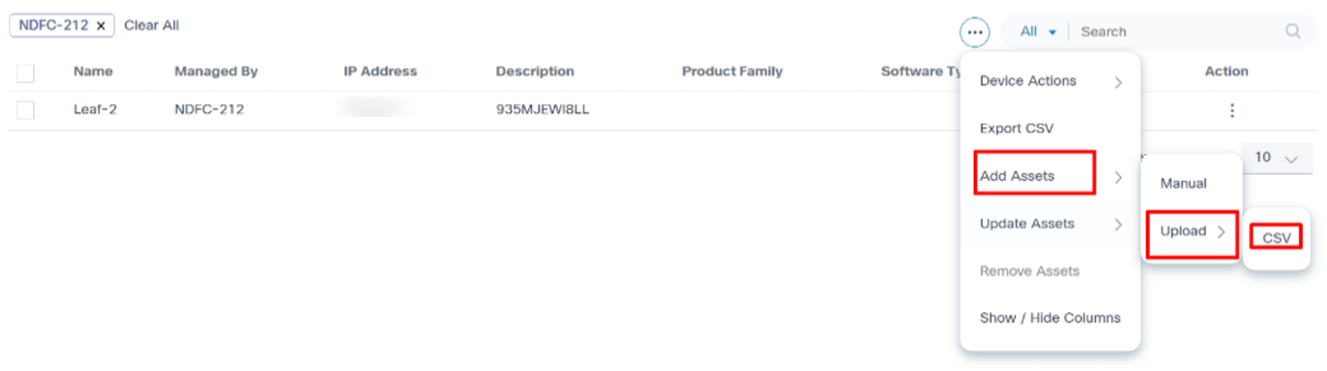
- On the Assets page, select the More Options > Add Assets > Upload > CSV. The Add Asset window opens.
- Select the Controller Type and Controller Instance.
- Use the drag-and-drop function to add an asset from a CSV file.
- Click Save.
Managing vManage Devices
Managing vManage devices involves organizing the devices into logical groups through a bulk upload process. During this process, tags are created on the vManage controller, which effectively categorizes the devices. The tags are then synchronized with the BPA system, where they are converted into asset groups. This method allows for more efficient management and operation of specific device groups, enhancing automation and improving operational efficiency. By ensuring seamless synchronization between vManage and BPA, the system facilitates streamlined workflows and better device management practices.
To complete the bulk upload process:
- Prepare device data by compiling a list of devices to upload, ensuring all necessary information (e.g., device names, IP addresses, and any other required attributes) is included in a structured format, such as a .CSV file.
- Log in to the vManage controller interface to access VManage Controller.
- Navigate to the Bulk Upload Section.
- Upload the device file by selecting the upload option and choosing the prepared .CSV file.
- Assign tags to each device for grouping during the upload process.
- Confirm the details and initiate the bulk upload process to create entries for each device on the vManage controller.
- When the upload is complete, verify that all devices are correctly organized and tagged within the vManage system.
- Ensure that the vManage controller synchronizes the newly created tags with the BPA system, converting them into asset groups for further management.
- Access the BPA system to review the asset groups, ensuring all devices are properly categorized for management.
- Continuously monitor device groups, adjusting to tags or groupings as needed to maintain operational efficiency.
Devices in vManage are associated with tags and are automatically synchronized with the BPA system, where they are converted into asset groups. This allows each device to be logically grouped in BPA based on its assigned tags, enabling efficient management and RBAC.
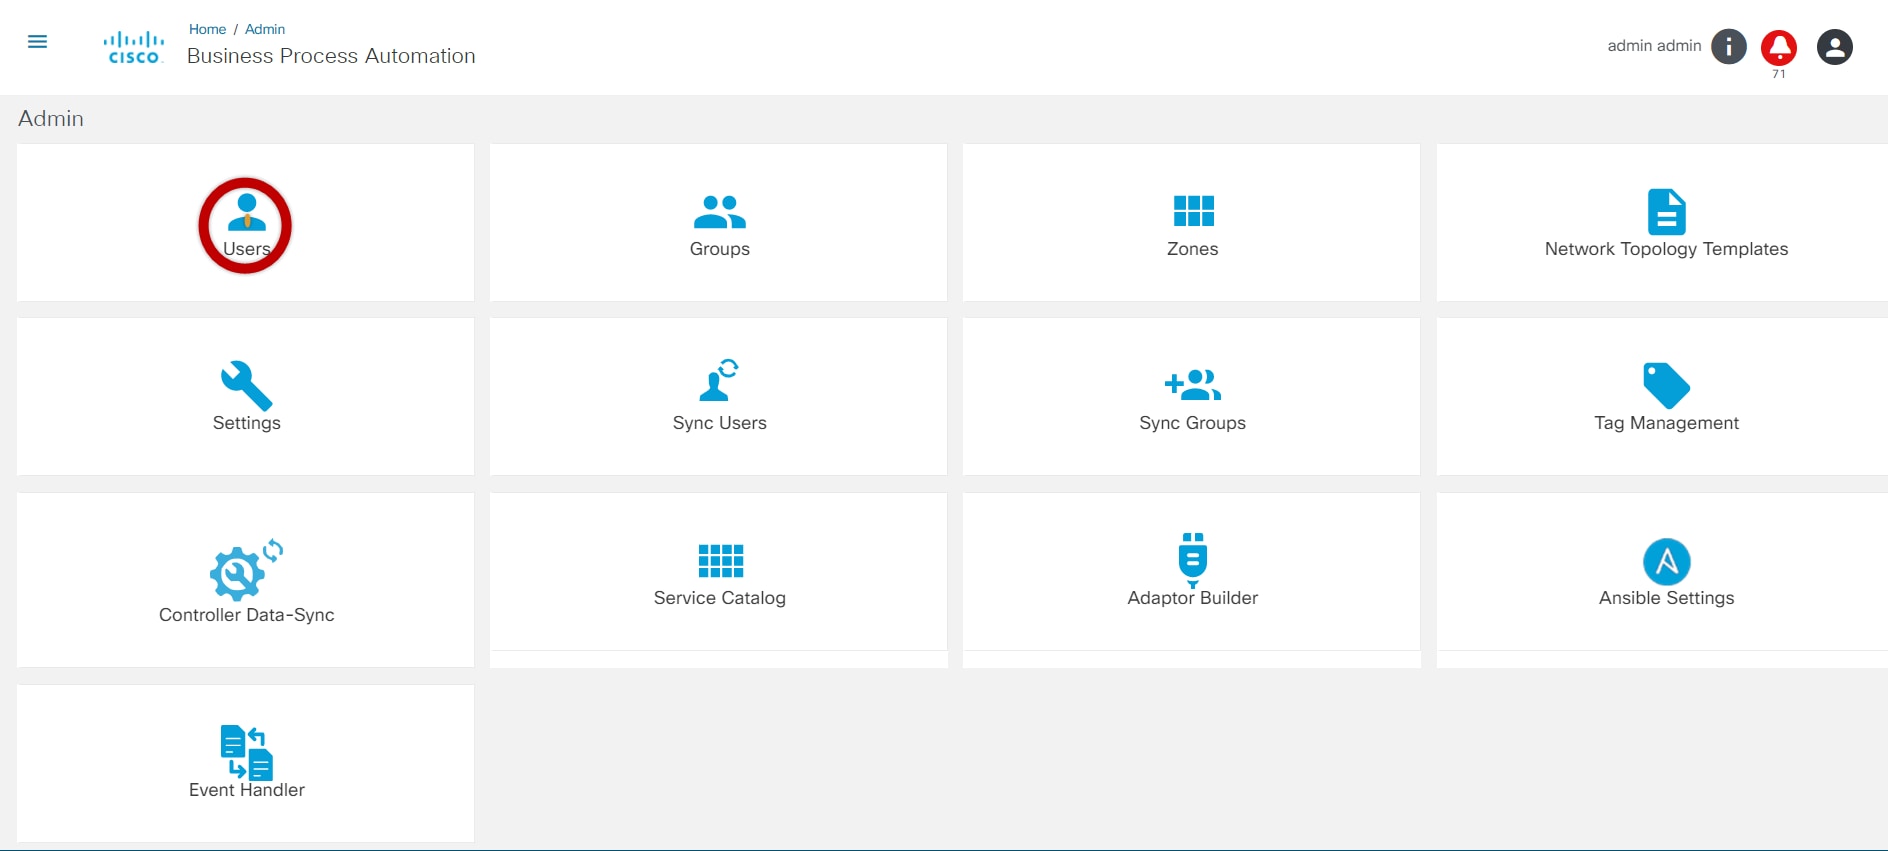
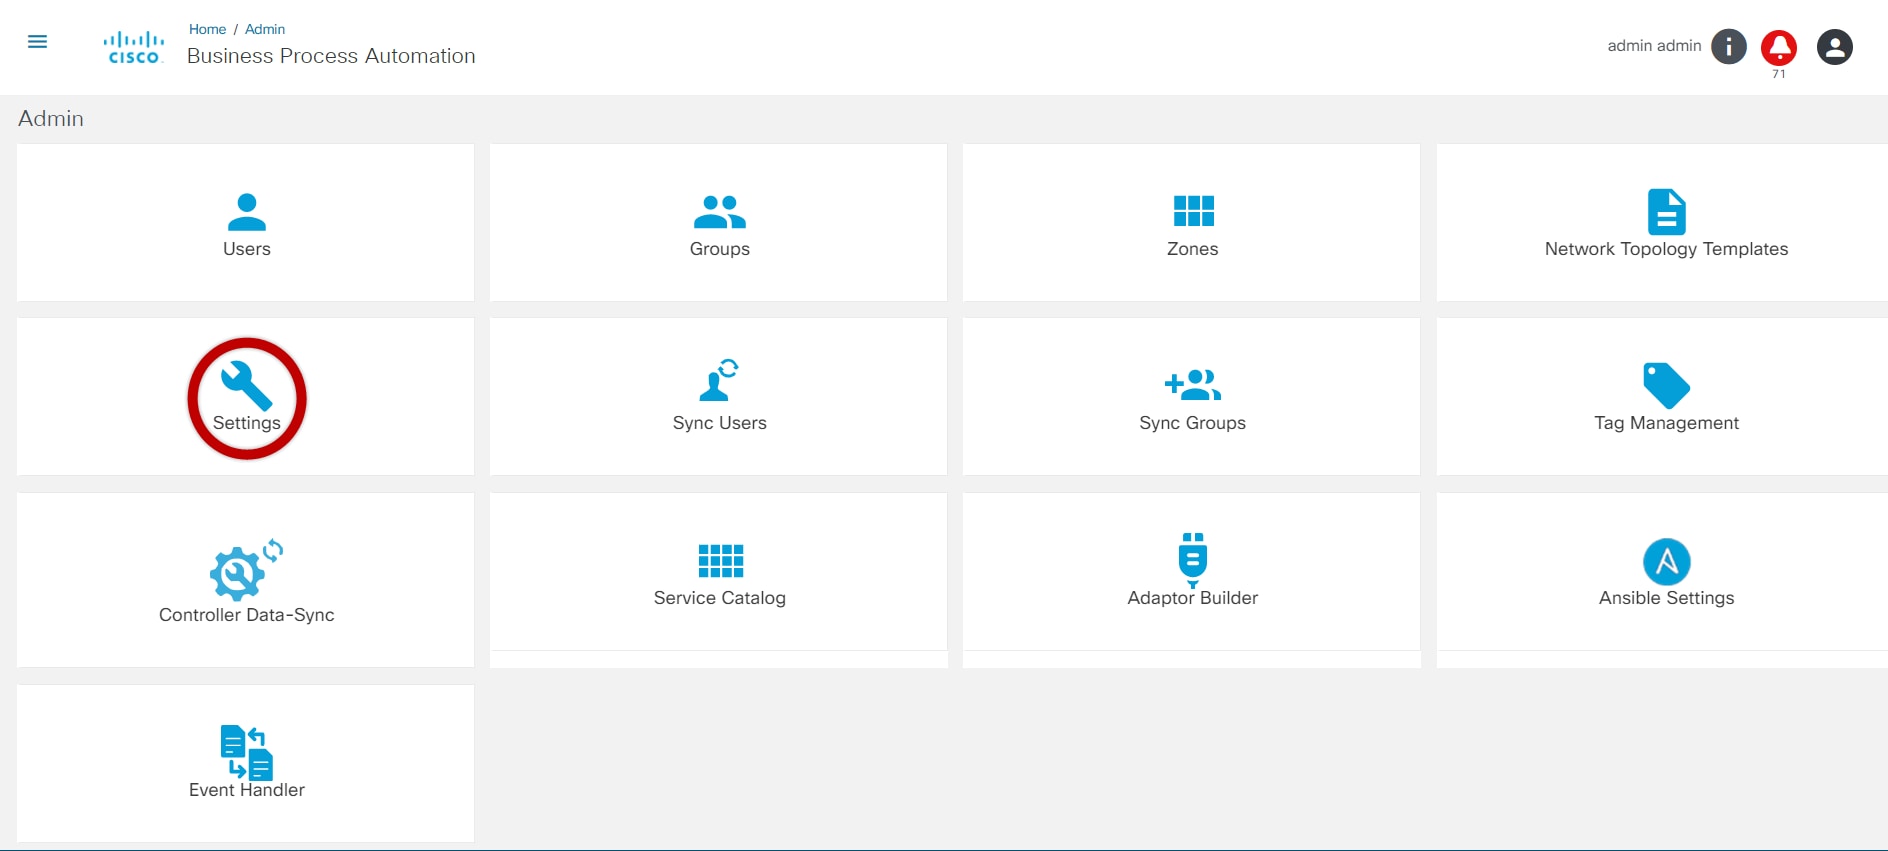
Admin Configuration

System Administrators can use the Admin menu to configure and manage BPA applications.
The Admin menu includes:
- Users: Create and manage users and assign them to user groups
- Groups: Manage user groups and group permissions
- Zones: Manage configuration domains in the BPA system
- Network Topology Templates: Manage process templates for creating network topologies
- Settings: Use settings to configure controllers (e.g., NSO), Simple Mail Transfer Protocol (SMTP), password settings, ticketing system, and to add custom settings
- Sync Users: Synchronize users from a LDAP server (enabled when LDAP integration is configured)
- Sync Groups: Synchronize user groups from a LDAP server (enabled when LDAP integration is configured)
- Tag Management: Manage tags used for tagging BPA artifacts
- Controller Data Sync: Synchronize service schemas, configuration templates, and other information from controllers
- Service Catalog: Manage service categories and onboard new services
- Adaptor Builder: Create and manage adapters for integration with external systems
- Ansible Settings: Sync services from a NSO server to the BPA system
- Event Handler: Configure rules for handling events sent to BPA
- Backup and Restore: Configure polices for backup and restore along with integration plugins and targets
- Scheduler: Manage job schedules
Refer to System Configuration for more details.
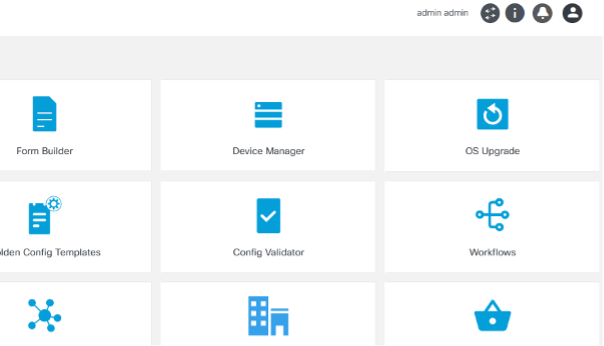
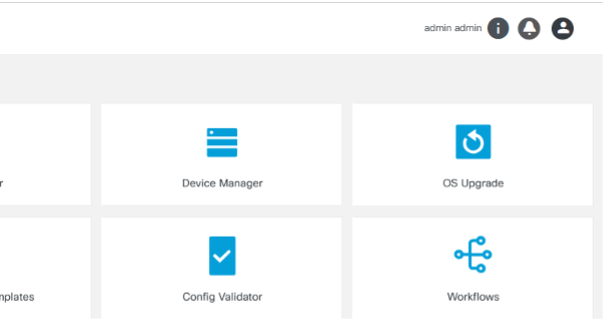
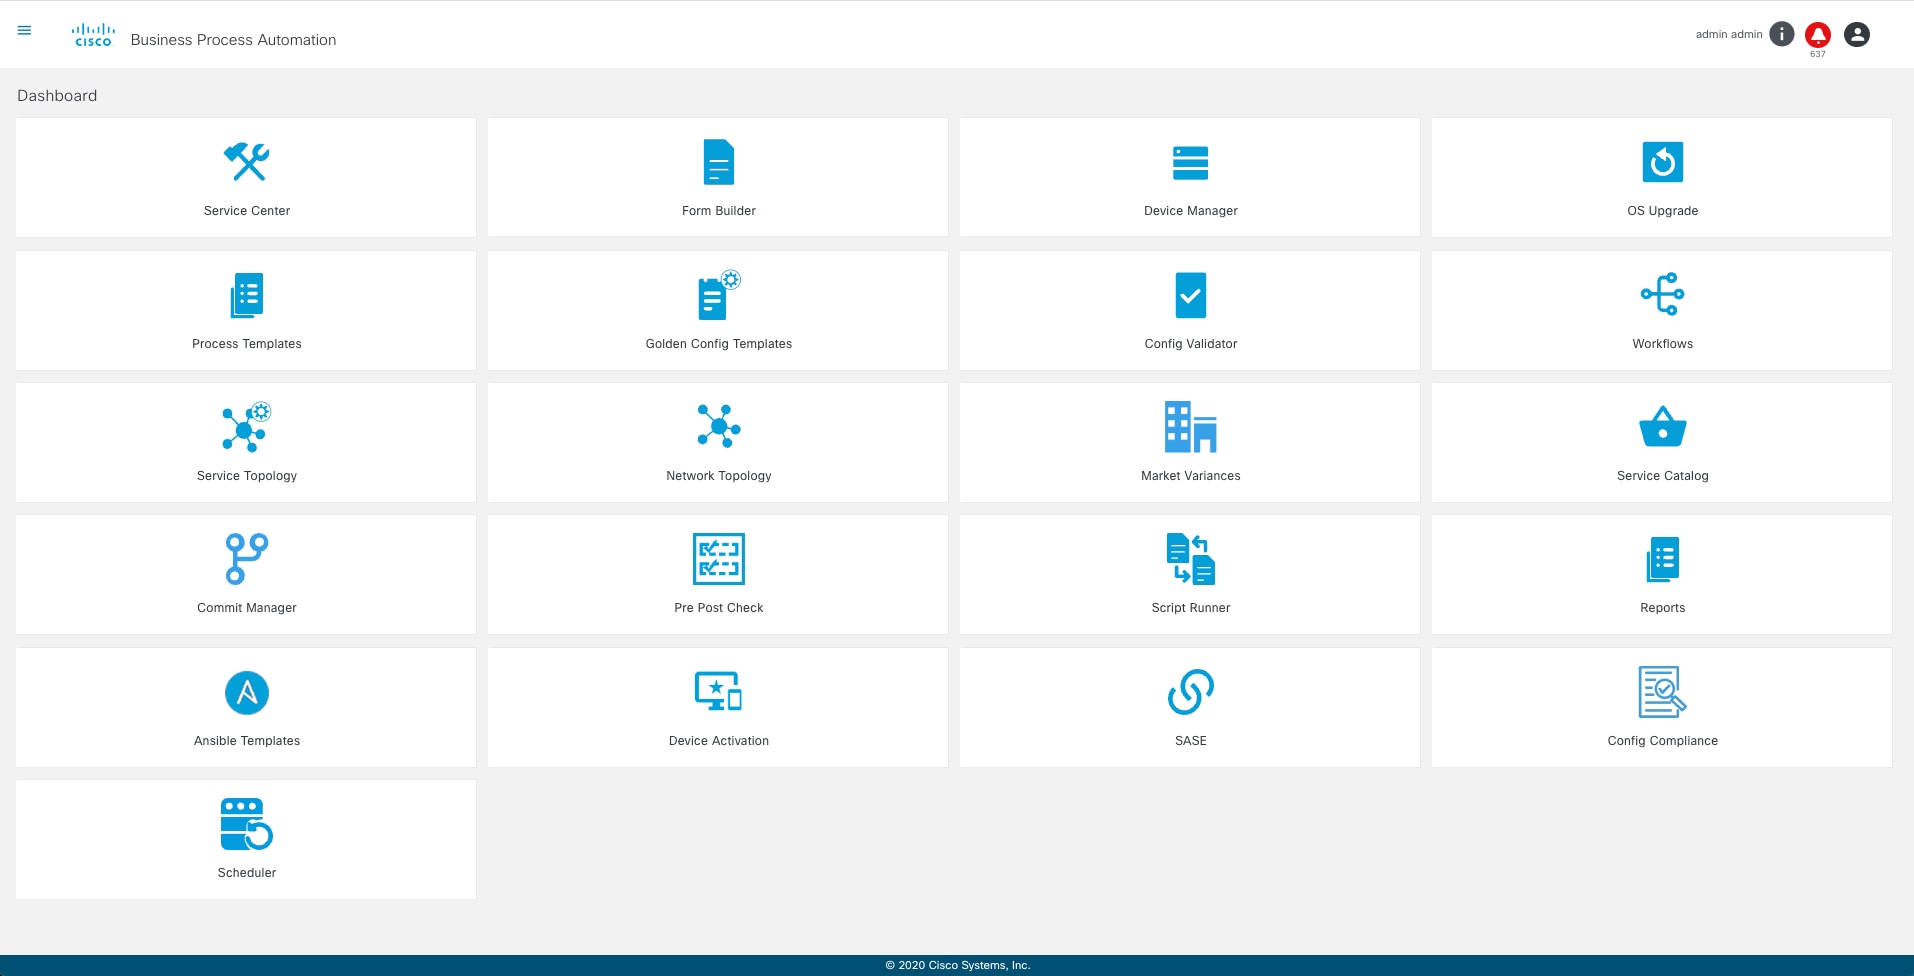
BPA Applications
BPA provides the applications listed below:
- Service Center
- Form Builder
- Device Manager
- OS Upgrade
- Process Templates
- GCT
- Config Validator
- Workflows
- Service Topology
- Network Topology
- Market Variance
- Device Activation
- Service Catalog
- Commit Manager
- Script Runner
- Ansible Templates
- OS Upgrade
- Configuration Compliance and Remediation
- Scheduler Service
Service Center
The Service Center application allows users to create and manage service instances. The parameters displayed on the screen while adding a service instance depends on the YANG model it is associated with. Users can create multiple instances for a service.
Refer to BPA User Guide Service Center Application for more details.
Form Builder
The Form Builder application allows users to design custom input forms or forms based on a service template’s YANG model. These forms can subsequently be used in a workflow to present a UI screen for user input or approvals.
Refer to Working with the Form Builder Application for more details.
Device Manager
The Device Manager application allows users to manage devices. Devices can be grouped into device groups, which allows for the easy management of the services for grouped devices. It also allows users to create and manage authorization groups which contain authentication information for accessing a device. Every device is associated with one authorization group. There can be multiple users associated with each authorization group so that users are provided access to devices associated with that authorization group.
Refer to Working with the Device Manager Application for more details.
OS Upgrade Classic
The OS Upgrade application displays the status of active, completed, and pending OS Upgrade workflow instances. It displays the upgrade result and provides statistics such as number of devices that are successfully upgraded. Users can check the number of devices that are set for upgrade for the workflow instance. If the upgrade is not completed, it indicates the associated step in the current workflow and the validation results of that step. Users can view the command output for every validation, pre- and post-checks executed for the upgrade.
Refer to Working with the OS Upgrade Application for more details.
Process Templates
The Process Template application allows users to manage templates, which consist of a set of commands to be executed against devices and associated validation rules to run against command execution results. The command result is evaluated against the rules to determine whether the result should be considered as pass or fail. For example, during OS upgrade, it is important to see the configuration state pre- and post-upgrade. It is also important to decide whether the prerequisites met the defined criteria for upgrade. Custom analysis can be performed using a script-based approach.
Users can use the templates in a workflow when provisioning a service to perform the tasks below:
- Configuration Validation
- Pre-checks (before provisioning a service)
- Post checks (after provisioning a service)
- OS Upgrade commands
Templates are also used to retrieve network and service topology data from devices.
Refer to BPA User Guide Process Template Application for more details.
Golden Config Templates
GCT are predefined configurations used to maintain consistent configuration on devices. The advantages are:
- Create, edit, and manage generic configuration templates that can be applied to one or more devices
- Parameterize templates to reuse them for devices in the same or different markets
- Ensures configuration consistency across devices
- Manage GCT versions
- Check compliance of devices against a GCT
Before building a template, consider planning network design and create templates based on that design. By using GCT, operational efficiency could be increased, configuration errors could be reduced, and compliance standards and best practices could be improved.
Refer to BPA User Guide Golden Configuration Template Application for more details.
Config Validator
The Config Validator application is used to validate a set of configuration commands against a Network Element Driver (NED). Users can input the configuration commands and the config validator indicates whether the set of configuration commands are valid. This ensures that the users always use valid configuration commands whenever required. Users can use the Config Validator to check the validity of the set of configuration commands in the following instances:
- A new NED is available
- A new version of an existing NED is available
- To ensure configuration commands that you are using are supported by specific version of NED
Refer to Working with the Config Validator Application for more details.
Workflows
A workflow allows users to automate business and technical processes that are enforced before or after making changes to infrastructure. Some examples are pre/post checks, approvals, integration with ticketing system or ITSM tools. A workflow typically includes a list of tasks (i.e., steps) to automate the process along with logical decisions (e.g., continue with operation or abort), timers for scheduling, manual tasks that require response from an end user and integration with other OSS/BSS systems.
BPA has embedded an open source, standards-based workflow engine. The workflow engine is fully integrated into BPA which allows for users to deploy and manage workflows directly from the BPA portal. Users can start a workflow, stop, or pause a workflow. The status of a workflow execution can be seen in BPA with a history of tasks executed. For troubleshooting, BPA also includes a debug view of workflows which allows operations to view execution status and inspect workflow state.
Refer to http://www.bpmn.org/ for more details on the file content structure.
Users can define workflow by using the BPA workflow editor or using an external BPMN v2.0 compliant modelling tool such as Camunda modeler. The workflow application allows the following actions:
- Overview of running instances, outstanding user tasks, and any open problems (i.e., incidents)
- View a list of tasks assigned to users/groups (i.e., user tasks)
- Edit workflows
- View workflow BPMN diagrams
- Start a workflow (i.e., workflow instance)
- View a running workflow
- Download the workflow instance in. bpmn format
- Upload Decision Model and Notation (DMN) rules
- View the DMN Product Requirements Document diagram and tables
- Drag and drop the existing process definition and DMN rules in workflow edit mode
- Creating a DMN
- Editing a DMN
- Evaluating a DMN
Refer to Working with the Workflows Application for more details.
Working with the Topology Application
The Topology application allows users to view topology details from two different perspectives.
Service Topology
The Service Topology application allows users to view the service instances and devices on which the services are deployed in a graph. The graph helps to visualize how services and associated devices are connected. Choose the service, its instances, and view devices associated with those service instances in the network. This gives users a quick overview of device details, their placement in the network, and configuration.
Network Topology
The Network Topology application allows users to view a graph representation of a network of devices. It allows users to filter devices based on name, device group, or device type. Users can view the configuration commands of each device in the topology map. Users can also preview the device details such as protocol, IP address, port, authorization group, NED ID, admin state, and device type. This provides an overview of devices in the network based on preference and helps in taking further action related to placing new devices or modifying the configuration of existing devices.
Refer to Working with Topologies for more details.
Market Variance
Market variances are predefined data sets that can be customized for a geographic region or markets and can be leveraged across the BPA platform (e.g., NTP server settings, logging server settings, etc.). The values can be stored specific to region, market, and device type. The parameterized values can be leveraged in the GCT, service provisioning, and workflows.
Refer to Working with Market Variances for more details.
Device Activation
The Device Activation application enables Zero Touch Provisioning (ZTP) for devices via Simple Network Management Protocol (SNMP) or DHCP notifications. Device details for ZTP (including serial number) can be onboarded via the Device Activation application. On a SNMP/ DHCP event, the device activation workflow is triggered to onboard the device. The application leverages capabilities of market/global variances, GCT templates, and pre-/post diff in device activation workflows.
Refer to BPA User Guide Device Activation for more details.
Service Catalog
The Service Catalog application provides a unified view to onboard services, order services, and review service statuses. This application allows a user to categorize, tag, search, and favorite services. Order progress can be viewed as milestones. Admin users can manage service items, categories, and tags.
Refer to BPA User Guide Service Catalog) for more details.
Commit Manager
The Commit Manager application supports:
- Working with NSO commit queues
- Disabling or enabling global commit queues
- Viewing commit queue items NSO capabilities to lock, unlock, prune, delete, etc. commit queue items
- Rolling back a service to the previous one
Refer to Working with the Commit Manager for more details.
Script Runner
The Script Runner application is used to run Ansible or Python scripts. A unique key is used to make each script unique. Users can add, execute, view, edit, delete, and download scripts and check the status of executed scripts (e.g., running, pending, completed, or all) based on the from-to date.
Refer to Working with the Script Runner Application for more details.
Ansible Templates
The Ansible Template application uses an existing BPA Ansible controller to handle Ansible Tower. This application is like an existing application for the NSO controller (e.g., Service Catalog). Templates use the underlying playbooks to execute service tasks on Ansible Tower infrastructure using controller and Ansible Agent within BPA.
Configuration Compliance and Remediation
The Configuration Compliance and Remediation (CnR) application enables network operators to run device configuration compliance using user-defined policies. Policies contain configuration blocks which can either be manually created or auto generated by the system from selected device configurations. Users can create rules against blocks. Rules can have values fetched from the Reference Data Management (RefD) application. The compliance jobs can be scheduled or run on-demand. The application provides a dashboard to view violation summaries as well as device and block -level details.
The operators can remediate compliance violations using the remediation framework. This framework uses workflows, configuration templates (e.g., GCTs), and process templates. The remediation jobs can be scheduled or run on-demand.
Refer to BPA User Guide Configuration Compliance and Remediation for more details.
Scheduler
The Scheduler application is a common service that enables other use cases and delivery teams to schedule arbitrary tasks. The schedule can be one -time or recurring. The schedule triggers and notifies the end users through Kafka messages which are consumed by the receiving application.
Refer to the Working with the Scheduler section for more details.
OS Upgrade
The OS Upgrade framework is a cross-domain, cross-controller, comprehensive solution built on top of the BPA v4.0 platform for software upgrades. It supports multiple controllers, starting with support for Cisco Catalyst Center, vManage, and NSO in this release and expanding to include additional controllers in subsequent releases.
Refer to BPA User Guide OS Upgrade for more details.
CI/CD-CT
Continuous Integration, Continuous Delivery - Continuous Testing (CI/CD-CT) is a Minimum Viable Product solution which supports the creation and execution of use case pipelines with limited functionality.
Description and Key Capabilities
The BPA dashboard provides unified visibility for the following CI/CD-CT pipeline services:
| Service | Description |
|---|---|
| NFV | Supports end-to-end Virtual Network Function (VNF) orchestration
with relevant pre-check and post-check. NFV pipeline integrations
include: - GitHub for artifacts like .sol files and Day0 configurations - CXTM to execute pre- and post-check test cases - Security scan tools to run the vulnerability checks - JFrog Artifactory for uploading artifacts for review / use in different environments - NFV MANO stack to execute this pipeline and orchestrate the VNF instances |
| Golden Config Template (GCT) | Supports applying specific configurations to devices by using BPA
GCT applications. GCT pipeline integrations include: - GitHub for artifacts like configurations - CXTM to execute pre- and post-check test cases - Security scan tools to run the vulnerability checks - JFrog Artifactory to upload successfully executed artifacts for review or use it in different environments |
| External Jenkins Pipelines | External Jenkins Pipelines Allow users to integrate with externally running Jenkins pipelines and monitor and operate those pipelines from unified BPA dashboards. |
Key Benefits
- BPA provides a unified dashboard with all pipeline creations and executions.
- The CI/CD-CT pipeline allows users to create pipelines for Dev stage and is auto-promoted to pre-prod and production environments.
- Pipelines are integrated with GitHub bots. Pipeline execution is automatically triggered when the artifacts change in GitHub.
Supported Controllers and Platforms
| Domain | BPA | Controller |
|---|---|---|
| Generic | Release 4.0.2 | NSO |
Refer to BPA User Guide CI/CD-CT for more information.
Backup and Restore
Backup and Restore Framework is a cross-domain, cross-controller, comprehensive solution built on top of the BPA v4.0 platform to backup and restore device configuration from or to devices. The framework implements an agent capability-based approach to fetch configuration from devices. The restore feature is implemented using workflows for easy customization. The framework supports storage of device configuration in an external system using a plugin approach.
Refer to BPA User Guide Backup and Restore for more details.
Reference Data Management
RefD is an application that manages the local and external data in BPA which is leveraged by other BPA use-case applications for dynamic fetching of variables data.
Description and Key Capabilities
RefD provides a unified dashboard to manage the hierarchical data nodes. Key capabilities include:
- An interface to either create variable data hierarchy nodes, populate the local variables data, or attach an external source to fetch the variables data periodically
- A robust query API to fetch key-value pairs across all node hierarchies or targeted nodes
- RefD APIs can be used by applications and use cases to fetch and manage dynamic variables
- Acts as a proxy to fetch external variables from applications (e.g., IP Address Management (IPAM), GitHub, Gitlab, Simple Storage Service, NSO etc.) using the plug-in framework
- Supports access policies via resource groups for fine-grained access to nodes
- Supports various data types (e.g., JSON, CSV, YAML, properties, and BPA generic forms)
Key Benefits
- Manages any flat or hierarchical data for applications within or outside of BPA
- Extending a data refresh to any new external system is pluggable using plug-ins
- Unified dashboard allows user to manage all node CRUD and search operations easily
- Supports data masking and controlled access to the data using access policies and RBAC
Supported Controllers and Platforms
| Domain | BPA | Controller |
|---|---|---|
| Generic | Release 4.1.1 | NSO |
Refer to BPA User Guide Reference Data Management for more information.
BPA Classic User Interface Portal
This chapter details all the user interface operations that can be performed using the BPA Classic Portal application.
Basic Application Navigation
The image below illustrates the application as it typically displays when users access it. The Home page displays business applications based on permissions granted to the assigned user group(s). The Notification icon notifies users with alerts from the applications.
The following applications display on the Home page:
- Service Center
- Form Builder
- Device Manager
- OS Upgrade
- Process Templates
- GCT
- Config Validator
- Workflows
- Topology
- Market variances
- Device Activation
- Migration
- Service Catalog
- Commit Manager
- Script Runner
- Ansible Templates
- Config Compliance
- Scheduler
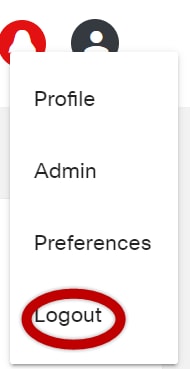
The User Profile icon includes the following options:
- Profile
- Admin (visible for admin users)
- Preferences
- Logout
Refer to Working with Business Applications section for more details.
Common Icon Description Table
The table below illustrates the common icons used in the application.
| Icon | Description |
|---|---|
 |
View the list of applications |
 |
Contains the following options: Profile, Admin, Preferences, and Logout |
 |
View the details about Business Process Automation such as the core-service and auth-service version details |
 |
View notifications |
 |
Perform the edit operation |
 |
Perform the delete operation |
 |
Refresh data |
 |
View and edit the settings |
 |
View the diagram |
 |
Pause an action |
 |
Stop an action |
 |
View output result |
 |
Download |
 |
View device details |
 |
Represents a service |
Notifications
Notifications are alerts presented to users when certain events occur in BPA. Alerts are shown for events such as:
- Netconf notifications for configured NSO (each NSO must be configured in conf/snmp-trap/config.json)
- Updated network topology
- Password expiration
- An application or workflow sends a message to users while performing operations requested by the user
- A task is assigned to a user
Select the Notification icon from the right corner of the page to view notifications.
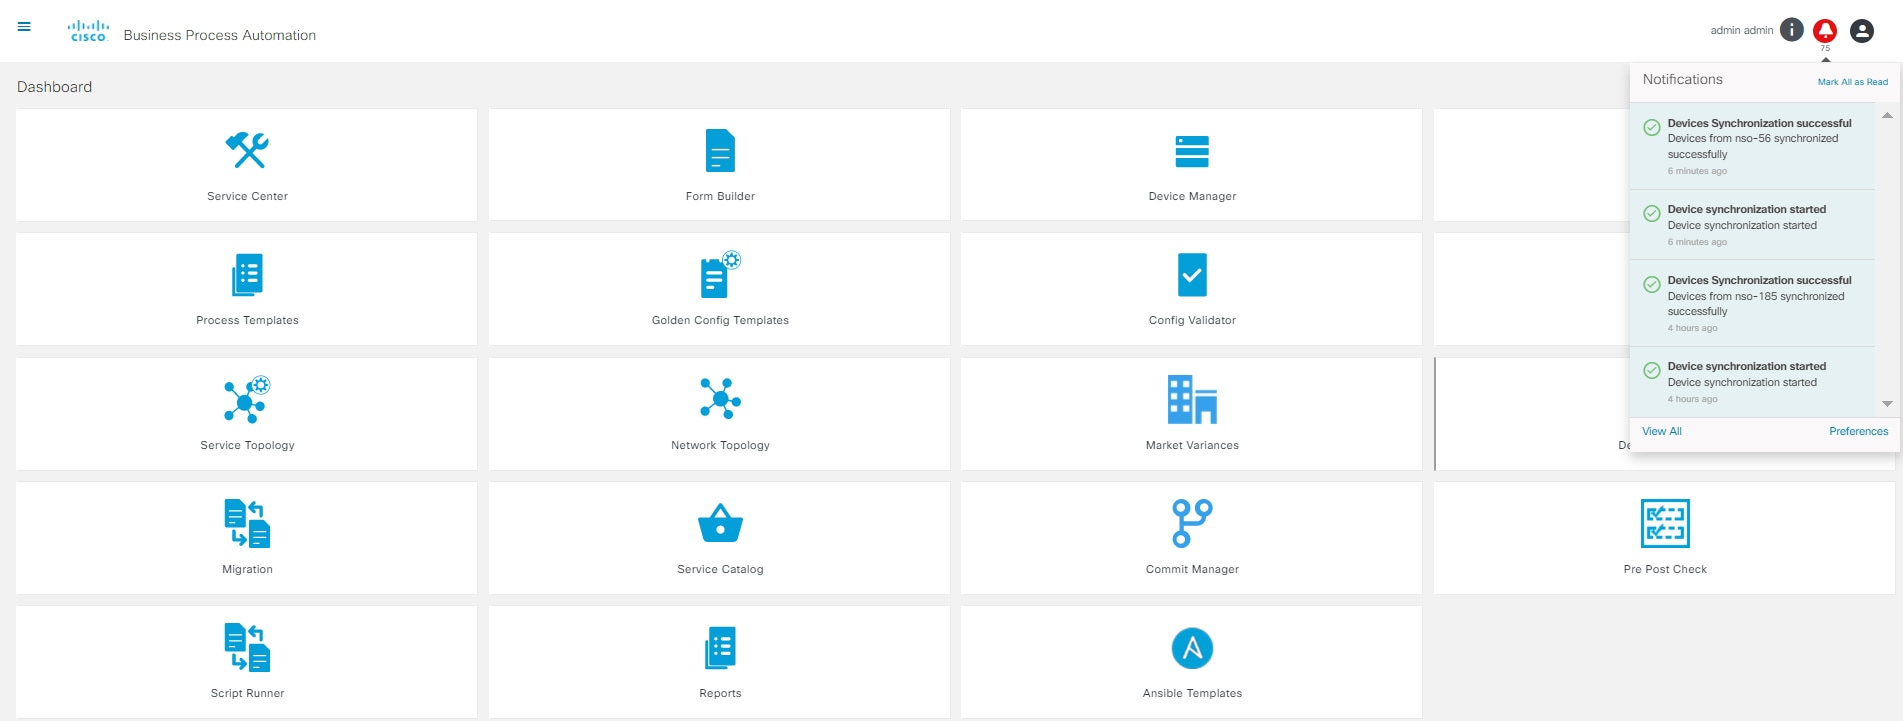
To view all notifications, select View All. Notifications can be filtered by severity.
Relevant user tasks in a workflow can be received as notifications when the notification preference workflow.usertask.notifications is enabled. This allows the user to claim and take actions on the user tasks directly from the notifications panel.
To set notification preferences, select Preferences.
Sorting and Search Operations
The various pages in the application provide sorting and search options in the user interface. Click the column header to sort the displayed list. The Search field is available in some pages such as Templates, Defined Workflows, etc., allowing users to filter specific data.
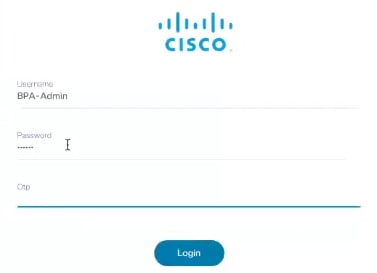
Logging In to the BPA Application
- Navigate to the application using any of the Supported Browsers.

- Enter a Username and Password and click Login. If the following Security Assertion Markup Language (SAML) window opens, then authentication is enabled.
Use the SAML server option for authentication if single-sign-on authentication is required.
- Click Login with <SSO Server> to navigate to the SAML server.
- Enter the Username and Password and click Log In. The BPA Home page displays. Contact a system Administrator to obtain login key details, if necessary.
If two-factor authentication is enabled, users must provide credentials and a One-Time Password (OTP) for login. Refer to the Enable OTP section of the BPA Installation Guide for more information.
- Use BPA credentials to enable and log in to TACACS. Refer to the Configuring TACACS section of the BPA Installation Guide for more information.
On successful login, the Home page displays.
Logging Out of the BPA Application
To prevent unauthorized access by other users, it is recommended that users log out of BPA upon each use. To log out, select the User Profile icon > Logout.
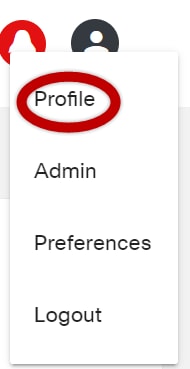
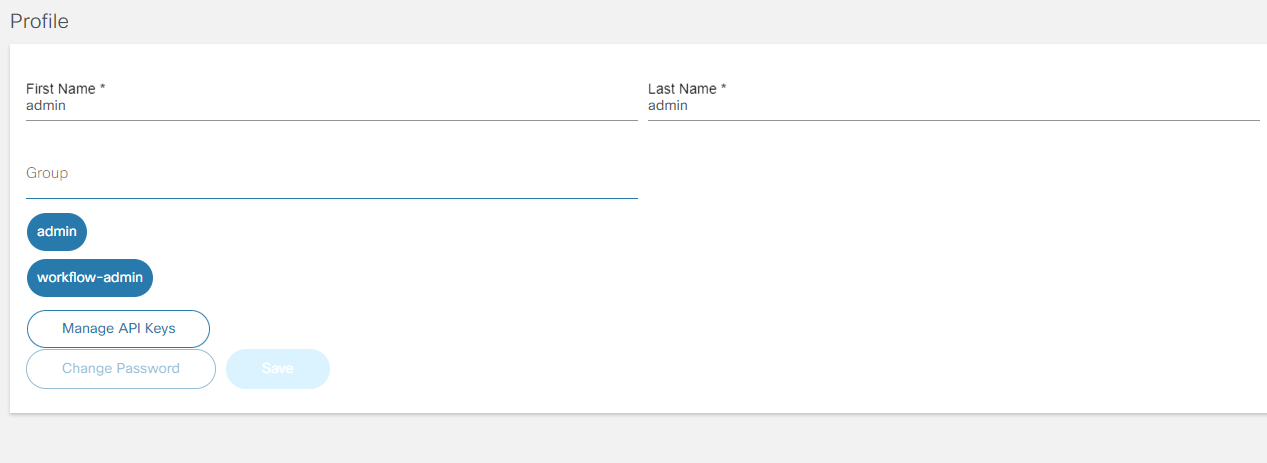
Viewing Profile Details
The Profile menu option allows users to view and update their information such as first name, last name, and email. It also lists all assigned groups and allows user to change their password.
To view the profile details, select the User Profile icon > Profile. The Profile page displays.
The preferences option displays when adding more than one NSO.
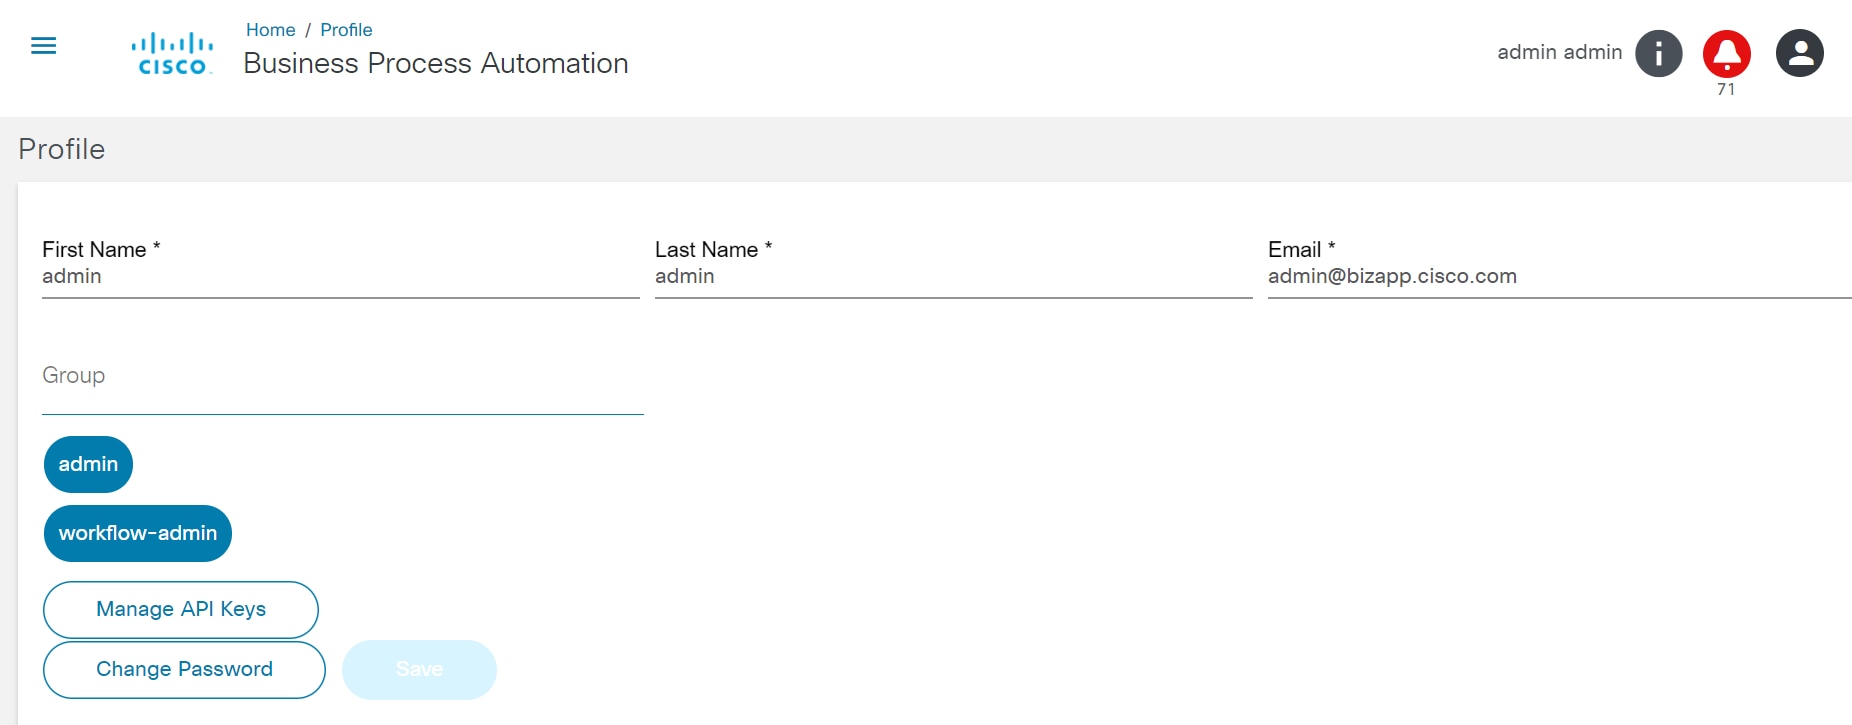
Editing Profile Details
To edit user credentials:
- Select the User Profile icon > Profile. The Profile page displays.
- Edit the details.
- Click Save.
To edit the password:
- Select the User Profile icon > Profile. The Profile page displays.
- Click Change Password.
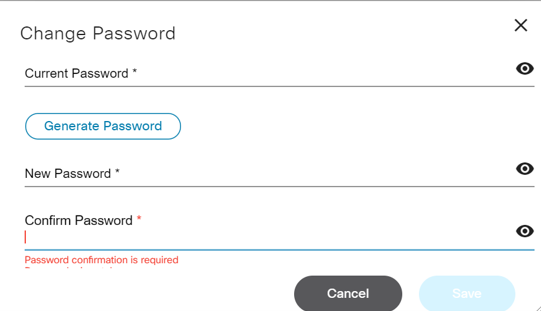
- Enter the current and new passwords, and then confirm the new password.
- Click Save.
It is recommended that users change their password periodically (i.e., every 90 days) or when they suspect that their account security might have been compromised. Password changes can only be initiated after successful login.
API Key Authentication
When Individual users or Administrators need to create new API Keys, they should perform the following steps:
- Select the User Profile icon >
Profile. The Profile page
displays.
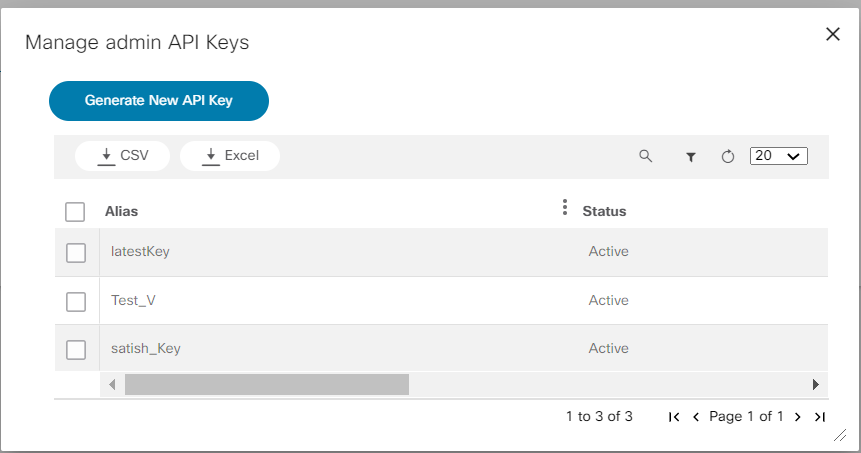
- Click Manage API Keys. The Manage admin
API Keys window opens.
- Click Generate New API Key and enter the Alias as per the login.
- Click Save to generate a one-time API key. The
API Key window opens.
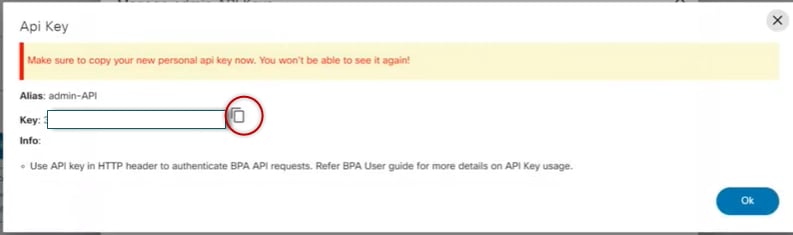
- Copy and save the API key by selecting the Copy icon to automatically copy the API key to clipboard. Once the key is generated it can be used anywhere inside the application.
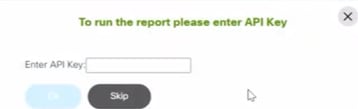
To generate reports from the Reports tab using the API key:
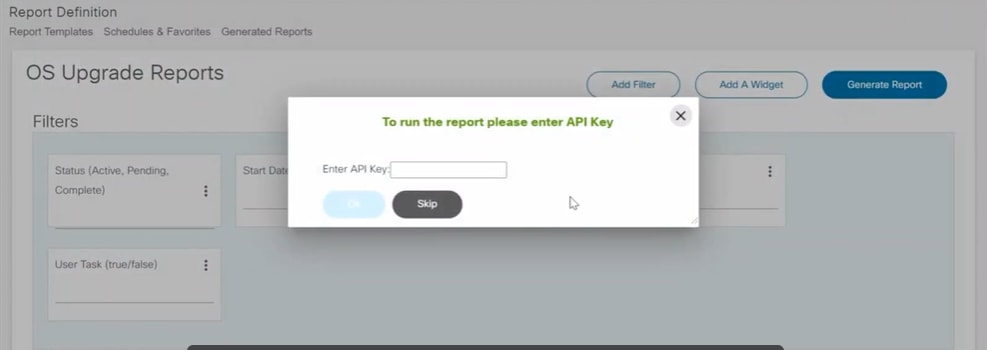
- Click Generate Report and enter the saved API
key. A different or incorrect API key does not work.
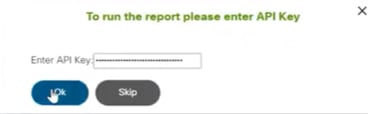
- Click OK after entering the API key for successful report generation.
System Configuration
To log in for the first time:
- Log in using the admin user credentials.
- Check and update the configuration settings. Refer to the Admin Settings section for more details.
- Sync all services from NSO to BPA by selecting the Sync Services Schema icon.
- Select the NSO to set as the default option upon logging in. Refer to Preferences for more details.
The BPA system configuration is done in two scenarios.
- Upon first BPA log in
- When updates are required because integration server details have changed and must be synced in BPA
Admin Settings
To view the admin options, select the User Profile icon > Admin. Manage the following components from this screen:
- Users
- Groups
- Zones
- Network Topology Templates
- Settings
- Tag Management
- Service Catalog
- Controller Data- Sync
- Sync Groups
- Sync User
- Adapter Builder
- Ansible Settings
- Event Handler
- Backup and Restore
Managing Users
The Users option allows users to add, edit, and delete users. To manage users:
- Select the User Profile icon > Admin. The Admin page displays.
- Select the Users tile to manage users.
Adding Users
Users can be added by clicking Add Users and be assigned to specific groups with the Editing Users option. To add new users:
- From the Admin page, select the Users tile. The Users page displays.
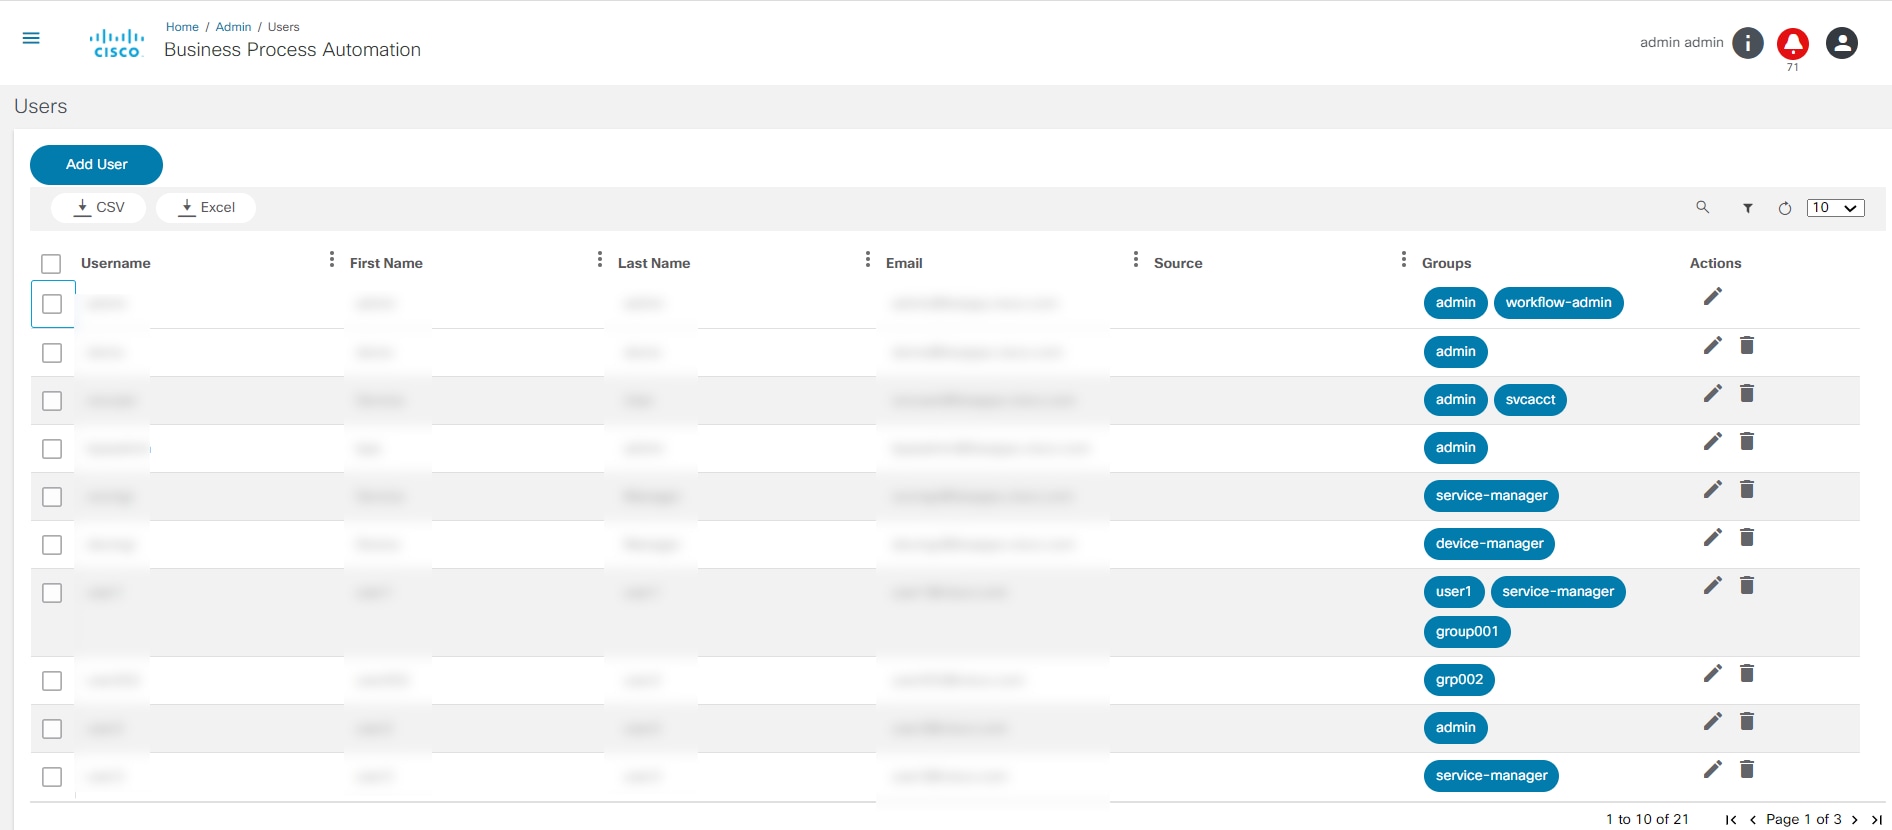
- Click Add User. The New User window opens.
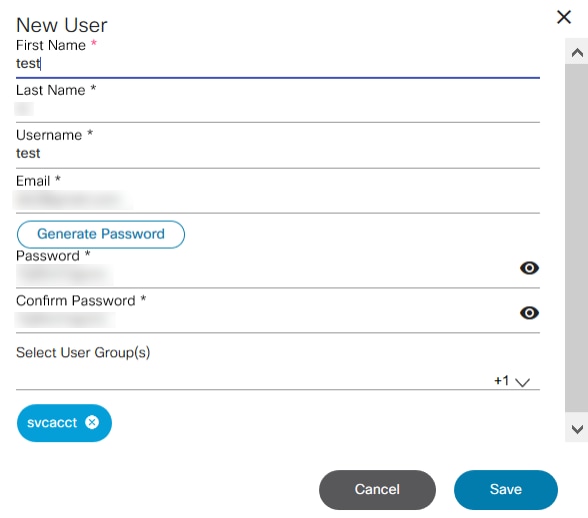
- Enter the First Name, Last Name, Username, Email ID, and Email, click Generate Password, and select the User Group.
- Click Save to create the user. A message displays in the top right corner of the screen when the user is added successfully.
Editing Users
Follow the steps below to edit user details:
- Select the Edit icon from the Actions column of the desired user. The Edit User window opens.
- Edit the necessary fields.
- To change the password, click Change Password. The Change Password window opens.
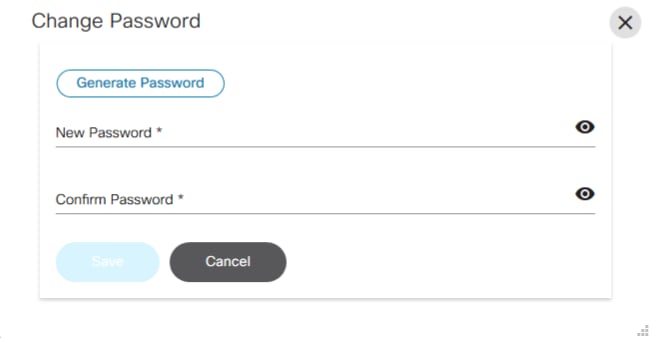
- Click Generate Password to obtain a New Password and Confirm Password.
- Click Save.
To assign groups to users:
- If the user is not assigned to any group, then the Select User Group(s) field displays. Select the check box of the desired group(s).
- If the user is already assigned to a group(s), then expand the Select User Group(s) field and select the desired group to assign the user.
- Use the Search field to search for a specific group. Groups have predefined policies, and the permissions or policies set depend on the type of resource.
- Click Save.
Deleting Users
To delete a user:
- Select the Delete icon from the Actions column of the desired user. A warning message displays.
- Click OK to delete the user.
Managing Groups and Permissions
To manage groups:
- Select the User Profile icon > Admin. The Admin page displays.

- Select the Groups tile to manage groups.
The Groups tile allows users to:
Adding Groups
The Add Groups option allows users to define application access and operation privilege to a group of users. The Administrator can provide access to specific BPA applications for the users belonging to a group. The Administrator can also enable and disable various operations of the applications (e.g., Start, Pause, etc.) for specific applications. Use the Admin > Users menu option to assign users to desired group(s).
Follow the steps below to add new groups:
- From the Admin page, select the Groups tile. The Groups page displays.
- Click Add Group. The
Add User Group window opens.
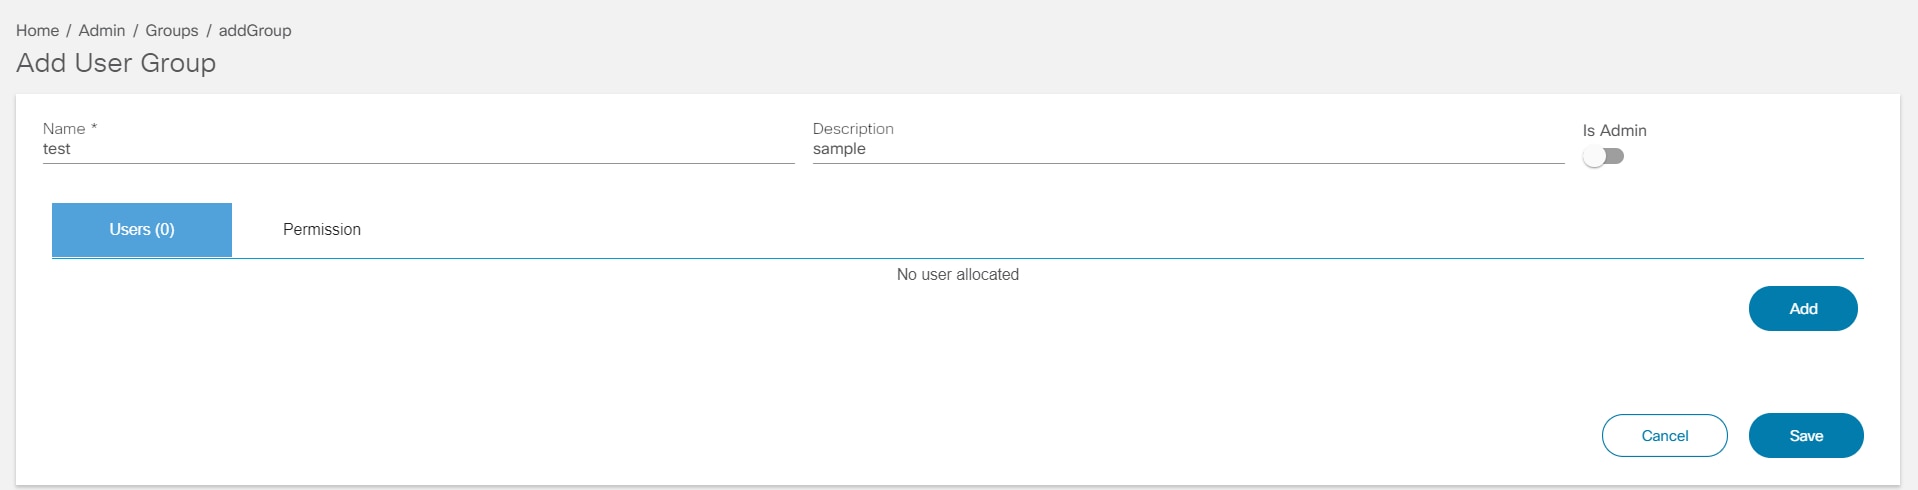
- Enter a Name and Description for the group. If the user is a group admin, then enable the Is Admin toggle to appoint the user as group admin.
- There are two options that are applicable if the user is not a
group admin:
- Users: Click Add to add users to a group. The Existing Users window opens. Select the users, assign them to the group, and click Save. Refer to Adding Users for more details on adding new users.
- Permissions: This tab lists all the BPA applications. Select the application to be enabled for the users in the group. Users can also enable or disable individual elements in the application. This option is available for workflows and Service Center. In workflows, users can enable View Form, Claim Task, and Add Workflow.
- Click Save. After the group is added successfully, a success message displays.
Editing Group Permissions
The Administrator can edit group permissions using the Edit option. Follow the steps below to edit group details:
- From the Groups page, select the Edit icon of the desired user group. The Edit Group window opens.
- Edit the Name and Description. If the user is a Group Administrator, then enable the Is Admin toggle.
- There are two options that are applicable if the user is not a
Group Administrator:
- Users: Click Add to add users to a group. The Existing Users window opens. Select the users being assigned to the group and click Save. Refer to Adding Users for more details about adding new users.
- Permission: This tab lists all the BPA applications. Select the application to be enabled for the users in the group. Users can also enable or disable individual elements in the application. This option is available for workflows and Service Center. In workflows, View Form, Claim Task, Add Workflow, and access for individual tabs present in workflow applications can be enabled.
- Click Update to update the details of the group. A success message displays after updating successfully. All device actions are displayed as columns.
- Select the applicable device actions for each of the controller instances for a specific user group.
Delete Groups
To delete a group:
- From the Groups page, select the Delete icon in the Actions column of the desired group. A warning message displays.
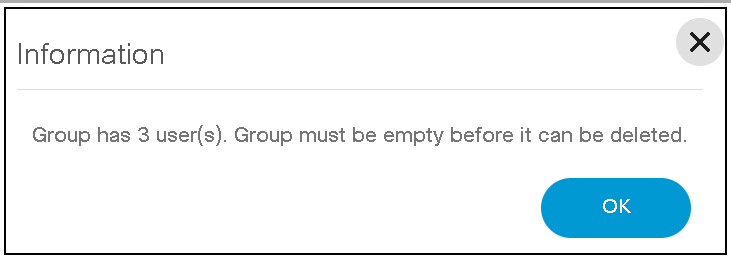
- Click OK to delete the group.
Managing Zones
Zones allow users to set up access control to NSOs. If the user has administrator privileges (admin), then they can create zones to increase network security or to manage access control for NSOs. Users in different zones have different NSOs displayed in the portal depending on the group and zone to which they belong to. Users can also configure NSOs to a zone.
Providing access control at a zone level, allows access to all NSOs in that zone. The list of access privileges include:
Adding a Zone
- Select the User Profile icon > Admin. The Admin page displays.
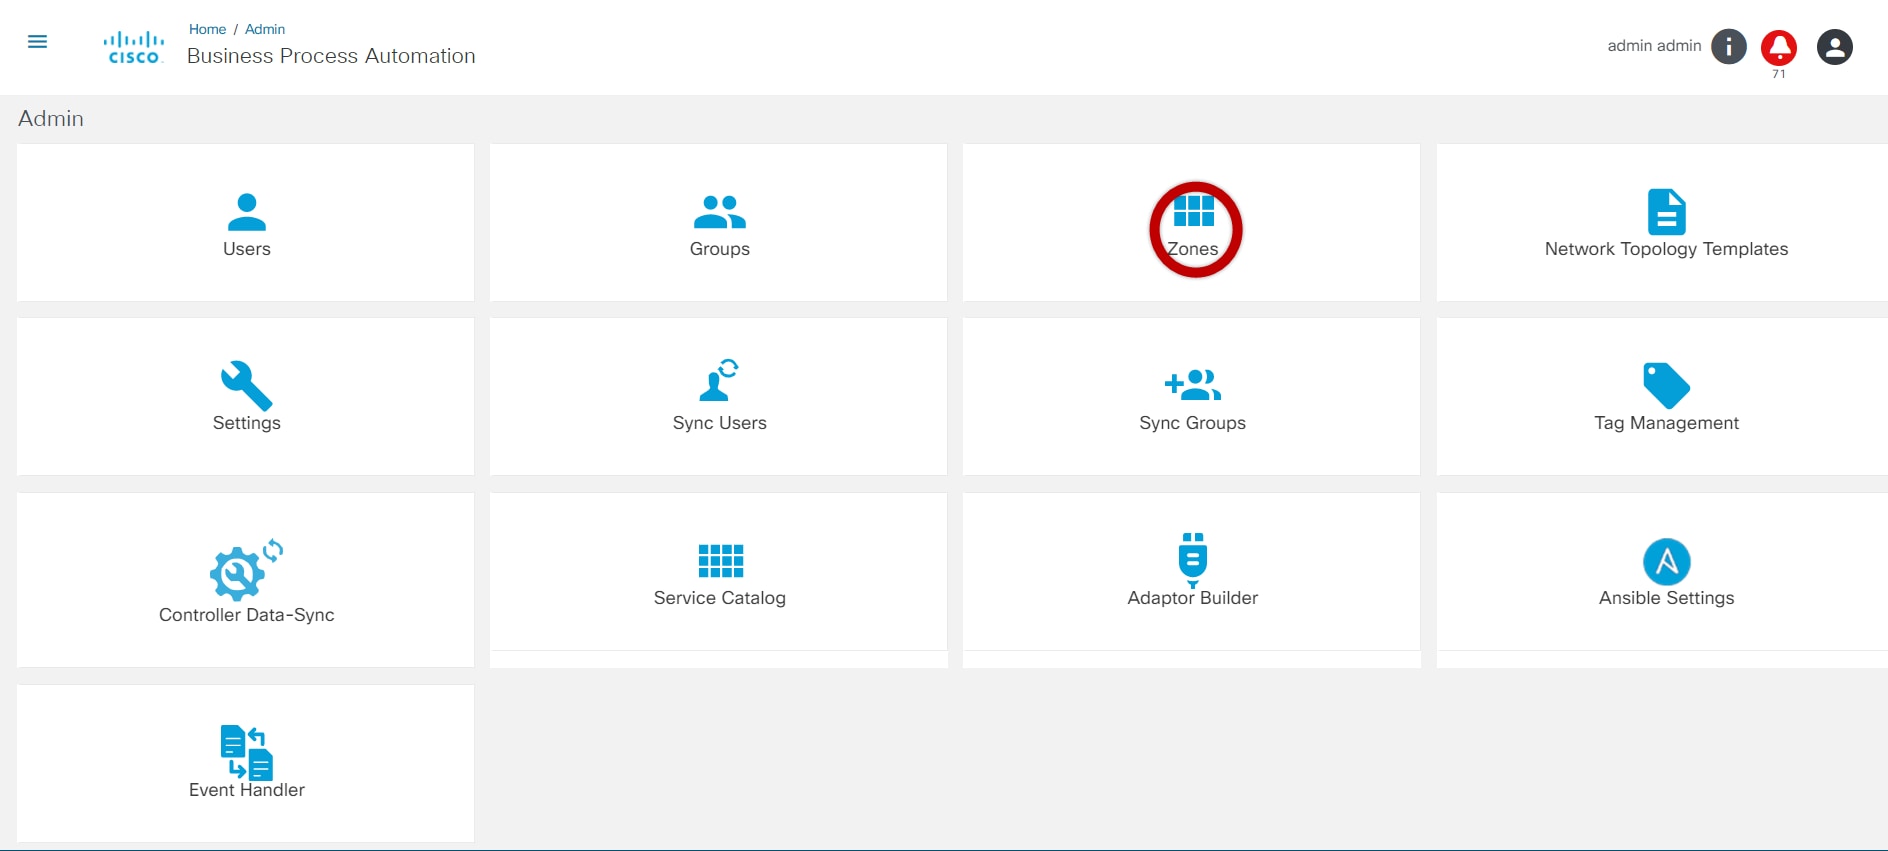
- Select the Zones tile. The Zones page displays.
- Click Add Zone. The Add Zone window opens.
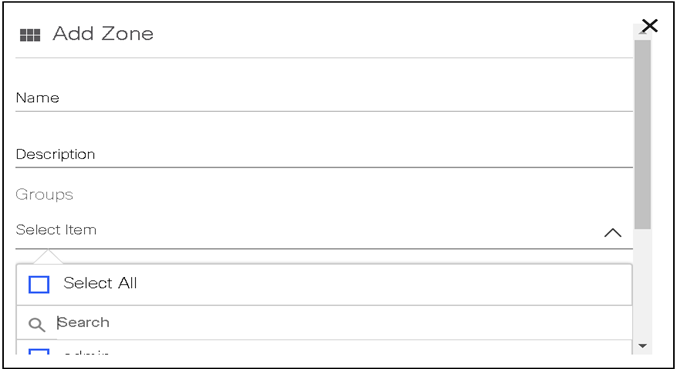
- Enter the Name and Description and select the check box of the desired group(s) from the Groups drop-down list. To assign users to a specific zone, add the user to a group and assign the group to the specific zone. Refer to Managing Users and Managing Groups and Permissions for more information.
- Click Save to create the zone.
Editing a Zone
- From the Zones page, select the Edit icon from the Actions column of the desired zone. The Edit Zone window opens.
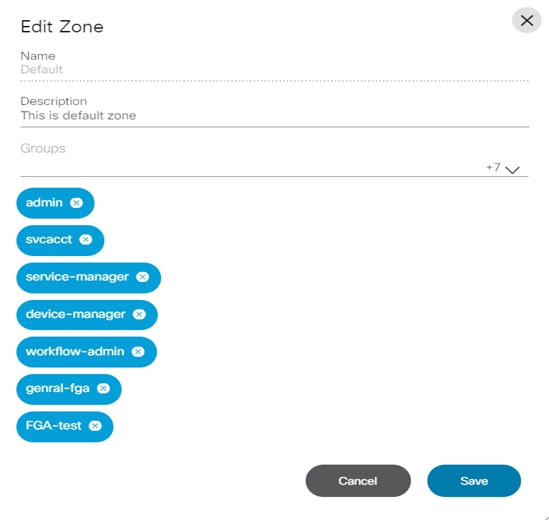
- Edit the necessary fields.
- Click Save to save the changes made.
Deleting a Zone
- From the Zones page, select the Delete icon from the Actions column of the desired zone. A warning message displays.
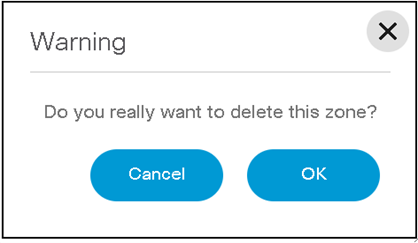
- Click OK to delete the group.
Managing Settings
Admin settings allow users to manage access details for:
- Controllers
- SMTP
- Support
- Password Settings
- Ticketing
- Data Purging
- Interactive-CLI
- Mask_Sensitive_Info
- Add or Delete Custom Settings
To view the Settings page:
- Select the User Profile icon > Admin. The Admin page displays.
- Select the Settings tile. The Settings page displays listing all categories.
- To edit any component detail, click the desired category, edit the details, and click Save.
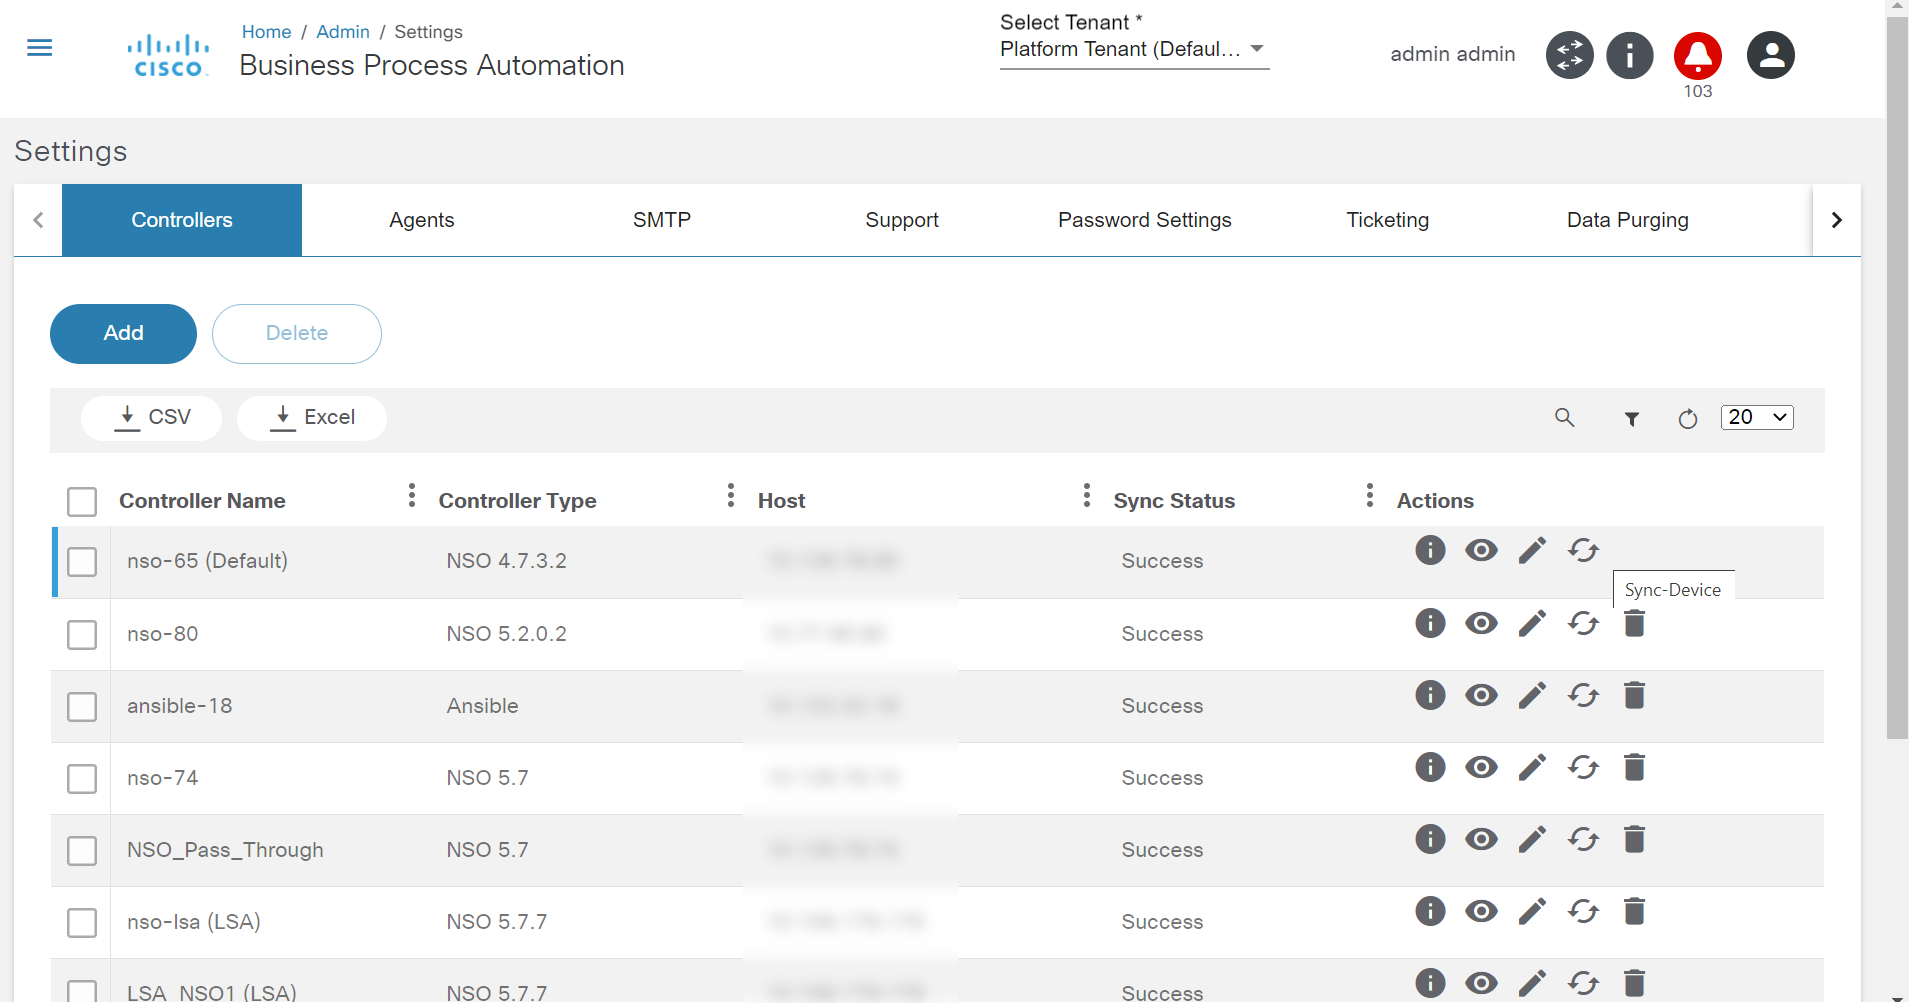
Controller Settings
BPA can manage one or more controller instances for NSO, vManage, Ansible, Cisco Catalyst Center, etc. Controller settings allow users to configure a controller instance. To manage the controllers’ settings, select the Settings tile on the Admin page and click the Controllers tab.
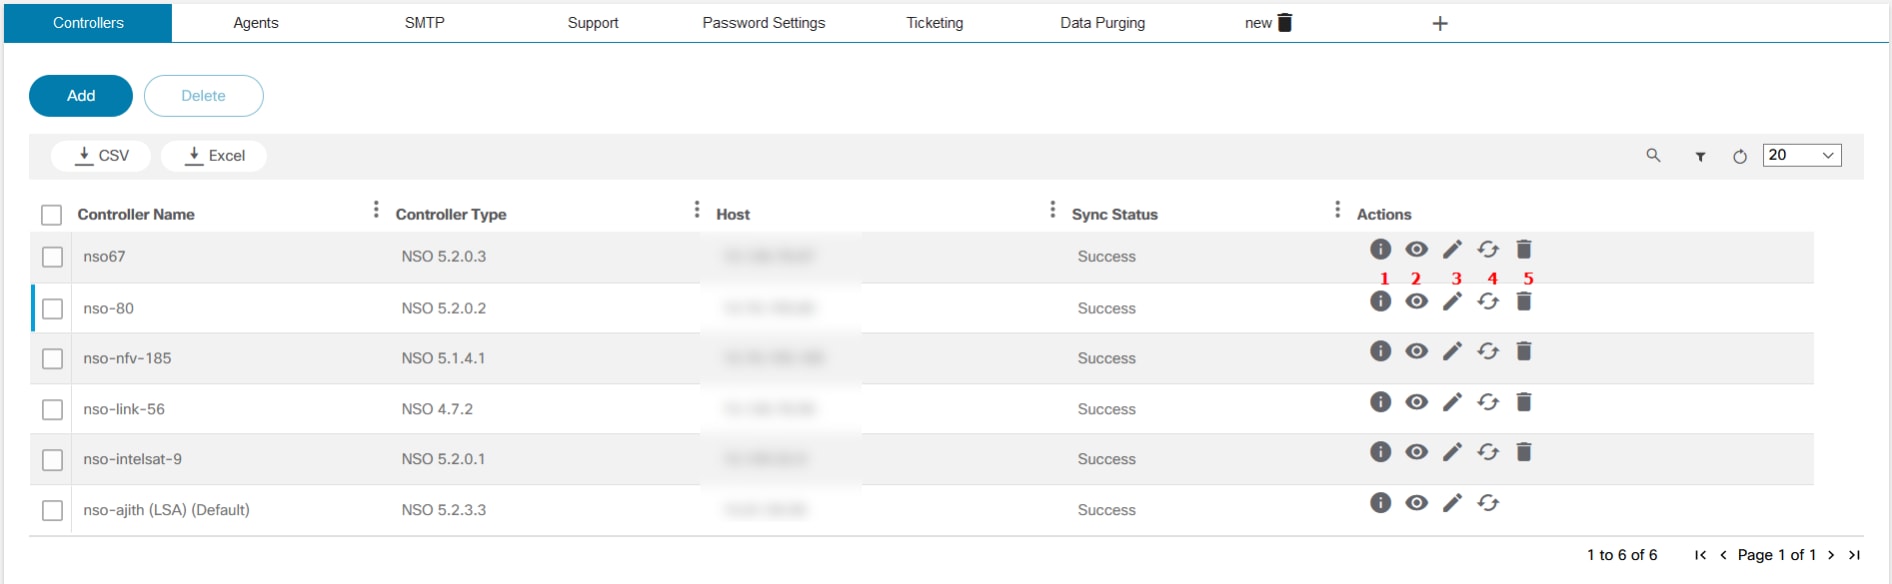
| Icon | Details |
|---|---|
| 1 | View detailed information about the sync status |
| 2 | View the controller details |
| 3 | Edit the controller |
| 4 | Start device synchronization |
| 5 | Delete the controller |
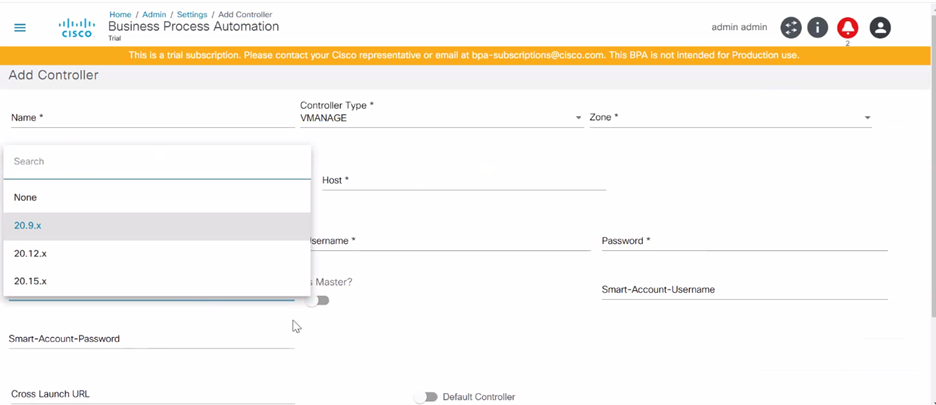
To add a controller:
- From the Controllers tab, click Add. The Add Controller window opens.
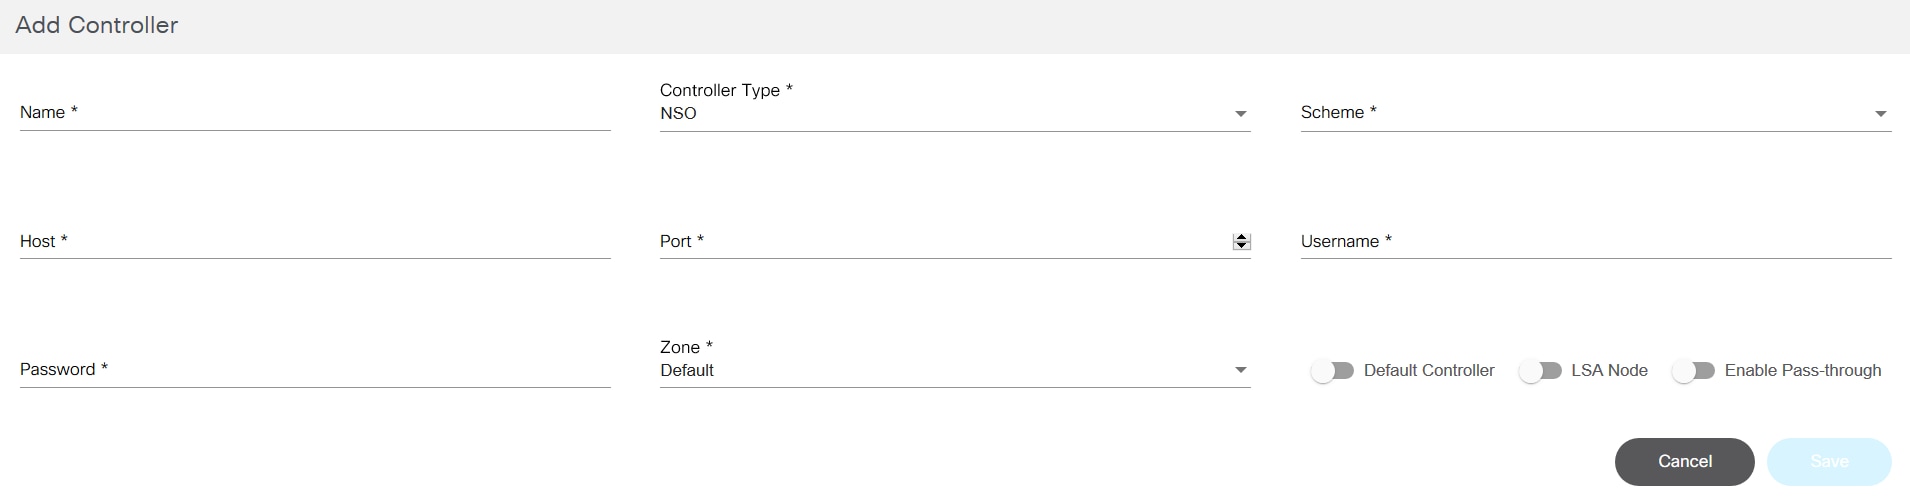
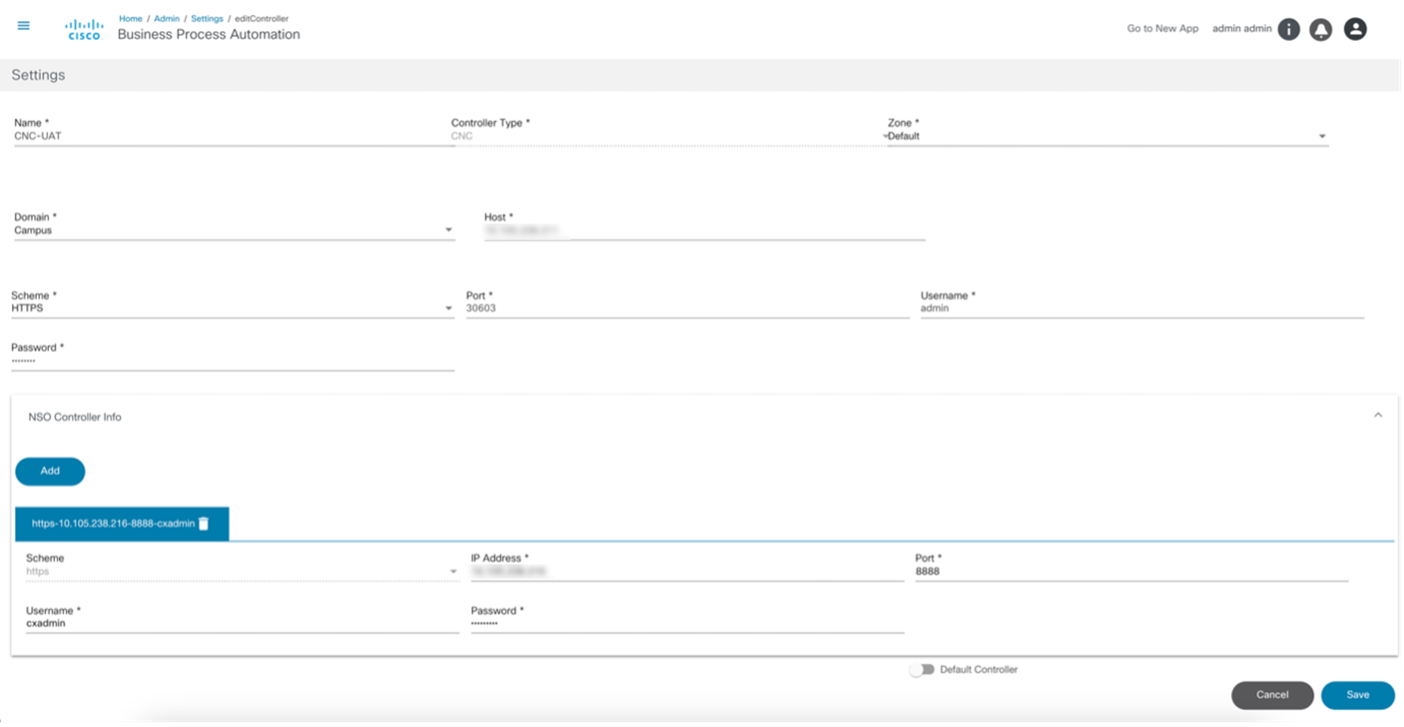
- The Add Controller window for NSO has a NSO Controller Info section to add underlying NSO controller details.
- The image below displays when the NSO Controller Info section is expanded and the user clicks Add.
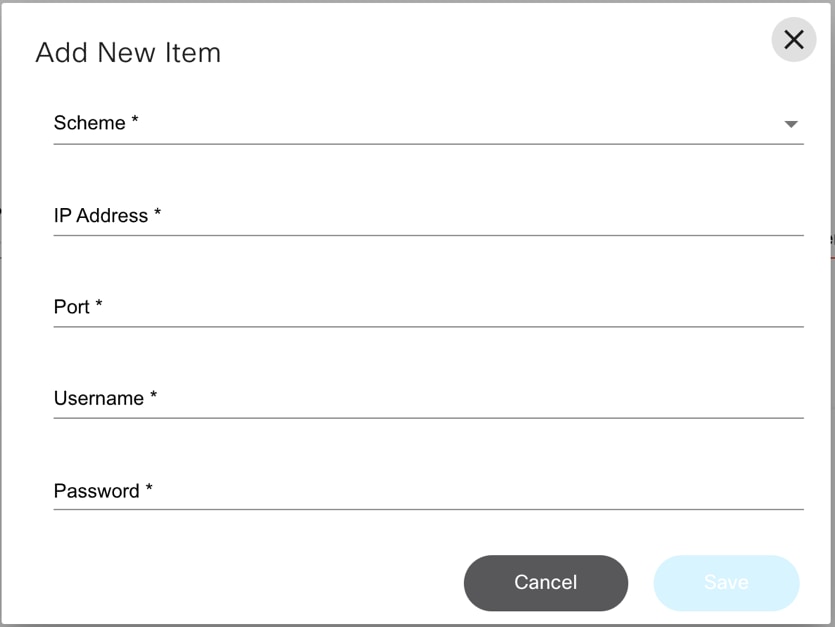
- A controller instance called Direct-to-Device is automatically added when BPA is deployed. Additional controller instances can be added by completing the form below:
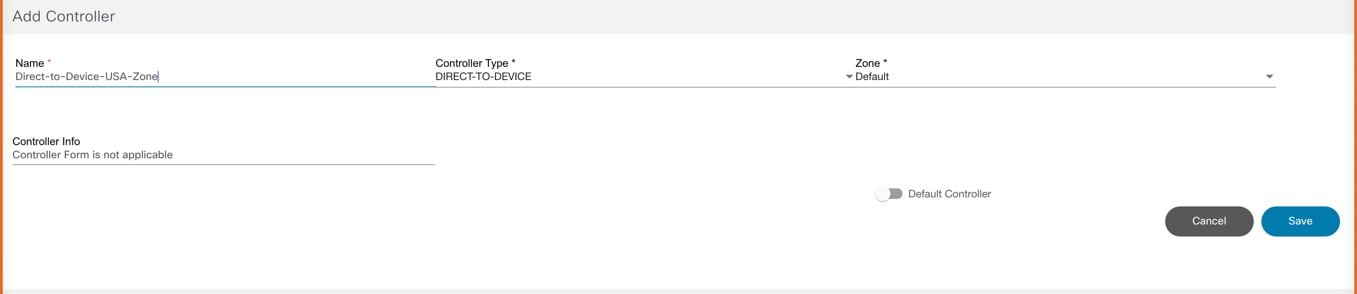
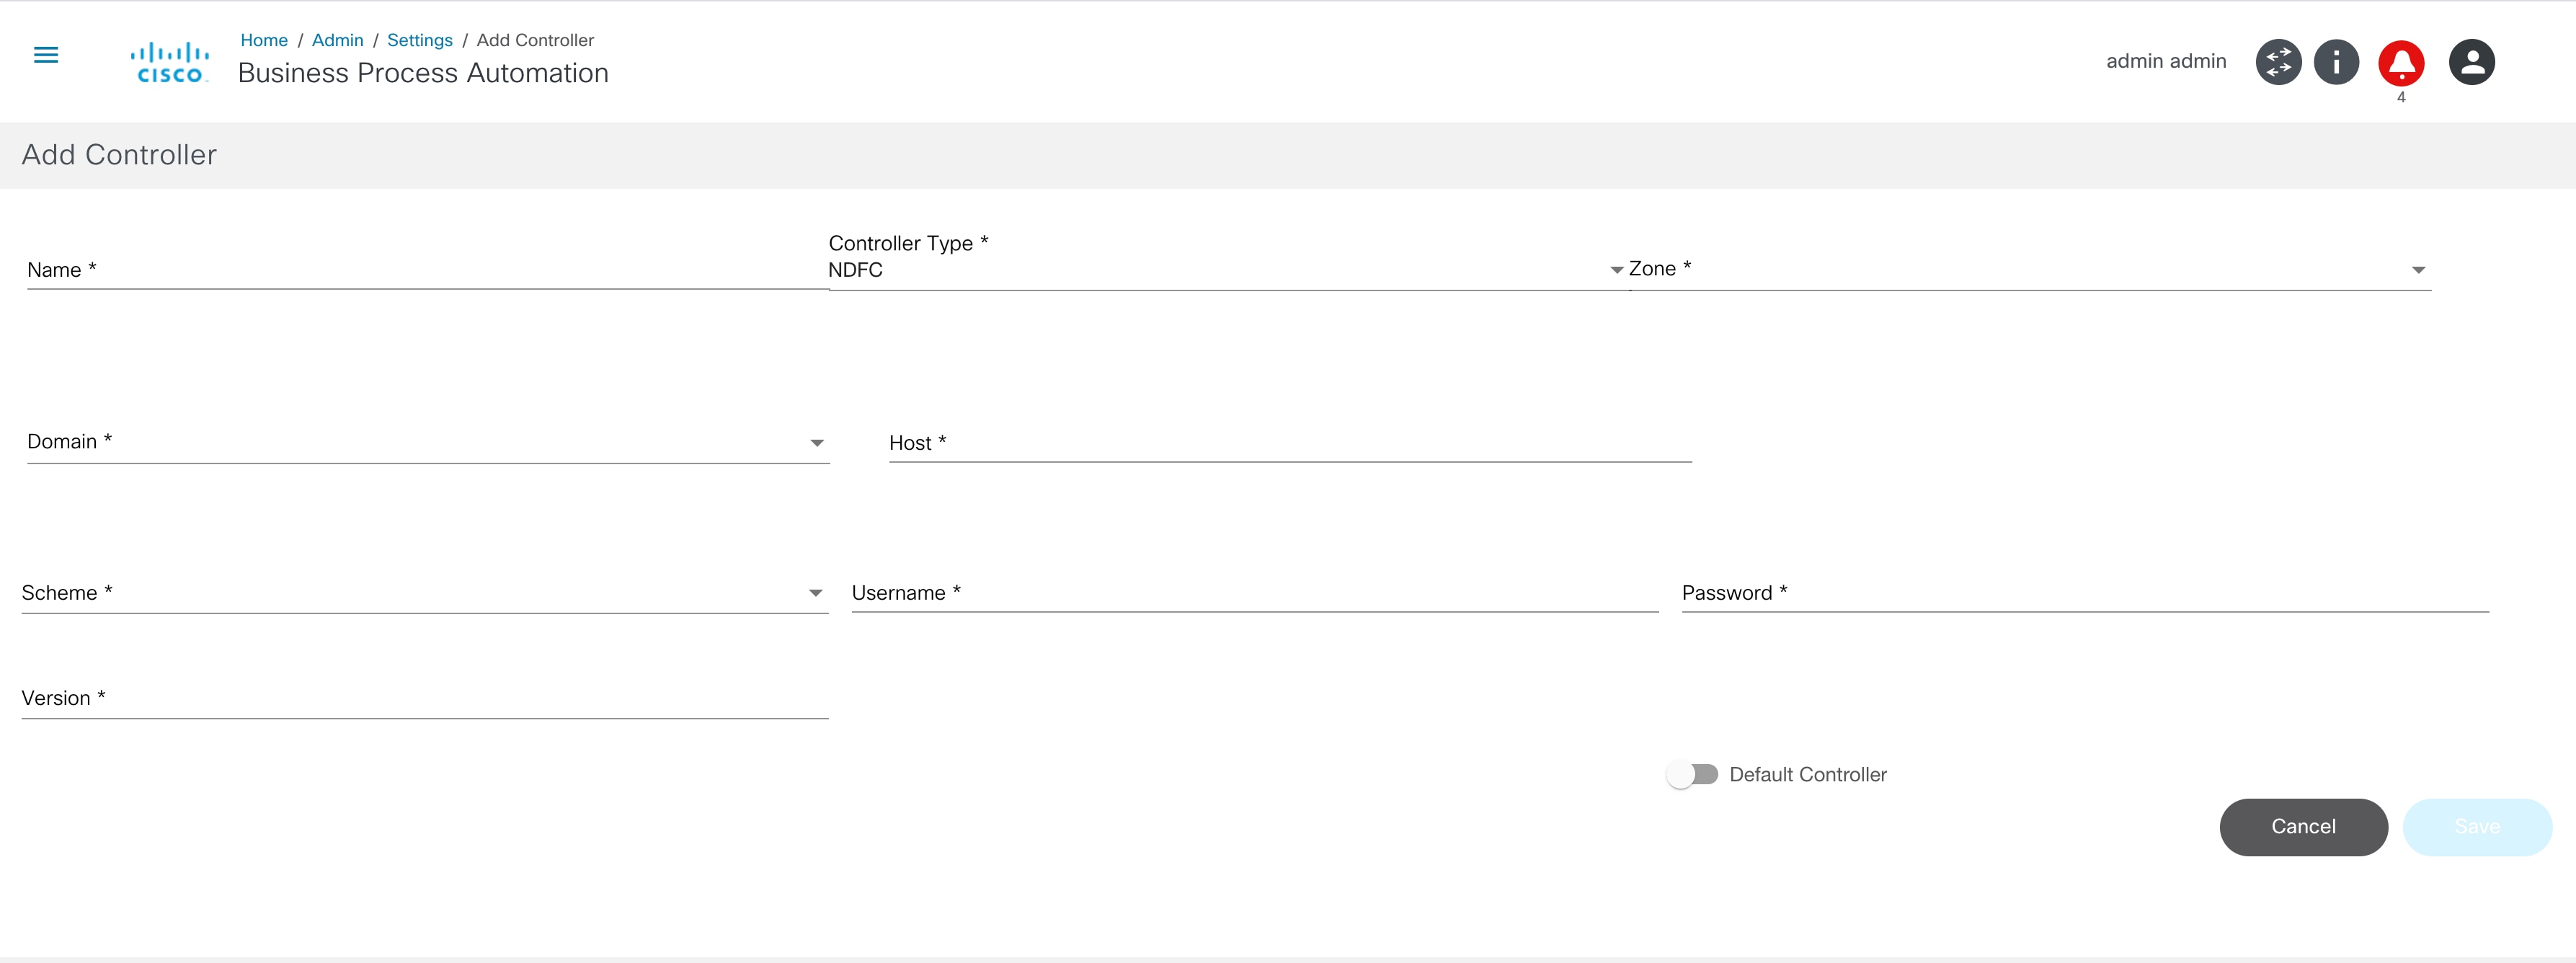
- Enter the following details to connect to the controller:
- Name: Enter the controller’s name
- Controller Type: Select from drop-down list
- Scheme: Select a web protocol scheme (HTTP or HTTPS) from the drop-down list
- Host Name: Enter the host name of the controller instance
- Port: Enter the port number at which the controller instance is listening
- Username: Enter the username for connecting to the controller API
- Password: Enter the password for connecting to the controller API
- Zone: Select a zone from the drop-down list. For details on adding zones and assigning groups to a specific zone, refer to Managing Zones.
- Default: Enable the toggle to make the controller instance the default
- LSA Node: Enable the toggle to configure the NSO controller in the Layered Services Architecture (LSA) Node. This is only applicable to NSO controllers.
- Version: Enter or select a version from the drop-down list for DCNM and Cisco Catalyst Center controller types
- Enable Pass-through: Enable the toggle to enable
pass-through/external authentication on the NSO side. It can be enabled
to use BPA credentials for NSO authentication provided the NSO is set up
to perform external authentication against the BPA (only applicable for
NSO controllers only)
- When enabled, it is no longer required to provide controller credentials; hence the Username and Password fields are hidden from the UI. All interactions to this controller happen via the current BPA user’s credentials
- To set up any NSO for external authentication with the current BPA, refer to the sample Python script called “ext-auth-BPA.py” available at the Bpa-nso-utils-3.x.xxx.xxx-zip/Ciscoutils/Nso-pass-through/Scripts folder path, as shown below:
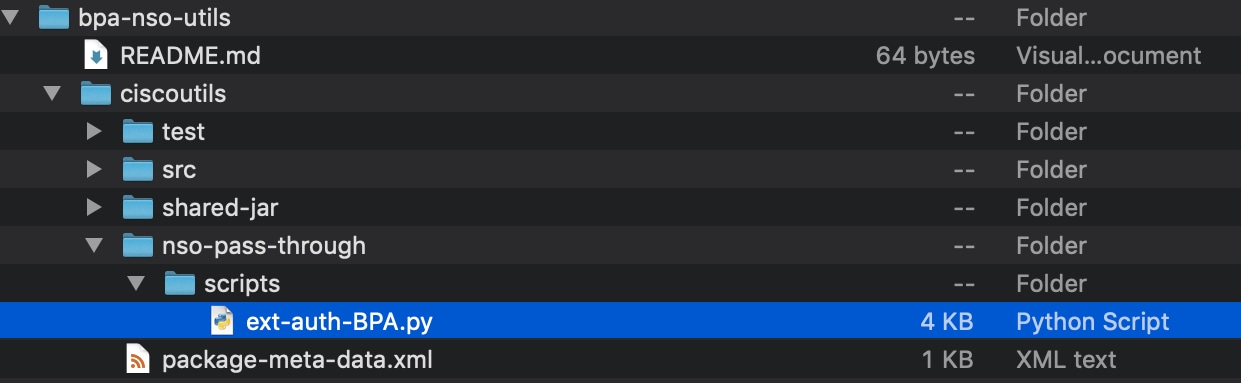
- When not enabled, the Username and Password fields are shown in the UI. Enter the NSO credentials to get it working with NSO native authentication
- Can be enabled for the LSA node as well
- Is Master?: Enable the toggle to indicate that a vManage controller instance is Master (only applicable for vManage controllers). There can be only one Master vManage instance per BPA installation; all other instances are region specific
NSO Settings
After enabling the LSA node in Settings, Resource Facing Service (RFS) options become available:
- Click Sync RFS. A list of all the Resource Facing Service (RFS) Nodes under the controller settings displays.
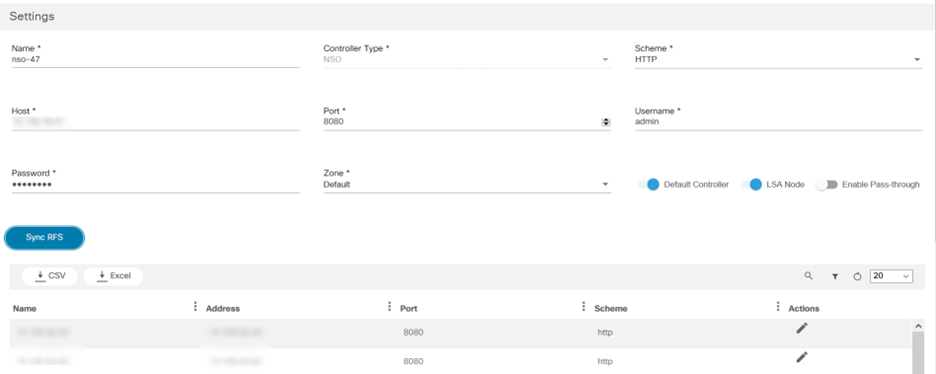
- Click Add RFS. The Add RFS Node window opens.
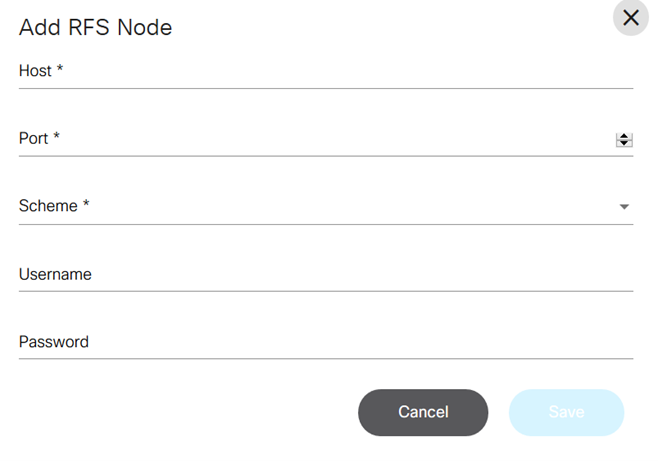
- Enter the Host, Port, Username, and Password .
- After updating the required fields, click Save.
Users can edit or delete the RFS node after it is created by selecting the controller, clicking Sync RFS , and then selecting the Edit icon or Delete icon for the RFS Node.
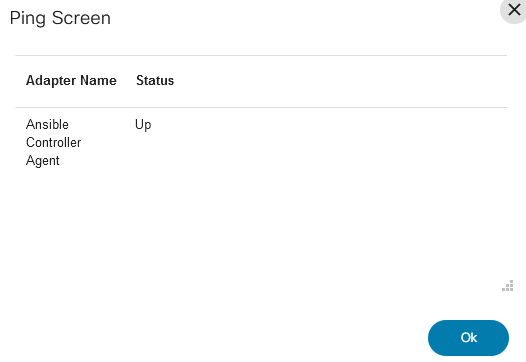
Agents

Agents lists all the controller agents that are deployed on BPA. Users can get the status and details of each agent.
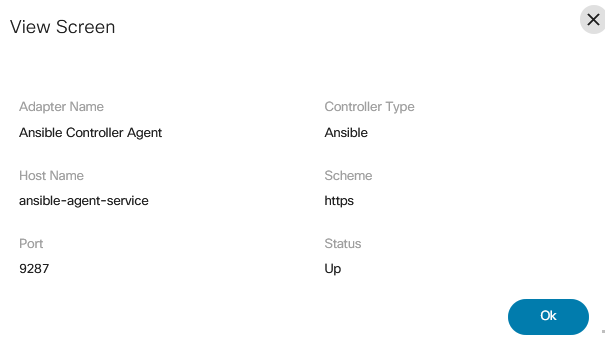
- From the Settings page, select the View icon from the Actions column of the desired agent to view its details. The View Screen window opens.
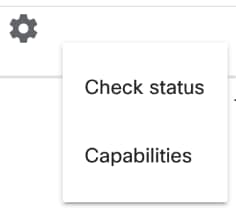
- From the Settings page, select the Gear icon > Check status from the Actions column of the desired agent to determine if it is pingable.
- From the Settings page, select the Gear icon > Capabilities from the Actions column of the desired agent to see all the agent’s available capabilities.
SMTP Settings
BPA supports SMTP server configuration which can be used by workflows or other applications to send email notifications to users.
To manage the SMTP settings:
- From the Admin page, select the Settings tile. The Settings page displays.
- Click the SMTP tab on the Settings page.
- Enter the following details to connect to the SMTP server:
- Host: Host name of the SMTP server
- Port: Port number on which the SMTP is listening
- Username: Username for connecting to the SMTP server
- Password: Password for connecting to the SMTP server
- From Mail ID: Enter the mail ID from which to send the mail
- After updating the required fields, click Save.
To edit other settings, refer to the corresponding sections below.
Support Settings
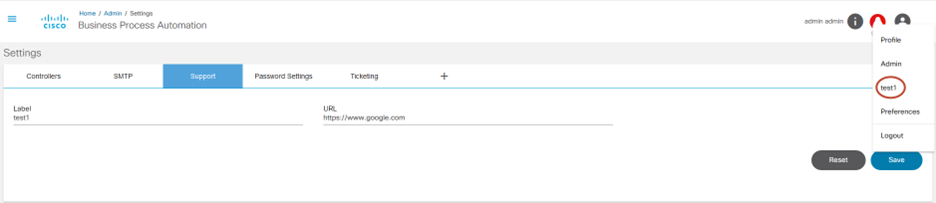
A support URL can be configured to provide additional help for users when they run into issues. A link displays under the User icon when a URL is configured, redirecting them to the Support tab.
- Enter the Name and URL, then click Save.
- Click Save again to display the Support tab.
Password Settings
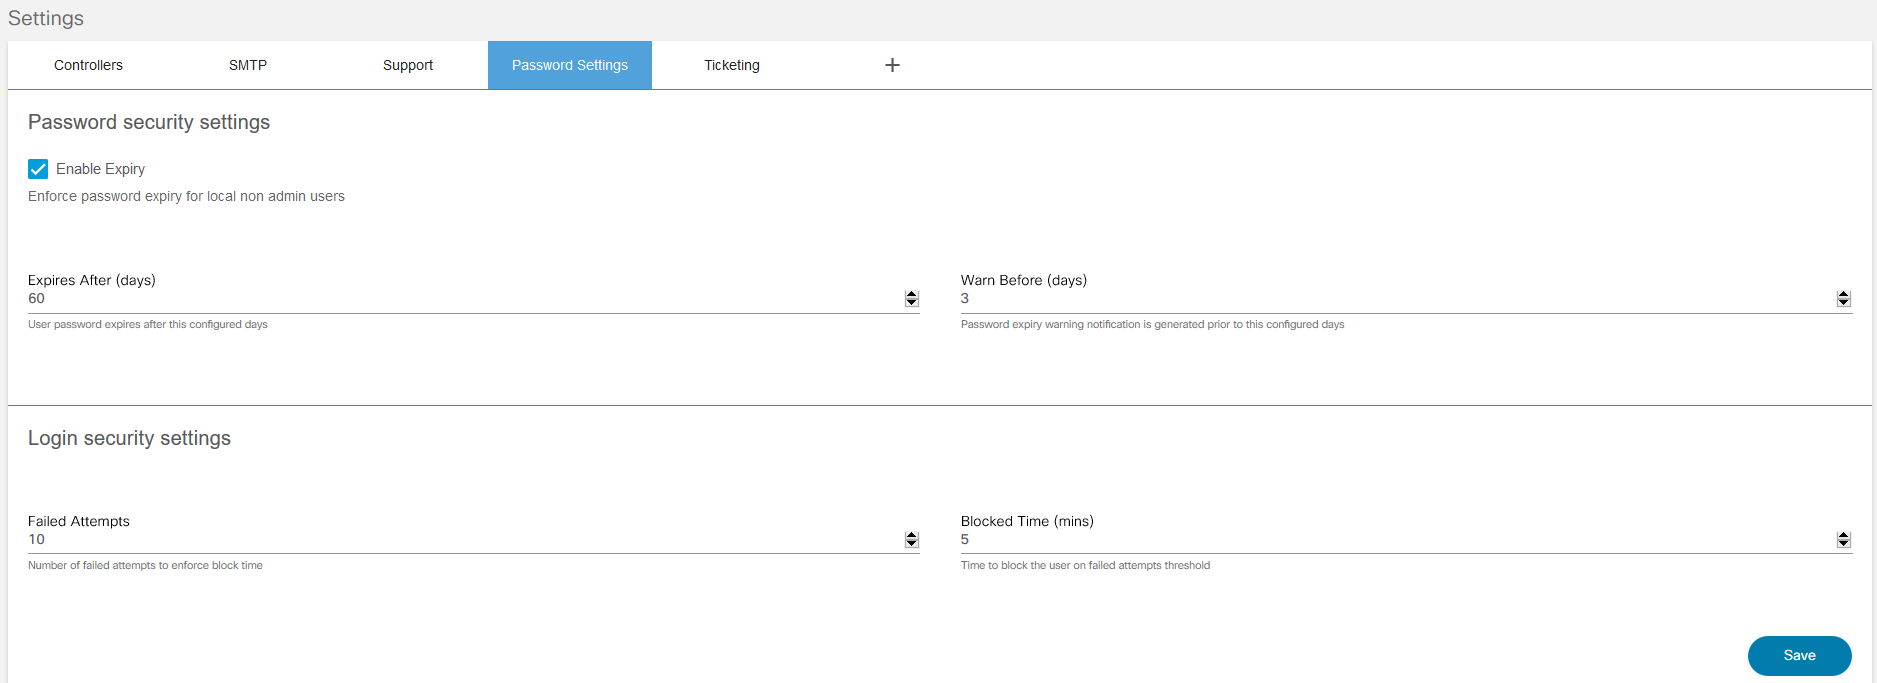
BPA facilitates adding password parameters to secure users and data.
- Set the password parameters listed in the following table as required on the Password Settings tab of the Settings page.
- Click Save.
| Password Parameters | Descriptions |
|---|---|
| Enable Expiry | Enforce password expiry for local non admin users |
| Expires After | User password expires after the configured days |
| Warn Before | Password expiry warning notification is generated prior to the configured days |
| Failed Attempts | Number of failed attempts allowed before the user is blocked from logging in |
| Blocked Time | Amount of time the user is blocked for exceeding the configured number of failed attempts |
Ticketing
The Ticketing tab on the Settings page allows users to configure a change management system in BPA.
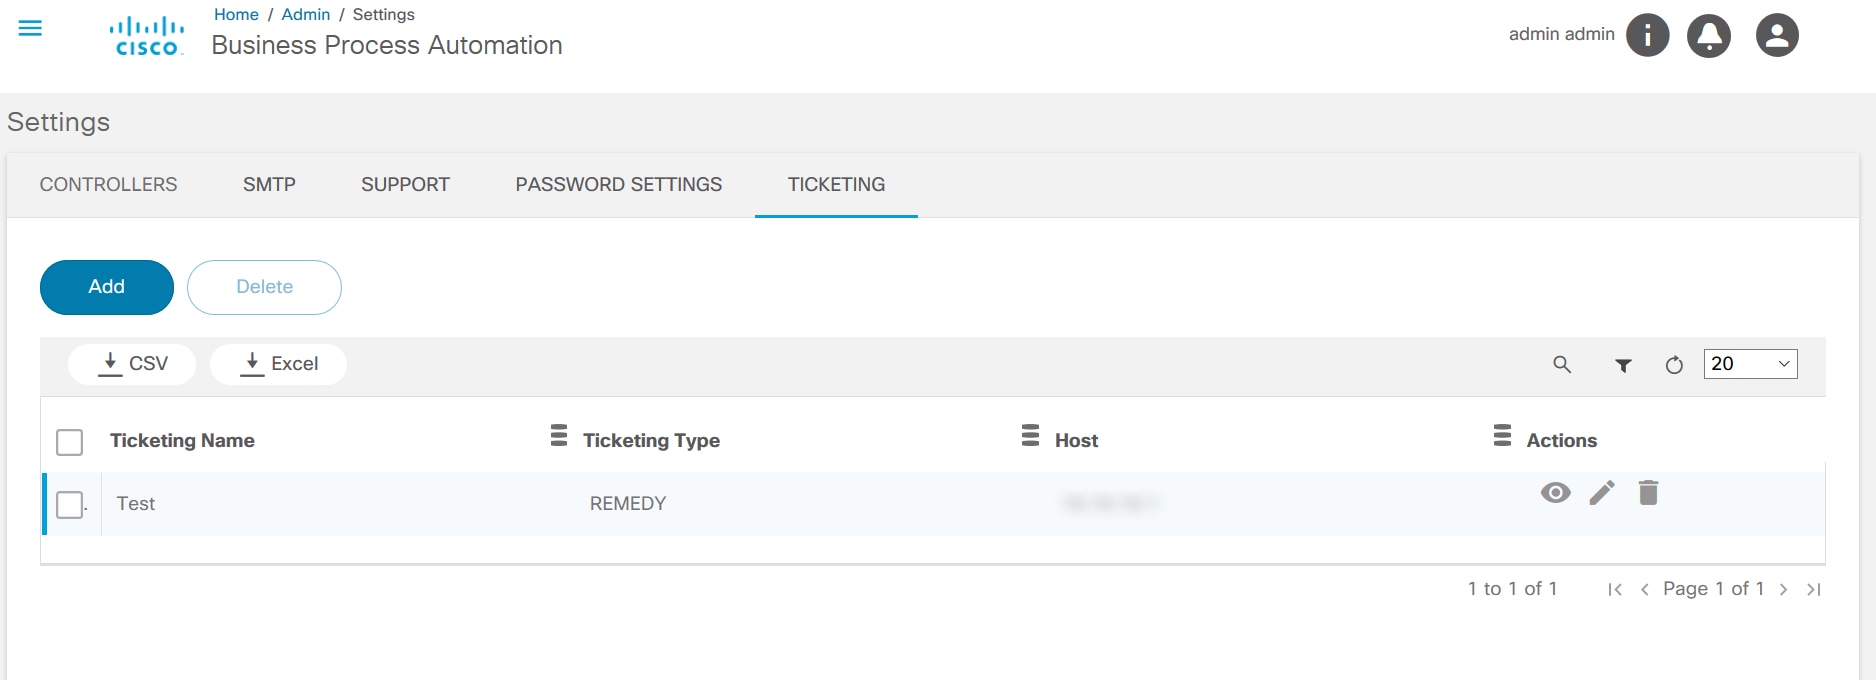
- Click Add. The Add Ticketing Instance window opens.
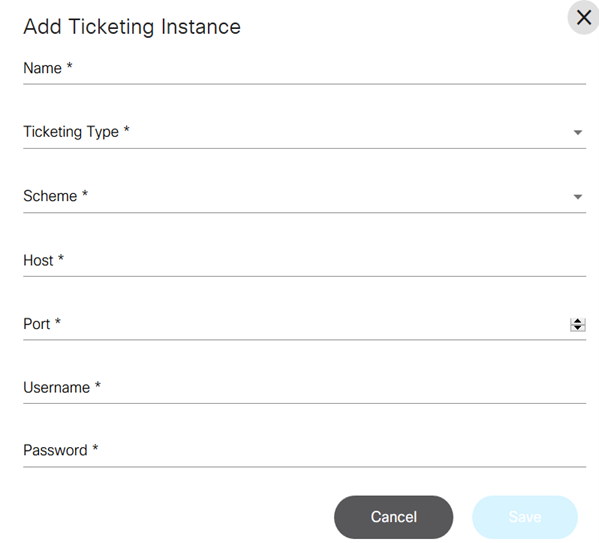
- Enter the Name, Host, and user credentials.
- Select the Ticketing Type, Scheme, and Port from their drop-down lists.
- Click Save.
Interactive-CLI
The interactive_cli tab on the Settings page allows users to configure commands that a group or user can execute as per RBAC. There are two options:
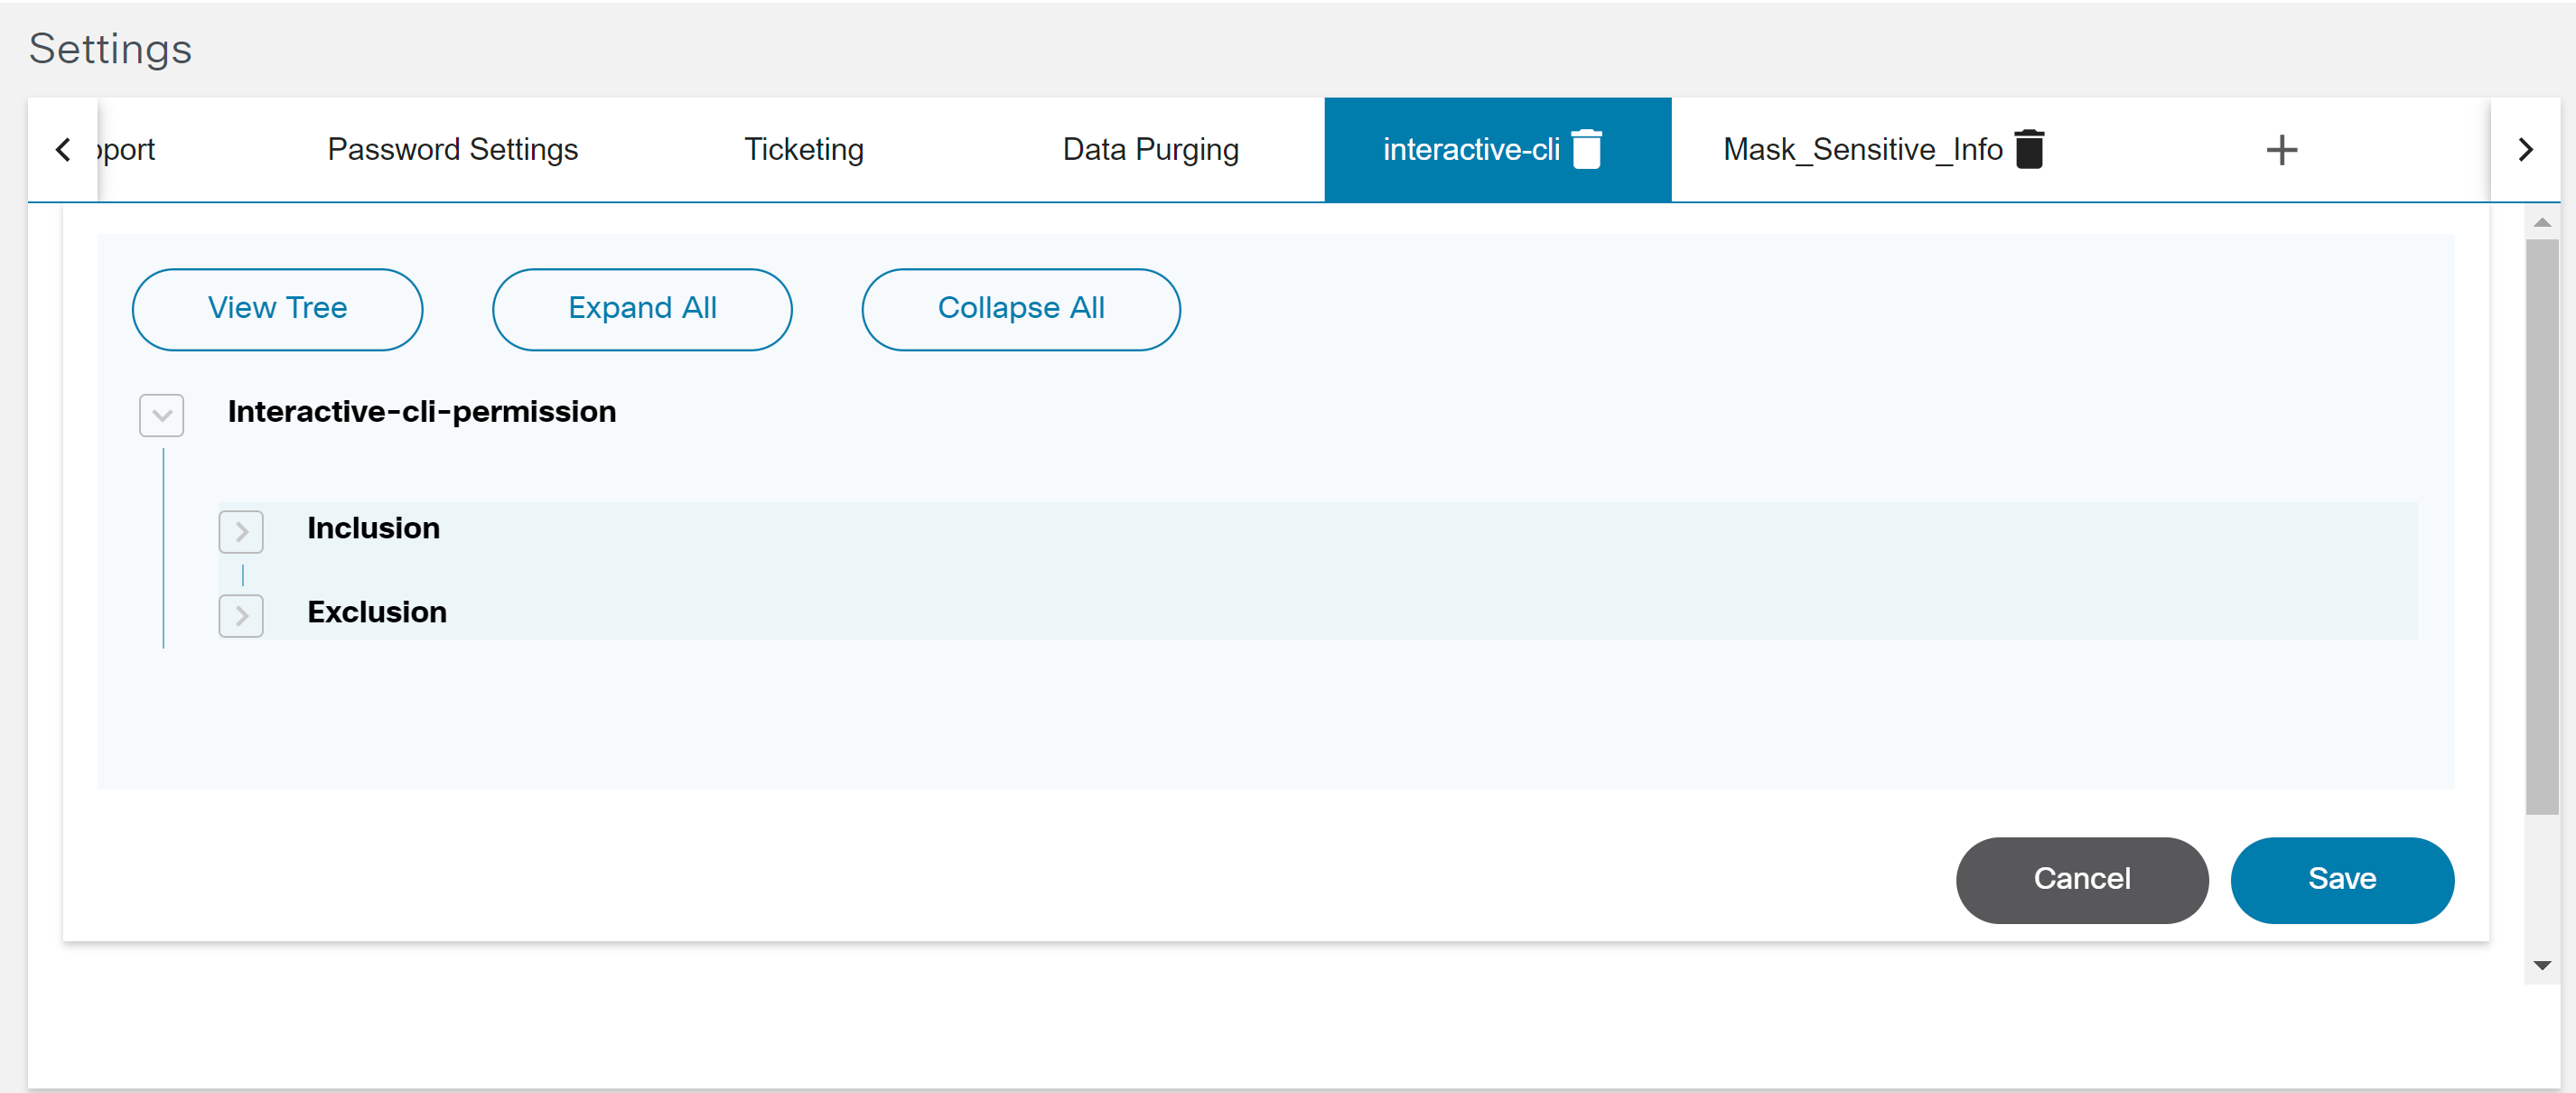
- Inclusion: Includes a list of commands which a user with can execute on device(s) using Interactive CLI.
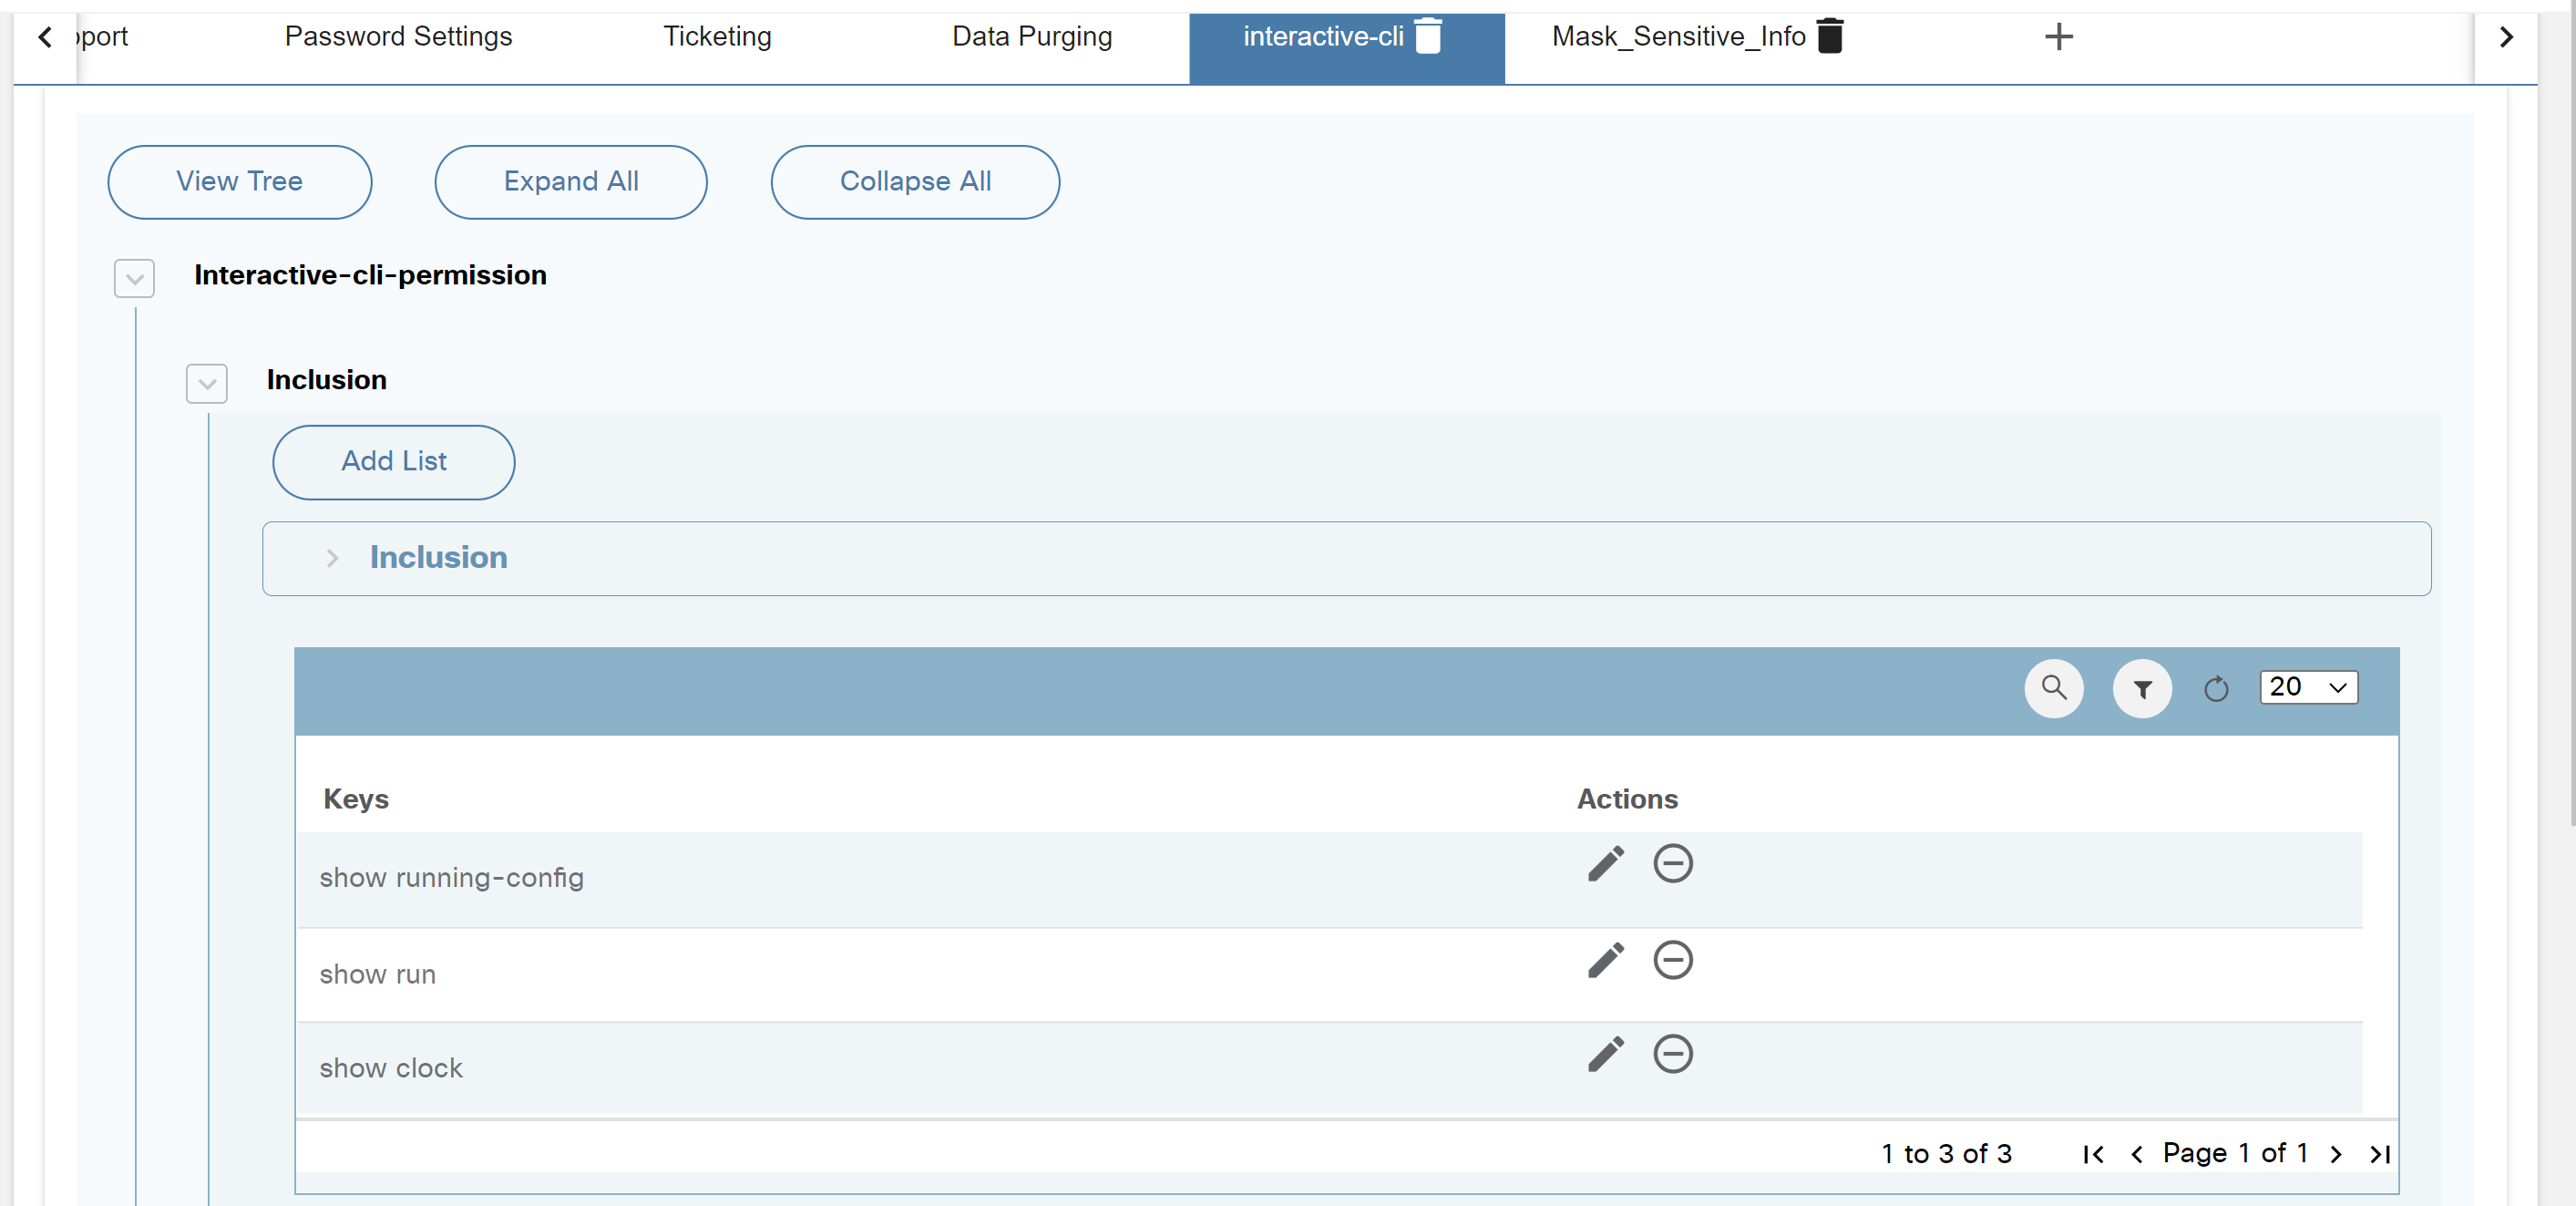
- Exclusion: Includes a list of commands a user is not allowed to execute on device(s) using interactive CLI.
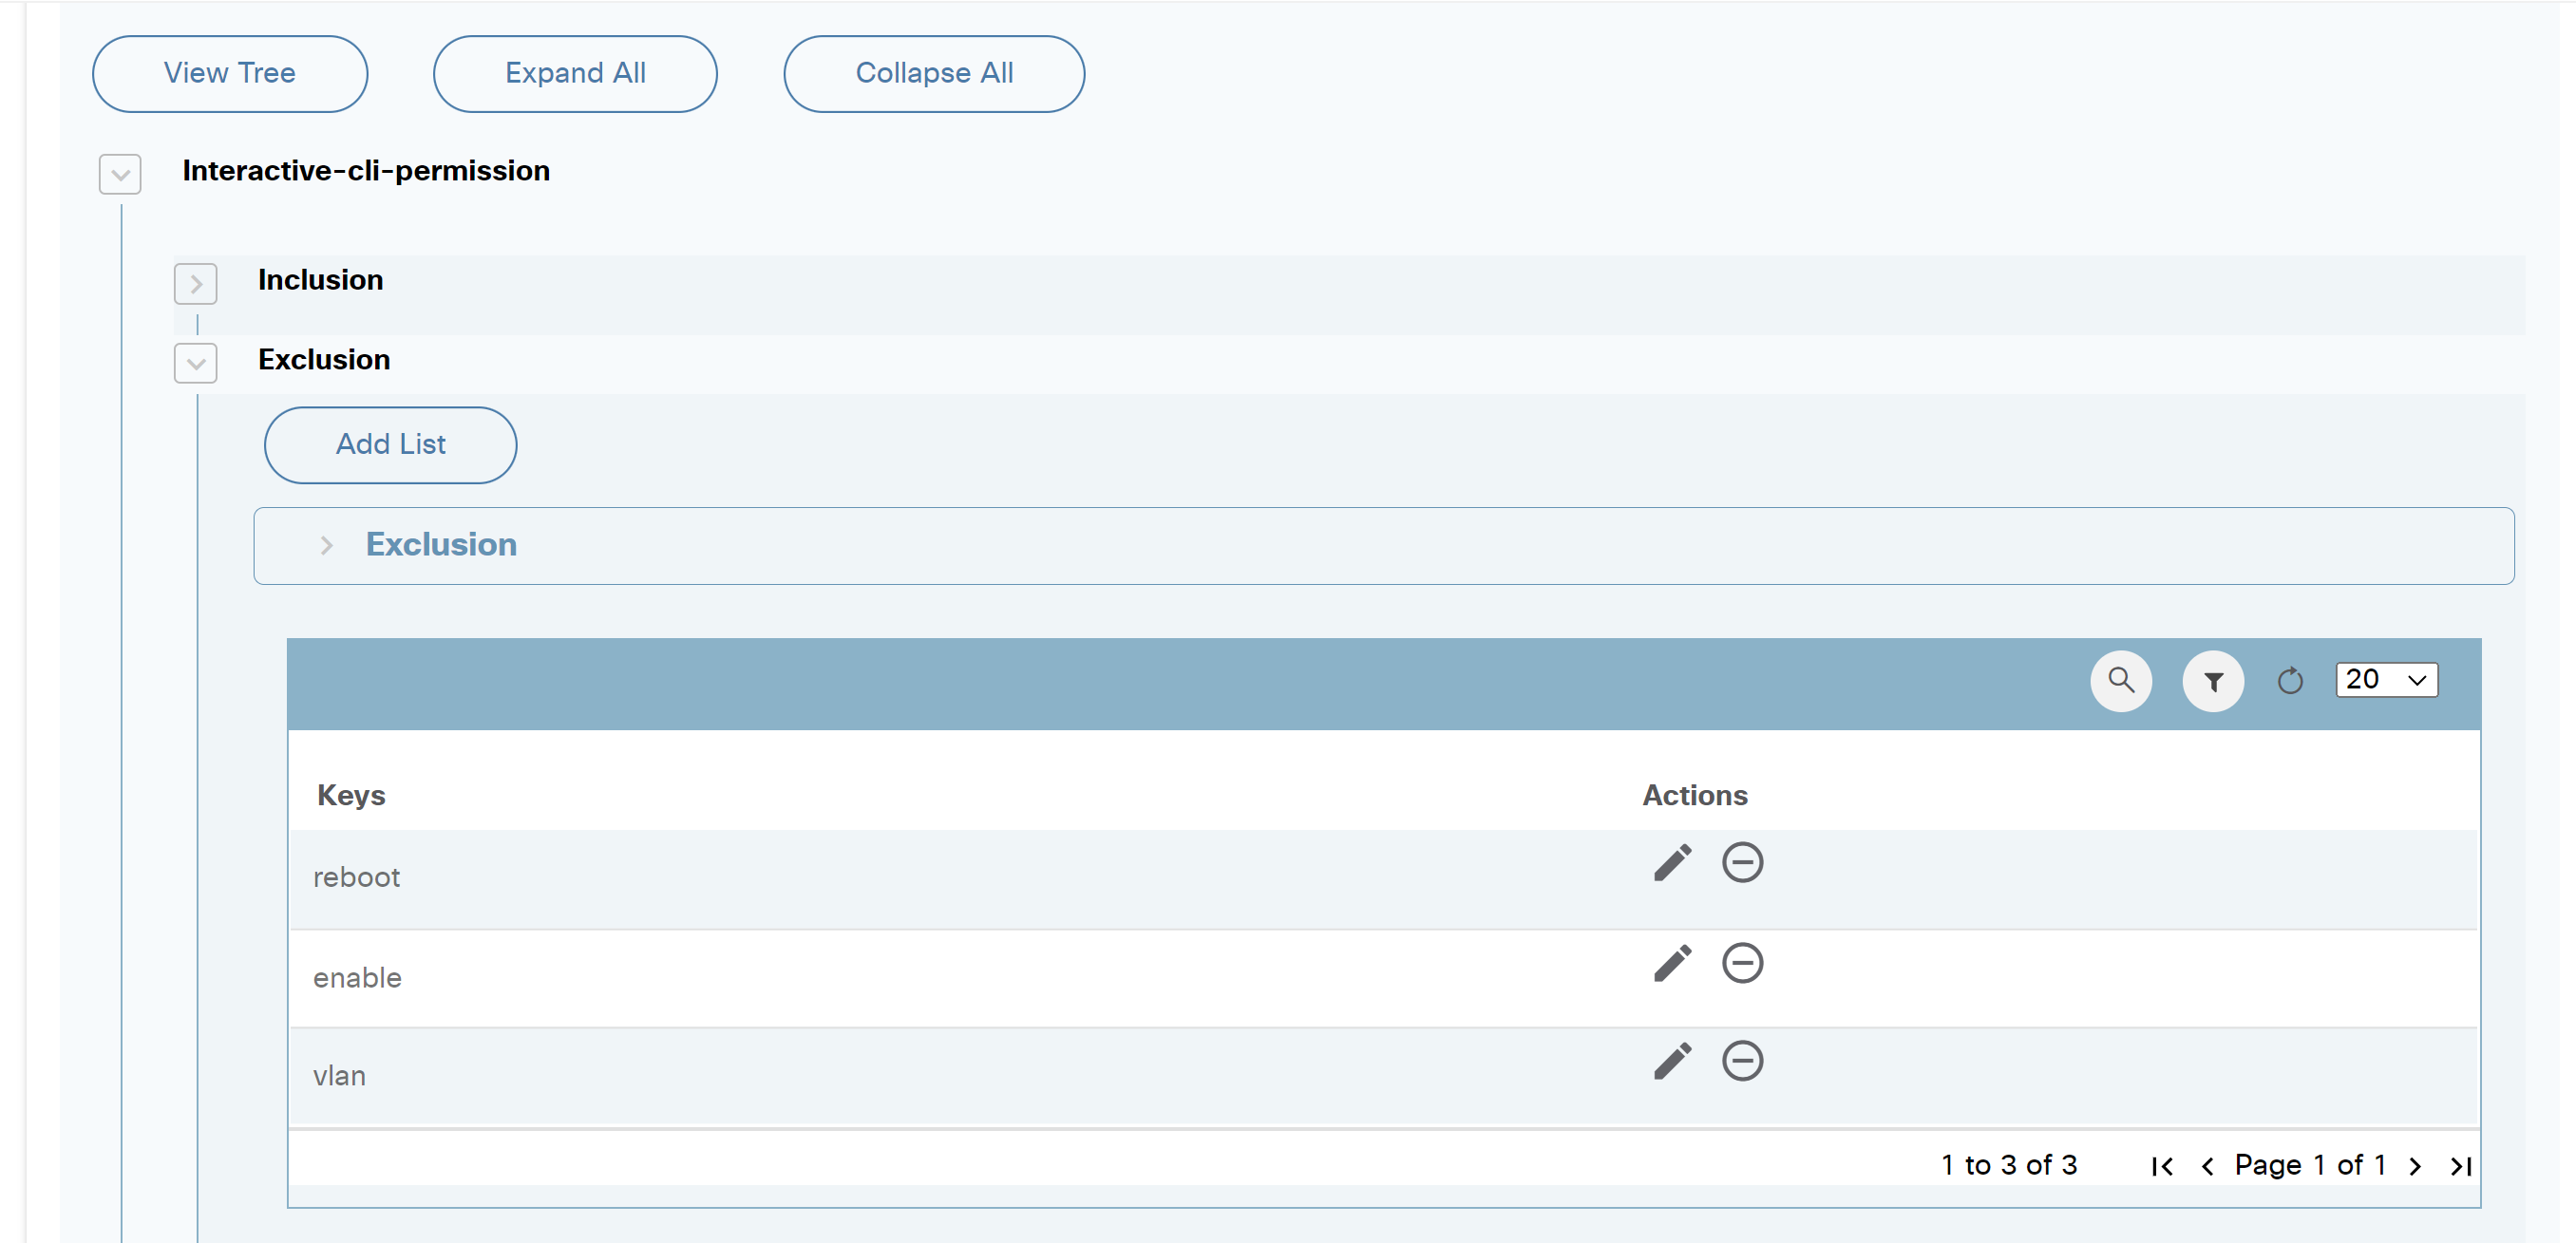
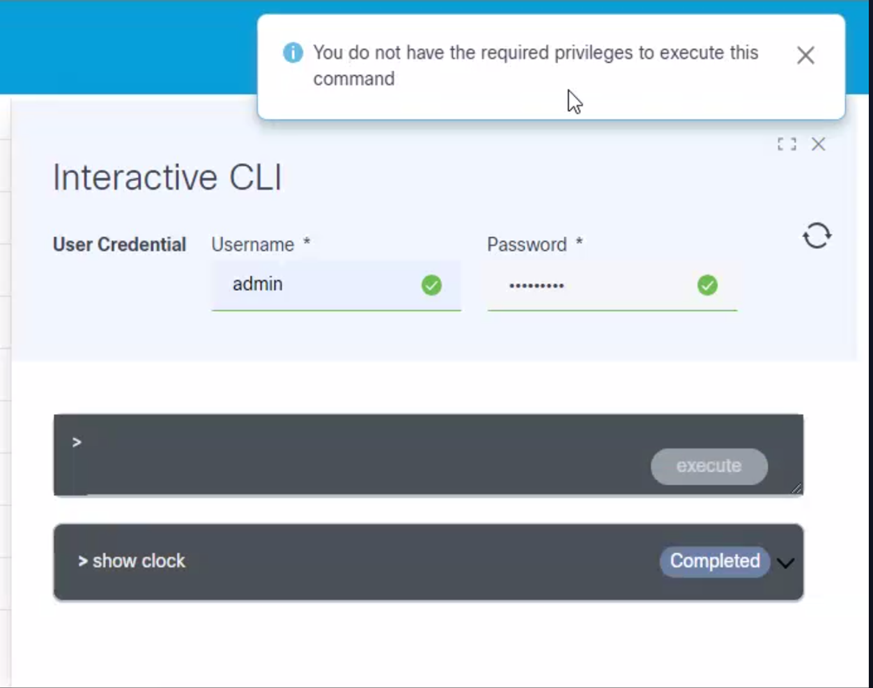
Mask_Sensitive_Info
The Mask_Sensitive_Info tab on the Settings page allows users to configure use cases’ sensitive data that needs to be masked.
In the images below, interactive-cli has been included; therefore, sensitive data is masked when displaying or downloading the device response.
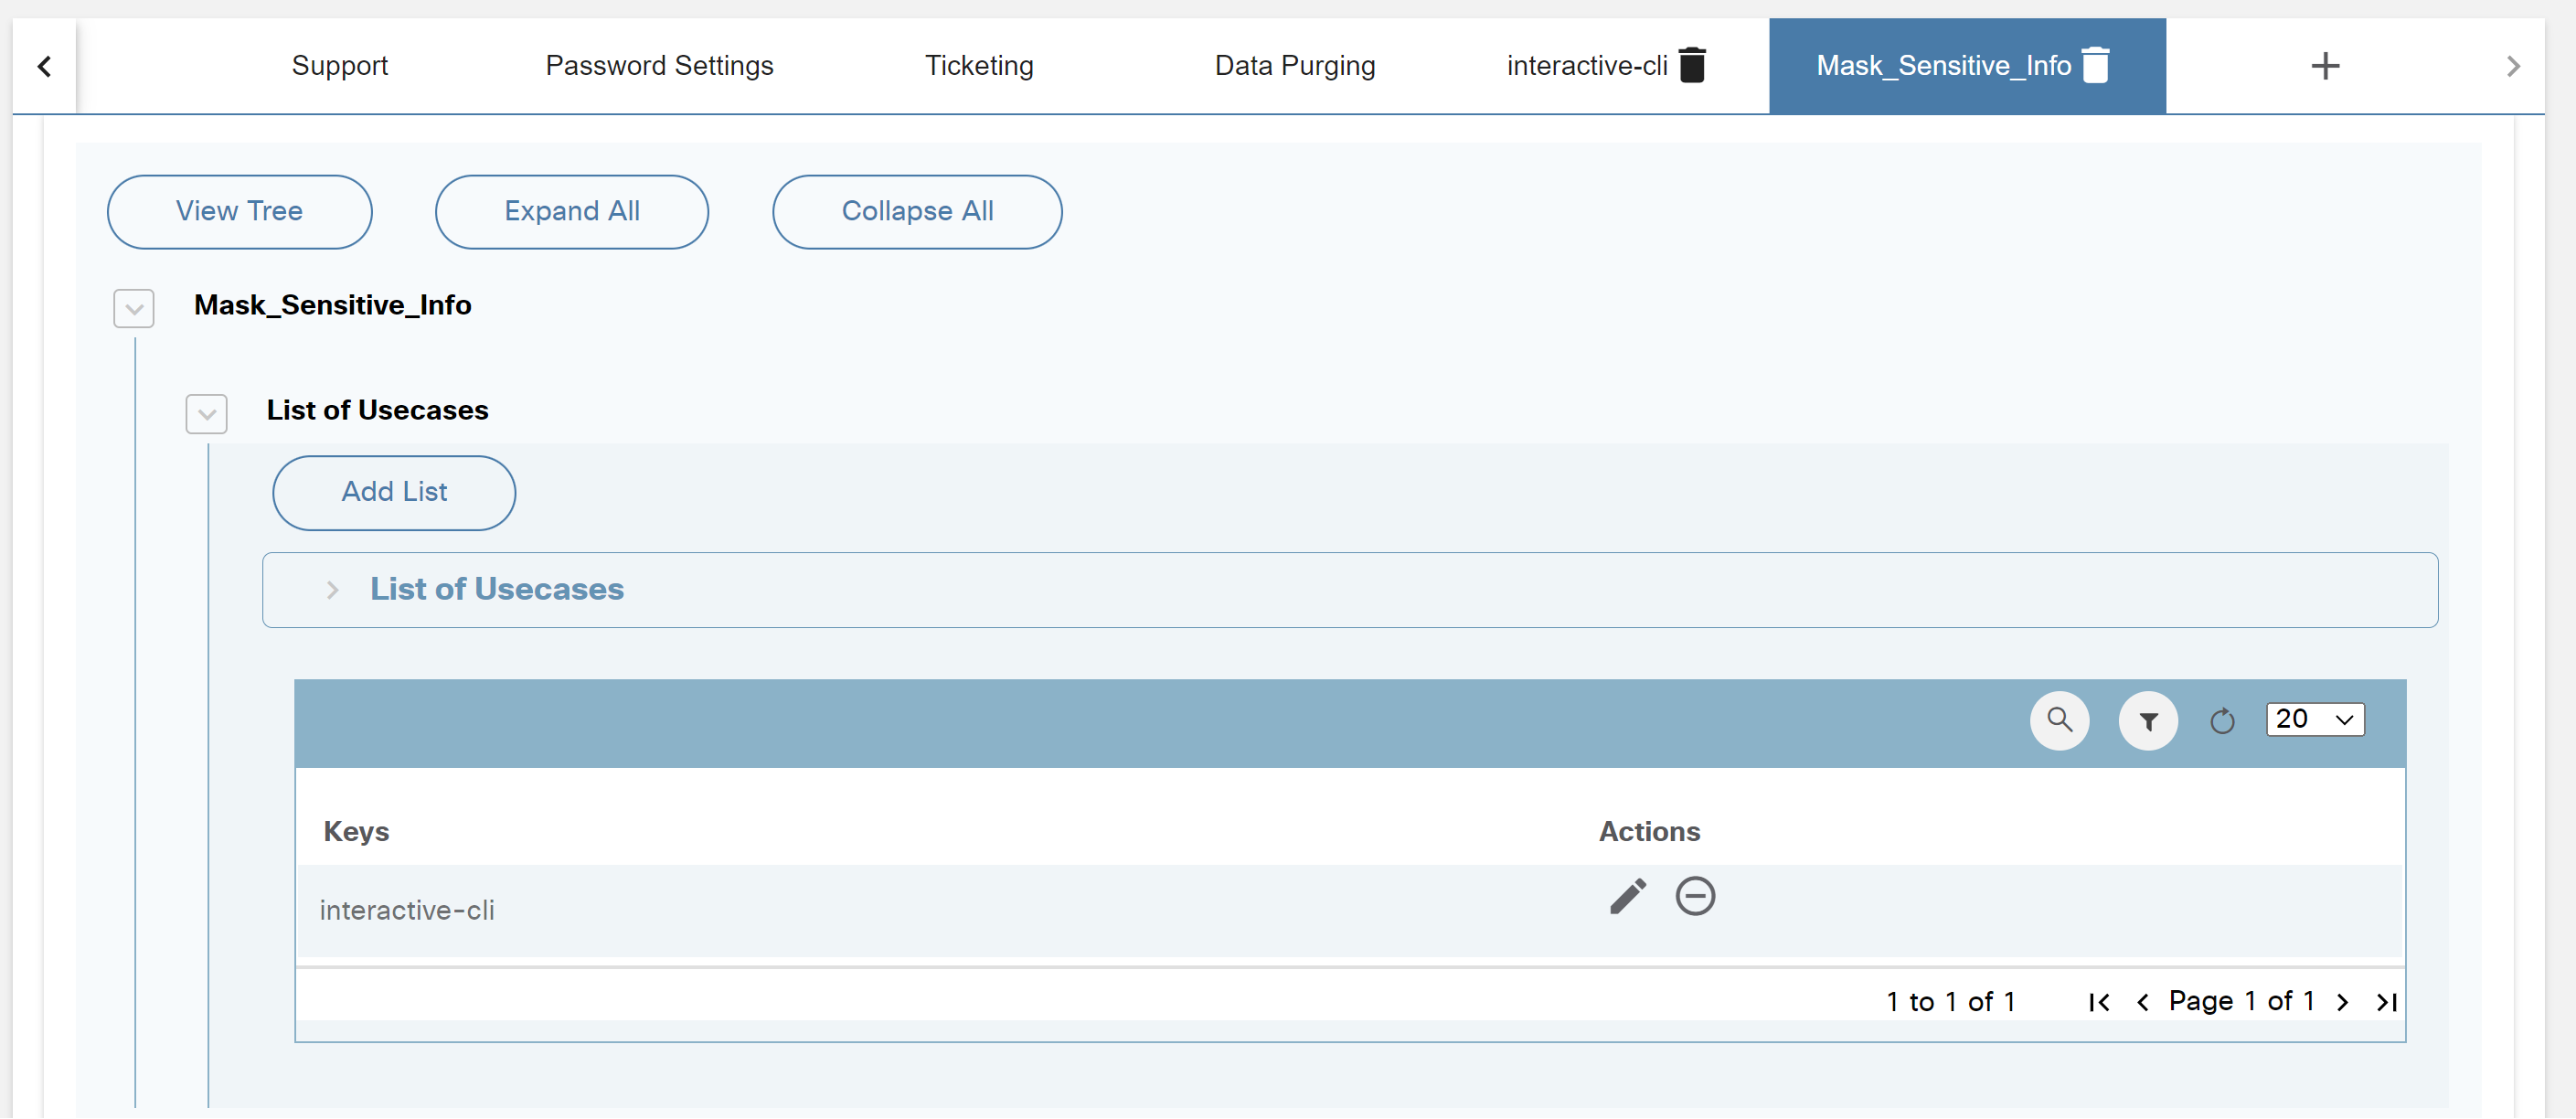
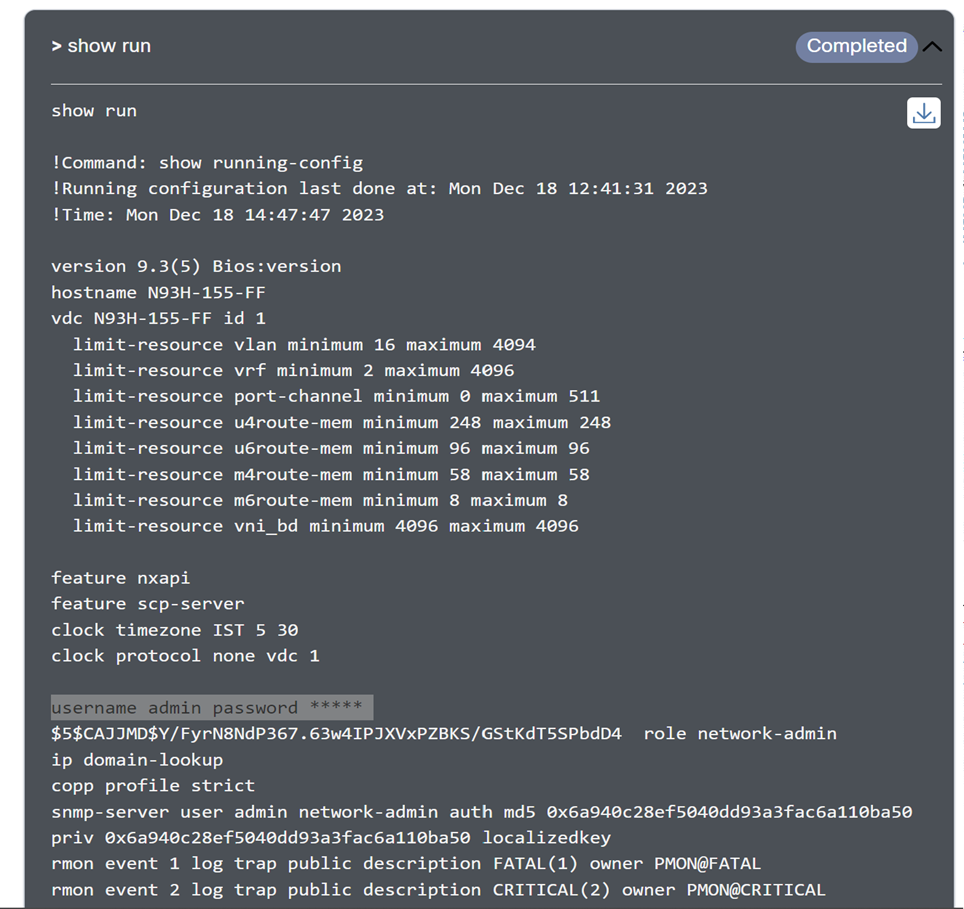
Add Custom Settings
Additional configuration elements can be created by adding more tabs and associating them with Form Builder generic forms. This allows users to create custom configurations that can be consumed by workflows.
Perform the following steps to add a tab:
- Click the Add icon at the top of the Settings page. The Add Tab window opens.
- Add a Name and select Generic (created in Form Builder) from the Form drop-down list, then click Save. A new tab displays with the form details.
- Edit and save the tab contents if required.
All custom settings created can also be accessed via the API.
HOST>/bpa/api/v1.0/settings/custom-form/CustomSettings
Method: GET
Response
{
    "_id": "5cac5c60e462ba27e5d85a05",
    "createdBy": {
        "name": "admin",
        "firstName": "admin",
        "lastName": "admin",
        "id": "b90306e7-7e55-447b-a531-df36ea55aae3"
    },
    "formName": "CustomSettings",
    "tabName": "CustomSettings",
    "data": {
        "Host": "10.1.1.XXX",
        "Port": "8080"
    },
    "__v": 0
}
In the code block example, CustomSettings is the tab added to the settings application.
Data Purging
This application helps to analyze and delete historical data based on a purge policy. Data that can be deleted includes template executions, diff analytics execution, workflow history, compliance reports, and completed service orders.
To schedule a data purge:
- Enter the Start Date and Start Time.
- Select the Repeat schedule check box.
- Select the hours and days to repeat the schedule as required.
- Enter the End Date and End Time and click Schedule.
- Click Analyze to view a summary of records that may be deleted.
- Click the View icon to see details of the last run.
- To delete previous runs, select any executions and click the Delete icon.
Only the Admin user can run and execute data purging defined in the “data-aging-policy-definition.json” fie.
Example:
{ "categories":{ "Process Templates Executions":{ "microservice":"core", "collection":"execution-outputs", "attribute":"executionDate", "age":365, "number_of_records_to_delete":2000 }, "Configuration compliance reports":{ "microservice":"core", "collection":"reports", "attribute":"modified_date", "age":365, "number_of_records_to_delete":2000 }, "Workflow History":{ "microservice":"core", "collection":"process-instances", "age":365, "number_of_records_to_delete":2000 }, "Completed orders from Service Catalog":{ "microservice":"serviceCatalog", "collection":"serviceorders", "attribute":"createdAt", "age":365, "number_of_records_to_delete":2000 } }}The data purging policy might be defined as follows:
- microservice: Name of microservice owing the data to be purged
- collection: Data collection to be purged from data base
- attribute: The collection attribute to evaluate purge criteria
- age: Threshold defined in days (i.e., the time limit to keep records) for deleting records
- Number_of_records_to_delete: Max number of defined records to be deleted
Network Topology Templates
Network Topology Templates are used by BPA to construct the network topology of devices. The topology can be viewed with the Network Topology application.
- Select the User Profile icon > Admin.
- Select the Network Topology Templates tab. The Network Topology Templates page displays.

The Network Topology Templates page displays a list of available templates and their general information, such as NED ID, Created Date, and Updated Date. Network Topology Templates allows users to:
- Add network topology templates by clicking Add
- Build network topology links by clicking Build
- Sync device locations by clicking Sync
- Edit a network topology template by selecting the Edit icon
- Delete a network topology template by selecting the Delete icon
Adding a Network Topology Template
To add a network topology template:
- From the Network Topology Templates page, click Add. The Create Topology Template window opens.
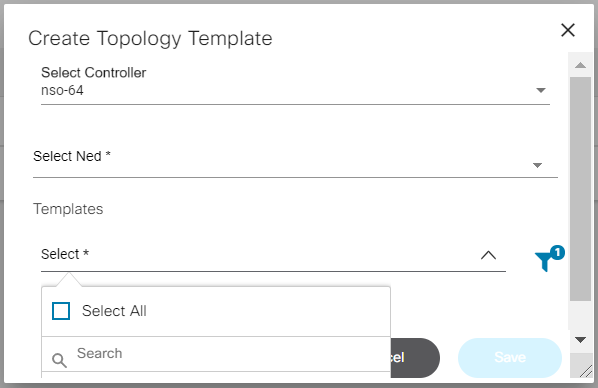
- Select the NSO, NED, and Templates from the drop-down lists.
- Click Save. A pop-up message displays at the top right corner of the screen.
The templates listed are created using the Process Templates application.

Build Network Topology Links
To retrieve data from the network and build links in the topology, click Build from the Network Topology Templates page. Users can add or update the network topology links. When the network topology links have been updated, a success pop-up window opens.
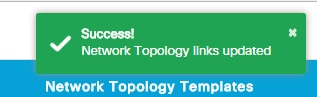
Sync Device Location
Click Sync from the Network Topology Templates page to update the latest location of the device in the network topology. A success pop-up window opens.
Edit Network Template
Perform the following steps to edit a network template:
- From the Network Topology Templates page, select the Edit icon from the Actions column of the desired network template. The Update Topology Template window opens.
- Select the required templates from the drop-down list and click Update.
Delete Network Templates
Perform the following steps to delete a network template:
- From the Network Topology Templates page, select the Delete icon from the Actions icon of the desired network template. A delete confirmation window opens.
- Click Ok.
Tag Management
Tag Management helps to manage tags. BPA artifacts such as Process Templates, GCTs, Form Builder forms etc., can be tagged with one or more tags which can be used to filter the artifacts.
Adding Tags
To add tags, follow the steps below:
- From the Admin page, select the Tag Management tile. The Tag Management page displays.
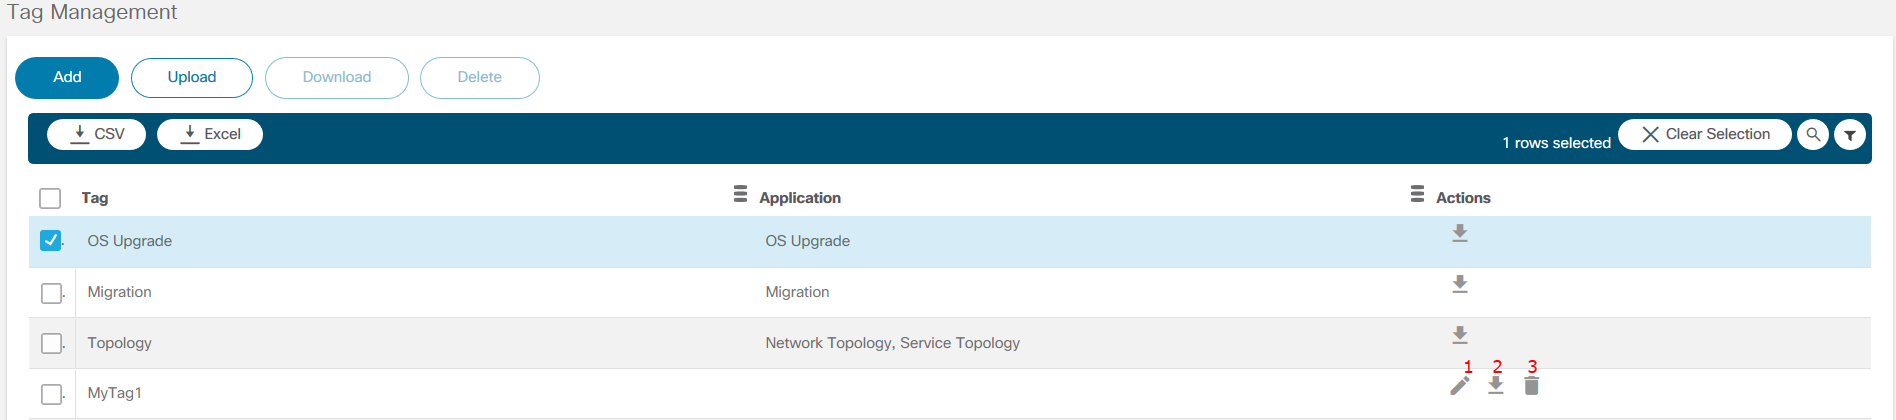
The numbers in the table below correspond to the icons shown in the Tag Management figure above.
| Number | Icon |
|---|---|
| 1 | Edit |
| 2 | Download Tags |
| 3 | Delete Tags |
- Click Add. The Add Tag window opens.
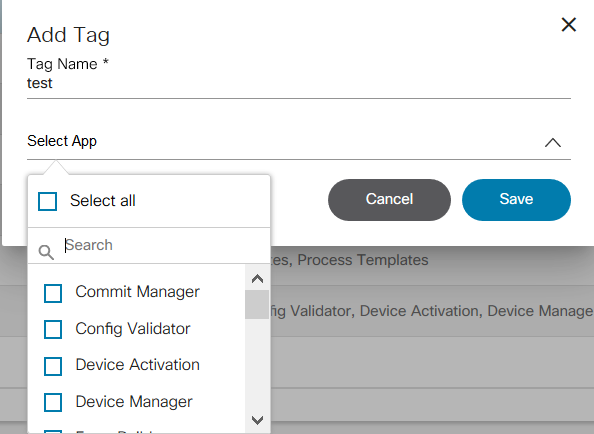
- Enter the Tag Name and select the one or more applications from the Select App drop-down list. To use the tag in all components, do not select any applications.
- Click Save.
Editing Tags
To edit tag details, follow the steps below:
- From the Tag Management page, select the Edit icon from the Actions column of the desired tag. The Edit Tag Item window opens.
- Edit the required fields as necessary.
- Click Save.
Deleting Tags
To delete a tag, follow the steps below:
- From the Tag Management page, select the Delete icon from the Actions column of the desired tag. A warning message displays.
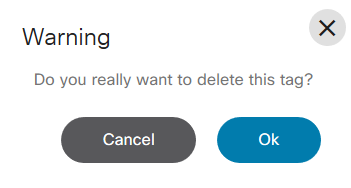
- Click OK to delete the tag.
Controller Data- Sync
To sync the controller data, follow the steps below:
- Select the User Profile icon > Admin. The Admin page displays.

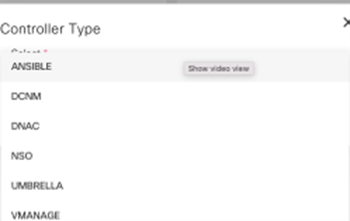

- Select the Controller Data-Sync tile. The Select controller(s) to sync page displays. Select the check box of a controller from the list and click Proceed.
- Alternatively, the Sync icon under the Actions section can be selected to trigger the sync process. In the case of a NSO controller, the sync action performs the services sync. For all other controller types, the sync process performs the template sync.
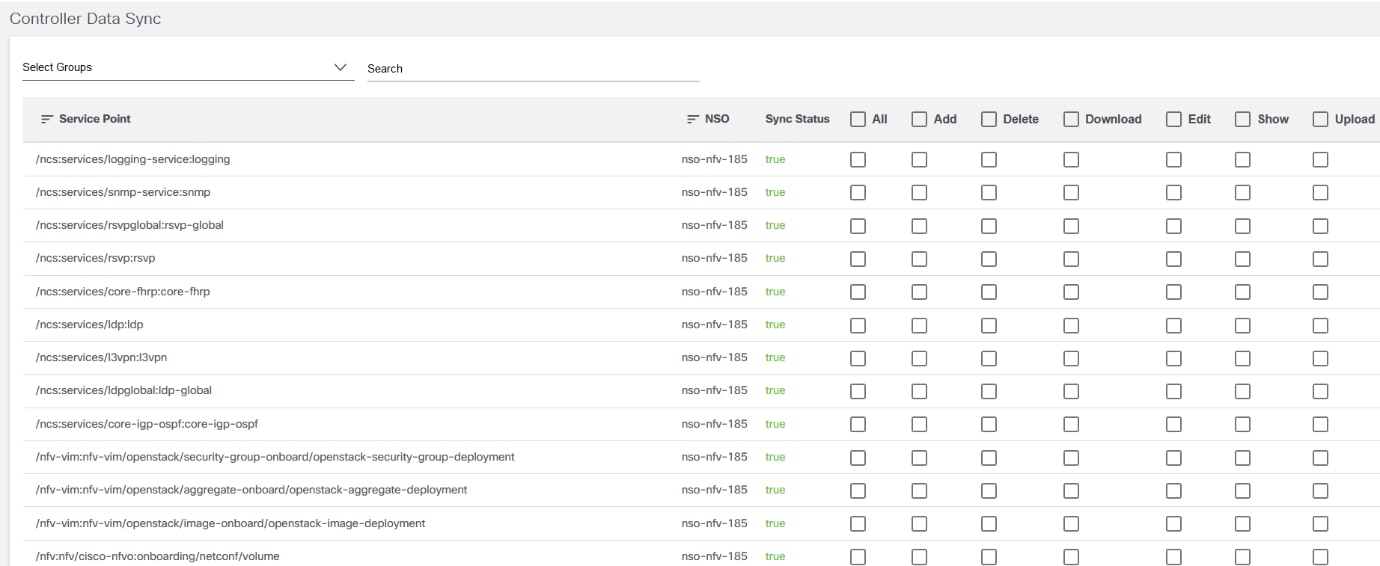
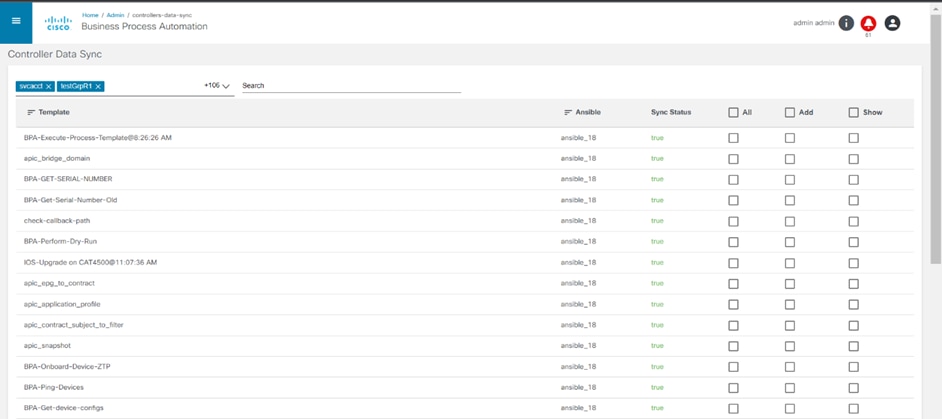
- For NSO, the Controller Data Sync window displays the service schemas retrieved from the configured controller. Users can view the sync status which shows the results as either true or false. In the window, the option to configure which groups have access to these services is available. Select a group from the Select Groups drop-down list and change permissions as required. Click Save before selecting the next group.
The Cicsoutlis package needs to be installed. Refer to the BPA Installation Guide for more information.
- The Cron scheduler automatically performs the controller data-sync. From the Select controller(s) to sync page, select the Gear icon from the Actions column of the desired controller. The Cron Scheduler to Sync window opens. Configure the Chron schedule for the controller instances. The same or different schedule can be selected for device sync and template sync. This feature is available for all controller types.
Managing the Service Catalog
To manage the Service Catalog:
- Select the User Profile icon > Admin. The Admin page displays.
- Select the Service Catalog tile to manage the services
The following components can be added through the Service Catalog option:
- Service Categories
- Service Items
- Orders
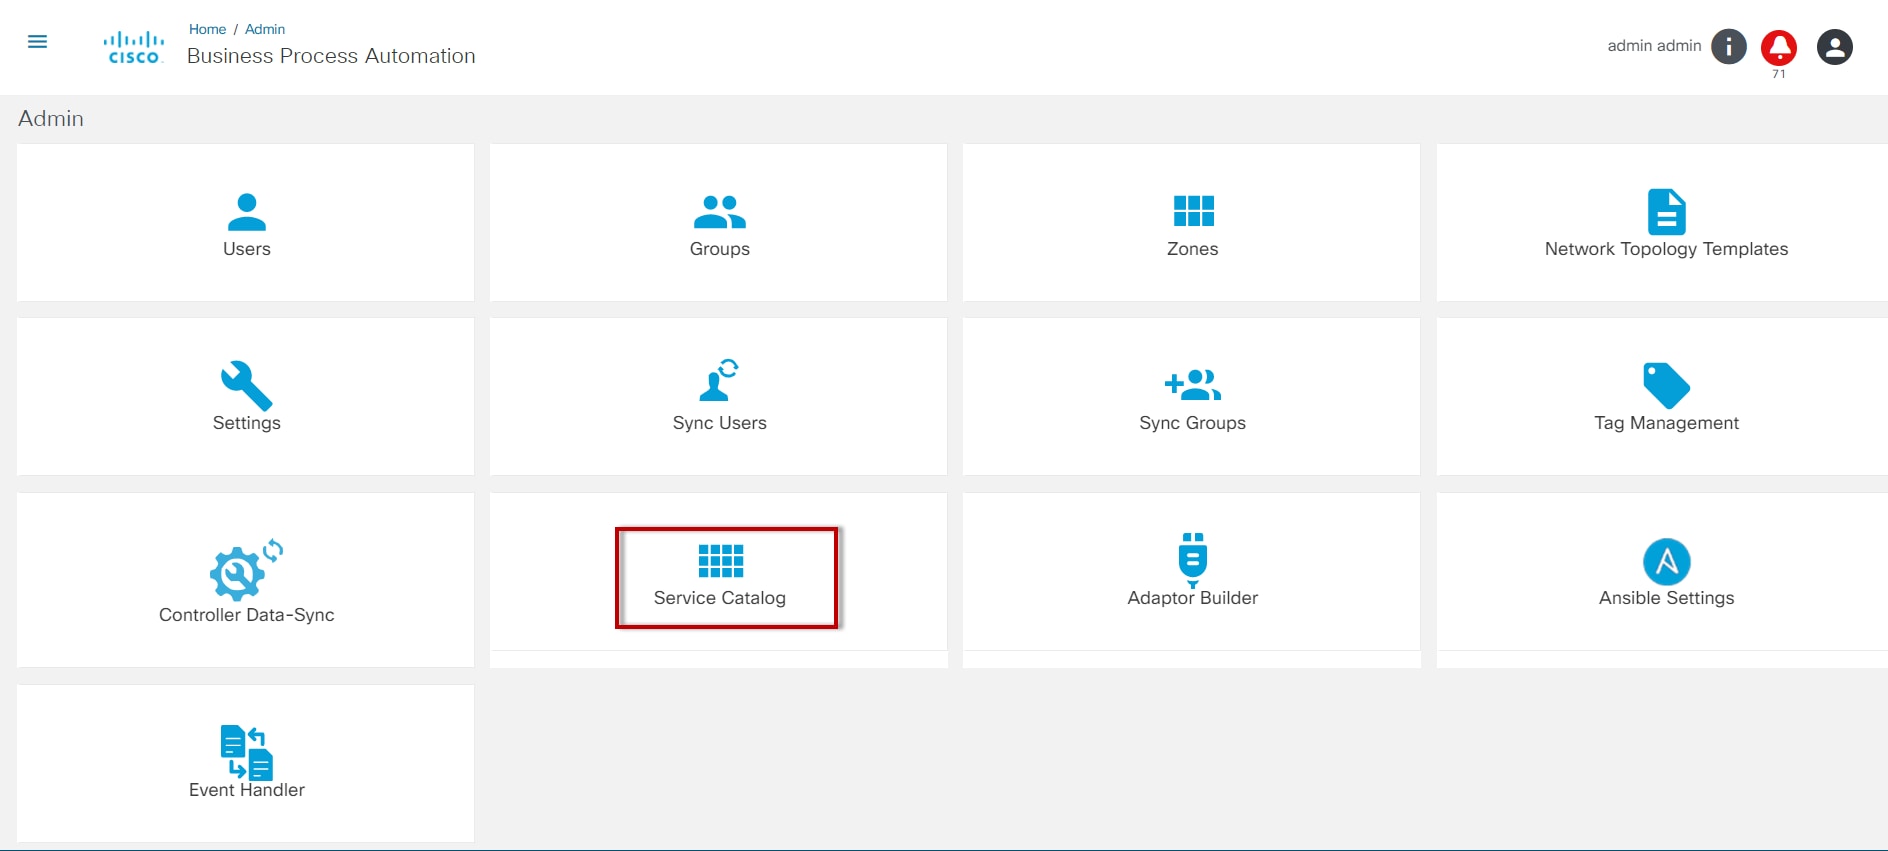
Service Categories
This option is used for managing service categories in the Service Catalog.
Adding a Service Category
To add a Service Category, follow the steps below:
- From the Admin page, select the Service Catalog tile. The Service Catalog page displays.
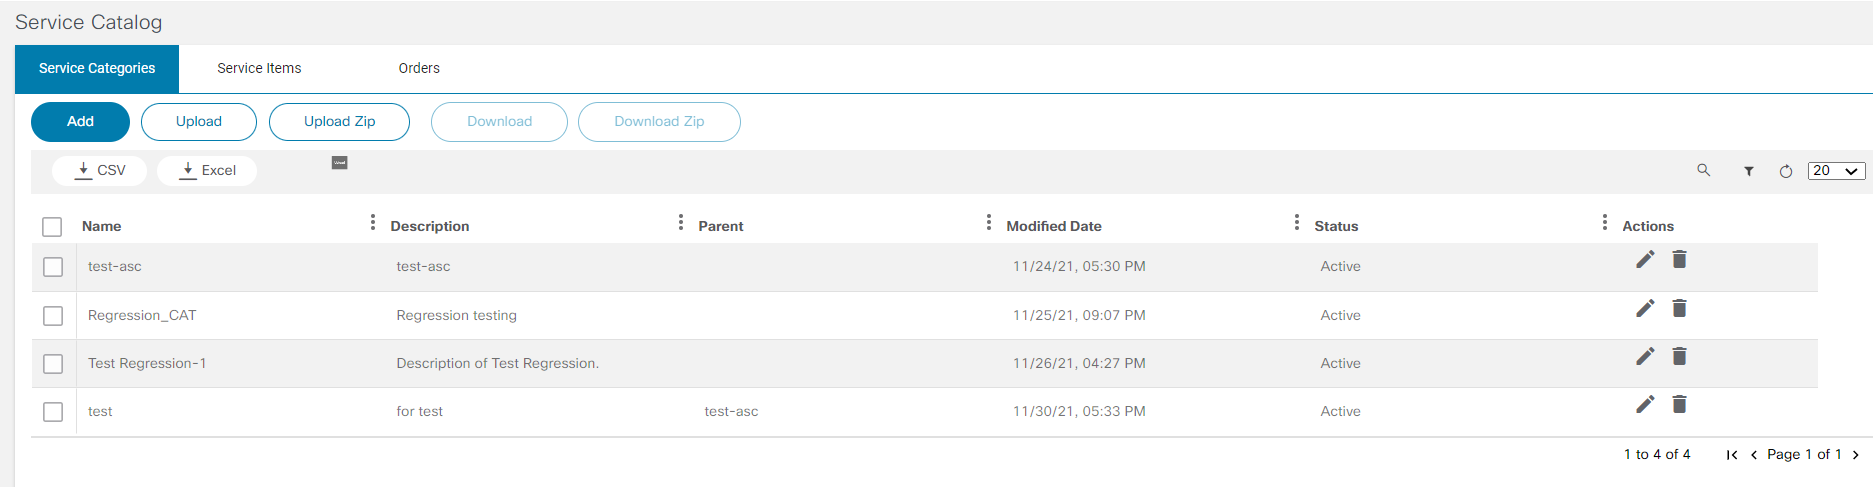
- Click the Service Categories tab.
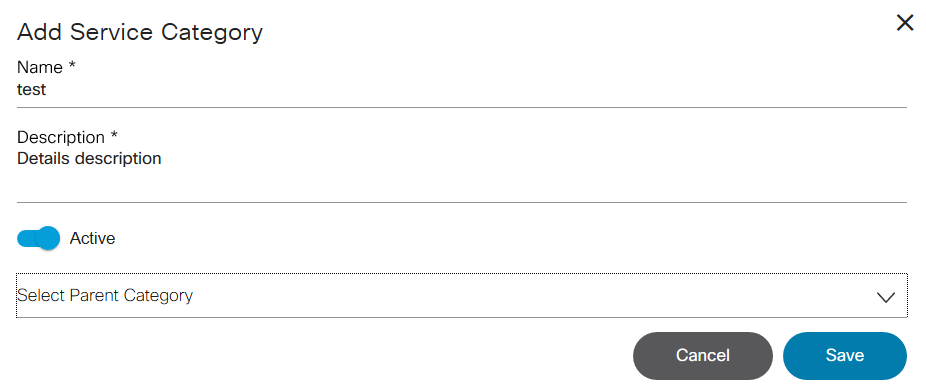
- Click Add.
- Enter a Name and Description for the Service Category.
- Enable the Active toggle to make the Service Category active for the order.
- Select the Parent Category from the list. The Parent Category is used for adding the new category in an already existing category.
- Click Save.
Editing a Service Category
To edit Service Category details, follow the steps below:
- From the Service Categories tab, select the Edit icon from the Actions column of the desired category. The Edit Service Category window opens.
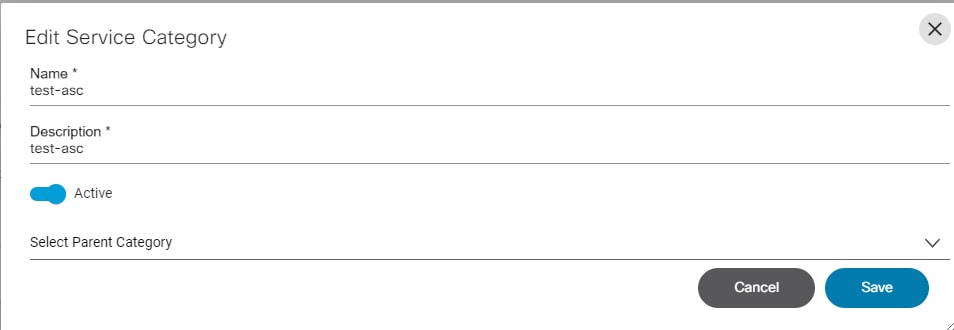
- Update the necessary fields and click Save.
Deleting a Service Category
To delete a category, follow the steps below:
- From the Service Categories tab, select the Delete icon from the Actions column of the desired category. A warning message displays.
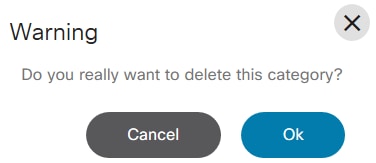
- Click OK to delete the Category.
Service Items
This option is used for managing service items in the Service Catalog.
Adding Service Items
- From the Admin page, click the Service Catalog tile. The Service Catalog page displays.
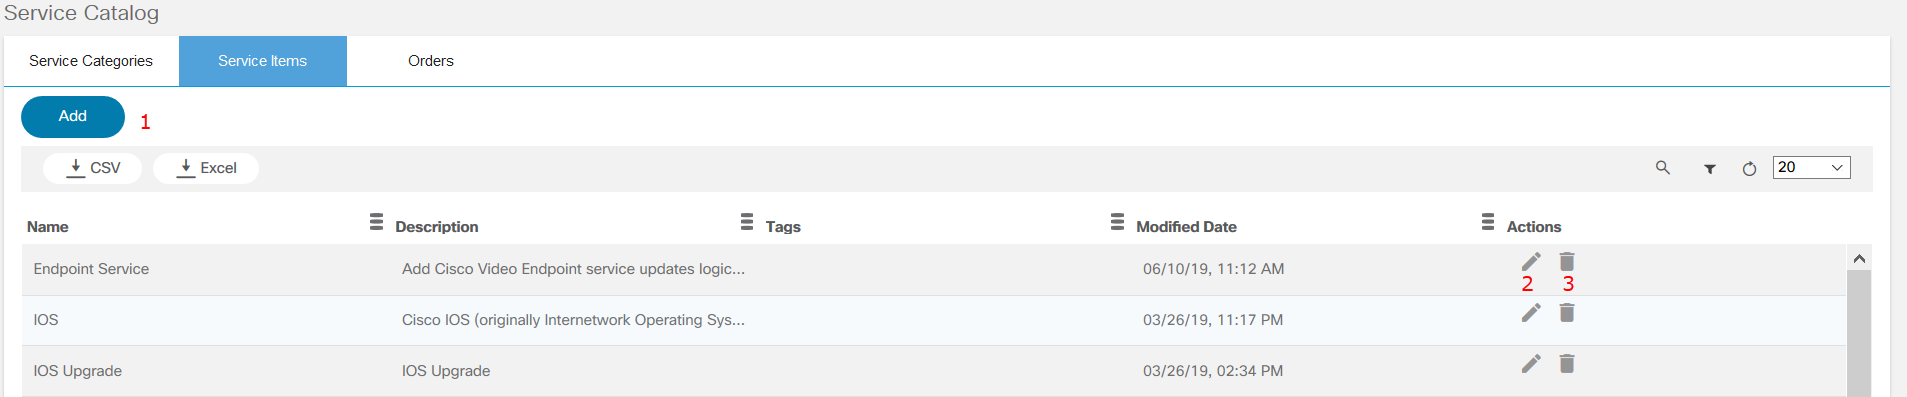
- Click the Service Items tab.
- Click Add.
- Enter a Name and Description.
- Select the Category from the drop-down list.
- Select the Status.
- Browse to select the image file and add it.
- Select the Tags from the drop-down list.
- Select the Order Form Type from the drop-down list.
- Select the Workflow and Version from the drop-down list.
- Enter the action Name, select the Workflow, Version, and Icon, and enter an Icon tooltip. Select the Plus icon to add the actions.
- Click Save.
Editing Service Item
To edit service item details:
- From the Service Items tab, select the Edit icon from the Actions column of the desired service item. The Edit Service Item window opens.
- Make the required edits.
- Click Save.
Deleting a Service Item
To delete a service item:
- From the Service Items tab, select the Delete icon from the Actions column of the desired service item. A warning message displays.
- Click OK to delete the item.
Orders
This option is used for viewing all service items ordered by users. Users can search for the order by Order ID, service, date, or the user that ordered the item.
In the Orders tab, use the filter to search for an order with a status of Completed or In Process.
Sync Users
Sync users imports the users from the configured servers.
If LDAP integration is enabled, users can be synced with the BPA database.
From the Admin screen, click Sync Users to sync the LDAP users.

Sync Groups
Sync users imports the users from the configured servers.
If LDAP integration is enabled, users can be synced with the BPA database.
From the Admin page, select the Sync Users tile to sync the LDAP users.
Adapter Builder
This enables calling APIs exposed by internal and external service providers. It can chain API calls as well as transform data between the API calls using internal BPA resources. Refer to Working with Adapter Builder for more details.
Ansible Settings
This is to configure the form so that data can be entered by a user as input for the Ansible template. For defining the input form, this application uses the Form Builder application.
Refer to Ansible Settings for more information.
Activate Template
All the templates from the Ansible controller are available on this page. Template names that start with “BPA” are used for BPA-specific functionalities.
Customized templates can be used with Form Builder form and users can launch the job in Ansible template.
Event Handler
Event handler automation is a framework that reacts to network events and automatically or manually trigger an action based on the severity of an event. This framework addresses closed loop scenarios and helps customers to react to events that may be triggered from devices or from an assurance and analytics solution. The framework has three stages:
- Data Augmentation: This stage can be configured to fetch additional data and augment it to the data received when an event is triggered
- Expression Evaluation: This stage evaluates an expression which is a set of rules; the evaluation is a Boolean value.
- Action Evaluation: The action associated with the Boolean evaluation are triggered in this final stage
Refer to the BPA Developer Guide for more information.
Backup and Restore
The backup and restore framework enables device configuration backups to be taken from various controllers and stored in a datastore that can be configured. The framework also supports a workflow-based approach to restore backup configurations on specific devices. The Backup and Restore admin application has the following components:
- Policies
- Schedules
- Device Config - Upload
- Backup History
- Target Repositories
- Target Plugins

Policies
Policies is the metadata definition to be adhered to while running the backup and restore flows.
List Policies Page
The Policies tab provides a grid view of all the policies available in the system.
It also provides options to add, edit, delete, upload, and download policies. Policies can be downloaded from one environment and uploaded into another.
Add or Edit a Policy
A policy has the following key fields:
- Policy Name: Name of the policy (must be unique)
- Active: This states that the policy is active. If it is set as inactive, then the policy is not shown to users when taking backups. All corresponding schedules are disabled
Backup Details:
- Target Repo: The target repository where the taken backups should be stored.
- Maximum Retention Count: The total number of backups retained per device. Once this value is reached, older device backups are deleted
- Patterns for Masking Sensitive Data: A list of patterns that are used to mask sensitive data during display. This does not change the configuration stored
- Ignore Patterns: A list of patterns that are used to ignore lines while comparing two configurations. This is used while creating checksums, to decide whether a previous backup and the current backup are the same. This does not change the configuration stored
- Compress: Compress the backup before storing
- Encrypt: Encrypt the backup before storing
Restore Details:
- Restore workflow: The workflow to execute during a restore process
- Controller Type: The controller type to which the policy applies (e.g., DCNM, NSO)
- Template: A section to add one or more pre/post templates and analytics templates. This is used during the restore workflow for validation
- Filter by (Tags): Restore workflows and templates can be filtered through tags
- Pre-check Template: A list of templates to only be used for pre-checks
- Post-check Template: A list of templates to only be used for post checks
- Enable Ticketing Integration: Select the check box to enable integration with a ticketing system The use case provides out-of-the-box integration with the ServiceNow system
Schedules
Schedules are created against policies. A user can select a list of devices and choose when to back up the device. Schedules can be one-time or periodic.
Schedules Tab
This tab lists all the schedules configured in the system. An Administrator is provided with options to add, edit, and delete schedules.
Adding or Editing a Schedule
Schedules have the following key fields:
- Schedule Name: A unique name to identify the schedule
- Policy Name: The policy to use while taking backups by this schedule
- Label: Optional label to be attached to all backups taken in this schedule
- Assets: A grid to select an asset group based on the list of devices to take backup of
- Schedule Details and Schedule Recurrence: Provides options to define various schedule parameters such as start date/time, recurrence pattern (including cron), and end date
Backup Configuration – Upload
Users can upload a “tar.gz” or .tgz file containing one or more device configuration to be saved as a configuration backup.
The upload file structure is as follows:
sample.tar.gz to sample.tar to
{{device-name}}.txt
The “Backup Configuration - Upload” file has the following key fields:
- Controller Type: Controller type to which the controller instance belongs (e.g., DCNM, NSO)
- Controller: Controller instance where controller devices are onboarded
- Policy: Policy to use while taking backups by this device configuration upload
- Label (Optional): Optional label to be attached to all backups taken in this device configuration upload
- Device Configuration File: Configuration file to be uploaded in “tgz” or “tar.gz” format
Backup History
This tab provides the historic view of completed backups along with references to the date, policy, schedule, and status.
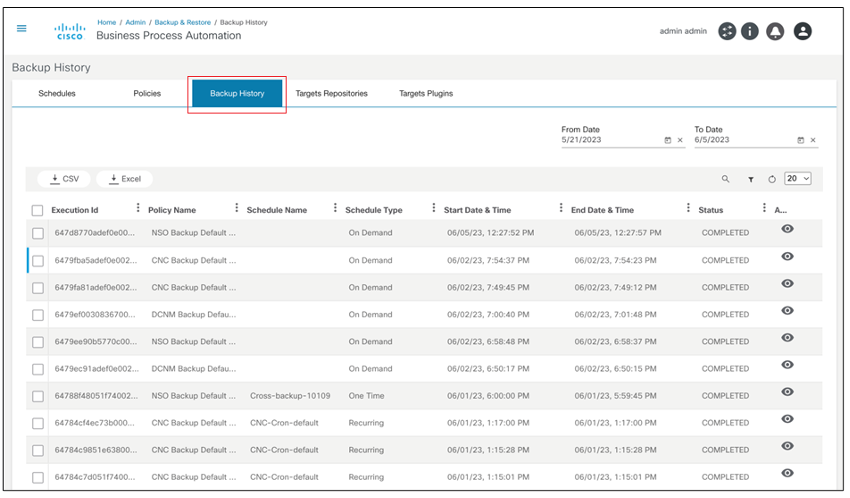
Users can view the detailed status of each execution.
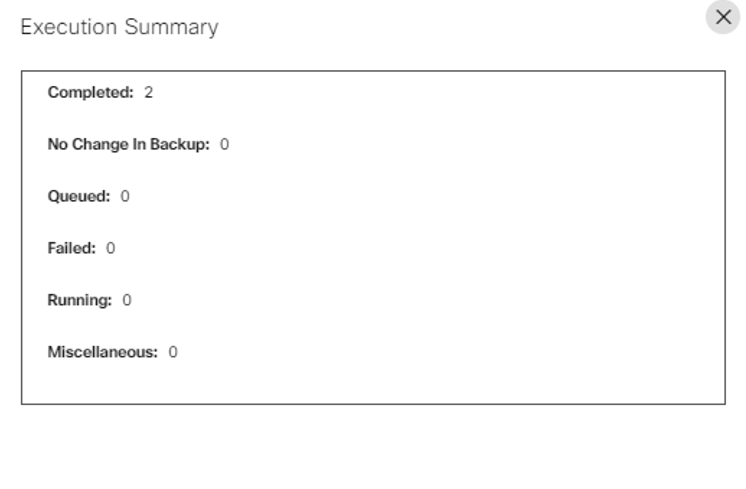
Target Repositories
Target repositories are instances of data systems where the backup configuration data is stored. The default, pre-configured target repository is the internal database.
Target Repositories Tab
The Target Repositories tab lists the target repositories configured for this system. Administrators can define the repository instances against different target types.
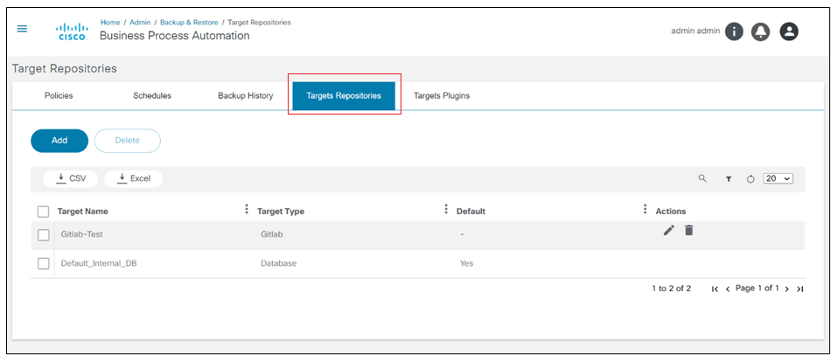
Adding or Editing Target Repositories
Key fields of the target repository are:
- Target Name: Name of the repository
- Target Type: The target type with a list of values from the Target Type column
- Target Form (Optional): Select the target form and complete the configuration data to be used against this target repository instance
- Batch Size: Select the target batch size
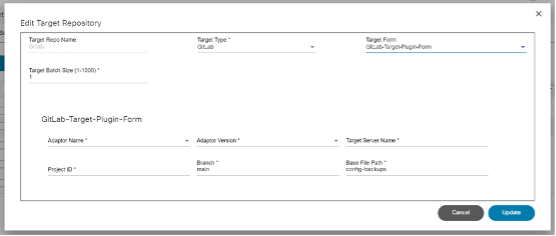
Target Plugins
Target Plugins Tab
The backup and restore framework provides an option to configure an external system as storage for the backup configurations. This feature is powered by a plugin architecture. Each plugin must implement a pre-defined interface (with a list of functions, input, and output parameters) and be uploaded into the target plugin page.
Adding or Editing Target Plugins
Target plugins have the following fields:
- Target Type: Target type name
- Execution Environment: The execution environment where the plugin runs. Currently, only NodeJS is supported
- Upload Plugin: The upload plugin file to be uploaded in .tgz or “tar.gz” format. This should be a Node Package Manager package
Backup Throttling
The backup process utilizes the Advanced Queueing Framework (AQF), leveraging its throttling limits for efficient operation. With AQF, request processing during scheduled backups is optimized, ensuring seamlessness within defined throttling parameters.
Preferences
The User Profile icon > Preferences option allows users to choose a preferred controller instance. Controller instances can belong to any controller type, such as Cisco Catalyst Center, DCNM, Ansible, NSO and vManage. In applications that display a controller instance selection box (shown when multiple controller instances are configured), the preferred controller instance is selected by default.
Preferences displays when adding more than one controller instance.
To set the default controller instance:
- Select the User Profile icon > Preferences. The Preferences page displays.
By default, All is selected. A user can change to the preferred controller instance as per their preference. If All is set as the preferred controller instance, then, based on the device selected, the controller instance is picked for any operations in Device Manager, Commands Templates, GCT, Service Center, and Form Builder pages by the system on which the device resides.

- Select the preferred controller instance from the drop-down list and click Save. This sets the preferred controller instance as the default option upon login.
Working with Business Applications
This section outlines details about all the applications available in BPA.
Working with the Form Builder Application
The Form Builder application is used to build forms for user input. These forms can be embedded in a workflow to gather input from an end user. The collected data can be used to make further decisions in the workflow or to construct payload before provisioning device via NSO.
Users can perform the following actions in the Form Builder application:
- Creating a Form
- Editing a Form
- Cloning a Form
- Importing and Exporting Forms
- Deleting Forms
- Runtime Form
Creating a Form
To create a new form:
- On the Form Builder page, click Add. The Create New Form page displays.
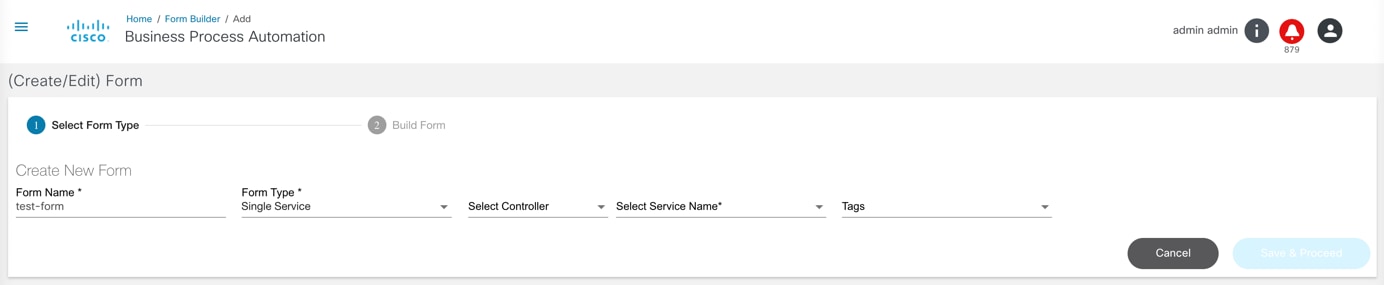
- Enter the Form Name and select the Form
Type. There are three options available:
- Single Service: Use this option to add/modify/delete input parameters for a specific NSO and service template
- Multi Service: Use this option to add/modify/delete input parameters for a NSO and multiple service templates
- Generic: Use this option to create a form that is generic (not based on a service template)
- Select the Tags from the drop-down list.
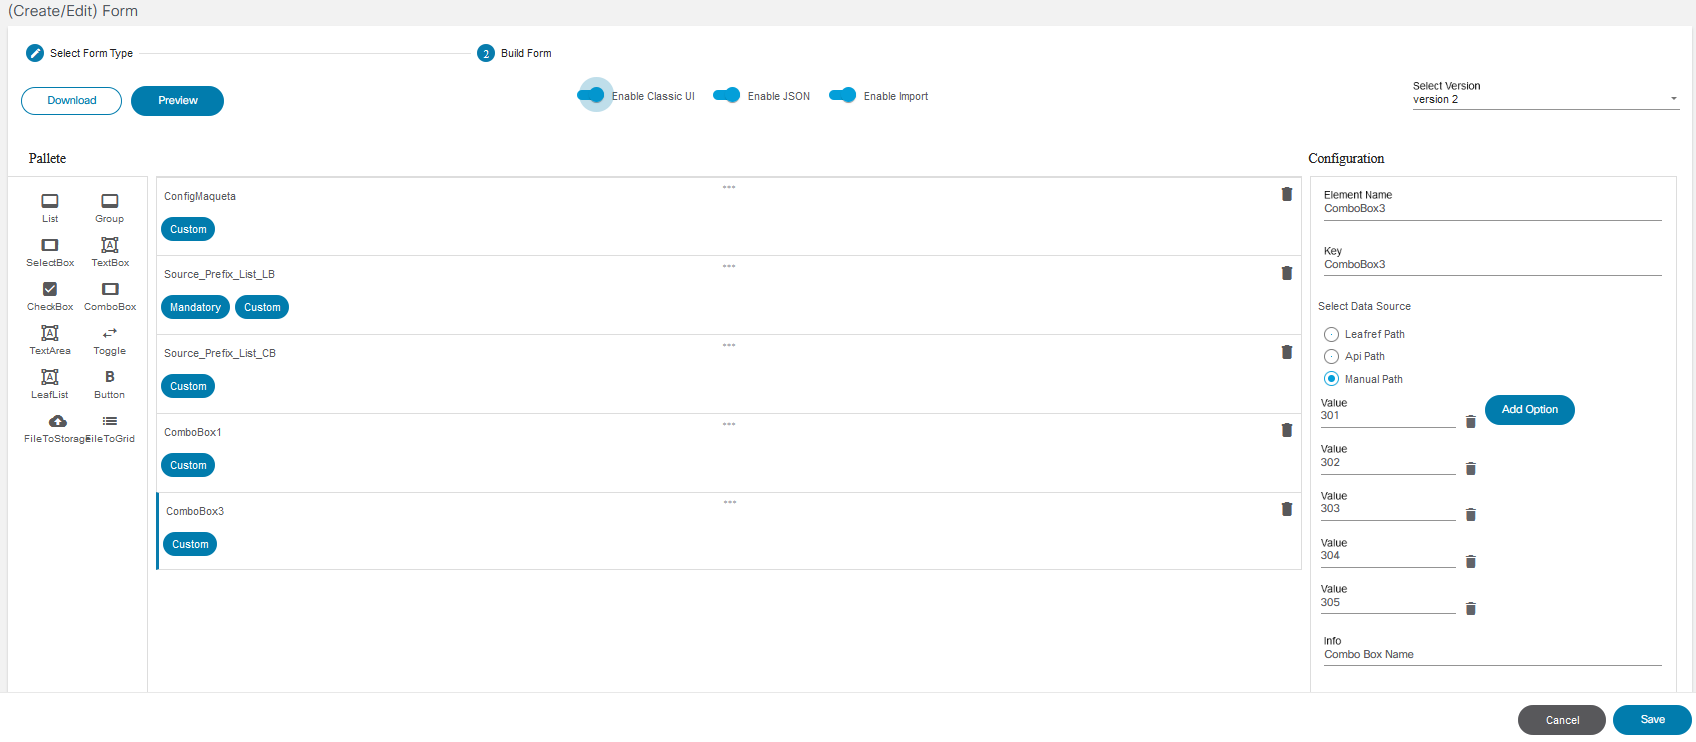
- After making the changes, preview the changes made and click Save. This saves the form in the database. To edit the form, refer to Editing a Form.
Viewing Forms
To view a form:
- Click the Form Builder application on the Home page. The Form Builder page displays the list of current forms. The list also displays the date of creation, modification, and includes actions that can be performed such as edit and delete.
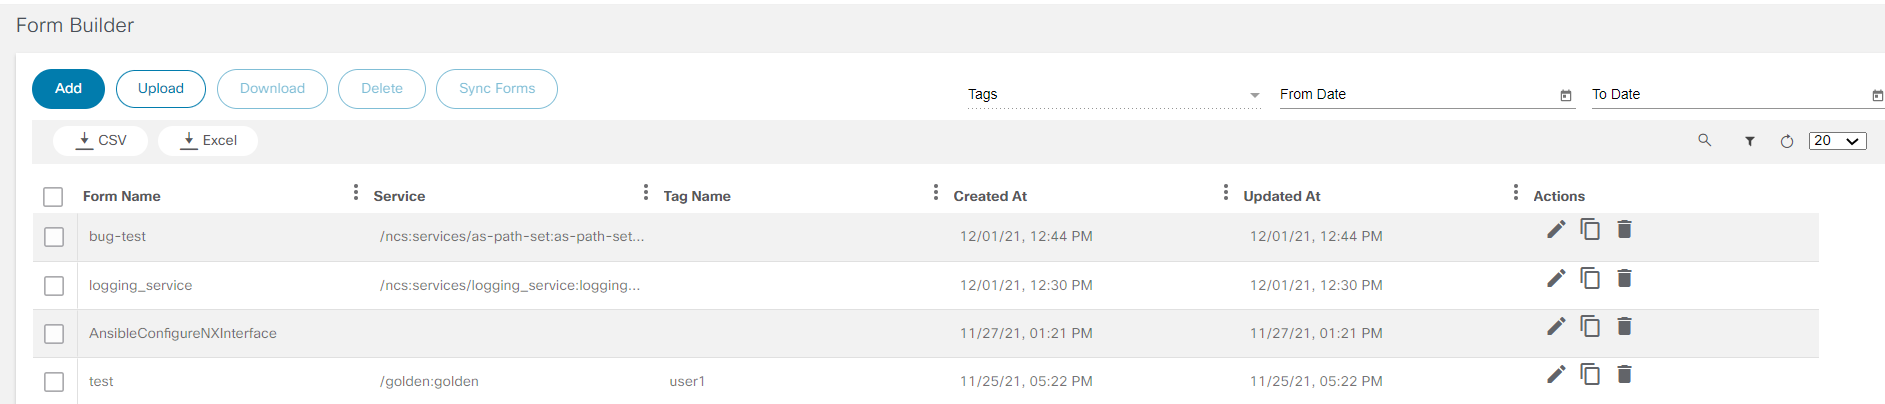
- Use the From Date, To Date, and Search options to filter the desired form for a desired time.
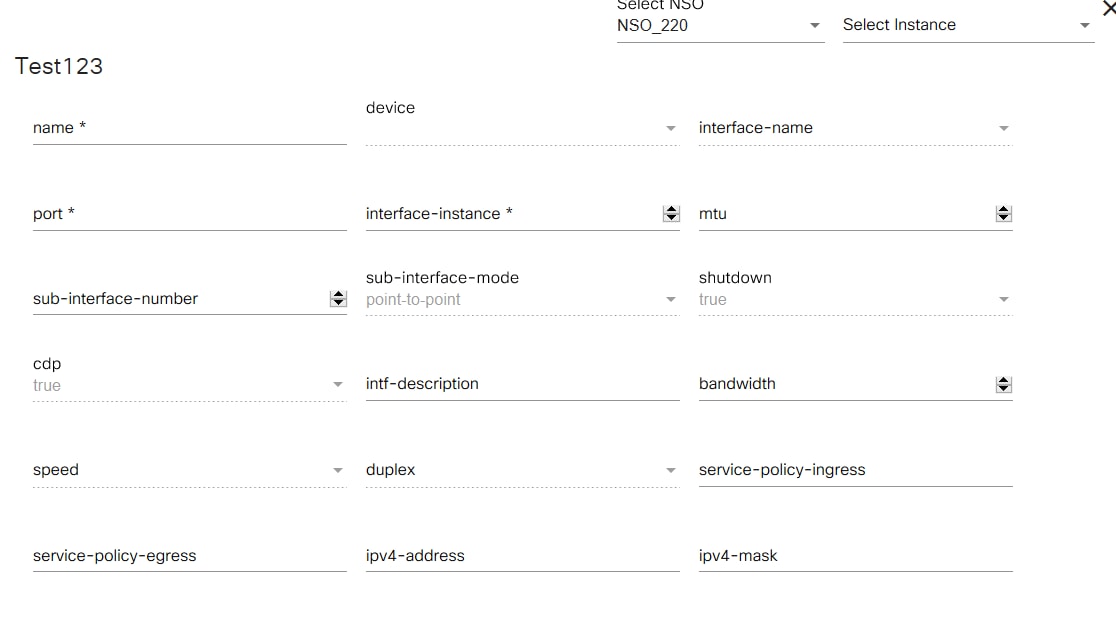
To enable classic UI, enable the Enable Classic UI toggle. Additionally, different versions of the classic UI can be selected.
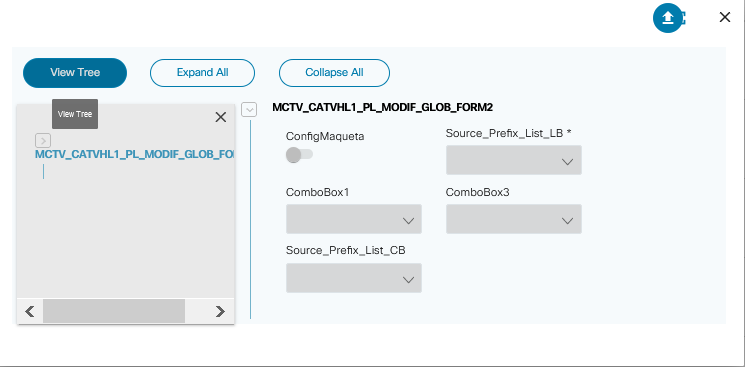
When clicking View Tree, users can expand and collapse all the fields.
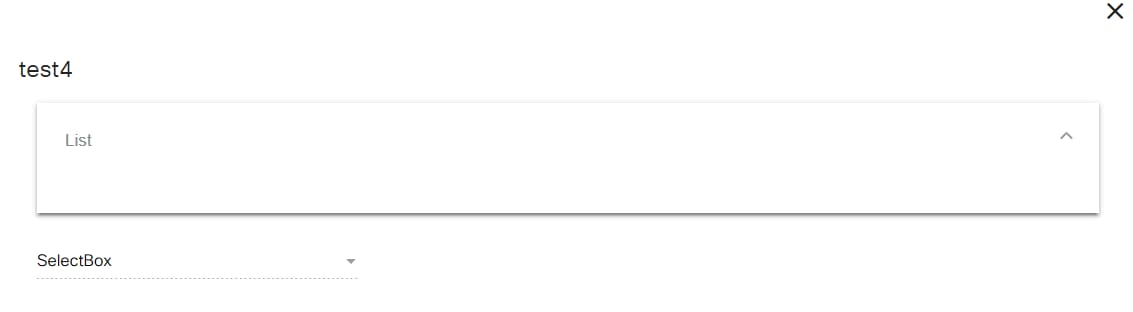
Use v2 to view the Form Builder details (list or container) in a more organized tree format in the left panel and content in the right panel with the ability to switch between grid and tab or list view. This reduces the scrolls to go to the last item in the container.
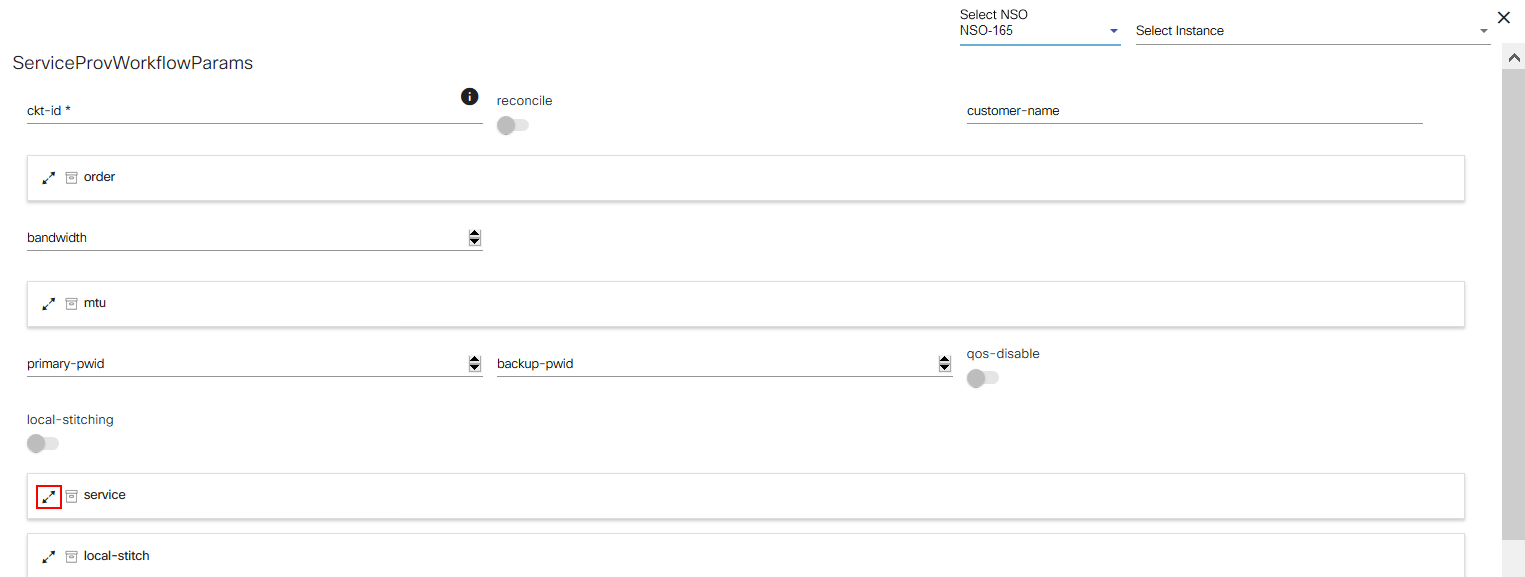
Select the Expand Icon to view the details of container.
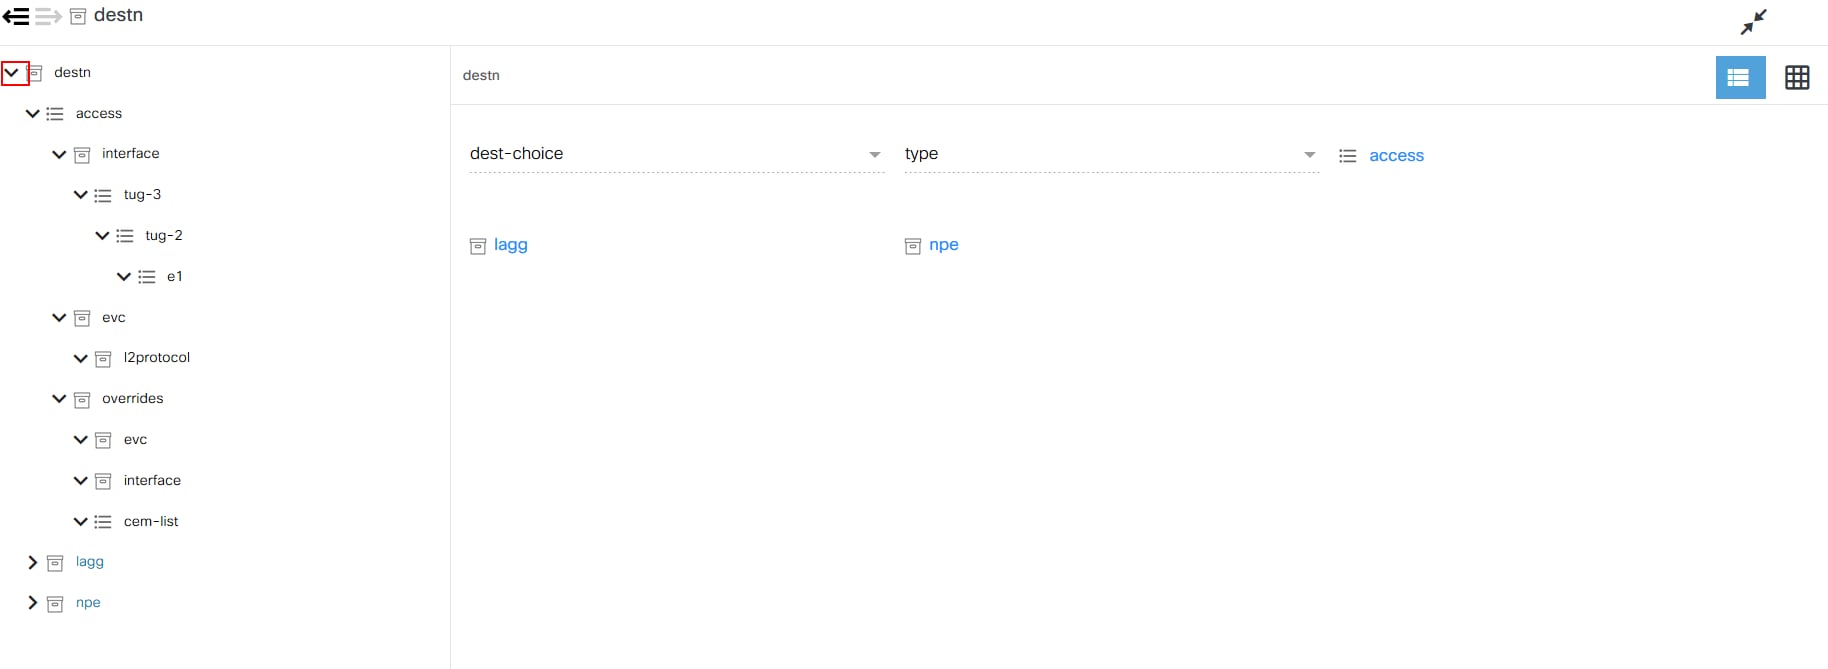
Select the Expand and Collapse icons to access the other components in the container.
Editing a Form
- On the Form Builder page, select the Edit icon for the form that you want to edit. The (Create/Edit) Form page displays. A model of the selected service(s) is rendered automatically. Users can further customize the parameters.
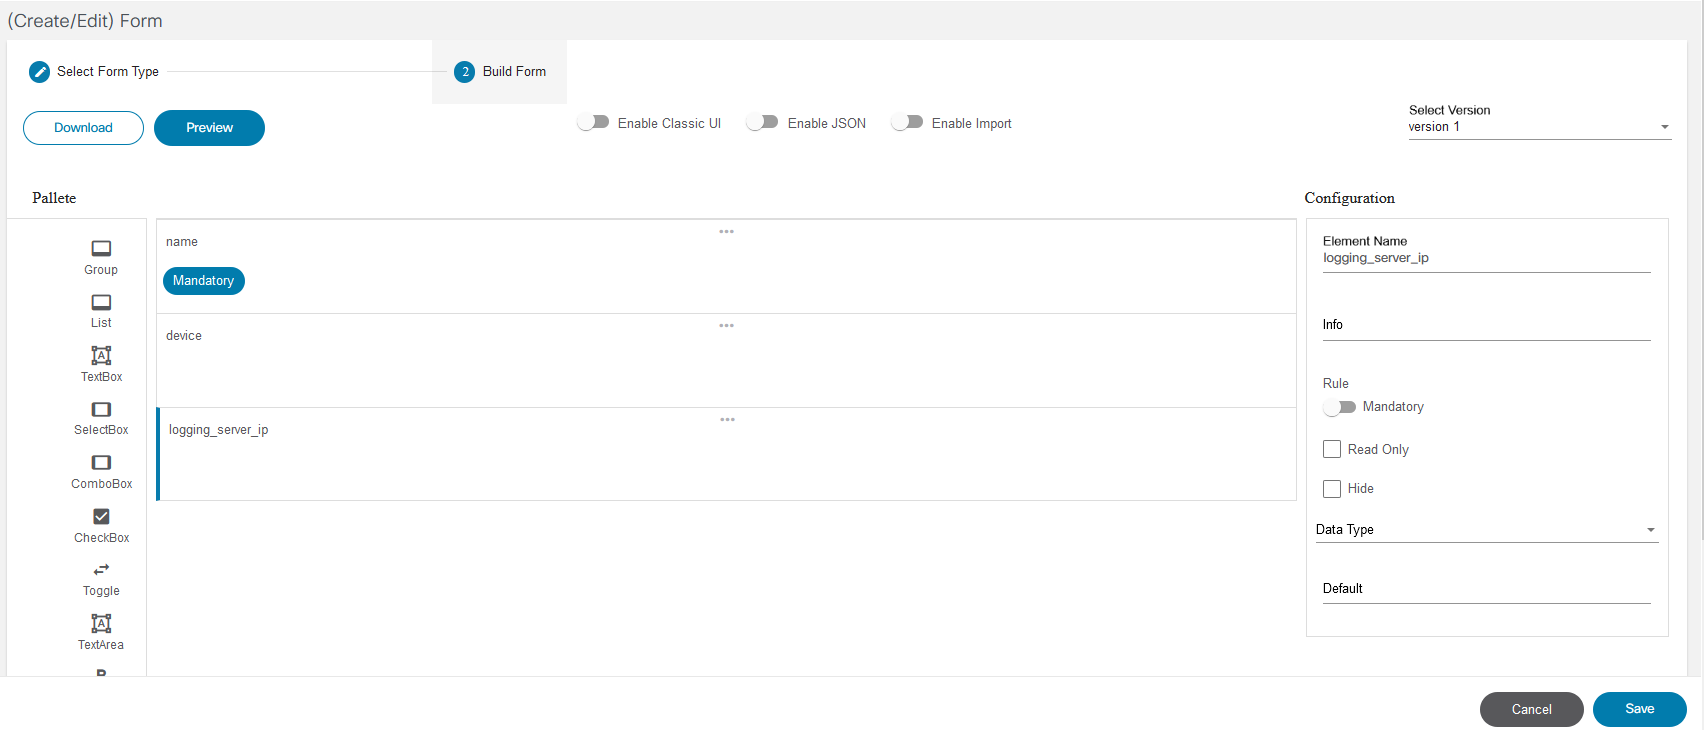
- If the JSON toggle is enabled, Form Builder runtime collects data from the user and creates a JSON payload which is stored in the workflow context.
- If the Import toggle is enabled, then an import option is provided during runtime to allow users to import input data from file.
- There are various options available under Palettes on the left panel of the screen. Users can drag and drop the desired component into the service template.
- To edit an individual element, click the Settings icon of that element. The corresponding Configure Element window opens.
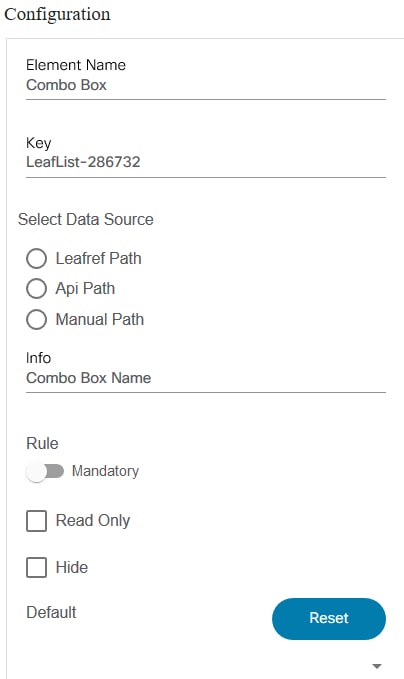
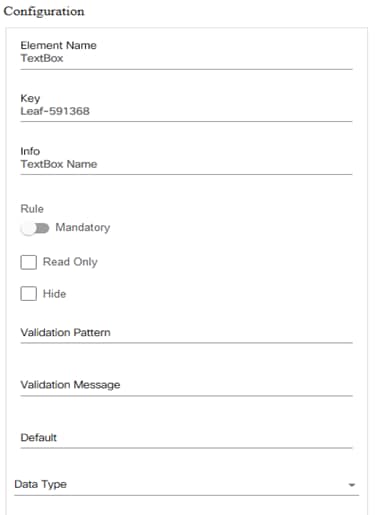
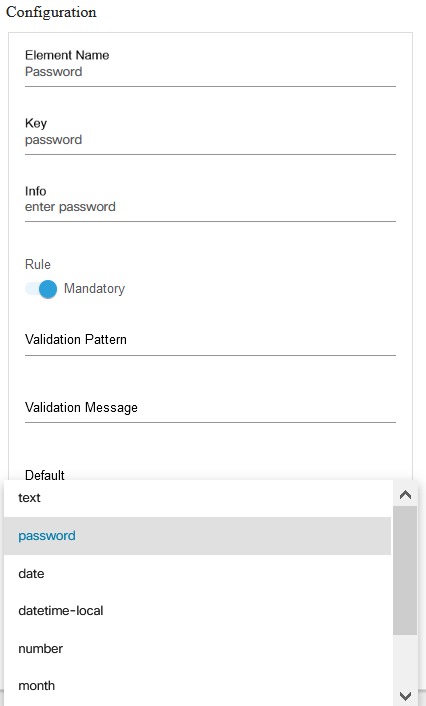
- Edit the element name and the visibility of this element. Select
or clear the Hide option based on the requirement.
- Select the Hide check box to hide any input parameters or devices as needed.
- Edit the Element Name field.
- If element is combo box or select box, then a data source can be selected.
- Select Leafref Path, API Path, or Manual Path as a data source.
- Edit rule settings for an element by using the Mandatory toggle button to make a rule mandatory or optional.
- Select the Read Only check box to make a field readable only. If it is not selected, the user is able to input or change values for that field.
- Select the Hide check box to hide the element at runtime.
- Edit the regular expression, if needed, in the Validation Pattern field. The regular expression pattern is a JavaScript regular expression pattern.
- If ansible controller is selected, then the element (i.e., password, username, and port) can be added.
- To use pattern checks, refer to W3Schools’ Java Script RegExp Reference page for details about the regular expression formation and usage.
Data Source Options Description Leafref The Leafref path from the NSO YANG model. API Path The API Path can be any BPA API URL and API response parses as per the specified JSON Path value. Parsed contents are used as the data element for this widget (e.g., API Path: /settings/nso/instances ; JSON Path: jsonpath : name). In the API path, the variable references can be included so that the value selected on other widget in this form can be passed on as a query parameter to this API path. This helps in conditional loading of data sources based on value of other widgets (e.g., API Path: /svcmgr/service/servicePoint?nsoInstance=${end-type} ; JSON Path: service_point). Here, end-type is the key identifier of another widget in the same form. Manual Path One or more values explicitly specified in the form. - The Validation Pattern field displays only if the element is of type, string. Otherwise, this field does not display in the form.
- Click OK.
- After editing the element and rule details, click Save to save the changes.
- Click Download to get the payload in JSON format.
The examples below demonstrate how JSON Paths can be used to extract values from a JSON data structure.
Example JSON
{
"service_schema": {
"telemetry:telemetry": {
"containsMultipleServicePath": false,
"containsWhenStatement": true,
"subscription": {
"mandatory": true,
"isCustomElement": false,
"sort_order": 3,
"interface-id": {
"deps": [
"/telemetry:telemetry/subscription/source-interface"
],
"evaluated_when_entry": false,
"mandatory": true,
"isCustomElement": false,
"sort_order": 4,
"when": true,
"data-type": "String",
"namespace": "/telemetry:telemetry/subscription/interface-id",
"label": "interface-id",
"nodeType": "Leaf"
},
"source-interface": {
"isCustomElement": false,
"sort_order": 3,
"options": [
"HundredGigE",
"Bundle-Ether",
"FortyGigE",
"GigabitEthernet",
"TenGigE"
],
"data-type": "enumeration",
"namespace": "/telemetry:telemetry/subscription/source-interface",
"label": "source-interface",
"nodeType": "Leaf"
},
"destination-id": {
"mandatory": true,
"isCustomElement": false,
"sort_order": 2,
"id": {
"deps": [
"/telemetry:telemetry",
"/telemetry:telemetry/destination-group"
],
"key": true,
"leafref": "/telemetry:telemetry/destination-group/name",
"mandatory": true,
"isCustomElement": false,
"sort_order": 0,
"data-type": "String",
"namespace": "/telemetry:telemetry/subscription/destination-id/id",
"label": "id",
"nodeType": "Leaf"
},
"keys": [
"id"
],
"namespace": "/telemetry:telemetry/subscription/destination-id",
"label": "destination-id",
"nodeType": "List"
},
"sensor-group-id": {
"mandatory": true,
"isCustomElement": false,
"sort_order": 1,
"interval": {
"isCustomElement": false,
"sort_order": 1,
"default": "30000",
"maxRange": 4294967295,
"minRange": 0,
"data-type": "int32",
"namespace":
"/telemetry:telemetry/subscription/sensor-group-id/interval",
"label": "interval",
"nodeType": "Leaf"
},
"sensor-group": {
"deps": [
"/telemetry:telemetry",
"/telemetry:telemetry/sensor-group"
],
"key": true,
"leafref": "/telemetry:telemetry/sensor-group/name",
"mandatory": true,
"isCustomElement": false,
"sort_order": 0,
"options": [
"oc-platform",
"cisco-platform",
"oc-bgp",
"cisco-bgp-ipv4",
"cisco-bgp-ipv6",
"oc-bundle",
"cisco-bundle",
"cisco-isis",
"oc-bgp-rib",
"cisco-bgp-rib",
"cisco-qos",
"oc-mpls",
"oc-acl",
"cisco-lldp"
],
"data-type": "enumeration",
"namespace":
"/telemetry:telemetry/subscription/sensor-group-id/sensor-group",
"label": "sensor-group",
"nodeType": "Leaf"
},
"keys": [
"sensor-group"
],
"namespace": "/telemetry:telemetry/subscription/sensor-group-id",
"label": "sensor-group-id",
"nodeType": "List"
},
"subscription-group-name": {
"key": true,
"mandatory": true,
"isCustomElement": false,
"sort_order": 0,
"data-type": "String",
"namespace":
"/telemetry:telemetry/subscription/subscription-group-name",
"label": "subscription-group-name",
"nodeType": "Leaf"
},
"keys": [
"subscription-group-name"
],
"namespace": "/telemetry:telemetry/subscription",
"label": "subscription",
"nodeType": "List"
},
"sensor-group": {
"mandatory": true,
"isCustomElement": false,
"sort_order": 2,
"name": {
"key": true,
"mandatory": true,
"isCustomElement": false,
"sort_order": 0,
"options": [
"oc-platform",
"cisco-platform",
"oc-bgp",
"cisco-bgp-ipv4",
"cisco-bgp-ipv6",
"oc-bundle",
"cisco-bundle",
"cisco-isis",
"oc-bgp-rib",
"cisco-bgp-rib",
"cisco-qos",
"oc-mpls",
"oc-acl",
"cisco-lldp"
],
"data-type": "enumeration",
"namespace": "/telemetry:telemetry/sensor-group/name",
"label": "name",
"nodeType": "Leaf"
},
"keys": [
"name"
],
"namespace": "/telemetry:telemetry/sensor-group",
"label": "sensor-group",
"nodeType": "List"
},
"destination-group": {
"mandatory": true,
"isCustomElement": false,
"sort_order": 1,
"address-family": {
"mandatory": true,
"isCustomElement": false,
"sort_order": 2,
"protocol": {
"isCustomElement": false,
"sort_order": 3,
"options": [
"grpc",
"tcp",
"udp"
],
"default": "tcp",
"data-type": "enumeration",
"namespace":
"/telemetry:telemetry/destination-group/address-family/protocol",
"label": "protocol",
"nodeType": "Leaf"
},
"encoding": {
"isCustomElement": false,
"sort_order": 2,
"options": [
"gpb",
"json",
"self-describing-gpb"
],
"default": "self-describing-gpb",
"data-type": "enumeration",
"namespace": "/telemetry:telemetry/destination-group/address-family/encoding",
"label": "encoding",
"nodeType": "Leaf"
},
"port": {
"key": true,
"mandatory": true,
"isCustomElement": false,
"sort_order": 1,
"maxRange": 65535,
"minRange": 1,
"data-type": "int32",
"namespace":
"/telemetry:telemetry/destination-group/address-family/port",
"label": "port",
"nodeType": "Leaf"
},
"ip": {
"key": true,
"mandatory": true,
"isCustomElement": false,
"sort_order": 0,
"data-type": "ipv4",
"namespace": "/telemetry:telemetry/destination-group/address-family/ip",
"label": "ip",
"nodeType": "Leaf"
},
"keys": [
"ip",
"port"
],
"namespace": "/telemetry:telemetry/destination-group/address-family",
"label": "address-family",
"nodeType": "List"
},
"vrf": {
"isCustomElement": false,
"sort_order": 1,
"default": "default",
"data-type": "String",
"namespace": "/telemetry:telemetry/destination-group/vrf",
"label": "vrf",
"nodeType": "Leaf"
},
"name": {
"key": true,
"mandatory": true,
"isCustomElement": false,
"sort_order": 0,
"data-type": "String",
"namespace": "/telemetry:telemetry/destination-group/name",
"label": "name",
"nodeType": "Leaf"
},
"keys": [
"name"
],
"namespace": "/telemetry:telemetry/destination-group",
"label": "destination-group",
"nodeType": "List"
},
"device": {
"deps": [
"/ncs:devices/device"
],
"key": true,
"leafref": "/ncs:devices/device/name",
"mandatory": true,
"isCustomElement": false,
"sort_order": 0,
"data-type": "String",
"namespace": "/telemetry:telemetry/device",
"label": "device",
"nodeType": "Leaf"
},
"keys": [
"device"
],
"service-point": "/telemetry:telemetry",
"label": "telemetry:telemetry",
"nodeType": "service"
}
}
}Examples of JSON Path
- service_schema.telemetry:telemetry.subscription.keys
- Resulting Content : “subscription-group-name”
- service_schema.telemetry:telemetry.subscription.interface-id.deps
- Content : “/telemetry:telemetry/subscription/source-interface”
- service_schema.telemetry:telemetry.subscription.source-interface.options
- Resulting Content : “HundredGigE”,“Bundle-Ether”,“FortyGigE”,“GigabitEthernet”,“TenGigE”
- service_schema.telemetry:telemetry.subscription.source-interface.options[0]
- Resulting Content : “HundredGigE”
- service_schema.telemetry:telemetry.subscription.subscription-group-name.key
- Resulting Content : true
Example Two:
{
    "_id": "5d336e66259cd02c05b14567",
    "createdBy": {
        "name": "admin",
        "firstName": "admin",
        "lastName": "admin",
        "id": "6fea3c84-20c7-4a40-b3a5-5a861a4ffb86"
    },
    "formName": "TMO_Settings",
    "tabName": "TMO_Settings",
    "tabId": "5d336df75ff94c2c00facec3",
    "data": {
        "database": {
            "host": "localhost",
            "port": "8080",
            "username": "admin",
            "password": "admin"
        },
        "usecases": [
            {
                "usecase": "VNF",
                "displayName": "Basic VNF Check",
                "canSchedule": true,
                "emailBody": ""
            },
            {
                "usecase": "ESC",
                "displayName": "Hello ESC Use Case",
                "emailBody": "HHHHHEEEEE"
            }
        ]
    },
    "__v": 0
}
Examples of JSONPath:
- data.usecases[x].usecase
- Resulting Content : “VNF”,“ESC”
- data.usecases[x].displayName
- Resulting Content : “Basic VNF Check”,“Hello ESC Use Case”
- data.database.host
- Resulting Content : “localhost”
- data.usecases[0].usecase
- Resulting Content : “VNF”
- data.usecases[1].usecase
- Resulting Content : “ESC”
Example Three
{
    "success": true,
    "response": {
        "jsonrpc": "2.0",
        "result": {
            "current_position": 1,
            "total_number_of_results": 6,
            "number_of_results": 6,
            "number_of_elements_per_result": 3,
            "results": [
                [
                    "arista-dcs",
                    "arista-dcs",
                    "5.2.4"
                ],
                [
                    "cisco-ios",
                    "cisco-ios",
                    "6.10"
                ],
                [
                    "cisco-iosxr",
                    "cisco-ios-xr",
                    "7.7"
                ],
                [
                    "cisco-nx",
                    "cisco-nx",
                    "5.7.6"
                ],
                [
                    "cisco-staros",
                    "cisco-staros",
                    "5.10.4"
                ],
                [
                    "juniper-junos",
                    "junos",
                    "4.1.3"
                ]
            ]
        },
        "id": 2
    }
}
Examples of JSON Path:
- response.result.results[0]
- Resulting Content : “arista-dcs”,“arista-dcs”,“5.2.4”
- response.result.results[0].[0]
- Resulting Content : “arista-dcs”
- response.result.results[0].[2]
- Resulting Content : “5.2.4”
- response.result.results[5]
- Resulting Content : “juniper-junos”,“junos”,“4.1.3”
- response.result.results[5].[0]
- Resulting Content : “juniper-junos”
- response.result.results[5].[1]
- Resulting Content : “junos”
- response.result.total_number_of_results
- Resulting Content : 6
Example Four:
[
    {
        "name": "All",
        "defaultPreference": true,
        "lsa": false,
        "default": false
    },
    {
        "name": "nso179",
        "defaultPreference": false,
        "lsa": false,
        "default": true
    },
    {
        "name": "nso226",
        "defaultPreference": false,
        "lsa": false,
        "default": false
    },
    {
        "name": "nso165",
        "defaultPreference": false,
        "lsa": false,
        "default": false
    },
    {
        "name": "USER_NSO",
        "defaultPreference": false,
        "lsa": false,
        "default": false
    }
]
JSON Path Examples:
- name : will list all the names
- Resulting Content : “All”,“nso179”,“nso226”,“nso165”,“USER_NSO”
- [0].name
- Resulting Content : “All”
- [1].name :
- Resulting Content : “nso179”
Example Five:
[
    {
        "id": "6fea3c84-20c7-4a40-b3a5-5a861a4ffb86",
        "username": "admin",
        "email_address": "admin@bizapps.cisco.com",
        "first_name": "admin",
        "last_name": "admin",
        "created_at": "2019-07-15T08:39:36.000Z",
        "local_user": true,
        "groups": [
            {
                "id": "1ef891d0-cb52-40bd-ae6d-61c829502489",
                "group": "admin"
            },
            {
                "id": "edfb066f-93b1-43e2-8ed1-5118f9651311",
                "group": "workflow-admin"
            }
        ]
    },
    {
        "id": "21512d4a-5e0a-4f0e-8de6-55c344d25aba",
        "username": "demo",
        "email_address": "demo@bizapps.cisco.com",
        "first_name": "demo",
        "last_name": "demo",
        "created_at": "2019-07-15T08:39:36.000Z",
        "local_user": true,
        "groups": [
            {
                "id": "1ef891d0-cb52-40bd-ae6d-61c829502489",
                "group": "admin"
            }
        ]
    },
    {
        "id": "02244f9d-8168-4ddf-9212-5811e4b6d913",
        "username": "svcuser",
        "email_address": "svcuser@bizapps.cisco.com",
        "first_name": "Service",
        "last_name": "User",
        "created_at": "2019-07-15T08:39:37.000Z",
        "local_user": true,
        "groups": [
            {
                "id": "1ef891d0-cb52-40bd-ae6d-61c829502489",
                "group": "admin"
            },
            {
                "id": "f7557a5e-0d75-4357-bcab-2a74680f2890
                "group": "svcacct"
            }
        ]
    },
    {
        "id\": "7100d085-3067-46c0-8f0b-945162f5e011",
        "username": "bpaadmin",
        "email_address": "bpaadmin@bizapps.cisco.com",
        "first_name": "bpa",
        "last_name": "admin",
        "created_at": "2019-07-15T08:39:37.000Z",
        "local_user": true,
        "groups": [
            {
                "id": "1ef891d0-cb52-40bd-ae6d-61c829502489",
                "group": "admin"
            }
        ]
    },
    {
        "id": "9ebfd385-f7c9-40f7-aa50-8c27d88a5c93",
        "username": "svcmgr",
        "email_address": "svcmgr@bizapps.cisco.com",
        "first_name": "Service",
        "last_name": "Manager",
        "created_at": "2019-07-15T08:39:37.000Z",
        "local_user": true,
        "groups": [
            {
                "id": "340d0431-52c0-4f43-9214-2a6db989b865",
                "group": "service-manager"
            }
        ]
    },
    {
        "id": "3be6eca7-bf5c-48d6-98fc-65208be59589",
        "username": "devmgr",
        "email_address": "devmgr@bizapps.cisco.com",
        "first_name": "Device",
        "last_name": "Manager",
        "created_at": "2019-07-15T08:39:37.000Z",
        "local_user": true,
        "groups": [
            {
                "id": "cc5b9f7e-12dc-46ec-b31c-529d7671d073",
                "group": "device-manager"
            }
        ]
    },
    {
        "id": "dcab8603-e763-4d5c-958b-d57e4bc7ee12",
        "username": "demouser",
        "email_address": "demouser@bizapps.cisco.com",
        "first_name": "demo",
        "last_name": "user",
        "created_at": "2019-07-15T08:39:37.000Z",
        "local_user": true,
        "groups": []
    }
]
JSON Path Examples:
- groups[x].group
- Resulting Content : “admin”,“workflow-admin”,“admin”,“admin”,“svcacct”,“admin”,“service-manager”,“device-manager”
- [0].last_name :
- Resulting Content : “admin”
Configure File to Grid and File to Storage
The File to Storage component helps you to upload and access a file within the BPA application and File to Grid component helps you to upload a file and render it on a grid on-the-fly.
To configure a File to Storage component in the form:
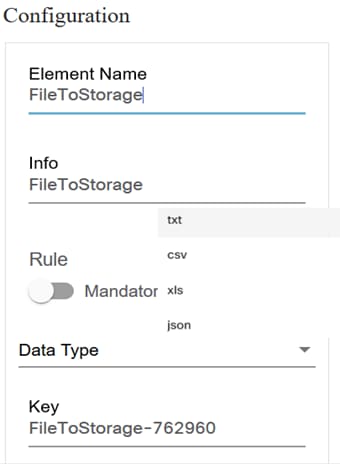
- Edit the Element Name
- Select the Data Type for the drop-down list.
To configure a file to grid component:
- Create a Group or List component.
- Add a file to grid component in the form.
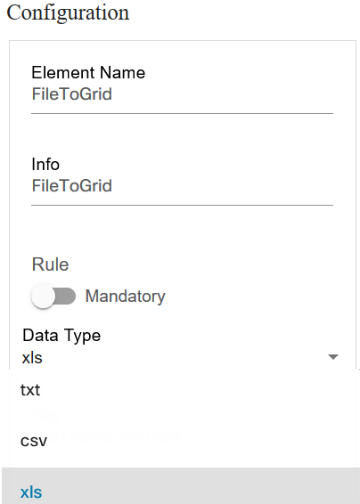
- Edit the Element Name and select the Data Type for the drop-down list.
Configure a Button
Users can configure a button component and provide the user or group accessibility to the button.
To configure the button component:
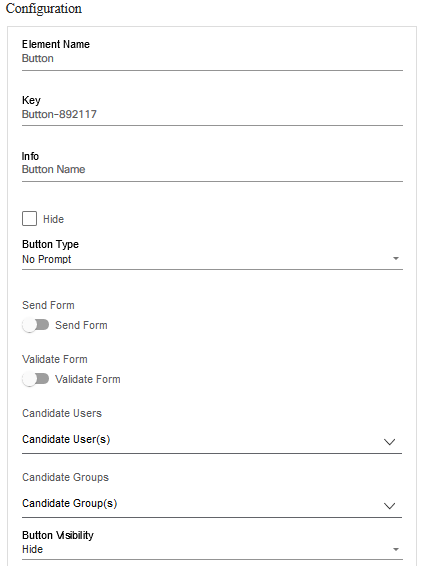
- Edit the Element Name and information.
- Select the Button Type, Candidate Users, and Candidate Groups from the drop-down list.
Cloning a Form
Cloning a form allows users to duplicate parts of the form or the entire form, saving time to make the process simpler. The clone method performs a copy of the set of matched elements that is, it copies the matched elements depending on the form selected for cloning and its service. To customize it, refer to Editing a Form.
To clone a form:
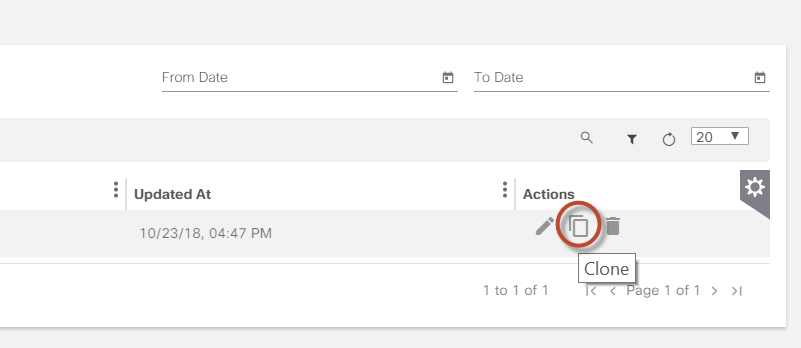
- Select the Clone icon of the form you want to clone. The (Create/Edit) Form window opens.

- Enter a name for the new form and click Save. The details of the form display.
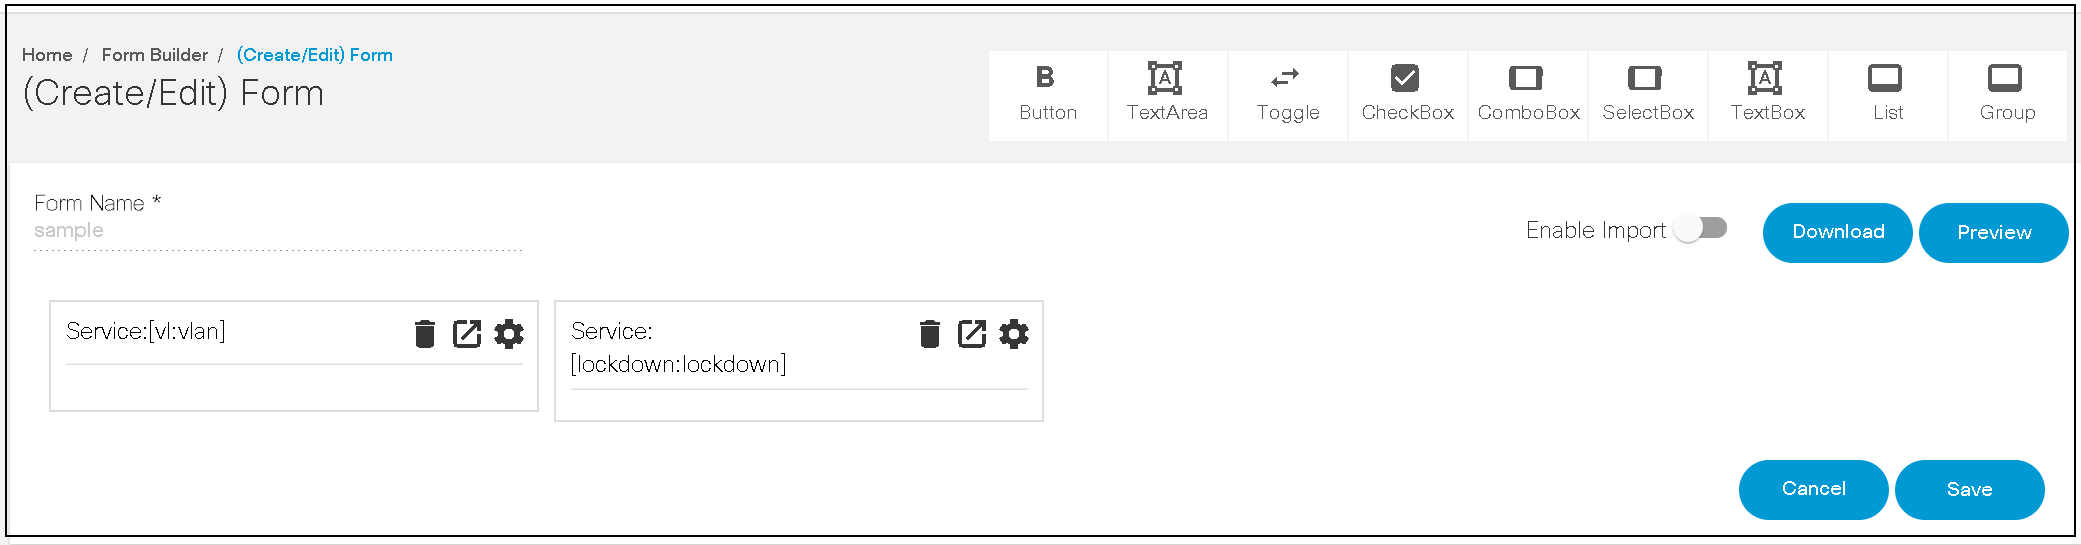
- Customize the details and click Save to save the cloned form.
Importing and Exporting Forms
This feature allows users to create a form by Importing or Exporting Forms a form as a back-up for future use. Exported forms are stored in JSON format.
Deleting a Form
To delete a form:
- Select the Delete icon on the specific form. A warning message displays.
- Click OK to delete the form.
Runtime Form
In BPA, runtime forms were utilized across various applications to capture user inputs and execute actions. With the release of BPA 5.1, a new interactive and user-friendly runtime form UI is being introduced, designed to enhance user experience by enabling seamless navigation through all sections and is only available in new BPA UI.
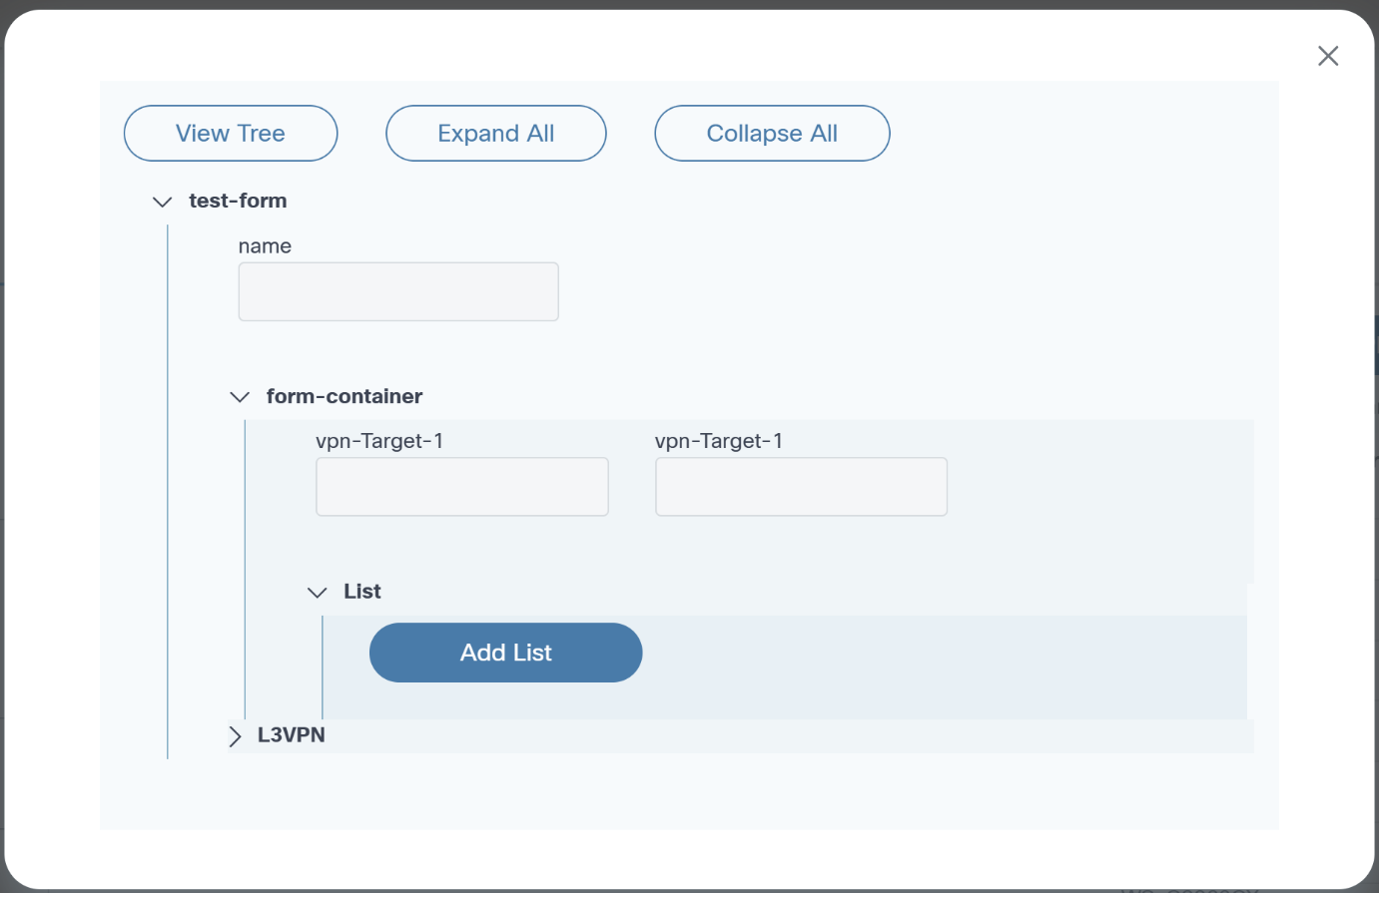
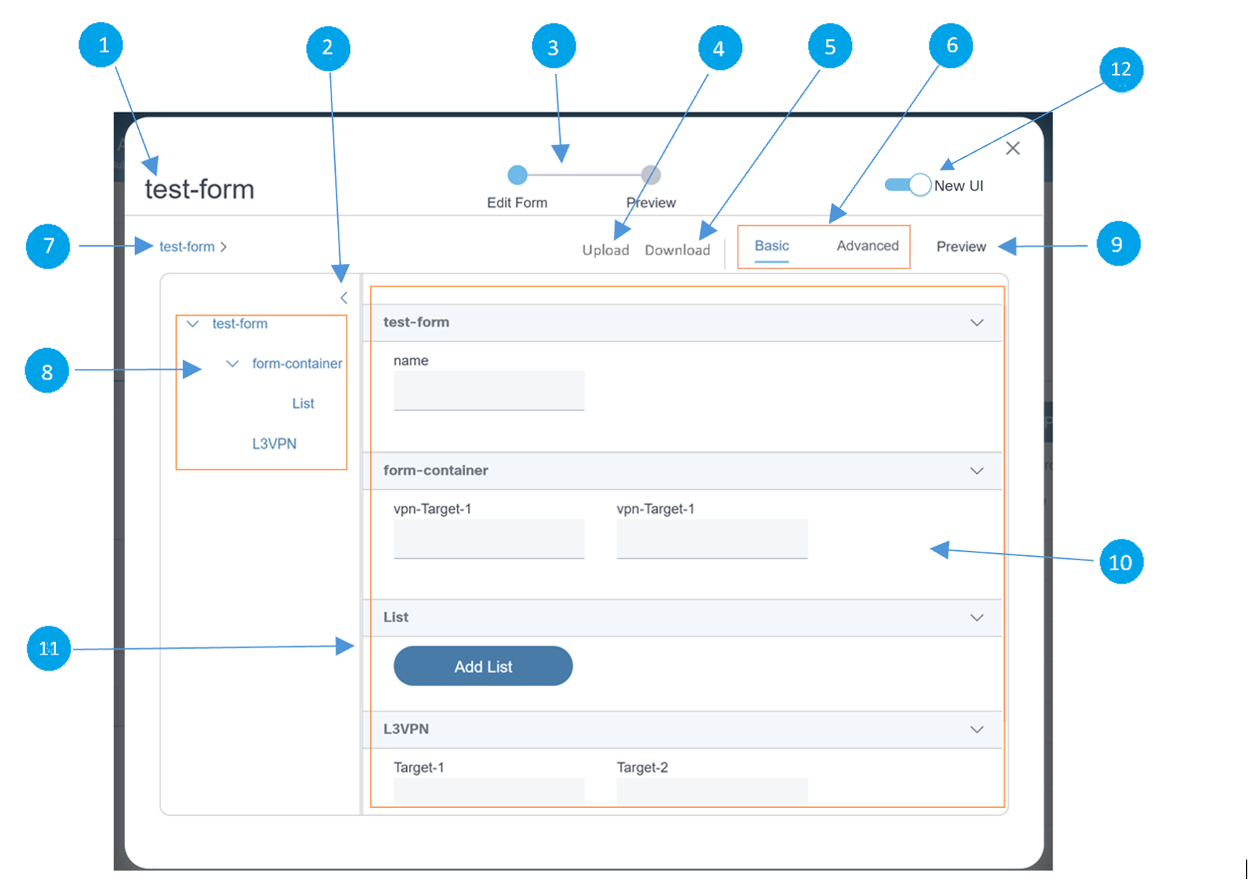
| Callout Number | Description |
|---|---|
| 1 | Displays the form name |
| 2 | Expands the width of the form hierarchy |
| 3 | Denotes the form status |
| 4 | Upload: Uploads the form data; accepts JSON files |
| 5 | Download: Downloads the form payload |
| 6 | Basic: Displays the form elements; does not display in the
hierarchical format Advanced: Displays the form data in JSON format Note: Users can update inputs for both Basic and Advanced. |
| 7 | Displays the global-level breadcrumb path; selecting a breadcrumb loads that portion of the form, including child elements in the right-hand section |
| 8 | Displays the form hierarchy starting from the form name and lists all child elements; like the breadcrumb path, it is selectable and loads the selected portion in the right-hand section |
| 9 | View the form preview in the actual hierarchy |
| 10 | Right-hand section where the form displays; this view changes depending on the tab selection |
| 11 | Vertical bar that can be dragged to adjust the visibility of the left and right sections of the form |
| 12 | Use the toggle button to switch between old or new runtime form |
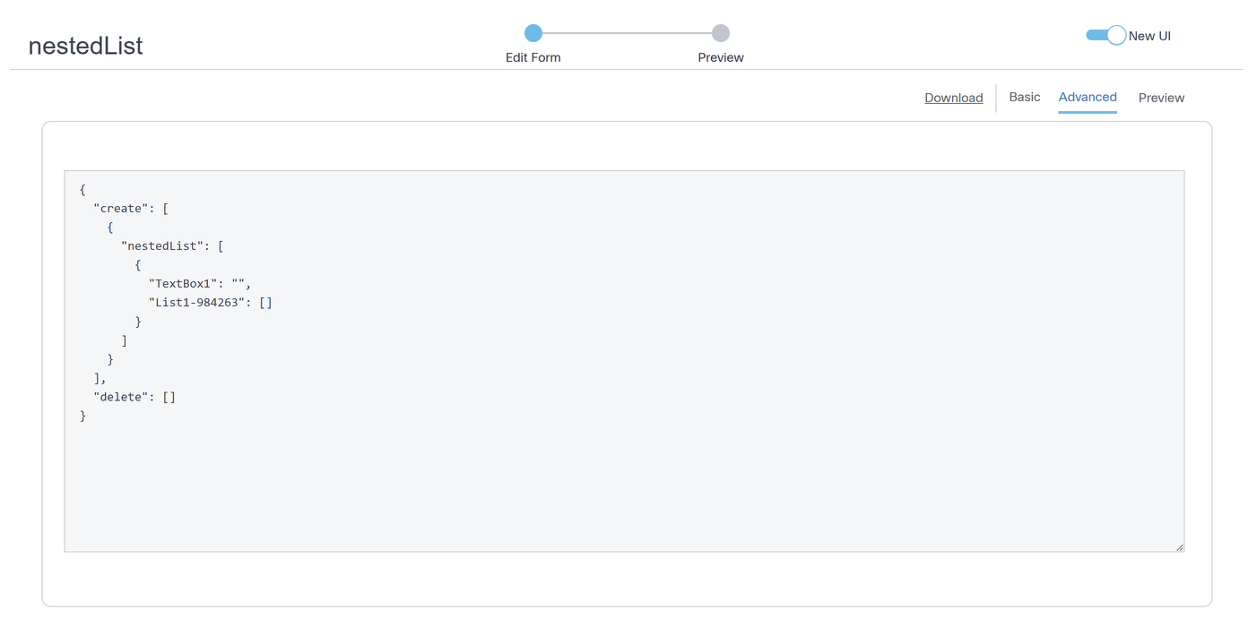
In Preview mode, the form is displayed in its actual hierarchy, with each level featuring an Edit icon.
Select the Exit icon to exit preview mode.
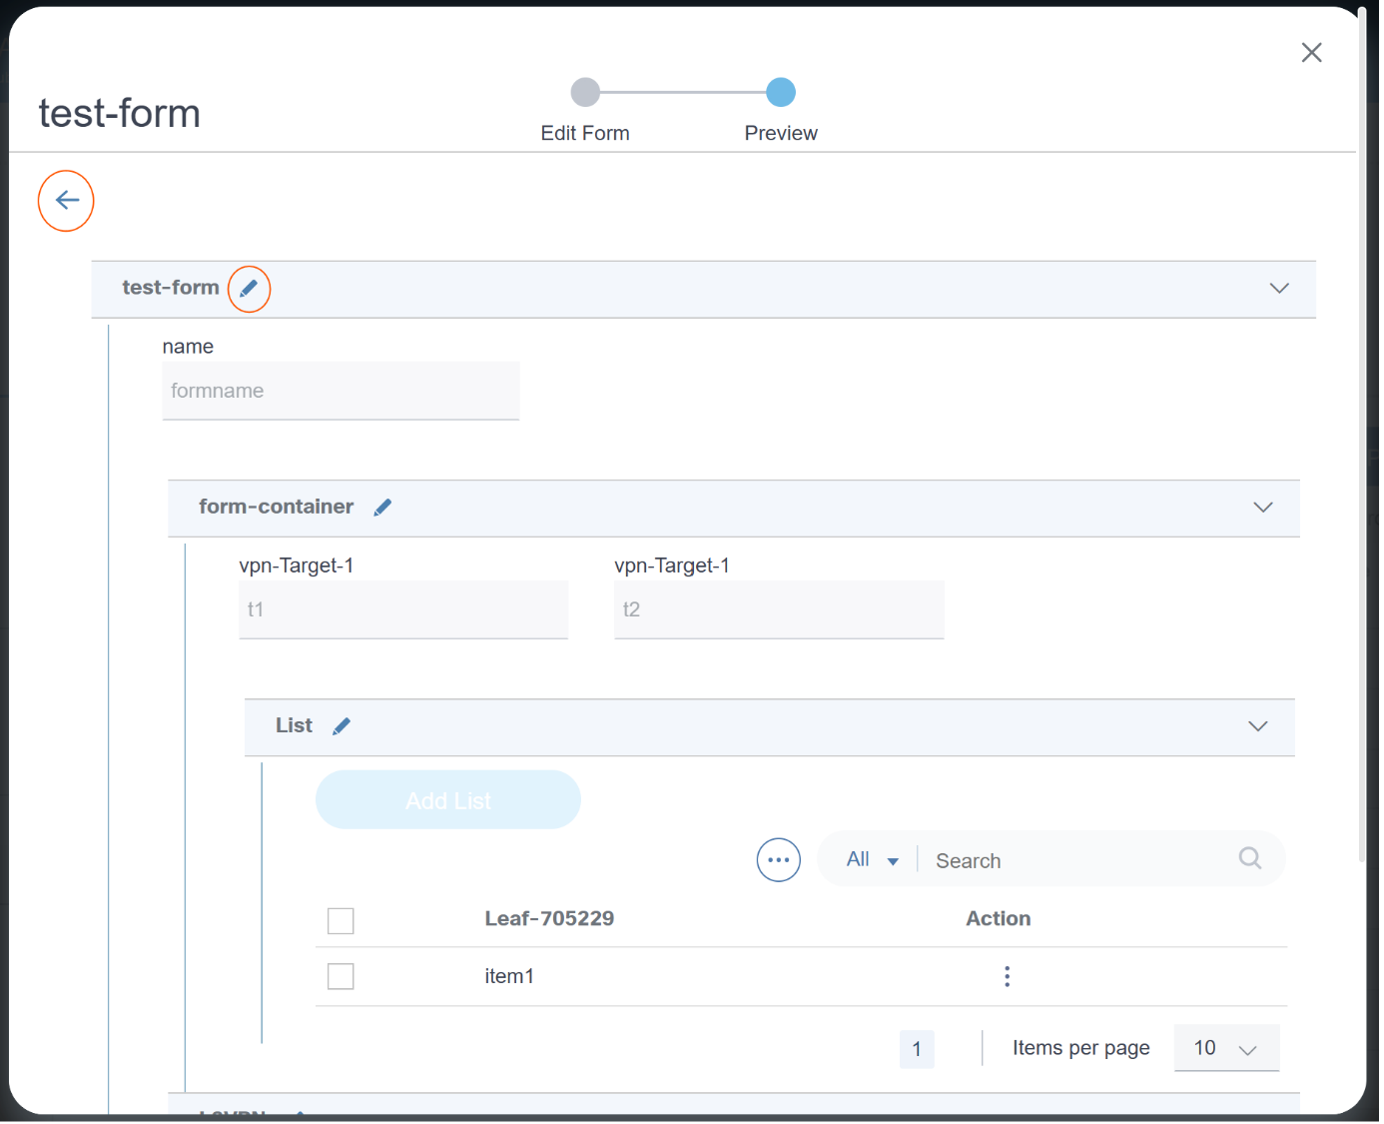
Working with the Device Manager Application
The Device Manager application allows you to manage the devices in the network.
The following actions can be performed in the Device Manager application:
- Adding a New Device
- Edit the Configuration of Existing Devices
- Delete devices
- Import/Export list of devices
- Download templates
- Manage Credentials
- Manage Device Groups
- View Configuration Backup Jobs
- View Configuration Restore Jobs
To view devices:
Click the Device Manager application on the Home page. The Device Manager screen displays.
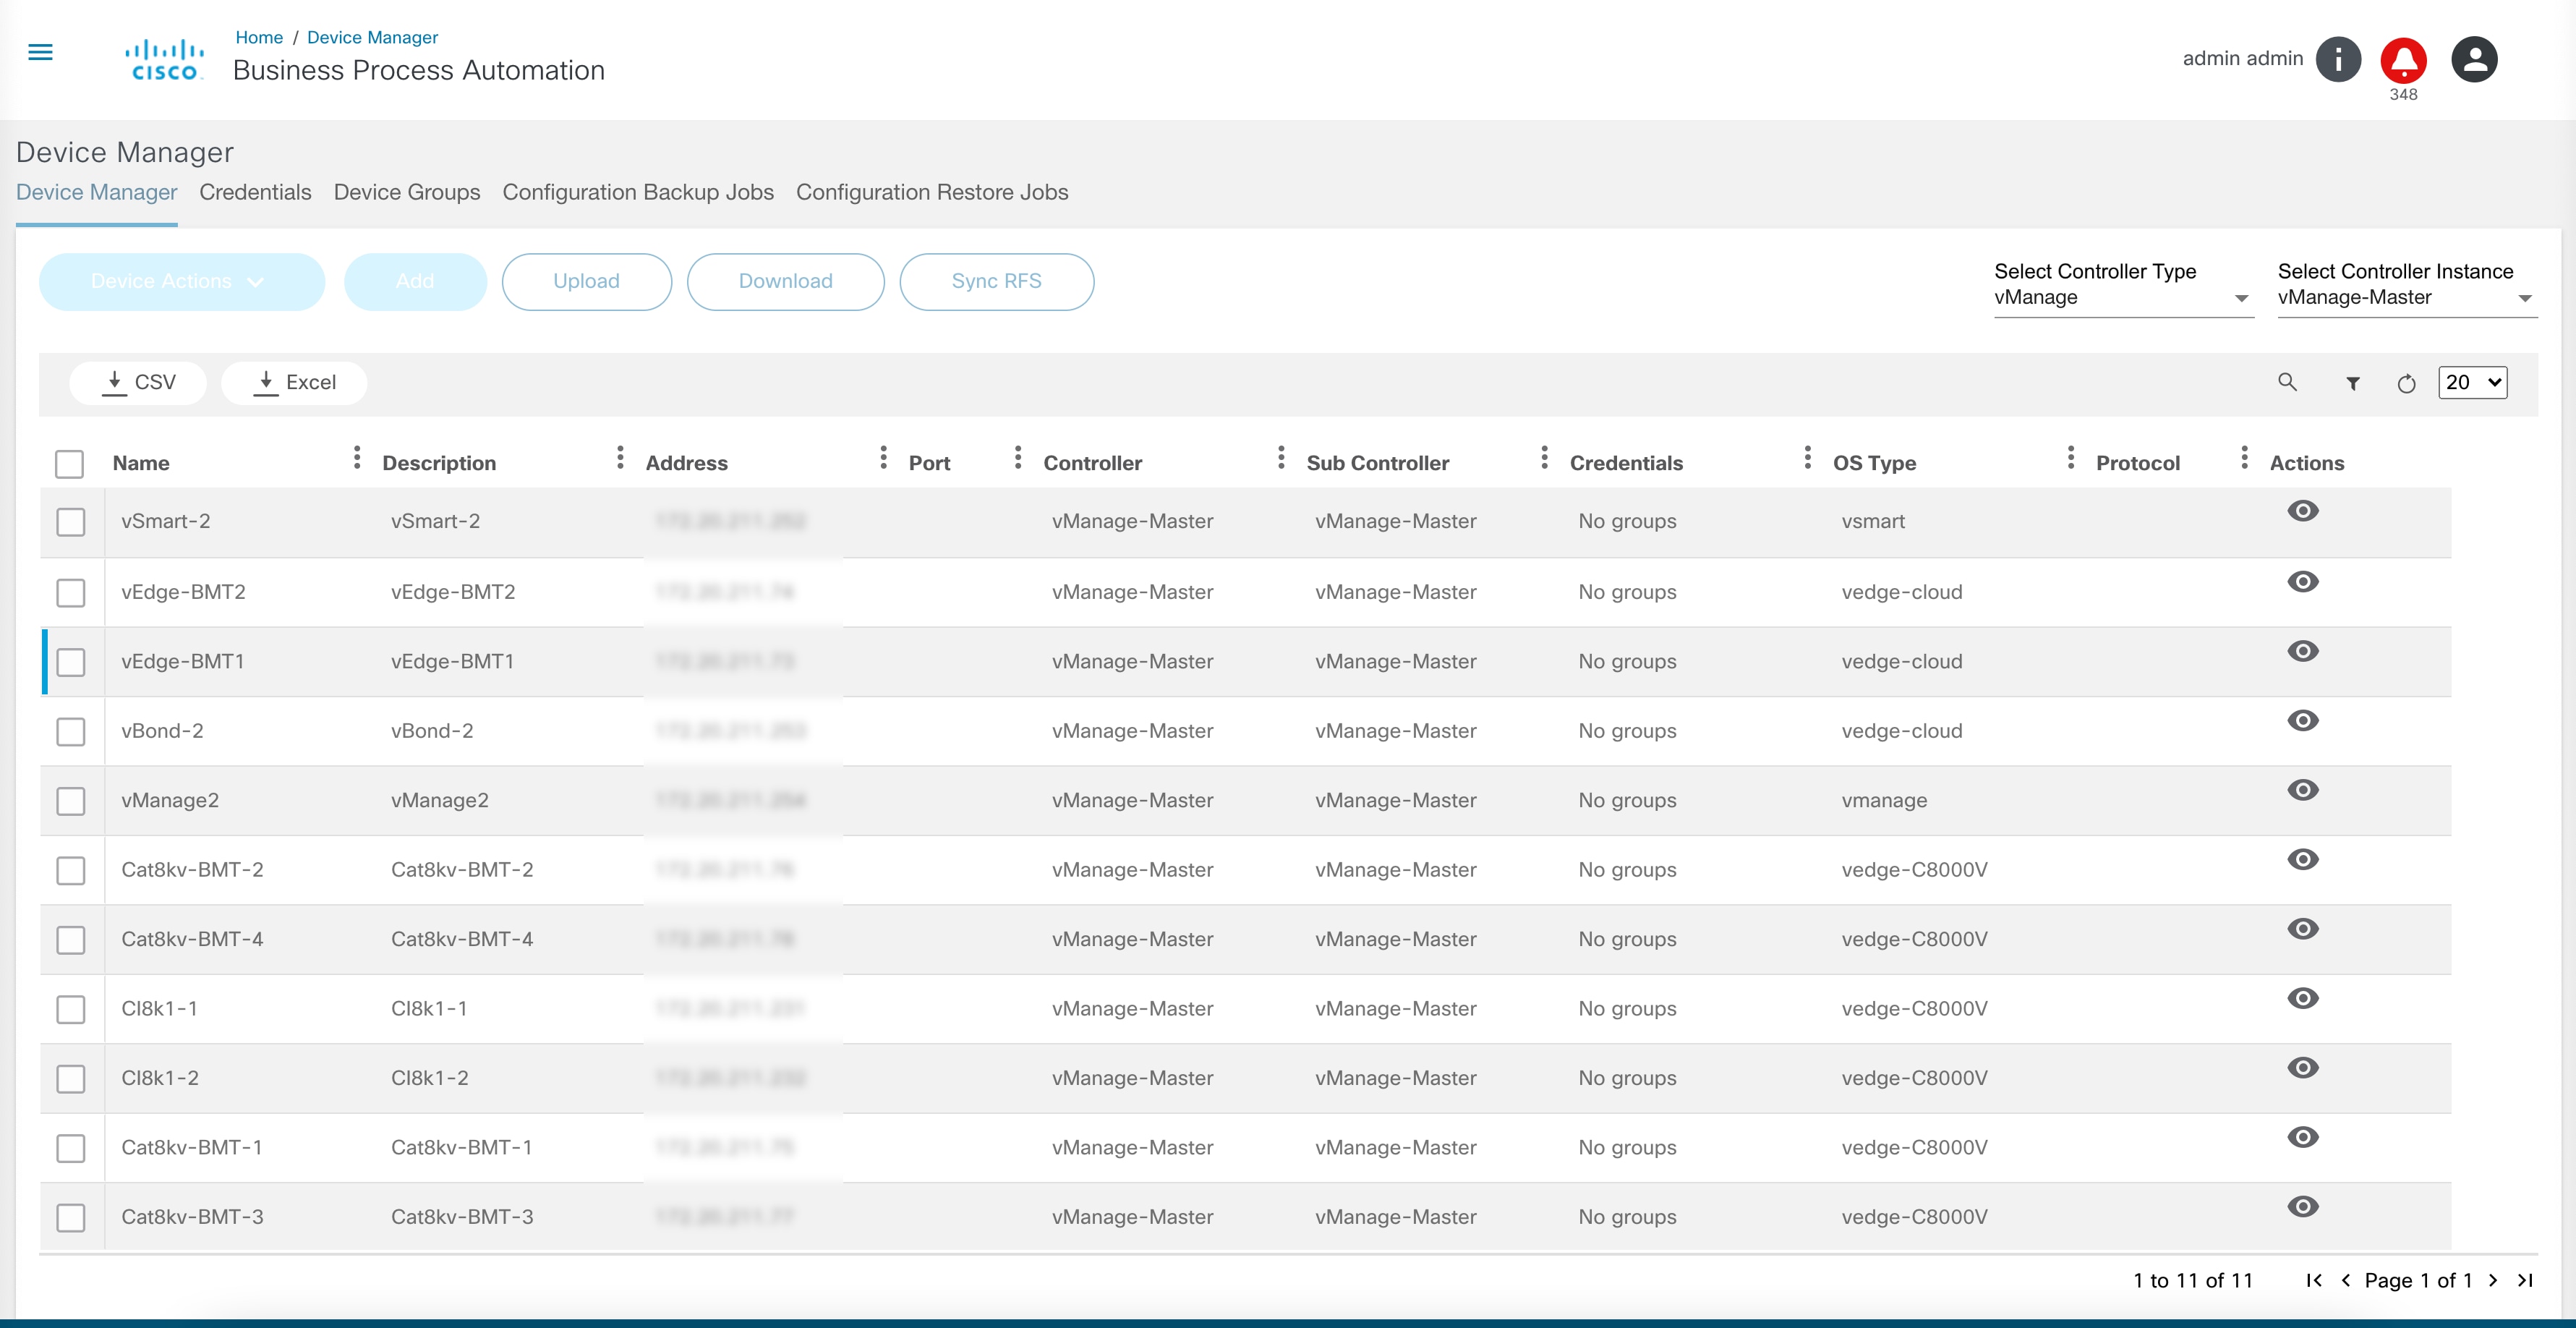
A list of devices in the network, their Name, IP Address, Port, auth group, type of NED, and protocol are displayed on the Device Manager page. The Add button is enabled for NSO and Direct-To-Device controllers. The Sync RFS button is enabled only for NSO controllers.
Device Actions
BPA allows users to perform several operations on devices using the Device Actions menu.
To access settings:
- Select the checkbox of the device.
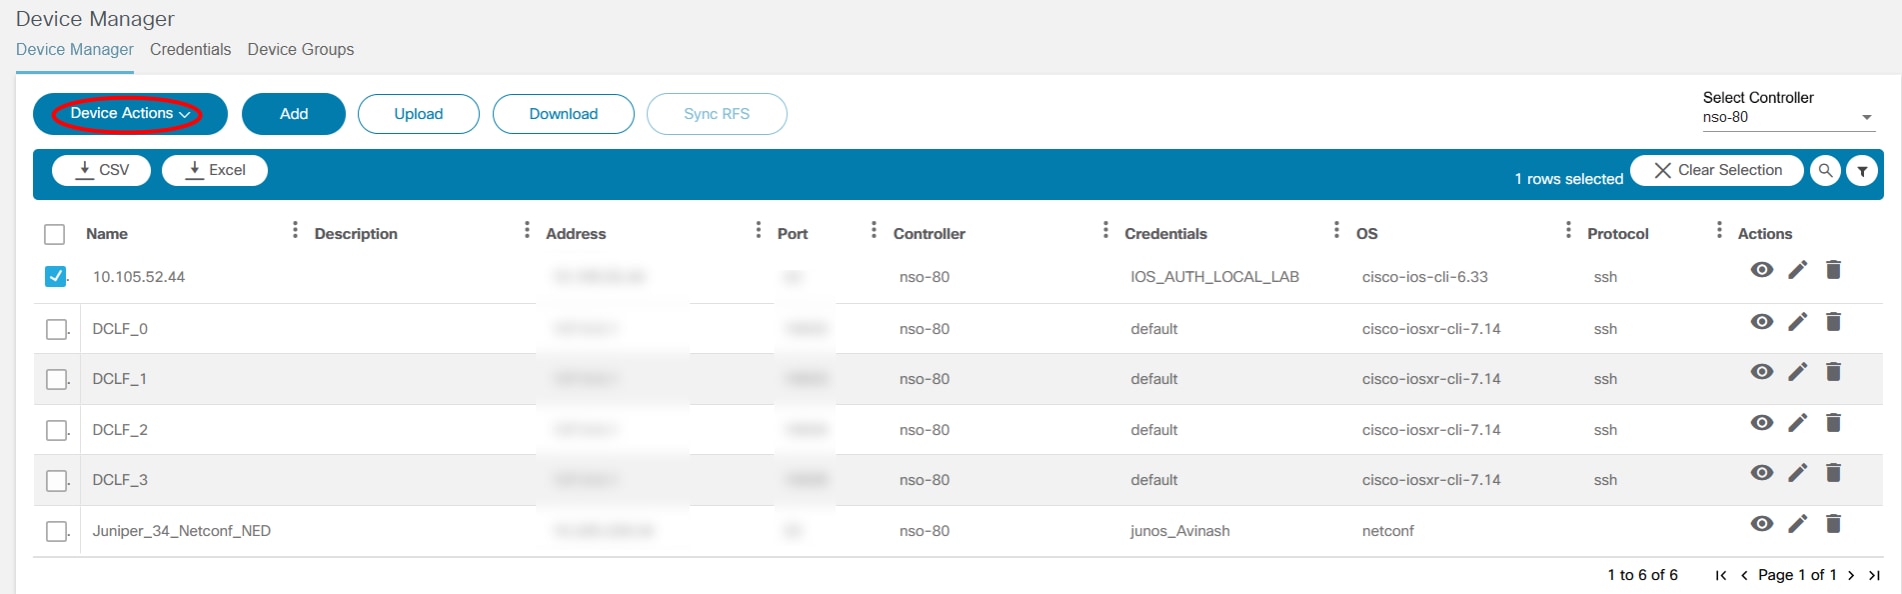
- Click Device Actions. A drop-down list displays.
The list of options under Device Actions varies across the controller types.
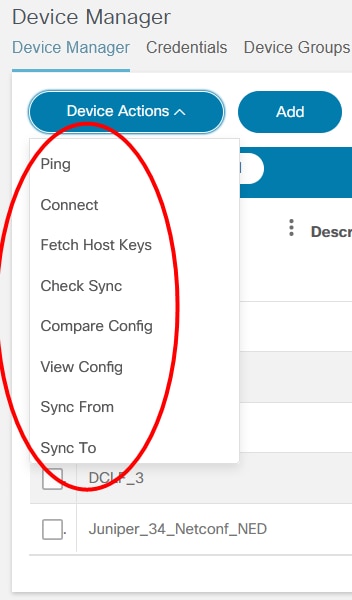
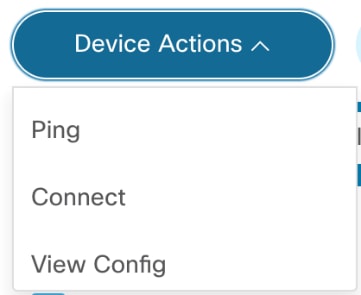
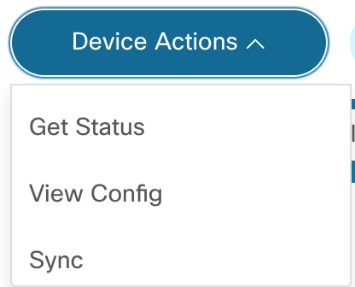
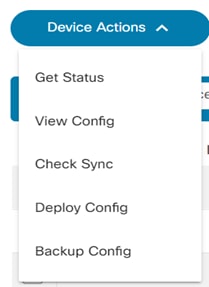
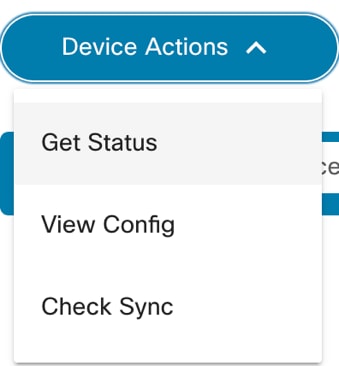
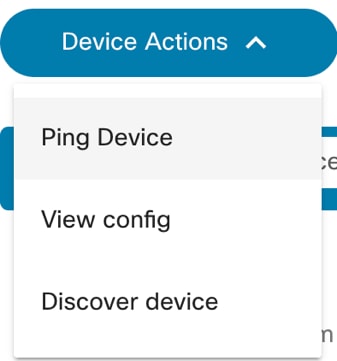
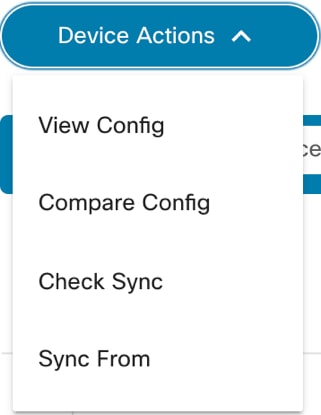
The Device Actions are explained below:
| Option | Description |
|---|---|
| Ping | Ping is used for troubleshooting, to test connectivity with a
device, and to determine its response time.  |
| Connect | Connect establishes connection to the selected devices and returns
the connection status. 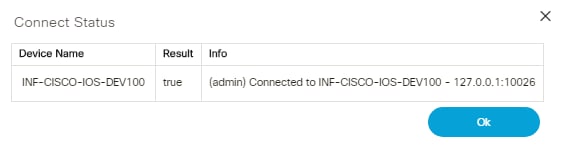 |
| Fetch Host Keys | Fetch Host Keys fetches the host key information from the selected
device. 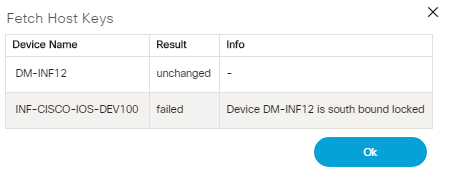 |
| Check Sync | Check Sync checks if the device configuration in the NSO CDB is
in-sync with the running configuration that is on the device. 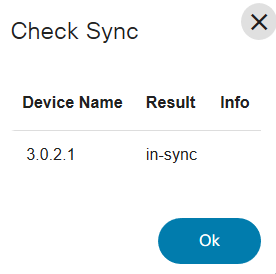 |
| Compare Config | Compare Config operation compares the configuration in the NSO CDB
against the running configuration on the selected device. 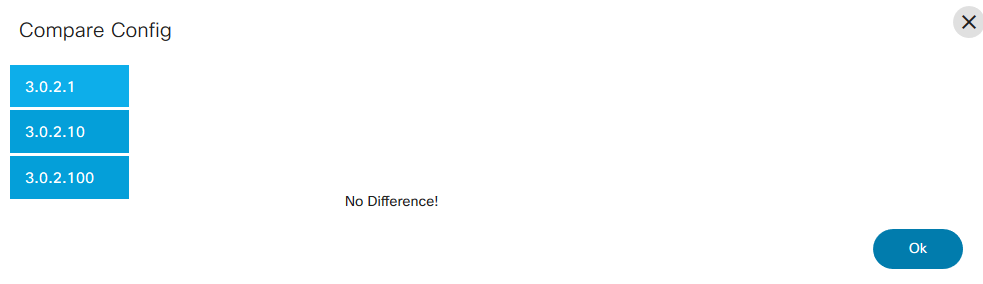 |
| View Config | View Config allows you to view the configuration of one or more
selected devices from the list. If you have selected more than one
device in the list, select the device name in the View
Config window to view its result. 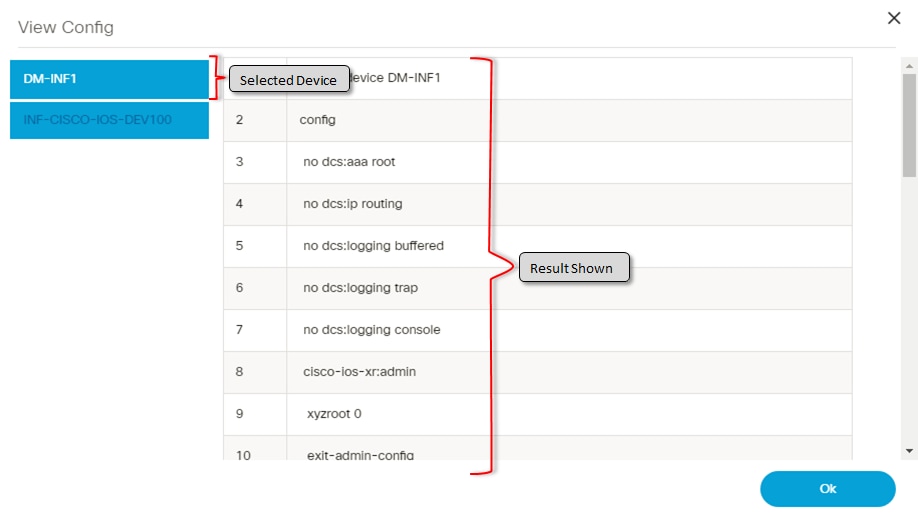 |
| Sync From | Sync From synchronizes the configuration to update NSO CDB with the
running configuration from device. 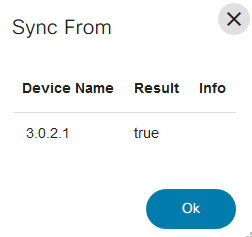 |
| Sync To | Sync To synchronizes the configuration stored in NSO CDB to the
device running configuration. 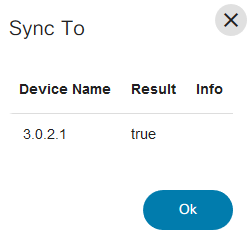 |
| Backup Config | Backup Config provides an option to trigger an on-demand backup for
the selected devices. Users can select the policy to be used for the
backup and an optional label to identify the backup. Backup Config is
applicable only if the controller type supports it (currently DCNM).
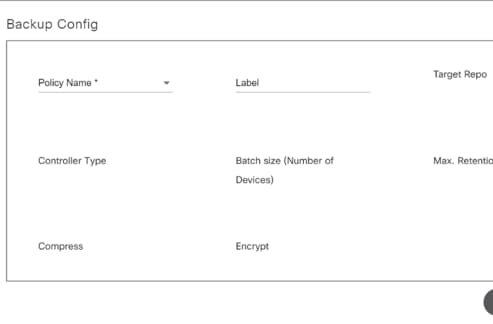 |
| Discover Device | The device selected in the main grid is treated as a Seed device.
BPA uses device discovery via the CDP neighbor command. Currently, BPA
discovers devices up to a depth of five. “Depth” represents the layer of
devices the immediate vicinity of the seed device. 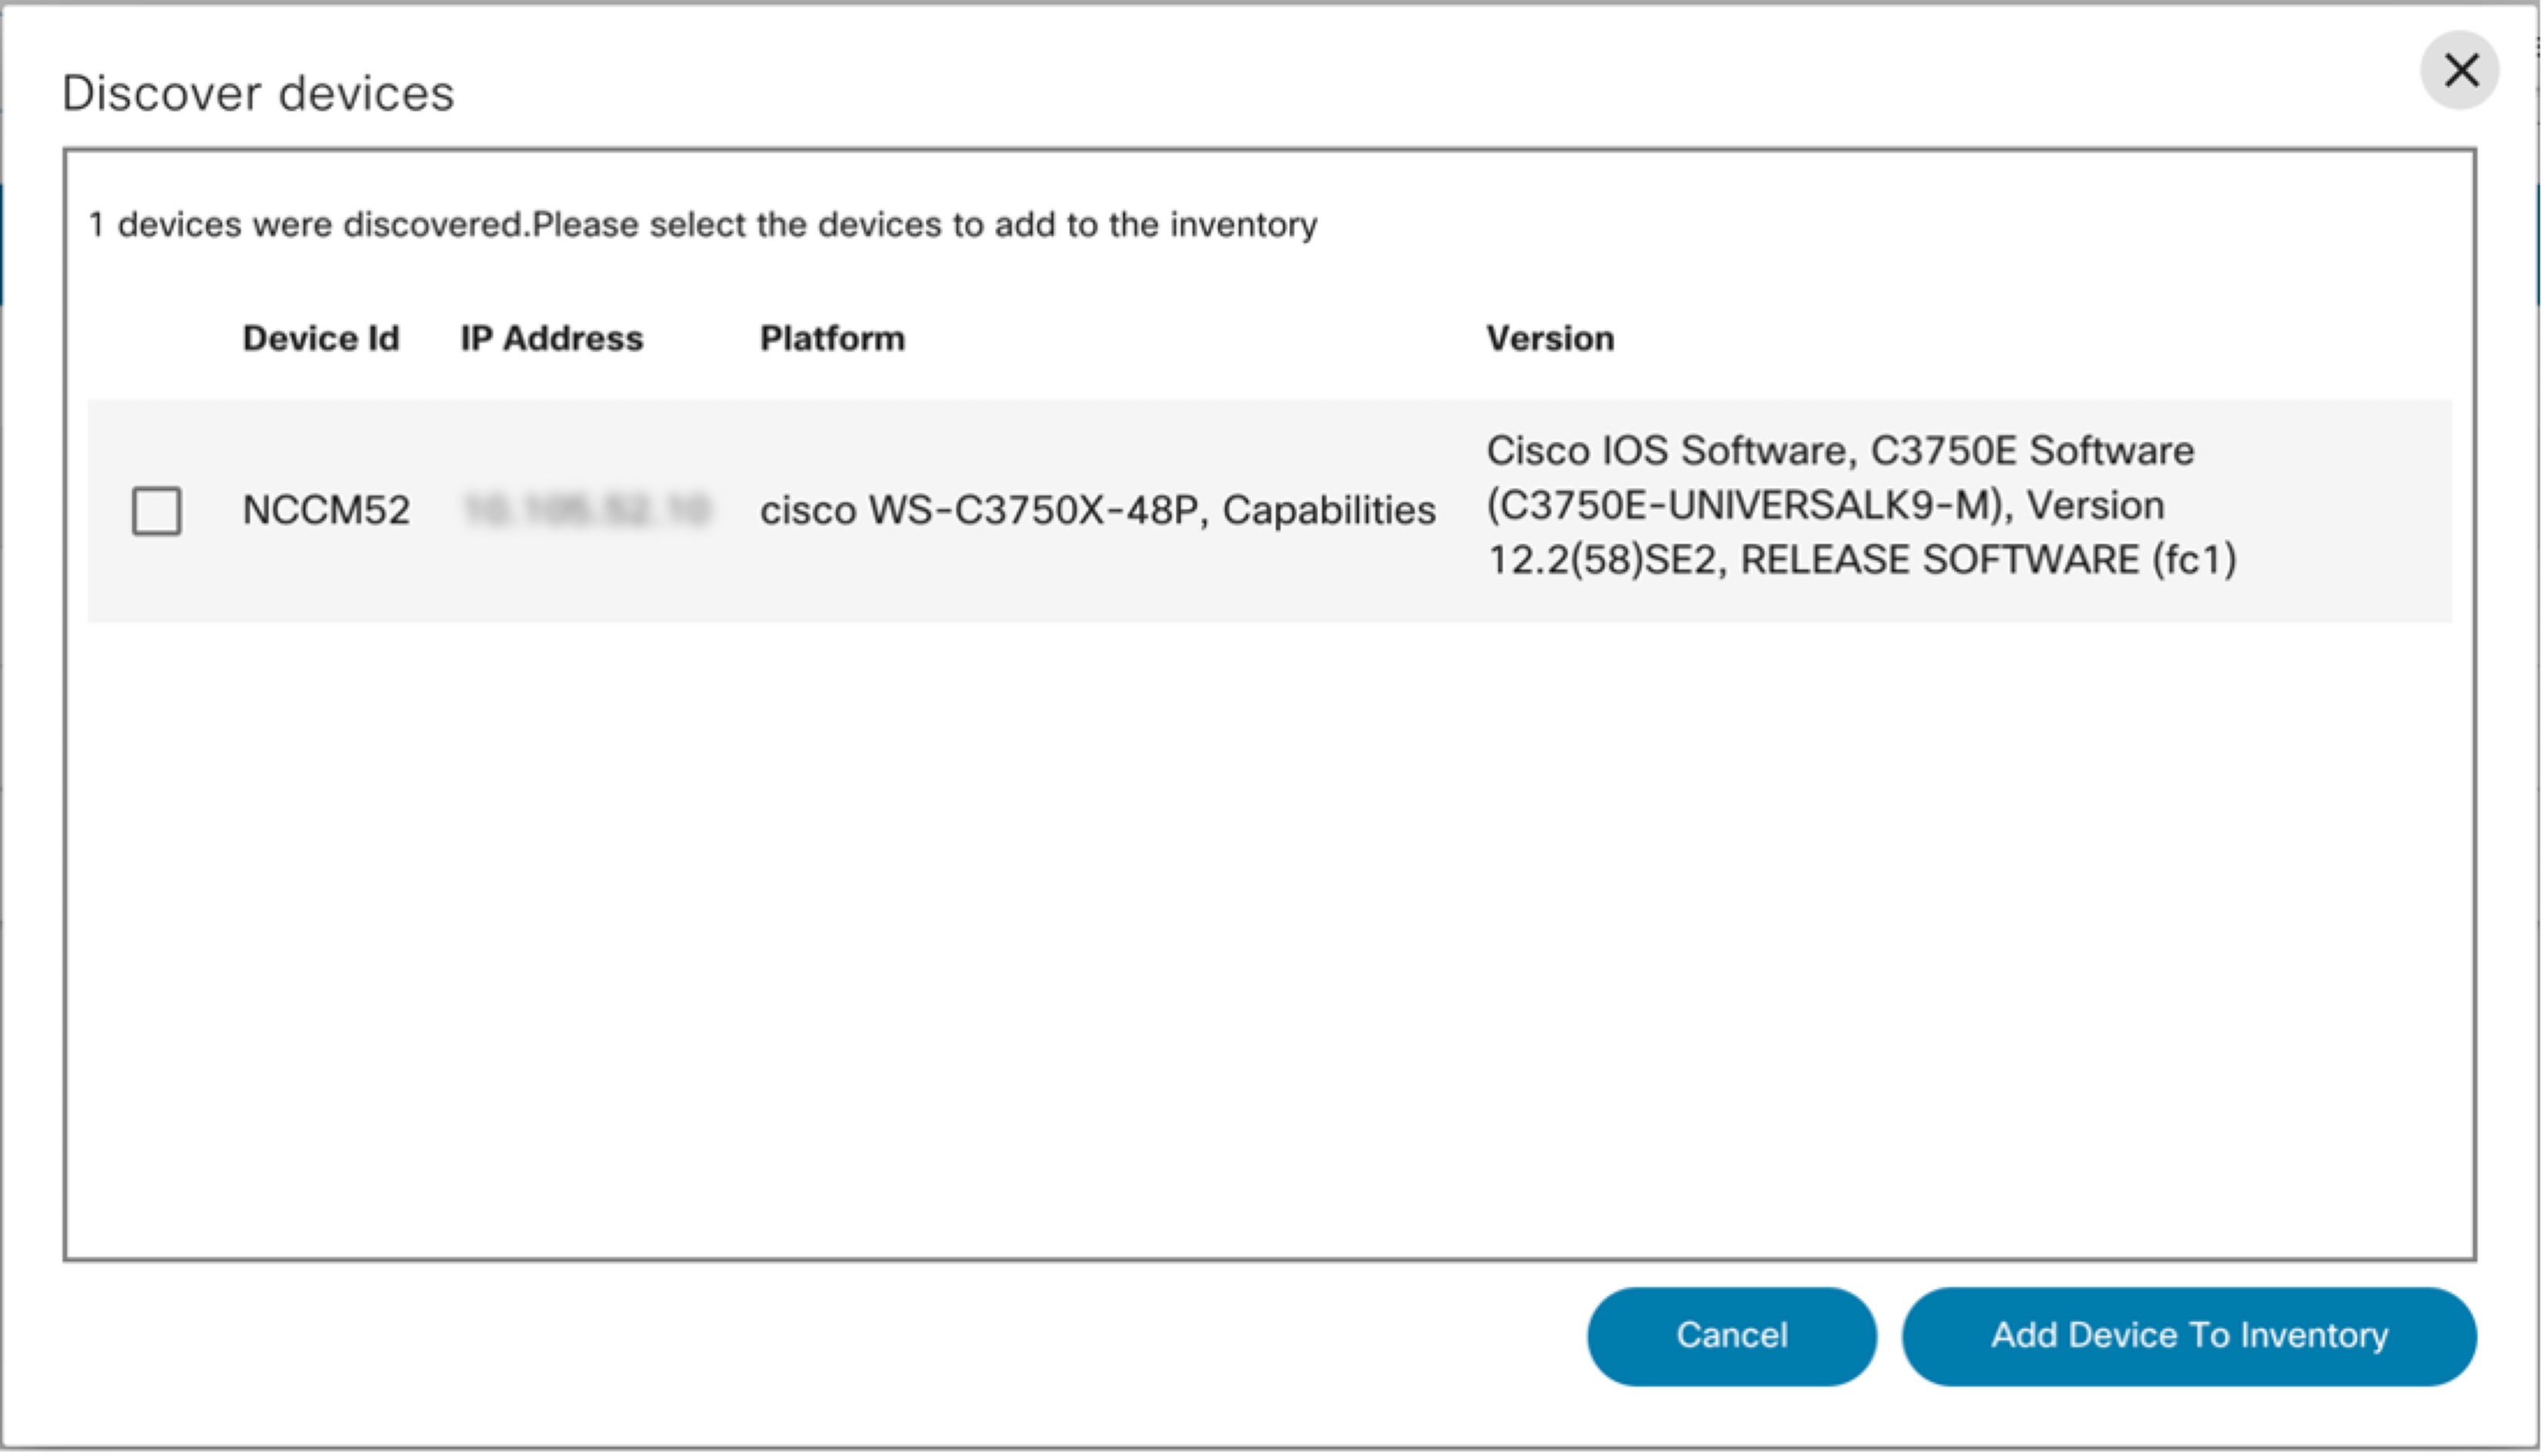 The Discover devices page
displays a list of discovered devices along with information regarding
the IP address, hostname, platform, and software version. To add a
device to the inventory, select the devices and click Add Device
to Inventory. The Discover devices page
displays a list of discovered devices along with information regarding
the IP address, hostname, platform, and software version. To add a
device to the inventory, select the devices and click Add Device
to Inventory. |
Adding Devices
Adding a device via Device Manager is only applicable for NSO and Direct-to-Device Controllers.
To add a new device, follow the steps below:
- Click Add on the Device Manager page. The Add Device window opens.
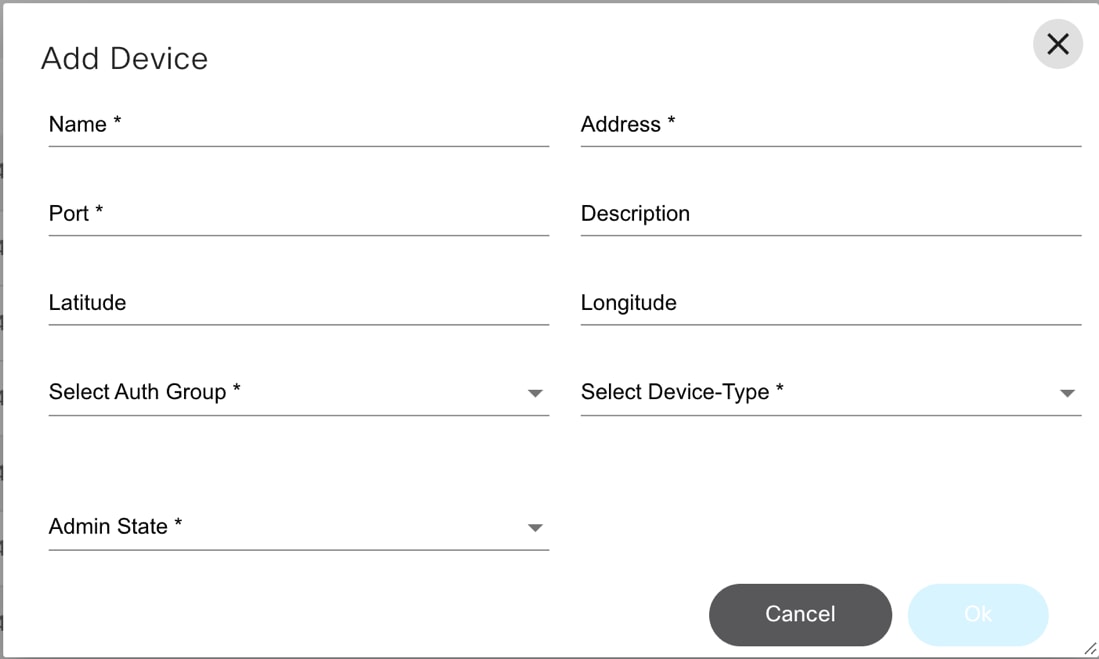
- For NSO Controllers, enter the following fields:
- Name: Enter name of the device
- Port: Enter Port number
- Latitude: Enter the geographical latitude information of the device
- Longitude: Enter the longitudinal geographical information of the device
- Authgroup: Select the Authgroup from the drop-down list for the device to add
- Admin State: Select the Admin State type from the Admin State drop-down list, for the device to add
- Address: Enter IP address of the device
- Description: Enter description of the device you are going to add to the network
- Device Type: Select the Device type from the drop-down list for the device to be added
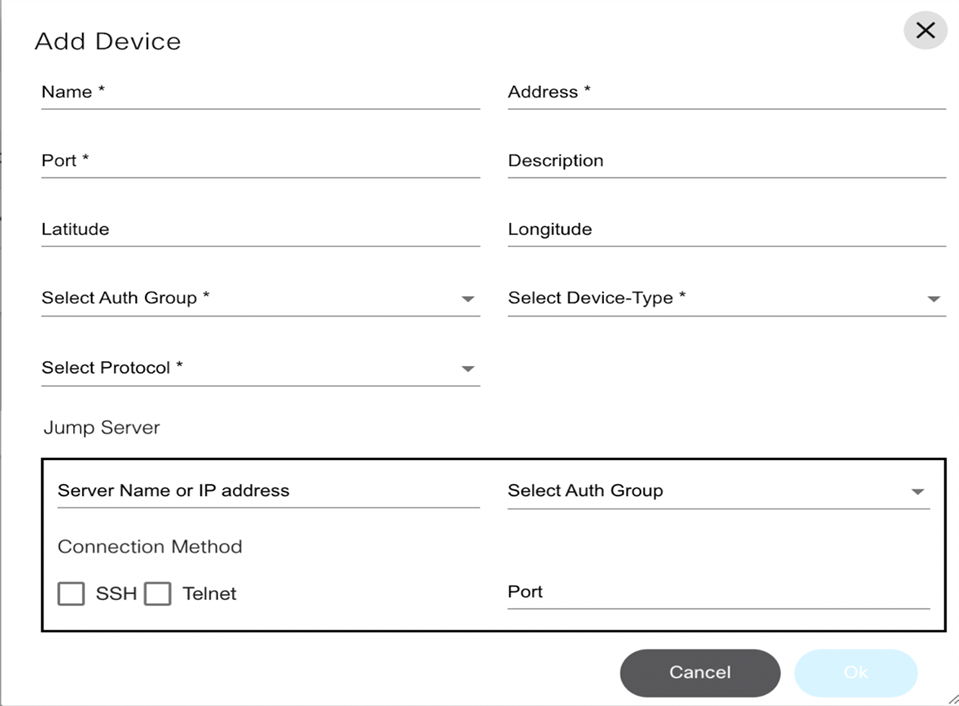
- For Direct-to-Device Controllers, enter the following fields:
- Name: Name of the device
- Address: IP address of the device
- Port: Port number
- Description: Description of the device you are going to add to the network
- Latitude: Geographical latitude information of the device
- Longitude: Longitudinal geographical information of the device
- Authgroup: Select the Authgroup from the drop-down list for the device
- Device Type: Select the device type (e.g., Cisco IOS, IOS-XR).
- Protocol: Select SSH or Telnet
- Jump Server: Details of the Jump Server (e.g., IP address, Auth group, protocol, and port)
- Click OK to add the device to the network.
Editing Device Details
Editing device details via Device Manager is only applicable for NSO, Ansible, and Direct-to-Device controllers.
To edit device details:
- Click Device Manager on the Home page to view the list of devices and select a device.
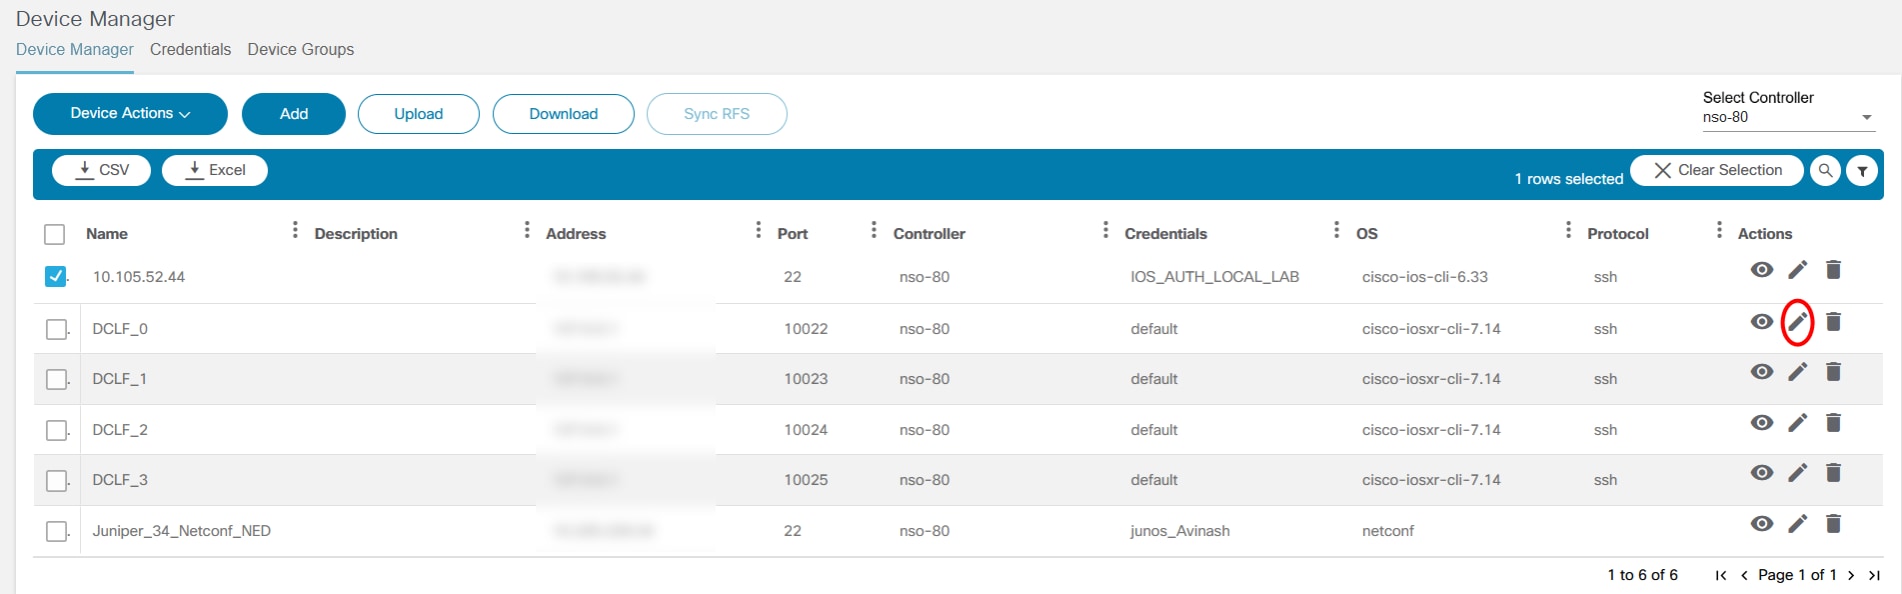
- Select the Edit icon. The Edit Device window opens.
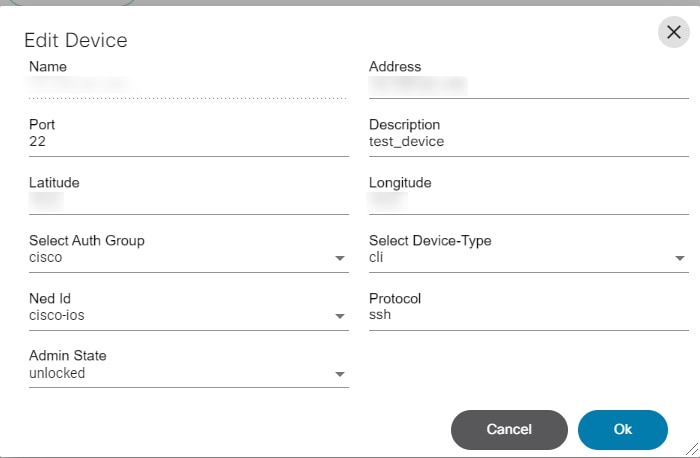
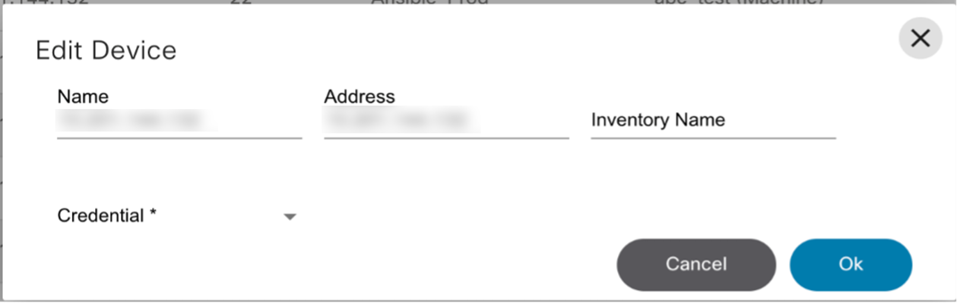
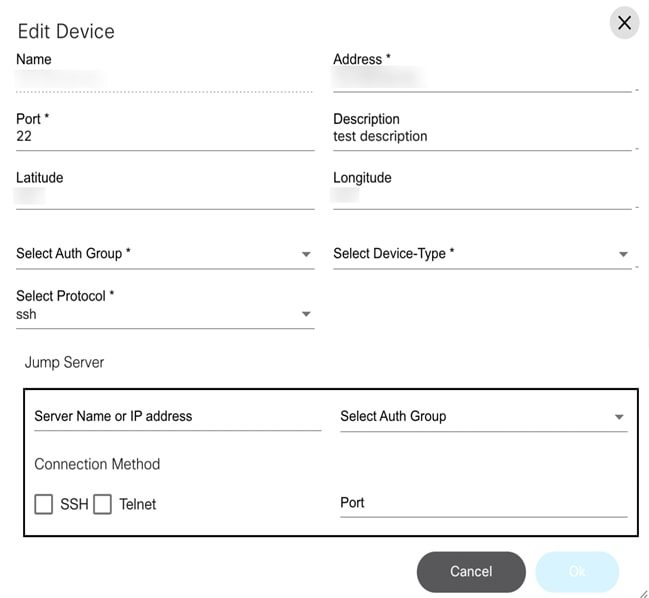
- Edit the device details based on Controller type.
- Click OK to save the changes.
Deleting a Device
Deleting devices via Device Manager is only supported for NSO and Direct-to-Device Controllers.
To delete a device:
- Select the Delete icon for the specific device. A warning message displays.
- Click OK to delete the device.
Importing Devices
Importing Devices via Device Manager is only supported for NSO controllers.
To import a device:
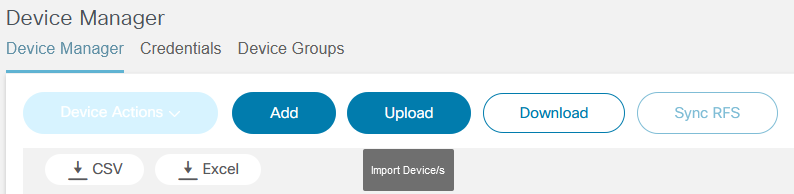
- Click Upload and locate the configuration file in your local system.
- If required, download the device template and use it to import the list of devices. For more information about the device template, refer to Downloading the Device Template.
Downloading the Device Template
Downloading the device template is only supported for NSO controllers.
To download the device template:
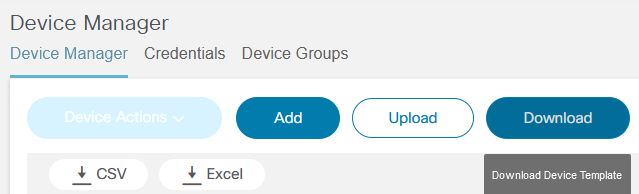
- Click Download. A template file (csv) with required fields is created and saved to the local system.
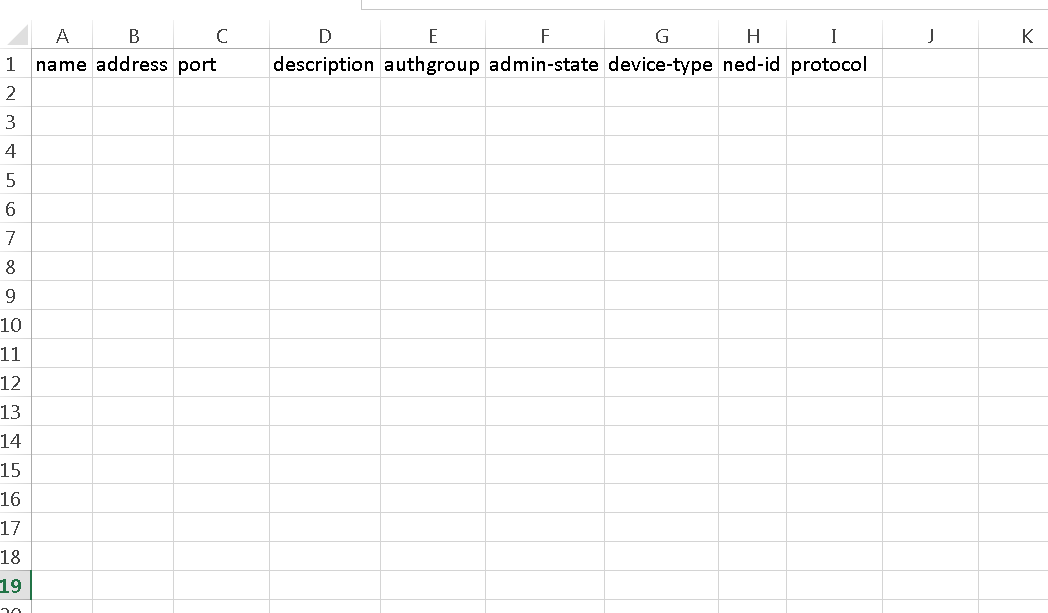
- Sync the RFS and Devices using Sync RFS.
Viewing Backup History
Viewing backup history is supported for the following:
- NSO
- CNC
- Cisco Catalyst Center
- DCNM
- NDFC
Users can select the View Backup History icon to view the Backup page. This page provides the list of backup configurations available for the selected device.
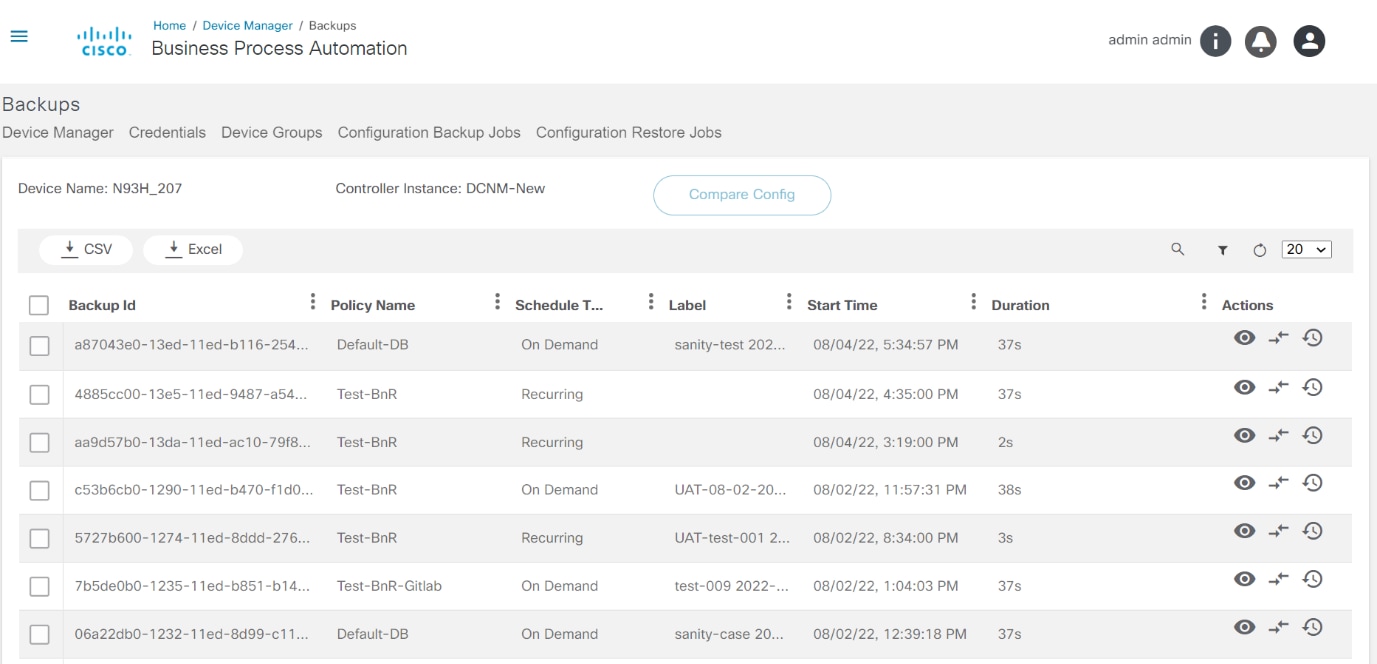
This page also provides the key functionalities for the selected device as outlined below.
View Backup Config
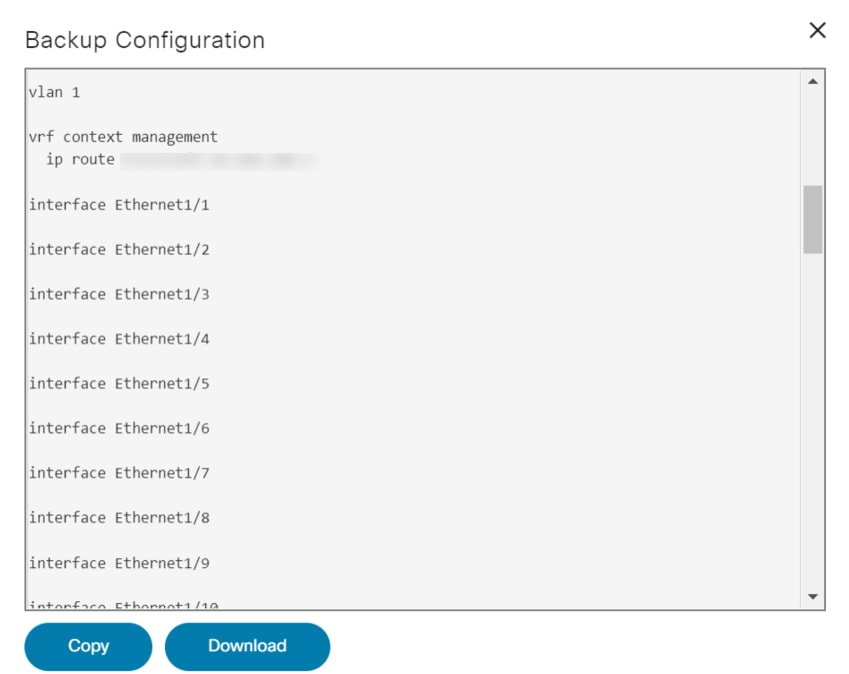
This page shows the device configuration from the backup store. The page also provides an option to download the configuration.
Compare Config
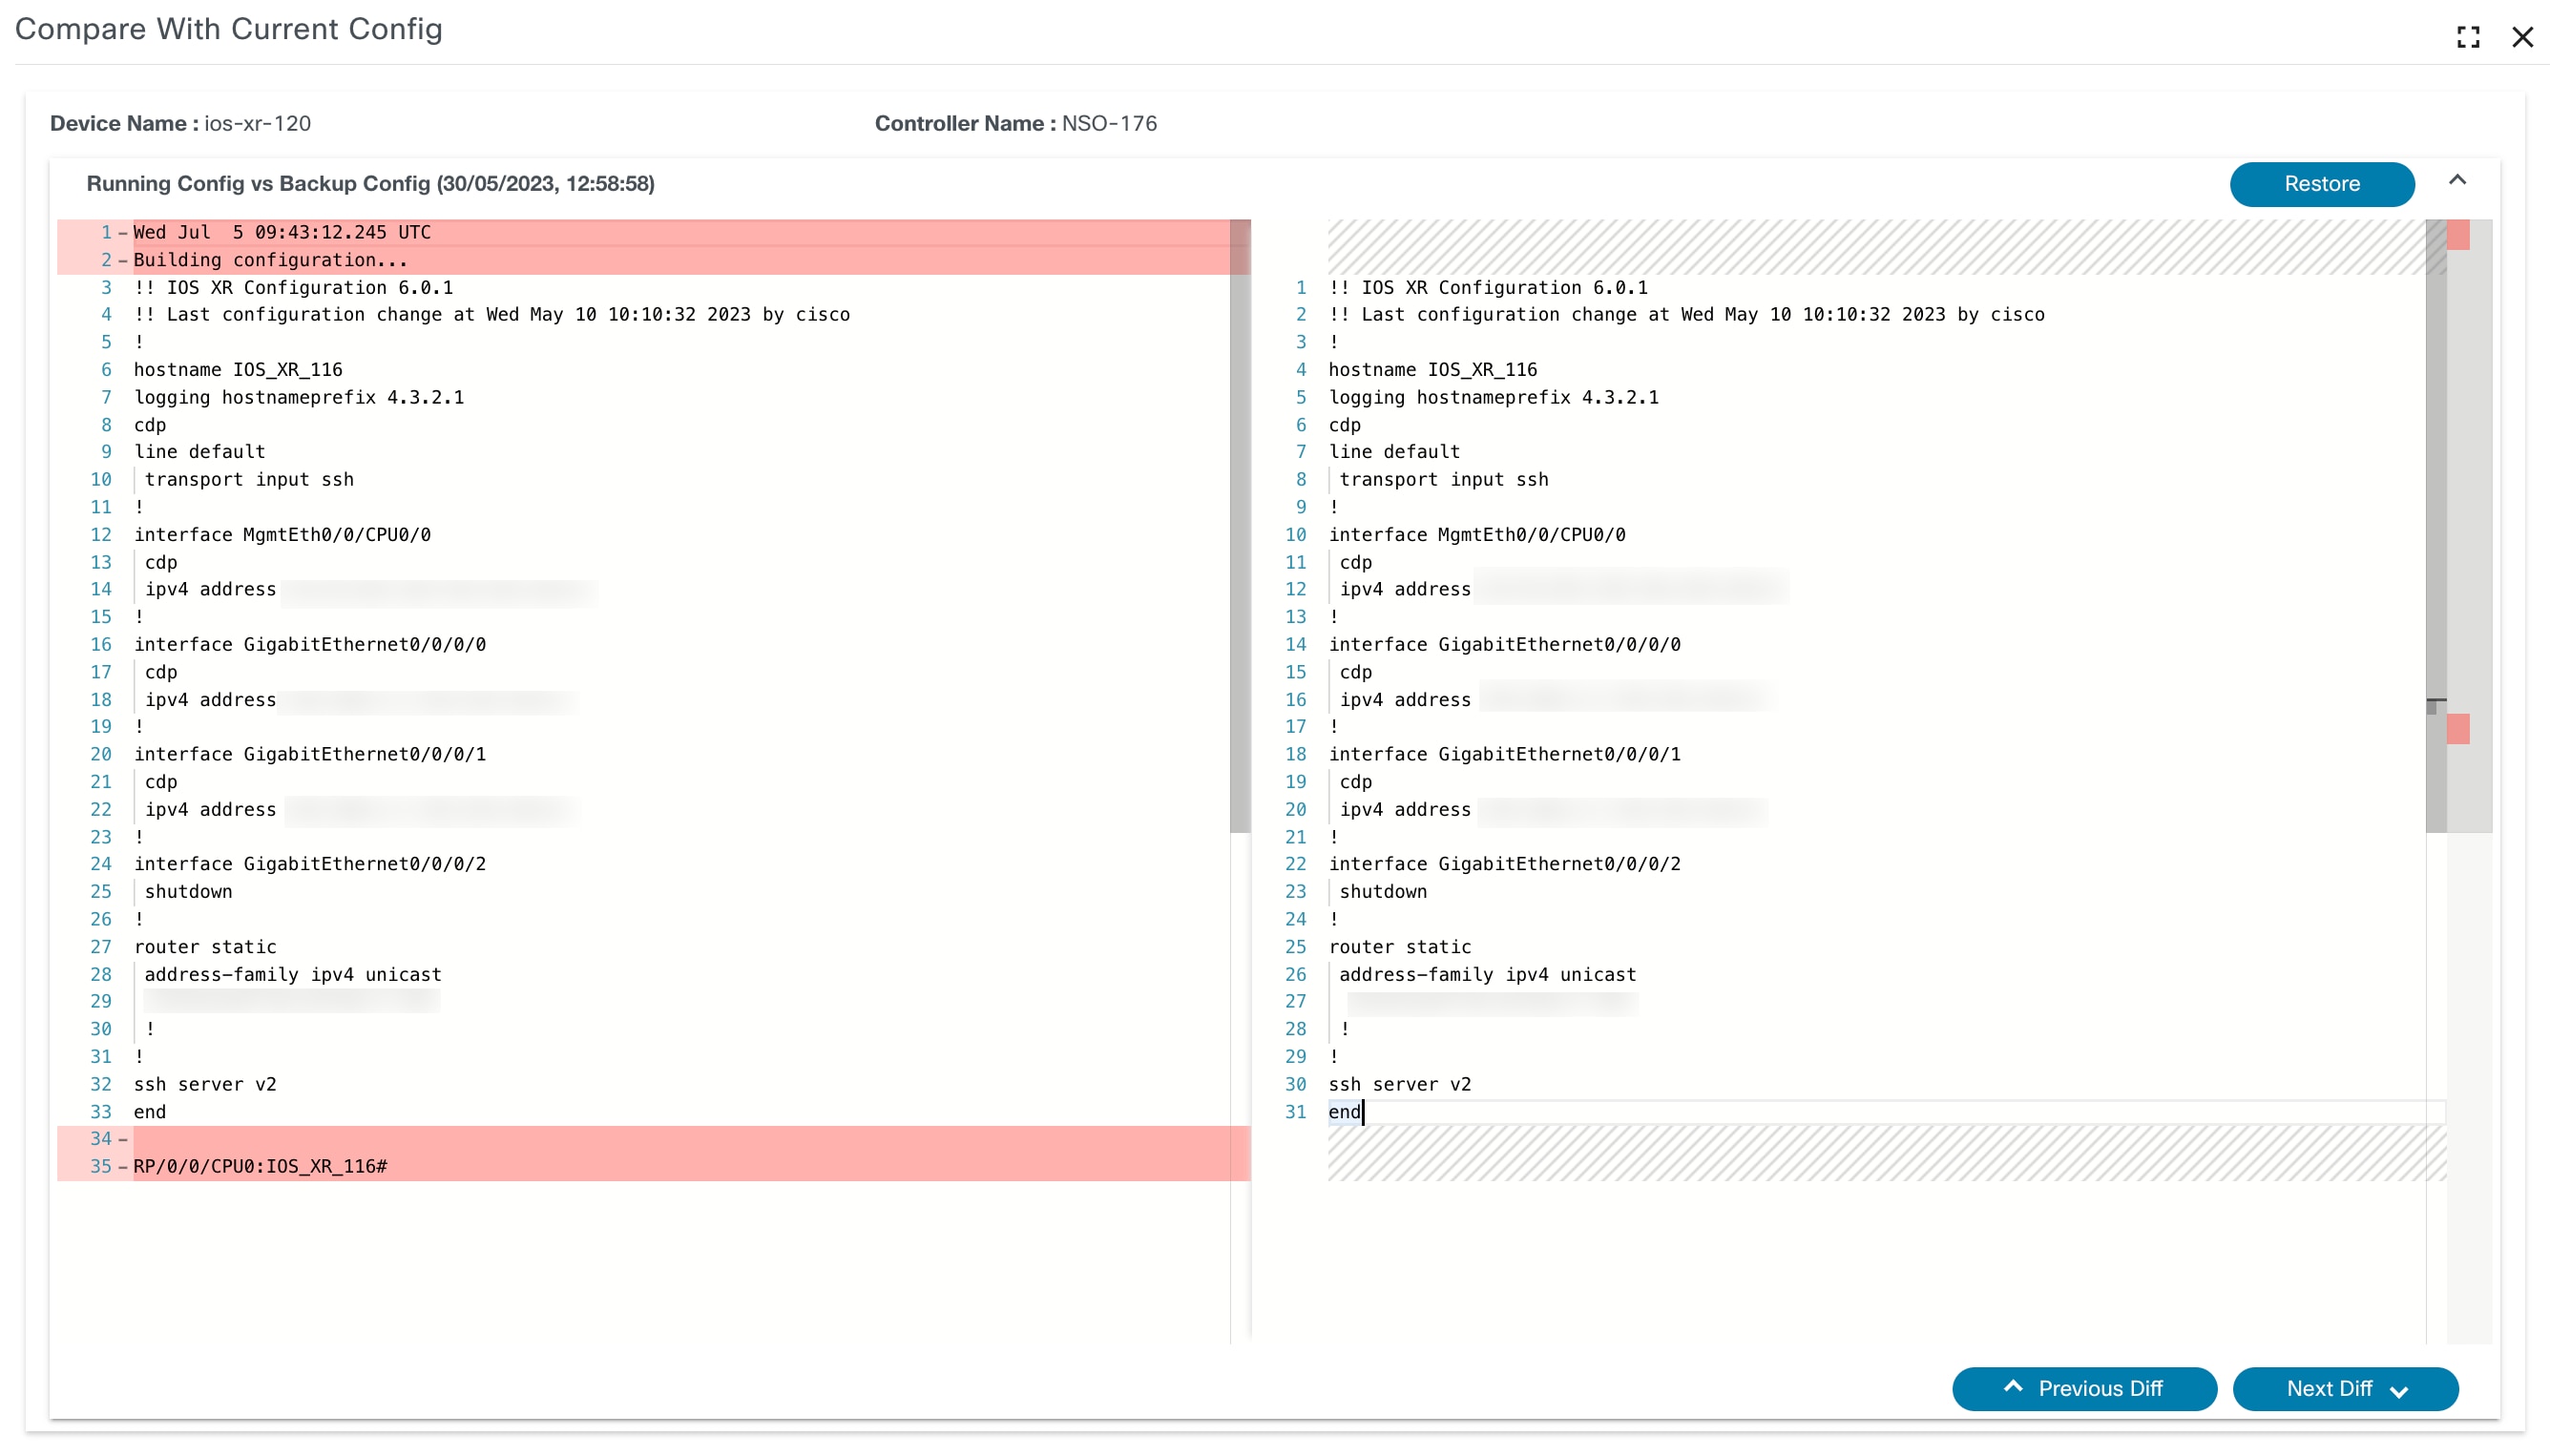
This option compares a backup with either the current running config or another backup config.
Restore Config

Users can select the Restore Config icon for any backup. This opens a confirmation dialog box with the relevant details. Once confirmed, the restore workflow associated with the corresponding policy is executed.
Credentials
The Credentials page is primarily supported for the NSO and Direct-to-Device controllers.
A read-only list of existing credentials fetched from the underlying controller is displayed for the Cisco Catalyst Center and Ansible controllers. There is no option to add, update or delete a credential for Cisco Catalyst Center, DCNM, Ansible, and vManage controllers.
The Credentials page allows users to map local users to remote users with the relevant SSH authentication information.
To access credentials, select Credentials on the Device Manager page.
The following actions can be performed:
- Adding new credentials
- Editing credentials
- Deleting from the available list of credentials
Adding Credentials
Adding credentials is only supported for NSO and Direct-to-Device controllers.
To add a credentials:
- On the Credentials page, click Add. The Add Auth Group window opens.
- Enter the following fields:
- Auth Group name
- Remote Name
- Device username
- Desired remote password
- Desired remote secondary password
- Click Save to add the Auth Group.
Editing Credentials
Editing credentials is only supported for NSO and Direct-to-Device controllers.
- Select the Credentials tab.
- Select a credential and Select the Edit icon. The Edit Auth Group window opens.
- Edit the details of default map and click Save.
- If required, add a umap by entering information
in one or more of the following tabs:
- admin
- nsouser
- operator
- Select Remote Name from the drop-down list
- Enter the device Username
- Select Remote Password from the drop-down list
- Enter a desired remote password
- Enter a desired remote secondary password
- Click Save to add the umap.
Deleting Credentials
Deleting credentials is only supported for NSO and Direct-to-Device controllers.
To delete a device’s credentials:
- On the Credentials page, select the Delete icon for the specific group. A warning message displays.
- Click OK to delete the group.
Device Groups
The Device Groups page is primarily supported for NSO and Cisco Catalyst Center controllers.
A read-only list of existing Device Groups fetched from the underlying controller is displayed for the DCNM and Ansible controllers. There is no option to add, update, or delete a Device Group for DCNM, Ansible, and vManage controllers.
The Device Groups page allows users to create a group of devices and assign a specific name to it. Users can perform different actions on the group that will be applied to all devices in that specific group.
To access Device Groups:
- Select the Device Groups page in the Device Manager application.
- The Device Group page displays with the
following options:
- Add device group
- Edit device group
- Delete devices
Adding a Device Group
Adding a device group is only supported for NSO controllers and Cisco Catalyst Center.
To add a device group:
- Click Add on the Device Group page. The Add Device Group window opens.
- Enter the name of the new group and click Save.
Editing Device Groups
Editing device groups is only supported for NSO controllers and Cisco Catalyst Center.
- Select Device Groups.
- Click the Edit icon of the specific group to be edited. The Edit Group Details window opens, which shows the list of all available devices.
- Enter the device name and add or remove devices in the left pane.
- On the right pane, select the groups to add and click Update.
Configuration Backup Jobs
The Configuration Backup Jobs page shows a list of all the recent backup configurations. The grid shows one entry per device, with the status of the latest backup. The data can be filtered by controller type, controller instance, status of backup, as well as a date range. By default, the grid shows data for the last two weeks.
The grid has the following actions:
View Backup Config
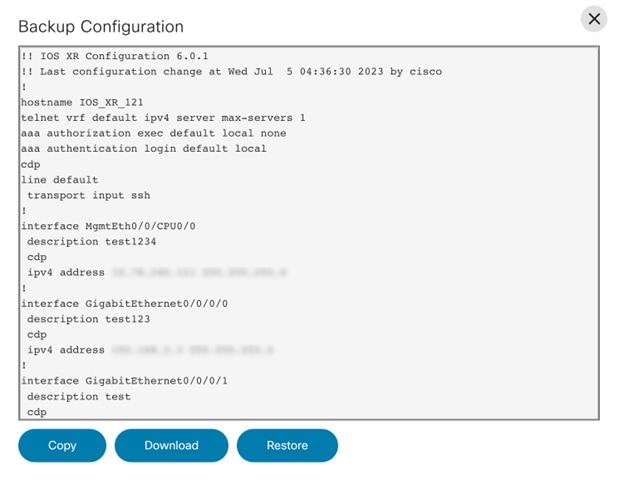
This action shows the device configuration from the backup store. An option to download the configuration is also available.
Compare Config
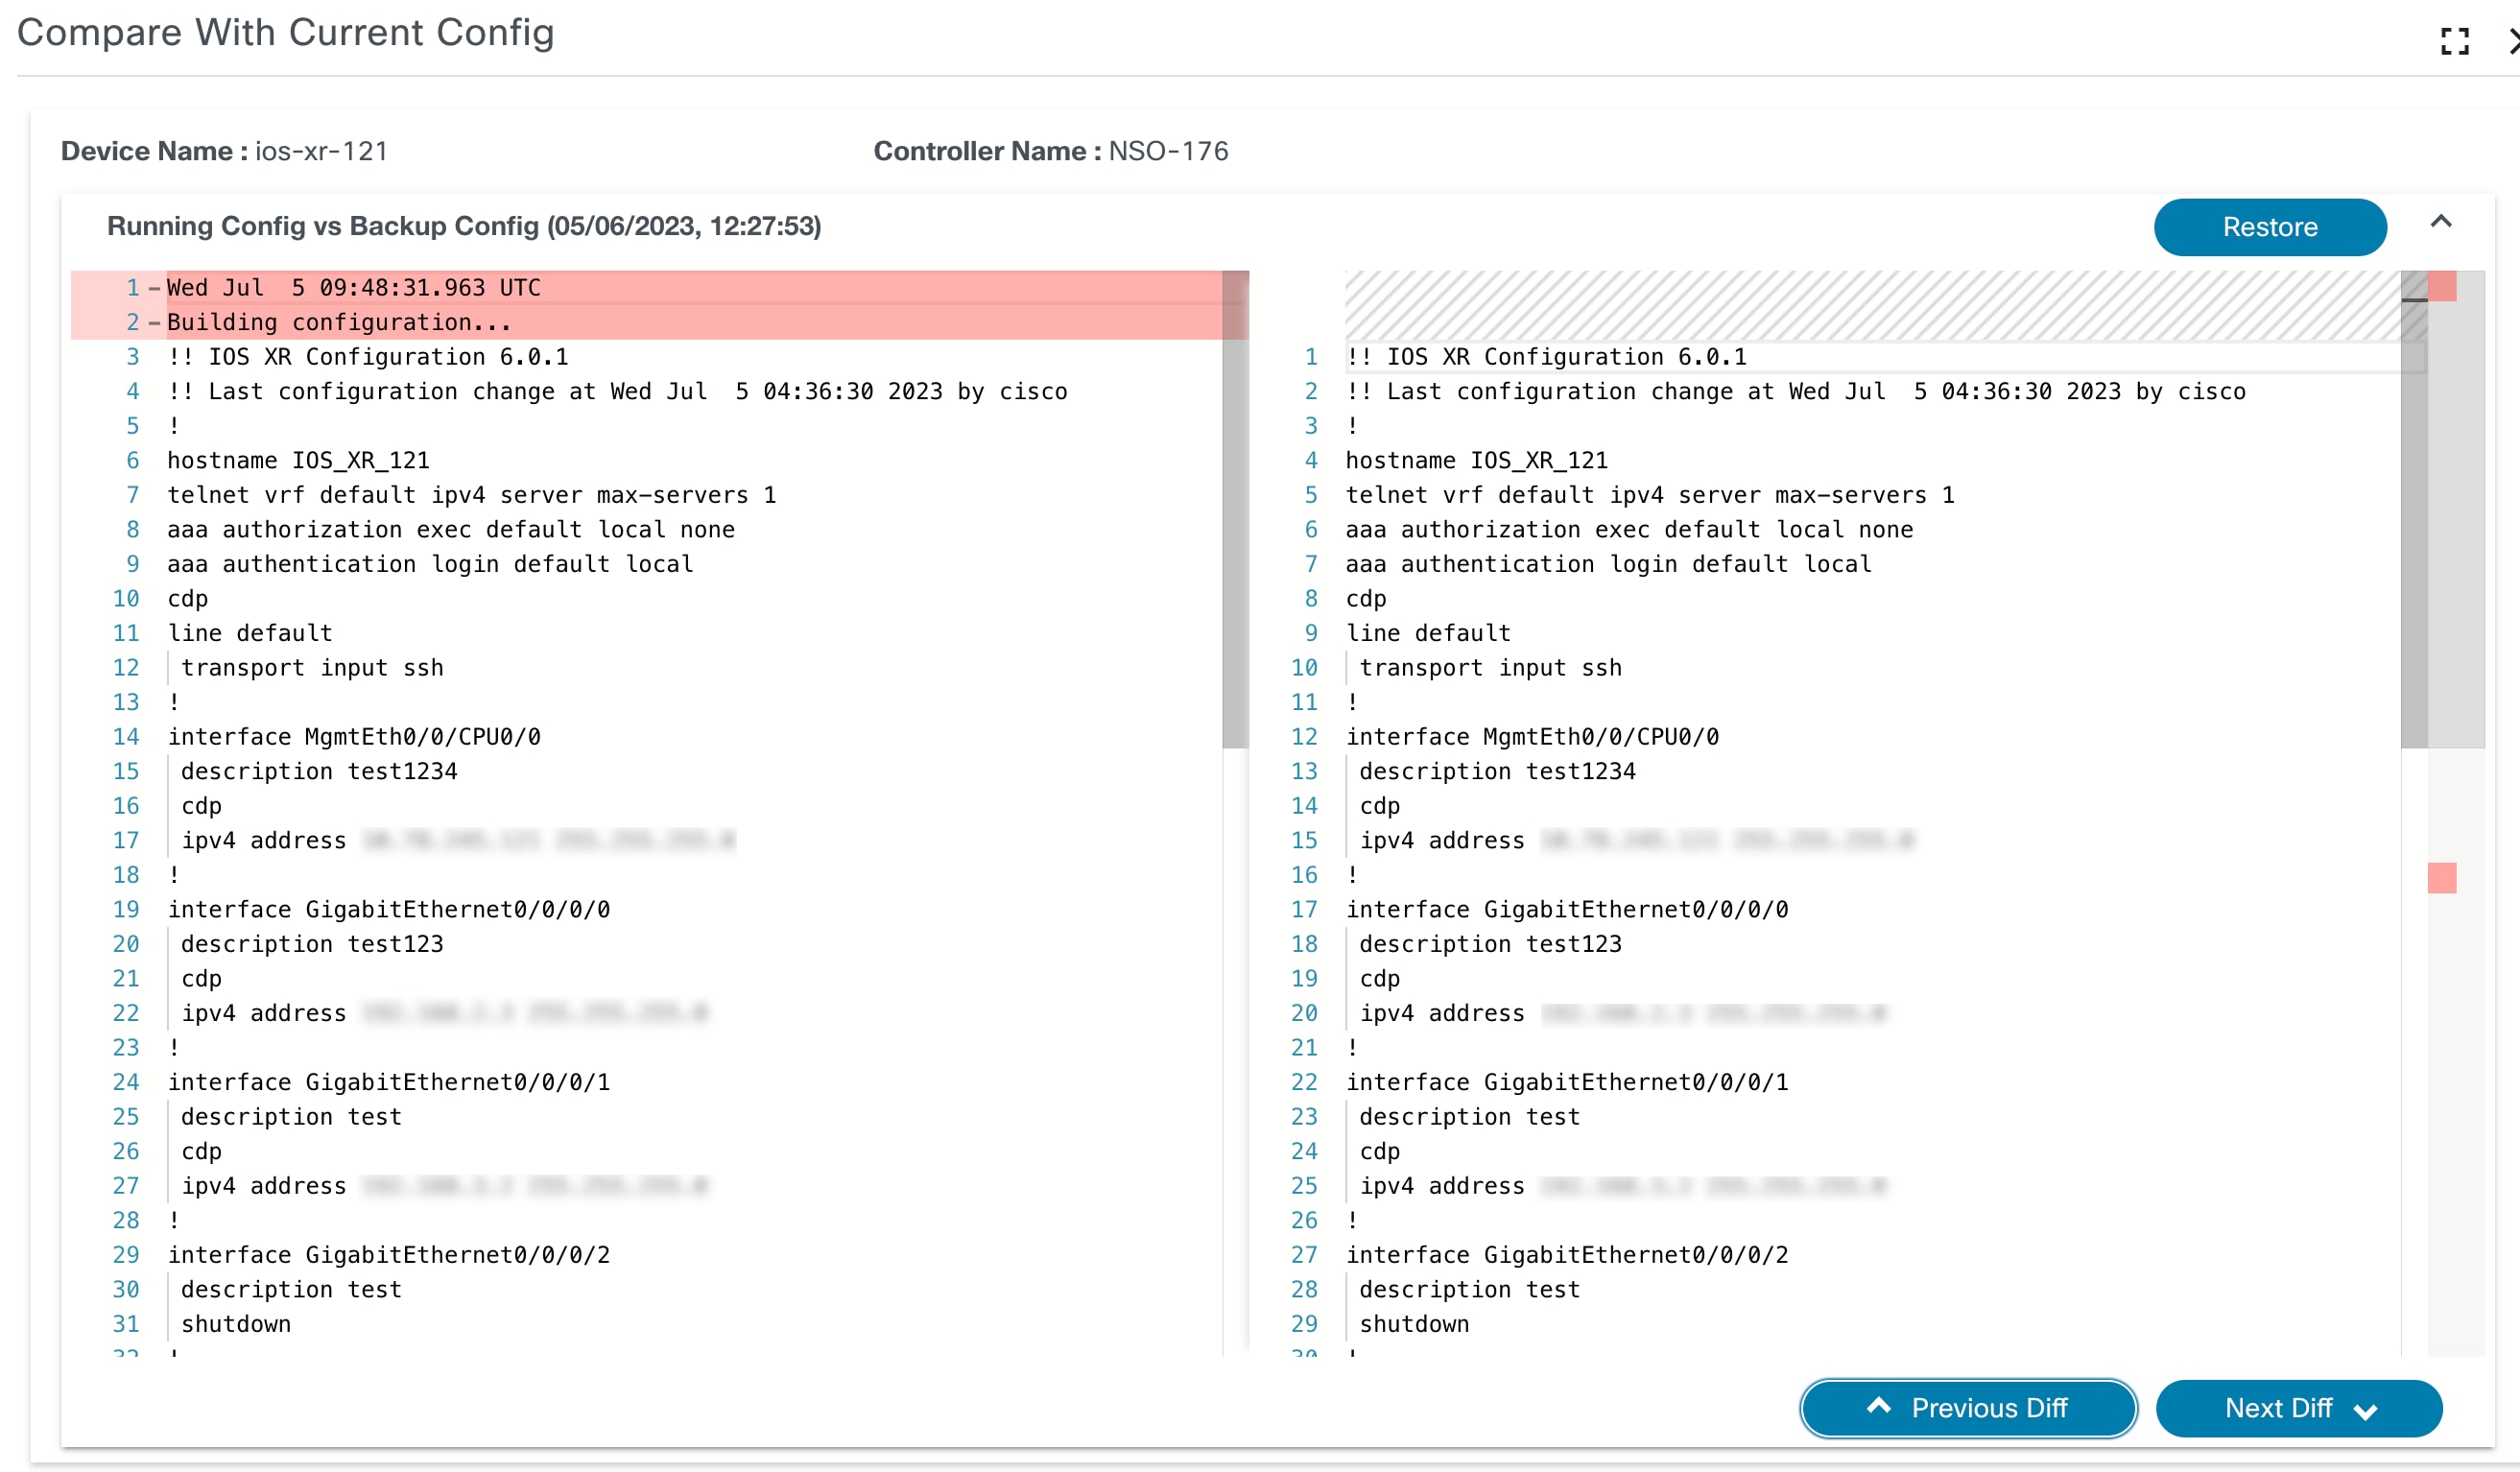
This option compares a backup with either the current running config or another backup config.
Configuration Restore Jobs
View Error Details

The View Error Details icon displays if the restore workflow has halted because of an error.
View Milestones
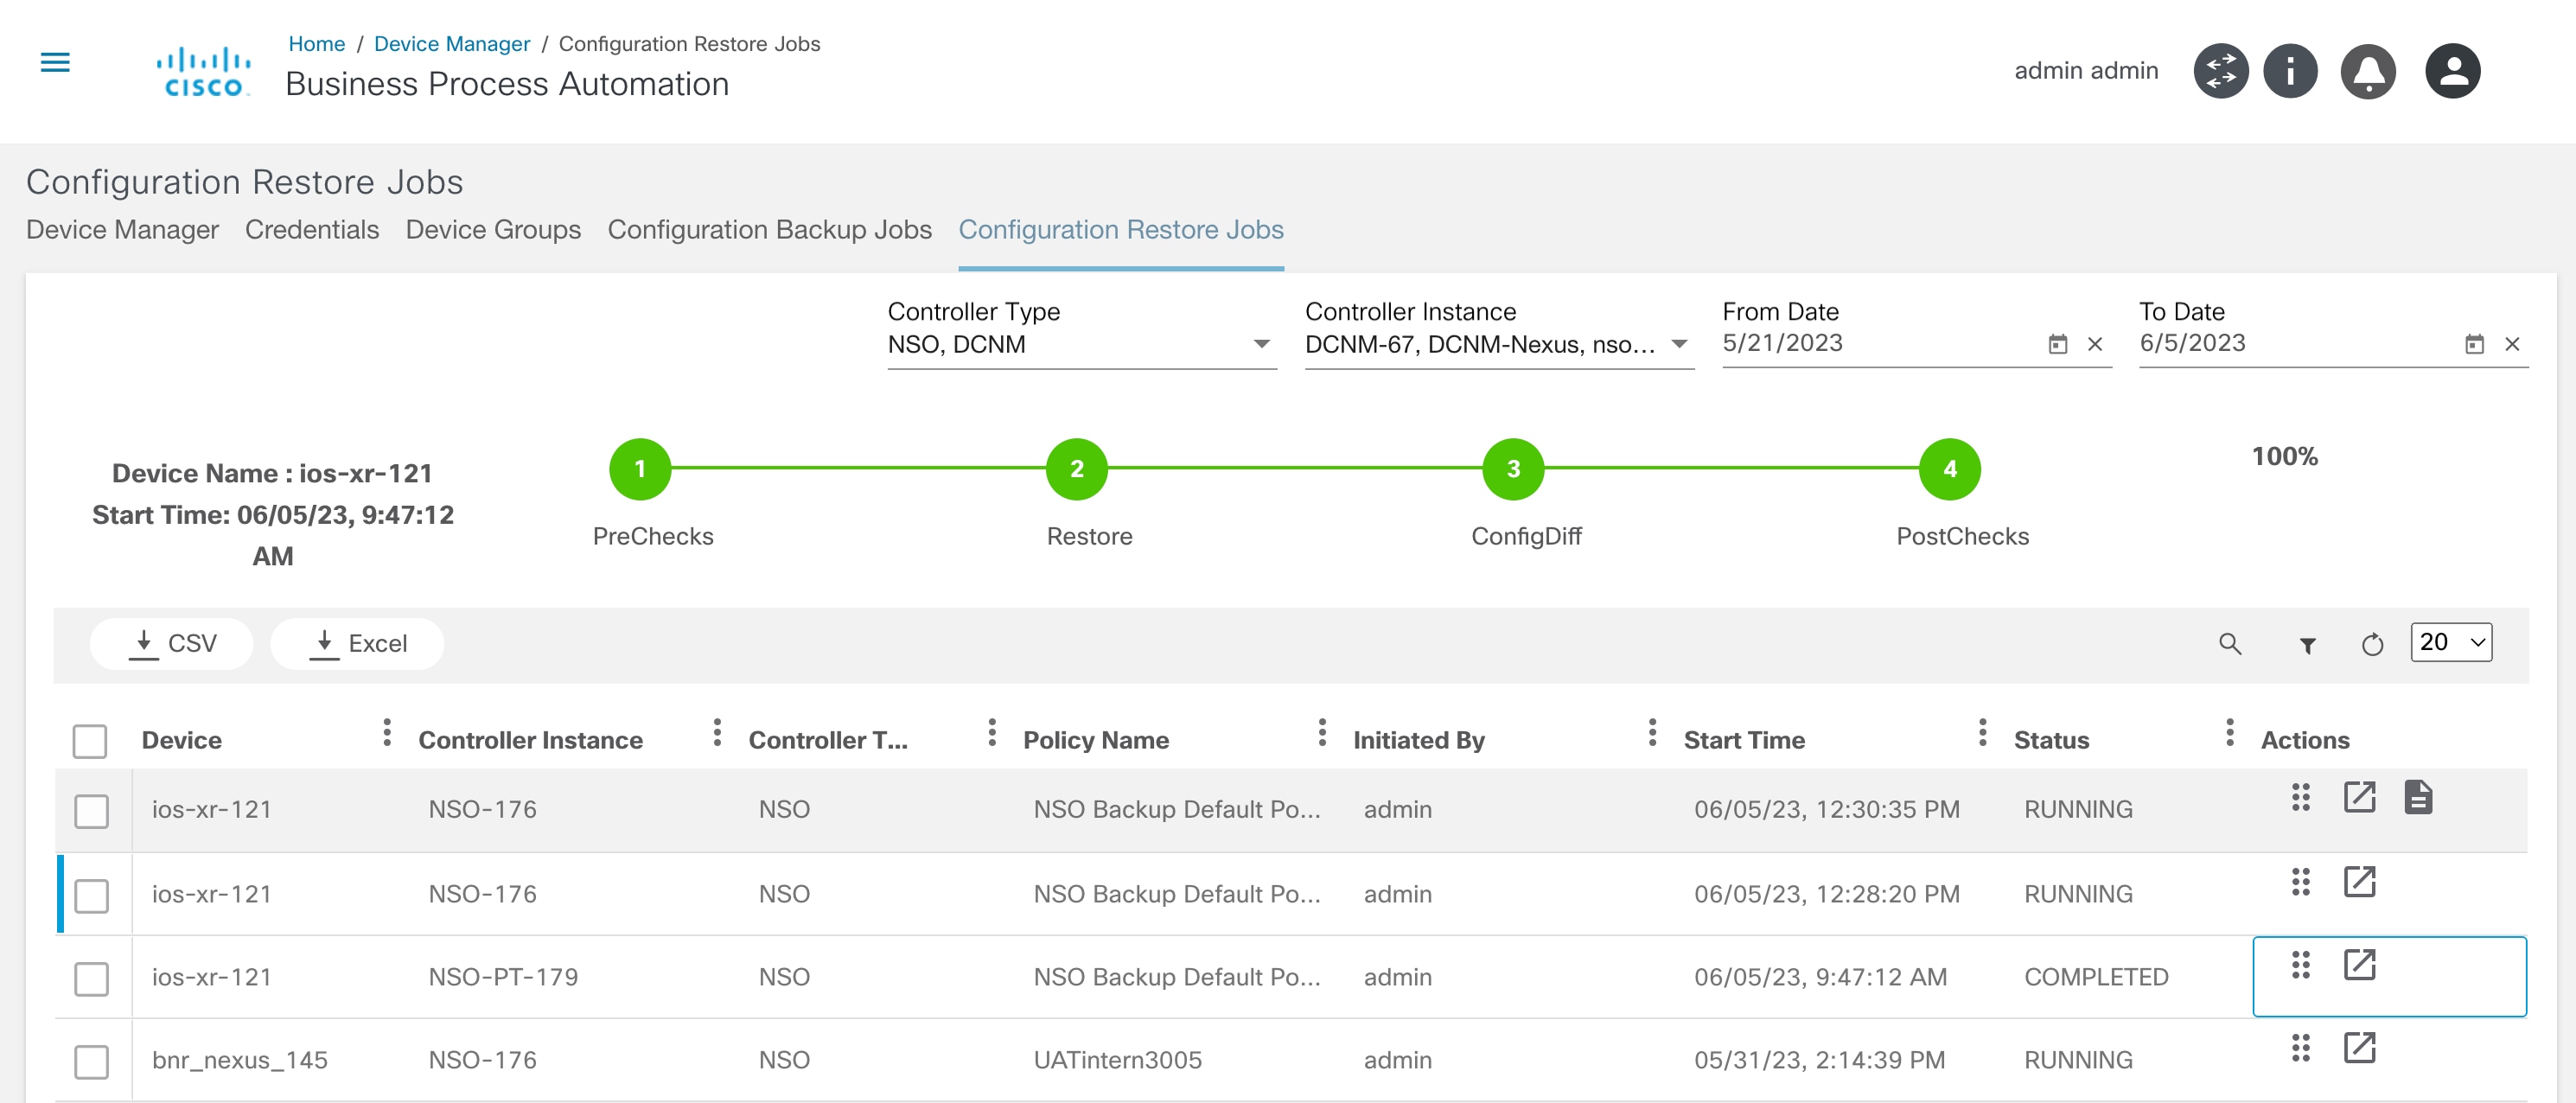
The Milestones icon gives a glimpse of the list of milestones and their corresponding status.
View Workflow Instance Details

The last icon in the grid cross launches the user to the workflow instance page in the workflow application. This enables the user to drill-down into the workflow execution details.
View and Claim Task Details
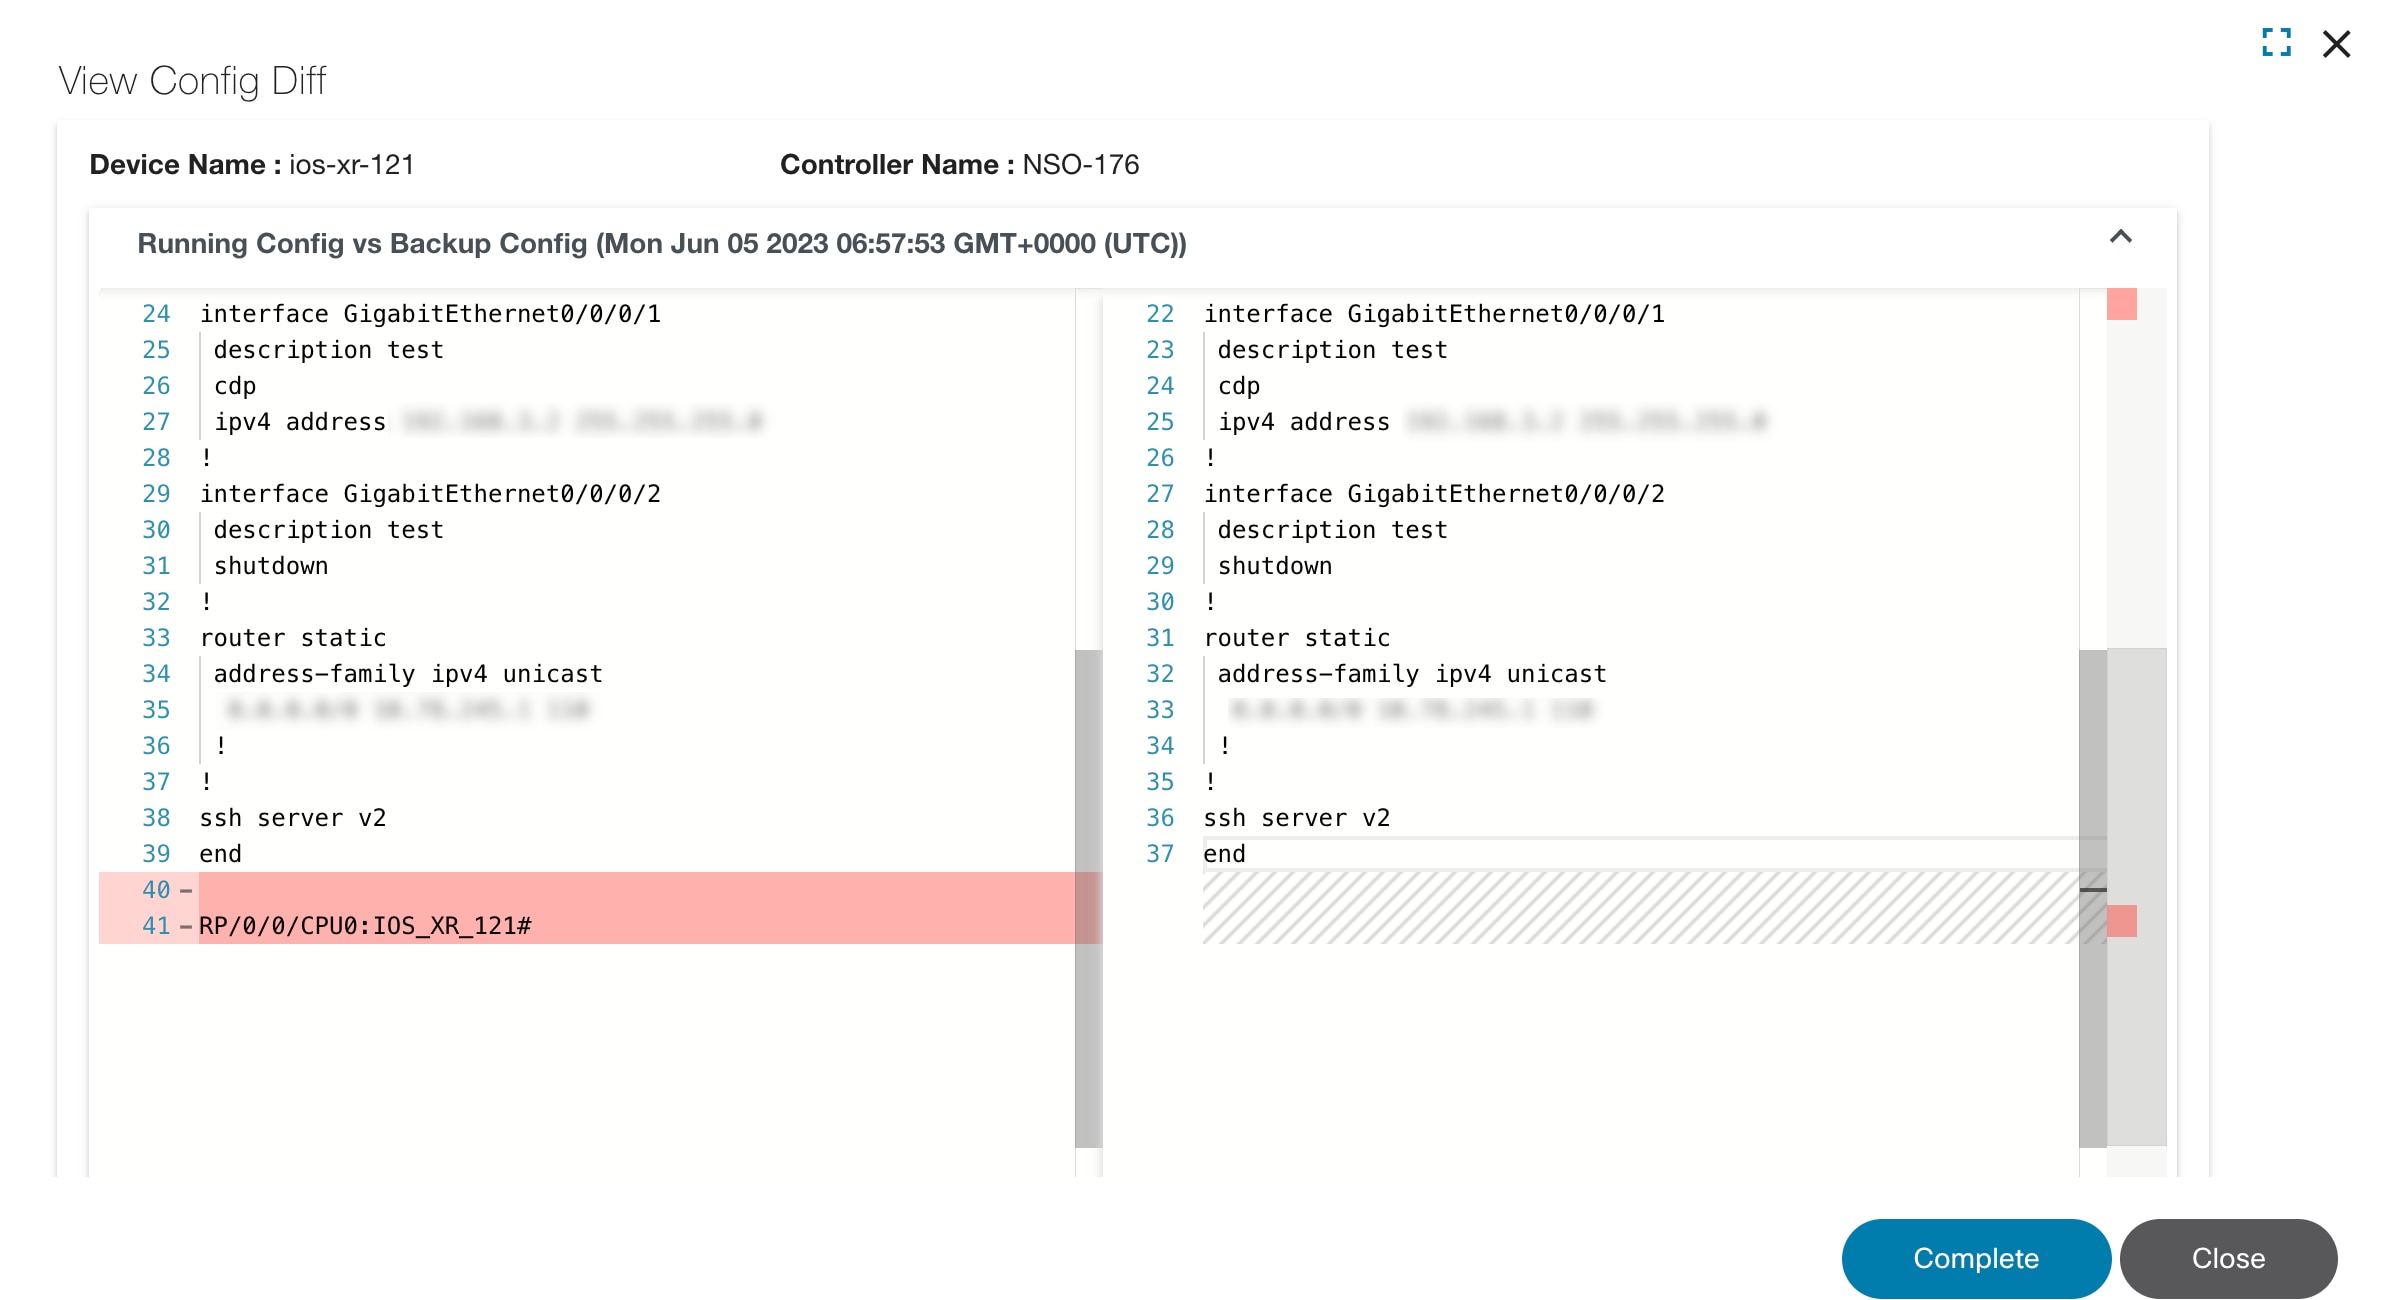
The Task icon is shown if the restore workflow instance is waiting in a user task activity. Selecting this icon will open a dialog box with the form details and actions corresponding to the user task.
Working with the OS Upgrade Application
The OS Upgrade application allows users to monitor upgrade operations performed on devices in the network.
The workflow for the OS Upgrade is configured by creating a Device Type in the Market Variance application. The Device Type has an option to specify the custom forms and workflows for a given OS Upgrade task. An OS upgrade task can be initiated by clicking Create Order in OS Upgrade application. In the Create Order page, users need to select the devices for the OS Upgrade.
The selection of devices can be done based on the selection filters as below:
- Select Controller Type: NSO or vManage
- Select the NSO (if more than one NSO is configured)
- Select the Region/Market or Device Group filter
- If the selected Filter is Region/Market, then further options (e.g., Region, Market, and Device Type) are available for selection
- If the Device Group filter is selected, then other
options for Device Group and Device
Type are available for selection:
- Select vManage (for vManage devices)
- Select filter: vManage controller instance
- Select device Type: vManage_Cpntroller
The OS Upgrade application displays the list of all the available process instances which are grouped into Active Workflows and Completed Workflows.
OS Upgrade for IOS and IOS-XR platforms are supported.
- Click OS Upgrade from the home page. The
Os Upgrade page displays with the following tabs:
- Active tab: Displays all the active process instances in the workflow and the status of the OS upgrade of selected devices
- Completed tab: Displays all the completed process instances in the workflow
- Pending tab: Displays all the pending process instances in the workflow
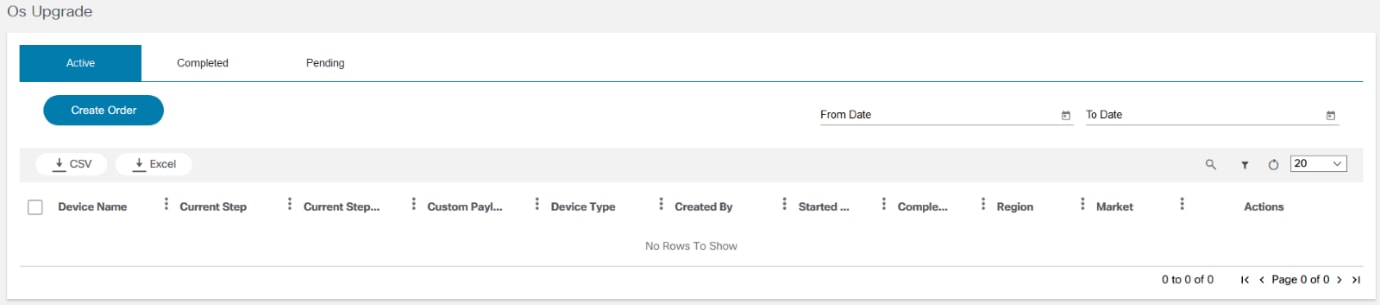
- Click Create Order.
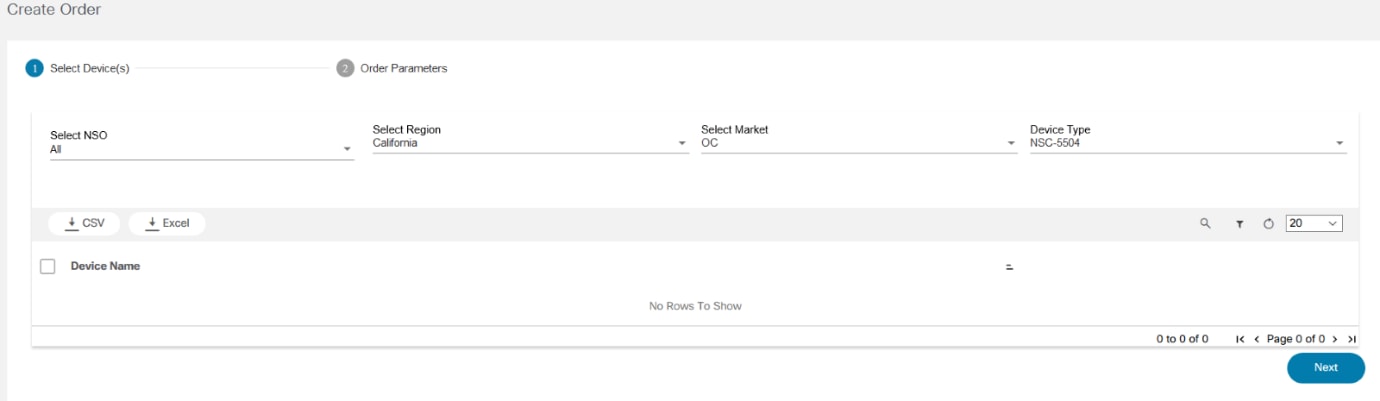
- Select NSO, Select Region, Select Market, select Device Type and Devices. Click Next.
- Enter the Custom CR Number and if required, schedule the time for now or later. Select the Schedule Type.
- Click Create Order.
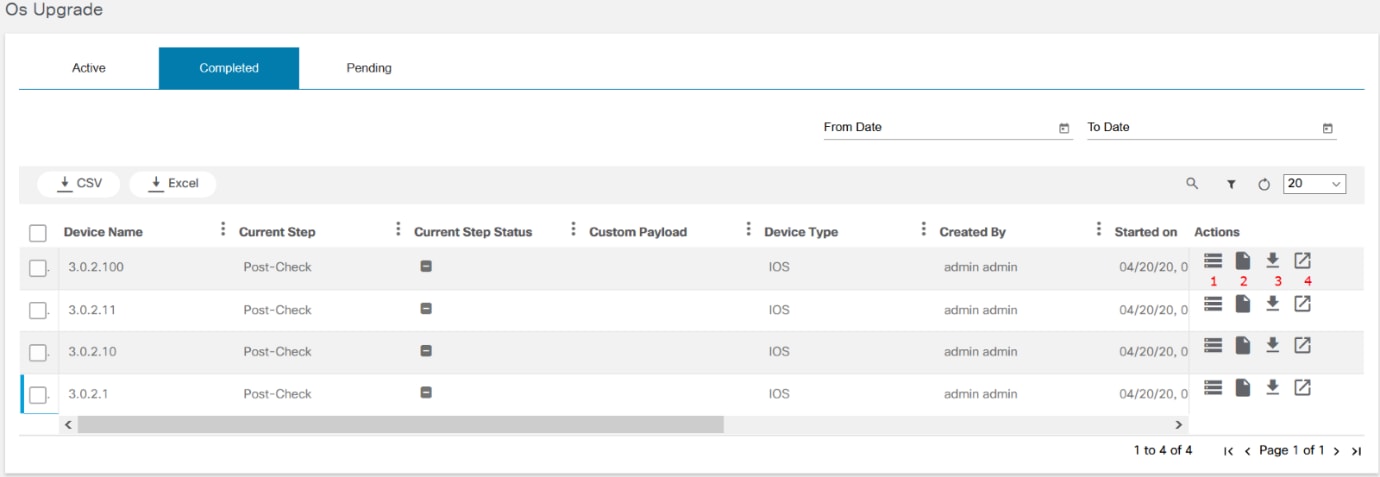
The numbers 1, 2, 3, and 4 below correspond to the icons in the figure above.
| Number | Description |
|---|---|
| 1 | View Device List |
| 2 | View Summary |
| 3 | Download Summary |
| 4 | View Task List |
Users can view the summary of complete workflows. Once the OS Upgrade completes successfully for the selected devices, the devices display in the Completed tab.

Click the View Summary icon to view the overview of OS Upgrade Summary of devices that includes a graphical representation of the upgrade summary.

Select the View Device List icon to see the device list and select the Eye icon to see Evaluation Results and Task List.
Select the Download Summary icon to download the summary.
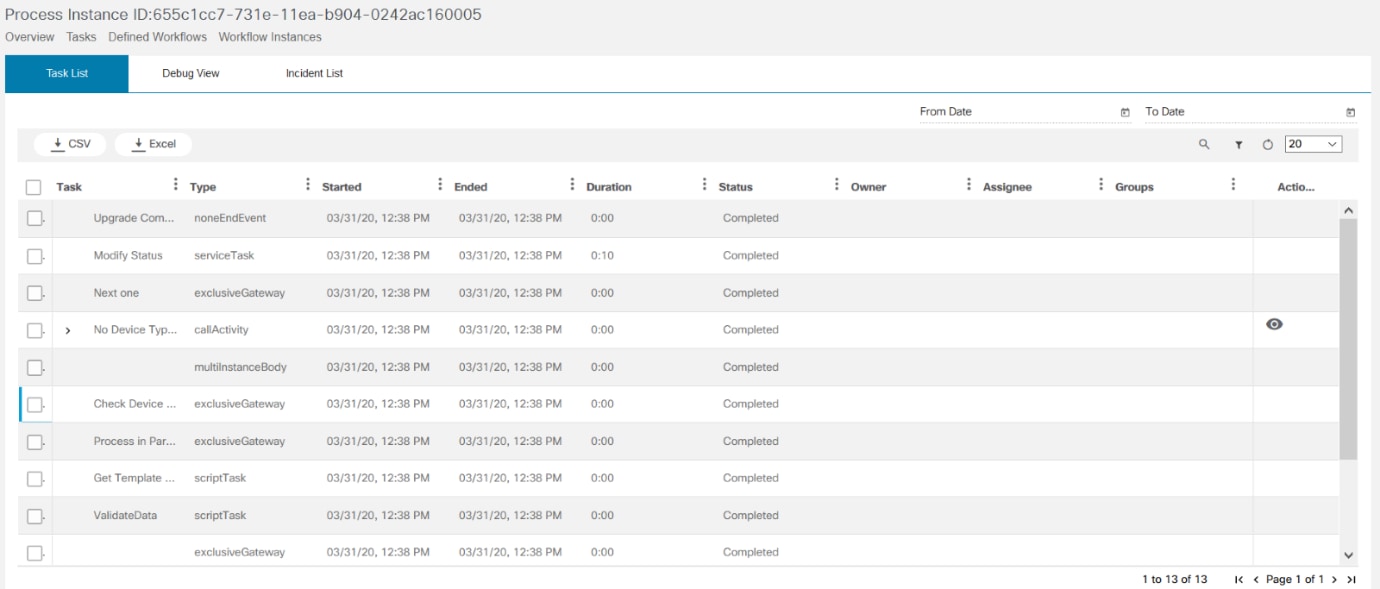
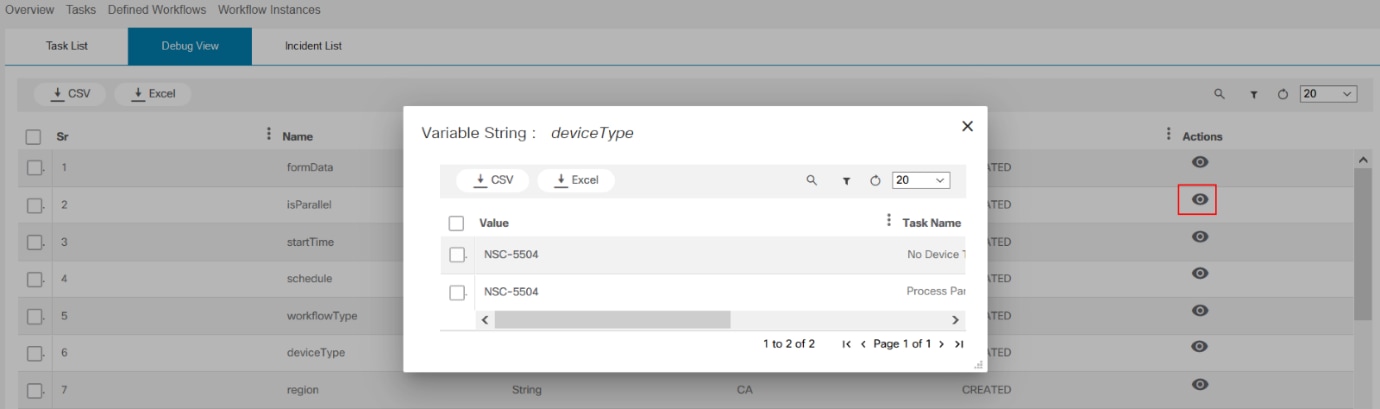
Select the View Task List icon to see the Task List, Debug View, and Incident List.
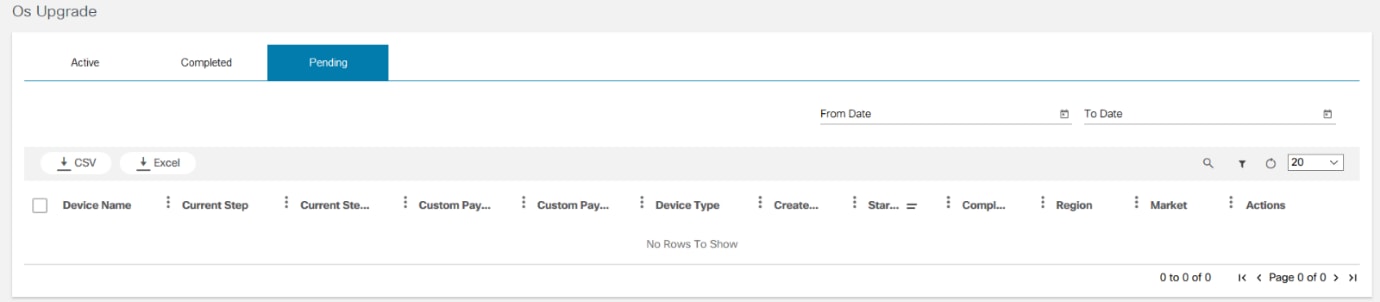
Pause, Resume, or Stop the incident if required. Any devices are scheduled for a specified date or time are shown in the Pending tab.
Working with Config Validator Application
The Config Validator application allows users to validate the configuration commands against Network Element Drivers (NED) in the NSO server. Using this app, users can select the NED and run the commands on it to check the validation. It also allows users to export the validation report that can be shared with TAC, if required.
Validate NED
To validate NED, follow the steps below:
- Click Config Validator on the Home page. The Config Validator page displays.
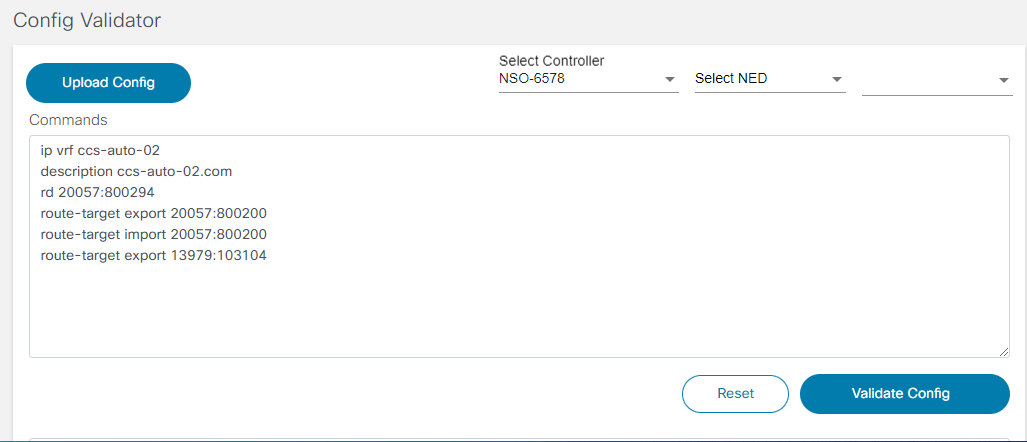
- Select NSO > NED from the drop-down list. These are NEDs in the NSO network on which commands are executed to know whether they are valid (e.g., - Cisco-ios, Cisco-iosxr, etc.). If the command is not listed, contact TAC support to extend the command support to NED.
- Select Version from the drop-down list.
- Enter the command to validate in the Commands
field, for example:
- ip vrf ccs-auto-02
- description ccs-auto-02.com
- rd 20057:800294
- route-target export 20057:800200
- route-target import 20057:800200
- route-target export 13979:103104
The new lines and single or double spaces on subsequent lines are important to ensure the accuracy of the command.
- Upload a configuration file by clicking Upload Config. These files are in .txt format.
- Click Validate Config to run the command.
- If desired, export the output result by clicking Export. The file is exported in .csv format.
During the validation stage, BPA performs a validation on the given commands and displays the output.
Working with the Workflows Application
The Workflows application provides an overview of the running instances, open tasks, open incidents, individual tasks, and the group tasks. It also displays the status of workflows.
- Select Workflows application from the Home page.
- The Workflows page shows the number of running instances, open tasks, open incidents, individual assigned or claimed tasks, and group tasks.
View Tasks
To claim a task or view the assigned task:
- Select the Tasks tab to view tasks.
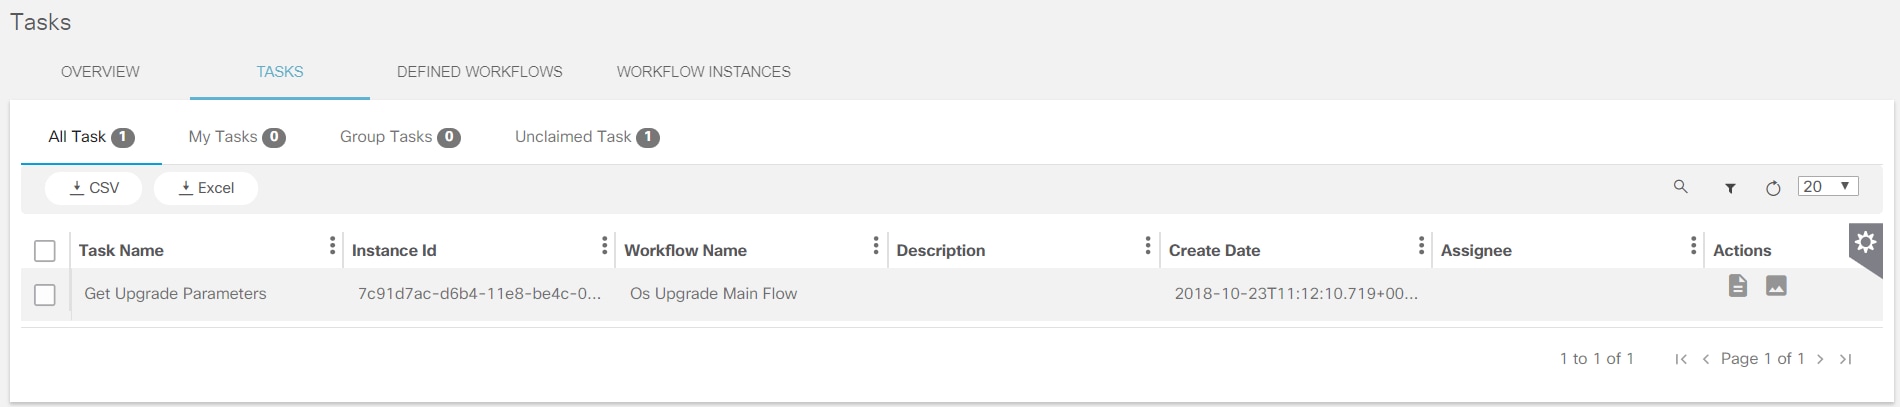
- The Tasks page displays the following
categories:
- All Tasks: Displays all tasks assigned to or can be claimed by user; all group tasks, and all unassigned tasks are listed
- My Tasks: Displays tasks assigned to or claimed by user; By default, assigned tasks display in this category
- My Groups: Displays all group tasks
- To assign the task to a specific group, use the Camunda Modeler. The Group name is created in the BPA Application.
- Use the properties from the Candidate Users or Candidate Groups
of the Camunda workflow model to indicate which user can act up on these
user tasks
- Unclaimed Tasks: Displays unclaimed tasks that can be claimed
- Each task displays its History, Diagram, and Description. Click each section to display the details. The task history is displayed by default.
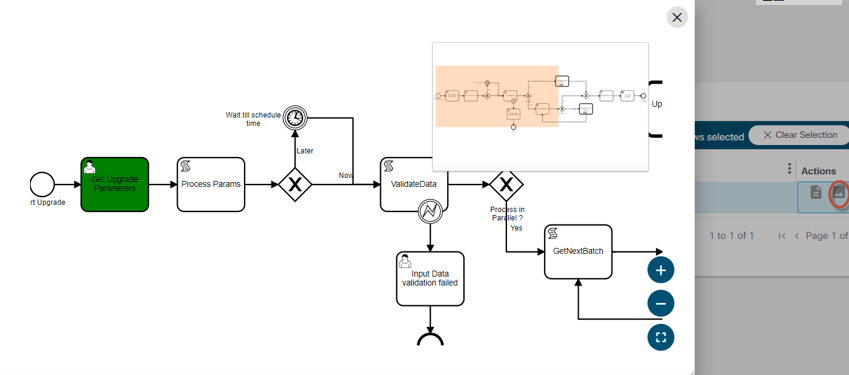
- Select the Diagram icon to view the diagram of
the task.
The Note icon allows users to claim the tasks. It is visible only for users who have the permission to claim the tasks. This permission is determined using following rules:
- Current user should be the part of candidate user group for this task or current user should be same as candidate user of this task
- Current users have view for permissions at user group level
- Click the Description option to view the description of the task.
- Click the My Groups and Unassigned sections to view the respective tasks.
- To complete a claimed or assigned task, click View Form in the My Tasks list. The UI Task displays.

- Click Complete after making the necessary changes.
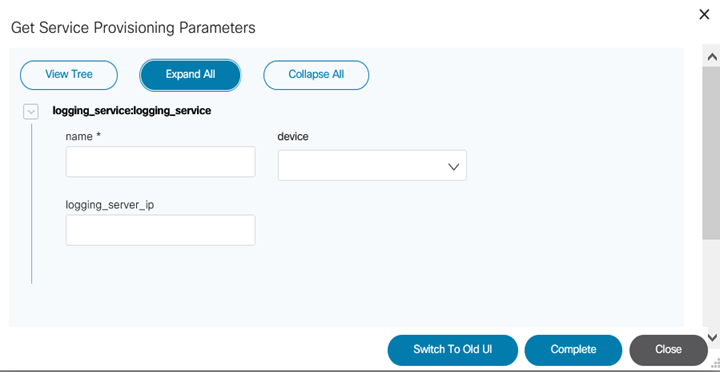
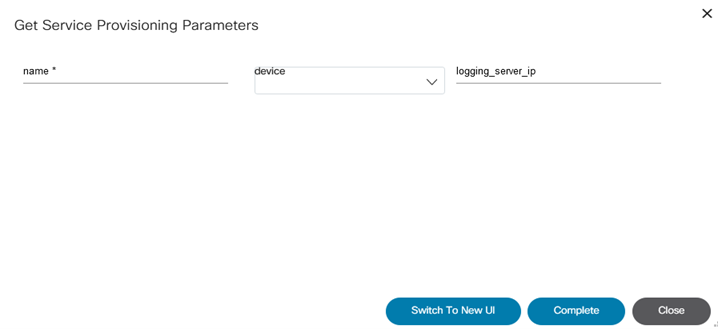
- Switch between old and new UI, view the tree structure, and expand or collapse the parameters.
- The File to Storage component helps users to upload a file. The uploaded file may be accessed subsequently using the file-handler APIs.
- File to Grid component helps to upload a file and render the data within a container or list based on matching keys.
- Click File to Grid and select .csv file the rows are automatically populated. If .txt file is selected, provide delimiter.
- Click File to Storage and select the file for the store. Copy the link or delete the file.

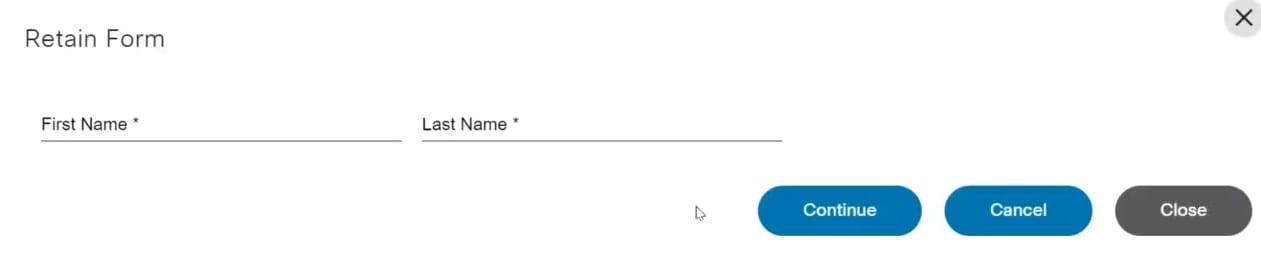
View the Defined Workflows
- Select the Defined Workflow tab to view the list
of defined workflows. These workflows are used in the upgrade process of
the devices. Users can perform the following actions in the
Defined Workflow page:
- Add a new workflow
- View the diagram of any workflow
- Start, edit, and delete the BPMN workflow
- View the instances and their status associated to the workflow
- Download the BPMN/DMN file of the workflow
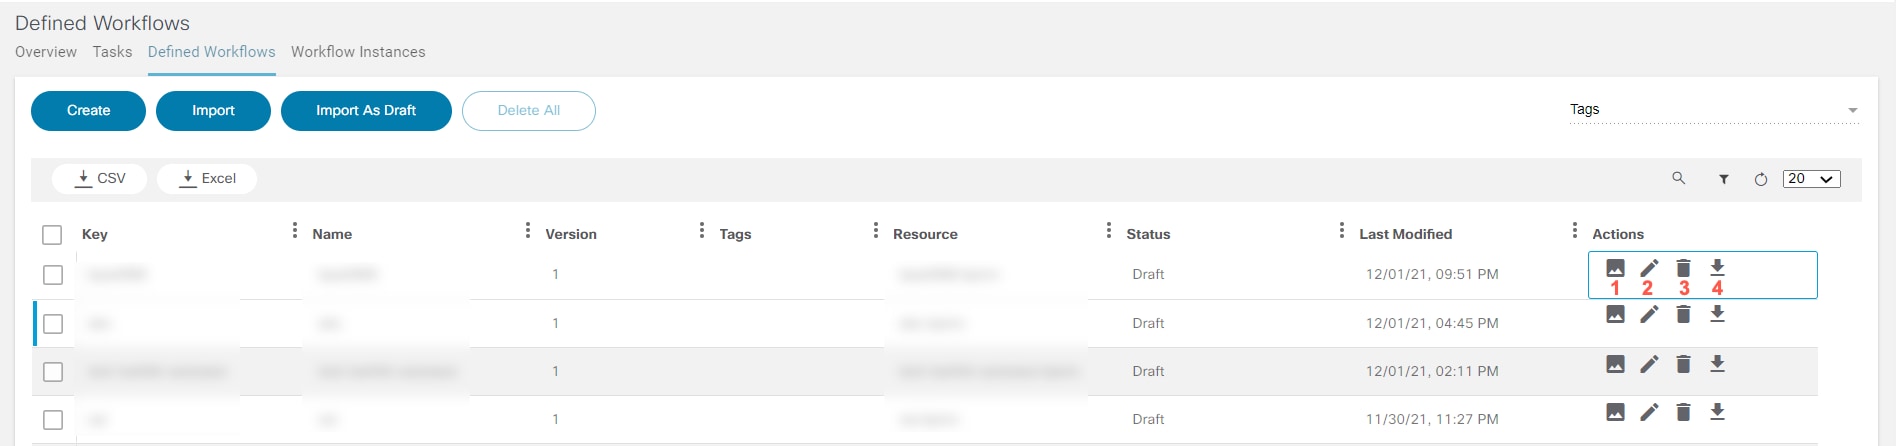
The numbers 1, 2, 3, and 4 correspond to the icons in the figure above and are defined in the following table. There is currently no option to edit DMN files.
| Icon | Description |
|---|---|
| 1 | View Diagram. The Settings icon in the diagram indicates the automatic process and User icon indicates the manual process. |
| 2 | Edit the Workflow (Only for BPMN) |
| 3 | Delete the Workflow |
| 4 | Download the BPMN/DMN File of the Workflow |
- Select View Diagram for the specific workflow to view the diagram. The diagram displays in a different window. Users must ensure to upload the BPMN file for the specific workflow to view the diagram.
- Select Auto Save to save the changes automatically after certain period.
- Click Download to get the BPMN file.
- Click Save As Draft to save the workflow as draft.
- Click Deploy to add the workflow to Camunda engine.

- Click Instances to view the number of instances running. A pop-up window opens with the list of instances and their details.
- Click Start to start the workflow.
- To delete a workflow, click the Delete icon for the specific workflow. A warning message displays. Click OK to delete the workflow.
- To download a workflow, click the Download icon of the specific workflow.
Adding a Workflow
To add a defined workflow, follow the steps below:
- Click Create, select the workflow type (e.g.,
BPMN or DMN), and enter the Workflow Name and unique
Key.
- Click Proceed.
If DMN is selected when creating the workflow, the DMN file can be created and the following screen displays:
- To import a defined workflow click Import. The New Process Definition page displays.
- Click Choose Files to select and upload the file.
- Click Deploy to upload a single file or Deploy All to upload multiple files.
Workflows can be assigned to one or more groups during deployment.
Importing a Workflow as a Draft
To import a defined workflow as draft:
- Click Import As Draft. The Upload Draft window opens.
- Click Choose Files to select and upload the file.
- Click Save As Draft to upload the file.
Deleting Multiple Workflows
To delete multiple workflows:
- Select the check boxes of the workflows to be deleted. To select all, select the blank check box at the top of the row. The Delete All button is enabled.
- Click Delete All. A confirmation displays.

- Click Ok to delete the selected workflows. The Delete Workflows detail window opens.
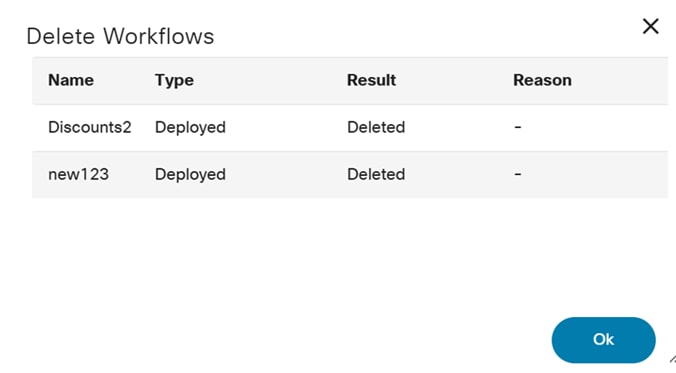
Script Execution in Camunda
The Camunda workflow engine in BPA supports scripting with the JSR-223 compatible script engine implementations. To use scripting, the Script Task needs to be added within the Camunda workflow.
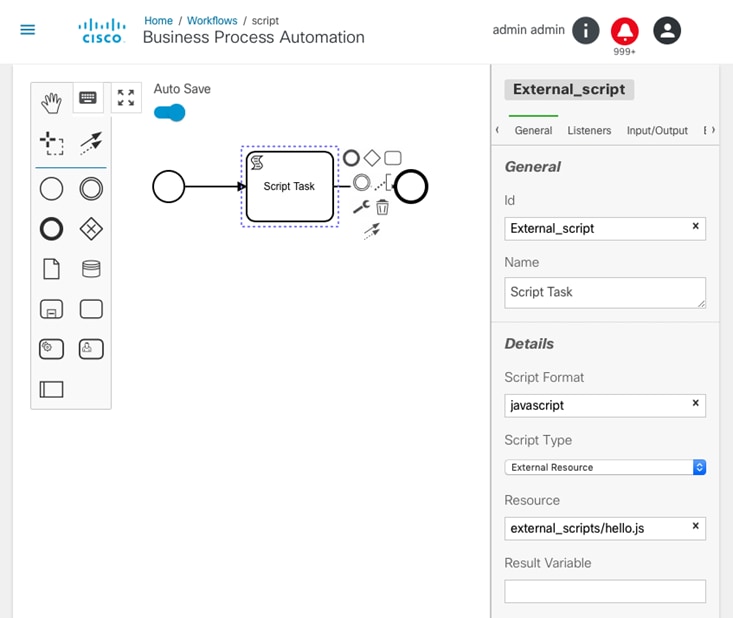
- Script task has an option of Script Type with
allowed values of Inline Script or External
Resource.
- If Inline Script is selected, then script code needs to be specified in Script field.
- If External Resource is selected, then the path to the external script file needs to be specified for Resource field.
- For any external scripts to be accessible as a
Resource path within the Camunda workflow, the
following configuration options must be included with the BPA
installation.
cd /opt/bpa/data/camunda/external_scripts/ EX: cat hello.js // generating a random number var a = Math.random(); print(a); print(\"Hello World\"); - Set the parameter below to true (/opt/bpa/
bpa-helm-chart-<.version>/vaules.yaml)
cisco-bpa-platform-cs-camunda:
enableExternalScripts: true
Viewing Workflow Instances
The Workflow Instances tab displays all the running instances of the workflow. Users can view the diagram to view the status of workflow, pause, and stop a workflow.
- Click the Workflow Instances tab at the of the Workflows page. The list of workflow instances displays.
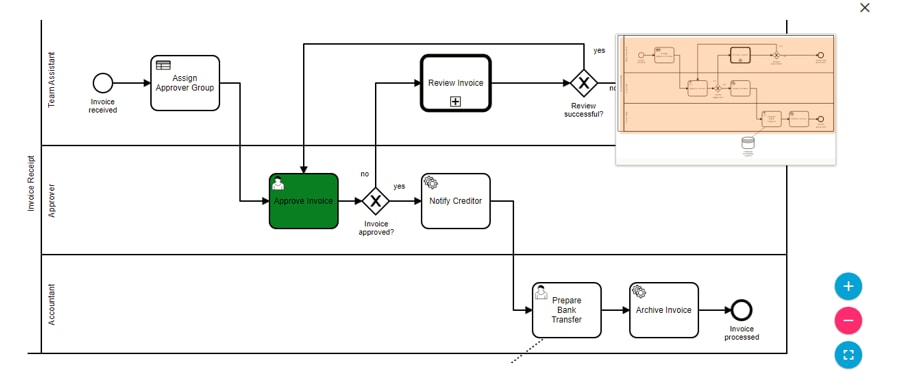
- The Workflow Instances tab displays the list of workflow instances their names, starting date, status, and tasks.
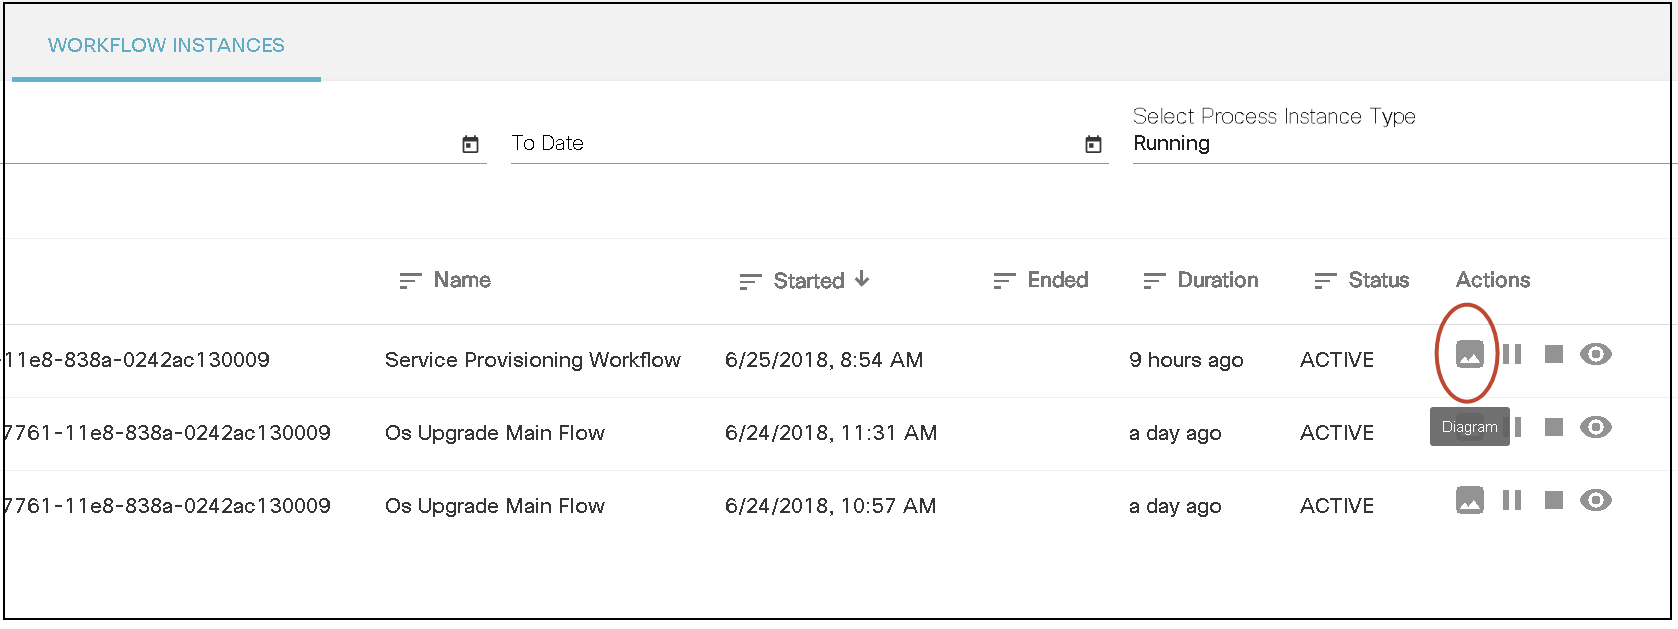
- Select the Diagram icon to view the workflow instance diagram in a separate window.
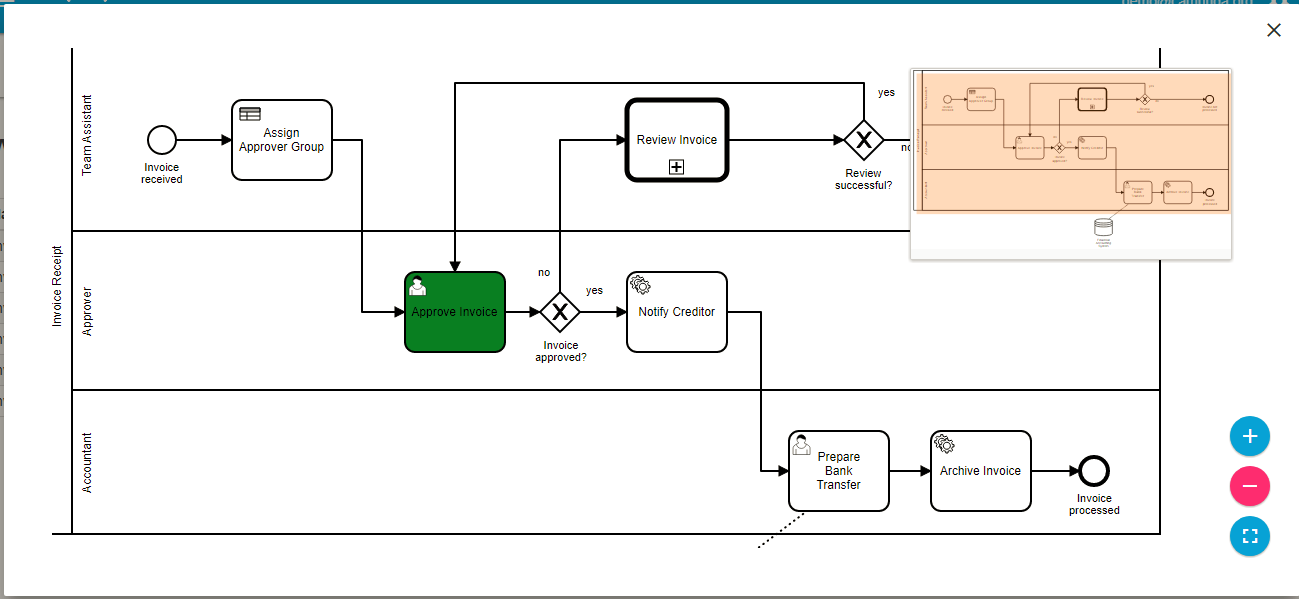
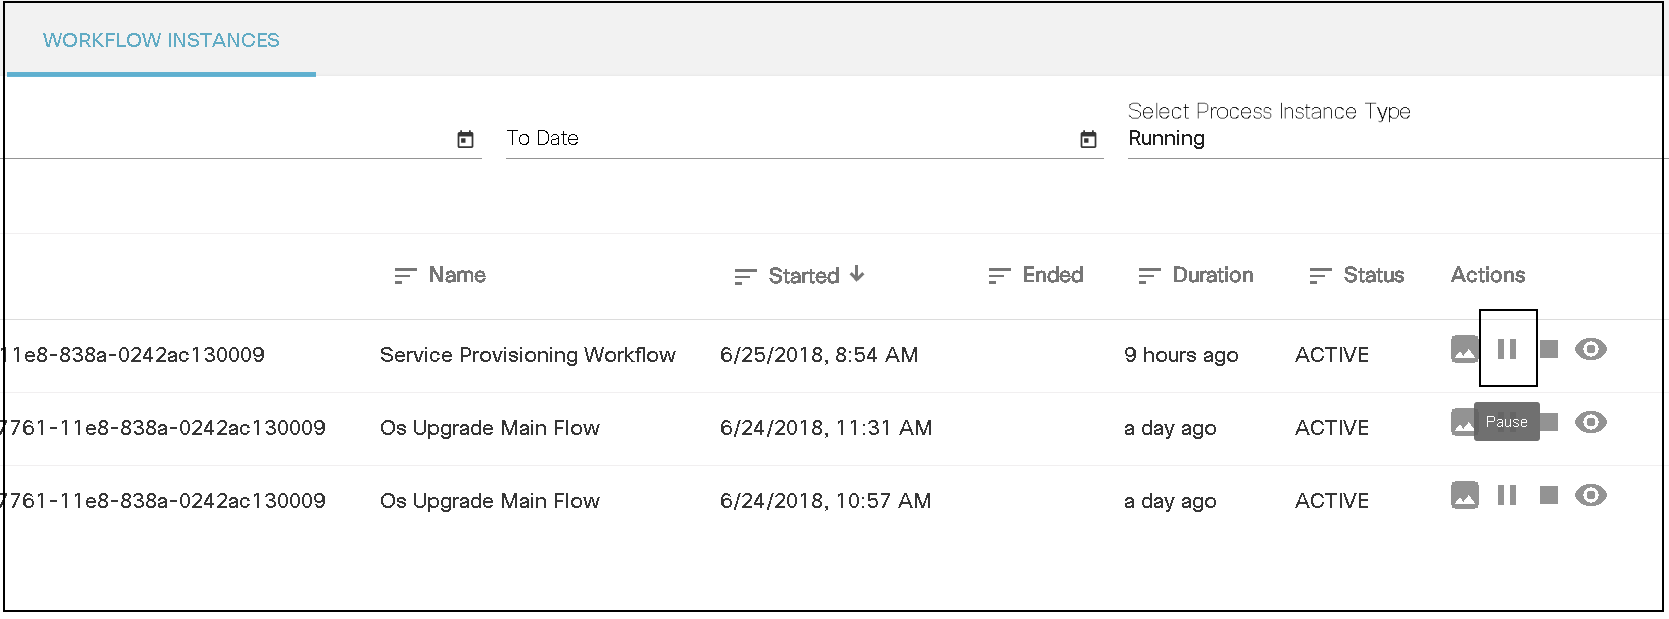
- Select the Pause icon to pause the current instance. A pop-up window opens to confirm the pause in the instance.
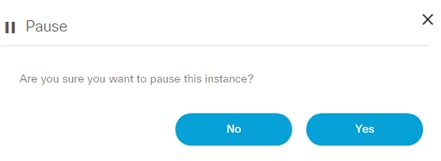
- Click Yes to pause or click No
to cancel the pause.
- Paused workflows can be resumed from the Workflow Instances page using the Resume button.
- Paused workflows are listed as Suspended in the instance list.
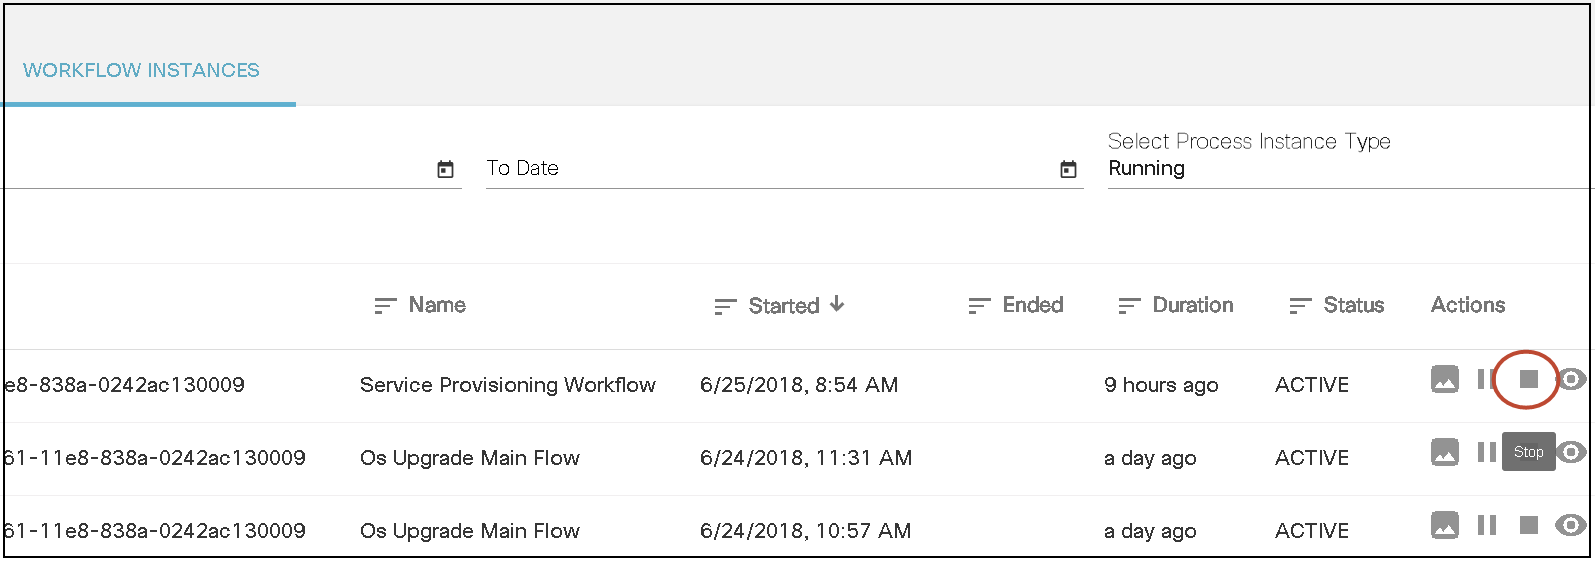
- Select the Stop icon to stop the current instance. A pop-up window opens to confirm stopping of the instance.
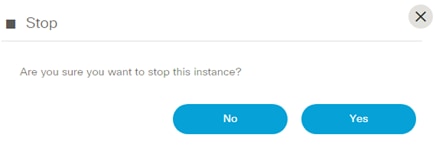
- Click Yes to pause or No to cancel the stop.
- Select the View Tasks icon to view the associated tasks, debug view and incident list.
- The Task List displays all the associated tasks. The Debug View shows the debug output. The Incident List shows the list of incidents. Select the Eye icon to view task variables in the Task List option and to view variable history in Debug View option.
- Users can pause, resume, or stop workflow using the buttons.
- For failed instances, users can restart the workflow using the Reset icon.

- Select the Restart Task From. If required add the variables.
- Click Add, enter the Name, and select the Data type and enter the value for the data type if other than Boolean is selected. Use Edit to change the variable type and value.
- Click Restart > Proceed to reinitiate the workflow.
Working with Topologies
Topology Service provides a way to model networks and network elements using a graphical representation. The Topology Service application displays the Service Topology, Network Topology, and Network Topology templates. Users can edit and delete Topology templates and create a template form or Build Network Topology link which is available in the Network Topology templates.
Prerequisites:
- Create templates containing topology-related commands using the Process Templates application.
- Associate one or more topology-specific templates with a specific NED and build the network topology links to populate the topology data in the database.
After completing the above, the topology data is available to view the network topology.
The different topology options are:
Service Topology
Service Topology shows relationships between devices and service instances. It also shows the topology on a geographical map if latitude/longitude values are defined on devices in NSO.
If LSA is enabled in the NSO Settings and the user selects a LSA node for NSO, the RFS node is auto populated and the user is required to select the RFS node.
To view the topology of a device, follow the steps below:
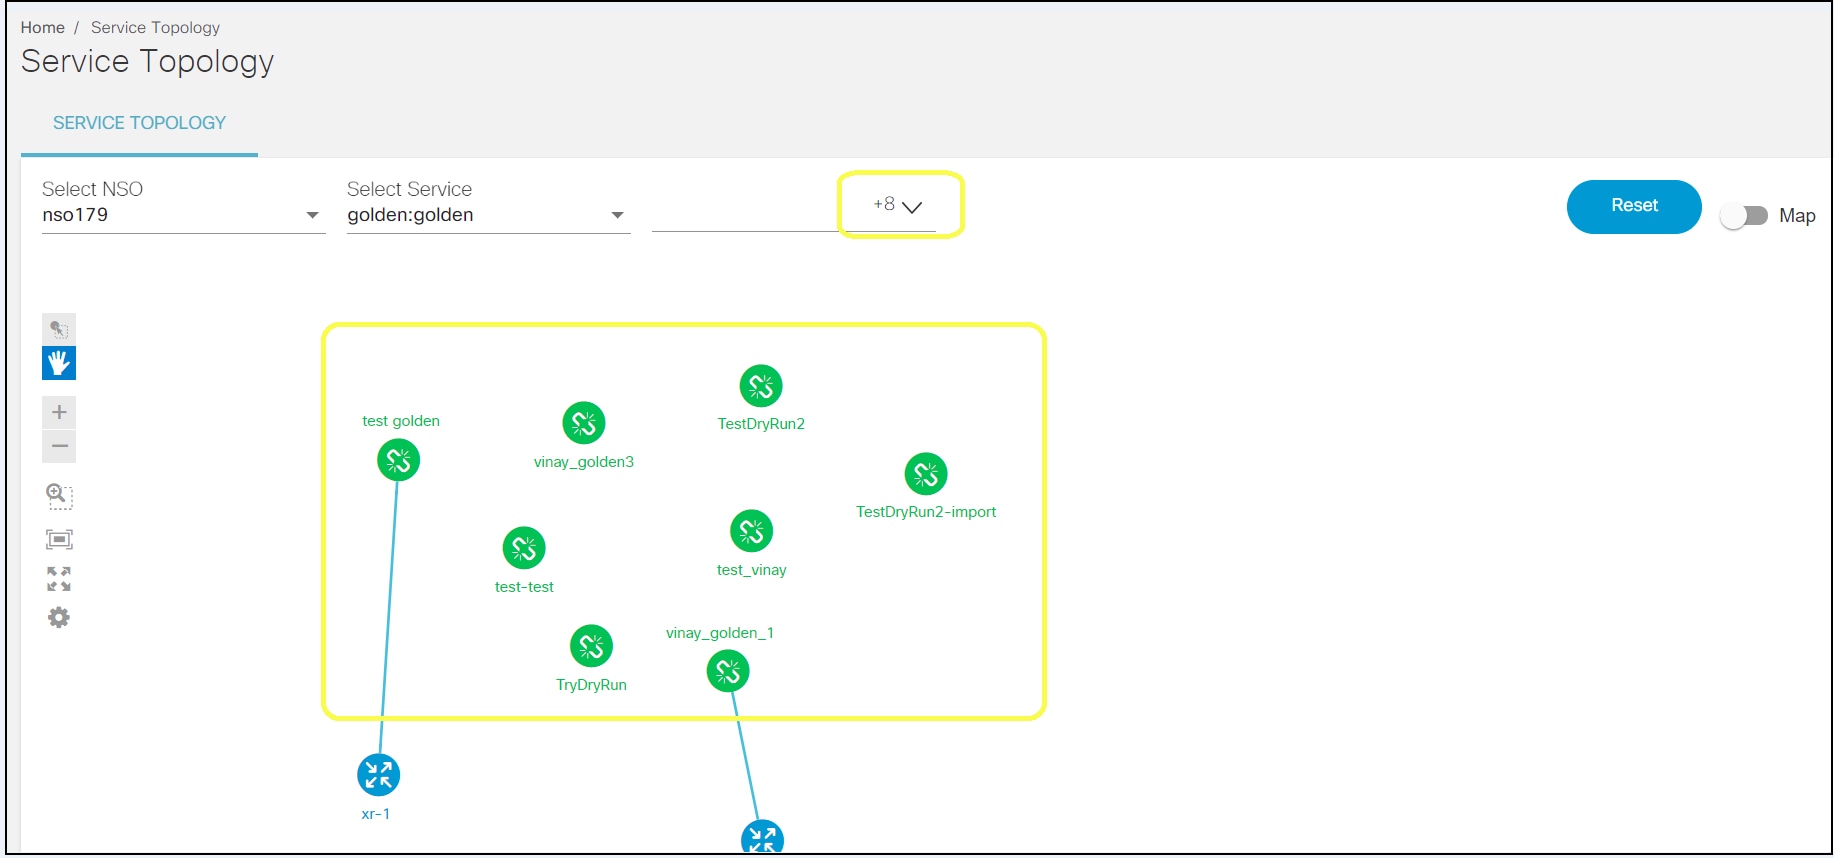
- Select a service from the Select Service drop-down list.
- Click Select Service Instance to select an instance from the drop-down list for the selected devices.
- Select Map icon to display a map view. The latitude and longitude are the prerequisites to achieve accurate location results for the service instance on the map.
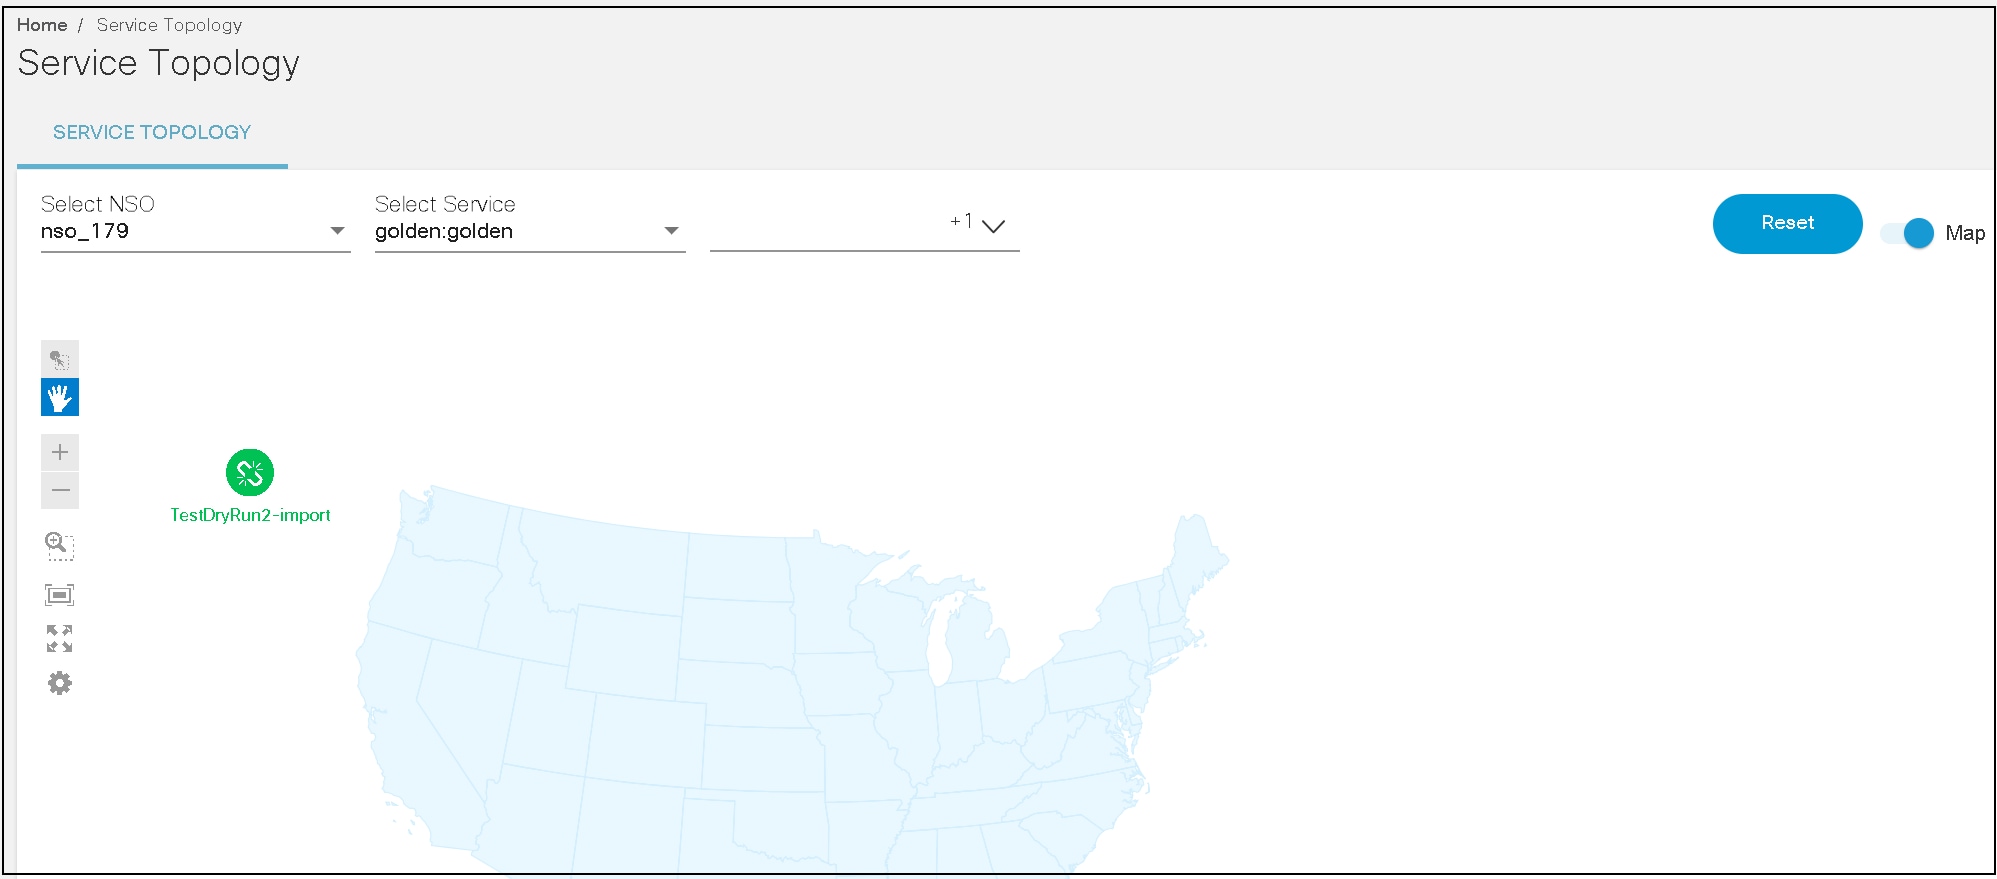
The location of a service instance is displayed on the Map. Green indicates service and blue indicates devices on the map.
- Click the Reset button if there are any selection errors.
- Click the service instance. A window opens with two buttons: Preview and Get Modifications.
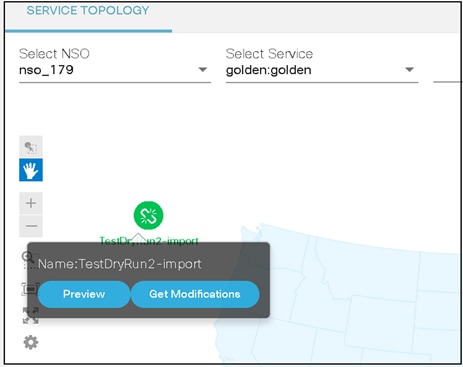
- Click Preview to view the service instance details. In the Preview window, users can download the service instance in JSON format.
- Click Get Modifications to view the modifications made by this service instance on the device.
Network Topology
Network topology is an arrangement of the various elements such as links, nodes, devices, etc. of a communication network which may work as a sender or receiver. Network topology is the topological structure of a network and may be depicted physically or logically.
This feature allows users to easily find a device by applying search filters as required.
- Click the Network Topology option to view the topology details.
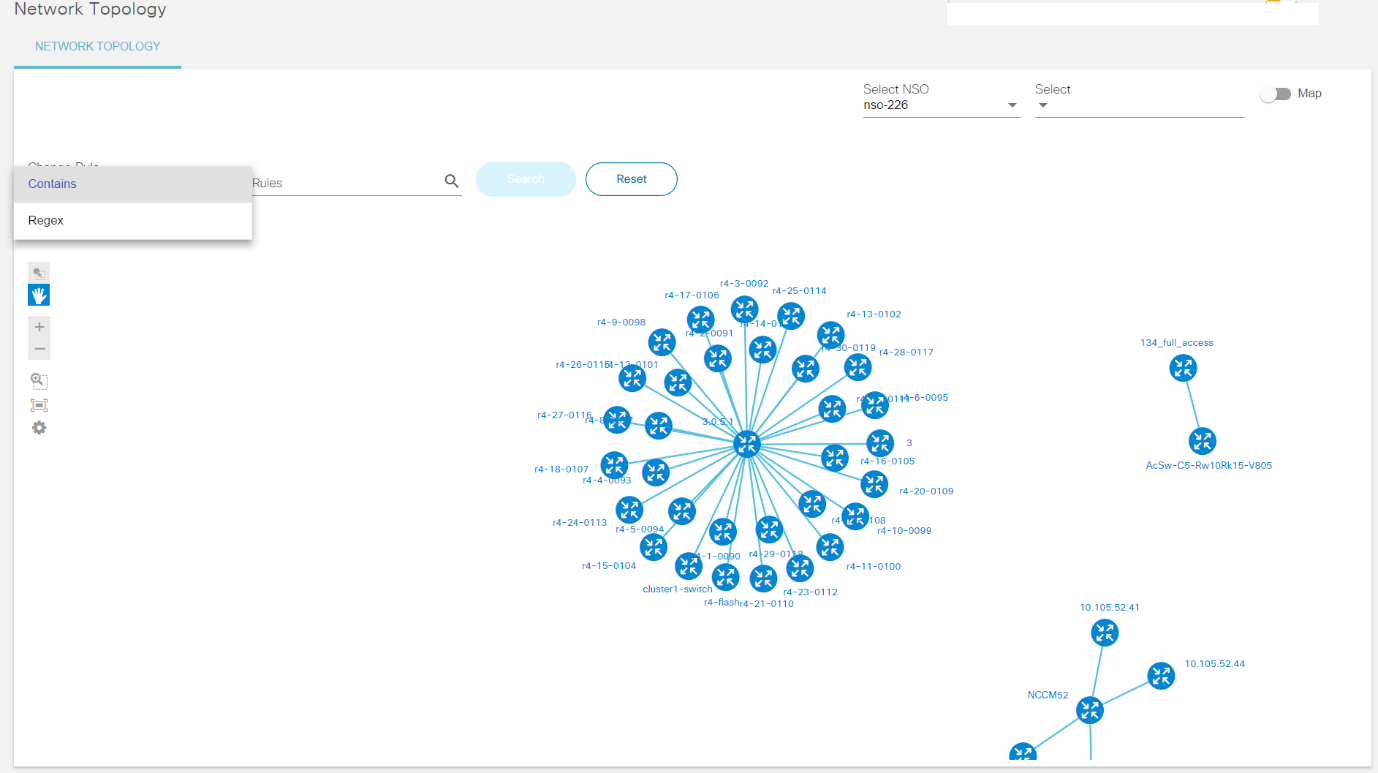
- Select the Change Rule option from the drop-down list to filter devices for topology view.
- Enter the desired rule for the device.
- Click the Reset button if there are any selection errors.
- Select the Map icon for map view display. The latitude and longitude are preset to achieve accurate location results for the service instance on map.
- Click the available device shown, a window opens with two options: Device Config and Device Preview.
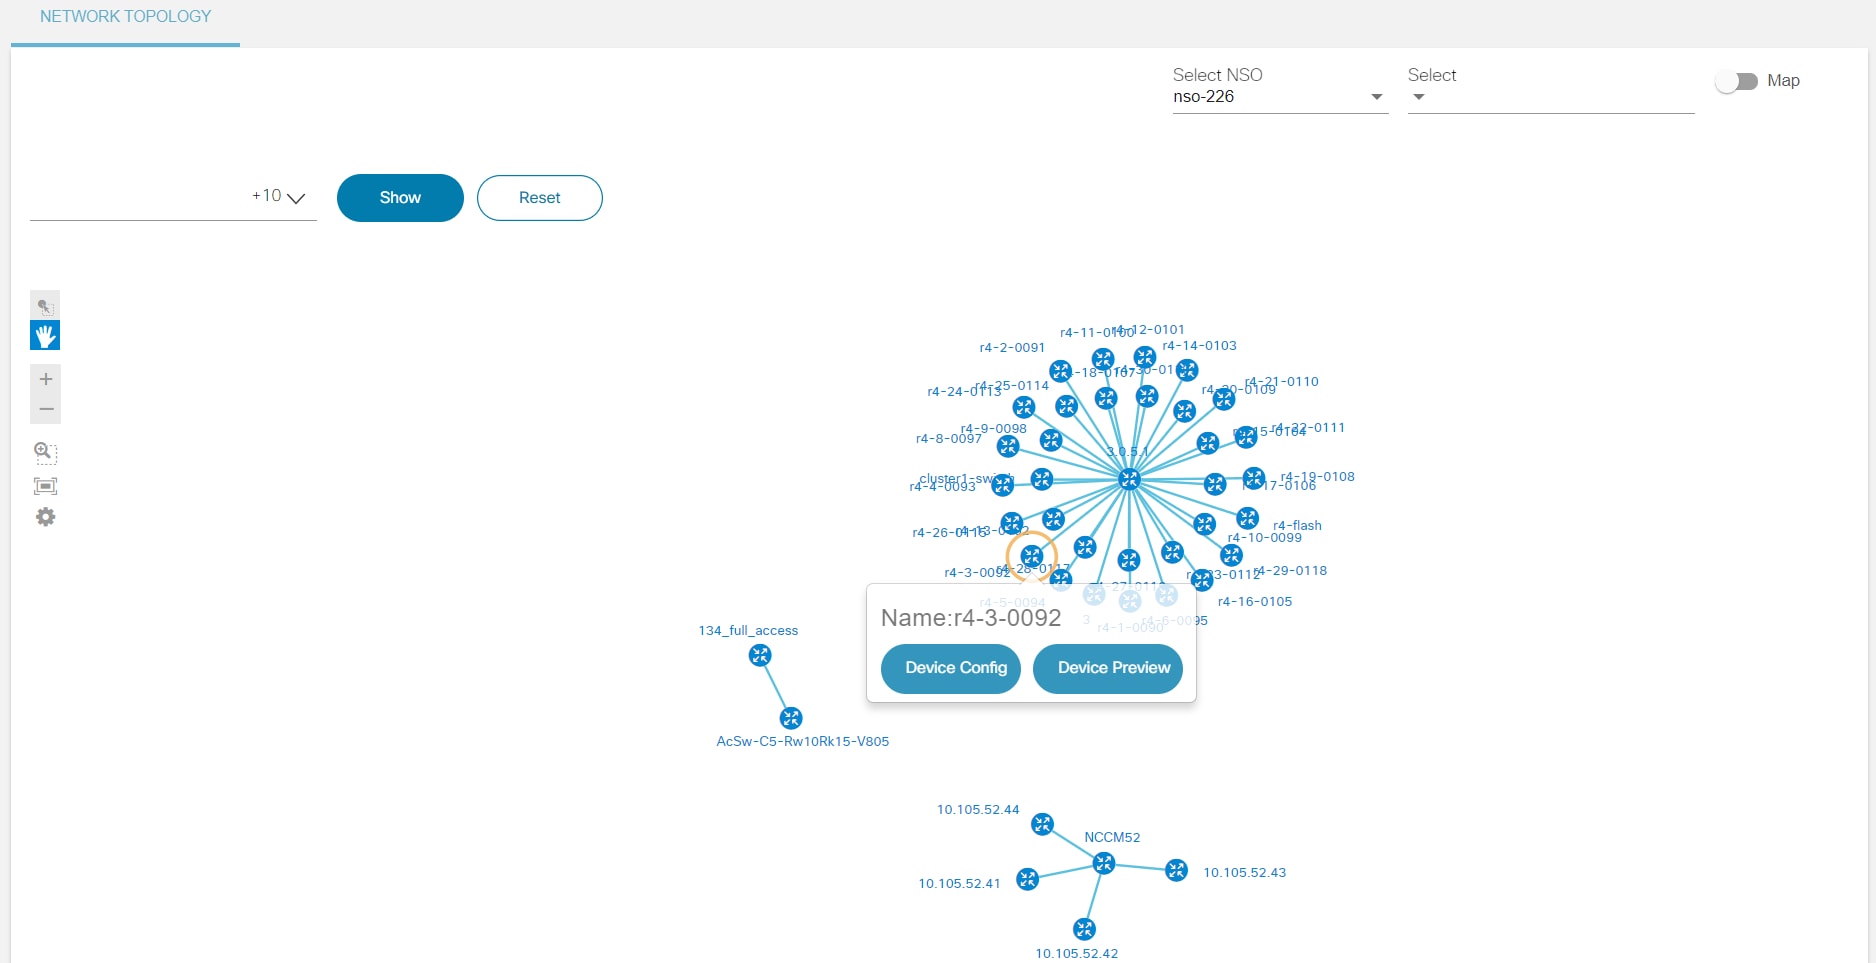
- Click Device Config to display the configuration list of the device.
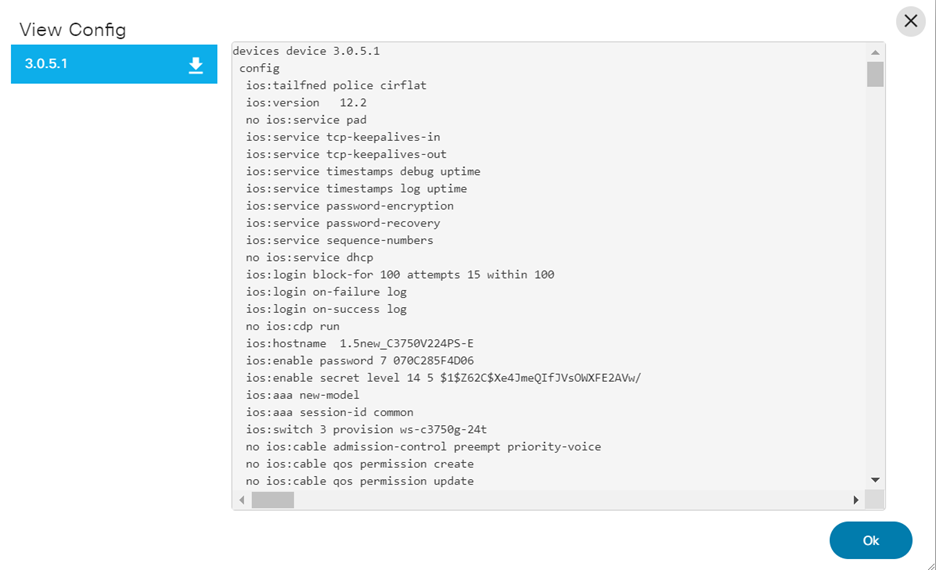
- Click Device Preview to view the device details. Users can view basic information about the device like Name, Address, Port, Description, AuthGroup, Device Type, NED-ID, Protocol, and Admin State.
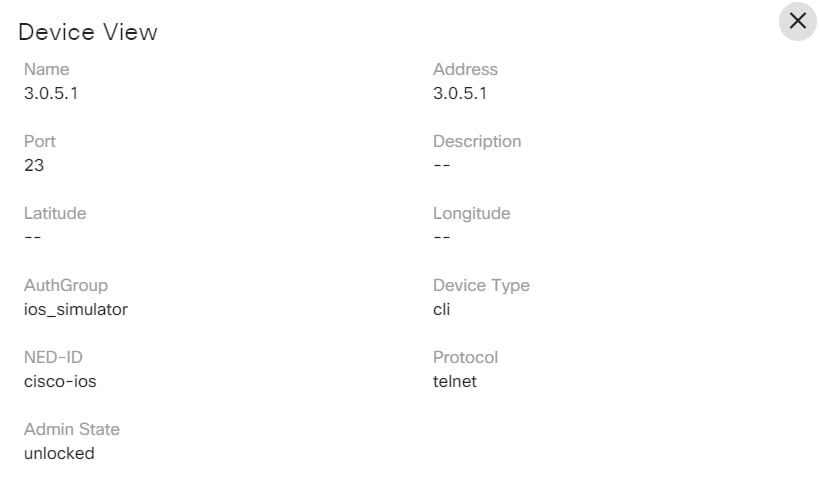
- Select the desired option (e.g., Search, NED, Device Group, Devices) to view the corresponding details. A sample figure is illustrated below:

Working with Market Variances
Market variances are parameterized data sets that can be leveraged across the BPA platform. Region specific data such as NTP server, logging server, SNMP server etc. can be stored by region, market, and device type. The parameterized values can be leveraged in GCT, service provisioning, and workflows.
Constructs used in the Market Variance application include:
- Regions: Defines a region with one or more markets (e.g., Southwest and Mid-West)
- Markets: Defines a specific market within a region
- Device Types: Associates a device type to global and market variance forms/data (e.g., IOS-XR)
- Variances: Defined for a specific device type, can
be a global or market variance
- Global variance data is common across markets and regions
- Market variance data is specific to that region and market
The following tasks can be performed in Market Variance:
- Add, edit, delete, download, and clone Market or Global Variance
- Manage device type
- Manage regions
- Manage markets
- Manage mapping of variance to service/GCT schema
Adding a Market or Global Variance
To add market variance:
- Click the Variances tab and click Add Market Variance. The Market Variance page displays.
- Select Device Type, Region, and Market.
- Click Save.
To add global variance:
- Select Variances tab and click Add Global Variance. The Global Variance page displays.
- Select Device Type and click Save.
Users can create market or global variances only if users have added a Device Type, Region, and Market prior to adding variances.
Editing Market and Global Variances
To edit a market variance, select the Edit icon to make changes to market variance and click Update.
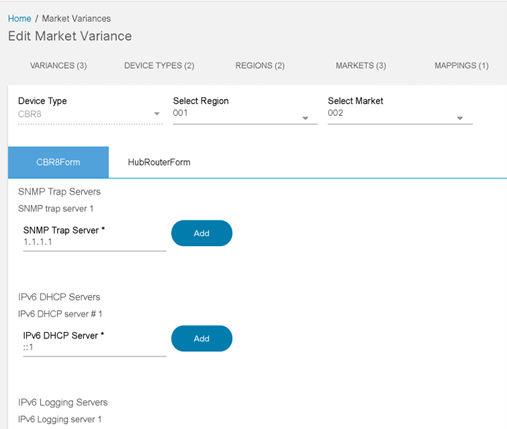
To edit a global variance, select the Edit icon to make changes to a global variance and then click Update.
Users can create market or global variances only if they have added a Device Type, Region, and Market prior to adding variances.
Cloning a Market Variance
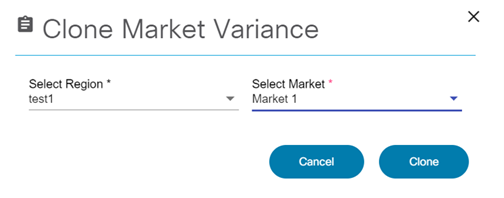
Cloning is supported only for a market variance. Select the Clone icon, then select a region and market from the Clone Market Variance window.
Downloading or Deleting a Variance
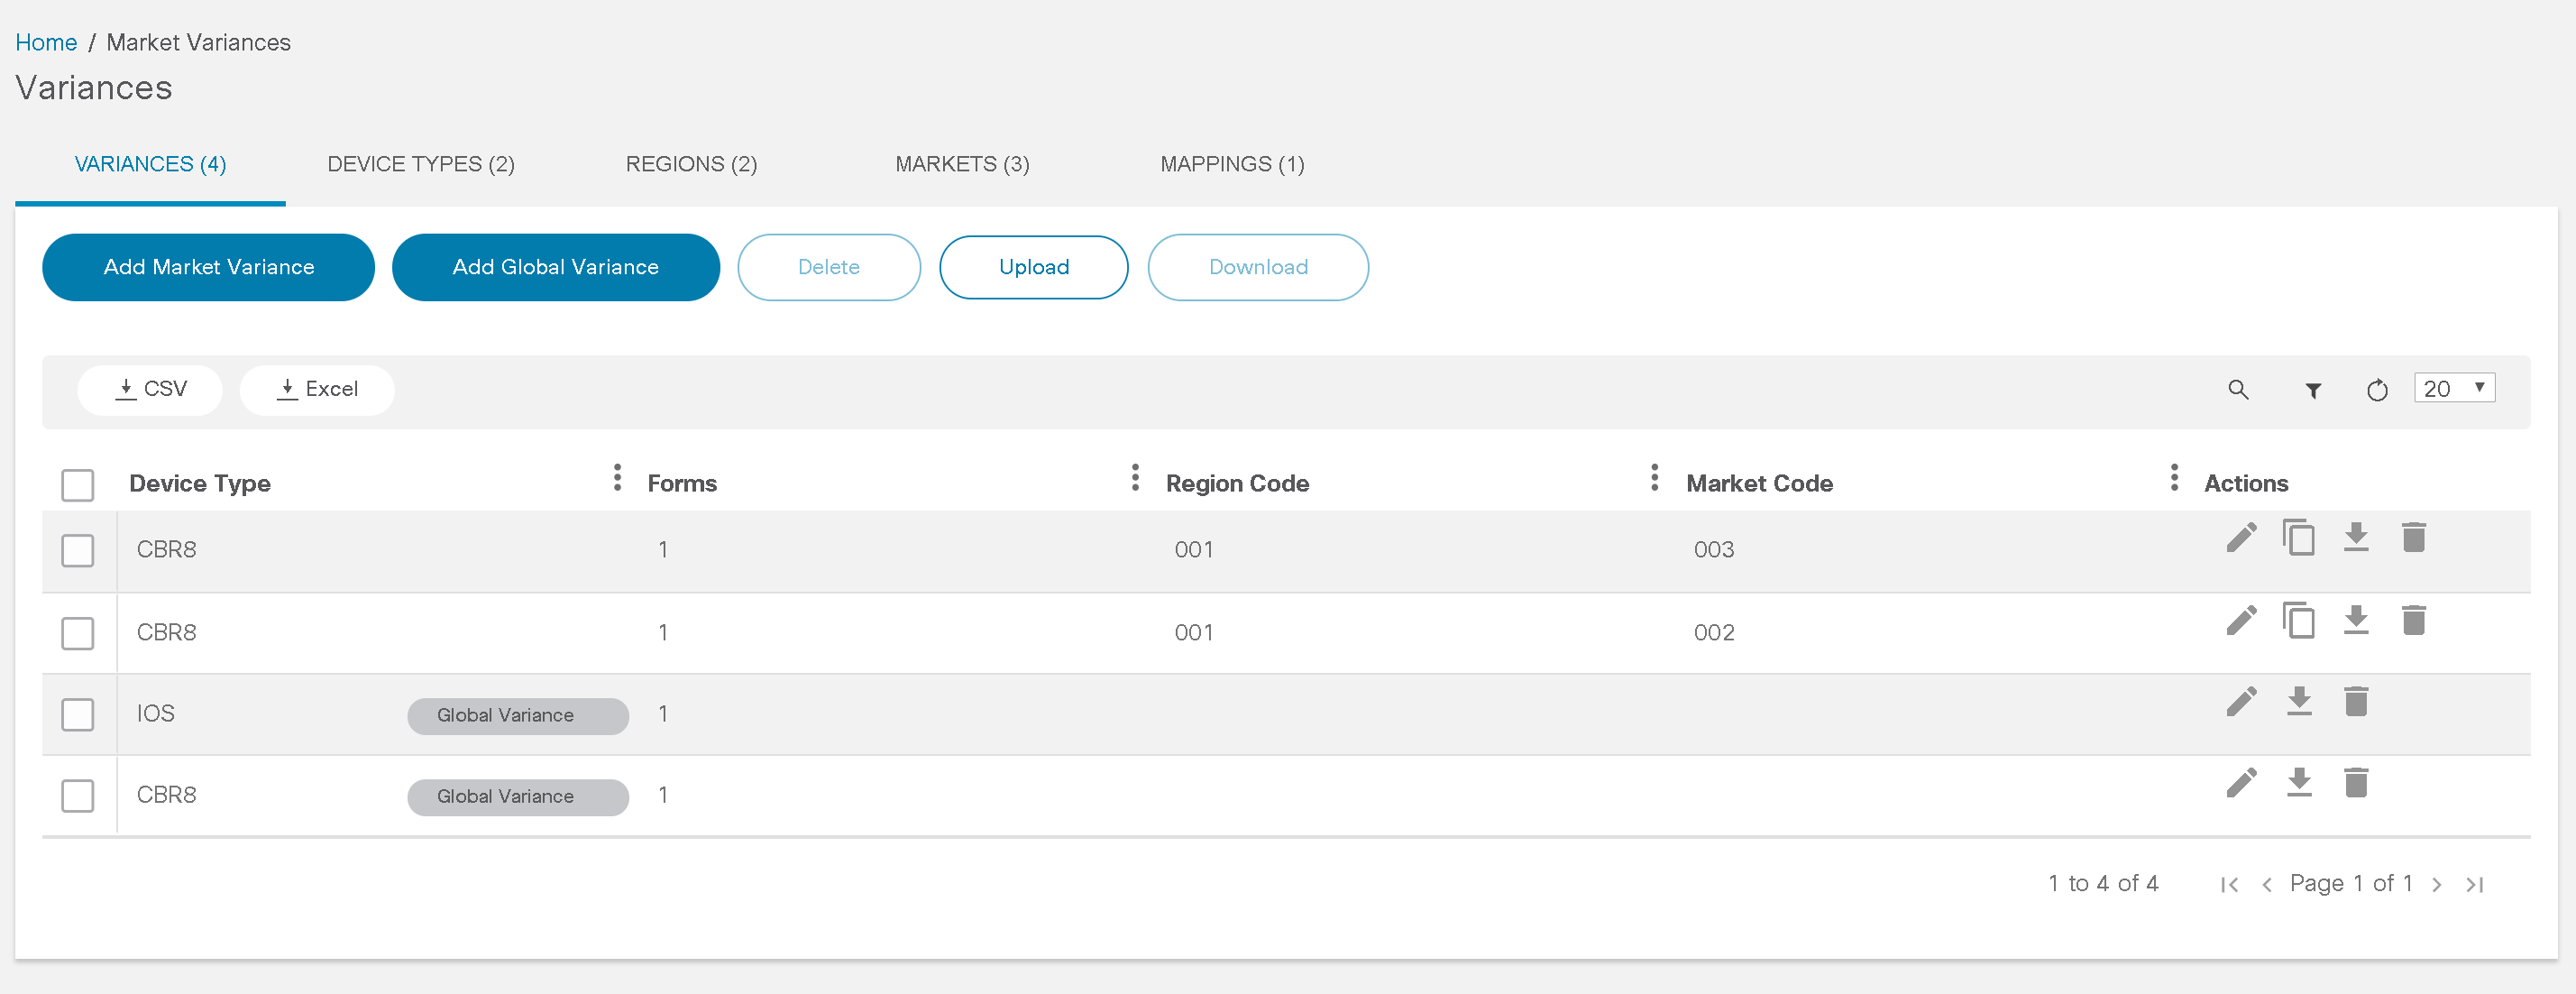
- Select the Download icon to obtain market data in JSON format.
- Select the Delete icon to remove the variance.
Adding a Device Type
A device type identifies the type of a device along with associated Global or Market Variance forms and applications that are allowed to use these variances. These forms must be built with Form Builder. Refer to Working with Form Builder Application for more information.
- Select the Device Type tab and click Add Device Type. The Device Type page displays.
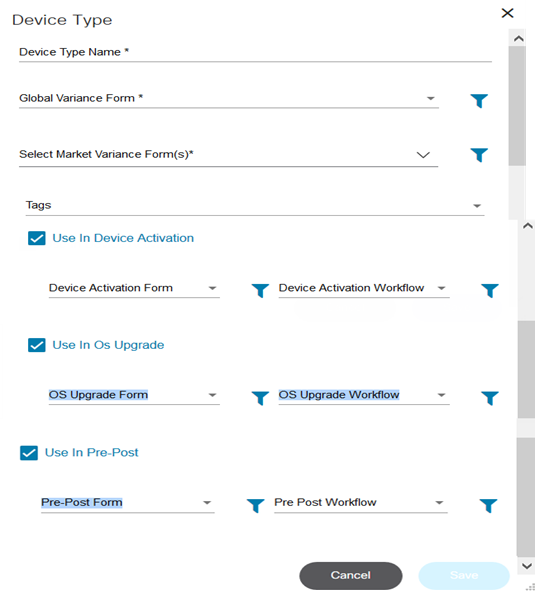
- Enter a Device Type Name, select a Global Variance Form and one or more Market Variance Form.
- Select the required tags from the Tags drop-down list.
- If Use In Device Activation is selected, select Device Activation Form and Device Activation Workflow.
- If Use In OS Upgrade is selected, select OS Upgrade Form and OS Upgrade Workflow.
- If Use In Pre-Post is selected, select Pre-Post Form and Pre-Post Workflow.
- Select Latest if the latest version of workflow to be used.
- Click Save.
Editing and Deleting Device Types
- Select the Edit icon and make the required changes.
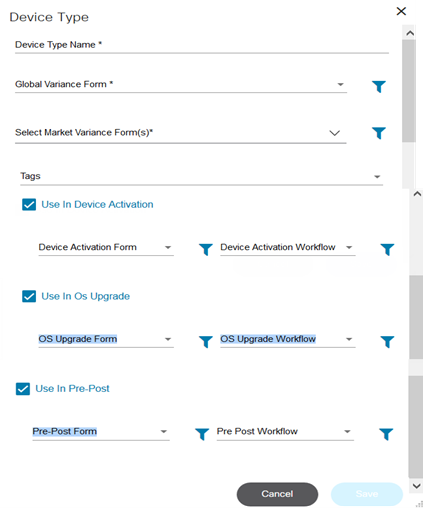
- Click Save.
- Select the Delete icon to remove the variance.
Adding and Editing a Region
- Select the Regions tab and click Add Region. The Region window opens.
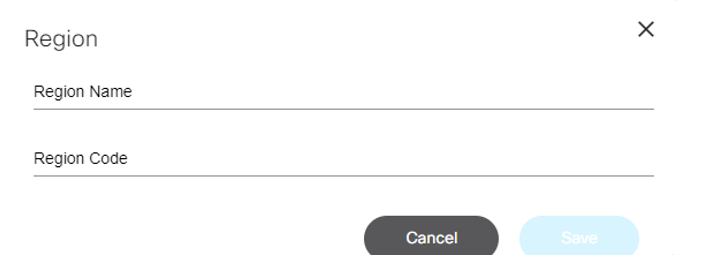
- Enter the Region Name and Region Code.
- Click Save.
- Select the Edit icon and make required changes.
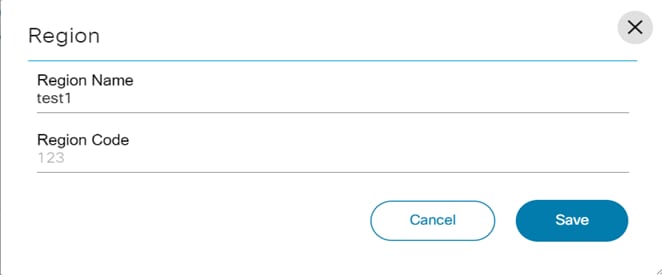
- Click Save.
Adding and Editing a Market
- Select the Markets tab and click Add Market, The Market window opens.
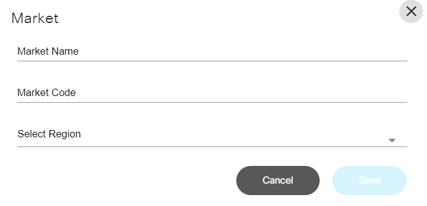
- Enter a Market Name, Market Code, and select a Region.
- Click Save.
- Select the Edit icon and make the required changes.
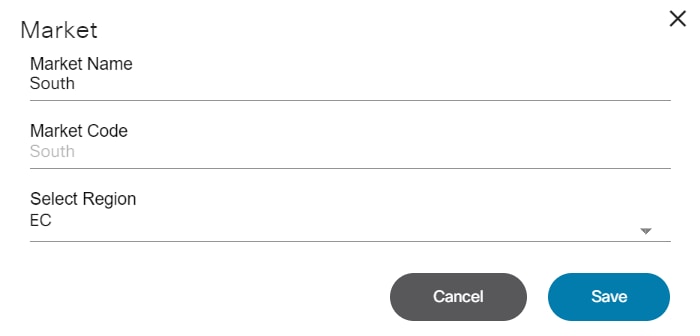
- Click Save.
Adding Mapping to Variances
- Select the Mapping tab and click Add Mapping. The Add Mapping page displays.

- Enter a Name and select a Source and a Template.
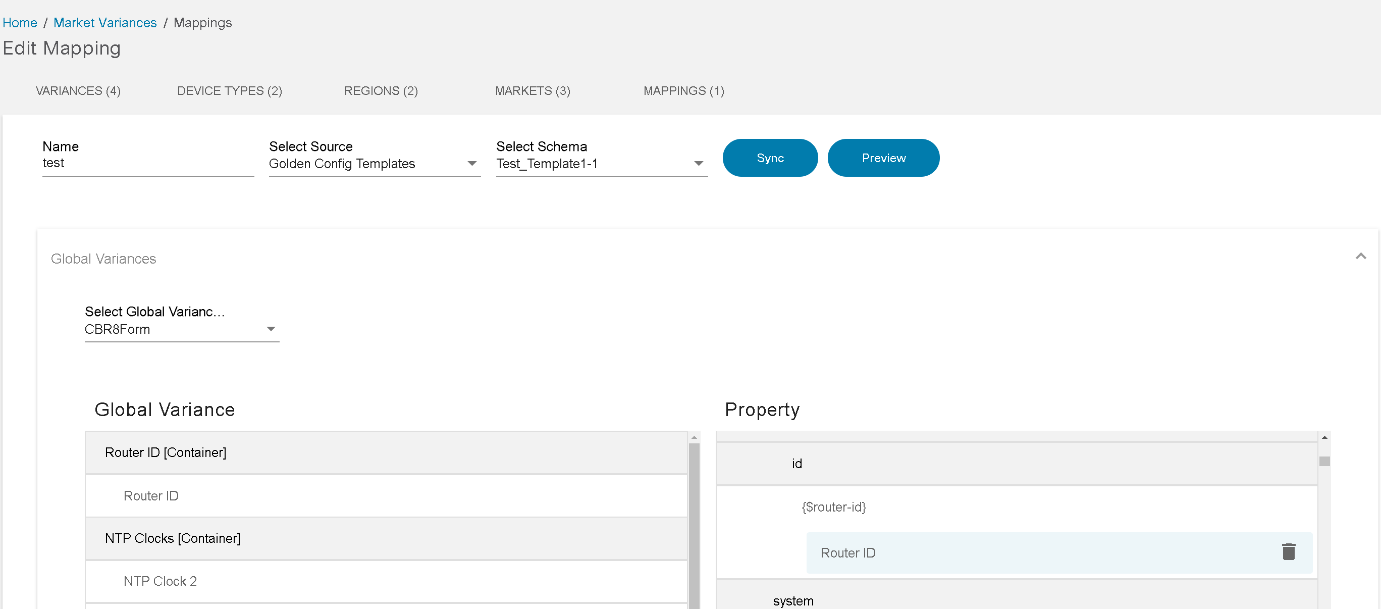
- Click Preview. If the template is Service Schema, then select NSO.
- Select the Global Variances and Market Variances.
- Map form parameters to Service Schema or GCT template parameters and click Save.
Controller Template Variable Mapping
The controller data mapping feature reduces the manual work required during a configuration update like Apply Config. For example, if users want to configure hundreds of devices and the configuration for the variables is predefined, then users can use Controller Data Mapping to enable auto-populating of the configuration during Apply Config.
The Controller Template Variable Mapping is found under Market Variance.
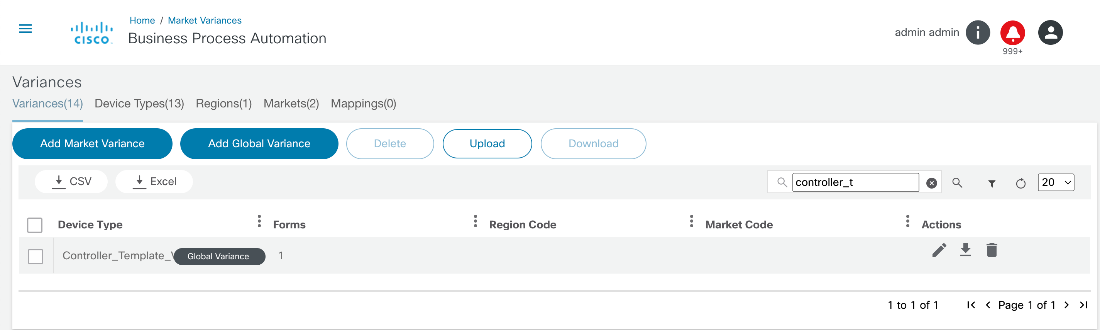
Select the Controller_Template_Variable check box and select the Edit icon.
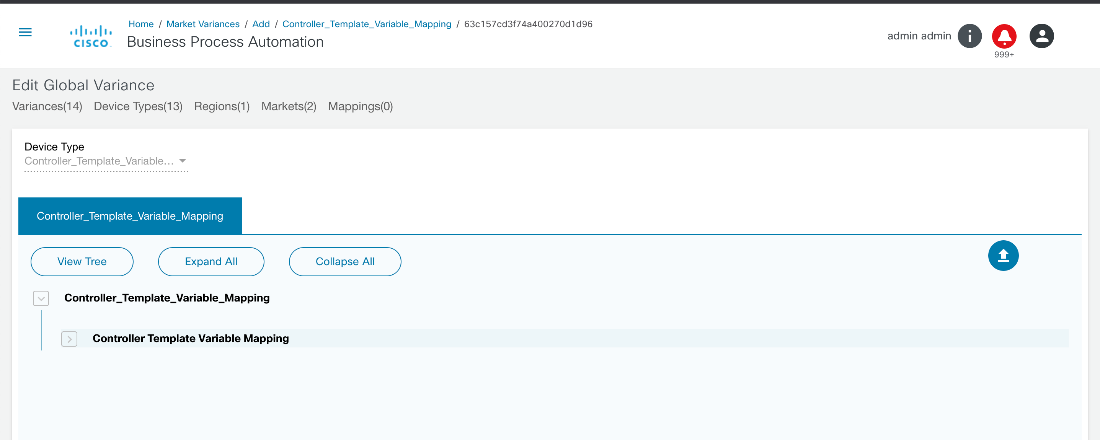
Adding Configurations
There are two ways to add configurations.
Manually Adding a Configuration
- Expand the Controller Template Variable Mapping heading.
- Click Add List. The Add New List Item window opens where the values that are used for auto-populating during Apply Config must be added.
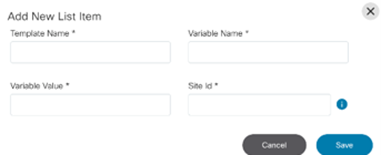
Downloading and Uploading the Configuration Template
To use the configuration mapping, the existing configuration template must be downloaded.
- Select the Controller_Template_Variable check
box and select the Download icon.
The sample format is below.
[ { "status": true, "data": { "type": "globalvariance", "id": "63c157cd3f74a400270d1d96", "deviceType": "Controller_Template_Variable_Mapping", "forms": { "Controller_Template_Variable_Mapping": { "controller-template-variable-mapping": [ { "templateName": "temp_cEdge_8000", "siteId": "204", "variableName": "Interface Name(sit_vpn_10_interface)", "variableValue": "Gi 1/0/1" }, { "templateName": "BPA_tmp_C8000v_Device_Template_Ver2.0", "variableName": "Address(vpn_next_hop_ip_address_0)", "variableValue": "address-from-mv", "siteId": "1225" } ] } }, "newRegionCode": "", "deviceTypeId": "63c157cd3e9dfc008f70c709" } } ] - Update the templateName, siteId, and variableName variables.
- Upload the file so that the Market Variance can save the updated values.
To upload the configuration template:
- Click Upload.
- Navigate to the configuration template that is updated and click Open.
After the upload process is complete, the configuration is applied during the Apply Config process, and the template name and siteID match; then Apply Config automatically populates the values from the Market Variance.
Adding vManage Controller for SD-WAN Use Cases
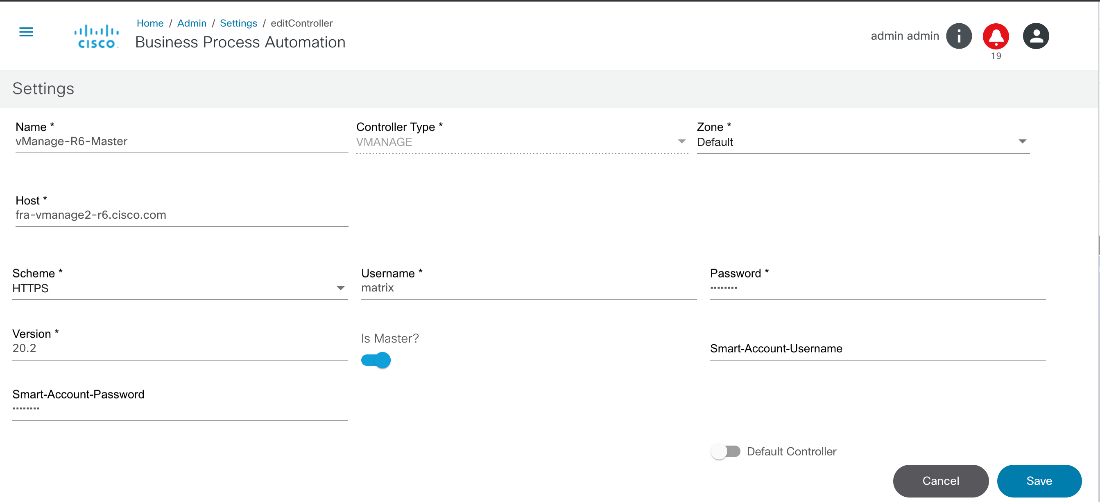
For enabling SD-WAN use cases, a master should be set up in a vManage instance in a default zone.
When adding or configuring a Global Administrator, a user group with Global Administrators needs to be mapped to a default zone. Also, the Global Administrator group (i.e., global-admin) should be mapped with other country administrator zones.
For example, there is a user called Global that can access the vManage master instance. In this case, global-admin was created as a group and the global user was mapped to the global-admin group. This global-admin group should be assigned with the default zone where the master vManager instance is configured.
For example, country Administrators must be configured for Asia and Europe. In this case, an asia-admin-group and an europe-admin-group are created. Respective users need to be added and mapped with the individual groups. Two new zones need to be created (e.g., vmanage-asia-zone, vmanage-europe-zone) and the groups created earlier (e.g., asia-admin-group, europe-admin-group) need to be mapped to these zones. The asia-admin-group is mapped to the asia-zone and the europe-admin-group is mapped to the europe-group. Also, the global-country Administrator is mapped to these zones so that the Global Administrator can view devices or templates across all of the secondary vManage instances.
When new secondary controllers are added, the secondary controllers should be mapped to the individual zones. For example, if a vmanage-asia instance is added, then the instance should be mapped with the asia-zone.
Working with Adapter Builder
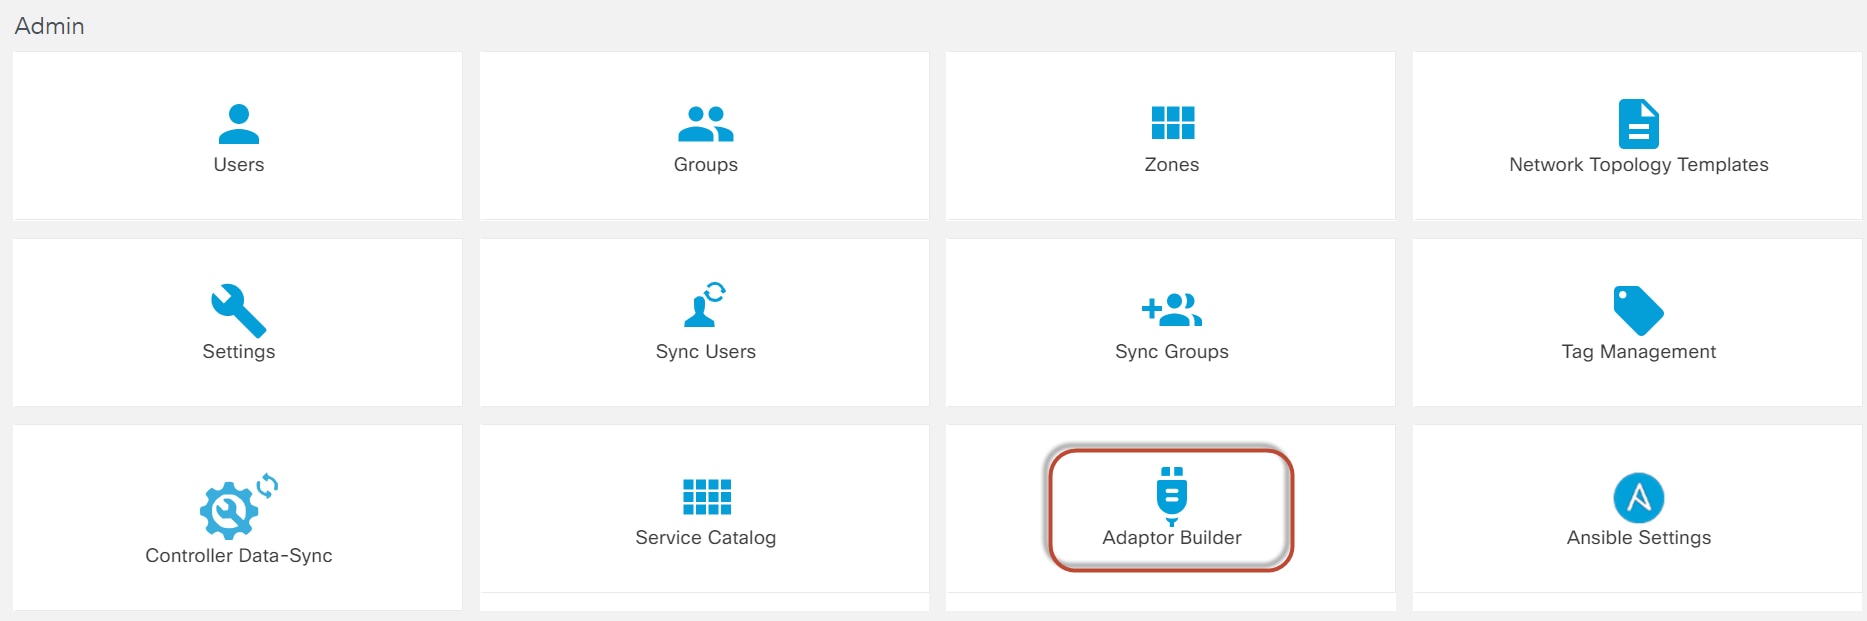
The Adapter Builder enables calling APIs exposed by internal and external service providers. It can chain API calls as well as transform data between the API calls using internal BPA resources.
Adapter Builder features include:
- A no-code approach to establishing API connectivity with external systems
- A configuration-driven approach to building Camunda element templates with the flexibility to configure multiple authentication mechanisms like Basic Auth, Bearer token, and API Keys
- Leveraging Swagger files or configuring endpoints from scratch
- Specifying the retry and timeout parameters for each endpoint to efficiently handle error scenarios
- Building element templates for all purposes (using a No-Auth mechanism)
- Downloading adapters from one server and seamlessly uploading into another server
- Building request and process response payloads by leveraging BPA’s built-in Script Runner capabilities
- A public Git Repository to store all the available adapters. This repository can be accessed by various Delivery Teams and customers to download the Adapter and then upload the same Adapter into their BPA installations. The Git repository also contains additional files for each of the Adapters such as the Readme.md, Postman collection, and Camunda workflows to demonstrate how the adapter can be used
Adapter Library
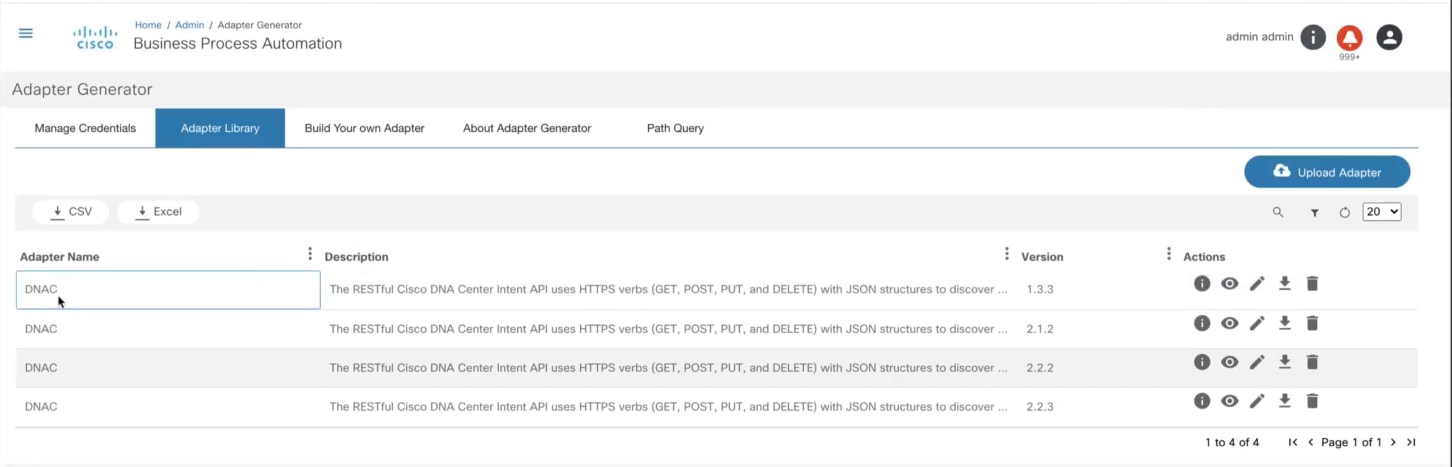
The Adapter Library tab lists the existing adapters.
From the Adapter Library, users can:
- Gather information by creating and uploading a Readme file
- Quickly view the Adapter features
- Edit an Adapter
- Download the Adapter details as a JSON file
- Delete one or more Adapters
Manage Credentials
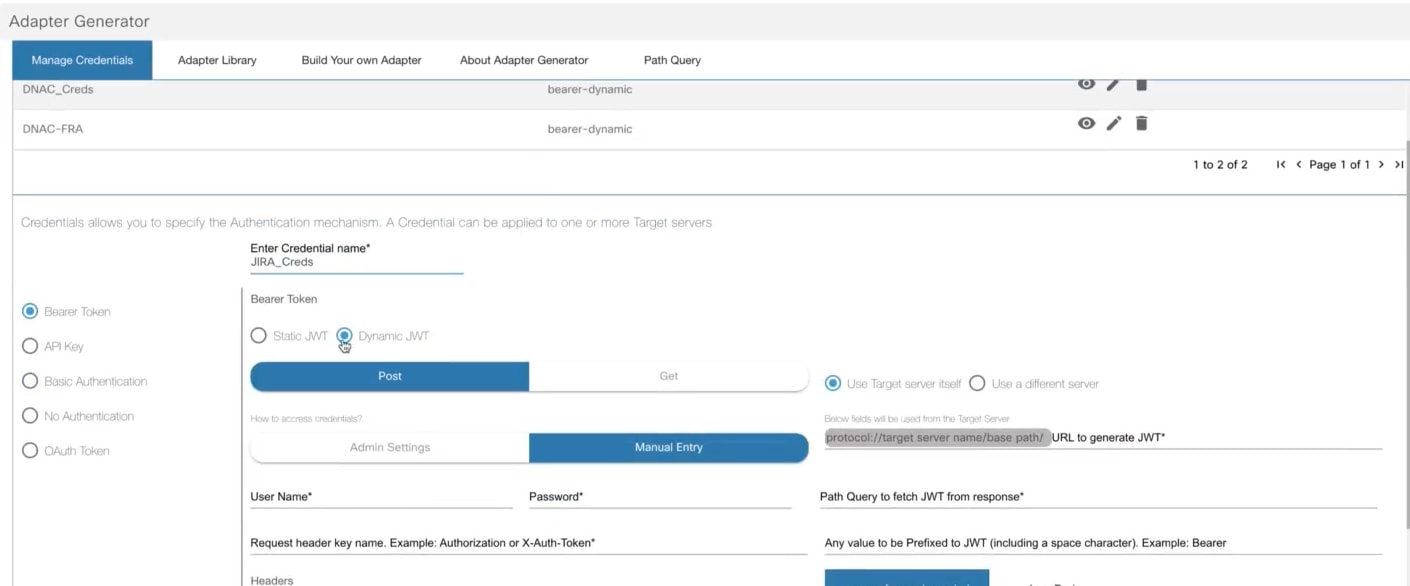
The Manage Credentials tab defines the authentication mechanism. The following authentication mechanisms are available:
- Bearer token
- API key
- Basic authentication
- No authentication
- OAuth token
Bearer Token
Perform the following for the Static JSON Web Token (JWT):
- Enter the Credentials name.
- Select one of the following radio buttons under Bearer
Token:
- Static JWT
- Dynamic JWT
- Enter the request header key as per the Administrator.
- Enter the value as per the user with a special character.
- Enter the actual JWT value.
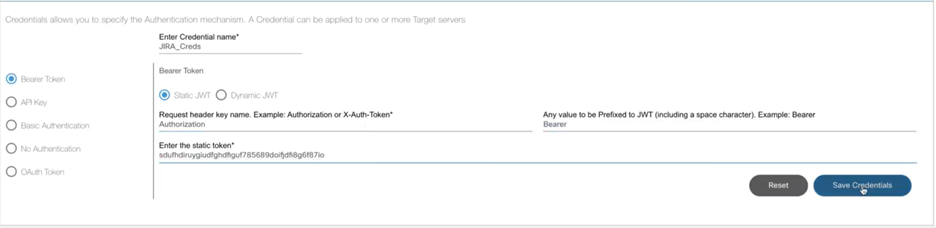
- Click Save Credentials.
- The new credential is added to the top of the credentials list on the Manage Credentials tab.

- Select the Edit icon to make any change.
Dynamic JWT is a two-step process which includes more features:
- Post
- Get
- Admin Settings
- Manual Entry
- Target Server
- Different Server
- Username
- Password
- URL to generate JWT
- Fetch JWT from response
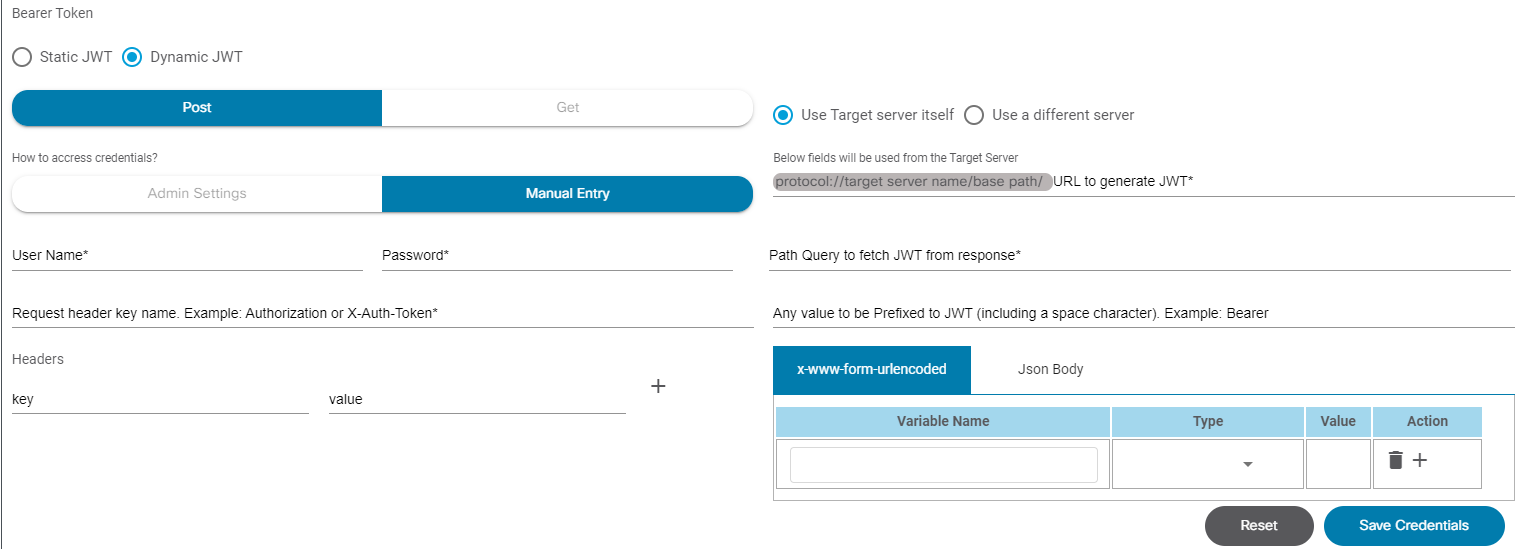
Perform the following for the Dynamic JWT:

- Click Admin Settings under How to access credentials?.
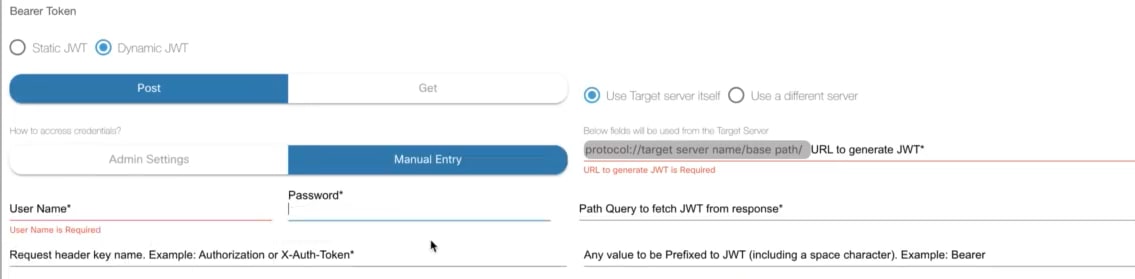
- Enter the required information. It is recommended to enter the credentials that are already stored in BPA. This can also be done manually by clicking Manual Entry, for which the username and password must be entered.
- Enter the Path Query (i.e., JWT) from BPA Postman along with the username and password in case of complex data transformation.
- Enter the basepath URL.
- The request header key name and value should be entered as below:
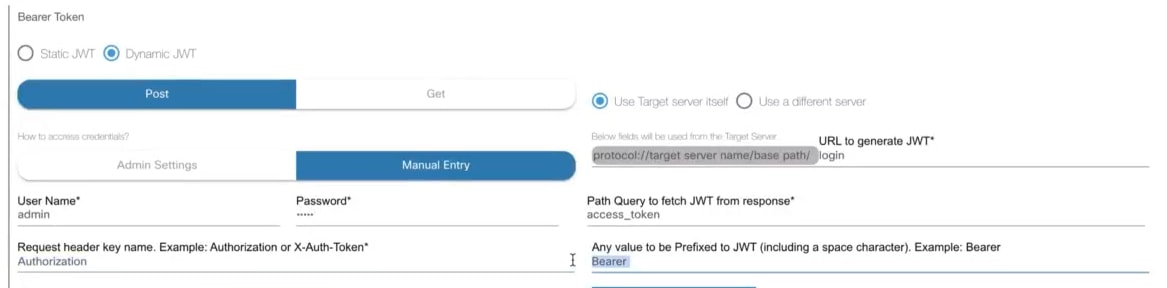
- The information can be passed through key, value, JSON body, and URL-encoded form.


API Key
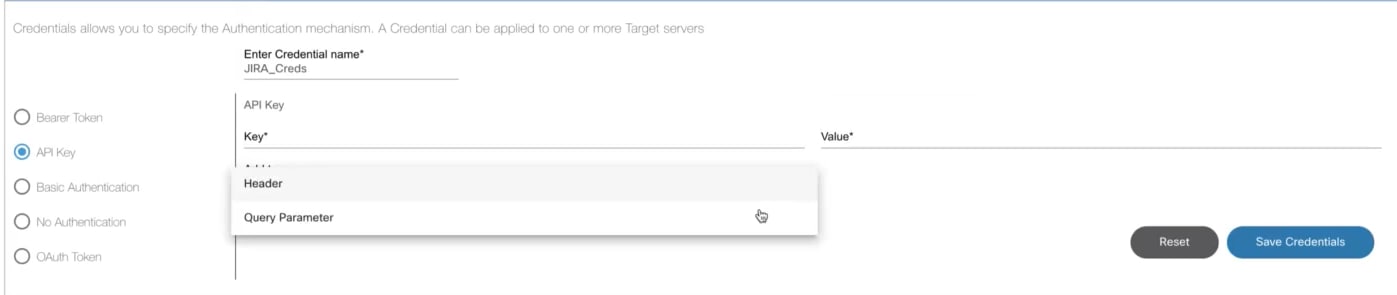
The following data should be entered for the API key:
- API key
- Value
- The API key as Header or Query Parameter
Basic Authentication

Provide the User Name and the Password.
No Authentication
The API can be directly done.
OAuth Token
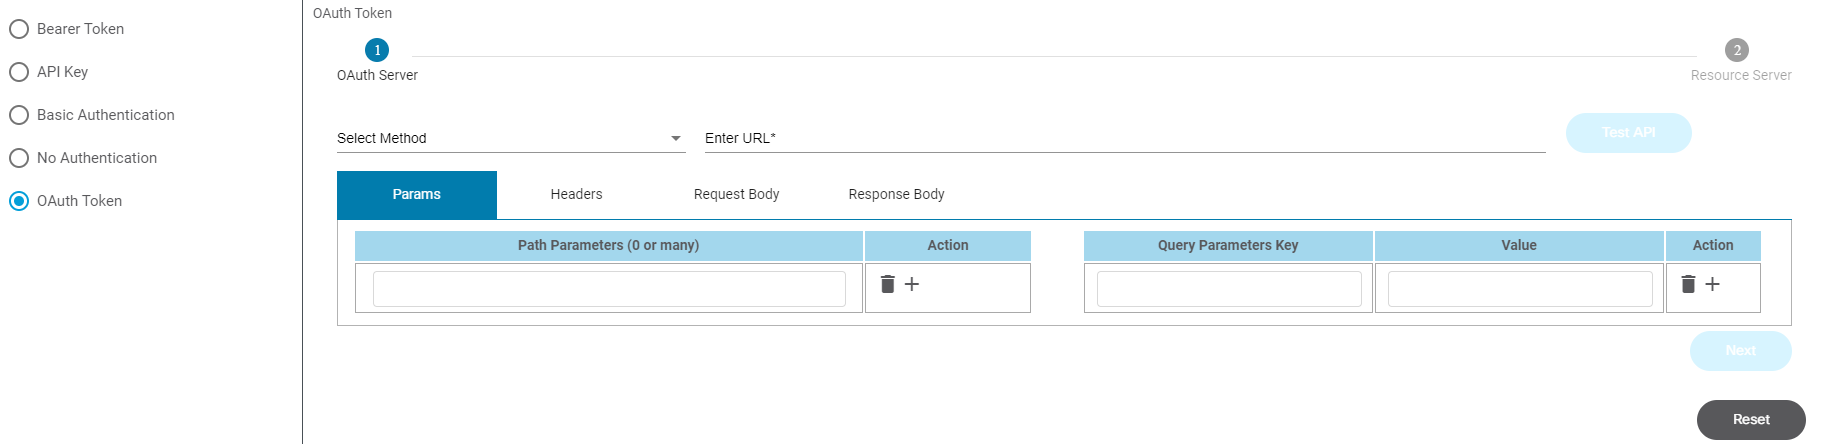
This is a three-step process which requires two servers: an OAuth Server and a Resource Server. This performs as below:
- API call 1 to the OAuth Server to generate the OAuth token.
- API call 2 to the Resource Server to generate the JWT token.
- Actual API call to the external system.
Build Your Own Adapter

The Build Your own Adapter tab is used to create a new adapter.
To build an adapter, perform the following:
- Enter the Adapter Name, Version, Description, Polling Frequency, Number of retries, and API Timeout.
- If one or more servers are present in an external system, they can be configured using target servers. In Configure target servers section enter the Host, Port, Base Path, and Credentials.
- Select the Add icon to add target servers.
- Click Next after all the entries are made. A new page displays where the Endpoints are configured.
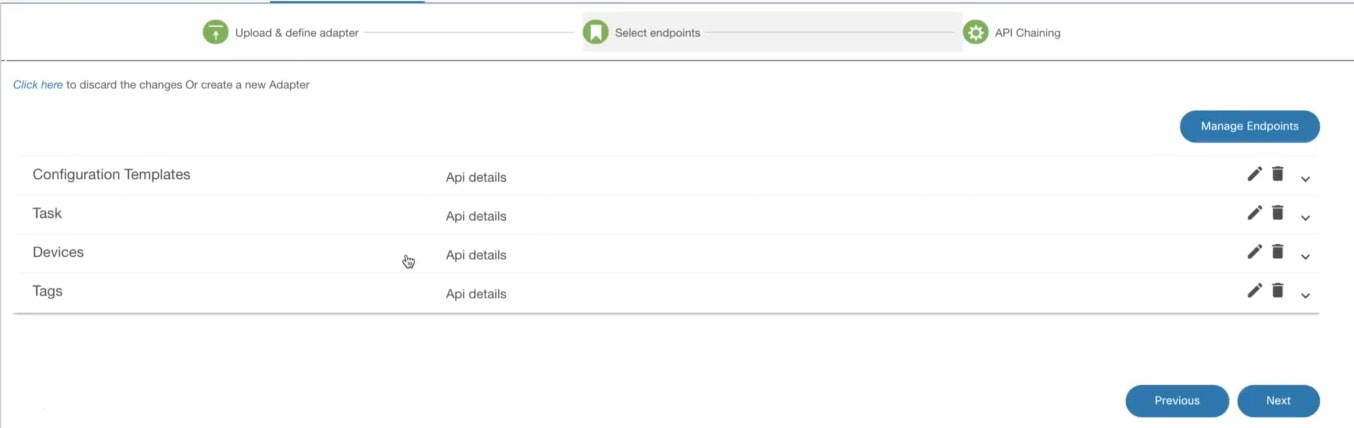
If the Expand icon is selected, individual details of the endpoints display.
- Click Next to prompt a new page.
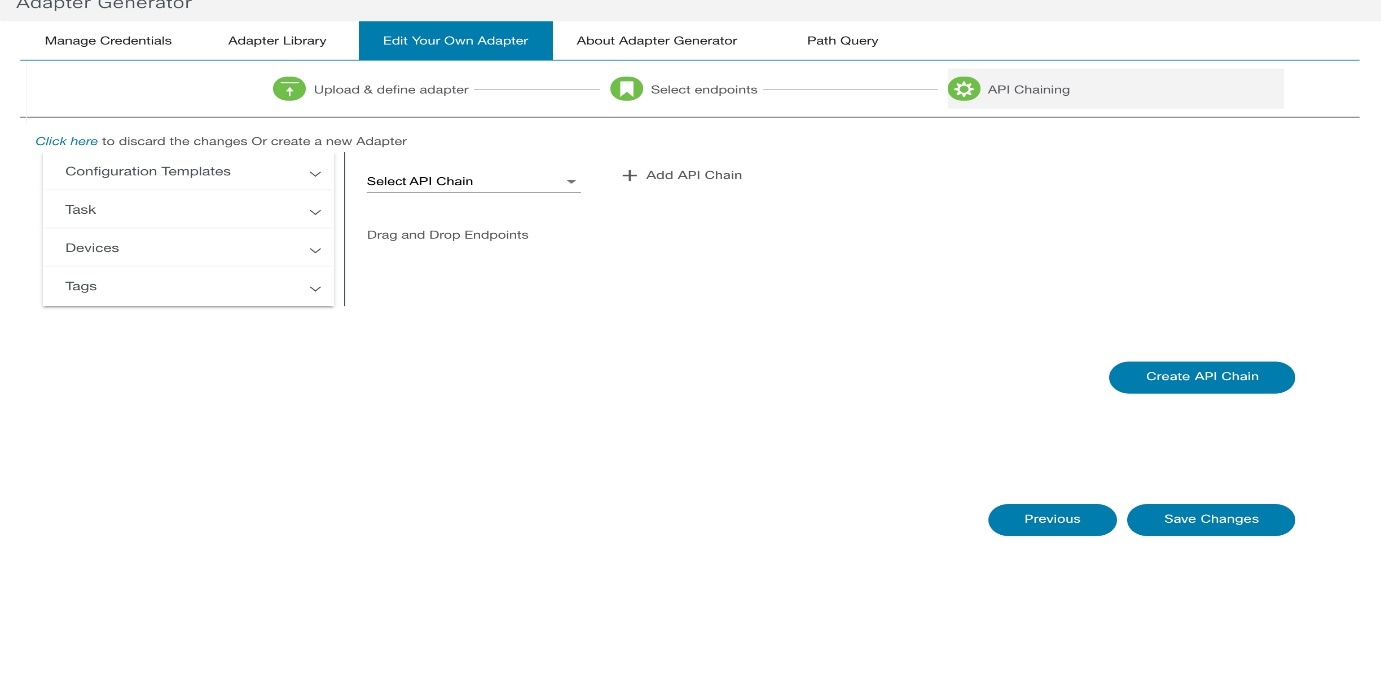
- Click Save Changes to save the corresponding adapter to the database.
About Adapter Generator

The About Adapter Generator tab provides the documentation for the Adapter generation.
Path Query
This page allows users to build a JSONata Path Query and validate it by using an input JSON object/array. The page provides the response, allowing users to validate whether the query built properly or not.
Perform the following:
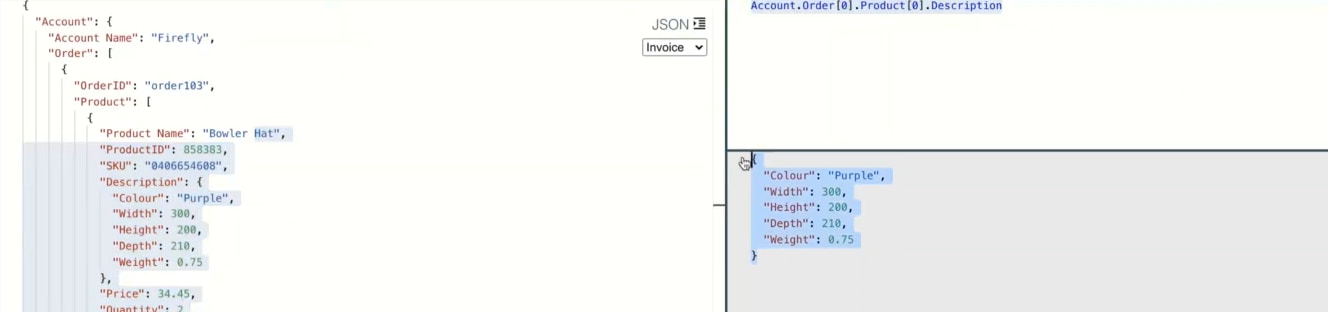
- Enter JSON data in the left panel.

- Enter Path Query on the right side.
- Evaluate the output in the BPA application instead of referring to another portal.
Working with the Commit Manager

The Commit Manager application provides the capability to work with NSO commit queues. The Commit Manager supports the ability to disable or enable global commit queues and view the items in the commit queue. Commit Manager supports NSO capabilities to lock, unlock, prune, delete, etc. for commit queue items. Users can roll back the service based on labels.
Users can perform the following tasks:
- View items in the commit queue
- Set global options
- Set item-specific actions
- Rollback based on label
Global Options
Perform the following to set the global options:
- Select Commit Manger tile on the Home screen. The Commit Manager page displays.
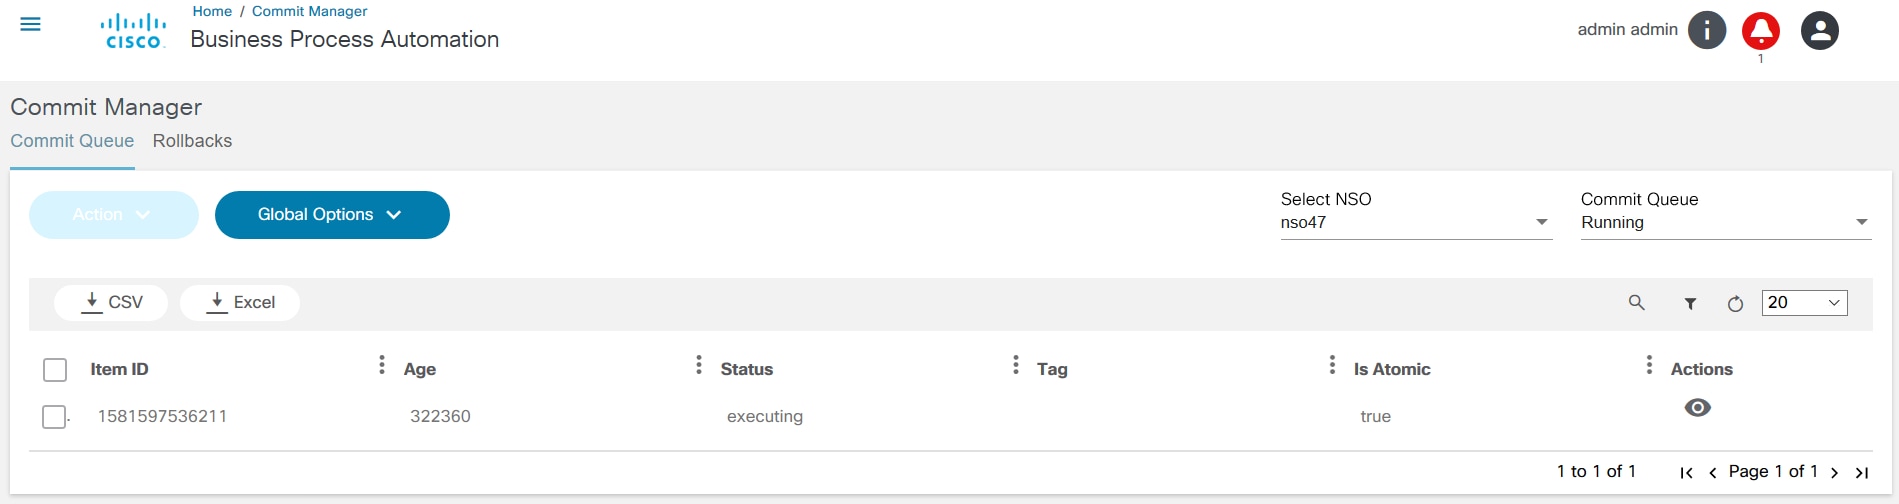
- Select the NSO from the Select NSO list. The Running commit Queue is displayed.
- Click Completed to see the completed queue.
- Click Global Options to perform the global configuration on the commit queue. A detailed explanation is provided for each option in the table below.
| Options | Actions |
|---|---|
| Lock Device | Adds an active queue-item to the commit-queue. Any queue item affecting the same devices entering the commit-queue waits for this lock item to be unlocked or deleted. |
| Clear Queue | Clears the entire queue. All devices present in the commit queue are out of sync after this action is executed. This action is not recommended for normal use cases. |
| Prune Device | Prunes all specified devices from all queue items in the commit queue. Affected devices are out of sync after this action is executed. Devices currently being committed to are not pruned. |
| Set Atomic | Sets atomic behavior of all queue items. If set to false, the devices contained in these queue items can start executing if the same devices in other non-atomic queue items ahead of it in the queue are completed. If set to true, the atomic integrity of these queue items is preserved. |
| Enable by Default | Enables the commit queue by default for this NSO. |
Item Options
Select the required item and select an action from the Action drop-down list. Actions are described in the table below.
| Options | Actions |
|---|---|
| Lock | Puts a lock on an existing queue item. A locked queue item cannot start executing until it has been unlocked. |
| Unlock | Unlocks a locked queue item. Unlocking a queue item which is not locked is ignored. |
| Prune | Prunes the specified devices from the queue item. Devices currently being committed to are not pruned. |
| Set Atomic | Sets the atomic behavior of a queue item. If this is set to false, the devices contained in this queue item can start executing if the same devices in other non-atomic queue items ahead of it in the queue are completed. If set to true, the atomic integrity of the queue item is preserved. |
| Delete | Deletes a queue item from the queue. If other queue items are waiting for the deleted item, they automatically start to run. The devices of the deleted queue item are out of sync after the action is executed if they have not started executing. |

Select the View icon on the Commit Manager page to view item details.
Rollbacks
Perform the following tasks on the Rollbacks tab:
- Preview the Rollback based on a label.
- Rollback based on a label.
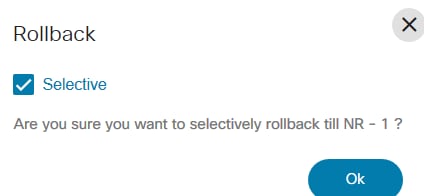
- Select the check boxes of one or more Rollbacks and click Rollback. Select the Selective check box if a selective rollback is required.
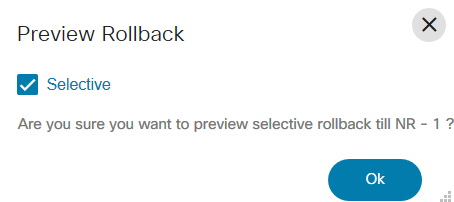
- Select the check box of a Rollback and click Preview Rollback. The preview is displayed in native, CLI, or XML formats. Select the Selective check box if a selective preview rollback is required.
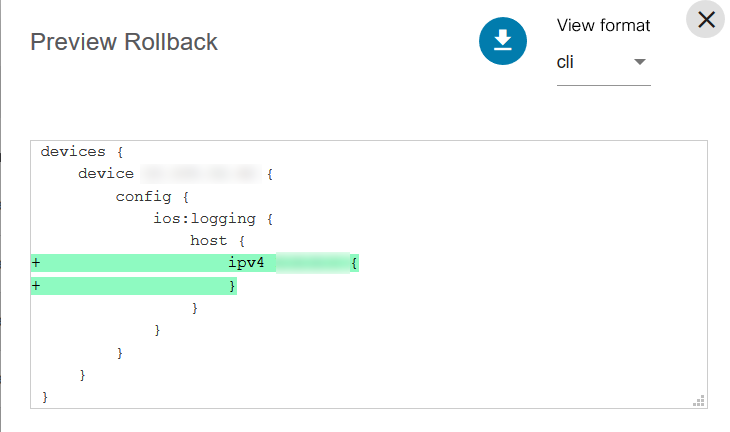
The required NSO can be selected from the Select NSO drop-down list. For Rollbacks, the Selective option is used to rollback only a particular commit. If the Selective check box is not selected, then all previous commits are rolled back.
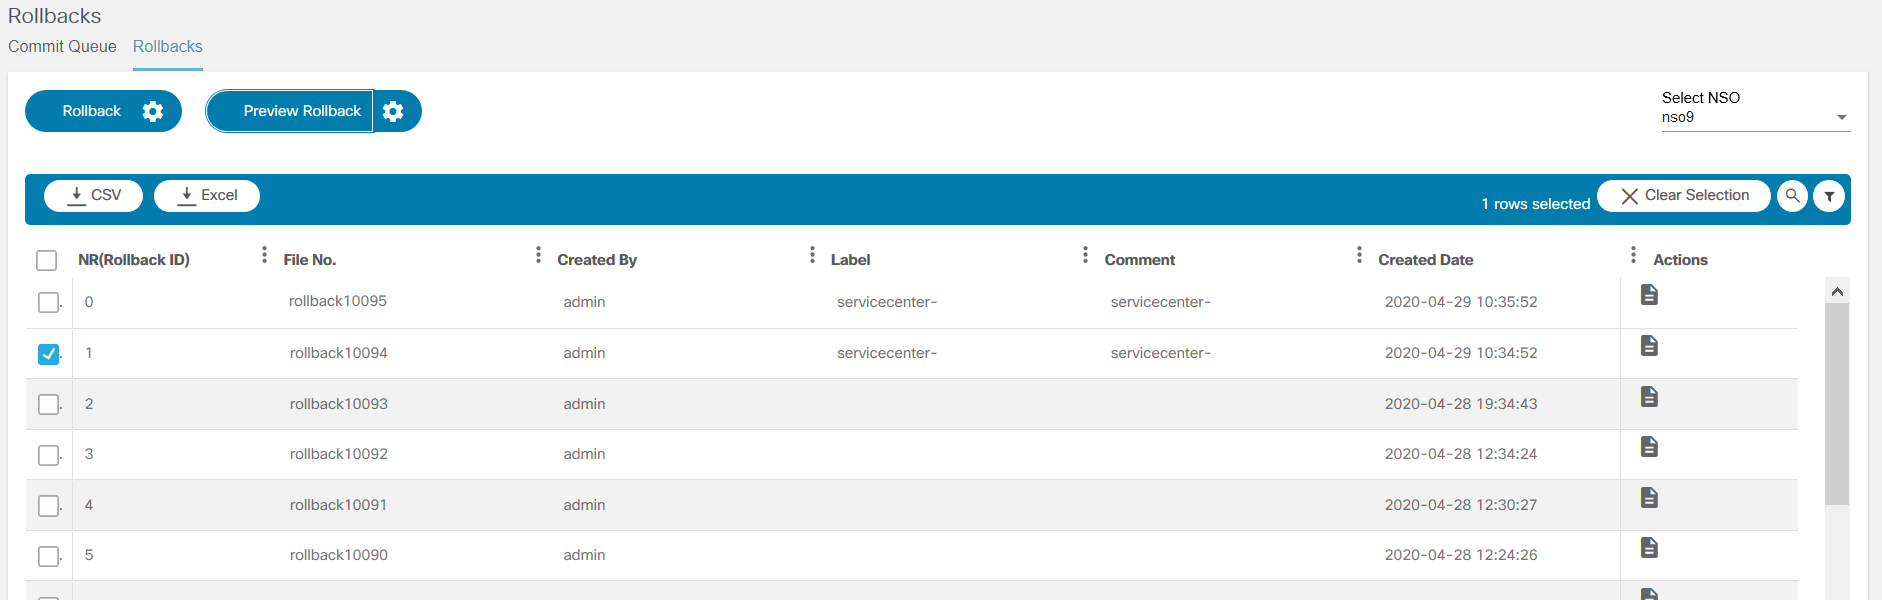
- Click the Config button next to Rollback, select the label, and click Commit to start the rollback. Optionally, select the Config button next to Preview Rollback and select the label to view the commit -dry run.
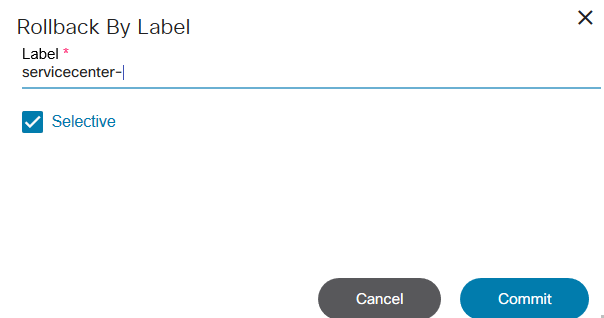
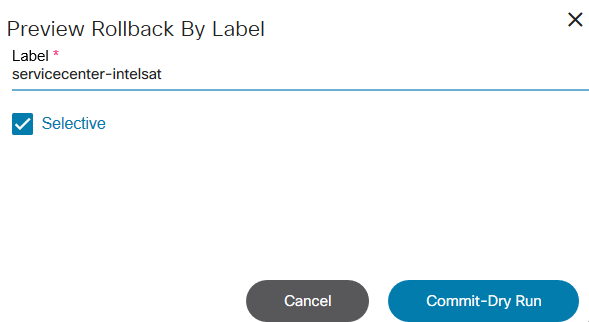
Working with the Script Runner Application
The Script Runner application allows users to run Python and Ansible scripts.
- Select the Script Runner tile from the
Home page. The Scripts page displays.
Users can add a new script and perform the following actions:
- Run: execute the script
- View: see the script
- Edit: make any changes to script
- Delete: remove the script
- Download: get a copy of the script

The numbers below correspond to the icons shown in the figure above.
| Number | Description |
|---|---|
| 1 | Run the Script |
| 2 | View the Script |
| 3 | Edit the Script |
| 4 | Delete the Script |
| 5 | Download the Script |
The Executions tab show the status of the scripts.
- Click Add.
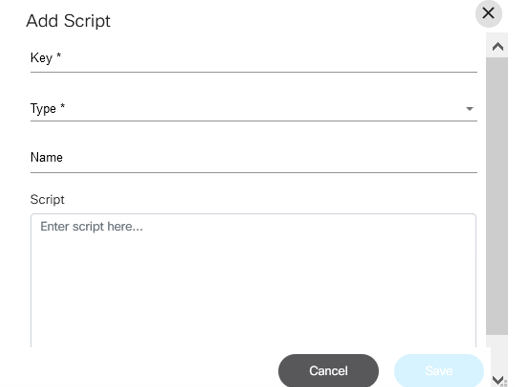
- Enter the Key, select the Type from the drop-down list, enter the Name and Script.
- Click Save.
Users can see the status on the Executions tab and check the logs by selecting the Eye icon in the Actions column.

Element Templates
BPA supports custom element templates for common tasks invoked from workflows. These can be accessed from the integrated modeler in workflows’ applications or downloadable as a package for the external modeler.
This section lists all supported BPA element templates. There are two categories of element templates, as follows:
- Service Task-based templates
- User Task-based templates
Service Task based templates are listed below.
Analytics Diff
- Purpose: This element template supports the execution of an analytics diff template and is typically used to generate pre-/post diff
- Parameters:
- Analytics Template ID: Identifier of analytics template already created in BPA
- Pre-Check Execution ID: Pre-check execution identifier typically captured during workflow execution
- Post Check Execution ID: Post check execution identifier typically captured during workflow execution
Analytics Multi Diff
- Purpose: This element template supports the execution of multiple analytics diff templates and is typically used to generate pre-/post diff
- Parameters:
- Payload: Payload to be passed for executing multiple analytics diff templates
- Sample Payload:
{
    "deviceList":[
        {
            "deviceName":"iosxr1",
            "templateId":"migration-template",
            "variablesMap":{
                "port_type":"TenGigE",
                "port_number":"0/2"
            }
        }
    ]
}
Create Service commit dry run
- Purpose: This element template supports the execution of commit dry run output for an NSO service instance
- Parameters:
- Payload: Payload to be passed for performing the commit dry run for an NSO Service Instance
- Sample Payload:
{
    "create":[
        {
            "prefix-set-service:prefix-set-service":[
                {
                    "name":"pre-test",
                    "prefix-set":[
                    ]
                }
            ]
        }
    ],
    "delete":[
    ]
}
Create Service Instance
- Purpose: This element template supports the committing of a service instance in NSO
- Parameters:
- Payload: Payload to be passed for performing the commit for an NSO service instance
- Sample Payload:
{
    "create":[
        {
            "prefix-set-service:prefix-set-service":[
                {
                    "name":"pre-test",
                    "prefix-set":[
                    ]
                }
            ]
        }
    ],
    "delete":[
    ]
}
Execute Template
- Purpose: This element template executes the Process Templates with complete payload
- Parameters:
- Device Name: Name of the device
- Template ID: Process template ID created in BPA
Execute Command Template
- Purpose: This element template executes the Process Templates with complete payload
- Parameters:
- Payload: Payload to be passed while executing the Command Template
- Sample Payload:
{
    "deviceName":"11.1.1.1",
    "templateId":"test2735",
    "commandList":[
        {
            "command":"show version",
            "isConfigMode":false,
            "goToStepOnPass":"",
            "goToStepOnFail":"",
            "passExpr":"",
            "rules":[

            ]
        }
    ]
}
GCT Dry Run
- Purpose: This element template supports GCT Dry Run
- Parameters:
- Template Name: Name of GCT template created
- Version: Version number of GCT template created
- Devices: Devices to be used for dry run
- Variables: Custom variables, if any
GCT Commit
- Purpose: This element templates supports commit of GCTs
- Parameters:
- Template Name: Name of GCT template created
- Version: Version number of GCT template created
- Devices: Devices to be used for dry run
- Variables: Custom variables, if any
Create Devices
- Purpose: This element template is to onboard a device
- Parameters:
- Payload: Payload to be passed while creating the device
- Sample Payload:
[
    {
        "address":"100.1.4.5",
        "admin-state":"unlocked",
        "authgroup":"default",
        "description":"",
        "latitude":"",
        "longitude":"",
        "device-type":"netconf",
        "name":"3.0.1.2",
        "ned-id":"lsa-netconf",
        "port":"8080",
        "protocol":""
    }
]
Fetch Host Keys
- Purpose: This element template fetches host keys for a device
- Parameters:
- Device Name: Name of the device to fetch the host keys for
Device Sync From
- Purpose: This element template performs the Device Sync operation for a device
- Parameters:
- Device Name: Name of the device to perform Sync with NSO for
Connect to Device
- Purpose: This element template connects to a specific device
- Parameters:
- Device Name: Name of the device to perform Sync with NSO for
Create Device Group
- Purpose: This element template creates Device Group in NSO
- Parameters:
- Name: Name of the group
- Device Name: Device names to be added
- Device Group: Device group to which the devices should be added
Send Mail
- Purpose: This element template supports sending an email
- Parameters:
- Receivers: Mail ID of the receivers
- Subject: Mail subject
- MailText: Mail content
Send Mail Advanced
- Purpose: This element template sends Mail from BPA
- Parameters:
- Payload: Payload to be passed for sending mail from BPA
- Sample Payload:
{
    "to": "receiver@xyz.com",
    "subject": "Mail Subject",
    "text": "Mail Text"
}
Create Ticket
- Purpose: This element template creates a ticket
- Parameters:
- Ticketing Instance Name: Name of the ticketing instance provided in BPA admin settings
- Payload: Payload to update the ticketing instance
External task template
- Purpose: This element template avoids holding HTTP connections in Camunda BPMN engine
- Parameters:
- Retry: Number of times to retry the HTTP request
- Timeout: Number of minutes to timeout the HTTP request
- URL: HTTP or HTTPS URL request
- Method: HTTP method (e.g., GET, POST, DELETE)
- Payload: HTTP payload for POST
- Headers: HTTP request headers
Update Ticket
- Purpose: This element template updates a ticket
- Parameters:
- Ticketing Instance Name: Name of the ticketing instance provided in BPA admin settings
- Ticket ID: Unique ticket ID, which it is to be updated
- Payload: Payload to update the ticketing instance
Create Notification
- Purpose: This element template creates a notification in BPA
- Parameters:
- Category: Notification category
- Severity: Info, success, error, warning (default value of info)
- Title: Notification title
- Description: Description of the notification
- User: User to be authorized for the notification
- Group: Group to be authorized for the notification
- Application Key: Application Key for the notification
- Enable Notification Key: Boolean value to enable the notification key toaster message
Create Notification Advanced
- Purpose: This element template creates a notification in BPA by passing payload
- Parameters:
- Payload: Payload to be passed for creating the
notification
[
    {
        "category":"nso.device.added",
        "severity":"error",
        "user":"admin",
        "payload":{
            "title":"New device added",
            "description":"10.1.1.1 managed successfully at NSO1"
        },
        "_options":{
            "toaster":true
        }
    }
]
- Payload: Payload to be passed for creating the
notification
User Task based templates are listed below:
Form Builder Task
- Description: User task to view form runtime
- Component Type: Runtime form component
- Input Parameters:
- Service form name
- Form buttons
View Commit Dry Run Task
- Description: User task to view commit dry run output
- Component Type: Commit dry run component
- Input Parameters:
- Form buttons
- Payload
Command Template Task
- Description: User task to view command template execution
- Component Type: Output view component
- Input Parameters:
- Form buttons
- Execution output ID
View Diff Task
- Description: User task to view diff execution
- Component Type: Diff view component
- Input Parameters:
- Diff ID
- Form buttons
OS Upgrade Task - Description: User task used to perform the OS Upgrade operation - Component Type: OS upgrade dialog component - Input Parameters: - Form buttons - Payload
OS Upgrade Device Details Task
- Description: User task used to show the OS Upgrade device details
- Component Type: OS upgrade device details component
- Input Parameters:
- Workflow Input ID
- Form buttons
UI Performance Improvements
To improve the UI performance, data in the grids display one week of data based on the created and modified dates by default. If users want to fetch older data, they can change the From Date and To Date fields.
The date filters are implemented in following applications.
- Form Builder
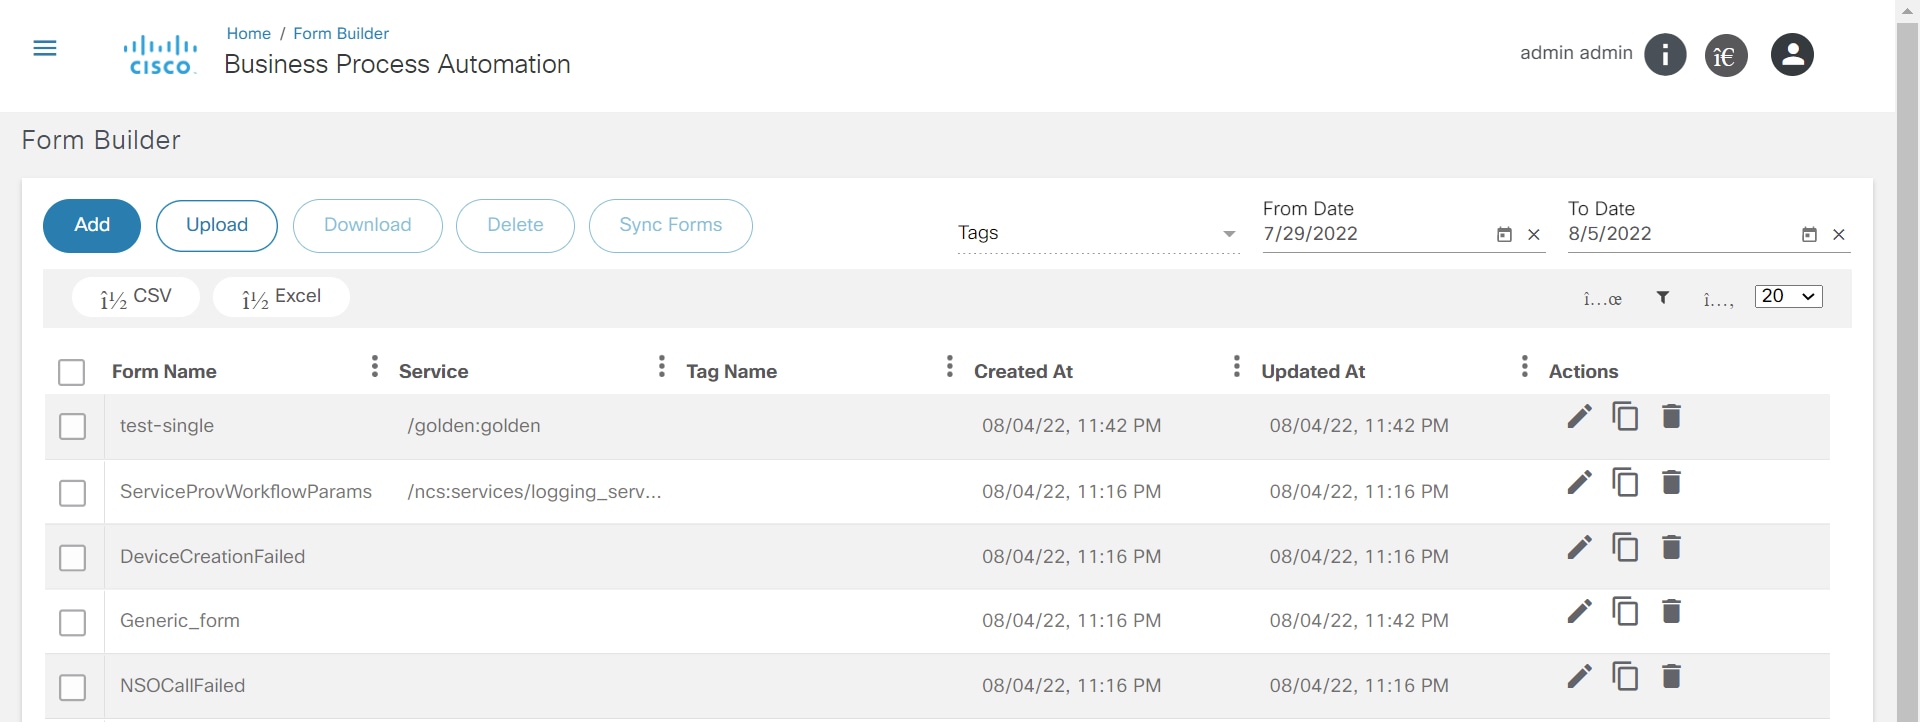
- OS Upgrade
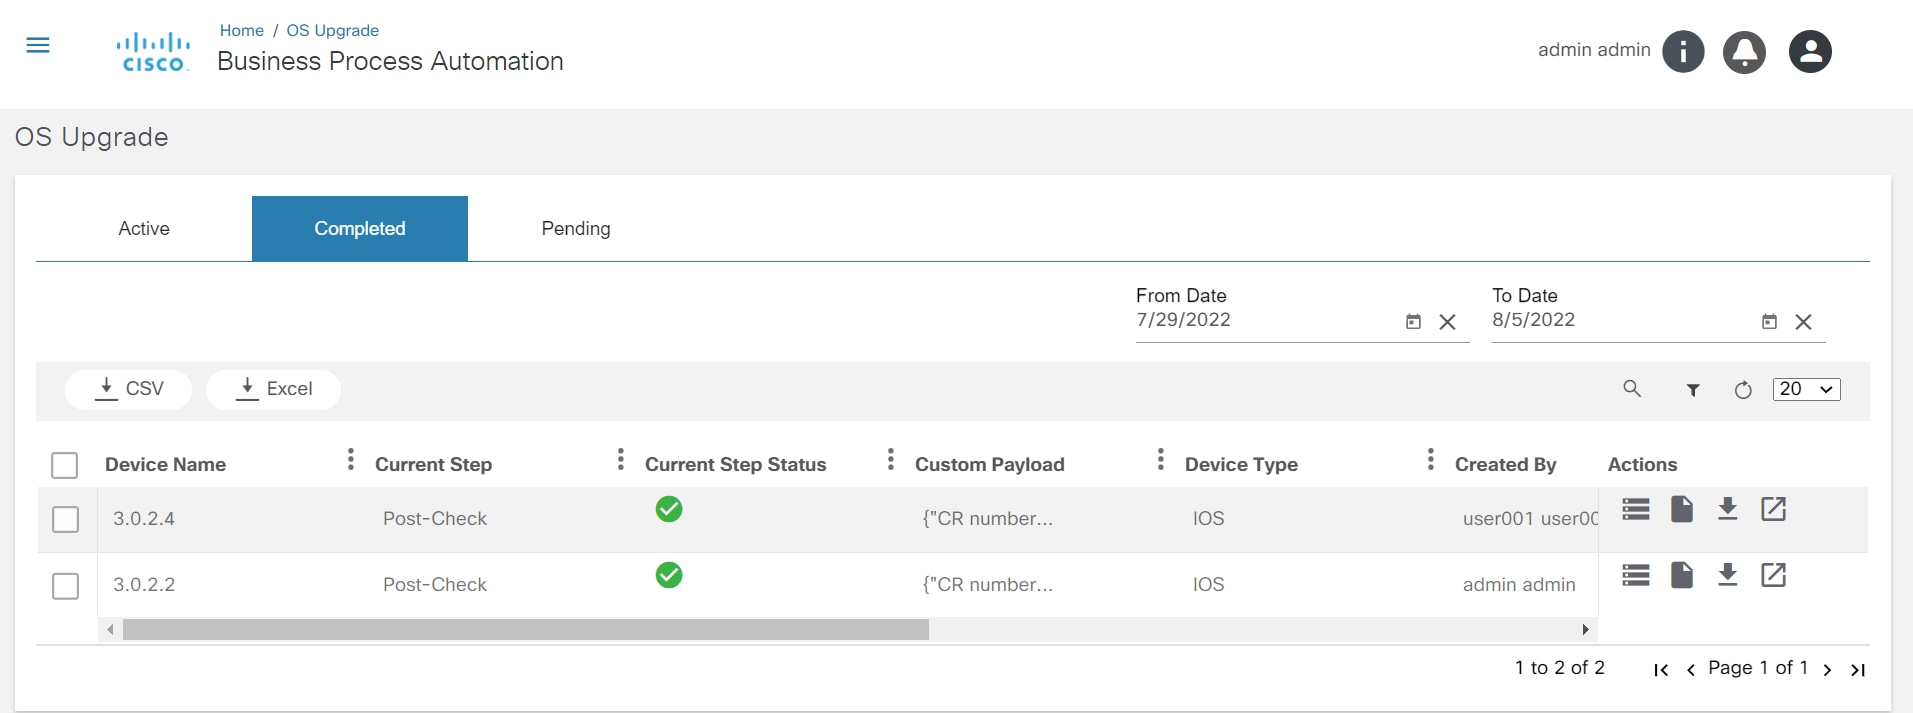
- Process Templates
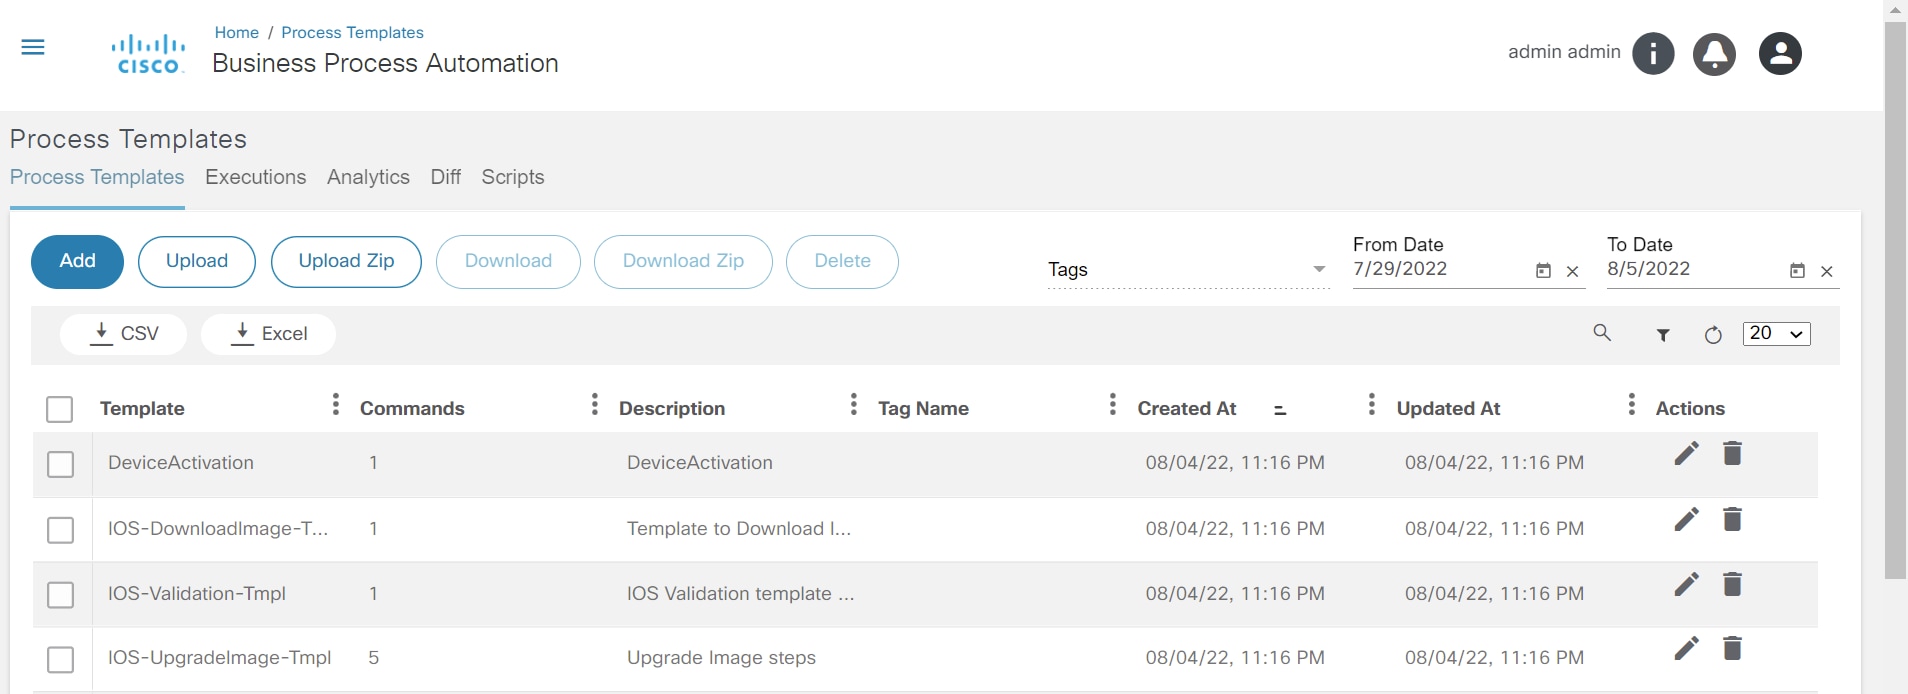
- GCT
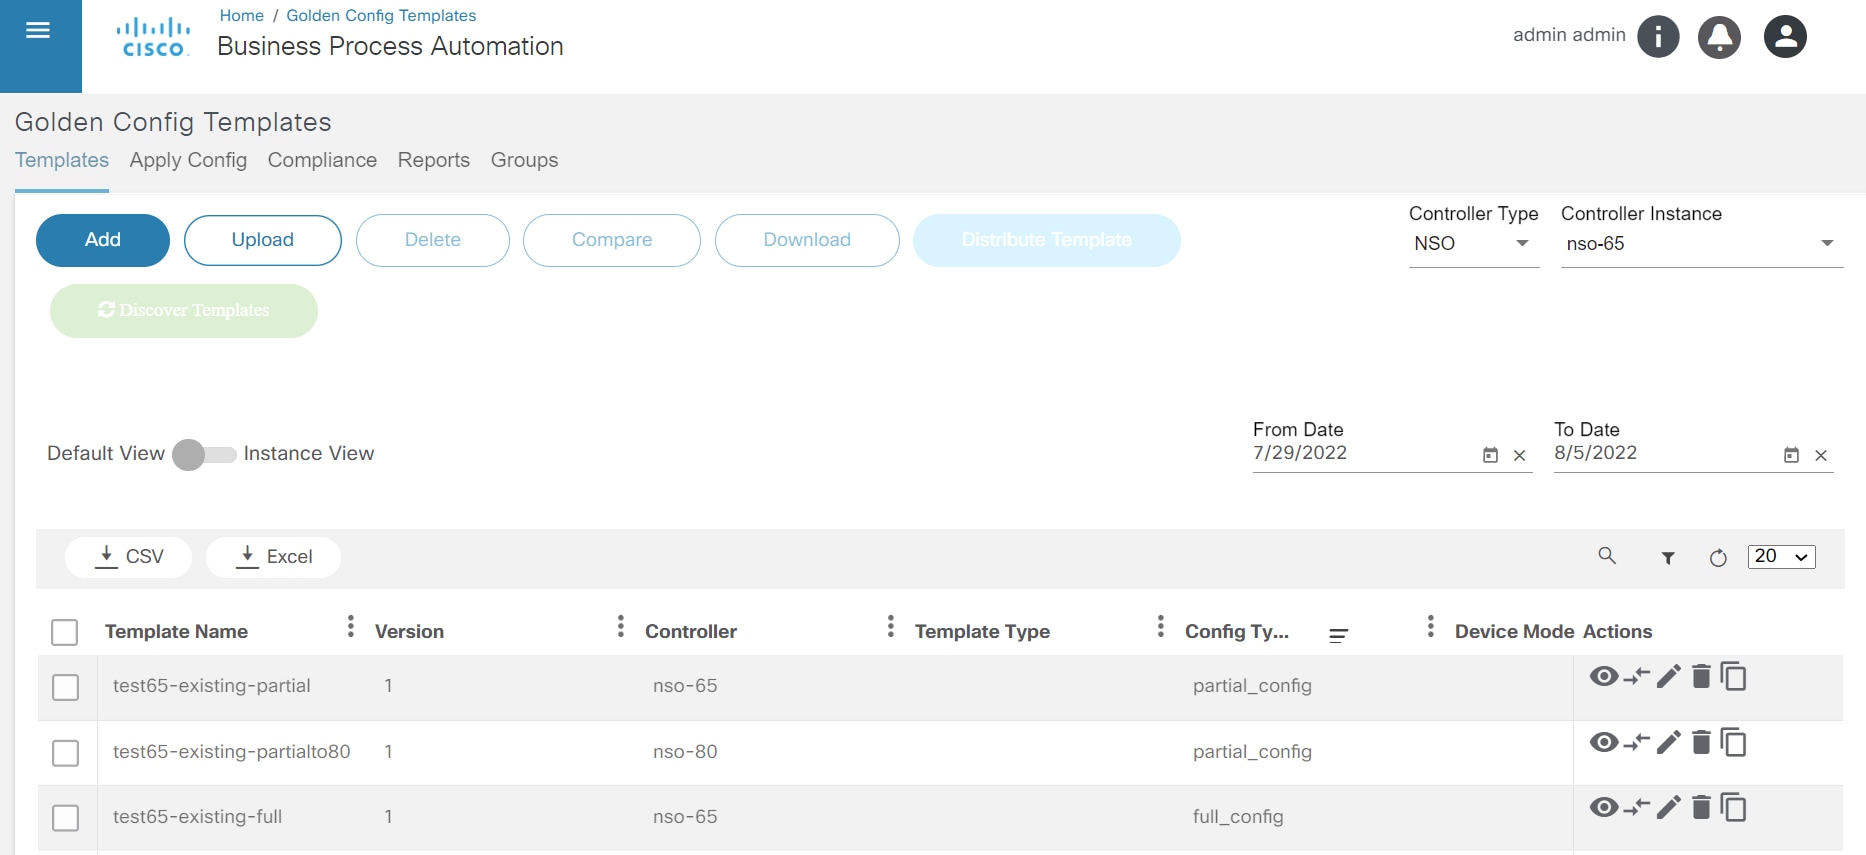
- Device Activation
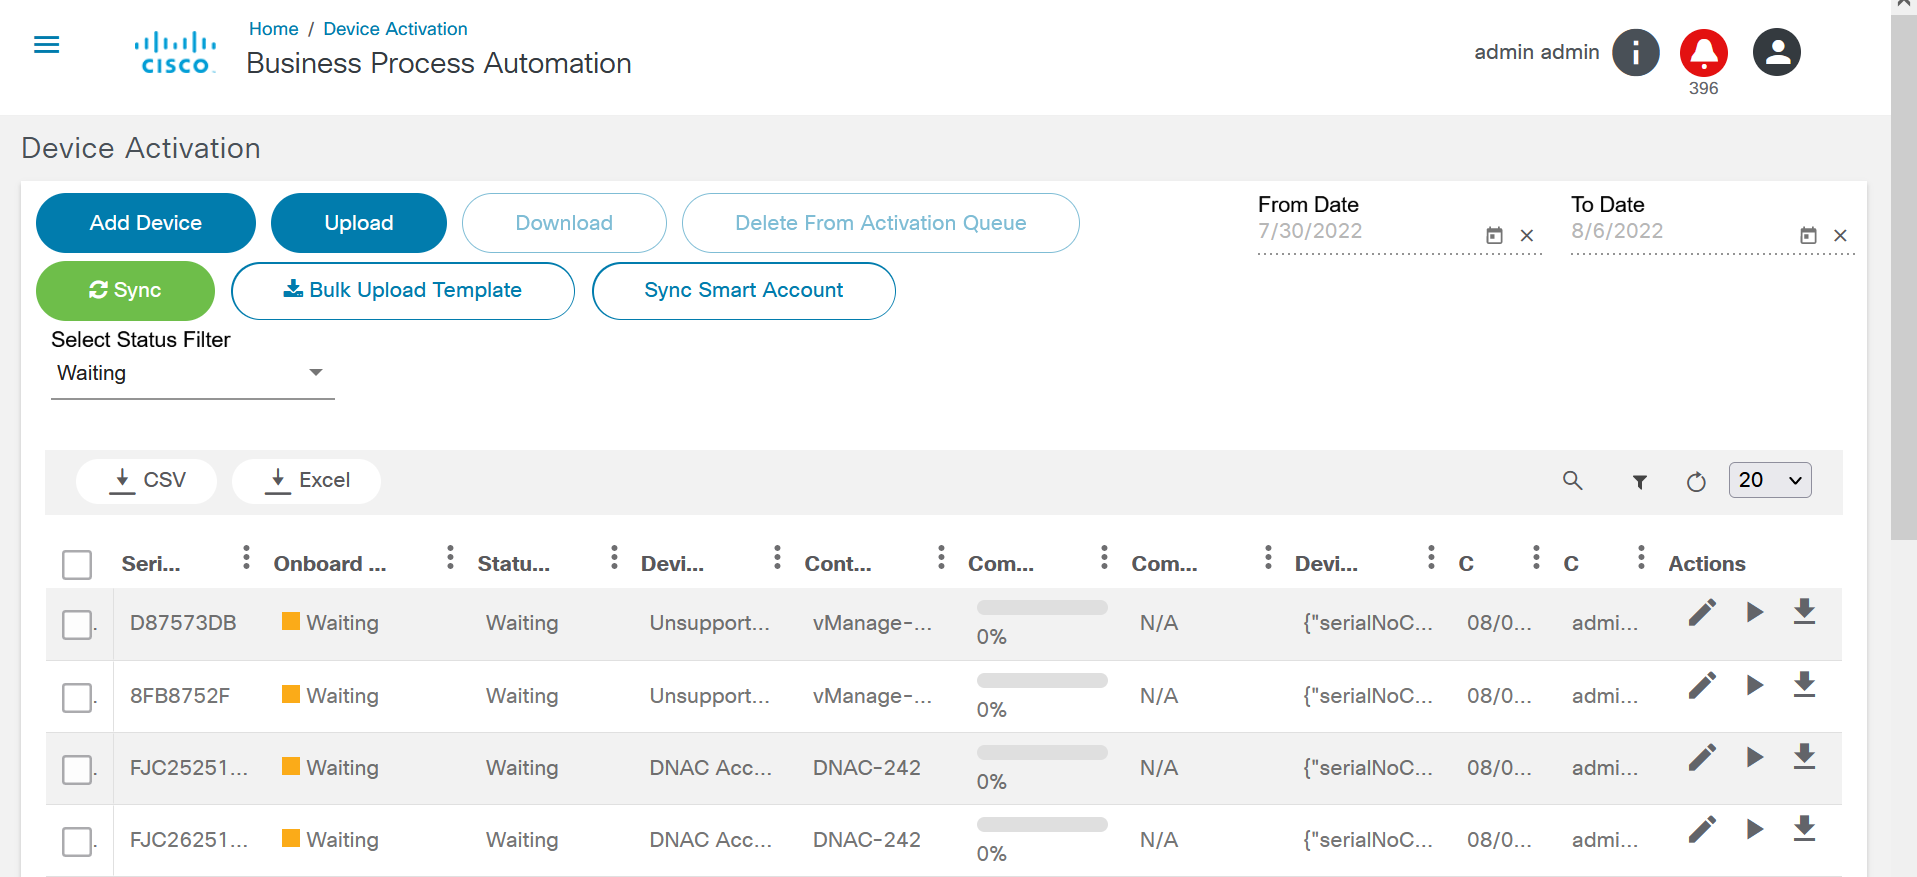
- Service Catalog
- Pre-Post
- Reports
- Script Runner
Persistent Filters Applied for Workflow and Service Catalog
If a user navigates to different tabs or sites after performing a particular filter in the Workflow or Service Catalog, the filter persists until the user logs out of the session.
The following actions can be applied to the persistent filters in the Workflow and Service Catalogs:
- Search
- From and To date filters
- Table filter
- Column field sorting
- Pagination
Workflows
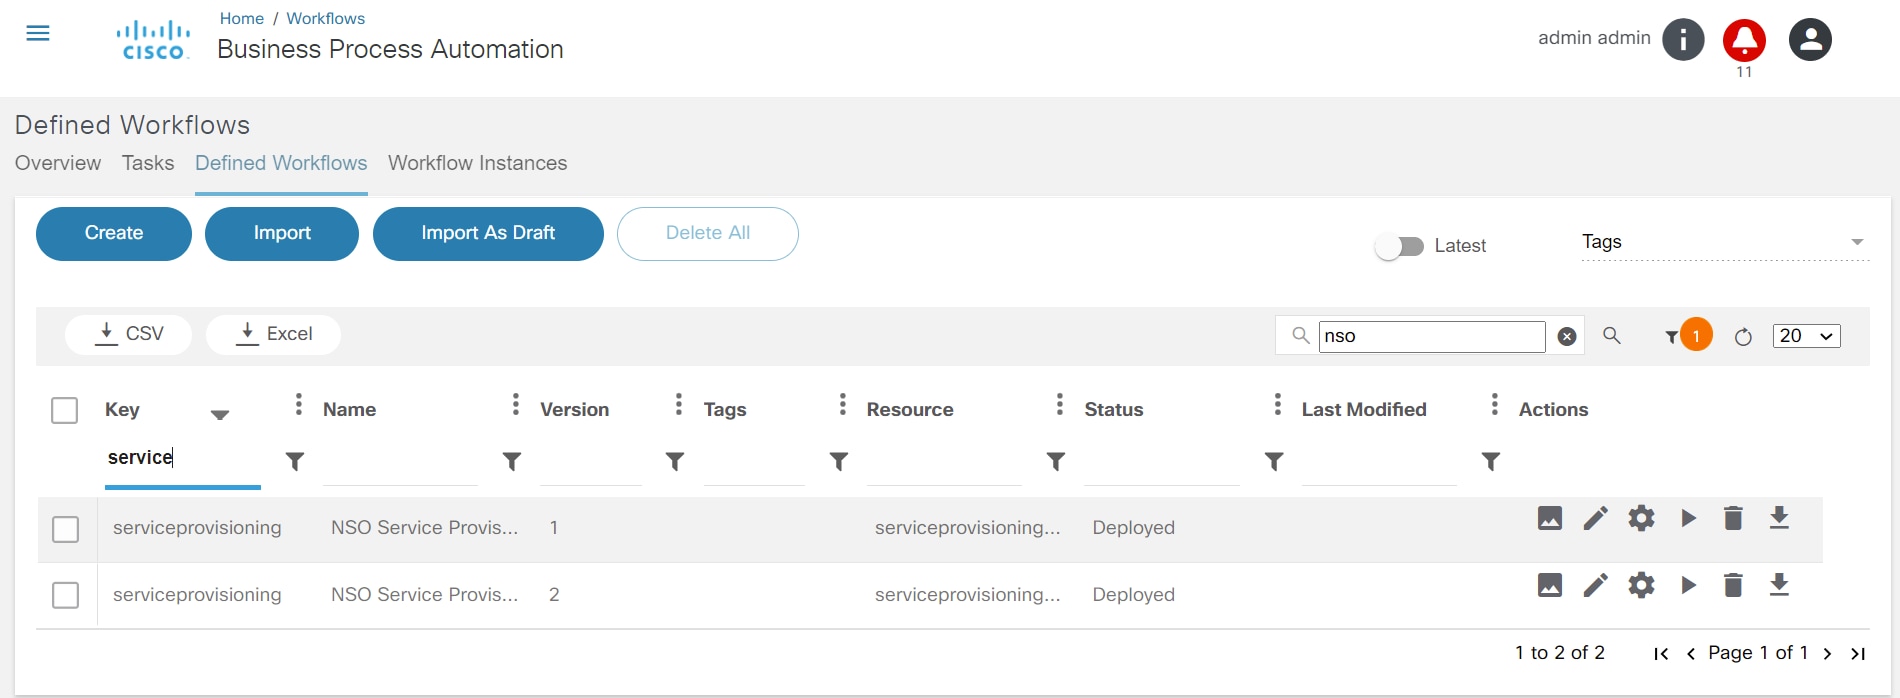
Tabs: Tasks, Defined Workflows, Workflow Instances
- Search and Table filter
- Column field Sorting
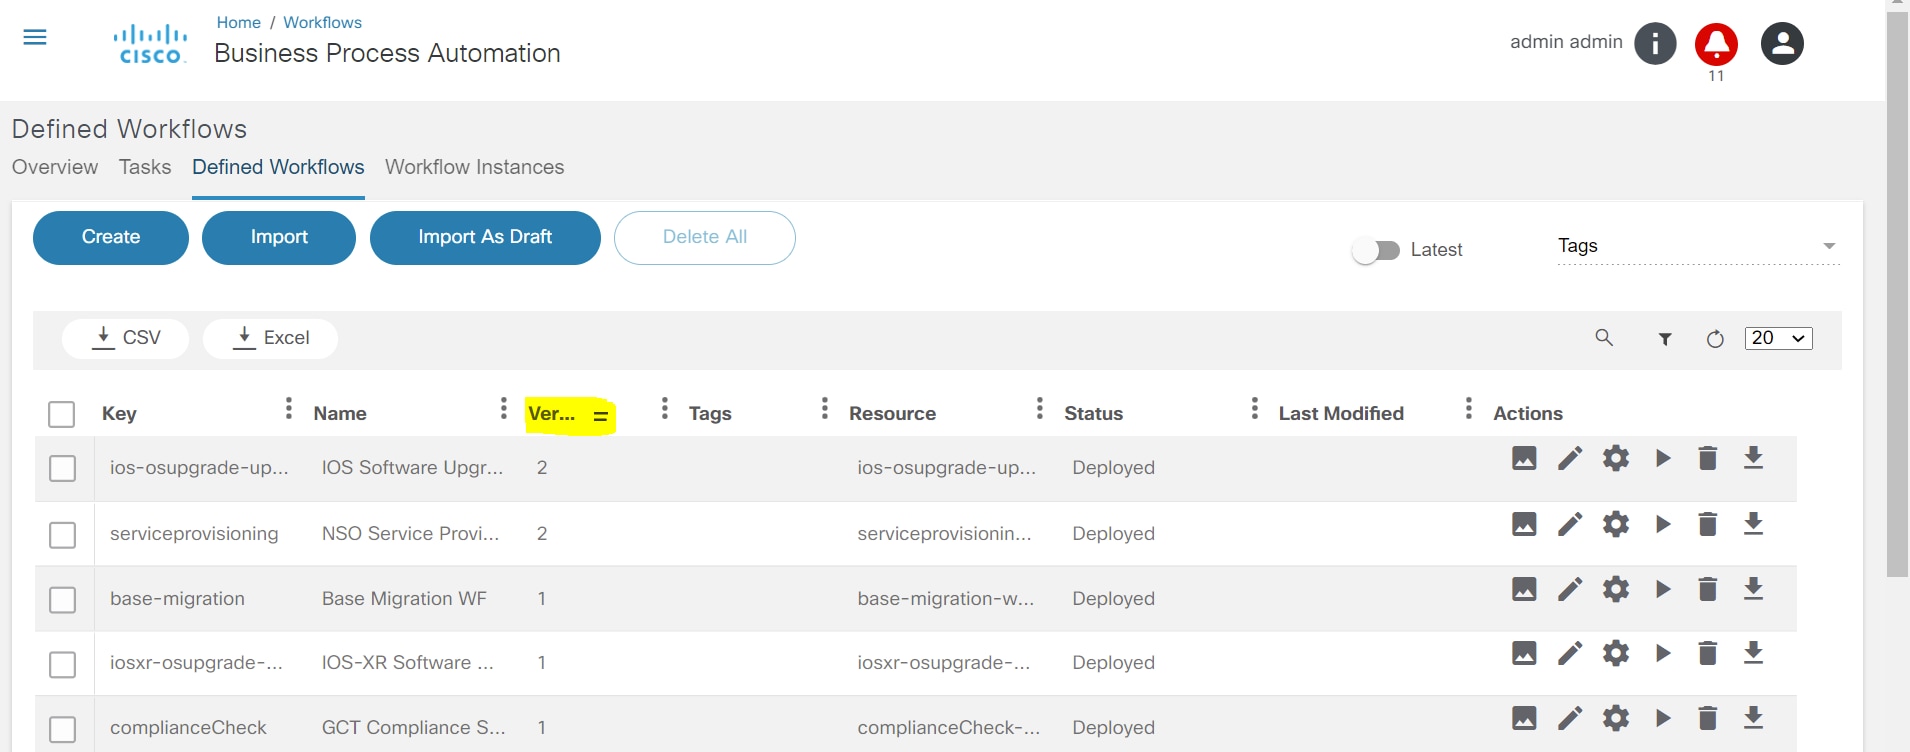
- From and To date filter and pagination
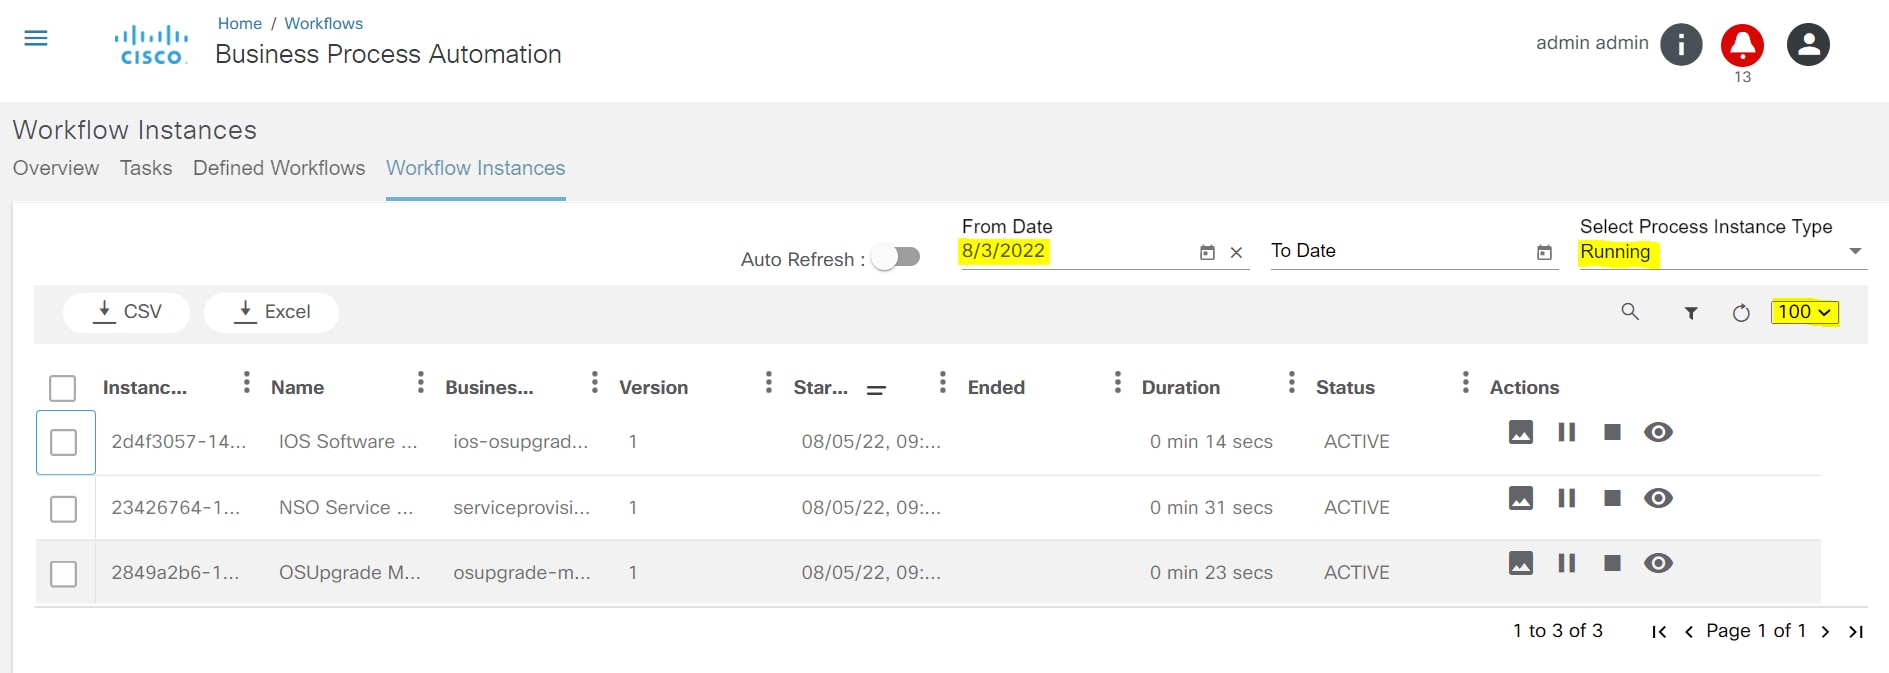
Service Catalog
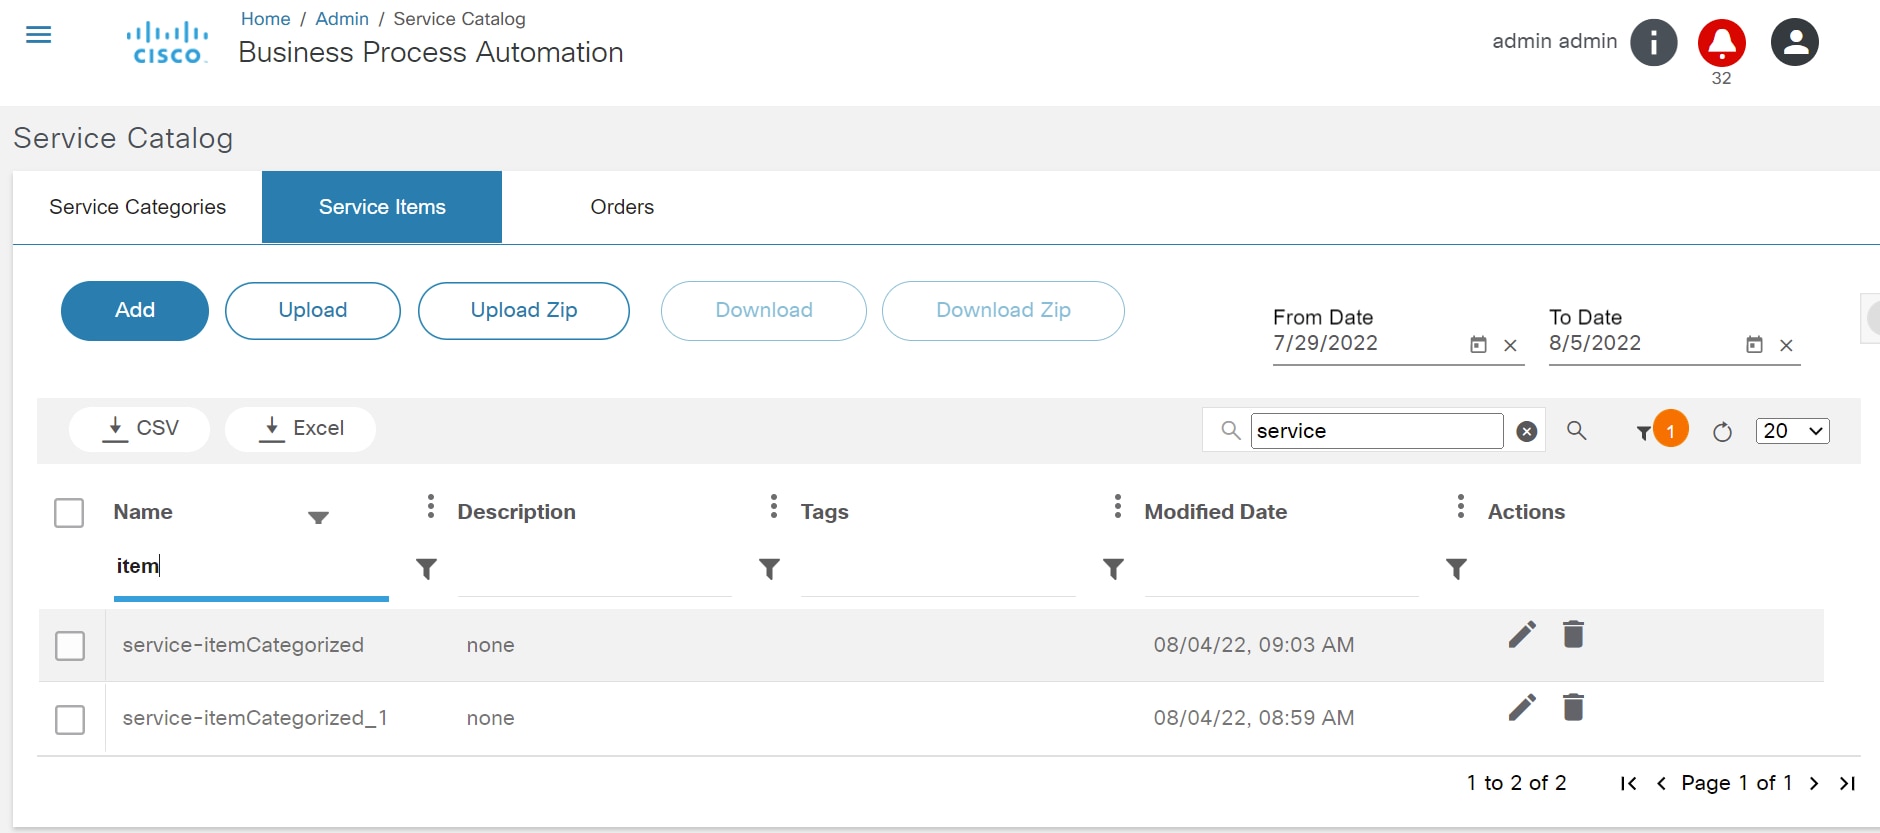
Tabs: Services, Active Services, Order History
The following actions applied persistent filters in service Catalog.
- Search
- From and To date filter
- Table filter
- Column field Sorting
- Pagination
- Search and Table filter
Working with the Scheduler
Schedules Tab
The Schedules tab lists all schedules handled by the application and includes an option to filter based on time range. By default, schedules from the last two weeks display.
The user can also add, edit, delete, import, and export schedules.
Users also have the option to view all triggers that have happened to date, for each of the schedules.
Adding and Editing Schedules
The add and edit schedule page has the following fields:
- Schedule Name: Name of the schedule; must be unique.
- Trigger Type: For this release, only Kafka message-based triggers are supported.
- Description: Optional description of the schedule
- Toggle to enable or disable the schedule.
- Details section:
- Topic Name: the Kafka topic name to which the schedule trigger messages should be published.
- Topic Message: The JSON message that must be published to the Kafka topic
- Schedule details: The common scheduler component UI which includes a calendar to select start date / time for the schedule.
- Schedule Recurrence section: An optional section to select recurrence through UI fields or to provide a cron pattern.
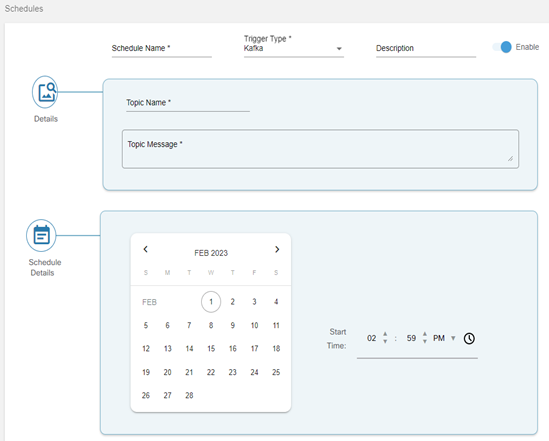
Troubleshooting
Accessing ELK Kibana Dashboard
To open the ELK Kibana dashboard:
- Launch the Kibana web interface by pointing the browser to port 5601 (e.g., http://localhost:5601).
- Replace localhost with the name of the Kibana host/ BPA server IP address.
- Log in with ELK/ Kibana account credentials. Focus is directed to Kibana.
- Log in with the Elastic superuser (e.g., admin).
- Reset the password if one is not provided when creating the cluster.
- Enter “admin” in the username field.
- Enter the password.
- Click Sign in. Users are redirected to the ELK homepage.
To change the default number of rows that display in the dashboard (up to 10,000):
- Open the main menu and select Stack Management > Advanced Settings.
- Scroll or search for the setting Number of rows.
- Change the number of rows to display and click Save changes.
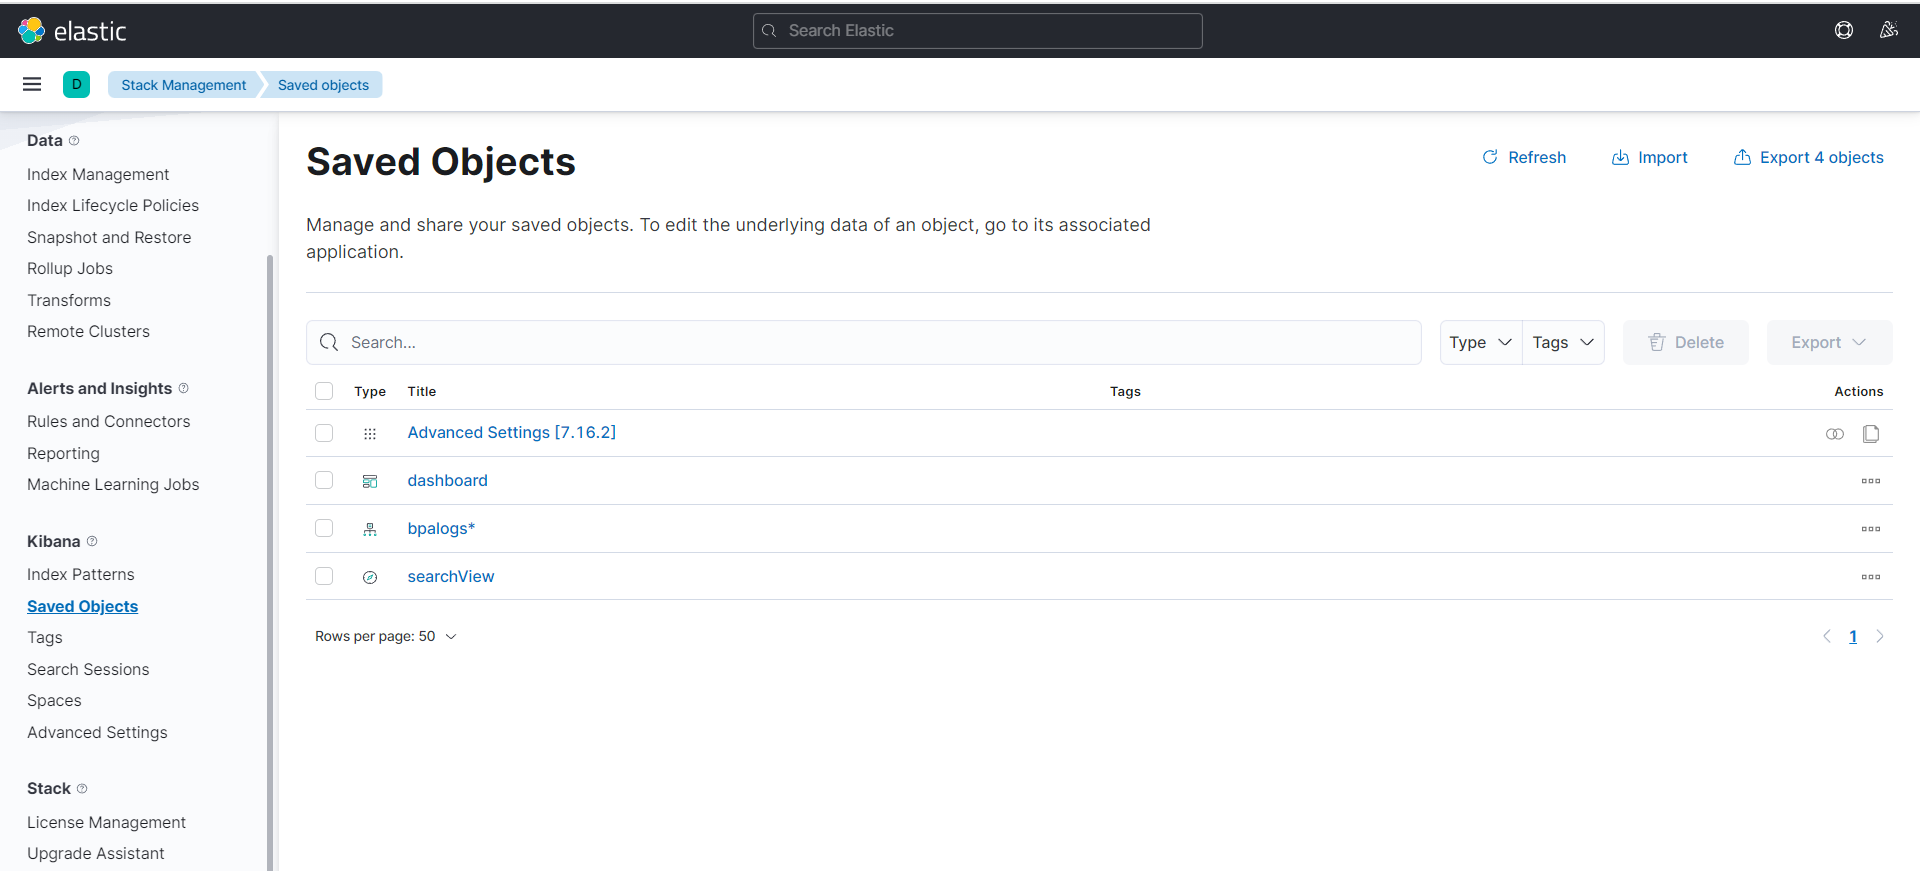
Applying Kibana Search and Kibana Filters
Kibana Discover
When connecting to Kibana, users are redirected to the Discover page. This page displays all the ELK stack’s most recent logs. Users can filter through the logs to locate specific log messages based on Search Queries and narrow search results to a specific time range with the Time Filter.
Kibana Discover includes the following:
- Search Bar: Directly under the main navigation menu, used to search specific fields or entire messages
- Time Filter: Top-right (clock icon), used to filter logs based on various relative and absolute time ranges
- Field Selector: Left, under the search bar used to select which fields to modify and display in the Log View
- Date Histogram: Bar graph under the search bar, showing the count of all logs and versus time (x-axis) based on the search and time filter; Users can click bars, or click-and-drag to narrow the time filter
- Log View: Bottom-right, used to view individual log messages and display log data filtered by fields; If no fields are selected, entire log messages display
Kibana Filtering
To assist users in searches, Kibana includes a filtering dialog box that provides simple filtering of data displayed in the main view.
To use the dialog box, click Add a filter + under the search box and experiment with the conditionals. Filters can be pinned to the Discover page, named using custom labels, enabled or disabled, and inverted.
Kibana Querying Language (KQL) and Lucene
In earlier versions, the only way to query Kibana was using Lucene syntax. With version 6.2, Kuery, or as it’s called now KQL, can be used to improve the search experience.
Since version 7.0, KQL is the default language for querying in Kibana, but users can revert to Lucene.
Kibana Searches
Searching Elasticsearch for a specific log message or strings within these messages is the basis of Kibana. In recent versions, improvements and changes to the way searching is done have been applied.
By default, users now use a new querying language called KQL (Kibana Querying Language) to search their data. Users accustomed to the previous method – using Lucene – can opt to do so as well.
Kibana querying is an art unto itself, and there are various methods users can use to perform searches on your data. Here are some of the most common search types:
Free-Text Search
- Free text search works within all fields including the source field, which includes all the other fields. If no specific field is indicated in the search, the search is done on all fields being analyzed.
- In the search field at the top of the Discover page, run these
searches and examine the results (set the time parameter on the top
right of the dashboard to the past month to capture more data):
- category
- Category
- categ
- cat*
- categ?ry
- “category”
- category/health
- “category/health”
- Chrome
- Chorm*
- Tips for Free-Text Search:
- Not case sensitive: Text searches are not case sensitive. Putting the text in double quotes (““) returns an exact match (e.g., [category/health] and [“category/health”] return different results).
- Wildcard Symbols and Search Kibana wildcard searches: Users can enter [*] to indicate any number of characters or [?] to indicate only one character.
Field-Level Searches
- Field-level queries with the following format are used to locate data inside specific fields: <fieldname>:search
- Run the following searches to view the outcome (some purposely
return no results):
- name:chrome
- name:Chrome
- name:Chr*
- response:200
- bytes:65
- bytes:[65 TO *]
- bytes:[65 TO 99]
- bytes:{65 TO 99}
- _exists_:name
- Tips for Field-Level Searches
- Field-type dependency Field-level searches depend on the type of field. (For Logz.io users by default, none of the fields are analyzed, which indicates that searches in Logz.io are case-sensitive (unlike free-text search) and cannot use wildcard searches (again, unlike free-text search)). The reason for saving all the fields as “not analyzed” is to save space in the index since the data is duplicated in an analyzed field called *_source*
- reviewSearching a range Users can search a range within a field using brackets. [ ] indicate that the results are inclusive. { } indicates results are exclusive.
- _exists_ Using the _exists_ prefix for a field searches the documents to see if the field exist.
- Capitalization and ranges When using a range, a very strict format is followed, and capital letters are used to specify the range.
Logical Statements
- Logical statements in searches are used in the following ways:
- USA AND Firefox
- USA OR Firefox
- (USA AND Firefox) OR Windows
- -USA
- !USA
- +USA
- NOT USA
- Tips for Logical Statements
- Users should use proper format such as capital letters to define logical terms like AND or OR
- Users can use parentheses to define complex, logical statements
- Users can use -,! and NOT to define negative terms
- Kibana special characters All special characters need to be properly escaped. The following is a list of all available special characters: + – && || ! ( ) { } [ ] ^ ” ~ * ? :
Proximity searches
- Proximity searches is an advanced feature of Kibana that takes advantage of the Lucene query language.
- [categovi~2] means a search for all the terms that are within two changes from [categovi]. This means that all categories are matched.
- Tips for Proximity searches
- Proximity searches use many system resources and often trigger internal circuit breakers in Elasticsearch. Searches requiring excessive memory to run are likely not to return results.
- Refer to the following is list of tips and best practices for search
types:
- Use free-text searches for quickly searching for a specific string. Use double quotes (“string”) to look for an exact match (e.g., “USA”).
- Use the asterisk wildcard symbol to replace any number of characters and the question mark wildcard symbol to replace only one character.
- Use the _exists_ prefix for a field to search for logs that have that field (e.g., _exists_:response).
- Users can search a range within a field (e.g., Using brackets, this means that the results are inclusive. Using curly brackets means that the results are exclusive).
- When using logical statements (e.g. AND, OR, TO) within a search, use capital letters. Example: response:[400 TO 500]
- Use -,! and NOT to define negative terms (e.g., response:[400 TO 500] AND NOT response:404).
- Proximity searches are useful for searching terms within a specific character proximity. For example, [categovi~2] will a search for all the terms that are within two changes from [categovi]. Proximity searches use a lot of resources – use wisely!
- Field level search for non-analyzed fields work differently than
free text search.
- Example: If the field value is Error – searching for field:*rror does not return the right answer
- If user don’t specify a logical operator, the default one is OR.
- Example: searching for Error Exception runs a search for Error OR Exception
- Using leading wildcards is a very expensive query and should be avoided when possible.
Writing a Query in Kibana Dashboard
To write a query in the Kibana dashboard to access BPA devices logs:
- Open the main menu and select Analytics > Discover. BPA specific logs display in the Discover page of the ELK portal.
Confirm that the bpalogs* index pattern is selected as follows:
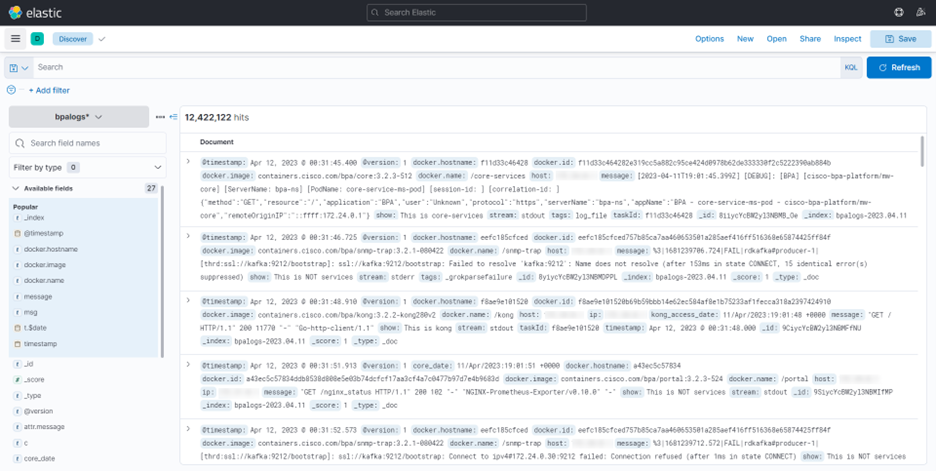
- Refer to the following images for all device actions, PT, and GCT specific logs.
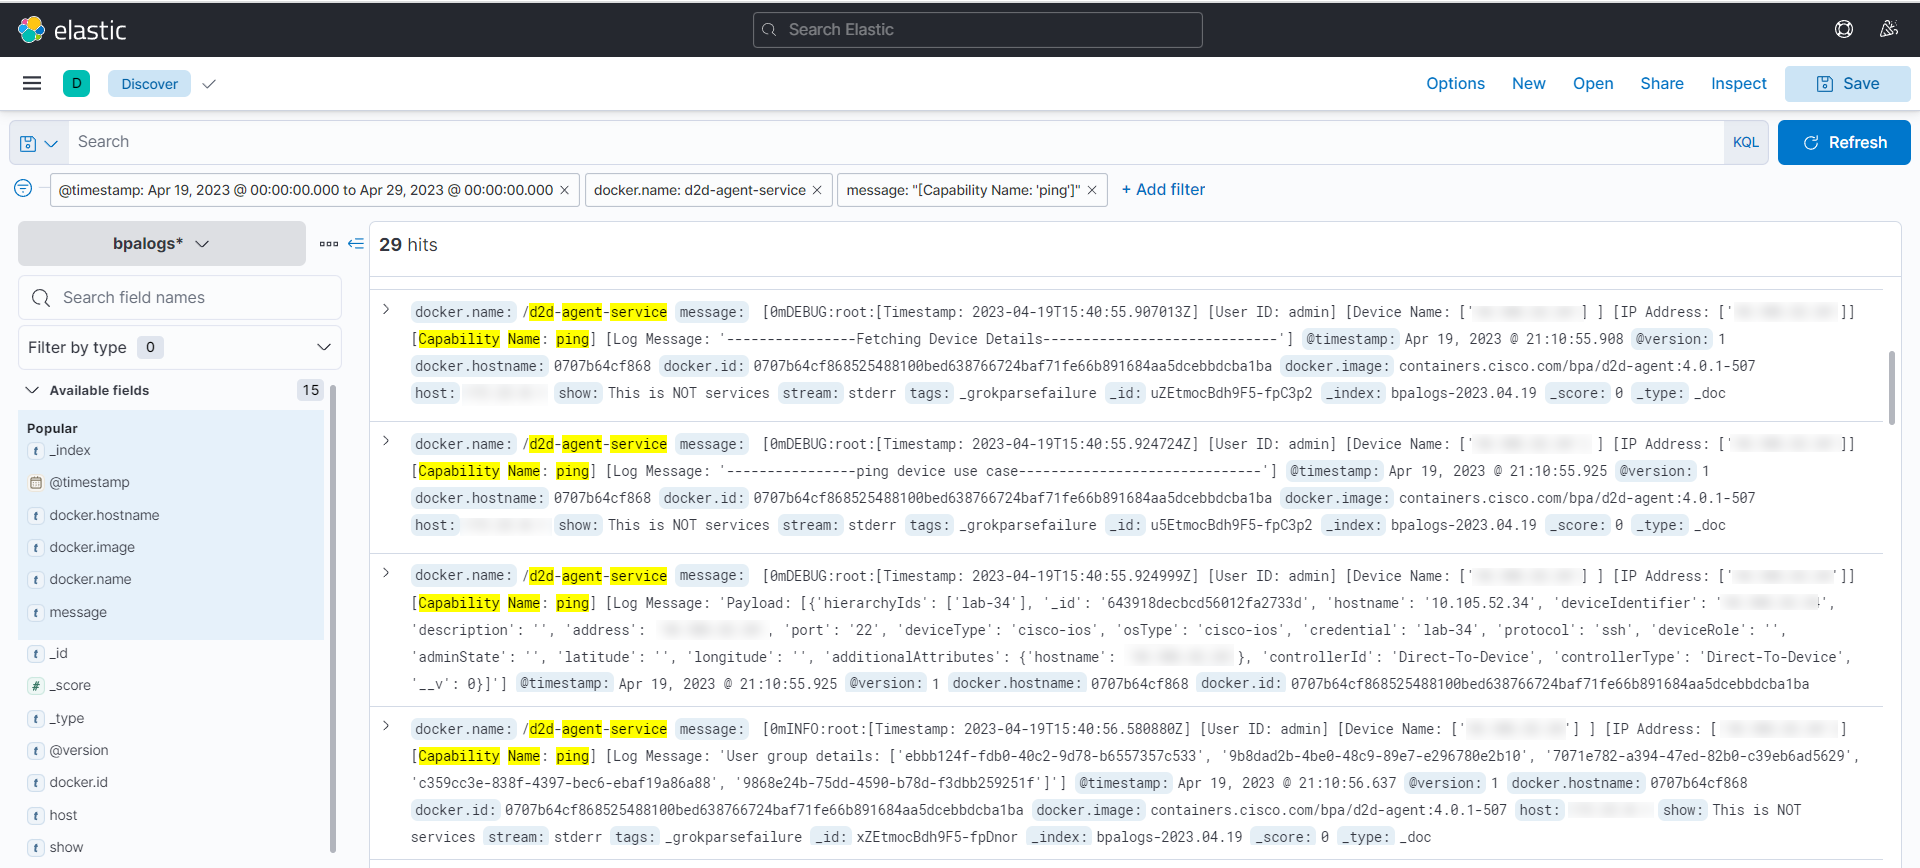
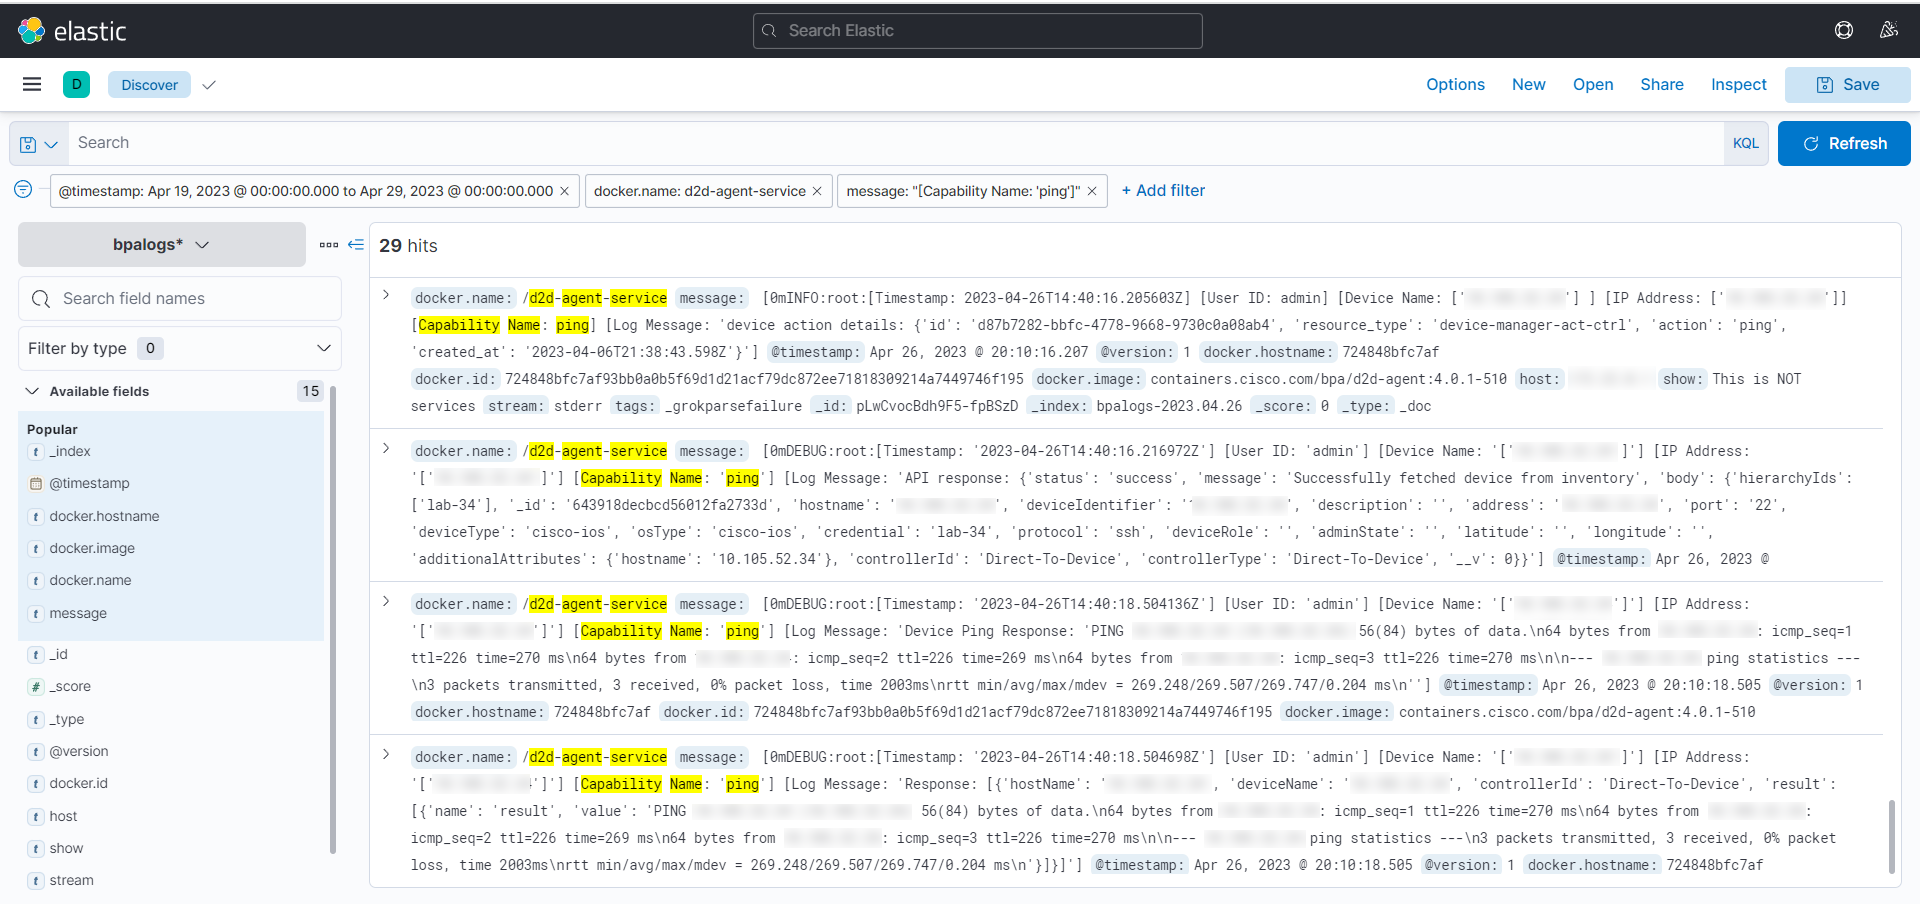
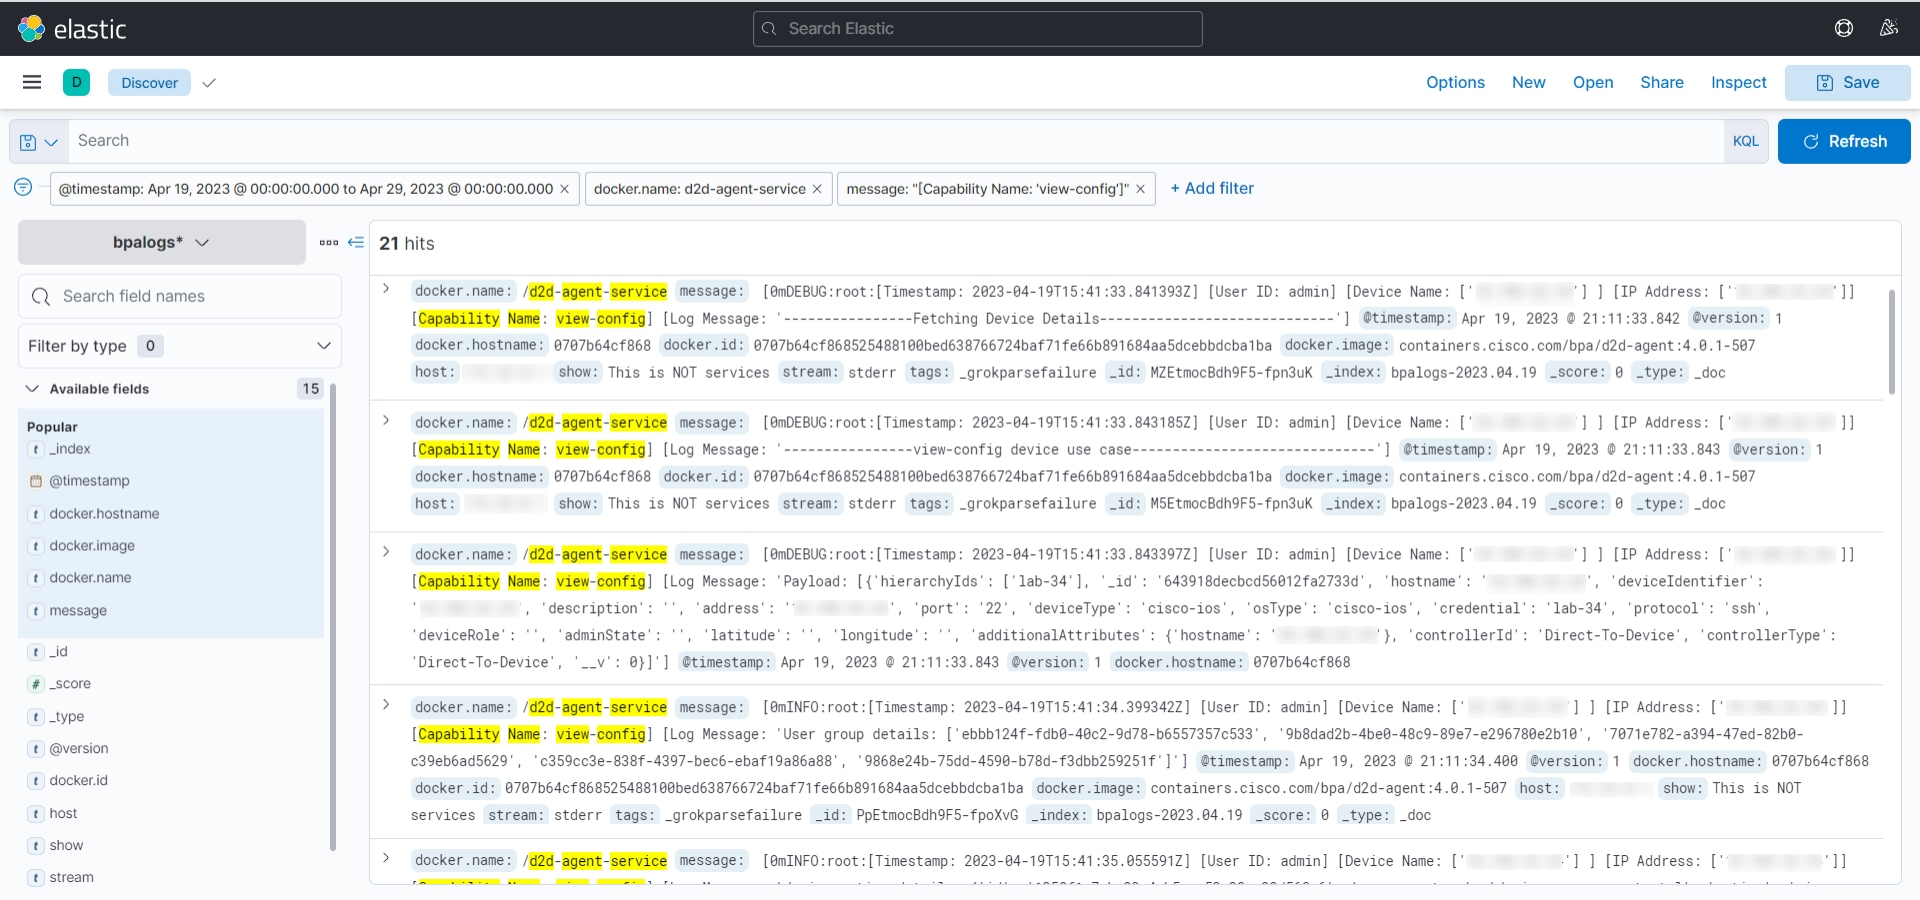
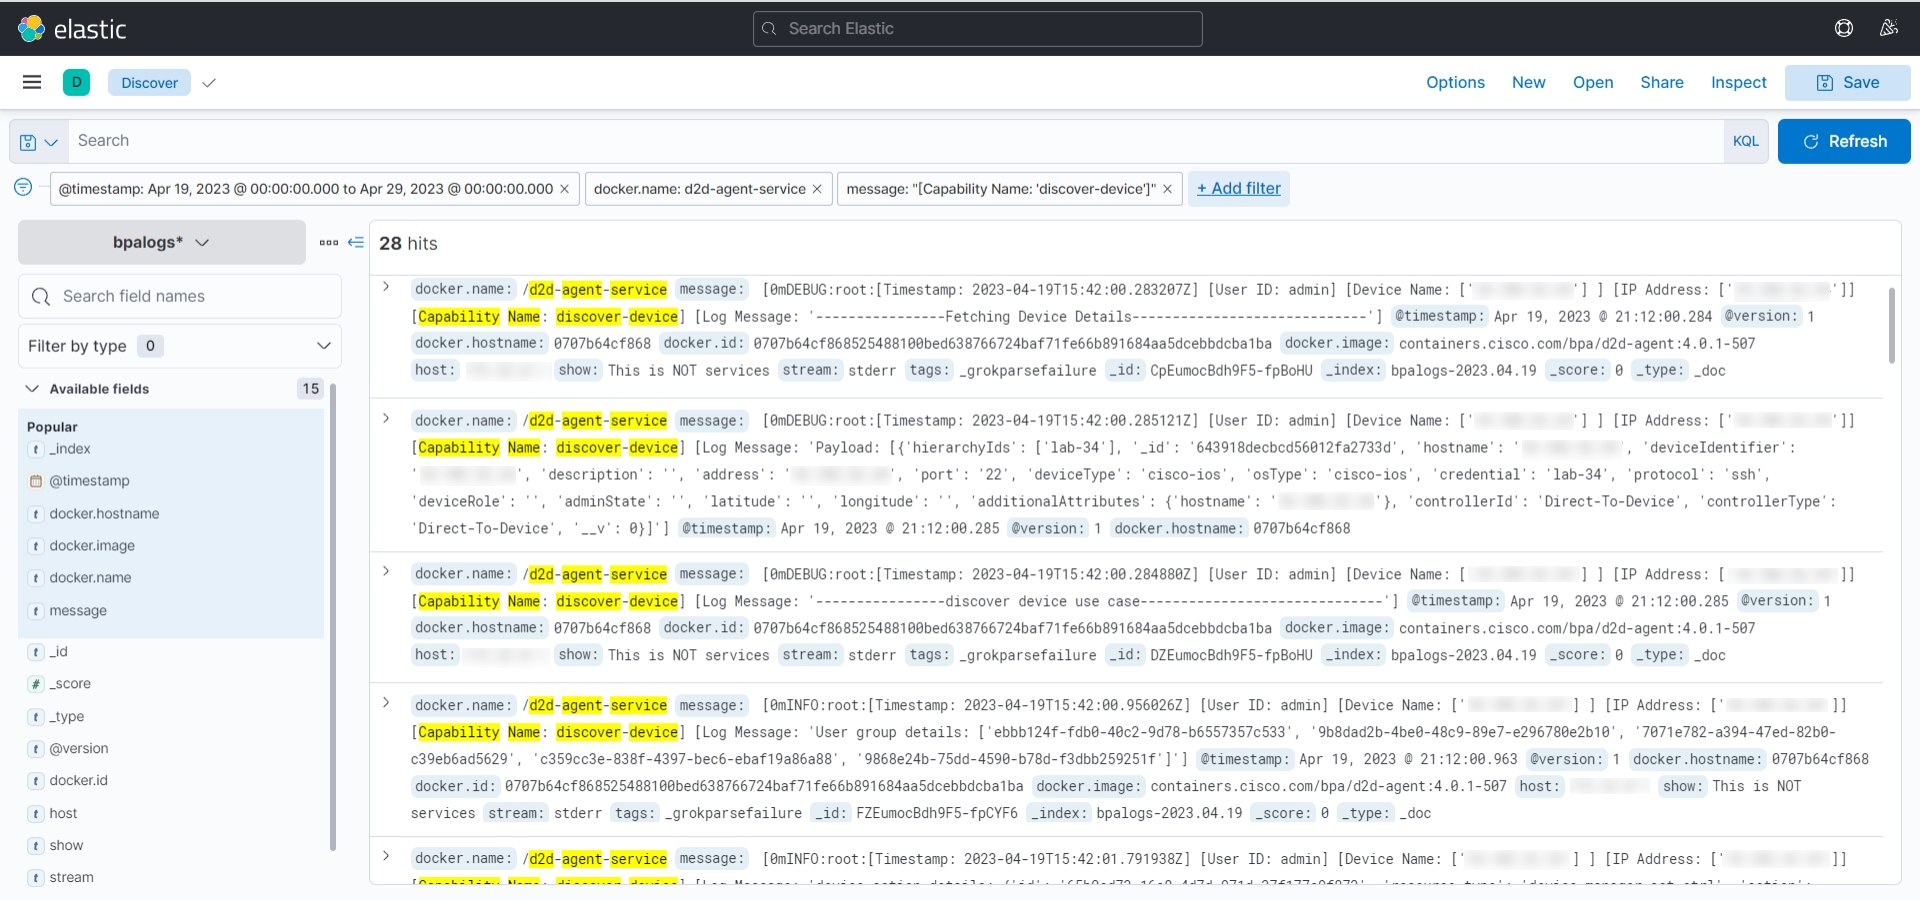
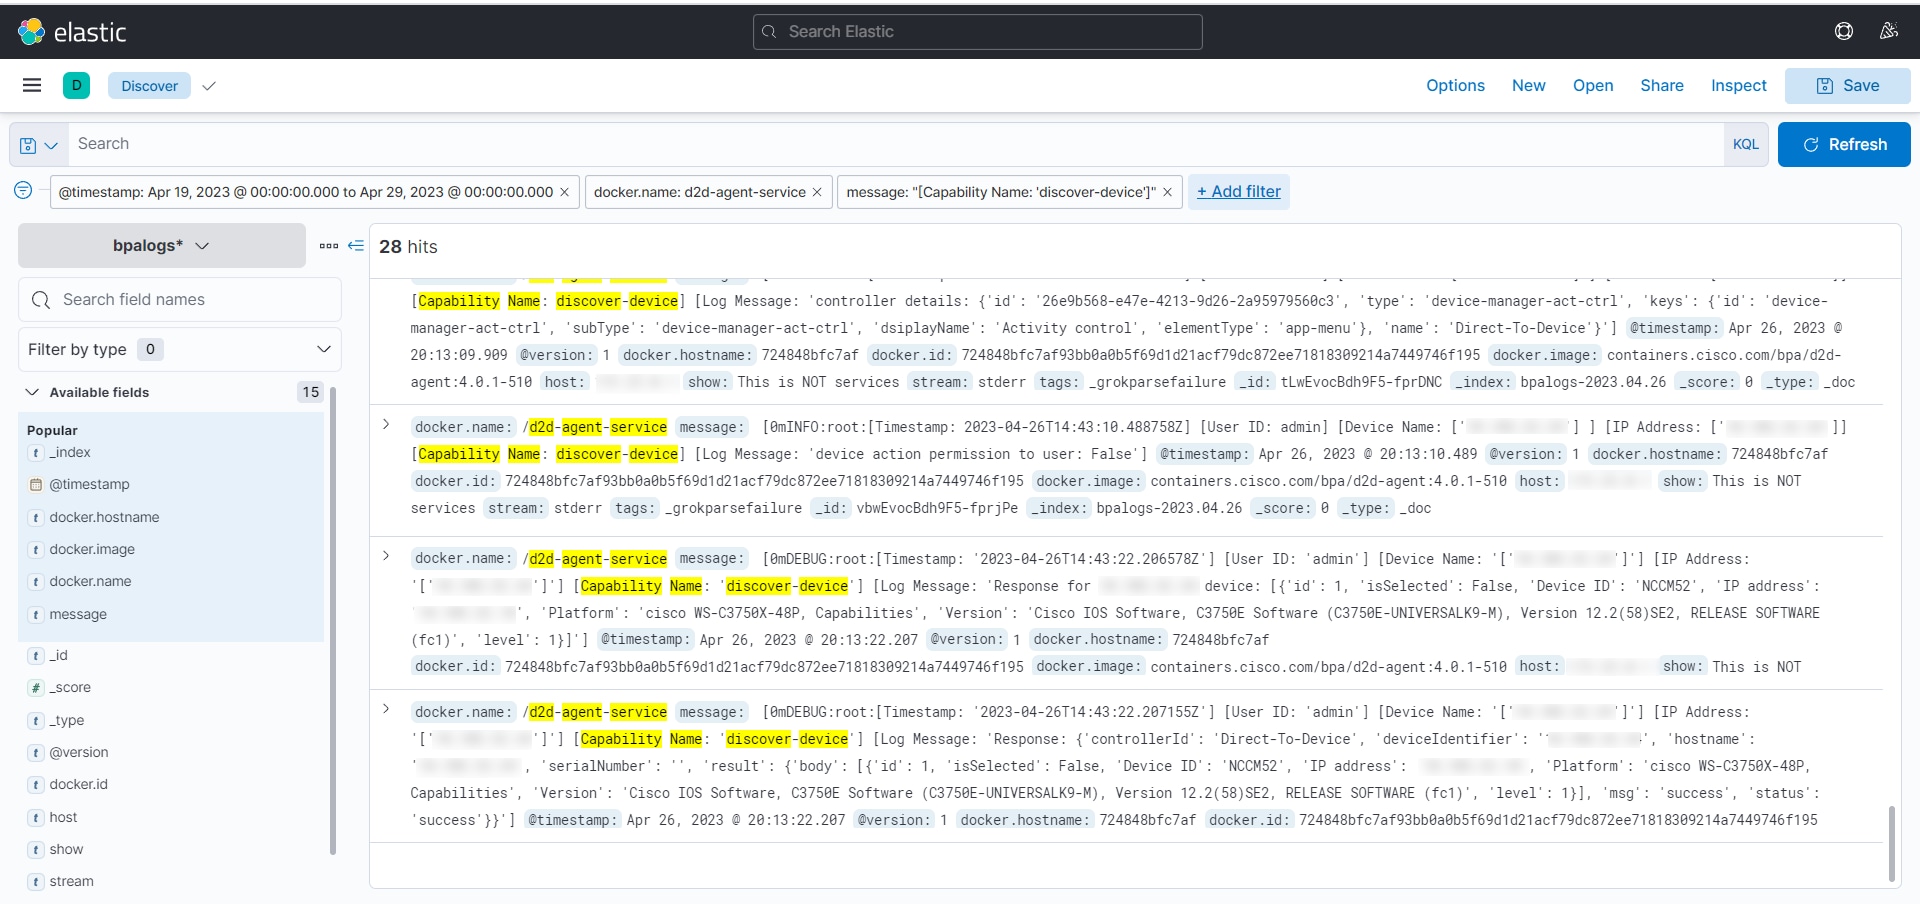
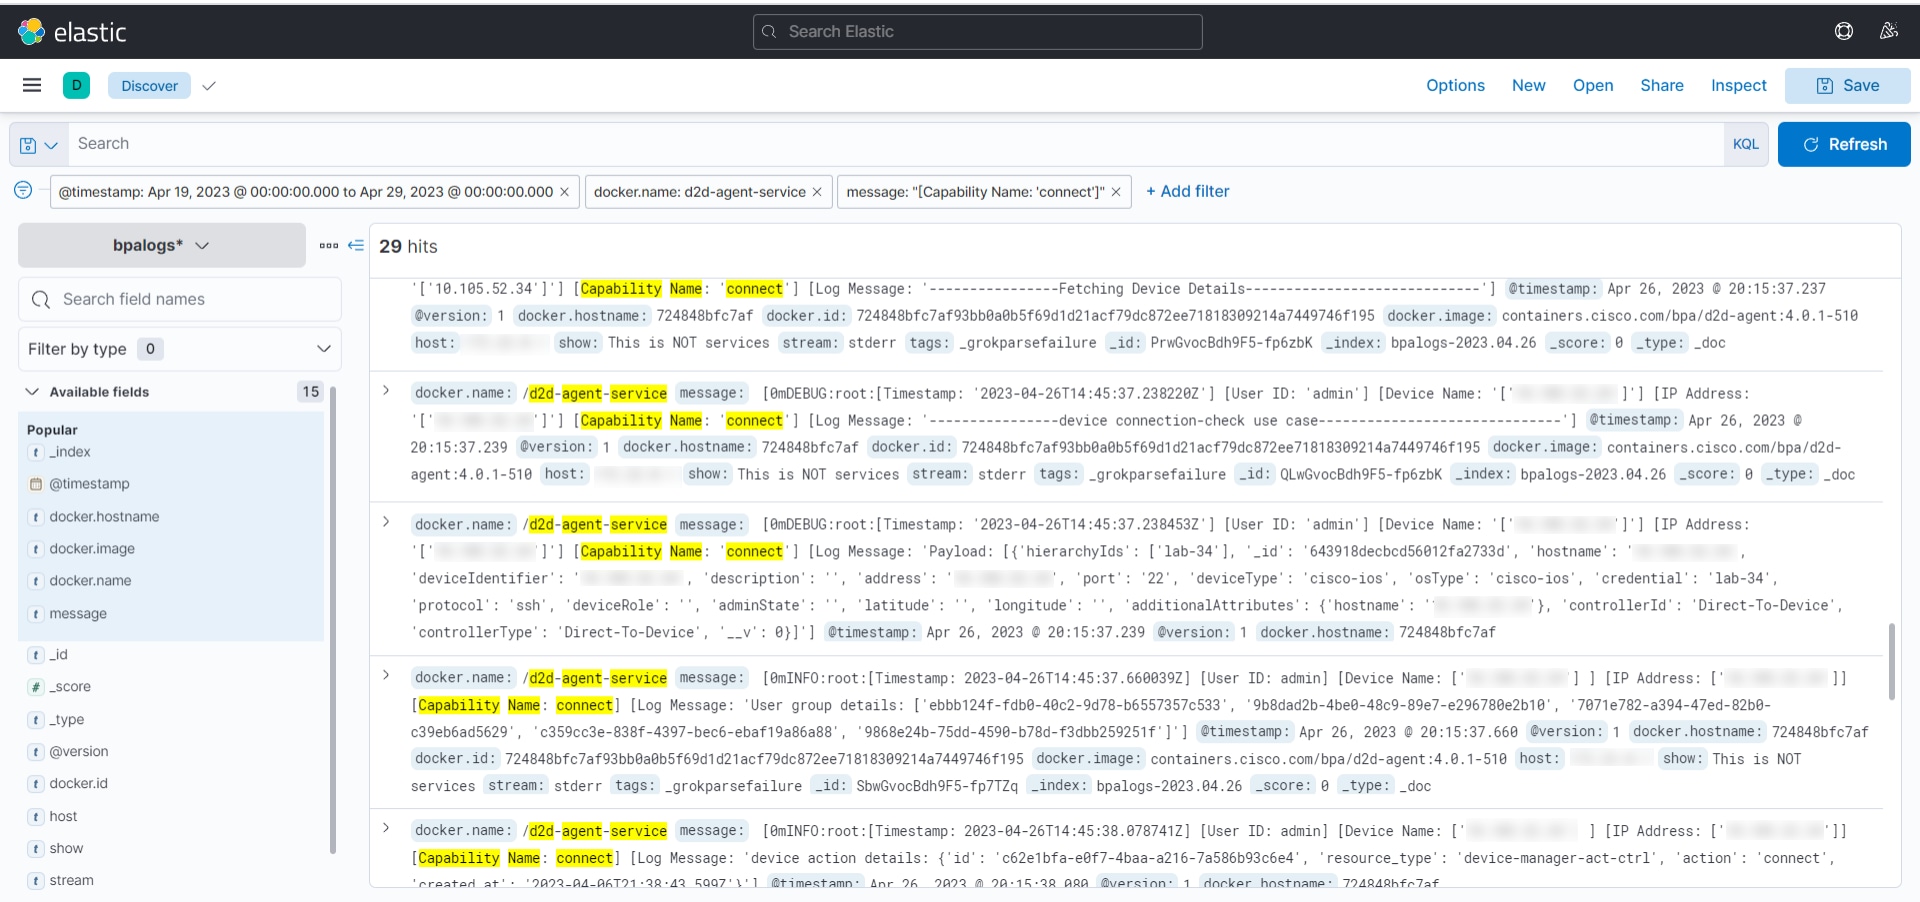
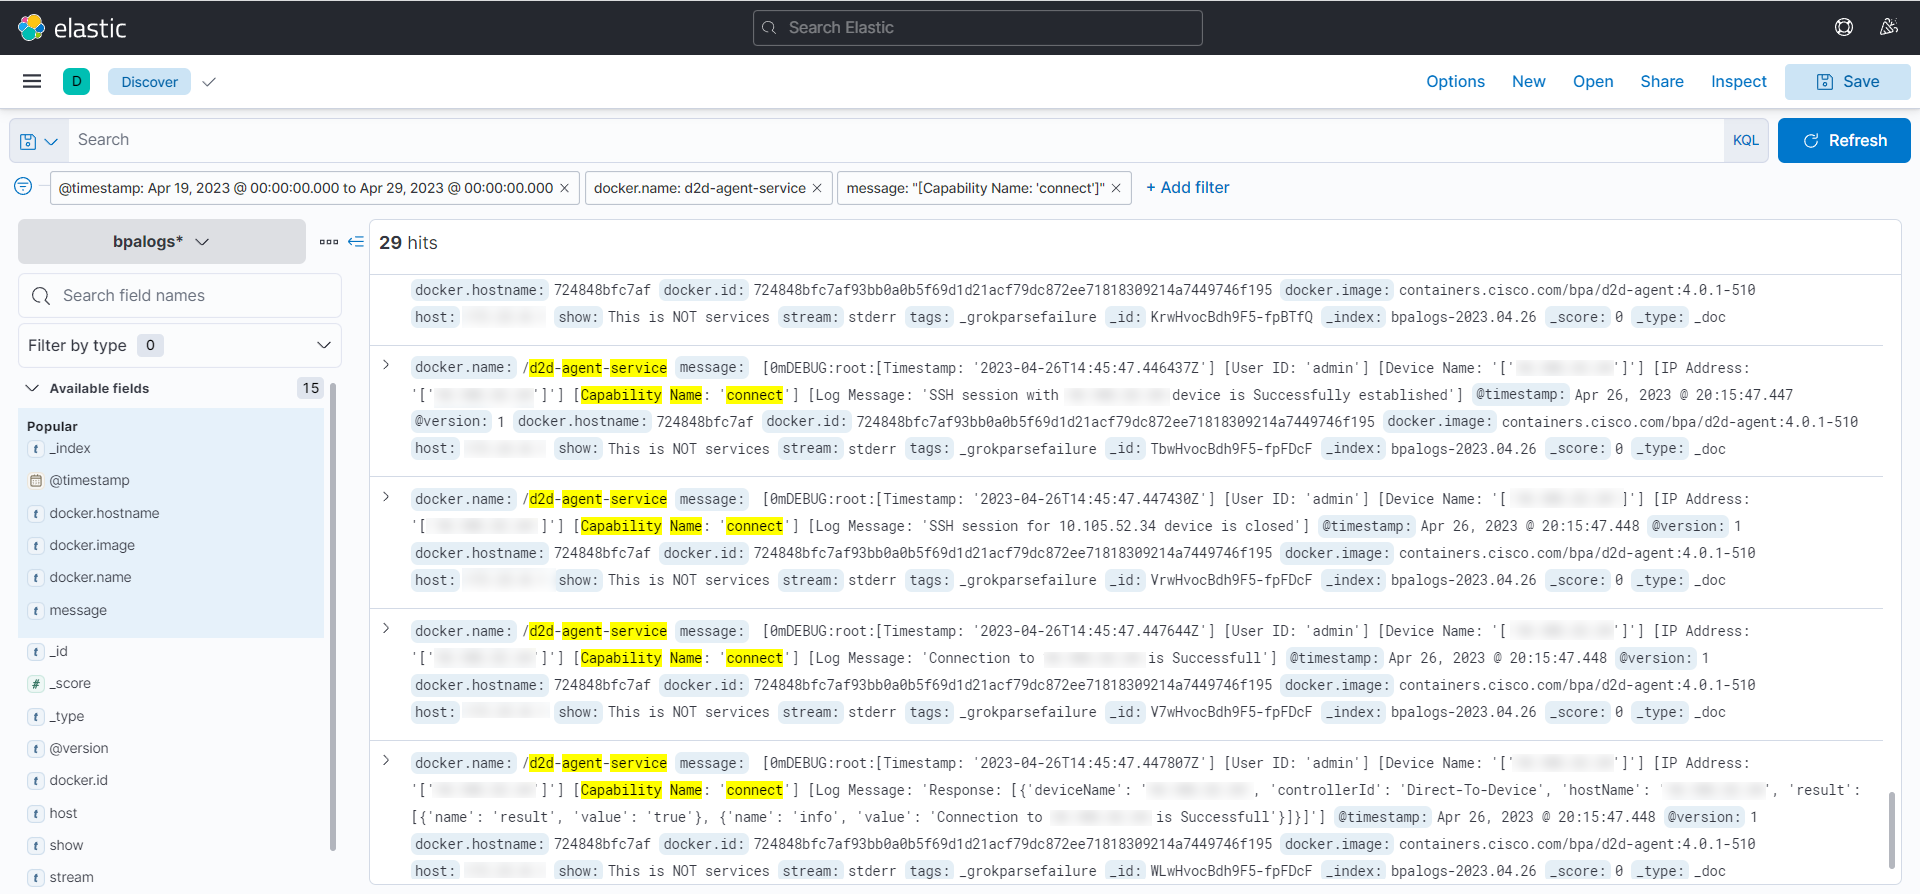
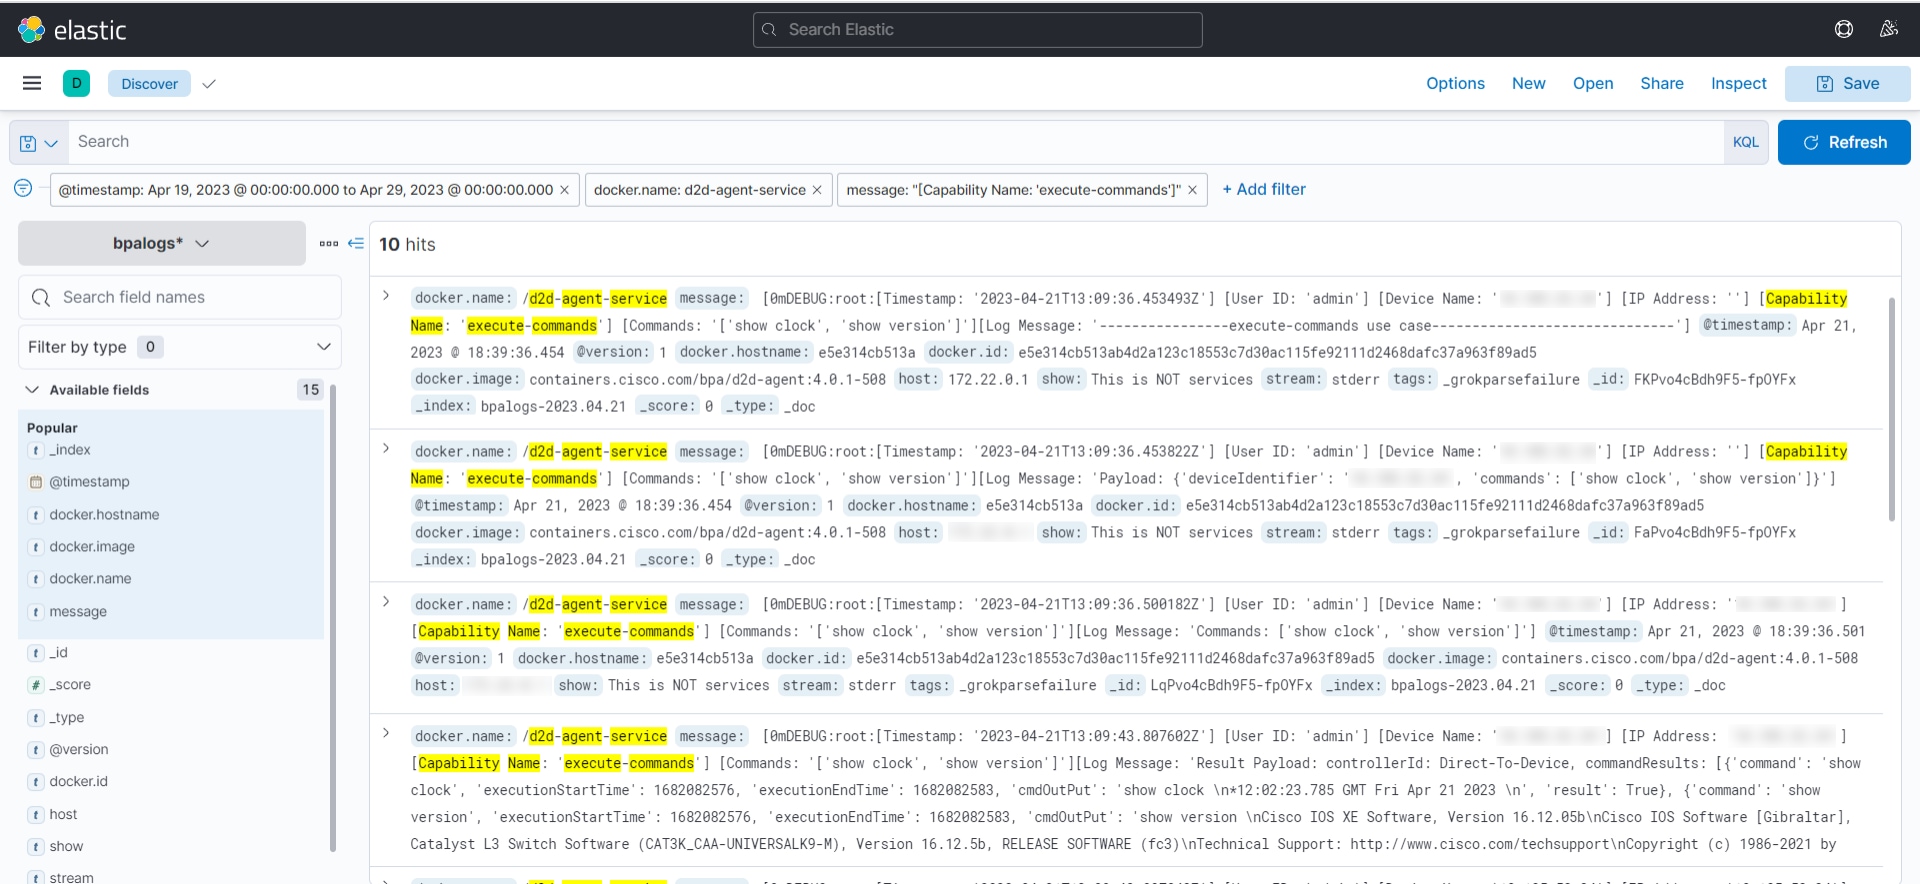
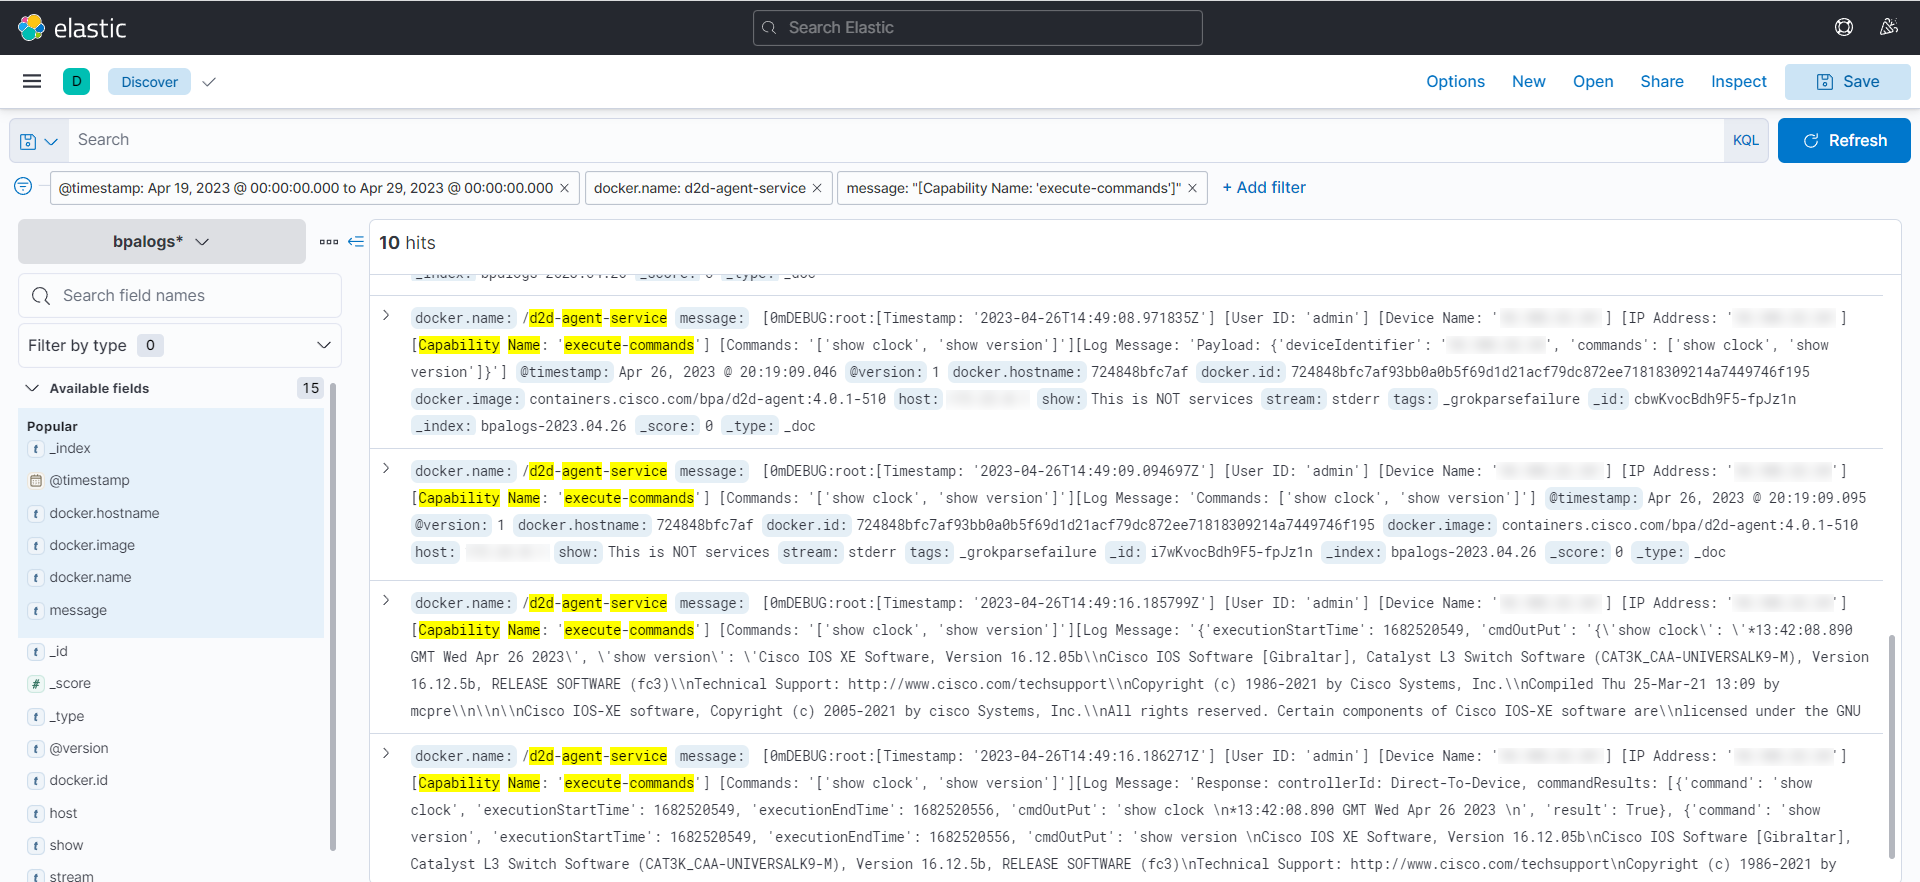


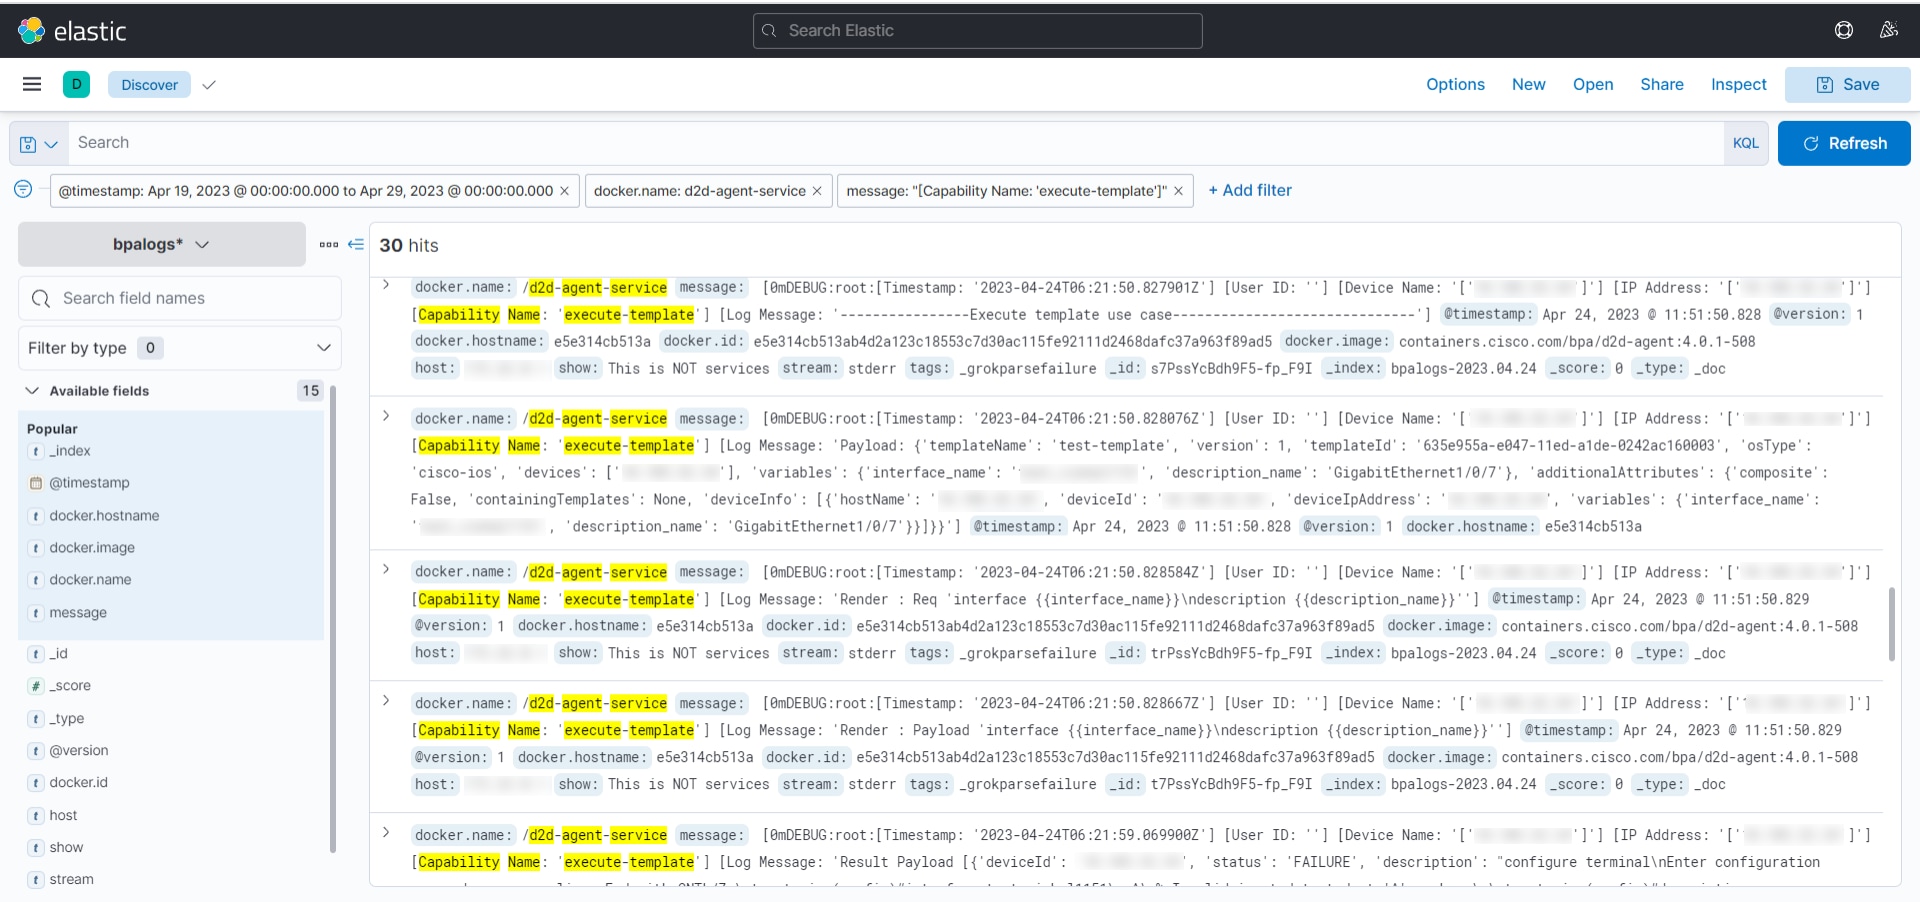
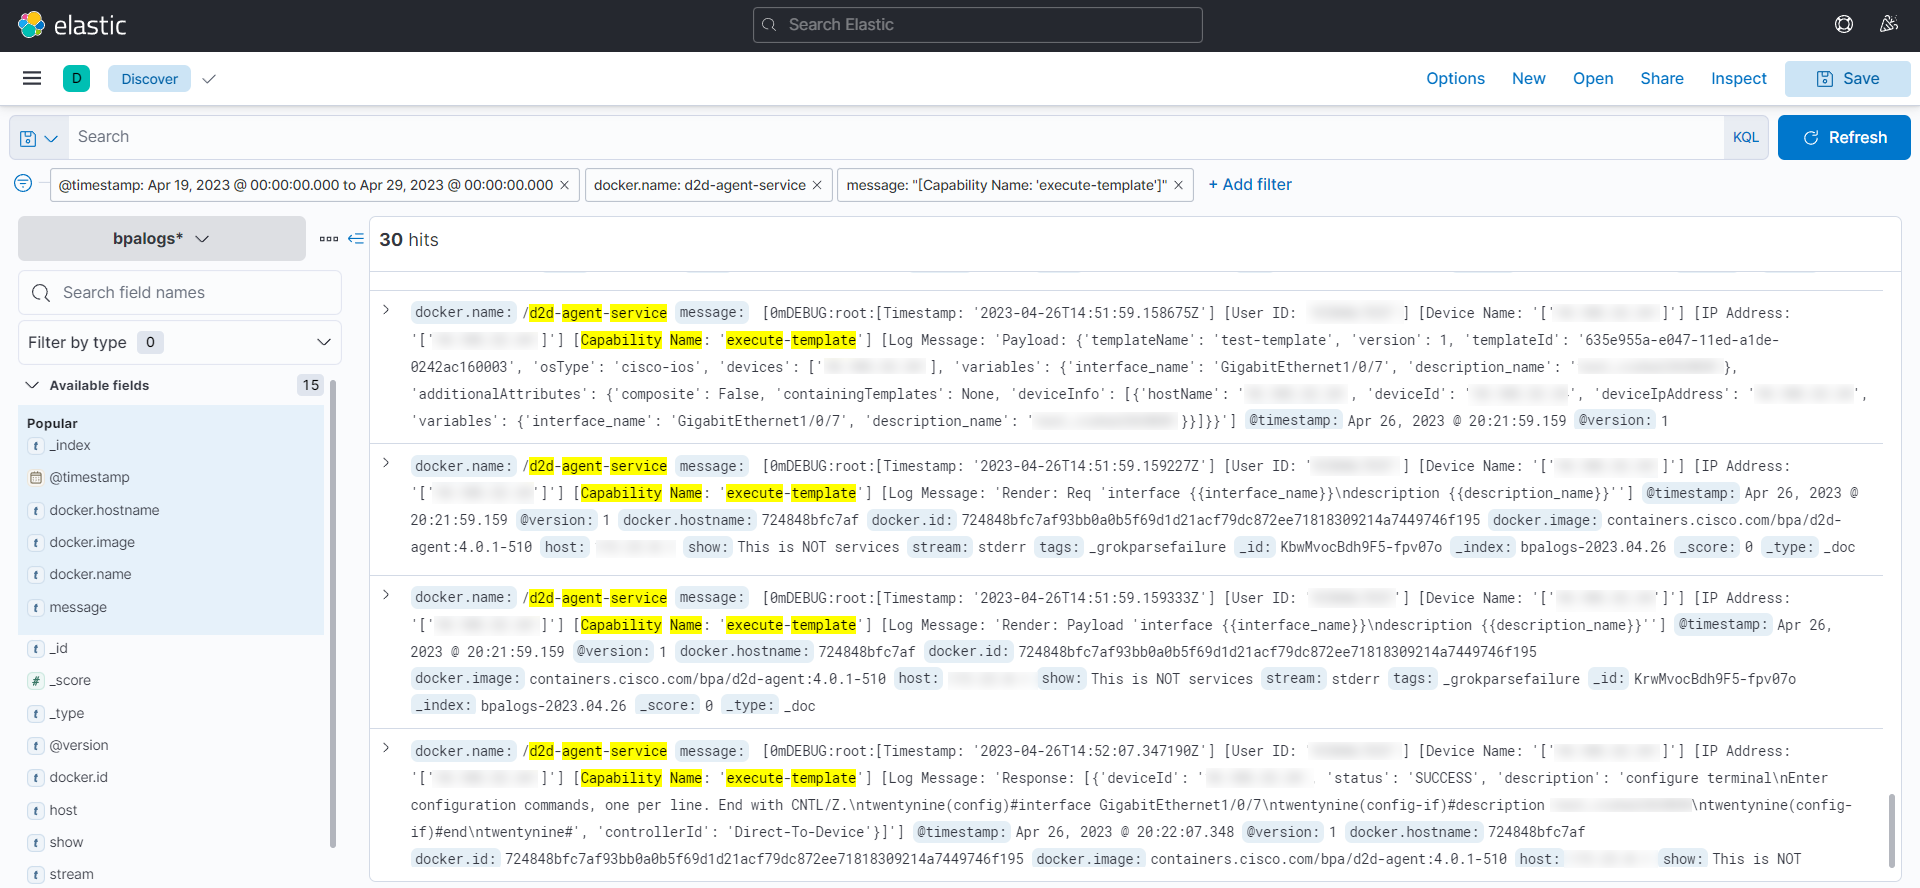
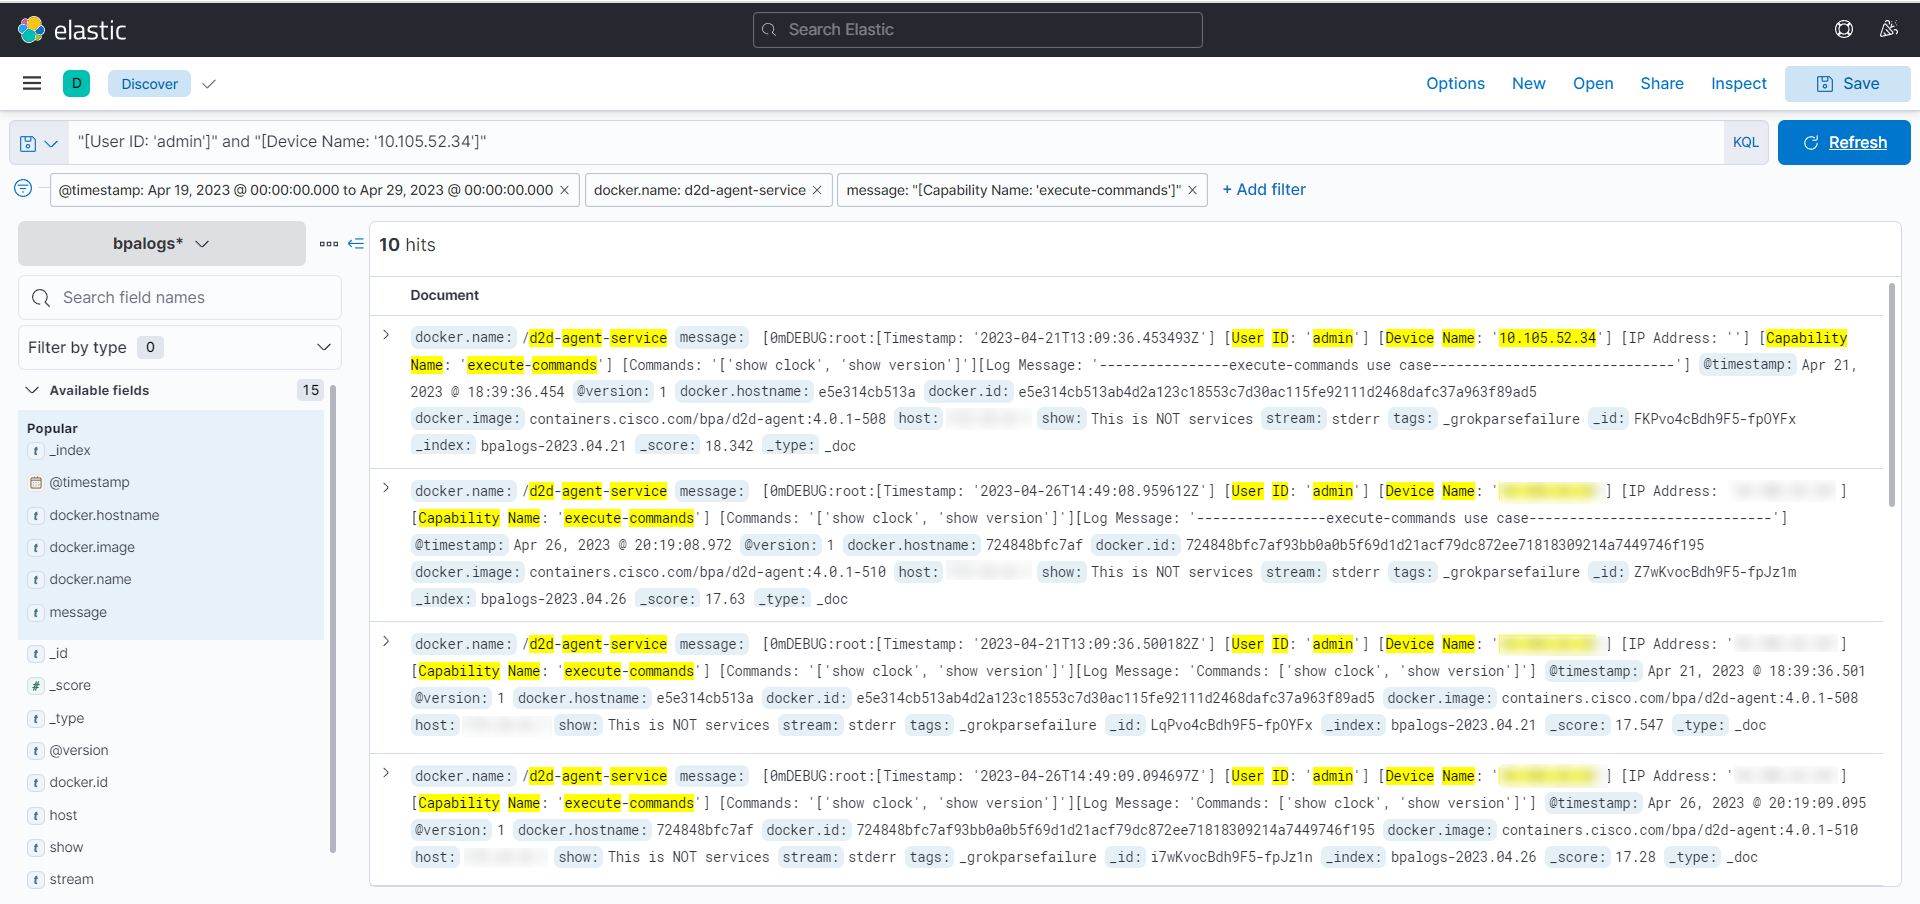
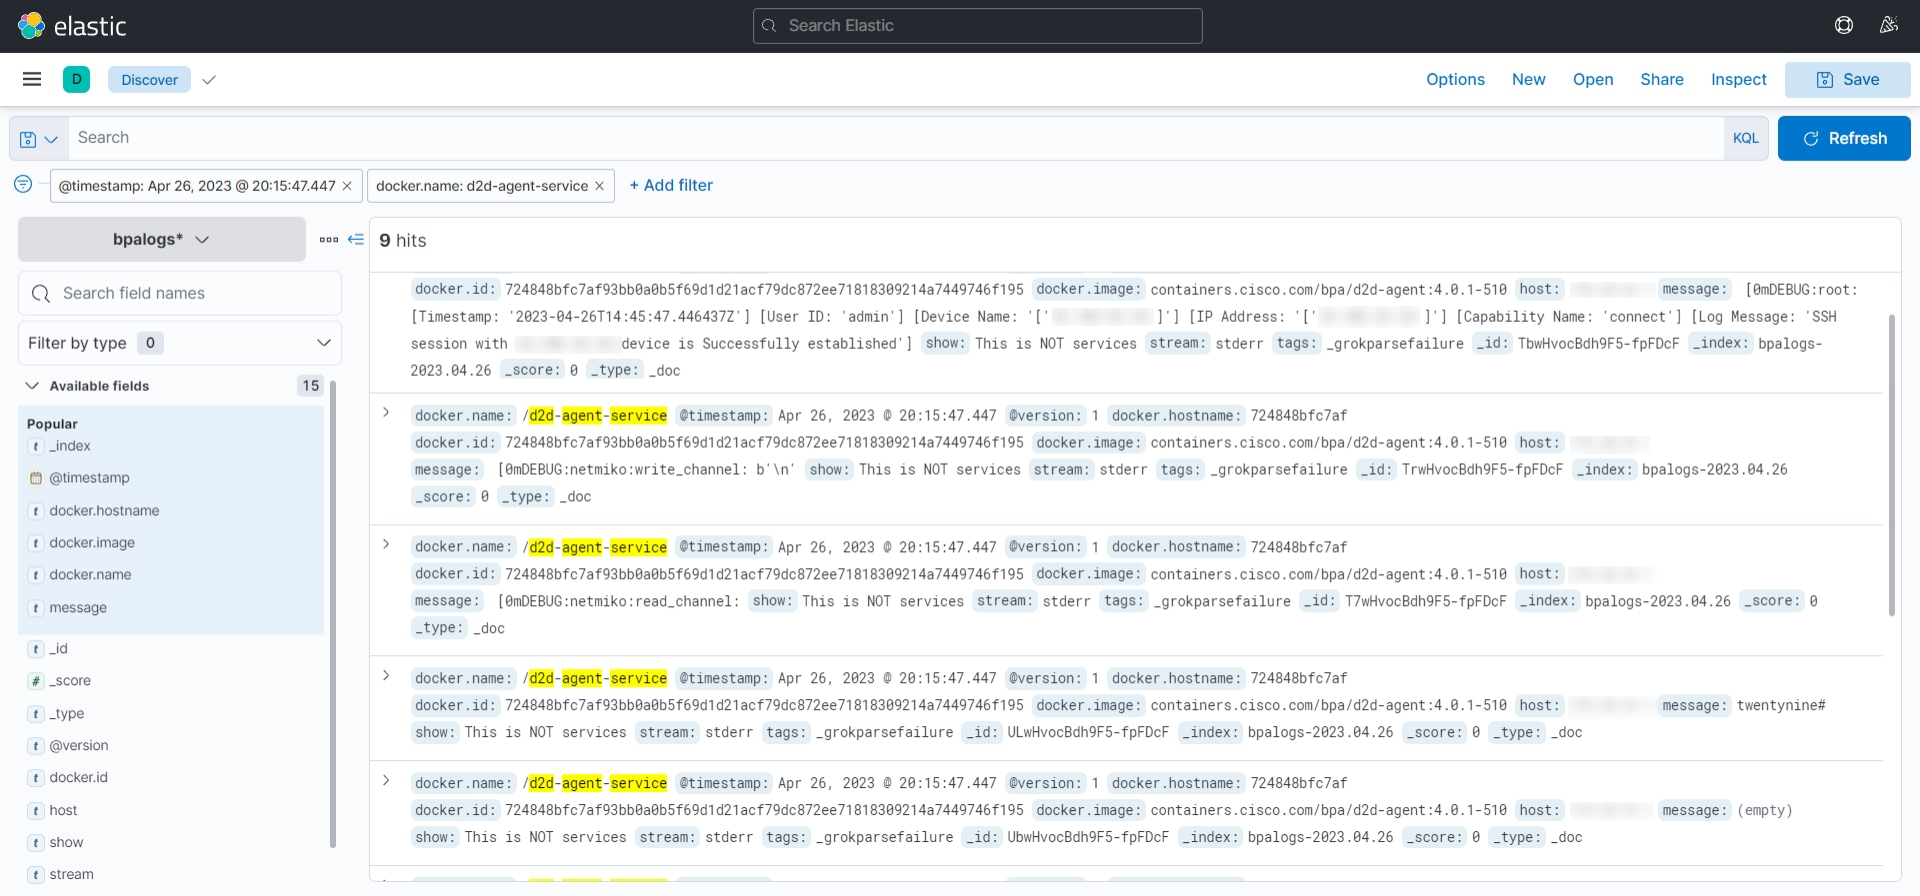
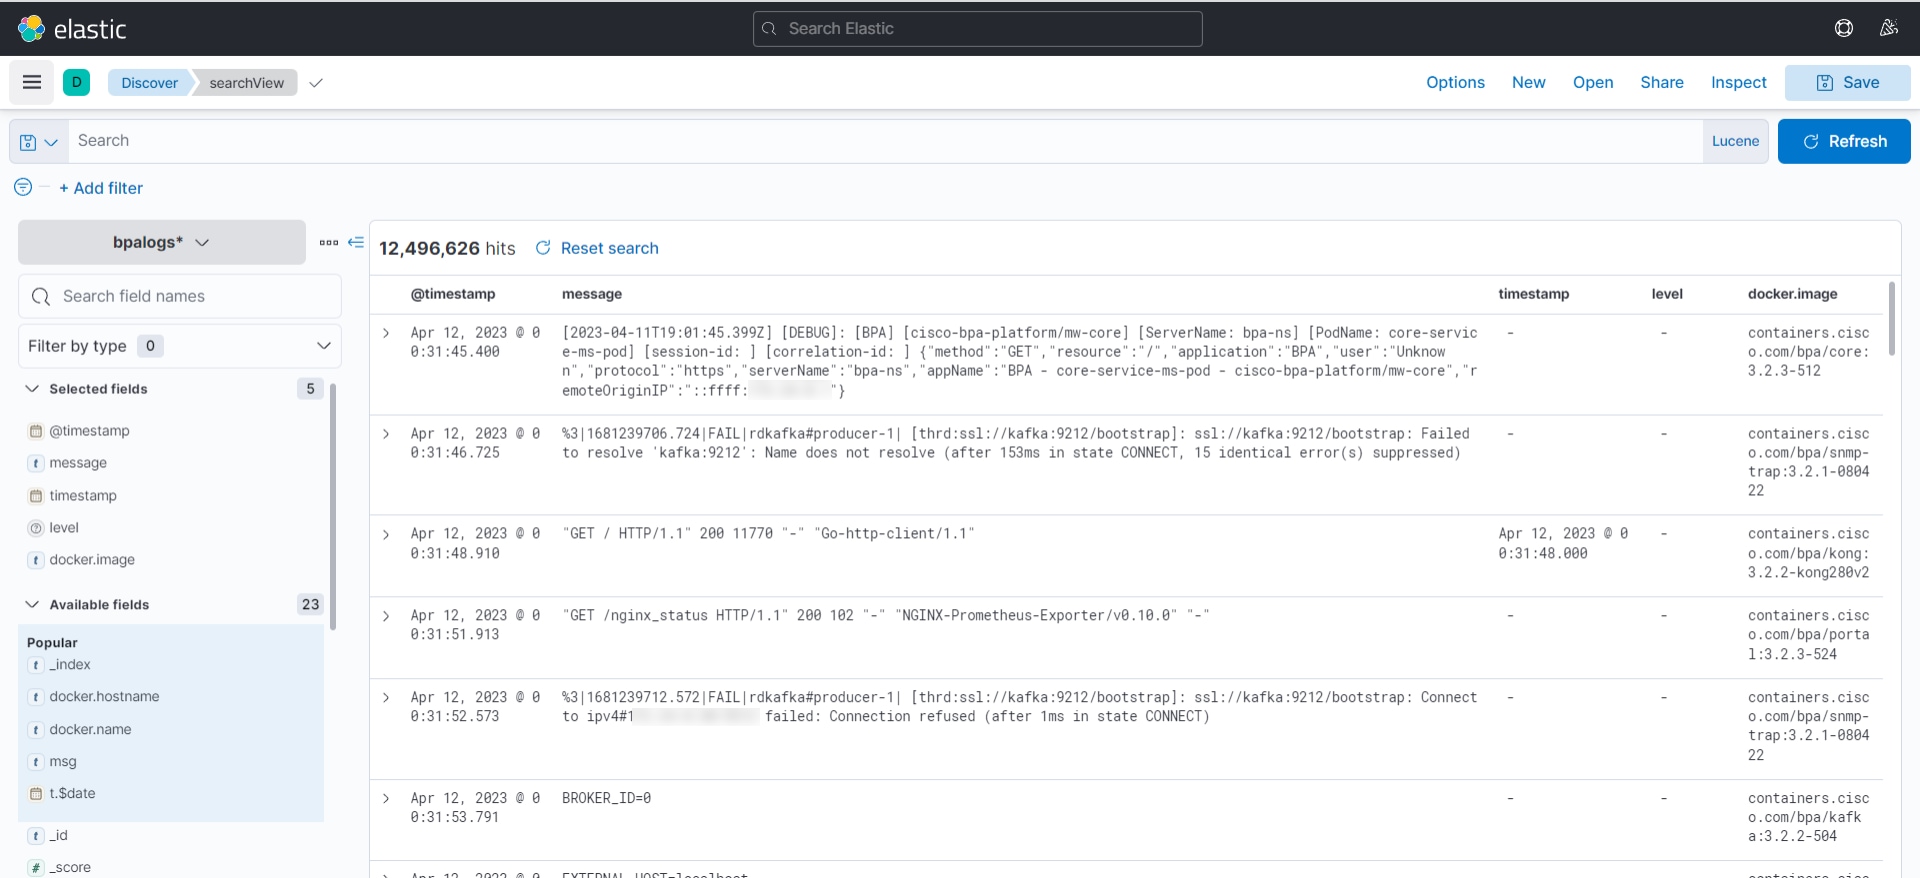
Kibana Search and Kibana Filters References
For more information on Kibana, see the references below:
Logging Issues
If users are unable to log in with valid credentials, the System Administer can identify one of the following possible issues:
- The micro services container may not be up or may have errors.
- The Postgres database may be down or there may be issues in the connection.
Contact the System Administrator and check the various docker specific commands on the server.
General Issues
Problem: No services are displayed in the Services drop-down list. This generally occurs when: logging in for the first time
Solution: Navigate to the Admin section and click ‘Sync Services Schema’ app. It displays the sync success or error message against every available service in the NSO server.
Problem: The portal is not able to communicate with the NSO server.
Solution: Navigate to Admin > Settings > NSO section connection setup details and check whether correct details are updated.
Problem: Changes done in Service Manager do not reflect.
Solutions:
- Any changes done in the Service Manager must be committed to the NSO server by clicking Commit in the Service Manager UI.
- Ensure the changes and review them using Commit Dry-Run and click Commit to save them.
- The changes done are specific to the current login session. If you log out without clicking Commit, the changes must be redone.
Problem: The Command Template execution returns the overall result as true irrespective of the command output.
Solution:
- Open the Process Templates application and locate the template name.
- Select the Edit icon and view the details on the screen.
- Check whether the Pass Criteria value is set for the template. If it is left blank, then the execution result is assumed to be true by default and the underlying command output results are not checked to determine the overall result.
BPA Use Cases
Configuration Compliance and Remediation
Golden Configuration Template Next Generation
Service Catalog Next Generation
Revision History
| Revision | Publish Date | Comments |
|---|---|---|
1.0 |
24-Sep-2025
|
Initial Release |
 Feedback
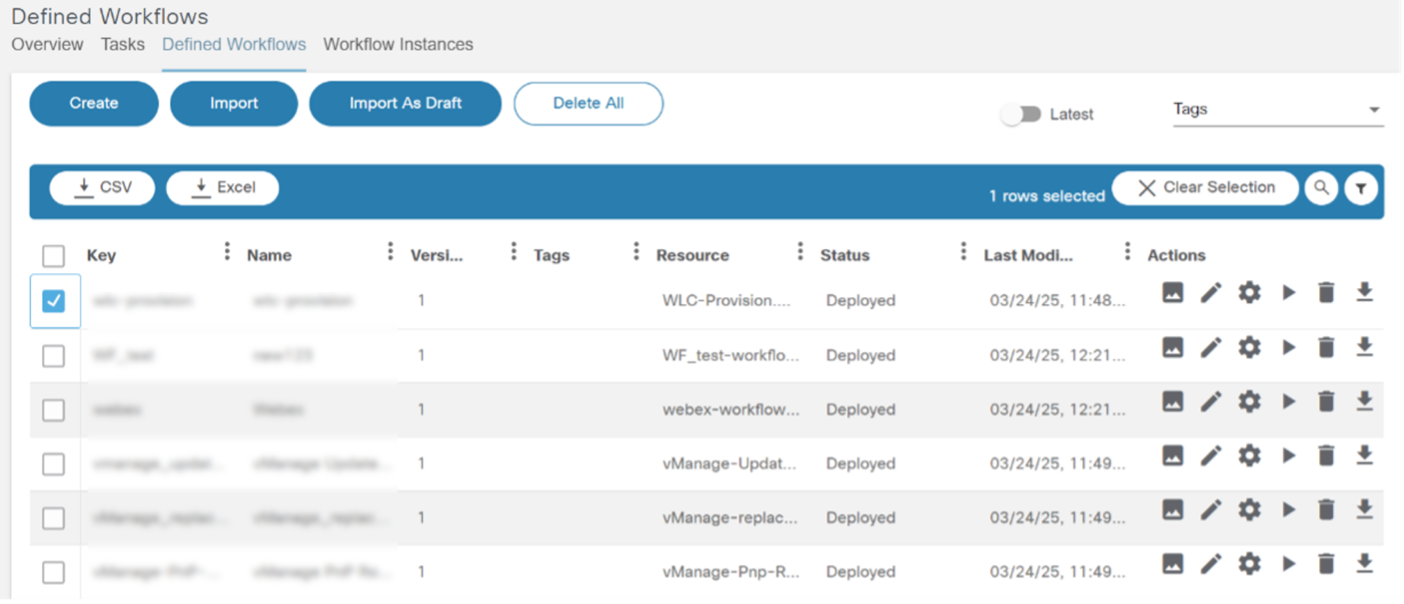