BPA User Guide Backup and Restore v5.1
Available Languages
- Introduction
- Components
- Configuration Backup
- Configuration Restore
- Administrator Application
- Roles and Access Control
- Deploying Artifacts via Ingester
- API Documentation
- Troubleshooting
Introduction
The device configuration Backup and Restore feature is crucial for managing network device configuration. This feature allows Administrators and Operators to save the current running configuration of a device and restore it, if needed.
Key Features
Backup and Restore has the following key features:
- Automated backups
- Can be scheduled regularly to ensure configuration backups are always up to date
- Reduces the risk of human error and ensures consistency
- Version control
- Keeps multiple versions of configuration backups
- Tracks changes over time and can revert to any previous version if needed
- Centralized management
- Manages backups for multiple devices from a single interface
- Stores backups in a central data store
- Makes it easier to ensure all devices are backed up regularly
- Security
- Encrypts backups to protect sensitive configuration data
- Implements access controls to restrict who can create, modify, or restore backups
- Compatibility
- Supports various device types and vendors
- Ensures the Backup and Restore process is compatible with different network hardware and software
Benefits
Backup and Restore has the following benefits:
- Disaster recovery: Quickly restore configurations after a hardware failure or security breach
- Efficiency: Save time and reduce errors by automating the Backup and Restore process
- Compliance: Maintain audit trails and logs for compliance with industry regulations and policies
- Peace of mind: Reliable backups allow users to make changes or updates with confidence
Components
Supported Controllers and Device Types
The table below provides the controller support matrix for the Backup and Restore use case.
| Controller | Latest Validated Controller Version | Fabric Type | OS Types | Support for Backup | Support for Restore |
|---|---|---|---|---|---|
| Network Services Orchestrator (NSO) | v6.4 | NA | IOS, IOS XE, IOS XR, NX-OS, Netconf | Yes | Yes |
| Cross Network Controller (CNC) | v6.0 | NA | IOS, IOS XE, IOS XR, NX-OS | Yes | Yes |
| Nexus Dashboard Fabric Controller (NDFC) | v3.0.1/Fabric 12.1.3b Backup and Restore specific validation done in v3.2.1e/Fabric v12.2.2 |
Classic Lan, vXLAN | NX-OS | Yes | Yes |
| Cisco Catalyst Center | v2.3.5 | NA | IOS XE, IOS XR | Yes | No |
Prerequisites
The prerequisites in this section are required to effectively use the compliance and remediation use case.
- Upload the subscription entitlement key for the Backup and Restore use case. Refer to Subscription Management for more information.
- Onboard and make the relevant controller available as a part of BPA Asset Manager. Refer to the Asset Manager section of the BPA User Guide for more details.
- Group the onboarded assets, according to customer requirements, into asset groups in the Next Generation (Next-Gen) portal.
Configuration Backup
Configuration backup involves saving the current running configuration of a device to a central storage location. This can either be scheduled by an Administrator to run periodically or taken on-demand by an Operator. The actions related to configuration backups are bundled in the Asset Manager UI.
To trigger an on-demand backup:
- On the Assets page, select one or more devices.
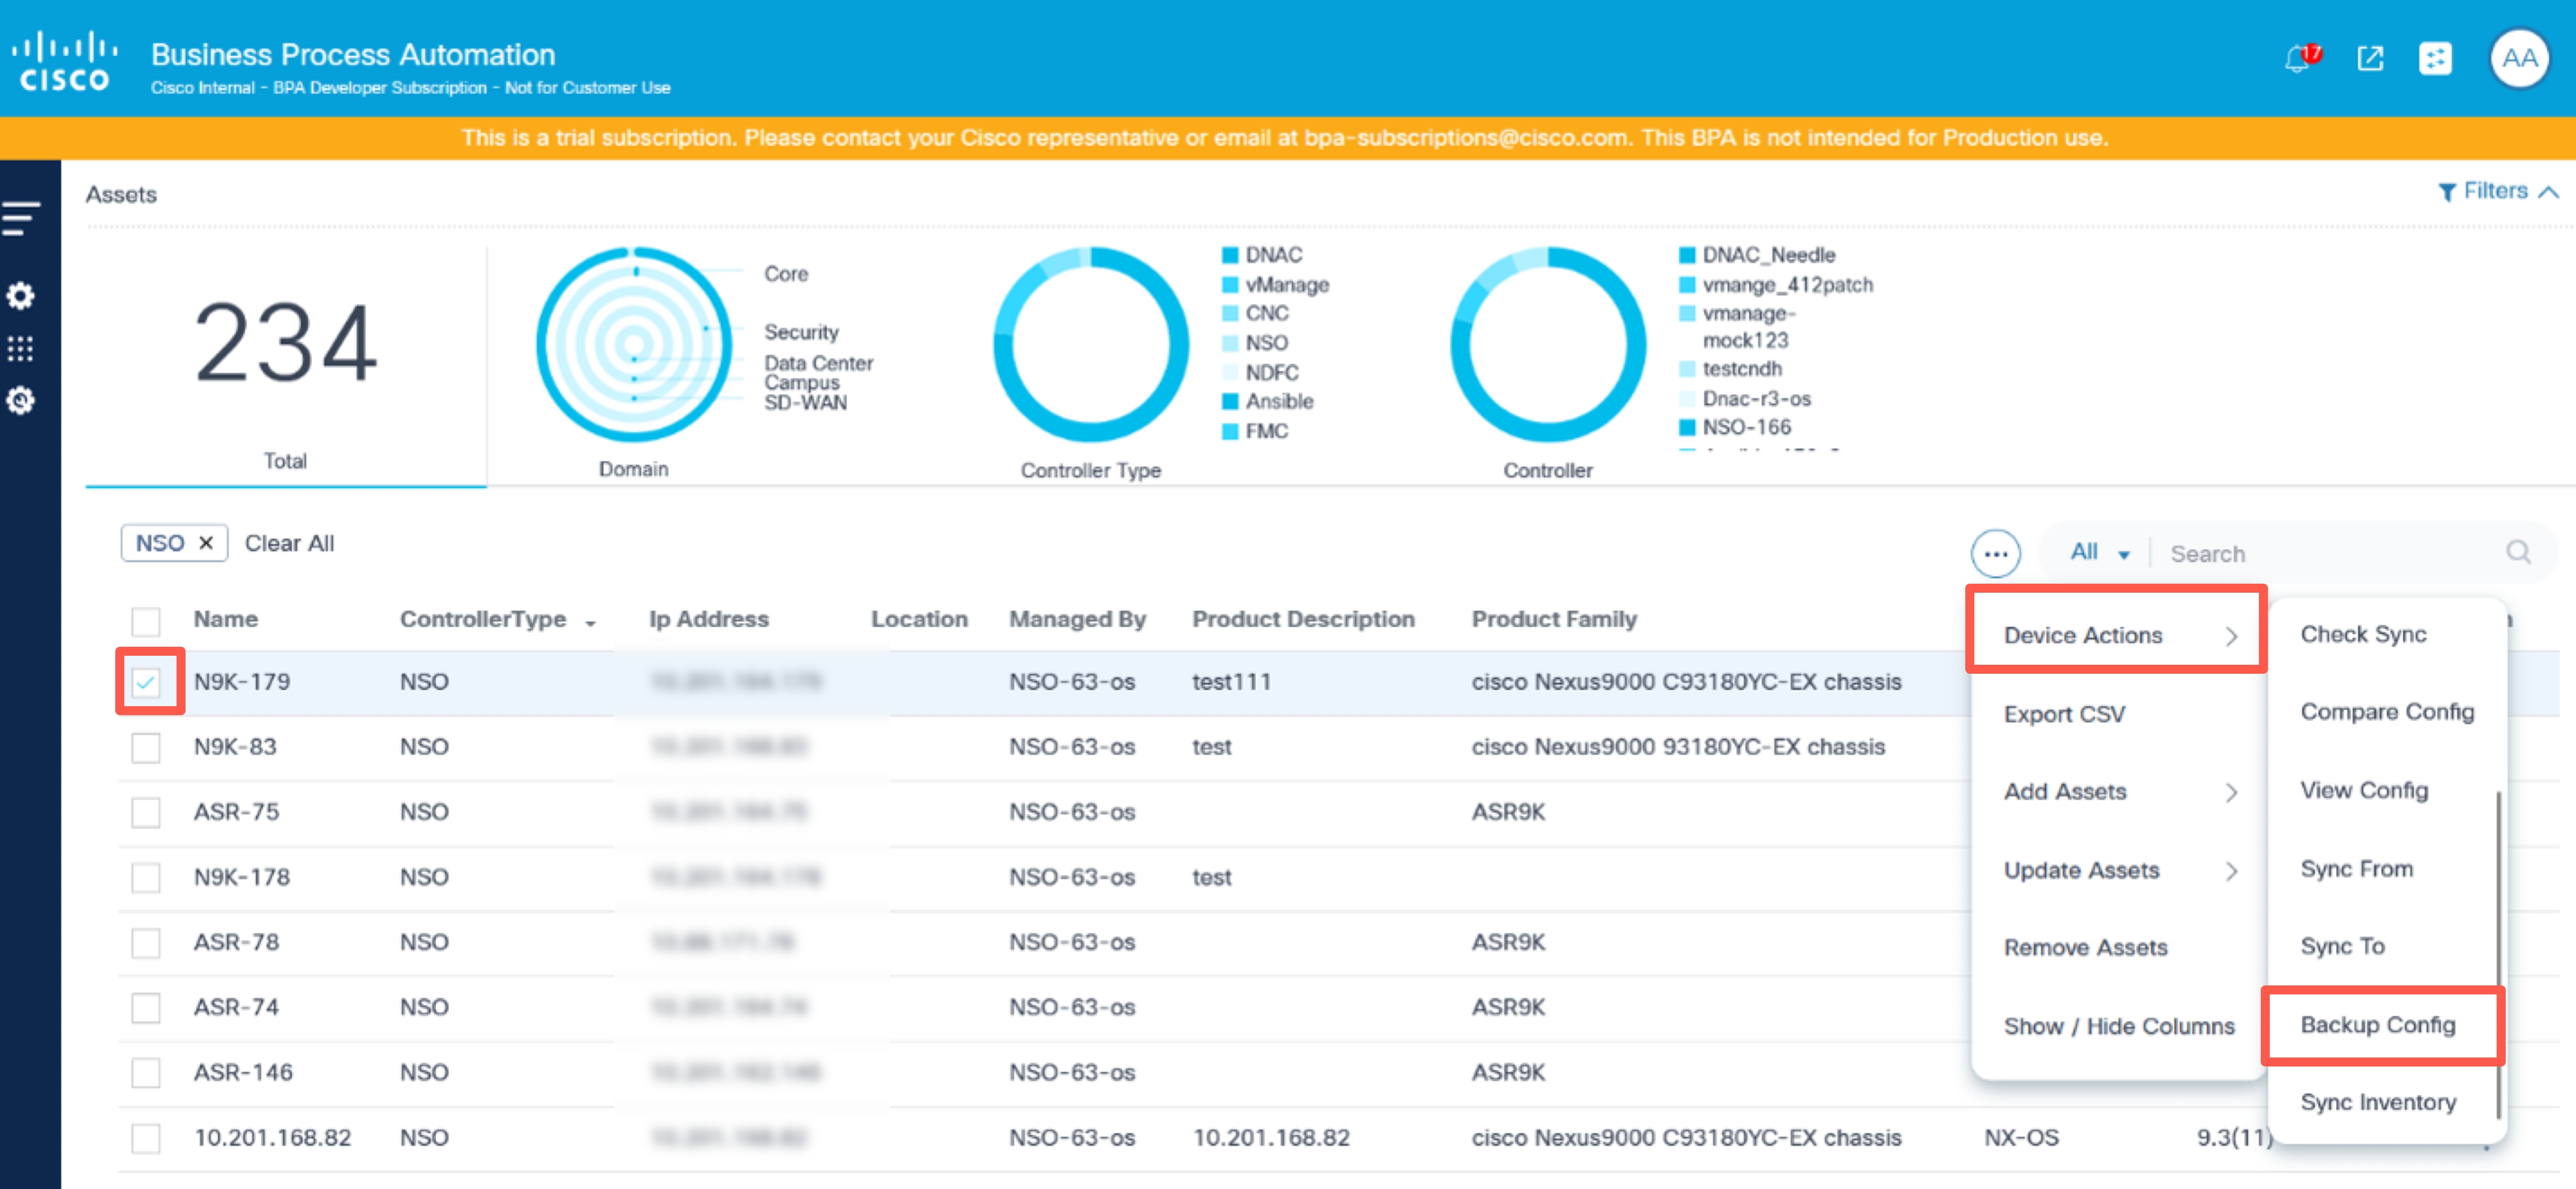
- Select the More Options icon > Device Actions > Backup Config. The Backup Configuration window opens.
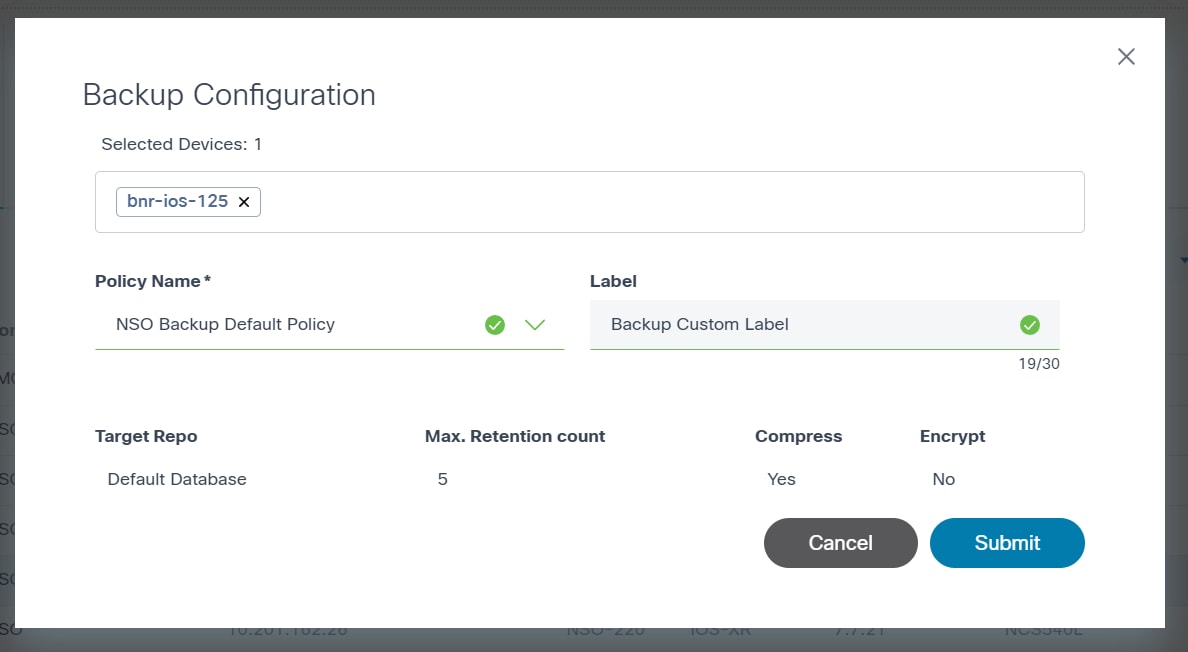
- Select the Policy Name and assign a custom Label.
- Click Submit to take a backup of the selected device(s).
View Backups
Users can view the history of the backups taken using the View Backups option.
- On the Assets page, select a device.
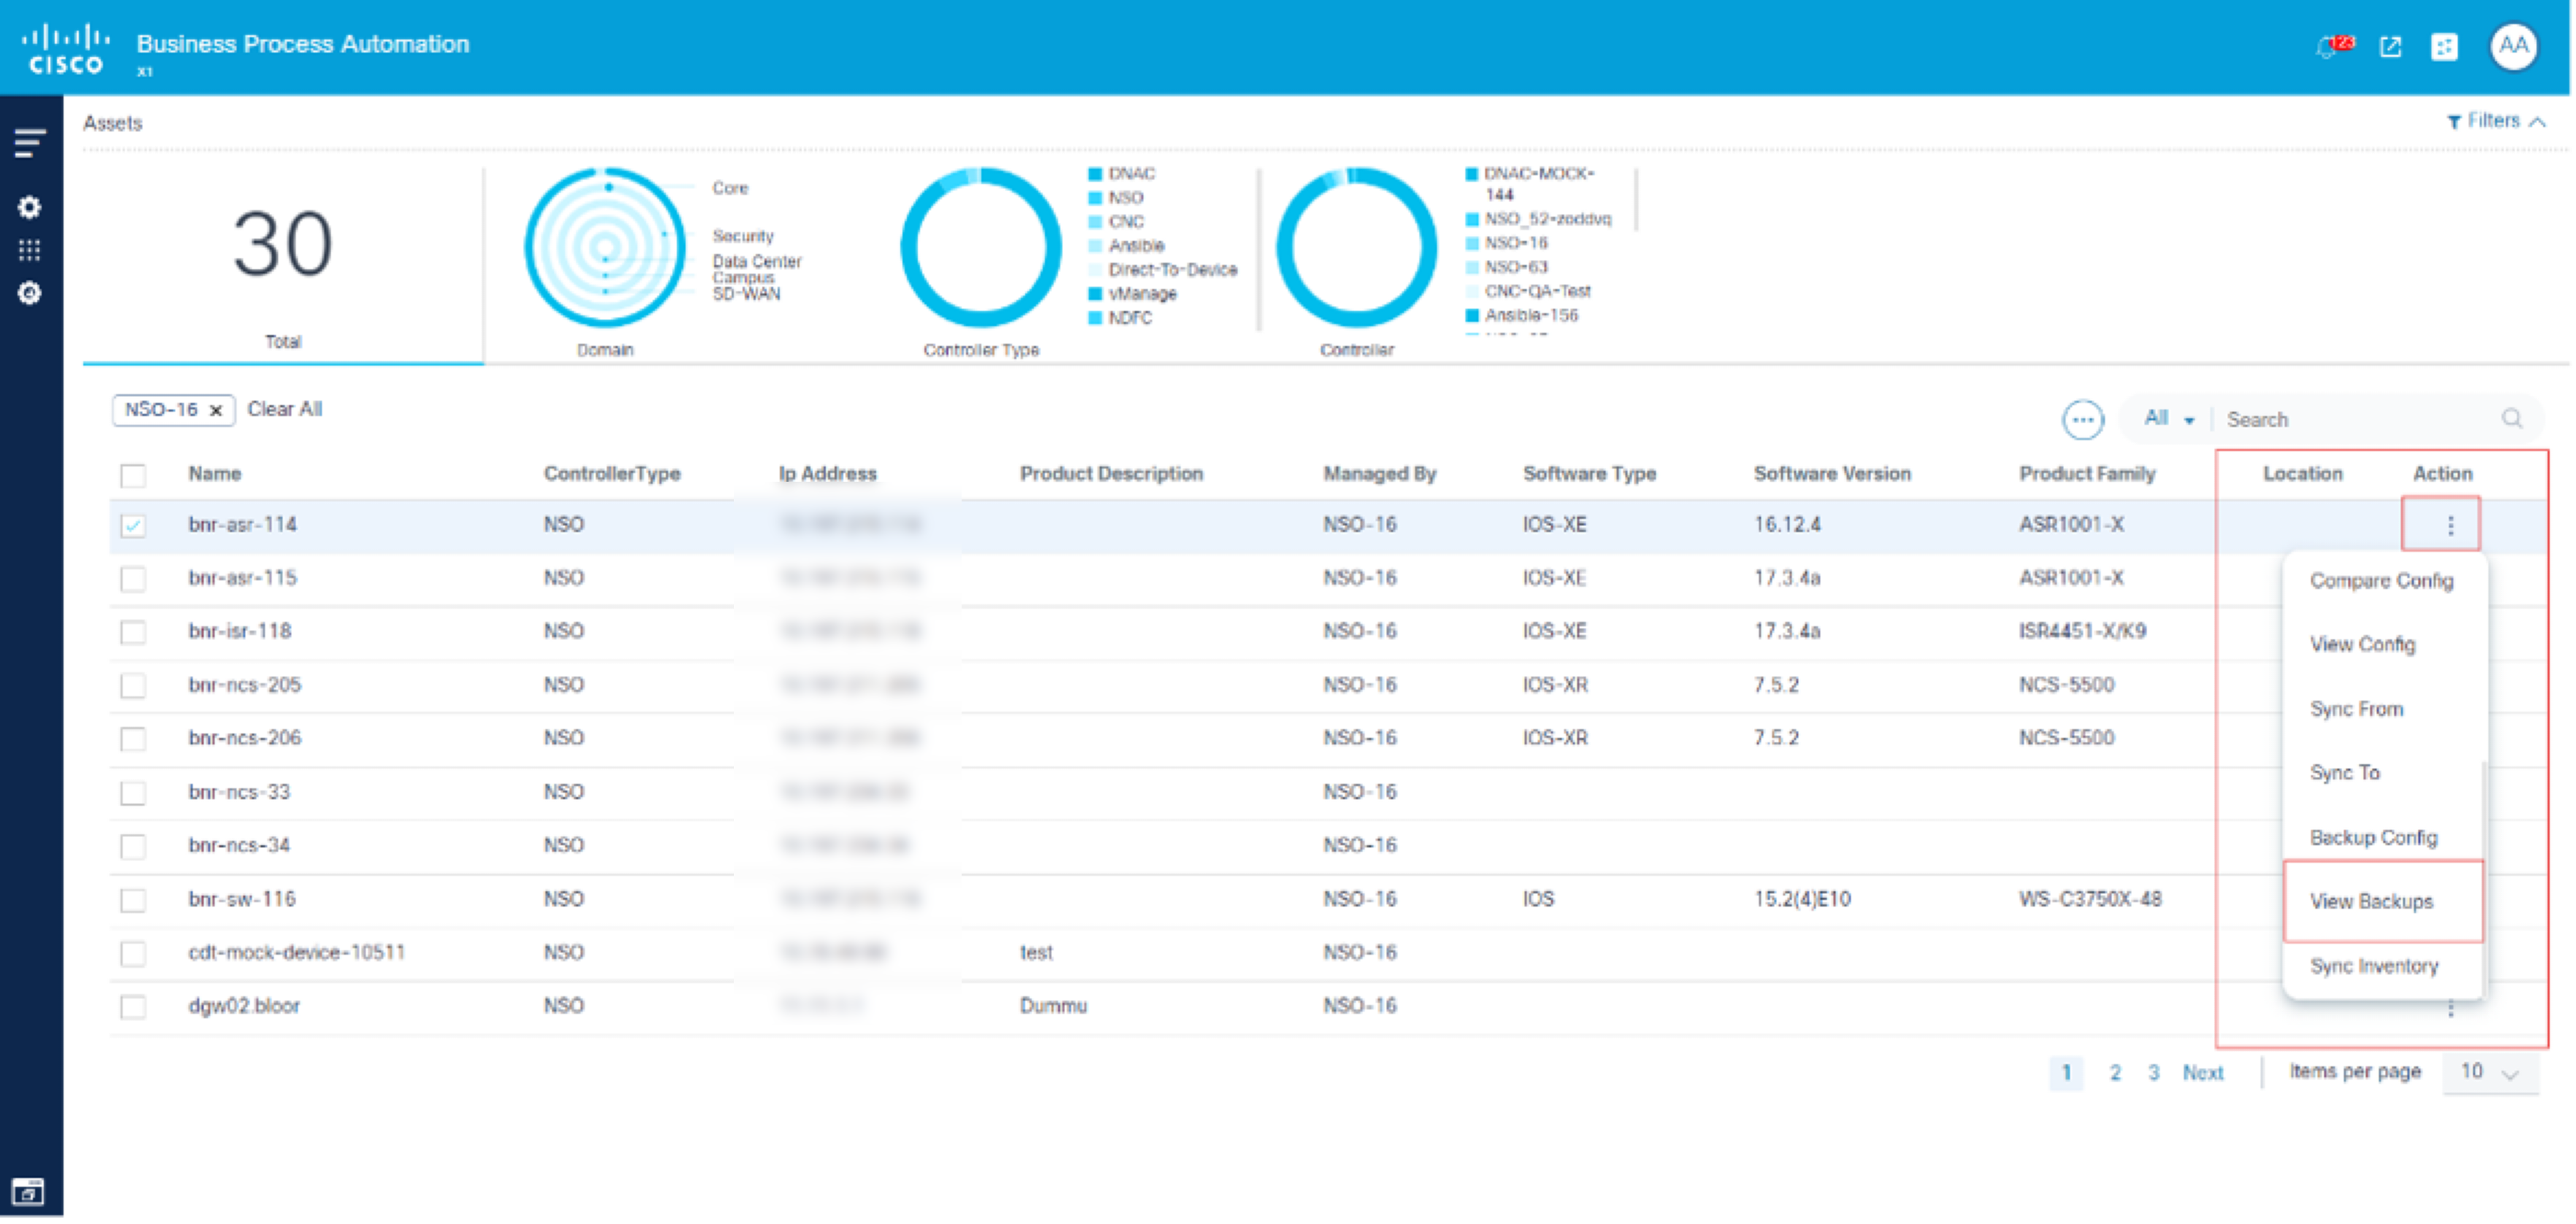
- Select the More Options icon > View Backups.
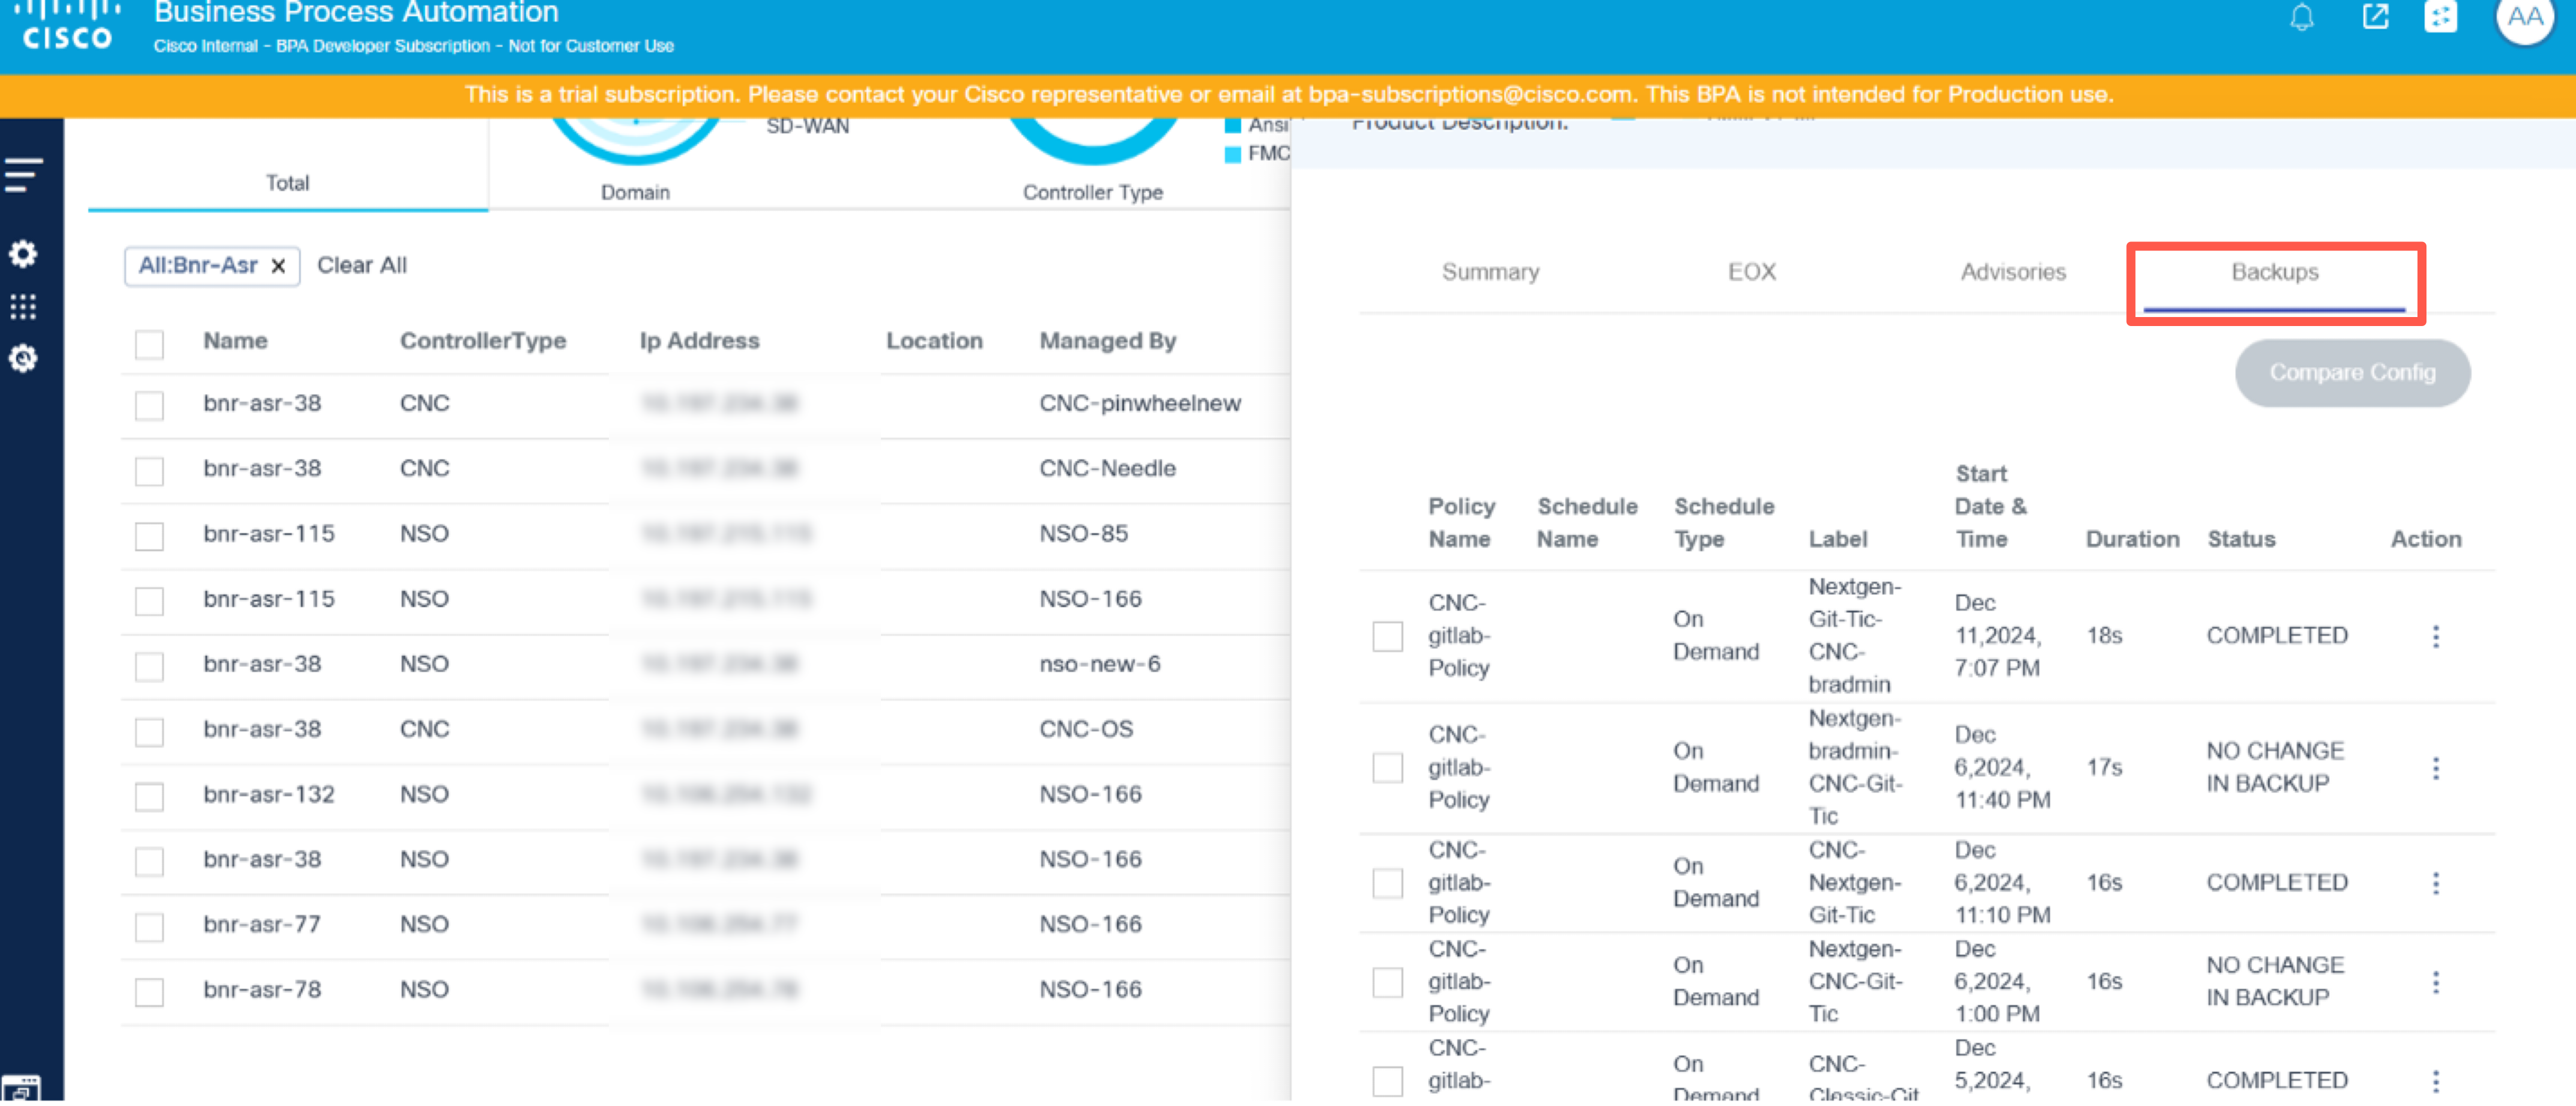
In the Backups tab, the available device backup displays its respective options. Users have the following options:
| Backup Options | Description |
|---|---|
| View Backup Config | View the backup configuration available at the selected backup date |
| Compare with Current Config | Compare the backup configuration with the running or device current configuration |
View Backup Configuration
Users can view the backup configuration at a selected backup date.
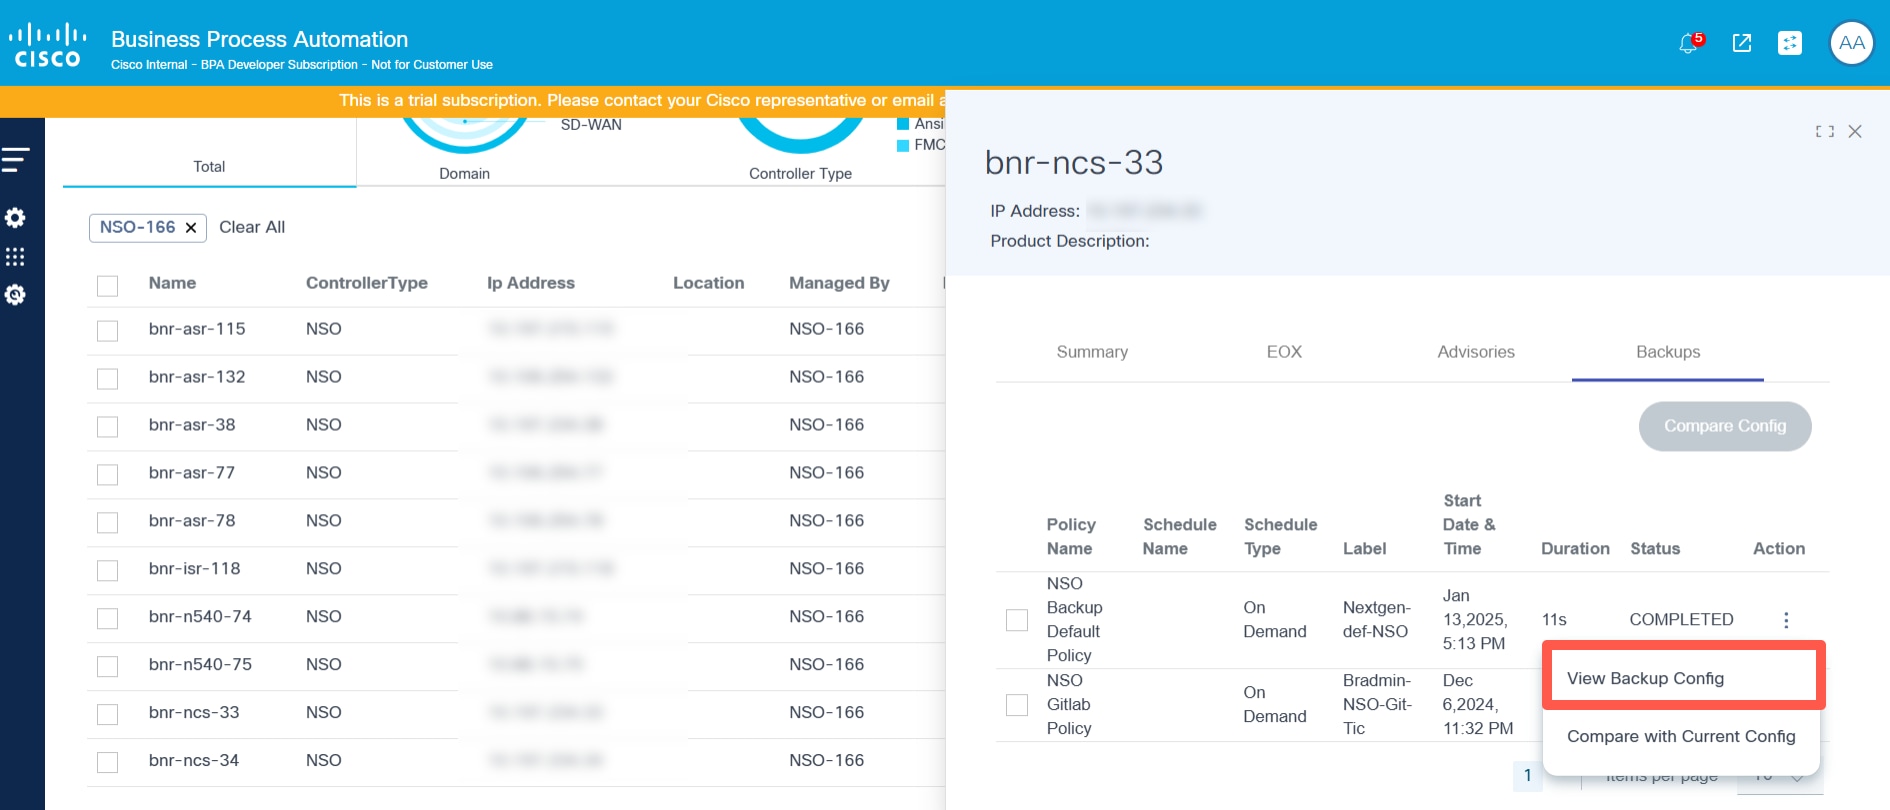
- From the Backups tab, select the More Options icon > View Backup Config. The Backup Configuration window opens.
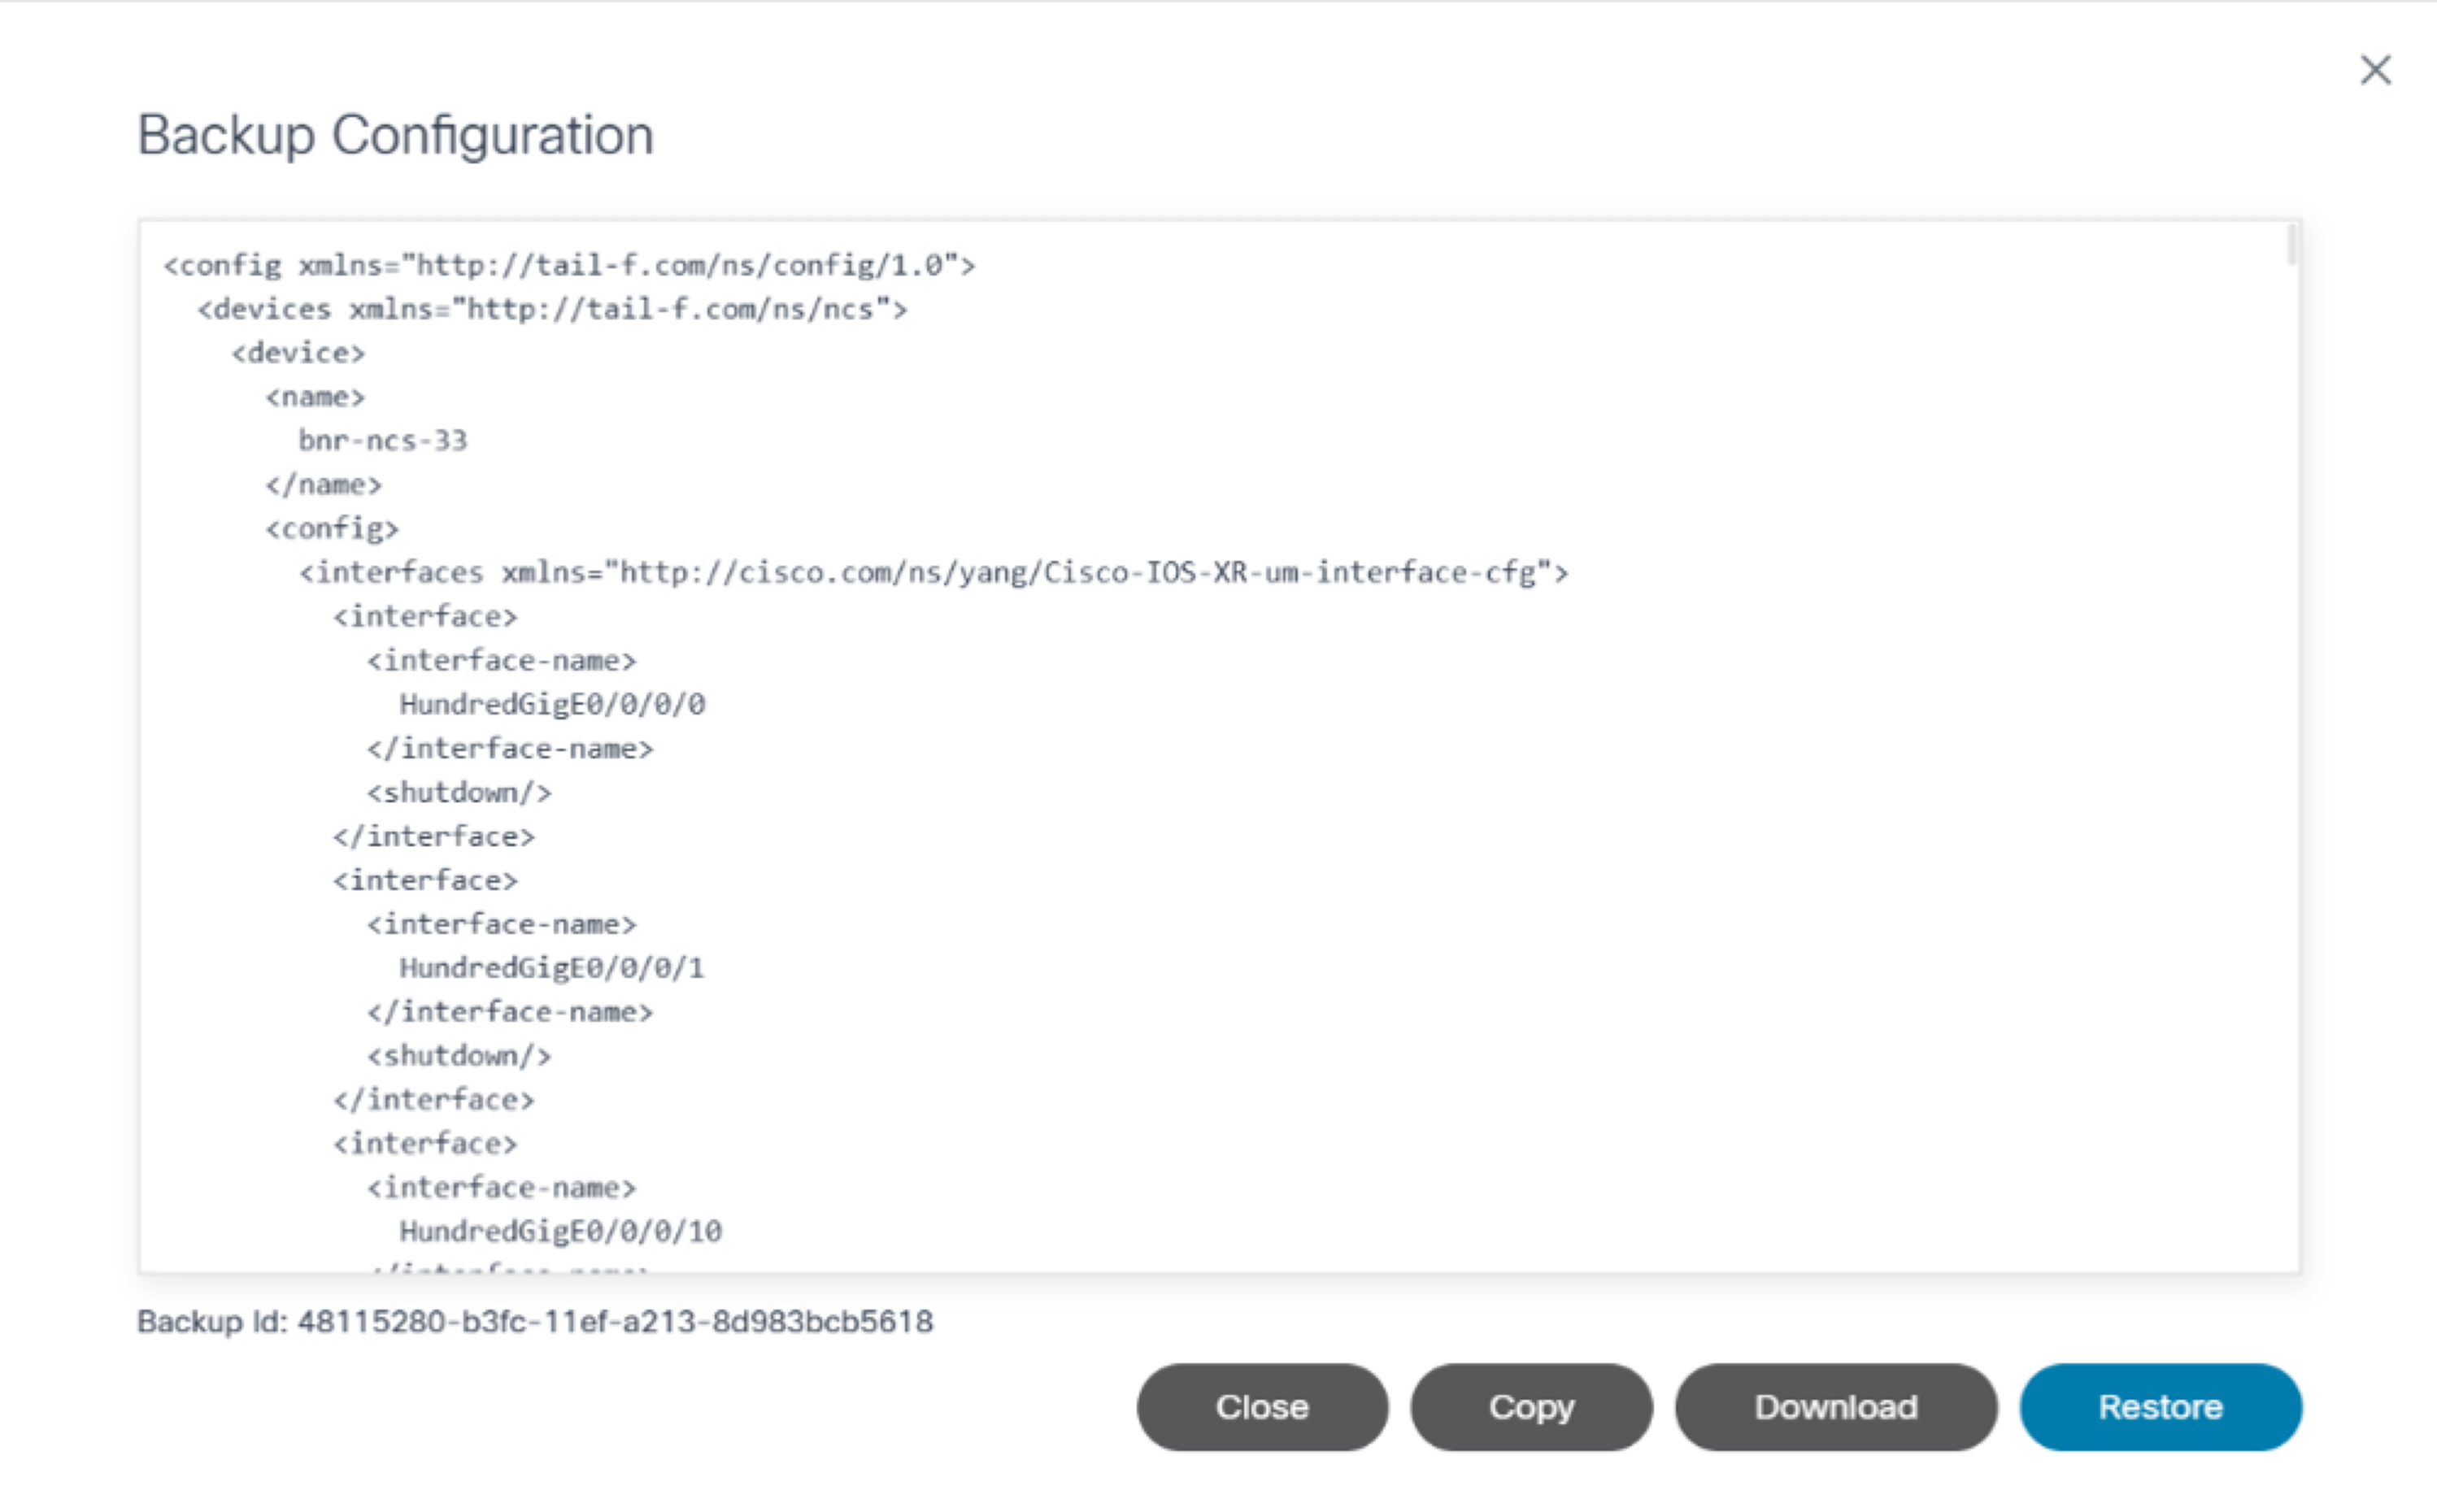
- View the backed-up configuration.
The following options are available in the Backup Configuration window:
| Backup Configuration Options | Description |
|---|---|
| Copy | Copy the backup configuration to the clipboard |
| Download | Download the backup configuration in text format |
| Restore | Initiate restore backup configuration |
Compare with Current Configuration
Users can compare the backup configuration with a device’s current or running configuration..
- From the Backups tab, select the More Options icon > Compare with Current Config. The Compare With Current Config window opens.
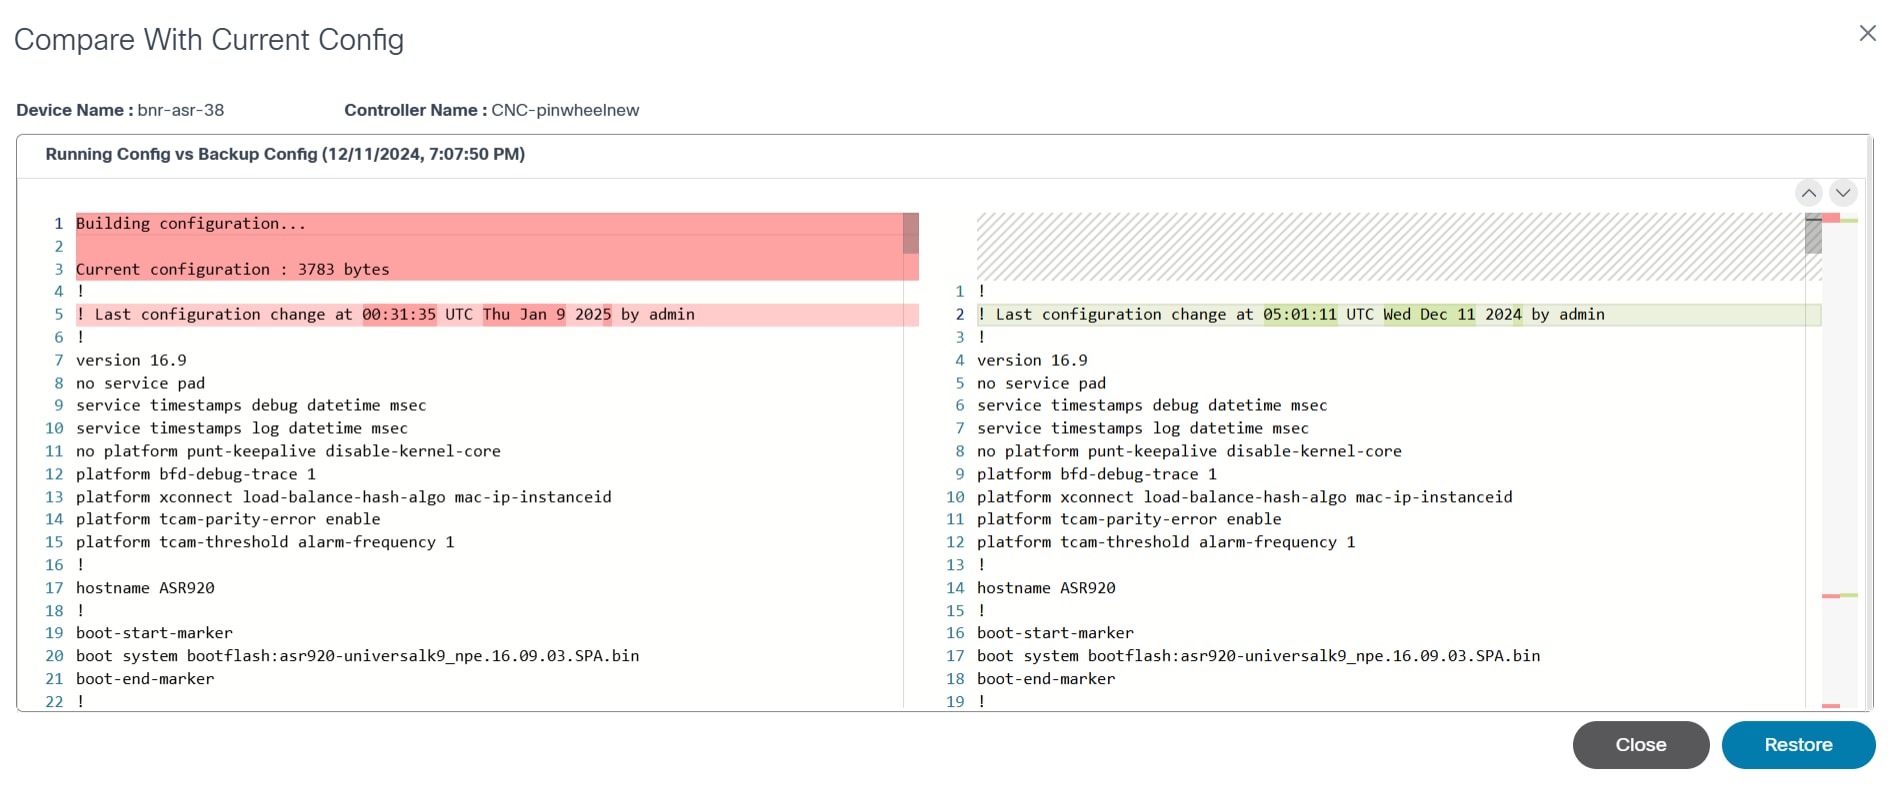
- View the comparison.
The following option is available in the Compare With Current Config window:
| Compare With Current Config Option | Description |
|---|---|
| Restore | Initiate restore backup configuration |
Restore Backup Device Configuration
To restore the backup configuration:
- From the Compare with Current Config window, click Restore. A confirmation displays.

- Click Ok. The Configuration Restore page displays.
Configuration Restore
Configuration restore involves applying a previously saved configuration to a device. This is done to recover from a misconfiguration or failure, or to quickly revert to a known good configuration after testing changes.
The configuration restore use case includes the following features:
This application adheres to subscription management enforcement and is rendered if either a wild-card or CFGBNR entitlement code is available in the certificate.
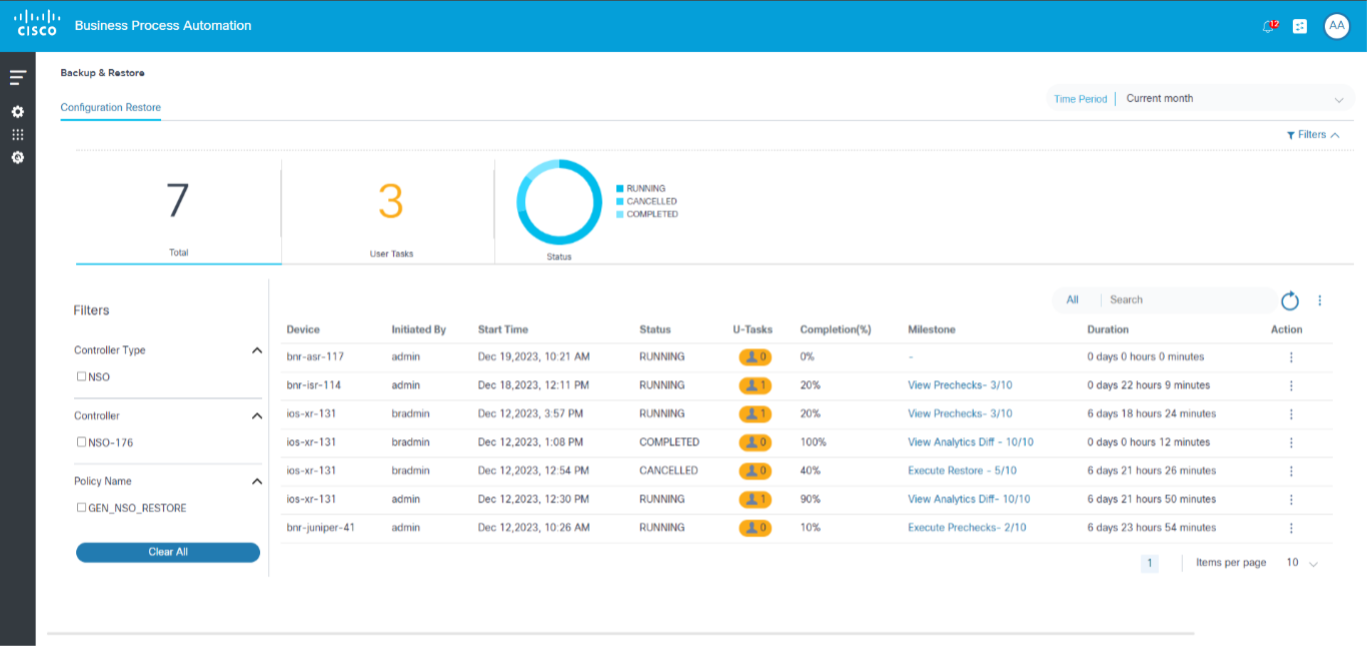
Restore Jobs List

The Configuration Restore tab displays a list of device configuration restore jobs executed by a user, sorted in descending order by start date and time. By default, the list shows jobs for the current month. Users can update the date range filter to view older jobs by selecting the Filters icon. At the top of the page, users can find a summary with the total job count, the total number of user tasks, and a chart with status information. In the left rail, users can filter the job list by key filter parameters such as Controller Type, Controller, and Policy Name.
When enabled, the Auto Refresh toggle allows the configuration restore data to automatically update every 30 seconds if there is at least one running job in the list.
User Task Details
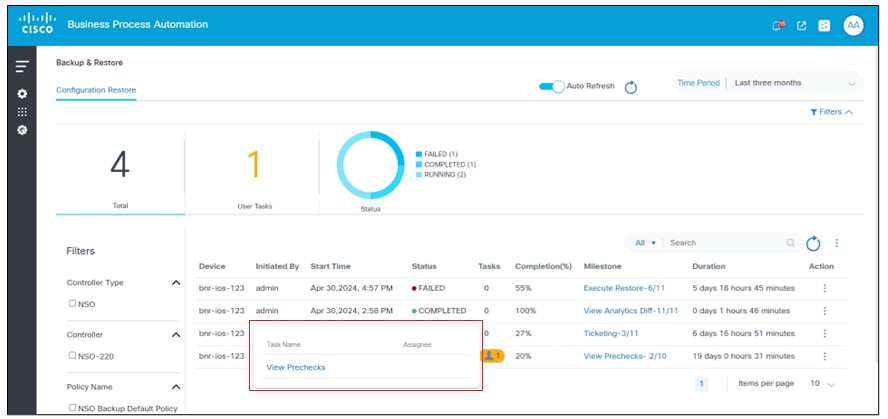
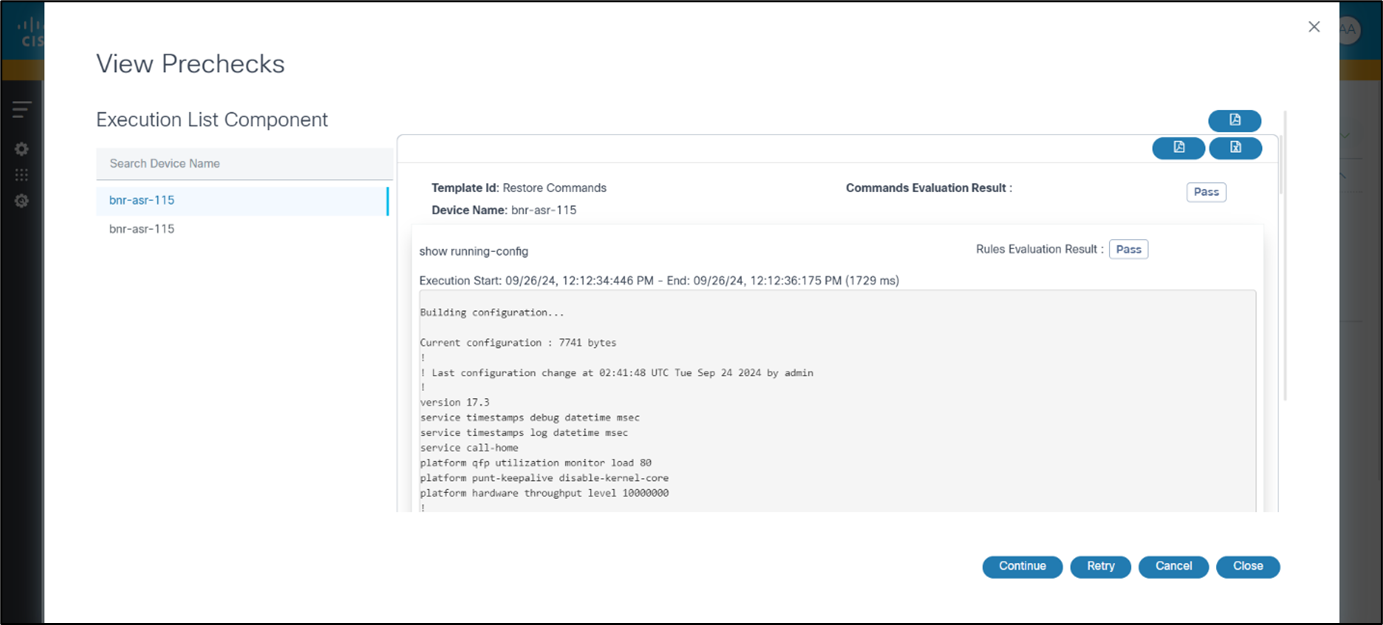
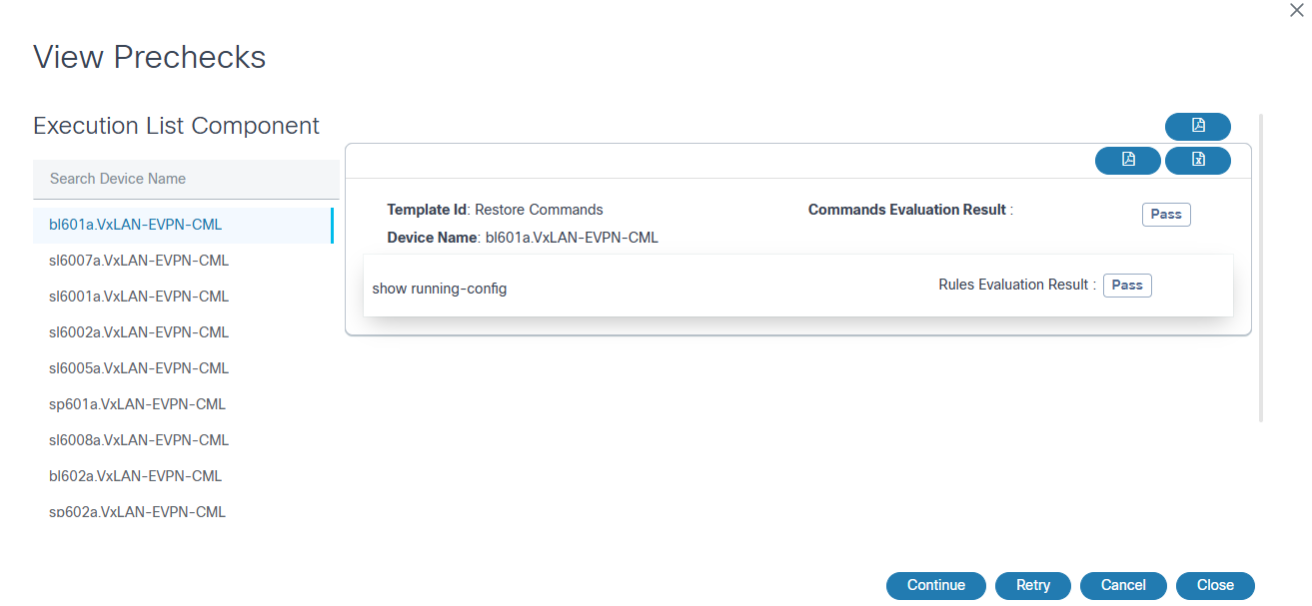
The User Task icon displays if the Tasks column value is greater than zero and is used to open the user task details dialog box. From within the user task details dialog box, clicking the option under the Task Name column opens a window for the user task. View Prechecks is the user task shown in the example below.
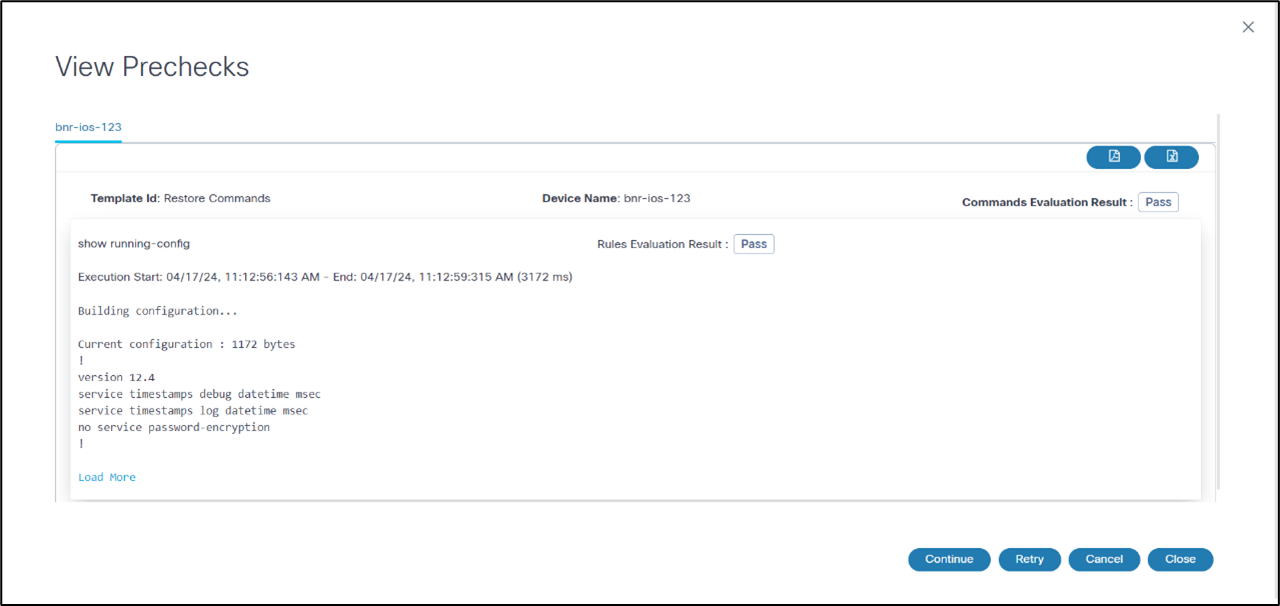
In the View Prechecks window, as shown in the example above, users can view task details and determine next steps for the task by clicking Continue, Retry, or Cancel.
Milestone Summary
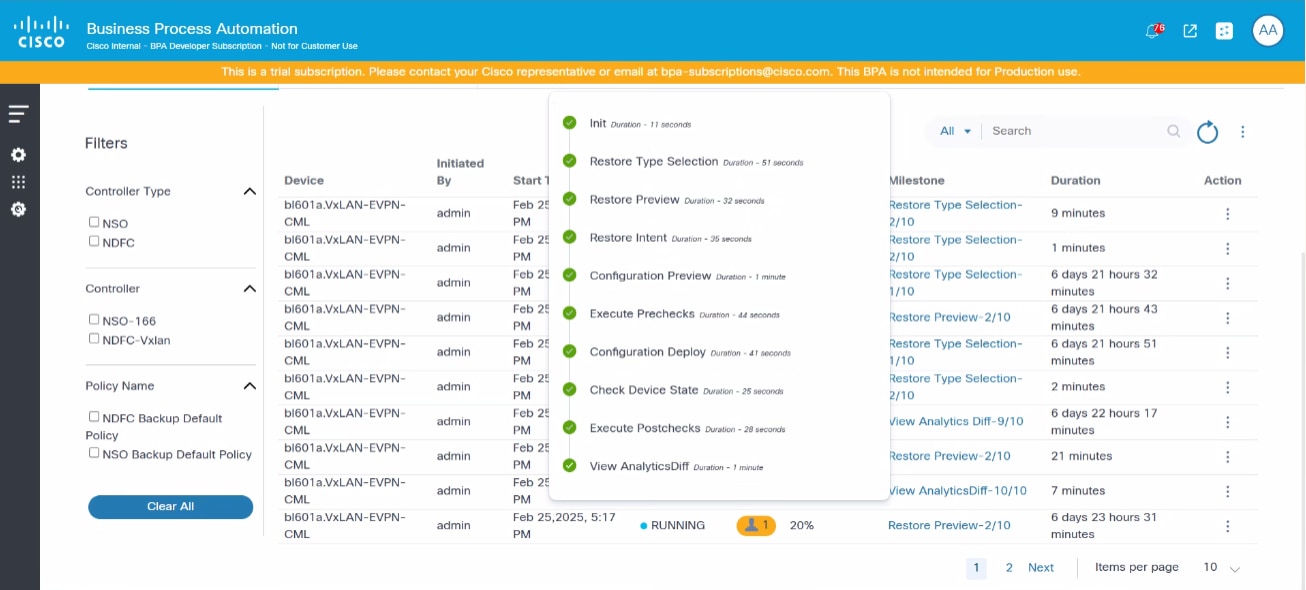
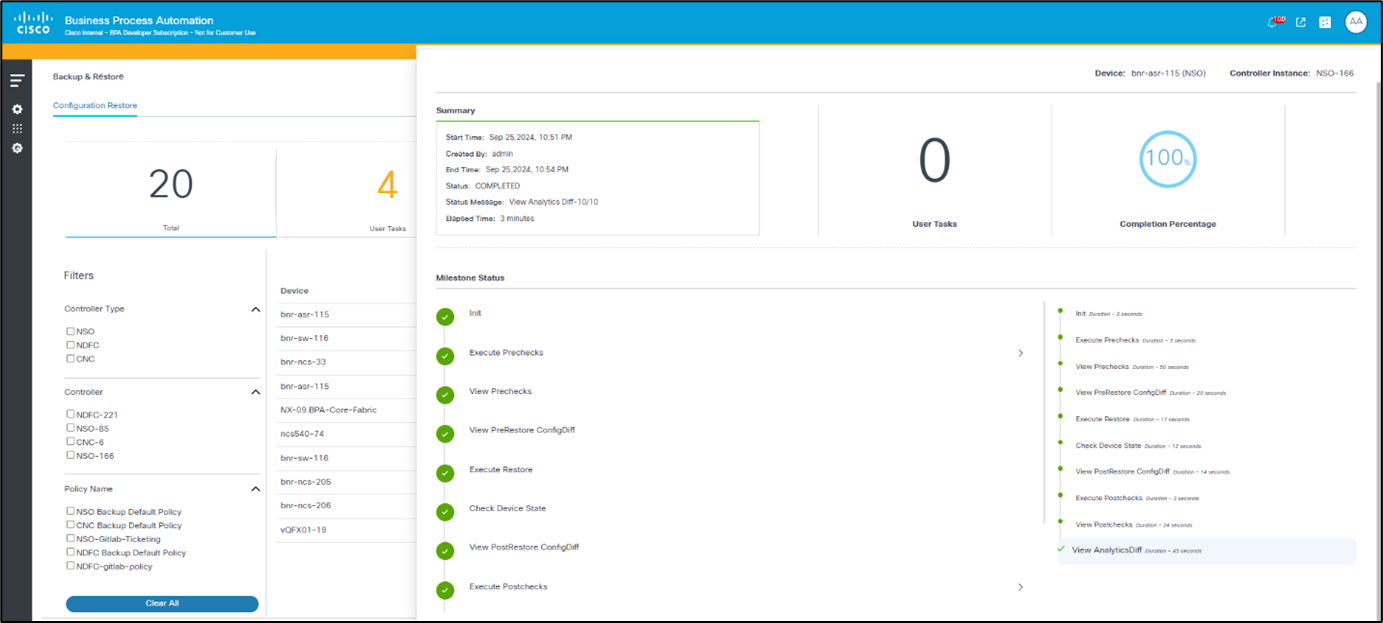
Updated Execution Milestones for NDFC VXLAN
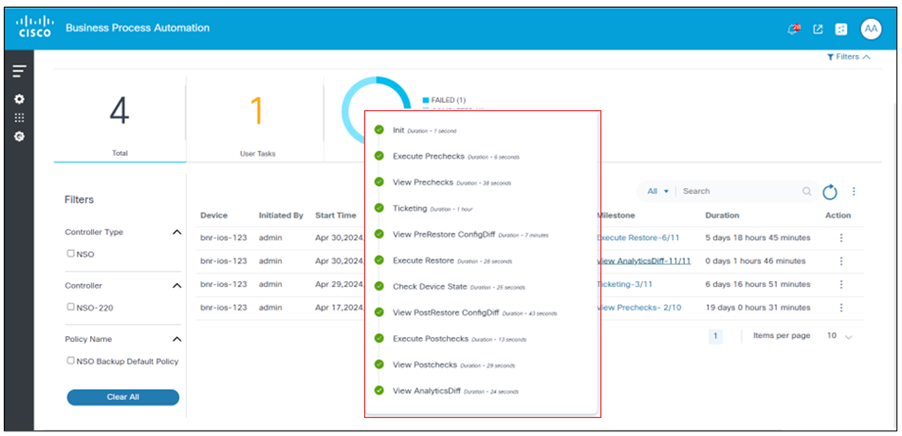
The execution process has been updated to include four new milestones between the initial stage and the execution of prechecks for all scenarios except for NDFC VXLAN fabric. This updated process follows the steps outlined in the figure above.
The updated process breakdown includes:
- Init: Begin the process to establish a foundation for the subsequent steps.
- Restore Type Selection: Choose the type of restore operation to be performed.
- Restore Preview: Review the restore plan before proceeding.
- Restore Intent: Confirm the intention to restore, ensuring that all necessary elements are included.
- Config Preview: Preview the configuration to verify all settings before execution.
- Execute Prechecks: Conduct pre-execution checks to ensure the environment is ready.
- Configuration Deploy: Formerly known as Execute Restore, this is the final step where the configuration is deployed.
- Check Device State: Access the device’s status dashboard to view its current operational state, including uptime, health, and performance metrics.
- Execute Post checks: After making any configuration changes or updates, perform post-checks to ensure all systems are functioning as expected.
- View Analytics Diff: Access the analytics section and select the Diff option to view the differences between precheck and post check.
Users can view all milestone details by clicking values in the Milestone column. Milestone details are outlined in the following section.
Milestone Details
- Init: The first milestone step must receive required data before continuing with the restore milestone process. If users have provided additional pre- or post-templates in the restore policy, the milestone summary details display in the user task. Users can add details and submit the form.
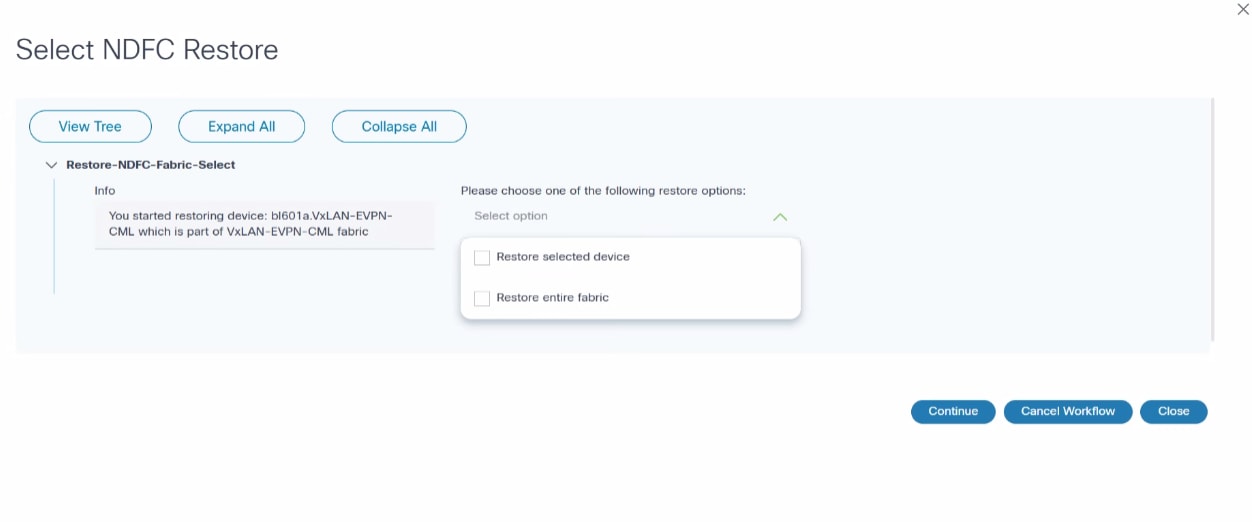
- Restore Type Selection: In the NDFC VXLAN process,
the Restore Type Selection milestone involves a task called “Select NDFC
Restore”:
- Select NDFC Restore User Task:
- Restore Selected Device: This option allows restoration of a specific device within the fabric
- Restore Entire Fabric: This option allows restoration of the entire fabric
- Decision Point:
- Continue Workflow: If the results are satisfactory, users can continue with the workflow
- Cancel Workflow: If there are concerns or issues, users can cancel the workflow to make necessary adjustments
- Select NDFC Restore User Task:
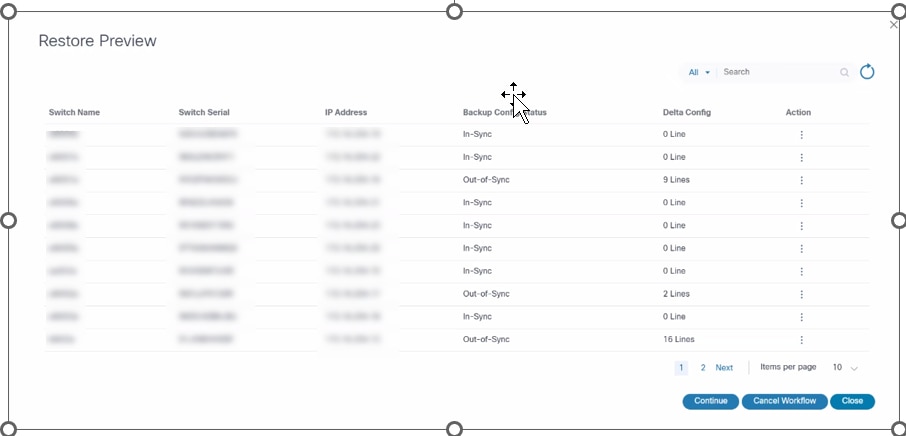
- Restore Preview: The “View Restore Preview” task is
a critical step in the NDFC VXLAN process where users are presented with
the restore preview results, allowing for a thorough review before
proceeding. This task fits into the workflow as follows:
- View Restore Preview User Task:
- Notification: Users are notified of the “View Restore Preview” task
- Review Restore Preview Results: Users can view the results of the restore preview, providing insights on the restore operation
- Decision Point:
- Continue Workflow: If the results are satisfactory, users can continue with the workflow
- Cancel Workflow: If there are concerns or issues, users can cancel the workflow to make necessary adjustments
- View Restore Preview User Task:
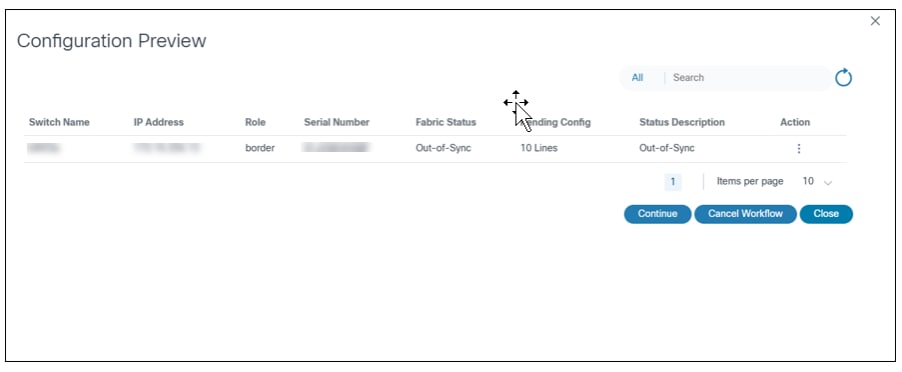
- Configuration Preview: A specific user task in the
NDFC VXLAN process that involves reviewing the configuration preview
results. This task provides a critical opportunity for users to assess
the planned configuration changes. The task is structured as follows:
- Configuration Preview User Task:
- Notification: Users are notified of the task to review the configuration preview results
- Review Config Preview Results: Users are presented with a detailed preview of the configuration that is planned to be deployed
- Decision Point:
- Continue Workflow: If the configuration is correct and meets expectations, users can proceed with the workflow
- Cancel Workflow: If there are discrepancies or concerns, users can cancel the workflow to address issues before proceeding
- Configuration Preview User Task:
- Execute Prechecks: The pre- or post-template has been executed and provides execution results.
- View Prechecks: Users can view task details and determine next steps for the task by clicking Continue, Retry, or Cancel. However, if users select Restore Entire Fabric during the Restore Type Selection milestone, prechecks are executed for all devices under the fabric.
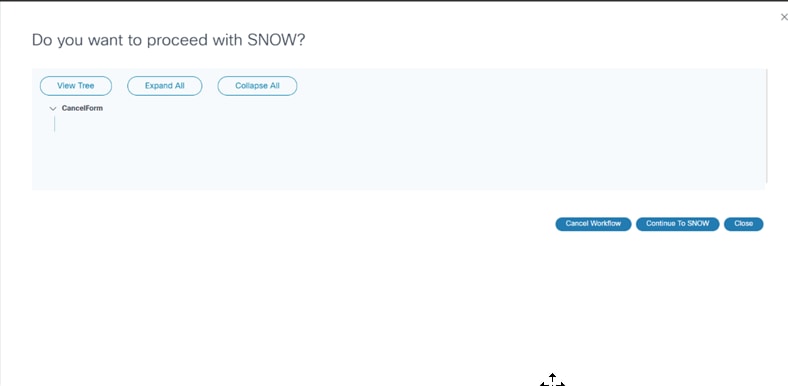
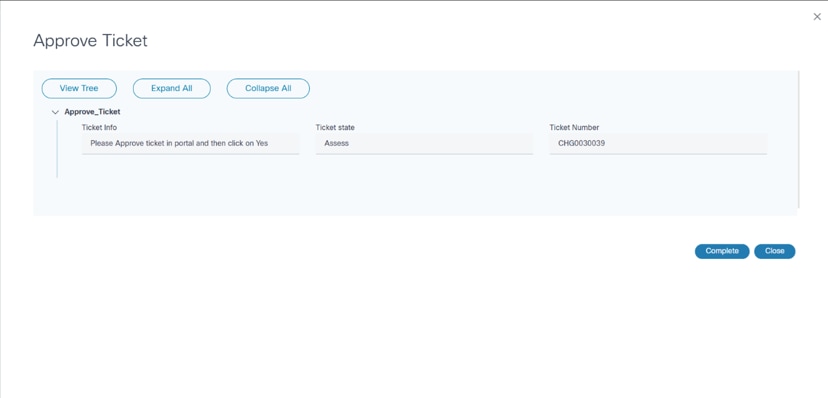
- Ticketing: Available if a user has enabled ticketing in a restore policy and has an external ticketing system (e.g., ServiceNow) and its process workflow. Additionally, if an adapter has been configured for an external ticketing system, it calls the ticketing sub-process.
After completing the sub-process, the workflow proceeds to the next milestone.
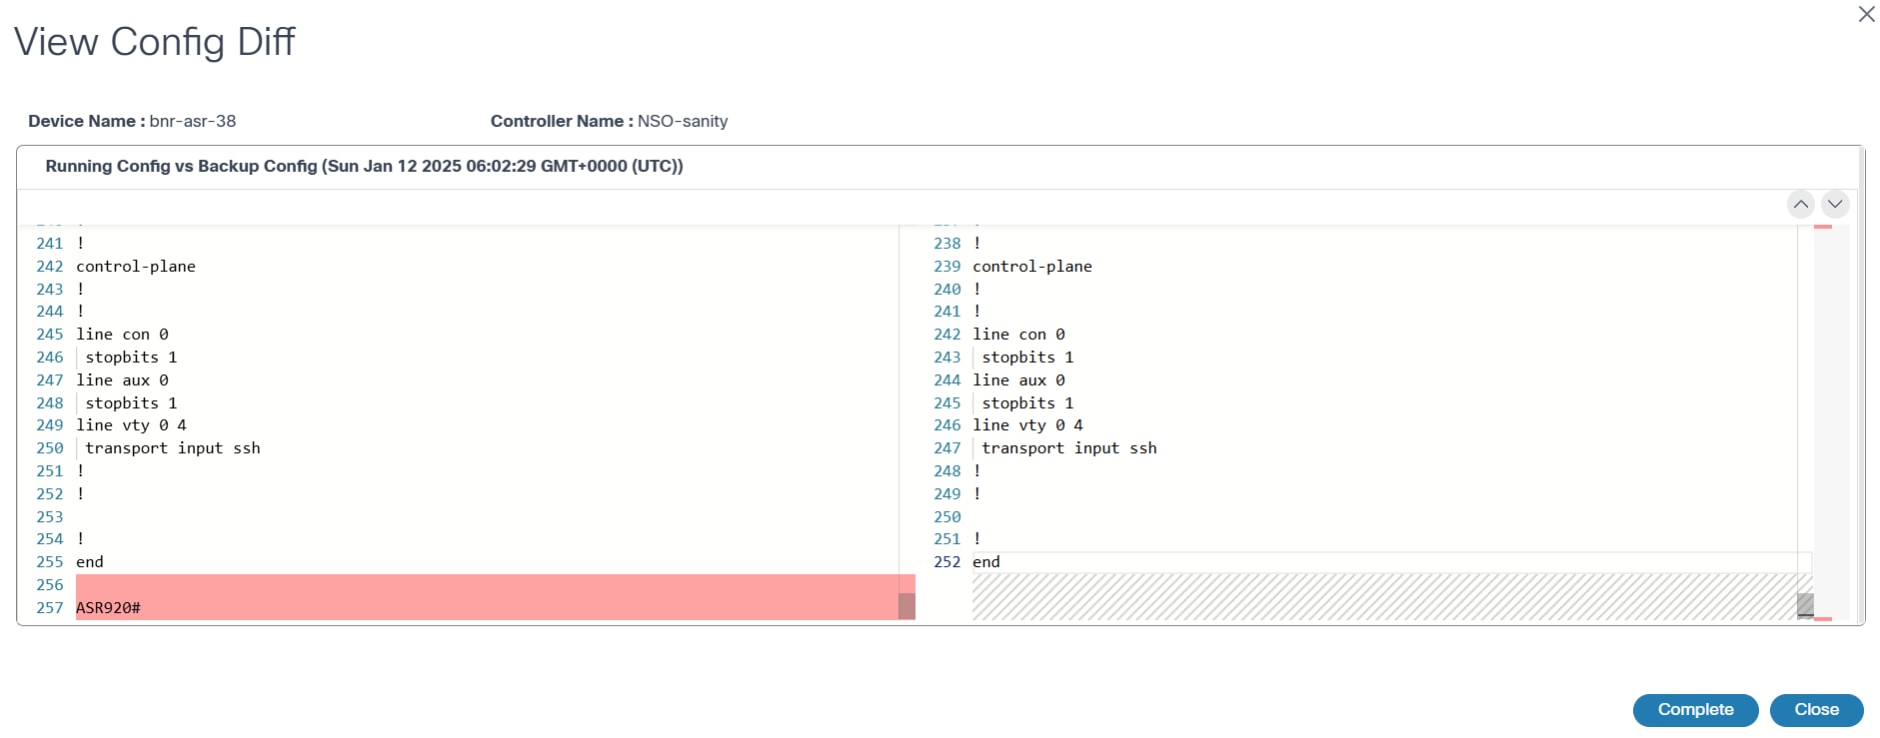
- View PreRestore Config Diff: Contains a user task which compares the backup configuration to the running configuration
- Execute Restore: The device configuration restore process occurs
- Check Device State: After the restore process is complete, the device is checked for connectivity and configuration sync
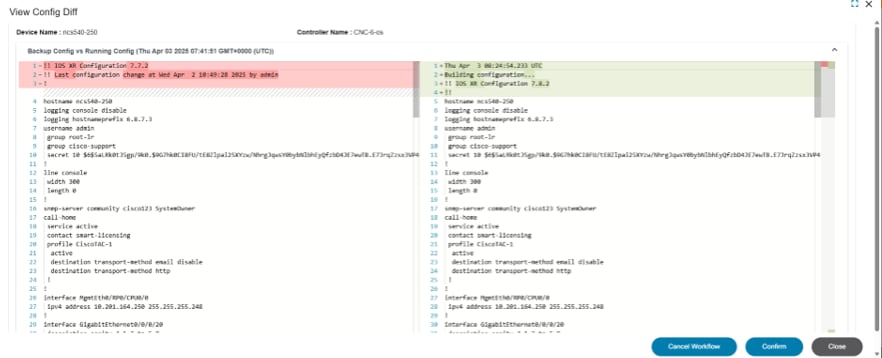
- View PostRestore Config Diff: After the restore process is complete, users can view a comparison between the running configuration and the backup configuration
- Execute Postchecks: The pre- or post-template has been executed and the execution result is provided
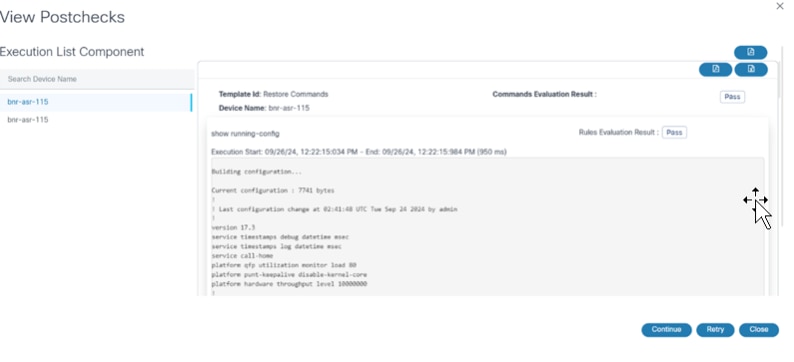
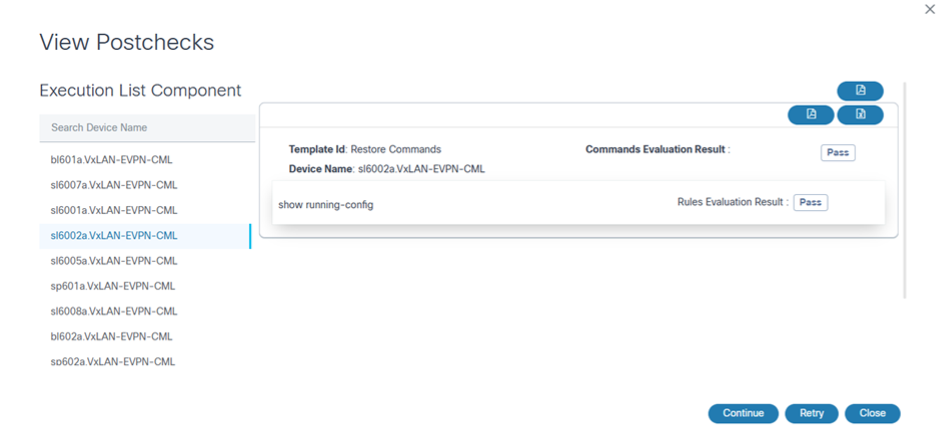
- View Postchecks: The user task displays. Users can view task details and determine next steps for the task by clicking Continue, Retry, or Cancel. If users select Restore Entire Fabric for NDFC VXLAN, post checks are executed for all devices under the fabric.
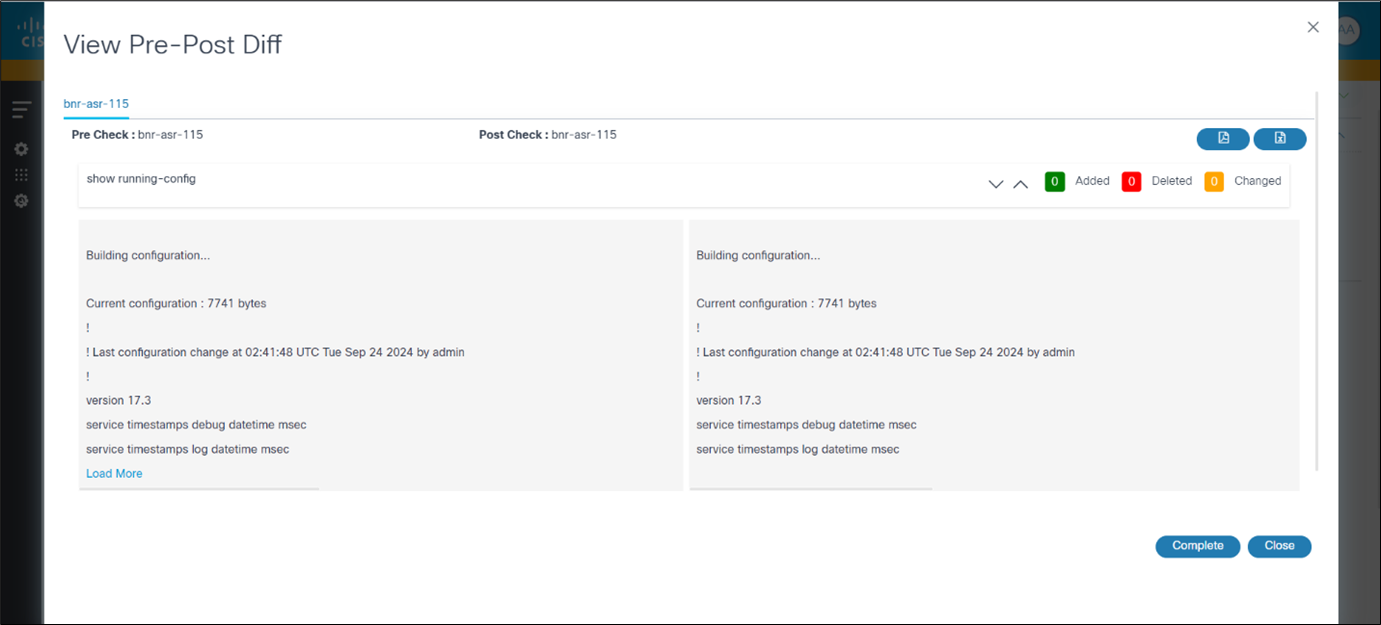
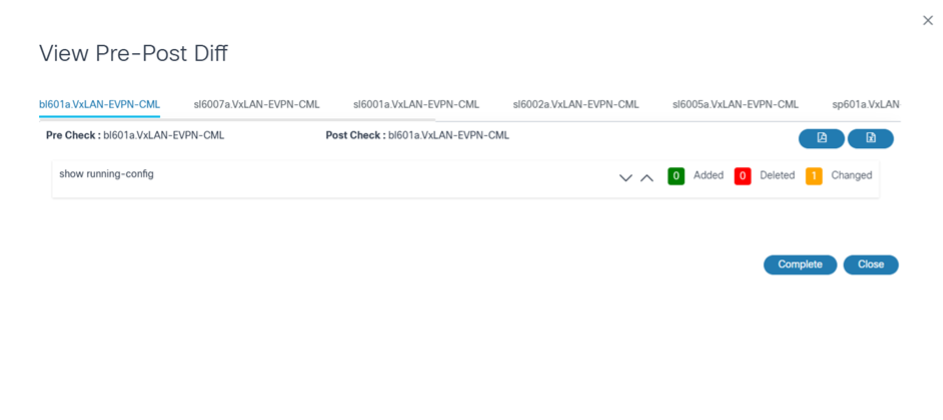
- View Analytics Diff: The user task displays. Users can view a comparison between pre-check and postcheck executions; when View Analytics Diff milestone is completed, the restore process is complete. If users select Restore Entire Fabric for NDFC VXLAN, pre-post diff are executed for all devices under the fabric.
Restore Jobs Details
In the Configuration Restore tab, users can click a row to view the details of a restore job, such as:
- User tasks in the job
- Percentage completion
- Workflow milestones
- Status and workflow execution details, such as command output for pre- and post-checks
The Milestone Status section provides an option to view existing content attached to different milestones. By default, the following content is available:
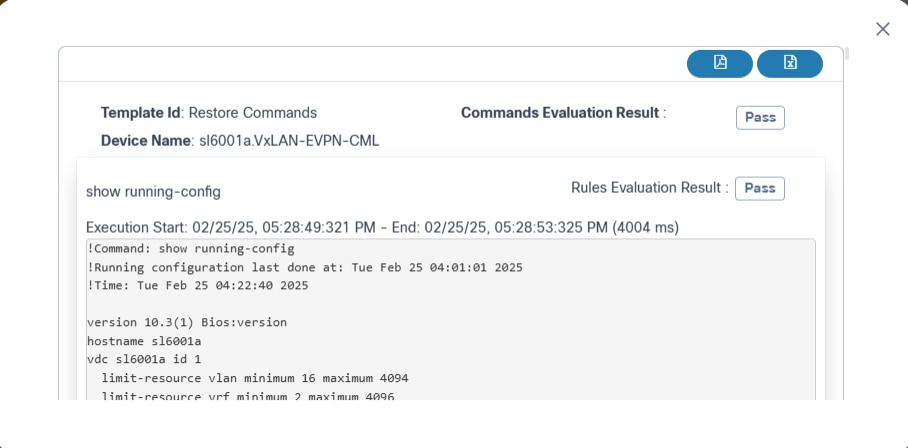
- Output for Execute Prechecks
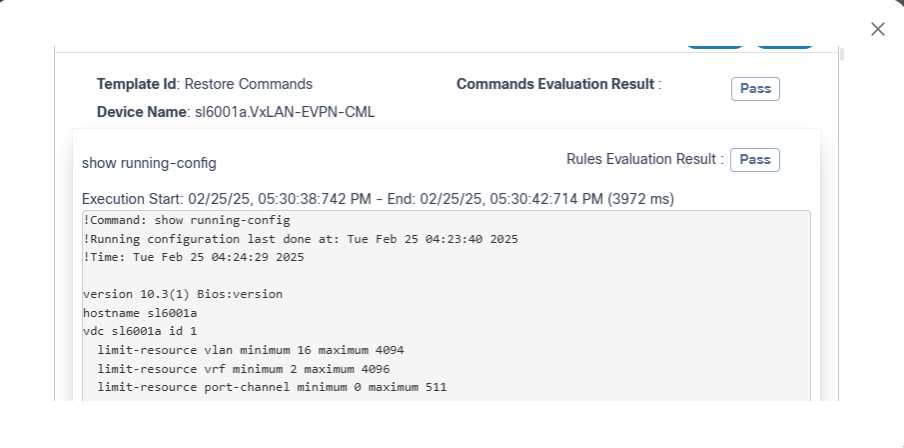
- Output for Execute Postchecks
- Output for View AnalyticsDiff

Administrator Application
The Backup and Restore framework enables a device configuration backup to be taken from various controllers and stored in a configurable datastore. The framework also supports a workflow-based approach to restore backup configuration on specific devices. The Backup and Restore Administrator application has the following components:
- Policies
- Schedules
- Device Configuration - Upload
- Backup History
- Target Repositories
- Target Plugins
Policies
Policies is the metadata definition to be adhered to while running the Backup and Restore flows.
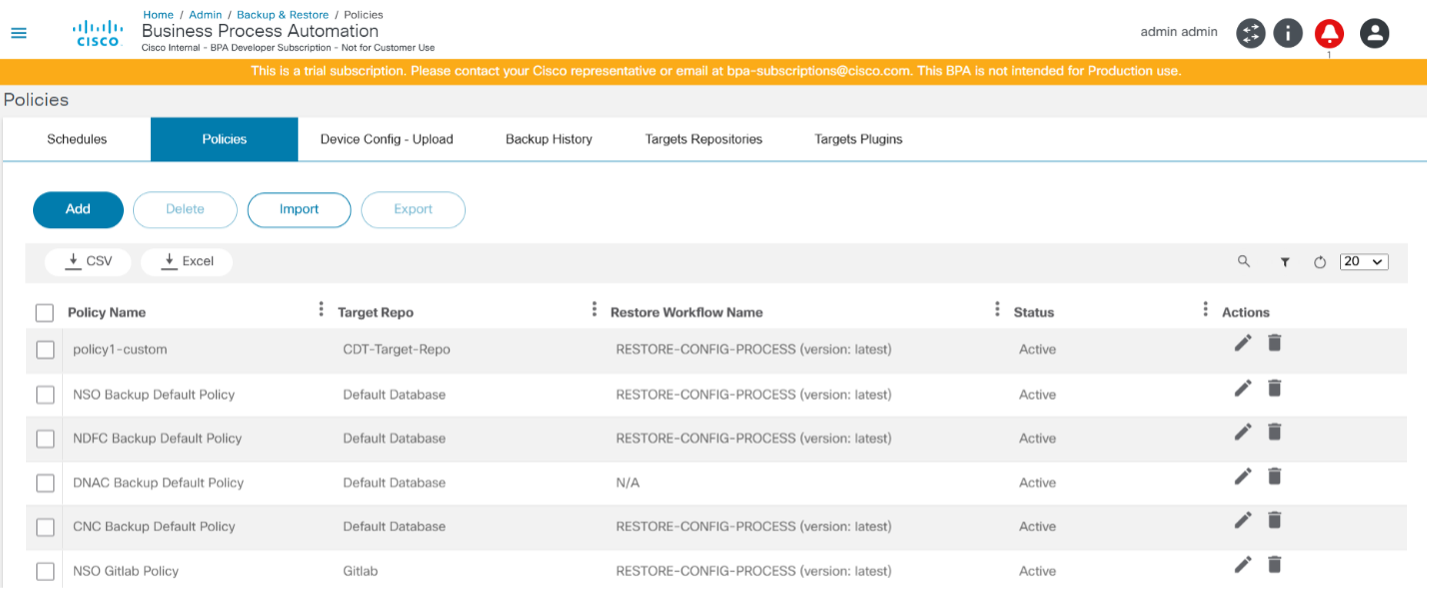
The Policies tab provides a grid view of all the policies available in the system and options to add, edit, delete, upload, and download policies. Policies can be downloaded from one environment and uploaded into another.
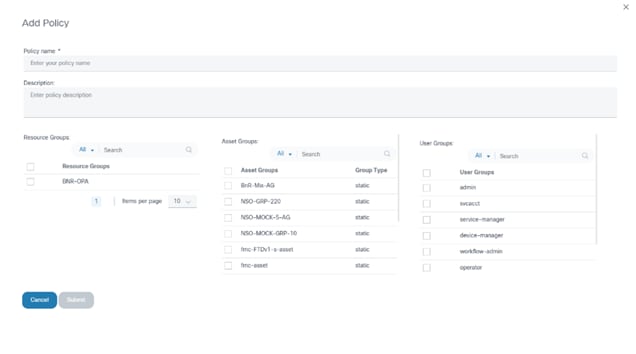
Adding or Editing a Policy
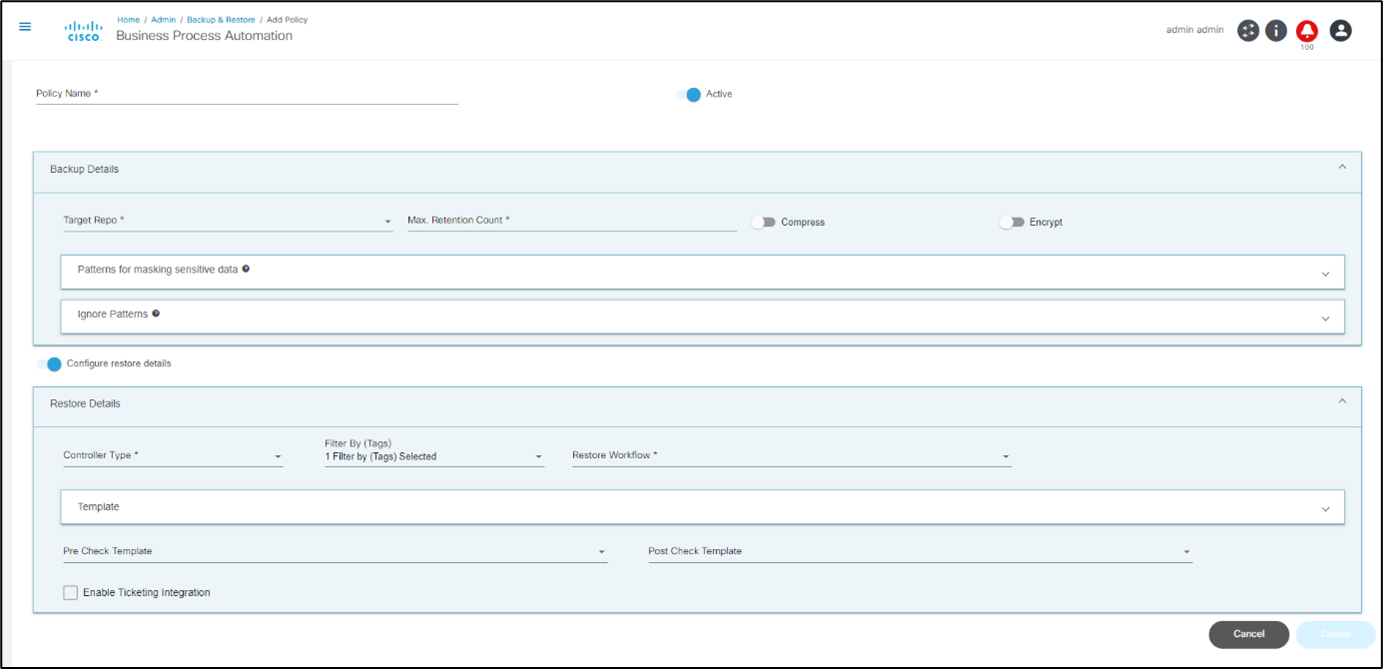
The Policies tab includes the following key fields:
- Policy Name: Name of the policy (must be unique)
- Active: When enabled, the policy is active; if not enabled, the policy is not shown to users for taking backups and all corresponding schedules are disabled
The Backup Details section includes the following fields:
- Target Repo: The target repository where backups are stored
- Max. Retention Count: Total number of backups to retain per device; once this value is reached, older device backups are deleted
- Patterns for masking sensitive data: List of patterns that can be used to mask sensitive data during display; this does not change the stored configuration
- Ignore Patterns: List of patterns that can be used to ignore lines when comparing two configurations; used while creating checksums to decide whether a previous backup and the current backup are the same, and it does not change the stored configuration
- Compress: When enabled, the backup is compressed before it is stored
- Encrypt: When enabled, the backup is encrypted before it is stored
The Restore Details section includes the following fields:
- Restore Workflow: The workflow that is executed during the restore process
- Controller Type: The controller type that the policy applies to (e.g., Data Center Network Manager (DCNM), NSO)
- Template: One or more pre- or post- templates and/or analytics templates can be added; used during the restore workflow for validation
- Filter By (Tags): Restore workflows and templates can be filtered using tags
- Pre-Check Template: List of templates only used for pre-checks
- Post Check Template: List of templates only used for post-checks
- Enable Ticketing Integration: Enables ticketing system integration; the use case provides out-of-the-box integration with the ServiceNow system
Schedules
Schedules are created against policies. Users can select a list of devices and choose when to back up the device. Schedules can be one-time or periodic.
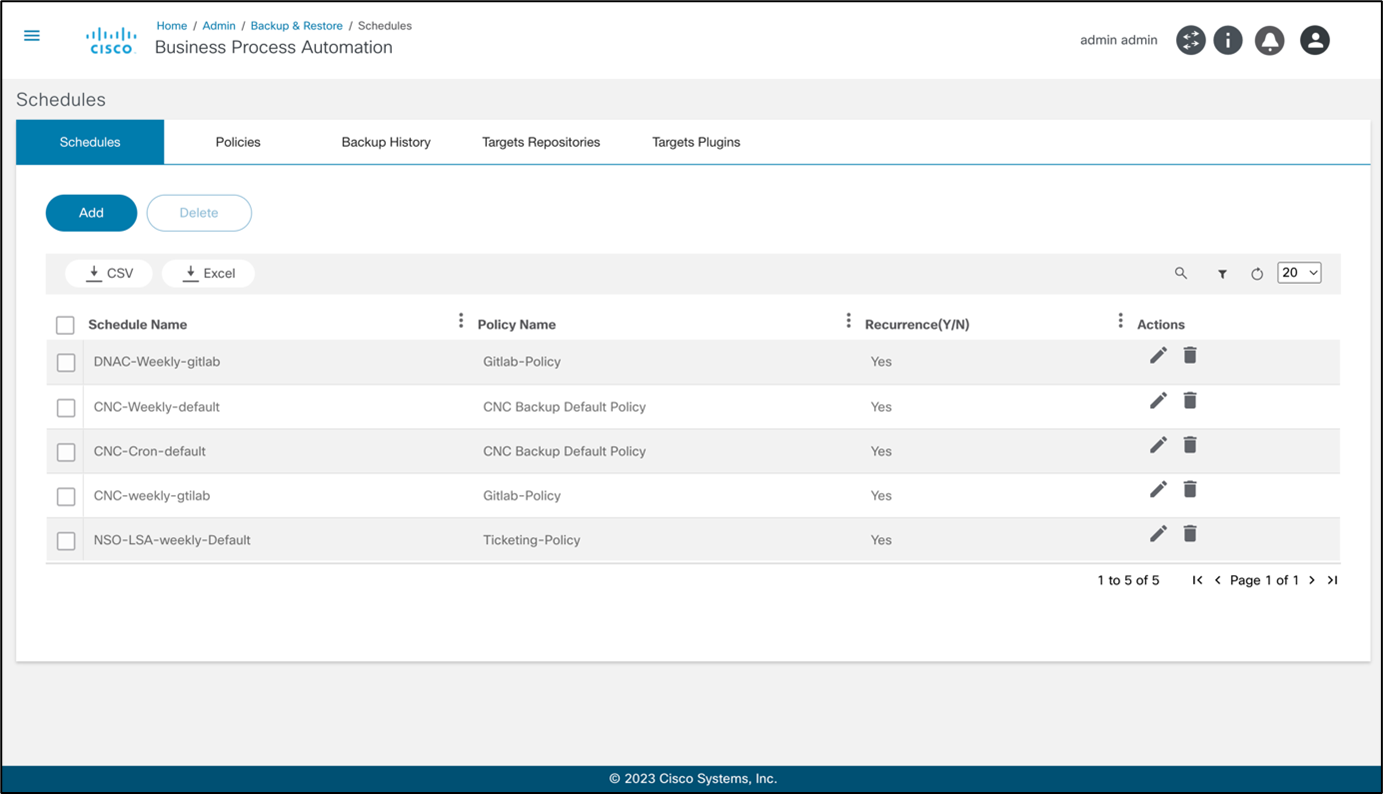
The Schedules tab lists all schedules configured in the system. Administrators are provided with options to add, edit, and delete schedules.
Adding or Editing a Schedule

The Schedules tab has the following key fields:
- Schedule Name: A unique name to identify the schedule
- Policy Name: The policy to use while taking backups with this schedule
- Label: Optional label to be attached to all backups taken in this schedule
- Asset Group: The asset group (i.e., list of devices) for backup
- Schedule Details and Schedule Recurrence sections: Contain fields to define various schedule parameters, such as start date and time, recurrence pattern (including Cron), and end date
Device Config - Upload
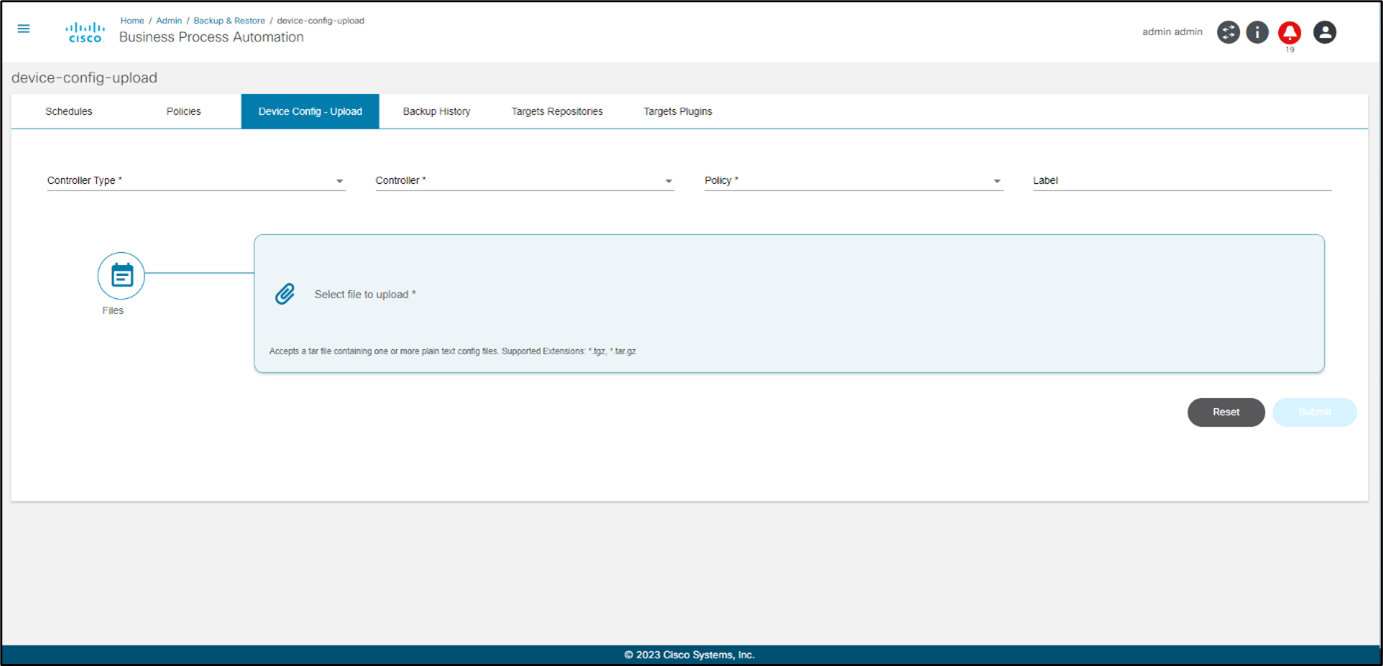
In the Device Config – Upload tab, users can upload a .tar.gz or .tgz file containing one or more device configurations to save it as a configuration backup.
The upload file structure is as follows: “sample.tar.gz” > “sample.tar” > “device-name.txt”
The Device Config – Upload tab includes the following key fields:
- Controller Type: Controller type to which the controller instance belongs (e.g., DCNM, NSO)
- Controller: Controller instance to which the controller devices are onboarded
- Policy: Policy used while taking backups by this device configuration upload
- Label: Optional label attached to all backups taken in this device configuration upload
- Files section: Configuration file to be uploaded in .tgz or .tar.gz format
Backup History
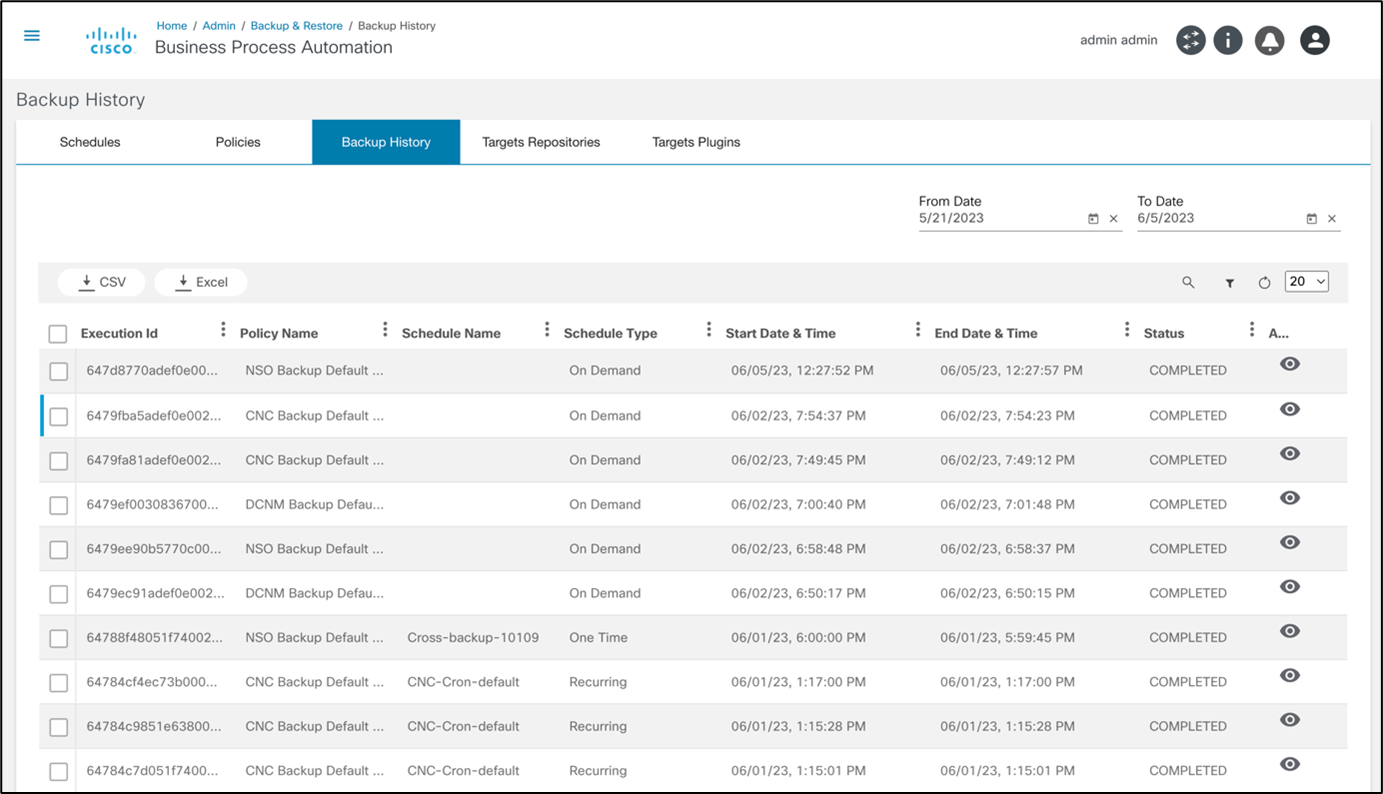
The Backup History tab provides a historic view of completed backups with references to their date, policy, schedule, and status.
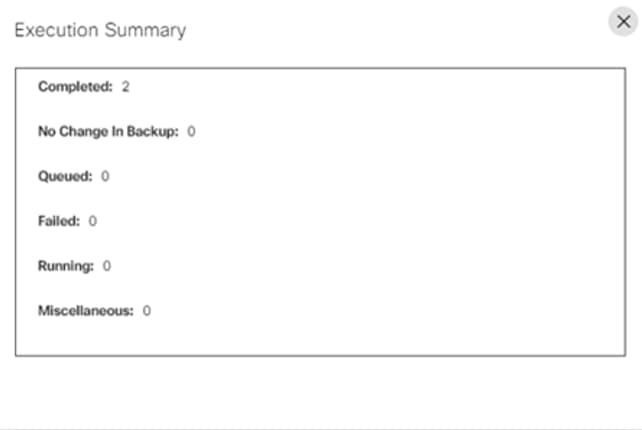
Users can view the detailed status of each execution.
Target Repositories
Target repositories are data systems where backup configuration data is stored. The default, pre-configured target repository is the internal database.
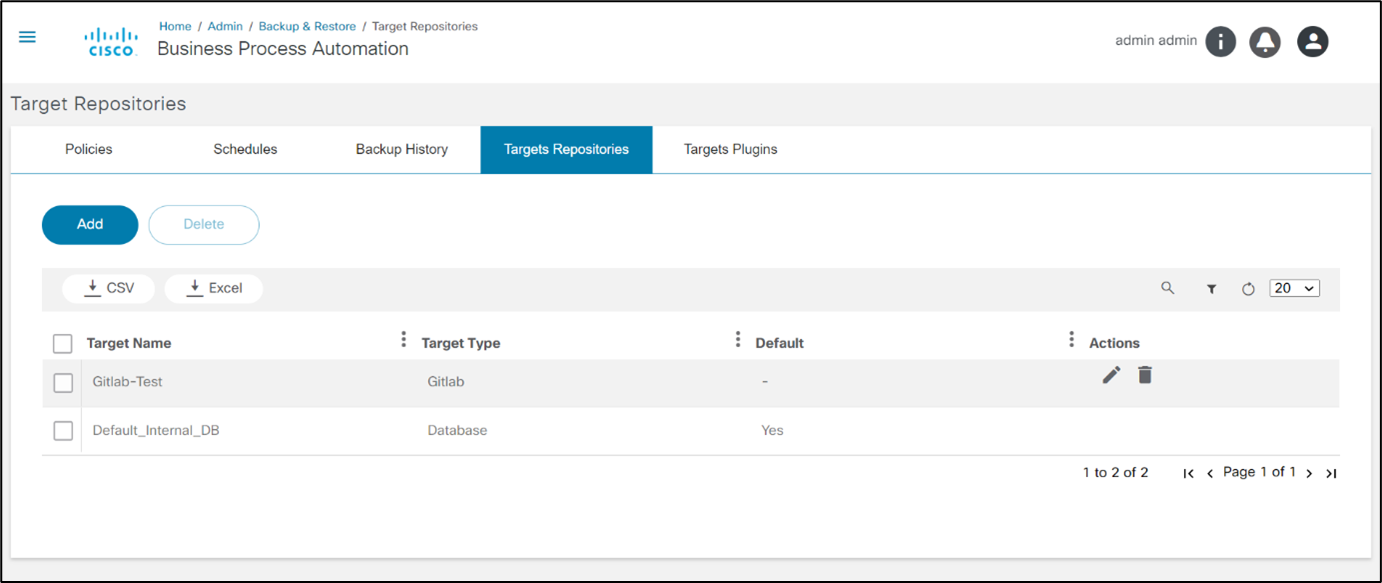
The Target Repositories tab displays a list of the target repositories configured for the system. Administrators can define the repository instances against different target types.
Adding or Editing Target Repositories
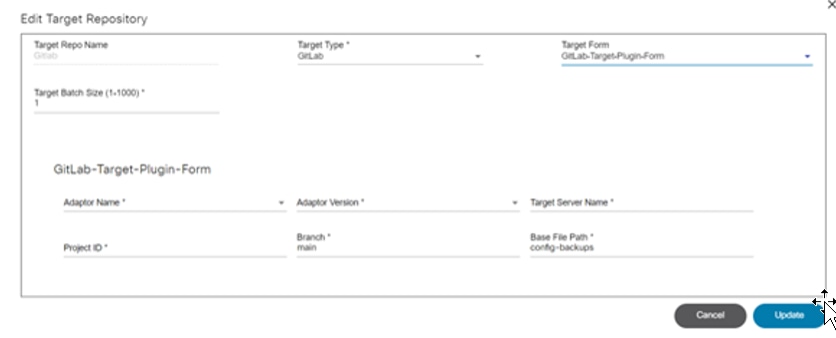
The Edit Target Repositories window has the following key fields:
- Target Name: Name of the repository
- Target Type: Name of the target type with a list of values from the Target Type tab
- Target Form: Optional target form; the configuration data to be used against this target repository instance must be completed (e.g., Adaptor Name, Adapter Version, etc.)
- Target Batch Size: The target batch size
Target Plugins
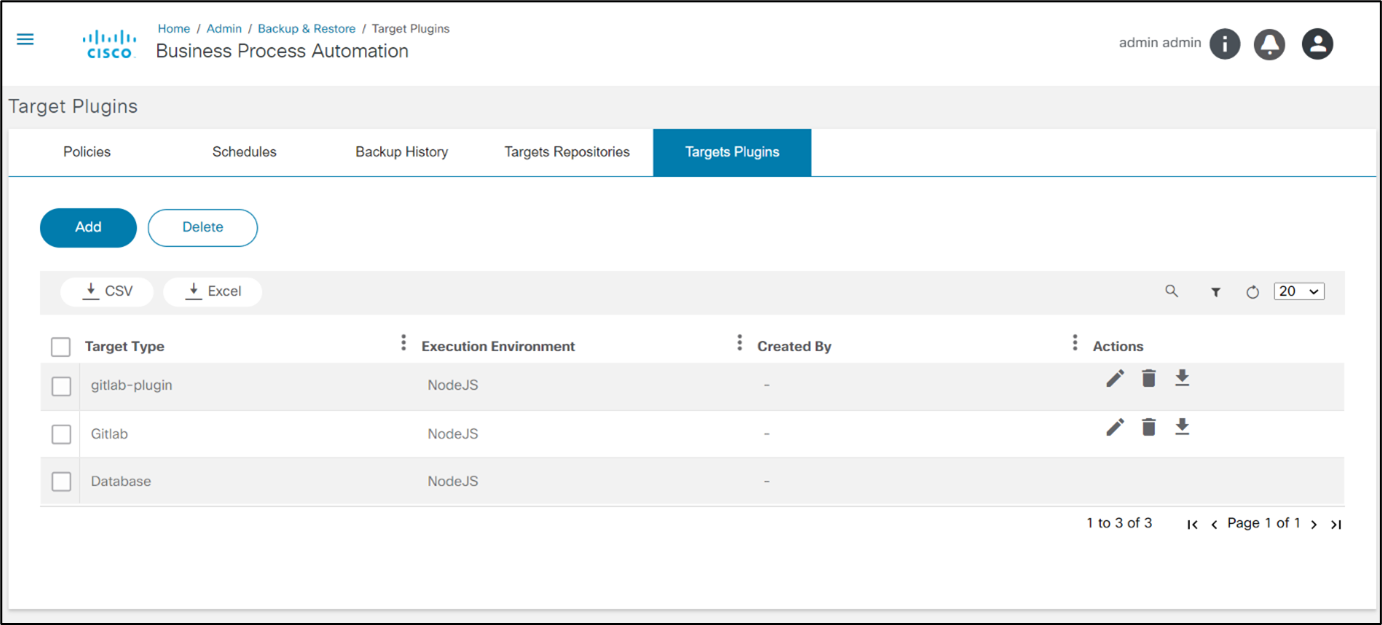
The Backup and Restore framework provides an option to configure an external system as storage for the backup configurations. This feature is powered by a plugin architecture. Each plugin implements a predefined interface with a list of functions, input, and output parameters and be uploaded in the Target Plugin tab.
Adding or Editing Target Plugins
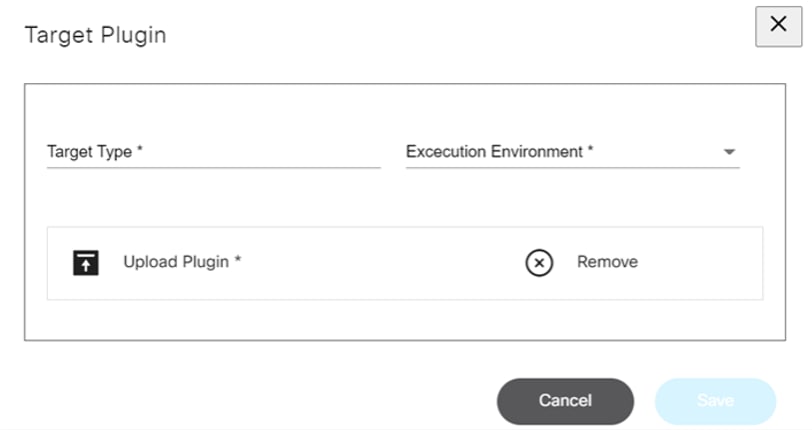
The Edit Target Plugins window has the following key fields:
- Target Type: Name of the plugin
- Execution Environment: Where the plugin runs; only NodeJS is currently supported
- Upload Plugin: Plugin file to be uploaded in .tgz or .tar.gz format; this should be a Node Package Manager (NPM) package
Backup Throttling
The backup process utilizes the Advanced Queueing Framework (AQF), leveraging its throttling limits for efficient operation. AQF optimizes request processing during scheduled backups, ensuring seamlessness within defined throttling parameters.
Roles and Access Control
Static Permissions List
The Configuration Backup and Configuration Restore pages in the Next-Gen’s portal support BPA’s Role-Based Access Control feature with the following permissions:
| Permission Group | Action | Description |
|---|---|---|
| ui-app | restore-jobs.show | Show or hide the Restore Jobs application |
| restore-jobs | view | View active and archived restore jobs, including the ability to view corresponding milestone details |
| restore-config | manage | Triggers the restore workflow and claims user tasks |
| backup-config | view | View, compare, and download device configuration backups |
| backup-config | manage | Triggers device configuration backups |
Pre-Defined Roles
Administrators can create or update roles as per the customer requirement. This use case has the following predefined roles:
| User Roles | Description | Permissions |
|---|---|---|
| Backup Restore Admin | All backup Backup and restore actions permissionRestore option permissions are allowed to this user | ui-app: backup-jobs.show, restore-jobs.show backup-jobs: view backup-config: view, manage backup-restore-policy: view restore-config: manage restore-jobs: view, manage |
| Backup Restore Read-only | Users can view device configurations, compare configurations, view backup history, and view configuration restore jobs | ui-app: backup-jobs.show, restore-jobs.show backup-jobs: view backup-config: view backup-restore-policy: view restore-jobs: view |
| Backup Operator | Users can take a backup of permitted devices, view device configurations, compare with current configurations | ui-app: backup-jobs.show, backup-jobs: view backup-config: view, manage backup-restore-policy: view |
Access Policies
The Access Policies feature ensures users have appropriate access to specific Backup and Restore policies and asset groups. This feature enhances security and operational efficiency by allowing Administrators to define and enforce access controls based on user roles and responsibilities. The access policies are managed through the Access Policy page, where Administrators can create, edit, and assign policies to users or groups. Administrators can define granular permissions, specifying which compliance policies and asset groups each user or group can view, edit, or manage. This level of detail helps to maintain strict control over sensitive information and critical operations.
Once the access policy is defined on all Configuration Backup and Configuration Restore pages in the Next-Gen UI, data is restricted based on the list of Backup and Restore policies and assets that the current user has access to.
To give users access permission:
- Create user(s) and assign them to user group(s).
- Create user role(s) and assign them to the created user group(s).
- Add asset(s) to the asset group(s).
- Create resource group(s) to assign backup policy resource(s).
- Create an access policy and select the relevant user group(s), asset group(s) and resource group(s).
Creating a Resource Group
To create a resource group in the Add Resource Group window:

- Enter a name in the Resource Group name field.
- Select backup-restore-policy from the Resource Type drop-down list.
- Select the check box of the desired backup policies to be provided with access to the user group.
- Click Submit.
Creating an Access Policy
Create access policies with resource group(s) and asset group(s) that needs to give permission to the user group(s).
Classic UI: Users, Groups, and Permissions
The Configuration Compliance application in the classic UI supports the group-based permission feature of BPA with the following permissions:
- View Policy Profiles: Enables read-only access to the configuration tabs (e.g., Policies, Rules, and Blocks)
- Create/Update Policy Profiles: Enables full access (e.g., read and write) to the configuration tabs (e.g., Policies, Rules, and Blocks).

- View Jobs: Enables read-only access to the Compliance Jobs tab and its content
- Opt in/out Jobs: Enables full access to the Compliance Jobs tab and its options
- View Execution Details from Compliance Summary: Enables drill-down from the Compliance Summary page to the Execution Details page
- View Violation Details from Execution Details: Enables drill-down from the grid in the Execution Details page to Device Compliance Details page
- View Violation Details from Network Summary Grid: Enables drill-down from the grid in the Network Summary page to the Device Compliance Details page
Deploying Artifacts via Ingester
Loading of the Backup and Restore use case artifacts can be automated using the Ingester framework. Once artifacts are developed, they can be exported, packaged, and deployed into the target environment using the steps below.
- Create an NPM package using the following commands:
mkdir <<package-name>> cd <<package-name>> npm init - Export configurations from the BPA portal (classic UI):
- Navigate to the BPA Classic UI > Admin > Backup & Restore.
- Export the Policies and Target Plugins.
- Rename the exported files as follows:
- Policies: “<<filename>>.bnrpolicy.json”
- Target Plugins: “<<filename>>.targettype.tgz”
- Package the Ingester data (.tgz):
- Copy all exported files into the NPM package created in Step 1.
- Run the
npm packcommand inside the NPM package to create the .tgz file.
- Deploy the Ingester data (.tgz) into the BPA Single Node
environment:
- Copy the .tgz file into the <<BPA core bundle>>/packages/data folder in the server where the BPA bundle is deployed.
- Restart the Ingester server using the
docker restart ingester-servicecommand.
- Deploy the ingester data (.tgz) into the BPA Multi-Node
environment:
- Copy the .tgz file into the /opt/bpa/packages/data folder in the server where the helm charts are deployed.
- Redeploy the ingester pod using the
kubectl rollout restart deployment ingester-service -n bpa-nscommand.
API Documentation
The API documentation details for Backup and Restore are located in the classic UI About window.
Troubleshooting
Issue: Device Backup Status is “No change in backup”
Potential cause: If there are no configuration changes between the device’s previous backup configuration and the current backup configuration, the status is “No change in backup”.
Issue: System is Displaying Multiple Backups, Even When There Are No Changes in the Configuration
Potential causes:
- The system initiates a new backup execution for every trigger, even if there are no changes in the configuration from the previous backup. This means the system does not create a new device configuration backup; instead, the execution refers to the previous backup.
- Once a backup is retrieved from a device, the system compares it with the previously available backup (i.e., a checksum of the two backups) to decide whether to store the new backup or not. In many cases, there are insignificant differences, like the date-time of the backup which results in the same configuration to be stored again.
Analysis: Review and update the Ignore patterns section of the backup policy to indicate the lines the system should ignore before comparing.
Issue: NSO Controller Device’s Backup Status is “Failed”
Potential cause: The NSO controller device’s backup fails if the ciscoutils NSO package is not deployed.
Analysis: Ensure the ciscoutils NSO package is successfully deployed in the server.
Potential cause: The NSO controller devices’ backup fails if the SCP configuration is not enabled in devices.
Analysis: Ensure the SCP configuration is enabled in the devices.
Refer to the Secure Shell Configuration Guide, Cisco IOS XE Release 3S for more information on enabling Secure Copy (SCP) for IOS XE devices.
Revision History
| Revision | Publish Date | Comments |
|---|---|---|
1.0 |
23-Sep-2025
|
Initial Release |
 Feedback