BPA User Guide Configuration Compliance and Remediation v5.1
Available Languages
- Introduction
- What’s New
- Assumptions and Prerequisites
- Compliance Dashboard
- Opening and Using the CSV File for Asset Compliance
- Reports
- Compliance Jobs
- Creating Offline Audit Jobs
- Run Now or Re-Run Compliance Jobs
- Remediation Jobs
- Configuration: Blocks and
Rules
- Functionality of Blocks
- Functionality of Rules
- List Blocks
- Adding or Editing Blocks and Rules
- Using Ignore Line Syntax
- Raising Violation
- Rules Management
- Dynamic User Defined Blocks - Best Practices
- Understanding Rule Hierarchy and RefD Integration in Rules and Non-RefD Rules
- RefD Integration
- Viewing Block Details
- Deleting Blocks
- Configuration: Auto Blocks Generation
- Block Identifier
- Configuration: Policies
- Roles and Access Control
- Offline Compliance
- Deploying Configurations through Ingester
- References
- API Documentation
- Troubleshooting
Introduction
The Configuration Compliance and Remediation (CnR) application equips network operators to conduct device configuration compliance checks for custom-defined policies constructed from configuration blocks. Operators manually craft or automatically generate configuration blocks using the system from selected device configurations. Users can also establish rules that apply to these blocks, with rule conditions potentially derived from values obtained from the RefD application. Operators can conveniently execute compliance checks according to a schedule or initiate the checks instantly.
The application boasts an intuitive dashboard, presenting a comprehensive overview of compliance violations, offering both summaries and detailed views at the device and configuration block levels.
The application includes a robust remediation framework for handling compliance infractions. This framework leverages workflows and templates—both configuration templates, known as Golden Configuration Templates (GCTs) and process templates—to streamline the remediation process. Similar to compliance checks, remediation tasks can be programmed to run on a timetable or triggered immediately to address violations promptly.
The Next-Generation (Next-Gen) portal’s Compliance and Remediation dashboard has features designed to enhance network security management, streamline compliance procedures, and simplify remediation activities. The dashboard provides a comprehensive summary of asset and policy compliance, making it easy for network operators to assess the health of their network and ensure that devices comply with strict security protocols.
Configuration blocks can be generated automatically and then edited or added manually, offering a balance between automation and customization. The system’s precise identification of configuration blocks and granular access control mechanisms, including detailed user, group and permission settings across classic and modern interfaces, ensure that network configurations remain both secure and in the hands of trusted personnel. These features provide a powerful toolset for organizations looking to maintain high network compliance and security standards.
What’s New
The following key features and enhancements have been introduced:
- A comprehensive reporting dashboard to generate, view, and download compliance reports
- Ability to perform offline compliance audits by uploading device configurations without onboarding the device using Asset Manager
- Ability to configure patterns in block config to mask sensitive device configuration data
- Ability to export policy and asset compliance summary grid data as CSV files
- View and compare generated remediation configurations against device running configurations
- Enhancements in blocks to support raising violations if the configuration exists
- Enable a connected user experience in policy create and edit pages to cross-launch into child components such as the block creation page
- Enhancement in compliance jobs create and edit pages to cross-launch into the policy edit page
Components
Compliance and remediation support the following controllers and device types:
| Controller | OS Types |
|---|---|
| NSO (6.5) | IOS XE, IOS XR, NX-OS, JunOS, Nokia SR-OS |
| CNC (6.0) | IOS XE, IOS XR, NX-OS |
| NDFC (3.2.0 / Fabric v12.2.2) | NX-OS |
| Cisco Catalyst Center (2.3.5) | IOS XE, IOS XR. Validated Compliance only |
| FMC (7.2.5) | FX-OS (FTD). Validated Compliance only |
| Direct To Device (D2D) | IOS XE, IOS XR, JunOS |
As part of the v5.0 release, the Compliance and Remediation (CnR) classic application has been deprecated. All CnR features are now fully integrated and available in the Next-Gen portal.
Assumptions and Prerequisites
The following prerequisites are required to effectively use the CnR use case.
- The subscription entitlement key for CnR use case should be uploaded.
- The relevant controller and devices should be onboarded and available as part of the BPA Asset Manager. Refer to the Asset Manager section in the BPA User Guide for details.
- The onboarded assets need to be grouped as per customer requirements into asset groups in Next-Gen portal.
Compliance Dashboard
The compliance dashboard provides a summarized view of violations on all devices for the selected time. The data for the current month displays by default. Users can change the time window to view historical data on compliance violations. The current month is the default selected view.
Configuration Compliance Flow Diagram
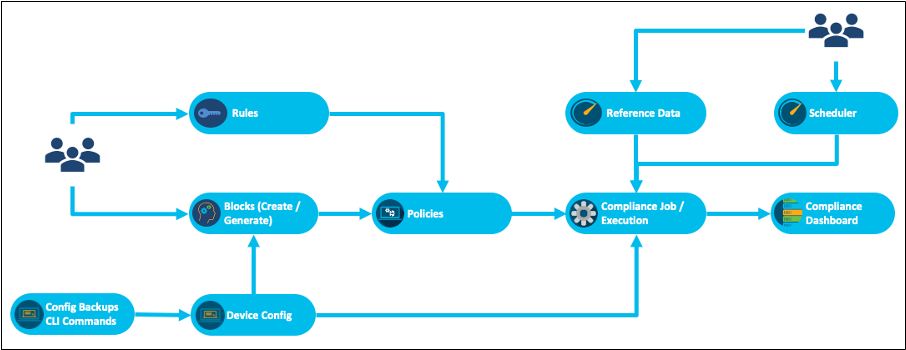
The compliance violations displayed in the dashboard are populated when a Compliance Job is run for a policy against a list of assets. The compliance policy is created by adding a list of block configurations along with necessary compliance rules. The compliance rule can have checks with either static values or dynamic variables for which data is fetched from the RefD application. A Compliance Job can be run on demand or as one-time or recurring schedule.
The configuration compliance includes the following important features:
- Blocks creation: Blocks are manually created or automatically generated using the Template Text Parser (TTP) template. They can be static or dynamic (with variables).
- Rules creation: Rules validate the variables in the blocks. Rule values can be set statically or retrieved dynamically from the Reference Data (RefD) system during execution time.
- Policy creation: Policies are created by selecting the list of blocks and the corresponding rules. The data for the rules can either be static of fetched from RefD framework dynamically at runtime.
- Compliance job creation: Compliance jobs are created by selecting a policy and an asset group (containing a list of assets) to run the compliance check. Users can choose to retrieve the device configuration from the backup framework or run live commands through process templates on the devices during execution. Fetching configuration from backup helps in offline auditing of devices without the need to connect to a live device. The jobs can be scheduled or run on demand.
- Compliance Violations: View compliance violations on the dashboard.
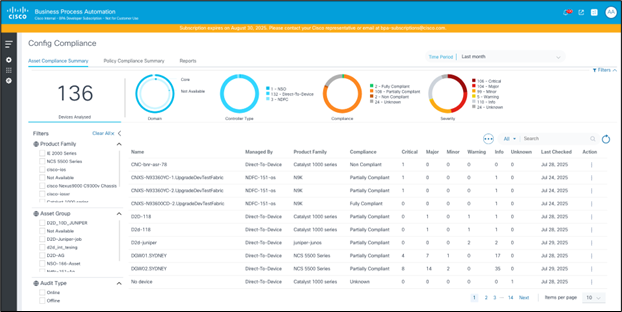
Asset Compliance Summary
The Asset Compliance Summary tab is an essential feature designed to provide a comprehensive overview of compliance violations across all devices within a network. This tab allows users to quickly identify compliance issues, ensuring that all devices adhere to established policies and standards. The interface is equipped with powerful filtering and search capabilities, making it easy to navigate and analyze compliance data.
Key Features
- Violation Summary per Device: The tab displays a summarized view of compliance violations for each device, giving users a quick snapshot of the overall compliance status categorized by severity levels such as critical, high, medium, and low.
- Detailed Violation Information: For each device, the pop-up window provides detailed information about the policies violated and the user can further drill down into the block and configuration line that caused the violation.
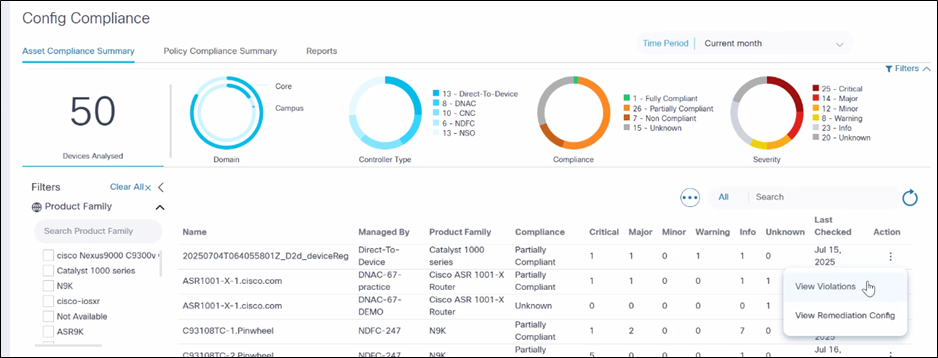
- Advanced Filtering Options: The filters located at the top and left of the tab allow users to narrow down the data displayed in the grid. Users can filter by date range, Asset Group, Product Family, and more, enabling a focused analysis of compliance data.
- Search Functionality: A search field is available to further refine the data in the grid. Users can quickly locate specific devices or manage by controller by entering relevant keywords or phrases.
- Customizable Date Range: By default, the current month is selected in the date range filter, providing the most recent compliance data. However, users can customize the date range to view data.
- Filters: Multiple filters such as Product family, Asset Group, and Audit Type are available. Apply the filter to refresh the grid.
- Export as CSV: A feature available to help users obtain a local copy of asset configuration compliance for offline analysis, reporting, and archival purposes. To export data as a CSV file, select Export as CSV from the the More Options icon. The downloaded CSV file contains the data that is currently displayed in the grid, respecting any applied filters.

CSV File Details for Asset Compliance
The CSV file includes all columns visible in the Asset Compliance Summary grid, such as device name, controller instance (managed by), product family of the device, device compliance status, violation count by severity (e.g., Critical, Major, Minor, Warning, Info, Unknown) and the date when compliance was last checked for the device.
If the grid has pagination, the export includes all records across pages, not just the visible page.
Opening and Using the CSV File for Asset Compliance
- Open the downloaded CSV file in Excel or any compatible spreadsheet application.
- Ensure that the content matches what is shown in the Asset Compliance Summary grid, including filtered results.

Viewing Asset Compliance Summary by Policy
Clicking on a row from the Asset Compliance Summary grid displays the details of asset violations, categorized by the different policies which the device is validated against. This serves as a detailed view for users to view the violation count by severity in each policy.
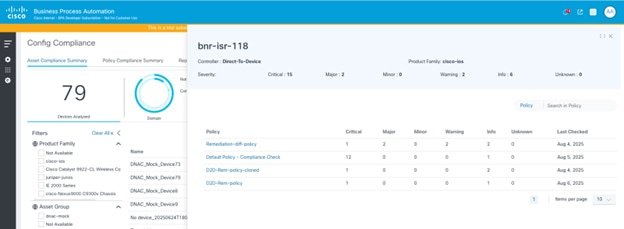
Viewing Violation Details
The Violation Details page displays block and rule level violations overlayed on the device configuration. In addition, users can also view the block configuration and suggested remediation configurations.
To view the Violation Details page from the Asset Compliance Summary page along with policy level split-up:
- Select a row in the Asset Compliance grid. A pop-up displays. The grid displays a split-up of compliance details by Policy.
- Select a row in the grid. The Violation Details page displays.
To view the Violations Details page from the Policy Compliance Summary grid:
- Select the Policy Compliance Grid.
- Select a row > Affected Asset Grid.
- Select a row. The Violations Details page displays.
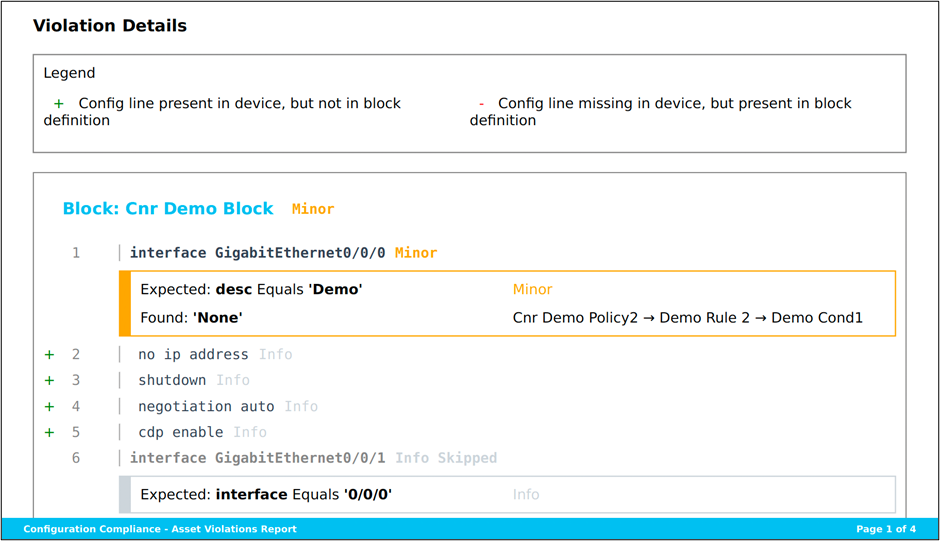
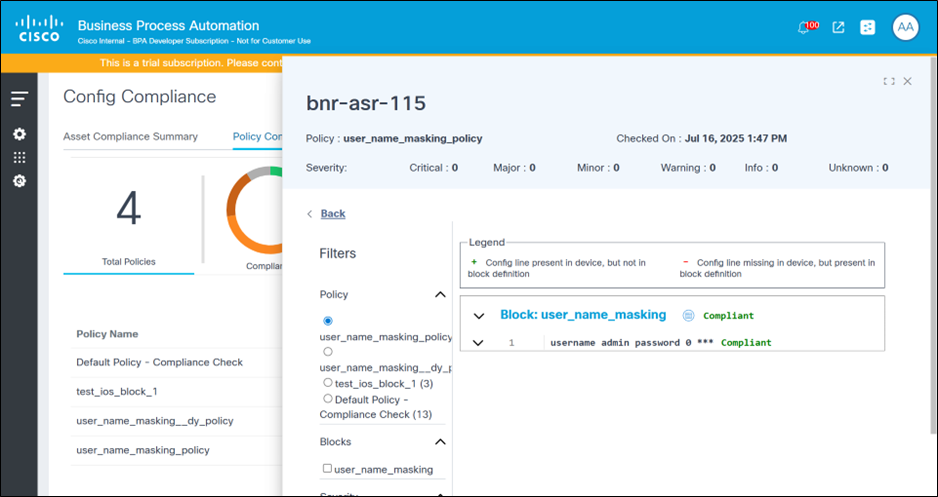
The right side of the Violations Details page shows the device configuration blocks and overlays the violations on top of it. Violations are listed against corresponding configuration line(s). In the case of a condition failure, the violation ribbon provides details of the rule name, the condition, and what is the expected configuration (as defined in the rule) versus what is the configuration retrieved from the device configuration.
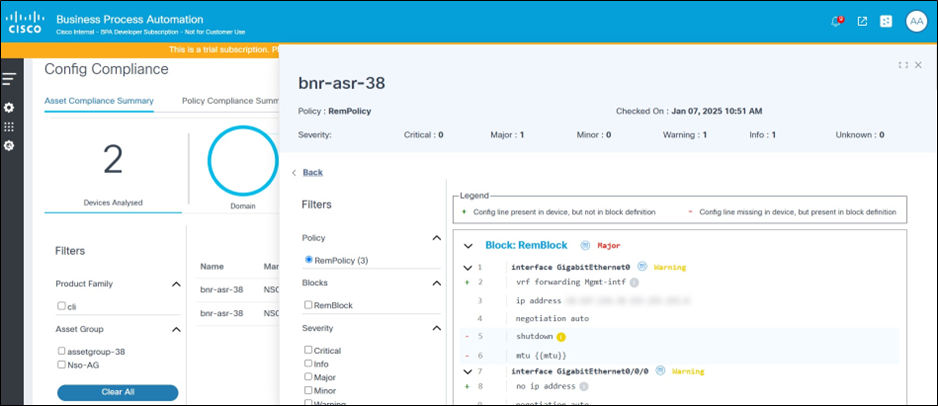
Block Symbols
- A “+” sign against a line implies that the configuration is not expected as per the block configuration, but additionally present in the device configuration.
- A “-” sign against a line implies the configuration is expected as per block configuration but is missing in the device configuration.
Filters
The filter section at the left side of the page allows users to perform the following actions:
- Change the policy; this refreshes the page and loads the violations for the newly selected policy
- Select the Blocks check boxes to view violations relevant to the selected blocks
- Select the Severity check boxes to view violations with given severity level(s)
- Select the Violation Type check boxes to view
violations of the selected type:
- Order mismatch: The order of the device configuration lines does not match the order defined in the block configuration
- Missing Config: View configuration lines which are expected as per the block configuration but missing in the device configuration
- Additional Config: View configuration lines which are not expected as per the block configuration, but additionally present in the device configuration
- Rule Failures: Failures of one or more conditions in rules.
- Missing Blocks: The entire device configuration block is missing or not matching with the defined block configuration.
- Skipped Blocks: This configuration block is skipped because the block filter conditions are not met.
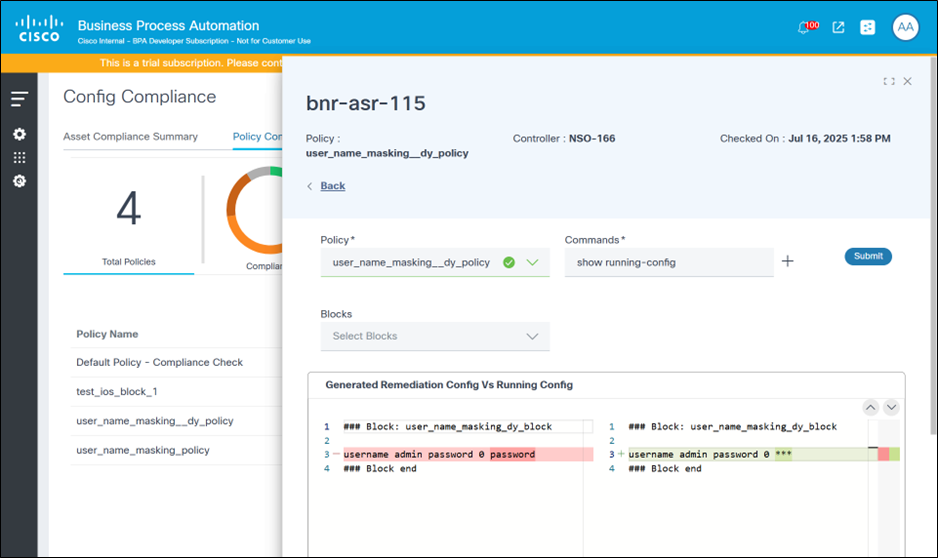
Viewing and Comparing Remediation Config
The Remediation Config page displays the generated configuration for the selected device for each of the blocks in a given policy. The configuration is generated and considers the block and rule details present in the policy, as well as the device configuration retrieved during compliance execution. Users have the option to update the configuration in the same page. This generated configuration can be pushed to the device using the remediation jobs feature. In addition, this page provides an option for users to compare the generated configuration against the current device running configuration. The user can specify one or more commands to retrieve the current device configuration.
To view the Remediation Config page from the Asset Compliance grid:
- Click the Asset Compliance Summary tab.
- In the asset compliance grid in the Action column , select the More Options icon > View Remediation Config. The Remediation Config page displays.
To view the Remediation Config page from the Policy Compliance grid:
- Click the Policy Compliance Summary tab.
- In the policy compliance grid, select the desired row. The Affected Assets grid displays.
- In the Action column, select the More Options icon > Select View Remediation Config. The Remediation Config page displays.
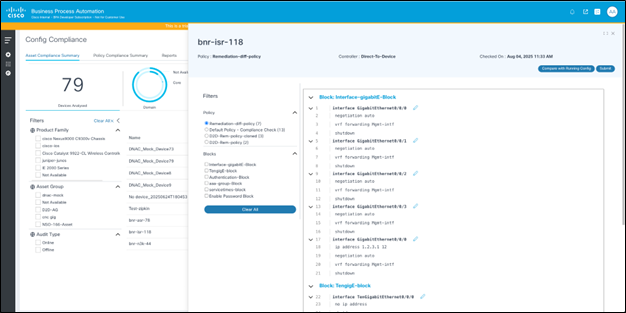
The Remediation Config page displays the following:
- Generated Remediation Config: The generated configuration is displayed on the right side of the page, along with option for users to edit the configuration blocks and submit changes to be saved
- Filters: The filters can be used to select a policy and then optionally select one or more blocks to see corresponding generated configuration
- Compare with Running Config: Click Compare with Running Config to display a detailed page that allows users to compare the generated configuration with the device running configuration

The Compare with Running Config page displays the following:
- Option to select a policy: The policy selected in the previous page is pre-selected.
- A Text box to enter one or more command(s) to be executed on the device
- A Submit button to run the command(s) on the device and retrieve the config
- Option to view and filter blocks: By default, all blocks within the policy are shown; users can select individual blocks as needed
- A Config Diff Viewer displaying the generated config and device config side-by-side, with highlights to the differences
Policy Compliance Summary
The Policy Compliance Summary tab is designed to provide a clear and concise overview of the compliance status of devices against defined policies. This tab helps users quickly assess the compliance landscape and identify areas of concern. The tab categorizes devices based on their compliance status, making it easy to understand and manage compliance briefly.
Compliance Statuses:
- Fully Compliant: All devices fulfill all compliance rules for the respective policy.
- Partially Compliant: Some devices comply with the rules, but others do not comply.
- Non-Compliant: No devices comply with the policy.
- Unknown: The policy cannot be checked for conformity due to problems with the network connection or the unavailability of backups.
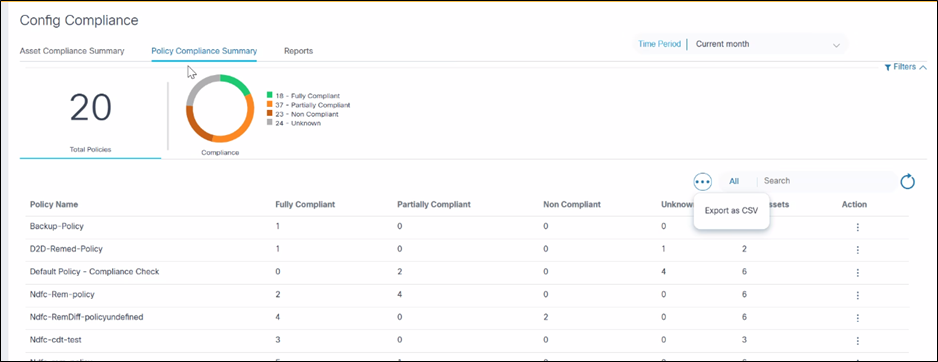
Export as CSV for Policy Compliance
The Export as CSV feature helps users obtain a local copy of policy compliance for offline analysis, reporting, and archival purposes. To export data as a CSV file, select Export as CSV from the More Options icon. The downloaded CSV file contains the data that is currently displayed in the grid, respecting any applied filters.
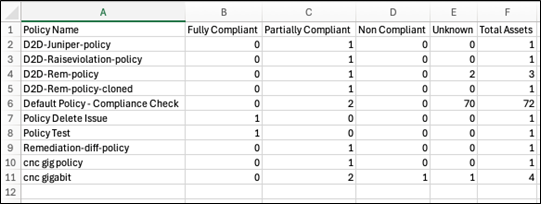
CSV File Details for Policy Compliance
The CSV file includes the policy name, total count of assets validated and breakdown of the count by compliance status (i.e., Fully Compliant, Partially Compliant, Non-Compliant, and Unknown). If the grid has pagination, the export includes all records across all pages, not just those displayed on the current page.
Opening and Using the CSV File for Policy Compliance
- Open the downloaded CSV file in Excel or any compatible spreadsheet application.
- Ensure that the content matches what is shown in the Policy Compliance Summary grid, including filtered results.
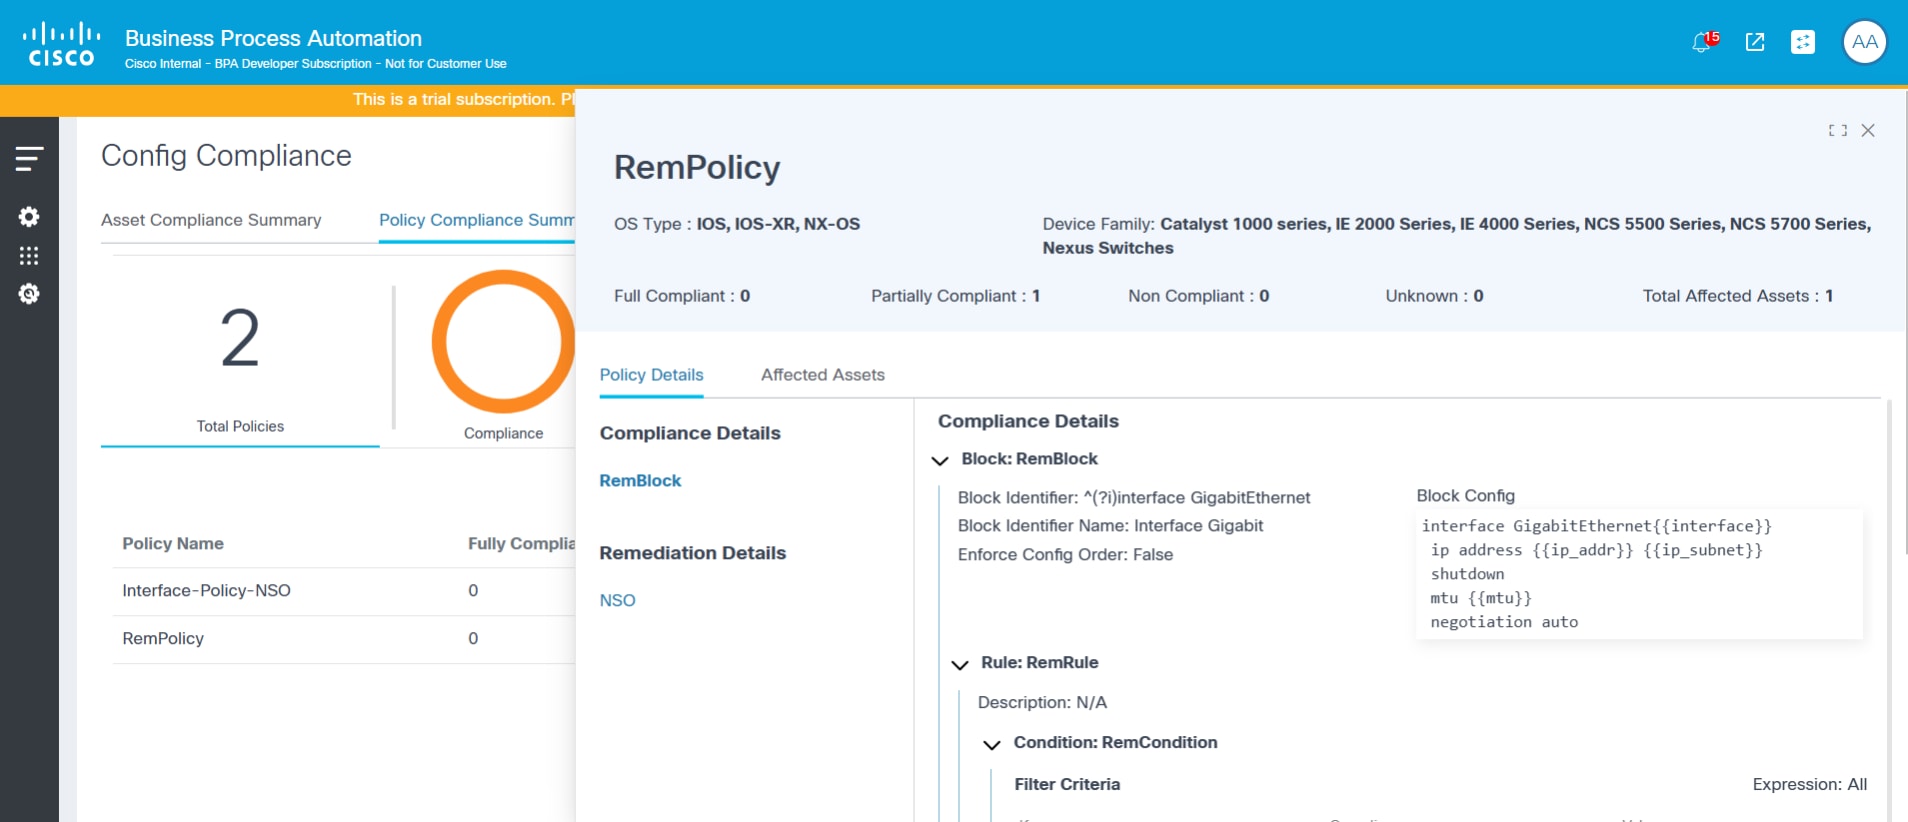
Viewing Policy Details
To view policy details:
- Select a policy from the More Options icon under the Action column.
- Select View Policy Details. The Policy Details page displays.
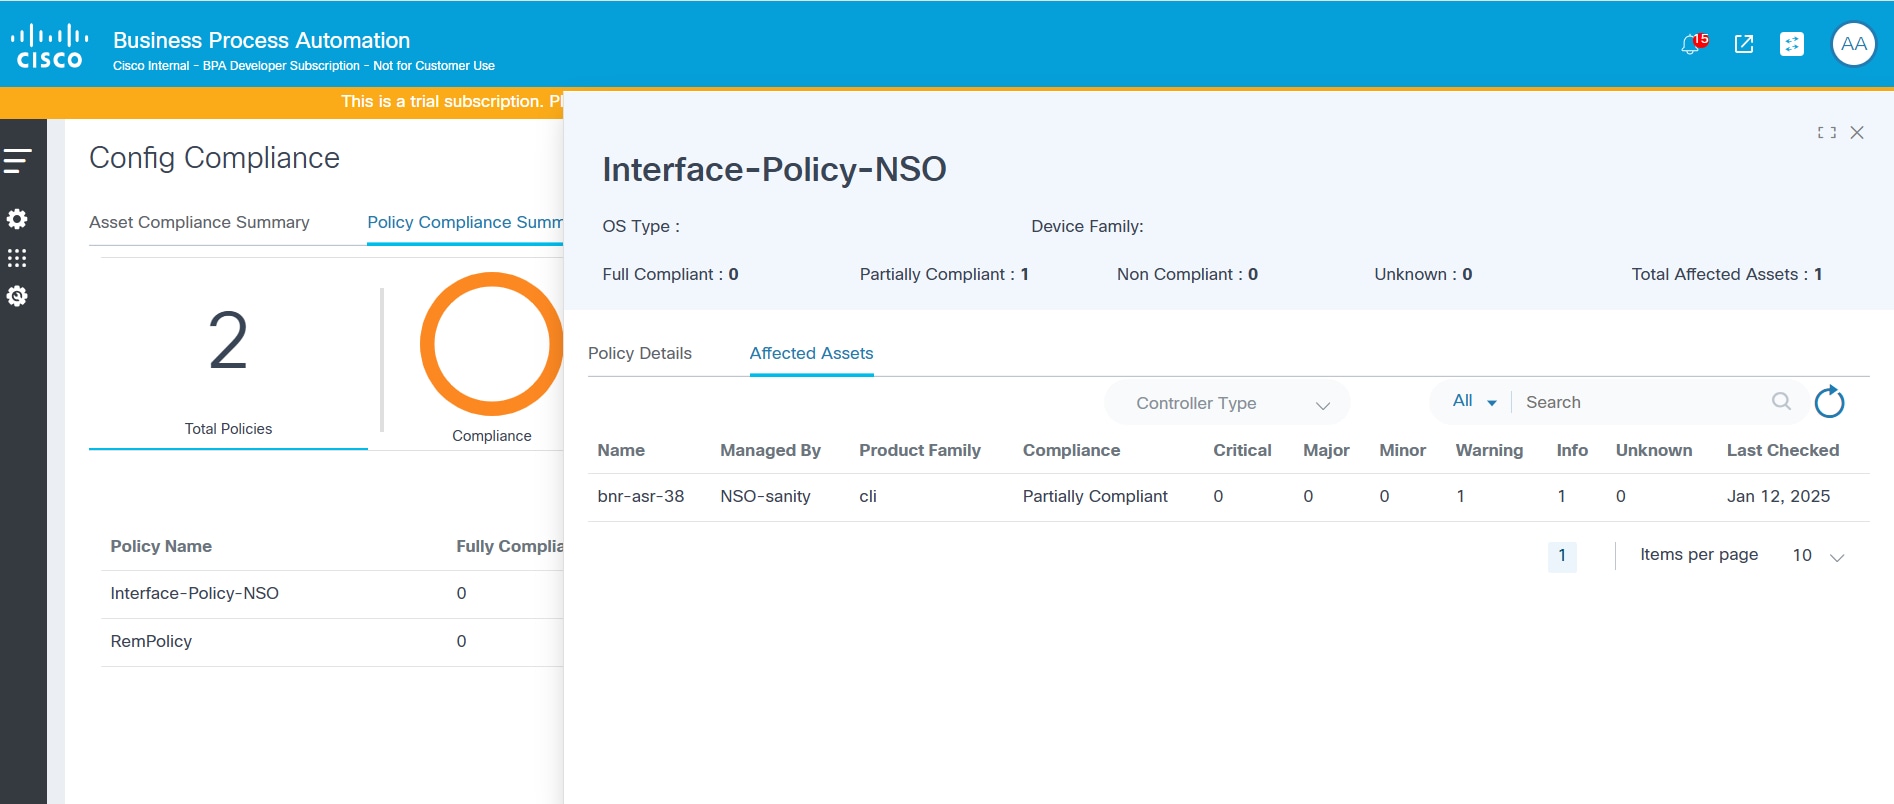
Viewing Affected Assets
The Affected Assets tab displays the list of assets analyzed under each policy and the violation count split by severity. Devices can be filtered using the Controller Type drop-down list and the search box.
To view Affected Assets from the Policy Compliance Summary tab:
- Select a row. The Compliance Policy window opens.
- Click the Affected Assets tab.
Reports
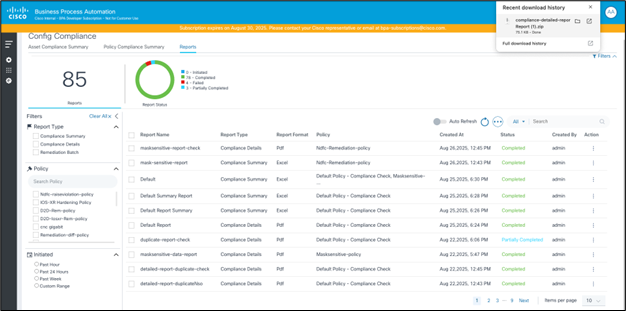
The reports section is designed to provide comprehensive insights into device compliance, identify violations, and facilitate remediation efforts. The application offers a user-friendly interface for generating, viewing, downloading, and managing various types of compliance reports.
Reporting Dashboard
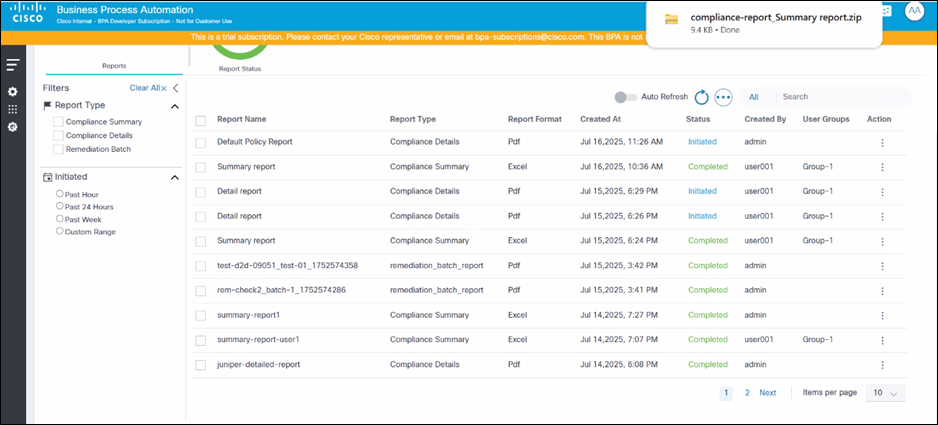
The Reporting Dashboard serves as the central hub for all compliance reporting activities. Users can efficiently manage their reports from this single interface. Key functionalities available on the Reports Dashboard include:
- Viewing Reports: Users can view a list of all generated reports, including their name, type, associated policy, format, creation date, and current status (e.g., Initiated, Completed, Failed, Partially Completed)
- Downloading Reports: Reports, once generated, can be downloaded for offline analysis or archival purposes; the Action column provides options for downloading
- Deleting Reports: Users have the ability to remove old or unnecessary reports from the dashboard, helping to maintain a clean and organized reporting environment
- Filtering and Searching: The dashboard provides extensive filtering options, allowing users to quickly locate specific reports based on criteria such as Report Type (e.g., Compliance Details, Compliance Summary, Remediation Batch), Policy, and Initiation Status (e.g., Past Hour, Past 24 Hours, Past Week, Custom Range); a search bar is also available
- Report Status Monitoring: A visual summary (i.e., pie chart) indicates the status of reports, displaying how many are initiated, completed, failed, or partially completed.
The Reporting dashboard is the landing page under the Reports tab on the Compliance and Remediation dashboard.
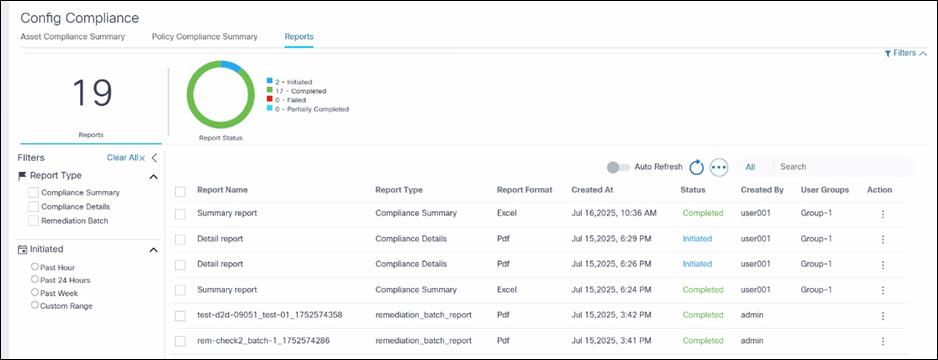
- Available report types include:
- Compliance Summary Report
- Compliance Detailed Report
- Remediation Batch Report
- Use filters to select the following:
- Report type
- Policy
- Initiated Time period (the report list is filtered based on the selected time frame)
- Option to auto-refresh the report list
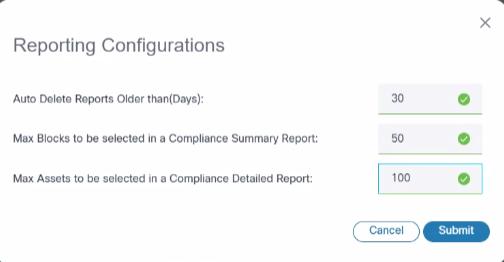
Reporting Configurations
Reporting Configurations enables an administrator to configure key reporting-related parameters, based on deployment and business requirements. The following parameters are available for configuration:
- Auto Delete Reports Older than (Days): Any report older than this duration gets deleted from the system
- Max Blocks to be selected per Policy in a Compliance Summary Report: Helps to keep the number of tabs in the excel file to a readable limit
- Max Assets to be selected in a Compliance Detailed Report: Helps to limit the number of PDF files generated for a given detailed report

Generating Reports
The application provides a dedicated interface for generating new compliance reports, allowing users to select the report type, define the scope, and apply specific filters. The report generation process is initiated from the “Generate Report” action under the Reporting dashboard page.
Key aspects of report generation include:
- Selecting Report Type: Users can choose between the
following different report types
- Summary Report: Provides an overview of compliance across all devices for the selected policies
- Detailed Report: Offers a more granular detailed view, providing in-depth information about specific violations for each device
- Naming the Report: Users are required to provide a relevant name for the generated report
- Time Period Selection: Reports can be generated for specific timeframes, such as “Current month” or custom ranges, to focus on recent compliance data
- Applying Filters: Comprehensive filtering options
enable users to narrow down the scope of the report
- Policy: Select one or more compliance policies to be included in the report. Policy selection is mandatory
- Block: Within the selected policies, choose specific configuration blocks to be included in the report. Block selection is optional
- Asset Group: Users can filter the assets in scope by selecting one or more asset groups
- Asset Selection: This is applicable only for
detailed reports
- Users can select specific devices for which the report should be generated
- The asset table displays details such as Name, Serial Number, IP Address, Managed By, and current Compliance status with counts for different severity levels
To generate a Compliance Summary Report:
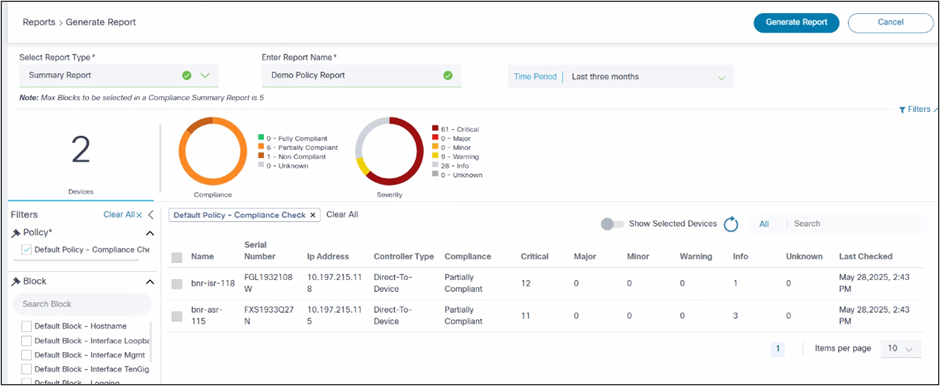
- Select Summary Report in the Select Report Type drop-down list.
- Enter a report name.
- Select a time range. The policies and blocks will be listed based on this selection.
- Select a policy. Additional policies can also be selected.
- Optionally, select Blocks. If none selected, all blocks are included.
- Select required Asset groups, compliance status, and severity levels.
- Click Generate Report.
- In the report list page, the report status is set to Initiated
- Upon completion, status changes to Completed. If some of the sub-reports fail, the status changes to Partially Completed
- If the entire report generation fails, a notification is displayed and status changes to Failed
- Once completed, the download option is available. Users can download a zip file which contains the excel reports
To generate a Compliance Detailed Report:
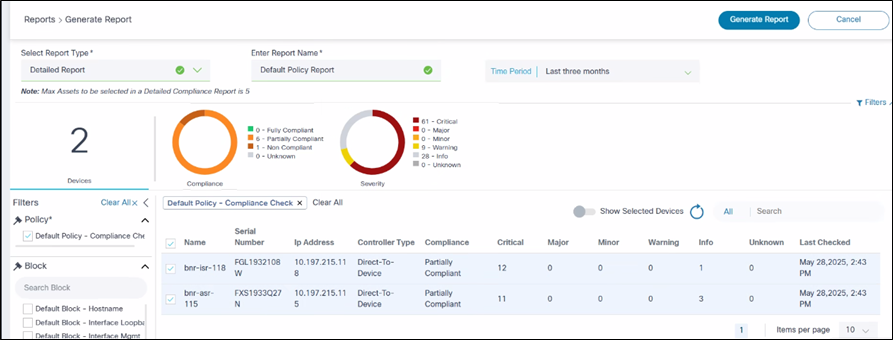
- Select Detailed Report in the Select Report Type drop-down list.
- Enter a report name.
- Select a time range. The policies and blocks will be listed based on this selection.
- Select a policy. Additional policies can also be selected.
- Optionally, select Blocks. If none selected, all blocks are included.
- Select required Asset groups, compliance status, and severity levels.
- Select required assets from the grid. Users have the option to “Select all” devices and “Show selected devices”.
- Click Generate Report.
- In the report list page, the report status is set to Initiated
- Upon completion, status changes to Completed. If some of the sub-reports fail, the status changes to Partially Completed
- If the entire report generation fails, a notification is displayed and status changes to Failed
Downloading and Viewing Reports
Completed reports can be downloaded using the Download icon in the desired row of the Reporting Dashboard grid.
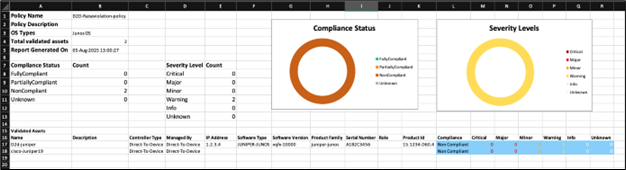
Understanding the Configuration Compliance Summary Report
The Compliance Summary report is a zip file that contains individual PDF reports, with one PDF generated per device. This report type offers an overview of compliance violation per policy, along with block level drill-down mapping violation details against the devices.
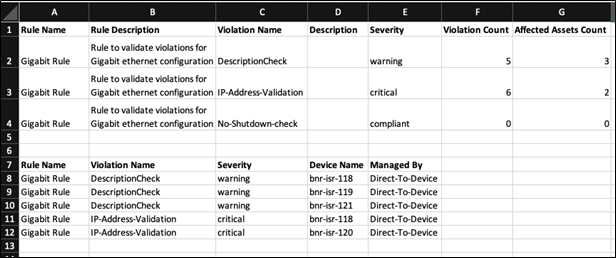
Each Excel report includes the following sheets and provides the following information:
- Policy Summary:
- Overview details, such as the policy name, description, OS type(s), and total validated assets
- A grid and chart view of the validated assets count split by compliance status (e.g., Fully Compliant, Partially Compliant, Non-Compliant, and Unknown)
- A grid and chart view of the total violation count split by severity level (e.g., Critical, Major, Minor, Warning Info, and Unknown)
- An asset grid with device details, compliance status, and violation count for each severity level
- Block Summary:
- Block details such as block name, description, block config, block identifier details, and block violation severity settings
- Count of violations, rules passed, rules failed, and validated assets for the given block
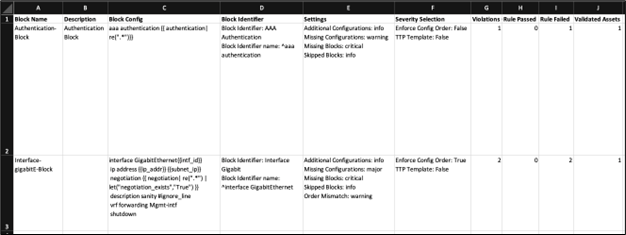
- Rule and violation details per block:
- The violation level grid displays a list of rule names, description, violation name, description severity level, count of violations seen across assets, and the count of affected assets
- The device level grid displays the mapping between rule, violation, severity, device name, ,and controller name (managed by)
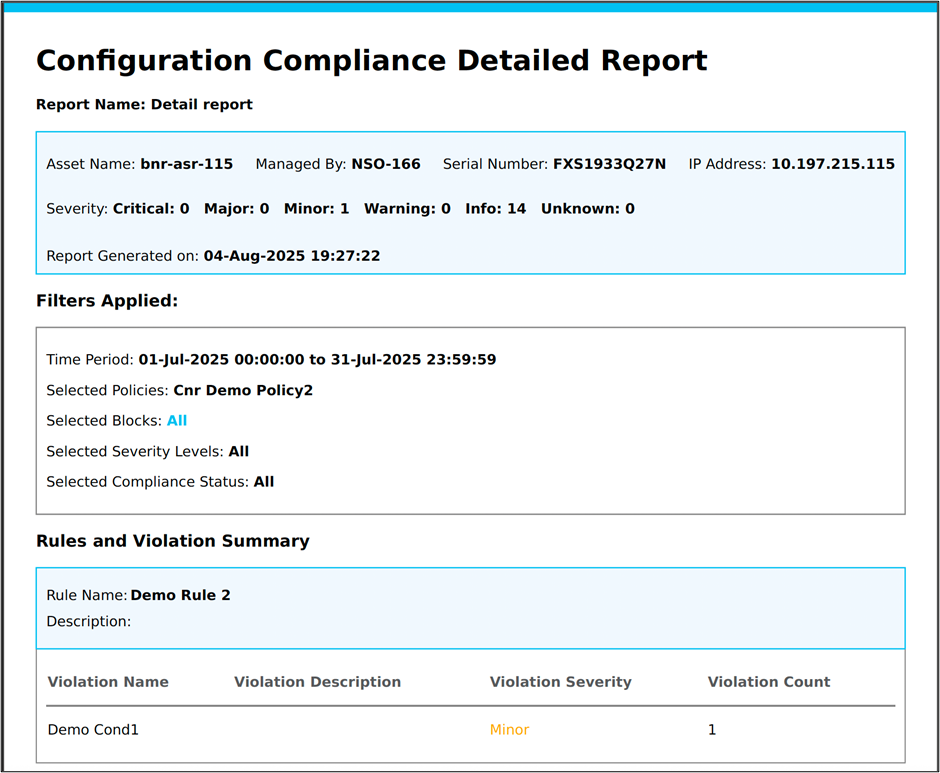
The Compliance details report contains the following information:
- Report Name: Identifies the name of the report
- Asset Name: Specifies the device for which the compliance check was performed
- Other Asset Details: Includes details such as the IP address and serial number, if present
- Severity: Provides a summary count of violations by severity level
- Report Generated on: Indicates the timestamp of when the report was created
- Filters Applied: Outlines details of specfic filter criteria used to generate a specific report, ensuring transparency and reproducibility. This includes the time period, selected policies, blocks, severity levels, and compliance statuses
- Rules and Violation Summary: Lists each rule that was evaluated and provides a summary of violations found for that rule. The summary grid shows the Violation Name, Description, Severity, and the number of times this violation has occurred
- Violation Details: Offers explicit details about each device configuration line for the selected blocks, along with the violation details for each line
Delete Reports
Reports can be deleted individually by selecting the Delete icon or in bulk by selecting the checkboxes for the reports and selecting the More Options icon > Delete.
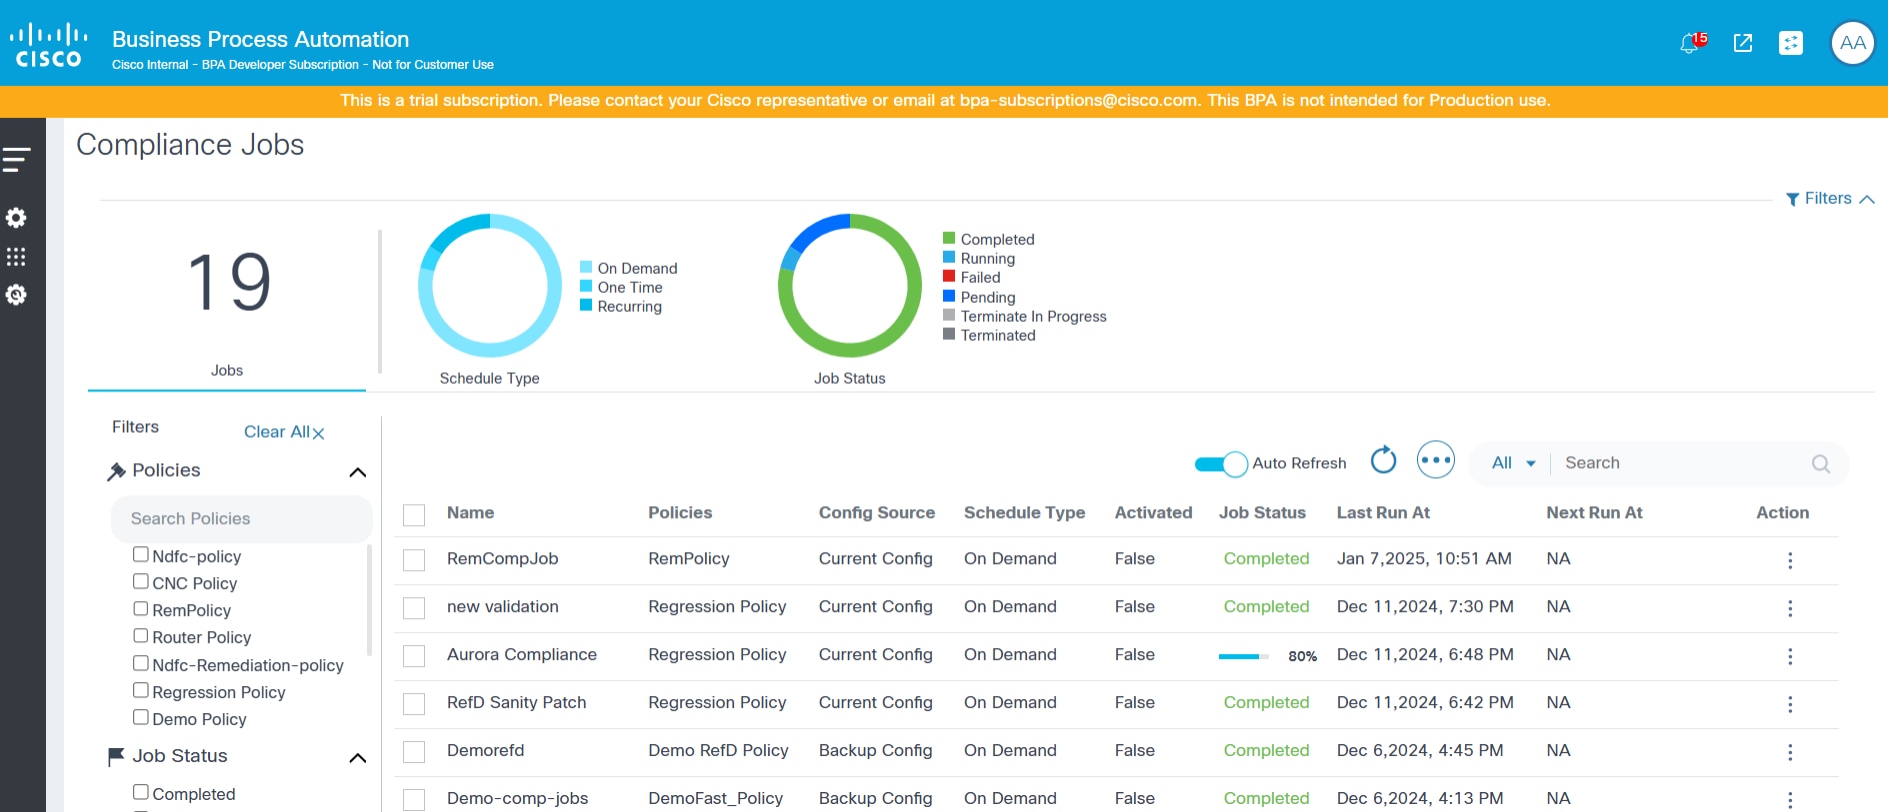
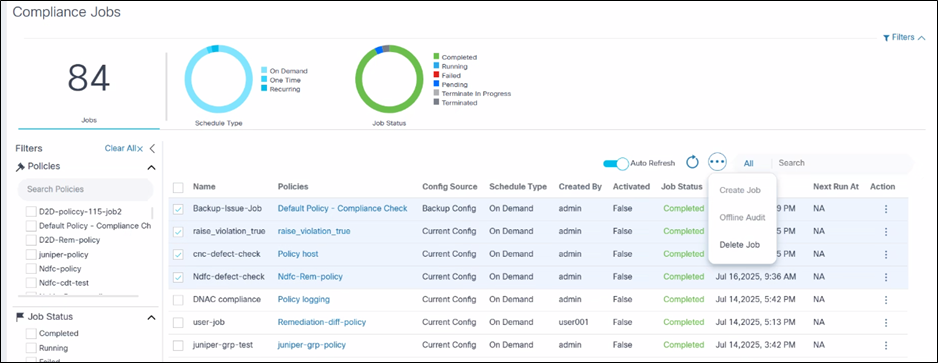
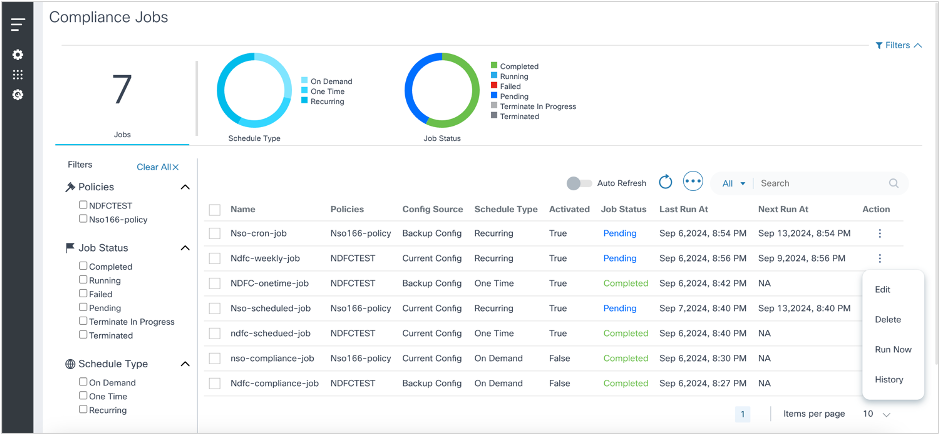
Compliance Jobs
The Compliance Jobs feature in the Next-Gen portal is designed to help users create, manage, and execute Compliance Jobs on selected policies and asset groups. These jobs can be scheduled to run at regular intervals or executed on-demand, ensuring that all assets are consistently checked for compliance.
Key Features
- List Compliance Jobs: View all defined Compliance Jobs, with options to offline audit, filter, create, edit, delete, and execute jobs.
- Scheduled and On-Demand Jobs: Set up jobs to run at scheduled intervals or execute them immediately, as needed.
- Fine-Grained Access Control: Access to Compliance Jobs is controlled based on user permissions, ensuring that users only see jobs related to policies for which they have access.
- Filtering Options: Filter jobs by policies, job status, schedule type, and date range for easy navigation and management.
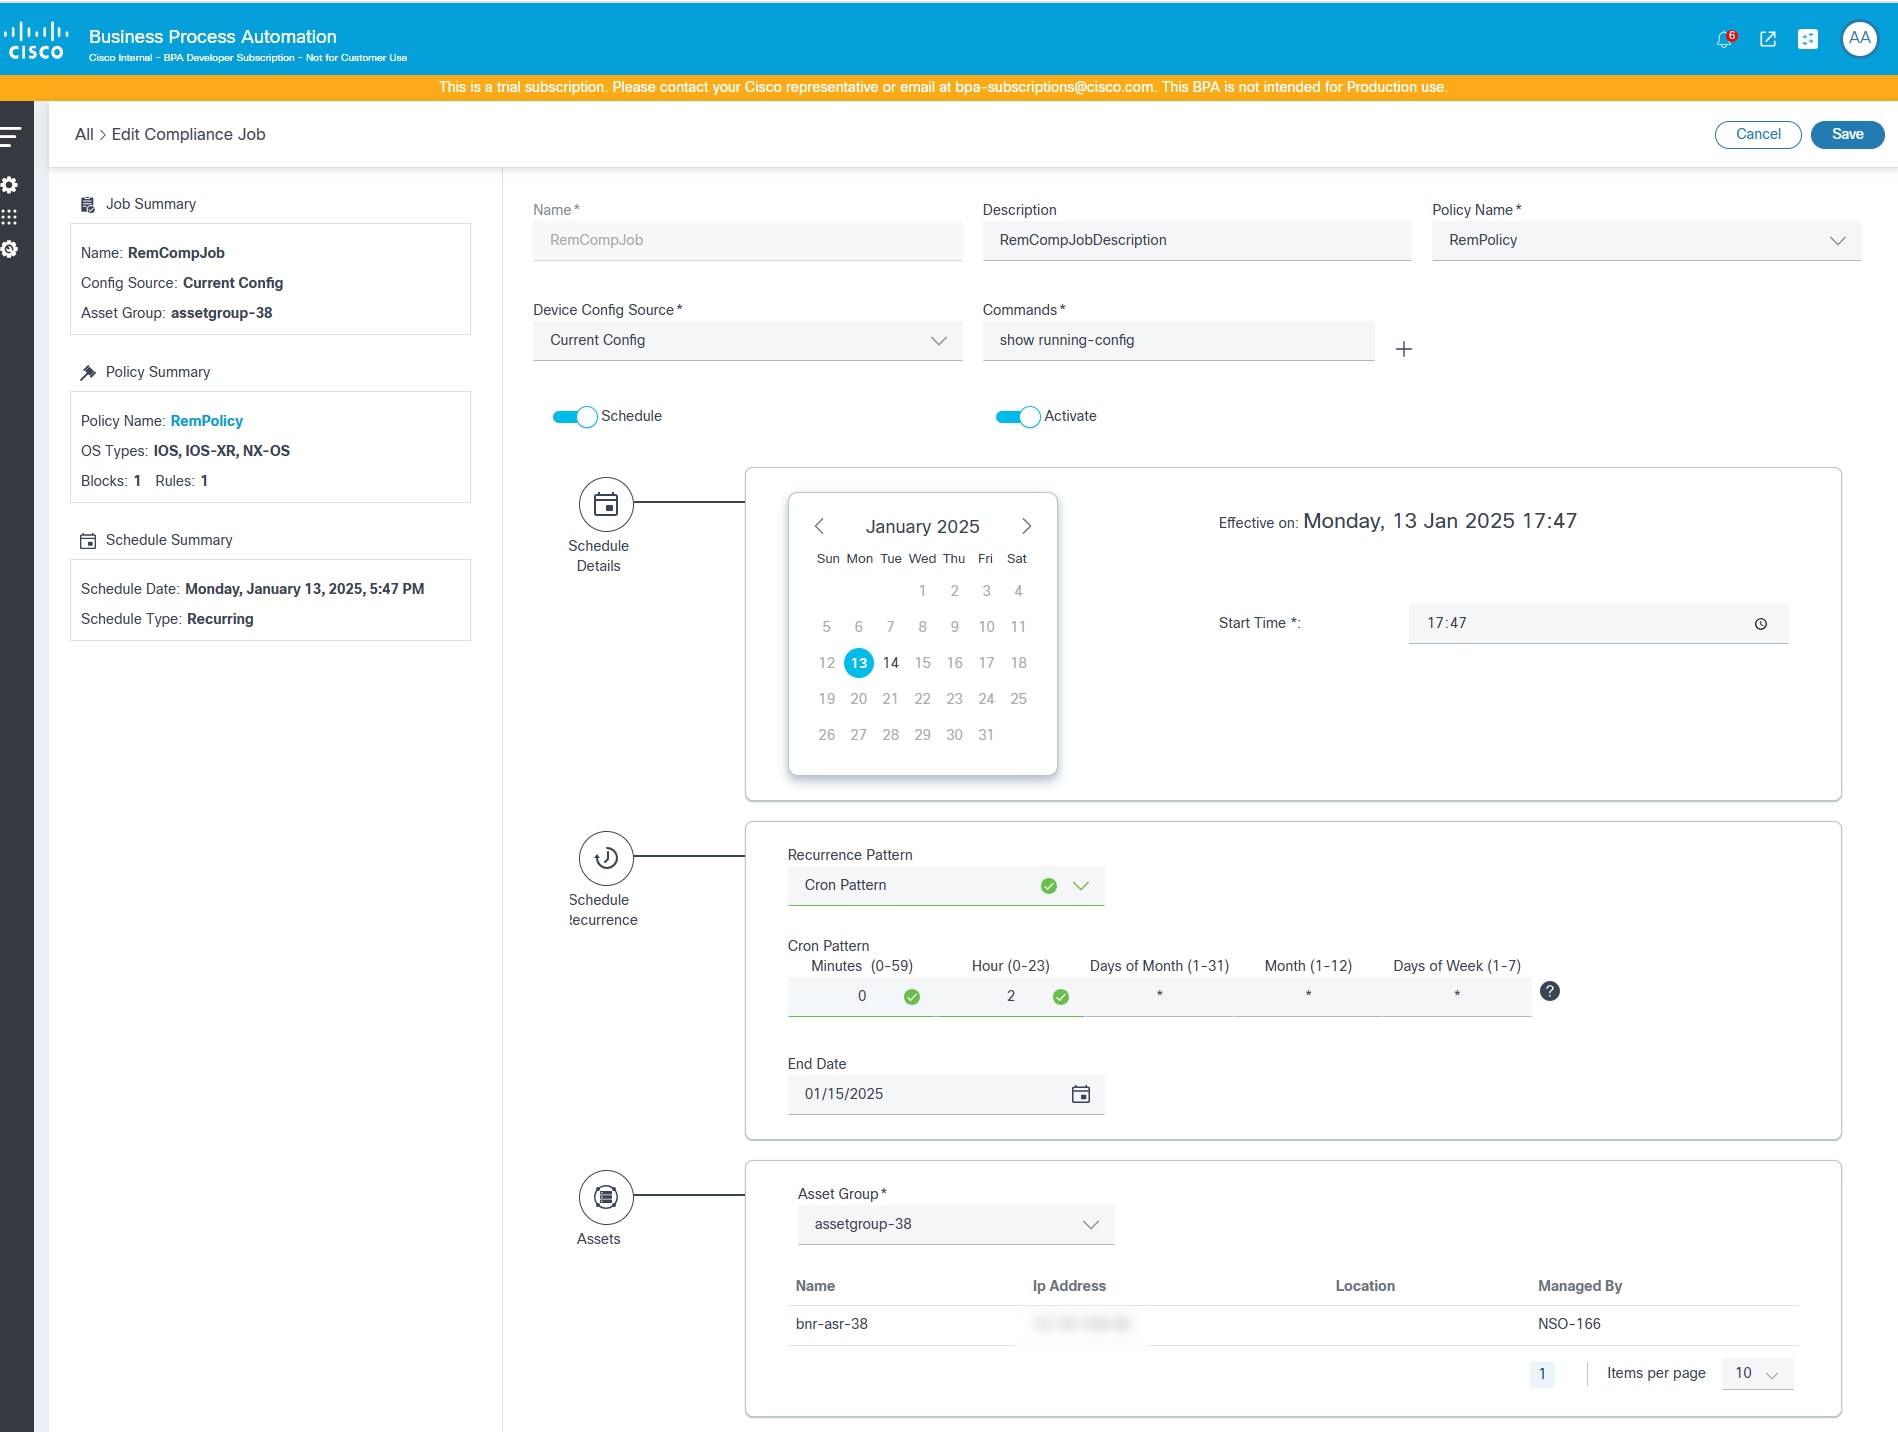
Creating Compliance Jobs
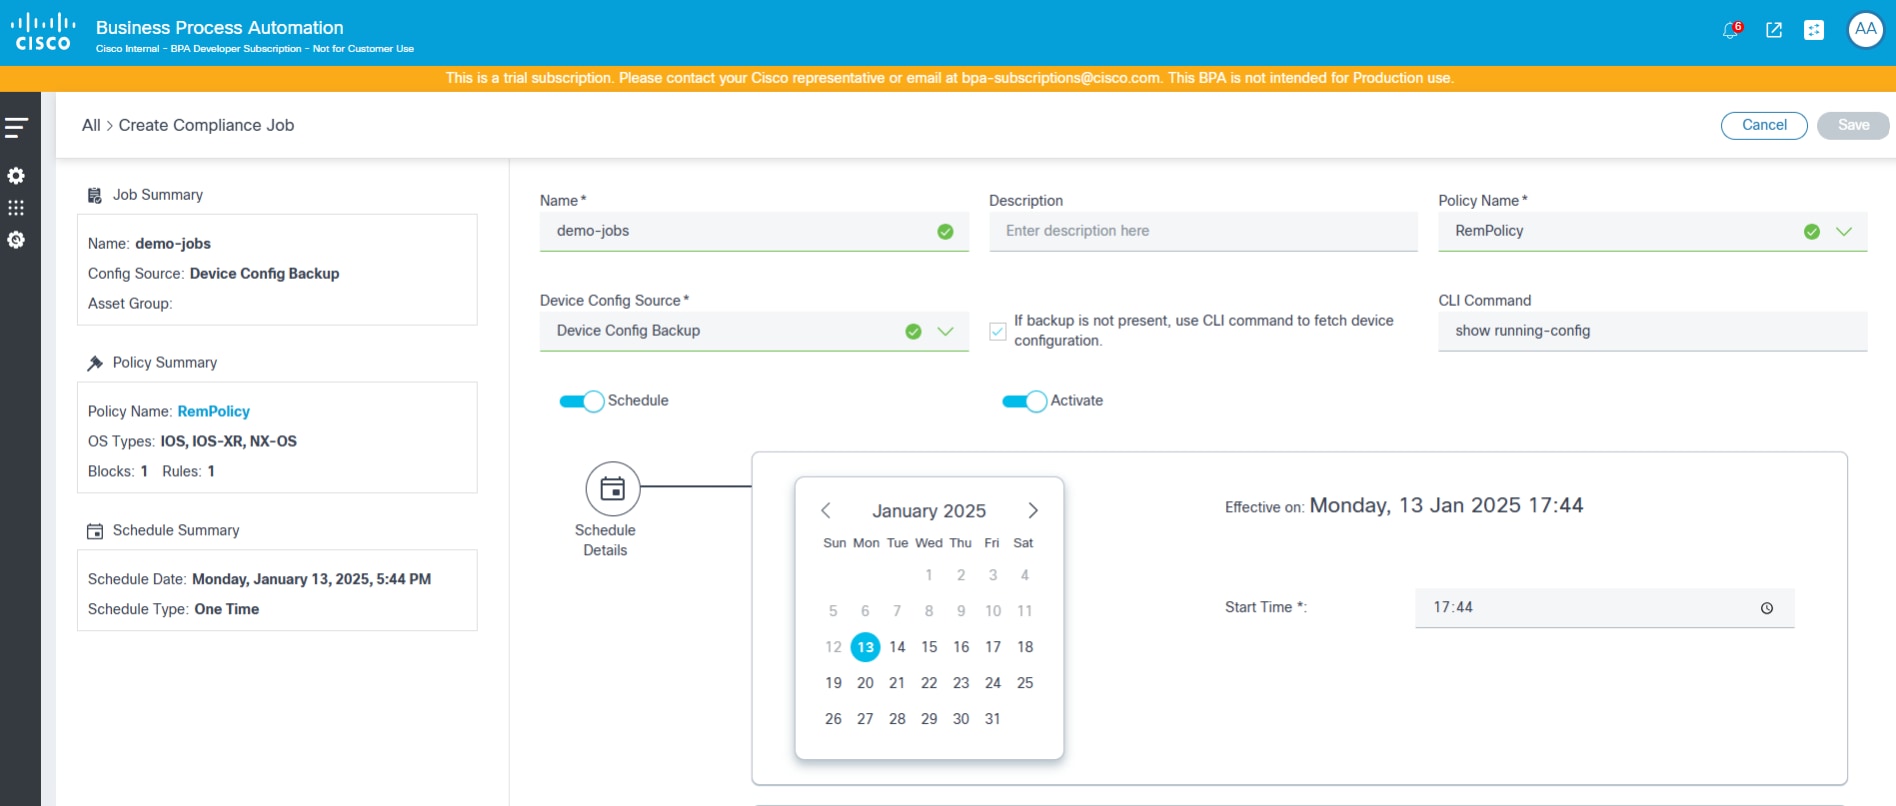
The Compliance Job Create page includes the following attributes:
- Name: Name of the job
- Description: An optional description
- Policy Name: A drop-down list to select a policy to run, potentially filtered by access policies configured for the logged in user
- Device Config Source: A drop-down list to select the source to fetch device configuration (Current Config or Device Config Backup) for running the Compliance Job and a check box to indicate whether to fallback to a CLI command if backup is not present.
- User Defined Variables: Editable text box for available namespace when the selected policy has user defined variables
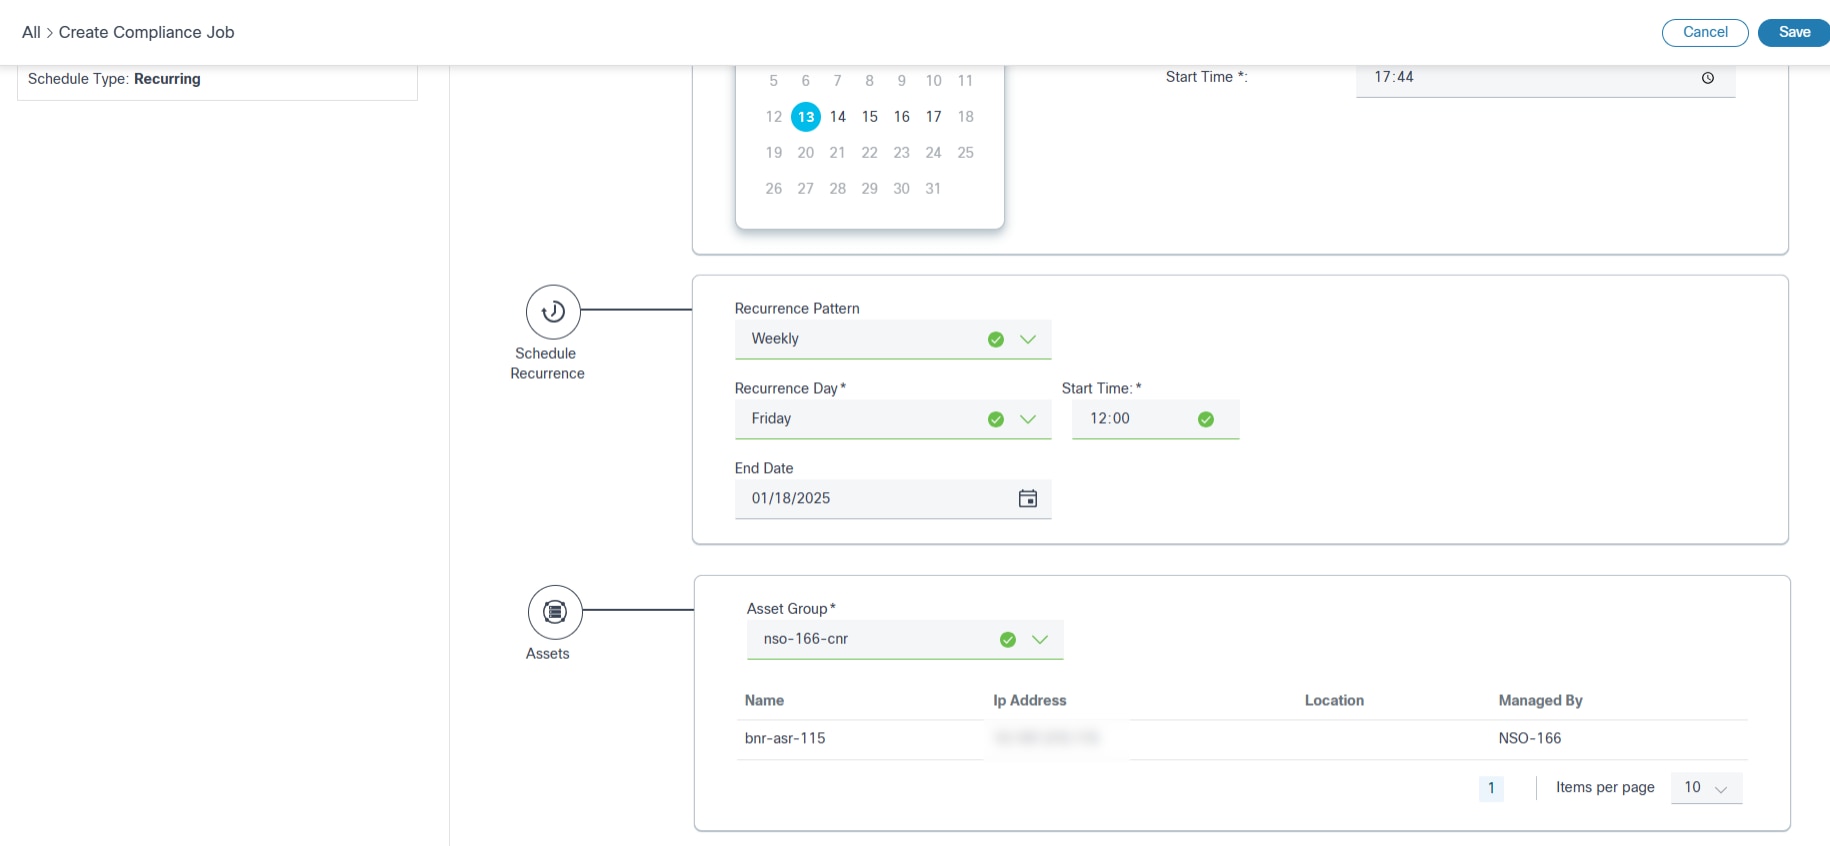
- Schedule Details: Section to select various schedule parameters like start and end date / time, recurrence pattern, etc.
- Assets: Section to select an asset group to identify the list of devices to run compliance
- Schedule: Toggle to enable or disable running the job on schedule (one-time or recurring); If disabled, the job is executed immediately
- Is Active: Indicates whether the selected schedule is active or not
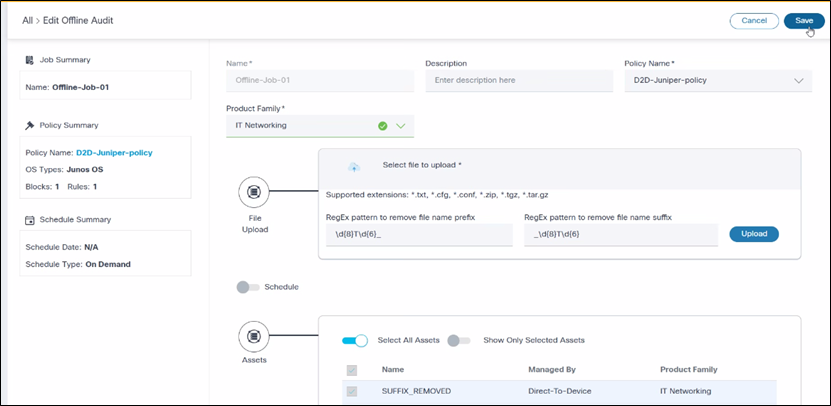
Creating Offline Audit Jobs
The Offline Audit feature in Compliance Jobs allows users to perform compliance checks on device configurations without requiring the devices to be onboarded into BPA. Users can manually upload the device configuration as a file. Several device configurations can be compressed and uploaded together as a zip file. Once uploaded, these configuration files are parsed and Compliance Jobs can be created using those file content as the source. The results from the offline audits are then displayed on the compliance dashboard alongside the online audit results.
The Offline Audit page includes the following attributes:
- Name: Name of the job
- Description: An optional description
- Policy Name: A drop-down list to select a policy to run, potentially filtered by access policies configured for the logged in user
- Product Family: A drop-down list to select the product family
- File Upload: Use the offline audit feature to upload the configuration files manually; This is done through an upload interface where you select the files from the local system
- Schedule: Toggle to turn on the schedule
- Assets: Shows list of devices as per uploaded file content
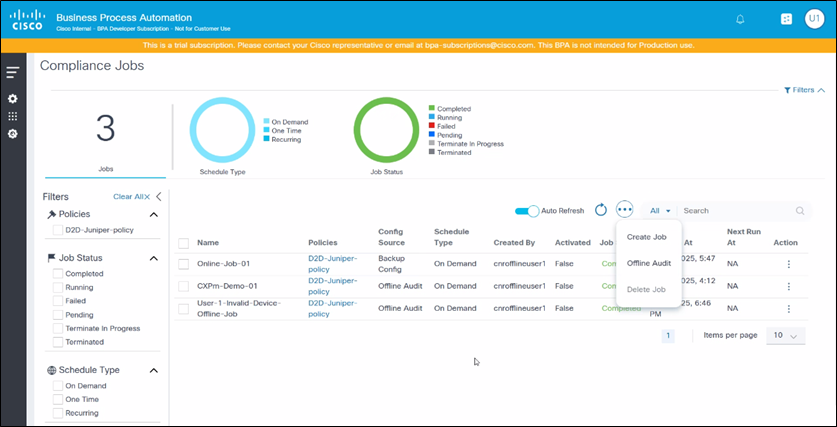
To create offline audit jobs:
- Select Offline Audit from the More Options icon.
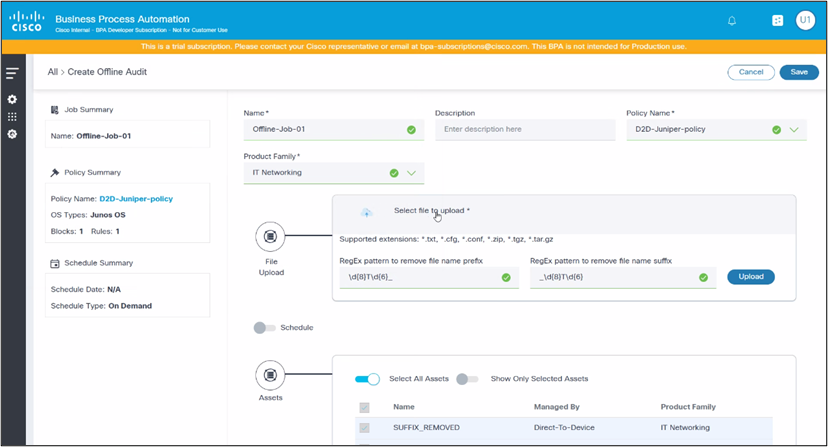
- Click Select file to upload to upload configuration files.
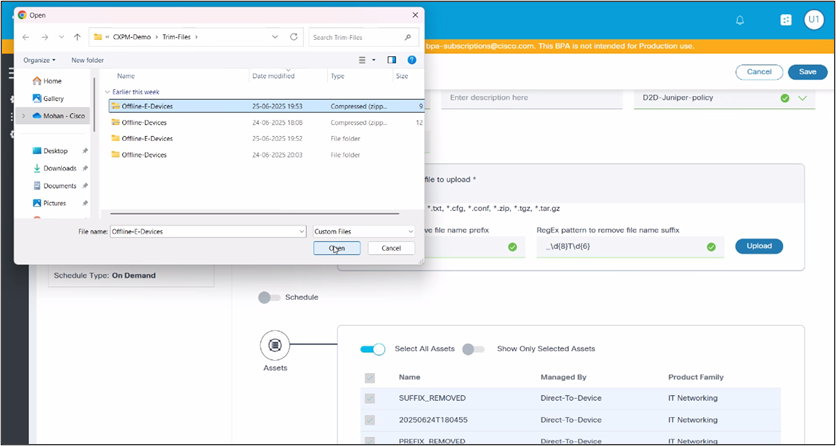
- If the configuration files are compressed in a folder or archive, extract the files before uploading.

- Apply the Regex Pattern for File Name Trimming (Optional).

- Click Upload. A confirmation message displays, indicating that the files have been saved in the database and are uploaded successfully.
- Click Save to create the offline audit job.
Editing Compliance Jobs
To edit Compliance Jobs, follow the steps provided in Creating Compliance Jobs.
Run Now or Re-Run Compliance Jobs
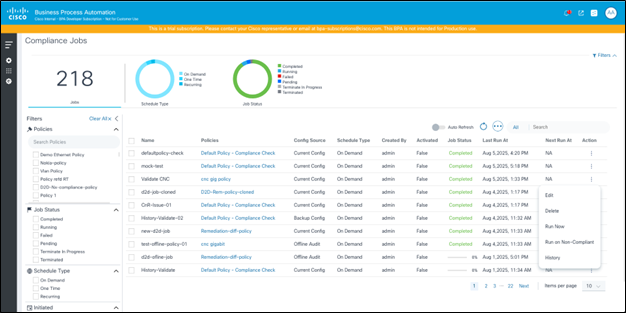
The Compliance Jobs grid has an option to run a job on demand by selecting Run Now from the More Options icon. If a job has an existing execution, users can select Run on Non-Compliant from the More Options icon. This action runs the compliance job only on the list of assets which are not marked as Fully Compliant in the previous execution.
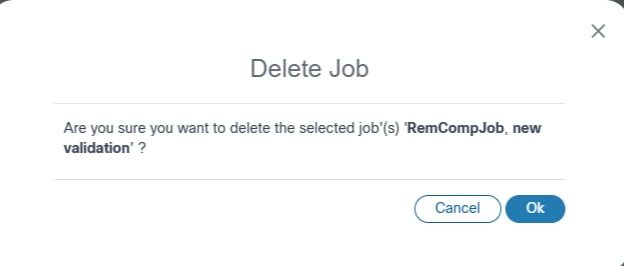
Deleting Compliance Jobs
The portal provides an option to delete one or more Compliance Jobs if the user has the correct Role Based Access Control (RBAC) role. Jobs cannot be deleted when an execution is in progress. Users can choose to delete single or multiple Compliance Jobs.
To delete a Compliance Job:
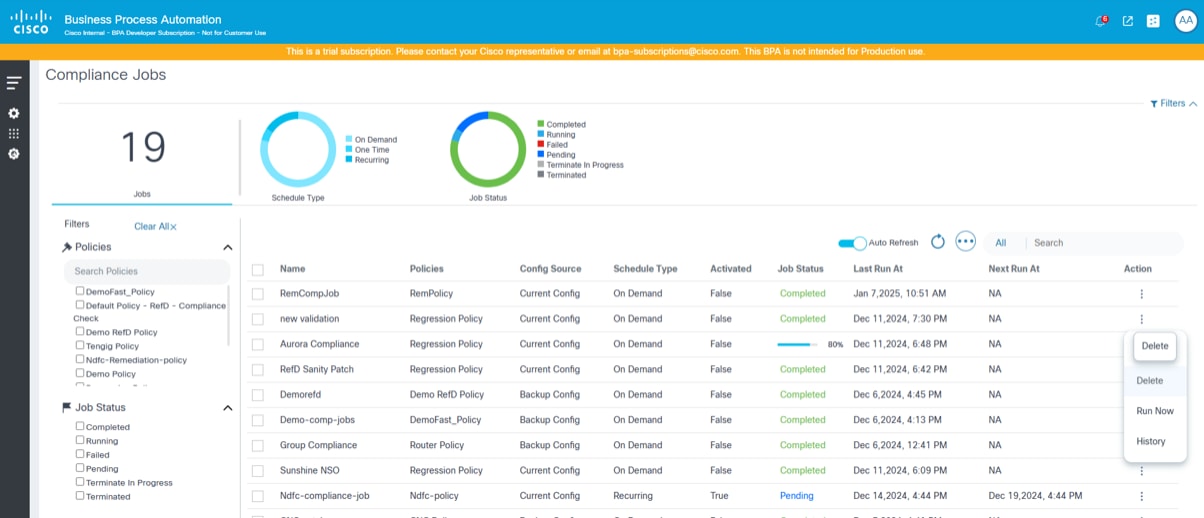
- From the Compliance Jobs page, select the More Options icon > Delete on the job to delete.
OR
To delete multiple Compliance Jobs, select the check boxes for the jobs to delete and select More Options > Delete Job. A confirmation displays.
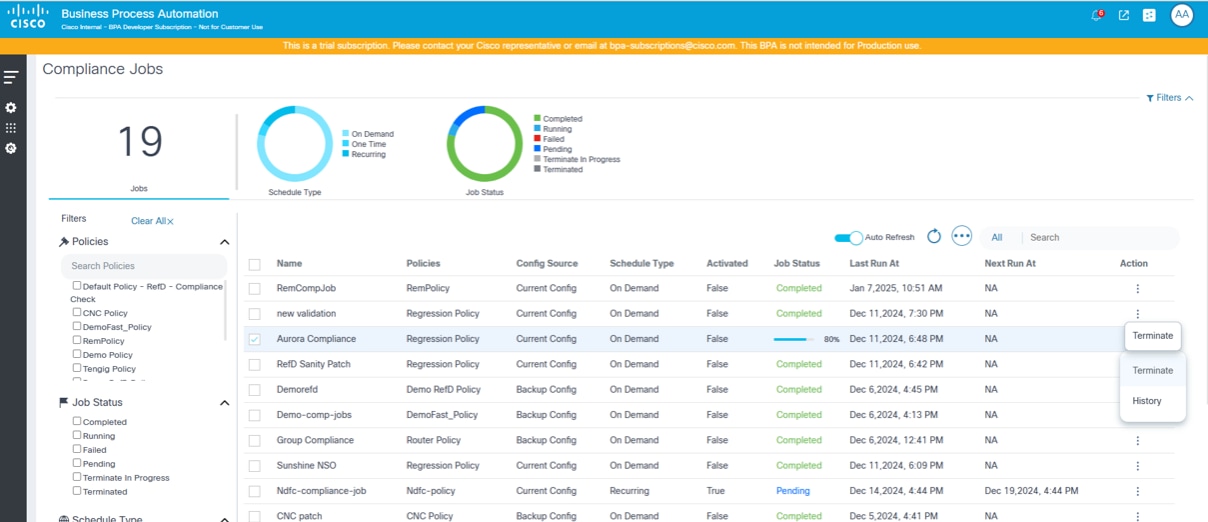
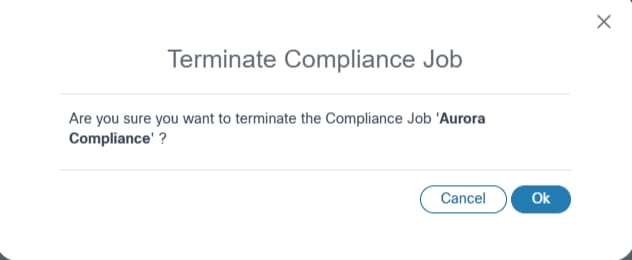
Terminating Compliance Jobs
The portal provides users an option to terminate a running execution of a given job. When a job is terminated, the currently running devices complete their execution and cancel all further queued up device executions.
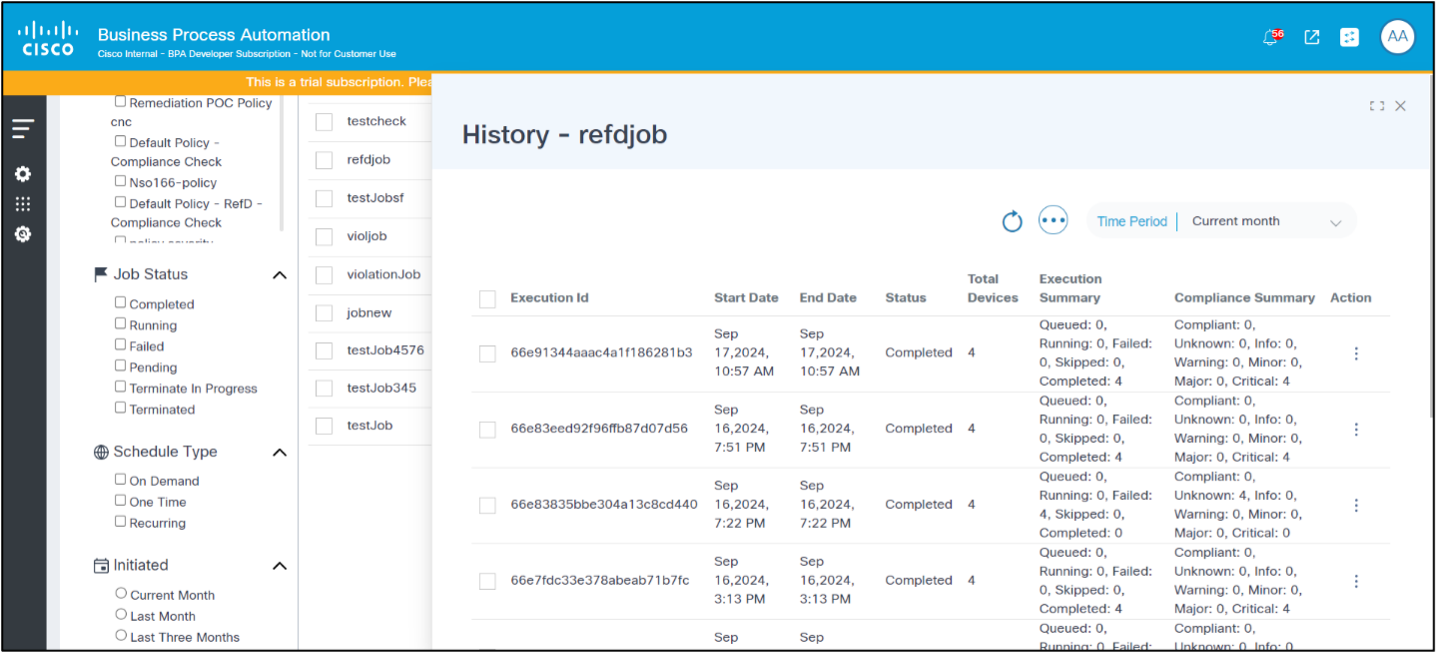
Compliance Jobs History
The History option in the Compliance Job shows the list of executions for the selected job, filtered by the schedule date range.
To view the history of a Compliance Job, from the Compliance Jobs page, select the More Options icon > History. The History page displays.
Remediation Jobs
The Remediation Framework allows operators to remediate compliance violations listed on the compliance dashboard. This framework uses workflows, GCTs, and process templates.
Configuration Remediation Flow Diagram
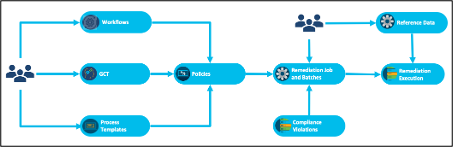
The configuration remediation use case enables operators to fix configuration violations on devices using Remediation Jobs. The compliance policy is first configured with the appropriate workflow, GCT templates and process templates per controller type. A Remediation Job is run for a policy against a list of affected assets. During remediation, the values to apply on a device can be fetched from various source of data including compliance execution result, RefD application and existing device configuration. The workflow can be customized as per specific customer requirement to accommodate additional steps during remediation.
The most important steps of the remediation feature are explained below:
GCT Template
GCTs are a BPA core feature used to apply configuration changes on devices using controller-specific templates.
- Creation of a GCT template that updates the device configurations, resolving compliance violations
- The framework supports automatic variable mapping if the variables
within the GCT template conform to the following syntax:
- For single device configuration blocks: <>_<>. Example: management_interface_ipv4_addr, management_interface_ipv4_subnet
- Multiple device configuration blocks are planned for a future release
- If “Block Identifier Name” and “Variable Name from block” contain spaces, these spaces should be replaced by underscores (“_“) (e.g., If”Block Identifier Name” is “Management Interface” and “Variable Name” is “IPV4_ADDR”, then the variable name in the GCT should be “Management_Interface_IPV4_ADDR”)
- Users can check the “gctVars” output from the compliance device
execution to see if the GCT variables syntax and mappings are correct;
To obtain the compliance device execution, use the following REST APIs:
- Get executions to find the execution ID
- URL: /api/v1.0/compliance-remediation/compliance-executions
- Method: GET
- Get Device Executions using execution ID
- URL: https://<>/bpa/api/v1.0/compliance-remediation/compliance-device-executions?executionId=<>
- Method: GET
- Get executions to find the execution ID
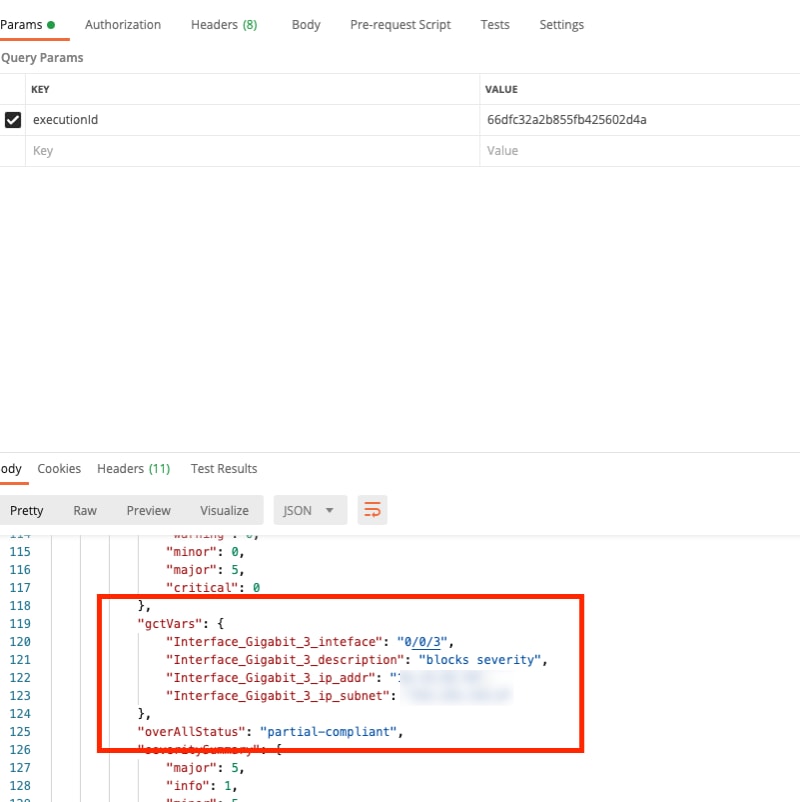
- To retrieve the variables from the block, use the following REST
API:
- URL: https://<>/bpa/api/v1.0/compliance-remediation/utils/schema
- Method: POST
- Body: {“blockName”: “<< block name >>” }
- Validate the GCT templates by applying the templates to the devices for both dry run and commit
- Configure the above GCT templates in the compliance policy
Workflows
The Remediation framework provides the following out-of-the-box reference workflows:
- REMEDIATION PROCESS: This workflow has the common set of steps involved in remediation execution.
- REMEDIATION SUB-PROCESS: This workflow contains variable assignment, GCT dry run and GCT commit tasks that can be customized by other teams according to requirements.
Both workflows can be used as-is, updated, or replaced according to customer needs.
Process Templates
Process templates and analytics templates can be configured against the policy to run pre- and post-checks and compare output.
Policies
The CnR policy stitches together the workflows, GCT templates, and process templates per device type which can be used to remediate configuration using jobs.
Remediation Jobs
Remediation jobs help operators to apply remediation policies against a selected list of affected assets. The Remediation Job can be executed on-demand or on schedule. At runtime, the remediation workflow can pull data from a variety of sources including the device details, compliance execution details, and RefD framework.
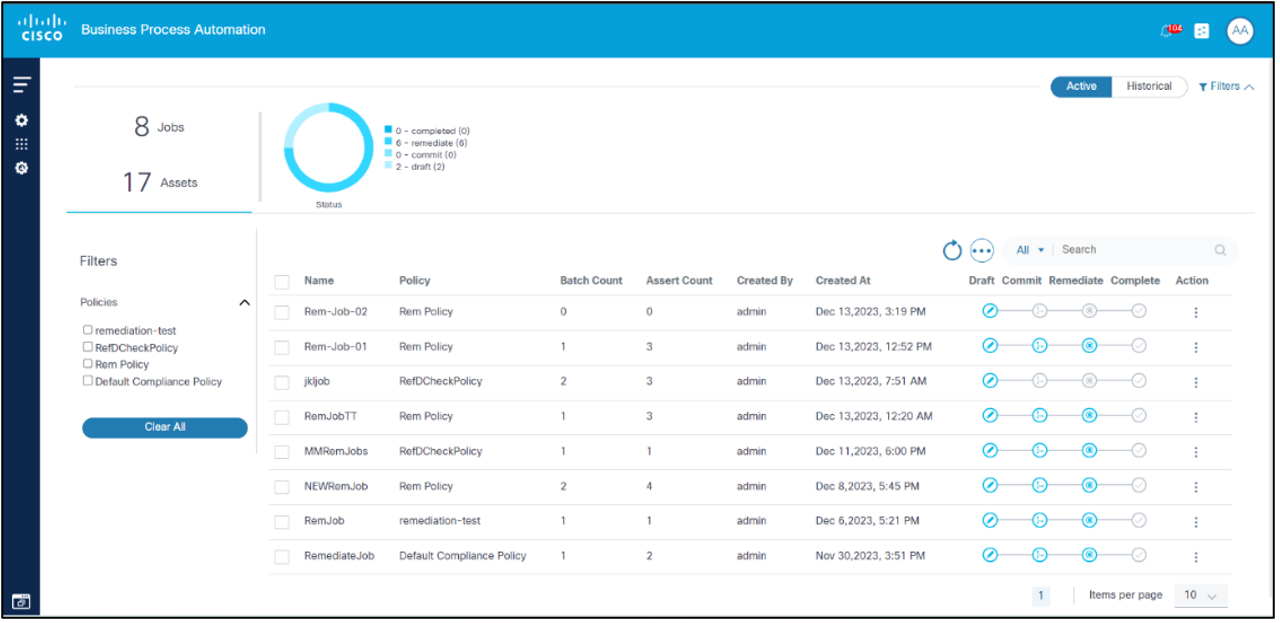
Remediation Jobs List
Users can filter, sort, and view Remediation Jobs created in the dashboard as follows:
- Jobs: Displays total jobs created
- Assets: Displays total assets created
- Status: Displays jobs by status
- Active and Historical: Displays Active or Historical (inactive) jobs, based on the selection
- Policies: Filters Remediation Jobs by policies
- Main Grid: Displays the default list of jobs which can be sorted by clicking the header and includes a search by Name & Policy with paginations
- Actions: Jobs can be archived or deleted when they are in a draft or completed state; a running job cannot be archived or deleted
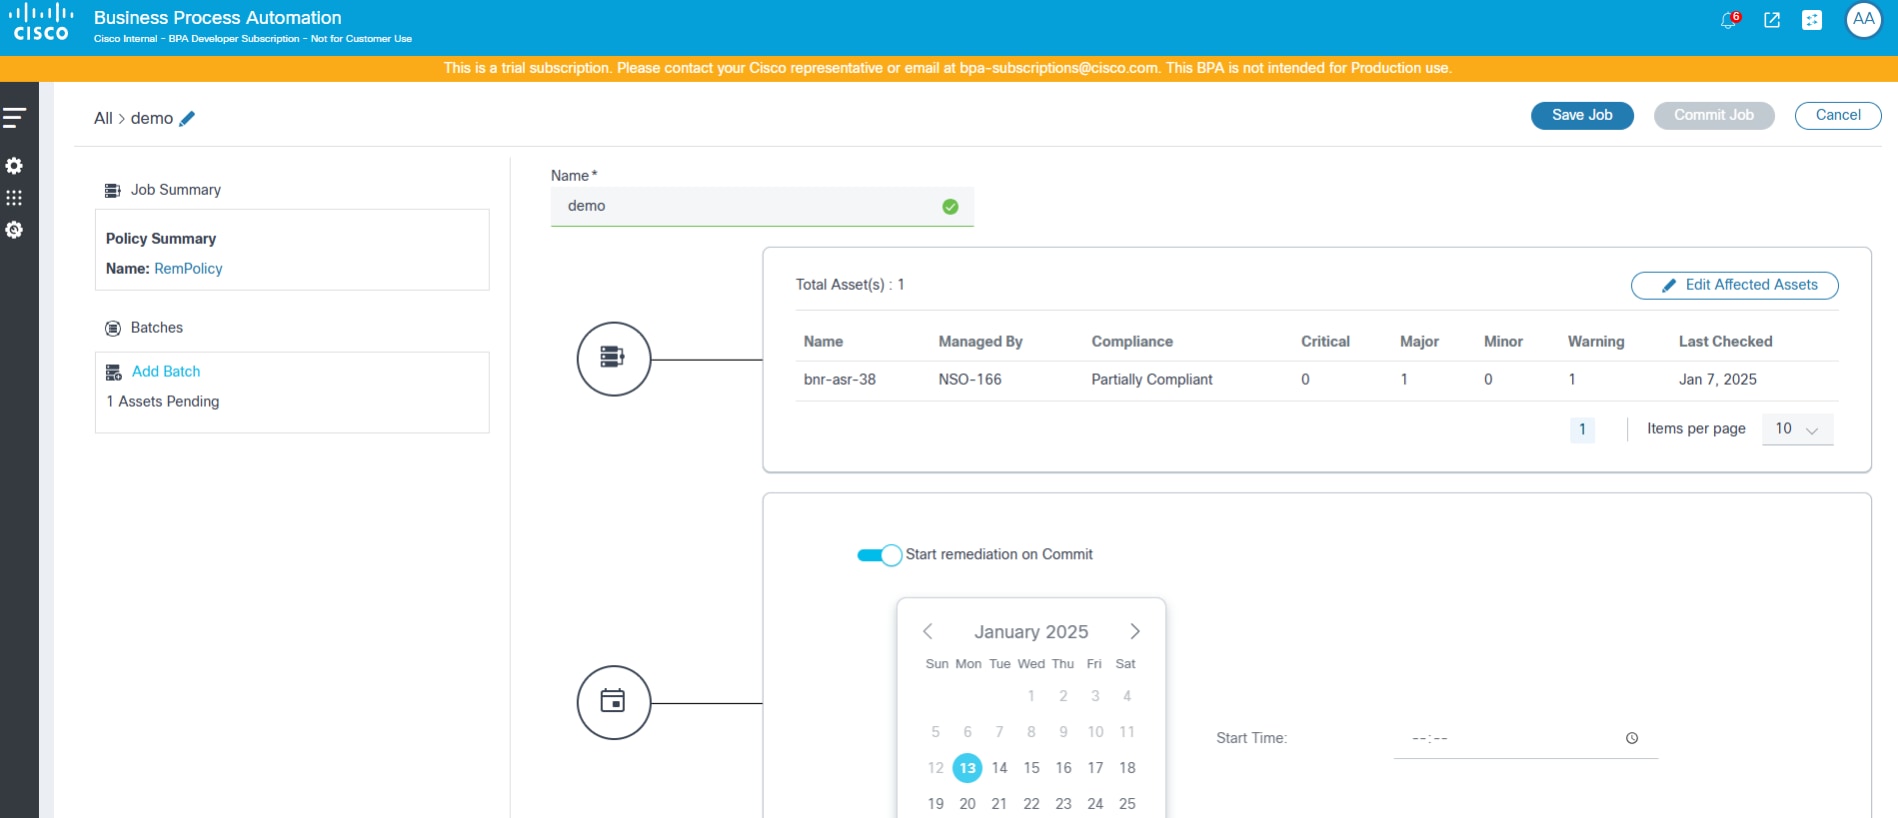
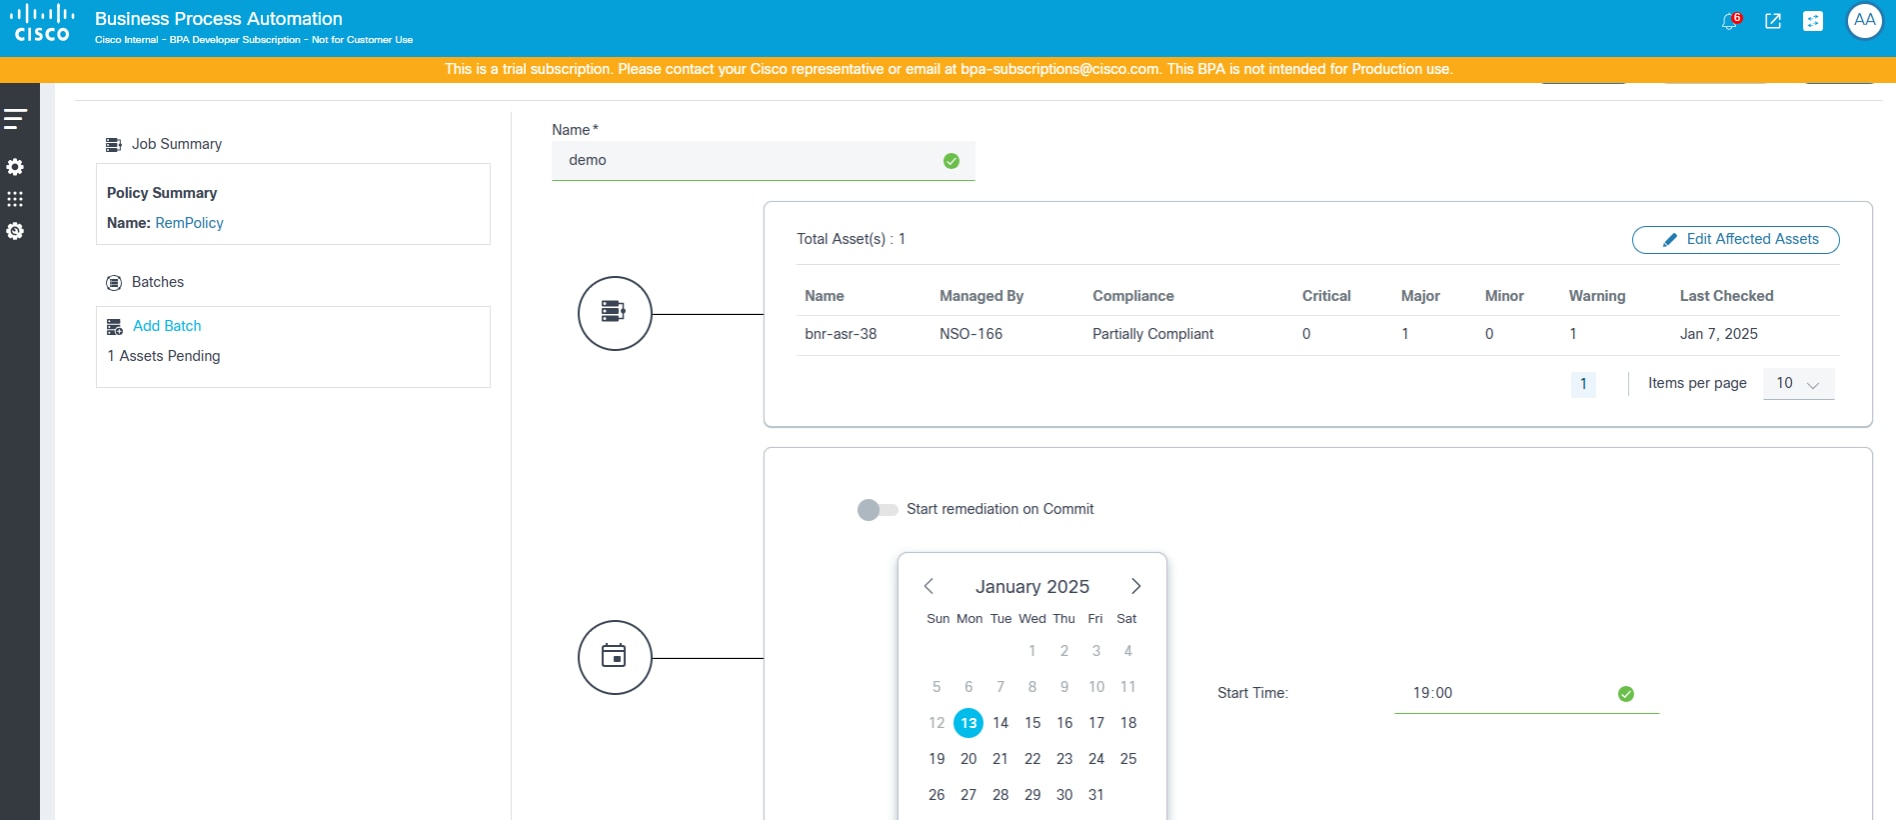
Creating and Editing Remediation Jobs
Remediation Jobs are created from the Job List page and can be created by performing the following steps:
- Select the More Options icon > Create Job. The Create Job page displays.
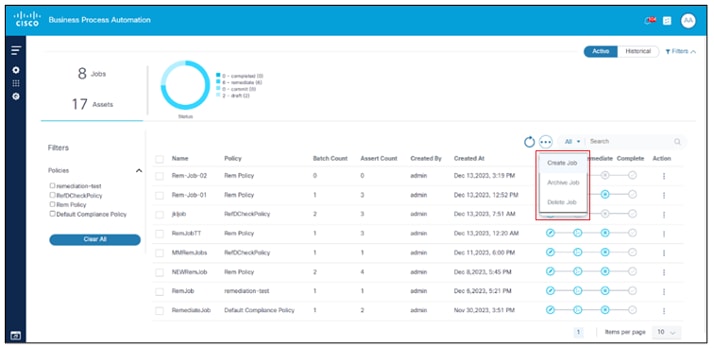
- Complete or edit the details.
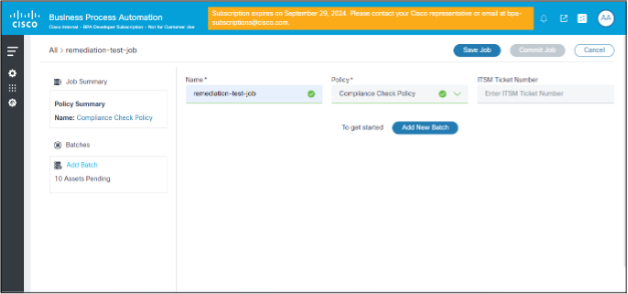
- Click Save Job.
To add batches to jobs from the Create Job page:
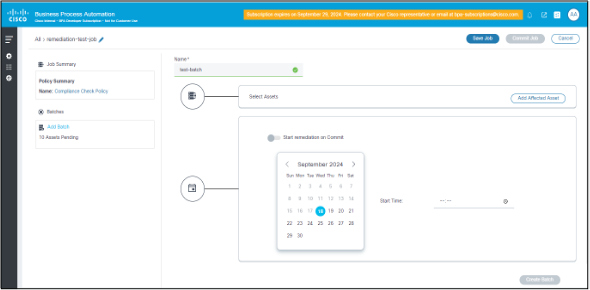
- Click Add New Batch.
- Enter the Name, Affected asset details, and Schedule details.
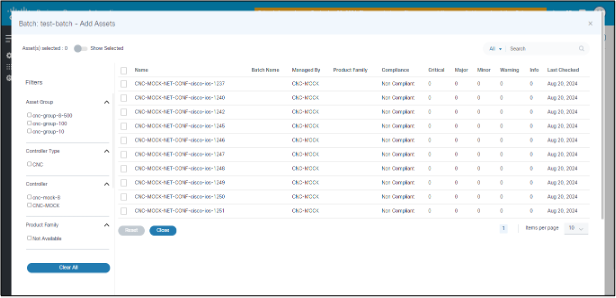
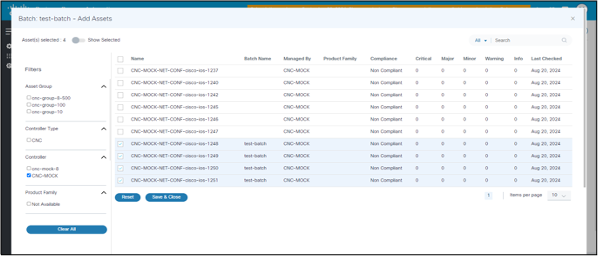
- Click Add Affected Assets.
- In the Assets Details page, select the list of affected assets and click Save Job.
- Filter the assets based on the Controller Type, Controller, Asset Group, and Product Family.
- Once the assets are selected, click Save & Close to return to the previous page.
Once the affected assets are added, the batch can be run one time–either on save or at a scheduled future time.
A single Remediation Job has more than one batch. Each batch can be started on commit or on a scheduled date and time.
An on-commit remediation batch can be run On Demand or Scheduled.
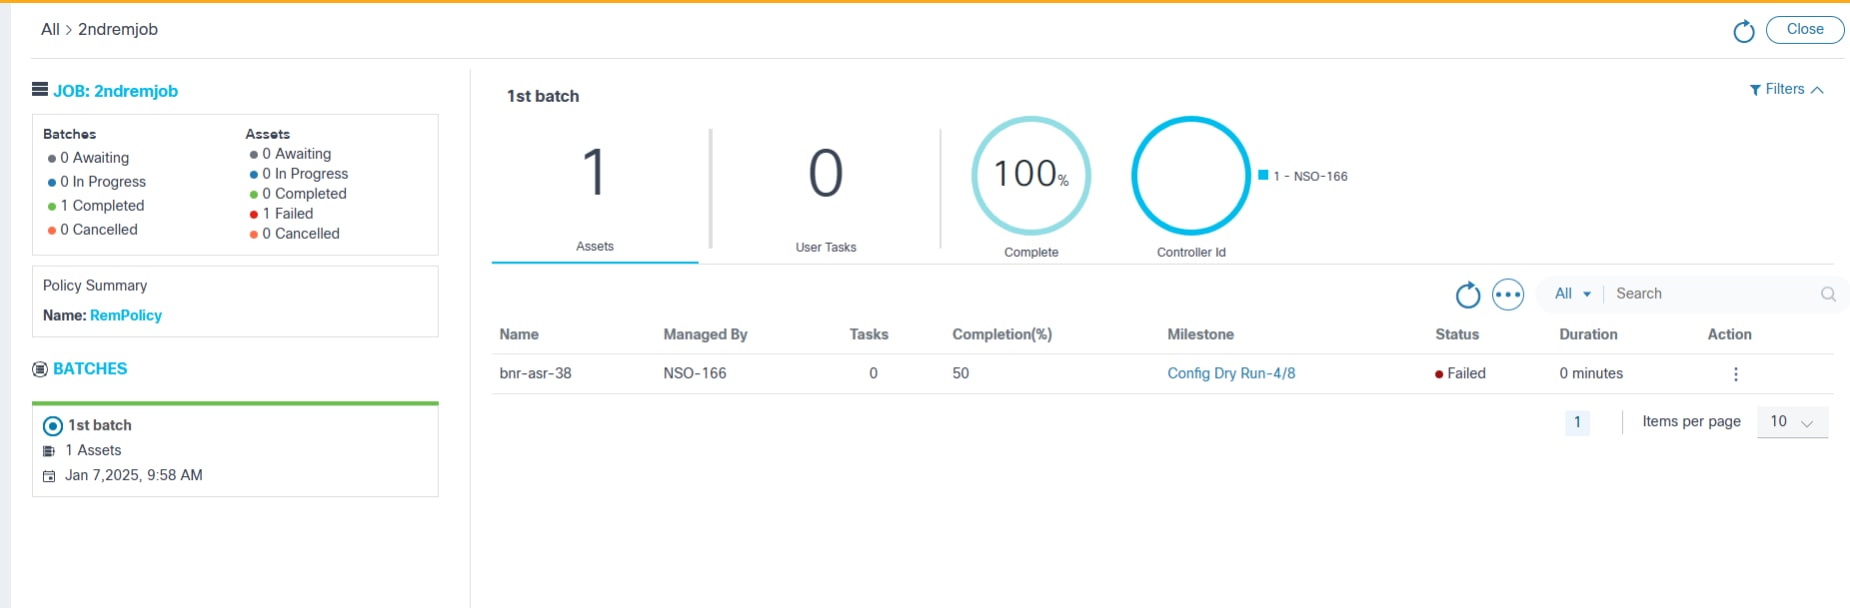
Remediation Execution: List of Devices
Once the remediation job is committed, execution is triggered, and the status of the job is displayed in the List Devices page under Remediation Jobs. Users can apply filters by Controller ID, Name, Managed By, Product Family.
- JOB: displays the status details of batches and assets and the name of the policy selected to run remediation job
- BATCHES: displays the list of batches as part of the current remediation job
- Auto Refresh: displays the options to auto refresh the page every 30 seconds if the job is in running state, refresh the page, or cancel to go back to the previous page
- Batch Level Details: displays the batch level summary details including total asset count, user tasks count, completion percentage, and controller details
- Asset Grid: displays the Asset grid view including user task, completion percentage, and current milestone for each asset
Remediation Execution: Inline User Task Details
In the device list, the Tasks column indicates whether a user has any tasks to be performed.
To view inline user task details:
- Select the task count. The User Tasks list window opens.
- Select a task. The User Task Details window opens.
The following actions can be taken from inline:
- Complete
- Retry
- Cancel
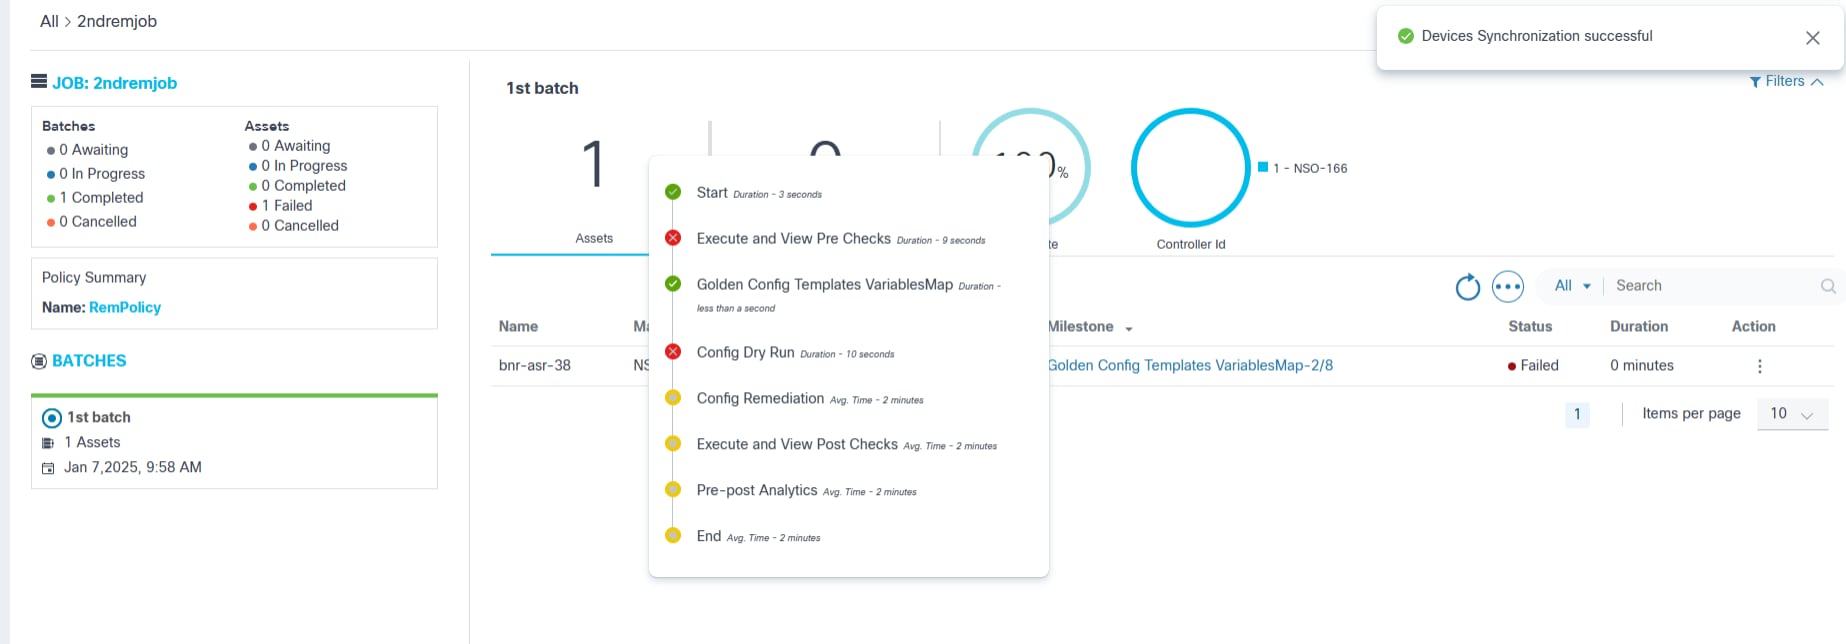
Remediation Execution: Inline Milestone Details
In the device list, the Milestone column indicates the current milestone related to the given device’s remediation.
To view inline milestone details, select the column. The Milestone Details window opens.
The following statuses are available for milestones:
- Not Started
- Running
- Completed
- Failed
Remediation Execution: Generating and Downloading Batch Summary PDF Reports
Batch summaries can be generated and downloaded.
To download the summary report as a PDF per batch:
- Select the More Options icon > Generate Report. The system checks internally for the report to be ready. When the report is ready, the Download Report option is enabled.
- Select the More Options icon > Download Report. The PDF downloads.
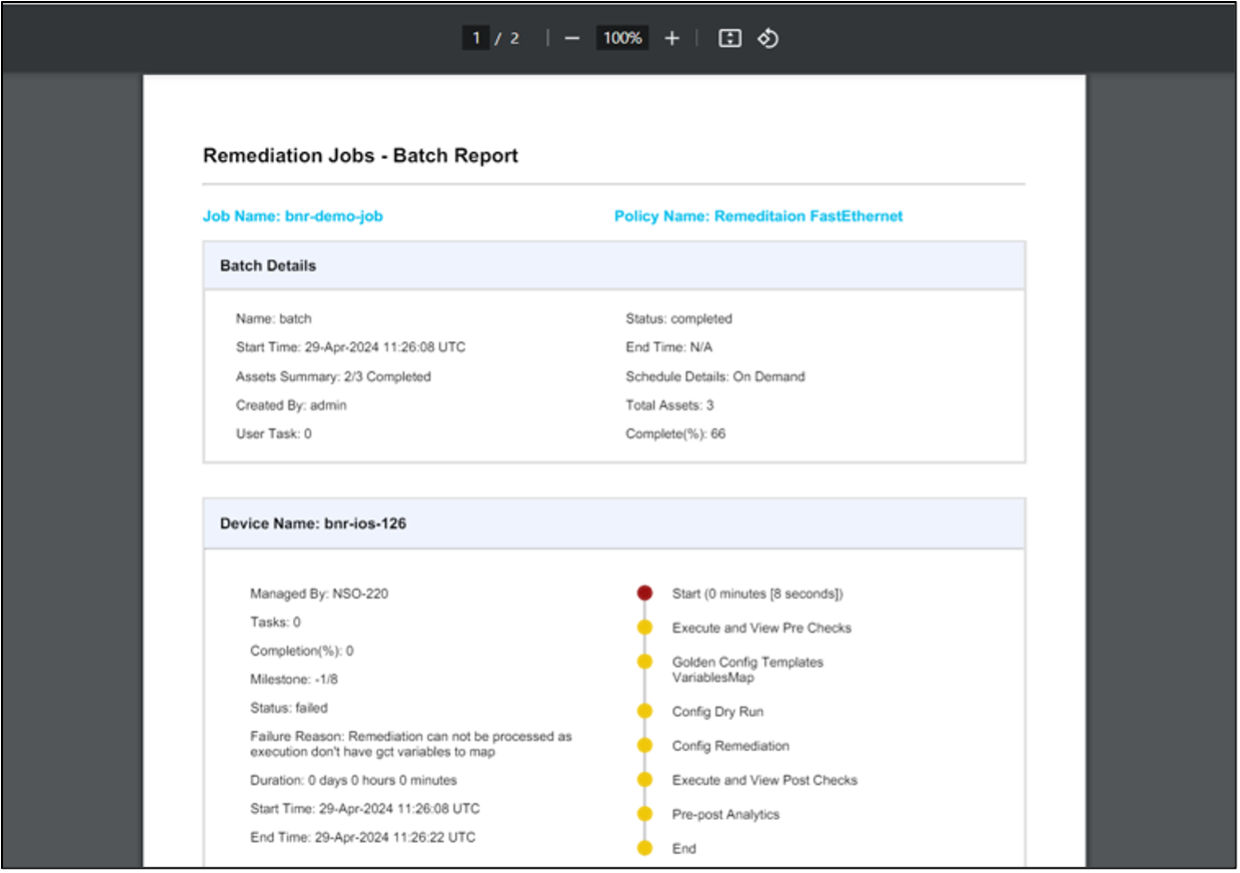
The Remediation Jobs Batch Report contains a Batch Details section, which provides a summary of the remediation batch, such as job name, batch name, start and end time, total assets, and overall status. This is followed by a Device Detail section (one section per device) which includes the device name, device specific remediation status, timeline, duration and the list of milestones, and the status.
Remediation Execution: Device Details
To view device details for milestones, select the Device Details page. The Milestone View page displays.
A summary of the remediation for the given device with a detailed milestone status displays including command output of key milestones completed. For example, the process template command outputs, GCT dry run output, and analytics difference output content can be viewed.
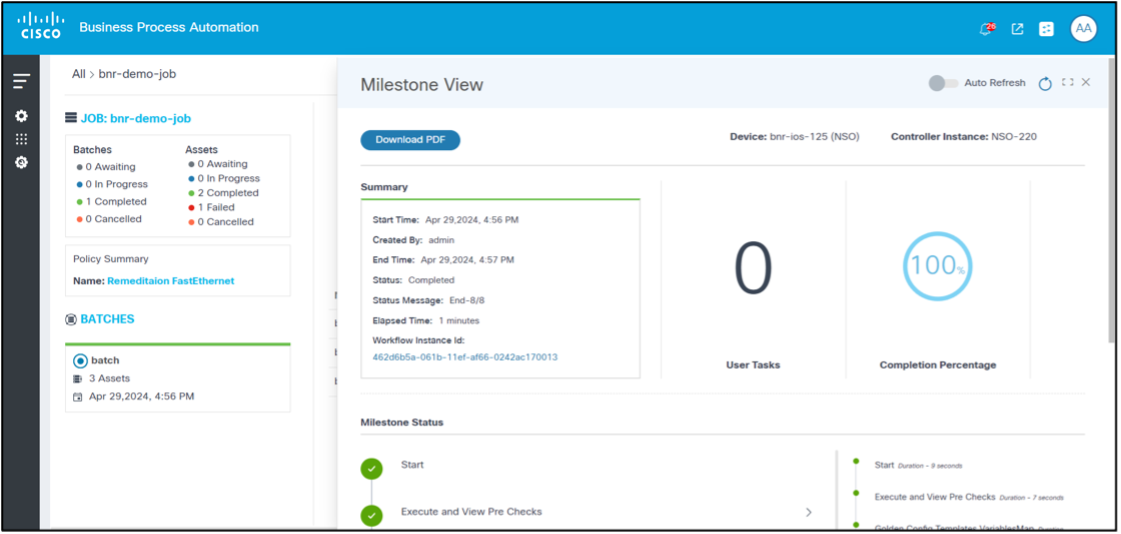
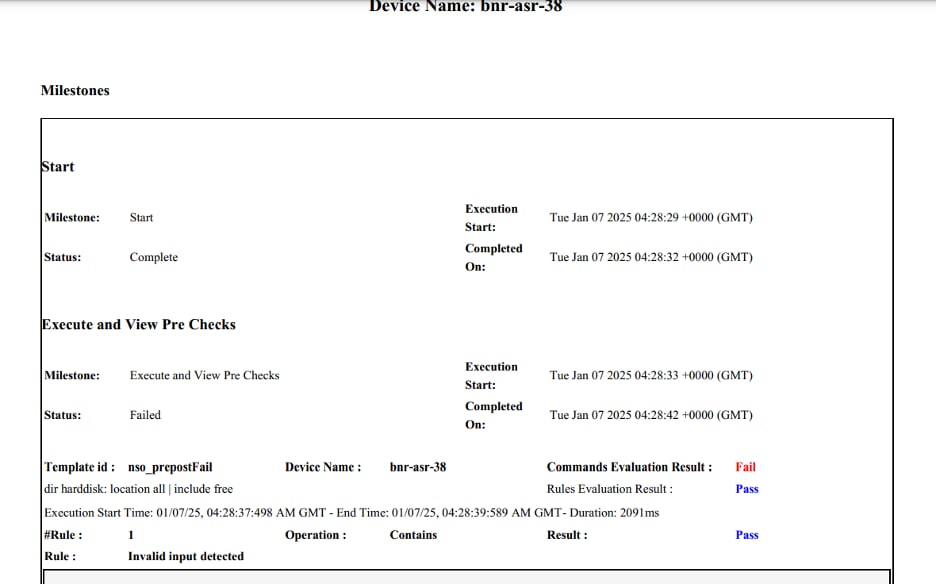
Remediation Execution: Device Details - Milestone Report
To view the milestone report:
- Select the Device Details page. The Milestone View page displays.
- Click Download PDF. The Milestone View Report is generated and downloaded as shown below.
This report provides more elaborate milestone details and corresponding content for the selected device remediation.
Configuration: Blocks and Rules
Functionality of Blocks
Configuration blocks are essential elements for creating and enforcing compliance policies in network management systems. They represent device CLI configurations, such as those for interfaces, router Border Gateway Protocol (BGP), and more. The following are key features of configuration blocks:
- Modularity: Configuration blocks allow for modular policy creation, enabling Administrators to define and manage discrete sections of device configurations independently. This modularity simplifies the process of updating and maintaining compliance policies.
- Granularity: By splitting device configurations into smaller, manageable parts, Administrators can perform accurate compliance checks and enforce specific standards. This ensures that every part of the device configuration follows the required policies.
- Reusability: Once defined, configuration blocks can be reused across multiple compliance policies and devices. This reusability reduces redundancy and ensures consistency in configuration management.
- Static Configuration Block: A static
configuration block represents the raw device configuration without any
variables.
Example: The following block can be used to run a compliance check on the TwentyFiveGigE0/0/0/31interface
interface TwentyFiveGigE0/0/0/31 description au01-inv-5g-08 enp94s0f0 no shutdown load-interval 30 l2transport - Dynamic Configuration Block: A dynamic
configuration block represents the device configuration that includes
variables which allows for more adaptable and reusable. These blocks
function like a TTP template, applying to the device configurations and
fetching the values for the variables. Conditions can be added to rules
to validate these variables. Refer to https://ttp.readthedocs.io/en/latest/Overview.html for
more details on TTP.
Example: The following block can be used to run a compliance check on all TwentyFiveGigE interfaces
interface TwentyFiveGigE{{INTERFACE_ID}}
  description {{DESCRIPTION}}
  no shutdown
  load-interval {{LOAD_INTERVAL}}
  l2transport
Dynamic Configuration Block with Sub-Hierarchies: This block functions like a dynamic configuration block and is used to retrieve values from device configurations that have multiple hierarchies.
Example: The following example demonstrates a device configuration, and the corresponding dynamic block used to retrieve values from a hierarchical structure.
Device Configuration which has hierarchical structure:
router bgp 12.34
address-family ipv4 unicast
  router-id 1.1.1.X
!
vrf CT2S2
  rd 102:103
  !
  neighbor 10.1.102.XXX
  remote-as 102.XXX
  address-family ipv4 unicast
    send-community-ebgp
    route-policy vCE102-link1.102 in
    route-policy vCE102-link1.102 out
  !
  !
  neighbor 10.2.102.XXX
  remote-as 102.XXX
  address-family ipv4 unicast
    route-policy vCE102-link2.102 in
    route-policy vCE102-link2.102 out
  !
  !
vrf AS65000
  rd 102:XXX
  !
  neighbor 10.1.37.X
  remote-as 65000
  address-family ipv4 labeled-unicast
    route-policy PASS-ALL in
    route-policy PASS-ALL out
Dynamic Block Configuration to parse the configuration above.
<group name="bgp_cfg">
router bgp {{ ASN }}
<group name="ipv4_afi">
address-family ipv4 unicast {{ _start_ }}
  router-id {{ bgp_rid }}
</group>

<group name="vrfs">
vrf {{ vrf }}
  rd {{ rd }}

  <group name="neighbors">
  neighbor {{ neighbor }}
  remote-as {{ neighbor_asn }}
  <group name="ipv4_afi">
  address-family ipv4 unicast {{ _start_ }}
    send-community-ebgp {{ send_community_ebgp }}
    route-policy {{ RPL_IN }} in
    route-policy {{ RPL_OUT }} out
  </group>
  </group>
</group>
</group>
Functionality of Rules
Rules allow users to define conditions to validate against variables present in a configuration block. As part of an execution, the compliance engine parses the device configuration, finds matching instances of device block instances, reads values out of the lines, and runs conditions defined in the rules against the values. The result, whether the configuration lines have any violation or not, is stored for display in dashboard.
Configuration rules are now part of the block creation lifecycle. Hence there is no separate page to view rules. Rules can be listed, created and updated under corresponding block create or update page.
In the CnR framework, rules play a crucial role in validating configurations against specified conditions. This section provides an overview of how rules are integrated and managed within the system.
- Purpose: Rules allow users to define conditions used to validate variables present within a configuration block
- Execution Process:
- The compliance engine parses the device configuration
- Identifies matching instances of device block instances
- Extracts values from the configuration lines
- Applies the conditions defined in the rules to these values
- Results indicating violations are stored and displayed in the dashboard
Integration with Block Lifecycle
- Lifecycle Integration: Configuration rules are now integral to the block creation lifecycle
- Management:
- Rules are listed, created, and updated directly within the pages used for block creation or updates
- There is no separate page dedicated to viewing rules, streamlining their management within the block lifecycle
This integration ensures that compliance checks are seamlessly incorporated into the configuration management process, enabling efficient monitoring and management of device configurations against predefined rules.
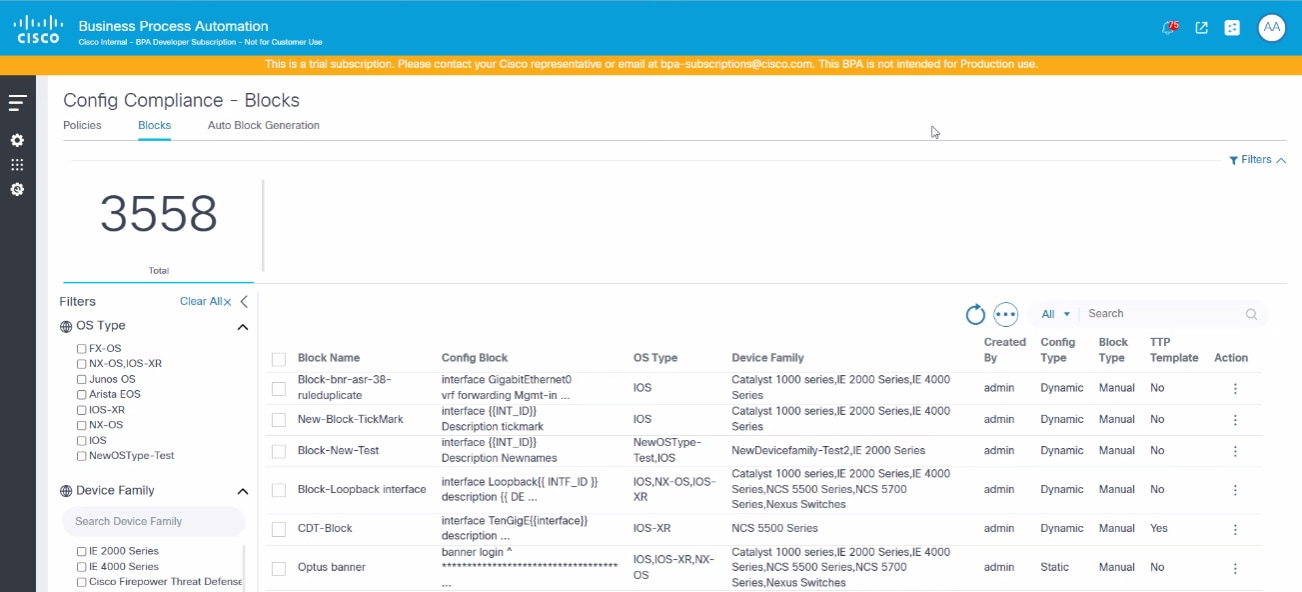
List Blocks
The Blocks page lists all configuration blocks and provides actions to generate, add, edit, delete, import, and export blocks. Users can filter, sort, and view block details.
Details of Features Block
- Total Count: Displays the total number of blocks created
- Filter Options:
- OS Types and Device Family: Allows users to filter blocks based on selected criteria
- Main Grid:
- Displays a default list of blocks
- Users can sort the list by clicking the column headers
- Includes a search feature allowing users to search by all attributes or specifically by Block Name
- Supports pagination for easy navigation through the list
- Actions:
- Edit: Users can modify existing blocks
- Delete: Users can remove blocks from the list
Adding or Editing Blocks and Rules
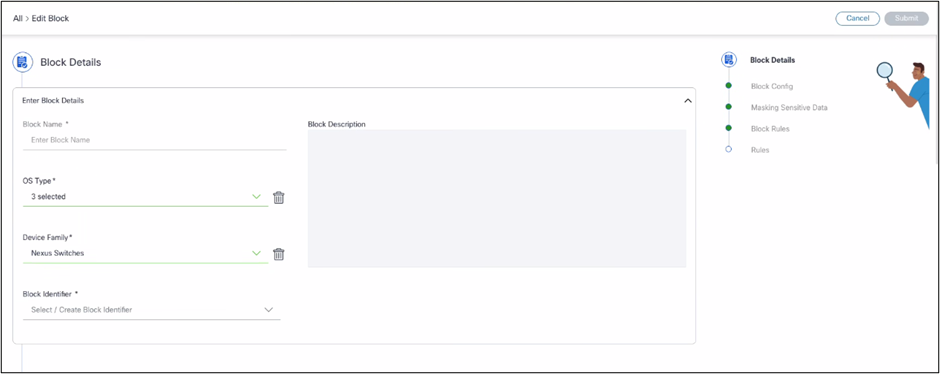
The Add or Edit Block page is designed to capture and manage essential information regarding blocks. This page outlines the following sections:
- Basic Block Details:
The Basic Details section includes:
- Block Name: Designated name for the block
- Description: A brief overview or explanation of the block’s purpose or functionality
- OS Type: Operating system type associated with the block
- Device Family: Category or group of devices compatible with the block
- Block Identifier Selection: Options for selecting a unique identifier for the block
- Add or Edit Block Identifier Details: If a
suitable block identifier is not present, users can use the same fields
to add or edit the following block identifier details:
- Block Identifier Name: The specific name given to the block identifier
- Pattern: The pattern or format that the block identifier follows
- Multi: Toggle to indicate whether to treat the config block as a multi-line configuration

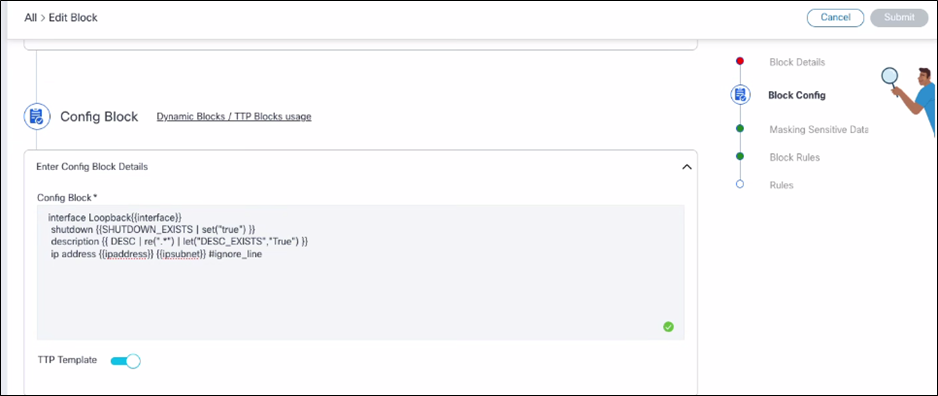
- Block Config:
The Block Config section includes:
- Config Block: Represents the configuration of a device, incorporating different variables. This configuration outlines how the device should be set up and managed within the system.
- TTP Template: Indicates whether the block is designated as a Template Transformation Protocol (TTP) Template, helping to identify the blocks used as templates for transforming or standardizing configurations across devices.

Using Ignore Line Syntax
The Ignore Line Syntax allows users to add a comment at the end of a specific configuration line in a block to instruct the system to skip any compliance checks or violations on that line. This prevents the line from appearing as a violation in reports or dashboard.
Complete the following steps to use Ignore Line Syntax:
- Locate the configuration line to exclude from the compliance checks (e.g., ip address).

- Append the line by using comment syntax “#ignore_line” at the end of that line. Example: ip address {{ipAddress}} {{ipSubnet}} #ignore_line
Raising Violation
This Template Text Parser (TTP) functionality in block config can be used to indicate whether a violation should be raised if a particular line exists.
Complete the following steps to use the TTP functionality:
- In the Block Config section of the block create or edit page, find the config line to control.
- Define a TTP variable using the set or let command as follows:
- If the config line shutdown exists, use the set command to define a
variable as follows:
shutdown | {{SHUTDOWN_FLAG | set(“true”)}}” - If users have an existing variable in the config line like
description {{DESC}}, use the let command as follows:
description {{ DESC | re(“.*“) | let(”DESC_EXISTS”, “True”) }}
- If the config line shutdown exists, use the set command to define a
variable as follows:
- Use these variables (SHUTDOWN_FLAG or DESC_EXISTS in above sample) in a rule to raise violations.
Effect:
A violation is displayed on the dashboard page if the “shutdown” or “description config” lines are available in the device configuration. The severity of the violation depends on the selection done in rule creation.
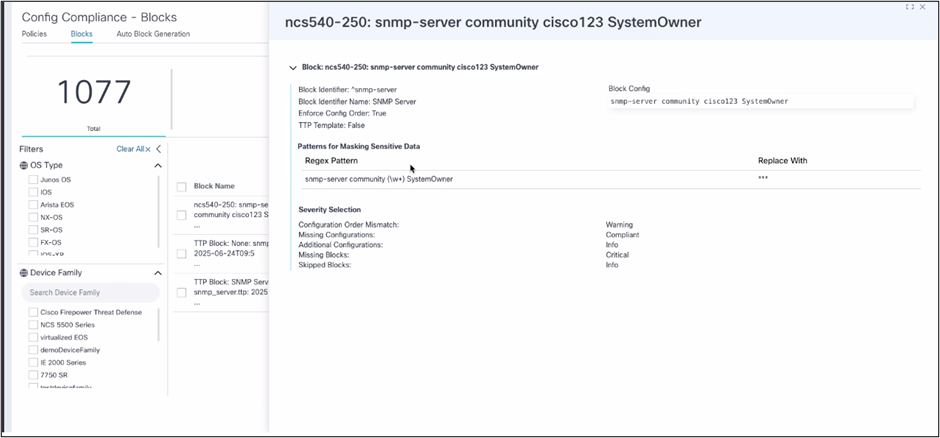
- Mask Sensitive Data:
Mask Sensitive Data is a feature that allows users to define patterns using regular expressions to identify and mask sensitive information (such as passwords or keys) in device configurations. This prevents sensitive data from being displayed in violation views or remediation configuration diffs by replacing matched data with a specified mask (e.g., “***“).
To mask the sensitive data, complete the following steps:
- In the Mask Sensitive Data section:
- Add multiple regular expression (regex) patterns to identify sensitive data
- Specify the replacement string to mask the matched data (e.g., ““) For example, the Regex pattern can be filled with a password (to match any text starting with”password” followed by a word) and the replacement should be .
- Add as many regex patterns as needed; they are displayed in a grid format
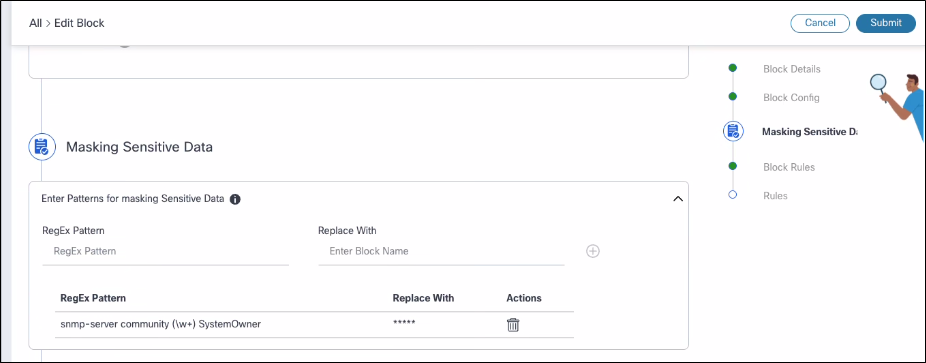
- Delete any pattern from the list if no longer needed.
- The system uses the regular expressions to find matching sensitive
device configuration data and replace it with the specified mask (e.g.,
“***“). This masking is used in the following pages:
- Compliance dashboard > Affected Assets > View violations page: The configuration data displayed in the UI as well as asset compliance report generated based on these violation details
- Compliance dashboard > View Remediation Config > View Remediation Diff page: The device configuration data displays masked sensitive data according to the block’s mask settings
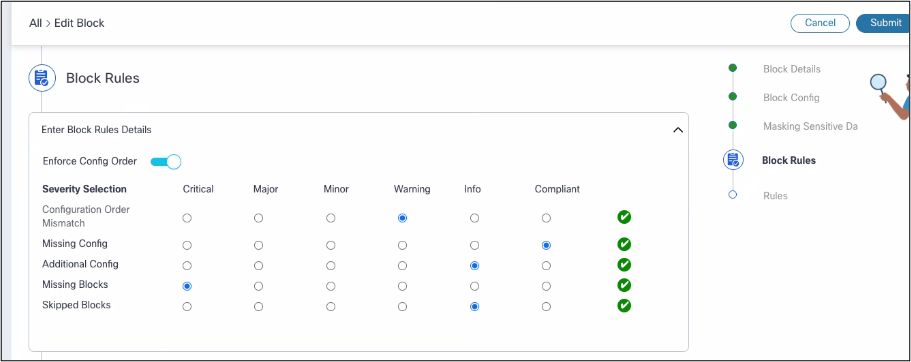
- Block Rules (Severity Selection):
The Block Rules section includes:
- Enforce Config Order: Ensures that configuration lines display in the correct order during compliance checks. The compliance engine checks the sequence of configuration lines against the expected order.
- Severity Selection: Allows users to assign a severity level to violations within a block. Severity levels help to prioritize and manage compliance issues effectively.
- Configuration Order Mismatch: Identifies discrepancies in the order of configuration lines and gives alerts when the sequence of device configuration lines does not match the expected order.
- Missing Config:
- Detects missing configuration lines
- Highlights expected configuration lines that are absent in the device configuration
- Checks if the entire device configuration block is missing or does not match the defined block configuration
- Additional Config:
- Identifies unexpected configuration lines
- Displays configuration lines present in the device configuration but not expected according to the block configuration
- Skipped Blocks:
- Indicates configuration blocks that are not checked
- The block is skipped if it does not meet the specified filter conditions
Rules Management
In the CnR framework, users can manage block rules through the “Add or Edit Blocks” interface. This functionality is structured as shown in the section below:
- Rules Configuration:
- Users can set up and manage rules that the compliance engine uses to validate configurations
- Users can create, edit, or delete rules as needed
- Rules List:
- Provides a comprehensive list of all created rules, offering visibility into their details
- Users can edit existing rules or delete the rules that are no longer needed
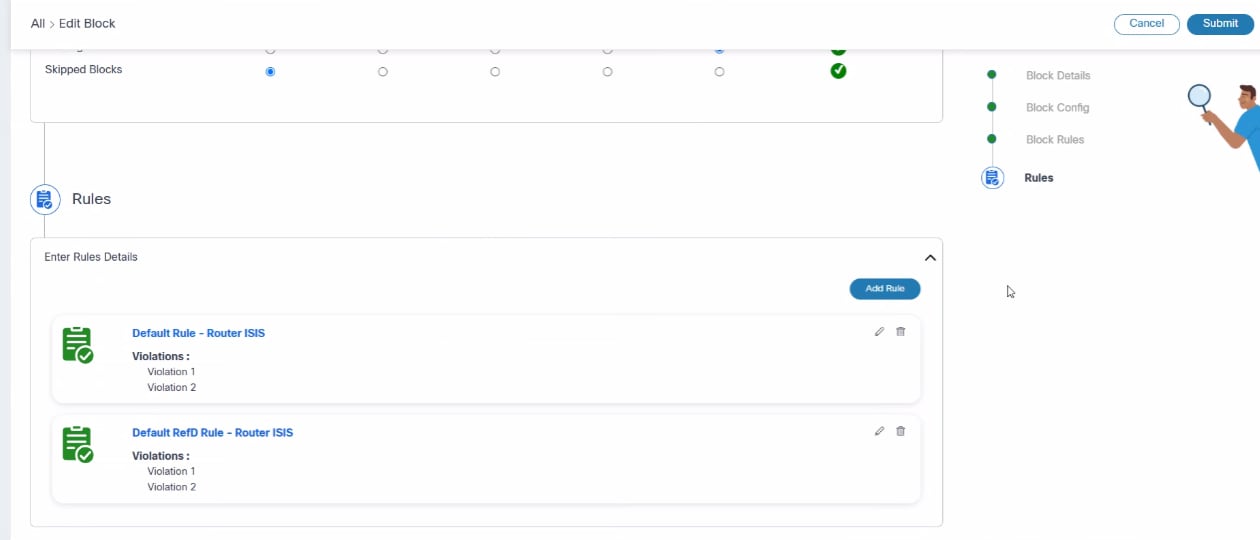
Adding or Editing Rule Details
- Rule Name:
- Assign a unique name to the rule for identification
- This field is mandatory to ensure each rule can be distinctly recognized
- Default Rule:
- Specify whether the rule should be set as a default rule
- Users can enable this setting to make the rule a default within the compliance framework
- Description:
- Provides additional context or information about the rule
- This field is optional but can be helpful for documentation and clarity
- Violations:
- Manage the list of violations associated with the rule
- Users can add, edit, or delete violations as needed
Adding or Editing Rule Violations
Rule violations are a critical component in the compliance execution, detailing the specific checks that need to be performed. Below is an overview of how rule violations can be created and managed:
- Basic Mode:
- User Interface Elements: This mode allows users to create rule violations using a Graphical User Interface (GUI). This approach is typically more user-friendly and accessible for those who prefer not to engage with coding.
- Step-by-Step Guidance: Users are guided through the process of defining checks using predefined UI elements.
- Advanced Mode:
- JSON-like Code Format: For users who are comfortable with coding, this mode allows for the creation of rule violations by typing them in a structured, JSON-like format.
- Flexibility and Precision: This method provides greater flexibility and precision for defining complex rule checks.
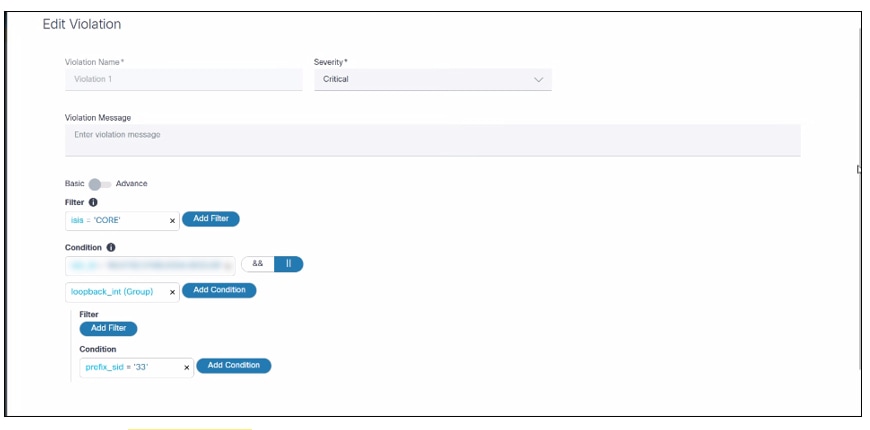
Rule violations have the following sections:
- Violation Name: Name of the violation
- Severity: Defines the compliance severity if this violation fails during an execution
- Violation Message: The message displays when a violation check fails
- Violation Filter Criteria: Applies the violation
conditions where non-group schema variables can be used
- Utilized in the filter criteria to set conditions based on individual data elements that are not part of a group
- Enables users to select criteria according to the data’s hierarchy and structure, ensuring precise and relevant filtering
- Rules Conditions: Actual conditions to check
compliance here both Group and Non-Group Schema Variables can be used
- Both types of variables are employed in rules to create comprehensive conditions
- Group Variables: Allow conditions to apply to collections of related data, ensuring thorough checks within structured groups
- Non-Group Variables: Permit conditions to apply to independent data elements, providing flexibility in rule application
Dynamic User Defined Blocks - Best Practices
- Ensure variable names are unique within each block.
- Avoid using variables in group names.
- For sub-hierarchy configurations, use “<group>” in blocks.
- To capture values for similar configuration lines in a single
variable, use the variable as follows:
{{ <<var-name>> | line | joinmatches(',') }}. Enclose the configuration line within{{ start }}and{{ end }}as demonstrated in the following example:
| Device Config | Block Config |
|---|---|
| ip domain list vrf Mgmt-intf core.cisco.com ip domain list cisco.com ip domain list east.cisco.com ip domain list west.cisco.com |
{{_start_}} ip domain list {{ domains | _line_ | joinmatches(‘,’) }} {{ _end_ }} ip domain list vrf {{ vrf_name }} {{ vrf_domain }} |
- To capture a value that contains spaces from a configuration line,
use the variable in the block as shown in the table below:
{{ <<var-name>> | re(".*") }}
| Device Config | Block Config |
|---|---|
| interface HundredGigE0/0/1/31 description Interface : 12ylaa01 Hg0/0/1/31 mtu 9216 |
interface {{ INTF_ID }} description {{ INTF_DESC | re(“.*“) }} mtu 9216 |
Understanding Rule Hierarchy and RefD Integration in Rules and Non-RefD Rules
In the Dynamic Block TTP, there are two distinct schemas that determine how configurations are structured and validated.
- Group-Based Schema:
- This schema organizes configurations in a hierarchical manner, establishing a parent-child relationship between elements
- Ideal for complex configurations where elements are logically nested and interrelated
- Rules can be defined to validate the hierarchical relationships and dependencies between different configuration elements
- Non-Group-Based Schema:
- Configurations are structured in a flat format, with all elements existing at the same level without hierarchical relationships
- Suitable for simpler configurations where hierarchy is not necessary
- Rules can be set to ensure that each configuration element meets specific criteria
RefD Integration
- Purpose of RefD:
- Role: Serves as a tool for managing local and external variables within the BPA framework
- Functionality:
- Dynamic Fetching: Facilitates the dynamic retrieval and management of variable data, allowing compliance checks to adapt to real-time data changes
- API Interaction: Offers APIs for BPA use cases to access and manage these dynamic variables and values, ensuring smooth integration into compliance workflows
Syntax for Compliance Rule Values
The CnR use case integrates with the RefD framework to dynamically utilize data within compliance checks and remediation workflows. A detailed breakdown of how this integration works, particularly focusing on the syntax and types of variables used, is shown below:
- Keyword: The syntax must begin with “RefD”
- Parameters: The “key” parameter is mandatory in the syntax
- Example:
plaintext
Copy Code
RefD:ns={$SITE}&key={{#device.deviceIdentifier}}.interfaces.MgmtEth{{ INT_ID }}.ipv4_addr
Types of Variables
- User-Defined Variables:
- Configured during the creation of Compliance Jobs.
- Scope: Applicable to all executions for the specified job
- Syntax:
{$VarName} - Example:
{$SITE}
- System Variables
- Pre-defined by the framework based on context data available during execution
- Currently, the framework provides access to the device object
- Syntax:
{{#VarName}} - Examples:
{{#device.deviceIdentifier}}- Represents the device identifier{{#device.additionalAttributes.serialNumber}}- Represents the device serial number
- TTP Variables
- Present in the block configuration
- Syntax:
{{ VarName }} - Example:
{{ INT_ID }}
Non-RefD Rules
- These rules are like RefD rules, but do not begin with the “RefD” keyword
- Example:
plaintext
Copy Code
{$int_id}.{{#device}}.{{ mtu_val }}
Variable Usage
- User-Defined Variables: Represented as
{$Var} - System Variables: Represented as
{{#Var}}, exposing attributes like deviceIdentifier, controllerId, controllerType, etc. - TTP Variables: Represented within double curly
brackets as
{{var}}
Execution
- During job creation, their values can be set if $ variables are specified
- The combined values from the variables are compared with the fetched device configuration to ensure compliance
Viewing Block Details
To access block details:
- Navigate to the Blocks page.
- Select or click the row in the grid to view the details of the specific block.The Block Details page displays on the right side of the screen.
Clicking hyperlinks, if any, within the details redirects users to the relevant block or related information.
Deleting Blocks
The portal allows users to delete one or more blocks, provided they have the appropriate RBAC permissions. Users can perform these actions by completing the following steps:
For single-block deletion:
- Navigate to the Blocks page.
- Click the More Options icon next to the block to be deleted.
- Select the Delete option. A confirmation message displays.
For multiple-blocks deletion:
- Navigate to the Blocks page.
- Select the check boxes next to each block to be deleted.
- Click the More Options icon and select Delete. A confirmation message.
Configuration: Auto Blocks Generation
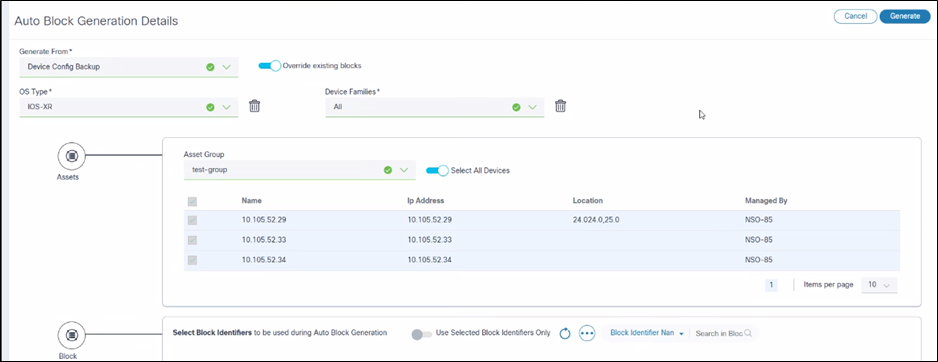
Block generation allows users to automatically create blocks based on a device’s configuration. This automation reduces the time and effort required for manual creation and makes it easier for users to edit blocks by adding or removing variables, rather than starting from scratch.
Click a row to view block generation details.
Auto Blocks Generation
The Automatic Block Generation page includes the following fields:
- Generate From: The source from which blocks are
generated. It has the following three options:
- Device Config Backup: The system picks a device configuration from the backup use case
- File Upload: A File Upload window opens for users to upload the device configuration
- Current Config: Enter the CLI configuration command the system uses to fetch the device configuration.
- OS Type: List of OS types for which this block is relevant.
- Device Family: List of device families for which this block is relevant.
- Assets: The Assets feature provides a structured
approach to select devices for generating dynamic blocks
- Asset Group Selection:
- Allows users to choose a pre-defined group of devices, known as an asset group, which is used for generating dynamic blocks
- Facilitates the management and organization of devices by grouping them based on specific criteria, such as location, type, or function
- Subset Device Selection:
- Users have the flexibility to select a specific subset of devices from within the chosen Asset Group
- Enables users to focus on a particular segment of devices, allowing for more targeted block generation and management
- Asset Group Selection:
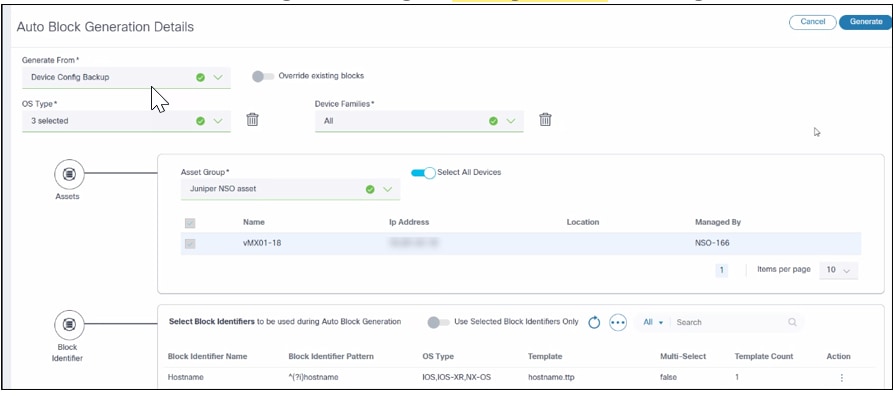
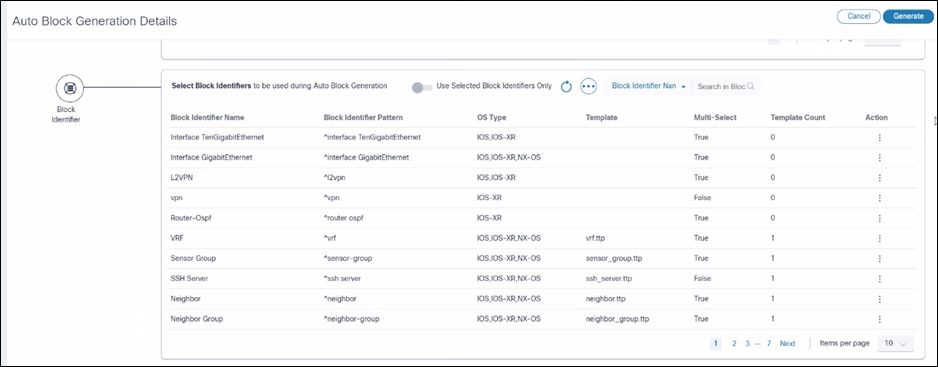
- Block Identifier: Provides an option for users to select the list of block identifiers used during block generation. It also provides block identifier management capabilities inline.
Block Identifier
A Block Identifier uses CiscoConfParser to extract a configuration block from the entire device configuration. Each block identifier should be associated with a regex pattern. Users can create their own block identifiers or update existing block identifiers using either the UI or the API. The platform currently provides an estimated 55-60 default block identifiers. Each identifier is unique to an OS type and is loaded during the BPA application deployment through the Ingester service. A TTP template can be associated with each block identifier. Both the name and pattern of a block identifier must be unique.
If the Multi option is enabled for the block identifier, the compliance framework generates multiple configuration blocks from the matched configurations. Otherwise, it treats all matched configurations as a single block.
Examples for block identifiers with Multi option True: interface, router bgp, vrf, l2vpn etc.
Examples for block identifiers with Multi option False: logging, snmp-server, domain, etc.
Examples:
{
  “name”: “BundleEthernet Interface”,
  “osType”: [“IOS”, “IOS-XR”, “NX-OS”],
  “multi”: true,
  “blockIdentifier”: “^(?i)interface Bundle-Ether”,
  “templates”: [“parent_interface.ttp”]
}

{
  “name”: “Loopback Interface”,
  “osType”: [“IOS”, “IOS-XR”, “NX-OS”],
  “multi”: true,
  “blockIdentifier”: “^(?i)interface Loopback”,
  “templates”: [“parent_interface.ttp”]
}
List Block Identifier
List Block Identifier allows users to view the list of block identifiers along with search and sort functions. This feature is available within the Generate Blocks page.
Create or Edit Block Identifier
The Block Identifier List section on the Auto Block Generation page provides users with the tools to manage block identifiers effectively. The functionalities are listed below:
- Create Block Identifiers
- Users can add new block identifiers to the list
- This allows introduction of unique identifiers that can be used to organize and differentiate blocks
- Edit Block Identifiers
- Existing block identifiers can be modified
- Enables updates or corrections to identifiers, ensuring they remain accurate and relevant to the blocks they represent
- Delete Block Identifier
- Users have the option to remove block identifiers from the list
- Facilitates the management of identifiers by allowing the removal of those that are no longer needed or applicable
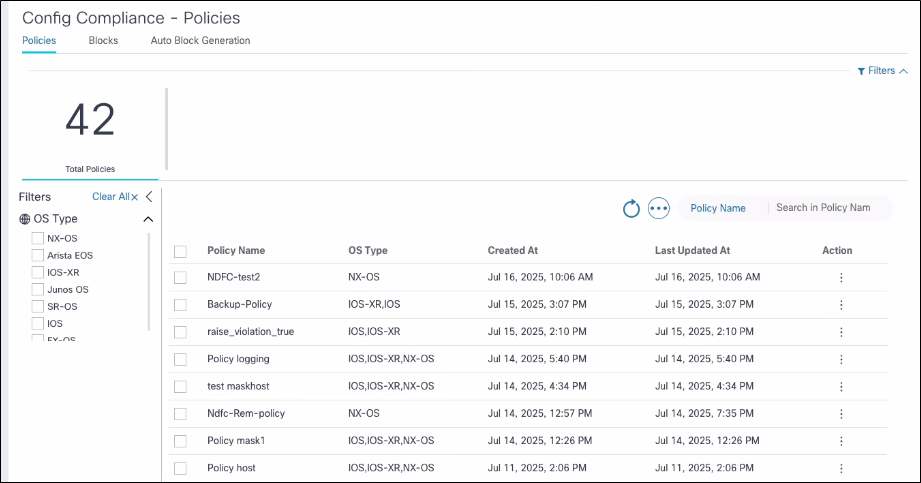
Configuration: Policies
A set of policies, rules, and blocks to enable compliance execution can be defined on the Policies tab. A policy is a user-defined template consisting of configuration blocks and rules. A list of configuration blocks and a list of rules for each configuration block to create a policy can be selected.
List Policies
A list of policies can be displayed on the Policies tab which also provides actions for adding, editing, deleting, importing, and exporting policies.
Adding and Editing Policies
This section outlines the Add Policy and Edit Policy page:
Policy Details
- Policy Name: Name of policy
- OS Type: List of supported OS types for this policy
- Device Family: List of supported device families for this policy
- Policy Description (optional): Describes the policy with a short description
The OS Type and Device Family fields are auto-populated based on the selected blocks in the next section.
Select Blocks Dialog
The “Select Blocks” feature is a user-friendly interface designed to assist users in choosing configuration blocks for inclusion in a policy. Its functionalities are listed in this section:
- Pop-up Dialog
- Purpose: Offers a dedicated space for users to select configuration blocks without leaving the current page
- User Interaction: Ensures an intuitive selection process by presenting options in a separate, focused dialog box
- Add and Select Options
- Multiple Selections: Users can choose one or more configuration blocks to include in a policy
- Flexibility: Supports the inclusion of various blocks based on the user’s specific policy requirements
- Navigation Features
- Filters: Allows users to narrow the list of available blocks based on specific criteria, making it easier to find relevant blocks
- Pagination: Organizes blocks into manageable pages, improving navigation through large sets of data
- Search Capabilities: Enables quick location of blocks by name or other identifiers, streamlining the selection process
Users can create new blocks by clicking Create in the Block Selection section. A new browser tab cross-launches and users can create a new block. Once submitted, users can return to the original tab and select the newly created block to add it to the policy.
Conditional Filters
The Conditional Filters feature is an advanced tool allowing users to apply specific criteria to configuration blocks, ensuring precise and targeted compliance checks.
- Enables users to apply configurations or run compliance checks on selected configuration blocks based on predefined conditions
- Focuses resources and efforts on relevant blocks by filtering out those that do not meet the specified criteria
- Users can define conditions that configuration blocks must meet to be included in compliance checks or other processes
- Only the blocks matching these conditions are executed, while others are ignored, allowing more precise control
Use Case Example:
- Selective Compliance Checks: If a policy is intended to check configurations on only two specific interfaces out of the 20 available, users can set conditions to limit the compliance checks to only those two interfaces.
- Select Rules: Option to select one or more rules for a given configuration block.
Remediation Section
The Policies page provides an optional section to define remediation details per controller type.
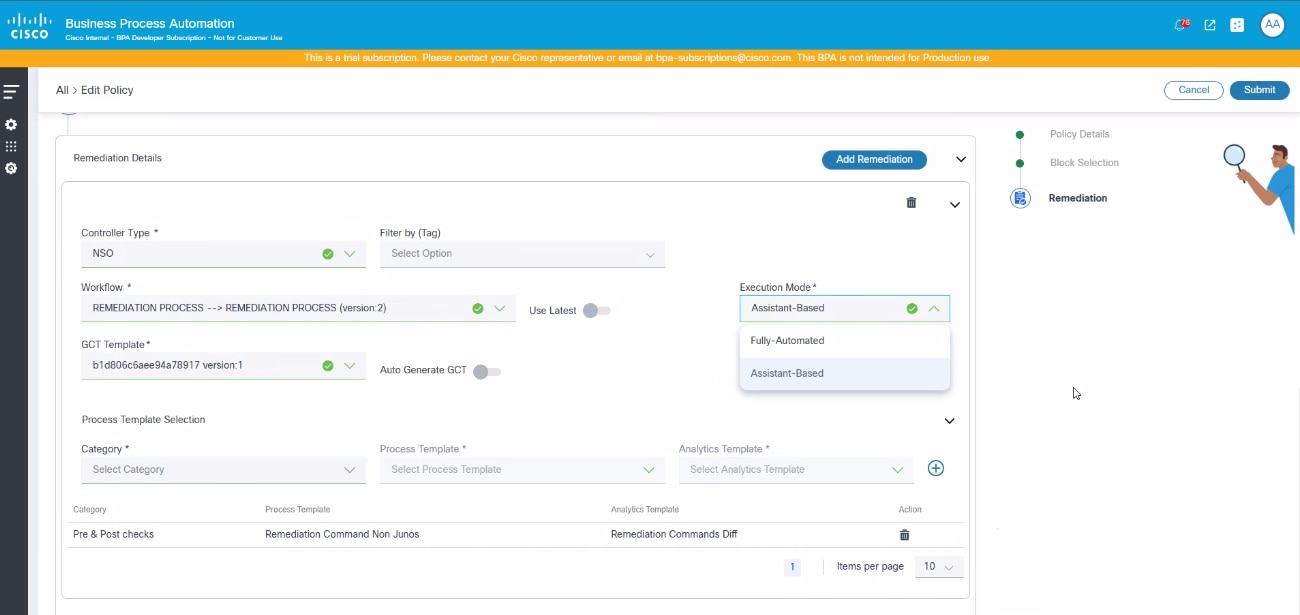
- Controller Type: List of controller types with support for remediation
- Remediation Workflow: Workflow to be executed for devices from the selected controller type
- GCT Template: One or more GCT templates to be applied
- Process Template: One or more process templates to be executed as part of both pre-check and post check, along with corresponding analytics template.
- Pre-Check Template: Optional list of process templates to be executed only for pre-check
- Post Check Template: Optional list of process templates to be executed only for post check
- Execution Mode:
- Fully Automatic: The remediation process runs automatically without manual intervention or user tasks
- Assistant Based: The system creates user tasks which require manual assistance during the remediation process
Auto-Generate GCT Feature
The Auto-Generate GCT feature is designed to streamline the process of creating GCT templates necessary for remediation. It works as detailed below:
- Automatically generates GCT templates based on the results and details of compliance execution
- Automates the template creation process
- The generated templates are tailored to address issues identified during compliance checks, ensuring remediation actions align with compliance needs
Roles and Access Control
Static Permissions List
The Configuration Compliance dashboard in the Next-Gen portal supports the RBAC feature of BPA with the following permissions representing how a dynamic text block of config is displayed in a GUI representation for handling the rules and conditions:
| Group | Action | Description |
|---|---|---|
| ui-app | complianceDashboard.show | Show/Hide Compliance Dashboard App |
| ui-app | remediationDashboard.show | Show Remediation Jobs App |
| ui-app | complianceJobs.show | Show Compliance Jobs App |
| ui-app | complianceConfigurations.show | Show Compliance Configuration App |
| complianceDashboard | assetsComplianceSummary | View assets compliance summary |
| complianceDashboard | policyComplianceSummary | View policies compliance summary |
| complianceDashboard | viewViolations | View violation details |
| complianceDashboard | policyComplianceAssetsSummary | View affected assets |
| complianceDashboard | viewReports | View reporting dashboard, report settings and download reports |
| complianceDashboard | manageReports | Create and delete reports |
| complianceDashboard | manageReportSettings | Modify report settings |
| remediationDashboard | viewRemediationJobs | View Remediation Jobs |
| remediationDashboard | viewRemediationMilestones | View Remediation Milestones |
| remediationDashboard | manageRemediationJobs | Manage Remediation Jobs like create, delete, archive and handle user tasks |
| complianceJobs | viewComplianceJobs | View Compliance Jobs and executions |
| complianceJobs | manageComplianceJobs | Manage Compliance Jobs |
| complianceConfigurations | viewComplianceConfigurations | View compliance configurations like policies, blocks, rules, block generation, block identifiers and TTP templates |
| complianceConfigurations | manageCompliancePolicies | Manage compliance policies |
| complianceConfigurations | manageComplianceBlocks | Manage compliance blocks and rules and block identifiers |
| complianceConfigurations | manageComplianceBlockGeneration | Manage compliance block generation and TTP templates |
Pre-Defined Roles
The Configuration Compliance and Remediation use case has the pre-defined roles listed in the table below:
| Role | Description | Permissions |
|---|---|---|
| Compliance Administrator | Administrator role with all compliance-related permissions | UI Applications: Show Asset Manager - Show Asset Group - View Compliance Dashboard - Show Compliance Jobs - Show Compliance Configuration Asset: View Asset List - View Backup Config for Assets - Backup Config - Perform Controller Enabled Device Actions Asset Group: - View Asset Groups - Manage Assets Groups - Create Dynamic Asset Groups Backup Config: View, compare, and download device configuration backups Backup Restore Policy: View backup restore policies Compliance Dashboard: - View assets’ compliance summaries - View policies’ compliance summaries - View violations - View affected assets Create and delete reports View reporting dashboard, report settings and dowload reports Modify report settings: Compliance Jobs View compliance jobs and executions - Manage compliance jobs Compliance Configurations: - View compliance configurations like policies, blocks, and rules - Manage compliance policies - Manage compliance blocks, rules, and block identifiers - Manage compliance block generation and TTP templates |
| Compliance Operator | Operator role with all compliance permissions, except for configuration management | UI Applications: - Show Asset Manager - Show Asset Group - View Compliance Dashboard - Show Compliance Jobs - Show Compliance Configuration Asset: View Asset List - View Backup Config for Assets - Backup Config - Perform Controller Enabled Device Actions Asset Group: - View Asset Groups - Manage Assets Groups - Create Dynamic Asset Groups Backup Config: View, compare, and download device configuration backups Backup Restore Policy: View backup restore policies Compliance Dashboard: - View assets compliance summary - View policies compliance summary - View violations - View affected assets Create and delete reports View reporting dashboard, report settings and dowload reports Compliance Jobs: View compliance jobs and executions - Manage compliance jobs Compliance Configurations: View compliance configurations like policies, blocks, and rules |
| Compliance Read-Only | Provides all read-only permissions related to compliance use case | UI Applications: - Show Asset Manager - Show Asset Group - View Compliance Dashboard - Show Compliance Jobs - Show Compliance Configuration Asset: View Asset List - View Backup Config for Assets - Perform Controller Enabled Device Actions Asset Group: - View Asset Groups Backup Config: View, compare, and download device configuration backups Backup Restore Policy: View backup restore policies Compliance Dashboard: View assets compliance summary - View policies compliance summary - View violations - View affected assets View reporting dashboard, report settings and download reports Compliance Jobs: View compliance jobs and executions Compliance Configurations: View compliance configurations like policies, blocks, and rules |
| Remediation Administrator/Remediation Operator | Operator role with all remediation-related permissions | UI Applications: - Show Asset Manager - Show Asset Group - View Remediation Dashboard Asset: - View Asset List Asset Group: - View Asset Groups Manage Assets Groups - Create Dynamic Asset Groups Remediation Dashboard: - View Remediation Jobs - View Remediation Milestones - View assets compliance summary - Manage remediation jobs like create, delete, archive, and handle user tasks - View affected assets |
| Remediation Read-Only | Provides all read-only permissions related to remediation use case | UI Applications: - Show Asset Manager - Show Asset Group - View Remediation Dashboard Asset: - View Asset List Asset Group: - View Asset Groups Create Dynamic Asset Groups Remediation Dashboard: - View Remediation Jobs - View Remediation Milestones - View assets compliance summary - View affected assets |
Access Policies
The Access Policies feature ensures users have appropriate access to specific compliance policies and asset groups. This feature enhances security and operational efficiency by allowing Administrators to define and enforce access controls based on user roles and responsibilities. The Access Policies are managed through the Access Policy page, where Administrators can create, edit, and assign policies to users or groups. Administrators can define granular permissions, specifying which compliance policies and asset groups each user or group can view, edit, or manage. This level of detail helps in maintaining strict control over sensitive information and critical operations.
Once the access policy is defined, data is restricted on all compliance and remediation pages in the Next-Gen UI, based on the list of CnR policies and assets to which the current user has access to.
To provide user access:
- Create user(s) and assign them a to user group(s).
- Create user role(s) and assign them to the created user group(s).
- Add asset(s) to an asset group(s).
- Create resource group(s) to assign compliance policy resource(s).
- Create an access policy and select relevant user group(s), asset group(s) and resource group(s).
Creating Resource Group
Create a Resource Group using the compliance remediation-policy from the Resource Type drop-down list and select compliance polices that need to be given access to the respective user group.
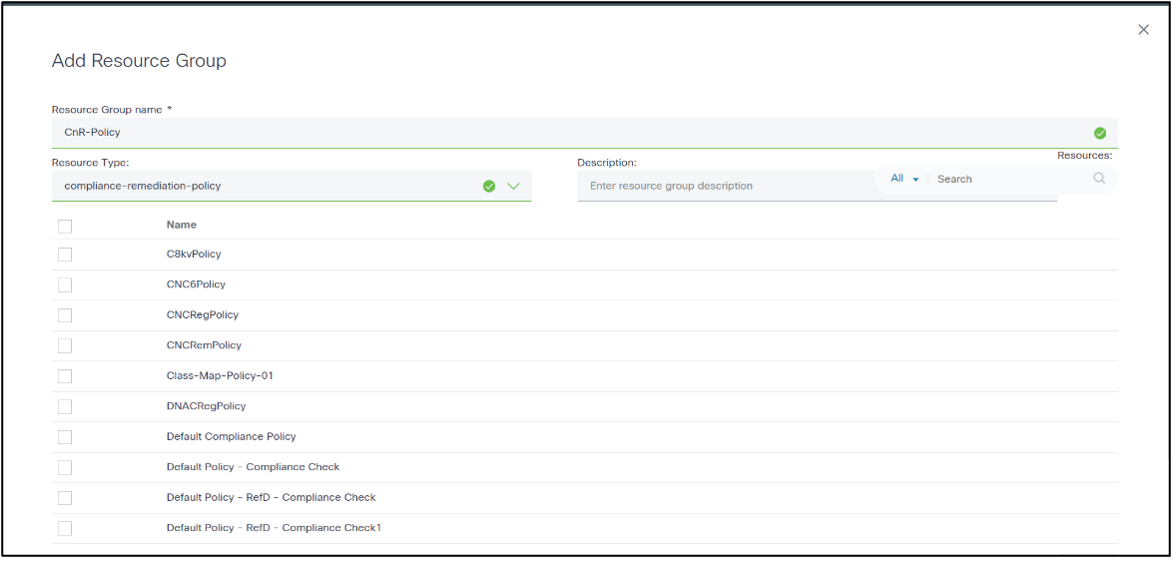
Create Access Policy
Create an access policy with resource group(s) and asset group(s) that to need give permission to the user group(s).
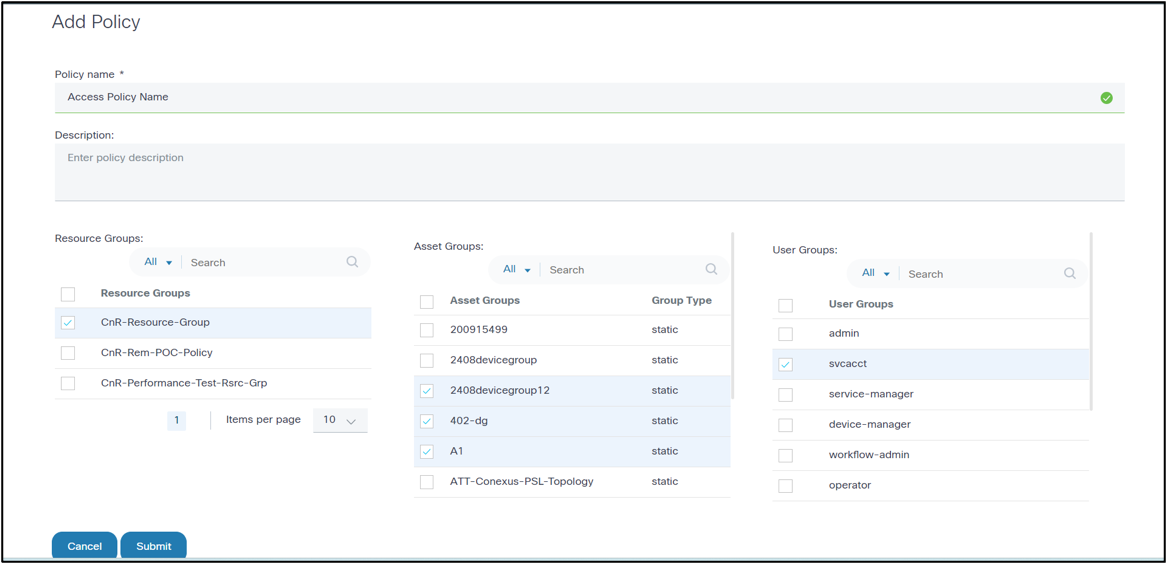
Offline Compliance
The Offline Compliance feature enables users to run compliance checks against device configurations which are not available through active devices in the asset inventory.
Users can run offline compliance using the device backup config or by creating an offline audit in Compliance Jobs. Results of the executions can be viewed on the Compliance dashboard.
Using Device Backup Config
Administrators can manually upload a zip file containing the running-configuration for a desired set of devices. This feature is available under the Device Config – Upload section in the Backup & Restore application. Once the device configurations are uploaded, a Compliance Job for the desired devices can be created by selecting Device Backup Config as the source of device configuration. During execution, the uploaded device configuration is retrieved from the Backup application and compliance check is executed on it.
Using Create Offline Audit feature in Compliance Jobs
To run compliance against a device configuration offline, users can select Offline Audit from the More Options icon on the Compliance Jobs page. This allows users to manually upload a zip file containing the running-configuration directly in the Compliance application. During execution, the uploaded device configuration is parsed and the compliance check is executed.
Deploying Configurations through Ingester
The loading of compliance configuration artifacts can be automated using the Ingester framework. Once artifacts are developed, they can be exported, packaged, and deployed into the target environment using the following steps.
- Create the NPM package using the following commands:
mkdir <<package-name>> cd <<package-name>> npm init (press "enter" for all prompts) - Export configurations from BPA portal (Classic UI)
- Navigate to BPA Classic UI > Configuration Compliance & Remediation > Configurations
- Export “TTP Templates/Block Identifiers/Blocks/Rules/Policies”
- Rename the exported files as follows:
- TTP Templates: <<filename>>.cnrttptemplate.json
- Block Identifiers: <<filename>>.cnrblockidentifier.json
- Blocks: <<filename>>.cnrblock.json
- Rules: <<filename>>.cnrrule.json
- Policies: <<filename>>.cnrpolicy.json
- Package ingester data (.tgz)
- Copy all exported files into the npm package created in “step-1”
- Run the
npm packcommand inside the npm package to create the “.tgz” file
- Deploying ingester data (.tgz) into BPA Single Node env
- Copy the .tgz file into the <<BPA core bundle>>/packages/data folder in the server where BPA bundle deployed
- Restart the Ingester server (docker restart ingester-service)
- Deploying Ingester data (.tgz) into BPA Multi Node env
- Copy the .tgz file into the /opt/bpa/packages/data folder in the server where helm charts are deployed
- Redeploy Ingester pod
(
kubectl rollout restart deployment ingester-service -n bpa-ns)
References
| Name | Description |
|---|---|
| TTP | Template Text Parser used in configuration blocks |
| Conf Parser | Configuration field parser used to parse CLI device configuration |
API Documentation
The API documentation details for compliance and remediation can be found in the classic UI About pop-up:
Troubleshooting
Dashboard
Recent Compliance Job Results Do Not Display
Observation: Recent Compliance Job results do not display in the Next-Gen portal dashboard.
Potential Cause 1: The dashboard has a date range selection, which defaults to “Current Month”. If a new month has recently started (e.g., today is first of the month), the executions run before yesterday (last day of previous month) will not display.
Analysis: Verify that the correct date range is selected in the dashboard, including previous month’s days, if required, to show proper violations data.
Potential Cause 2: A different user may have run a Compliance Job on the same policy and/or asset combination. The dashboard shows violations as found during the latest run within the selected date range.
Analysis: As an Administrator (or user with access to all Compliance Jobs), review the list of Compliance Jobs and their history to determine which policy or asset group combinations are executed.
Compliance Jobs
Entire Execution Status Set as “Skipped”
Observation: While running Compliance Jobs, an entire execution status is marked as ”Skipped”. No violations are reported.
Potential Cause: An existing execution for the same job is still running.
Analysis: A Compliance Job can have only one execution in running state at any given point in time. Verify whether an earlier execution is still running. Executions that are stuck or running for an extended period of time can be terminated/
Device Status Set as “Skipped”
Observation: In a Compliance Job execution, the status for some of the devices are marked as “Skipped”.
Potential Cause: Compliance capability is not enabled for the controller type to which that device belongs.
Analysis: Compliance policy applies only to devices within the asset group that have the capability enabled.
Device Status Set as “Failed”
Observation: In a Compliance Job execution, the status for some devices are marked as ”Failed”.
Potential Cause: Runtime errors that occurred during the compliance execution process. These errors can be code errors or incorrect configurations in policies, blocks, rules, block identifiers, etc.
Analysis:
API to locate the reason for runtime errors:
- Get executions to find execution id
API: /api/v1.0/compliance-remediation/
compliance-executions
Method: GET
- Get Device Executions using execution id
API: /api/v1.0/compliance-remediation/
compliance-device-executions?
executionId=<< exeution-id >>
Method: GET
Compliance Rules
Rules Display Empty Value
Observation: During the execution of a Compliance Job, the rule variables display empty values.
Analysis:
- If data is being retrieved from the RefD application, confirm that the RefD keys are in the correct format. If they are, confirm that the RefD application has data for the key linked to the compliance variable in the rules. Additionally, verify that the correct RefD key is being sent from the compliance app by checking the compliance service logs. Refer to Understanding Rule Hierarchy and RefD Integration in Rules and Non-RefD Rules.
- Check the compliance block execution result using the following
API:
URL: /api/v1.0/compliance-remediation/compliance-block-executions?deviceExecutionId=<>
Method: GET
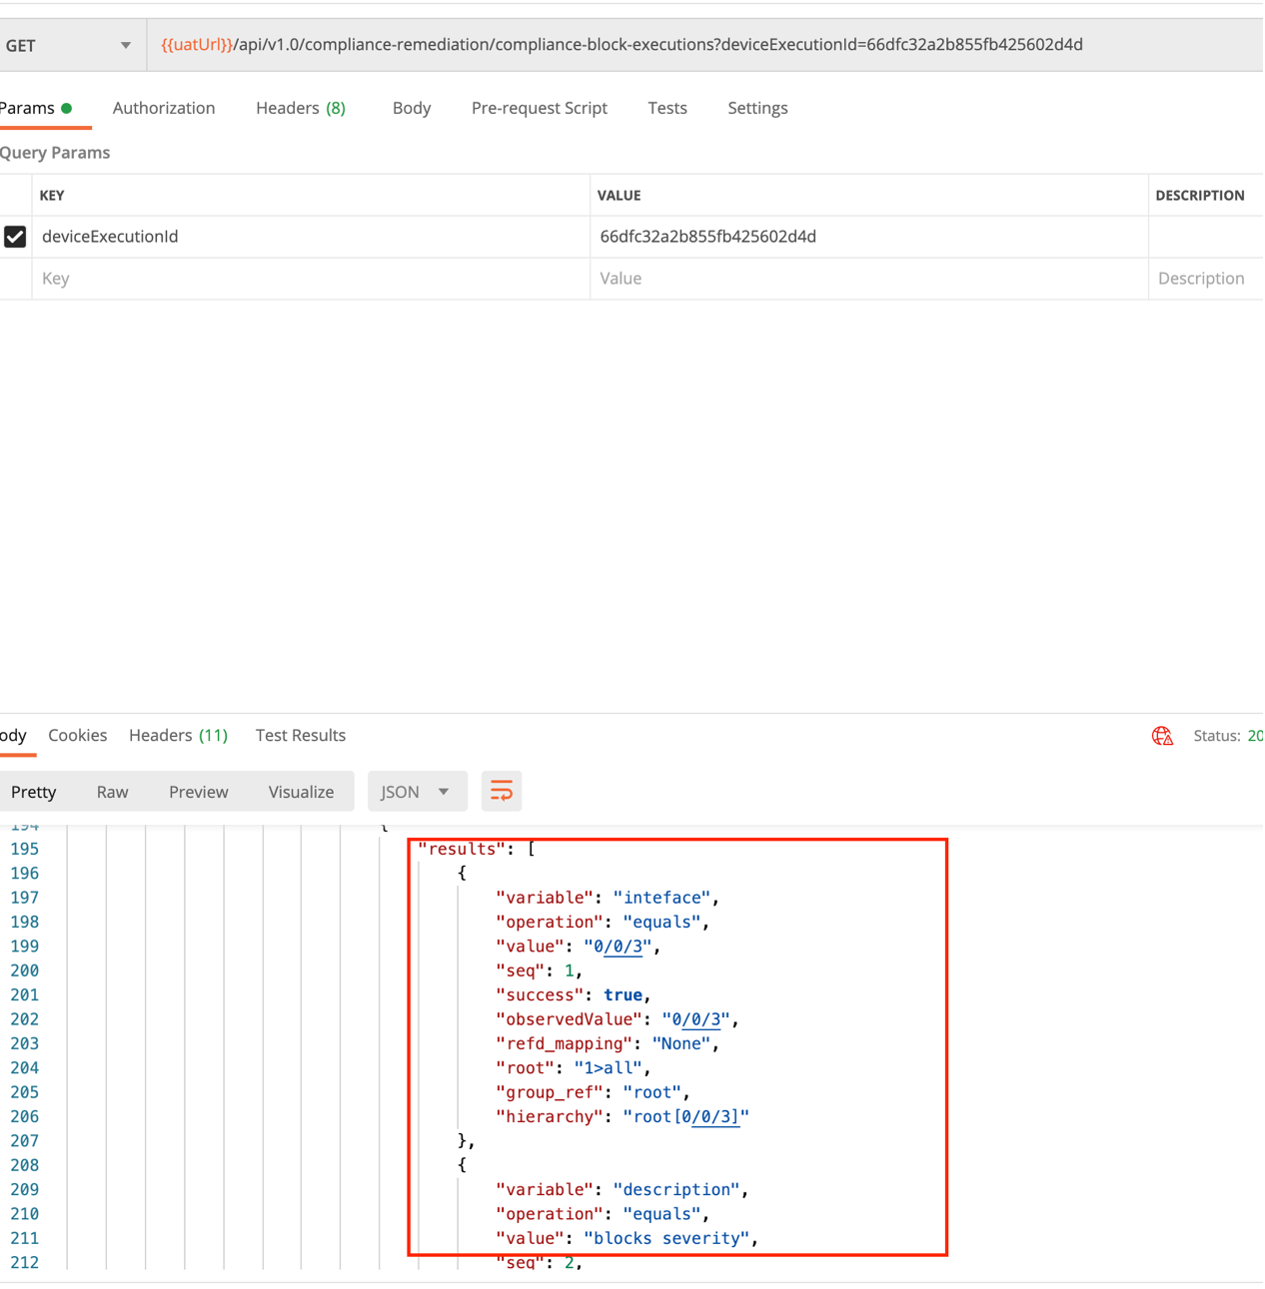
- Verify whether the block has sub-hierarchies or a single hierarchy and ensure that the rules are configured according to the hierarchy.
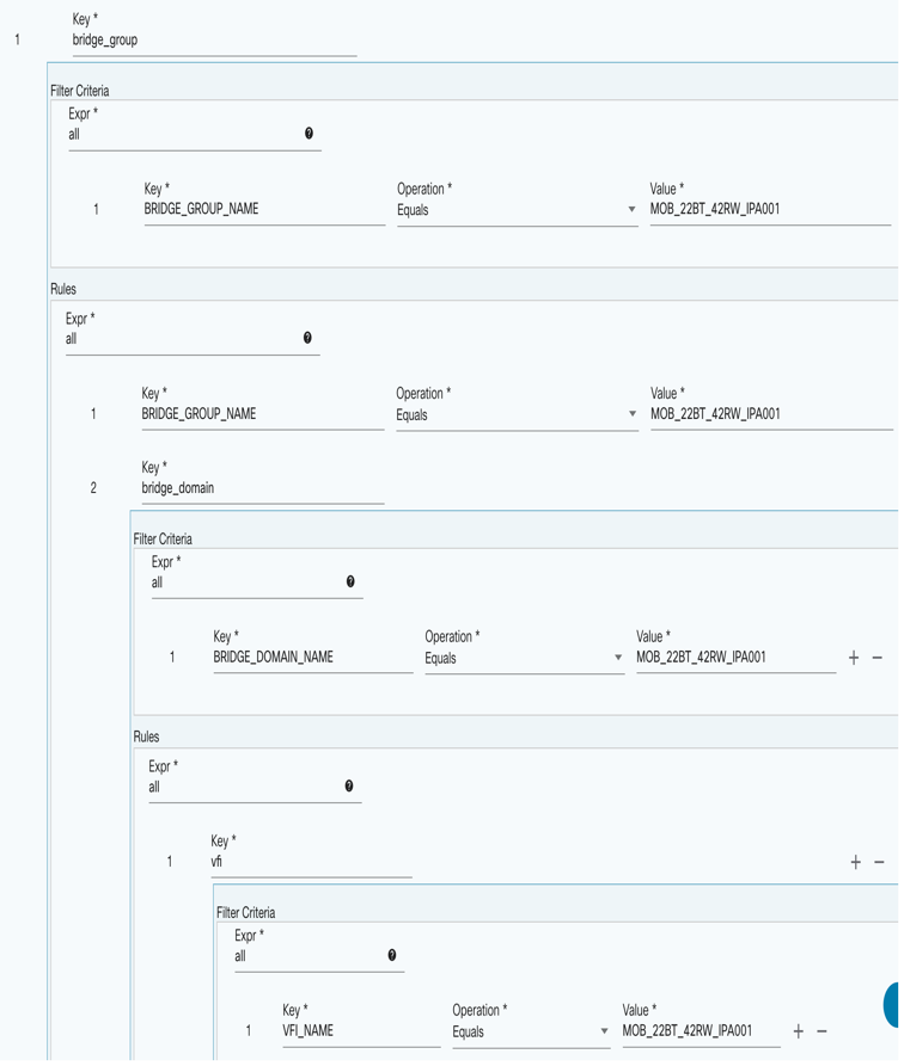
- Verify that the TTP Parser is extracting the value from device configuration by running the following python script:
from ttp import ttp
### Provide device config inside the below variable
data_to_parse = """
"""

### Provide block config inside the below variable
ttp_template = """
"""

### Create parser object and parse data using template:
parser = ttp(data=data_to_parse, template=ttp_template)
parser.parse()

### Check results and see if TTP parser extracts the value or not
results = parser.result()
print(results)
Monitoring Compliance Logs
Single Node Env:
docker logs -f compliance-remediation-serviceMulti Node Kubernetes Env:
kubectl logs -f services/compliance-remediation-service -n bpa-nsKibana Logs Monitoring:
https://<< BPA HOST >>:30401
Revision History
| Revision | Publish Date | Comments |
|---|---|---|
1.0 |
24-Sep-2025
|
Initial Release |
 Feedback