BPA User Guide Golden Configuration Template Next Generation V5.1
Available Languages
- Introduction
- Managing Templates
- Available Menu Options
- Creating Templates
- Editing or Updating Templates
- Recovering from Template Creation or Edit Error
- Viewing Templates
- Deleting Templates
- Downloading and Uploading Templates
- Comparing Templates
- Cloning Templates
- Distributing Templates
- Sync Templates
- Template Dashboard Features
- Template Version Management for vManage
- Deployment Jobs
- Groups
- Role-Based Access Control for Restricted Access
- Instance View
Introduction
The Golden Device Configuration Template (GCT) provides predefined configurations that allow users to maintain consistent configurations on devices. This enhances operational efficiency, reduces configuration errors, and supports compliance standards and best practices. GCT can be parameterized to enable the reuse of templates across multiple devices and controllers. It also supports the creation and management of templates.
A unified user experience is provided for managing the configuration across multiple controller instances using GCT. It enables users to create device configuration templates, import templates, and search for a specific template within the application. Users can also view, edit, delete, and clone templates as needed.
Managing Templates
GCT supports advanced functionalities such as comparing different templates, cloning existing ones, and distributing them to target controllers, enabling streamlined and consistent configuration management across the network.
Available Menu Options
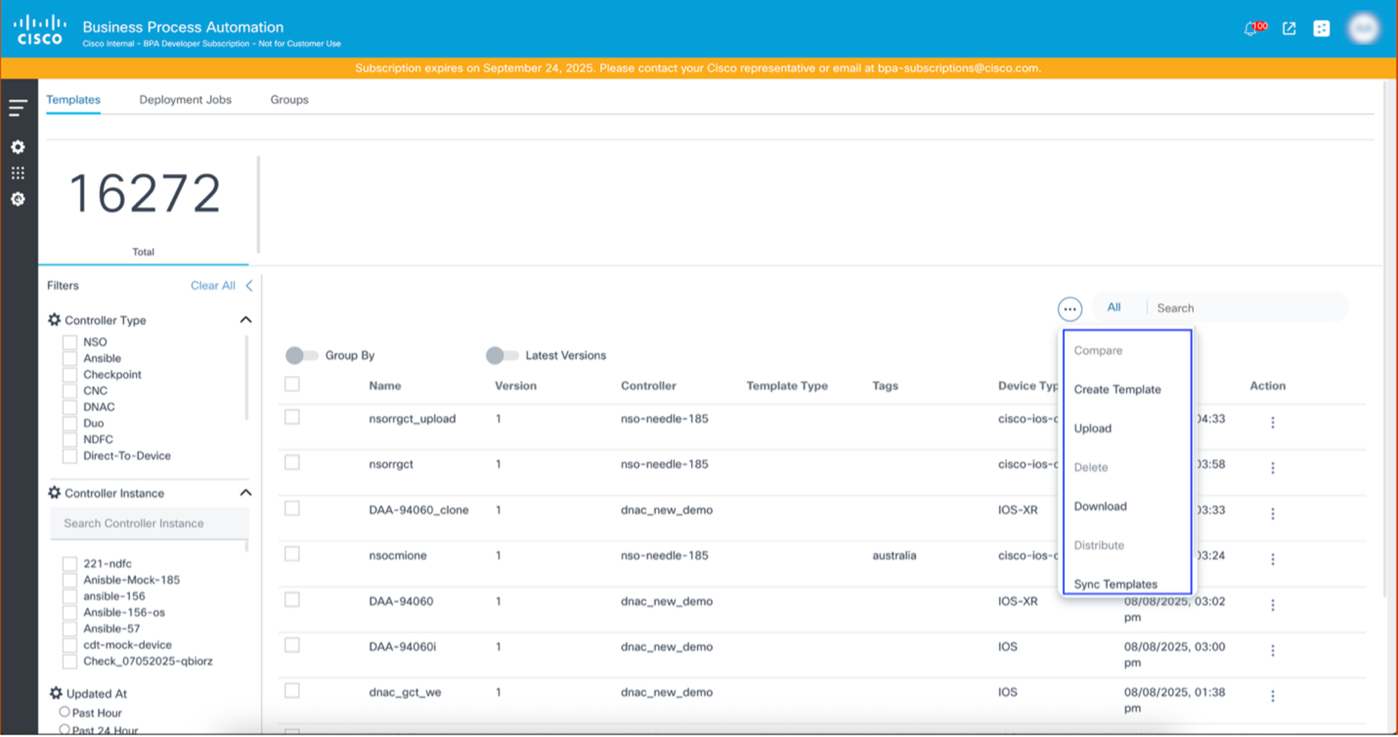
GCT includes the following menu options:
- Create Template: Initiate the template creation process
- Upload: Upload the templates
- Delete: Delete multiple templates at once
- Download: Download the current configuration of the template
- Distribute: Distribute or copy the template to the target controller (different from the source controller)
- Sync Templates: Fetch the updated template configuration from the source controller
Creating Templates
The Create Template feature allows users to efficiently build new configuration templates tailored for various platforms. This supports template creation for multiple controllers, including: Cisco Network Services Orchestrator (NSO), Ansible, Cisco Catalyst Center, Cisco Nexus Dashboard Fabric Controller (NDFC), Cisco Crosswork Network Controller (CNC), and Device to Device (D2D).
To create a new template:
- Log in to the BPA application.
- Click the Templates tab.
- Select the More Options icon > Create Template.
The Create Template process consists of four (4) milestones along with the pre-requisite step to select a Controller Type and Controller Instance.
The four milestone are:
- Template Details
- Configuration
- Assign Variables
- Review
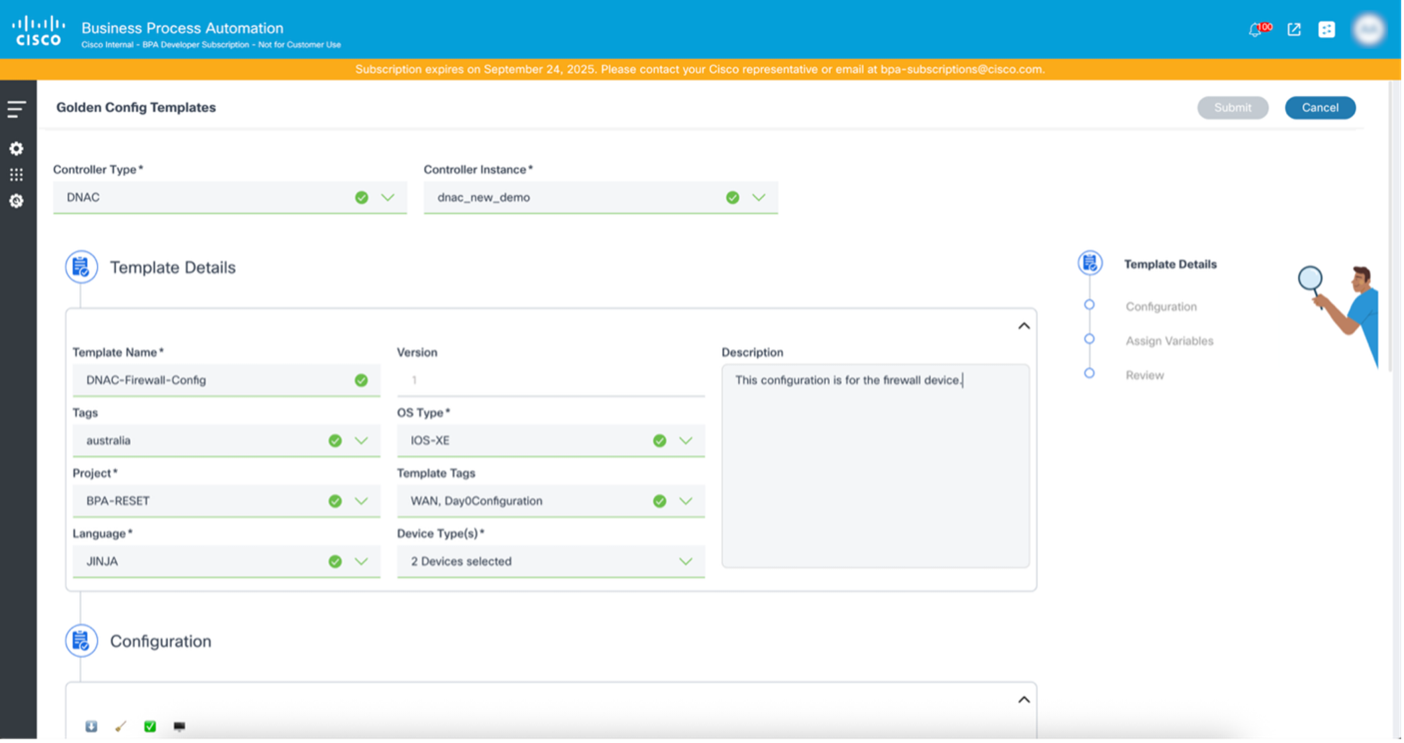
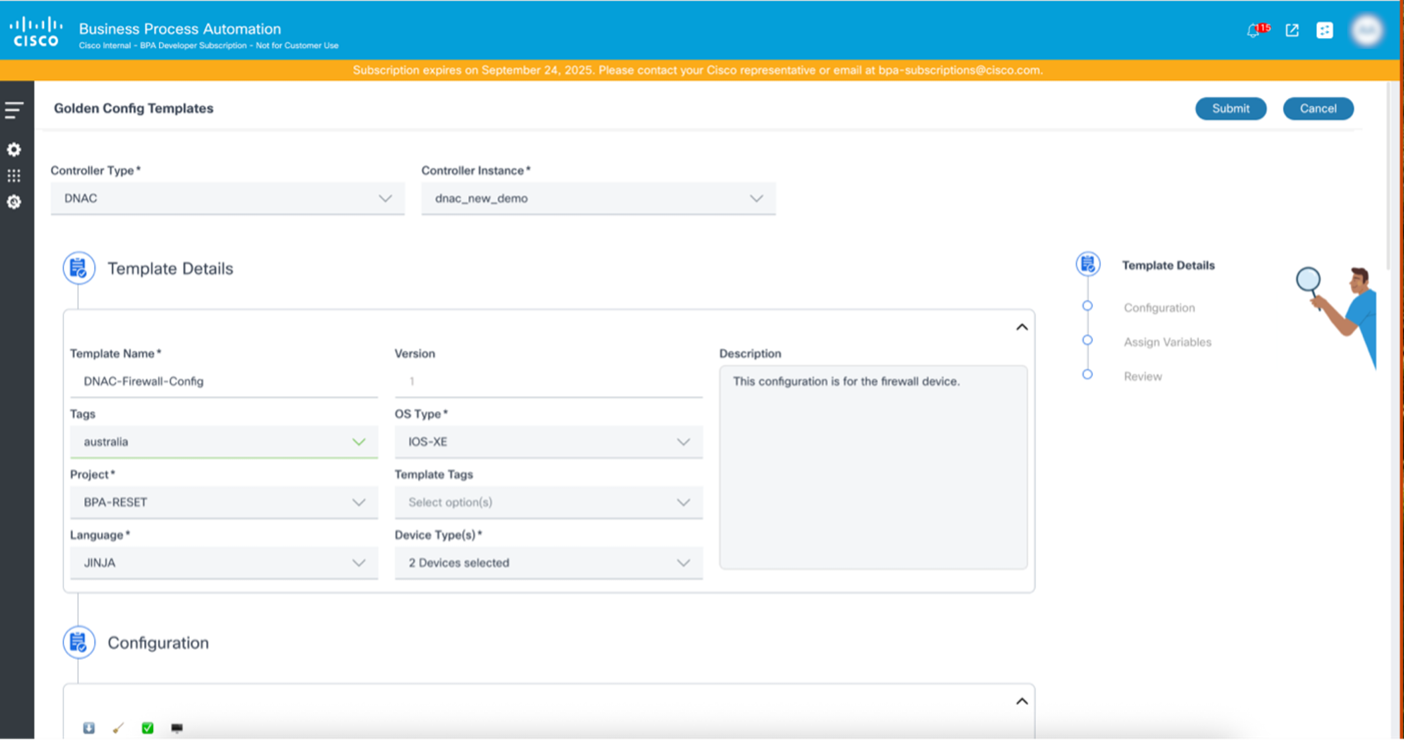
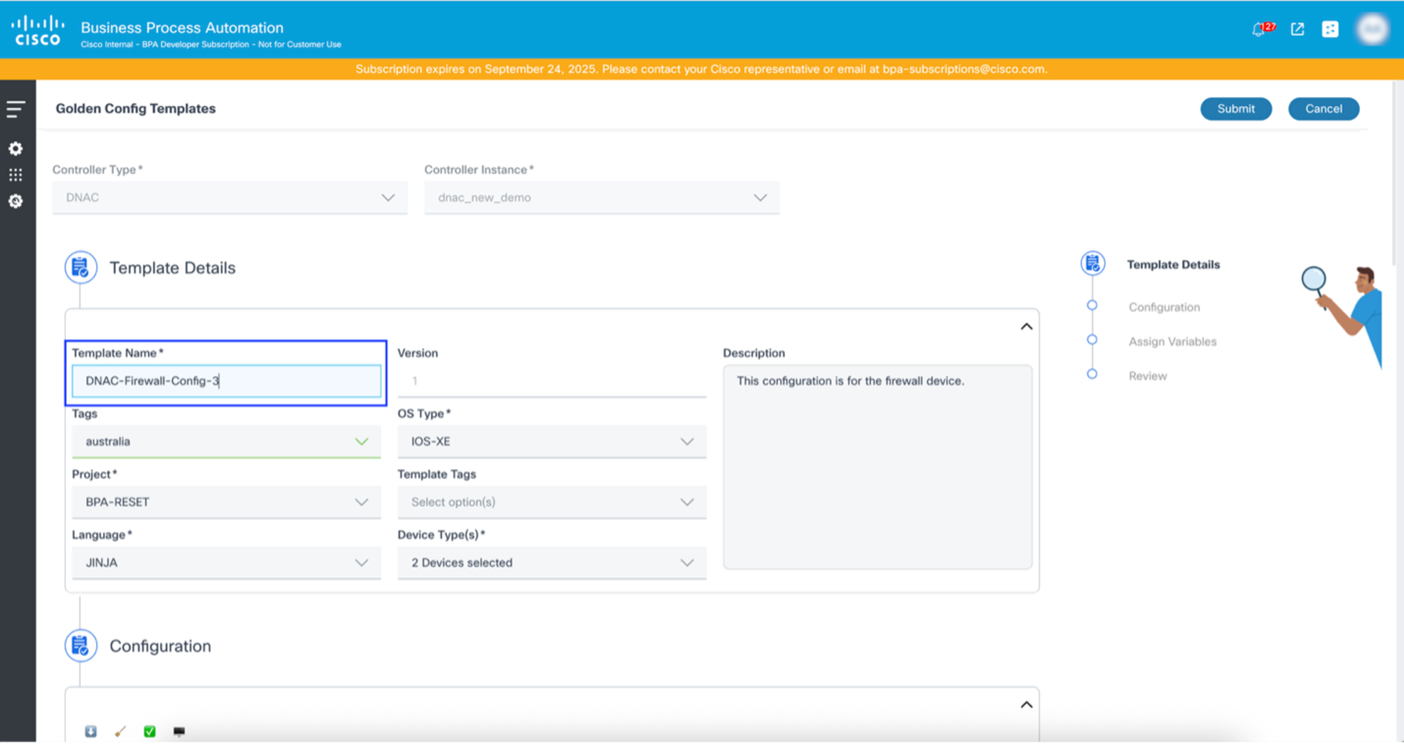
Template Details
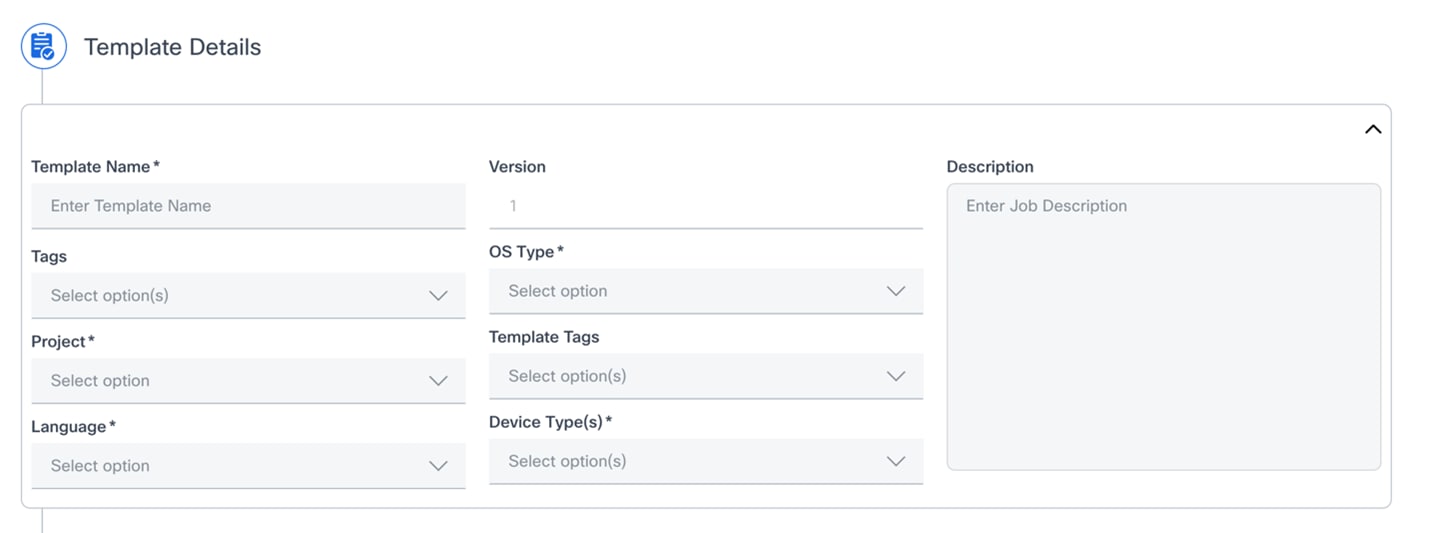
The Template Details section allows users to define the core properties and metadata for the Configuration Template.
The following are the fields within the Template Details section for the Cisco Catalyst Center Controller Type:
- Template Name
- Purpose: A mandatory field where users can enter a unique, descriptive name for the template
- Input: Text input (e.g., My_Core_Router_Template or Branch_Switch_Config_v2)
- Version
- Purpose: Displays the current version of the template; it is typically auto-populated and indicates the template’s iteration
- Input: Read-only; defaults to one (1) for new templates
- Description
- Purpose: Provides a comprehensive description of the template's purpose, the specific configurations it implements, and any other relevant notes
- Input: Free-form text (e.g., This template applies standard Quality of Service (QoS) and routing configurations for enterprise core routers.)
- Tags
- Purpose: Allows users to associate one or more tags with the template for easier categorization and searching
- Input: Select one or more options from a predefined list
- OS Type
- Purpose: A mandatory field to specify the operating system type for which this template is designed (e.g., IOS XE, NX-OS)
- Input: Select an option from the drop-down list
- Project
- Purpose: A mandatory field to assign the template to a specific project, aiding in organization and access control
- Input: Select an option from the drop-down list
- Template Tags
- Purpose: Similar to “Tags”, these are specific tags related to the template itself that are to be used within BPA
- Input: Select one or more options from a predefined list
- Language
- Purpose: A mandatory field to specify the language or format of the configuration commands within the template (e.g., JINJA, CLI, VELOCITY)
- Input: Select an option from the dropdown list
- Device Type(s)
- Purpose: A mandatory field to indicate the specific types of devices this template is intended for (e.g., Routers, Switches, Firewalls)
- Input: Select one or more options from the drop-down list
The following are the NSO template detail fields, excluding the details covered earlier:
- Select Network OS
- Purpose: A mandatory field to specify the Network Operating System (OS) and version for which the template is designed, ensuring compatibility between the template and the target device's OS
- Input: Select an option from the drop-down list ( e.g., cisco-iosxr-cli-7.61)
- Source
- Purpose: A mandatory field that defines how the configuration template is generated or sourced; options typically include creating a template from an existing device configuration or starting a new one
- Input: Select an option from the drop-down list (e.g., Existing Device Config)
- Select Device
- Purpose: A mandatory field to specify a particular device model or type that the template is intended for; this helps to ensure the template's applicability to specific hardware
- Input: Select an option from the drop-down list (e.g., ncs-250)
- Select Config Type
- Purpose: A mandatory field that specifies the type of configuration being managed by the template, such as a full device configuration or a partial configuration focusing on specific features
- Input: Select an option from the drop-down list. (e.g., Partial Device Configuration)
- Select Config Path
- Purpose: A mandatory field that specifies the specific path within the device's configuration hierarchy that the template manages; this is especially relevant for partial configurations.
- Input: Select an option from the dropdown list (e.g., cisco-ios-xr:call-home)
The following are the Template Details fields for NDFC, excluding the details covered earlier:
- Template Type
- Purpose: A mandatory field to categorize the general type of configuration the template represents (e.g., POAP, POLICY, SHOW, PROFILE etc)
- Input: Select an option from a predefined list
- Template Sub Type
- Purpose: A mandatory field to further refine the categorization of the template, providing more specific details about its function
- Input: Select an option from a predefined list
- Template Content Type
- Purpose: A mandatory field to define the format or nature of the content within the template (e.g., CLI, Jinja2)
- Input: Select an option from a predefined list
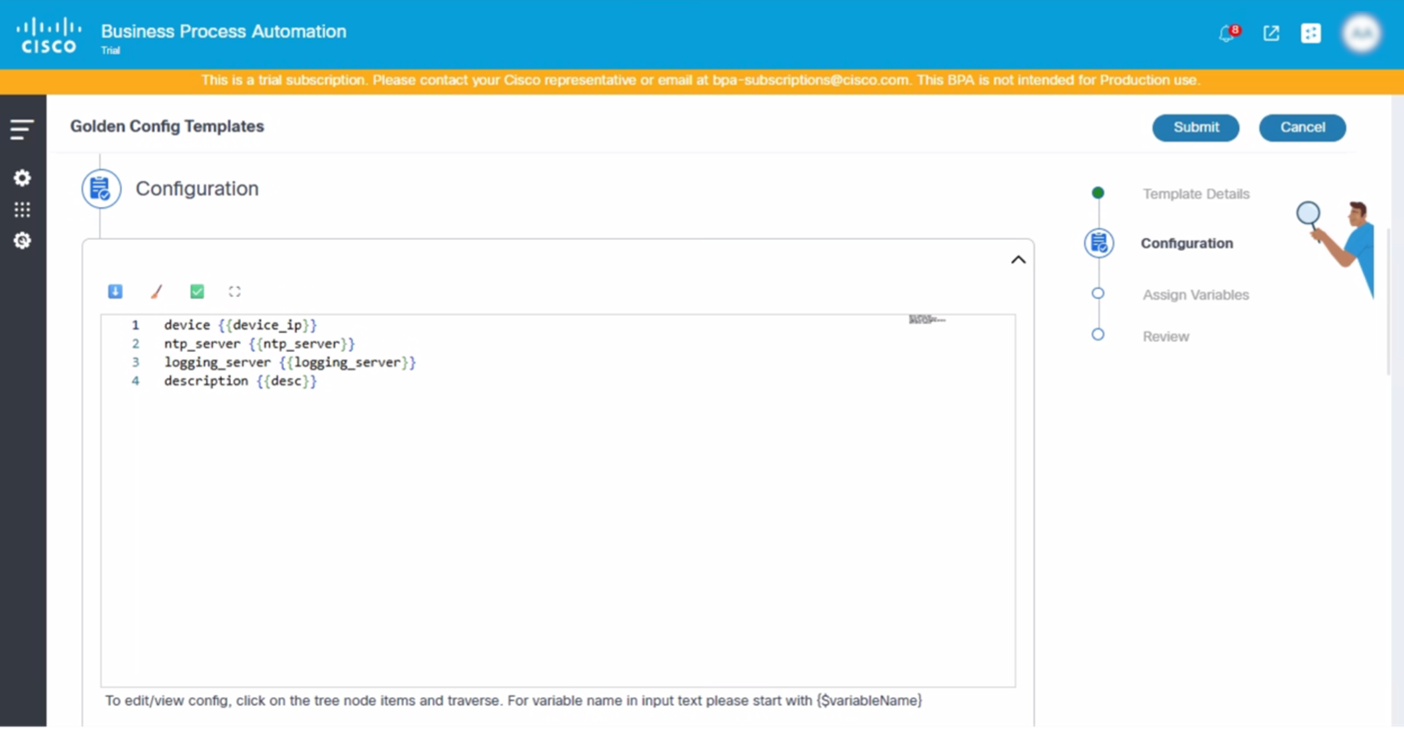
Configuration
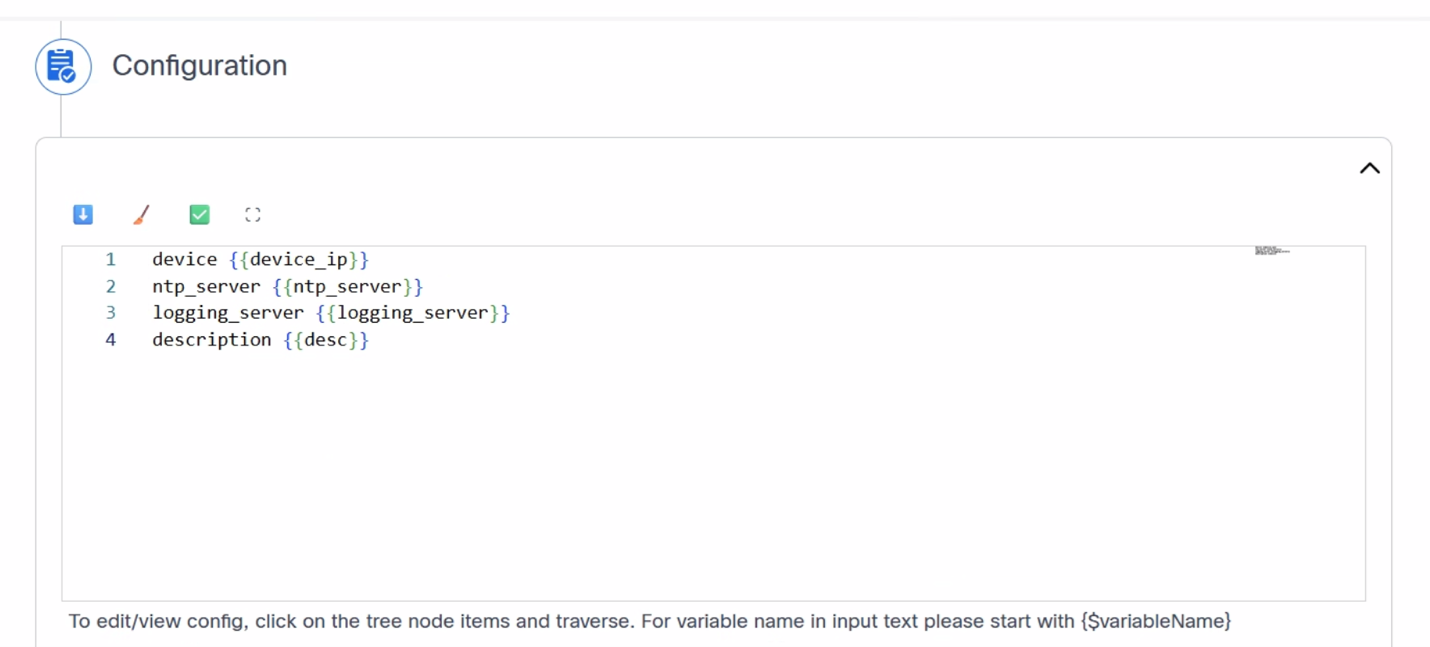
This section instructs users on how to define the configuration for their templates within a configuration text box that supports syntax checking for various template formats (e.g., Command Line Interface (CLI), JINJA, YAML, etc.). Users can create the configuration using variables. The use of variables is fundamental for creating dynamic, reusable, and scalable configurations, allowing a single template to be applied across many devices or services with different parameters.
Example:
For Cisco Catalyst Center and NDFC:
hostname {{ device_name }}
Similarly, based on the controllers, users can define the variables. The following are the icons and their usage:
| Icon | Description |
|---|---|
 |
Download Icon Download the configuration |
 |
Clear Icon Clear the Configuration |
 |
Validate Icon Validate the configuration |
 |
Fullscreen Icon View the configuration in fullscreen |
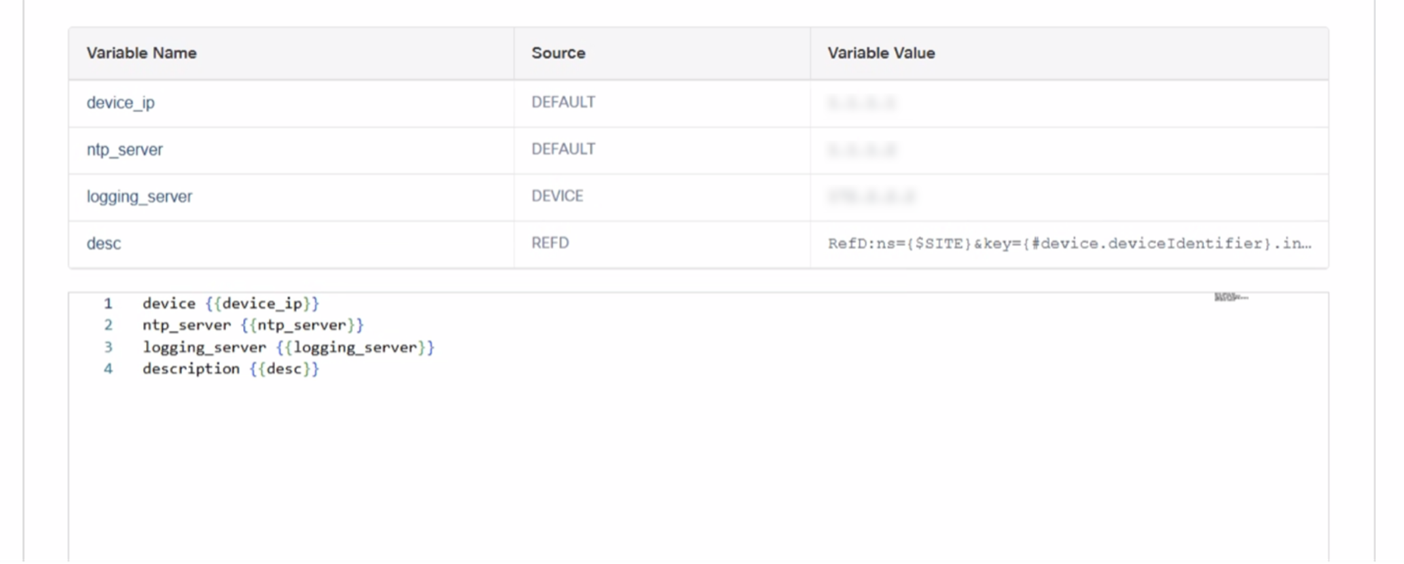
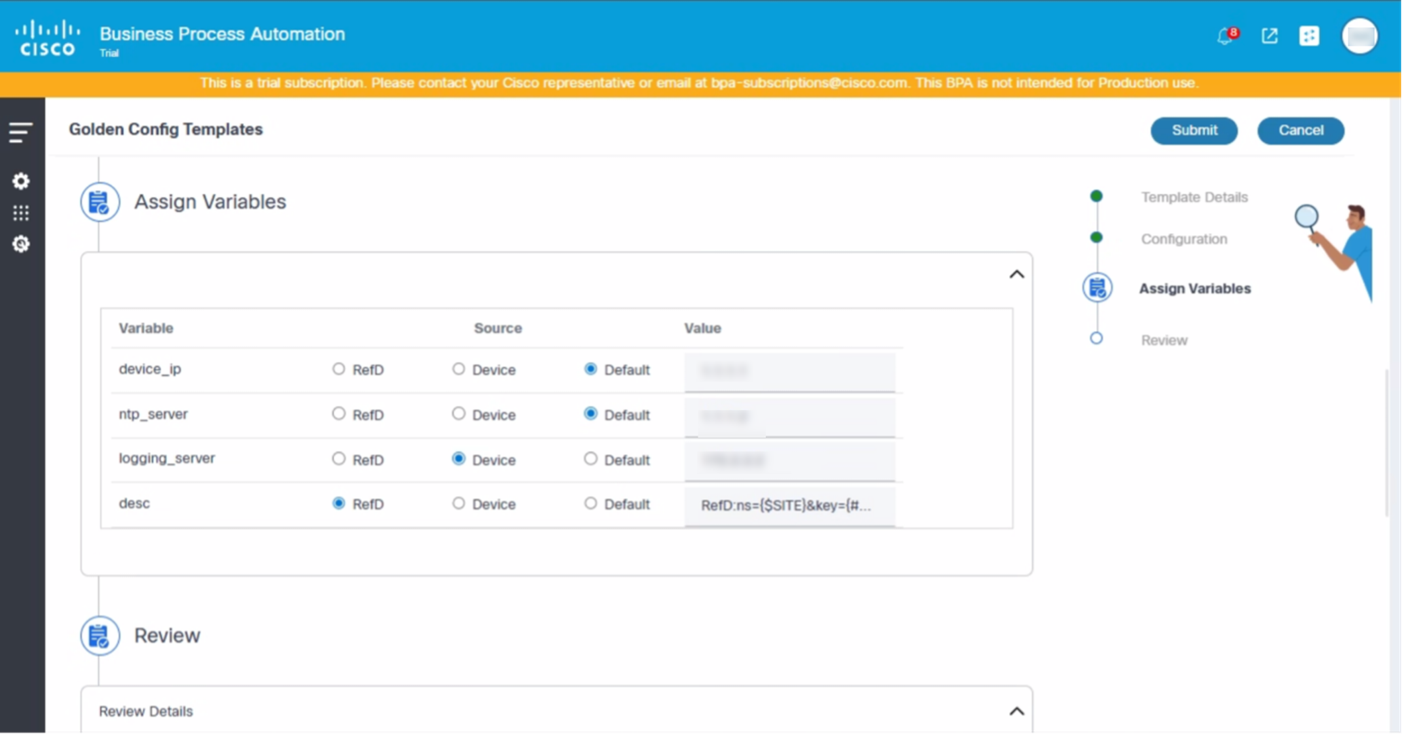
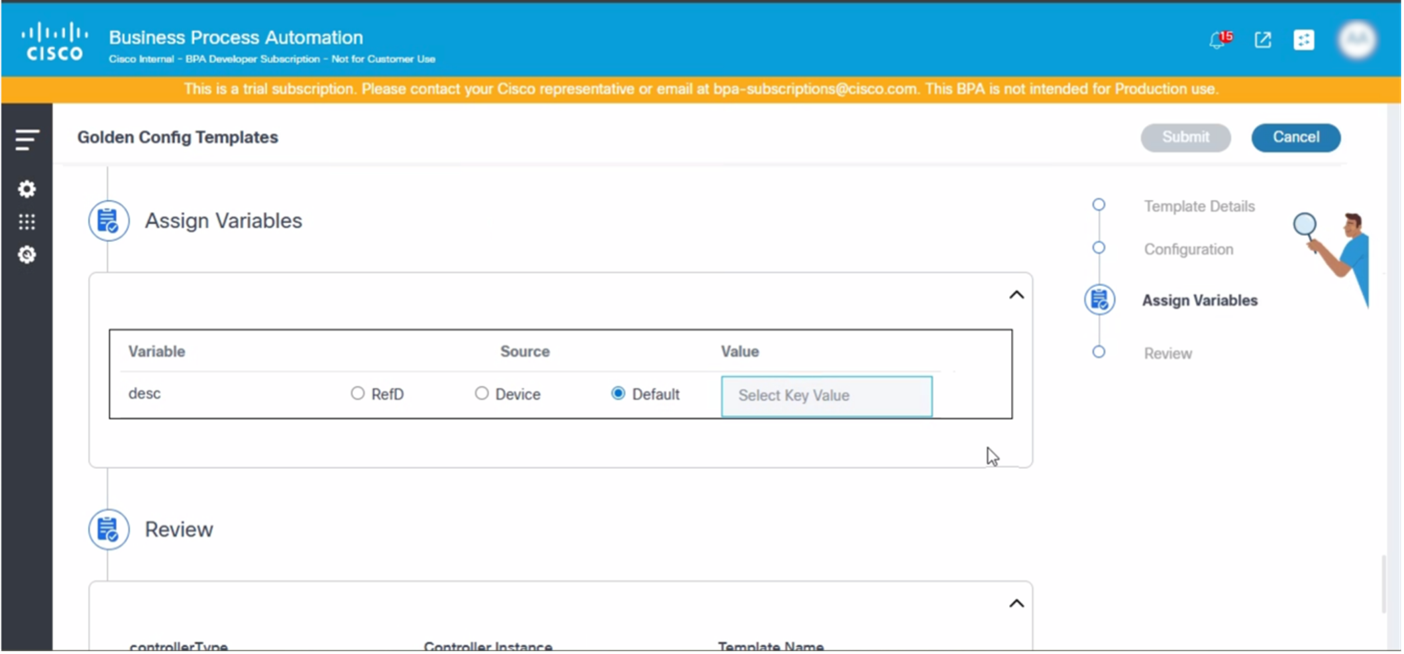
Assign Variables
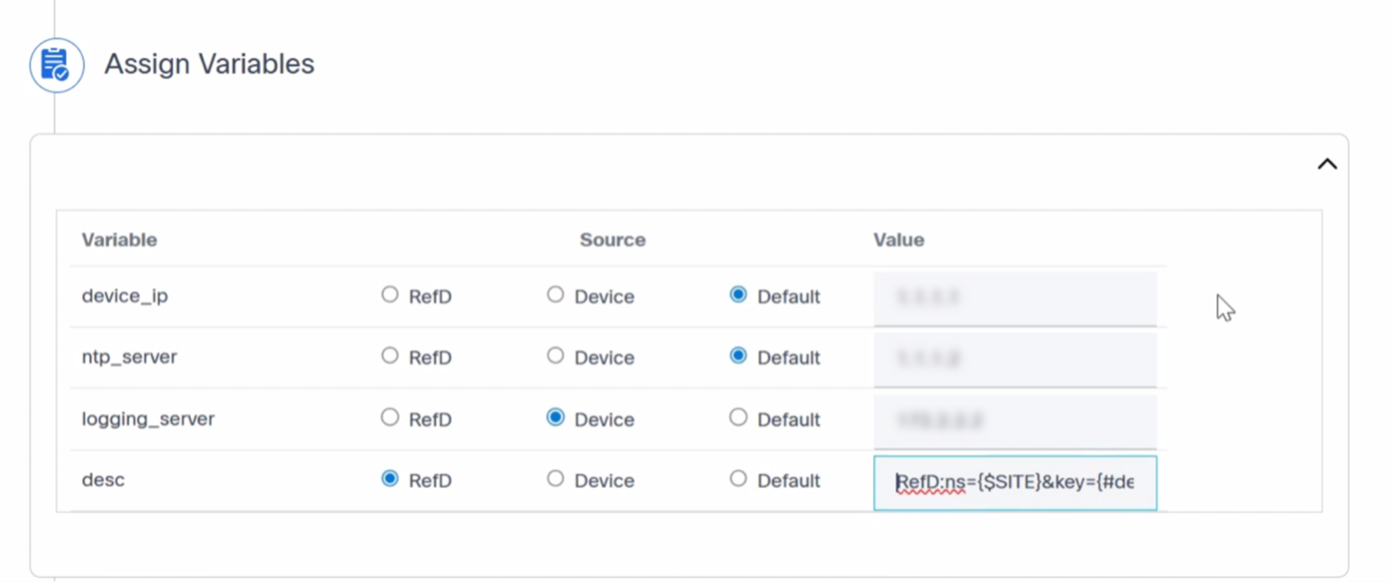
The Assign Variables section is where users can provide the actual values for the variables defined in the Configuration section. Users can choose the source from where the values are fetched.
- RefD: Provide the name space and the path to actual RefD node from where the values are fetched
- Device: Fetch values for the respective variables from the device
- Default: User-defined values
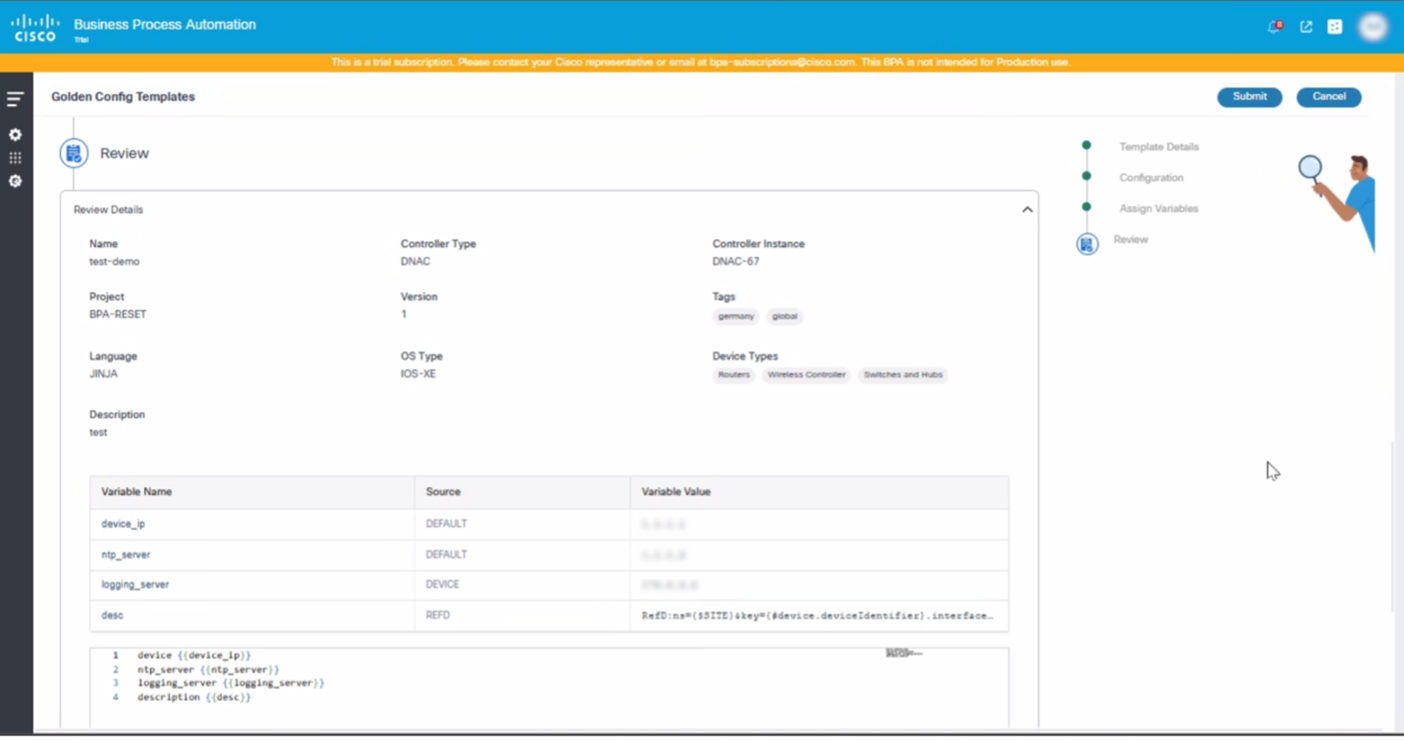
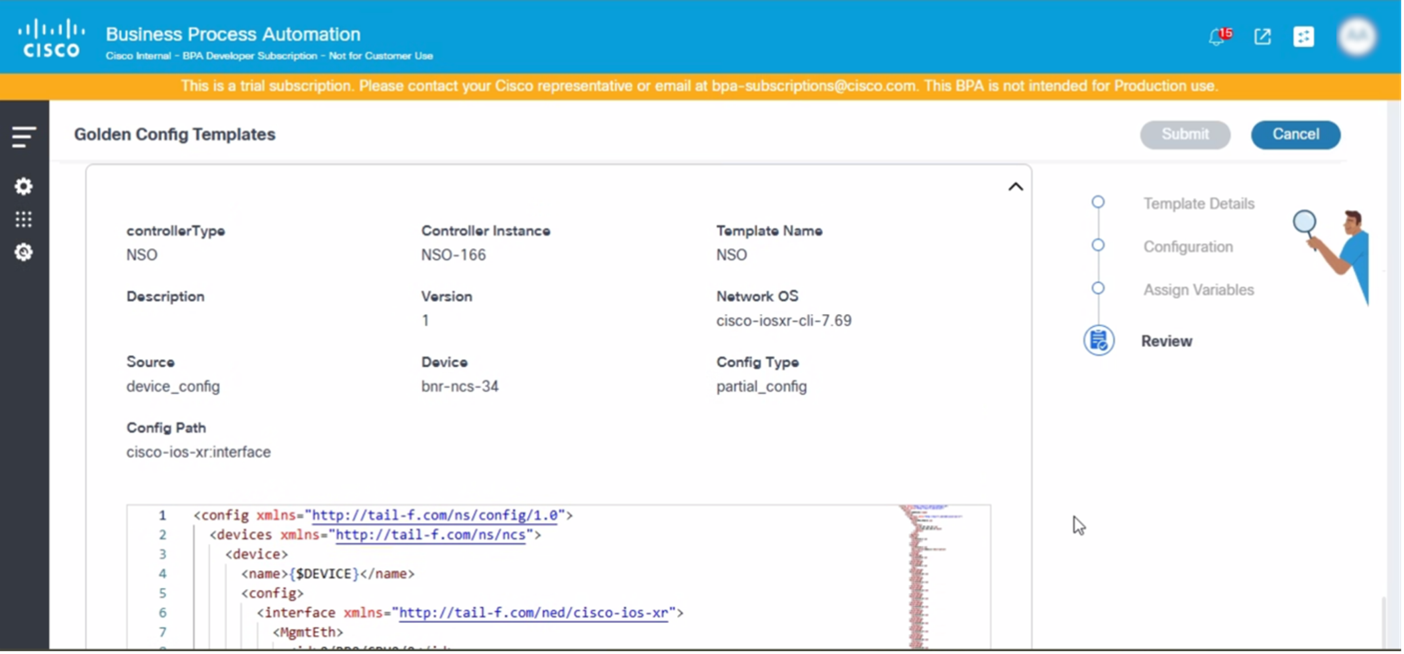
Review
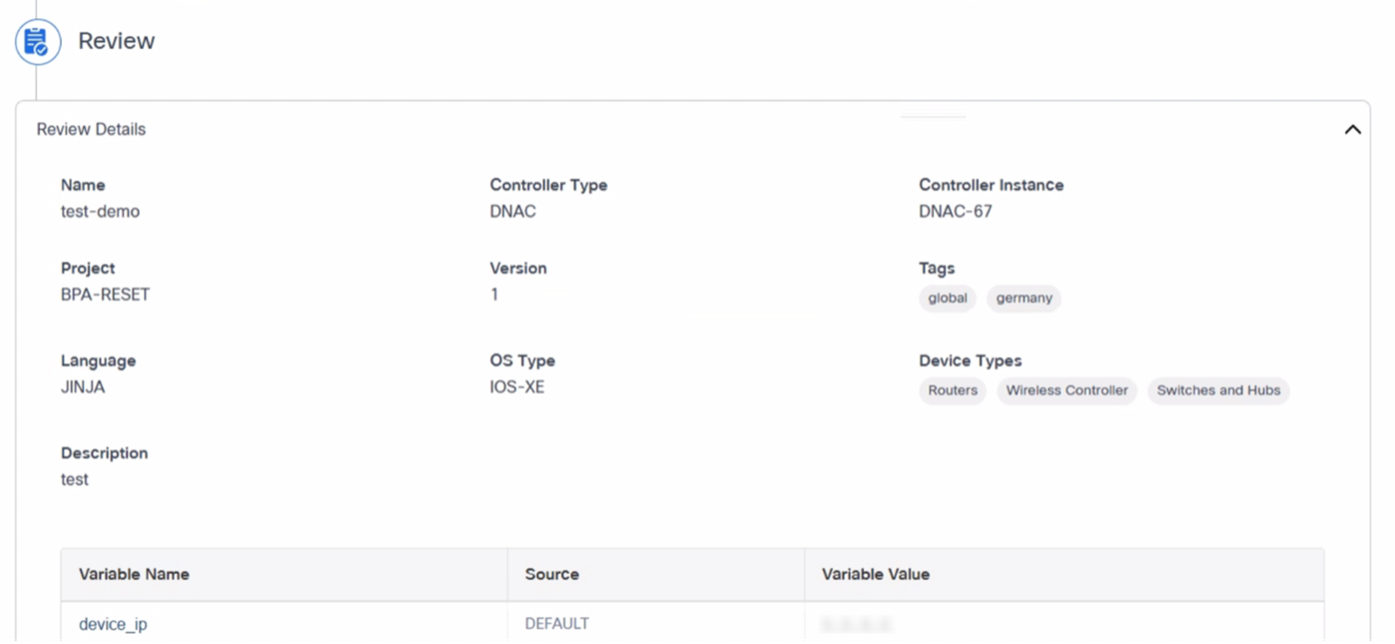
This is the final step in the template creation process where users can review all details provided for the template creation. After review, users can click Submit to create the template.
The template creation process differs based on the Controller Type. For example:
- Cisco Catalyst Center: The template must first be created on the source controller. After a successful deployment, the template is saved to the BPA database. If deployment fails, an error message displays prompting users to fix the issues and resubmit the template.
- CNC, NSO, Ansible, and D2D: The BPA database serves a the single source of truth. After validation, templates are saved directly to the BPA database.
Creating a Template in Cisco Catalyst Center
To create a template in the Cisco Catalyst Center:
- Log in to the BPA application.
- Click the Templates tab.
- Select the More Options icon > Create Template. The Golden Config Templates window opens.
- Update the required fields (e.g., Controller Type, Controller Instance, Template Name, etc.).
- Update the configuration under the Configuration section.
- Assign the available variables in the Configuration.
- Review the template and click Submit.
The template is successfully created and displays on the Template Dashboard.
Users can create templates for various controllers, with the available fields dynamically adjusting based on the selected controller type. The user interface clearly indicates which fields are mandatory and which are optional during the template creation process, ensuring a streamlined and user-friendly experience.
This adaptive design helps users efficiently provide the necessary information specific to each controller. For more details on each milestone of the create template process, refer to the Template Details, Configuration, Assign Variables, and Review sections.
Creating a Template for NSO
NSO supports the following template configuration types:
- Manual Configuration: Refers to any configuration changes made directly to a network device, such as a router, switch, or firewall, by a human operator without using NSO's orchestration capabilities. For example, logging directly in to the device via Secure Shell or console and entering configuration commands.
- Existing Device Config: Refers to the complete, current configuration running on a physical or virtual network device. It serves as the baseline for NSO to compare against when applying new configurations or verifying the state of services.
- Partial Device Config: Refers to the specific parts of a device's configuration that NSO is responsible for managing or orchestrating as part of a service. Unlike the Existing Device Config which is the whole configuration, Partial Device Config is a subset and represents the configuration elements that are owned and managed by NSO for a particular service instance. NSO often manages services that only require changes to specific parts of a device's configuration (e.g., a Virtual Local Area Network (VLAN), a Virtual Private Network (VPN) tunnel, or a specific routing protocol configuration). Partial Device Config allows NSO to focus only on these relevant parts without taking over the entire device configuration.
To create a template for NSO:
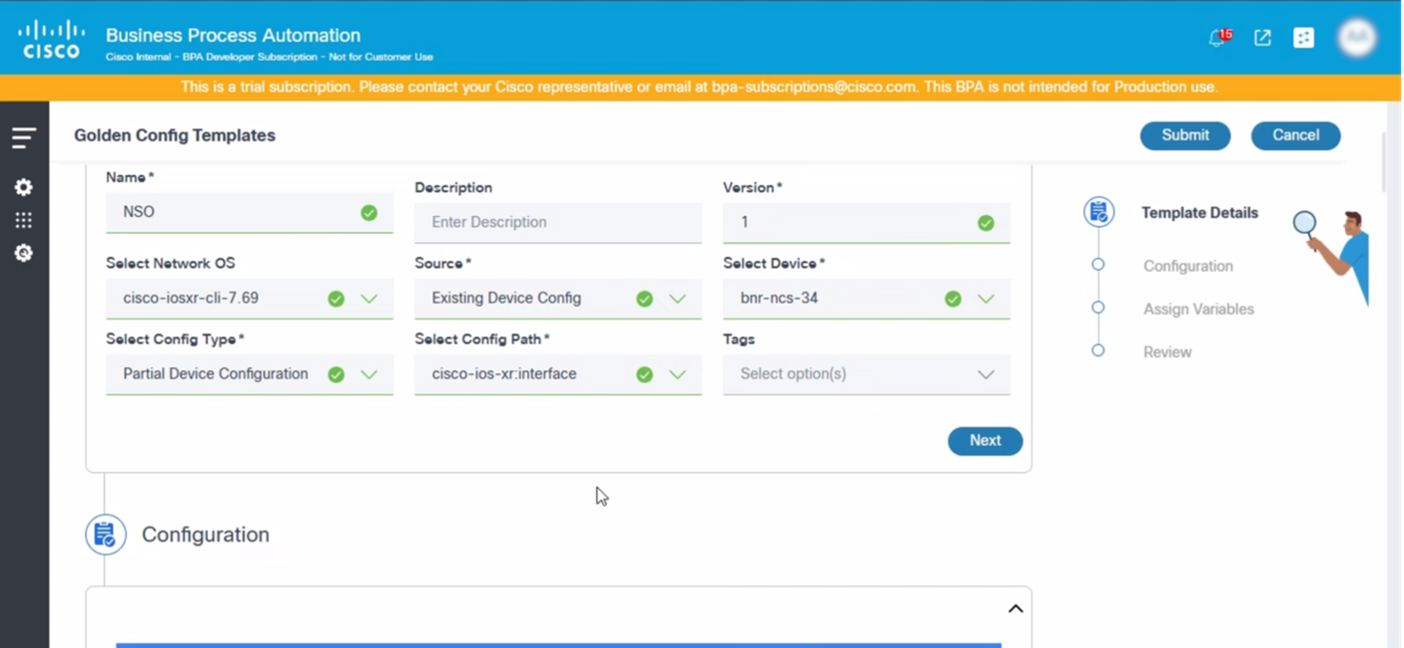
- Update the required fields.
- Click Next.
The Configuration section auto-populates as shown below:

- Use the following syntax to add the variables:
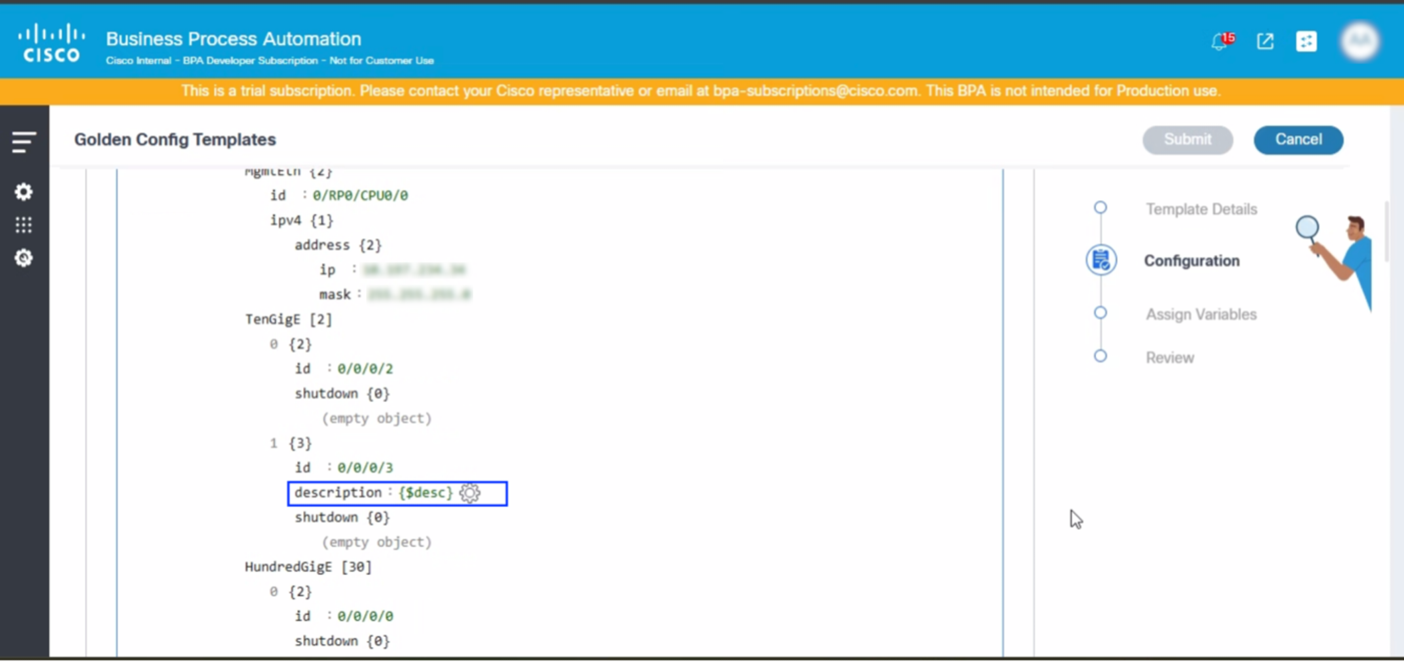
- Select the Settings icon. The Parameter desc pop-up window opens.
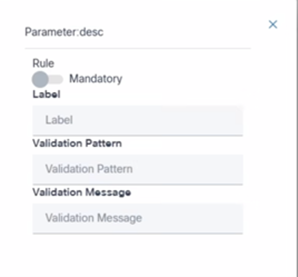
- Assign the values to the variables.
- Review the details and click Submit.
Editing or Updating Templates
Common scenarios for editing or updating a template include:
- To enable a new wireless security feature (e.g., WPA3 with specific EAP methods) across all access points
- To introduce a new Guest Wi-Fi SSID with unique authentication
- An organization decides to standardize interface descriptions, implement a new NTP server hierarchy, or change logging destinations for all devices
In these scenarios, users need the capability to edit the template.
To edit a template, select the More Options icon > Edit under the Actions column of a specific template.
This opens the template in edit mode. For more details on creating template, refer to the Creating Templates section.
Recovering from Template Creation or Edit Error

During the template creation or edit process, users may encounter errors due to missing mandatory information or configuration issues. When the mandatory fields are not updated, the user interface highlights these mandatory fields and the Submit button remains disabled until all required information is provided.
If there are configuration issues, a pop-up error message displays while submitting or validating the template. The pop-up provides the validation error message returned by the controller, enabling users to identify and resolve the issues before proceeding.
Viewing Templates
In order to quickly review the configuration of a template, users can click an individual row or select the More Options icon > View option for each template under the Actions column.

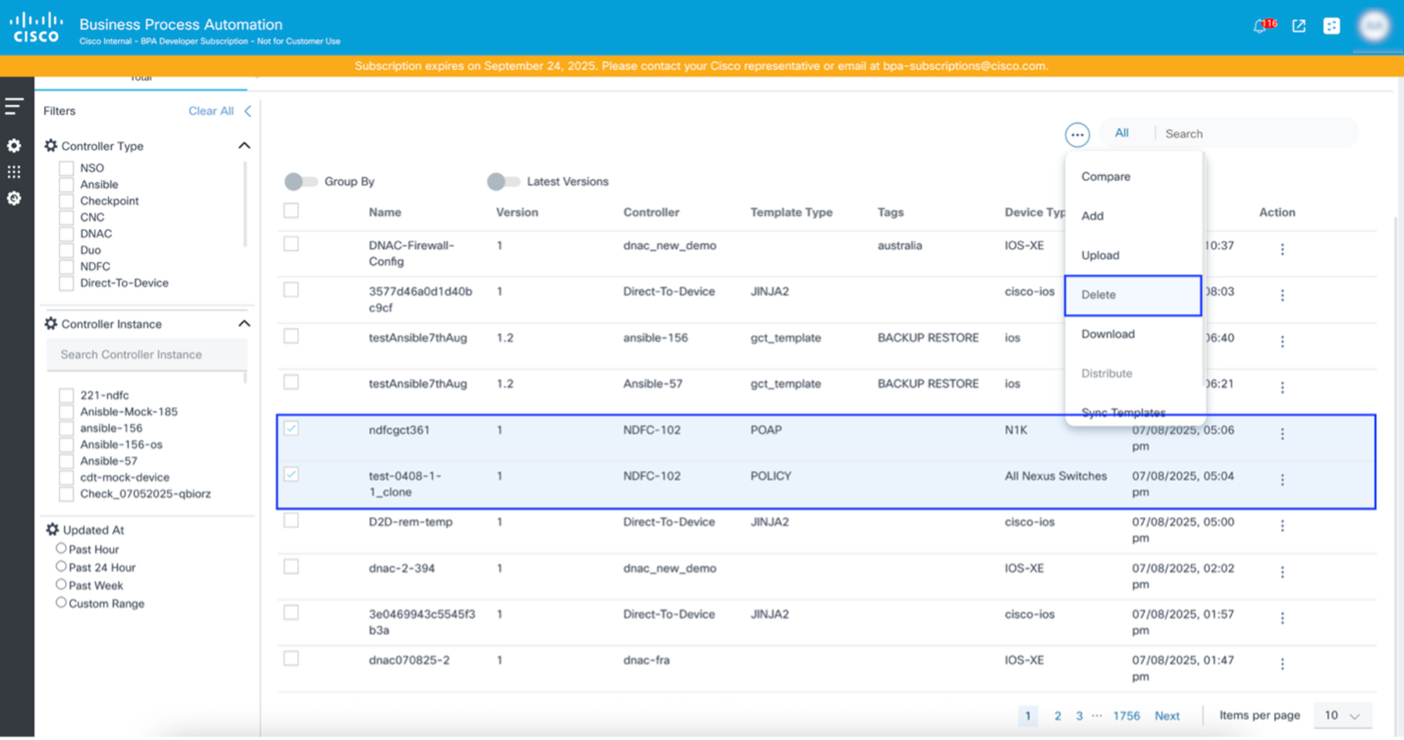
Deleting Templates
Common scenarios for deleting templates include:
- When a particular network feature (e.g., an old authentication method like Wired Equivalent Privacy, or a specific routing protocol that has been phased out) is no longer supported or in the network. Templates that solely configure this obsolete feature can be deleted.
- When an entire office building, campus, or remote site is being closed down and its network infrastructure is removed. Any site-specific templates (e.g.,"Branch_Office_A_Security_Template") that were only relevant to that location can be deleted.
To delete a template:
- Select the More Options icon > Delete under the Action column of the desired template.
- Click Delete to delete the template.
Downloading and Uploading Templates
Common scenarios for downloading templates include:
- When users want to store Cisco Catalyst Center templates (especially complex CLI or design templates) in an external version control system (e.g., Git) to track changes, revert to previous versions, and ensure disaster recovery
- When users develop and test templates in a staging or Cisco Catalyst Center lab instance and need to deploy them to a Cisco Catalyst Center production instance
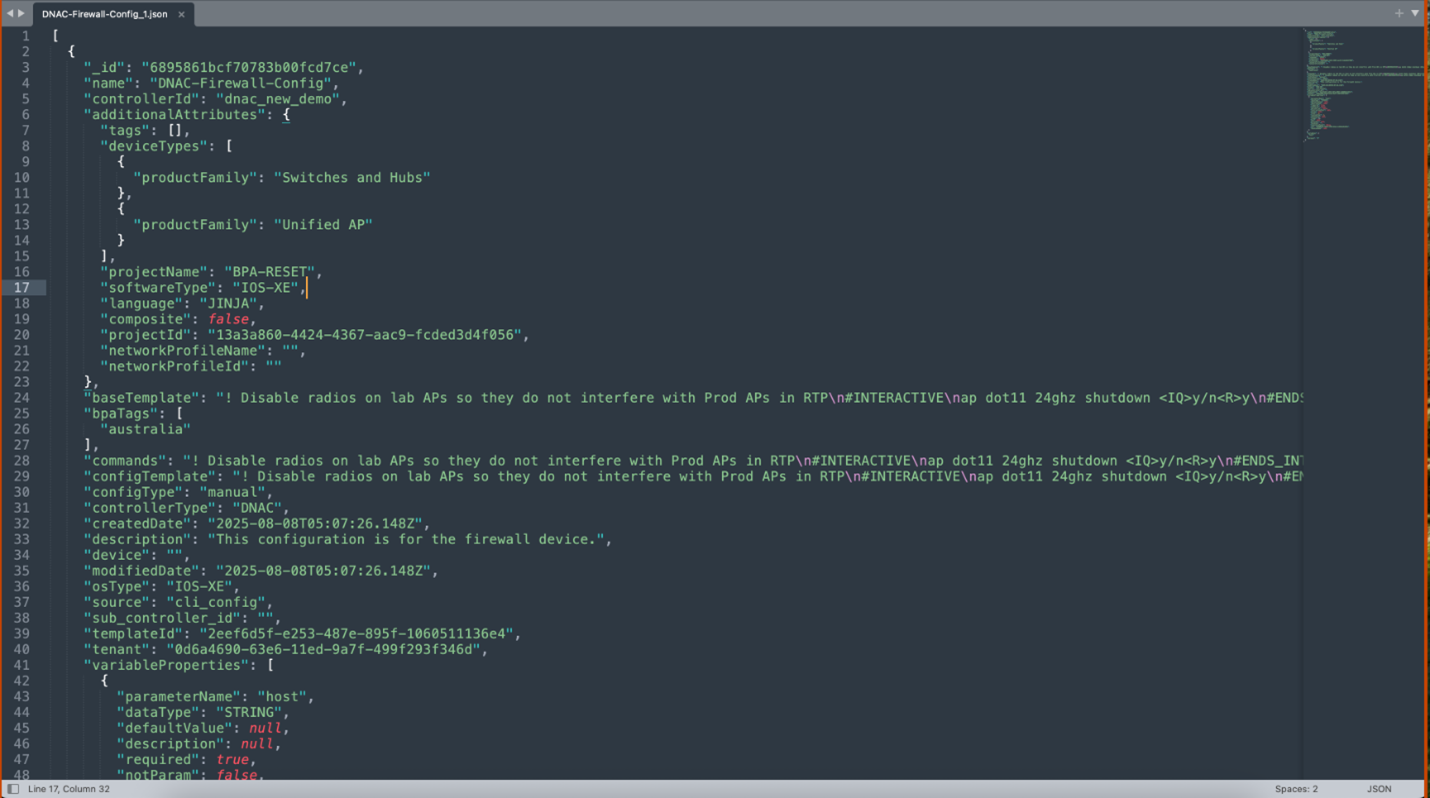
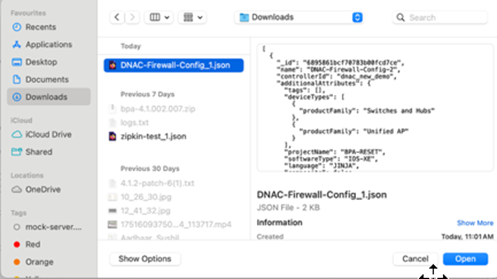
To download a template:
- Select the More Options icon > Download under the Action column of the desired template.
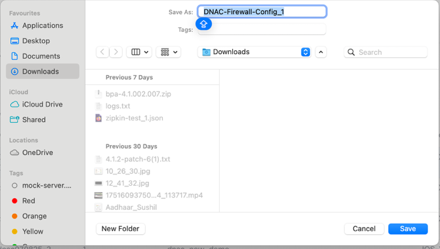
- Provide a name for the template and click Save.
To upload a template:
- Update the template name and remove the template ID of a previously downloaded template.
- From the BPA Templates tab, select the More Options icon > Upload.
- Select the updated template.
- Select the target Controller Instance for which the templates are created for.
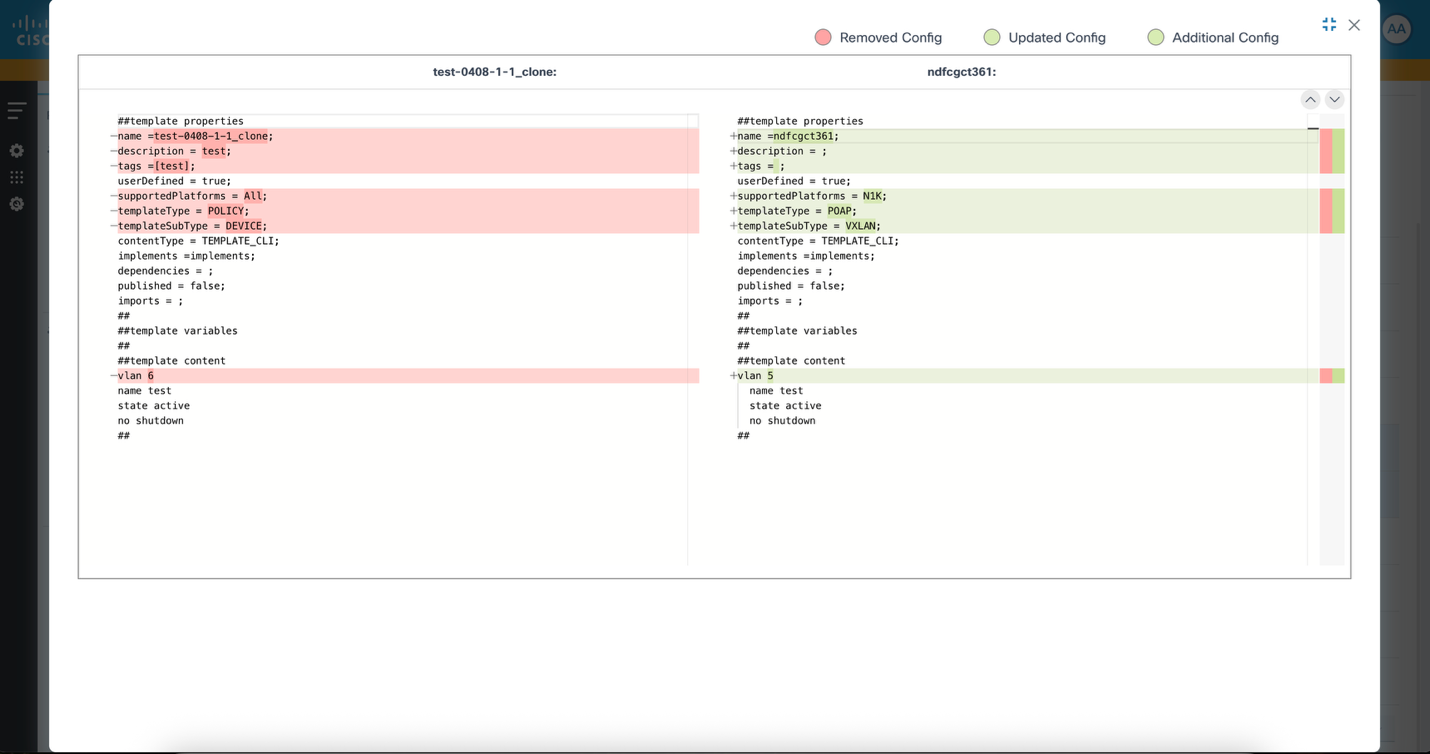
Comparing Templates
Common scenarios for comparing templates include:
- When a service instance fails to deploy on a specific device, and users suspect a subtle error in the generated configuration due to the Jinja2 template or Python logic. Comparing the problematic template (or the configuration it generates) with a working version or a known-good configuration helps to identify the exact line or parameter causing the failure
- When the Security Team audits the logic within a Firewall-Service model to ensure it always configures specific security policies or logging parameters or to verify that the service model's YANG definition and its underlying configuration templates enforce all required security and compliance standards.
- When there are two service models (e.g., MPLS-L3VPN and SD-WAN-Overlay) that provision similar network constructs and have distinct underlying configurations. Comparing templates helps to understand the precise differences in their YANG definitions or configuration generation logic, aiding in design, support, and potential consolidation.
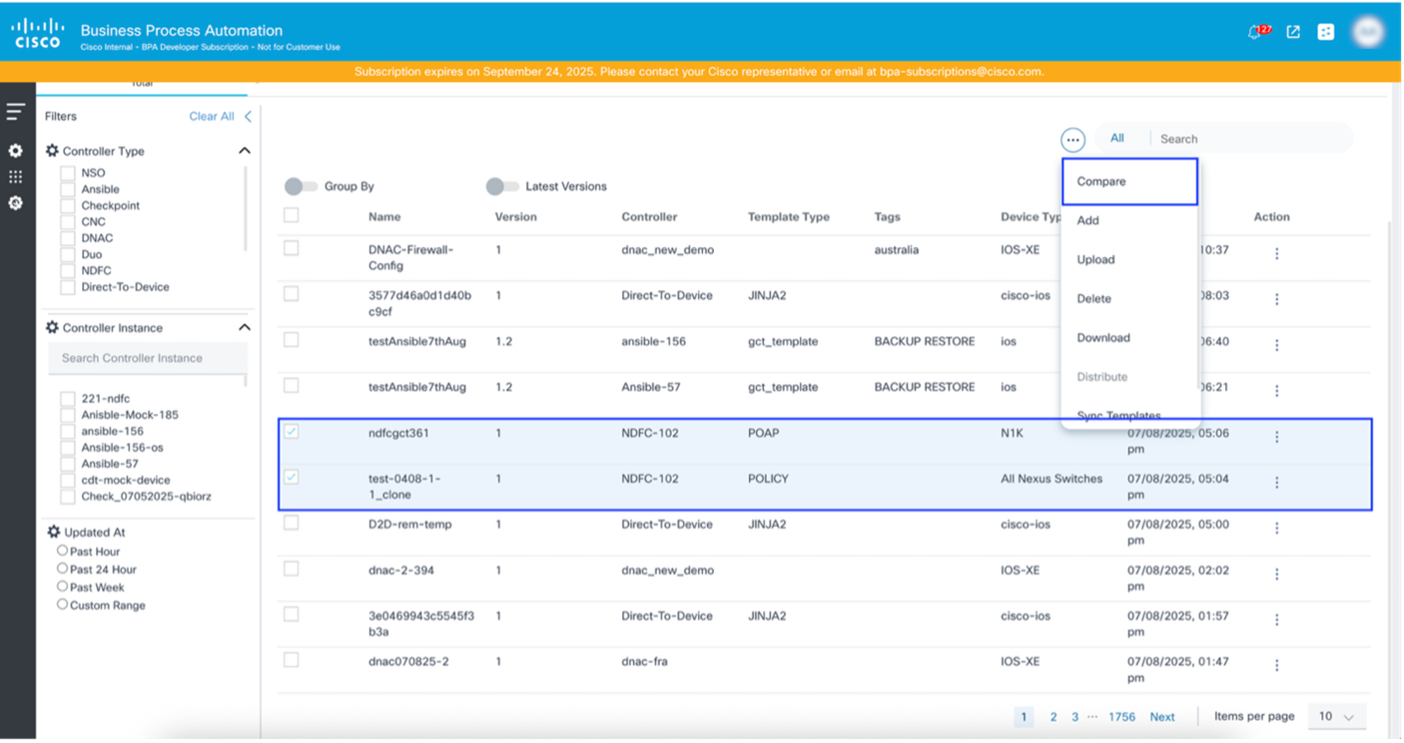
- Select the templates to be compared.
- Select the More Options icon > Compare. A comparision window opens.
Cloning Templates
Common scenarios for cloning an existing template include:
- When an existing "L3VPN Service" model works for Cisco IOS-XR devices and users need to extend the support to include Juniper MX series routers for the same service. Users can clone the existing "L3VPN Service" model and create new Jinja2 templates or modify the Python logic within the cloned model to generate the equivalent L3VPN configurations for Juniper devices while maintaining the same high-level service abstraction.
- When users plan to refactor a complex "Internet Access Service" model to improve its performance or add significant new features. Users need to test these changes extensively without impacting the production service. They can clone the production "Internet Access Service" model, implement the major changes in the cloned version, and deploy it to a separate NSO instance or a lab environment for thorough testing.
- When users are developing v2.0 of "Data Center Interconnect Service" model, which introduces breaking changes or significant new functionality, while v1.0 is still in production for existing customers. They can clone the v1.0 service model and develop v2.0 in the cloned version, allowing v1.0 to remain stable and in production while v2.0 undergoes development, testing, and eventual deployment.
Clone template functionality creates new template in the source controller. Users need to update the name of new template. To clone a template:
- Select the More Options Icon > Clone under the Action column of a template. The template open in edit mode.
- Provide a new Template Name.
- Click Submit.
Cloning a Template in vManage
Unlike other controllers, vManage does not open the template in edit mode when cloning. Instead, a pop-up window for the selected template opens where users can change the associated Resource Group.
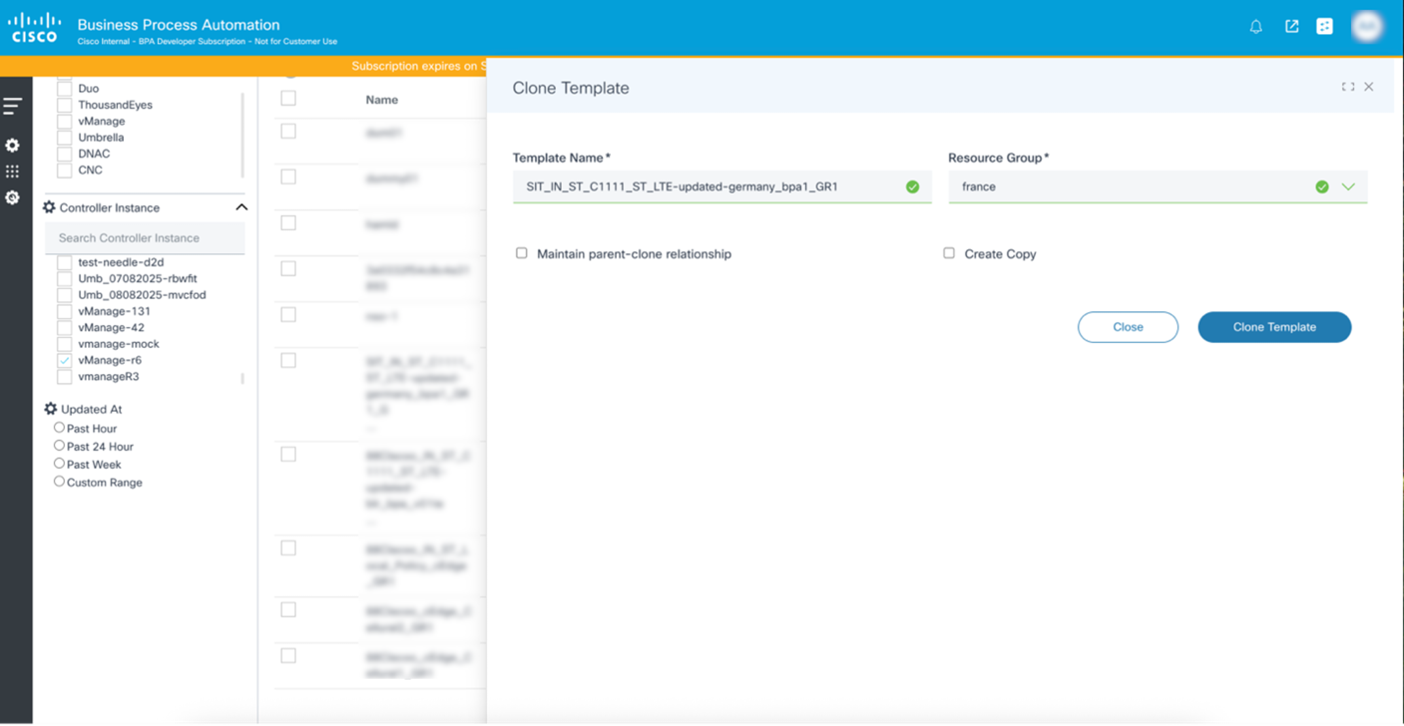
Users have two options when cloning a template:
- Maintain parent-clone relationship: Retains a link to the parent of the cloned template. If the parent template’s configuration changes, an Update icon is displayed on cloned template. Cloned templates can copy the changes from the parent template if needed.
- Create Copy: Creates a copy of all features of a template along with the device template.
Distributing Templates
The distribute template functionality helps users to create a clone of a template where the target controller is different than the source controller.
Common scenarios where users distribute or copy the template to a target controller include:
- When there are separate environments for development or testing (staging) and live operations (production). New configurations and features are built and validated in staging before being deployed to production.
- When a large enterprise has multiple DNAC deployments, with one deployment per major geographic region (e.g., North America, EMEA, APAC). To maintain brand consistency and operational efficiency, core network configurations should be standardized.
To distribute a template:
- Select the template to distribute.
- Select the More Options icon > Distribute. The Distribute Template window opens.
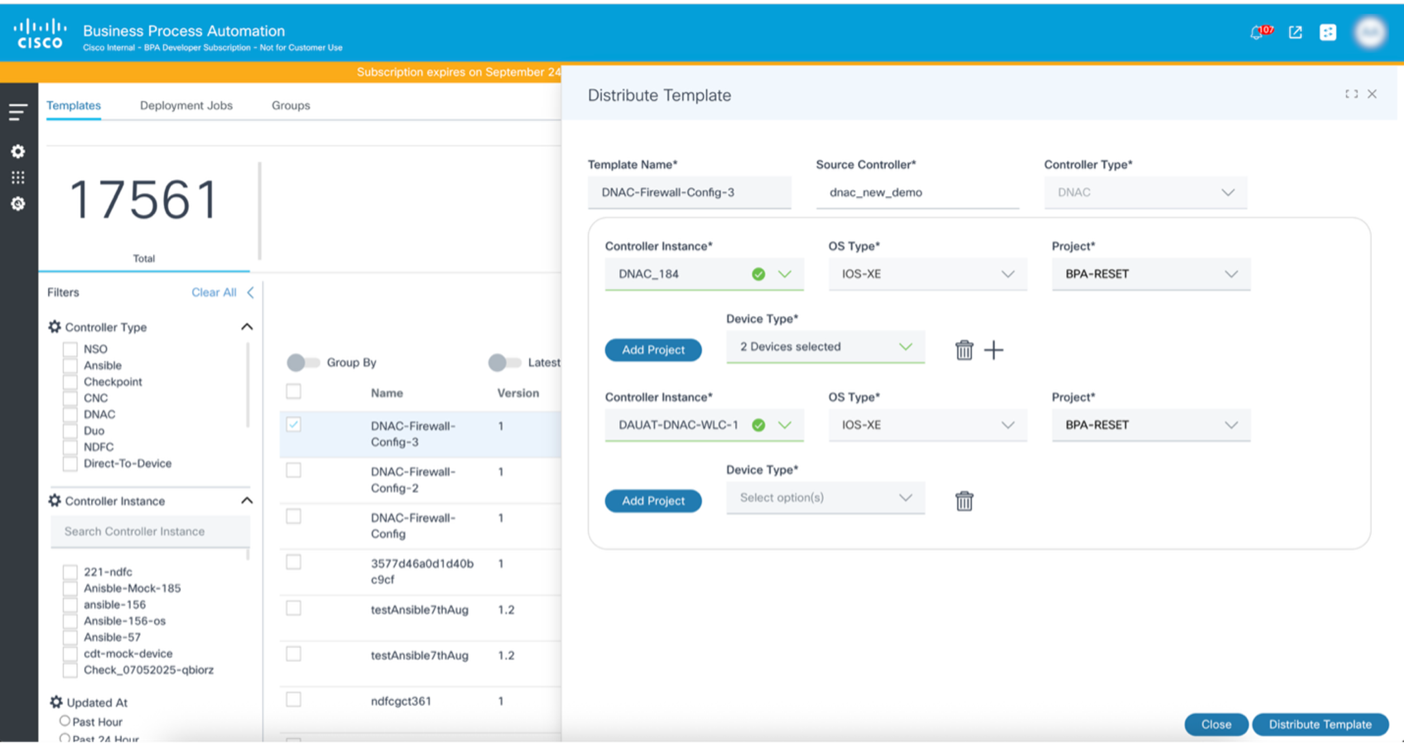
- Click Distribute Template.
Distributing Templates in vManage
Template distribution in vManage happens unidirectionally, from the primary controller to the secondary controller. When onboarding a vManage controller, a certain controller can be selected as the primary and all other controllers are automatically assigned as secondary.
To distribute a template in vManage:
- Add the target controller (secondary) where the template needs to be distributed.
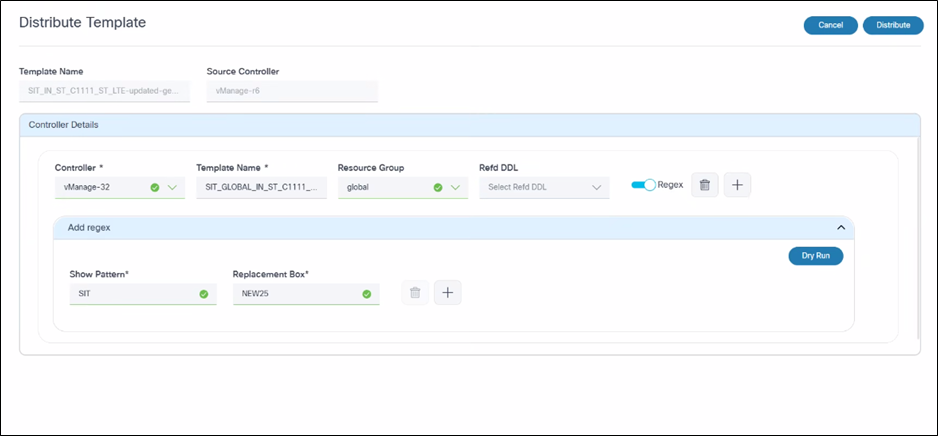
- Select the Resource Group to be associated with the distributed template.
- Enter a Template Name under the Controller Details section.
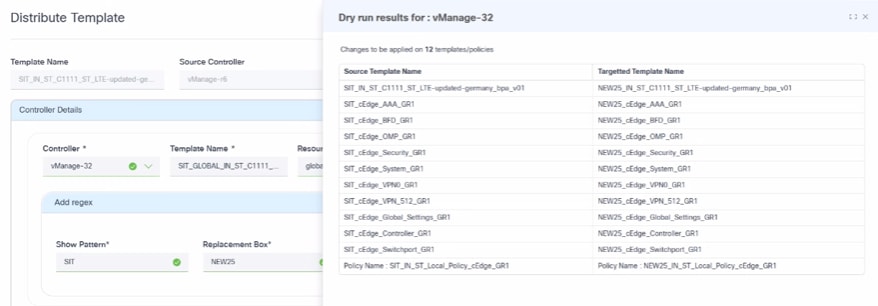
- Click Dry Run. The Dry run results window opens and displays the Source Template Name (source controller) and the Targeted Template Name within the non-master controller.
- Click Distribute. A Distribution Results window opens.
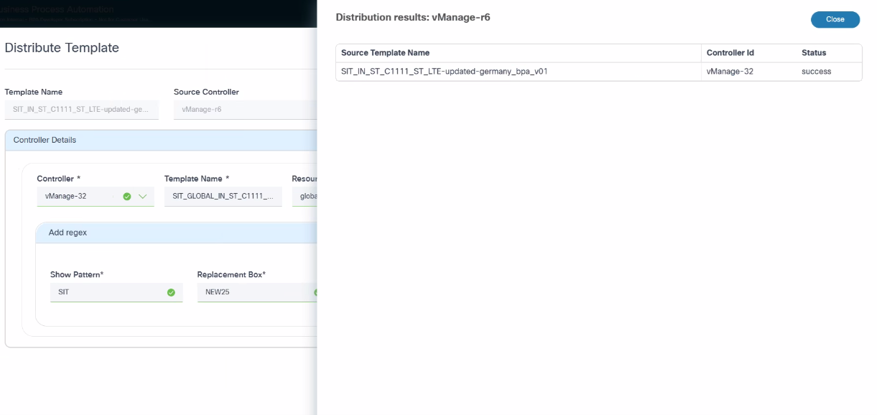
The template is successfully distributed from the non-master controller to other controller instance(s).
Sync Templates
The Sync Templates functionality is used to fetch the latest templates from the source controller, ensuring that the BPA database has the most up-to-date data. Users must select the controller instance and select the More Options > Sync Template.
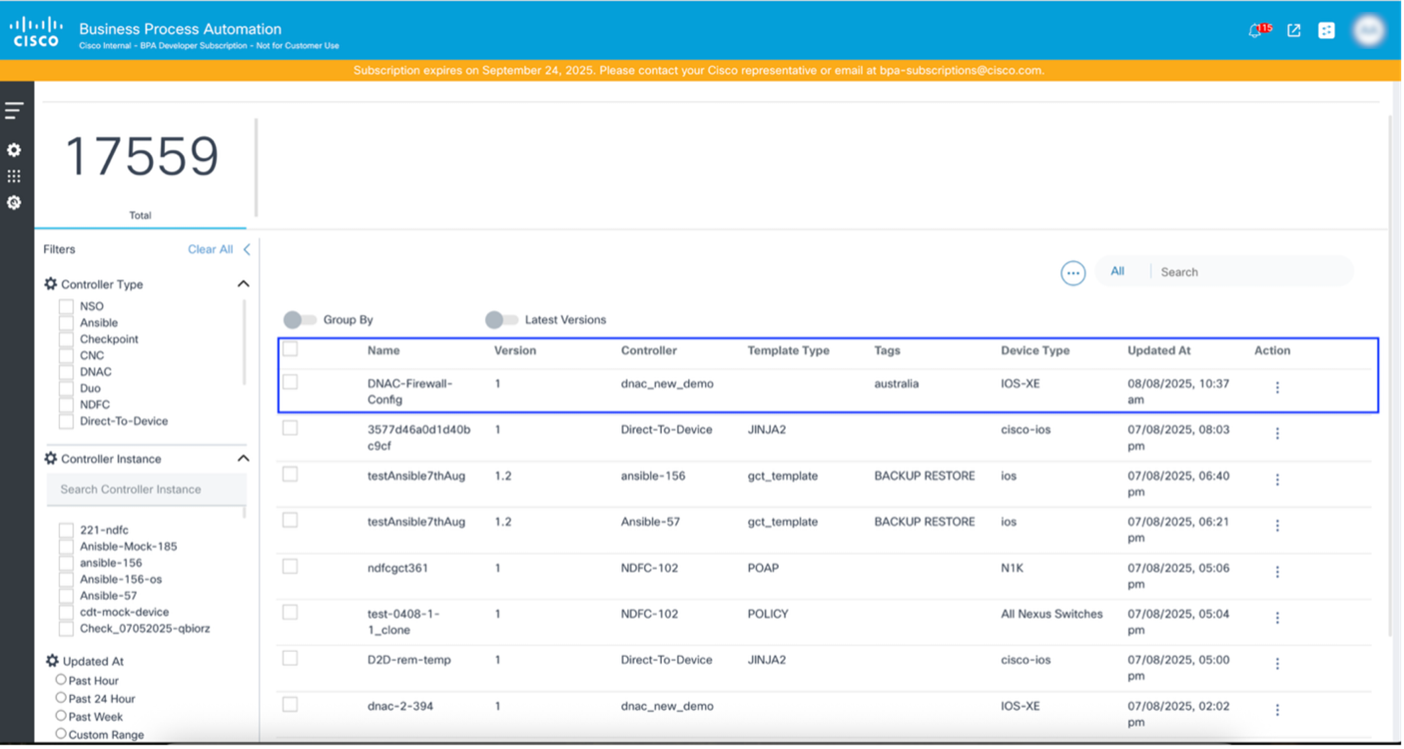
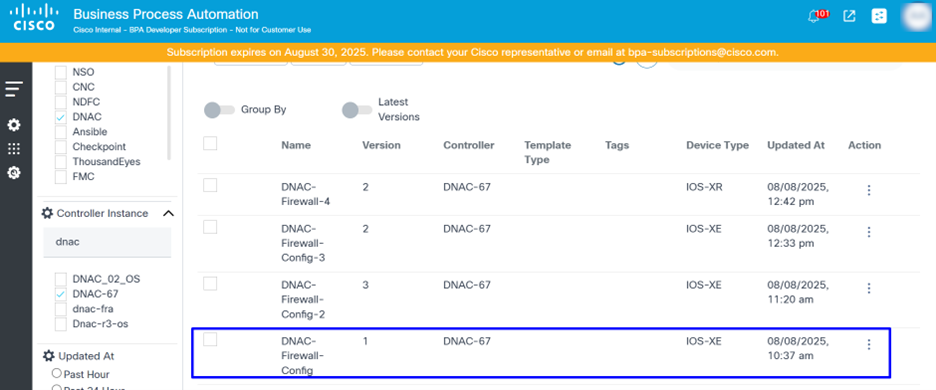
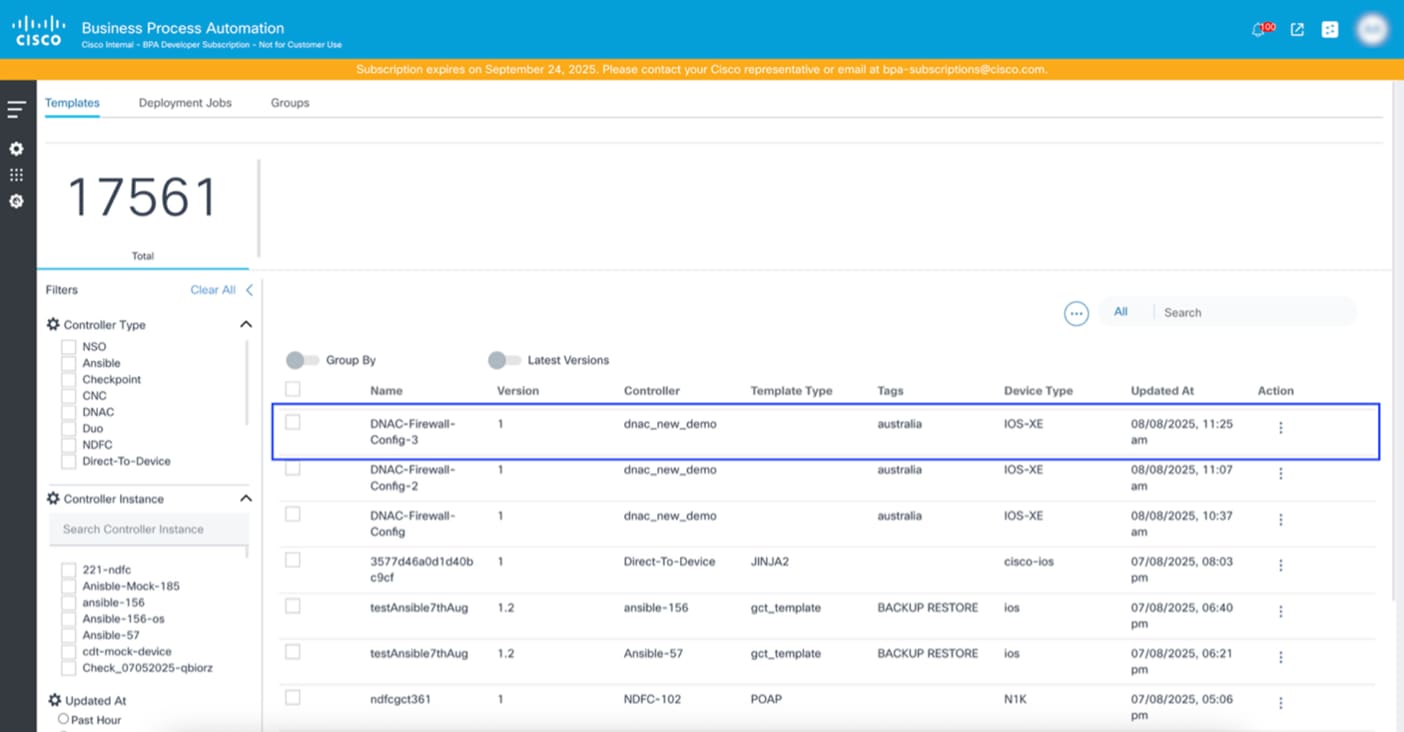
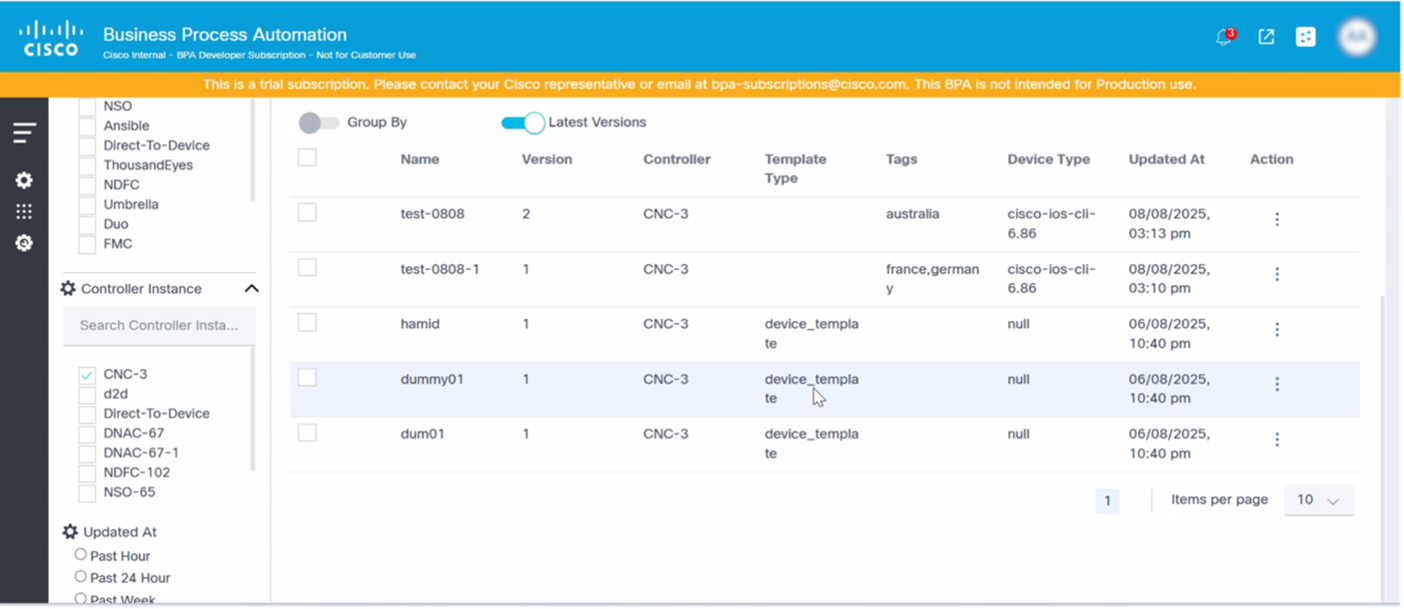
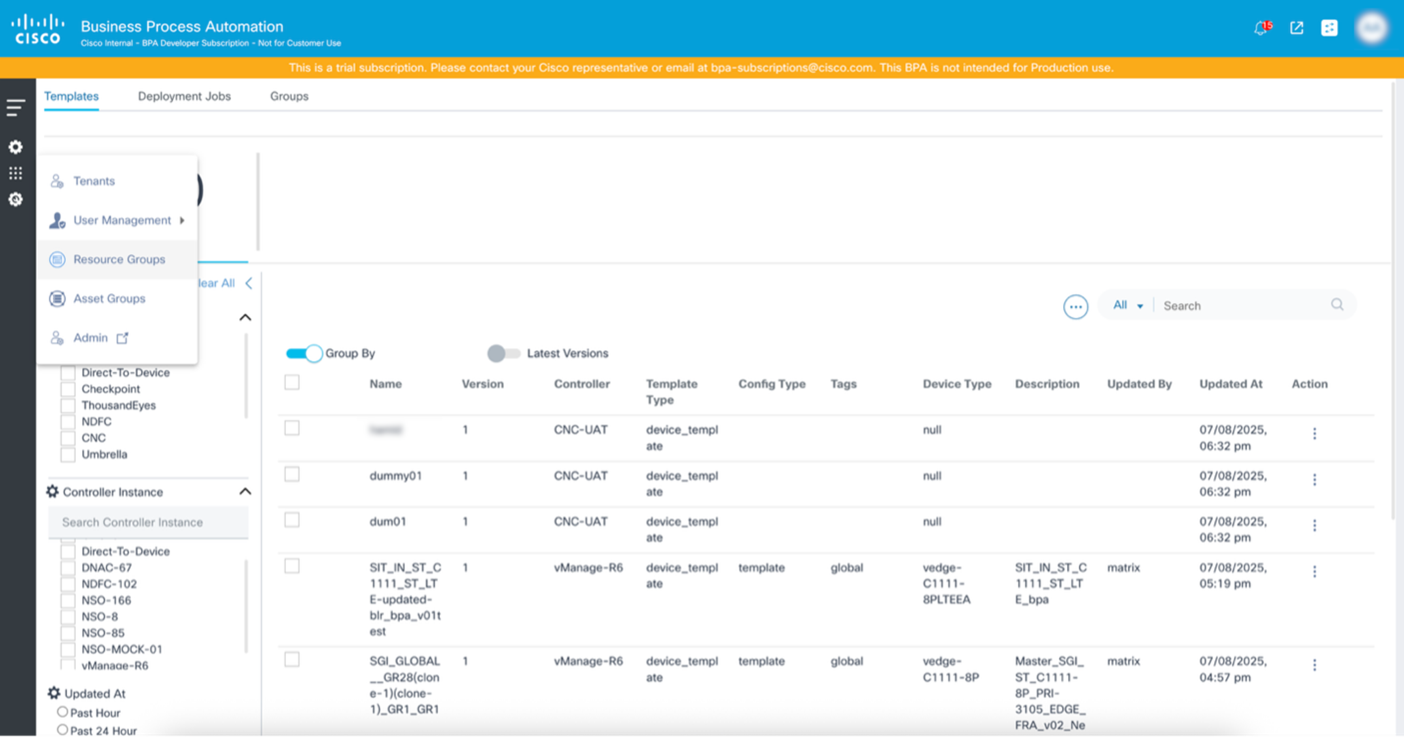
Template Dashboard Features
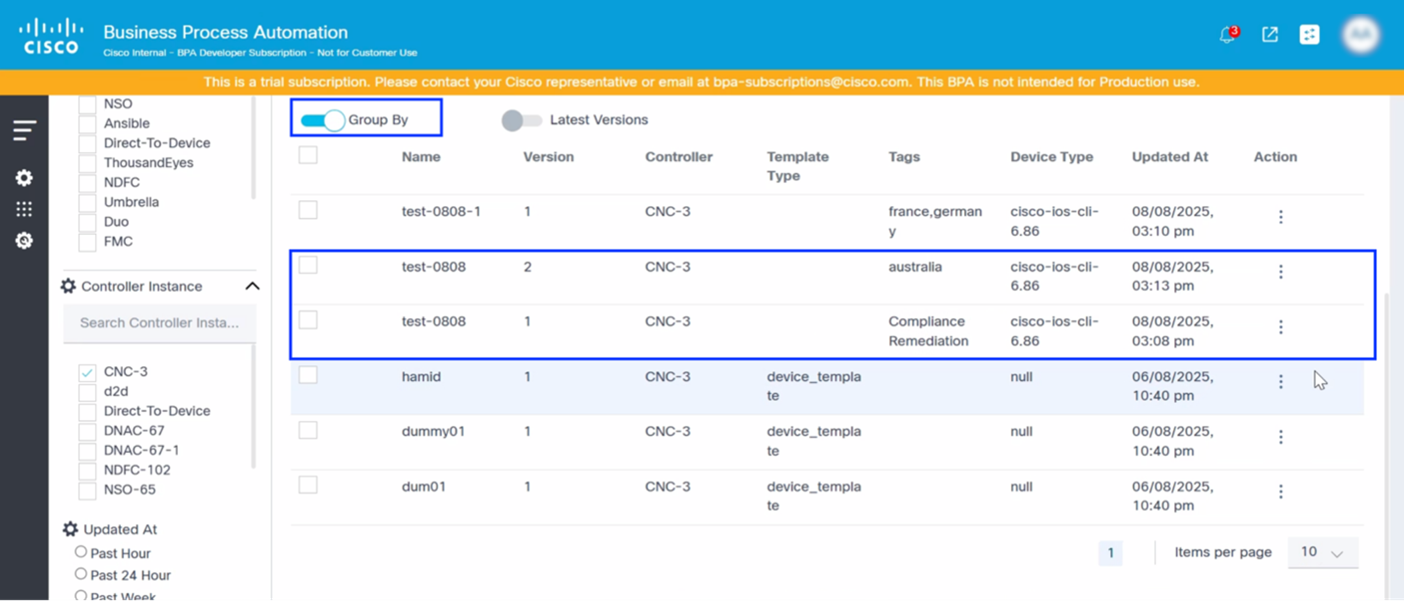
Group By
Grouping templates by name (or using a consistent naming convention) is a powerful organizational strategy that significantly improves manageability, searchability, and operational efficiency across all three platforms. This allows users to view multiple versions of the templates listed close to each other.
Latest Versions
The Latest Version toggle allows users to only view the latest version of any template, automatically filtering out any older versions of the templates.
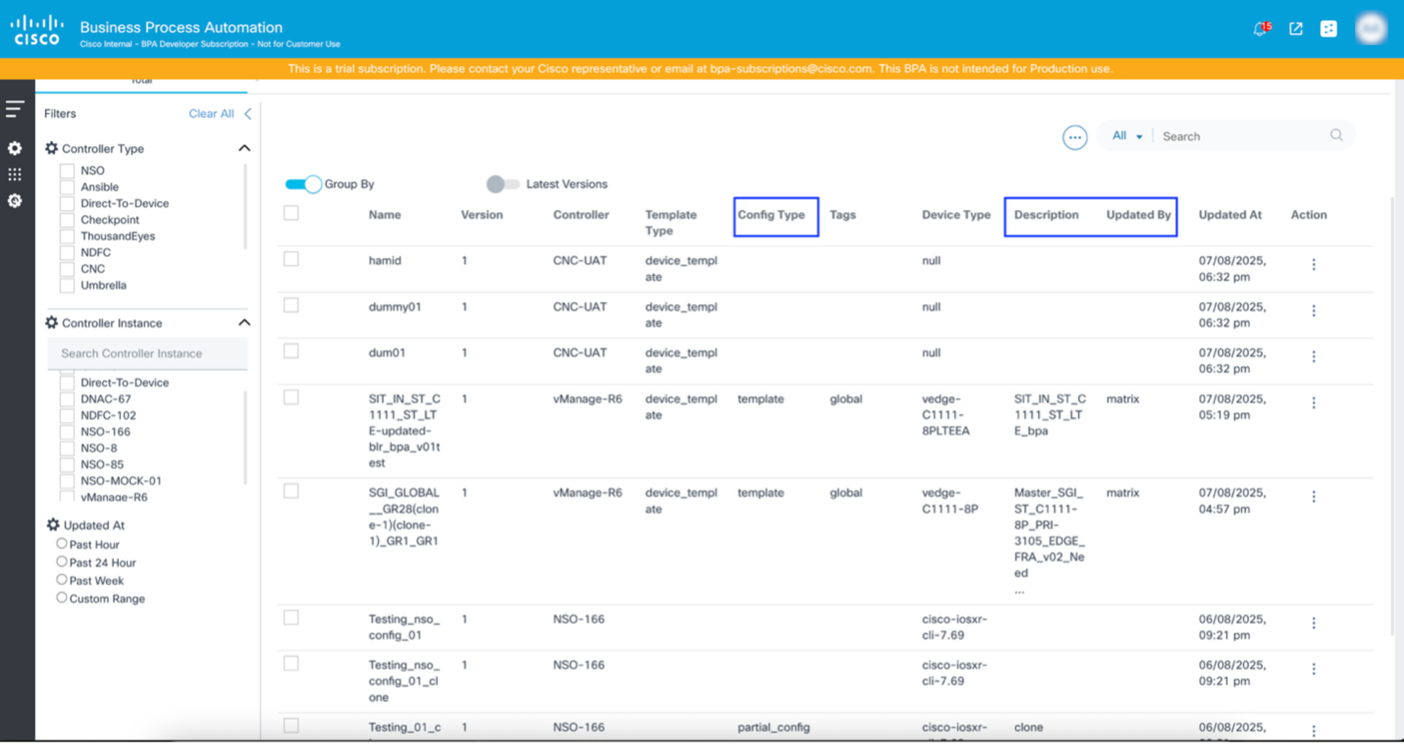
Show/Hide Columns
This functionality allows users to add other columns on the dashboard which are relevant based on the controller. To show or hide columns:
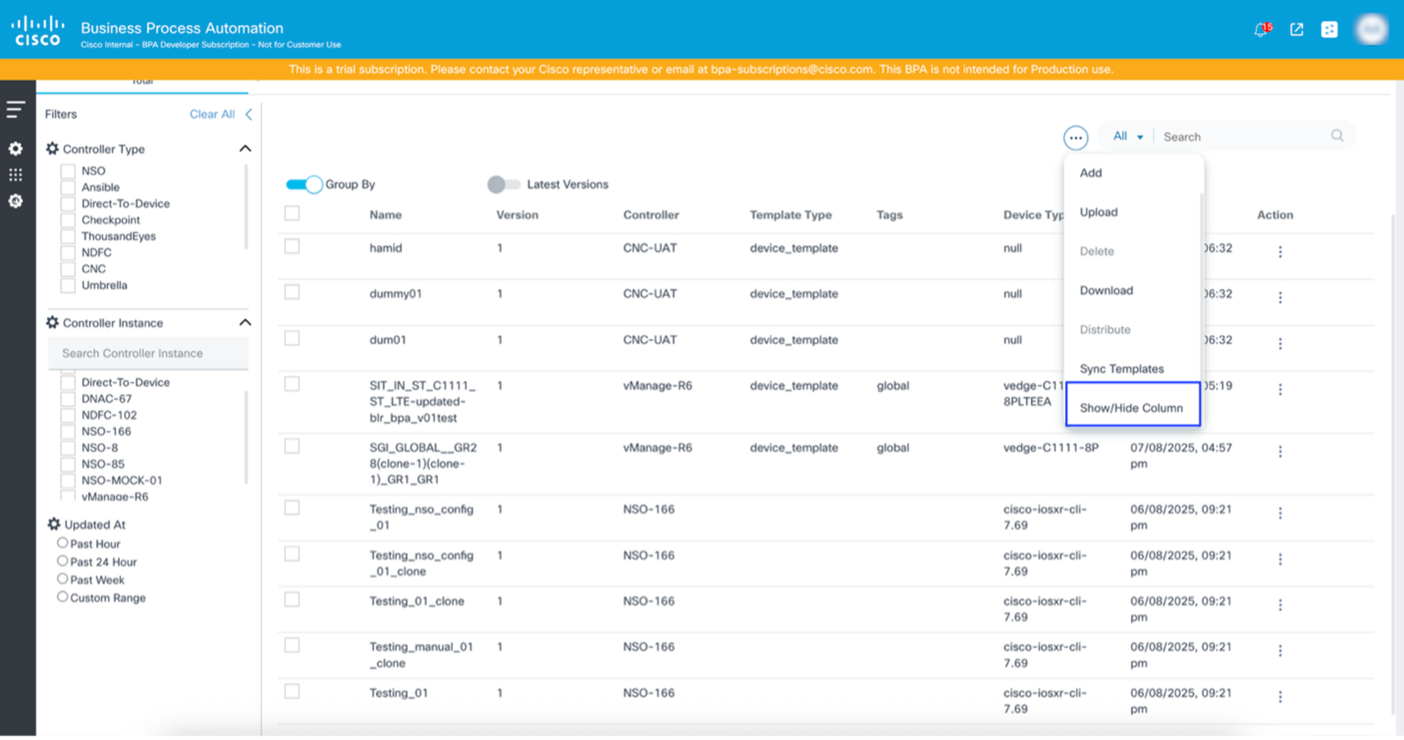
- Select the More Options icon > Show/Hide Column. The Edit Columns window opens.
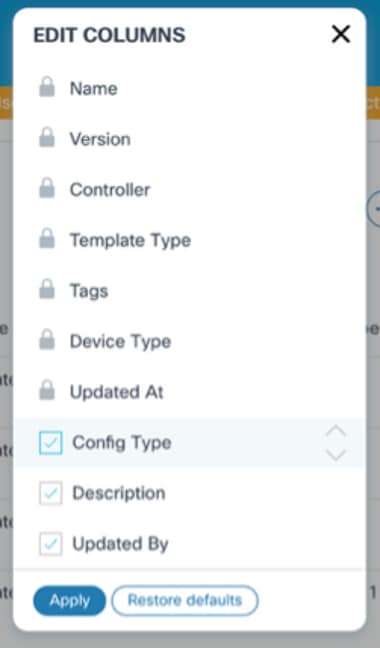
- Select or deselect the check boxes of the optional columns.
- Click Apply.
Template Version Management for vManage
This functionality allows users to specify how many previous versions of the template can be retained in BPA for vManage controller. Within the market variant, a policy is available which requires configuration.
For template version management:
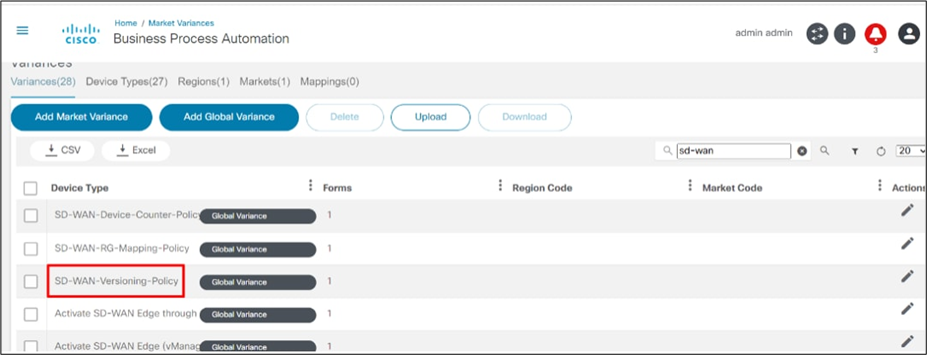
- Under the Varainces tab, select any desired Device Type. The Device Type detailed window opens.
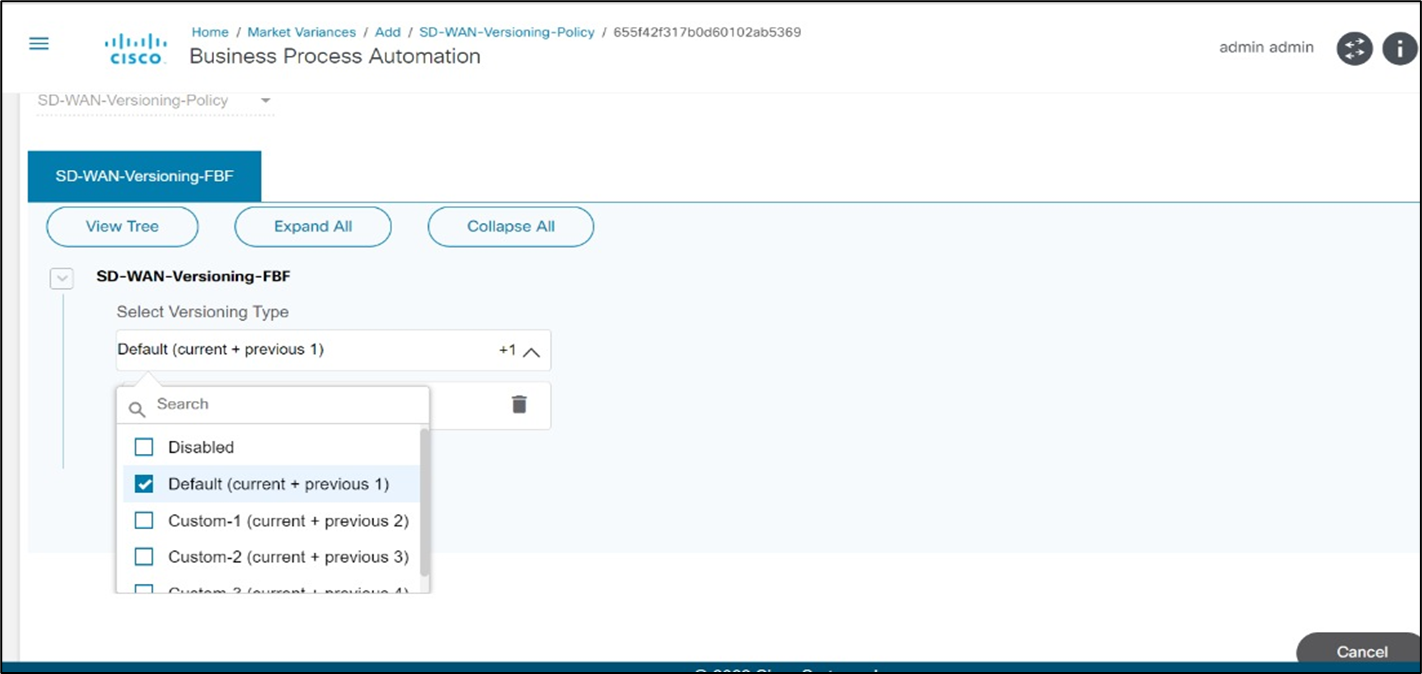
- Select a version from the Select Versioning Type drop-down list.
Deployment Jobs
The Deployment Job section is the command center for pushing configuration changes and deploying network designs. In network automation, accuracy and control are paramount. This section instructs users on how to manage the entire deployment lifecycle, from initial validation to final application, ensuring that network operates exactly as intended.
Two critical functionalities are available in this section:
- Creating Preview Jobs: Before committing any chnages to the live network, users can generate a detailed preview of the configuration. This provides a "dry run" of the template, enabling users to review the exact commands that are pushed to each target device. This proactive validation minimizes errors, identifies potential conflicts, and builds confidence in the deployment strategy.
- Creating Provisioning Jobs: After reviewing the preview, users can execute the provisionings job to apply the templates to target devices. The provisioning process handles the secure and efficient application of configurations, ensuring consistency and compliance across the network infrastructure.
Users can gain unparalleled control over the network deployments by mastering the creation of both preview and provisioning jobs, allowing for rapid, reliable, and risk-reduced configuration management.
Dashboard
The new dashboard introduced in the GCT Next-Gen UI consolidates the view of execution jobs’ details and statuses for all configuration templates.
It provides following features:
- Ability to create new configuration templates’ execution jobs
- Stores complete details of historical execution job details and their statuses
- Ability to redeploy the configuration templates execution jobs
- Fine-grained access to jobs based on user groups and access policies
- Single interface to create, execute, preview, and provision for all controller types
To access Deployment Jobs:
- Navigate to the GCT Next-Gen portal.
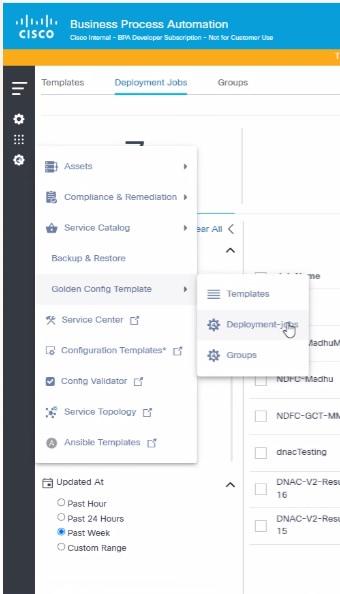
- Select the Menu icon > Golden Config Template > Deployment Jobs.
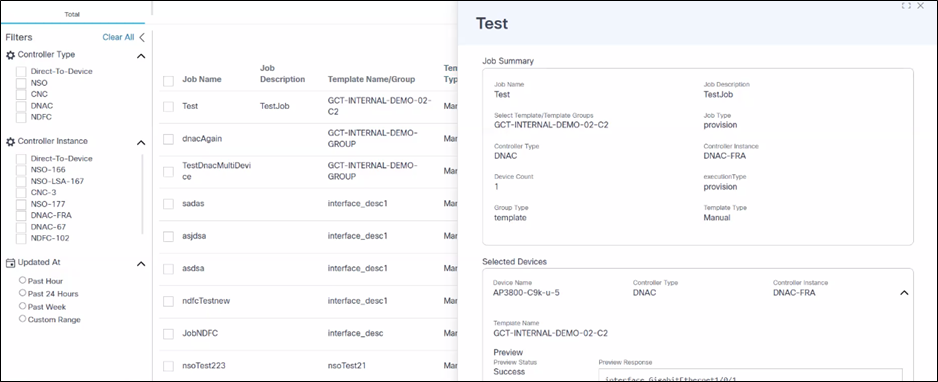
The Configuration Template Deployment Job dashboard displays a list of jobs with following details:
- Job Name, Job Description, Template Name/Group
- Number of targeted devices’ success and failure counts
- Job Status, Created By, and available Actions
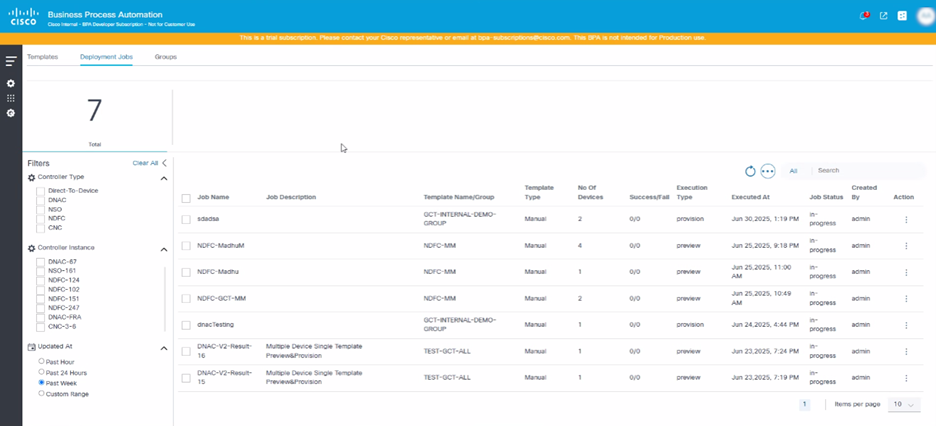
Click the desired job’s row to view the detailed results of preview and provision at the device-level.
Existing jobs can be redeployed by editing an existing job.
Creating and Managing Deployment Jobs
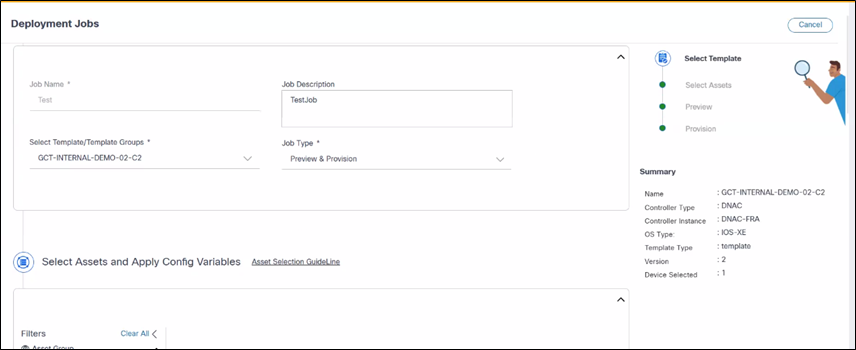
To create Preview and Provisioning jobs:
- Click the Deployment Jobs tab.
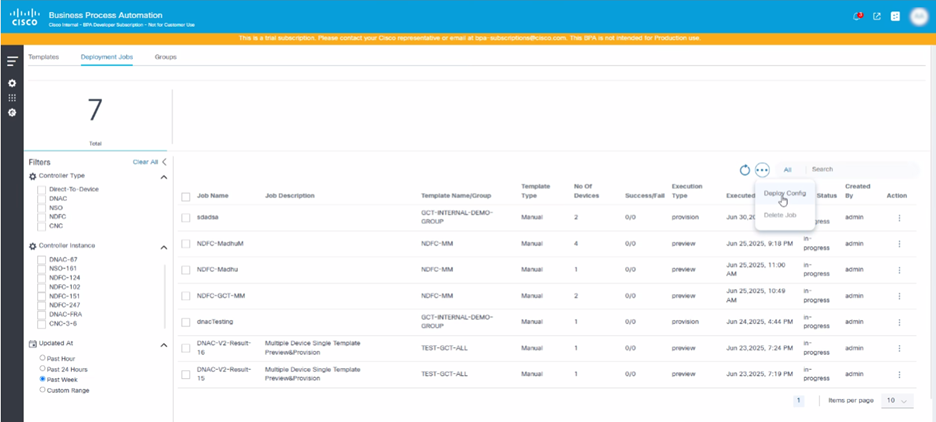
- Select the More Options icon > Deploy Config. The Deployment Jobs window opens.
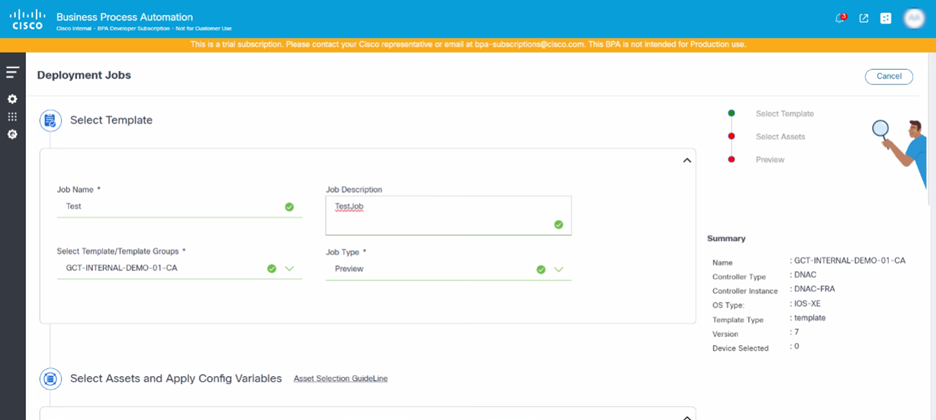
- Update the required fields (e.g., Job Name and Job Description).

- Search for and select a template or template group from the Select Template/Template Groups drop-down list.
- Select Preview or Preview & Provision from the Job Type drop-down list.

a. **Preview**: Simulate the template's configurations on selected devices without applying the template configuration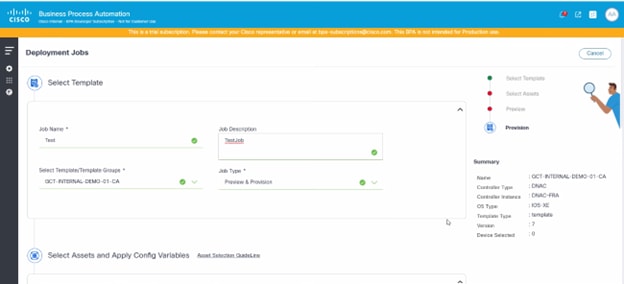
b. **Preview & Provision**: Execute a preview (dry-run) and apply the template configuration on selected devicesSelecting Target Devices and Populating the Template Variables
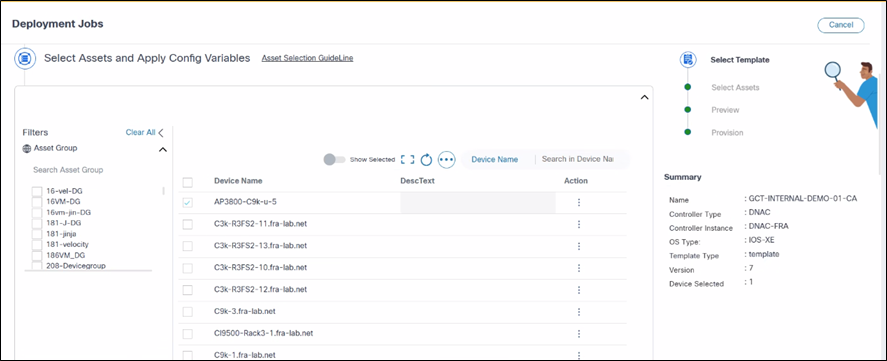
Users must select asset groups or devices as targets for template configuration deployments. The list of available assets is displayed based on the access policy permissions provided to the user groups.
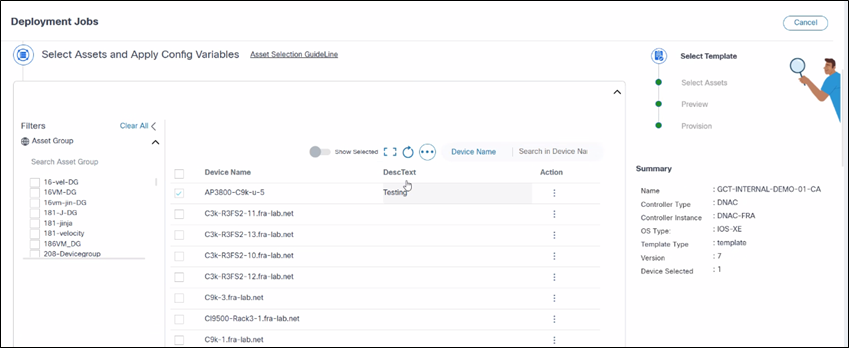
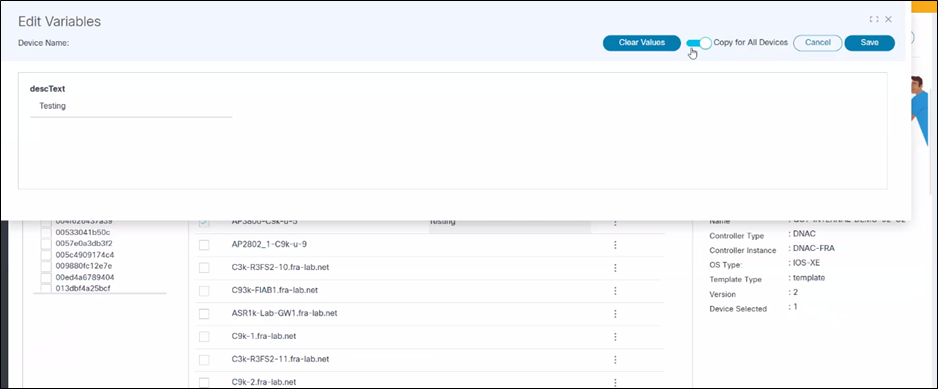
Users should provide values for any template variables in the grid interface. If the list of variables is extensive, the horizontal scroll helps users to populate variables. The grid features include:
- Ability to edit or clear variable values
- Show Selected toggle
- Full screen icon
- Refresh icon
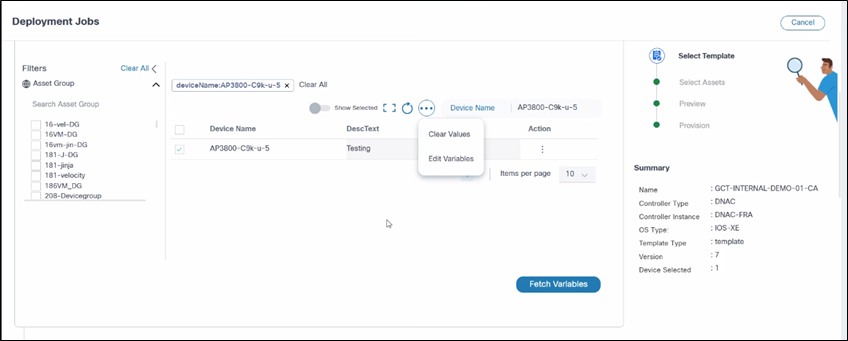
- More Options icon:
- Clear Values: Clear all populated variables
- Edit Variables: Populate all variables
- Search in Device Name field
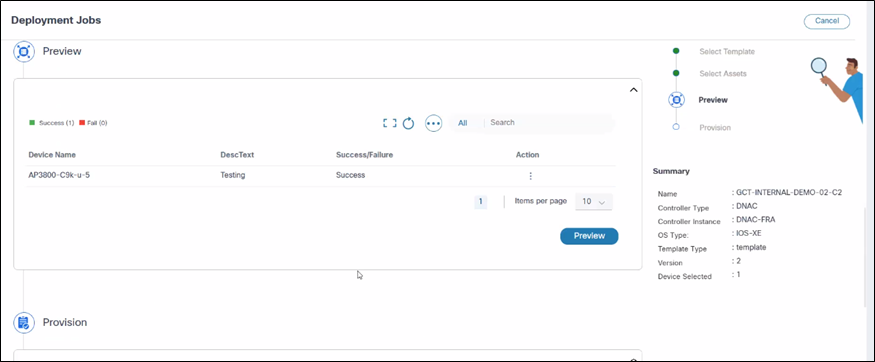
Previewing and Provisioning Configurations
To preview and provision configurations:
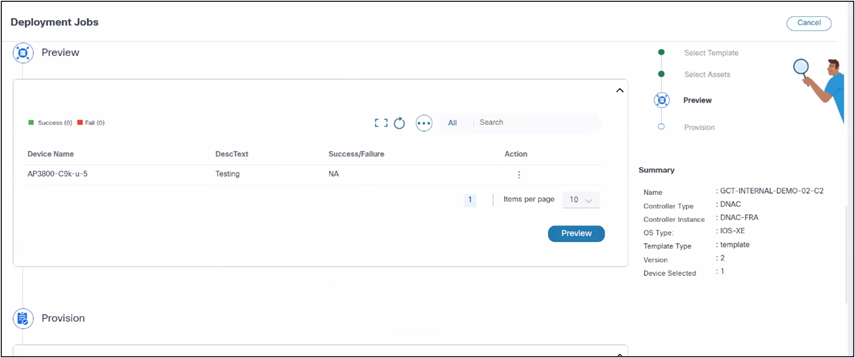
- Click Preview to perform a dry-run on all devices and selected templates or template groups. Success or failure results display.
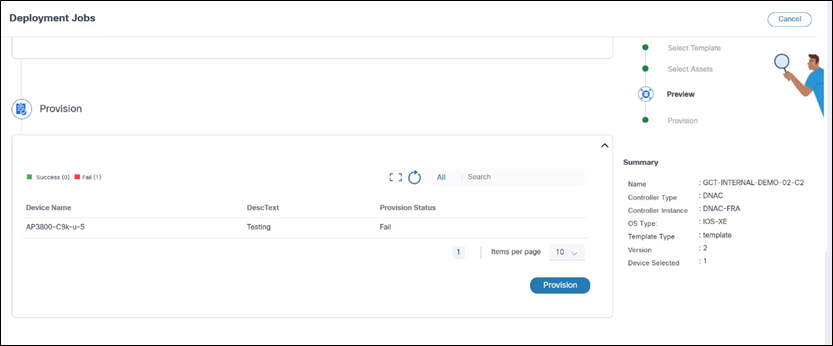
- Click Provision to commit the configuration to all selected devices. The system applies the configuration to the selected devices. A Provision pop-up window opens and displays the success or failure results for each device.
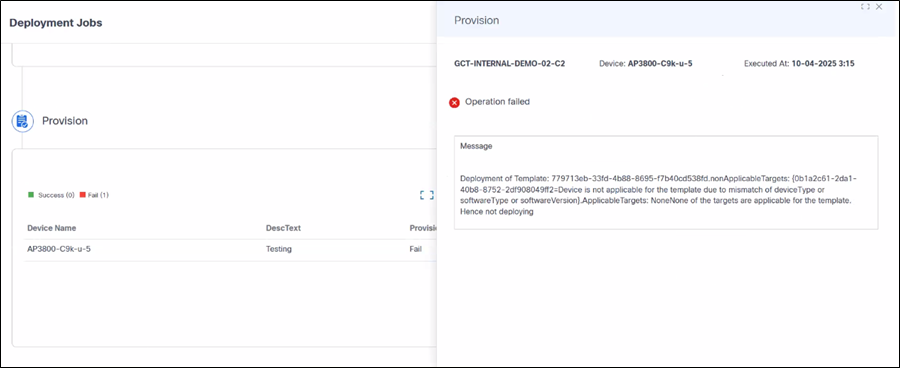
Recovering from Errors
Users can view the error details on the side panel of each device. Since errors may vary from device to device and controller to controller, it is important to review the error logs in detail. For example, if a template is not compatible with a specific device, users can remove the device from preview and provisioning. Similarly, if the “device not reachable” error is encountered, wait and retry after some time.
Handling Deployment Failures and Redeployment
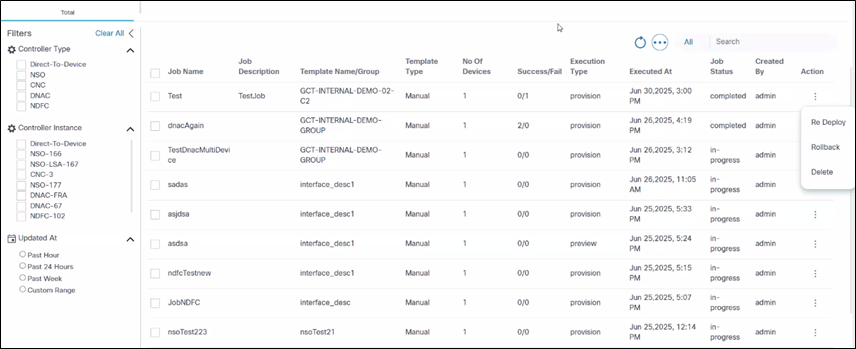
If a deployment job fails on some devices, troubleshoot and resolve device issues and redeploy the job by selecting the More Options icon > Re Deploy from a job’s Action column.
Reployment helps users to edit the existing job and redeploy to the affected devices. Key points include:
- Redeployment uses the previously selected templates and devices
- The system updates job results to reflect the latest results based on the job type
- Redeployment supports all controllers mentioned (e.g., NSO, CNC, NDFC, DNAC, vManage and Ansible)
Groups
Template groups provide a logical container or organizational structure for the network configuration templates. Instead of managing a flat list of potentially hundreds or thousands of templates, users can categorize and arrange them into meaningful collections.
Benefits of Groups
As network automation scales and the template library grows, effective organization becomes paramount. Template groups offer the following benefits:
- Improve Organization and Discoverability: Eliminate clutter and quickly locate specific templates. Grouping templates by function, device type, location, or project makes the template library intuitive and easy to navigate, saving valuable time.
- Enhance Role-Based Access Control (RBAC): Assign granular permissions to specific sets of templates. Users can grant different user roles (e.g., Network Architects, Network Operations Center Engineers, Automation Developers) varying levels of access (read-only, modify, execute) to distinct template groups, ensuring that users only interact with the templates relevant to their job function.
- Streamline Lifecycle Management: Organize templates by their status or environment (e.g., "Production Approved," "Development Sandbox," "Deprecated"). This helps to manage the template lifecycle, ensuring that only validated templates are used in production and making it easier to identify and archive outdated ones.
- Simplify Collaboration: Facilitate teamwork by assigning ownership or responsibility for specific template groups to different teams or individuals. This promotes accountability and prevents unintended modifications.
- Enforce Standardization: Promote consistency by grouping templates that adhere to specific policies, naming conventions, or design standards. This helps ensure that all configurations deployed from a particular group meet the organizational requirements.
- Scalability and Future-Proofing: As the network automation grows and new services or technologies are introduced, template groups provide a flexible framework to incorporate and manage new templates without overwhelming the existing library.
Managing Groups
This section outlines creating, editing, and deleting GCT groups using available GCT or Device Templates.
Creating Groups
The Add Template Group feature is for grouping related GCTs. It enables logical segregation and efficient management of device configuration templates.
To create a new group:
- Select the More Options icon > Add. A new form opens.
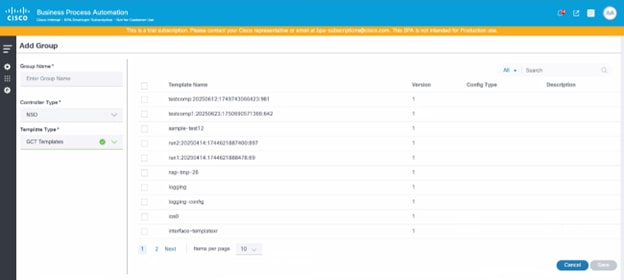
- Update the required fields (e.g., Group Name, Controller Type).
- Select one of the following options from the Template Type drop-down list:
- GCT Templates: These templates are part of the BPA.
- Device Templates: These templates contain pre-configured templates available in the device, and are updated to BPA as part of Controller Sync Data. An additional option for Controller Instance displays. Select the appropriate controller instance.
The available templates are then loaded into the grid.
- Select the check box of the templates to be grouped and click Save. This creates the group and users are redirected to the Groups Dashboard page.
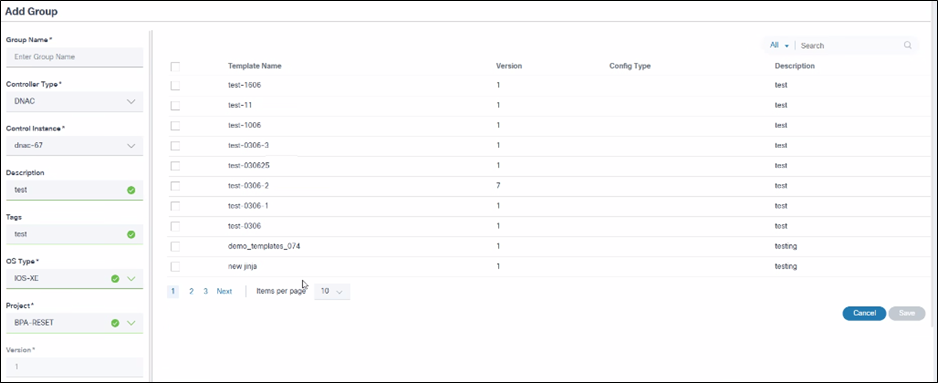
This form is similar to NSO, Ansible, and CNC controller types; for Cisco Catayst Center, the form fields are different. Additional fields for Cisco Catalyst Center are:
- Description
- Purpose: Provide a comprehensive description of the template group’s purpose, or any other relevant notes
- Input: Text area (e.g., this template group applies for standard QoS and routing configurations for enterprise core routers)
- Tags
- Purpose: Allows users to associate one or more tags with the template group for easier categorization and searching
- Input: Text area
- OS Type
- Purpose: A mandatory field to specify the operating system type for which this template group is designed (e.g., IOS XE, NX-OS)
- Input: Select an option from the drop-down list
- Project
- Purpose: A mandatory field to assign the template group to a specific project, aiding in organization and access control
- Input: Select an option from the drop-down list
- Language
- Purpose: This is a mandatory field to specify the language or format of the configuration commands within the template group (e.g., JINJA, CLI, VELOCITY)
- Input: Select an option from the drop-down list
- Device Type(s)
- Purpose: A mandatory field to indicate the specific types of devices this template group is intended for (e.g., routers, switches, firewalls)
- Input: Select one or more options from the drop-down list
Editing Groups
Editing template groups is a critical maintenance and optimization activity in GCT management. The following are the key reasons why template groups need to be edited:
- Organizational Changes
- Department Reorganization: When business units are restructured, template groups need realignment
- Site Consolidation or Expansion: Merging or splitting locations requires template group restructuring
- Role Redefinition: Changes in network device responsibilities necessitate template group updates
- Operational Evolution
- New Device Roles: Introduction of new network functions (SD-WAN, IoT gateways)
- Technology Upgrades: Migration to new platforms requiring group recategorization
- Service Changes: Adding or removing network services affects group organization
- Compliance and Security Updates
- Regulatory Changes: Updates to regulations require template group modifications
- New Compliance Requirements: Updated regulations (PCI-DSS, GDPR, SOX) require template group modifications
- Security Policy Updates: Enhanced security standards require group-level policy changes require group restructuring
- Security Enhancements
- Threat Landscape Evolution: New security threats require updated group policies
- Access Control Refinement: Changing permissions and access levels for different groups
- Risk classification updates: Reclassifying devices based on updated risk assessments
- Technical Infrastructure Changes
- Network Architecture Evolution: Changes in overall network design requires updates to how devices are grouped
- Topology Changes: Network redesign affects how devices should be grouped
- Technology Migration: Moving from legacy to modern platforms
- Vendor Changes: Switching vendors requires new group categorizations
- Device Lifecycle Management
- Hardware Refresh: New device models need appropriate group assignments
- End-of-life Devices: Removing obsolete device categories from groups
- Capacity Planning: Adjusting groups based on performance and capacity needs
- Operational Efficiency Improvements
- Performance Optimization: Continuous template refinement
- Template Consolidation: Merging similar groups to reduce complexity
- Group Splitting: Dividing large groups for better manageability
- Hierarchy Optimization: Restructuring parent-child relationships for efficiency
To edit a group:
Edit Group
- In the Action colunm, select the More Options icon > Edit.
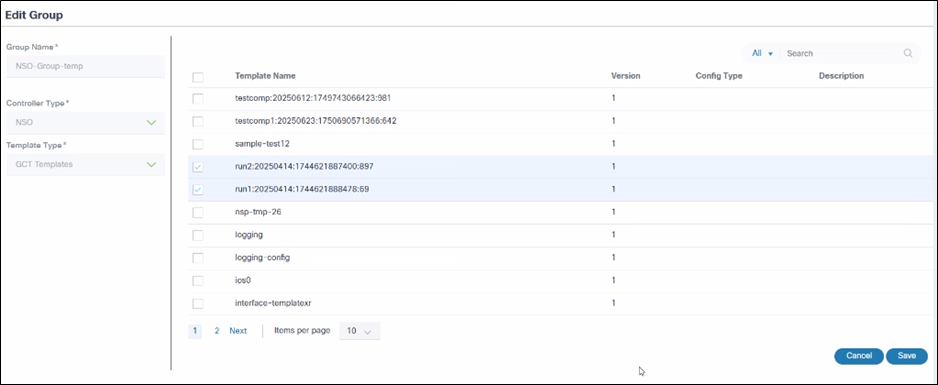
- Select the specific template(s) to be updated.
- Click Save.
Deleting Groups
Deleting template groups is an important maintenance activity in GCT management. The following are the key reasons why template groups need to be deleted:
- Obsolete Technology and Equipment
- End-of-Life Hardware
- Platform Migration
- Organizational Restructuring
- Business Changes
- Operational Consolidation
- Compliance and Security Cleanup
- Policy Changes
- Access Control Simplification
- Error Recovery and Correction
- Mistake Remediation
- Data Integrity
To delete multiple groups:
- Select the check box of the groups to be deleted.
- Select the More Options icon > Delete. A confirmation displays.
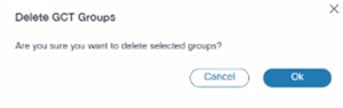
- Click Ok.
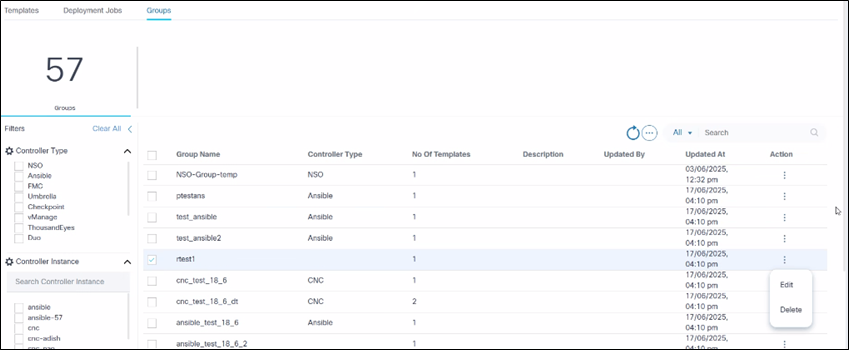
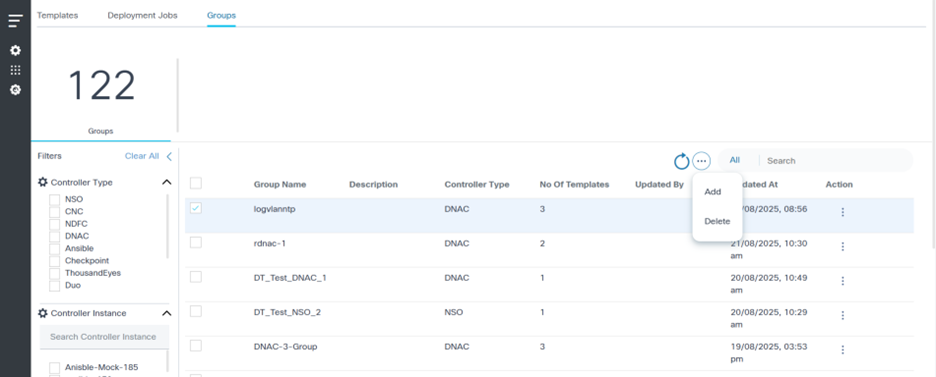
Group Dashboard
The Groups dashboard displays the available template groups in the grid.
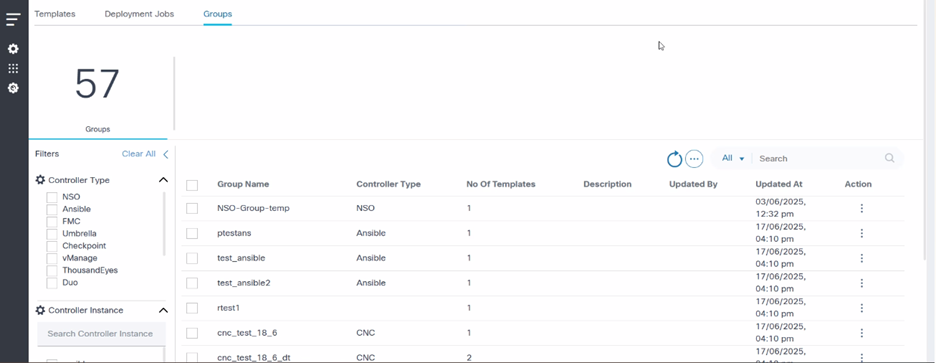
- Click the Groups tab in the GCT application.
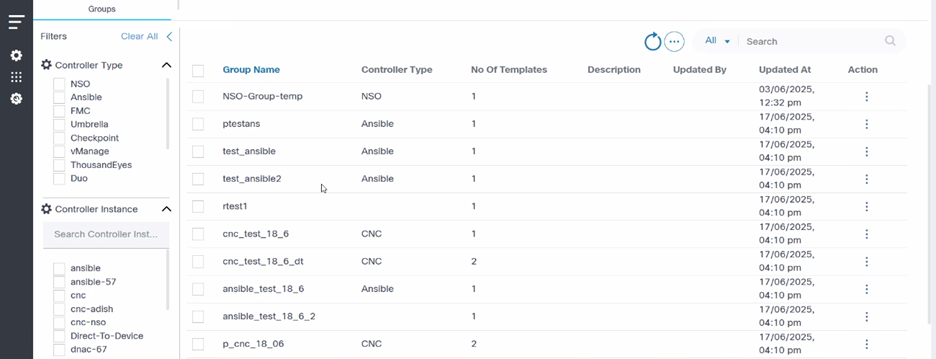
- Select the specific Controller Type and Controller Instance filters.
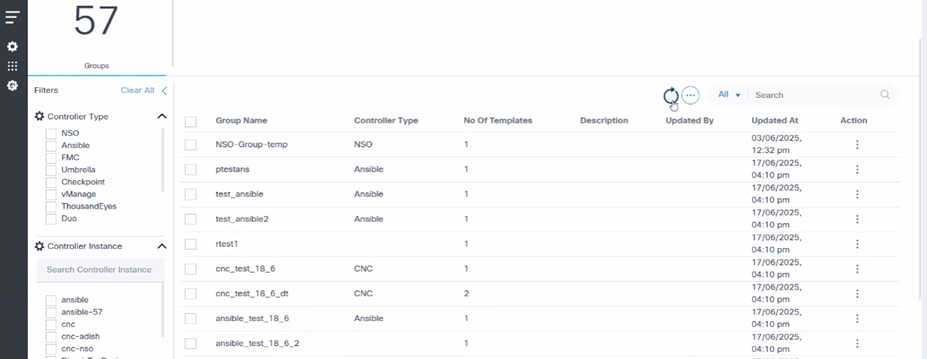
- Select the Refresh icon to fetch the data again.
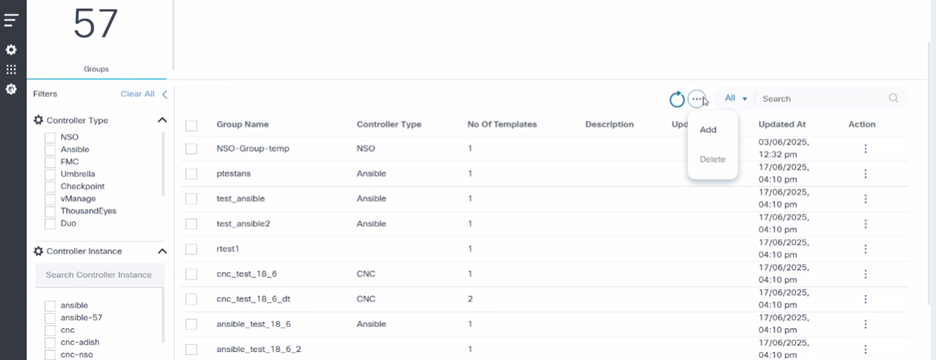
- Select the More Options icon to Add or Delete the groups.
Role-Based Access Control for Restricted Access
To restrict access to the templates, users can use the Role-Based Access Control (RBAC) feature.
Available Roles
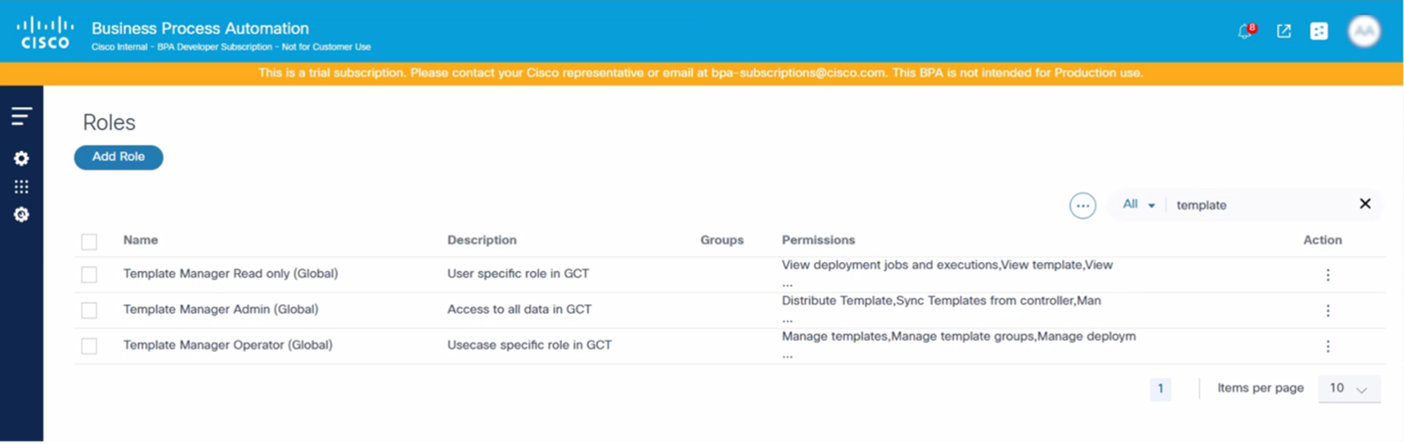
By default, the GCT application has the following three (3) roles that are assigned when a group is created:
- Template Manager Administrator: An adminisrator role with all permissions. These users can edit or delete any templates, deployment jobs, or groups.
- Template Manager Operator: These users have manage permissions and can manage templates (CURD), deployment jobs, and groups as well as sync group templates
- Template Manager Readonly: These users have read-only permissions to view the templates, groups, and deployment jobs
Associating the Access Policy
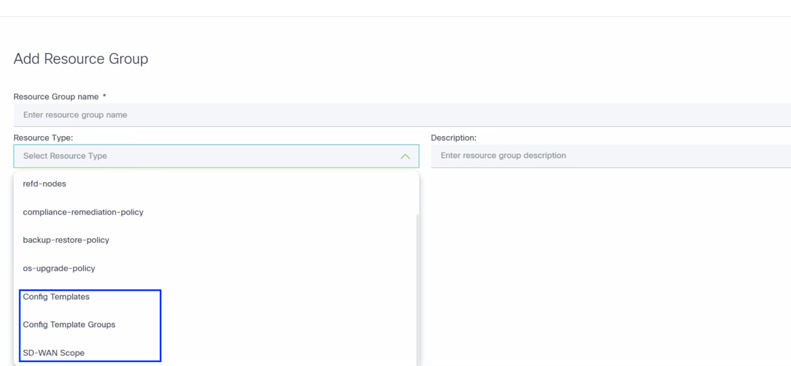
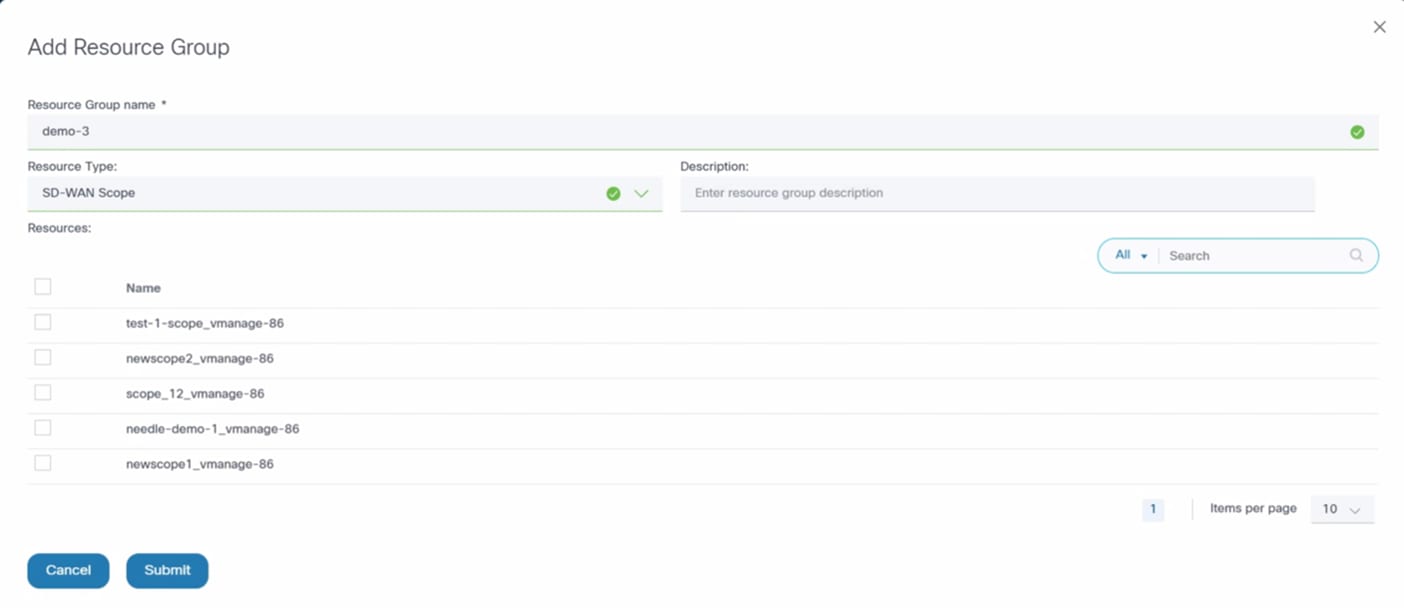
Creating Resource Groups
To create a Resource Group:
- Select the Settings icon > Resource Groups. The Resource Groups page displays.
- Click Add Resource Group. The Add Resource Group window opens.
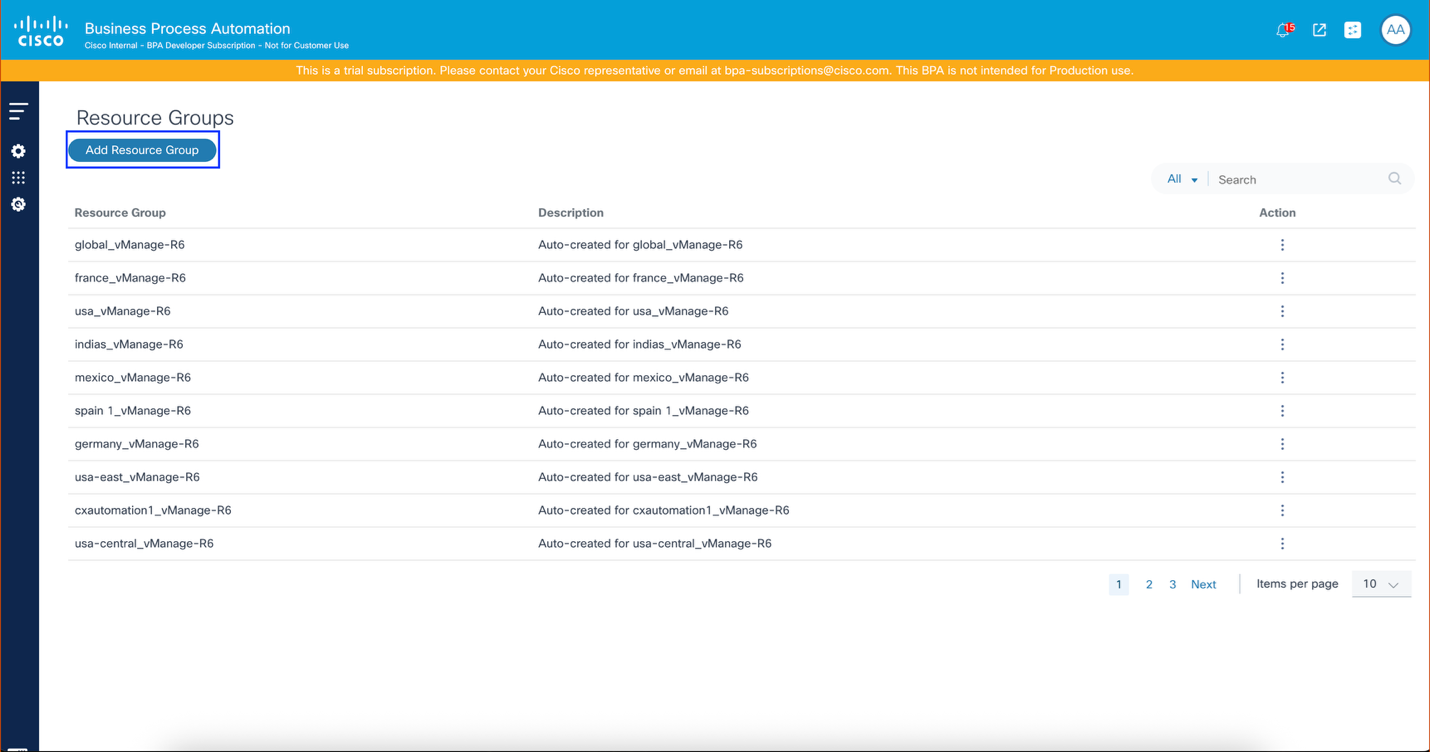
- Provide a Resource Group name, Resource Type, and Description.
- Config Templates: Lists all templates
- Config Template Groups: Lists all template groups
- SD-WAN Scope: Lists all scopes (applicable for vManage v20.15 controller).
- Config Templates: Lists all templates
- Config Template Groups: Lists all template groups
- SD-WAN Scope: Lists all scopes (applicable for vManage v20.15 controller)
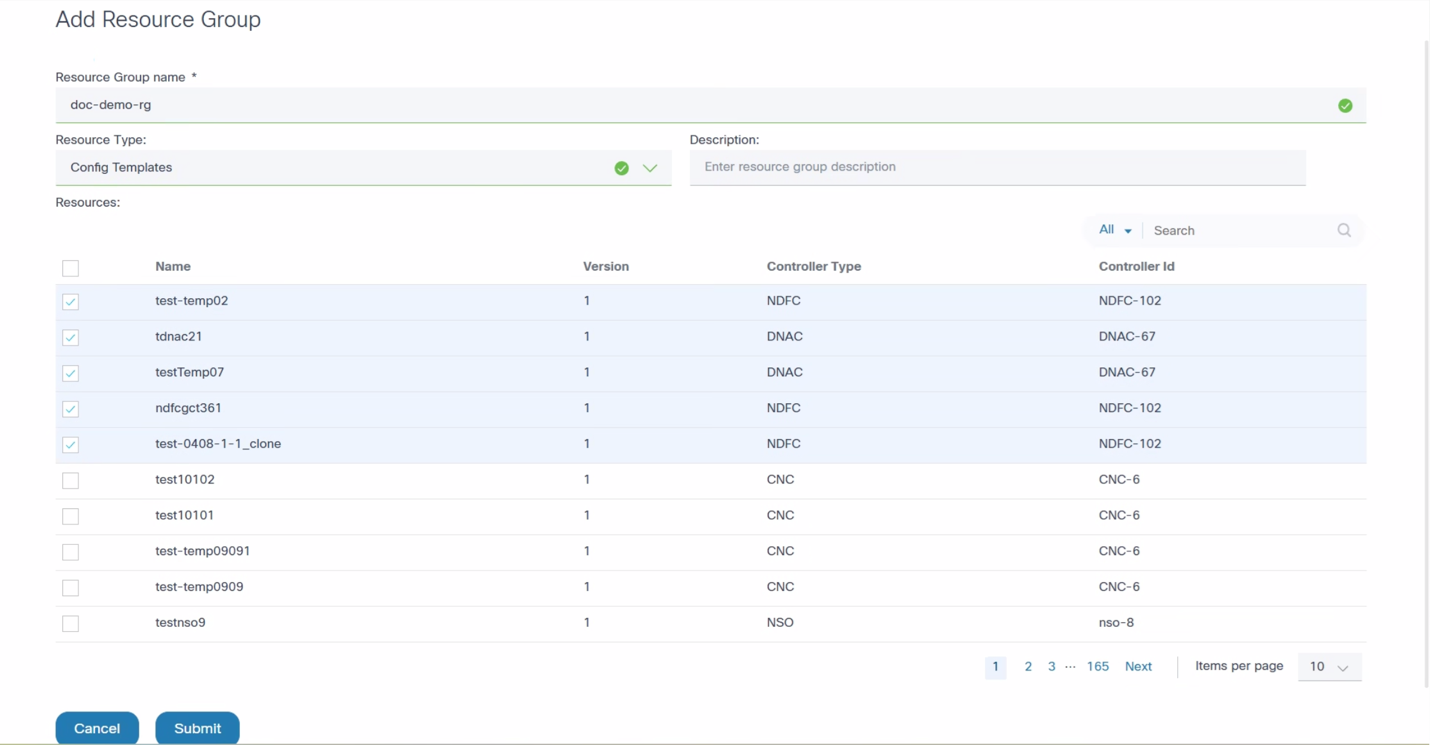
- Select the desired resources.
- Click Submit. The resouce group is created.
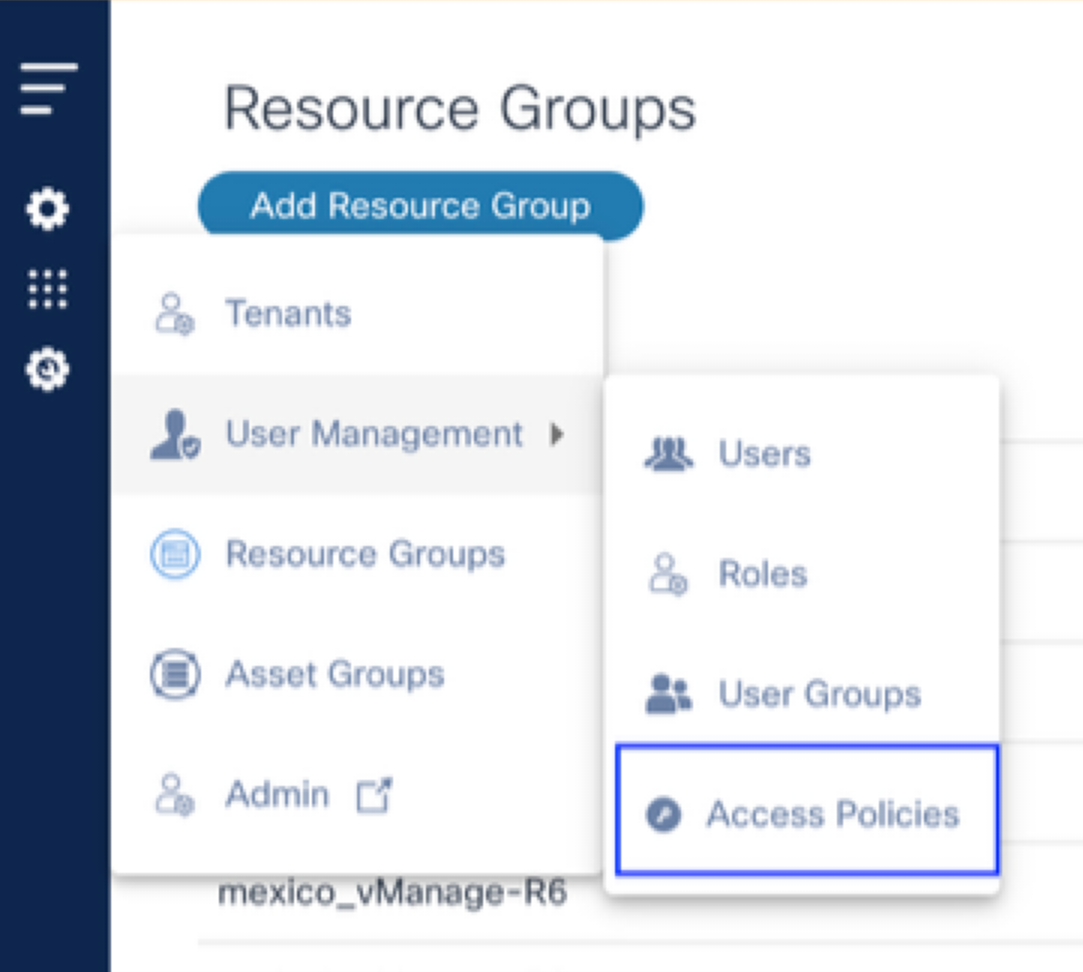
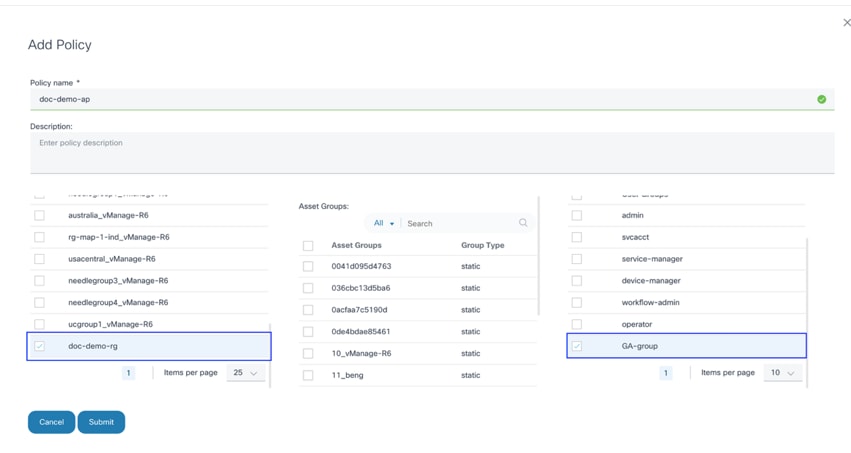
Creating Access Policies
To create a new policy:
- Select the Settings icon > User Management > Access Policies. The Add Policy window opens.
- Select the check box of the resource group created in the previous section.
- Select the check box of the group the user is assigned to.
- Click Submit.
vManage Notes on RBAC
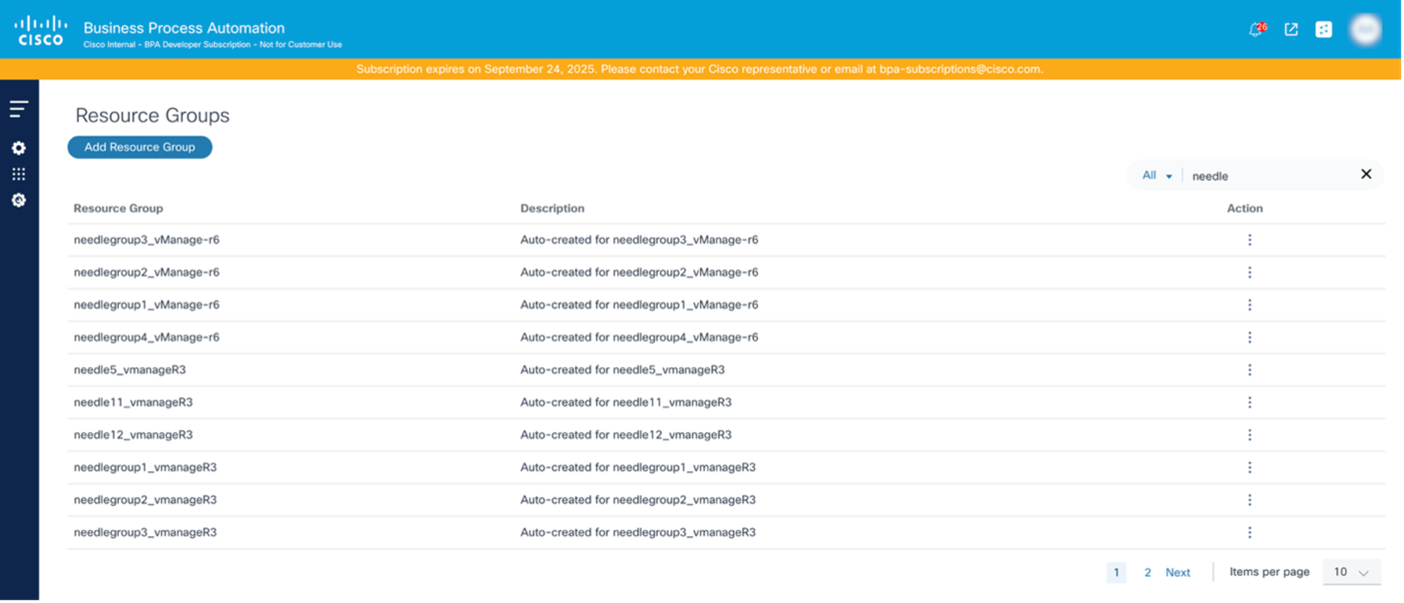
vManage version 20.9 and 20.12
For the vManage controller v20.12 and v20.9, the vManage resource group is mapped to the BPA resource group. When the BPA Controller Data sync (or sync templates within the GCT application) occurs, the BPA resource groups are automatically created to map the vManage resource groups.
For example, if the vManage controller instance is “vManage-R6” and the resource group is “needle”, then the BPA resource group is named “needle-vManage-R6”. All templates associated with the needle resource groups are automatically mapped.
vManage users are not required to create the resource group manually.
These auto-created resource groups can be used in the Access Policy to
restrict access to the templates and include the “Auto-created for
vManage version 20.15
For vManage controller v20.15, users can select scopes while creating a resource group. The scopes available in BPA are directly mapped from the scopes defined on the controller.
For example, if the scope name on the controller is “firewall”, then the BPA scope name is formatted as “<<scope-name>>-<<controller-id-in-bpa>>” (e.g., firewall-vManage-R6).
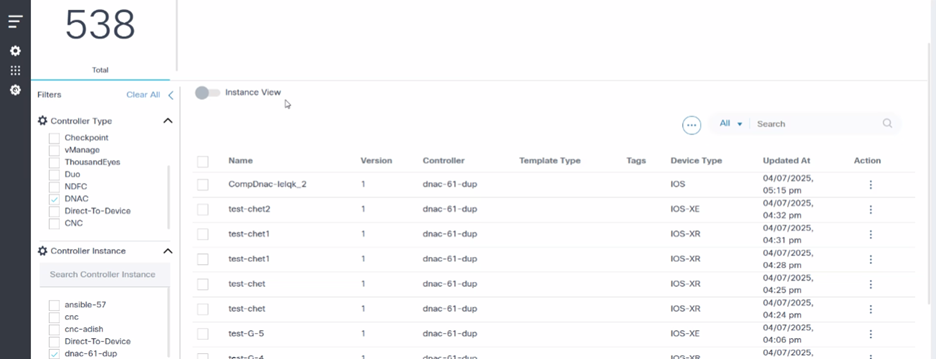
Instance View
The Instance View functionality provides a powerful mechanism to verify the consistency of the network configuration templates across multiple Cisco Catalyst Center deployments. It acts as an auditing and verification tool, allowing users to quickly identify discrepancies and ensure standardization of network configurations.
As network environments grow and become more distributed, managing configuration templates across multiple Cisco Catalyst Center instances (e.g., for different regions, staging versus production, or disaster recovery sites) becomes critical. The Instance View helps to:
- Maintain Standardization: Ensures that all regional or distributed Cisco Catalyst Center instances are using the same approved templates for critical network configurations (e.g.,security policies, QoS settings, standard device baselines)
- Detect Configuration Drift: Proactively identifies when a template on a targeted Cisco Catalyst Center has been inadvertently modified, is outdated, or is completely missing compared to the designated golden source
- Verify Deployments: Confirms that new or updated templates have been successfully propagated to all intended Cisco Catalyst Center instances after a promotion process (e.g., from stage to production)
- Simplify Auditing: Provides clear, actionable insights for compliance checks, demonstrating that the network adheres to defined configuration standards across all management points
- Streamline Troubleshooting: Allows quick idenification of regional configuration issues stemming from a template mismatch, saving valuable time in diagnosis
How it Works:
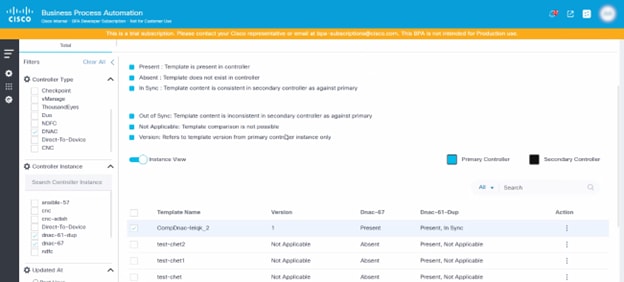
The Instance View performs a configuration comparison of templates using a designated primary controller (which is set during the initial controller onboarding or configuration) as the authoritative source. it then compares the templates present on this primary controller against those on other connected target controllers.
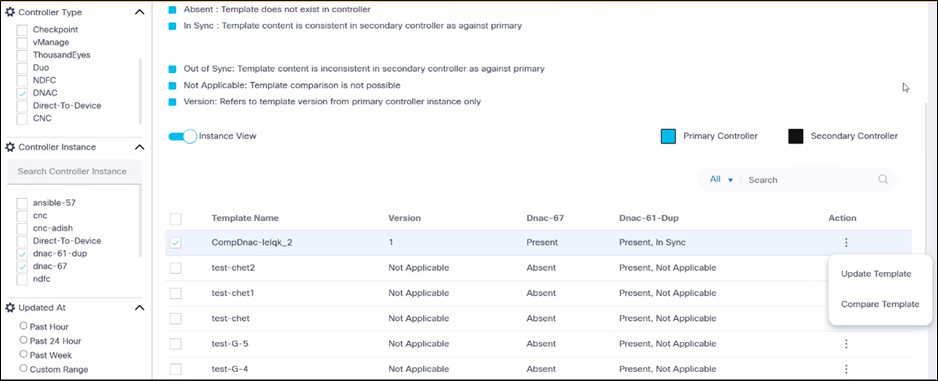
Understanding the Status:
For each template, the Instance View displays one of the following statuses, indicating its consistency relative to the primary controller:
- In Sync: The template on the target controller is identical in content and name of the template on the primary controller. This indicates perfect synchronization.
- Out Of Sync: A template with the same name exists on both the primary and target controllers, but their content differs. This highlights a potential configuration drift or an unapproved change on the target controller.
- Absent: The template exists on the primary controller but is missing from the target controller. This indicates that the target controller is not up-to-date with the standard template library.
- Not Applicable: Template comparison is not possible with the primary controller.
Key Considerations:
The accuracy and utility of the Instance View relies on the correct designation of the primary controller, as all comparisons are made relative to its template library. Ensure that the primary controller holds the most current and authoritative versions of the network configuration templates.
Activate the Instance View toggle on the Template Dashboard for Instance View.
The status of the campus template compared to the primary controller template is displayed above. There is one primary controller, and the rest are secondary controllers. If the template is present on the primary controller, then there are various statuses against the secondary controller. Users must first identify one controller as the primary controller; there can be only one primary controller.
The following two (2) actions are available:
- Compare: The primary controller template is compared to the secondary controller template. There is a drop-down list where the controller to compare can be selected.
- Update Template:
- Case 1: When clicking Update template, users are provided with an option to update the secondary controller template with respect to the primary controller template. Users can select multiple controllers, however only those controllers that do not have a template or a template that is out of sync can be selected. Once a template has been added, users can select Create or Update.
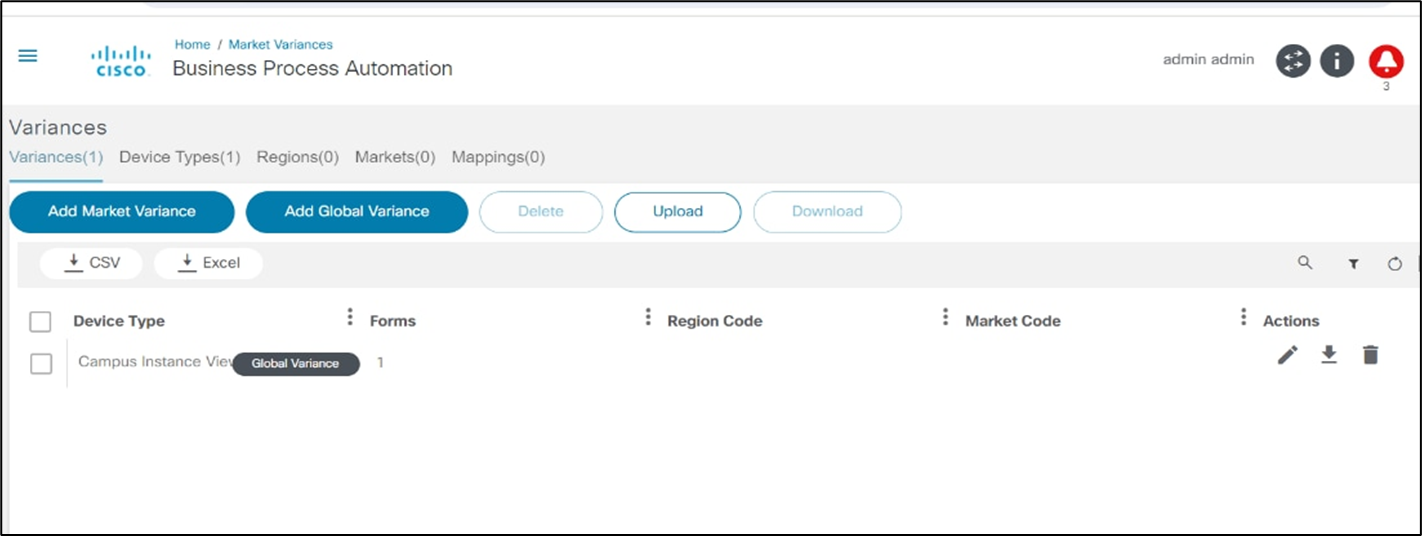
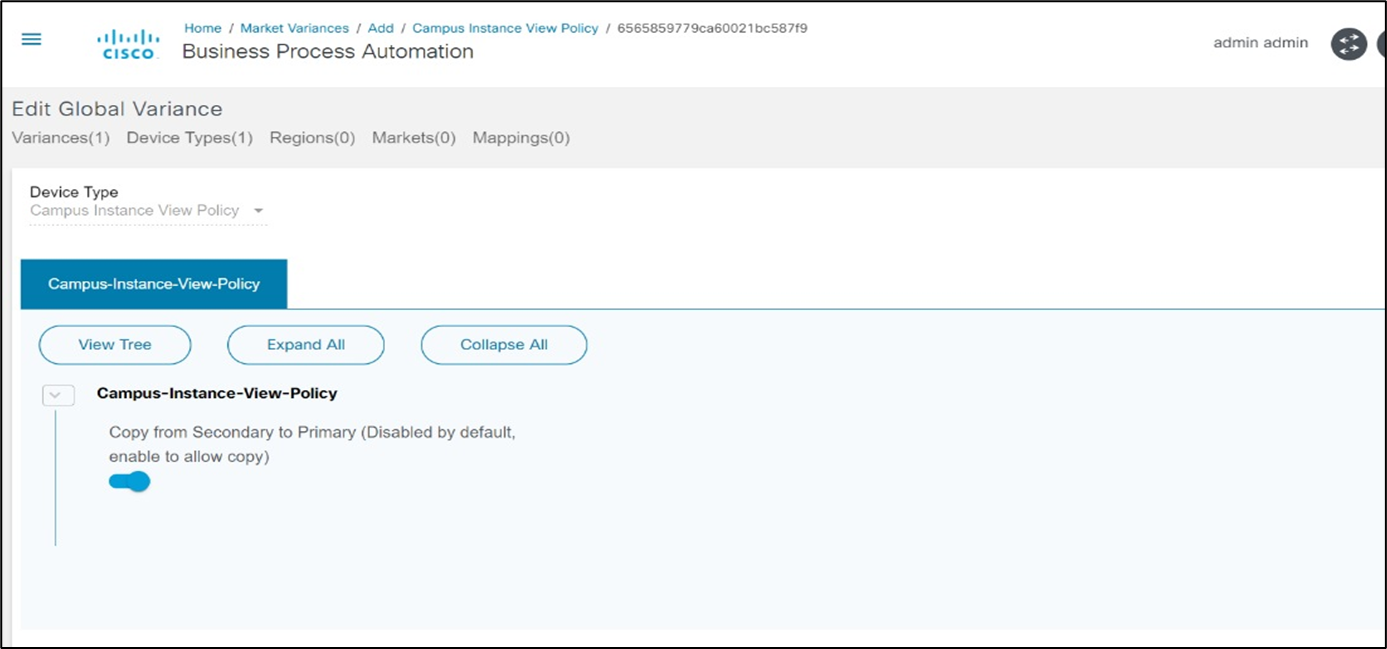
- Case 2: If a template is absent on the primary controller, users are provided with an option to create a template from the secondary controller to the primary controller. Users must set the permissions in the market variances in the “Campus Instance View Policy”. Once the permissions are set, the Update button is enabled for the secondary to primary controller.
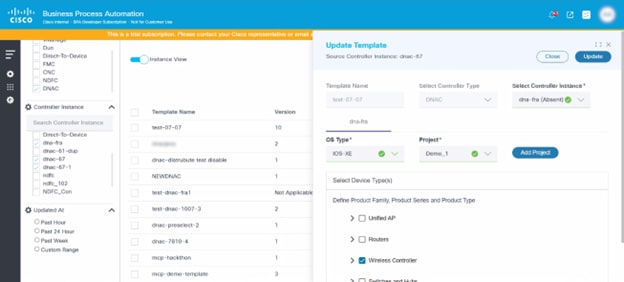
- Case 3: There is an option to create a project
through the GCT application. To create a project, click Add
Project. The Create Project window opens.
Revision History
| Revision | Publish Date | Comments |
|---|---|---|
1.0 |
24-Sep-2025
|
Initial Release |
 Feedback