BPA User Guide OS Upgrade v5.1
Available Languages
- Introduction
- Prerequisites
- Working with the
OS Upgrade Application
- Software Image Management
- Image Distribution Server Management
- Software Insights
- Software Conformance
- Prerequisites
- Creating EPLD Module Data in Reference Data Management Application
- Viewing and Managing the Software Conformance
- Creating Software Conformance Policies
- Executing Software Conformance Checks On-demand
- Scheduling the Execution of Software Conformance Checks
- Updating Software Conformance Policies
- Deleting Software Conformance Policies
- Viewing and Downloading Conformance Results
- Upgrade Policy
- Upgrade Jobs
- Settings
- Deployment Configuration
- Access Control
- Troubleshooting OS Upgrade Issues
Introduction
Business Process Automation’s (BPA) OS Upgrade application provides a comprehensive automation solution to perform software conformance and upgrades of network devices across different domains. It supports multiple domain controllers and provides a unified user experience. It supports both base Operating System (OS) upgrades and Software Maintenance Update (SMU) or RPM Package Manager (RPM) patch updates.
Key Capabilities
The OS Upgrade application provides the following key automation capabilities:
- Software Image Management: A centralized list of software images and their versions (from all vendors) for the software upgrade process to use
- Software Insights: Identifies software risks and vulnerabilities exposed to network assets and obtains insights on vendor-recommended software versions
- Software Conformance: Identifies all assets in the network whose software images must be upgraded
- Upgrade Method Of Procedure (MOP) Definition: Predefines the upgrade process along with pre- and post-checks for each vendor device model or family
- Upgrade Jobs: Schedules upgrades for non-conformant assets during maintenance windows across geo-regions, monitors the upgrade progress, and obtains detailed reports
End-to-End Flow
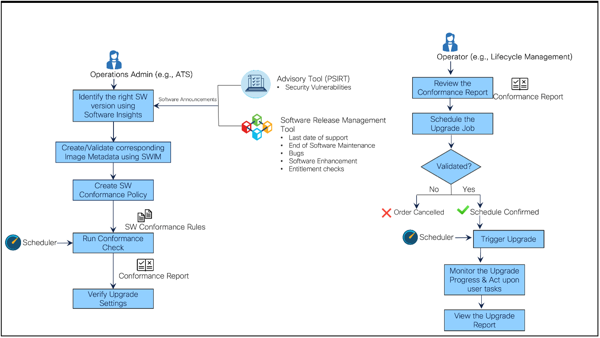
The figure above depicts the OS Upgrade application call flows for two different user personas: Operations Administrator and Network Operator, which comes Out-of-the-Box (OOB). Refer to Access Control for more information about OOB roles and corresponding permissions.
| Persona | Description | Workspace |
|---|---|---|
| Operations Administrator | Discovers software vulnerabilities (e.g., advisories, bugs, end-of-life bulletins) impacting network assets | BPA: OS Upgrade/Software image Management /Advisories |
| Operations Administrator | Identifies the impacted software version and impacted assets and determines the correct target version based on vendor-provided suggestions | BPA: OS Upgrade/Software Image Management/Insights |
| Operations Administrator | Creates the required software image metadata | BPA: OS Upgrade/Software Image Management/Software Images |
| Operations Administrator | Creates the intent for affected device models and executes the policy on-demand or upon the scheduled policy execution | BPA: OS Upgrade/Software conformance policy |
| Operations Administrator | Identifies the non-conformant or affected assets | BPA: OS Upgrade/Software conformance /View Results |
| Operations Administrator | Creates or modifies the upgrade policy as per the upgrade MOP; this includes predefining the pre- and post-checks, workflows for distribution or activation, traffic diversion or reversal, and rollback for single or multi-step upgrades | BPA: OS Upgrade/Upgrade Policy |
| Network Operator | Schedules a job to upgrade all non-conformant devices | BPA: OS Upgrade/Upgrade Jobs |
| Network Operator | Monitors the upgrade job progress | BPA: OS Upgrade/Upgrade Jobs/Job Details |
| Network Operator | Acts upon user tasks, if any, to sort out issues and enables the process to proceed to the next step | BPA: OS Upgrade/Upgrade Jobs/ Job Details |
Value Proposition
The following value-adds below are provided by the OS Upgrade application:
- An API -first approach for enabling easier service consumption from the Northbound Operations Support Systems (OSS) and Business Support Systems (BSS)
- Quick validation of network devices’ software conformance across networks managed by various domain controllers
- Operators have more control over upgrade jobs by using batching, queueing, and scheduling mechanisms
- Upgrade jobs can be created early for reviews and executed later
- A queueing mechanism that enables faster, better throughput with minimal to zero failures
- Pre-upgrade automatic configuration backups, enabling seamless restorations in case of failures
- Pre- and post-check executions, ensuring upgrades are successful without service disruptions
- A policy-driven approach that provides the flexibility to predefine the upgrade MOP with pre- and post-validation checks, distribution or activation, traffic diversion or reversal, and rollback processes, allowing them to be customized as required
Supported Controllers and Device Platforms
The following platforms have been validated in BPA and are supported OOB. However, the framework is generic and can be extended to new platforms. OOB support for additional platforms will be provided in future releases based on priority.
| Domain Controller(s) | Device Platforms |
|---|---|
| Cisco Catalyst Center v2.3.7.5-70434 | - Cisco IOS, Cisco IOS-XE |
| vManage v20.12.4 | - Cisco IOS, Cisco IOS-XE Note: Devices must be v17.9.x or above for remote server distribution to work |
| Nexus Dashboard Fabric Controller (NDFC) v12.1.2e and v12.2.2 | - Cisco-NXOS (N9k) |
| Firewall Management Center (FMC) v7.4.1 | - Firepower 3140 |
| Network Services Orchestrator (NSO) v6.3 | - Cisco-IOSXR (NCS540, NCS560, ASR9K) - Cisco-NXOS (N9K) Note: NX-OS NED v5.25.17 or above is required |
| Cross Network Controller (CNC) v6.0 | - Cisco-IOSXR (NCS540, ASR9K) |
| ANSIBLE v2.9.18 (AWX - 17.1.0) | - Cisco-IOSXR (NCS540, ASR9K) |
| Direct-to-Device (via Teletype Network (Telnet) and Secure Shell (SSH)) | - Cisco-IOSXR (NCS540, ASR9K) |
New Features
For incremental features made available for the OS Upgrade use case for this release, refer to the BPA Release Notes.
Prerequisites
The following prerequisite conditions must be met before using the OS Upgrade application:
- OS Upgrade, Backup and Restore, Scheduler services, and all required platform services or controller agent services are up and running
- Required artifacts (e.g., workflows, process templates, default upgrade policies etc.) are loaded
- Required controllers are added and devices are synchronized successfully; refer to Supported Controllers and Device Platforms for more information
Working with the OS Upgrade Application
The OS Upgrade application is comprised of the following components:
- Software Image Management (SWIM)
- Image Distribution Server Management
- Software Insights
- Software Conformance
- Upgrade Policy
- Upgrade Jobs
- Settings
Software Image Management
The SWIM component allows Operations users to maintain software image details for controllers like NSO, ANSIBLE, CNC, FMC, and Direct-to-Device which do not have OOB image management support. It also lists the software image details maintained by controllers like vManage, NDFC, and Cisco Catalyst Center, providing a centralized list of software maintained across all domain controllers. Software images and the image distribution server are the two main sub-components within the SWIM module.
Software Images
To access the Software Images page:
- Log in to BPA with credentials that have access to Software Image Management.
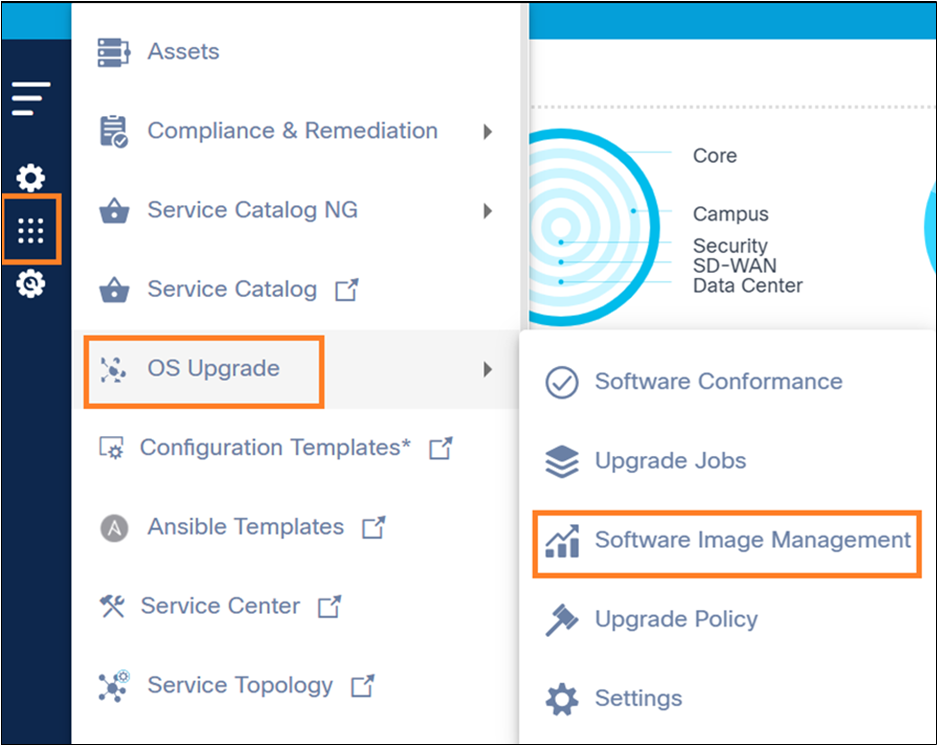
- Select OS Upgrade > Software Image Management.
The Image Management page displays the following tabs: Software Images, Image Distribution Server, Advisories, and Insights.
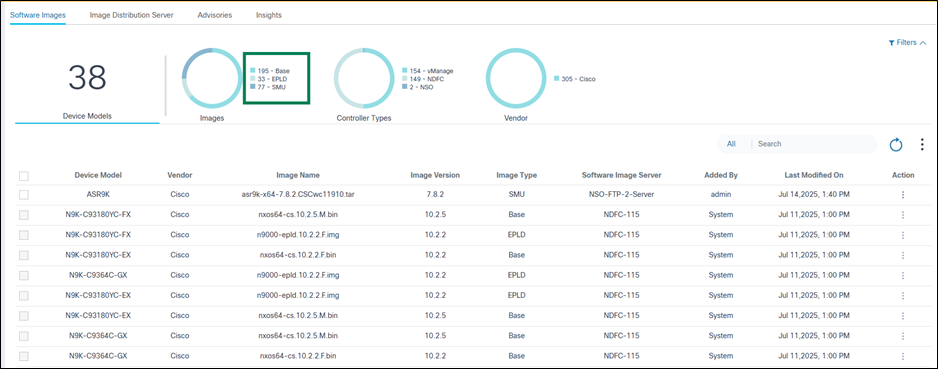
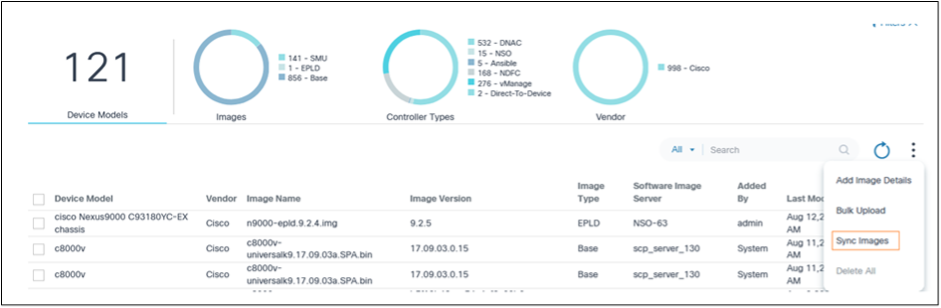
The Software Images tab contains the following:
- An analytics section, displayed at the top, that provides the
following:
- The total number of device models and associated software images
- An Images quick filter which allows filtering images based on type (e.g., base, SMU); the number indicates the total number of images associated with a respective image type
- A Controller Types quick filter that allows filtering images based on controller type (e.g., Cisco Catalyst Center, vManage, NSO or NDFC, Direct-to-Device, CNC, ANSIBLE, FMC) for which the images are hosted; the number indicates the total number of images associated with a respective controller type
- A Vendor quick filter which allows filtering images based on the vendor that published the software
- The More Options icon provides
the following functionalities:
- Add Image Details: Add new image metadata
- Bulk Upload: Bulk upload image metadata in .csv format
- Sync Images: Sync image metadata from controllers (e.g., Cisco Catalyst Center, vManage, NDFC, and FMC)
- Delete All: Bulk deletion of selected images
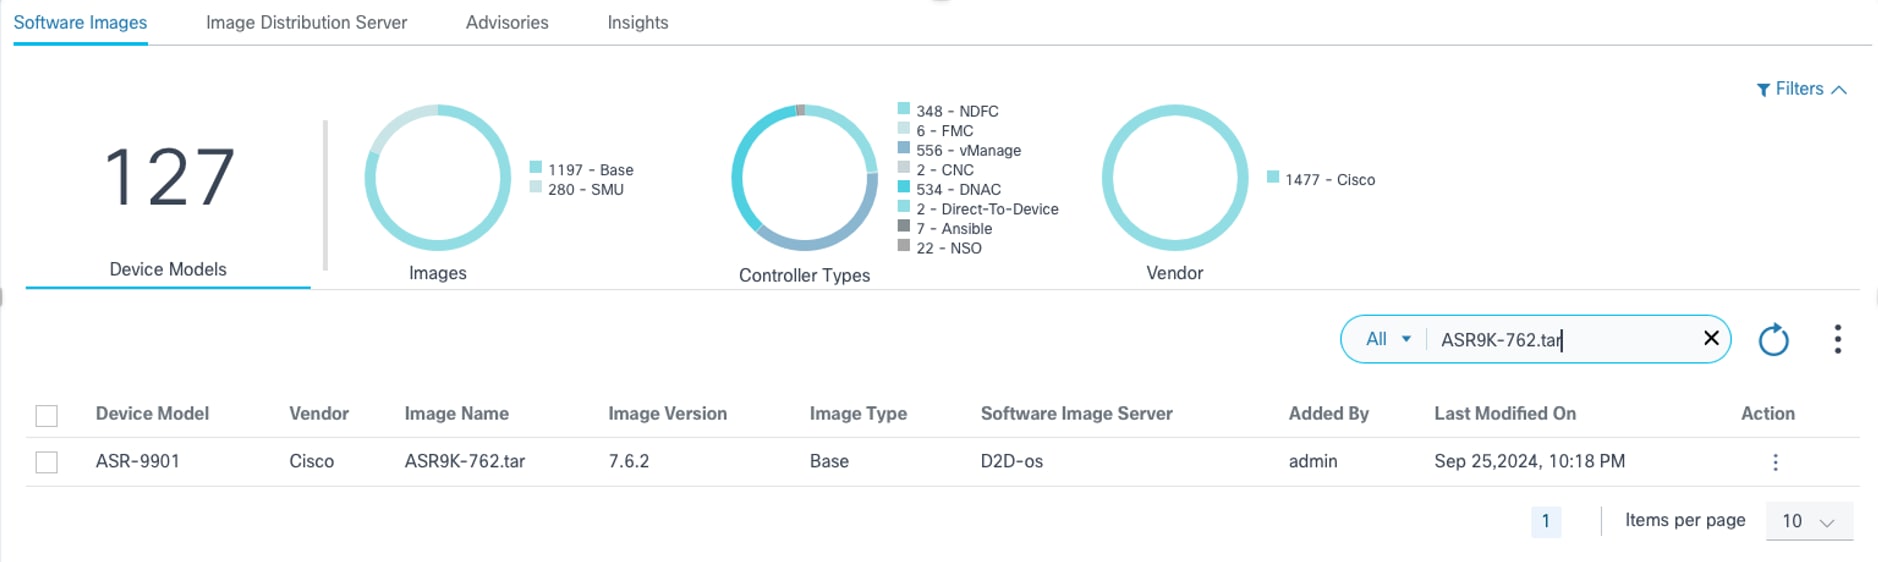
- The Search filter can be used for searching
images and includes the following exclusive search filters:
- All: Search across all fields
- Image Name: Search for the images with a specific image name
- Device Model: Search for the images with a specified model
- Image Version: Search for images with a specific software version
- Software Image Server: Search for the images associated with a specific image server
- The Refresh icon refreshes the page and clears selected filters.
- Existing images are displayed in a grid table with the following
columns:
- Device Model: Device model for which the image details are applicable
- Vendor: Vendor that publishes the software images
- Image Name: File name of the image
- Image Version: Software version of the image
- Image Type: Determines the image type (e.g., base, SMU, Electronic Programmable Logic Device (EPLD))
- Software Image Server: Image server where the current image exists
- Added By: User who added the image metadata
- Last Modified On: Timestamp of the last image details update
- Action: Provides a More Options icon from which row-specific actions (e.g., edit, delete) can be selected
- Sort images by clicking on a respective column header
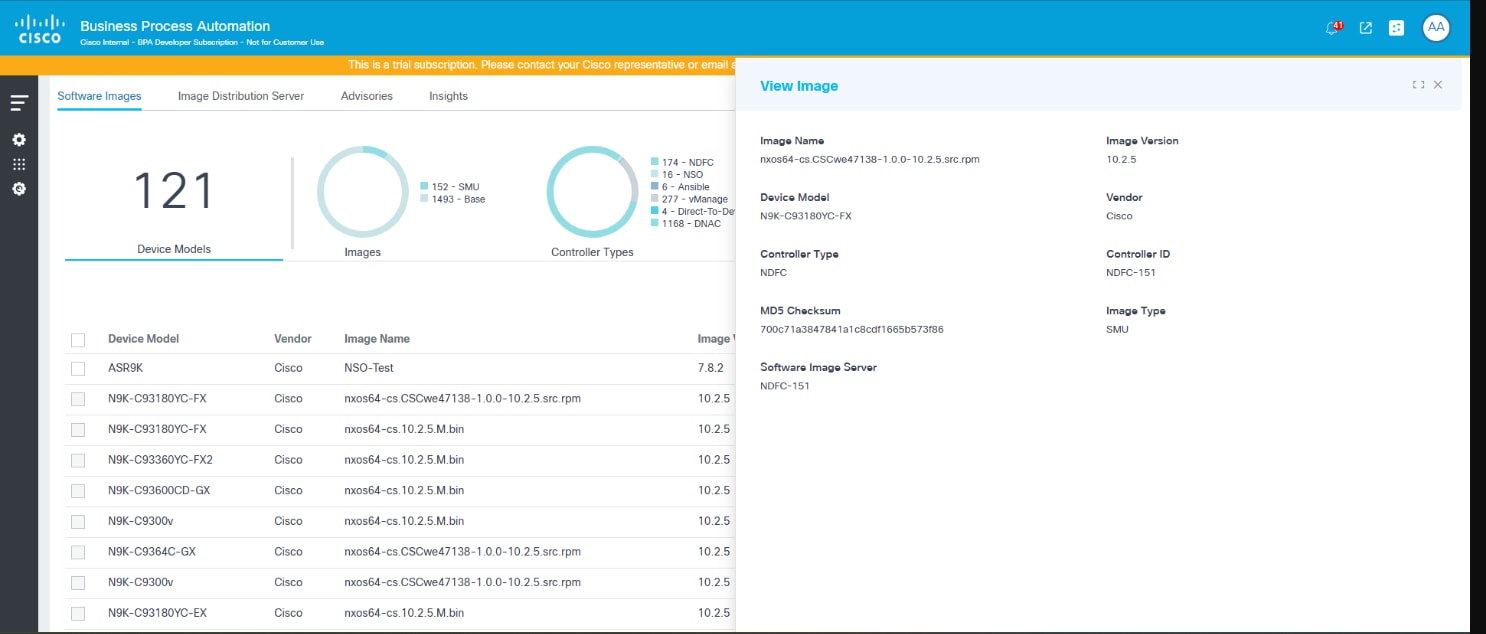
- Clicking a row opens the View Image window
Syncing Software Images Metadata
To perform on-demand synchronization of software images:
- Select the More Options icon > Sync Images. The image metadata details from vManage, Cisco Catalyst Center, NDFC, and FMC are discovered and persisted in BPA.
- If the image name from the FMC controller includes the word “FTD” or “Firepower Threat_Defense”, then the deviceModel for that image is mapped as FTD.
OR
If the image name from the FMC controller includes the word “FMC”, “FW_Mgmt_Center”, or “Firewall_Management_Center”, then the deviceModel for that image is mapped as FMC.
- Images from vManage remote servers initially have the Universally Unique Identifier (UUID) mapped in the Version column after the sync operation. Operators must manually edit the required remote server metadata and update it with the appropriate image version. If this mapping is not done, then other OS Upgrade components (e.g., software conformance, upgrade policies, upgrade jobs etc.) do not work as expected.
- To schedule automatic SWIM meta data sync at regular intervals, refer to Deployment Configuration.
Adding Software Image Metadata
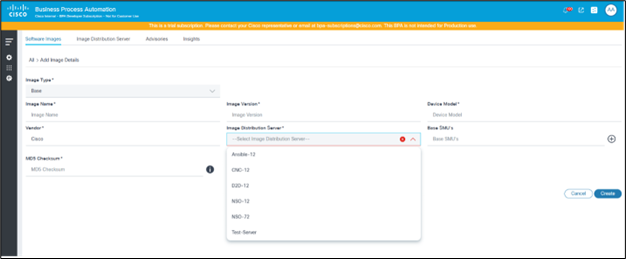
- Select the More Options icon > Add Image Details. The Add Image Details page displays.

- Enter information in the following fields:
- Image Type: The image type (e.g., base, SMU, EPLD)
- Image Name: Name of the image file; users can enter either a relative or absolute path of the image in the Name field. If users provide an absolute path, the image is fetched directly from that path; if users provide a relative path, the system resolves the full path by adding the base path defined in the repository server during distribution
- Image Version: Software version of the image
- Device Model: The device model for which the image is getting tagged
- Vendor: The vendor or provider that published the image; the default is Cisco, but this can be changed as needed
- Image Distribution Server: Select the image distribution server which hosts the software file indicated in the Image Name field. Upon selecting an image distribution server, images are generated for all controller IDs associated with the specified controller type defined within the image distribution server. If a user adds or removes controller instances under the image distribution server, the corresponding software images are added or removed for those controller instances.
- Base SMU’s: SMU’s which are present in the base golden image; this option is only applicable if the image type is Base
- MD5 Checksum: Image MD5 checksum for verification
- Click Create. The Progress notification displays followed by a confirmation message.
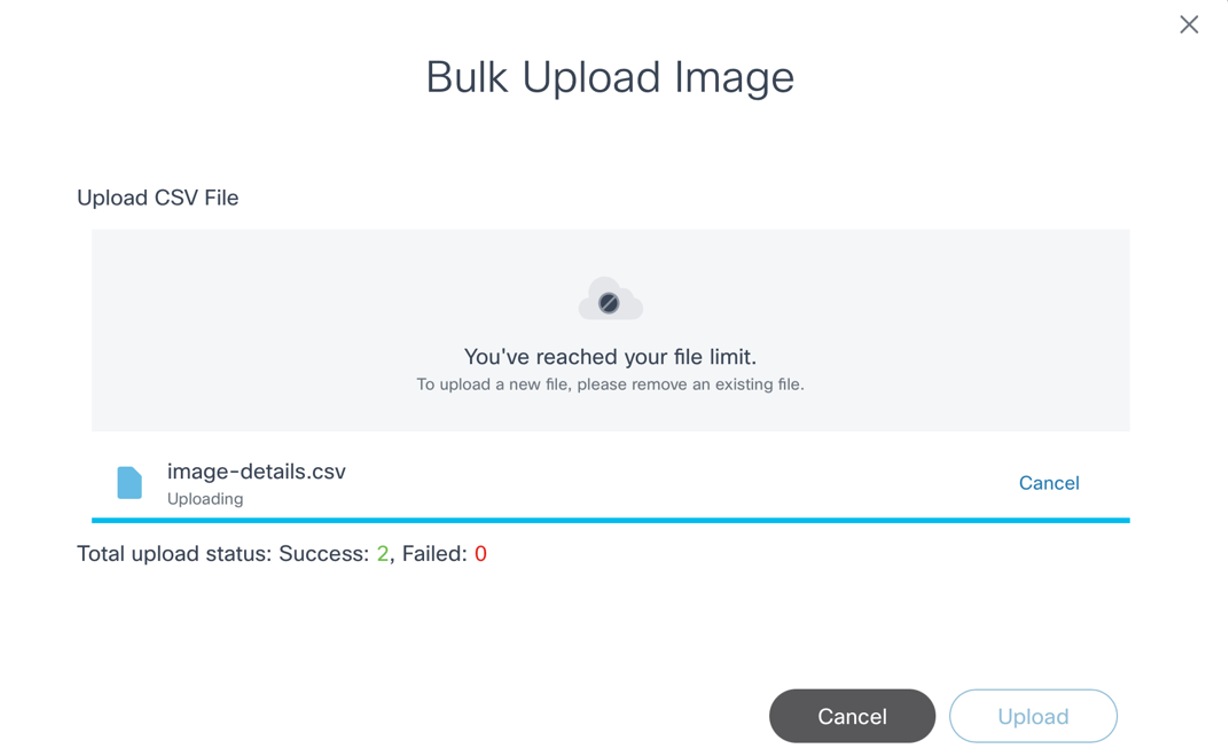
Bulk Uploading Software Image Metadata

- Prepare a .csv file with the necessary image details and the following column names:
- Image Name
- Version
- Device Model
- Vendor
- Image Type
- Image Distribution Server
- MD5 Checksum
- Select the More Options icon > Bulk Upload. The Bulk Upload Image window opens.
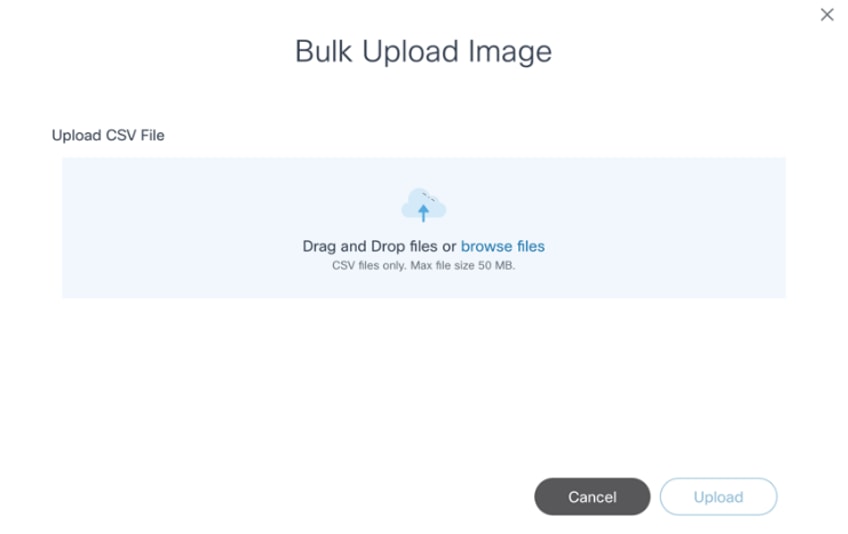
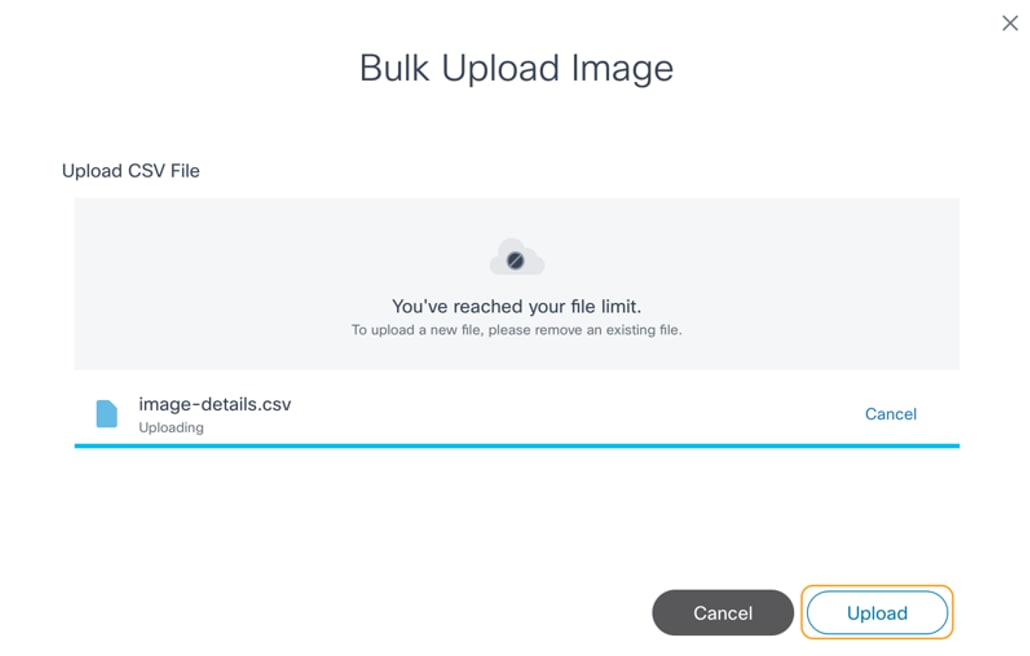
- Select a prepared .csv file and click Upload. Image details from the .csv are validated and then processed. Once the file is uploaded, the final bulk upload status displays.
Editing Existing Software Image Metadata
- Locate the image which needs to be updated using the Search filter.
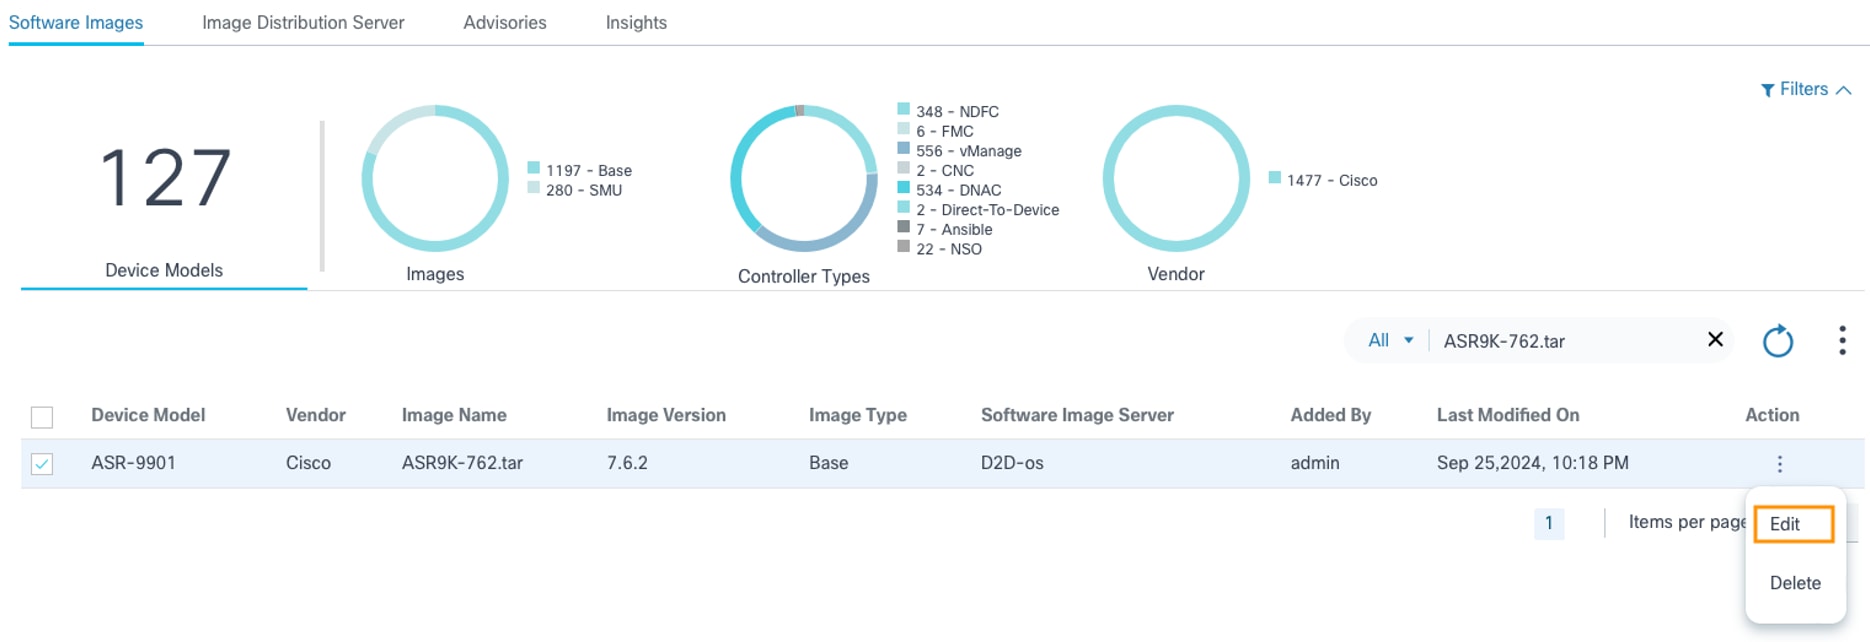
- From the Action column of the desired image, select the More Options icon > Edit.
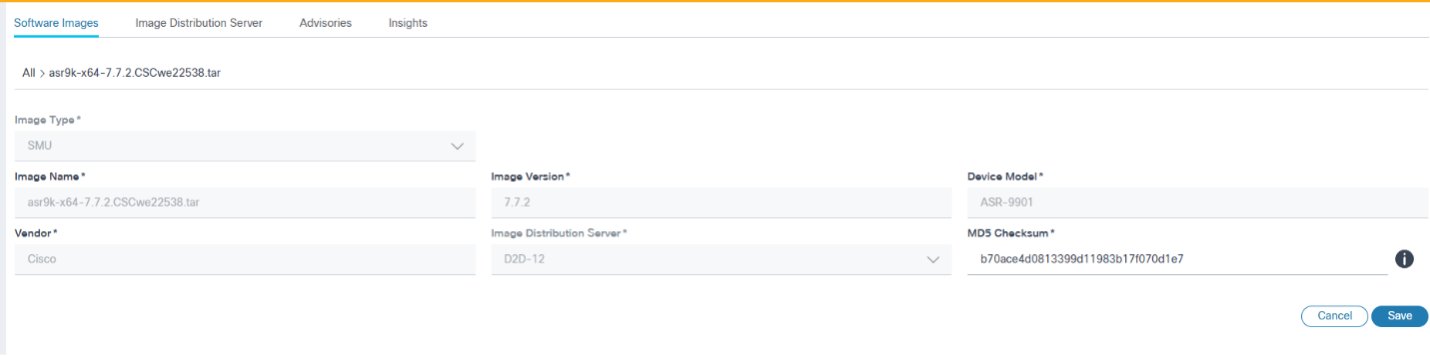
- Update the required parameters and click Save to save the changes or click Cancel to discard the changes. Progress notification displays followed by a confirmation message for the image update.
- Editing is available for CNC, NSO, D2D, ANSIBLE, FMC and vManage controllers (only applicable for remote server image metadata)
- Updating the device model is only supported for vManage remote server images
- Only the Software Version field can be updated for vManage remote server image metadata
- For vManage images, users can view the software image server in place of controller instances
Deleting Software Image Metadata
Search in Software Image Metadata
- Use the Search field to locate a desired image.
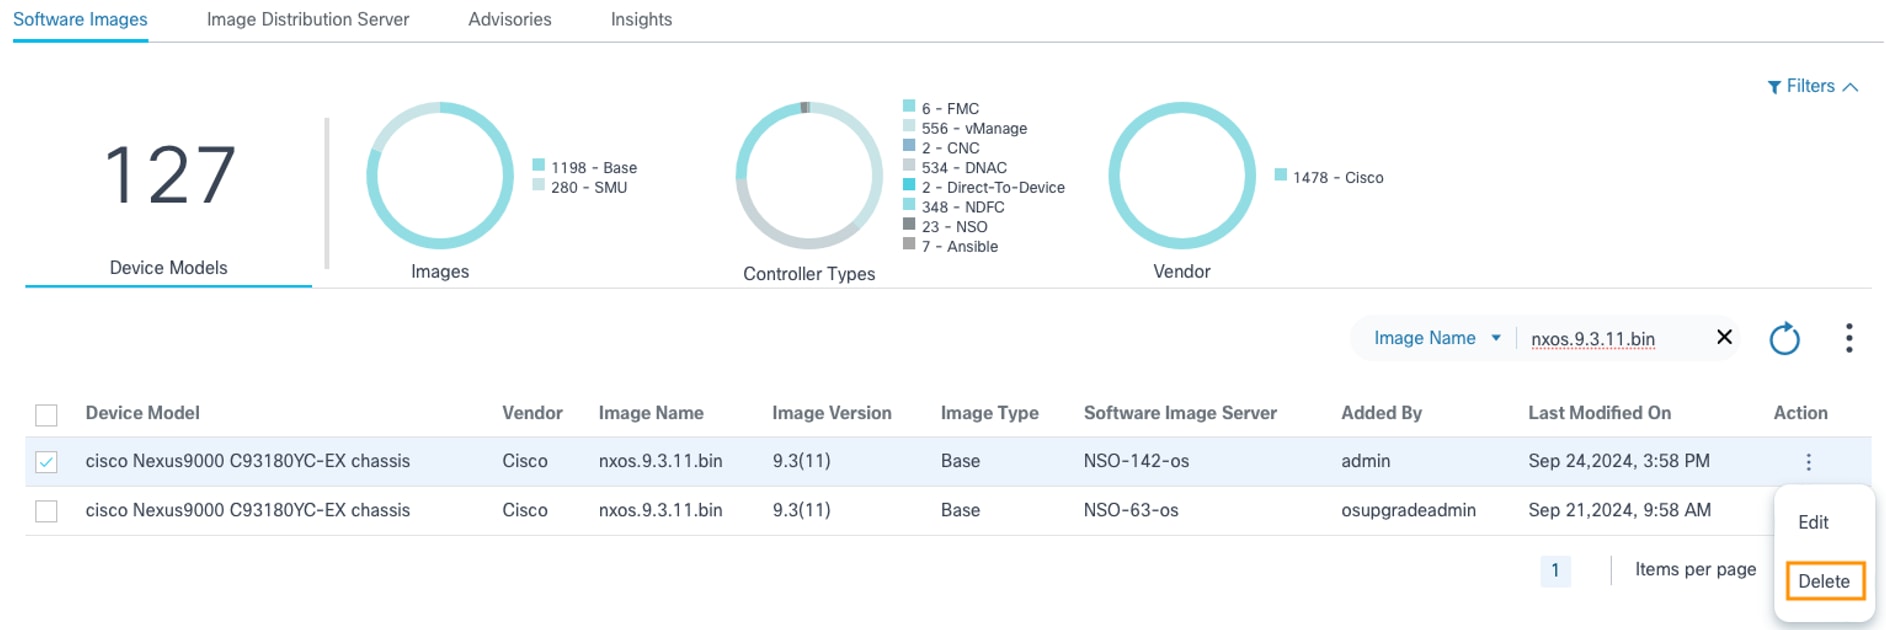
- From the Action column of the desired image, select the More Options icon > Delete to delete an image.
OR
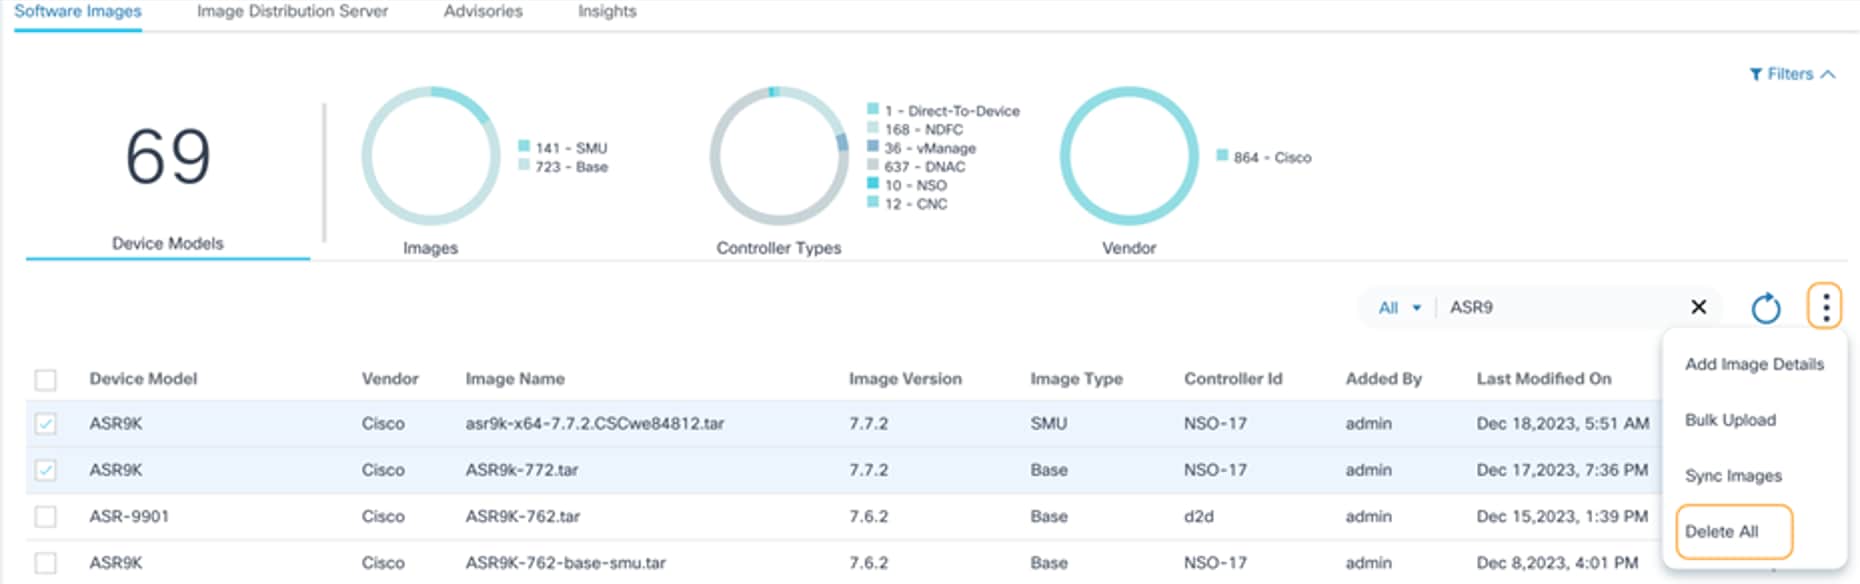
Select the desired images and select the More Options icon > Delete All to delete multiple images.
A confirmation displays.
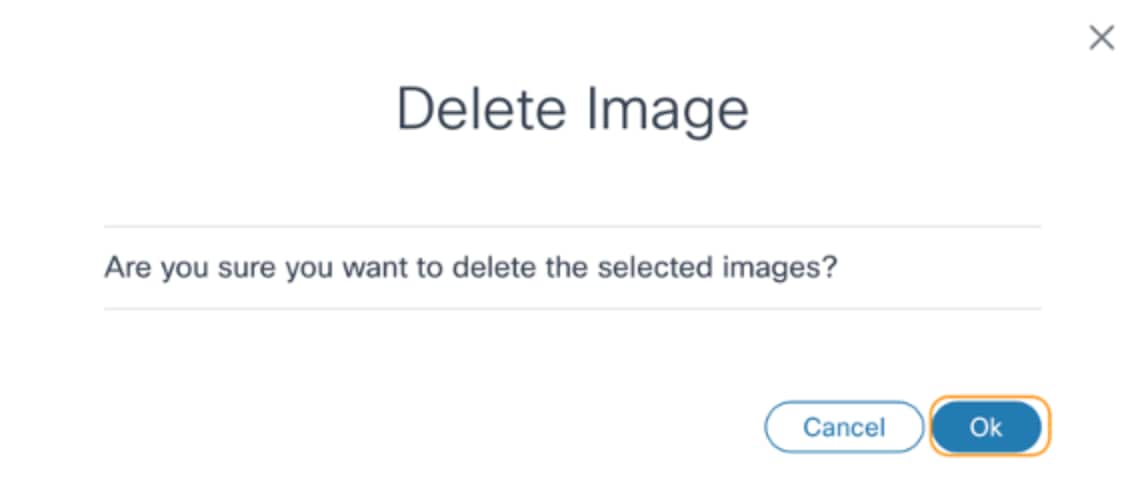
- Click Ok. A progress notification displays followed by a confirmation message.
- Image metadata can only be added for NSO, ANSIBLE, Direct-to-Device, and CNC controllers. For all other enterprise controllers, built-in SWIM capability is leveraged, and images are discovered from respective controllers
- Image discovery capability is not supported for NSO, ANSIBLE, Direct-to-Device, and CNC controllers’ image servers.
- By default, vManage remote server image metadata contains UUID for version parameter post-sync. Users must edit the metadata and update the UUID with the corresponding version. The corresponding image version can be identified from either the vManage controller or by logging into the device where the image exists.
Image Distribution Server Management
Image Distribution Server
The component allows Operations users to maintain image repository server details for CNC, NSO, ANSIBLE, FMC, and Direct-To-Device controllers which do not have OOB image repository management support.
To access the Image Distribution Server page:
- Log in to BPA with credentials that have manage access to the Image Distribution Server.
- Select OS Upgrade > Software Image Management.
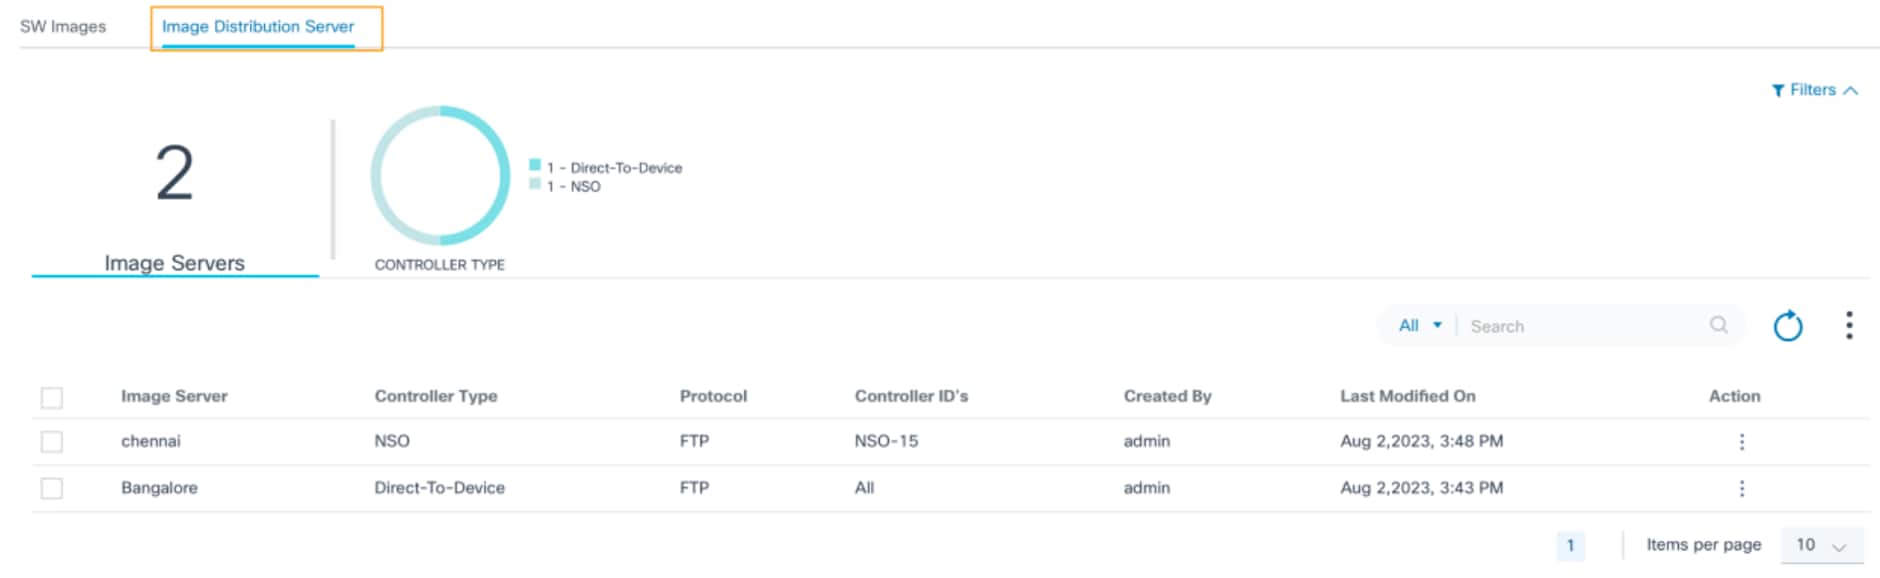
- Click the Image Distribution Server tab.
The Image Distribution Server tab contains the following:
- An analytics section, displayed at the top, that provides the
following:
- The total number of image servers onboarded on this BPA instance
- A Controller Type quick filter which allows filtering image servers based on the controller type (e.g., NSO, Direct-to-Device, CNC, ANSIBLE, FMC); the number indicates the total number of image distribution servers associated to that controller type
- A More Options icon which provides the following
functionalities:
- Add Image Server: Add new image distribution server
- Delete All: Bulk delete of selected distribution servers
- A Search filter which can be used for searching
the distribution servers and includes the following exclusive search
filters:
- All: Searches across all fields
- Image Server: Searches for servers with a specific server name
- Controller ID: Searches for servers associated with a specific controller ID
- A Refresh icon which can be used to refresh the page and clear selected filters
- Existing distribution servers are displayed in a grid table with following columns:
- Image Server: Unique name of
the repository server
- Controller Type: Controller type which this image server is applicable to
- Protocol: Copy protocol supported by the repository server
- Controller IDs: Controller instances for which the current repository server is usable or applicable; controller instance refers to the devices managed through that controller
- Created By: The user who onboarded the repository server
- Last Modified On: Timestamp of when the server details were last updated
- Action: Provides row-specific actions such as Edit and Delete
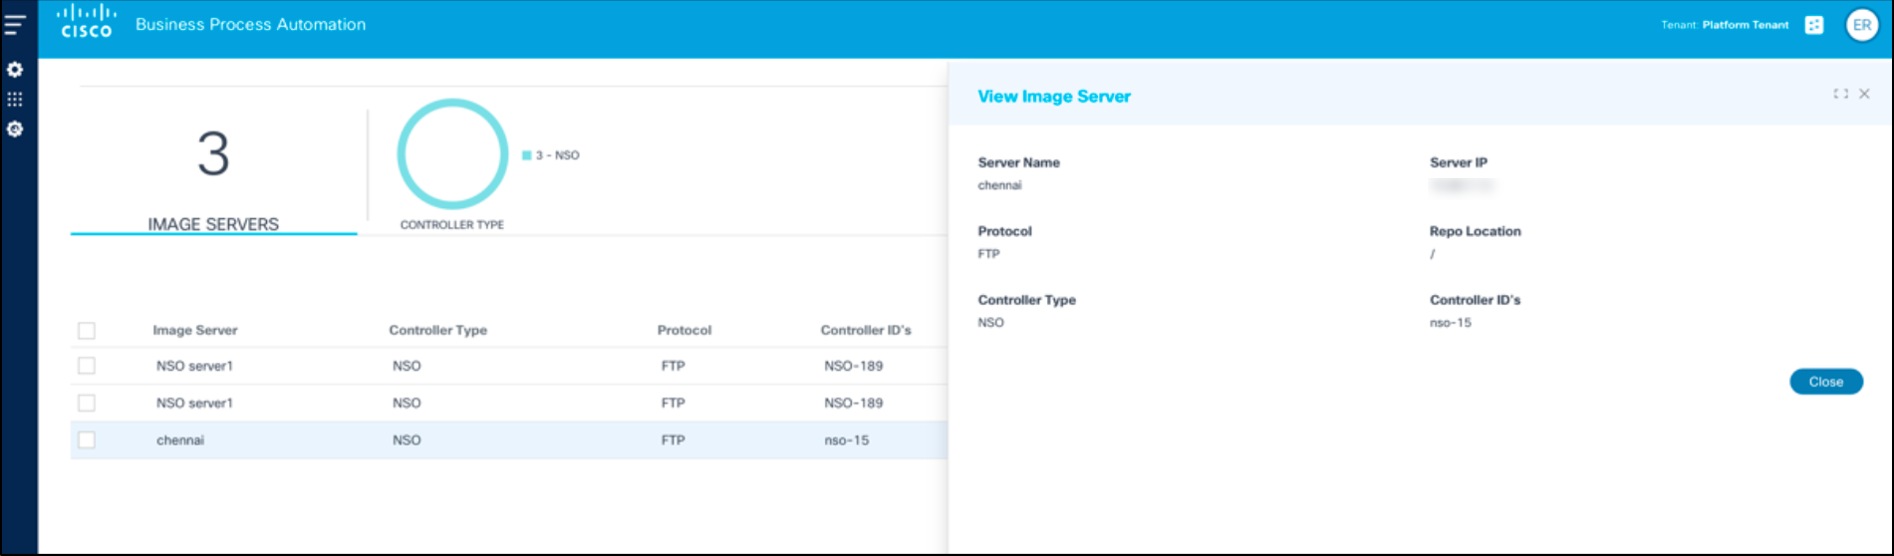
- Clicking a row opens the View Image Server window
Adding Image Server Details
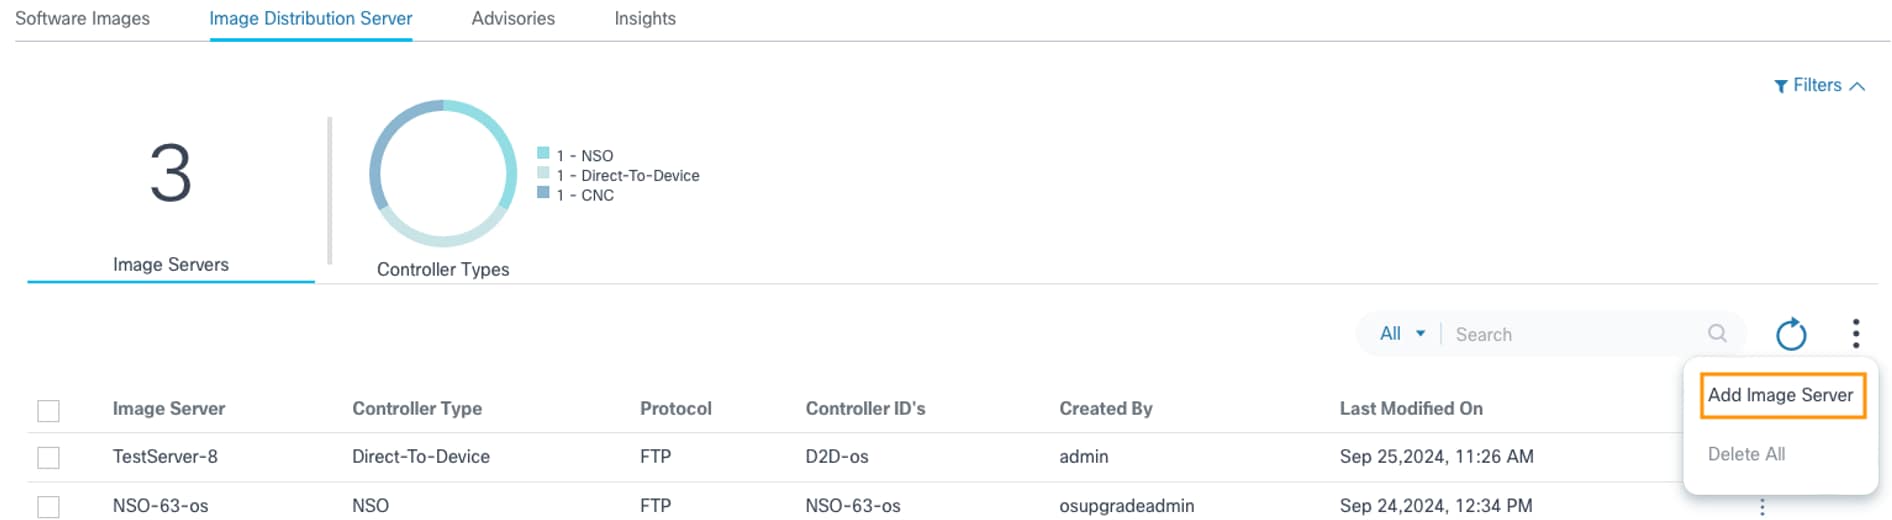
- Select the More Options icon > Add Image Server. The Add Image Server page displays.
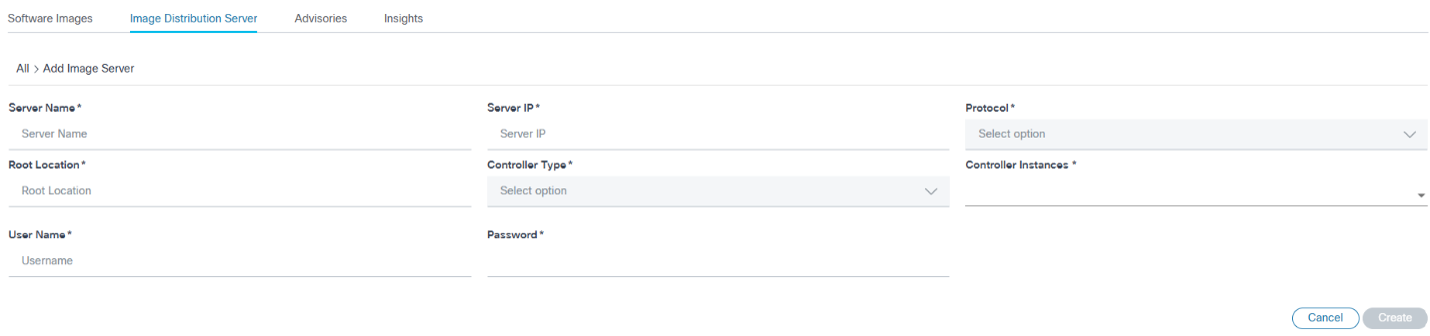
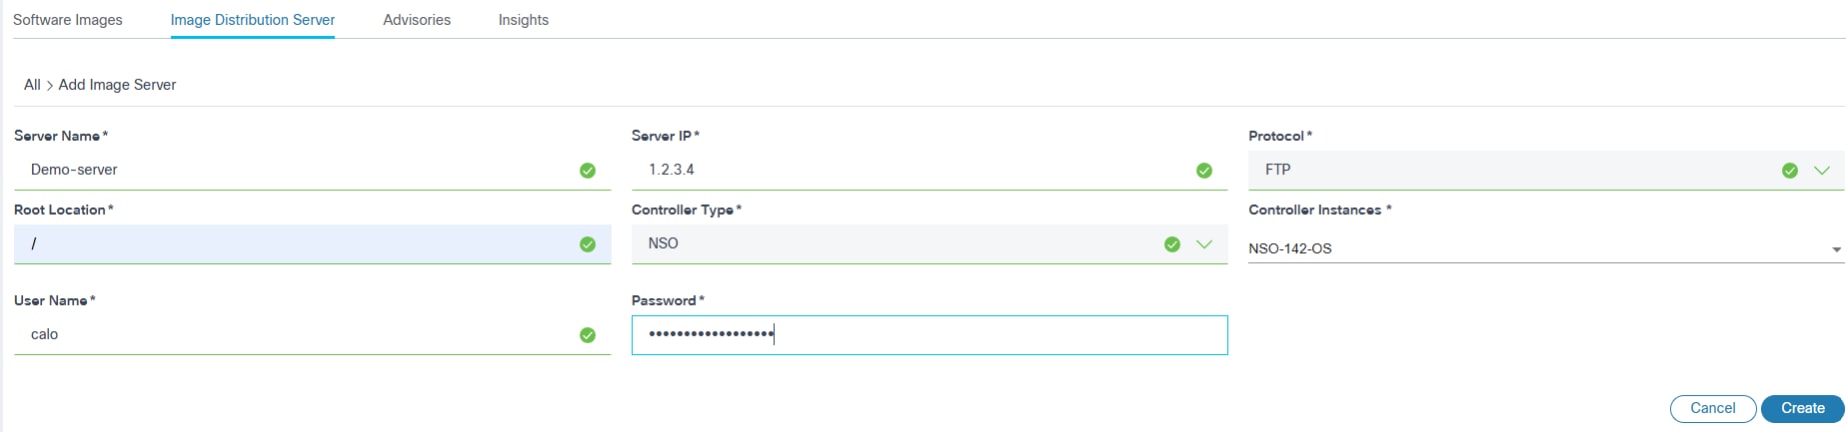
- Enter information in the following fields:
- Server Name: Unique name for the image repository server
- Server IP: IPv4 address of the repository server
- Protocol: Supported by the image repository server for the image copy
- Repo Location: Base path of the image files in repository server
- Controller Type: Controller type for which the current image server is applicable
- Controller Instances: One or more applicable controller instances based on the devices they manage for which the given image repository server should be used for copying the image
- User: Custom credentials to be used for accessing the image files from the repository
- Click Create. The progress notification displays followed by a confirmation message.
Editing Image Server Details
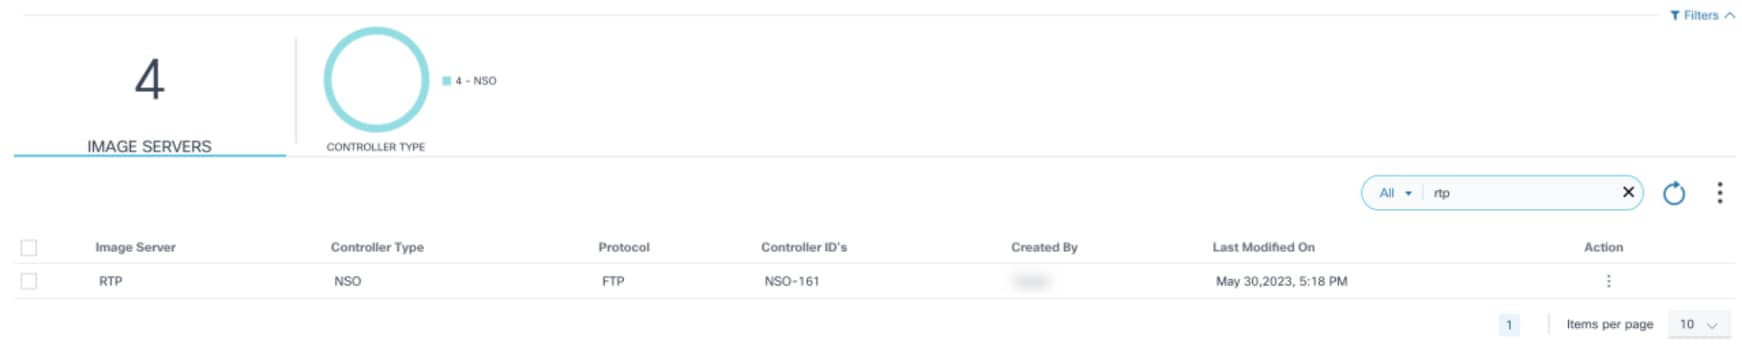
- Using the Search field, locate the distribution server which needs to be updated.
- From the Action column, select the More Options icon > Edit.
- Update the required parameters.
- Click Save. Progress notification displays followed by a confirmation message.
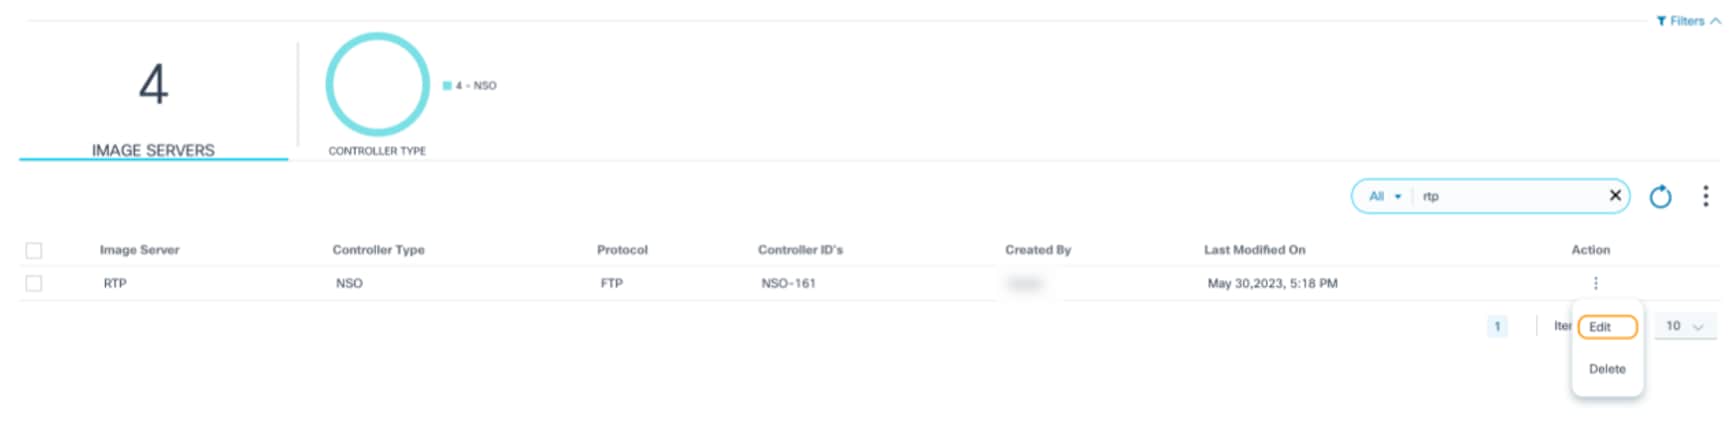
Deleting Image Server Details
- Using the Search filter, locate the desired server(s).
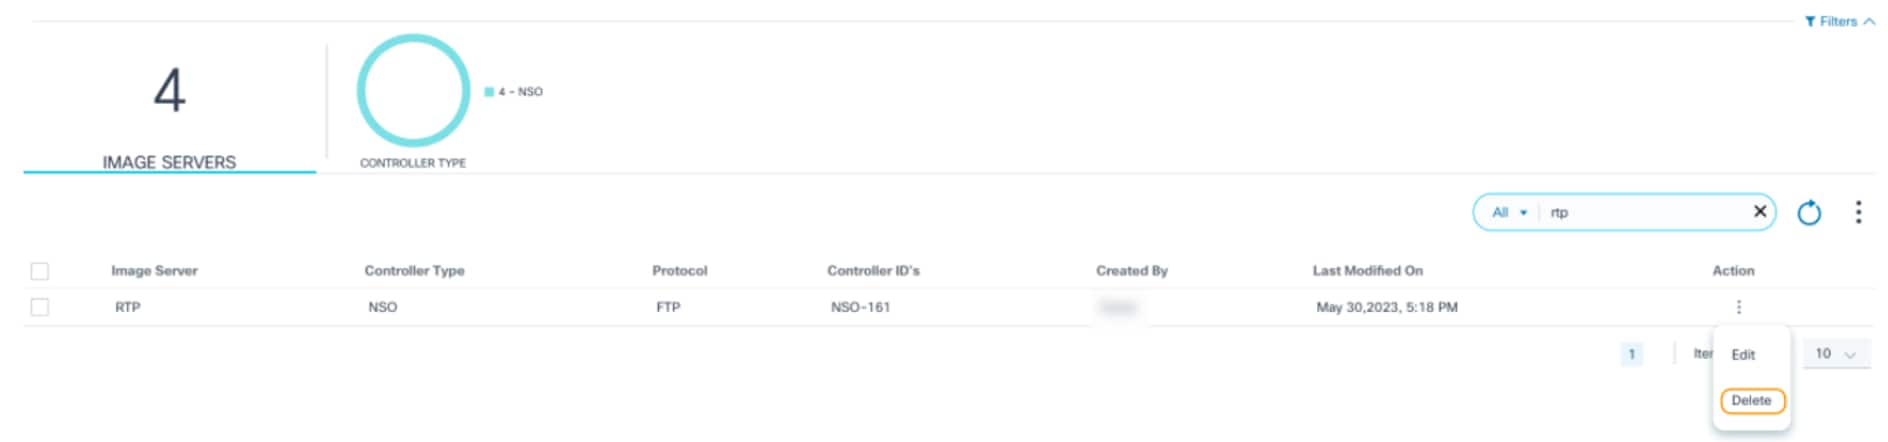
- From the Action column, select the More Options icon > Delete to delete a single distribution server.
OR
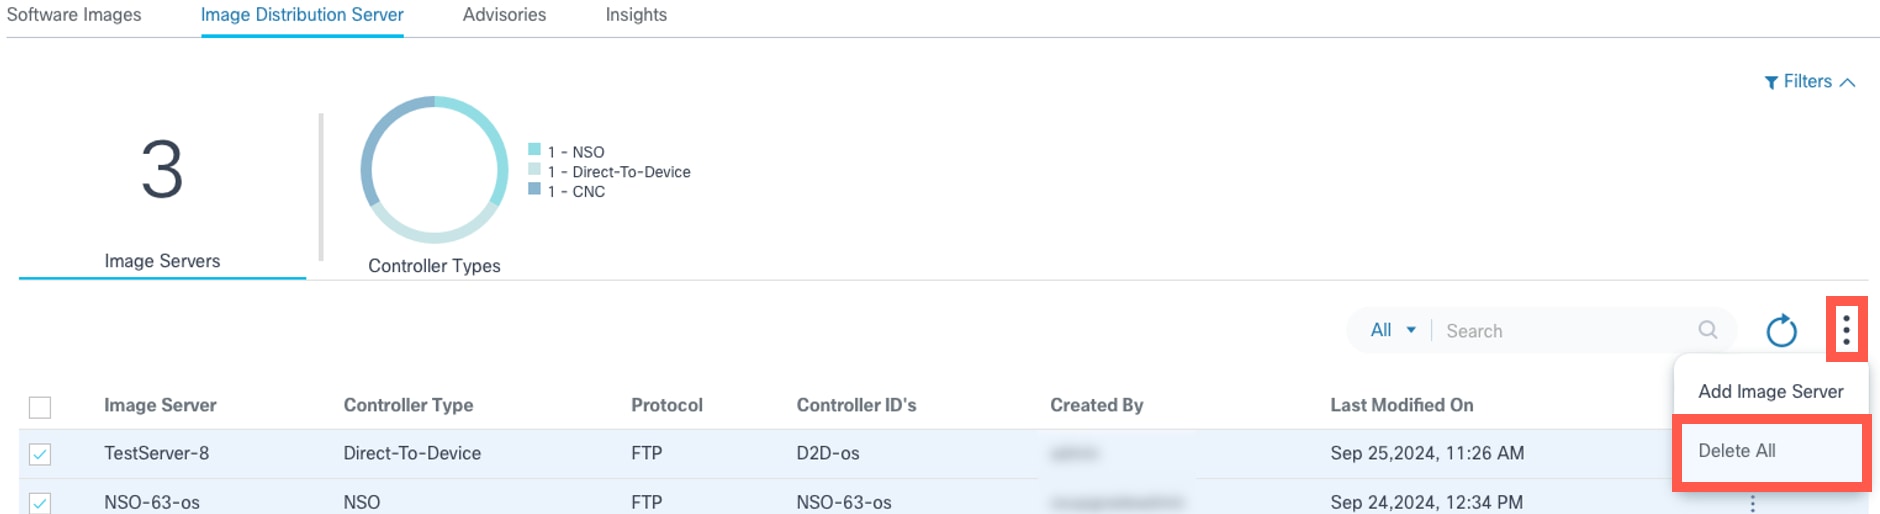
Select the desired servers and select the More Options icon > Delete All to delete multiple distribution servers.
A confirmation displays.

- Click Ok. Progress notifications display followed by a confirmation message.
Software Insights
Software Insights discovers all security vulnerabilities, such as security advisories, bugs, and software end-of-life exposed by the network assets. It also provides software suggestions for the device models managed by Cisco Catalyst Center and NDFC controllers. It allows Administrator users to select the suggested software version for network assets and creates a conformance policy for the device models if the suggestion is available.
Prerequisites
- Enable the Adapter for insights. The Adapter for the Cisco insights server, named “Cisco-Insights-Adapter”, is available OOB. To integrate with some external third-party Insights servers, corresponding Adapters need to be built. Refer to Configuring Insights Adapter in the BPA Developer Guide for more information.
- Internet connectivity is required for the BPA system to connect to the Cisco cloud.
- Verify that the client_id and client_secret are in the Adapter configuration before proceeding with the sync operation.
- If required, proxy for the internet can be configured by following the steps below.
- For IOS-XR OS Type, custom device series-to-model mapping can be done in Reference Data Management (RefD) as required. For more information about custom series-to-model mapping, refer to the BPA Developer Guide.
- BPA Kubernetes Pods require internet access to gather the advisories, bugs, and end-of-life details from Cisco. If the BPA network does not have direct internet access, but is available via proxy, use the steps below to make Kubernetes Pods use the proxy for internet.
- Update the script with actual proxy address in place of <<http://proxy-domain.com:port>>.
- Configure the environment parameters against each pod in the deployment YAML or helm charts.
- Execute the below script in the Kubernetes node by adding all the deployment names in the NO_PROXY or no_proxy configuration.
#!/bin/bash
# Define the environment variables
HTTP_PROXY=”<<http://proxy-domain.com:port>>”
HTTPS_PROXY=”<< http://proxy-domain.com:port>>”
http_proxy=”<<http://proxy-domain.com:port>>”
https_proxy=”<<http://proxy-domain.com:port>>”

NO_PROXY="*.svc,localhost,127.0.0.1,192.168.0.0/16,10.0.0.0/8,172.16 .0.0/12,adaptor-builder,agent-manager-service,ansible-agentservice,artifacts,auth-service,backup-restoreservice,cadvisor,camunda,camunda-external-tasks-service,camundascript-external-tasks-service,checkpoint-agent-service,cicdservice,cmd-analyzer,cnc-agent-service,command-templatesservice,compliance-remediation-service,core-services,d2d-agentservice,dashboard-metrics-scraper,dcnm-agent-service,deviceactivation,device-manager-service,dnac-agent-service,duo-agentservice,dynamic-actions,elk,elk-public,event-handlerms,grafana,ingesterservice,kafka,kafka1,kafka2,kafka3,kong,kubernetes-dashboard,marketvariance,milestones-ms,mongodb-arb,mongodb1,mongodb2,ndfc-agentservice,nfv,nfv-app-event-listener,nfv-managerservice,nginxexporter,nodeexporter,nso-agent-service,osupgradems,osupgrade-nxtgen-service,perimeter-security,policy-resolverservice,portal,portalinternal,postgresdb,postgresdb1,postgresdb2,postgresdb3,prometheus,p rometheusexporter,sase-service,scheduler-service,script-runnerhelper-service,script-runner-service,service-catalog-ms,snmptrap,template-manager-service,thousandeyes-agent-service,tmfconnector,umbrella-agent-service,vmanage-agentservice,zookeeper1,zookeeper2,zookeeper3,zookeeper4,zookeeper5"

no_proxy="*.svc,localhost,127.0.0.1,192.168.0.0/16,10.0.0.0/8,172.16 .0.0/12,adaptor-builder,agent-manager-service,ansible-agentservice,artifacts,auth-service,backup-restoreservice,cadvisor,camunda,camunda-external-tasks-service,camundascript-external-tasks-service,checkpoint-agent-service,cicdservice,cmd-analyzer,cnc-agent-service,command-templatesservice,compliance-remediation-service,core-services,d2d-agentservice,dashboard-metrics-scraper,dcnm-agent-service,deviceactivation,device-manager-service,dnac-agent-service,duo-agentservice,dynamic-actions,elk,elk-public,event-handlerms,grafana,ingesterservice,kafka,kafka1,kafka2,kafka3,kong,kubernetes-dashboard,marketvariance,milestones-ms,mongodb-arb,mongodb1,mongodb2,ndfc-agentservice,nfv,nfv-app-event-listener,nfv-managerservice,nginxexporter,nodeexporter,nso-agent-service,osupgradems,osupgrade-nxtgen-service,perimeter-security,policy-resolverservice,portal,portalinternal,postgresdb,postgresdb1,postgresdb2,postgresdb3,prometheus,prometheusexporter,sase-service,scheduler-service,script-runnerhelper-service,script-runner-service,service-catalog-ms,snmptrap,template-manager-service,thousandeyes-agent-service,tmfconnector,umbrella-agent-service,vmanage-agentservice,zookeeper1,zookeeper2,zookeeper3,zookeeper4,zookeeper5"
# Get the list of deployments
deployments=$(kubectl get deployments -n bpa-ns | grep -v NAME | awk '{print $1}')

# Loop through each deployment and set the environment variables
for dp in $deployments;do
         kubectl set env deployment/$dp\
                     HTTP_PROXY=$HTTP_PROXY \
                     HTTPS_PROXY=$HTTPS_PROXY \
                    http_proxy=$http_proxy \
                     https_proxy=$https_proxy \
                     NO_PROXY=$NO_PROXY \
                     no_proxy=$no_proxy \
                    -n bpa-ns
doneFetching Software Insights Data into BPA
To sync software insights data into BPA:
- Log into BPA with credentials that have access to sync software insights data.
- Select OS Upgrade > Software Image Management from the side panel.

- Click the Advisories tab.
Sync to fetch Software Insights into BPA

- Click Sync.
This discovers all security advisories, priority bugs, end-of-life bulletins, and software suggestions related to the assets present in the inventory. Security advisories and software end-of-life dates are determined based on the OS type and software version. Priority bugs and software suggestions are determined based on the product ID and software version.
Last Updated shows the date and time when the insights data were last synced, and the Sync Status field displays the last sync status.
Viewing and Managing Security Advisories
To access the Advisories page:
- Log in to BPA with credentials that have manage access to Advisories.
- Select OS Upgrade > Software Image Management.
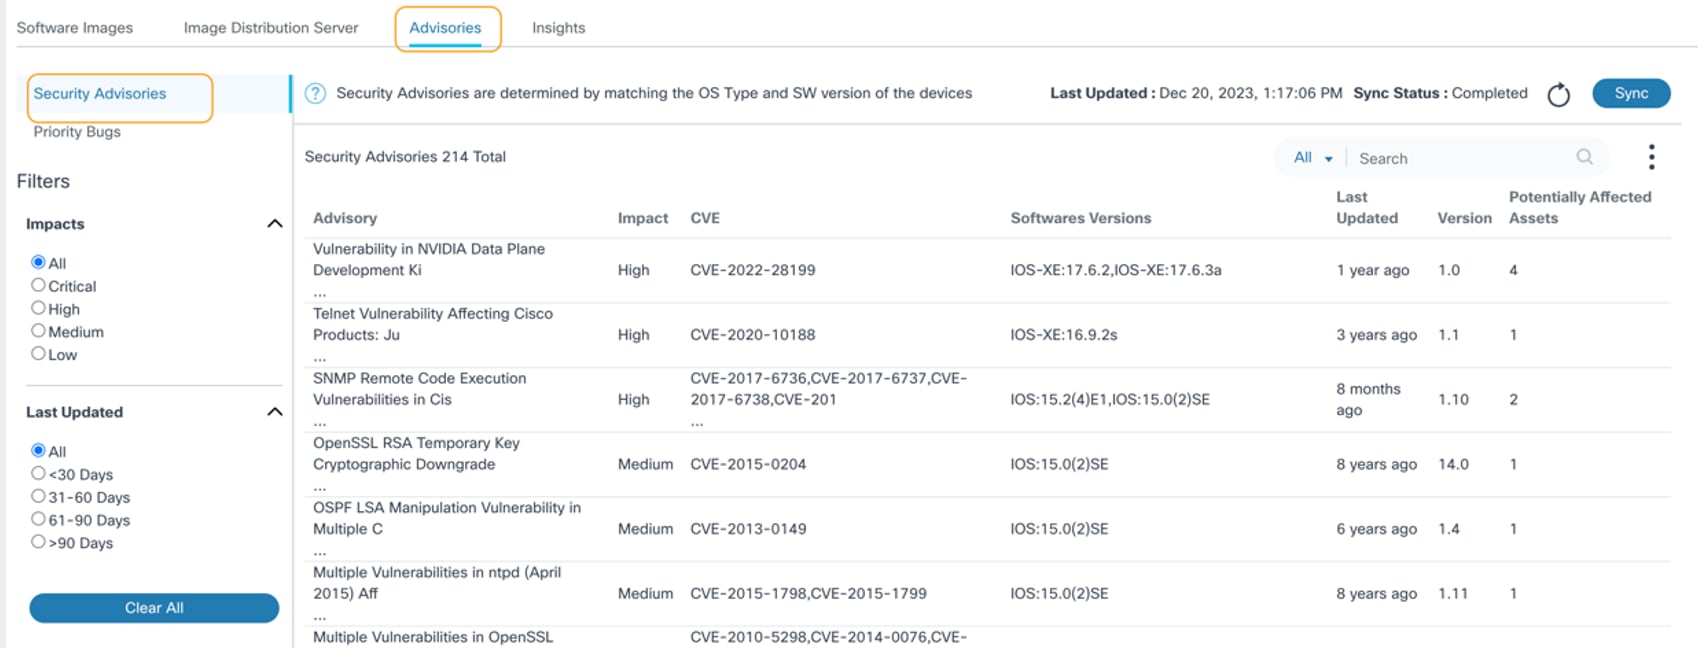
- Click the Advisories tab. The Security Advisories page opens by default.
The following options are displayed for filtering advisories data:
- Impacts allows filtering based on advisory severity; All is selected by default
- Last Updated allows filtering based on the advisory’s last update date; All is selected by default
- Clear All resets the selected filters
- The Search filter is used for searching the advisories and includes the following exclusive search filters:
- All: Searches across columns such as Advisory, CVE, and Software Versions
- Advisory: Searches for advisories with the terms specified in the search
- CVE: Searches for advisories with specific Common Vulnerabilities and Exposures (CVE)
- Software Versions: Searches for advisories associated with specific OS types or software versions
- The Refresh icon is used to refresh the page and clear the selected filters
- Existing advisories are displayed with the following columns:
- Advisory: Summary of the advisory
- Impact: Advisory severity
- CVE: CVEs assigned
- Software Versions: OS type and software versions impacted
- Last Updated: Date and time when the advisory was last updated
- Version: Advisory version
- Potentially Affected Assets: Number of assets that might be affected by the advisory
- Clicking the header field sorts the advisories
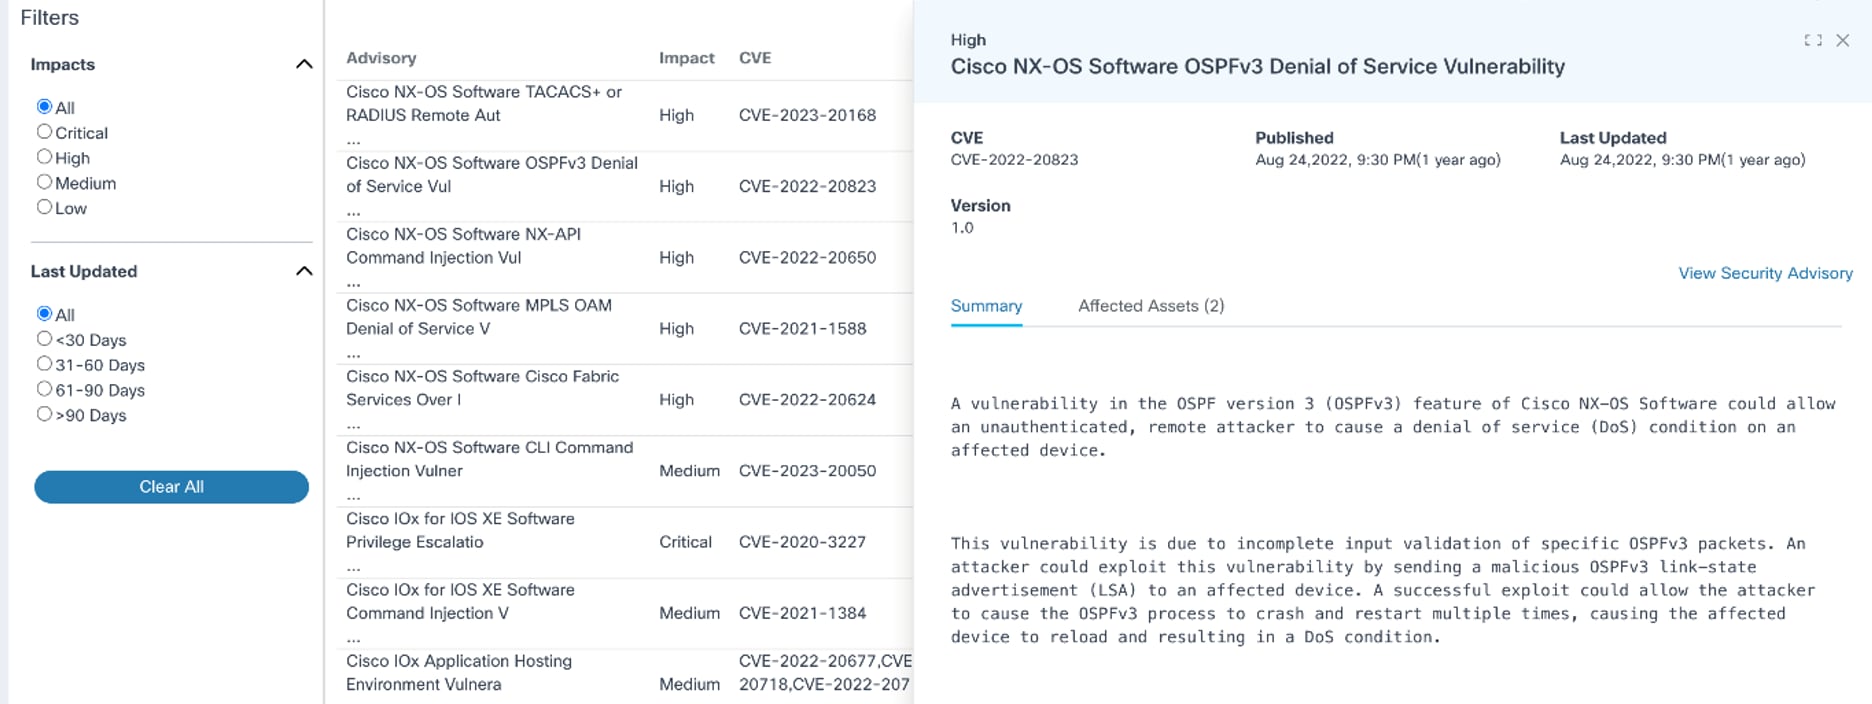
- Selecting an advisory row opens an advisory’s detail view which
includes the following tabs:
- Summary: Displays a summary of the selected advisory; displays by default
- Affected Assets: Displays potentially affected asset details such as Asset Name, Serial Number, Model Name, Software Version, IP Address, and Controller ID; sorting and searching the assets can be performed in this tab
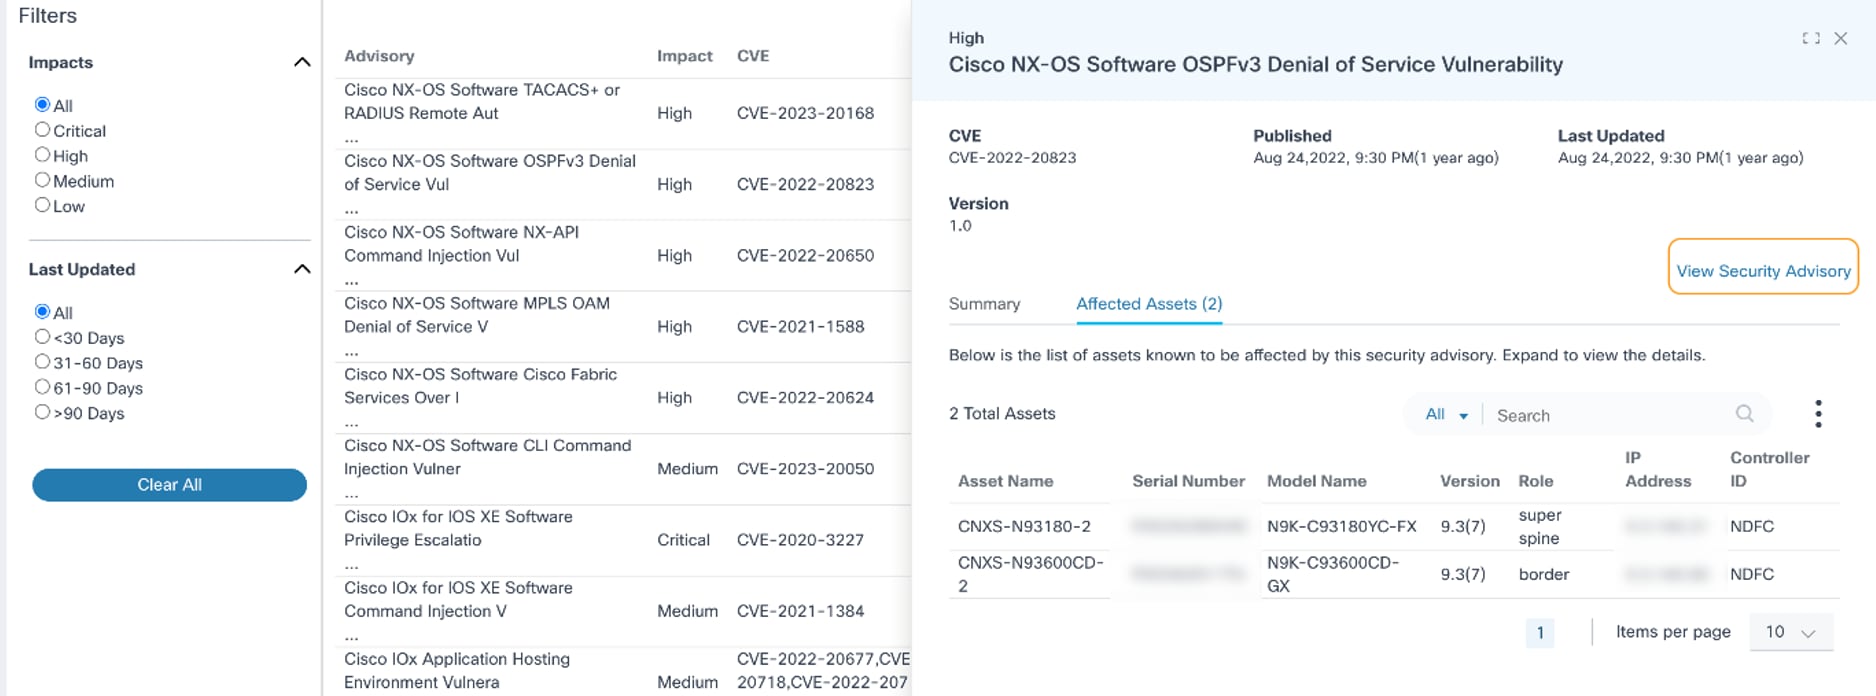
- View Security Advisory link: Navigates to the official Advisory page
Viewing and Managing Priority Bugs

After opening the Advisories page as described in the previous section, click on the Priority Bugs tab. The Priority Bugs page displays.
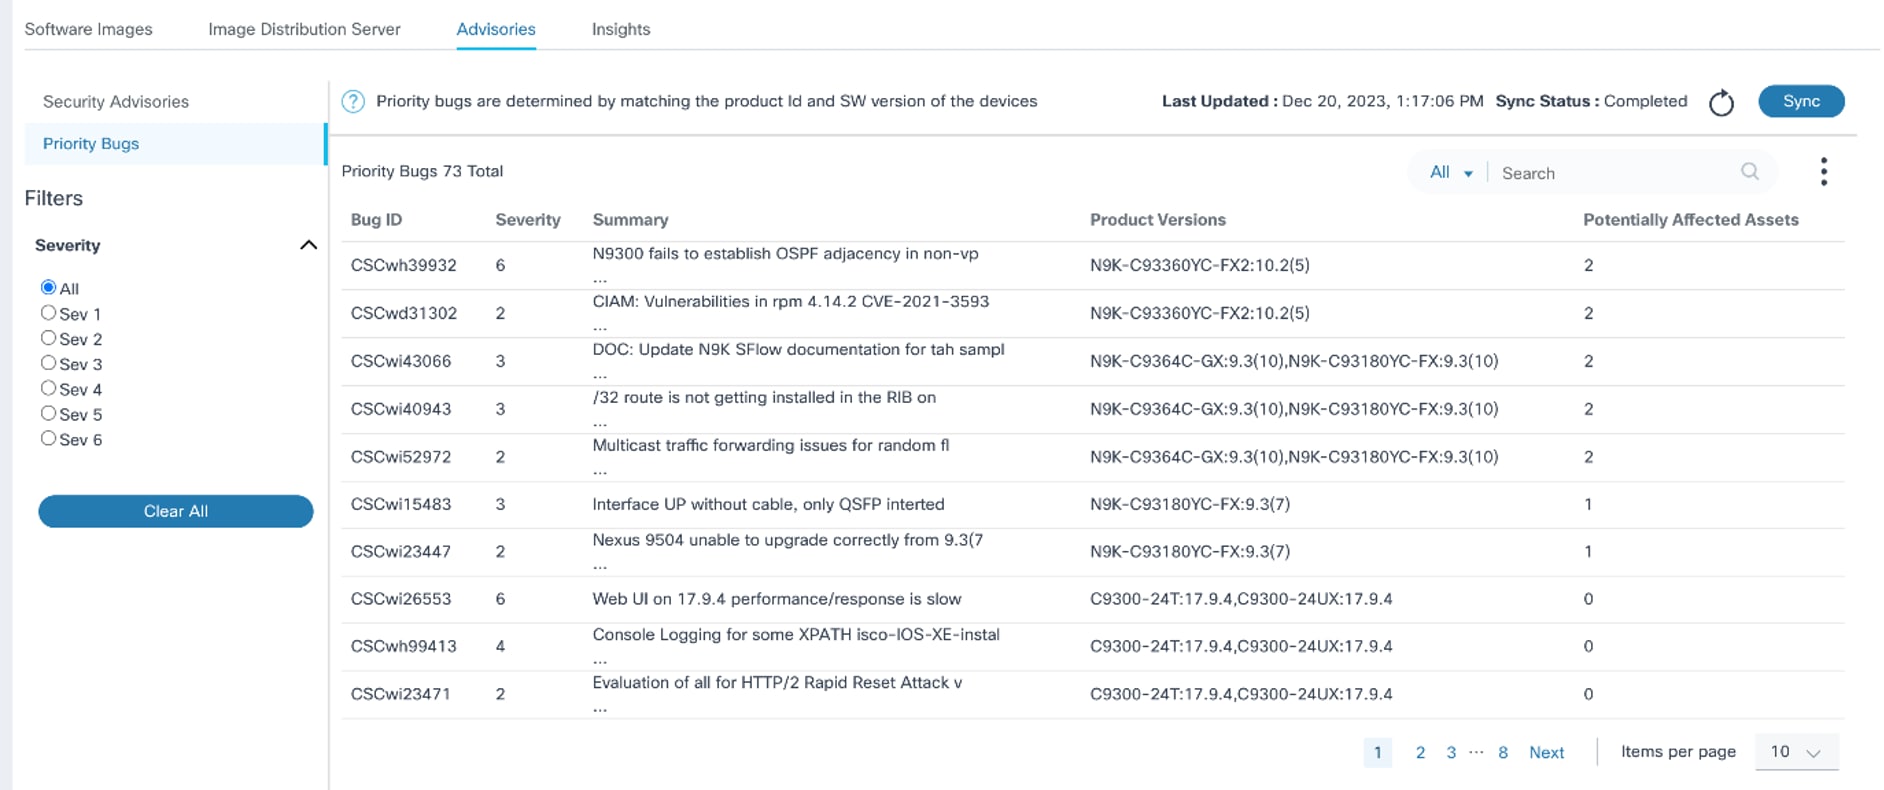
The following options are available on the Priority Bugs page:
- A Severity filter which allows filtering based on bug severity; All is selected by default
- The Search filter can be used for searching the
bugs and includes the following exclusive search filters:
- All: Searches across all fields
- Bug ID: Searches for bugs with a specified bug ID
- Summary: Searches for bugs with specific keywords present in the summary
- Product Versions: Searches for bugs associated with a specific product ID or software version
- The Refresh icon can be used to refresh the page and clear the selected filters
- Priority Bugs are displayed in the table with the following
columns:
- Bug ID
- Severity: Bug severity
- Summary: Summary details of the bug
- Product Versions: Product ID and software versions impacted
- Potentially Affected Assets: Number of assets that might be affected by the bug
- Sorting can be done by clicking on any column header except for Potentially Affected Assets

- Clicking a bug opens the bug’s detailed view which includes the
following:
- Summary tab: Displays Bug Severity, Description, and Workaround details
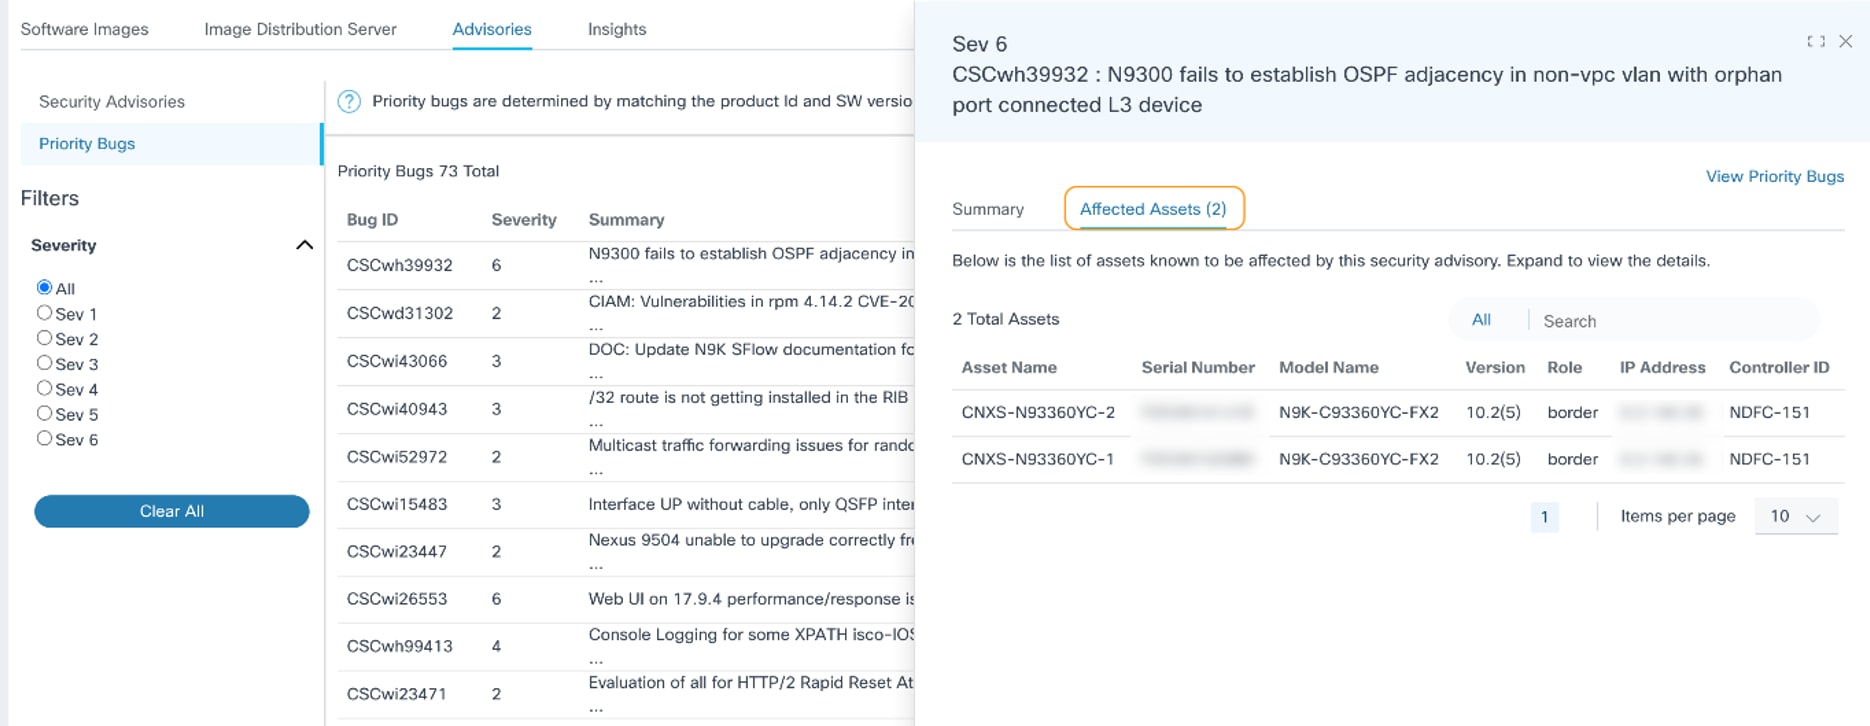
- Affected Assets tab: Displays all potentially affected asset details such as Asset Name, Serial Number, Model Name, Software Version, IP Address, and Controller ID; sorting and searching the assets can be performed in this tab
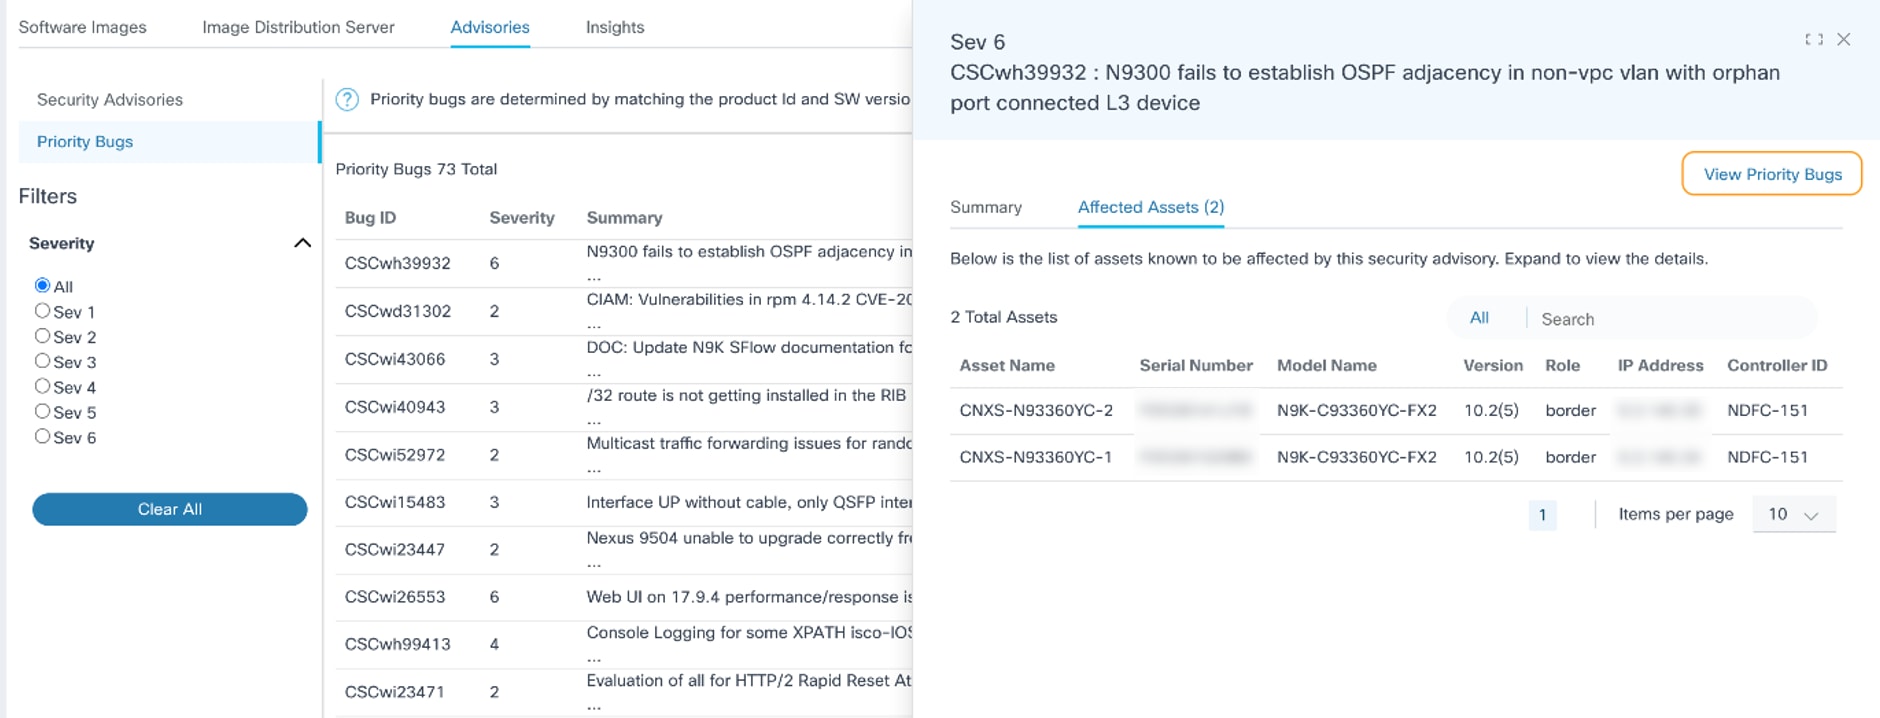
- View Priority Bugs link: Navigates to the official Bug Search Tool
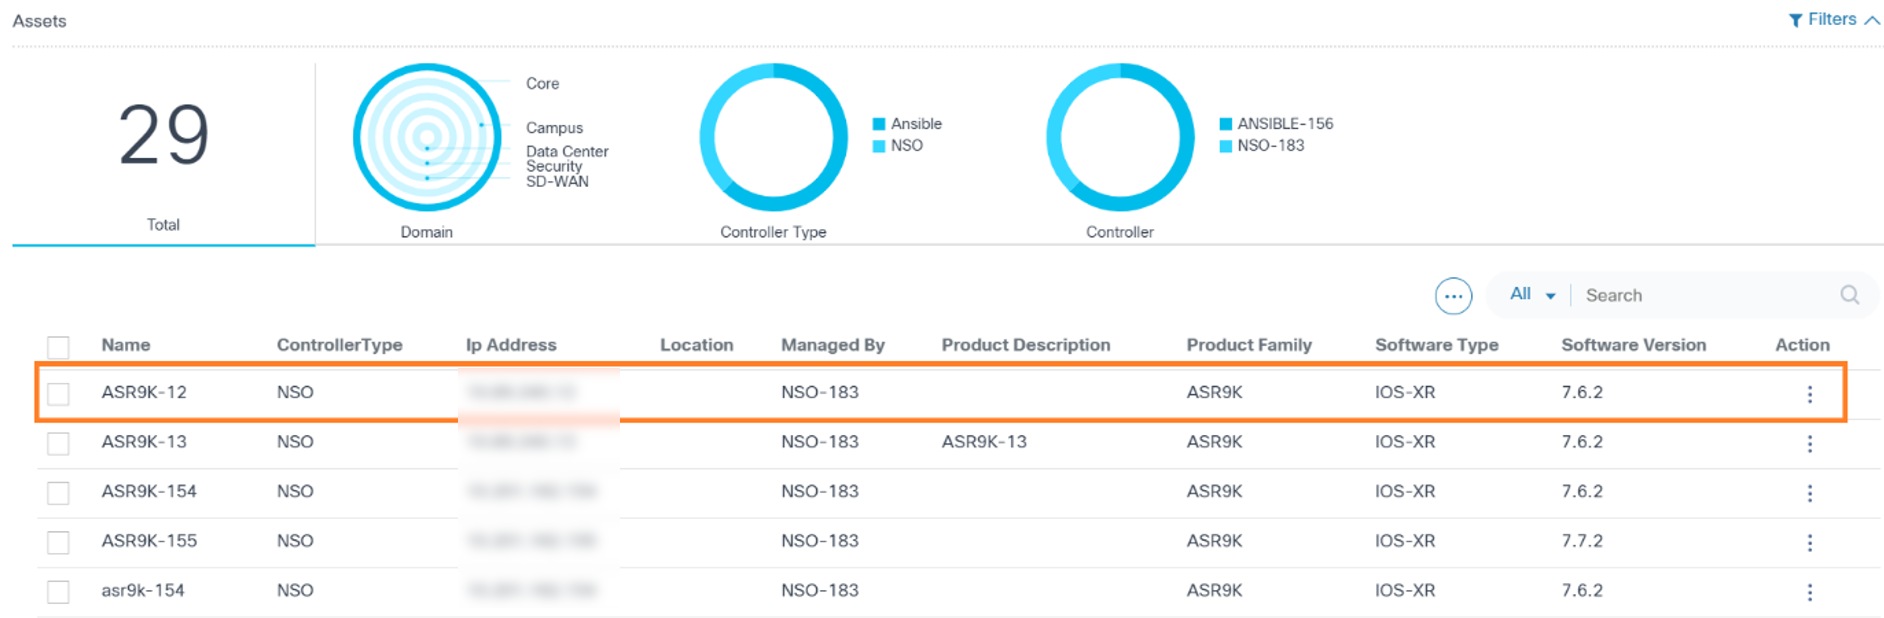
In Asset Manager, users can view a list of all assets. Upon selecting any asset, a panel displays asset-level information, which includes asset software vulnerability details organized into two tabs: Advisories and EOX.

The Advisories tab contains two sub-tabs, Security Advisories and Priority Bugs. More details about these tabs are provided in the sections below.
Security Advisories

On the Security Advisories sub-tab, users can view all security advisories impacting a selected asset. The columns in the security advisories table include Advisories, Impact, CVE, Last Updated, and Version.
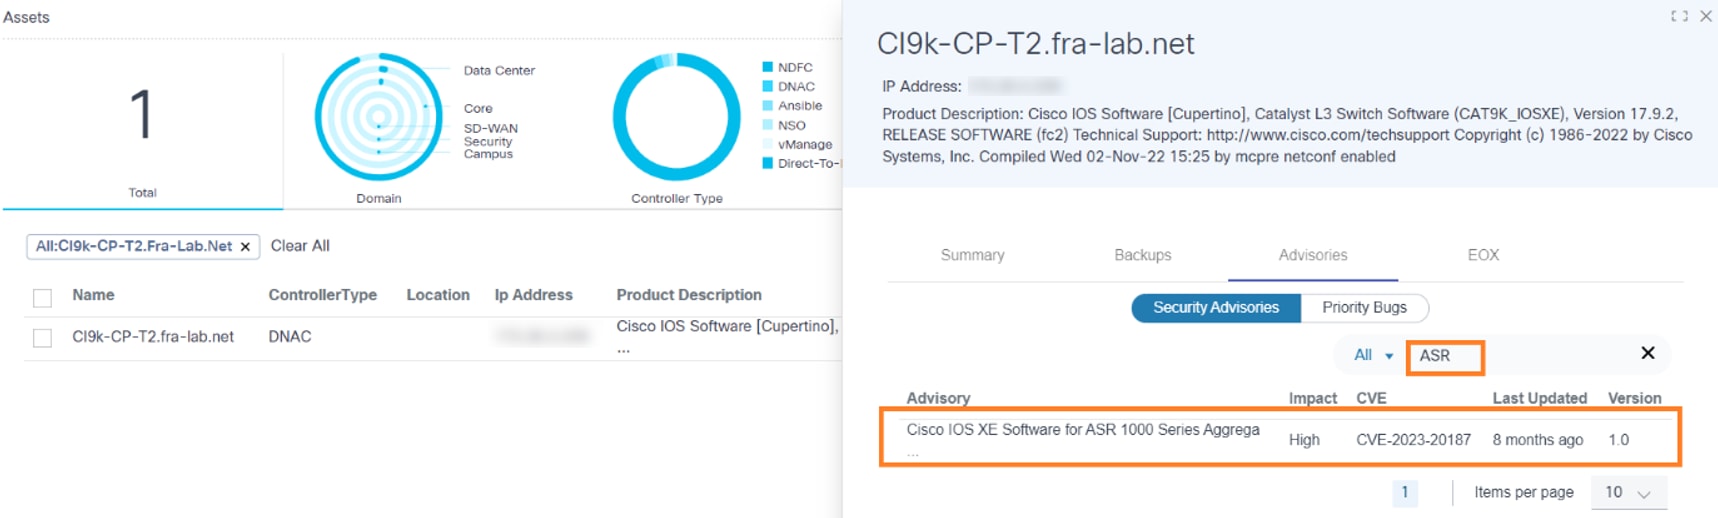
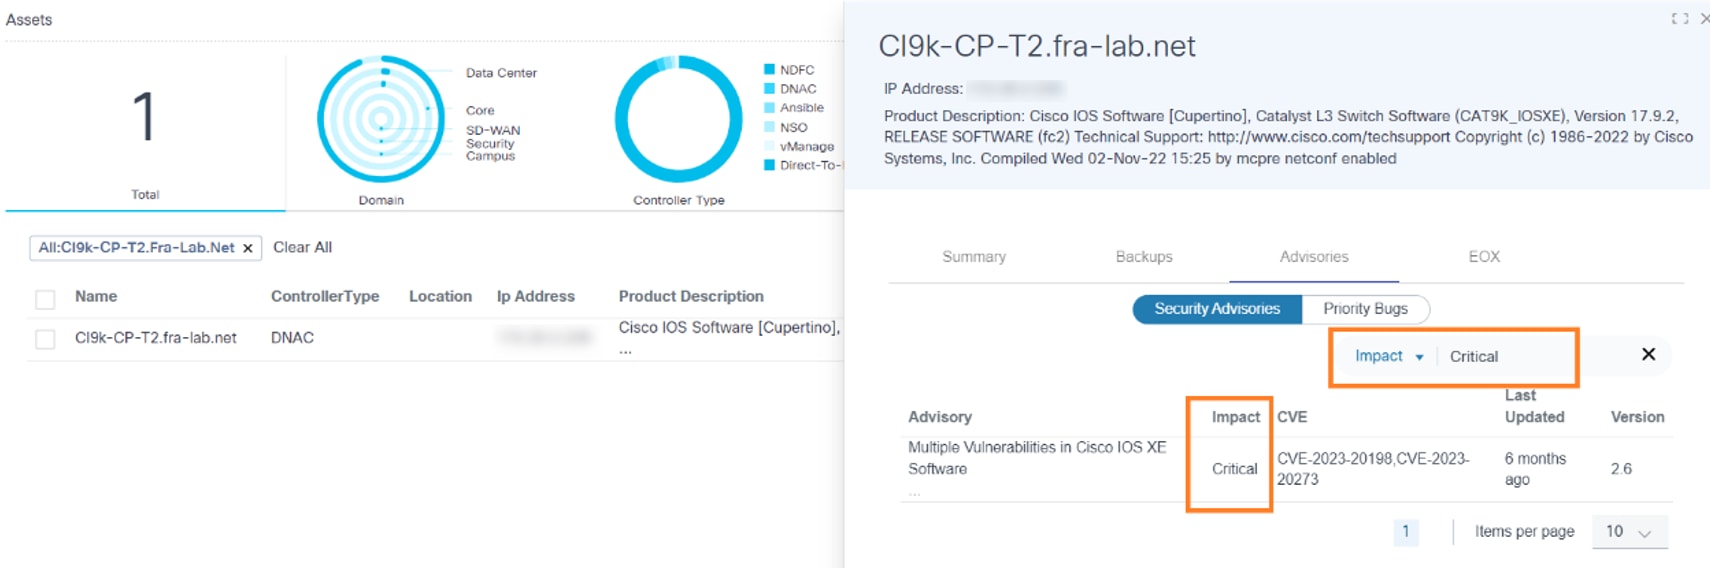
Users can search advisories based on values in the Advisories, Impact, CVE, Last Updated, and Version columns. Pagination allows users to navigate between pages.
Priority Bugs
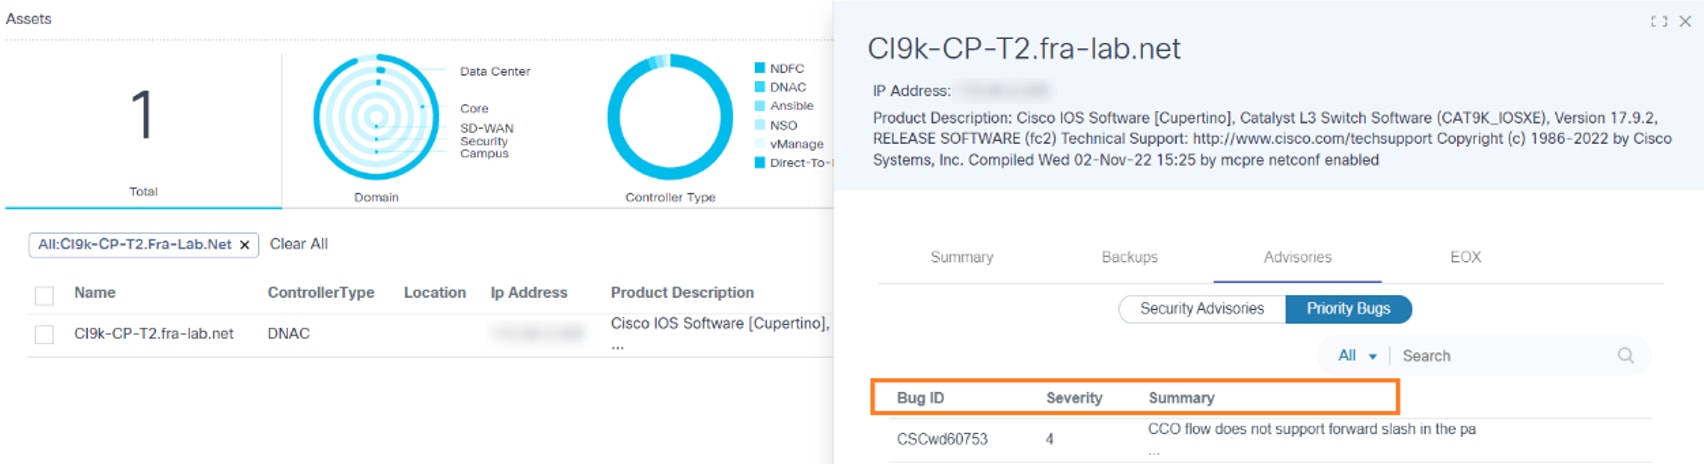
On the Priority Bugs sub-tab, users can access all priority bugs affecting a given asset. The columns in this tab include Bug ID, Severity, and Summary.
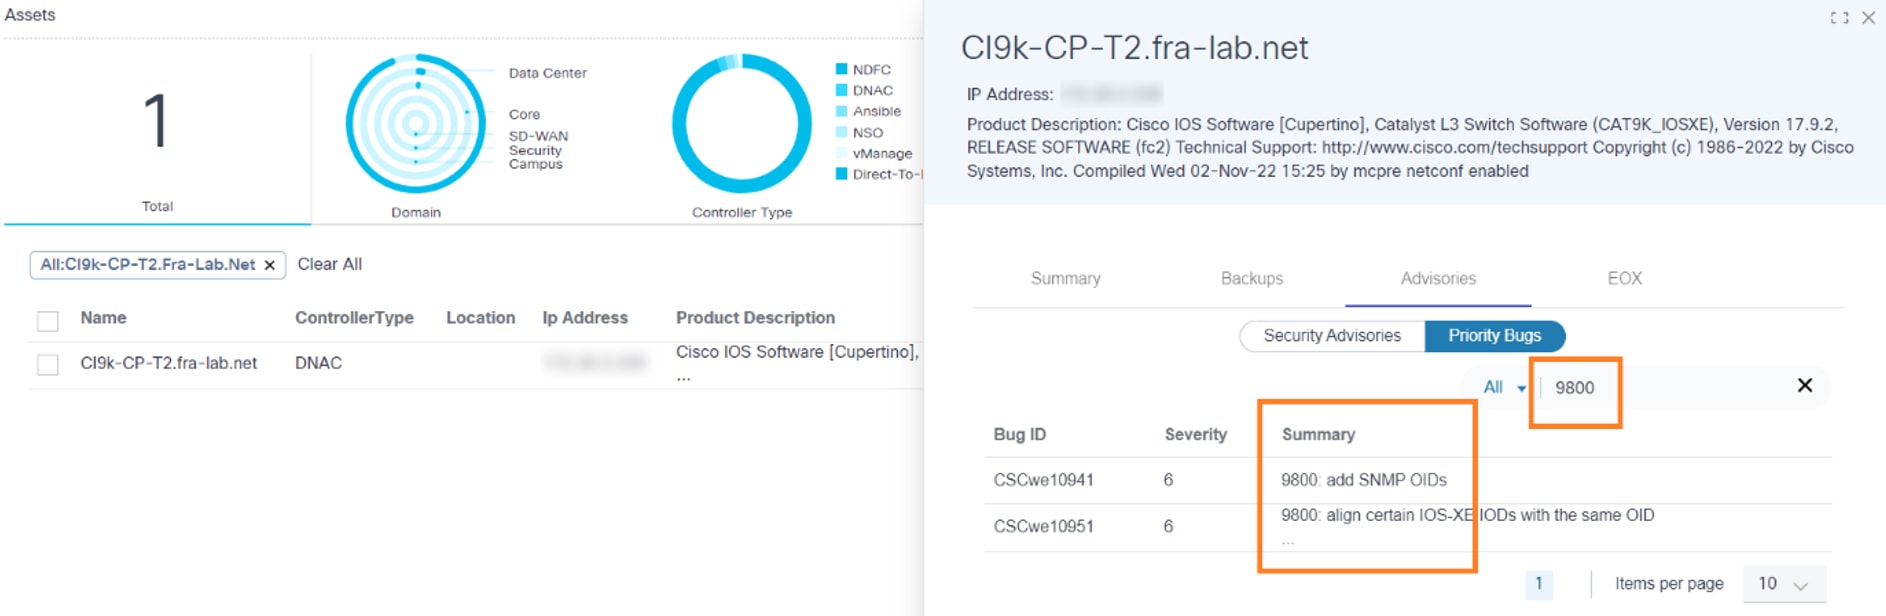
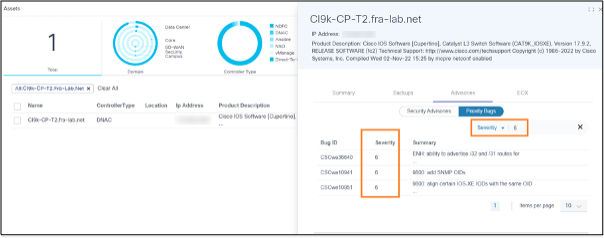
Users can search for priority bugs based on values in the Bug ID, Severity, and Summary columns. Pagination facilitates easy navigation between pages.
EOX
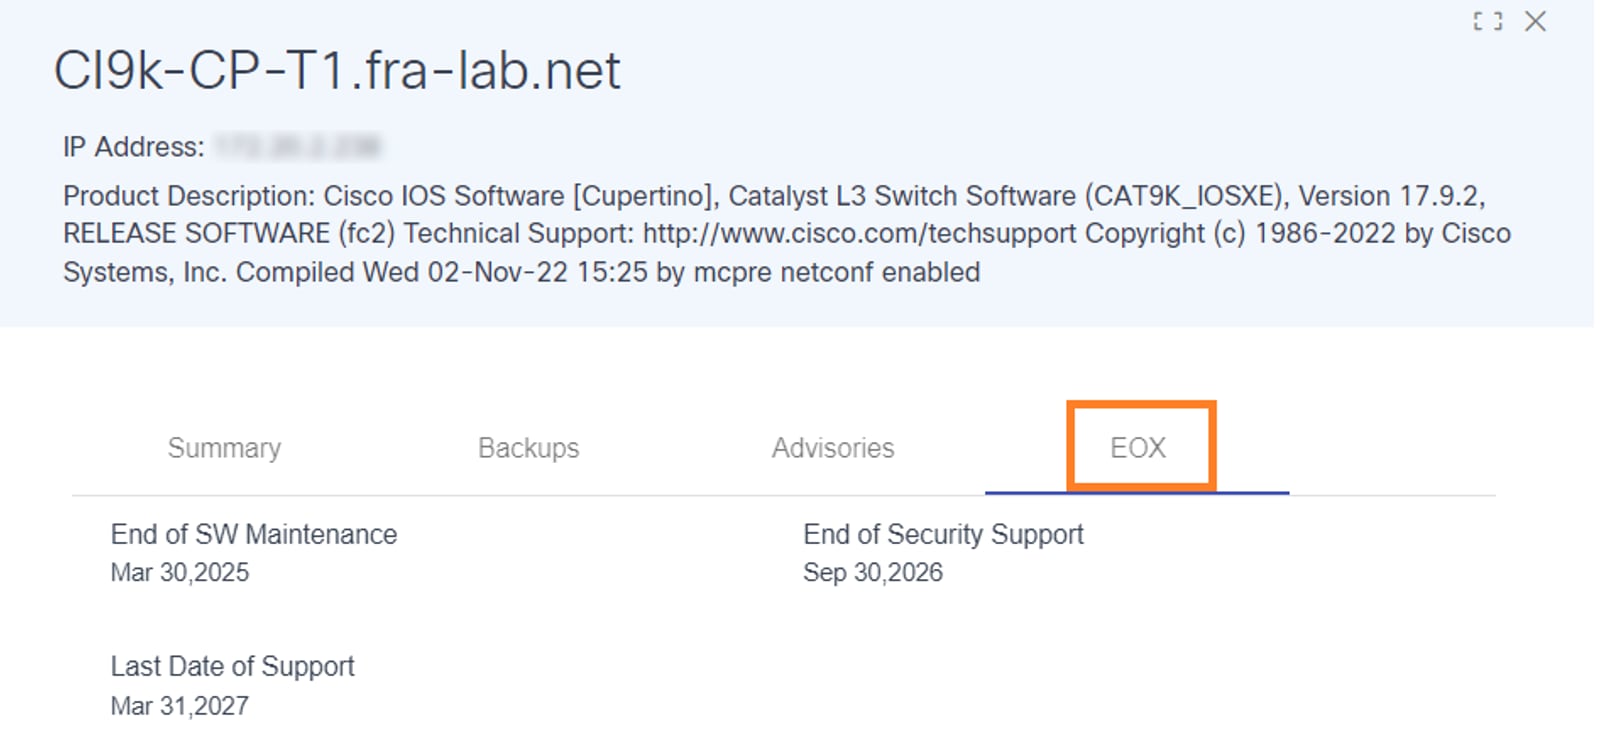
The EOX tab displays software end-of-life data specific to an asset, including three important dates:
- End of Software Maintenance
- End of Security Support
- Last Date of Support
Viewing Software Insights
Software Insights provides software suggestions for the device models managed by Cisco Catalyst Center and NDFC controllers, allowing Administrator users to create a conformance policy for the device models if the suggestion is available.
To access Software Insights:
- Log in to BPA with credentials that have manage access to Insights.
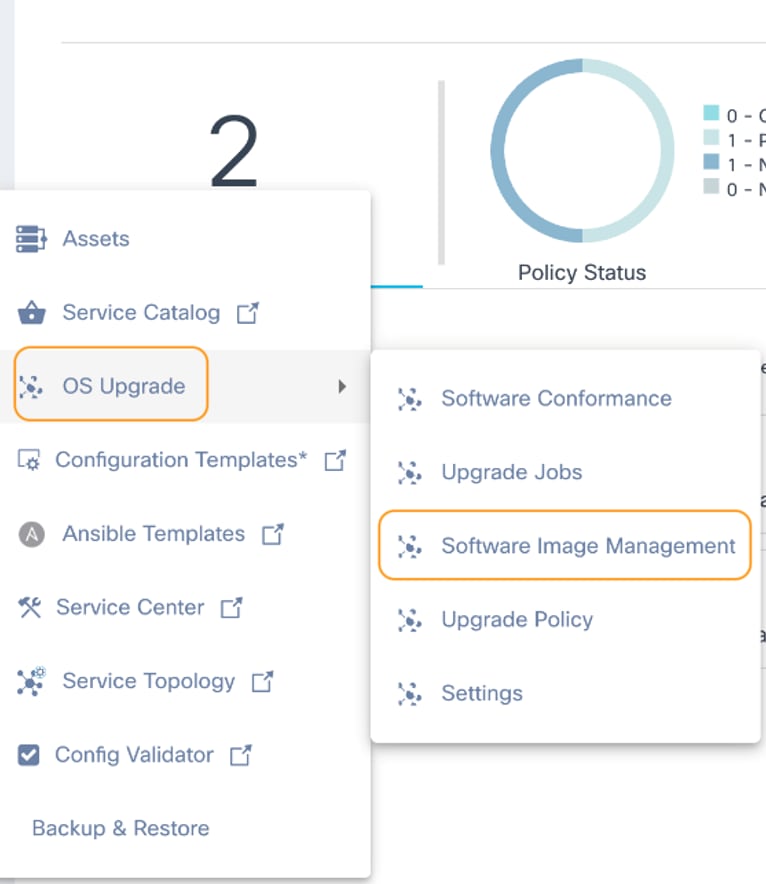
- Select OS Upgrade > Software Image Management from the side panel.
- Click the Insights tab.
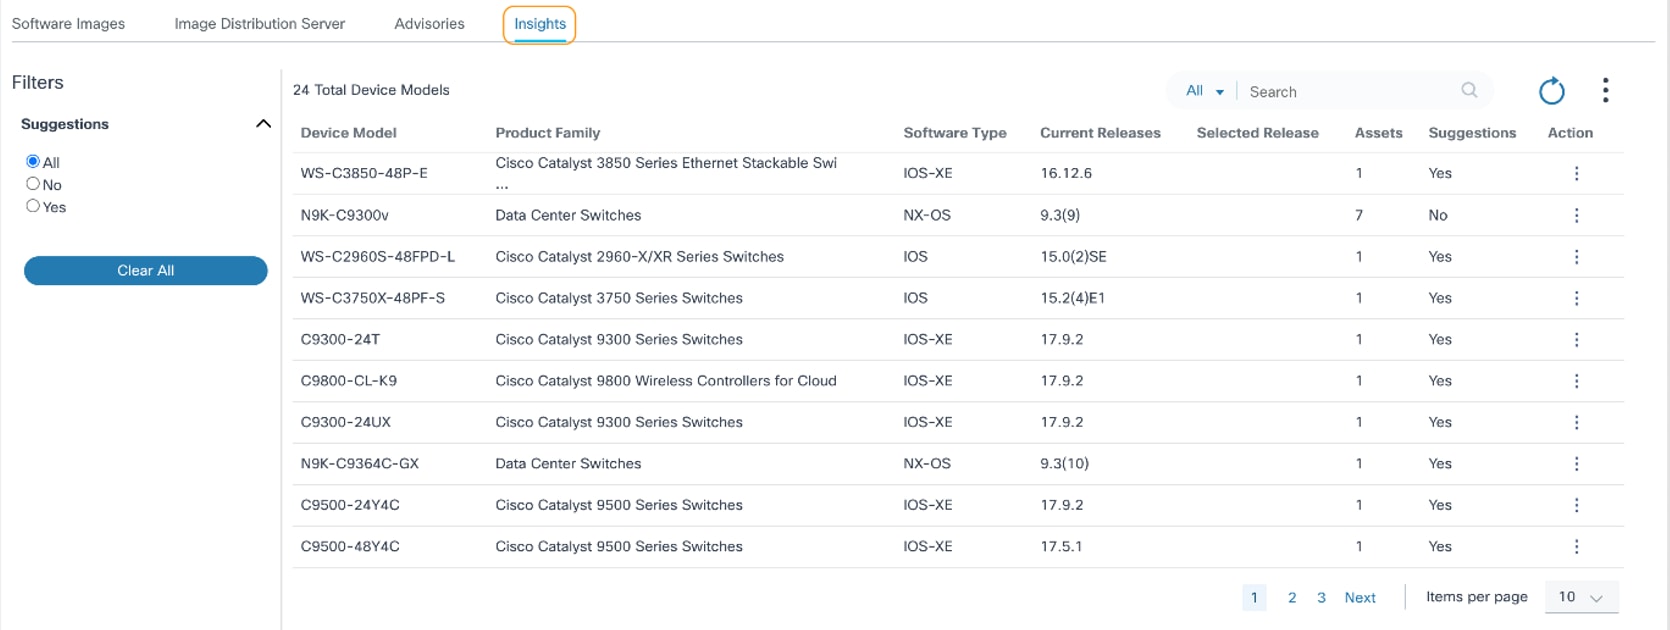
The Insights tab contains the following:
- A filter which allows users to filter data based on
Suggestions. All is selected by
default.
- Yes filters the data for device models with suggestions
- No filters the data for device models without suggestions
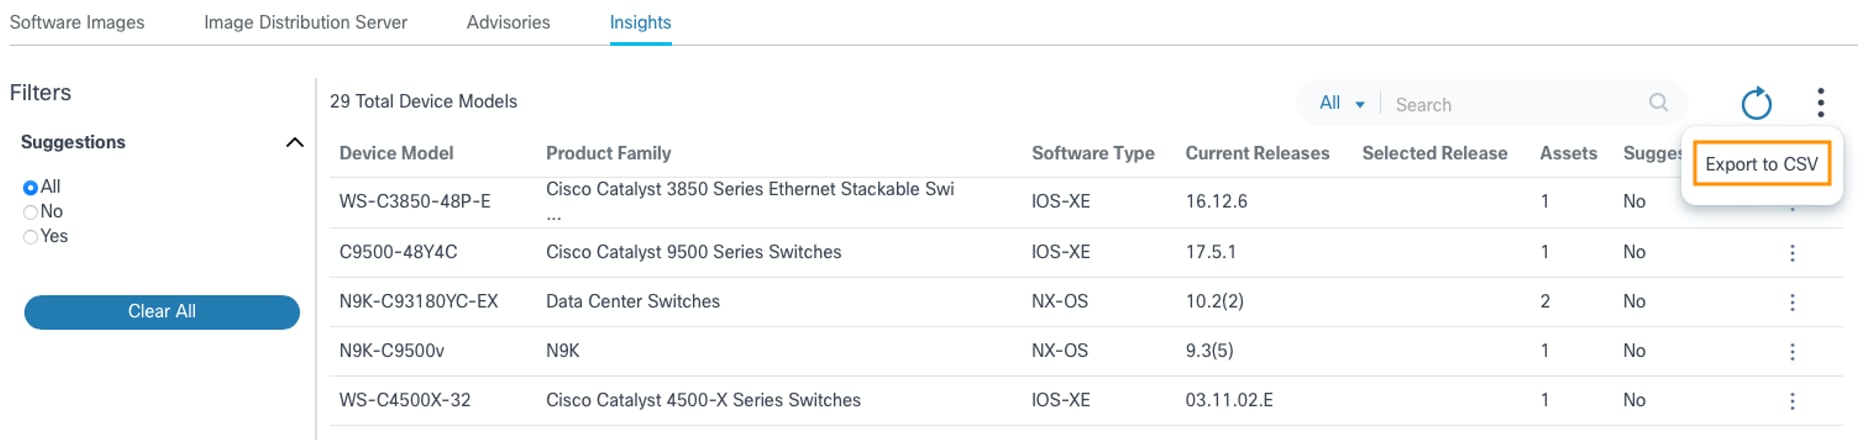
- The More Options icon provides an Export
to CSV option to export the data displayed in the page
- The Refresh icon refreshes the page and clears selected filters
- The Search filter is used for searching the data and includes the following exclusive search filters:
- All: Searches across all columns (e.g., Device Model, Product Family, and Software Type)
- Device Model: Searches for data with a specific device model name
- Product Family Searches for data with s specific product family name
- Software Type: Searches for data with a specific
software type name
- Existing device models are displayed with the following columns:
- Device Model: Name of the device model
- Product Family: Name of the product family the device model belongs to
- Software Type: Name of the software type the device model belongs to
- Current Releases: List of the unique software versions which are currently present in the inventory for the device model
- Selected Release: Suggested release version which has been selected as an optional version from the suggestions provided by the Cisco
- Assets: Number of assets present in the Asset Manager for the device model
- Suggestions: Displays Yes or No for any suggestions available for the device model
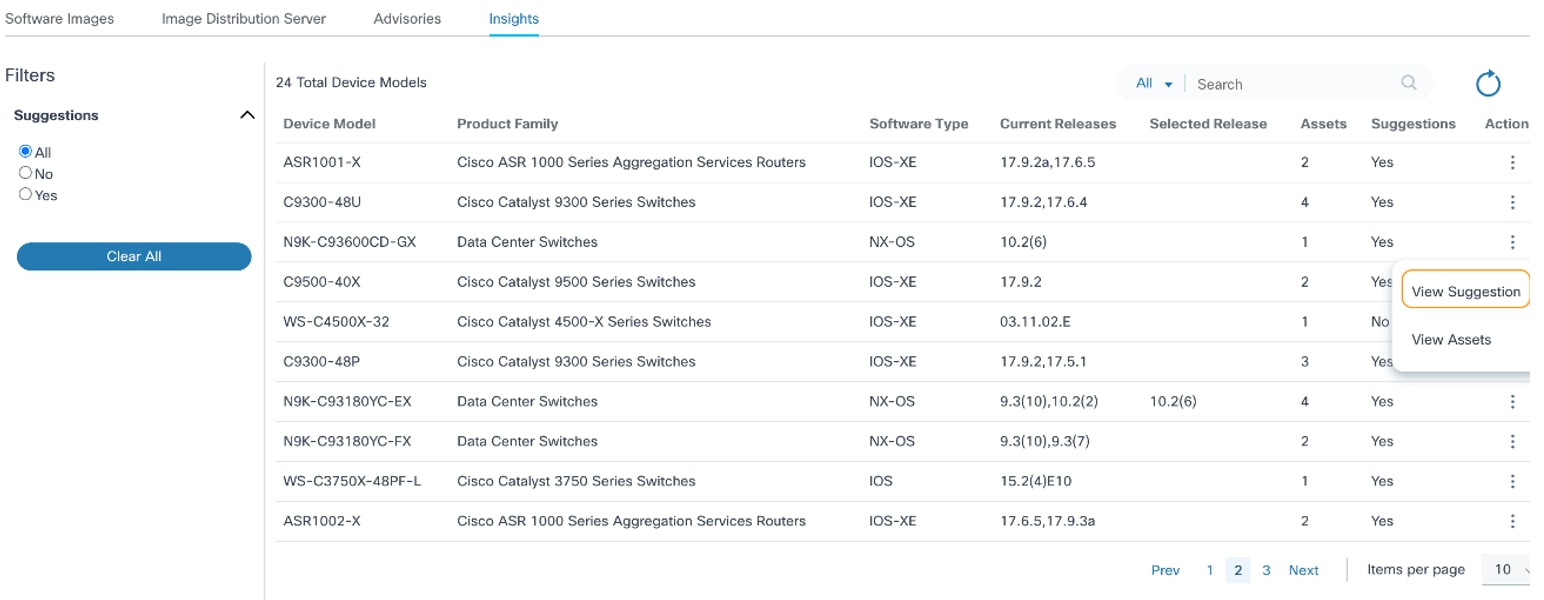
- Action: Provides row-specific actions via the More Options icon (e.g., View Suggestions and View Assets)
Viewing and Choosing Vendor-Suggested Software Versions
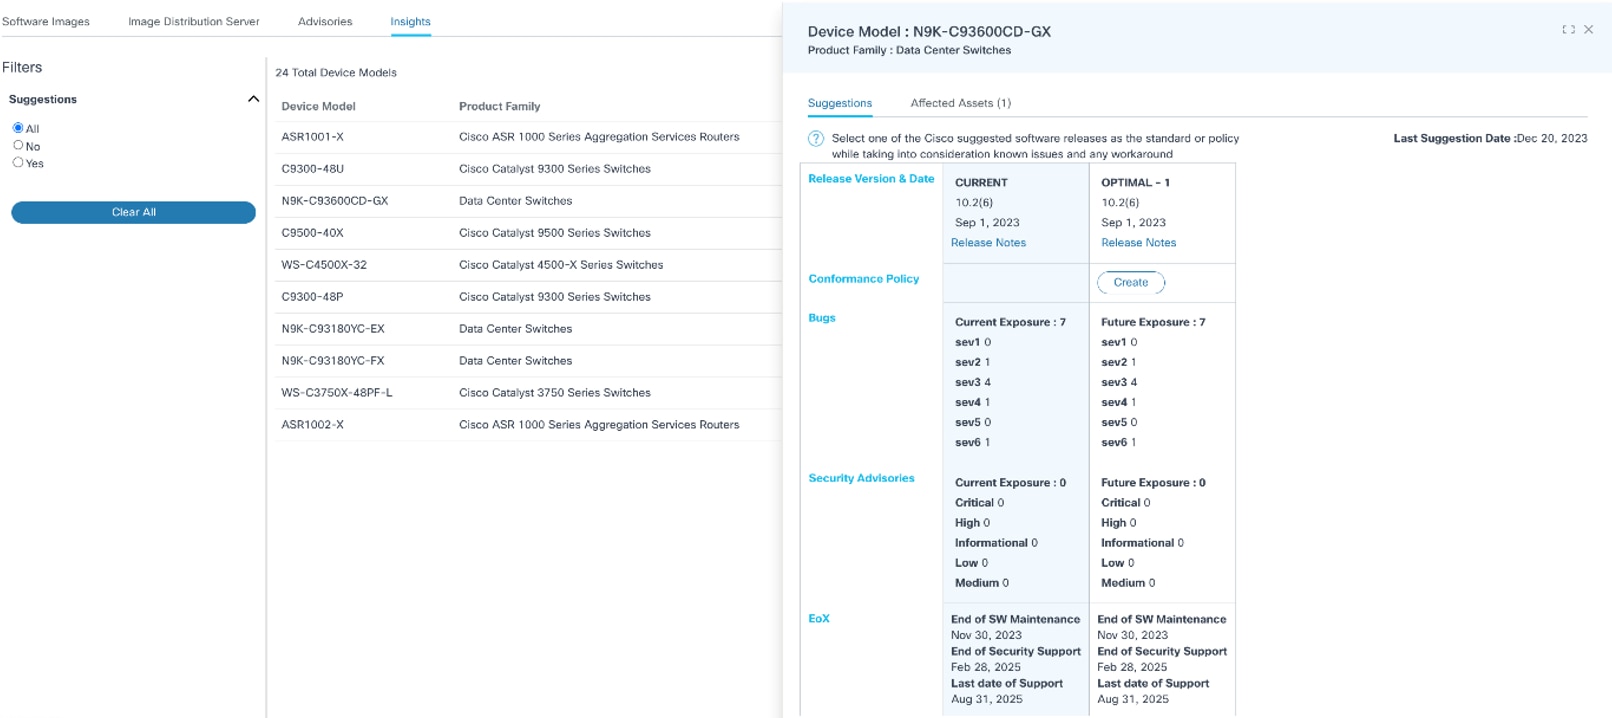
Selecting the More Options icon > View Suggestions from the Action column opens a side panel with all insight details. The Suggestions tab has the current and suggested release details for the selected device model; it is possible for a device model to have more than one suggestion. The following data is available:
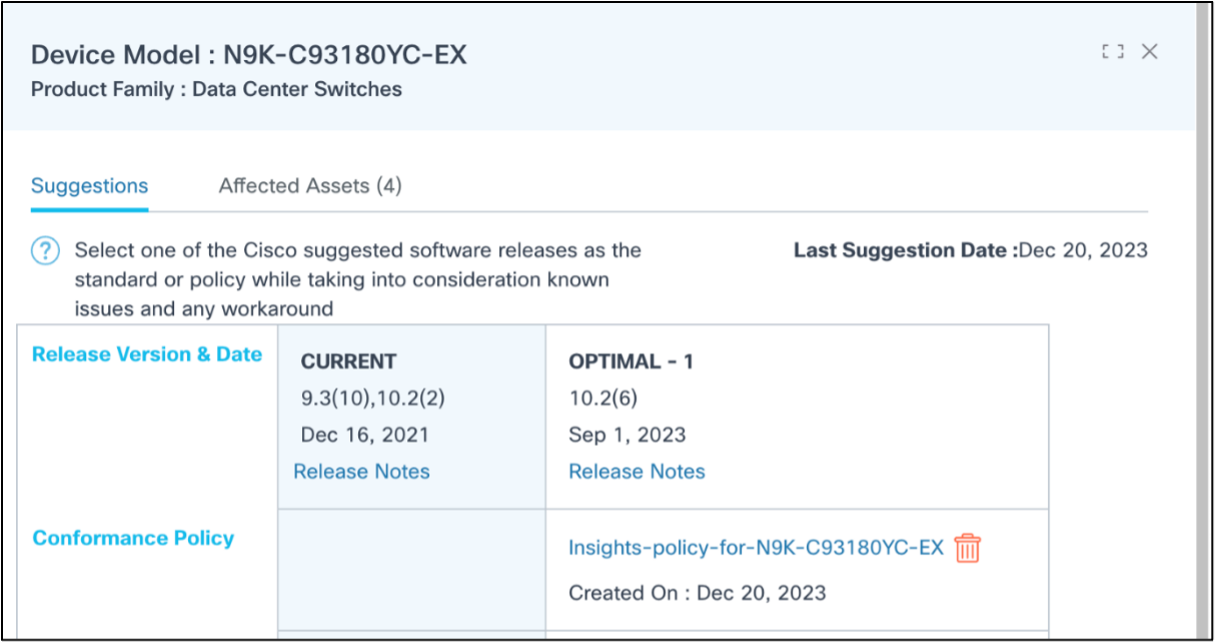
- Release Version and Date: Release version, date, and notes details display for current and suggested releases if available in Cisco cloud; if the assets in the inventory belong to more than one version, all applicable versions are displayed as comma separated values in the Current column
- Create Conformance Policy: Allows Administrators to create a conformance policy for a specific version with the device role as Any
- Bugs: Displays a consolidated bug count for each release
- Security Advisories: Displays a consolidated advisory count for each release
- EoX: Displays End of Software Maintenance, End of Security Support, and Last date of Support dates for each release
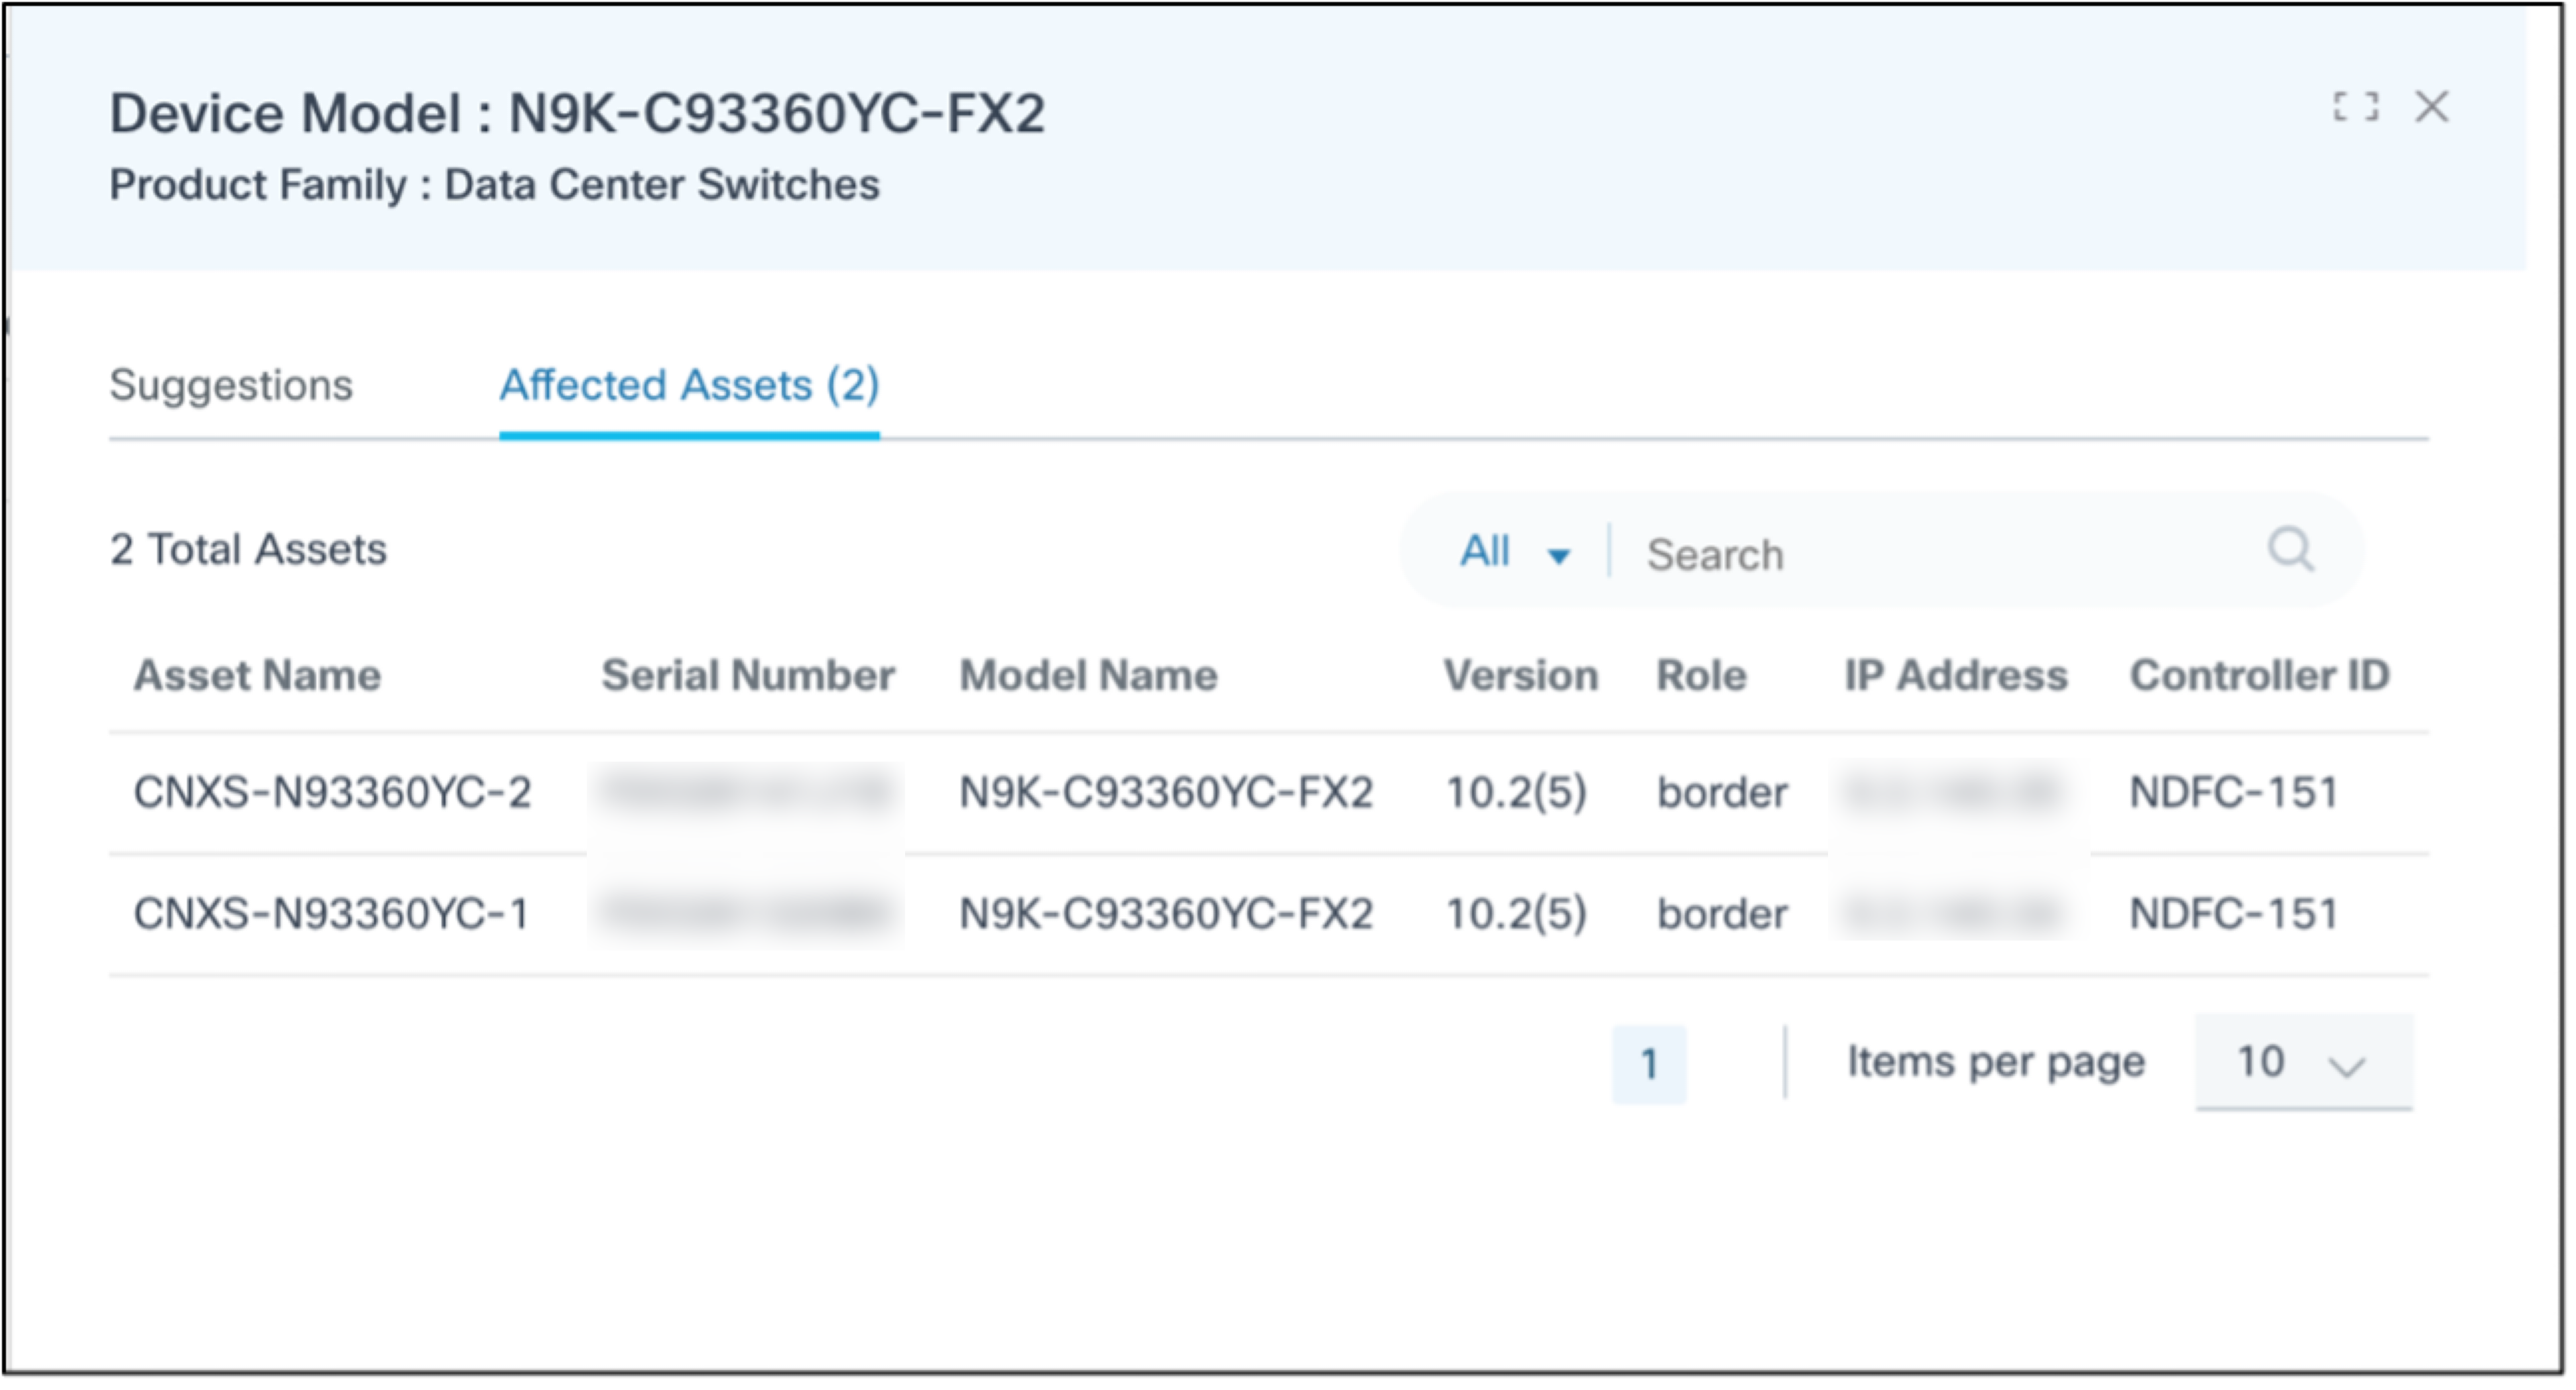
Selecting the More Options icon > View Assets from the Action column opens a side panel where the Affected Assets tab displays by default. The Affected Assets tab shows potentially affected asset details in columns like Asset Name, Serial Number, Model Name, Software Version, IP Address, and Controller ID. Sorting and searching the assets can be performed in this tab.
Identifying Devices Needing Software Upgrade
Refer to Software Conformance for more information.
Software Conformance
Software Conformance helps identify the assets in a network that are non-compliant with the intended target software version. The validation is based on policies and rules through which software conformance intents are defined. These policies can be executed on a scheduled basis or on-demand. Upon successful execution of the conformance policy, the conformance result is obtained which provides the status of applicable assets. The conformance scope depends on various criteria, such as device role, managing controller instance, etc.
Prerequisites
- Software images of controllers like Cisco Catalyst Center, vManage, NDFC, and FMC must be in-sync. Refer to Syncing Software Images Metadata for more information.
- Necessary software image metadata for controllers like NSO, CNC, Direct-to-Device, and ANSIBLE must be added. Refer to Adding Software Image Metadata for more information.
- Users must have access to the RefD application to manage EPLD module data.
- EPLD module information for required releases should be pre-populated in the RefD application
- Users must manually add EPLD module information in the RefD application if it is not available OOB
Creating EPLD Module Data in Reference Data Management Application
Before creating a conformance policy, create EPLD module reference data in the RefD application. The RefD application includes EPLD module information for Nexus software versions v10.2(8) and v10.4(5) respectively. For other device versions, EPLD model information must be manually added in the RefD application.
Complete the following steps to add other releases to the EPLD module metadata:
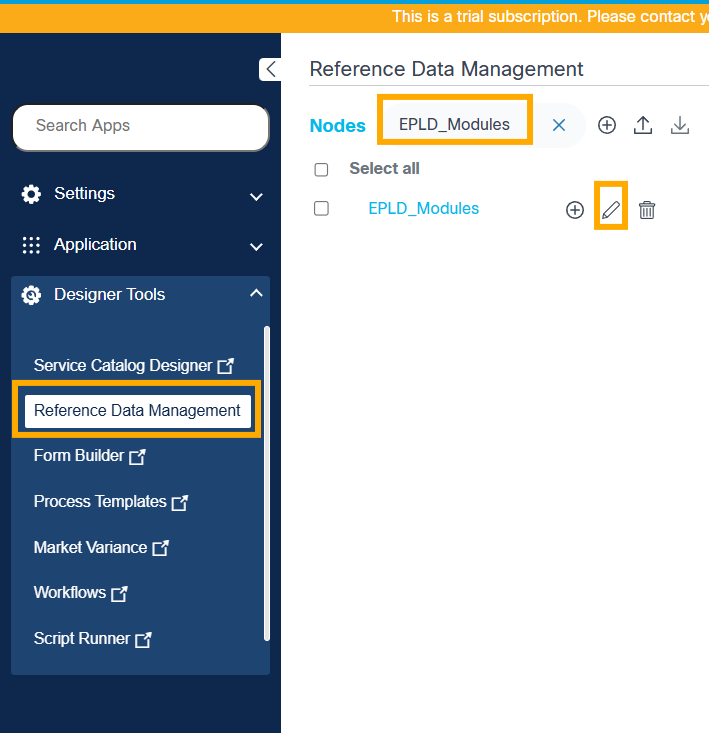
- Navigate to the Reference Data Management application and search for “EPLD_Modules”.
- Select the “EPLD_Modules” file and select the Edit icon.
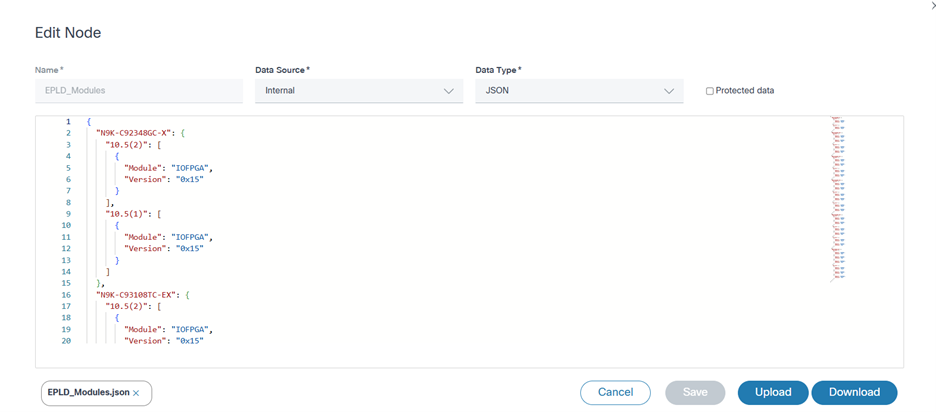
- Add the new release EPLD module metadata by appending a new entry with the following structure:
structure:
  "N9K-C92348GC-X": {
    "10.5(2)": [
      {
        "Module": "IOFPGA",
        "Version": "0x15"
      }
    ]
}- Click Save and validate the new EPLD module metadata that is available for selection in the conformance policy. EPLD data for the supported releases pre-populate.
Viewing and Managing the Software Conformance
- Log in to BPA with credentials that have access to Software Conformance.
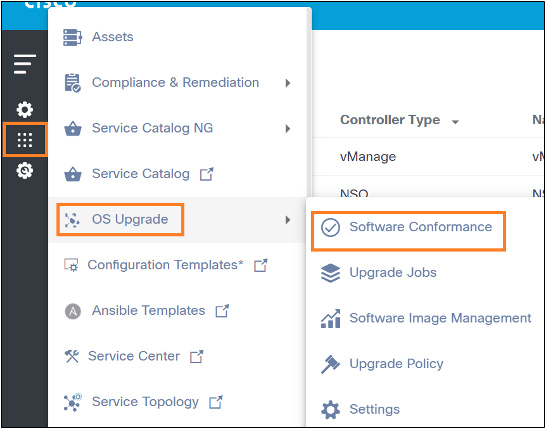
- Select OS Upgrade > Software Conformance. The Software Conformance page displays.
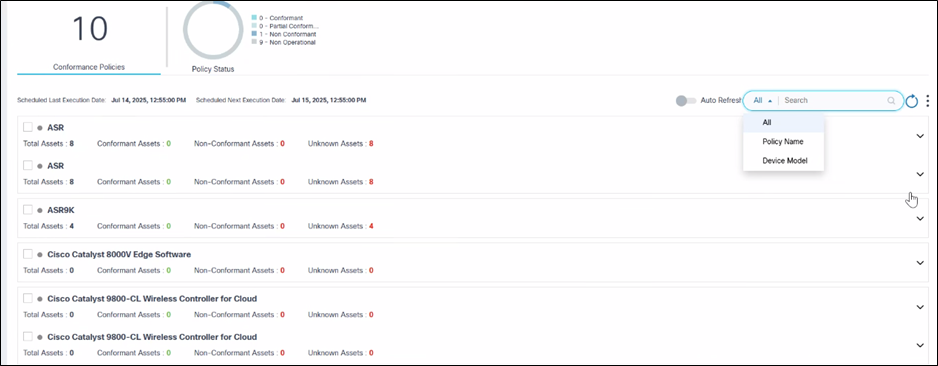
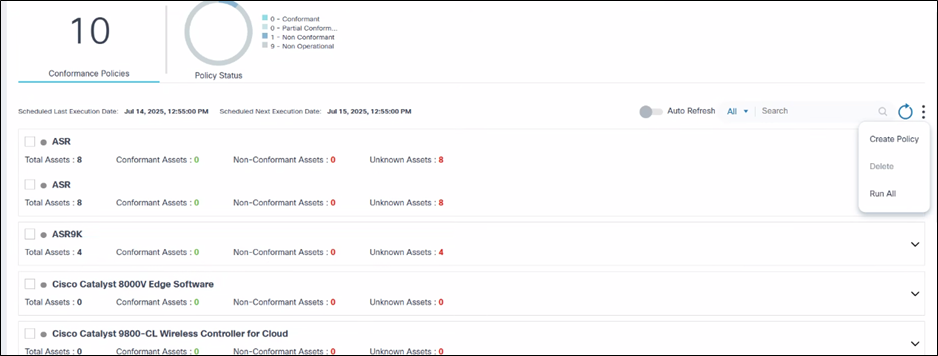
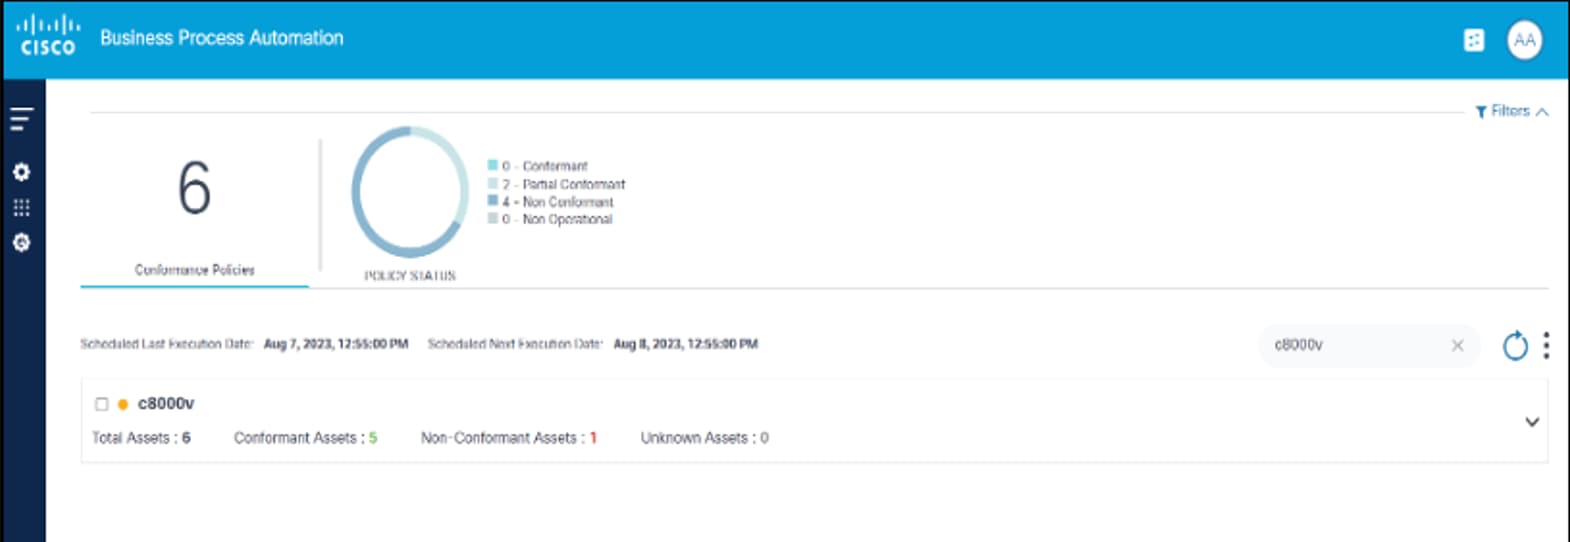
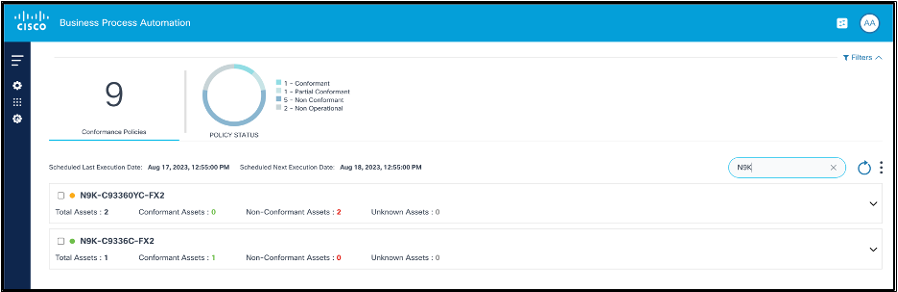
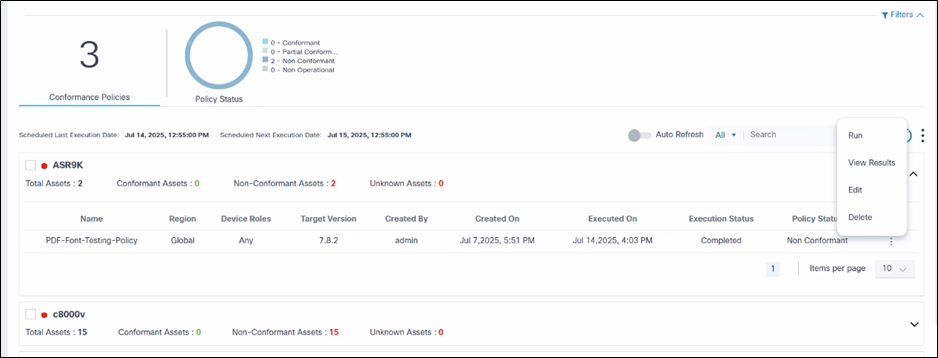
The Software Conformance page contains the following:
- An analytics section, displayed at the top, that provides the
following:
- The total number of conformance policies existing in the system
- A Policy Status quick filter to filter based on
the following criteria:
- Conformant: All BPA-managed devices with a specified model are on the defined software version
- Partial Conformant: Some BPA-managed devices with a specified model are on the defined software version; the remaining devices are in different software versions
- Non-Conformant: All BPA managed devices with a specified model are on different software versions when compared to a given software version
- Non-Operational: No applicable devices are found based on the device model specified in the policy
- Scheduled Last Execution Date and Scheduled Next Execution Date which indicate the date and time of previously executed scheduled conformance checks and when the next scheduled conformance check is for all the policies
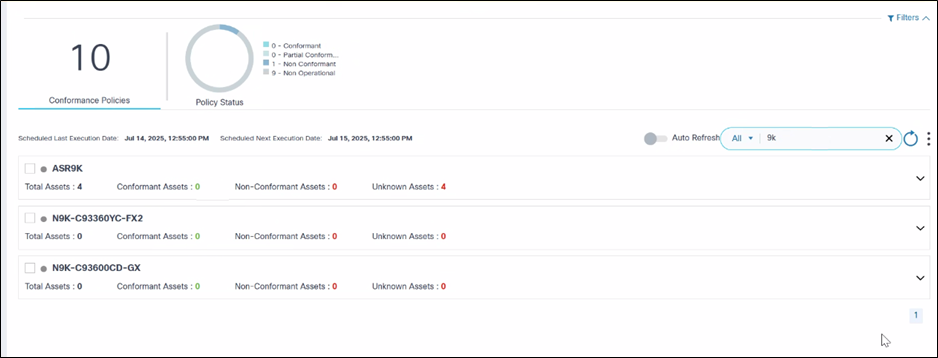
- A Search field which is used to filter policies based on device model, policy name, or all; users can select All to search across all parameters
- An Auto Refresh toggle allows automatic
refreshing of the In-Progress conformance policy at user-defined
intervals when enabled. To enable the toggle:
- Go to OS Upgrade > Settings to change the refresh interval
- Modify the auto refresh interval with a desired value
- Click Save
- Software conformance policy dashboard refreshes at the new interval when the Auto Refresh toggle is enabled
- A Refresh icon to refresh the page and clear the selected filters
- A More Options icon which
provides the following options:
- Create a policy
- Run all policies
- Delete multiple selected policies
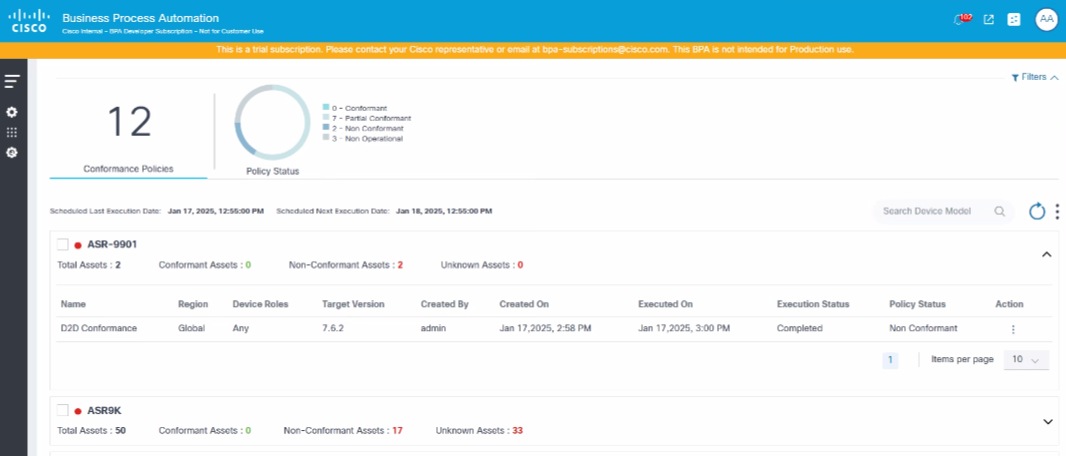
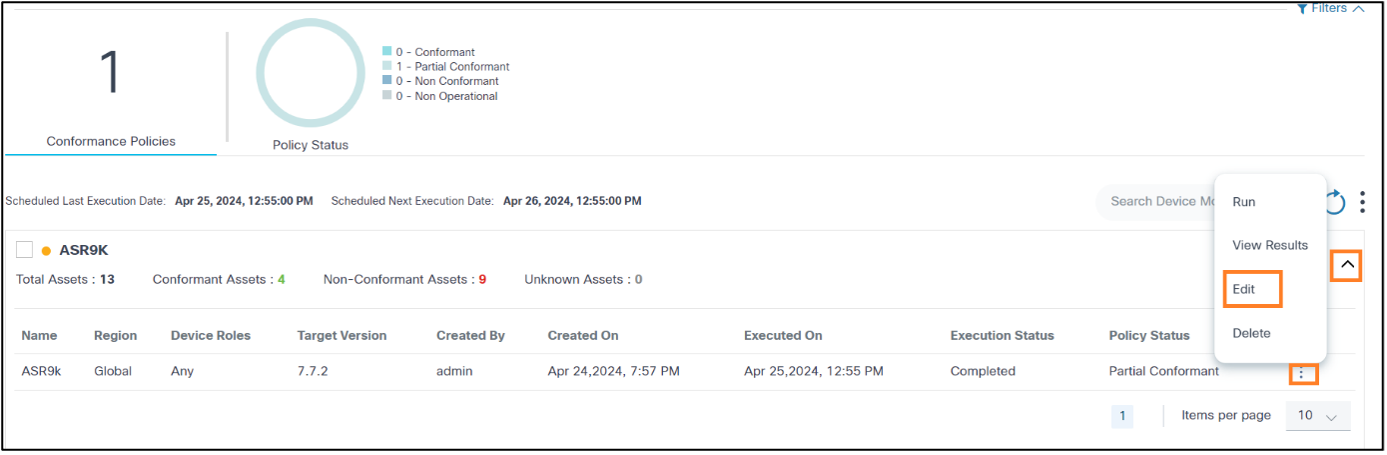
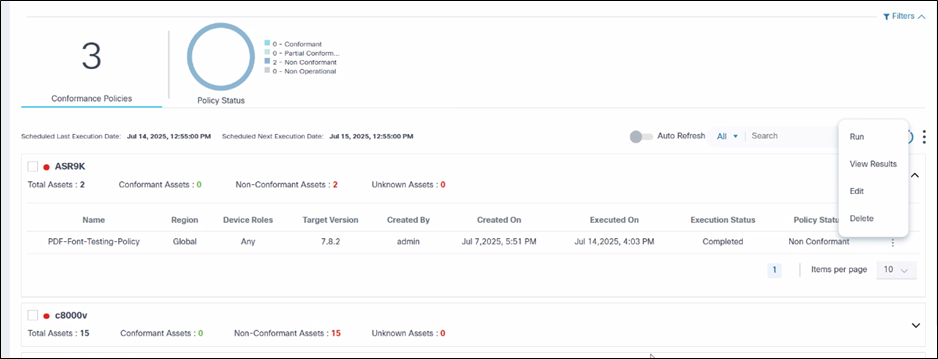
Policies are grouped based on the device models and display as expandable panels to provide a single view across device models managed by different controllers.

In the collapsed view, the panel displays the device model and quick statistics such as Total Assets, Conformant Assets, Non-Conformant Assets, and Unknown Assets.

In the expanded view, all policies related to device model display. For each policy, additional actions, including Run, Edit Policy, View Results, etc., can be performed by selecting the More Options icon from the Action column.
Creating Software Conformance Policies
- Log in to the BPA with credentials that have manage access to Software Conformance.
- Select OS Upgrade > Software Conformance. The Software Conformance page displays.
- Select the More Options icon > Create Policy.
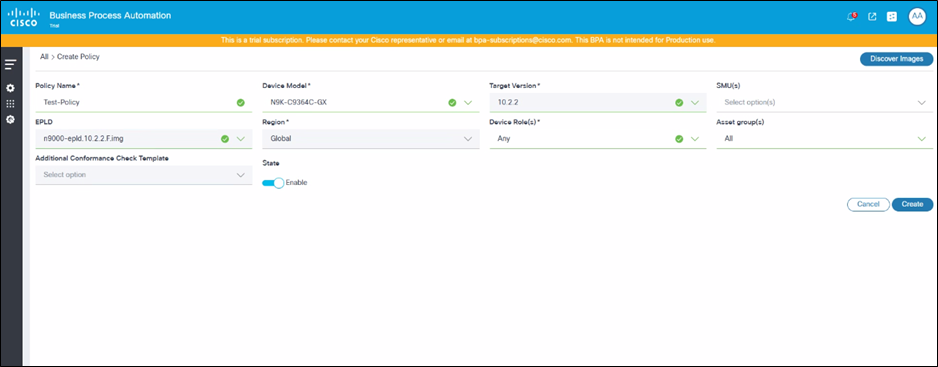
- Enter information into the Policy Name, Device Model(s), Target Version, SMU’s, EPLD, Device Role, Asset Groups, and Additional Conformance Check Template fields. SMU(s), Asset Group(s), and Additional Conformance Check Template are optional fields.
- Click Create. A confirmation displays.
- Use case Administrators have the flexibility to create multiple policies with different device roles for a selected device model. More than one role can be selected in a single policy.
- If Any is selected from the Device Role(s) drop-down list, then all other device roles (e.g., Access, Core, etc.) are disabled. If any other device role is selected, then Any is disabled.
- For devices managed by controllers like CNC, NSO, ANSIBLE, and Direct-to-Device, the Any role (selected from the Device Role(s) drop-down list) can be used to perform the compliance check because the devices do not have role information.
- If Any is selected from the Device Role(s) drop-down list for FMC, then software conformance is executed on all devices, which includes standalone, control, and data devices.
- SMU(s) conformance and upgrades are only supported for CNC, NSO, ANSIBLE, FMC, Direct-to-Device, and NDFC controllers.
- Only Global from the Region drop-down list is supported in this release
- Users can select Asset Group(s) from the drop-down list. All is selected by default. Users have the option to select one or more Asset Groups. If a specific Asset Group is selected, then the policy is only executed against the selected Asset Group’s devices.
- If the expected values for the Device Model, Target Version, and SMU(s) fields are not displayed, click Discover Images and try again.
- The Device Model, Asset Group(s), and Role fields together form a unique policy; duplicate polices are not allowed.
- The EPLD field populates values only when EPLD image metadata is available for selected device model(s) and target version.
- The Policy Name is unique and duplicate policy names are not allowed.
- Process templates that are tagged to OS Upgrade Next Generation (Next-Gen) are displayed in the Additional Conformance Check Template field.
- Locate the created policy by entering the device model in the Search field.

- Click Policy to view the policy’s detail view.
Executing Software Conformance Checks On-demand
- Log in to BPA with credentials that have execute access.
- Select OS Upgrade > Software Conformance. The Software Conformance page displays.
- Locate the policy to be executed on-demand using the Search field.

- From the policy’s Action column, select the More Options > Run. A confirmation displays to validate whether a live inventory check should be performed for the devices.
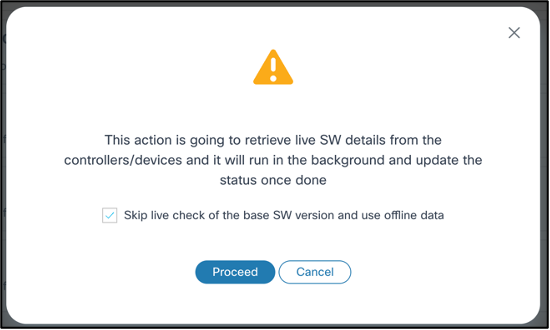
- If a live inventory sync is required before running conformance checks, clear the Skip Live Check of the Base SW Version and use offline data check box and click Proceed. In this case, the conformance check is only executed post-sync. A notification displays on the top right corner.

- A conformance check is performed using asset inventory data by default.
- During this process, if the inventory or device sync fails, the respective policy device is marked as Unknown, and the SMU check is skipped.
- For SMUs, real-time data is retrieved from the device before performing conformance checks whether the Skip Live Check of the Base SW Version and use offline data check box is selected or not.
- When a policy includes multiple device models, executing that policy for a device model initiates the execution of all associated policies.
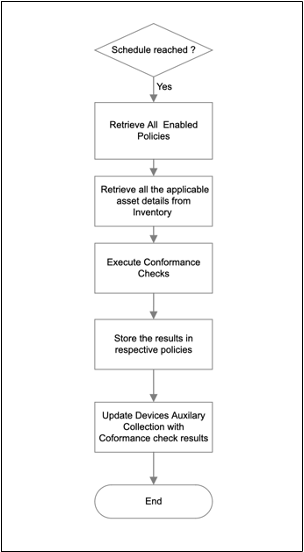
Scheduling the Execution of Software Conformance Checks
Software conformance checks can be performed automatically at regular intervals using the scheduler service. Scheduled conformance checks can be configured to run:
- Daily
- Twice a day
- Weekly
- Once
Once the schedule is reached, all policies in an Enabled state are executed automatically and conformance results are stored in the respective policies.
Refer to Software Conformance for more information.
Updating Software Conformance Policies
- Log in to the BPA with credentials that have Manage access for Software Conformance
- Select OS Upgrade > Software Conformance. The Software Conformance page displays.
- Use the Search field to locate the desired policy.
- From the policy’s Action column, select the More Options icon > Edit.

- Edit the Target Version, SMUs, Device Roles, Controller ID(s), Policy State and Additional Conformance Check Template fields as needed.
- Click Save. A confirmation displays.

Deleting Software Conformance Policies
- Log in to BPA with credentials that have manage access.
- Select OS Upgrade > Software Conformance. The Software Conformance page displays.
- Use the Search field to locate the desired policy.

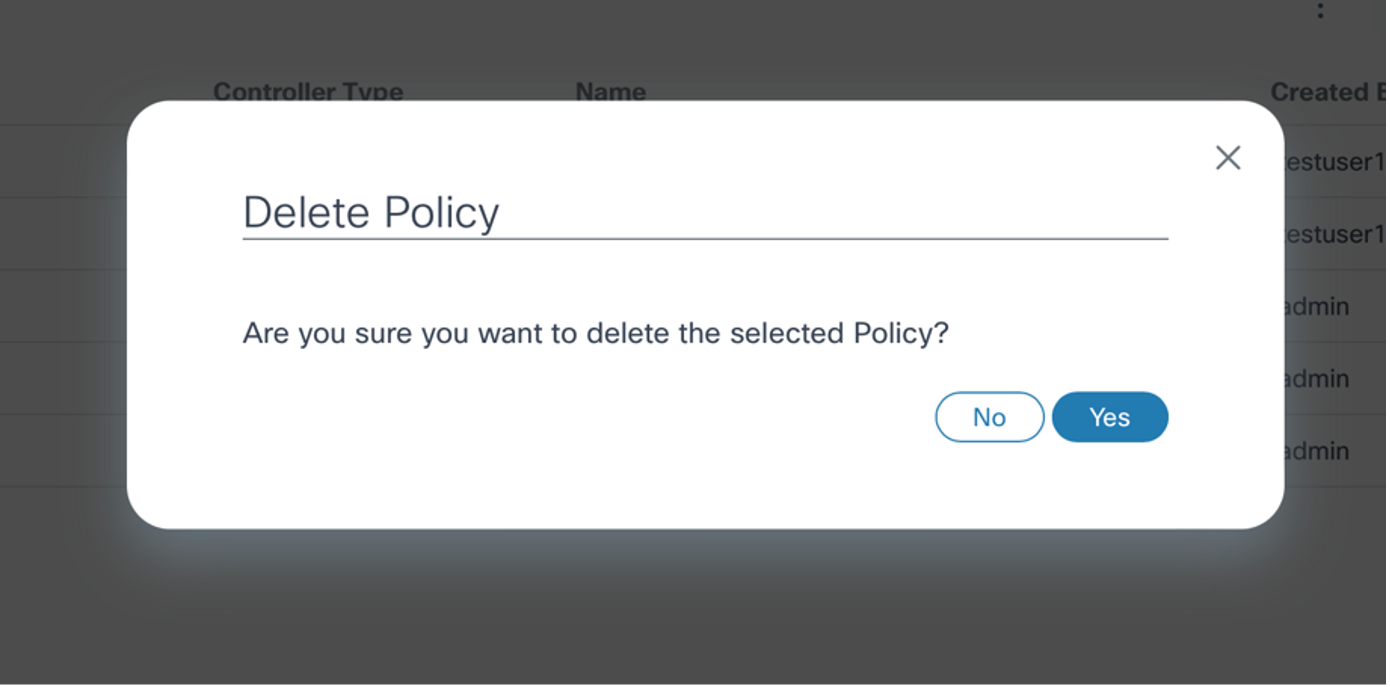
- From the policy’s Action column, select the More Options icon > Delete. A confirmation window opens.
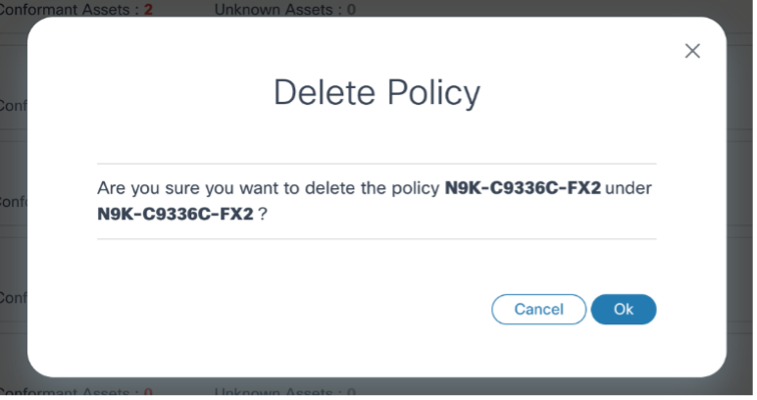
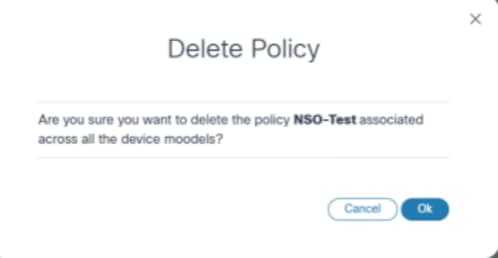
- Click OK. The policy is deleted.
- If a policy is associated with more than one device model, deleting a policy removes all related policies for each associated model.
- When the Software Conformance policy is used for an in-progress Upgrade Job, the policy cannot be deleted.
Viewing and Downloading Conformance Results
Once a policy is executed:
- On the Software Conformance page, select the More Options icon > View Results. The Results page displays where users can view the conformance status of the devices.
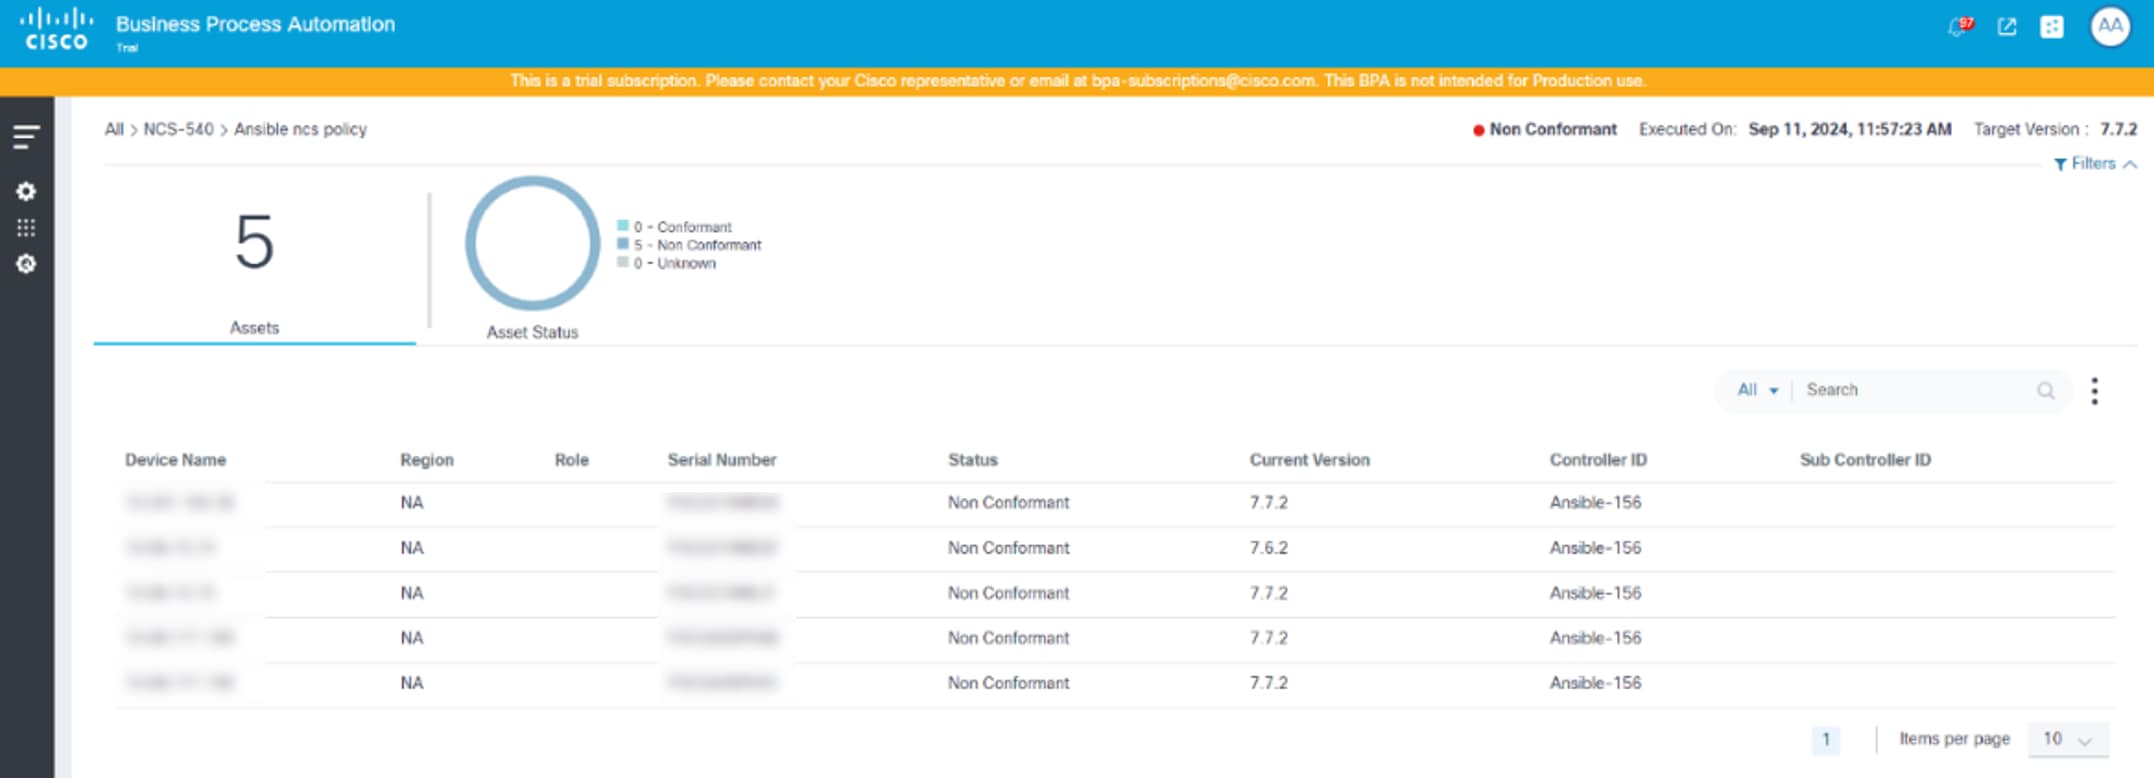
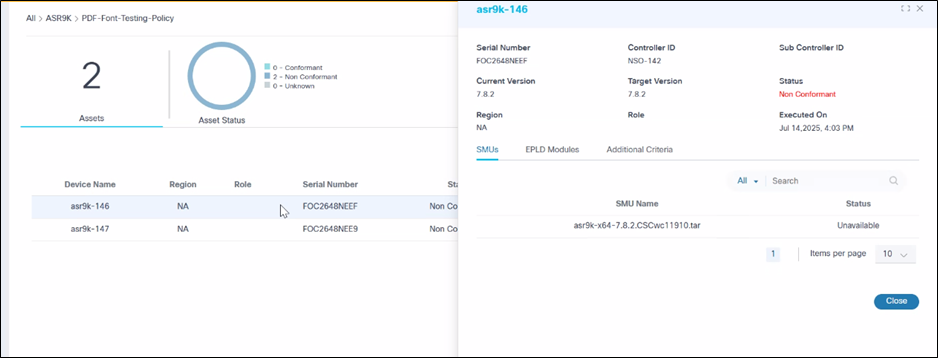
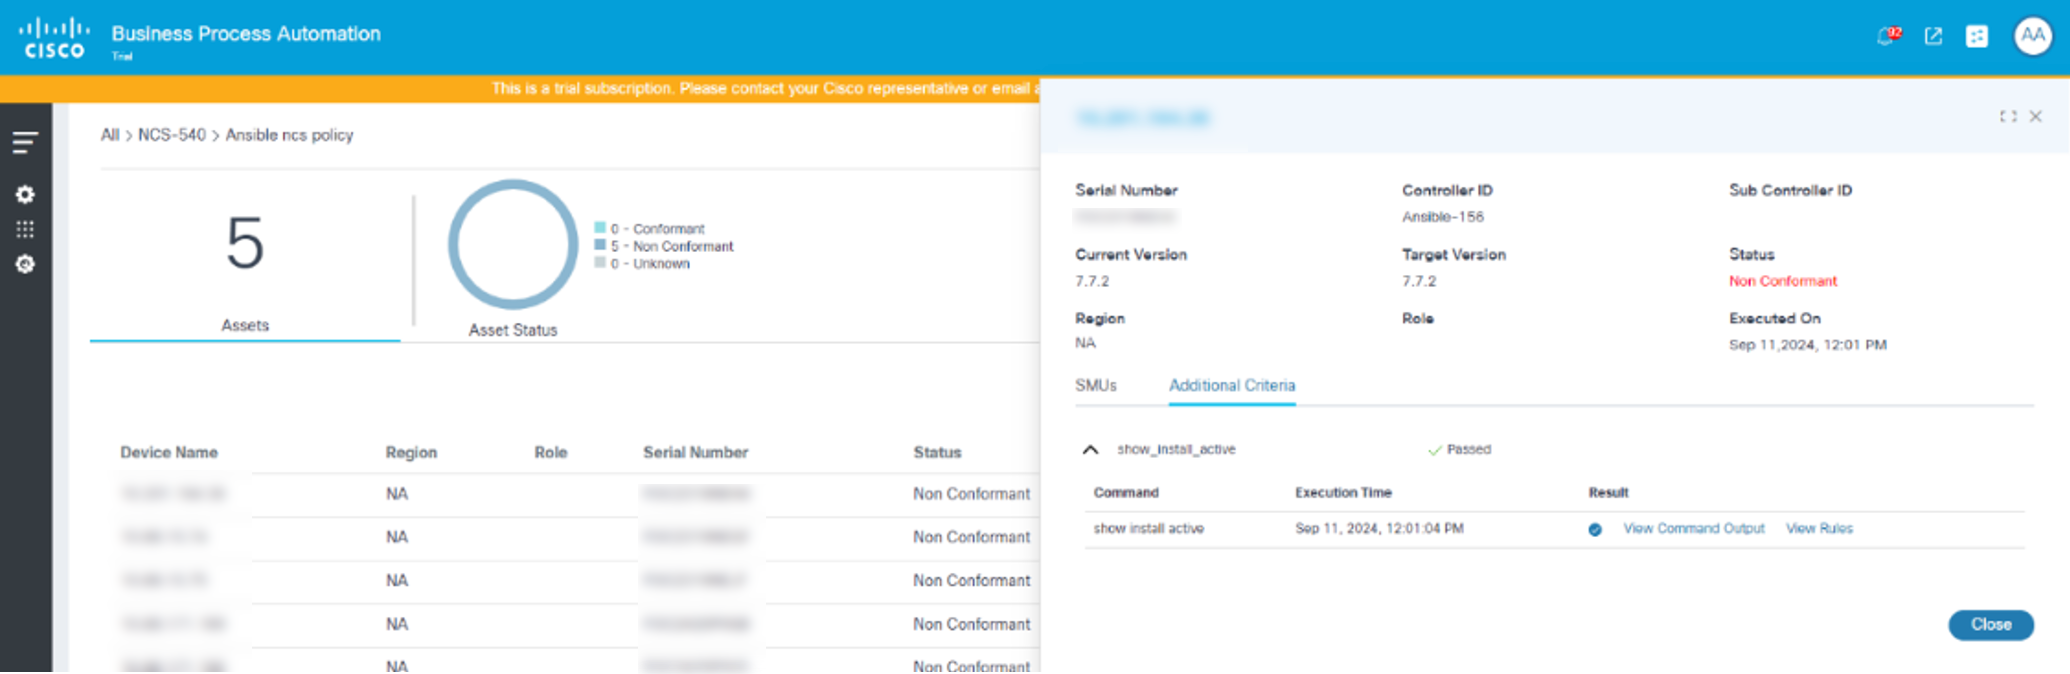
- Select a row to display specific asset details along with the SMU status and additional criteria.
- From a device’s Action column, select the More Options icon > View Results.
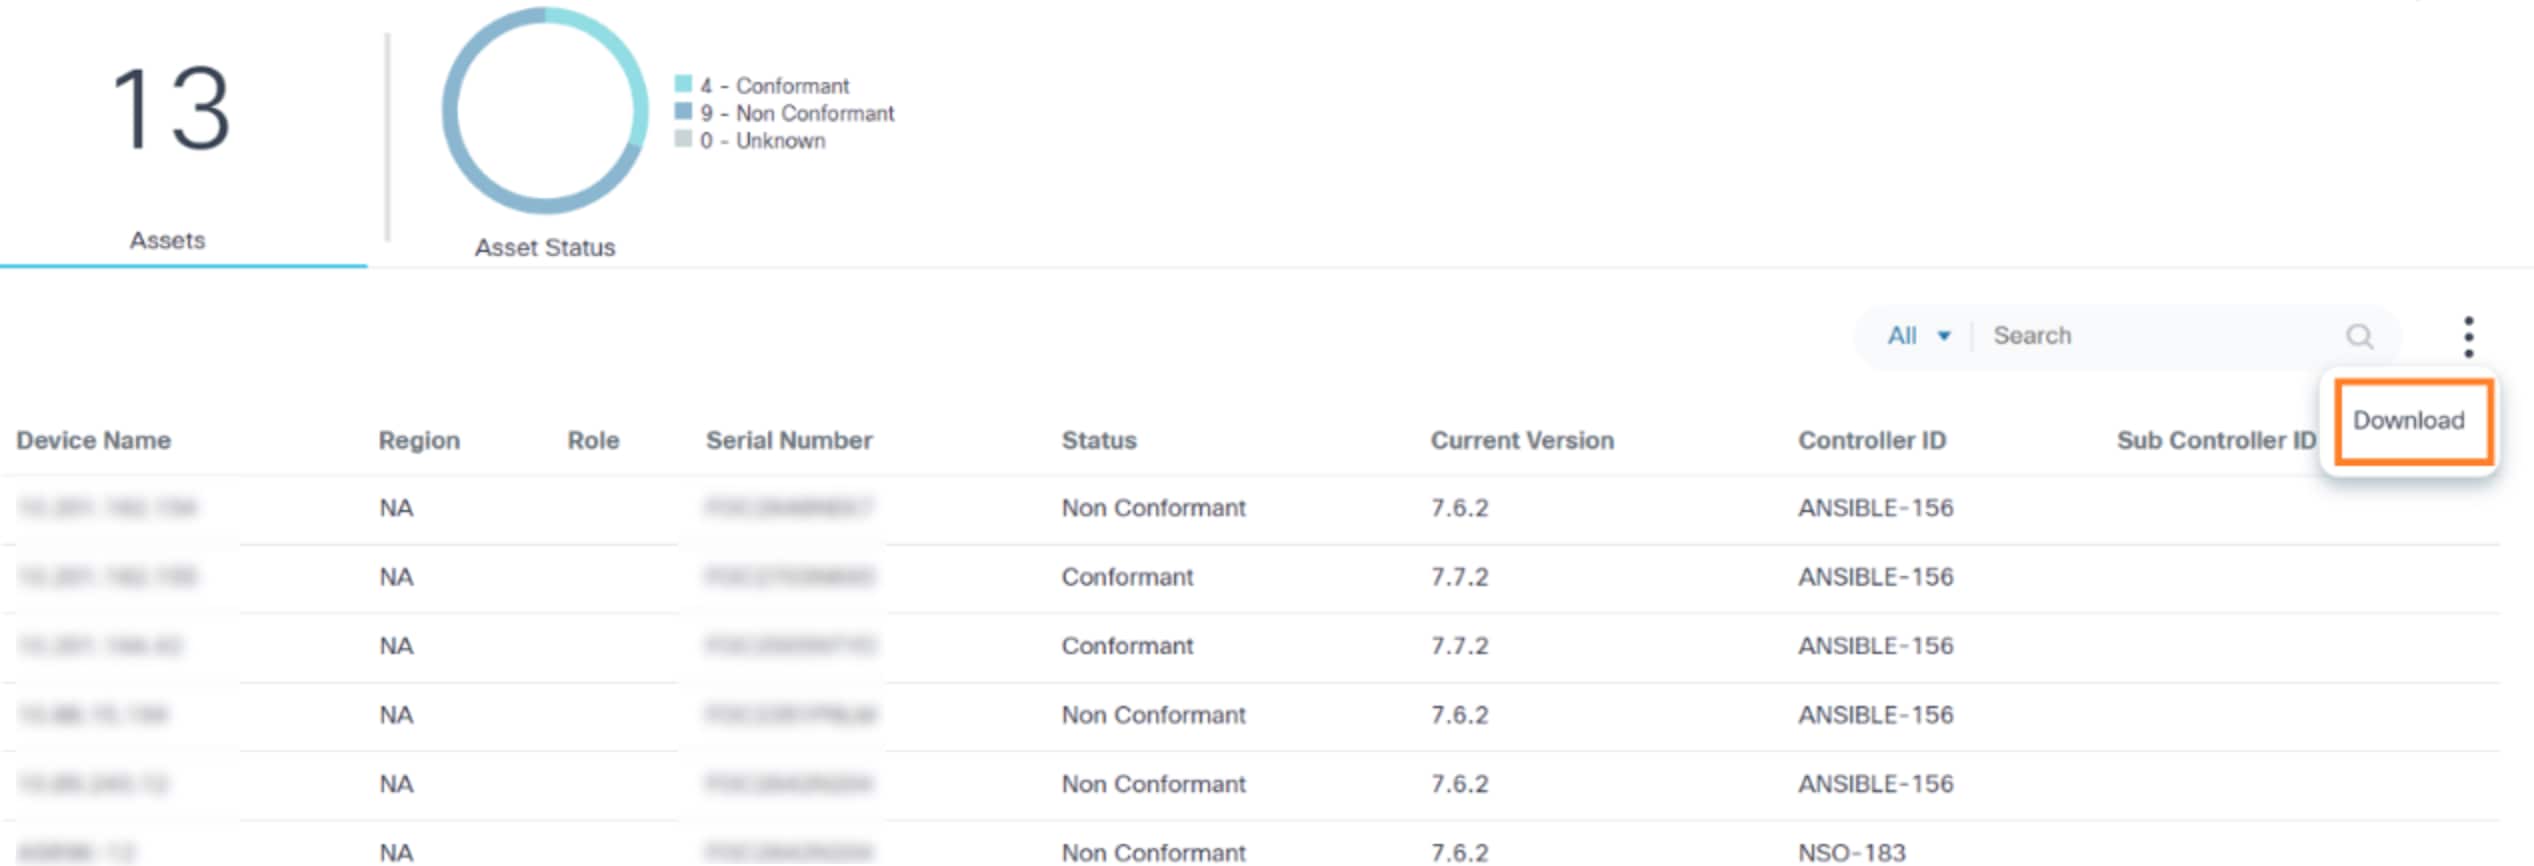
- Select the More Options icon > Download to download the results in .csv format with the SMU availability status.

Possible device statuses:
- Conformant: Indicates the device is conforming to the defined policy
- Non-Conformant: Indicates the device is non-conforming when met with the following conditions:
| Target Version | SMU | Compliance Check | Status |
|---|---|---|---|
| Non-Conformant | NA | NA | Non-Conformant |
| Conformant | Unavailable | Rules Failed | Non-Conformant |
| Conformant | Available | Rules Failed | Non-Conformant |
| Conformant | Unavailable | Rules Success | Non-Conformant |
- Unknown: Indicates the device software conformance check could not be performed because the device does not have current software version information.
Criteria for the Unknown status includes:
| Target Version | SMU | EPLD | Compliance Check | Status |
|---|---|---|---|---|
| Non-Conformant | NA | NA | NA | Non-Conformant |
| Conformant | Unavailable | Non-Conformant | Rules Failed | Non-Conformant |
| Conformant | Unavailable | Conformant | Rules Failed | Non-Conformant |
| Conformant | Available | Conformant | Rules Failed | Non-Conformant |
| Conformant | Available | Non-Conformant | Rules Failed | Non-Conformant |
| Conformant | Unavailable | Conformant | Rules Success | Non-Conformant |
| Conformant | Unavailable | Conformant | Rules Success | Non-Conformant |
Possible SMU statuses:
- Available: Indicates the SMU is present in the device and in an Active state
- Unavailable: Indicates the SMU may not exist or that it does exist but is in an Inactive state
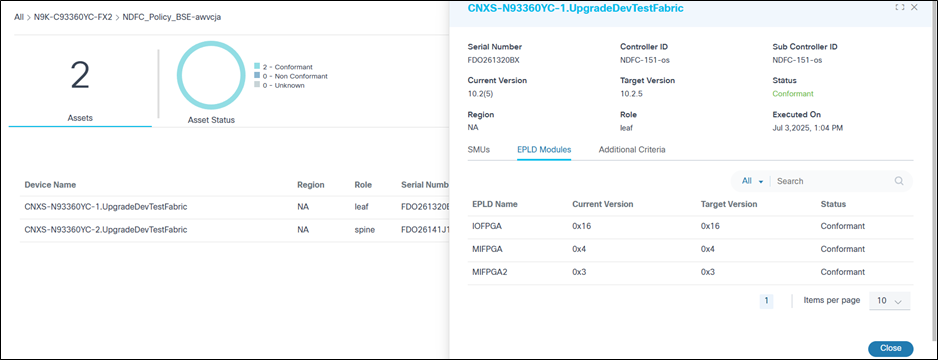
Possible EPLD Module Statuses:
- Conformant: Indicates the EPLD module is present in the device with the expected target version
- Non-Conformant: Indicates the EPLD module is present in the device with unmatched expected target version
- Missing Module: Indicates the EPLD modules are not configured or subscribed in the device
Possible compliance check template statuses:
- Success: Indicates the device successfully executed the process template with valid commands and rules
- Failed: Indicates the device failed to execute the process template (e.g., when commands are incorrect)
- NA: Indicates the device is not eligible to execute the process template (e.g.,when the device is non-conformant with the defined target version)
- Software conformance checks only work with devices belonging to the default tenant
- Software conformance checks rely on the asset inventory as the source of truth for current software versions of the devices. If asset inventory data is stale, software conformance checks results are stale. To avoid the stale data issue, use the live inventory check feature when starting the conformance policy execution
- The default schedule can be changed in OS Upgrade > Settings > Software Conformance
- After upgrading to BPA 5.1, all pre-existing policies are moved to a disabled state; users must edit each policy, select the appropriate values, enable it, and then save the changes for further use
Upgrade Policy
The upgrade policy component supports two types of policies:
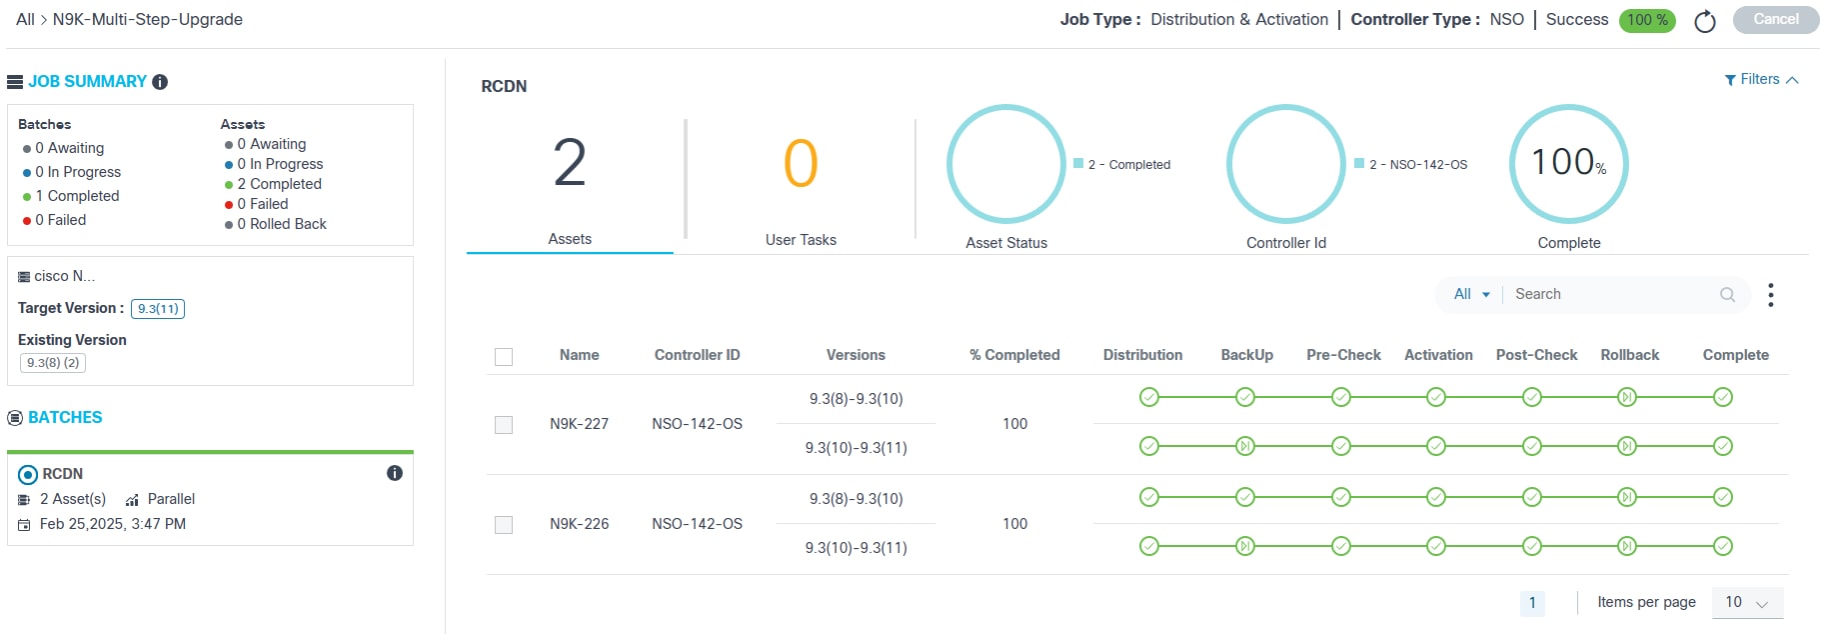
- Single-step policy:
- Any-Any
- <specific source version (7.7.1)> - <specific target version (7.7.2)>
- Multi-step policy:
- v7.7.1 - 7.7.2
- v7.7.2 - 7.7.8
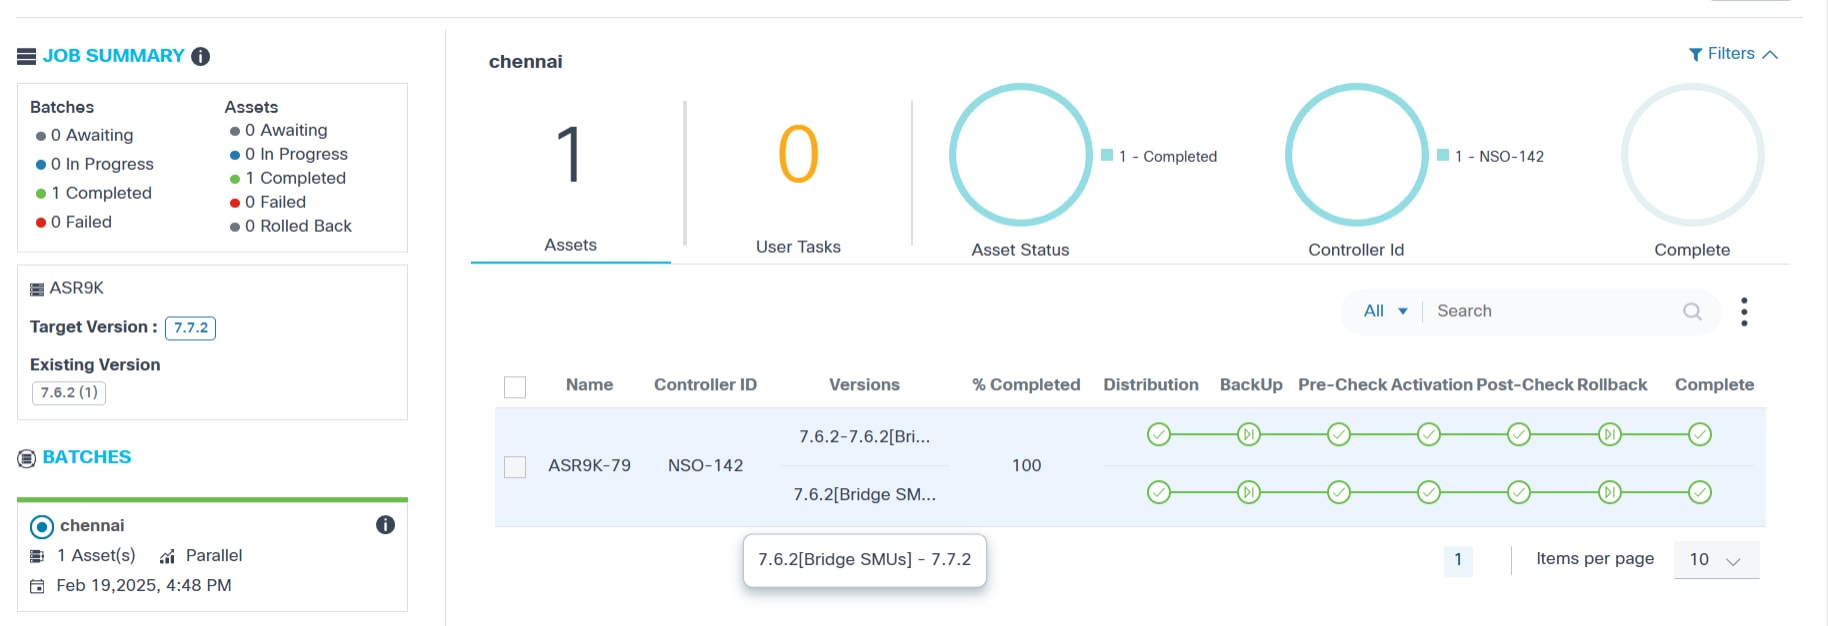
- Multi-step upgrade can include Bridge SMUs, as show in the example
below:
- v7.7.1 - v7.7.1[Bridge SMUs]
- V7.7.1[Bridge SMUs] - 7.7.8
The upgrade policy component provides the flexibility to predefine the following platform-specific artifacts:
- Upgrade paths
- Pre- and post-validation templates or workflows
- Distribution workflow
- Activation workflow
- Backup workflow
- Timeout values
- Rollback workflow
- Valid pre- and post-differences
- Traffic diversion workflow or traffic reversal workflow
Prerequisites
- Required pre- and post-validation process templates or workflows
- Required backup, distribution, activation, and rollback workflows
- Required image metadata
Viewing and Managing Upgrade Policies
To access the Upgrade Policy page:
- Log in to BPA with credentials that have sufficient access to Upgrade Policy.
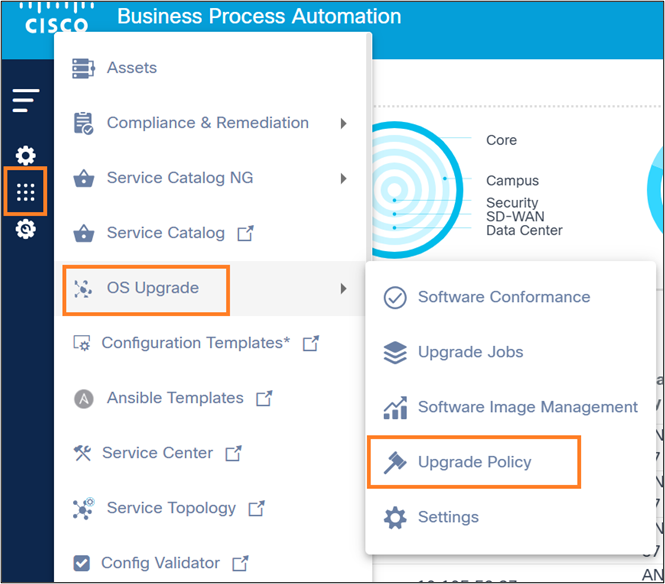
- Select OS Upgrade > Upgrade Policy. The Upgrade Policy page displays.
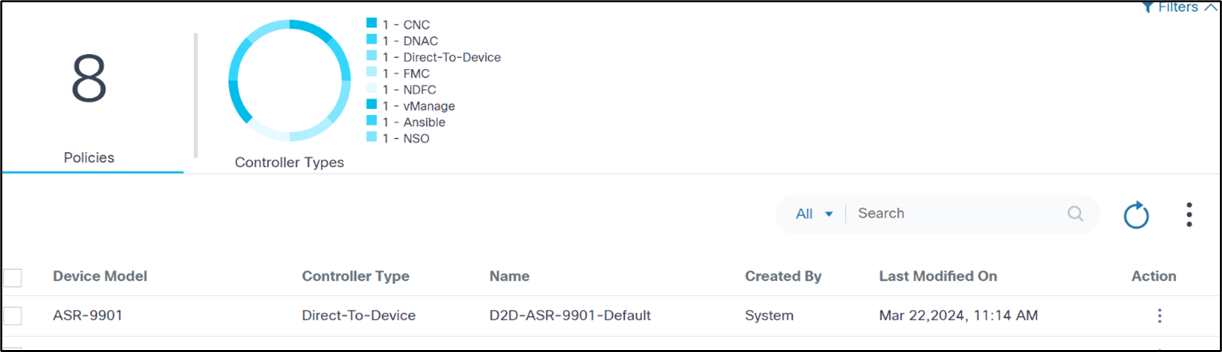
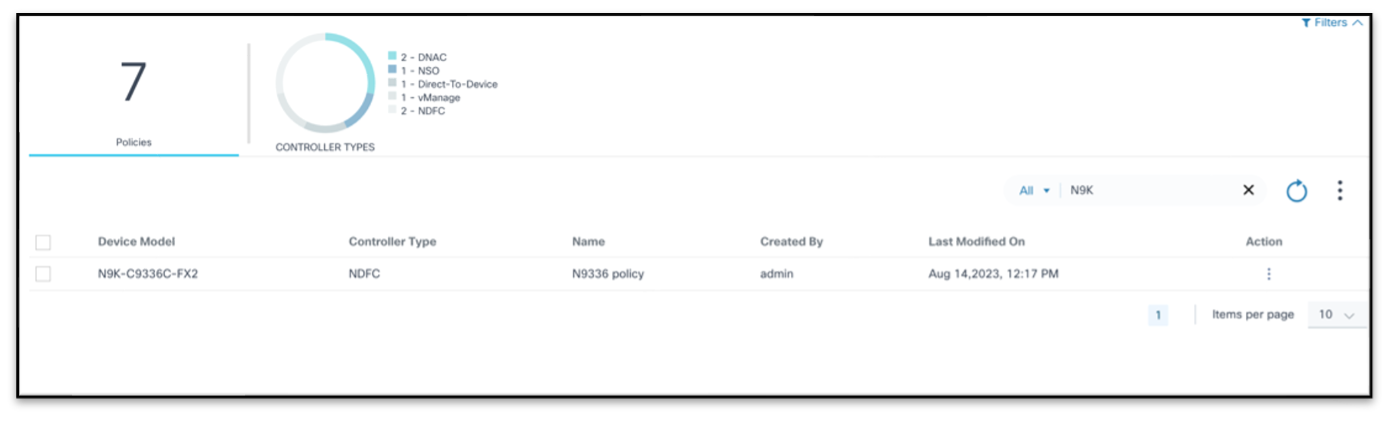
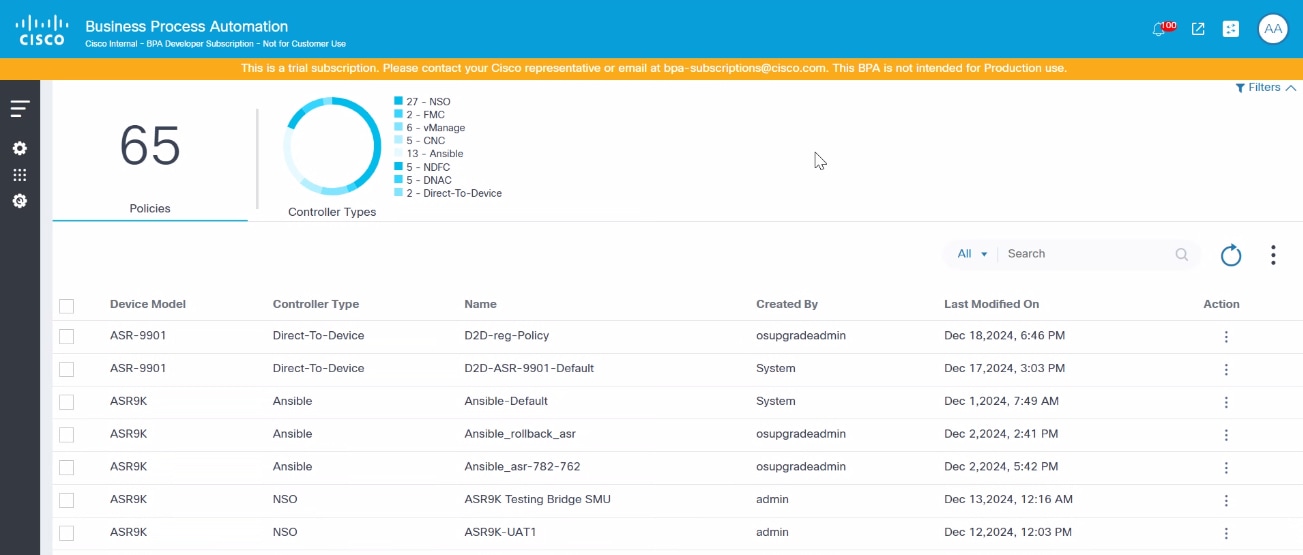
The Upgrade Policy page contains the following:
- An analytics section, displayed at the top, that provides the
following:
- The total number of upgrade policies in the system
- A Controller Types quick filter that provides the ability to filter by type of controller
- A More Options icon which provides the option to Create Policy and bulk processing actions such as Delete All selected policies
- A Search filter to search policies which can be
filtered as follows:
- All: Search across all the fields
- Device Model: Search for policies with a specified model
- Name: Search for policies with a specified policy name
- Created By: Search for policies with a specified user
- Sort policies by clicking the respective column names or table fields
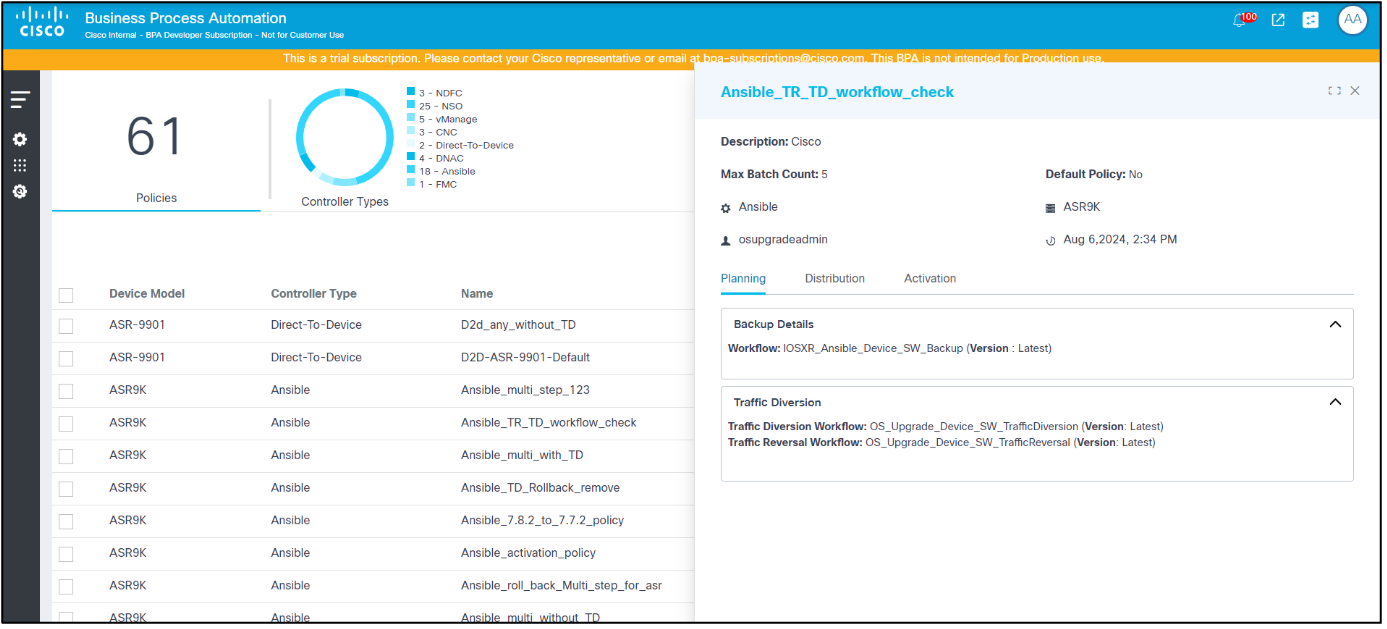
- Clicking a particular policy or row a policy’s detail view
Creating Upgrade Policies
- Log in to BPA with credentials that have manage access for Upgrade Policies.
- Select OS Upgrade > Upgrade Policy. The Upgrade Policy page displays.
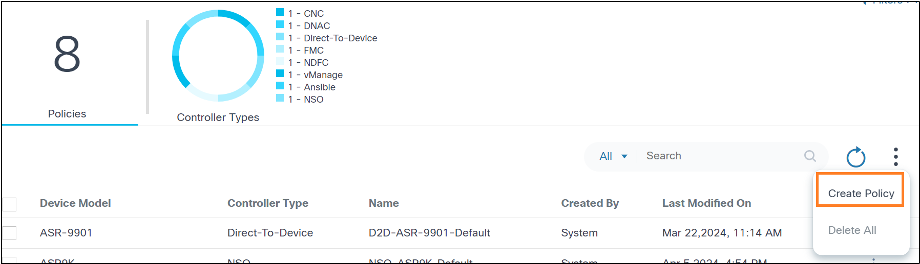
- Select More Options > Create Policy. The Create Upgrade Policy page displays.
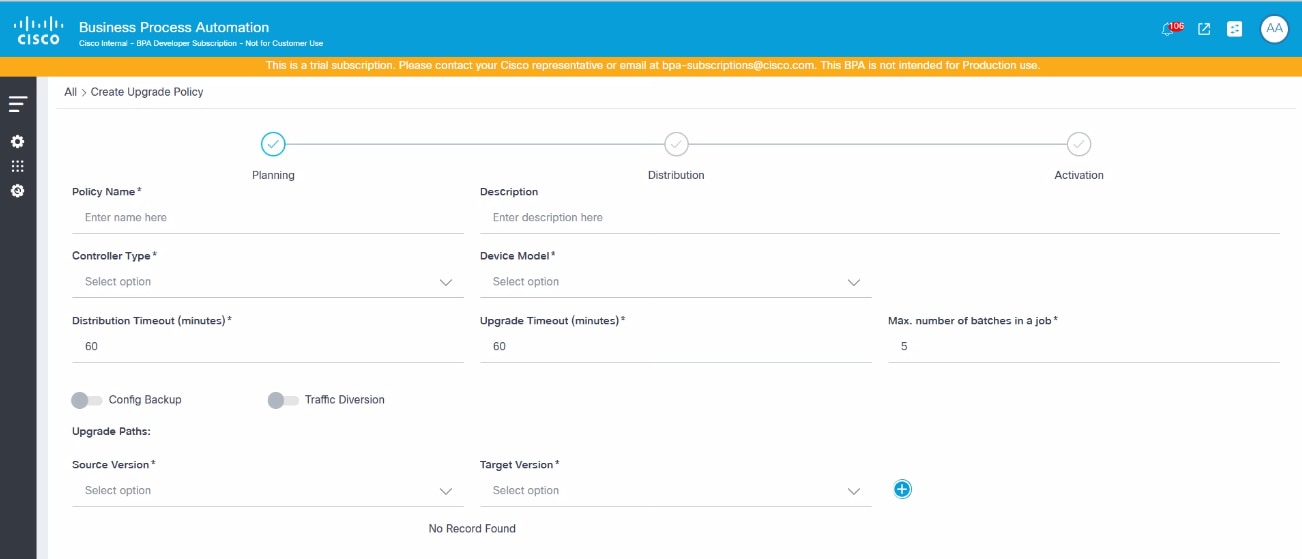
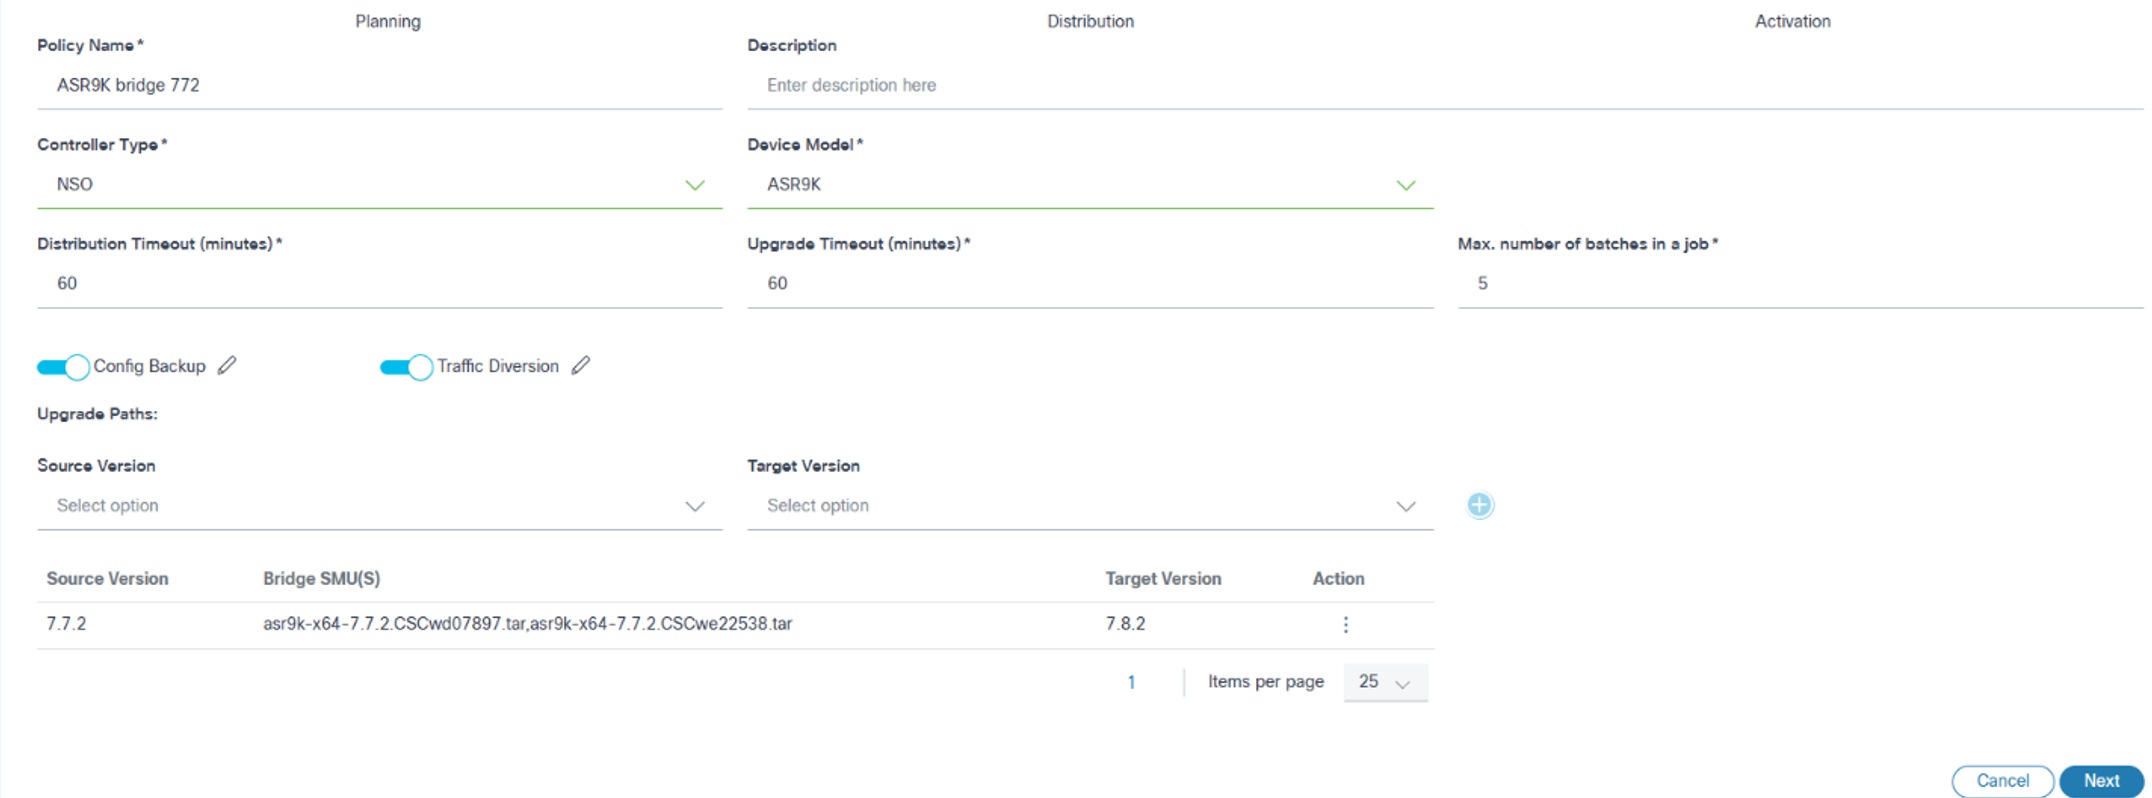
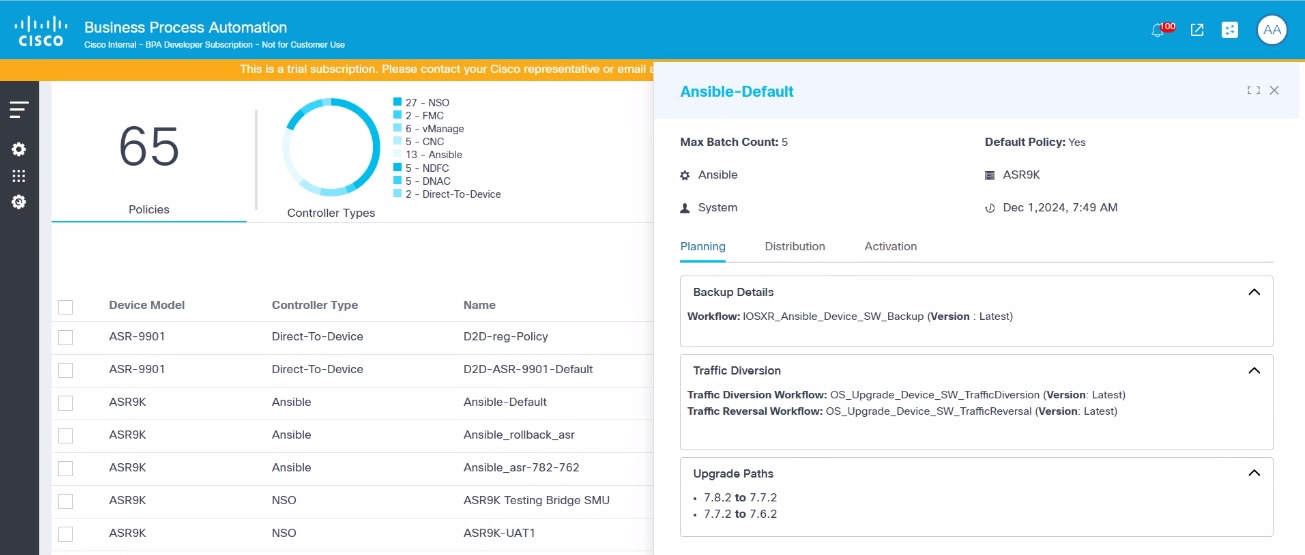
Planning
- Configure the parameters related to the overall policy. The table below provides a brief description of each field.
| Field | Description |
|---|---|
| Policy Name | Name of the policy |
| Description | Brief description of the policy |
| Controller Type | Appropriate controller which is used to perform the OS upgrade |
| Device Model | Device model which is used to perform the OS upgrade |
| Distribution Timeout(minutes) | Maximum wait time in minutes for the image distribution activity |
| Upgrade Timeout(minutes) | Maximum wait time in minutes for the image activation activity |
| Maximum number of batches in a job | Number of batches that can be added in a job; the maximum number of batches allowed is 20 |
| Config Backup Toggle | Enable this toggle if backup is required and complete the following
fields in the window for vManage and Direct-to-Device
controllers: - Workflow Name: The applicable backup workflow Note: If the workflows cannot be found, then ensure that the workflows are properly tagged with the OS Upgrade NextGen tag - Use latest workflow: If selected, the latest version of the selected workflow is used - Workflow Version: The custom workflow version; can only be selected if Use latest workflow is not selected. For NDFC, NSO, CNC, and Cisco Catalyst Center controllers, backup is taken via the Backup and Restore service. Therefore, a backup and restore policy must be selected in Backup details window. Note: Users must select the appropriate policy for the controller type. Refer to the Backup and Restore section for more information on backup and restore policies. To enable backup for Nexus devices, feature scp-server configuration must be present on the target devices. |
| Traffic Diversion Toggle | Enable this toggle if traffic diversion is required and complete the
following fields in the Traffic Diversion
window: - Traffic Diversion Workflow: The applicable traffic diversion workflow. Note: If the workflows cannot be found, then ensure that the workflows are correctly tagged with the OS Upgrade NextGen tag - Traffic Reversal Workflow: The applicable traffic reversal workflow. Note: If the workflows cannot be found, then ensure that the workflows are correctly tagged with the OS Upgrade NextGen tag - Use latest workflow: The latest version of the above selected workflow - Workflow Version: The custom workflow version; can only be selected if Use latest workflow is not selected |
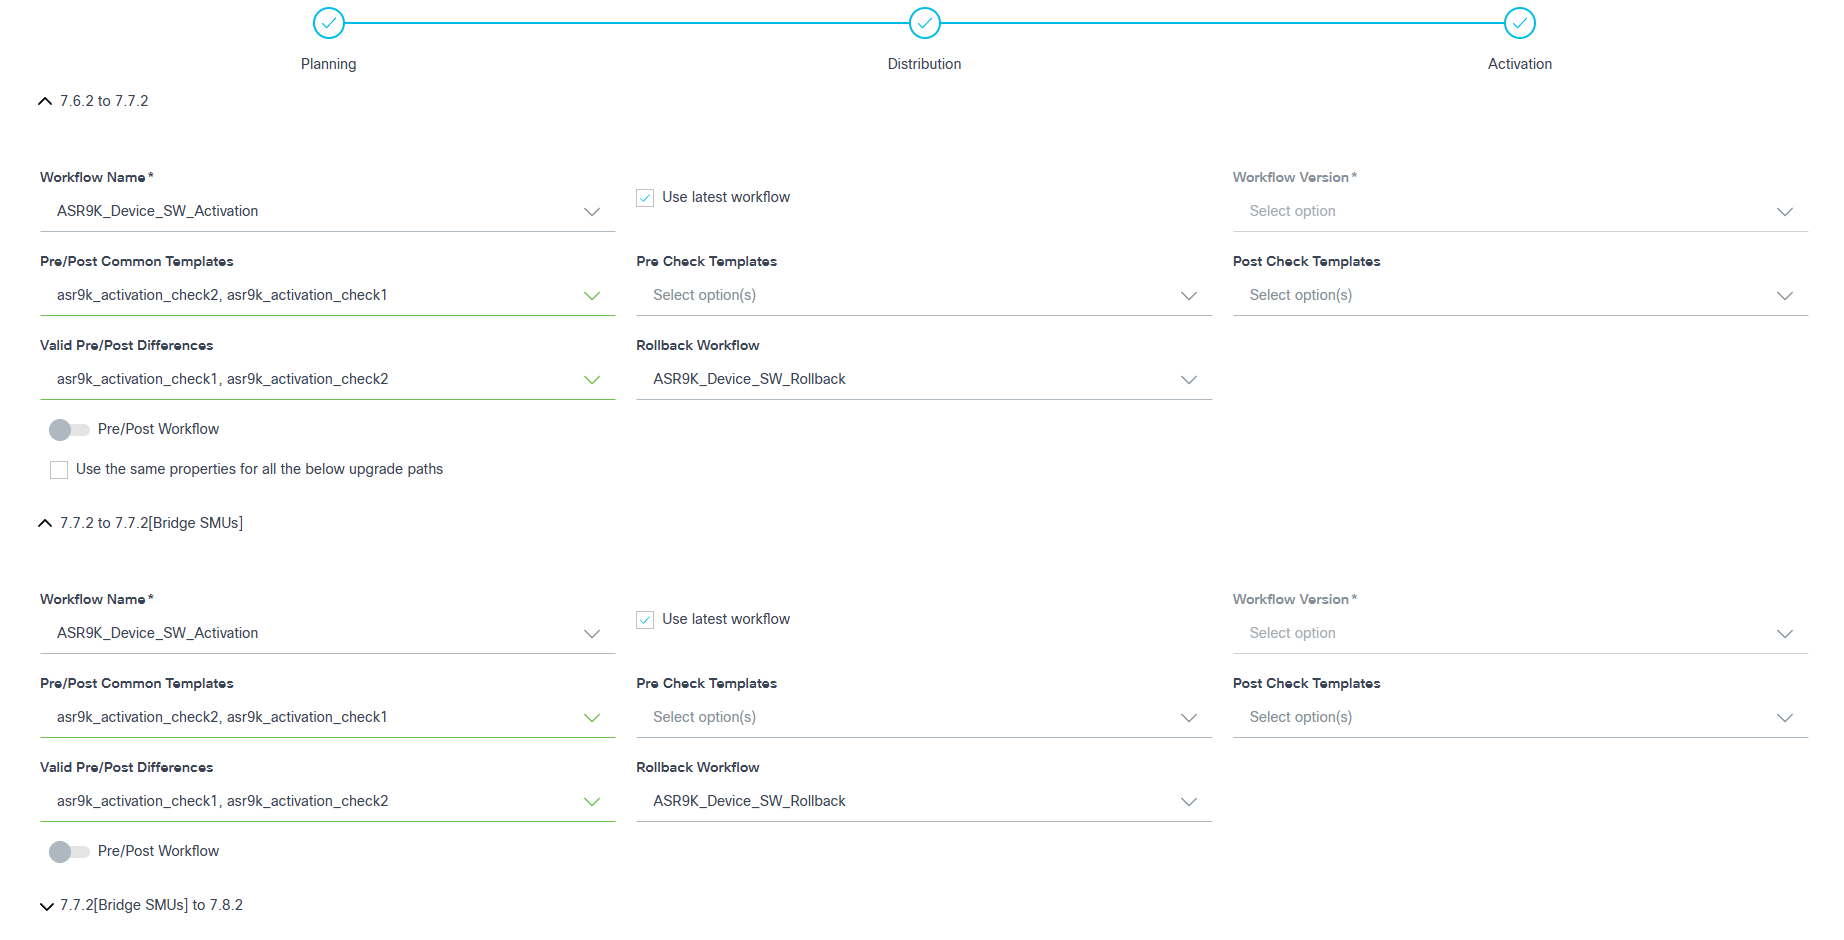
| Upgrade Paths | The upgrade paths define applicable step upgrade paths; multiple
source, and target versions can be added in the following fields to
accommodate varying demands - Source Version: The start version of the upgrade path - Target Version: The end version of the upgrade path - Source Version (Any) to Target Version (Any): This is made available by selecting Any for both the Source Version and Target Version fields, which is the default value for all device models; in this scenario, the Distribution and Activation pages provide a unified process for the upgrade - Source Version (Specific Version) to Target Version (Specific Version): This is made available by selecting specific image versions available for the device model; multiple source and target versions can be added; the number of distribution and activation upgrade process inputs matches the number of source and target versions added, and each is presented as a collapsible section that is labeled with the corresponding source and target versions. An upgrade path requires mandatory SMUs to be applied on the source version before upgrading to the target version by adding them as Bridge SMUs to the respective upgrade path. For more details regarding Bridge SMUs, refer to the next section. |
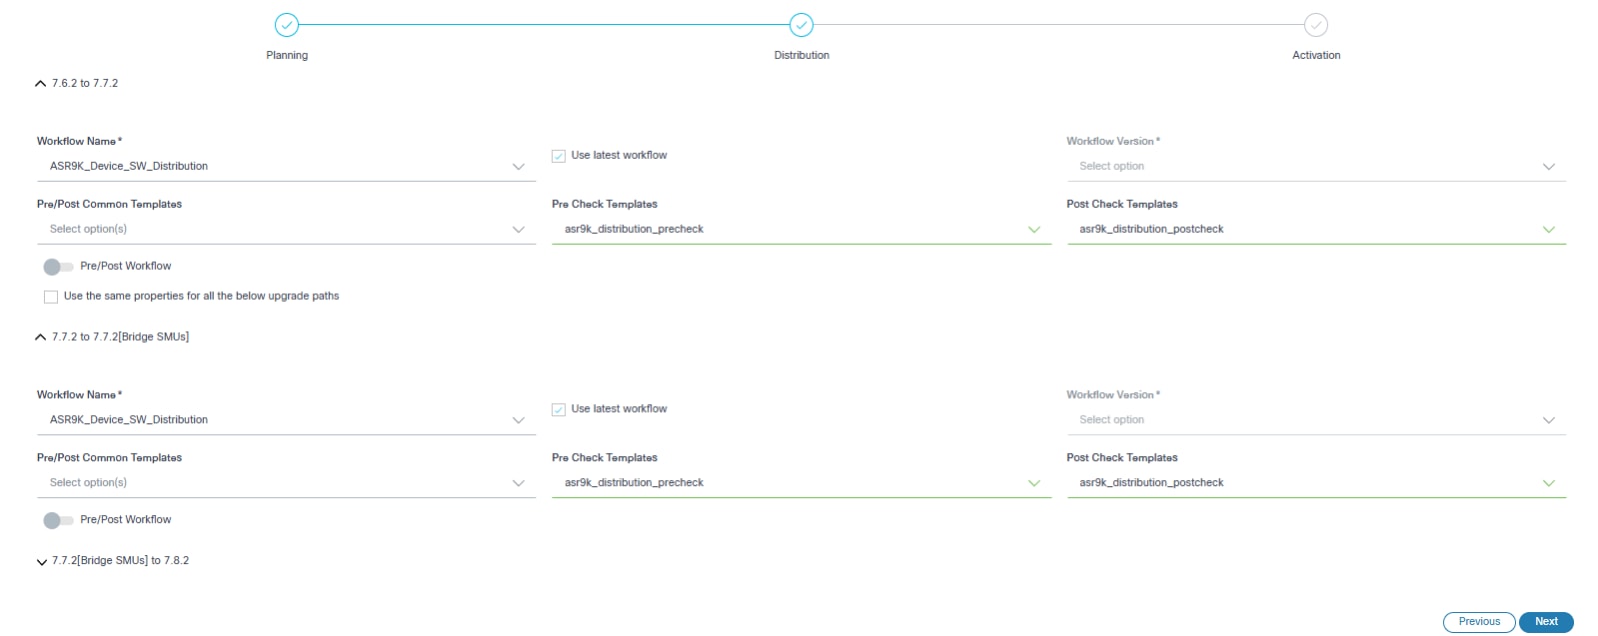
Bridge SMUs
Bridge SMUs, also called mandatory upgrade or downgrade SMUs, are a prerequisite and required to be installed before upgrading or downgrading to another software release of the same platform or model.
Adding Bridge SMUs in an Upgrade Path
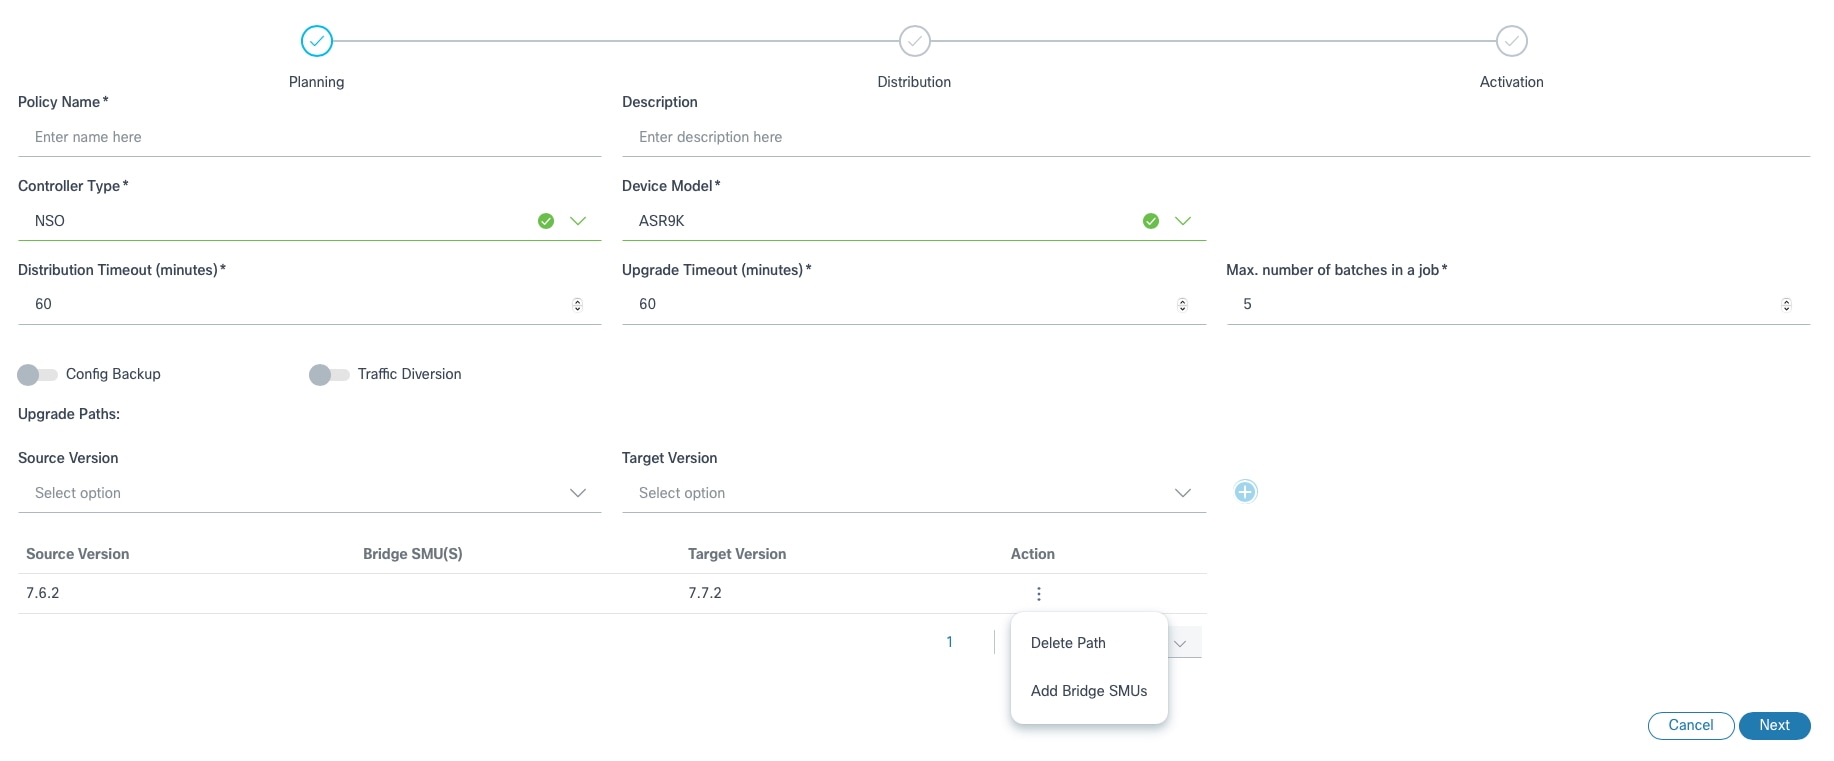
- After adding an Upgrade Path, select the More Options icon. The Delete Path and Add Bridge SMUs options display.

- Select Add Bridge SMUs. The Add Bridge SMUs window opens. All available Bridge SMUs display for the specified upgrade path.

- In the Add Bridge SMUs window, select the appropriate check box(es) to add Bridge SMUs or clear the check boxes to remove them. After adding the Bridge SMUs, the upgrade path updates with the selected Bridge SMU details.
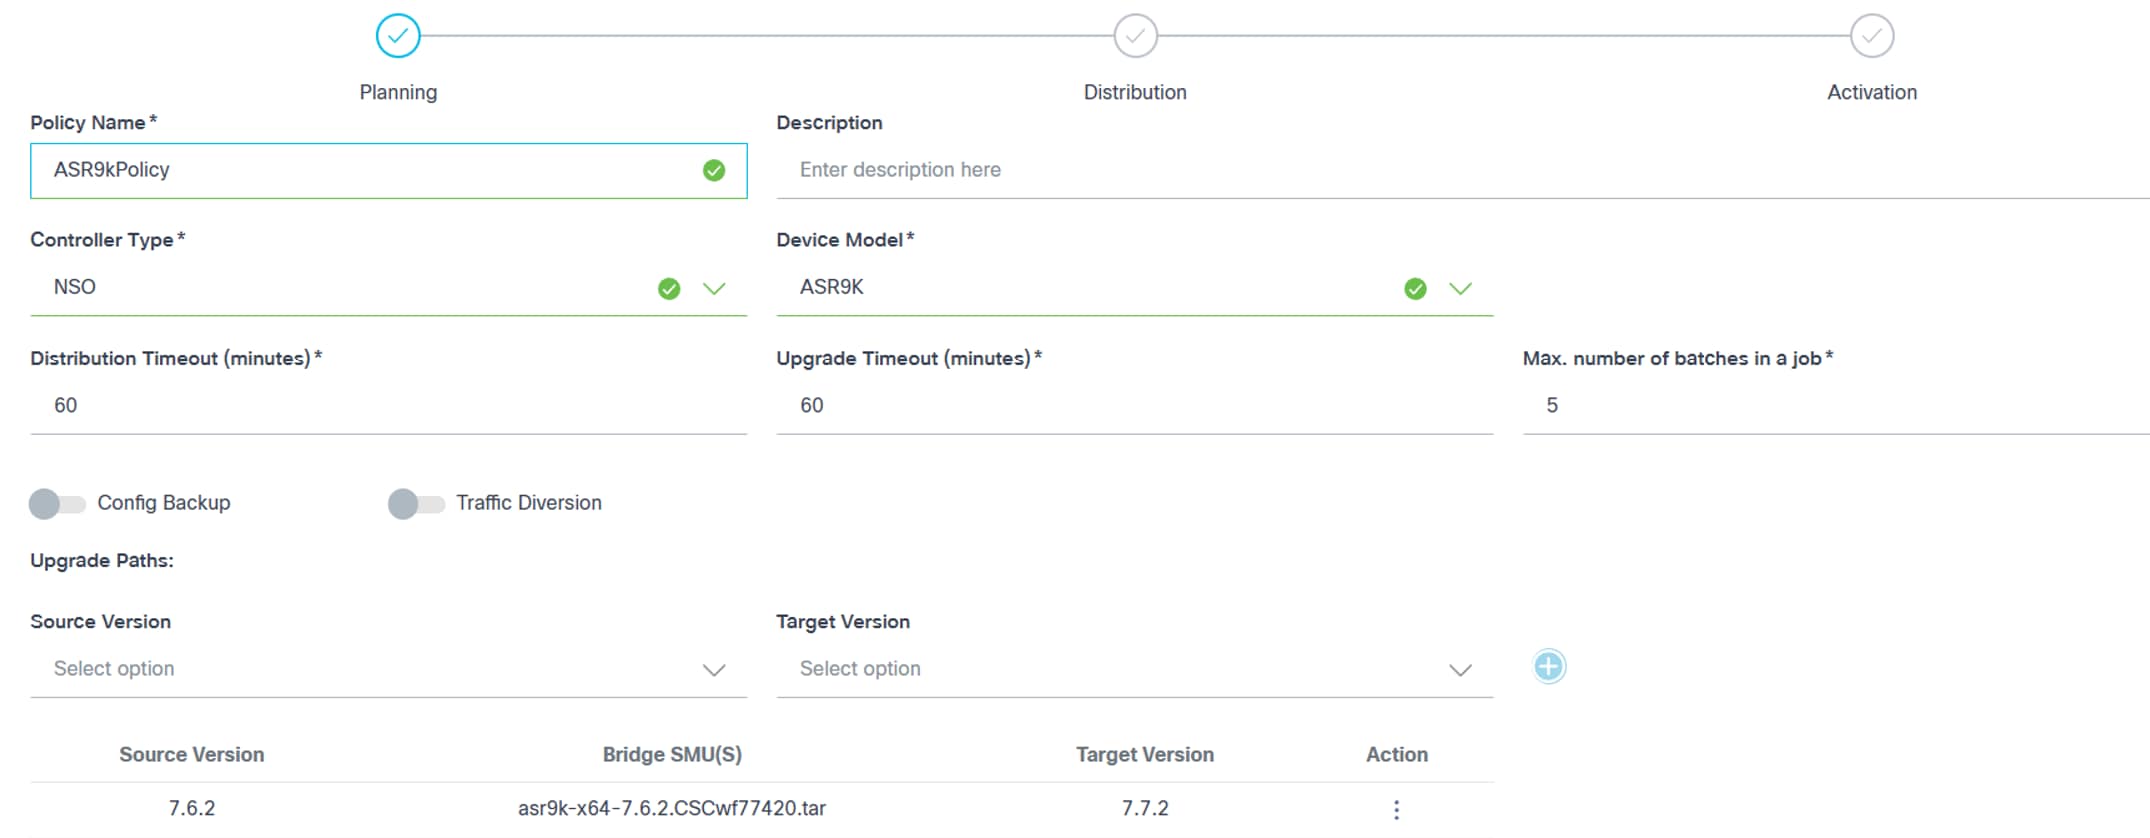
- 7.6.2 – 7.6.2 [Bridge SMUs]
This path represents updating the device running on v7.6.2 with the Bridge SMUs.
- 7.6.2 [Bridge SMUs] – 7.7.2
This path represents upgrading the device from v7.6.2 to v7.7.2. In this case, the source version of the device is 7.6.2 including the Bridge SMUs applied to it.
Editing Bridge SMUs
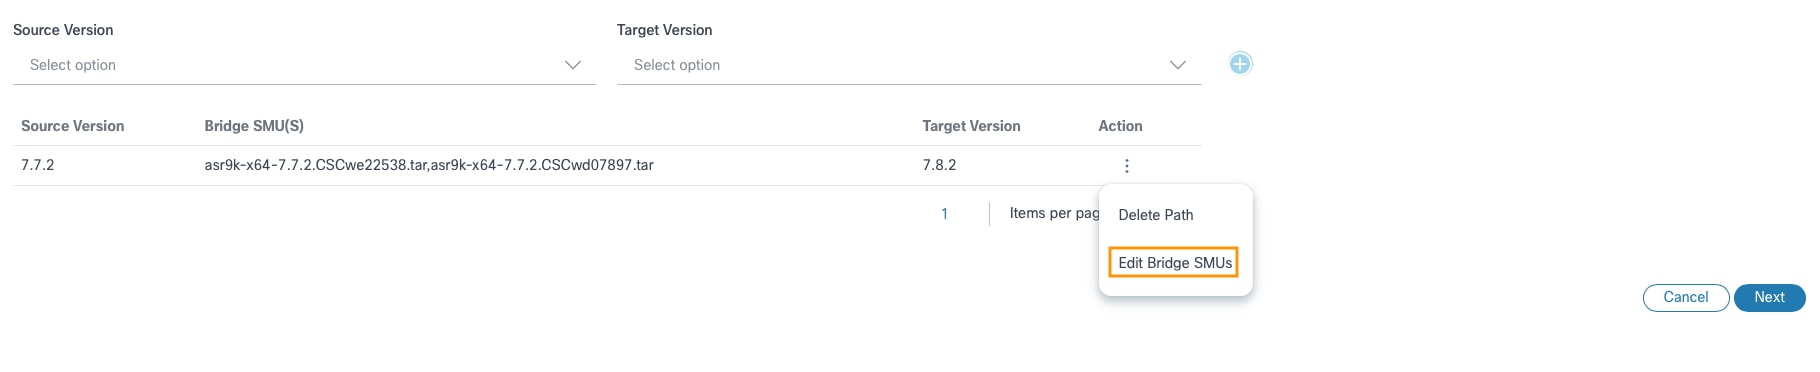
- In the Upgrade Paths section, select the More Options icon > Edit Bridge SMUs. The Edit Bridge SMUs window opens.
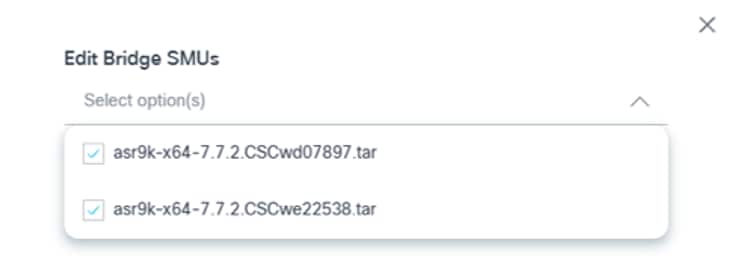
- Select or clear the appropriate check boxes to update the Bridge SMUs.
- Click Ok. A summary of the changes display.
- Verify the summary of changes and click Next.
Deleting Bridge SMUs
- In the Upgrade Paths section, select the More Options icon > Edit Bridge SMUs. The Edit Bridge SMUs window opens.
- Clear the appropriate check boxes to remove Bridge SMUs.
- Click Ok. A summary of the changes display.
Distribution
Distribution takes input parameters related to Image Distribution (i.e., image copy). The following images are the required input parameters for each upgrade path type.
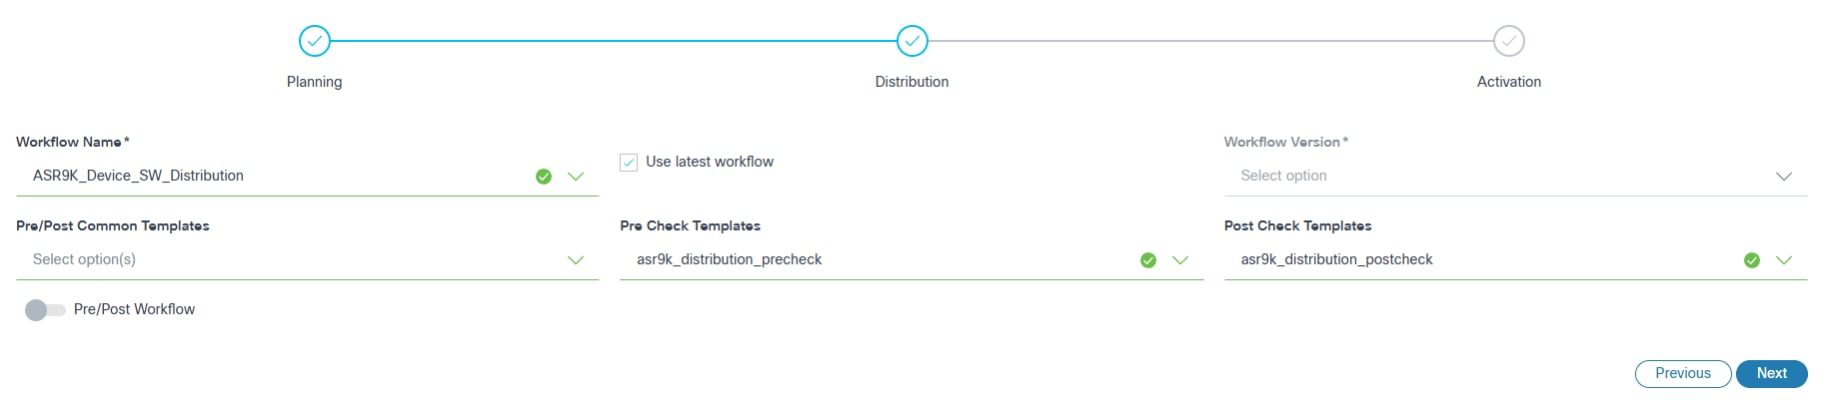
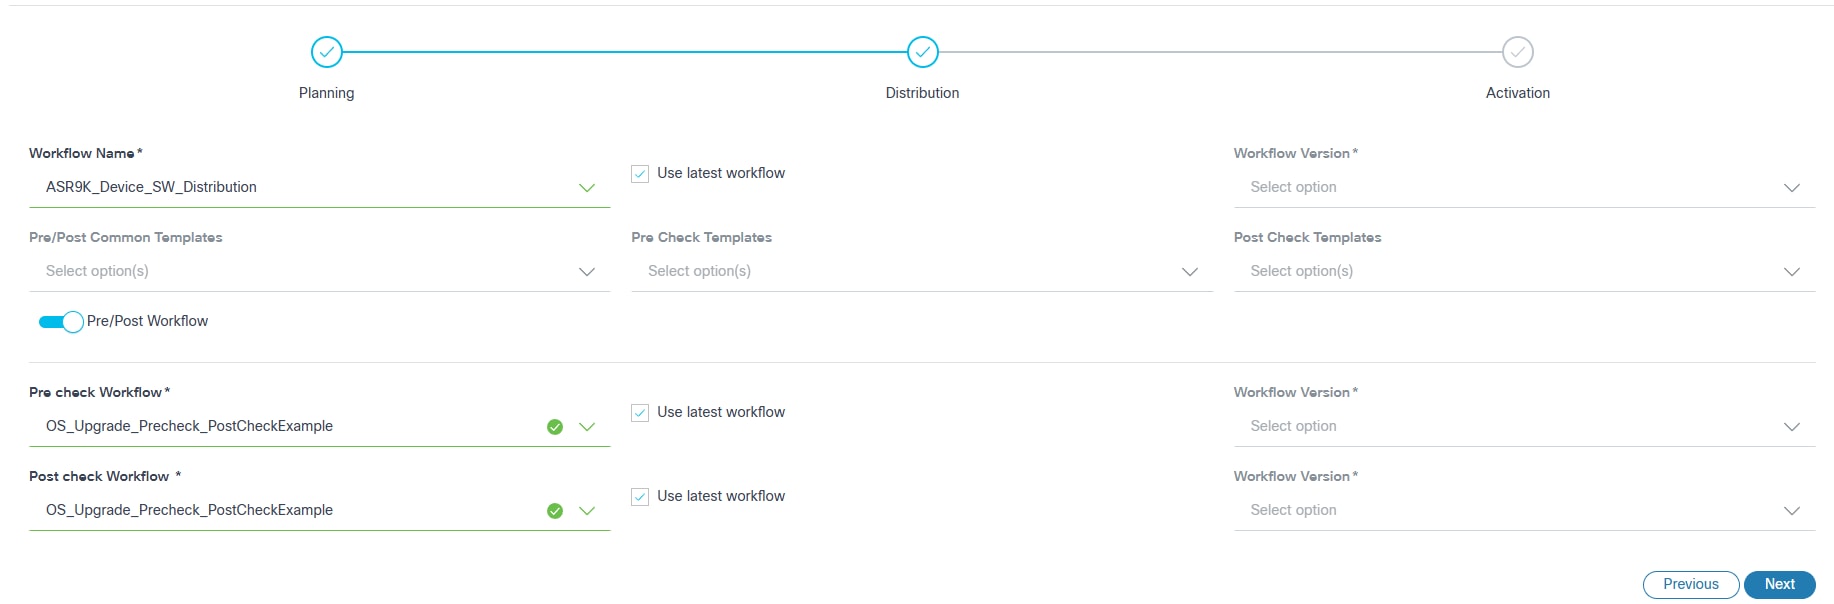
- Configure the parameters related to image distribution.
- The following table provides a brief description of each field.
| Field | Description |
|---|---|
| Workflow Name | The applicable distribution workflow |
| Use latest workflow | Select the latest version of the selected workflow |
| Workflow Version | The custom workflow version; this can only be selected if Use latest workflow check box is not selected |
| Pre/Post Common Templates | The process templates that are executed in both stages (i.e.,
pre-check and post-check) Note: Checks are only specific to the Distribution Milestone. Refer to the Process Templates for more information |
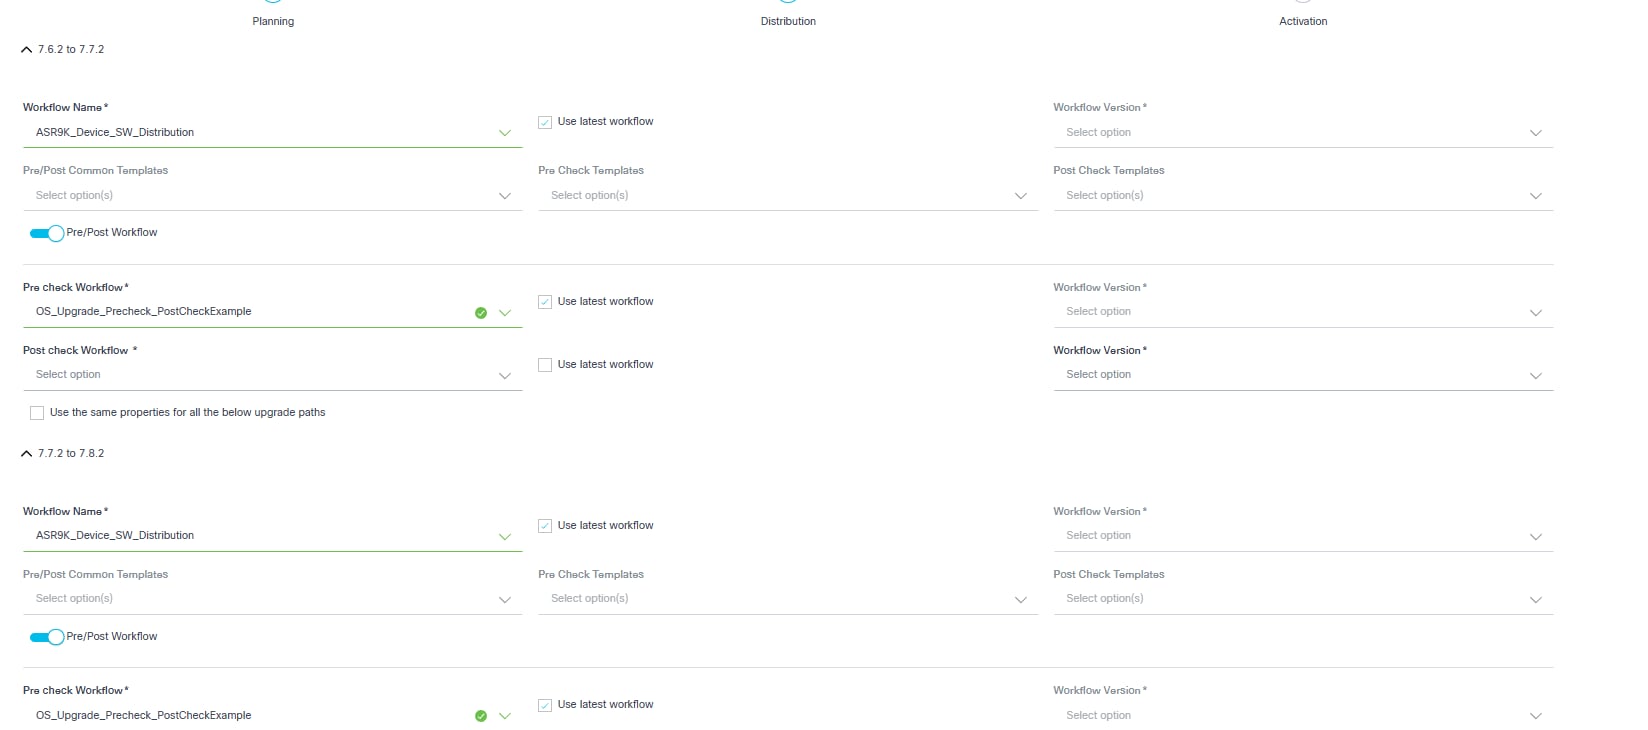
| Pre/Post Workflow Toggle | Allows users to select the execution of pre- or post-check workflows within the Distribution Milestone. When the toggle is turned on, only pre- or post-check workflows can be configured. |
| Pre-Check Workflow | Includes the commands executed solely during the pre-check stage.
Note: These checks are specific to the Distribution Milestone. |
| Post-Check Workflow | The Post-Check Workflow comprises the commands uniquely executed
during the post-check stage. Note: These checks are specific to the Distribution Milestone. |
| Pre-Check Templates | The process templates which contain exclusive pre-check commands;
templates are only executed during the pre-check
stage. Note: Checks are only specific to the Distribution Milestone. |
| Post-Check Templates | The process templates which contain exclusive post-check commands;
templates are only executed during the post-check
stage. Note: Checks are only specific to the Distribution Milestone. |
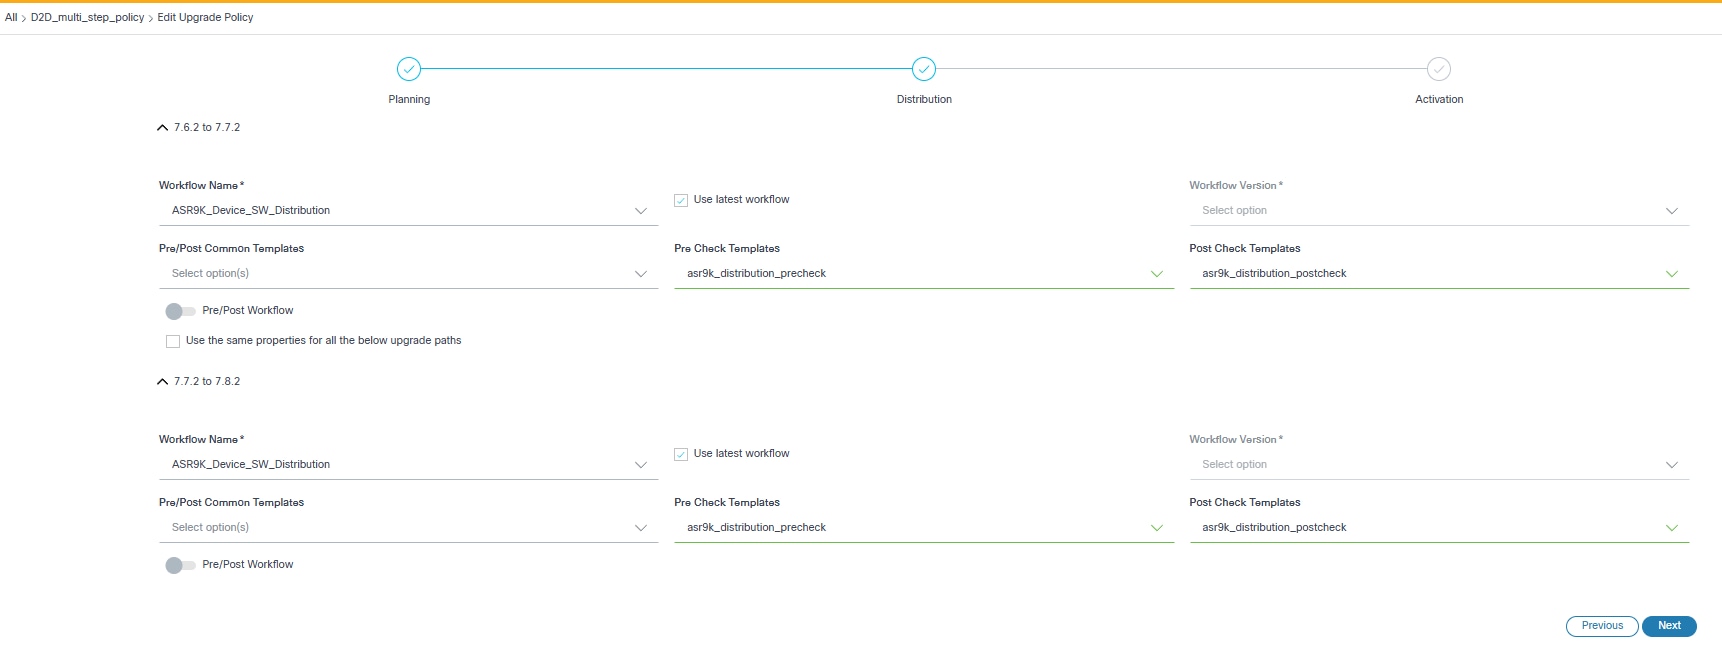
| Use the same properties for all the below upgrade paths | Consistent properties are applied across all upgrade paths in
multi-select upgrades. Note: If selected, the same properties are applied to all upgrade paths in the multi-select upgrade. |
- Click Next to continue to the Activation section.
Activation
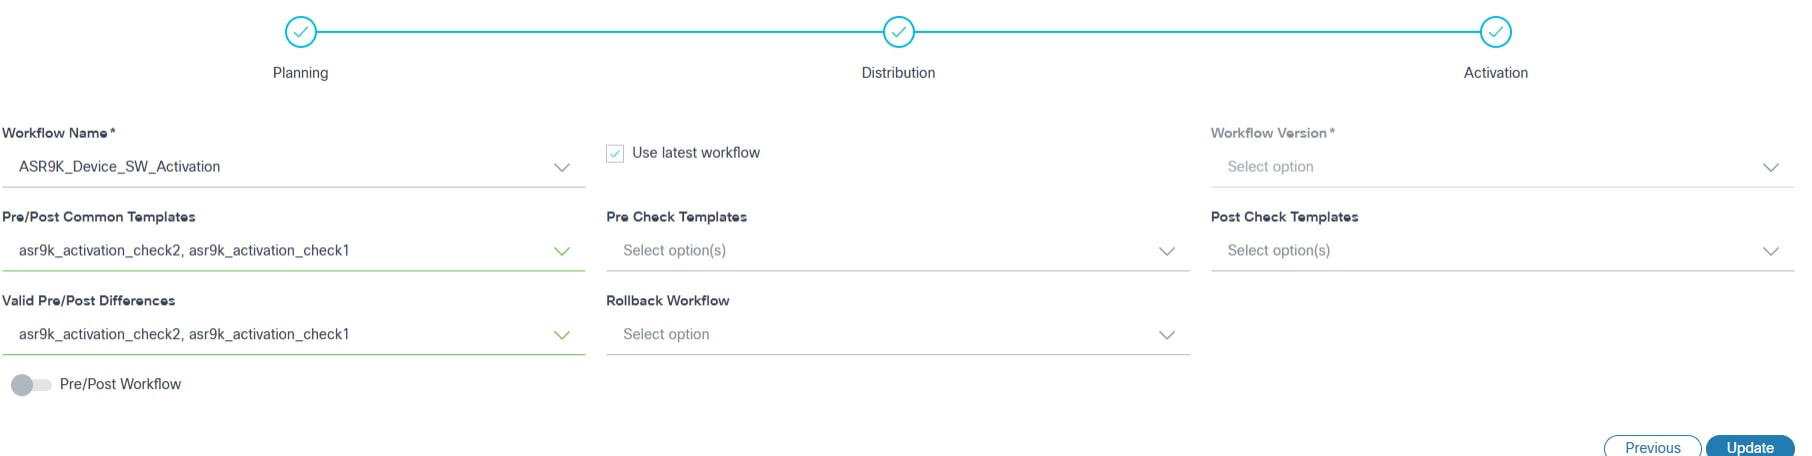

- Configure the parameters related to image activation.
- The table below provides a brief description of each field.
| Field | Description |
|---|---|
| Workflow Name | The applicable activation workflow |
| Use latest workflow | Select the latest version of the selected workflow |
| Workflow Version | The custom workflow version; can only be selected if Use latest workflow check box is not selected |
| Pre/Post Common Templates | The process templates that are executed in both stages (i.e.,
pre-check and post-check). Note: Checks are only specific to the Activation milestone. Refer to the Process Templates for more information |
| Pre-Check Templates | The process templates which contain exclusive pre-check commands;
templates are only executed during the pre-check
stage. Note: Checks are only specific to the Activation milestone. |
| Post Check Templates | The process templates which contain exclusive post-check commands;
templates are only executed during the post-check
stage. Note: Checks are only specific to the Activation milestone. |
| Valid Pre-/Post Difference | The process templates that are selected to ignore the
differences. Note: Checks are only specific to the Activation milestone. |
| Rollback Workflow | The applicable rollback workflow. Note: If one of the upgrade paths with the rollback workflow is selected in the multi-select upgrade, then all other upgrade steps are selected with the rollback workflow by default. |
| Pre-Check Workflow | This custom pre-check workflow consists of specific commands whose
execution results can be selected and reviewed. It is carried out only
during the pre-check stage. Note: These checks are specific to the Activation Milestone. |
| Post-Check Workflow | This custom post-check workflow consists of specific commands whose
execution results can be selected and reviewed. It is carried out only
during the post-check stage. Note: These checks are specific to the Activation Milestone. |
| Use the same properties for all the below upgrade paths | Consistent properties are applied across all upgrade paths in
multi-select upgrades. Note: If selected, the same properties are applied to all upgrade paths in the multi-select upgrade. |
- The required public key algorithm for Nexus devices must be configured in NSO.
- Configure the features of bgp, bfd, and hsrp to execute pre- and post-check templates in the Nexus devices.
- Click Create. A summary of the fields displays.
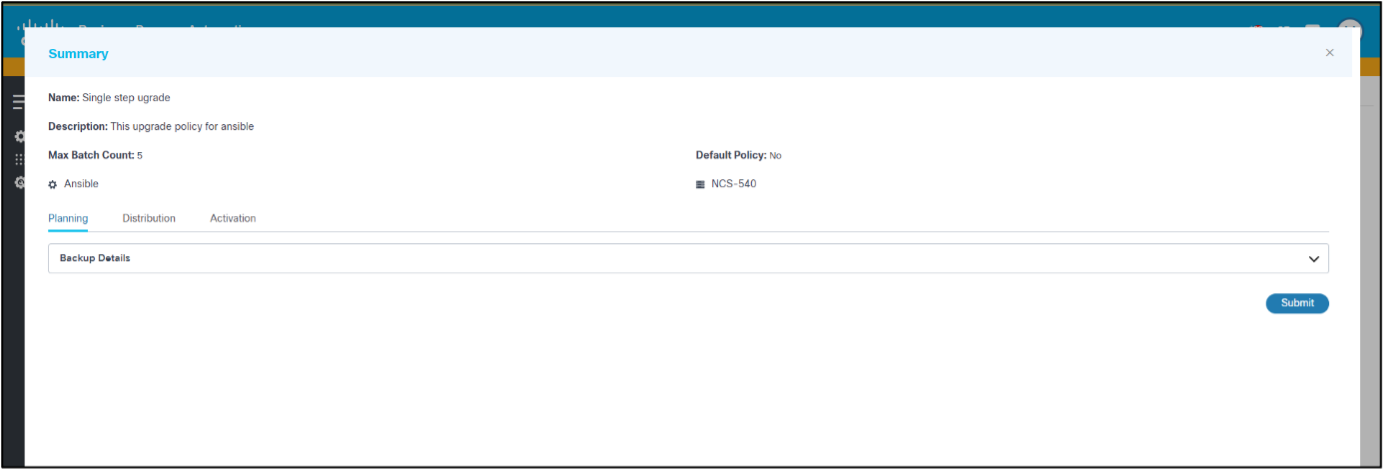
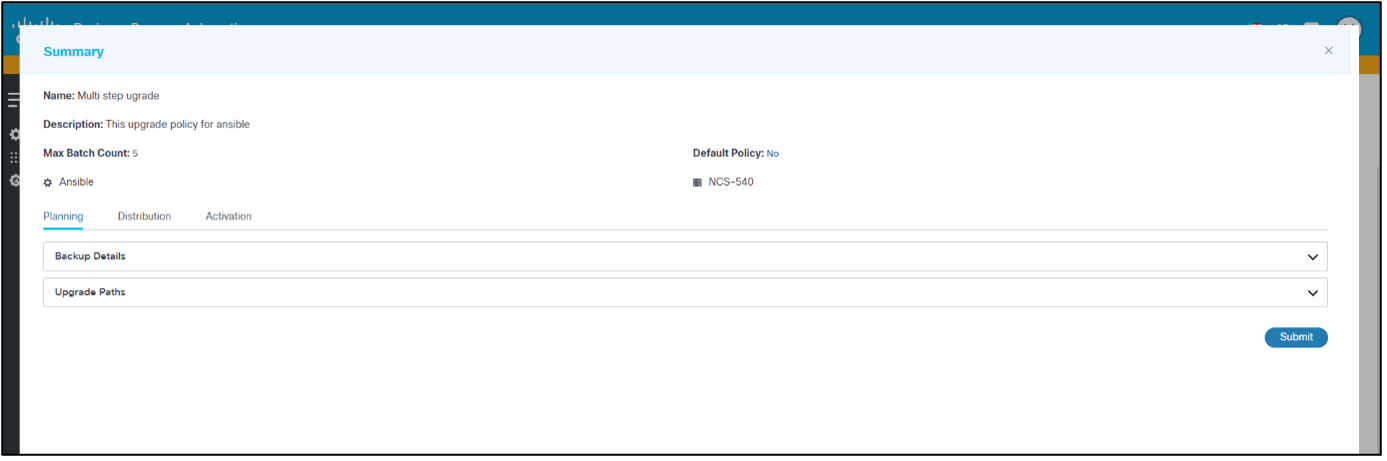
- Verify the summary of the fields and click Submit. A progress notification displays followed by a confirmation message. Policies are visible on the page upon successful creation.
Additional upgrade policies for other device models can be created as required.
Editing Upgrade Policies
- From the Upgrade Policy page, locate the desired policy using the Search field.

- From the policy’s Action column, select the More Options icon > Edit.
- Update the relevant fields and click Update. A summary of the changes displays.
- Verify the summary of changes and click Submit. Progress notifications display followed by a confirmation message.
Viewing Upgrade Policies
- From the Upgrade Policy page, select the row of the desired upgrade policy. The policy’s detail view opens.
Deleting Upgrade Policies
- From the Upgrade Policies page, locate the desired policy using the Search field**.
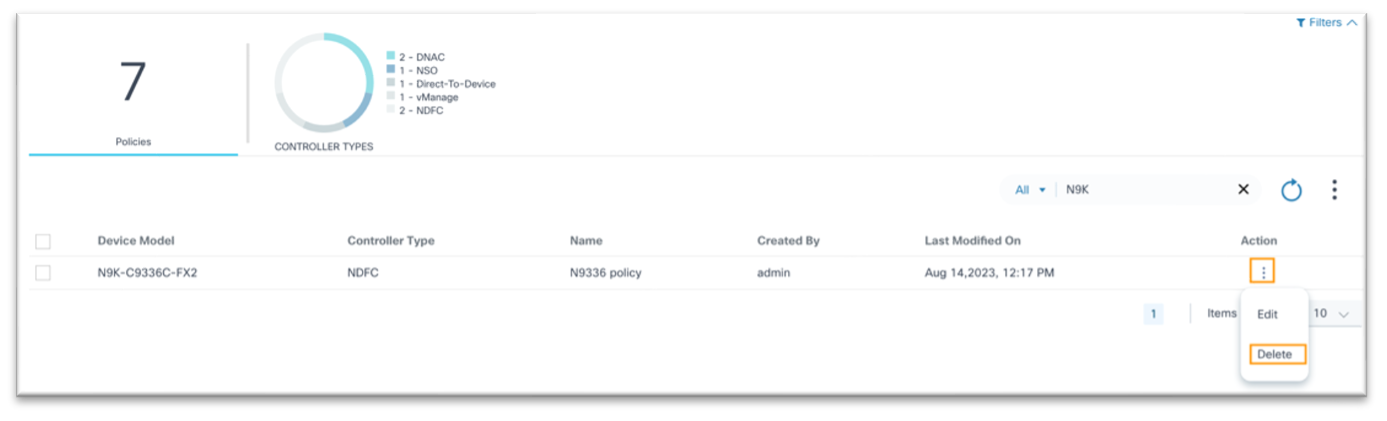
- From the policy’s Action column, select More Options > Delete. A confirmation window opens
- Click Yes.
Controlling Access to Upgrade Policies
This feature provides access control for upgrade policies, restricting unauthorized users from updating the policies defined in the OS Upgrade application. Administrators can restrict access by defining a resource group with accessible policies.
To create a resource group:
- Navigate to Settings > Resource Groups.
- Create a resource group with policies that non-administrator users can access. Non-administrator users belonging to this user group now only have access to the policies available in this resource group.
- Create an access policy to associate the resource group with a user group,
Refer to Access Control for more information.
- It is possible for users to select the incorrect workflows for Distribution and Activation, resulting in unintended behavior. It is the responsibility of the user to correctly map the workflow and verify the applicability for milestones such as Distribution, Activation, Rollback, and Device Models.
- Workflows and process templates must be mapped with the OS Upgrade Next-Gen tag for them to be available for selection when creating or updating policies.
- Default OOB policies created by the system user cannot be deleted, but users can edit the process templates and workflows.
Upgrade Jobs
Software upgrades are managed using the Upgrade Job application, which is comprised of one or more batches with each batch having one or more network devices. A job can be created in draft mode and saved multiple times. Upgrades can begin only after the job is committed, allowing operators to plan for change in advance.
Prerequisites
- Reserved Maintenance window for upgrades
- Preapprovals for Upgrade Change Request
- Config Backup and Restore service must be up and running
- Scheduler service must be up and running
- BPA Adapters for external systems (e.g., a ticketing system), if any, must be onboarded
Viewing and Managing Upgrade Jobs
- Log in to BPA with credentials that have access to Upgrade Jobs.
- Select OS Upgrade > Upgrade Jobs. The Upgrade Job page displays.
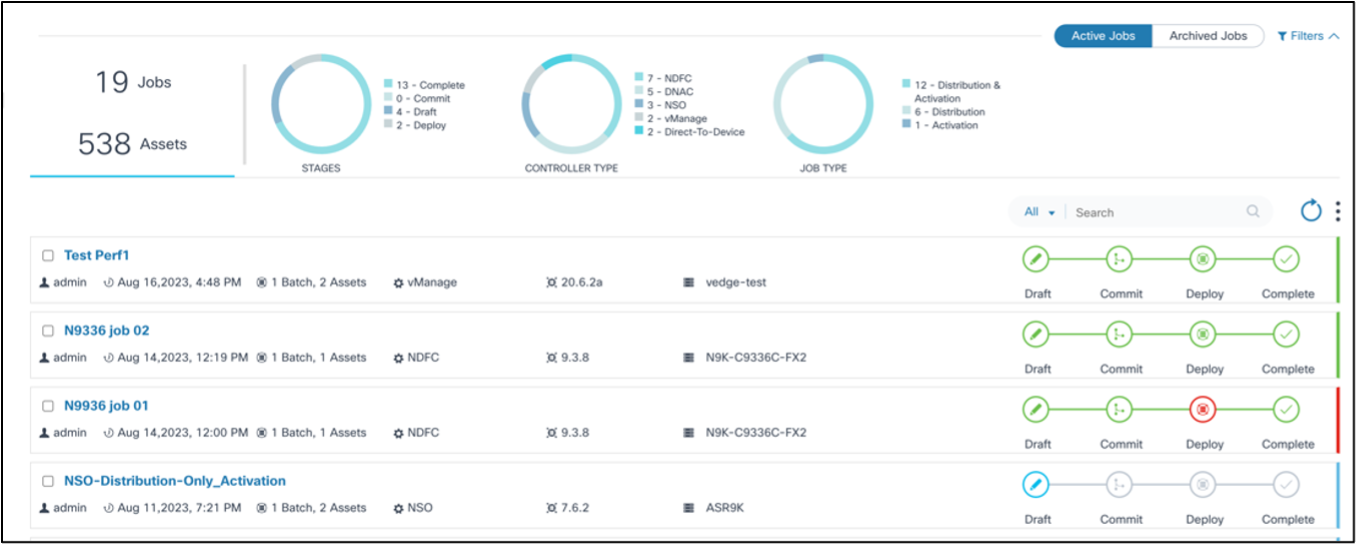
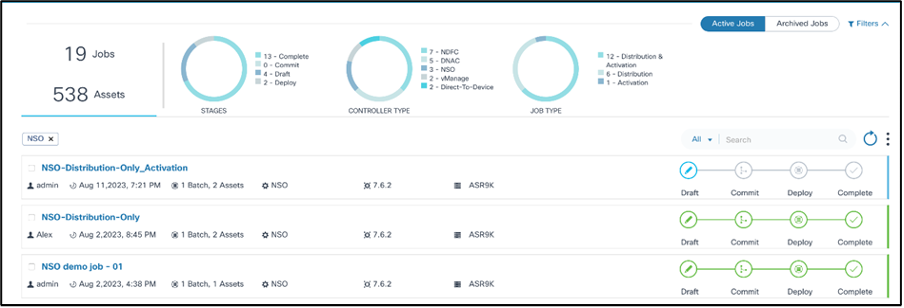
The Upgrade Job page contains the following:
- An Active Jobs and Archived Jobs toggle which can be used to switch between active and archived jobs
- An analytics section, displayed at the top, that provides the
following:
- Total jobs and assets associated with the jobs
- Stages chart with the following filters:
- Draft: Job is in draft phase and not yet committed
- Commit: Job is committed with all necessary devices, batches, or schedules until the schedule is reached
- Deploy: Upgrade activity has started for one or more batches
- Complete: Upgrade activity is complete for all devices belonging to all batches
- Controller Type chart: Allows job filtering by Cisco Catalyst Center, vManage, NSO, NDFC, Direct-to-Device, CNC, ANSIBLE, and FMC controller types
- Job Types chart with the following filters:
- Distribution: Jobs that perform staging or copying of images from controller to devices
- Activation: Jobs that perform the activation or upgrade of a device’s software
- Distribution & Activation: Jobs that perform both staging or copying and activation or upgrade of a device’s software
- The Search field which can be used to perform a generic search across all metadata or by the Job Name and Created By fields
- The Refresh icon which can be used to refresh the job summary and clear the chart filters or any custom search in the Search field
- The More Options icon which provides options to Create a new upgrade job and to Archive or Delete selected jobs; users can select or unselect All
- Jobs display as panels and provide a quick view of the following
information:
- The User Task icon displays with the number of user tasks if there are any user tasks available
- The user that created the job
- The job creation date
- The number of batches and assets
- The controller type (e.g., Cisco Catalyst Center, vManage, NDFC, Direct-to-Device, CNC, ANSIBLE, or FMC)
- The target version
- The applicable device model
- A milestone view of job stages (i.e., Draft, Commit, Deploy, and
Complete) with a color legend for each milestone:
- Grey: Milestone has not started
- Blue: Milestone is in-progress
- Red: Milestone issue
- Green: Milestone completed
- A color legend at the end of the milestones that displays the
job’s status:
- Green: Job is complete
- Red: Job has issues
- Blue: Job is in progress
Scheduling Upgrade Jobs
To create a job:

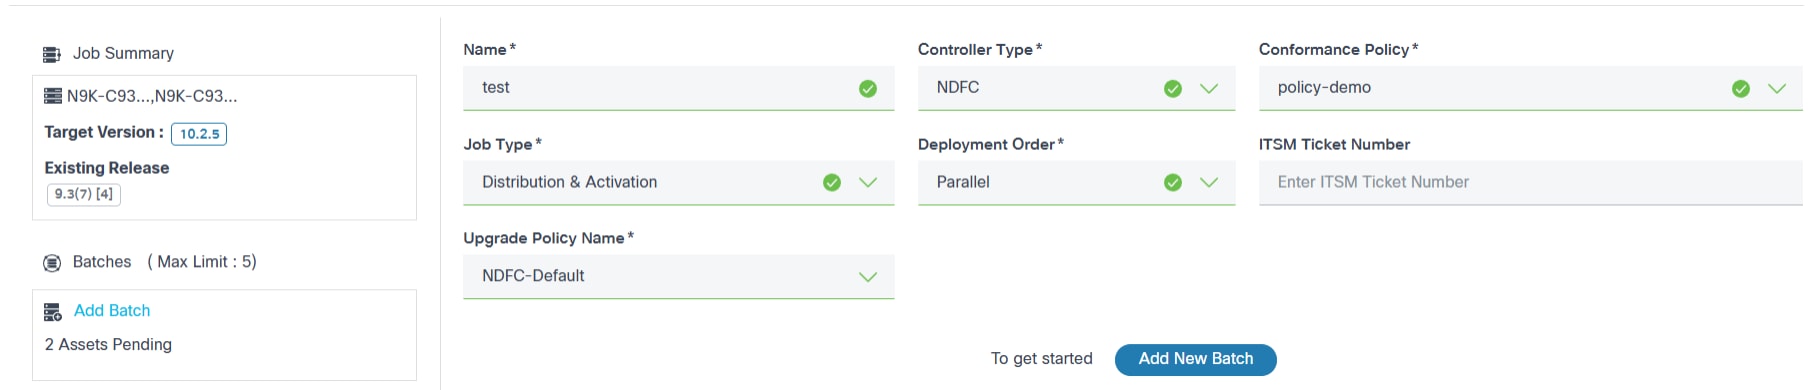
- From the Upgrade Job page, select the More Options icon > Create Job. The Create Upgrade Job page displays.
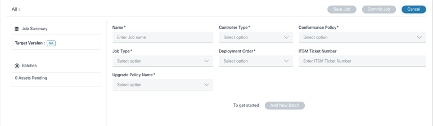
- Enter a job name in the Name field.
- Select the Controller Type (e.g., Cisco Catalyst Center, vManage, NDFC, Direct-to-Device, CNC, FMC, ANSIBLE, or NSO).
- Select a Conformance Policy having non-conformant devices.
The following details display on the left side of the Create Job form under Job Summary:
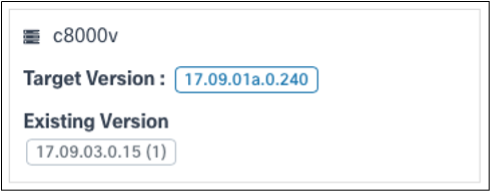
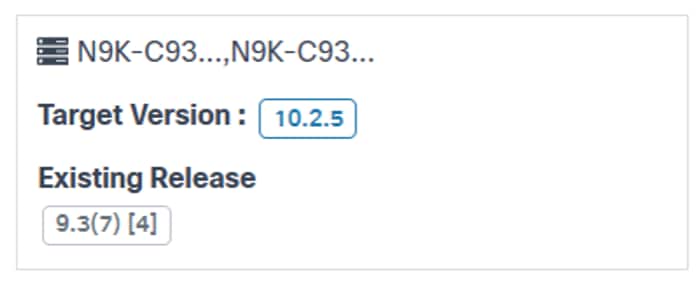
- Affected device model(s)
- Target version
- Aggregate of existing release versions and their corresponding count
- Maximum number of batches allowed
- Total number of non-conformant assets
- Option to add batch
- Select one of the following upgrade job types:
- Distribution: Distribution-only jobs are helpful when the staging of software image happens before the actual activation
- Activation: Activation-only jobs are helpful to perform the upgrades of devices for which distribution is already completed via a distribution-only job
- Distribution & Activation: Both image distribution or staging and activation happen within the same job, which is helpful in scenarios where an ample maintenance window is available to cover both copying images to a device and upgrading
- Select the Upgrade Order. Multiple devices are processed at the same time in Parallel mode whereas devices are processed one by one in Sequential mode.
- Add the change request number in the IT Service Management (ITSM) Ticket Number field.
- Select the Upgrade Policy Name. Only applicable upgrade policies display based on the controller type and the conformance policy device model; users can select one of the upgrade policies. If the software conformance policy has more than one associated model, then all relevant upgrade polices associated with each model are displayed. Users should carefully select the upgrade policy which works for all models.
- Select the Software Image Server to specify which vManage image repository (e.g., local or remote) is used.
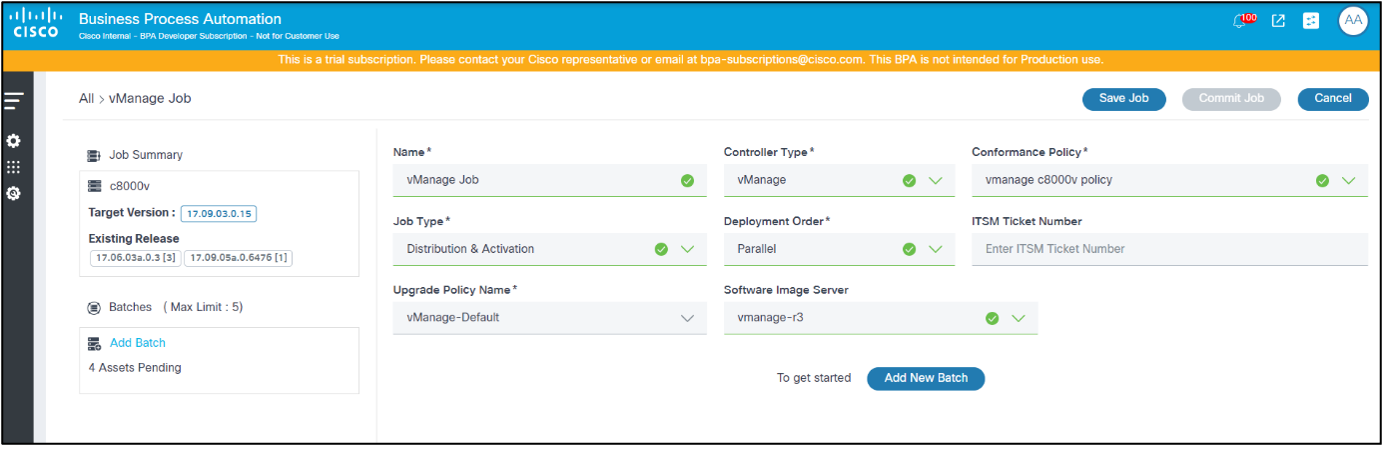
- Click Save Job to save the draft until the job is ready to be committed.

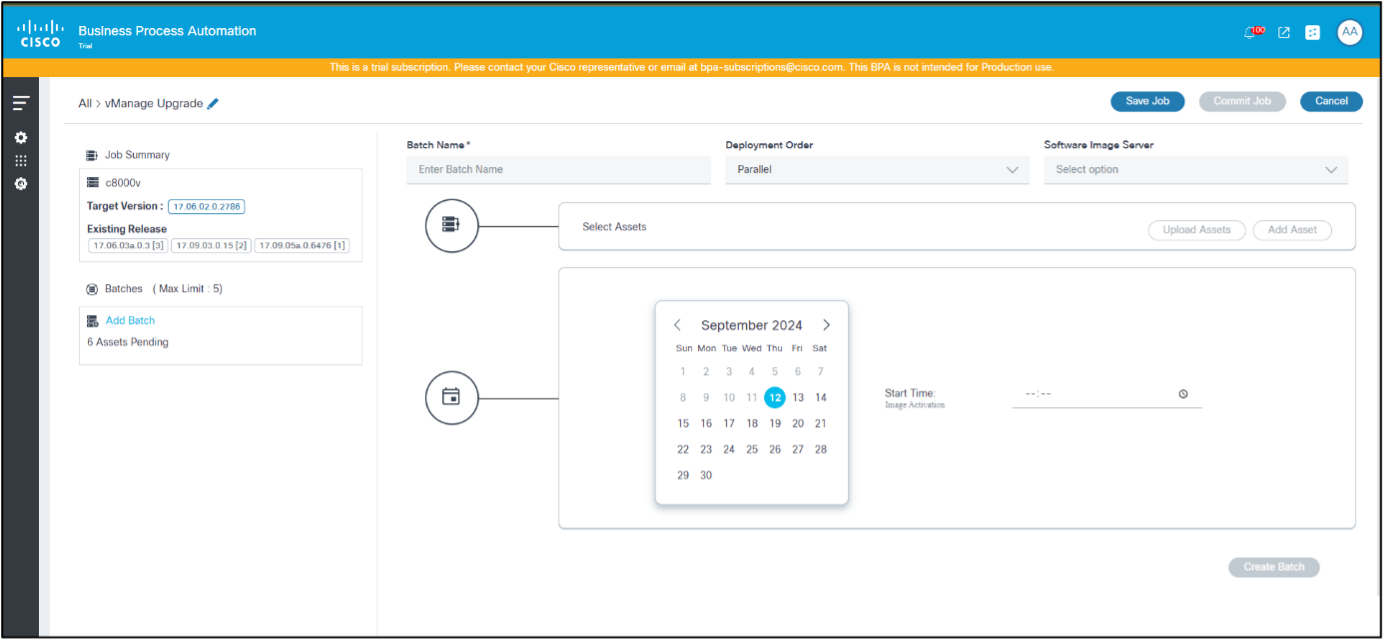
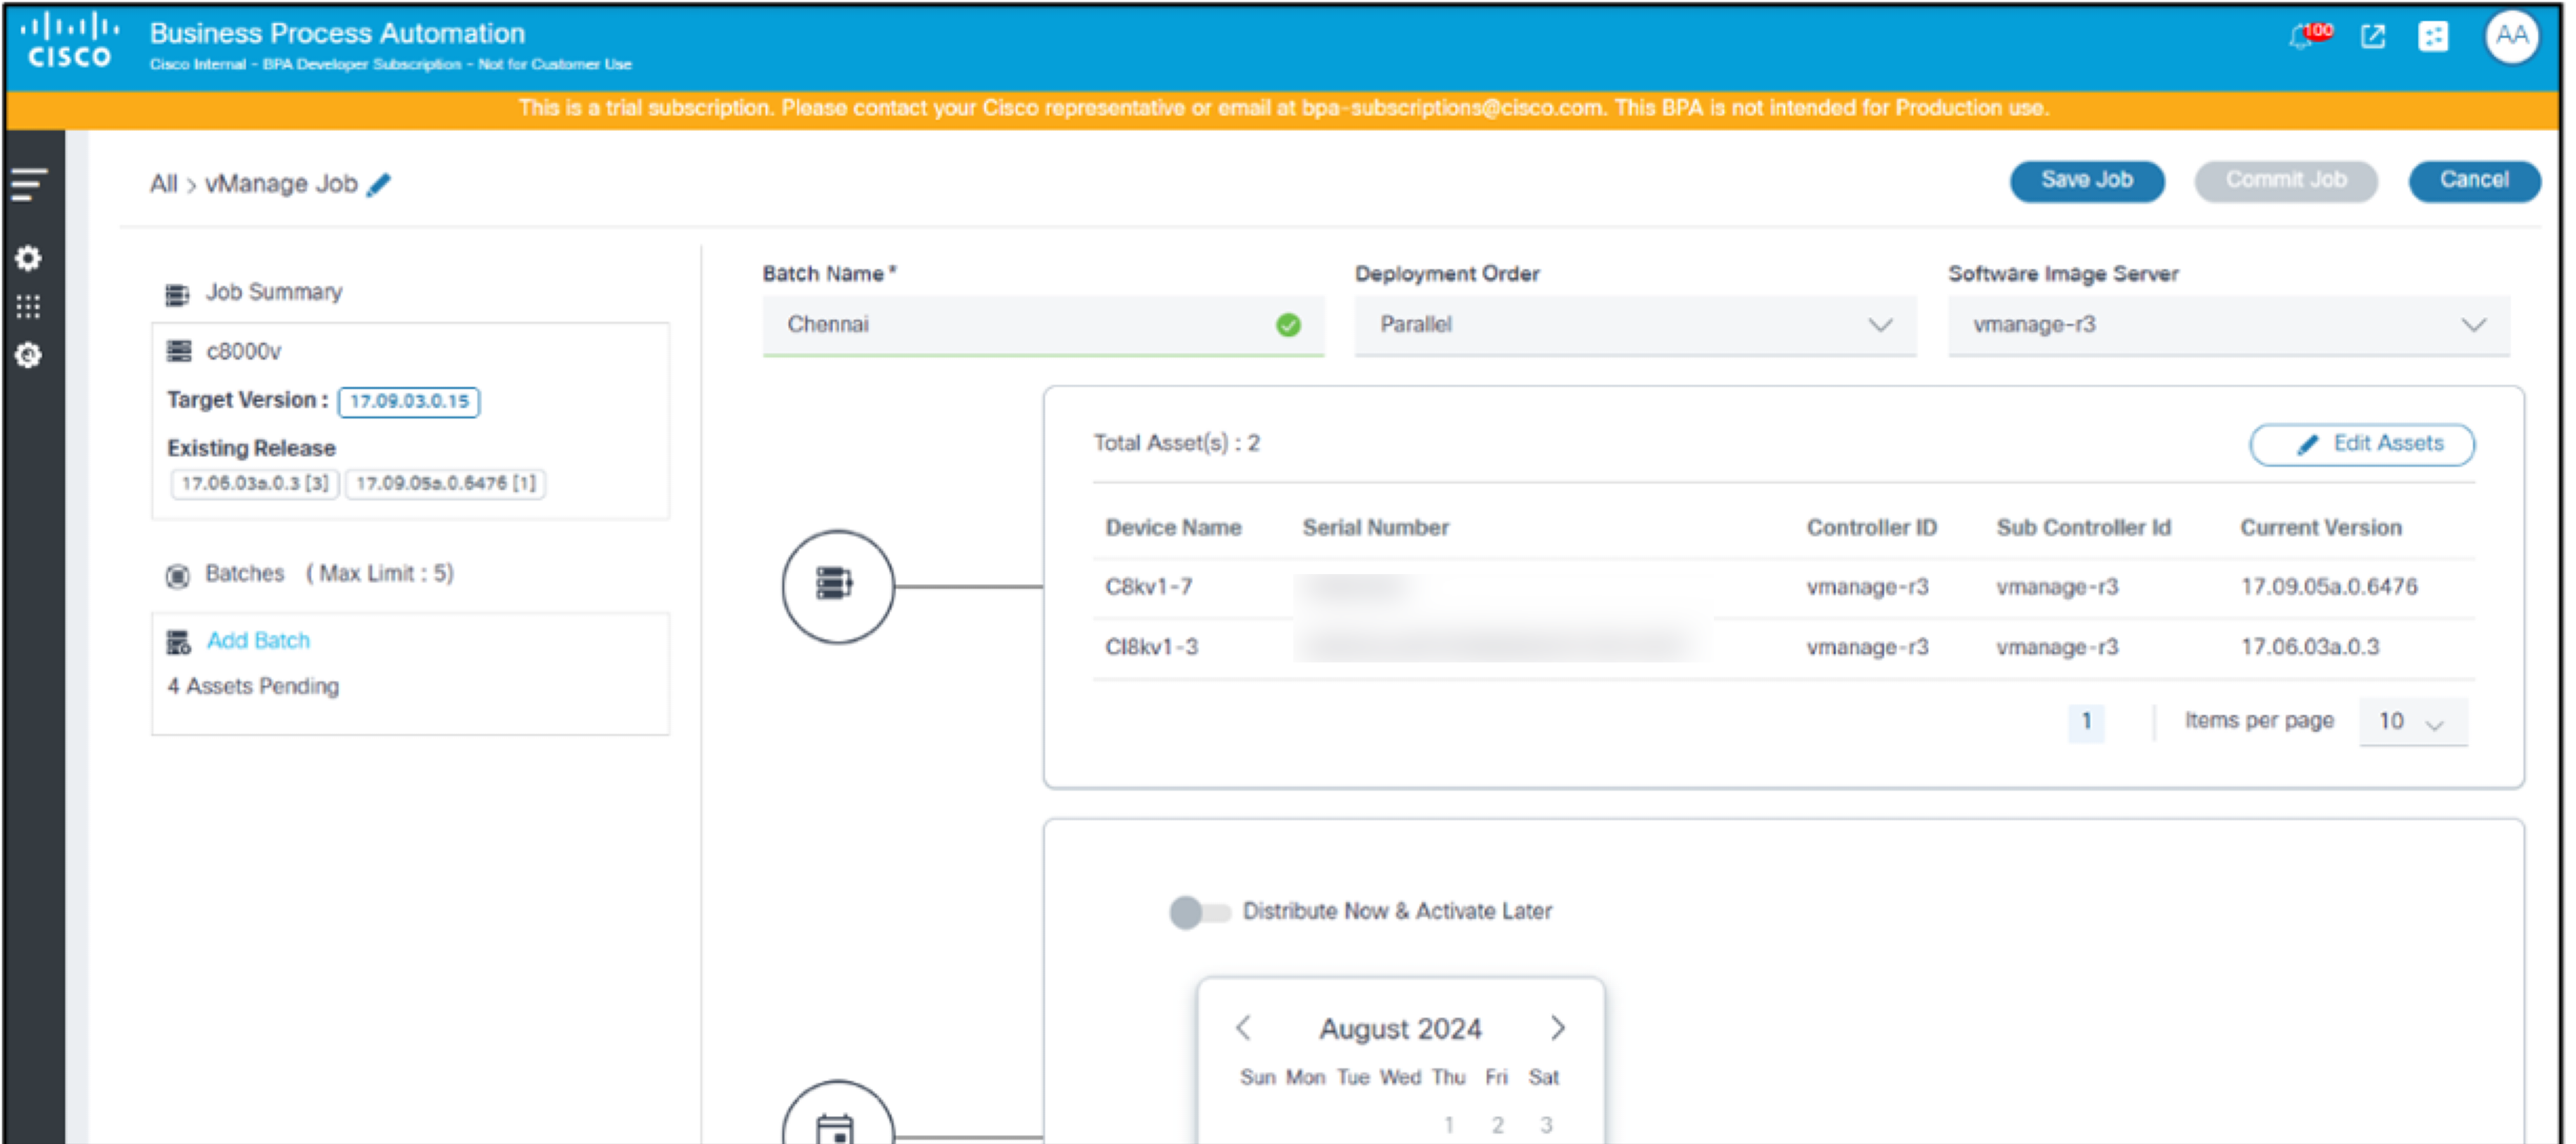
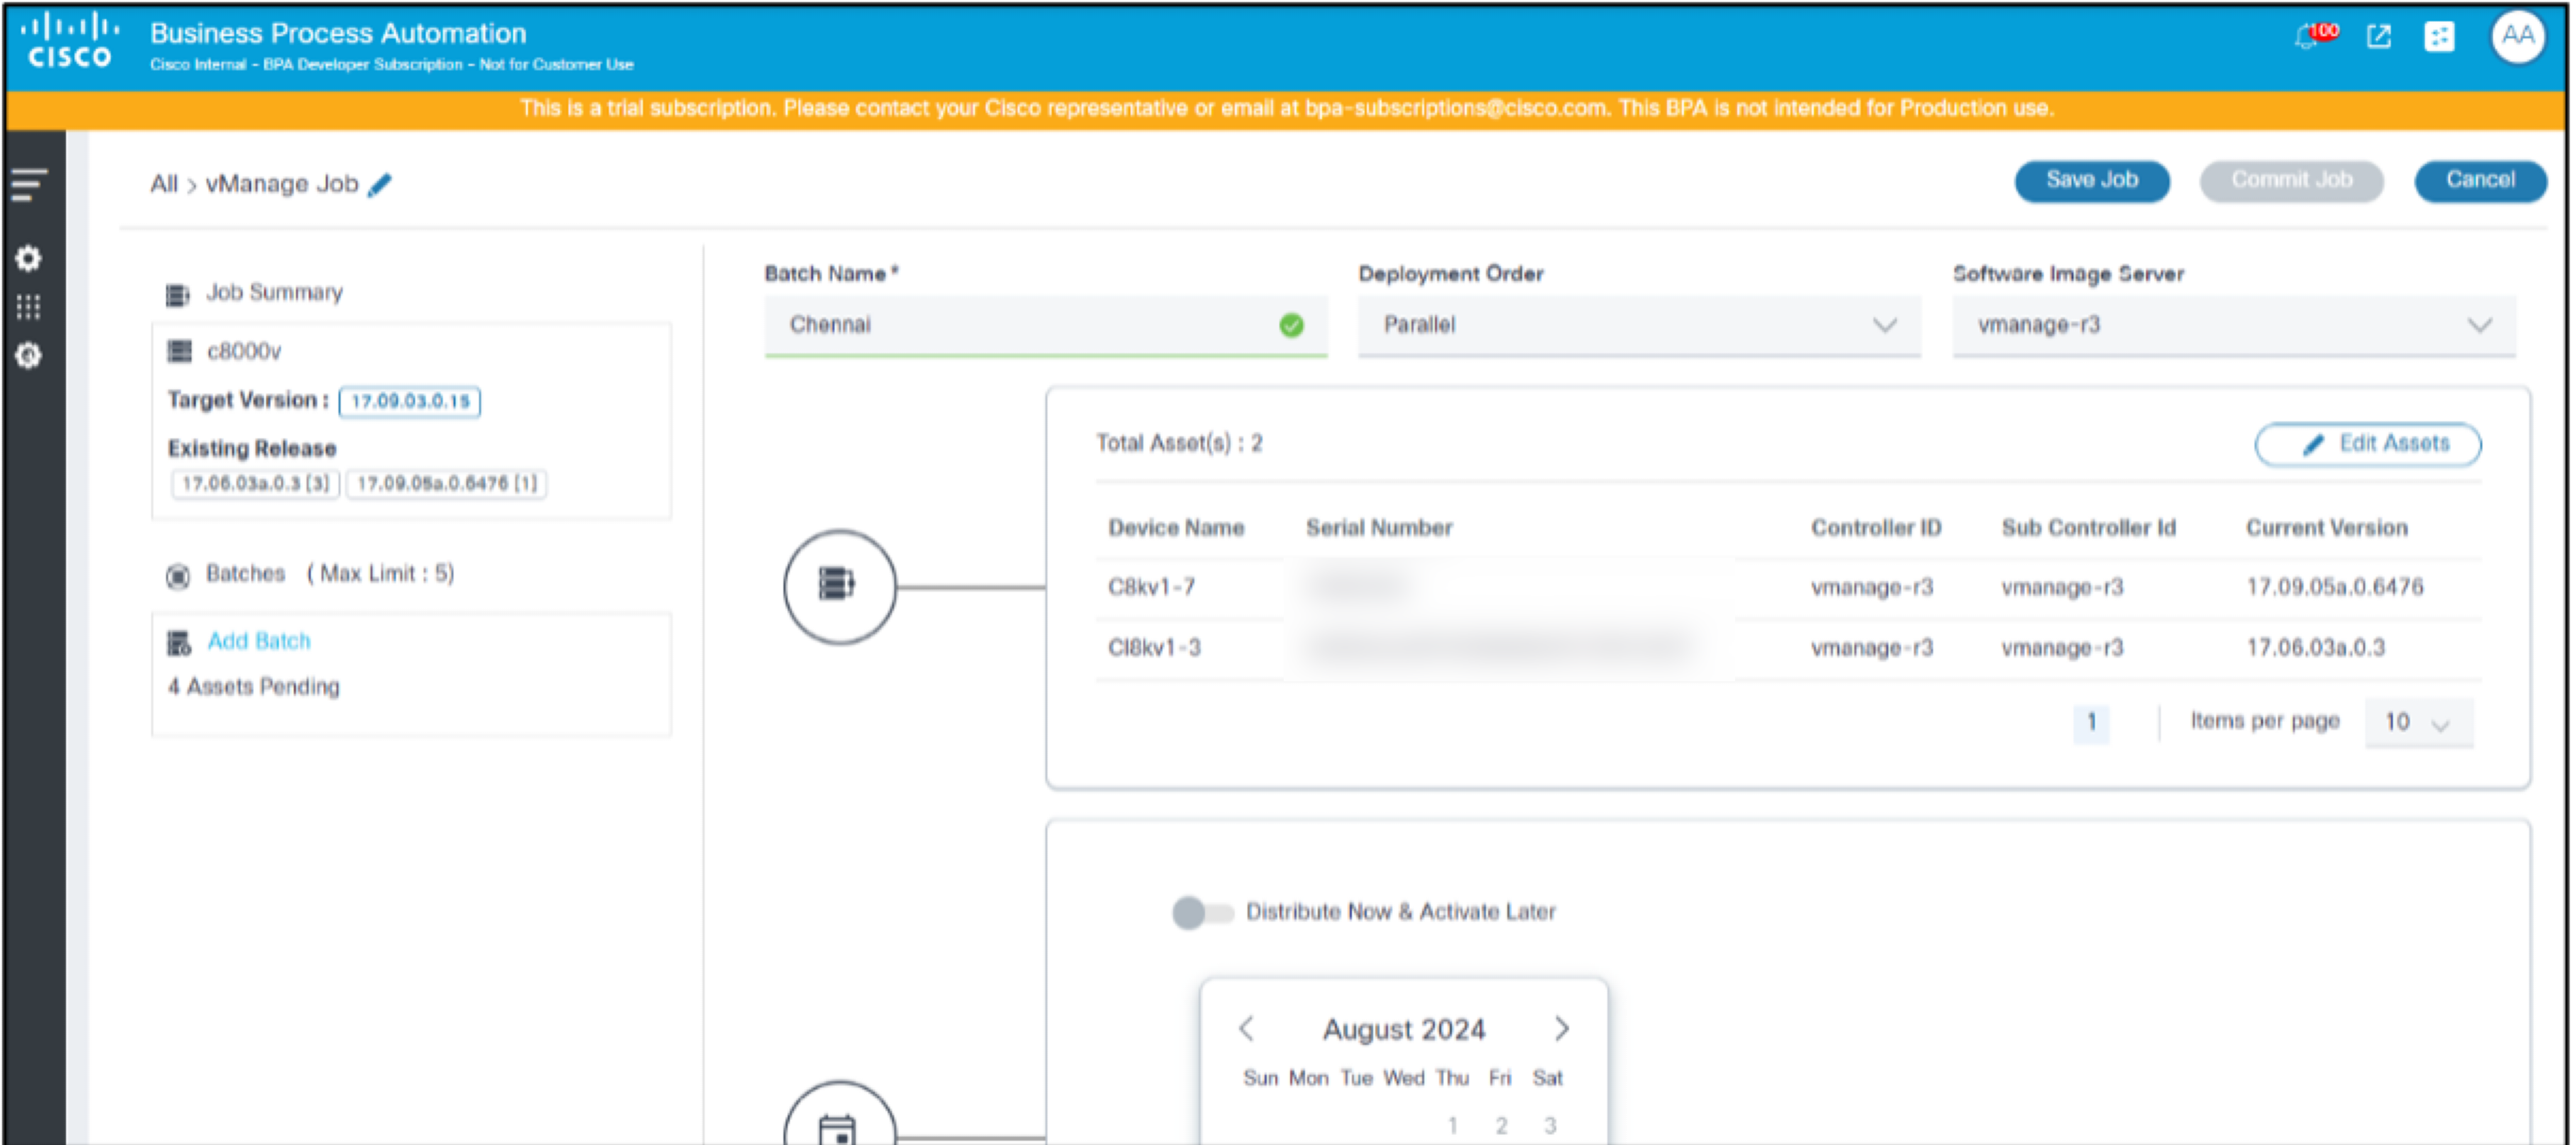
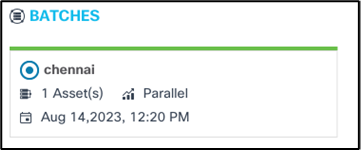
- To add a batch, click the Add Batch link or Add New Batch. The Batch Creation window opens.

- Enter a relevant Batch Name and select the Deployment Order.
- Select the Software Image Server to specify which vManage repository (e.g., local or remote) is used.
- Add assets to the batches. Assets can be added to batches in two ways:

Option 1:
- Click Upload Assets. The Upload Assets window opens.
- Select a .csv file to upload.
- Device Name: Name of the device or asset
- Serial Number: Serial number of the device
- Controller ID: Name of the controller managing the device
- Sub Controller ID: Name of the sub controller ID managing the device
- Click Upload. The .csv file data is validated and both the valid and invalid data displays. The Show Invalid Only toggle can be used to filter the invalid devices from the uploaded asset details.
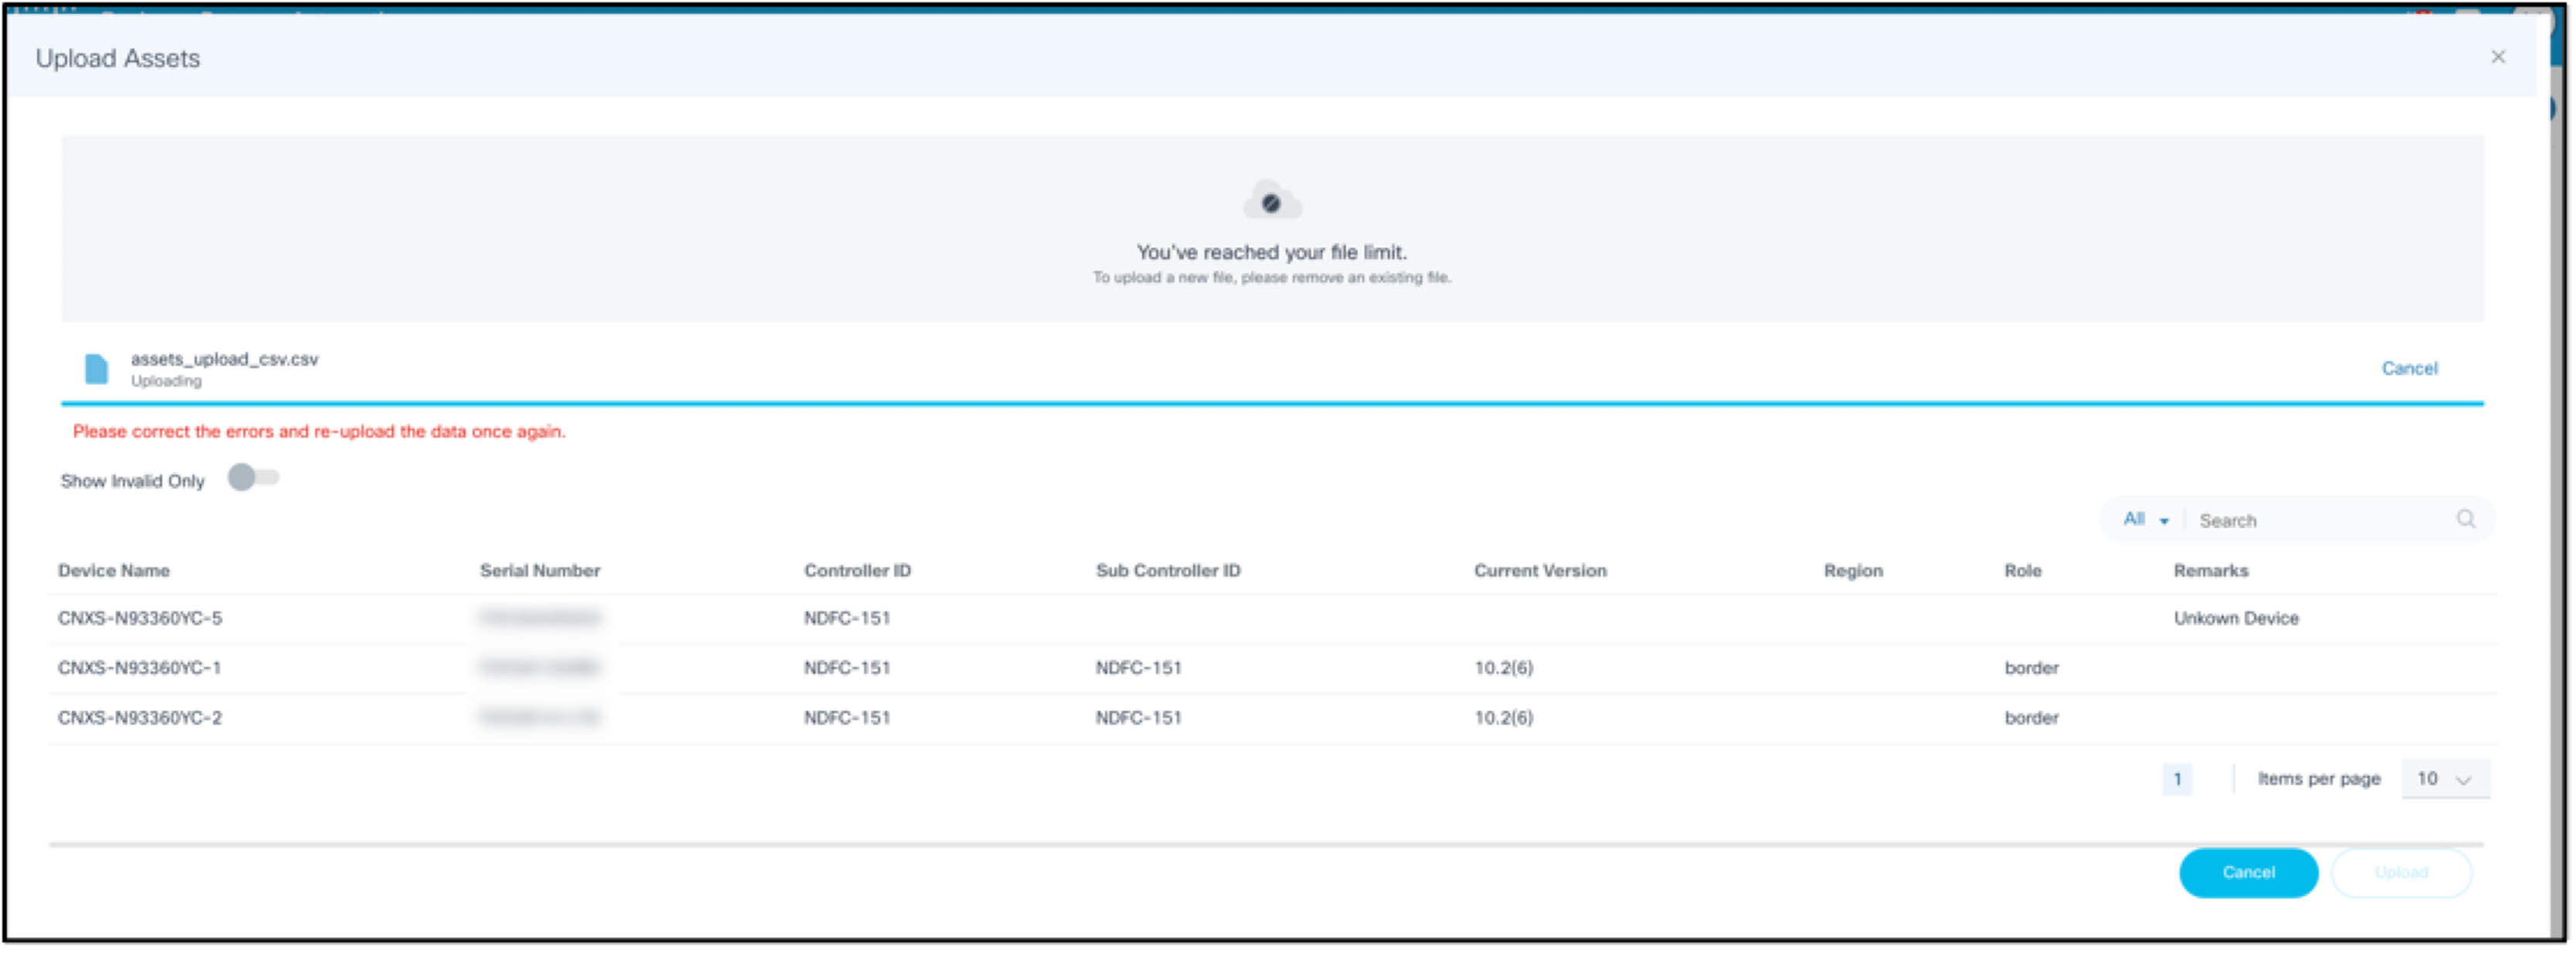
- If there are errors in the uploaded file, correct the errors and re-upload it.
Option 2:
- Click Add Assets. The Asset Selection window opens.
- For the FMC controller type only, select the control node or standalone node for doing the upgrade.
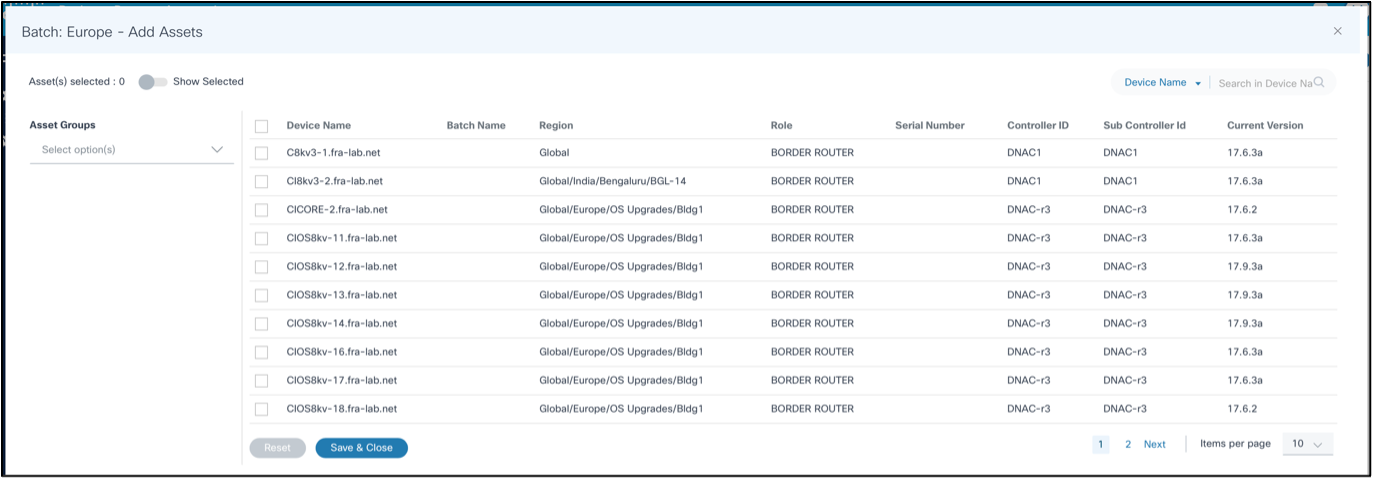
- Select the appropriate device(s) to include with the current batch.
The Search filter can be used to filter devices based on different attributes and all devices matching the filtering criteria can be selected in bulk by selecting the check box in the Device Name column header. Users also have the option to filter by Asset Groups.
The Show Selected toggle can be enabled to view the selected assets only.
- Click Save and Close.
Clicking Reset discards the selections and retains the original state of the asset selection.
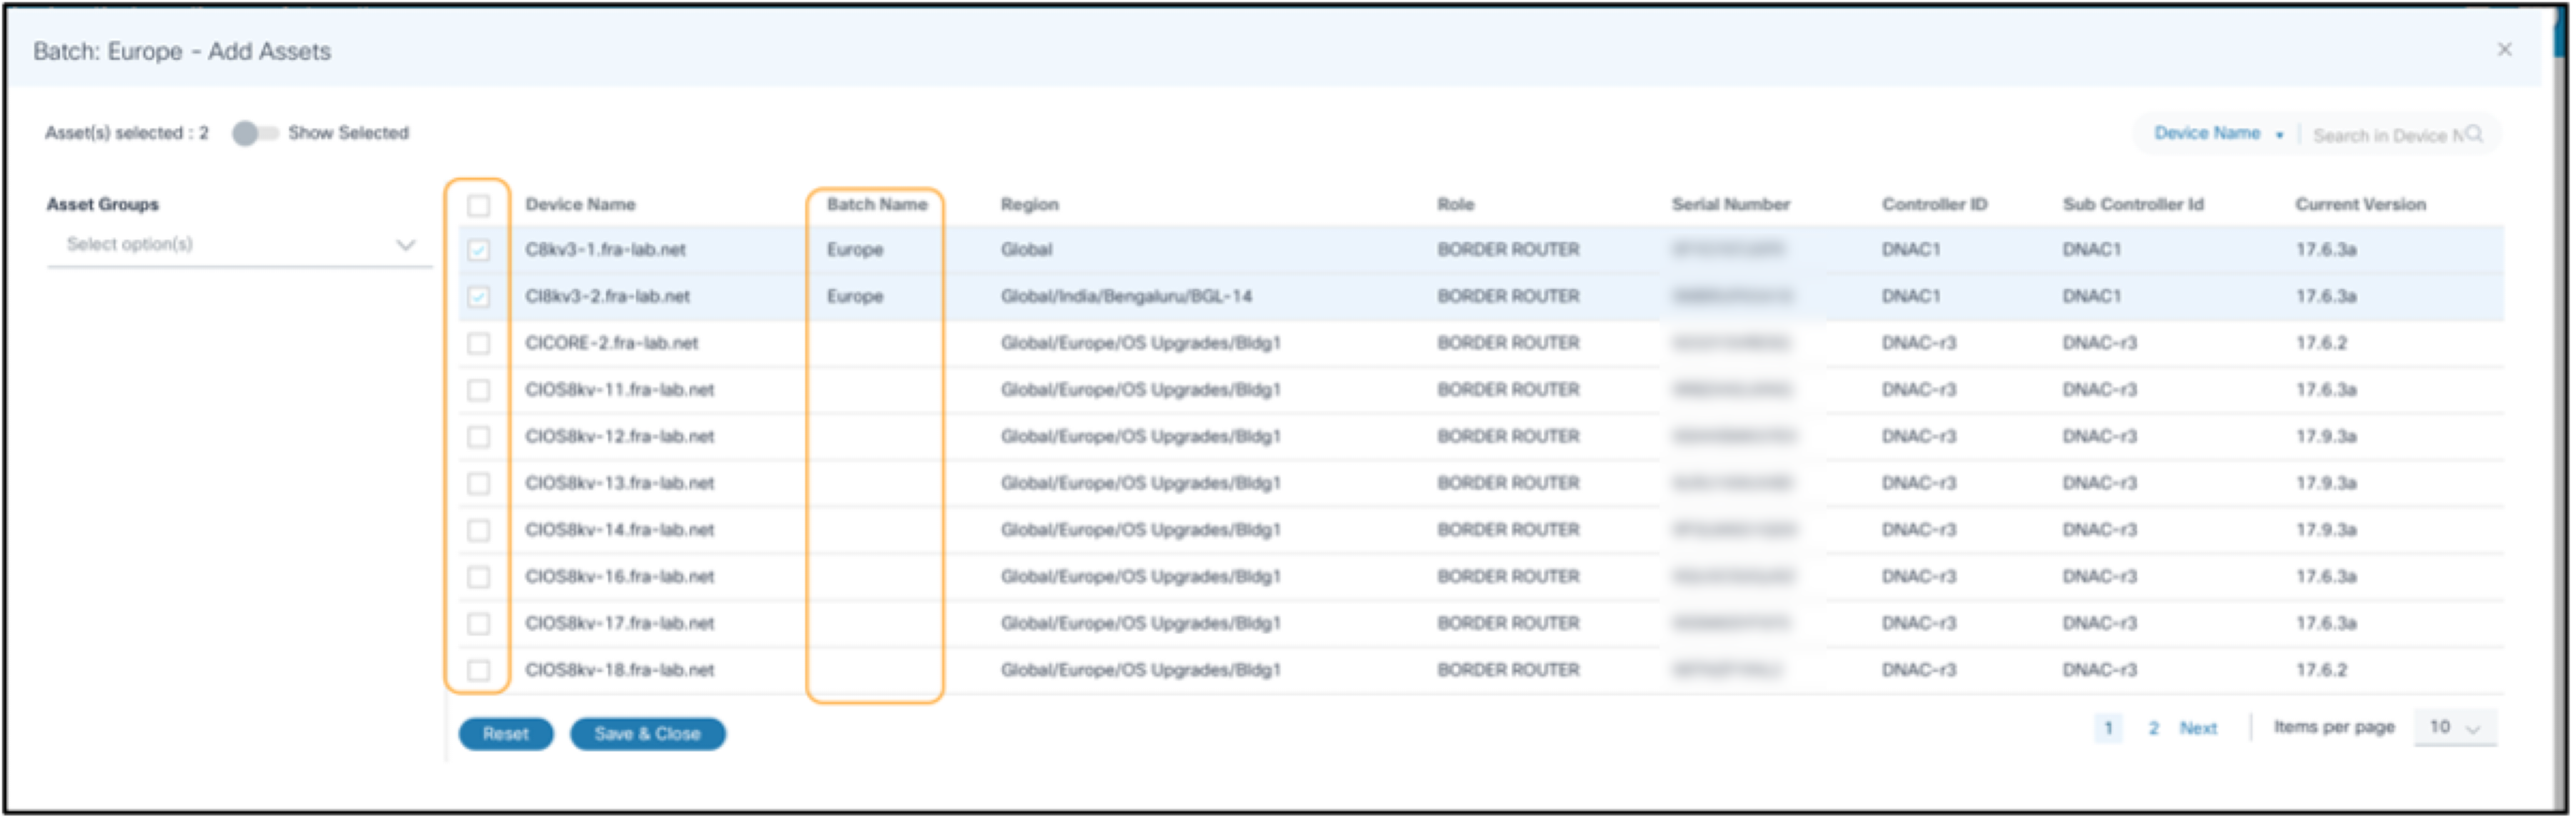
- If the asset selection needs modification, click Edit Assets.
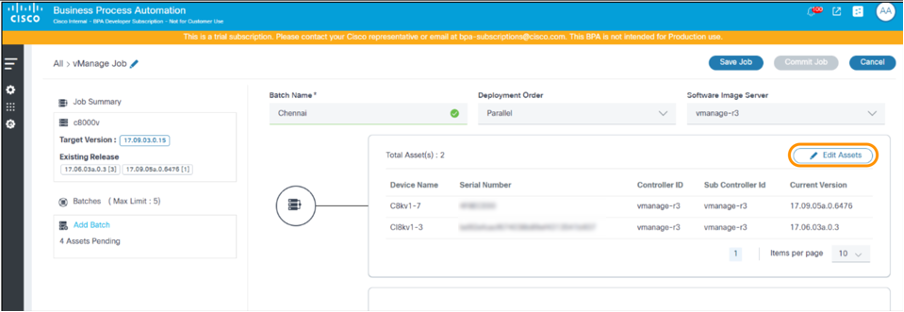
- Select or clear assets to make the necessary changes and click Save and Close. While editing the batch assets, currently selected assets that are part of a different job and batch can be identified using check marks and the batch name displayed in the Batch Name column.
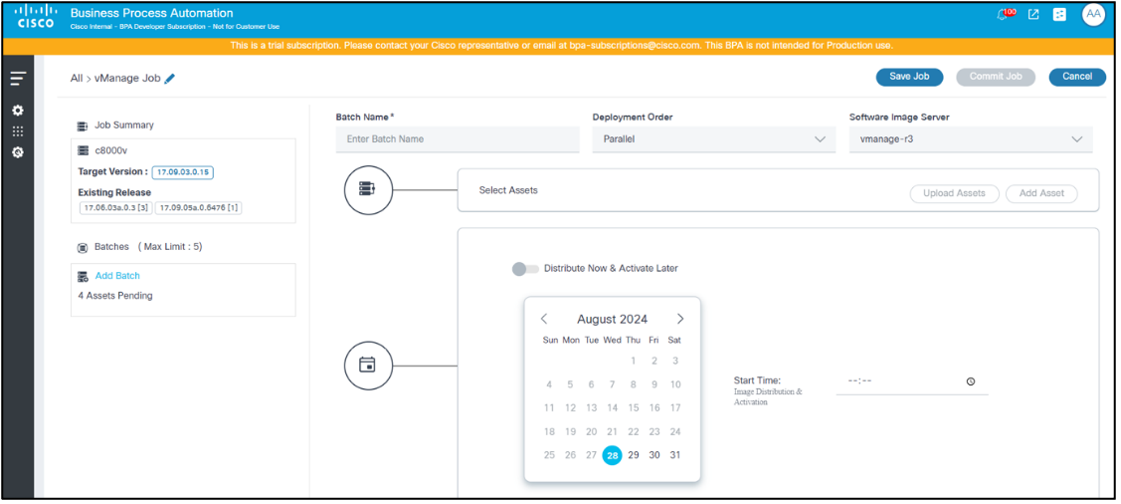
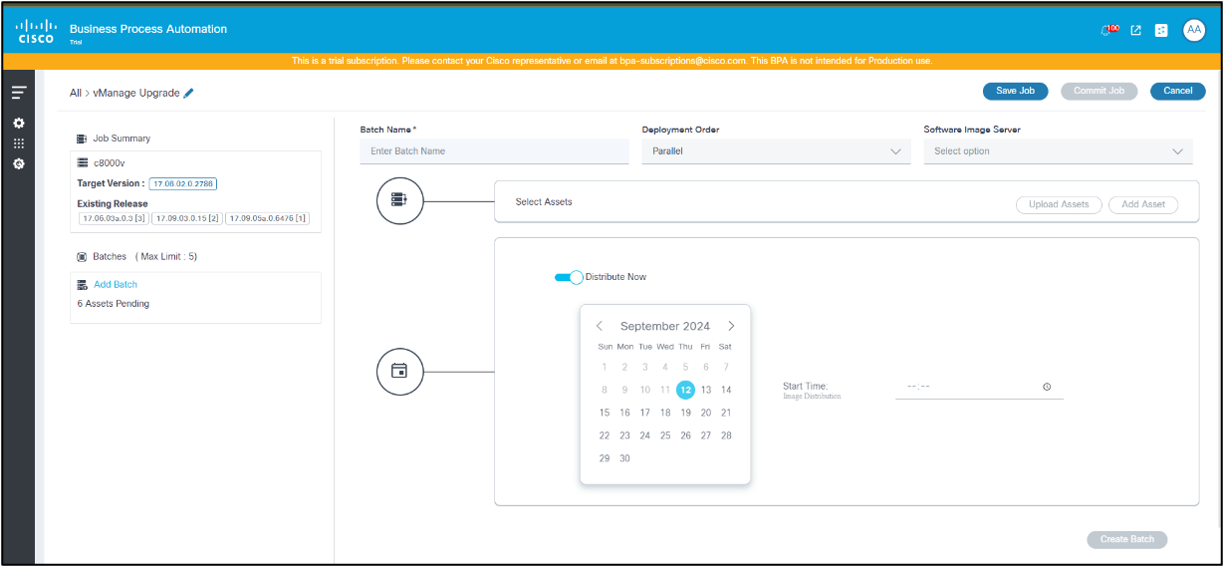
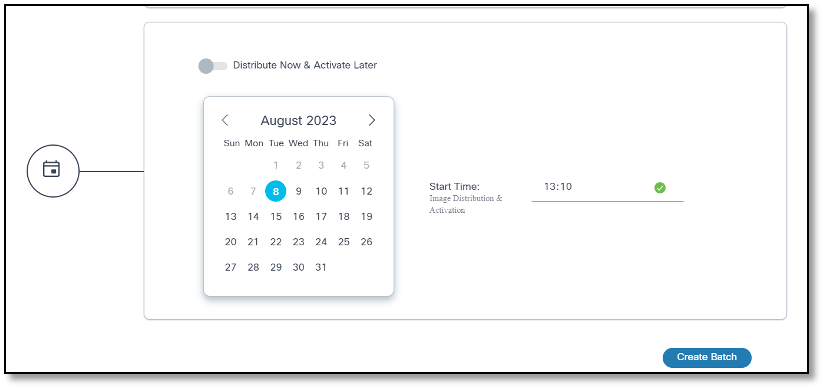
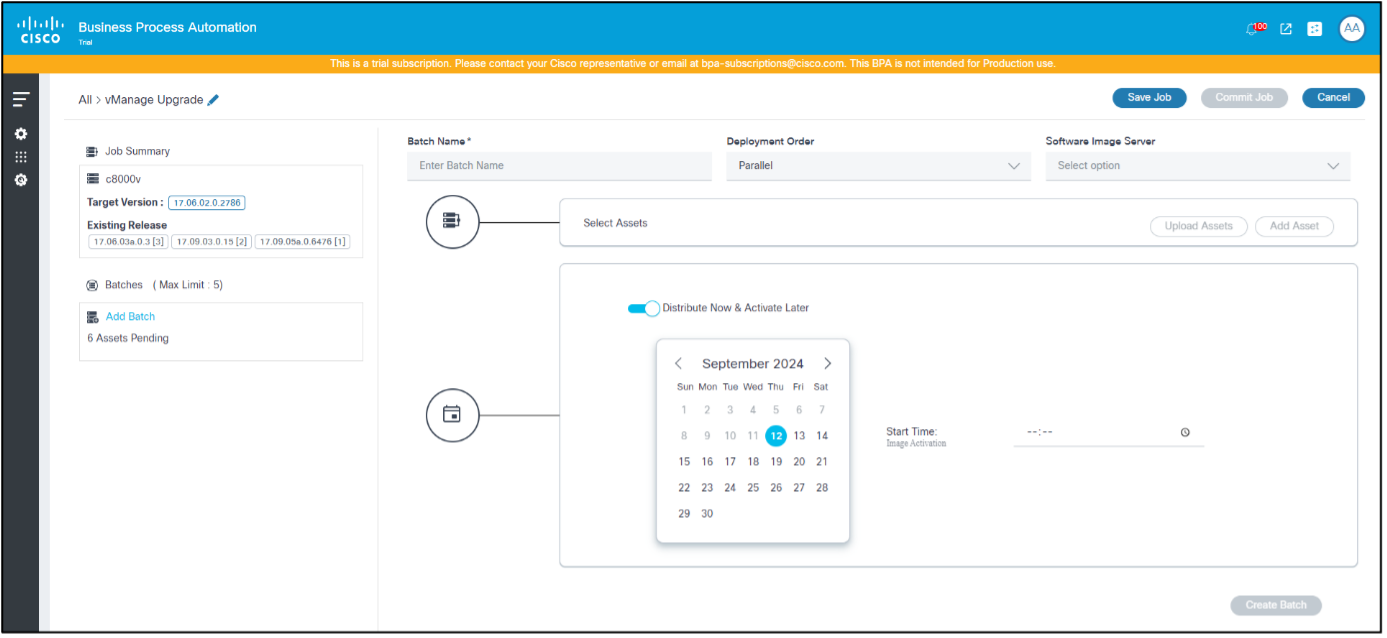
- Select a date from the date picker and a time from the time picker to schedule a time to trigger the upgrade type selected for the current batch.
Possible scenarios are as follows:
| Job Type | Distribute Now Toggle | Schedule Date and Time | Distribution Details |
|---|---|---|---|
| Distribution | Disabled by default | Active | Distribution occurs on the specified scheduled date and time |
| Distribution | Enabled | Disabled | Distribution occurs post job commit |
| Activation | N/A | Active | Activation occurs on the specified date and time |
| Distribution & Activation | Disabled by default | Active | Distribution and activation occurs on the specified date and time |
| Distribution & Activation | Enabled | Active | Distribution occurs post job commit and activation triggers on the specified scheduled date and time |
- When scheduling multiple batches, provide a time gap between the two batches so that system overload can be avoided. If the multiple batches are overlapping, consider adding them to a single batch.
- When the Distribute Now and Activate Later toggle is enabled, provide a time gap between the job commit time and the activation schedule. If not, activation workflows might create user tasks which require manual intervention (i.e., users must wait until distribution completion and retry).
- Click Create Batch. The batch can be viewed on the left side of the page.
Create as many batches as required. A job can be in Draft state until all the required information is available.
- Click Commit Job to finalize the job creation. The job transitions to the Deploy state when the schedule is triggered for any of the batches.
Editing a Batch in a Job
- Select the desired batch from the left panel.
- Click Edit Assets.
- Make the necessary changes by selecting or clearing assets in Add Assets or Upload Assets or by modifying the batch schedule by making changes to the date or Start Time.
- Click Update Batch.
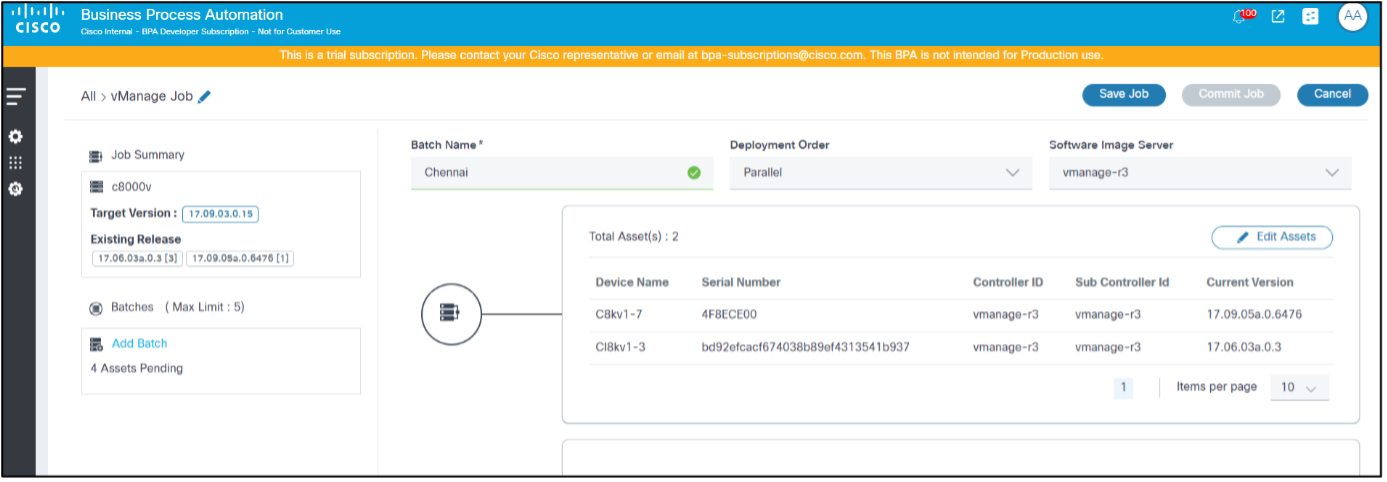
Upgrade Job Execution and Progress Monitoring
- Log in to BPA with credentials that have access to Upgrade Jobs.
- Select OS Upgrade > Upgrade Jobs. The Upgrade Job page displays.
- Use the Search filter in combination with available chart filters to quickly filter the job.
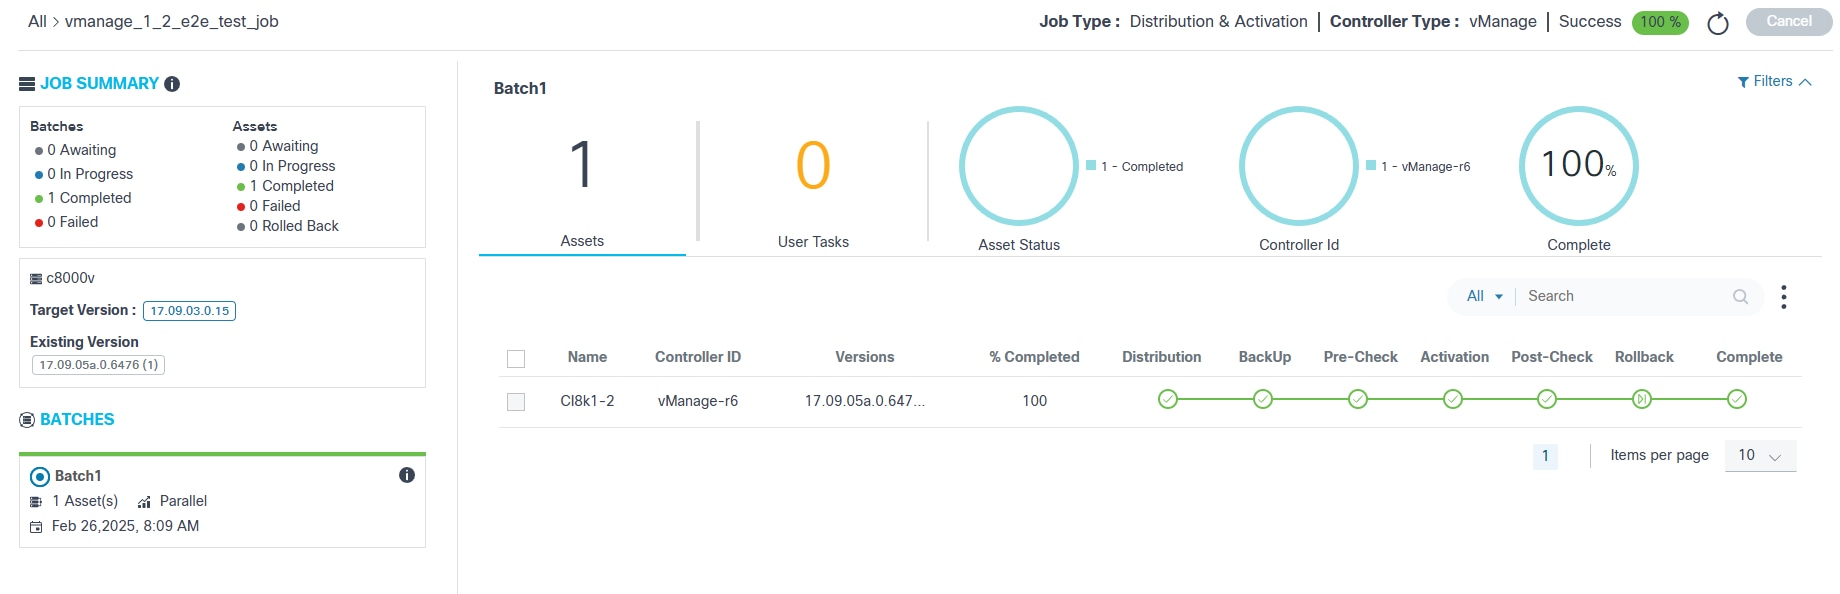
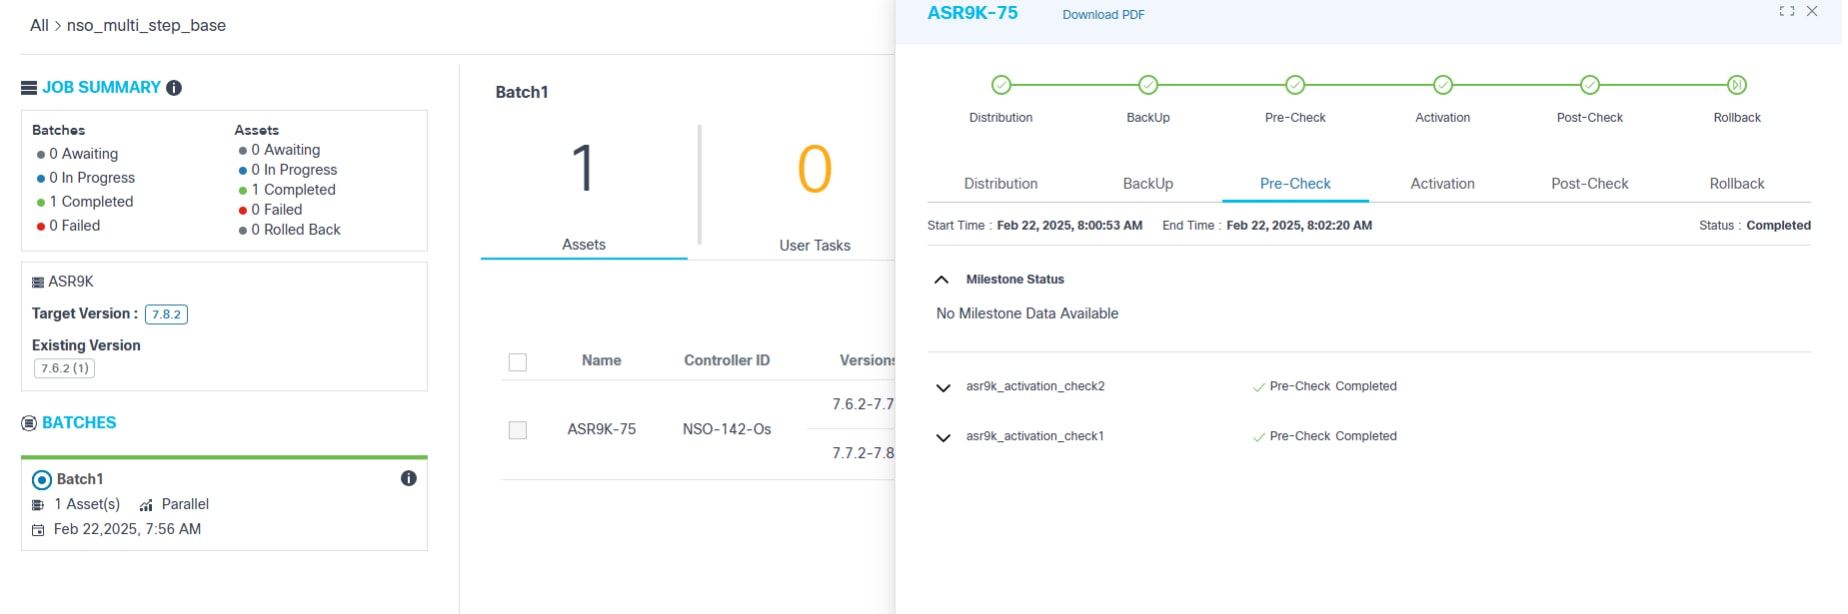
- Click the desired job. The Job Summary page displays.
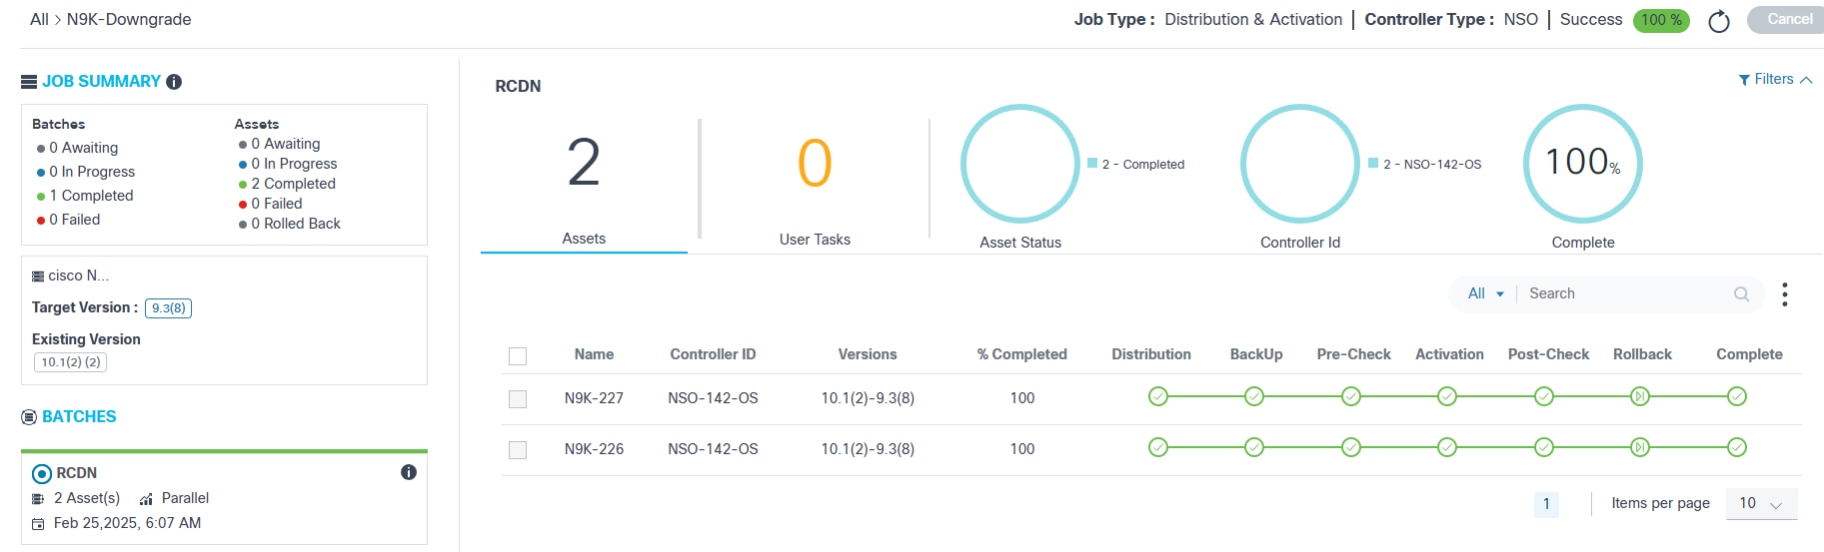
The left panel provides the following information:

- A quick summary of batches and respective assets
- The job’s affected device model, target software version, and existing release version
- A list of batches that are part of this job
- Batch details:
- Grey top border indicates that the batch is waiting for the schedule
- Blue top border indicates that the batch deployment is in-progress
- Green top border indicates that the batch deployment complete
The following information displays at the top of the Job Summary page:

- The breadcrumb navigation of the current job (e.g., All > vmanage_1_2_e2e). The All option switches to Jobs Dashboard
- The job type
- The controller type
- Job status with completion percentage:
- Success: Upgrade job is successful
- Failed: Upgrade job failed for some reason
- In-Progress: Upgrade job is in-progress
- Awaiting: Job is committed but waiting for one or more batch schedules to be reached
The following options are available on the Job Summary page:
- The Refresh icon allows users to retrieve updates on-demand
- Cancel is used to cancel the jobs in Draft and Commit stages unless the schedule for any of the batches is reached
- Activate creates a new activation job in the
Draft state with the same batches and assets that were part of the
previously completed job
- Activate is only available if the job type is Distribution and it is successfully completed
- If the activation job is already created and Activate is clicked, a message displays with the status of the previously created job and provides an option to redirect the job already created; in the newly created job, users have the option to edit or delete the batches or assets, but job type, controller type, and conformance policy are not editable.
- A paginated list of assets is displayed below the analytics section
- The Search field allows for general and
field-specific searches for columns such as:
- Device Name
- Controller ID
- Serial Number
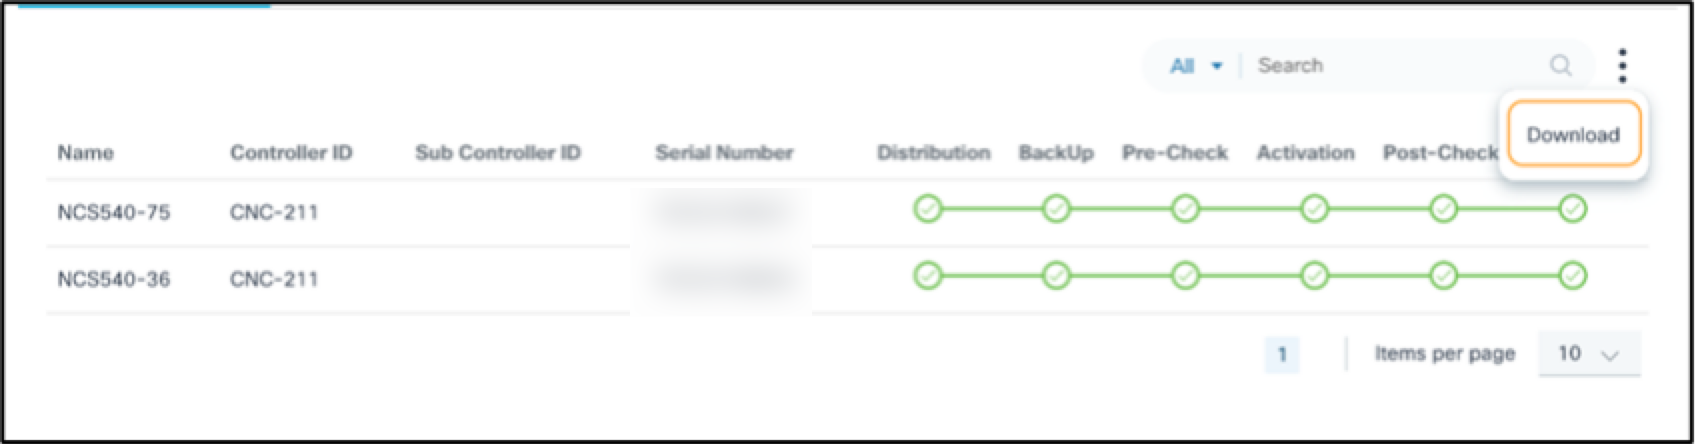
- The option to download the batch-level report by selecting the More Options icon > Download; the report consists of the batch-level details with device details


- Sorting can be done by clicking the column names
- The following upgrade milestones are displayed for each device
along with Name, Controller ID,
Versions, and % Completed:
- Distribution
- Backup
- Pre-Check
- Traffic-Diversion
- Activation
- Post-Check
- Traffic-Reversal
- Rollback
- Complete
Sub milestones also known as custom milestones are the intermediate significant steps executed and viewed under the standard milestone when added. For more information about adding custom milestones, refer to the BPA Developer Guide.
Traffic diversion and traffic reversal are moved under the activation milestone.
- A milestone color legend which consists of the following:
- Grey Check: Pending
- Blue Check: In-Progress
- Green Flag: Skipped
- Green Check: Completed
- Orange Check: User Task
- Red Check: Failed
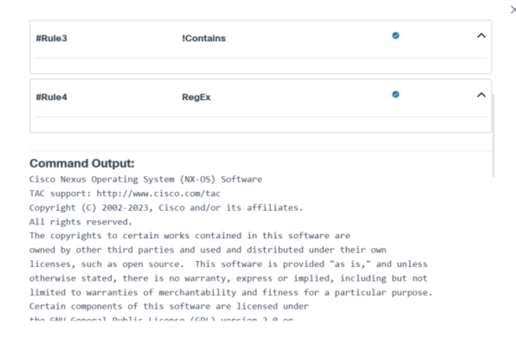
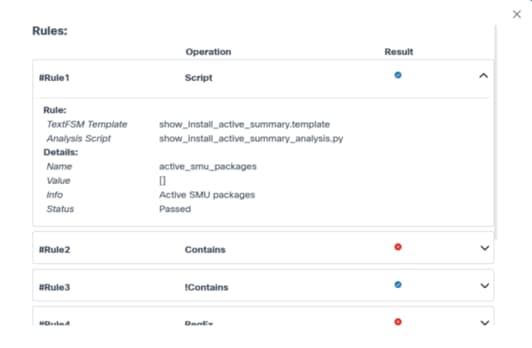
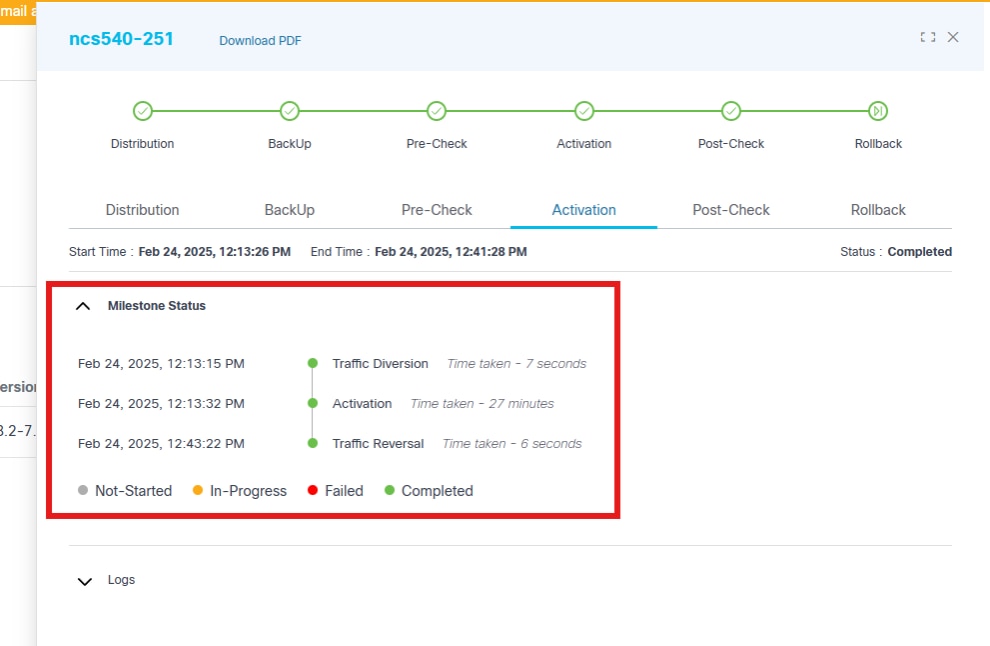
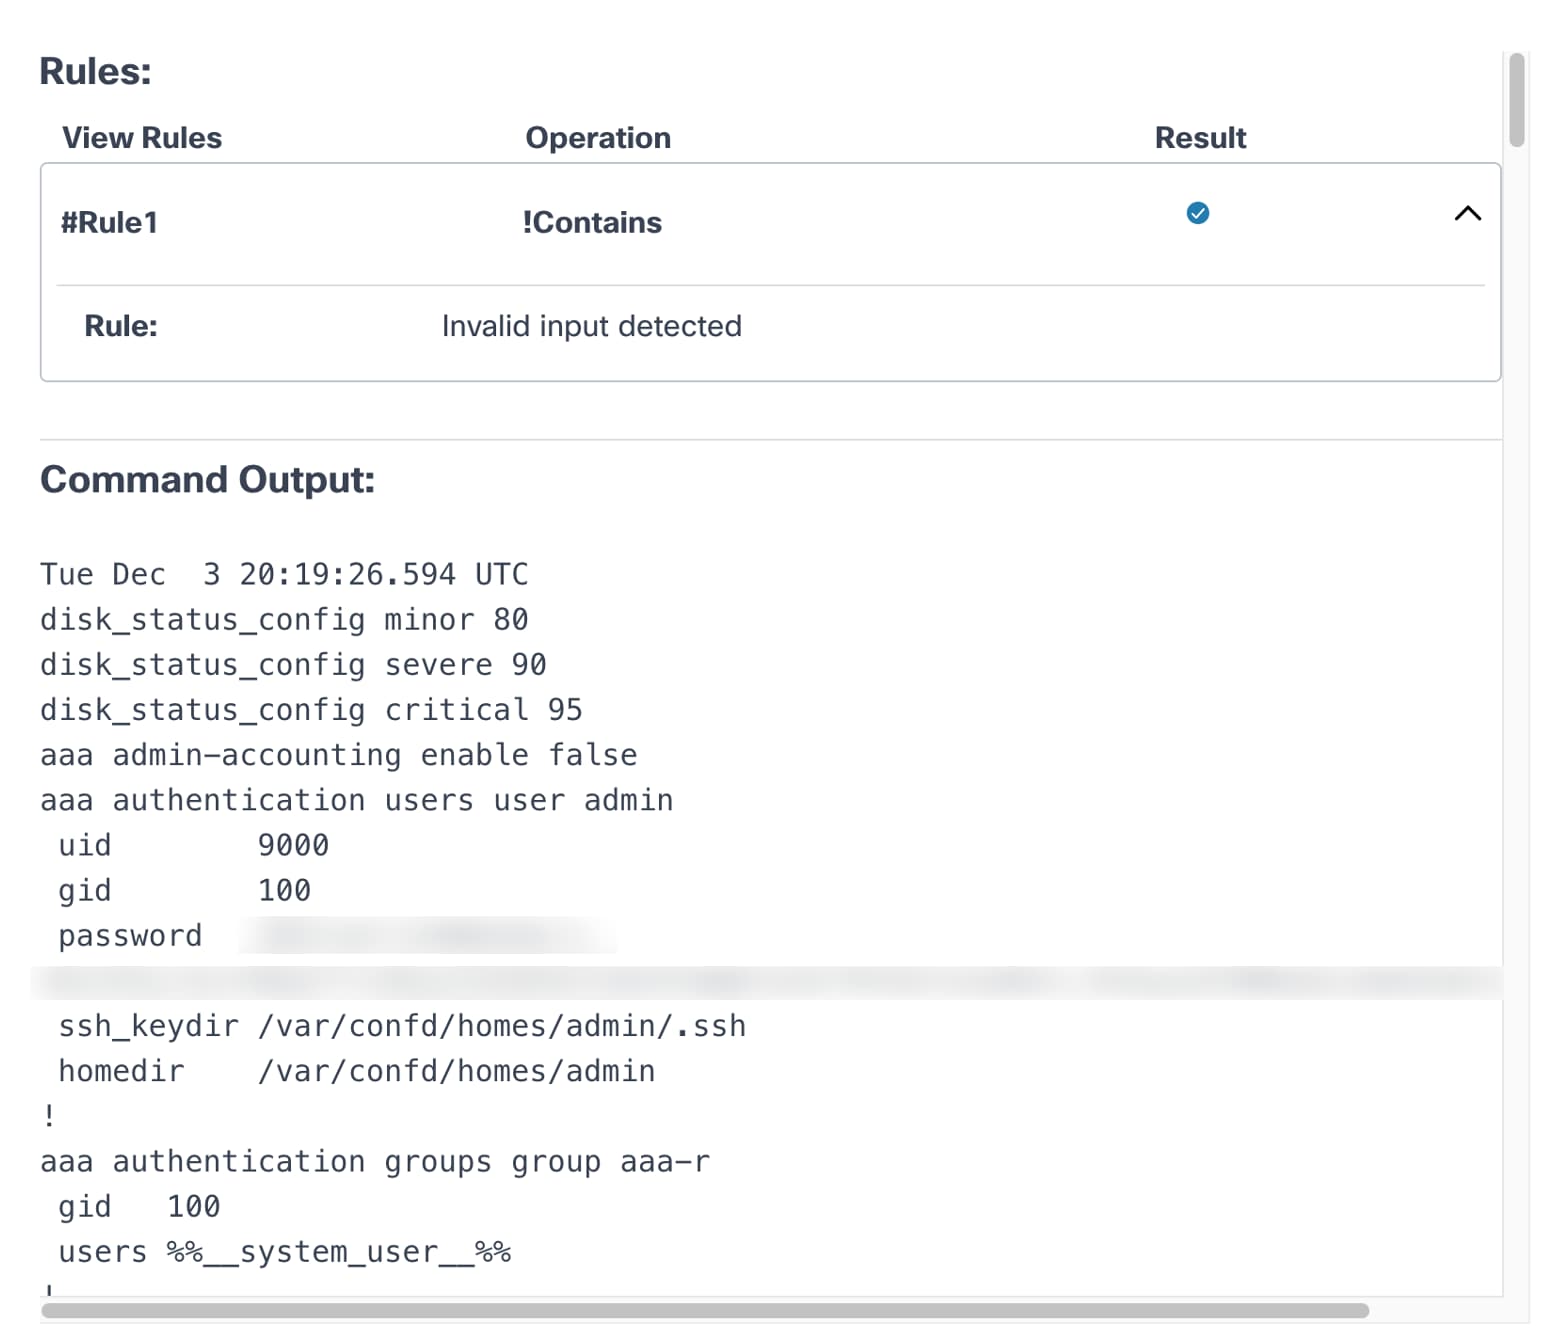
For milestones with pre- or post-check execution, users can view full command output along with the validation rules and their statuses for all commands configured in the respective process template.
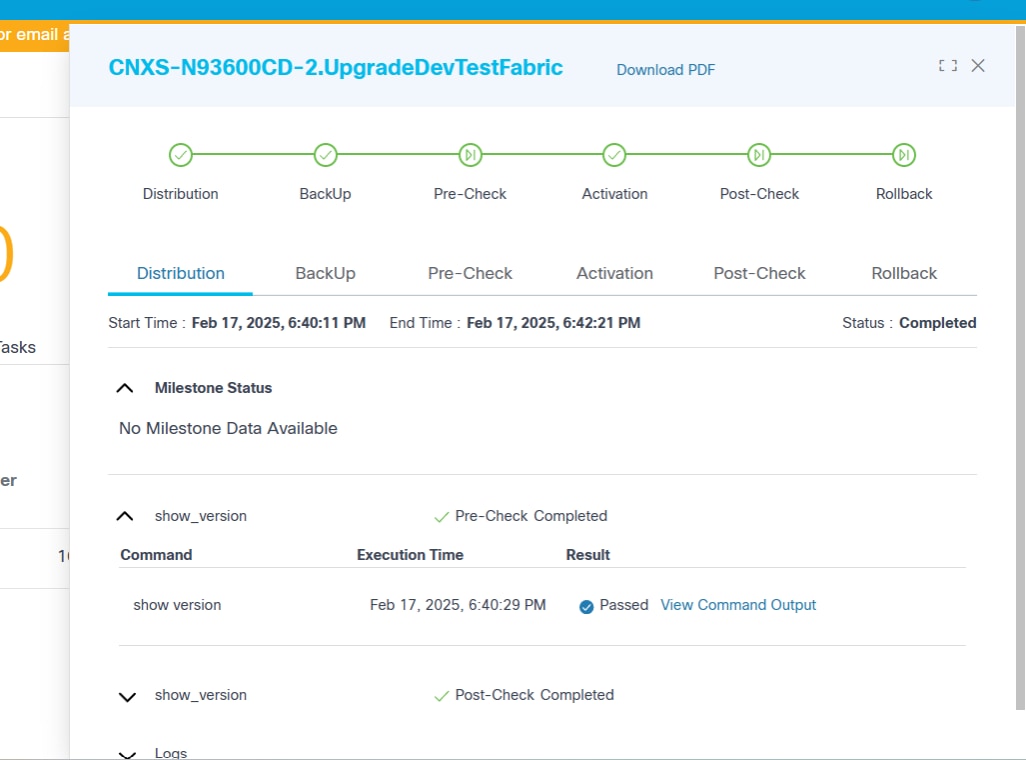
- To view the command output and the rules associated with the pre- and post-check commands, click the View Command Output link.
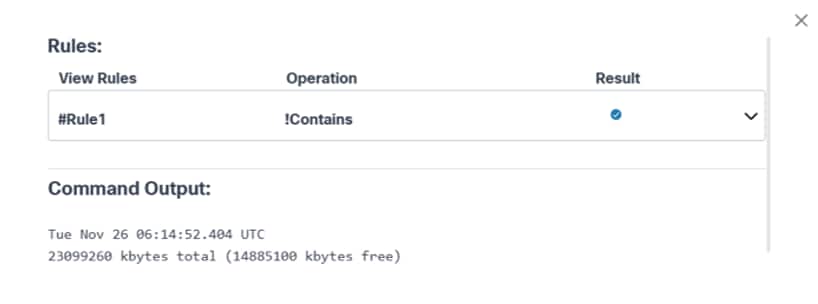
- Select the Expand icon to view full details of each rule.
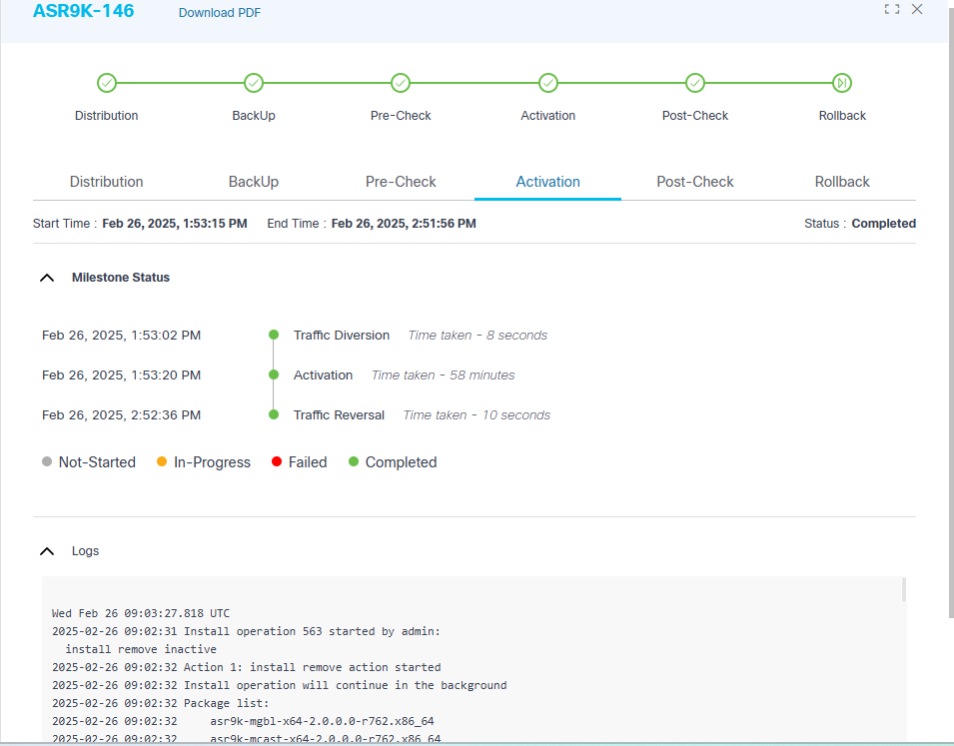
The figure above provides details of the activation milestone, which includes live logs to help monitor the progress of the software activation of a particular device.
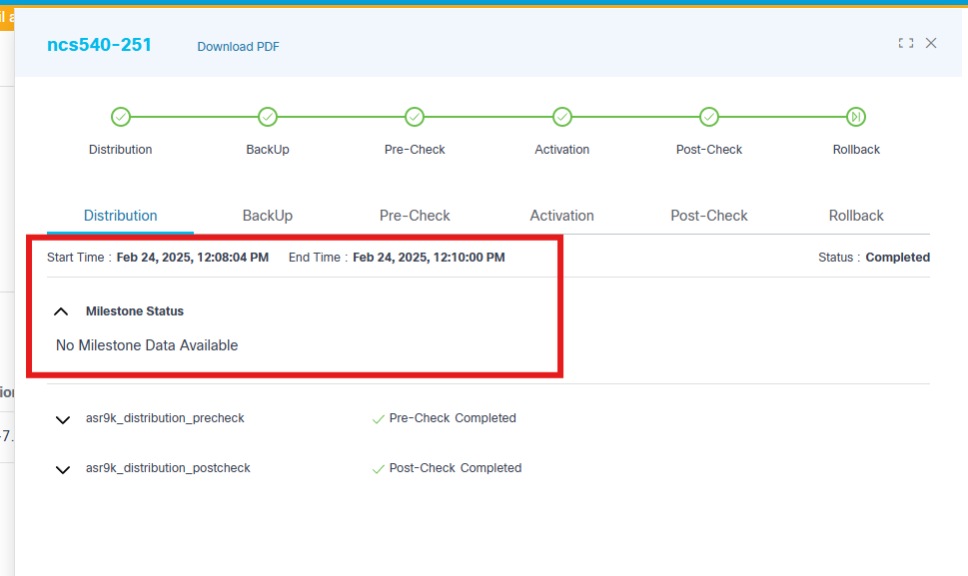
When a milestone starts or completes, clicking the milestone displays more information.

An analytics section, displayed at the top of the Job Summary page, displays the following information related to the currently selected job:
- The batch name (e.g., Asia)
- Filters ^ collapses and expands the analytics section
- The following batch details are shown in order:
- Assets: Total number of assets
- User Tasks: Total number of user tasks waiting for the Operations user or Administrator’s input
- Asset Status: Filters the batch devices according to their status. The Rollback filter has been added to help identify devices that are successfully rolled back.
- Controller ID: Filters the batch devices belonging to selected controller ID
- Complete: Overall batch completion percentage
To act upon any user tasks, click the User Tasks count. The User Task Details window opens with the following:
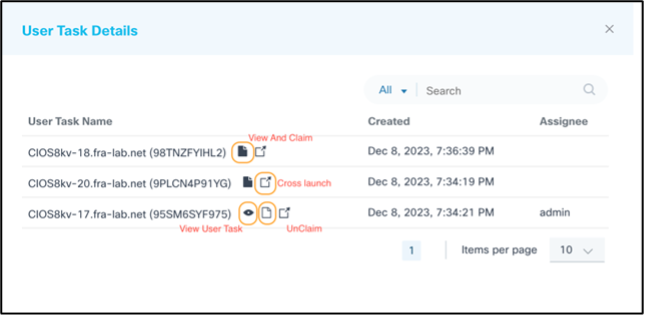
- A list of user tasks which correspond to respective devices requiring attention
- The following icons for user tasks options:
- View and Claim: View the user task details
- Cross Launch: View the BPA workflow tasks in the classic UI
- Unclaim: Remove the user task assignment
- View User Task: View the user task details
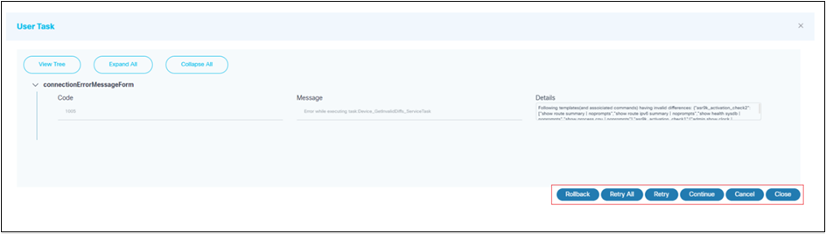
View option of User Task
- The following options display based on the context of the
task:
- Retry: Re-executes the task
- Retry All: Re-executes all the pre- and post-checks
- Continue: Continues to the next task
- Rollback: Rolls back to the previous version; This option is available when the Activation or Post-Check is failed, or invalid differences are found between the Pre-/Post-checks
- Cancel: Cancels the current job
- Close: Closes the User Task window.
- Act on the user tasks, if any, and select the Refresh icon to refresh the total user tasks count
- Total batch completion percentage
- Clickable chart to filter by controller IDs
Downloading Software Upgrade Report
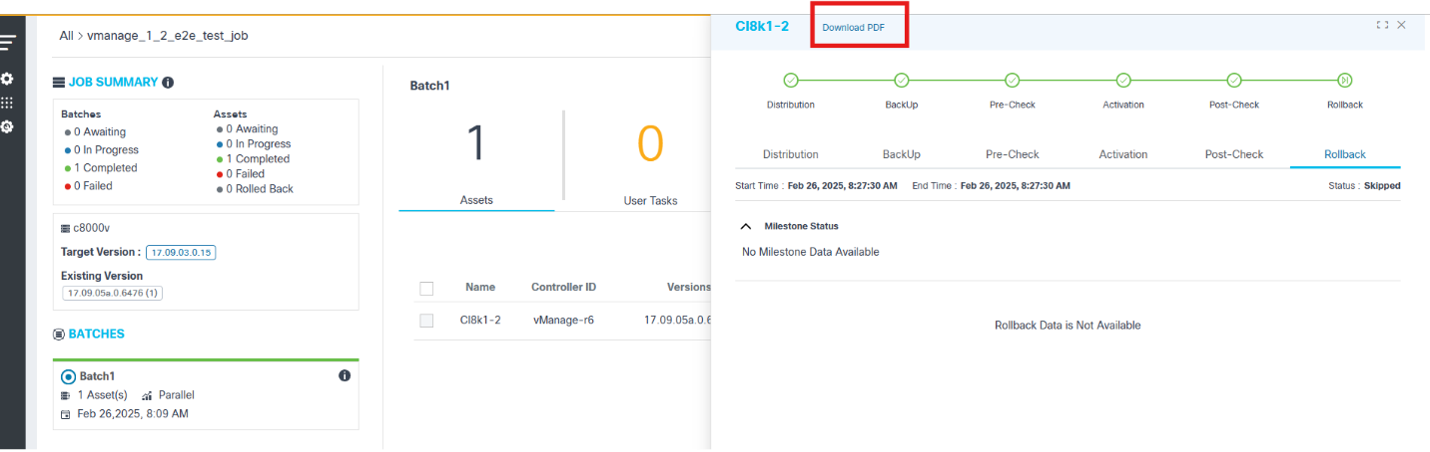
The device name is displayed followed by Download PDF in the header of the detail view. Users can generate and download the upgrade report in PDF format for the currently selected device. To download the upgrade report in PDF format:
- Click Download PDF. The Download Report Option window opens.
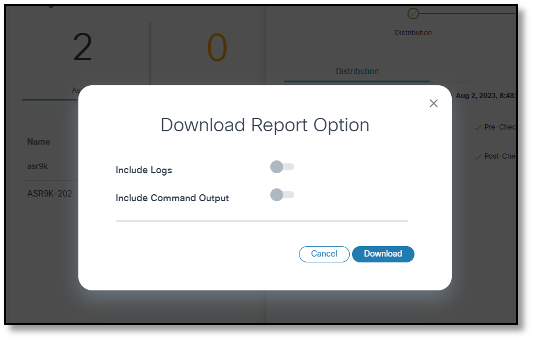
- Enable the Include Logs and Include
Command Outputs toggles.
- Include Logs: Includes live logs, if any, in the report
- Include Command Output: Includes the command output of pre- and post-checks in the report; In this case, rules are followed by the command output
- Click Download. Report generation starts.
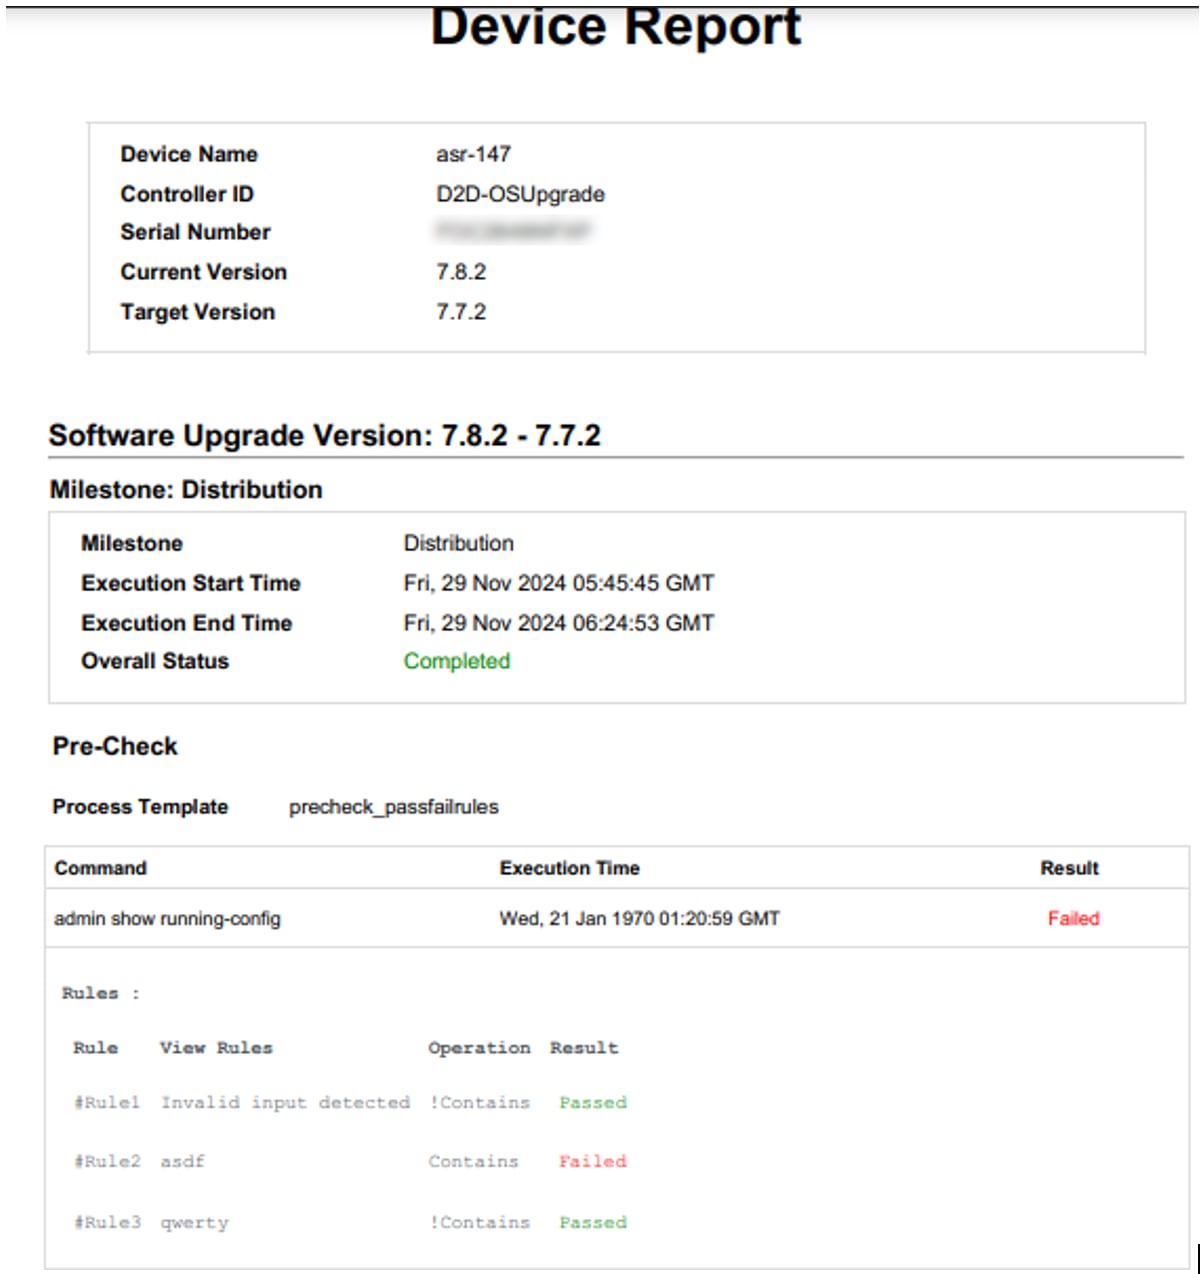
Archiving Jobs
- Log in to BPA with credentials that have sufficient access to Upgrade Jobs.
- Select OS Upgrade > Upgrade Jobs. The Upgrade Job page displays.
- Use the Search filter in combination with available chart filters to filter the job(s).
- Select one or more jobs.

- Select the More Options icon > Archive.
Deleting Jobs
- Log in to BPA with credentials that have sufficient access to Upgrade Jobs.
- Select OS Upgrade > Upgrade Jobs. The Upgrade Job page displays.
- Use the Search filter in combination with available chart filters to filter the job(s).
- Select one or more jobs.

- Select the More Options icon > Delete Job.
Deleting Batches in Jobs
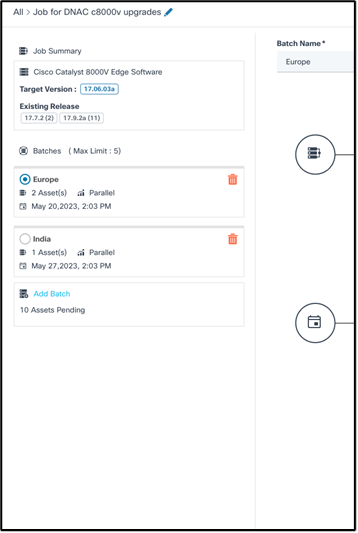
- Select the Delete icon of the desired batch in the side panel. A confirmation window opens.
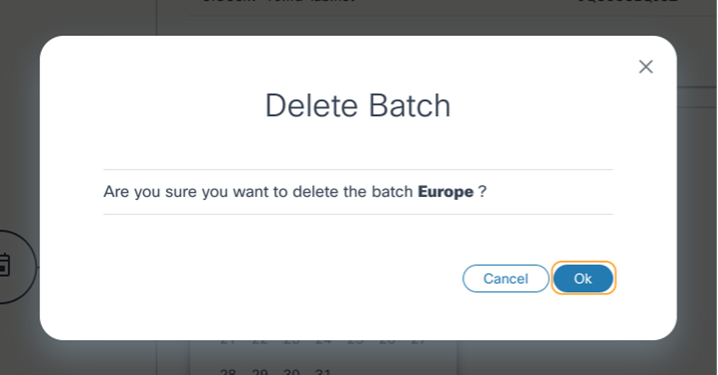
- Click Ok.
Assets associated with the deleted batch return to the pending assets pool and are available for selection in new or existing batches.
Cancelling Jobs
- Log in to BPA with credentials that have sufficient access to Upgrade Jobs.
- Select OS Upgrade > Upgrade Jobs. The Upgrade Job page displays.
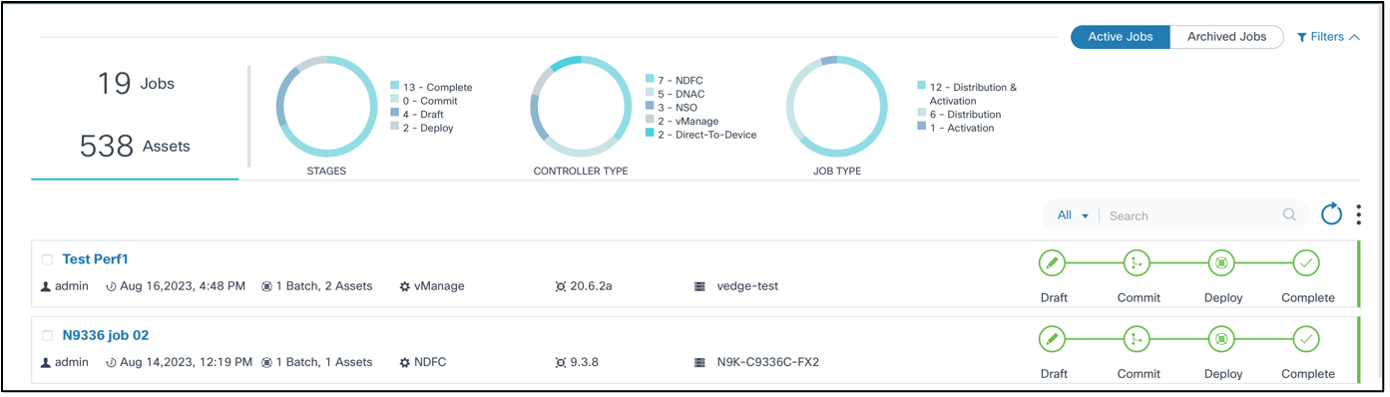
- Use the Search filter in combination with available chart filters to filter the desired job.
- Click the desired job. The Job Summary page displays.

- Click Cancel.
Rolling Back Completed Jobs or Upgrades
- Log in to BPA with credentials that have sufficient access to Upgrade Jobs.
- Select OS Upgrade > Upgrade Jobs. The Upgrade Job page displays.

- Use the Search filter in combination with available chart filters to filter the desired job.
- Click the desired job. The Job Summary page displays. Select the required batch on the left side pane and select the desired devices which needs Complete confirmation / Rollback on the right-side panel
- Select the More Options icon and click either Rollback or Complete menu actions as per the requirement.
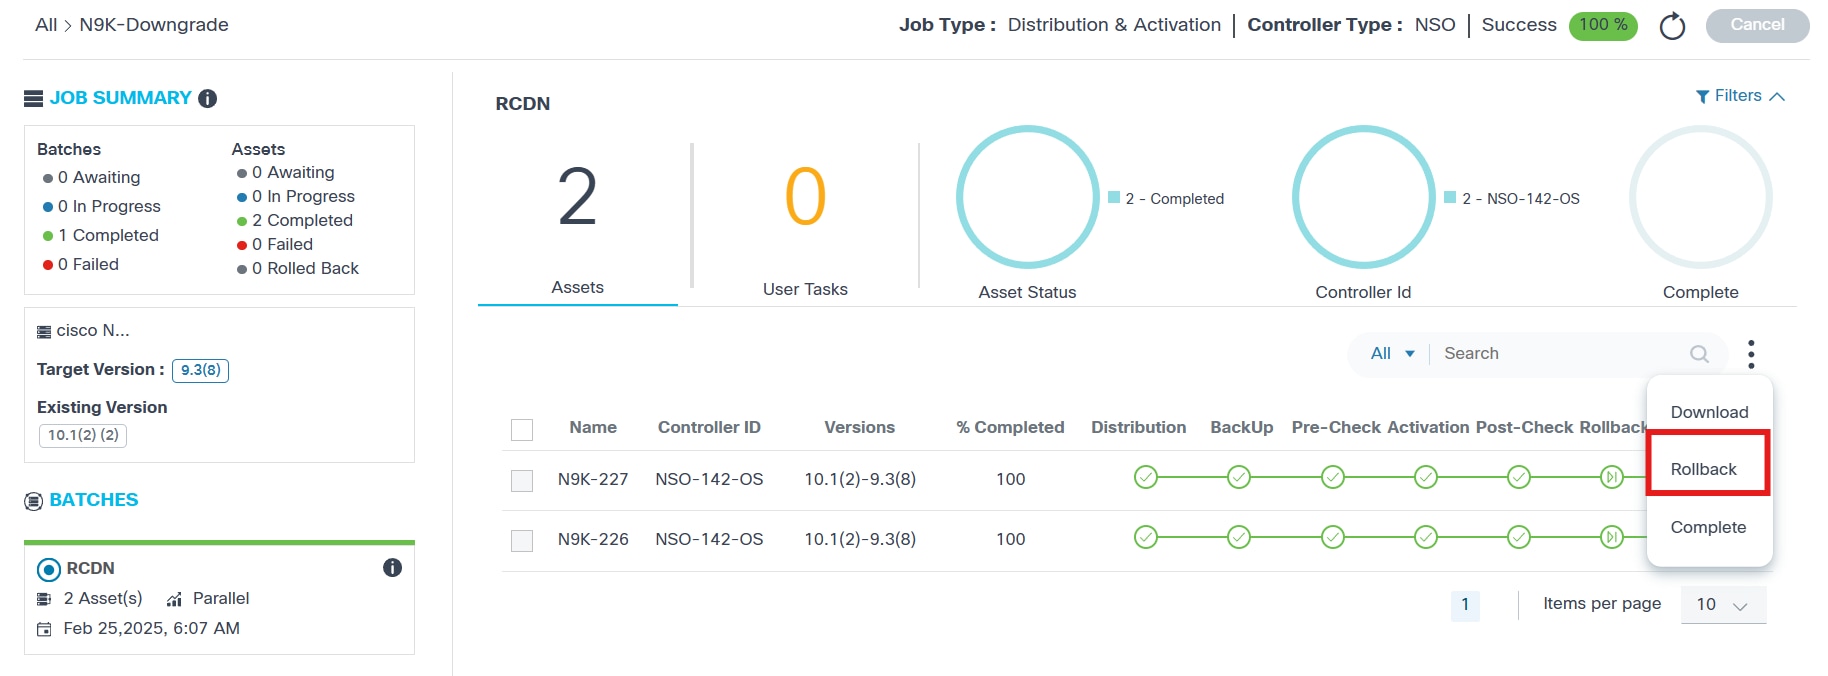
- Settings must be configured for enabling the rollback option of a completed upgraded job; refer to Settings for more information.
- If no action taken within the time, devices automatically move to a Complete state
- Devices are available for the on-demand rollback action if the rollback has previously been completed or the rollback milestone is in the Awaiting state
Settings
OS Upgrade settings provide a placeholder to hold common settings used across other components of the OS Upgrade application.
To access the Settings page:
- Log in to BPA with credentials that have manage access to Settings.
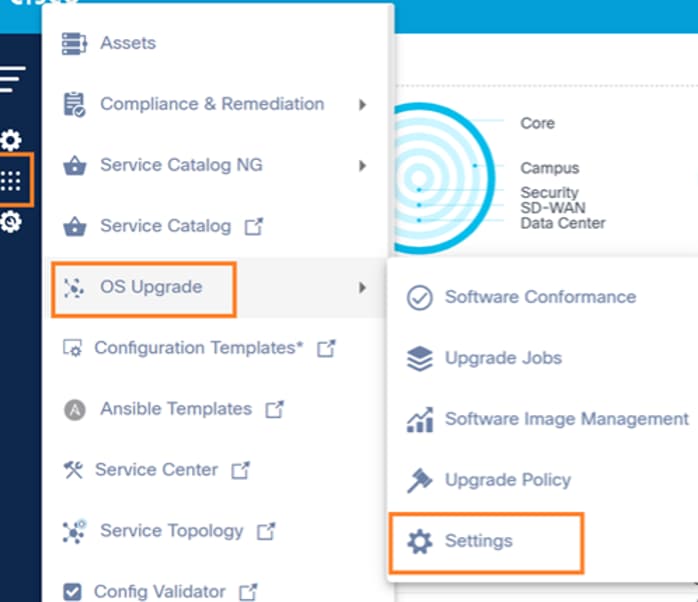
- Select OS Upgrade > Settings. The Settings page opens.
The Settings page has the two following tabs:
- Software Conformance: Configurations which allow automatic conformance execution schedules can be updated in this tab
- Rollback: Configurations which allow rollback of a complete device upgrade can be updated in this tab
Software Conformance
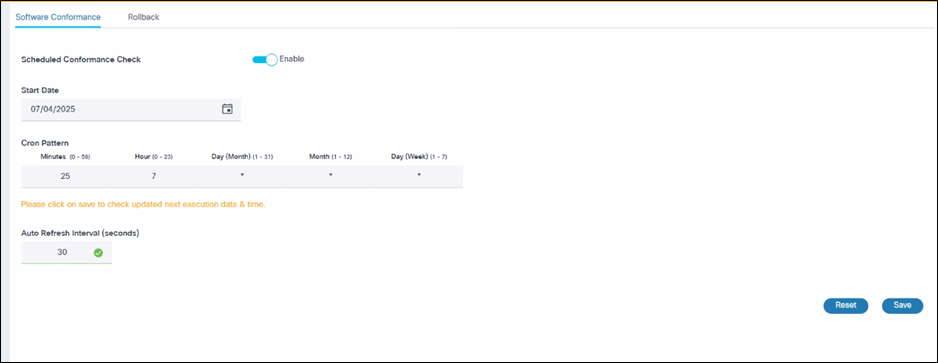
The Software Conformance tab provides the following:
- Scheduled Conformance Check: Enable or disable the schedule
- Start Date: Select the MM/DD/YYYY
- Cron Pattern: Provide the following details:
- Minutes (0-59)
- Hour (0-23)
- Day (Month) (1-31)
- Month (1-12)
- Day (Week) (1-7)
- Add Auto Refresh Interval: Default value is 30 seconds
- Save: Save changes
Rollback
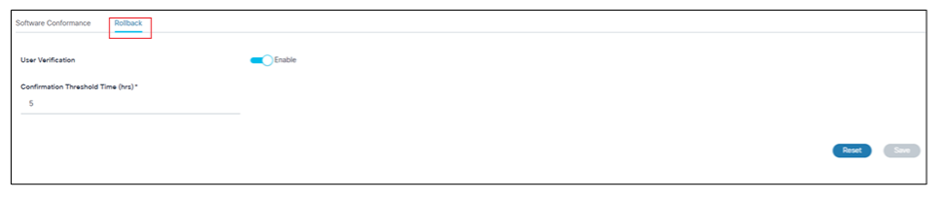
The Rollback tab provides the following:
- User Verification Toggle: Enable or disable user
verification
- Enabled State: Devices in the upgrade job wait for user confirmation to rollback or complete the upgrade until the threshold time configured in Configuration Threshold Time (hrs) is reached; when reached, the devices automatically move into the Completed state
- Disabled State: Devices in the upgrade job automatically complete the upgrade without waiting for user confirmation
- Confirmation Threshold Time: Add a threshold time to wait in hours
- Save: Save changes
Deployment Configuration
- Default schedules for both the conformance policy check and the SWIM metadata are configured daily at 7:25 AM local time.
- To change the default schedules of the SWIM image metadata sync, navigate to the BPA installed directory “<BPA install directory>/conf/@cisco-bpa-platform/mw-osupgrade-nxtgen/config.json” and update the schedule.swimSchedule property with the Cron expression. Schedules can be updated post deployment. Refer to Software Conformance for more information.
- To increase or decrease the maximum number of devices processed in parallel mode for different controller types:
- Update the following files:
- Cisco Catalyst Center File: “<BPA_INSTALL_DIRECTORY>/conf/@cisco-bpa-platform/mw-dnac-agent/config.json”
- vManage File: “<BPA_INSTALL_DIRECTORY>/conf/@cisco-bpa-platform/mw-vmanage-agent/config.json”
- NDFC File: “<BPA_INSTALL_DIRECTORY>/conf/@cisco-bpa-platform/mw-ndfc-agent/config.json”
- FMC File: “<BPA_INSTALL_DIRECTORY>/conf/@cisco-bpa-platform/mw-fmc-agent/config.json”
- Navigate to Update throttling > capabilities > image-activation, image-distribute to increase the concurrent activation or distribution limit.
Access Control
Role Based Access Control
BPA supports Roles Based Access Control (RBAC). In the RBAC model, a role encapsulates a set of permissions (i.e., actions) that a user can perform. For access control, Administrators can assign either pre-defined roles or newly created roles with permissions to user groups. A user can belong to one or more user groups and each user group may be assigned to one or more roles which entitles the users in that group to certain access permissions.
The table below outlines the OOB OS Upgrade roles and associated permissions.
| Service | Group | Intent | Super Admin | Use case Administrator | Read Only User (OS Upgrade Use Case Read Only User) | Operator |
|---|---|---|---|---|---|---|
| OSUpgradeService | ui_app | Show or hide the Upgrade Jobs application | Yes | Yes | Yes | Yes |
| OSUpgradeService | ui_app | Show or hide the Software Conformance application | Yes | Yes | Yes | Yes |
| OSUpgradeService | ui_app | Show or hide the SWIM application | Yes | Yes | Yes | Yes |
| OSUpgradeService | ui_app | Show or hide the Software Upgrade Policies application | Yes | Yes | Yes | Yes |
| OSUpgradeService | ui_app | Show or hide the Software Upgrade settings | Yes | Yes | Yes | Yes |
| OSUpgradeService | Upgrade Jobs | Manage upgrade jobs (e.g., create, update, delete, and commit) | Yes | Yes | No | Yes |
| OSUpgradeService | Upgrade Jobs | Cancel upgrade jobs | Yes | Yes | No | Yes |
| OSUpgradeService | Upgrade Jobs | On-demand archival of the jobs | Yes | Yes | No | Yes |
| OSUpgradeService | Upgrade Jobs | Manual approval | Yes | Yes | No | Yes |
| OSUpgradeService | Software-conformance-policy | View software conformance policies and execution results | Yes | Yes | Yes | Yes |
| OSUpgradeService | Software-conformance-policy | Create, update and delete software conformance policies | Yes | Yes | No | No |
| OSUpgradeService | Software-conformance-policy | On-demand execution of software conformance policies | Yes | Yes | No | Yes |
| OSUpgradeService | Upgrade Policy | View OS upgrade policies | Yes | Yes | Yes | Yes |
| OSUpgradeService | Upgrade Policy | Manage OS upgrade policies | Yes | Yes | No | No |
| OSUpgradeService | Swim-image-management | Create, update, and delete software images | Yes | Yes | No | Yes |
| OSUpgradeService | Swim-image-management | View SWIM | Yes | Yes | Yes | Yes |
| OSUpgradeService | Swim-image-management | Sync software images | Yes | Yes | No | Yes |
| OSUpgradeService | Software-recommendations | Sync software recommendations metadata | Yes | Yes | No | No |
| OSUpgradeService | Software-recommendations | View advisories or insights | Yes | Yes | Yes | Yes |
| OSUpgradeService | Software-recommendations | Manage the conformance policy | Yes | Yes | No | No |
| OSUpgradeService | Software-conformance-setting | View software conformance settings | Yes | Yes | Yes | Yes |
| OSUpgradeService | Software-conformance-setting | Manage software conformance settings | Yes | Yes | No | No |
Resource Groups
This feature provides fine grain access control for BPA resources, such as upgrade policies, restricting unauthorized users from updating the policies defined in the OS Upgrade application. Administrators can restrict access by defining a resource group with accessible policies.
To create a resource group:
- Navigate to Settings > Resource Groups.
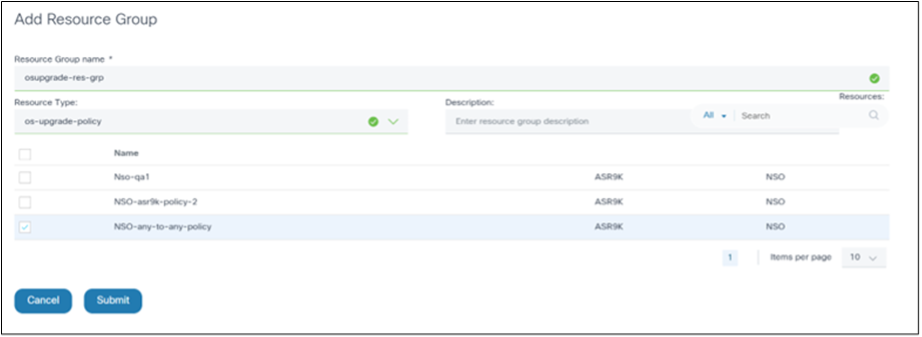
- Create a resource group with policies that non-administrator users can access.
- Select os-upgrade-policy as the Resource Type. Corresponding resources display.
- Select the required upgrade policies.
- Click Submit. Non-administrator users belonging to this user group now have access to the policies available in the selected resource group only.
To associate the resource group with a user group, create an access policy.
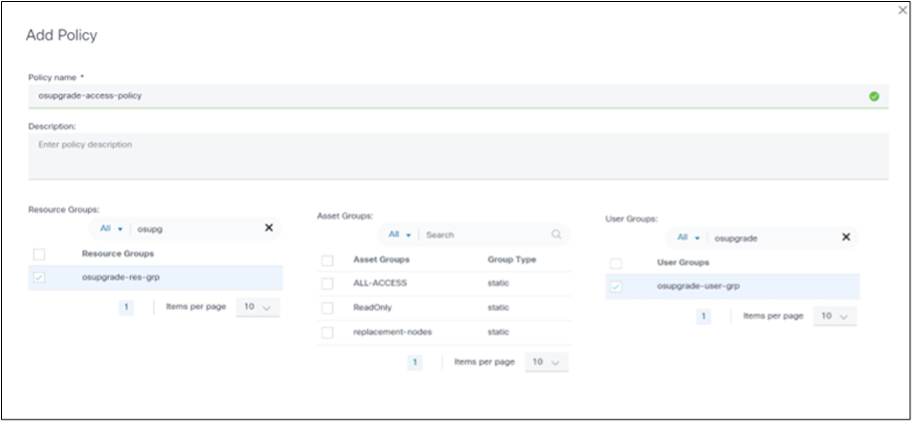
- Users
- Roles
- User Groups
- Access Polices
- Resource Groups
- Asset Groups
Below is an example of a non-administrator user having access to restricted resources:
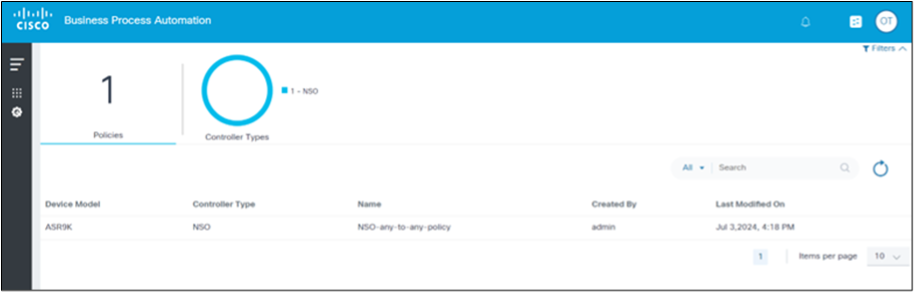
Zero-Trust Flag Setting
Resources accessible by a user can vary based on the zero-trust flag setting. The zero-trust flag can be set to true or false. The following table summarizes the resource access possibilities based on the zero-trust flag setting.
| User | User Group | Access Policy | Resource Group | Resources | Zero-Trust | Enabled |
|---|---|---|---|---|---|---|
| User 1 | UG1 | AP1 | RG1 | 2 resources | 2 resources | 2 resources |
| User 1 | UG1 | AP2 | RG2 | 0 resources | 0 resources | 0 resources |
| User 1 | UG1 | AP3 | Nil | 0 resources | All resources | |
| User 1 | UG1 | Nil | Nil | 0 resources | All resources |
To enable or disable the zero-Trust flag:
- Navigate to the following configuration path:
cd /opt/bpa/bpa-helm-chart-<version>/charts/cisco-bpa-platform-mw-auth/public_conf/config.json - Modify the zeroTrustPolicies value.
- Navigate to the following core bundle:
cd /opt/bpa/bpa-helm-chart-<version> - Run the following command to delete the core helm:
helm delete bpa-rel -n bpa-ns - Run the following command to check the status of the pods
kubectl get pods -n bpa-ns - Run the following command to install the core helm after all pods
are terminated:
helm install bpa-rel --create-namespace --namespace bpa-ns - Run the following command to verify the status of the pods that
come up:
kubectl get pods -n bpa-ns
Troubleshooting OS Upgrade Issues
This section provides troubleshooting tips related to the issues observed with the OS Upgrade application in BPA.
Target Device Model Cannot Be Seen When Creating a Conformance Policy
Ensure the corresponding image metadata is available in Software Images under SWIM. If not found, perform either of the following options:
- Sync images to retrieve image metadata from controllers such as Cisco Catalyst Center, NDFC, vManage, and FMC
- Create required image metadata for controllers such as NSO, CNC, Direct-to-Device, and ANSIBLE
Software Conformance Shows a Non-Operational Status
This could be due to the following reasons:
- No assets were found with the selected model when creating the software conformance policy
- The model’s name in SWIM does not match the conformance device model in the device inventory for all devices
- If the SMU was chosen as part of software conformance creation and the SMU discovery failed for all devices
- The process template selected for compliance check template execution failed or was not found
- The serial number or current version is unavailable for all devices under the selected model when creating software conformance
The Software Conformance Result Status of Certain Devices Is Unknown
This could be due to the following reasons:
- The model’s name in SWIM does not match the conformance device model in the device inventory
- If the SMU was chosen as part of software conformance creation and the SMU discovery failed for a device
- The process template selected for compliance check template execution failed or was not found
- The serial number or current version is unavailable for the devices
Upgrade Job Completion Progress Percentage
If the upgrade job completion progress percentage is less than 100 even though the upgrade is completed, then confirm that the Wait for Rollback settings is enabled under OS Upgrade > Settings > Rollback and that the User Verification toggle is on. If the overall completion percentage remains below 100, select Rollback or Complete.
Job Schedule Reached, Devices are Stuck in Awaiting State
If the devices are stuck in an Awaiting state after the scheduled job is initiated, try restarting Kafka, Camunda, Scheduler, and OS Upgrade micro services.
Revision History
| Revision | Publish Date | Comments |
|---|---|---|
1.0 |
24-Sep-2025
|
Initial Release |
 Feedback