-
Cisco MDS 9000 Family Fabric Manager Configuration Guide, Release 2.x
-
New and Changed Information
-
Index
-
Preface
- Part 1 - Fabric Manager Applications
- Part 2 - Cisco MDS SAN-OS Installation and Configuration Files
-
Part 3 - Switch Configuration
-
Cisco Fabric Services
-
VSAN Configuration
-
Dynamic VSAN Configuration
-
Zone Configuration
-
Inter-VSAN Routing Configuration
-
PortChannel Configuration
-
Interface Configuration
-
FCIP Configuration
-
Configuring the SAN Extension Tuner
-
iSCSI configuration
-
FICON Configuration
-
Configuring Intelligent Storage Services
-
Additional Configuration
-
- Part 4 - Security Configuration
- Part 5 - Network and Performance Monitoring
- Part 6 - Troubleshooting
-
GUI/CLI Usage Chart
-
Interface Nonoperational Reason Codes
-
Managing Cisco FabricWare
-
 Feedback
Table Of Contents
PortChannel Configuration
PortChannels refer to the aggregation of multiple physical interfaces into one logical interface to provide higher aggregated bandwidth, load balancing, and link redundancy. PortChannels can connect to interfaces across switching modules, so a failure of a switching module cannot bring down the PortChannel link.
This chapter describes how to use the PortChannel wizard to configure PortChannels. This chapter contains the following sections:
PortChannel Functionality
A PortChannel has the following functionality:
•
Provides a point-to-point connection over ISL (E ports) or EISL (TE ports). Multiple links can be combined into a PortChannel.
•
•
•
PortChanneling and trunking are used separately across an ISL:
•
•
The Cisco MDS 9000 Family of switches supports 128 PortChannels with 16 interfaces per PortChannel. A PortChannel number refers to the unique (to each switch) identifier associated with each channel group. This number ranges from 1 to 128.
Using the PortChannel Wizard
To create a PortChannel with the PortChannel Wizard in Fabric Manager, follow these steps:
Step 1
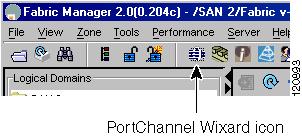
You see the first PortChannel Wizard screen.
Figure 17-1 PortChannel Wizard Icon
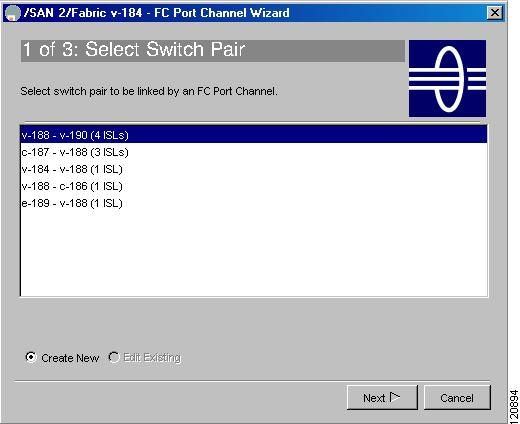
Step 2
Figure 17-2 Select Switch Pairs
Step 3
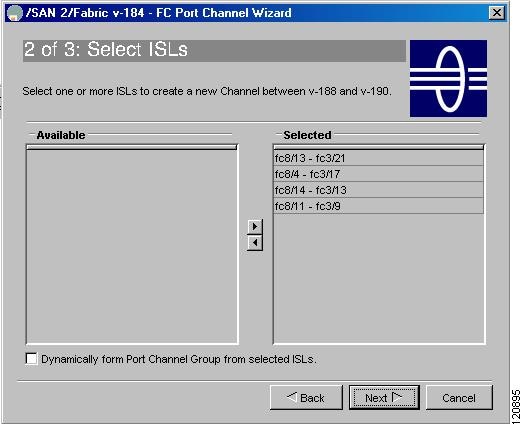
Step 4
Figure 17-3 shows a list of the ISLs.
Figure 17-3 Select ISLs
Step 5
Step 6
Step 7
Figure 17-4 Dynamically Form a PortChannel
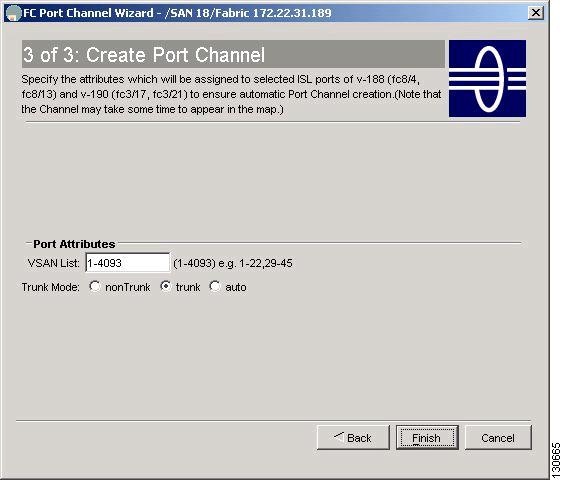
Step 8
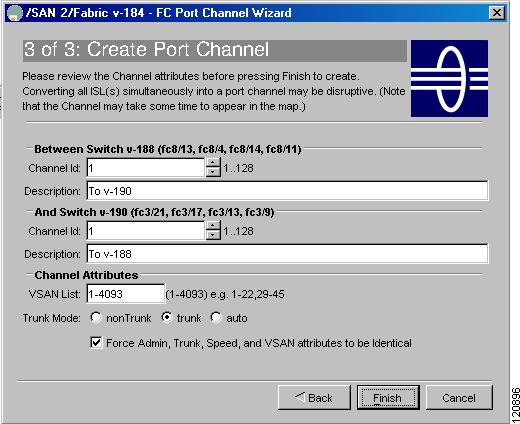
Figure 17-5 Create a PortChannel
Step 9
Step 10
The following attributes are shown in Figure 17-5:
•
•
•
Step 11
The PortChannel is created. Note that it may take a few minutes before the new PortChannel is visible in the Fabric pane.
Modifying PortChannels
To modify an existing PortChannel configuration using Fabric Manager, follow these steps:
Step 1
Step 2
Step 3
Step 4