-
Cisco MDS 9000 Family Fabric Manager Configuration Guide, Release 2.x
-
New and Changed Information
-
Index
-
Preface
- Part 1 - Fabric Manager Applications
- Part 2 - Cisco MDS SAN-OS Installation and Configuration Files
-
Part 3 - Switch Configuration
-
Cisco Fabric Services
-
VSAN Configuration
-
Dynamic VSAN Configuration
-
Zone Configuration
-
Inter-VSAN Routing Configuration
-
PortChannel Configuration
-
Interface Configuration
-
FCIP Configuration
-
Configuring the SAN Extension Tuner
-
iSCSI configuration
-
FICON Configuration
-
Configuring Intelligent Storage Services
-
Additional Configuration
-
- Part 4 - Security Configuration
- Part 5 - Network and Performance Monitoring
- Part 6 - Troubleshooting
-
GUI/CLI Usage Chart
-
Interface Nonoperational Reason Codes
-
Managing Cisco FabricWare
-
 Feedback
Table Of Contents
Configuring Intelligent Storage Services
Enabling Intelligent Storage Services
Disabling Intelligent Storage Services
Configuring SCSI Flow Services
Fibre Channel Write Acceleration
Configuring Fibre Channel Write Acceleration
Viewing SCSI Flow Statistics and Clearing SCSI Flow Statistics
Configuring Intelligent Storage Services
The Storage Services Module (SSM) supports Intelligent Storage Services on Cisco MDS 9000 Family switches running Cisco MDS SAN-OS Release 2.0(2b) or later software. Intelligent Storage Services support in Cisco MDS SAN-OS Release 2.0(2b) includes the following:
•
Fibre Channel write acceleration
•
Intelligent Storage Services support in Cisco MDS SAN-OS Release 2.1(1) include the following:
•
•
•
This chapter includes the following sections:
•
•
Intelligent Storage Services
All Intelligent Storage Services must be enabled on an SSM before the service can be configured. For switches running Cisco MDS SAN-OS Release 2.1(1a) or later software, these services are enabled for all ports on the SSM, or provisioned in groups of four ports. Switches running earlier releases that support intelligent storage services enable a service across all ports.
Note
Intelligent Storage Services include the following:
•
•
•
•
Enabling Intelligent Storage Services
In Cisco MDS SAN-OS Release 2.1(1a) or later, you can provision a subset of the ports for an SSM feature. The port range must be a multiple of four (for example fc4/1 through fc4-12).
To enable Intelligent Storage Services in Fabric Manager for an SSM and provision all ports or a group of ports to use these services, follow these steps:
Step 1
Step 2
Step 3
Step 4
Step 5
Step 6
Note
Step 7
Step 8
Step 9
Disabling Intelligent Storage Services
To disable Intelligent Storage Services in Fabric Manager for an SSM and free up a group of ports that used these services, follow these steps:
Step 1
Step 2
Step 3
Step 4
Step 5
Note
SCSI Flow Services
A SCSI flow is a SCSI initiator/target combination. SCSI Flow Services provides enhanced features for SCSI flows such as write acceleration and flow monitor for statistics gathering on an SSM. SCSI flows can exist between an initiator/target combination on one SSM, or between two SSMs on different Cisco MDS switches.
Note
The SCSI flow manager resides on a supervisor module and handles the configuration of SCSI flows, validating them and relaying configuration information to the appropriate SSM. It also handles any dynamic changes to the status of the SCSI flow due to external events. The SCSI flow manager registers events resulting from operations, such as port up or down, VSAN suspension, and zoning that affects the SCSI flow status, and updates the flow status and configuration accordingly.
The SCSI flow manager on the initiator communicates to its peer on the target side using Cisco Fabric Services (CFS). Peer communication allows the initiator SCSI flow manager to validate target parameters and program information on the target side.
Fabric Manager creates SCSI flows when Fibre Channel write acceleration or SCSI flow statistics gathering is configured.
Configuring SCSI Flow Services
A SCSI flow specification consists of the following attributes:
•
•
•
•
Note
To configure a Fibre Channel flow on Fabric Manager, follow these steps:
Step 1
Step 2
Step 3
Step 4
Step 5
Fibre Channel Write Acceleration
Fibre Channel write acceleration minimizes application latency or reduces transactions per second over long distances. For synchronous data replication, Fibre Channel write acceleration increases the distance of replication or reduces effective latency to improve performance.To take advantage of this feature, both the initiator and target devices must be directly attached to an SSM.
The Fibre Channel write acceleration feature also allows the configuration of the buffer count. You can change the number of 2 KB buffers reserved on the target side for a SCSI flow.
You can estimate the number of buffers to configure using the following formula:
(Number of concurrent SCSI writes * size of SCSI writes in bytes) / FCP data frame size in bytes
Note
Note
Configuring Fibre Channel Write Acceleration
A SCSI flow is created when you configure Fibre Channel write acceleration. The SCSI flow consists of the following attributes:
•
•
•
•
To configure Fibre Channel write acceleration on Fabric Manager, and optionally modify the number of write acceleration buffers, follow these steps:
Step 1
Step 2
Step 3
Step 4
Step 5
SCSI Flow Statistics
The statistics that can be collected for SCSI flows include SCSI reads and writes, SCSI commands, and errors. To take advantage of this feature, only the initiator must be directly attached to an SSM.
Note
Note
Enabling SCSI Flow Statistics
To enable SCSI flow statistics monitoring using Fabric Manager, follow these steps:
Step 1
Step 2
Step 3
Step 4
Viewing SCSI Flow Statistics and Clearing SCSI Flow Statistics
To clear SCSI flow statistics using Fabric Manager, follow these steps:
Step 1
Step 2
Step 3
Step 4
Step 5
SANTap
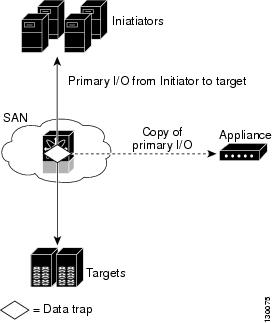
The SANTap feature allows third party data storage applications, such as long distance replication and continuous backup, to be integrated into the SAN. The protocol-based interface that is offered by SANTap allows easy and rapid integration of the data storage service application because it delivers a loose coupling between the application and an SSM, thereby reducing the effort needed to integrate applications with the core services being offered by the SSM. See Figure 23-1.
Figure 23-1 Integrating Third-Party Storage Applications in a SAN
You can use SANTap to remove your appliance-based storage applications from the primary data path in your SAN. Removing these applications from the primary data path prevents the applications from compromising the security, availability, and performance of your SAN. SANTap copies the data at line speed and makes it available to other storage applications, isolating these storage applications from affecting your SAN while maintaining the integrity of the data the storage applications need.
SANTap operates in three modes:
•
•
•
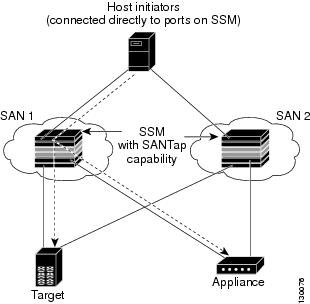
Transparent Mode
Transparent mode eliminates the need for any reconfiguration of either the host or target when introducing SANTap based applications. This mode of operation requires that either the host initiator or target is directly connected to an SSM. See Figure 23-2.
Figure 23-2 SANTap Transparent Mode Example
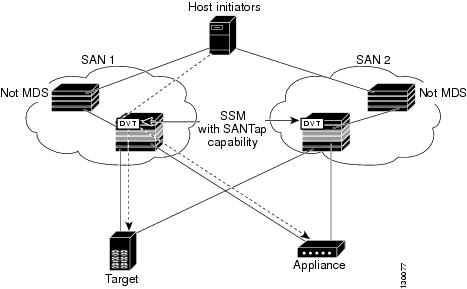
Proxy Mode-1
Proxy mode-1 assigns Cisco-specific WWNs to the virtual initiators (VIs) and digital virtual targets (DVTs). The benefit of this mode is that it eliminates the transparent mode requirement that a host initiator or a target be connected directly to an SSM. In proxy mode-1, the SSM can be anywhere in the SAN. However, this mode requires reconfiguration of legacy applications. See Figure 23-3.
Figure 23-3 SANTap Proxy Mode-1 Example
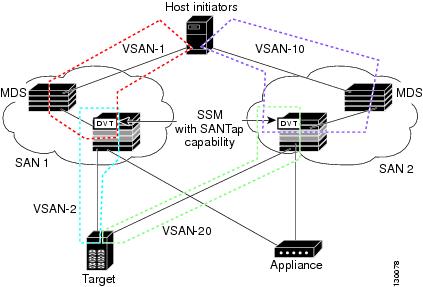
Proxy Mode-2
Proxy mode-2 includes the benefits of transparent mode and proxy mode-1 but does not have the limitations of those modes. However, it does require that the administrator partition the SAN using VSANs. The host initiator and the DVT are in one VSAN while the VI and the target are in another VSAN. See Figure 23-4.
Figure 23-4 SANTap Proxy Mode-2 Example
Configuring SANTap
To configure SANTap using Fabric Manager, follow these steps:
Step 1
Step 2
Step 3
Step 4
Note
Step 5
Step 6
Note
NASB
As of Cisco MDS SAN-OS Release 2.1(1), SSMs support Network-Accelerated Serverless Backup (NASB).
Data movement in the fabric uses considerable processor cycles that can cause client applications to slow down noticeably. Offloading data movement operations to a media server allows the client applications to run normally even during a backup operation. Media servers can further offload the data movement operation to NASB devices, which allows the media server to focus on the coordination functions needed to complete the backup.
Most backups performed today are server-free. In server-free backups, the application server is not involved in moving the data. The data can be moved by either a media server or an NASB device.
When the media server is the data mover, it moves the data between the disks and the tapes. The backup application runs on both the client device and the media server. However, the backup application in the client device performs minimal tasks for the backup operation.
The media server performs the following backup operations:
•
•
•
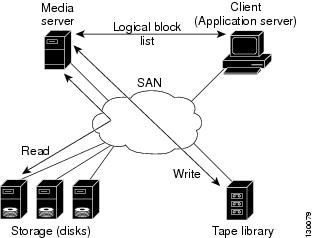
The backup application in the client device maps the data to be backed up and creates the logical block list associated with the data. The movement of data from the physical disks to the backup device (tape) is not performed by the client device. This reduces substantial load on the client device.
An example configuration is shown in Figure 23-5. The media server moves the data directly between the storage disks and the tape devices during backups.
Figure 23-5 Example Configuration with Media Server as Data Mover
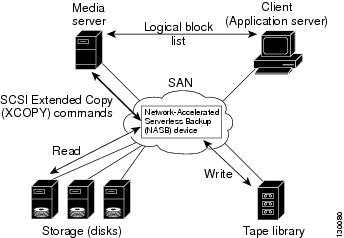
When the NASB is the data mover, it moves the data between the disks and the tapes. The NASB device is a SCSI target device capable of handling SCSI Extended Copy (XCOPY) commands as well as a SCSI initiator device capable of issuing read/write commands to disks and other backup media, such as tapes. See Figure 23-6.
Figure 23-6 Example Configuration with NASB Device as Data Mover
The task of managing and preparing the source and destination targets is performed by the media server. For example, if the destination is a tape library, the media server issues commands to load and unload the correct tape and position of the tape write head at the correct offset within the tape.
Configuring NASB
VSANs used with NASB must be configured to permit default zoning.
To permit default zoning on a VSAN using Fabric Manager, follow these steps:
Step 1
Step 2
Step 3
Step 4
To configure NASB using Fabric Manager, follow these steps:
Step 1
Step 2
Step 3
Step 4
Note
Step 5
Note
Step 6
Note