-
Catalyst 4500 Series Software Configuration Guide, 7.5
-
Preface
-
Product Overview
-
Using the Command-Line Interface
-
Configuring the Switch IP Address and Default Gateway
-
Configuring Ethernet and Fast Ethernet Switching
-
Configuring Gigabit Ethernet Switching
-
Configuring Fast EtherChannel and Gigabit EtherChannel
-
Configuring Spanning Tree
-
Configuring Spanning Tree PortFast, BPDU Guard, BPDU Filter, UplinkFast, BackboneFast, and Loop Guard
-
Configuring VTP
-
Configuring VLANs
-
Configuring VLAN Trunks on Fast Ethernet and Gigabit Ethernet Ports
-
Configuring Dynamic VLAN Membership with VMPS
-
Configuring GVRP
-
Configuring QoS
-
Configuring Multicast Services
-
Configuring Port Security
-
Configuring Unicast Flood Blocking
-
Configuring the IP Permit List
-
Configuring Protocol Filtering
-
Checking Port Status and Connectivity
-
Configuring CDP
-
Using Switch TopN Reports
-
Configuring UDLD
-
Configuring SNMP
-
Configuring RMON
-
Configuring SPAN and RSPAN
-
Administering the Switch
-
Configuring Switch Access Using AAA
-
Modifying the Switch Boot Configuration
-
Working with System Software Images
-
Using the Flash File System
-
Working with Configuration Files
-
Configuring Switch Acceleration
-
Configuring System Message Logging
-
Configuring DNS
-
Configuring NTP
-
Glossary
-
Index
-
 Feedback
Table Of Contents
Configuring Dynamic VLAN Membership with VMPS
VMPS and Dynamic Port Hardware and Software Requirements
Default VMPS and Dynamic Port Configuration
Configuration Guidelines for Dynamic Ports and VMPS
Troubleshooting VMPS and Dynamic Port VLAN Membership
Dynamic Port VLAN Membership with Auxiliary VLANs
Configuring Dynamic Port VLAN Membership with Auxiliary VLANs
Configuring Dynamic VLAN Membership with VMPS
This chapter describes how to configure dynamic VLAN membership for ports in your network using the VLAN Management Policy Server (VMPS) on the Catalyst enterprise LAN switches.
Note
For complete syntax and usage information for the commands used in this chapter, refer to the Command Reference—Catalyst 4000 Family, Catalyst 2948G, and Catalyst 2980G Switches.
This chapter consists of these major sections:
•
•
•
•
•
Understanding How VMPS Works
With VMPS, you can dynamically assign switch ports to VLANs based on the source MAC address of the device connected to the port. When you move a host from a port on one switch in the network to a port on another switch in the network, the switch assigns the new port to the proper VLAN for that host dynamically.
When you enable VMPS, a MAC address-to-VLAN mapping database downloads from a Trivial File Transfer Protocol (TFTP) server to the VMPS server, and the VMPS server begins to accept client requests. VMPS remains enabled, regardless whether you reset or power cycle the switch.
The VMPS opens a User Datagram Protocol (UDP) socket to communicate and listen to client requests. When the VMPS server receives a valid request from a client, it searches its database for a MAC address-to-VLAN mapping.
If the assigned VLAN is restricted to a group of ports, VMPS verifies the requesting port against this group. If the VLAN is allowed on the port, the VLAN name is returned to the client. If the VLAN is not allowed on the port and VMPS is in open mode, the host receives an "access denied" response. If VMPS is in secure mode, the port is shut down and you must manually bring the port back up with the set port command.
If a VLAN in the database does not match the current VLAN on the port and active hosts are on the port, VMPS sends an access denied or a port shutdown response based on the VMPS secure mode.
You can configure a fallback VLAN name. If you connect a device with a MAC address that is not in the database, VMPS sends the fallback VLAN name to the client. If you do not configure a fallback VLAN and the MAC address does not exist in the database, VMPS sends an access denied response when VMPS is in open mode. If VMPS is in secure mode, it sends a port shutdown response.
You can also make an explicit entry in the configuration table to deny access to specific MAC addresses for security reasons by specifying the --NONE-- keyword for the VLAN name. In this case, VMPS sends an access denied or port shutdown response.
A dynamic port can belong to only one native VLAN in software releases prior to software release 6.2(1). With software release 6.2(1), a port can belong to a native VLAN and an auxiliary VLAN. See the "Dynamic Port VLAN Membership with Auxiliary VLANs" section for complete details.
When the link comes up, a dynamic port is isolated from its static VLAN. The source MAC address from the first packet of a new host on the dynamic port is sent to the VMPS server, which attempts to match the MAC address to a VLAN in the VMPS database. If there is a match, VMPS provides the VLAN number to assign to the port. If there is no match, VMPS either denies the request or shuts down the port (depending on the VMPS secure mode setting).
You can use up to 50 hosts (MAC addresses) on a dynamic port if they are all authorized for the same VLAN. Each host that comes online through the port is checked against the VMPS database before the host is assigned to a VLAN.
If you move a host from one dynamic port to another, the port remains assigned to the VLAN until another MAC address changes the VLAN. You do not need to do clean up. All clean up is completed by the VMPS database.
VMPS and Dynamic Port Hardware and Software Requirements
VMPS and dynamic port membership requires these software and hardware versions (later software versions might be required depending on the specific hardware):
•
•
•
Default VMPS and Dynamic Port Configuration
Table 12-1 shows the default VMPS configurations.
Configuration Guidelines for Dynamic Ports and VMPS
This section lists the guidelines and restrictions for configuring dynamic ports and VMPS:
•
•
•
•
•
•
•
Note
Configuring VMPS
To configure VMPS, follow these steps:
Step 1
a.
b.
c.
Step 2
a.
b.
See the "Configuring the VMPS Server" section for more information.
Step 3
a.
b.
See the "Configuring VMPS Clients" section for more information.
Step 4
Creating the VMPS Database
To use VMPS, you first must create a VMPS database and store it on a TFTP server. The VMPS parser is line based. Start each entry in the file on a new line. The example at the end of this section corresponds to the information described below.
The VMPS database can have up to five sections:
Section 1, Global settings, lists the settings for the VMPS domain name, security mode, fallback VLAN, and the policy for VMPS and VTP domain name mismatches.
•
•
•
•
In the example at the end of this section, the VMPS domain name is WBU, the VMPS mode is set to open, the fallback VLAN is set to the VLAN default, and if the VTP domain name does match the VMPS domain name, then VMPS sends an access denied response message.
Section 2, MAC addresses, lists MAC addresses and authorized VLAN names for each MAC address.
•
•
•
In the example at the end of this section, MAC addresses are listed in the MAC table. Notice that the MAC address fedc.ba98.7654 is set to --NONE--. This setting explicitly denies this MAC address from accessing the network.
Section 3, Port groups, lists groups of ports on various switches in your network that you want grouped together. You use these port groups when defining VLAN port policies.
•
•
•
The example at the end of this section has two port groups:
–
–
Section 4, VLAN groups, lists groups of VLANs you want to associate together. You use these VLAN groups when defining VLAN port policies.
•
•
The example at the end of this section has the VLAN group Engineering, which consists of the VLANs hardware and software.
Section 5, VLAN port policies, lists the VLAN port policies, which use the port groups and VLAN groups to further restrict access to the network.
•
The example at the end of this section has three VLAN port policies specified.
–
–
–
This example shows a sample VMPS database configuration file:
!Section 1: GLOBAL SETTINGS!VMPS File Format, version 1.1! Always begin the configuration file with! the word "VMPS"!!vmps domain <domain-name>! The VMPS domain must be defined.!vmps mode {open | secure}! The default mode is open.!vmps fallback <vlan-name>!vmps no-domain-req { allow | deny }!! The default value is allow.vmps domain WBUvmps mode openvmps fallback defaultvmps no-domain-req deny!!Section 2: MAC ADDRESSES!MAC Addressesvmps-mac-addrs!! address <addr> vlan-name <vlan_name>!address 0012.2233.4455 vlan-name hardwareaddress 0000.6509.a080 vlan-name hardwareaddress aabb.ccdd.eeff vlan-name Greenaddress 1223.5678.9abc vlan-name ExecStaffaddress fedc.ba98.7654 vlan-name --NONE--address fedc.ba23.1245 vlan-name Purple!!Section 3: PORT GROUPS!Port Groups!vmps-port-group <group-name>! device <device-id> { port <port-name> | all-ports }!vmps-port-group WiringCloset1device 198.92.30.32 port 3/2device 172.20.26.141 port 2/8vmps-port-group "Executive Row"device 198.4.254.222 port 1/2device 198.4.254.222 port 1/3device 198.4.254.223 all-ports!!Section 4: VLAN GROUPS!VLAN groups!!vmps-vlan-group <group-name>! vlan-name <vlan-name>!vmps-vlan-group Engineeringvlan-name hardwarevlan-name software!!Section 5: VLAN PORT POLICIES!VLAN port Policies!!vmps-port-policies {vlan-name <vlan_name> | vlan-group <group-name> }! { port-group <group-name> | device <device-id> port <port-name> }!vmps-port-policies vlan-group Engineeringport-group WiringCloset1vmps-port-policies vlan-name Greendevice 198.92.30.32 port 4/8vmps-port-policies vlan-name Purpledevice 198.4.254.22 port 1/2port-group "Executive Row"Configuring the VMPS Server
When you enable VMPS on the VMPS server, the switch downloads the VMPS database from the TFTP or RCP server and begins accepting VMPS requests.
You can set one primary and up to two backup VMPS servers. The primary VMPS server and backup VMPS servers do not communicate with each other about the VMPS database. You must enable VMPS on each server and manually update each VMPS server when you update the VMPS database.
To configure a VMPS server, perform this task in privileged mode. You must complete this task for the primary and any backup VMPS servers in your network.
This example shows how to set the VMPS database as Bldg-G.db on the TFTP server with the IP address 172.20.22.7 and enable VMPS on the switch:
Console> (enable) set vmps downloadmethod tftpvmps download method : TFTPConsole> (enable) set vmps tftpserver 172.20.22.7 Bldg-G.dbIP address of the TFTP server set to 172.20.22.7VMPS configuration filename set to Bldg-G.dbConsole> (enable) set vmps state enableVlan Membership Policy Server enable is in progress.Console> (enable)Configuring VMPS Clients
When you configure a VMPS client, you must configure VMPS on the VMPS client before setting dynamic ports.
You cannot make trunk ports or secure ports a dynamic port. If you attempt to make a trunk port a dynamic port, VMPS disables trunking on the port to make it a dynamic port.
To configure VMPS client switches, perform this task in privileged mode:
This example shows how to specify the primary VMPS server and two backup VMPS servers, and verify the VMPS server specification:
Console> (enable) set vmps server 192.0.0.1 primary192.0.0.1 added to VMPS table as primary domain server.Console> (enable) set vmps server 192.0.0.6192.0.0.6 added to VMPS table as backup domain server.Console> (enable) set vmps server 192.0.0.9192.0.0.9 added to VMPS table as backup domain server.Console> (enable) show vmps serverVMPS Client Status:---------------------VMPS VQP Version: 1Reconfirm Interval: 60 minServer Retry Count: 3VMPS domain server: 192.0.0.1 (primary)192.0.0.6192.0.0.9This example sets ports 1 to 3 on module 3 to dynamic mode, disables trunking port 1 on module 2 to make it a dynamic port, and verifies the port configuration:
Console> (enable) set port membership 3/1-3 dynamicPorts 3/1-3 vlan assignment set to dynamic.Console> (enable) set port membership 2/1 dynamicSpantree port fast start option enabled for ports 2/1.Trunk mode set to off for ports 2/1.Console> show portPort Name Status Vlan Level Duplex Speed Type1/1 connect trunk normal full 100 100 BASE-TX1/2 connect trunk normal half 100 100 BASE-TX2/1 connect dyn normal full 155 OC3 MMF ATM3/1 connect dyn-5 normal half 10 10 BASE-T3/2 connect dyn-5 normal half 10 10 BASE-T3/3 connect dyn-5 normal half 10 10 BASE-T...Console> (enable)
Note
Monitoring VMPS
To display information about MAC address-to-VLAN mappings, perform one of these tasks in privileged mode:
To show VMPS statistics, perform this task in privileged mode:
Maintaining VMPS
To clear VMPS statistics, perform this task in privileged mode:
To clear a VMPS server entry from the VMPS client, perform this task in privileged mode:
To reconfirm the dynamic port VLAN membership assignments, perform this task in privileged mode:
Step 1
Reconfirm dynamic port VLAN membership.
reconfirm vmps
Step 2
Verify the dynamic VLAN reconfirmation status.
show dvlan statistics
This example shows how to reconfirm dynamic port VLAN membership assignments:
Console> (enable) reconfirm vmpsreconfirm process startedUse 'show dvlan statistics' to see reconfirm statusConsole> (enable)To download the VMPS database manually and refresh the existing VMPS database, perform this task in privileged mode. If you are updating the VMPS database, you need to download the VMPS database to the primary and backup VMPS servers.
To disable VMPS on the VMPS server, perform this task in privileged mode. When you disable the VMPS server, any active dynamic ports in the network will retain the VLAN until the host releases the VLAN or disconnects from the port.
Step 1
Disable VMPS.
set vmps state disable
Step 2
Verify that VMPS is disabled.
show vmps
This example shows how to disable VMPS on the switch:
Console> (enable) set vmps state disableAll the VMPS configuration information will be lost and the resources released on disable.Do you want to continue (y/n[n]): yVlan Membership Policy Server disabled.Console> (enable)Configuring Static Ports
To return a port to the static mode, perform this task in privileged mode:
Step 1
Configure to static mode.
set port membership mod_num/port_num static
Step 2
Verify the static port assignments.
show port [mod_num[/port_num]]
This example shows how to return port 1 on module 3 to static mode:
Console> (enable) set port membership 3/1 staticPort 3/1 vlan assignment set to static.Spantree port fast start option set to default for ports 3/1.Console> (enable)Troubleshooting VMPS and Dynamic Port VLAN Membership
The next two sections describe how to troubleshoot VMPS and dynamic port VLAN membership.
Troubleshooting VMPS
Table 12-2 shows the VMPS error messages that you might see when you enter the set vmps state enable or the download vmps command.
After VMPS successfully downloads the VMPS database configuration file, it parses the existing file on the VMPS server and builds a database. When the parsing is complete, VMPS displays statistics about the total number of lines parsed and the number of parsing errors.
To obtain more information on VMPS parsing errors, set the syslog level for VMPS to 3 using the set logging level vmps command.
Troubleshooting Dynamic Ports
A dynamic port might shut down under these circumstances:
•
•
To reenable a dynamic port that has been shut down, enter the set port enable command.
When you move a PC from a hub connected to the switch to a direct port on the VMPS client, both ports remain assigned to the same VLAN.
The VMPS query and response messages are multicast packets with a destination address of 01000CCCCCCD.
VMPS Example
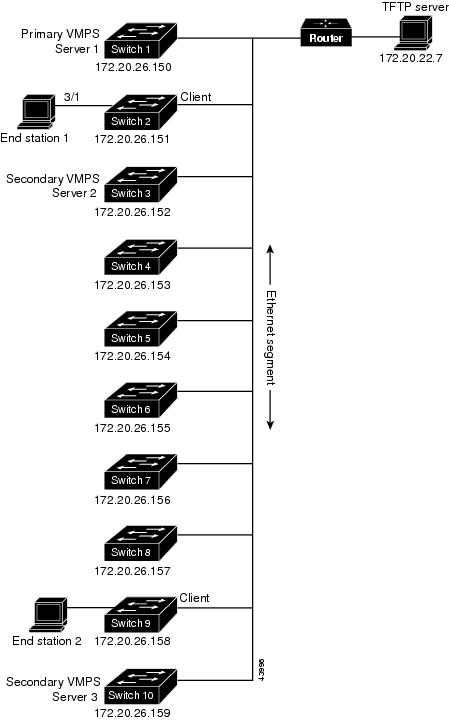
Figure 12-1 shows a network with a VMPS server switch, two backup VMPS servers, and VMPS client switches with dynamic ports. In this example, the following assumptions apply:
•
•
•
•
–
–
•
Figure 12-1 Dynamic Port VLAN Membership Configuration
To configure VMPS and dynamic ports, follow these steps:
Step 1
a.
Console> (enable) set vmps tftpserver 172.20.22.7 Bldg-G.dbb.
Console> (enable) set vmps state enableAfter entering these commands, the file Bldg-G.db is downloaded to Switch 1. Switch 1 becomes the VMPS server.
Step 2
a.
Console> (enable) set vmps tftpserver 172.20.26.152 Bldg-G.dbb.
Console> (enable) set vmps state enablec.
After you enter these commands, the file Bldg-G.db is downloaded to each switch.
Step 3
a.
Console> (enable) set vmps server 172.20.26.150 primaryb.
Console> (enable) set vmps server 172.20.26.152Console> (enable) set vmps server 172.20.26.159c.
Console> (enable) show vmps serverStep 4
Console> (enable) set port membership 3/1 dynamicStep 5
When End Station 2 sends a packet, Switch 2 sends a query to the primary VMPS server, Switch 1. Switch 1 responds with a message to assign port 3/1 to the VLAN specified in the VMPS database. Because spanning tree PortFast mode is enabled by default on dynamic ports, port 3/1 connects immediately and enters forwarding mode.
Step 6
Dynamic Port VLAN Membership with Auxiliary VLANs
This section describes how to configure a dynamic port to belong to two VLANs—a native VLAN and an auxiliary VLAN. This section uses the following terminology:
•
•
•
•
With software release 6.2(1) and later releases, the dynamic ports can belong to two VLANs. The switch port configured for connecting an IP phone can have separate VLANs configured for carrying:
•
•
Configuration Guidelines
This section lists the guidelines and restrictions for configuring dynamic port VLAN membership for auxiliary VLANs:
•
•
•
•
•
Configuring Dynamic Port VLAN Membership with Auxiliary VLANs
This example shows how to add voice ports to auxiliary VLANs and specify an encapsulation type:
Console> (enable) set port auxiliaryvlan 5/9 222Auxiliaryvlan 222 configuration successful.AuxiliaryVlan AuxVlanStatus Mod/Ports------------- ------------- -------------------------222 active 5/9Console> (enable)Console> (enable) set port auxiliaryvlan 5/9 untaggedPort 2/48 allows the connected device send and receive untagged packets and without 802.1p priority.Console> (enable)This example shows how to specify port 5/9 as a dynamic port:
Console> (enable) set port membership 5/9 dynamicWarning: Auxiliary Vlan set to dot1p|untagged on dynamic port. VMPS will be queried for IP phones.Port 5/9 vlan assignment set to dynamic.Spantree port fast start option enabled for ports 5/9.Console> (enable)This example shows that the auxiliary VLAN ID specified cannot be the same as the native VLAN ID:
Console> (enable) set port auxiliaryvlan 5/10 223Auxiliary vlan cannot be set to 223 as PVID=223.Console> (enable)