-
Catalyst 4500 Series Software Configuration Guide, 7.5
-
Preface
-
Product Overview
-
Using the Command-Line Interface
-
Configuring the Switch IP Address and Default Gateway
-
Configuring Ethernet and Fast Ethernet Switching
-
Configuring Gigabit Ethernet Switching
-
Configuring Fast EtherChannel and Gigabit EtherChannel
-
Configuring Spanning Tree
-
Configuring Spanning Tree PortFast, BPDU Guard, BPDU Filter, UplinkFast, BackboneFast, and Loop Guard
-
Configuring VTP
-
Configuring VLANs
-
Configuring VLAN Trunks on Fast Ethernet and Gigabit Ethernet Ports
-
Configuring Dynamic VLAN Membership with VMPS
-
Configuring GVRP
-
Configuring QoS
-
Configuring Multicast Services
-
Configuring Port Security
-
Configuring Unicast Flood Blocking
-
Configuring the IP Permit List
-
Configuring Protocol Filtering
-
Checking Port Status and Connectivity
-
Configuring CDP
-
Using Switch TopN Reports
-
Configuring UDLD
-
Configuring SNMP
-
Configuring RMON
-
Configuring SPAN and RSPAN
-
Administering the Switch
-
Configuring Switch Access Using AAA
-
Modifying the Switch Boot Configuration
-
Working with System Software Images
-
Using the Flash File System
-
Working with Configuration Files
-
Configuring Switch Acceleration
-
Configuring System Message Logging
-
Configuring DNS
-
Configuring NTP
-
Glossary
-
Index
-
 Feedback
Table Of Contents
Configuring Fast EtherChannel and Gigabit EtherChannel
Understanding How EtherChannel Works
Understanding Frame Distribution
Hardware Support for EtherChannel
EtherChannel Configuration Guidelines and Restrictions
Guidelines for Configuring a Port
Guidelines for Configuring VLANs and Trunks
EtherChannel Interaction with other Features
Understanding Administrative Groups and EtherChannel IDs
Configuring EtherChannel Using PAgP
Defining an EtherChannel Administrative Group
Setting the EtherChannel Spanning Tree Port Cost
Setting the EtherChannel Spanning Tree Port VLAN Cost
Removing an EtherChannel Bundle
Displaying EtherChannel Configuration Information
Displaying EtherChannel Traffic Statistics
Displaying EtherChannel PAgP Statistics
EtherChannel Configuration Examples
Configuration Example of a Four-Port Fast EtherChannel
Configuration Example of Two-Port Gigabit EtherChannel
Configuring EtherChannel Using LACP
Specifying the EtherChannel Protocol
Specifying the System Priority
Specifying an Administrative Key Value
Specifying the Channel Path Cost
Specifying the Channel VLAN Cost
Displaying EtherChannel Traffic Utilization
Display Spanning Tree-Related Information for EtherChannels
Configuring Fast EtherChannel and Gigabit EtherChannel
This chapter describes how to configure Fast EtherChannel and Gigabit EtherChannel port bundles on the Catalyst enterprise LAN switches. The configuration procedures in this chapter apply to Fast Ethernet and Gigabit Ethernet switch ports on switching modules and fixed-configuration switches, as well as to supervisor engine Fast Ethernet and Gigabit Ethernet uplink ports.
Note
For complete information on installing Catalyst 4000 family Fast Ethernet and Gigabit Ethernet modules, refer to the Catalyst 4000 Family Installation Guide.
Note
This chapter consists of these major sections:
•
•
•
•
•
Understanding How EtherChannel Works
These sections describe how EtherChannel works:
•
•
Overview of EtherChannel
Fast EtherChannel and Gigabit EtherChannel port bundles let you group multiple Fast or Gigabit Ethernet ports into a single logical transmission path between switch and router, host, or other switch. Depending on your hardware, you can form an EtherChannel with up to eight compatibly configured Fast or Gigabit Ethernet ports on the switch. In addition, on the Catalyst 4000 family switches, you can configure an EtherChannel using ports from multiple modules. All ports in an EtherChannel must be the same speed.
The switch distributes frames across the ports in an EtherChannel according to the source and destination MAC addresses. If a port within an EtherChannel fails, traffic previously carried over the failed port switches to the remaining ports within the EtherChannel. A trap is sent when a failure identifies the switch, the EtherChannel, and the failed link.
You can configure both Fast and Gigabit EtherChannel bundles as trunk links. After you have formed a channel, you can configure any port in the channel as a trunk. The configuration is applied to all ports in the channel. You can also configure identical trunk ports as an EtherChannel. For more information, see the "EtherChannel Configuration Guidelines and Restrictions" section and "Configuring VLAN Trunks on Fast Ethernet and Gigabit Ethernet Ports."
Understanding Frame Distribution
EtherChannel distributes frames across the links in a channel based on the low-order bits of the source and destination MAC addresses of each frame. The frame distribution method is not configurable.
Hardware Support for EtherChannel
EtherChannel support is hardware dependent. You can use the show port capabilities command to determine whether your hardware supports EtherChannel, and to confirm which ports you can bundle into a single EtherChannel.
An EtherChannel bundle can consist of any two to eight ports. Ports in an EtherChannel bundle do not have to be continuous, and they do not have to be on the same module.
Due to the port ID handling by the spanning tree feature, the maximum supported number of channels is 126 for a 6-slot chassis.
PAgP and LACP
Port Aggregation Control Protocol (PAgP) and Link Aggregation Control Protocol (LACP) allow ports with similar characteristics to form a channel through dynamic negotiation with adjoining switches. PAgP is a Cisco-proprietary protocol that can be run only on Cisco switches and those switches released by licensed vendors. LACP, which is defined in IEEE 802.3ad, allows Cisco switches to manage Ethernet channeling with devices that conform to the 802.3ad specification.
Note
To use PAgP, see the "Understanding the PAgP" section. To use LACP, see the "Understanding the LACP" section.
EtherChannel Configuration Guidelines and Restrictions
If improperly configured, some EtherChannel ports are disabled automatically to avoid network loops and other problems. Follow the guidelines below to avoid configuration problems.
Note
Guidelines for Configuring a Port
This section lists the guidelines and restrictions for configuring a port for EtherChannel:
•
•
•
Note
•
•
•
•
•
•
•
With software release 7.3(1) and later releases, LACP behavior for half-duplex links has changed and affected ports are no longer suspended. Instead of suspending a port, LACP PDU transmission (if any) is suppressed. If the port is part of a channel, the port is detached from the channel but still functions as a nonchannel port. A syslog message is generated when this condition occurs. Normal LACP behavior is reenabled automatically when the link is set back to full duplex.
Guidelines for Configuring VLANs and Trunks
This section lists the guidelines and restrictions for configuring VLAN and trunks for EtherChannel:
•
•
•
•
•
EtherChannel Interaction with other Features
This section lists the guidelines and restrictions for EtherChannel's interaction with other features:
•
•
•
•
•
•
•
•
•
•
•
Note
Understanding the PAgP
Use the information in the following sections if you are configuring EtherChannel using PAgP. If you are using LACP, see the "Understanding the LACP" section.
PAgP Modes
The Port Aggregation Protocol (PAgP) facilitates the automatic creation of Fast EtherChannel and Gigabit EtherChannel links by exchanging packets between channel-capable ports. The protocol learns the capabilities of port groups dynamically and informs the neighboring ports.
After PAgP identifies correctly paired channel-capable links, it groups the ports into a channel. The channel is then added to the spanning tree as a single bridge port. A given outbound broadcast or multicast packet is transmitted out one port in the channel only, not out every port in the channel. In addition, outbound broadcast and multicast packets that are transmitted on one port in a channel are blocked from returning on any other port of the channel.
There are four user-configurable channel modes: on, off, auto, and desirable. PAgP packets are exchanged only between ports in auto and desirable mode. Ports that are configured in on or off mode do not exchange PAgP packets. The auto and desirable modes can be modified with the silent and non-silent keywords. Table 6-1 describes each mode.
Both the auto and desirable modes allow ports to negotiate with connected ports to determine if they can form a channel, based on criteria such as port speed, trunking state, native VLAN, and so on.
Ports can form an EtherChannel when they are in different channel modes as long as the modes are compatible, as follows:
•
•
•
•
•
Understanding Administrative Groups and EtherChannel IDs
Configuring an EtherChannel creates an administrative group, designated by an integer between 1 and 1024, inclusive, to which the EtherChannel belongs. You can assign an administrative group number manually or let the system software assign the next available administrative group number automatically.
Forming an EtherChannel without specifying an administrative group number creates a new automatically numbered administrative group consisting of the ports you configure as an EtherChannel. An administrative group can contain a maximum of eight ports.
You can define an EtherChannel administrative group without forming an EtherChannel. Only ports belonging to the same administrative group can form a single EtherChannel together.
In addition to the administrative group number, each EtherChannel is automatically assigned a unique EtherChannel ID. Use the show channel group command to display the EtherChannel ID.
EtherChannel administrative group numbers are stored in NVRAM and remain the same after the switch is reset or power cycled. EtherChannel IDs are not saved in NVRAM. The ID can change if the EtherChannel is torn down and renegotiated, or if the switch is reset or power cycled.
Configuring EtherChannel Using PAgP
These sections describe how to configure an EtherChannel bundle using PAgP:
•
•
•
•
•
•
•
Note
Creating an EtherChannel
You create an EtherChannel port bundle by specifying the ports in the channel and the channeling mode. When you create an EtherChannel, an administrative group number is assigned automatically if one is not already assigned to the specified ports. In addition, a channel ID is assigned.
The silent and non-silent keywords function only with the auto and desirable modes.
To create an EtherChannel port bundle, perform this task in privileged mode:
This example shows how to create an EtherChannel bundle and verify the configuration:
Console> (enable) set port channel 3/5-6 onPort(s) 3/5-6 are assigned to admin group 57.Port(s) 3/5-6 channel mode set to on.Console> (enable) show port channelPort Status Channel Admin ChMode Group Id----- ---------- -------------------- ----- -----3/5 connected on 57 8353/6 connected on 57 835----- ---------- -------------------- ----- -----Port Device-ID Port-ID Platform----- ------------------------------- ------------------------- ----------------3/5 069003103(5500) 3/5 WS-C40003/6 069003103(5500) 3/6 WS-C4000----- ------------------------------- ------------------------- ----------------Console> (enable)Defining an EtherChannel Administrative Group
You can define EtherChannel administrative groups manually to identify groups of ports that are allowed to form an EtherChannel bundle. When you create an EtherChannel port bundle, an administrative group is defined automatically. Administrative group membership is limited by hardware restrictions.
The admin_group can be any value between 1 and 1024, inclusive.
Caution
To define an EtherChannel administrative group, perform this task in privileged mode:
This example shows how to assign ports to an administrative group and verify the configuration:
Console> (enable) set port channel 3/5-6 50Port(s) 3/5-6 are assigned to admin group 50.Console> (enable) show channel group 50Admin Port Status Channel Channelgroup Mode id----- ----- ---------- -------------------- --------50 3/5 connected auto silent 050 3/6 connected auto silent 0Admin Port Device-ID Port-ID Platformgroup----- ----- ------------------------------- ------------------------- ----------50 3/550 3/6Console> (enable)Setting the EtherChannel Spanning Tree Port Cost
To set the spanning tree port cost for an EtherChannel, perform this task in privileged mode:
This example shows how to set the EtherChannel port path cost for channel ID 768:
Console> (enable) show channel group 20Admin Port Status Channel Channelgroup Mode id----- ----- ---------- --------- --------20 1/1 notconnect on 76820 1/2 connected on 768Admin Port Device-ID Port-ID Platformgroup----- ----- ------------------------------- ------------------------- ----------20 1/120 1/2 066510644(cat26-lnf(NET25)) 2/1 WS-C6009Console> (enable)Console> (enable) set channel cost 768 12Port(s) 1/1,1/2 port path cost are updated to 31.Channel 768 cost is set to 12.Warning:channel cost may not be applicable if channel is broken.Console> (enable)Setting the EtherChannel Spanning Tree Port VLAN Cost
The spanning tree port VLAN cost provides an alternate cost for some of the VLANs in a trunk channel. This provides load balancing of VLAN traffic across multiple channels configured with trunking, as some VLANs in the channel can have port VLAN cost, and the remaining VLANS in the channel have port cost.
To set the spanning tree port VLAN cost for an EtherChannel, perform this task in privileged mode:
This example shows how to set the EtherChannel VLAN cost for channel ID 768:
Console> (enable) show channel group 20Admin Port Status Channel Channelgroup Mode id----- ----- ---------- --------- --------20 1/1 notconnect on 76820 1/2 connected on 768Admin Port Device-ID Port-ID Platformgroup----- ----- ------------------------------- ------------------------- ----------20 1/120 1/2 066510644(cat26-lnf(NET25)) 2/1 WS-C6009Console> (enable)Console> (enable) set channel vlancost 768 12Channel 768 vlancost set to 12.Console> (enable)Removing an EtherChannel Bundle
To return a Fast EtherChannel or Gigabit EtherChannel bundle to its default configuration, perform this task in privileged mode:
This example shows how to return a channel to its default configuration and how to verify the configuration:
Console> (enable) set port channel 3/5-6 mode autoPort(s) 3/5-6 channel mode set to auto.Console> (enable) show port channelNo ports channellingConsole> (enable)Displaying EtherChannel Configuration Information
To display EtherChannel configuration information, perform one of these tasks in privileged mode:
This example shows how to display EtherChannel configuration information by port:
Console> (enable) show port channel infoSwitch Frame Distribution Method: mac bothPort Status Channel Admin Channel Speed Duplex Vlanmode group id----- ---------- -------------------- ----- ------- ----- ------ ----3/5 connected on 56 835 a-100 a-full 13/6 connected on 56 835 a-100 a-full 1----- ---------- -------------------- ----- ------- ----- ------ ----Port ifIndex Oper-group Neighbor Oper-Distribution PortSecurity/Oper-group Method Dynamic port----- ------- ---------- ---------- ----------------- -------------3/5 377 1 mac both3/6 377 1 mac both----- ------- ---------- ---------- ----------------- -------------Port Device-ID Port-ID Platform----- ------------------------------- ------------------------- ----------------3/5 069003103(5500) 3/5 WS-C40003/6 069003103(5500) 3/6 WS-C4000----- ------------------------------- ------------------------- ----------------Port Trunk-status Trunk-type Trunk-vlans----- ------------ ------------- -----------------------------------------------3/5 not-trunking negotiate 1-10053/6 not-trunking negotiate 1-1005----- ------------ ------------- -----------------------------------------------Port Portvlancost-vlans----- --------------------------------------------------------------------------3/53/6----- --------------------------------------------------------------------------Port Port Portfast Port Portpriority vlanpri vlanpri-vlans----- -------- -------- ------- ------------------------------------------------3/5 32 disabled 03/6 32 disabled 0----- -------- -------- ------- ------------------------------------------------Port IP IPX Group----- -------- -------- --------3/5 on auto-on auto-on3/6 on auto-on auto-on----- -------- -------- --------Port GMRP GMRP GMRPstatus registration forwardAll----- -------- ------------ ----------3/5 enabled normal disabled3/6 enabled normal disabled----- -------- ------------ ----------Port GVRP GVRP GVRPstatus registration applicant----- -------- ------------- ---------3/5 disabled normal normal3/6 disabled normal normal----- -------- ------------- ---------Port Qos-Tx Qos-Rx Qos-Trust Qos-DefCos----- ------ ------ ------------ ----------3/5 - - untrusted 03/6 - - untrusted 0----- ------ ------ ------------ ----------Console> (enable)Displaying EtherChannel Traffic Statistics
To display EtherChannel traffic statistics, perform this task in privileged mode:
This example shows how to display EtherChannel traffic statistics information for EtherChannel ID 835:
Console> show channel 835 macChannel Rcv-Unicast Rcv-Multicast Rcv-Broadcast-------- -------------------- -------------------- --------------------835 0 119200 0Channel Xmit-Unicast Xmit-Multicast Xmit-Broadcast-------- -------------------- -------------------- --------------------835 0 184171 0Channel Rcv-Octet Xmit-Octet-------- -------------------- --------------------835 11283708 14942104Channel Dely-Exced MTU-Exced In-Discard Lrn-Discrd In-Lost Out-Lost-------- ---------- ---------- ---------- ---------- ---------- ----------835 0 0 0 0 0 0Console> (enable)Displaying EtherChannel PAgP Statistics
To display EtherChannel PAgP statistics, perform one of these tasks in privileged mode:
This example shows how to display EtherChannel PAgP statistics information by EtherChannel administrative group:
Console> show channel group 58 statisticsPort Admin PAgP Pkts PAgP Pkts PAgP Pkts PAgP Pkts PAgP Pkts PAgP PktsGroup Transmitted Received InFlush RetnFlush OutFlush InError----- ------- ----------- --------- --------- --------- --------- ---------3/5 58 194 81 0 0 0 03/6 58 204 85 0 0 0 0Console> (enable)EtherChannel Configuration Examples
These sections contain Fast and Gigabit EtherChannel configuration examples:
•
•
Note
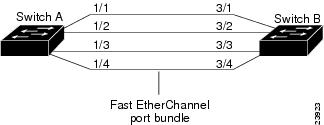
Configuration Example of a Four-Port Fast EtherChannel
This example shows how to configure a four-port Fast EtherChannel link between two switches. Figure 6-1 shows two switches connected through four 100BASE-TX Fast Ethernet ports.
Figure 6-1 Example of a Fast EtherChannel Port Bundle
To configure a four-port EtherChannel link between two switches, follow these steps:
Step 1
Switch_A> (enable) set vlan 50 1/1-4VLAN 50 modified.VLAN 1 modified.VLAN Mod/Ports---- -----------------------50 1/1-42/1-23/1-3Switch_A> (enable) set port speed 1/1-4 100Ports 1/1-4 transmission speed set to 100Mbps.Switch_A> (enable) set port duplex 1/1-4 fullPorts 1/1-4 set to full-duplex.Switch_A> (enable)Switch_B> (enable) set vlan 50 3/1-4VLAN 50 modified.VLAN 1 modified.VLAN Mod/Ports---- -----------------------50 3/1-4Switch_B> (enable) set port speed 3/1-4 100Ports 3/1-4 transmission speed set to 100Mbps.Switch_B> (enable) set port duplex 3/1-4 fullPorts 3/1-4 set to full-duplex.Switch_B> (enable)Step 2
Switch_A> (enable) show port channelNo ports channellingSwitch_A> (enable)Switch_B> (enable) show port channelNo ports channellingSwitch_B> (enable)Step 3
Switch_A> (enable) set port channel 1/1-4 desirablePort(s) 1/1-4 channel mode set to desirable.Switch_A> (enable) %PAGP-5-PORTFROMSTP:Port 1/1 left bridge port 1/1%PAGP-5-PORTFROMSTP:Port 1/2 left bridge port 1/2%PAGP-5-PORTFROMSTP:Port 1/3 left bridge port 1/3%PAGP-5-PORTFROMSTP:Port 1/4 left bridge port 1/4%PAGP-5-PORTFROMSTP:Port 1/2 left bridge port 1/2%PAGP-5-PORTFROMSTP:Port 1/3 left bridge port 1/3%PAGP-5-PORTFROMSTP:Port 1/4 left bridge port 1/4%PAGP-5-PORTTOSTP:Port 1/1 joined bridge port 1/1-4%PAGP-5-PORTTOSTP:Port 1/2 joined bridge port 1/1-4%PAGP-5-PORTTOSTP:Port 1/3 joined bridge port 1/1-4%PAGP-5-PORTTOSTP:Port 1/4 joined bridge port 1/1-4Switch_B> (enable) %PAGP-5-PORTFROMSTP:Port 3/1 left bridge port 3/1%PAGP-5-PORTFROMSTP:Port 3/2 left bridge port 3/2%PAGP-5-PORTFROMSTP:Port 3/3 left bridge port 3/3%PAGP-5-PORTFROMSTP:Port 3/4 left bridge port 3/4%PAGP-5-PORTFROMSTP:Port 3/2 left bridge port 3/1-4%PAGP-5-PORTFROMSTP:Port 3/3 left bridge port 3/1-4%PAGP-5-PORTFROMSTP:Port 3/4 left bridge port 3/1-4%PAGP-5-PORTTOSTP:Port 3/1 joined bridge port 3/1-4%PAGP-5-PORTTOSTP:Port 3/2 joined bridge port 3/1-4%PAGP-5-PORTTOSTP:Port 3/3 joined bridge port 3/1-4%PAGP-5-PORTTOSTP:Port 3/4 joined bridge port 3/1-4Step 4
Switch_A> (enable) show port channelPort Status Channel Channel Neighbor Neighbormode status device port----- ---------- --------- ----------- ------------------------- ----------1/1 connected desirable channel WS-C4003 JAB023806(Sw 3/11/2 connected desirable channel WS-C4003 JAB023806(Sw 3/21/3 connected desirable channel WS-C4003 JAB023806(Sw 3/31/4 connected desirable channel WS-C4003 JAB023806(Sw 3/4----- ---------- --------- ----------- ------------------------- ----------Switch_A> (enable)Switch_B> (enable) show port channelPort Status Channel Channel Neighbor Neighbormode status device port----- ---------- --------- ----------- ------------------------- ----------3/1 connected auto channel WS-C4012 009979082(Sw 1/13/2 connected auto channel WS-C4012 009979082(Sw 1/23/3 connected auto channel WS-C4012 009979082(Sw 1/33/4 connected auto channel WS-C4012 009979082(Sw 1/4----- ---------- --------- ----------- ------------------------- ----------Switch_B> (enable)
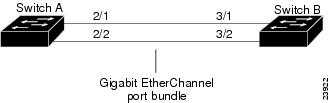
Configuration Example of Two-Port Gigabit EtherChannel
This example shows how to configure a two-port Gigabit EtherChannel link between two switches. Figure 6-2 shows two switches connected through four 1000BASE-SX Gigabit Ethernet ports.
Figure 6-2 Example of a Gigabit EtherChannel Port Bundle
To configure a two-port Gigabit EtherChannel link between two switches, follow these steps:
Step 1
Switch_A> (enable) set vlan 100 2/1-2VLAN 100 modified.VLAN 1 modified.VLAN Mod/Ports---- -----------------------100 2/1-2Switch_A> (enable)Switch_B> (enable) set vlan 100 3/1-2VLAN 100 modified.VLAN 1 modified.VLAN Mod/Ports---- -----------------------100 3/1-2Switch_B> (enable)Step 2
Switch_A> (enable) show port channelNo ports channellingSwitch_A> (enable)Switch_B> (enable) show port channelNo ports channellingSwitch_B> (enable)Step 3
Switch_A> (enable) set port channel 2/1-2 onPort(s) 2/1-2 channel mode set to on.Switch_A> (enable) %PAGP-5-PORTFROMSTP:Port 2/1 left bridge port 2/1%PAGP-5-PORTFROMSTP:Port 2/2 left bridge port 2/2%PAGP-5-PORTTOSTP:Port 2/1 joined bridge port 2/1-2%PAGP-5-PORTTOSTP:Port 2/2 joined bridge port 2/1-2Switch_B> (enable) set port channel 3/1-2 onPort(s) 3/1-2 channel mode set to on.Switch_B> (enable) %PAGP-5-PORTFROMSTP:Port 3/1 left bridge port 3/1%PAGP-5-PORTFROMSTP:Port 3/2 left bridge port 3/2%PAGP-5-PORTTOSTP:Port 3/1 joined bridge port 3/1-2%PAGP-5-PORTTOSTP:Port 3/2 joined bridge port 3/1-2Step 4
Switch_A> (enable) show port channelPort Status Channel Channel Neighbor Neighbormode status device port----- ---------- --------- ----------- ------------------------- ----------2/1 connected on channel WS-C4003 JAB023806LN( 3/12/2 connected on channel WS-C4003 JAB023806LN( 3/2----- ---------- --------- ----------- ------------------------- ----------Switch_A> (enable)Switch_B> (enable) show port channelPort Status Channel Channel Neighbor Neighbormode status device port----- ---------- --------- ----------- ------------------------- ----------3/1 connected on channel WS-C4003 JAB023806JR( 2/13/2 connected on channel WS-C4003 JAB023806JR( 2/2----- ---------- --------- ----------- ------------------------- ----------Switch_B> (enable)
Understanding the LACP
Use the information in these sections if you are configuring EtherChannel using LACP. If you are using PAgP, see the "Understanding the PAgP" section.
LACP Modes
You may manually turn on channeling by setting the port channel mode to on, and you may turn channeling off by setting the port channel mode to off.
If you want LACP to handle channeling, use the active and passive channel modes. To start automatic EtherChannel configuration with LACP, you need to configure at least one end of the link to active mode to initiate channeling, because ports in passive mode passively respond to initiation and never initiate the sending of LACP packets.
Table 6-2 describes the EtherChannel modes that use LACP.
LACP Parameters
LACP uses the following parameters:
•
Each switch running LACP must have a system priority. You can specify the system priority automatically or through the CLI (see the "Specifying the System Priority" section). The switch uses the MAC address and the system priority to form the system ID and is also used during negotiation with other systems.
•
Each port in the switch must have a port priority. You can specify the port priority automatically or through the CLI (see the "Specifying the Port Priority" section). The port priority and the port number form the port identifier. The switch uses the port priority to decide which ports to put in standby mode when a hardware limitation prevents all compatible ports from aggregating.
•
Each port in the switch must have an administrative key value. You can specify the administrative key value automatically or through the CLI (see the "Specifying an Administrative Key Value" section). The administrative key defines the ability of a port to aggregate with other ports. The following factors determine a port's ability to aggregate with other ports:
–
–
When enabled, LACP always tries to configure the maximum number of compatible ports in a channel, up to the maximum allowed by the hardware (eight ports). If LACP is not able to aggregate all the ports that are compatible (for example, the remote system might have more restrictive hardware limitations), then the system places all the ports that cannot be actively included in the channel in hot standby state and uses them only if one of the channeled ports fails.
You can configure different channels with ports that have been assigned the same administrative key. For example, if you assign eight ports to the same administrative key, you may configure four ports in a channel using LACP active mode and the remaining four ports in a manually configured channel using the on mode. An administrative key is meaningful only in the context of the switch that allocates it; there is no global significance to administrative key values.
Configuring EtherChannel Using LACP
These sections describe how to configure EtherChannel using LACP:
•
•
•
•
•
•
•
Note
Specifying the EtherChannel Protocol
Note
Note
To specify the EtherChannel protocol, perform this task in privileged mode:
This example shows how to specify the LACP protocol for modules 2 and 3:
Console> (enable) set channelprotocol lacp 2,3Mod 2 is set to LACP protocol.Mod 3 is set to LACP protocol.Console> (enable)Use the show channelprotocol command to display the protocols for all modules.
Specifying the System Priority
Note
The system priority value must be a number in the range of 1 through 65,535, where higher numbers represent lower priority. The default priority is 32,768.
To specify the system priority, perform this task in privileged mode:
This example shows how to specify the system priority as 20,000:
Console> (enable) set lacp-channel system-priority 20000LACP system priority is set to 20000Console> (enable)Use the show lacp-channel sys-id command to display the LACP system ID and system priority.
Specifying the Port Priority
The port priority value must be a number in the range of 1 through 255, where higher numbers represent lower priority. The default priority is 128.
To specify the port priority, perform this task in privileged mode:
This example shows how to specify the port priority as 10 for ports 1/1 to 1/4 and 2/6 to 2/8:
Console> (enable) set port lacp-channel 1/1-4,2/6-8 port-priority 10Port(s) 1/1-4,2/6-8 port-priority set to 10.Console> (enable)Use the show lacp-channel group admin_key info command to display the port priority.
Specifying an Administrative Key Value
Note
You can specify an administrative key value to a set of ports. If you do not specify an administrative key value, the system automatically selects a value. In both cases, the value can range from 1 through 1024.
If you choose a value for the administrative key, and this value has already been used in the system, then the system moves all the ports originally associated with the previously assigned administrative key value to another automatically assigned value, and it assigns the modules and ports you specified in the command to the administrative key value that you specified.
The maximum number of ports to which an administrative key can be assigned is eight.
The default mode for all ports being assigned the administrative key is passive; however, if the channel was previously assigned a particular mode (see the "Changing the Channel Mode" section), assigning the administrative key will not affect it—that is, the channel mode that you specified previously is maintained.
To specify the administrative key value, perform this task in privileged mode:
This example assigns ports 4/1 to 4/4 the same administrative key, allowing the system to pick its value:
Console> (enable) set port lacp-channel 4/1-4Port(s) 4/1-4 are assigned to admin key 96.Console> (enable)This example shows how to assign ports 4/4 to 4/6 the administrative key 96 (you specify the 96). In this example, the administrative key was previously assigned to another group of ports by the system (see the previous example), so those ports will be moved to another administrative key:
Console> (enable) set port lacp-channel 4/4-6 96Port(s) 4/1-3 are moved to admin key 97.Port(s) 4/4-6 are assigned to admin key 96.Console> (enable)This example shows the system response when more than eight ports are assigned the same administrative key value:
Console> (enable) set port lacp-port channel 2/1-2,4/1-8 123No more than 8 ports can be assigned to an admin key.Console> (enable)Use the show lacp-channel group command to display administrative key values for ports.
Changing the Channel Mode
You can change the channel mode for a set of ports that were previously assigned the same administrative key (see the "Specifying an Administrative Key Value" section).
To change the channel mode, perform this task in privileged mode:
Change the channel mode.
set port lacp-channel mod/ports mode [on | off | active | passive]
This example shows how to change the channel mode for ports 4/1 and 4/6, setting it to on. The administrative key for ports 4/1 and 4/6 is unchanged.
Console> (enable) set port lacp-channel 4/1,4/6 mode onPort(s) 4/1,4/6 channel mode set to on.Console> (enable)Use the show lacp-channel group admin_key command to display the channel mode for ports.
Specifying the Channel Path Cost
You can specify the channel path cost by using a global command that configures both LACP and PAgP. For more information, see the "Setting the EtherChannel Spanning Tree Port Cost" section.
Specifying the Channel VLAN Cost
You can specify the channel VLAN cost with a global command that configures both LACP and PAgP. See the "Setting the EtherChannel Spanning Tree Port VLAN Cost" section for information.
Clearing LACP Statistics
To clear LACP statistics, perform this task in privileged mode:
This example shows how to clear LACP statistics:
Console> (enable) clear lacp-channel statisticsLACP channel counters are cleared.Console> (enable)Displaying EtherChannel Traffic Utilization
To display the traffic utilization on the EtherChannel ports, perform this task:
This example shows how to display traffic utilization on EtherChannel ports:
Console> (enable) show lacp-channel trafficChanId Port Rx-Ucst Tx-Ucst Rx-Mcst Tx-Mcst Rx-Bcst Tx-Bcst------ ----- ------- ------- ------- ------- ------- -------808 2/16 0.00% 0.00% 50.00% 75.75% 0.00% 0.00%808 2/17 0.00% 0.00% 50.00% 25.25% 0.00% 0.00%816 2/31 0.00% 0.00% 25.25% 50.50% 0.00% 0.00%816 2/32 0.00% 0.00% 75.75% 50.50% 0.00% 0.00%Console> (enable)Disabling an EtherChannel
To disable an EtherChannel, perform this task for ports 2/2 to 2/8:
This example shows how to disable an EtherChannel:
Console> (enable) set port lacp-channel 2/2-8 mode offPort(s) 2/2-8 channel mode set to off.Console> (enable)Display Spanning Tree-Related Information for EtherChannels
You can display the channel ID and the truncated port list for all ports that are channeling. Ports that are not channeling are identified by their port number.
To display spanning tree-related information for EtherChannels, perform this task:
These examples show how to display spanning tree-related information for EtherChannels:
Console> show spantree 4/6Port Vlan Port-State Cost Priority Portfast Channel_id------------------------ ---- ------------- ----- -------- ---------- ----------4/6 1 not-connected 4 32 disabled 0Console>Console> show spantree 4/7-8Port Vlan Port-State Cost Priority Portfast Channel_id------------------------ ---- ------------- ----- -------- ---------- ----------4/7-8 1 blocking 3 32 disabled 770Console>