-
Catalyst 4500 Series Software Configuration Guide, 7.5
-
Preface
-
Product Overview
-
Using the Command-Line Interface
-
Configuring the Switch IP Address and Default Gateway
-
Configuring Ethernet and Fast Ethernet Switching
-
Configuring Gigabit Ethernet Switching
-
Configuring Fast EtherChannel and Gigabit EtherChannel
-
Configuring Spanning Tree
-
Configuring Spanning Tree PortFast, BPDU Guard, BPDU Filter, UplinkFast, BackboneFast, and Loop Guard
-
Configuring VTP
-
Configuring VLANs
-
Configuring VLAN Trunks on Fast Ethernet and Gigabit Ethernet Ports
-
Configuring Dynamic VLAN Membership with VMPS
-
Configuring GVRP
-
Configuring QoS
-
Configuring Multicast Services
-
Configuring Port Security
-
Configuring Unicast Flood Blocking
-
Configuring the IP Permit List
-
Configuring Protocol Filtering
-
Checking Port Status and Connectivity
-
Configuring CDP
-
Using Switch TopN Reports
-
Configuring UDLD
-
Configuring SNMP
-
Configuring RMON
-
Configuring SPAN and RSPAN
-
Administering the Switch
-
Configuring Switch Access Using AAA
-
Modifying the Switch Boot Configuration
-
Working with System Software Images
-
Using the Flash File System
-
Working with Configuration Files
-
Configuring Switch Acceleration
-
Configuring System Message Logging
-
Configuring DNS
-
Configuring NTP
-
Glossary
-
Index
-
 Feedback
Table Of Contents
Configuring Gigabit Ethernet Switching
Understanding How Gigabit Ethernet Works
Understanding How Gigabit Ethernet Flow Control Works
Sending and Receiving Pause Frames
Understanding How Port Negotiation Works
Understanding How Oversubscribed Gigabit Ethernet Works
Oversubscribed Gigabit Ethernet Overview
Oversubscribed Gigabit Ethernet Example
Default Gigabit Ethernet Configuration
Configuring Gigabit Ethernet Ports
Setting Gigabit Ethernet Port Names
Setting Gigabit Ethernet Port Priority Levels
Configuring Flow Control on Gigabit Ethernet Ports
Configuring Port Negotiation on Gigabit Ethernet Ports
Configuring errdisable State Gigabit Ethernet Port Timeout Periods
Checking Gigabit Ethernet Port Connectivity
Configuring Gigabit Ethernet Switching
This chapter describes how to configure Gigabit Ethernet switching on the Catalyst enterprise LAN switches. The configuration procedures in this chapter apply to Gigabit Ethernet switching modules, fixed-configuration switches, and uplink ports on the supervisor engine.
Note
For complete syntax and usage information for the commands used in this chapter, refer to the Command Reference—Catalyst 4000 Family, Catalyst 2948G, and Catalyst 2980G Switches.
This chapter consists of these major sections:
•
•
•
Understanding How Gigabit Ethernet Works
These sections describe how Gigabit Ethernet works:
•
•
•
Understanding How Gigabit Ethernet Flow Control Works
These sections describe how flow control works:
•
Flow-Control Overview
Flow control is a feature that Gigabit Ethernet ports use to inhibit the transmission of incoming packets. If a buffer on a Gigabit Ethernet port runs out of space, the port transmits a special packet that requests remote ports to delay sending packets for a period of time. This special packet is called a pause frame.
Sending and Receiving Pause Frames
All Catalyst Gigabit Ethernet ports can receive and process pause frames from other devices. However, not all Catalyst Gigabit Ethernet ports can transmit pause frames to other devices.
Table 5-1 identifies the Catalyst Gigabit Ethernet switches, modules, and ports that can transmit pause frames to other devices.
Using Flow-Control Keywords
Table 5-2 describes the guidelines for using different configurations of the send and receive keywords with the set port flowcontrol command.
Understanding How Port Negotiation Works
Caution
Note
With Gigabit Ethernet ports, port negotiation is used to exchange flow-control parameters, remote fault information, and duplex information (even though Cisco Gigabit Ethernet ports only support full-duplex mode). With Gigabit Ethernet ports, you configure port negotiation using the set port negotiation command. Gigabit Ethernet port negotiation is enabled by default.
The ports on both ends of a Gigabit Ethernet link must have the same setting. The link will not come up if the ports at each end of the link are set inconsistently (port negotiation enabled on one port and disabled on the other). Table 5-3 shows the four possible port negotiation configurations for a Gigabit Ethernet link and the resulting link status for each configuration.
Table 5-3 Gigabit Ethernet Port Negotiation Configuration and Possible Link States
Off
Off
Up
Up
On
On
Up
Up
Off
On
Up
Down
On
Off
Down
Up
1 Near End refers to the local Gigabit EtherChannel module port.
2 Far End refers to the remote port at the other end of the Gigabit link.
Note
Understanding How Oversubscribed Gigabit Ethernet Works
These sections describe how the Catalyst 4000 family oversubscribed Gigabit Ethernet modules work:
•
•
Oversubscribed Gigabit Ethernet Overview
The Catalyst 4000 family Gigabit Ethernet modules provide a network-backbone connection for multiple servers or high-end workstations. The following modules are supported:
•
This 1000BASE-T 14-port module provides 2 dedicated uplink module ports (GBIC) and 12 oversubscribed ports (possible blocking).
•
This 1000BASE-X 18-port module provides 2 dedicated uplink module ports (GBIC) and 16 oversubscribed ports (possible blocking).
On all modules, each uplink module port has 1-Gbps dedicated bandwidth. These ports typically connect to the network backbone.
Table 5-4 lists the uplink module port IDs for each module.
Table 5-4 Uplink Port Module IDs for Gigabit Ethernet Modules
WS-X4412-2GB-T
13 14
WS-X4418-GB
1 2
On all modules, the oversubscribed ports are segmented into groups of four ports each. Each group of four ports shares 1 Gbps of bandwidth. The average bandwidth that clients and servers need to connect to ports in the same group should not exceed 1 Gbps.
Table 5-5 shows how the oversubscribed ports are grouped for module WS-4412-2GB-TX.
Table 5-5 Oversubscribed Port Groupings for Module WS-4412-2GB-TX
1 2 3 4
5 6 7 8
9 10 11 12
Uplink Ports
13 14
Table 5-6 shows how the oversubscribed ports are grouped for module WS-4418-2GB.
Table 5-6 Oversubscribed Port Groupings for Module WS-4418-2GB
Uplink Ports
1 2
3 5 7 9
4 6 8 10
11 13 15 17
12 14 16 18
The oversubscribed Gigabit Ethernet ports are designed for end-station connections. We do not recommend connecting these ports to switches or routers.
Each group of four oversubscribed ports has a buffer for incoming frames to allow connected devices to transmit traffic simultaneously. Because the inbound buffer is small, the default (and recommended) flow-control configuration for the oversubscribed ports is receive desired and transmit on.
You can bundle multiple oversubscribed ports into a Gigabit EtherChannel link to connect to channel-capable servers. Bundling multiple oversubscribed ports in the same port group increases the total available bandwidth and provides redundancy with quick failover for links to servers and hosts that support the Port Aggregation Protocol (PAgP).
Oversubscribed Gigabit Ethernet Example
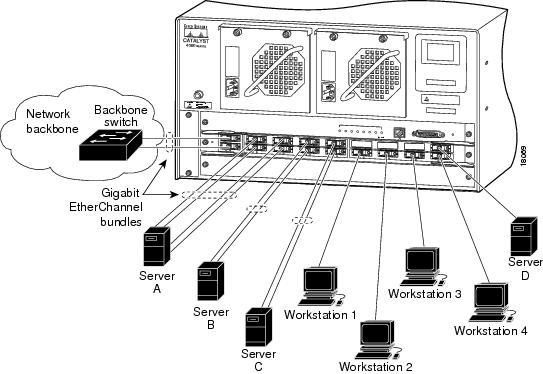
Figure 5-1 shows an example of an 18-port server switching module (WS-X4418-GB) connecting multiple network servers and high-end workstations to the Gigabit Ethernet network backbone. These configurations are shown:
•
•
•
•
•
Figure 5-1 Example of a Server Switching Network Topology
Default Gigabit Ethernet Configuration
Table 5-7 shows the Gigabit Ethernet default configuration.
Configuring Gigabit Ethernet Ports
These sections describe how to configure Gigabit Ethernet switching ports on the Catalyst enterprise LAN switches:
•
•
•
•
•
•
Note
Setting Gigabit Ethernet Port Names
You can assign names to the ports on Gigabit Ethernet modules to facilitate switch administration.
To assign a name to a port, perform this task in privileged mode:
Step 1
Assign a name to a port.
set port name mod_num/port_num [name_string]
Step 2
Verify that the port name is configured.
show port [mod_num[/port_num]]
This example shows how to set the name for ports 2/1 and 2/2 and how to verify that the port names are configured correctly:
Console> (enable) set port name 2/1 Backbone ConnectionPort 2/1 name set.Console> (enable) set port name 2/2 Wiring ClosetPort 2/2 name set.Console> (enable) show port 2Port Name Status Vlan Level Duplex Speed Type----- ------------------ ---------- ---------- ------ ------ ----- ------------2/1 Backbone Connectio connected trunk normal full 1000 1000BASESX2/2 Wiring Closet notconnect 1 normal full 1000 1000BASESX<...output truncated...>Last-Time-Cleared--------------------------Tue Dec 22 1998, 13:42:04Console> (enable)Setting Gigabit Ethernet Port Priority Levels
You can configure the priority level for each port. When two ports simultaneously request access to the switching bus, the switch uses the priority level to determine the order in which the ports
get access.To set the port priority level, perform this task in privileged mode:
This example shows how to set the port priority level to high for port 2/1 and verify that the port priority is configured correctly:
Console> (enable) set port level 2/1 highPort 2/1 level set to high.Console> (enable) show port 2/1Port Name Status Vlan Level Duplex Speed Type----- ------------------ ---------- ---------- ------ ------ ----- ------------2/1 Backbone Connectio connected trunk high full 1000 1000BASESX<...output truncated...>Last-Time-Cleared--------------------------Tue Dec 22 1998, 13:42:04Console> (enable)Configuring Flow Control on Gigabit Ethernet Ports
To configure flow control on a Gigabit Ethernet port, perform this task in privileged mode:
This example shows how to turn transmit and receive flow control on and how to verify the flow-control configuration:
Console> (enable) set port flowcontrol send 2/1 onPort 2/1 flow control send administration status set to on(port will send flowcontrol to far end)Console> (enable) set port flowcontrol receive 2/1 onPort 2/1 flow control receive administration status set to on(port will require far end to send flowcontrol)Console> (enable) show port flowcontrol 2/1Port Send FlowControl Receive FlowControl RxPause TxPause Unsupportedadmin oper admin oper opcodes----- -------- -------- -------- -------- ------- ------- -----------2/1 on on on on 0 0 0Console> (enable)Configuring Port Negotiation on Gigabit Ethernet Ports
Note
To enable port negotiation on a 1000BASE-X Gigabit Ethernet port, perform this task in privileged mode:
Step 1
Enable Gigabit Ethernet port negotiation.
set port negotiation mod_num/port_num enable
Step 2
Verify the port negotiation configuration.
show port negotiation [mod_num/port_num]
This example shows how to enable port negotiation and verify the configuration:
Console> (enable) set port negotiation 2/1 enablePort 2/1 negotiation enabledConsole> (enable) show port negotiation 2/1Port Link Negotiation----- ----------------2/1 enabledConsole> (enable)To disable port negotiation on a 1000BASE-X Gigabit Ethernet port, perform this task in privileged mode:
Step 1
Disable Gigabit Ethernet port negotiation.
set port negotiation mod_num/port_num disable
Step 2
Verify the port negotiation configuration.
show port negotiation [mod_num/port_num]
This example shows how to disable port negotiation and verify the configuration:
Console> (enable) set port negotiation 2/1 disablePort 2/1 negotiation disabledConsole> (enable) show port negotiation 2/1Port Link Negotiation----- ----------------2/1 disabledConsole> (enable)Configuring errdisable State Gigabit Ethernet Port Timeout Periods
For information on configuring a timeout period for ports in errdisable state, see "Configuring Ethernet and Fast Ethernet Switching."
Checking Gigabit Ethernet Port Connectivity
Note
Use the ping and traceroute commands to test connectivity out Gigabit Ethernet ports.
To check connectivity out a port, perform this task in privileged mode:
This example shows how to ping a remote host and how to trace the hop-by-hop path of packets through the network using traceroute:
Console> (enable) ping somehostsomehost is aliveConsole> (enable) traceroute somehosttraceroute to somehost.company.com (10.1.2.3), 30 hops max, 40 byte packets1 engineering-1.company.com (173.31.192.206) 2 ms 1 ms 1 ms2 engineering-2.company.com (173.31.196.204) 2 ms 3 ms 2 ms3 gateway_a.company.com (173.16.1.201) 6 ms 3 ms 3 ms4 somehost.company.com (10.1.2.3) 3 ms * 2 msConsole> (enable)