-
Catalyst 4500 Series Software Configuration Guide, 7.5
-
Preface
-
Product Overview
-
Using the Command-Line Interface
-
Configuring the Switch IP Address and Default Gateway
-
Configuring Ethernet and Fast Ethernet Switching
-
Configuring Gigabit Ethernet Switching
-
Configuring Fast EtherChannel and Gigabit EtherChannel
-
Configuring Spanning Tree
-
Configuring Spanning Tree PortFast, BPDU Guard, BPDU Filter, UplinkFast, BackboneFast, and Loop Guard
-
Configuring VTP
-
Configuring VLANs
-
Configuring VLAN Trunks on Fast Ethernet and Gigabit Ethernet Ports
-
Configuring Dynamic VLAN Membership with VMPS
-
Configuring GVRP
-
Configuring QoS
-
Configuring Multicast Services
-
Configuring Port Security
-
Configuring Unicast Flood Blocking
-
Configuring the IP Permit List
-
Configuring Protocol Filtering
-
Checking Port Status and Connectivity
-
Configuring CDP
-
Using Switch TopN Reports
-
Configuring UDLD
-
Configuring SNMP
-
Configuring RMON
-
Configuring SPAN and RSPAN
-
Administering the Switch
-
Configuring Switch Access Using AAA
-
Modifying the Switch Boot Configuration
-
Working with System Software Images
-
Using the Flash File System
-
Working with Configuration Files
-
Configuring Switch Acceleration
-
Configuring System Message Logging
-
Configuring DNS
-
Configuring NTP
-
Glossary
-
Index
-
 Feedback
Table Of Contents
SNMP ifindex Persistence Feature
Understanding How SNMPv1 and SNMPv2c Work
SNMPv1 and SNMPv2c Default Configuration
Configuring SNMPv1 and SNMPv2c from an NMS
Configuring SNMPv1 and SNMPv2c from the CLI
SNMPv1 and SNMPv2c Enhancements in Software Release 7.5(1)
Setting Multiple SNMP Community Strings
Clearing SNMP Community Strings
Specifying Access Numbers for Hosts
Clearing IP Addresses Associated with Access Numbers
Specifying and Displaying an Interface Alias
Configuring SNMPv3 from an NMS
Configuring SNMPv3 from the CLI
Configuring SNMP
This chapter describes how to configure Simple Network Management Protocol (SNMP) on Catalyst enterprise LAN switches.
Note
For complete syntax and usage information for the commands used in this chapter, refer to the Command Reference—Catalyst 4000 Family, Catalyst 2948G, and Catalyst 2980G Switches.
This chapter consists of these major sections:
•
•
•
•
•
•
SNMP Terminology
The following SNMP terminology is used in this chapter.
authentication—The process of ensuring message integrity and protection against message replays, including data integrity and data origin authentication.
authoritative SNMP engine—One of the SNMP copies used in network communication is designated the allowed SNMP engine which protects against message replay, delay, and redirection. The security keys used for authenticating and encrypting SNMPv3 packets are generated as a function of the authoritative SNMP engine's engine ID and user passwords. When an SNMP message expects a response (for example, get exact, get next, set request), the receiver of these messages is authoritative. When an SNMP message does not expect a response, the sender is authoritative.
community string—A text string used to authenticate messages between a management station and an SNMPv1 or SNMPv2c engine.
data integrity—A condition or state of data in which a message packet has not been altered or destroyed in an unauthorized manner.
data origin authentication—The ability to verify the identity of a user on whose behalf the message is supposedly sent. This ability protects users against both message capture and replay by a different SNMP engine, and against packets received or sent to a particular user that uses an incorrect password or security level.
encryption—A method of hiding data from an unauthorized user by scrambling the contents of an SNMP packet.
group—A set of users belonging to a particular security model. A group defines the access rights for all the users belonging to it. Access rights define the SNMP objects that can be read, written to, or created. In addition, the group defines the notifications that a user is allowed to receive.
notification host—An SNMP entity to which notifications (traps) are to be sent.
notify view—A view name (not to exceed 64 characters) for each group; the view name defines the list of notifications that can be sent to each user in the group.
privacy—An encrypted state of the contents of an SNMP packet; in this state the contents are prevented from being disclosed on a network. Encryption is performed with an algorithm called CBC-DES (DES-56).
read view—A view name (not to exceed 64 characters) for each group; the view name defines the list of object identifiers (OIDs) that can be read by users belonging to the group.
security level—A type of security algorithm performed on each SNMP packet. There are three levels: noauth, auth, and priv. The noauth level authenticates a packet by a string match of the username. The auth level authenticates a packet by using either the HMAC MD5 or SHA algorithms. The priv level authenticates a packet by using either the HMAC MD5 or SHA algorithms and encrypts the packet using the CBC-DES (DES-56) algorithm.
security model—The security strategy used by the SNMP agent. Currently, software supports three security models: SNMPv1, SNMPv2c, and SNMPv3.
Simple Network Management Protocol (SNMP)—A network management protocol that provides a means to monitor and control network devices, and to manage configurations, statistics collection, performance, and security.
Simple Network Management Protocol Version 2c (SNMPv2c)—This second version of SNMP supports centralized and distributed network management strategies and includes improvements in the Structure of Management Information (SMI), protocol operations, management architecture, and security.
SNMP engine—A copy of SNMP that can reside on the local or remote device.
SNMP group—A collection of SNMP users that belong to a common SNMP list that defines an access policy, in which object identification numbers (OIDs) are both read-accessible and write-accessible. Users belonging to a particular SNMP group inherit all of these attributes defined by the group.
SNMP user—A person for which an SNMP management operation is performed. For informs, the user is the person on a remote SNMP engine who receives the informs.
SNMP view—A mapping between SNMP objects and the access rights available for those objects. An object can have different access rights in each view. Access rights indicate whether the object is accessible by either a community string or a user.
trap—A message sent by an SNMP agent to a console or terminal indicates a significant event occurred.
write view—A view name (not to exceed 64 characters) for each group; the view name defines the list of object identifiers (OIDs) that are able to be created or modified by users of the group.
Understanding How SNMP Works
SNMP is an application-layer protocol that facilitates the exchange of management information between network devices. SNMP enables network administrators to manage network performance, find and solve network problems, and plan for network growth.
There are three versions of SNMP:
•
•
•
Security Models and Levels
A security model is an authentication strategy that is set up for a user and the group in which the user resides. A security level is the permitted level of security within a security model. A combination of a security model and a security level will determine which security mechanism is employed when handling an SNMP packet. Three security models are available: SNMPv1, SNMPv2c, and SNMPv3. Table 24-1 identifies what the combinations of security models and levels mean.
Note the following about SNMPv3 objects:
•
•
•
•
•
SNMP ifindex Persistence Feature
The SNMP ifIndex persistence feature is always enabled. With the ifIndex persistence feature, the ifIndex value of the port and VLAN is always retained and used after the following occurrences:
•
•
•
•
•
For Fast EtherChannel and Gigabit EtherChannel interfaces, the ifIndex value is only retained and used after a high-availability switchover.
Understanding How SNMPv1 and SNMPv2c Work
The components of SNMPv1 and SNMPv2c network management fall into three categories:
•
•
•
Note
SNMP network management uses these SNMP agent functions:
•
•
•
–
–
–
–
–
•
–
–
–
Note
Catalyst enterprise LAN switches are managed devices that support SNMP network management with the following features:
•
•
•
Note
SNMPv1 and SNMPv2c Default Configuration
Table 24-2 describes the SNMP default configuration.
Configuring SNMPv1 and SNMPv2c from an NMS
To configure SNMP from a Network Management System (NMS), refer to the NMS documentation (see the "Using CiscoWorks2000" section).
The switch supports up to 20 trap receivers through the RMON2 trap destination table. Configure the RMON2 trap destination table from the NMS.
Configuring SNMPv1 and SNMPv2c from the CLI
Note
Note
To configure SNMPv1 and SNMPv2c from the command-line interface (CLI), perform this task in privileged mode:
This example shows how to define community strings, assign a trap receiver, and specify which traps to send to the trap receiver:
Console> (enable) set snmp community read-only EveryoneSNMP read-only community string set to 'Everyone'.Console> (enable) set snmp community read-write AdministratorsSNMP read-write community string set to 'Administrators'.Console> (enable) set snmp community read-write-all RootSNMP read-write-all community string set to 'Root'.Console> (enable) set snmp trap 172.16.10.10 read-writeSNMP trap receiver added.Console> (enable) set snmp trap 172.16.10.20 read-write-allSNMP trap receiver added.Console> (enable) set snmp trap enable allAll SNMP traps enabled.Console> (enable) show snmpRMON: DisabledExtended RMON: Extended RMON module is not presentTraps Enabled:Port,Module,Chassis,Bridge,Repeater,Vtp,Auth,ippermit,Vmps,config,entity,stpxPort Traps Enabled: 1/1-2,4/1-48,5/1Community-Access Community-String---------------- --------------------read-only Everyoneread-write Administratorsread-write-all RootTrap-Rec-Address Trap-Rec-Community---------------------------------------- --------------------172.16.10.10 read-write172.16.10.20 read-write-allConsole> (enable)
Note
SNMPv1 and SNMPv2c Enhancements in Software Release 7.5(1)
These sections describe enhancements added to software release 7.5(1):
•
•
•
•
•
Setting Multiple SNMP Community Strings
You can set multiple SNMP community strings using the community-ext keyword. Community strings defined with the community-ext keyword cannot be duplicates of existing community strings. When you add a new community string using the community-ext keyword, appropriate entries are created in the vacmAccessTable (if a view is specified), snmpCommunityTable, and the vacmSecurityToGroup table.
To set multiple SNMP community strings from the CLI, perform this task in privileged mode:
This example shows how to set an additional SNMP community string:
Console> (enable) set snmp community-ext public1 read-onlyCommunity string public1 is created with access type as read-onlyConsole> (enable)This example shows how to restrict the community string to an access number:
Console> (enable) set snmp community-ext private1 read-write access 2Community string private1 is created with access type as read-write access number 2Console> (enable)This example shows how to change the access number to the community string:
Console> (enable) set snmp community-ext private1 read-write access 3Community string private1 is updated with access type as read-write accessnumber 3Console> (enable)This example shows how to display the SNMP configuration:
Console> (enable) show snmpSNMP:EnabledRMON:DisabledExtended RMON Netflow Enabled :None.Memory usage limit for new RMON entries:85 percentTraps Enabled:NonePort Traps Enabled:NoneCommunity-Access Community-String---------------- --------------------read-only publicread-write privateread-write-all secretAdditional- Access-Community-String Access-Type Number View-------------------- -------------- ------- -----------------------------------public1 read-onlypublic2 read-only 1private1 read-write 2 1.3.6secret1 read-write-all 500 1.3.6.1.4.1.9.9Trap-Rec-Address Trap-Rec-Community Trap-Rec-Port Trap-Rec-Owner Trap-Rec-Index---------------- ------------------ ------------- -------------- --------------Console> (enable)Clearing SNMP Community Strings
You can clear community strings using the clear snmp community-ext command. When you use this command to clear a community string, corresponding entries in the vacmAccessTable and vacmSecurityToGroup tables are also removed.
To clear an SNMP community string from the CLI, perform this task in privileged mode:
Step 1
Clear an SNMP community string.
clear snmp community-ext community-string
Step 2
Verify the SNMP configuration.
show snmp
This example shows how to clear an SNMP community string:
Console> (enable) clear snmp community-ext public1Community string public1 has been removedConsole> (enable)Specifying Access Numbers for Hosts
You can specify a list of access numbers associated with one or more hosts to limit which hosts can use a specific community string to access the system. You can specify more than one IP address associated with an access number by separating each IP address with a space. If the new IP address uses an existing access number, the switch addes the new IP addresses to the list.
To specify an access number for a host from the CLI, perform this task in privileged mode:
Step 1
Specify an access number for a host.
set snmp access-list access_number IP_address [ipmask maskaddr]
Step 2
Verify the SNMP configuration.
show snmp access-list
These examples show how to specify an access number for a host:
Console> (enable) set snmp access-list 1 172.20.60.100Access number 1 has been created with new IP Address 172.20.60.100Console> (enable) set snmp access-list 2 172.20.60.100 mask 255.0.0.0Access number 2 has been created with new IP Address 172.20.60.100 mask 255.0.0.0Console> (enable) set snmp access-list 2 172.20.60.7Access number 2 has been updated with new IP Address 172.20.60.7Console> (enable) set snmp access-list 2 172.20.60.7 mask 255.255.255.0Access number 2 has been updated with existing IP Address 172.20.60.7 mask 255.255.255.0Console> (enable)This example shows how to display the SNMP configuration:
Console> (enable) show snmp access-listAccess-Number IP-Addresses/IP-Mask------------- -------------------------1 172.20.60.100/255.0.0.01.1.1.1/-2 172.20.60.7/-2.2.2.2/-3 2.2.2.2/155.0.0.04 1.1.1.1/2.1.2.42.2.2.2/-2.2.2.5/-Console> (enable)Clearing IP Addresses Associated with Access Numbers
To clear IP addresses associated with access numbers from the CLI, perform this task in privileged mode:
Step 1
Clear IP addresses associated with access numbers.
clear snmp access-list access_number IP_address [[IP_address] ...]
Step 2
Verify the SNMP configuration.
show snmp access-list
These examples show how to clear IP addresses associated with access numbers:
Console> (enable) clear snmp access-list 101All IP addresses associated with access-number 101 have been cleared.Console> (enable)Console> (enable) clear snmp access-list 2 172.20.60.8Access number 2 no longer associated with 172.20.60.8Console> (enable)Specifying and Displaying an Interface Alias
You can specify and display an interface alias. The length of the alias can be up to 64 characters.
To specify and display an interface alias, perform this task in privileged mode:
Step 1
Specify an interface alias.
set snmp ifalias {ifIndex} [ifAlias]
Step 2
Display the interface alias.
show snmp ifalias [ifIndex]
These examples show how to specify and display an interface alias:
Console> (enable) set snmp ifalias 1 Inband portifIndex 1 alias setConsole> (enable)Console> (enable) show snmp ifalias 1ifIndex ifName ifAlias---------- -------------------- ---------------------------------1 sc0 Inband portConsole> (enable)Understanding SNMPv3
SNMPv3 contains all the functionality of SNMPv1 and SNMPv2, but SNMPv3 has significant enhancements to administration and security. SNMPv3 is an interoperable standards-based protocol. SNMPv3 provides secure access to devices by authenticating and encrypting packets over the network. The security features provided in SNMPv3 are as follows:
•
•
•
Benefits of SNMPv3
SNMPv3 provides the following benefits for managing your network:
•
•
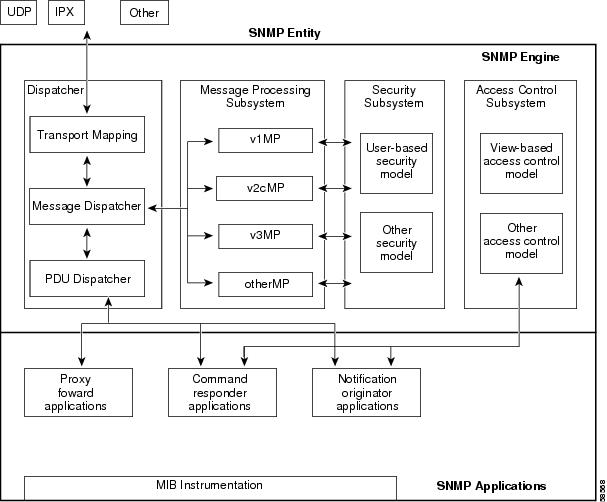
SNMP Entity
In SNMPv3, the terms SNMP Agents and SNMP Managers are no longer used. These concepts have been combined into what is called an SNMP entity. An SNMP entity is made up of an SNMP engine and SNMP applications. An SNMP engine is made up of these four components (Figure 24-1):
•
•
•
•
Figure 24-1 SNMP Entity for Traditional SNMP Agents
Dispatcher
The Dispatcher is a simple traffic manager that sends and receives messages. After receiving a message, the Dispatcher tries to determine the version number of the message and then passes the message to the appropriate Message Processing Model. The Dispatcher is also responsible for dispatching PDUs to applications and for selecting the appropriate transports for sending messages.
Message Processing Subsystem
The Message Processing Subsystem accepts outgoing PDUs from the Dispatcher and prepares them for transmission by wrapping them in a message header and returning them to the Dispatcher. The Message Processing Subsystem also accepts incoming messages from the Dispatcher, processes each message header, and returns the enclosed PDU to the Dispatcher. An implementation of the Message Processing Subsystem may support a single message format corresponding to a single version of SNMP (SNMPv1, SNMPv2c, SNMPv3), or it may contain a number of modules, each supporting a different version of SNMP.
Security Subsystem
The Security Subsystem authenticates and encrypts messages. Each outgoing message is passed to the Security Subsystem from the Message Processing Subsystem. Depending on the services required, the Security Subsystem may encrypt the enclosed PDU and some fields in the message header. In addition, the Security Subsystem may generate an authentication code and insert it into the message header. After encryption, the message is returned to the Message Processing Subsystem.
Each incoming message is passed to the Security Subsystem from the Message Processing Subsystem. If required, the Security Subsystem checks the authentication code and performs decryption. The processed message is returned to the Message Processing Subsystem. An implementation of the Security Subsystem may support one or more distinct security models. So far, the only defined security model is the User-Based Security Model (USM) for SNMPv3, specified in RFC 2274.
The USM protects SNMPv3 messages from the following potential security threats:
•
•
•
•
The USM currently defines the use of HMAC-MD5-96 and HMAC-SHA-96 as the possible authentication protocols and CBC-DES as the privacy protocol.
SNMPv1 and SNMPv2c security models provide only weak authentication (community names) and no privacy.
Access Control Subsystem
The responsibility of the Access Control Subsystem is straightforward. It determines whether access to a managed object should be allowed. Currently, one access control model, the View-Based Access Control Model (VACM), has been defined. With VACM, you can control which users and which operations can have access to which managed objects.
Applications
SNMPv3 applications refer to internal applications within an SNMP entity. These internal applications can generate SNMP messages, respond to received SNMP messages, generate notifications, receive notifications, and forward messages between SNMP entities. Currently, there are five types of applications:
•
•
•
•
•
Configuring SNMPv3 from an NMS
To configure SNMP from a Network Management System (NMS), refer to your NMS documentation (also see the "Using CiscoWorks2000" section).
The switch supports up to 20 trap receivers through the RMON2 trap destination table. Configure the RMON2 trap destination table from the NMS.
Configuring SNMPv3 from the CLI
Note
To configure SNMPv3 from the command-line interface (CLI), perform this task in privileged mode:
This example shows how to set a MIB view name to interfacesMibView:
Console> (enable) set snmp view interfacesMibView 1.3.6.1.2.1.2 includedSnmp view name was set to interfacesMibView with subtree 1.3.6.1.2.1.2 included, nonvolatile.This example shows how to set the access rights for a group called guestgroup to SNMPv3 authentication read mode:
Console> (enable) set snmp access guestgroup security-model v3 authentication read
interfacesMibView
Snmp access group was set to guestgroup version v3 level authentication,readview interfacesMibView, context match:exact, nonvolatile.This example shows how to specify the target addresses:
Console> (enable) set snmp notify notifytable1 tag routers trapSnmp notify name was set to notifytable1 with tag routers notifyType trap, and storageType nonvolatile.These examples show how to set the snmpTargetAddrEntry in the target address table:
Console> (enable) set snmp targetaddr router_1 param p1 172.20.21.1Snmp targetaddr name was set to router_1 with param p1ipAddr 172.20.21.1, udpport 162, timeout 1500, retries 3, storageType nonvolatile.Console> (enable) set snmp targetaddr router_2 param p2 172.20.30.1Snmp targetaddr name was set to router_2 with param p2ipAddr 172.20.30.1, udpport 162, timeout 1500, retries 3, storageType nonvolatile.These examples show how to set SNMP target parameters:
Console> (enable) set snmp targetparams p1 user guestuser1 security-model v3
message-processing v3 authentication
Snmp target params was set to p1 v3 authentication, message-processing v3,user guestuser1 nonvolatile.Console> (enable) set snmp targetparams p2 user guestuser2 security-model v3 message-processing v3 privacySnmp target params was set to p2 v3 privacy, message-processing v3,user guestuser2 nonvolatile.These examples show how to configure guestuser1 and guestuser2 as users:
Console> (enable) set snmp user guestuser1 authentication md5 guestuser1password privacy
privacypasswd1
Snmp user was set to guestuser1 authProt md5 authPasswd guestuser1password privProt des privPasswdprivacypasswd1 with engineid 00:00:00:09:00:10:7b:f2:82:00:00:00 nonvolatile.Console> (enable) set snmp user guestuser2 authentication sha guestuser2passwordSnmp user was set to guestuser2 authProt sha authPasswd guestuser2password privProt no-priv with engineid00:00:00:09:00:10:7b:f2:82:00:00:00 nonvolatile.These examples show how to set guestuser1 and guestuser2 as members of the groups guestgroup and mygroup:
Console> (enable) set snmp group guestgroup user guestuser1 security-model v3Snmp group was set to guestgroup user guestuser1 and version v3, nonvolatile.Console> (enable) set snmp group mygroup user guestuser1 security-model v3Snmp group was set to mygroup user guestuser1 and version v3, nonvolatile.Console> (enable) set snmp group mygroup user guestuser2 security-model v3Snmp group was set to mygroup user guestuser2 and version v3, nonvolatile.This example shows how to verify the SNMPv3 setup for guestuser1 from a workstation:
workstation% getnext -v3 10.6.4.201 guestuser1 ifDescr.0Enter Authentication password :guestuser1passwordEnter Privacy password :privacypasswd1ifDescr.1 = sc0This example shows how to verify the SNMPv3 setup for guestuser1 in the snmpEngineID MIB from a workstation:
workstation% getnext -v3 10.6.4.201 guestuser1 snmpEngineIDEnter Authentication password :guestuser1paswordEnter Privacy password :privacypasswd1snmpEngineID = END_OF_MIB_VIEW_EXCEPTIONThis example shows how to verify the SNMPv2c setup for public access from a workstation:
workstation% getnext -v2c 10.6.4.201 public snmpEngineIDsnmpEngineID.0 =00 00 00 09 00 10 7b f2 82 00 00 00This example shows how to increase guestgroup's access right to read privileges for snmpEngineMibView:
Console> (enable) set snmp view snmpEngineMibView 1.3.6.1.6.3.10.2.1 includedSnmp view name was set to snmpEngineMibView with subtree 1.3.6.1.6.3.10.2.1 included, nonvolatileConsole> (enable) set snmp access guestgroup security-model v3 authentication read snmpEngineMibViewSnmp access group was set to guestgroup version v3 level authentication,readview snmpEngineMibView, nonvolatile.This example shows how to verify the SNMPv3 access for guestuser1 from a workstation:
% getnext -v3 10.6.4.201 guestuser1 snmpEngineIDEnter Authentication password :guestuser1passwordEnter Privacy password :privacypasswd1snmpEngineID.0 =00 00 00 09 00 10 7b f2 82 00 00 00This example shows how to remove access for guestgroup:
Console> (enable) clear snmp acc guestgroup security-model v3 authenticationCleared snmp access guestgroup version v3 level authentication.This example shows how to verify that the access for guestuser1 has been removed from a workstation:
% getnext -v3 10.6.4.201 guestuser1 ifDescr.1Enter Authentication password :guestuser1passwordEnter Privacy password :privacypasswd1Error code set in packet - AUTHORIZATION_ERROR:1.This example shows how to verify the access for guestuser2 from a workstation:
% getnext -v3 10.6.4.201 guestuser2 ifDescr.1Enter Authentication password :guestuser2passwordEnter Privacy password :privacypasswd2REPORT received, cannot recover:usmStatsUnsupportedSecLevels.0 = 1Using CiscoWorks2000
CiscoWorks2000 is a family of web-based and management platform-independent products for managing Cisco enterprise networks and devices. CiscoWorks2000 includes Resource Manager Essentials and CWSI Campus, which allow you to deploy, configure, monitor, manage, and troubleshoot a switched internetwork. For more information, refer to the following publications:
•
•