-
Catalyst 4500 Series Software Configuration Guide, 7.5
-
Preface
-
Product Overview
-
Using the Command-Line Interface
-
Configuring the Switch IP Address and Default Gateway
-
Configuring Ethernet and Fast Ethernet Switching
-
Configuring Gigabit Ethernet Switching
-
Configuring Fast EtherChannel and Gigabit EtherChannel
-
Configuring Spanning Tree
-
Configuring Spanning Tree PortFast, BPDU Guard, BPDU Filter, UplinkFast, BackboneFast, and Loop Guard
-
Configuring VTP
-
Configuring VLANs
-
Configuring VLAN Trunks on Fast Ethernet and Gigabit Ethernet Ports
-
Configuring Dynamic VLAN Membership with VMPS
-
Configuring GVRP
-
Configuring QoS
-
Configuring Multicast Services
-
Configuring Port Security
-
Configuring Unicast Flood Blocking
-
Configuring the IP Permit List
-
Configuring Protocol Filtering
-
Checking Port Status and Connectivity
-
Configuring CDP
-
Using Switch TopN Reports
-
Configuring UDLD
-
Configuring SNMP
-
Configuring RMON
-
Configuring SPAN and RSPAN
-
Administering the Switch
-
Configuring Switch Access Using AAA
-
Modifying the Switch Boot Configuration
-
Working with System Software Images
-
Using the Flash File System
-
Working with Configuration Files
-
Configuring Switch Acceleration
-
Configuring System Message Logging
-
Configuring DNS
-
Configuring NTP
-
Glossary
-
Index
-
 Feedback
Table Of Contents
Configuring Switch Access Using AAA
Understanding How Authentication Works
Understanding How Login Authentication Works
Understanding How Local Authentication Works
Understanding How Local User Authentication Works
Understanding How TACACS+ Authentication Works
Understanding How RADIUS Authentication Works
Understanding How Kerberos Authentication Works
Using a Kerberized Login Procedure
Using a Non-Kerberized Login Procedure
Understanding How 802.1x Authentication Works
802.1x Parameters Configurable on the Switch
802.1x VLAN Assignment Using a RADIUS Server
Authentication Default Configuration
Authentication Configuration Guidelines
Configuring Login Authentication
Setting Authentication Login Attempts on the Switch
Setting Authentication Login Attempts for Privileged Mode
Configuring Local Authentication
Disabling Local Authentication
Configuring Local User Authentication
Enabling Local User Authentication
Disabling Local User Authentication
Configuring TACACS+ Authentication
Enabling TACACS+ Authentication
Setting the TACACS+ Timeout Interval
Setting the TACACS+ Login Attempts
Enabling TACACS+ Directed Request
Disabling TACACS+ Directed Request
Disabling TACACS+ Authentication
Configuring RADIUS Authentication
Enabling RADIUS Authentication
Setting the RADIUS Timeout Interval
Setting the RADIUS Retransmit Count
Specifying Optional Attributes for RADIUS Servers
Disabling RADIUS Authentication
Configuring Kerberos Authentication
Defining the Kerberos Local-Realm
Mapping a Kerberos Realm to a Host Name or DNS Domain
Enabling Credentials Forwarding
Disabling Credentials Forwarding
Monitoring and Maintaining Kerberos
Configuring 802.1x Authentication
Enabling and Initializing 802.1x Authentication for Individual Ports
Setting and Enabling Automatic Reauthentication of the Supplicant
Manually Reauthenticating the Supplicant
Setting the Authenticator-to-Supplicant Retransmission Time for EAP-Request/Identity Frames
Setting the Back-End Authenticator-to-Supplicant Retransmission Time for EAP-Request Frames
Setting the Back-End Authenticator-to-Supplicant Frame-Retransmission Number
Resetting the 802.1x Configuration Parameters to the Default Values
Understanding How Authorization Works
TACACS+ Primary and Fallback Options
Authorization Default Configuration
TACACS+ Authorization Configuration Guidelines
Configuring TACACS+ Authorization
Enabling TACACS+ Authorization
Disabling TACACS+ Authorization
Understanding How Accounting Works
Specifying When to Create Accounting Records
Accounting Default Configuration
Accounting Configuration Guidelines
Configuring Switch Access Using AAA
This chapter describes how to configure authentication, authorization, and accounting (AAA) to monitor and control access to the command-line interface (CLI) on the Catalyst enterprise LAN switches.
Note
For complete syntax and usage information for the commands used in this chapter, refer to the Command Reference—Catalyst 4000 Family, Catalyst 2948G, and Catalyst 2980G Switches.
This chapter consists of these major sections:
•
•
•
Understanding How Authentication Works
You can configure any combination of these authentication methods to control access to the switch:
•
•
•
•
•
•
•
Note
When local authentication is enabled together with one or more other authentication methods, local authentication is always attempted last. However, you can specify different authentication methods for console and Telnet connections. For example, you might use local authentication for console connections and RADIUS authentication for Telnet connections.
These sections describe how the different authentication methods work:
•
•
•
•
•
•
•
Understanding How Login Authentication Works
Login authentication increases the security of the system by preventing unauthorized users from guessing the password. The user is allowed only a specific number of attempts to successfully log in to the switch. If the user fails to authorize the password, the system delays any subsequent accesses and captures the user ID and the IP address of the station in the syslog and in the SNMP trap.
You can configure the maximum number of login attempts from the CLI and SNMP with the set authentication login attempt command. (You would use the set authentication enable attempt command to set login limits for accessing enable mode.) The configurable range is three (default) to ten tries. Setting the limit to zero (0) disables login authentication.
All authentication methods are supported: RADIUS, TACACS+, Kerberos, or local
The lockout (delay) time is also configurable from the CLI and SNMP with the set authentication login lockout command. (You would use the set authentication enable lockout <time> command to set a delay time for accessing enable mode.) The configurable range is 30 to 43,200 seconds; setting the lockout time to zero (0) disables this function.
If you are locked out at the console, the console does not allow you to log in during that lockout time. If you are locked out from a telnet session, the connection closes when the limit is reached. Furthermore, the switch closes any subsequent access from that station during the lockout time and provides an appropriate notice.
Understanding How Local Authentication Works
Local authentication uses locally configured login and enable passwords to authenticate login attempts. The login and enable passwords are local to each switch and are not mapped to individual usernames.
Local authentication is enabled by default, but can be disabled if one of the other authentication methods is enabled. If local authentication is disabled and you then disable all other authentication methods, local authentication is reenabled automatically.
You can enable local authentication and one or more of the other authentication methods at the same time. Local authentication is only attempted if the other authentication methods fail.
Understanding How Local User Authentication Works
Local user authentication uses local user accounts and passwords that you create to validate the login attempts of local users. Each switch can have a maximum of 25 local user accounts. Before you can enable local user authentication, you must define at least one local user account.
You set up local user accounts by creating a unique username and password combination for each local user. Each username must be fewer than 65 characters and can be any alphanumeric character, at least one of which must be alphabetic.
You configure each local user account with a privilege level; valid privilege levels are 0 or 15. A local user with a privilege level of 0 can access commands in normal mode, while a local user with a privilege level of 15 can access commands in both normal or privilege mode.
Once a local user is logged in, the user canuse only commands that are available for that privilege level. A local user can enter privilege mode only if that user enters the correct enable password.
Note
Understanding How TACACS+ Authentication Works
TACACS+ is an enhanced version of TACACS, a User Datagram Protocol (UDP)-based access-control protocol specified by RFC 1492. TACACS+ controls access to network devices by exchanging Network Access Server (NAS) information between a network device and a centralized database to determine the identity of a user or device. TACACS+ uses TCP to ensure reliable delivery and encrypt all traffic between the TACACS+ server and the TACACS+ daemon on a network device.
TACACS+ works with many authentication types, including fixed password, one-time password, and challenge-response authentication. TACACS+ authentication usually occurs in these instances:
•
•
When you request privileged or restricted services, TACACS+ encrypts your user password information using the MD5 encryption algorithm and adds a TACACS+ packet header. This header information identifies the packet type being sent (for example, an authentication packet), the packet sequence number, the encryption type used, and the total packet length. The TACACS+ protocol then forwards the packet to the TACACS+ server.
A TACACS+ server can provide authentication, authorization, and accounting functions. These services, while all part of TACACS+, are independent of one another, so that a given TACACS+ configuration can use any or all of the three services.
When the TACACS+ server receives the packet, it does the following:
•
•
You can configure a TACACS+ key on the client and server. If you configure a key on the switch, it must be the same as the one configured on the TACACS+ servers. The TACACS+ clients and servers use the key to encrypt all TACACS+ packets transmitted. If you do not configure a TACACS+ key, packets are not encrypted. The TACACS+ key must be fewer than 100 characters.
With TACACS+, you can do the following:
•
•
•
•
•
•
•
TACACS+ authentication is disabled by default. You can enable TACACS+ authentication and local authentication at the same time.
If local authentication is disabled and you then disable all other authentication methods, local authentication is reenabled automatically.
Understanding How RADIUS Authentication Works
RADIUS is a client-server authentication and authorization access protocol used by the NAS to authenticate users attempting to connect to a network device. The NAS functions as a client, passing user information to one or more RADIUS servers. The NAS permits or denies network access to a user based on the response it receives from one or more RADIUS servers. RADIUS uses UDP for transport between the RADIUS client and server.
You can configure a RADIUS key on the client and server. If you configure a key on the client, it must be the same as the one configured on the RADIUS servers. The RADIUS clients and servers use the key to encrypt all RADIUS packets transmitted. If you do not configure a RADIUS key, packets are not encrypted. The key itself is never transmitted over the network.
Note
With RADIUS, you can do the following:
•
•
•
•
•
•
•
RADIUS authentication is disabled by default. You can enable RADIUS authentication and other authentication methods at the same time. You can specify which method to use first using the primary keyword.
If local authentication is disabled and you then disable all other authentication methods, local authentication is reenabled automatically.
Understanding How Kerberos Authentication Works
Kerberos is a client-server-based secret-key network authentication method that uses a trusted Kerberos server to verify secure access to both services and users. In Kerberos, this trusted server is called the key distribution center (KDC). The KDC issues tickets to validate users and services. A ticket is a temporary set of electronic credentials that verify the identity of a client for a particular service.
These tickets have a limited life span and can be used in place of the standard user password authentication mechanism if a service trusts the Kerberos server from which the ticket was issued. If the standard user password method is used, Kerberos encrypts user passwords into the tickets, ensuring that passwords are not sent on the network in clear text. When you use Kerberos, passwords are not stored on any machine (except for the Kerberos server) for more than a few seconds. Kerberos also guards against intruders who might pick up the encrypted tickets from the network.
Table 28-1 defines terms used in Kerberos.
Telnet clients and servers through both the console and in-band management port can be Kerberized.
Note
Note
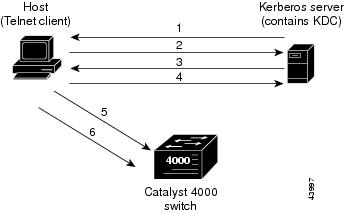
Using a Kerberized Login Procedure
You can use a Kerberized Telnet session if you are logging in through the in-band management port. After the Telnet client and services have been Kerberized, the following process takes place when a user attempts to Telnet to the switch:
1.
2.
3.
4.
5.
6.
Figure 28-1 illustrates the Kerberos Telnet connection process.
Figure 28-1 Kerberized Telnet Connection
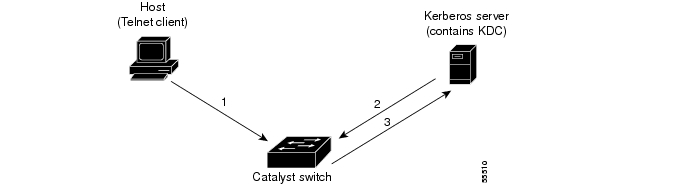
Using a Non-Kerberized Login Procedure
If you log into a switch using a non-Kerberized login procedure, the switch takes care of authentication to the KDC on behalf of the login client. However, the user password transfers, in clear text, from the login client to the switch.
Note
When you launch a non-Kerberized login, the following process takes place:
1.
2.
3.
4.
5.
Figure 28-2 illustrates the non-Kerberized login process.
Figure 28-2 Non-Kerberized Telnet Connection
Understanding How 802.1x Authentication Works
IEEE 802.1x is a client-server-based access control and authentication protocol that restricts unauthorized devices from connecting to a local area network (LAN) through publicly accessible ports. 802.1x authenticates each user device connected to a switch port before making available any services offered by the switch or the LAN. Until the device is authenticated, 802.1x access control allows only Extensible Authentication Protocol over LAN (EAPOL) traffic through the port to which the device is connected. After authentication is successful, normal traffic can pass through the port.
802.1x controls network access by the creating two distinct virtual access points at each port. One access point is an uncontrolled port; the other is a controlled port. All traffic through the single port is available to both access points. Only EAPOL traffic is allowed to pass through the uncontrolled port, which is always open. The controlled port is open only when the device connected to the port has been authorized by 802.1x. After this authorization takes place, the controlled port opens, allowing normal traffic to pass.
Table 28-2 defines the terms used in 802.1x.
Table 28-2 802.1x Terminology
Authenticator PAE
(Referred to as the "authenticator") entity at one end of a point-to-point LAN segment that enforces supplicant authentication. The authenticator is independent of the actual authentication method and functions only as a pass-through for the authentication exchange. It communicates with the supplicant, submits the information from the supplicant to the authentication server, and authorizes the supplicant when instructed to do so by the authentication server.
Authentication server
Entity that provides the authentication service for the authenticator PAE. It checks the credentials of the supplicant PAE, and then notifies its client, the authenticator PAE, whether the supplicant PAE is authorized to access the LAN/switch services.
Authorized state
Status of the port after the supplicant PAE is authorized.
Both
Bidirectional flow control, incoming and outgoing, at an unauthorized switch port.
Controlled port
Secured access point.
EAP
Extensible authentication protocol.
EAPOL1
Encapsulated EAP messages that can be handled directly by a LAN MAC service.
In
Flow control only on incoming frames in an unauthorized switch port.
Port
Single point of attachment to the LAN infrastructure (for example, MAC Bridge ports).
PAE2
Protocol object associated with a specific system port.
PDU
Protocol data unit.
RADIUS
Remote Access Dial In User Service.
Supplicant PAE
(Referred to as the "supplicant") entity that requests access to the LAN/switch services and responds to information requests from the authenticator.
Unauthorized state
Status of the port before the supplicant PAE is authorized.
Uncontrolled port
Unsecured access point that allows the uncontrolled exchange of PDUs.
1 EAPOL = Extensible Authorization Protocol over LAN
2 PAE = Port access entity
Traffic Control
You can restrict traffic in both directions or just incoming traffic.
Authentication Server
The frames exchanged between the authenticator and the authentication server are dependent on the authentication mechanism, so they are not defined by the 802.1x standard. You can use other protocols, but we recommend RADIUS for authentication, particularly when the authentication server is located remotely, because RADIUS has extensions that support encapsulation of EAP frames built into it.
802.1x Parameters Configurable on the Switch
With 802.1x, you can do the following:
•
•
•
•
•
•
•
•
•
•
802.1x VLAN Assignment Using a RADIUS Server
In software release 6.3 or earlier releases, once the 802.1x client is authenticated, it is assigned to an NVRAM-configured VLAN. With software release 7.2(1) and later releases, after authentication, an 802.1x client can receive its VLAN assignment from the RADIUS server.
VLAN assignment allows you to restrict users to a specific VLAN. For example, guest users could be put in a VLAN with limited access to the network.
802.1x authenticated ports are assigned to a VLAN based on the username of the supplicant connected to the port. The VLAN assignment feature works in conjunction with the RADIUS server, which has a database of username-to-VLAN mappings.
After a successful port 802.1x authentication, the RADIUS server sends the VLAN in which the user needs access. 802.1x port behavior with the VLAN assignment feature is summarized as follows:
•
•
•
•
•
•
•
•
•
•
In order for 802.1x VLAN assignment using a RADIUS server to successfully complete, the RADIUS server must return the following three RFC 2868 attributes back to the authenticator (the Cisco switch to which the supplicant attaches):
•
•
•
Attribute [64] must contain the value "VLAN" (type 13). Attribute [65] must contain the value "802" (type 6). Attribute [81] specifies the VLAN name in which the successfully authenticated 802.1x supplicant should be put.
Note
Configuring Authentication
These sections describe how to configure the different authentication methods:
•
•
•
•
•
•
•
•
•
Authentication Default Configuration
Table 28-3 shows the default configuration for authentication.
Authentication Configuration Guidelines
This section lists guidelines for configuring authentication on the switch:
•
•
•
•
•
•
•
•
•
•
•
•
•
•
•
•
•
Configuring Login Authentication
The next two sections describe how to configure login authentication on the switch.
Setting Authentication Login Attempts on the Switch
To set up login authentication on the switch, perform this task in privileged mode:
This example shows how to limit login attempts to 5, set the lockout time for both console and Telnet connections to 50 seconds, and verify the configuration:
Console> (enable) set authentication login attempt 5Login authentication attempts for console and telnet logins set to 5.Console> (enable) set authentication login lockout 50Login lockout time for console and telnet logins set to 50.Console> (enable) show authenticationLogin Authentication: Console Session Telnet Session Http Session--------------------- ---------------- ---------------- ----------------tacacs disabled disabled disabledradius disabled disabled disabledkerberos disabled disabled disabledlocal enabled(primary) enabled(primary) enabled(primary)attempt limit 5 5 -lockout timeout (sec) 50 50 -Enable Authentication: Console Session Telnet Session Http Session---------------------- ----------------- ---------------- ----------------tacacs disabled disabled disabledradius disabled disabled disabledkerberos disabled disabled disabledlocal enabled(primary) enabled(primary) enabled(primary)attempt limit 3 3 -lockout timeout (sec) disabled disabled -Console> (enable)Setting Authentication Login Attempts for Privileged Mode
To set up login authentication for privileged mode, perform this task in privileged mode:
This example shows how to limit enable mode login attempts to 5, set the enable mode lockout time for both console and Telnet connections to 50 seconds, and verify the configuration:
Console> (enable) set authentication enable attempt 5Enable mode authentication attempts for console and telnet logins set to 5.Console> (enable) set authentication enable lockout 50Enable mode lockout time for console and telnet logins set to 50.Console> (enable) show authenticationLogin Authentication: Console Session Telnet Session Http Session--------------------- ---------------- ---------------- ----------------tacacs disabled disabled disabledradius disabled disabled disabledkerberos disabled disabled disabledlocal enabled(primary) enabled(primary) enabled(primary)attempt limit 5 5 -lockout timeout (sec) 50 50 -Enable Authentication: Console Session Telnet Session Http Session---------------------- ----------------- ---------------- ----------------tacacs disabled disabled disabledradius disabled disabled disabledkerberos disabled disabled disabledlocal enabled(primary) enabled(primary) enabled(primary)attempt limit 5 5 -lockout timeout (sec) 50 50 -Console> (enable)Configuring Local Authentication
The following sections describe how to configure local authentication on the switch.
Enabling Local Authentication
Note
To enable local authentication on the switch, perform this task in privileged mode:
This example shows how to enable local login and enable authentication for both console and Telnet connections and how to verify the configuration:
Console> (enable) set authentication login local enablelocal login authentication set to enable for console and telnet session.Console> (enable) set authentication enable local enablelocal enable authentication set to enable for console and telnet session.Console> (enable) show authenticationLogin Authentication: Console Session Telnet Session--------------------- ---------------- ----------------tacacs disabled disabledradius disabled disabledkerberos disabled disabledlocal enabled(primary) enabled(primary)Enable Authentication: Console Session Telnet Session---------------------- ----------------- ----------------tacacs disabled disabledradius disabled disabledkerberos disabled disabledlocal enabled(primary) enabled(primary)Console> (enable)Setting the Login Password
The login password controls access to the user mode CLI. Passwords are case sensitive, can contain up to 30 characters, and use any printable ASCII characters, including a space.
Note
To set the login password for local authentication, perform this task in privileged mode:
Set the login password for access. Enter your old password (press Return on a switch with no password configured), enter your new password, and reenter your new password.
set password
This example shows how to set the login password on the switch:
Console> (enable) set passwordEnter old password:old_passwordEnter new password:new_passwordRetype new password:new_passwordPassword changed.Console> (enable)Setting the Enable Password
The enable password controls access to the privileged mode CLI. Passwords are case sensitive, can contain up to 30 characters, and can use any printable ASCII characters, including a space.
Note
To set the enable password for local authentication, perform this task in privileged mode:
This example shows how to set the enable password on the switch:
Console> (enable) set enablepassEnter old password:<old_password>Enter new password:<new_password>Retype new password:<new_password>Password changed.Console> (enable)Disabling Local Authentication
Caution
To disable local authentication on the switch, perform this task in privileged mode:
This example shows how to disable local login and enable authentication for both console and Telnet connections, and how to verify the configuration (you must have RADIUS or TACACS+ authentication enabled before you disable local authentication):
Console> (enable) set authentication login local disablelocal login authentication set to disable for console and telnet session.Console> (enable) set authentication enable local disablelocal enable authentication set to disable for console and telnet session.Console> (enable) show authenticationLogin Authentication: Console Session Telnet Session--------------------- ---------------- ----------------tacacs disabled disabledradius enabled(primary) enabled(primary)kerberos disabled disabledlocal disabled disabledEnable Authentication: Console Session Telnet Session---------------------- ----------------- ----------------tacacs disabled disabledradius enabled(primary) enabled(primary)kerberos disabled disabledlocal disabled disabledConsole> (enable)Recovering a Lost Password
To recover a lost local authentication password, follow these steps. You must complete Steps 3 through Step 7 within 30 seconds of a power cycle or the recovery will fail. If you have lost both the login and enable passwords, repeat the process for each password.
Step 1
Step 2
Step 3
Step 4
Step 5
Step 6
Step 7
Step 8
Configuring Local User Authentication
The following sections describe how to configure local user authentication authentication on the switch.
Creating a Local User Account
Local user accounts and passwords must be fewer than 65 characters and can consist of any alphanumeric characters. Local user accounts must contain at least one alphabetic character.
To create a local user account on the switch, perform this task in privileged mode:
Step 1
Create a new local user account.
set localuser user username password pwd privilege privilege_level
Step 2
Verify the local user account.
show localusers
This example shows how to create a local user account and password, set the privilege level, and verify the configuration:
Console> (enable) set localuser user picard password captain privilege 15Added local user picard.Console> (enable) show localusersLocal User Authentication: disabledUsername Privilege Level--------- -------------picard 15Console> (enable)Enabling Local User Authentication
To enable local user authentication on the switch, perform this task in privileged mode:
Step 1
Enable local user authentication.
set localuser authentication enable
Step 2
Verify the local user authentication configuration.
show authentication
This example shows how to create a local user account, enable local user authentication, and verify the configuration:
Console> (enable) set localuser authentication enableLocal User Authentication enabled.Console> (enable) show authenticationLogin Authentication: Console Session Telnet Session Http Session--------------------- ---------------- ---------------- ----------------tacacs disabled disabled disabledradius disabled disabled disabledkerberos disabled disabled disabledlocal * enabled(primary) enabled(primary) enabled(primary)attempt limit 3 3 -lockout timeout (sec) disabled disabled -Enable Authentication: Console Session Telnet Session Http Session---------------------- ----------------- ---------------- ----------------tacacs disabled disabled disabledradius disabled disabled disabledkerberos disabled disabled disabledlocal * enabled(primary) enabled(primary) enabled(primary)attempt limit 3 3 -lockout timeout (sec) disabled disabled -* Local User Authentication enabled.Console> (enable)Disabling Local User Authentication
To disable local user authentication on the switch, perform this task in privileged mode:
Step 1
Disable local user authentication.
set localuser authentication disable
Step 2
Verify the local authentication configuration.
show authentication
This example shows how to disable local user authentication for the switch and how to verify the configuration:
Console> (enable) set localuser authentication disablelocal user authentication set to disable.Console> (enable) show authenticationLogin Authentication: Console Session Telnet Session Http Session--------------------- ---------------- ---------------- ----------------tacacs disabled disabled disabledradius disabled disabled disabledkerberos disabled disabled disabledlocal * enabled(primary) enabled(primary) enabled(primary)attempt limit 3 3 -lockout timeout (sec) disabled disabled -Enable Authentication: Console Session Telnet Session Http Session---------------------- ----------------- ---------------- ----------------tacacs disabled disabled disabledradius disabled disabled disabledkerberos disabled disabled disabledlocal * enabled(primary) enabled(primary) enabled(primary)attempt limit 3 3 -lockout timeout (sec) disabled disabled -* Local User Authentication disabled.Console> (enable)Deleting a Local User Account
To delete a local user account on the switch, perform this task in privileged mode:
Step 1
Delete a local user account.
clear localuser picard
Step 2
Verify the local user account has been deleted.
show localusers
This example shows how to disable local user authentication for the switch and how to verify the configuration:
Console> (enable) clear localuser number1Console> (enable) show localusersUsername Privilege Level--------- -------------picard 15Console> (enable)Configuring TACACS+ Authentication
The following sections describe how to configure TACACS+ authentication on the switch.
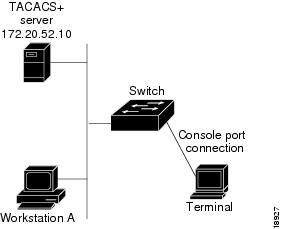
Specifying TACACS+ Servers
Specify one or more TACACS+ servers before you enable TACACS+ authentication on the switch. The first server you specify is the primary server, unless you explicitly make one server the primary server by using the primary keyword.
To specify one or more TACACS+ servers, perform this task in privileged mode:
Step 1
Specify the IP address of one or more TACACS+ servers.
set tacacs server ip_addr [primary]
Step 2
Verify the TACACS+ configuration.
show tacacs
This example shows how to specify TACACS+ servers and verify the configuration:
Console> (enable) set tacacs server 172.20.52.3172.20.52.3 added to TACACS server table as primary server.Console> (enable) set tacacs server 172.20.52.2 primary172.20.52.2 added to TACACS server table as primary server.Console> (enable) set tacacs server 172.20.52.10172.20.52.10 added to TACACS server table as backup server.Console> (enable) show tacacsLogin Authentication: Console Session Telnet Session--------------------- ---------------- ----------------tacacs disabled disabledradius disabled disabledlocal enabled(primary) enabled(primary)Enable Authentication: Console Session Telnet Session---------------------- ----------------- ----------------tacacs disabled disabledradius disabled disabledlocal enabled(primary) enabled(primary)Tacacs key:Tacacs login attempts: 3Tacacs timeout: 5 secondsTacacs direct request: disabledTacacs-Server Status---------------------------------------- -------172.20.52.3172.20.52.2 primary172.20.52.10Console> (enable)Enabling TACACS+ Authentication
Note
You can enable TACACS+ authentication for login and enable access to the switch. If desired, you can use the console and telnet keywords to specify that TACACS+ authentication be used only on console or Telnet connections. If you are using both RADIUS and TACACS+, you can use the primary keyword to force the switch to try TACACS+ authentication first.
To enable TACACS+ authentication, perform this task in privileged mode:
This example shows how to enable TACACS+ authentication for console and Telnet connections and how to verify the configuration:
Console> (enable) set authentication login tacacs enabletacacs login authentication set to enable for console and telnet session.Console> (enable) set authentication enable tacacs enabletacacs enable authentication set to enable for console and telnet session.Console> (enable) show authenticationLogin Authentication: Console Session Telnet Session--------------------- ---------------- ----------------tacacs enabled(primary) enabled(primary)radius disabled disabledlocal enabled enabledEnable Authentication: Console Session Telnet Session---------------------- ----------------- ----------------tacacs enabled(primary) enabled(primary)radius disabled disabledlocal enabled enabledConsole> (enable)Specifying the TACACS+ Key
Note
To specify the TACACS+ key, perform this task in privileged mode:
Step 1
Configure the key used to encrypt packets.
set tacacs key key
Step 2
Verify the TACACS+ configuration.
show tacacs
This example shows how to specify the TACACS+ key and verify the configuration:
Console> (enable) set tacacs key Secret_TACACS_keyThe tacacs key has been set to Secret_TACACS_key.Console> (enable) show tacacsTacacs key: Secret_TACACS_keyTacacs login attempts: 3Tacacs timeout: 5 secondsTacacs direct request: disabledTacacs-Server Status---------------------------------------- -------172.20.52.3172.20.52.2 primary172.20.52.10Console> (enable)Setting the TACACS+ Timeout Interval
You can specify the timeout interval between retransmissions to the TACACS+ server. The default timeout is 5 seconds.
To specify the TACACS+ timeout interval, perform this task in privileged mode:
Step 1
Configure the TACACS+ timeout interval.
set tacacs timeout seconds
Step 2
Verify the TACACS+ configuration.
show tacacs
This example shows how to set the server timeout interval and verify the configuration:
Console> (enable) set tacacs timeout 30Tacacs timeout set to 30 seconds.Console> (enable) show tacacsTacacs key: Secret_TACACS_keyTacacs login attempts: 3Tacacs timeout: 30 secondsTacacs direct request: disabledTacacs-Server Status---------------------------------------- -------172.20.52.3172.20.52.2 primary172.20.52.10Console> (enable)Setting the TACACS+ Login Attempts
You can specify the number of failed login attempts allowed.
To specify the number of login attempts allowed, perform this task in privileged mode:
Step 1
Configure the number of allowed login attempts.
set tacacs attempts number
Step 2
Verify the TACACS+ configuration.
show tacacs
This example shows how to set the number of login attempts and verify the configuration:
Console> (enable) set tacacs attempts 5Tacacs number of attempts set to 5.Console> (enable) show tacacsTacacs key: Secret_TACACS_keyTacacs login attempts: 5Tacacs timeout: 30 secondsTacacs direct request: disabledTacacs-Server Status---------------------------------------- -------172.20.52.3172.20.52.2 primary172.20.52.10Console> (enable)Enabling TACACS+ Directed Request
When TACACS+ directed request is enabled, users must specify the host name of a configured TACACS+ server (in the form username@server_hostname) or the authentication request will fail.
To enable TACACS+ directed request, perform this task in privileged mode:
Step 1
Enable TACACS+ directed request on the switch.
set tacacs directedrequest enable
Step 2
Verify the TACACS+ configuration.
show tacacs
This example shows how to enable TACACS+ directed request and verify the configuration:
Console> (enable) set tacacs directedrequest enableTacacs direct request has been enabled.Console> (enable) show tacacsTacacs key: Secret_TACACS_keyTacacs login attempts: 5Tacacs timeout: 30 secondsTacacs direct request: enabledTacacs-Server Status---------------------------------------- -------172.20.52.3172.20.52.2 primary172.20.52.10Console> (enable)Disabling TACACS+ Directed Request
To disable TACACS+ directed request, perform this task in privileged mode:
Step 1
Disable TACACS+ directed request on the switch.
set tacacs directedrequest disable
Step 2
Verify the TACACS+ configuration.
show tacacs
This example shows how to disable TACACS+ directed request:
Console> (enable) set tacacs directedrequest disableTacacs direct request has been disabled.Console> (enable)Clearing TACACS+ Servers
To clear one or more TACACS+ servers, perform this task in privileged mode:
This example shows how to clear a specific TACACS+ server from the configuration:
Console> (enable) clear tacacs server 172.20.52.3172.20.52.3 cleared from TACACS tableConsole> (enable)This example shows how to clear all TACACS+ servers from the configuration:
Console> (enable) clear tacacs server allAll TACACS servers clearedConsole> (enable)Clearing the TACACS+ Key
To clear the TACACS+ key, perform this task in privileged mode:
Step 1
Clear the TACACS+ key.
clear tacacs key
Step 2
Verify the TACACS+ configuration.
show tacacs
This example shows how to clear the TACACS+ key:
Console> (enable) clear tacacs keyTACACS server key cleared.Console> (enable)Disabling TACACS+ Authentication
If you disable TACACS+ authentication with both RADIUS and local authentication disabled, local authentication is reenabled automatically.
To disable TACACS+ authentication, perform this task in privileged mode:
This example shows how to disable TACACS+ authentication for console and Telnet connections and how to verify the configuration:
Console> (enable) set authentication login tacacs disabletacacs login authentication set to disable for console and telnet session.Console> (enable) set authentication enable tacacs disabletacacs enable authentication set to disable for console and telnet session.Console> (enable) show authenticationLogin Authentication: Console Session Telnet Session--------------------- ---------------- ----------------tacacs disabled disabledradius disabled disabledlocal enabled(primary) enabled(primary)Enable Authentication: Console Session Telnet Session---------------------- ----------------- ----------------tacacs disabled disabledradius disabled disabledlocal enabled(primary) enabled(primary)Console> (enable)Configuring RADIUS Authentication
The following sections describe how to configure RADIUS authentication on the switch.
Specifying RADIUS Servers
To specify one or more RADIUS servers, perform this task in privileged mode:
This example shows how to specify a RADIUS server and verify the configuration:
Console> (enable) set radius server 172.20.52.3172.20.52.3 with auth-port 1812 added to radius server table as primary server.Console> (enable) show radiusLogin Authentication: Console Session Telnet Session--------------------- ---------------- ----------------tacacs disabled disabledradius disabled disabledlocal enabled(primary) enabled(primary)Enable Authentication: Console Session Telnet Session---------------------- ----------------- ----------------tacacs disabled disabledradius disabled disabledlocal enabled(primary) enabled(primary)Radius Deadtime: 0 minutesRadius Key:Radius Retransmit: 2Radius Timeout: 5 secondsRadius-Server Status Auth-port----------------------------- ------- ------------172.20.52.3 primary 1812Console> (enable)Enabling RADIUS Authentication
Note
You can enable RADIUS authentication for login and enable access to the switch. If desired, you can use the console and telnet keywords to specify that RADIUS authentication be used only on console or Telnet connections. If you are using both RADIUS and TACACS+, you can use the primary keyword to force the switch to try RADIUS authentication first.
To configure RADIUS authentication, perform this task in privileged mode:
Step 1
Enable RADIUS authentication for normal login mode.
set authentication login radius enable [all | console | http | telnet] [primary]
Step 2
Enable RADIUS authentication for enable mode.
set authentication enable radius enable [all | console | http | telnet] [primary]
Step 3
Create a user $enab15$ on the RADIUS server, and assign a password to that user.
See the Note on Table 28-3 for additional information.
Step 4
Verify the RADIUS configuration.
show authentication
Note
If your RADIUS server does not support the $enab15$ username, you can set the service-type attribute (attribute 6) to Administrative (value 6) for a RADUIS user to directly launch the user into enable mode without asking for a separate enable password.This example shows how to enable RADIUS authentication and verify the configuration:
Console> (enable) set authentication login radius enableradius login authentication set to enable for console and telnet session.Console> (enable) set authentication enable radius enableradius enable authentication set to enable for console and telnet session.Console> (enable) show authenticationLogin Authentication: Console Session Telnet Session--------------------- ---------------- ----------------tacacs disabled disabledradius enabled(primary) enabled(primary)local enabled enabledEnable Authentication: Console Session Telnet Session---------------------- ----------------- ----------------tacacs disabled disabledradius enabled(primary) enabled(primary)local enabled enabledConsole> (enable)Specifying the RADIUS Key
The RADIUS key is used to encrypt and authenticate all communication between the RADIUS client and server. You must configure the same key on the client and the RADIUS server.
The length of the key is limited to 65 characters. It can include any printable ASCII characters except tabs.
To specify the RADIUS key, perform this task in privileged mode:
Step 1
Configure the RADIUS key used to encrypt packets sent to the RADIUS server.
set radius key key
Step 2
Verify the RADIUS configuration.
show radius
This example shows how to specify the RADIUS key and verify the configuration (in normal mode, the RADIUS key value is hidden):
Console> (enable) set radius key Secret_RADIUS_keyRadius key set to Secret_RADIUS_keyConsole> (enable) show radiusLogin Authentication: Console Session Telnet Session--------------------- ---------------- ----------------tacacs disabled disabledradius enabled(primary) enabled(primary)local enabled enabledEnable Authentication: Console Session Telnet Session---------------------- ----------------- ----------------tacacs disabled disabledradius enabled(primary) enabled(primary)local enabled enabledRadius Deadtime: 0 minutesRadius Key: Secret_RADIUS_keyRadius Retransmit: 2Radius Timeout: 5 secondsRadius-Server Status Auth-port----------------------------- ------- ------------172.20.52.3 primary 1812Console> (enable)Setting the RADIUS Timeout Interval
You can specify the timeout interval between retransmissions to the RADIUS server. The default timeout is 5 seconds.
To specify the RADIUS timeout interval, perform this task in privileged mode:
Step 1
Configure the RADIUS timeout interval.
set radius timeout seconds
Step 2
Verify the RADIUS configuration.
show radius
This example shows how to specify the RADIUS timeout interval and verify the configuration:
Console> (enable) set radius timeout 10Radius timeout set to 10 seconds.Console> (enable) show radiusLogin Authentication: Console Session Telnet Session--------------------- ---------------- ----------------tacacs disabled disabledradius enabled(primary) enabled(primary)local enabled enabledEnable Authentication: Console Session Telnet Session---------------------- ----------------- ----------------tacacs disabled disabledradius enabled(primary) enabled(primary)local enabled enabledRadius Deadtime: 0 minutesRadius Key: Secret_RADIUS_keyRadius Retransmit: 2Radius Timeout: 10 secondsRadius-Server Status Auth-port----------------------------- ------- ------------172.20.52.3 primary 1812Console> (enable)Setting the RADIUS Retransmit Count
You can specify the number of times the switch will attempt to contact a RADIUS server before the next configured server is tried. By default, each RADIUS server will be tried two times.
To specify the RADIUS retransmit count, perform this task in privileged mode:
Step 1
Configure the RADIUS server retransmit count.
set radius retransmit count
Step 2
Verify the RADIUS configuration.
show radius
This example shows how to specify the RADIUS retransmit count as 4 and how to verify the configuration:
Console> (enable) set radius retransmit 4Radius retransmit count set to 4.Console> (enable) show radiusLogin Authentication: Console Session Telnet Session--------------------- ---------------- ----------------tacacs disabled disabledradius enabled(primary) enabled(primary)local enabled enabledEnable Authentication: Console Session Telnet Session---------------------- ----------------- ----------------tacacs disabled disabledradius enabled(primary) enabled(primary)local enabled enabledRadius Deadtime: 0 minutesRadius Key: Secret_RADIUS_keyRadius Retransmit: 4Radius Timeout: 10 secondsRadius-Server Status Auth-port----------------------------- ------- ------------172.20.52.3 primary 1812Console> (enable)Setting the RADIUS Dead Time
You can configure the switch so that when a RADIUS server does not respond to an authentication request, the switch marks that server as dead for the length of time specified in the set radius deadtime command. Any authentication requests received during the dead time interval (such as other users attempting to log in to the switch) are not sent to a RADIUS server marked dead. Configuring a dead time speeds up the authentication process, by eliminating timeouts and retransmissions to the dead RADIUS server.
If you configure only one RADIUS server, or if all of the configured servers are marked dead, the dead time is ignored because there are no alternate servers available.
To set the RADIUS dead time, perform this task in privileged mode:
Step 1
Configure the RADIUS server dead time interval.
set radius deadtime minutes
Step 2
Verify the RADIUS configuration.
show radius
This example shows how to set the RADIUS dead time interval and verify the configuration:
Console> (enable) set radius deadtime 5Radius deadtime set to 5 minute(s).Console> (enable) show radiusLogin Authentication: Console Session Telnet Session--------------------- ---------------- ----------------tacacs disabled disabledradius enabled(primary) enabled(primary)local enabled enabledEnable Authentication: Console Session Telnet Session---------------------- ----------------- ----------------tacacs disabled disabledradius enabled(primary) enabled(primary)local enabled enabledRadius Deadtime: 5 minutesRadius Key: Secret_RADIUS_keyRadius Retransmit: 4Radius Timeout: 10 secondsRadius-Server Status Auth-port----------------------------- ------- ------------172.20.52.3 primary 1812172.20.52.2 1812Console> (enable)Specifying Optional Attributes for RADIUS Servers
You can specify optional attributes in the RADIUS ACCESS_REQUEST packet. The set radius attribute command allows you to specify the transmission of certain optional attributes such as Framed-IP address, NAS-Port, Called-Station-Id, Calling-Station-Id and so on. You can set attribute transmission by either the attribute number or the attribute name. Transmission of the attributes is disabled by default.
Note
To specify optional attributes for the RADIUS server, perform this task in privileged mode:
This example shows how to specify and enable the framed-IP address attribute by number:
Console> (enable) set radius attribute 8 include-in-access-req enableTransmission of Framed-ip address in access-request packet is enabled.Console> (enable) show radiusRADIUS Deadtime: 0 minutesRADIUS Key: 123456RADIUS Retransmit: 2RADIUS Timeout: 5 secondsFramed-Ip Address Transmit: EnabledRADIUS-Server Status Auth-port Acct-port----------------------------- ------- ------------ ------------10.6.140.230 primary 1812 1813Console> (enable)This example shows how to specify and disable the framed-IP address attribute by name:
Console> (enable) set radius attribute framed-ip-address include-in-access-req disableTransmission of Framed-ip address in access-request packet is disabled.Console> (enable)Clearing RADIUS Servers
To clear one or more RADIUS servers, perform this task in privileged mode:
This example shows how to clear a single RADIUS server from the configuration:
Console> (enable) clear radius server 172.20.52.3172.20.52.3 cleared from radius server table.Console> (enable)This example shows how to clear all RADIUS servers from the configuration:
Console> (enable) clear radius server allAll radius servers cleared from radius server table.Console> (enable)Clearing the RADIUS Key
To clear the RADIUS key, perform this task in privileged mode:
Step 1
Clear the RADIUS key.
clear radius key
Step 2
Verify the RADIUS configuration.
show radius
This example shows how to clear the RADIUS key and verify the configuration:
Console> (enable) clear radius keyRadius key cleared.Console> (enable) show radiusLogin Authentication: Console Session Telnet Session--------------------- ---------------- ----------------tacacs disabled disabledradius disabled disabledlocal enabled(primary) enabled(primary)Enable Authentication: Console Session Telnet Session---------------------- ----------------- ----------------tacacs disabled disabledradius disabled disabledlocal enabled(primary) enabled(primary)Radius Deadtime: 0 minutesRadius Key:Radius Retransmit: 2Radius Timeout: 5 secondsRadius-Server Status Auth-port----------------------------- ------- ------------172.20.52.3 primary 1812Console> (enable)Disabling RADIUS Authentication
If you disable RADIUS authentication with both TACACS+ and local authentication disabled, local authentication is reenabled automatically.
To disable RADIUS authentication, perform this task in privileged mode:
This example shows how to disable RADIUS authentication:
Console> (enable) set authentication login radius disableradius login authentication set to disable for console and telnet session.Console> (enable) set authentication enable radius disableradius enable authentication set to disable for console and telnet session.Console> (enable) show authenticationLogin Authentication: Console Session Telnet Session--------------------- ---------------- ----------------tacacs disabled disabledradius disabled disabledlocal enabled(primary) enabled(primary)Enable Authentication: Console Session Telnet Session---------------------- ----------------- ----------------tacacs disabled disabledradius disabled disabledlocal enabled(primary) enabled(primary)Console> (enable)Configuring Kerberos Authentication
Before you can use Kerberos as an authentication method on the switch, you need to configure the Kerberos server. You will need to create a database for the KDC and add the switch to the database.
To configure the Kerberos server, follow these steps:
Step 1
/usr/local/sbin/kdb5_util create -r CISCO.EDU -sStep 2
ank host/Cat4012.cisco.edu@CISCO.EDUStep 3
ank user1@CISCO.EDUStep 4
ank user1/admin@CISCO.EDUStep 5
ktadd host/Cat4012.cisco.edu@CISCO.EDUStep 6
Step 7
/usr/local/sbin/krb4kdc/usr/local/sbin/kadmindThe following sections describe how to configure Kerberos authentication on the switch.
Enabling Kerberos
To enable Kerberos authentication, perform this task in privileged mode:
This example shows how to enable Kerberos as the login authentication method for Telnet and verify the configuration:
Console> (enable) set authentication login kerberos enable telnetkerberos login authentication set to enable for telnet session.Console> (enable) show authenticationLogin Authentication: Console Session Telnet Session--------------------- ---------------- ----------------tacacs disabled disabledradius disabled disabledkerberos disabled enabled(primary)local enabled(primary) enabledEnable Authentication:Console Session Telnet Session---------------------- ----------------- ----------------tacacs disabled disabledradius disabled disabledkerberos disabled enabled(primary)local enabled(primary) enabledConsole> (enable)This example shows how to enable Kerberos as the login authentication method for the console and verify the configuration:
Console> (enable) set authentication login kerberos enable consolekerberos login authentication set to enable for console session.Console> (enable) show authenticationLogin Authentication: Console Session Telnet Session--------------------- ---------------- ----------------tacacs disabled disabledradius disabled disabledkerberos enabled(primary) enabled(primary)local enabled enabledEnable Authentication:Console Session Telnet Session---------------------- ----------------- ----------------tacacs disabled disabledradius disabled disabledkerberos enabled(primary) enabled(primary)local enabled enabledConsole> (enable)Defining the Kerberos Local-Realm
The Kerberos realm is a domain consisting of users, hosts, and network services that are registered to a Kerberos server. To authenticate a user defined in the Kerberos database, the switch must know the hostname or IP address of the host running the KDC and the name of the Kerberos realm.
To configure the switch to authenticate to the KDC in a specified Kerberos realm, perform this task in privileged mode:
Note
This example shows how to define a local-realm and how to verify the configuration:
Console> (enable) set kerberos local-realm CISCO.COMKerberos local realm for this switch set to CISCO.COM.Console> (enable) show kerberosKerberos Local Realm:CISCO.COMKerberos server entries:Realm:CISCO.COM, Server:187.0.2.1, Port:750Kerberos Domain<->Realm entries:Domain:cisco.com, Realm:CISCO.COMKerberos Clients NOT MandatoryKerberos Credentials Forwarding EnabledKerberos Pre Authentication Method set to NoneKerberos config key:Kerberos SRVTAB EntriesSrvtab Entry 1:host/niners.cisco.com@CISCO.COM 0 932423923 1 1 8 01;;8>00>50;0=0=0Console> (enable)Specifying a Kerberos Server
You can specify to the switch which KDC to use in a specific Kerberos realm. Optionally, you can also specify the port number of the port the KDC is monitoring. The Kerberos server maintains information that you enter in a table with one entry for each Kerberos realm. The maximum number of entries in the table is 100.
To specify the Kerberos server, perform this task in privileged mode:
This example shows how to define which Kerberos server will serve as the KDC for the specified Kerberos realm and how to clear the entry:
Console> (enable) set kerberos server CISCO.COM 187.0.2.1 750Kerberos Realm-Server-Port entry set to:CISCO.COM - 187.0.2.1 - 750Console> (enable)Console> (enable) clear kerberos server CISCO.COM 187.0.2.1 750Kerberos Realm-Server-Port entry CISCO.COM-187.0.2.1-750 deletedConsole> (enable)Mapping a Kerberos Realm to a Host Name or DNS Domain
Optionally, you can map a host name or Domain Name Server (DNS) domain to a Kerberos realm.
To map a Kerberos realm to either a host name or DNS domain, perform this task in privileged mode:
This example shows how to map a Kerberos realm, called CISCO.COM, to a DNS domain and how to clear the entry:
Console> (enable) set kerberos realm CISCO CISCO.COMKerberos DnsDomain-Realm entry set to CISCO - CISCO.COMConsole> (enable)Console> (enable) clear kerberos realm CISCO CISCO.COMKerberos DnsDomain-Realm entry CISCO - CISCO.COM deletedConsole> (enable)Copying SRVTAB Files
To make it possible for remote users to authenticate to the switch using Kerberos credentials, the switch must share a key with the KDC. To allow this configuration, you must give the switch a copy of the file that is stored in the KDC and which contains the key. These files are called SRVTAB files on the switch and KEYTAB files on the servers.
The most secure method to copy SRVTAB files to the hosts in your Kerberos realm is to copy them onto physical media and then manually copy the files onto the system. To copy SRVTAB files to a switch that does not have a physical media drive, you must transfer them through the network by using the Trivial File Transfer Protocol (TFTP).
When you copy the SRVTAB file from the switch to the KDC, the switch parses the information in this file and stores it in the running configuration in the Kerberos SRVTAB entry format. If you enter the SRVTAB directly into the switch, create an entry for each Kerberos principal (service) on the switch. The entries are maintained in the SRVTAB table. The maximum size of the table is 20 entries.
To remotely copy SRVTAB files to the switch from the KDC, perform this task in privileged mode:
This example shows how to retrieve a SRVTAB file from the KDC, enter a SRVTAB directly into the switch, and verify the configuration:
Console> (enable) set kerberos srvtab remote 187.20.32.10 /users/jdoe/krb5/ninerskeytab
Console> (enable)
Console> (enable) set kerberos srvtab entry host/niners.cisco.com@CISCO.COM 0 932423923 1 1 8 03;;5>00>50;0=0=0Kerberos SRVTAB entry set toPrincipal:host/niners.cisco.com@CISCO.COMPrincipal Type:0Timestamp:932423923Key version number:1Key type:1Key length:8Encrypted key tab:03;;5>00>50;0=0=0Console> (enable) show kerberosKerberos Local Realm:CISCO.COMKerberos server entries:Realm:CISCO.COM, Server:187.0.2.1, Port:750Realm:CISCO.COM, Server:187.20.2.1, Port:750Kerberos Domain<->Realm entries:Domain:cisco.com, Realm:CISCO.COMKerberos Clients NOT MandatoryKerberos Credentials Forwarding EnabledKerberos Pre Authentication Method set to NoneKerberos config key:Kerberos SRVTAB EntriesSrvtab Entry 1:host/niners.cisco.com@CISCO.COM 0 932423923 1 1 8 03;;5>00>50;0=0=0Srvtab Entry 2:host/niners.cisco.edu@CISCO.EDU 0 933974942 1 1 8 00?58:127:223=:;9Console> (enable)Deleting an SRVTAB Entry
To delete the SRVTAB entry, perform this task in privileged mode:
Delete the SRVTAB entry for a particular Kerberos principal.
clear kerberos srvtab entry kerberos-principal principal-type
This example shows how to clear a SRVTAB entry:
Console> (enable) clear kerberos srvtab entry host/niners.cisco.com@CISCO.COM 0Console> (enable)Enabling Credentials Forwarding
A user authenticated to a Kerberized switch has a TGT and can use it to authenticate to a host on the network. However, if forwarding is not enabled and a user tries to list credentials after authenticating to a host, the output will show no Kerberos credentials present.
To enable credentials forwarding, configure the switch to forward user TGTs when they authenticate from the switch to Kerberized remote hosts on the network using Kerberized Telnet.
As an additional layer of security, you can configure the switch so that after users authenticate to it, these users can authenticate only to other services on the network with Kerberized clients. If you do not make Kerberos authentication mandatory and Kerberos authentication fails, the application attempts to authenticate users using the default method of authentication for that network service. For example, Telnet prompts for a password.
To configure clients to forward user credentials as they connect to other hosts in the Kerberos realm, perform this task in privileged mode:
This example shows how to configure clients to forward user credentials and verify the configuration:
Console> (enable) set kerberos credentials forwardKerberos credentials forwarding enabledConsole> (enable) show kerberosKerberos Local Realm:CISCO.COMKerberos server entries:Realm:CISCO.COM, Server:187.0.2.1, Port:750Realm:CISCO.COM, Server:187.20.2.1, Port:750Kerberos Domain<->Realm entries:Domain:cisco.com, Realm:CISCO.COMKerberos Clients NOT MandatoryKerberos Credentials Forwarding EnabledKerberos Pre Authentication Method set to NoneKerberos config key:Kerberos SRVTAB EntriesSrvtab Entry 1:host/aspen-niners.cisco.edu@CISCO.EDU 0 933974942 1 1 8 00?91:107:423=:;9Console> (enable)This example shows how to configure the switch so that Kerberos clients are mandatory for users to authenticate to other network services:
Console> (enable) set kerberos clients mandatoryKerberos clients set to mandatoryConsole> (enable)Disabling Credentials Forwarding
To clear the credentials forwarding configuration, perform this task in privileged mode:
This example shows how to clear the credentials forwarding configuration and verify the change:
Console> (enable) clear kerberos credentials forwardKerberos credentials forwarding disabledConsole> (enable) show kerberosKerberos Local Realm not configuredKerberos server entries:Kerberos Domain<->Realm entries:Kerberos Clients NOT MandatoryKerberos Credentials Forwarding DisabledKerberos Pre Authentication Method set to NoneKerberos config key:Kerberos SRVTAB EntriesConsole> (enable)To clear the Kerberos clients' mandatory configuration, perform this task in privileged mode:
This example shows how to clear the clients' mandatory configuration and verify the change:
Console> (enable) clear kerberos clients mandatoryKerberos clients mandatory clearedConsole> (enable) show kerberosKerberos Local Realm not configuredKerberos server entries:Kerberos Domain<->Realm entries:Kerberos Clients NOT MandatoryKerberos Credentials Forwarding DisabledKerberos Pre Authentication Method set to NoneKerberos config key:Kerberos SRVTAB EntriesConsole> (enable)Kerberos server entries:Kerberos Domain<->Realm entries:Kerberos Clients MandatoryKerberos Credentials Forwarding DisabledKerberos Pre Authentication Method set to Encrypted Unix Time StampKerberos config key:Kerberos SRVTAB EntriesConsole> (enable)Defining a Private DES Key
You can define a private DES key for the switch. You can use the private DES key to encrypt the secret key that the switch shares with the KDC so that when the show kerberos command is executed, the secret key is not displayed in clear text. The key length should be eight characters or less.
To define a DES key, perform this task in privileged mode:
This example shows how to define a DES key and verify the configuration:
Console> (enable) set key config-key abcdKerberos config key set to abcdConsole> (enable) show kerberosKerberos Local Realm:CISCO.COMKerberos server entries:Realm:CISCO.COM, Server:170.20.2.1, Port:750Realm:CISCO.COM, Server:172.20.2.1, Port:750Kerberos Domain<->Realm entries:Domain:cisco.com, Realm:CISCO.COMKerberos Clients MandatoryKerberos Credentials Forwarding DisabledKerberos Pre Authentication Method set to Encrypted Unix Time StampKerberos config key:abcdKerberos SRVTAB EntriesSrvtab Entry 1:host/aspen-niners.cisco.edu@CISCO.EDU 0 933974942 1 1 8 12151><88?=>>3>11Console> (enable)To clear the DES key, perform this task in privileged mode:
This example shows how to clear the DES key:
Console> (enable) clear key config-keyKerberos config key clearedConsole> (enable)Encrypting a Telnet Session
After a user authenticates to the switch using Kerberos and wants to Telnet to a different switch or host, the authentication method that the Telnet server uses determines if the new session is a Kerberized Telnet session. If the Telnet server uses Kerberos for authentication, you can have all the application data packets encrypted during the duration of the Telnet session. To encrypt the Telnet session, use the encrypt kerberos option in the telnet command.
To encrypt a Telnet session, perform this task in privileged mode:
This example shows how to configure a Telnet session for Kerberos authentication and encryption:
Console> (enable) telnet encrypt kerberos 172.20.52.5Monitoring and Maintaining Kerberos
You can use the following commands to display and clear Kerberos configurations from the switch:
•
•
•
To display Kerberos configuration information, perform this task in privileged mode:
This example shows how to display Kerberos configuration information:
Console> (enable) show kerberosKerberos Local Realm:CISCO.COMKerberos server entries:Realm:CISCO.COM, Server:187.0.2.1, Port:750Realm:CISCO.COM, Server:187.20.2.1, Port:750Kerberos Domain<->Realm entries:Domain:cisco.com, Realm:CISCO.COMKerberos Clients NOT MandatoryKerberos Credentials Forwarding EnabledKerberos Pre Authentication Method set to NoneKerberos config key:Kerberos SRVTAB EntriesSrvtab Entry 1:host/niners.cisco.com@CISCO.COM 0 932423923 1 1 8 03;;5>00>50;0=0=0Srvtab Entry 2:host/niners.cisco.edu@CISCO.EDU 0 933974942 1 1 8 00?58:127:223=:;9Console> (enable)To display Kerberos credentials information, perform this task in privileged mode:
This example shows how to display the Kerberos credentials:
Console> (enable) show kerberos credsNo Kerberos credentials.Console> (enable)To clear all Kerberos credentials, perform this task in privileged mode:
This example shows how to clear all credentials from the switch:
Console> (enable) clear kerberos credsConsole> (enable)Configuring 802.1x Authentication
The following sections describe how to configure 802.1x authentication on the switch:
•
•
•
•
•
•
•
Enabling 802.1x Globally
You must enable 802.1x authentication for the entire system before configuring it for individual ports. After you globally enable 802.1x authentication, you can configure individual ports for 802.1x authentication if they meet the specific requirements required by 802.1x. To enable 802.1x authentication for individual ports, see the "Enabling and Initializing 802.1x Authentication for Individual Ports" section.
To globally enable 802.1x authentication, perform this task in privileged mode:
This example shows how to globally enable 802.1x authentication:
Console> (enable) set dot1x system-auth-control enabledot1x system-auth-control enabled.Disabling 802.1x Globally
When 802.1x authentication is enabled for the entire system, you can disable it globally. When 802.1x authentication is disabled globally, it is no longer available at any port, even ports that were previously configured for it.
To globally disable 802.1x authentication, perform this task in privileged mode:
This example shows how to globally disable 802.1x authentication:
Console> (enable) set dot1x system-auth-control disabledot1x system-auth-control disabled.Enabling and Initializing 802.1x Authentication for Individual Ports
After 802.1x authentication is globally enabled, you can enable and initialize 802.1x authentication from only the console for individual ports. To globally enable 802.1x authentication, see the "Enabling 802.1x Globally" section.
Note
To enable and initialize 802.1x authentication for access to the switch, perform this task in privileged mode:
This example shows how to enable 802.1x authentication on port 1 in module 4, initialize 802.1x authentication on the same port, and verify the configuration:
Console> (enable) set port dot1x 4/1 port-control autoPort 4/1 dot1x port-control is set to auto.Trunking disabled for port 4/1 due to Dot1x feature.Spantree port fast start option enabled for port 4/1.Console> (enable) set port dot1x 4/1 initializePort 4/1 initializing...Port 4/1 dot1x initialization complete.Console> show port dot1x 4/1Port Auth-State BEnd-State Port-Control Port-Status----- ------------------- ---------- ------------------- -------------4/1 connecting finished auto unauthorizedPort Multiple-Host Re-authentication----- ------------- -----------------4/1 disabled disabledSetting and Enabling Automatic Reauthentication of the Supplicant
You can specify how often 802.1x authentication reauthenticates the supplicant if you do so prior to enabling automatic 802.1x supplicant reauthentication. If you do not specify a time period prior to enabling supplicant reauthentication, 802.1x defaults to 3600 seconds (valid values are from 1 to 65,535 seconds).
Automatic 802.1x supplicant reauthentication can be enabled for supplicants connected to a specific port. To manually reauthenticate the supplicant connected to a specific port, see the "Manually Reauthenticating the Supplicant" section.
To set how often 802.1x authentication reauthenticates the supplicant and enable automatic 802.1x reauthentication, perform this task in privileged mode:
This example shows how to set automatic reauthentication to 7200 seconds, enable 802.1x reauthentication, and verify the configuration:
Console> (enable) set dot1x re-authperiod 7200dot1x re-authperiod set to 7200 secondsConsole> (enable) set port dot1x 4/1 re-authentication enablePort 4/1 re-authentication enabled.Console> (enable) show port dot1x 4/1Port Auth-State BEnd-State Port-Control Port-Status----- ------------------- ---------- ------------------- -------------4/1 connecting finished auto unauthorizedPort Multiple Host Re-authentication----- ------------- -----------------4/1 disabled enabledManually Reauthenticating the Supplicant
You can manually reauthenticate the supplicant connected to a specific port at any time. When you want to configure automatic 802.1x supplicant reauthentication, see the "Setting and Enabling Automatic Reauthentication of the Supplicant" section.
To manually reauthenticate a supplicant connected to a specific port, perform this task in privileged mode:
Manually authenticate the supplicant connected to a specific port.
set port dot1x mod/port re-authenticate
This example shows how to manually reauthenticate the supplicant connected to port 1 on module 4:
Console> (enable) set port dot1x 4/1 re-authenticatePort 4/1 re-authenticating...dot1x re-authentication successful...dot1x port 4/1 authorized.Enabling Multiple Hosts
You can enable a specific port to allow multiple-user access. When a port is enabled for multiple users, and a supplicant connected to that port is authorized successfully, any host (with any MAC address) is allowed to send and receive traffic on that port. If you then connect multiple supplicants to that port through a hub, you can reduce the security level on that port.
To enable multiple-user access on a specific port, perform this task in privileged mode:
This example shows how to enable access for multiple hosts on port 1 on module 4:
Console> (enable) set port dot1x 4/1 multiple-host enablePort 4/1 multiple hosts allowed.Disabling Multiple Hosts
You can disable multiple-user access on any port where it is enabled.
To disable multiple-user access on a specific port, perform this task in privileged mode:
Disable multiple hosts on a specific port.
set port dot1x mod/port multiple-host disable
This example shows how to disable access for multiple hosts on port 1 on module 4:
Console> (enable) set port dot1x 4/1 multiple-host disablePort 4/1 multiple hosts not allowed.Setting the Quiet Period
When the authenticator cannot authenticate the supplicant, it remains idle for set a period of time and then tries again. The idle time is determined by the quiet-period value. (The default is 60 seconds.) You may set the value from 0 to 65,535 seconds.
To set the value for the quiet period, perform this task in privileged mode:
This example shows how to set the quiet period to 45 seconds:
Console> (enable) set dot1x quiet-period 45dot1x quiet-period set to 45 seconds.Setting the Authenticator-to-Supplicant Retransmission Time for EAP-Request/Identity Frames
The supplicant notifies the authenticator that it received the EAP-request/identity frame. When the authenticator does not receive this notification, the authenticator waits a set period of time and then retransmits the frame. You may set the amount of time that the authenticator waits for notification from 1 to 65,535 seconds. The default is 30 seconds.
To set the authenticator-to-supplicant retransmission time for the EAP-request/identity frames, perform this task in privileged mode:
Set the authenticator-to-supplicant retransmission time for EAP-request/identity frames.
set dot1x tx-period seconds
This example shows how to set the authenticator-to-supplicant retransmission time for the EAP-request/identity frame to 15 seconds:
Console> (enable) set dot1x tx-period 15dot1x tx-period set to 15 seconds.Setting the Back-End Authenticator-to-Supplicant Retransmission Time for EAP-Request Frames
The supplicant notifies the back-end authenticator that it received the EAP-request frame. When the back-end authenticator does not receive this notification, the back-end authenticator waits a set period of time, and then retransmits the frame. You may set the amount of time that the back-end authenticator waits for notification from 1 to 65,535 seconds. The default is 30 seconds.
To set the back-end authenticator-to-supplicant retransmission time for the EAP-request frames, perform this task in privileged mode:
Set the back-end authenticator-to-supplicant retransmission time for EAP-request frame.
set dot1x supp-timeout seconds
This example shows how to set the back-end authenticator-to-supplicant retransmission time for the EAP-request frame to 15 seconds:
Console> (enable) set dot1x supp-timeout 15dot1x supp-timeout set to 15 seconds.Setting the Back-End Authenticator-to-Authentication-Server Retransmission Time for Transport Layer Packets
The authentication server notifies the back-end authenticator each time it receives a transport layer packet. When the back-end authenticator does not receive a notification after sending a packet, the back-end authenticator waits a set period of time, and then retransmits the packet. You may set the amount of time that the back-end authenticator waits for notification from 1 to 65,535 seconds. The default is 30 seconds.
To set the value for the retransmission of transport layer packets from the back-end authenticator to the authentication server, perform this task in privileged mode:
Set the back-end authenticator-to-authentication-server retransmission time for transport layer packets.
set dot1x server-timeout seconds
This example shows how to set the value for the retransmission time for transport layer packets sent from the back-end authenticator to the authentication server to 15 seconds:
Console> (enable) set dot1x server-timeout 15dot1x server-timeout set to 15 seconds.Setting the Back-End Authenticator-to-Supplicant Frame-Retransmission Number
The authentication server notifies the back-end authenticator each time it receives a specific number of frames. When the back-end authenticator does not receive this notification after sending the frames, the back-end authenticator waits a set period of time and then retransmits the frames. You may set the number of frames that the back-end authenticator retransmits from 1 to 10 (the default is 2).
To set the number of frames retransmitted from the back-end authenticator to the supplicant, perform this task in privileged mode:
Set the back-end authenticator-to-supplicant frame retransmission number.
set dot1x max-req count
This example shows how to set the number of retransmitted frames sent from the back-end authenticator to the supplicant to 4:
Console> (enable) set dot1x max-req 4dot1x max-req set to 4.Resetting the 802.1x Configuration Parameters to the Default Values
You can reset the 802.1x configuration parameters to the default values with a single command, which also globally disables 802.1x.
To reset the 802.1x configuration parameters to the default values, perform this task in privileged mode:
Step 1
Reset the 802.1x configuration parameters to the default values and globally disable 802.1x.
clear dot1x config
Step 2
Verify the 802.1x configuration.
show dot1x
This example shows how to reset the 802.1x configuration parameters to the default values:
Console> (enable) clear dot1x configThis command will disable dot1x on all ports and take dot1x parameter values back to factory defaults.Do you want to continue (y/n) [n]?yDot1x config cleared.Console> (enable) 2002 Sep 06 11:34:27 %SECURITY-1-DOT1X_BACKEND_SERVER:No Radius servers configuredSetting the Trace Severity
You can alter the trace severity for 802.1x authentication with this command. The number setting affects the number of trace messages displayed. Low numbers result in fewer messages; high numbers result in more messages.
To set the trace severity for 802.1x, perform this task in privileged mode:
This example shows how to set the trace severity for 802.1x authentication to 5:
Console> (enable) set trace dot1x 5DOT1X tracing set to 5Warning!! Turning on trace may affect the operation of the system.Use with caution.Using the show Commands
You can use these show commands to access information about 802.1x authentication and its configuration:
•
•
•
•
To display the usage options for the show port dot1x command, perform this task in normal mode:
This example shows how to display the usage options for the show port dot1x command:
Console> (enable) show port dot1x helpUsage: show port dot1x [<mod[/port]>]show port dot1x statistics [<mod[/port]>]To display the values for all the parameters associated with the authenticator PAE and back-end authenticator on a specific port on a specific module, perform this task in normal mode:
This example shows how to display the values for all the parameters associated with the authenticator PAE and back-end authenticator on port 1 on module 4:
Console> (enable) show port dot1x 4/1Port Auth-State BEnd-State Port-Control Port-Status----- ------------------- ---------- ------------------- -------------4/1 connecting finished auto unauthorizedPort Multiple Host Re-authentication----- ------------- -----------------4/1 disabled enabledTo display the statistics for the different types of EAP frames transmitted and received by the authenticator on a specific port on a specific module, perform this task in normal mode:
Display the statistics for the different types of EAP frames transmitted and received by the authenticator on a specific port on a specific module.
show port dot1x statistics mod/port
This example shows how to display the statistics for the different types of EAP frames transmitted and received by the authenticator on port 1 on module 4:
Console> (enable) show port dot1x statistics 4/1Port Tx_Req/Id Tx_Req Tx_Total Rx_Start Rx_Logoff Rx_Resp/Id Rx_Resp----- --------- ------ -------- -------- --------- ---------- -------4/1 97 0 97 0 0 0 0Port Rx_Invalid Rx_Len_Err Rx_Total Last_Rx_Frm_Ver Last_Rx_Frm_Src_Mac----- ---------- ---------- -------- --------------- -------------------4/1 0 0 0 0 00-00-00-00-00-00To display the global 802.1x parameters, perform this task in normal mode:
Display the PAE capabilities, protocol version, system-auth-control, and other global dot1x parameters.
show dot1x
This example shows how to display the global 802.1x parameters:
Console> (enable) show dot1xPAE Capability Authenticator OnlyProtocol Version 1system-auth-control enabledre-authentication disabledmax-req 2quiet-period 60 secondsre-authperiod 3600 secondsserver-timeout 30 secondssupp-timeout 30 secondstx-period 30 secondsAuthentication Example
Figure 28-3 shows a simple network topology using TACACS+. In this example, TACACS+ authentication is enabled and local authentication is disabled for both login and enable access to the switch for all Telnet connections. When Workstation A attempts to connect to the switch, the user is challenged for a TACACS+ username and password.
However, only local authentication is enabled for both login and enable access on the console port. Any user with access to the directly connected terminal can access the switch using the login and enable passwords.
Figure 28-3 Example of a TACACS+ Network Topology
This example shows how to configure the switch so that TACACS+ authentication is enabled for Telnet connections and local authentication is enabled for console connections. In addition, a TACACS+ encryption key is specified.
Console> (enable) show tacacsTacacs key:Tacacs login attempts: 3Tacacs timeout: 5 secondsTacacs direct request: disabledTacacs-Server Status---------------------------------------- -------Console> (enable) set tacacs server 172.20.52.10172.20.52.10 added to TACACS server table as primary server.Console> (enable) set tacacs key tintin_et_milouThe tacacs key has been set to tintin_et_milou.Console> (enable) set authentication login tacacs enable telnettacacs login authentication set to enable for telnet session.Console> (enable) set authentication enable tacacs enable telnettacacs enable authentication set to enable for telnet session.Console> (enable) set authentication login local disable telnetlocal login authentication set to disable for telnet session.Console> (enable) set authentication enable local disable telnetlocal enable authentication set to disable for telnet session.Console> (enable) show tacacsTacacs key: tintin_et_milouTacacs login attempts: 3Tacacs timeout: 5 secondsTacacs direct request: disabledTacacs-Server Status---------------------------------------- -------172.20.52.10 primaryConsole> (enable)Understanding How Authorization Works
Your switch supports TACACS+ and RADIUS authorization to control access to the switch. Authorization limits access to specified users using a dynamically applied access list (or user profile) based on the username and password pair. The access list resides on the host running the TACACS+ or RADIUS server. The server responds to the user password information and applies the access list.
The following sections describe how authorization works.
Authorization Events
You can enable TACACS+ authorization for the following:
•
•
•
TACACS+ Primary and Fallback Options
You can specify the primary and fallback options used in the authorization process. The following primary options and fallback options are available:
•
•
•
•
TACACS+ Command Authorization
You can require authorization for all commands or for configuration (enable mode) commands only. Configuration commands include the following:
•
•
•
•
•
•
•
•
•
•
•
•
•
•
The following TACACS+ authorization process occurs for every command that you enter:
•
•
•
RADIUS Authorization
RADIUS has limited authorization. The Service-Type attribute in the authentication protocol provides authorization information. This attribute is part of the user-profile.
When you login using RADIUS authentication and you do not have Administrative/Shell (6) Service-Type access, the NAS authenticates you and logs you in to exec mode if authentication succeeds. If you have Administrative/Shell (6) Service-Type access, the NAS authenticates you and logs you in to privileged mode if authentication succeeds.
Configuring Authorization
The following sections describe how to configure authorization.
Authorization Default Configuration
Table 28-4 shows the default authorization configuration.
TACACS+ Authorization Configuration Guidelines
Keep the following guidelines in mind when you configure authorization on the switch:
•
•
•
•
•
Configuring TACACS+ Authorization
The next two sections describe how to configure TACACS+ authorization on the switch.
Enabling TACACS+ Authorization
To enable TACACS+ authorization on the switch, perform this task in privileged mode:
This example shows how to enable TACACS+ exec mode authorization for both console and Telnet connections. Authorization is configured with the tacacs+ option. The fallback option is deny:
Console> (enable) set authorization exec enable tacacs+ deny bothSuccessfully enabled enable authorization.Console>This example shows how to enable TACACS+ enable mode authorization for console and Telnet connections. Authorization is configured with the tacacs+ option. The fallback option is deny:
Console> (enable) set authorization enable enable tacacs+ deny bothSuccessfully enabled enable authorization.Console>This example shows how to enable TACACS+ command authorization for both console and Telnet connections. Authorization is configured with the tacacs+ option. The fallback option is deny:
Console> (enable) set authorization commands enable config tacacs+ deny bothSuccessfully enabled commands authorization.Console> (enable)This example shows how to verify the configuration:
Console> (enable) show authorizationTelnet:-------Primary Fallback------- --------exec: tacacs+ denyenable: tacacs+ denycommands:config: tacacs+ denyall: - -Console:--------Primary Fallback------- --------exec: tacacs+ denyenable: tacacs+ denycommands:config: tacacs+ denyall: - -Console> (enable)Disabling TACACS+ Authorization
To disable TACACS+ authorization on the switch, perform this task in privileged mode:
This example shows how to disable TACACS+ exec mode authorization for both console and Telnet connections and how to verify the configuration:
Console> (enable) set authorization exec disable bothSuccessfully disabled enable authorization.Console> (enable)This example shows how to disable TACACS+ enable mode authorization for both console and Telnet connections and how to verify the configuration:
Console> (enable) set authorization enable disable bothSuccessfully disabled enable authorization.Console> (enable)This example shows how to disable TACACS+ command authorization for both console and Telnet connections and how to verify the configuration:
Console> (enable) set authorization commands disable bothSuccessfully disabled commands authorization.Console> (enable)This example shows how to verify the configuration:
Console> (enable) show authorizationTelnet:-------Primary Fallback------- --------exec: tacacs+ denyenable: tacacs+ denycommands:config: tacacs+ denyall: tacacs+ denyConsole:--------Primary Fallback------- --------exec: tacacs+ denyenable: tacacs+ denycommands:config: tacacs+ denyall: tacacs+ denyConsole> (enable)Authorization Example
Figure 28-4 shows a simple example of network topology that uses TACACS+.
In this example, TACACS+ authorization is enabled for enable mode access to the switch for both Telnet and console connections, authorizing configuration commands. When Workstation A initiates a command on the switch, the switch registers a request with the TACACS+ daemon. The TACACS+ daemon determines if the user is authorized to use the feature and sends a response either executing the command or denying access.
Figure 28-4 Example of a TACACS+ Network Topology
This example show that TACACS+ authorization is enabled for enable mode access to the switch for both Telnet and console connections, authorizing configuration commands:
Console> (enable) set authorization enable enable tacacs+ deny bothSuccessfully enabled enable authorization.Console> (enable) set authorization commands enable config tacacs+ deny bothSuccessfully enabled commands authorization.Console> (enable) show authorizationTelnet:-------Primary Fallback------- --------exec: tacacs+ denyenable: tacacs+ denycommands:config: tacacs+ denyall: - -Console:--------Primary Fallback------- --------exec: tacacs+ denyenable: tacacs+ denycommands:config: tacacs+ denyall: - -Console> (enable)Understanding How Accounting Works
The following sections describe how accounting works.
Accounting Overview
You can configure these accounting methods to monitor access to the switch:
•
•
Accounting allows you to track user activity to a specified host, suspicious connection attempts in the network, and unauthorized changes to the NAS configuration. The accounting information is sent to the accounting server where it is saved in the form of a record. Accounting information typically consists of the user's action and the duration for which the action lasted. You can use the accounting feature for security, billing, and resource allocation purposes.
The accounting protocol operates in a client-server model, using TCP for transport. The NAS acts as the client and the accounting server as the daemon. The NAS sends accounting information to the server. After successfully processing the information, the server sends a response to the NAS, acknowledging the request. All transactions between the NAS and server are authenticated using a key.
After accounting has been enabled and an accountable event occurs on the system, the accounting information is gathered dynamically in memory. When the event ends, an accounting record is created and sent to the NAS; the system then deletes the record from memory. The amount of memory used by the NAS for accounting varies depending on the number of concurrent accountable events.
Accounting Events
You can configure accounting for the following types of events:
•
•
Note
•
•
Specifying When to Create Accounting Records
You can configure the switch to gather accounting information and create records. When Accounting is configured (using the set accounting command), the switch can generate two types of records:
•
•
Accounting records are created and sent to the server at two events:
•
•
Note
Specifying RADIUS Servers
To specify one or more RADIUS servers, perform this task in privileged mode:
This example shows how to specify a RADIUS server and verify the configuration:
Console> (enable) set radius server 172.20.52.3172.20.52.3 with auth-port 1812 added to radius server table as primary server.Console> (enable) show radiusLogin Authentication: Console Session Telnet Session--------------------- ---------------- ----------------tacacs disabled disabledradius disabled disabledlocal enabled(primary) enabled(primary)Enable Authentication: Console Session Telnet Session---------------------- ----------------- ----------------tacacs disabled disabledradius disabled disabledlocal enabled(primary) enabled(primary)Radius Deadtime: 0 minutesRadius Key:Radius Retransmit: 2Radius Timeout: 5 secondsRadius-Server Status Auth-port----------------------------- ------- ------------172.20.52.3 primary 1812Console> (enable)Updating the Server
You can configure the switch to send accounting information to the TACACS+ server. There are two options:
•
•
Suppressing Accounting
You can configure the system to suppress accounting when an unknown user with no username accesses the switch by using the set accounting suppress null-username enable command.
Note
Configuring Accounting
The following sections describe how to configure accounting for both TACACS+ and RADIUS.
Accounting Default Configuration
Table 28-5 shows the default accounting configuration.
Table 28-5 Accounting Default Configuration
Accounting
Disabled
Accounting events (EXEC, system, commands, and connect)
Disabled
Accounting records
Stop-only
Accounting Configuration Guidelines
This section lists guidelines for configuring accounting on the switch:
•
•
Note
Configuring Accounting
The next two sections describe how to configure RADIUS and TACACS+ accounting on the switch.
Enabling Accounting
To enable accounting on the switch, perform this task in privileged mode:
This example shows how to enable stop-only TACACS+ accounting events:
Console> (enable) set accounting connect enable stop-only tacacs+Accounting set to enable for connect events in stop-only mode.Console> (enable)Console> (enable) set accounting exec enable stop-only tacacs+Accounting set to enable for exec events in stop-only mode.Console> (enable)Console> (enable) set accounting system enable stop-only tacacs+Accounting set to enable for system events in stop-only mode.Console> (enable)Console> (enable) set accounting commands enable all stop-only tacacs+Accounting set to enable for commands-all events in stop-only mode.Console> (enable)This example shows how to suppress accounting of unknown users:
Console> (enable) set accounting suppress null-username enableAccounting will be suppressed for user with no username.Console> (enable)This example shows how to periodically update the server:
Console> (enable) set accounting update periodic 120Accounting updates will be periodic at 120 minute intervals.Console> (enable)This example shows how to verify the configuration:
Console> (enable) show accountingEvent Method Mode----- ------- ----exec: tacacs+ stop-onlyconnect: tacacs+ stop-onlysystem: tacacs+ stop-onlycommands:config: - -all: tacacs+ stop-onlyTACACS+ Suppress for no username: enabledUpdate Frequency: periodic, Interval = 120Accounting information:-----------------------Active Accounted actions on tty0, User (null) Priv 0Active Accounted actions on tty288091924, User (null) Priv 0Overall Accounting Traffic:Starts Stops Active----- ----- ------Exec 0 0 0Connect 0 0 0Command 0 0 0System 1 0 0Console> (enable)Disabling Accounting
To disable accounting on the switch, perform this task in privileged mode:
This example shows how to disable stop-only accounting:
Console> (enable) set accounting connect disableAccounting set to disable for connect events.Console> (enable)Console> (enable) set accounting exec disableAccounting set to disable for exec events.Console> (enable)Console> (enable) set accounting system disableAccounting set to disable for system events.Console> (enable)Console> (enable) set accounting commands disableAccounting set to disable for commands-all events.Console> (enable)This example shows how to disable suppression of unknown users:
Console> (enable) set accounting suppress null-username disableAccounting will be not be suppressed for user with no username.Console> (enable)This example shows how to verify the configuration:
Console> (enable) show accountingEvent Method Mode----- ------- ----exec: - -connect: - -system: - -commands:config: - -all: - -TACACS+ Suppress for no username: disabledUpdate Frequency: new-infoAccounting information:-----------------------Active Accounted actions on tty0, User (null) Priv 0Active Accounted actions on tty288091924, User (null) Priv 0Overall Accounting Traffic:Starts Stops Active----- ----- ------Exec 0 0 0Connect 0 0 0Command 0 0 0System 1 2 0Console> (enable)Accounting Example
Figure 28-5 shows a simple network topology using TACACS+. When Workstation A initiates an accountable event on the switch, the switch gathers event information and forwards the information to the server at the conclusion of the event. Accounting information is gathered at the conclusion of the event. Accounting is suspended for unknown users and the system is updated periodically every 120 minutes.
Figure 28-5 Example of a TACACS+ Network Topology
This example shows that TACACS+ accounting is enabled for connection, EXEC, system, and all command accounting:
Console> (enable) set accounting connect enable stop-only tacacs+Accounting set to enable for connect events in stop-only mode.Console> (enable) set accounting exec enable stop-only tacacs+Accounting set to enable for exec events in stop-only mode.Console> (enable) set accounting commands enable all stop-only tacacs+Accounting set to enable for commands-all events in stop-only mode.Console> (enable) set accounting update periodic 120Accounting updates will be periodic at 120 minute intervals.Console> (enable) show accountingEvent Method Mode----- ------- ----exec: tacacs+ stop-onlyconnect: tacacs+ stop-onlysystem: tacacs+ stop-onlycommands:config: - -all: tacacs+ stop-onlyTACACS+ Suppress for no username: enabledUpdate Frequency: periodic, Interval = 120Accounting information:-----------------------Active Accounted actions on tty0, User (null) Priv 0Active Accounted actions on tty288091924, User (null) Priv 0Overall Accounting Traffic:Starts Stops Active----- ----- ------Exec 0 0 0Connect 0 0 0Command 0 0 0System 1 0 0Console> (enable)