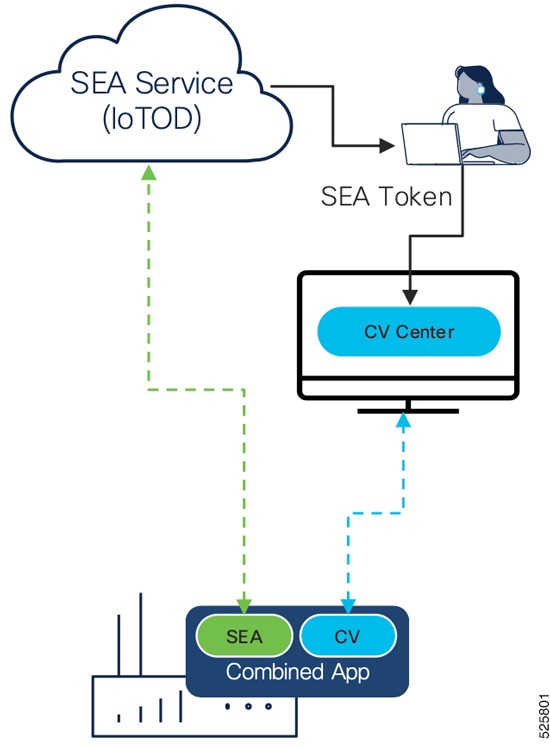
Integrate with Cisco Cyber Vision

ISE - pxGrid

From Platform Exchange Grid page, you can configure ISE pxGrid Cisco Cyber Vision integration.

Cisco Platform Exchange Grid (pxGrid) is an open, scalable data-sharing and threat control platform that allows seamless integration between multivendor identity, network, security and asset management systems.

To access the Platform Exchange Grid page, choose Admin > Integrations > ISE - pxGrid from the main menu.

For more information about how to perform this integration, refer to the manual Integrating Cisco Cyber Vision with Cisco Identity Services Engine (ISE).

ISE-API

Security Group Tags (SGTs) are 16-bit labels assigned to devices or groups of devices to define their roles and associated security policies within a network.

Using Cisco Cyber Vision, you can map static subnets, network-based groups, or user-defined groups directly to SGTs. A secure, active Cisco Identity Services Engine (ISE) API connection enables the automatic synchronization of these mappings from Cisco Cyber Vision to Cisco ISE. This integration allows you to effectively enforce TrustSec policies across your network.

To create IP-to-SGT mappings based on group definitions, choose Admin > Integrations > ISE – API from the main menu.

For further details on IP-to-SGT mapping, refer to the manual Integrate Cisco Cyber Vision with Cisco Identity Services Engine (ISE).

XDR

Cisco Cyber Vision can be integrated with XDR, a cloud-native, built-in platform that connects the Cisco Secure portfolio with your infrastructure. This integration allows you to significantly reduce dwell time and human-powered tasks.


Note


SecureX reached its end of life on July 31, 2024.


Cisco XDR is an online platform that centralizes security events from various Cisco software equipments through an API. For instance, events such as those from Cisco Cyber Vision or firewall activities can be transmitted to Cisco XDR and correlated, then presented across diverse dashboards.

XDR integration enables three features in Cisco Cyber Vision:

  • Without XDR SSO login, the Investigate in XDR Threat Response button will appear on components' technical sheets.

  • With XDR SSO login, the Report to XDR button will appear on certain events of the event calendar page. This button is utilized to push the events to XDR.

  • With XDR SSO login, an XDR ribbon featuring several functionalities can be activated within Cisco Cyber Vision.

This section details the configuration of XDR in Cisco Cyber Vision and different authorized features.

XDR Configuration

Before you begin

The Cisco XDR configuration in Cisco Cyber Vision requests:

  • An Admin access to Cisco Cyber Vision Center.

  • A Cisco Cyber Vision Center with internet access.

  • A XDR account with an admin role.

Procedure


Step 1

From the main menu, choose Admin > Integrations > XDR.

Step 2

Click the dropdown arrow of the Region field.

Step 3

Select the region from dropdown list.

Step 4

Click Enable XDR to enable the link.

Once you enable the link, the button turns red to indicate Disable XDR.

By completing the steps above, you are now able to use the button Investigate in XDR Threat Response that will appear in the components' technical sheet. To install and use the XDR ribbon and the Report to XDR button, complete the steps herebelow.

Step 5

Click the user menu located in the top right corner of the GUI.

Step 6

Click My Settings.

A new XDR menu appears on the right of the My settings page.

Step 7

Click the Log in button.

A Grant Application Access popup appears with an authentication code.

Step 8

Click Verify and Authorize.

The browser opens a new page with the Security Cloud Sign On window to grant Cisco Cyber Vision access to XDR.

Step 9

Enter Email and click Continue.

Step 10

Click Authorize Cyber Vision.

A Client Access Granted popup appears.

Step 11

In Cisco Cyber Vision Center > My Settings, the XDR menu indicates that Cisco Cyber Vision is connected to XDR.

Step 12

Use the Ribbon status toggle button to enable the XDR ribbon.

Once you enable the Ribbon status toggle button, message appears.

Step 13

To log out, click Logout of XDR.

Step 14

Click Save settings.


XDR Ribbon

Once configured and activated, the XDR ribbon will appear at the bottom of the Cisco Cyber Vision GUI of the Explore menu.

The XDR ribbon in the Device List view:

The Cisco XDR Getting Started Guide explains how to use the XDR ribbon.

For example, to find observables and investigate them in XDR Threat Response, click the Find Observables icon like below:

XDR Event Integration

Once XDR has been configured in Cisco Cyber Vision, a Report to XDR button appears on some events of the event calendar page. Using this button will push the event to XDR and create an incident.

The XDR button appears on three categories of event:

  • Anomaly Detection

  • Control Systems Events

  • Signature Based Detection

The Report to XDR button on a Control Systems Events:

XDR Component Button

Once XDR has been configured in Cisco Cyber Vision, the button Investigate in Cisco Threat Response appears on the components' technical sheet. The component's IP and MAC addresses will be investigated in XDR Threat Response if you use this button.

External Resources for XDR Integration

Herebelow is the list of all URLs called by the Cisco Cyber Vision Center in case you need to authorize them, for example in a firewall.

Center:

North America

  • Cisco XDR Platform: https://visibility.amp.cisco.com/iroh/

  • Cisco XDR Private Intelligence: https://private.intel.amp.cisco.com/ctia/

  • Cisco XDR Automation: https://automate.us.security.cisco.com/api/

Europe

  • Cisco XDR Platform: https://visibility.eu.amp.cisco.com/iroh/

  • Cisco XDR Private Intelligence: https://private.intel.eu.amp.cisco.com/ctia/

  • Cisco XDR Automation: https://automate.eu.security.cisco.com/api/

Asia Pacific, Japan, and China

  • Cisco XDR Platform: https://visibility.apjc.amp.cisco.com/iroh/

  • Cisco XDR Private Intelligence: https://private.intel.apjc.amp.cisco.com/ctia/

  • Cisco XDR Automation: https://automate.apjc.security.cisco.com/api/

Web client:

  • conure.apjc.security.cisco.com

  • conure.us.security.cisco.com

  • conure.eu.security.cisco.com

Secure Equipment Access

A secure equipment access solution is a Cisco offering that

  • provides secure remote access for operations teams to manage and troubleshoot operational technology assets,

  • eliminates the need for costly on-site service visits,

  • enables Zero Trust Network Access gateway functionality.

For more details, see the SEA documentation on Cisco DevNet.

Integration with Cyber Vision

You can integrate SEA with Cyber Vision for unified management in the Cyber Vision Center. The integration requires the SEA agent (an IOx application) to run on your network device. You install the SEA agent and the Cyber Vision sensor app with the same workflow. One IOx application packages both runtimes.

Figure 1. Integrate Cyber Vision with SEA
CV integration with SEA

Feature history table

Feature

Release Information

Feature Description

Enable Cyber Vision Center as an SEA Gateway

Release 5.5.x

The Secure Equipment Access agent can run directly on the Cyber Vision Center. This setup eliminates the need to host the agent within an IOx application. When you enable the Center as an SEA gateway, you provide secure, remote access to the Center and its network resources through the IoT Operations Dashboard. You do not need direct inbound access.

Integrate Cisco Cyber Vision Center with SEA

The purpose of this integration is to enable seamless and unified management of both Secure Equipment Access (SEA) and Cisco Cyber Vision through the CV Center. This combined approach simplifies deployment and ongoing management of both components on the same device, while ensuring separation of their operations.

Before you begin

Ensure the following:

  • Administrative access to Cisco Cyber Vision Center

  • Tenant admin access to the SEA organization where you intend to connect with CV.

Procedure


Step 1

Log in to Cisco Cyber Vision Center, and from the main menu, choose Admin > Integrations > SEA.

Step 2

On the SEA page, in the Configuration section, select a region from the drop-down list and click Connect.

Step 3

Log in to the IoT Operations Dashboard with your IoT OD credentials.

Step 4

On the IoT Operations Dashboard, click Connect.

Step 5

On the SEA page, verify your details listed in the Configuration section.

Step 6

Click Enable SEA.

Step 7

(Optional) To validate the configuration, click Validate configuration.


A success message appears on the SEA page, indicating that SEA is configured.

What to do next

Install the compatible sensors. For more information, see the "Install sensors with the sensor management extension" topic in the Cisco Cyber Vision Sensor Application for Cisco Switches Installation Guide.

Enable Cyber Vision Center as an SEA Gateway

Configure your Cyber Vision Center as a Secure Equipment Access (SEA) gateway.

Enabling Cyber Vision Center as an SEA gateway removes the need for an external IOx application. This setup offers secure remote support and allows centralized asset management through the IoT Operations Dashboard.

Before you begin

Ensure your Cyber Vision Center is connected to SEA.

Procedure


Step 1

Log in to Cyber Vision Center.

Step 2

From the main menu, choose Admin > Integrations > SEA.

Step 3

(Optional) In the Center as gateway section, optionally enter a name for your center.

If you do not add a center name, Cyber Vision Center uses the Center's Fully Qualified Domain Name (FQDN) from Admin > Web Server Certificate.

Step 4

Click Enable Center as Gateway.


  • Your Cyber Vision Center contacts the SEA tenant and registers itself as a new SEA agent. Log in to SEA and choose System Management > Network Devices to view the new agent. The new network device appears in the list.

  • Once you enable Center as gateway, a direct link to the IoT OD SEA dashboard becomes available. If you have access to multiple tenants in IoT OD, select the correct tenant to view your new network device.

What to do next

Add new assets to your center as needed. These assets will be reachable through your Center, which now acts as a gateway. You can manage and access other assets directly from the Center. For more information, see Manually Add Assets in the IoT Operations Dashboard (IoT OD) documentation.

Cisco In Product Support

A Cisco In Product Support is a virtual assistant that:

  • provides customers and partners with a unified self-service experience across multiple support domains,

  • offers tools for managing cases, checking bug applicability, troubleshooting hardware, and managing licensing, and

  • enables users to connect directly with case owners, managers, or Technical Assistance Center (TAC) duty managers for escalations or assistance.

Table 1. Feature History Table

Feature

Release Information

Feature Description

Cisco In Product Support

Release 5.3.x

Use Cisco In Product Support to manage your Cisco support cases and related tasks directly from the Center.

Functionality

Cisco In Product Support is designed to simplify and speed up support activities for Cisco customers and partners.

You can address technical challenges and manage support team interactions efficiently by using a single interface that consolidates multiple support services.

The tool integrates with Cisco’s back-end systems to provide up-to-date case tracking, bug search, and device troubleshooting resources.

Examples

  • A partner uses Cisco In Product Support to submit and track a hardware replacement (RMA) request.

  • A customer uses the assistant to check whether a reported bug affects their installed software version.

  • A network engineer leverages the self-service troubleshooting function to diagnose hardware issues without opening a formal support ticket.

Access Cisco In Product Support

Open Cisco In Product Support to interact with Cisco TAC support within your product.

Cisco In Product Support provides integrated access to Cisco TAC services. You can use Cisco In Product Support to open TAC cases, record screens, or upload files directly from your product interface.

Before you begin

  • Ensure you have a Cisco account with TAC access.

Procedure


Step 1

From the main menu, choose Admin > Integrations > Cisco In Product Support.

Note


Cisco In Product Support integration is enabled by default. Its icon is available on the page.

Step 2

Click the Cisco In Product Support icon.

Step 3

Click Sign In to enable TAC’s virtual assistance.


After you enable Cisco In Product Support, you can:

  • Open Cisco Support Case

  • Record Screen

  • Upload Local File

What to do next

To generate and upload diagnostics, click the System Statistics icon.