高度なネットワーク構成

この章は、次の項で構成されています。

イーサネット インターフェイスのメディア設定

イーサネット インターフェイスのメディア設定にアクセスするには、etherconfig コマンドを使用します。個々のイーサネット インターフェイスが現在の設定と共に一覧表示されます。インターフェイスを選択すると、可能なメディア設定が表示されます。例については、メディア設定の編集例 を参照してください。

etherconfig を使ったイーサネット インターフェイスのメディア設定の編集

etherconfig コマンドを使って、イーサネット インターフェイスのデュプレックス設定(全二重/半二重)や速度(10/100/1000 Mbps)を設定できます。デフォルトでは、インターフェイスが自動的にメディア設定を選択しますが、場合によってはこの設定を上書きする必要があります。


(注)  


「セットアップとインストール」の章の説明に従って GUI のシステム設定ウィザード(またはコマンドライン インターフェイスの systemsetup コマンド)を実行し、変更を確定していれば、電子メールゲートウェイ上でデフォルトのイーサネット インターフェイス設定が構成されているはずです。


一部の電子メールゲートウェイは、光ファイバ ネットワーク インターフェイス オプションを備えています。その場合は、各電子メールゲートウェイ上の使用可能なインターフェイスのリストに 2 つの追加イーサネット インターフェイス(Data 3 と Data 4)が表示されます。これらのギガビット光ファイバ インターフェイスは、異種混在構成で銅線(Data 1、Data 2、および Management)インターフェイスとペアにすることができます。ネットワーク インターフェイス カードのペアリングおよびチーミング を参照してください。

メディア設定の編集例

mail3.example.com> etherconfig

Choose the operation you want to perform:
- MEDIA - View and edit ethernet media settings.
- PAIRING - View and configure NIC Pairing.
- VLAN - View and configure VLANs.
- LOOPBACK - View and configure Loopback.
- MTU - View and configure MTU.
- MULTICAST - Accept or reject ARP replies with a multicast address.

[]> media
Ethernet interfaces:
1. Data 1 (Autoselect: <100baseTX full-duplex>) 00:06:5b:f3:ba:6d
2. Data 2 (Autoselect: <100baseTX full-duplex>) 00:06:5b:f3:ba:6e
3. Management (Autoselect: <100baseTX full-duplex>) 00:02:b3:c7:a2:da

Choose the operation you want to perform:
- EDIT - Edit an ethernet interface.
[]> edit
Enter the name or number of the ethernet interface you wish to edit.
[]> 2
Please choose the Ethernet media options for the Data 2 interface.
1. Autoselect
2. 10baseT/UTP half-duplex
3. 10baseT/UTP full-duplex
4. 100baseTX half-duplex

5. 100baseTX full-duplex


6. 1000baseTX half-duplex
7. 1000baseTX full-duplex
[1]> 5
Ethernet interfaces:
1. Data 1 (Autoselect: <100baseTX full-duplex>) 00:06:5b:f3:ba:6d
2. Data 2 (100baseTX full-duplex: <100baseTX full-duplex>) 00:06:5b:f3:ba:6e
3. Management (Autoselect: <100baseTX full-duplex>) 00:02:b3:c7:a2:da
Choose the operation you want to perform:
- EDIT - Edit an ethernet interface.
[]>
Choose the operation you want to perform:
- MEDIA - View and edit ethernet media settings.
- PAIRING - View and configure NIC Pairing.
- VLAN - View and configure VLANs.
- LOOPBACK - View and configure Loopback.
- MTU - View and configure MTU.
- MULTICAST - Accept or reject ARP replies with a multicast address.
[]>
ネットワーク インターフェイス カードのペアリングおよびチーミング

NIC ペアリングで 2 つの物理データ ポートを組み合わせることにより、NIC からアップストリームのイーサネット ポートへのデータ パスに障害が発生した場合に、バックアップ イーサネット インターフェイスを提供できます。ペアリングでは、基本的に各イーサネット インターフェイスをプライマリ インターフェイスおよびバックアップ インターフェイスとして設定します。プライマリ インターフェイスに障害が発生した場合(つまり、NIC とアップストリーム ノード間のキャリアが途切れた場合)は、バックアップ インターフェイスがアクティブになり、アラートが送信されます。プライマリ インターフェイスは再度起動したときに自動的にアクティブになります。この製品のマニュアルでは、「NIC ペアリング」と「NIC チーミング」は同義語です。


(注)  


NIC ペアリングは、C170、C190、および C195 電子メールゲートウェイでは使用できません。


十分な数のデータ ポートがあれば、複数の NIC ペアを作成できます。ペアを作成するときは、任意のデータ ポートを組み合わせることができます。次に例を示します。

Data 1 と Data 2

Data 3 と Data 4

Data 2 と Data 3

など

一部の電子メールゲートウェイは、光ファイバ ネットワーク インターフェイス オプションを備えています。その場合は、各電子メールゲートウェイ上の使用可能なインターフェイスのリストに 2 つの追加イーサネット インターフェイス(Data 3 と Data 4)が表示されます。これらのギガビット光ファイバ インターフェイスは、異種混在構成で銅線(Data 1、Data 2、および Management)インターフェイスとペアにすることができます。

NIC ペアの名前

NIC ペアを作成するときは、そのペアを参照するときに使用する名前を指定する必要があります。バージョン 4.5 よりも前の AsyncOS で作成した NIC ペアには、アップグレード後、自動的に「Pair 1」というデフォルト名が指定されます。

NIC ペアリングに関して生成されたアラートは、特定の NIC ペアを名前で参照します。

NIC ペアリングと既存のリスナー

リスナーが割り当てられたインターフェイスで NIC ペアリングをイネーブルにすると、バックアップ インターフェイスに割り当てられた全リスナーの削除、再割り当て、ディセーブル化のいずれかを選択するように求められます。

etherconfig コマンドを使った NIC ペアリングのイネーブル化


(注)  


NIC ペアリングは、C170、C190、および C195 電子メールゲートウェイでは使用できません。


mail3.example.com> etherconfig


Choose the operation you want to perform:

- MEDIA - View and edit ethernet media settings.

- PAIRING - View and configure NIC Pairing.

- VLAN - View and configure VLANs.

- LOOPBACK - View and configure Loopback.

- MTU - View and configure MTU.

- MULTICAST - Accept or reject ARP replies with a multicast address.

[]> pairing
Paired interfaces:

Choose the operation you want to perform:

- NEW - Create a new pairing.

[]> new

Please enter a name for this pair (Ex: "Pair 1"):

[]> Pair 1

Warning: The backup (Data 2) for the NIC Pair is currently configured with one or more
IP addresses. If you continue, the Data 2 interface will be deleted.

Do you want to continue? [N]> y

The interface you are deleting is currently used by listener "OutgoingMail".

What would you like to do?

1. Delete: Remove the listener and all its settings.

2. Change: Choose a new interface.

3. Ignore: Leave the listener configured for interface "Data 2" (the listener will be
disabled until you add a new interface named "Data 2" or edit the listener's settings).


[1]>

Listener OutgoingMail deleted for mail3.example.com.

Interface Data 2 deleted.

Paired interfaces:

1. Pair 1:


Primary (Data 1) Active, Link is up

Backup (Data 2) Standby, Link is up

Choose the operation you want to perform:

- DELETE - Delete a pairing.

- STATUS - Refresh status.

[]>

仮想ローカル エリア ネットワーク(VLAN)

電子メールゲートウェイの任意の物理ネットワークポートに、複数の仮想ローカルエリアネットワーク(VLAN)を設定できます。

VLAN を使用すると、以下が可能になります。

  • 電子メールゲートウェイが接続できるネットワークの数を、電子メールゲートウェイ上の物理インターフェイスの数以上に増やすことができます。
  • 既存のリスナーの別の「ポート」に、より多くのネットワークを定義できます。
  • 管理を容易にするためまたは帯域幅を増やすために、セキュリティ目的でネットワークをセグメント化できます。

使用事例:

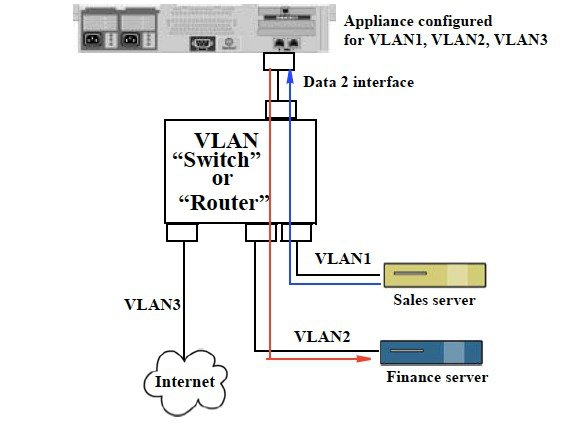
VLAN の制限事項のために直接通信できない 2 つのメールサーバが、電子メールゲートウェイを介してメールを送信できます。電子メールゲートウェイの Data 2 インターフェイスは、VLAN1 および VLAN2 で設定されます。青い線は、営業ネットワーク(VLAN1)からアプライアンスに送信されたメールを示しています。電子メールゲートウェイはメールをいつものように処理してから、配信時にパケットを宛先 VLAN2 情報(赤線)でタグ付けします。

VLAN による電子メールゲートウェイ間通信の実現

図 1. VLAN による電子メールゲートウェイ間通信の実現

VLAN の設定について

「データ」および「管理」ポートおよび一部の電子メールゲートウェイモデルで使用可能な光ファイバデータポートなど、電子メールゲートウェイの任意の物理ネットワークポートに、複数の VLAN を設定できます。AsyncOS は、最大 30 の VLAN をサポートします。

物理ポートは、VLAN に配置するために IP アドレスを設定する必要がありません。VLAN を作成した物理ポートに VLAN 以外のトラフィックを受信する IP アドレスを設定できるため、VLAN のトラフィックと VLAN 以外のトラフィックの両方を同じインターフェイスで受信できます。

VLAN は、NIC ペアリング(ペアになっている NIC で使用可能)や Direct Server Return(DSR)と併用できます。

VLAN は、「VLAN DDDD」という形式の名前を持つ動的な「データ ポート」として表示されます。「DDDD」は最大 4 桁の ID です(VLAN 2、VLAN 4094 など)。VLAN ID は、電子メールゲートウェイで一意である必要があります。

関連項目

FTP、SSH、および SCP アクセス

VLAN の管理

VLAN の作成、編集、および削除を行うには、etherconfig コマンドを使用します。作成後、[ネットワーク(Network)] > [インターフェイス(Interfaces)] ページまたは CLI の interfaceconfig コマンドを使用して VLAN を設定できます。すべての変更を保存することを忘れないでください。

etherconfig コマンドによる新しい VLAN の作成

この例では、Data 1 ポート上に 2 つの VLAN(VLAN 31 と VLAN 34)を作成します。

mail3.example.com> etherconfig


Choose the operation you want to perform:

- MEDIA - View and edit ethernet media settings.

- PAIRING - View and configure NIC Pairing.

- VLAN - View and configure VLANs.

- LOOPBACK - View and configure Loopback.

- MTU - View and configure MTU.

- MULTICAST - Accept or reject ARP replies with a multicast address.

[]> vlan

VLAN interfaces:

Choose the operation you want to perform:

- NEW - Create a new VLAN.

[]> new

VLAN ID for the interface (Ex: "34"):

[]> 34

Enter the name or number of the ethernet interface you wish bind to:

1. Data 1

2. Data 2

3. Management

[1]> 1


VLAN interfaces:

1. VLAN 34 (Data 1)

Choose the operation you want to perform:


- NEW - Create a new VLAN.

- EDIT - Edit a VLAN.

- DELETE - Delete a VLAN.

[]> new

VLAN ID for the interface (Ex: "34"):

[]> 31

Enter the name or number of the ethernet interface you wish bind to:

1. Data 1

2. Data 2

3. Management

[1]> 1

VLAN interfaces:

1. VLAN 31 (Data 1)

2. VLAN 34 (Data 1)

Choose the operation you want to perform:

- NEW - Create a new VLAN.

- EDIT - Edit a VLAN.

- DELETE - Delete a VLAN.

[]>

Choose the operation you want to perform:

- MEDIA - View and edit ethernet media settings.

- PAIRING - View and configure NIC Pairing.

- VLAN - View and configure VLANs.

- LOOPBACK - View and configure Loopback.

- MTU - View and configure MTU.

- MULTICAST - Accept or reject ARP replies with a multicast address.

[]>

interfaceconfig コマンドによる VLAN の IP インターフェイスの作成

この例では、VLAN 31 イーサネット インターフェイス上に新しい IP インターフェイスを作成します。

インターフェイスに変更を加えると、電子メールゲートウェイとの接続が閉じることがあります。

mail3.example.com> interfaceconfig

Currently configured interfaces:

1. Data 1 (10.10.1.10/24: example.com)

2. Management (10.10.0.10/24: example.com)

Choose the operation you want to perform:

- NEW - Create a new interface.

- EDIT - Modify an interface.

- GROUPS - Define interface groups.

- DELETE - Remove an interface.

[]> new


Please enter a name for this IP interface (Ex: "InternalNet"):


[]> InternalVLAN31

Would you like to configure an IPv4 address for this interface (y/n)? [Y]>

IPv4 Address (Ex: 10.10.10.10):

[]> 10.10.31.10

Netmask (Ex: "255.255.255.0" or "0xffffff00"):

[255.255.255.0]>

Would you like to configure an IPv6 address for this interface (y/n)? [N]>

Ethernet interface:

1. Data 1

2. Data 2

3. Management

4. VLAN 31

5. VLAN 34

[1]> 4

Hostname:

[]> mail31.example.com

Do you want to enable SSH on this interface? [N]>

Do you want to enable FTP on this interface? [N]>

Do you want to enable HTTP on this interface? [N]>

Do you want to enable HTTPS on this interface? [N]>

Currently configured interfaces:

1. Data 1 (10.10.1.10/24: example.com)

2. InternalVLAN31 (10.10.31.10/24: mail31.example.com)

3. Management (10.10.0.10/24: example.com)

Choose the operation you want to perform:

- NEW - Create a new interface.

- EDIT - Modify an interface.

- GROUPS - Define interface groups.

- DELETE - Remove an interface.

[]>

Web インターフェイスを使用した VLAN の設定

etherconfig コマンドを使用して VLAN を作成した後、[ネットワーク(Network)] > [リスナー(Listeners)] ページを使用して設定できます。

Direct Server Return

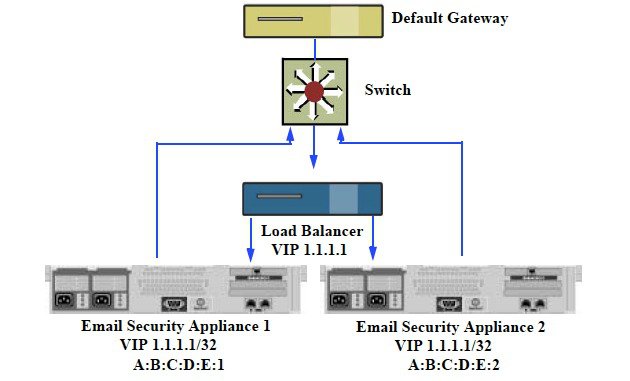
Direct Server Return(DSR)は、同じ Virtual IP(VIP; 仮想 IP)を共有する複数の電子メールゲートウェイ間で負荷を分散するための軽量負荷分散メカニズムをサポートする機能です。

DSR は、電子メールゲートウェイの「ループバック」イーサネット インターフェイス上に作成された IP インターフェイスを介して実装されます。


(注)  


電子メールゲートウェイの負荷分散の設定は、このマニュアルでは取り上げません


Direct Server Return のイネーブル化

DSR をイネーブルにするには、参加している各電子メールゲートウェイの「ループバック」イーサネット インターフェイスをイネーブルにします。次に、CLI の interfaceconfig コマンドまたは GUI の [ネットワーク(Network)] > [インターフェイス(Interfaces)] ページを使用して、ループバック インターフェイス上に仮想 IP(VIP)で IP インターフェイスを作成します。最後に、CLI の listenerconfig コマンドまたは GUI の [ネットワーク(Network)] > [リスナー(Listeners)] ページを使用して、新しい IP インターフェイス上にリスナーを作成します。すべての変更を保存することを忘れないでください。


(注)  


ループバック インターフェイスを使用した場合、電子メールゲートウェイはそのインターフェイスの ARP 応答を発行しません


DSR をイネーブルにするときは、次のルールが適用されます。

すべてのシステムが同じ仮想 IP(VIP)アドレスを使用します。

すべてのシステムがロード バランサと同じスイッチおよびサブネット上にある必要があります。
図 2. DSR を使用したスイッチ上の複数の電子メールゲートウェイ間でのロードバランス

DSR を使用したスイッチ上の複数の電子メールゲートウェイ間でのロードバランス

etherconfig コマンドによるループバック インターフェイスのイネーブル化

イネーブルになったループバック インターフェイスは、他のインターフェイス(Data 1 など)と同じように扱われます。

mail3.example.com> etherconfig

Choose the operation you want to perform:

- MEDIA - View and edit ethernet media settings.

- PAIRING - View and configure NIC Pairing.

- VLAN - View and configure VLANs.

- LOOPBACK - View and configure Loopback.

- MTU - View and configure MTU.

- MULTICAST - Accept or reject ARP replies with a multicast address.


[]> loopback

Currently configured loopback interface:

Choose the operation you want to perform:


- ENABLE - Enable Loopback Interface.

[]> enable

Currently configured loopback interface:


1. Loopback

Choose the operation you want to perform:

- DISABLE - Disable Loopback Interface.

[]>

Choose the operation you want to perform:

- MEDIA - View and edit ethernet media settings.

- PAIRING - View and configure NIC Pairing.

- VLAN - View and configure VLANs.

- LOOPBACK - View and configure Loopback.

- MTU - View and configure MTU.

- MULTICAST - Accept or reject ARP replies with a multicast address.

[]>

interfaceconfig コマンドによるループバック上の IP インターフェイスの作成

ループバック インターフェイス上に IP インターフェイスを作成します。

mail3.example.com> interfaceconfig

Currently configured interfaces:

1. Data 1 (10.10.1.10/24: example.com)

2. InternalV1 (10.10.31.10/24: mail31.example.com)

3. Management (10.10.0.10/24: example.com)

Choose the operation you want to perform:

- NEW - Create a new interface.

- EDIT - Modify an interface.

- GROUPS - Define interface groups.

- DELETE - Remove an interface.

[]> new

Please enter a name for this IP interface (Ex: "InternalNet"):

[]> LoopVIP

Would you like to configure an IPv4 address for this interface (y/n)? [Y]>

IPv4 Address (Ex: 10.10.10.10):

[]> 10.10.1.11

Netmask (Ex: "255.255.255.0" or "0xffffff00"):

[255.255.255.0]> 255.255.255.255

Would you like to configure an IPv6 address for this interface (y/n)? [N]>

Ethernet interface:

1. Data 1

2. Data 2

3. Loopback

4. Management

5. VLAN 31

6. VLAN 34

[1]> 3

Hostname:

[]> example.com

Do you want to enable SSH on this interface? [N]>


Do you want to enable FTP on this interface? [N]>


Do you want to enable HTTP on this interface? [N]>

Do you want to enable HTTPS on this interface? [N]>


Currently configured interfaces:

1. Data 1 (10.10.1.10/24: example.com)

2. InternalV1 (10.10.31.10/24: mail31.example.com)

3. LoopVIP (10.10.1.11/24: example.com)

4. Management (10.10.0.10/24: example.com)

Choose the operation you want to perform:

- NEW - Create a new interface.

- EDIT - Modify an interface.

- GROUPS - Define interface groups.

- DELETE - Remove an interface.

[]>

新しい IP インターフェイス上のリスナーの作成

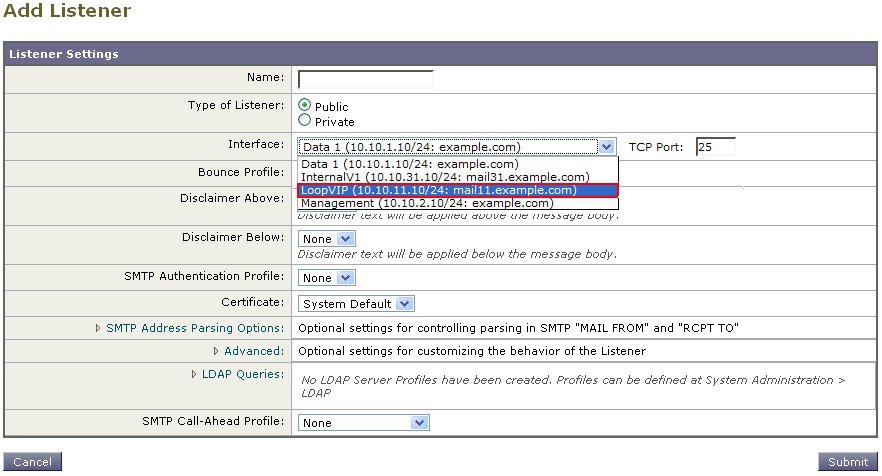
GUI または CLI を使って新しい IP インターフェイス上にリスナーを作成します。たとえば、次の図に示すように、新たに作成した IP インターフェイスを GUI の [リスナーを追加(Add Listener)] ページで選択できます。

図 3. 新しいループバック IP インターフェイス上のリスナーの作成


イーサネット インターフェイスの最大伝送単位

最大伝送単位(MTU)は、イーサネット インターフェイスが受け入れる最大のデータ単位です。etherconfig コマンドを使用してイーサネット インターフェイスの MTU を減らすことができます。イーサネット インターフェイスが受け入れることができる最大 MTU のデフォルト MTU サイズは 1500 バイトです。

インターフェイスの MTU を編集するには:

mail3.example.com> etherconfig

Choose the operation you want to perform:

- MEDIA - View and edit ethernet media settings.

- PAIRING - View and configure NIC Pairing.

- VLAN - View and configure VLANs.

- LOOPBACK - View and configure Loopback.

- MTU - View and configure MTU.

- MULTICAST - Accept or reject ARP replies with a multicast address.

[]> mtu

Ethernet interfaces:

1. Data 1 mtu 1400

2. Data 2 default mtu 1500

3. Management default mtu 1500

Choose the operation you want to perform:

- EDIT - Edit an ethernet interface.

[]> edit

Enter the name or number of the ethernet interface you wish to edit.

[]> 2

Please enter a non-default (1500) MTU value for the Data 2 interface.

[]> 1200

Ethernet interfaces:

1. Data 1 mtu 1400

2. Data 2 mtu 1200

3. Management default mtu 1500

Choose the operation you want to perform:

- EDIT - Edit an ethernet interface.

[]>

マルチキャスト アドレスでの ARP 応答の受け入れまたは拒否

マルチキャスト アドレスで ARP 応答を受け入れるか拒否するかを指定できます。この機能を設定するには、MULTICAST サブコマンドを使用します。

次の例で、マルチキャストアドレスで ARP 応答を受け入れるように電子メールゲートウェイを設定する方法を示します。


mail.example.com> etherconfig
Choose the operation you want to perform:
- MEDIA - View and edit ethernet media settings.
- VLAN - View and configure VLANs.
- LOOPBACK - View and configure Loopback.
- MTU - View and configure MTU.
- MULTICAST - Accept or reject ARP replies with a multicast address.
[]> multicast
ARP replies with a multicast address will be rejected.
Choose the operation you want to perform:
- ACCEPT - Accept ARP replies with a multicast address.
[]> accept
ARP replies with a multicast address will be accepted.