Cisco Sensor Connect for IoT Services Quick Start Guide
Available Languages
Overview of Cisco Sensor Connect for IoT Services
Cisco Sensor Connect for IoT Services solution enables delivery of advanced BLE capabilities over Cisco Catalyst Wireless infrastructure. The key component of this solution is the IoT Orchestrator which is a Cisco IOx application that can be deployed on any existing Cisco Catalyst 9800 Wireless Controller platforms running software version Cisco IOS-XE 17.15.3 and later. With the Cisco Sensor Connect for IoT Services solution, you have capabilities to securely onboard and control BLE devices, and consume data telemetry using the Message Queuing Telemetry Transport (MQTT).
Prerequisites for IoT Orchestrator
● Controller must be configured for initial configuration with APs joined and clients connected to the network.
● Controller must run on version Cisco IOS-XE 17.15.3 or 17.17.1.
● Download the IoT Orchestrator (Spaces Orchestrator SoftwareSpaces Orchestrator Software) image that will be posted in the following page:
https://software.cisco.com/download/home/286323456/type
For more information about the Sensor Connect for IoT Services, see the Related DocumentationRelated Documentation.
Related Documentation
● Cisco Spaces Smart Operation
● Cisco Spaces ACT
● Cisco Spaces Unlimited
● Cisco Wireless Advantage
Supported Cisco Wireless Controller Platforms
● Cisco Catalyst CW9800H1 and CW9800H2 Wireless Controllers
● Cisco Catalyst CW9800M Wireless Controller
● Cisco Catalyst 9800-40 Wireless Controller
● Cisco Catalyst 9800-80 Wireless Controller
● Cisco Catalyst 9800-L Wireless Controller
Supported Access Points
For supported access points, see the Cisco Sensor Connect for IoT Services Release Notes, Release 1.1.
Deployment Workflow
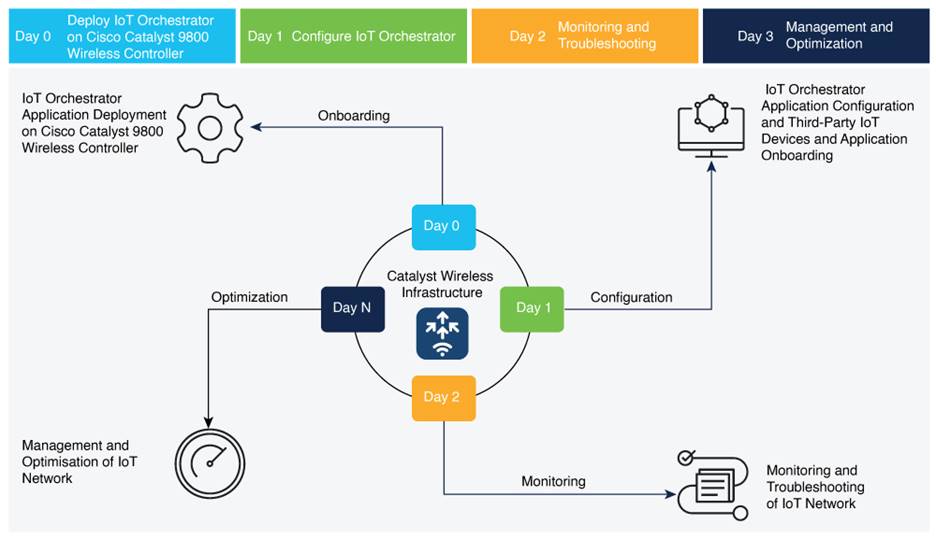
Deployment Workflow
Day-0 Activities
- Deploying IoT Orchestrator Application on Cisco Catalyst 9800 Wireless Controller
- Launching IoT Orchestrator
- Day-0 WebUI Wizard for IoT Orchestrator Application
- Changing your Username and Password
Day-1 Activities
- Day-1: Configuring Cisco Catalyst 9800 Wireless Controller from IoT Orchestrator
- Register the Third-Party Applications
- Error! Reference source not found.
- Registering Partner Application to Interact with the IoT Orchestrator Application
Day-0: Deploying the IoT Orchestrator Application on Cisco Catalyst 9800 Wireless Controller
Before you begin
● Download IoT Orchestrator and save it on your system where you will login to the Controller Web UI.
Summary:
If you want to use the IoT Orchestrator application, you will need to deploy the IoT Orchestrator application on Cisco Catalyst 9800 Wireless Controller.
Deploying IoT Orchestrator Application on Cisco Catalyst 9800 Wireless Controller
Step 1. Log in to the Cisco Catalyst 9800 Wireless Controller Web UI.

Cisco Catalyst 9800 Wireless Controller Web UI
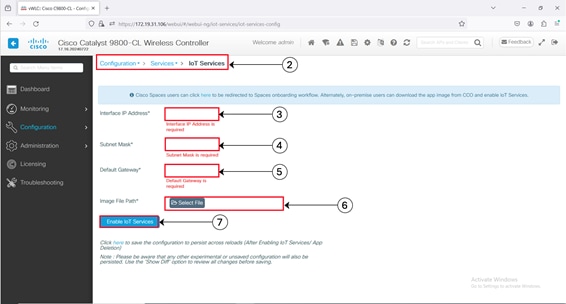 |
Configuration > Services > IoT Services
Step 2. Navigate to Configuration > Services > IoT Services.
Step 3. Enter the IP address of the IoT Orchestrator.
Note: The IP addresses must be unique and different from the other IP addresses configured in Cisco Catalyst 9800 Wireless Controller. If you configure an IP address that overlaps with other interfaces, you will get an error message as the deployment flow will fail. For example, in the subnet 192.168.1.0/30, 192.168.1.1 can be used as the IP address of the IoT Orchestrator, and 192.168.1.2 can be used as the IP address of the default gateway.
Step 4. Enter the subnet mask of the IoT Orchestrator.
Note: The recommended size of the mask is /30 that allows two valid hosts (IoT Orchestrator and VirtualPortGroup Interface of Cisco Catalyst 9800 Wireless Controller).
Step 5. Enter the IP address of the default gateway for the IoT Orchestrator.
Note: The default gateway IP address is the IP address of the VirtualPortGroup interface in Cisco Catalyst 9800 Controller.
Step 6. Enter the NAT IP address used by Cisco Access Points to reach the IoT Orchestrator.
Note: This configuration is necessary only when a direct connection between Cisco Access Points and the IoT Orchestrator is not possible, such as when a Cisco Catalyst 9800 Wireless Controller is behind a firewall or in a remote data center. For more information, see the NAT Configuration chapter in Cisco Sensor Connect for IoT Services Configuration Guide.
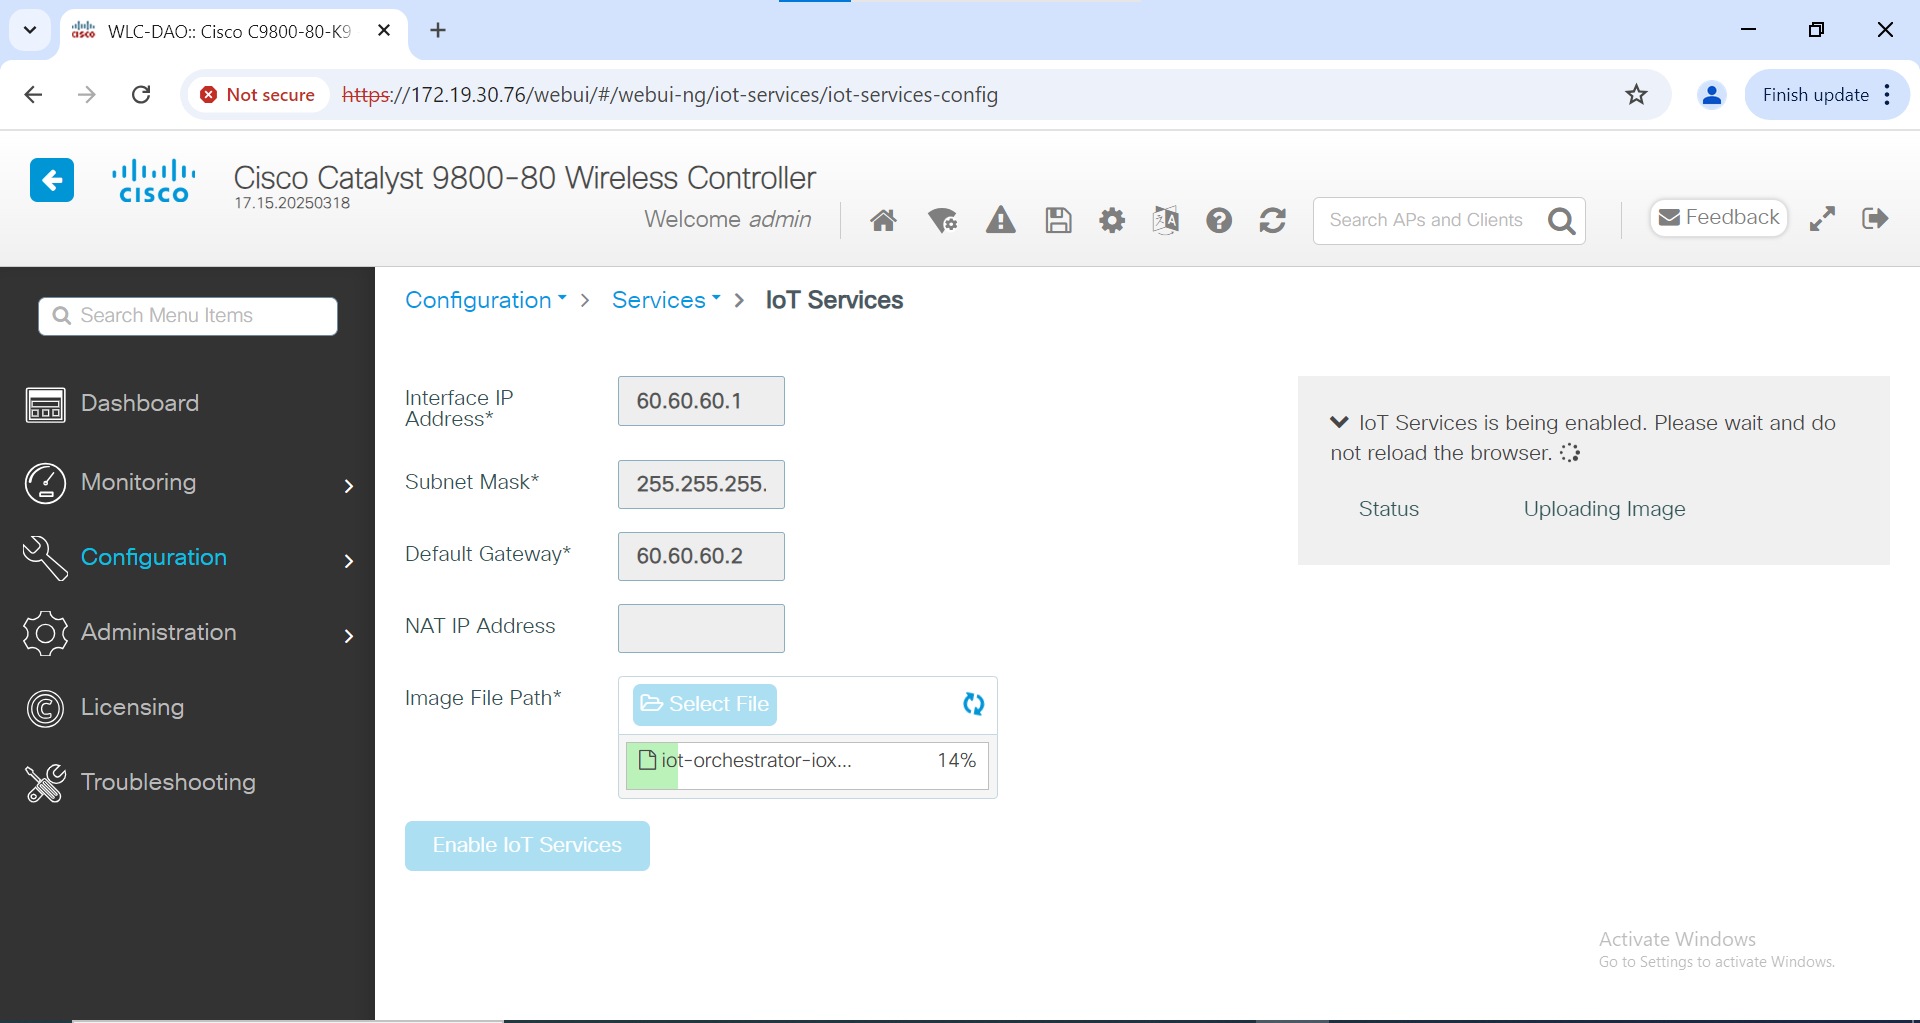
Step 7. In the Image File Path field, click Select File to select the IoT Orchestrator image and click Open.
Note: You must have the IoT Orchestrator image downloaded on your local machine.
Step 8. Click Enable IoT Services to upload the image from your machine to the Cisco Catalyst 9800 controller.
Enabling IoT Services
You get to view a banner that displays the following status:
· Installing
· Activating
· Starting
· Running
Note: It might take few minutes to complete from Installation to Running.
Note:
· When the status moves from Installing to Activating, this implies that the application is installed by the Cisco IOS-XE infrastructure.
· When the status moves from Activating to Starting, this implies that the application is getting started by the Cisco IOS-XE infrastructure.
· When the status moves from Starting to Running, this implies that the application is in Running state.
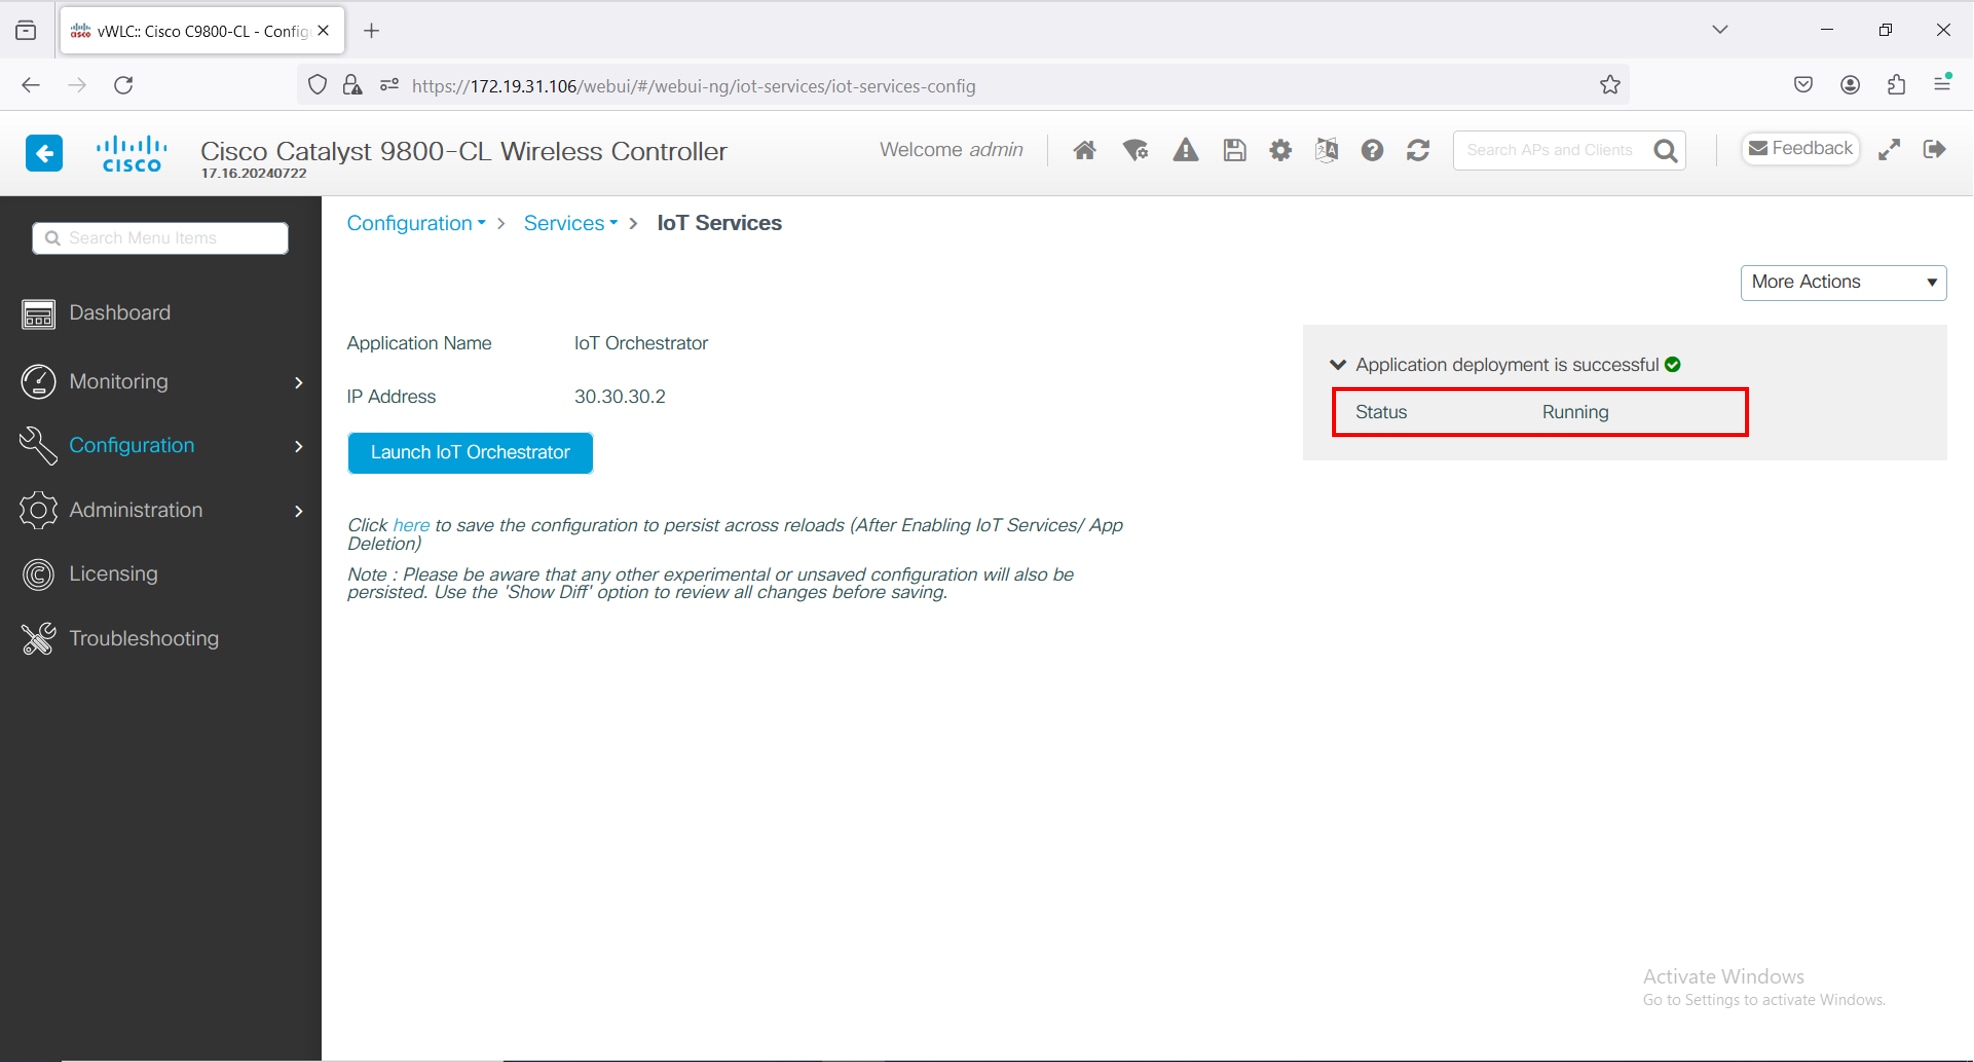
Thus, the IoT Orchestrator image is uploaded from your laptop or computer to the Cisco Catalyst 9800 Wireless Controller.
Once the IoT Orchestrator application deployment is successful, you get to view the application name (IoT Orchestrator by default) and IP address of the application.
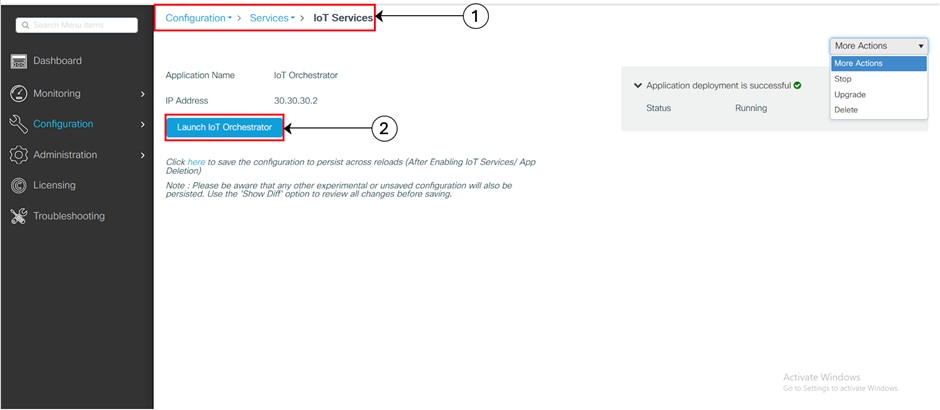
Viewing Application Name and IP Address
NOTE:
● The Cisco IOS-XE application framework is used to deploy and start the containers. The application now runs as an IOx container in the Cisco Catalyst 9800 Wireless Controller.
● The use of app-hosting commands to install, uninstall, activate, deactivate, start, or stop is not supported and may lead to an error state of the IoT Orchestrator. The use of the IOx web interface (from Configuration > Services > IOxConfiguration > Services > IOx) is also not supported for performing any operations on the IoT Orchestrator. Only the IoT Services web interface (from Configuration > Services > IoT Services) is supported for Day-0 and Day-1 management operations for the IoT Orchestrator.
Before you begin
● Ensure that the IoT Orchestrator status is in Running state.
● Ensure that the IP address of the IoT Orchestrator is reachable from your computer or laptop.
● The IoT Orchestrator may take up to an additional 2 minutes after reaching the Running state to discover HA capabilities in the Cisco Catalyst 9800 Wireless Controller and to synchronize all databases between controllers.
Summary:
If you want to access the IoT Orchestrator Web UI, you will need to launch the IoT Orchestrator application.
Procedure
On the Configuration > Services > IoT Services page, click Launch IoT Orchestrator.
Launching IoT Orchestrator
Note: To verify the IP network is reachable, you will need to ping the IP address using the terminal session.
When there is a firewall or similar device (such as a router with Access Control Lists (ACLs)), between Cisco Access Points and Wireless IoT Orchestrator or between Wireless IoT Orchestrator and external custom application, the firewall or similar device must be configured with rules that allow proper connectivity.
Connectivity Between Cisco Access Points and Wireless IoT Orchestrator
The following ports must be opened from Cisco Access Points to Wireless IoT Orchestrator:
Table 1. Protocol, Port, and Usage Details
| Protocol |
Port |
Usage |
| TCP |
50221 |
AP initial HTTP Connection with Wireless IoT Orchestrator |
| TCP |
43626 |
Establish aconnection with Wireless IoT Orchestrator |
Connectivity Between External Applications and Wireless IoT Orchestrator
The following ports must be opened from external application to Wireless IoT Orchestrator:
Table 2. Protocol, Port, and Usage Details
| Protocol |
Port |
Usage |
| TCP |
8081 |
Wireless IoT Orchestrator REST API interface |
| TCP |
41883 |
MQTT Publisher listening port |
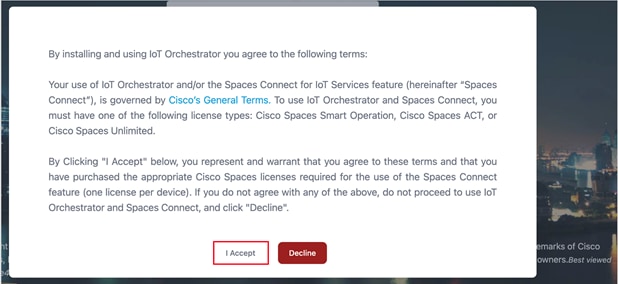
Licensing Details to Use IoT Orchestrator
Read the terms and conditions and click I Accept.
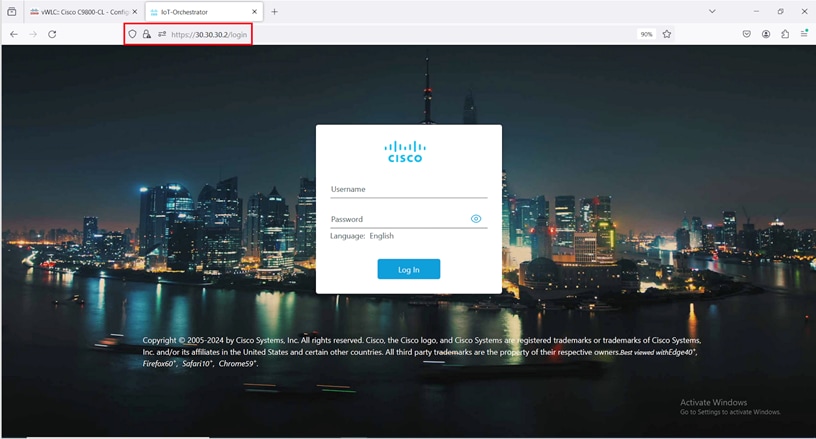
The IoT Orchestrator login page is displayed.
IoT Orchestrator Login Page
Day-0 WebUI Wizard for IoT Orchestrator Application
Summary:
To login to the IoT Orchestrator application for Day-0, you will need to perform the following steps:
Procedure
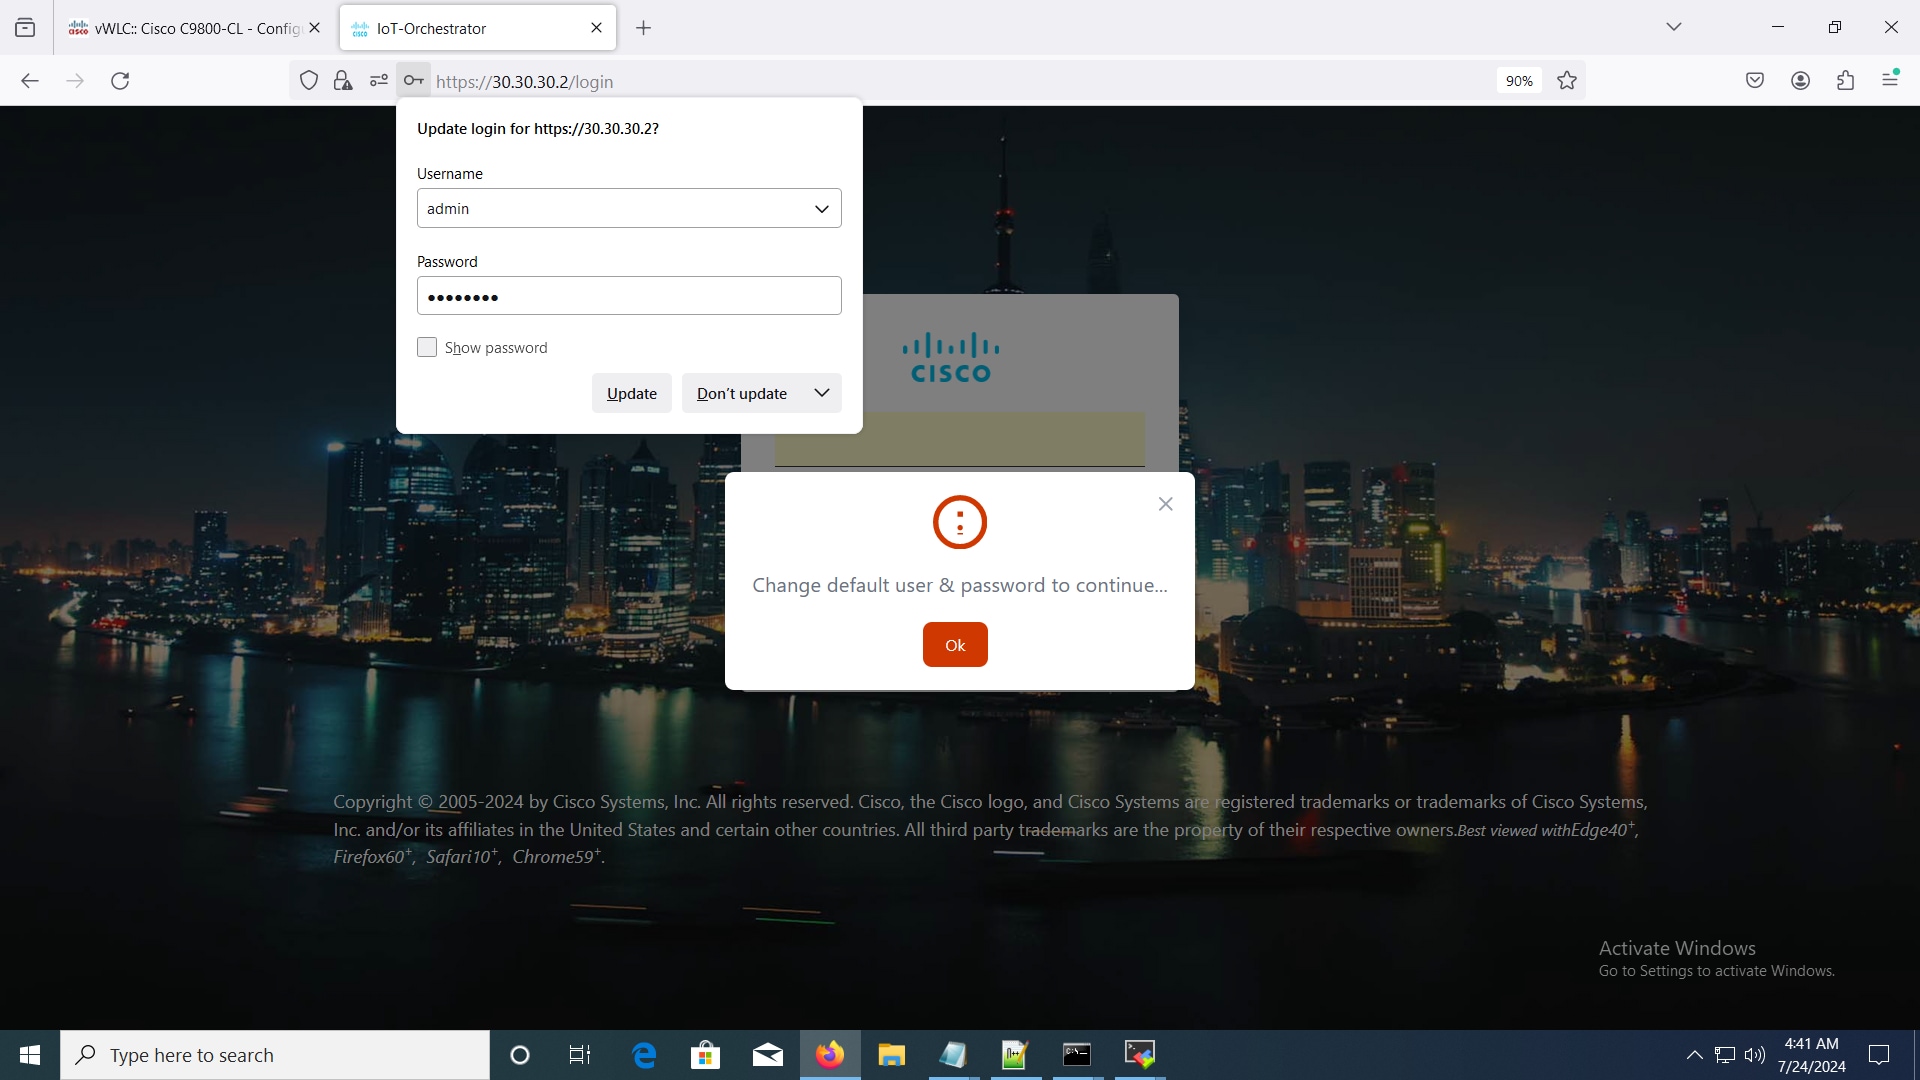
Enter admin for username and password for password (default credentials).
Default Credentials Login Page
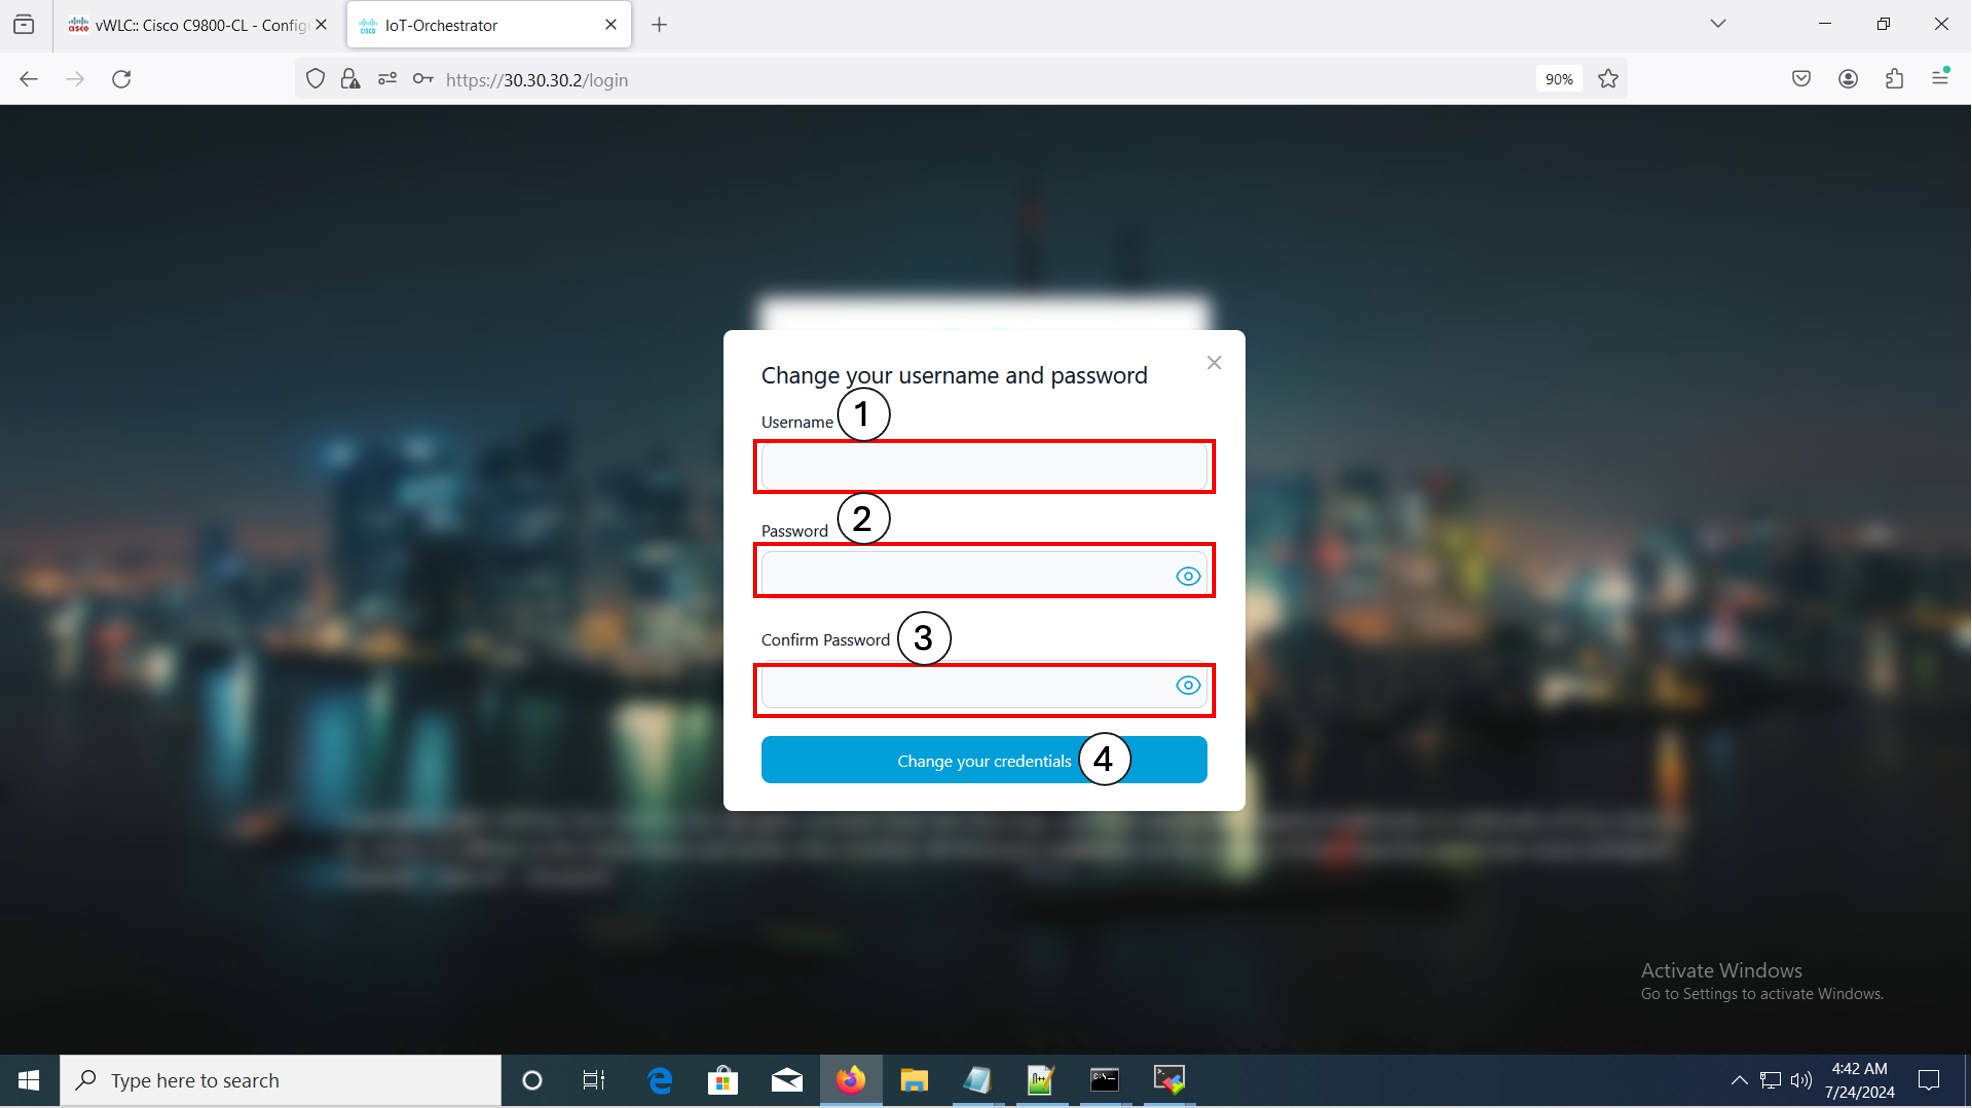
Changing your Username and Password
Summary:
To create a Day-0 user profile, you will need to change the default username and password.
Note:
· You will need to enter the IoT Orchestrator password in the Login Page.
· This login is the IoT Orchestrator login credentials and not the same as the controller login credentials.
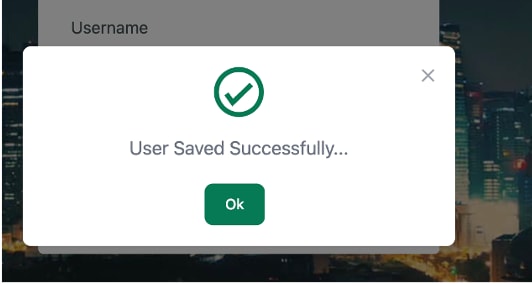 |
Changing your Username and Password
User Saved Successful Pop-Up
Note:
● If you do not remember your admin credentials, you will need to perform a password recovery procedure. For more information, see the Recovering Admin Password from the Wireless IoT Orchestrator document.
● If you enter the incorrect password three times consecutively, a lockdown timer will appear. After the timer completes, if you enter the login password incorrectly again, the timer will update, extending up to an hour.
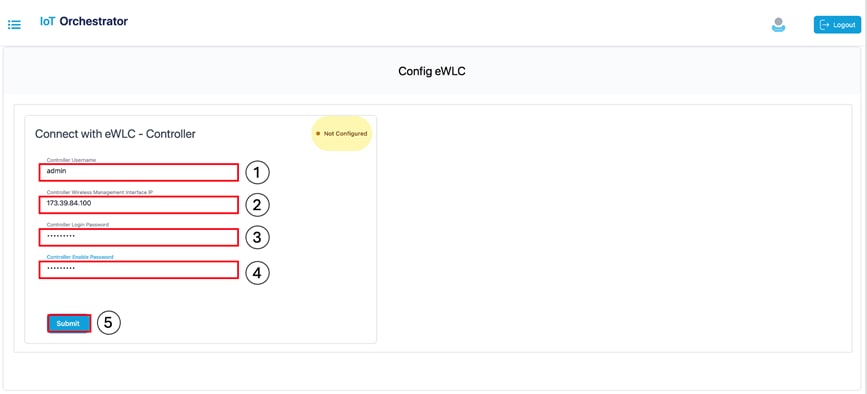
Day-1: Configuring Cisco Catalyst 9800 Wireless Controller from IoT Orchestrator
In the IoT Orchestrator dashboard, choose the Administrator > 9800 Wireless Controller configuration page and perform the following:
Summary:
To connect the APs (available in the Controller) to the IoT Orchestrator, you will need to connect the IoT Orchestrator to the Cisco Catalyst 9800 Wireless Controller and push the token and certificate to the controller.
IoT Orchestrator is supported on any AP join profile. The application enables it automatically only on the default-ap-profile when it starts. A customer can manually use the command no cisco-dna grpc to configure any other AP join profile. This configuration permits APs in that profile to establish gRPC channels with IoT Orchestrator.
Connect with the Controller
A pop-up window is displayed stating the following:
The connection establishment with the controller is successful.
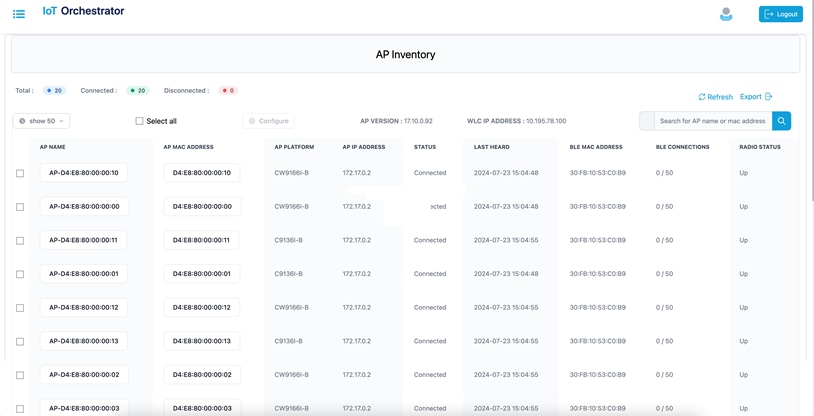
Note: To verify if all the APs connected to the controller are connected to the IoT Orchestrator, check the Inventory > Access Points page from the IoT Orchestrator UI.
AP Inventory Page
AP BLE Transmit Configuration (Optional)
Procedure
Step 1. Log in to the Cisco Catalyst 9800 Wireless Controller Web UI.
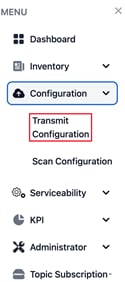
Step 2. From the MENU, choose Configuration > Transmit Configuration.
IoT Orchestrator Dashboard – Configuration > Transmit Configuration
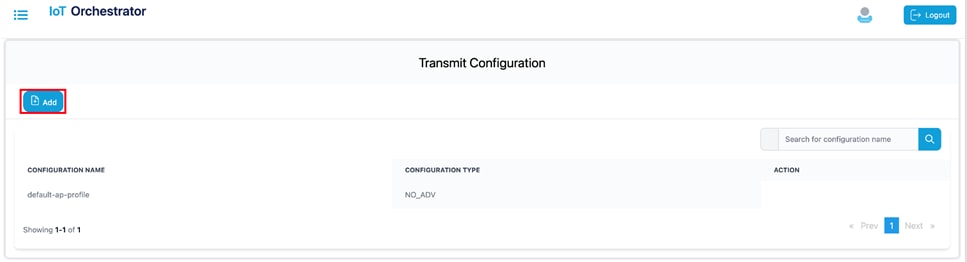
Step 3. Click Add.
 |
Transmit Configuration Page
Transmit Configuration – Add Page
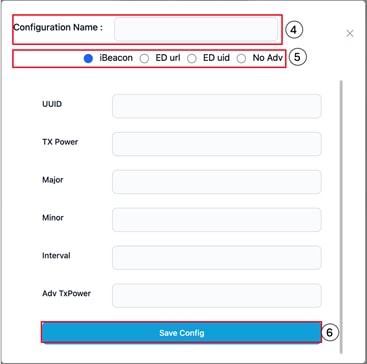
Step 4. Enter a name for the transmit configuration.
Step 5. Choose one of the following transmission methods:
· iBeacon: Enter the UUID, TX power, major, minor, interval, and Adv TxPower values.
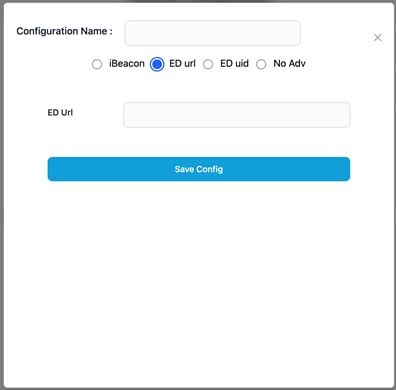
· ED url: Enter the ED url.
ED url Configuration
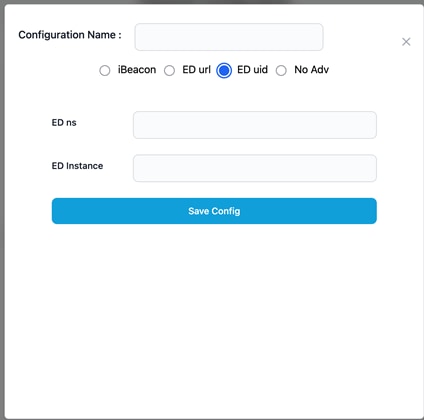
· ED uid: Enter the ED ns and ED instance values.
ED uid Configuration
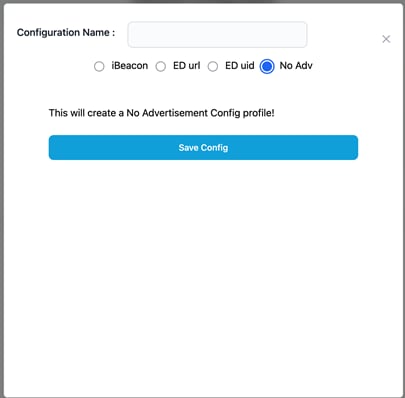
· No Advertisement:
No Adv Configuration
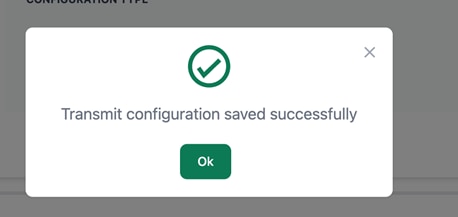
Step 9. Click Save Config.
 |
Transmit Configuration Successful Message
 |
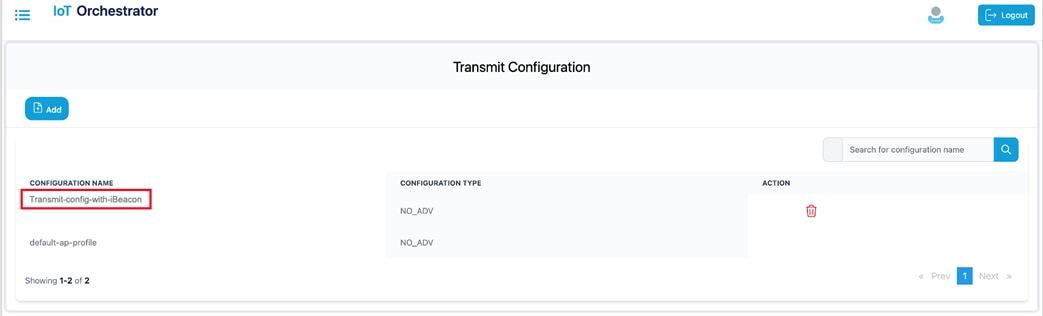
Transmit Configuration List
Scan Configuration
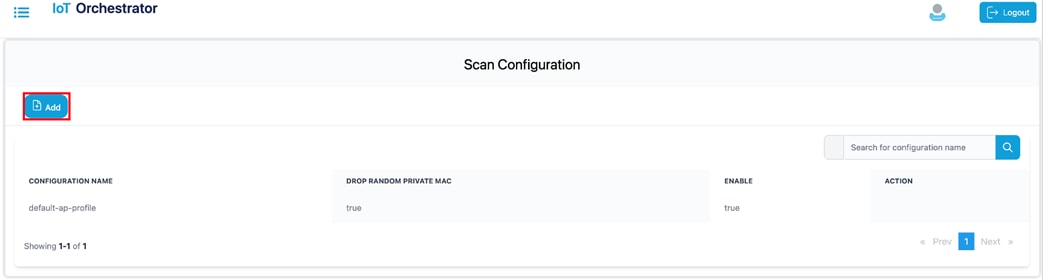
Step 1. Log in to the Cisco Catalyst 9800 Wireless Controller Web UI.
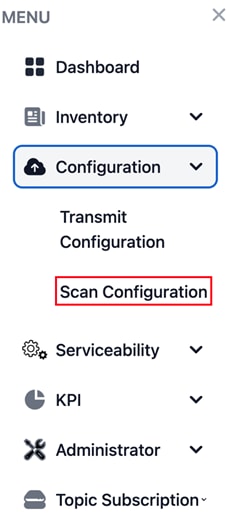
Step 2. From the MENU, choose Configuration > Scan Configuration.
 |
IoT Orchestrator Dashboard – Configuration > Scan Configuration
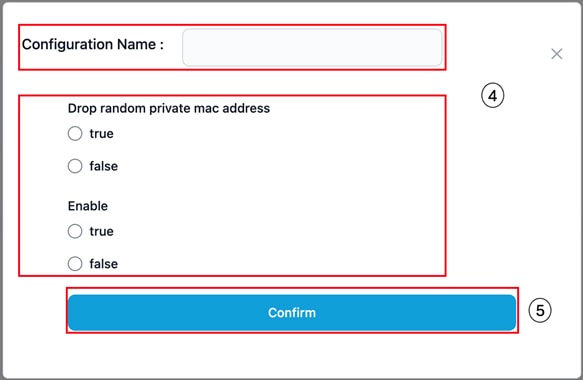
Step 10. Click Add.
 |
Scan Configuration Page
Configuration pop-up
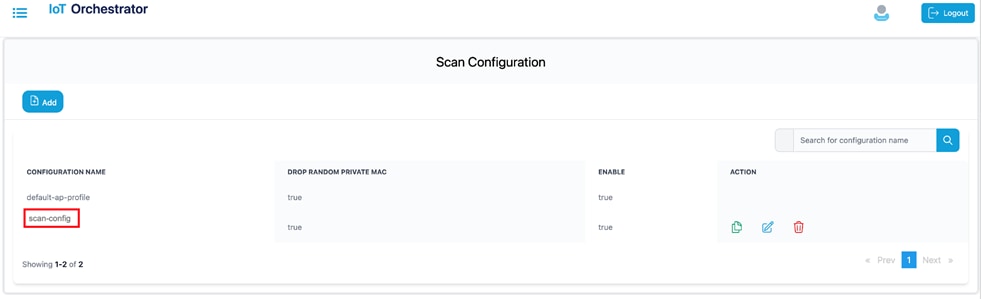 |
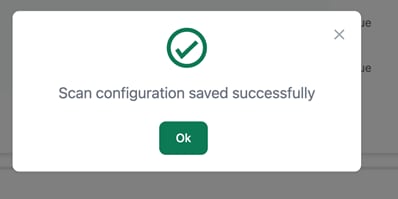
Scan Configuration Successful Message
The value gets added to the scan configuration list.
Scan Configuration List
Register the Third-Party Applications
Summary:
If you want to access the BLE devices, you will need to register your third-party applications in the IoT Orchestrator application.
Uploading Custom Certificates for REST API Authentication
By default, the IoT Orchestrator listens on port 8081 for API requests over HTTPS. APIs are authenticated
using API keys generated by the IoT Orchestrator, and the HTTPS server uses a self-signed certificate
automatically provisioned by the IoT Orchestrator during the Day-0 flow.
To overwrite the default certificate, perform the following:
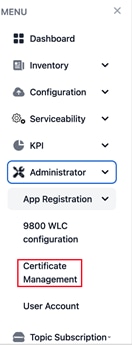
Step 1. Choose the Administrator > Certificate Management page. To generate certificates, see Creating a Server Certificate section.
 |
Administrator > Certificate Management Dashboard Page
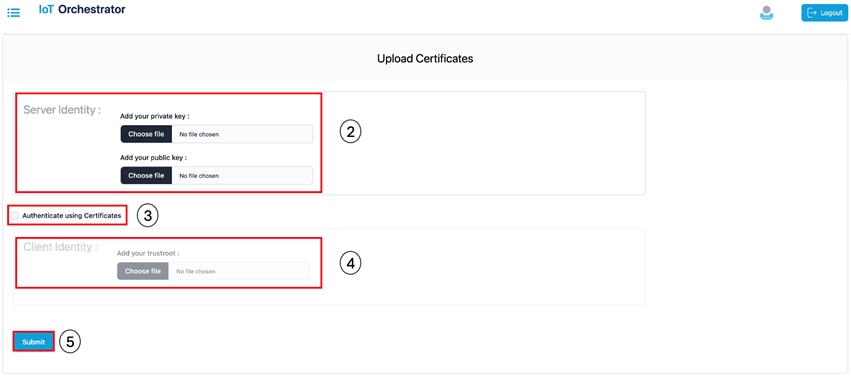
The Upload Certificates page is displayed.
Upload Certificates Page
Step 2. In the Server Identity section, select the private and public keys. To authenticate RESTful APIs using API keys, skip Step 3 and Step 4.
Step 3. Select the Auth using Certificates check box to authenticate REST APIs with certificates.
Step 4. In the Client Identity section, select the root certificate for certificate verification during TLS handshake.
Step 5. Click Submit to validate the certificate and key.
A pop-up is displayed stating that the HTTPS server is created.
Creating a Server Certificate
The following process is required when using a certificate generated by a Certificate Authority (CA). By default, the IoT Orchestrator is ready to onboard or connect and stream data, creating self-signed certificates to secure requests to the REST API interface or when protecting MQTT streaming with a TLS layer. If a certificate signed by a Certificate Authority (CA) is needed, then a certificate signing request (CSR) is required.
The following procedure details how to obtain this CSR and upload it to the IoT Orchestrator:
Before you begin
● The openssl must be available in the terminal.
Step 1. Generate a private key and Certificate Signing Request (CSR) for server by executing the following commands:
openssl genrsa -out server.key 2048
openssl req -new -key server.key -out server.csr
You will be prompted to enter the following information:
● Country Name (2 letter code)
● State or Province Name (full name)
● Locality Name (e.g., city)
● Organization Name (e.g., company)
● Organizational Unit Name (e.g., department)
● Common Name (domain name or IP address of IoT Orchestrator)
● Email Address
Note: Use the CSR file generated with the Certificate Authority (CA) of your choice to generate a new certificate for the IoT Orchestrator.
Step 2. Upload the server.key and the certificate provided by your digital certificate service provider.
Note:
● If you want to authenticate RESTful APIs using APIKeys, you must attach the private key (server.keyserver.key) and the certificate generated by the Certificate Authority (CA) of your choice. The former should be added within the Add your private keyAdd your private key section and the later within the Add your public keyAdd your public key section.
● To authenticate RESTful APIs using certificates, in addition to the private key (server.keyserver.key) and the certificate generated by the Certificate Authority (CA), you will also need the Root Certificate, which can be downloaded from the Certificate Authority (CA) website. The Root Certificate should be added in the Add your trustrootAdd your trustroot field under the Client IdentityClient Identity section.
Note:
· The file extension for private key must be .key.
· The file extension for public key must be .crt.
Registering Partner Application to Interact with the IoT Orchestrator Application
Summary:
You need to register the partner applications (such as onboard application, control application, and data receiver application) to access BLE devices using the IoT Orchestrator.
You can register the partner applications using one of the following ways:
● API keys (or)
● Certificates. For information, see the Auth using CertificatesAuth using Certificates in Uploading Certificate and Key to Open HTTP Server and Listen for APIs section.
How do you authorize:
You can authorize the applications by generating keys.
Procedure
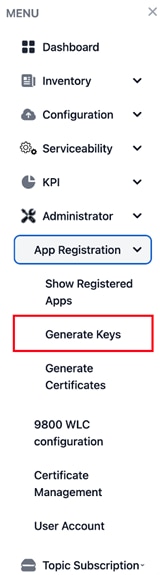
Step 1. Choose the Administrator > App Registration > Generate Keys.
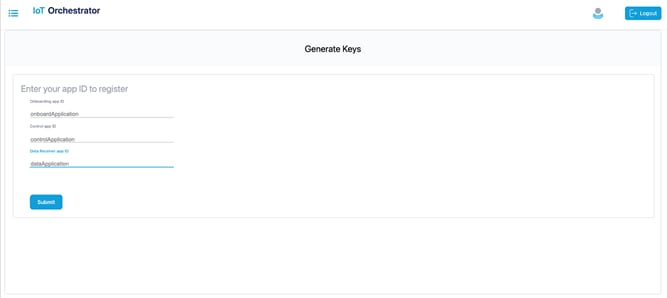
Administrator > App Registration > Generate Keys Page
The Generate Keys page is displayed.
Generate Keys
Step 2. Enter the application IDs for the onboard application, control application, and data receiver application.
Note:
● The application IDs are used to generate keys.
● The application IDs can be any string, but do not use the colon (':') character in the application ID, as it is not supported.
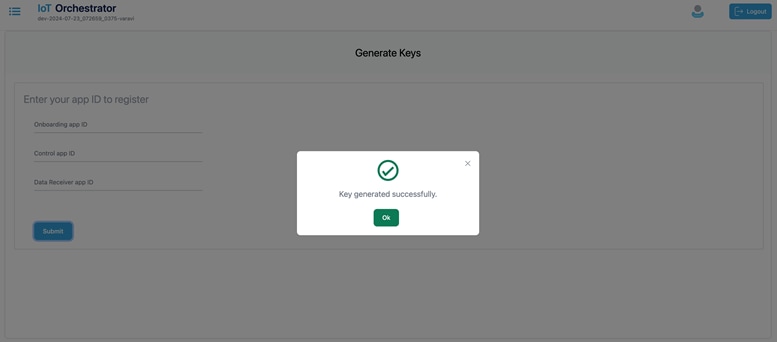
Step 3. Click Submit.
The keys are generated successfully.
 |
Keys Generated Message Pop-Up
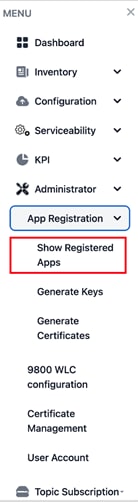
Step 4. From MENU, choose the Administrator > App Registration > Show Registered Apps.
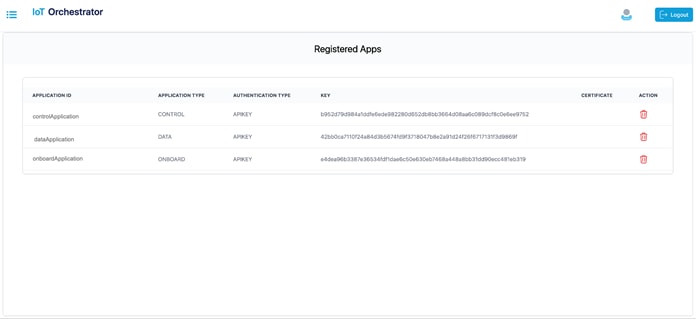
Administrator > App Registration > Show Registered Apps Page
The Registered Apps page is displayed. You get to view the keys or certificates generated for the applications.
Keys or Certificates Generated for Applications
Device Onboarding
For information on onboarding BLE devices using SCIM, see the Onboarding BLE Devices using SCIM section in Cisco Sensor Connect for IoT Services Programmability Guide.
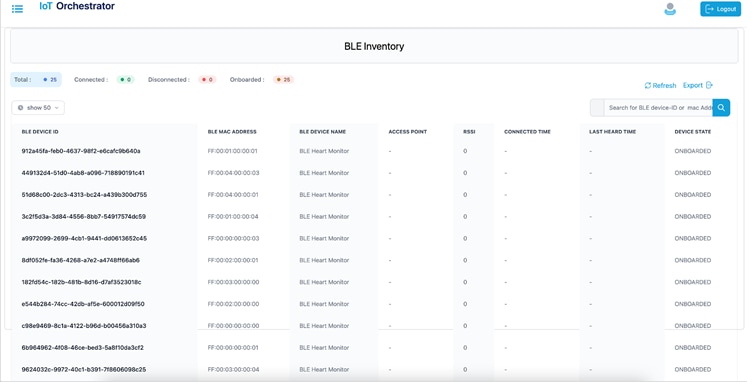
BLE Inventory
Summary:
You will be able to view the information of the BLE devices that are onboarded in the IoT Orchestrator.
Displays the BLE devices that are onboarded and the respective states.
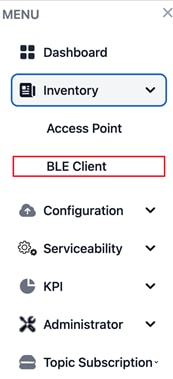
Step 1. From the MENU, choose the Inventory > BLE Client.
Inventory > BLE Client Page

BLE Inventory
Device Control & Telemetry
Registering Data Receiver Application
Summary:
You will need to register the data receiver application to receive the streaming messages from the IoT Orchestrator.
For information on registering data application, see the Registering the Data Receiver Application section in Cisco Sensor Connect for IoT Services Programmability Guide.
Registering a Topic
Summary:
You will need to register the topic to receive the streaming messages from the BLE devices.
For information on registering a topic, see the Registering a Topic section in Cisco Sensor Connect for IoT Services Programmability Guide.
Subscribing to a Topic
Summary:
You will need to subscribe to a topic to receive the streaming messages from the BLE devices using the registered data receiver applications.
For information on subscribing to a topic, see the Subscribing to Advertisements and Notifications section in Cisco Sensor Connect for IoT Services Programmability Guide.
BLE Connectionless Use Case for Asset Tracking
For information on BLE connectionless use case, receive onboarded BLE device advertisements in Data Receiver application, see the Use Case 1: Asset Tracking section in Cisco Sensor Connect for IoT Services Programmability Guide.
BLE Connection Based Use Case
For information on BLE connection-based use case, see the Use Case 2: Remote Patient Health Monitoring (requiring BLE connection, reading, and writing) section in Cisco Sensor Connect for IoT Services Programmability Guide.
BLE Connection Based Use Case with GATT Notification
For information on BLE connection-based use case with GATT notification, see the Use Case 3: BLE Notification-based Use Cases section in Cisco Sensor Connect for IoT Services Programmability Guide.
Release Table
This document is the quick start guide for Cisco Sensor Connect for IoT Services.
| Date |
Release Version |
| April 1, 2025 |
Release 1.1 |
Communications, Services, and Additional Information
● To receive timely, relevant information from Cisco, sign up at Cisco Profile Manager.
● To get the business impact you’re looking for with the technologies that matter, visit Cisco Services.
● To submit a service request, visit Cisco Support.
● To discover and browse secure, validated enterprise-class apps, products, solutions, and services, visit Cisco DevNet.
● To obtain general networking, training, and certification titles, visit Cisco Press.
● To find warranty information for a specific product or product family, access Cisco Warranty Finder.
Cisco Bug Search Tool
Cisco Bug Search Tool (BST) is a gateway to the Cisco bug-tracking system, which maintains a comprehensive list of defects and vulnerabilities in Cisco products and software. The BST provides you with detailed defect information about your products and software.
Documentation Feedback
To provide feedback about Cisco technical documentation, use the feedback form available in the right pane of every online document.
Copyright © 2025, Cisco Systems, Inc. All rights reserved.
 Feedback
Contact Cisco
- Open a Support Case

- (Requires a Cisco Service Contract)
This Document Applies to These Products
- Collaboration Endpoints - Retired Products
- Conferencing - Retired Products
- Contact Center - Retired Products
- Optical Networking - Retired Products
- Routers - Retired Products
- Security - Retired Products
- Servers - Unified Computing (UCS) Retired Products
- Storage Networking Retired Products
- Switches - Retired Products
- Video - Retired Products
- Wireless - Retired Products