Location Analytics Report

This chapter describes the Location Analytics Report.

Overview

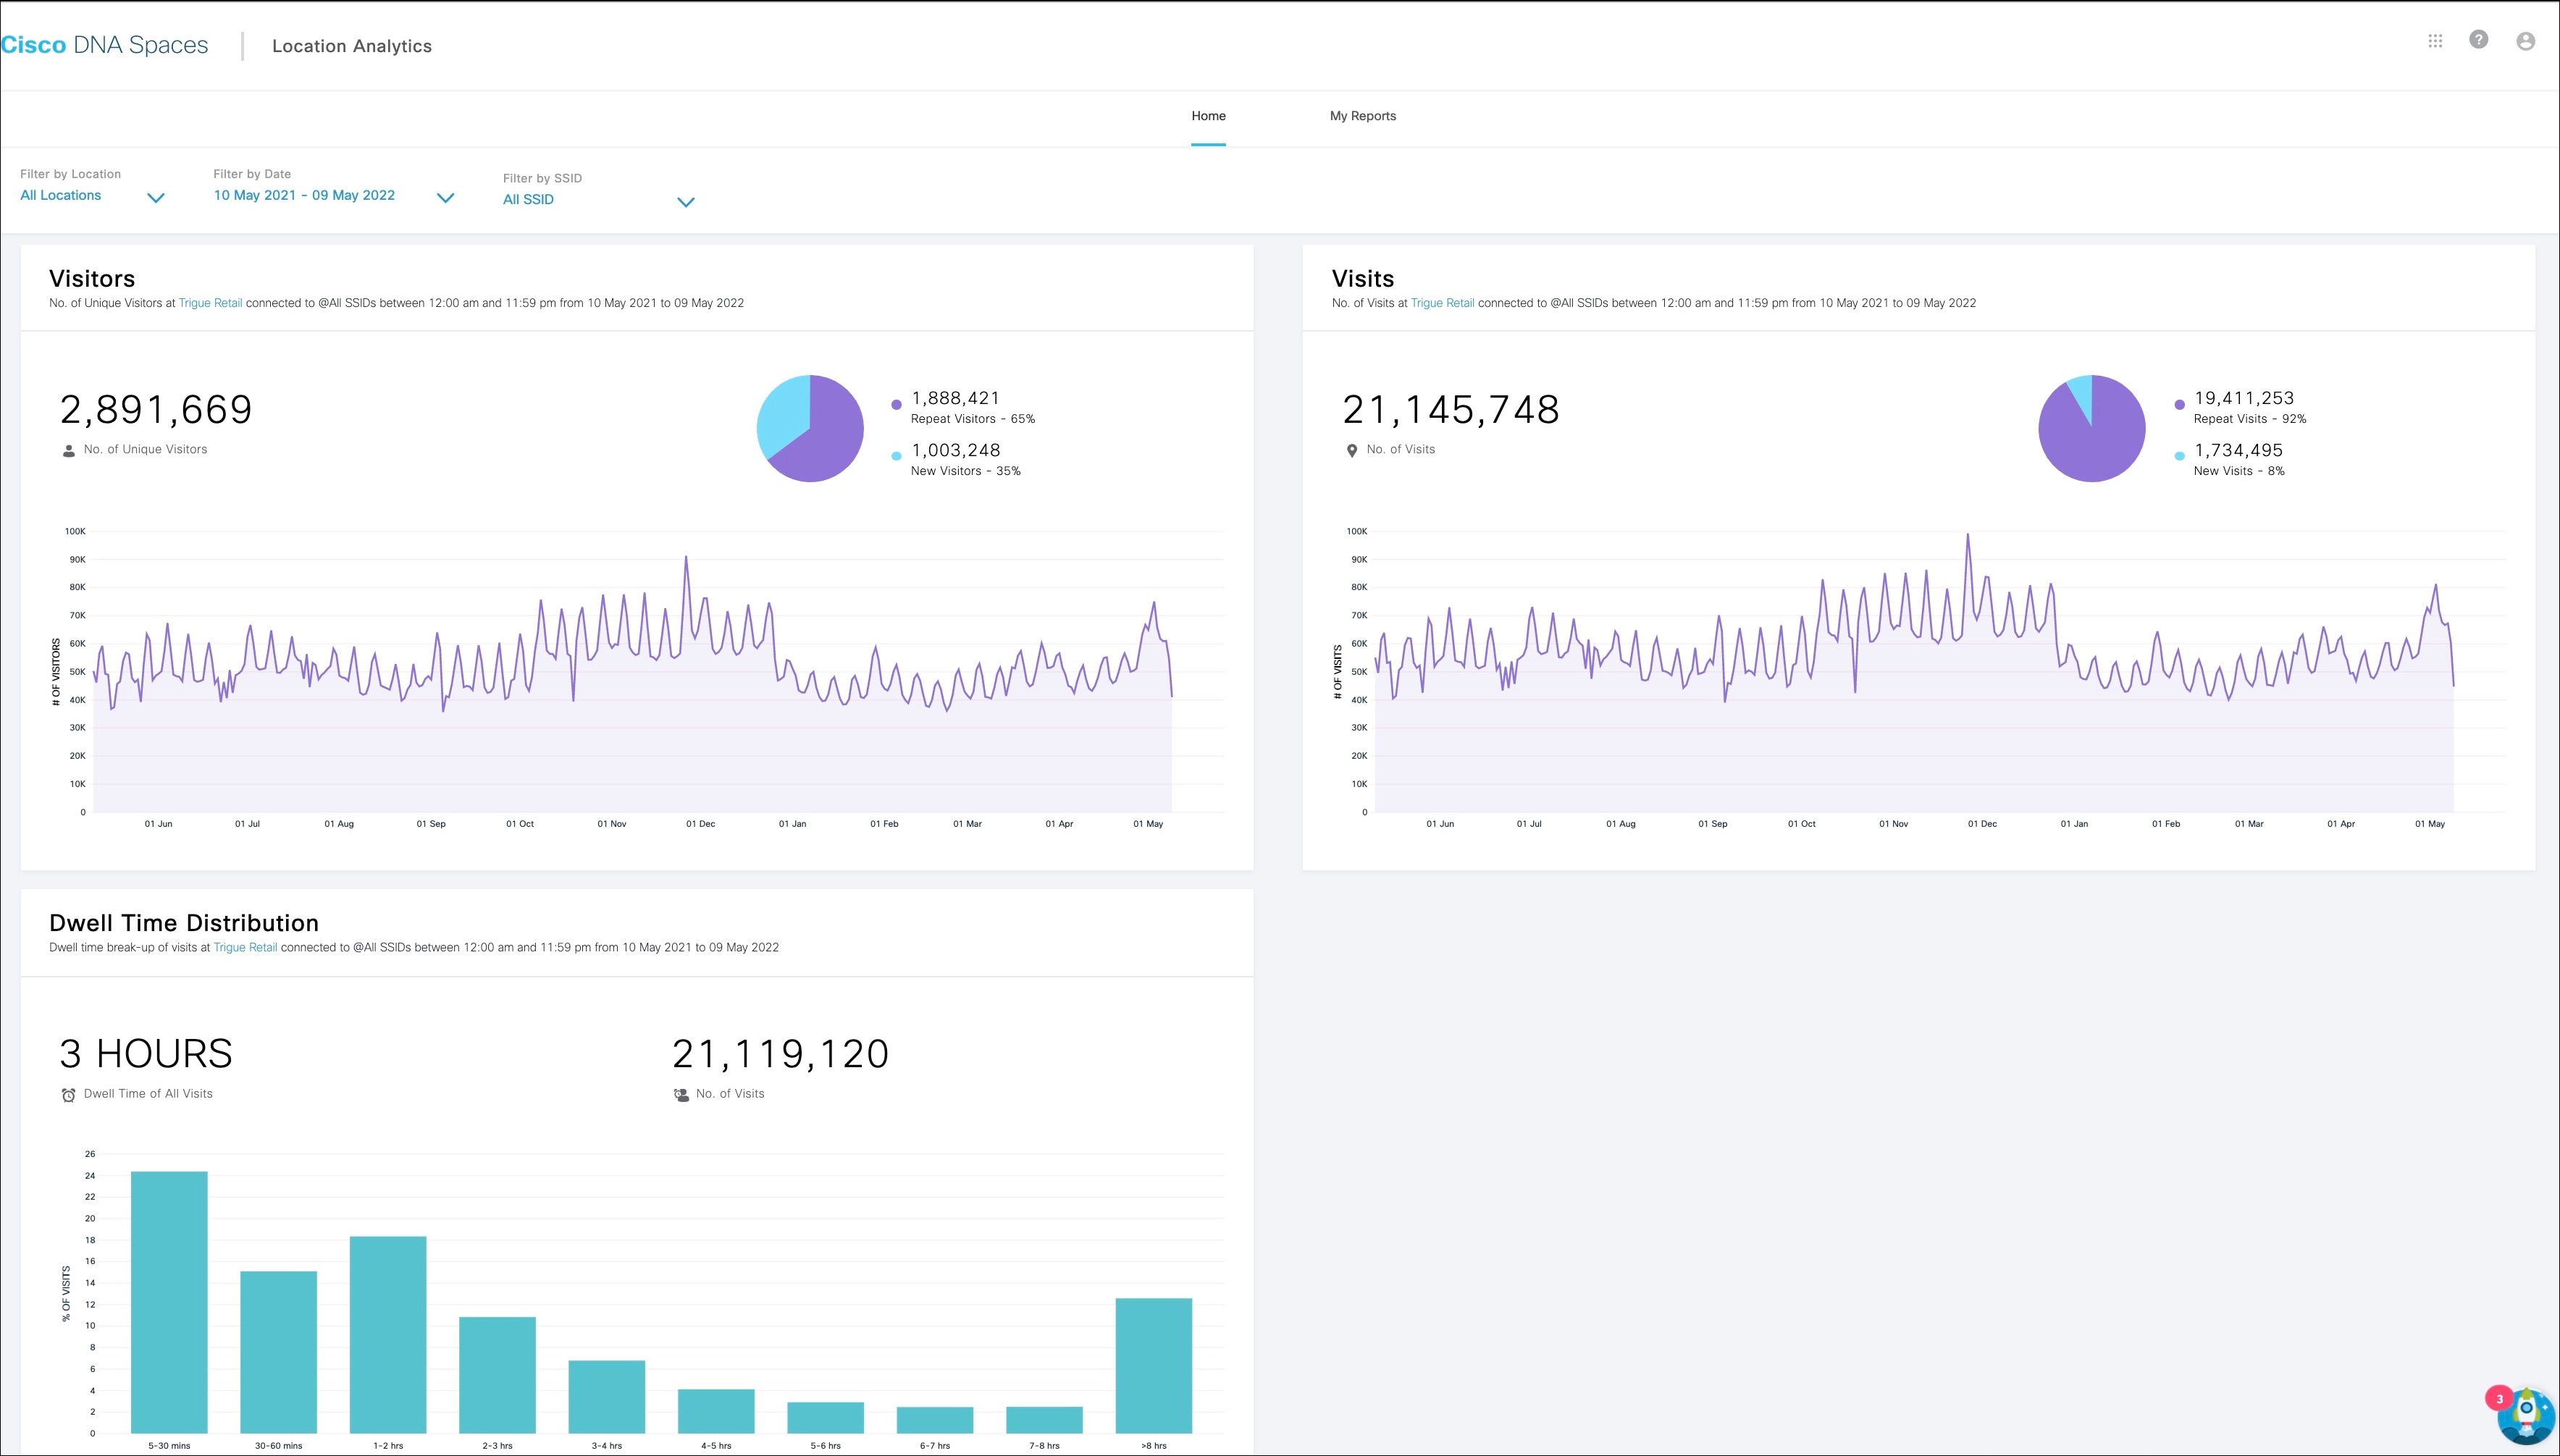
The Location Analytics app enables you to view reports of visits in your locations.The visits of your employees are also counted in the report.

Location Analytics shows the hierarchy path of the filtered location. The filtered location path is displayed in the widgets available in the home page and the Custom Reports section except for the Path widget.

Viewing Location Analytics Report

To view the location analytics report, perform the following steps:

Procedure


Step 1

In the Cisco Spaces dashboard, choose Home.

Step 2

In the window that appears, click Location Analytics.

The Location Analytics report appears.

By default, the report is shown for the root location from January 01, 2019 till date. You can filter the report by location, date, and SSID. Report is not shown if there is no data.

Step 3

From the Filter by Location drop-down list, choose the parent location for which you want to view the report.

Note 

Only for ACT licenses, you can view the report for floors and zones. However, for the SEE and EXTEND licenses, you can filter only network locations.

Step 4

From the Filter by date drop-down list, choose the date range for which you want to view the report.

In the Choose date range window, you can specify an available time period or you can specify a custom date range by specifying the start date and end date. Click Apply.

The following periods will be available for selection by default:

  • Today: The report displays the total number of visits on each hour of the particular day.

  • Yesterday: The report displays the total number of visits on each hour of the previous day.

  • Current Week: The report displays the total number of visits on each day of the current week.

  • Previous Week: The report displays the total number of visits on each day of the previous week.

  • Current Month: The report displays the total number of visits on each day of the current month.

  • Previous Month: The report displays the total number of visits on each day of the previous month.

  • Last 15 days: The report displays the total number of visits on each day of the previous 15 days.

  • Last 30 days: The report displays the total number of visits on each day of the previous 30 days.

  • Last 3 Months: The report displays the total number of visits on each day of previous 3 months.

  • Last 6 Months: The report displays the total number of visits on each day of previous 6 months.

  • Custom: The report displays the total number of visits on each day of the time range specified.

To view the visit details for a particular day, hover over that day on the graph.

Step 5

From the Filter by SSID drop-down list, choose the SSID for which you want to view the report.

The following SSID options will be available for selection:

  • All SSIDs: Displays the visit data in the filtered locations for the specified period captured using the SSIDs in those locations.

  • Custom SSID configured in Cisco DNA Spaces: Displays the visit data in the filtered locations for the specified period captured using the particular SSID.

Note 

The report gets displayed for the filters applied. You can apply the filters only if you are an ACT license user. The SEE and EXTEND license users cannot use the SSID filter. However, they can use the date range filter, and filter the locations except the group, floor and zone locations.


Location Analytics Report

Figure 1. Location Analytics Report

You can view the following information in the Location Analytics report:

  • Visitors: Displays total number of unique visitors in the filtered location during the period specified. The count for New Unique Visitors and Repeat Unique Visitors are shown separately along with their percentage. Also a graph is shown that displays the unique visitor count for each day of the specified period.

    • New Visitors: Total number of unique visitors who visit the filtered location for the first time.

    • Repeat Visitors: Total number of unique vistors who have visited the filtered location more than once.

  • Visits: Displays total number of visits in the filtered location during the period specified . The count for New Visits and Repeat Visits are shown separately along with their percentage. Also a graph is shown that displays the visit count for each day of the specified period

    • New Visits: Total number of unique first time visit in the filtered location.

    • Repeat Visits: Total number of unique visits that occurred more than once in the filtered location.


    Note

    • Visits having a duration of less than five minutes are excluded. This helps to exclude transient and transitory visitors, who contribute to inflating the visitor and visits count.

    • Visits having a duration of more than 1440 minutes are excluded. This helps to exclude devices that are always on, and contribute to inflating the average duration metric.


  • Dwell Time Distribution: Displays the dwell time break-up for the visits occurred in the filtered location during the period specified for all SSIDs. The dwell time of all visits and total number of visits are also displayed. The count for 0-5 min represents the total number of visits of the duration 0 to 5 minutes in the filtered locations.

  • Path widget: Displays the visitor traverse pattern between locations and also the percentage of visits at various floors or zones within the same Network. In your custom report, hover the cursor over any floor or zone in the Path widget to view the exact visit count. You can filter using only the locations available below the Network to view the path analytics. The Path widget is only available for the Cisco Spaces ACT license accounts.

You can create custom reports with widgets with different filters.

Creating Custom Reports

In addition to the default report displayed for location analytics, you can create custom reports by applying widget filters. Each custom report can have multiple widgets. You can create widgets with different combinations of report types, locations, time period, SSIDs, visit ranges, and View By options. You can add more than one widget with same report type in a custom report.

To create a custom report, perform the following steps:

Procedure


Step 1

In the Cisco Spaces dashboard, choose Home.

Step 2

In the window that appears, click Location Analytics.

Step 3

Click the three-parallel line icon displayed at the top-left of the window.

Step 4

In the window that appears, click My Reports.

Step 5

Click Create New Report.

Step 6

In the Create New Report window that appears, enter a name and description for the report.

Step 7

Click Create.

Step 8

Click Add New Widget.

Step 9

In the Add a Widget wizard, do the following:

  1. In the Name of the widget field, enter a name for the widget.

  2. Click the type of report that needs to be added in the custom report.

    The report types available for selection will be the ones available for default report.

    You can select only one report type for a widget.
  3. Click Next .

  4. In the Choose Locations window, check the locations for which you want to view the report.

    Note 
    • If you are selecting the report types as "Visitors", you can choose only one location. For other report types, you can filter more than one location.

    • You can choose only upto network locations for filtering. You cannot choose floors and zones for filtering.

  5. Click Next.

  6. In the Filter by window, specify the time period for which you want to view the report by specifying the values in From and To fields.

  7. From the SSID drop-down list, choose the SSID for which you want to view the report.

    The following SSID options will be available for selection:

    • All SSIDs: Displays the visit data in the filtered locations for the specified period captured using the SSIDs in those locations.

    • Without SSIDs: Displays the visit data in the filtered locations for the specified period that are not captured through SSIDs. For example, the visitors who have visited a filtered location, but not connected to any of the SSIDs in the filtered location during the time period specified. However, the visits of those visitors who have connected atleast once to any of the SSIDs previously only will be counted.

    • Custom SSID configured in Cisco DNA Spaces: Displays the visit data in the filtered locations for the specified period captured using the particular SSID.

    Note 

    You can apply the filters only if you are an ACT license user. The SEE license users cannot use the SSID filter. However, they can use the date range filter, and filter the locations except the group, floor and zone locations.

  8. From the Visit Range drop-down list, choose the time for which you want to view the report. For example, if you choose Mid Night, the report shows the details of visits happened at mid night on the selected locations during the specified period.

    The following options will be available for selection:

    • All Day: The visits happened during the entire day ( 12 am to 11:59 pm) will be included in the report.

    • Mid Night: Only the visits during mid night (12 am to 2:59 am) will be included in the report.

    • Early Morning: Only the visits during early morning (3 am to 4:59 am) will be included in the report.

    • Morning: Only the visits during morning (5 am to 8:59 am) will be included in the report.

    • Business Hours: Only the visits during business hours (9 am to 4.59 pm) will be included in the report.

    • Evening:: Only the visits during evening (5 pm to 8:59 pm) will be included in the report.

    • Late Evening: Only the visits during late evening (9 pm to 11:59 pm) will be included in the report.

    • AM: Only the visits during early morning (12 am to 11:59 am) will be included in the report.

    • PM: Only the visits during late evening (12 pm to 11:59 pm) will be included in the report.

  9. From the View By drop-down list, choose the order in which data must be displayed in the report.

    • by day: The report displays the visit data for each day of the specified period.

    • by Hour of Day: The report displays the visit data for each hour of the day. The visit count for a particular hour will be total visits occurred during the specified period at that particular hour. For example, in the "by hour of day" report for November 2019, the visit count displayed at 2 pm will be the total of number of visits occurred between 2.00 pm and 2:59 pm during the entire month of November 2019.

    • by Week: The report displays the visit data for each week in the specified period.

    • by Day of Week: The report displays the visit data for each week in the specified period with visit count for each day on that particular week.

    • by Month: The report displays the visit data for each month in the specified period.

  10. Click Add.

    The new widget gets added to the custom report.

Step 10

Similarly, you can add multiple widgets to a custom report using the Add New Widget icon.

The custom report created gets listed in the My Reports window.

Note 

ACT (Advanced) subscription customers are allowed to apply all filters (Location, SSID, Time Range and Visit Range) in the widgets. SEE (Base) and EXTEND subscription customers are restricted to apply SSID and Visit Ranges filters, and cannot filter group, floor and zone locations.


Sharing Custom Reports

Share Custom Report feature in the Location Analytics app allows you to share reports with both Cisco Spaces users and non-Cisco Spaces users. Non-Cisco Spaces users must perform a one-time registration to access the reports. If you do not have the necessary permissions to access the report, request access from the administrator or the user who initiated the report.

You cannot access a report if it is deleted or revoked. Only an administrator or a sender can revoke a report.

To share a custom report, perform the following steps:

Procedure


Step 1

In the Cisco Spaces dashboard, choose Home.

Step 2

In the window that appears, click Location Analytics.

Step 3

In the window that appears, click My Reports.

Step 4

Click a report from the available custom report list.

Step 5

Click the share icon displayed at the top-right of the window.

The Share Report window is displayed.

Step 6

Enter the following information:

  • Add Email: Enter the email address of the recipient of the report. This is a mandatory field.

  • Add Message: Enter your email message.

Note 
  • Use the Preview option to view how the report is shared with the recipient.

  • Click the edit icon next to the report name to edit the name of the custom report.

Step 7

Click Share.

A success notification message is displayed in the window.