Using Advanced Settings

SNMP

Simple Network Management Protocol Version 2 (SNMPv2) is a protocol for network management. This protocol is used for collecting information, configuring, and managing all the devices in the network.

Managing SNMP using GUI

To manage SNMP using GUI, perform the following steps:

Procedure


Step 1

Click Advanced > SNMP.
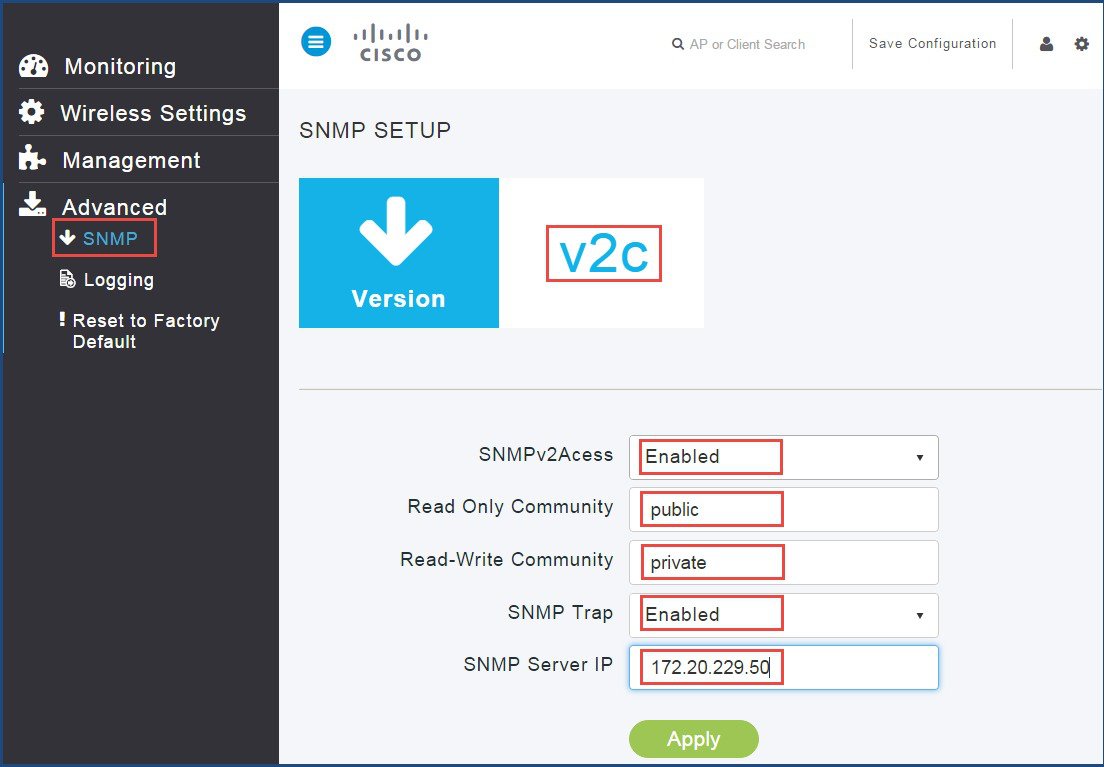
The SNMP Setup screen appears displaying the supported version details.


Step 2

From the SNMPv2 Access drop-down list, choose Enabled.

The default option is disabled.

Step 3

Enter the community name in the Read Only Community field.

The default option is public.

Step 4

Enter the community name in the Read-Write Community field.

The default option is private.

Step 5

From the SNMP Trap drop-down list, choose Enabled.

The default option is Disabled. The SNMP Trap Receiver tool receives logs and displays the SNMP traps sent from the network.

Step 6

Enter IP address of the server in the SNMP Server IP field.

Step 7

Click Apply.


Managing SNMP using CLI

To manage SNMP using CLI, perform the following steps:

Procedure


Step 1

Log in to the Mobility Express controller CLI.

Step 2

Enter the following commands to enable and view the SNMP version:

(Cisco Controller) >config snmp version v2c enable
(Cisco Controller) >show snmpversion
Step 3

Enter the following commands to configure and view the Read-Only Community:

(Cisco Controller) >config snmp community accessmode ro public

(Cisco Controller) >show snmpcommunity
Step 4

Enter the following commands to configure and view the Read-Write Community:

(Cisco Controller) >config snmp community accessmode rw private
(Cisco Controller) >show snmpcommunity
Step 5

Enter the following commands to configure and view the SNMP Trap Receive:

(Cisco Controller) >config snmp trapreceiver create 10.10.10.10 

(Cisco Controller) >show snmptrap
Step 6

Enter the following commands to send the SNMP traps:

(Cisco Controller) >config snmp trapreceiver mode enable
(Cisco Controller) >show snmptrap

Logging

The System Message logging feature logs the system events to a remote server, called a Syslog server. Each system event triggers a syslog message that contains the details of the event.

If the System Message logging feature is enabled, the controller sends a syslog message to the syslog server which is configured on the controller.

System Logging using GUI

To perform system logging using GUI, follow these steps:

Procedure


Step 1

Click Advanced > Logging.

The Logging Setup screen appears.
Step 2

Choose Enabled from Syslog Logging drop-down list.

The default option is disabled.


Step 3

Enter the IPv4 address in the Syslog Server IP field.

Step 4

From the Logging level drop-down list, choose syslog severity level.

Step 5

From the Syslog Facility drop-down list, choose the syslog severity level.

Step 6

Click Apply.


System Logging using GUI using CLI

To perform system logging using CLI, follow these steps:

Procedure


Step 1

Enter the following commands to configure Syslog Server IP:

(Cisco Controller) >config logging syslog level <0-7>               
<0-7>          	Set syslog message logging message severity level.
alerts         	Set syslog message logging severity to 'alerts' (severity 1).
critical       	Set syslog message logging severity to 'critical' (severity 2).
debugging      	Set syslog message logging severity to 'debugging' (severity 7).
emergencies    	Set syslog message logging severity to 'emergencies' (severity 0).
errors         	Set syslog message logging severity to 'errors' (severity 3).
informational  	Set syslog message logging severity to 'informational' (severity 6).
notifications  	Set syslog message logging severity to 'notifications' (severity 5).
warnings       	Set syslog message logging severity to 'warnings' (severity 4).
Step 2

Enter the following commands to configure Syslog Logging Facility:

(Cisco Controller) >config logging syslog facility <facility>
auth-private   	Authorization system (private).
authorization  	Authorization system.
cron           	Cron/at facility.
daemon         	System daemons.
ftp            	FTP daemon.
kern           	Kernel.
local0         	Local use.
local1         	Local use.
local2         	Local use.
local3         	Local use.
local4        	Local use.
local5         	Local use.
local6         	Local use.
local7         	Local use.
lpr            	Line printer system.
mail           	Mail system.
news        	USENET news.
sys12          	System use.
sys13          	System use.
sys14          	System use.
sys15          	System use.
syslog         	Syslog itself.
user           	User process.
uucp           	Unix-to-Unix copy system.

Reset to Factory Default

You can change the Mobility Express network to its default configuration by performing Reset to Factory Default.


Note

  • This operation must be performed by an Admin user. You cannot restore the previous configurations.

  • Performing Reset to Factory Default using GUI deletes the controller configuration from all the Mobility Express capable Access Points which is followed by a reboot of the primary AP. After the reboot, all Mobility Express capable Access Points will broadcast the CiscoAirProvsion SSID.


Mobility Express Network to Factory Default using GUI

To set Mobility Express network to factory default settings using GUI, perform the following steps:

Procedure


Step 1

Click Advanced > Reset to Factory Default.

The Reset Mobility Express Controller to Factory Default page appears.


Step 2

Click Continue.

A confirmation message box appears.


Step 3

Click Yes.