Managing Mobility Express Network

Using the Management tab, the admin users can perform the following:

  • Configure access to the Mobility Express controller
  • Manage admin accounts
  • Configure time
  • Perform a software update

Management Access

Configuring Management Access using GUI

The Management Access interface on the Mobility Express controller is the default interface for in-band management of the controller and connectivity to enterprise services. It is also used for communications between the controller and access points. There are four types of Management Access supported on the Mobility Express controller.
  1. HTTP Access—To enable HTTP access mode, choose Enabled from the HTTP Access drop-down list. This allows you to access the controller GUI using http://<ip-address> through a web browser. Otherwise, choose Disabled.

    The default value is Disabled. HTTP access mode is not a secure connection.

  2. HTTPS Access—To enable HTTPS access mode, choose Enabled from the HTTPS Access drop-down list. This allows you to access the controller GUI using http://ip-address through a web browser. Otherwise, choose Disabled.

    The default value is Enabled. HTTPS access mode is a secure connection.

  3. Telnet Access—To enable Telnet access mode, choose Enabled from the Telnet Access drop-down list. This allows remote access to the controller’s CLI using your laptop’s command prompt. Otherwise, choose Disabled.

    The default value is Disabled. The Telnet access mode is not a secure connection.

  4. SSHv2 Access—To enable Secure Shell Version 2 (SSHv2) access mode, choose Enabled from the SSHv2 Access drop-down list. This is a more secure version of Telnet that uses data encryption and a secure channel for data transfer. Otherwise, choose Disabled.

    The default value is Enabled. The SSHv2 access mode is a secure connection.

To enable or disable the different types of management access on the controller, perform the following steps:

Procedure


Step 1

Click Management > Access.
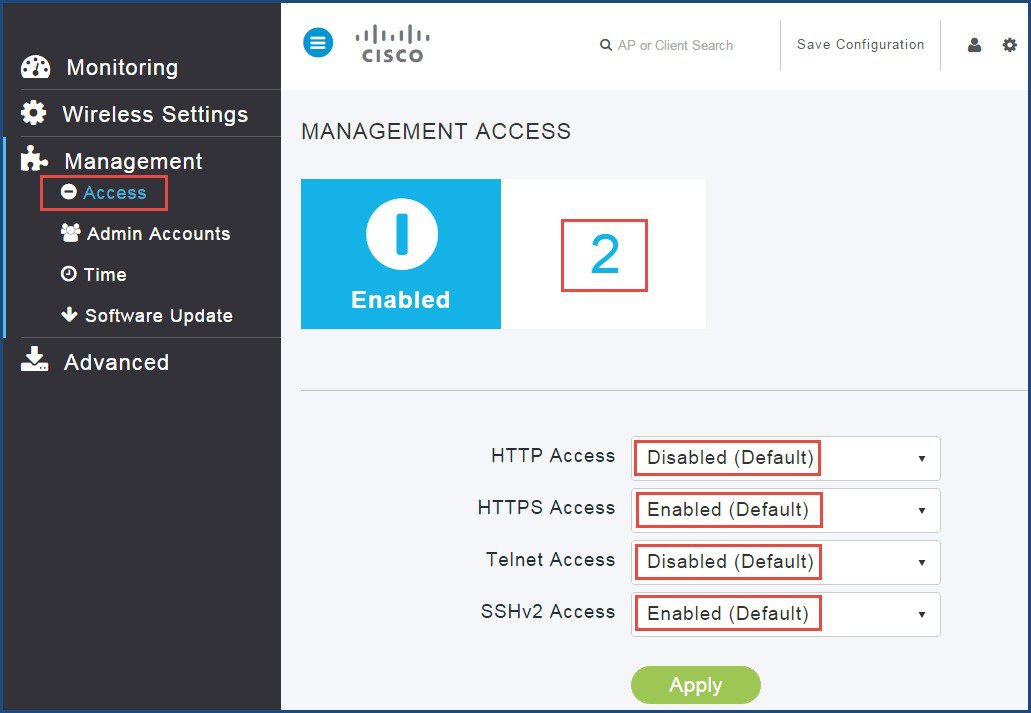
The Management Access page appears displaying the count of the access type which are enabled.


Step 2

For the various Access Types, choose either as Enabled or Disabled.

Note 

There must be at least one access enabled else admin user will be locked out of Mobility Express Controller and you have to use console to make changes for providing access again.

Step 3

Click Apply.


Configuring Management Access using CLI

To configure the management access using CLI, enter the following commands:
  • (Cisco Controller) >config network webmode <enable | disable>
  • (Cisco Controller) >config network secureweb <enable | disable>
  • (Cisco Controller) >config network ssh <enable | disable>
  • (Cisco Controller) >config network telnet <enable | disable>

Managing Administrator Accounts

You can configure admin usernames and passwords to prevent unauthorized users from reconfiguring the controller and viewing configuration information.

The Admin user accounts are required for logging into Mobility Express controller to monitor and configure the wireless network. The admin accounts can be configured with Read/Write or Read only privileges.

  • Choose Management > Admin Accounts.
  • The Admin Accounts page appears displaying the count of administrator accounts on the controller and list of all administrator accounts available on the Cisco Mobility Express controller.


Creating an Admin Account using GUI

To create an admin account using GUI, perform the following steps:


Procedure


Step 1

Click Add New User.

Step 2

Enter the admin user name in the Account Name field.

Note 

Admin account name must be unique. It is case-sensitive and can contain up to 24 ASCII characters without spaces.

Step 3

Choose Read/Write or Read Only from Access drop-down list.

Read Only—It creates an administrative account with read-only privileges. The admin user can only view the controller configuration but cannot make any changes to the configuration.

Read/Write—It creates an administrative account with read and write privileges. The admin user can view and make changes to the controller configuration.

Step 4

Enter the new password for admin user account in the New Password field.

  1. Passwords are case sensitive and cannot contain space.

  2. The password must contain a minimum of 8 characters from ALL of the following classes:

    1. Lowercase letters

    2. Uppercase letters

    3. Digits

    4. Special characters.

  3. No character in the password can be repeated more than three times consecutively.

  4. The password must not contain the word Cisco or a management username. The password must also not be any variant of these words, obtained by reversing the letters of these words, or by changing the capitalization of letters, or by substituting 1, |, or ! or substituting 0 for o or substituting $ for s.

Step 5

Re-enter the password in the Confirm Password field.

Step 6

Click Apply to the save changes.


Creating an Admin Account using CLI

To create an admin account using CLI, perform the following steps:

Procedure


Step 1

Log in to the Mobility Express controller CLI.

Step 2

Create admin user using the following CLI commands:

(Cisco Controller) >config mgmtuser add <username> <password> <read-only | read-write>
	
To view the list of all the admin accounts, use the CLI below

 (Cisco Controller) >show mgmtuser

Editing an Admin Account using GUI

To edit an admin account using GUI, perform the following steps:

Procedure


Step 1

Click Edit .


Step 2

Change password and click Apply.

Note 

Access cannot be changed for an admin account after creation, it can only be deleted and recreated.


Editing an Admin Account using CLI

To edit an admin account using CLI, perform the following steps:

Procedure


Step 1

Log in to the Mobility Express controller CLI.

Step 2

Edit an existing admin user account using the following command:

(Cisco Controller) >config mgmtuser password <username> <password>
Note 

Access cannot be changed for an admin account after creation, it can only be deleted and recreated.


Deleting Admin Account using GUI

To delete an admin account using GUI, perform the following steps:

Procedure


Step 1

Click Delete in the GUI.


Step 2

Click OK to confirm.


Deleting Admin Account using CLI

To delete an admin account using CLI, perform the following steps:

Procedure


Step 1

Log in to the Mobility Express controller CLI.

Step 2

Delete an existing admin user account using the following command:

(Cisco Controller) >config mgmtuser delete <username>

Managing Time on Mobility Express Controller

The system date and time on the Cisco Mobility Express controller is first configured when running the initial Wireless Express setup wizard.

A Network Time Protocol (NTP) server can be configured to synchronize date and time if one was not configured during the Wireless Express setup. Greenwich Mean Time (GMT) is used as the standard for setting the time zone on the controller.

Configuring NTP Server on Mobility Express Controller using GUI

To configure an NTP server, perform the following steps:

Procedure


Step 1

Choose Management > Time from the left pane.


Step 2

Choose the desired time zone from the Time zone drop down list.

Note 

To change the Time zone; disable the NTP state, change the Time zone and enable the NTP state.

Step 3

Choose Enable from NTP State drop-down list.

Step 4

Enter the polling interval in seconds in the NTP Polling Interval field.

Note 

The polling interval ranges from 3600 to 604800 seconds.

Step 5

Enter the NTP server's IPv4 address in the NTP Server field

Step 6

Click Apply.

Note 

Synchronizing of the date and time with the NTP server occurs every moment when the controller reboots and at each user-defined polling interval.


Configuring NTP Server on Mobility Express Controller using CLI

To configure NTP server on Mobility Express Controller using CLI, perform the following steps:

Procedure


Step 1

Log in to the Mobility Express controller CLI.

Step 2

Configure an NTP server from CLI using the following commands:

(Cisco Controller) >config time ntp server <index> <NTP IP Address>
<index> 1 as only one NTP server is supported on Mobility Express controller
(Cisco Controller) >config time ntp interval <interval>
 <interval>     Enter NTP polling interval, between 3600 and 604800(in seconds).
Step 3

Configure the Time zone using anyone of the following commands:

(Cisco Controller) >config time timezone location <location_index> 
(Cisco Controller) >config time timezone delta <delta_hours> <delta_min>
<delta_hours>  Enter the local hour difference from Universal Coordinated Time (UTC).
<delta_mins>   Enter the local minute difference from Universal Coordinated Time (UTC).
Step 4

View current date and time along with time setting using the following command:

(Cisco Controller) >show time

Configuring Date and Time Manually on Mobility Express Controller using GUI (Method I)

To configure date and time manually using GUI, perform the following steps:

Procedure


Step 1

Choose the desired Time Zone from the Time Zone drop down list.

Step 2

Check the check box for Set Time Automatically from Current Location to set time based on the Time Zone.


Configuring Date and Time Manually on Mobility Express Controller using GUI (Method II)

Procedure


Step 1

Click Date icon from Set Time Manually field and change the date.

Step 2

Click Time icon from Set Time Manual and choose time from the drop down list.

Step 3

Click Apply.


Configuring Date and Time Manually on Mobility Express Controller using CLI

To configure date and time manually using CLI, perform the following steps:

Procedure


Step 1

Log in to the Mobility Express controller CLI.

Step 2

Configure time manually using the following command:

(Cisco Controller) >config time manual <MM/DD/YY> <HH:MM:SS>
Step 3

Configure the Time zone using one of the following commands:

 (Cisco Controller) >config time timezone location <location_index> 
(Cisco Controller) >config time timezone delta <delta_hours> <delta_min>
<delta_hours>  Enter the local hour difference from Universal Coordinated Time (UTC).
<delta_mins>   Enter the local minute difference from Universal Coordinated Time (UTC).
Step 4

View current date and time along with the time setting using the following command:

(Cisco Controller) >show time

Updating Cisco Mobility Express Software

Cisco Mobility Express controller software update can be performed using the controller's web interface. Software update ensures that both the controller software and all the Access Points associated are updated. The APs that have older software are automatically upgraded to the Mobility Express software on joining the primary AP. An AP joining the controller compares its Cisco Mobility Express software version with the primary AP version and incase of mismatch, the new AP requests for a software upgrade. The primary AP facilitates the transfer of the new software from the TFTP server to the new AP.

Ssoftware download on the Access Points is automatically sequenced to ensure that not more than two APs are downloading the software simultaneously and the queue refreshes till all the APs requiring upgrade have downloaded the new image.

Primary AP facilitates transfer of image from the TFTP server to the Subordinate APs. The AP images are stored and served from the TFTP server upon request.

Before you upgrade the Mobility Express network, ensure the following pre-requisites are met:

Pre-requisites for Software Update

  1. A TFTP server is reachable from the management IP address of the Mobility Express controller.

  2. The AP bundle with AP images downloaded from CCO is unzipped and copied into the TFTP server.

Software Update Sequence:

  1. Download the AIR-AP1850-K9-ME-<version>.zip or AIR-AP1830-K9-ME-<version>.zip file from cisco.com on a device running TFTP server. Unzip the file to extract the AP images.

  2. Configure TFTP parameters on the Software Update page.

  3. Initiate image pre-download on Mobility Express network.

  4. Reboot of or scheduled reboot of Mobility Express Controller and associated Access Points.


Note

  • image pre-download on APs is automatically sequenced, such that not more than two APs are pre-download the image simultaneously.
  • During the image pre-download there is no service interruption. After completion of the image pre-download on all APs, a manual or scheduled reboot of Mobility Express network must be triggered.

To begin Software Update, perform the following steps:

Procedure


Step 1

Download the AIR-AP1850-K9-ME-<version>.zip or AIR-AP1830-K9-ME-<version>.zip file from cisco.com to a machine running TFTP server.


Step 2

Unzip the AIR-AP1850-K9-ME-<version>.zip file to extract the AP images.


Updating Cisco Mobility Express network using GUI

To update the software using GUI, perform the following steps:

Procedure


Step 1

Log in to the Mobility Express user interface and choose Management > Software Update.

The system displays the current version of the Mobility Express.
Step 2

Enter the value in the IP Address(IPv4) field.

Note 

We recommend to have TFTP server in the same network as the management interface.

Step 3

Enter the File Path of the unzipped AP images.

Step 4

Click Save Tftp Parameters.

Step 5

To initiate the image pre-download, click Update Now or Schedule Later.

  • Update Now––Initiates the image pre-download instantaneously. After image pre-download is complete on all APs, click Restart to manually reboot the APs. After the reboot, all APs will run the new image.

  • Schedule Later–– Initiates the image pre-download instantaneously. However,reboot of the APs happen at a scheduled time configured by the user in the Set Reboot Time field.

Step 6

Once the image pre-download starts, you can view the status by expanding Preimage Download Status.

Image pre-download involves different states, such as:
  1. Predownloading—The AP actively downloads an image on its flash during this state.

  2. Initiated—A image pre-download request is sent to the AP during this state.

  3. BackedOff—When image pre-download is initiated on two APs, the next two APs are identified and

    moved to Initiated state. After the image pre-download on the first two APs, APs which are in Initiated state are moved to pre-downloading state. If the Initiated state timer expires before the image pre-download is complete on the first set of the APs, the APs in Initiated state are moved to BackedOff state.

    .
    Note 

    Each time the AP is BackedOff, the Update Attempts count increments.

  4. Completed—image pre-download is complete on the AP.

After the image pre-download is complete, the status dashboard displays Update Complete and notifies the user to reboot the Mobility Express network.

Step 7

After image pre-download is complete, Mobility Express network needs to be re-booted to run the new software. If Update Now was selected for image pre-download, click Restart to reboot all the APs in the Mobility Express network.

Note 

If you chose Schedule Later for image pre-download and specified Set Reboot Time, do not Restart the APs, as the reboot happens at the scheduled time.

Step 8

After few minutes, log into Mobility Express and check the new version in the Software Update page.


Updating Cisco Mobility Express Network using CLI

To upgrade Cisco Mobility Express Network using CLI, perform the following steps:

Procedure


Step 1

Log in to Cisco 1850 AP running Mobility Express controller using Telnet or SSH.

Step 2

Specify the data type, using the following command:

(Cisco Controller) >transfer download datatype ap-image
Step 3

Specify the transfer mode, using the following command:

(Cisco Controller) >transfer download ap-images mode tftp
Step 4

Specify the IP address of the TFTP server, using the following command:

(Cisco Controller) >transfer download ap-images serverIp <IP addr>
Step 5

Specify the path of the AP images on the TFTP server, using the following command:

(Cisco Controller) >transfer download ap-images imagePath <path to AP images>
Note 

For successful image pre-download, ensure that path to the AP images is correct.

Step 6

Pre-download the image on the APs, using the following command:

(Cisco Controller) >transfer download start 

Output:


Mode........................................... TFTP  
Data Type...................................... ap-image
TFTP Server IP................................. 10.1.1.77
TFTP Packet Timeout............................ 10
TFTP Max Retries............................... 10
TFTP Path...................................... ap_bundle_8.1.112.30/
	
This may take some time.
Are you sure you want to start? (y/N) y

TFTP Code transfer starting.

Triggered APs to pre-download the image.
Reboot the controller once AP Image pre-download is complete. 
Step 7

Check the pre-download status, using the following command:

(Cisco Controller) >show ap image all

Output:


Total number of APs............... 3
Number of APs
       Initiated.........................1
       Predownloading....................2
       Completed predownloading..........0
       Not Supported.....................0
       Failed/BackedOff to Predownload...0
                   Primary    Backup  Predownload Predownload Next Retry  Retry Failure
AP Name	             Image     Image 	   Status      Version    Time      Count Reason
 ––––––––––––––   ––––––––––  –––––––--  ––––––––    –––––––––   –––––––   ––––  –––––
AP6412.256e.0e78 8.1.112.21	 8.1.112.21 Predownloading   ––	          NA	      NA	 
APAOEC.F96C.D640 8.1.112.21	 8.1.112.21 Predownloading   ––	          NA       NA	
3600-gemini	     8.1.112.21	 8.1.112.21 Predownloading	  ––	          NA              

Wait for the image pre-download to complete on the APs.

(Cisco Controller) >show ap image all

Total number of APs............... 3
Number of APs
       Initiated.........................1
       Predownloading....................2
       Completed predownloading..........0
       Not Supported.....................0
       Failed/BackedOff to Predownload...0
                    Primary    Backup  Predownload Predownload Next Retry Retry Failure
AP Name	             Image     Image 	   Status      Version    Time      Count Reason
 ––––––––––––––   ––––––––––  –––––––--  ––––––––    –––––––––   –––––––   ––––  –––––
AP6412.256e.0e78 8.1.112.21	 8.1.112.21 Complete     ––	          NA	      NA	 
APAOEC.F96C.D640 8.1.112.21	 8.1.112.21 Complete     ––	          NA       NA	
3600-gemini	     8.1.112.21	 8.1.112.21 Complete	    ––	          NA              
Step 8

When pre-download is complete, reset the system using the following command:

(Cisco Controller) >reset system 

Output:


The system has unsaved changes.
Would you like to save them now? (y/N) y

Configuration Saved!
System will now restart!
Cisco 1850 running Mobility Express re-boots followed by the rest of APs.
Step 9

Log in to the Mobility Express and check the version of primary image.

The System displays the new version and the Backup Image displays the previous version.