Deploying Mobility Express

Pre-requisites for Deploying Mobility Express

The pre-requisites for deploying Mobility Express network are as follows:

  1. You must not have other Cisco wireless controllers, neither appliance nor virtual, in the same network, during set up or daily operation of a Cisco Mobility Express network.

  2. Configure a DHCP server on the switch or externally so that Cisco 1800 series Access Point can obtain an IP address at boot up. The DHCP server also assigns IP address to other APs and wireless clients.

  3. Configure a TFTP server which can be accessed from the Management interface of Mobility Express. Save the AIR-<AP Type>-K9-<version>.tar and AIR-<AP Type>-K9-ME-<version>.zip file (unzipped) on the TFTP server.

  4. Decide on the first AP to set up. The first AP to setup must support Cisco Mobility Express controller functionality. You can also connect multiple Cisco 1800 series Access Points running Mobility Express to the switch.

  5. If your network is using universal regulatory domain access points, then you need to prime the access point to the right regulatory domain, before the APs start serving clients. For more information, see Cisco Aironet Universal AP Priming and Cisco Air Provision User Guide, at this URL:

    http://www.cisco.com/c/en/us/td/docs/wireless/access_point/ux-ap/guide/uxap-mobapp-g.html
  6. A Wi-Fi-enabled laptop with G Band to connect to the pre-defined CiscoAirProvision SSID. The laptop needs to have a compatible browser. For a list of browsers compatible with the with the Cisco Mobility Express wireless LAN controller web interface and the initial configuration wizard, see .
Connecting Mobility Express Capable Access Point

To connect Mobility Express capable access point, perform the following steps:

Procedure


Step 1

Connect and power up the Mobility Express capable access point.

  1. The switch port to which Cisco 1800 Access Point is connected can be a trunk port or an access port. If multiple VLANs are being used for client traffic, the switch port should be configured to trunk the VLANs. Also, note that management traffic is untagged and if a VLAN is being used for management, it should be configured as a native VLAN on the switch port.

    Example of the switch port is as follows:

    interface GigabitEthernet1/0/37
     description » Connected to Master AP « 
     switchport trunk native vlan 122 
     switchport trunk allowed vlan 10,20,122
     switchport mode trunk
    
Step 2

Observe the access point LED (for LED descriptions, see LED Status Indication ).

  1. When you power up the access point—The access point starts a power-up sequence that you can verify by observing the access point LED. If the power-up sequence is successful, the discovery and join process starts. During this process, the LED blinks sequentially green, red, and OFF.

  2. When the access point joins the Mobility Express controller—The LED chirps green if no clients are associated or turn green if one or more clients are associated.

  3. If the LED is not ON—The access point does not receive power.

  4. If the LED blinks sequentially for more than 10 minutes— This could be because the access point does not have the Mobility Express capable image.


Configuring Mobility Express controller using Over-the-Air Setup Wizard

To configure the Mobility Express using Over-the-Air Setup wizard, perform the following steps:

Procedure


Step 1

When a LED chirps green, connect a WiFi enabled laptop, through Wi-Fi, to the CiscoAirProvision SSID. The default password is password.

The laptop gets an IP address from subnet 192.168.1.0/24.

Note 

CiscoAirProvision SSID is broadcast at 2.4GHz.

Step 2

Open a browser and go to http://192.168.1.1 which redirects to the initial configuration wizard.

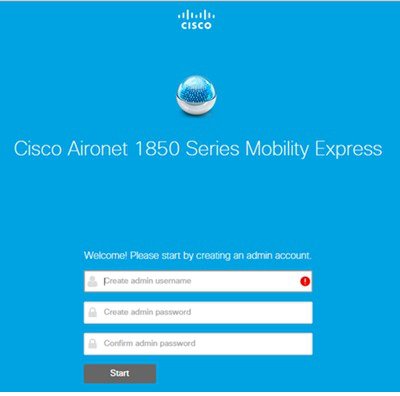
The initial configuration wizard's admin account page appears.

Figure 1. Initial Configuration Wizard's Admin Account Page

The banner on the opening page shows the name of the AP model on which the Mobility Express wireless LAN controller is being configured. For example, 'Cisco Aironet 1850 Series Mobility Express'.

Note 

Take the checklist that you have filled before and proceed with the following steps.

Step 3

Create an admin account on the controller by specifying the following parameters and then click Start.

  • Enter the admin username. Maximum up to 24 ASCII characters.

  • Enter the password. Maximum up to 24 ASCII characters.

When specifying a password, ensure that:
  • The password must contain characters from at least three of the following classes – lowercase letters, uppercase letters, digits, special characters.

  • No character in the password can be repeated more than three times consecutively.

  • The new password must not be the same as the associated username and the username reversed.

  • The password must not be cisco, ocsic, or any variants obtained by changing the capitalization of letters of the word Cisco. In addition, you cannot substitute 1, I, or ! for i, 0 for o, or $ for s.

Step 4

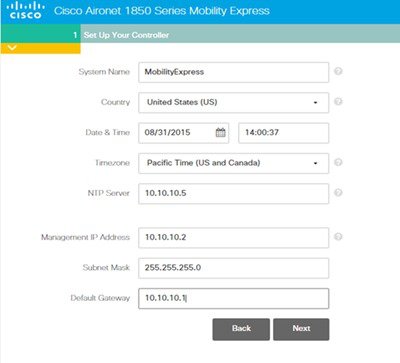
Set up your controller by specifying the values.

On the Set Up Your Controller screen, using the checklist, specify the following:

Field Name

Description

System Name

Enter the system name for Mobility Express. Example: MobilityExpress-WLC

Country

Choose the country from the drop down list.

Date & Time

Choose the current date and time.
Note 

The wizard attempts to import the clock information (date and time) from the computer using JavaScript. It is highly recommended that you confirm the clock settings before continuing. The access points depend on clock settings to join the WLC.

Time Zone

Choose the current time zone.

NTP Server

Enter the NTP server details.

Management IP Address

Enter the Management IP address.

Subnet Mask

Enter the subnet mask address.

Default Gateway

Enter the default gateway.

Figure 2. Set Up Your Controller Tab
Step 5

Click Next.

Step 6

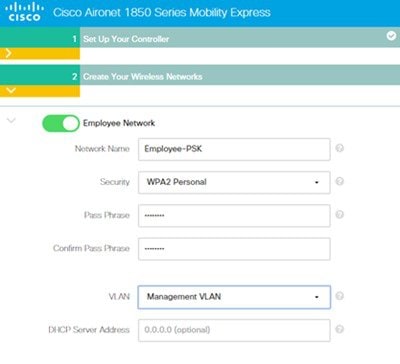
Create the wireless networks by specifying the following fields:

Field Name

Description

Network Name

Enter the network name.

Security

Choose the security type from the drop-down list. (Choose either WPA2 Personal which uses Pre-Shared Key (PSK) authentication or select WPA2 Enterprise (also called 802.1x) which requires a RADIUS server for authentication).

Pass Phrase

If you have chosen WPA2 Personal security, specify the Pre-Shared Key (PSK).

Confirm Pass Phrase

Re-enter and confirm the pass phrase.

Authentication Server IP Address

Enter the IP address of the Authentication Server

Shared Secret

If you have chosen WPA2 Enterprise, specify the shared secret for the RADIUS server.

VLAN

Choose Management VLAN or create a new VLAN

VLAN ID

If you have created a new VLAN specify the VLAN ID. (VLAN ID from 1 to 4096).

Figure 3. Create Your Wireless Networks Tab Fields
Step 7

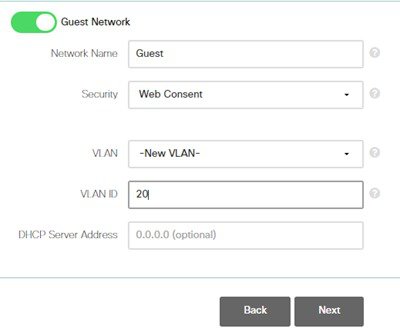
Enable the Guest Network slider and specify the following parameters:

Field Name

Description

Network Name

Specify the SSID for your Guest network.

Security

Choose Web Consent or WPA2 Personal from the drop-down list.

Pass Phrase

If WPA2 Personal security is chosen, specify the Pre-Shared Key (PSK).

VLAN

Choose Employee VLAN or create a New VLAN (with VLAN ID 1 to 4096).

VLAN ID

Specify the VLAN ID of the new VLAN (with VLAN ID 1 to 4096).

Figure 4. Create Your Wireless Networks - Guest


Step 8

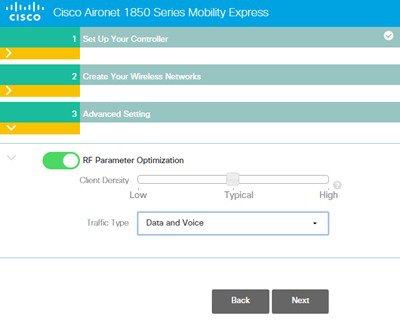
In the Advanced Settings tab, enable RF Parameter Optimization slider and optimize by indicating the expected client density and traffic type in your network.

Figure 5. Advanced Settings Tab
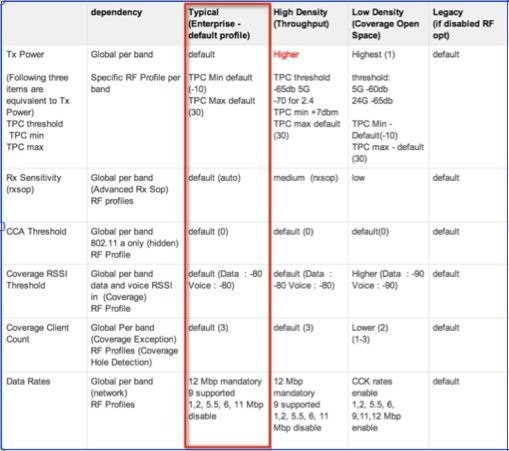
The following table depicts the default values when low, typical, or high deployment type is selected from RF parameters


Step 9

Select Traffic Type and click Next to continue.

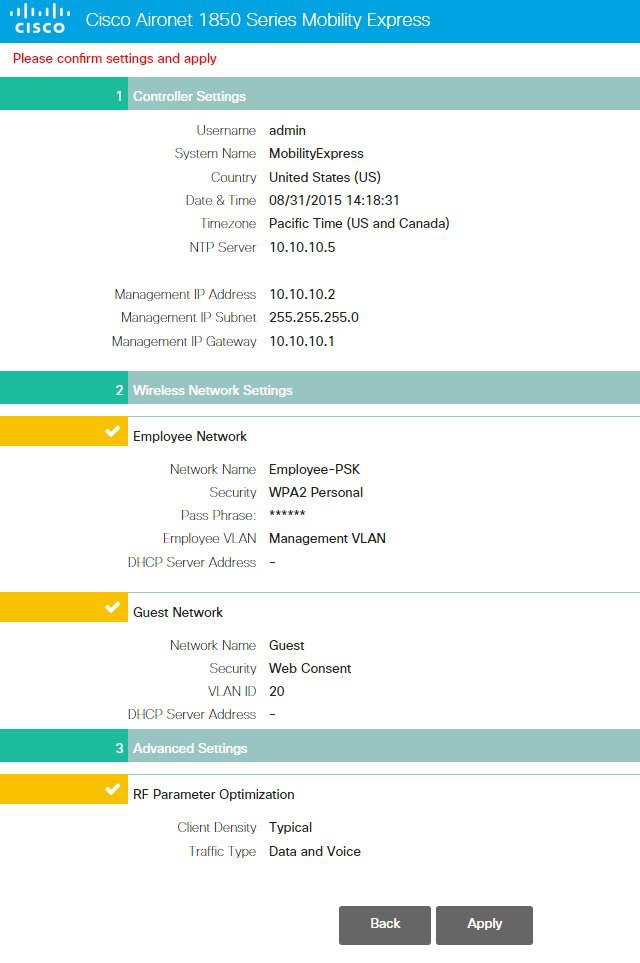
A confirmation screen displays the summary of the configuration.

Step 10

Click Apply, if all the settings are correct

A message appears with a prompt 'System will reboot...Do you want to apply these configuration?

Step 11

Click OK to reboot.

Note 

After the Access Point reboots, it will start the Mobility Express controller function.

Step 12

APs reboots and join the Mobility Express controller, if there are more than one 1800 series APs.


Configuring Mobility Express controller using Startup Wizard from CLI

Console Connection

Before you can configure the AP to Mobility Express Controller, connect to the port marked ‘CONSOLE’ using SecureCRT, Putty or similar applications. The default parameters for the console ports are 9600 baud, eight data bits, one stop bit, and no parity. The console ports do not support hardware flow control. Choose the serial baud rate of 9600.

Startup Wizard from CLI

After connecting to the 'CONSOLE' port on the AP, power up the AP. After a few minutes, the following Welcome message will be shown. To configure the Mobility Express controller, follow the steps as shown in the example below.
Cisco Aironet 1850 Series Mobility Express
Welcome to the Cisco Wizard Configuration Tool
Use the '-' character to backup

Would you like to terminate autoinstall? [yes]: yes
Enter Administrative User Name (24 characters max): admin
Enter Administrative Password (3 to 24 characters): ********
Re-enter Administrative Password                 : ********

System Name [Cisco_ca:09:20] (31 characters max): Mobility Express
Enter Country Code list (enter 'help' for a list of countries) [US]: US
Configure a NTP server now? [YES][no]: Yes
Enter the NTP server's IP address: 10.10.10.77
Enter timezone location index (enter 'help' for a list of timezones): 5

Management Interface IP Address: 10.10.10.10
Management Interface Netmask: 255.255.255.0
Management Interface Default Router: 10.10.10.1
Create Employee Network? [YES][no]: YES
Employee Network Name (SSID)?: Employee
Employee VLAN Identifier ?: 122
Employee Network Security? [PSK][enterprise]: PSK
Employee PSK Passphrase (8-38 charachters)?: Cisco123
Re-enter Employee PSK Passphrase: Cisco123
Create Guest Network? [yes][NO]: NO
Enable RF Parameter Optmization? [YES][no]: YES
Client Density [TYPICAL][Low][High]: TYPICAL
Traffic with Voice [NO][Yes]: YES

Configuration correct? If yes, system will save it and reset. [yes][NO]: yes
Cleaning up Provisioning SSID

Configuration saved!
Resetting system with new configuration...

Note

After the AP has finished rebooting, login to the Mobility Express controller WebUI using the Management IP address.


Logging into Mobility Express

To log in to the Mobility Express, perform the following steps:

Procedure


Step 1

Enter the IP address of the Mobility Express management interface in the web browser.

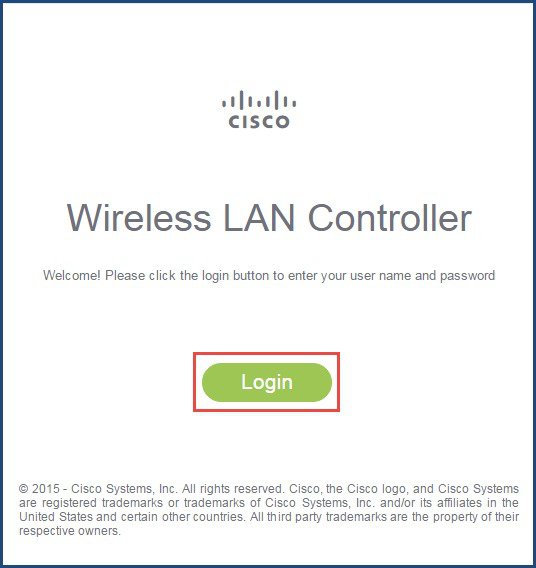
The Cisco Wireless LAN Controller window appears.
Step 2

Click Login.

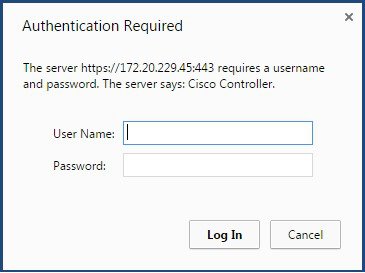
Step 3

Enter the administrator user name and password.

Note 

The Mobility Express controller uses a self-signed certificate for HTTPs. Therefore, all browsers display a warning message and asks whether you wish to proceed with an exception or not when the certificate is presented to the browser. Accept the risk and proceed to access the Mobility Express Wireless LAN Controller login page.

The Network Summary page appears.