IPv6 Client Address Learning

Information About IPv6 Client Address Learning

Client Address Learning is configured on embedded wireless controller to learn the IPv4 and IPv6 address of wireless client, and the client's transition state maintained by the embedded wireless controller on association and timeout.

There are three ways for an IPv6 client to acquire IPv6 addresses:

  • Stateless Address Auto-Configuration (SLAAC)

  • Stateful DHCPv6

  • Static Configuration

In all of these methods, the IPv6 client always sends a neighbor solicitation Duplicate Address Detection (DAD) request to ensure that there is no duplicate IP address on the network. The embedded wireless controller snoops on the Neighbor Discovery Protocol (NDP) and DHCPv6 packets of the client to learn about its client IP addresses.

Address Assignment Using SLAAC

The most common method for IPv6 client address assignment is SLAAC, which provides simple plug-and-play connectivity, where clients self-assign an address based on the IPv6 prefix.

SLAAC is configured as follows:

  • A host sends a Router Solicitation message.

  • The host waits for a Router Advertisement message.

  • The host take the first 64 bits of the IPv6 prefix from the Router Advertisement message and combines it with the 64 bit EUI-64 address (in the case of Ethernet, this is created from the MAC address) to create a global unicast message. The host also uses the source IP address, in the IP header, of the Router Advertisement message, as its default gateway.

  • Duplicate Address Detection is performed by the IPv6 clients to ensure that random addresses that are picked do not collide with other clients.


Note


The choice of algorithm is up to the client and is often configurable.

The last 64 bits of the IPv6 address can be learned by using one of the following algorithms:

  • EUI-64, which is based on the MAC address of the interface

  • Private addresses that are randomly generated


Figure 1. Address Assignment Using SLAAC


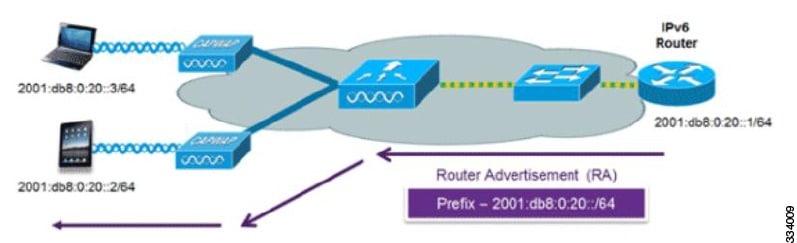
The following Cisco IOS configuration commands from a Cisco-capable IPv6 router are used to enable SLAAC addressing and router advertisements:

ipv6 unicast-routing
interface Vlan20
description IPv6-SLAAC
ip address 192.168.20.1 255.255.255.0
ipv6 address FE80:DB8:0:20::1 linklocal
ipv6 address 2001:DB8:0:20::1/64
ipv6 enable
end

Stateful DHCPv6 Address Assignment

The use of DHCPv6 is not required for IPv6 client connectivity if SLAAC is already deployed. There are two modes of operation for DHCPv6, that is, Stateless and Stateful.

The DHCPv6 Stateless mode is used to provide clients with additional network information that is not available in the router advertisement, but not an IPv6 address, becuase this is already provided by SLAAC. This information includes the DNS domain name, DNS servers, and other DHCP vendor-specific options.

Figure 2. Stateful DHCPv6 Address Assignment

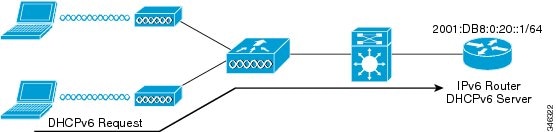
The following interface configuration is for a Cisco IOS IPv6 router implementing stateless DHCPv6 with SLAAC enabled:

ipv6 unicast-routing
ipv6 dhcp pool IPV6_DHCPPOOL
address prefix 2001:db8:5:10::/64
domain-name cisco.com
dns-server 2001:db8:6:6::1
interface Vlan20
description IPv6-DHCP-Stateless
ip address 192.168.20.1 255.255.255.0
ipv6 nd other-config-flag
ipv6 dhcp server IPV6_DHCPPOOL
ipv6 address 2001:DB8:0:20::1/64
end

Static IP Address Assignment

Statically configured address on a client.

Router Solicitation

A Router Solicitation message is issued by a host controller to facilitate local routers to transmit a Router Advertisement from which the controller can obtain information about local routing, or perform stateless auto configuration. Router Advertisements are transmitted periodically and the host prompts with an immediate Router Advertisement using a Router Solicitation such as - when it boots or following a restart operation.

Router Advertisement

A Router Advertisement message is issued periodically by a router or in response to a Router Solicitation message from a host. The information contained in these messages is used by a host to perform stateless auto configuration and to modify its routing table.

Neighbor Discovery

IPv6 Neighbor Discovery is a set of messages and processes that determine relationships between neighboring nodes. Neighbor Discovery replaces the Address Resolution Protocol (ARP), Internet Control Message Protocol (ICMP) Router Discovery, and ICMP Redirect used in IPv4.

IPv6 Neighbor Discovery inspection analyzes neighbor discovery messages in order to build a trusted binding table database, and IPv6 Neighbor Discovery packets that do not comply, are dropped. The neighbor binding table in the tracks each IPv6 address and its associated MAC address. Clients are removed from the table according to neighbor-binding timers.

Neighbor Discovery Suppression

The IPv6 addresses of wireless clients are cached by a device. When the device receives an NS multicast looking for an IPv6 address, and if the target address is known to the device and belongs to one of its clients, the device will reply with an NA message on behalf of the client. At the end of this process, the equivalent of the ARP table of IPv4 is generated, but is more efficient because it uses fewer messages.


Note


The device acts as a proxy and responds with NA, only when the ipv6 nd suppress command is configured.

If the device does not have the IPv6 address of a wireless client, the device does not respond with NA; instead, it forwards the NS packet to the wireless side. To resolve this, an NS Multicast Forwarding knob is provided. If this knob is enabled, the device gets the NS packet for the IPv6 address that it does not have (cache miss) and forwards it to the wireless side. This packet reaches the intended wireless client, and the client replies with NA.

Note that this cache miss scenario occurs rarely, and only very few clients who do not implement complete IPv6 stack may not advertise their IPv6 address during NDP.

Router Advertisement Guard

  • Port on which the frame is received

  • IPv6 source address

  • Prefix list

  • Trusted or Untrusted ports for receiving the router advertisement guard messages

  • Trusted/Untrusted IPv6 source addresses of the router advertisement sender

  • Trusted/Untrusted Prefix list and Prefix ranges

  • Router preference

Router Advertisement Throttling

RA throttling allows the controller to enforce limits to the RA packets headed toward the wireless network. By enabling RA throttling, routers that send multiple RA packets can be trimmed to a minimum frequency that will still maintain an IPv6 client connectivity. If a client sends an RS packet, an RA is sent back to the client. This RA is allowed through the controller and unicast to the client. This process ensures that the new clients or roaming clients are not affected by the RA throttling.

Prerequisites for IPv6 Client Address Learning

Before configuring IPv6 client address learning, configure the embedded wireless controller clients to support IPv6.

Configuring IPv6 on Embedded Wireless Controller Interface

Follow the procedure given below to configure IPv6 on an interface:

Before you begin

Enable IPv6 on the client and IPv6 support on the wired infrastructure.

Procedure

  Command or Action Purpose

Step 1

enable

Example:


Device> enable 

Enables privileged EXEC mode.

Enter your password, if prompted.

Step 2

configure terminal

Example:


Device# configure terminal

Enters global configuration mode.

Step 3

interface GigabitEthernet 0

Example:

Device(config)# interface GigabitEthernet0

Creates the GigabitEthernet interface and enters interface configuration mode.

Step 4

ip address fe80::1 link-local

Example:

Device(config-if)# ip address 198.51.100.1 255.255.255.0
   Device(config-if)# ipv6 address fe80::1 link-local
   Device(config-if)# ipv6 address 2001:DB8:0:1:FFFF:1234::5/64 
   Device(config-if)# ipv6 address 2001:DB8:0:0:E000::F/64

Configures IPv6 address on the GigabitEthernet interface using the link-local option.

Step 5

ipv6 enable

Example:

Device(config)# ipv6 enable

(Optional) Enables IPv6 on the GigabitEthernet interface.

Step 6

end

Example:

Device(config)# end

Exits interface mode.

Native IPv6

IPv6

IPv6 (Internet Protocol version 6) is a

  • packet-based communications protocol developed to exchange data, voice, and video traffic over digital networks, and

  • successor to IPv4, offering a much larger address space and several functional enhancements to support the growing requirements of modern networks.

IPv6 is based on IP, but adds a much larger address space and improvements such as a simplified main header and extension headers. The architecture of IPv6 helps existing IPv4 users transition to IPv6. It allows continued use of services such as end-to-end security, quality of service (QoS), and globally unique addresses. The larger IPv6 address space allows networks to scale and provide global reachability.


Note


Features and functions that work on IPv4 networks with IPv4 addresses also work on IPv6 networks with IPv6 addresses.


Configure IPv6 addressing (CLI)

Enable IPv6 communication and routing capabilities on physical and VLAN interfaces using commands.

Note


All features and functions that operate on IPv4 networks with IPv4 addresses also function on IPv6 networks with IPv6 addresses.


Procedure


Step 1

Enter the global configuration mode.

Example:

Device# configure terminal

Step 2

Configure IPv6 for unicasting.

Example:

Device(config)# ipv6 unicast-routing 

Step 3

Create the GigabitEthernet interface and enter the interface configuration mode.

Example:

Device(config)# interface GigabitEthernet0

Step 4

Specify a global IPv6 address.

Example:

Device(config-if)# ipv6 address FD09:9:2:49::53/64   

Step 5

Enable IPv6 on the interface.

Example:

Device(config-if)# ipv6 enable  

Step 6

Suppress IPv6 router advertisement transmissions on the interface.

Example:

Device(config-if)# ipv6 nd ra suppress all 

Step 7

Return to the global configuration mode and configure the ports that are connected to the supported APs with the wireless management interface.

Example:

Device(config-if)# exit 
Device(config)# wireless management interface gigabitEthernet vlan 64

Step 8

Specify IPv6 static routes.

Example:

Device(config)# ipv6 route ::/0 FD09:9:2:49::1

Create an AP join profile (GUI)

Set up an AP join profile that controls AP joining behavior and preferences using the GUI.

Procedure


Step 1

Choose Configuration > Tags & Profiles > AP Join.

Step 2

On the AP Join Profile window, click the General tab and click Add.

Step 3

In the Name field, enter a name for the AP join profile.

Step 4

(Optional) Enter a description for the AP join profile.

Step 5

Choose CAPWAP > Advanced.

Step 6

Select IPv6 from the Preferred Mode drop-down list under the Advanced tab to set the preferred mode of APs to IPv6.

Step 7

Click Save & Apply to Device.


Create an AP join profile (CLI)

Create an AP join profile using commands.

Procedure


Step 1

Enter the global configuration mode.

Example:

Device# configure terminal

Step 2

Configure an AP profile and enter the AP profile configuration mode.

Example:

Device(config)# ap profile ap-profile

Step 3

Add a description for the AP profile.

Example:

Device(config-ap-profile)# description ap-profile-name

Step 4

Set the preferred mode of APs as IPv6.

Example:

Device(config-ap-profile)# preferred-mode ipv6  

Configure the primary and backup Embedded Wireless Controller (GUI)

Set up a reliable wireless network by designating primary and backup controllers to ensure continuous connectivity in case of failures using the GUI.

Before you begin

Ensure that you have configured an AP join profile prior to configuring the primary and backup embedded wireless controllers.

Procedure


Step 1

Choose Configuration > Tags & Profiles > AP Join.

Step 2

On the AP Join Profile window, click the AP join profile name.

Step 3

In the Edit AP Join Profile window, click the CAPWAP tab.

Step 4

In the High Availability tab, under Backup Controller Configuration, check the Enable Fallback check box.

Step 5

Enter the primary and secondary controller names and IP addresses.

Step 6

Click Update & Apply to Device.


Configure primary and backup controller (CLI)

Set up failover by designating primary and backup controllers on an AP to ensure continuous operation if the primary controller becomes unavailable using commands.

Procedure


Step 1

Enter the global configuration mode.

Example:

Device# configure terminal

Step 2

Configure an AP profile and enter the AP profile configuration mode.

Example:

Device(config)# ap profile profile-name

Step 3

Configure AP CAPWAP parameters with the primary backup controller's name.

Example:

Device(config)# capwap backup primary primary-controller-name primary-controller-ip

Note


Enable fast heartbeat so that capwap backup primary and capwap backup secondary work.

The AP may disconnect if the link between the controller and the AP is unreliable and fast heartbeat is enabled.

Step 4

Configure AP CAPWAP parameters with the secondary backup controller's name.

Example:

Device(config)# capwap backup secondary secondary-controller-name secondary-controller-ip

Step 5

Configure the system logging settings for the APs.

Example:

Device(config)# syslog host ip-address

Step 6

Initiate AP image downgrade from a TFTP server for all the APs.

Example:

Device(config)# tftp-downgrade tftp-server-ip imagename

Verify IPv6 configuration

Use these show command to verify the IPv6 configuration:

Device# show wireless interface summary
Interface Name   Interface Type VLAN ID IP Address   IP Netmask     NAT-IP Address   MAC Address
--------------------------------------------------------------------------------------------------
GigabitEthernet0 Management     0       0.0.0.0     255.255.255.0  0.0.0.0          d4c9.3ce6.b854
                                      fd09:9:2:49::54/64