Cisco Active Testing for Wireless with ThousandEyes On-Prem Deployment Guide
Available Languages
Bias-Free Language
The documentation set for this product strives to use bias-free language. For the purposes of this documentation set, bias-free is defined as language that does not imply discrimination based on age, disability, gender, racial identity, ethnic identity, sexual orientation, socioeconomic status, and intersectionality. Exceptions may be present in the documentation due to language that is hardcoded in the user interfaces of the product software, language used based on RFP documentation, or language that is used by a referenced third-party product. Learn more about how Cisco is using Inclusive Language.
- US/Canada 800-553-2447
- Worldwide Support Phone Numbers
- All Tools
 Feedback
 Feedback
How Many Active Testing APs do I Need?
Where Do I Place Active Testing APs?
Installation and Configuration Procedure
Configure the Cisco Wireless 9800 Series Wireless LAN Controller
Radio Profile and RF Tag - AP Radio Configuration
Policy Tag- WLAN/SSID Configuration
Site Tag - AP Profile Configuration
[Optional] Proxy Configuration
Configure Tests in ThousandEyes
Wireless Active Testing Configuration
Configure Endpoint Agent Labels
Leveraging Wireless Active Test Data in ThousandEyes
Interpreting and Utilizing Wireless Active Test Data in ThousandEyes Platform
How to Test Different Applications in Different SSIDs
Active Testing with ThousandEyes on the Cisco CW9172H Access Point transforms network assurance by turning each compatible access point into a synthetic client. This capability allows end-to-end tests to be performed from the wireless client’s perspective, right at the network edge. Organizations across all customer segments can gain real-time visibility into onboarding, connectivity, and application-level experiences directly through the ThousandEyes Dashboard, without relying on real client devices. Continuous tests from each CW9172H access point acting as a synthetic client provide a baseline understanding of network performance, which is especially valuable before and after maintenance windows such as firmware upgrades or configuration changes.
This proactive approach addresses a longstanding challenge: ensuring that core services like authentication, DHCP, and DNS are fully operational after updates. Comprehensive AP-to-AP connectivity tests give IT teams confidence that the network is ready for business operations, reducing the risk of downtime and accelerating issue resolution. These metrics aid rapid root cause identification and end-to-end visibility from the access point to the cloud, all without requiring additional hardware. With this capability, customers can proactively assure readiness, minimize mean time to resolution (MTTR), and deliver an optimal user experience that differentiates Cisco from competitors.
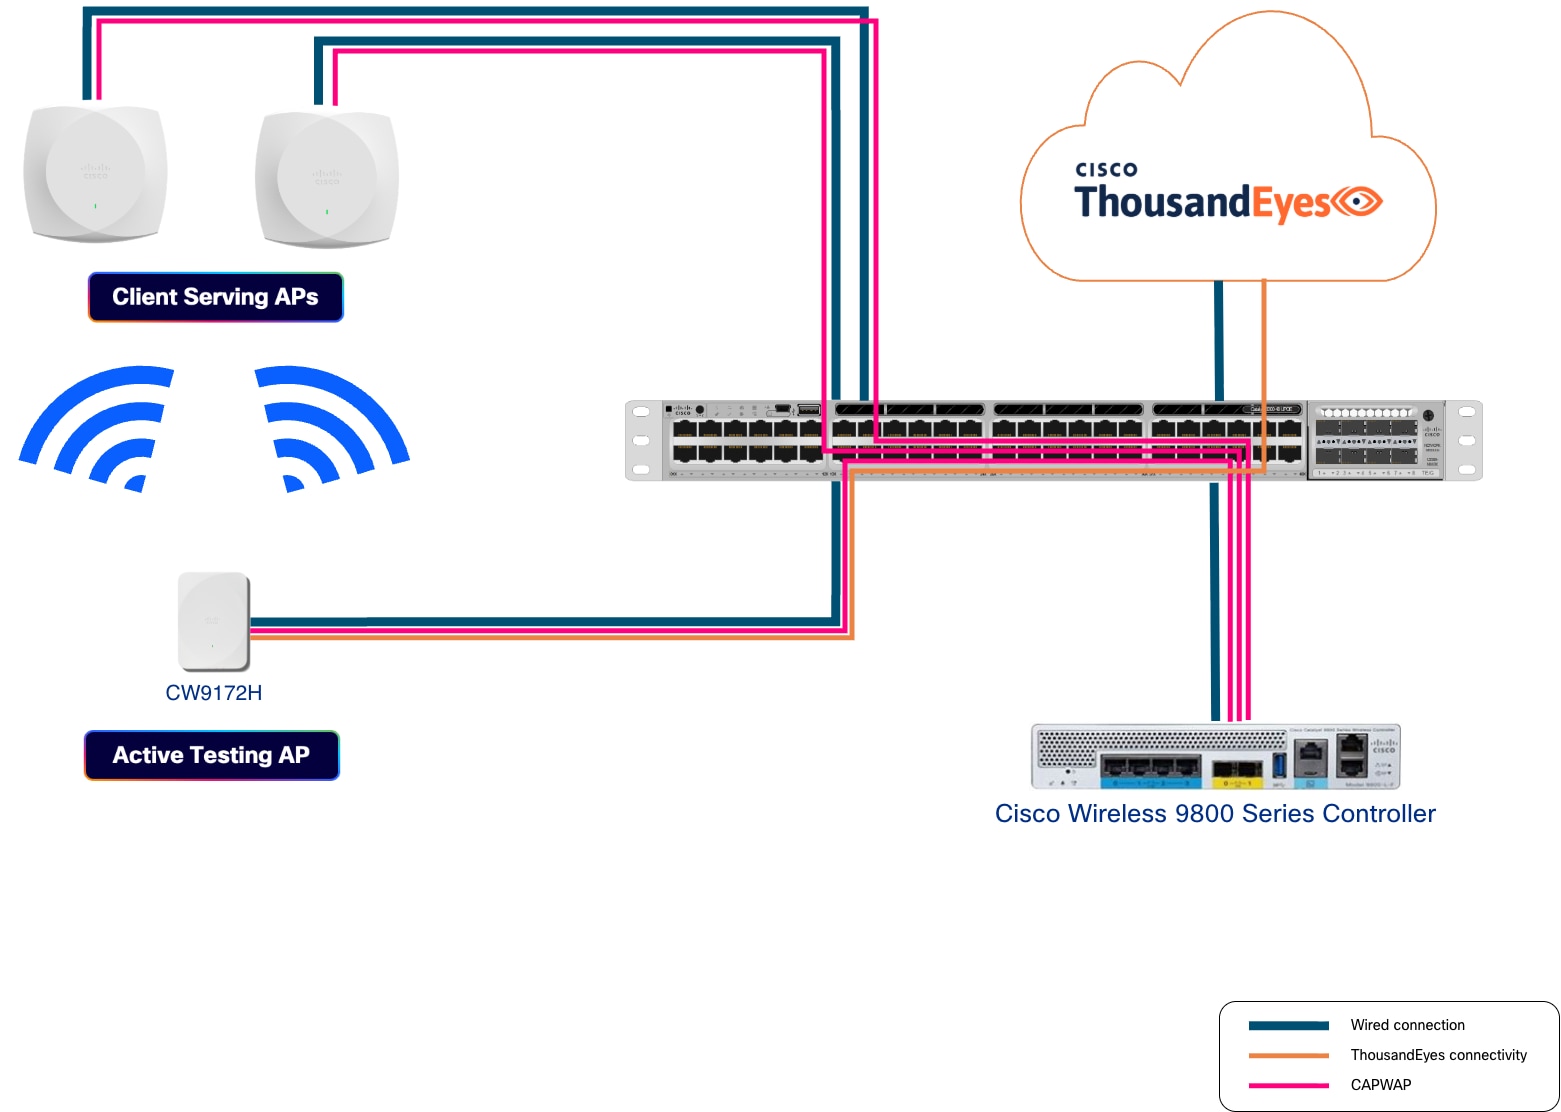
This document describes the installation, configuration, and operation of the Active Testing Access Points in both the Cisco Wireless 9800 Wireless LAN Controller and the ThousandEyes website.
● One or more CW9172H Access Points
● Cisco Wireless 9800 Wireless LAN Controller running Cisco IOS® XE 17.18.2 or later
● All form factors are supported except the Embedded Wireless Controller in Switch
● Local and FlexConnect modes are supported
● One Cisco Wireless Essentials license per Access Point
● One ThousandEyes Endpoint Agent Advantage license per Access Point (also known as End User Monitoring Advantage)
● ThousandEyes account to get access to the ThousandEyes platform
● IP reachability to ThousandEyes (direct, Network Address Translation [NAT], or proxy). Only the wired management VLAN of the active testing APs needs to be able to reach the ThousandEyes platform, the WLC does not. You can find the list of the necessary network connections in https://docs.thousandeyes.com/product-documentation/global-vantage-points/endpoint-agents/installing/system-requirements#network-connections.
The following security types are supported in 2.4 GHz, 5 GHz and 6 GHz. WPA2 and WPA3 are both supported, including PMF (disabled, optional, required). Beacon protection is not supported.
Table 1. Supported security types
| WLAN Types |
Supported types |
Unsupported types |
| AKM Suites |
● 802.1X
● PSK
● FT-802.1X
● FT-PSK
● 802.1X-SHA256
● PSK-SHA256
● SAE
● FT-SAE
● OWE, including OWE Transition Mode
|
● Suite-B
● Suite-B-192
● SAE-EXT-KEY
● FT-SAE-EXT-KEY
|
| Ciphers |
● CCMP-128
|
● GCMP-128
● CCMP-256
● GCMP-256
|
| PHY Mode / Wi-Fi versions |
● HE (802.11ax / Wi-Fi 6 + 6E)
● VHT (802.11ac / Wi-Fi 5)
● HT (802.11n / Wi-Fi 4)
● Legacy (802.11abg).
All PHY modes up to Wi-Fi 6E are supported |
● EHT (802.11be or Wi-Fi 7)
|
The supported EAP types are:
● PEAP: requires username & password plus server-side certificate. In this implementation server-side certificate is ignored.
● LEAP: requires username & password.
● EAP-FAST: requires username & password plus PAC provisioning. In this implementation, PAC provisioning is automatic.
● EAP-TLS: both sides have a certificate.
● HTTP proxy with Basic Authentication is not supported
● Testing Hidden SSIDs is not supported
● When connecting to Captive Portal SSID, it is not possible to perform any action such as fill a form or accept the terms
● The Active Testing AP in fabric mode is not supported, a fabric WLC cannot manage an Active Testing AP. However, if you want to test fabric SSIDs, you can deploy the AP Over-The-Top (OTT), you will need a separate/dedicated WLC.
When deciding how to size the solution, several approaches are possible—from customers who want to ensure every single AP in a site is working, to those who prefer to get just one data point per site regardless of its size. To help answer the sizing question, instead of providing a single formula, the following questions and answers should guide you in finding the right approach for your business needs.
How Many Active Testing APs do I Need?
As previously discussed, the appropriate approach depends on your specific business requirements. If wireless connectivity is critical to your operations and you wish to ensure optimal performance, it is advisable to conduct comprehensive testing. The current recommended ratio is 1 active testing AP for every 5 client-serving APs. While there is no limit in the maximum supported ratio, we recommend not going over 1:10. Please note that Active Testing APs will not connect to an AP (BSSID) if its RSSI falls below the following thresholds:
● 2.4 GHz: -73 dBm
● 5 GHz: -70 dBm
● 6 GHz: -68 dBm
Where Do I Place Active Testing APs?
Wireless Active Testing was incorporated into the wall plate access point (CW9172H) to provide the most accurate and realistic results by closely simulating the radio frequency (RF) environment experienced by actual clients. Since end-user devices are typically situated near floor level rather than ceiling level, it is recommended that active testing APs be positioned near the floor (e.g. such as a desk or cubicle height).
Active testing APs can be mounted on the wall, or, if preferred, placed on a desktop using the available accessory, CW-ACC-DESK1-00.
It is recommended to test the most critical applications relevant to your business by emulating typical client behavior within your environment. For example, in an office setting, this may involve productivity applications, while in a warehouse, it could include logistics applications that support order picking and related activities. Please note that each active testing AP supports a maximum of 10 tests. However, it is possible to configure additional tests and manage their priorities as outlined in this article: https://docs.thousandeyes.com/product-documentation/global-vantage-points/endpoint-agents/assign_tests_to_agents.
Installation and Configuration Procedure
These are the steps to install and configure the solution:
1. Create a ThousandEyes Account
2. Configure the Cisco Wireless 9800 Series Wireless LAN Controller
3. Configure Tests in ThousandEyes
4. Leveraging Wireless Active Test Data in ThousandEyes
If you already have a ThousandEyes account, you can leverage it; otherwise, you will need to create an account. For more information around the account process please visit: https://docs.thousandeyes.com/product-documentation/getting-started/getting-started-with-account-setup
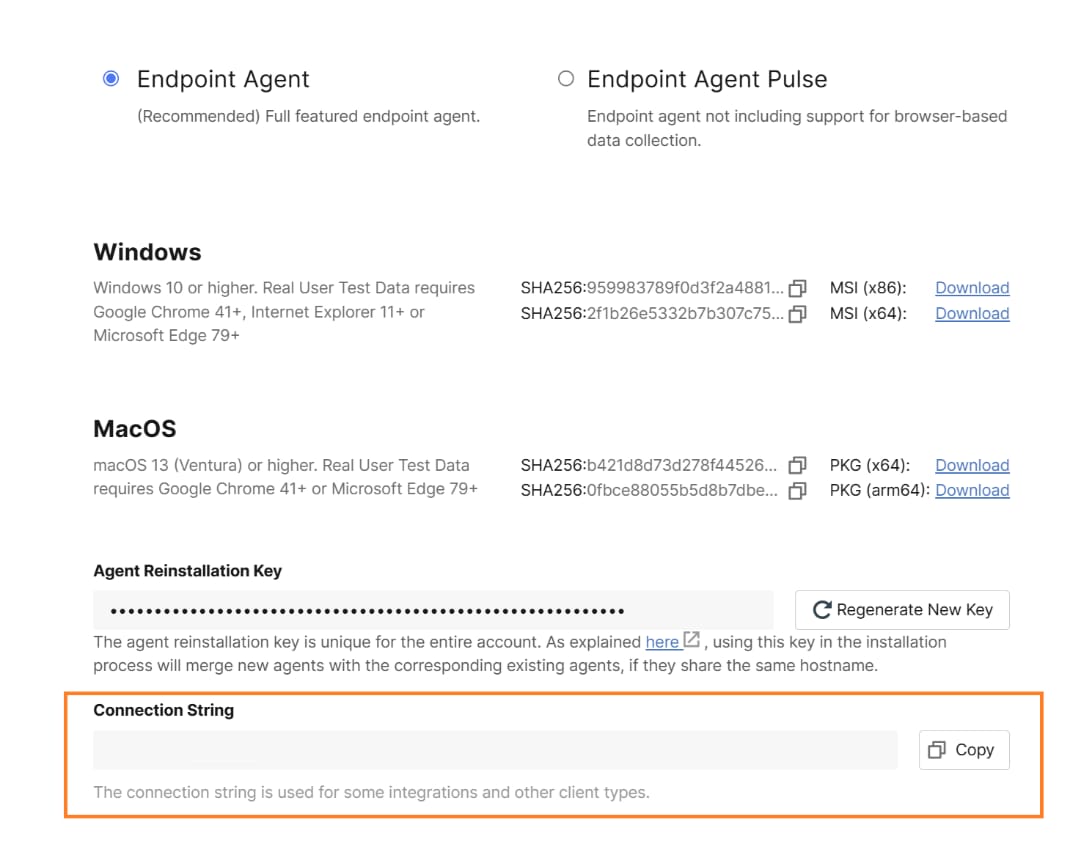
Once you have an account, you need the Connection String for endpoint agents. You can copy the Connection String in the UI installer section of the ThousandEyes platform (see screenshot below).
● If you do not have any endpoint agents, click on the “Download” button to view the Connection String
● If you already have endpoint agents, you can click on “Add New Endpoint Agent” to view the Connection String
● The Connection String acts as a token that accurately identifies the account group where the agent should be installed.
Configure the Cisco Wireless 9800 Series Wireless LAN Controller
Once you have a Cisco Wireless 9800 Series Wireless LAN Controller (WLC) running the required image, follow these steps to configure it.
Note: The 9172H access point, like any other Wi-Fi 7 access point needs to be onboarded as a Global Use Access Point. Please refer to the following guide for further details: Cisco Wireless Global Use Access Points Deployment Guide.
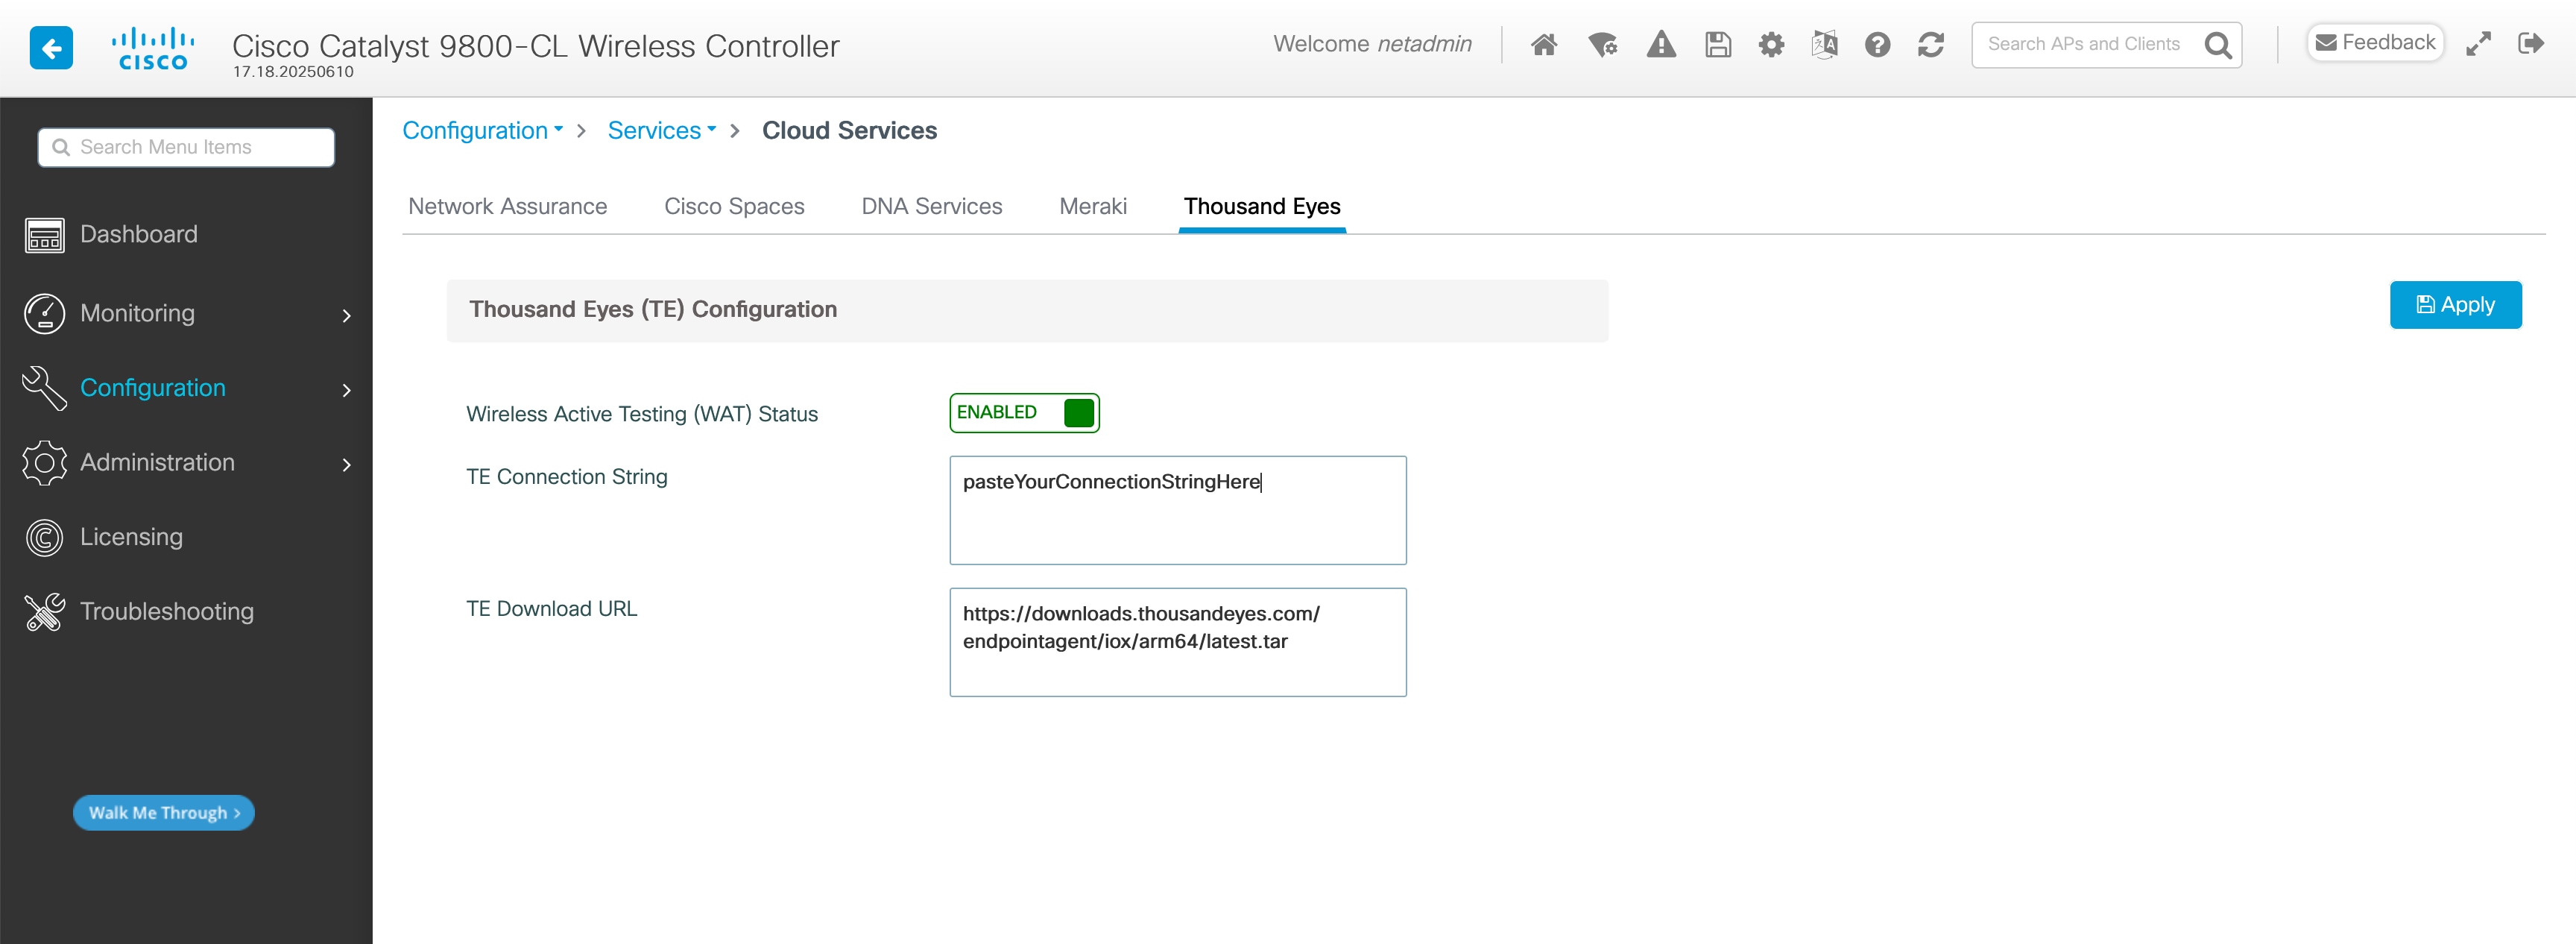
WebUI: Navigate to the Configuration > Services > Cloud Services > Thousand Eyes tab and:
Step 1. Enable it (enabled by default)
Step 2. Paste the connection string you obtained in the previous step
Note: the TE Download URL is predefined and populated by default.
CLI:
wireless active testing !enabled by default
wireless active testing thousand-eyes connection-string <connection-string>
To check the configuration, it is recommended to run the following command. A sample output is shown as well.
CLI:
show wireless active testing configuration
CW9800#show wireless active testing configuration
Wireless Active Testing (WAT) Management - Configuration
===========================================================
Administrative State : Enabled
ThousandEyes Endpoint Agent
---------------------------
Connection String : theconnectionstring
Download URL : https://downloads.thousandeyes.com/endpointagent/iox/arm64/latest.tar
Radio Profile and RF Tag - AP Radio Configuration
A special configuration is needed in the Radio Profile for the AP to act as a wireless synthetic client.
Create a new Radio Profile specific for testing APs; it will only be used for testing APs.
WebUI: Navigate to Configuration > Tags & Profiles > RF/Radio > Radio tab > click on Radio Profile in the table and enable Wireless Active Testing Radio Selection.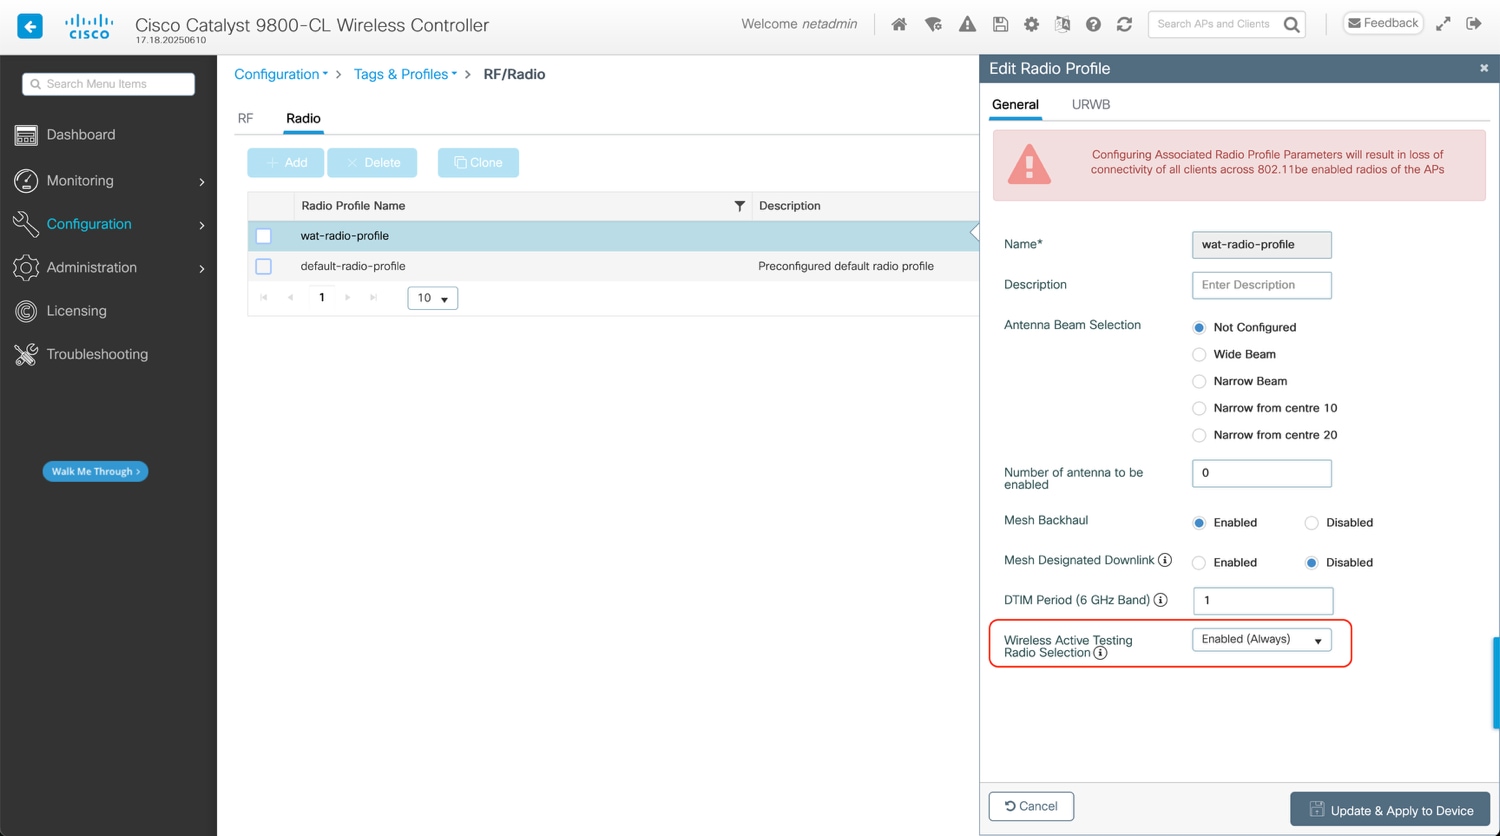
A new RF tag dedicated to testing APs is also required to leverage the recently created Radio Profile. Create the new RF Tag and select the RF profile created in the previous step for each of the slots shown below. The CW9172H has 3 slots:
1. Slot 0: 2.4 GHz radio
2. Slot 1: 5 GHz radio
3. Slot 2: 6GHz radio
Note: It is important to match the slot numbers shown above exactly.
WebUI: Configuration > Tags & Profiles > Tags > RF tab > create a new RF Tag > for each of the slots shown above select the recently created Radio Profile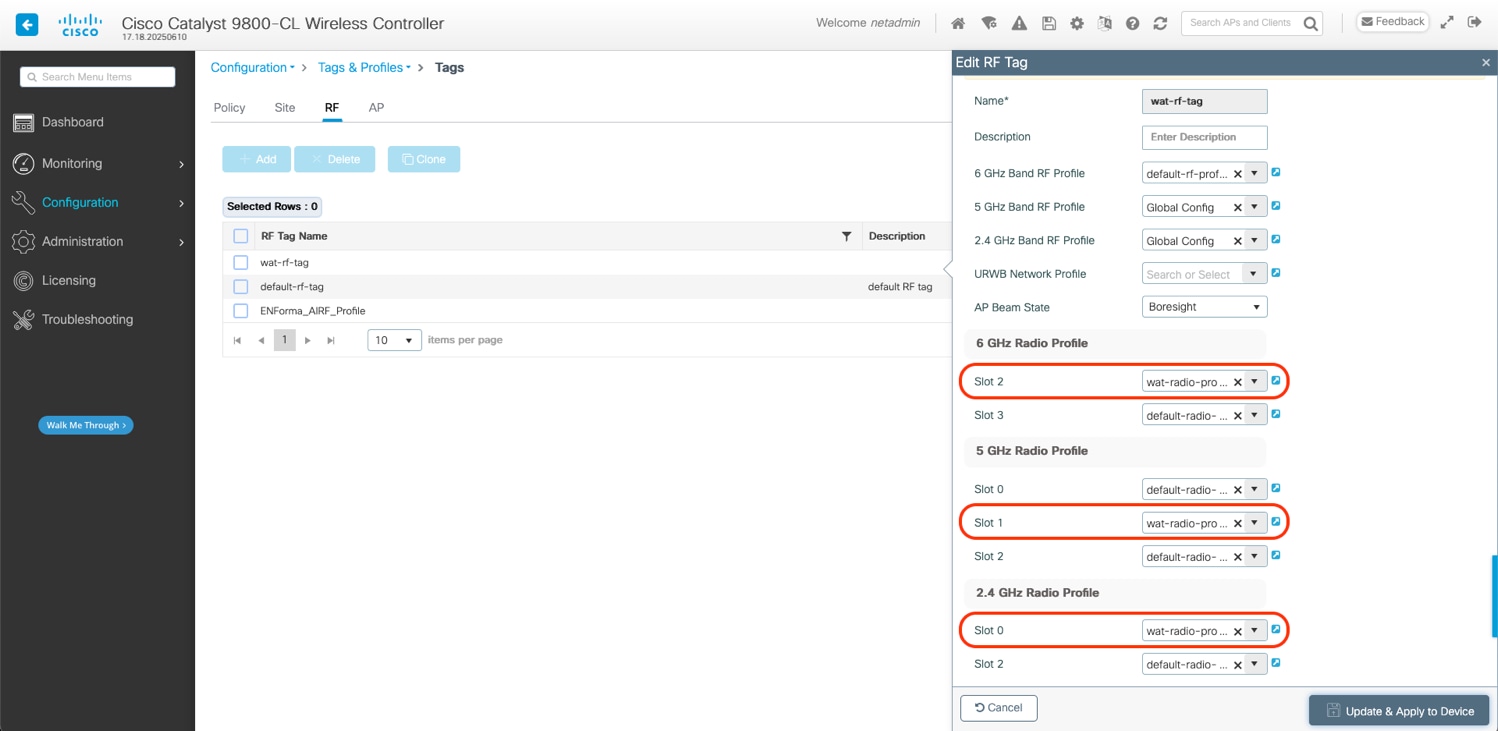
CLI:
wireless profile radio <radio-profile-name>
active testing radio-selection always
wireless tag rf <rf-tag-name>
dot11 24ghz slot0 radio-profile <radio-profile-name>
dot11 5ghz slot1 radio-profile <radio-profile-name>
dot11 6ghz slot2 radio-profile <radio-profile-name>
To check the configuration, it is recommended to run the following command. A sample output is shown as well.
CLI:
show wireless profile radio detailed <radio-profile-name>
show wireless tag rf detailed <rf-tag-name>
CW9800#show wireless profile radio detailed wat-radio-profile
Radio Profile name : wat-radio-profile
Description :
Beam-Selection : Not configured
Number of antenna to be enabled : 0
Mesh Backhaul : Enabled
Mesh Designated Downlink : Disabled
DTIM period : 1
URWB
Role : Not Configured
Channel : Not Configured
Channel Width : 80 MHz
AES : Fixed Key
Key Control Rotation Timeout : 15
Channel List : Not Configured
Point-to-Multi-Point
RSSI Threshold : 0
Auto Scan : Disabled
Cluster ID : CiscoURWB
Tower ID :
Wireless Active Testing (WAT) Configuration
WAT Admin State (Radio Selection) : Enabled (Always)
CW9800#show wireless tag rf detailed wat-rf-tag
Tag Name : wat-rf-tag
Description :
----------------------------------------
6ghz RF Policy : default-rf-profile-6ghz
5ghz RF Policy : Global Config
2.4ghz RF Policy : Global Config
2.4ghz slot 0 Radio Profile : wat-radio-profile
5ghz slot 0 Radio Profile : wat-radio-profile
6ghz slot 1 Radio Profile : default-radio-profile
2.4ghz slot 2 Radio Profile : default-radio-profile
6ghz slot 2 Radio Profile : wat-radio-profile
6ghz slot 3 Radio Profile : default-radio-profile
AP Beam State : Boresight
URWB Profile :
Policy Tag- WLAN/SSID Configuration
It is recommended to use the same policy tag as your normal APs for the Active Testing APs; this will make the configuration in the ThousandEyes dashboard easier. However, you may choose not to do so. The testing AP (CW9172H) will not broadcast any SSIDs even if they are in the policy tag.
The possible security types that can be currently tested are listed in Supported security types section.
WebUI: Configuration > Tags & Profiles > WLANs
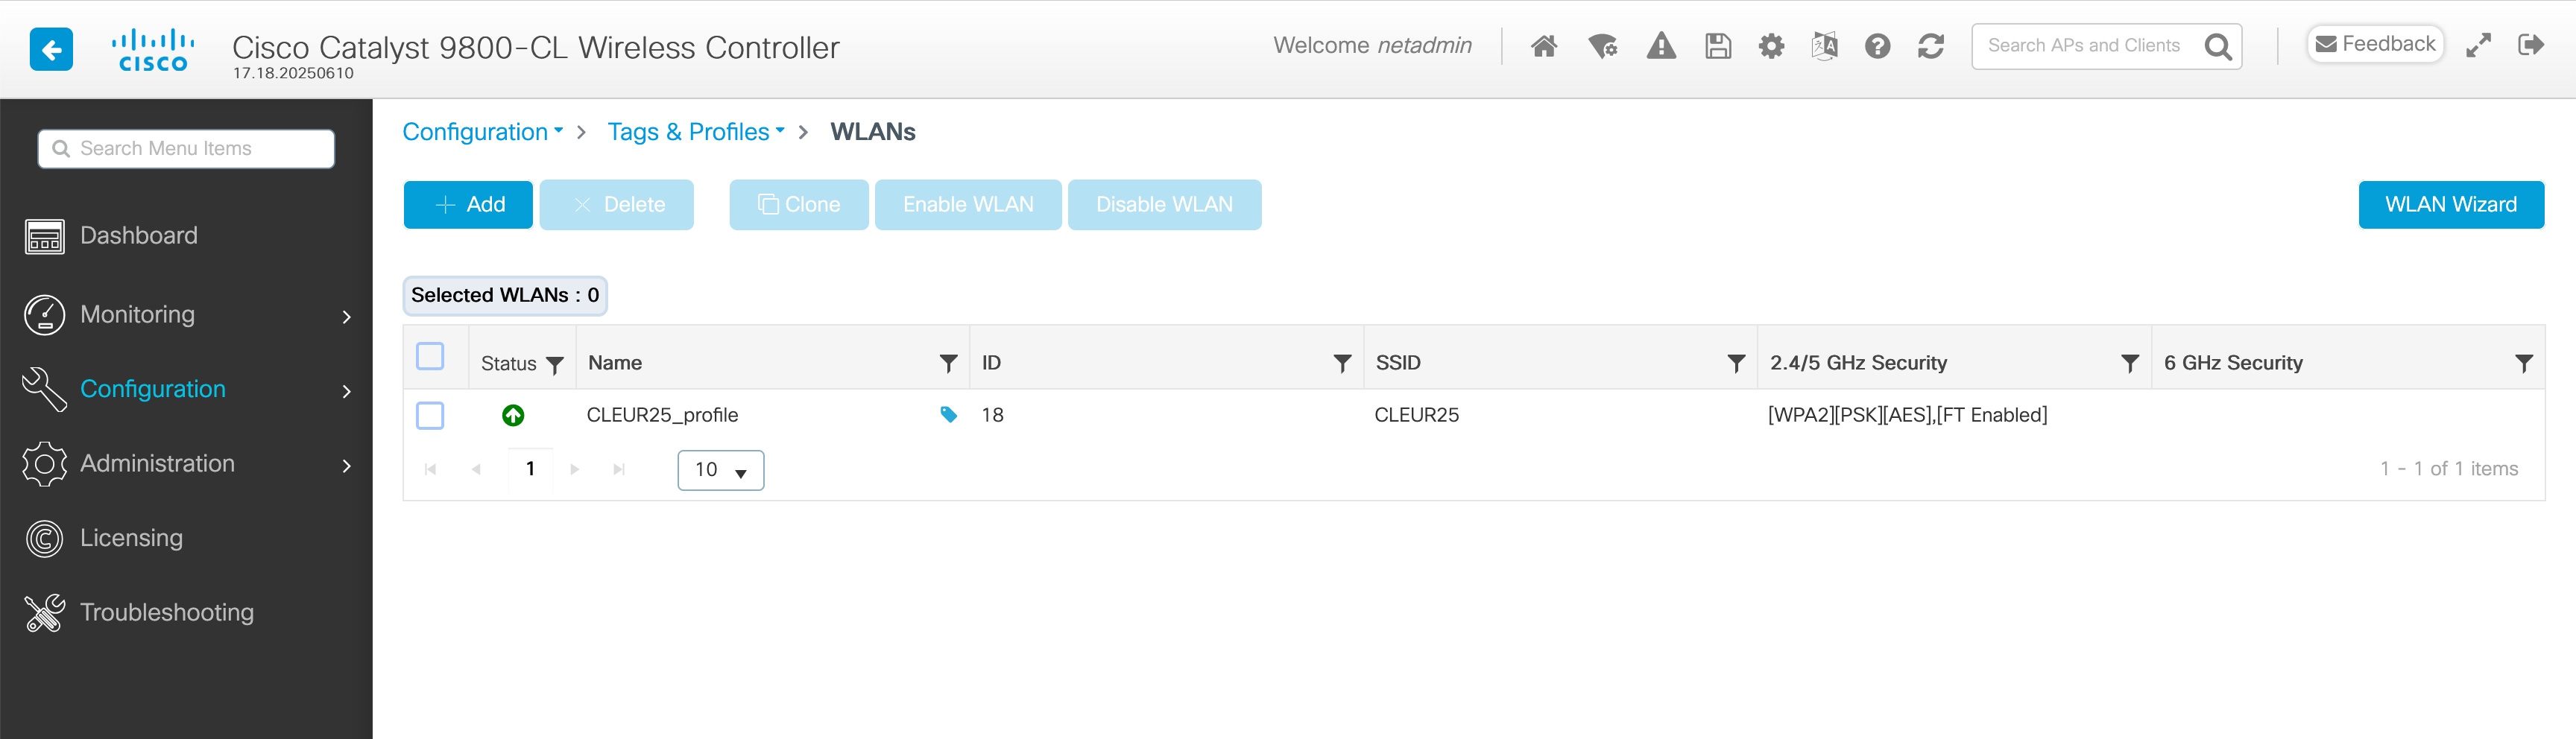
Configuration > Tags & Profiles > Tags > Policy tab > click on Policy Tag in table
CLI:
wlan CLEUR25_profile 18 CLEUR25
radio policy dot11 24ghz
radio policy dot11 5ghz
security ft
security wpa psk set-key ascii 0 Cisco123!
no security wpa akm dot1x
security wpa akm psk
security pmf optional
no shutdown
wireless profile policy CLEUR25_profile
autoqos mode fastlane
description CLEUR25_profile
dhcp-tlv-caching
exclusionlist timeout 180
http-tlv-caching
ipv4 flow monitor avc_ipv4_assurance input
ipv4 flow monitor avc_ipv4_assurance_dns input
ipv4 flow monitor avc_ipv4_assurance_rtp input
ipv4 flow monitor avc_ipv4_assurance output
ipv4 flow monitor avc_ipv4_assurance_dns output
ipv4 flow monitor avc_ipv4_assurance_rtp output
ipv6 flow monitor avc_ipv6_assurance input
ipv6 flow monitor avc_ipv6_assurance_dns input
ipv6 flow monitor avc_ipv6_assurance_rtp input
ipv6 flow monitor avc_ipv6_assurance output
ipv6 flow monitor avc_ipv6_assurance_dns output
ipv6 flow monitor avc_ipv6_assurance_rtp output
vlan VLAN15
no shutdown
wireless tag policy PT_Alcob_LabE3_PlantaE_d99eb
description "PolicyTagName PT_Alcob_LabE3_PlantaE_d99eb"
wlan CLEUR25_profile policy CLEUR25_profile
To check the configuration, it is recommended to run the following command. A sample output is shown as well.
CLI:
wlan CLEUR25_profile 18 CLEUR25
radio policy dot11 24ghz
radio policy dot11 5ghz
security ft
security wpa psk set-key ascii 0 Cisco123!
no security wpa akm dot1x
security wpa akm psk
security pmf optional
no shutdown
wireless profile policy CLEUR25_profile
autoqos mode fastlane
description CLEUR25_profile
dhcp-tlv-caching
exclusionlist timeout 180
http-tlv-caching
ipv4 flow monitor avc_ipv4_assurance input
ipv4 flow monitor avc_ipv4_assurance_dns input
ipv4 flow monitor avc_ipv4_assurance_rtp input
ipv4 flow monitor avc_ipv4_assurance output
ipv4 flow monitor avc_ipv4_assurance_dns output
ipv4 flow monitor avc_ipv4_assurance_rtp output
ipv6 flow monitor avc_ipv6_assurance input
ipv6 flow monitor avc_ipv6_assurance_dns input
ipv6 flow monitor avc_ipv6_assurance_rtp input
ipv6 flow monitor avc_ipv6_assurance output
ipv6 flow monitor avc_ipv6_assurance_dns output
ipv6 flow monitor avc_ipv6_assurance_rtp output
vlan VLAN15
no shutdown
wireless tag policy PT_Alcob_LabE3_PlantaE_d99eb
description "PolicyTagName PT_Alcob_LabE3_PlantaE_d99eb"
wlan CLEUR25_profile policy CLEUR25_profile
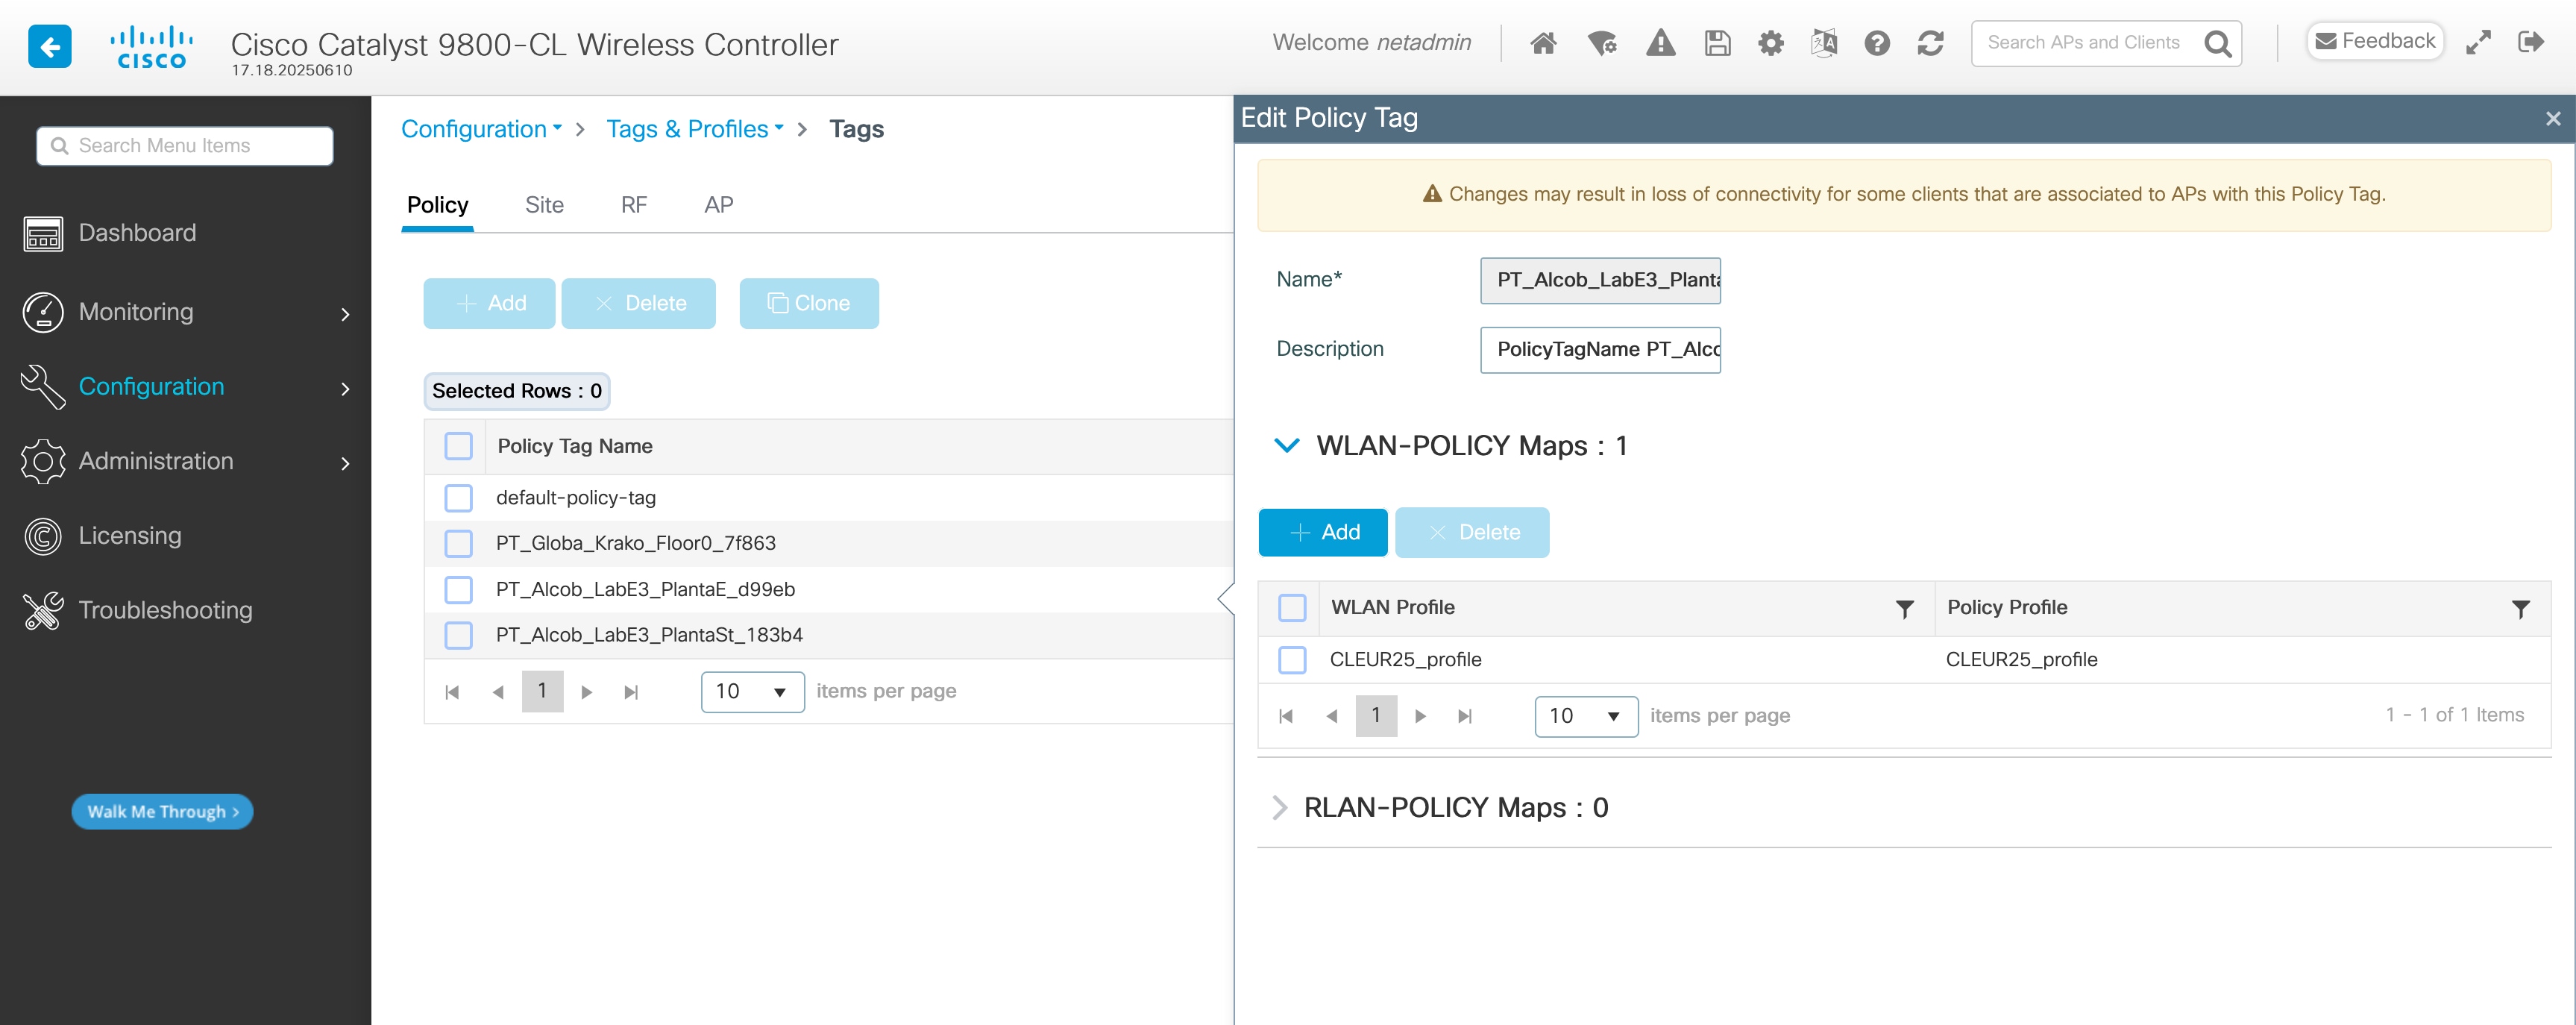
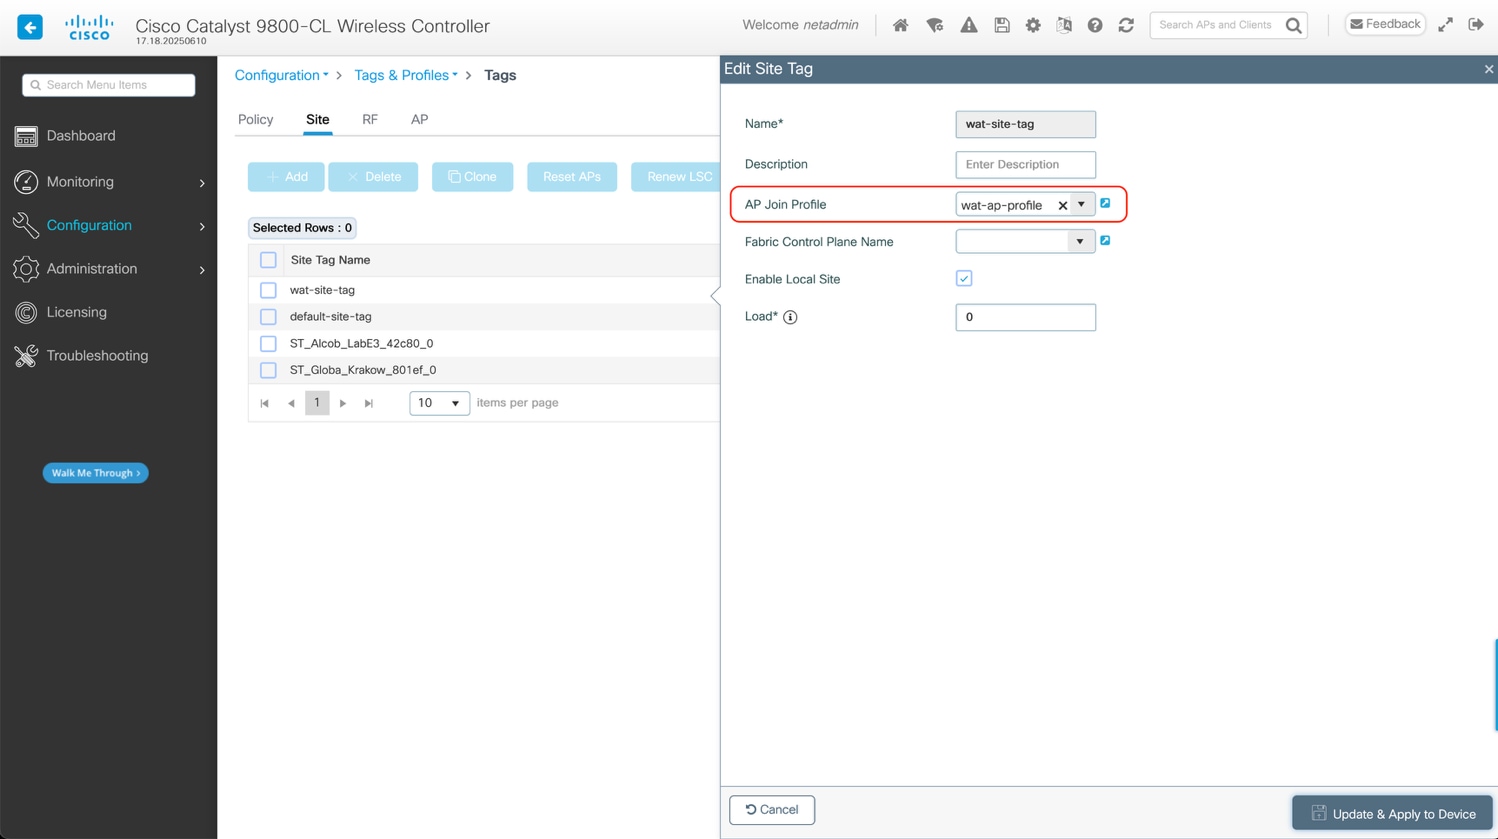
Site Tag - AP Profile Configuration
Application hosting must be enabled on the AP Profile used by testing APs (CW9172H). Nevertheless, this doesn’t change the licensing requirements stated in Requirements.
WebUI: Configuration > Tags & Profiles > AP Join > Click on AP Join Profile in table, then within the AP Profile select the General tab and enable Apphost.
It is also recommended to configure NTP in the AP Join Profile.
An existing AP Join Profile and its corresponding site tag can be used, or specific ones can be created. See the below example.
WebUI: Configuration > Tags & Profiles > Tags select the Site tab.
CLI:
ap profile <ap-profile-name>
apphost
ntp ip <ntp-ip-address>
wireless tag site <site-tag-name>
ap-profile <ap-profile-name>
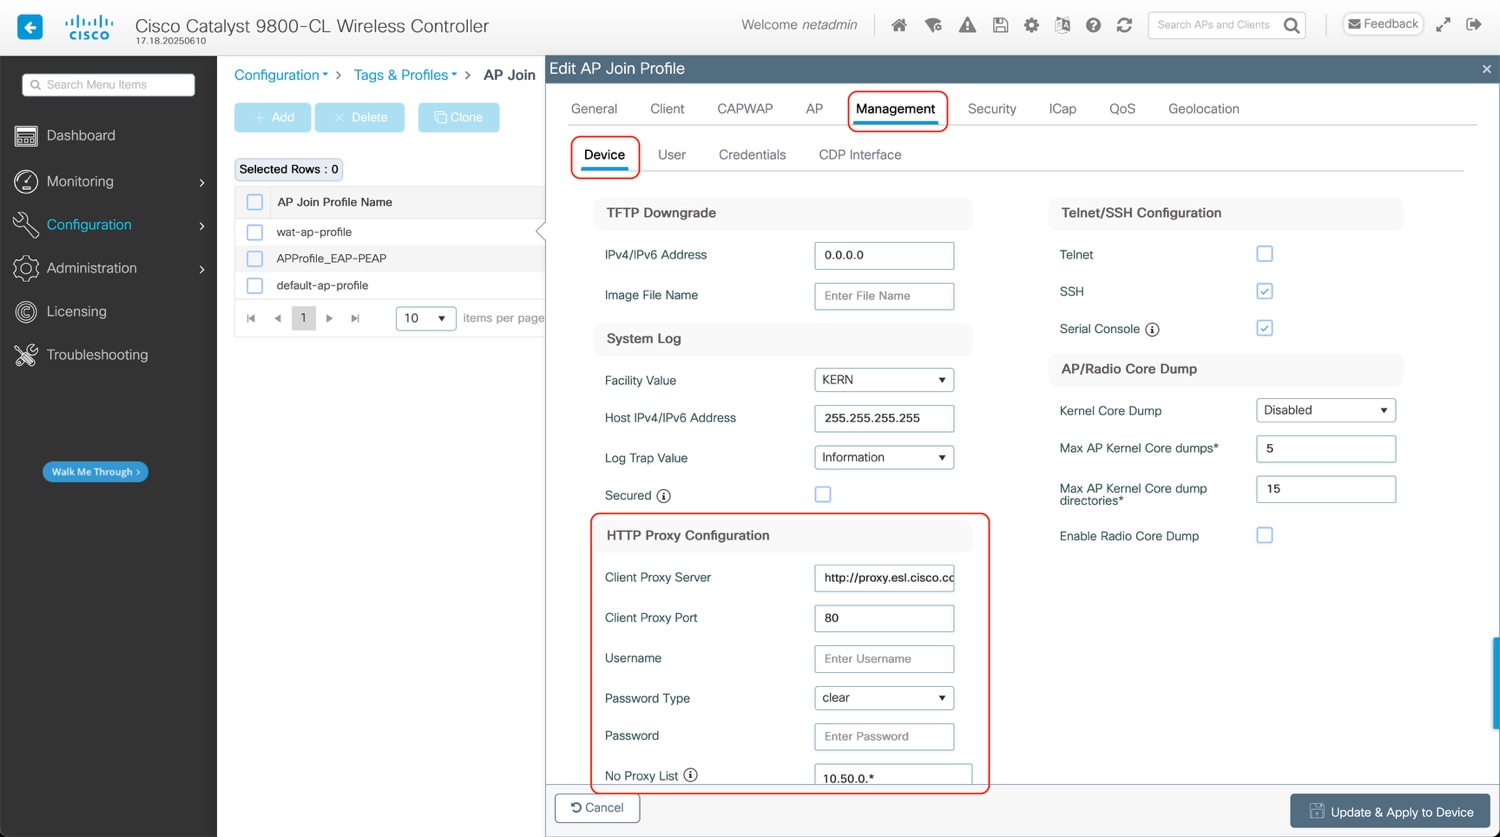
[Optional] Proxy Configuration
If you don’t require a proxy for the wired management VLAN of the testing APs, you may skip this section.
Downloading the ThousandEyes Agent and the posterior communication with the ThousandEyes Platform requires internet access. If your AP management VLAN does not have direct internet access, and requires a HTTP Proxy to access, configure the proxy in the AP Join Profile.
Note: Currently HTTP proxy with Basic Authentication is not supported.
WebUI: Configuration > Tags & Profiles > AP Join > Click on AP Join Profile in table, then within the AP Profile select the Management tab and then the Device tab, under HTTP Proxy Configuration section enter the necessary details.
Client Proxy Server needs to be in the following format:
| http://< URL or IP > https://< URL or IP > |
CLI:
ap profile <ap-profile-name>
apphost
ip http client proxy <hostname>
Note: hostname needs to be in the following format:
http://< URL or IP >
https://< URL or IP >
To check the configuration, it is recommended to run the following command. A sample output is shown as well.
CLI:
show ap profile name <ap-profile-name> detailed
CW9800#show ap profile name wat-ap-profile detailed
AP Profile Name : wat-ap-profile
[…]
NTP server : 173.38.201.115
[…]
Proxy :
Hostname : http://proxy.esl.cisco.com
Port : 80
NO_PROXY list : 10.50.0.*
Username : Not Configured
This is the same procedure that is valid for the existing Cisco Wireless 9800 Series controller. This section serves only as a reminder; nothing has changed in that procedure.
There are several strategies on how to assign site tags:
● Static: You select the AP and assign specific tags. The configuration is saved on the controller based on the AP’s Ethernet MAC address. When an AP joins that specific controller, it will always be assigned the specified tags.
● Location: This is a configuration construct internal to the C9800 (it’s not the AP location that you can configure on each AP), and it’s used primarily in the Basic Setup flow. A location allows you to create a group of three tags (policy, site, and RF) and assign APs to it.
● Filter: You can use a regex expression to assign tags to APs as they join the controller. As of today, you can set a filter based only on AP names, so this method cannot be used for out-of-the-box APs.
● AP: The AP itself carries the tag info learned through Plug and Play (PnP) or pushed from the controller
For simplicity, use either the regex filter approach or the bulk tag assignment.
Create a regex rule based on the AP name to assign tags.
WebUI: Configuration > Tags & Profiles > Tags > AP > Filter
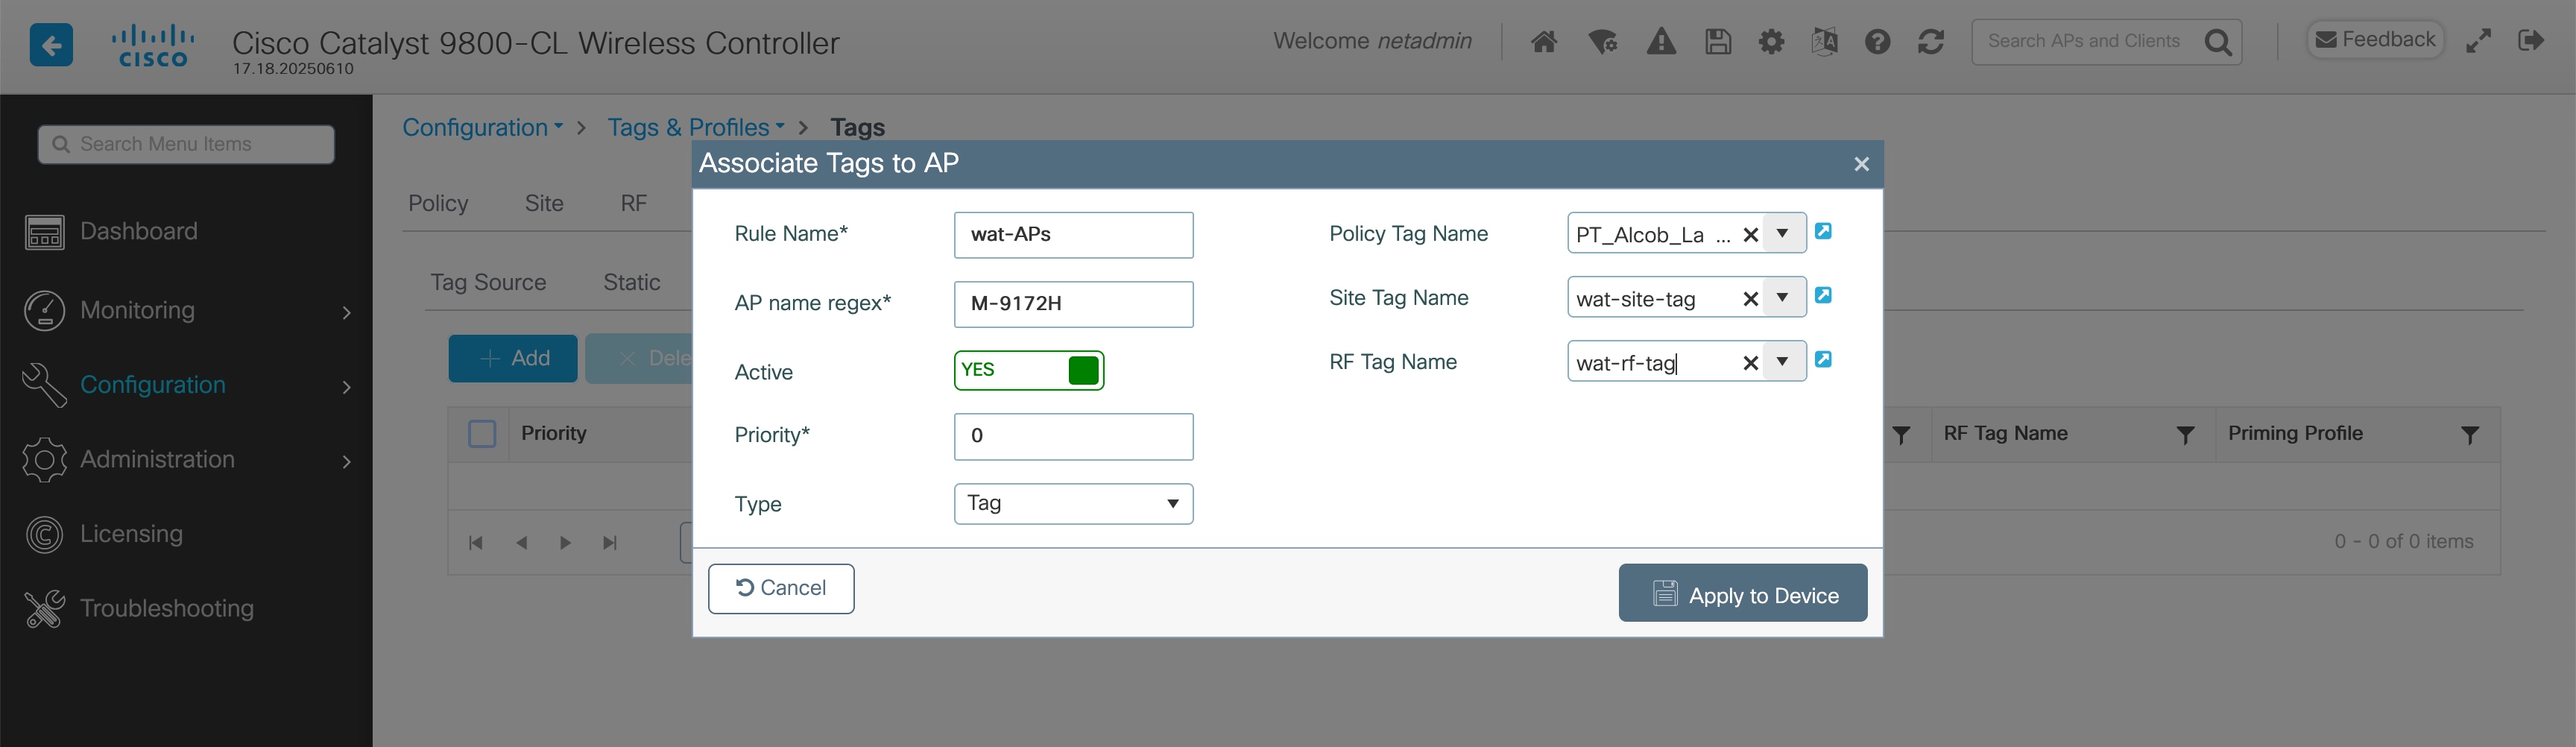
CLI:
ap filter name wat-APs
ap name-regex M-9172H
tag policy PT_Alcob_LabE3_PlantaE_d99eb
tag rf wat-rf-tag
tag site wat-site-tag
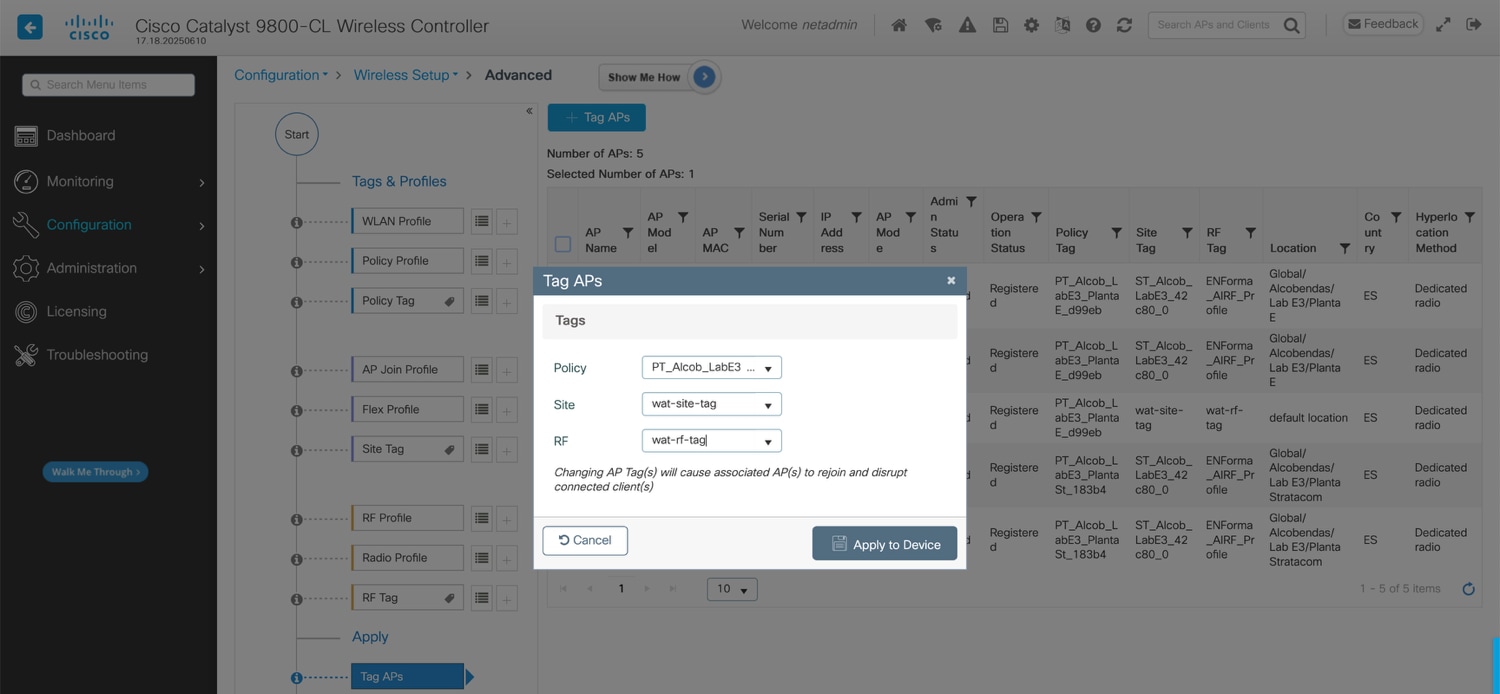
Use this method to easily assign the same tag to multiple APs .
WebUI: Configuration > Wireless Setup > Advanced
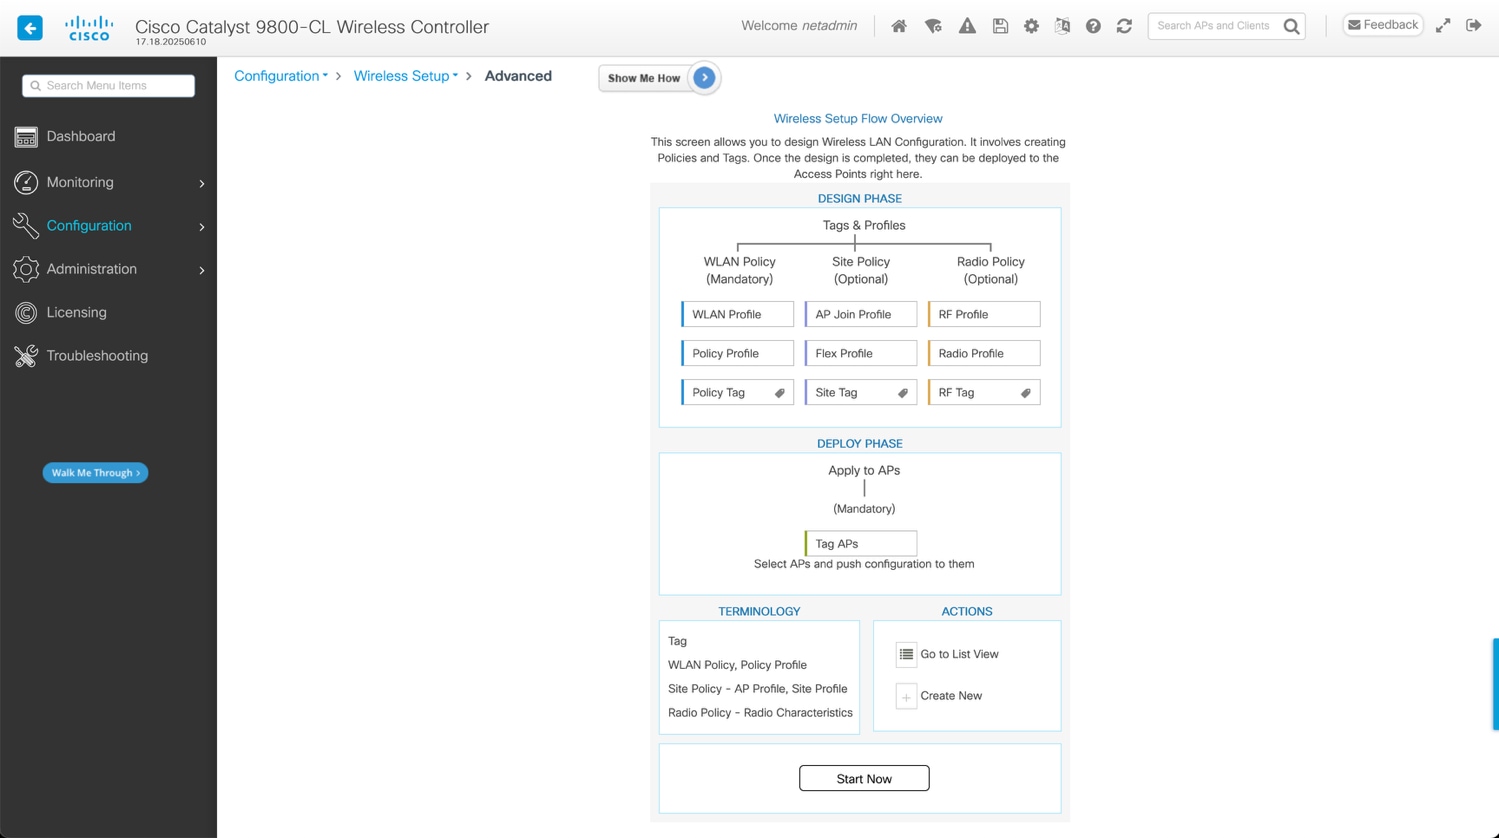
Click on Start Now at the bottom and then go to the Apply section and click the icon to display the AP list:

Select the APs that you want to tag:
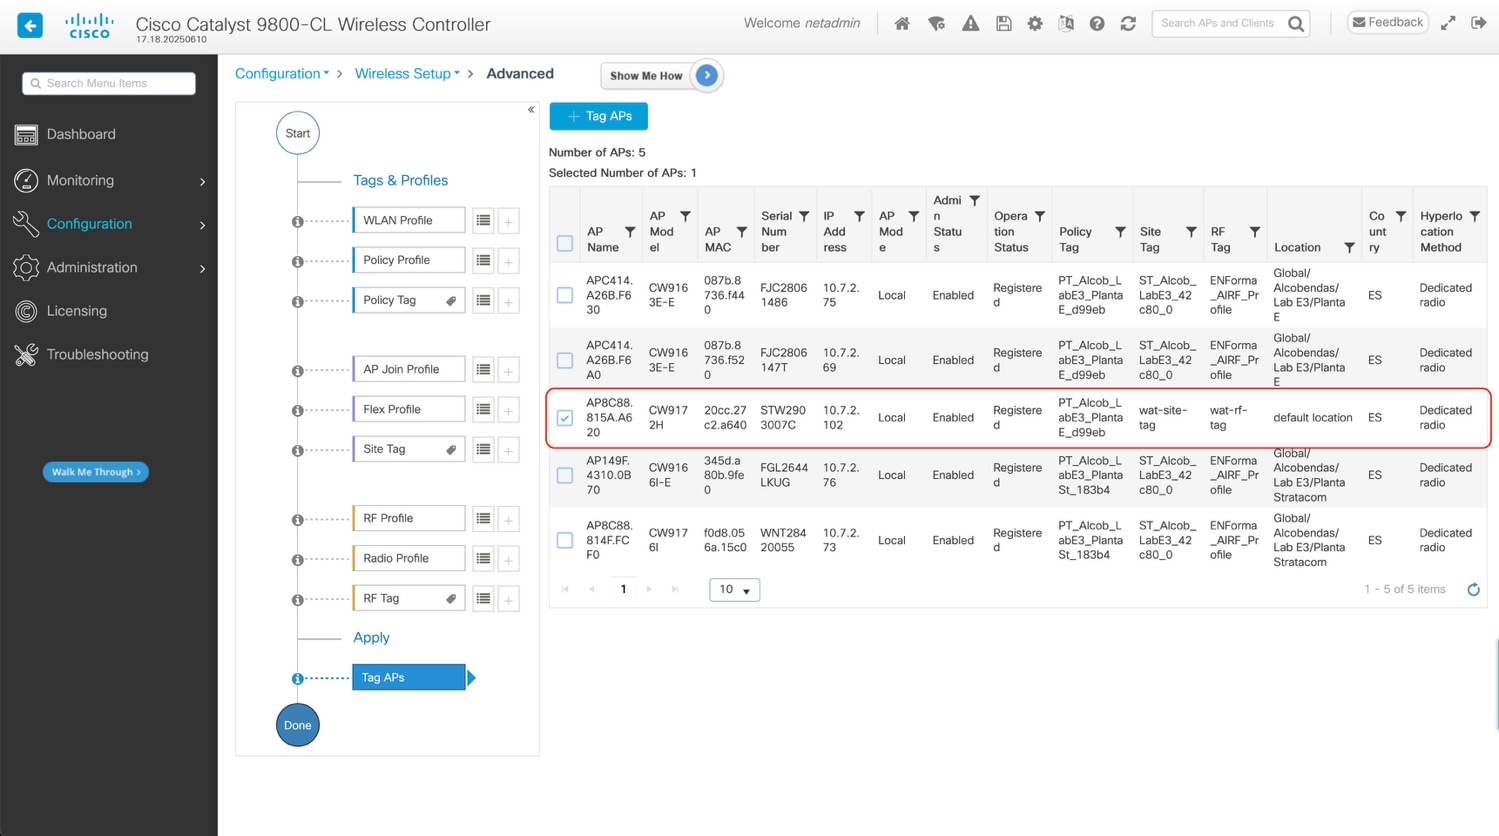
And select the tags you want to use.
Configure Tests in ThousandEyes
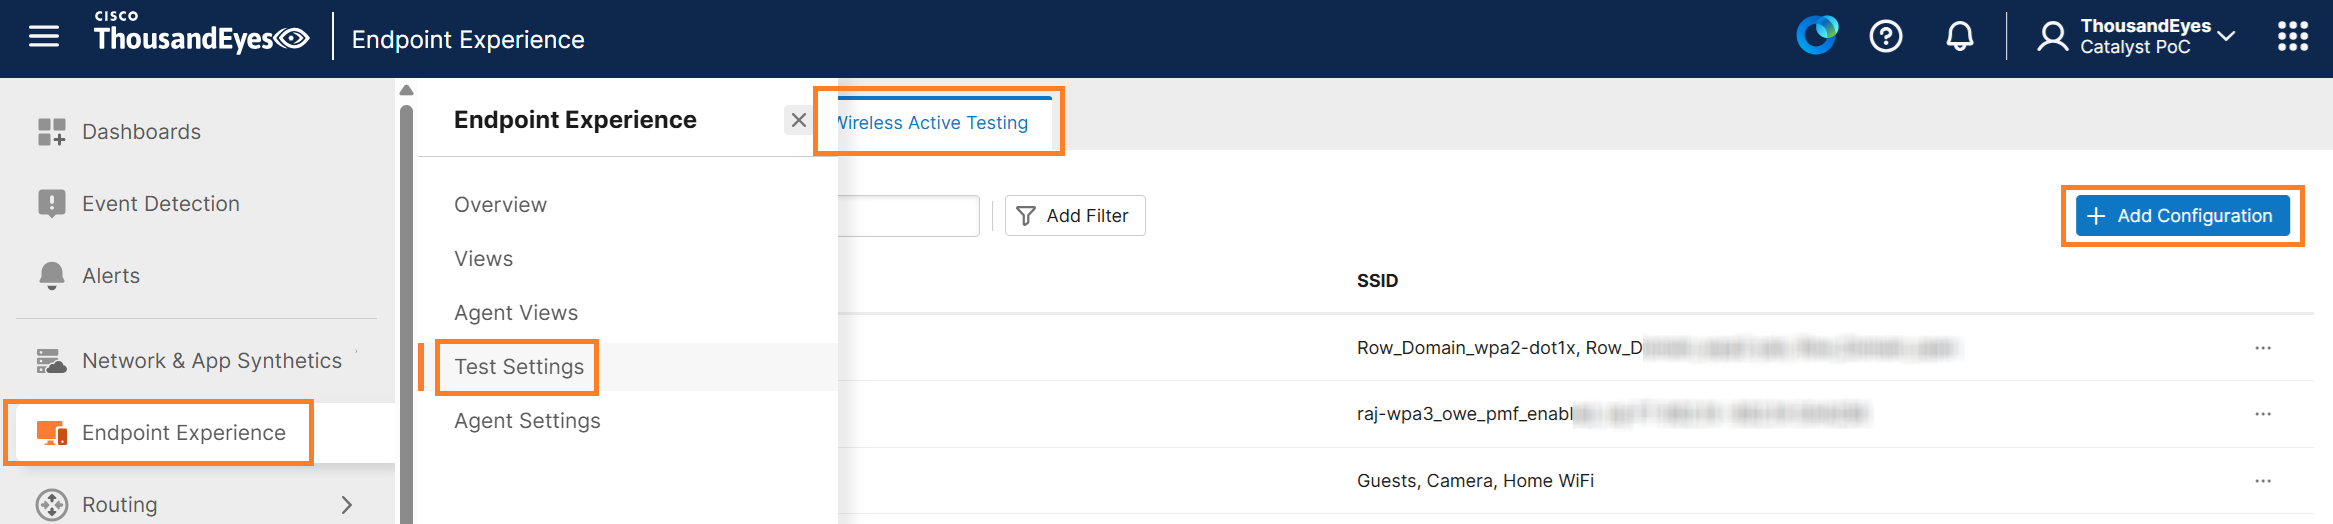
After completing the WLC configuration, the Endpoint Agents running on the Cisco Wireless Access Points will appear in the ThousandEyes portal. Please note that it may take approximately 5 to 10 minutes for the Endpoint Agent to register on the ThousandEyes platform after installation on the WLC.
On the ThousandEyes platform, navigate to Endpoint Experience, and then click on Agent Settings. In the Agent Settings, click on Add Filter. Then, in the Platform filter, select Cisco Wireless. This ensures that only Endpoint Agents installed on Wireless Access Points are displayed.
After validating that the Endpoint Agents are installed on the Access Points and successfully registered to the ThousandEyes platform, the next step is to configure the SSIDs. The Endpoint Agent will use these SSIDs to connect to and cycle between various APs that are broadcasting the desired SSID. To configure an SSID, navigate to SSID Configurations and click on Create SSID Configuration.
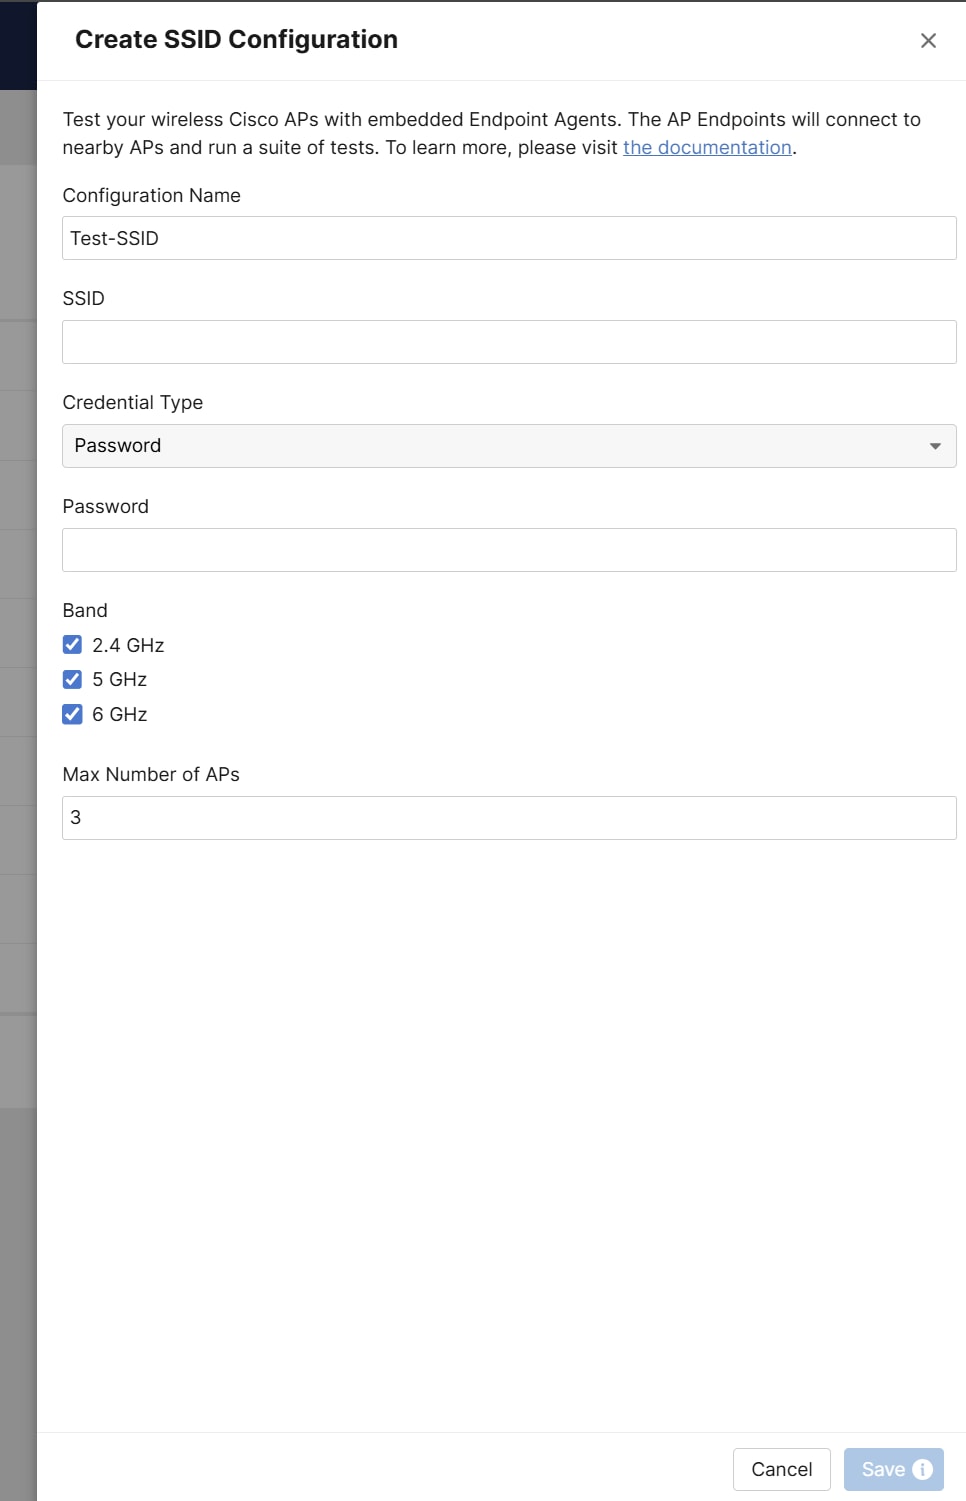
Note: A maximum of three SSIDs can be configured per active testing AP.
The SSID Configuration section contains the following fields:
● Configuration Name – An arbitrary name for the configuration.
● SSID - A list of available SSIDs that will be imported into ThousandEyes when the Active Testing Access Point is onboarded. In this dropdown menu, you can select the preferred SSID for this configuration. Alternatively, you are not limited to these suggestions and may manually configure any arbitrary SSID.
● Credential Type – Specifies the authentication configuration. Authentication options are covered below.
● Band – Specifies the wireless band for testing.
● Max Number of APs – Specifies the maximum number of BSSIDs that the Active Testing Access Point will test during one round.
Authentication is required for an Active Testing Access Point to connect to and authenticate with SSIDs. Within the SSID Configuration section, the Credential Type field allows you to specify the type of authentication to be used. The available options are:
● Password
● Open
If you select Password, you must provide the PSK (Pre-Shared Key) used for this SSID.
If you select Username/Password, you must choose one of the supported EAP methods: PEAP, LEAP, or EAP-FAST, and provide the corresponding username and password.
If you select Certificate, you must choose either the LSC (Locally Significant Certificate) option or the Manual option.
LSC is a feature that enables you to manage and control the digital certificates provisioned on Access Points (APs). With LSC, certificates are issued directly from your own Certificate Authority (CA), giving you greater oversight and security. LSC is commonly used for securing wired 802.1X authentication. For more information about what LSC is and how to configure it you may refer to the following guide: https://www.cisco.com/c/en/us/support/docs/wireless/catalyst-9100-access-points/221127-configure-locally-significant-certificat.html
These are the available certificate options:
● If LSC is selected, three configuration options are available:
◦ EAP Outer Identity: Optional field. Defaults to “anonymous” if not specified.
◦ Verify Server Certificate: Enabled by default (recommended). When enabled, the agent validates the RADIUS server certificate. If disabled, the agent will not validate the RADIUS certificate.
◦ Trusted Server CA Certificate: Optional field. In environments where different Certificate Authorities (CAs) issue infrastructure certificates (such as AP or WLC certificates) and RADIUS server certificates, the client must trust the CA that issued the RADIUS certificate to authenticate securely. Therefore, this setting must be populated with the CA that signs the RADIUS server certificate when multiple CAs are in use. If the same CA signs both the AP/WLC certificate and the RADIUS server certificate and is already trusted by the client device, this field does not need to be provided.
● If Manual is selected, five configuration options are available:
◦ Client Bundle (PKCS #12): The Client Bundle is a single PKCS#12 file (.p12 or .pfx) file that include the client certificate chain and private key.
◦ Private Key Password: Optional field. Password used to unlock the private key in the Client Bundle. Leave empty if the PKCS#12 file has no password.
◦ EAP Outer Identity: Optional field. Defaults to “anonymous” if not specified.
◦ Verify Server Certificate: Enabled by default. When enabled, the agent validates the RADIUS server certificate. If disabled, the agent will not validate the RADIUS certificate.
◦ Trusted Server CA Certificate: Optional field. In environments where different Certificate Authorities (CAs) issue infrastructure certificates (such as AP or WLC certificates) and RADIUS server certificates, the client must trust the CA that issued the RADIUS certificate to authenticate securely. Therefore, this setting must be populated with the CA that signs the RADIUS server certificate when multiple CAs are in use. If the same CA signs both the AP/WLC certificate and the RADIUS server certificate and is already trusted by the client device, this field does not need to be provided.
No authentication is required when this option is selected.
Wireless Active Testing Configuration
Once the SSIDs imported from the WLC have been configured on the ThousandEyes platform, you can proceed to configure wireless testing. In this section, we will create a Wireless Active Testing configuration and associate the previously configured SSIDs with the Active Testing Access Point.
Navigate to Endpoint Experience, click on Test Settings, then select Wireless Active Testing, and click on Create New Wireless Test.
As shown in the figure below, the Wireless Active Testing section consists of three parts.
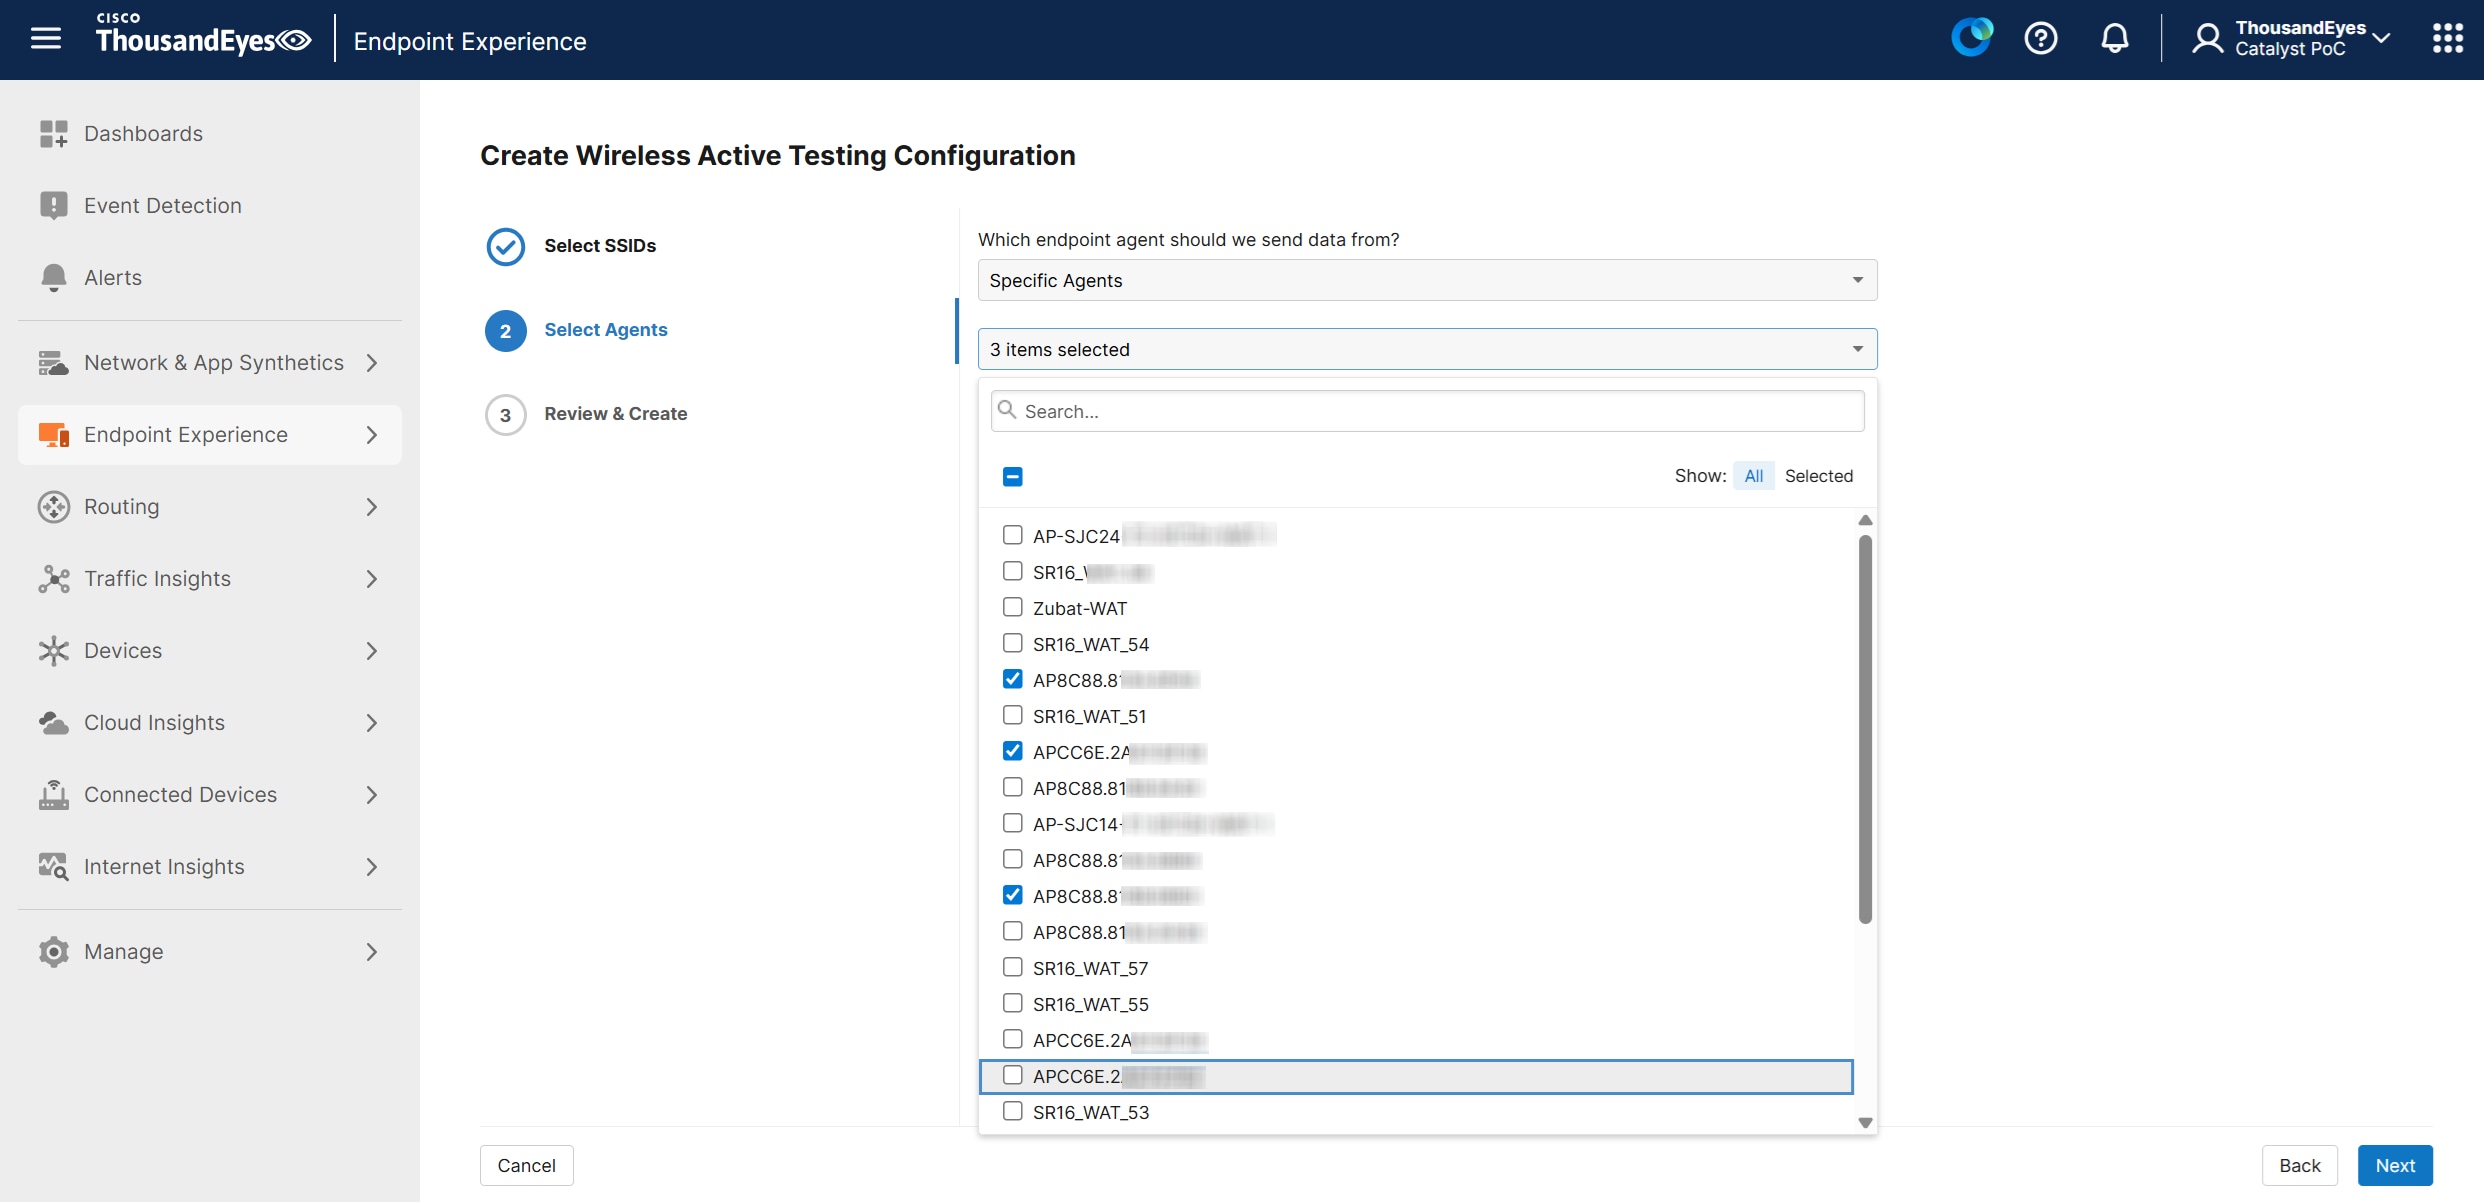
1. Select SSIDs - provide a name for your Wireless Sensor Configuration and select up to three SSIDs for Wireless Active Testing.
2. Select Agents - select the Endpoint Agents you want to associate with these SSIDs for testing. There are three options for selecting which Endpoint Agents will use the previously selected SSIDs for testing:
◦ All Agents – All Endpoint Agents running on Access Points
◦ Specific Agents – Only selected Endpoint Agents
◦ Agent Labels - Only Endpoint Agents associated with a specific label.
Note: Agent Label is a logical construct that acts as a tag to group or manage Agents. See the next section for a sample.
3. Review & Create - In the final part, review the configuration, and if everything looks correct, click Create. Once the configuration is complete, the Active Testing Access Point will begin connecting to the configured SSIDs and gathering wireless metrics.
Note: After completing the configuration, data may take up to 20 minutes to become available on the ThousandEyes platform, but typically it takes much less time.
Configure Endpoint Agent Labels
An Agent Label is a logical construct that acts as a tag to group or manage Agents. There are several ways to use them, for example one might create a label for all agents that are running on APs. For that one can use the Platform filter to select all agents running on Access Points: Cisco Wireless.
Note: SSID-based labels cannot be used within Wireless Active Testing configuration.
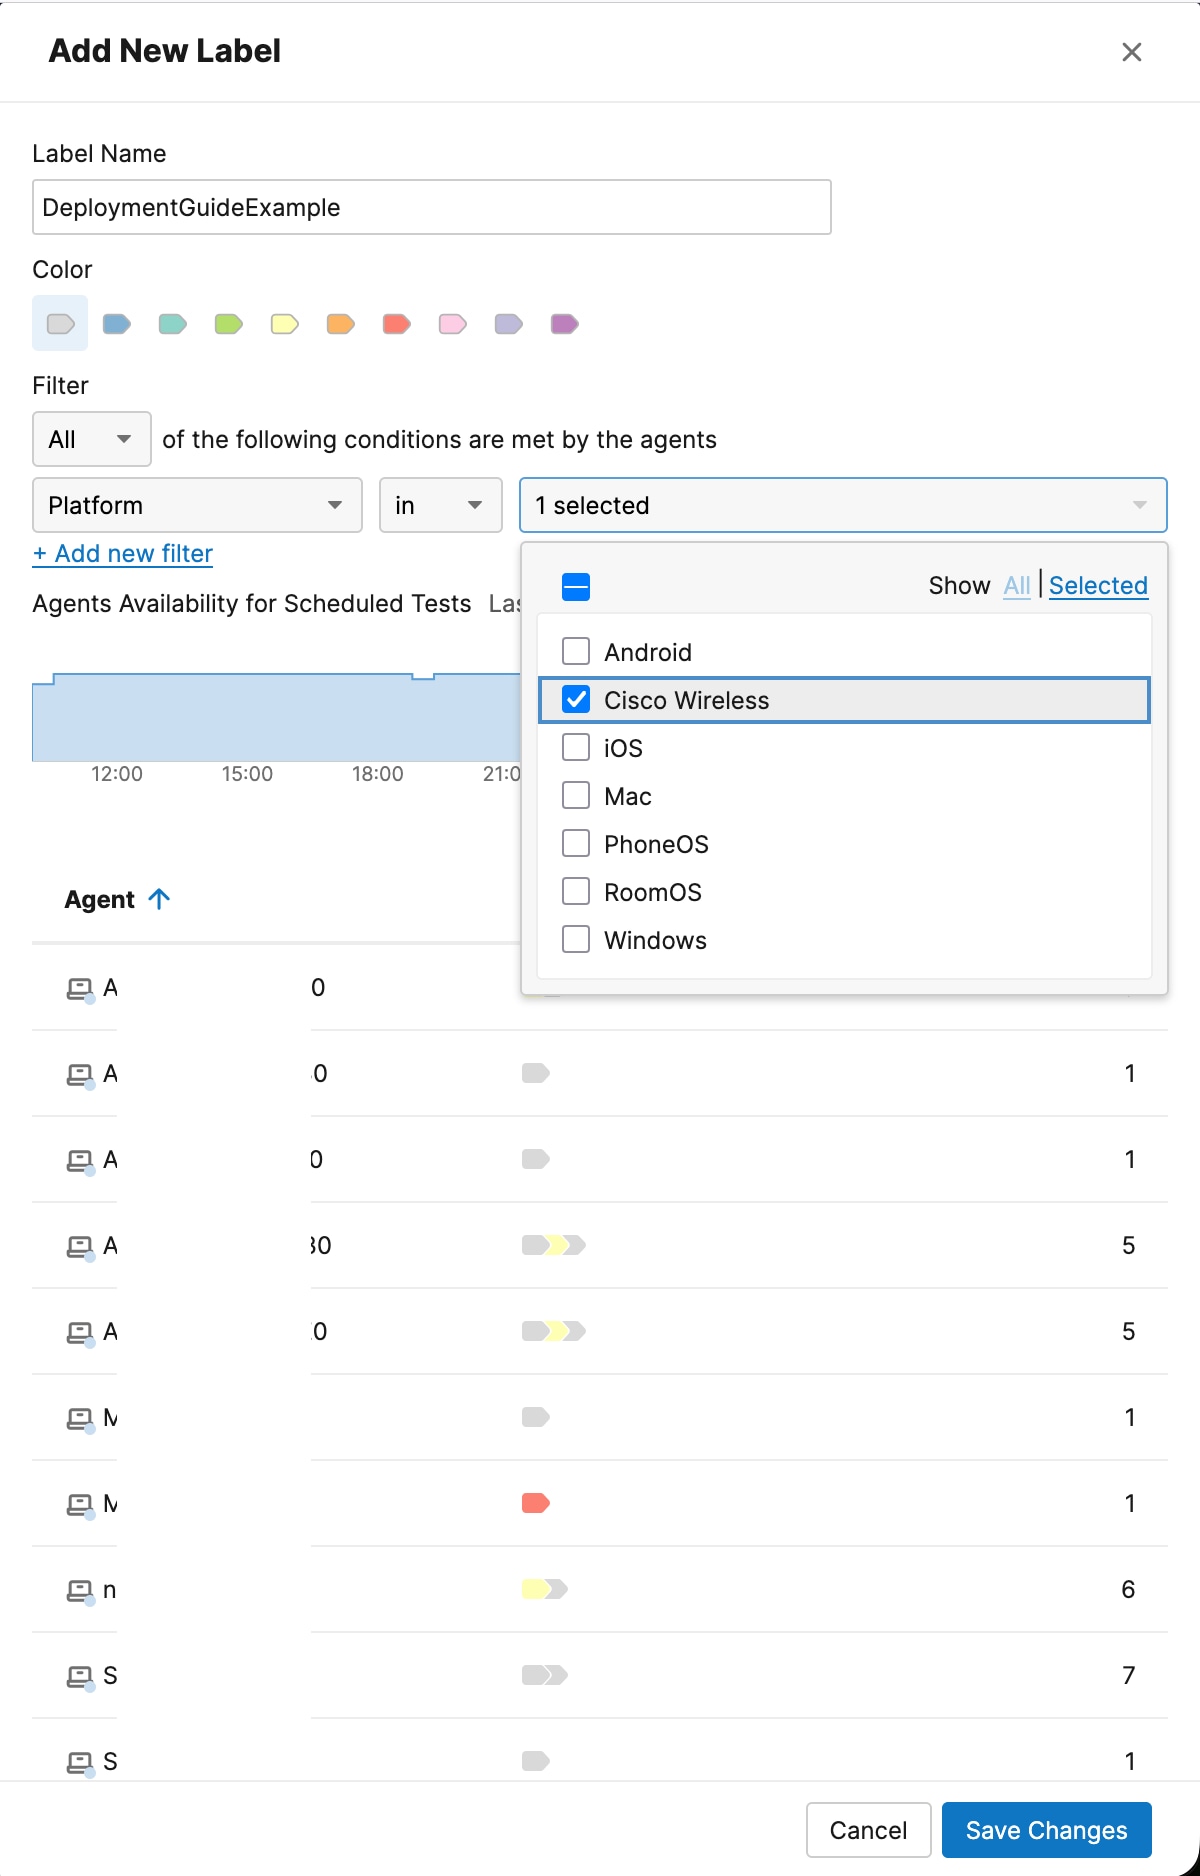
For more information about labels, refer to the documentation here: https://docs.thousandeyes.com/product-documentation/global-vantage-points/endpoint-agents/configuring/configure-endpoint-agent-labels
For more details please visit: https://docs.thousandeyes.com/product-documentation/global-vantage-points/endpoint-agents/configuring/configure-endpoint-agent-labels
In addition to wireless monitoring, Wireless Active Testing with the ThousandEyes Endpoint Agent lets you set up synthetic tests for critical business applications. The configuration process is the same as for other Endpoint Agents. For detailed instructions and best practices, see Monitoring an Application using Synthetic Tests.
Leveraging Wireless Active Test Data in ThousandEyes
Interpreting and Utilizing Wireless Active Test Data in ThousandEyes Platform
This section focuses specifically on the Wireless Active Testing data within the ThousandEyes platform. It provides guidance on how to interpret and effectively use the test data generated from these tests.
For broader guidance on viewing Endpoint Agent data, please refer to this document: https://docs.thousandeyes.com/product-documentation/end-user-monitoring/viewing-data#local-networks-view
Dashboards make it easy to monitor and visualize large volumes of test data, and help you quickly identify and resolve issues.
To help you track test results efficiently and reduce the need for external assistance, we offer Dashboard Templates. These templates promote consistency and support best practices for managing multiple account organizations.
For more information about dashboards, see the following articles:
● Using Dashboard Templates: https://docs.thousandeyes.com/product-documentation/dashboards/dashboard-templates
● Customizing your Dashboard: https://docs.thousandeyes.com/product-documentation/dashboards/customizing-your-dashboard
● Troubleshooting with Dashboard Drill-Down: https://docs.thousandeyes.com/product-documentation/dashboards/troubleshooting-with-drill-down
Navigate to Endpoint Experience > Agent Views in the ThousandEyes platform.
Use the Search section to enter and select the specific Endpoint Agent you want to examine.
The Agent Views screen is divided into multiple sections.
Under the Metrics section, select Connection, and from the metrics dropdown menu on the right-hand side, select RSSI.
The graph in the middle will display the SSIDs tested during the selected time frame along with their corresponding RSSI values.
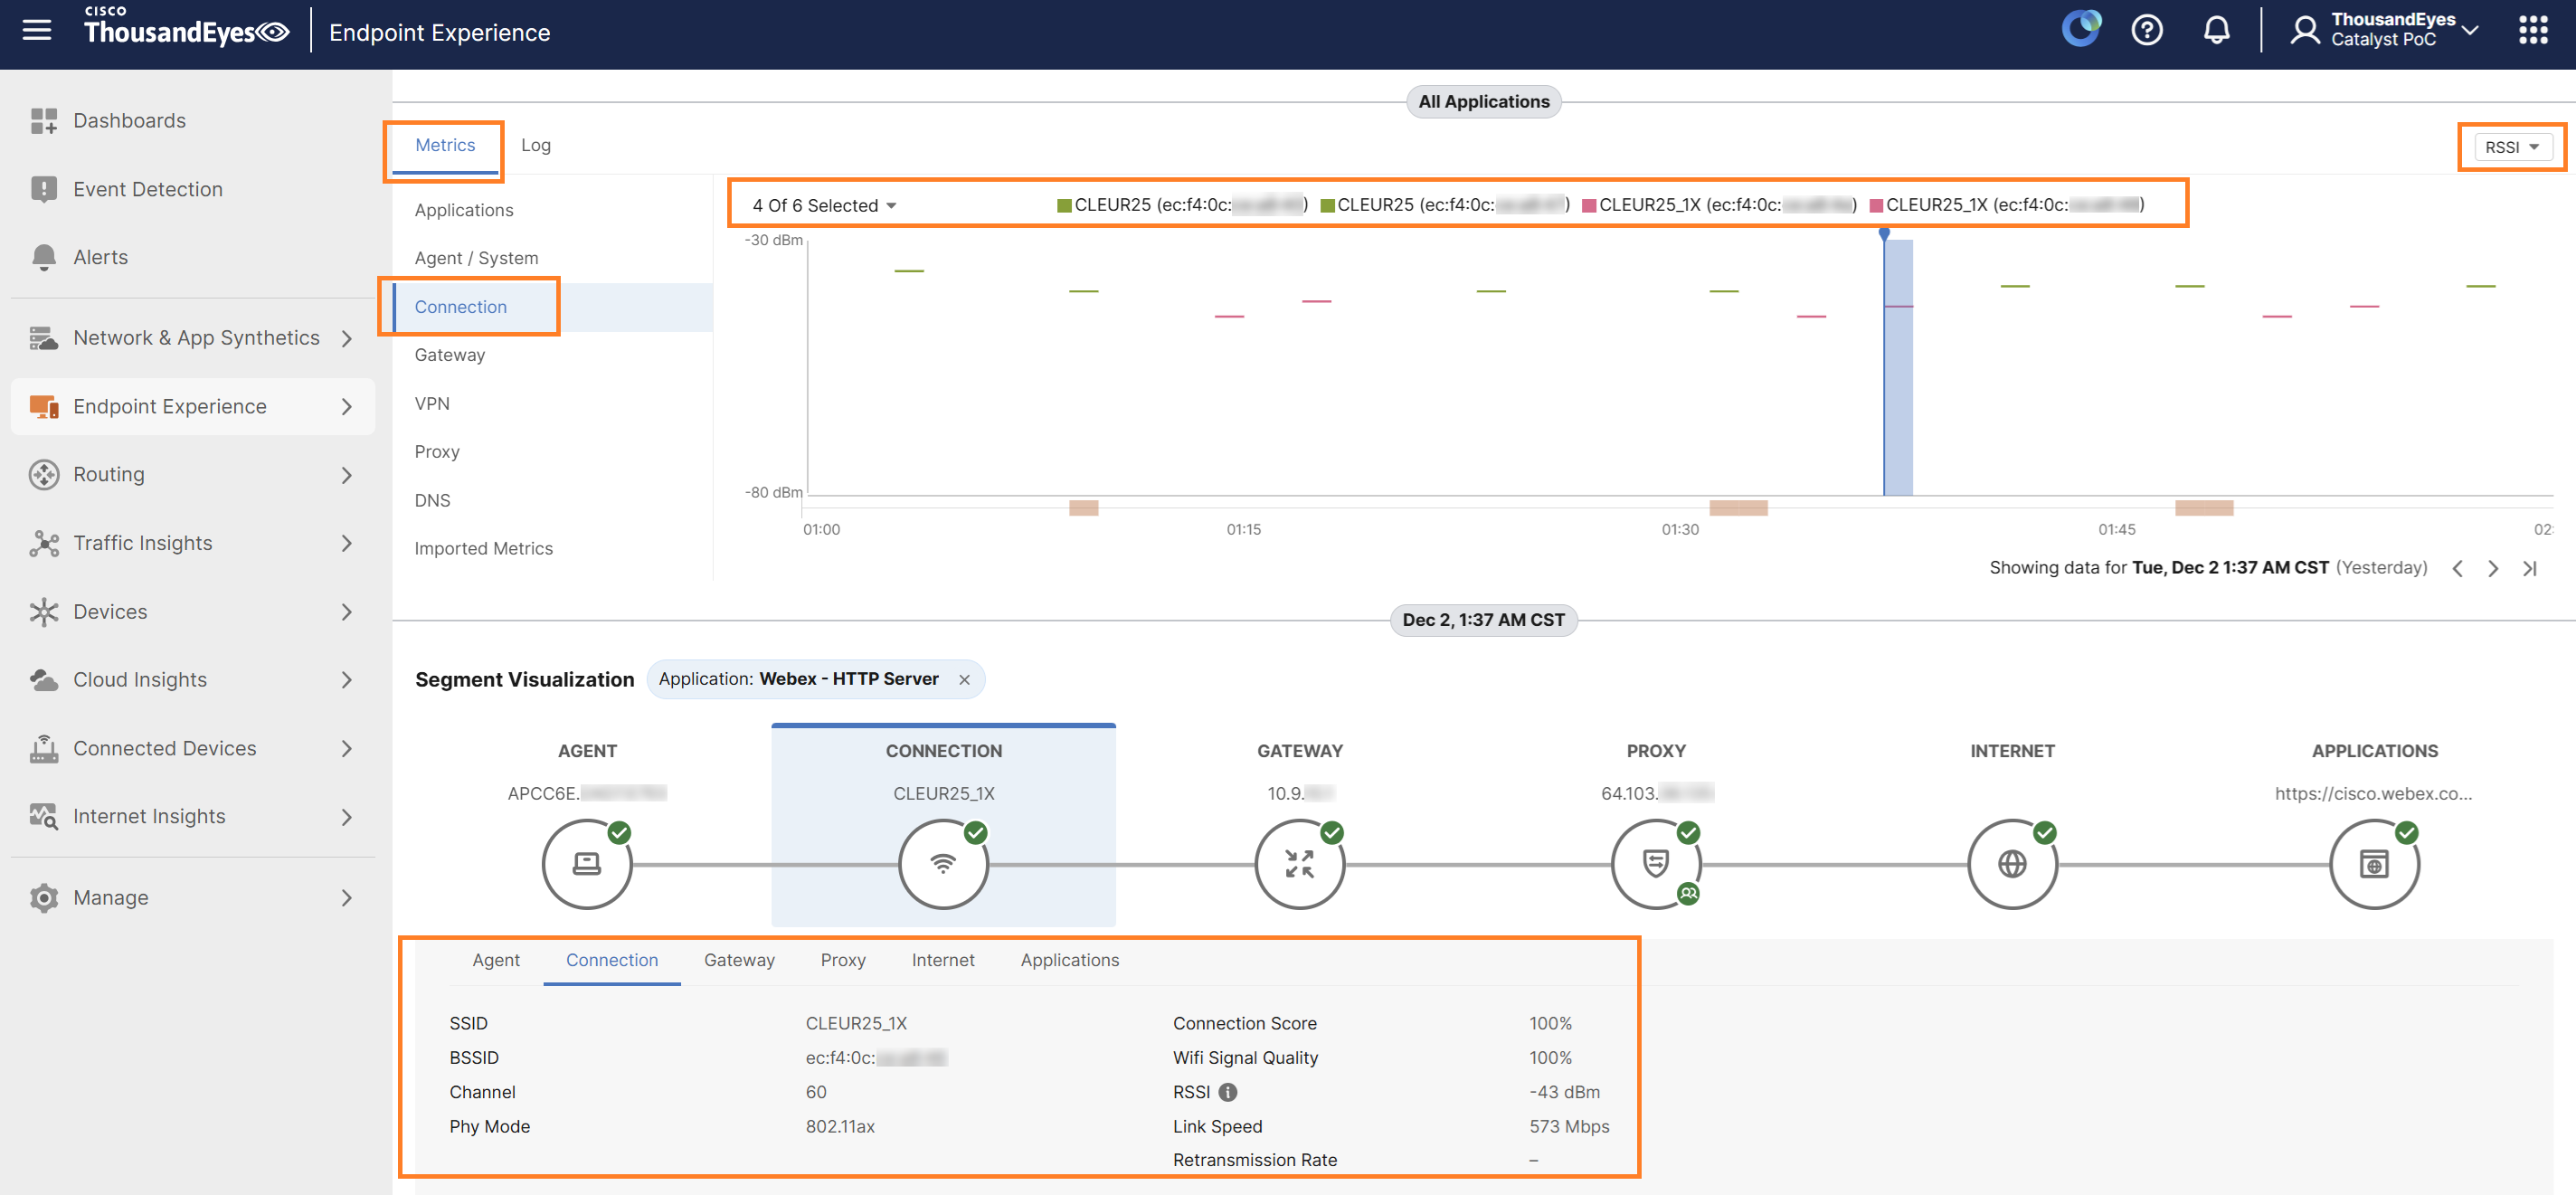
Within the Segment Visualization section, under the Connection tab, you can view wireless-related data such as SSID, BSSID, Channel, Phy Mode, Connection Score, Wi-Fi Signal Quality, RSSI, Link speed.
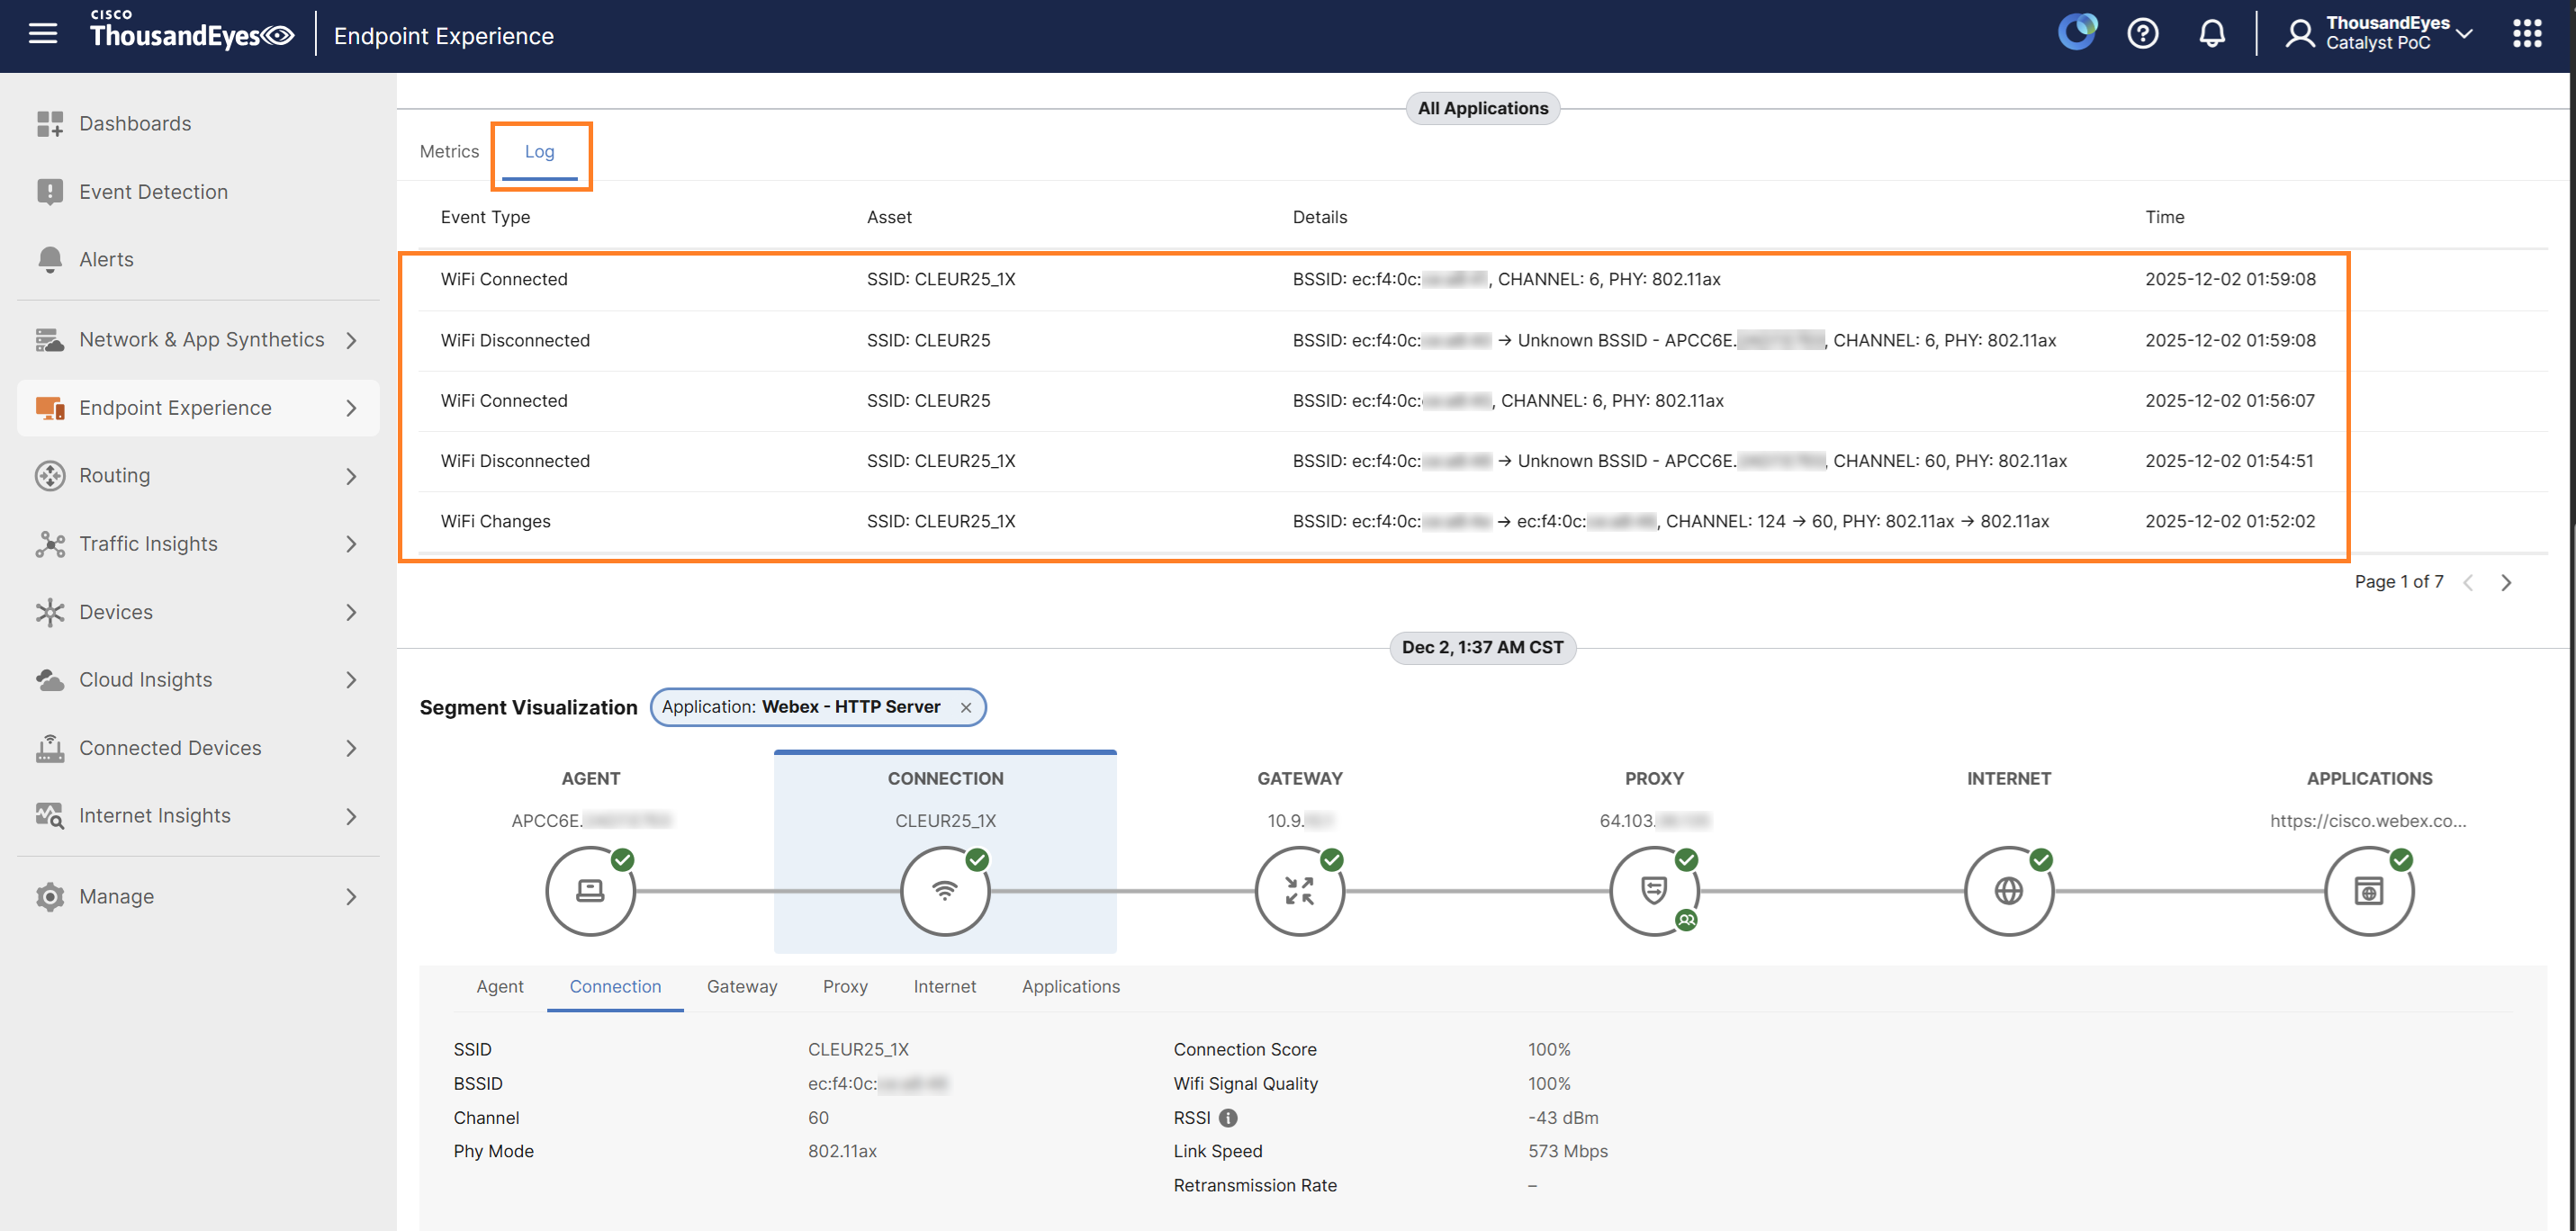
You can click on the Log tab next to Metrics to see the logs reported during the selected timeframe. These logs provide detailed entries for events.
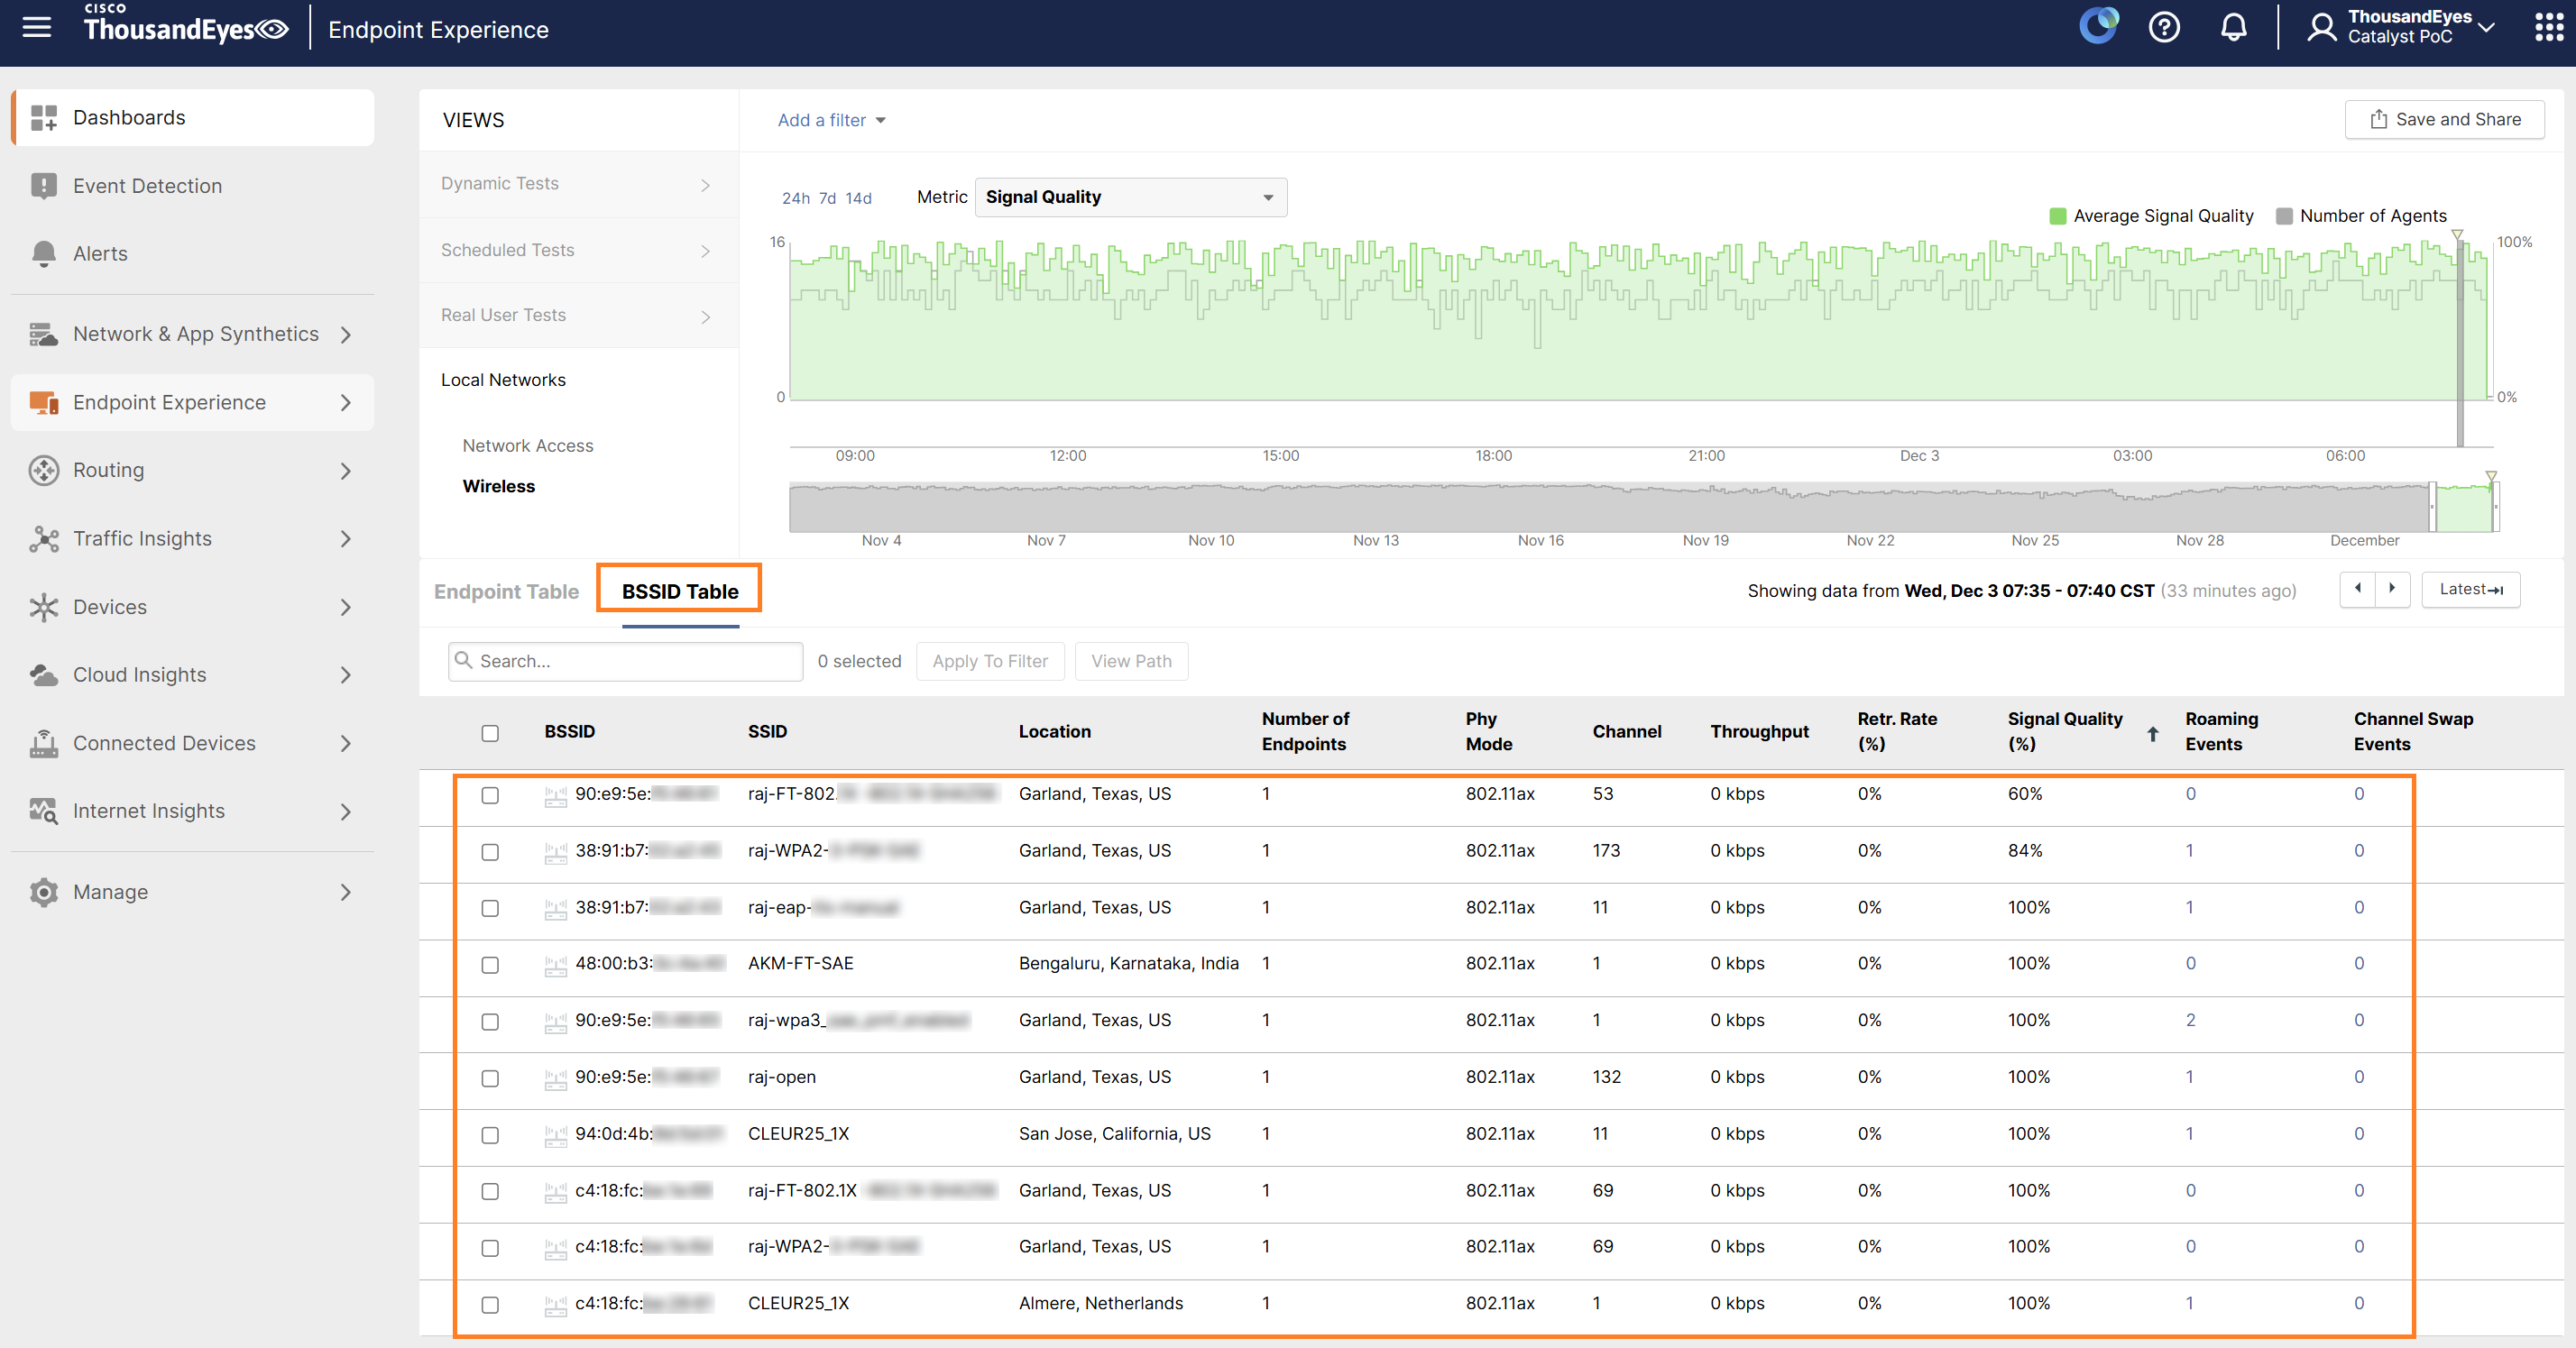
The Local Networks view allows you to see wireless data aggregated across multiple Endpoint Agents, unlike the Single Agent View which focuses on individual agents. To access this view, navigate to Endpoint Experience > Views, then select Local Networks and Wireless.
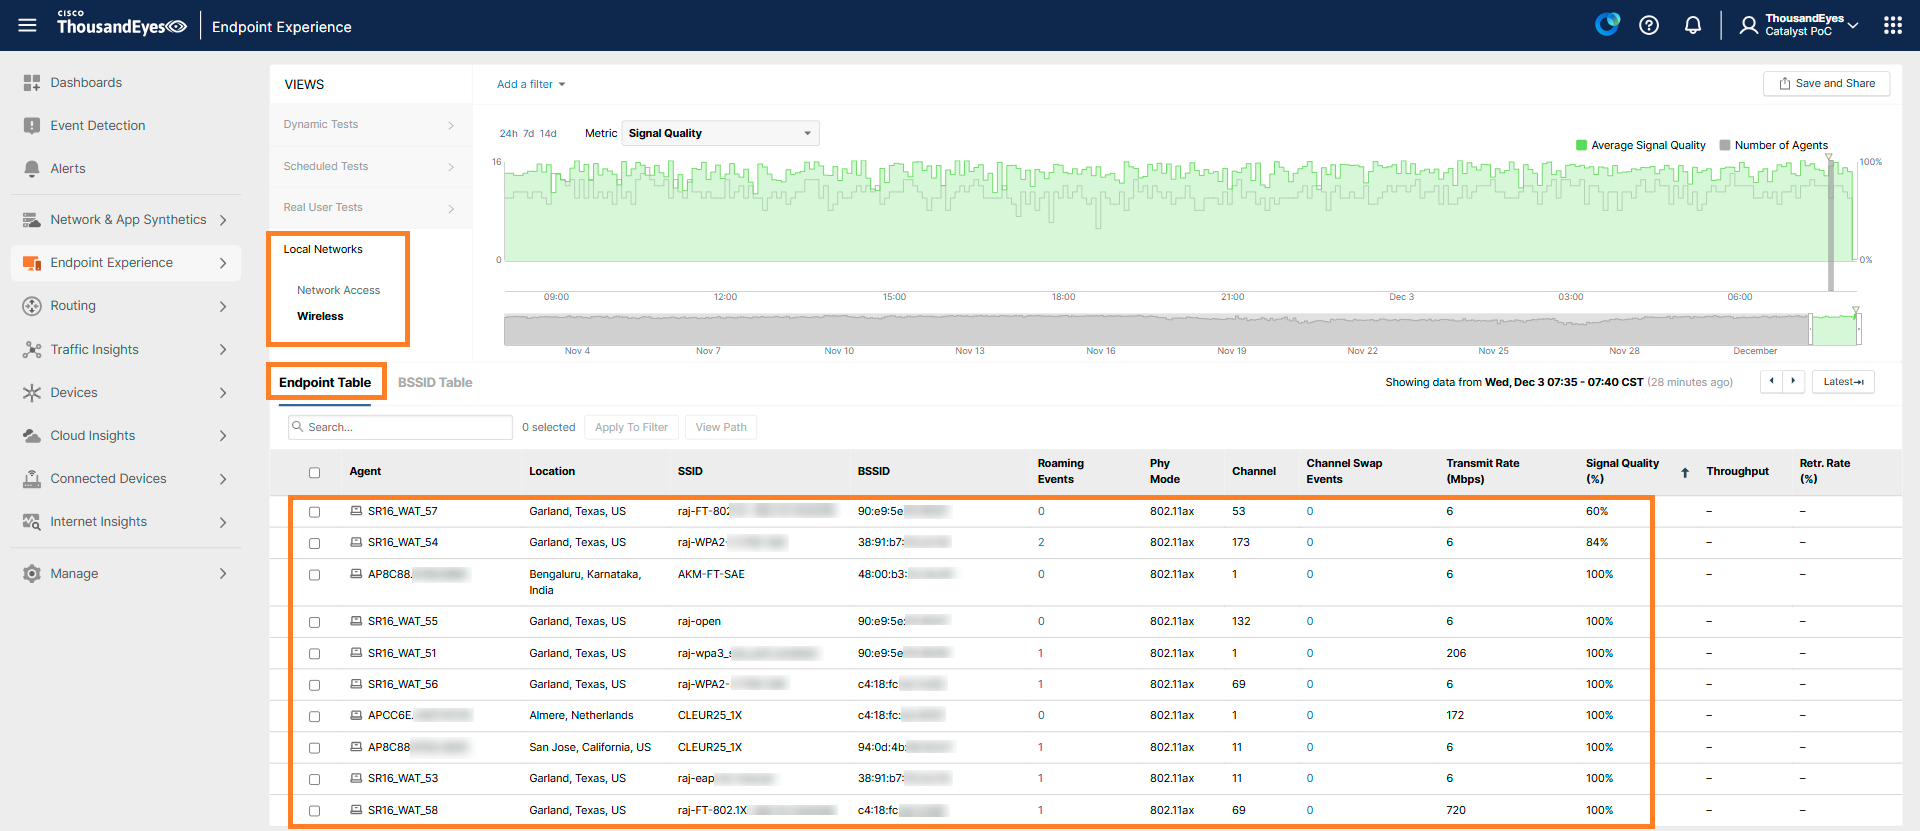
Within this view, the Endpoint Table displays all the endpoint agents that were active during the selected timeframe along with relevant wireless metrics.
BSSID Table provides the same view from the BSSID perspective.
How to Test Different Applications in Different SSIDs
In some scenarios one might want to test different things in SSID A vs SSID B. For example, SSID A might be the Corporate SSID and SSID B might be a Guest SSID.
Here’s the procedure:
Step 1. Create SSID config for SSID A (as shown in step SSID Configuration).
Step 2. Create SSID config for SSID B.
Step 3. Create an Agent Label "L1". This is not mandatory, although it is recommended in order to manage at scale as explained in Configure Endpoint Agent Labels.
Step 4. Create a Wireless Sensor Configuration selecting both SSID A and SSID B. Then assign it to your agent label: L1 (or if you don’t want to use labels, assign it directly to agents).
Step 5. Create an Agent Label "SSID_A_tests", configure it with the filter “SSID” in “SSID A”.
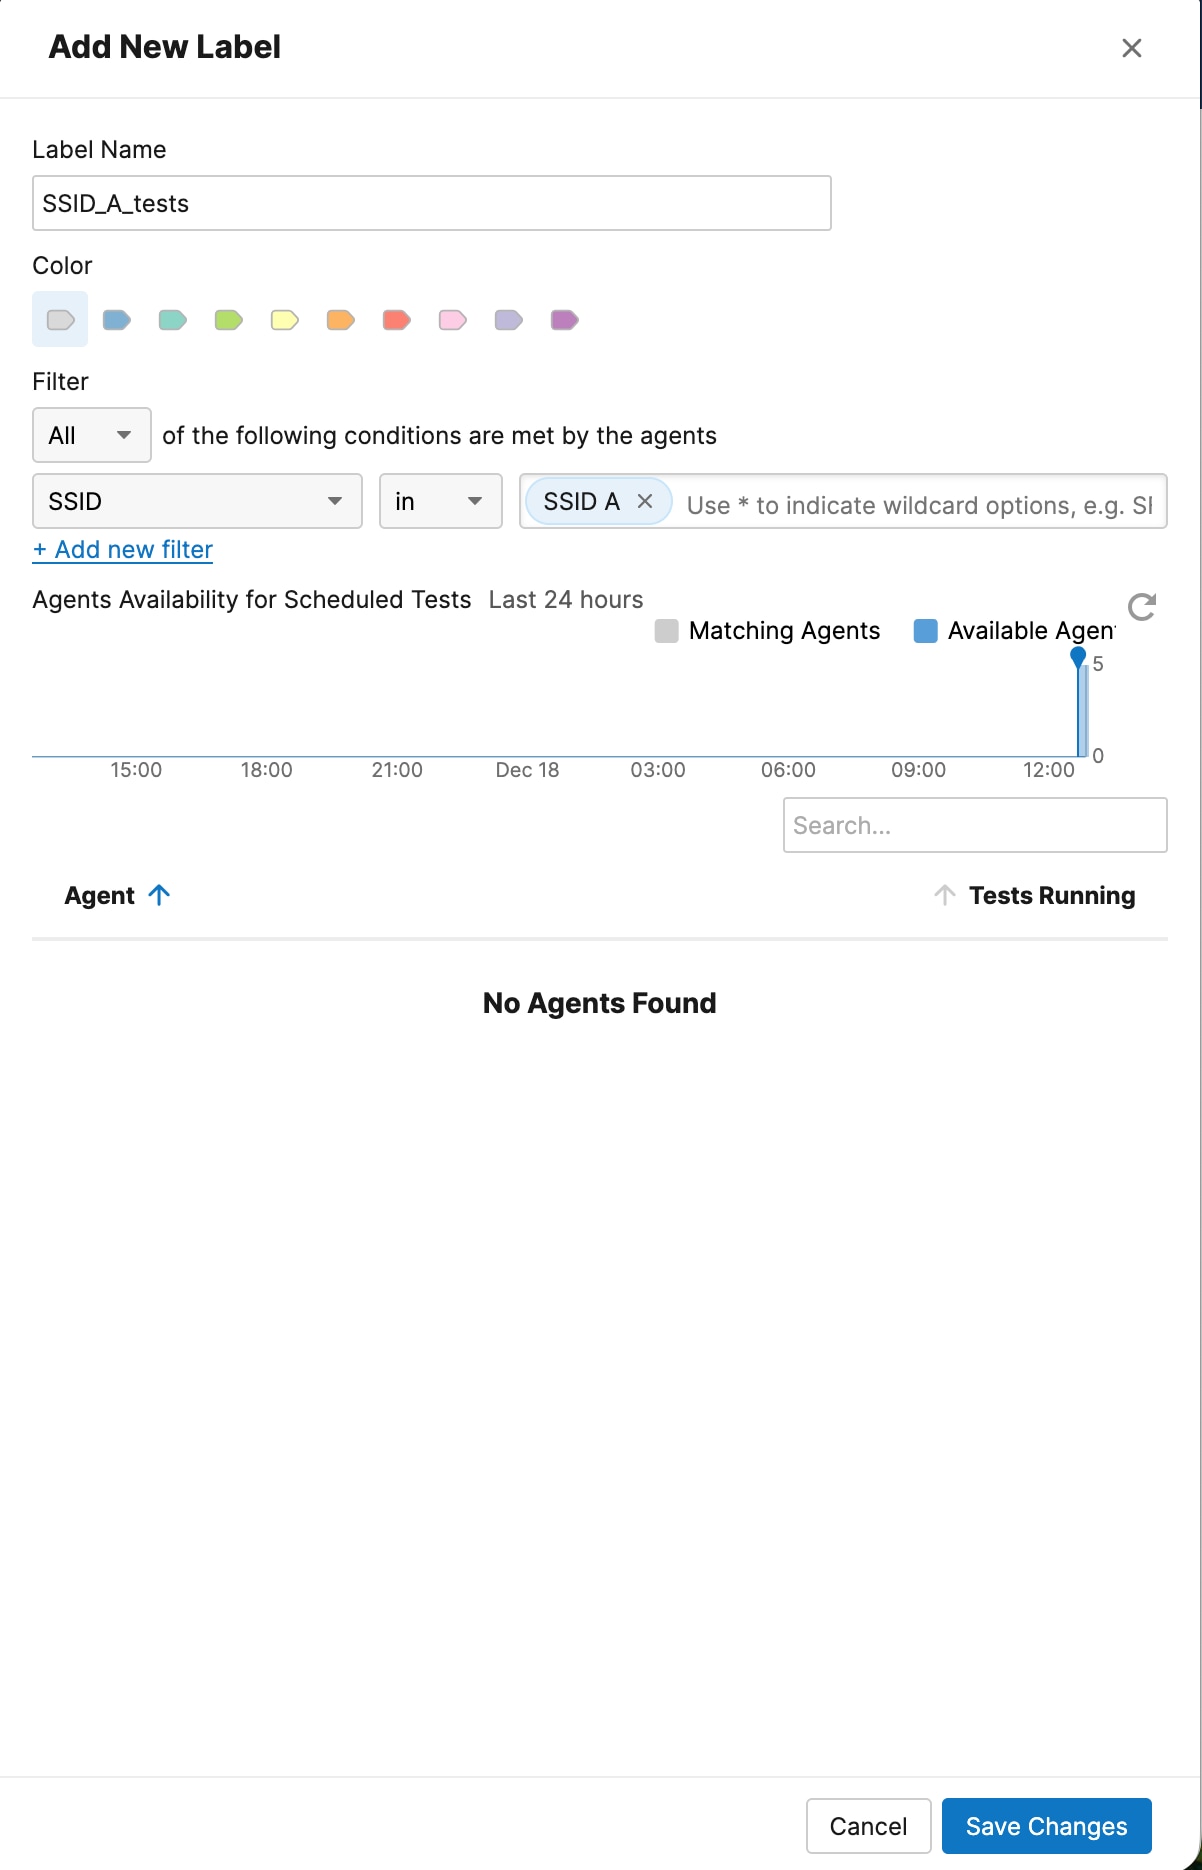
Step 6. Create an Agent Label "SSID_B_tests”, configure it with the filter “SSID” in “SSID B”.
Step 7. Assign the scheduled tests you want to test in SSID A to the label “SSID_A_tests”.
Step 8. Assign the scheduled tests you want to test in SSID B to the label “SSID_B_tests”.
Each time in the testing cycle that the SSID changes, the agent will check to which SSID you’re connected and run the appropriate tests.
The following commands can be executed in the APs to get more information about how active testing is doing.
show wat configuration
show wat agent status
show wat manager stats
show wat manager history
show wat logs
show wat test configuration
show wat test summary
show wat detail
Cisco Catalyst 9800 Series Wireless Controller Software Configuration Guide, Cisco IOS XE 17.18.x: Wireless Active Testing: https://www.cisco.com/content/en/us/td/docs/wireless/controller/9800/17-18/config-guide/b_wl_17_18_cg/m_thousandeyes-integration-enhancements.html
ThousandEyes Wireless Active Testing configuration guide: https://docs.thousandeyes.com/product-documentation/global-vantage-points/endpoint-agents/wireless-active-testing