Upgrading Contact Center Software Components
Available Languages
Table Of Contents
Upgrading Contact Center Software Components
Contact Center Deployment Models
Upgrading Contact Center Components
Upgrading a Specific Contact Center Test Bed
Test Bed 1: Cisco Unified CallManager Post-Routed and Parent/Child Call Flows
Test Bed 2: Cisco Unified Customer Voice Portal Post-Routed Call Flows
Set up New Active Directory Environment
Upgrade Existing Intelligent Contact Management Support Tools Server
Upgrade Core and Access Switches
Upgrade Distributor Administrator Workstation/Historical Database Server
Upgrade Side A Central Controller Components
Upgrade Side B Central Controller Components
Upgrade Client Administrator Workstation
Upgrade Peripheral Gateway (Side A and Side B)
Upgrade Cisco Outbound Option Dialer
Upgrade CTI OS Agent and Supervisor Desktop
Upgrade from Windows 2000 to Windows Server 2003
Upgrade Cisco CallManager Clusters
Upgrade Gateways and Gatekeepers
Cisco CallManager Installation and Upgrade Documentation
Contact Center Installation and Upgrade Documentation
Cisco Unity Connection Installation and Upgrade Documentation
CRS and IP IVR Installation and Upgrade Documentation
Upgrading Contact Center Software Components
This topic discusses in more detail the upgrade sequence for all the contact center components configured in specific deployment models for Cisco Unified Communications Release 5.0.
Upgrade procedures for individual components are not described in this document, since they are available in individual component upgrade documents. See the Related Documentation section at the end of this topic for the appropriate upgrade documents and their URLs.
This topic contains the following sections:
•
Contact Center Deployment Models
•
Contact Center Deployment Models
Upgrade procedures in this document are specifically tailored for each of the deployment models in the contact center test environment, since each of the sites includes different components.
Detailed information about these contact center deployment models at the different sites is available in the System Architecture Reference Manual for Contact Center at: http://www.cisco.com/univercd/cc/td/doc/systems/unified/unified1/starmipc/ch2model.htm
Listed below are the various deployment models in the Cisco Unified Communications contact center test environment:
Compare the above deployments to your specific deployment to best understand the upgrade process that is applicable in your environment.
This section provides the general upgrade sequence for the various components in the different deployment models. More detailed upgrade procedures are discussed later in this topic.
Single Site
In the contact center single site model, upgrade the components in the following order:
1.
2.
a.
b.
c.
d.
e.
f.
g.
3.
4.
5.
6.
7.
8.

Note
9.
Multi-Site Centralized
In the contact center multi-site centralized model, upgrade the components in the following order:
1.
2.
a.
b.
c.
d.
e.
f.
g.
h.
i.
j.
3.
4.
5.
6.
7.
8.
Note
9.
Multi-Site Distributed
In the contact center multi-site distributed model, upgrade the components in the following order:
1.
2.
a.
b.
c.
d.
e.
f.
g.
h.
i.
j.
3.
4.
5.
6.
7.
8.
Note
9.
Upgrading Contact Center Components
This section describes the following upgrade strategies for contact center components:
•
•
•
See "Planning Your System Upgrade" for detailed information on the above upgrade strategies and Chapter 2, "Preparing for System Upgrade" for the software release versions of the components involved in the upgrade. For more information about the number of seats in these various types of sites, see the Summary of Upgrade Strategies table in "Planning Your System Upgrade."
Single Stage Upgrade
The Single Stage upgrade process is recommended for small single/multi-site installations and can be performed in a single maintenance window. This enables you to upgrade all the components in a brief period of time with no loss of functionality.
You should upgrade the components in the order listed in Table 4-1:
Multi-Staged System Upgrade
A Multi-Staged System upgrade is the recommended approach for medium/large single-site and medium multi-site installations. In this upgrade process, components are grouped together for upgrading in several stages or maintenance windows. Within each maintenance window, there is a recommended order for upgrading each component.
The grouping of the components into the stages may vary depending on the size of the networks being upgraded. For smaller networks, one or more separate maintenance windows may be collapsed into a single maintenance window. Additional stages may be necessary for larger sites.
After each maintenance window, we recommend that you verify that the operation of all basic and critical call types remains unaffected, before you initiate the next upgrade stage listed in the table.
See Chapter 2, "Preparing for System Upgrade" for the software release versions of the components involved in the upgrade.
The stages and the contact center components you should upgrade during each stage are listed in Table 4-2.
Upgrading a Specific Contact Center Test Bed
The contact center test sites are set up as two separate test beds:
•
•
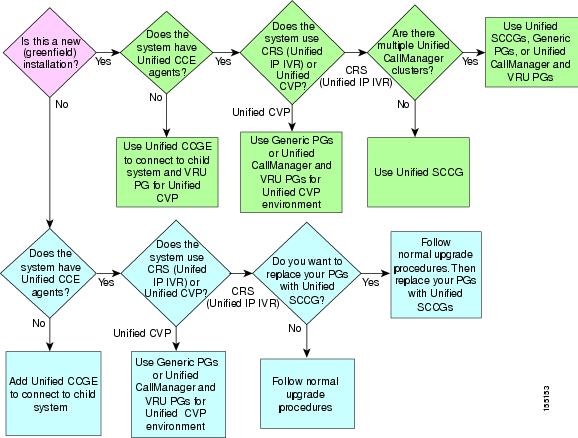
Test Bed 1: Cisco Unified CallManager Post-Routed and Parent/Child Call Flows
Use the flow chart shown in Figure 4-1 to determine the various installation and upgrade options that are available based on the type of call flow that is being implemented in your environment:
•
•
Note
For detailed information on the deployment options and limitations for the Unified CallManager Post-Routed and Parent/Child call flows, see the Cisco Unified Contact Center Gateway feature in the the System Architecture Reference Manual for Contact Center at: http://www.cisco.com/univercd/cc/td/doc/systems/unified/unified1/starmipc/ch2model.htm
For information on related installation and upgrade considerations, see Cisco Intelligent Contact Management Considerations.
Figure 4-1 Installation and Upgrade Options in Test Bed 1
For detailed installation and upgrade information on the Unified SCCG and Unified CCGE, see Cisco IPCC Gateway Deployment Guide ICM/IPCC Enterprise Edition Release 7.0(0) at:
For detailed information on the streamlined installation and web-based administration of the Unified SCC, see System IPCC Enterprise Installation and Configuration Guide, Cisco IPCC Enterprise Edition at:
Test Bed 2: Cisco Unified Customer Voice Portal Post-Routed Call Flows
This section describes the detailed upgrade procedures for the components in Test Bed 2 using the Multi-Staged System upgrade approach. Individual contact center components are upgraded from the 4.1 release set to Cisco Unified Communications release software during separate maintenance windows.
Note
The different stages and the order of components within each stage are listed in Table 4-2. The following is a sequential list of the tasks required to upgrade the contact center components in Test Bed 2:
1.
2.
3.
4.
5.
6.
7.
8.
9.
10.
11.
12.
13.
Verify Software Versions
Ensure that the contact center components targeted for the upgrade are at the current release versions. See the Upgrade Release Versions table for contact center components in Chapter 2, "Preparing for System Upgrade" for the correct software versions.
Set up New Active Directory Environment
Set up the new Active Directory (AD) environment prior to starting the upgrade process to ensure proper interworking with Cisco Unified Intelligent Contact Management (Unified ICM) Release 7.0. Make sure of the following:
•
•
The ICM Setup can detect the mode the domain is set at via the Domain Manager tool. If it detects that the Active Directory in Windows is not set up correctly (that is, in native mode), the ICM Setup prevents users from installing the ICM system.
Set up the new Active Directory (AD) environment as follows:
1.
2.
For information on upgrading Windows 2000 domain controllers to Windows Server 2003, see How to upgrade Windows 2000 domain controllers to Windows Server 2003 on the Microsoft Help and Support website.
Upgrade Existing Intelligent Contact Management Support Tools Server
Upgrade the existing ICM Support Tools Server to ensure compatibility with the newer Support Tools Agents installed on the ICM nodes during the upgrade process. The ICM Support Tools Server is compatible with the older Support Tools Agents.
Upgrade Core and Access Switches
1.
2.
3.
Upgrade Distributor Administrator Workstation/Historical Database Server
1.
2.
3.
4.
5.
6.
7.
8.
9.
10.
11.
12.
13.
14.
Upgrade Side A Central Controller Components
1.
Note
2.
3.
4.
5.
6.
7.
8.
9.
10.
Note
11.
12.
13.
14.
15.
16.
17.
18.
Upgrade Side B Central Controller Components
After completing the upgrade of Side A Central Controller, you have to perform the following procedures to bring the Side A Central Controller into service, before you can upgrade Side B:
1.
2.
3.
Basic operations:
•
•
•
•
•
•
•
Router Operations:
•
•
Logger Operations:
•
•
•
•
HDS Operations:
•
•
Security Operations:
•
•
Script Editor Operations:
•
•
•
ICMDBA Operations:
•
•
Support Tools Operations:
•
4.
Note
5.
6.
7.
8.
9.
10.
11.
12.
13.
14.
Note
15.
16.
Upgrade Client Administrator Workstation
1.
2.
3.
4.
5.
6.
7.
8.
9.
10.
11.
12.
Upgrade Peripheral Gateway (Side A and Side B)
While different Peripheral Gateways (PGs) can be upgraded at different times, you must upgrade Side A and Side B of the redundant PG pairs within the same maintenance window, along with the associated CTI Servers, CTI OS servers, and Cisco Outbound Option Dialers.
For proper Outbound Option operation, you must upgrade all Cisco Outbound Option Dialers during the same maintenance window as the Campaign Manager.
1.
2.
3.
4.
5.
6.
7.
8.
9.
10.
11.
12.
13.
14.
15.
Note
16.
17.
18.
19.
20.
21.
22.
23.
24.
25.
26.
Upgrade Cisco Outbound Option Dialer
1.
2.
3.
4.
5.
6.
7.
8.
9.
10.
11.
12.
Upgrade CTI OS Agent and Supervisor Desktop
1.
2.
3.
Upgrade from Windows 2000 to Windows Server 2003
Upgrading from Windows 2000 to Windows Server 2003 requires a considerable amount of planning and preparation.
Listed below are the main points to be aware of prior to performing the upgrade:
•
•
•
•
Note
For a comprehensive list of hardware and software supported by the Windows Server 2003 Operating System, see the Windows Server Catalog at the Microsoft website.
For more information on upgrading to Windows 2003, see the Windows Server 2003 Upgrade Assistance Center information at the Windows Server 2003 Support website or the web-based product documentation at the Product Documentation for Windows Server 2003 website.
After upgrading the ICM system on Windows 2000 as listed above, upgrade the Operating System to Windows Server 2003 and apply the automated hardening provided by the ICM system.
Do this by either:
•
•
http://www.cisco.com/univercd/cc/td/doc/product/icm/icmentpr/icm70doc/coreicm7/config7/icme70sg.pdfUpgrading the OS on a WebView Server
When upgrading the Operating System on a server with the WebView Server software installed, do the following:
1.
2.
3.
Note
4.
5.
6.
Upgrade Cisco CallManager Clusters
Follow the best practices specified in the Developing Migration Strategies for Cisco CallManager 5.0 for migrating and upgrading the Cisco CallManager cluster.
Be aware of the following before you start the Cisco CallManager upgrade process:
•
•
•
•
•
Upgrade only those Cisco CallManager clusters in the test bed that are targeted for upgrade as follows:
1.
Note
2.
3.
System data and configuration information are gathered and stored on a network storage location that you specify. The exported data is verified by the Upgrade Assistant.
4.
5.
–
–
–
–
Note
6.
Upgrading the Publisher
When upgrading the publisher, remember to do the following:
•
•
•
•
Note
Upgrading the Subscriber
When upgrading the subscribers, remember to do the following:
•
•
•
•
Reinstalling Latest JTAPI Client
1.
2.
Recovering from a Failed Upgrade
In case the upgrade to Unified CallManager 5.0(2) fails, you have one of following two options to go back to your Cisco CallManager Release 4.1(3)SR1 setup:
•
•
Upgrade Gateways and Gatekeepers
1.
2.
3.
Related Documentation
Compatibility Documentation
•
•
•
http://www.cisco.com/univercd/cc/td/doc/product/voice/sw_ap_to/crscomtx.pdfCisco CallManager Installation and Upgrade Documentation
•
http://www.cisco.com/en/US/products/sw/voicesw/ps556/prod_release_note09186a008062bd3b.html•
•
•
•
http://www.cisco.com/en/US/products/sw/voicesw/ps556/products_administration_guide09186a0080631d80.html•
http://www.cisco.com/en/US/products/sw/voicesw/ps556/prod_installation_guide09186a00803f5c57.html•
http://www.cisco.com/en/US/products/sw/voicesw/ps556/products_installation_guide_book09186a00803bea43.html•
http://www.cisco.com/en/US/products/sw/voicesw/ps556/prod_installation_guide09186a00803f5c59.htmlContact Center Installation and Upgrade Documentation
•
http://www.cisco.com/application/pdf/en/us/guest/products/ps1001/c1178/ccmigration_09186a00805670e0.pdf•
http://www.cisco.com/application/pdf/en/us/guest/products/ps1844/c1097/ccmigration_09186a00804d73b7.pdf•
http://www.cisco.com/application/pdf/en/us/guest/products/ps1001/c1097/ccmigration_09186a0080626383.pdf•
http://www.cisco.com/application/pdf/en/us/guest/products/ps1844/c1676/ccmigration_09186a00804d8b1c.pdf•
http://www.cisco.com/application/pdf/en/us/guest/products/ps1001/c1097/ccmigration_09186a00804d7115.pdf•
http://www.cisco.com/application/pdf/en/us/guest/products/ps1001/c1097/ccmigration_09186a00804d7106.pdf•
http://www.cisco.com/application/pdf/en/us/guest/products/ps1001/c1952/ccmigration_09186a00805e1ea2.pdf•
http://www.cisco.com/application/pdf/en/us/guest/products/ps1001/c1952/ccmigration_09186a0080520003.pdf•
http://www.cisco.com/application/pdf/en/us/guest/products/ps1006/c1097/ccmigration_09186a0080552e0b.pdf•
http://www.cisco.com/application/pdf/en/us/guest/products/ps1006/c1097/ccmigration_09186a0080552e11.pdf•
http://www.cisco.com/application/pdf/en/us/guest/products/ps427/c1097/ccmigration_09186a00805e2465.pdf•
http://www.cisco.com/application/pdf/en/us/guest/products/ps14/c1676/ccmigration_09186a00804d2a89.pdfCisco Unity Connection Installation and Upgrade Documentation
•
http://www.cisco.com/en/US/products/ps6509/products_installation_guide_book09186a00805201e8.html•
http://www.cisco.com/en/US/products/ps6509/products_upgrade_guides_book09186a0080511ad7.htmlCRS and IP IVR Installation and Upgrade Documentation
•
http://www.cisco.com/application/pdf/en/us/guest/products/ps6879/c1178/ccmigration_09186a008063b195.pdf•
http://www.cisco.com/application/pdf/en/us/guest/products/ps6879/c1097/ccmigration_09186a0080610e12.pdf•
http://www.cisco.com/application/pdf/en/us/guest/products/ps6879/c1689/ccmigration_09186a0080611818.pdf•
http://www.cisco.com/application/pdf/en/us/guest/products/ps6879/c1097/ccmigration_09186a0080612a78.pdf
 Feedback
Contact Cisco
- Open a Support Case

- (Requires a Cisco Service Contract)
This Document Applies to These Products
- Collaboration Endpoints - Retired Products
- Conferencing - Retired Products
- Contact Center - Retired Products
- Optical Networking - Retired Products
- Routers - Retired Products
- Security - Retired Products
- Servers - Unified Computing (UCS) Retired Products
- Storage Networking Retired Products
- Switches - Retired Products
- Video - Retired Products
- Wireless - Retired Products