Configure MRA

Configure MRA Access Control

Define how clients must authenticate for Mobile and Remote Access (MRA) requests.


Caution

If you are upgrading from X8.9 or earlier, the settings applied after the upgrade are not the same as listed here. R refer instead to the upgrade instructions in the Expressway Release Notes.


Procedure


On the Expressway-C, go to Configuration > Unified Communications > Configuration > MRA Access Control.


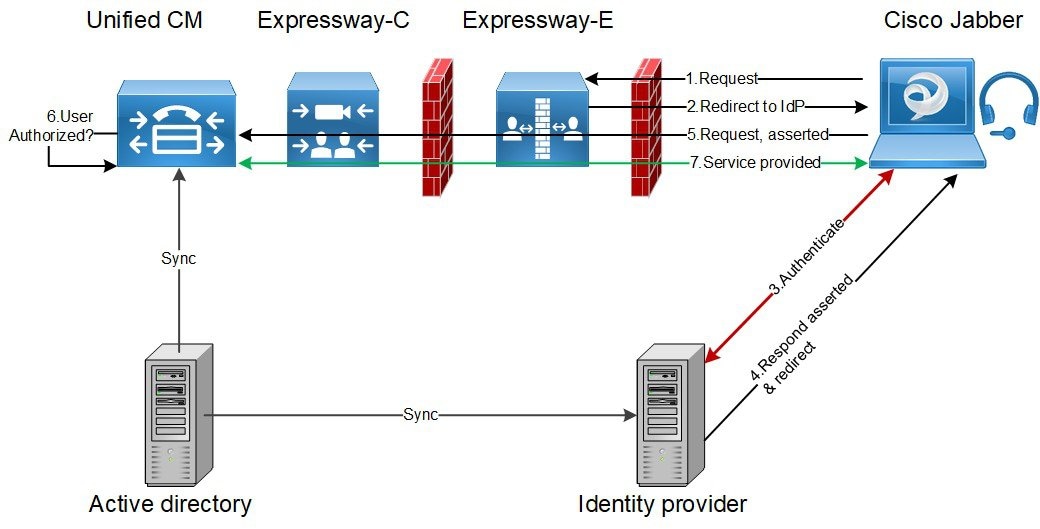
Authorization and Authentication Comparison

We use the concepts "authorization" and "authentication" in documentation and the user interface. At a high level, these terms can be explained using a hotel analogy:

  • Authentication: Equates to hotel registration by a visitor. Defines the initial check-in process to allow you access into the hotel, where you prove who you are by presenting credentials like a passport or driving license.

  • Authorization: Equates to a hotel key card given to a visitor. Controls the specific hotel room and other services that you are allowed to use during your stay.

The fields you actually see in the Web UI depend on whether MRA is enabled (Unified Communications mode set to Mobile and remote access) and on the selected authentication path. Not all the fields in the table are necessarily displayed.

Expressway (Expressway-C) Settings for Access Control

Table 1. Settings for MRA Access Control

Field

Description

Default

Authentication path

Hidden field until MRA is enabled. Defines how MRA authentication is controlled.

SAML SSO authentication: Clients are authenticated by an external IdP.

UCM/LDAP basic authentication: Clients are authenticated locally by the Unified CM against their LDAP credentials.

SAML SSO and UCM/LDAP: Allows either method.

None: No authentication is applied. The default until MRA is first enabled. The "None" option is required (rather than just leaving MRA turned off) because some deployments must turn on MRA to allow functions which are not actually MRA. (Such as the Web Proxy for Meeting Server, or XMPP Federation.) Only these customers should use "None". It is not recommended in other cases.

None before MRA turned on

UCM/LDAP after MRA turned on

Authorize by OAuth token with refresh

This option requires self-describing tokens for authorization. It's our recommended authorization option for all deployments that have the infrastructure to support them.

Only Jabber clients are currently capable of using this authorization method. Other MRA endpoints do not currently support it. The clients must also be in OAuth token with refresh authorization mode.

Important: From X8.10.1, the Expressway fully supports the benefits of self-describing tokens (including token refresh, fast authorization, and access policy support). However, not all of the benefits are actually available throughout the wider solution. Depending on what other products you use (Unified CM, IM and Presence Service, Cisco Unity Connection) and what versions they are on, not all products fully support all benefits of self-describing tokens.

If you use this option on Expressway, you must also enable OAuth with refresh on the Unified CMs, and on Cisco Unity Connection if used. The process is summarized below.

On

Authorize by OAuth token

(previously SSO Mode)

Available if Authentication path is SAML SSO or SAML SSO and UCM/LDAP.

This option requires authentication through the IdP. Currently, only Jabber clients are capable of using this authorization method, which is not supported by other MRA endpoints.

Off

Authorize by user credential

Available if Authentication path is UCM/LDAP or SAML SSO and UCM/LDAP.

Clients attempting to perform authentication by user credentials are allowed through MRA. This includes Jabber, and supported IP phone and TelePresence devices.

Off

Identity providers: Create or modify IdPs

Available if Authentication path is SAML SSO or SAML SSO and UCM/LDAP.

For more information, see Identity Provider Selection.

SAML Metadata

Available if Authentication path is SAML SSO or SAML SSO and UCM/LDAP.

Determines how to generate the metadata file for the SAML agreement. The possible modes are:

  • Cluster: Generates a single cluster-wide SAML metadata file. You must import only this file to IdP for the SAML agreement.

  • Peer: Generates the metadata files for each peer in a cluster. You must import each metadata file into IdP for the SAML agreement.

Identity providers: Export SAML data

Available if Authentication path is SAML SSO or SAML SSO and UCM/LDAP.

For details about working with SAML data, see SAML SSO Authentication Over the Edge.

Allow Jabber iOS clients to use embedded Safari

By default the IdP or Unified CM authentication page is displayed in an embedded web browser (not the Safari browser) on iOS devices. That default browser is unable to access the iOS trust store, and so cannot use any certificates deployed to the devices.

This setting optionally allows Jabber on iOS devices to use the native Safari browser. Because the Safari browser is able to access the device trust store, you can now enable password-less authentication or two-factor authentication in your OAuth deployment.

A potential security issue exists for this option. The mechanism to return browser control from Safari to Jabber after the authentication completes, uses a custom URL scheme that invokes a custom protocol handler. It's possible that another application other than Jabber could intercept the scheme and gain control from iOS. In that case, the application would have access to the OAuth token in the URL.

If you are confident that your iOS devices will not have other applications that register the Jabber custom URL scheme, for example because all mobile devices are managed, then it's safe to enable the option. If you are concerned about the possibility of another app intercepting the custom Jabber URL, then do not enable the embedded Safari browser.

No

Check for internal authentication availability

Available if Authorize by OAuth token with refresh or Authorize by OAuth token is enabled.

The default is No, for optimal security and to reduce network traffic.

Controls how the Expressway-E reacts to remote client authentication requests by selecting whether or not the Expressway-C should check the home nodes.

The request asks whether the client may try to authenticate the user by OAuth token, and includes a user identity with which the Expressway-C can find the user's home cluster:

  • Yes: The get_edge_sso request will ask the user’s home Unified CM if OAuth tokens are supported. The home Unified CM is determined from the identity sent by the Jabber client's get_edge_sso request.

  • No: If the Expressway is configured not to look internally, the same response will be sent to all clients, depending on the Edge authentication settings.

The option to choose depends on your implementation and security policy. If all Unified CM nodes support OAuth tokens, you can reduce response time and overall network traffic by selecting No. Or select Yes if you want clients to use either mode of getting the edge configuration—during rollout or because you can't guarantee OAuth on all nodes.

Caution: Setting this to Yes has the potential to allow rogue inbound requests from unauthenticated remote clients. If you specify No for this setting, the Expressway prevents rogue requests.

No

Allow activation code onboarding

Only available if Authorize by OAuth token with refresh or Authorize by OAuth token is enabled. This setting enables onboarding by activation code in the Expressway. The default value is No. Set the value to Yes to enable this option.

No

SIP token extra time to live

Available if Authorize by OAuth token is On.

Optionally extends the time-to-live for simple OAuth tokens (in seconds). Gives users a short window to accept calls after their credentials expire. However, it increases the potential security exposure.

0 seconds

Configure Cisco Unified Communications Manager for OAuth with Refresh

To use self-describing tokens on Expressway (Authorize by OAuth token with refresh), you must also enable OAuth with refresh on Unified CM, and on Unity Connection if you use it. The settings are summarized here for convenience. For details, refer to the Cisco Unified Communications Manager or Cisco Unity Connection documentation.

Procedure


Do one of the following actions.

  • For Unified CM, enable OAuth with Refresh Login Flow and Caching, in the System > Enterprise Parameters.
  • For Unity Connection, enable OAuth with Refresh Login Flow and add CUCM Publisher to the Authz server settings.

Check Unified CM Support

You can check what authorization methods your Unified CM servers support. This displays the version numbers in use.

Procedure

On the Expressway, select Configuration > Unified Communications > Unified CM servers.


Configure OAuth with Refresh (Self-Describing) on Unified CM SIP Lines

From version X12.5, OAuth is supported on the Unified CM SIP line interface for Jabber clients only. When OAuth is enabled on the Unified CM SIP line and Jabber client, on-premises clients are authorized using self-describing tokens instead of client certificates.

Support for OAuth on the Unified CM SIP line from X12.5 means that secure SIP and SRTP is possible without Certificate Authority Proxy Function (CAPF). It enables end-to-end encryption of ICE and ICE passthrough calls over MRA.

Procedure


Step 1

On Unified CM node, do the following:

  1. Enable SIP OAuth Mode using the CLI command utils sip-oauth enable.

  2. Verify if SIP OAuth is set to listen on default ports (System > > Cisco Unified CM).

    The default ports are 5090 for on-premises and 5091 for MRA. To avoid port conflicts, ensure that these ports are not configured to listen any existing SIP Trunk in Unified CM.

The settings to enable SIP OAuth on the SIP line on Unified CM are summarized here for convenience. For detailed information, see the Cisco Unified Communications Manager documentation.

Step 2

After you enable Unified CM for SIP OAuth, discover or refresh the Unified CM nodes in Expressway-C.

A new CEOAuth (TLS) zone is created automatically in Expressway-C. For example, CEOAuth <Unified CM name>. A search rule is created to proxy the requests originating from the on-premises endpoints towards the Unified CM node. This zone uses TLS connections irrespective of whether Unified CM is configured with mixed mode. To establish trust, Expressway-C also sends the hostname and Subject Alternative Name (SAN) details to the Unified CM cluster

Step 3

Upgrade the Jabber clients to 12.5. Cisco Jabber 12.5 or later is required for either MRA or on-premises clients to connect using OAuth.

Step 4

Enable OAuth authorization on the Phone Security Profile (System > Security > Phone Security Profile) and apply the Phone Security Profile on the Jabber clients.


Refresh Servers on the Expressway-C

You must refresh the Cisco Unified Communications Manager and Cisco Unity Connection nodes defined on the Expressway-C. This fetches keys that the Expressway needs to decrypt the tokens.

Procedure


Step 1

For Unified CM, go to Configuration > Unified Communications > Unified CM servers and click Refresh servers.

Step 2

For Unity Connection, go to Configuration > Unified Communications > Unity Connection servers and click Refresh servers.


Check the Unified Communications Services Status

You can check the status of the Unified Communications services on both Expressway-C and Expressway-E.

Procedure


Step 1

Go to Status > Unified Communications.

Step 2

Review the list and status of domains, zones and (Expressway-C only) Unified CM and IM and Presence Service servers.

The page displays any configuration errors along with links to the relevant configuration page that you access to address the issue.


Working With the Allow List

Expressway-C automatically adds rules (inbound and outbound) to the HTTP allow list.

For example, it adds inbound rules to allow external clients to access the Unified Communications nodes discovered during MRA configuration. These include Unified CM nodes (running CallManager and TFTP service), IM and Presence Service nodes, and Cisco Unity Connection nodes.

  • Inbound rules are viewable at Configuration > Unified Communications > HTTP allow list > Automatic inbound rules.

  • Outbound rules are viewable at Configuration > Unified Communications > HTTP allow list > Automatic outbound rules.

Can I edit the allow list?

  • You can't add outbound rules to the list.

  • You can add your own inbound rules, if clients from outside need to access other web services inside the enterprise. For example, these services may require you to configure the allow list.

    • Jabber Update Server

    • Cisco Extension Mobility

    • Directory Photo Host

    • Advanced File Transfer (AFT)

    • Problem Report Tool server

  • You can't edit or delete auto-added rules in the list.

AFT feature

For the AFT feature to work across Expressway, make sure that all Unified CM IM and Presence Service nodes are on the allow list, whether manually or automatically added.

Automatic Inbound Rules

Expressway automatically edits the HTTP allow list when you discover or refresh Unified Communications nodes. This page shows the discovered nodes, and the rules that apply to those nodes.

The first list is Discovered nodes, and contains all the nodes currently known to this Expressway-C. For each node, the list contains the node's address, its type, and the address of its publisher.

The second list is the rules that have been added for you, to control client access to the different types of Unified Communications nodes. For each type of node in your MRA configuration, you'll see one or more rules in this list. They are shown in the same format as the editable rules, but you cannot modify these rules.

Table 2. Properties of Automatically Added Allow List Rules

Column

Description

Type

This rule affects all nodes of the listed type:

  • Unified CM servers: Cisco Unified Communications Managernodes

  • IM and Presence Service nodes: Cisco Unified Communications Manager IM and Presence Service nodes

  • Unity Connection servers: Cisco Unity Connection nodes

  • TFTP: TFTP nodes

Protocol

The protocol on which the rule allows clients to communicate with these types of nodes.

Ports

The ports on which the rule allows clients to communicate with these types of nodes.

Match type

Exact or Prefix. Depends on the nature of the service the clients access with the help of this rule.

Path

The path to the resource that clients access with the help of this rule. This may not be present, or may only be a partial match of the actual resource, if the rule allows Prefix match.

Methods

The HTTP methods that will be allowed through by this rule (such as GET).

Edit the HTTP Allow List

Procedure


Step 1

Go to Configuration > Unified Communications > HTTP allow list > Editable inbound rules to view, create, modify, or delete HTTP allow list rules.

The page has two areas; one for controlling the default HTTP methods, and the other showing the editable rules.

Step 2

(Optional) Use the check boxes to modify the set of default HTTP methods, then click Save.

You can override the defaults while you're editing individual rules. If you want to be as secure as possible, clear all methods from the default set and specify methods on a per rule basis.

When you change the default methods, all rules that you previously created with the default methods will use the new defaults.

Step 3

[Recommended] Delete any rules you don't need by checking the boxes in the left column, then clicking Delete.

Step 4

Click New to create a rule.

Step 5

Configure the rule to your requirements.

Here is some advice for each of the fields.

Table 3. Properties of Manually Added Allow List Rules

Column

Description

Description

Enter a meaningful description for this rule, to help you recognize its purpose.

Url

Specify a URL that MRA clients are allowed to access. For example, to allow access to http://www.example.com:8080/resource/path, just type it in exactly like that.

  • The protocol the clients are using to access the host must be http:// or https://

  • Specify a port when using a non-default port e.g. :8080

    (Default ports are 80 (http) and 443 (https))

  • Specify the path to limit the rule scope (more secure), e.g. /resource/path

    If you select Prefix match for this rule, you can use a partial path or omit the path. Be aware that this could be a security risk if the target resources are not resilient to malformed URLs.

Allowed methods

Select Use defaults or Choose methods.

If you choose specific HTTP methods for this rule, they will override the defaults you chose for all rules.

Match type

Select Exact match or Prefix match.

Your decision here depends on your environment. It is more secure to use exact matches, but you may need more rules. It is more convenient to use prefix matches, but there is some risk of unintentionally exposing server resources.

Deployment

If you are using multiple deployments for your MRA environment, you also need to choose which deployment uses the new rule. You won't see this field unless you have more than one deployment.

Step 6

Click Create Entry to save the rule and return to the editable allow list.

Step 7

(Optional) Click View/Edit to change the rule.


Upload Rules to the HTTP Allow List


Note

You cannot upload outbound rules.


Procedure


Step 1

Go to Configuration > Unified Communications > HTTP allow list > Upload rules.

Step 2

Browse to and select the CSV file containing your rule definitions.

See Allow List Rules File Reference.

Step 3

Click Upload.

The Expressway responds with a success message and displays the Editable inbound rules page.


Expressway-E for Mobile and Remote Access Configuration Workflow

This section describes the configuration steps required on the Expressway-C for Mobile and Remote Access.

Procedure


Configure DNS and NTP Settings on Expressway-E

If you have a cluster of Expressways, you must do this for every peer.


Note

The combination of <System host name>.<Domain name> is the FQDN of this Expressway-E. Ensure that this FQDN is resolvable in public DNS.


If you have a cluster of Expressway-Es, make sure that the Domain name is identical on each peer. The name is case-sensitive .

Make sure that the following basic system settings are configured on Expressway:

Before you begin

All Expressway systems are synchronized to a reliable NTP service (System > Time.

Procedure


Step 1

Access System > DNS.

Step 2

Set System host name and Domain name.

Step 3

Set Public DNS servers.

Step 4

Set an Authentication method in accordance with your local policy.


Enable SIP Protocol During Configuration

SIP and H.323 protocols are disabled by default on new installs of X8.9.2 and later versions.

Procedure


Step 1

On the Expressway-C, go to Configuration > Protocols > SIP.

Step 2

Set SIP mode to On and Save the page.


Enable the Expressway-E for Mobile and Remote Access

To enable Mobile and Remote Access functionality:

Procedure


Step 1

Go to Configuration > Unified Communications > Configuration.

Step 2

Set Unified Communications mode to Mobile and Remote Access.

Step 3

Click Save.


SAML SSO Authentication Over the Edge

SAML-based SSO is an option for authenticating Unified Communications service requests. The requests can originate inside the enterprise network, or, as described here, from clients requesting Unified Communications services from outside through MRA.

SAML SSO authentication over the edge requires an external identity provider (IdP). It relies on the secure traversal capabilities of the Expressway pair at the edge, and on trust relationships between the internal service providers and an externally resolvable IdP.

The endpoints do not need to connect via VPN. They use one identity and one authentication mechanism to access multiple Unified Communications services. Authentication is owned by the IdP, and there is no authentication at the Expressway, nor at the internal Unified CM services.

The Expressway supports two types of OAuth token authorization with SAML SSO:

  • Simple (standard) tokens. These always require SAML SSO authentication.

  • Self-describing tokens with refresh. These can also work with Unified CM-based authentication


Note

  • When the Jabber endpoint uses SSO with no refresh and originally authenticates remotely to Unified CM through Expressway/MRA and then moves back to the local network, no reauthentication is required for the endpoint (edge to on premises).

  • When the Jabber endpoint originally authenticates in the local network directly to Unified CM and then uses Expressway/MRA to access Unified CM remotely, reauthentication is required for the endpoint (On premises to edge).


About Simple OAuth Token Authorization

Prerequisites

  • Cisco Jabber 10.6 or later. Jabber clients are the only endpoints supported for OAuth token authorization through Mobile and Remote Access (MRA).

  • Cisco Unified Communications Manager 10.5(2) or later

  • Cisco Unity Connection 10.5(2) or later

  • Cisco Unified Communications Manager IM and Presence Service 10.5(2) or later

How it works

Cisco Jabber determines whether it is inside the organization's network before requesting a Unified Communications service. If Jabber is outside the network, it requests the service from the Expressway-E on the edge of the network. If SAML SSO authentication is enabled at the edge, the Expressway-E redirects Jabber to the IdP with a signed request to authenticate the user.

The IdP challenges the client to identify itself. When this identity is authenticated, the IdP redirects Jabber's service request back to the Expressway-E with a signed assertion that the identity is authentic.

The Unified Communications service trusts the IdP and the Expressway-E, so it provides the service to the Jabber client.

Figure 1. Simple OAuth token-based authorization for on-premises UC services

About Self-Describing OAuth Token Authorization with Refresh

Expressway supports using self-describing tokens as an MRA authorization option from X8.10.1. (Set Authorize by OAuth token with refresh to Yes.) Self-describing tokens offer significant benefits:

  • Token refresh capability, so users do not have to repeatedly re-authenticate.

  • Fast authorization.

  • Access policy support. The Expressway can enforce MRA access policy settings applied to users on the Unified CM.

  • Roaming support. Tokens are valid on-premises and remotely, so roaming users do not need to re-authenticate if they move between on-premises and off-premises.

Expressway uses self-describing tokens in particular to facilitate Cisco Jabber users. Jabber users who are mobile or work remotely, can authenticate while away from the local network (off-premises). If they originally authenticate on the premises, they do not have to re-authenticate if they later move off-premises. Similarly, users do not have to re-authenticate if they move on-premises after authenticating off-premises. Either case is subject to any configured access token or refresh token limits, which may force re-authentication.

For users with Jabber iOS devices, the high speeds supported by self-describing tokens optimize Expressway support for Apple Push Notifications (APNs).

We recommend self-describing token authorization for all deployments, assuming the necessary infrastructure exists to support it. Subject to proper Expressway configuration, if the Jabber client presents a self-describing token then the Expressway simply checks the token. No password or certificate-based authentication is needed. The token is issued by Unified CM (regardless of whether the configured authentication path is by external IdP or by the Unified CM). Self-describing token authorization is used automatically if all devices in the call flow are configured for it.

The Expressway-C performs token authorization. This avoids authentication and authorization settings being exposed on Expressway-E.

Prerequisites

  • Expressway is already providing Mobile and Remote Access for Cisco Jabber.

  • All other devices in the call flow are similarly enabled.

  • You have the following minimum product versions installed, or later:

    • Expressway X8.10.1

    • Cisco Jabber iOS 11.9

      If you have a mix of Jabber devices, with some on an older software version, the older ones will use simple OAuth token authorization (assuming SSO and an IdP are in place).

    • Cisco Unified Communications Manager 11.5(SU3)

    • Cisco Unified Communications Manager IM and Presence Service 11.5(SU3)

    • Cisco Unity Connection 11.5(SU3)

  • Make sure that self-describing authentication is enabled on the Cisco Expressway-C (Authorize by OAuth token with refresh setting) and on Unified CM and/or IM and Presence Service (OAuth with Refresh Login Flow enterprise parameter).

  • You must refresh the Unified CM nodes defined on the Expressway. This fetches keys from the Unified CM that the Expressway needs to decrypt the tokens.

OAuth Token Authorization Prerequisites

On the Expressway Pair

  • An Expressway-E and an Expressway-C are configured to work together at your network edge.

  • A Unified Communications traversal zone is configured between the Expressway-C and the Expressway-E.

  • The SIP domain that will be accessed via OAuth is configured on the Expressway-C.

  • The Expressway-C has MRA enabled and has discovered the required Unified CM resources.

  • The required Unified CM resources are in the HTTP allow list on the Expressway-C.

  • If you are using multiple deployments, the Unified CM resources to be accessed by OAuth are in the same deployment as the domain to be called from Jabber clients.

On Cisco Jabber Clients

  • Clients are configured to request the internal services using the correct domain names / SIP URIs / Chat aliases.

  • The default browser can resolve the Expressway-E and the IdP.

On Unified CM

Users who are associated with non-OAuth MRA clients or endpoints, have their credentials stored in Unified CM. Or Unified CM is configured for LDAP authentication

On the Identity Provider

The domain that is on the IdP certificate must be published in the DNS so that clients can resolve the IdP.

Identity Provider Selection

Cisco Collaboration solutions use SAML 2.0 (Security Assertion Markup Language) to enable SSO (single sign-on) for clients consuming Unified Communications services.

If you choose SAML-based SSO for your environment, note the following:

  • SAML 2.0 is not compatible with SAML 1.1 and you must select an IdP that uses the SAML 2.0 standard.

  • SAML-based identity management is implemented in different ways by vendors in the computing and networking industry, and there are no widely accepted regulations for compliance to the SAML standards.

  • The configuration of and policies governing your selected IdP are outside the scope of Cisco TAC (Technical Assistance Center) support. Use your relationship and support contract with your IdP Vendor to assist in configuring the IdP properly. Cisco cannot accept responsibility for any errors, limitations, or specific configuration of the IdP.

Although Cisco Collaboration infrastructure may prove to be compatible with other IdPs claiming SAML 2.0 compliance, only the following IdPs have been tested with Cisco Collaboration solutions:

  • OpenAM 10.0.1

  • Active Directory Federation Services 2.0 (AD FS 2.0)

  • PingFederate® 6.10.0.4

High Level Task List

  1. If you intend to use self-describing token authorization (Authorize by OAuth token with refresh) we recommend getting it working on-premises first, before attempting to enable it for MRA clients.

  2. Configure a synchronizable relationship between the identity provider and your on-premises directory so that authentication can securely be owned by the IdP. See "Directory Integration and Identity Management" in the Cisco Collaboration System 11.x Solution Reference Network Designs (SRND) document.

  3. Export SAML metadata file from the IdP. Check the documentation on your identity provider for the procedure. For example, see "Enable SAML SSO through the OpenAM IdP" in the SAML SSO Deployment Guide for Cisco Unified Communications Applications.

  4. Import the SAML metadata file from the IdP to the Unified CM servers and Cisco Unity Connection servers that will be accessed by single sign-on. See the Unified Communications documentation or help for more details.

  5. Export the SAML metadata files from the Unified CM servers and Cisco Unity Connection servers. For example, see "High-Level Circle of Trust Setup" in the SAML SSO Deployment Guide for Cisco Unified Communications Applications.

  6. Create the Identity Provider on the Expressway-C, by importing the SAML metadata file from the IdP.

  7. Associate the IdP with SIP domain(s) on the Expressway-C.

  8. Export the SAML metadata file(s) from the (primary) Expressway-C; ensure that it includes the externally resolvable address of the (primary) Expressway-E.

    The SAML metadata file from the Expressway-C contains the X.509 certificate for signing and encrypting SAML interchanges between the edge and the IdP, and the binding(s) that the IdP needs to redirect clients to the Expressway-E (peers).

  9. Import the SAML metadata files from the Unified CM servers and Cisco Unity Connection servers to the IdP. An example using OpenAM is in the SAML SSO Deployment Guide for Cisco Unified Communications Applications.

  10. If you intend to use a single, cluster-wide metadata file for SAML agreement, configure the mandatory attribute uid on the IdP. A Service Provider identifies the identity of an authenticated user through this attribute (for information about attribute mapping, refer to the IdP product documentation).


    Note

    This uid attribute must match the LDAP synchronized user id attribute that is used in Unified Communications applications.


  11. Similarly, import the SAML metadata file from the Expressway-C to the IdP. See the IdP documentation for details.

  12. Turn on SAML SSO at the edge, on the Expressway-C. See Configure MRA Access Control.

Import the SAML Metadata from the IdP

Procedure


Step 1

On the Expressway-C, go to Configuration > Unified Communications > Identity providers (IdP).

You only need to do this on the primary peer of the cluster.

Step 2

Click Import new IdP from SAML.

Step 3

Use the Import SAML file control to locate the SAML metadata file from the IdP.

Step 4

Set the Digest to the required SHA hash algorithm.

The Expressway uses this digest for signing SAML authentication requests for clients to present to the IdP. The signing algorithm must match the one expected by the IdP for verifying SAML authentication request signatures.

Step 5

Click Upload.

The Expressway-C can now authenticate the IdP's communications and encrypt SAML communications to the IdP.

Note 

You can change the signing algorithm after you have imported the metadata, by going to Configuration > Unified Communications > Identity providers (IdP), locating your IdP row then, in the Actions column, clicking Configure Digest).


Associate Domains with an IdP

You need to associate a domain with an IdP if you want the MRA users of that domain to authenticate through the IdP. The IdP adds no value until you associate at least one domain with it.

There is a many-to-one relationship between domains and IdPs. A single IdP can be used for multiple domains, but you may associate just one IdP with each domain.

Procedure


Step 1

On the Expressway-C, open the IdP list (Configuration > Unified Communications > Identity providers (IdP)) and verify that your IdP is in the list.

The IdPs are listed by their entity IDs. The associated domains for each are shown next to the ID.

Step 2

Click Associate domains in the row for your IdP.

This shows a list of all the domains on this Expressway-C. There are checkmarks next to domains that are already associated with this IdP. It also shows the IdP entity IDs if there are different IdPs associated with other domains in the list.

Step 3

Check the boxes next to the domains you want to associate with this IdP.

If you see (Transfer) next to the check box, checking it breaks the domain's existing association and associates the domain with this IdP.

Step 4

Click Save.

The selected domains are associated with this IdP.


Export the SAML Metadata from the Expressway-C

From X12.5, Cisco Expressway supports using a single, cluster-wide metadata file for SAML agreement with an IdP. Previously, you had to generate metadata files per peer in an Expressway-C cluster (for example, six metadata files for a cluster with six peers). Now, both cluster-wide and per-peer modes are supported. The settings are on Configuration > Unified Communications > Configuration > SAML Metadata. For the cluster-wide mode, export the metadata file from the primary peer for the SAML agreement. You must not export it from the other peers. If you change the primary peer for any reason, you must again export the metadata file from the new primary peer, and then reimport the metadata file to the IdP.


Note

The Expressway-C must have a valid connection to the Expressway-E before you can export the Expressway-C's SAML metadata.


Procedure


Step 1

Go to Configuration > Unified Communications > Configuration.

Step 2

In MRA Access Control section, choose a mode from the SAML Metadata list:

  • Cluster: Generates a single cluster-wide SAML metadata file. You must import only this file to an IdP for the SAML agreement.
  • Peer: Generates the metadata files for each peer in a cluster. You must import each metadata file to IdP for the SAML agreement. The Peer option is selected by default when Expressway is upgraded from an earlier SAML SSO enabled release to 12.5.

For new deployments, the SAML Metadata mode always defaults to Cluster.

For existing deployments, the mode defaults to Cluster if SAML SSO was disabled in your previous Expressway release, or to Peer if SAML SSO was previously enabled.

Step 3

Click Export SAML data.

This page lists the connected Expressway-E, or all the Expressway-E peers if it's a cluster. These are listed because data about them is included in the SAML metadata for the Expressway-C.

Step 4

If you choose Cluster for SAML Metadata, click Generate Certificate.

Step 5

Do the following:

  • On cluster-wide mode, to download the single cluster-wide metadata file, click Download.
  • On per-peer mode, to download the metadata file for an individual peer, click Download next to the peer. To export all in a .zip file, click Download All.
Step 6

Copy the resulting file(s) to a secure location that you can access when you need to import SAML metadata to the IdP.


IdPs Configurations

This topic covers any known additional configurations that are needed when using a particular IdP for OAuth token-based authorization over MRA.

These configuration procedures are required in addition to the prerequisites and high level tasks already mentioned, some of which are outside of the document's scope.

Active Directory Federation Services 2.0

After creating Relying Party Trusts for the Expressway-Es, you must set some properties of each entity, to ensure that Active Directory Federation Services (ADFS) formulates the SAML responses as Expressway-E expects them.

You also need to add a claim rule, for each relying party trust, that sets the uid attribute of the SAML response to the AD attribute value that users are authenticating with.

These procedures were verified on AD FS 2.0, although the same configuration is required if you are using AD FS 3.0.

You need to:

  • Sign the whole response (message and assertion)

  • Add a claim rule to send identity as uid attribute

Sign the Whole Response
Procedure

In Windows PowerShell®, run the following command for each Expressway-E's <EntityName> once per Relying Party Trust created on ADFS:

Set-ADFSRelyingPartyTrust -TargetName "<EntityName>" -SAMLResponseSignature MessageAndAssertion where <EntityName> must be a display name for the Relying Party Trust of Expressway-E as set in ADFS.


Add a Claim Rule for Each Relying Party Trust
Procedure

Step 1

Open the Edit Claims Rule dialog, and create a new claim rule that sends AD attributes as claims.

Step 2

Select the AD attribute to match the one that identify the OAuth users to the internal systems, typically email or SAMAccountName.

Step 3

Enter uid as the Outgoing Claim Type.


Activation Code Onboarding Through MRA

This feature optionally allows MRA-compliant devices to easily and securely register over MRA using an activation code. It is enabled with the Allow activation code onboarding setting on the Configuration > Unified Communications > Configuration page.

Onboarding with an activation code requires mutual TLS (mTLS) authentication. TLS is automatically enabled or disabled on the MRA port 8443, depending on whether onboarding with an activation code is enabled or disabled.

Existing deployments need to refresh Unified CMs before this feature can be used

If you have upgraded an existing Cisco Expressway from an earlier release than X12.5, refresh the currently configured Unified CMs on Cisco Expressway before you use this feature. To do this, go to Unified Communications > Configuration, select all the configured Unified CMs and click Refresh. This task is not necessary for any Unified CMs that you add later.

Prerequisites

Ensure the phone has been created and activaion enabled on CUCM, for more information see

  1. In Cisco CUCM Enterprise Parameters, Verify OAuth with Refresh login flow parameter is enabled.

    Go to Cisco Unified CM Administration > Enterprise Parameters > SSO and OAuth Configuration

  2. Check the cloud Onboarding page

    • To authorize the cluster (CCMAct service) to connect to the cloud-based device activation service, generate the voucher by clicking the Generate Voucher button.

      Check Enable Activation Code onboarding with Cisco Cloud


      Note

      Collab-edge DNS SRV record(s) need to exist for this domain


      MRA Activation domain should be provided. MRA activation domain provided to Cisco Cloud to redirect phones to customer Expressway-E(s).


      Note

      One MRA activation domain per CUCM cluster


  3. Go to Cisco Unified CM Administration > Advanced Features > MRA Service Domain menu to create and manage MRA service domains


    Note

    There will be one system level default MRA service domain, plus the option to establish MRA service domains at the device pool and device level. The MRA activation domain can also be used as a service domain. Different service domains can be used to direct phones to regional Expressway C/E pairs.


  4. Check MRA access control on Expressway

    • Go to Expressway C > Configuration > Unified Communications > Configuration

    • Check Authorize by OAuth token with refresh is set to On

    • Allow activation code onboarding set to Yes


      Note

      Enabling Activation Code Onboarding forces the Expressway-E to request a client certificate for any connections to TCP 8443


  5. Check Trusted Cisco manufacturing certificates (MICs) installed. They are required to access the activation code onboarding functionality

    • Go to Expressway E > Maintenance > Security certificates > Trusted CA certificate

    • Click Activate code onboarding trusted CA certificates

Dial via Office-Reverse through MRA

Mobile workers need the same high quality, security and reliability as when they place calls in the office. You can assure them of that when you enable the Dial via Office-Reverse (DVO-R) feature and they are using Cisco Jabber on a dual-mode mobile device. DVO-R routes Cisco Jabber calls through the enterprise automatically.

DVO-R handles call signaling and voice media separately. Call signaling, including the signaling for Mobile and Remote Access on Expressway, traverses the IP connection between the client and Cisco Unified Communications Manager. Voice media traverses the cellular interface and hairpins at the enterprise Public Switched Telephone Network (PSTN) gateway. Moving audio to the cellular interface ensures high-quality calls and securely maintained audio even when the IP connection is lost.

You can configure DVO-R so that, when a user makes a call, the return call from Cisco Unified Communications Manager goes to either:

  • The user’s Mobile Identity (mobile number).

  • An Alternate Number for the user (such as a hotel room).

Dial via Office-Reverse through MRA Prerequisites

This feature is dependent on the following versions of related systems:

  • Cisco Unified Communications Manager 11.0(1) or later

  • Cisco Jabber 11.1 or later

Call Flows

Figure 2. DVO-R calling
Figure 3. DVO-R using Mobility Identity
Figure 4. DVO-R using Alternate Number

How DVO-R Works with Expressway Mobile and Remote Access

When you dial a number, a signal is sent to Cisco Unified Communications Manager over the IP path (WLAN or mobile network). See stage 1 of Figure 2 or Figure 3.

Cisco Unified Communications Manager calls your mobile number or the Alternate Number you set (see stage 2 of Figure 2 or Figure 3.)

When you answer, Cisco Unified Communications Manager extends the call to the number you dialed and you hear ring back (see stage 3 of Figure 2 or Figure 3).

When the person answers, the ongoing call is hairpinned at the enterprise PSTN gateway.

If you made the call using a Mobile Identity, your call is anchored at the enterprise gateway. The call is active on your mobile and desk phone, so you can switch between the two (see stage 4 of Figure 2).

If you specified an Alternate Number, your ongoing call is not anchored and you cannot pick up on your desk phone (see stage 4 of Figure 3).

Notes

  • You can use Dual Tone Multi Frequency-based (DTMF) mid-call features (for example *81 for hold) on anchored calls if there is out-of-band DTMF relay between the PSTN gateway and Cisco Unified Communications Manager. You cannot utilize mid-call features when using an Alternate Number.

  • To prevent the callback leg from Cisco Unified Communications Manager routing to your voicemail — thus stopping the voicemail call going through to the person you are dialing — Cisco recommends that you set your DVO-R voicemail policy to ‘user controlled’. This ensures you must generate a DTMF tone by pressing any key on the keypad before your call can proceed.


Note

Although this feature now works for users calling over Mobile and Remote Access, there is no configuration on the Expressway. There is some configuration required on the Unified CM nodes and Cisco Jabber clients.


Configuration Checklist for DVO-R

  1. Set up Cisco Unified Communications Manager to support DVO-R.

  2. Set up DVO-R for each device.

  3. Set up user-controlled voicemail avoidance.

  4. Add Remote Destination (optional).

  5. Configure Cisco Jabber client settings.

Built-in-Bridge Recording through MRA

The Expressway supports Built-in-Bridge (BiB) recording over MRA. This feature can help organizations to comply with the phone recording requirements of the European Union's Markets in Financial Instruments Directive (MiFID II).

How it works

BiB can be used to record the audio portion of calls that are made or received by users working off-premises.

BiB is always enabled on the Expressway.

BiB is configurable on Cisco Unified Communications Manager. When BiB is enabled, Unified CM forks the call to and from the endpoint to a media recording server.

Bandwidth and call capacity impacts

If you plan to use this feature, be aware that it has significant impact on bandwidth and call capacity.

It requires additional network bandwidth to be provisioned. Details are provided in the Cisco Collaboration System 12.x Solution Reference Network Designs (SRND), section "Capacity Planning for Monitoring and Recording". Enabling BiB for MRA endpoints typically needs double bandwidth as, assuming both sides of the call are recorded, each BiB-enabled call consumes double the usual bandwidth.

Enabling BiB on MRA endpoints reduces the overall call capacity of Expressway nodes down to approximately one-third of their original capacity. This is because each call that is being recorded has two additional SIP dialogs associated with it (so essentially equivalent to three calls).

Built-in-Bridge Recording through MRA Prerequisites

BiB over MRA requires the following components, or later:

  • Any compatible clients:

    • Cisco Jabber for Windows 11.9

    • Cisco Jabber for Mac 11.9

    • Cisco Jabber for iPhone and iPad 11.9

    • Cisco Jabber for Android 11.9

    • Cisco IP Phone 7800 Series, Cisco IP Conference Phone 7832, or Cisco IP Phone 8800 Series devices which support MRA (not all these phones are MRA-compatible)

      The phones which currently support MRA are listed in the MRA Infrastructure Requirements section of this guide, or ask your Cisco representative for details.

  • Registrar/call control agent: Cisco Unified Communications Manager 11.5(1)SU3 BiB is not supported on Expressway-registered endpoints.

  • Edge traversal: Expressway X8.11.1

  • Recording server: Out of scope for this document. (Information about configuring recording for Cisco Unified Communications Manager is available in the Feature Configuration Guide for Cisco Unified Communications Manager.)

Configure BiB over MRA


Note

The default Cisco Expressway-C behavior is to rewrite the Contact header in REGISTER messages. When you turn SIP Path headers on, Cisco Expressway-C does not rewrite the Contact header, but adds its address into the Path header instead.


Procedure


Step 1

Verify that the BiB recording system in the Unified CM works correctly, before you configure BiB for MRA.

Step 2

Make sure that the prerequisites listed above are in place.

Step 3

SIP Path headers must be enabled on Cisco Expressway-C:

  1. On the Cisco Expressway-C, go to Configuration > Unified Communications > Configuration.

  2. Set SIP Path headers to On.

Step 4

Go to Configuration > Unified Communications > Unified CM servers.

Step 5

Click Refresh servers.


Configure a Secure Traversal Zone Connection for Unified Communications

Unified Communications features such as Mobile and Remote Access or Jabber Guest, require a Unified Communications traversal zone connection between the Expressway-C and the Expressway-E.

Configure only one Unified Communications traversal zone per Expressway traversal pair. That is, one Unified Communications traversal zone on the Expressway-C cluster, and one corresponding Unified Communications traversal zone on the Expressway-E cluster.

Use this workflow to set up a secure traversal zone connection.

Procedure

  Command or Action Purpose
Step 1

Install Expressway Security Certificates

Install suitable security certificates on Expressway-C and Expressway-E.

Step 2

Configure Encrypted Expressway Traversal Zones

Configure a Unified Communications traversal zone between Expressway-C and Expressway-E.

Install Expressway Security Certificates

You must set up trust between the Expressway-C and the Expressway-E with a suitable server certificate on both Expressways. The certificate must include the Client Authentication extension. The system will not let you upload a server certificate without this extension when Unified Communications features are enabled.

The Expressway includes a built-in mechanism to generate a certificate signing request (CSR) and is the recommended method for generating a CSR:

  • Ensure that the CA that signs the request does not strip out the client authentication extension.

  • The generated CSR includes the client authentication request and any relevant subject alternate names for the Unified Communications features that have been enabled (see Server Certificate Requirements for Unified Communications Manager).

Install on both Expressways the trusted Certificate Authority (CA) certificates of the authority that signed the Expressway's server certificates.

There are additional trust requirements, depending on the Unified Communications features being deployed.

  • For Mobile and Remote Access deployments:

    • The Expressway-C must trust the Unified CM and IM&P tomcat certificate.

    • If appropriate, both the Expressway-C and the Expressway-E must trust the authority that signed the endpoints' certificates.

  • For Jabber Guest deployments:

    • When the Jabber Guest server is installed, it uses a self-signed certificate by default. However, you can install a certificate that is signed by a trusted certificate authority. You must install on the Expressway-C either the self-signed certificate of the Jabber Guest server, or the trusted CA certificates of the authority that signed the Jabber Guest server's certificate.

For more details, see the Cisco Expressway Certificate Creation and Use Deployment Guide on the Expressway configuration guides page.

Procedure


Step 1

Go to Maintenance > Security > Server certificate to generate a CSR and to upload a server certificate to the Expressway.

Step 2

Go to Maintenance > Security > Trusted CA certificate and upload trusted Certificate Authority (CA) certificates to the Expressway.

Step 3

Restart the Expressway for the new trusted CA certificate to take effect.


Configure Encrypted Expressway Traversal Zones

To support Unified Communications features via a secure traversal zone connection between the Expressway-C and the Expressway-E:

  • The Expressway-C and Expressway-E must be configured with a zone of type Unified Communications traversal. This automatically configures an appropriate traversal zone (a traversal client zone when selected on Expressway-C or a traversal server zone when selected on Expressway-E) that uses SIP TLS with TLS verify mode set to On, and Media encryption mode set to Force encrypted.

  • Both Expressways must trust each other's server certificate. As each Expressway acts both as a client and as a server you must ensure that each Expressway’s certificate is valid both as a client and as a server.

  • Be aware that Expressway uses the SAN attribute to validate received certificates, not the CN.

  • If an H.323 or a non-encrypted connection is also required, a separate pair of traversal zones must be configured.

To set up a secure traversal zone, configure your Expressway-C and Expressway-E.

Procedure


Step 1

Go to Configuration > Zones > Zones.

Step 2

Click New.

Step 3

Configure the fields as follows (leave all other fields with default values):

Expressway-C

Expressway-E

Name

"Traversal zone" for example

"Traversal zone" for example

Type

Unified Communications traversal

Unified Communications traversal

Connection credentials section

Username

"exampleauth" for example

"exampleauth" for example

Password

"ex4mpl3.c0m" for example

Click Add/Edit local authentication database. In the popup dialog click New and enter the Name ("exampleauth") and Password ("ex4mpl3.c0m") and click Create credential.

SIP section

Port

Must match the Expressway-E setting.

7001 (default. See the Cisco Expressway IP Port Usage Configuration Guide , for your version, on the Cisco Expressway Series configuration guides page.)

TLS verify subject name

Not applicable

Enter the name to look for in the traversal client's certificate (must be in the Subject Alternative Name attribute). If there is a cluster of traversal clients, specify the cluster name here and ensure that it is included in each client's certificate.

Authentication section

Authentication policy

Do not check credentials

Do not check credentials

Location section

Peer 1 address

Enter the FQDN of the Expressway-E.

Note that if you use an IP address (not recommended), that address must be present in the Expressway-E server certificate.

Not applicable

Peer 2...6 address

Enter the FQDNs of additional peers if it is a cluster of Expressway-Es.

Not applicable

Step 4

Click Create zone.