NVIDIA Rack-Scale Systems, HGX and MGX Servers from Supermicro Ordering Guide
Available Languages
Bias-Free Language
The documentation set for this product strives to use bias-free language. For the purposes of this documentation set, bias-free is defined as language that does not imply discrimination based on age, disability, gender, racial identity, ethnic identity, sexual orientation, socioeconomic status, and intersectionality. Exceptions may be present in the documentation due to language that is hardcoded in the user interfaces of the product software, language used based on RFP documentation, or language that is used by a referenced third-party product. Learn more about how Cisco is using Inclusive Language.
- US/Canada 800-553-2447
- Worldwide Support Phone Numbers
- All Tools
 Feedback
 Feedback
Cisco is expanding Cisco Secure AI Factory with NVIDIA to deliver industry-leading, rack-scale, liquid-cooled AI infrastructure. Cisco will offer Supermicro liquid- and air-cooled systems and support, giving customers access to rack-scale and dense GPU systems. Cisco is the only NVIDIA technology partner to deliver an NVIDIA Cloud Partner–compliant reference architecture built on partner-developed networking systems, spanning both Cisco® Silicon One® and NVIDIA Spectrum-X switch silicon, unified by the Cisco Nexus® One architecture with a choice of Cisco NX-OS (the industry's most deployed data center OS) or Sonic.
The expansion of Cisco Secure AI Factory with NVIDIA to rack-scale infrastructure enables neoclouds, sovereign clouds, and enterprises to accelerate deployment of emerging AI use cases such as large-scale inference, agentic AI, and trillion-parameter model training on full-stack AI infrastructure, with integrated security and observability from Cisco. It provides the operational framework necessary to turn raw GPU power into a deployable enterprise AI stack. By using common operating models and existing technical competencies, organizations can implement trusted AI infrastructure without the complexity of new, proprietary skill requirements.
Purpose
This publication provides information about ordering AI cluster architecture (Cisco switching + ‘Supermicro’ GPU servers + services) from CCW estimate creation.
Scope
This ordering guide describes the information for:
● Technical Readiness
● Catalog of Product IDs
● Step by Step Ordering Process
Audience
Cisco sales teams and partners.
Technical Readiness
Partners can transact full AI cluster architecture (Cisco switching + 'Supermicro' GPU servers + services) within Cisco Commerce Workspace (CCW) under a single solution Bundle (MLB – Multi line Bundle) on Cisco Paper. Partners are required to collaborate with the sales team for all financial discussions. Sellers and Partners must complete the mandatory ‘Supermicro Questionnaire’ to validate customer readiness as part of the seller opportunity and quote in Cisco Commerce Workspace (CCW). Separate invoices are issued by Cisco for Cisco and Supermicro Products.
SMC-NV-RKSCALE-MLB
Table 1. PID of Major Line Bundle (MLB)
| Product ID (PID) |
Description |
| SMC-NV-RKSCALE-MLB |
NVIDIA Rack-Scale Systems from Supermicro |
Table 2. Racks Major Line PIDs
| Product ID (PID) |
Description |
| SRS-GB300-NVL72-M0 |
Supermicro 48U liquid-cooled NVIDIA GB300 NVL72 rack: 72x B300 GPUs and 36x Grace CPUs across 18 compute trays, 9x NVLink switch trays at 1.8TB/s. Includes 18x ODL BMC support and 18x NVIDIA entitlement. Supplied without in-rack CDU. |
| SRS-GB300-NVL72-M1 |
Supermicro 48U liquid-cooled NVIDIA GB300 NVL72 rack: 72x B300 GPUs and 36x Grace CPUs across 18 compute trays, 9x NVLink switch trays at 1.8TB/s. Includes in-rack CDU, 18x ODL BMC support and 18x NVIDIA entitlement. |
| SRS-GB300-NVL72-M3 |
Supermicro 48U liquid-cooled NVIDIA GB300 NVL72 rack: 72x Blackwell Ultra GPUs and 36x Grace CPUs across 18 compute trays with 9 NVLink switch trays at 1.8TB/s. Includes 250kW in-rack CDU. Supplied without NVIDIA management switch. |
| SRS-GB300-NVL72-M4 |
Supermicro 48U liquid-cooled NVIDIA GB300 NVL72 rack: 72x Blackwell Ultra GPUs and 36x Grace CPUs across 18 compute trays with 9 NVLink switch trays at 1.8TB/s. Supplied without in-rack CDU and without NVIDIA management switch. |
| SRS-VRRBN-NVL72-M2 |
Supermicro 48U liquid-cooled NVIDIA Vera Rubin NVL72 rack with 18 compute trays. Includes 18x ODL BMC support. Supplied without in-rack CDU. |
| SRS-VRRBN-NVL72-M4 |
Supermicro 48U liquid-cooled NVIDIA Vera Rubin NVL72 rack with 72x Rubin GPUs across 18 compute trays and NVLink switch trays. Supplied without in-rack CDU and without NVIDIA management switch. In-row or L2A sidecar CDU orderable separately. |
Table 3. Accessories Major Line PIDs
| Product ID (PID) |
Description |
| LCS-SCDU-1K3LR001 |
Supermicro in-row Coolant Distribution Unit, liquid-to-liquid, up to 1.8MW supporting multiple racks or a full cluster. N+1 redundant pumps with ATS, redundant PSUs, 20kW max draw. Warm water up to 40C. Modular row-by-row expansion. |
| LCS-SCDU-200AR001 |
Supermicro Liquid-to-Air sidecar CDU, up to 200kW in a closed loop fully isolated from facility water. N+1 redundant pumps with ATS, redundant PSUs, VFD-controlled fans, 19kW max draw. Touchscreen, web UI, Redfish, SNMP and SCC support. |
Table 4. Cisco Infra Services Major Line PIDs
| Product ID (PID) |
Description |
| CVIS-RA= |
Cisco Validated Infrastructure Service SW Toolkits |
Table 5. Professional Services Major Line PIDs
| Product ID (PID) |
Description |
| SMC-SVC-DEPLOY |
Supermicro Deployment Services |
| SMC-SVC-LC-ACC |
Supermicro Liquid Cool Consumable Services |
Table 6. Management Switch Major Line PIDs
| Product ID (PID) |
Description |
| N93108TC-FX3-MGX |
N9300 48p 100M/1/10GT & 6p 40/100G QSFP28+ with MGX Tray |
SMC-NV-DGPUSVR-MLB
Table 1.PID of Major Line Bundle (MLB)
| Product ID (PID) |
Description |
| SMC-NV-DGPUSVR-MLB |
NVIDIA HGX and MGX Servers from Supermicro |
Table 2. Server Major Line PIDs
| Product ID (PID) |
Description |
| SYS-822GS-NB3RT1 |
Supermicro 8U air-cooled system: 1x NVIDIA HGX B300 8-GPU baseboard, 2x Intel Xeon 6768P 64C, 16x 128GB DDR5-6400 RDIMM (2TB), 8x 3.84TB E1.S NVMe, 2x 1.92TB M.2 boot on SAS3808N RAID, 2x BlueField-3 B3240 DPU, TPM 2.0. |
| SYS-822GS-NB3RT2 |
Supermicro 8U air-cooled system: 1x NVIDIA HGX B300 8-GPU baseboard, 2x Intel Xeon 6768P 64C, 32x 128GB DDR5-6400 RDIMM (4TB), 8x 3.84TB E1.S NVMe, 2x 1.92TB M.2 boot on SAS3808N RAID, 2x BlueField-3 B3240 DPU, TPM 2.0. |
| SYS-422GL-FNR2-1 |
Supermicro 4U MGX dual-root PCIe system: 8x NVIDIA H200 NVL 141GB GPUs with 2x 4-way NVLink bridges, 2x Intel Xeon 6980P 128C, 16x 128GB DDR5-6400 RDIMM (2TB), 8x 3.84TB E1.S NVMe, 2x 1.92TB M.2 boot, 2x BlueField-3 B3220 crypto DPU. |
| SYS-422GL-FNR2-2 |
Supermicro 4U MGX dual-root PCIe system: 8x NVIDIA H200 NVL 141GB GPUs with 2x 4-way NVLink bridges, 2x Intel Xeon 6980P 128C, 24x 128GB DDR5-6400 RDIMM (3TB), 8x 3.84TB E1.S NVMe, 2x 1.92TB M.2 boot, 2x BlueField-3 B3220 crypto DPU. |
Table 3. Racks Major Line PIDs
| Rack Product ID (PID) |
Description |
| SRS-48UDLC-B300-M0 |
Supermicro 48U direct liquid-cooled rack accepting 1 to 8 SYS-422GS nodes, scaling to 64 HGX B300 GPUs per rack. Each node includes SDL BMC support. Supplied without in-rack CDU. |
| SRS-48UDLC-B300-M1 |
Supermicro 48U direct liquid-cooled rack accepting 1 to 8 SYS-422GS nodes, scaling to 64 HGX B300 GPUs per rack. Each node includes SDL BMC support. Includes in-rack CDU. |
| SRS-RUBIN-NVL8-M0 |
Supermicro 48U direct liquid-cooled rack accepting 1 to 9 SYS-222GS nodes, scaling to 72 HGX Rubin NVL8 GPUs per rack. Each node includes SDL BMC support and BF4 adapter support. Supplied without in-rack CDU. |
| SRS-RUBIN-NVL8-M1 |
Supermicro 48U direct liquid-cooled rack accepting 1 to 9 SYS-222GS nodes, scaling to 72 HGX Rubin NVL8 GPUs per rack. Each node includes SDL BMC support and BF4 adapter support. Includes in-rack CDU. |
Table 4. Server PIDs
| Rack Product ID (PID) |
Server Product ID (PID) |
Description |
| Server PIDs for HGX B300 LC Rack |
SYS422GSNB3RTLCC1 |
Supermicro 4U liquid-cooled system: 1x NVIDIA HGX B300 8-GPU DLC baseboard, 2x Intel Xeon 6768P 64C, 16x 128GB DDR5-6400 RDIMM (2TB), 8x 3.84TB E1.S NVMe, 2x 1.92TB M.2 boot on SAS3808N RAID, 2x BlueField-3 B3240 DPU, TPM 2.0. |
| SYS422GSNB3RTLCC2 |
Supermicro 4U liquid-cooled system: 1x NVIDIA HGX B300 8-GPU DLC baseboard, 2x Intel Xeon 6768P 64C, 32x 128GB DDR5-6400 RDIMM (4TB), 8x 3.84TB E1.S NVMe, 2x 1.92TB M.2 boot on SAS3808N RAID, 2x BlueField-3 B3240 DPU, TPM 2.0 |
|
| Server PIDs for HGX Rubin Rack |
SYS222GS-R2BTALC1 |
Supermicro 2U liquid-cooled Rubin system: 1x NVIDIA HGX Rubin NVL8 8-GPU baseboard, 2x Intel Xeon 6776P 64C, 16x 128GB DDR5-6400 RDIMM (2TB), 8x 3.84TB E1.S NVMe, 2x 1.92TB M.2 boot on Intel VROC, 2x BlueField-4 BF4240L DPU. |
| SYS222GS-R2BTALC2 |
Supermicro 2U liquid-cooled Rubin system: 1x NVIDIA HGX Rubin NVL8 8-GPU baseboard, 2x Intel Xeon 6776P 64C, 32x 128GB DDR5-6400 RDIMM (4TB), 8x 3.84TB E1.S NVMe, 2x 1.92TB M.2 boot on Intel VROC, 2x BlueField-4 BF4240L DPU. |
Table 5. Accessories Major Line PIDs
| Product ID (PID) |
Description |
| LCS-SCDU-1K3LR001 |
Supermicro in-row Coolant Distribution Unit, liquid-to-liquid, up to 1.8MW supporting multiple racks or a full cluster. N+1 redundant pumps with ATS, redundant PSUs, 20kW max draw. Warm water up to 40C. Modular row-by-row expansion. |
| LCS-SCDU-200AR001 |
Supermicro Liquid-to-Air sidecar CDU, up to 200kW in a closed loop fully isolated from facility water. N+1 redundant pumps with ATS, redundant PSUs, VFD-controlled fans, 19kW max draw. Touchscreen, web UI, Redfish, SNMP and SCC support. |
Table 6. Cisco Infra Services Major Line PIDs
| Product ID (PID) |
Description |
| CVIS-RA= |
Cisco Validated Infrastructure Service SW Toolkits |
Table 7. Professional Services Major Line PIDs
| Product ID (PID) |
Description |
| SMC-SVC-DEPLOY |
Supermicro Deployment Services |
| SMC-SVC-LC-ACC |
Supermicro Liquid Cool Consumable Services |
Table 8. Management Switch Major Line PIDs
| Product ID (PID) |
Description |
| N93108TC-FX3-MGX |
N9300 48p 100M/1/10GT & 6p 40/100G QSFP28+ with MGX Tray |
| N9K-C93108TC-FX3 |
N9300 48p 100M/1/10GT & 6p 40/100G QSFP28+ |
Table 9. Management Software Major Line PIDs
| Product ID (PID) |
Description |
| DC-MGT-SAAS |
N9300 48p 100M/1/10GT & 6p 40/100G QSFP28+ with MGX Tray |
| CNDL-DESELECT |
Conditional Deselect |
CCW - Create Estimate
This section provides more information and details related to packages and PIDs specific to AI cluster architecture (Cisco switching + 'Supermicro' GPU servers + services). It also provides references to additional buying programs and subscription packages that AI cluster architecture (Cisco switching + 'Supermicro' GPU servers + services) products may be included in.
Note:
● Attention: A fully completely consolidated EUQ is required for all product orders at the time of order entry. Failure to provide the completed EUQ may lead to price changes and will delay your order! Please review the EUQ submission instructions carefully to ensure your order can be processed quickly.
● Please note that this offer requires completion of technical questionnaire to quote. Please contact your Cisco Seller to submit the quotes to ensure the pricing and configurations meet the offer requirements.
● Please note that the order will be placed on a Compliance Hold for service validation with Supermicro. Please direct any questions to smc-compliance@cisco.com.
Step 1. Launch your web browser and navigate to the Cisco Commerce Estimate Creation page.
Step 2. Log In to Cisco screen, type your Cisco.com user ID and password.
Step 3. In the Estimates page, set preferences for this estimate by entering the SKU, PID, product description or product family (for example, SMC-NV-RKSCALE-MLB or SMC-NV-DGPUSVR-MLB) to search for the product you wish to order.
How to Configure SMC-NV-RKSCALE-MLB
Step 4.
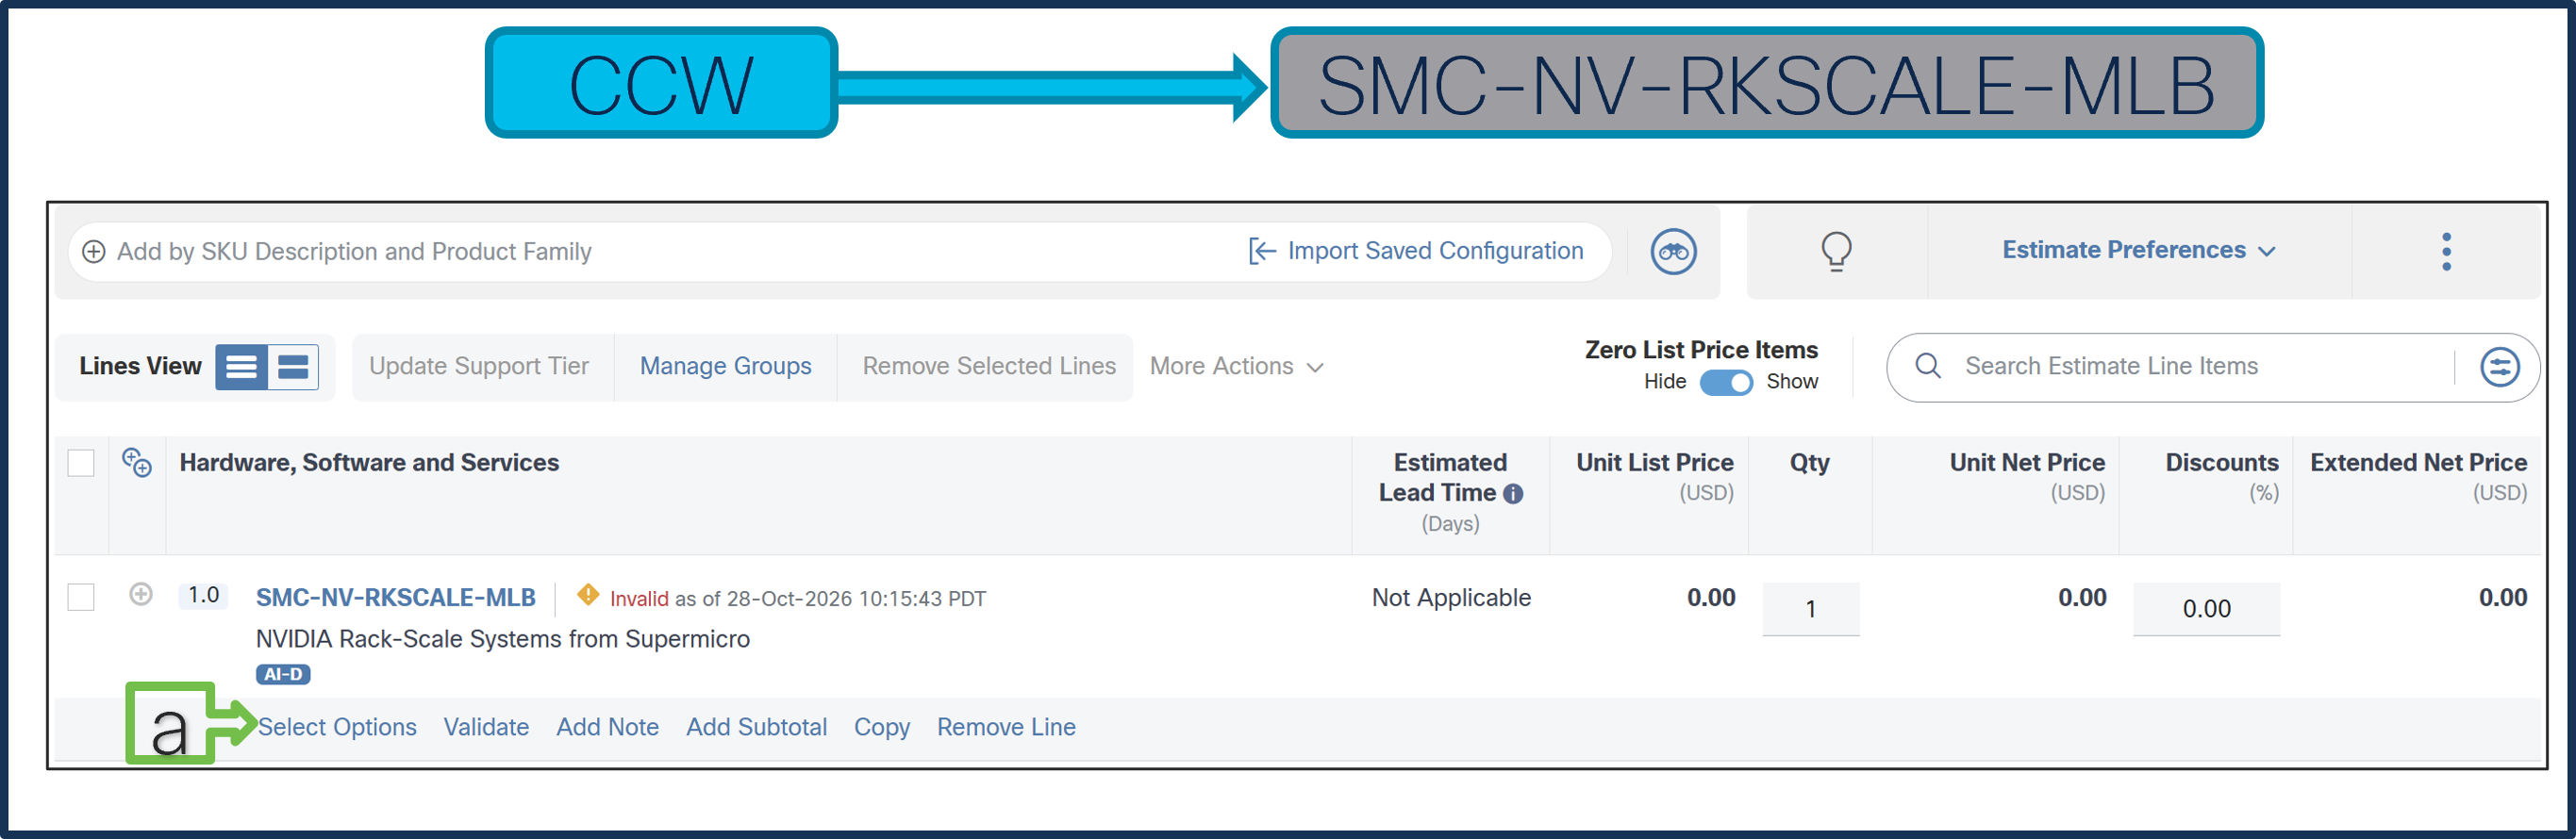
a. In CCW, search for MLB PID and click on “Add”
b. Click on “Select Options” to enter the configurator.
Step 5.
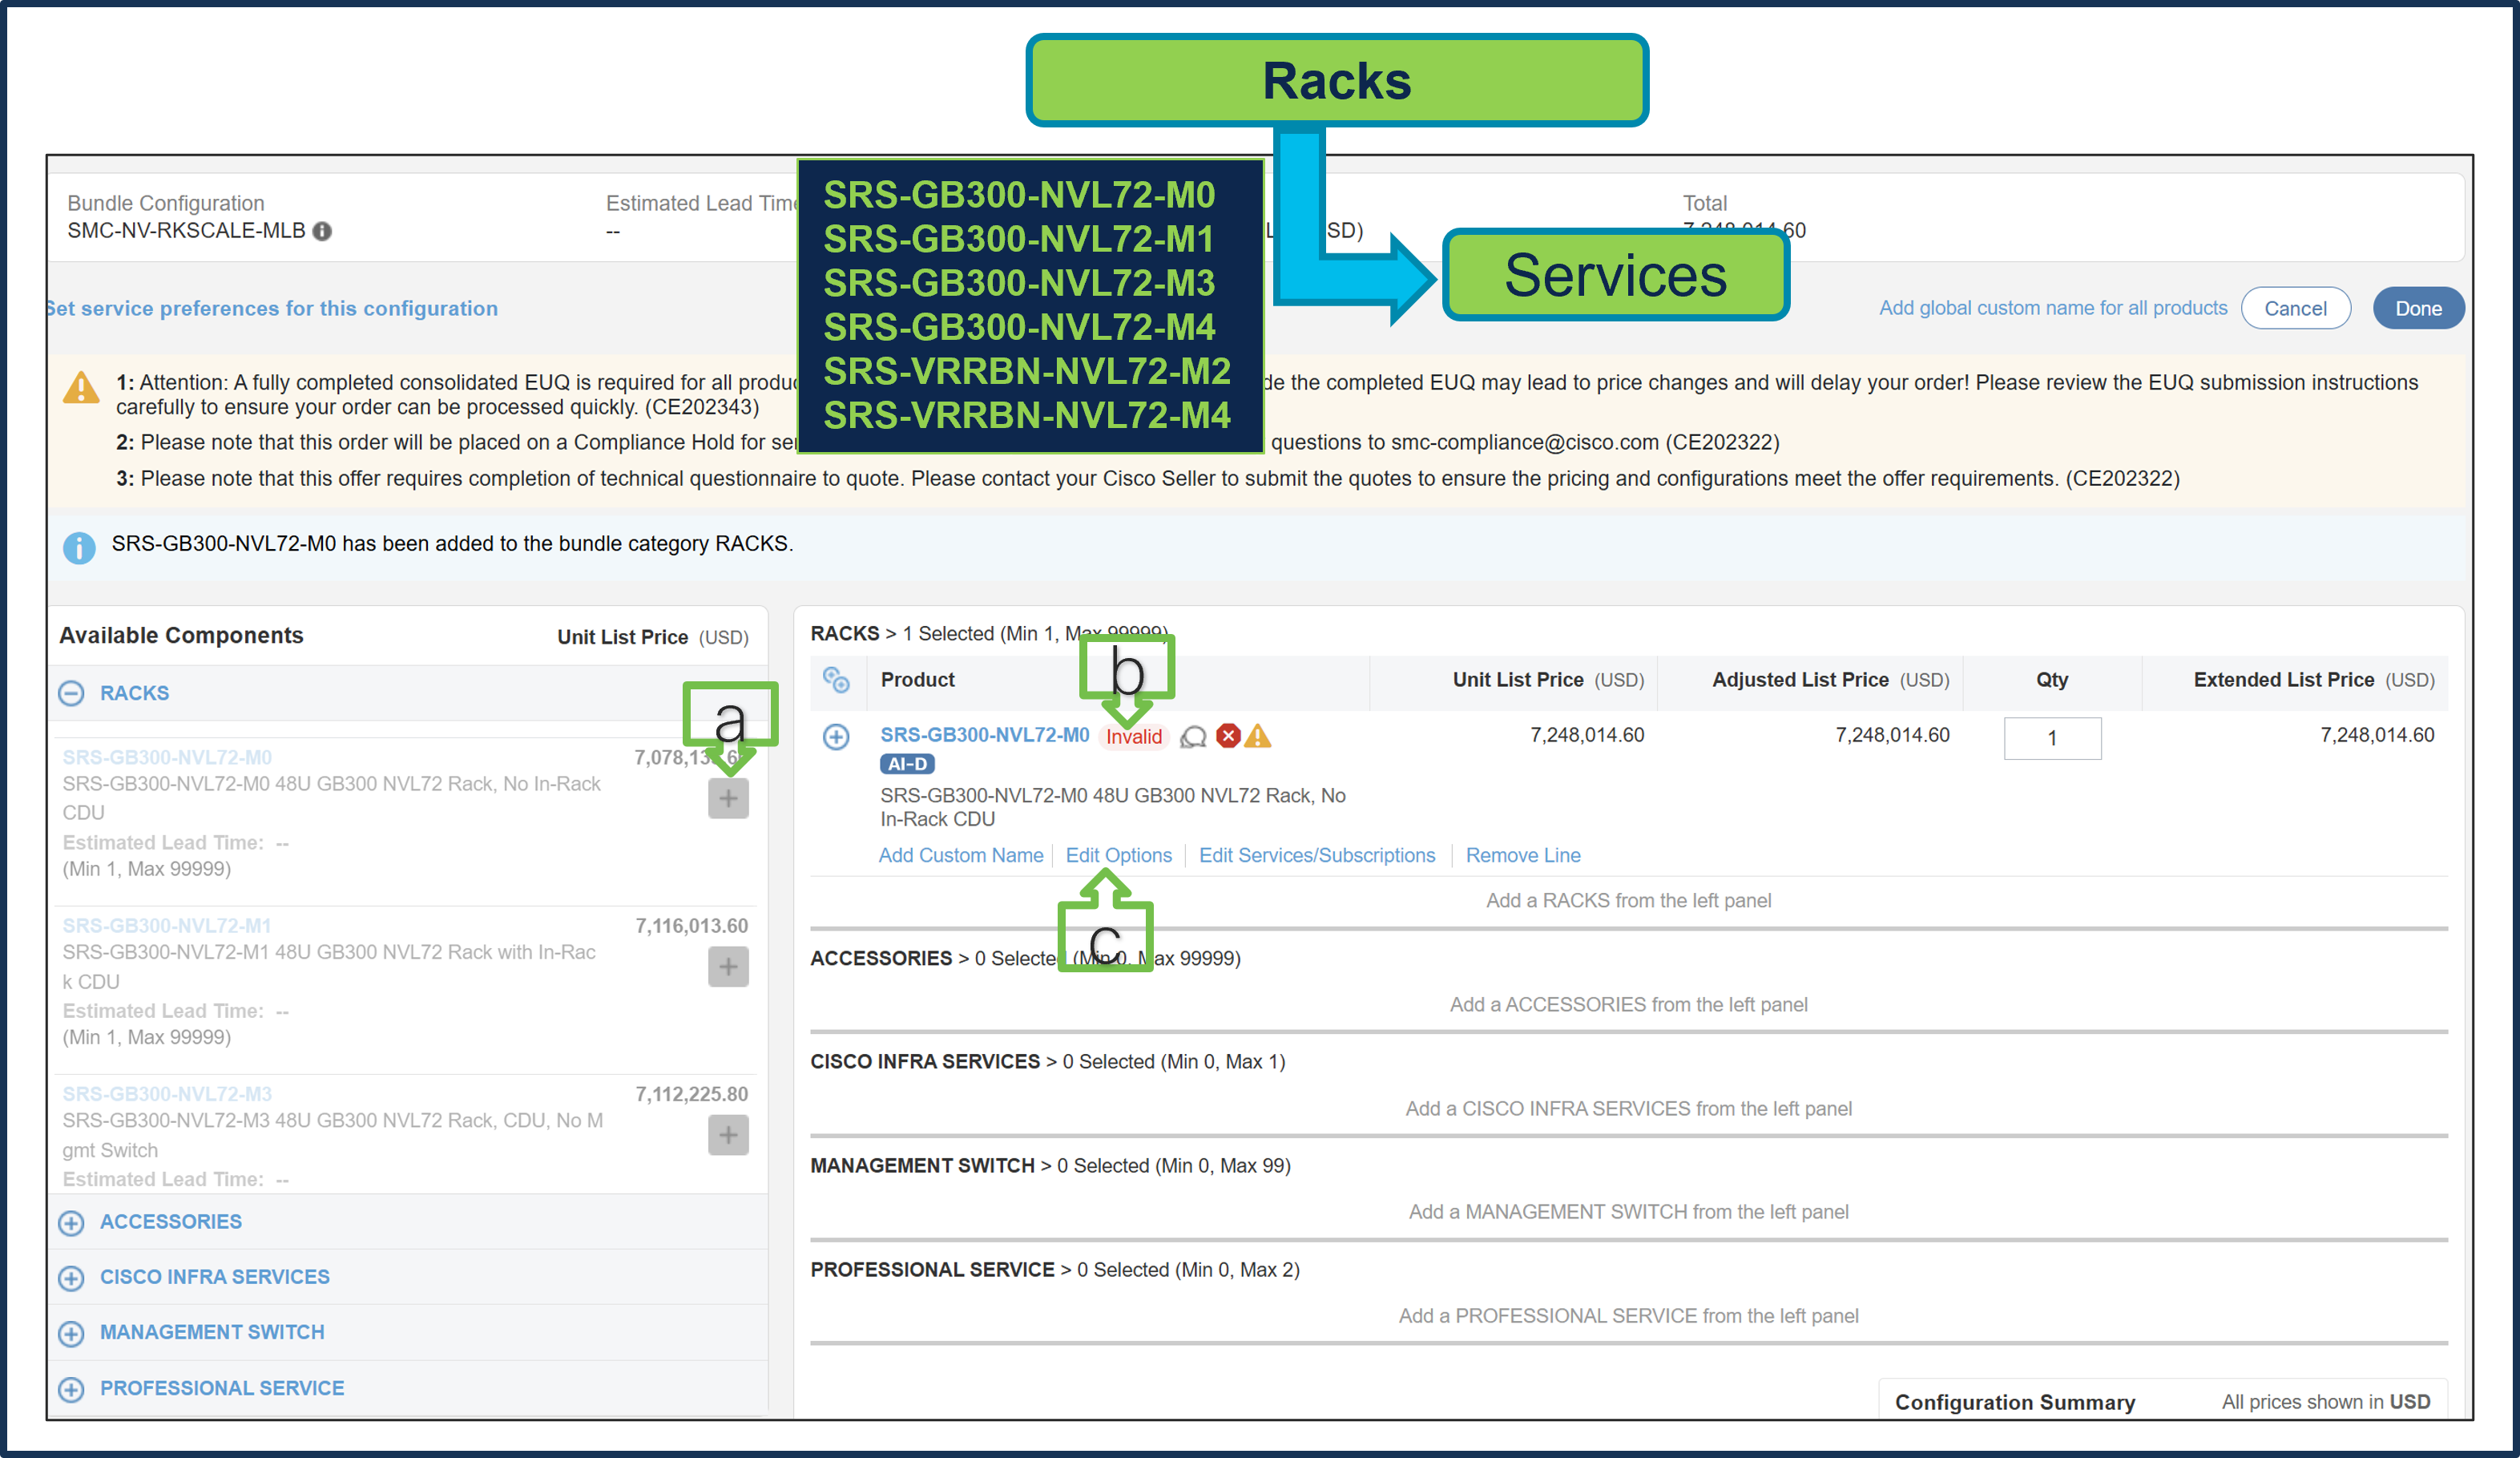
a. Select SRS-GB300-NVL72-M0 ATO from under MLB by clicking the “PLUS”.
b. Notice the SRS-GB300-NVL72-M0 ATO Status is now Invalid as further configuration needed.
c. Click on “Edit Options” to enter the configurator.
Note: SRS-GB300-NVL72-M0 and SRS-GB300-NVL72-M1 ship with NVIDIA management switches. Please select SRS-GB300-NVL72-M3 or SRS-GB300-NVL72-M4 to select Cisco Nexus management switches. Similarly, SRS-VRRBN-NVL72-M2 ships with NVIDIA management switches. Please select SRS-VRRBN-NVL72-M4 to select Cisco Nexus management switches.
Step 6.
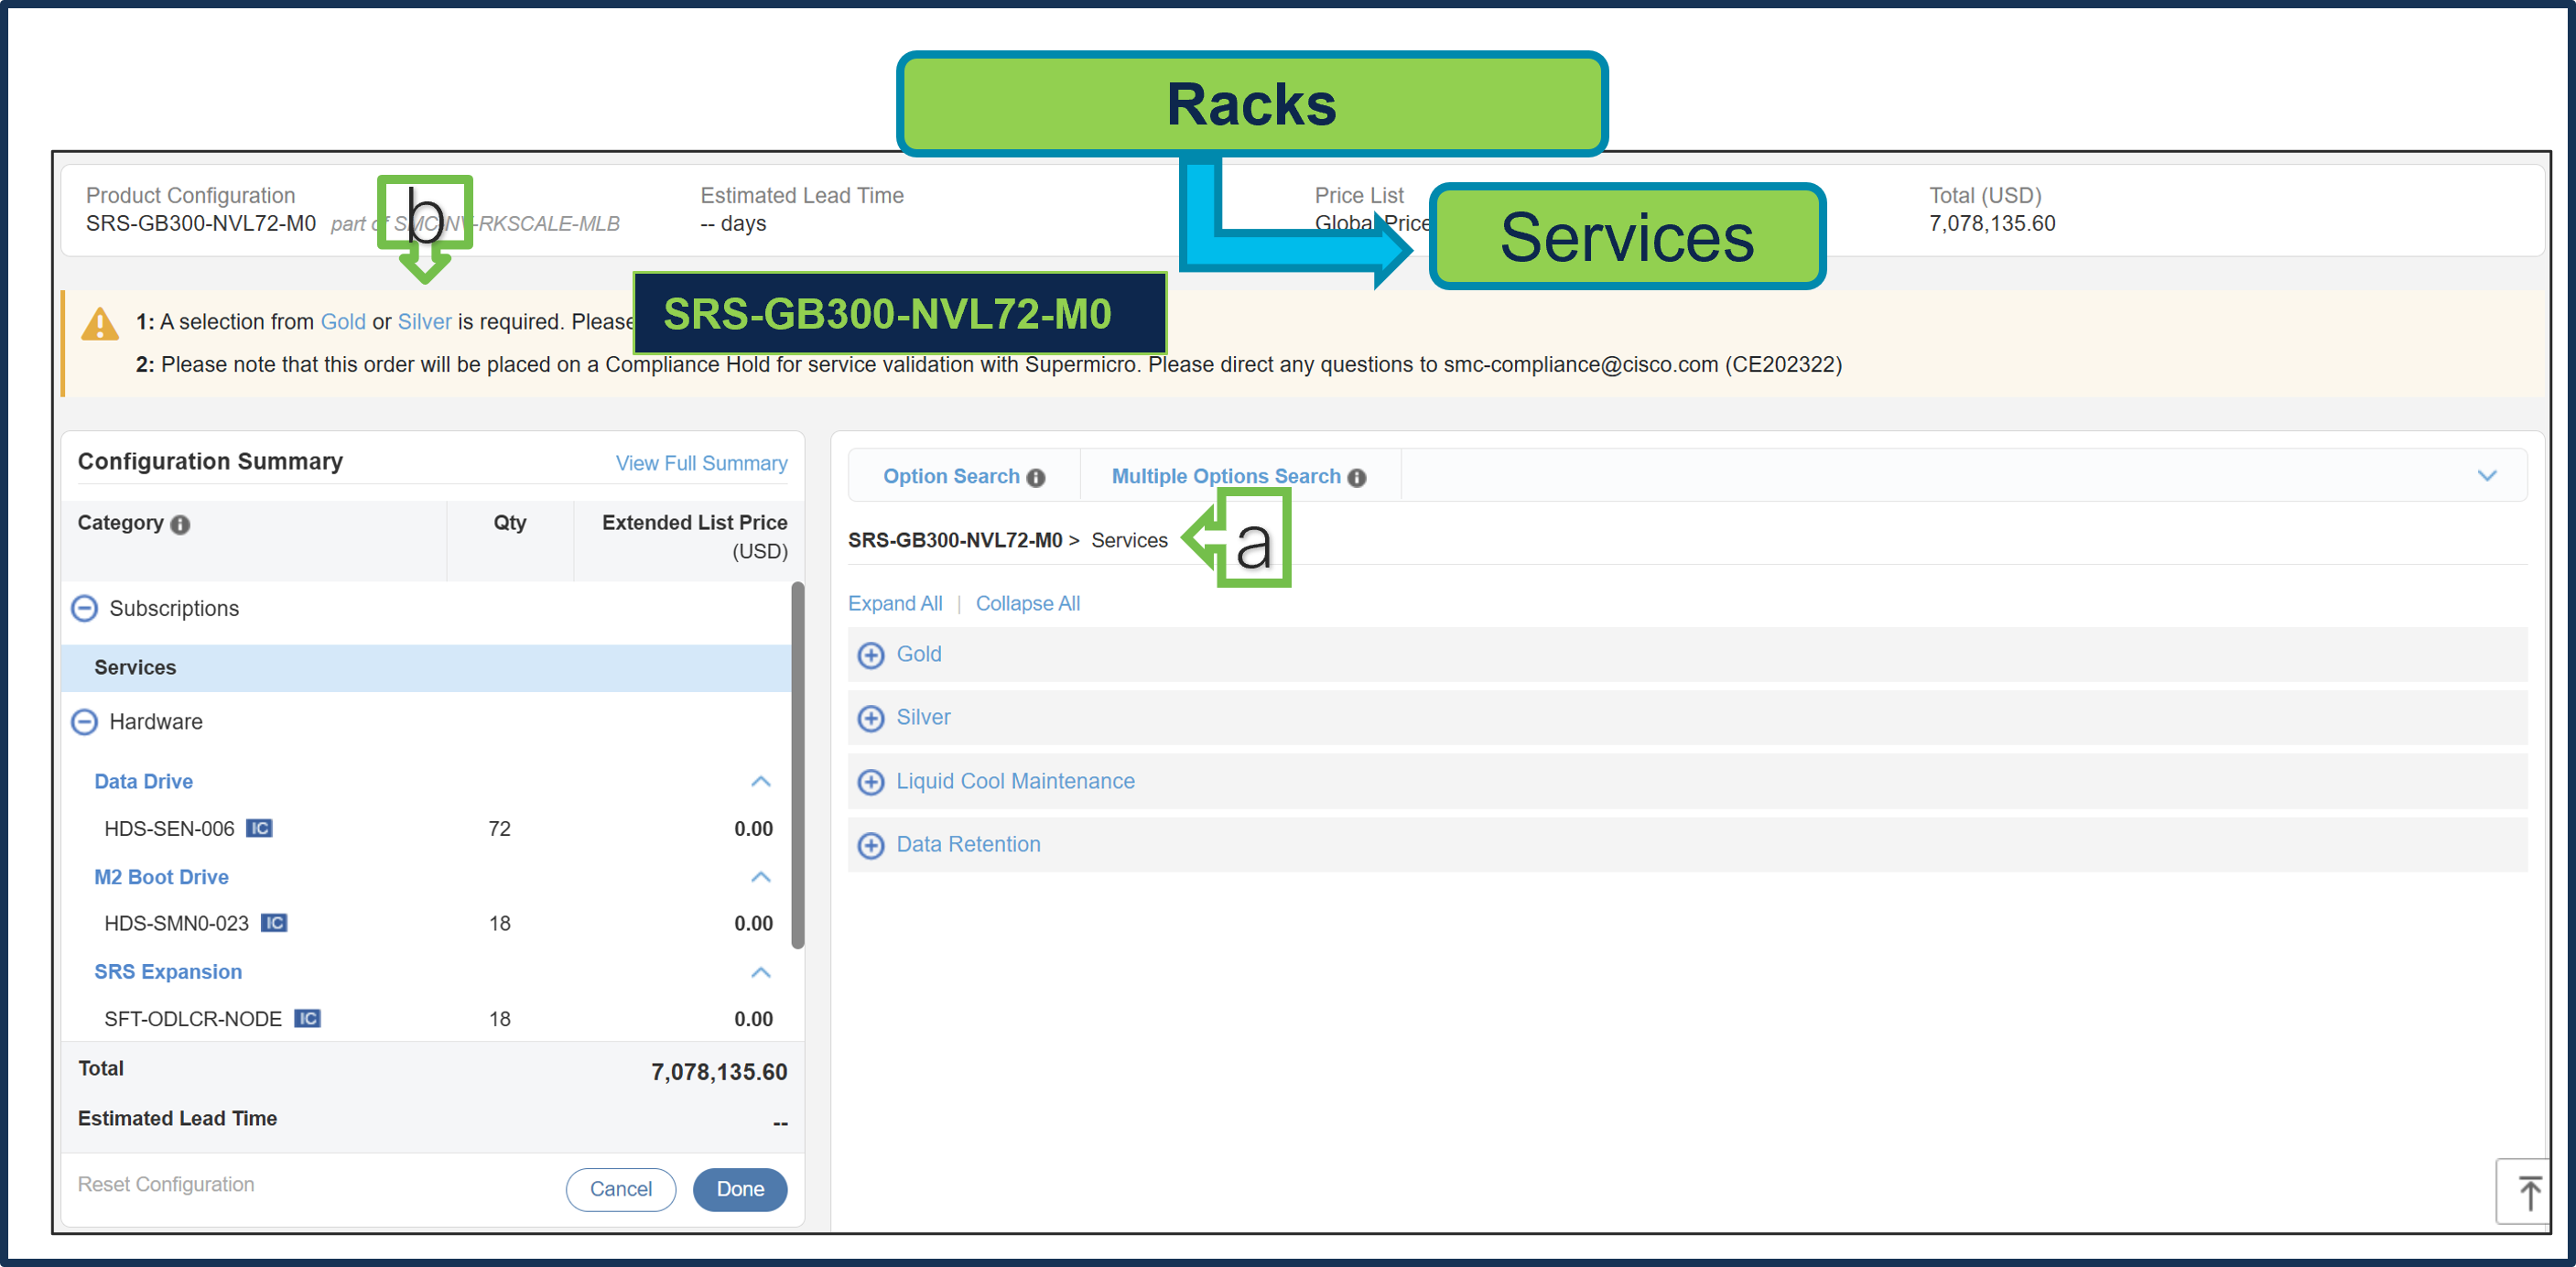
a. Configure SRS-GB300-NVL72-M0 by selecting Supermicro Services, as these are mandatory selections.
b. Follow the warning messages to configure the minimum required selections under Rack.
● Selecting Gold or Silver Services is mandatory. Gold Service selection is subject to review during quoting and is based on Super Micro Service availability at the selected install site location.
● If the selected rack has an in-rack CDU, or a separate L2L In Row or L2A Sidecar CDU is selected, Liquid Cool Maintenance Service is required.
● Data Retention Service is optional.
Step 7.
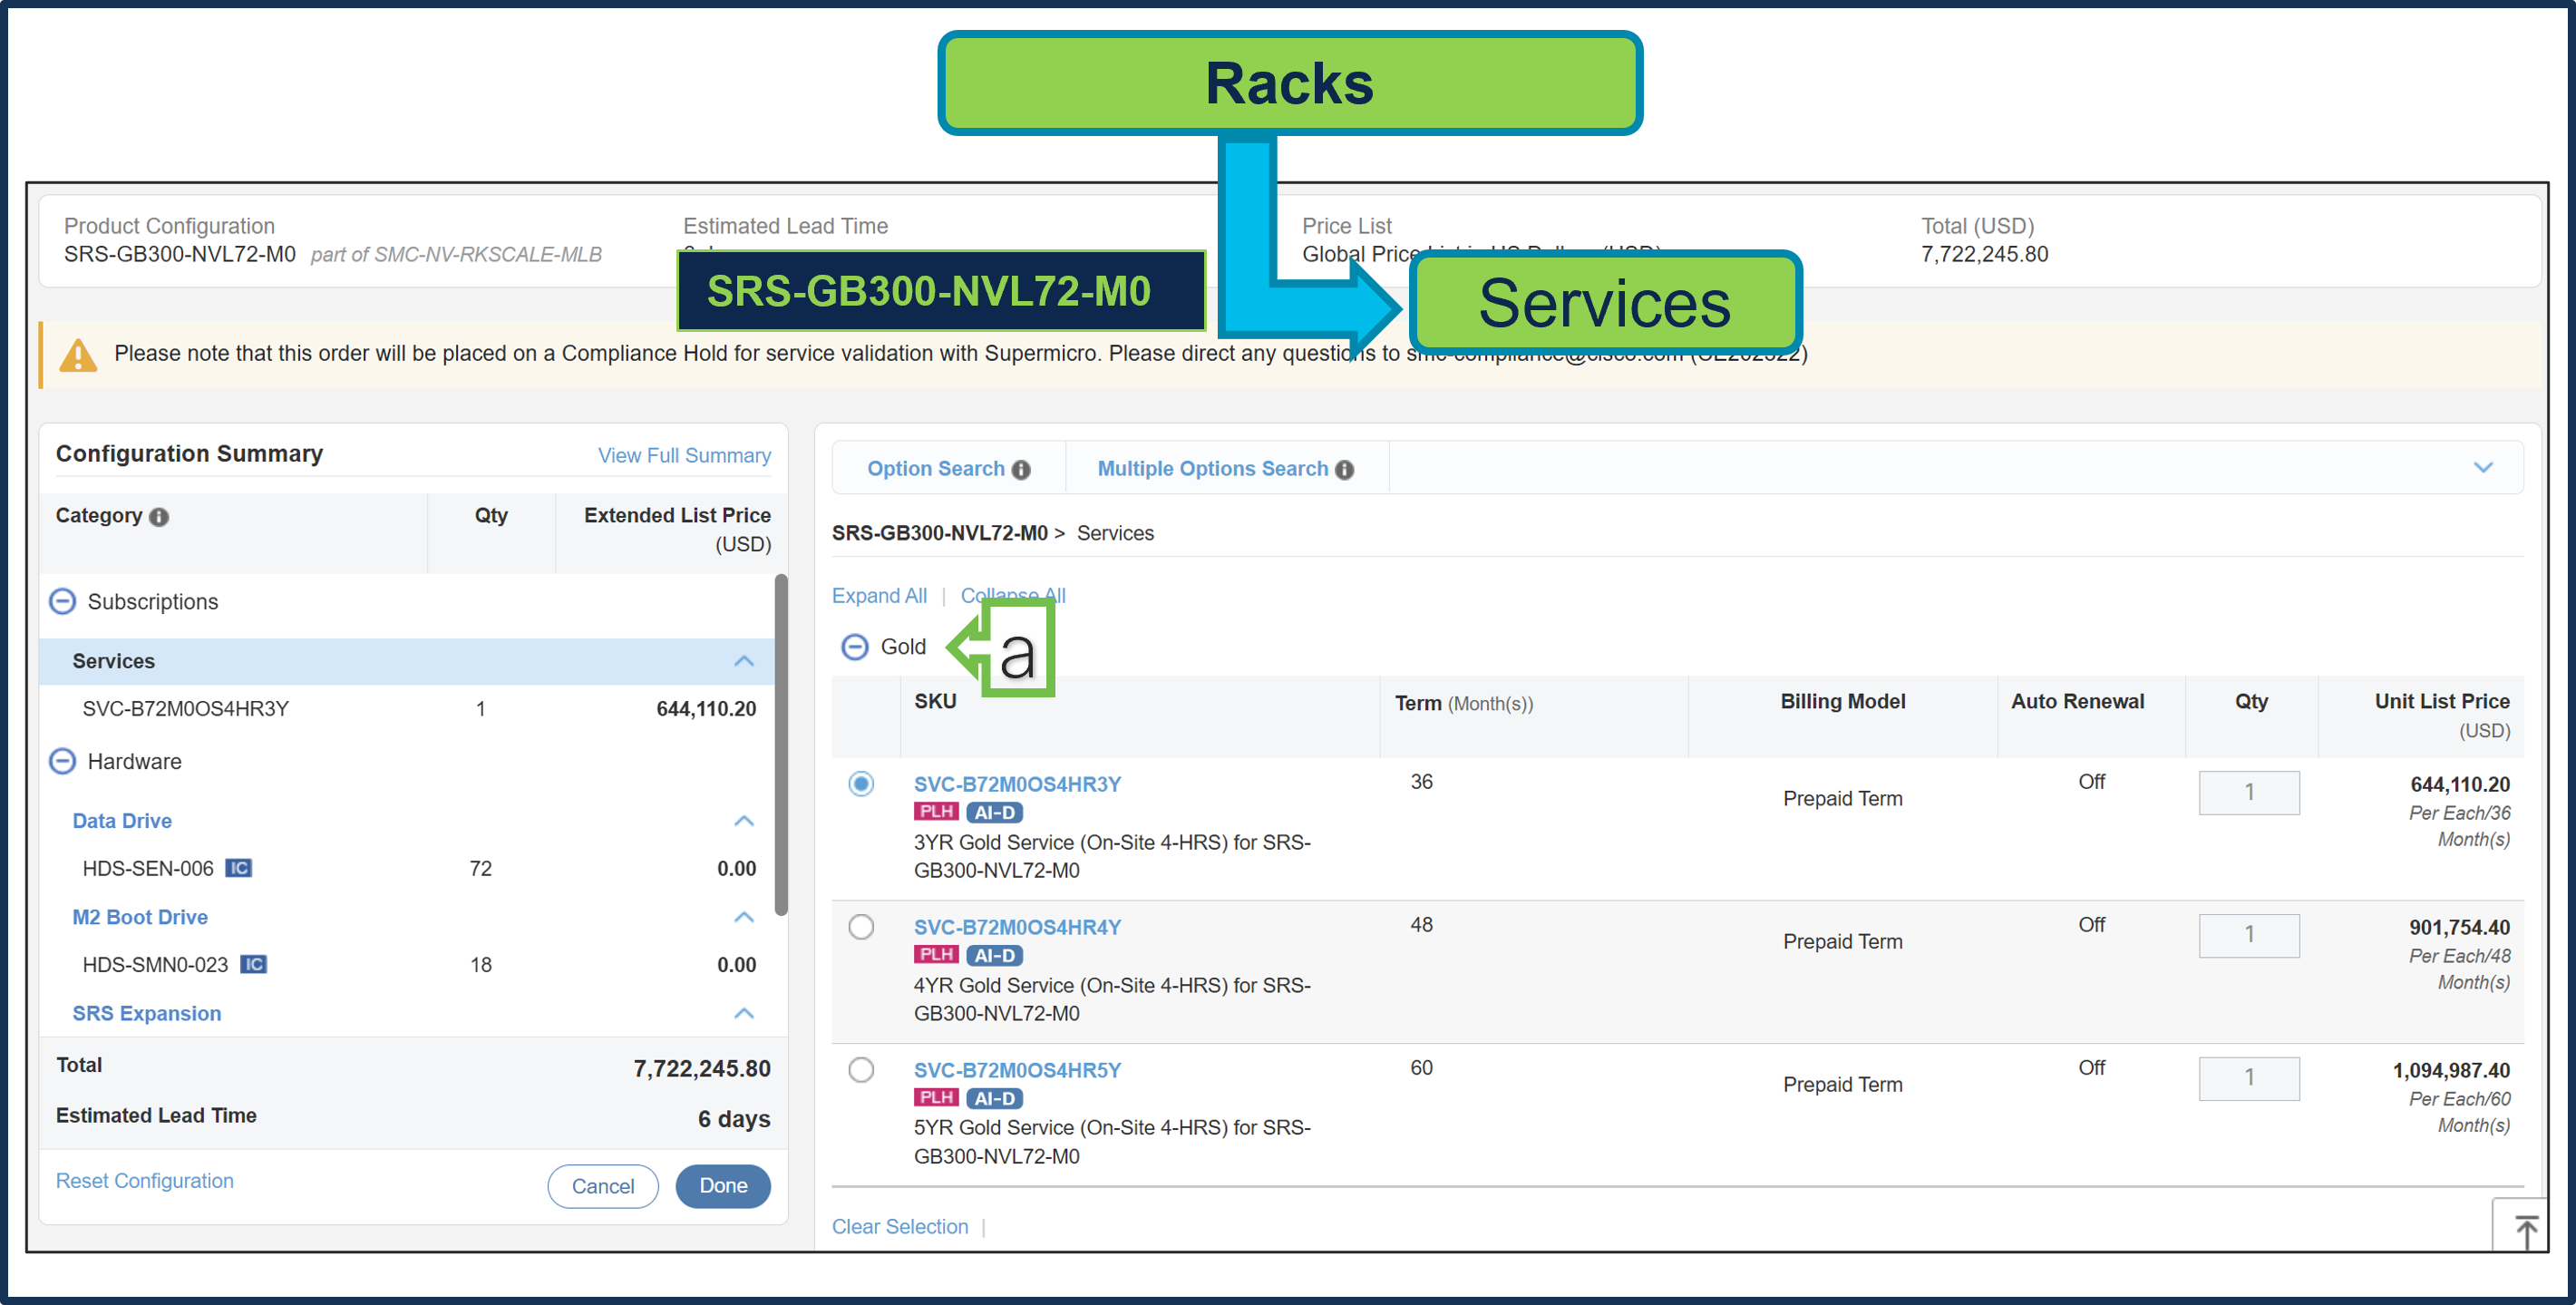
a. Gold Supermicro Services is selected. Gold Service selection is subject to review during quoting and is based on Super Micro Service availability at the selected install site location.
Step 8.
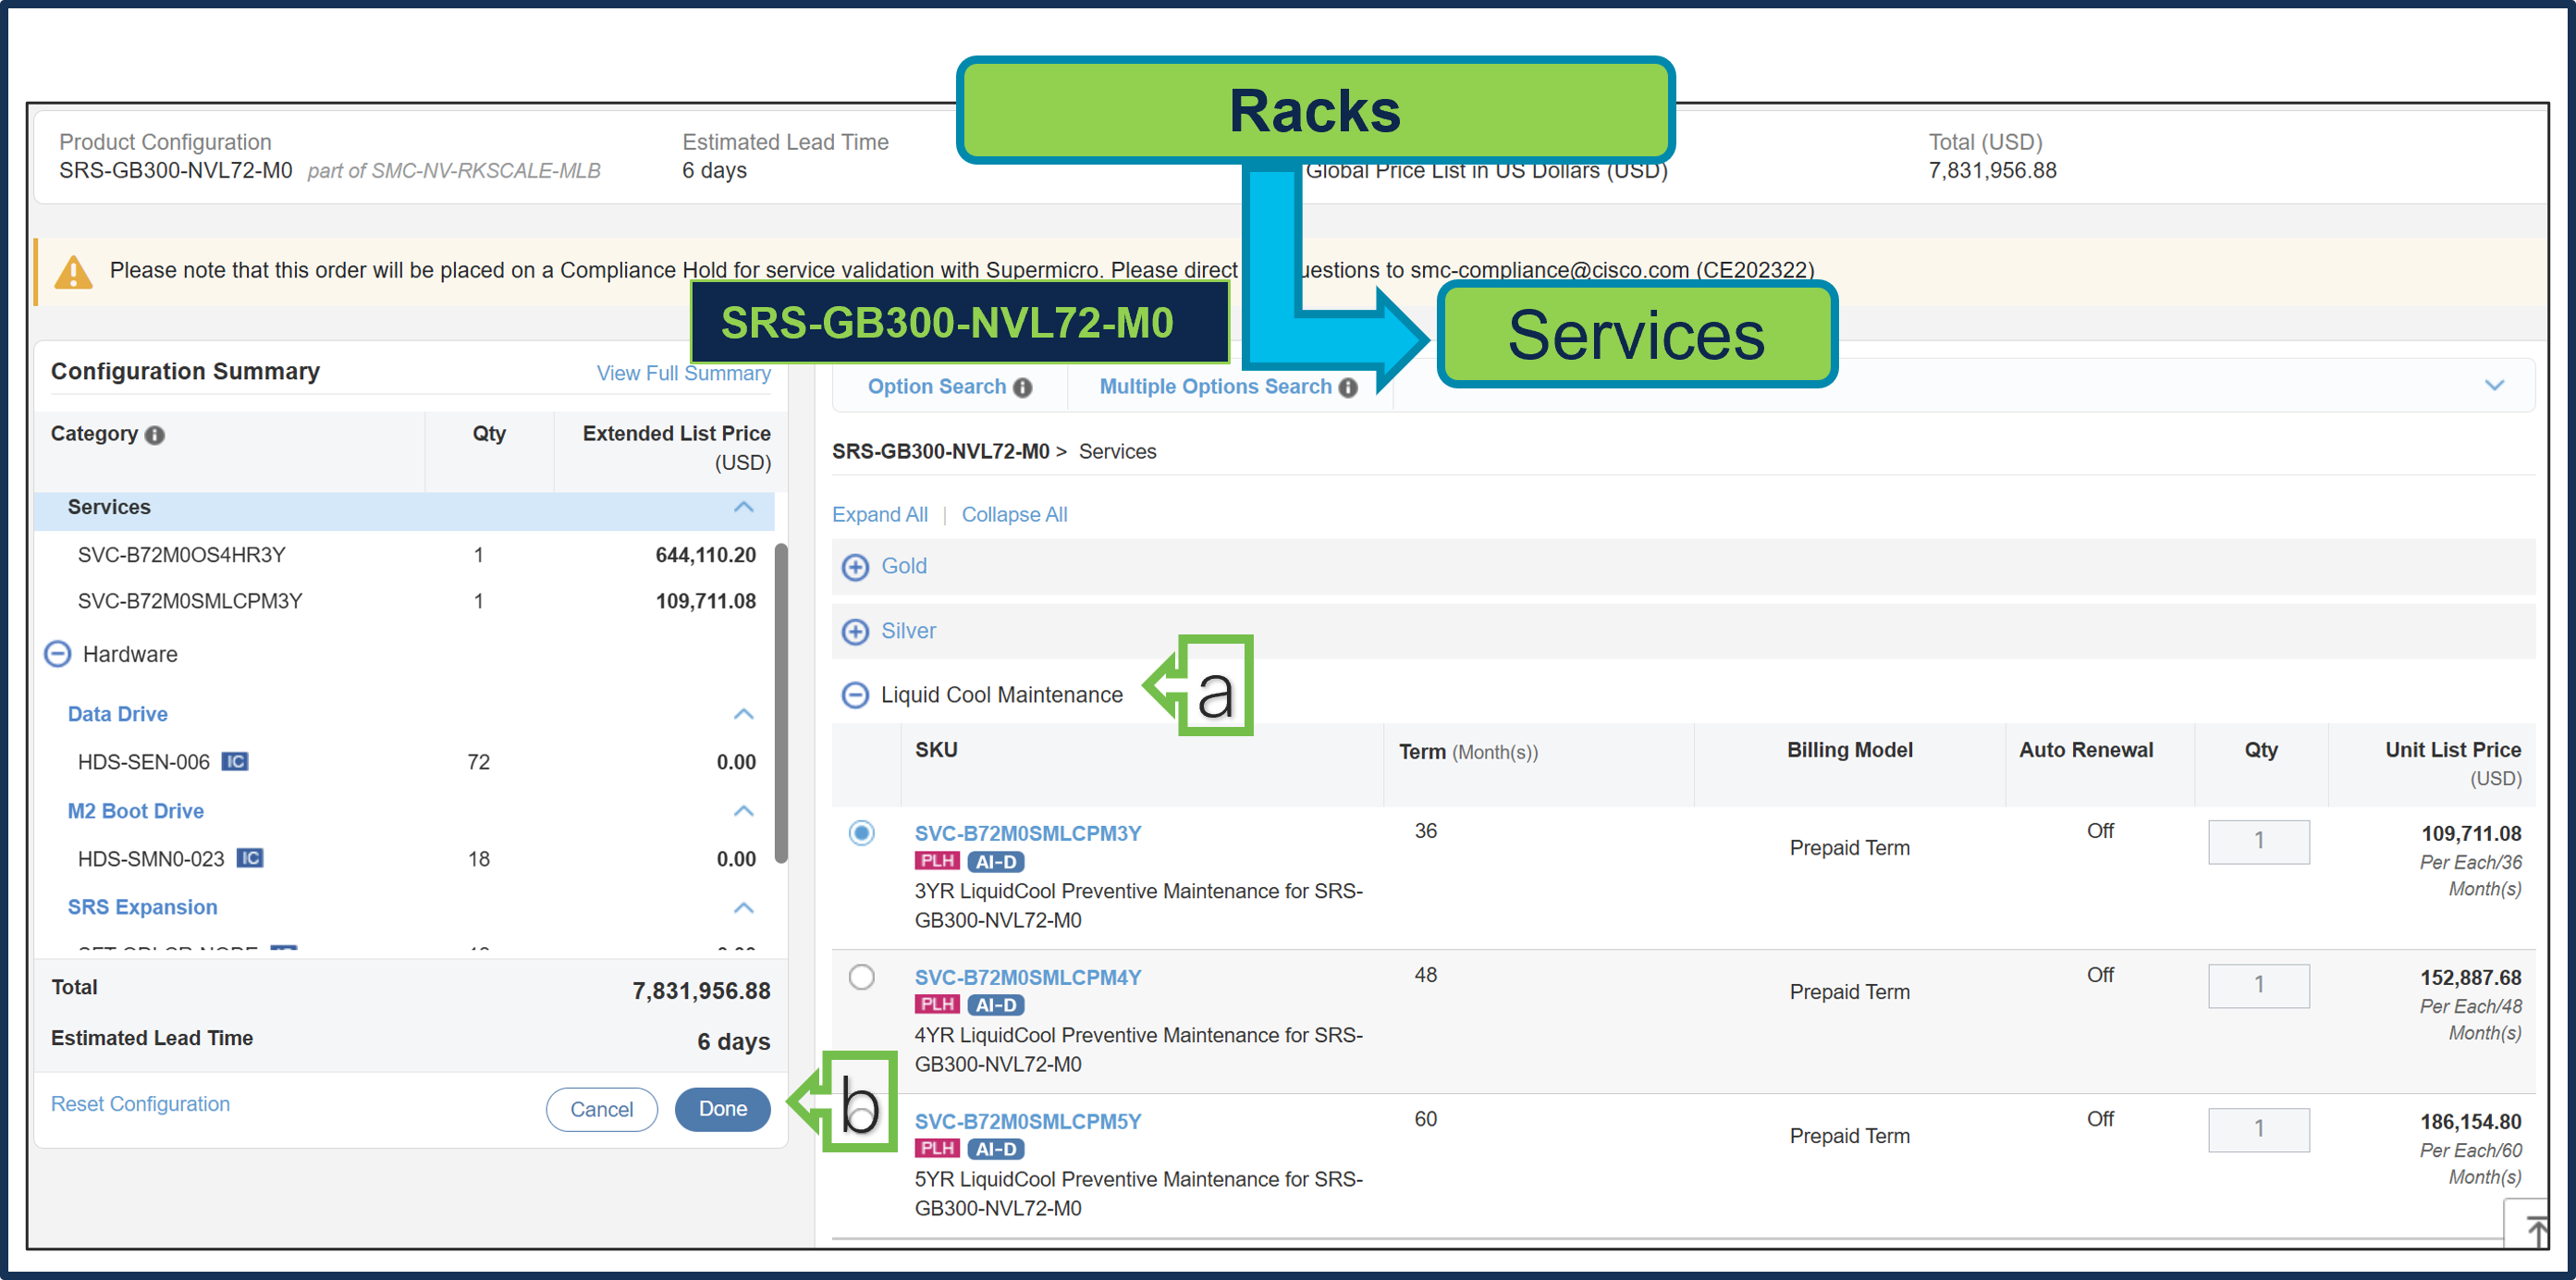
a. Given M0 Rack does not have In-rack CDU, so it is recommended to select separate L2L In Row or L2A Sidecar CDU and then Liquid Cool Maintenance Service is required.
b. Select Done when completed.
Step 9.
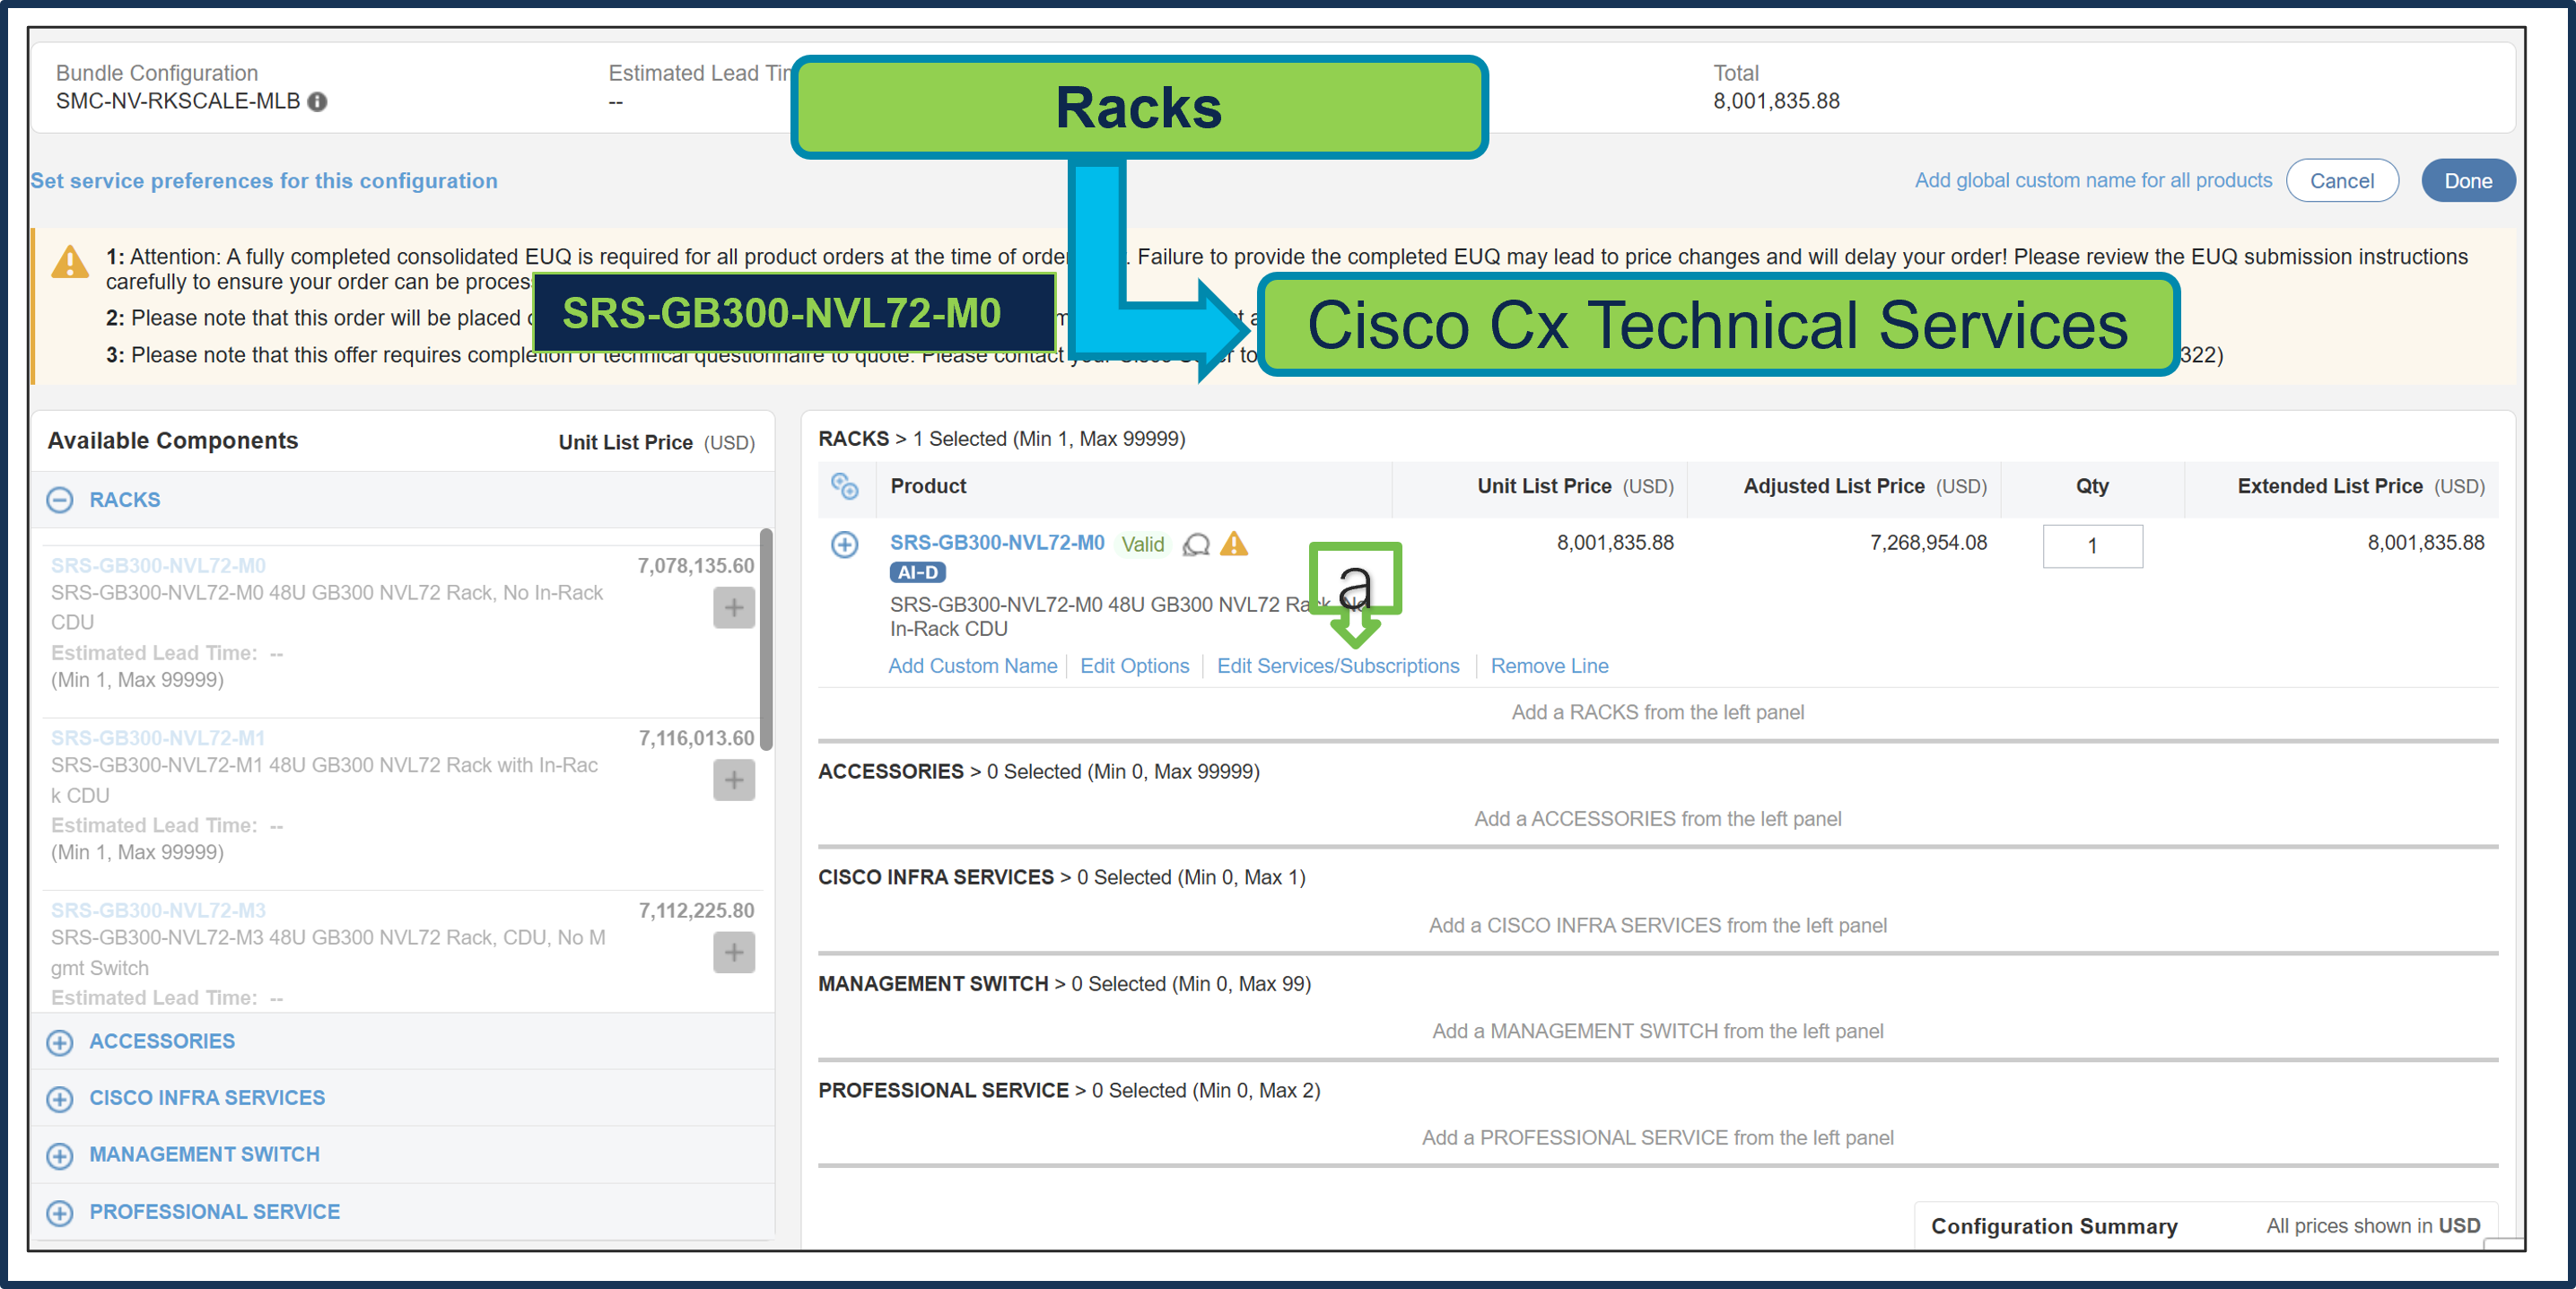
a. Note Status is now Valid.
b. Cisco CX IHV1 Technical Service is mandatory and cannot be removed.
c. The maximum duration of subscriptions will be automatically applied to the duration of technical services in this configuration. Please ensure Cisco IHVI Services Term aligns to the Gold/Silver services Term.
d. Go to “Edit Service/Subscription” to edit the technical service duration.
Step 10.
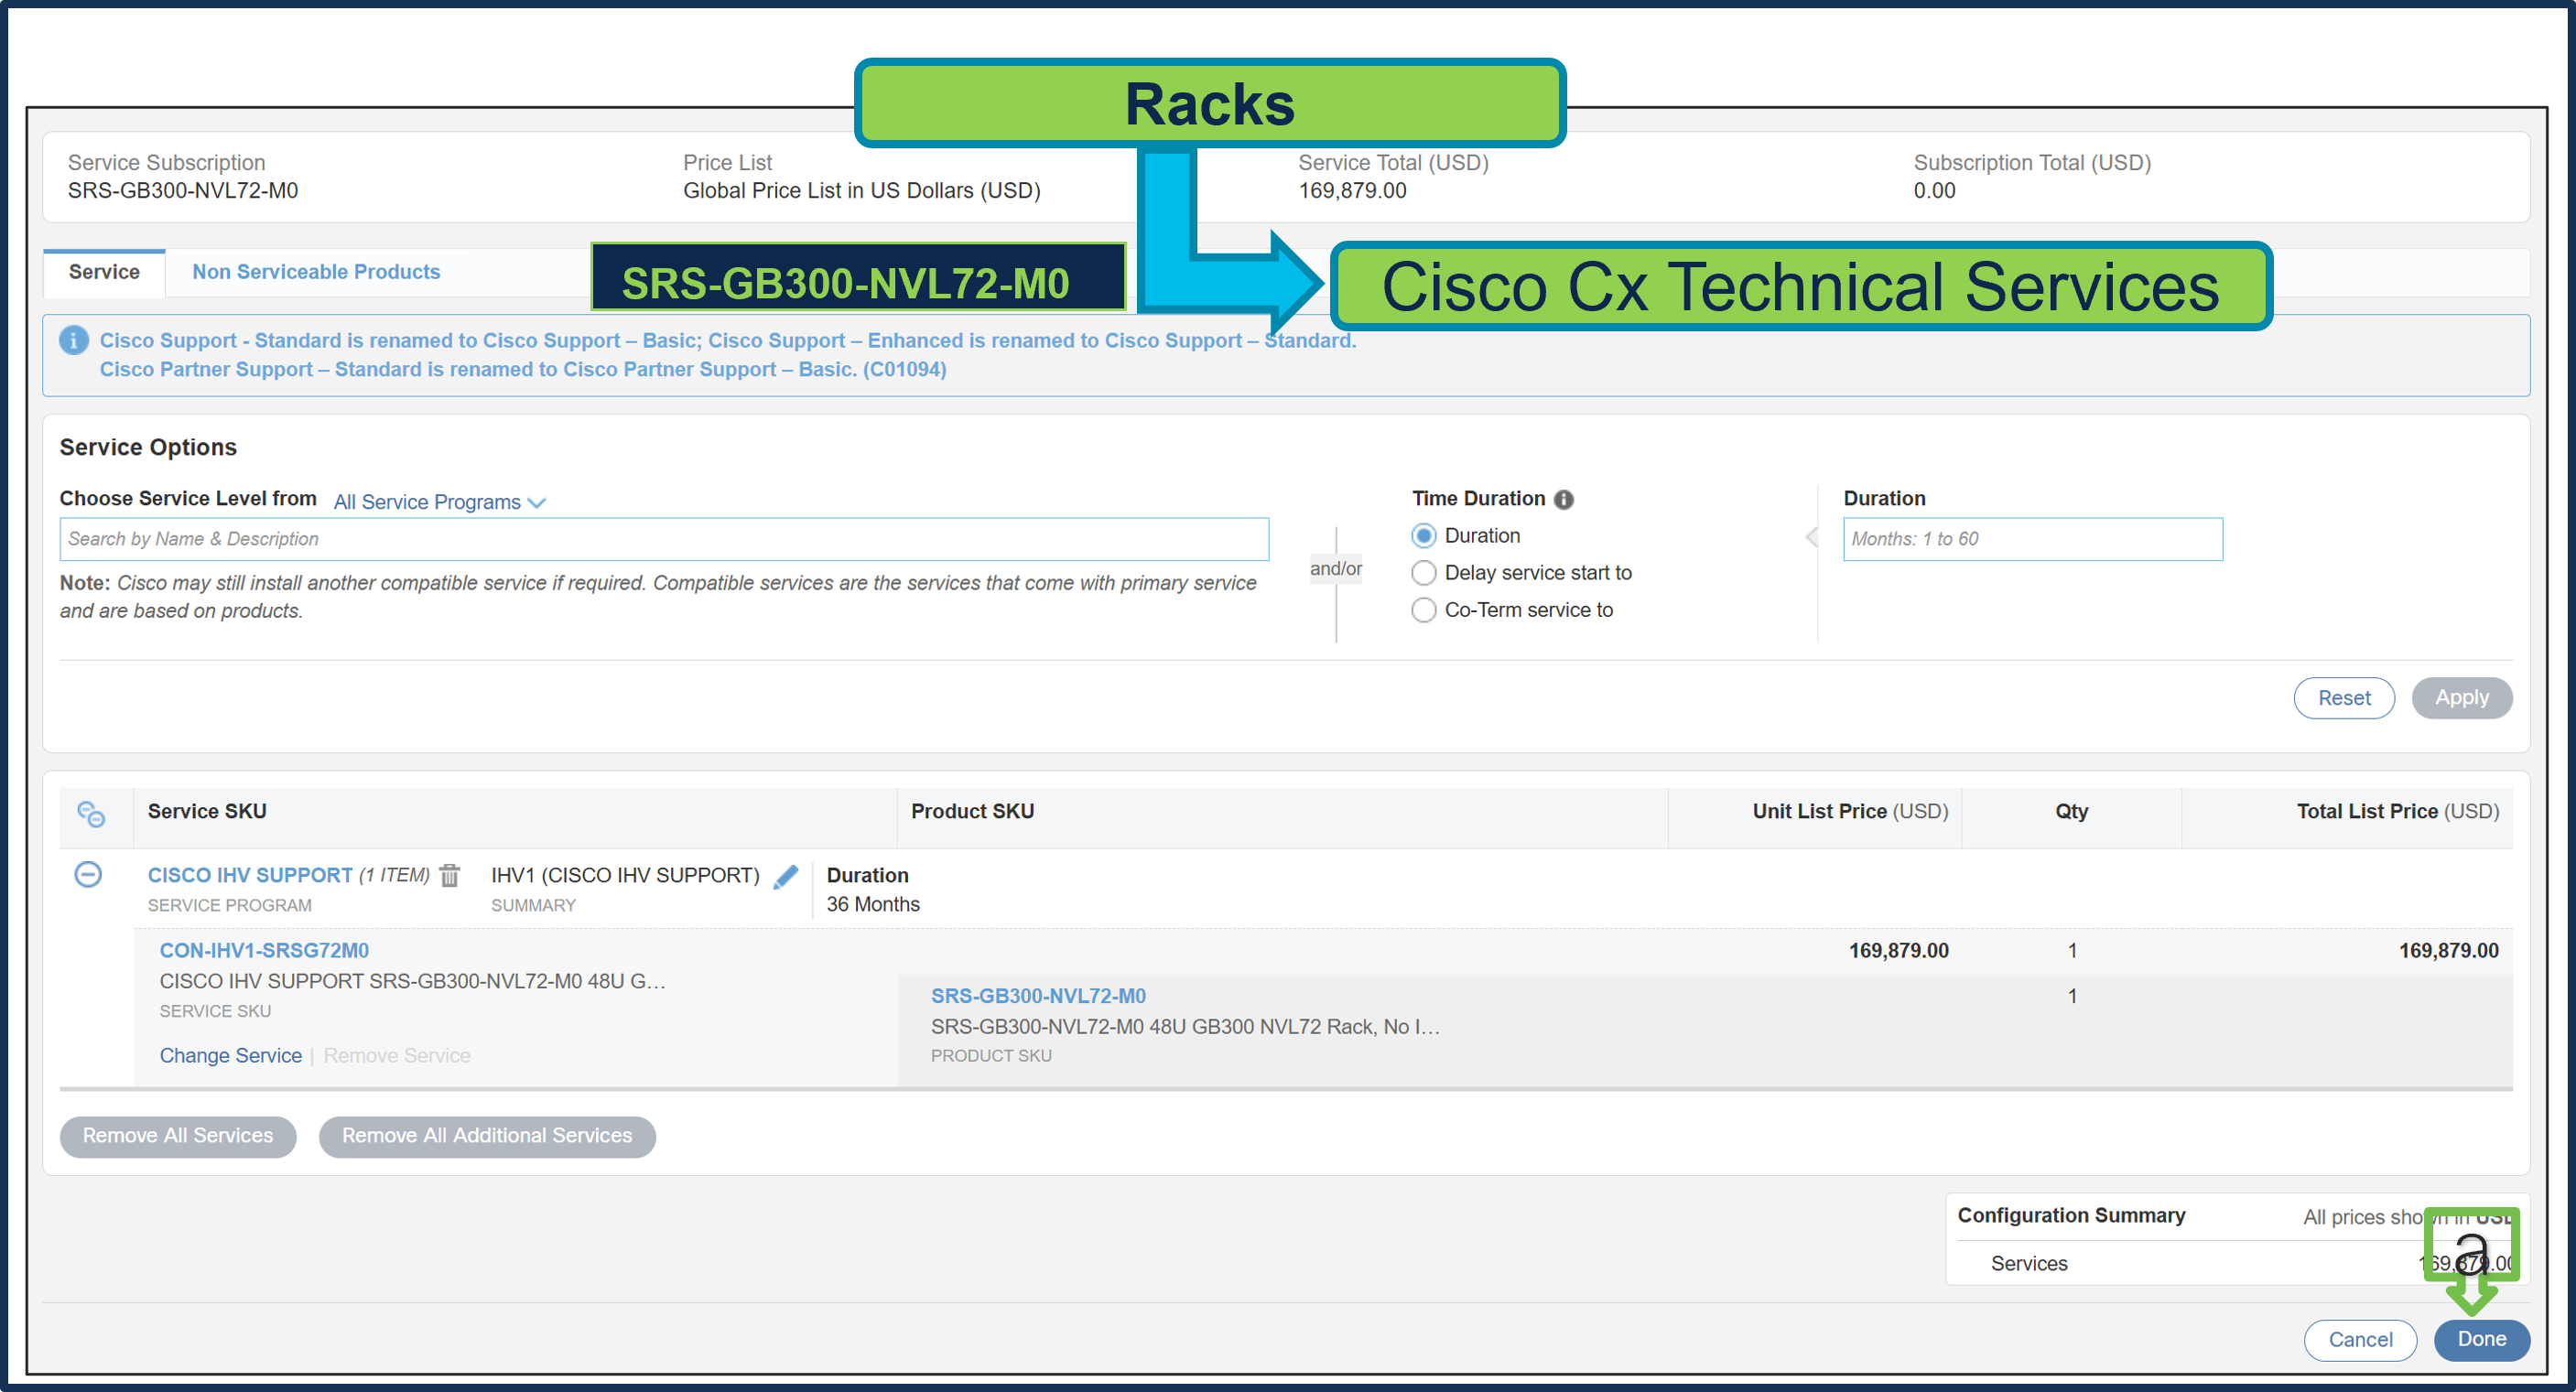
a. Since the Supermicro Services term is set to 36 months, the Cisco CX Technical Service term is also set to 36 months. Click Done.
Step 11.
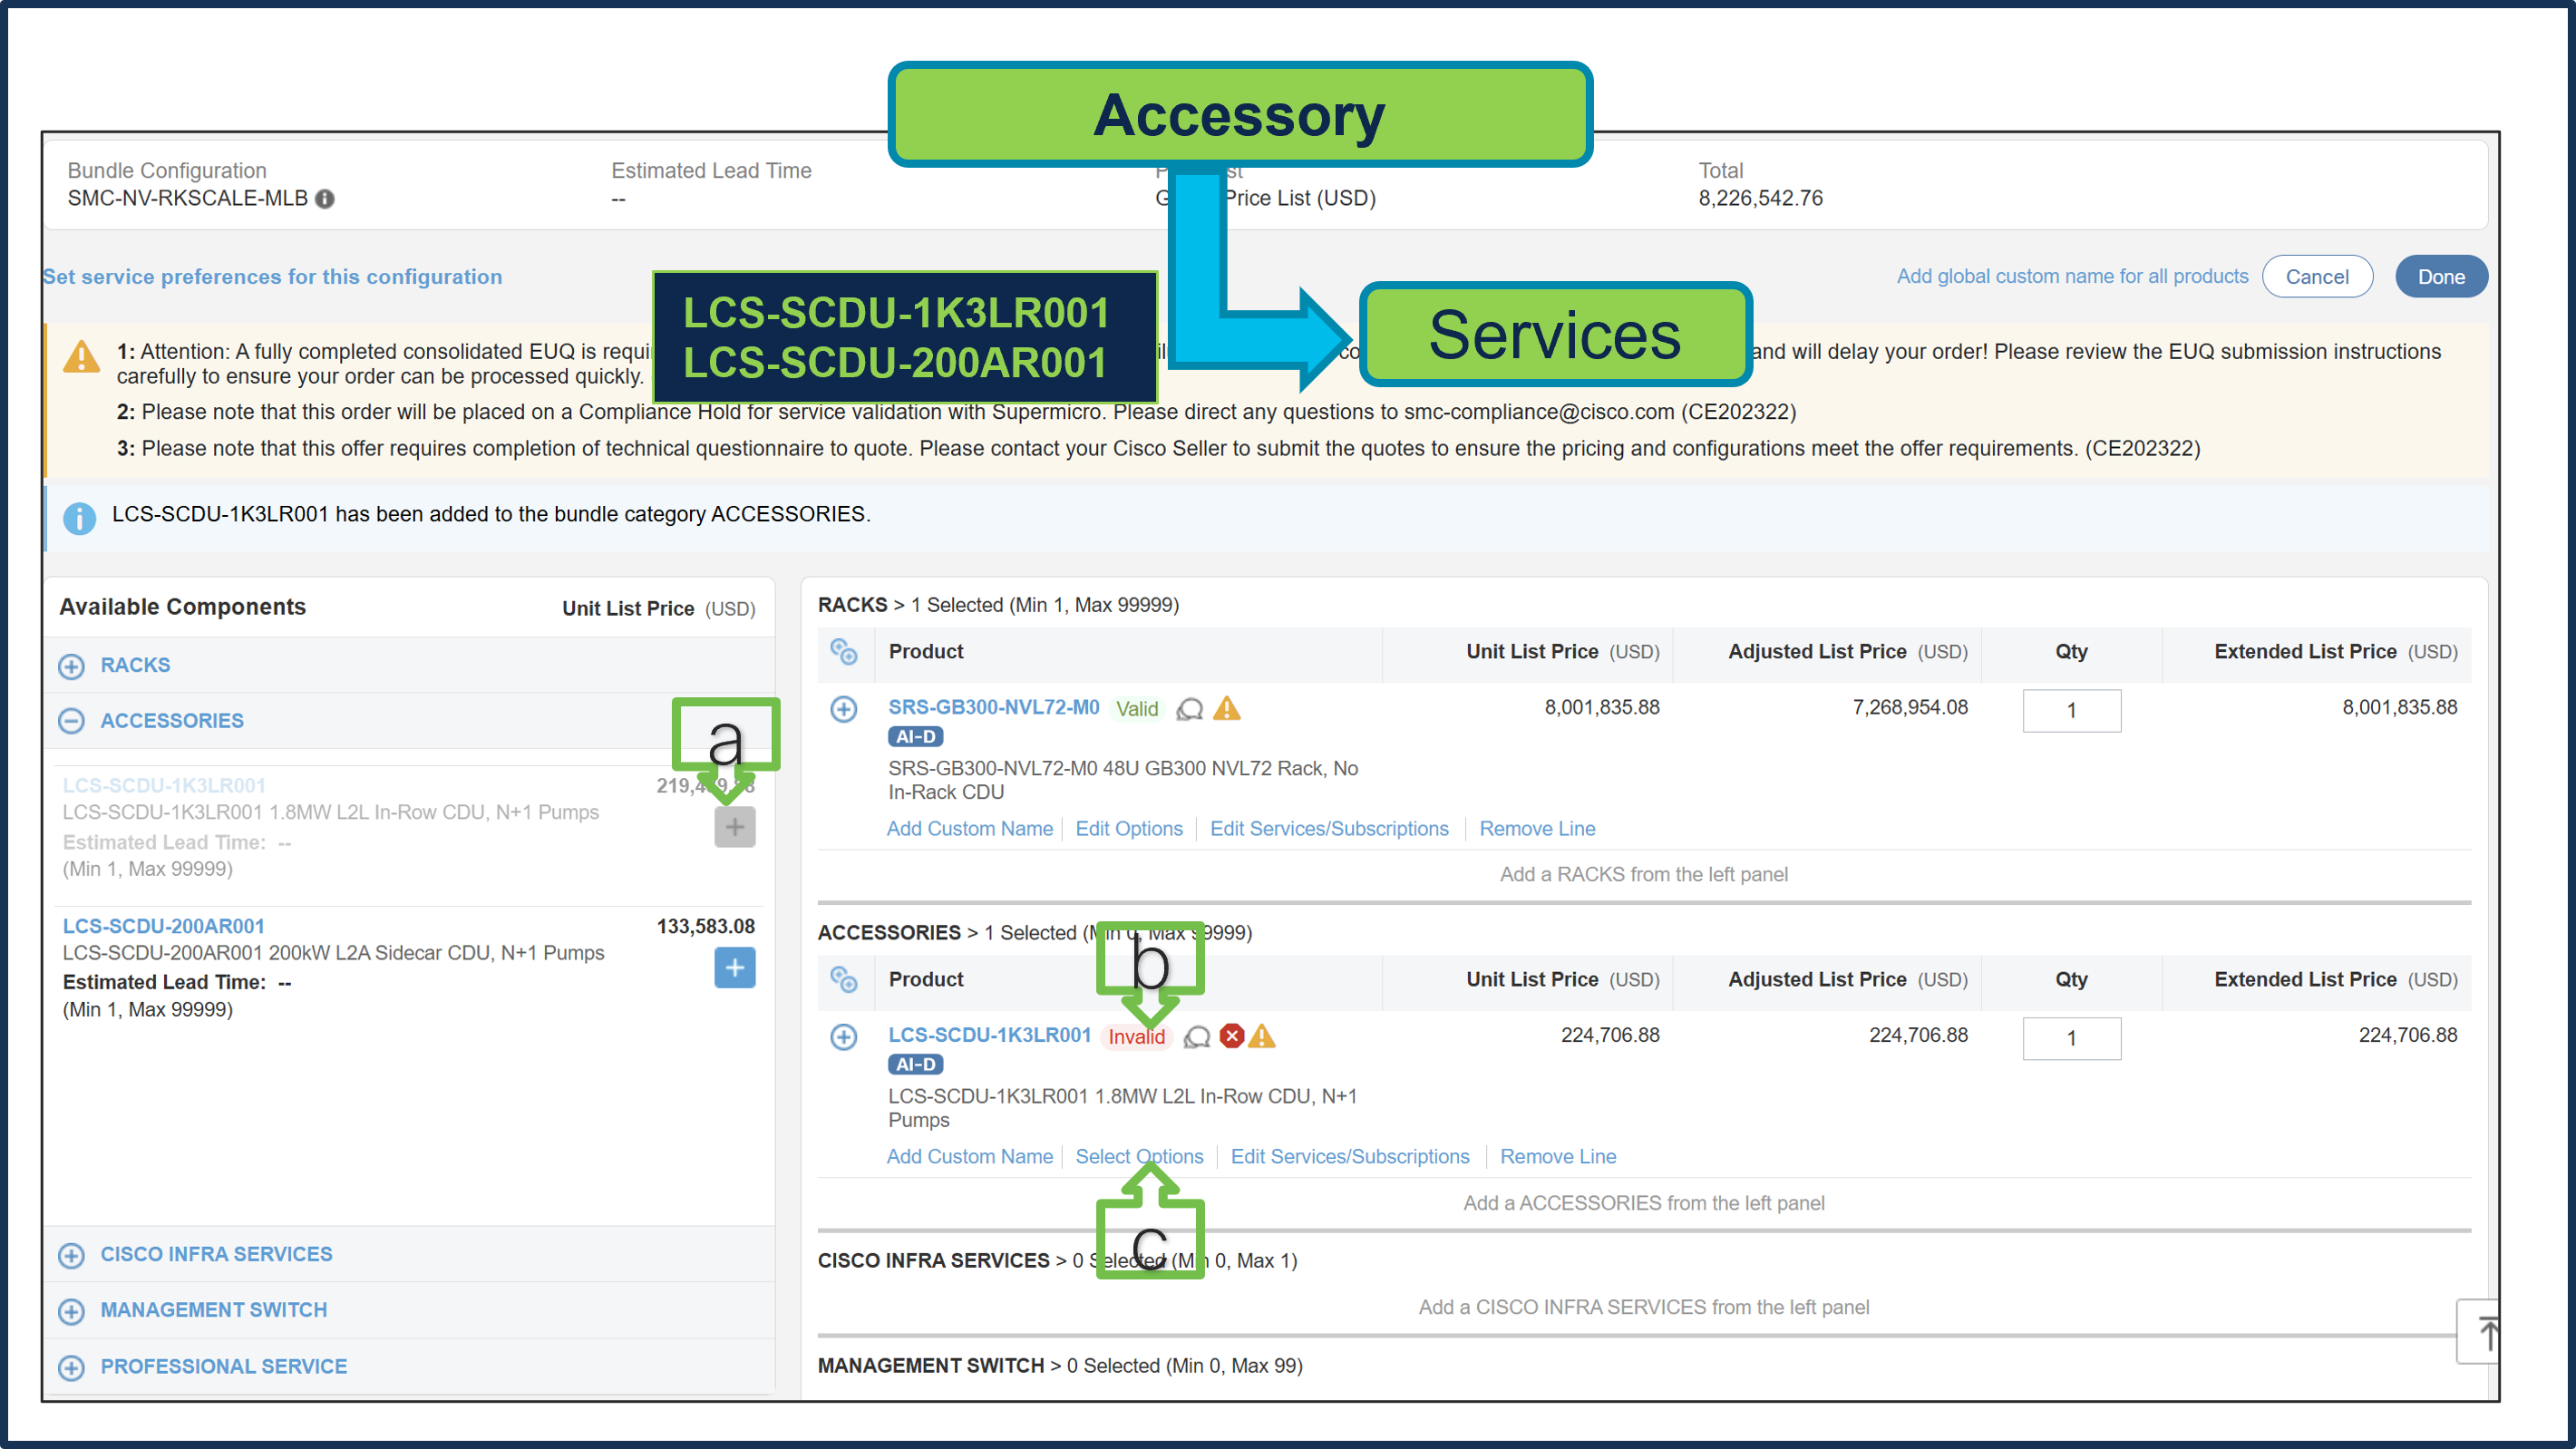
a. Select LCS-SCDU-1K3LR001 or LCS-SCDU-200AR001 ATO from Accessory under MLB by clicking “PLUS”.
b. Notice the LCS-SCDU-1K3LR001 ATO Status is invalid as further configuration needed.
c. Click ‘Select Options’ to enter the configurator.
Step 12.
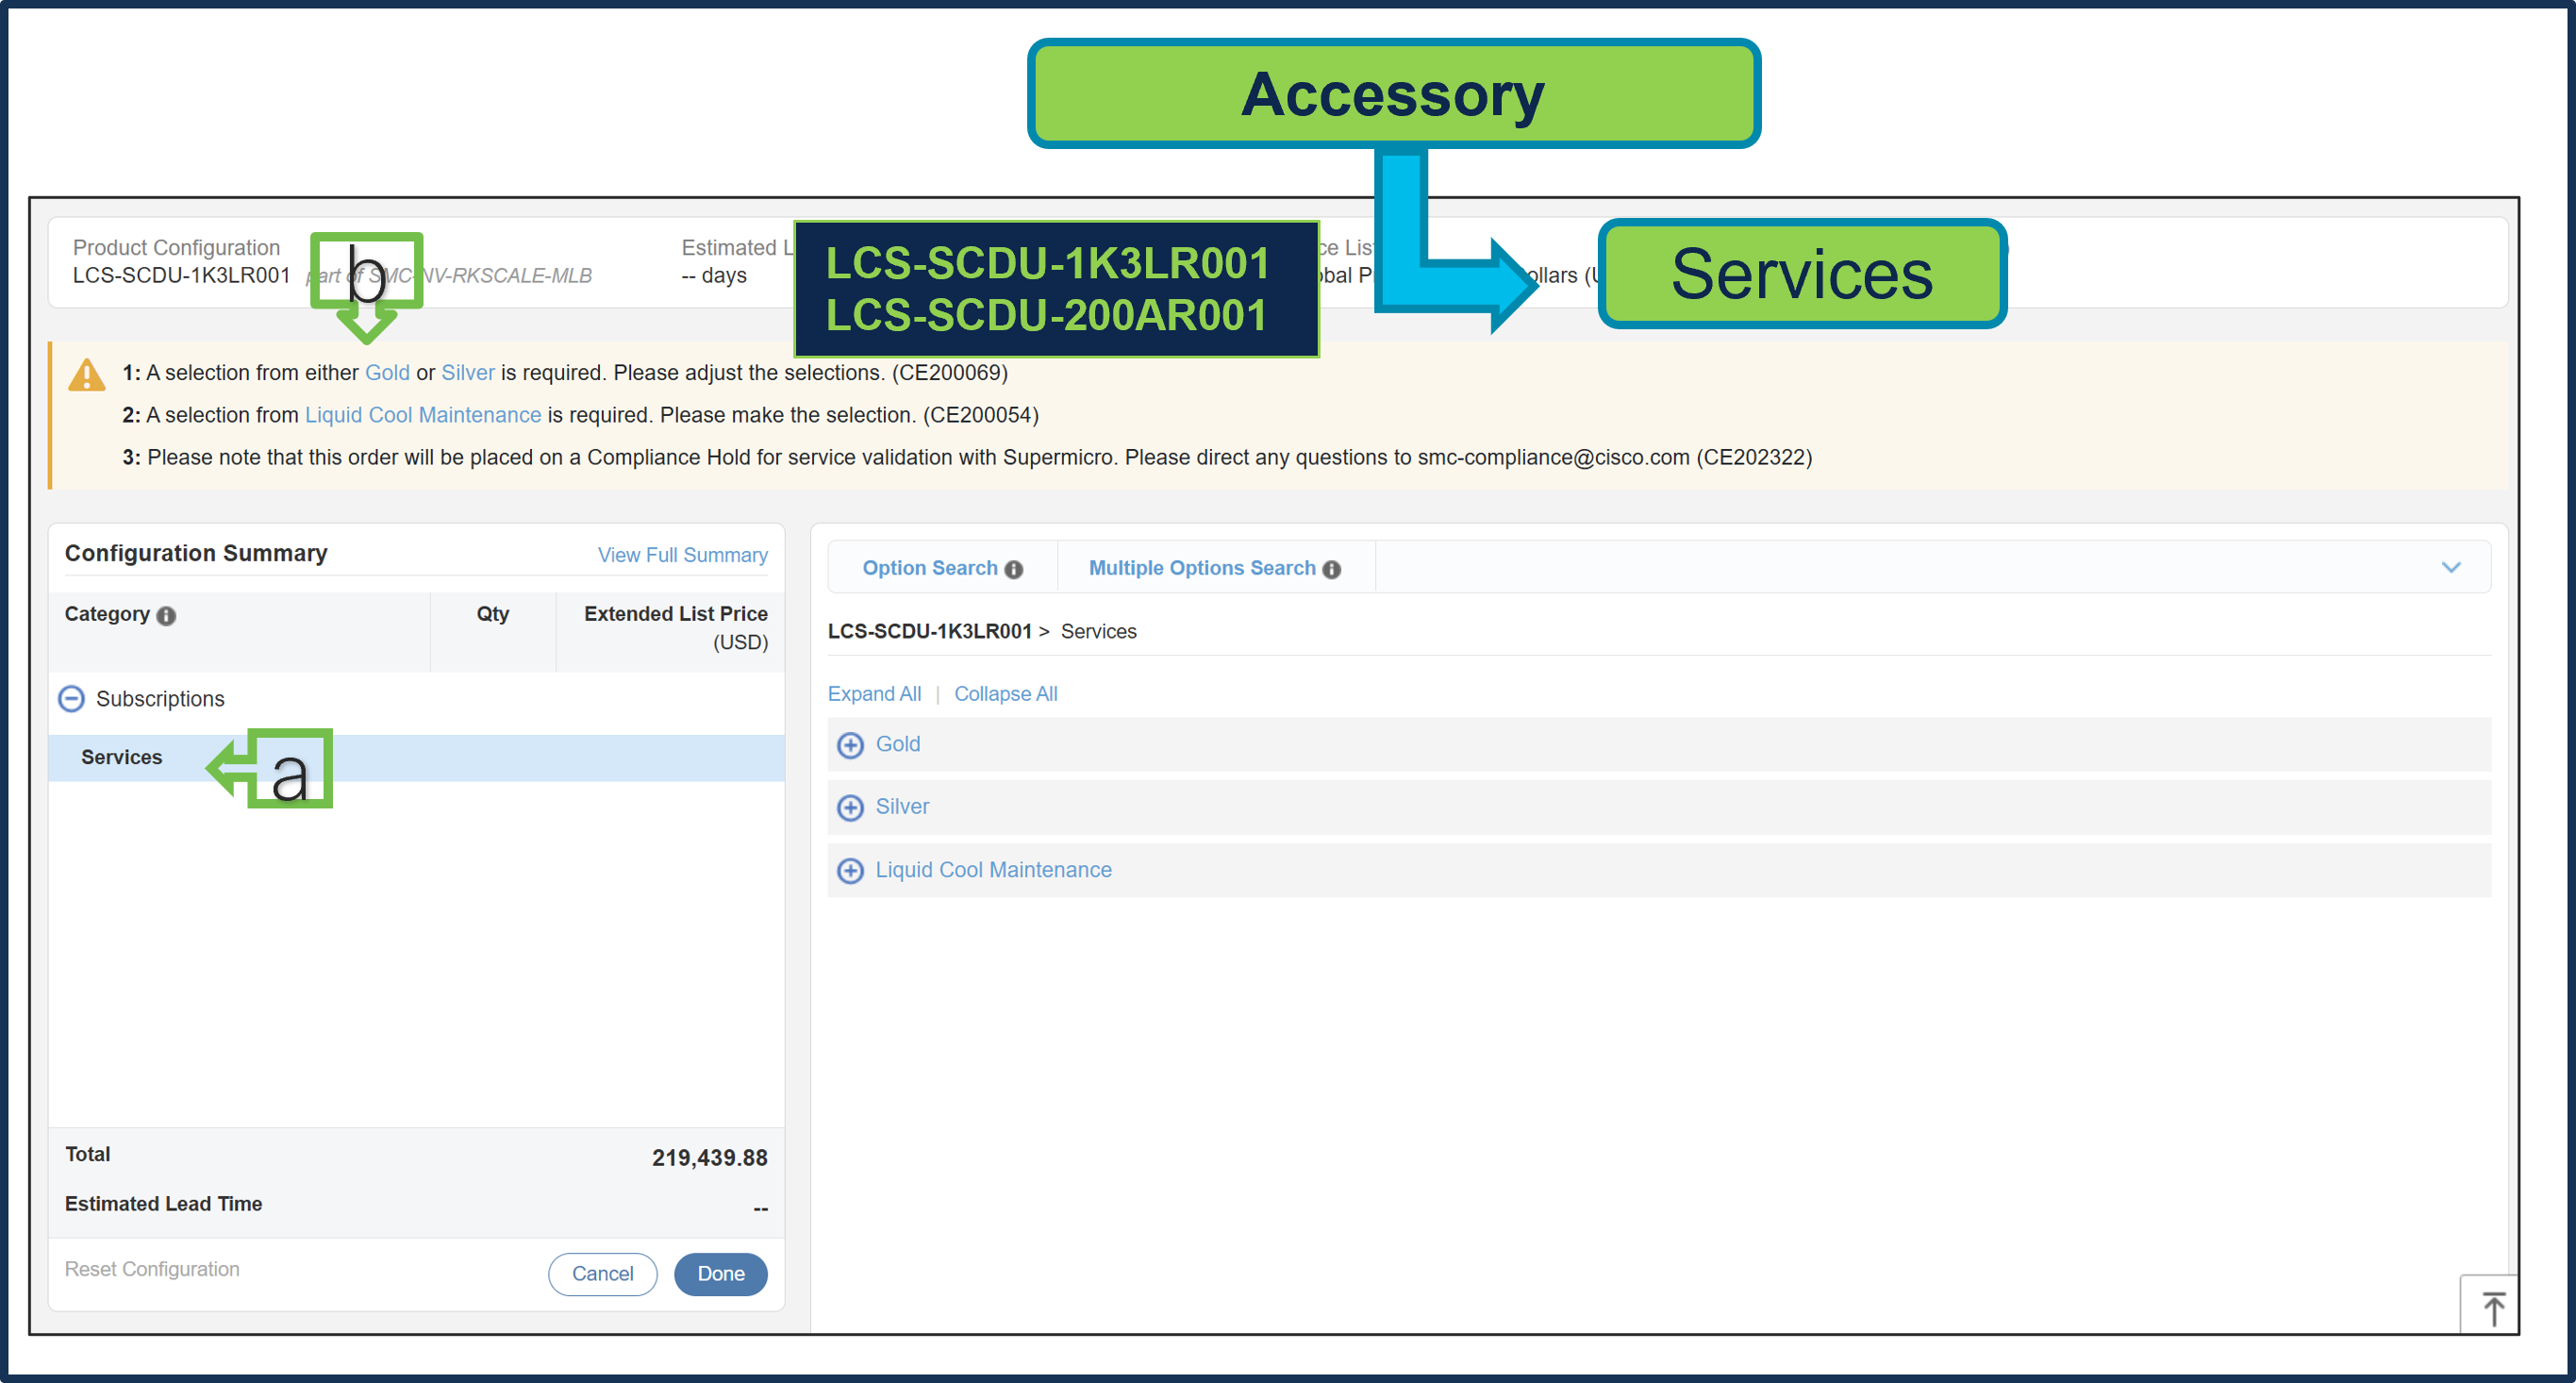
a. Configure LCS-SCDU-1K3LR001 by selecting Supermicro Services, as these are mandatory selections.
b. Follow warning messages to configure the minimum required selections.
● Selecting Gold or Silver Services is mandatory. Please ensure Cisco IHVI Services Term aligns to the Gold/Silver services Term.
● Selection of Liquid Cool Maintenance Service is also mandatory.
Step 13.
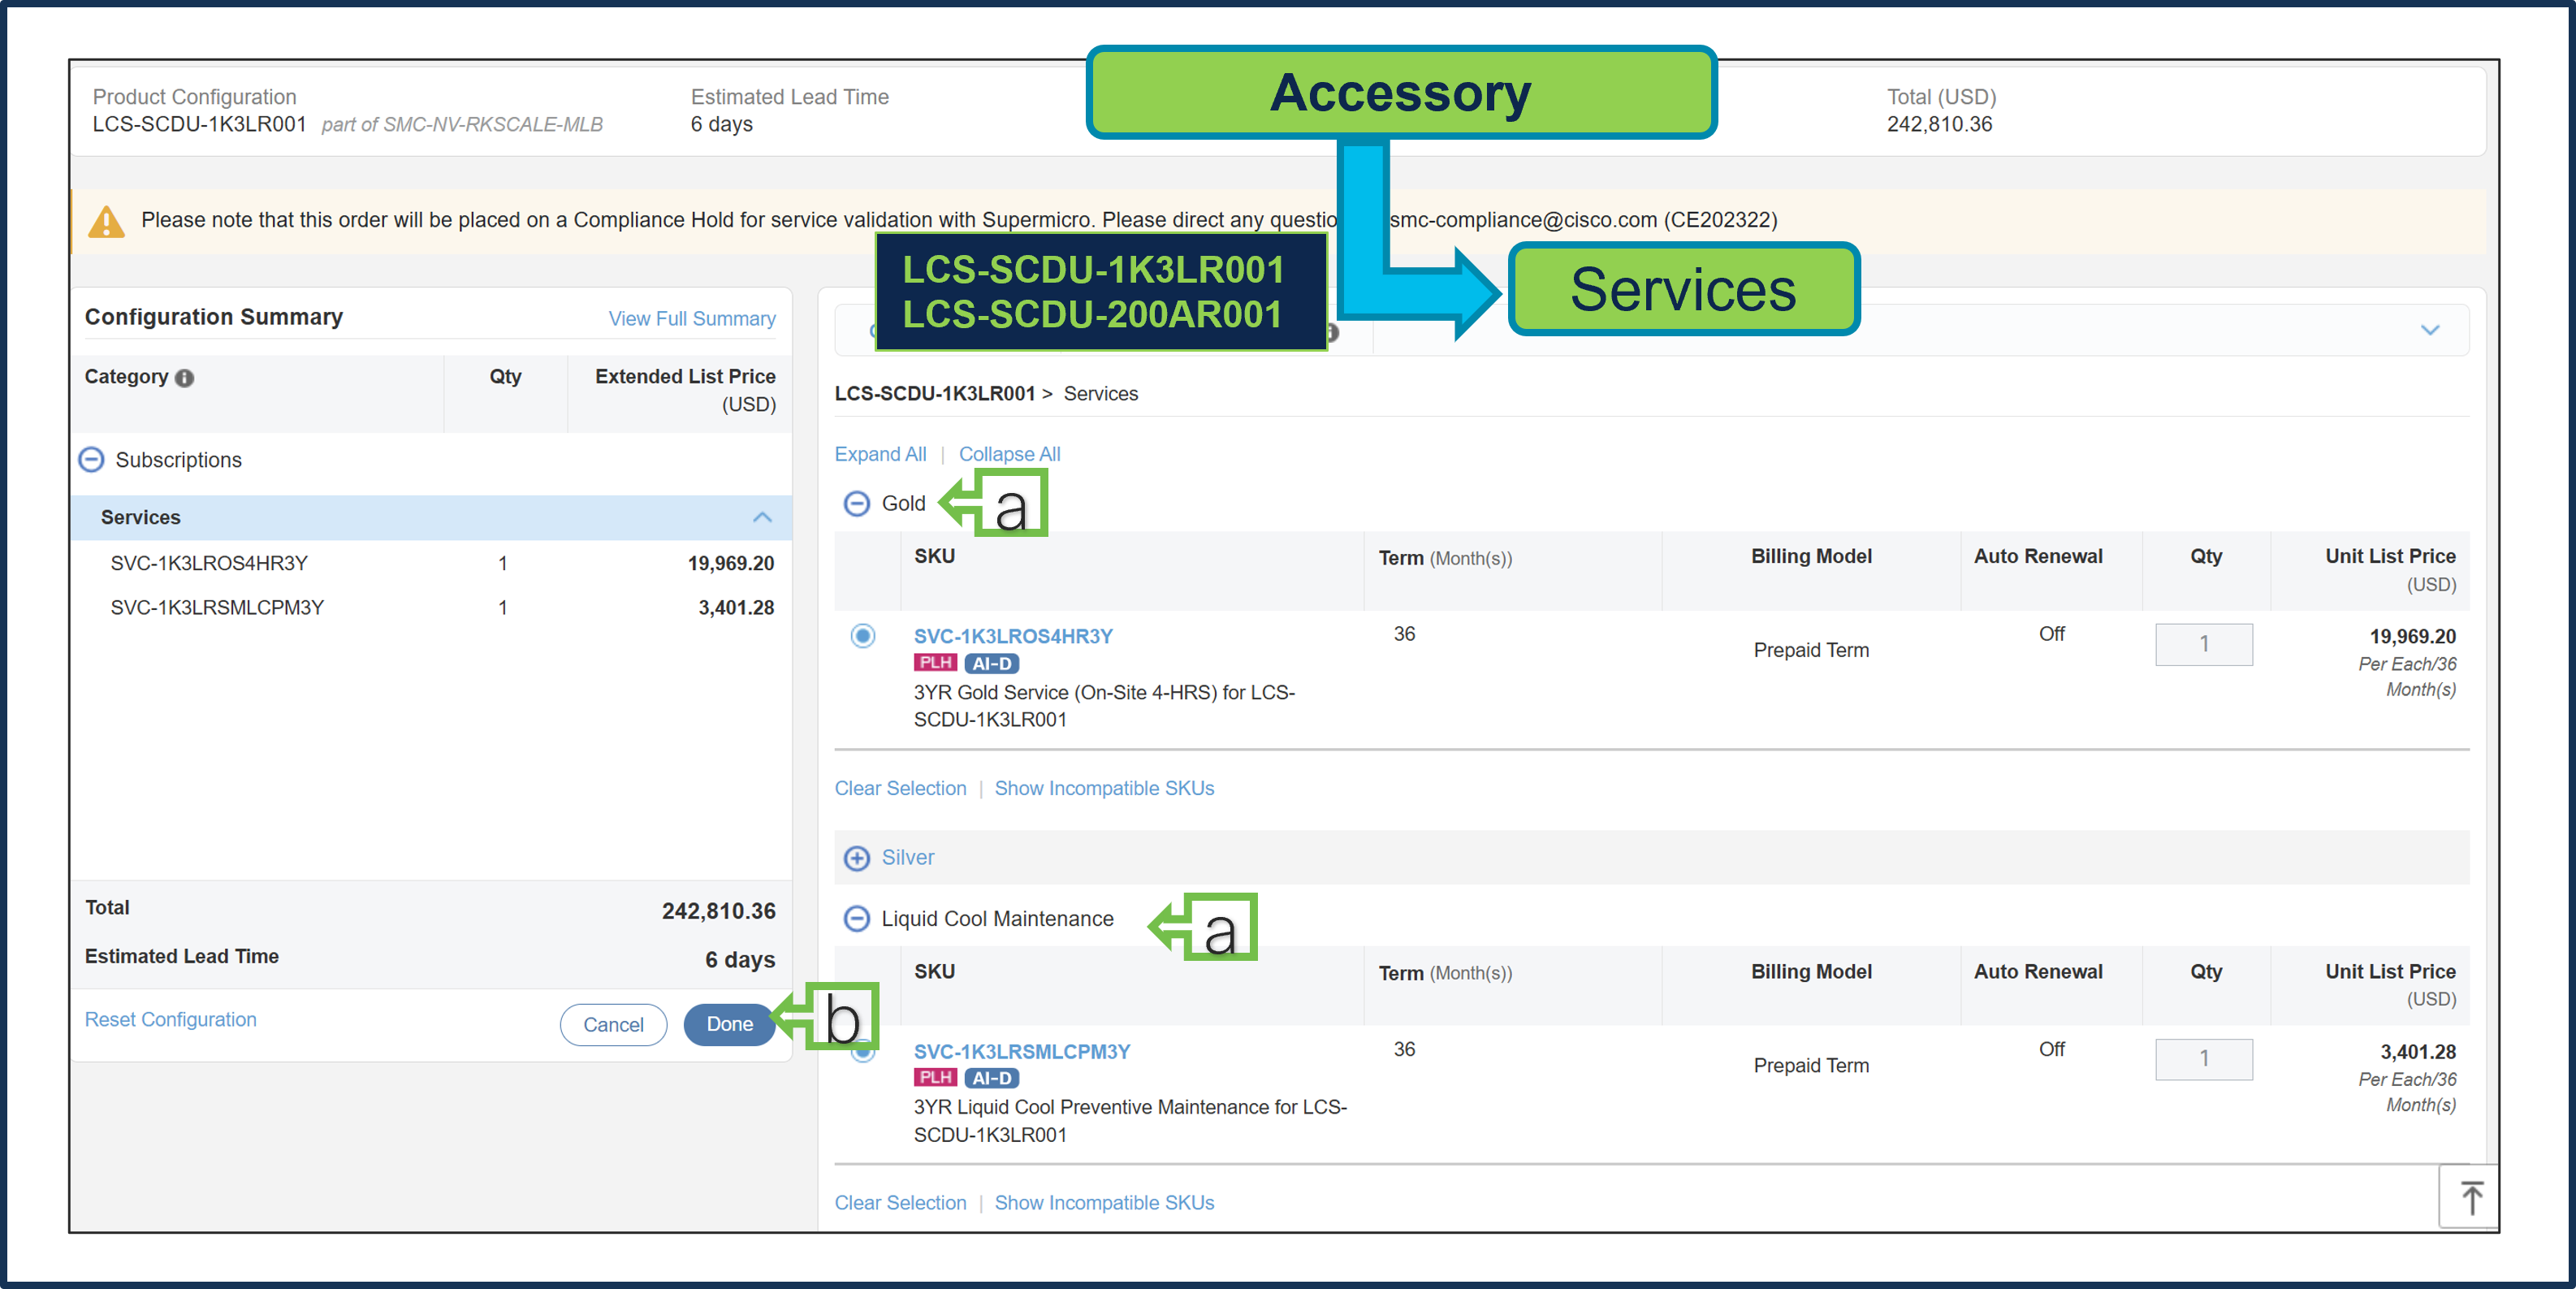
a. Gold & Liquid Cool Maintenance Supermicro Services are selected.
b. Select Done when completed.
Step 14.
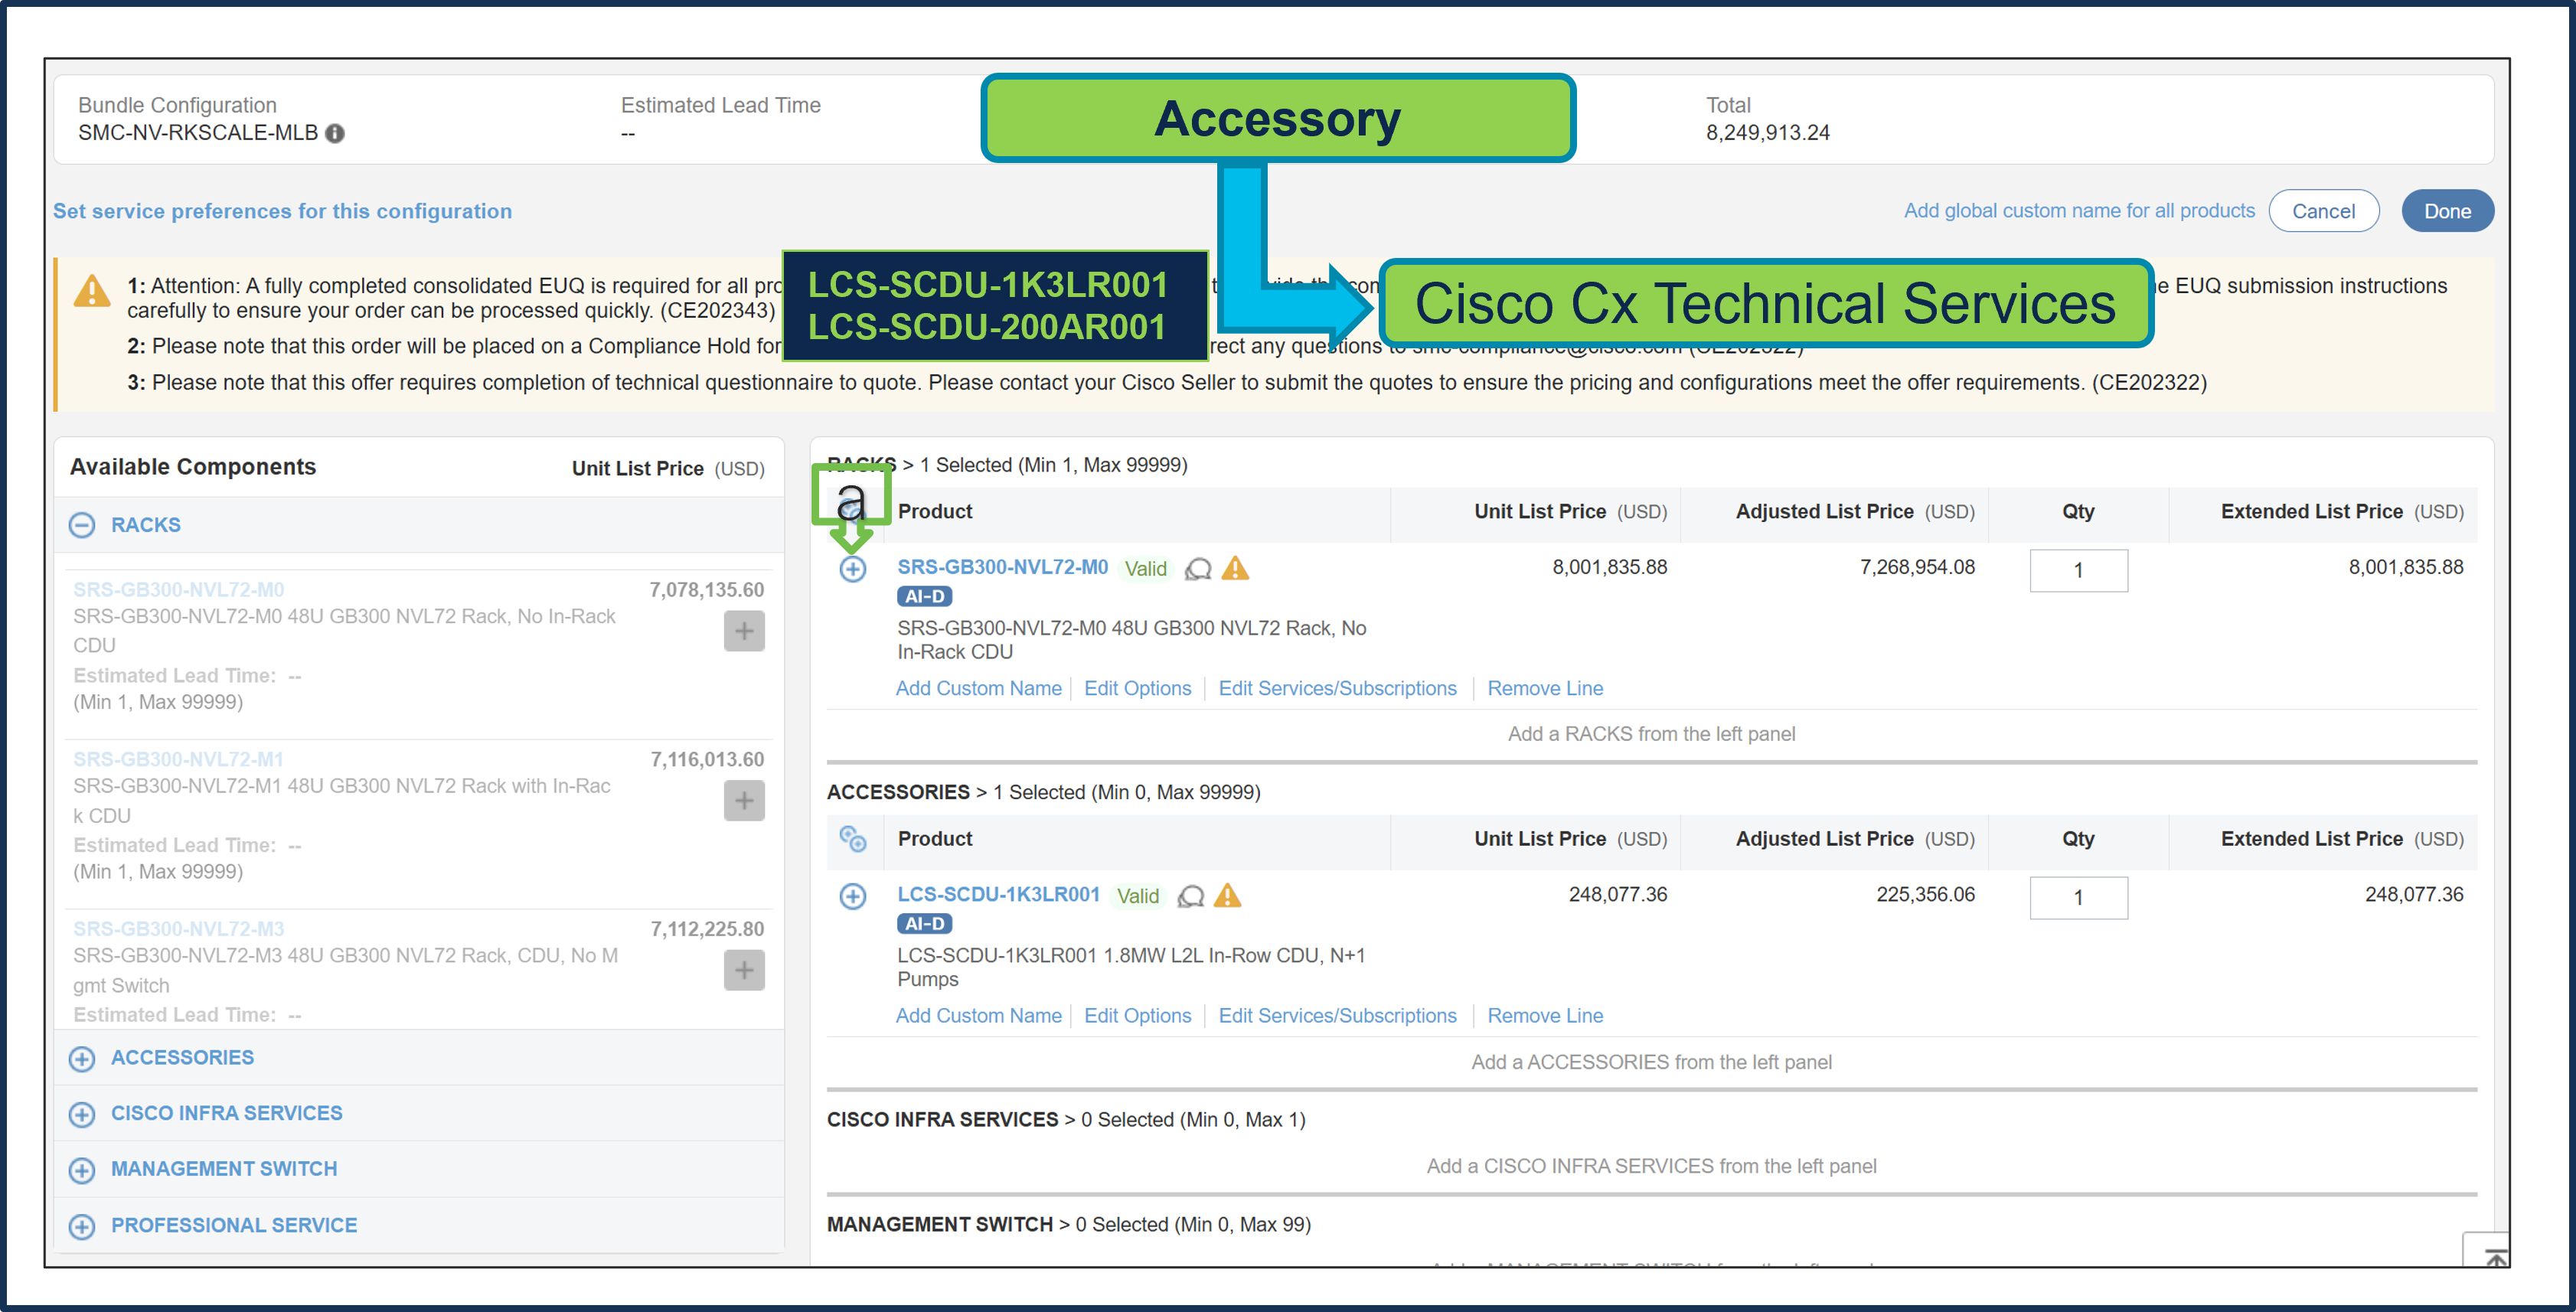
a. Note Status is now Valid.
b. Cisco CX IHV1 Technical Service is mandatory and cannot be removed.
c. The maximum duration of subscriptions will be automatically applied to the duration of technical services in this configuration. Please ensure Cisco IHVI Services Term aligns to the Gold/Silver services Term.
d. Go to “Edit Service/Subscription” to edit the technical service duration.
Step 15.
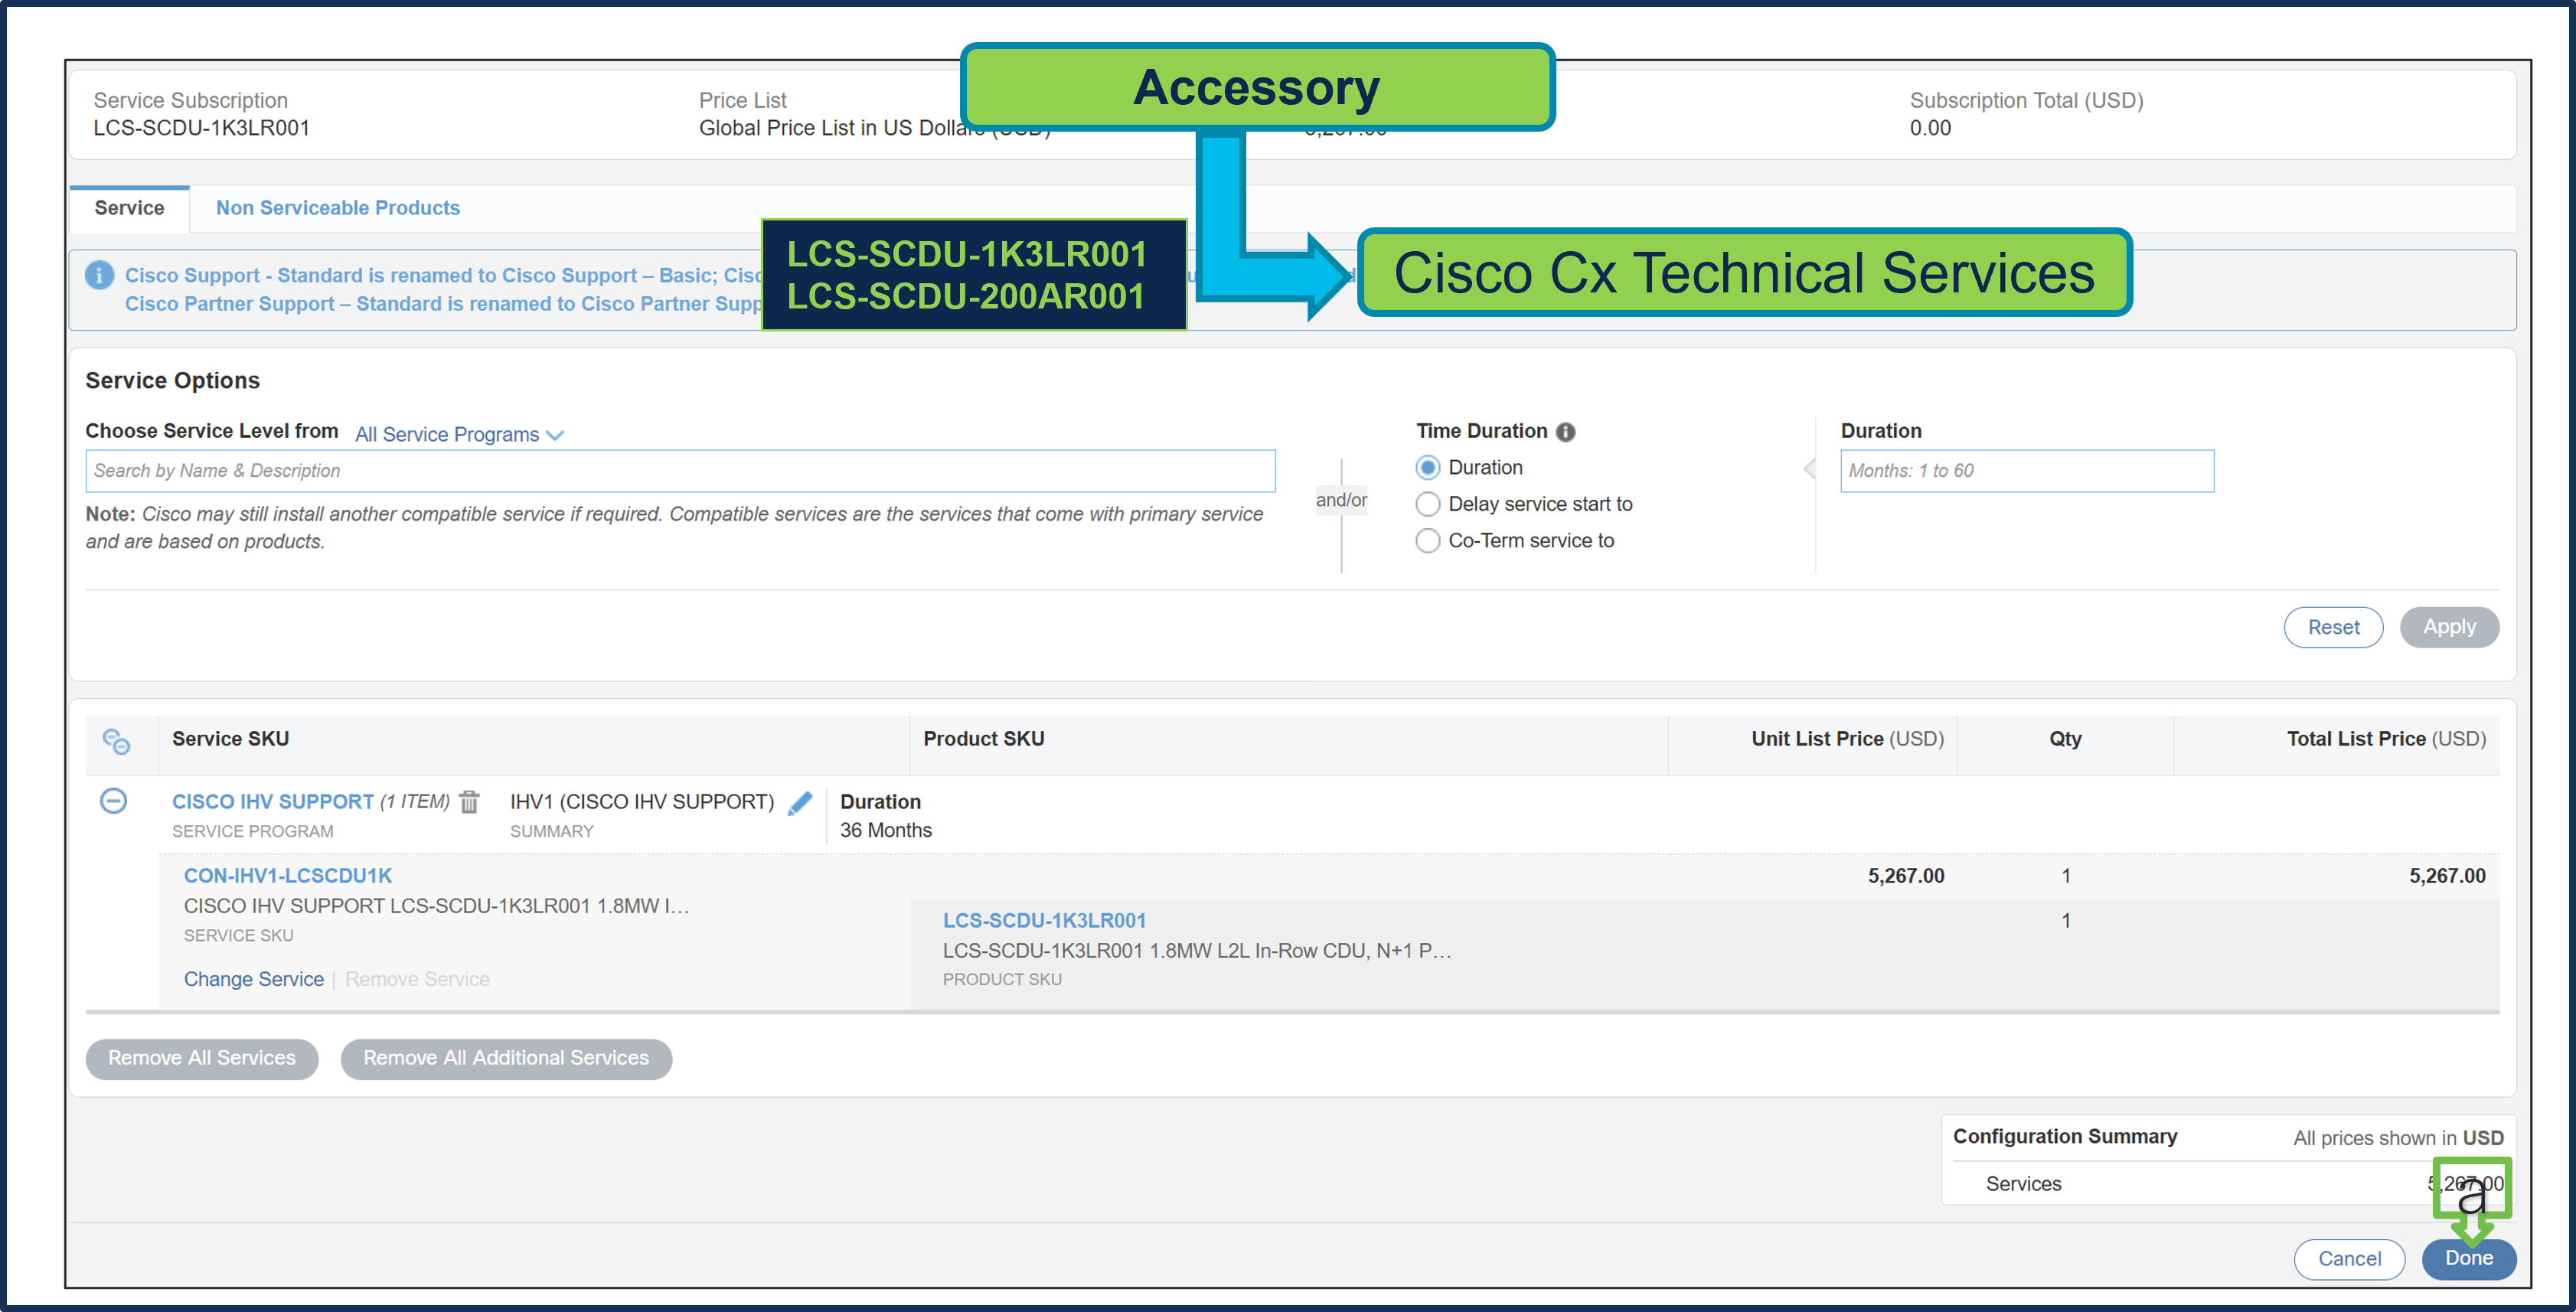
a. Since the Supermicro Services term is set to 36 months, the Cisco CX Technical Service term is also set to 36 months. Click Done.
Step 16.
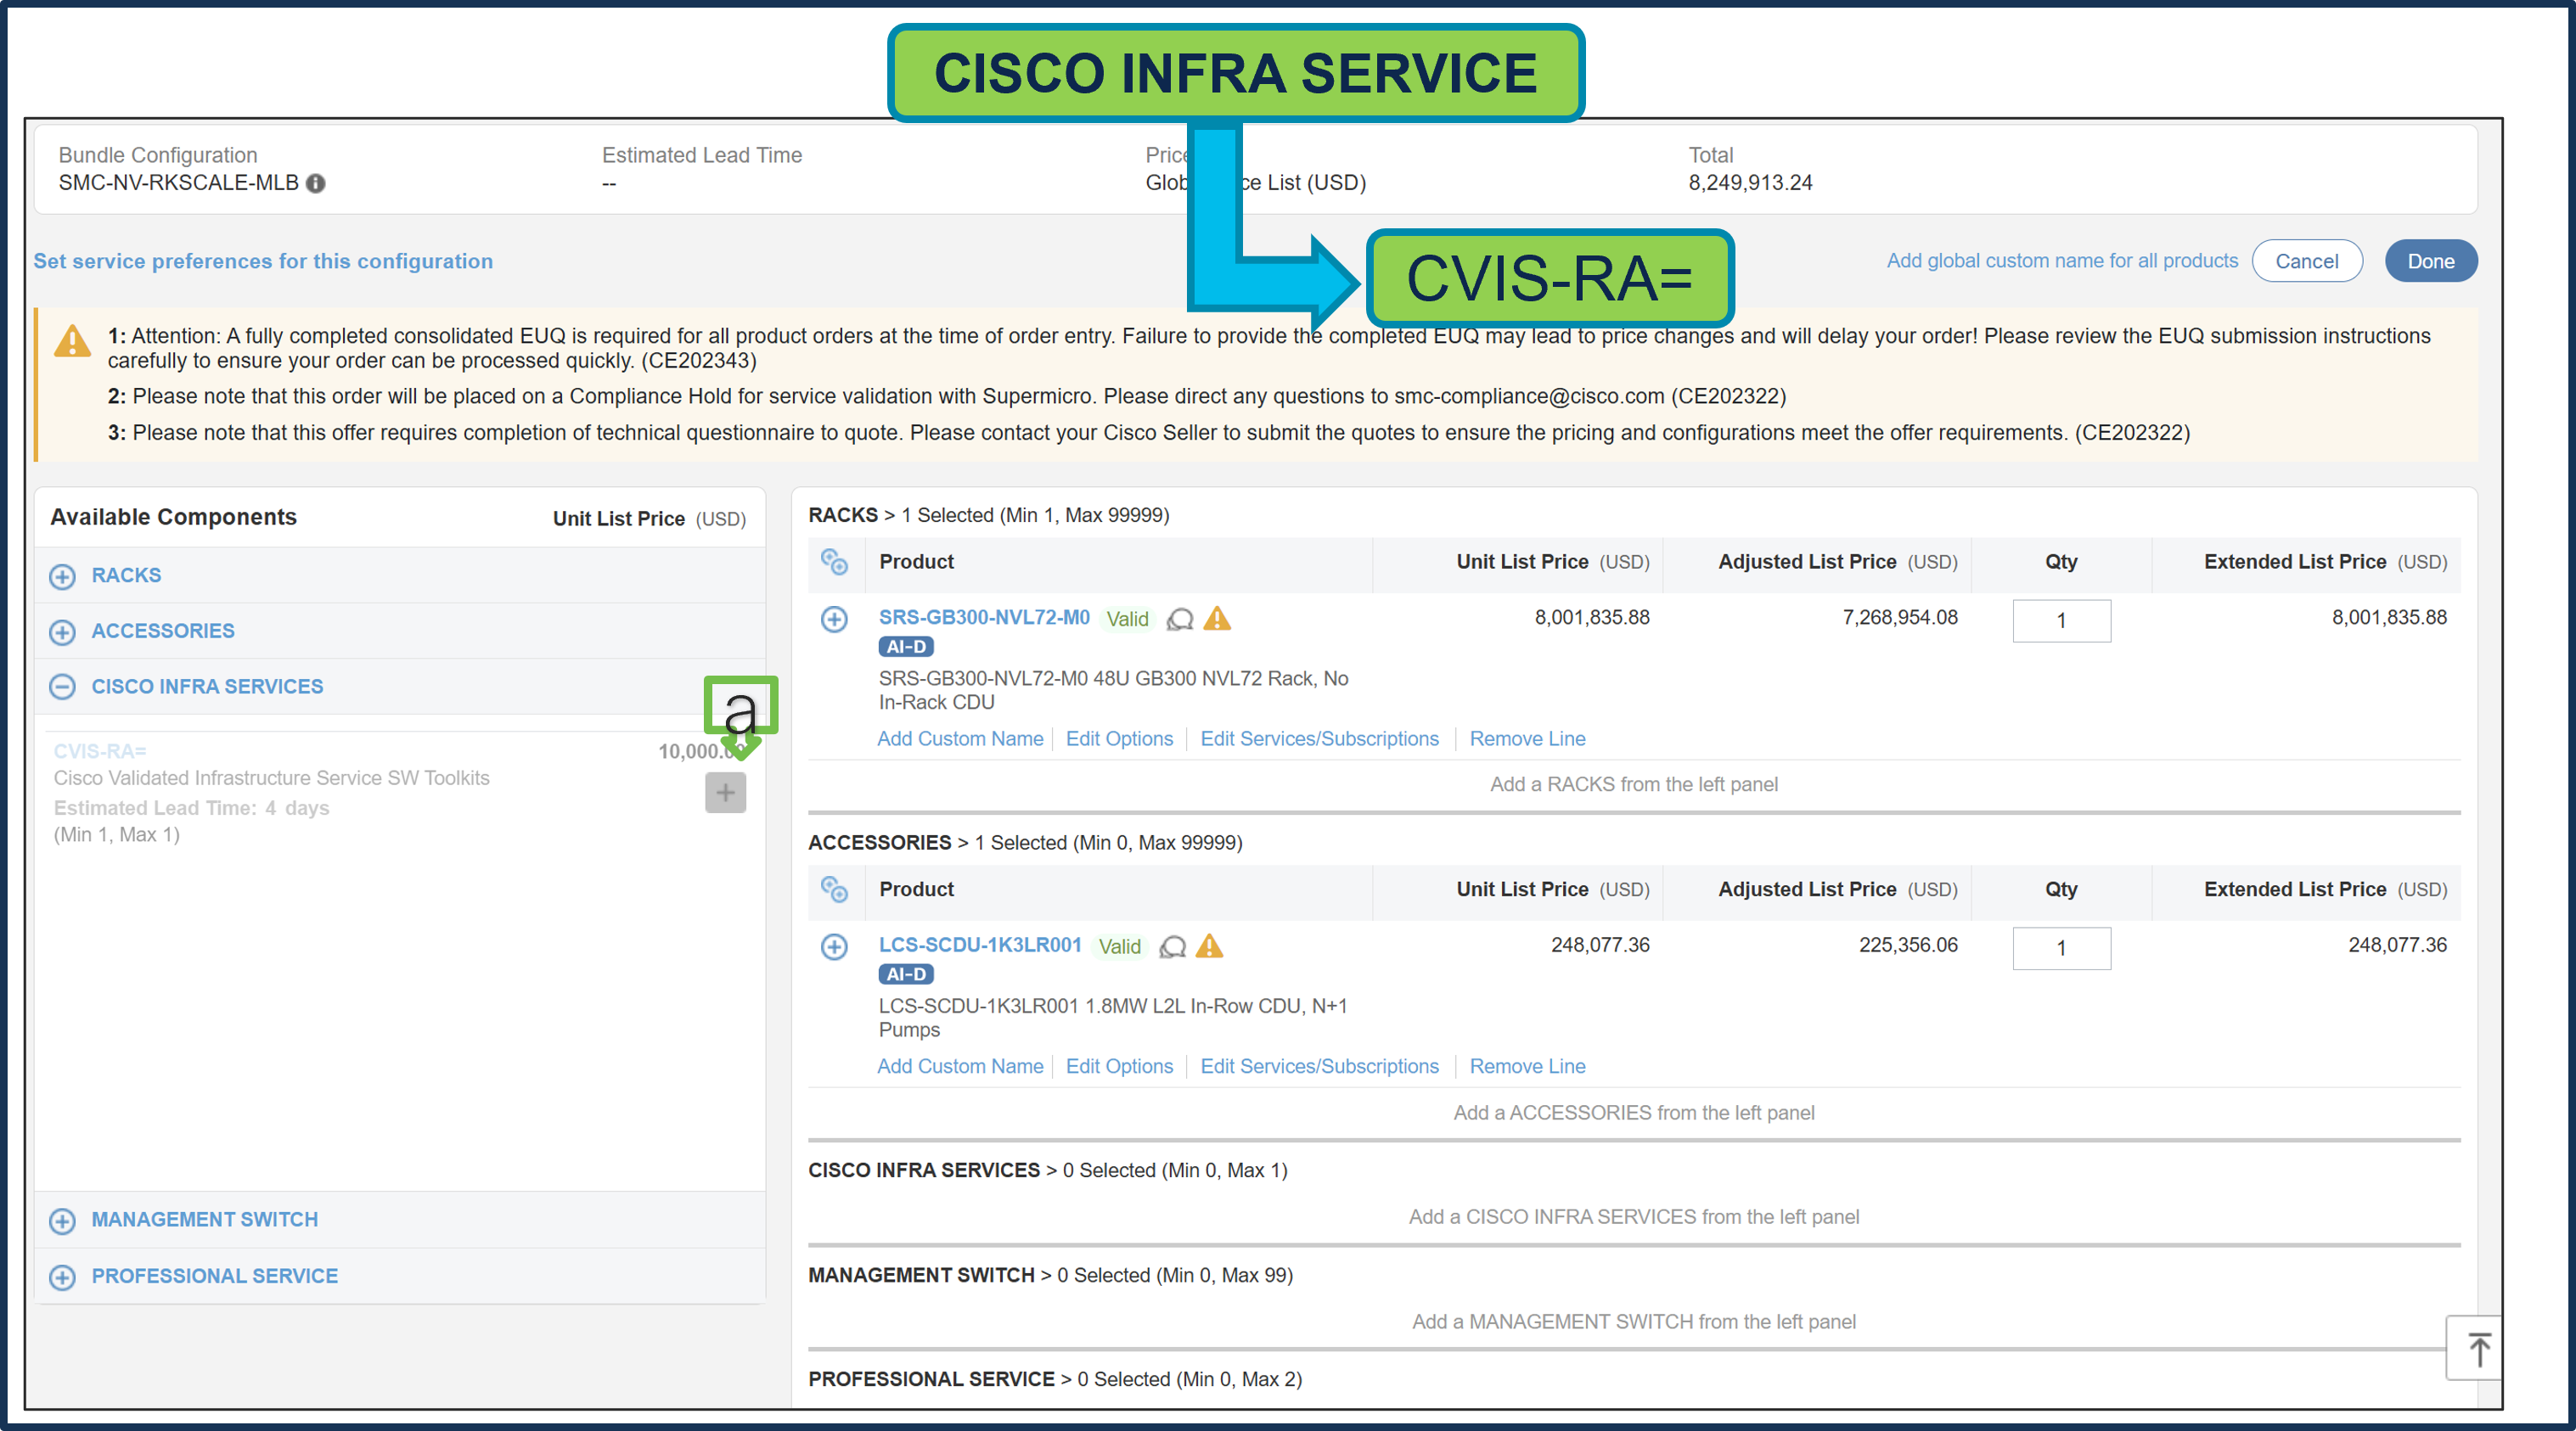
a. CISCO INFRA SERVICES: CVIS-RA= is optional and can be selected only with Rack M3 or M4. If selected, only 1 unit per cluster is allowed.
Step 17.
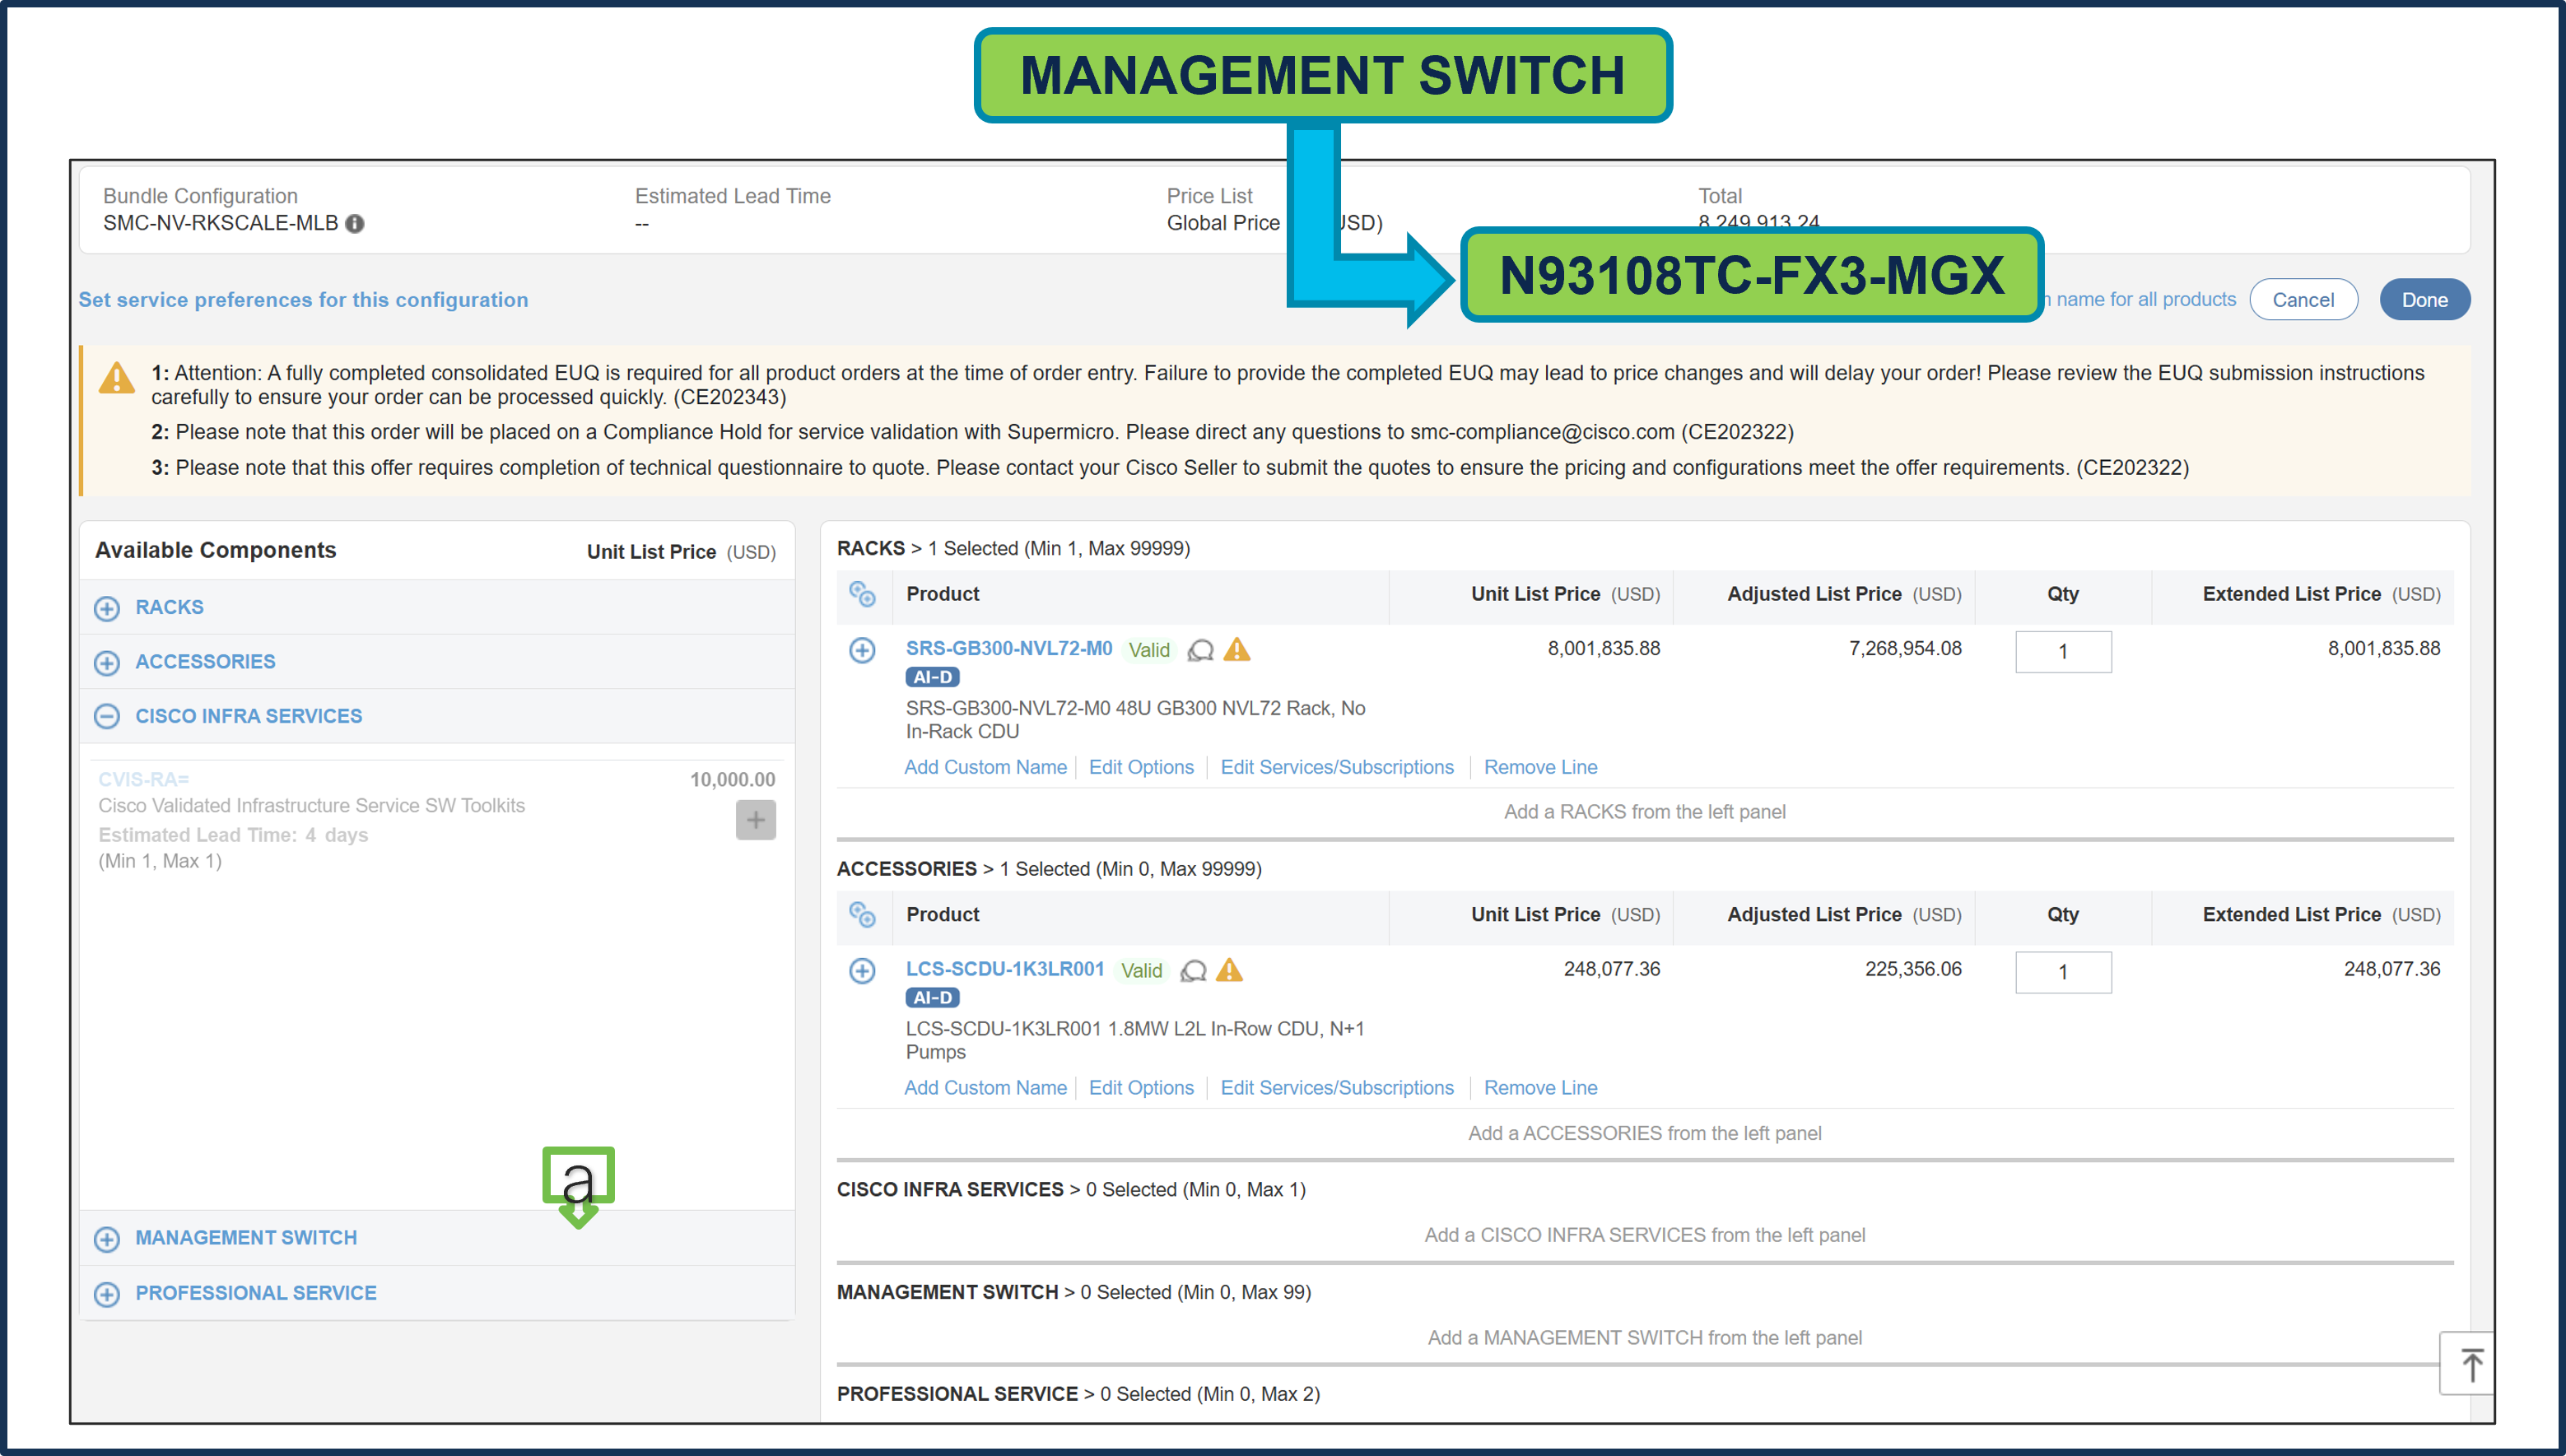
a. MANAGEMENT SWITCH: N93108TC-FX3-MGX is optional and can be selected only with Rack M3 or M4. If selected, only 2 units per rack are allowed. Configure the switch as needed.
Step 18.
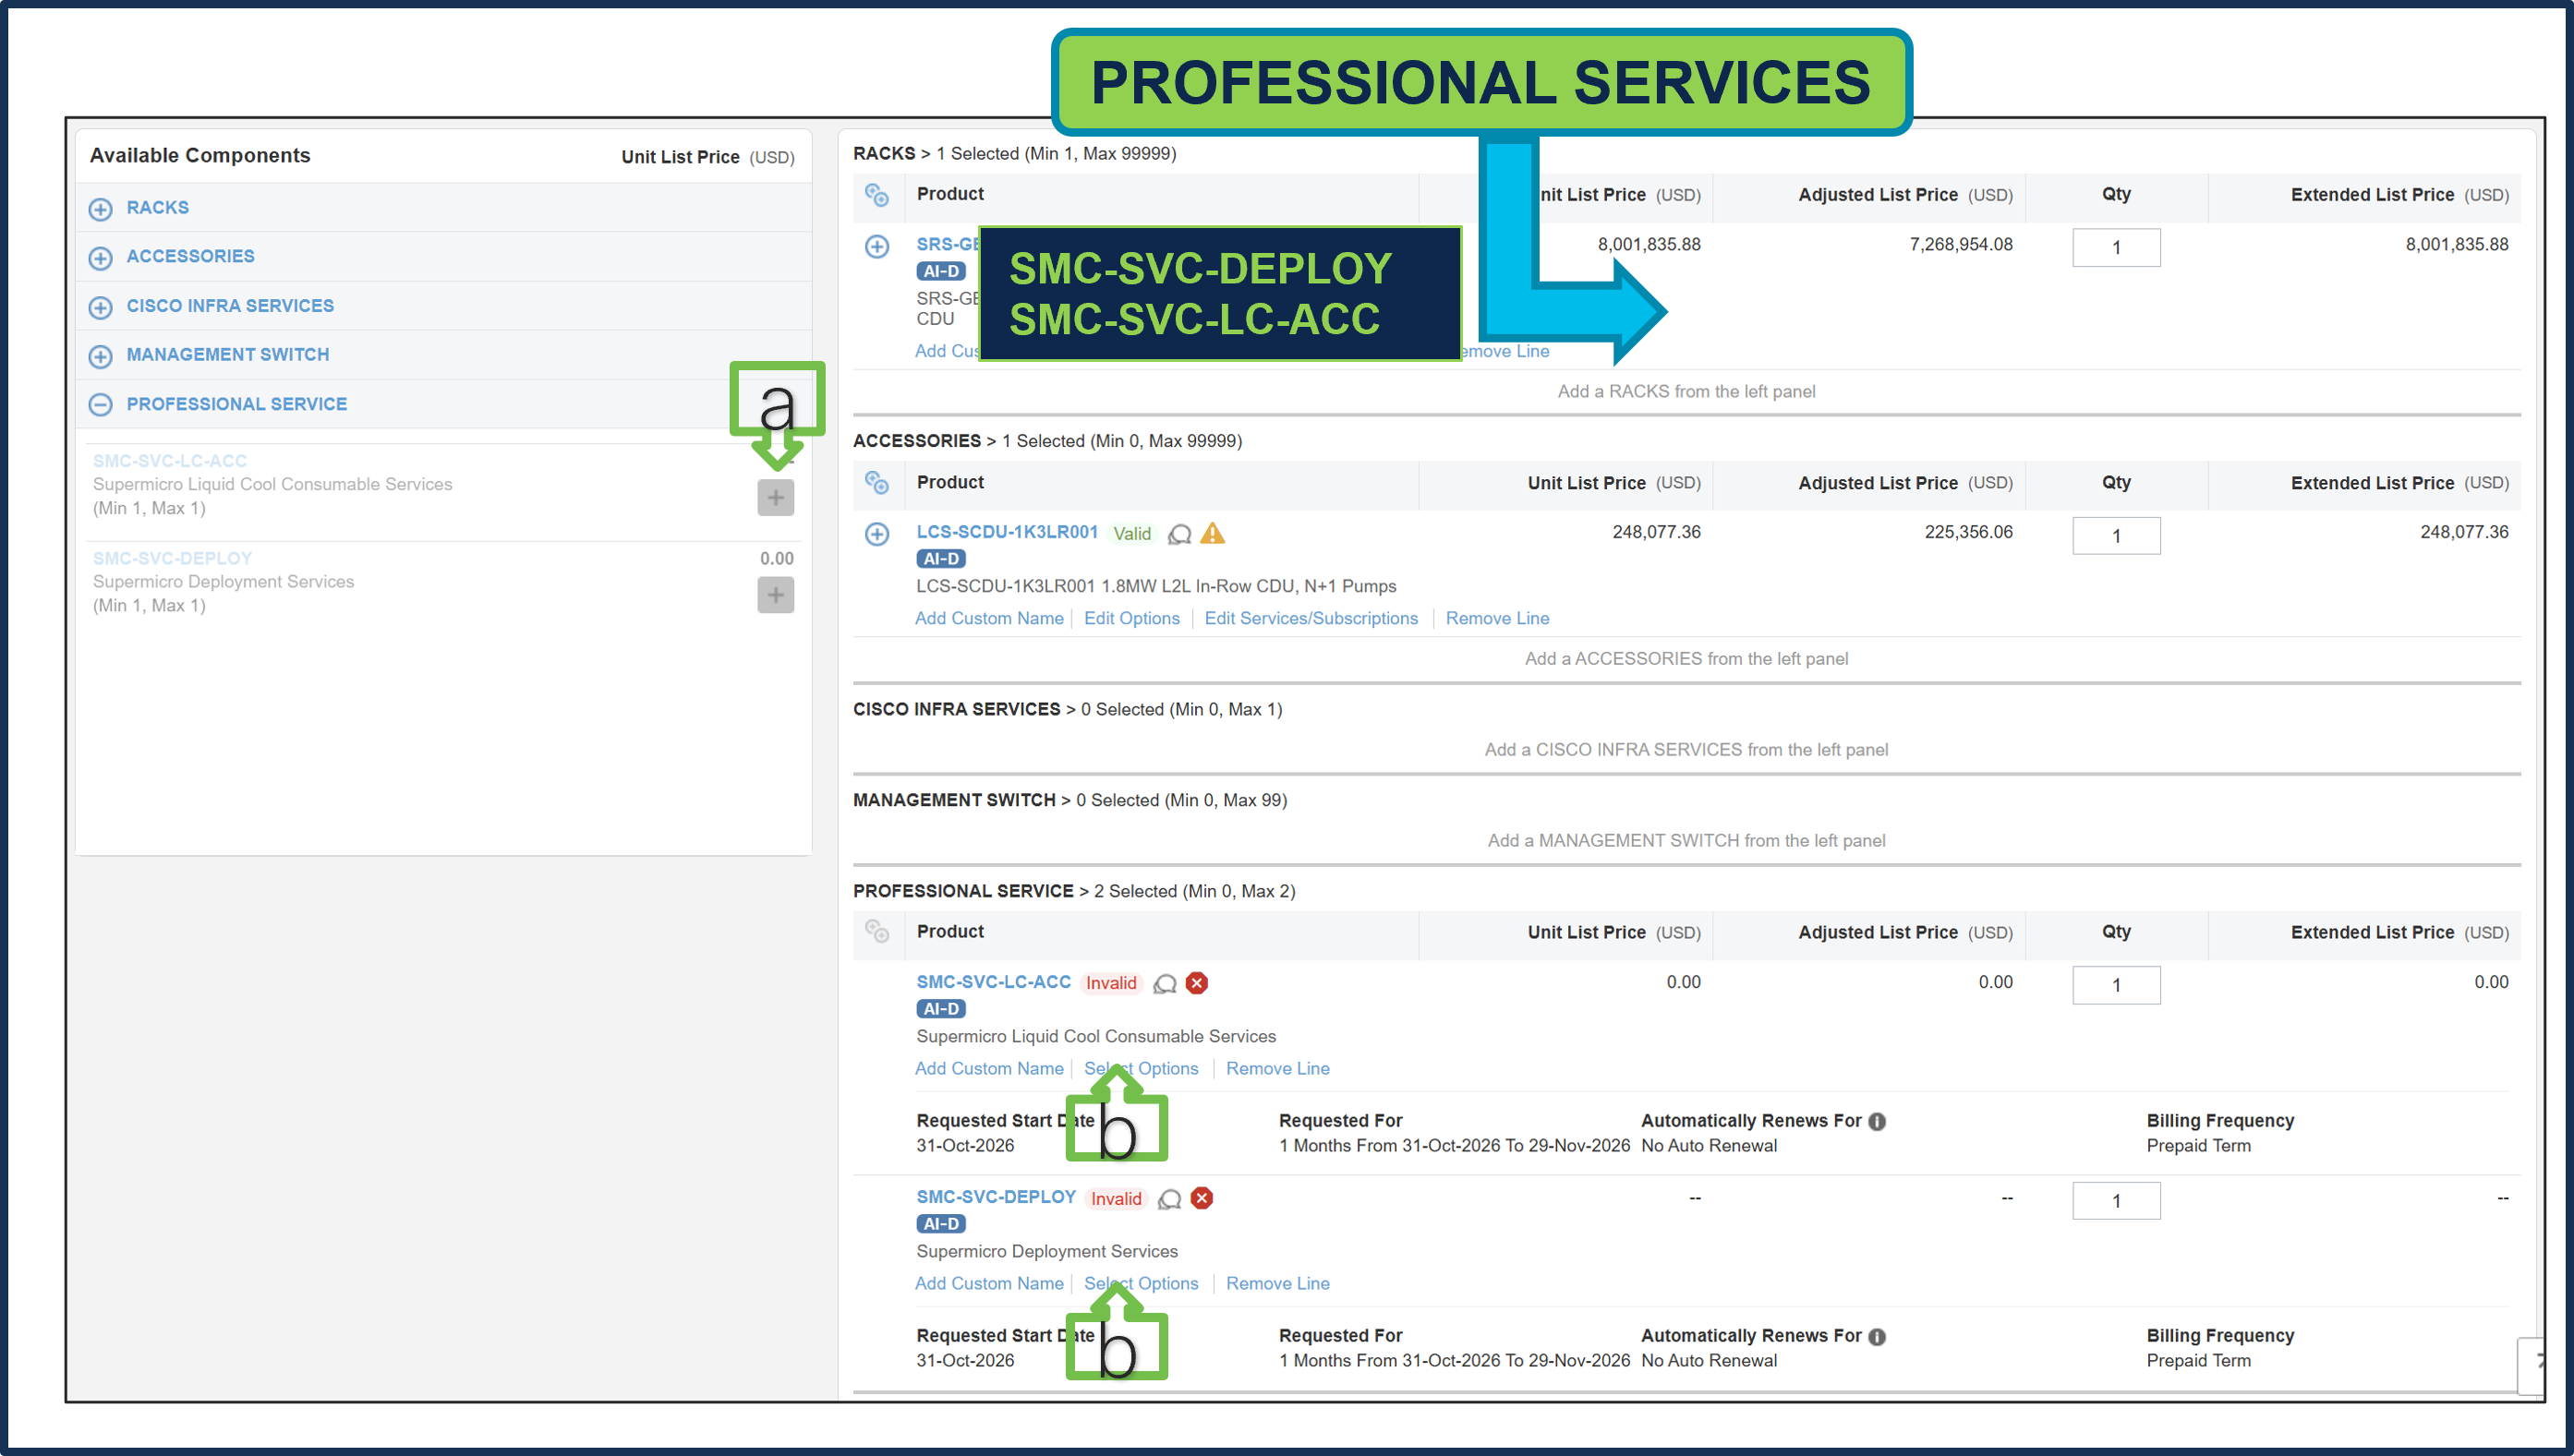
a. It is recommended that User Purchase Supermicro Professional Services: SMC-SVC-LC-ACC & SMC-SVC-DEPLOY. Make a selection by clicking “PLUS”.
b. Click on Edit Options to configure the Product.
Step 19.
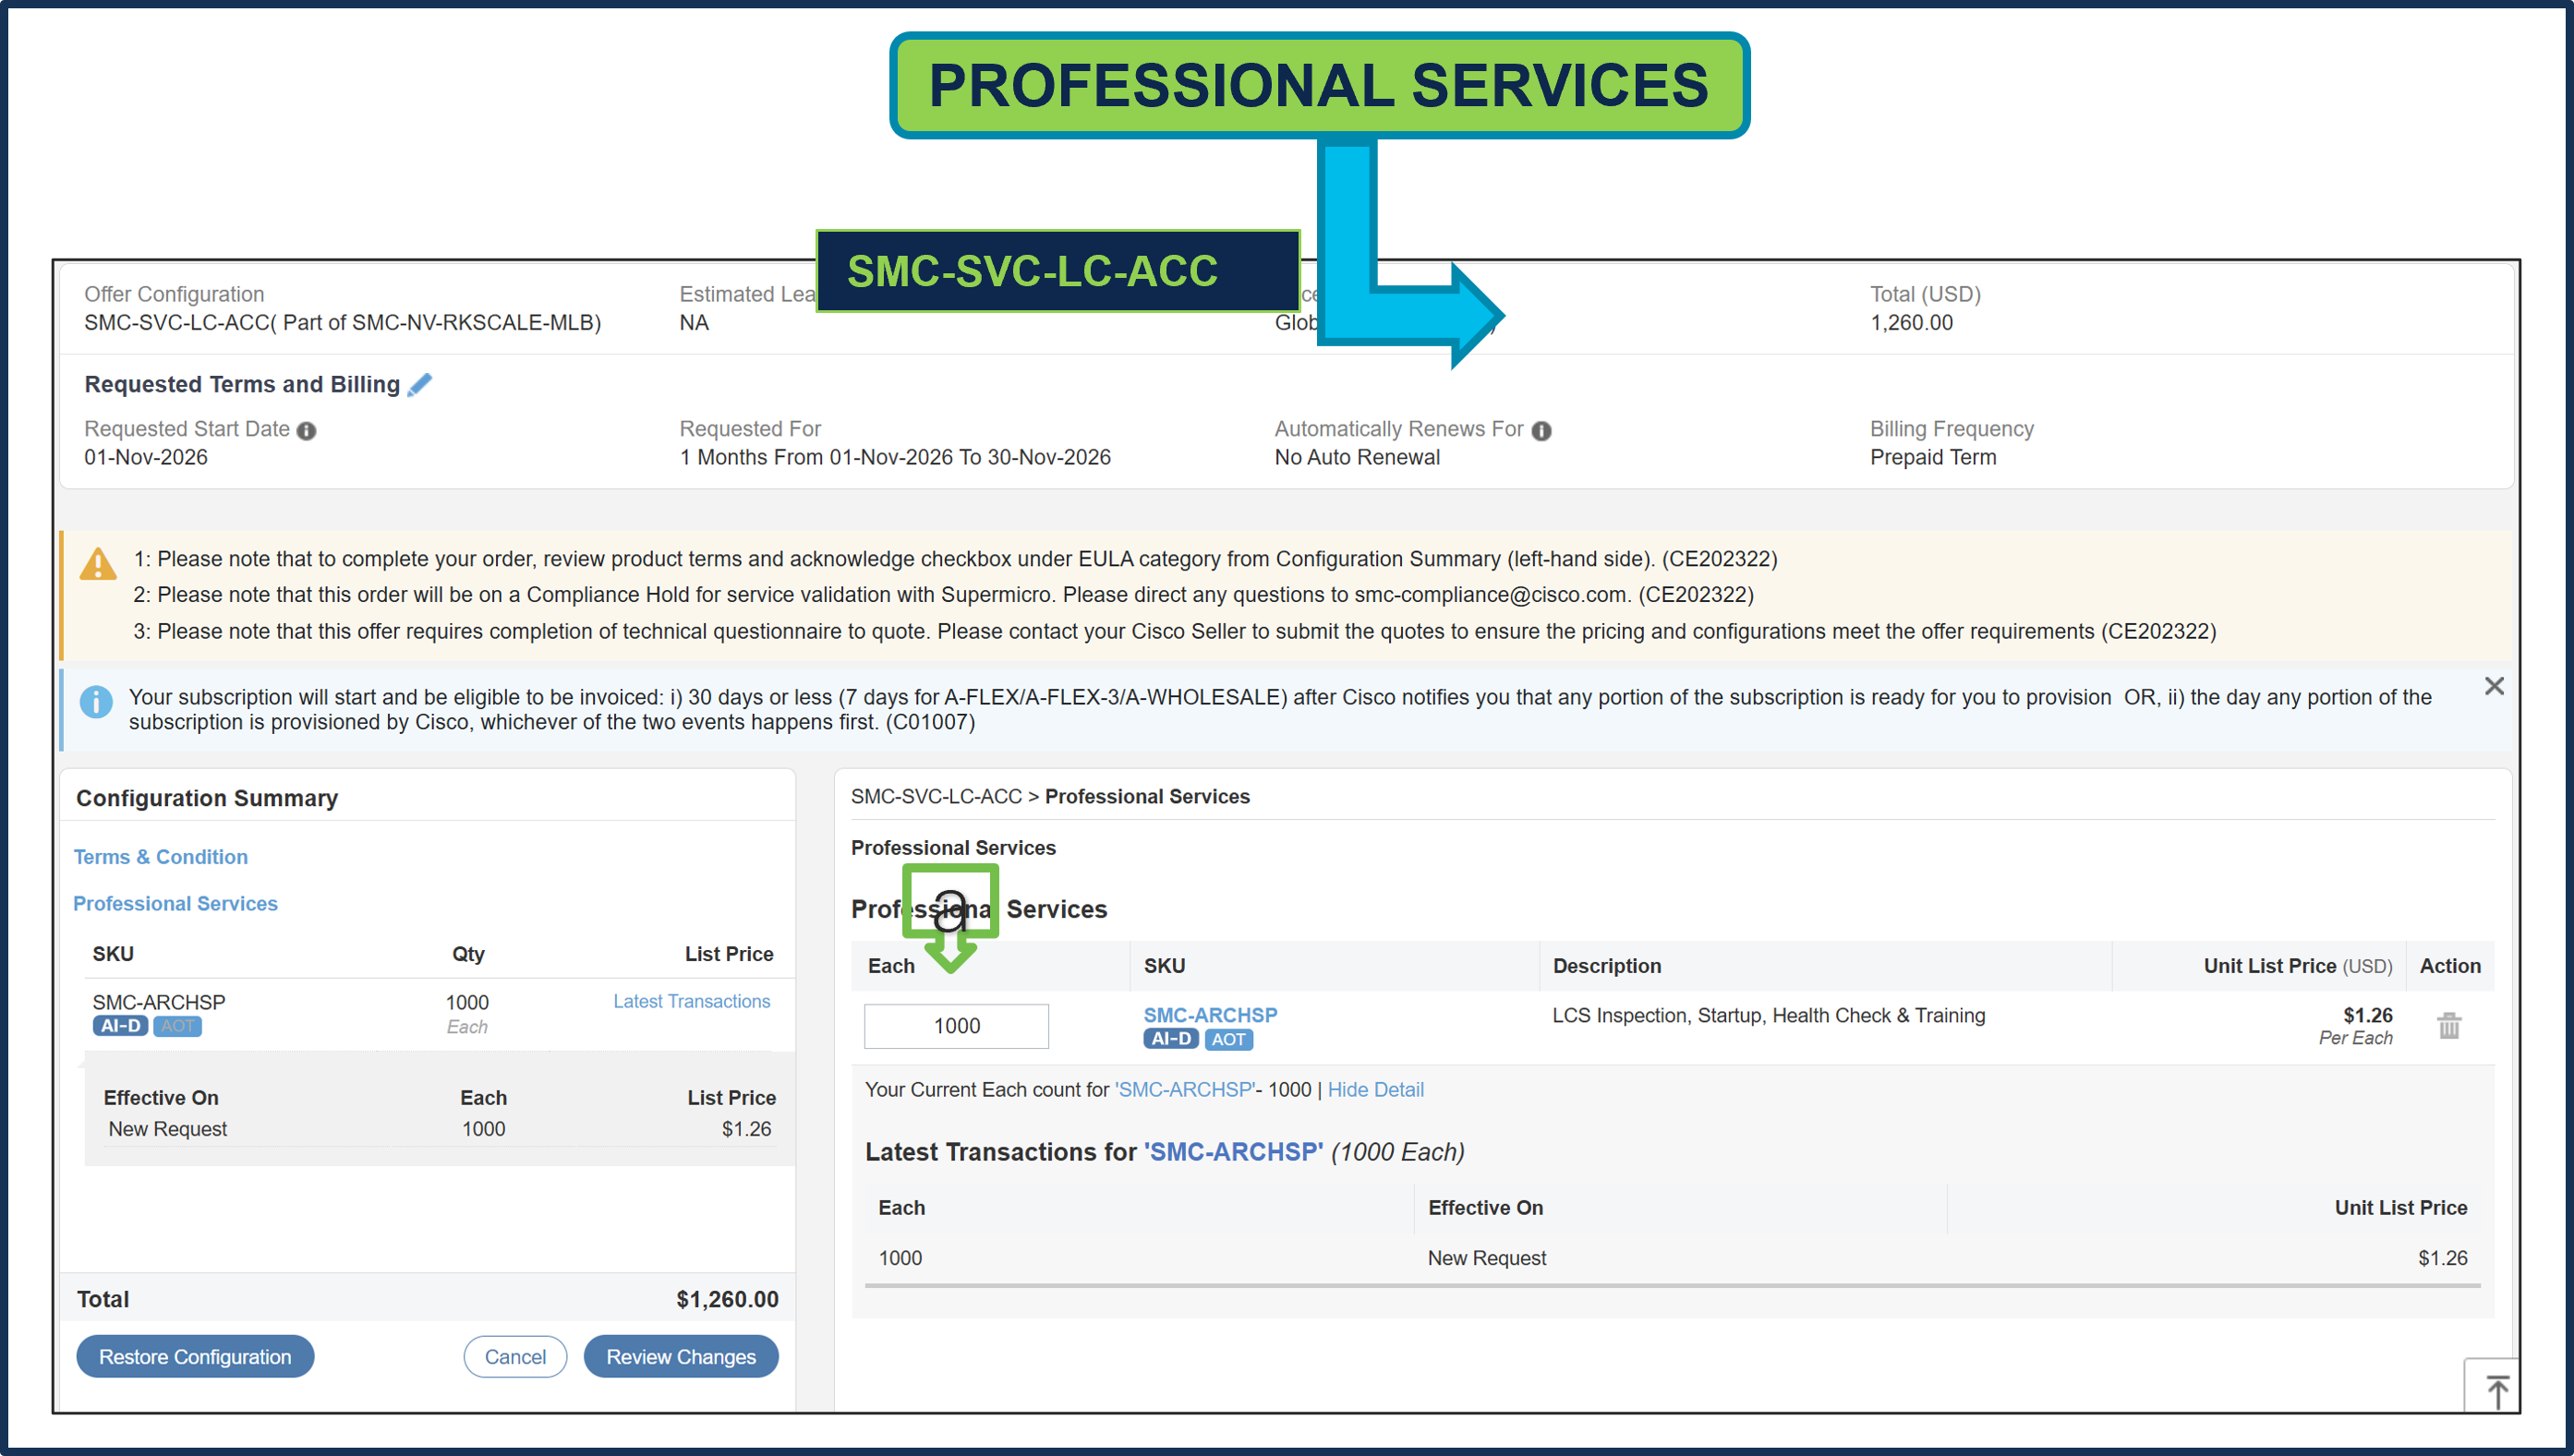
a. Supermicro Professional Service SKUs need to be selected and please ensure that seller selects the correct QTY.
Step 20.
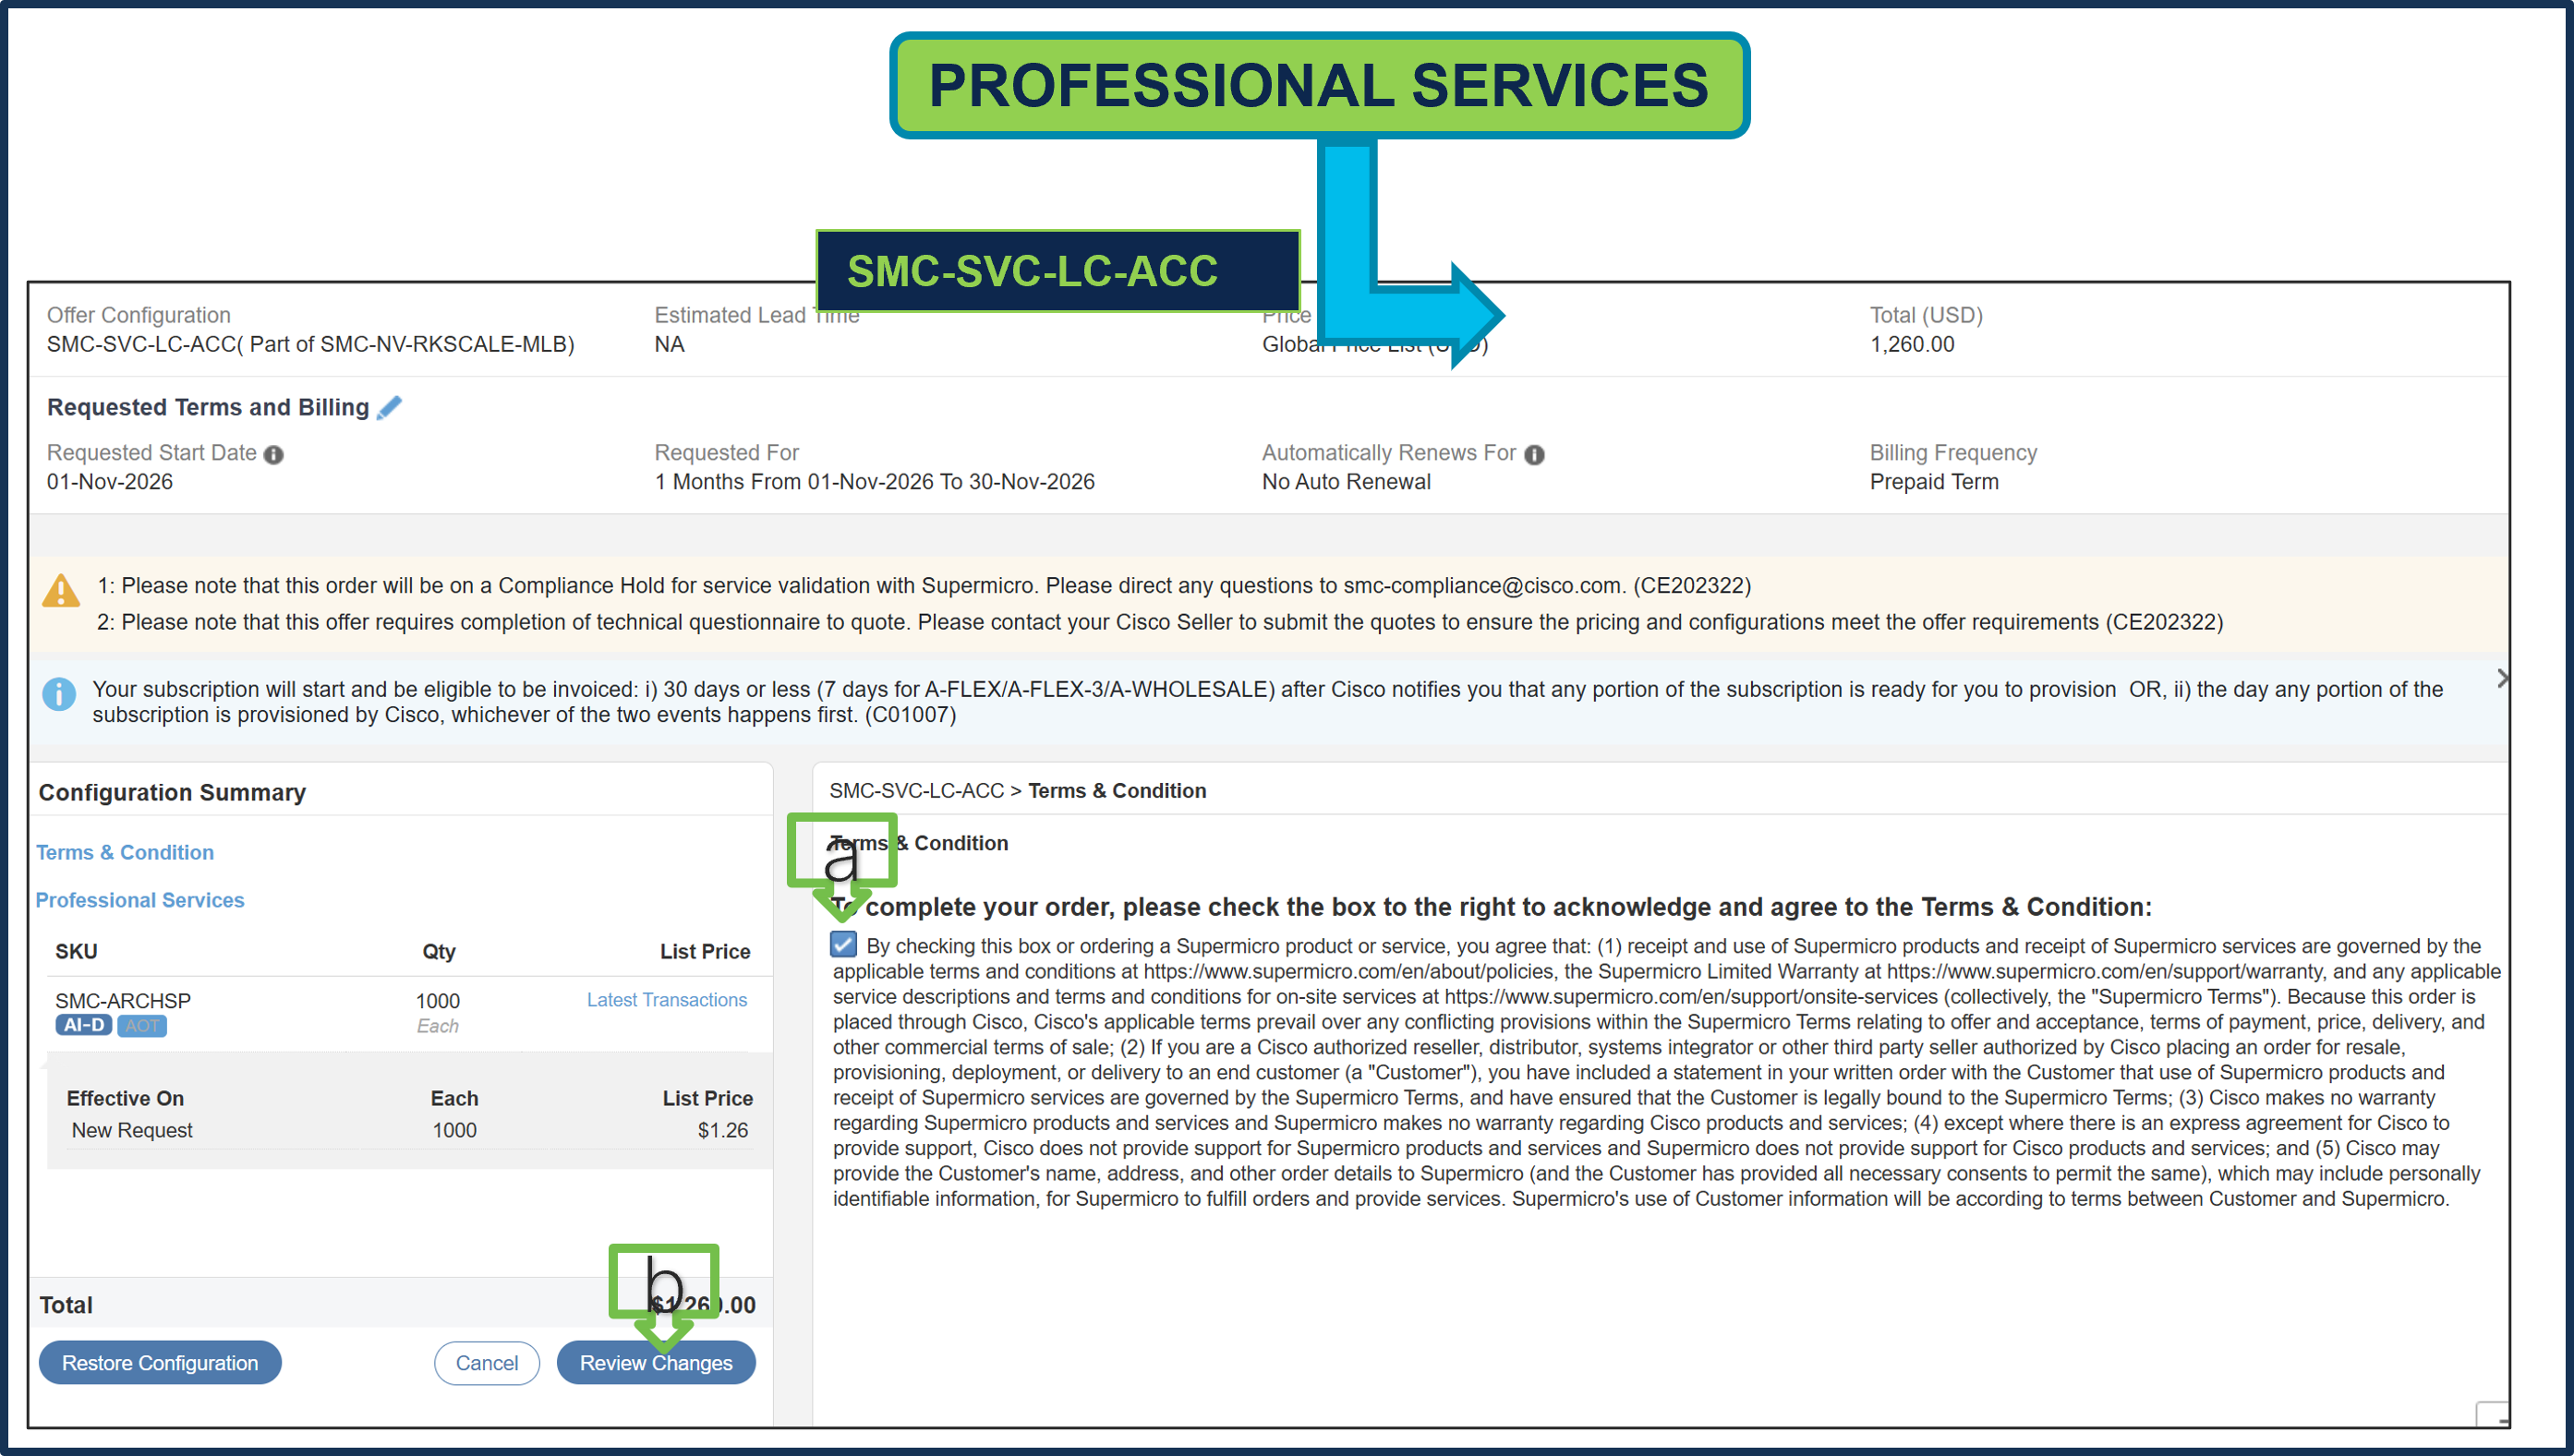
a. To complete the order, please check the box to the right to acknowledge and agree to the Terms & Conditions.
b. Click Review Changes, then “Done”.
Step 21.
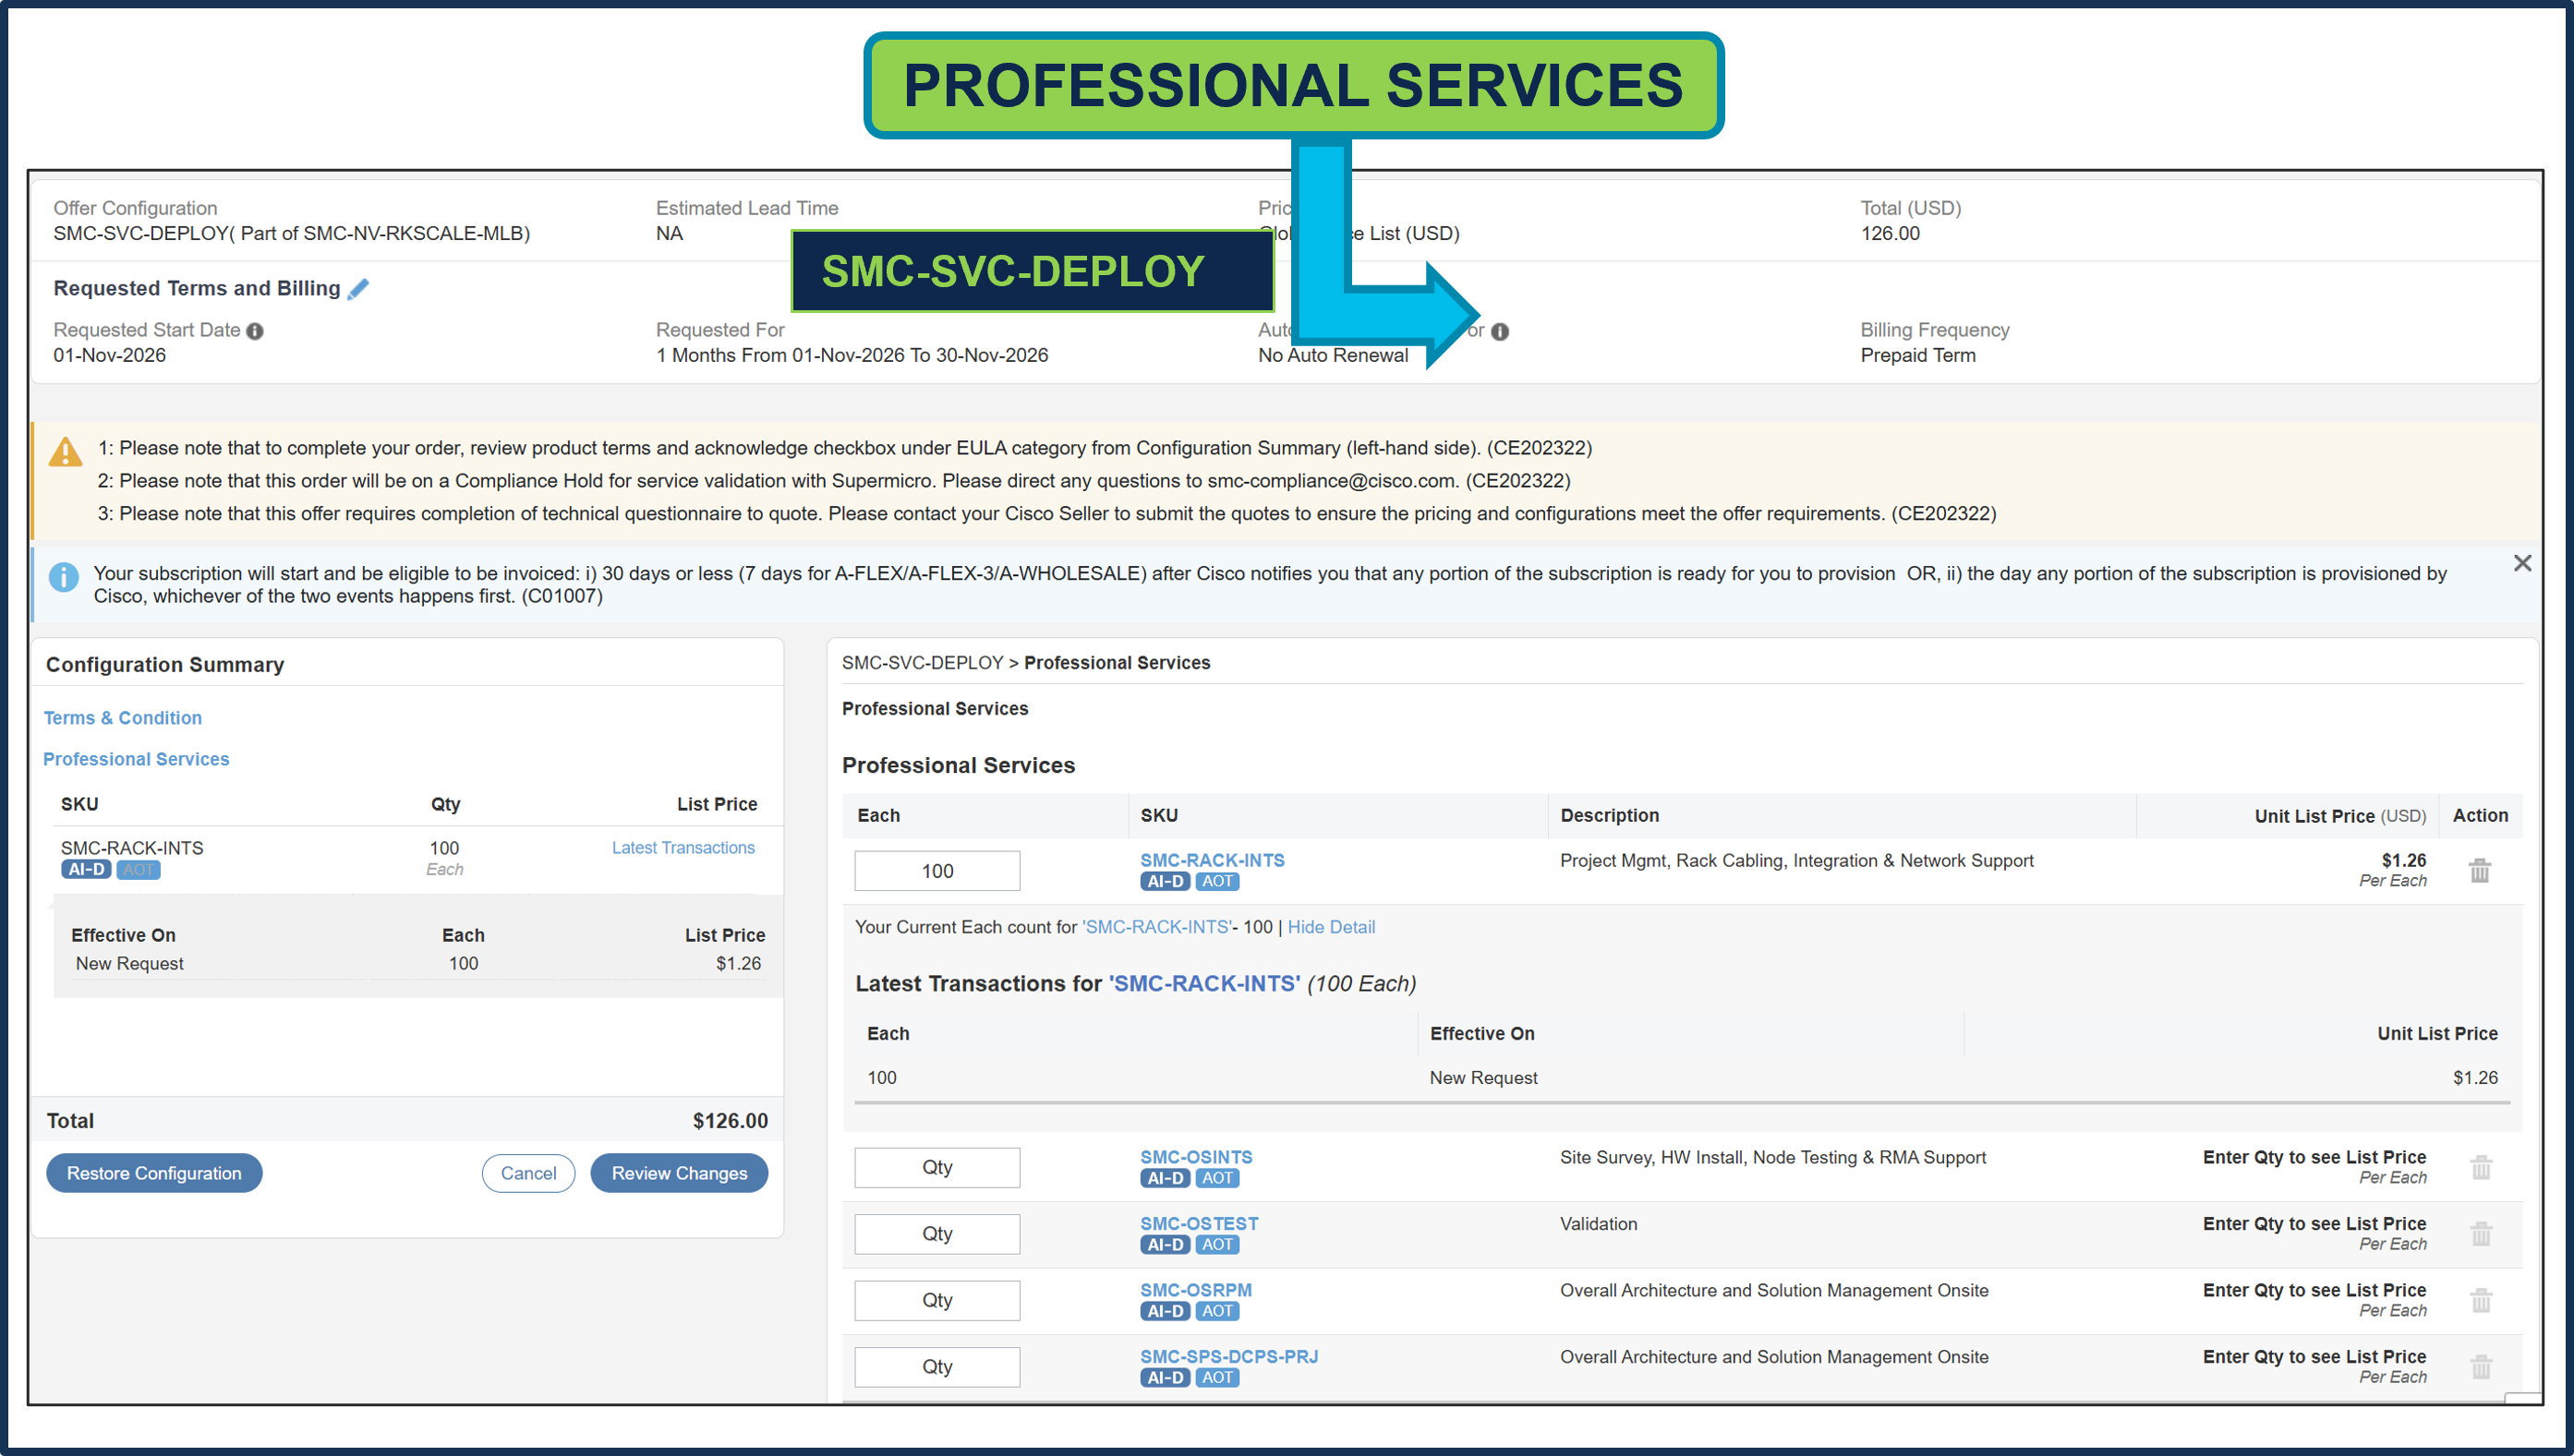
a. Supermicro Professional Service SKUs need to be selected and please ensure that seller selects the correct QTY.
Step 22.
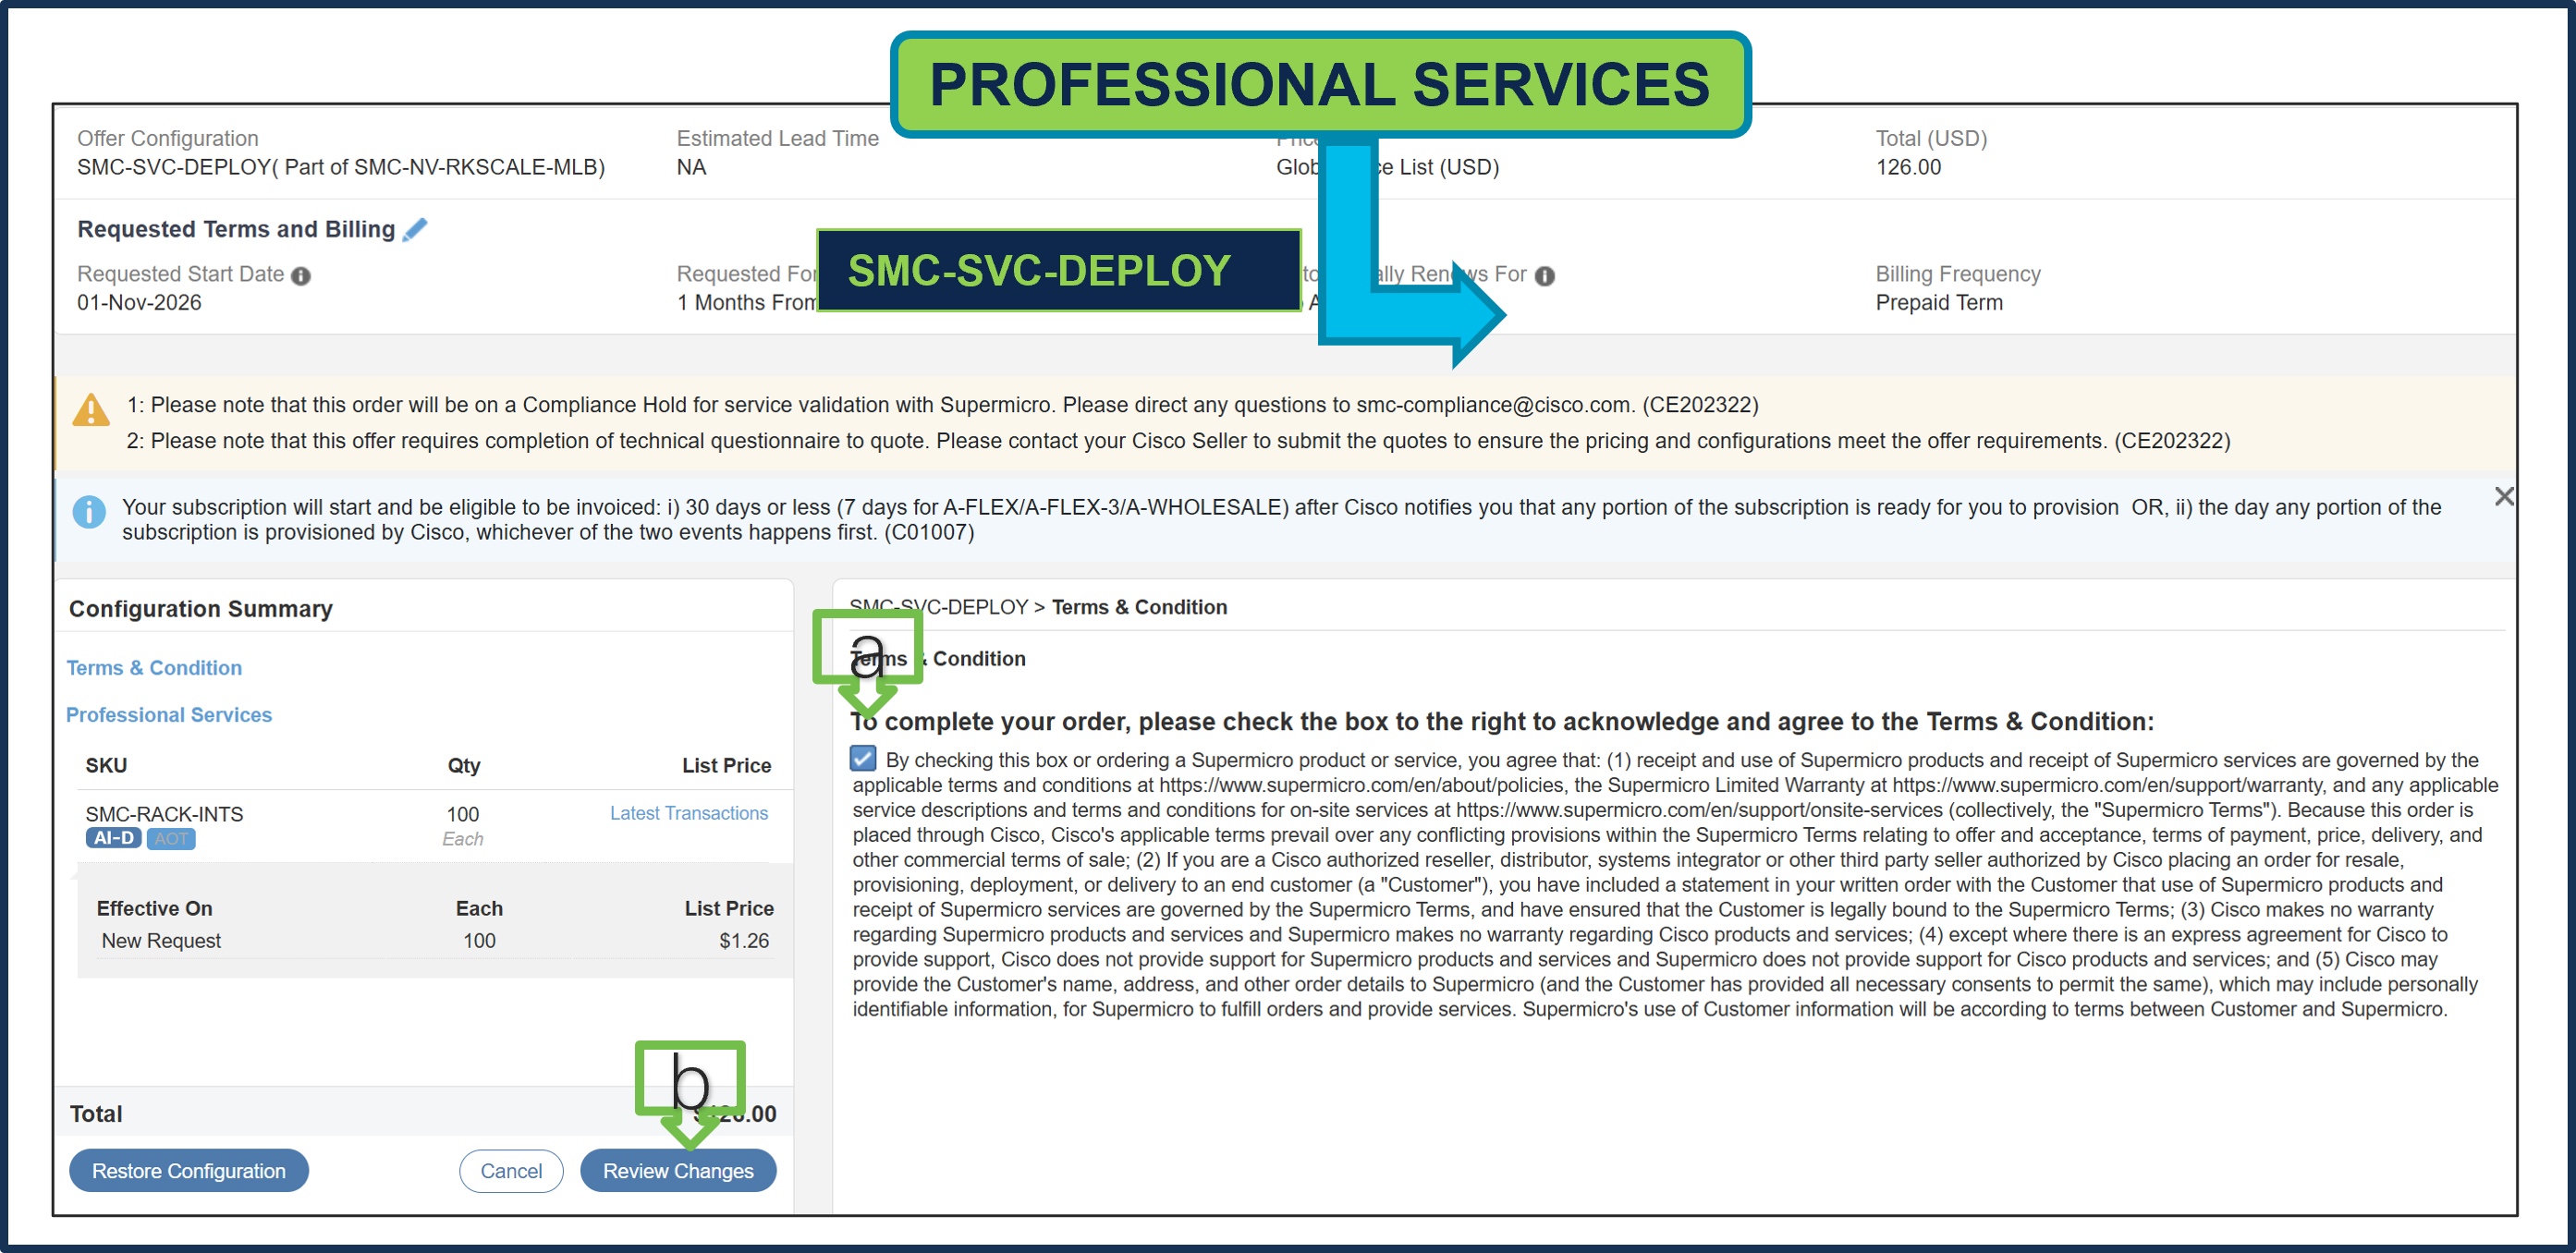
a. To complete the order, please check the box to the right to acknowledge and agree to the Terms & Conditions.
b. Click Review Changes, then “Done”.
Step 23.
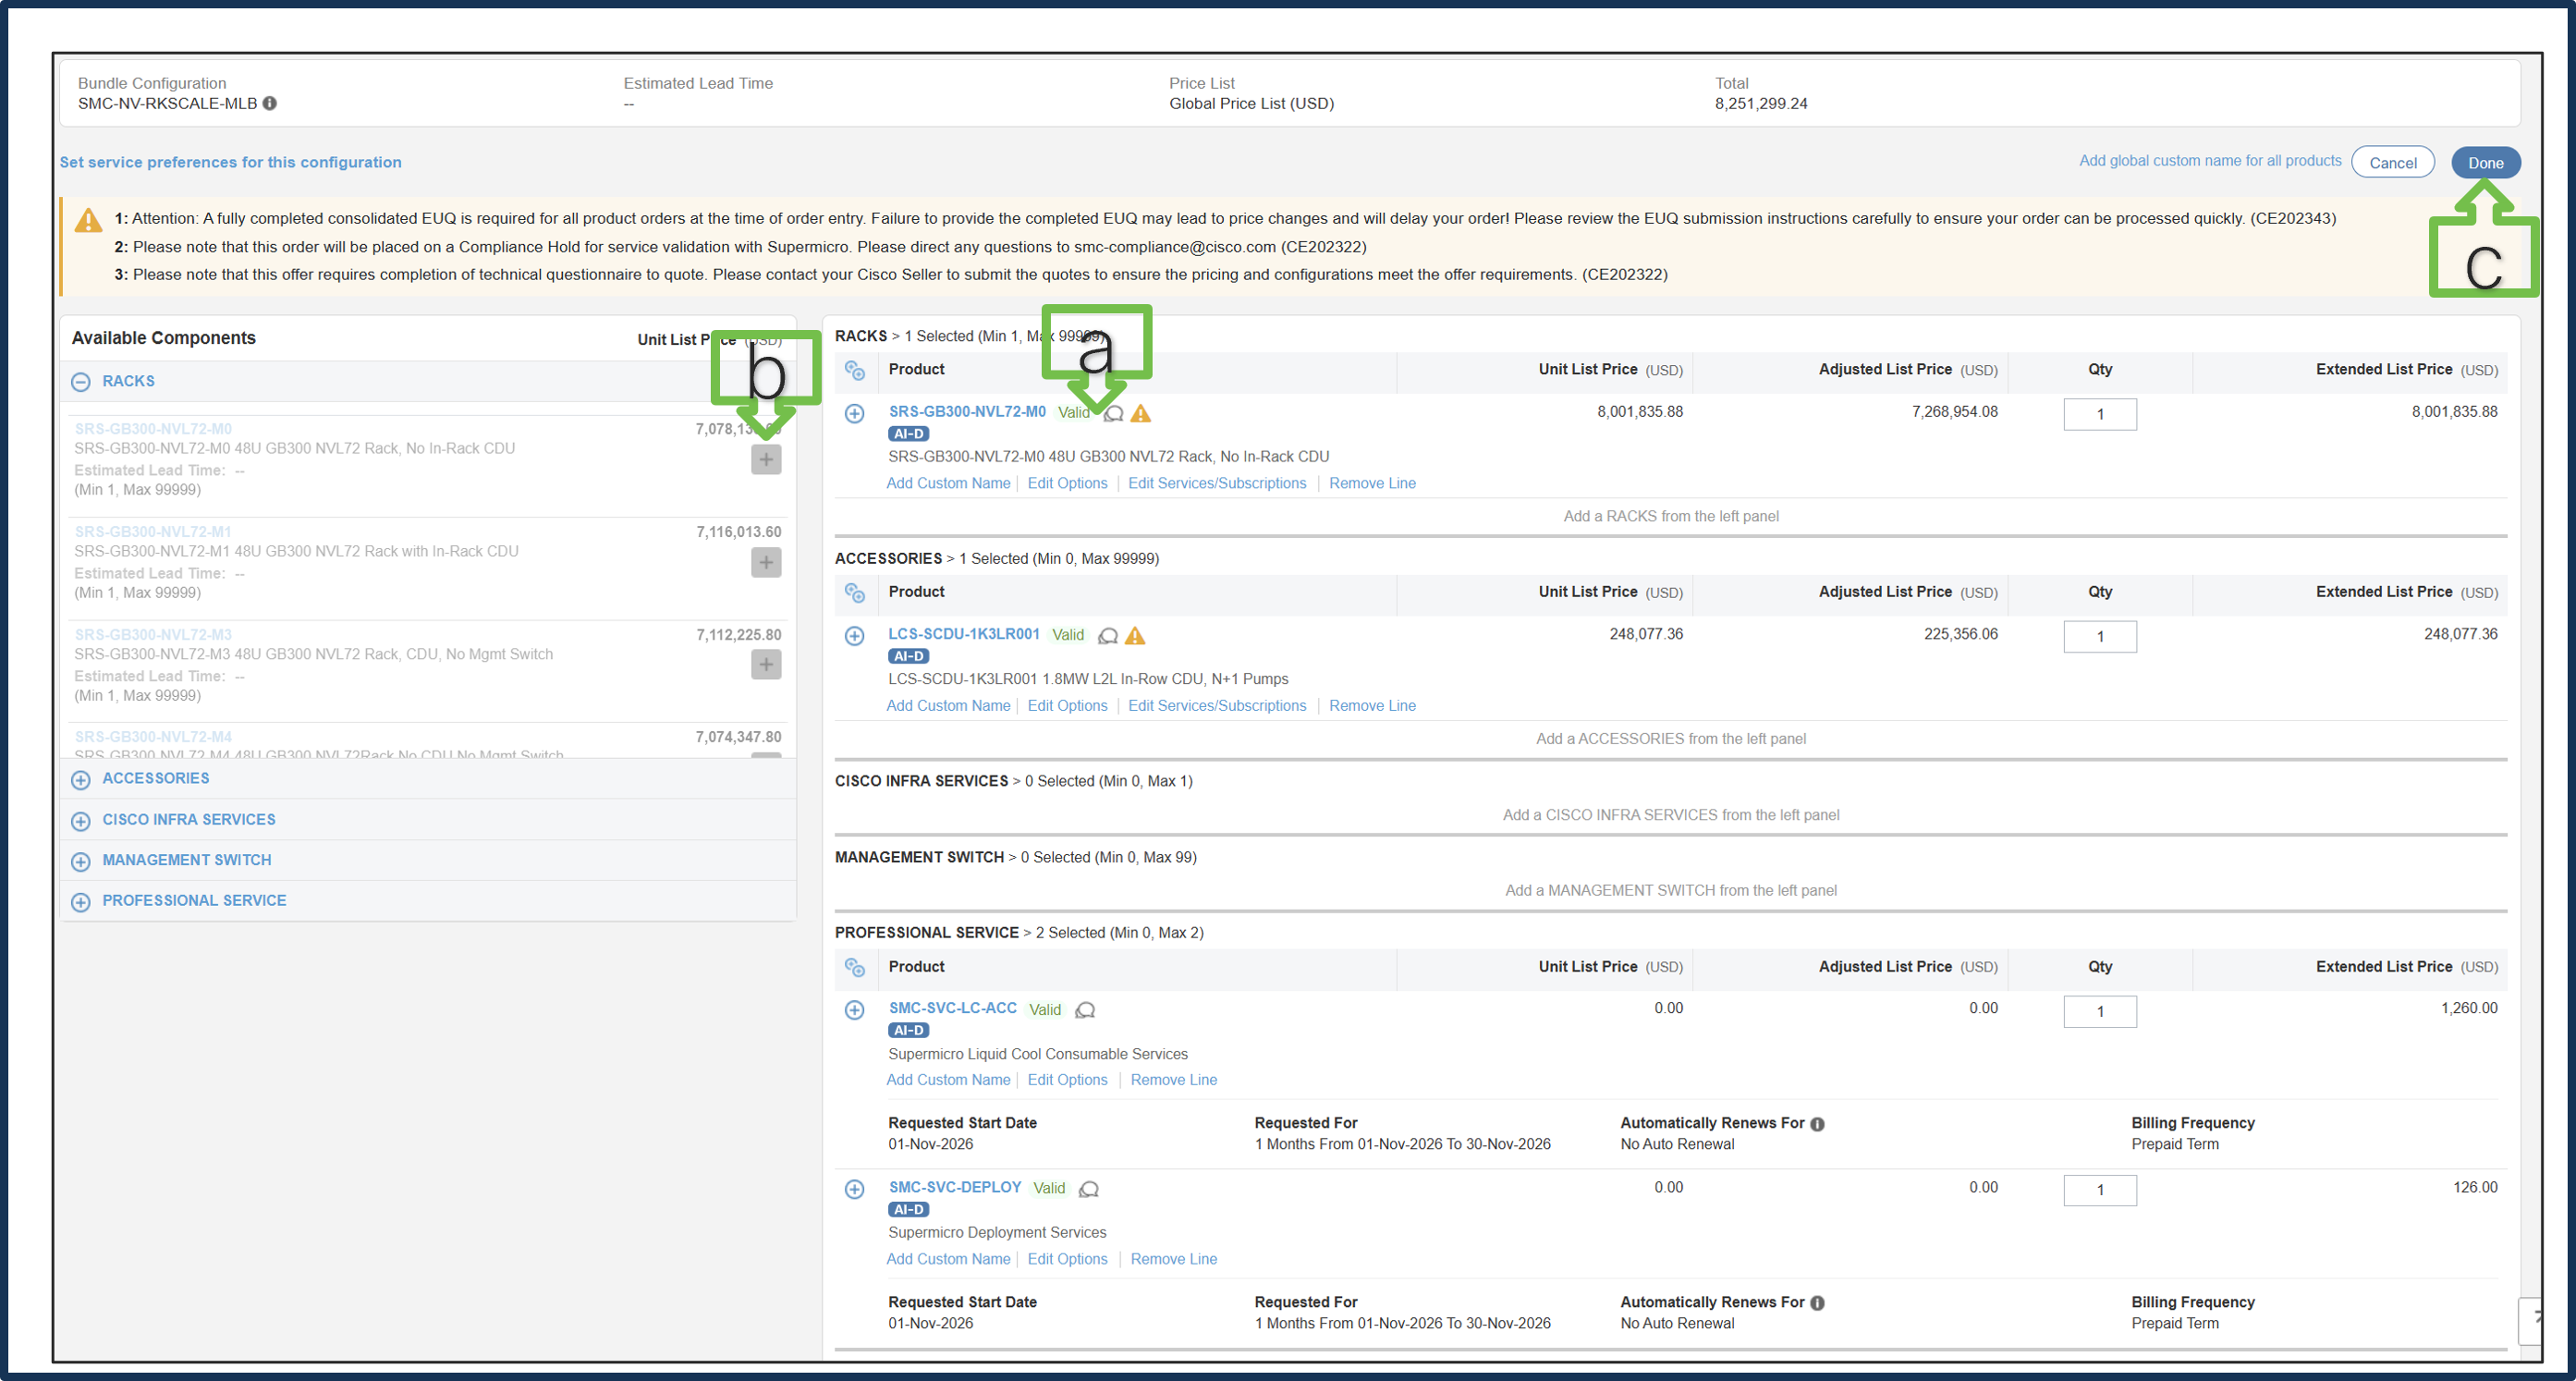
a. MLB configuration is complete when each product has a Valid status and all warning messages are cleared.
b. Click “PLUS” to expand and view the selections for each product.
c. Select DONE to complete the MLB configuration.
Step 24.
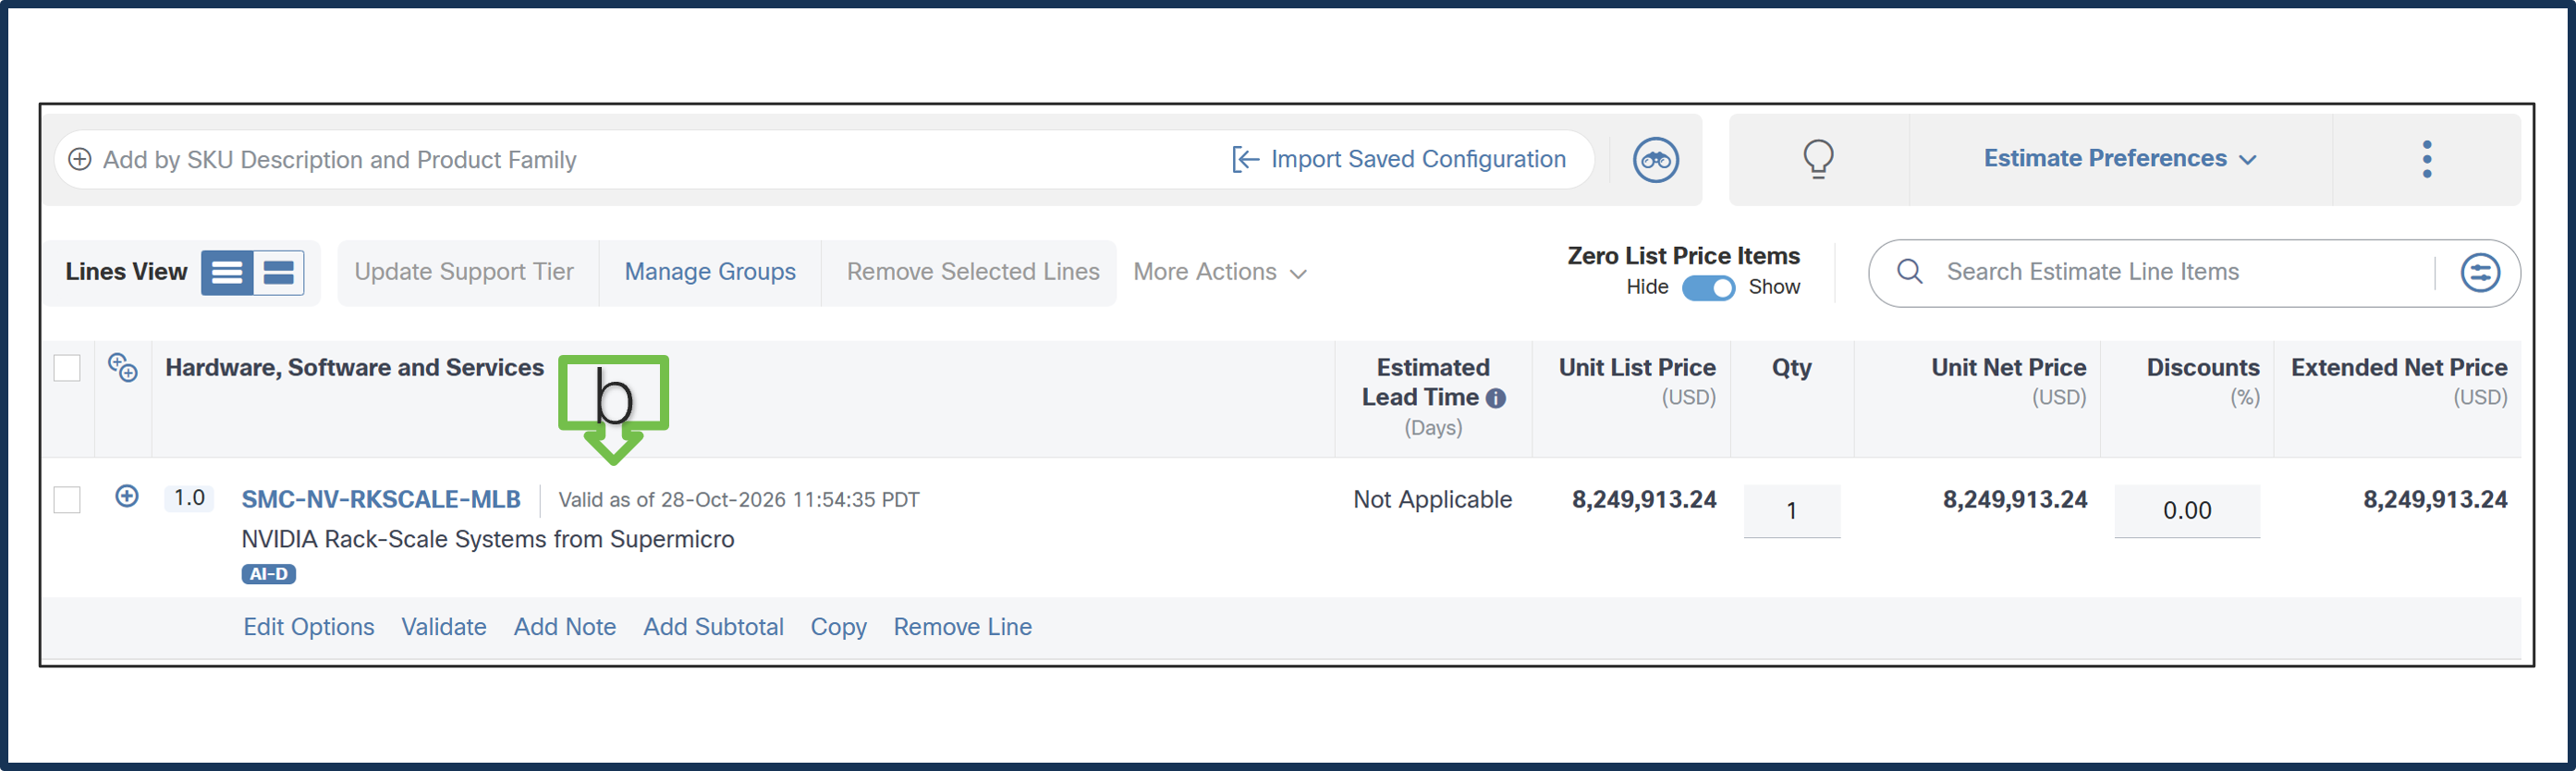
a. Line 1.0 is now valid configuration.
Step 25.
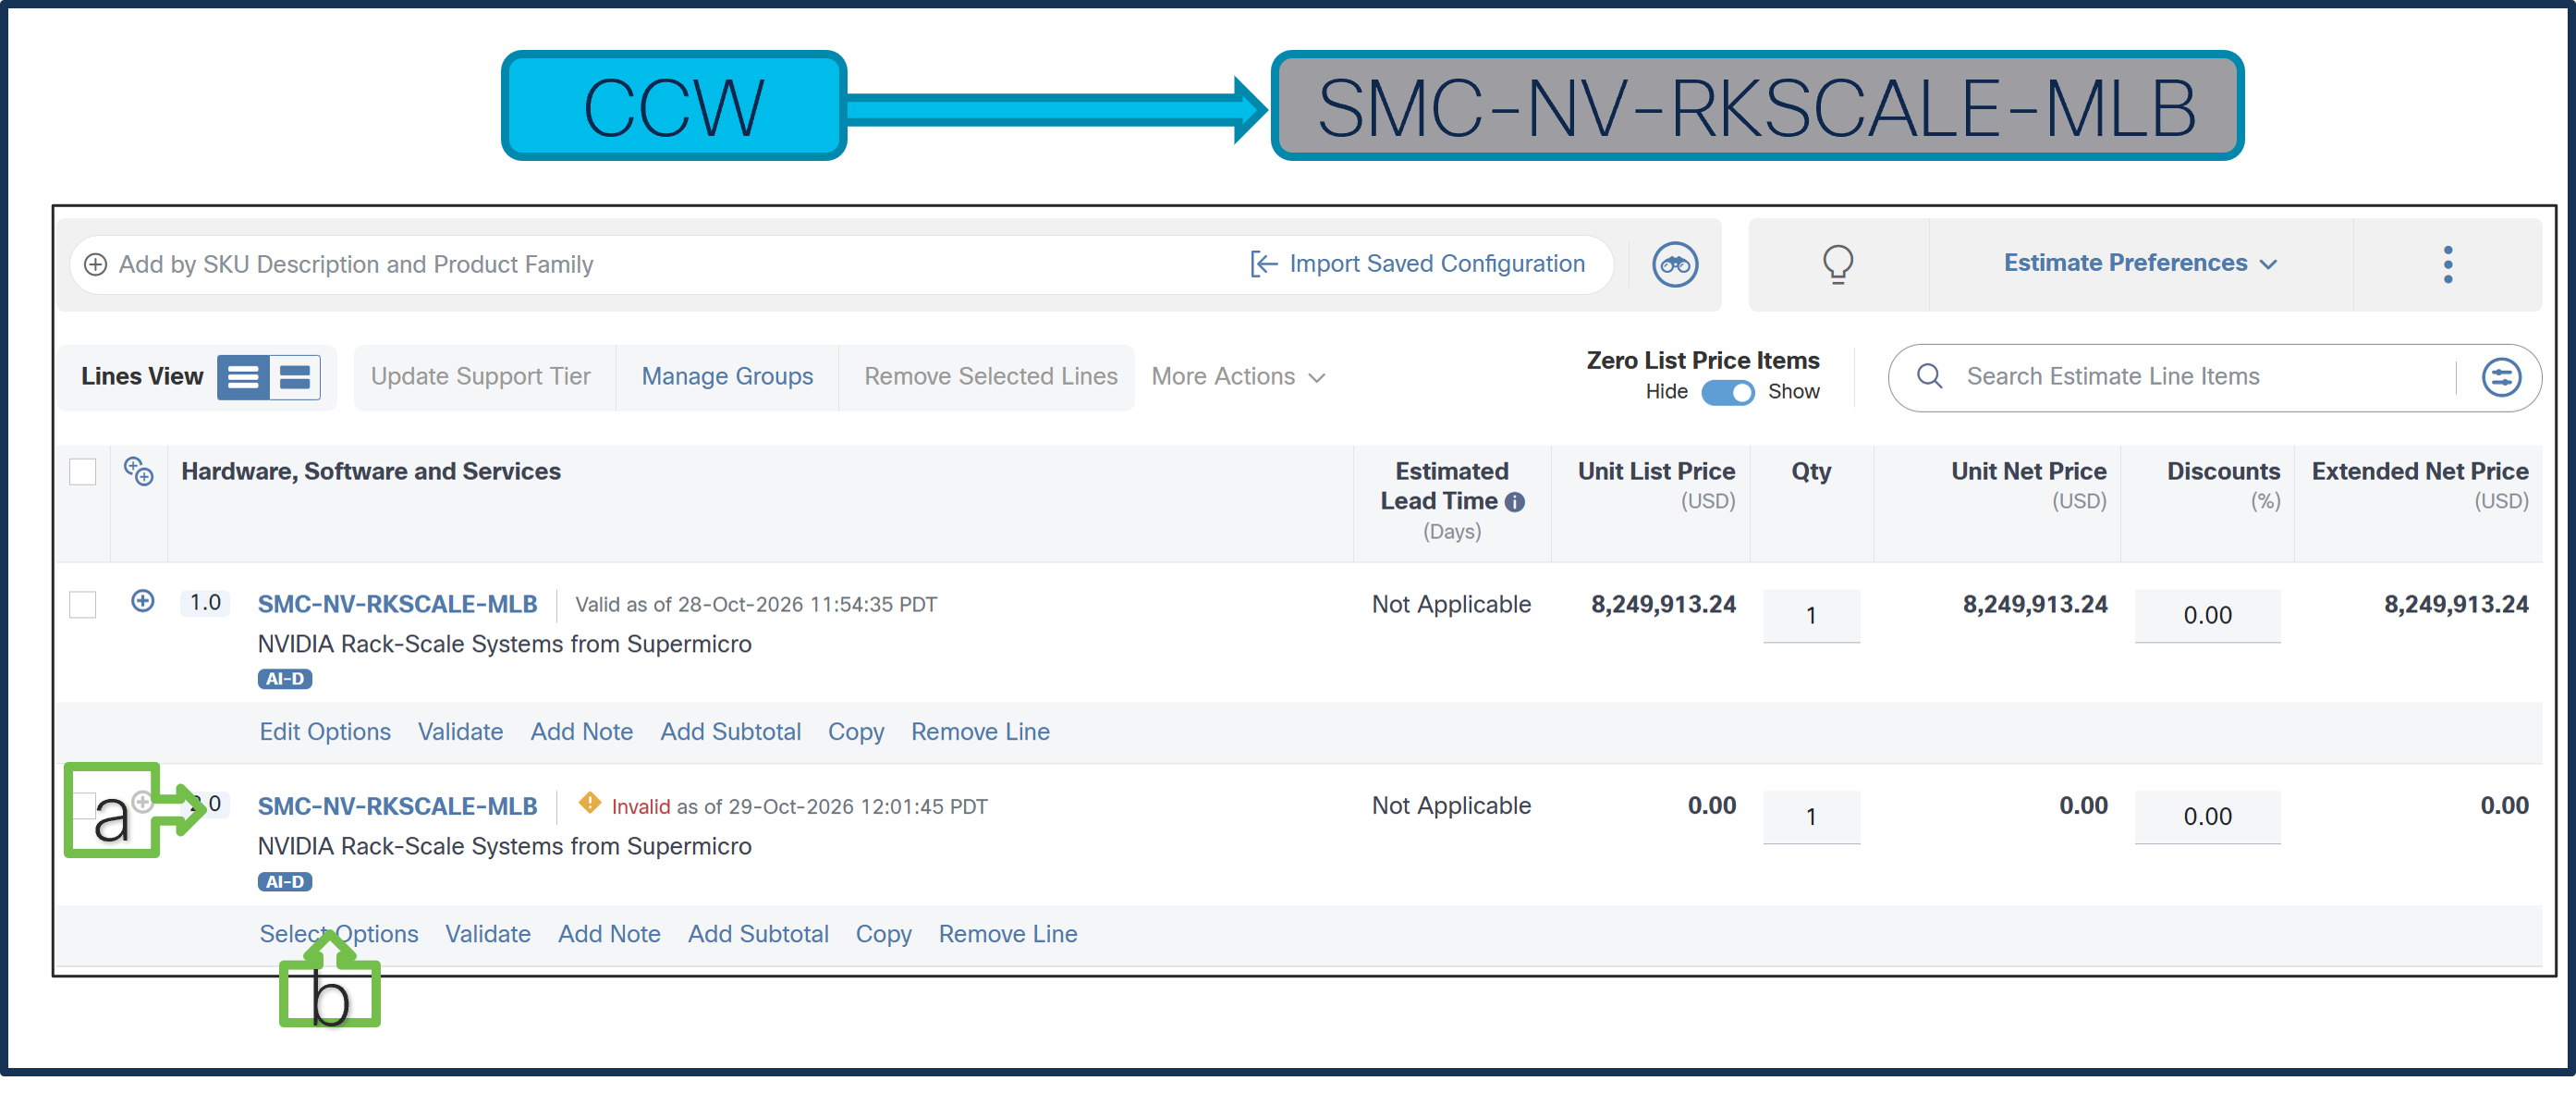
Currently, we restrict 1 QTY Rack selection per MLB. If multiple racks are required, create multiple MLB lines.
a. Add MLB: SMC-NV-RKSCALE-MLB in line 2.
b. Click Select Options to enter the configurator.
Step 26.
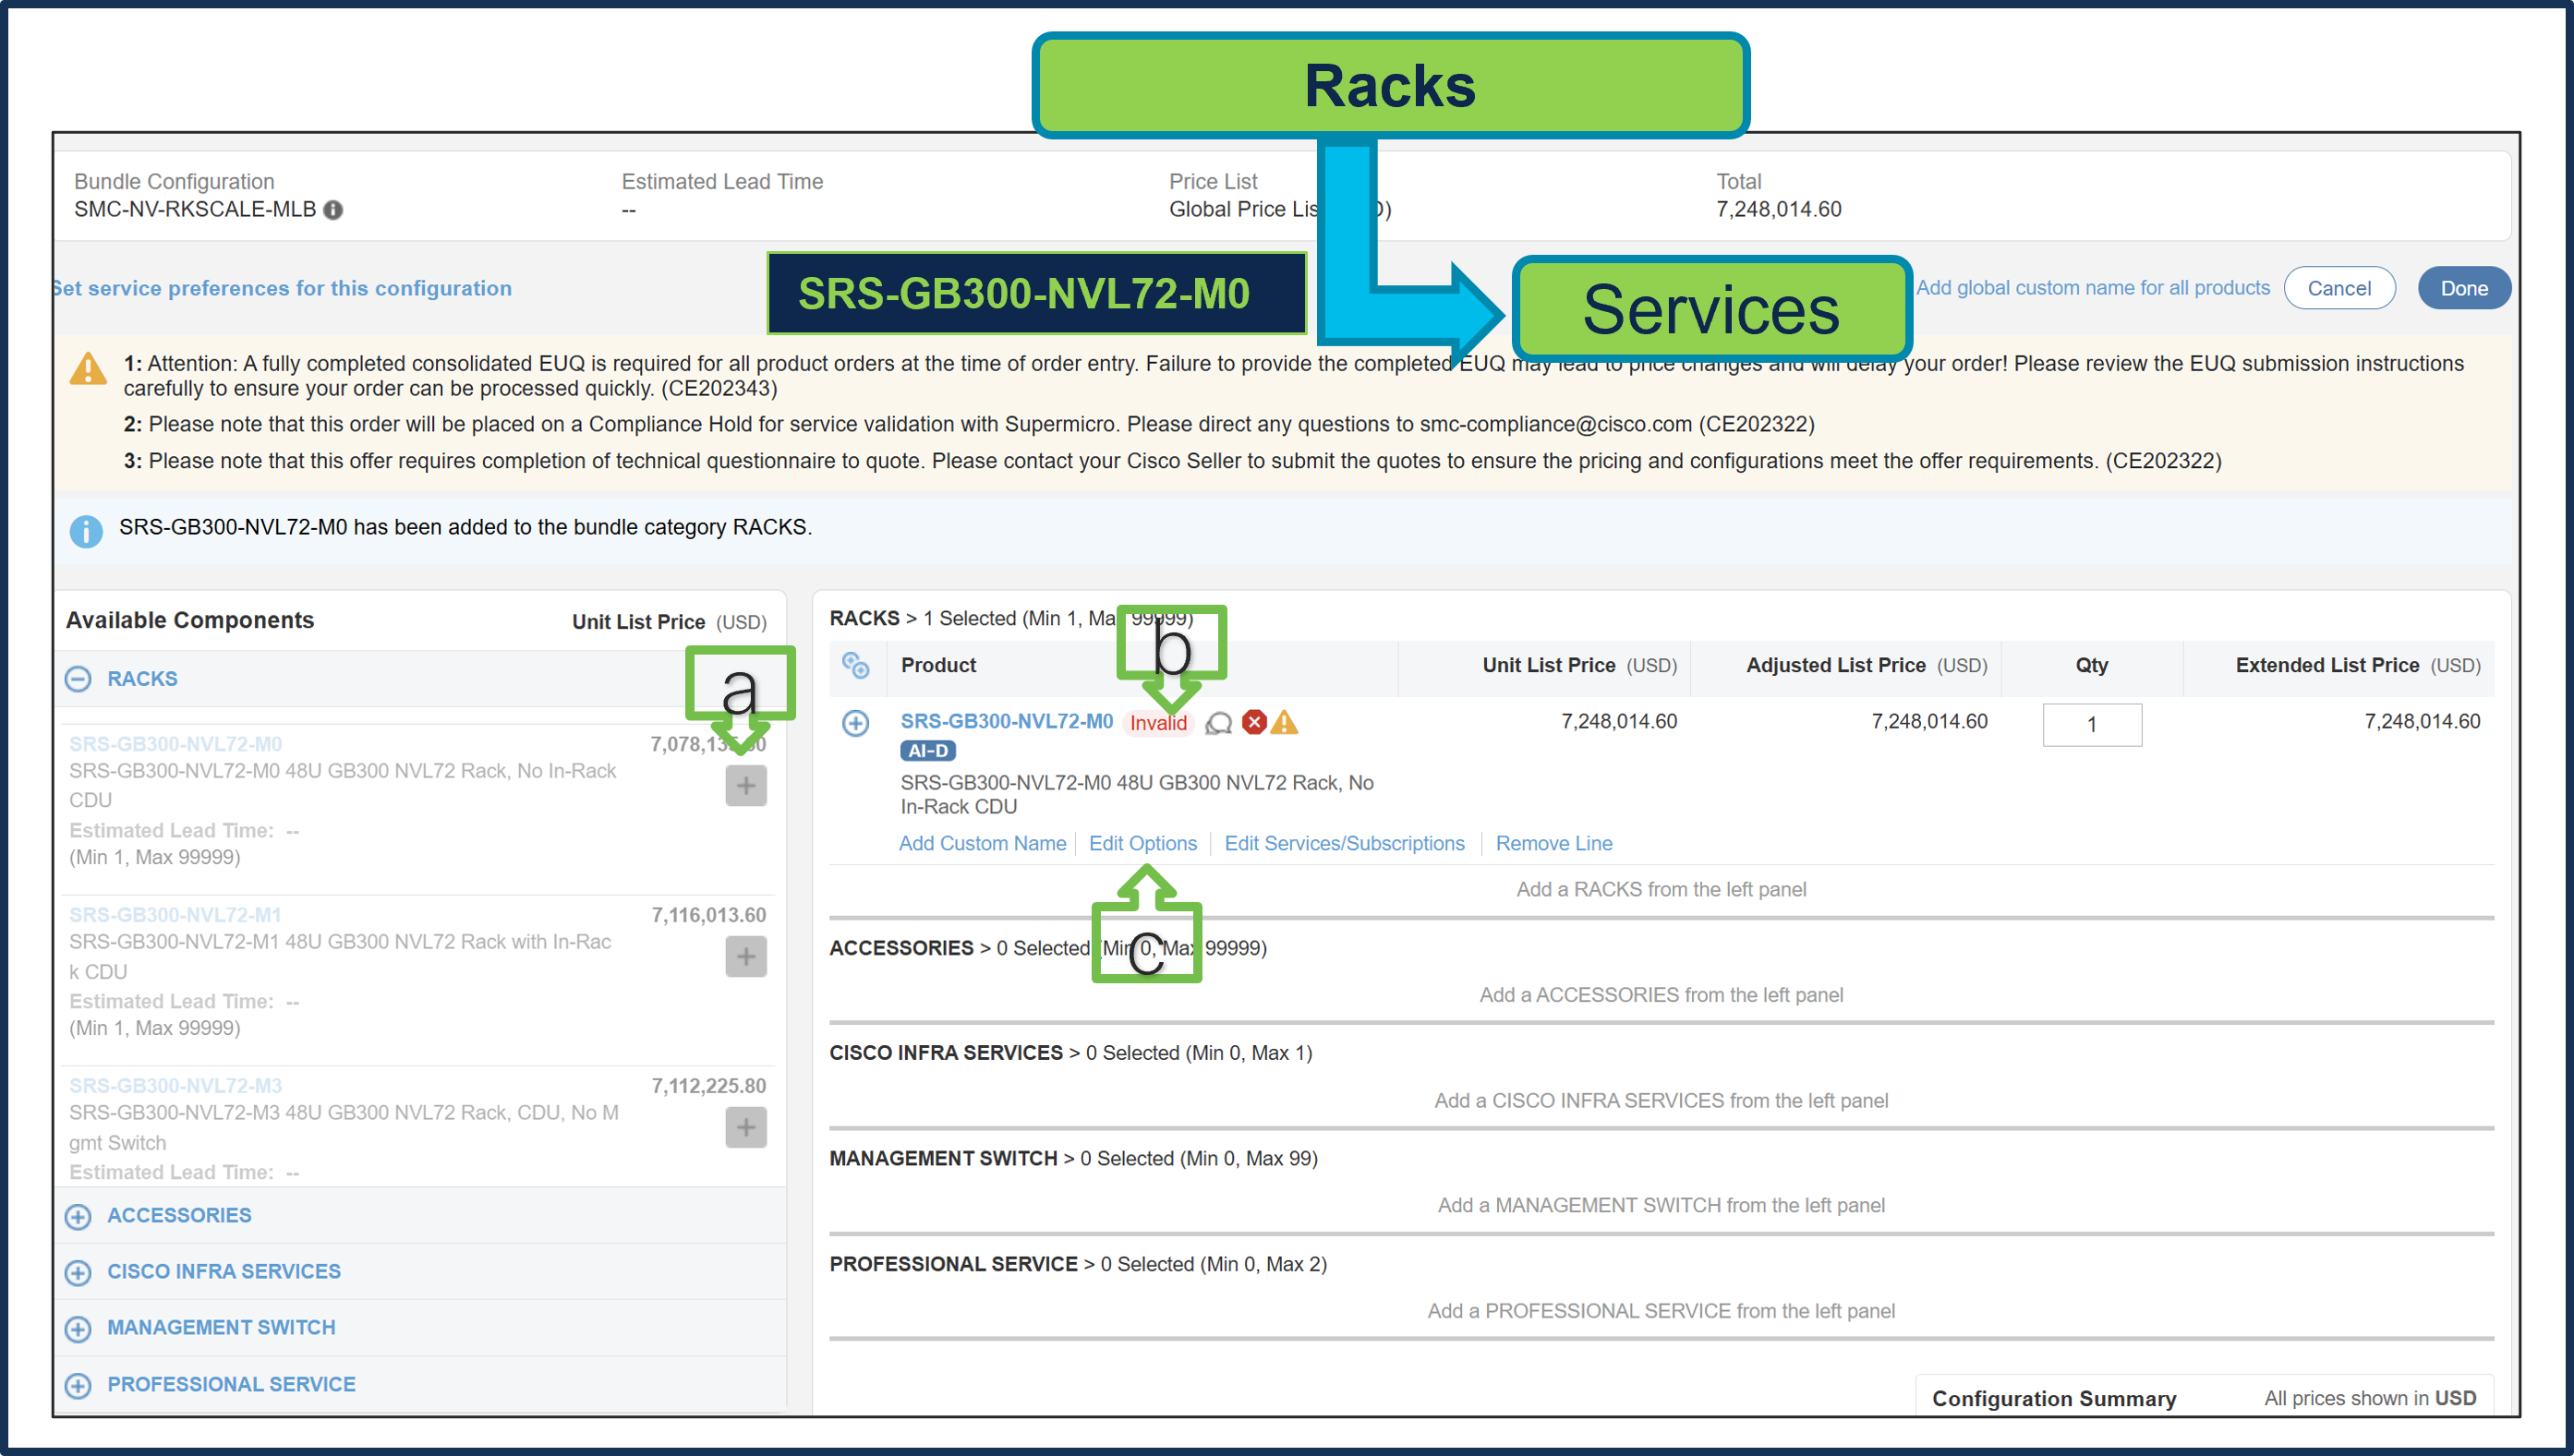
a. Select SRS-GB300-NVL72-M0 ATO from Rack under MLB by clicking “PLUS”
b. Notice that the SRS-GB300-NVL72-M0 ATO status is invalid because further configuration is needed.
c. Select ‘Edit Options’ to enter the configurator.
Step 27.
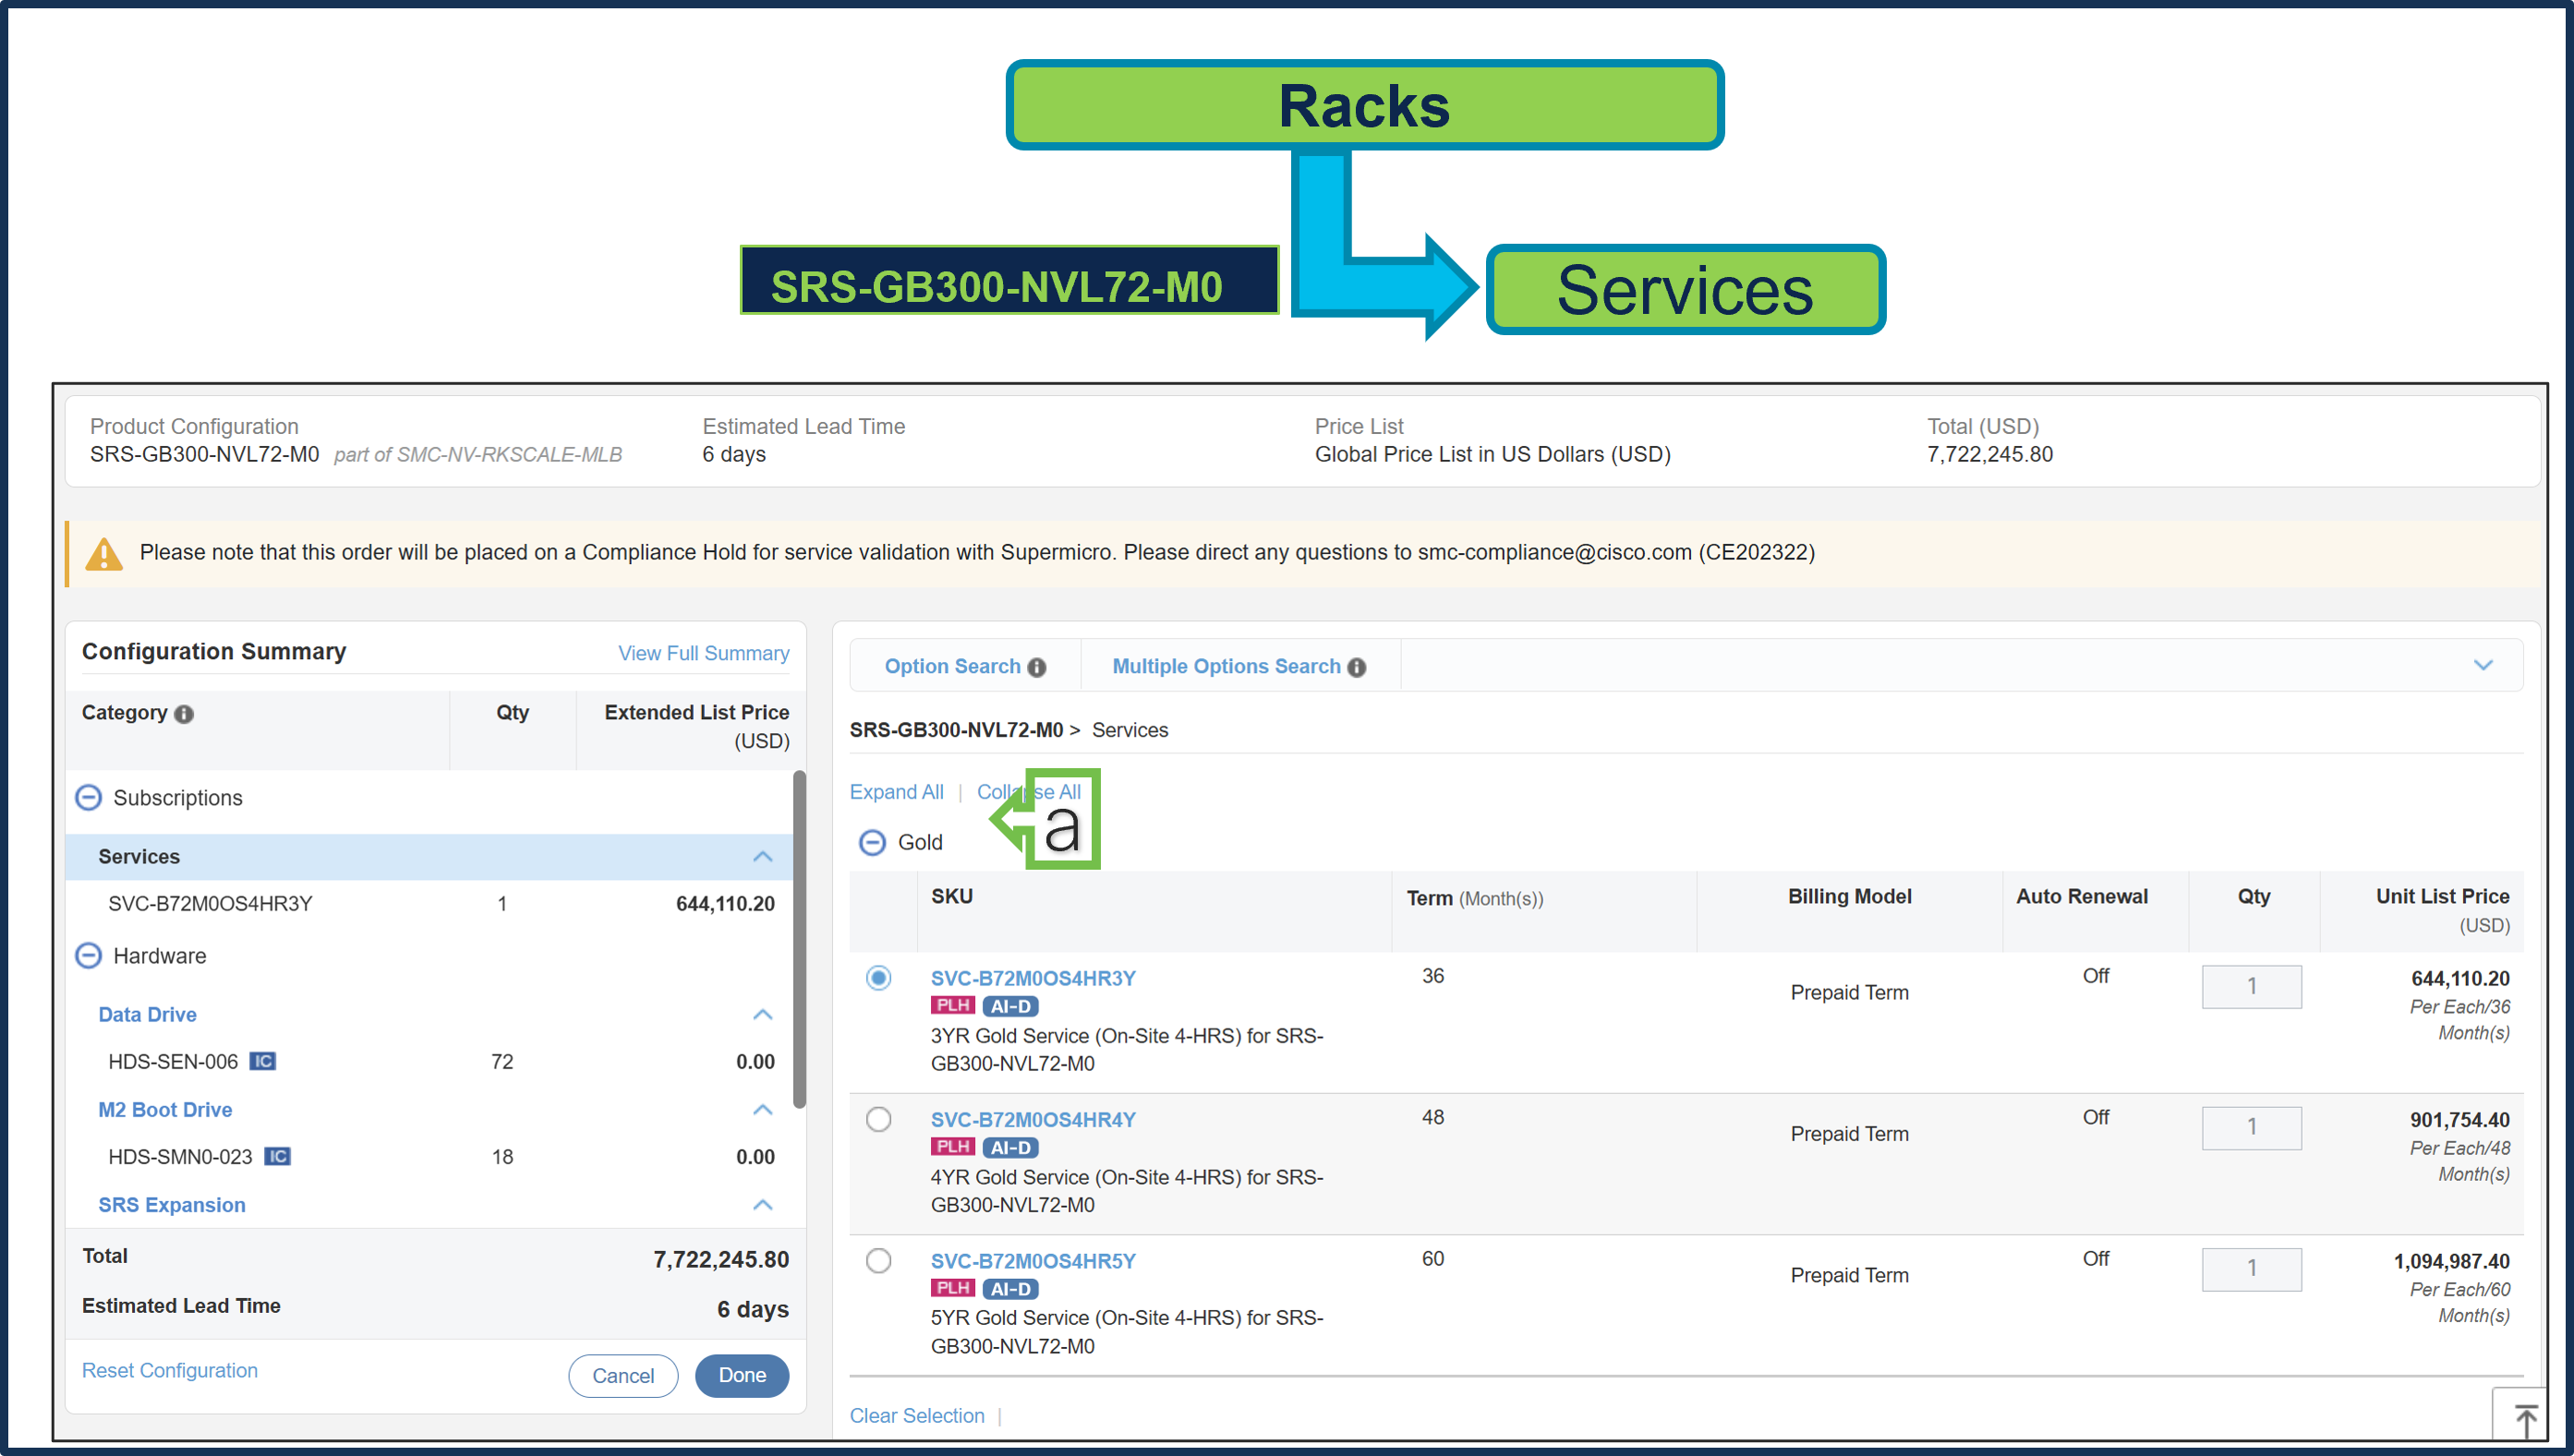
a. Gold Supermicro Services are selected.
Step 28.
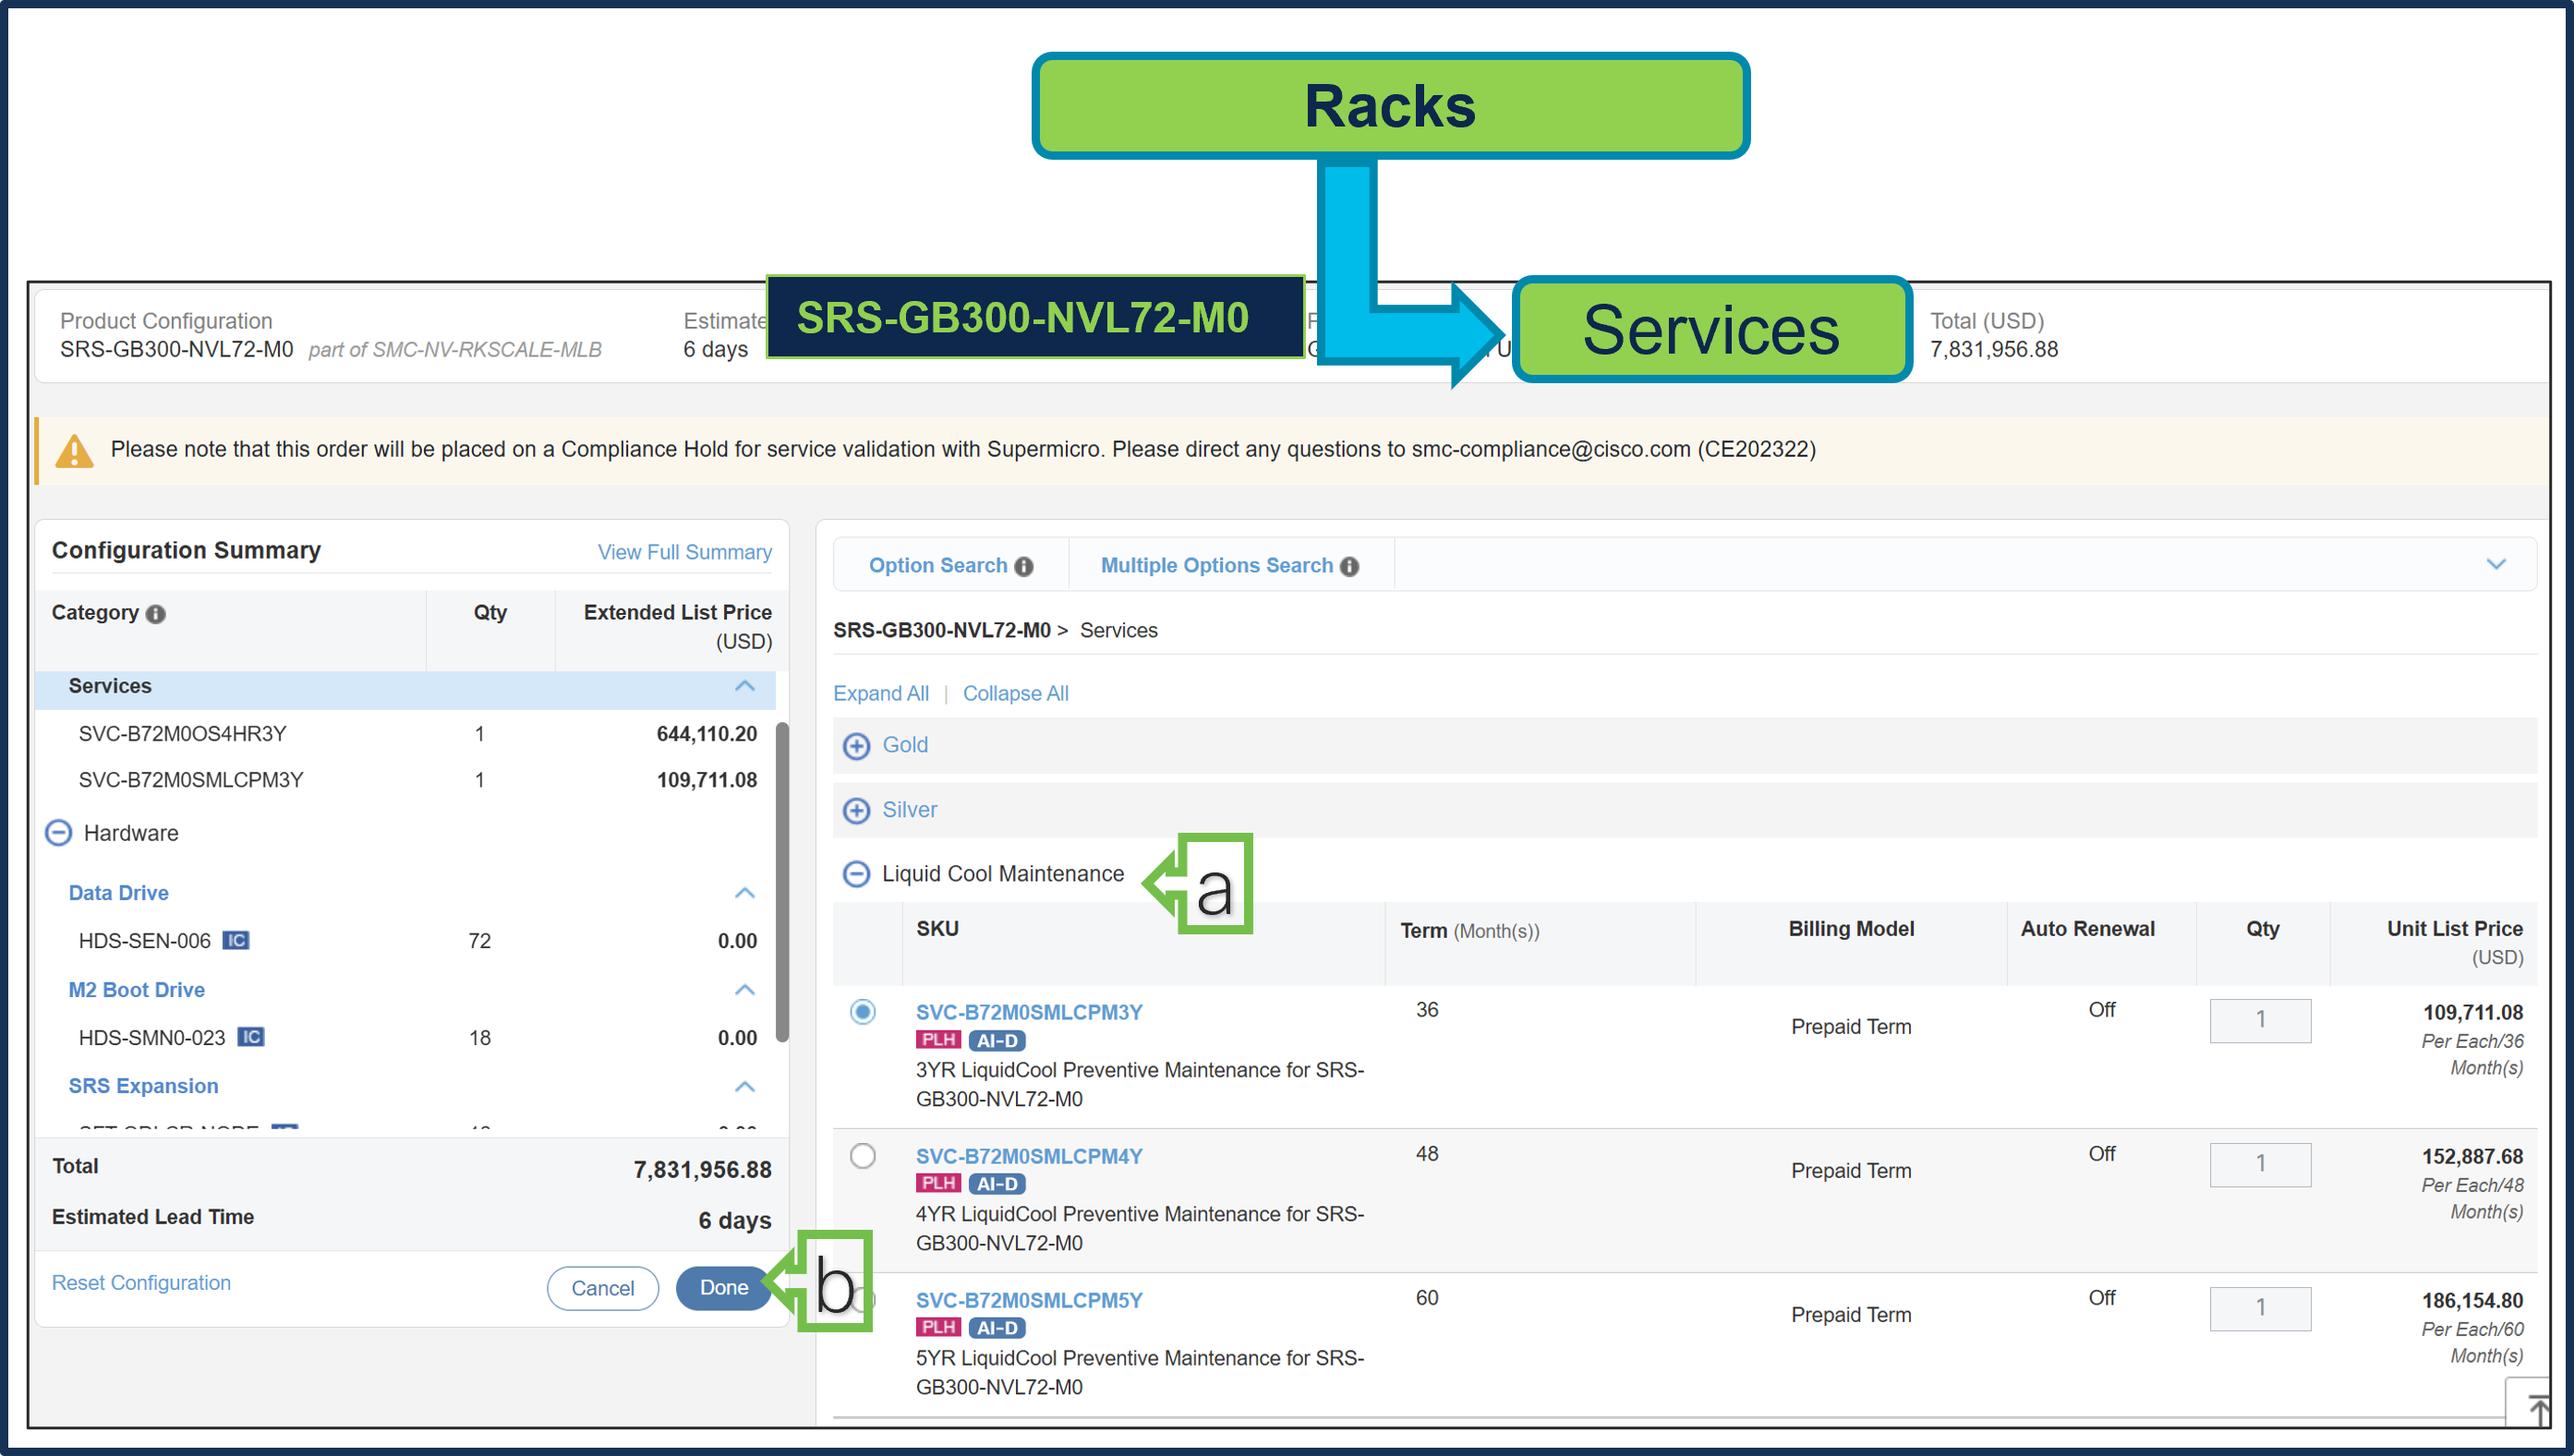
a. Since an in-row CDU was selected on line 1, Liquid Cool Maintenance Service is required.
b. Select Done when completed.
Step 29.
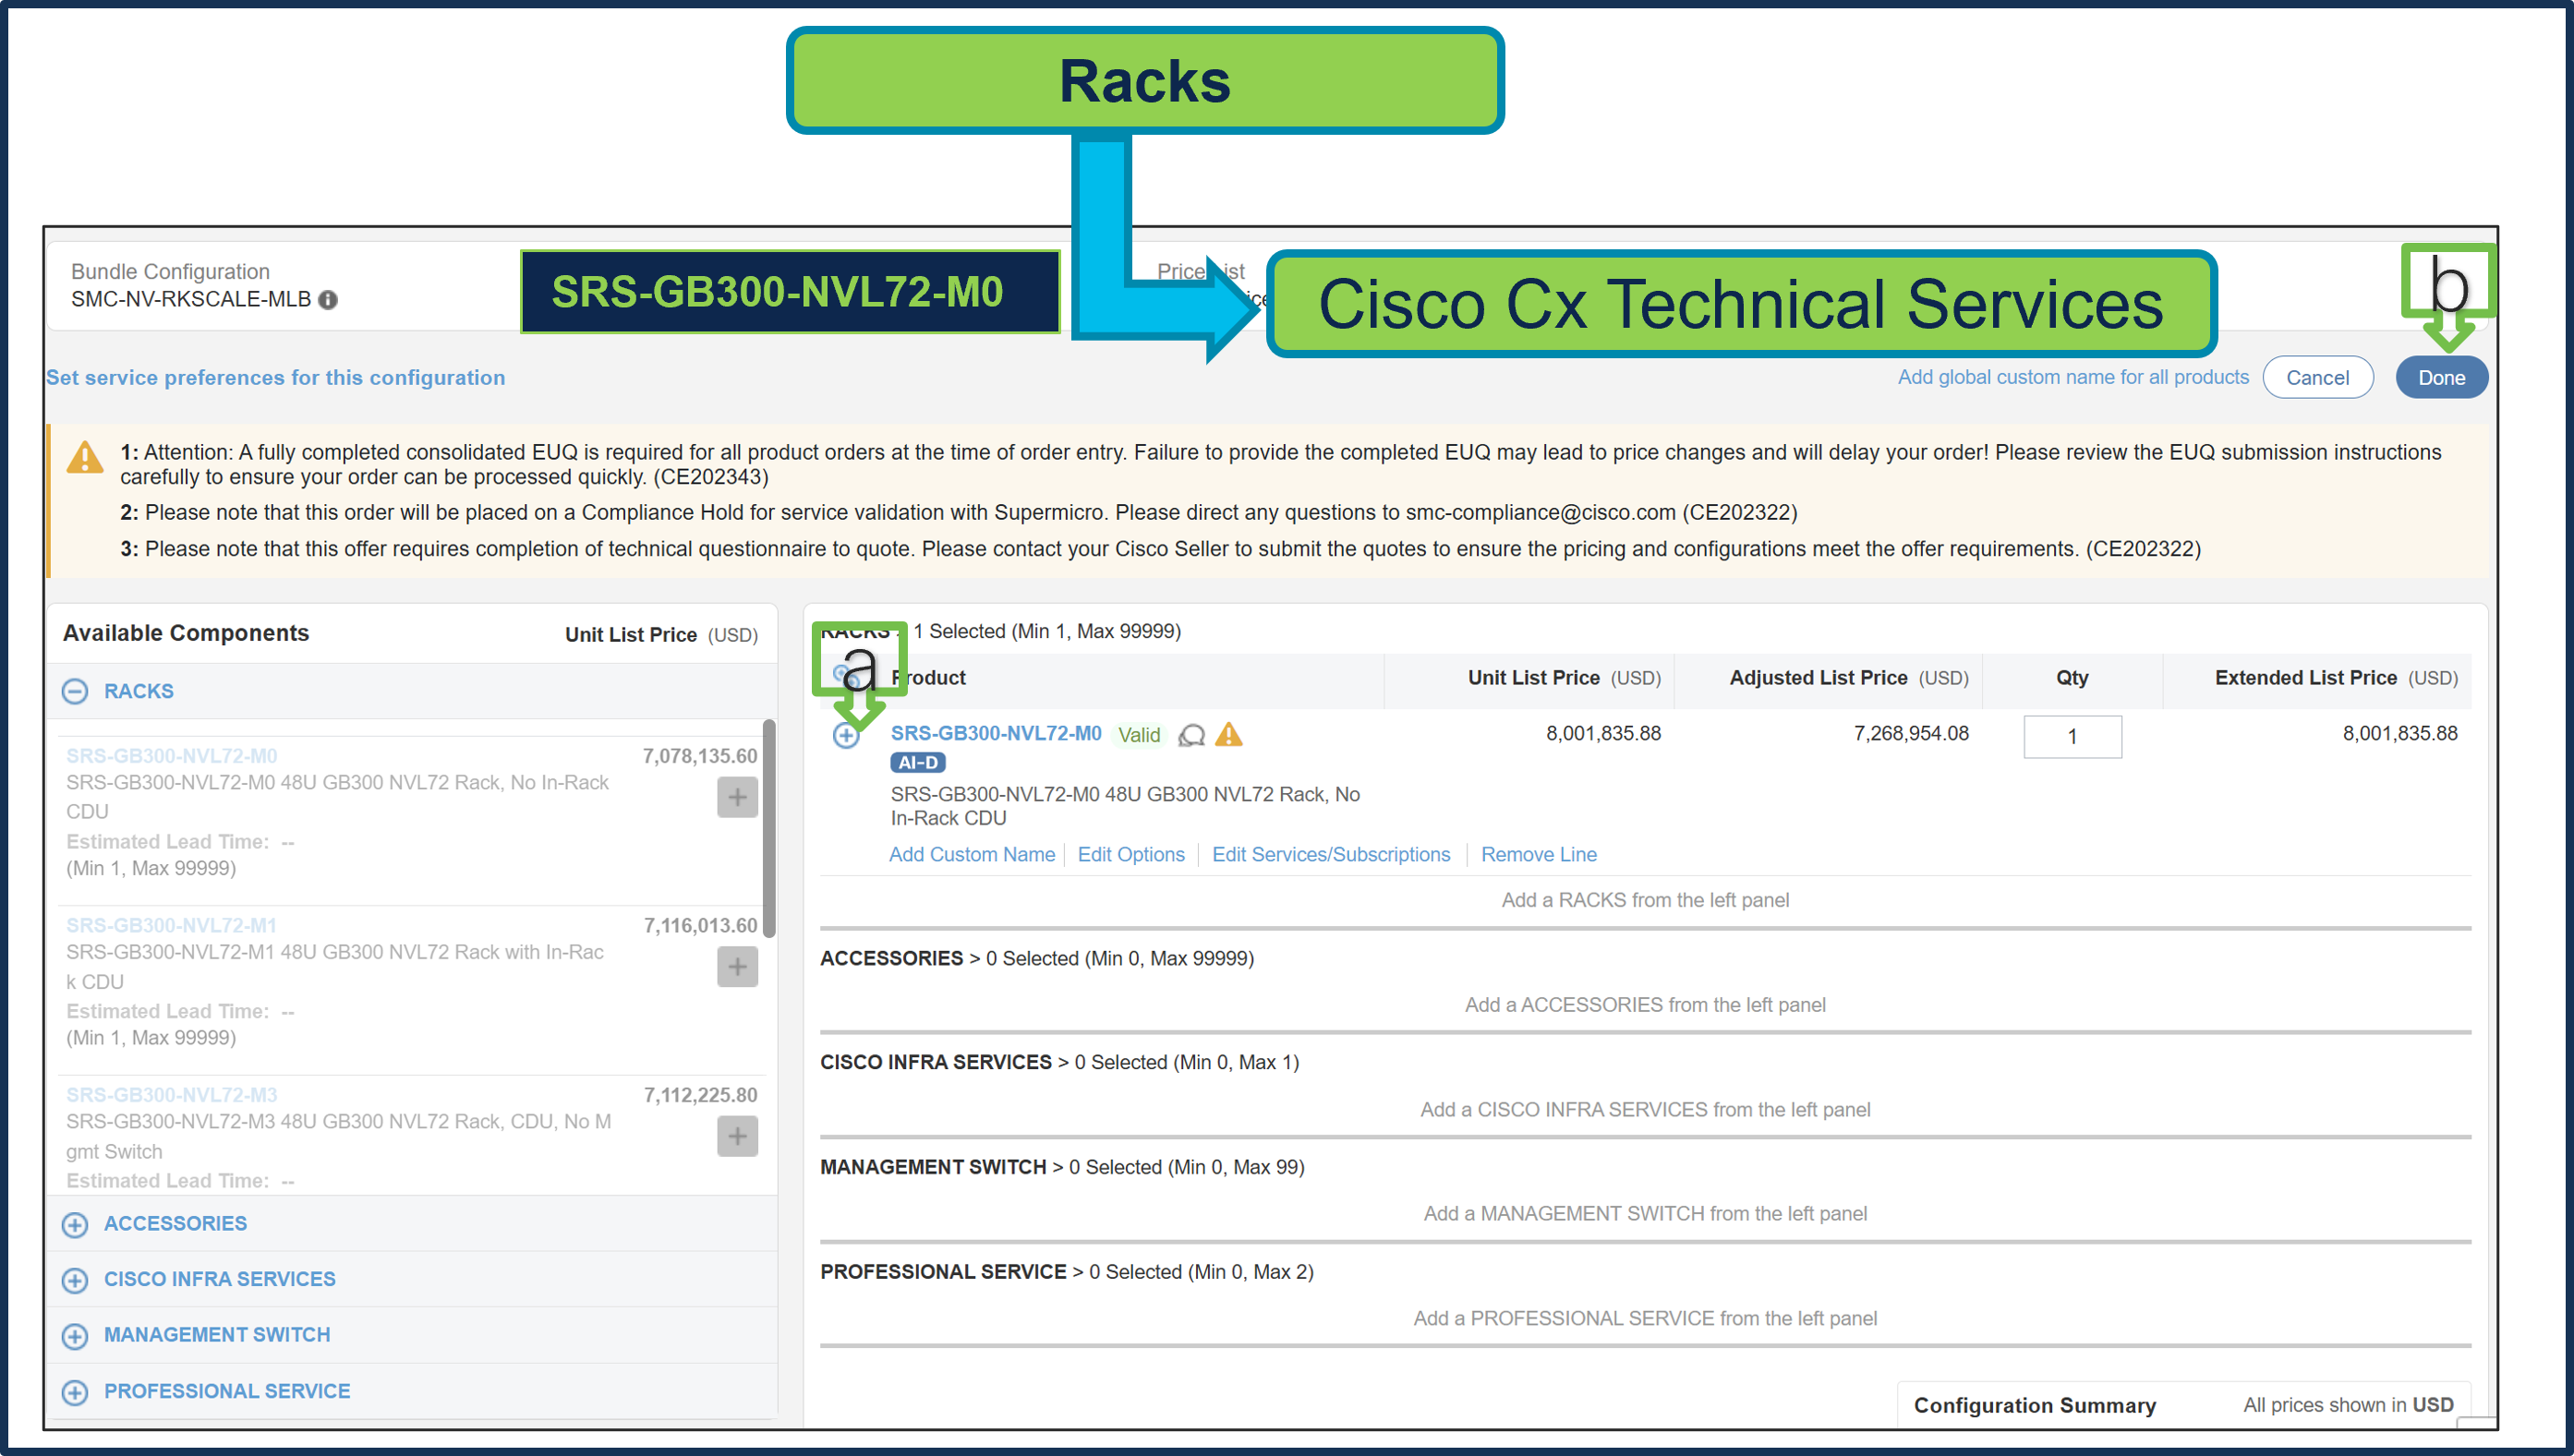
a. Status is now Valid. Repeat the same steps for Cisco CX Technical Services.
b. Click Done.
Step 30.
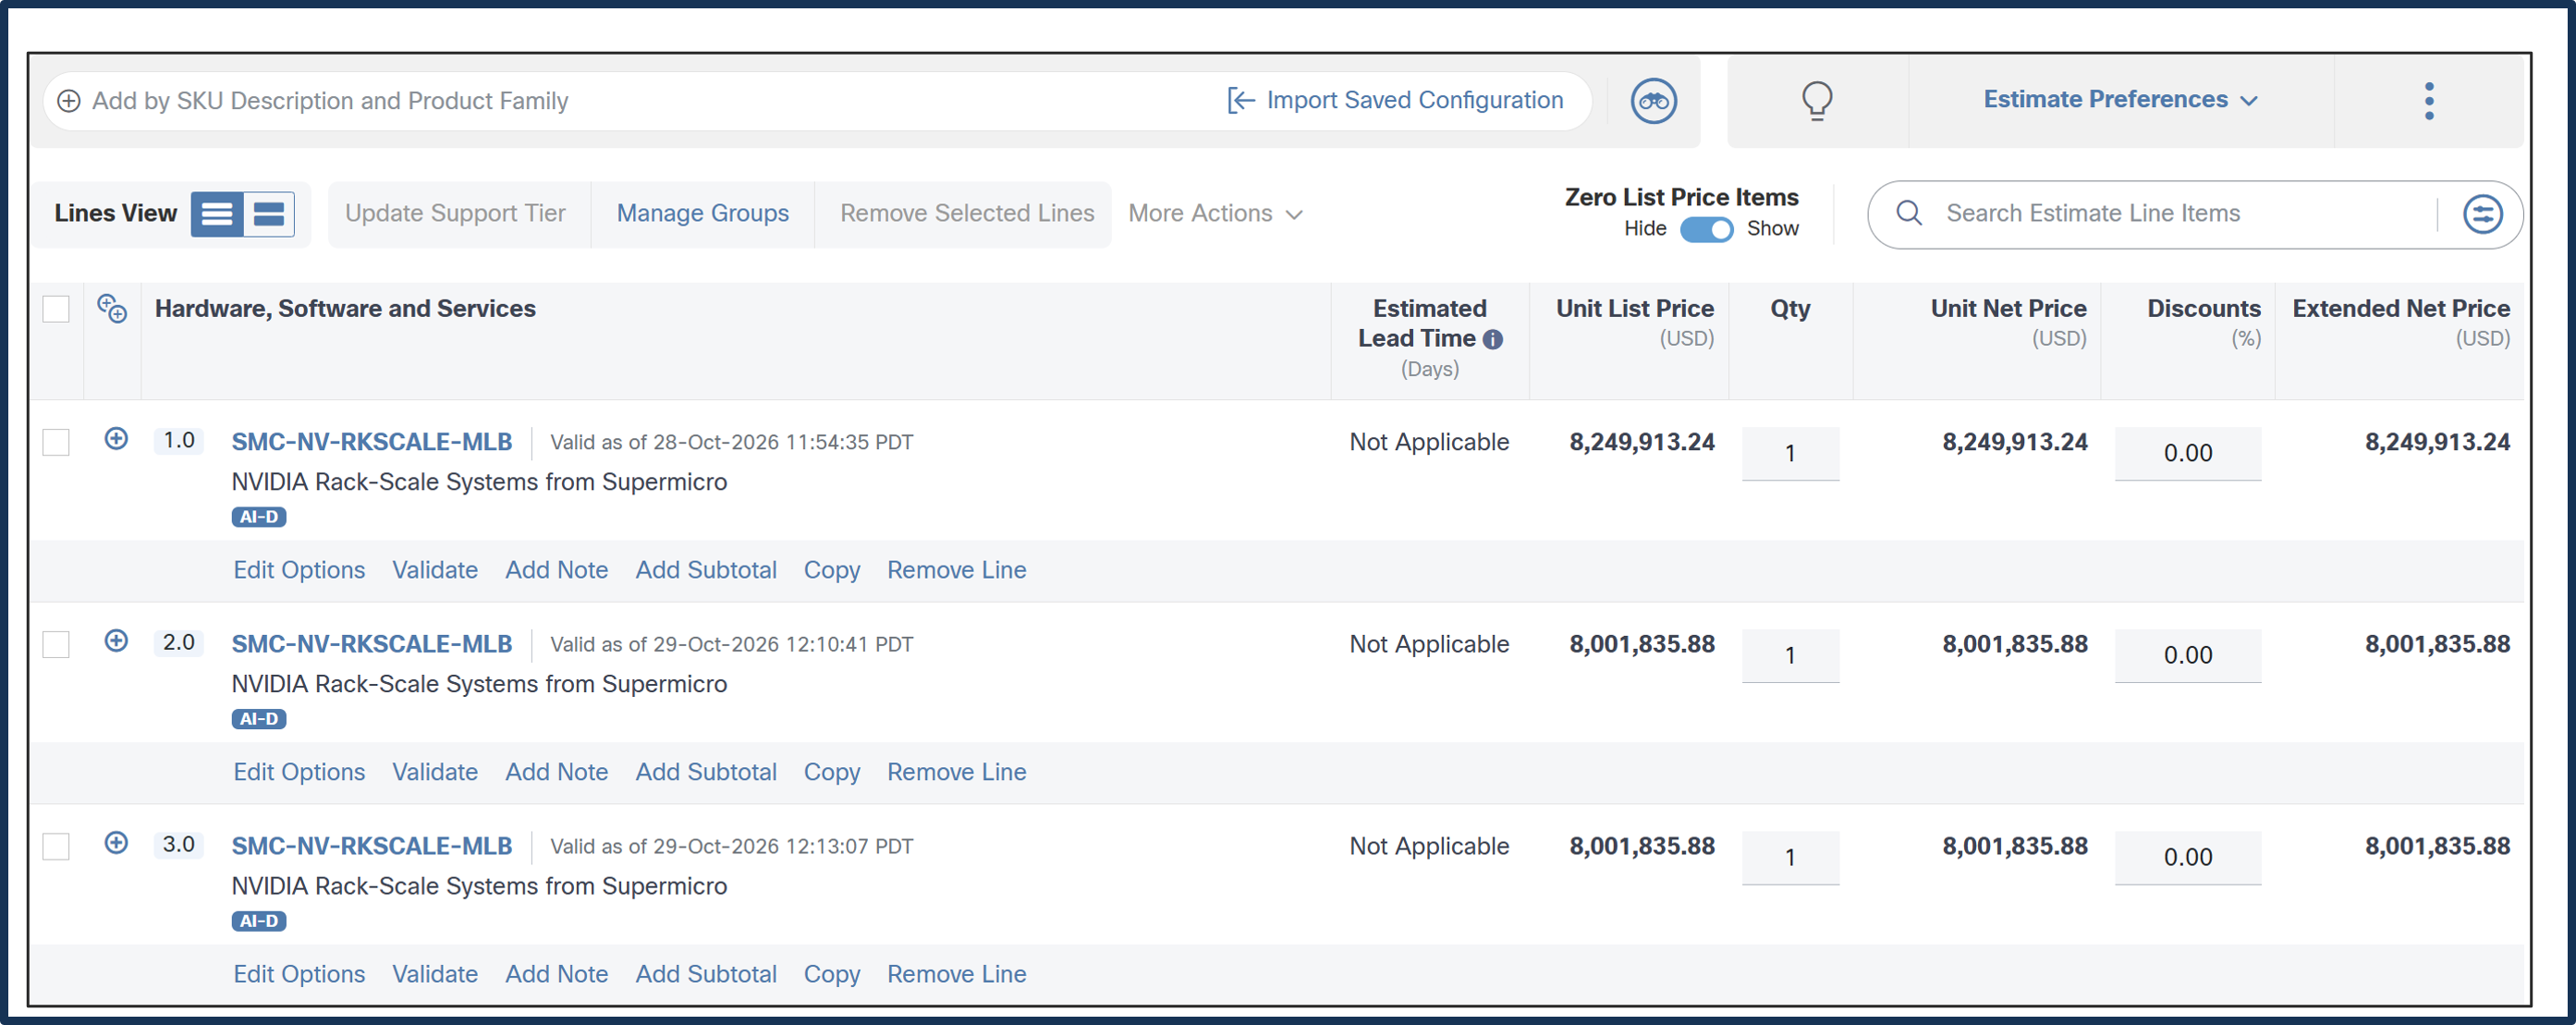
a. Line 1.0 & 2.0 are now valid configuration.
b. If more MLB units are needed, copy line 2.0 to additional lines, such as line 3.0.
How to Configure SMC-NV-DGPUSVR-MLB
Step 1.
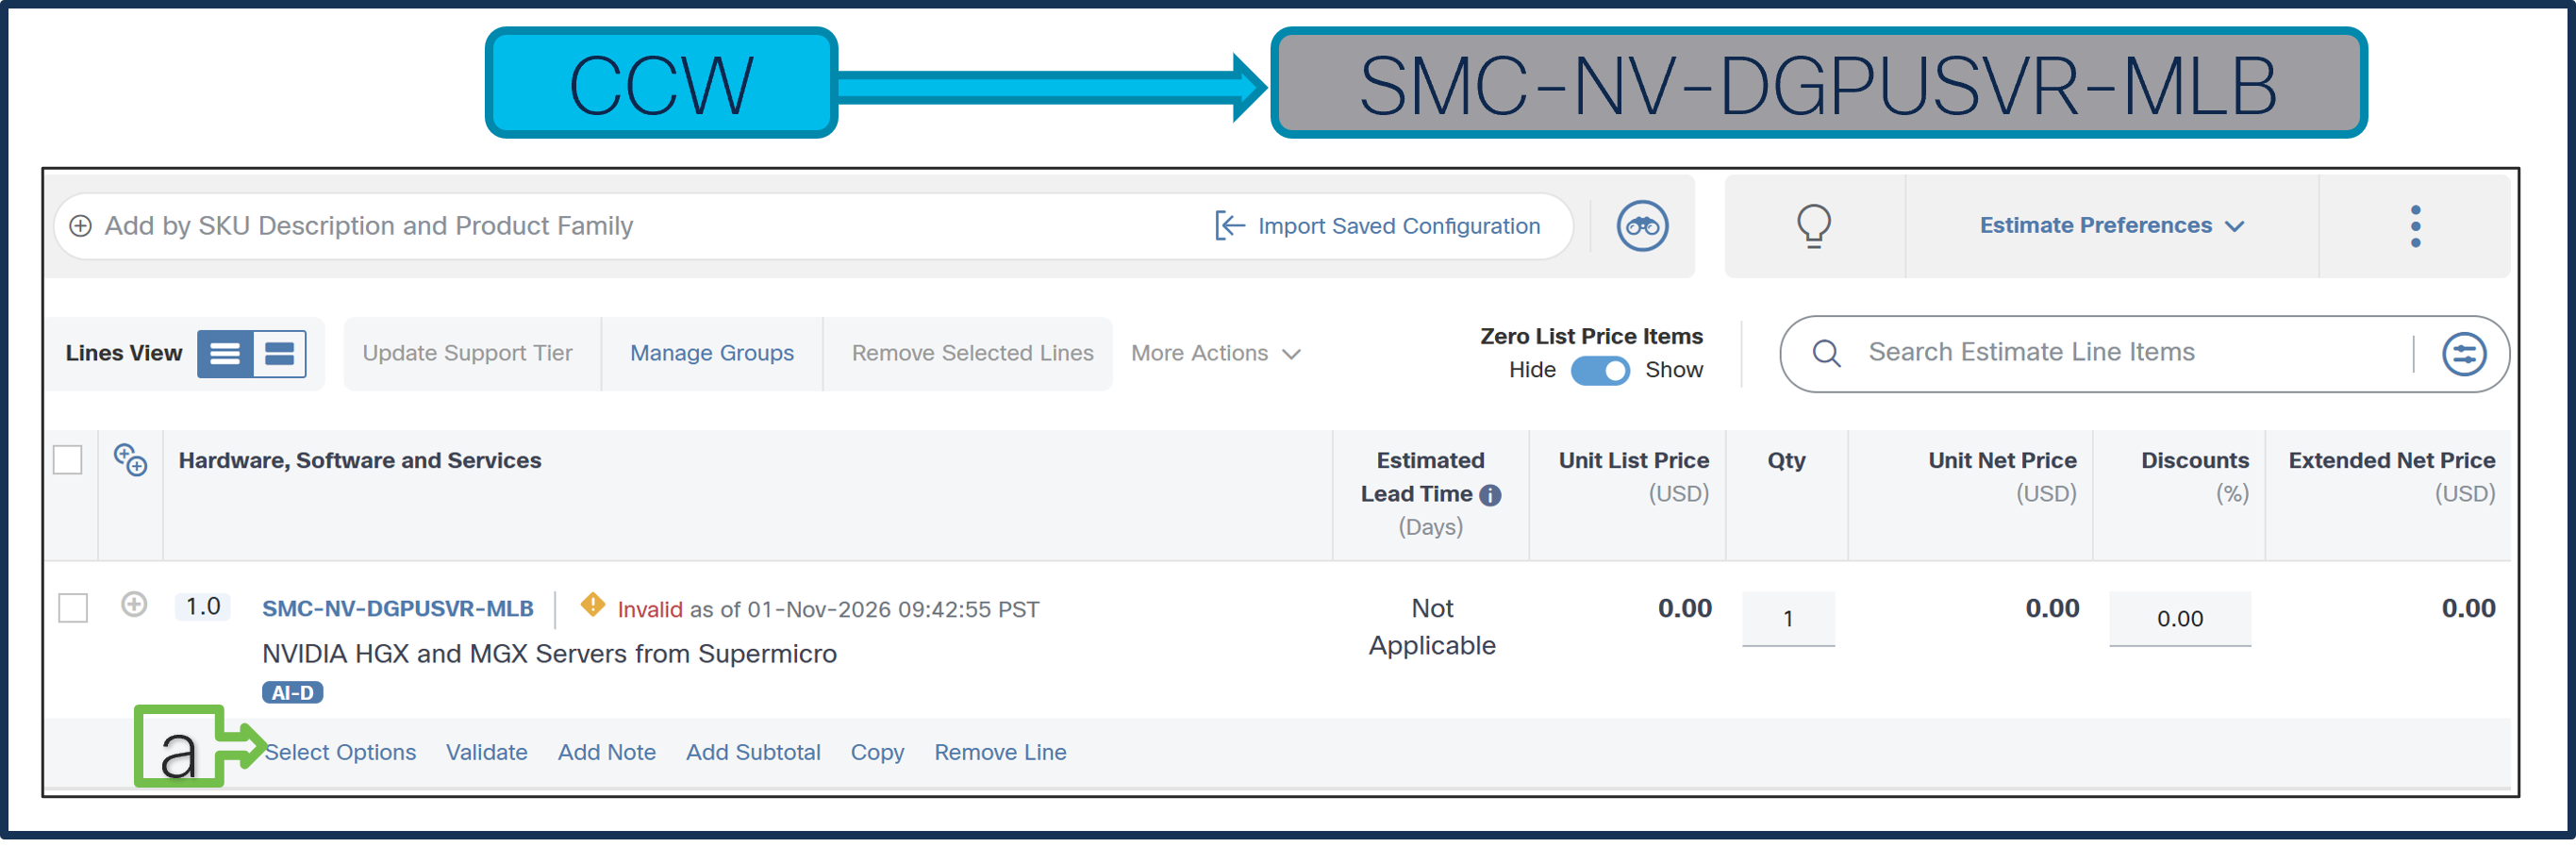
a. In CCW, search for MLB PID and click on “Add”
b. Click on “Select Options” to enter the configurator.
Step 2.
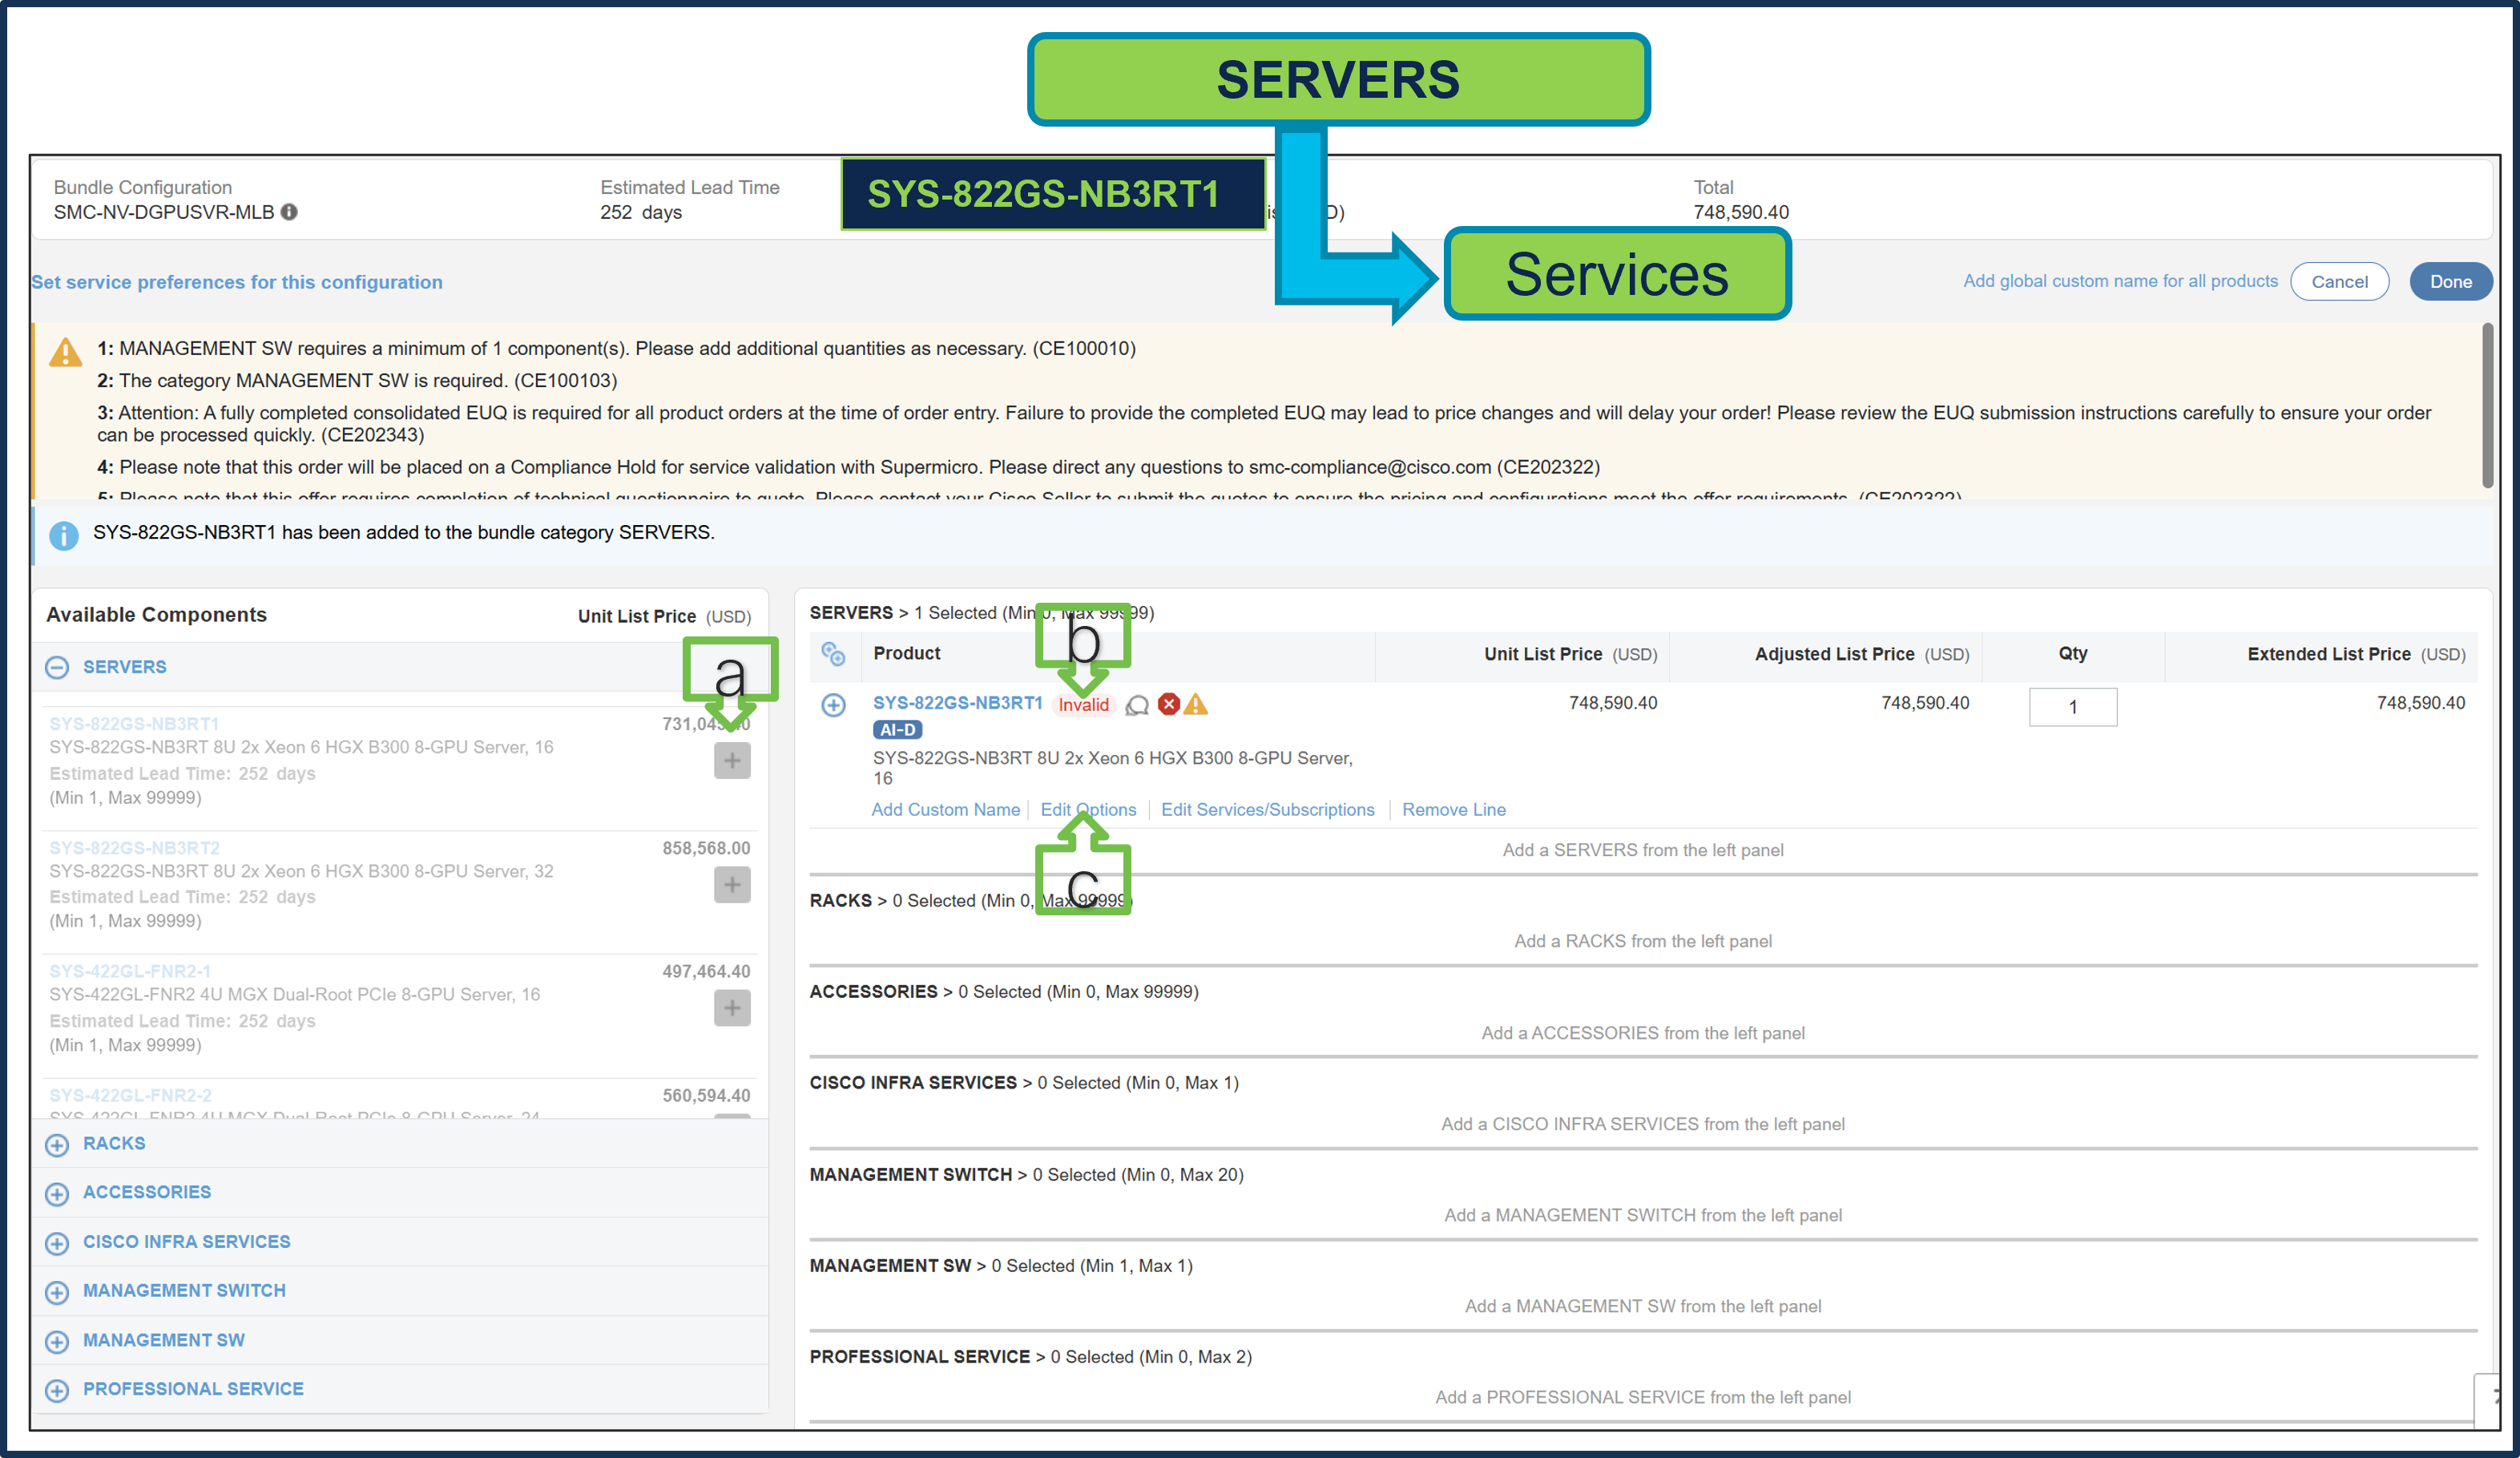
Selection of either SERVERS or RACKs is required, and both cannot be selected at the same time.
a. Select SYS-822GS-NB3RT1 from SERVERS Category under MLB by clicking the “PLUS”
b. Notice the SYS-822GS-NB3RT1 ATO Status is invalid as further configuration needed.
c. Select ‘Edit Options’ to enter the configurator.
Step 3.
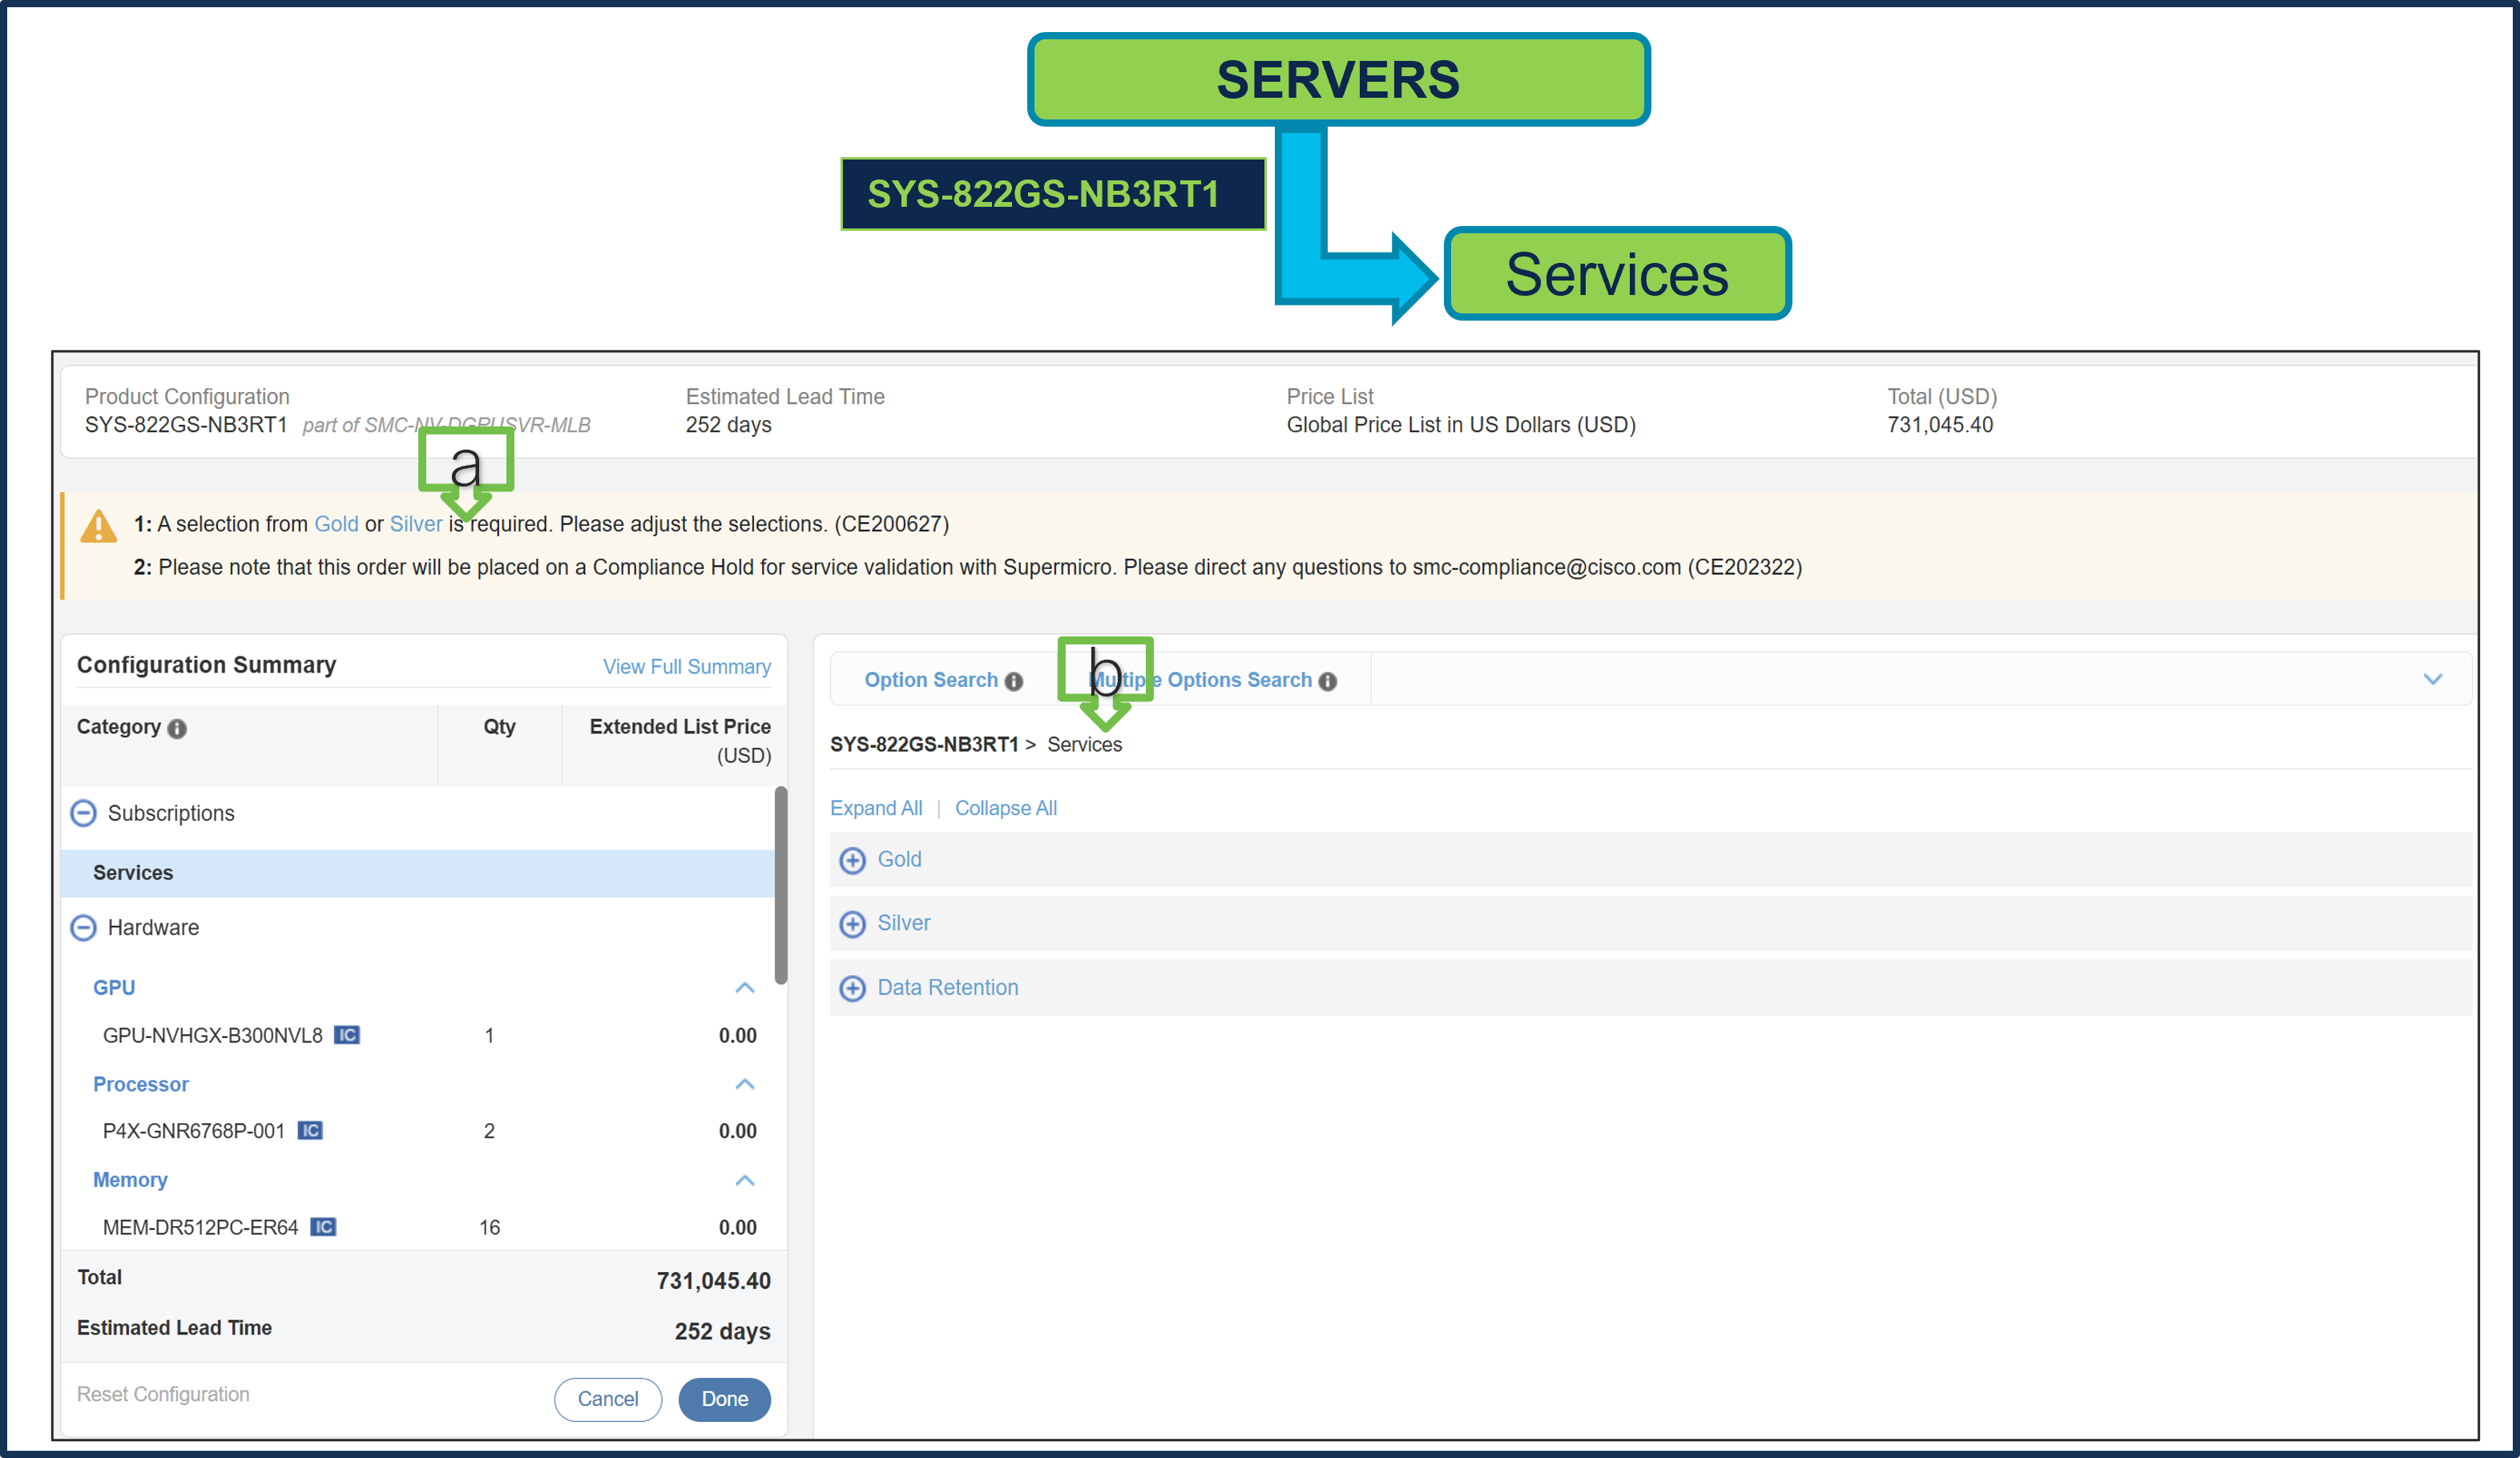
a. Configure SYS-822GS-NB3RT1 by selecting Supermicro Services as these are mandatory selections.
b. Follow warning messages to configure the minimum required selections under Server.
● Selection between Gold or Silver Services is mandatory. Gold Service selection is subject to review during quoting and is based on Super Micro Service availability at the selected install site location.
● Data Retention Service is optional selection.
Step 4.
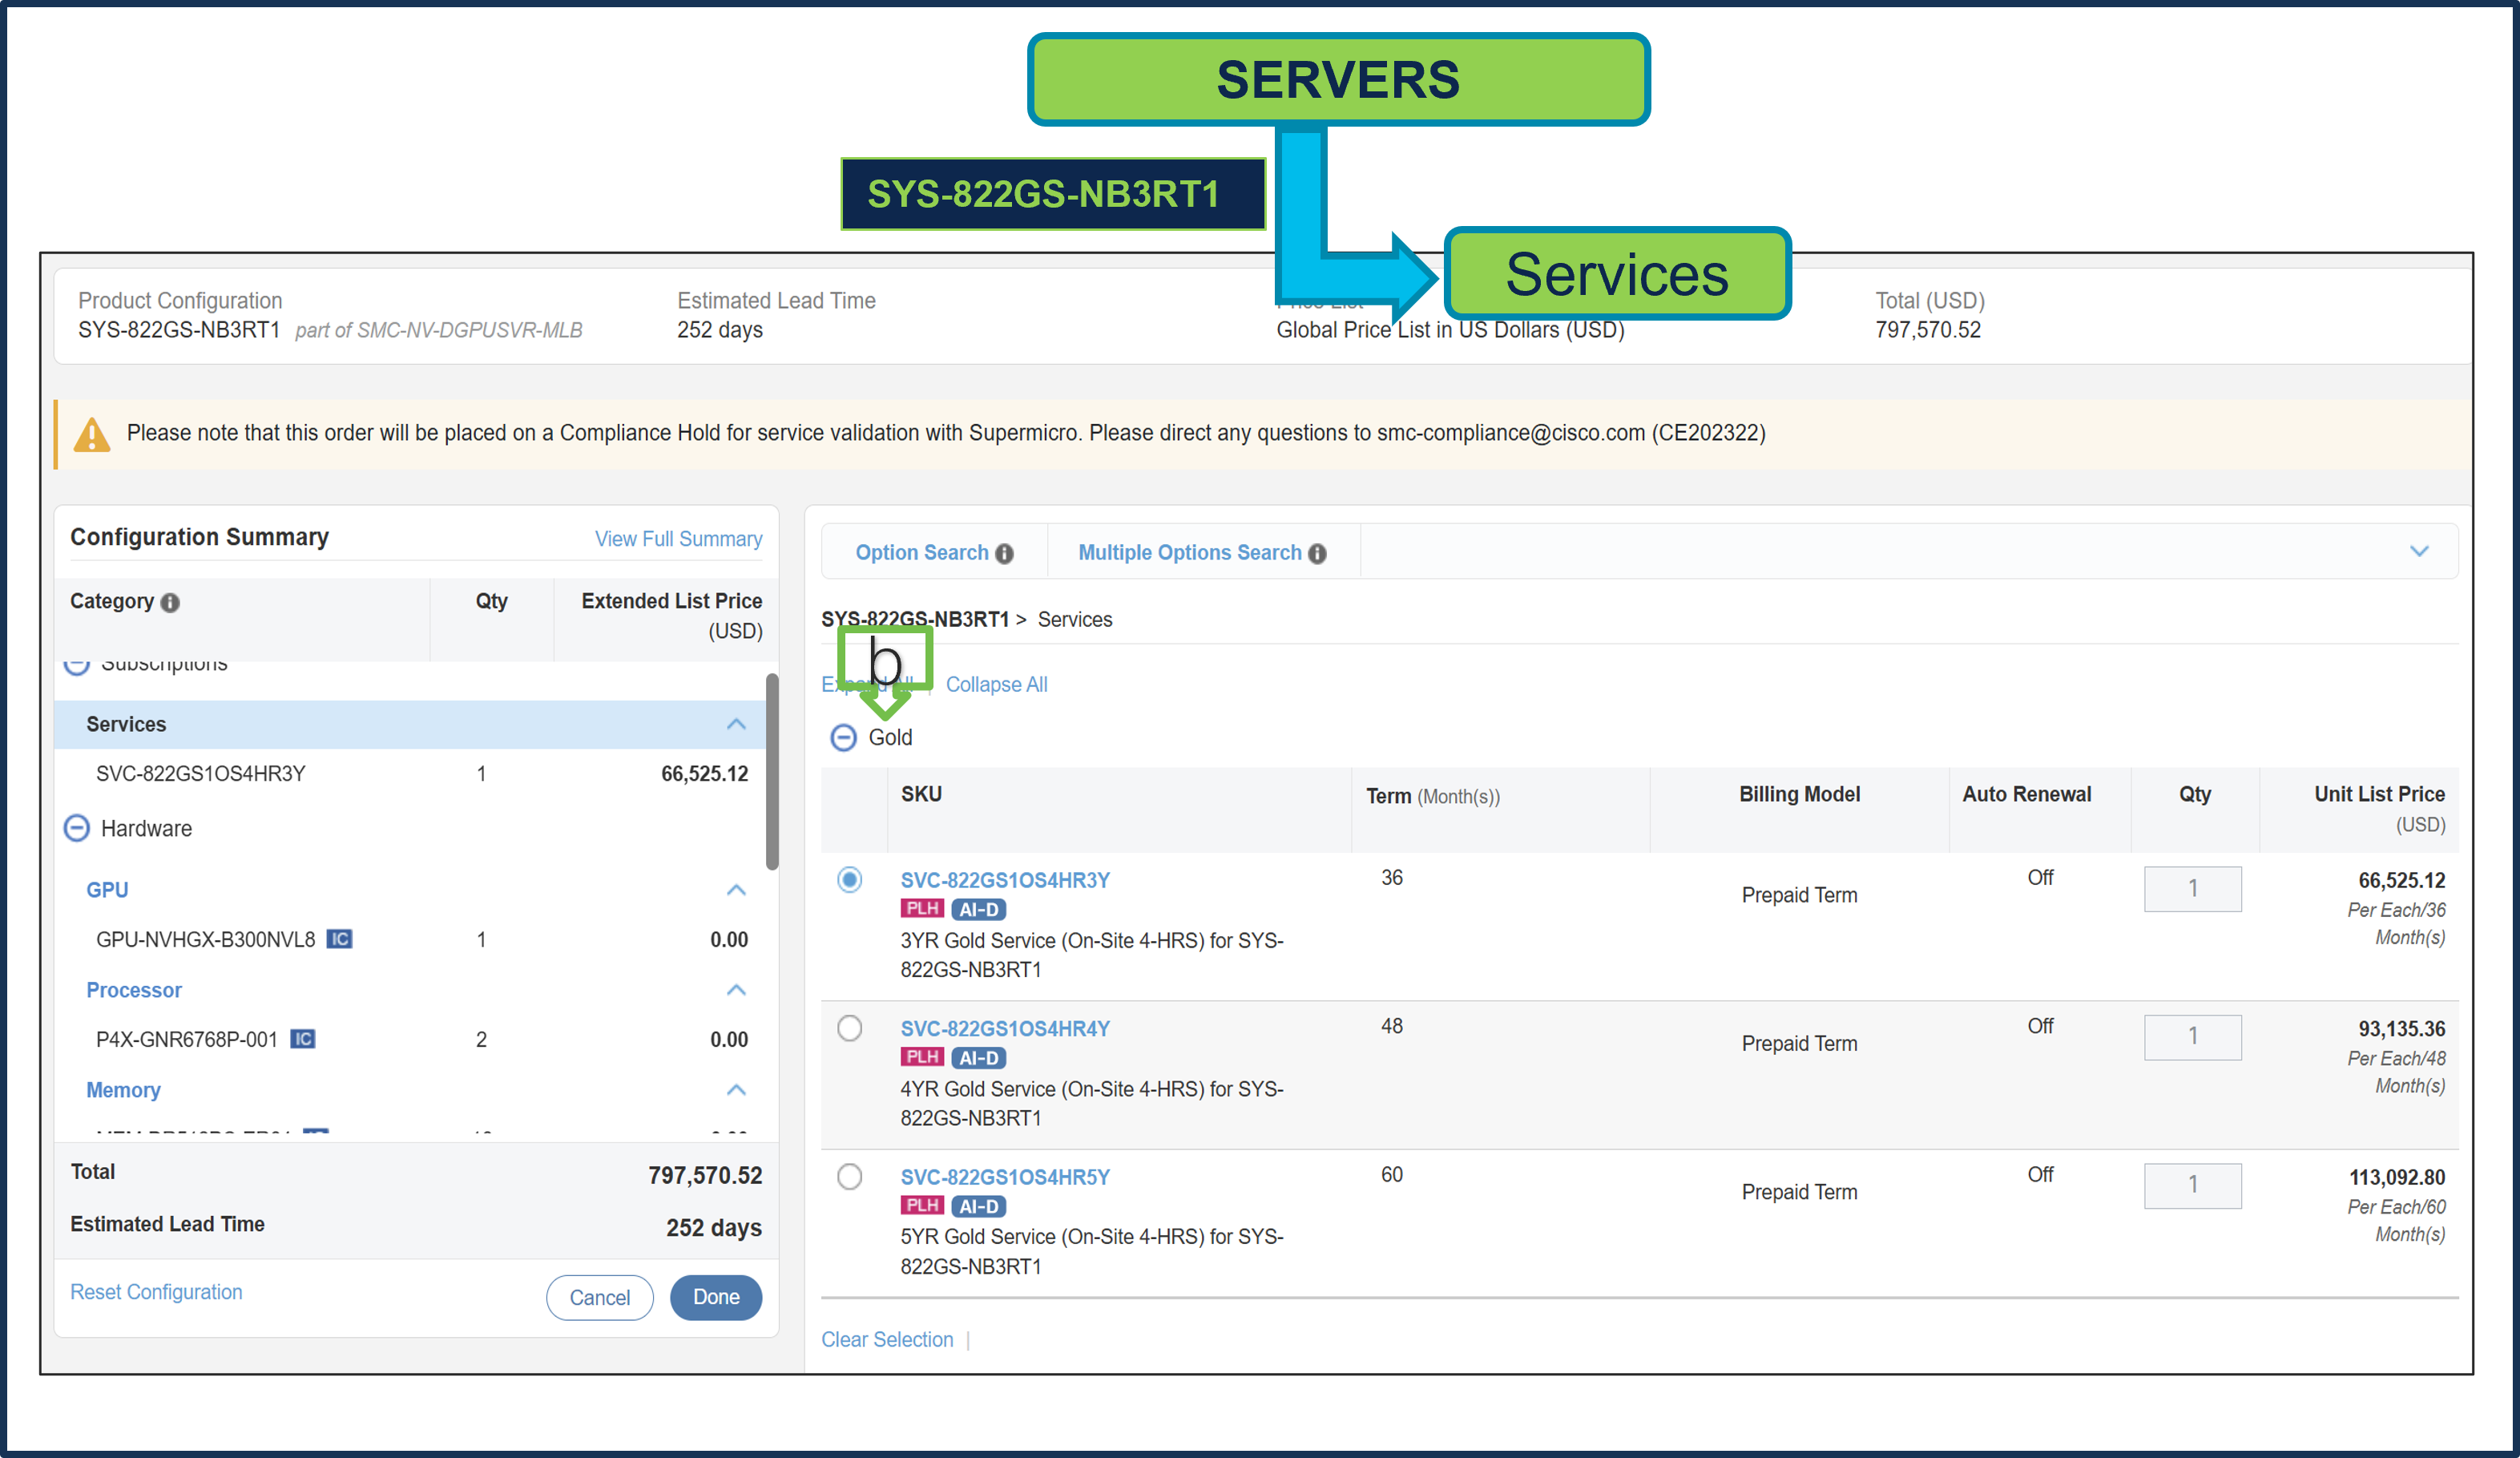
a. Gold Supermicro Services is selected. Gold Service selection is subject to review during quoting and is based on Super Micro Service availability at the selected install site location.
Step 5.
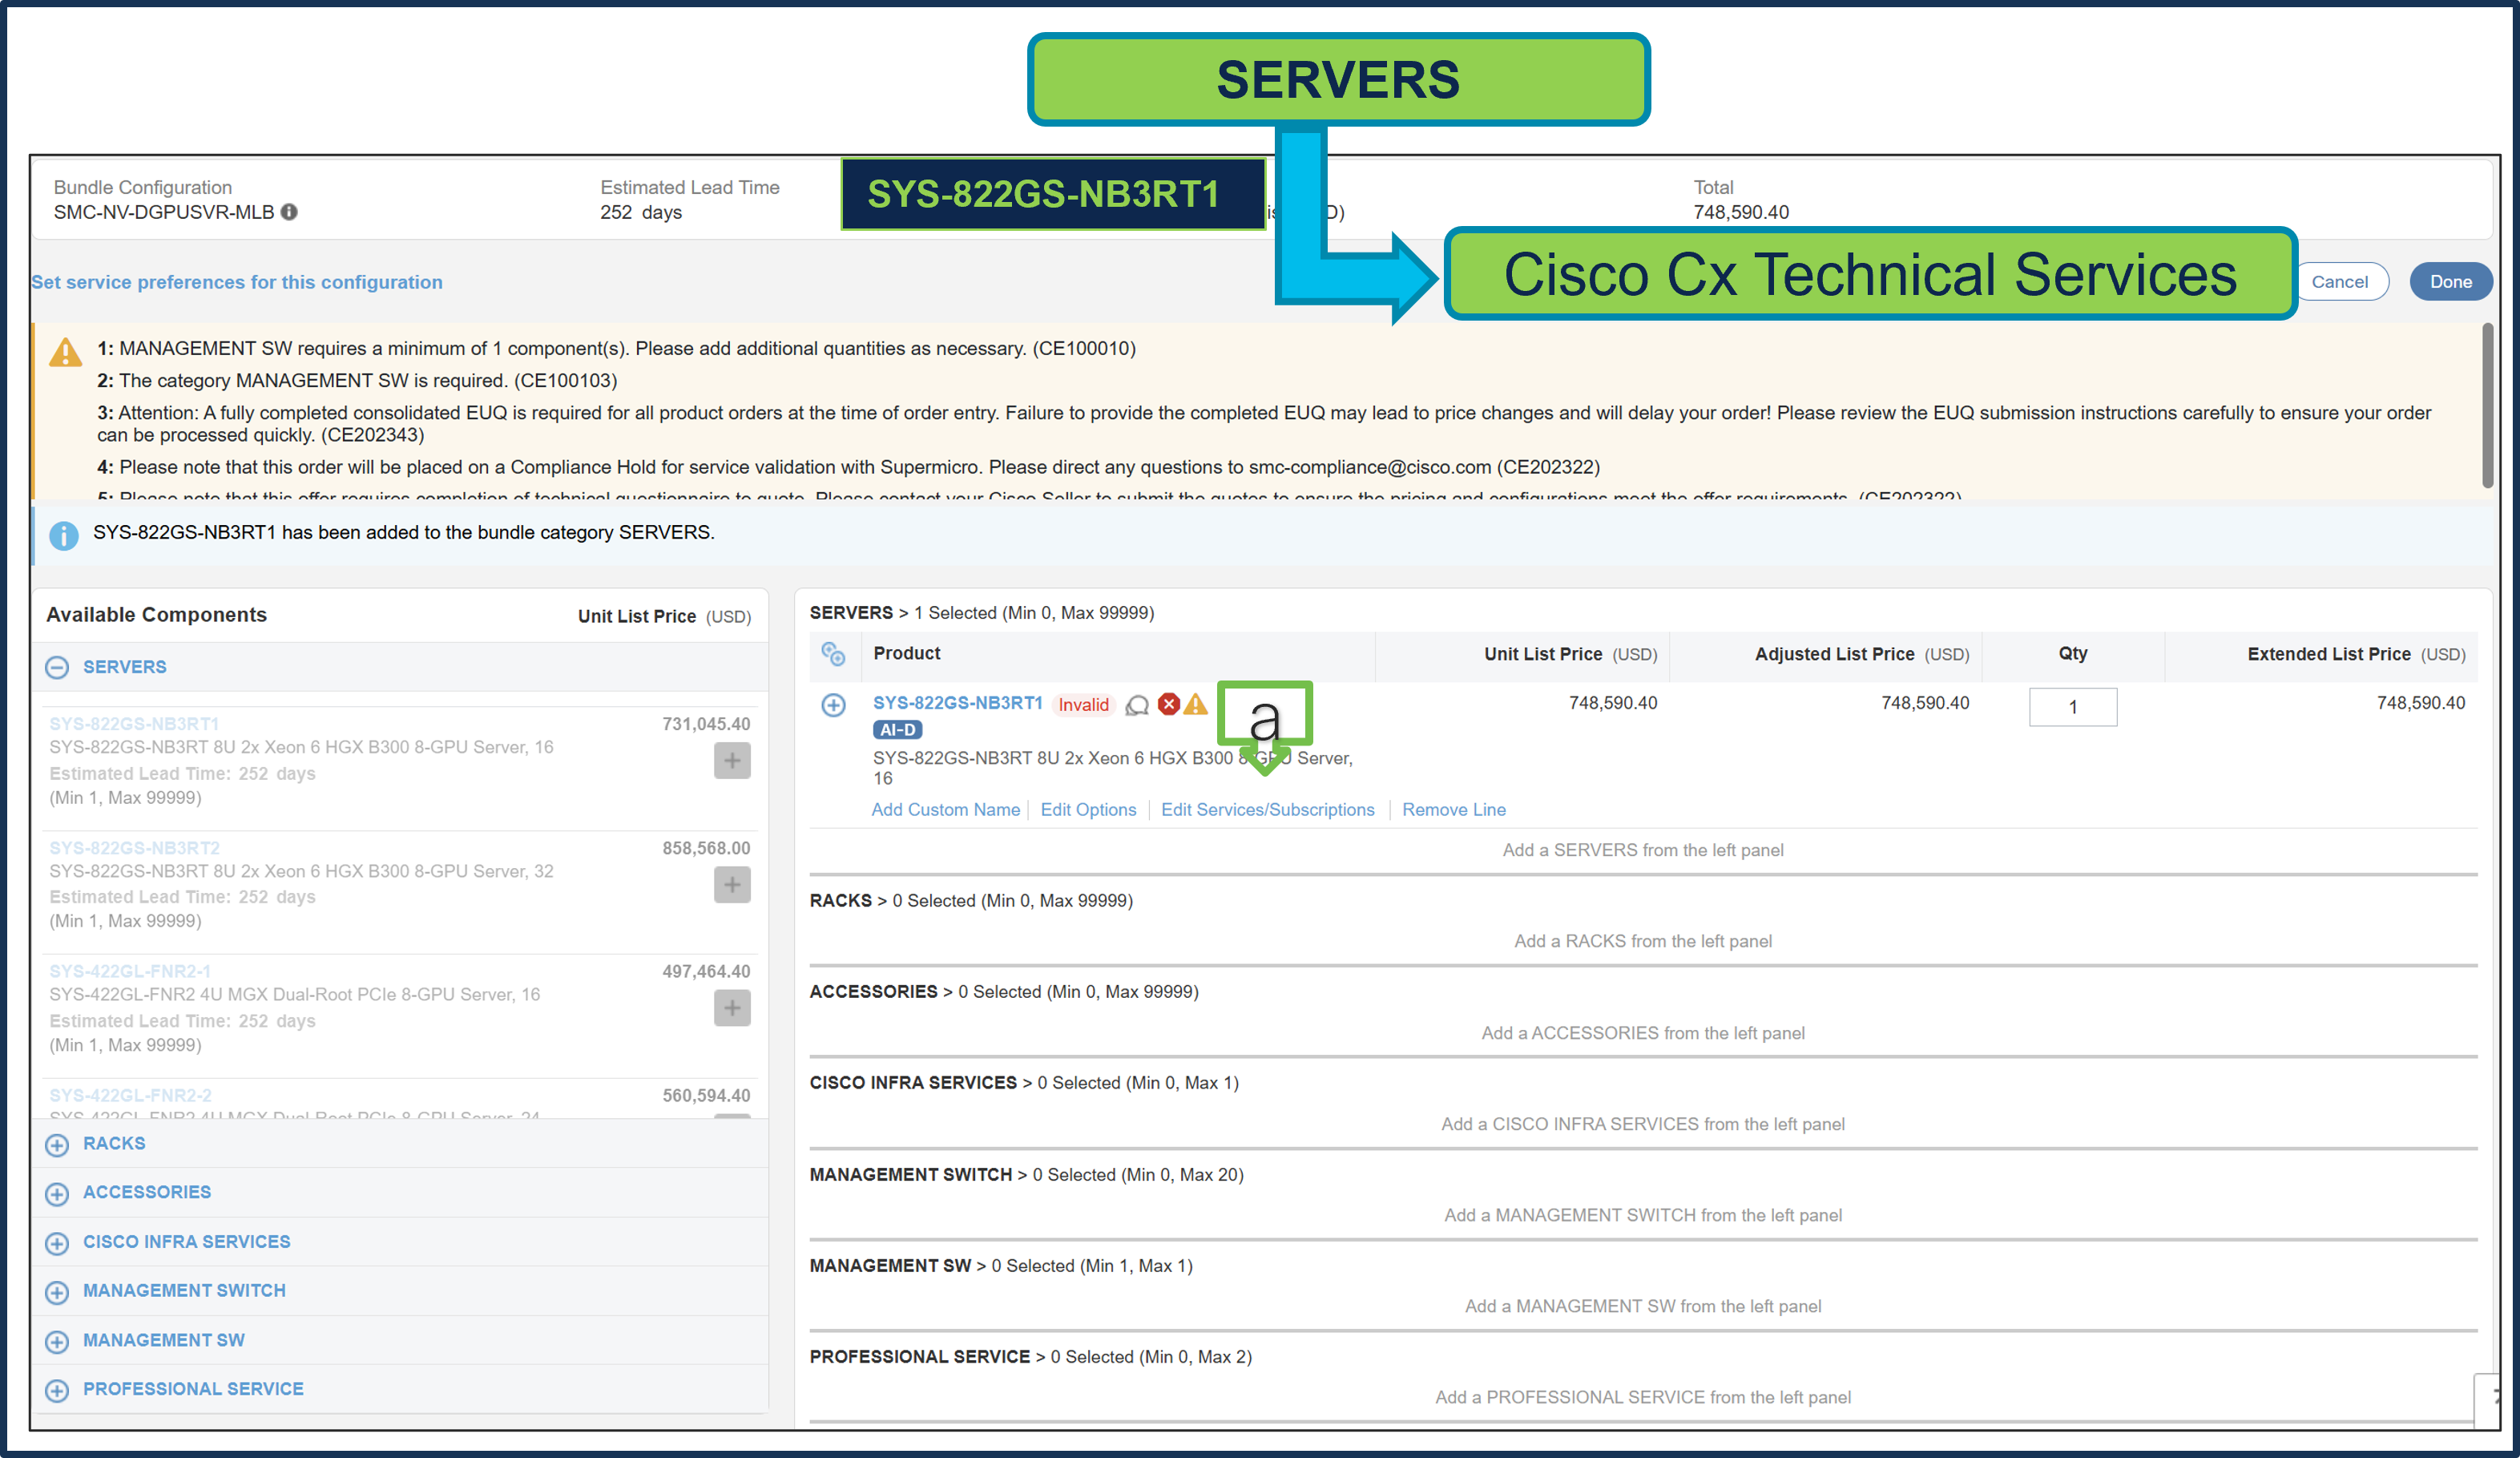
a. Note Status is now Valid.
b. Please note that Cisco CX IHV1 Technical Service is mandatory and cannot be removed.
c. The maximum duration of subscriptions will be automatically applied to the duration of technical services in this configuration. Please ensure Cisco IHVI Services Term aligns to the Gold/Silver services Term.
d. Go to "Edit Service/Subscription" to edit the duration of technical services.
Step 6.
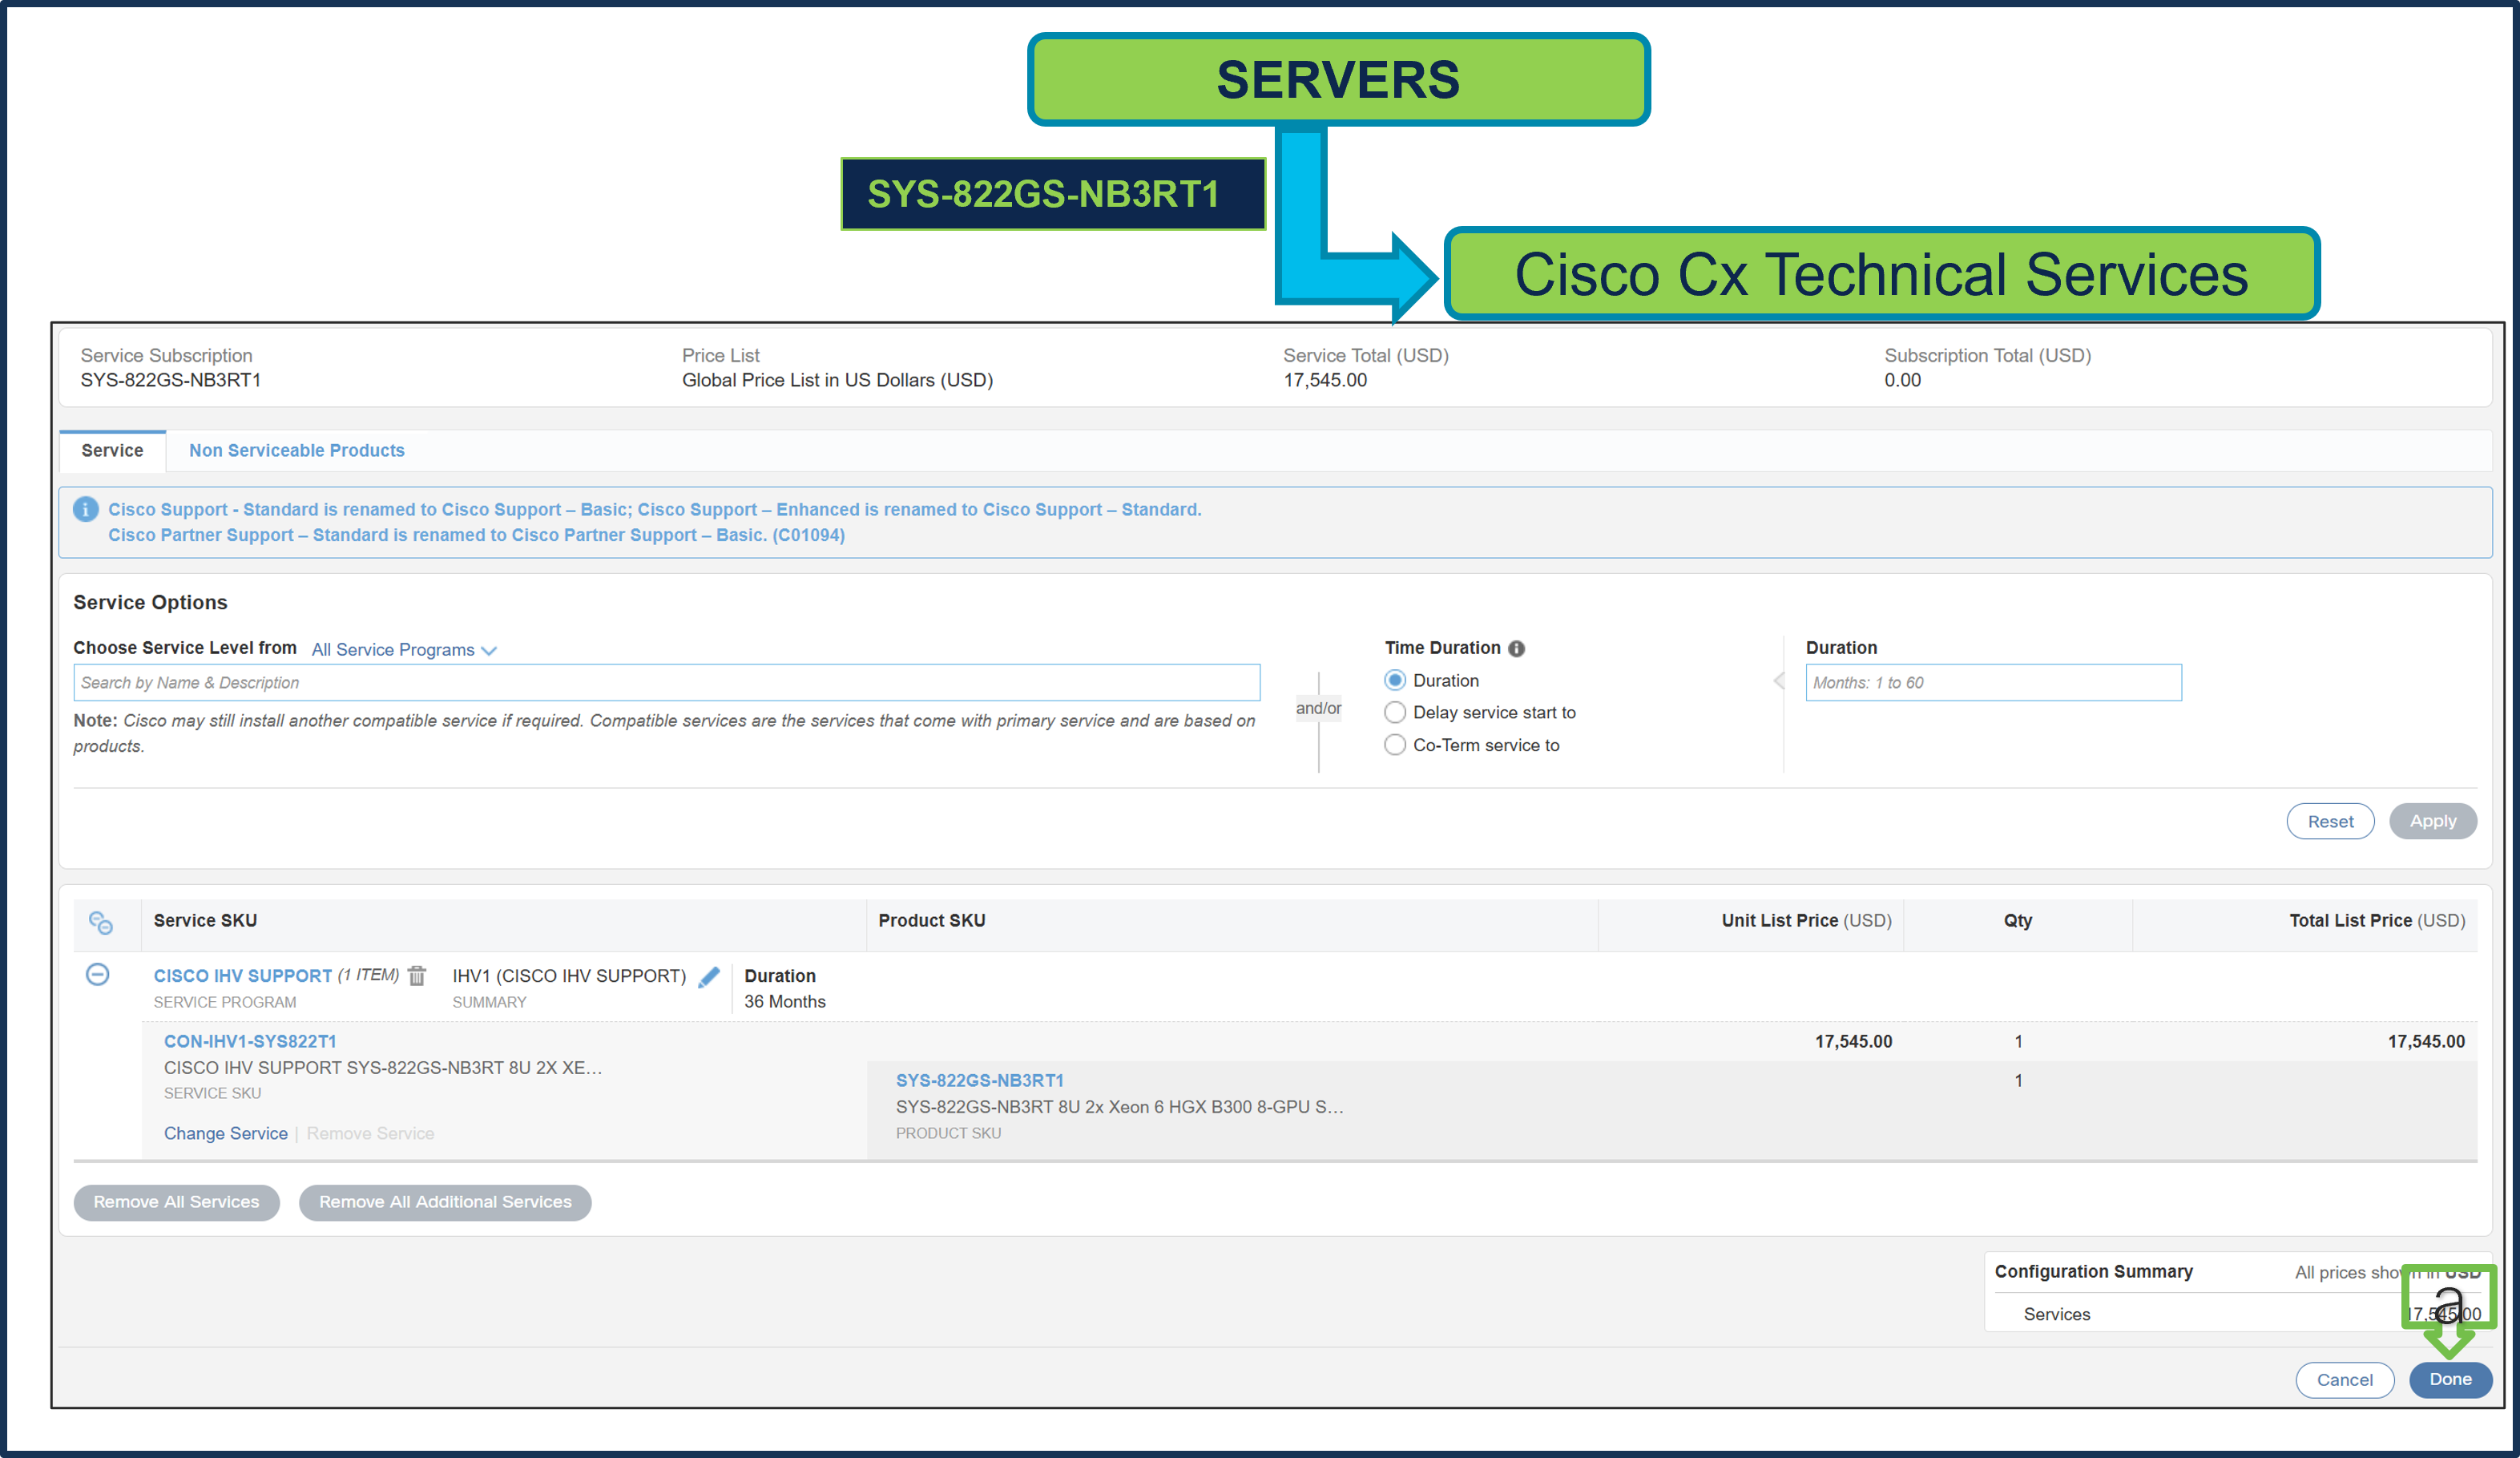
a. Since Supermicro Services Term selected in 36 month, hence, Cisco CX Technical Service Term Duration is also defaulted to 36 Months. a) Click Done.
Step 7.
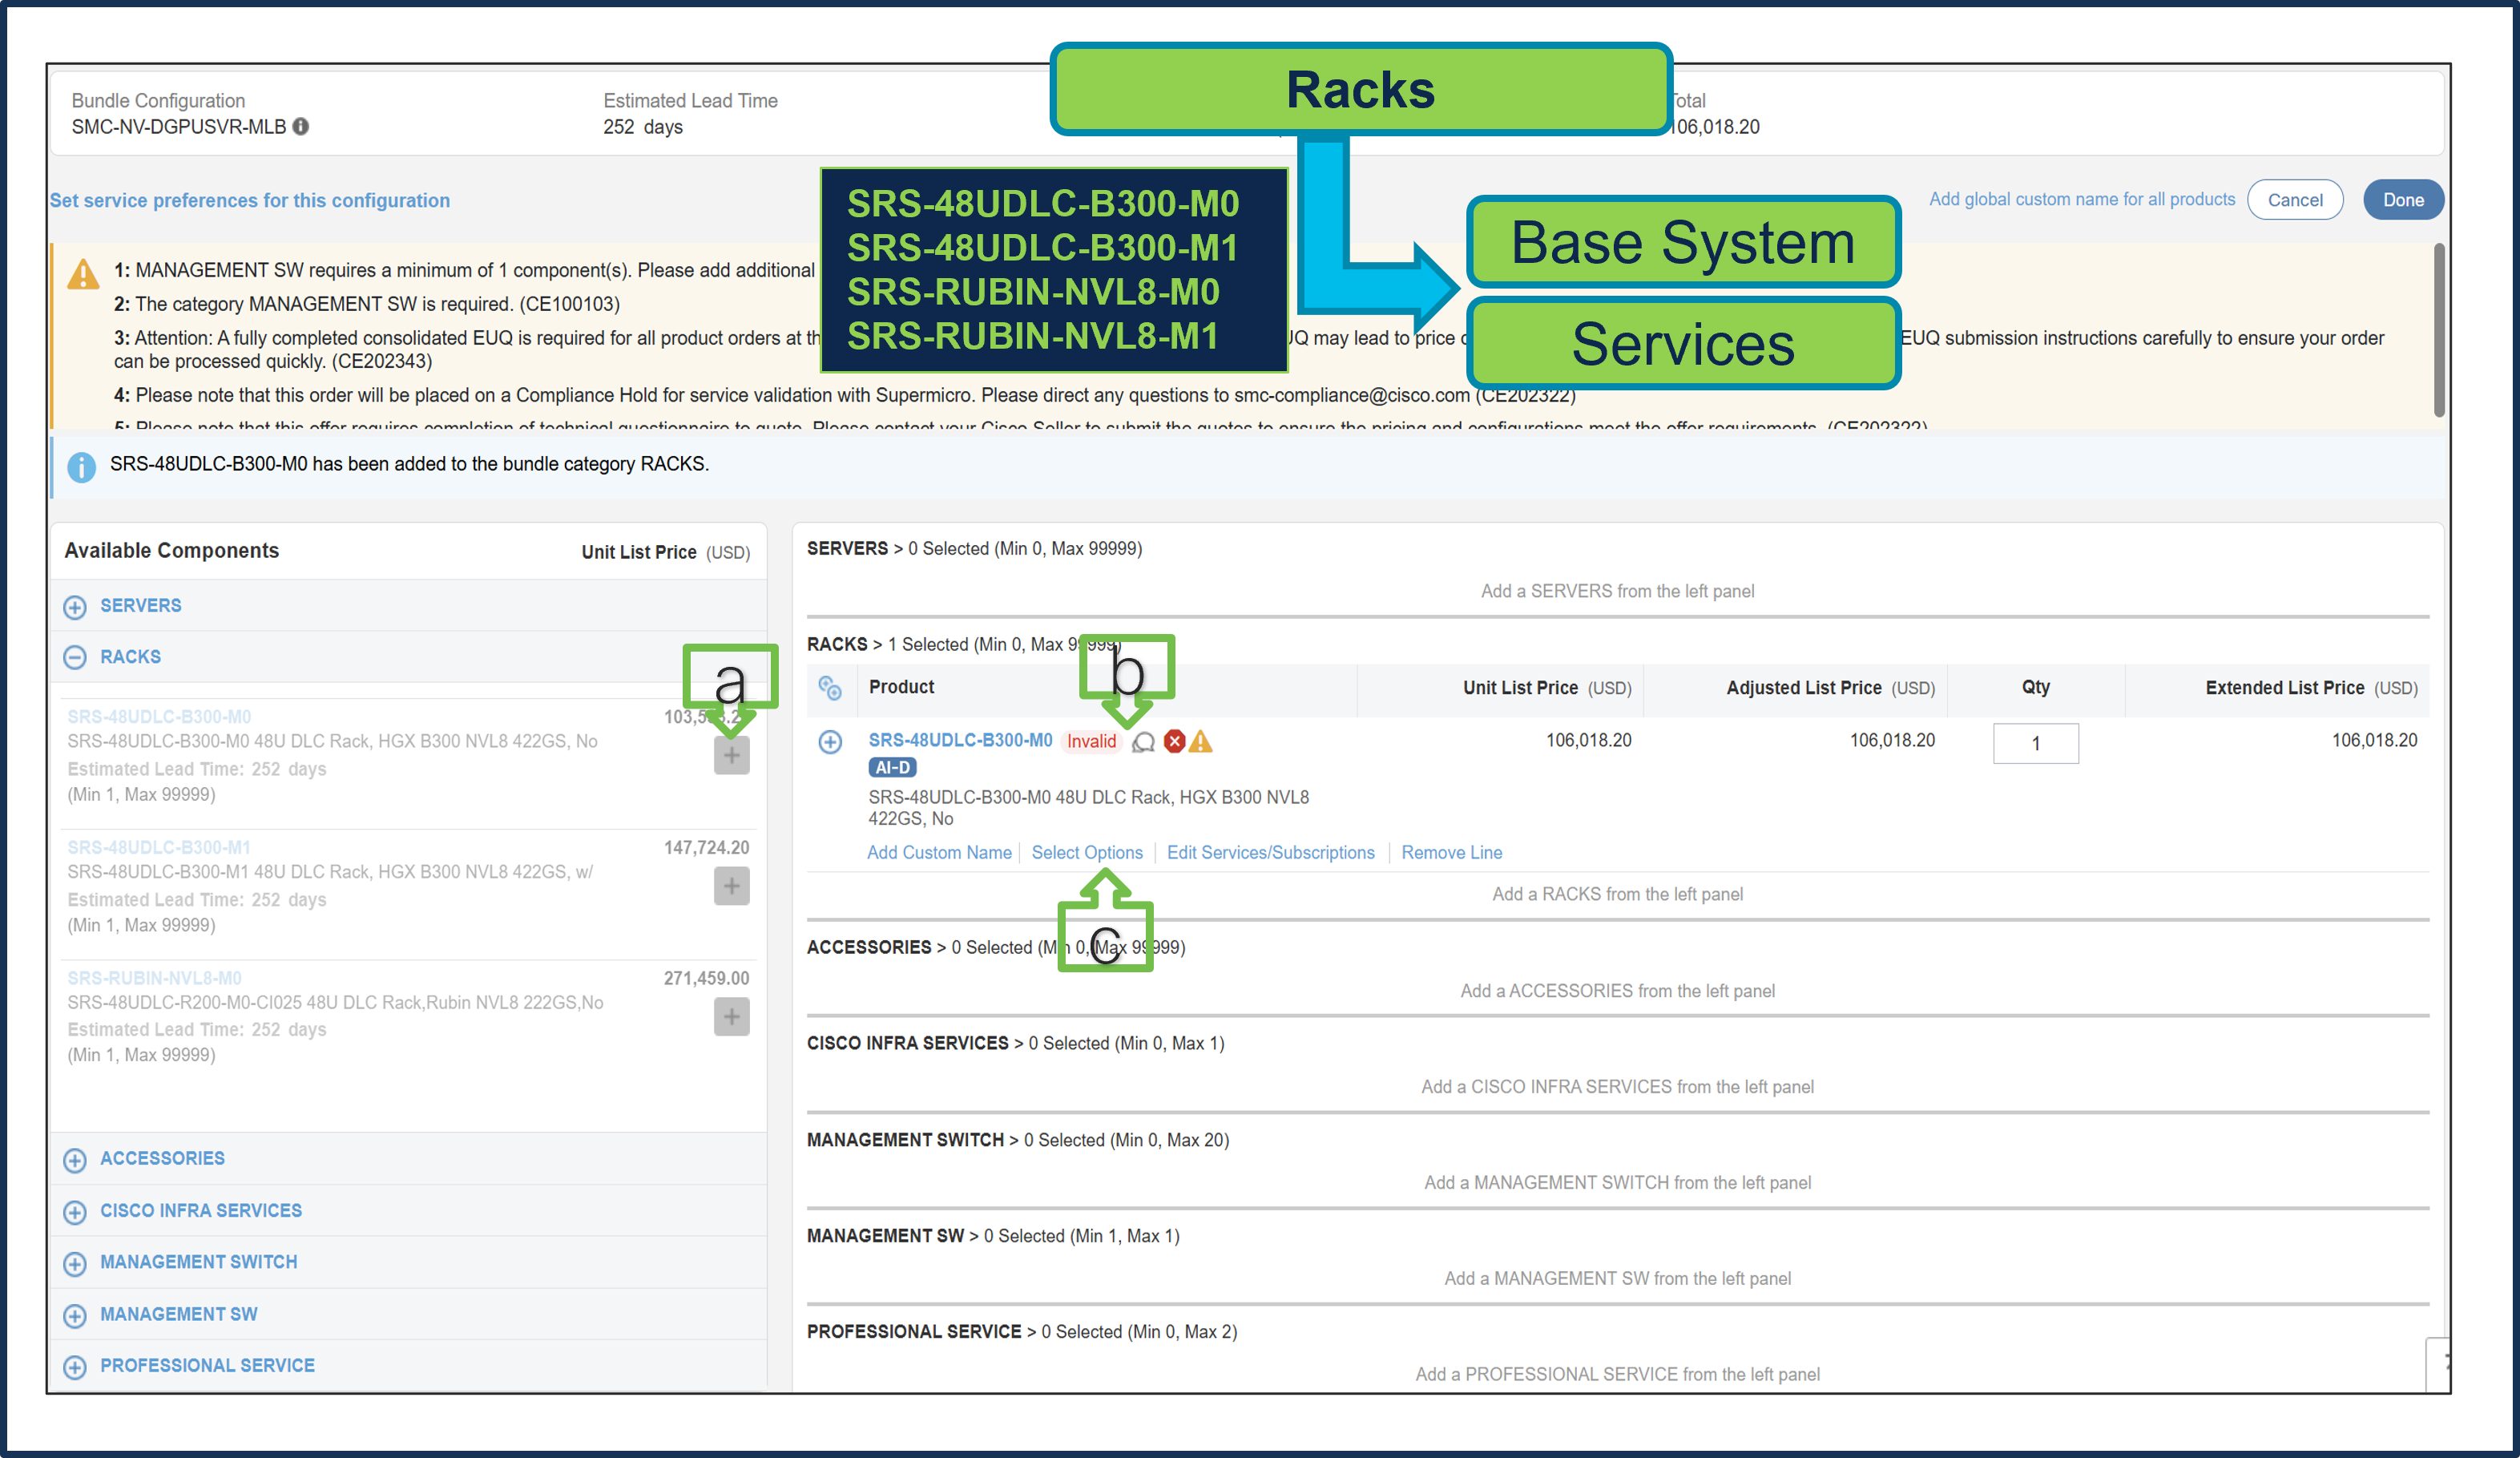
Selection of either SERVERS or RACKs is required, and both cannot be selected at the same time.
a. Select SRS-48UDLC-B300-M0 from Rack under MLB by clicking the “PLUS”
b. Notice the SRS-48UDLC-B300-M0 ATO Status is invalid as further configuration needed.
c. Select ‘Select Options’ to enter the configurator.
Step 8.
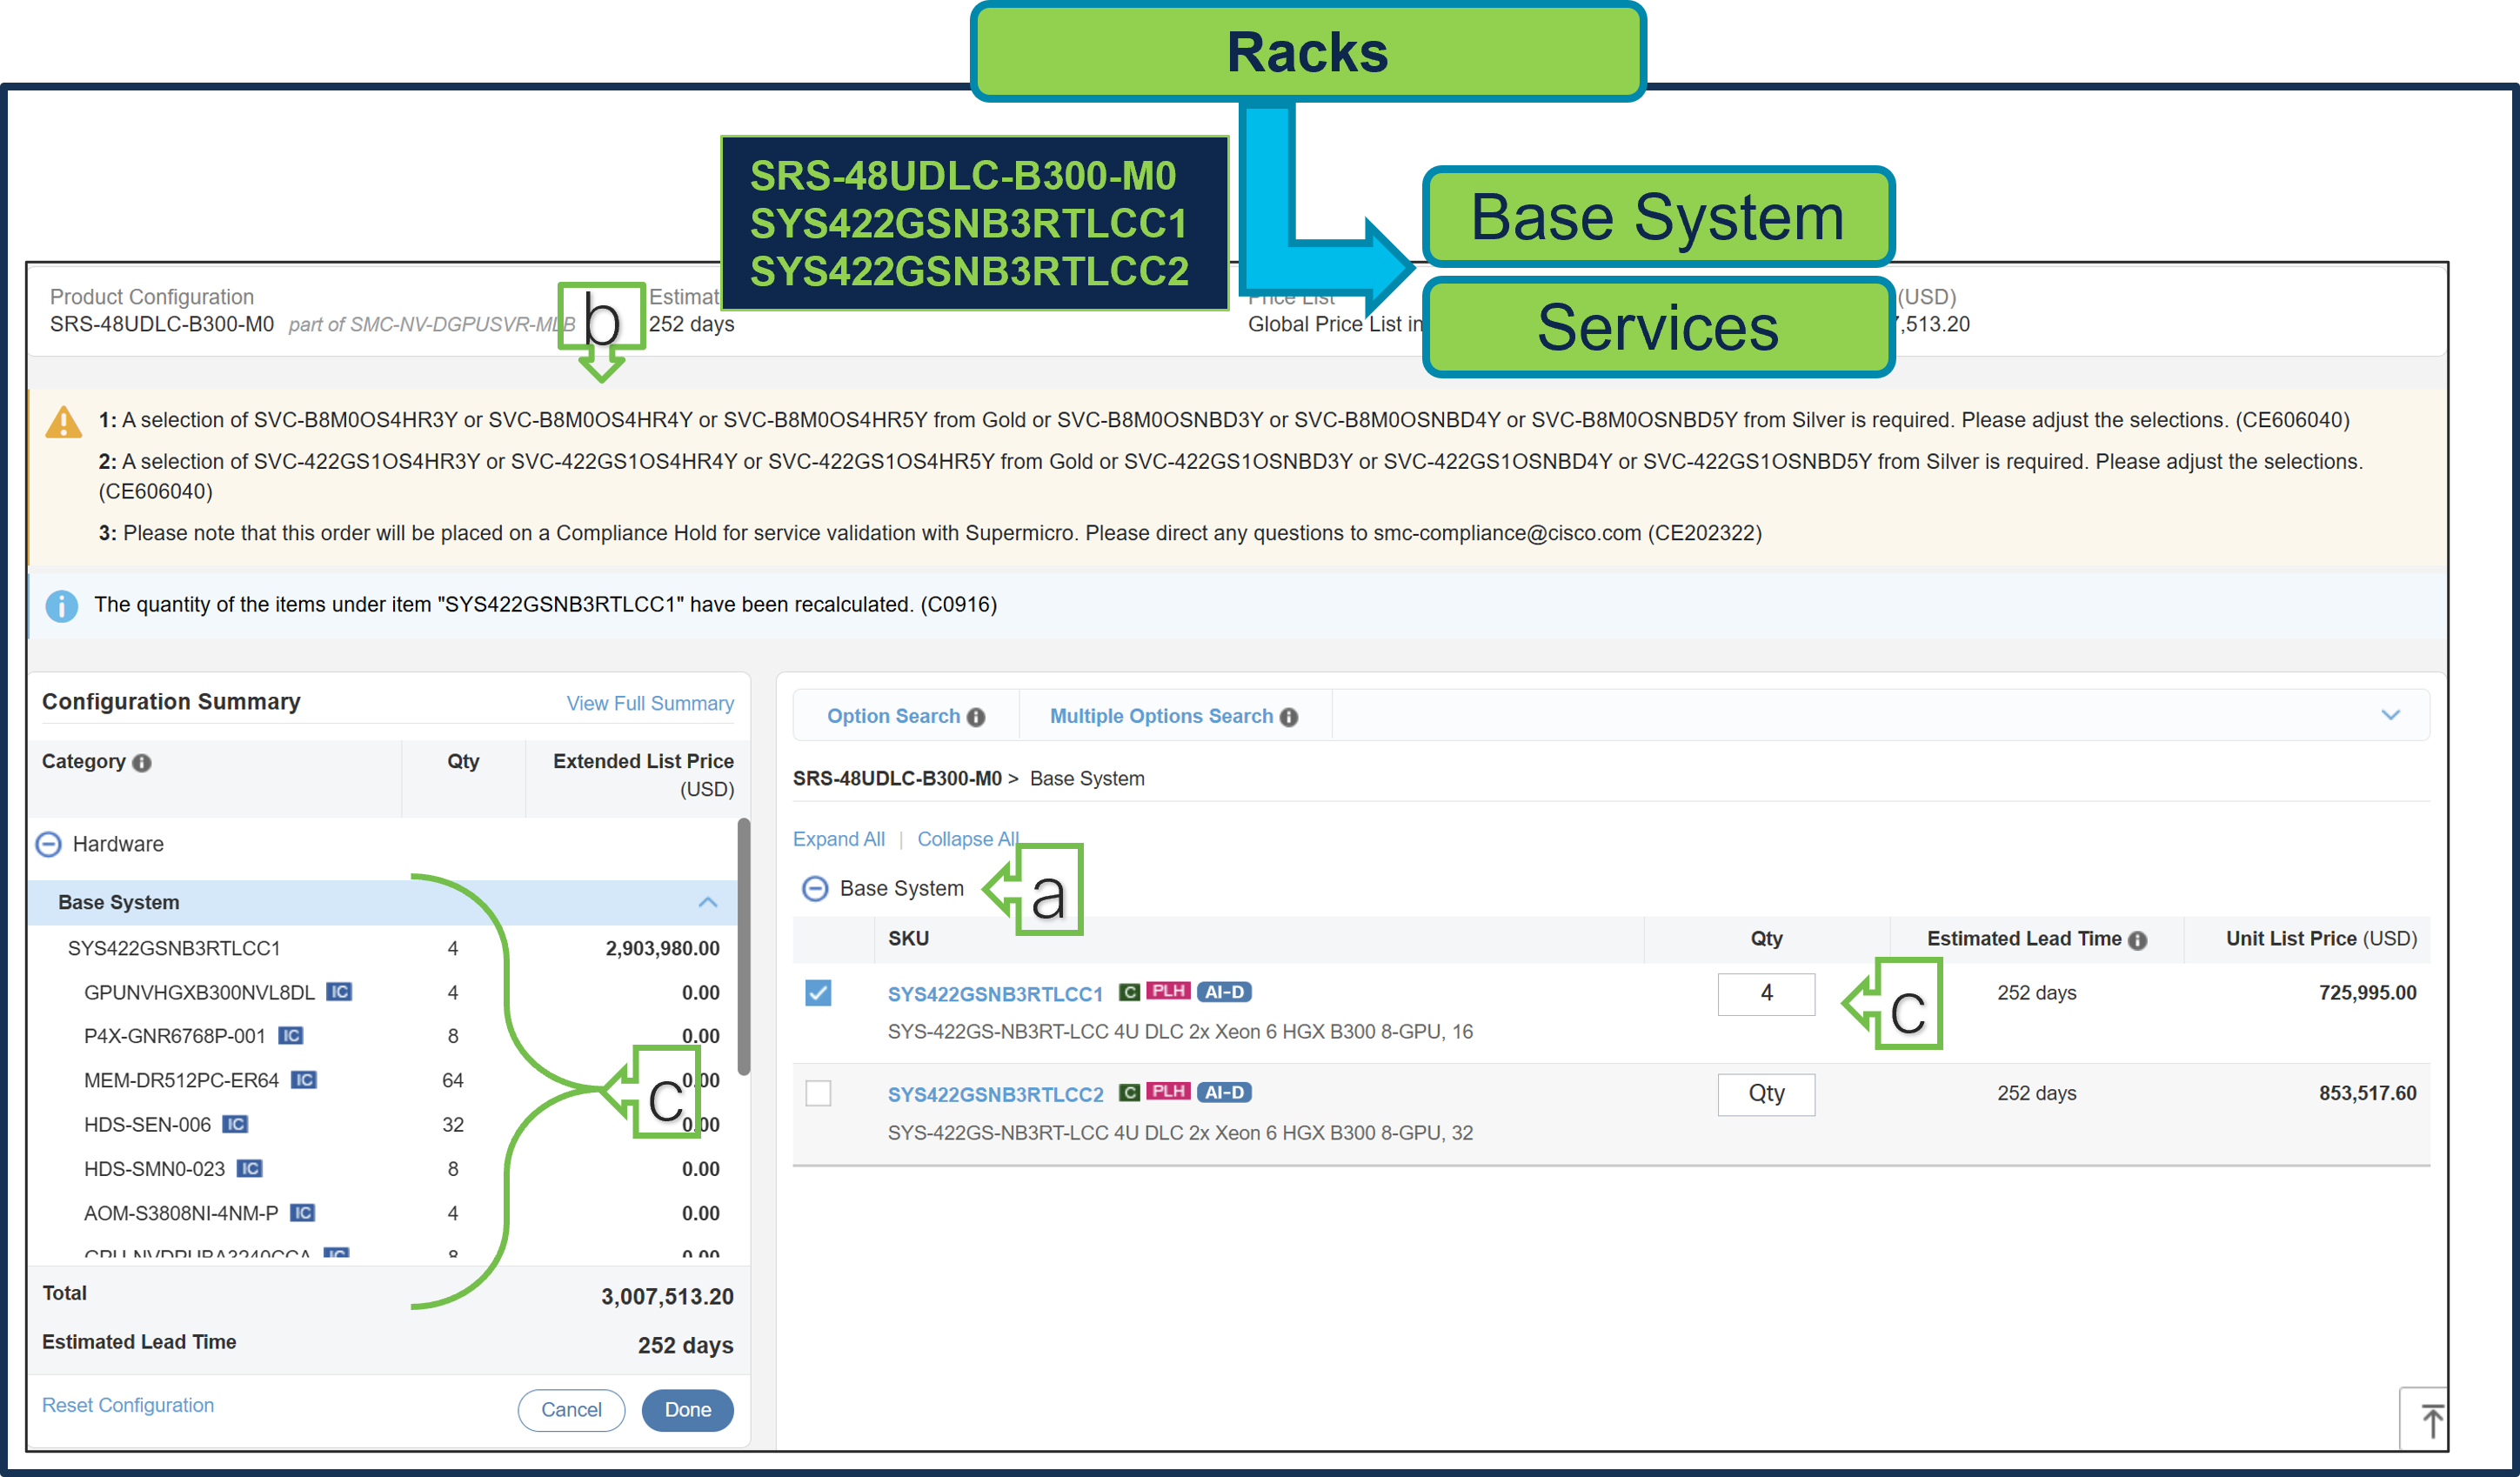
a. Configure SRS-48UDLC-B300-M0 by selecting Base System (Server) and Services as these are mandatory selection.
b. Follow warning messages to configure the minimum required selections under Rack.
c. Server Components like Processor, Memory, Storage Drive, GPU, etc. are fixed and preselected. Only Server QTY is variable.
d. Both Server Types can be selected together and combined max QTY allowed for Server per Rack is 9.
Step 9.
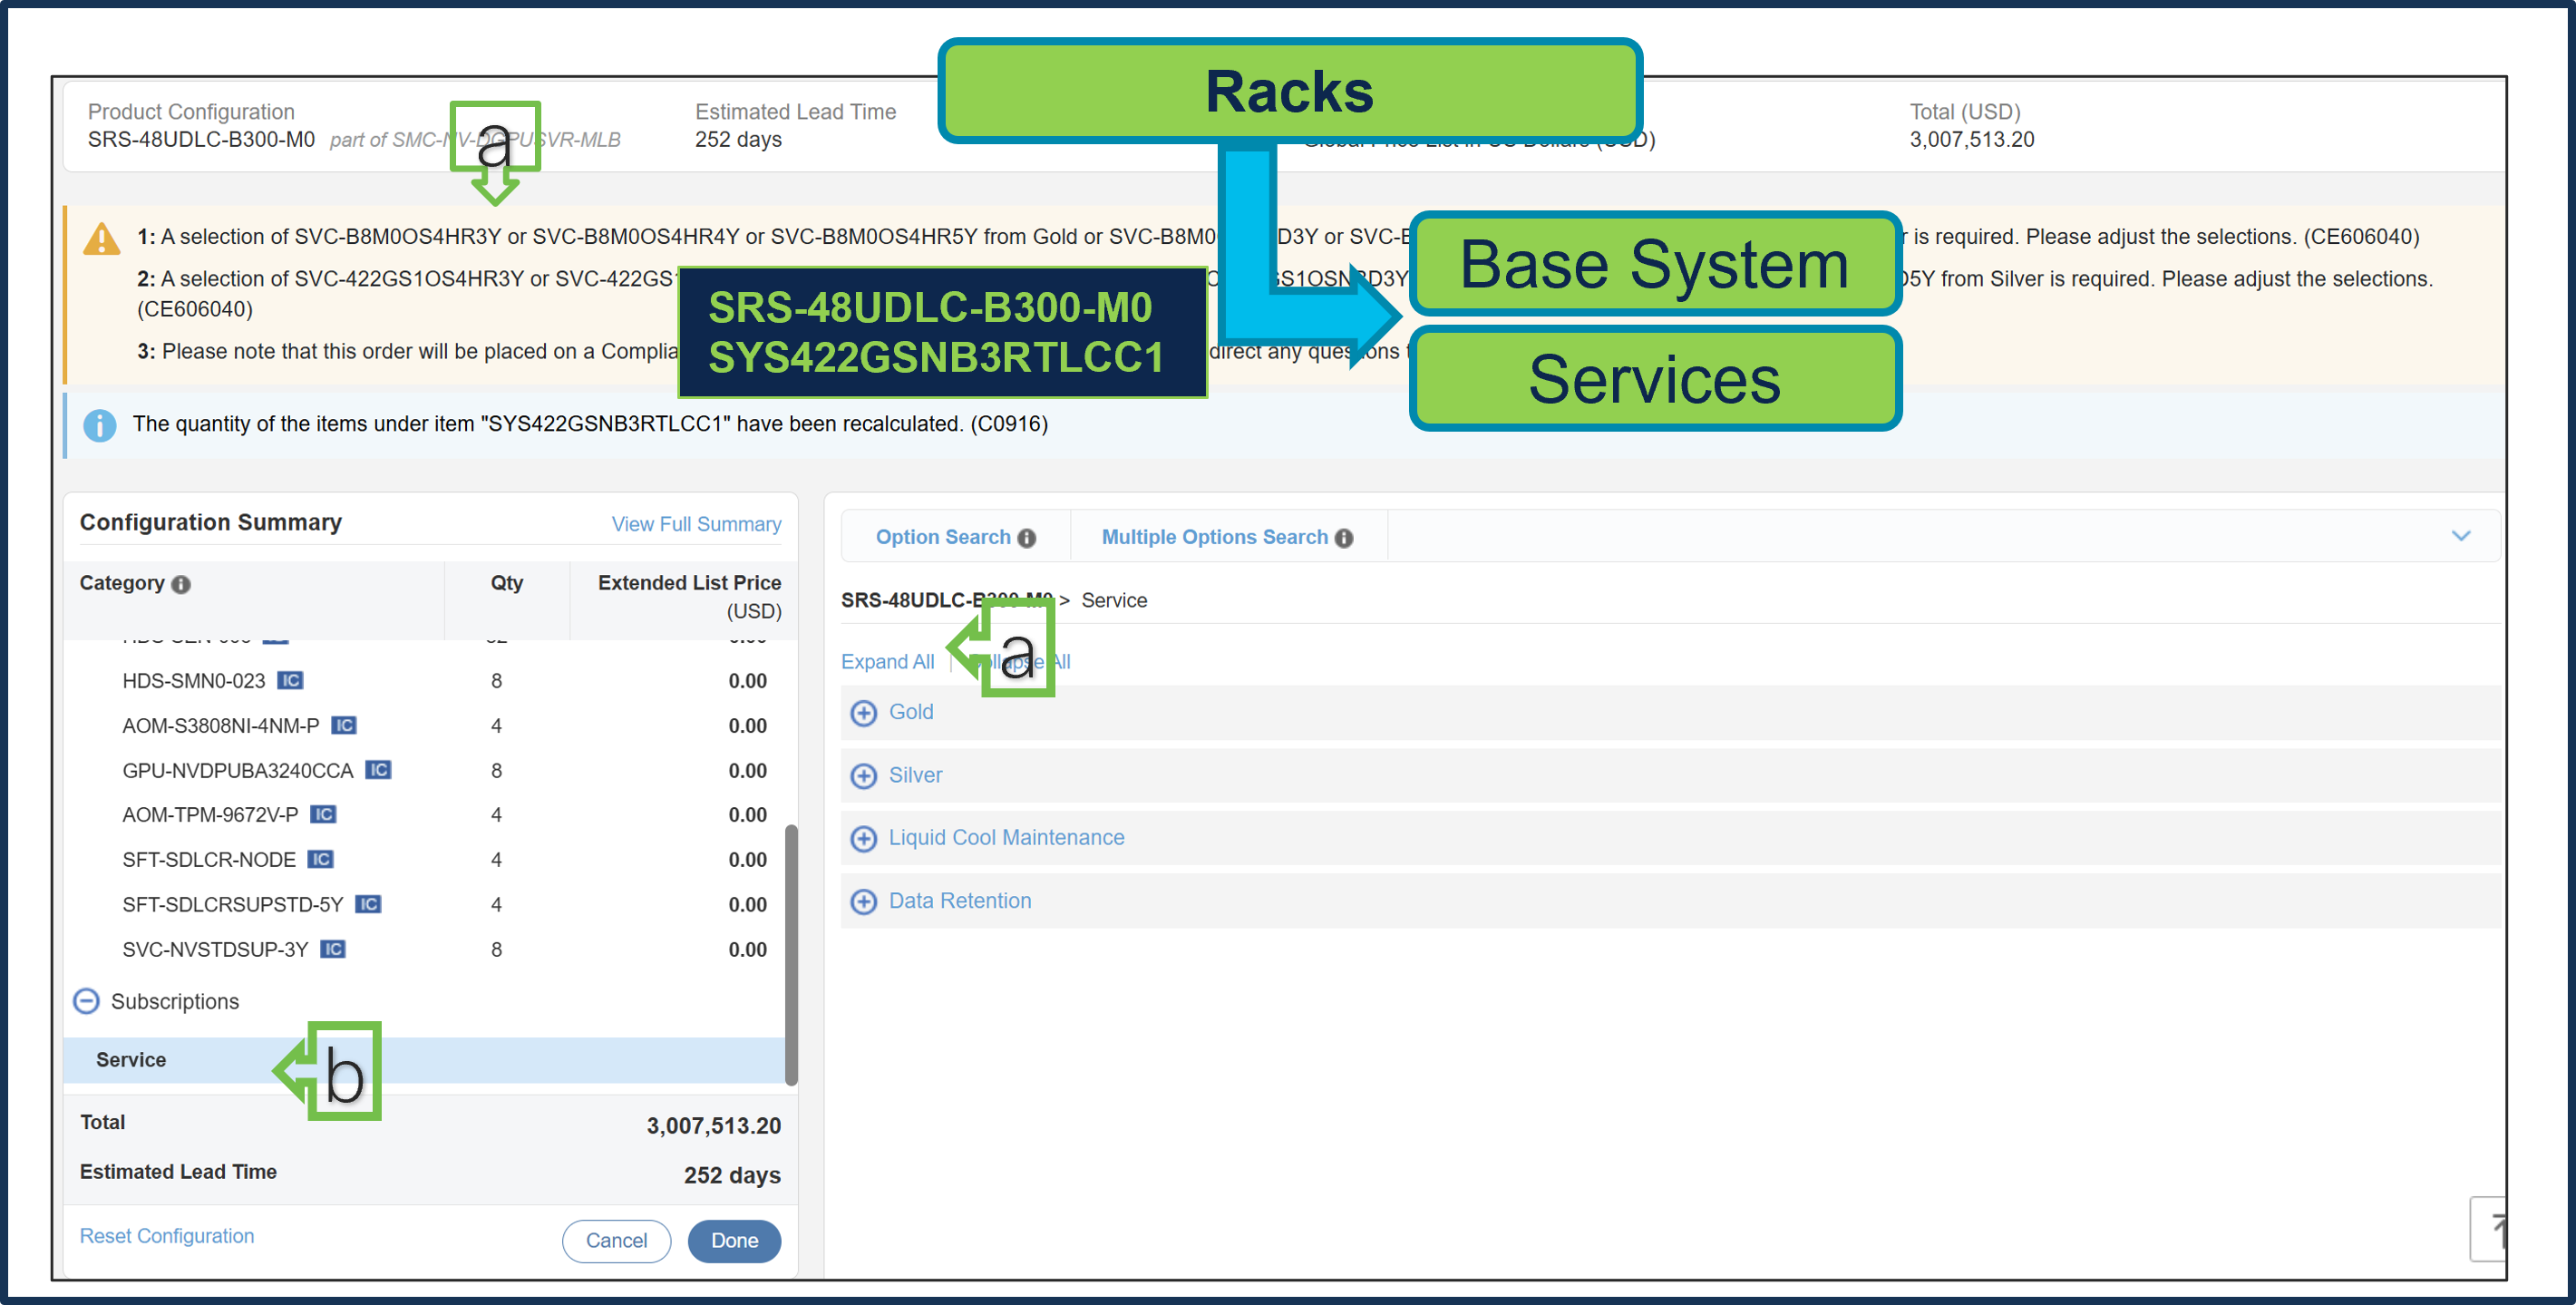
a. Service Type must be selected for the Rack, Server Type 1, and Server Type 2. The quantities for each Service SKU must align exactly with the corresponding Server quantities. For example, if the quantity for Server A is 4, the associated Service SKU must also be set to a quantity of 4.
● Selection between Gold or Silver Services is mandatory. Gold Service selection is subject to review during quoting and is based on Super Micro Service availability at the selected install site location.
● If selected Rack has In-rack CDU or separate L2L In Row or L2A Sidecar CDU is selected then Liquid Cool Maintenance Service is required.
● Data Retention Service is optional selection.
Step 10.
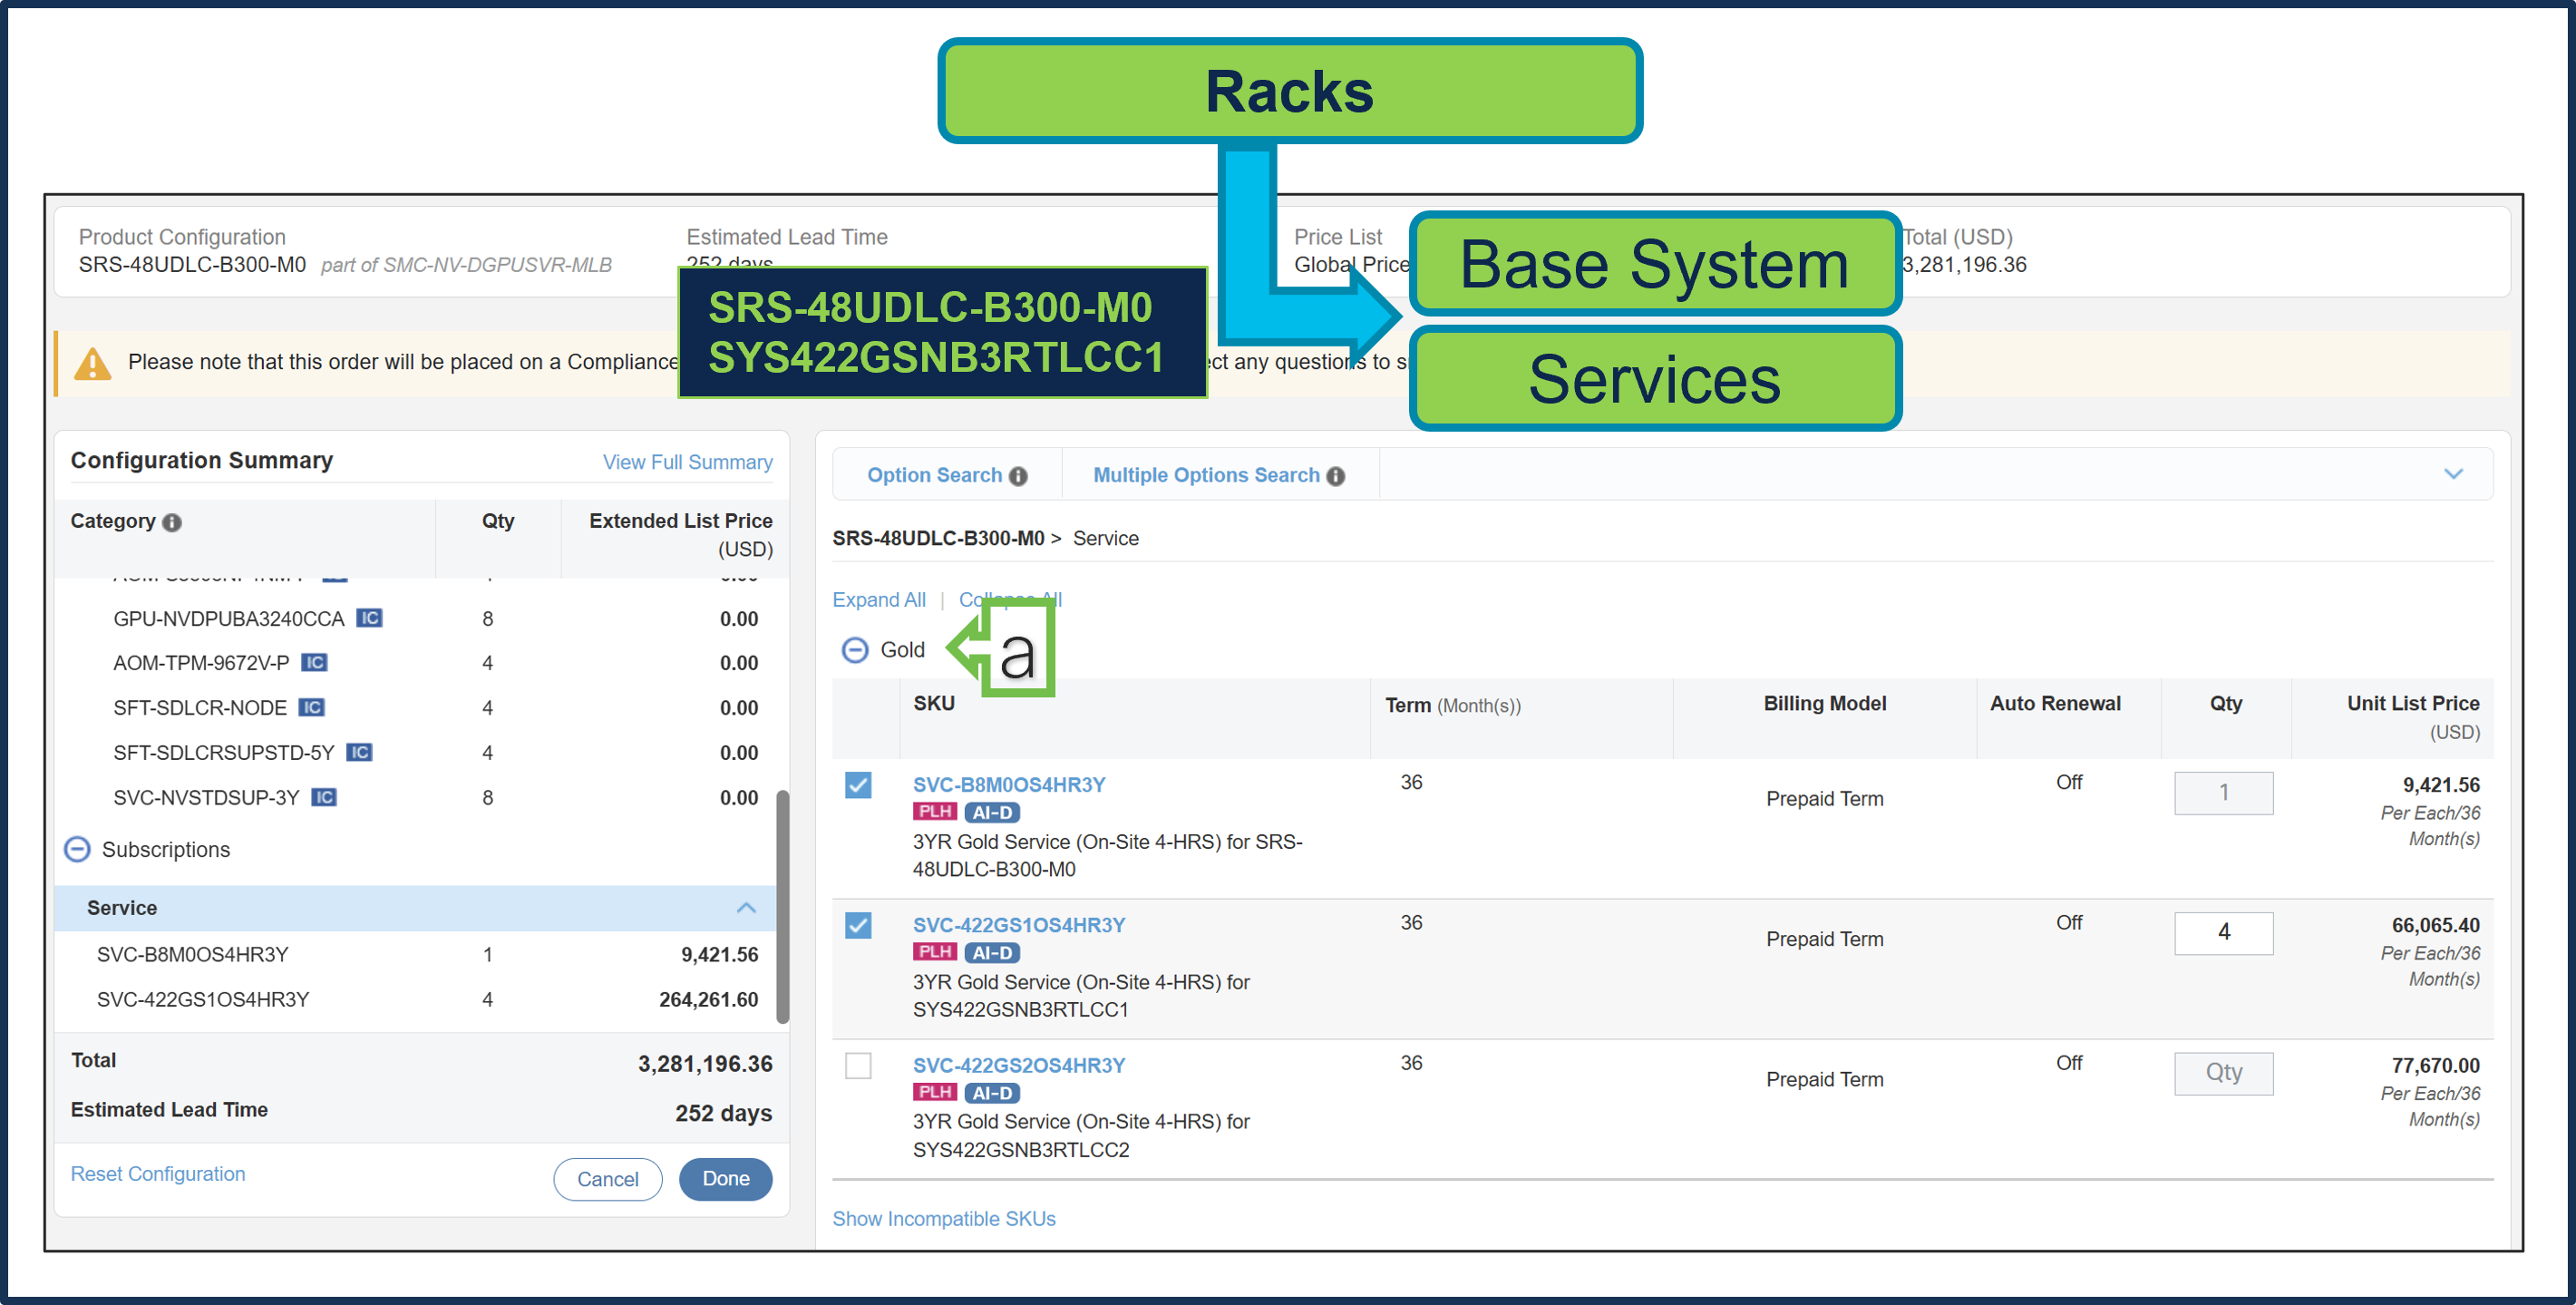
a. Gold Supermicro Services is selected. Gold Service selection is subject to review during quoting and is based on Super Micro Service availability at the selected install site location
Step 11.
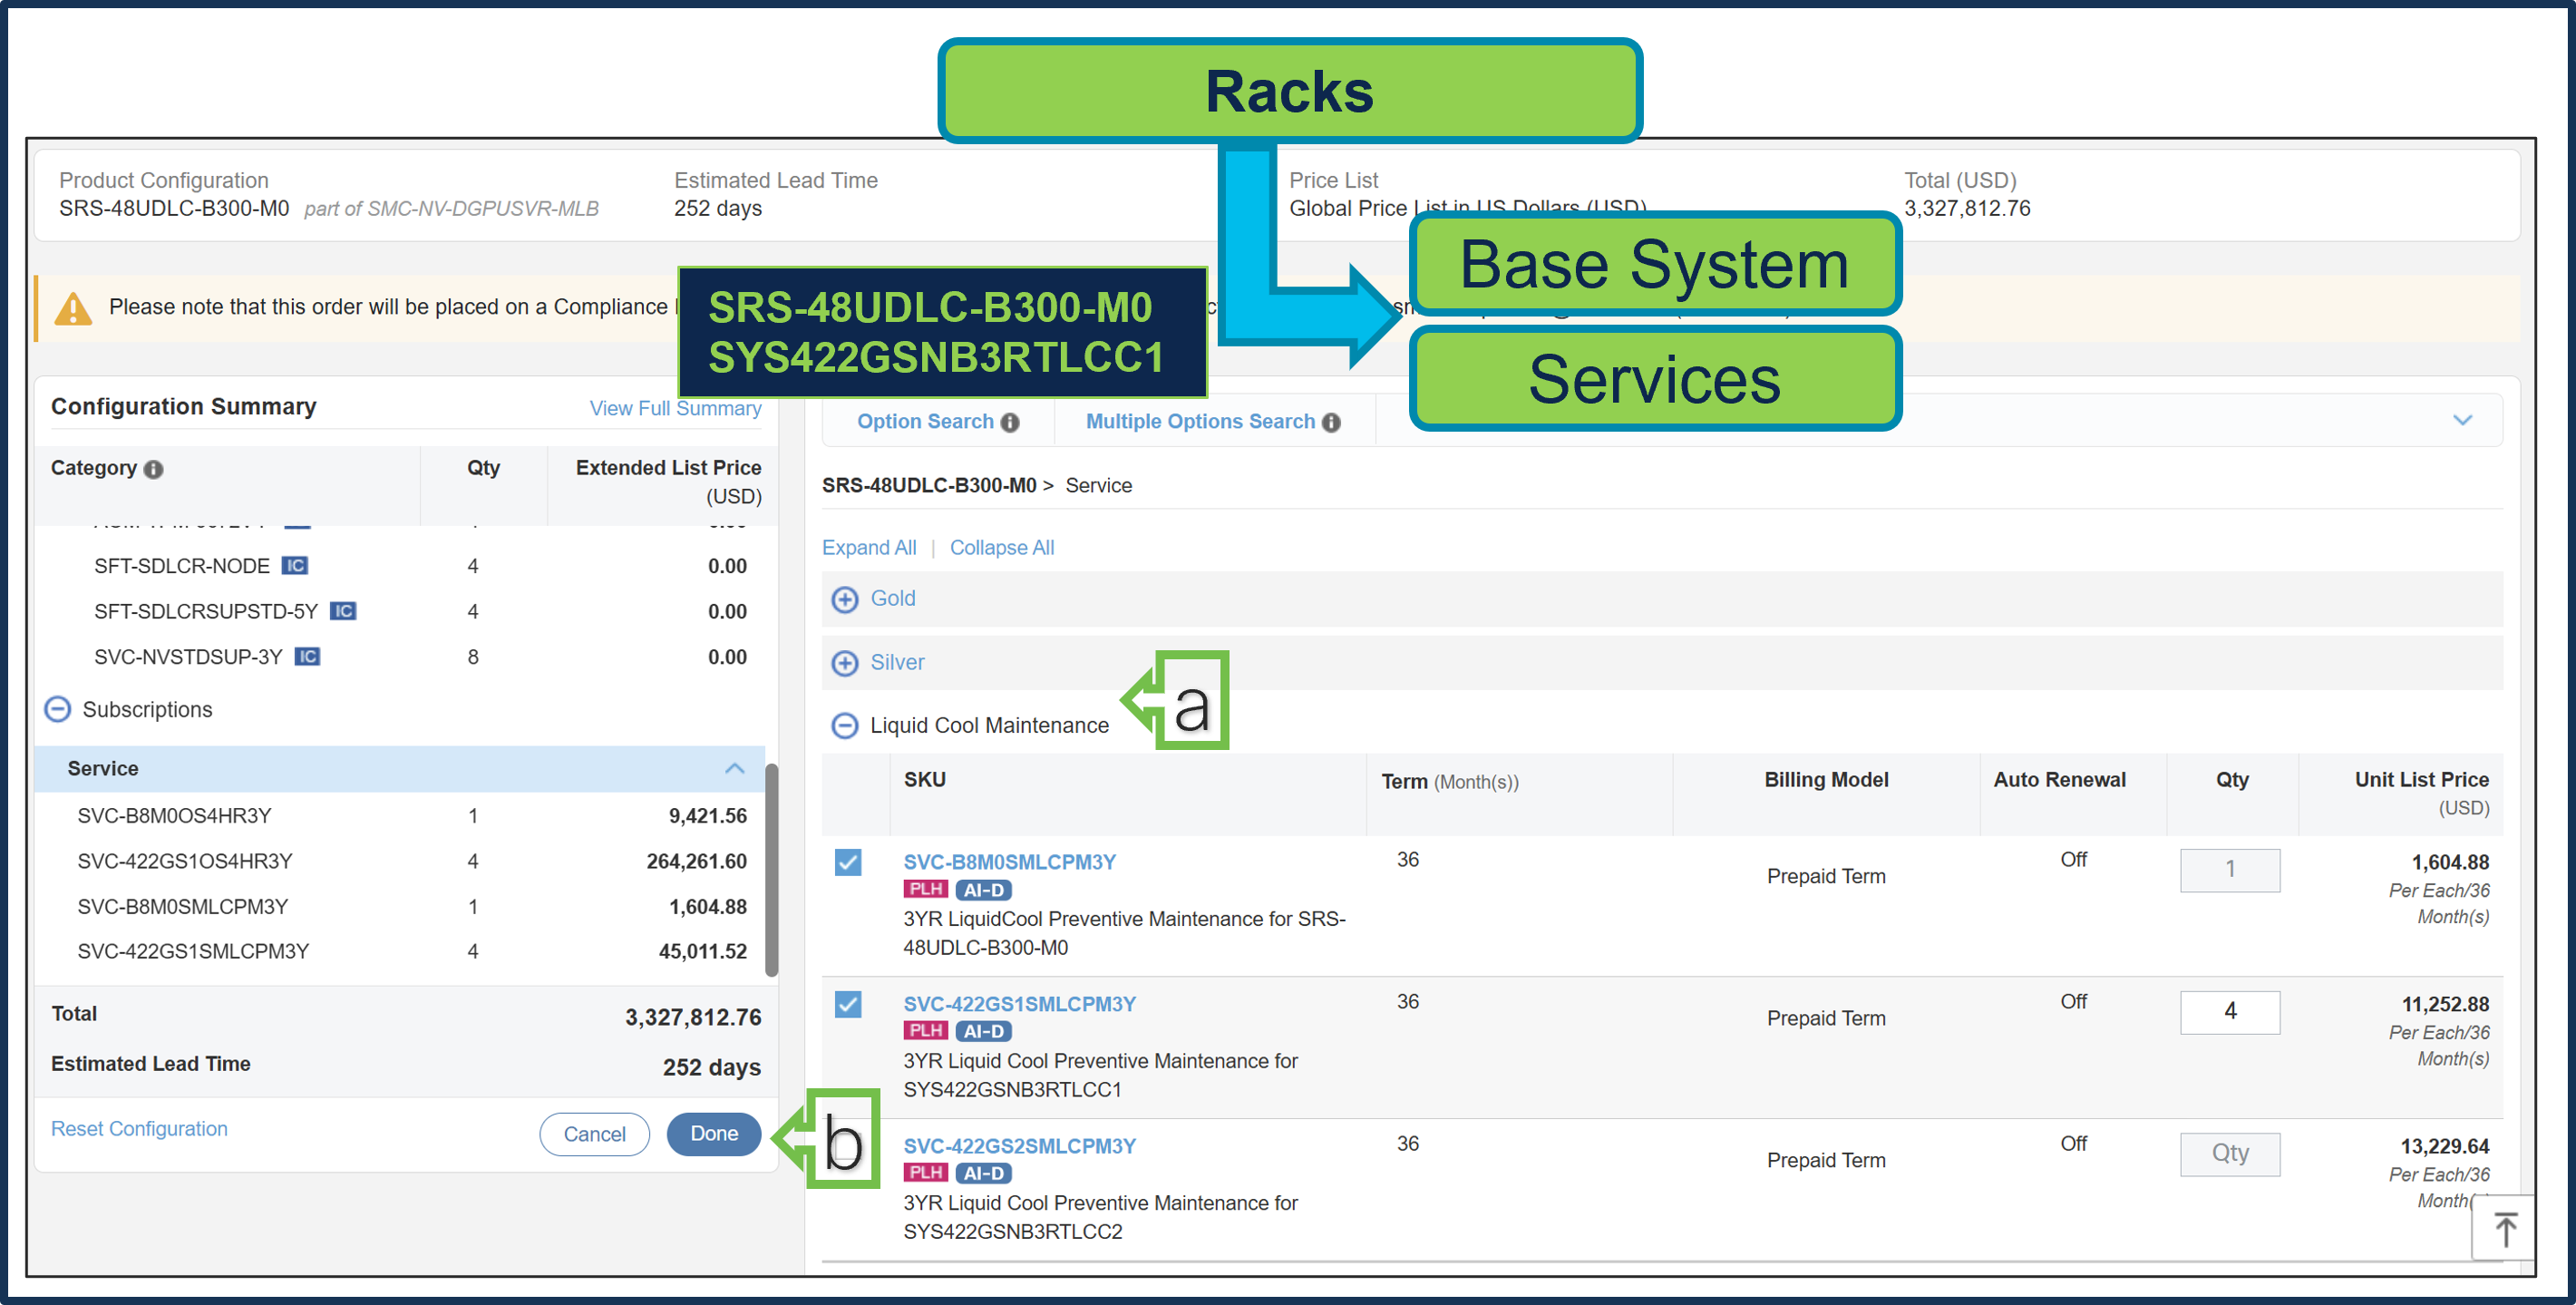
a. Given M0 Rack does not have In-rack CDU, so it is recommended to select separate L2L In Row or L2A Sidecar CDU and then Liquid Cool Maintenance Service is required.
b. Select Done when completed.
Step 12.
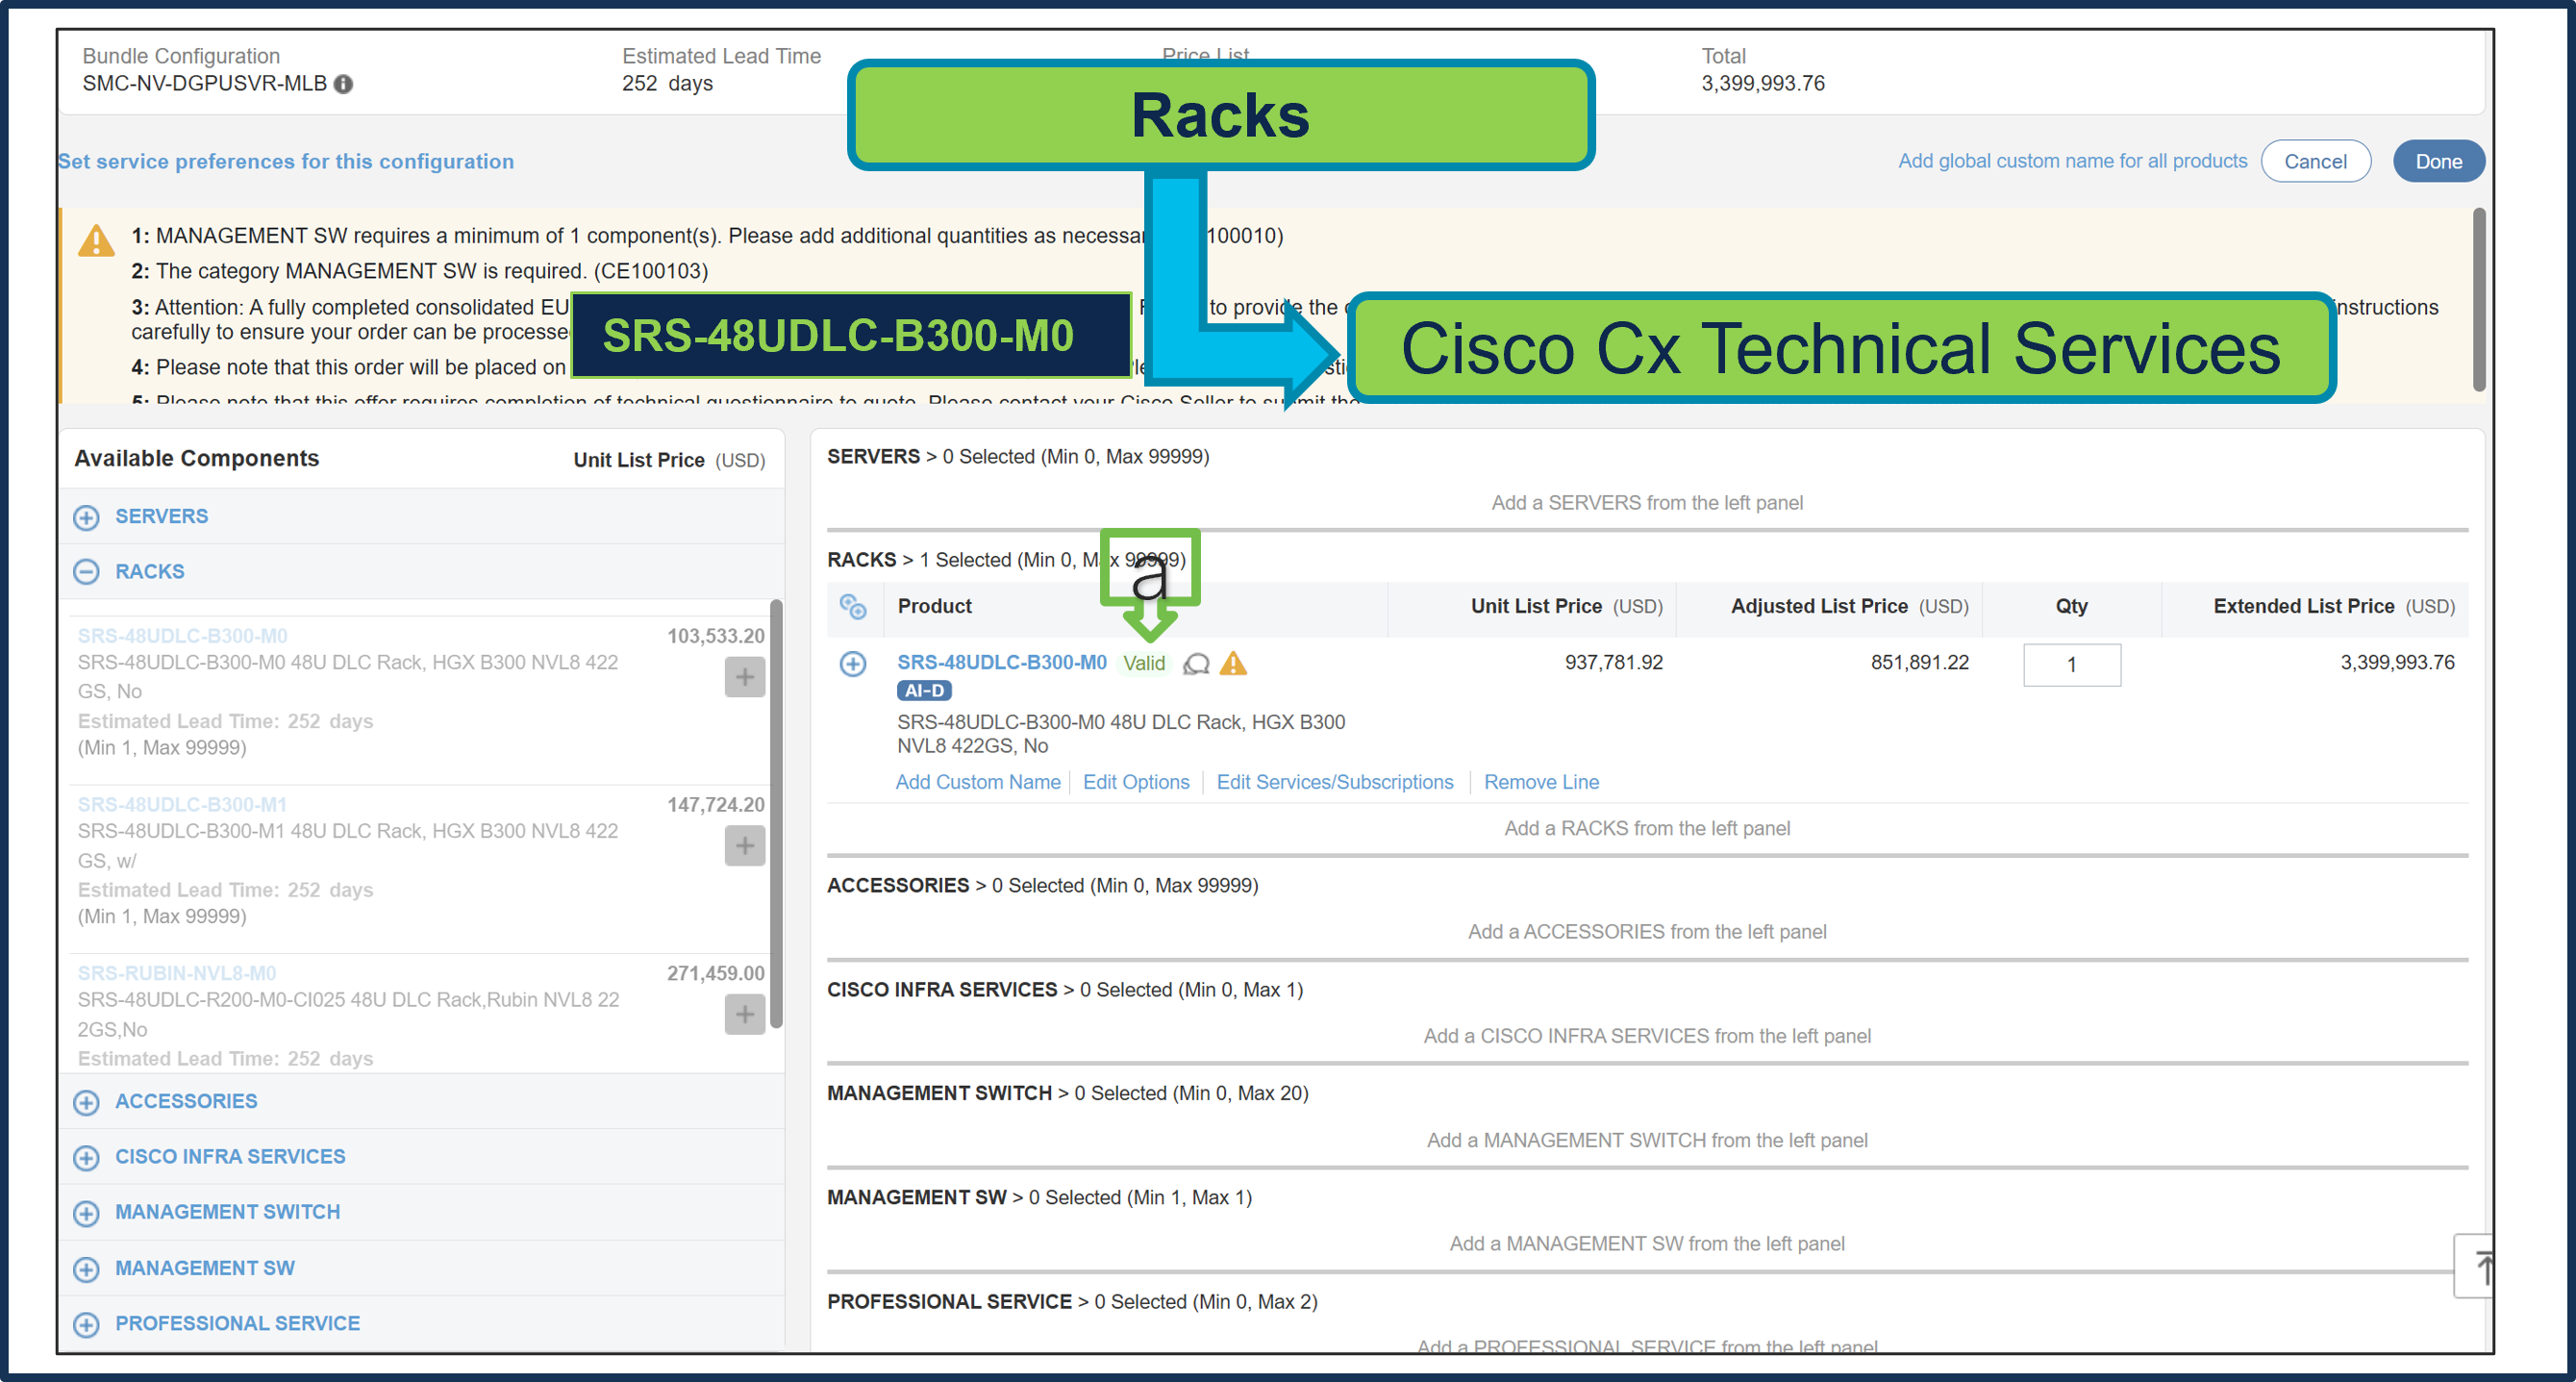
a. Note Status is now Valid.
b. Please note that Cisco CX IHV1 Technical Service is mandatory and cannot be removed.
c. The maximum duration of subscriptions will be automatically applied to the duration of technical services in this configuration. Please ensure Cisco IHVI Services Term aligns to the Gold/Silver services Term.
d. Go to "Edit Service/Subscription" to edit the duration of technical services.
Step 13.
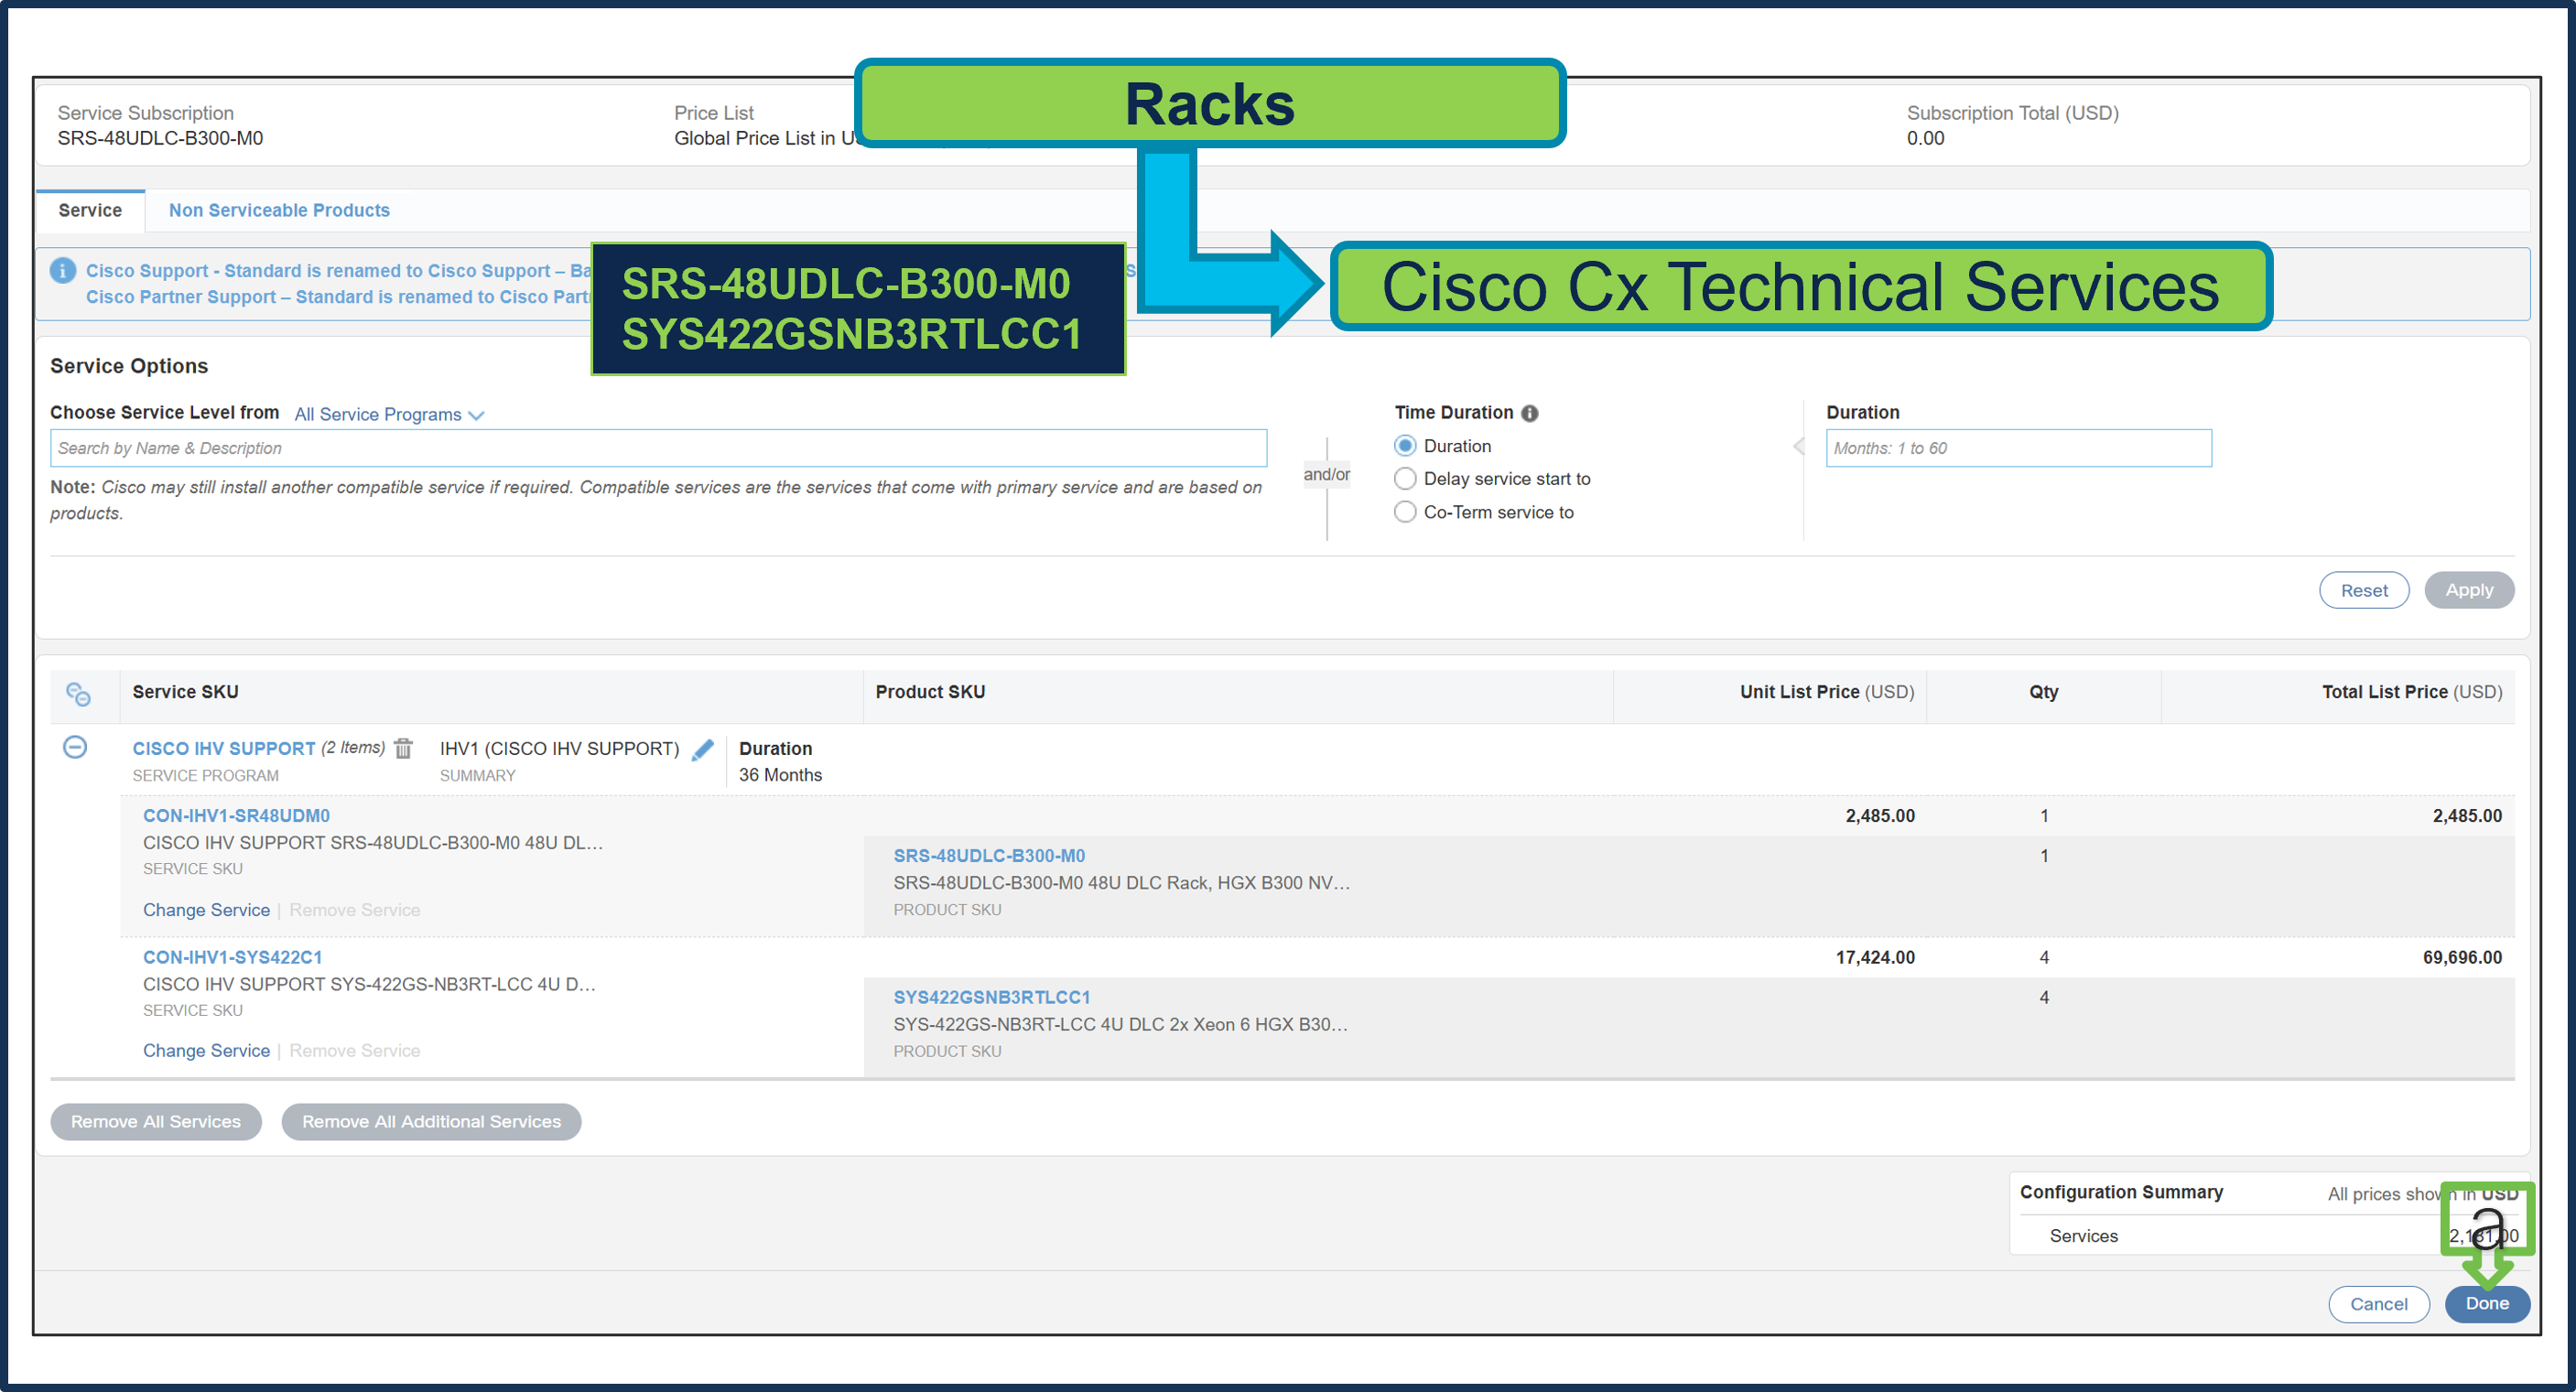
a. Since Supermicro Services Term selected in 36 months, Cisco CX Technical Service Term Duration is also defaulted to 36 Months. Click done.
Step 14.
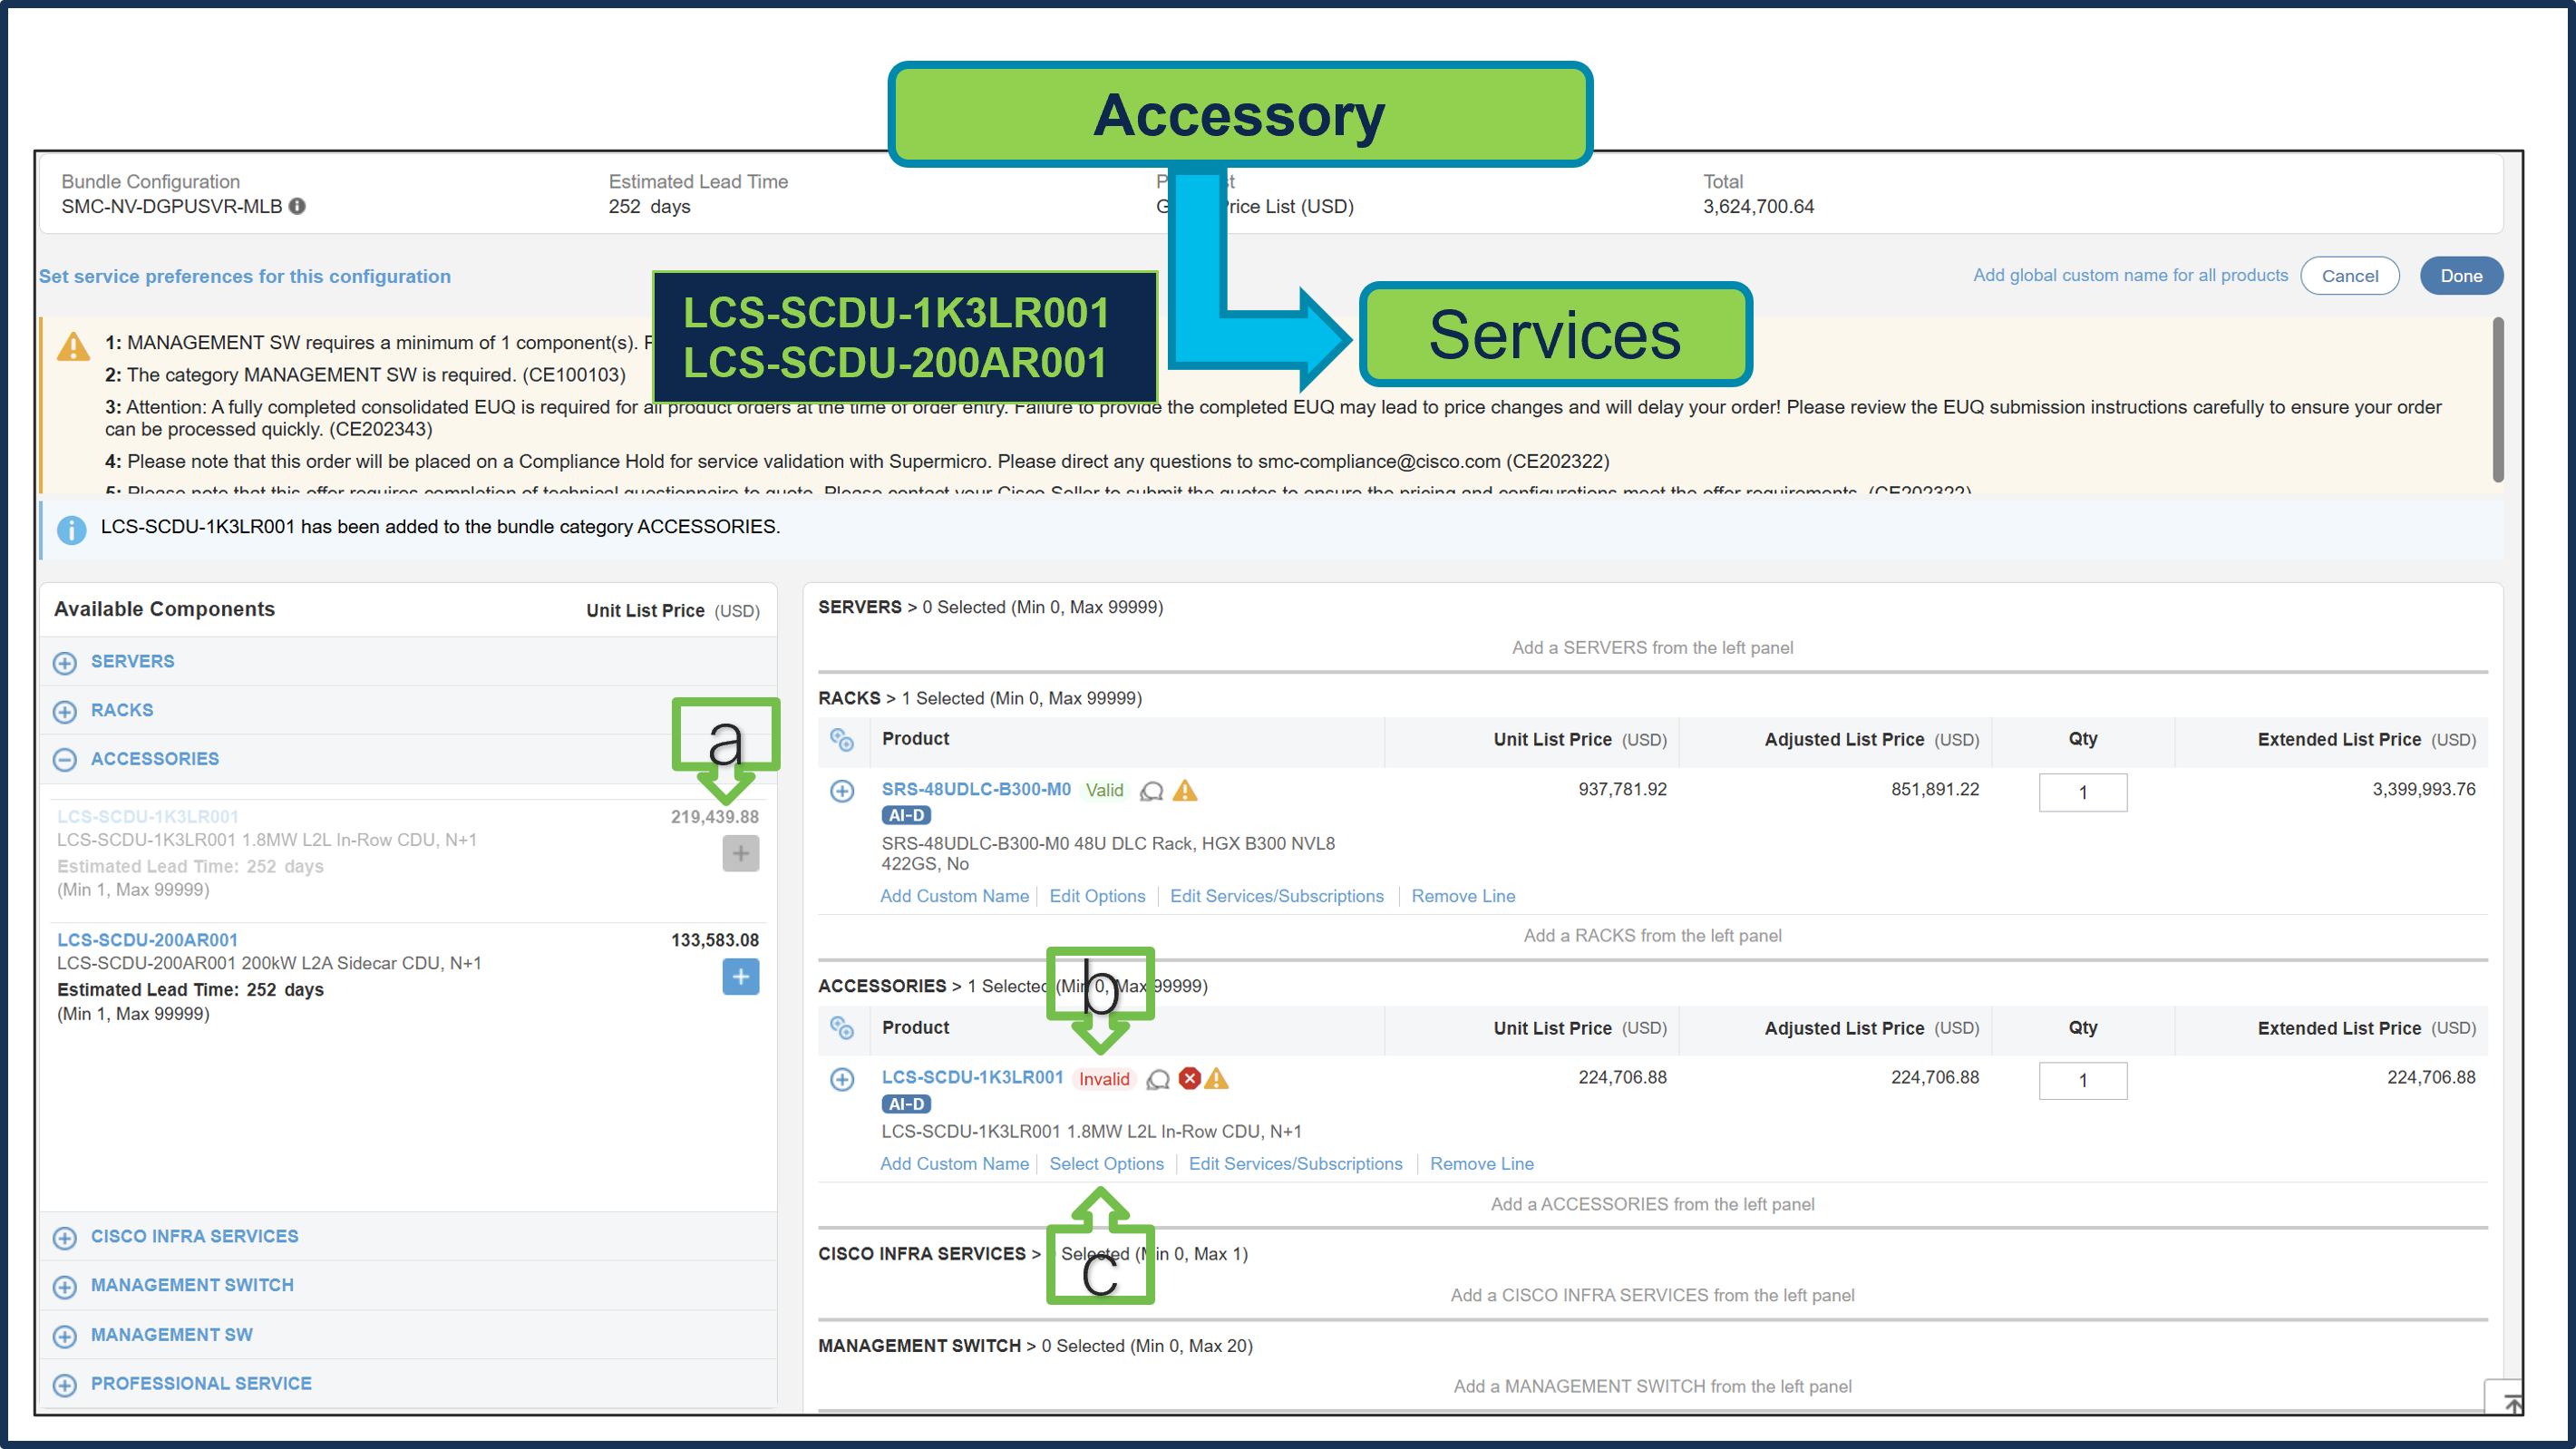
a. Select LCS-SCDU-1K3LR001 or LCS-SCDU-200AR001ATO from Accessory under MLB by clicking the “PLUS”
b. Notice the LCS-SCDU-1K3LR001 ATO Status is invalid as further configuration needed.
c. Select ‘Select Options’ to enter the configurator
Step 15.
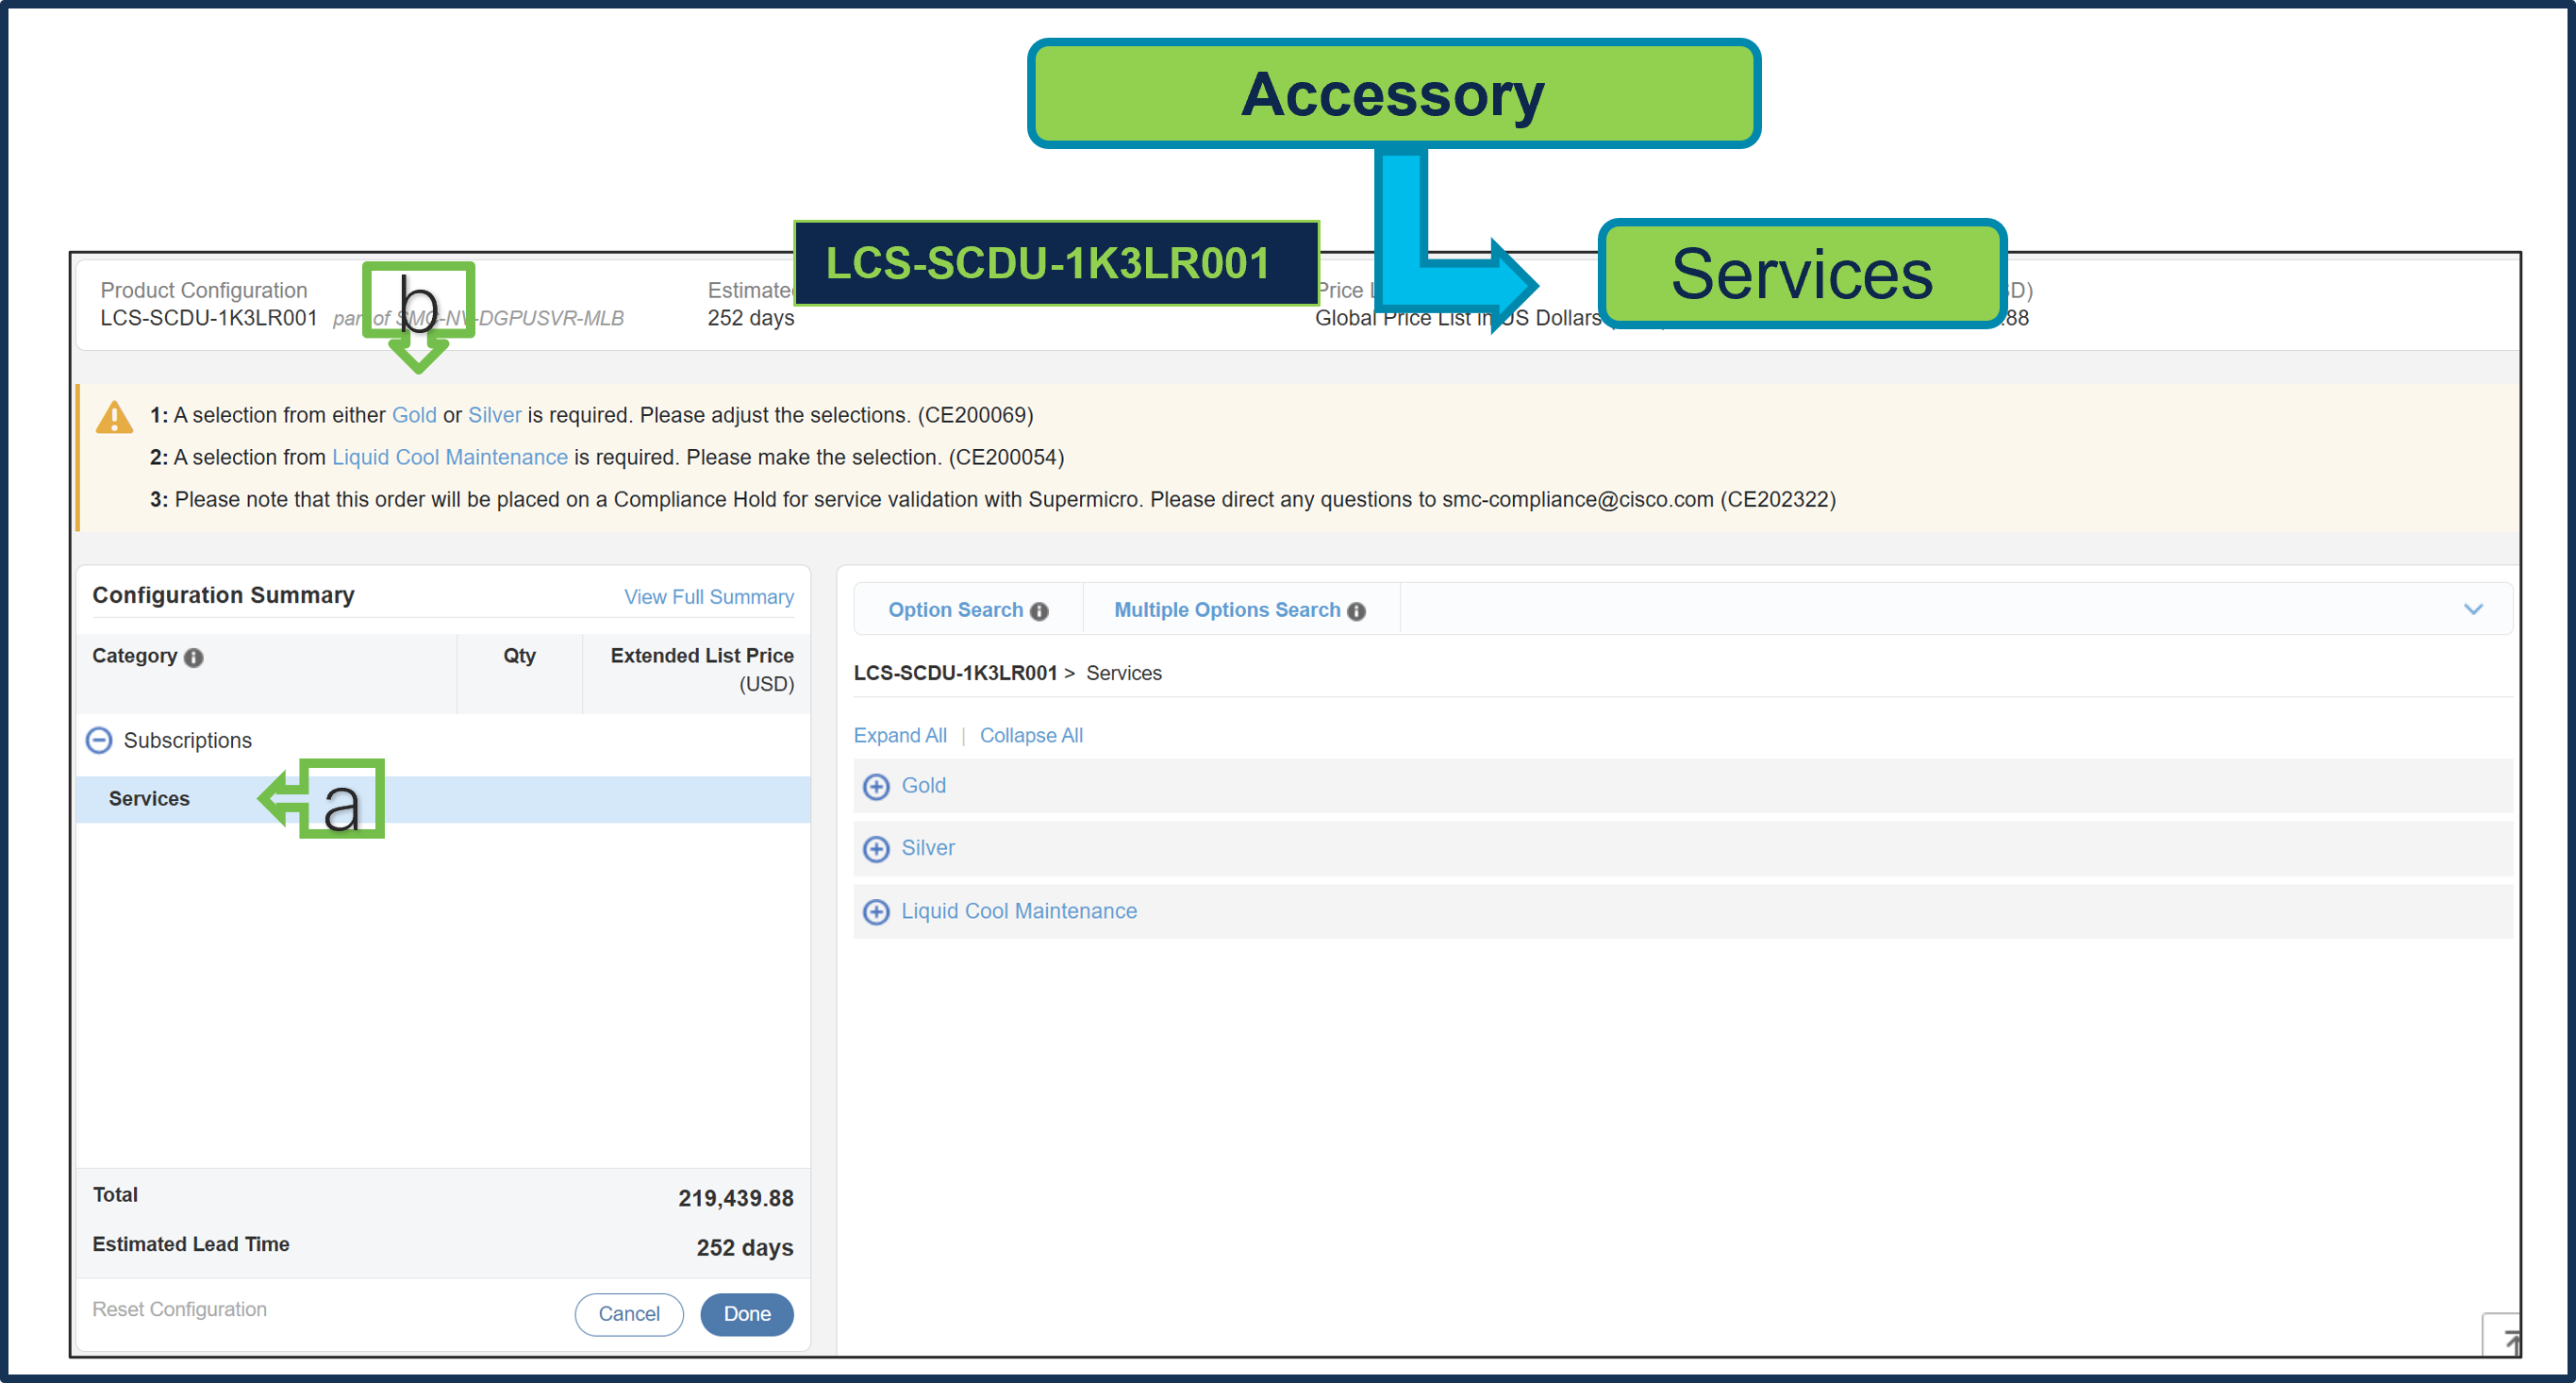
a. Configure LCS-SCDU-1K3LR001 by selecting Supermicro Services as these are mandatory selection.
b. Follow warning messages to configure the minimum required selections.
● Selection from Gold or Silver Services is mandatory. Gold Service selection is subject to review during quoting and is based on Super Micro Service availability at the selected install site location.
● Selection of Liquid Cool Maintenance Service is also mandatory
Step 16.
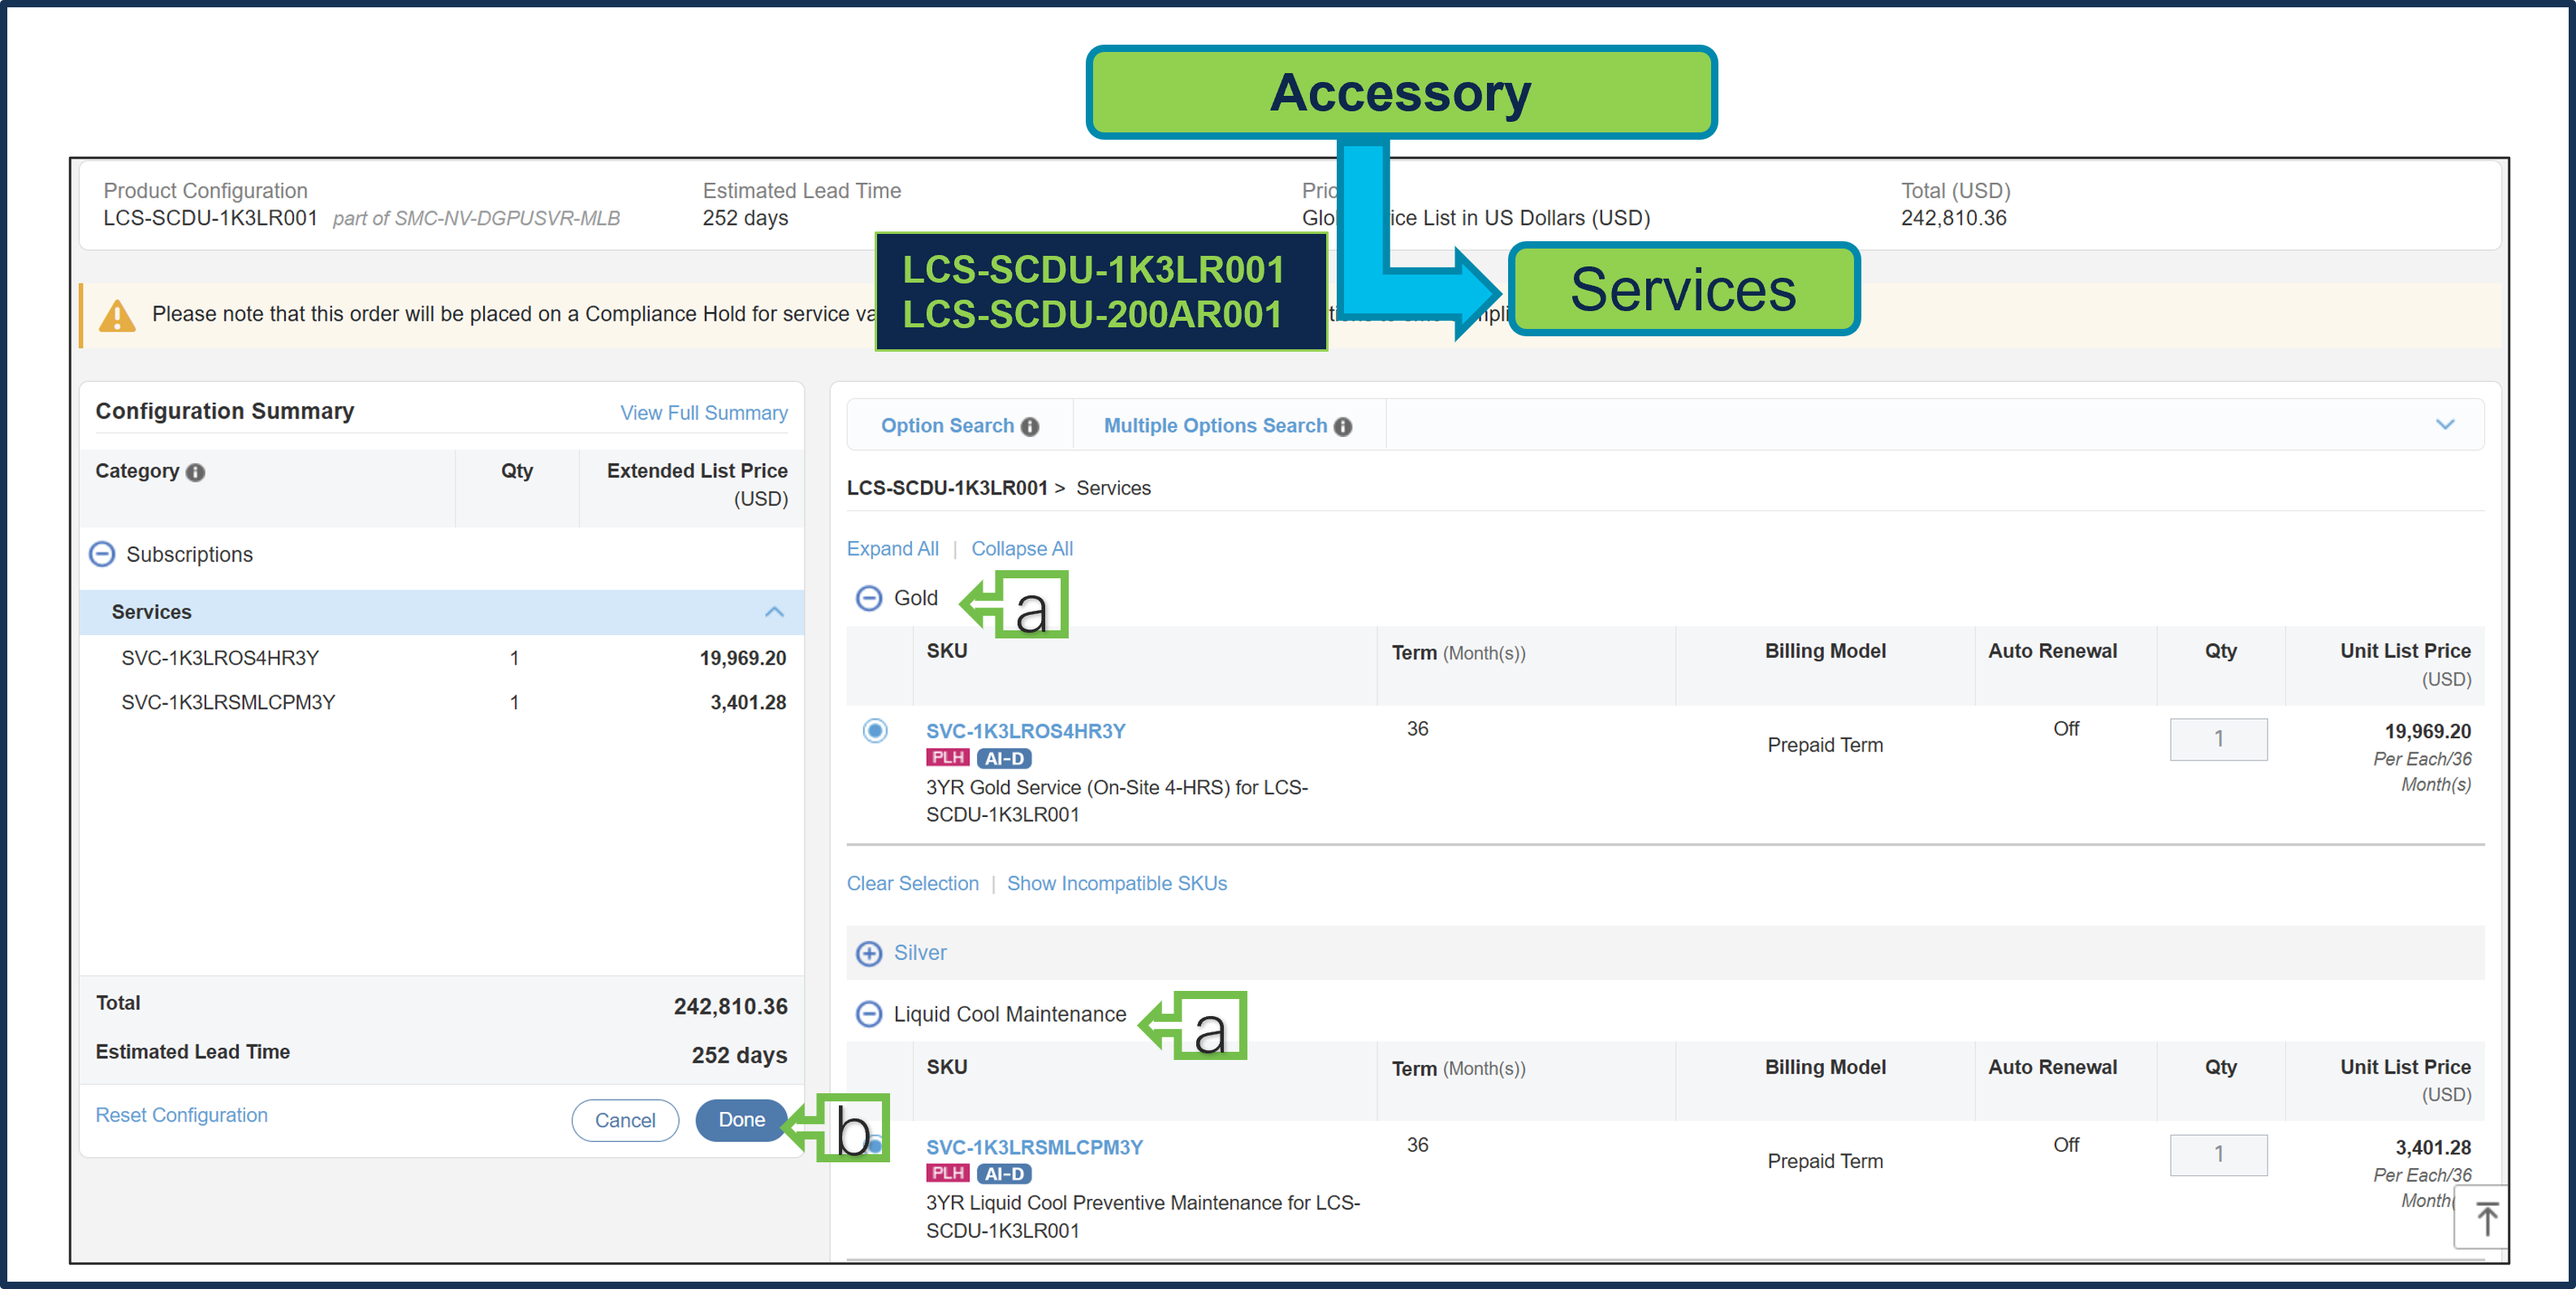
a. Gold & Liquid Cool Maintenance Supermicro Services are selected.
b. Select Done when completed.
Step 17.
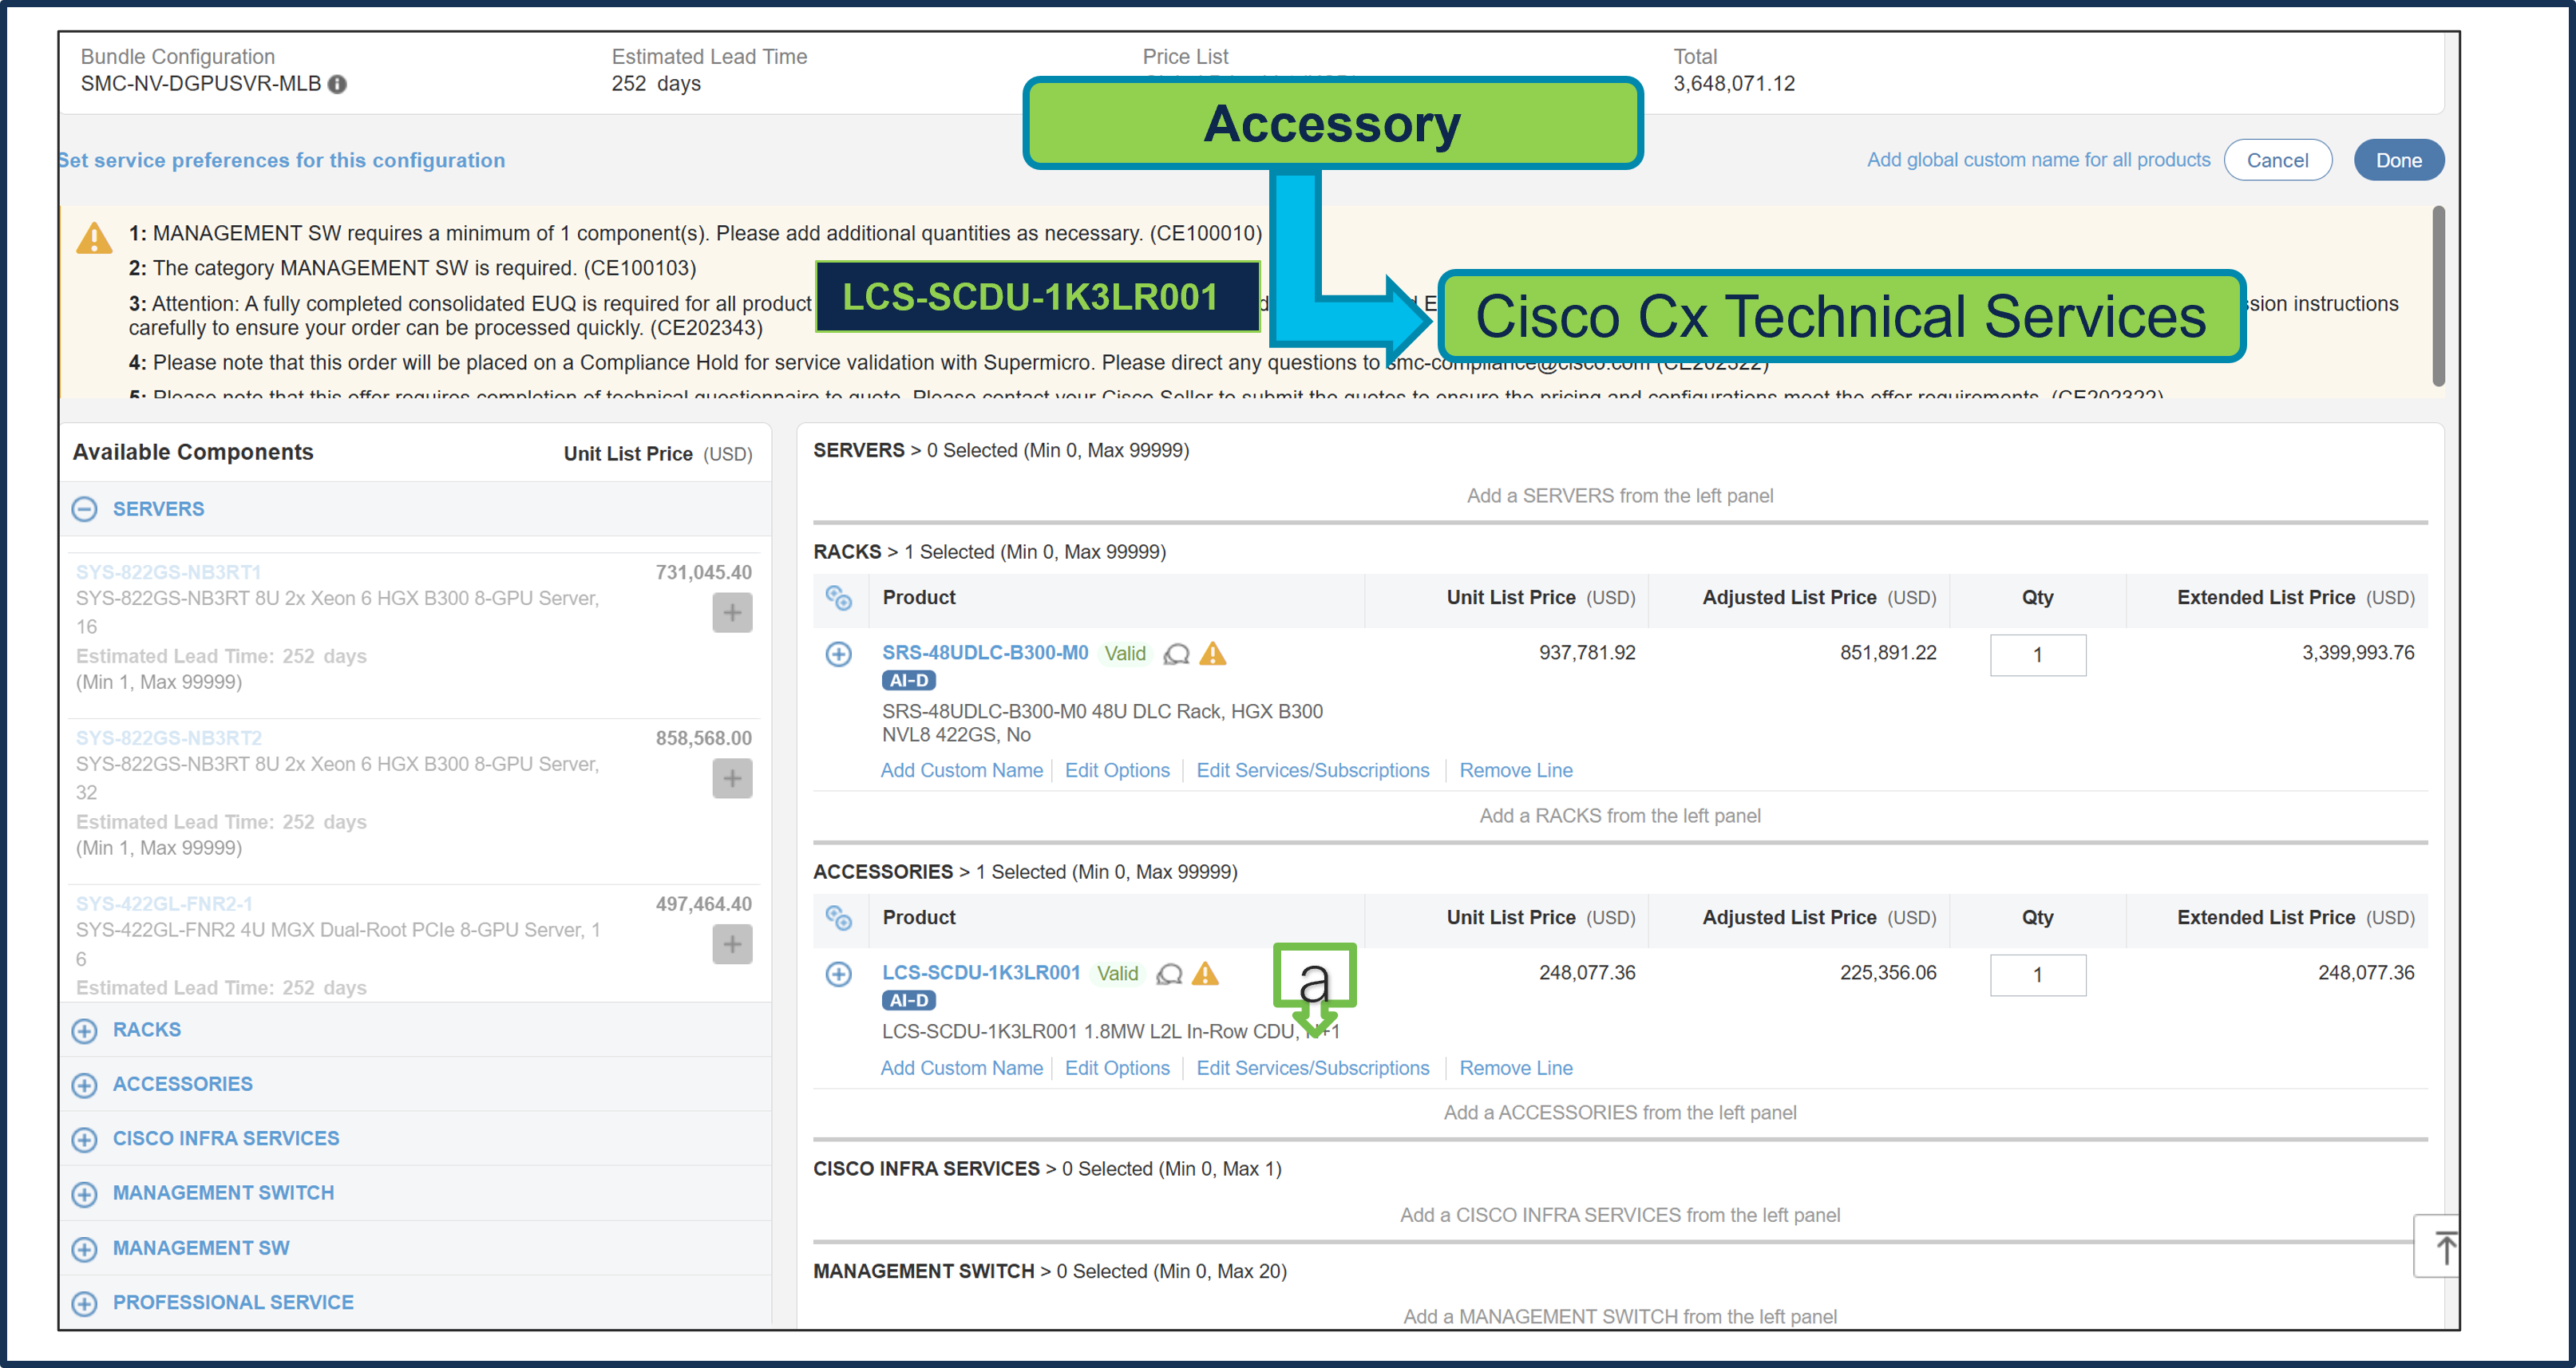
a. Note Status is now Valid.
b. Please note that Cisco CX IHV1 Technical Service is mandatory and cannot be removed.
c. The maximum duration of subscriptions will be automatically applied to the duration of technical services in this configuration. Please ensure Cisco IHVI Services Term aligns to the Gold/Silver services Term.
d. Go to "Edit Service/Subscription" to edit the duration of technical services.
Step 18.
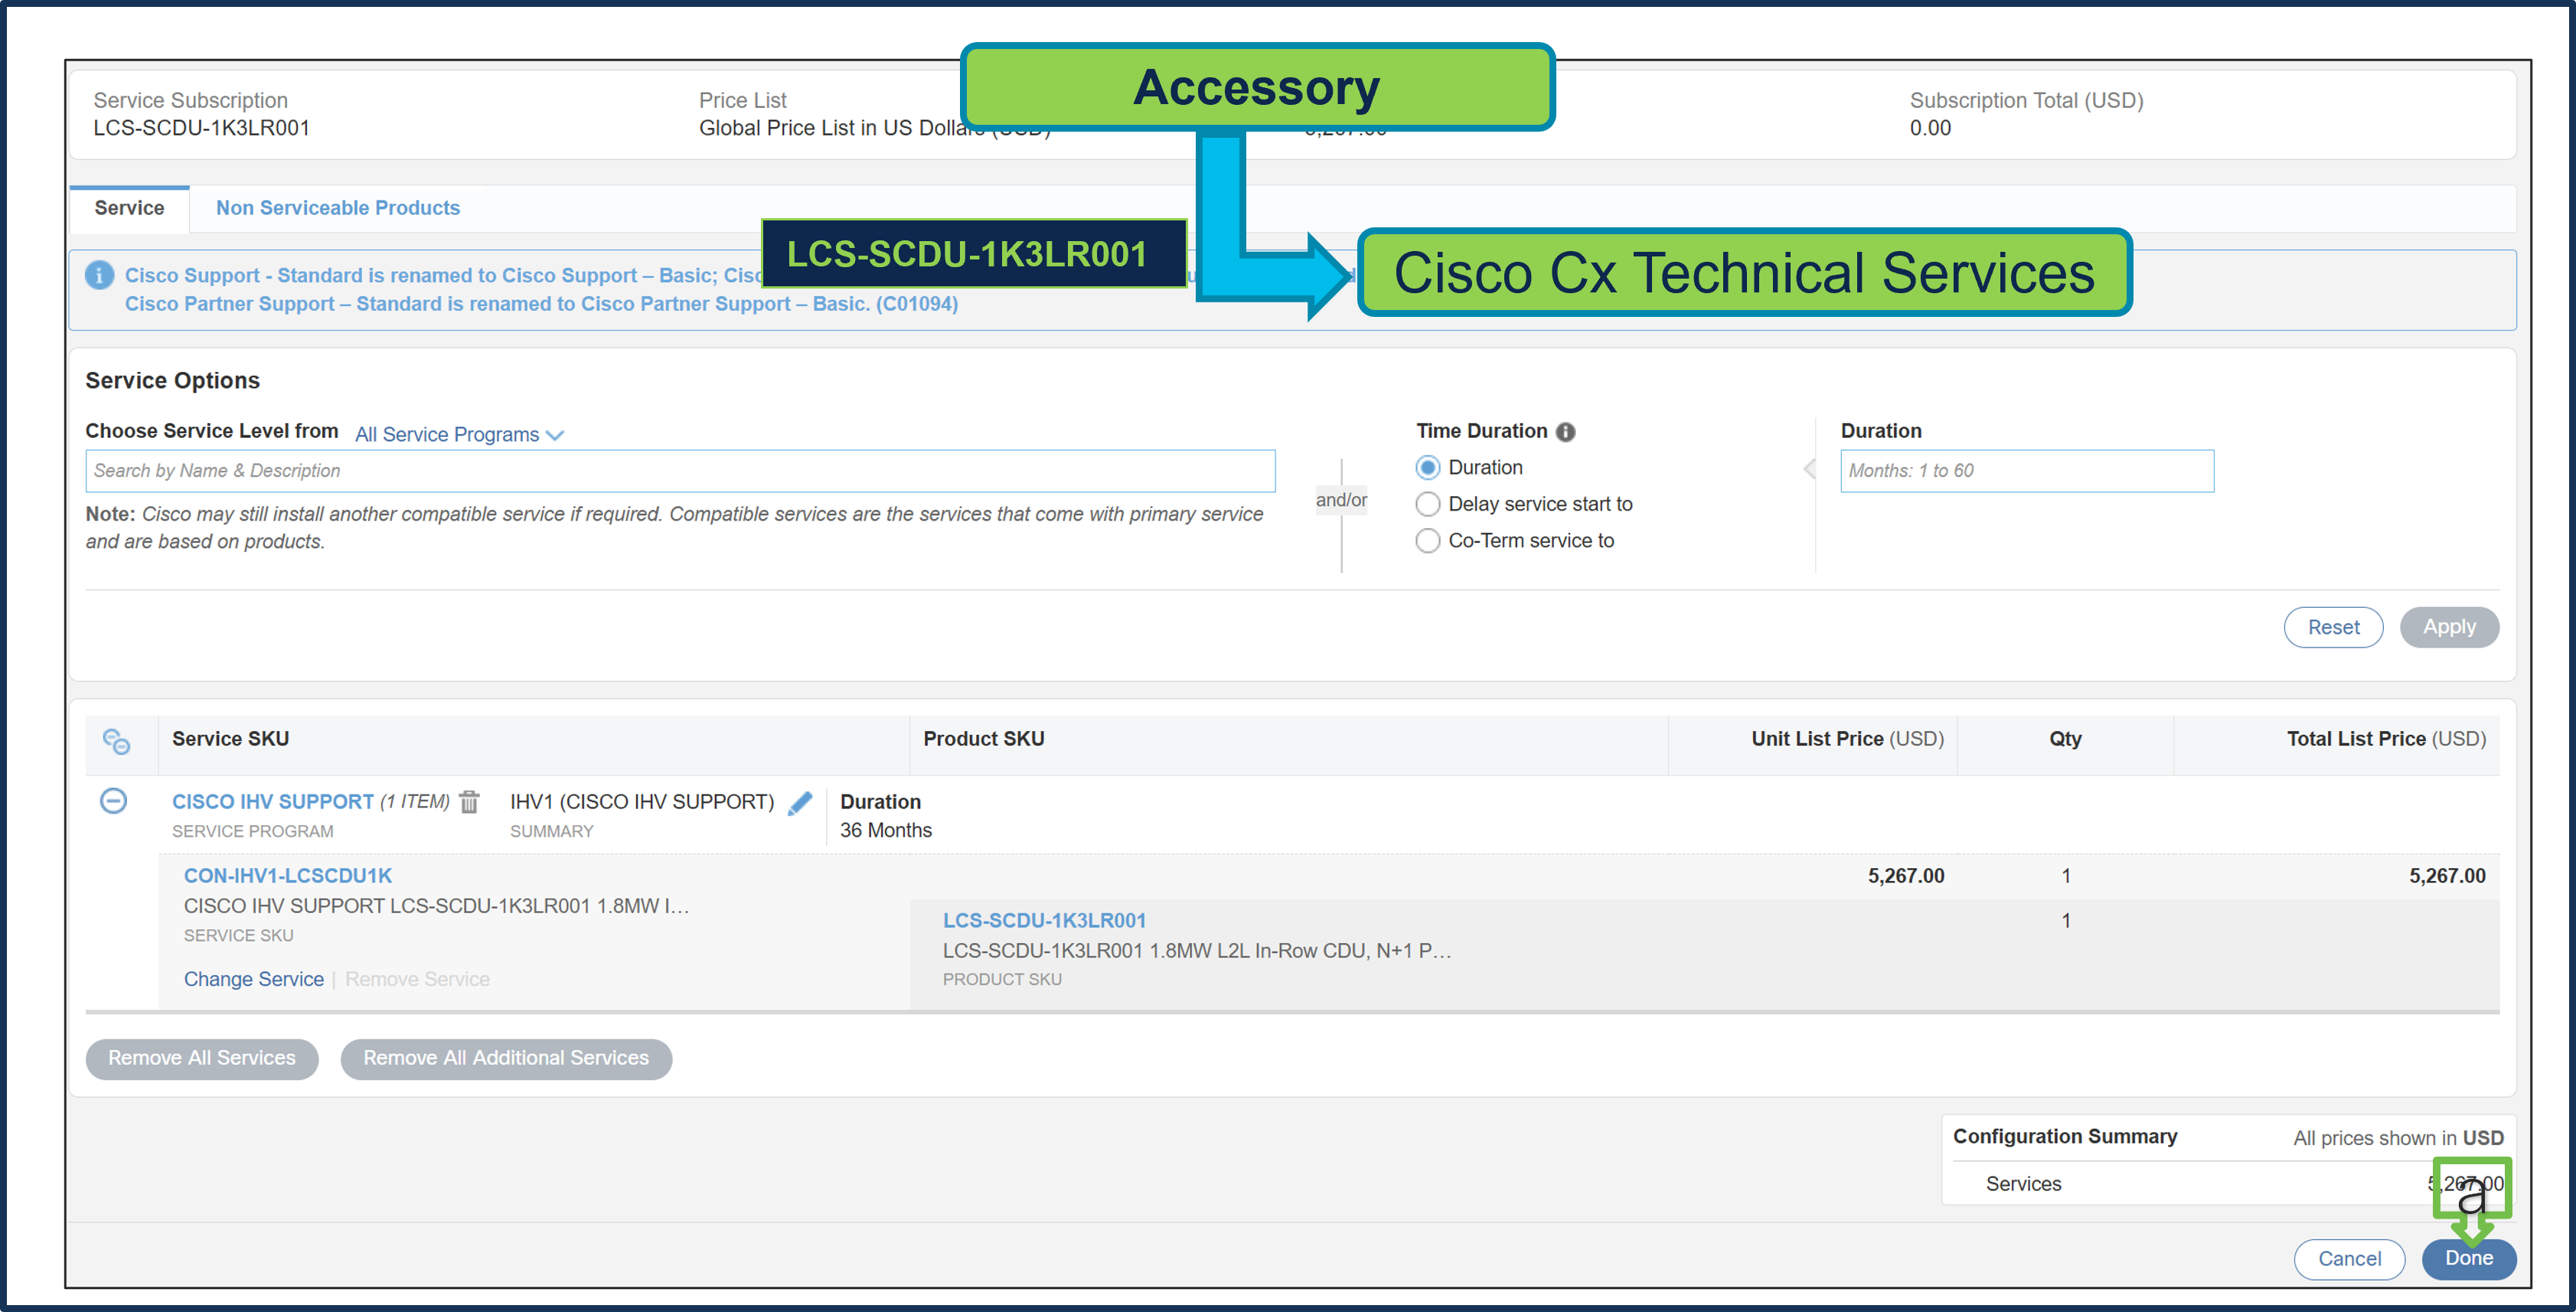
a. Since Supermicro Services Term selected in 36 months, hence, Cisco CX Technical Service Term Duration is also defaulted to 36 Months. Click Done
Step 19.
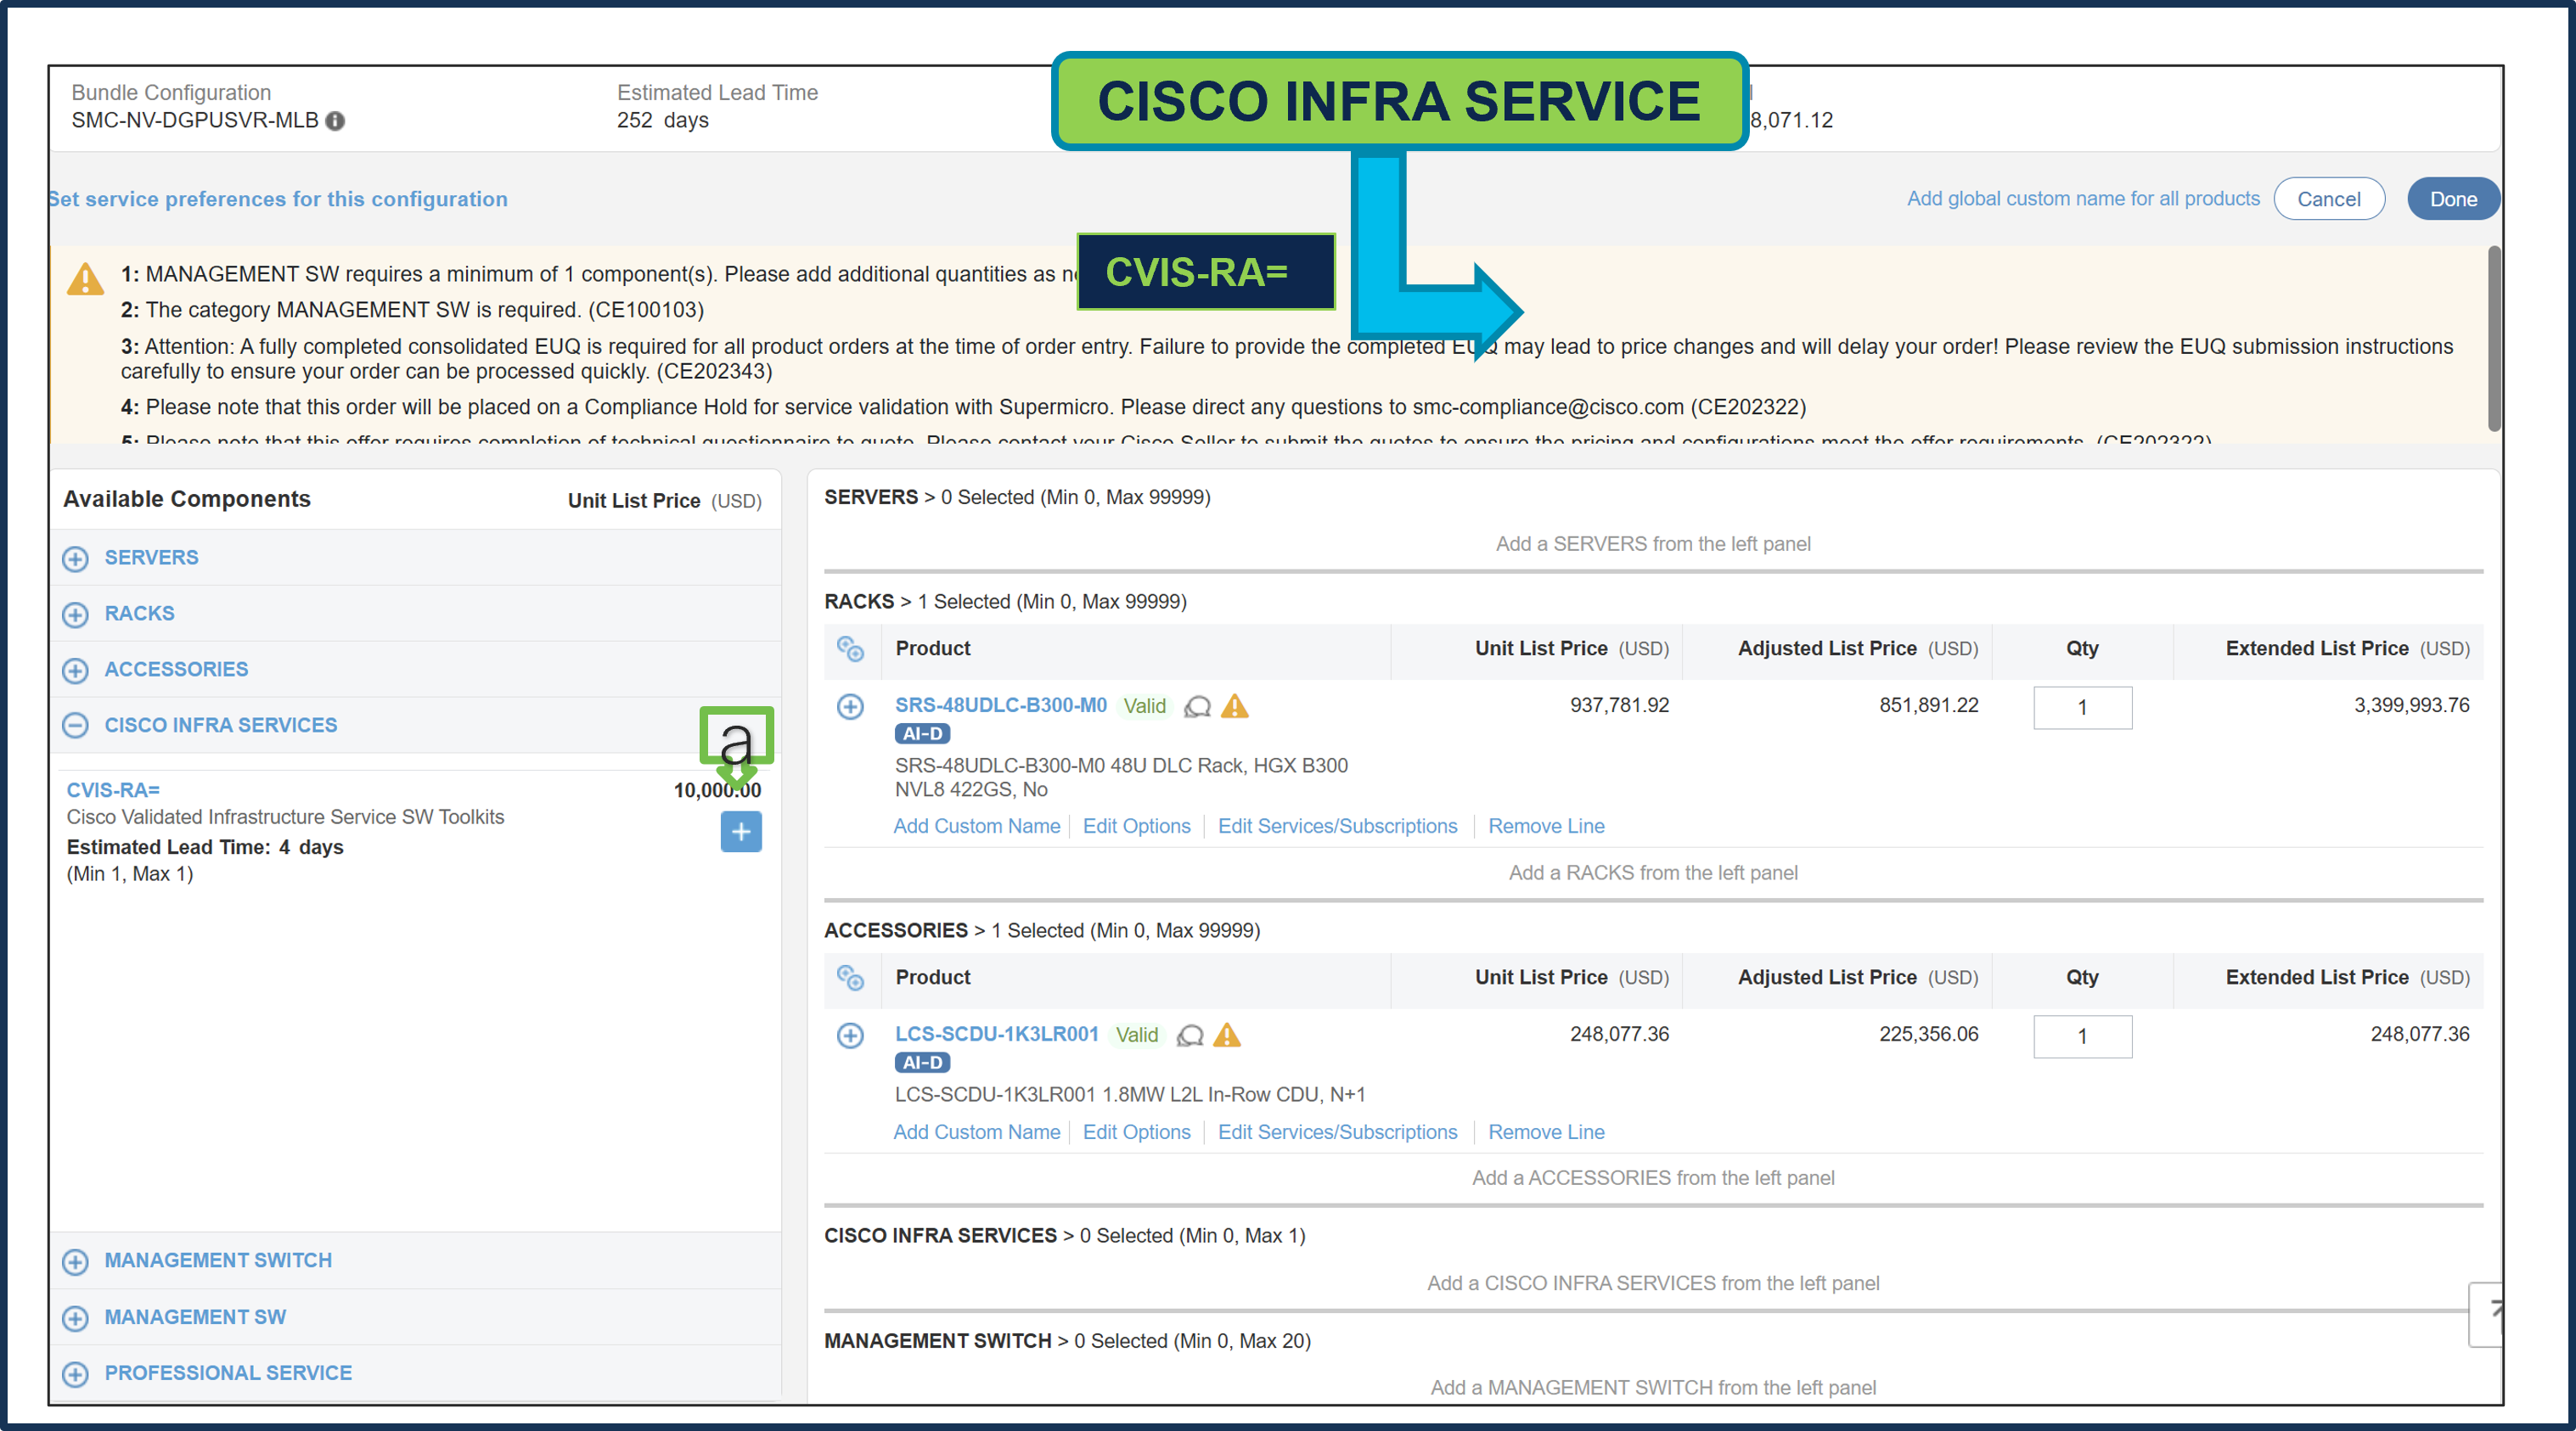
a. CISCO INFRA SERVICES: CVIS-RA= is an optional selection and can be selected if needed. If selected, then it needs to be selected only 1 QTY per Cluster.
Step 20.
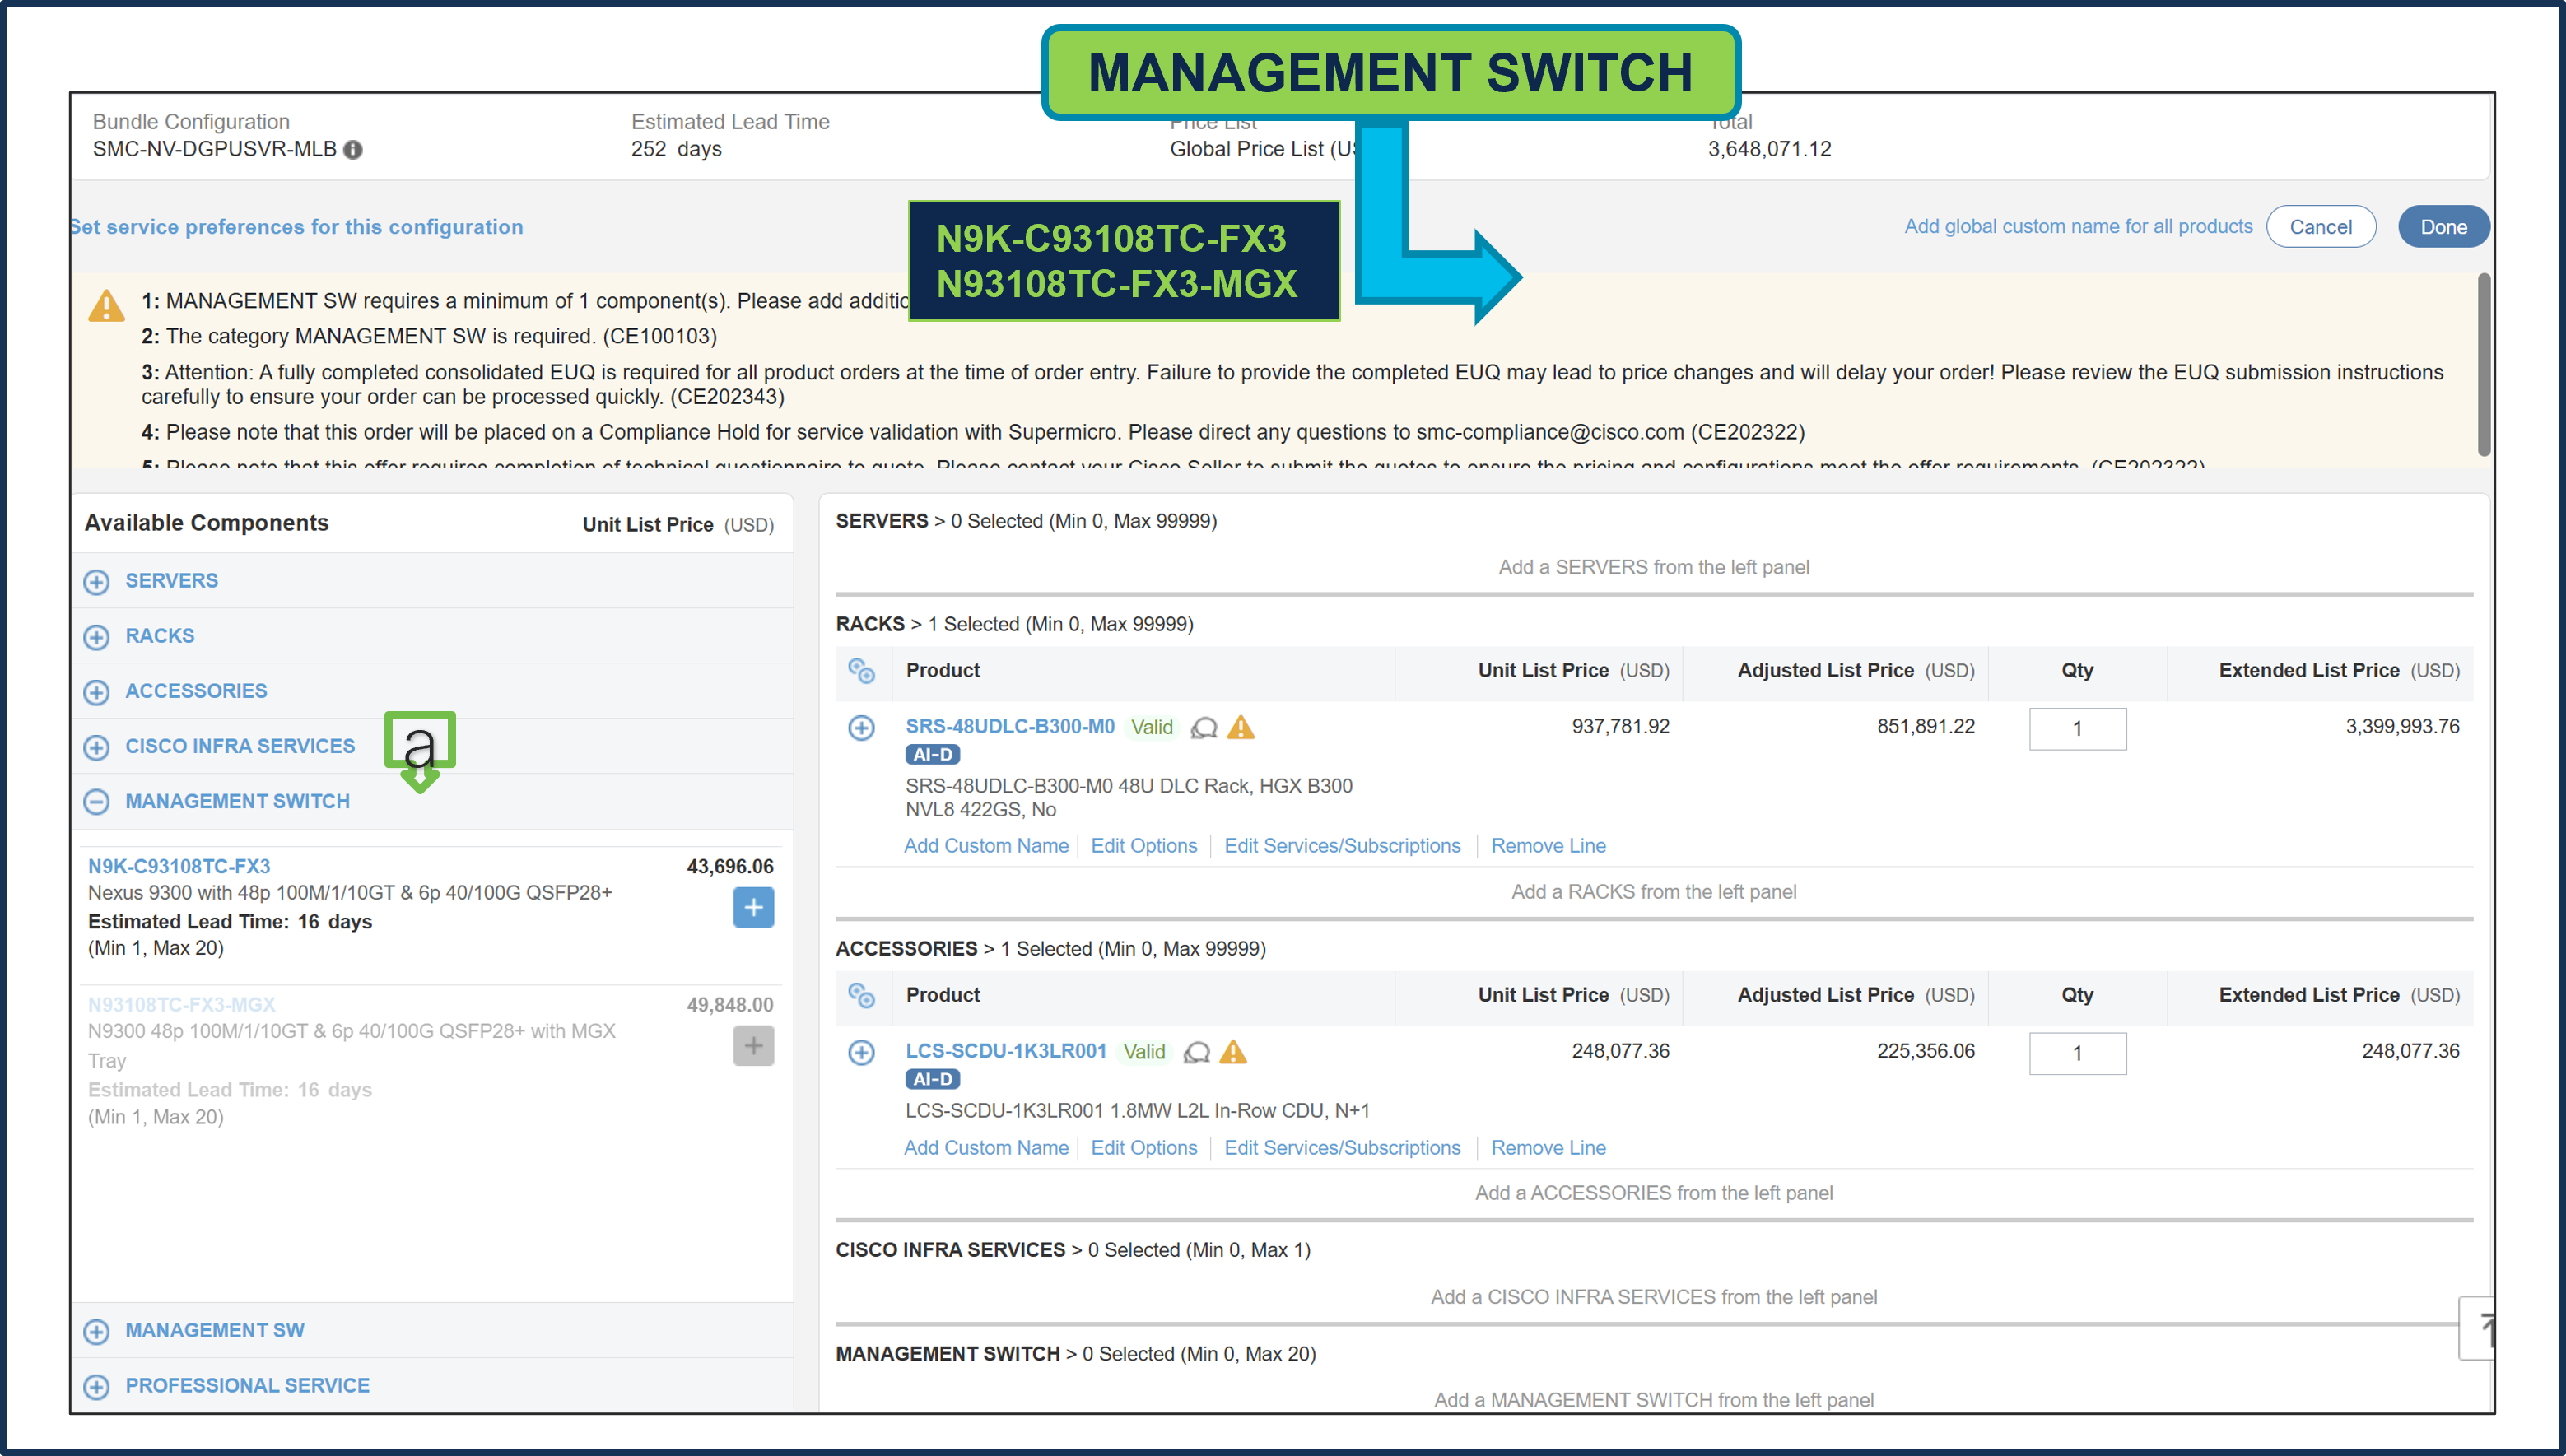
a. MANAGEMENT SWITCH is an optional selection and can be selected if needed.
● With B300 Rack, Switch PID: N9K-C93108TC-FX3 can be selected.
● With Rubin Rack, Switch PID: N93108TC-FX3-MGX can be selected.
● If selected, then it needs to be selected 2 QTY per Rack. Configure the Switch as needed
Step 21.
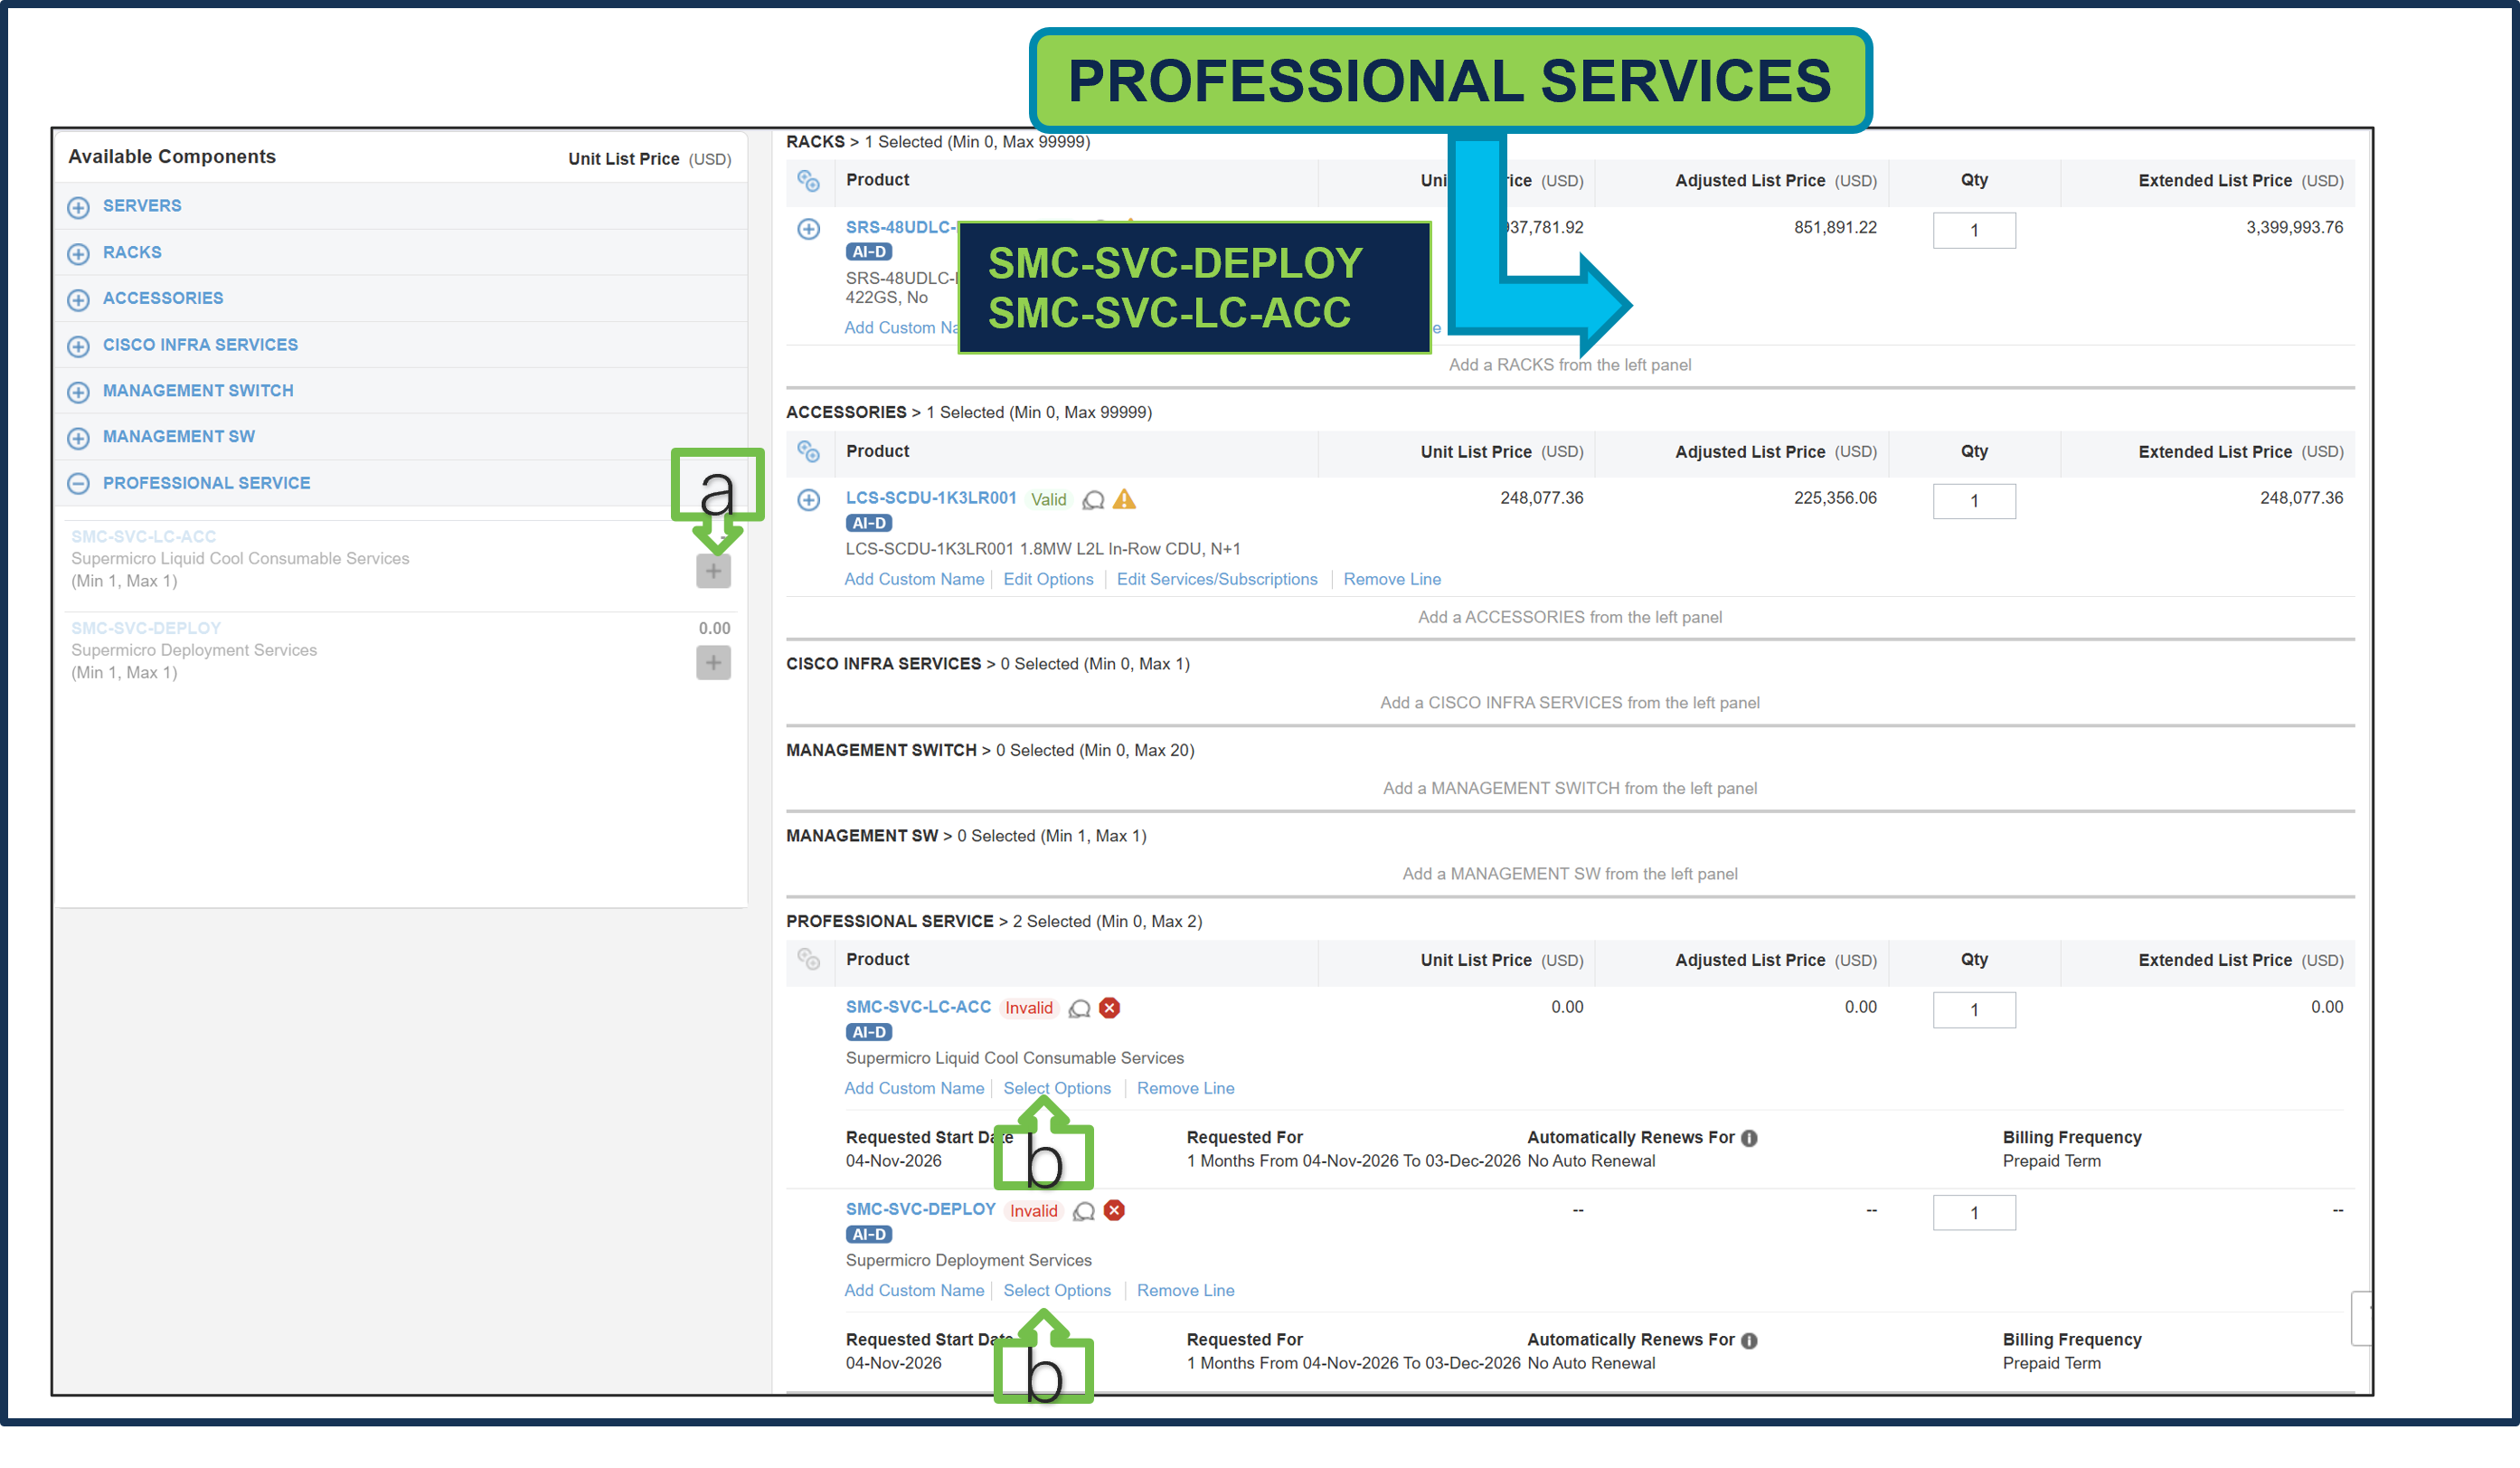
a. It is recommended that User Purchase Supermicro Professional Services: SMC-SVC-LC-ACC & SMC-SVC-DEPLOY. Make a selection by clicking “PLUS”.
b. Click on Edit Options to configure the Product.
Step 22.
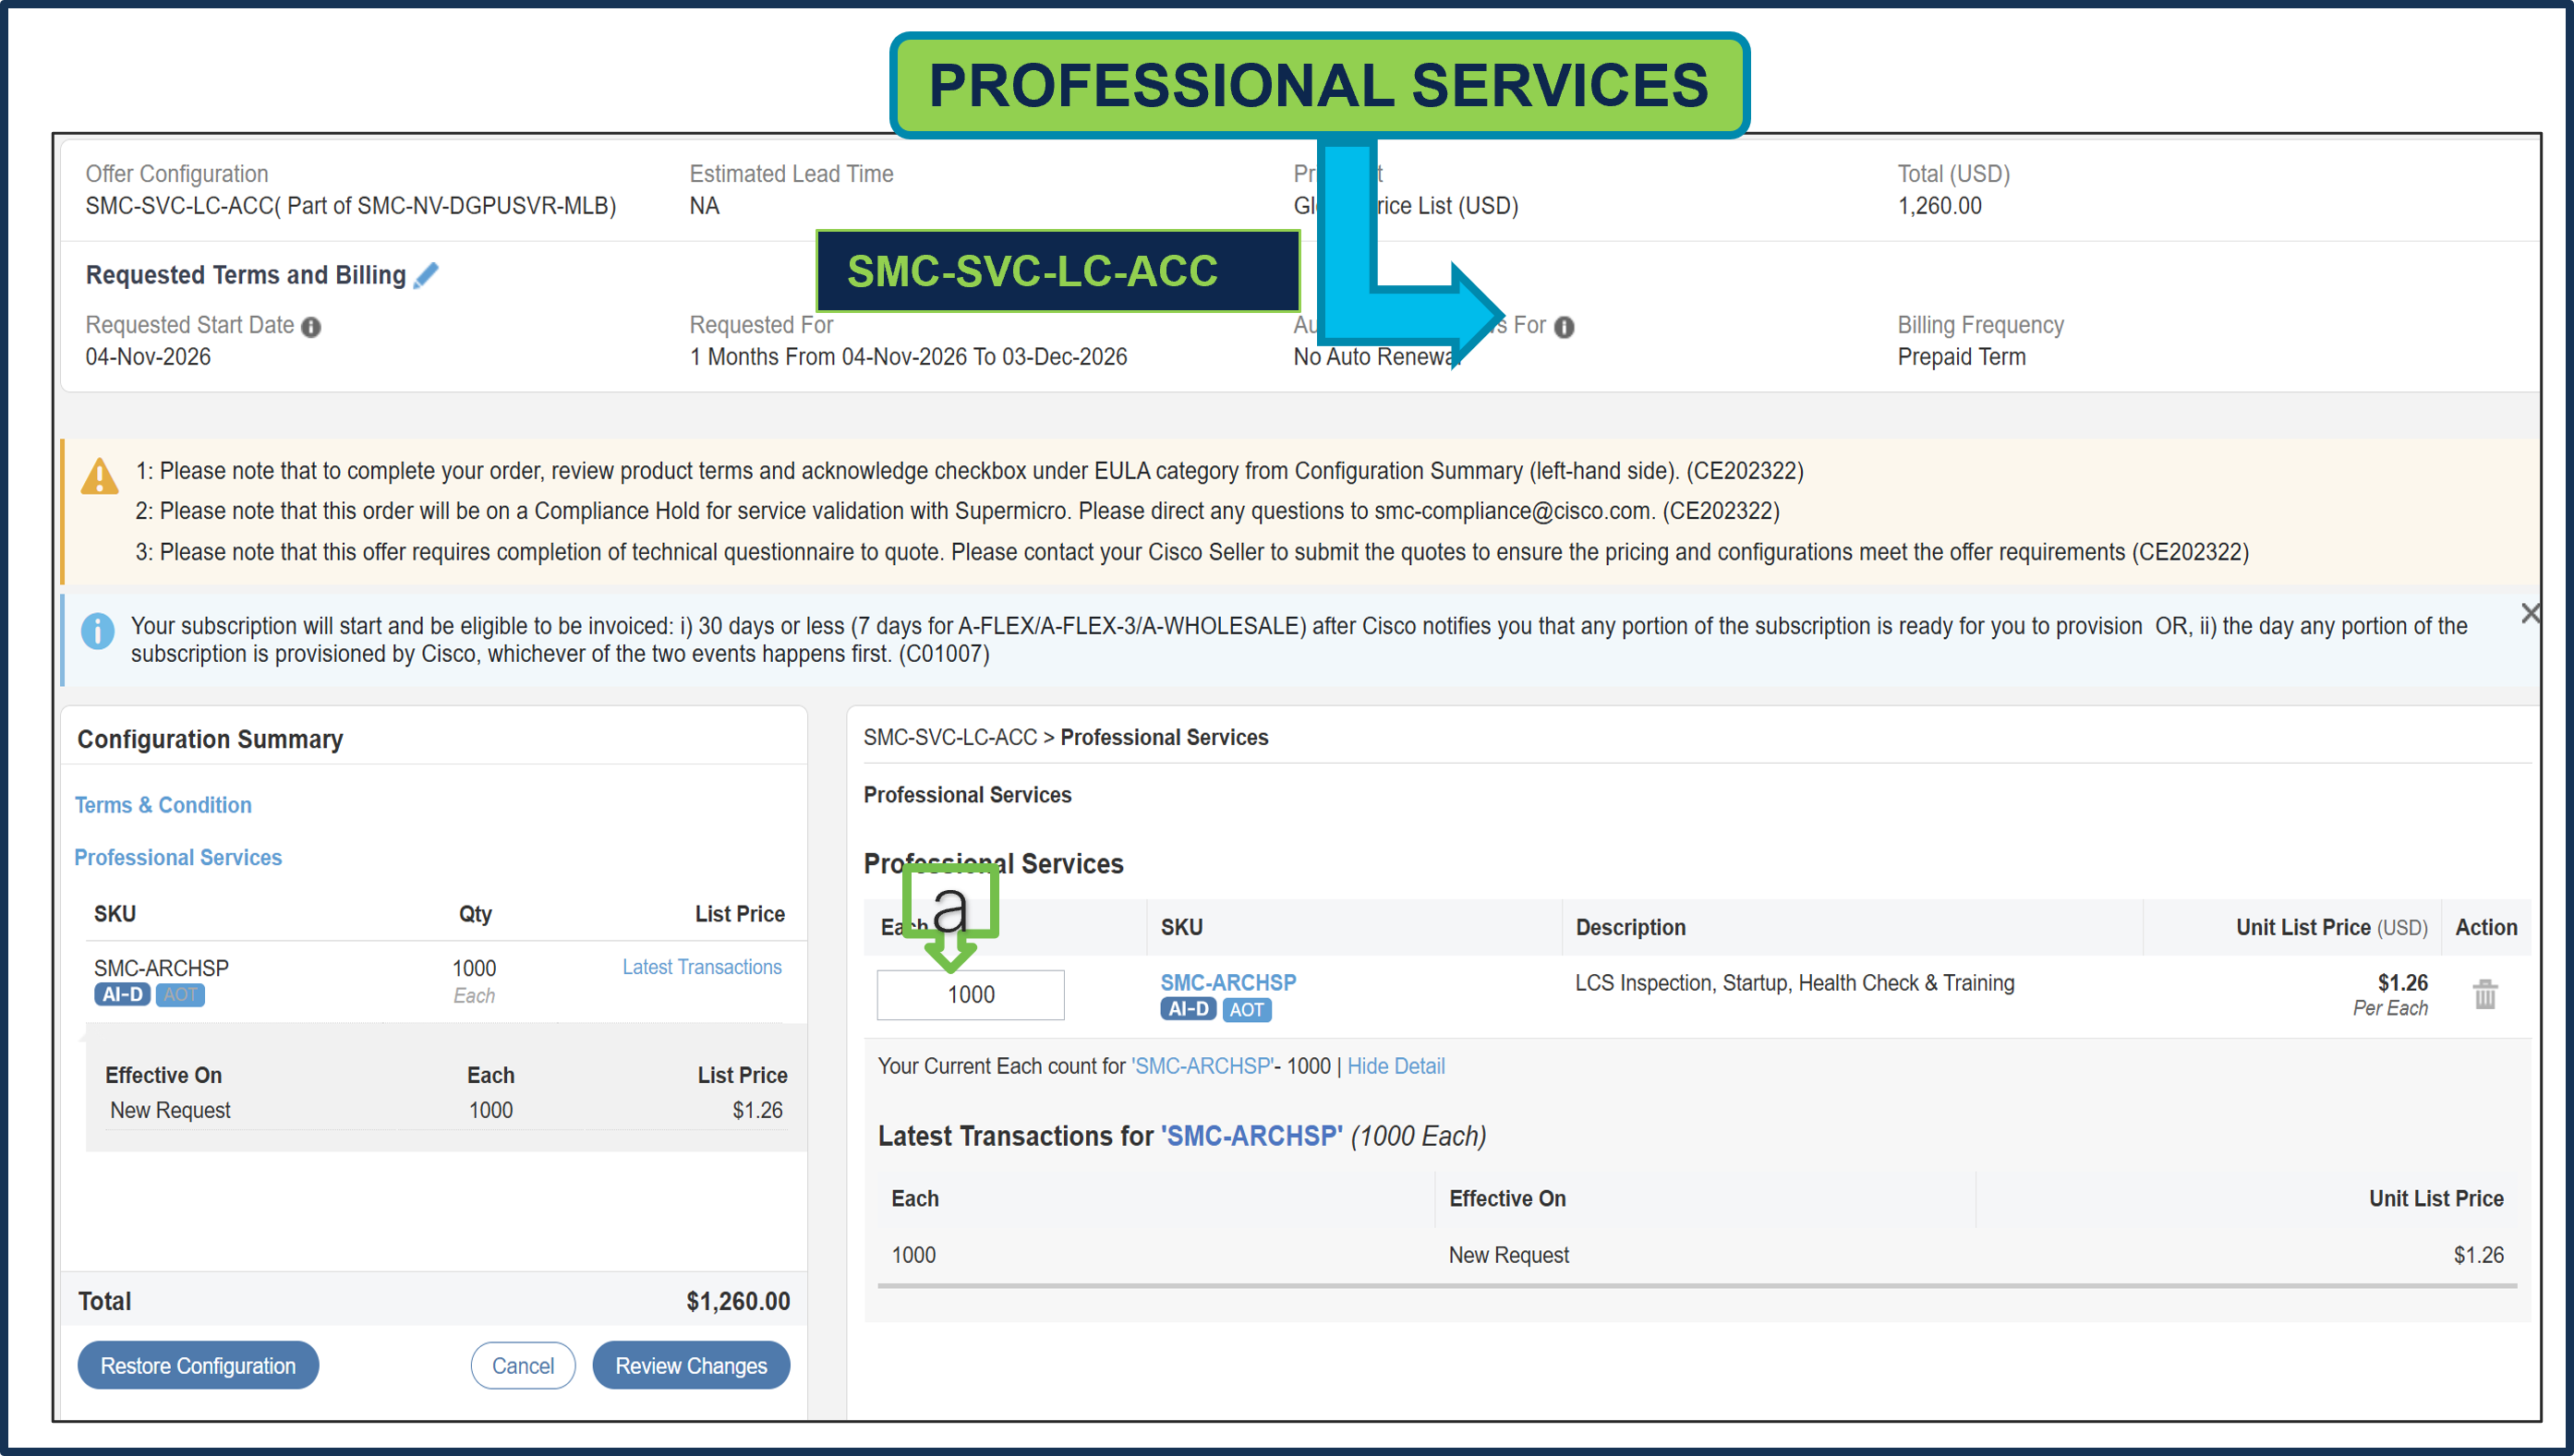
a. Supermicro Professional Service SKUs need to be selected and please ensure that seller selects the correct QTY.
Step 23.
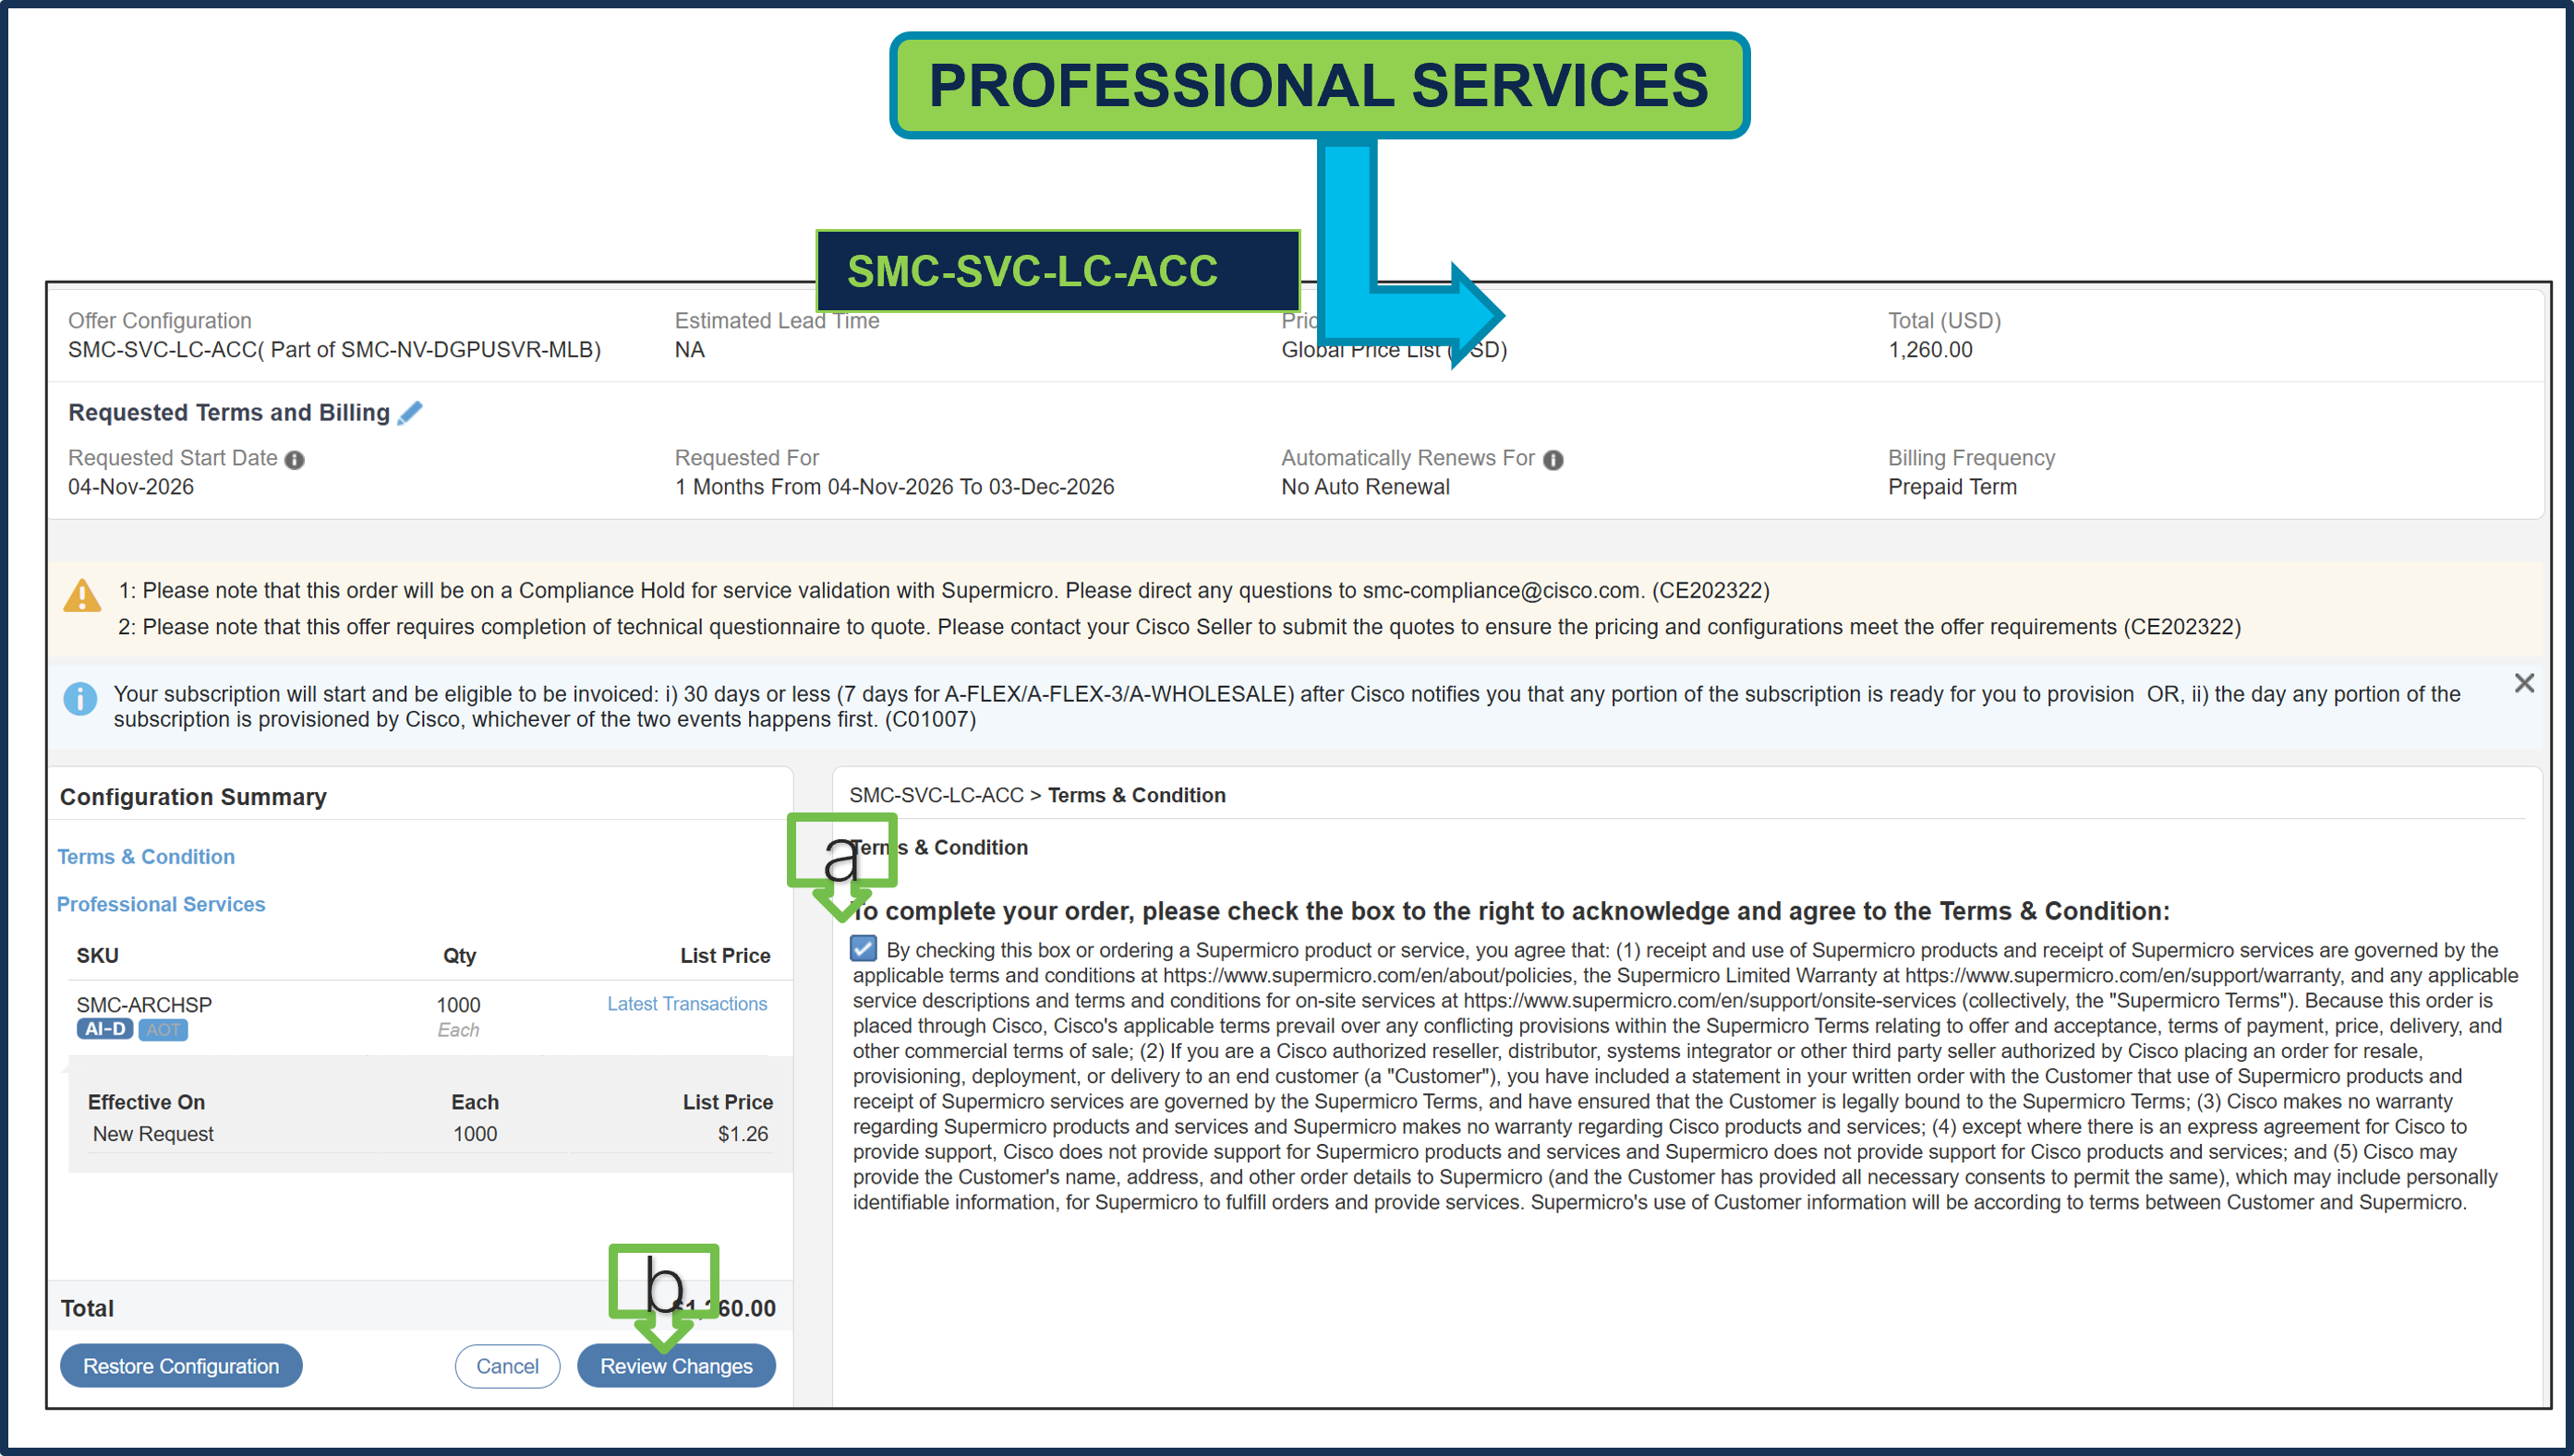
a. To complete the order, please check the box to the right to acknowledge and agree to the Terms & Conditions.
b. Click Review Changes, then “Done”.
Step 24.
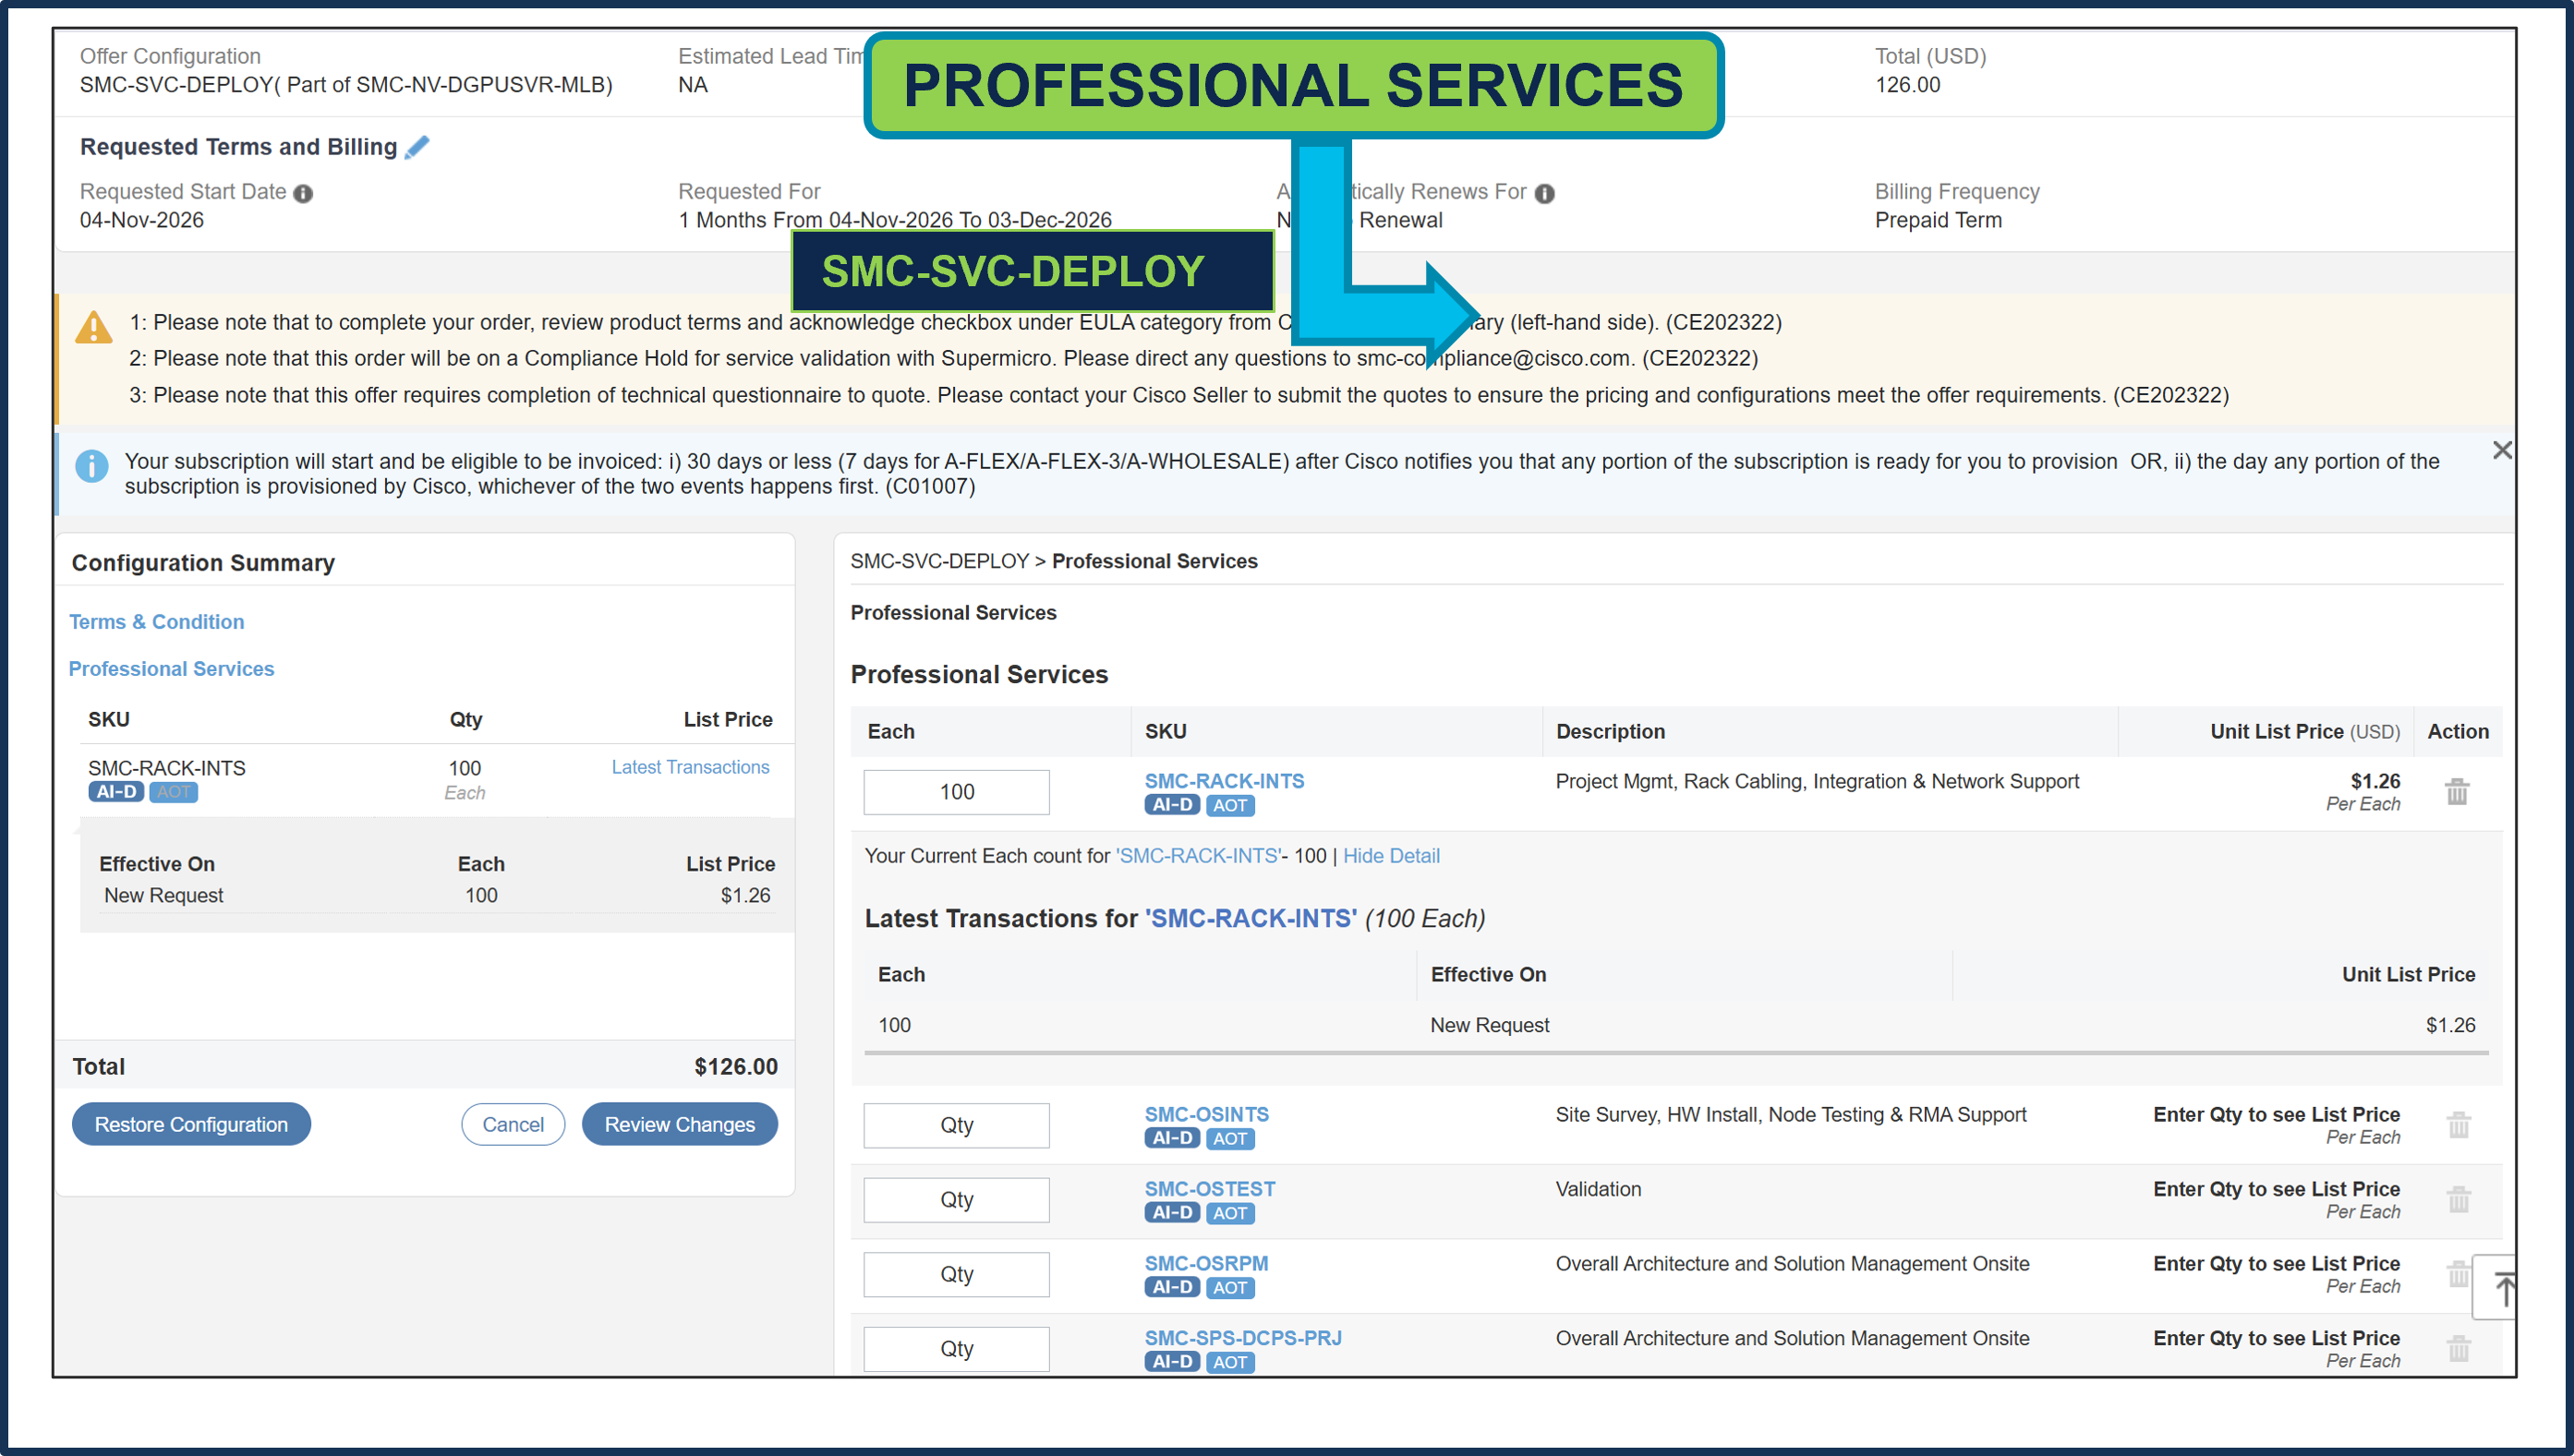
a. Supermicro Professional Service SKUs need to be selected and please ensure that seller selects the correct QTY.
Step 25.
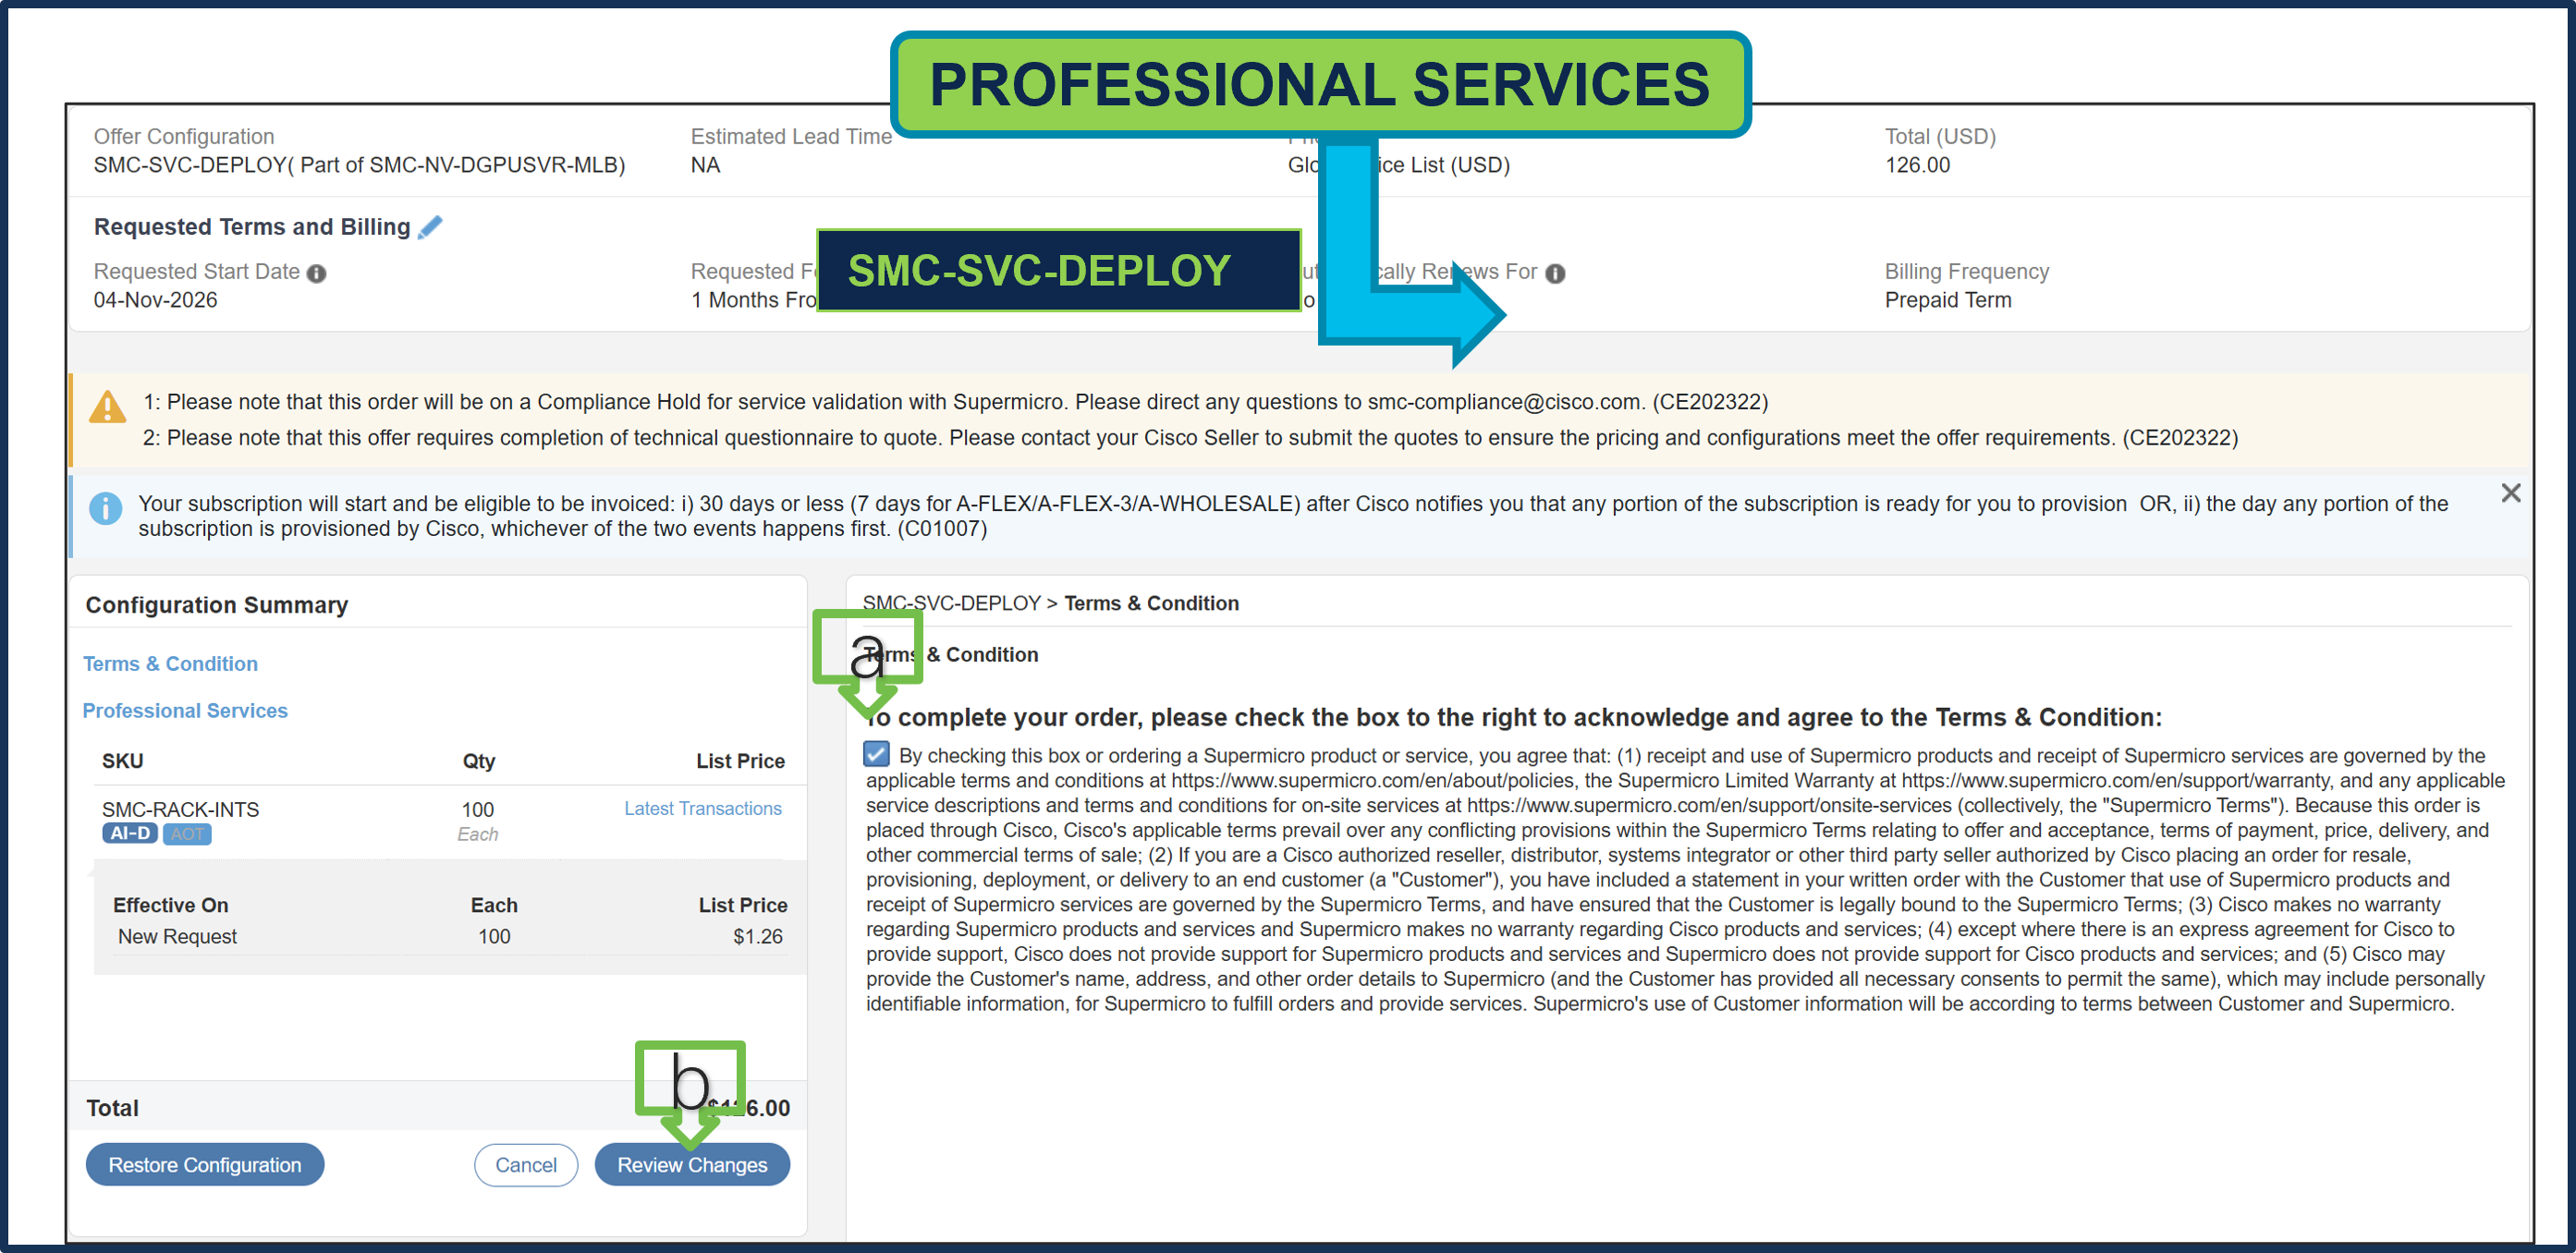
a. To complete the order, please check the box to the right to acknowledge and agree to the Terms & Conditions.
b. Click Review Changes, then “Done”
Step 26.
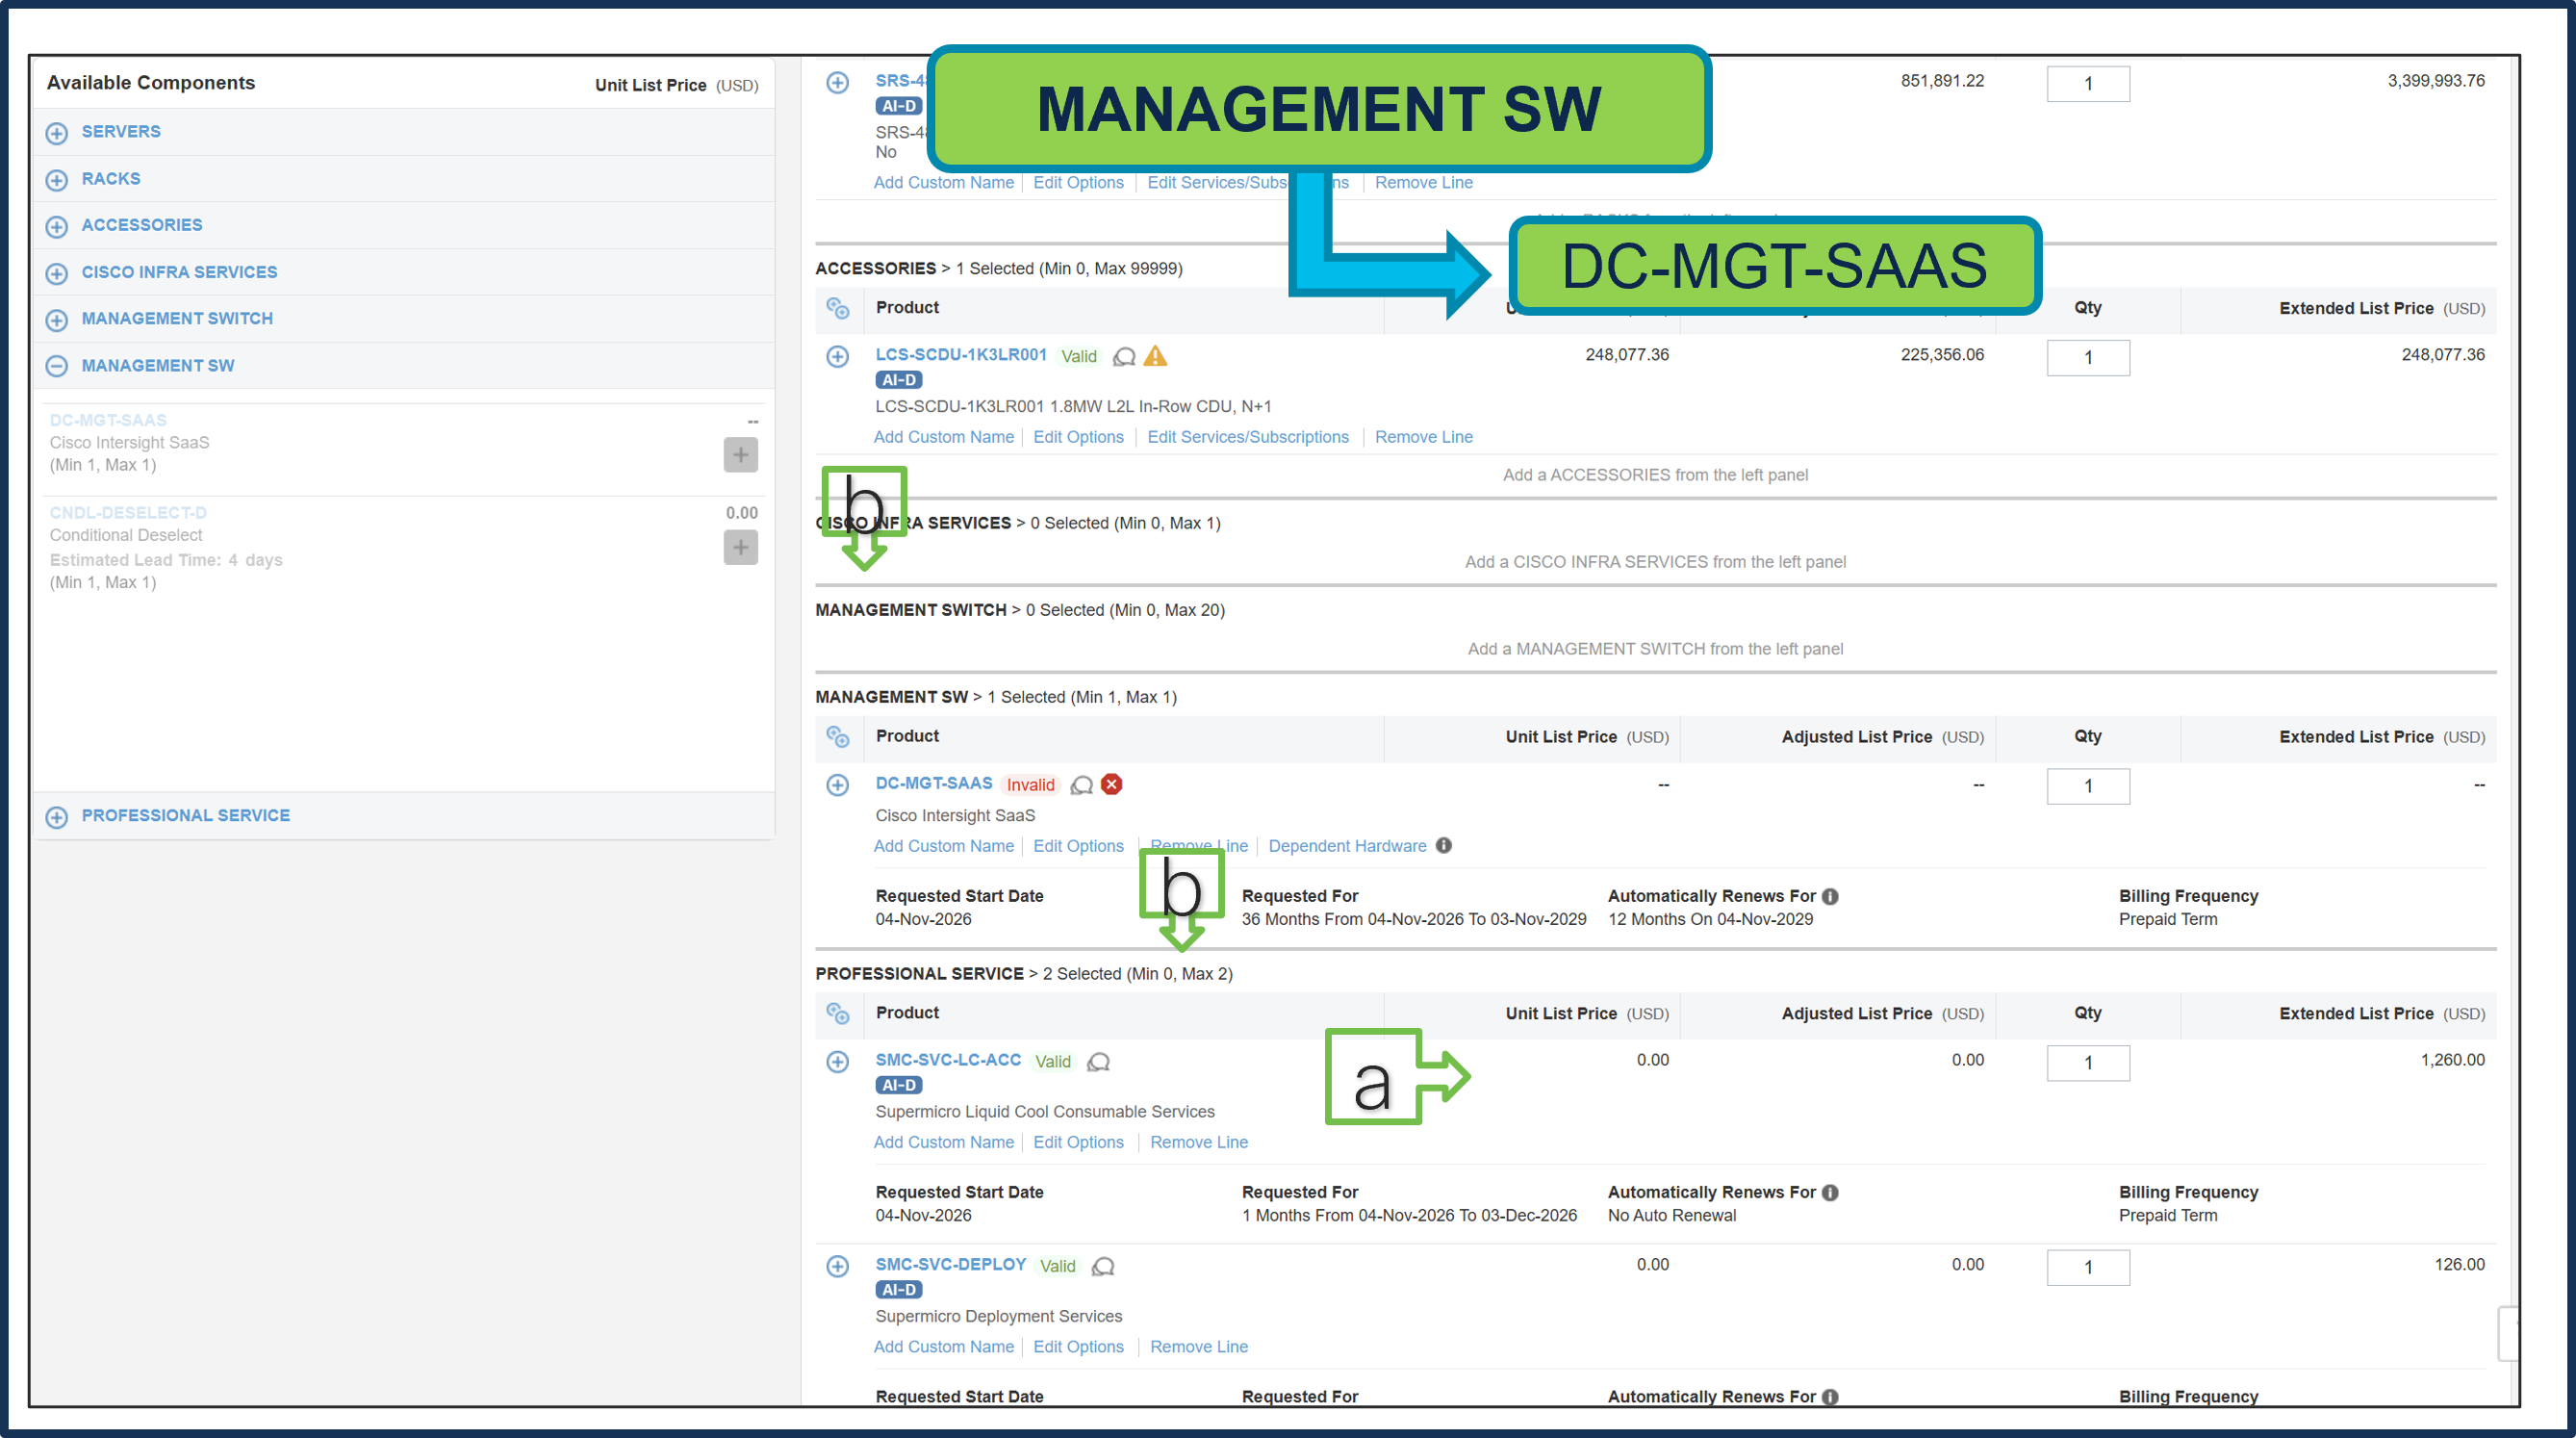
a. It is recommended that Term Duration for HW Support align with Software Subscription Duration.
b. Intersight is a required selection, if you have not previously purchased Cisco Intersight Software. Please make selection by clicking “PLUS”. Click on Edit Options to configure.
Step 27.
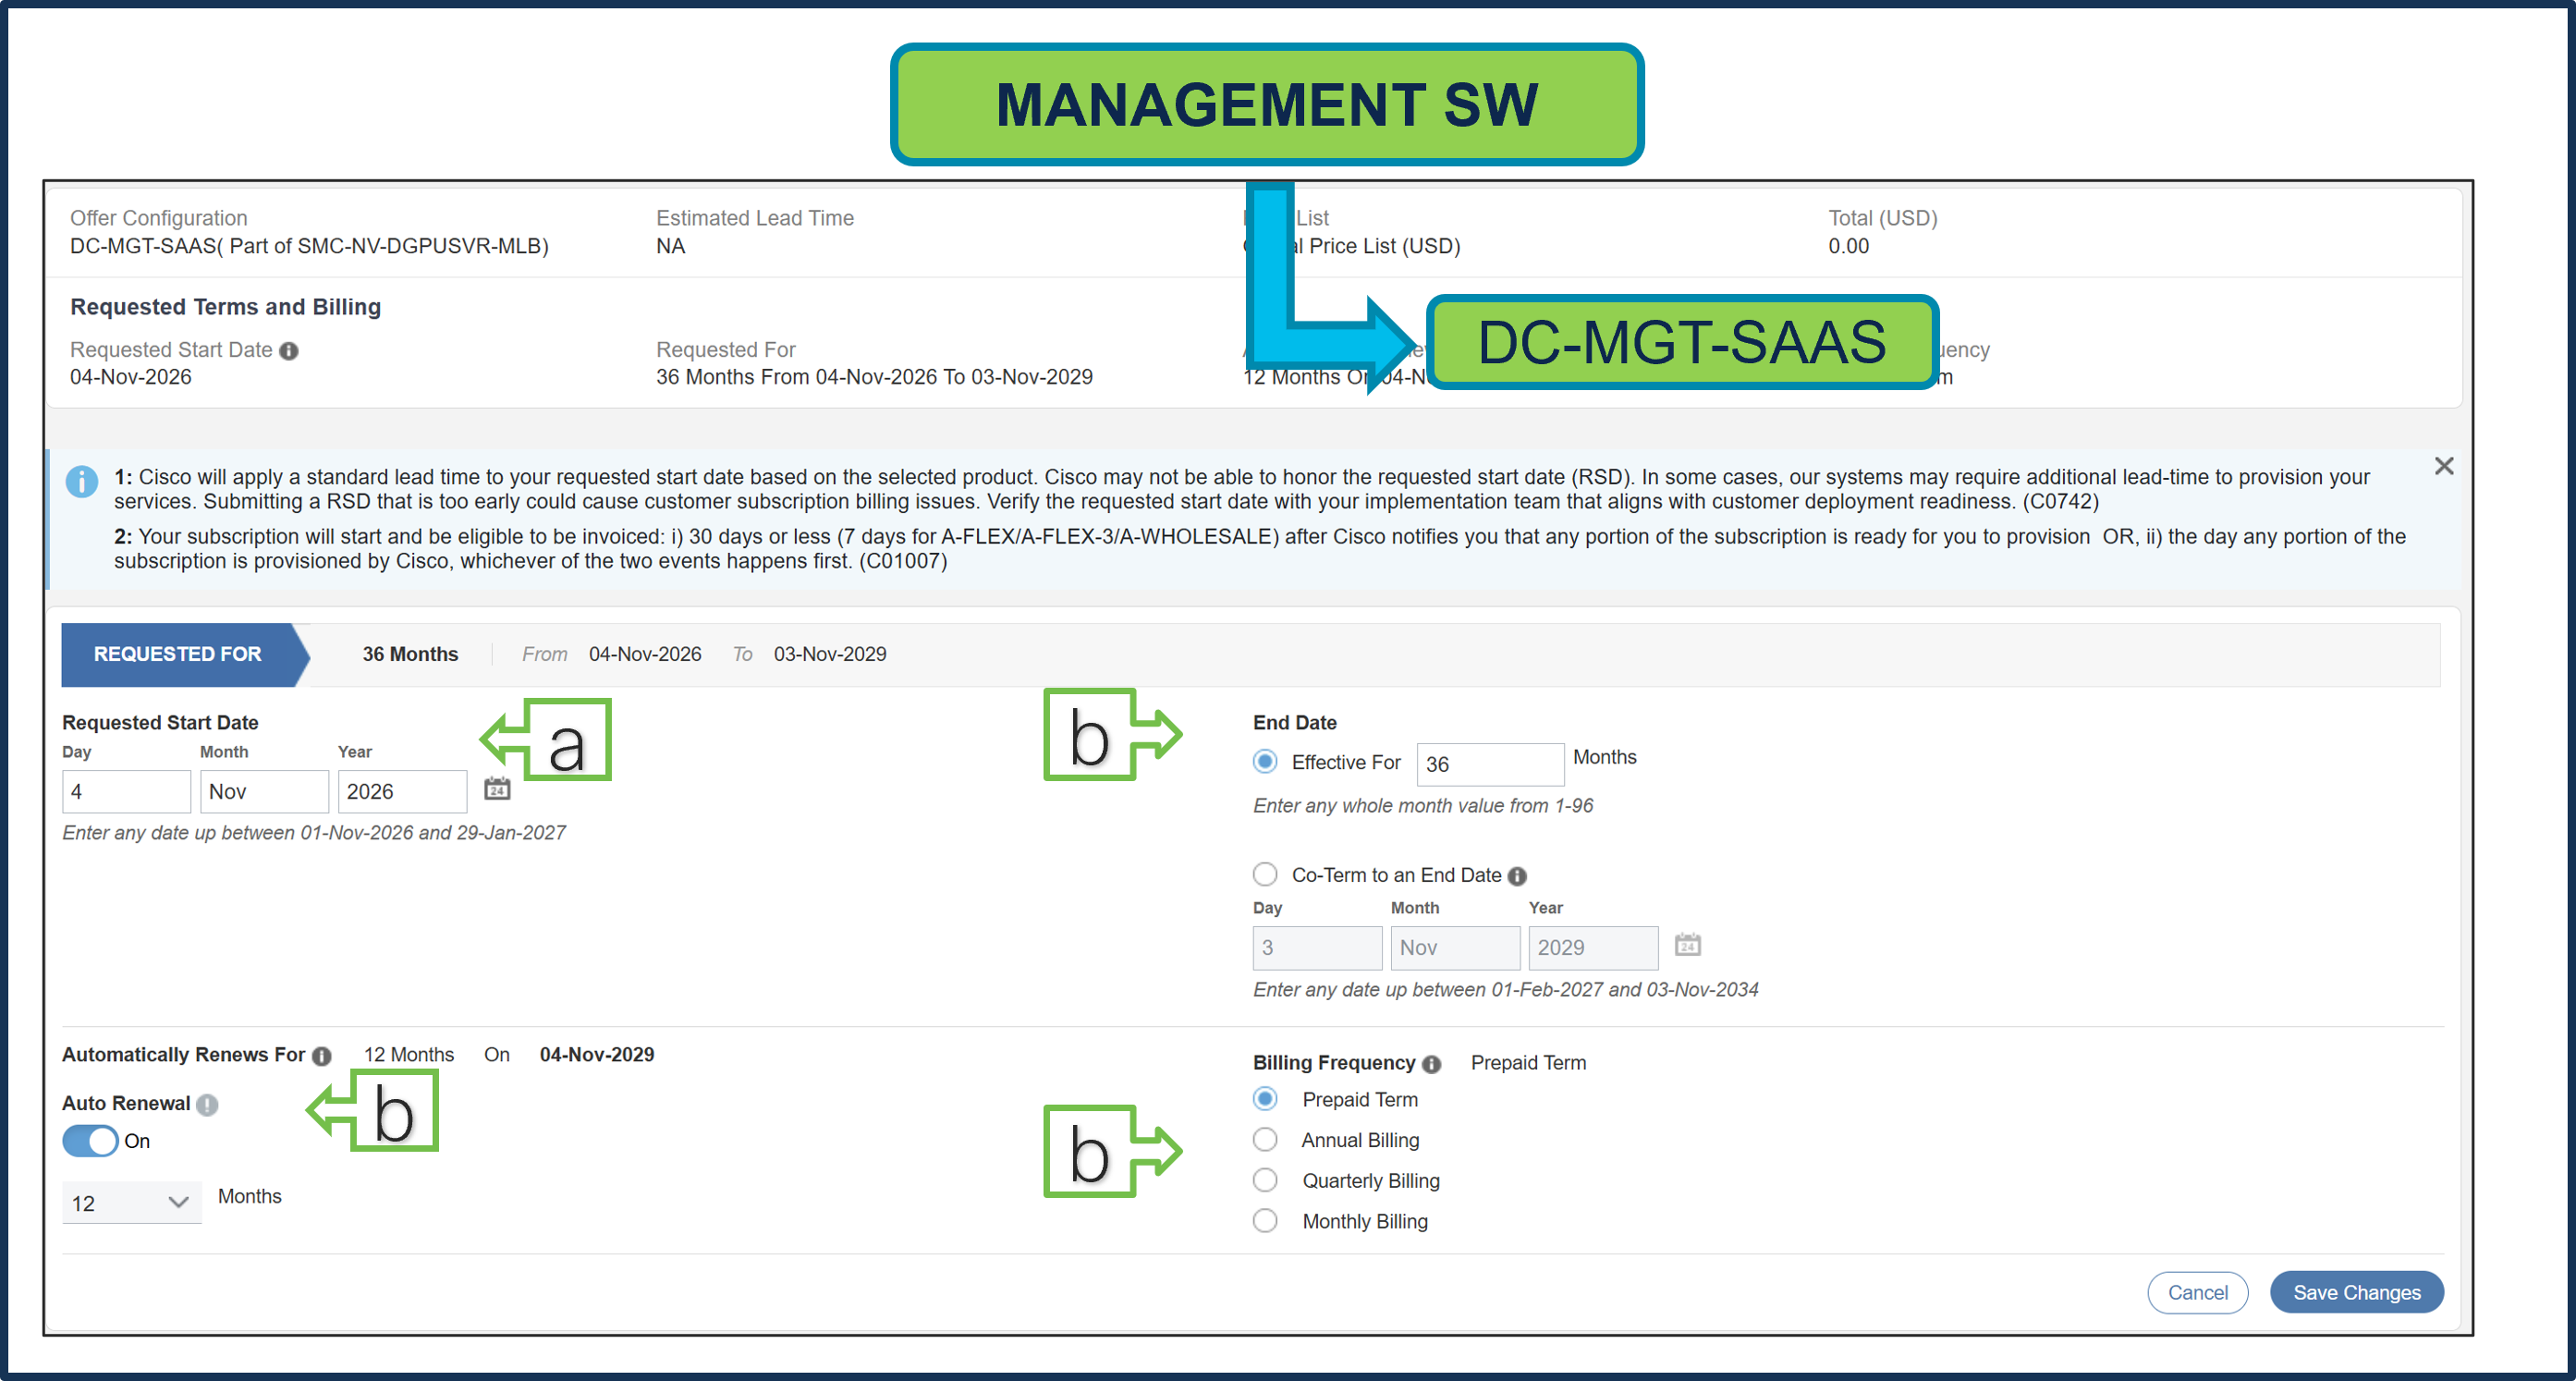
a. Requested Start Date (RSD) is now dependent on HW Ship Date and will automatically starts when the HW ships. If you change the RSD, the Software will start either on the RSD you picked or the HW Ship Date whichever is later.
b. End Date (duration in months) is defaulted to 36 Months, Auto Renewal (on/off) is defaulted to On and Billing Frequency is defaulted to Prepaid Term. You can still change the setting accordingly.
Step 28.
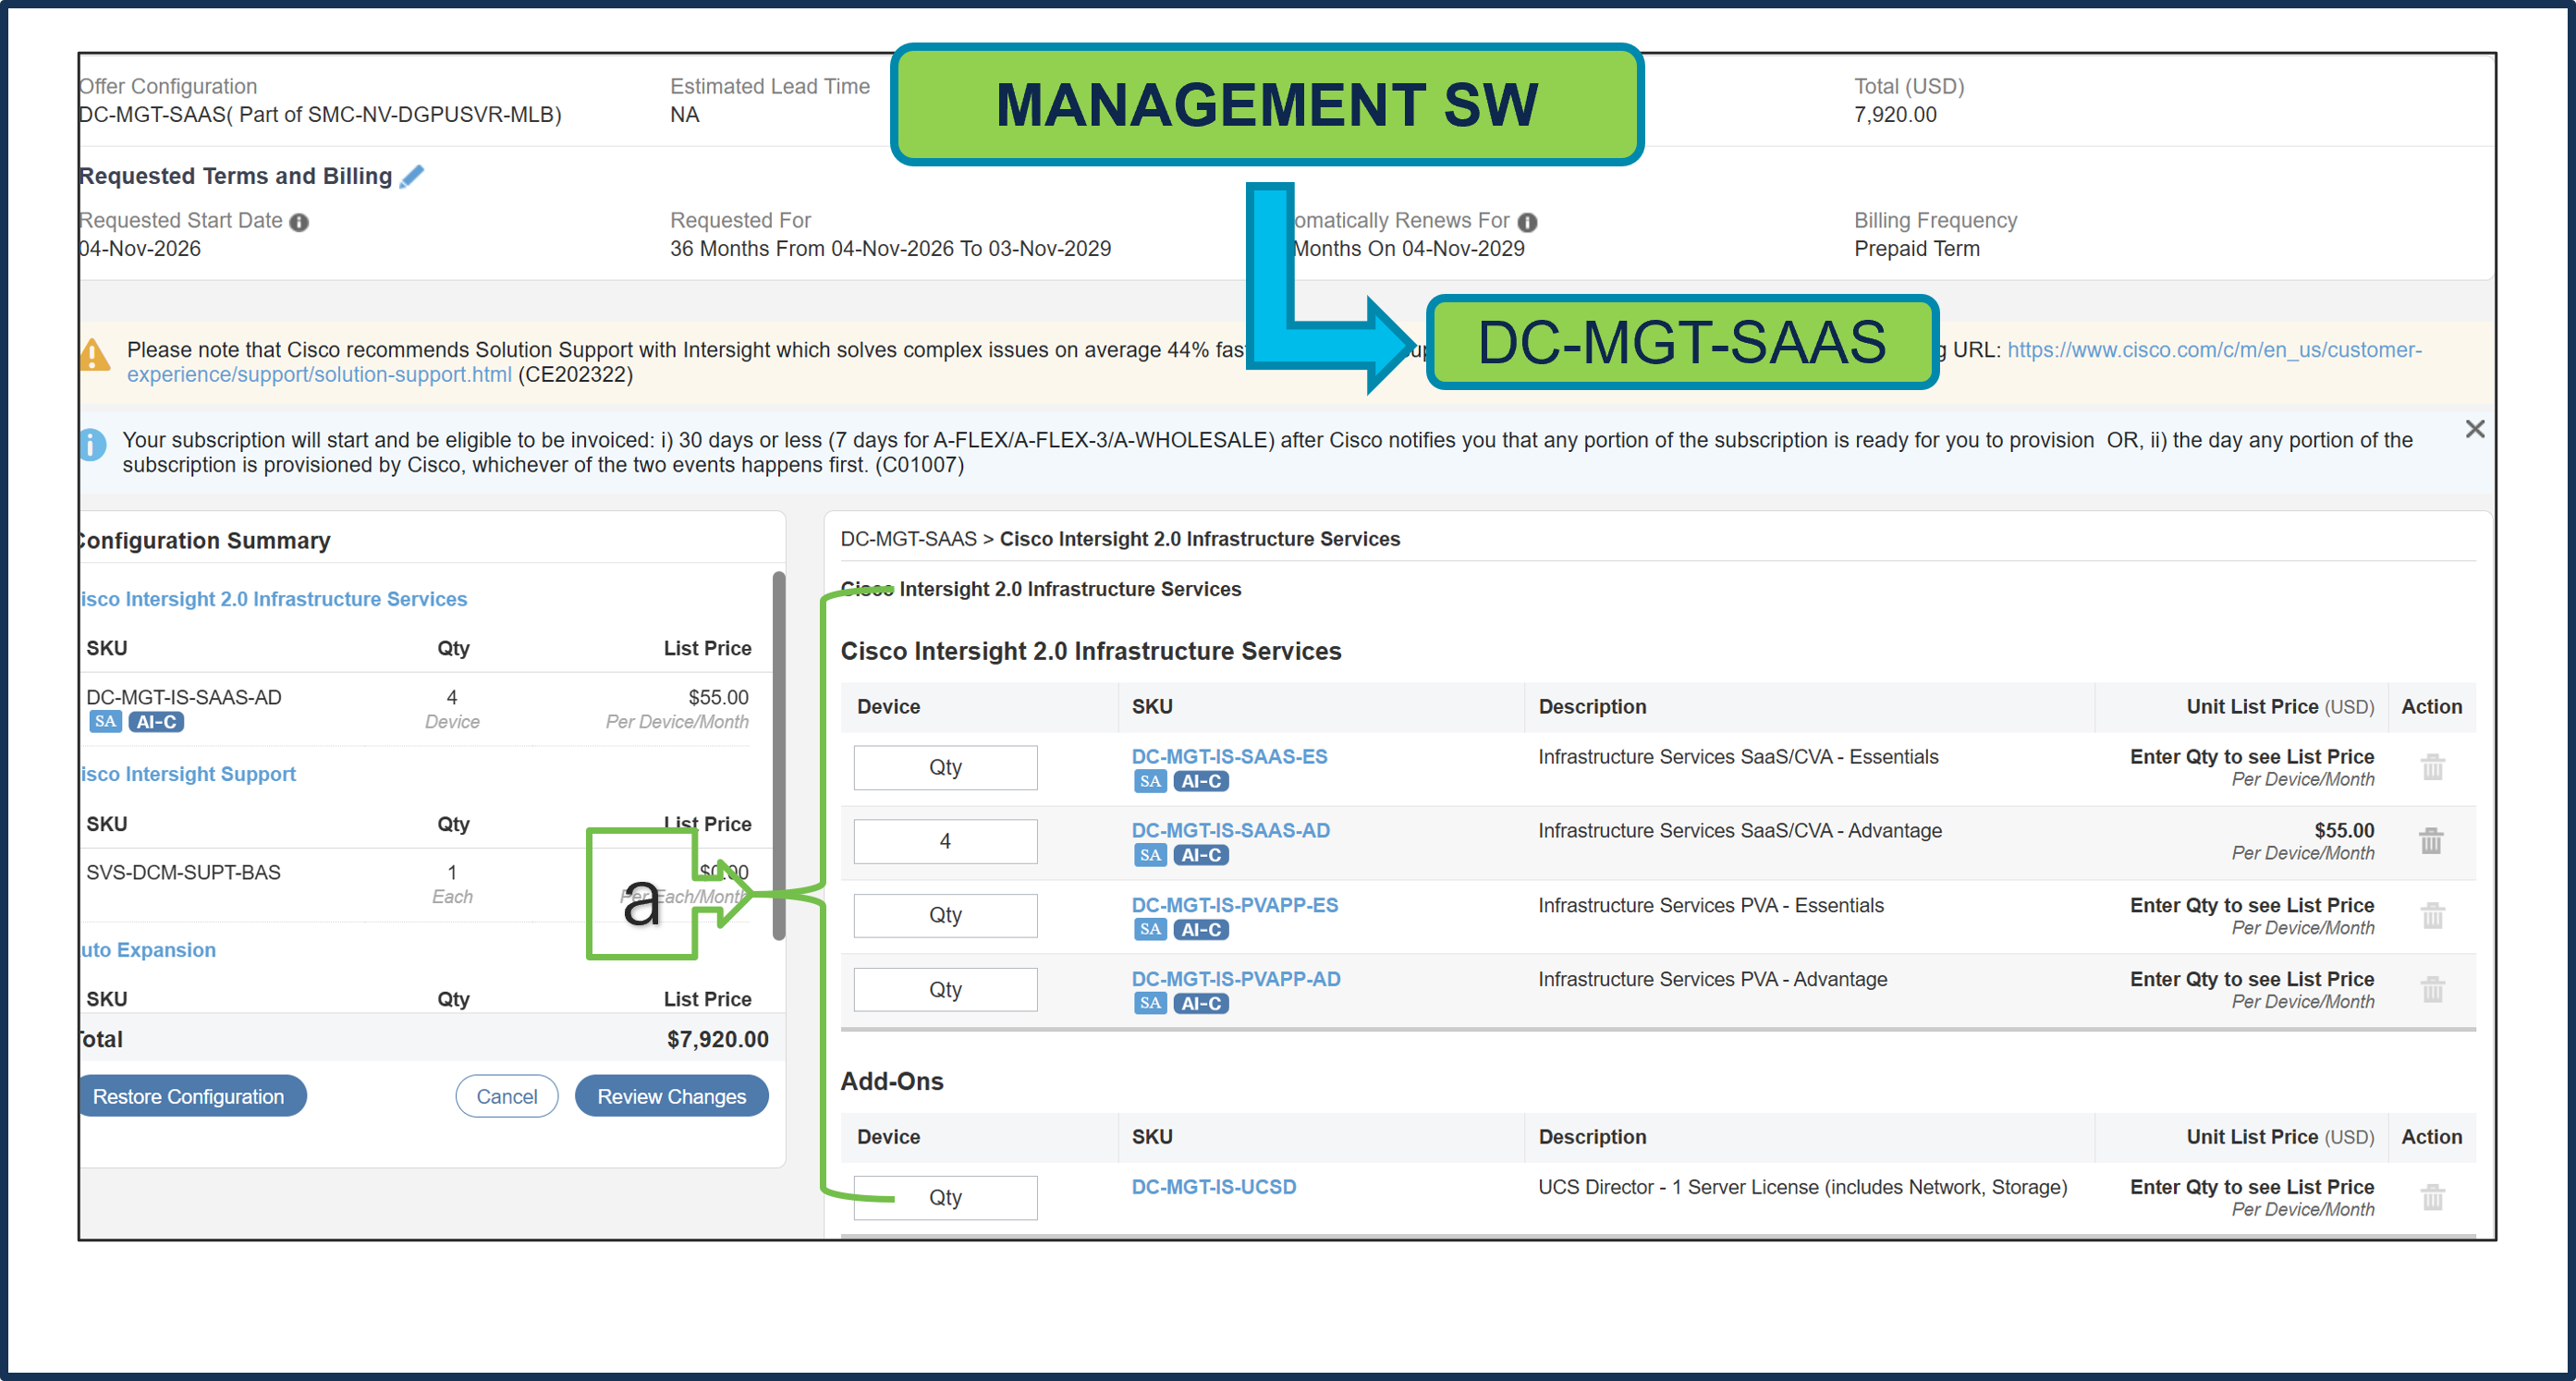
a. The quantity of Cisco Intersight 2.0 Infrastructure Services License under Offer: DC-MGT-SAAS should be equal to the quantity of Server selected. Enter the quantity
Step 29.
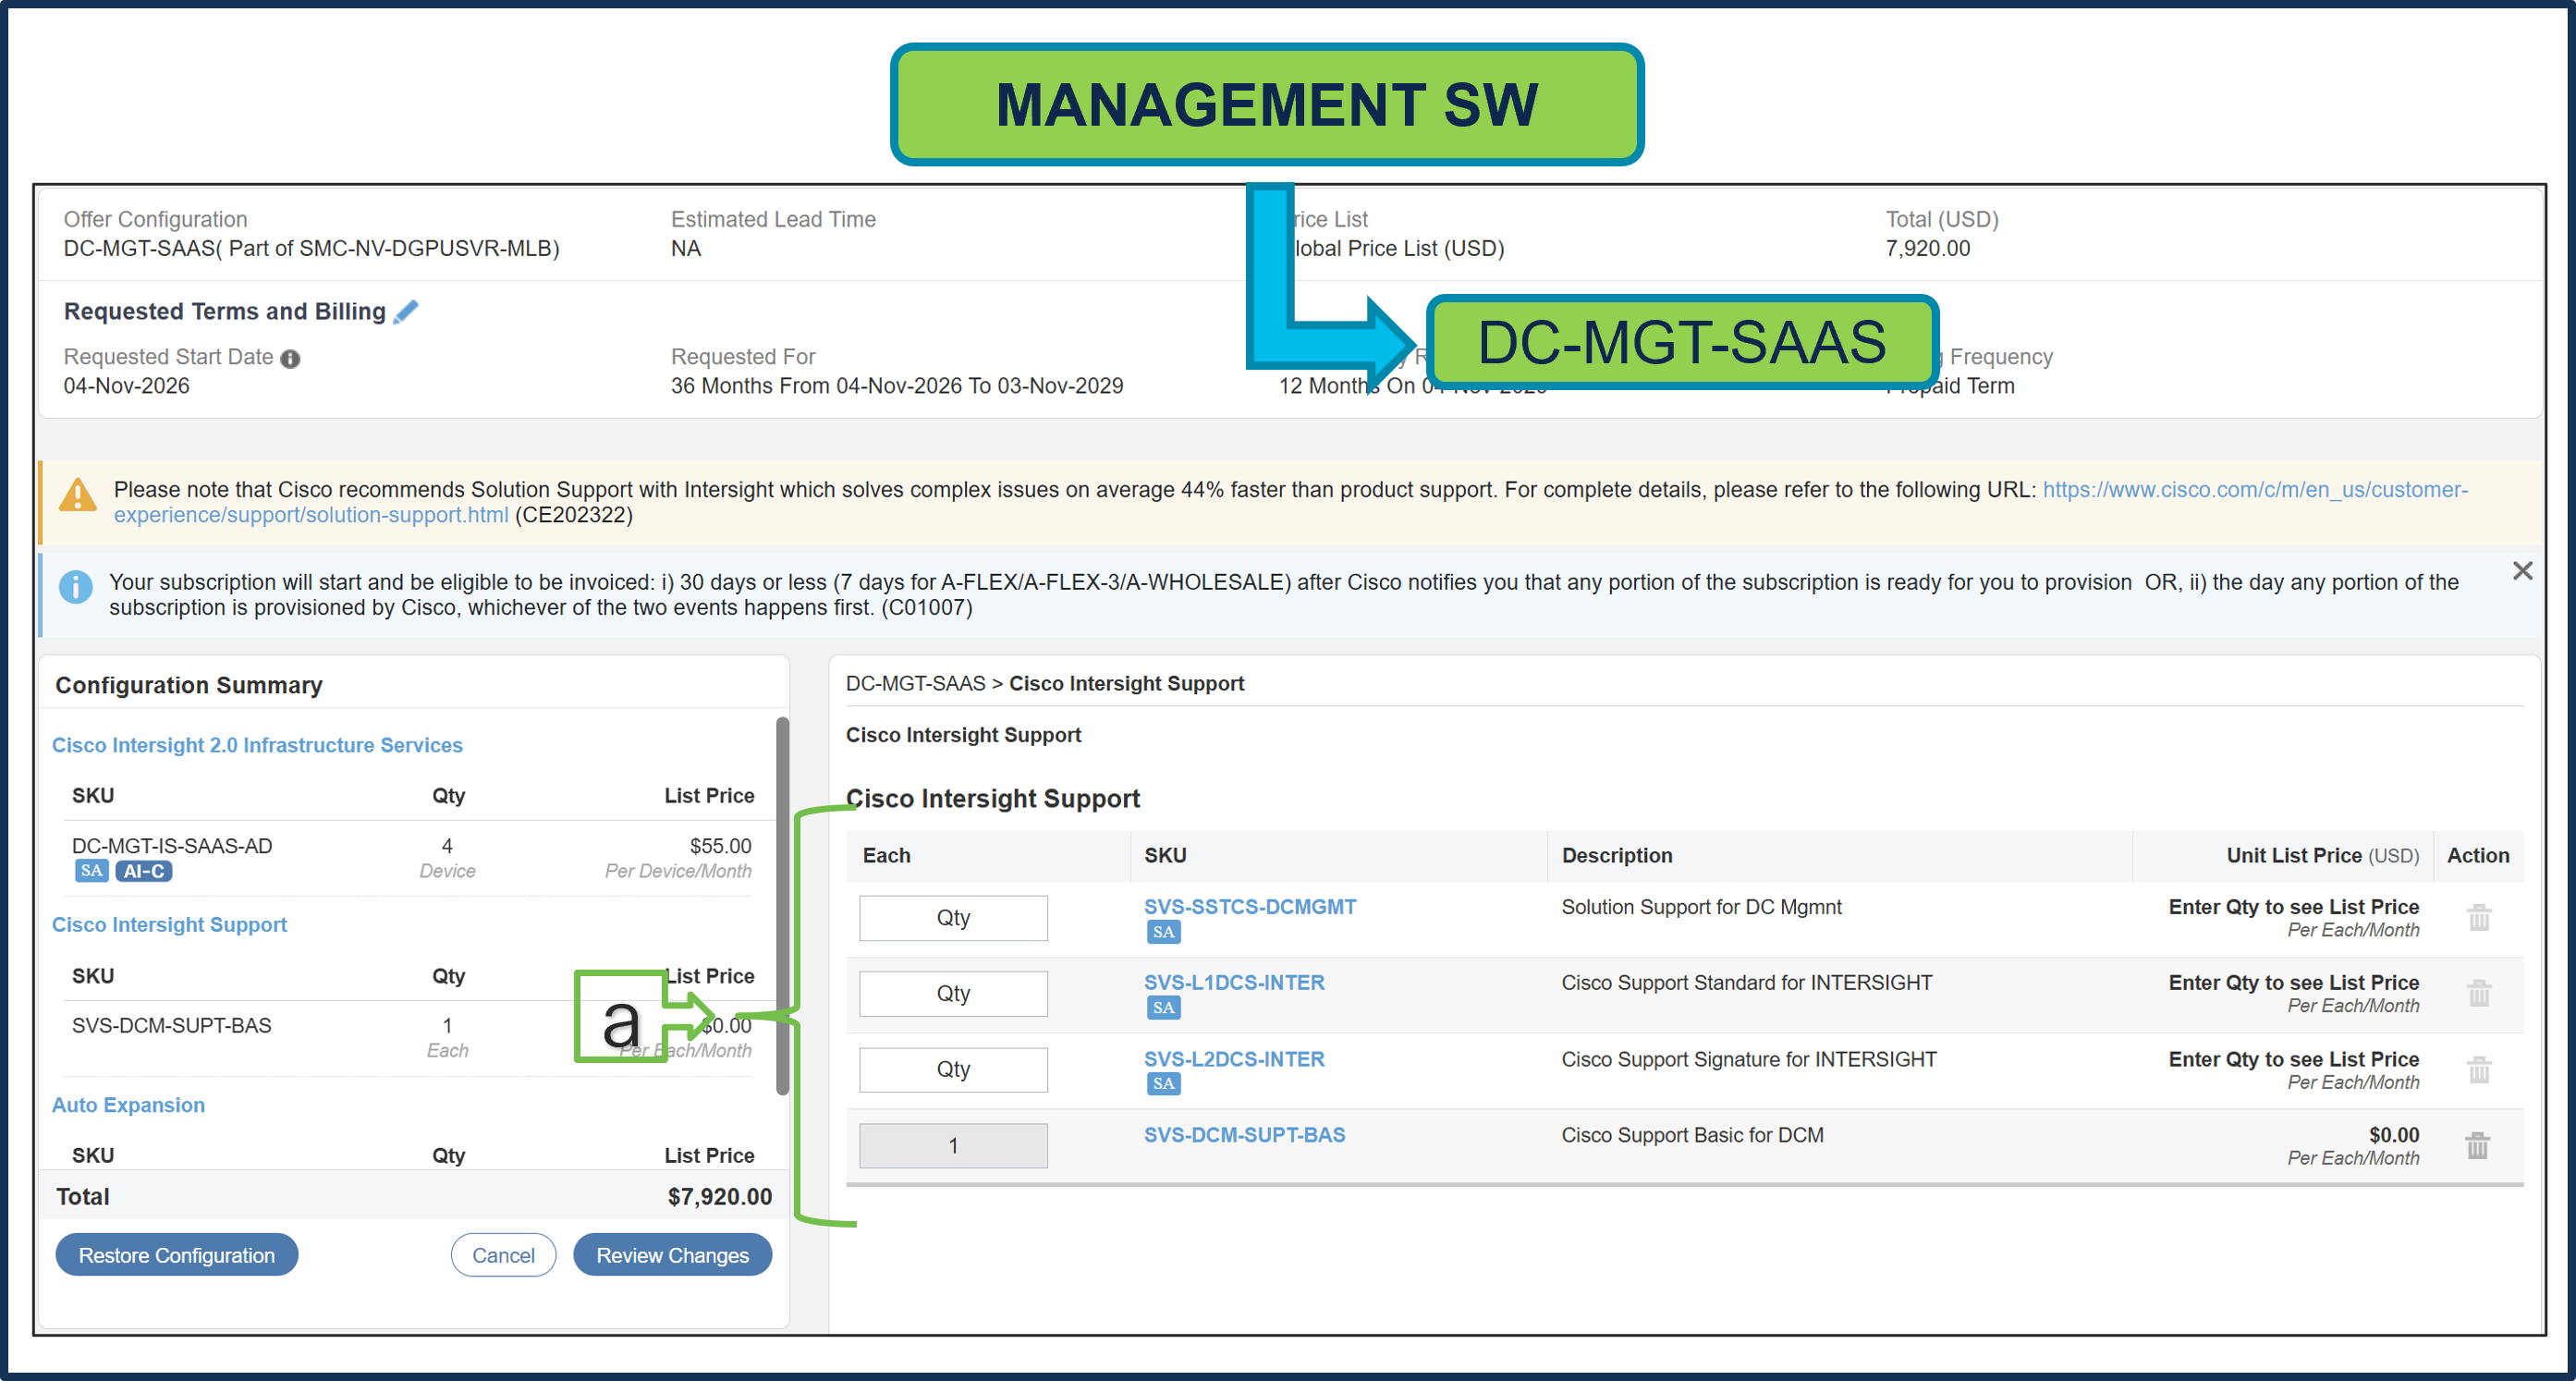
a. The Cisco Intersight License comes with separate Support. Basic Embedded Support is the default selection. Customer may upgrade to Solution Support, CX Success Track L1 and L2 (supported only with SAAS) if needed
Step 30.
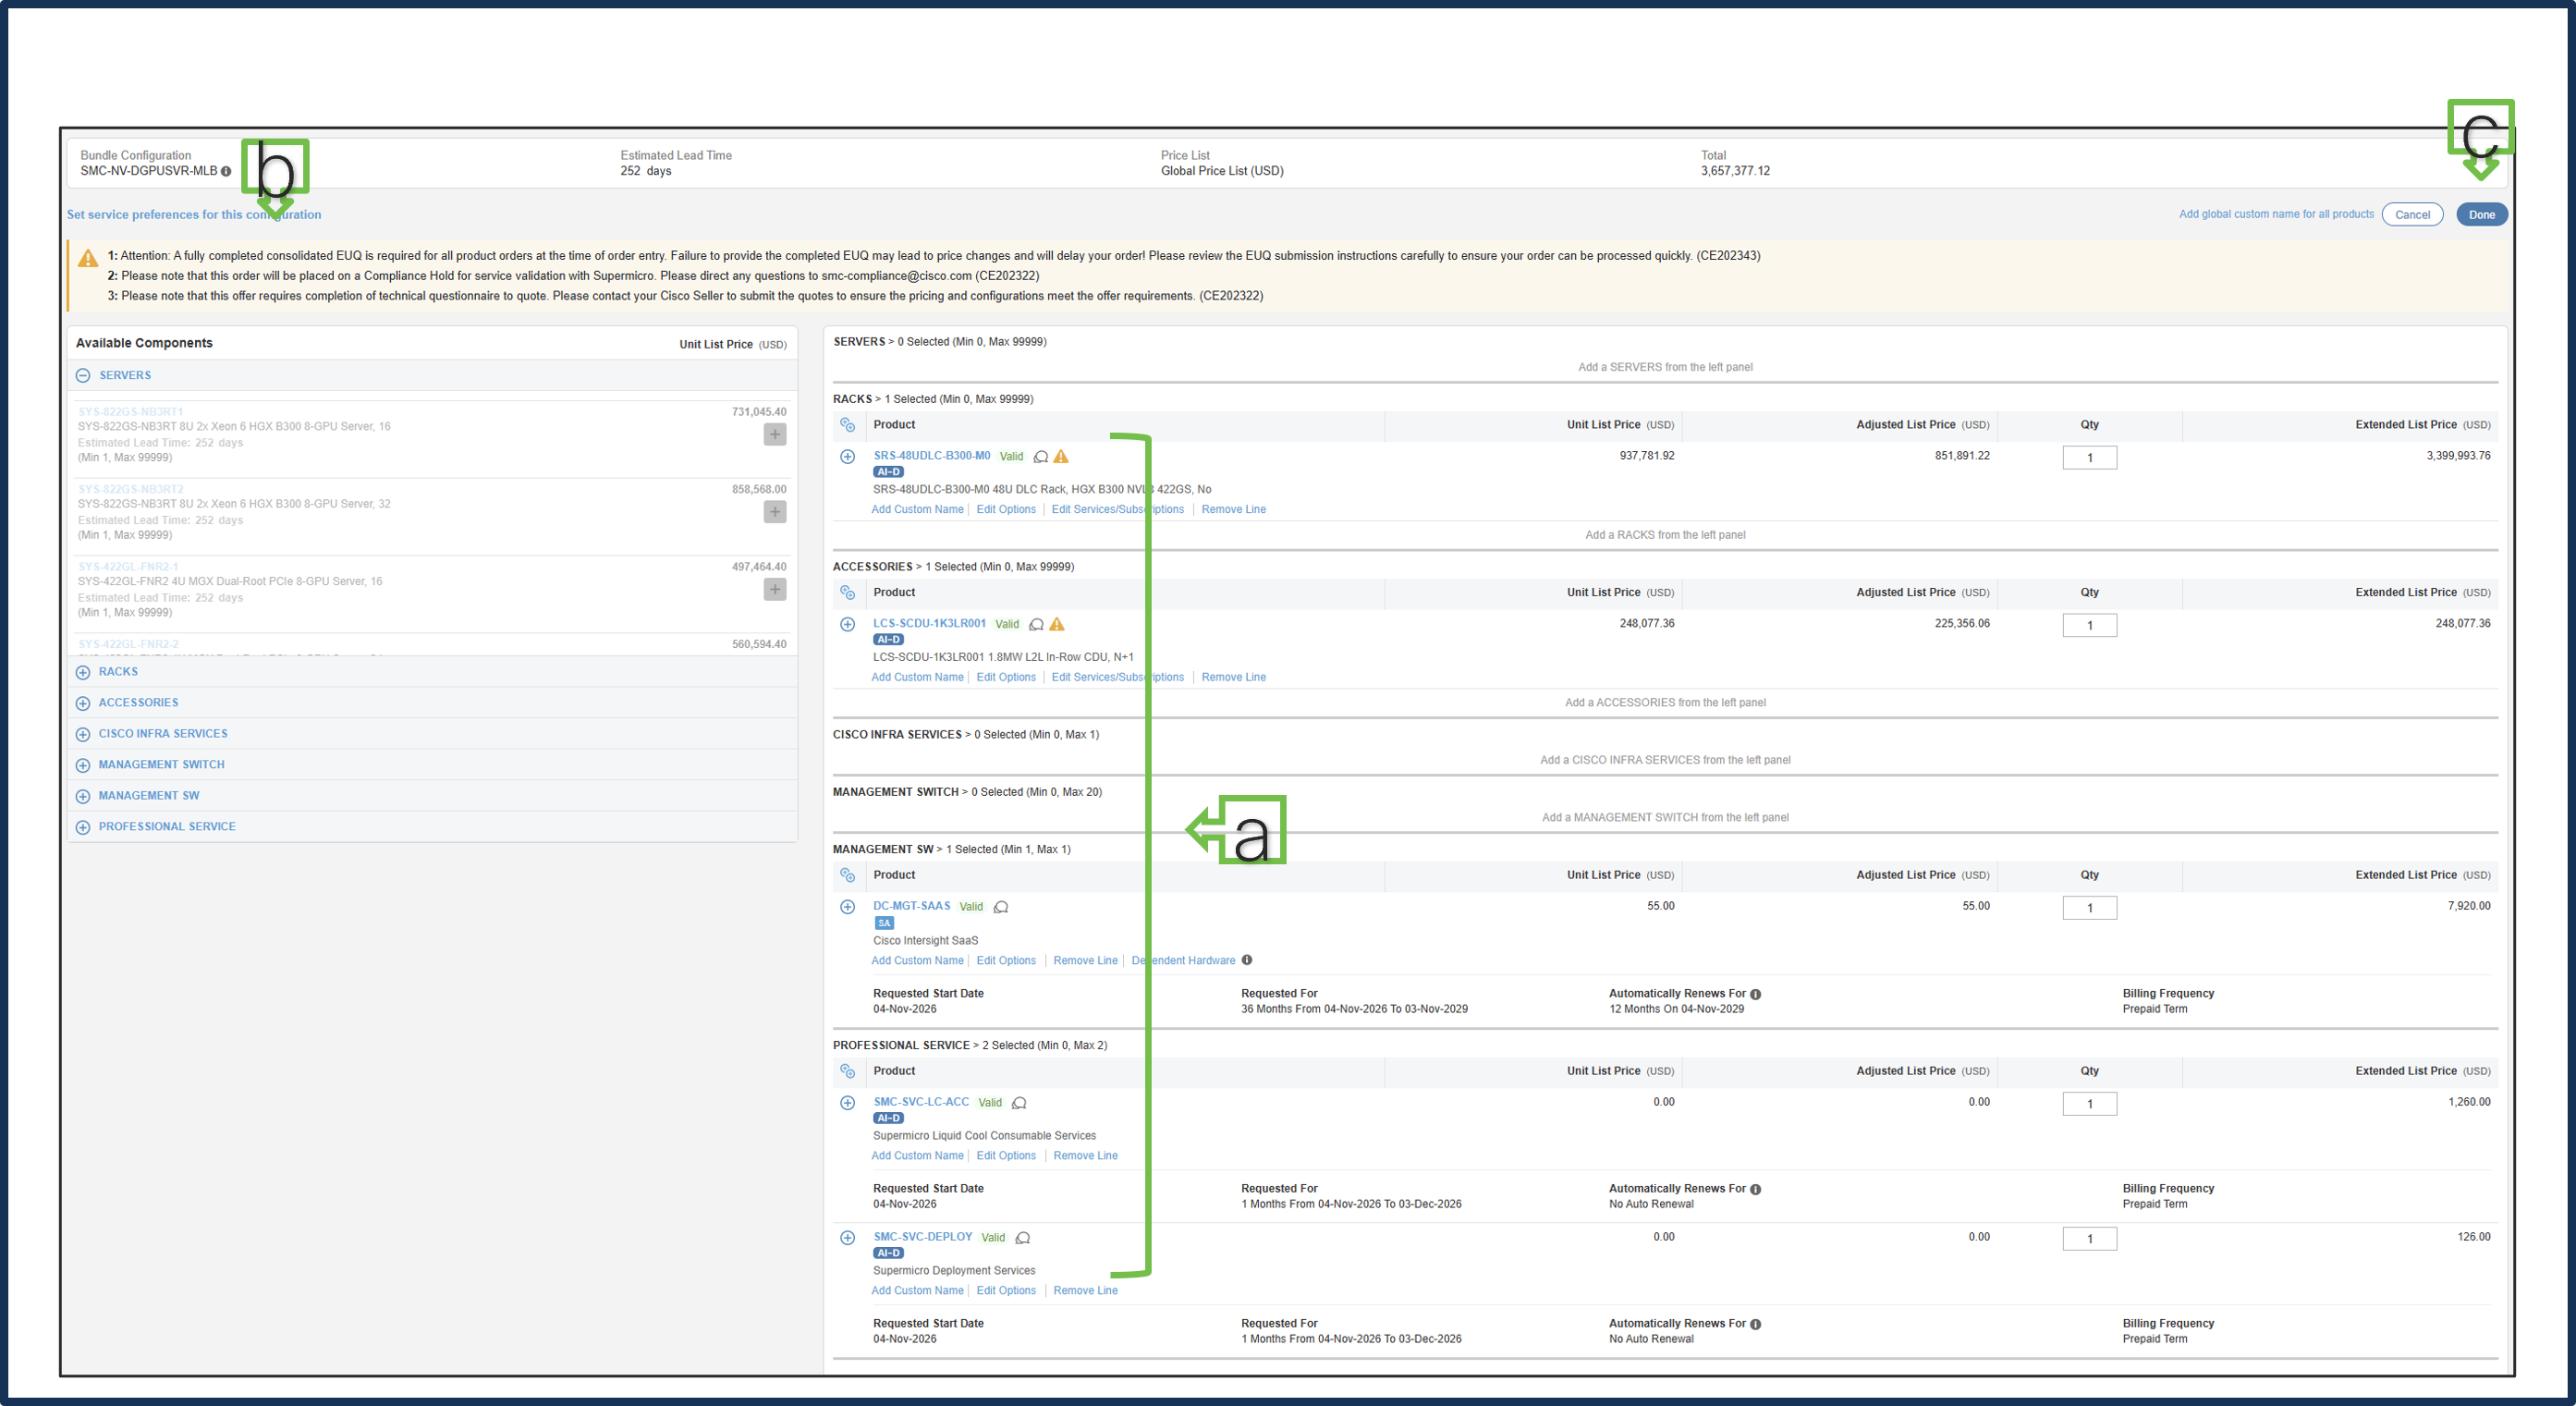
a. MLB configuration is complete when each product has a Valid status and all warning messages are cleared.
b. Click “PLUS” to expand and view the selections for each product.
c. Select DONE to complete the MLB configuration.
Step 31.
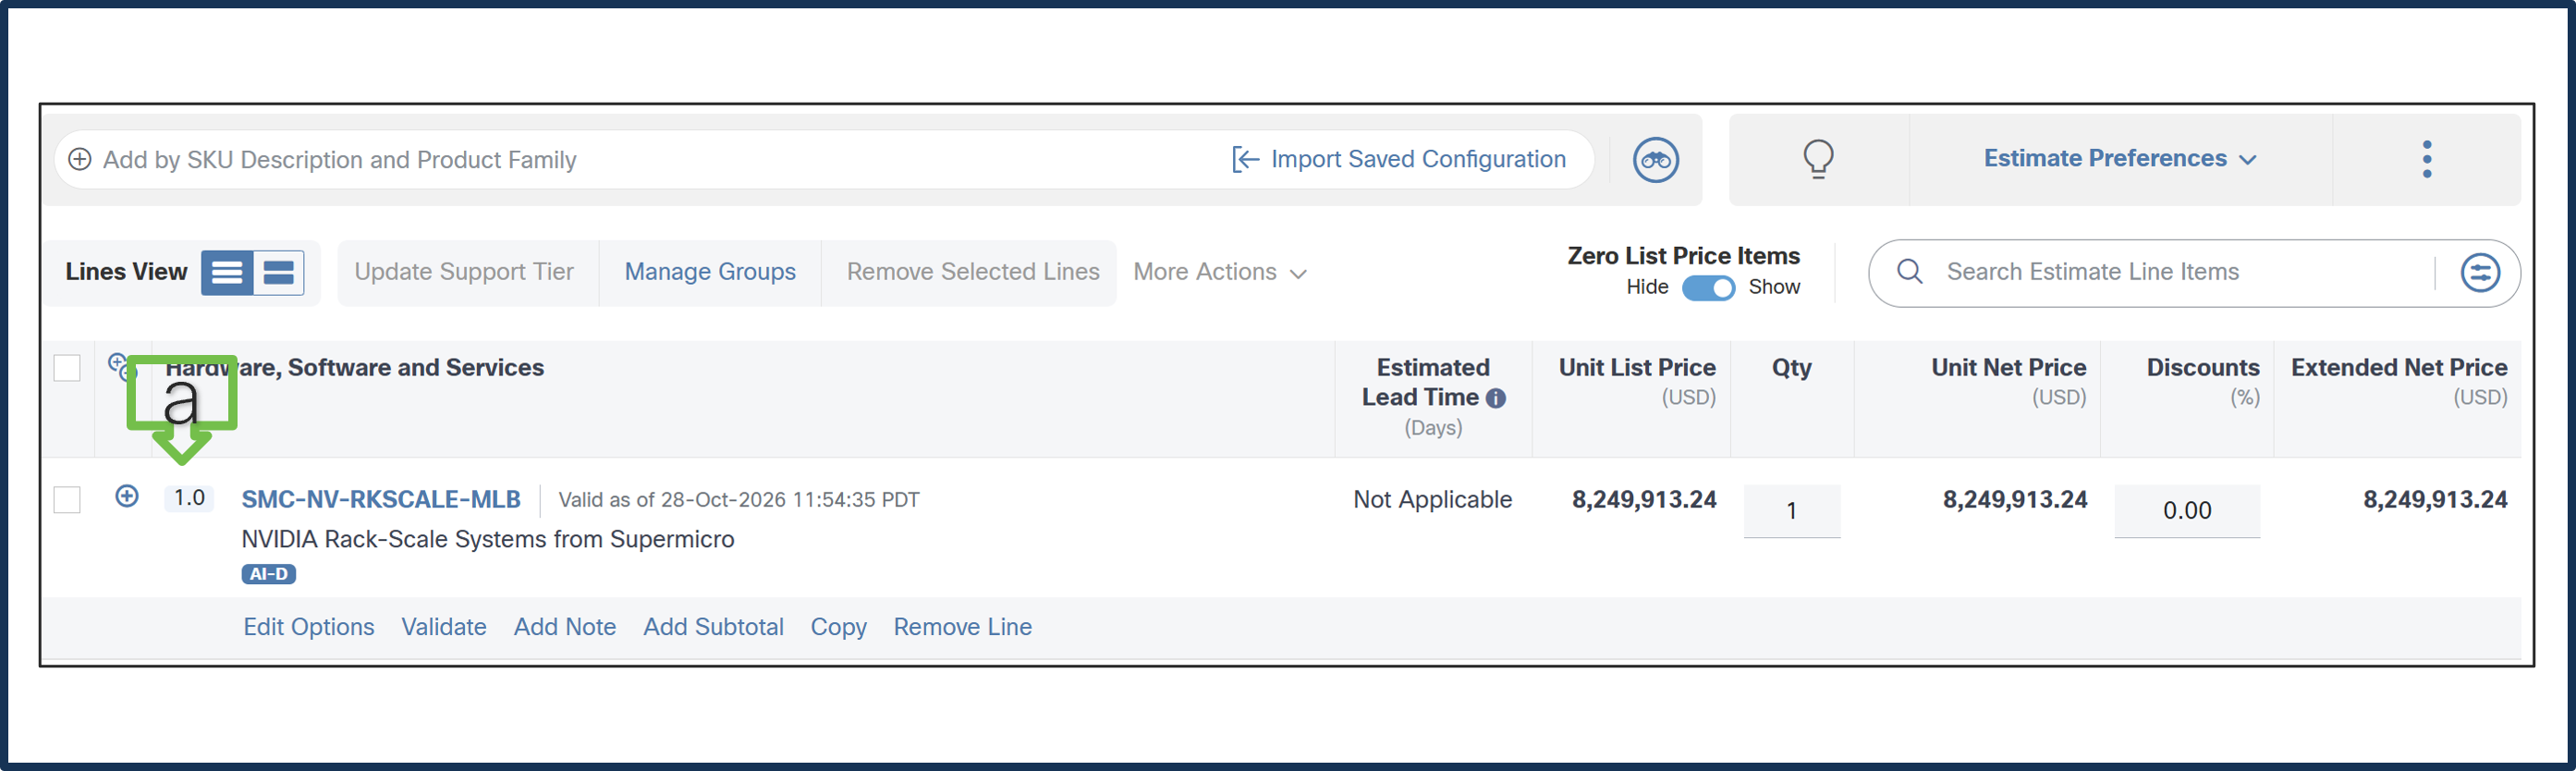
a. Line 1.0 is now valid configuration.
Step 32.
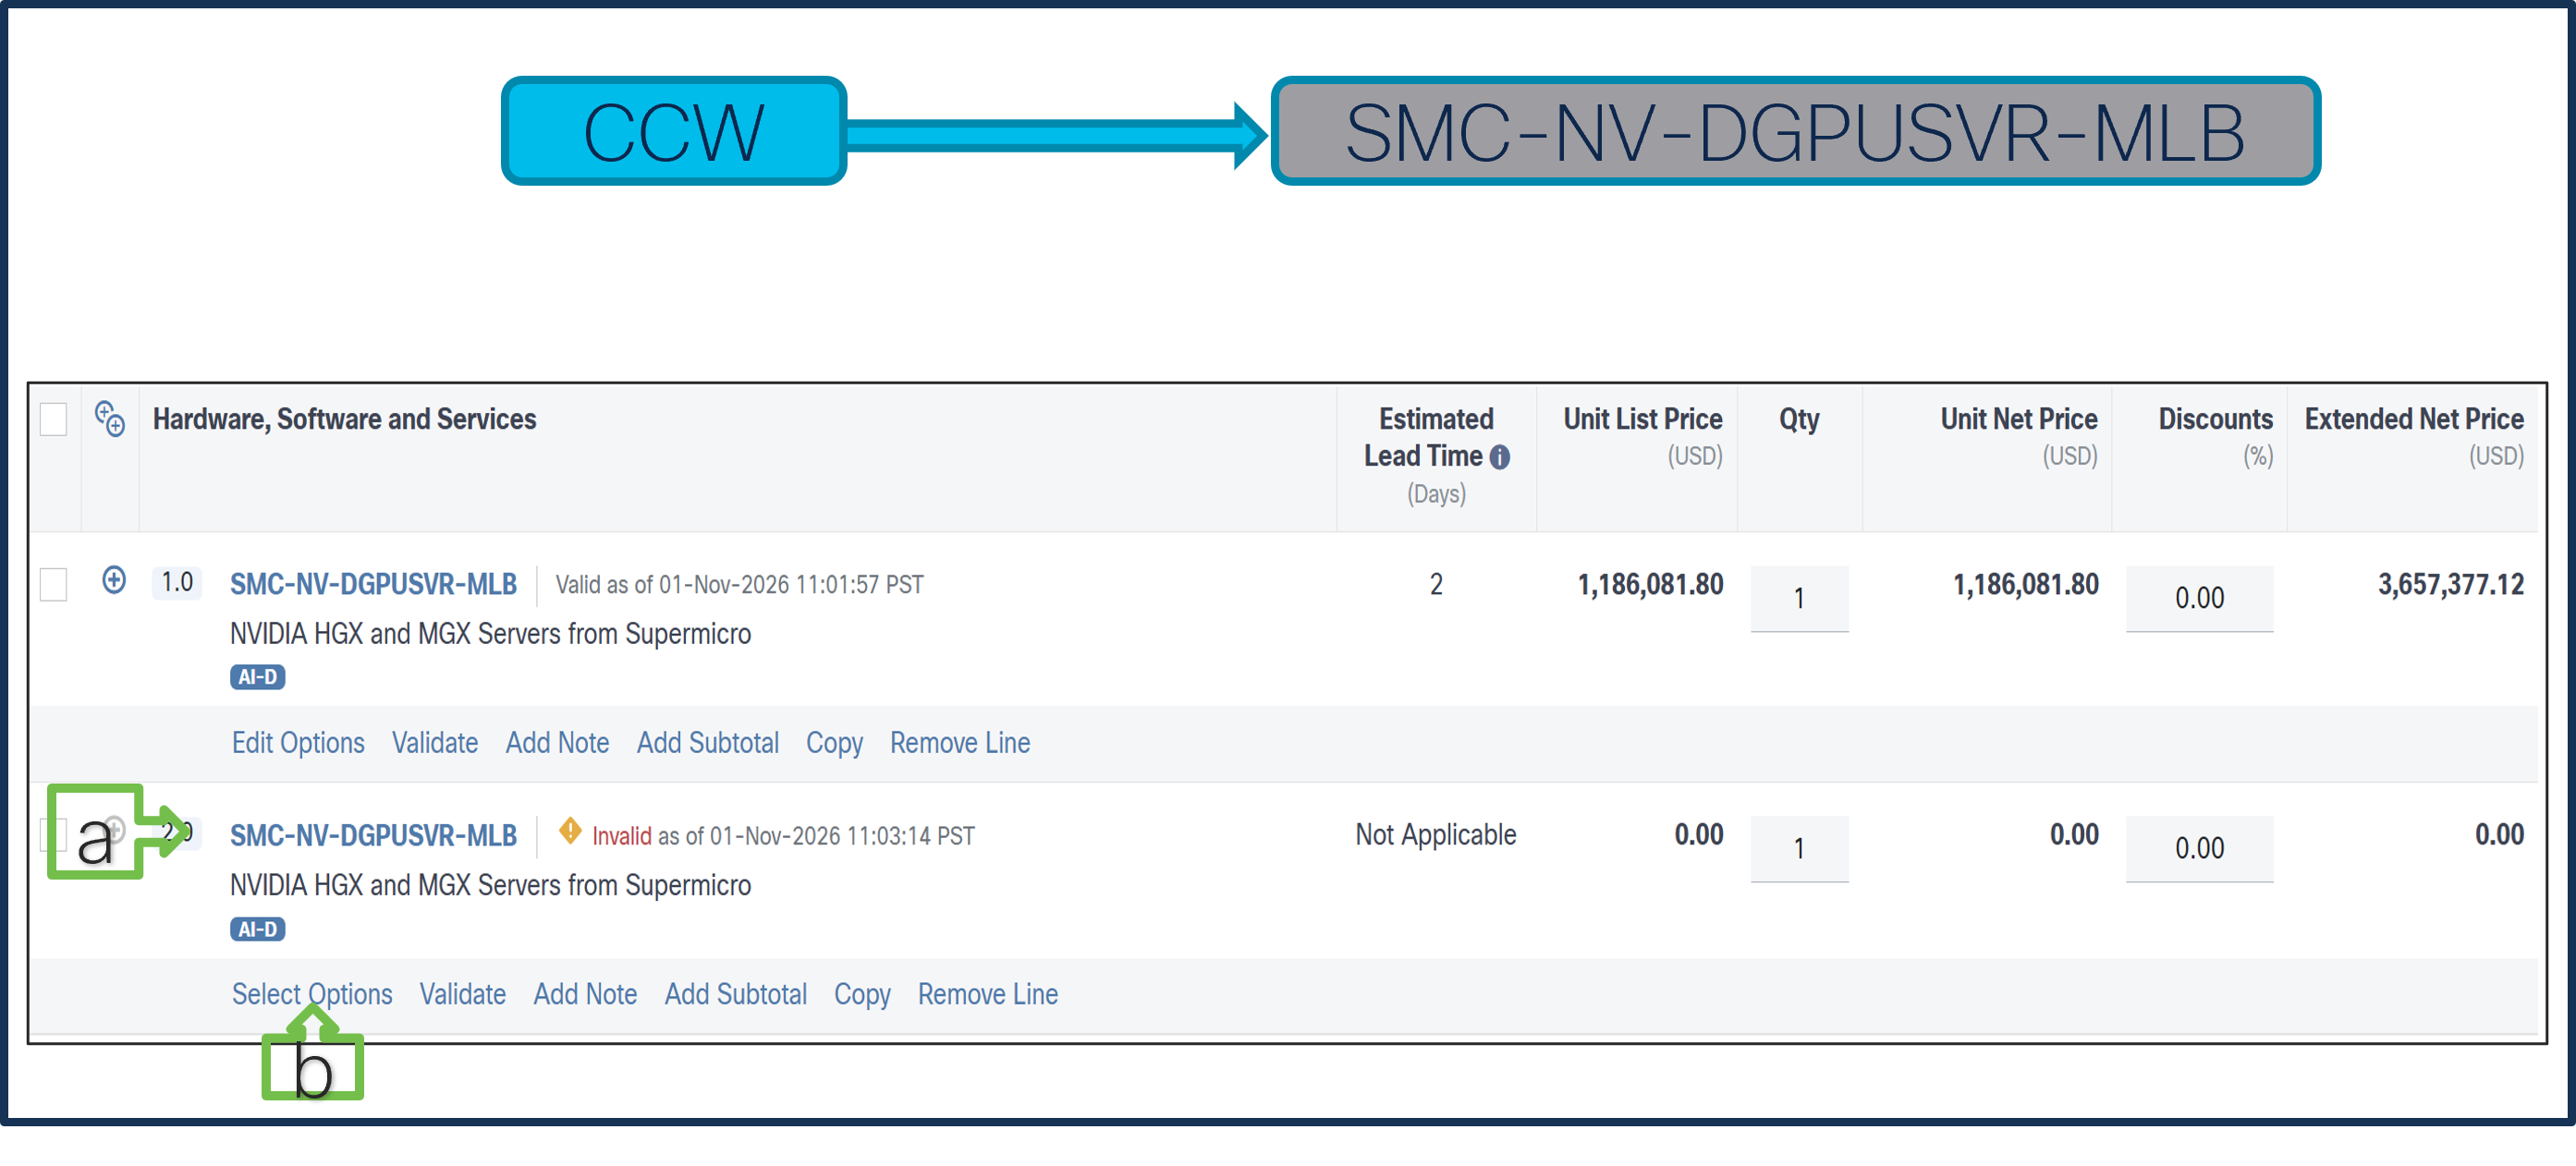
Currently, we restrict 1 QTY Rack selection per MLB. If multiple racks are required, create multiple MLB lines.
a. Add MLB: SMC-NV-DGPUSVR-MLB in line 2.
b. Click Select Options to enter the configurator.
Step 33.
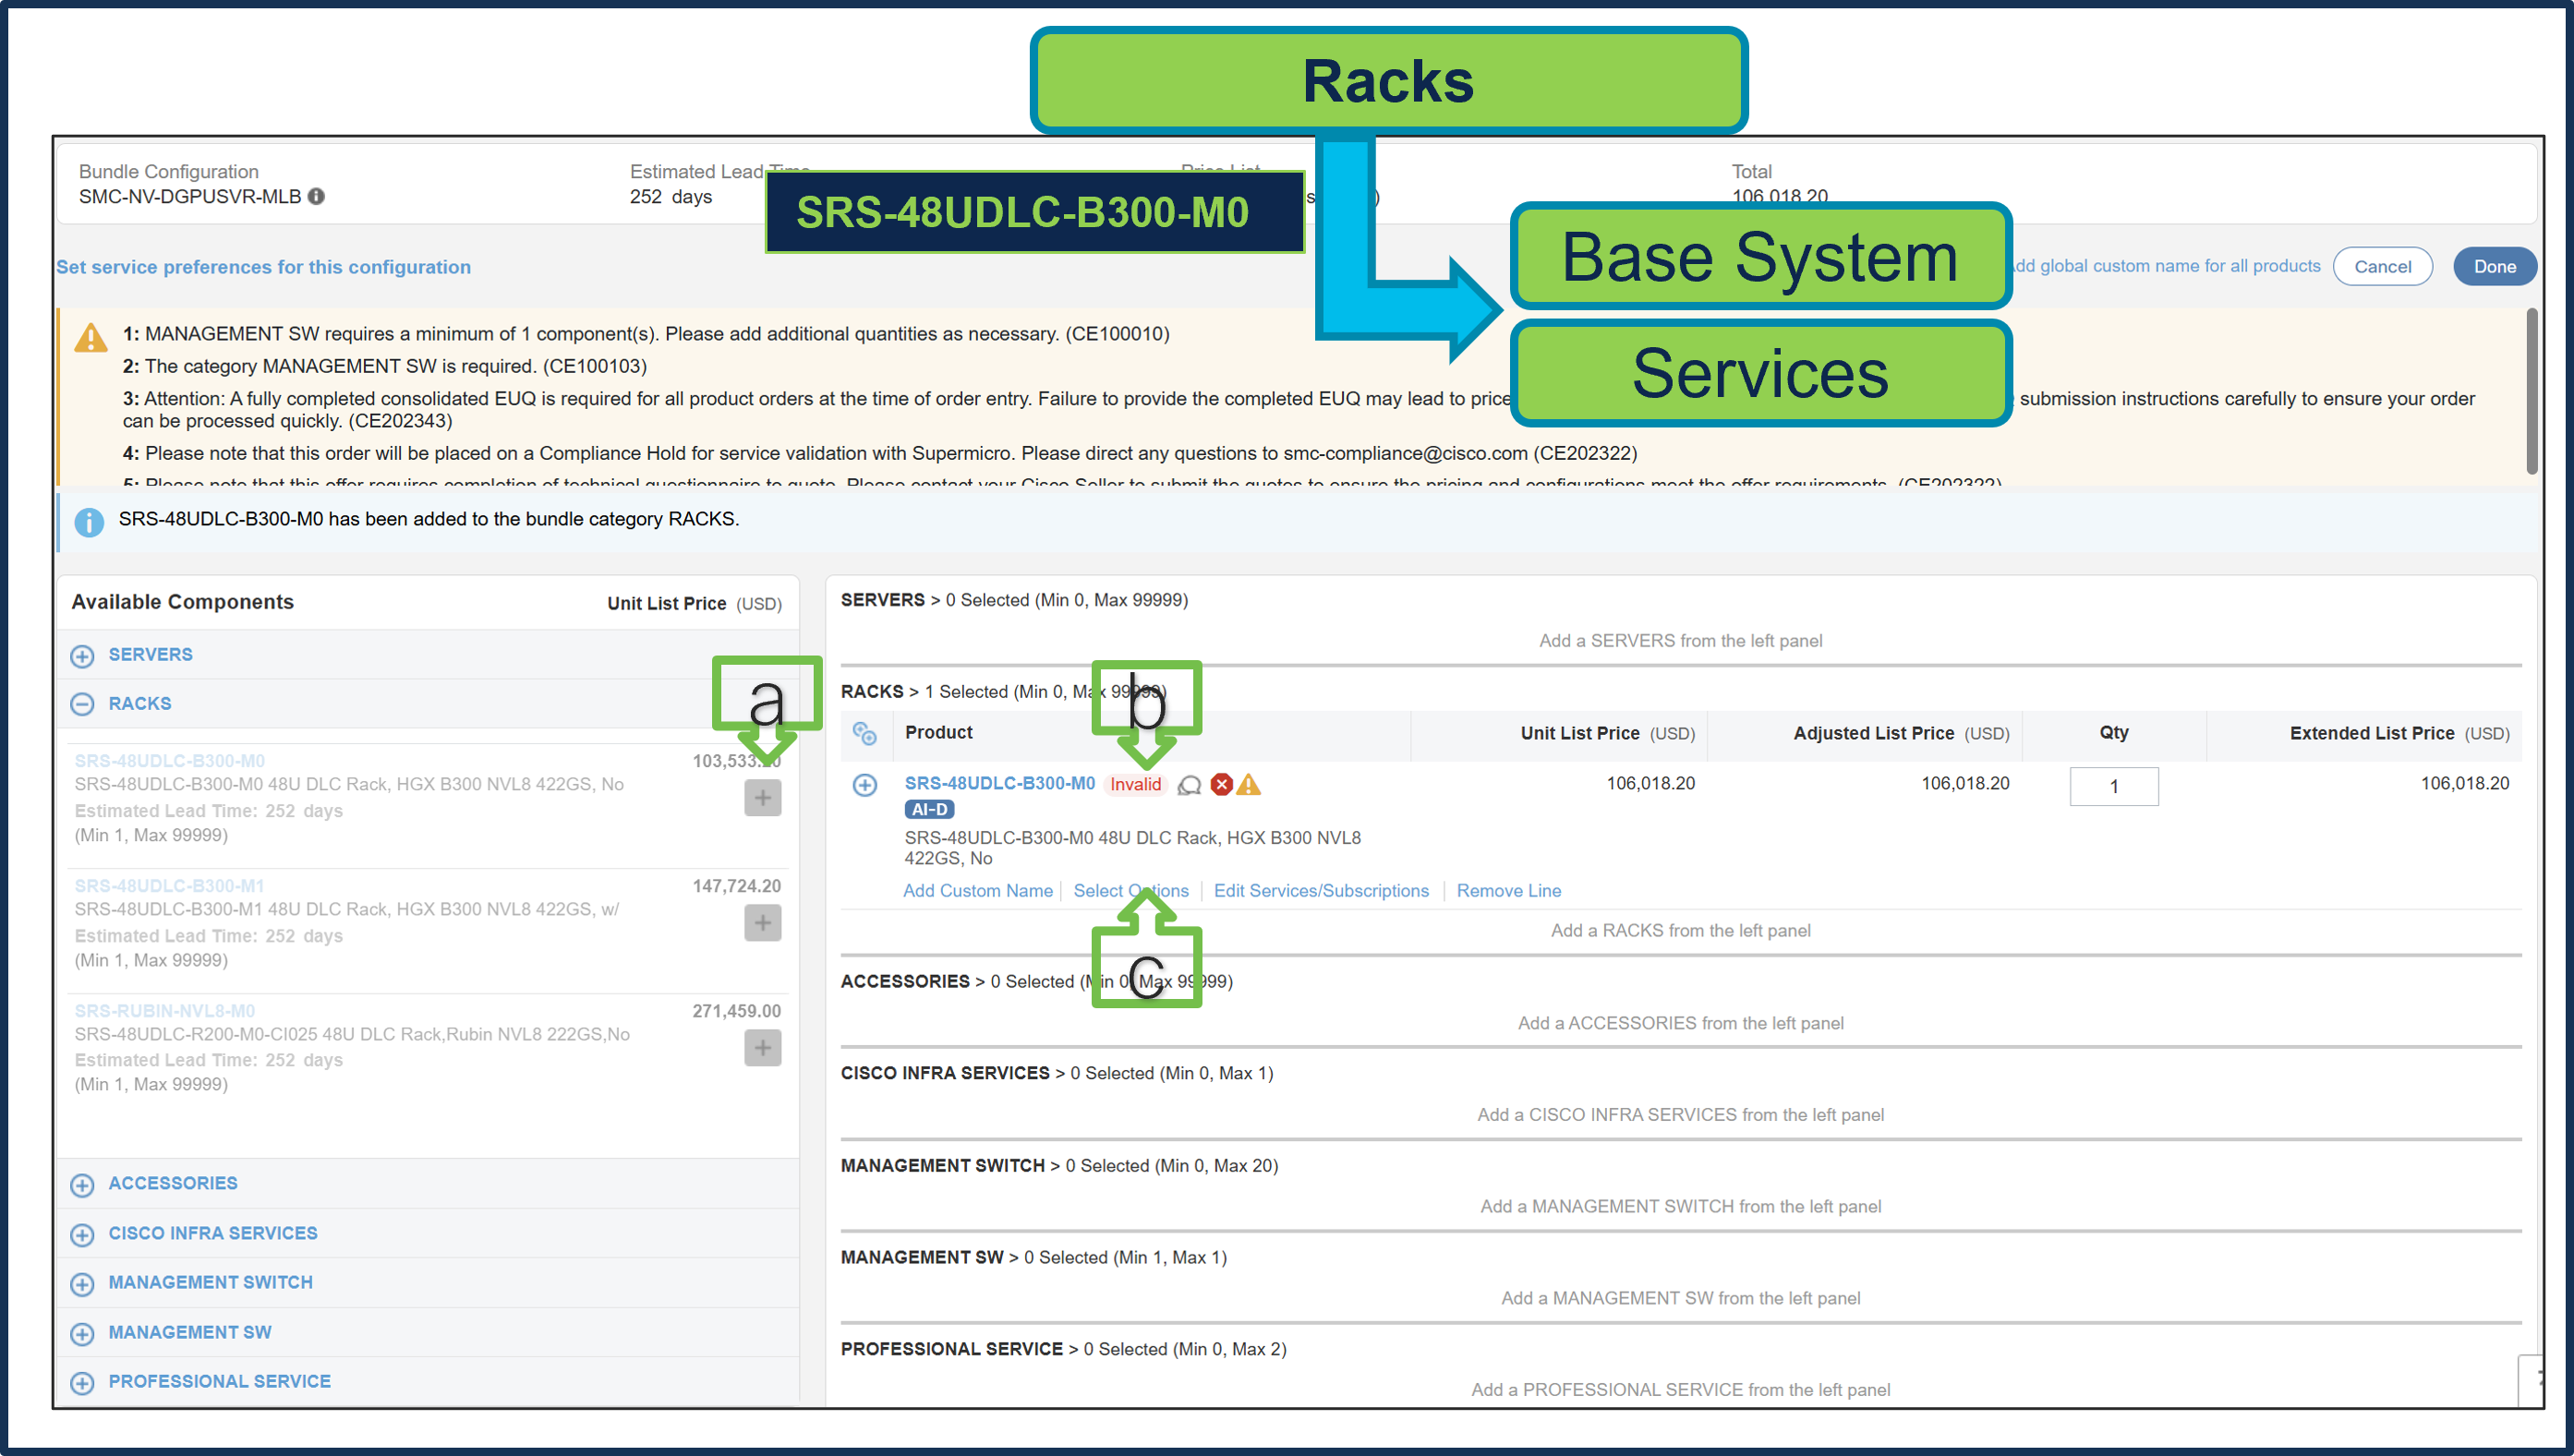
a. Select SRS-48UDLC-B300-M0 ATO from Rack under MLB by clicking “PLUS”
b. Notice that the SRS-48UDLC-B300-M0 ATO status is invalid because further configuration is needed.
c. Select ‘Edit Options’ to enter the configurator.
Step 34.
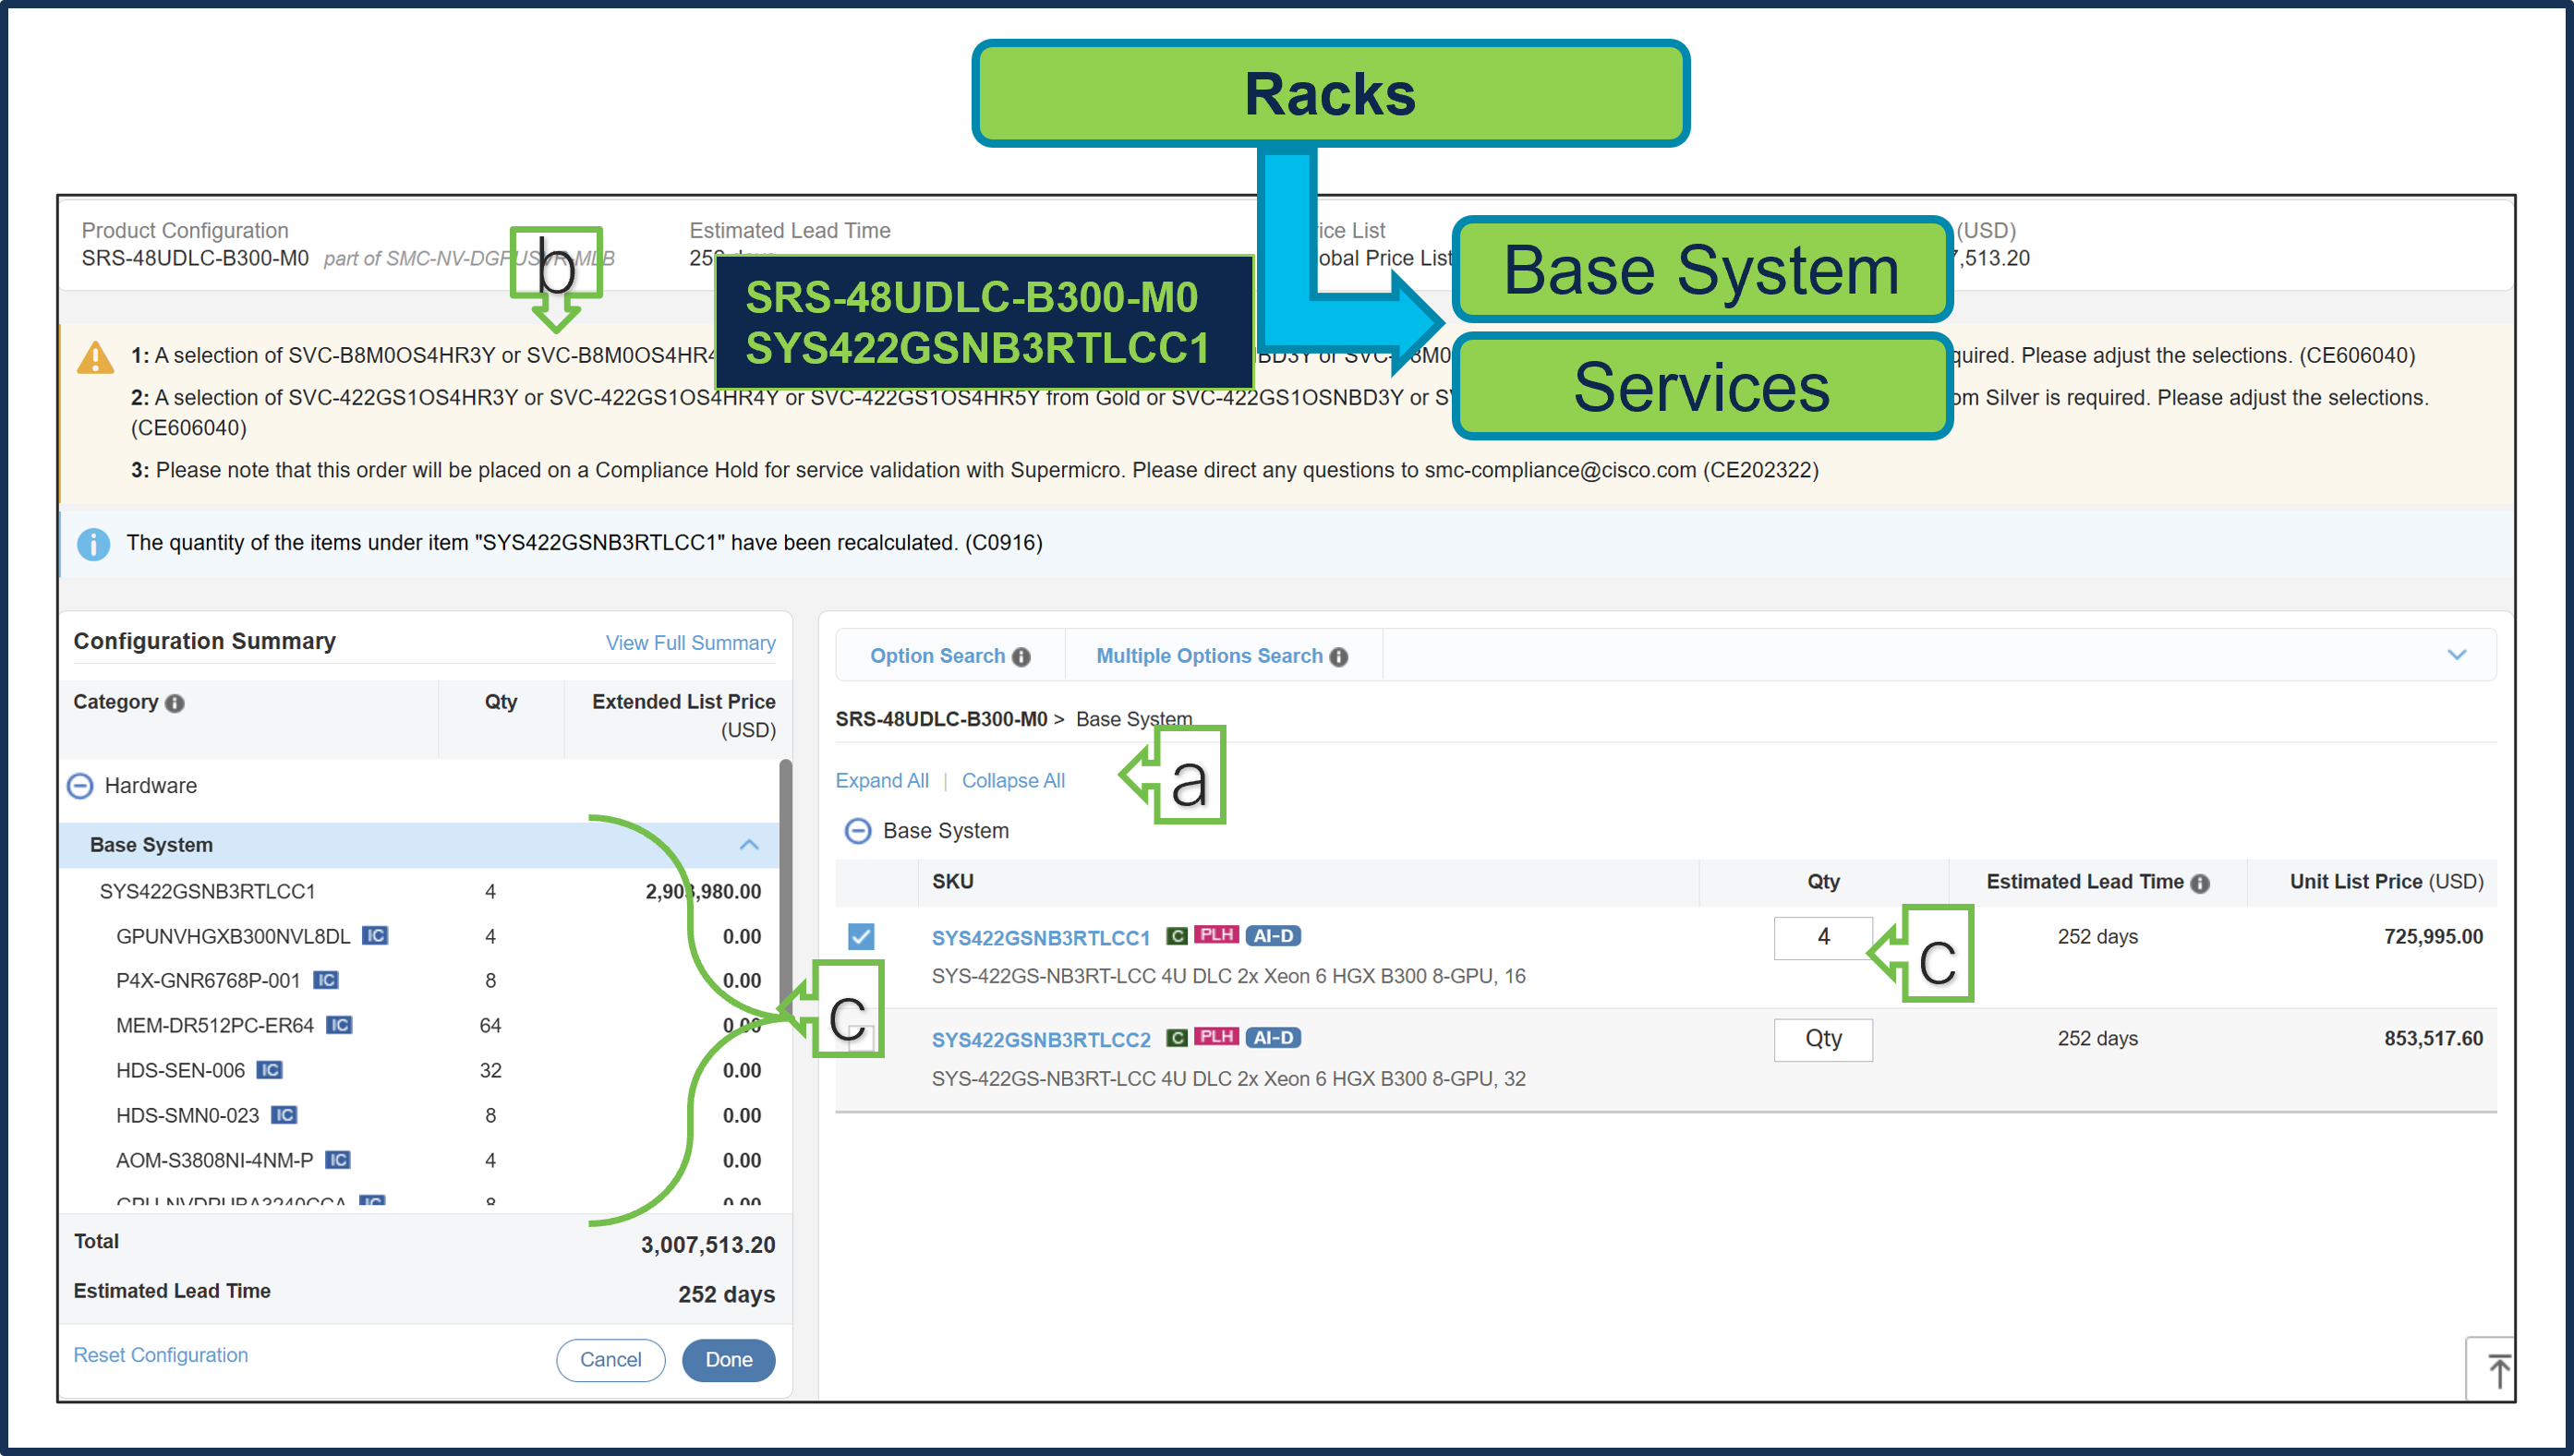
a. Configure SRS-48UDLC-B300-M0 by selecting Base System (Server) and Services as these are mandatory selection.
b. Follow warning messages to configure the minimum required selections under Rack.
c. Server Components like Processor, Memory, Storage Drive, GPU, etc. are fixed and preselected. Only Server QTY is variable.
d. Both Server Types can be selected together and combined max QTY allowed for Server per Rack is 9.
Step 35.
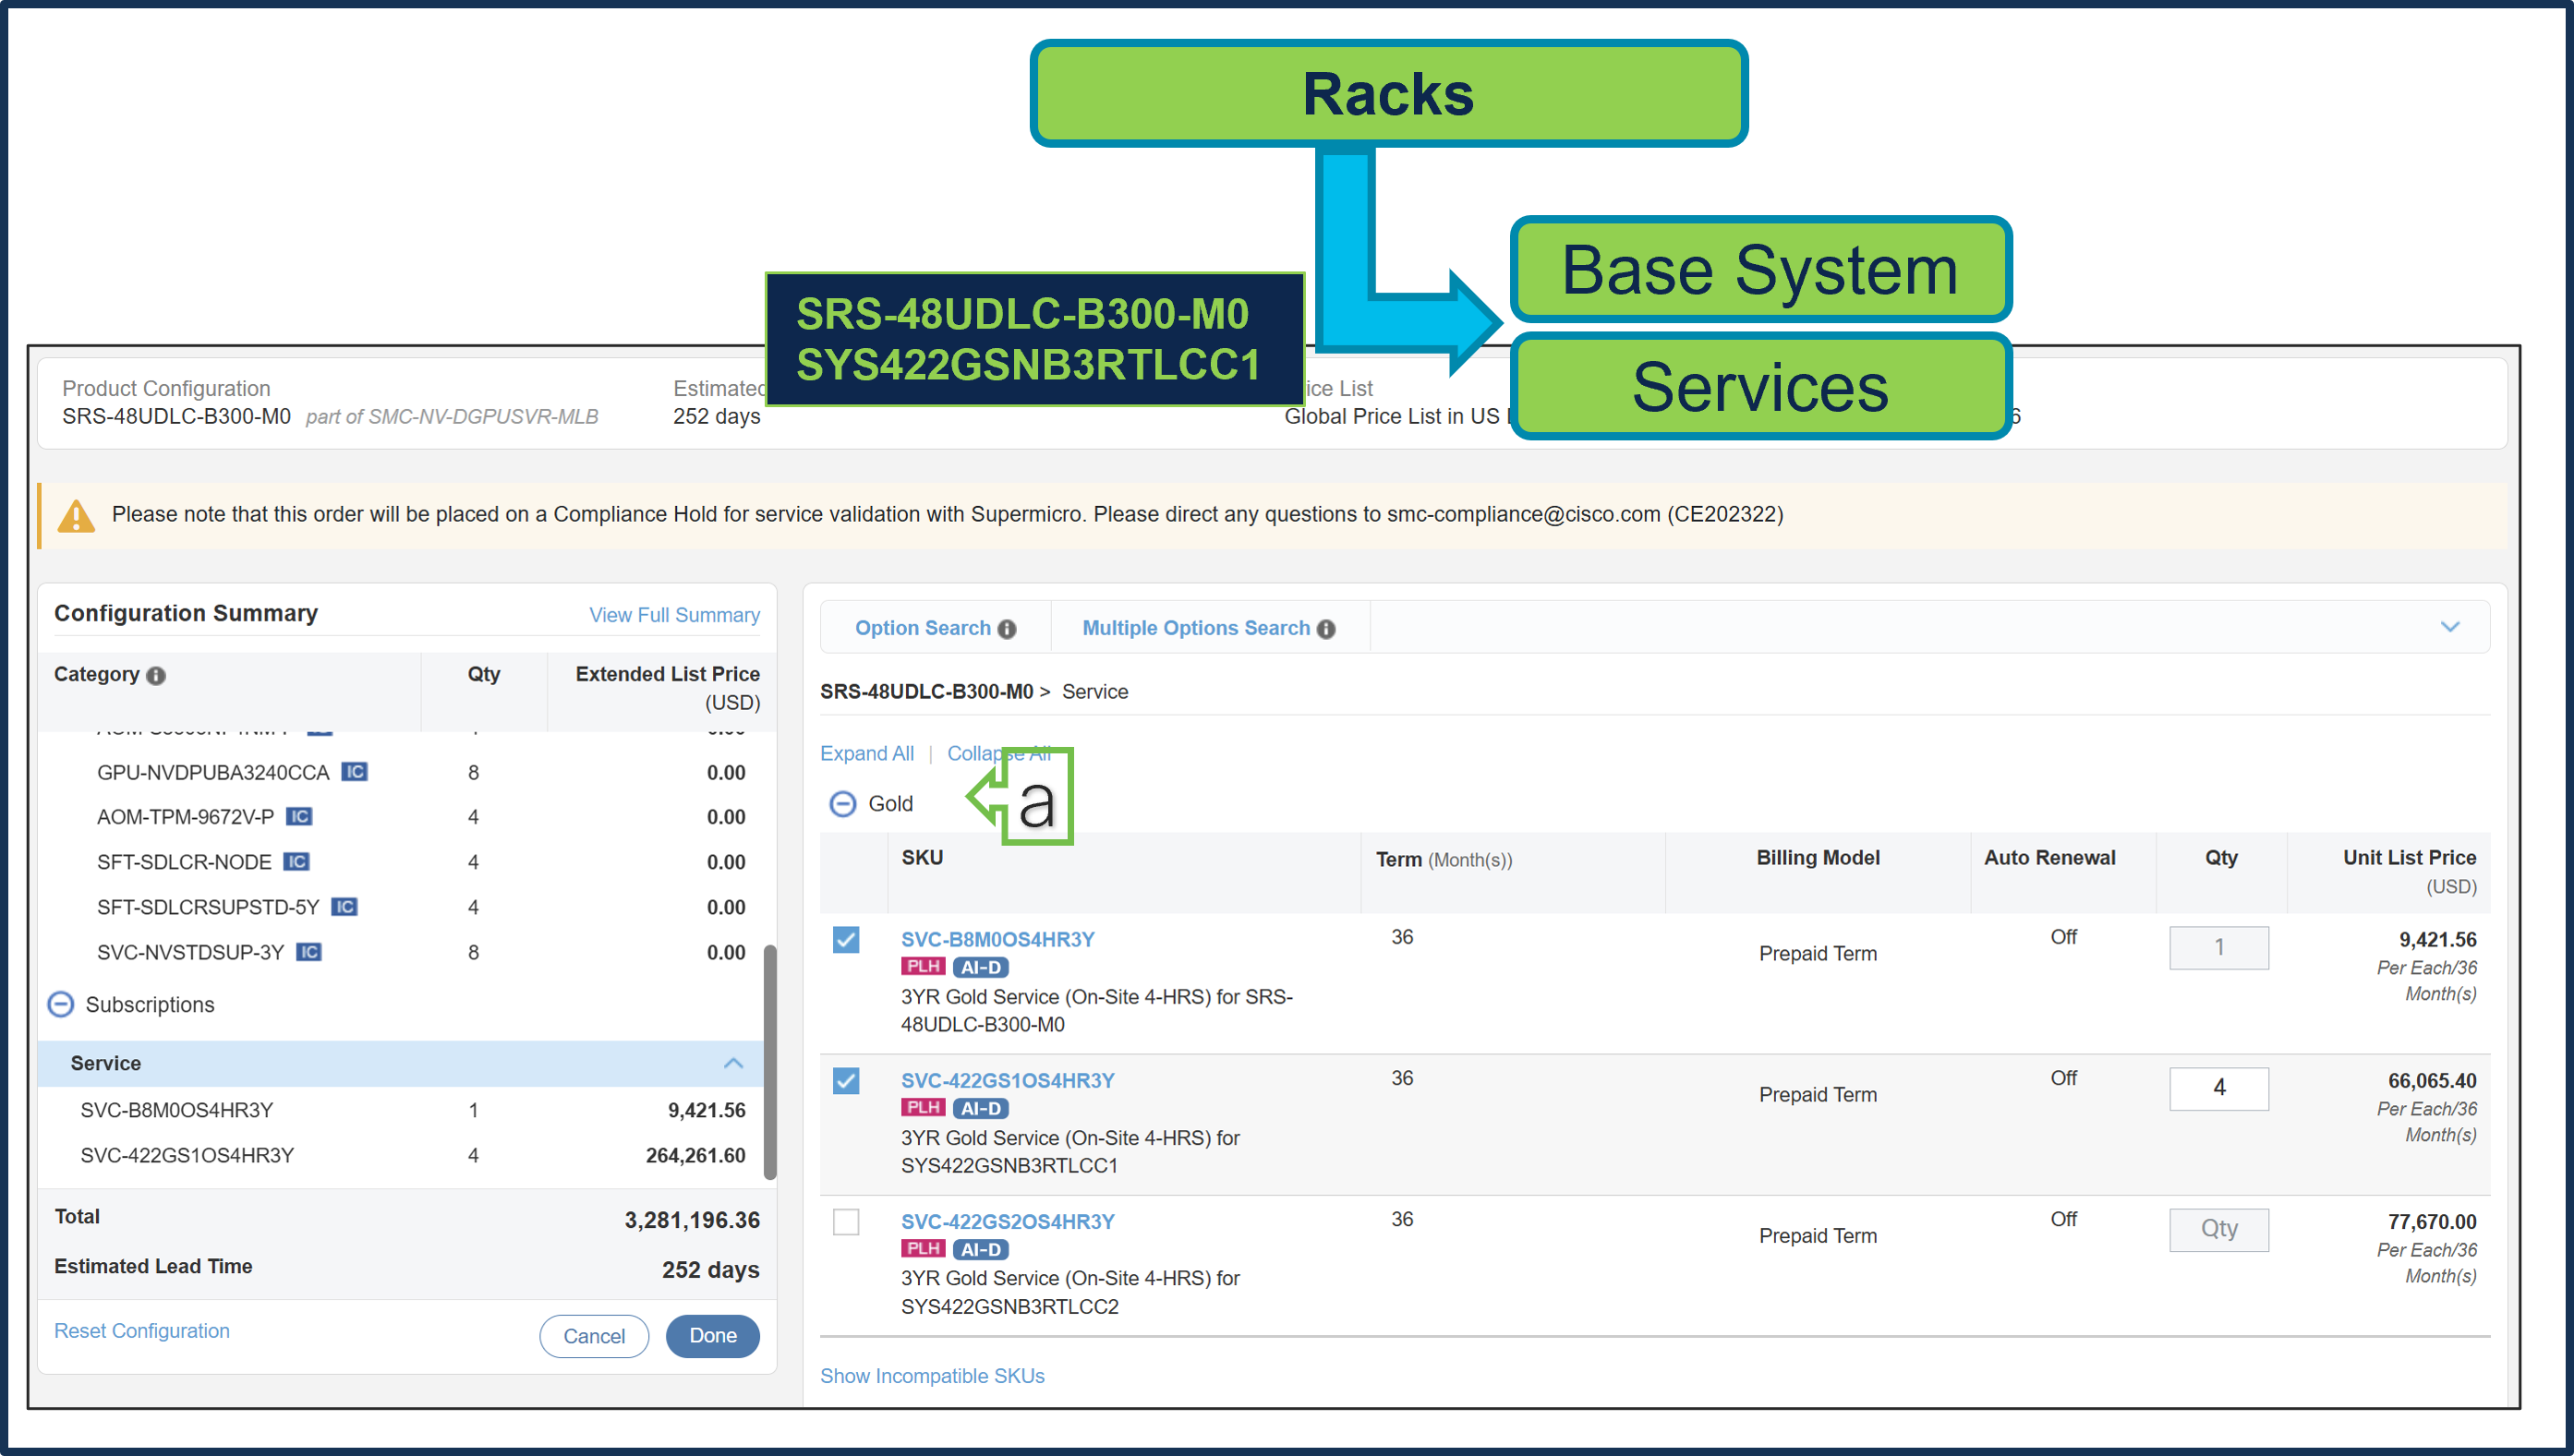
a. Gold Supermicro Services are selected.
Step 36.
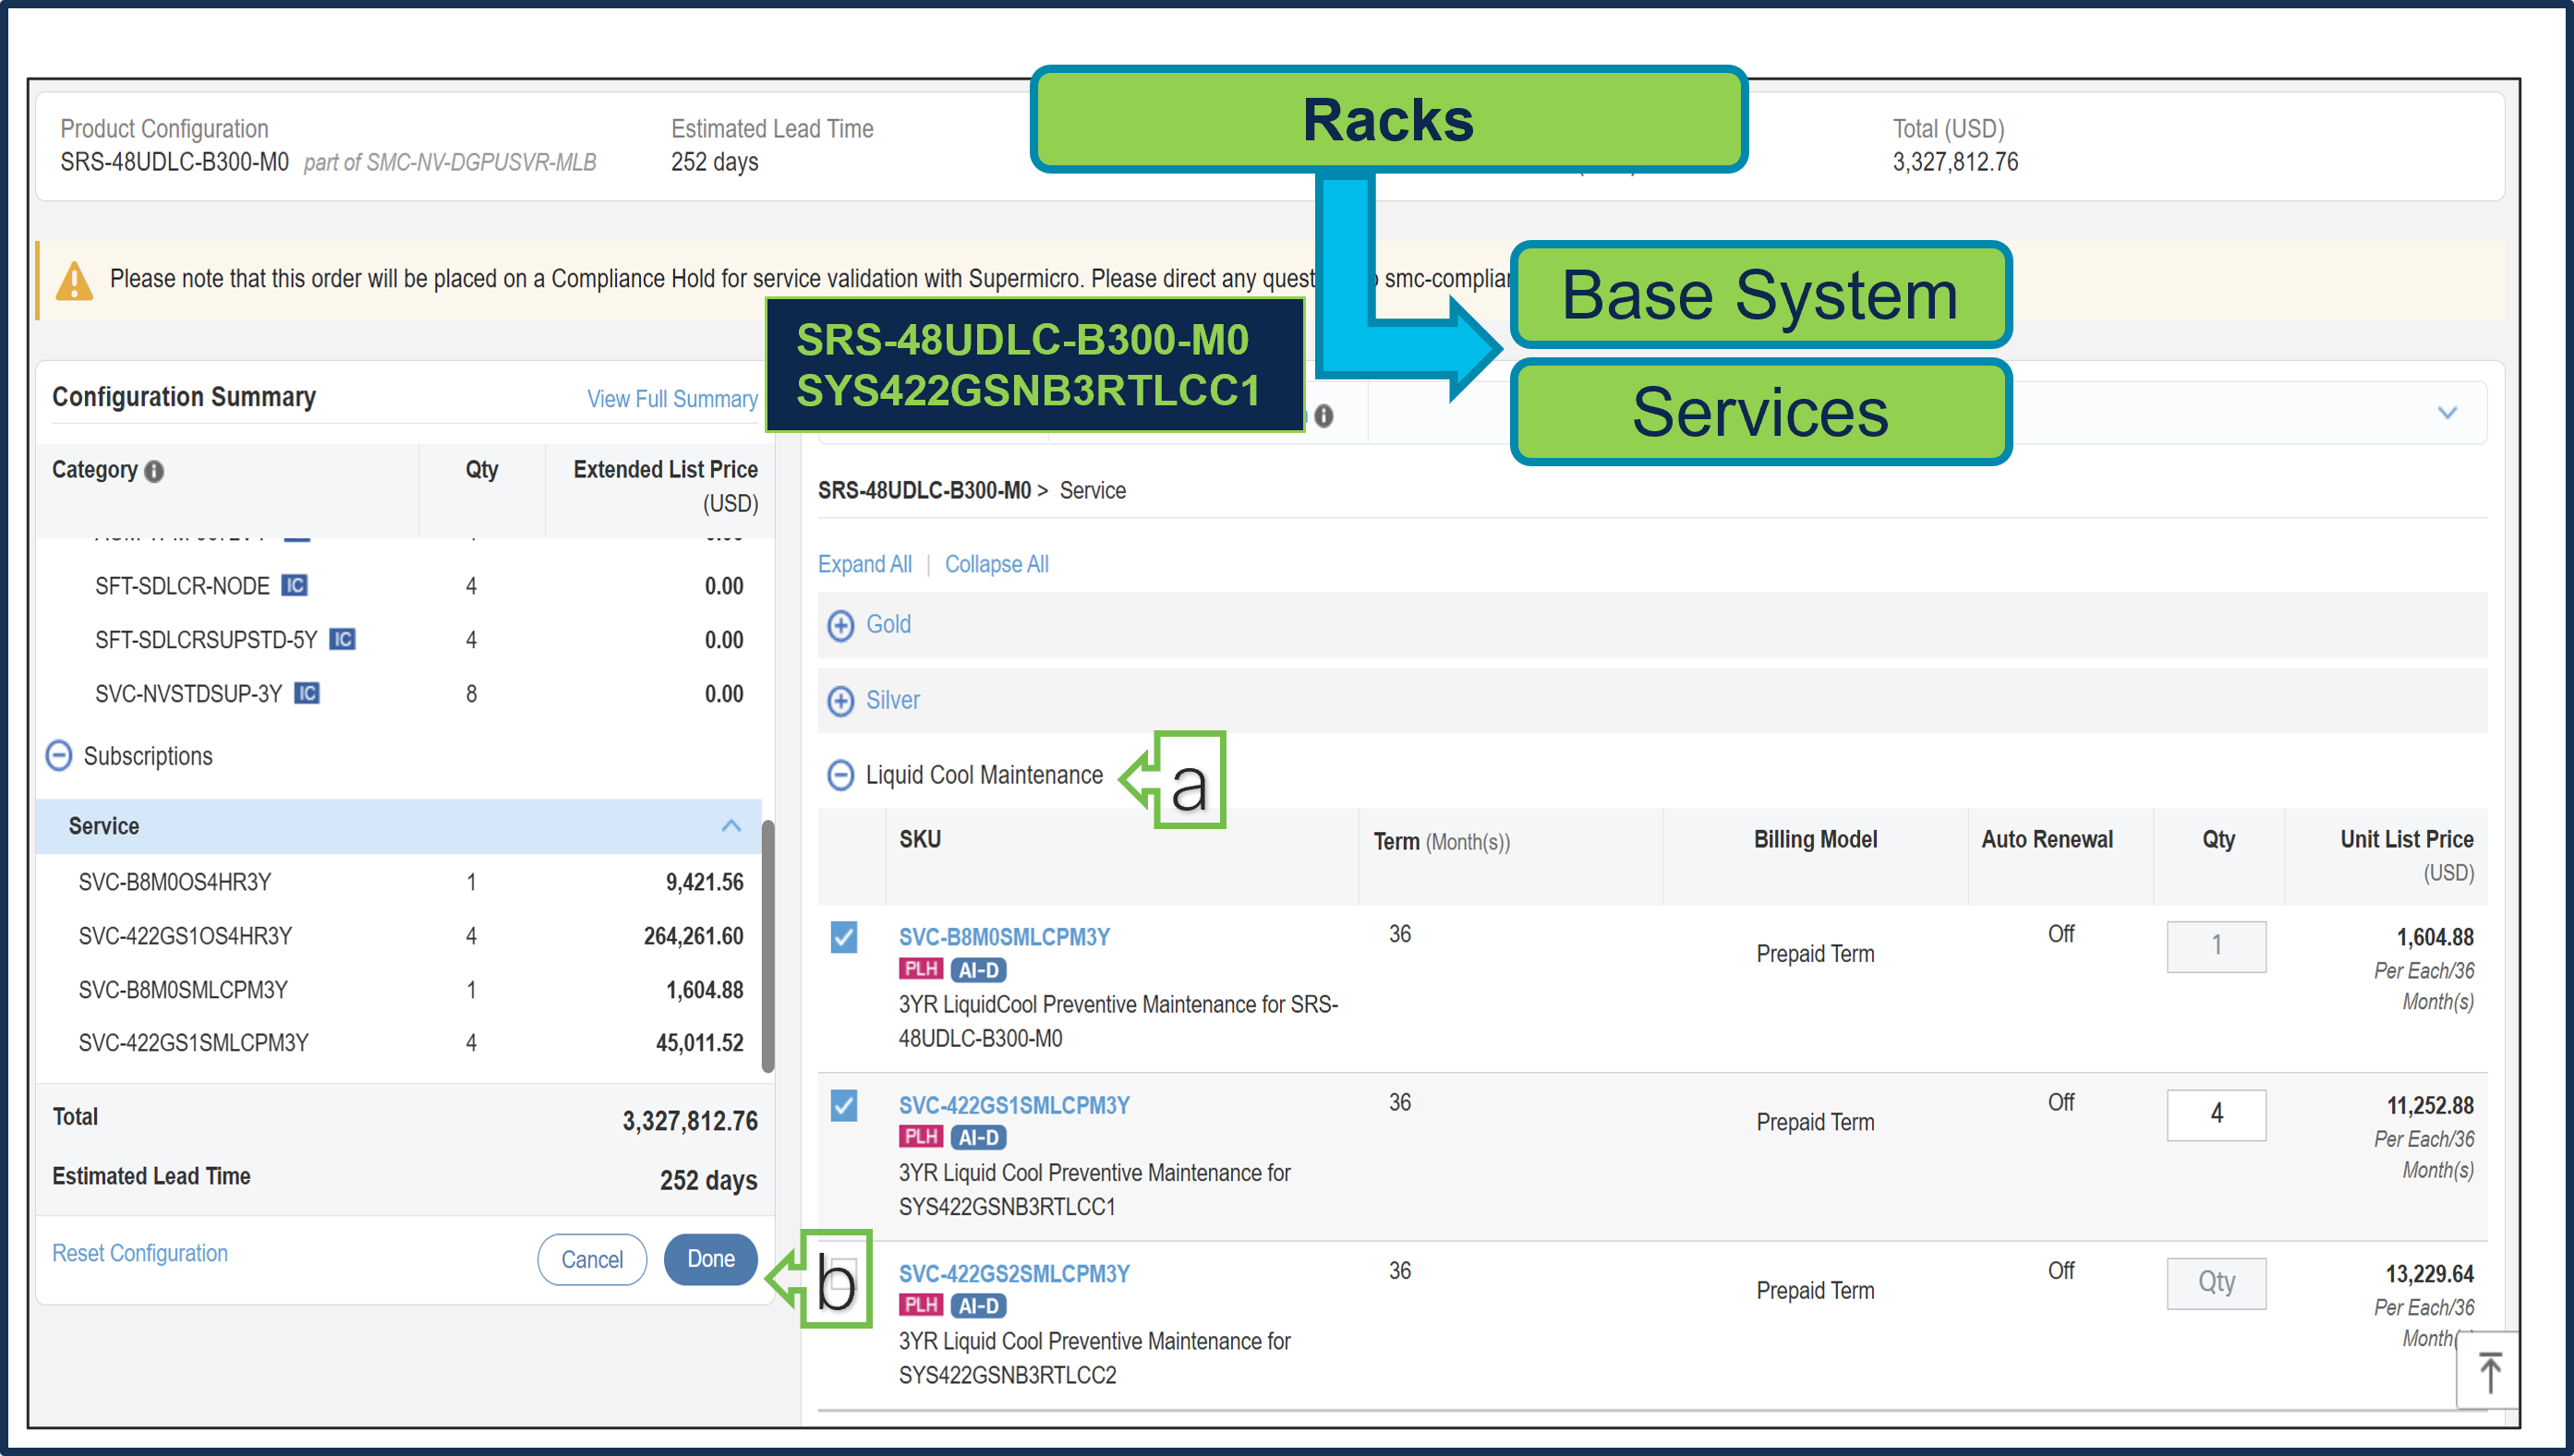
a. Given we have selected in-row CDU in Line No. 1, Liquid Cool Maintenance Service is selected.
b. Select Done when completed.
Step 37.
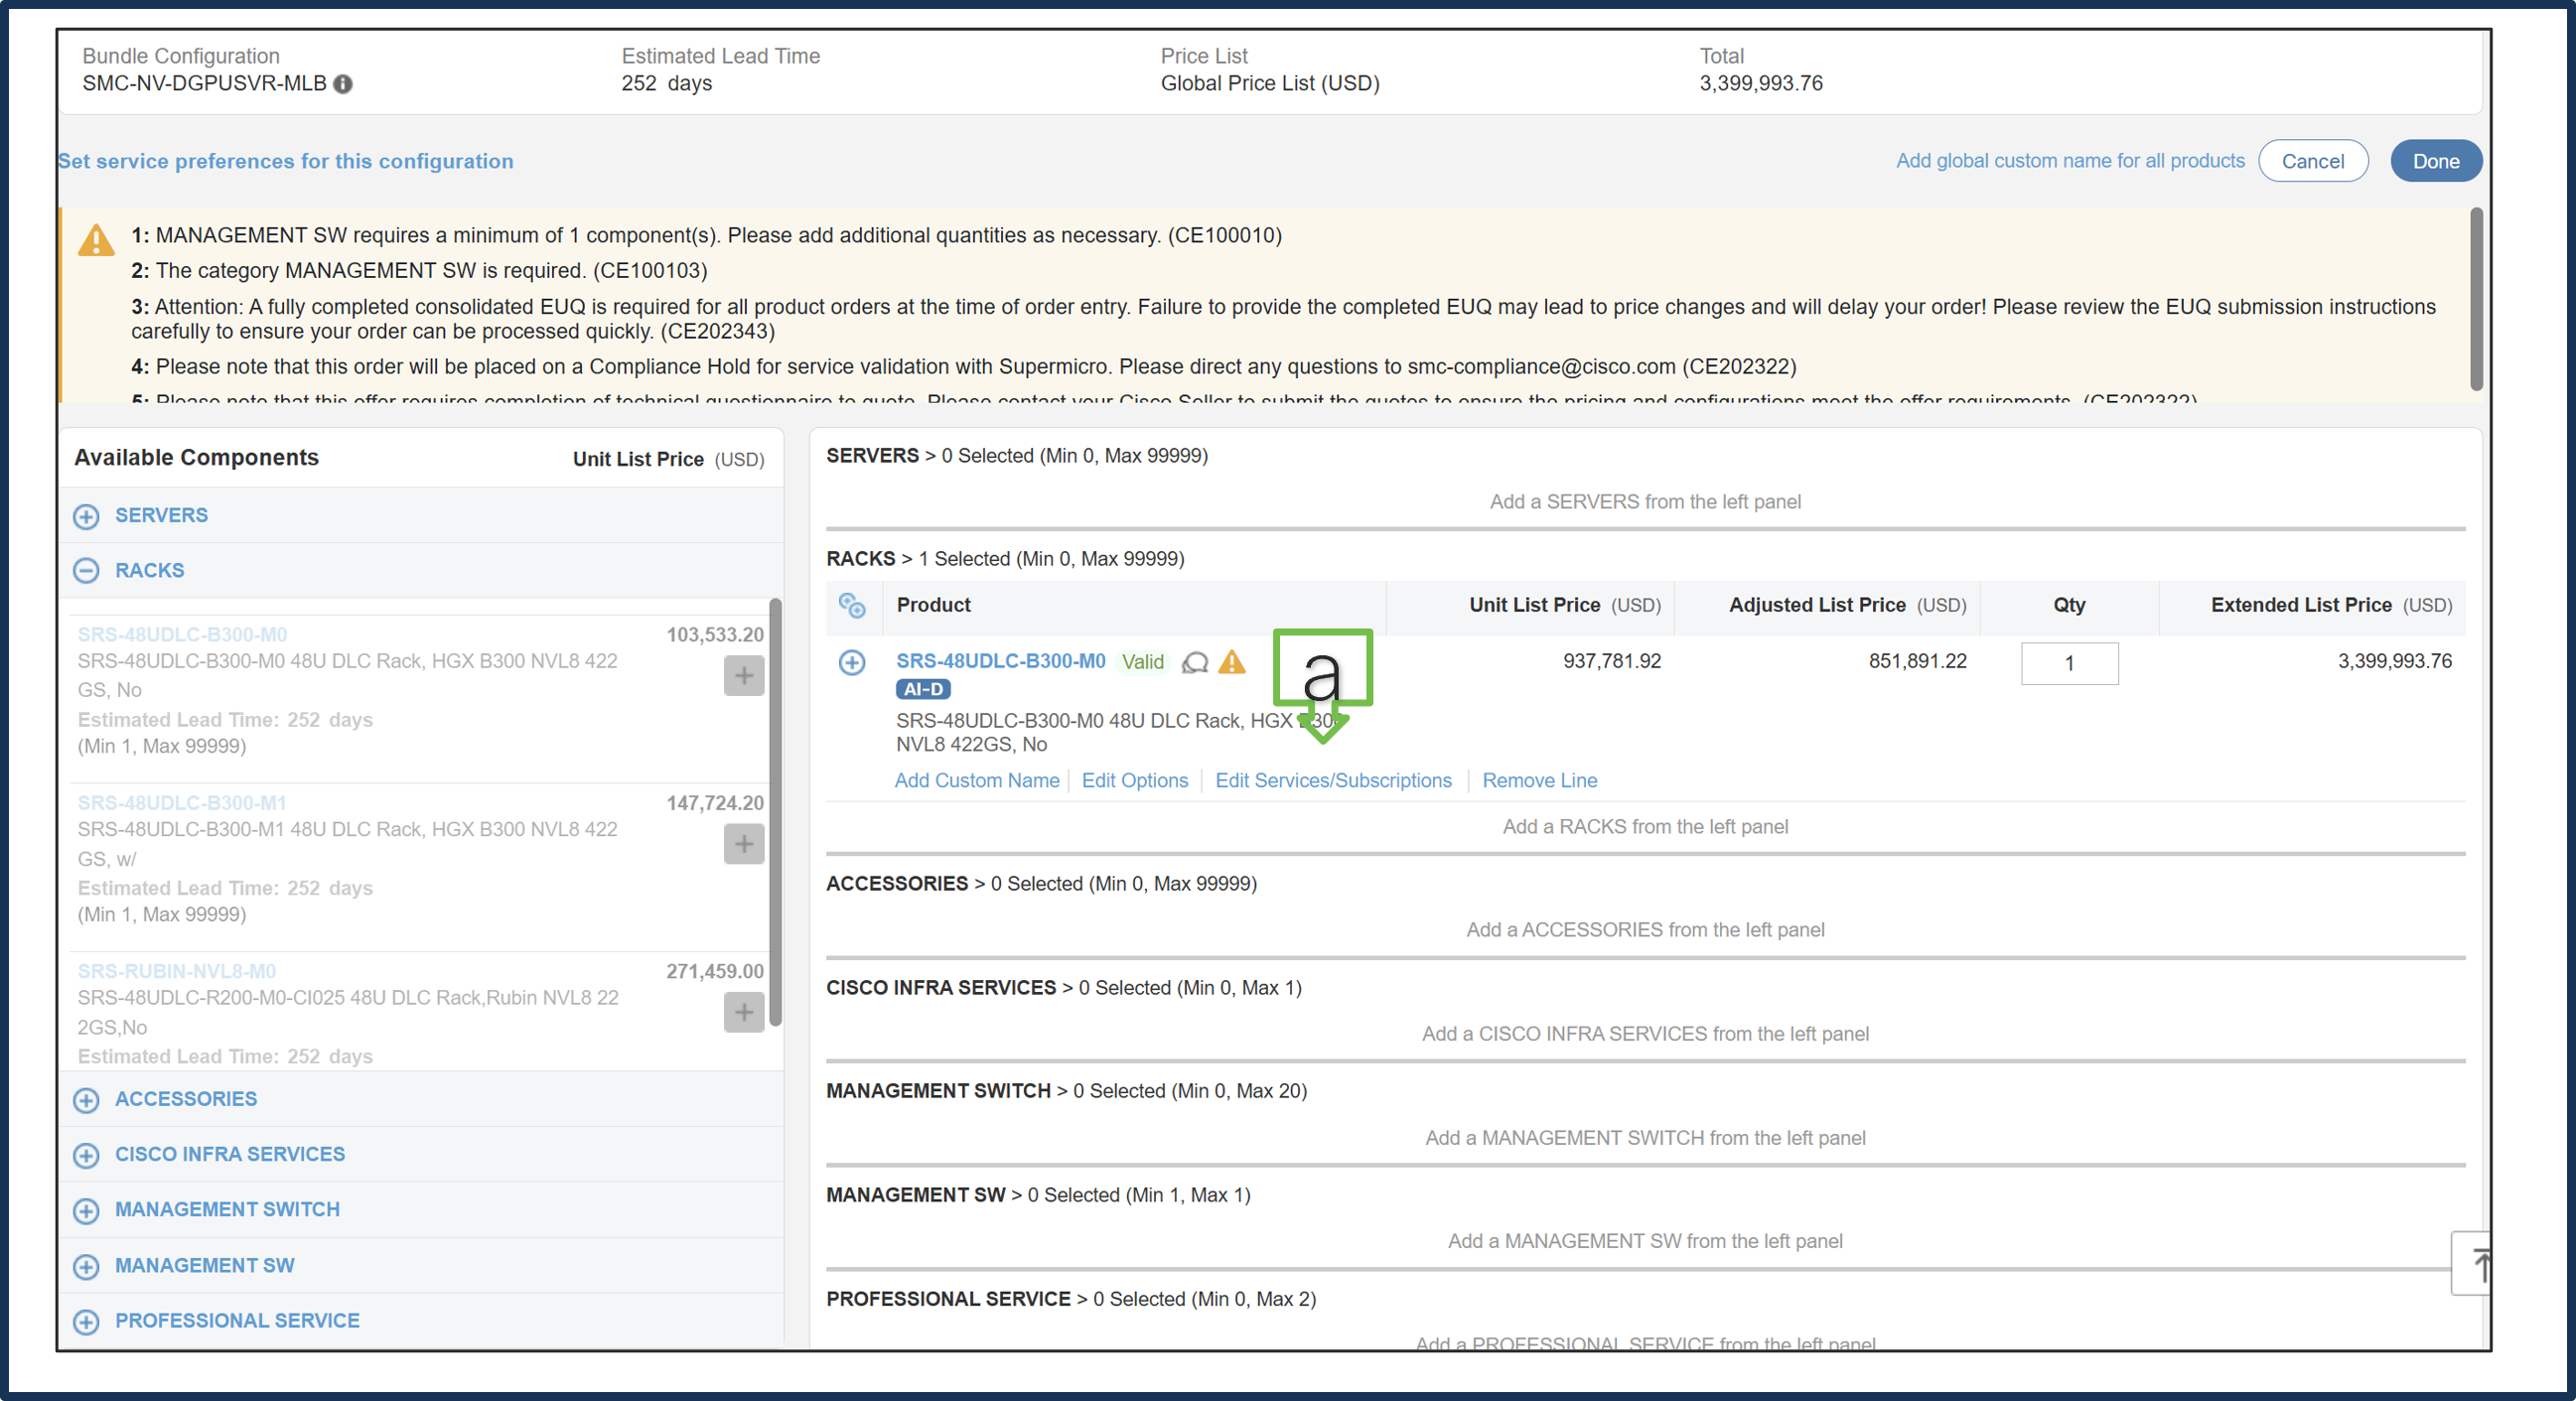
a. Note Status is now Valid. Repeat the same steps for Cisco CX Technical Services.
b. Click Done.
Step 38.
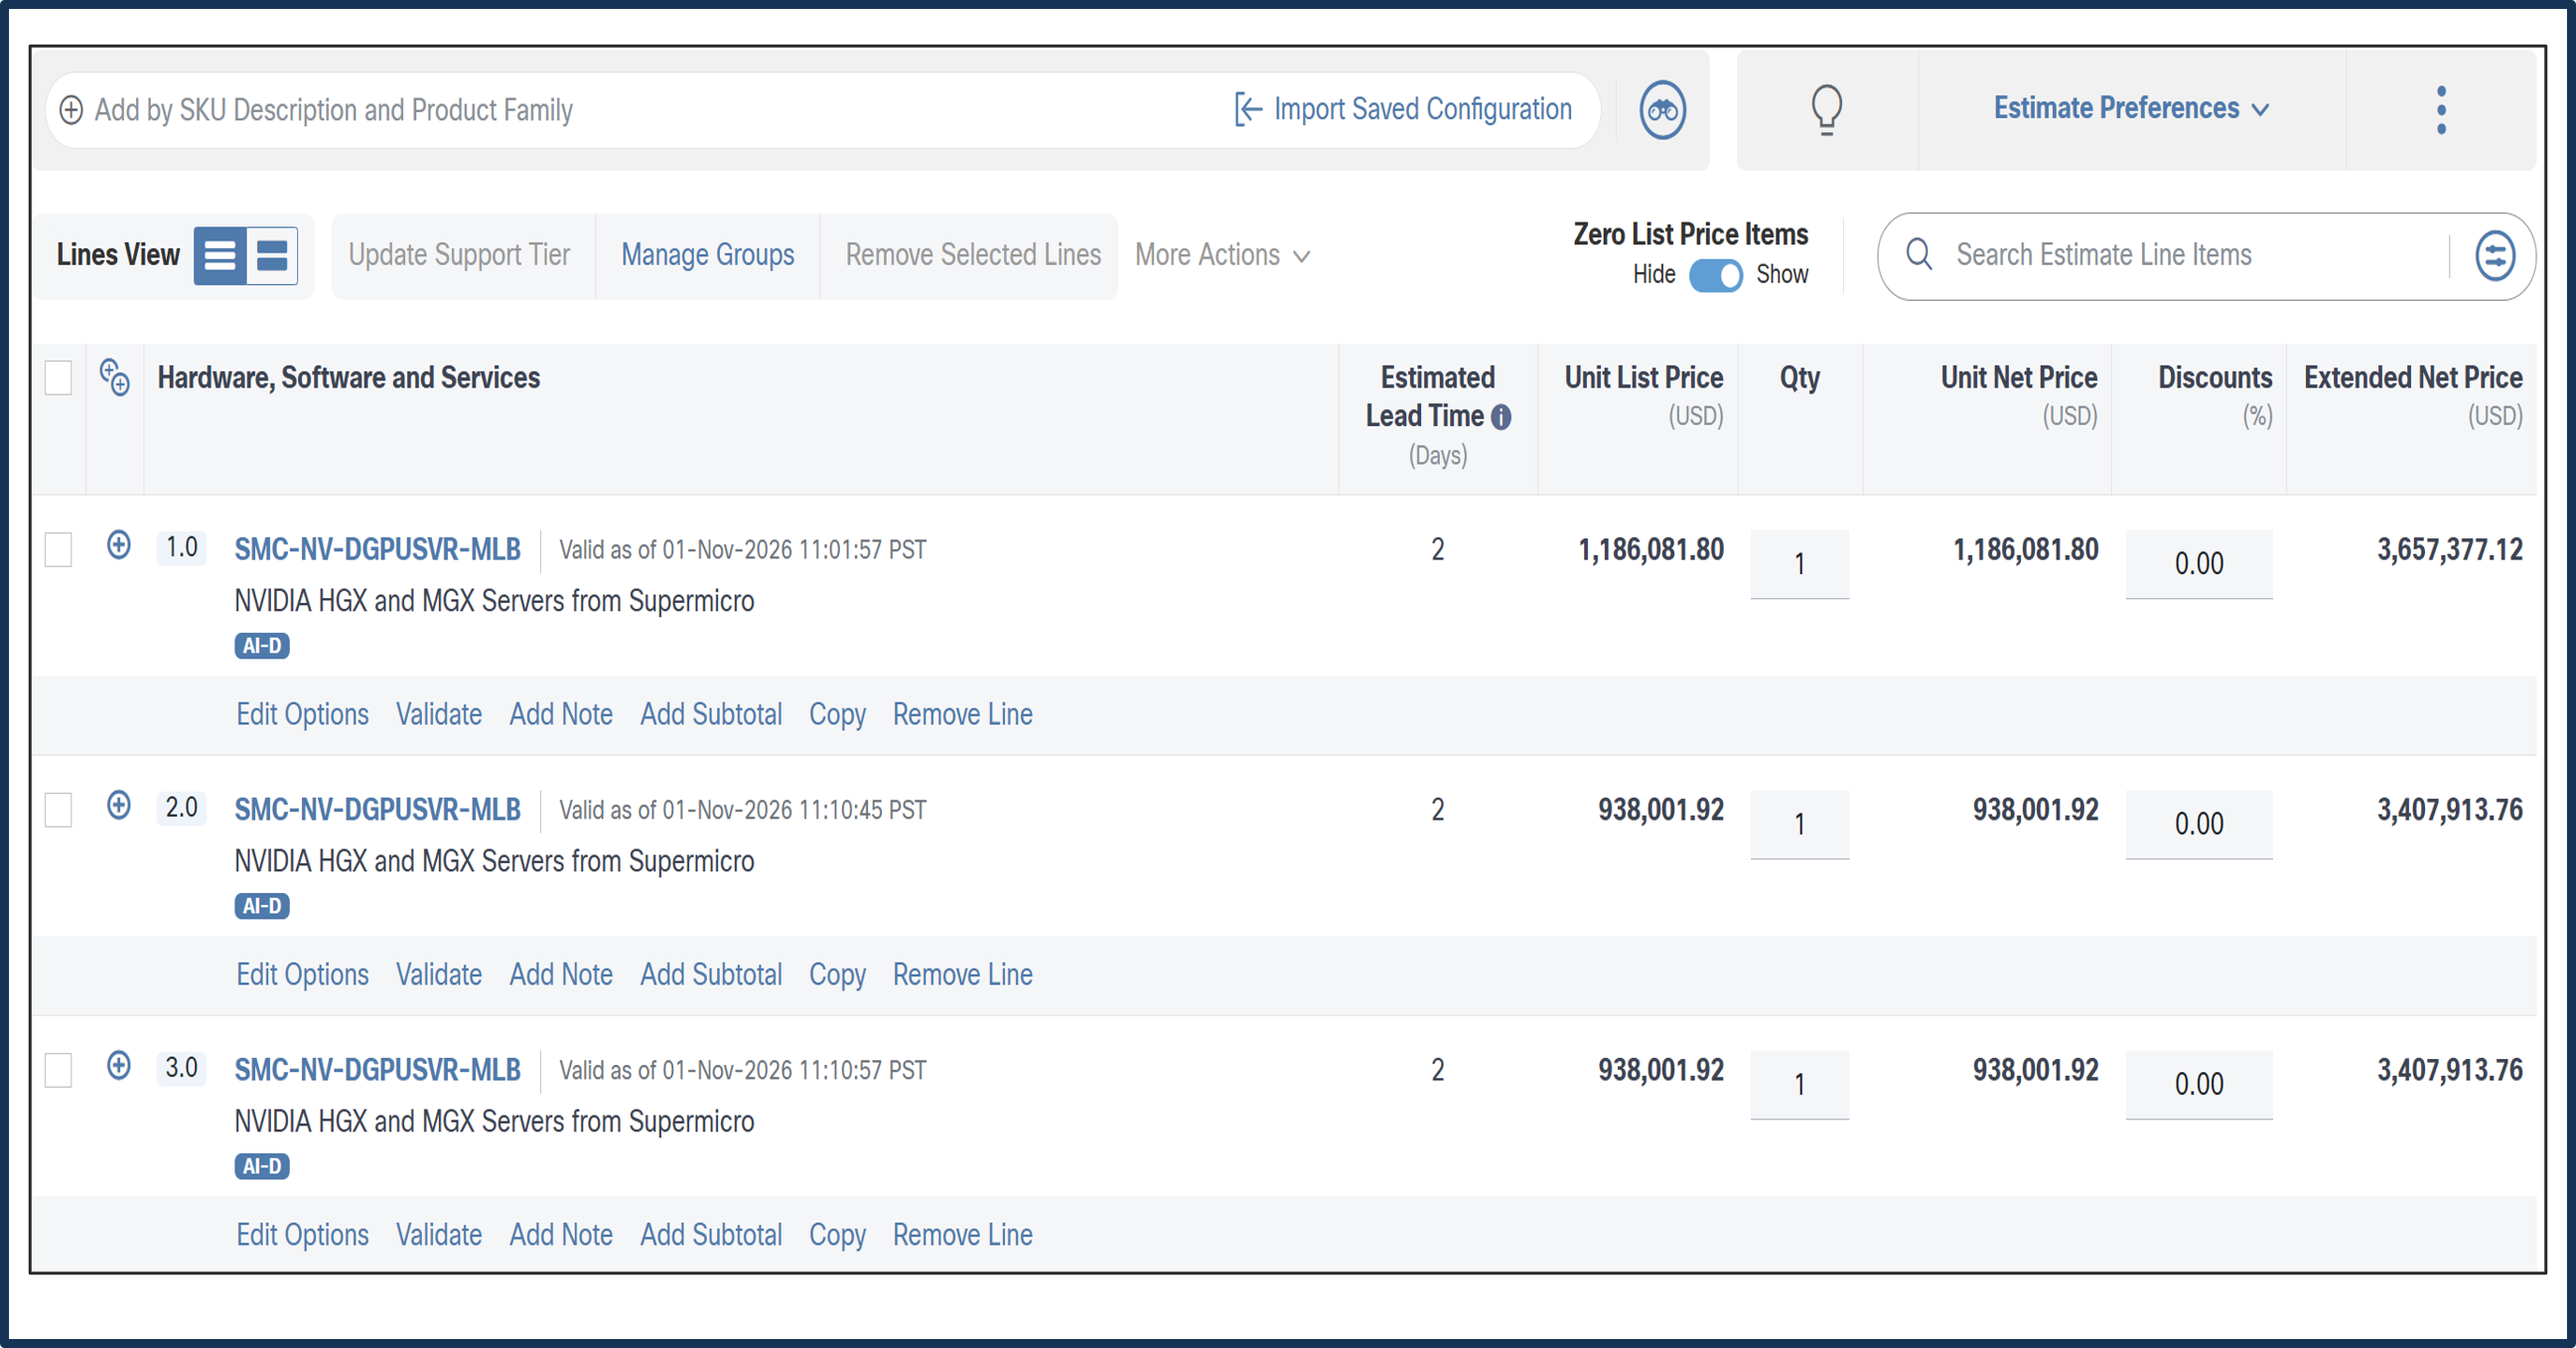
a. Line 1.0 & 2.0 are now valid configuration.
b. If need more QTY of MLB, copy Line 2.0 into multiple lines. e.g. Line 3.0 copied from Line 2.0.
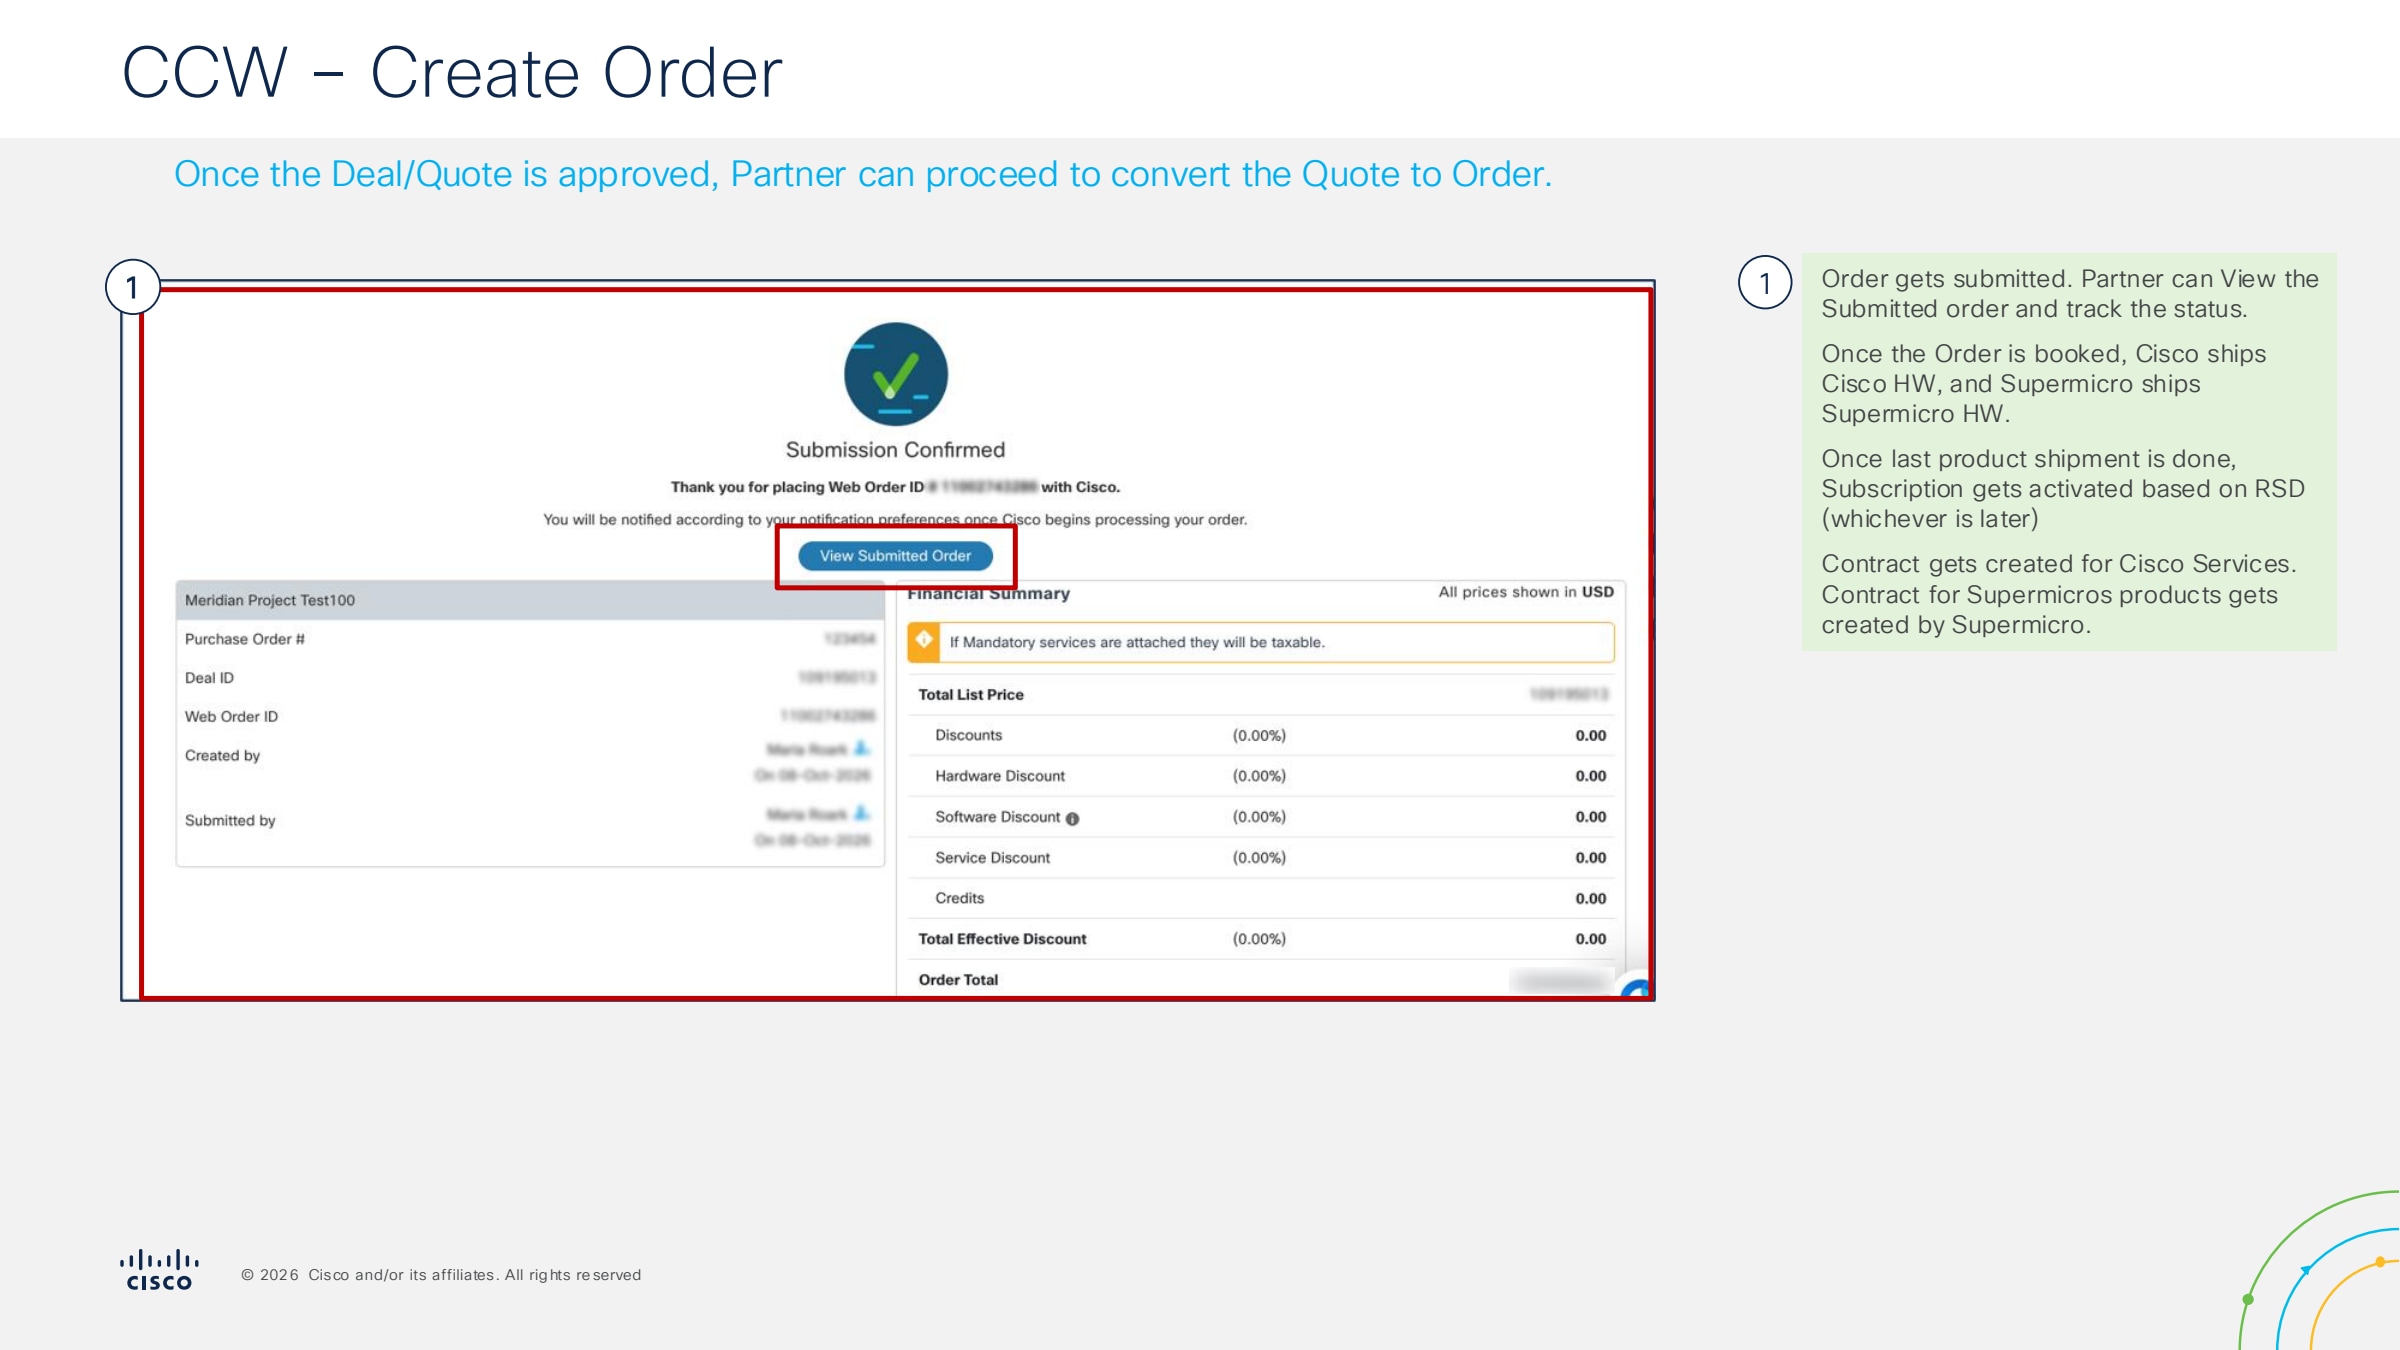
CCW – Create Order
● Estimate Validation & Deal Linking: Once the Estimate (BOM) is validated (free of configuration errors and export compliance flags), it serves as the foundation for the transaction. You must then import or link this Estimate to a Deal ID.
● Quote Generation and Data Entry: Within the Deal, generate a Quote. At this stage, you must enter specific transaction details, including:
◦ End Customer and Ship-to information.
◦ Requested delivery dates.
● Submission for Approval: Submit the Quote for the required approval workflow. Depending on the discount level or product type (e.g., Supermicro resell), this may trigger a review by Regional Sales Management (DSM), Finance, or Product Management.
● Deal/Quote Approval: The Deal is considered finalized only when the Quote status moves to "Approved." This indicates that all pricing and compliance checks have been satisfied
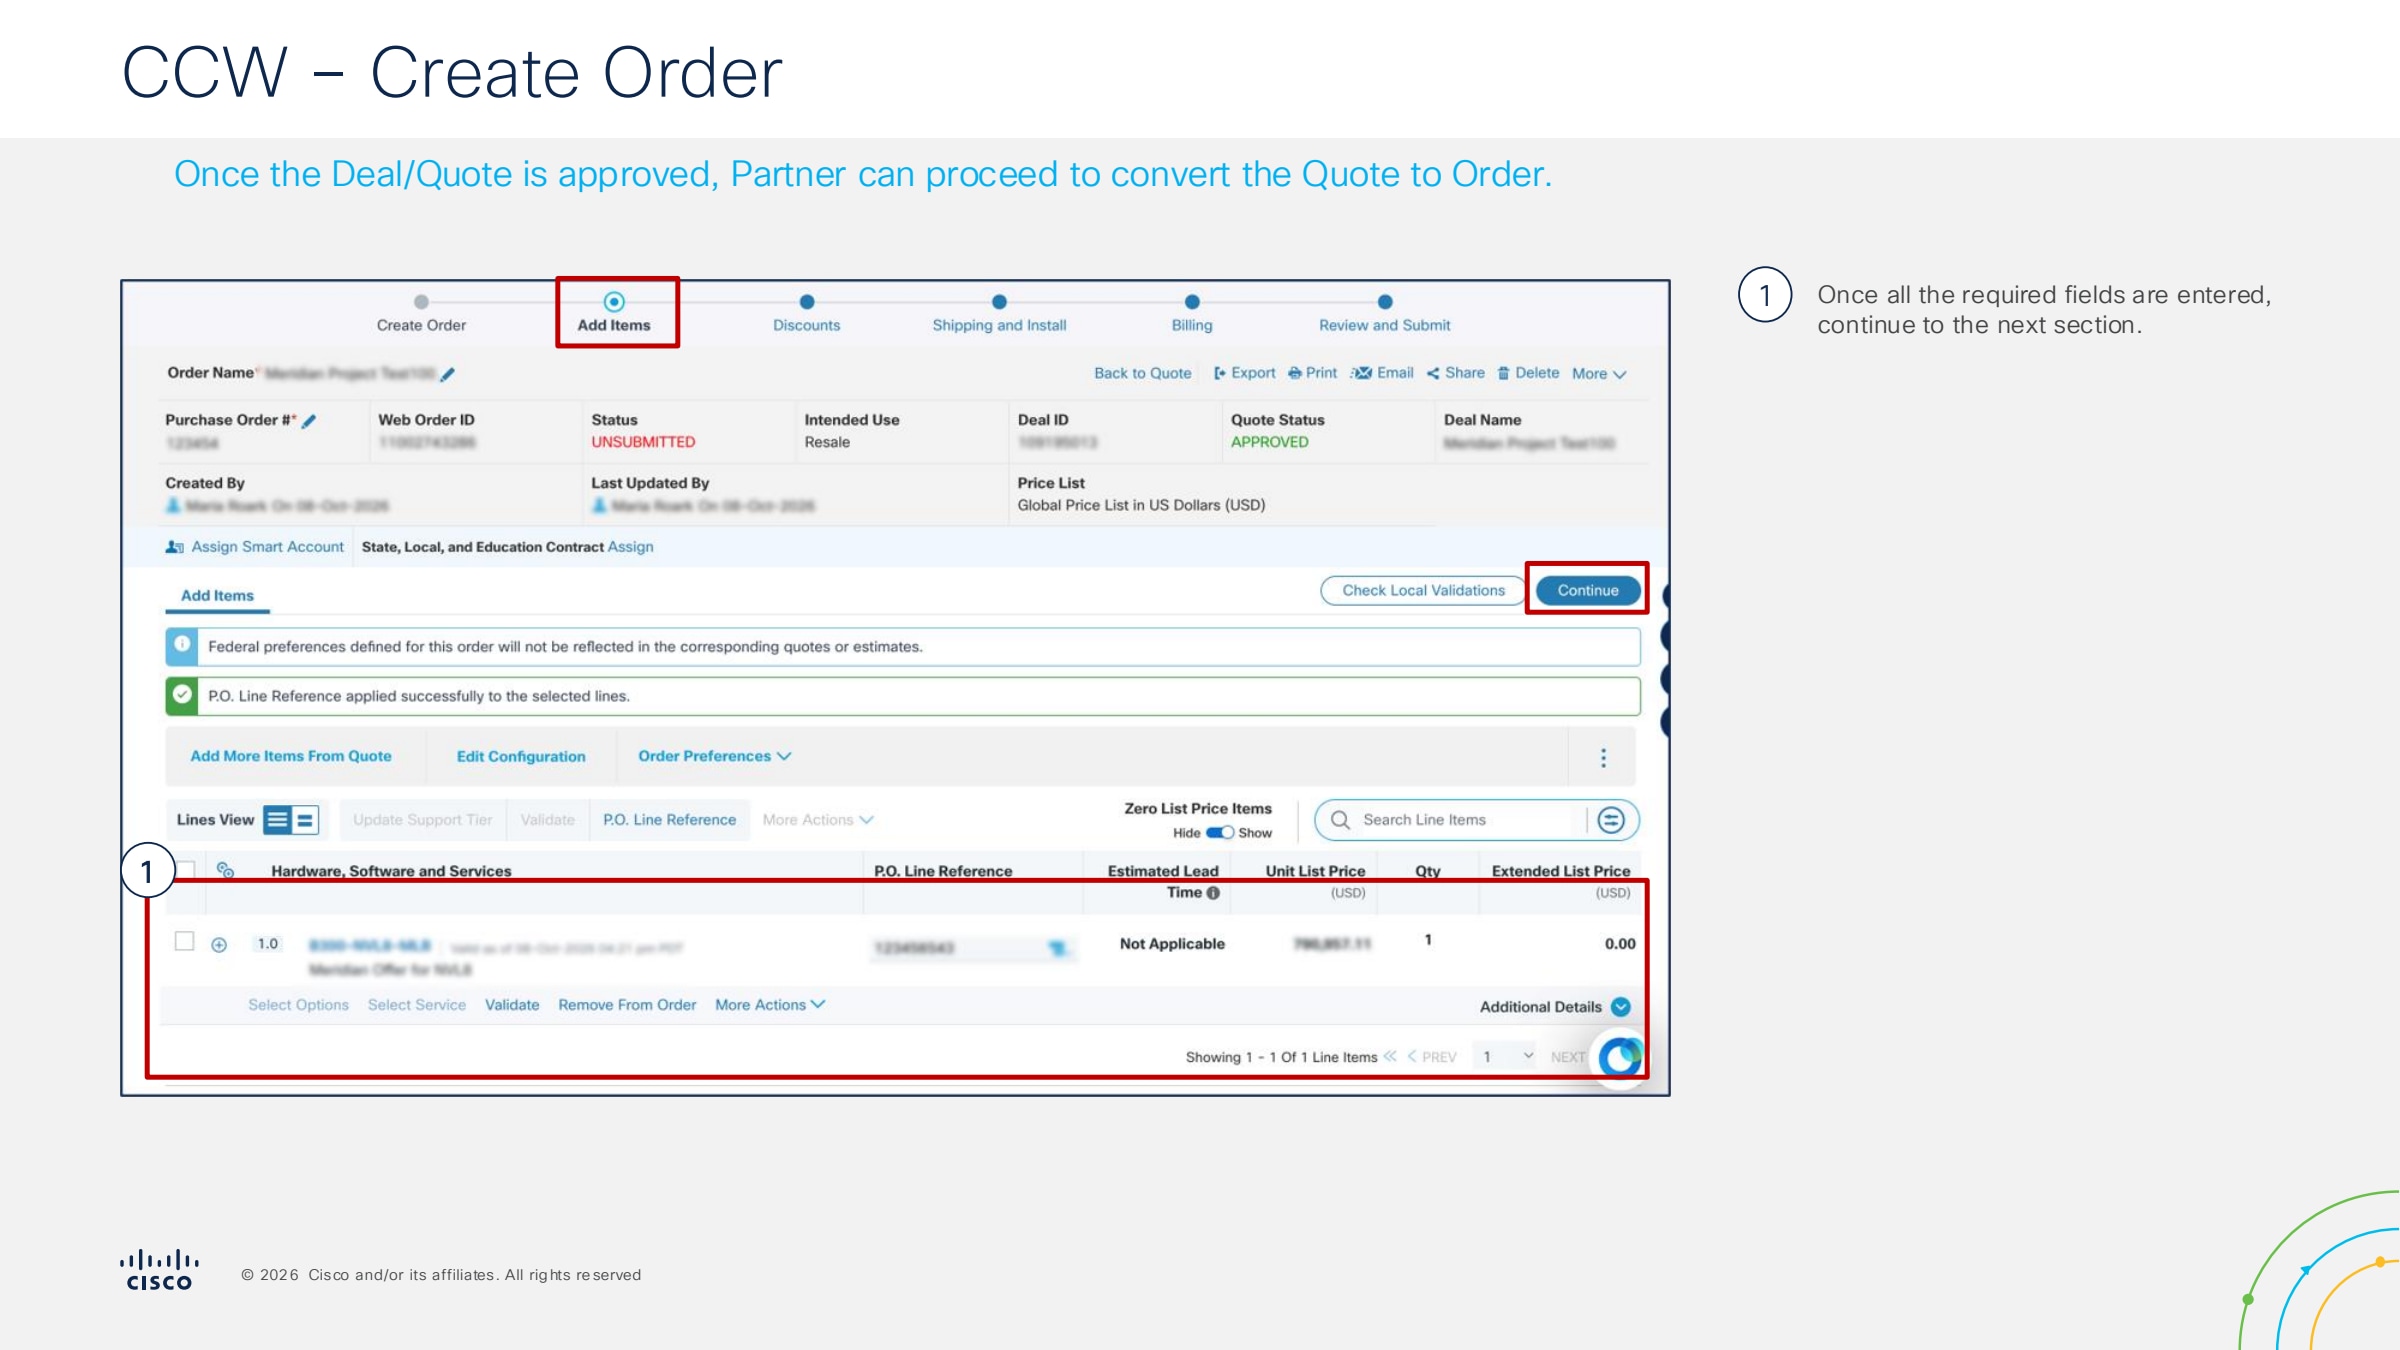
● Order Conversion and Submission: With an approved Quote, you can now proceed to the "Convert to Order" phase. Review the final terms, attach any required purchase orders (PO), and submit the order for fulfillment.
Step 1.
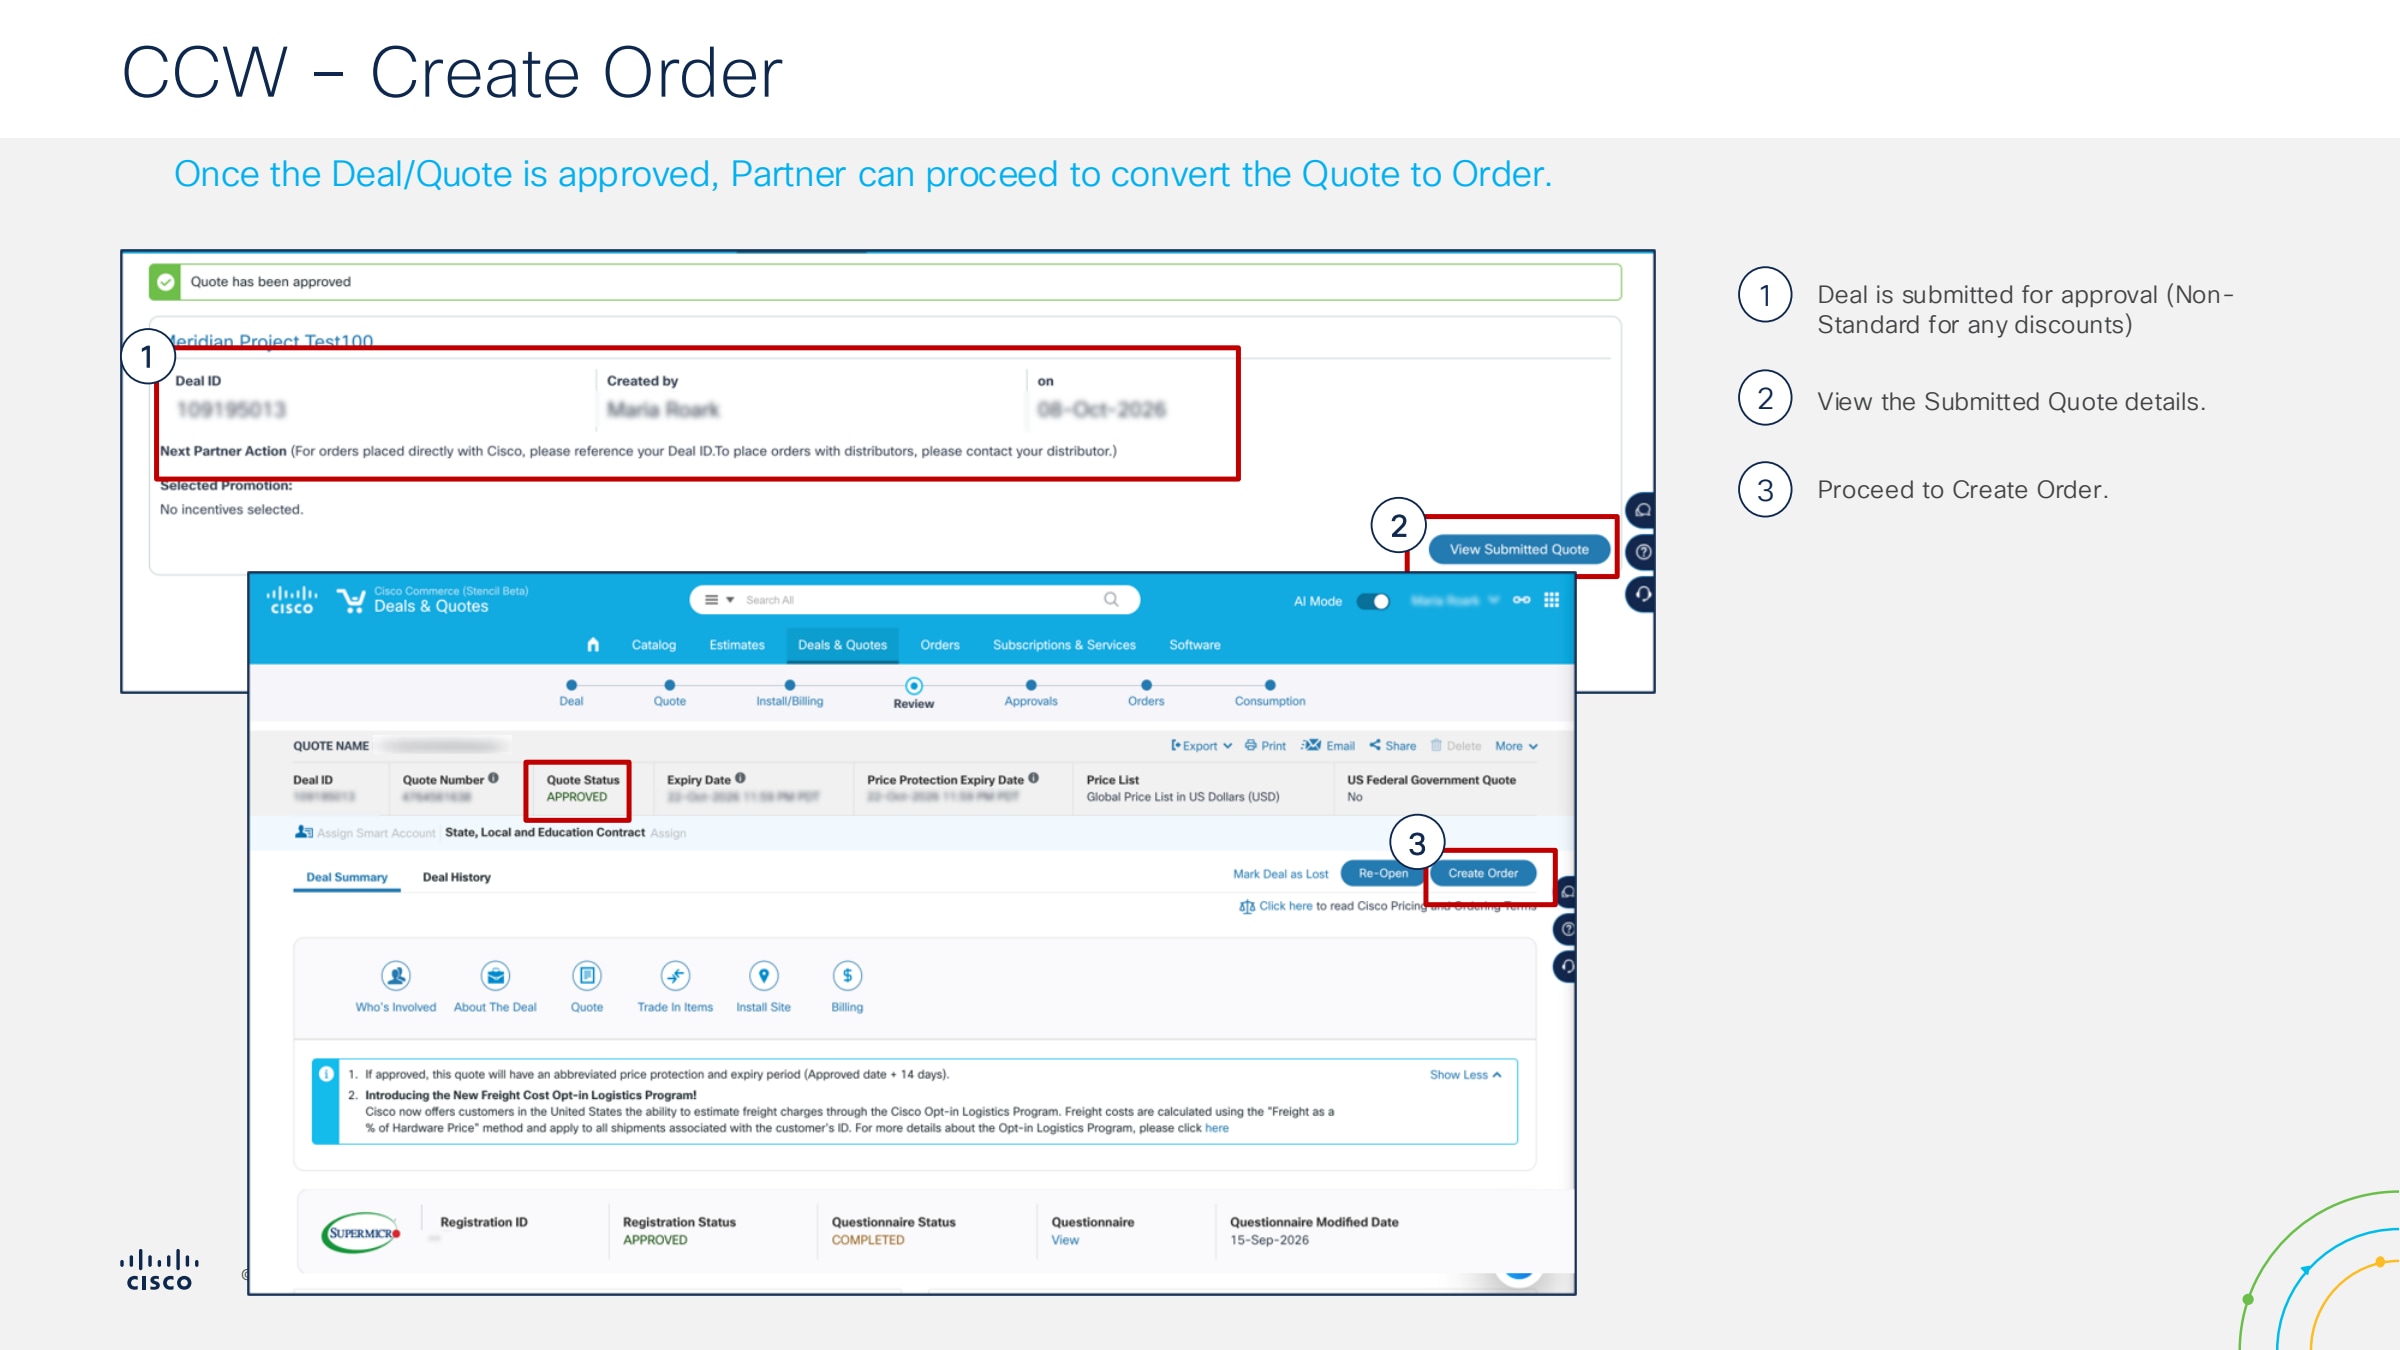
Step 2.
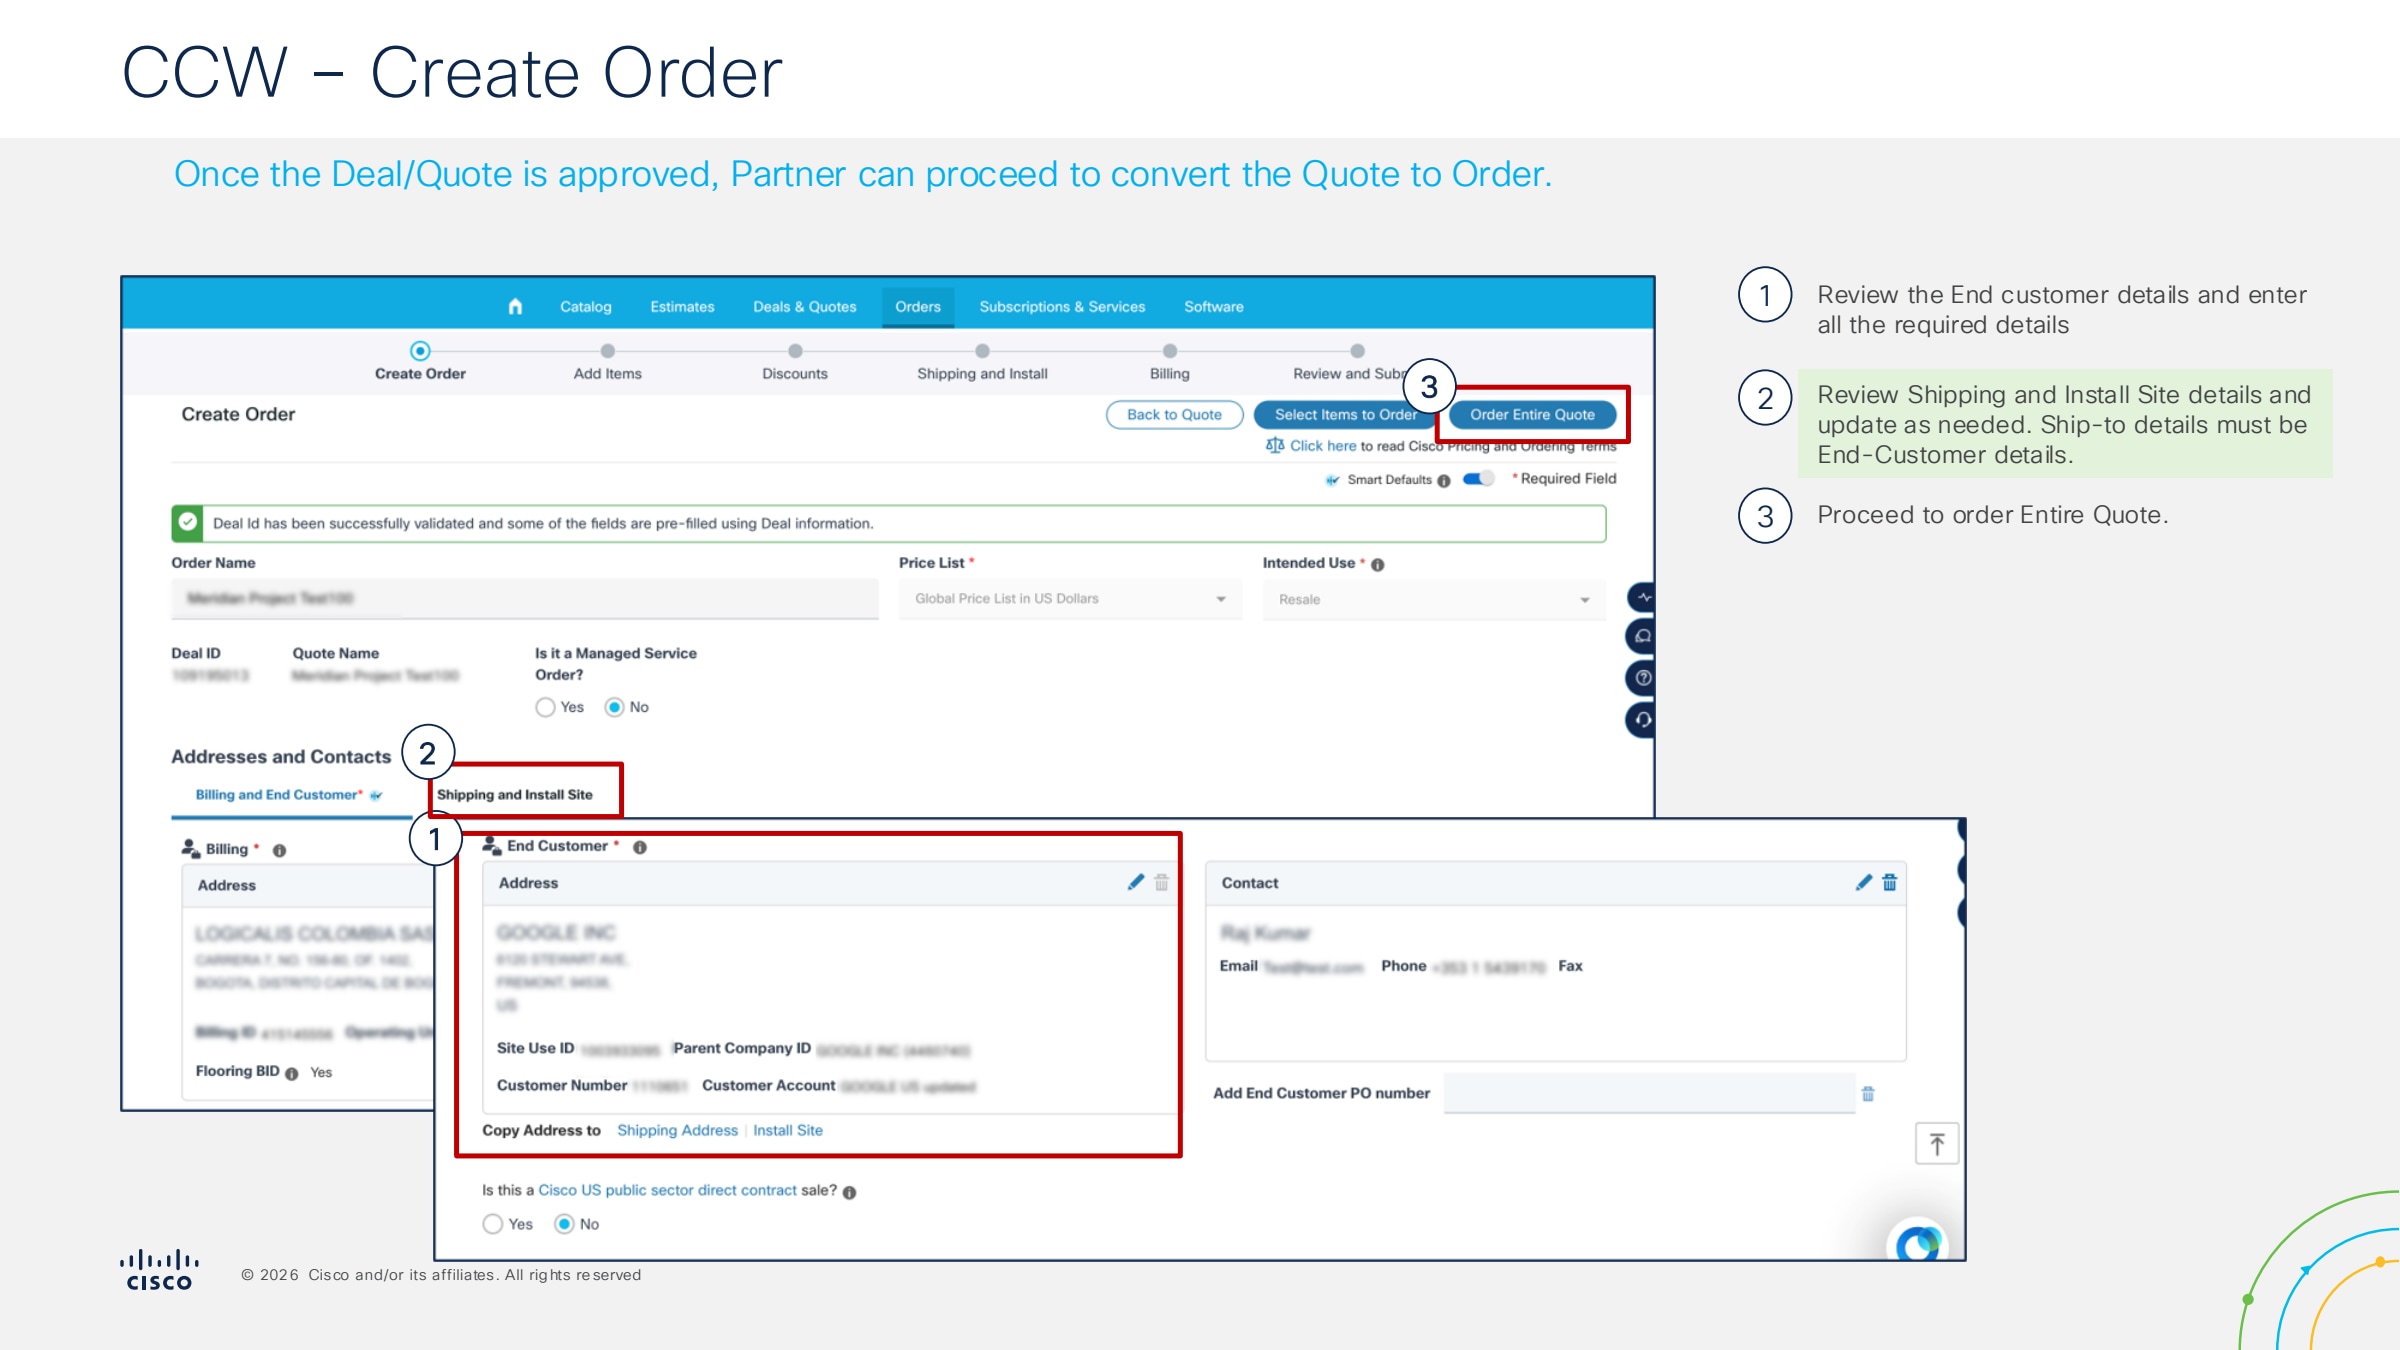
Step 3.
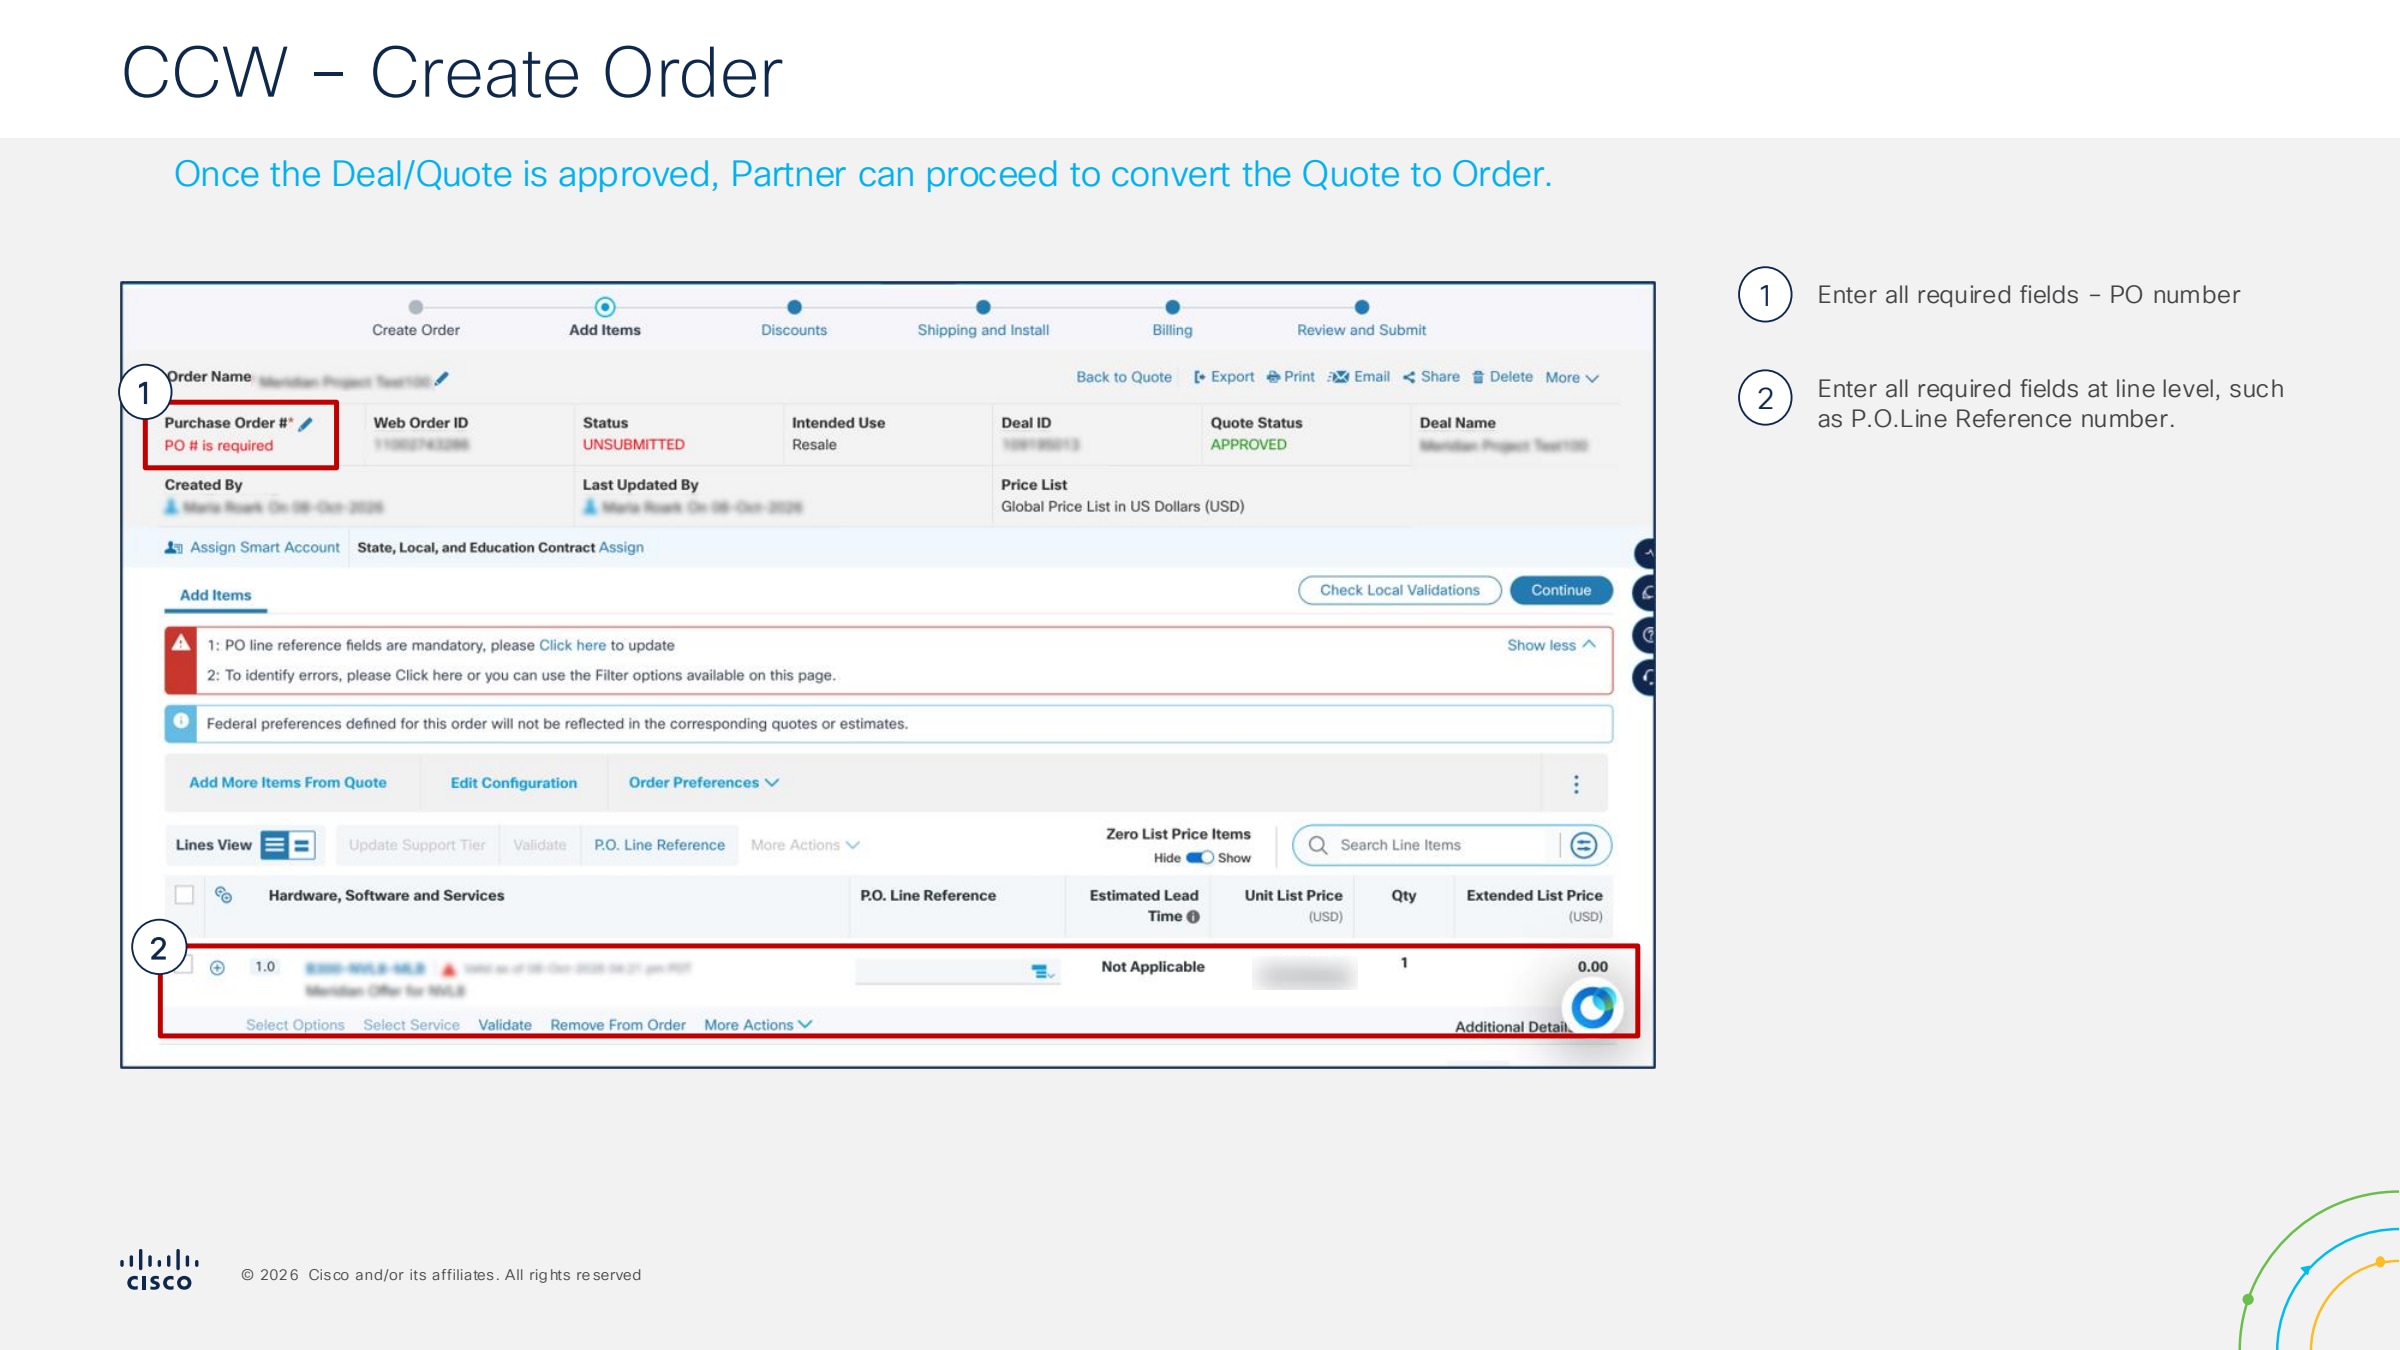
Step 4.
‘
Step 5.
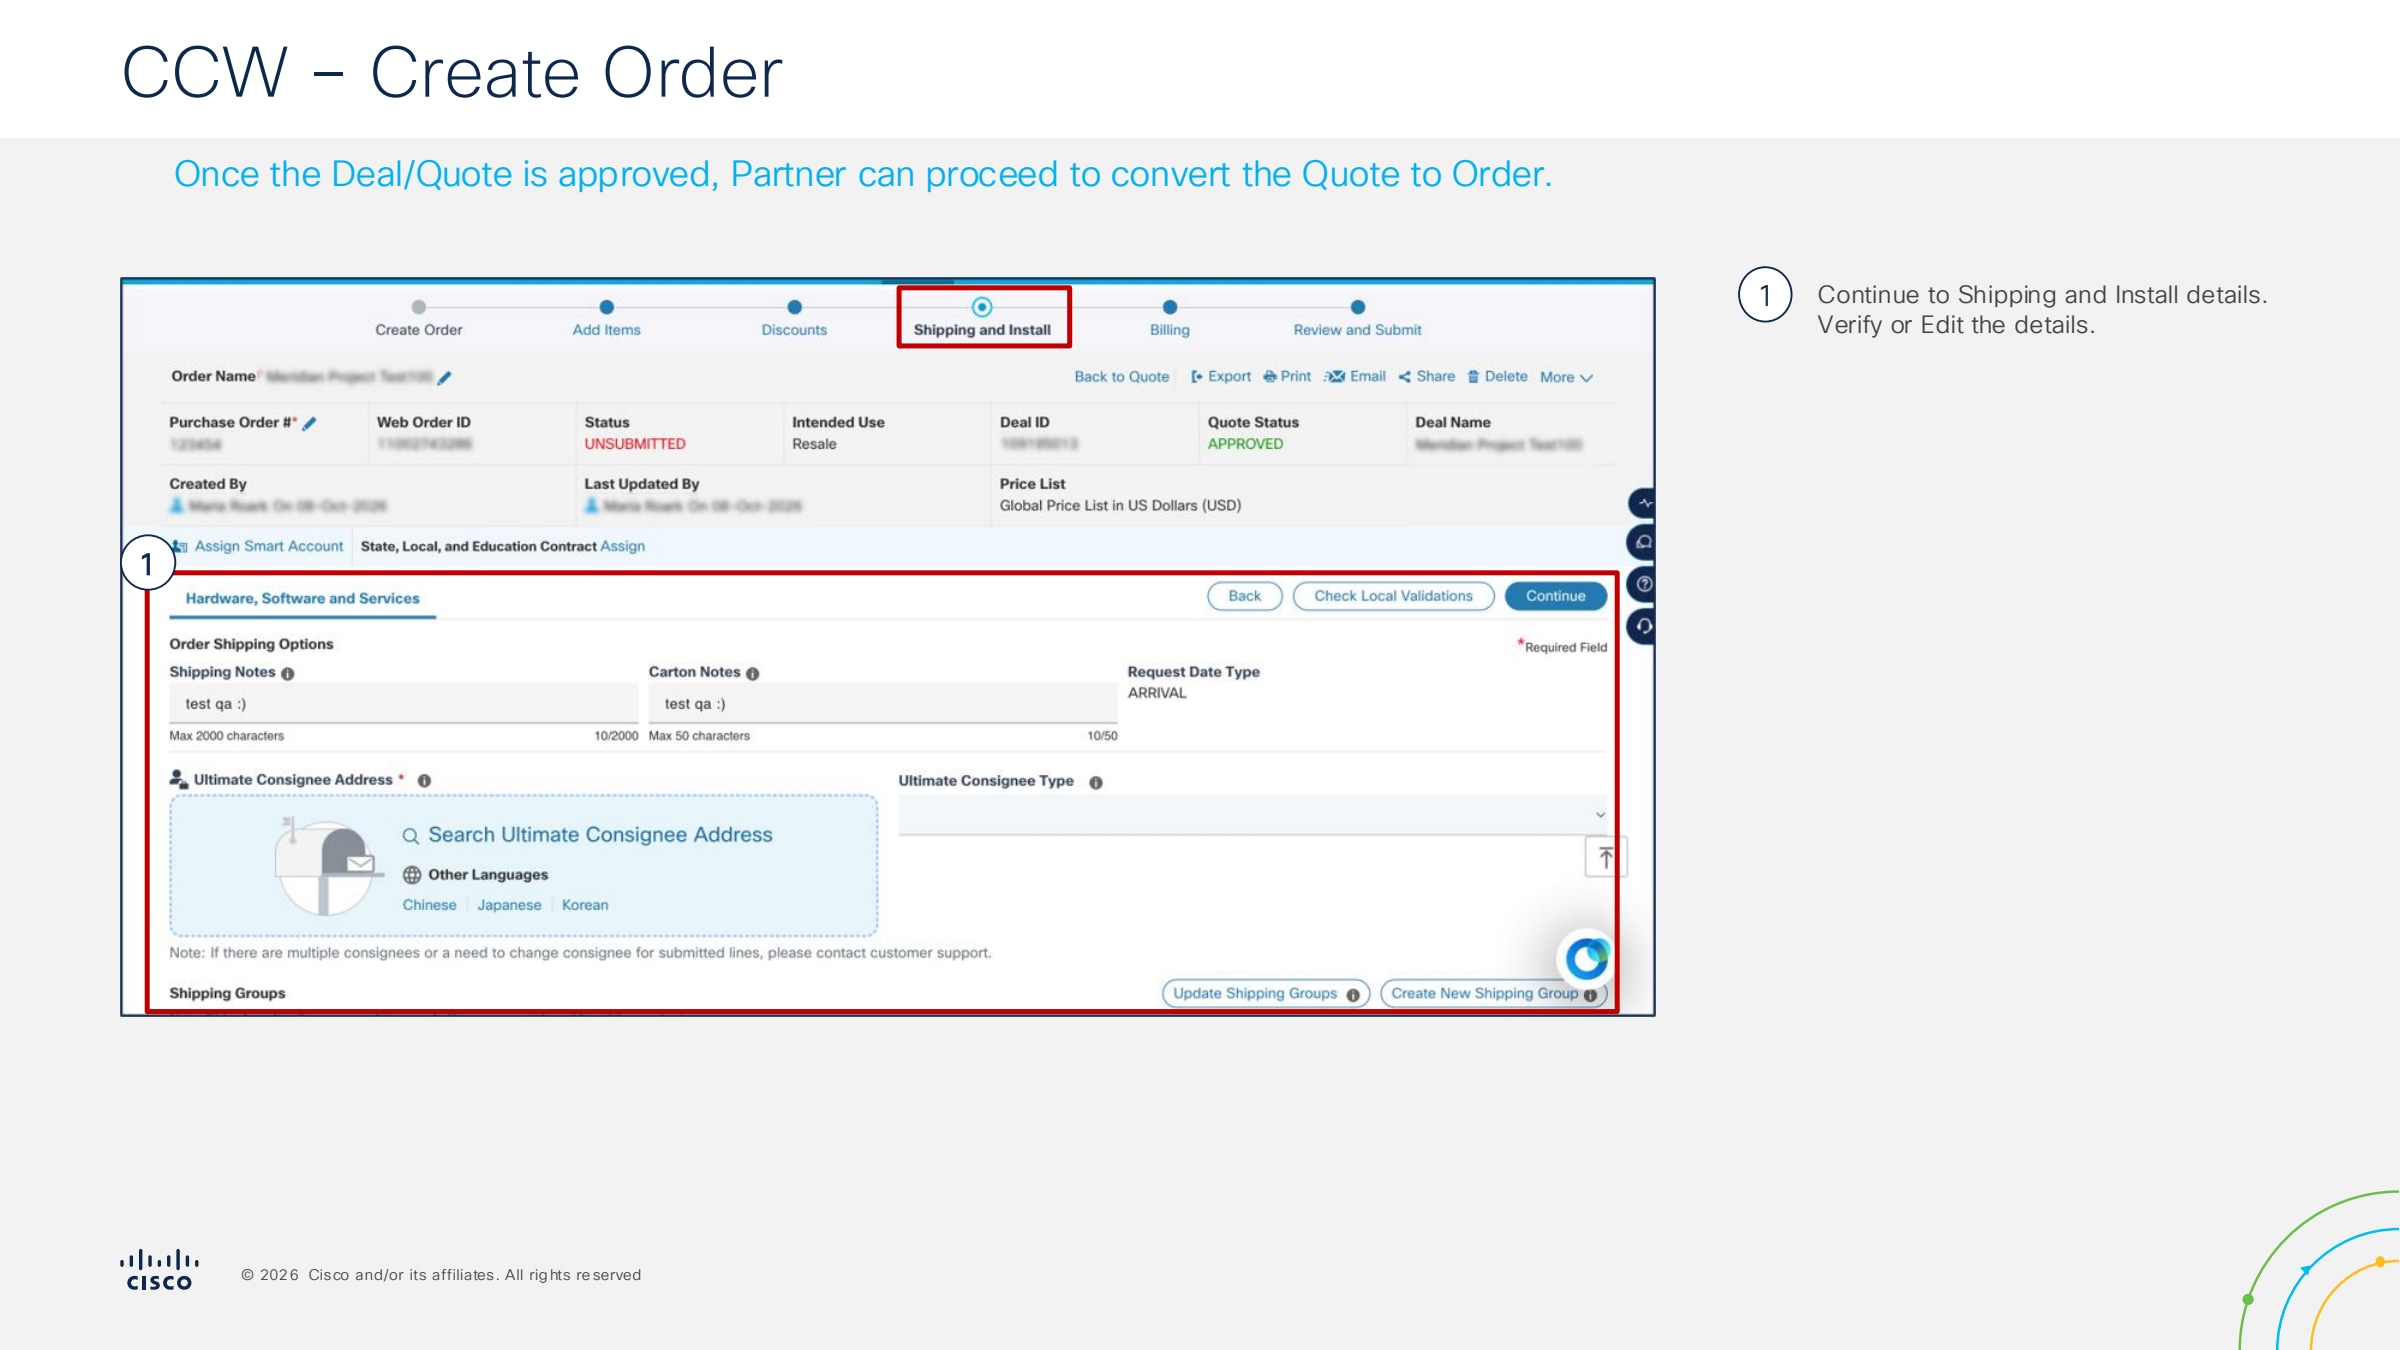
Step 6.
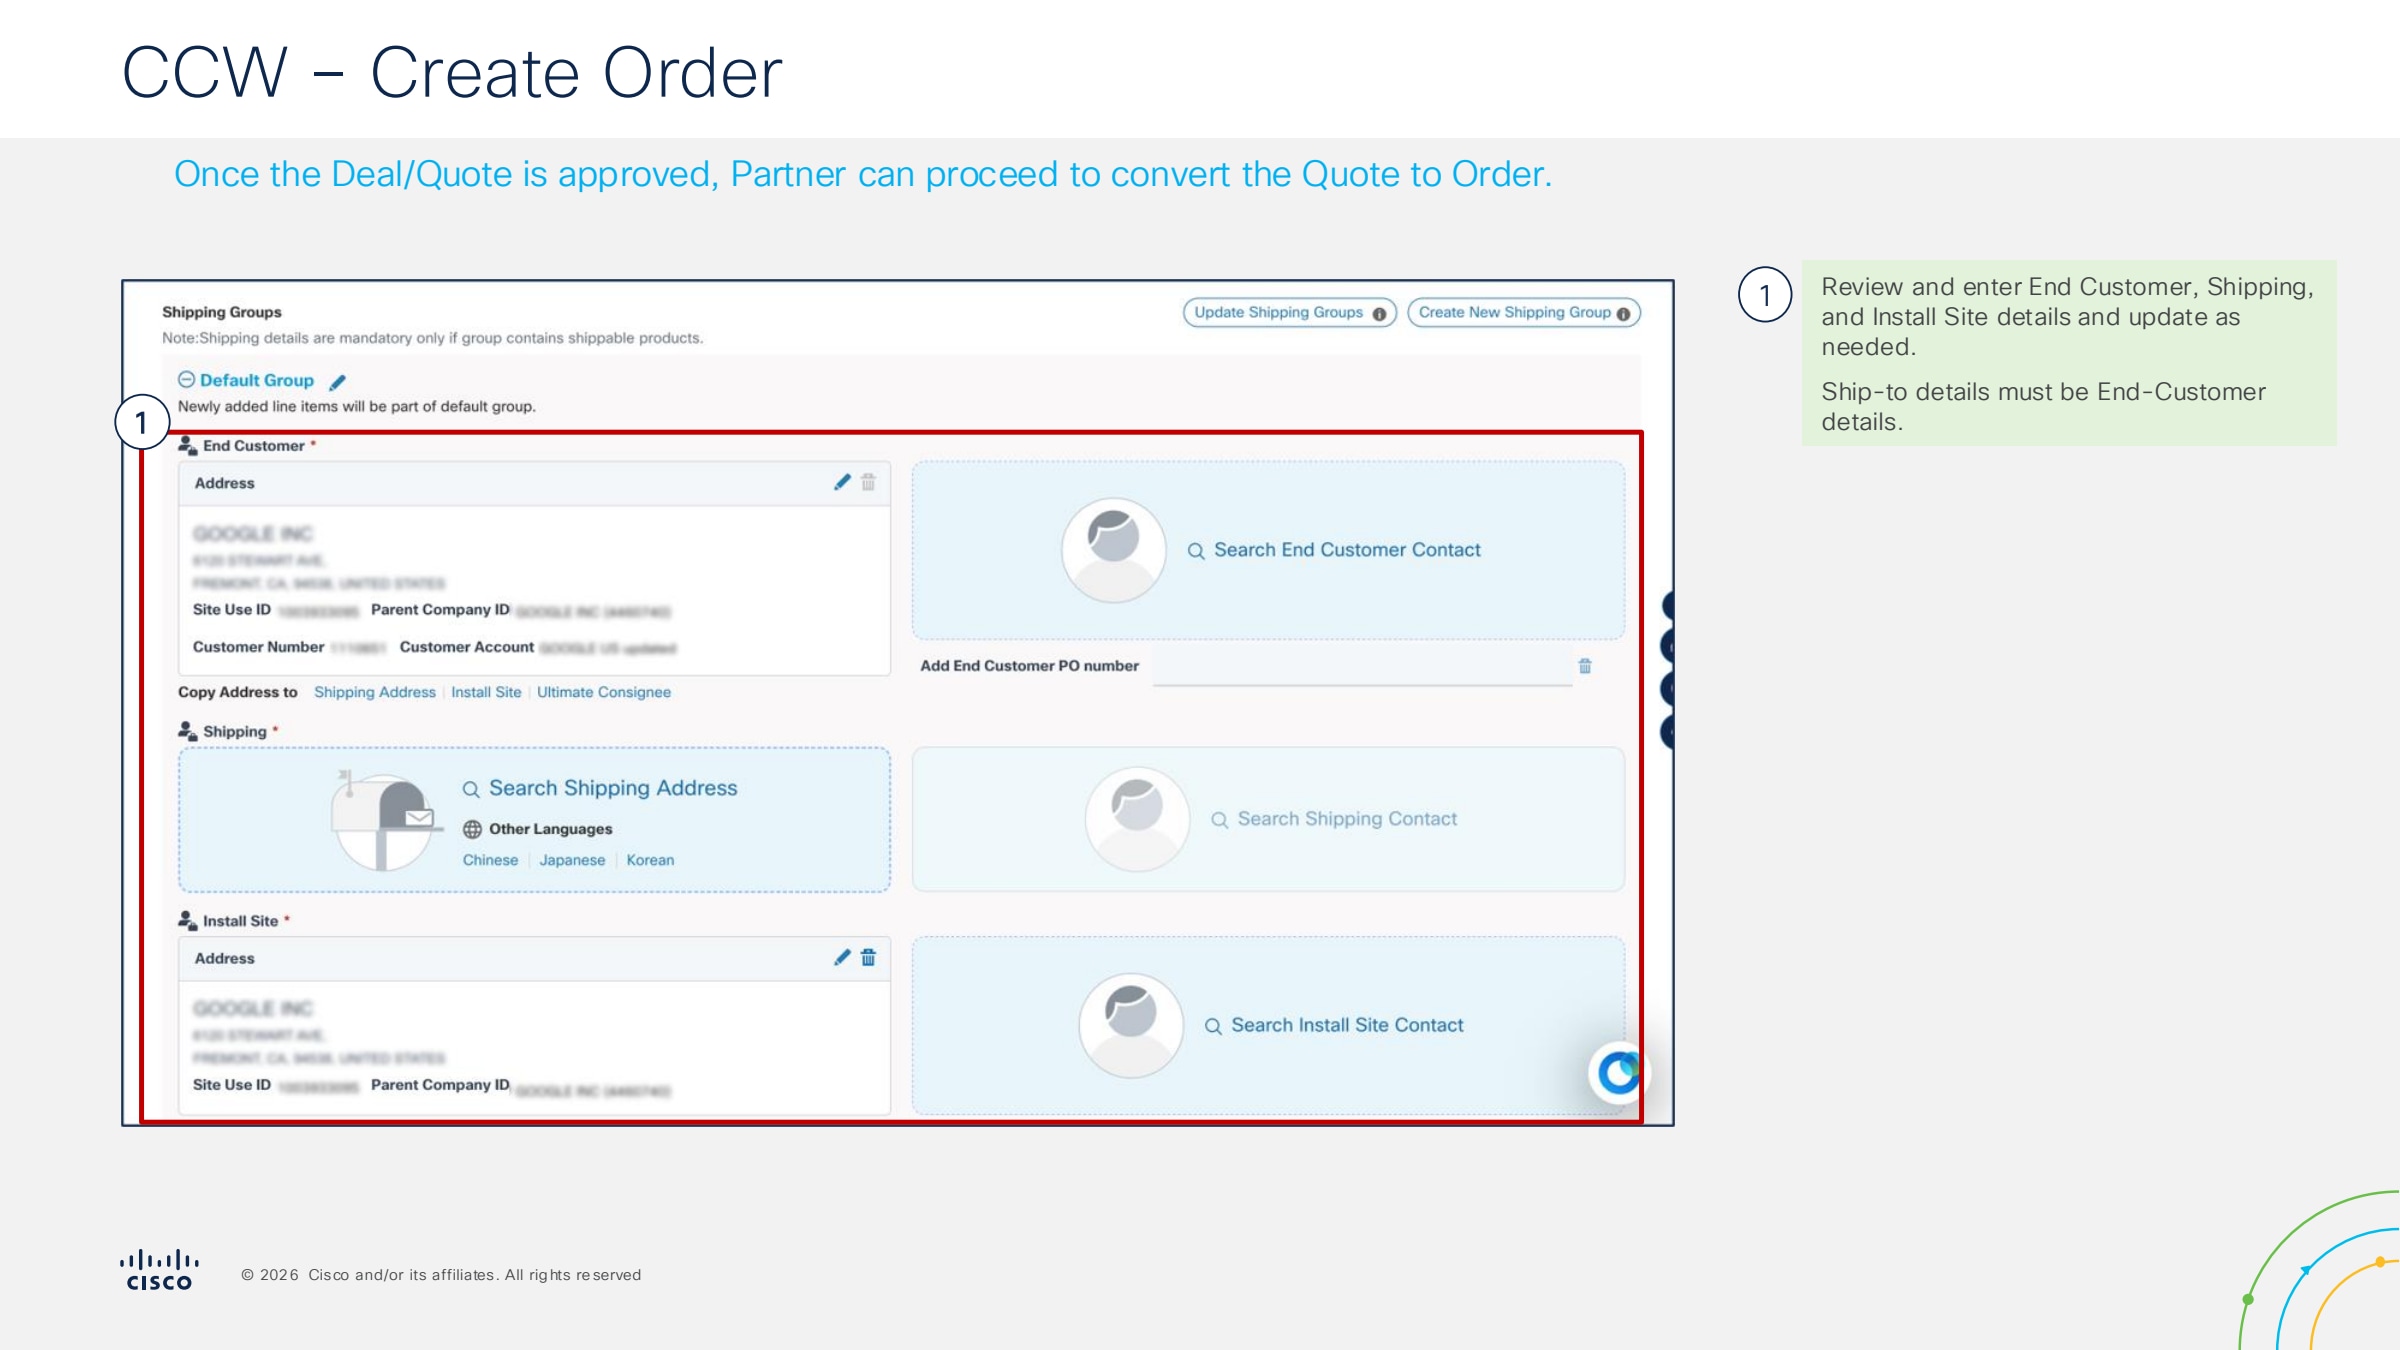
Step 7.
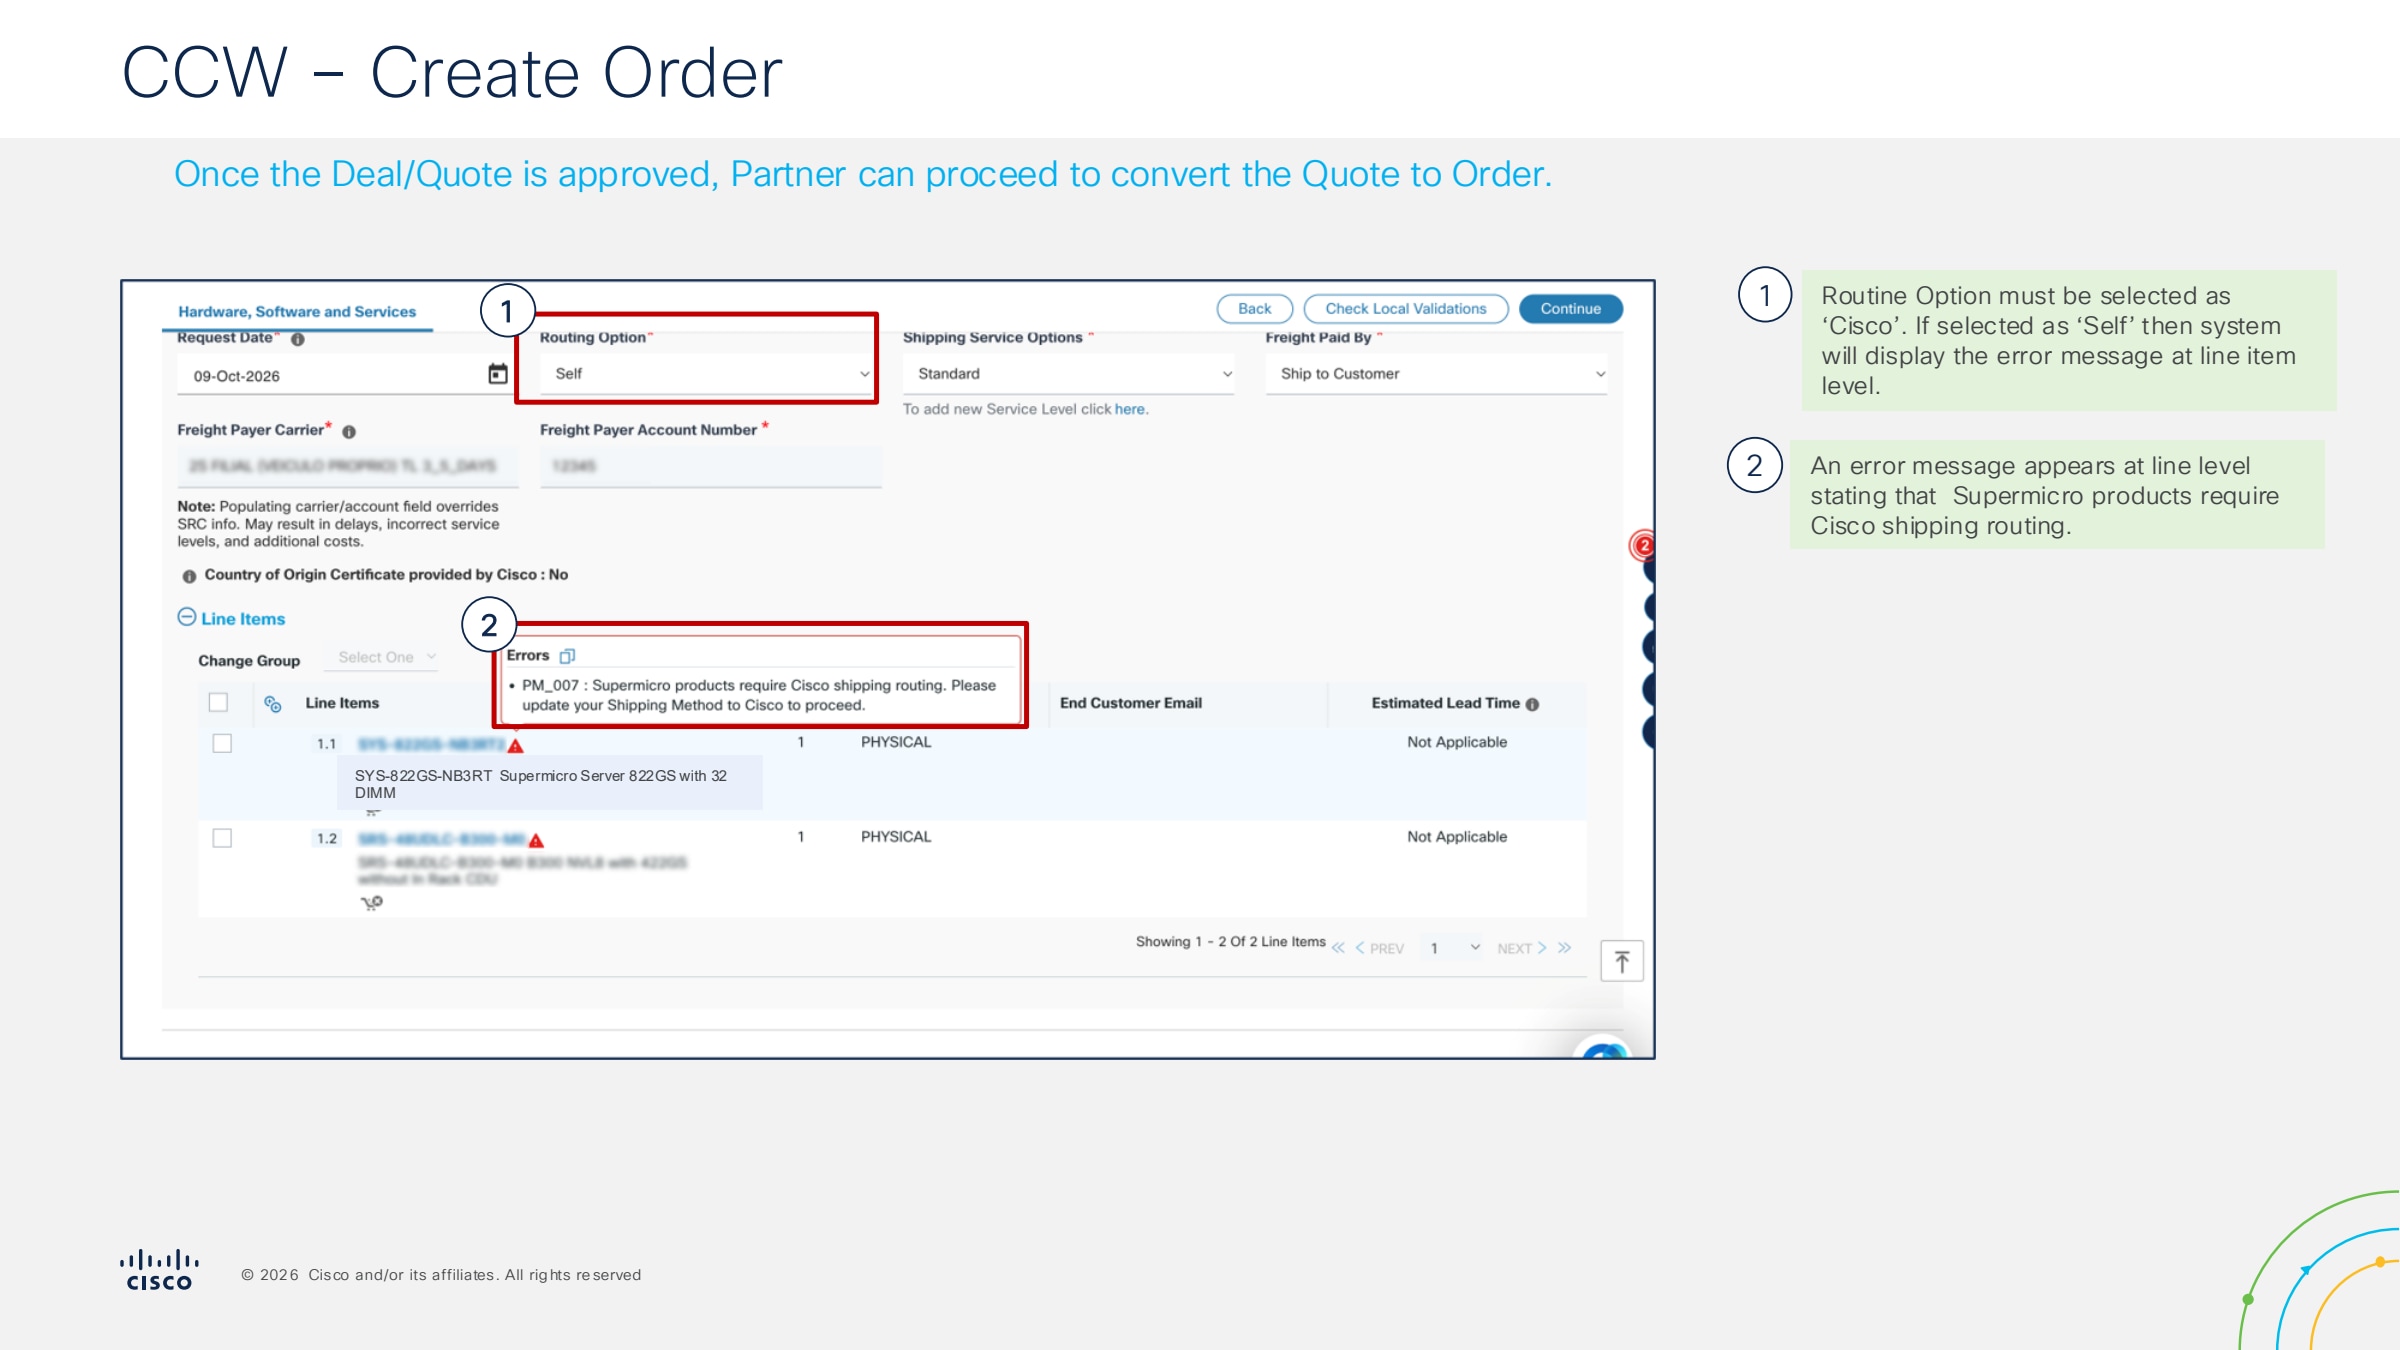
Step 8.
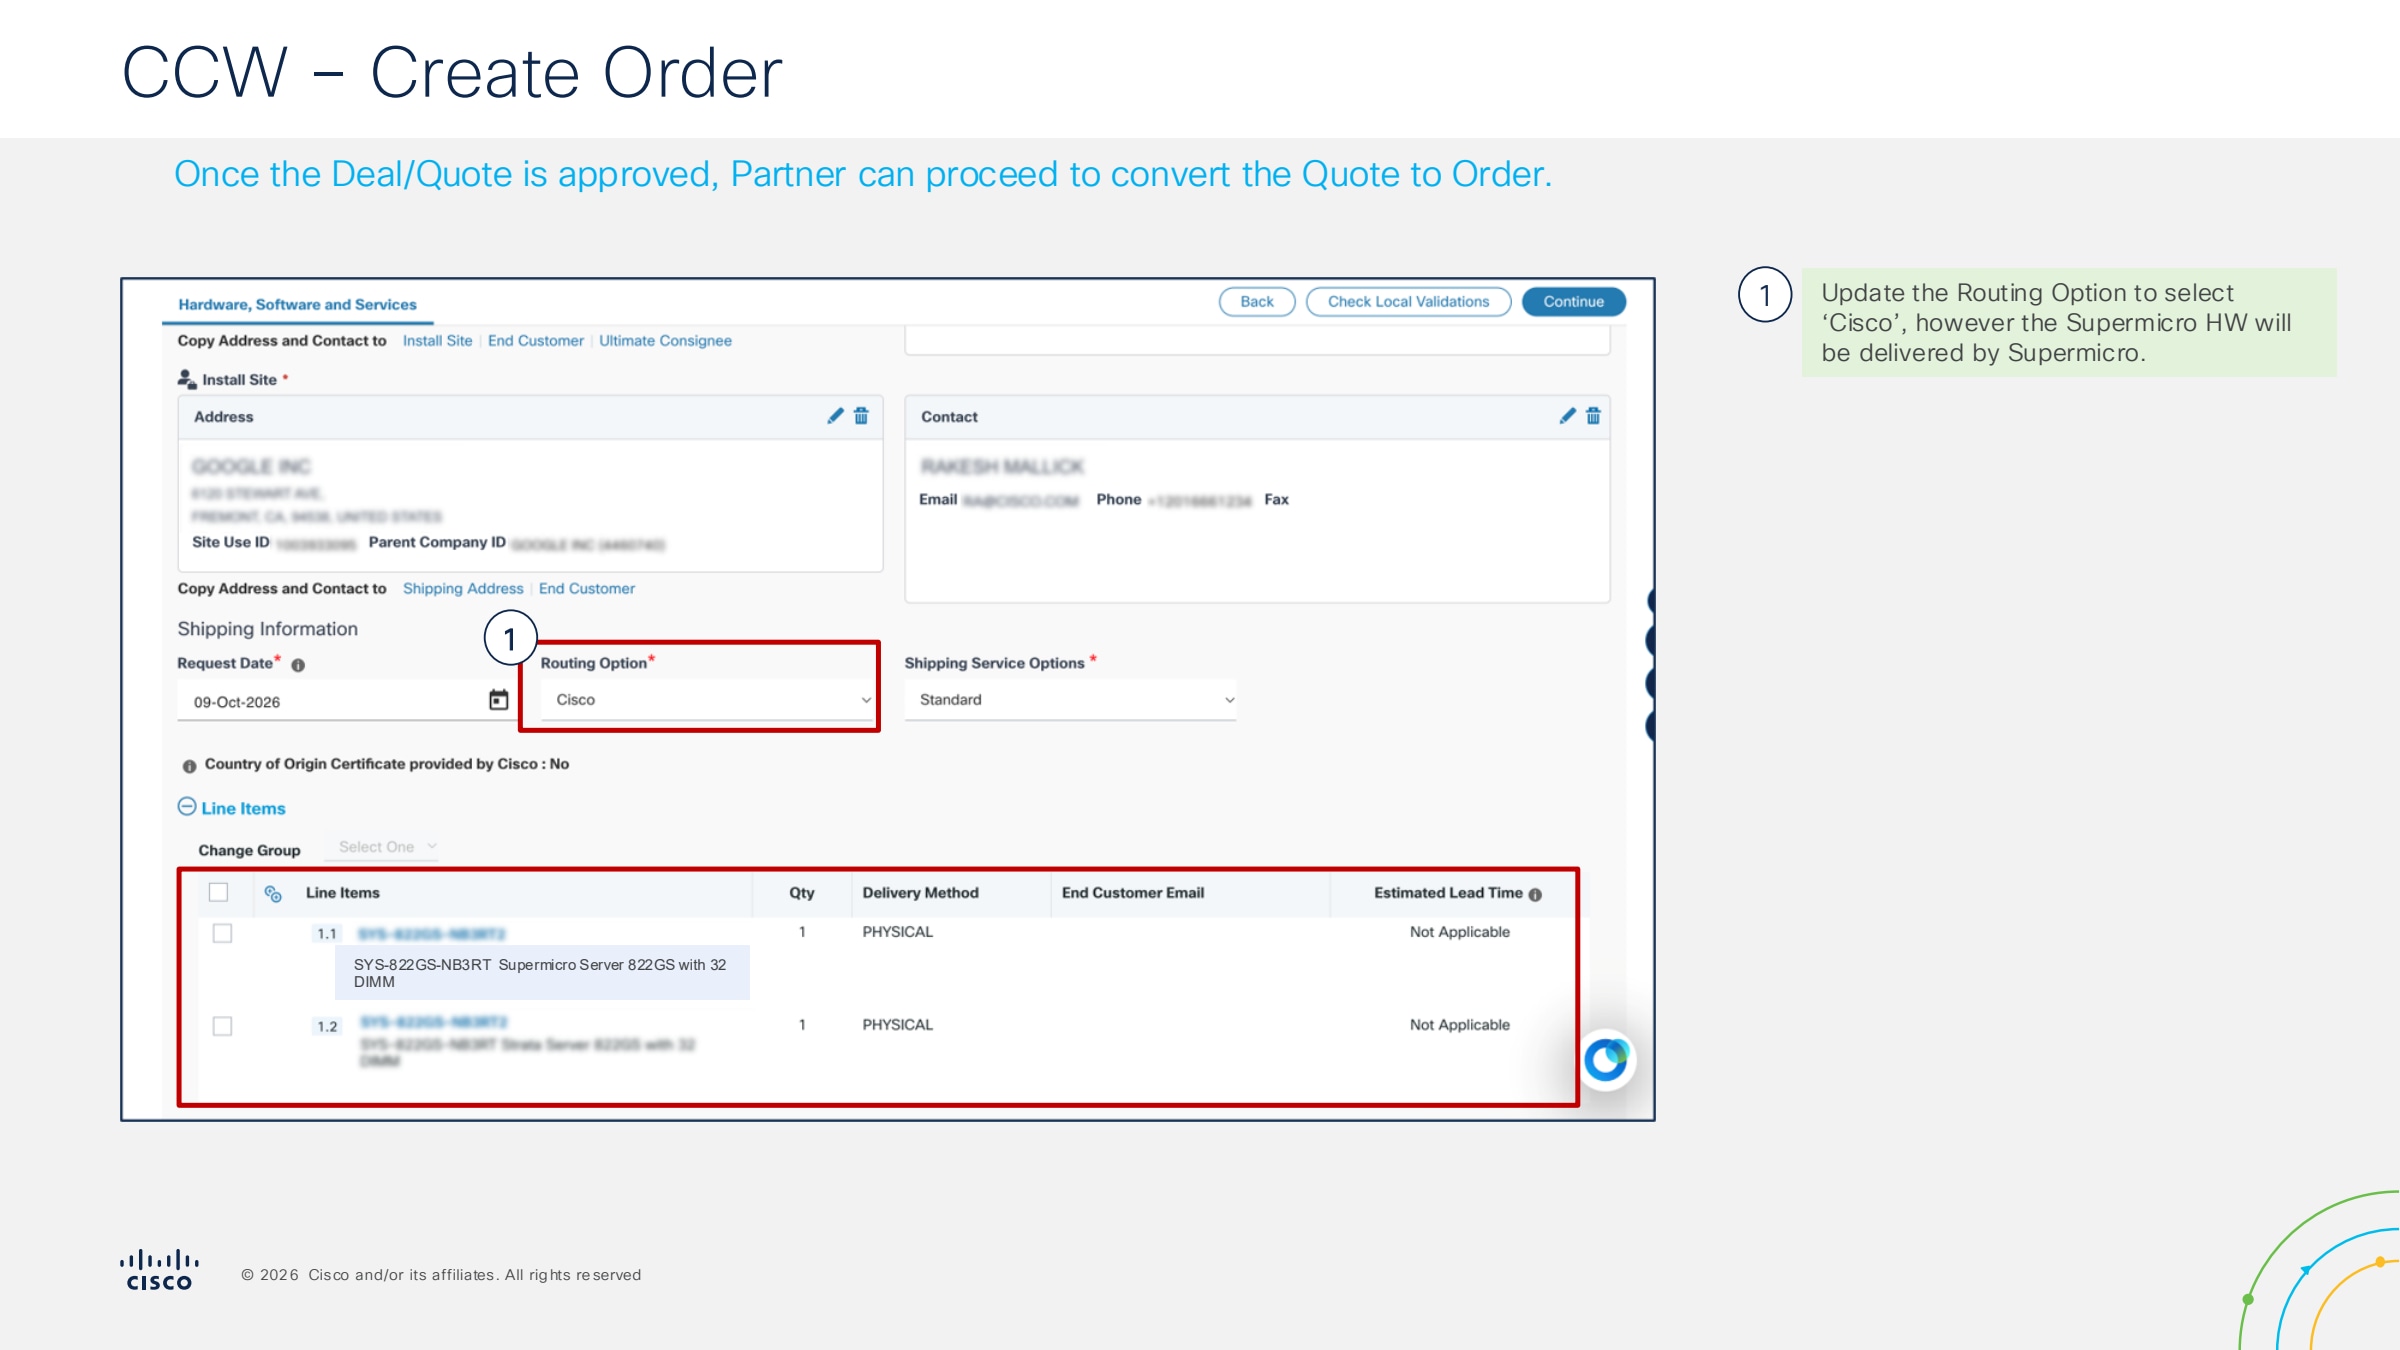
Step 9.
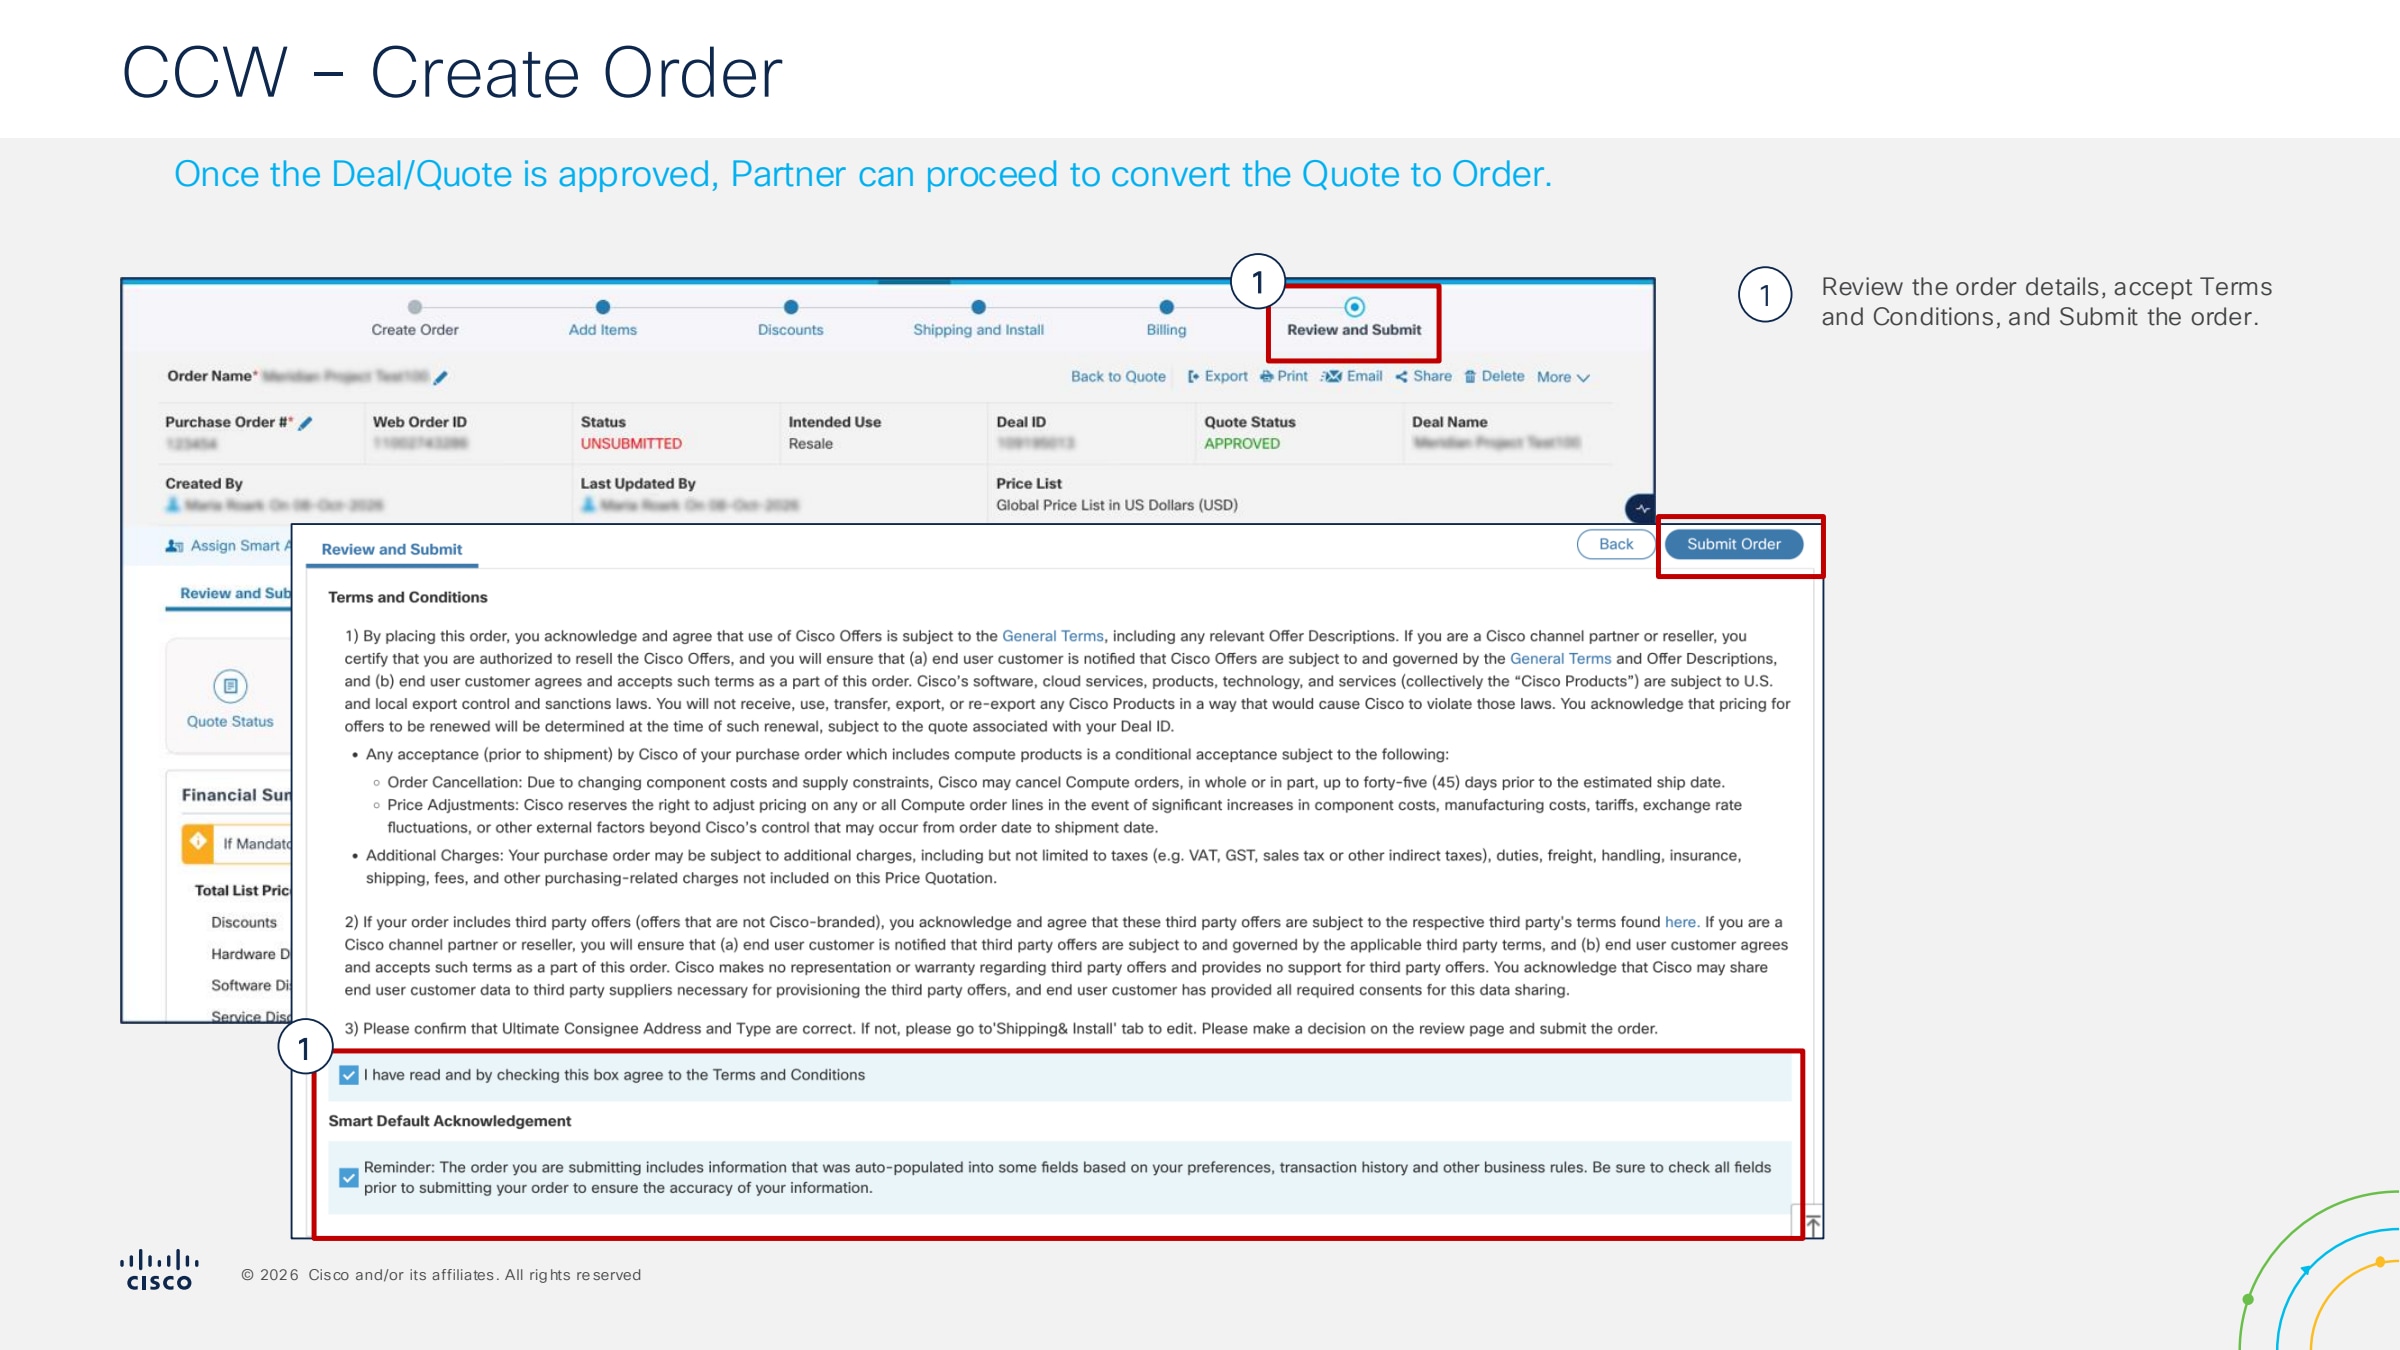
Step 10.