AI POD Ordering Guide
Available Languages
Bias-Free Language
The documentation set for this product strives to use bias-free language. For the purposes of this documentation set, bias-free is defined as language that does not imply discrimination based on age, disability, gender, racial identity, ethnic identity, sexual orientation, socioeconomic status, and intersectionality. Exceptions may be present in the documentation due to language that is hardcoded in the user interfaces of the product software, language used based on RFP documentation, or language that is used by a referenced third-party product. Learn more about how Cisco is using Inclusive Language.
- US/Canada 800-553-2447
- Worldwide Support Phone Numbers
- All Tools
 Feedback
 Feedback
Companies around the world, in every industry, are keen to leverage AI to transform their business, improve customer satisfaction, and gain a competitive advantage. Deploying enterprise AI applications, especially generative AI, is a complex process that requires careful planning, evaluation of models and infrastructure, and execution. Enterprises often face challenges when scaling AI infrastructure, ensuring data privacy and security, and bridging the skills gap. Cisco AI PODs simplify and accelerate full AI lifecycle deployment with pre-validated, high-performance infrastructure, empowering developers and IT Ops to innovate sustainably in the Cisco Secure AI Factory with Nvidia. Cisco can help you to right-size your investment in AI-related infrastructure while balancing current business and IT needs, with a view to scalability in the future.
Purpose
This publication provides information about the ordering of AI POD Solution from CCW estimate creation.
Scope
This ordering guide describes the information for:
● Catalog of Product IDs of AI POD Solution.
● Step by step process of ordering AI POD Solution.
Audience
Cisco sales teams and partners.
Catalog of Product IDs (PIDs)
AIPOD-POD1
Table 1. PID OF MAJOR LINE BUNDLE (MLB)
| Product ID (PID) |
Description |
| AI POD - Front-End Fabric |
Table 2. FRONT END FABRIC PIDs
| Description |
|
| Nexus 9300 Series, 64p 400G Switch |
|
| N9K-C9332D-GX2B |
Nexus 9300 Series, 32p 400G Switch |
| N9324C-SE1U |
N9300 Series, 24p 100G Smart Switch |
| N9K-9364DGX2A-AIP1 |
Nexus 9300 Series, 64p 400G Switch AI POD |
Table 3. COMPUTE PIDs
| Product ID (PID) |
Description |
| UCSC-C240-M8SX |
UCS C240 M8 Rack w/ o CPU, mem, drives, 2U w SFF backplane |
| UCSC-C245-M8SX |
UCS C245M8 Rack w/ oCPU, mem, drv, 2Uw24SFF HDD/ SSD backplane |
| CAI-845A-M8 |
UCS C845A M8 base server w/ o CPU, mem, drives |
| UCSX-9508-D-U |
UCS 9508 Chassis Configured |
| UCSC-885A-M8-H23 |
UCS C885A M8 Rack - H200 GPU, 8x CX-7, 2x CX-7, 2.3TB Mem |
| UCSC-885A-M8-H20 |
UCS C885A M8 Rack - H200 GPU, 2x CX-7, 1.5TB Mem |
| UCSC-885A-M8-H25 |
UCS C885A M8 Rack - H200 GPU, 8x CX-7, 2x CX-7, 3TB Mem |
| UCSC-885A-M8-H26 |
UCS C885A M8 Rack - H200 GPU, 8x CX-7, 2x B3220, 2.3TB Mem |
Table 4. FABRIC INTERCONNECT PIDs
| Product ID (PID) |
Description |
| UCSX-FI-6536-D-U |
Fabric Interconnect 6536 |
Table 5. OS KUBERNETES PIDs
| Product ID (PID) |
Description |
| RH-OKE-B-P1S= |
OpenShift Kubernetes Engine (Bare Metal), Prem 1-Yr SnS Req (1-2 CPU upto 64cores) |
| RH-OKE-B-P3S= |
OpenShift Kubernetes Engine (Bare Metal), Prem 3-Yr SnS Req (1-2 CPU upto 64cores) |
| RH-ACM-B-P1S= |
AdvancedClusterMgmt for OKE (Bare Metal), Prem 1-Yr SnS Req (1-2CPU upto 64cores) |
| RH-ACM-B-P3S= |
AdvancedClusterMgmt for OKE (Bare Metal), Prem 3-Yr SnS Req (1-2CPU upto 64cores) |
| RH-OCP-B-P1S= |
OpenShift Container Platform (Bare Metal), Prem 1-Yr SnS Req (1-2 CPU upto 64cores) |
| RH-OCP-B-P3S= |
OpenShift Container Platform (Bare Metal), Prem 3-Yr SnS Req (1-2 CPU upto 64cores) |
| RH-OPP-B-P1S= |
OpenShift Platform Plus (Bare Metal), Prem 1-Yr SnS Req (1-2 CPU upto 64cores) |
| RH-OPP-B-P3S= |
OpenShift Platform Plus (Bare Metal), Prem 3-Yr SnS Req (1-2 CPU upto 64cores) |
| RH-OPPDF-B-P1S= |
OPP and ODF Adv (Bare Metal), Prem 1-Yr SnS Req (1-2CPU upto 64cores) |
| RH-OPPDF-B-P3S= |
OPP and ODF Adv (Bare Metal), Prem 3-Yr SnS Req (1-2CPU upto 64cores) |
| RH-OAI-B-P1S= |
OpenShift AI (Bare Metal), Prem 1-Yr SnS Req (1-2 CPU upto 64 cores) |
| RH-OAI-B-P3S= |
OpenShift AI (Bare Metal), Prem 3-Yr SnS Req (1-2 CPU upto 64 cores) |
Table 6. MANAGEMENT CLUSTER PIDs
| Product ID (PID) |
Description |
| UCSX-9508-AIP-U |
UCS 9508 Chassis Configured |
| UCSC-C220-M8S |
UCS C220 M8 Rack w/ o CPU, mem, drives, 1U w SFF backplane |
| UCSC-C225-M8S |
UCS C225 M8 Rack w/ oCPU, mem, drv, 1U wSFF HDD/ SSD backplane |
| N9K-C93108TC-FX3 |
Nexus 9300 with 48p 100M/ 1/ 10GT & 6p 40/ 100G QSFP28+ |
Table 7. ADOPTION SERVICES PIDs
| Product ID (PID) |
Description |
| CON-CXP-DCC-SAS |
Solution Attached Services for DC - Cloud and Compute |
| MINT-COMPUTE |
SolutionsPlus: DC Compute Mentored Installation - MINT |
Table 8. NEXUS DASHBOARD PIDs
| Product ID (PID) |
Description |
| ND-CLUSTER-L4 |
Nexus Dashboard Cluster - Performance |
| ND-VIRTUAL= |
Cisco Nexus Dashboard - Virtual form |
Table 9. CISCO INTERSIGHT PIDs
| Product ID (PID) |
Description |
| DC-MGT-SAAS |
Cisco Intersight SaaS |
| CNDL-DESELECT-D |
Conditional Deselect |
AIPOD-POD2
Table 10. PID OF MAJOR LINE BUNDLE (MLB)
| Product ID (PID) |
Description |
| AIPOD-POD2 |
AI POD - Front-End Fabric |
Table 11. SCALE UNIT 1 PIDs
| Product ID (PID) |
Description |
| N9K-C9332D-GX2B |
Nexus 9300 Series, 32p 400G Switch |
| N9K-C9364D-GX2A |
Nexus 9300 Series, 64p 400G Switch |
Table 12. SCALE UNIT 2 PIDs
| Product ID (PID) |
Description |
| N9K-9364DGX2A-AIP1 |
Nexus 9300 Series, 64p 400G Switch AI POD |
| N9K-9364DGX2A-AIP2 |
Nexus 9300 Series, 64p 400G Switch AI POD |
Table 13. SCALE UNIT 3 PIDs
| Product ID (PID) |
Description |
| N9364E-SG2-Q |
Cisco Nexus 9300 64x 800G QSFP-DD Switch |
| N9364E-SG2-Q-AIP |
Cisco Nexus 9300 64x 800G QSFP-DD Switch AI POD |
Table 14. COMPUTE PIDs
| Product ID (PID) |
Description |
| CAI-845A-M8 |
UCS C845A M8 base server w/ o CPU, mem, drives |
| UCSC-885A-M8-H23 |
UCS C885A M8 Rack - H200 GPU, 8x CX-7, 2x CX-7, 2.3TB Mem |
| UCSC-885A-M8-H28 |
UCS C885A M8 Rack - H200 GPU, 8x B3140H, 2x B3220, 2.3TB Mem |
| UCSC-885A-M8-H26 |
UCS C885A M8 Rack - H200 GPU, 8x CX-7, 2x B3220, 2.3TB Mem |
Table 15. FRONT END FABRIC PIDs
| Product ID (PID) |
Description |
| N9K-9364DGX2A-AIP3 |
Nexus 9300 Series, 64p 400G Switch AI POD |
| N9K-C9332DGX2B-AIP |
Nexus 9300 Series, 32p 400G Switch AI POD |
| N9324C-SE1U |
N9300 Series, 24p 100G Smart Switch |
| N9K-9364DGX2A-AIP4 |
Nexus 9300 Series, 64p 400G Switch POD |
Table 16. OS KUBERNETES PIDs
| Product ID (PID) |
Description |
| RH-OKE-B-P1S= |
OpenShift Kubernetes Engine (Bare Metal), Prem 1-Yr SnS Req (1-2 CPU upto 64cores) |
| RH-OKE-B-P3S= |
OpenShift Kubernetes Engine (Bare Metal), Prem 3-Yr SnS Req (1-2 CPU upto 64cores) |
| RH-ACM-B-P1S= |
AdvancedClusterMgmt for OKE (Bare Metal), Prem 1-Yr SnS Req (1-2CPU upto 64cores) |
| RH-ACM-B-P3S= |
AdvancedClusterMgmt for OKE (Bare Metal), Prem 3-Yr SnS Req (1-2CPU upto 64cores) |
| RH-OCP-B-P1S= |
OpenShift Container Platform (Bare Metal), Prem 1-Yr SnS Req (1-2 CPU upto 64cores) |
| RH-OCP-B-P3S= |
OpenShift Container Platform (Bare Metal), Prem 3-Yr SnS Req (1-2 CPU upto 64cores) |
| RH-OPP-B-P1S= |
OpenShift Platform Plus (Bare Metal), Prem 1-Yr SnS Req (1-2 CPU upto 64cores) |
| RH-OPP-B-P3S= |
OpenShift Platform Plus (Bare Metal), Prem 3-Yr SnS Req (1-2 CPU upto 64cores) |
| RH-OPPDF-B-P1S= |
OPP and ODF Adv (Bare Metal), Prem 1-Yr SnS Req (1-2CPU upto 64cores) |
| RH-OPPDF-B-P3S= |
OPP and ODF Adv (Bare Metal), Prem 3-Yr SnS Req (1-2CPU upto 64cores) |
| RH-OAI-B-P1S= |
OpenShift AI (Bare Metal), Prem 1-Yr SnS Req (1-2 CPU upto 64 cores) |
| RH-OAI-B-P3S= |
OpenShift AI (Bare Metal), Prem 3-Yr SnS Req (1-2 CPU upto 64 cores) |
Table 17. MANAGEMENT CLUSTER PIDs
| Product ID (PID) |
Description |
| UCSX-9508-D-U |
UCS 9508 Chassis Configured |
| UCSC-C220-M8S |
UCS C220 M8 Rack w/ o CPU, mem, drives, 1U w SFF backplane |
| UCSC-C225-M8S |
UCS C225 M8 Rack w/ oCPU, mem, drv, 1U wSFF HDD/ SSD backplane |
| N9K-C93108TC-FX3 |
Nexus 9300 with 48p 100M/ 1/ 10GT & 6p 40/ 100G QSFP28+ |
Table 18. NEXUS DASHBOARD PIDs
| Product ID (PID) |
Description |
| ND-CLUSTER-L4 |
Nexus Dashboard Cluster - Performance |
| ND-VIRTUAL= |
Cisco Nexus Dashboard - Virtual form |
Table 19. ADOPTION SERVICES PIDs
| Product ID (PID) |
Description |
| CON-CXP-DCC-SAS |
Solution Attached Services for DC - Cloud and Compute |
| MINT-COMPUTE |
SolutionsPlus: DC Compute Mentored Installation - MINT |
Table 20. CISCO INTERSIGHT PIDs
| Product ID (PID) |
Description |
| DC-MGT-SAAS |
Cisco Intersight SaaS |
| CNDL-DESELECT-D |
Conditional Deselect |
Configuring AIPOD-POD1
This section provides more information and details related to packages and PIDs specific to AIPOD-POD1. It also provides references to additional buying programs and subscription packages that AIPOD-POD1 solution may be included in.
Step 1. Launch your web browser and navigate to the Cisco Commerce Estimate Creation page.
Step 2. Log In to Cisco screen, type your Cisco.com user ID and password.
Step 3. In the Estimates page, set preferences for this estimate by entering the SKU, PID, product description or product family (for example, AIPOD-POD1) to search for the product you wish to order.
Step 4.

a. In CCW, search for MLB PID and click on “Add”
b. Click on “Select Options” to enter the configurator.
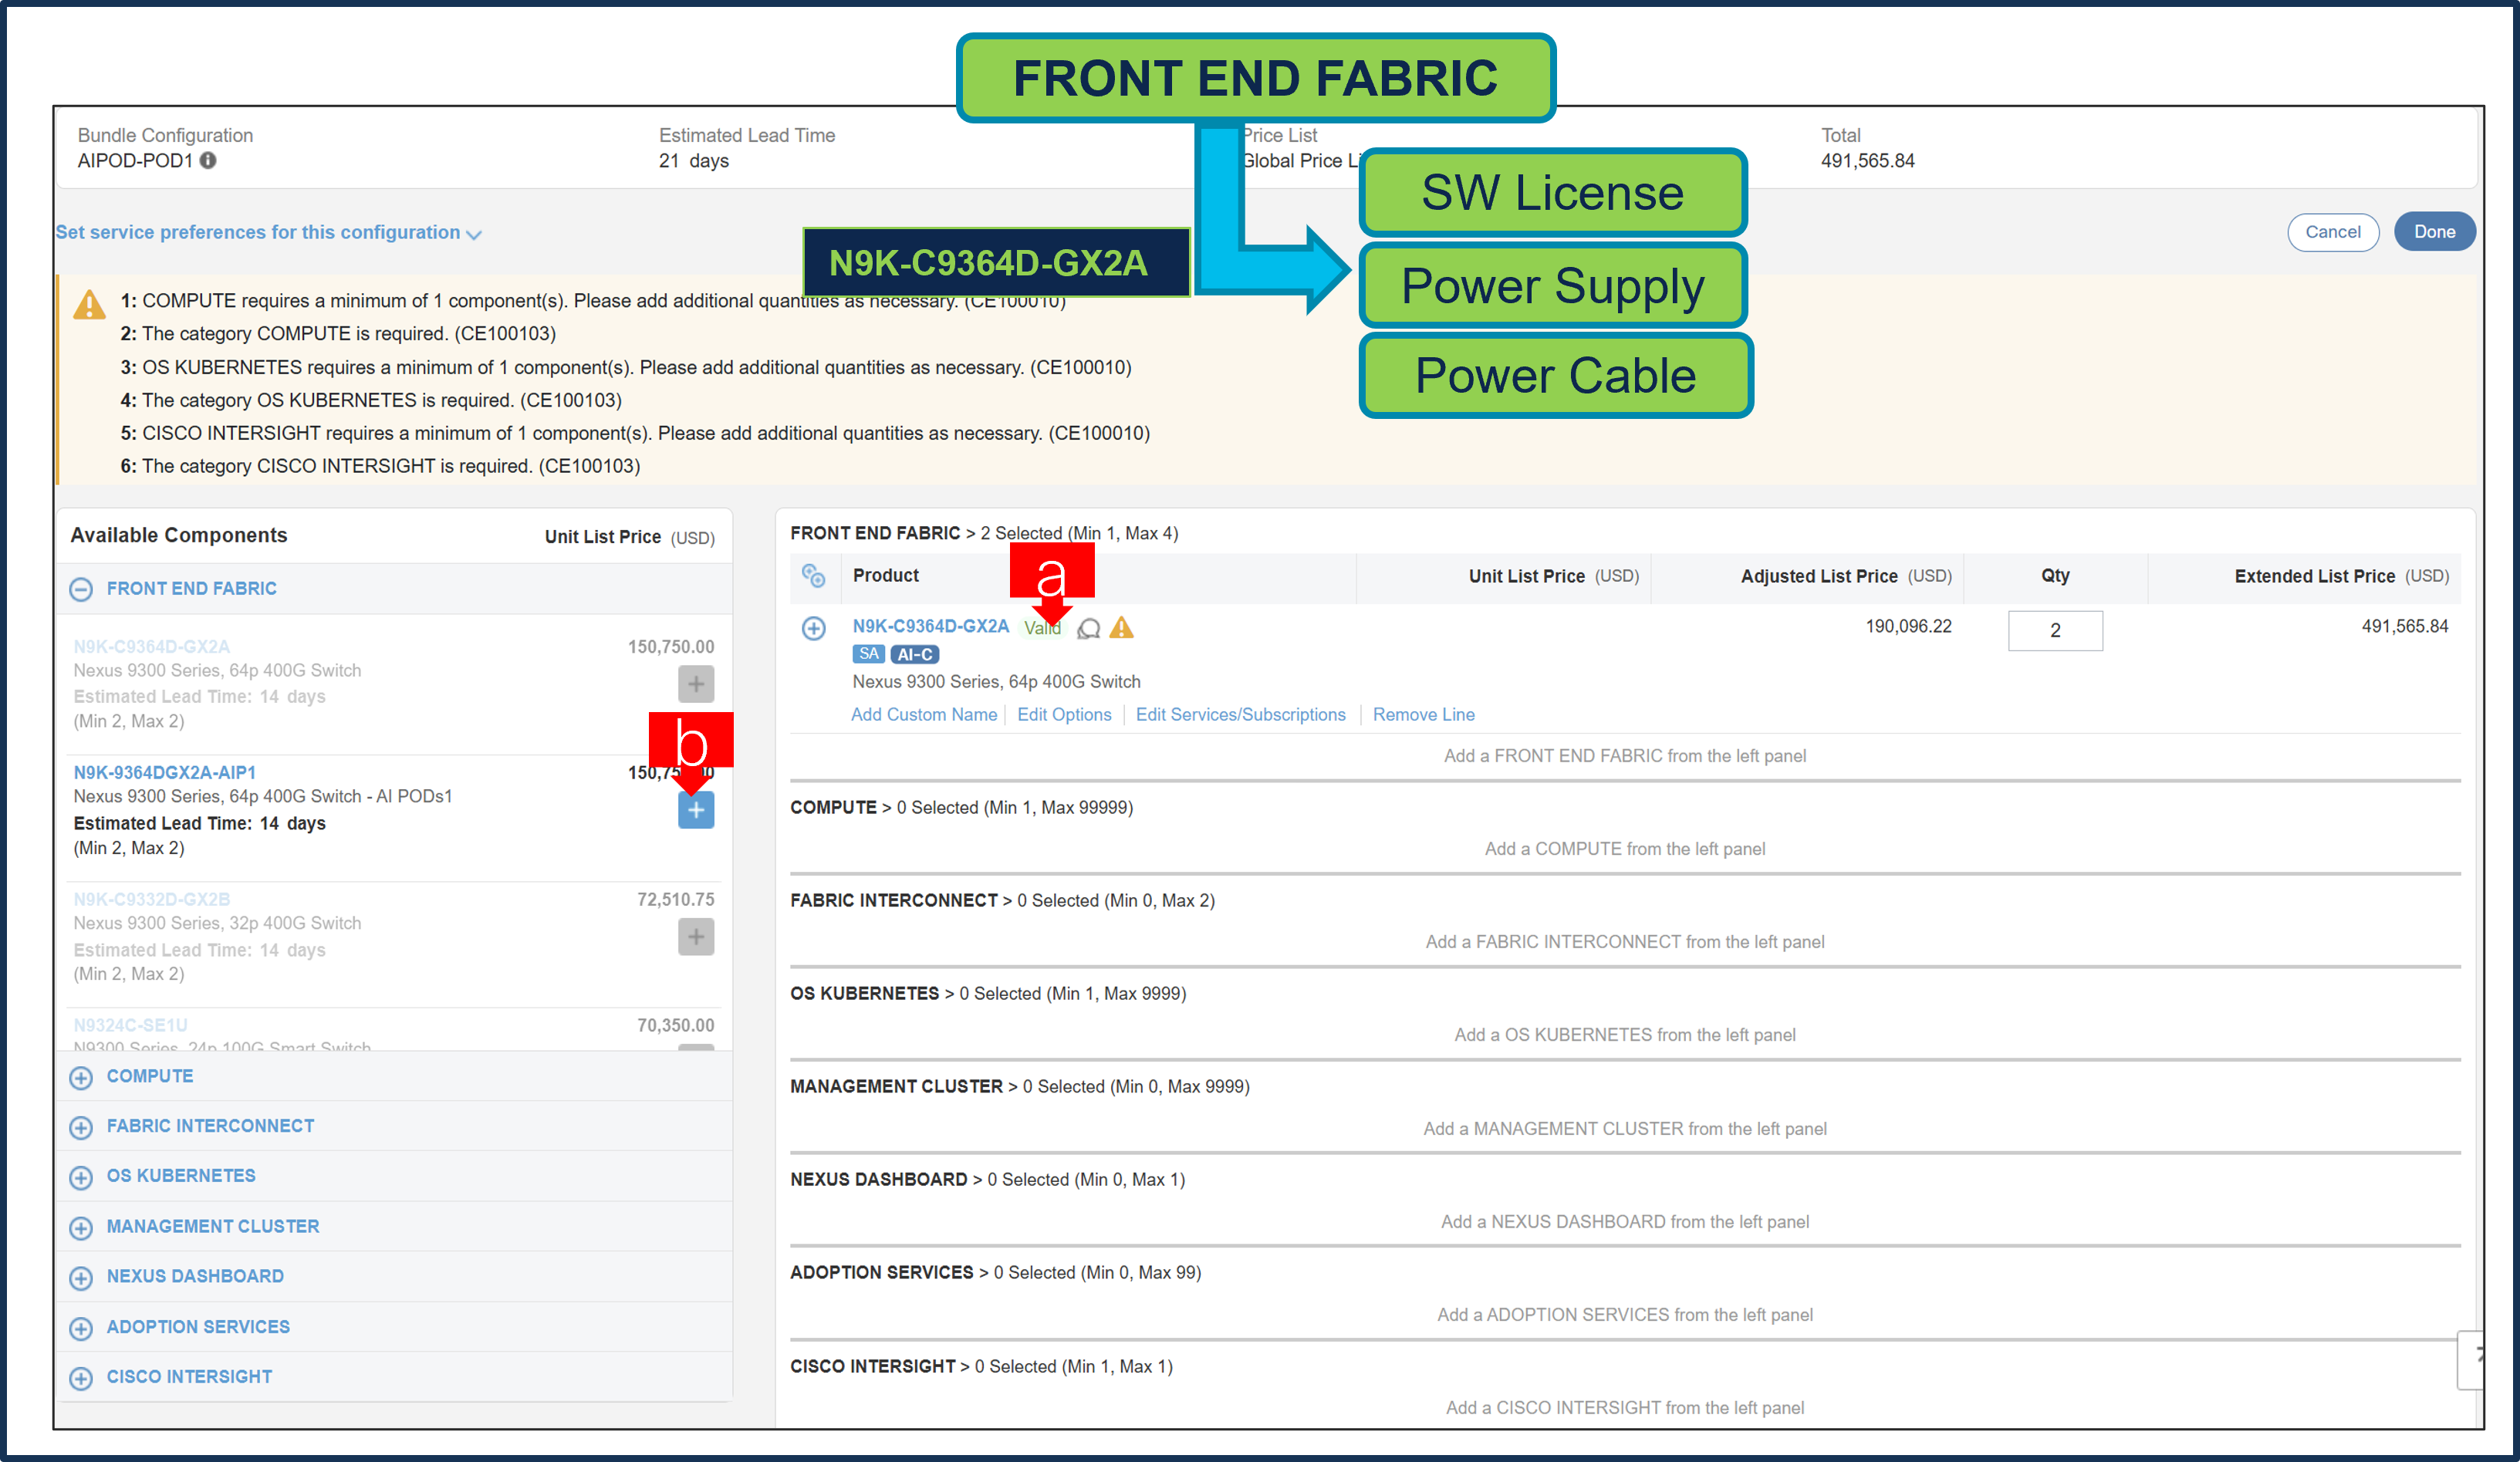
Step 5.

a. Select at least 1 pair of Leaf Switch Node from Category: FRONT END FABRIC under MLB by clicking the “PLUS”
b. Notice the N9K-C9364D-GX2A status is “invalid” as further configuration needed.
c. Click on “Edit Options” to enter the configurator.
Step 6.
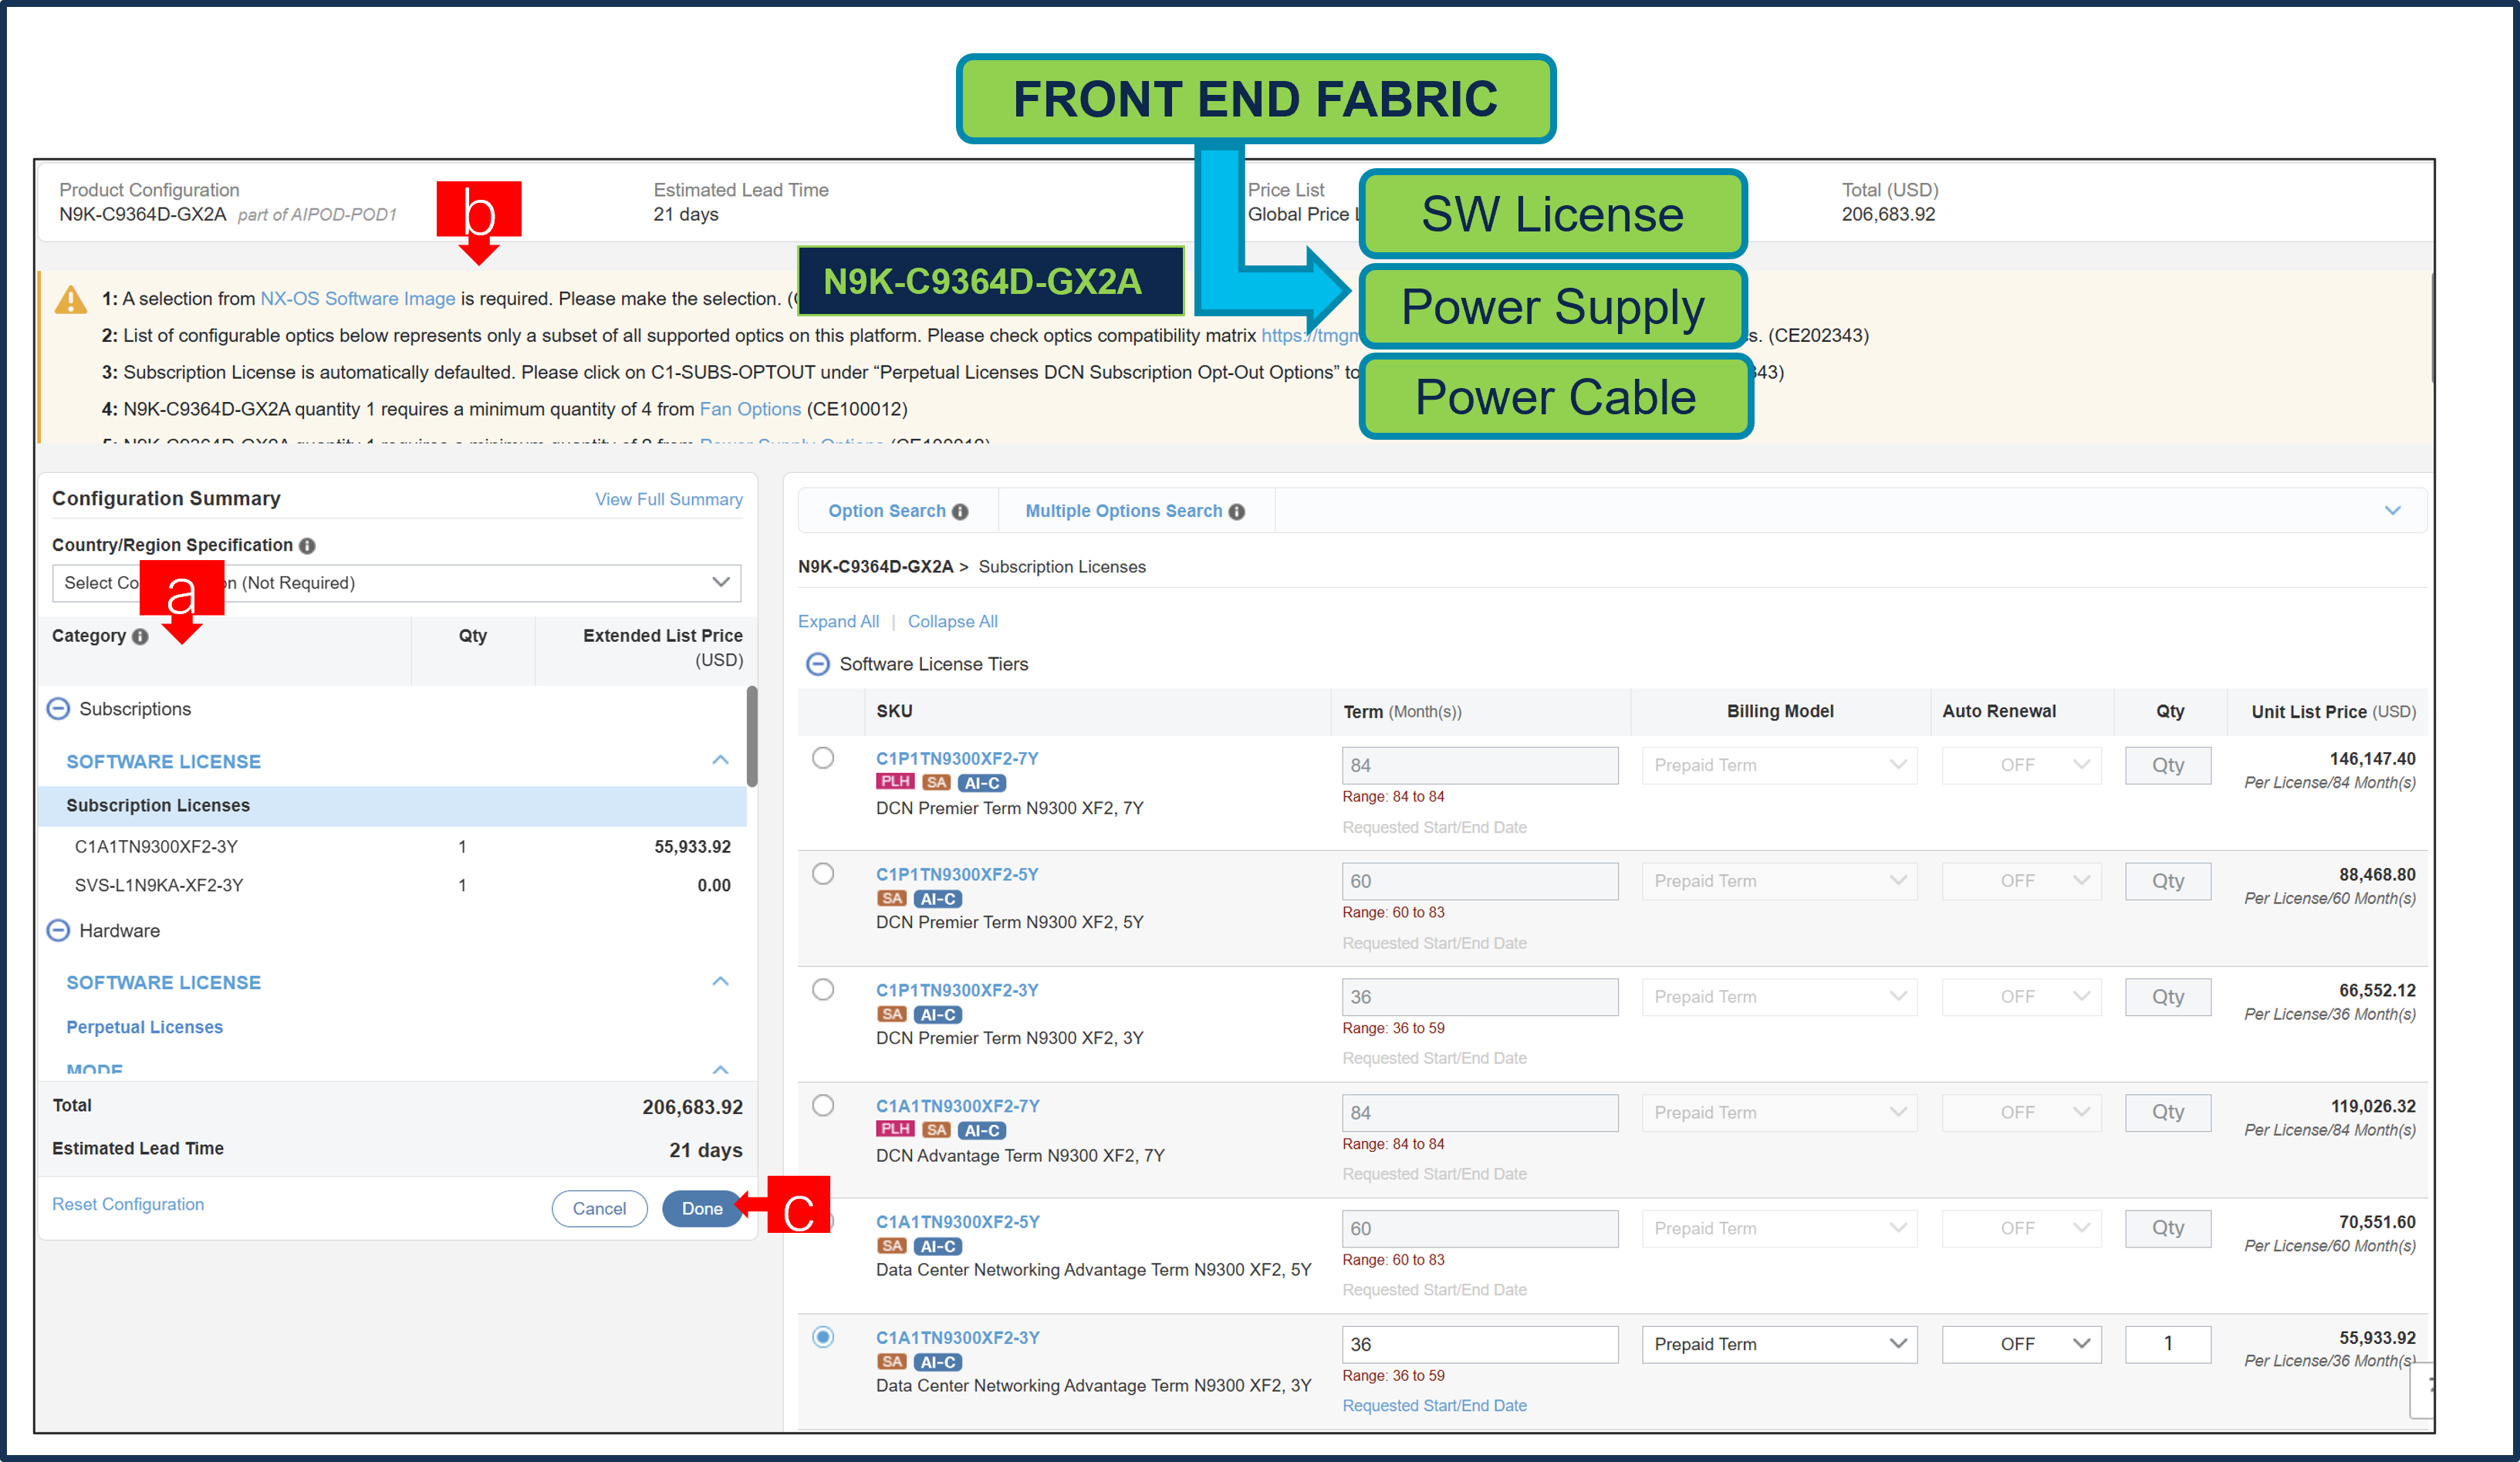
a. Configure N9K-C9364D-GX2A by making selection from category window on the left.
b. Follow warning messages to configure the minimum required option PIDs.
c. Click on “Done” when completed.
Step 7.
a. Note the status is now “Valid”
b. Spine Switch under Category: FRONT END FABRIC is option selection and User can select the click “Plus” to add and configure pair of Spine Switch.
Step 8.
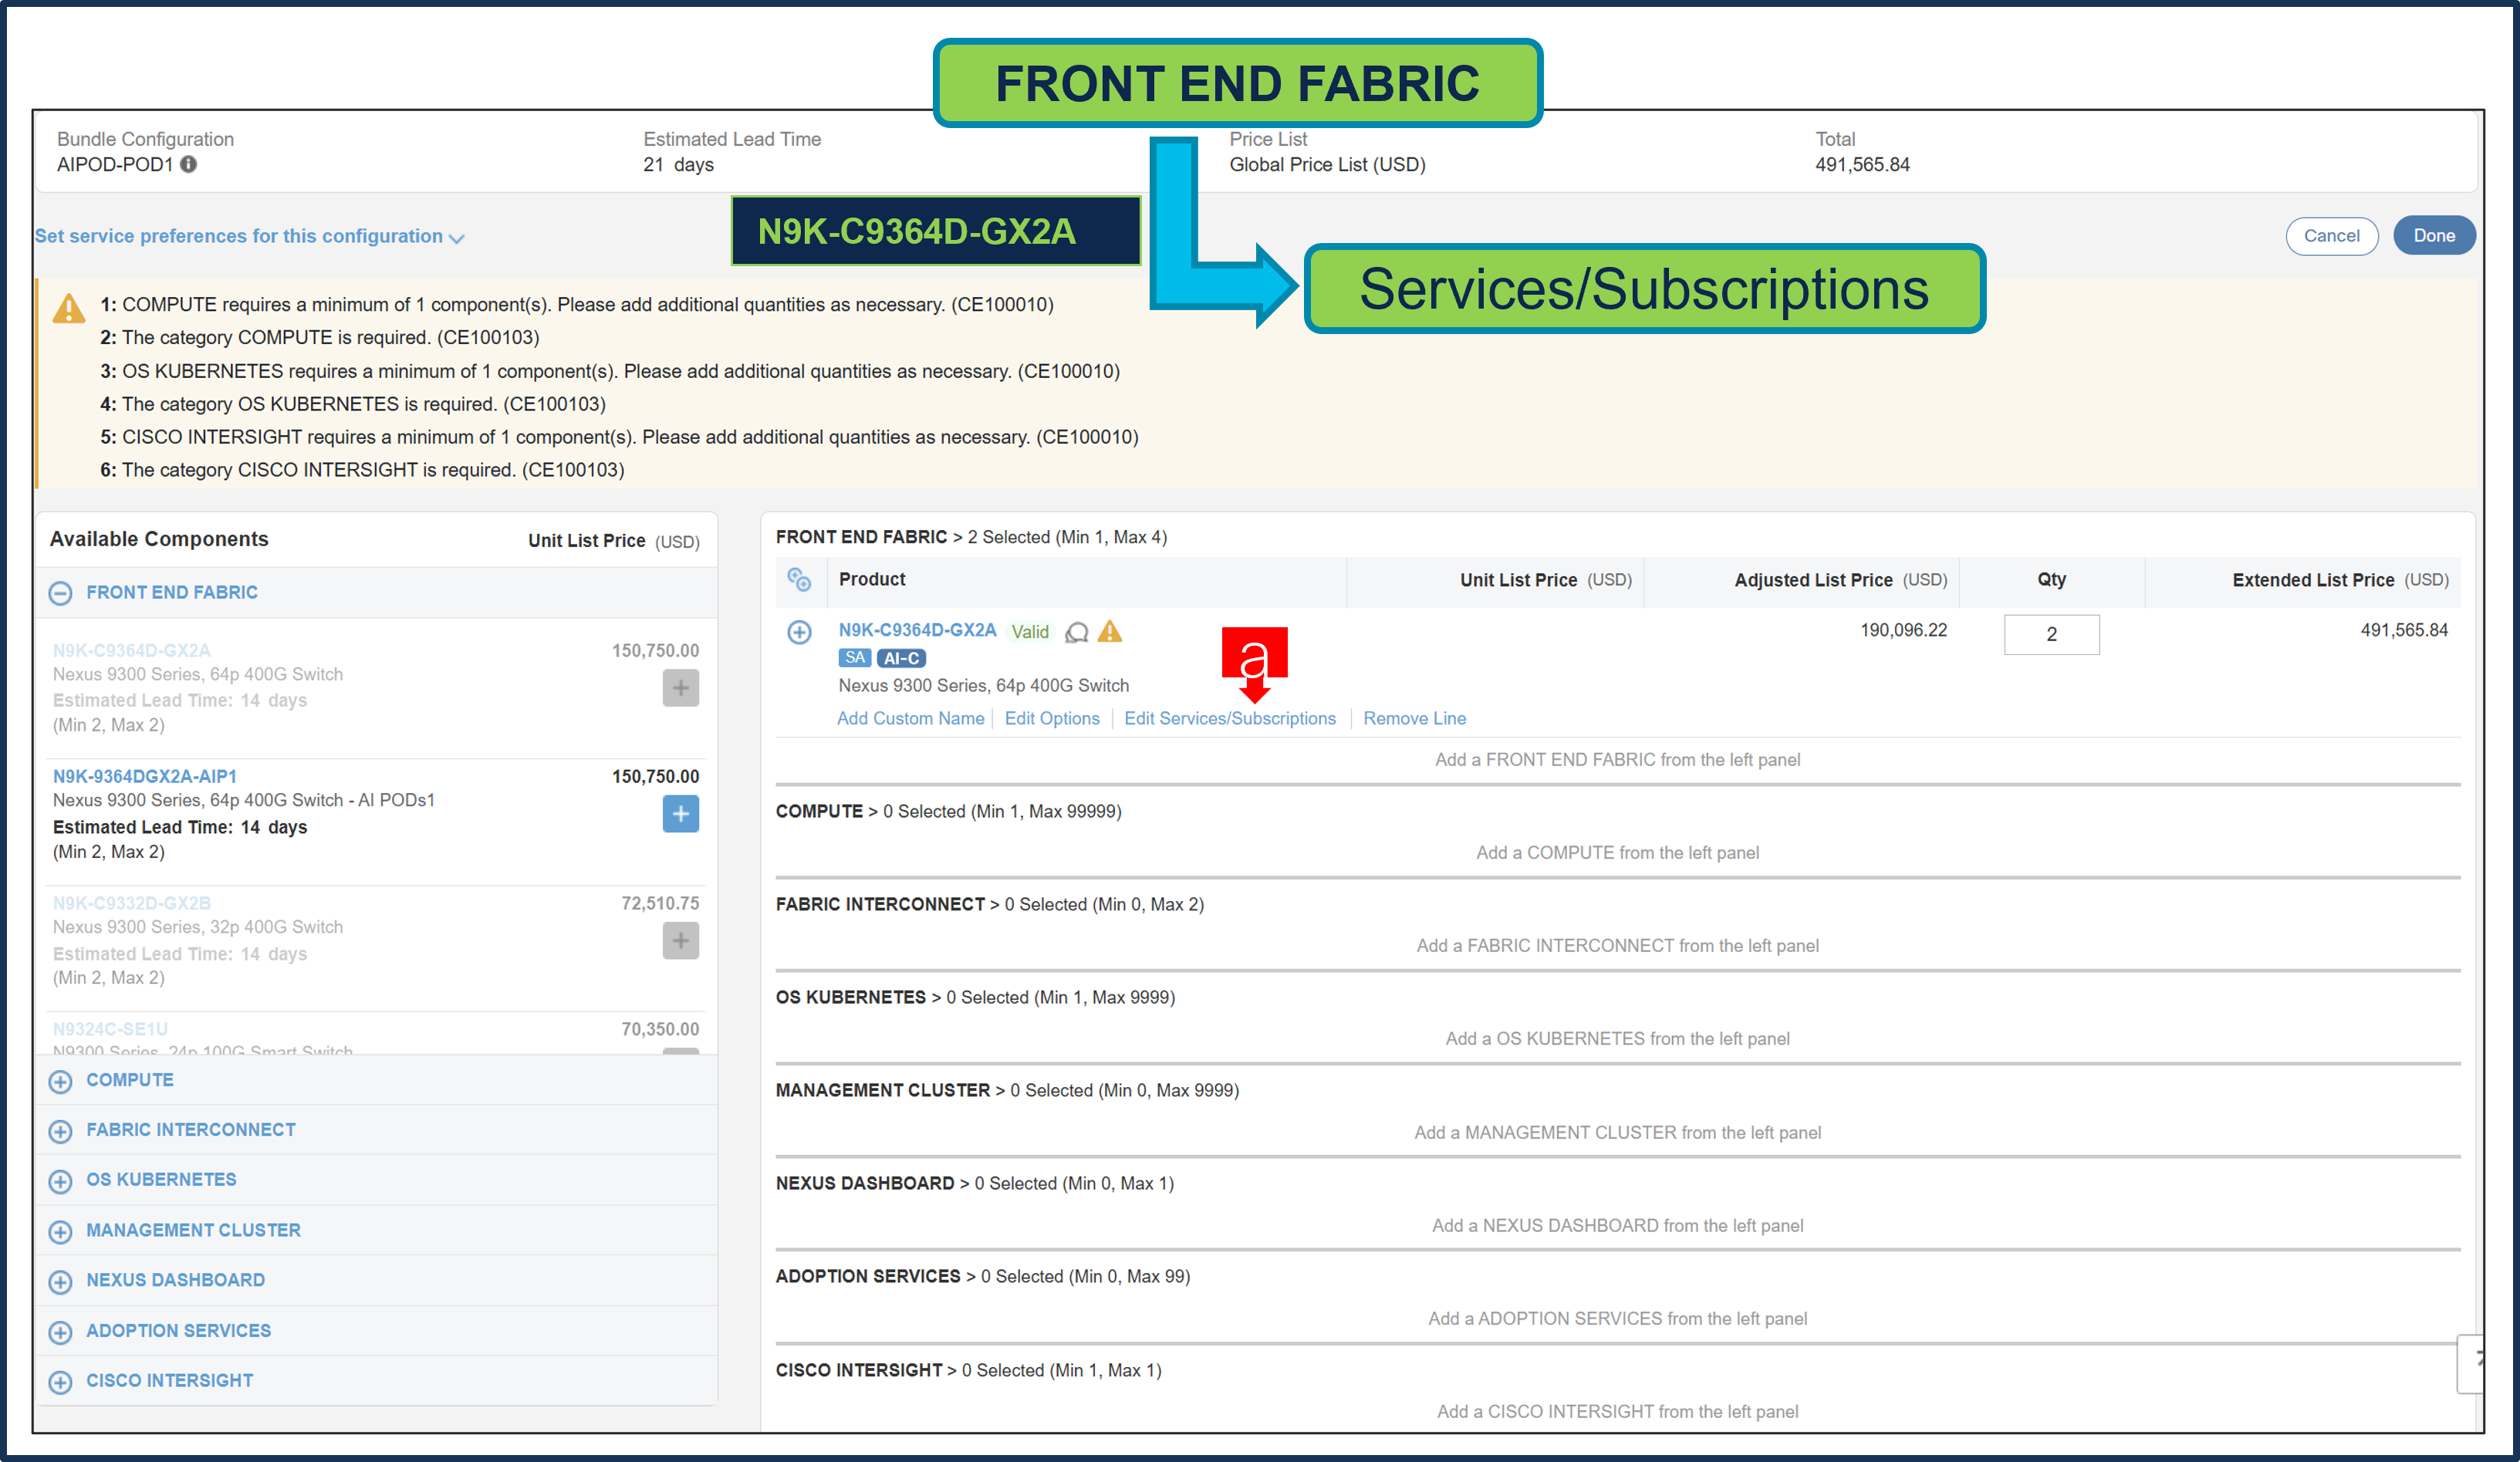
a. Click on “Edit Services/Subscriptions” to edit Term Duration for HW Support.
Note: It is recommended that Term Duration for HW Support must align with Software Subscription Duration.
Step 9.
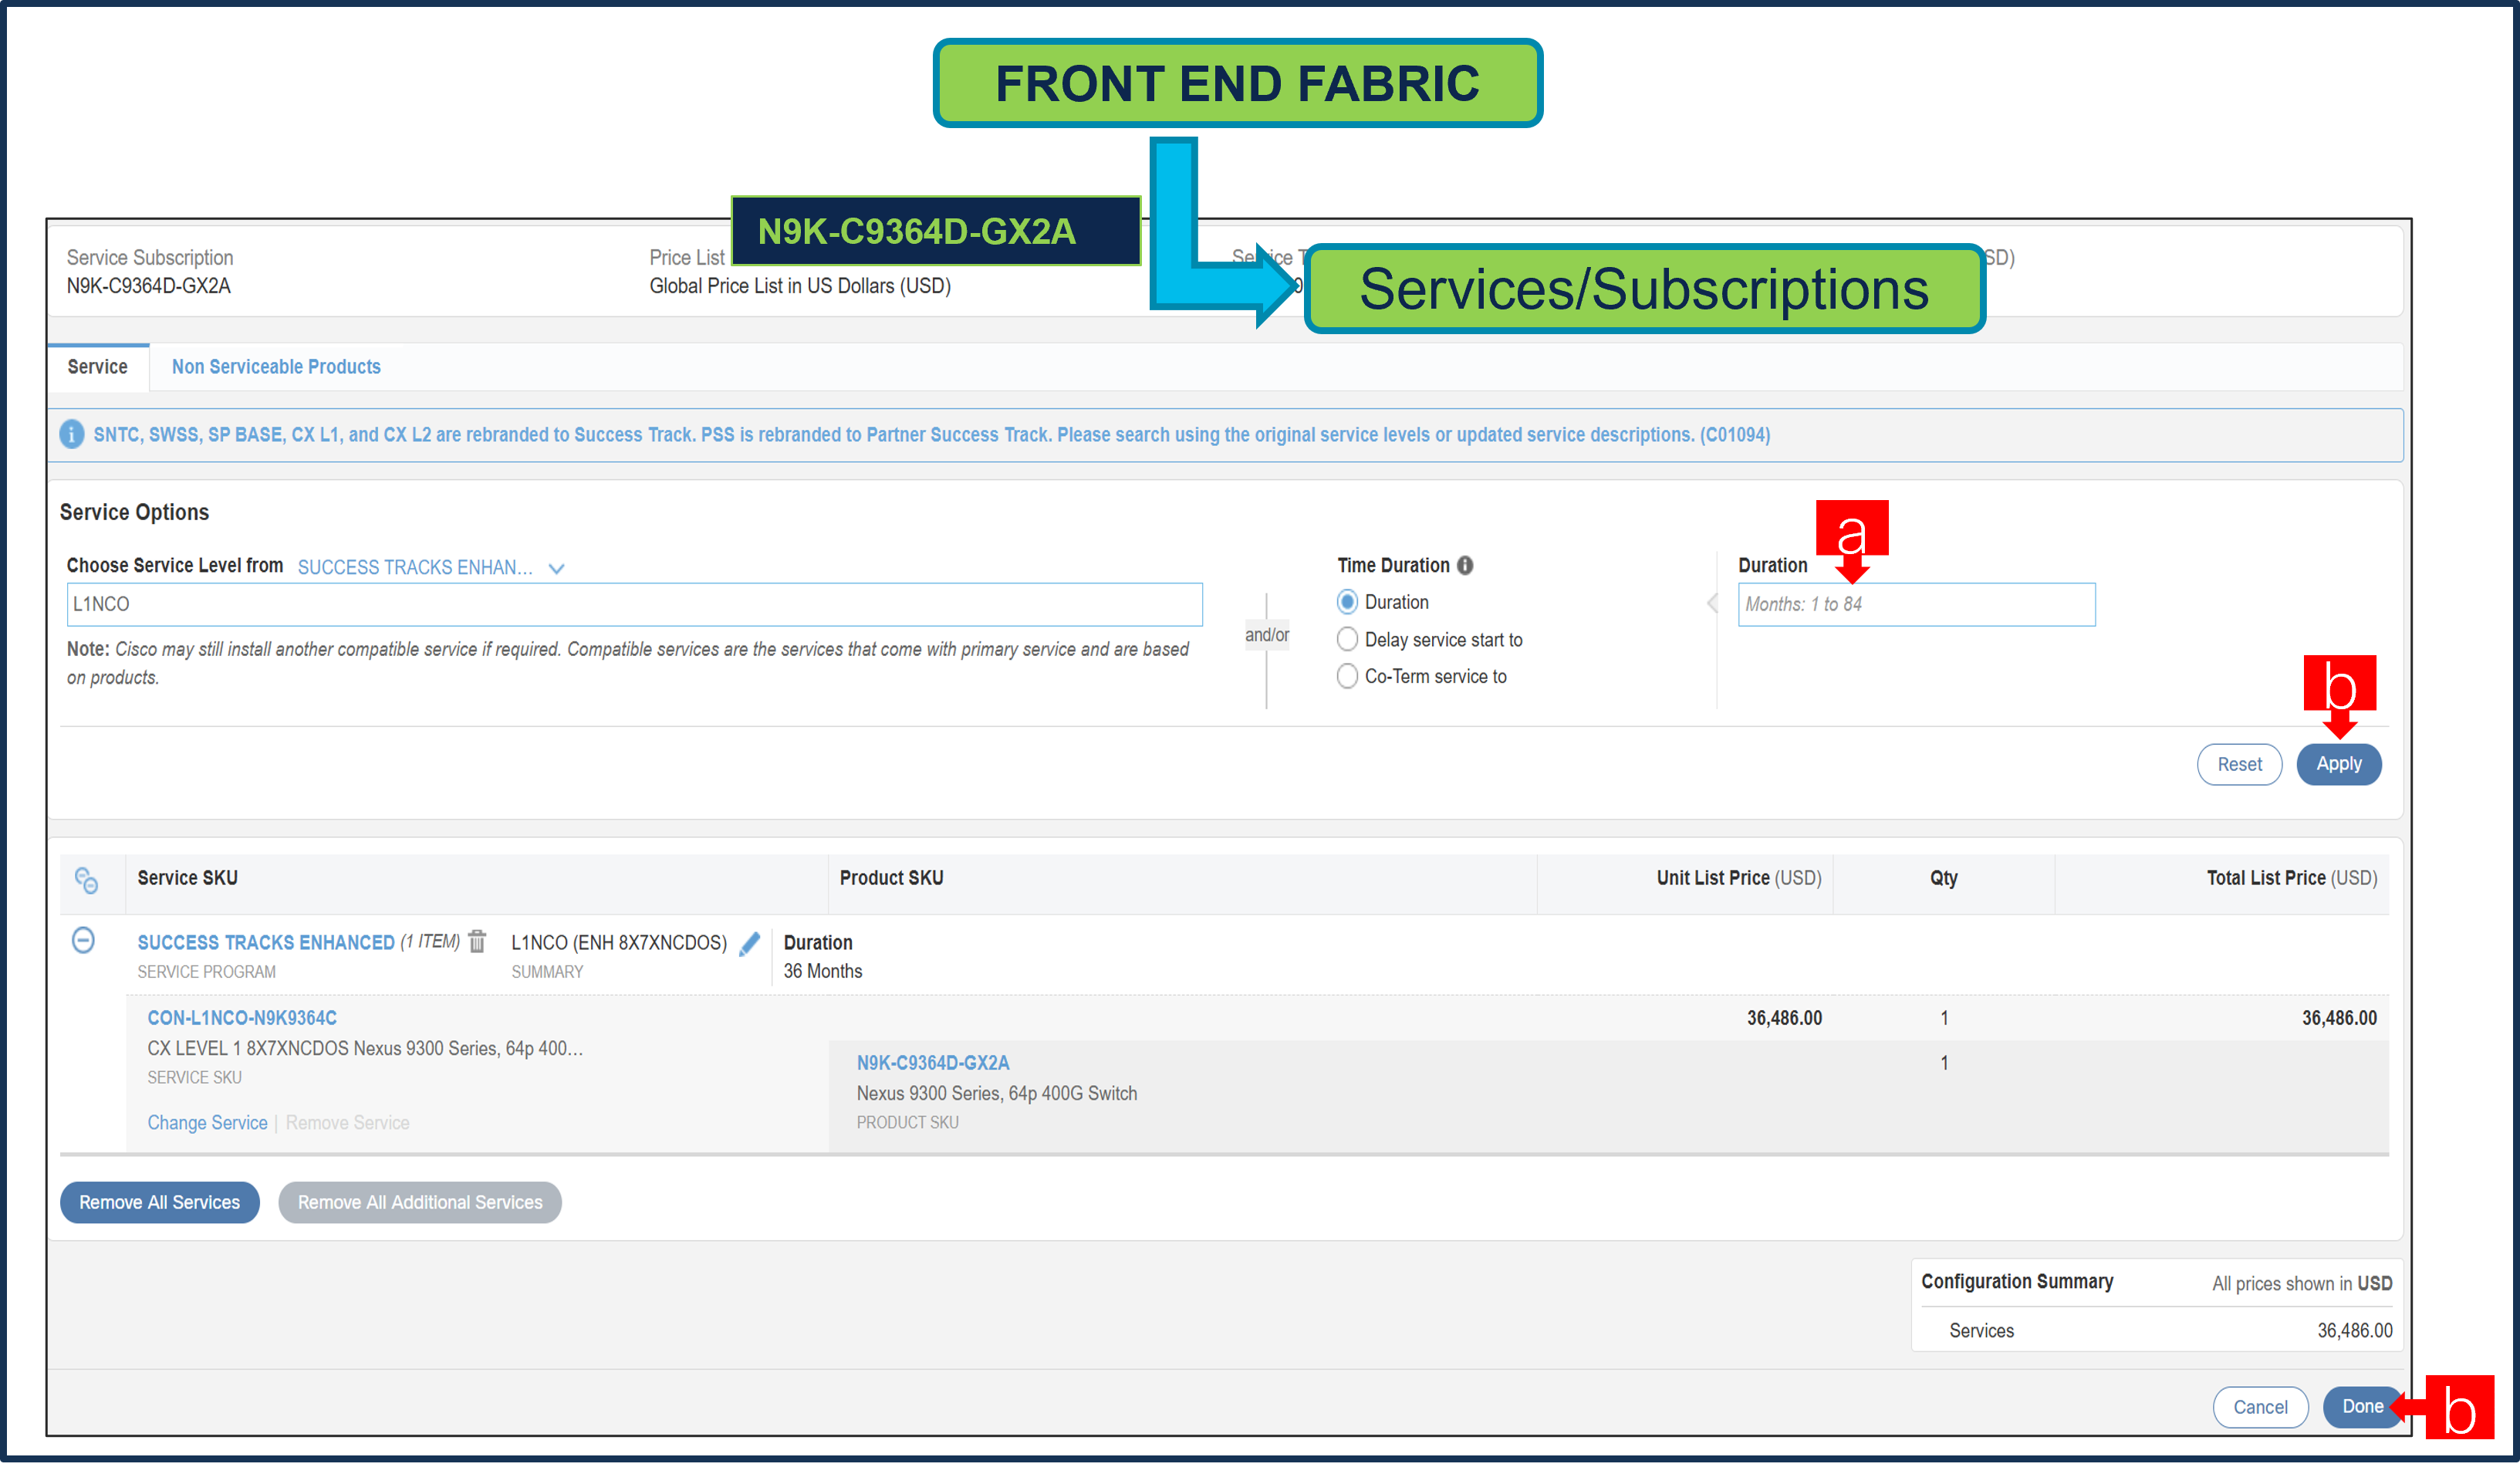
a. It is recommended that Customer selects CX Success Track Level 1 or Level 2 or Solution Support to ensure consistent SLA response time between Hardware and Software.
b. Enter the Term Duration, Click on “Apply” and “Done”
Step 10.
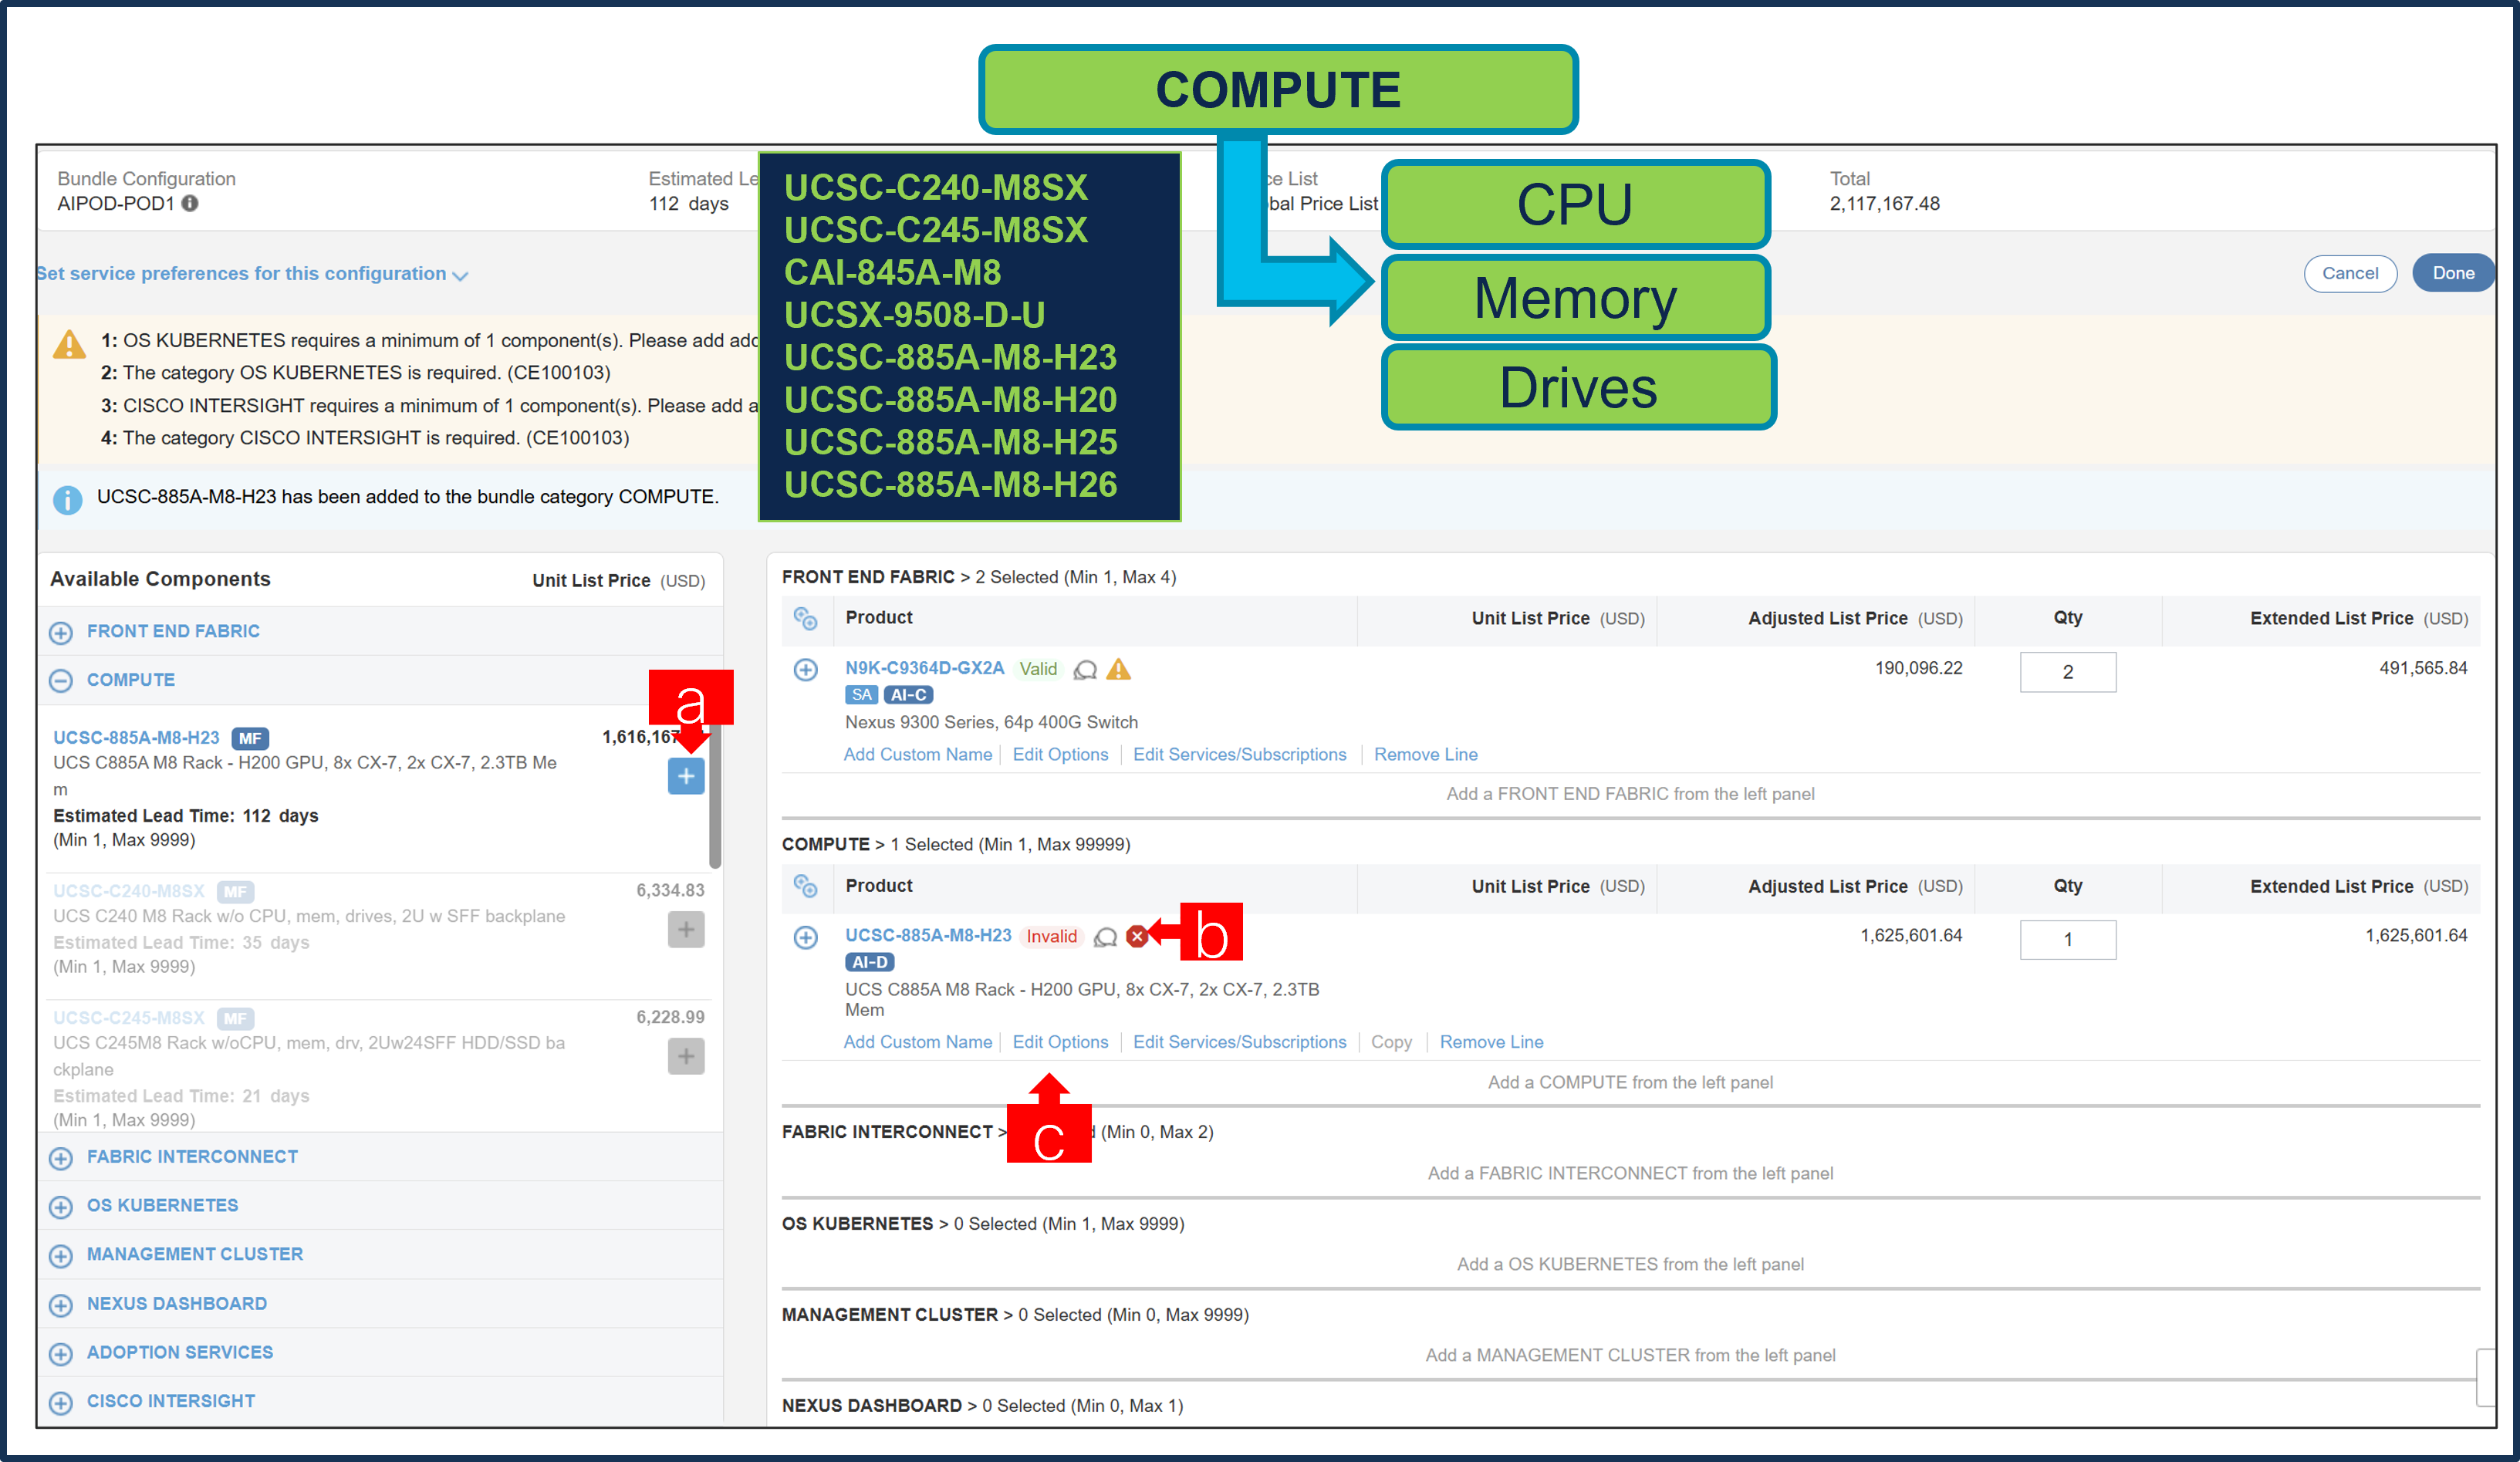
a. Select at least 1 Server/chassis from Category: COMPUTE under MLB by clicking the “PLUS”
b. Notice the PID: UCSC-885A-M8-H23 Status is invalid as further configuration needed.
c. Select ‘Edit Option’ to enter the configurator.
Step 11.
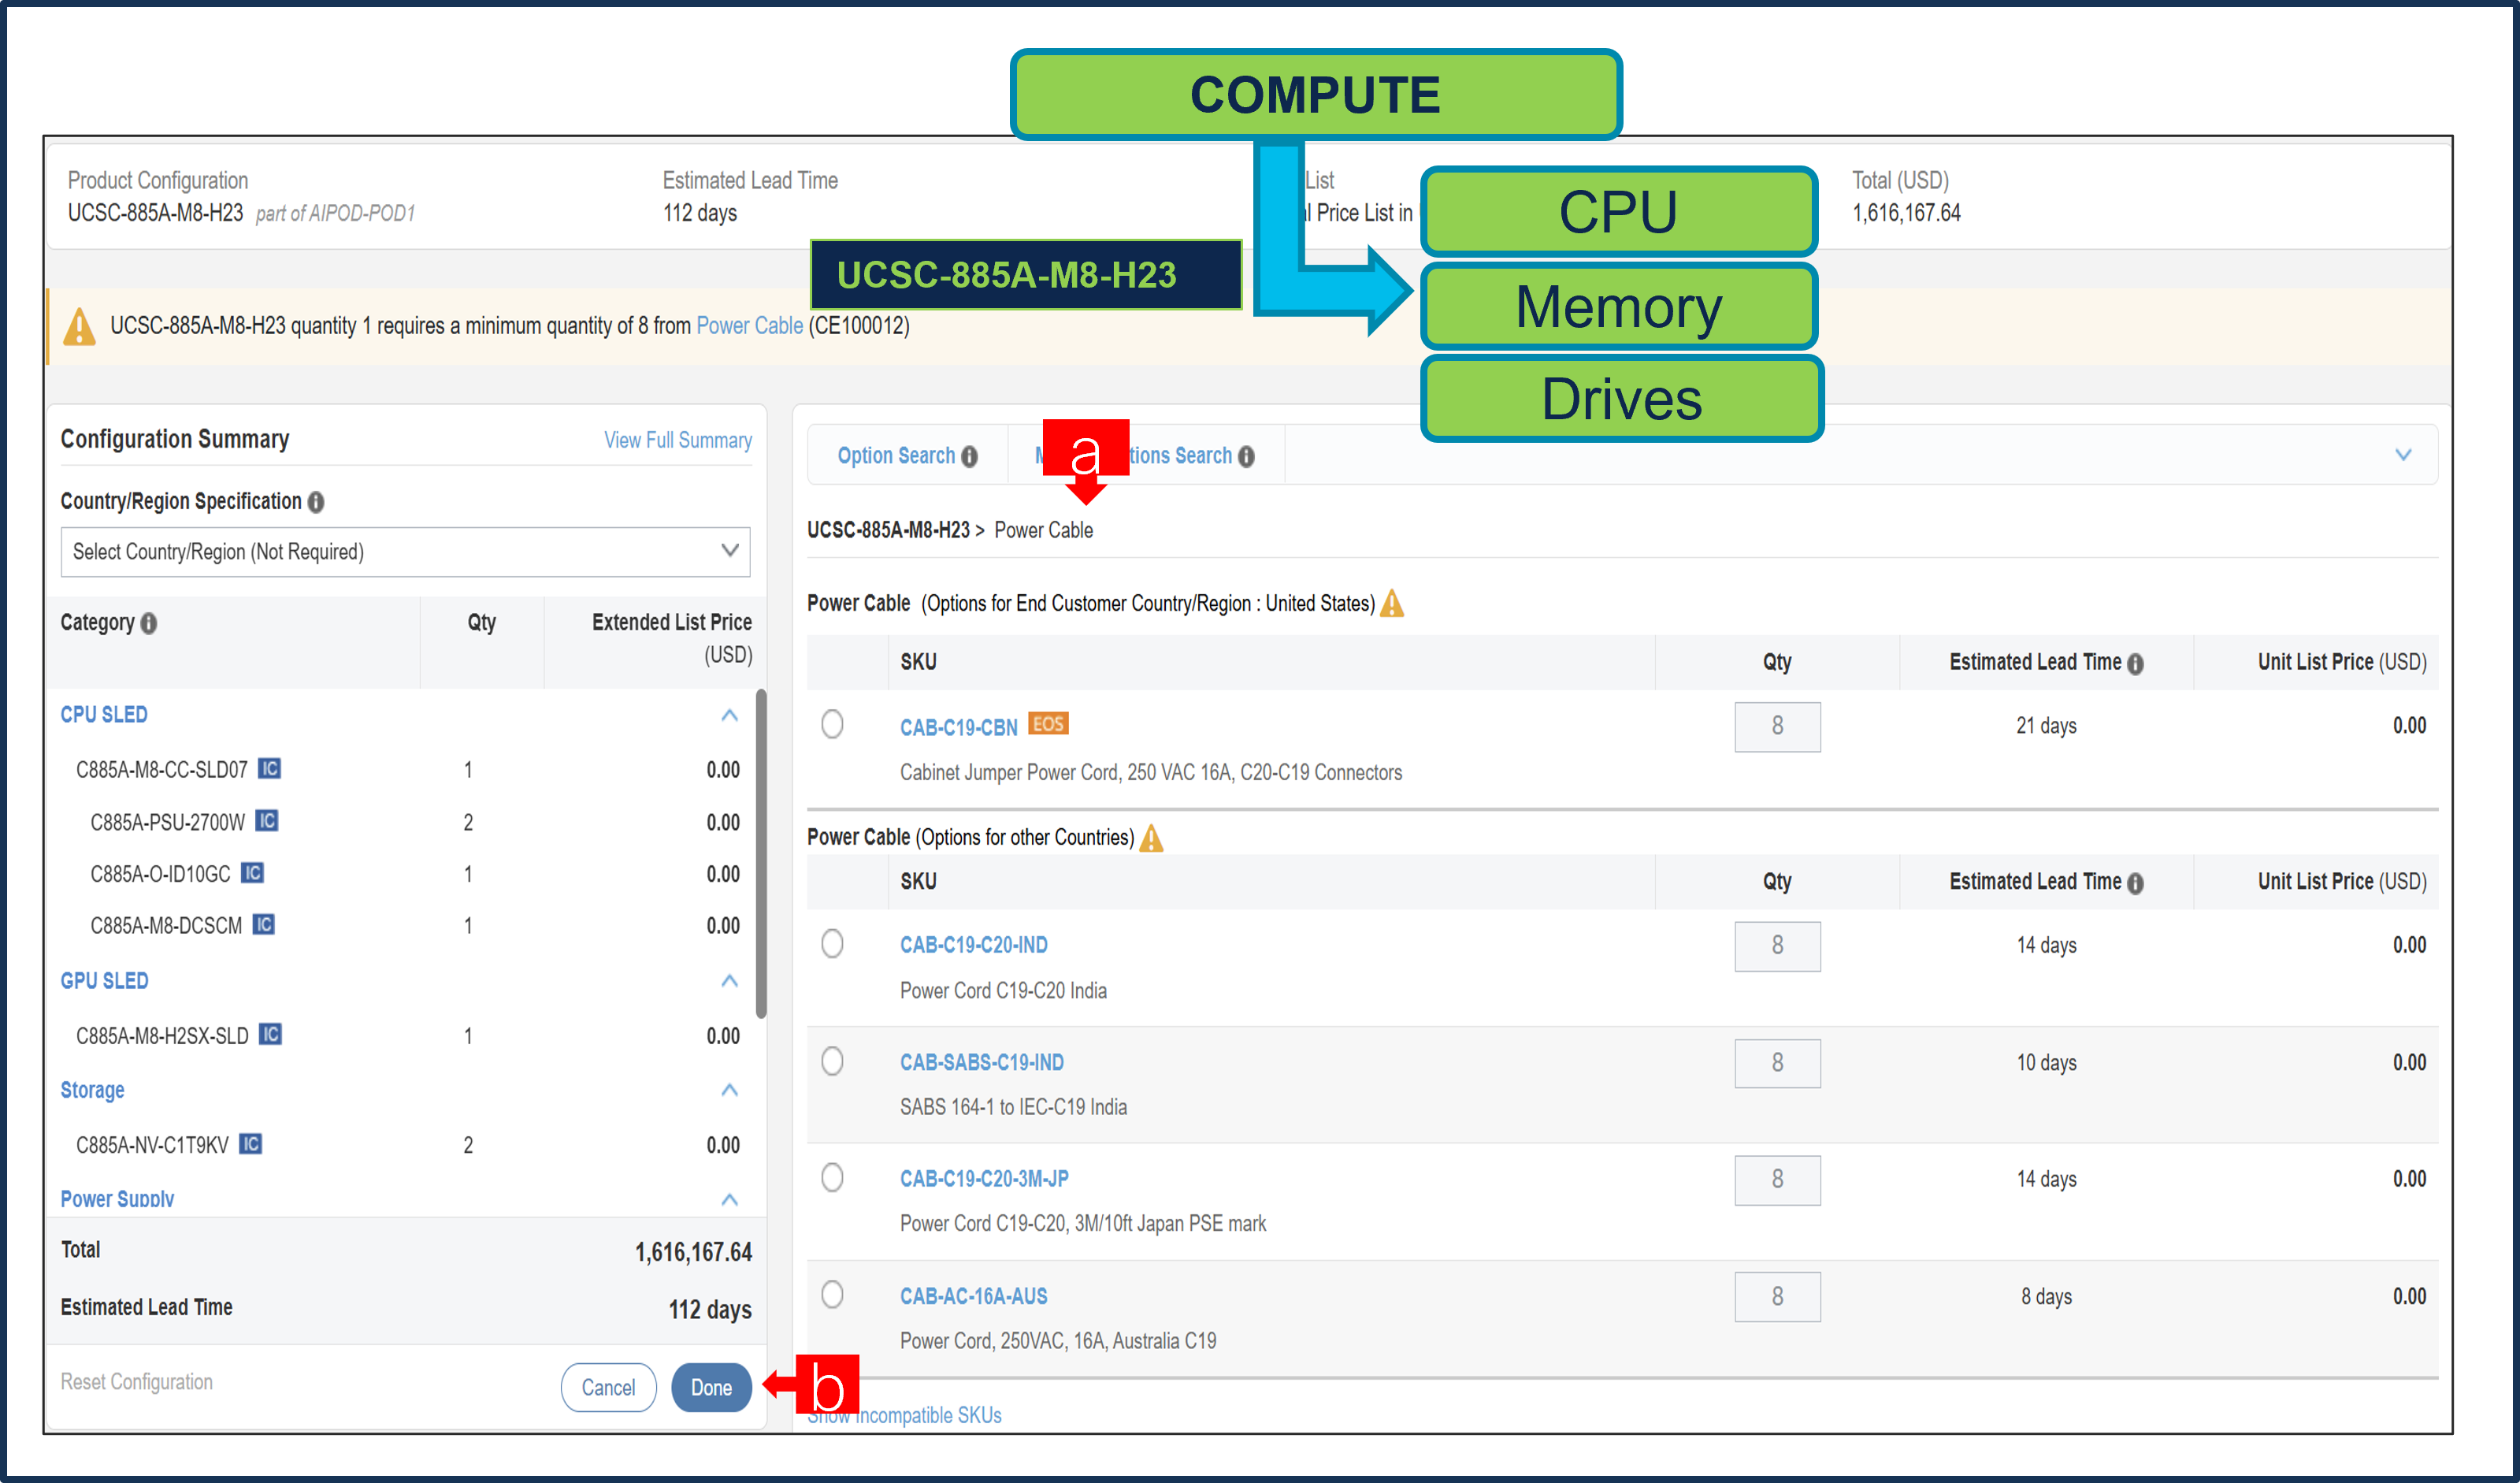
a. Configure PID: UCSC-885A-M8-H23 by selecting Power Cable from category window on the left.
b. Select Done when completed.
Step 12.
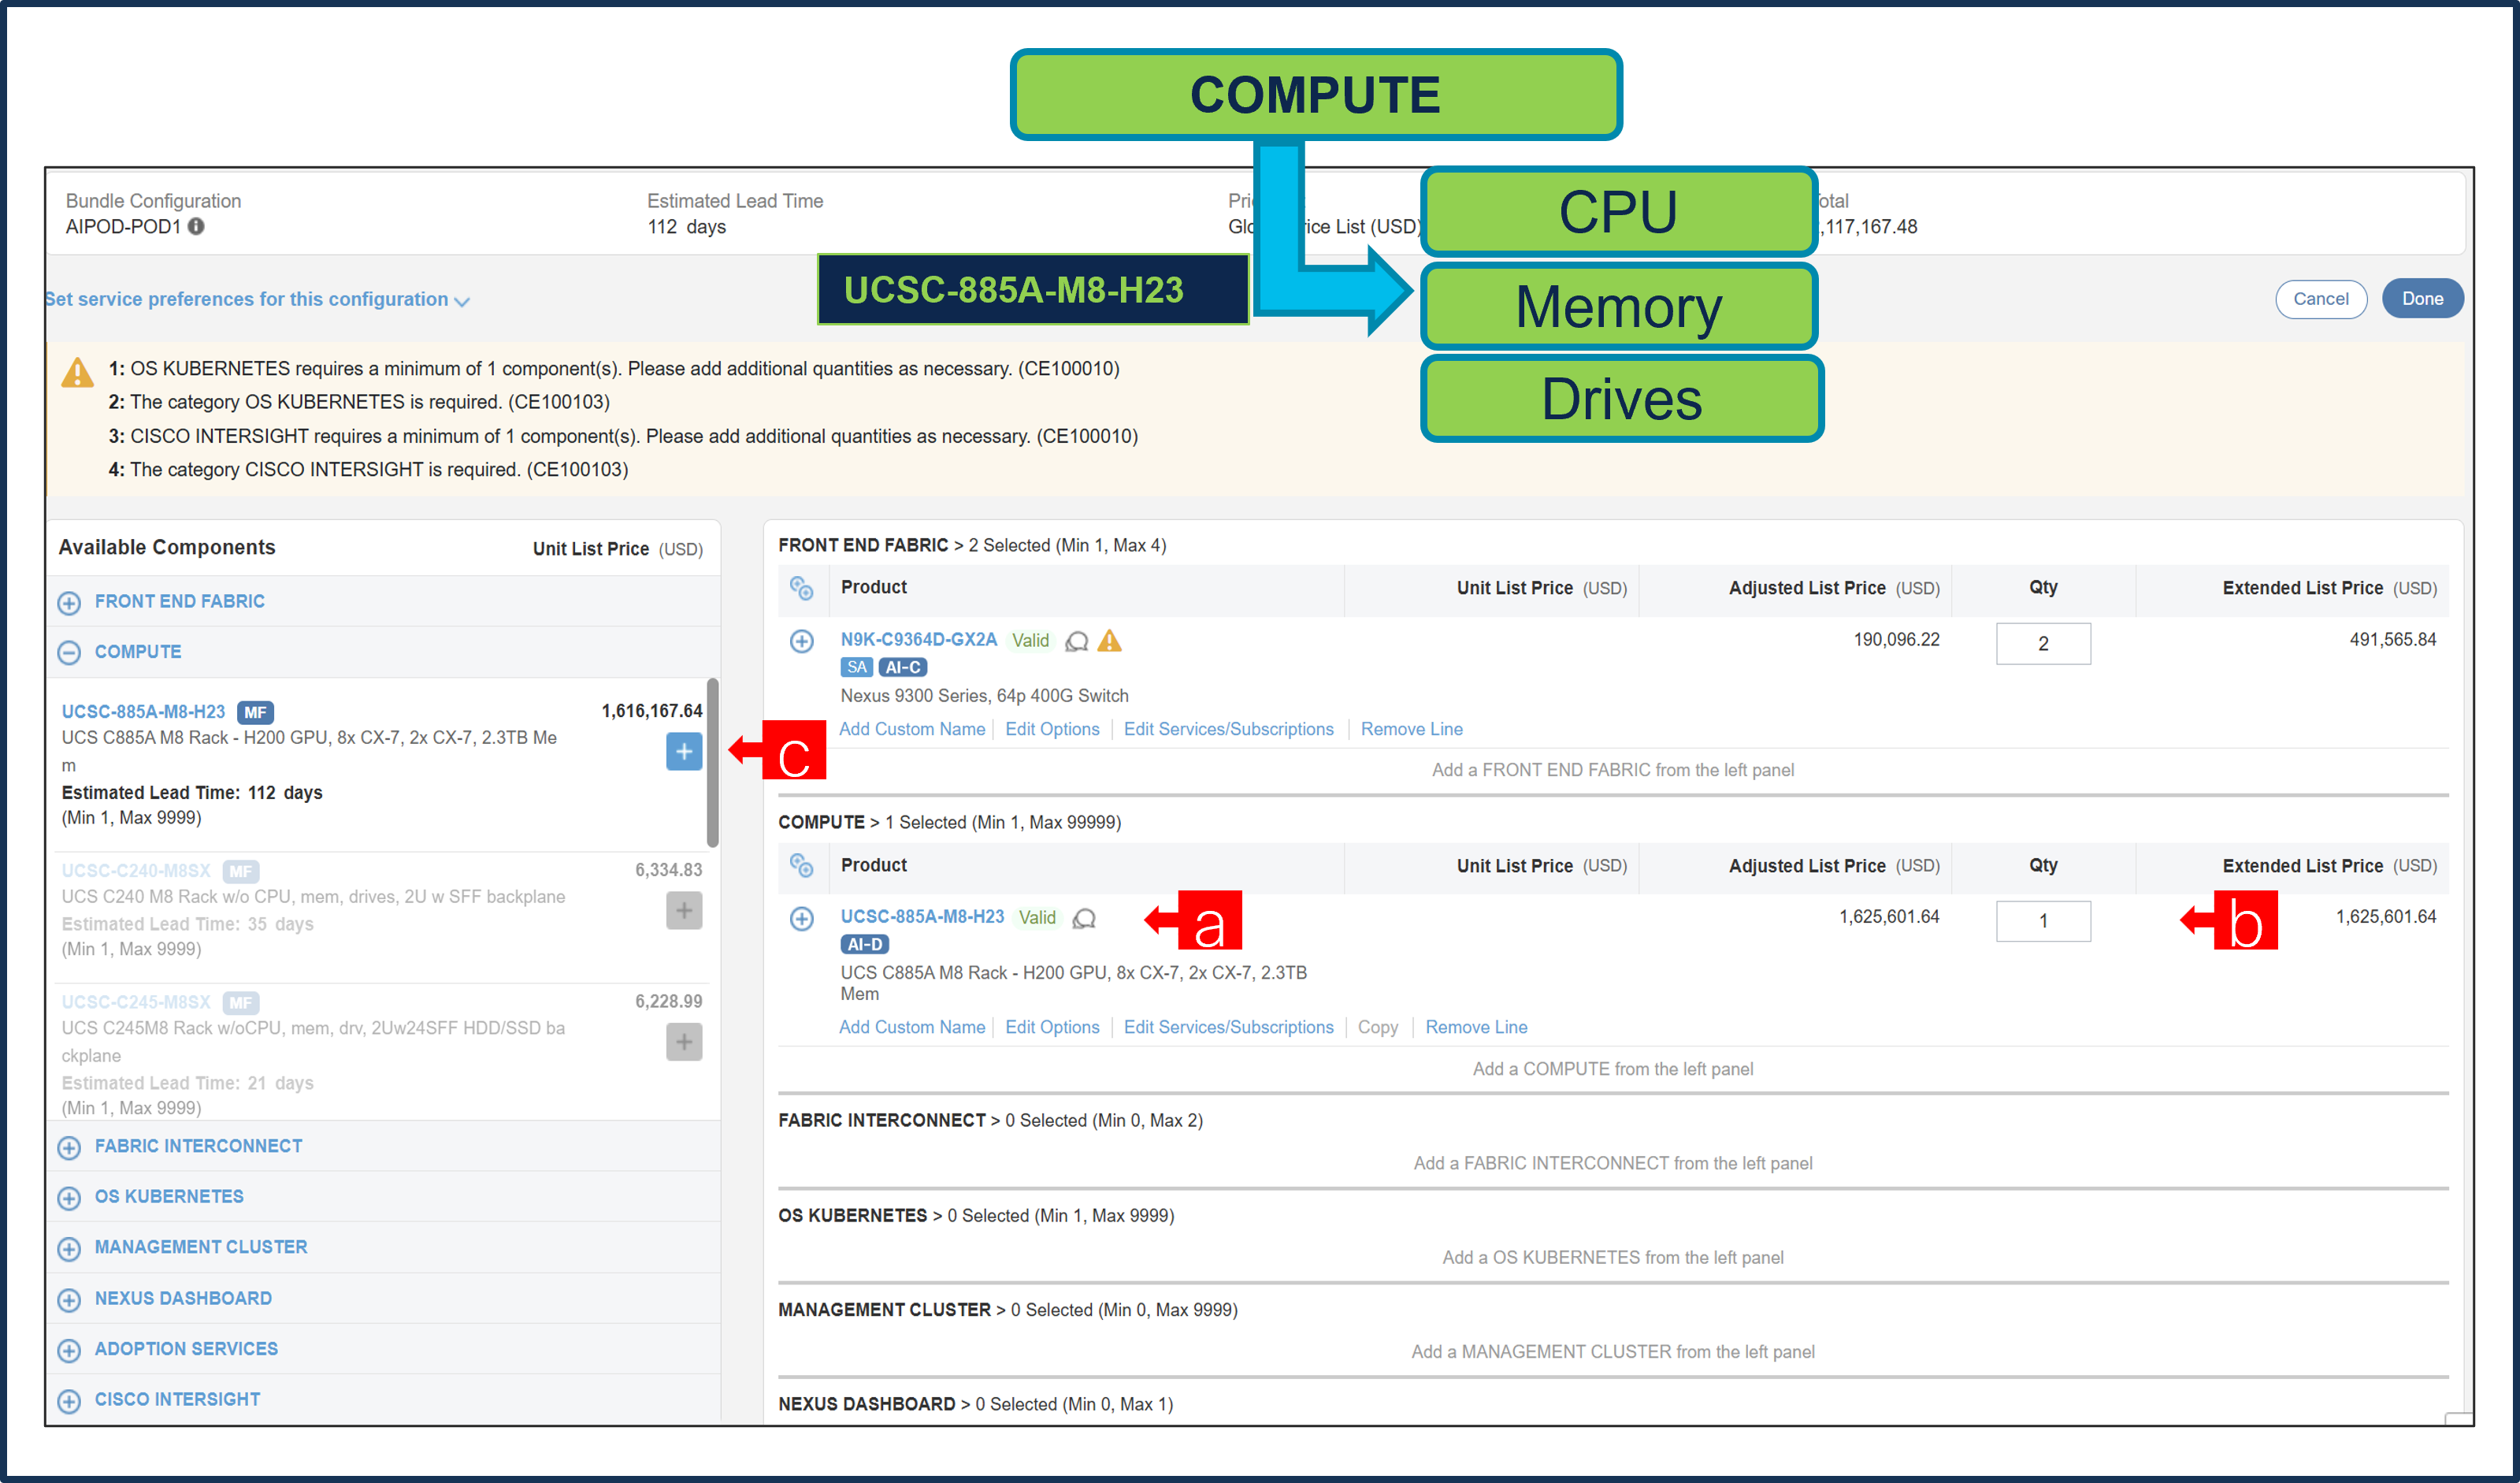
a. Note the status is now “Valid”
b. Increase the quantity for multiples of same configuration.
c. Click the “Plus” to add and configure the same product with different option/quantities. Mixing of Servers are not allowed.
Step 13.
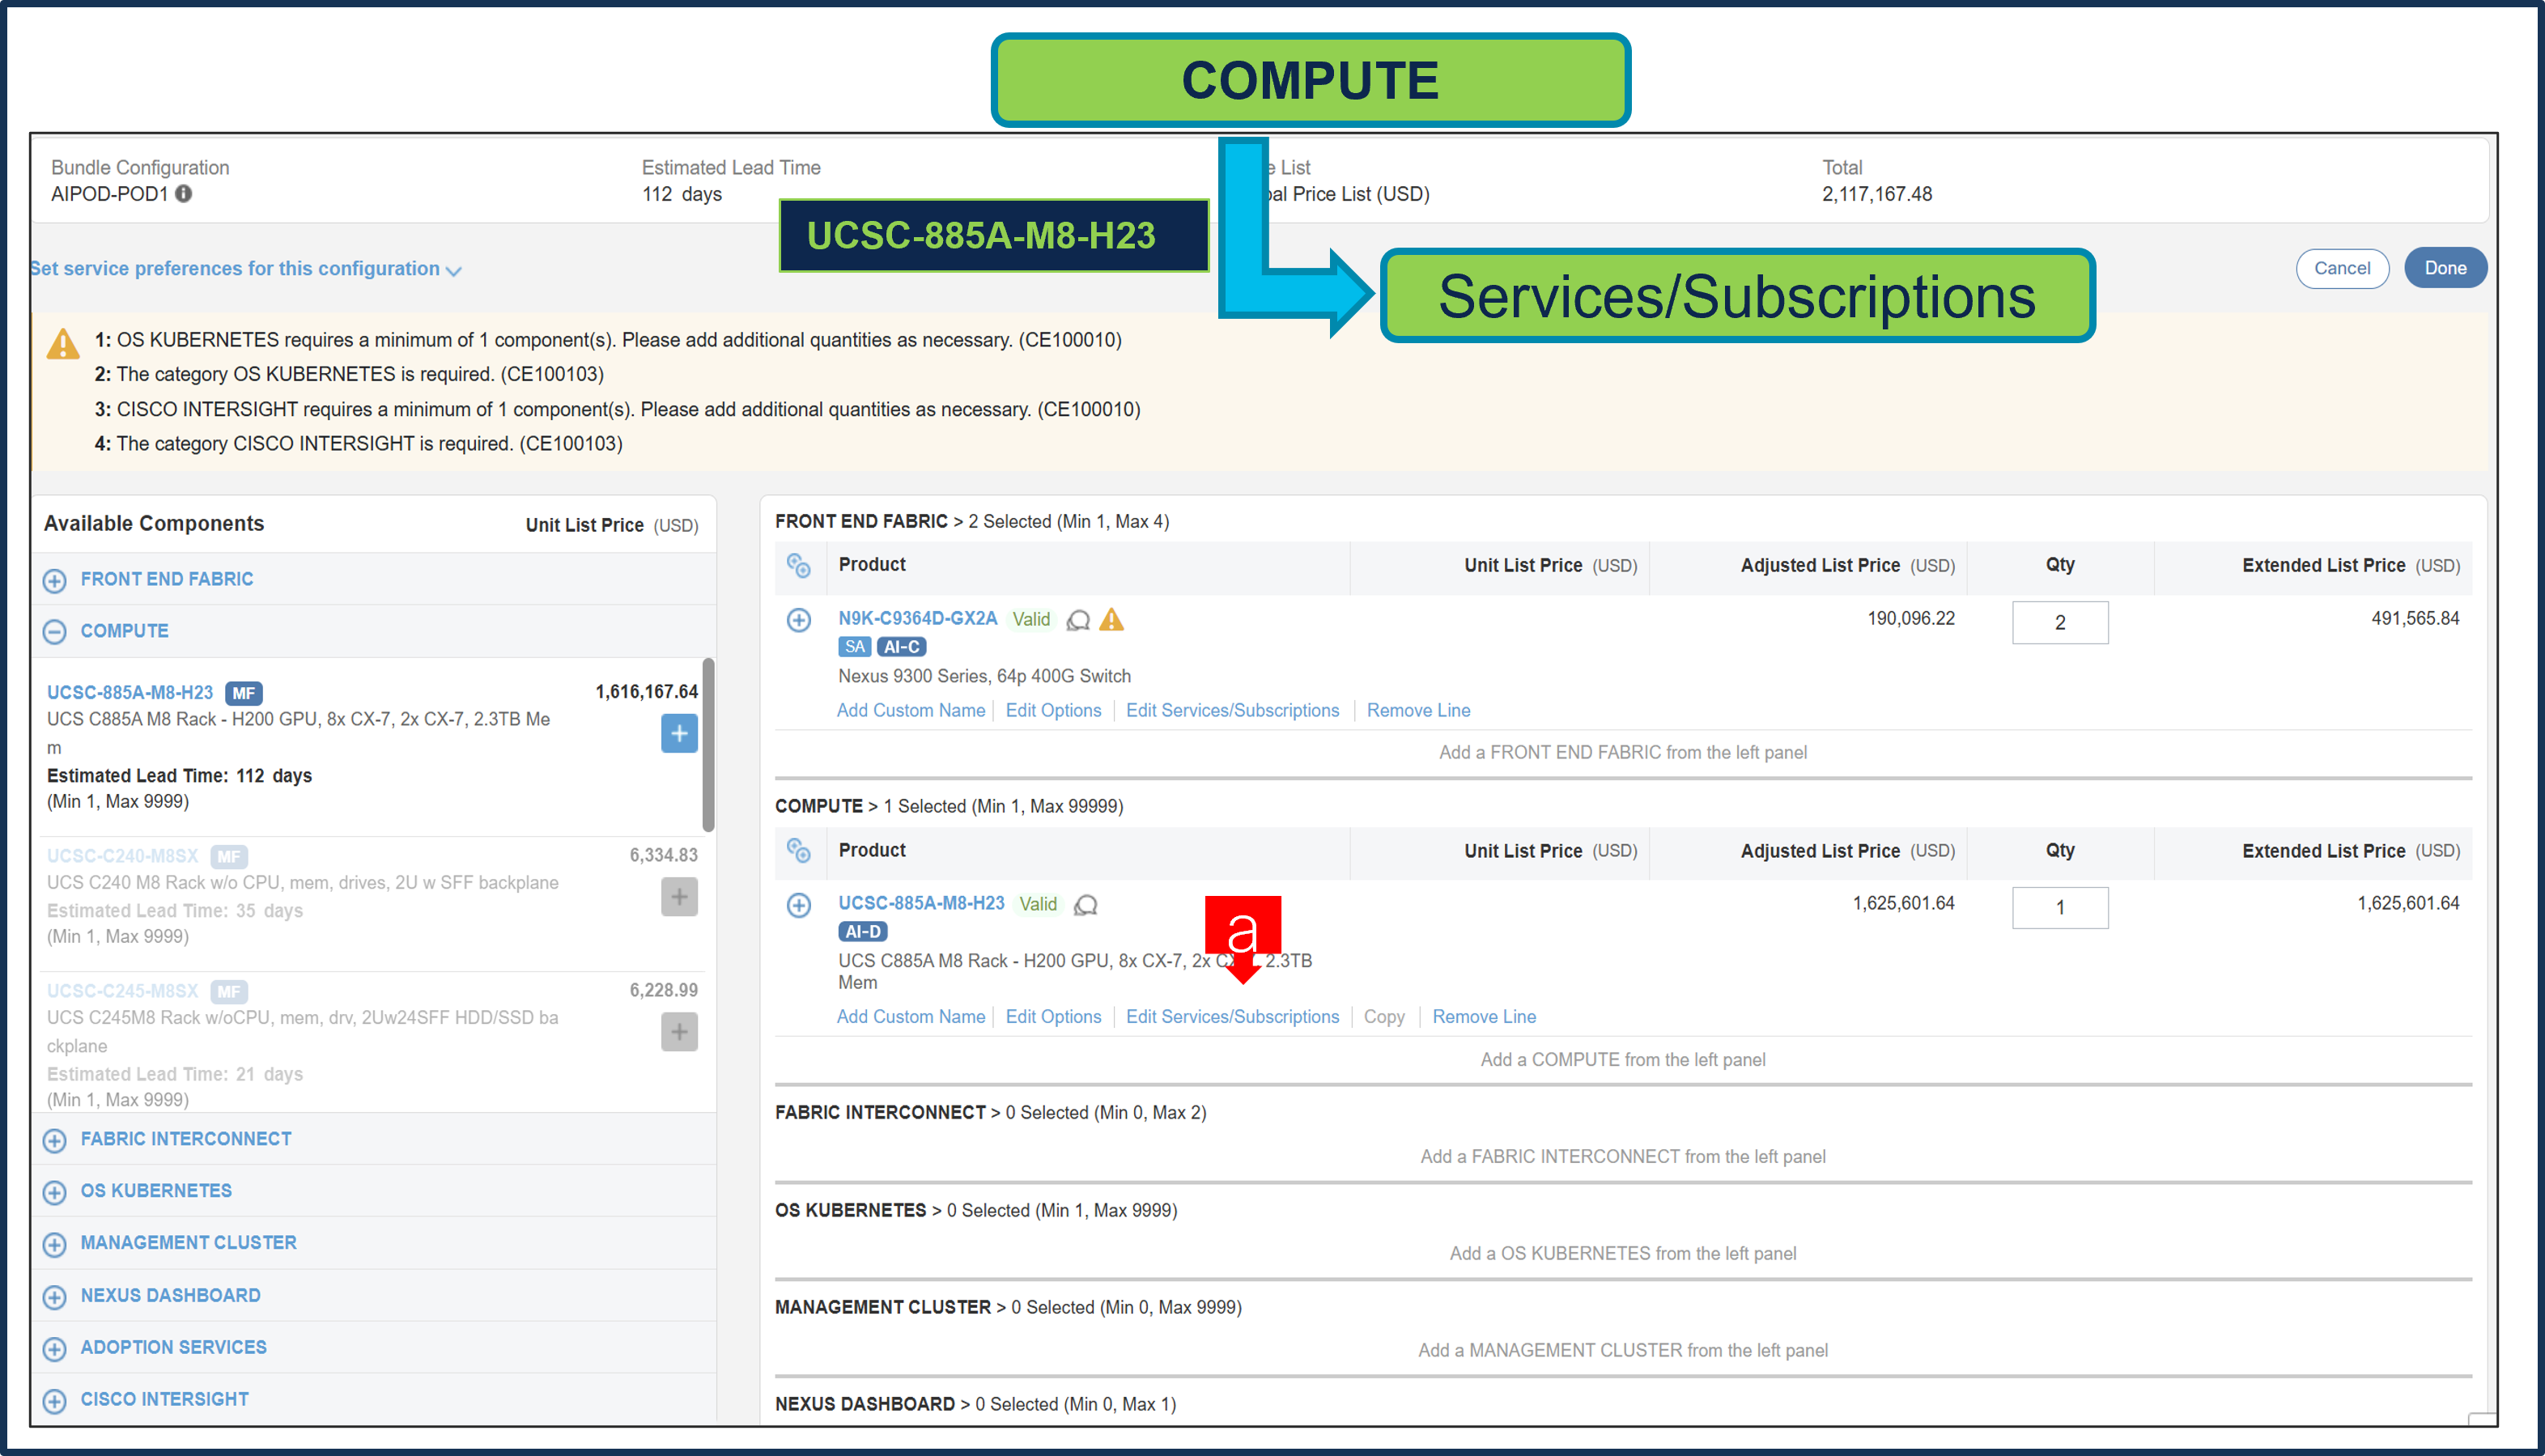
a. Click on “Edit Services/Subscriptions” to edit Term Duration for HW Support.
Note: It is recommended that Term Duration for HW Support must align with Software Subscription Duration.
Step 14.
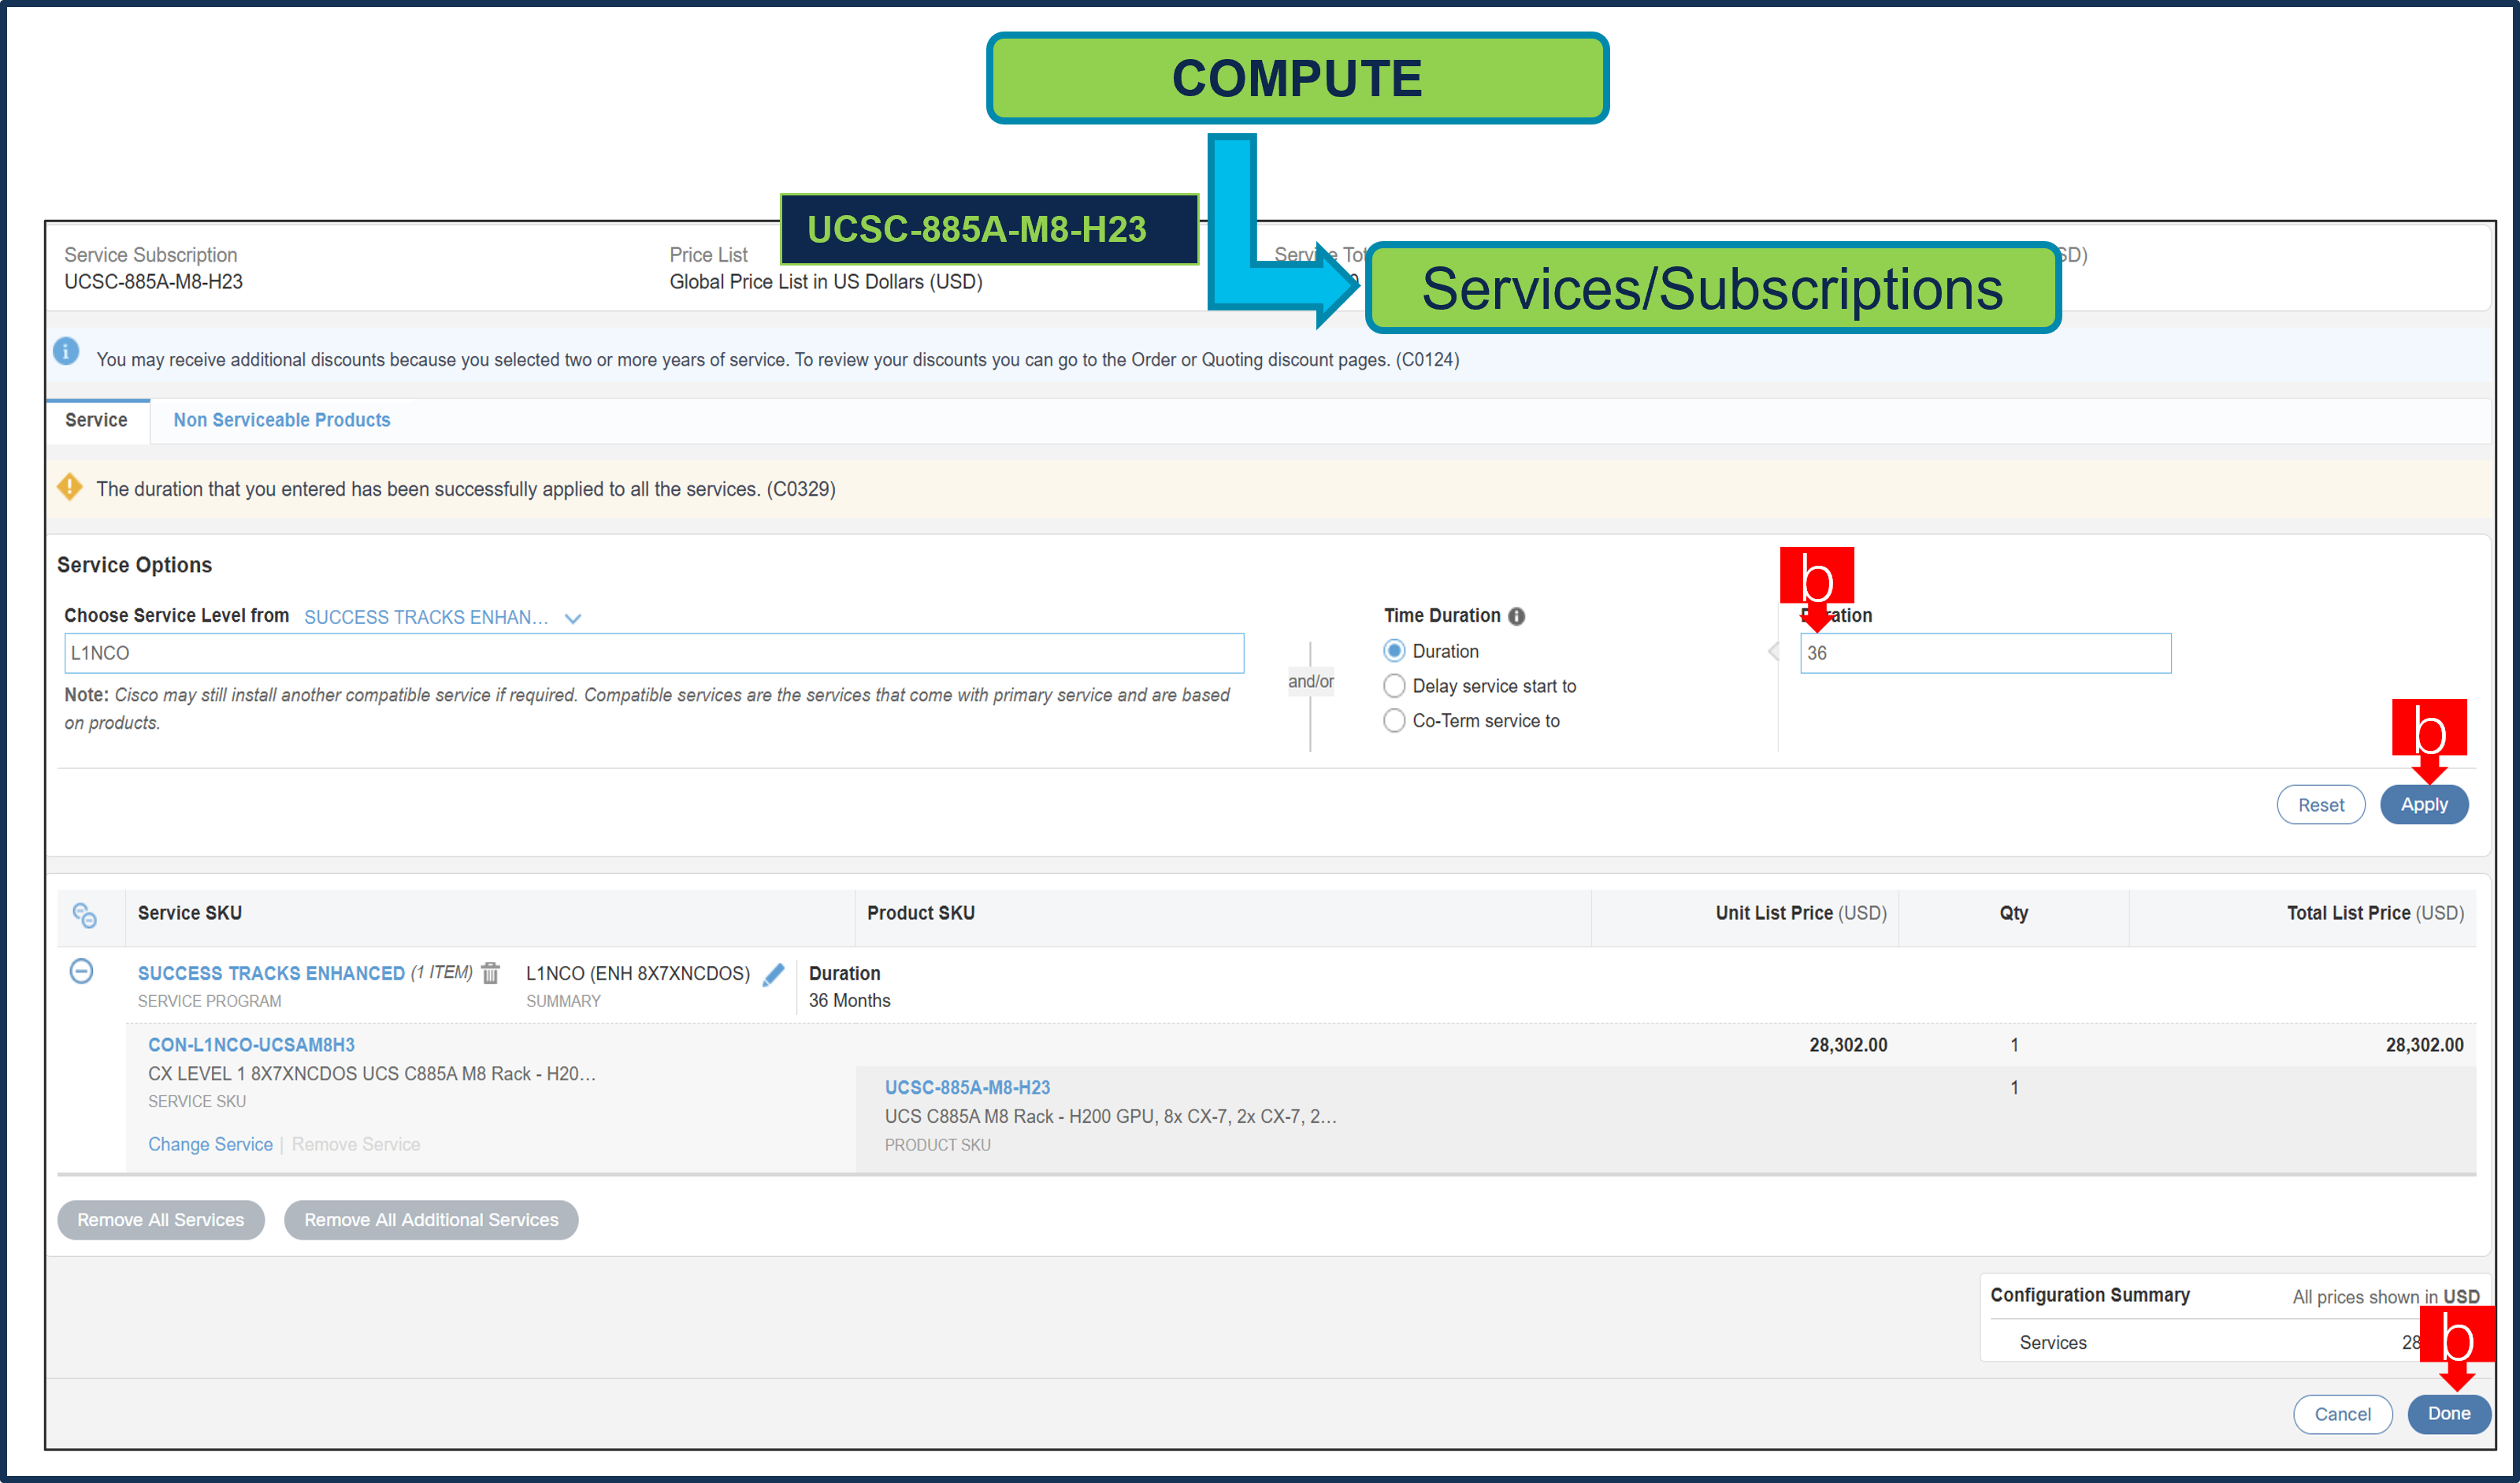
a. It is recommended that Customer selects CX Success Track Level 1 or Level 2 or Solution Support to ensure consistent SLA response time between Hardware and Software.
b. Enter the Term Duration, Click on “Apply” and “Done”
Step 15.
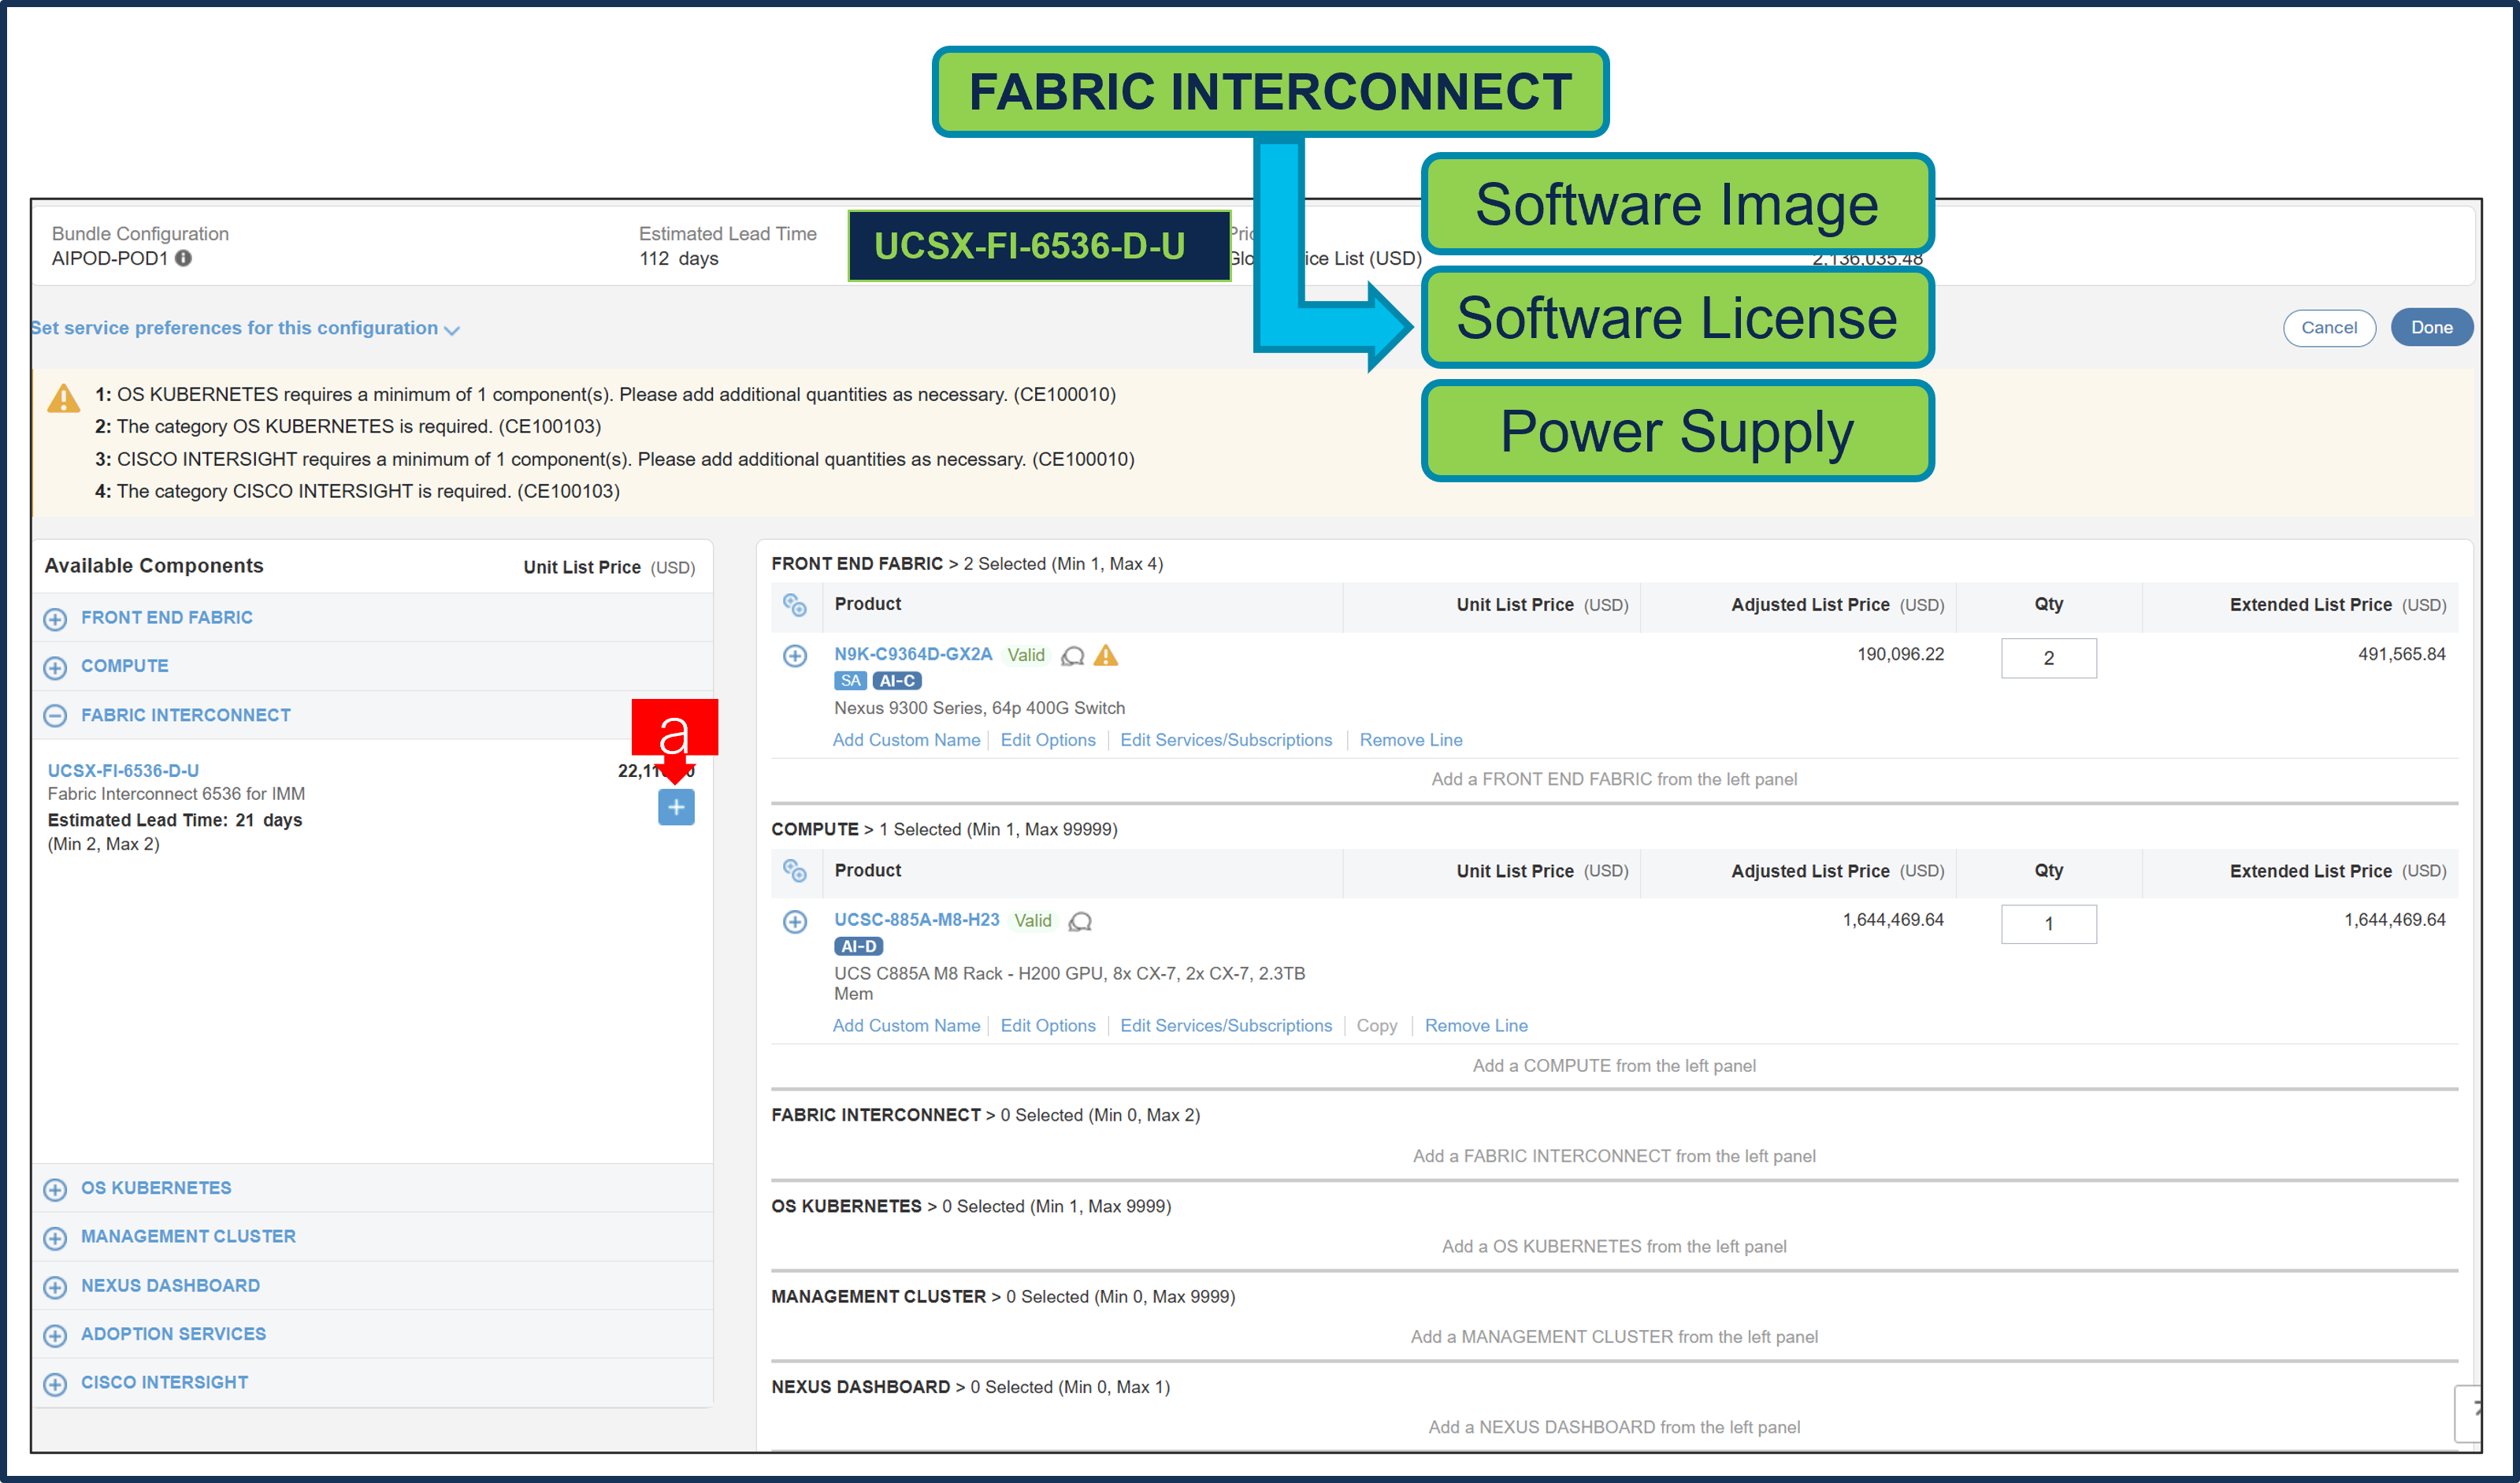
a. Fabric Interconnect Category is an optional selection and can be selected by clicking the “PLUS”
Step 16.
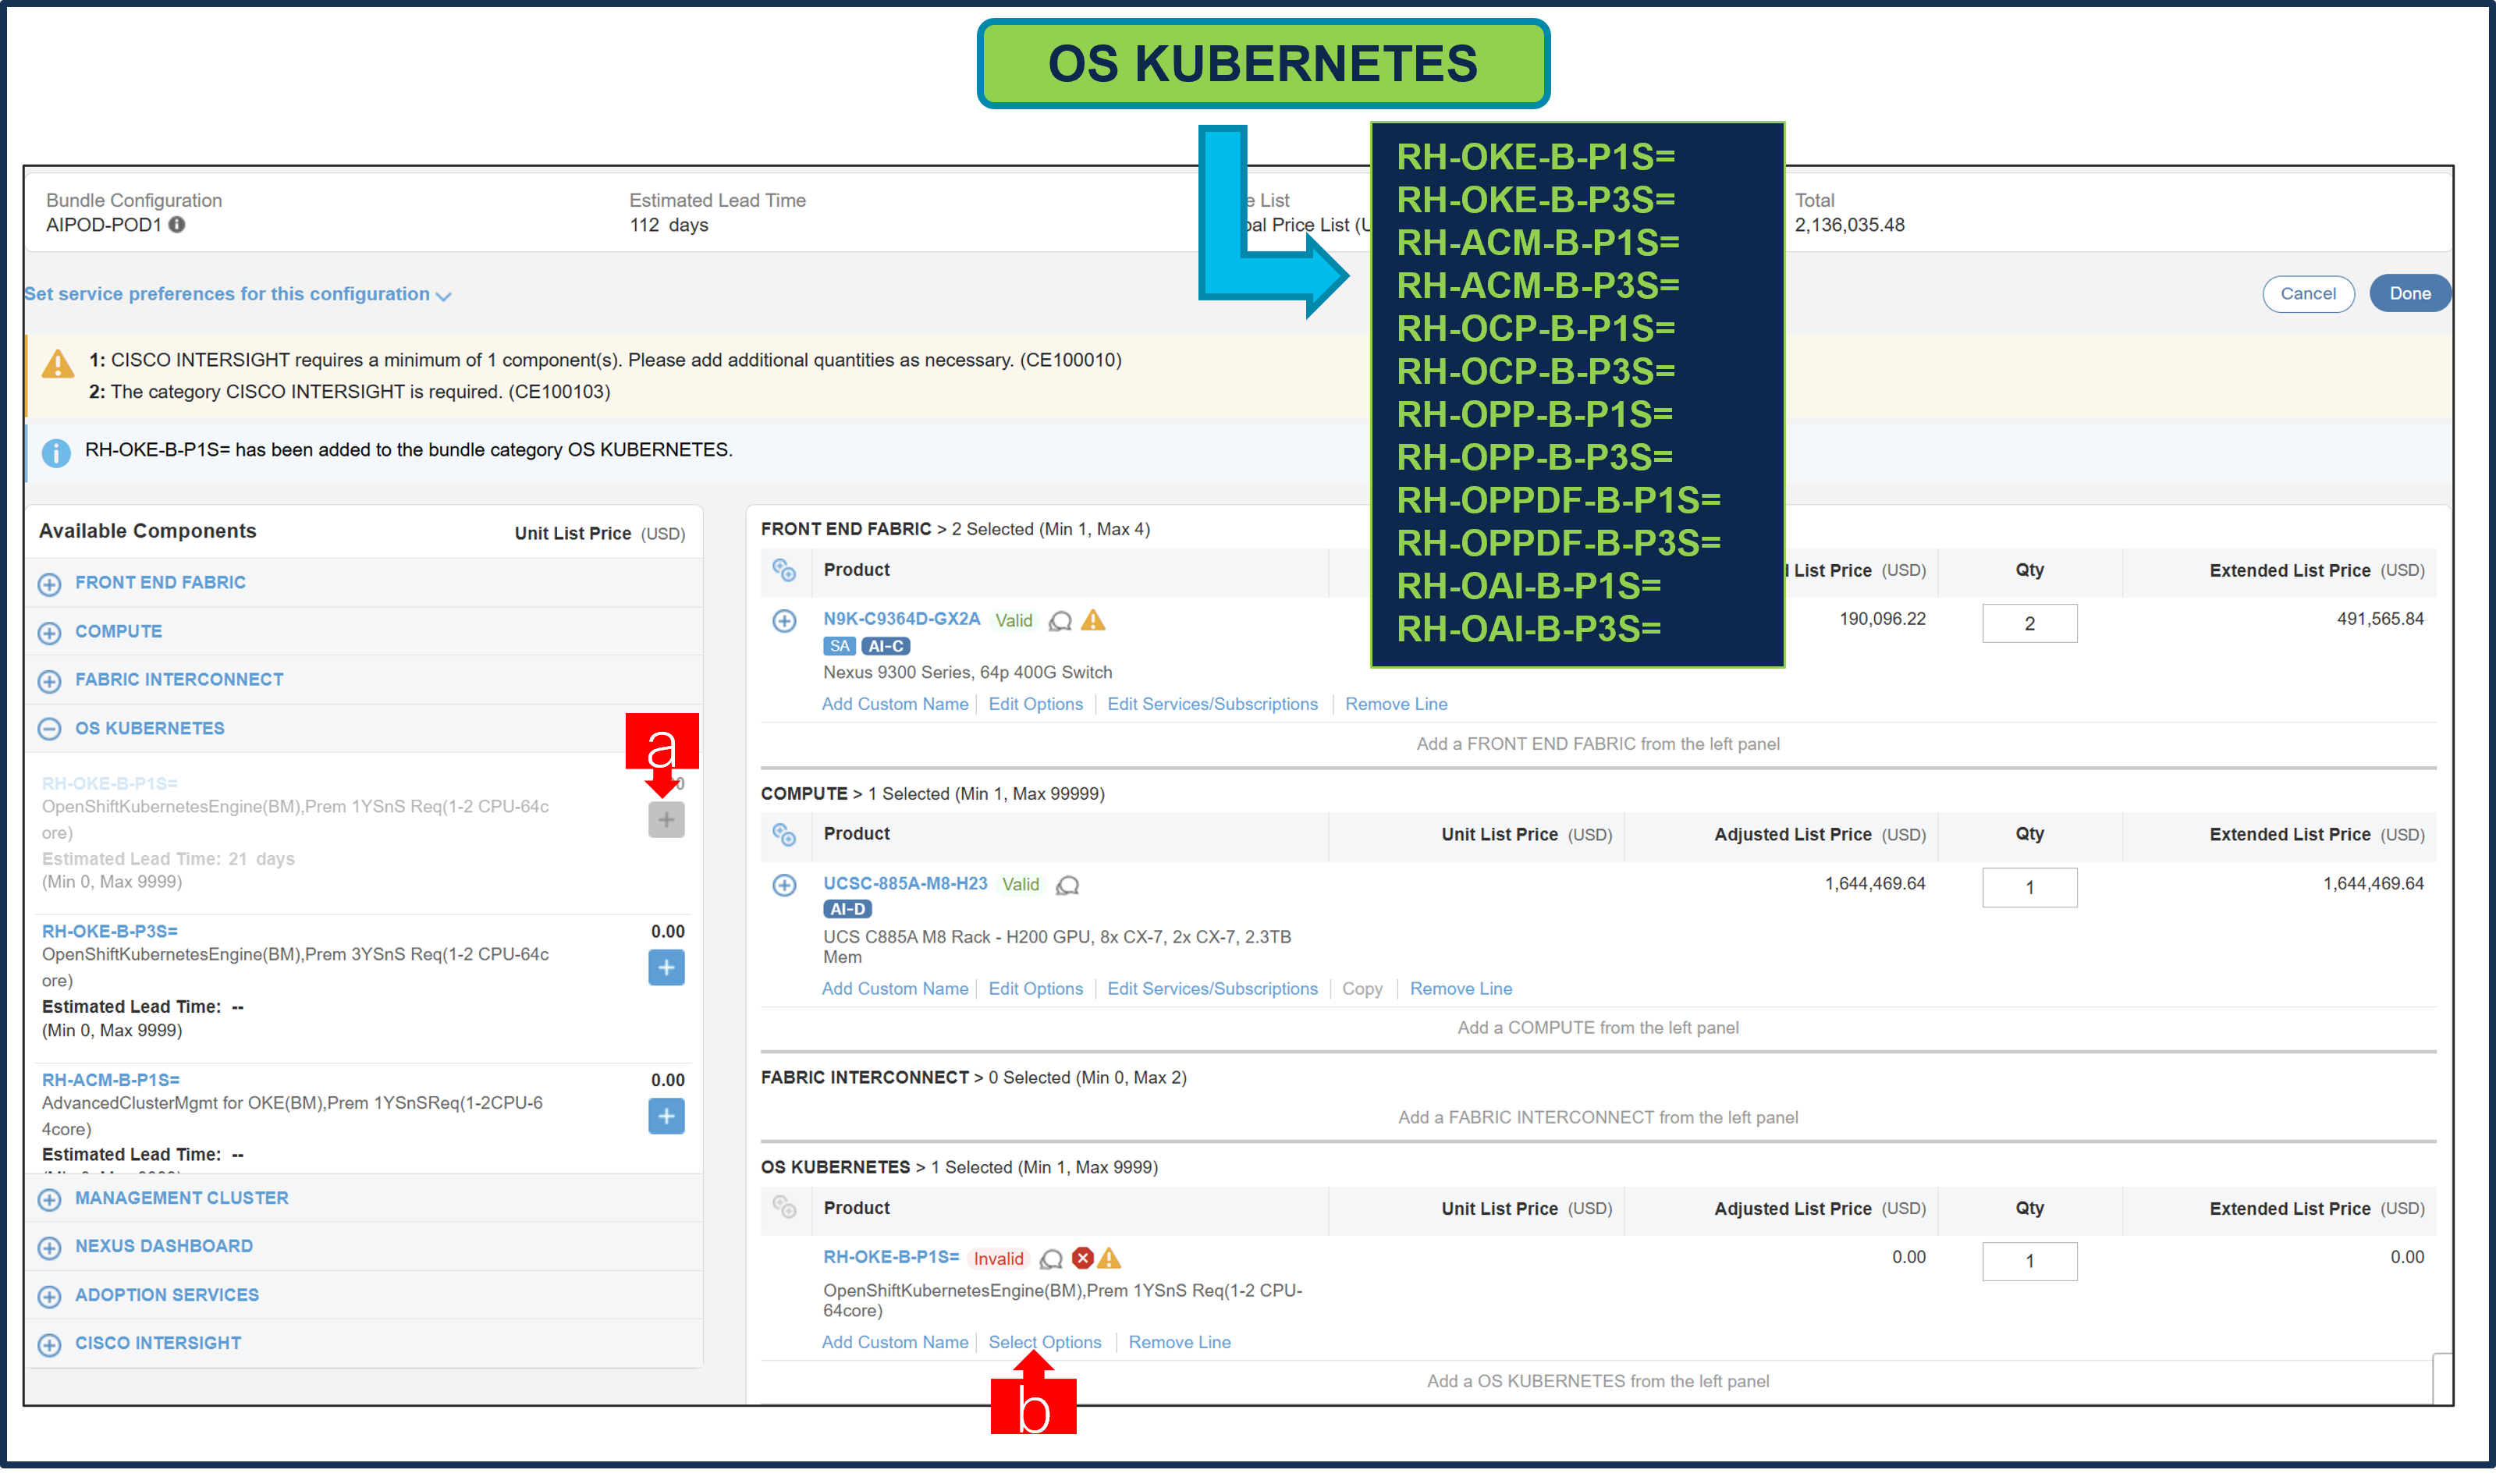
a. Please select appropriate QTY of RedHat OpenShift License from OS KUBERNETES Category.
b. Click on Select Options to Configure.
Step 17.

a. MANAGEMENT CLUSTER Category is an optional selection and can be selected by clicking the “PLUS”
Step 18.
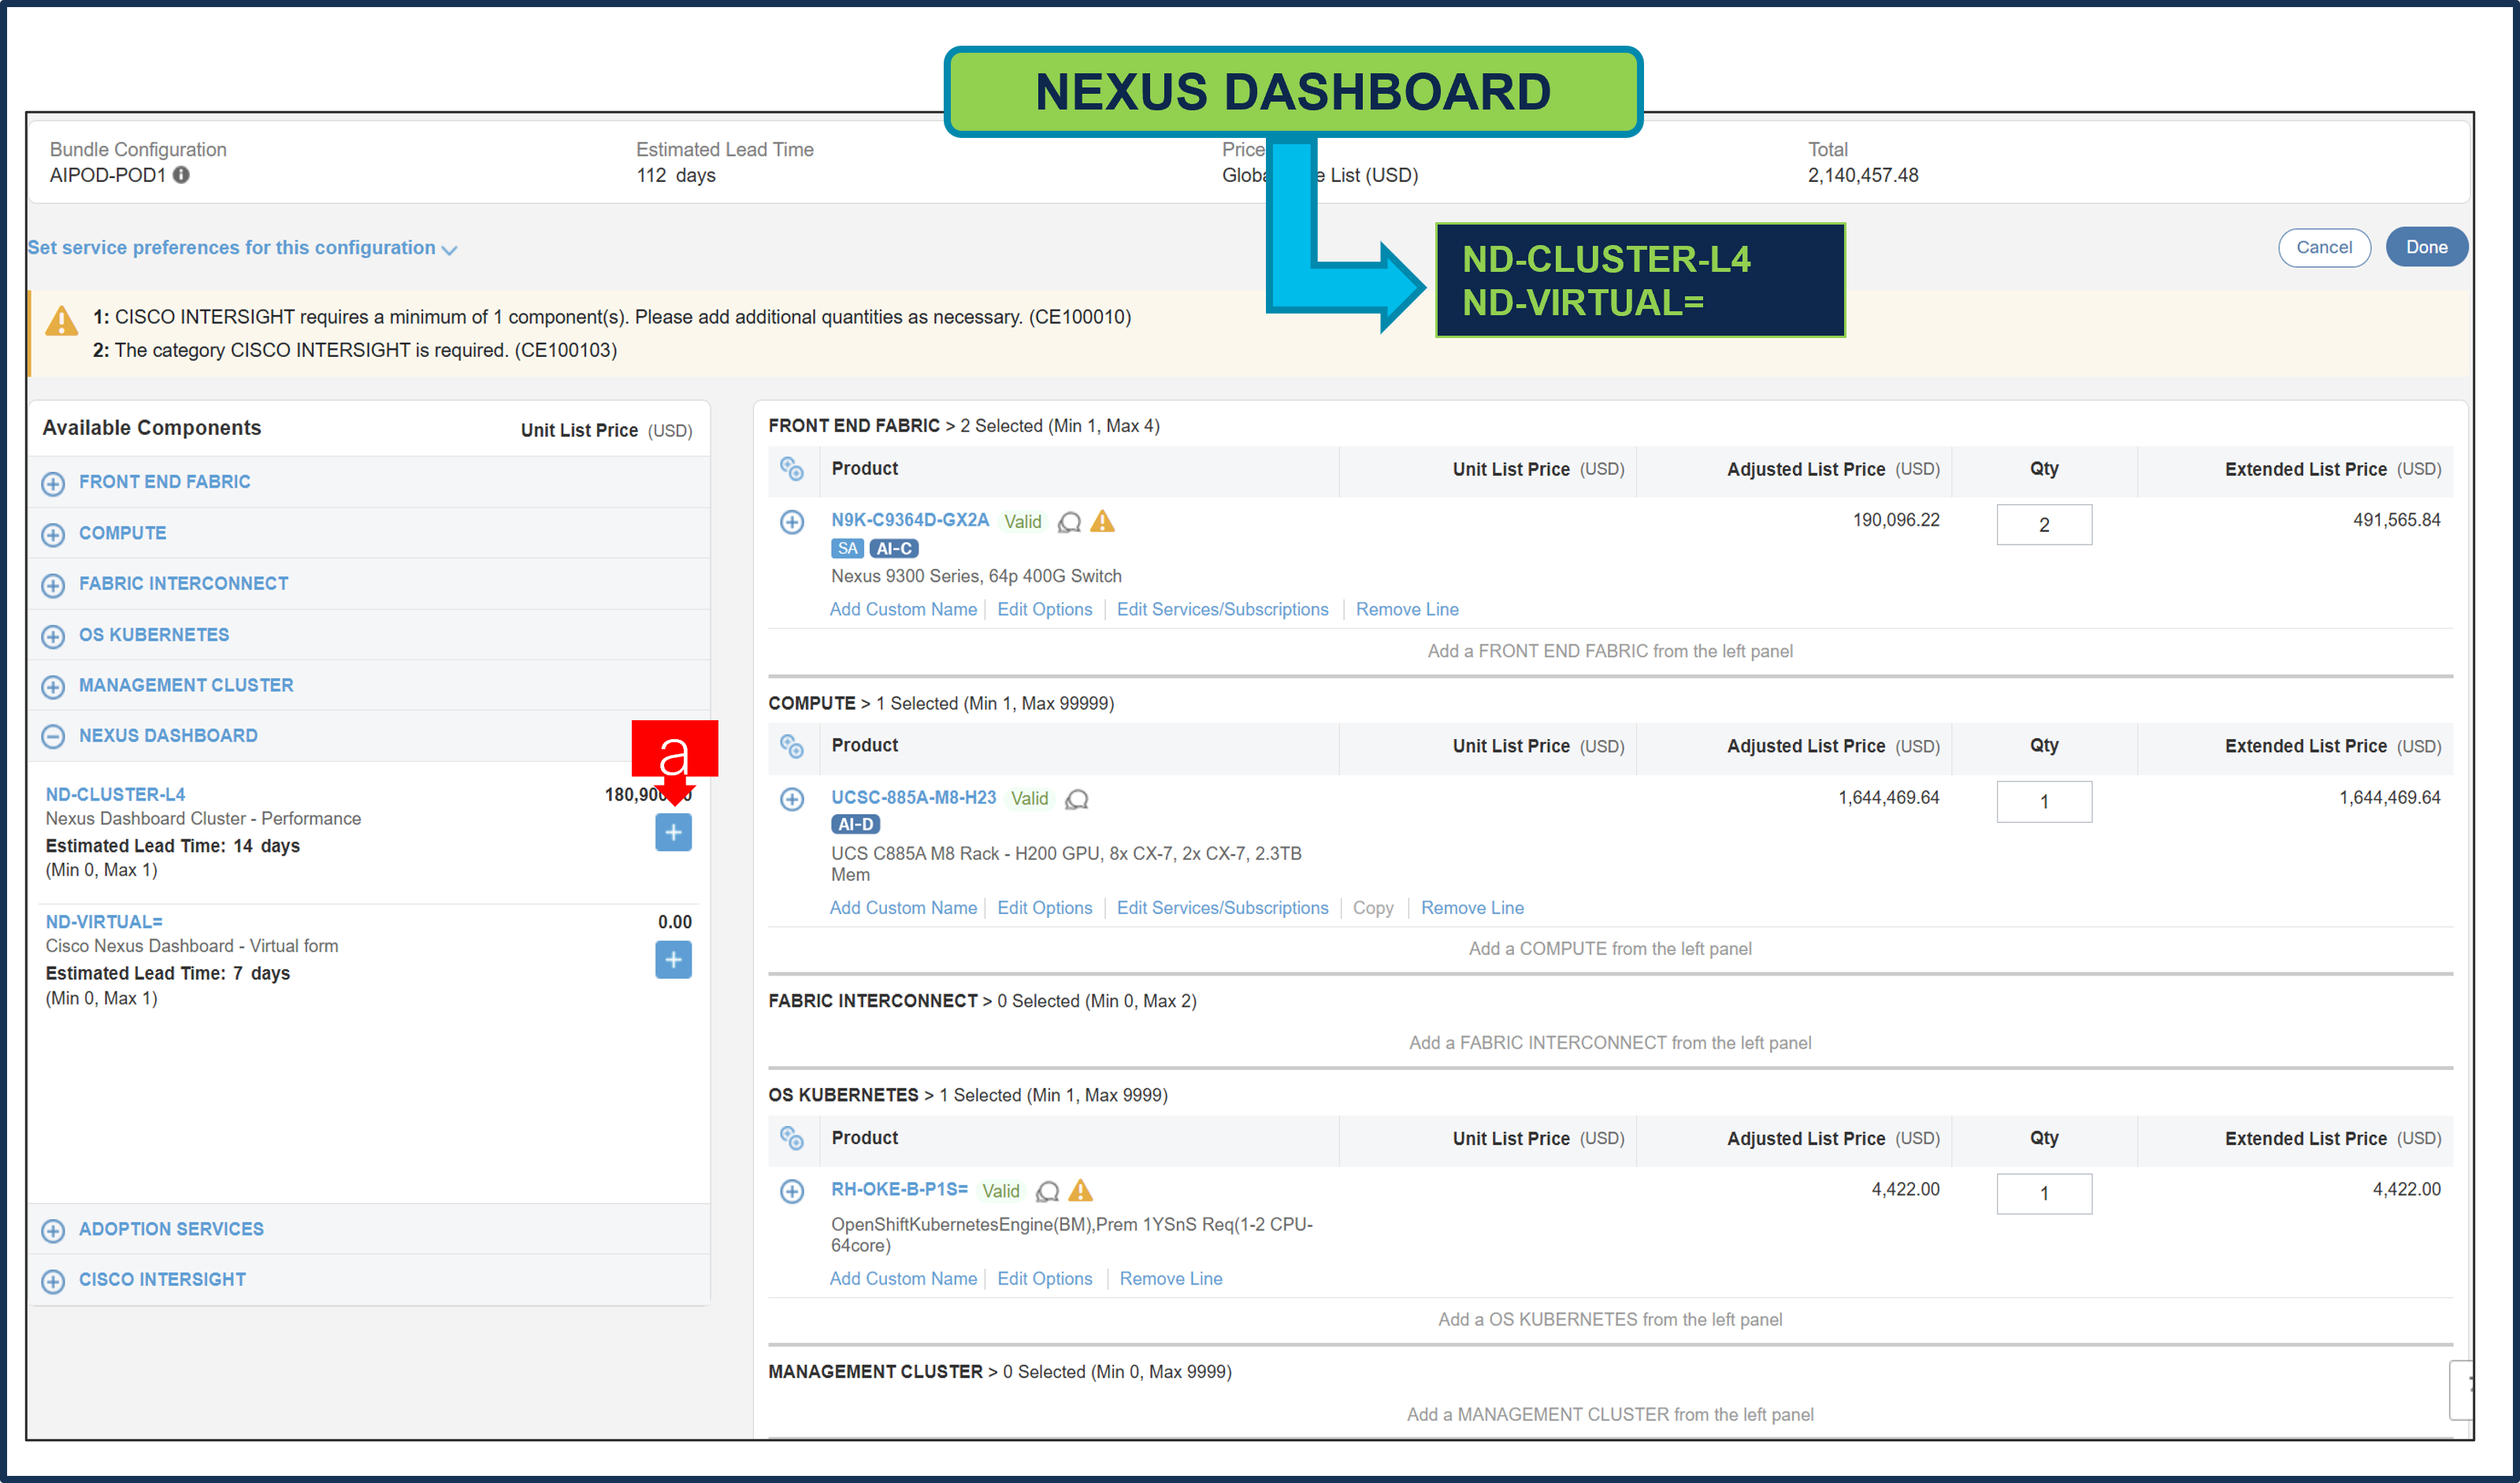
a. NEXUS DASHBOARD Category is an optional selection and can be selected by clicking the “PLUS”
Step 19.
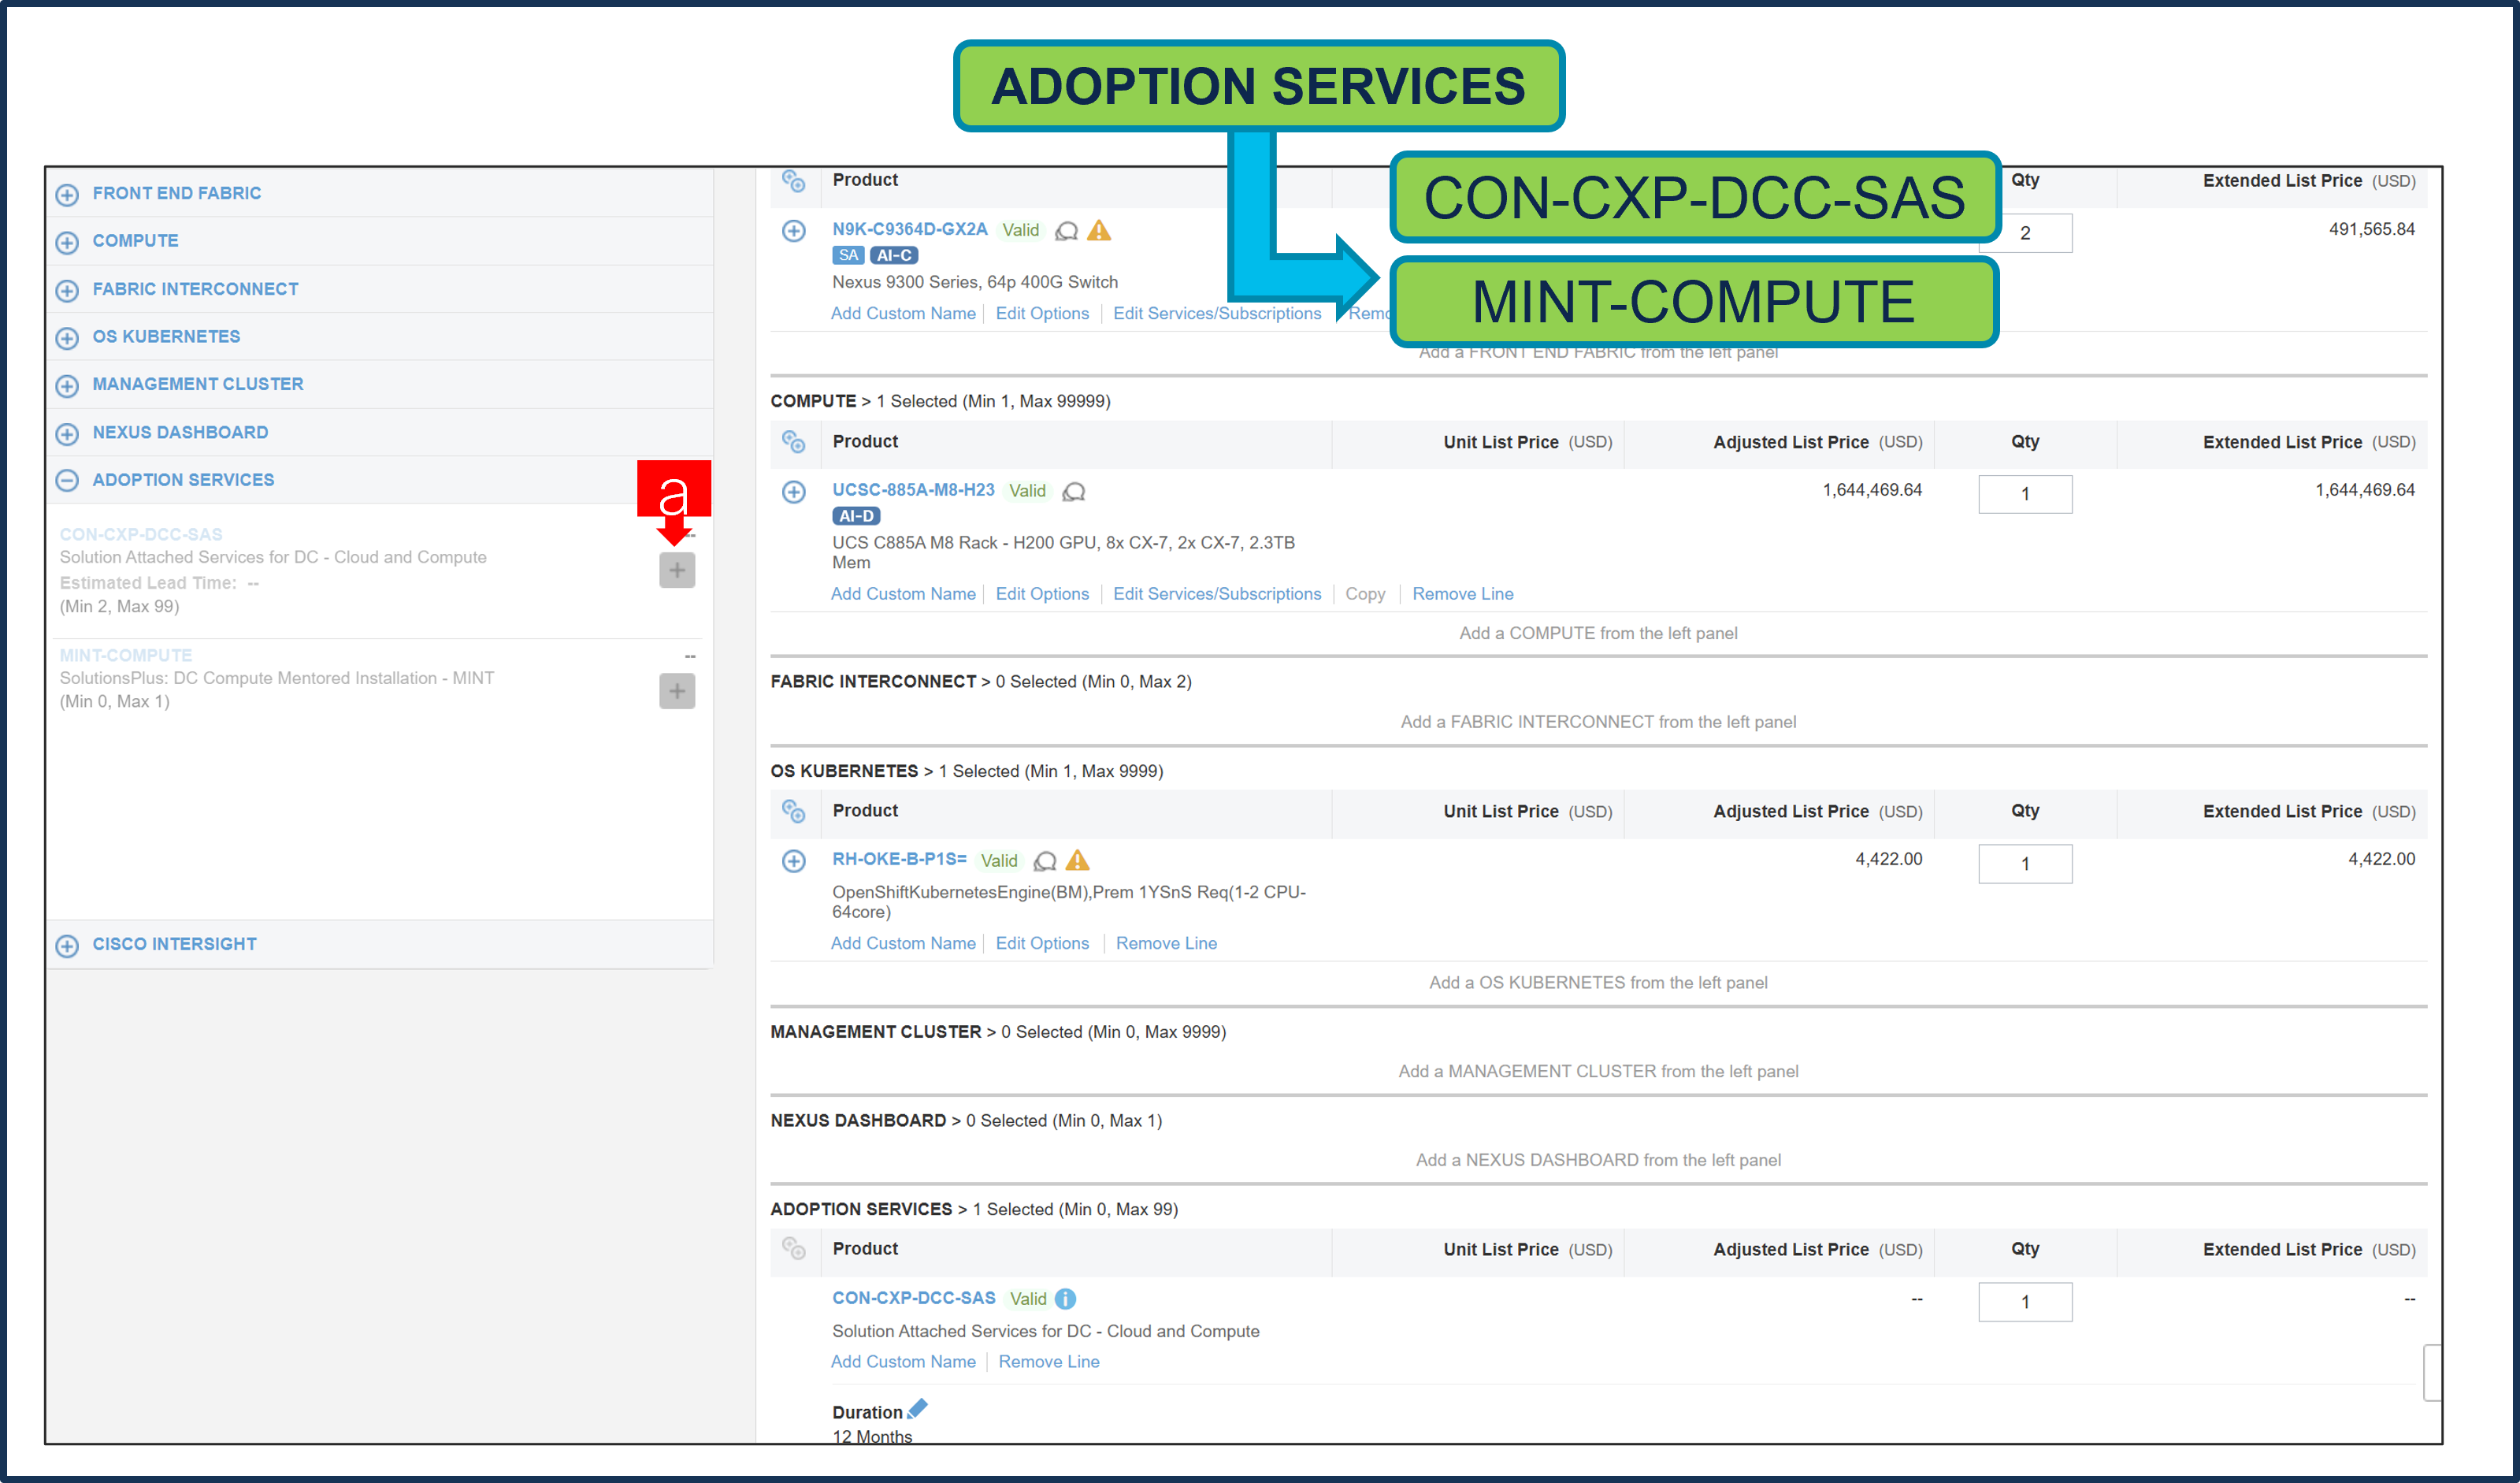
a. Please select at least one option from the ADOPTION SERVICES Category. Users can select either Cisco CX Service or MINT Services or can optout.
Step 20.
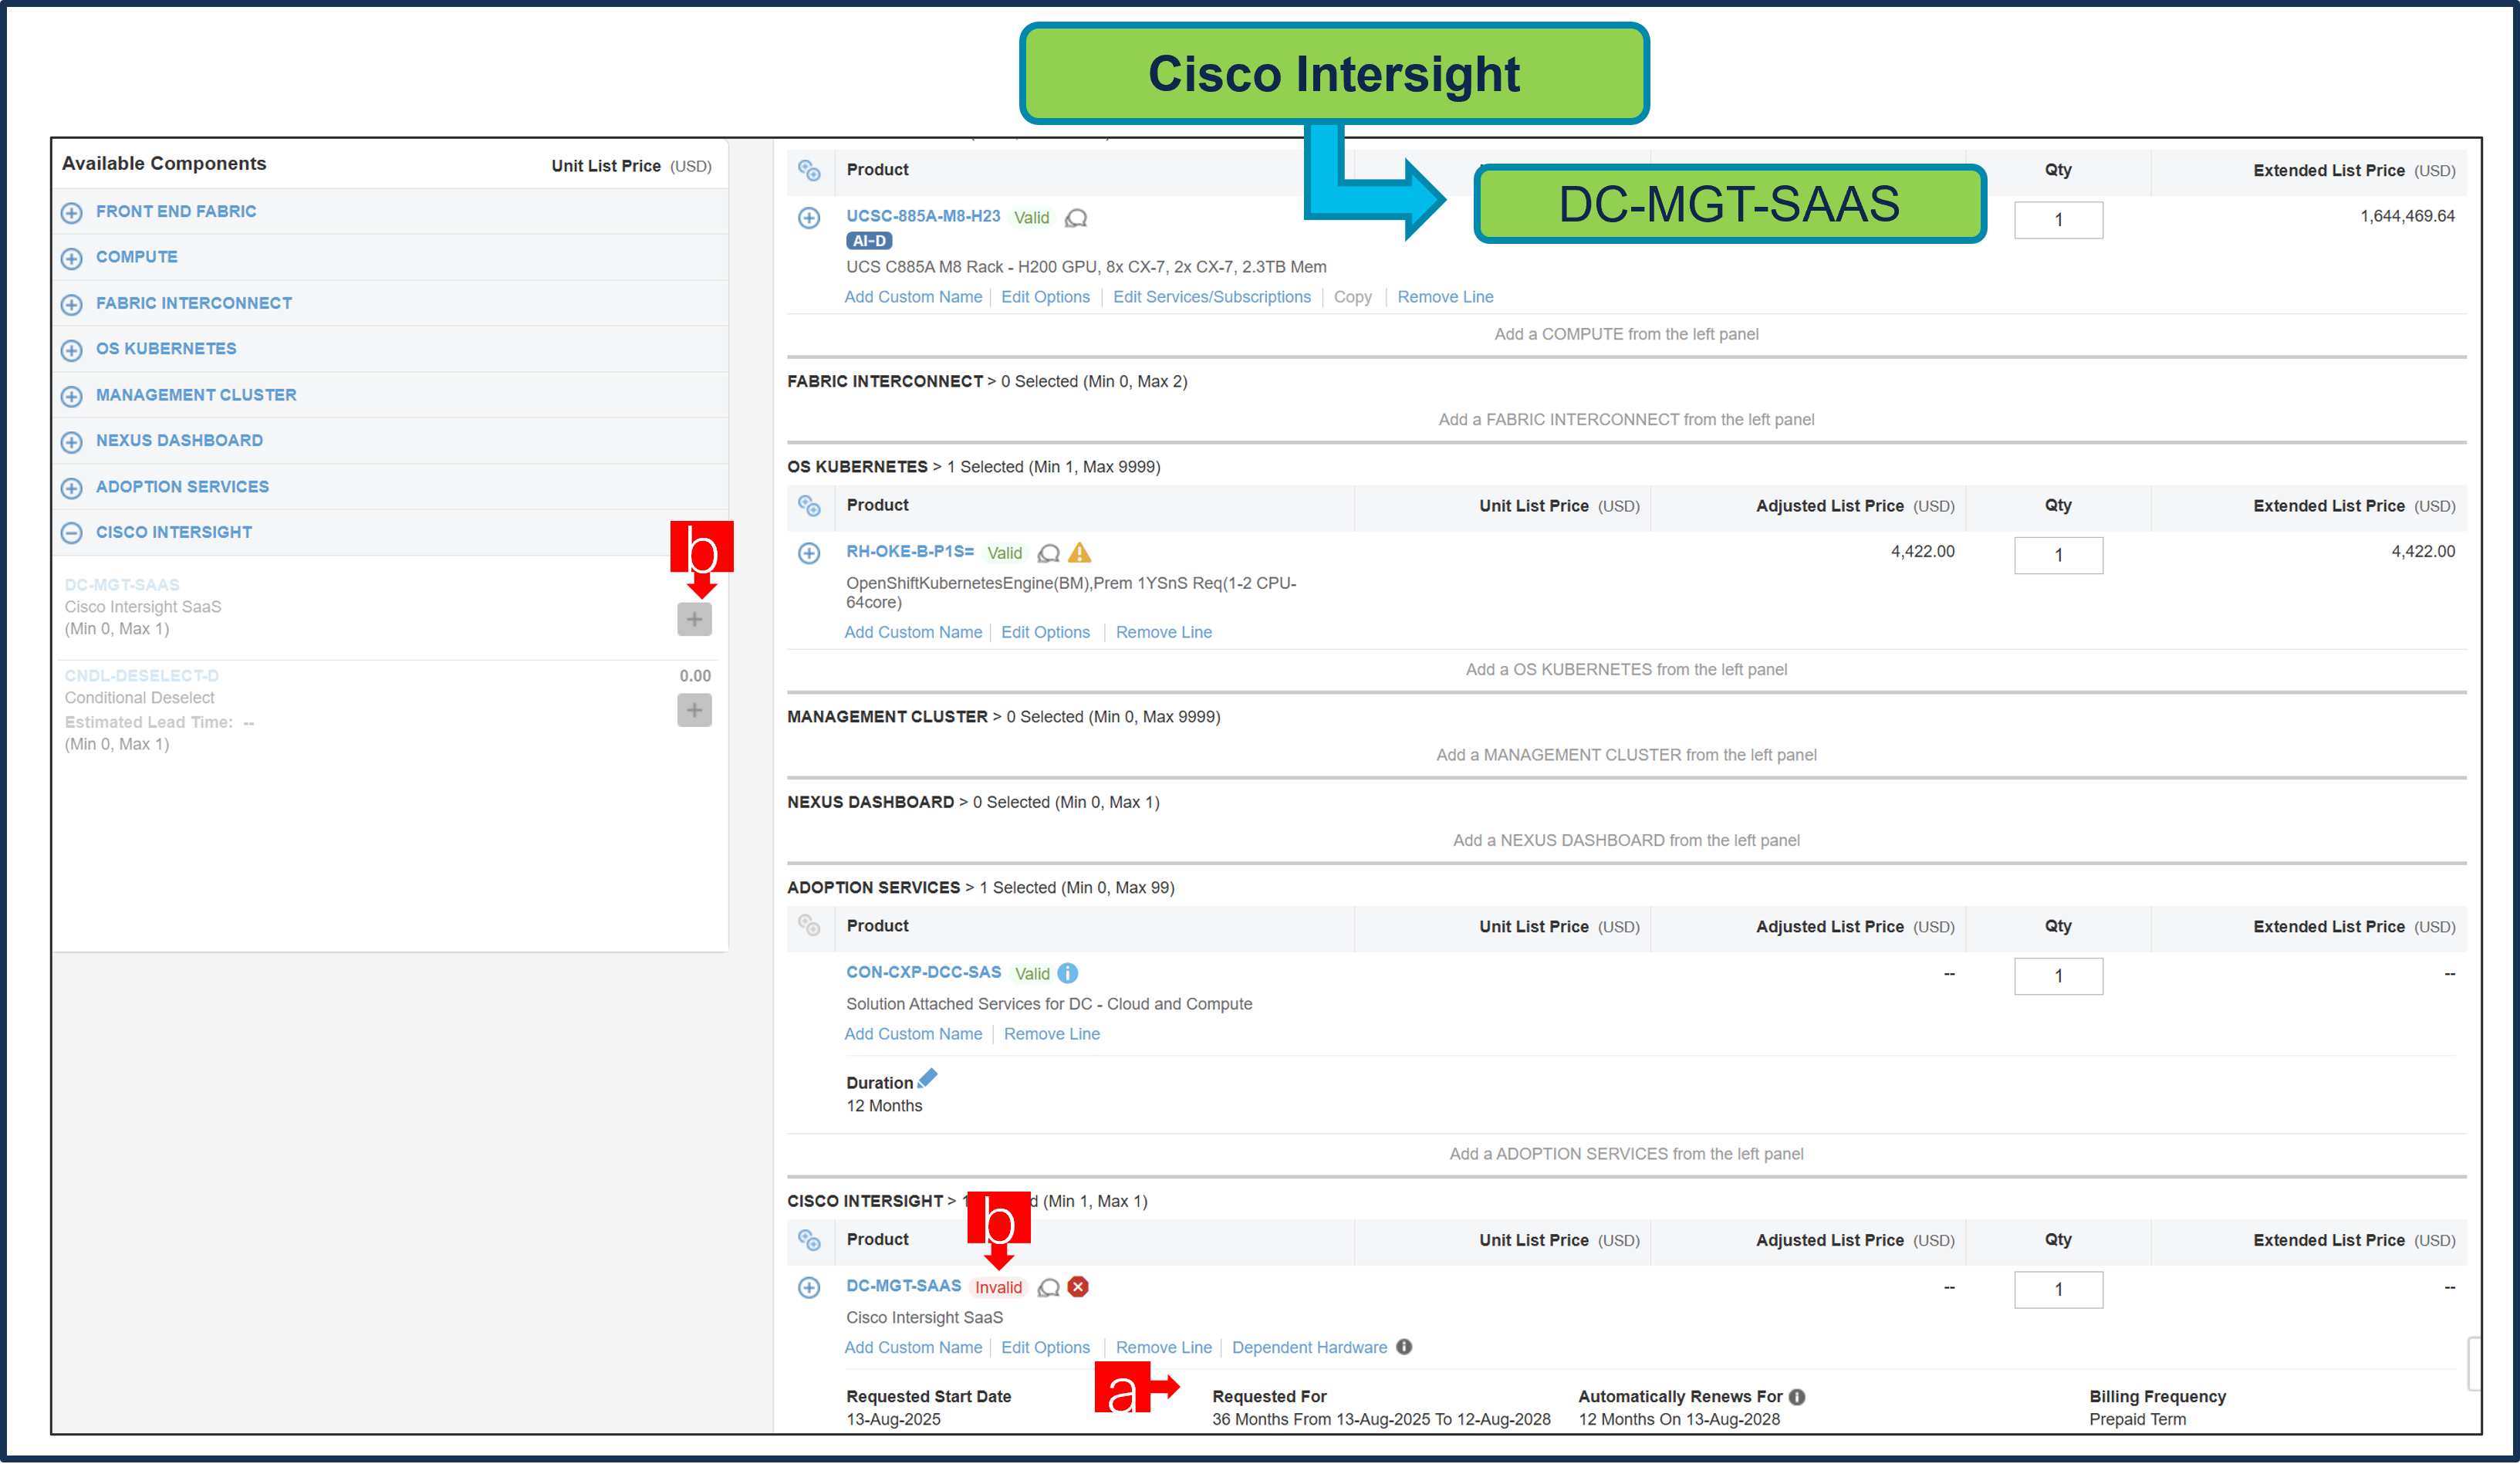
a. It is recommended that Term Duration for HW Support align with Software Subscription Duration.
b. Intersight is a required selection, if you have not previously purchased Cisco Intersight Software. Please make selection by clicking “PLUS”. Click on Edit Options to configure.
Step 21.
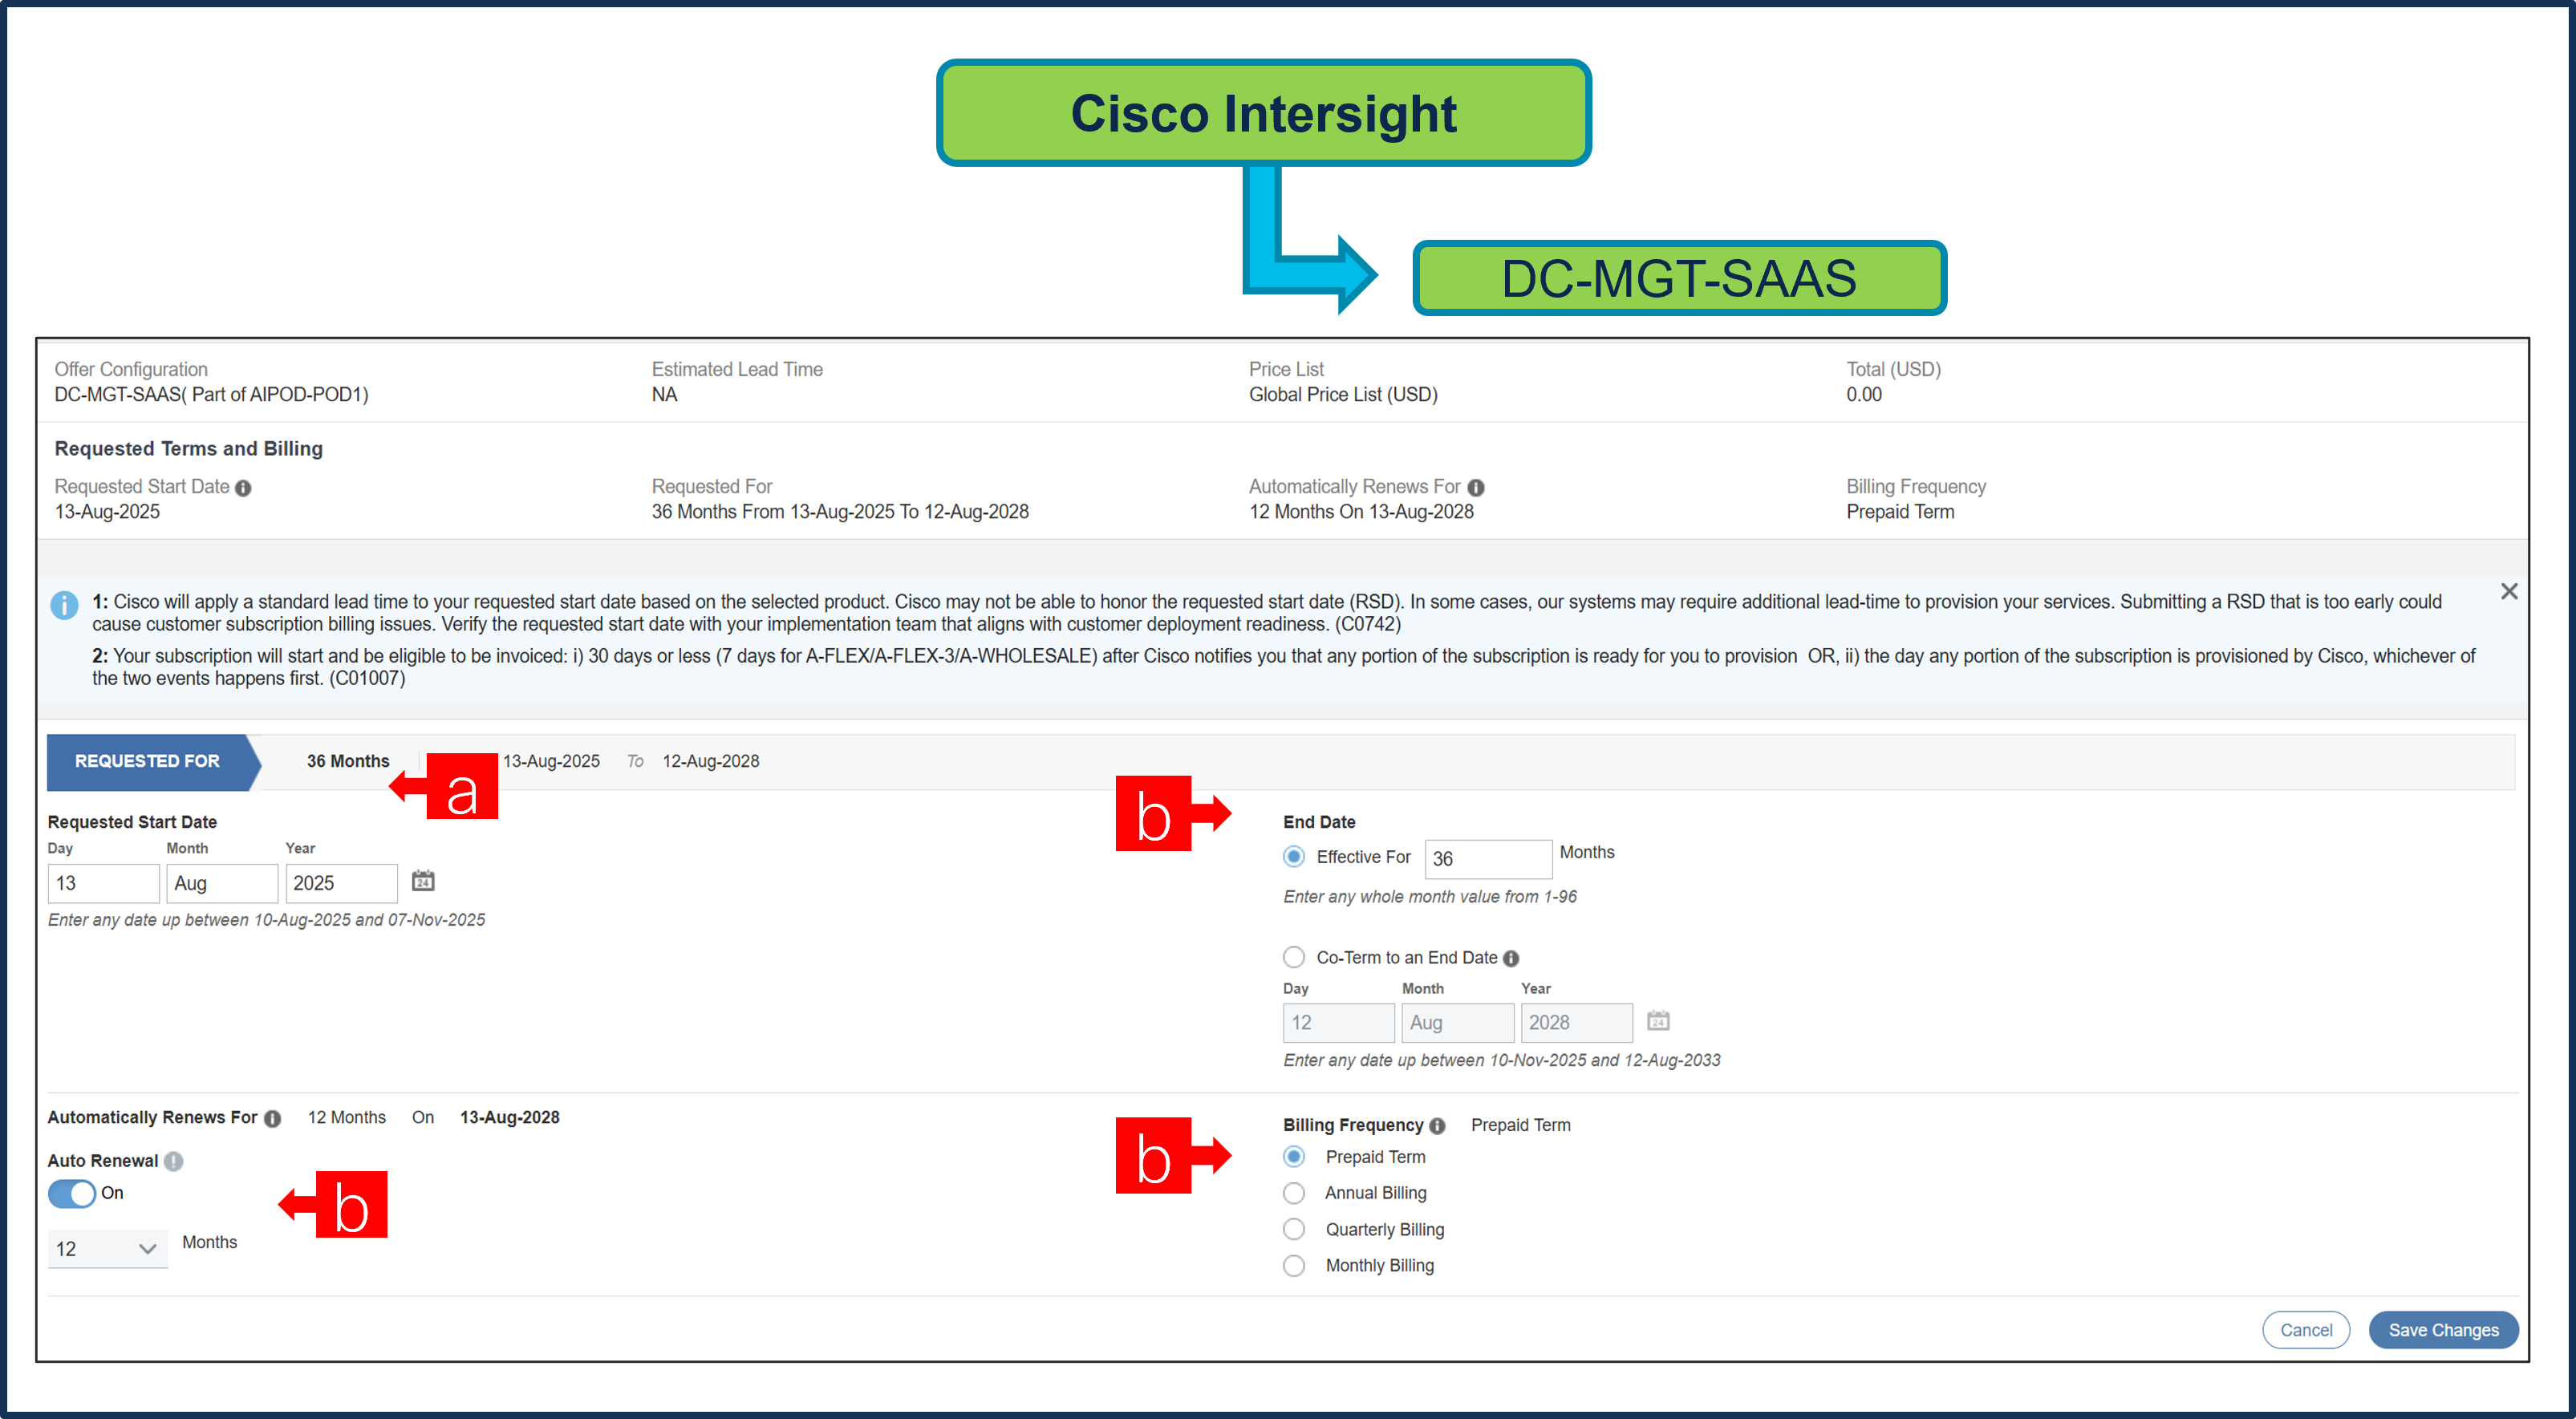
a. Requested Start Date (RSD) is now dependent on HW Ship Date and will automatically starts when the HW ships. If you change the RSD, the Software will start either on the RSD you picked or the HW Ship Date whichever is later.
b. End Date (duration in months) is defaulted to 36 Months, Auto Renewal (on/off) is defaulted to Off and Billing Frequency is defaulted to Prepaid Term. You can still change the setting accordingly.
Step 22.

a. The quantity of Cisco Intersight 2.0 Infrastructure Services License under Offer: DC-MGT-SAAS should be equal to the quantity of Server selected. Enter the quantity.
Step 23.
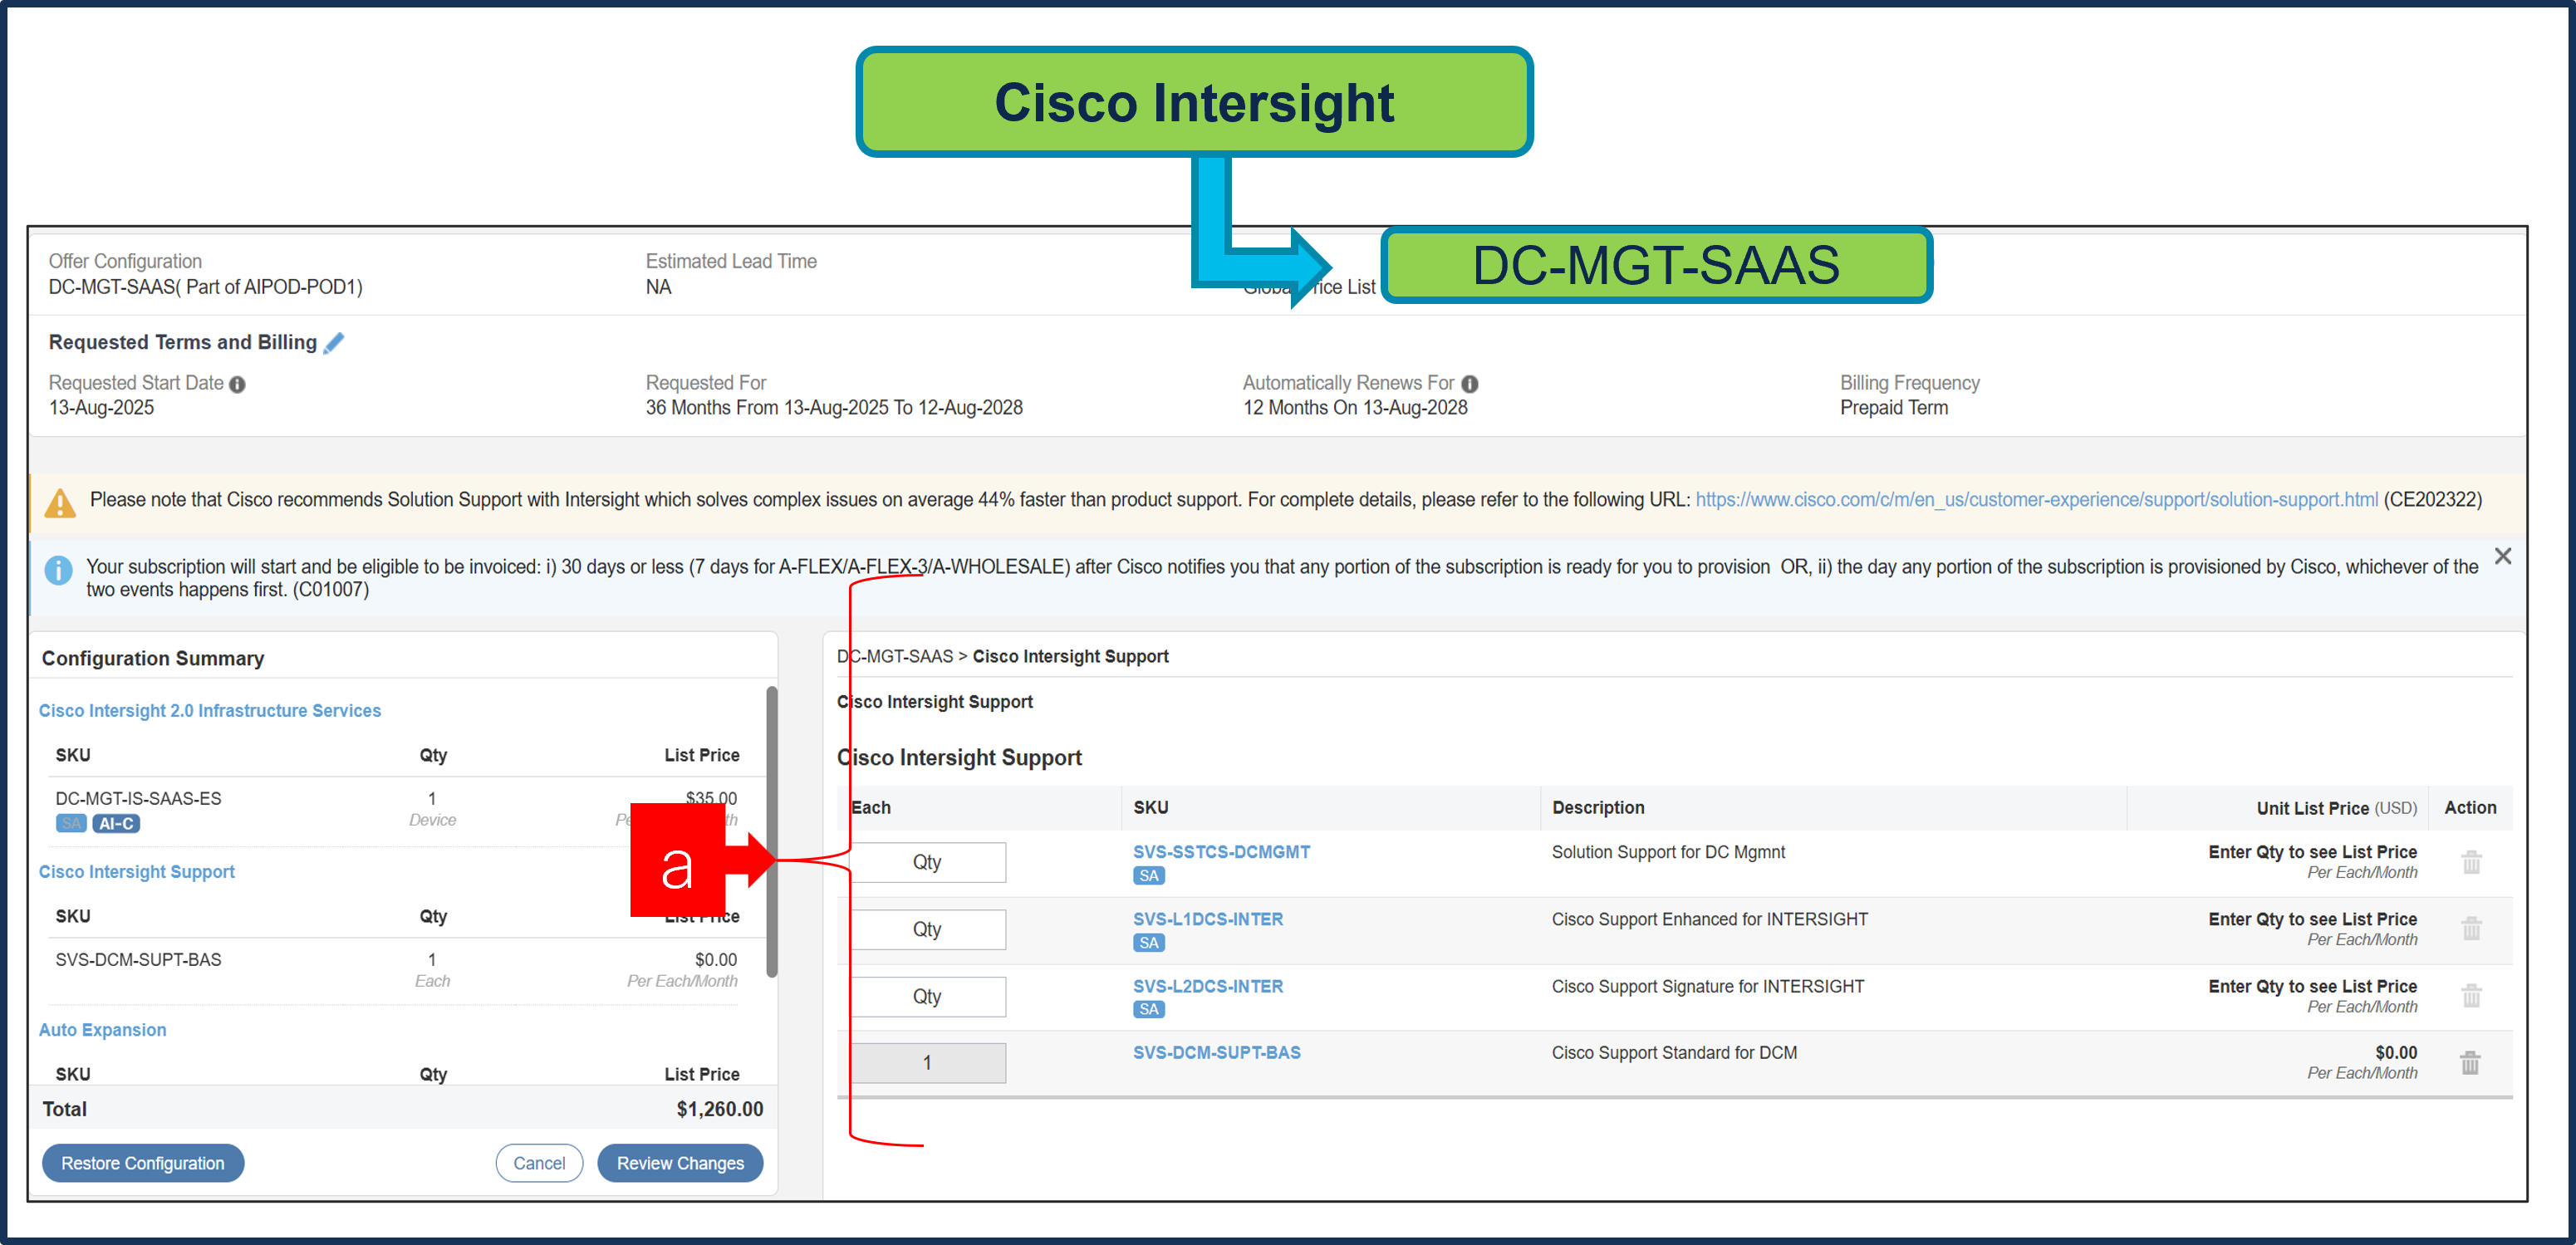
a. The Cisco Intersight License comes with separate Support. Basic Embedded Support is the default selection. Customer may upgrade to Solution Support, CX Success Track L1 and L2 (supported only with SAAS) if needed.
Step 24.
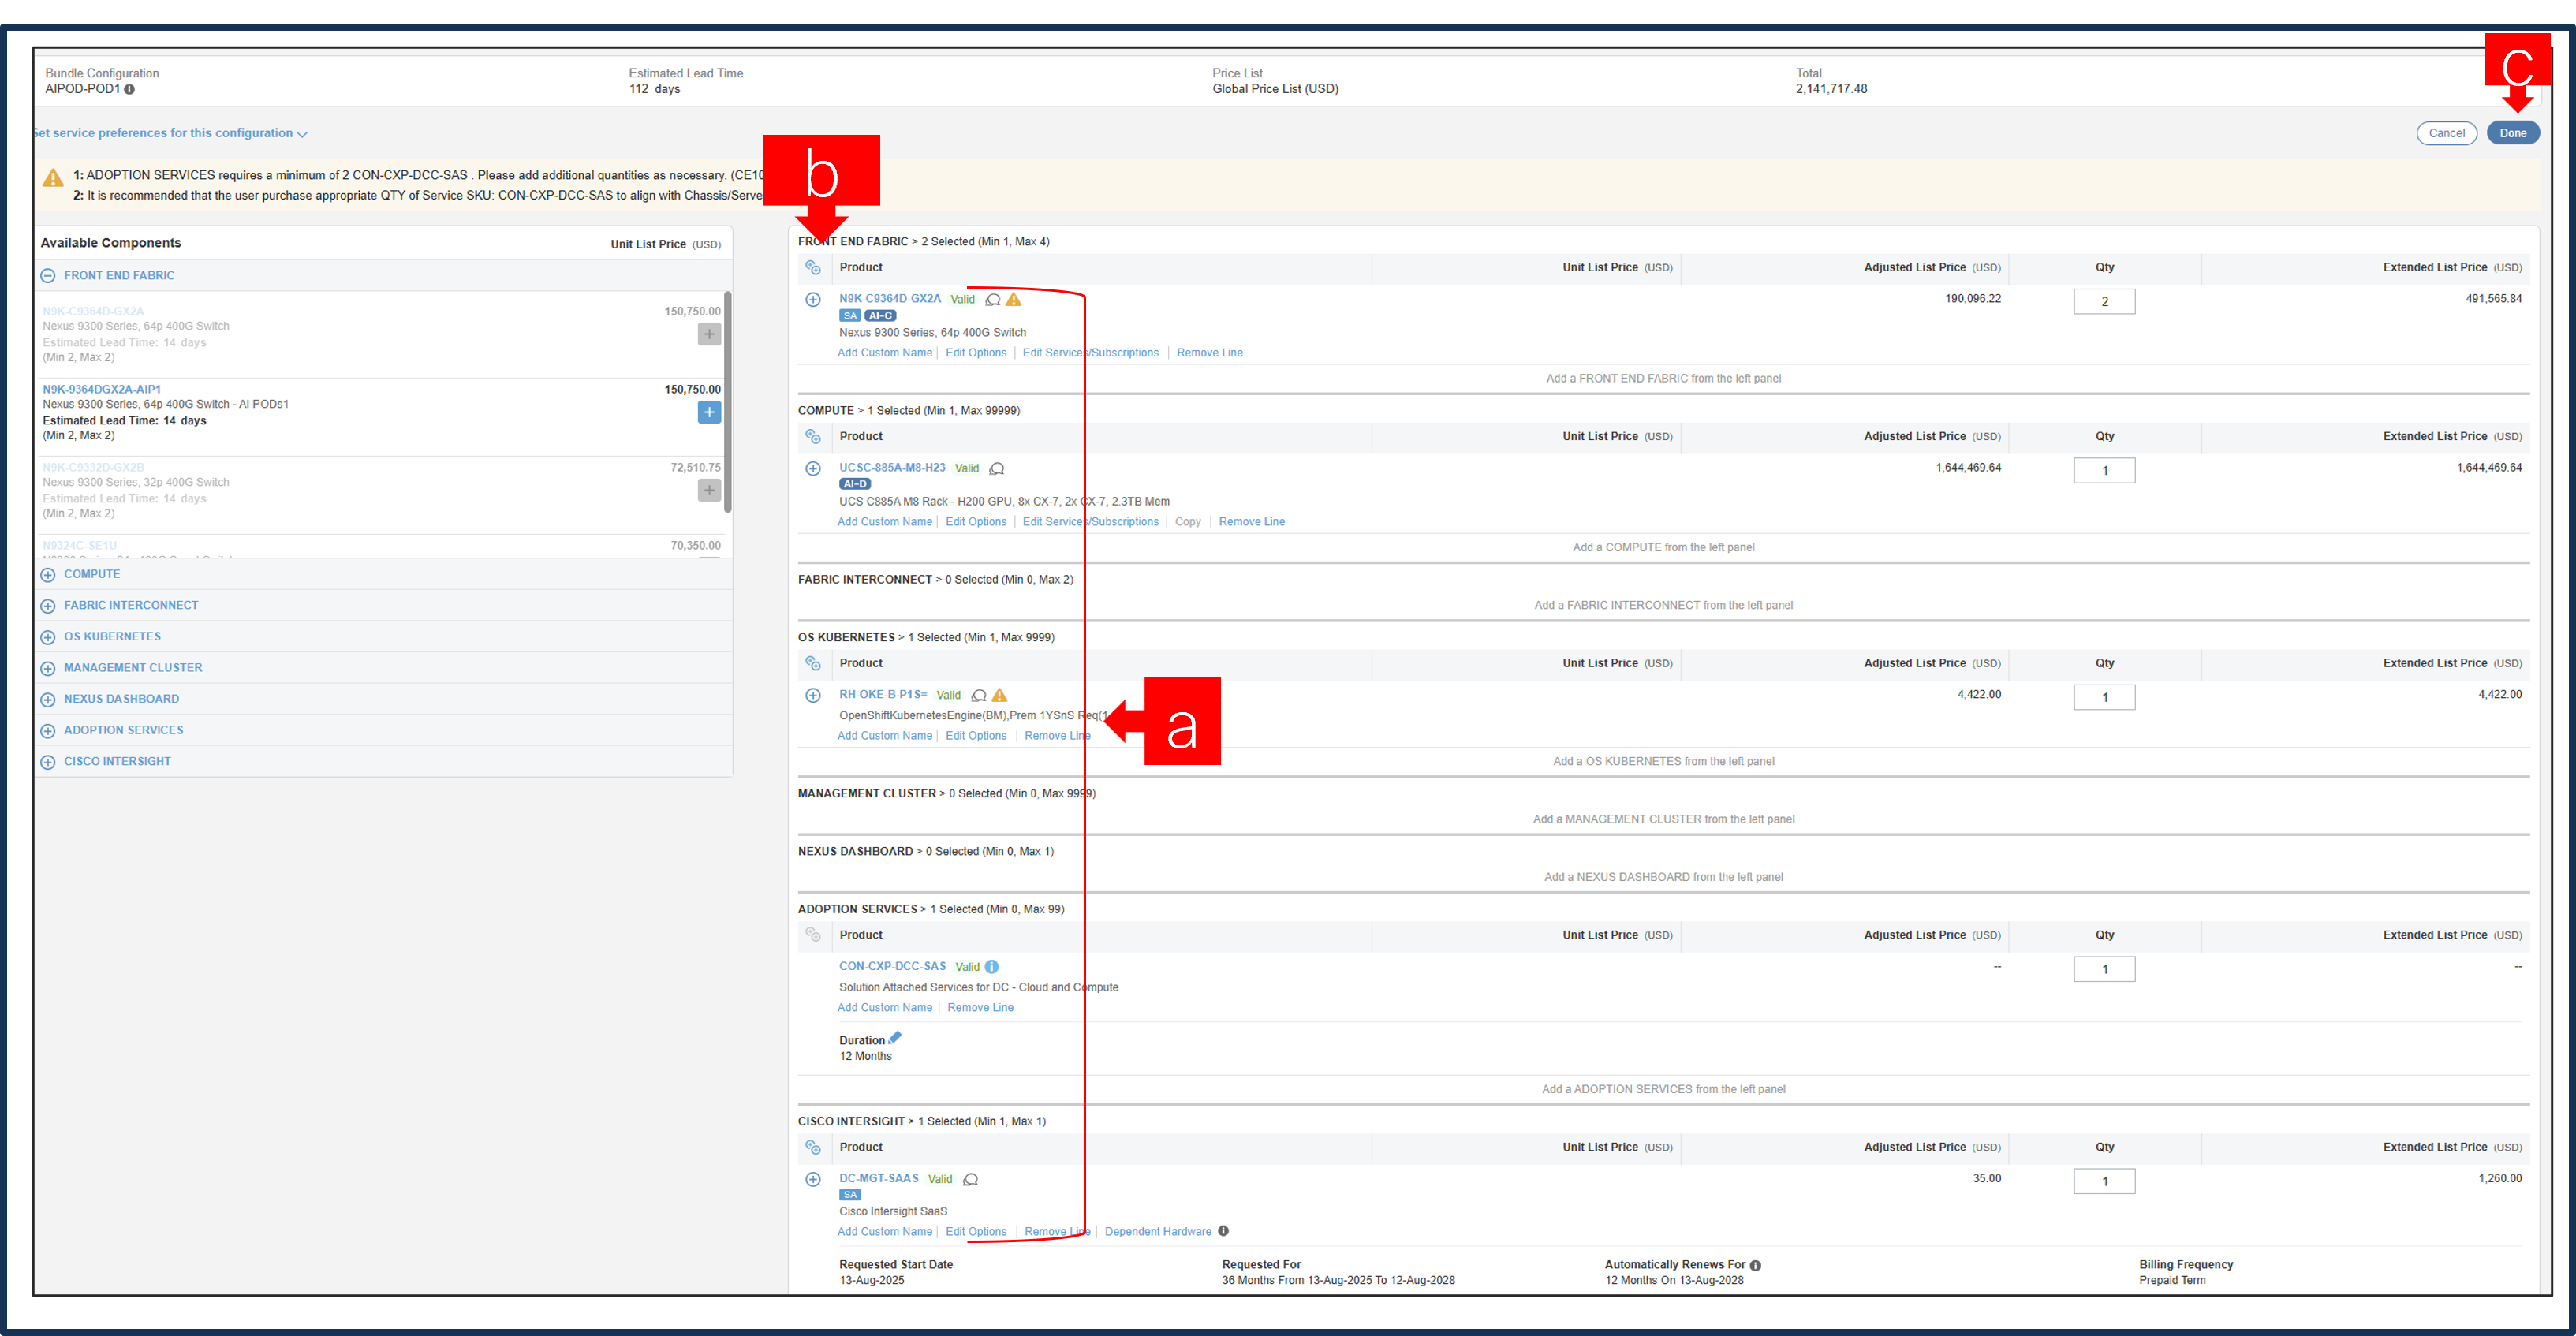
a. Configuration for MLB is completed when status of each Product is Valid, and warning messages are cleared.
b. Click on the “PLUS” to expand and view the selections made for each Product.
c. Click on “Done” to complete MLB configuration.
Step 25.
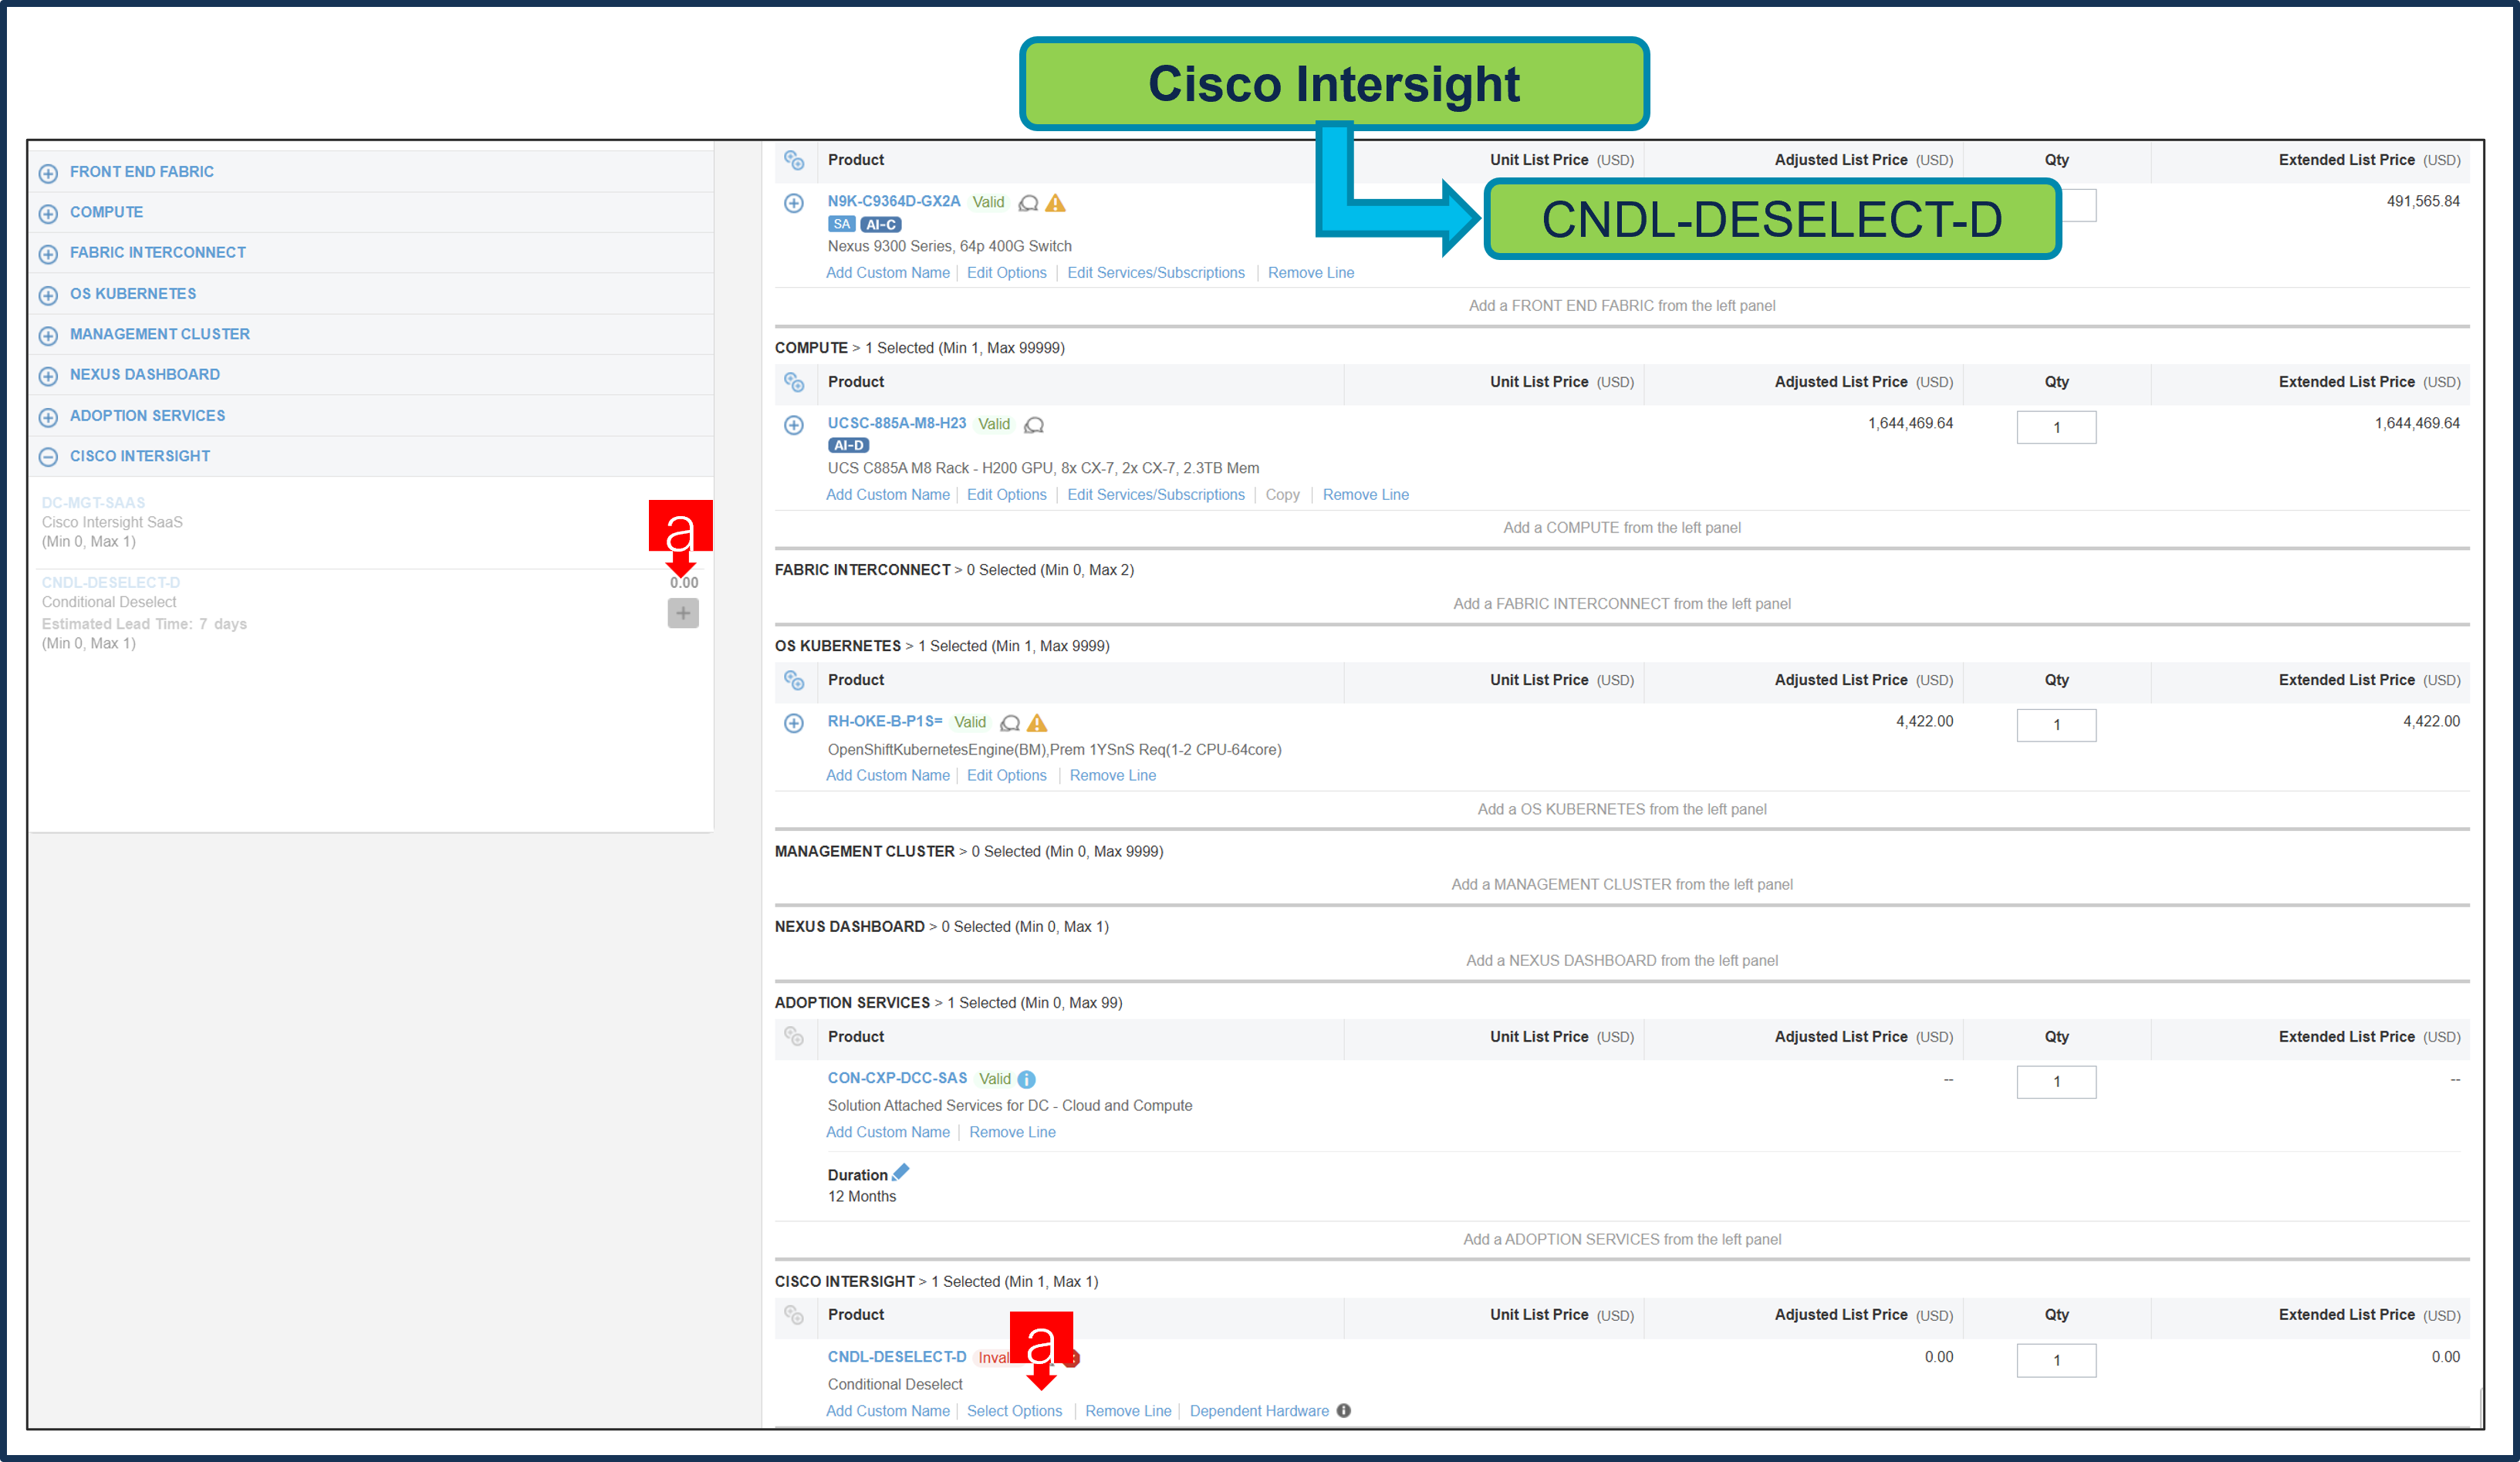
a. CNDL-DESELECT-D is meant to select only if Customer has already purchased Cisco Intersight License via EA Contract or order is for Disti Fulfillment.
Step 26.
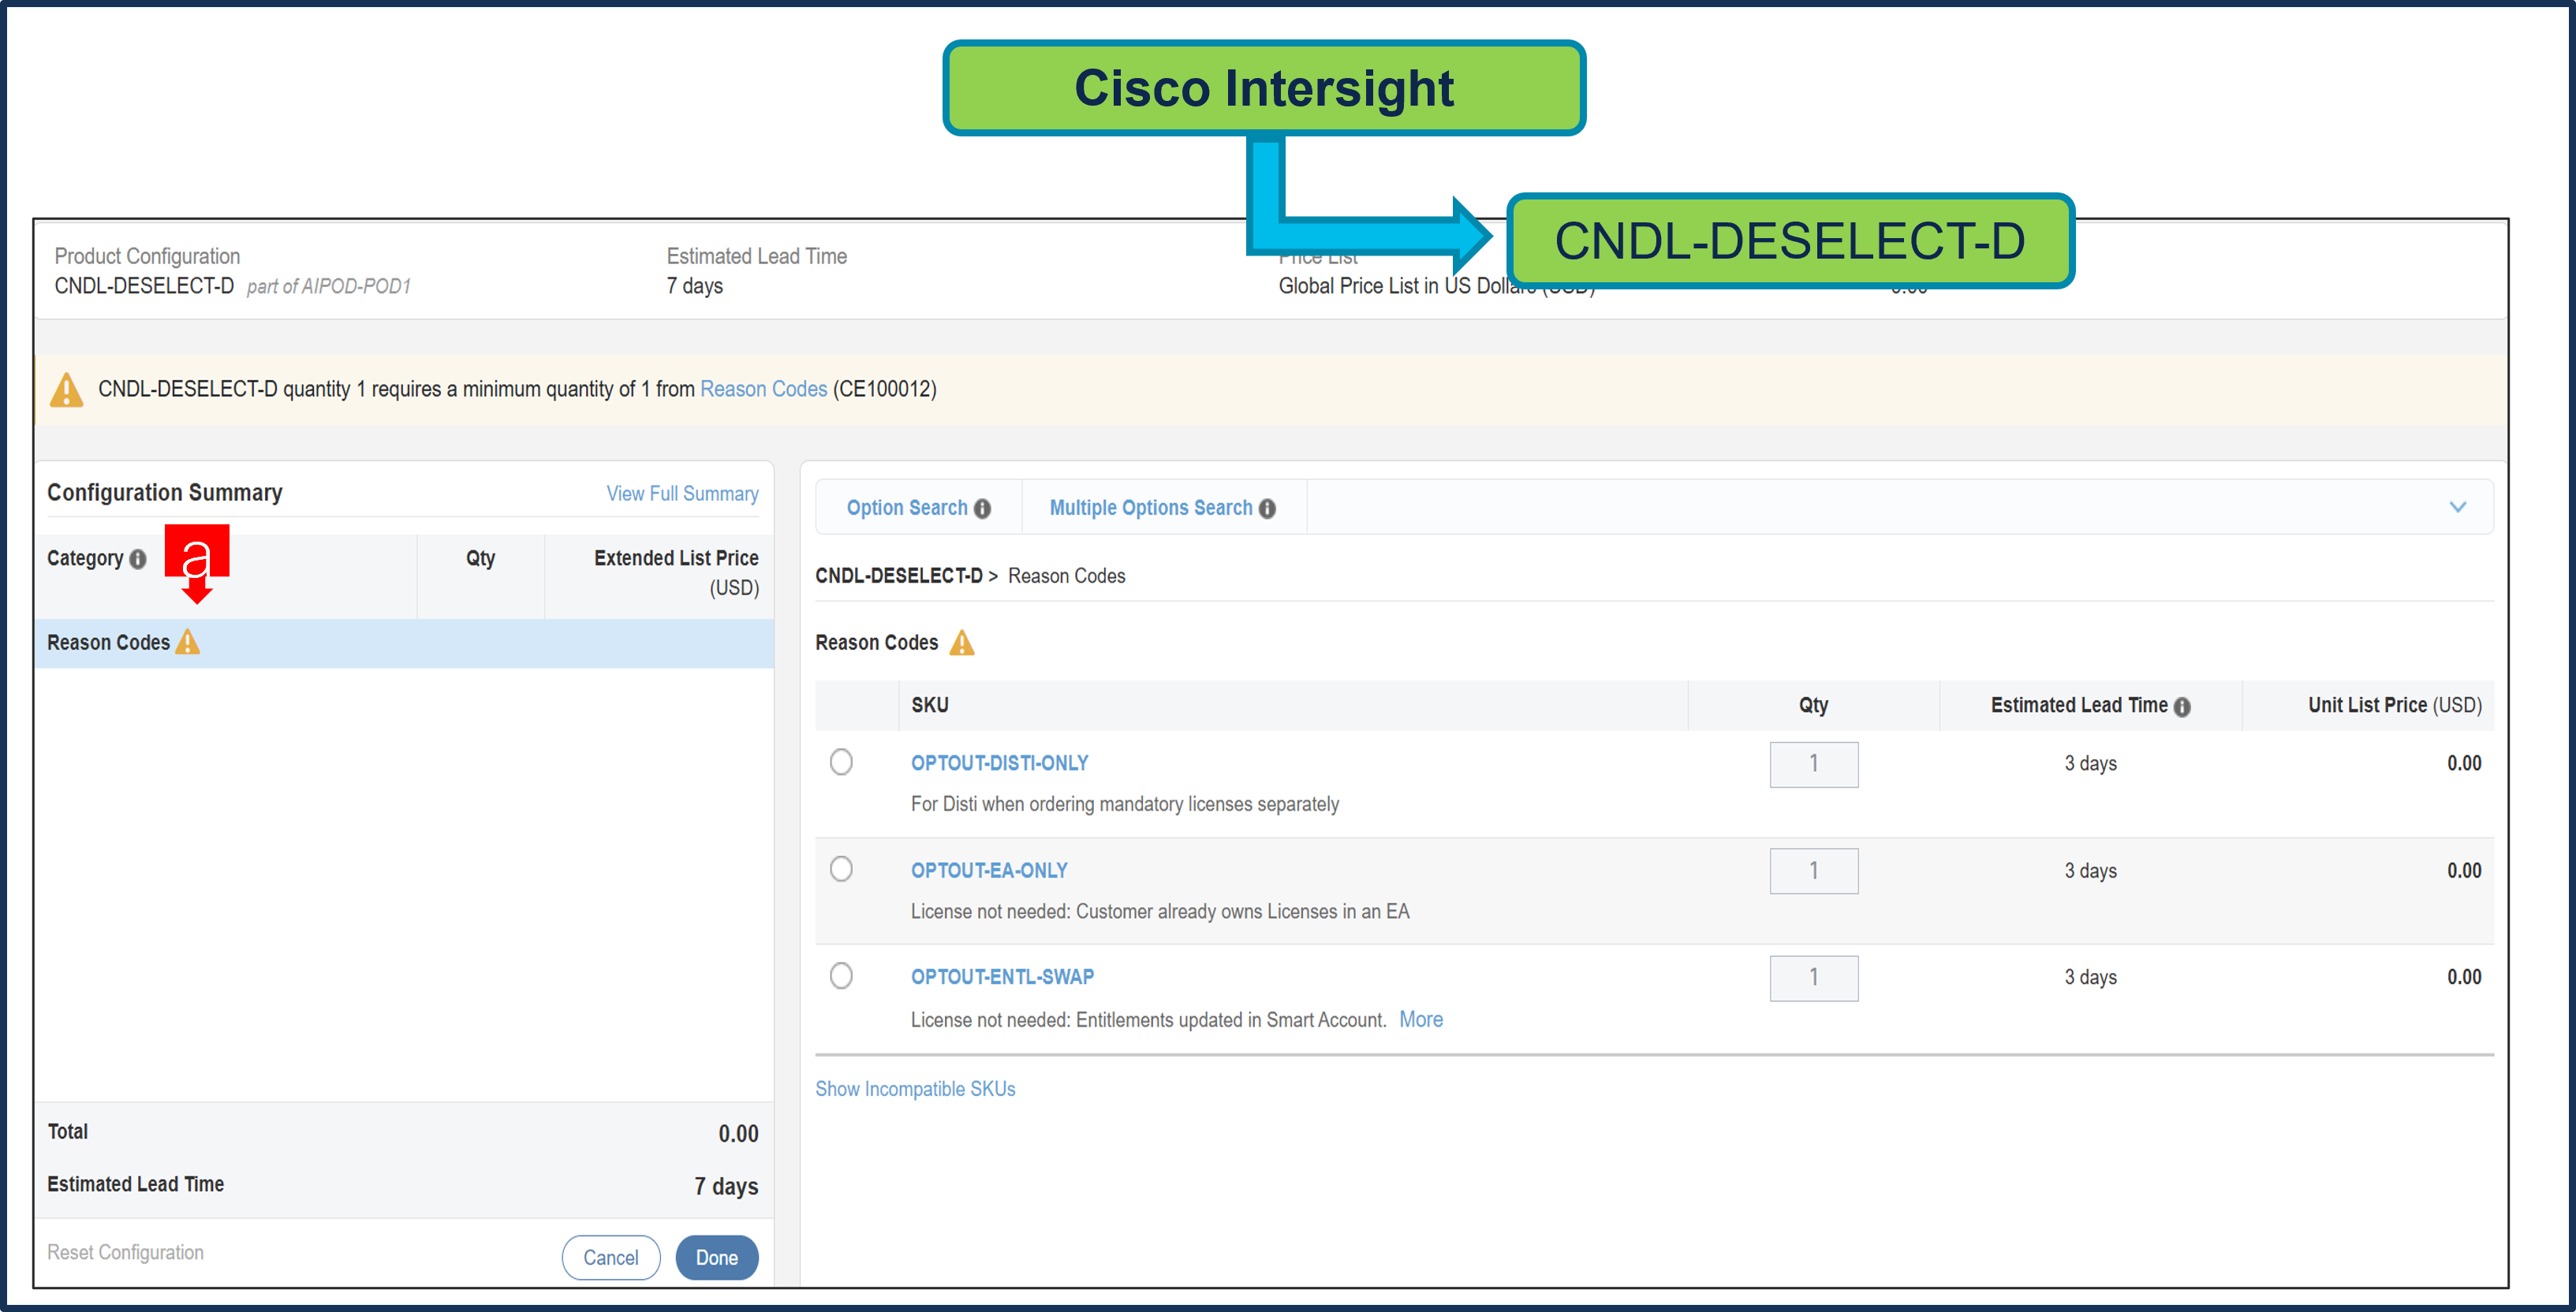
a. Please select appropriate Reason Code
Step 27.
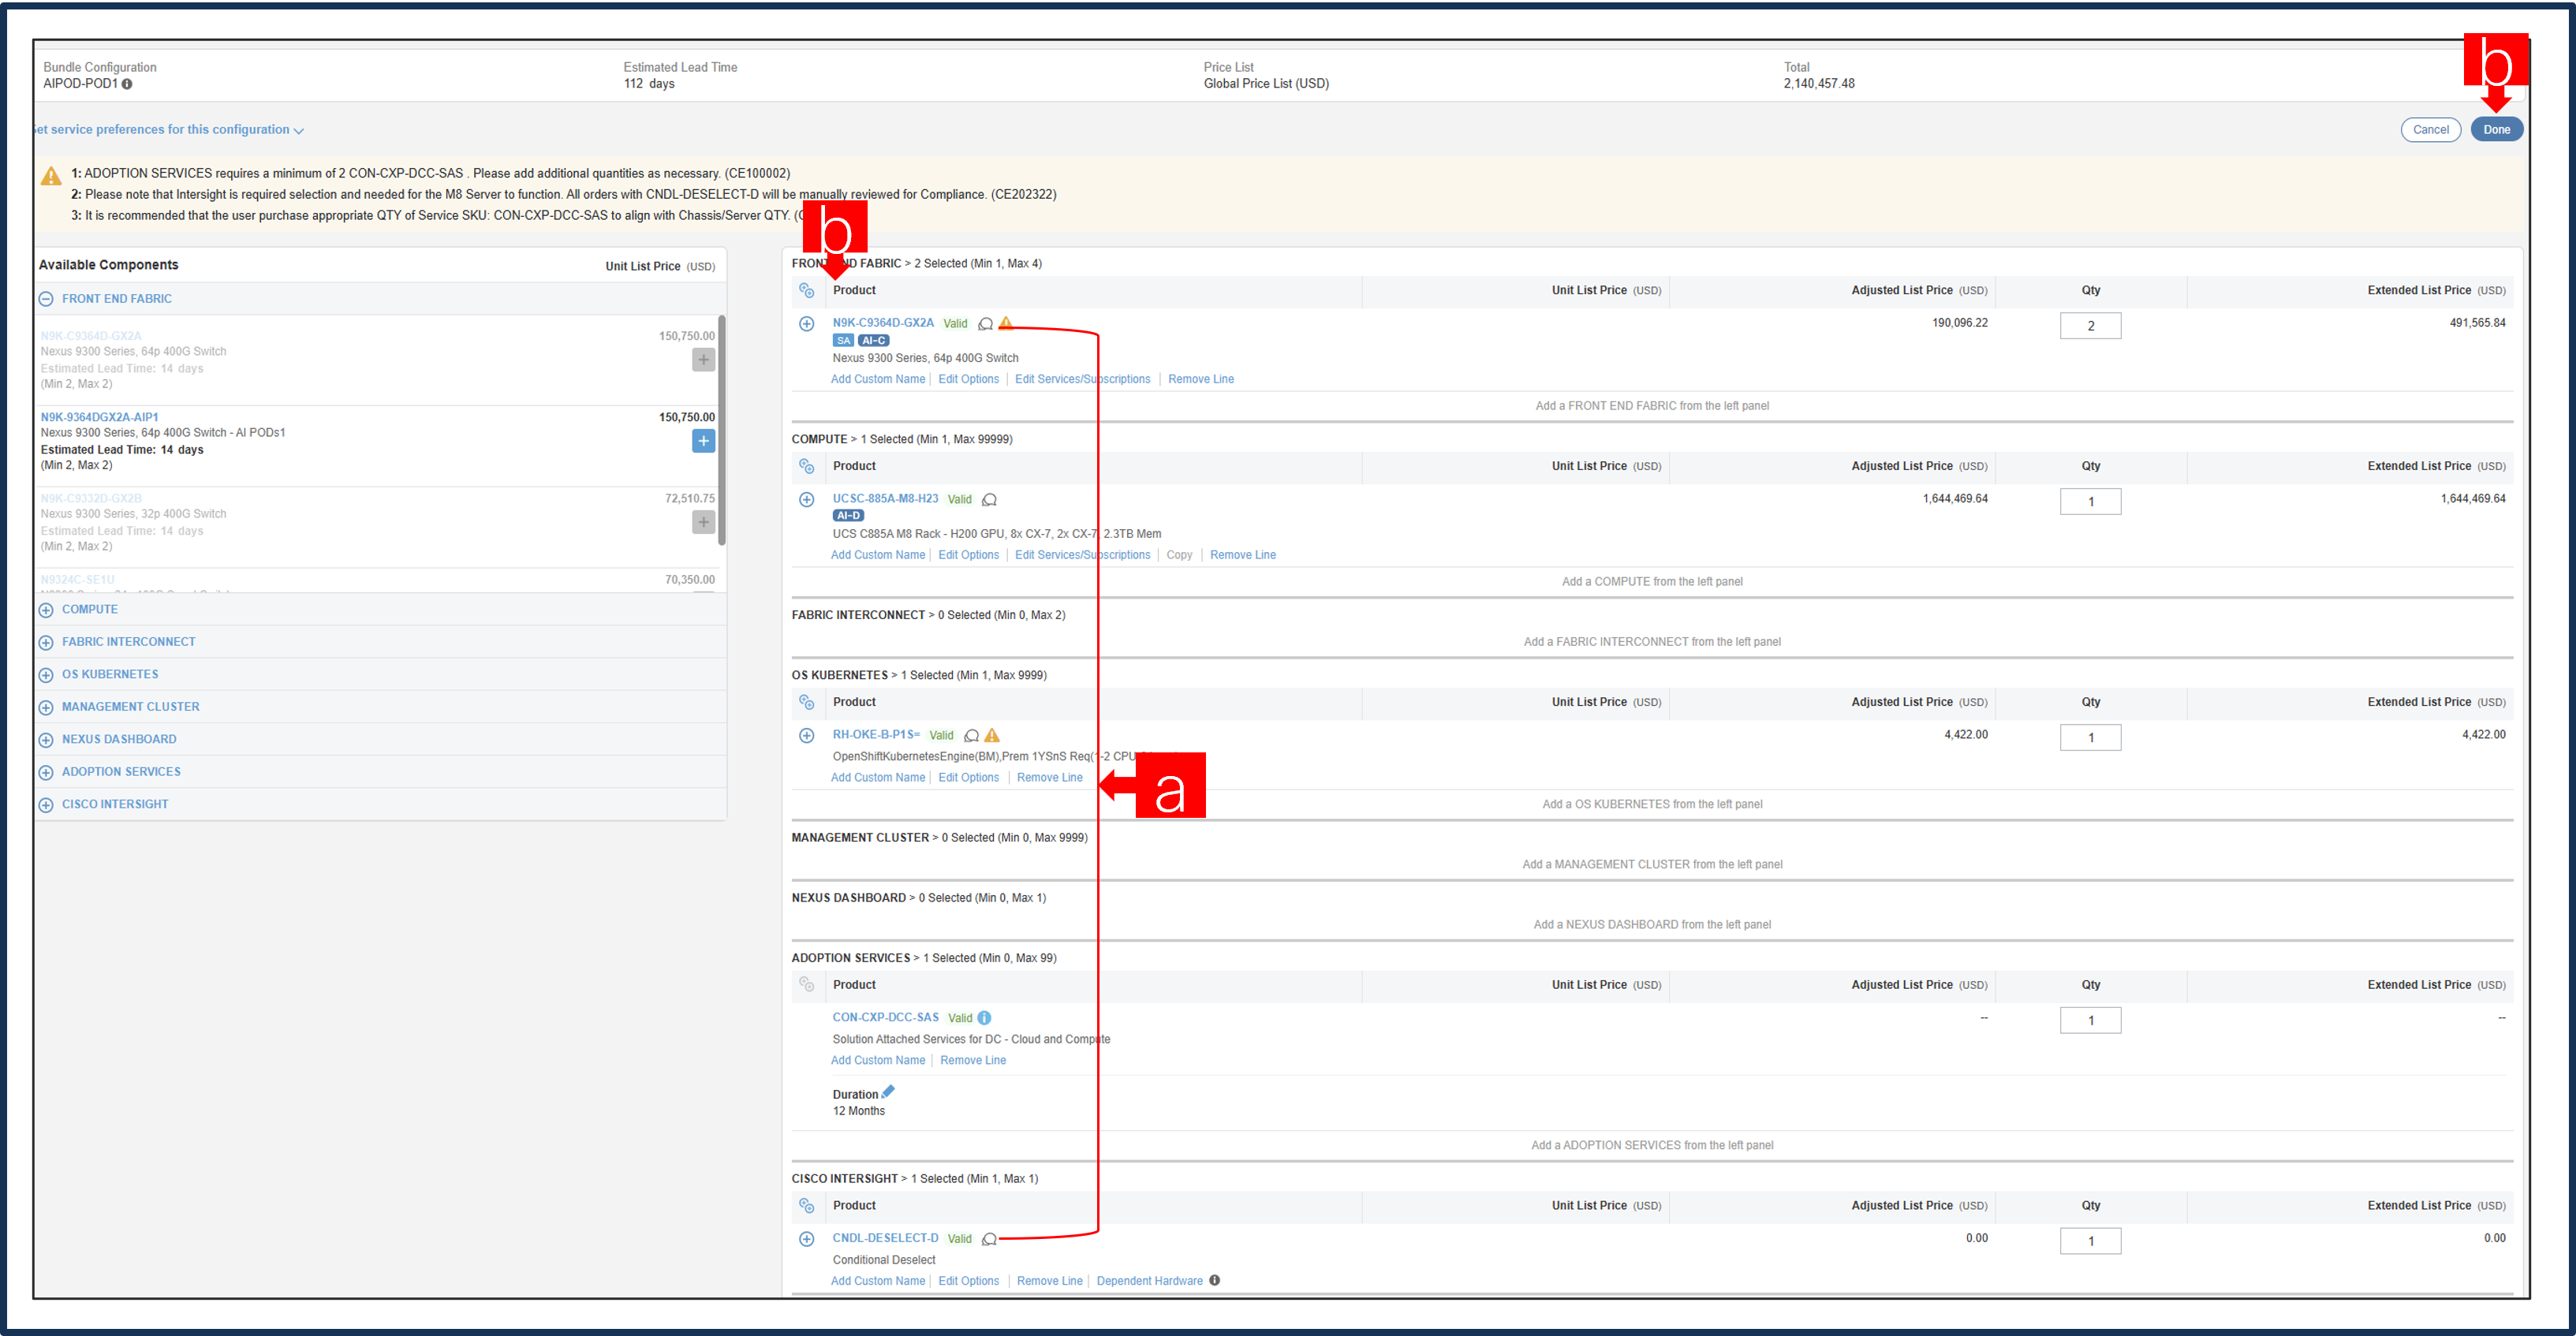
a. Configuration for MLB is completed when status of each Product is Valid and warning messages are cleared.
b. Click on the “PLUS” to expand and view the selections made for each Product.
c. Click on “Done” to complete MLB configuration.
Configuring AIPOD-POD2
This section provides more information and details related to packages and PIDs specific to AIPOD-POD2. It also provides references to additional buying programs and subscription packages that AIPOD-POD2 solution may be included in.
Step 1. Launch your web browser and navigate to the Cisco Commerce Estimate Creation page.
Step 2. Log In to Cisco screen, type your Cisco.com user ID and password.
Step 3. In the Estimates page, set preferences for this estimate by entering the SKU, PID, product description or product family (for example, AIPOD-POD2) to search for the product you wish to order.
Step 4.
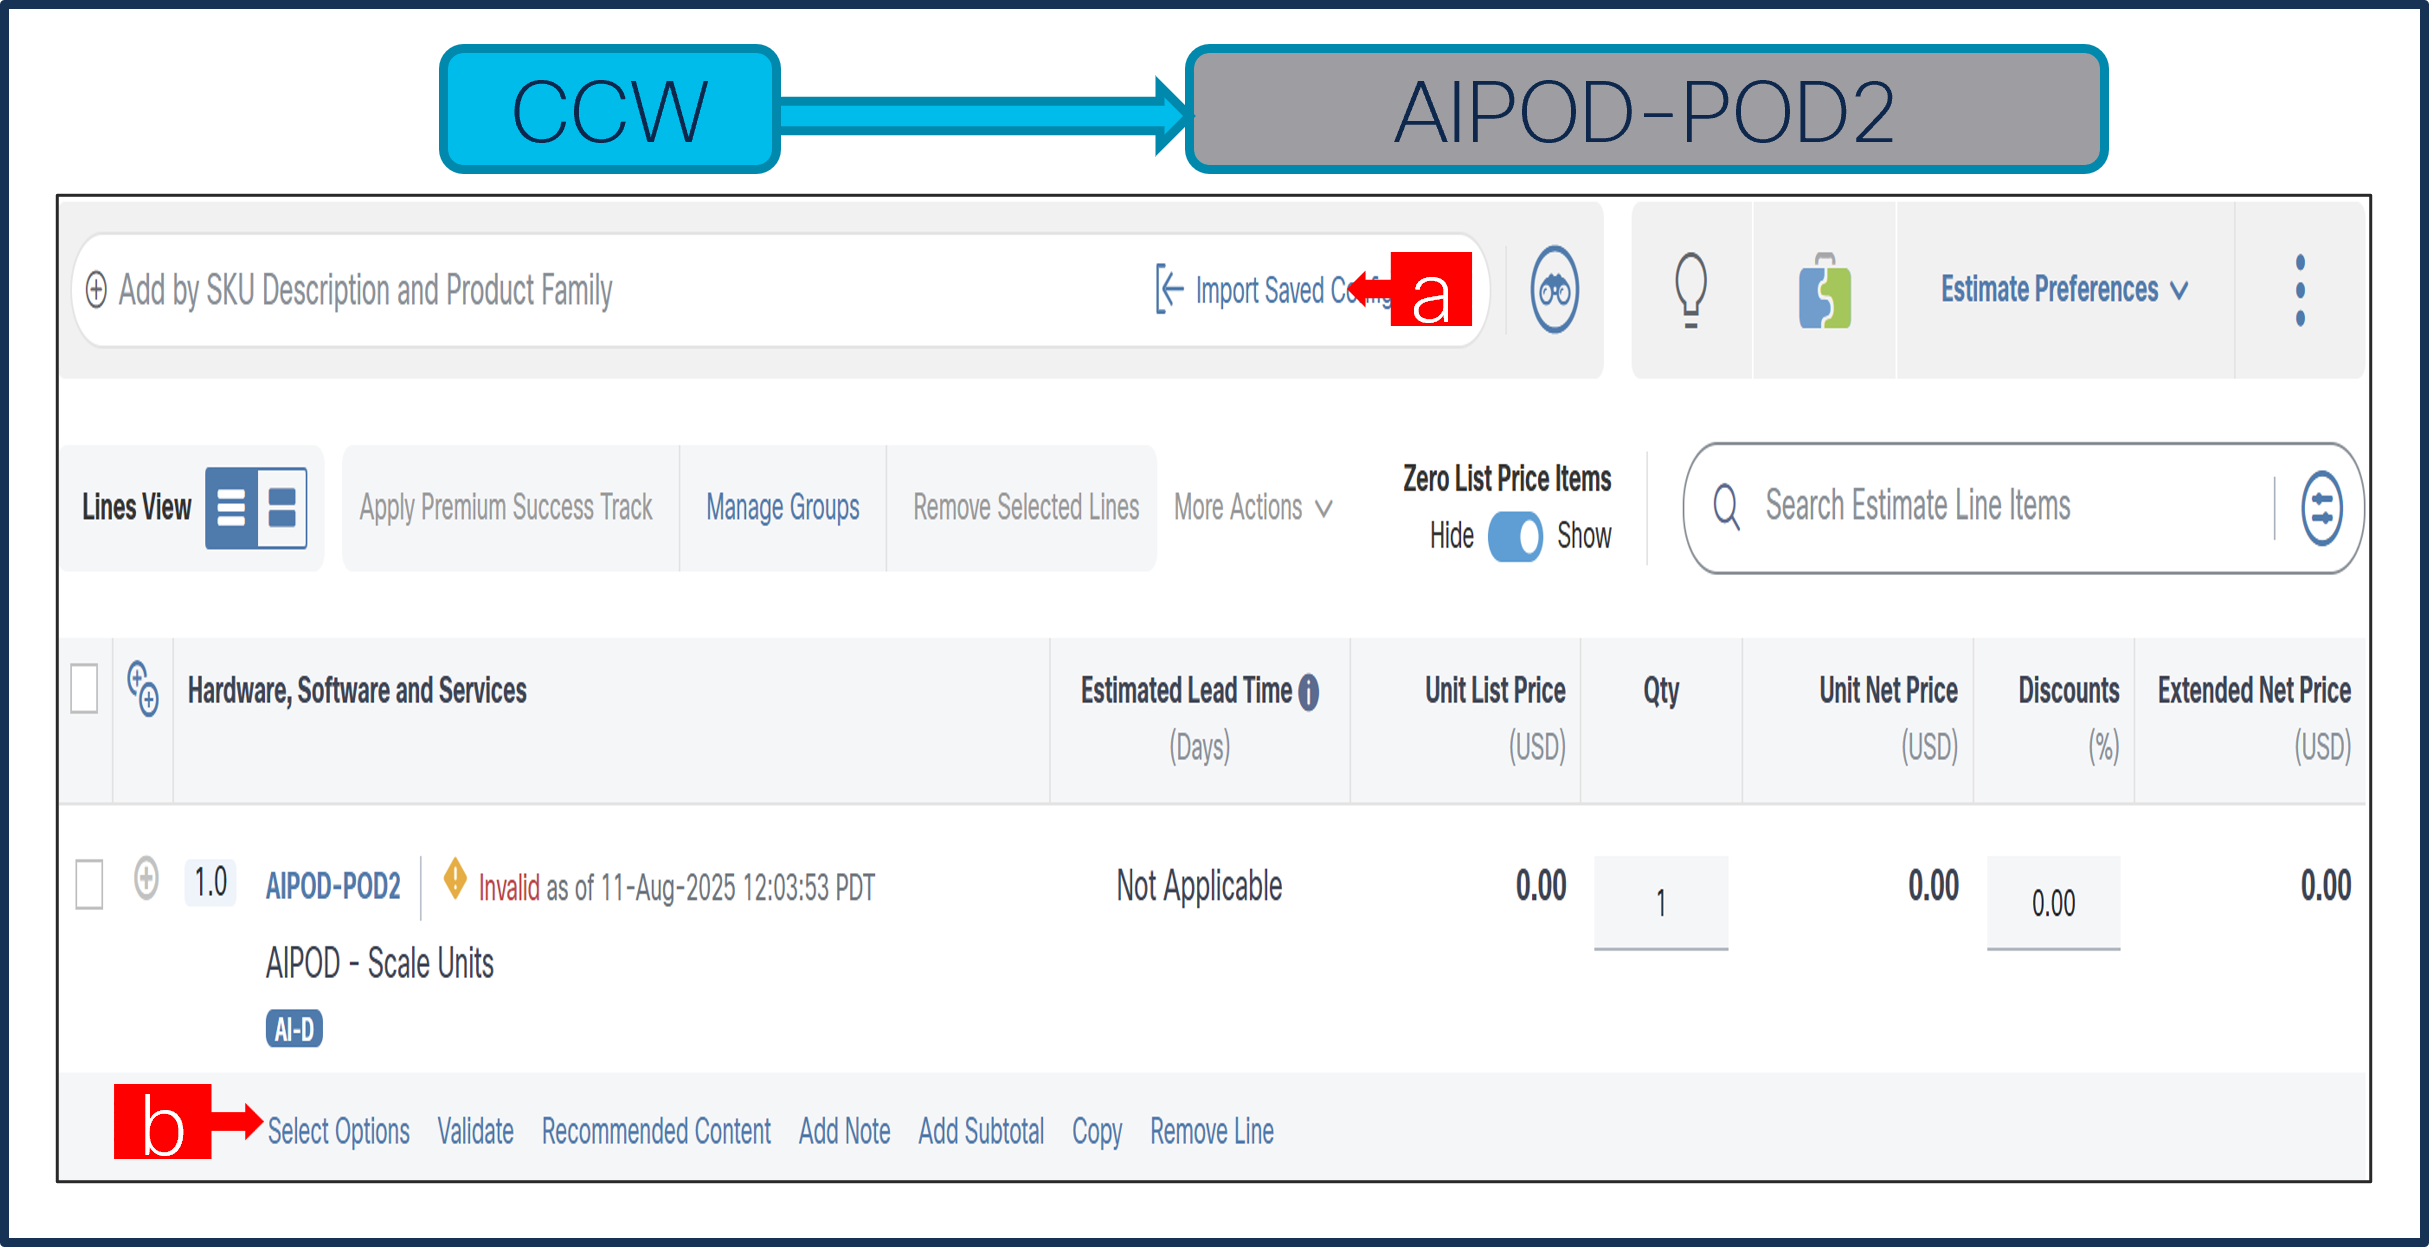
a. In CCW, search for MLB PID and click on “Add”
b. Click on “Select Options” to enter the configurator.
Step 5.
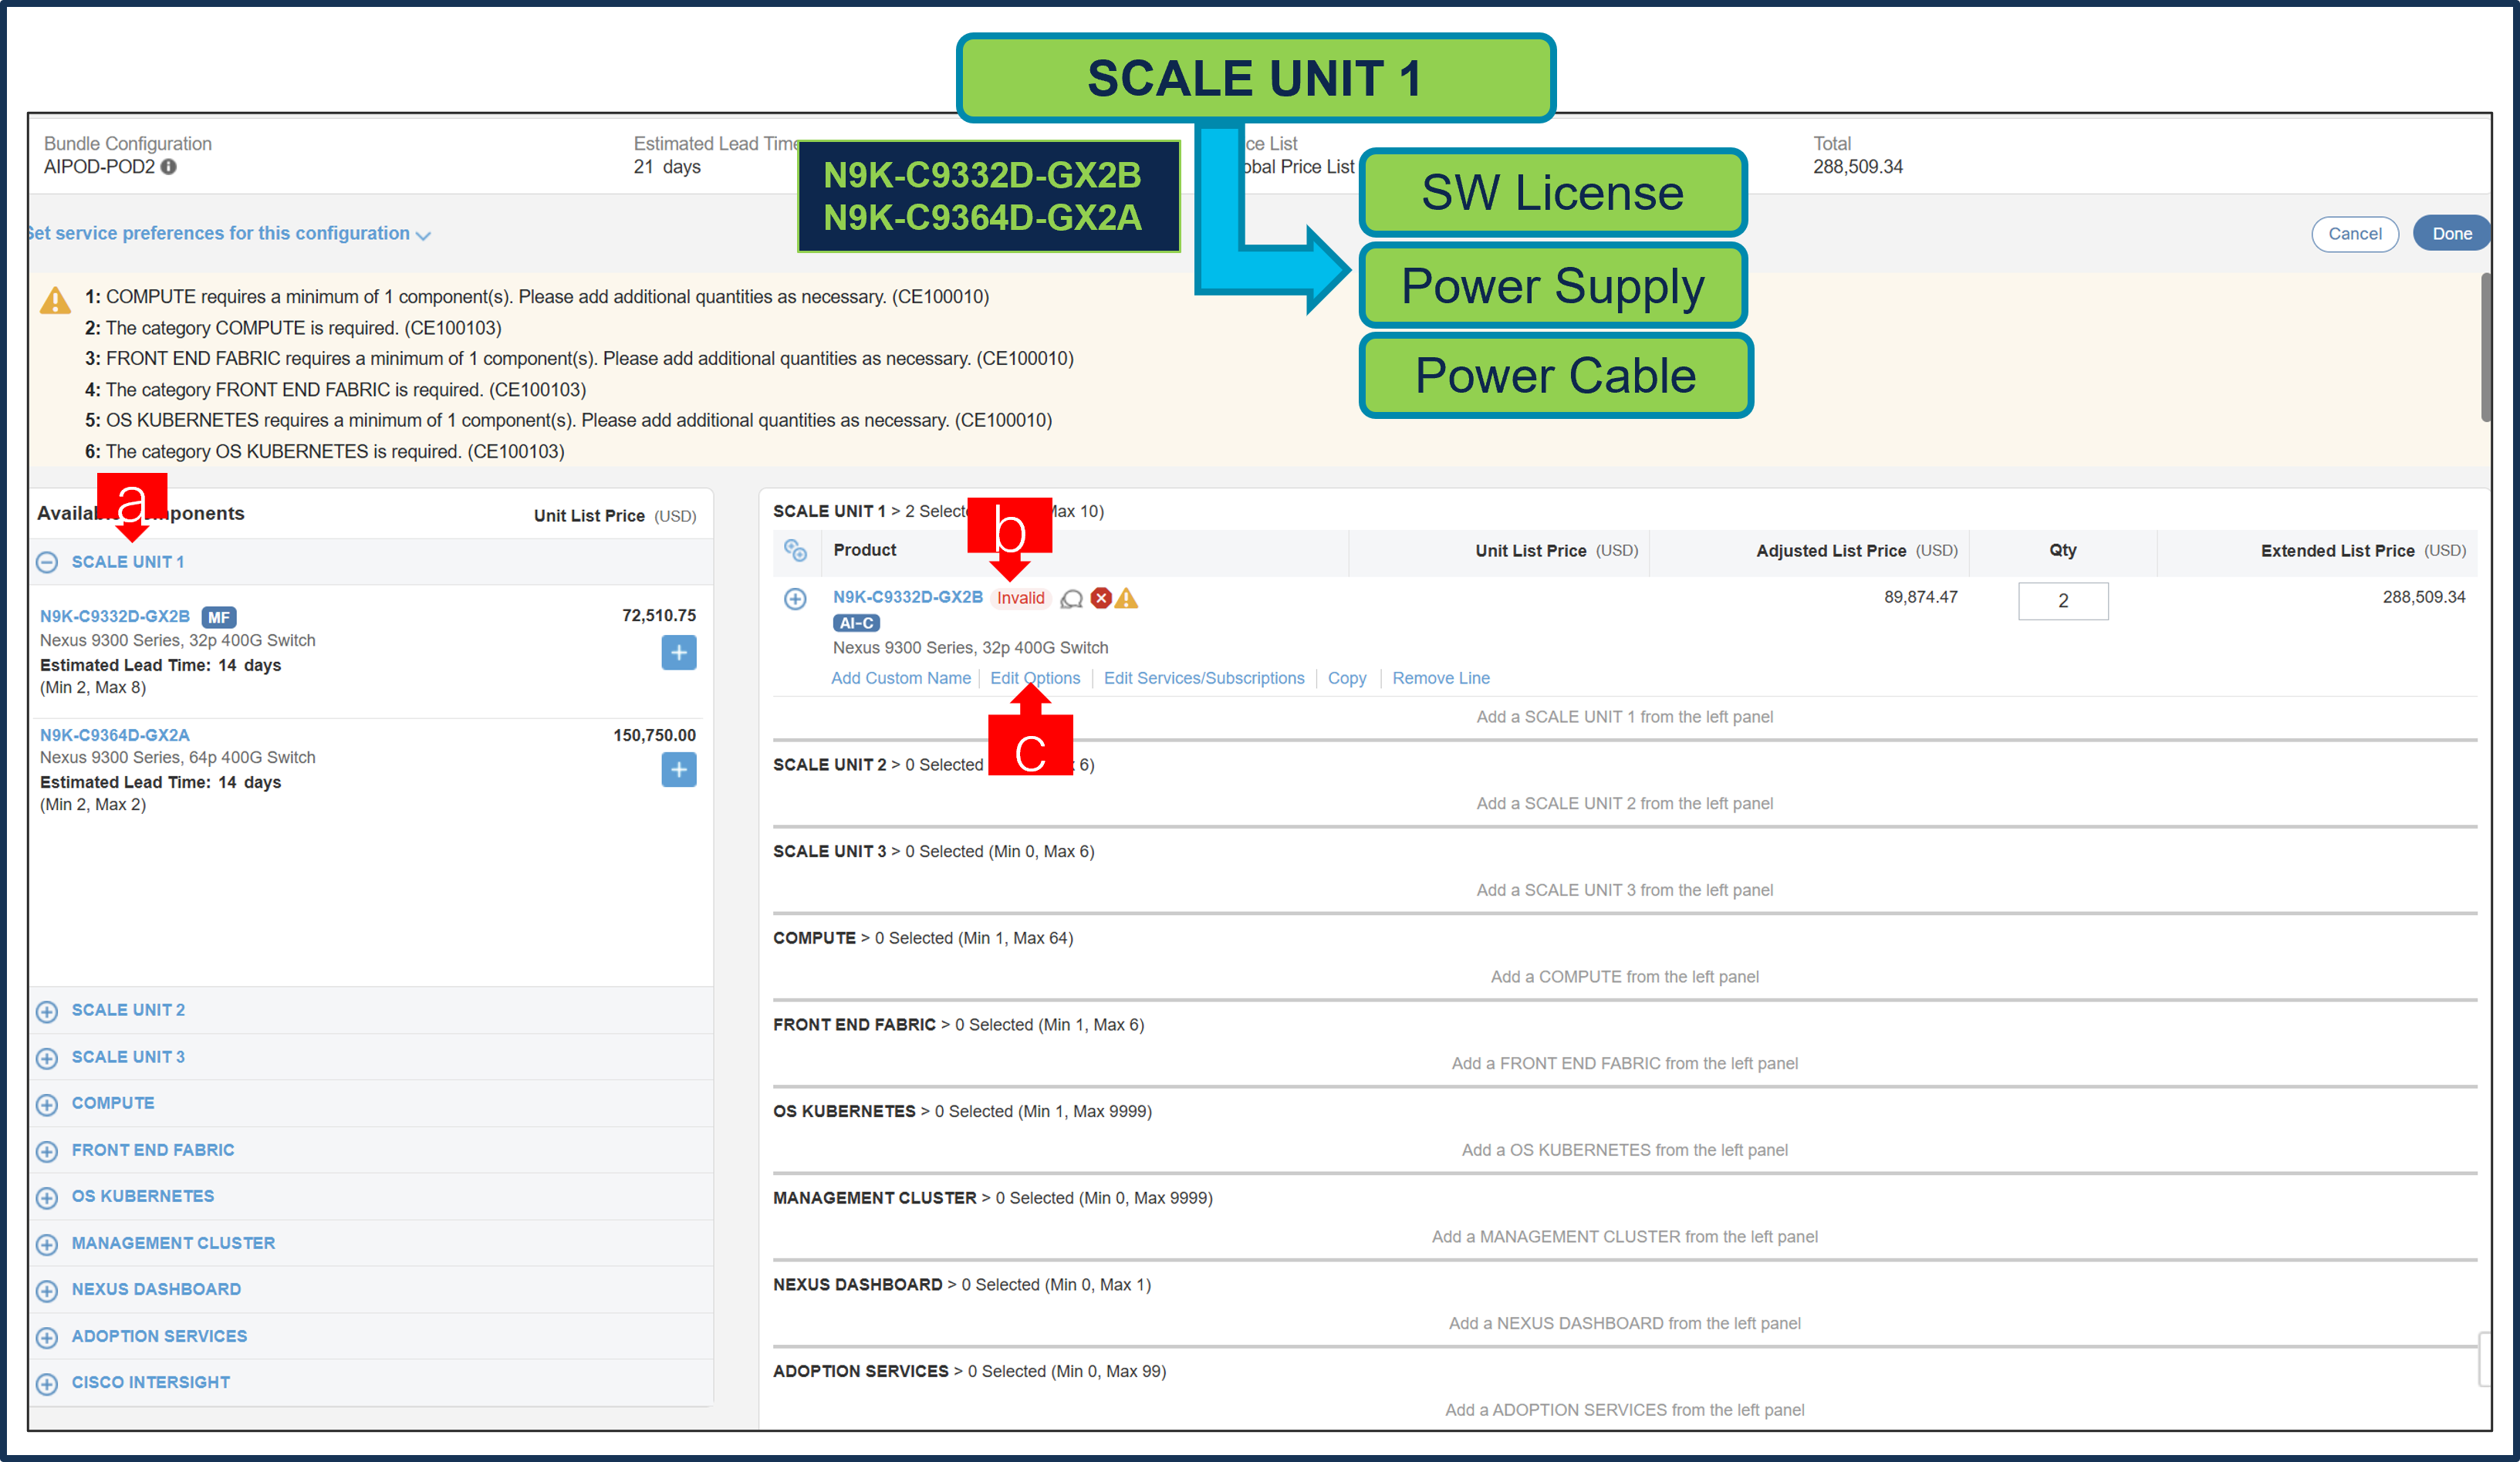
a. At least 1 selection from Category: SCALE UNIT 1 or SCALE UNIT 2 or SCALE UNIT 3 and multiple Scale Units selections are not allowed. It is recommended that users must make selection Scales Units first to configure this solution. Each Scale Unit offers Leaf and Spine Switch Nodes and a minimum of 1 pair of Leaf Switch Nodes is mandatory, and Spine Switch is an option selection. Switches can only be selected in multiple of 2.
b. Notice the PID: N9K-C9332D-GX2B Status is invalid as further configuration needed.
c. Select ‘Edit Option’ to enter the configurator.
Note: QTY of SCALE UNIT Leaf Switch Nodes and FRONT-END FABRIC may need to be updated based on QTY of COMPUTE Servers selected.
Step 6.
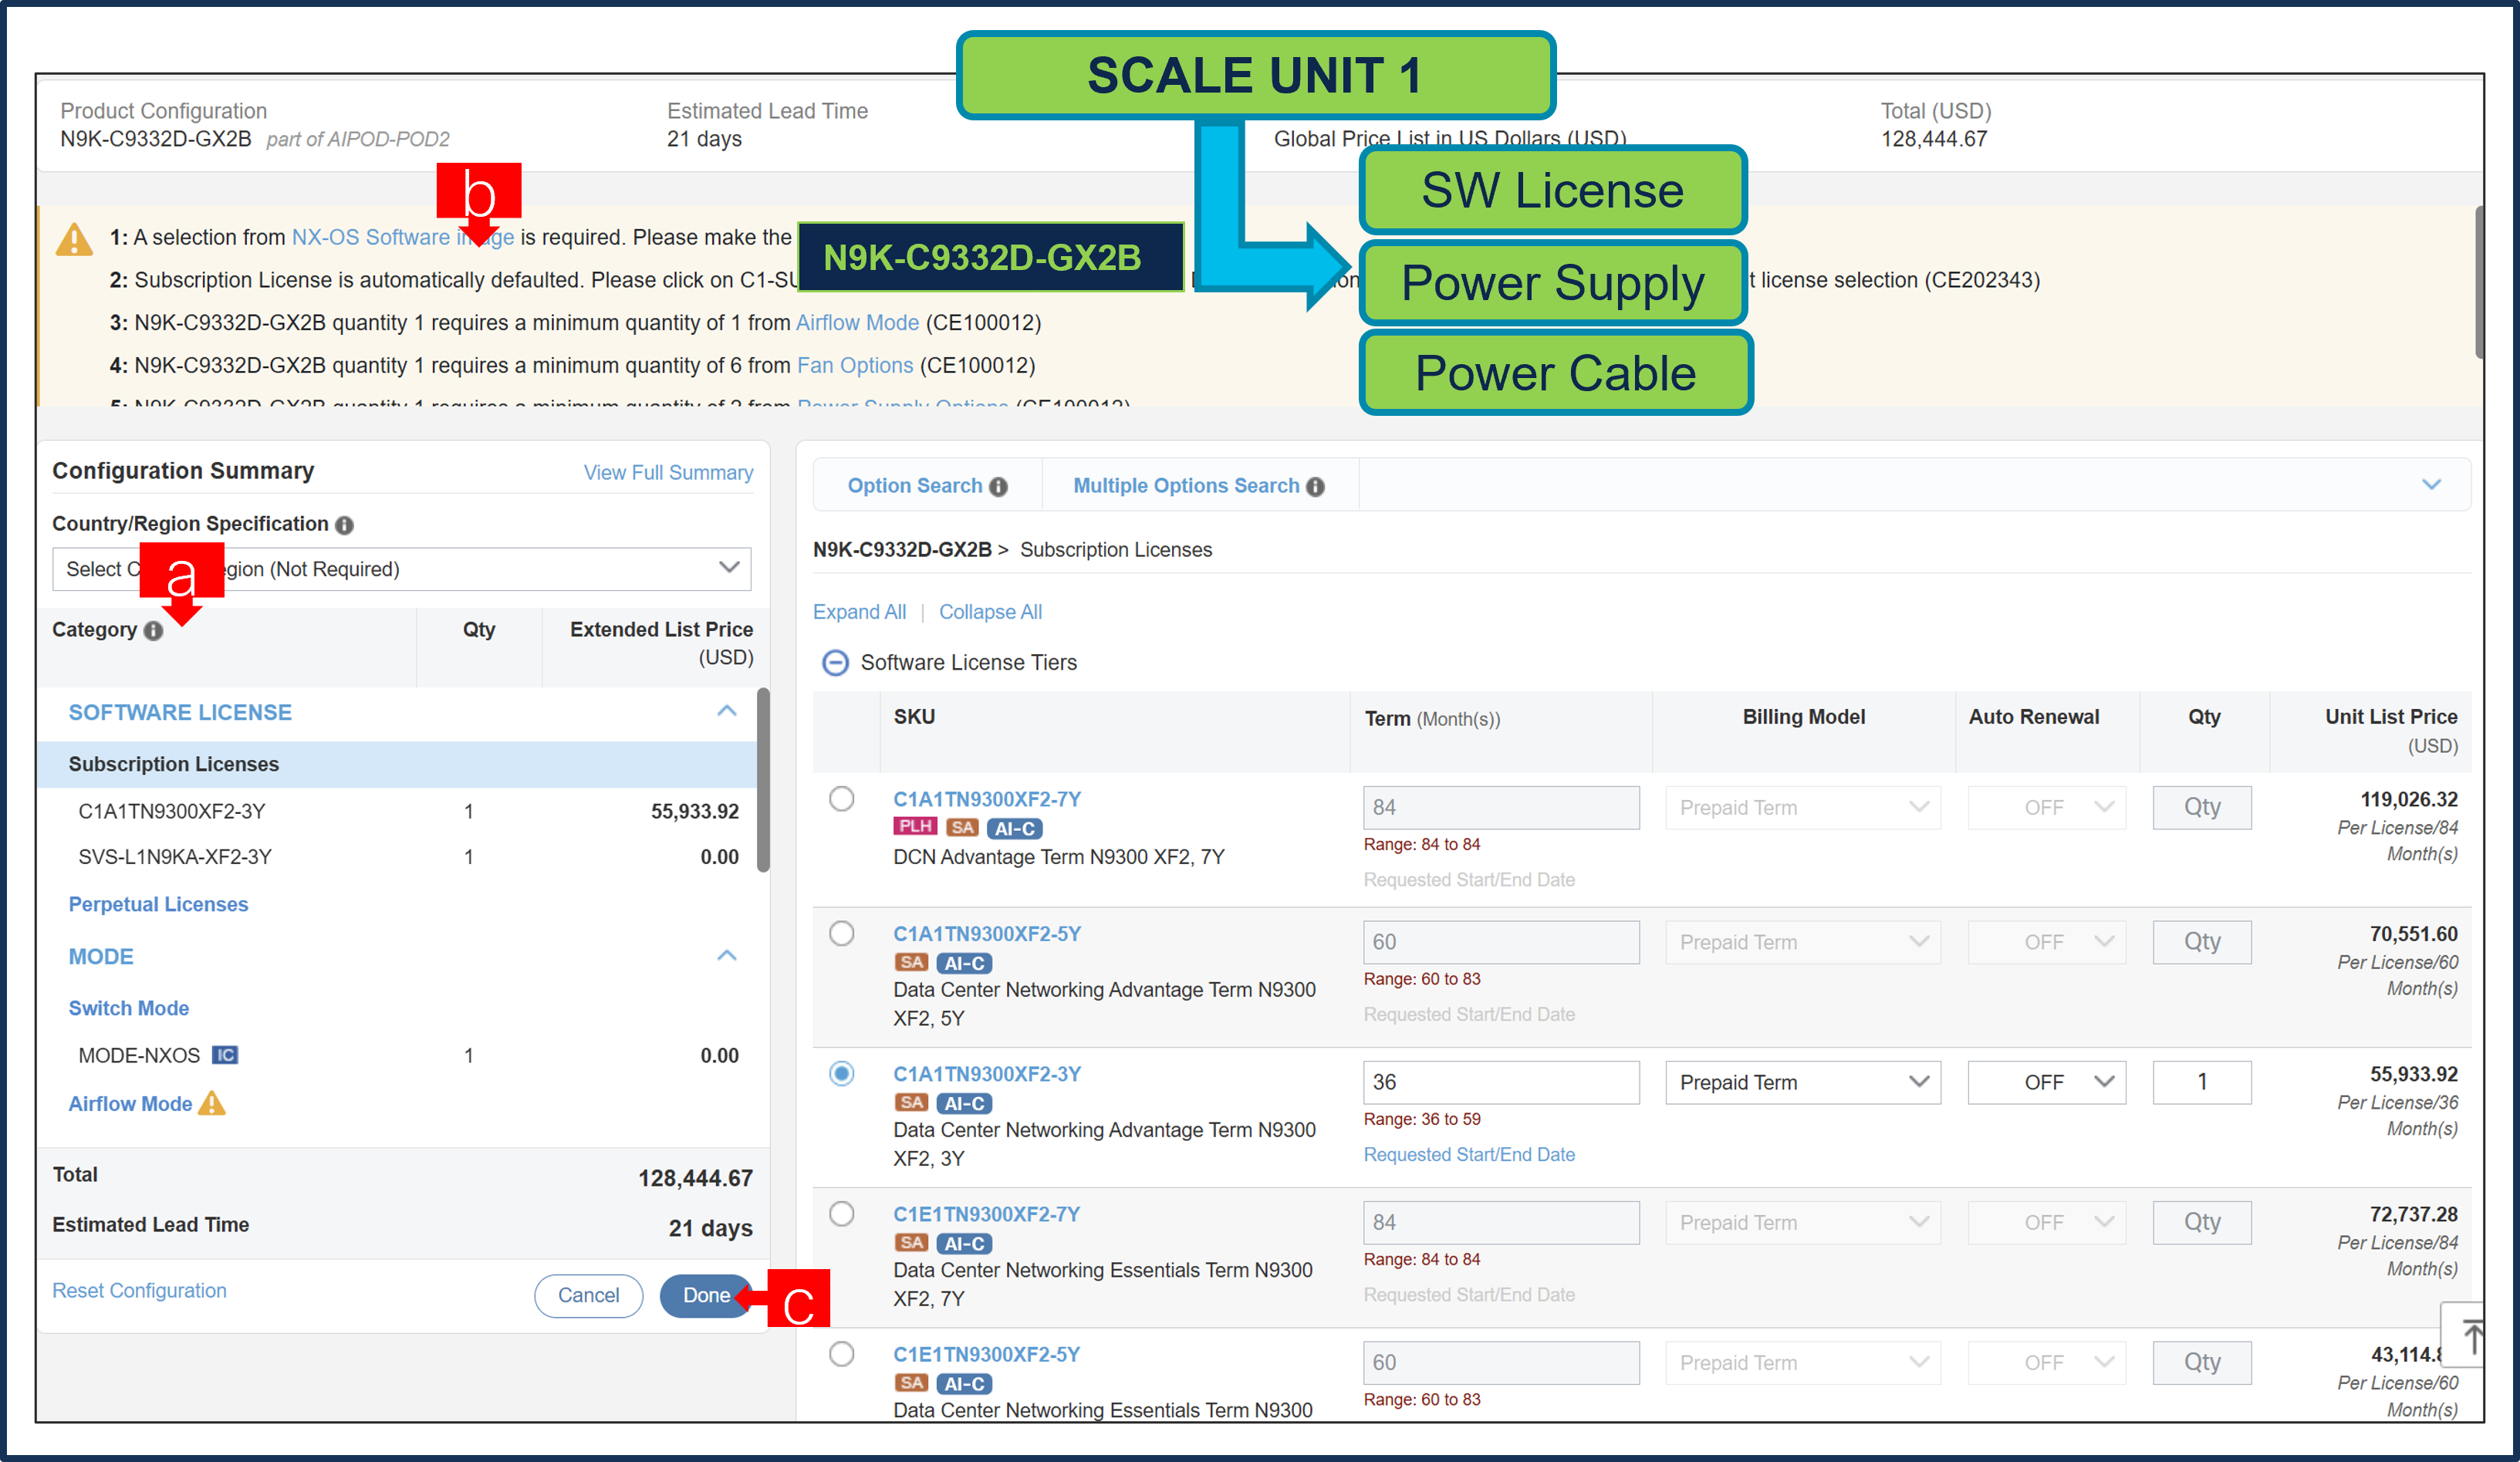
a. Configure N9K-C9332D-GX2B by making selection from category window on the left.
b. Follow warning messages to configure the minimum required option PIDs.
c. Click on “Done” when completed.
Step 7.

a. Note the status is now “Valid”
b. Increase the quantity for multiples of same configuration.
c. Click on the “Plus” to add and configure the same product with different option/quantities or select a different product.
Step 8.

a. Click on “Edit Services/Subscriptions” to edit Term Duration for HW Support.
Note: It is recommended that Term Duration for HW Support must align with Software Subscription Duration.
Step 9.

a. It is recommended that Customer selects CX Success Track Level 1 or Level 2 or Solution Support to ensure consistent SLA response time between Hardware and Software.
b. Enter the Term Duration, Click on “Apply” and “Done”
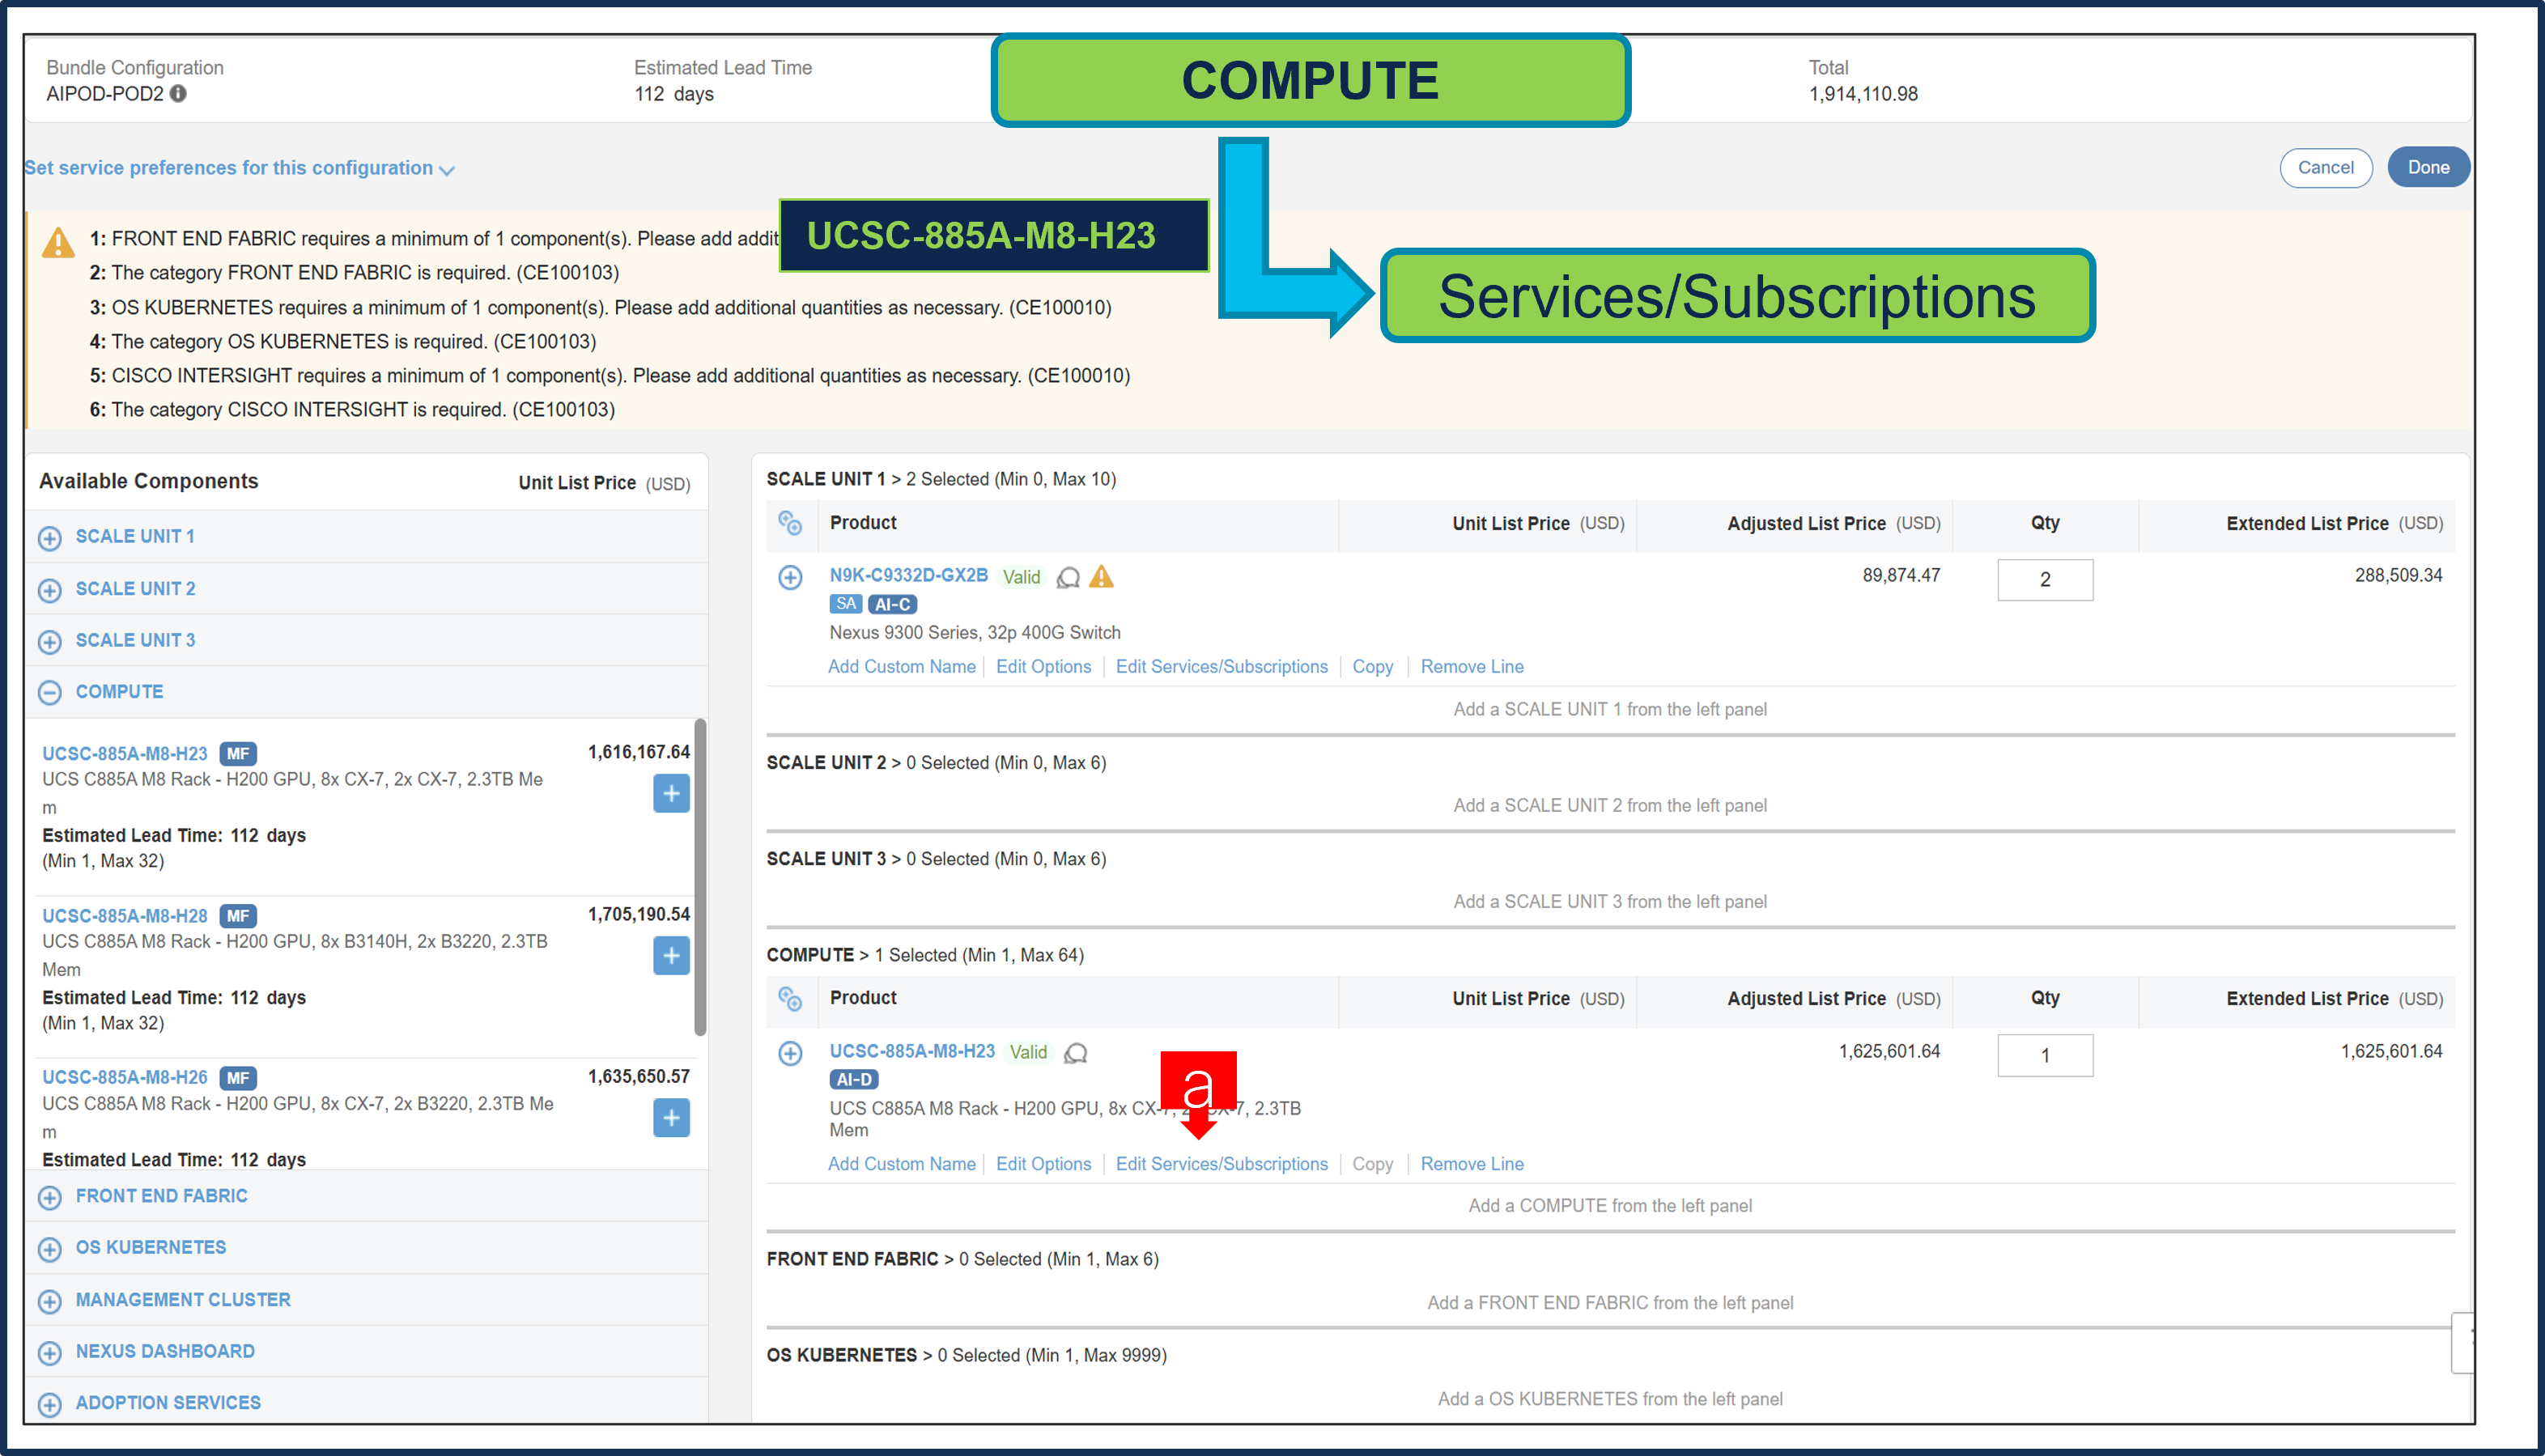
Step 10.

a. Select at least 1 Server/chassis from Category: COMPUTE under MLB by clicking the “PLUS”
b. Notice the PID: UCSC-885A-M8-H23 Status is invalid as further configuration needed.
c. Select ‘Edit Option’ to enter the configurator.
Step 11.

a. Configure PID: UCSC-885A-M8-H23 by selecting Power Cable from category window on the left.
b. Select Done when completed.
Step 12.
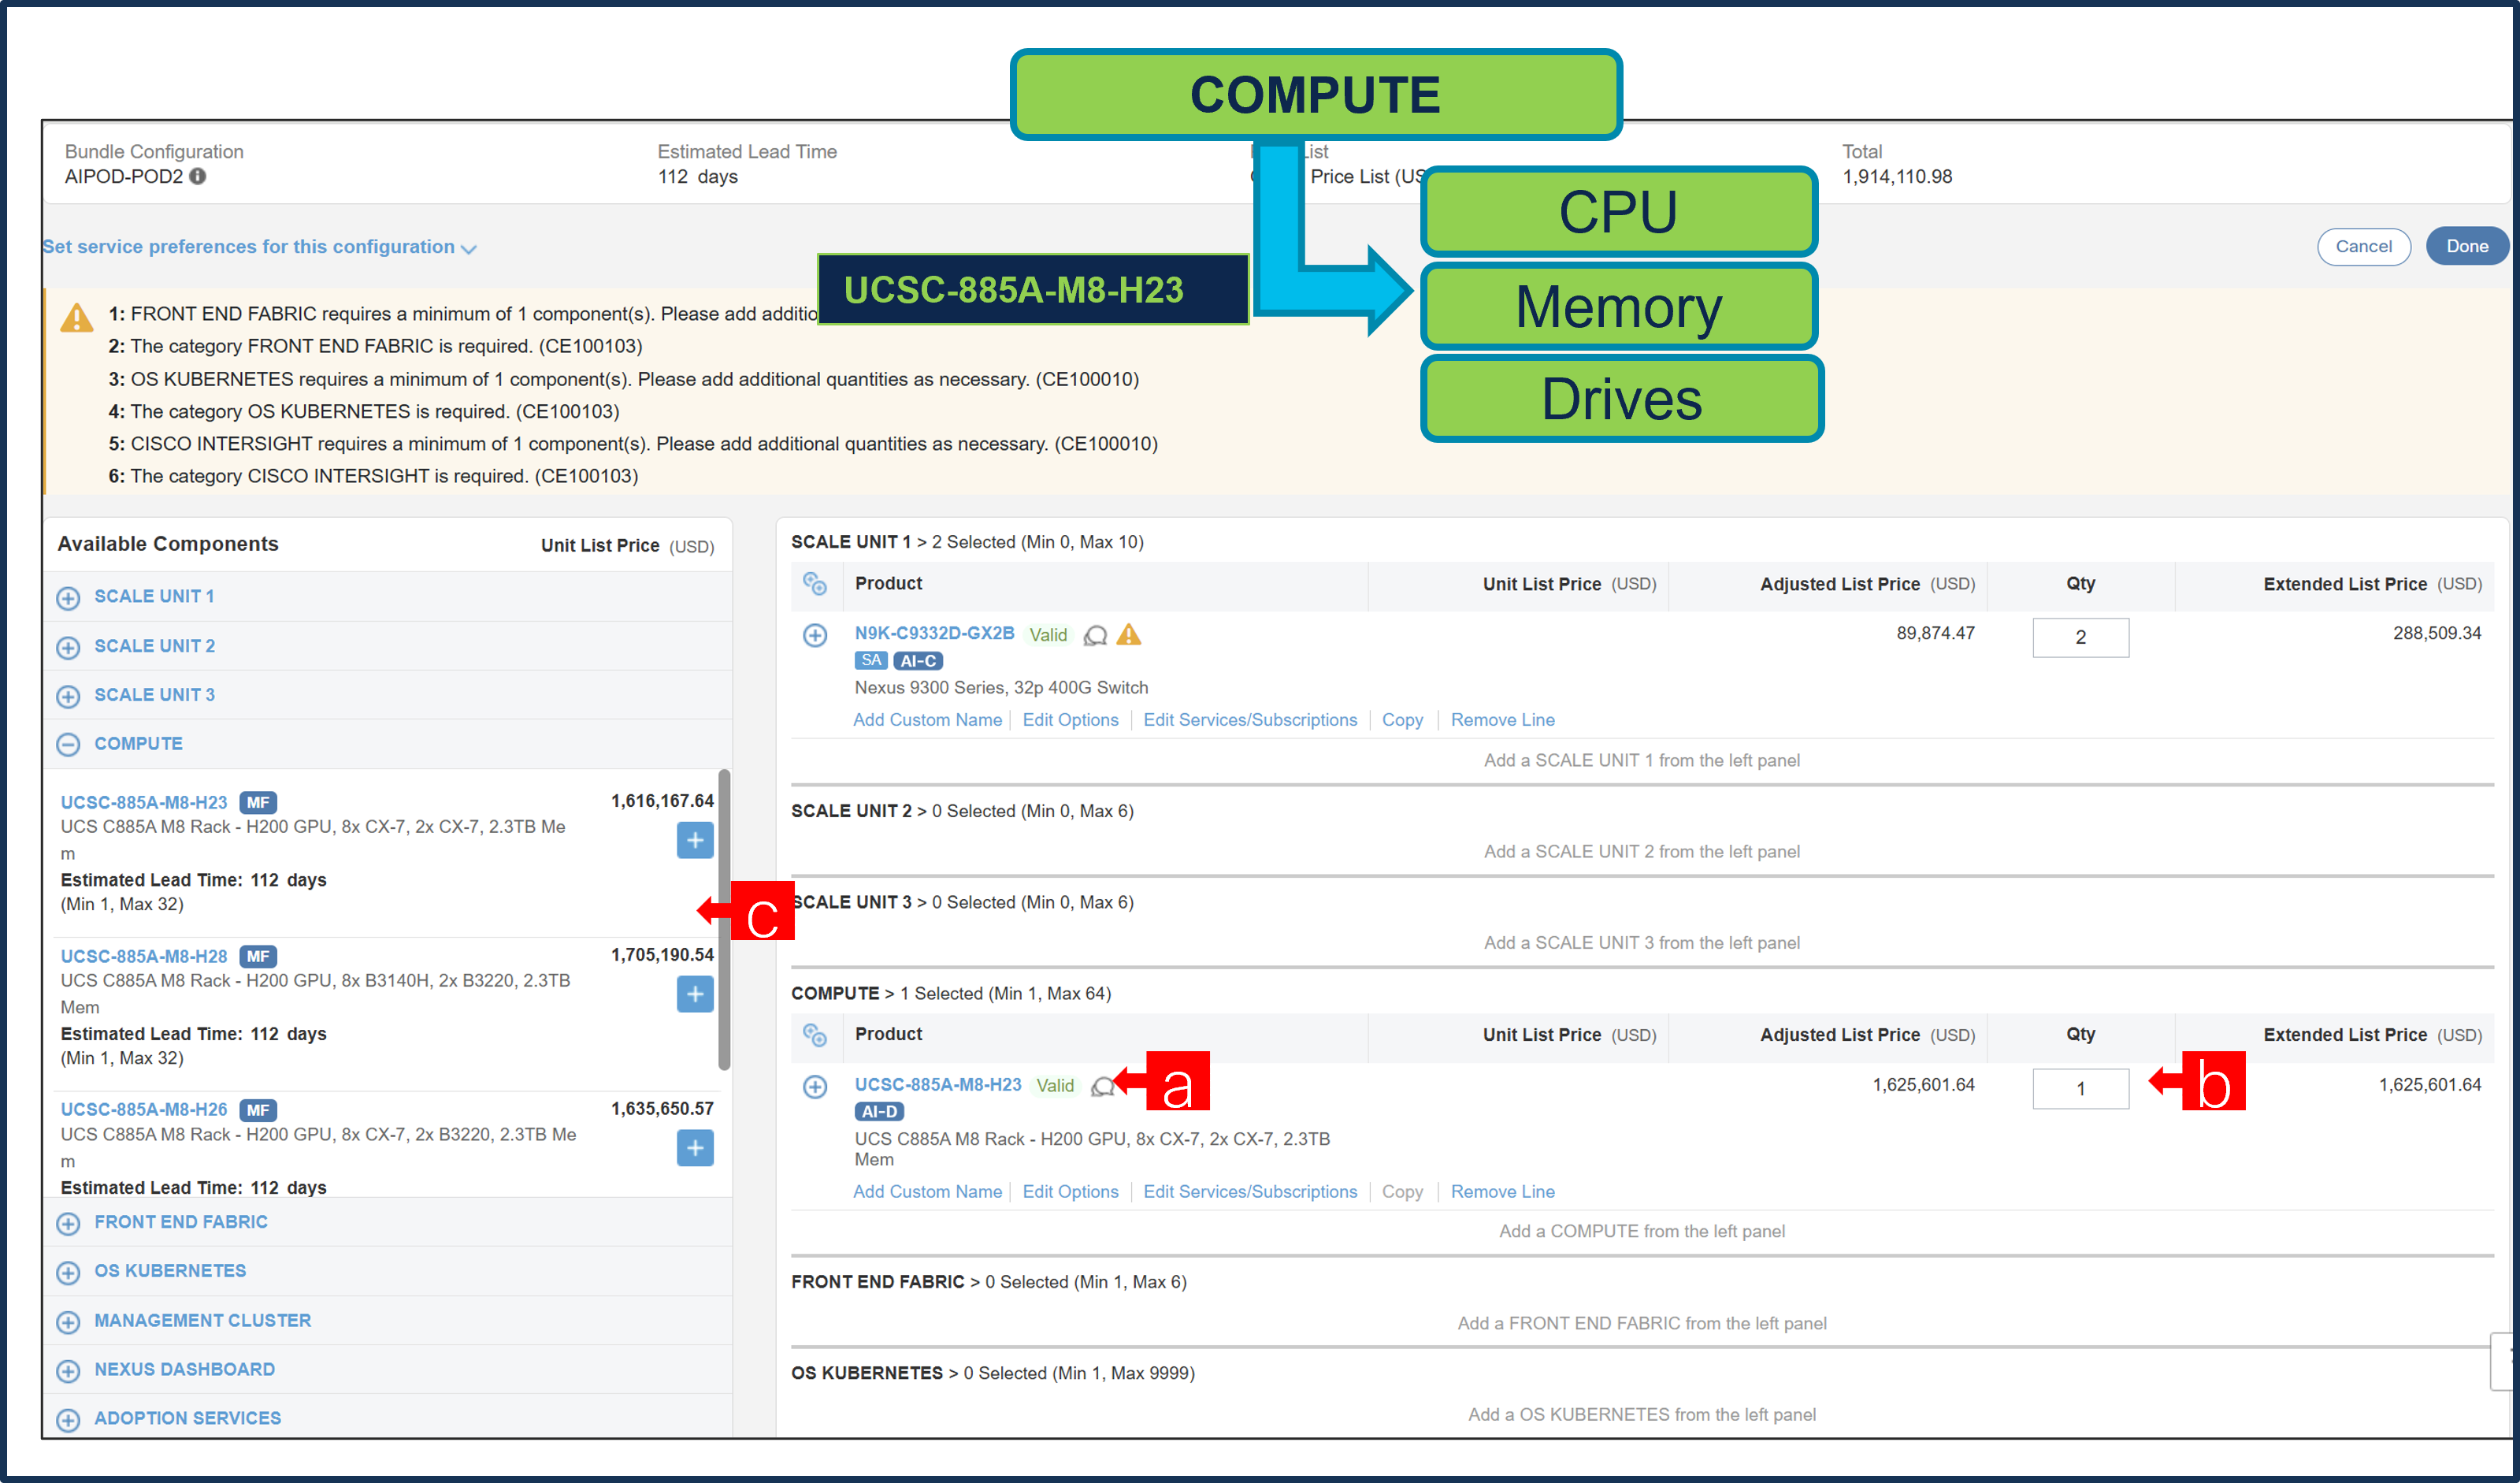
a. Note the status is now “Valid”
b. Increase the quantity for multiples of same configuration.
c. Click the “Plus” to add and configure the same product with different option/quantities.
Step 13.
a. Click on “Edit Services/Subscriptions” to edit Term Duration for HW Support.
Note: It is recommended that Term Duration for HW Support must align with Software Subscription Duration.
Step 14.

a. It is recommended that Customer selects CX Success Track Level 1 or Level 2 or Solution Support to ensure consistent SLA response time between Hardware and Software.
b. Enter the Term Duration, Click on “Apply” and “Done”
Step 15.
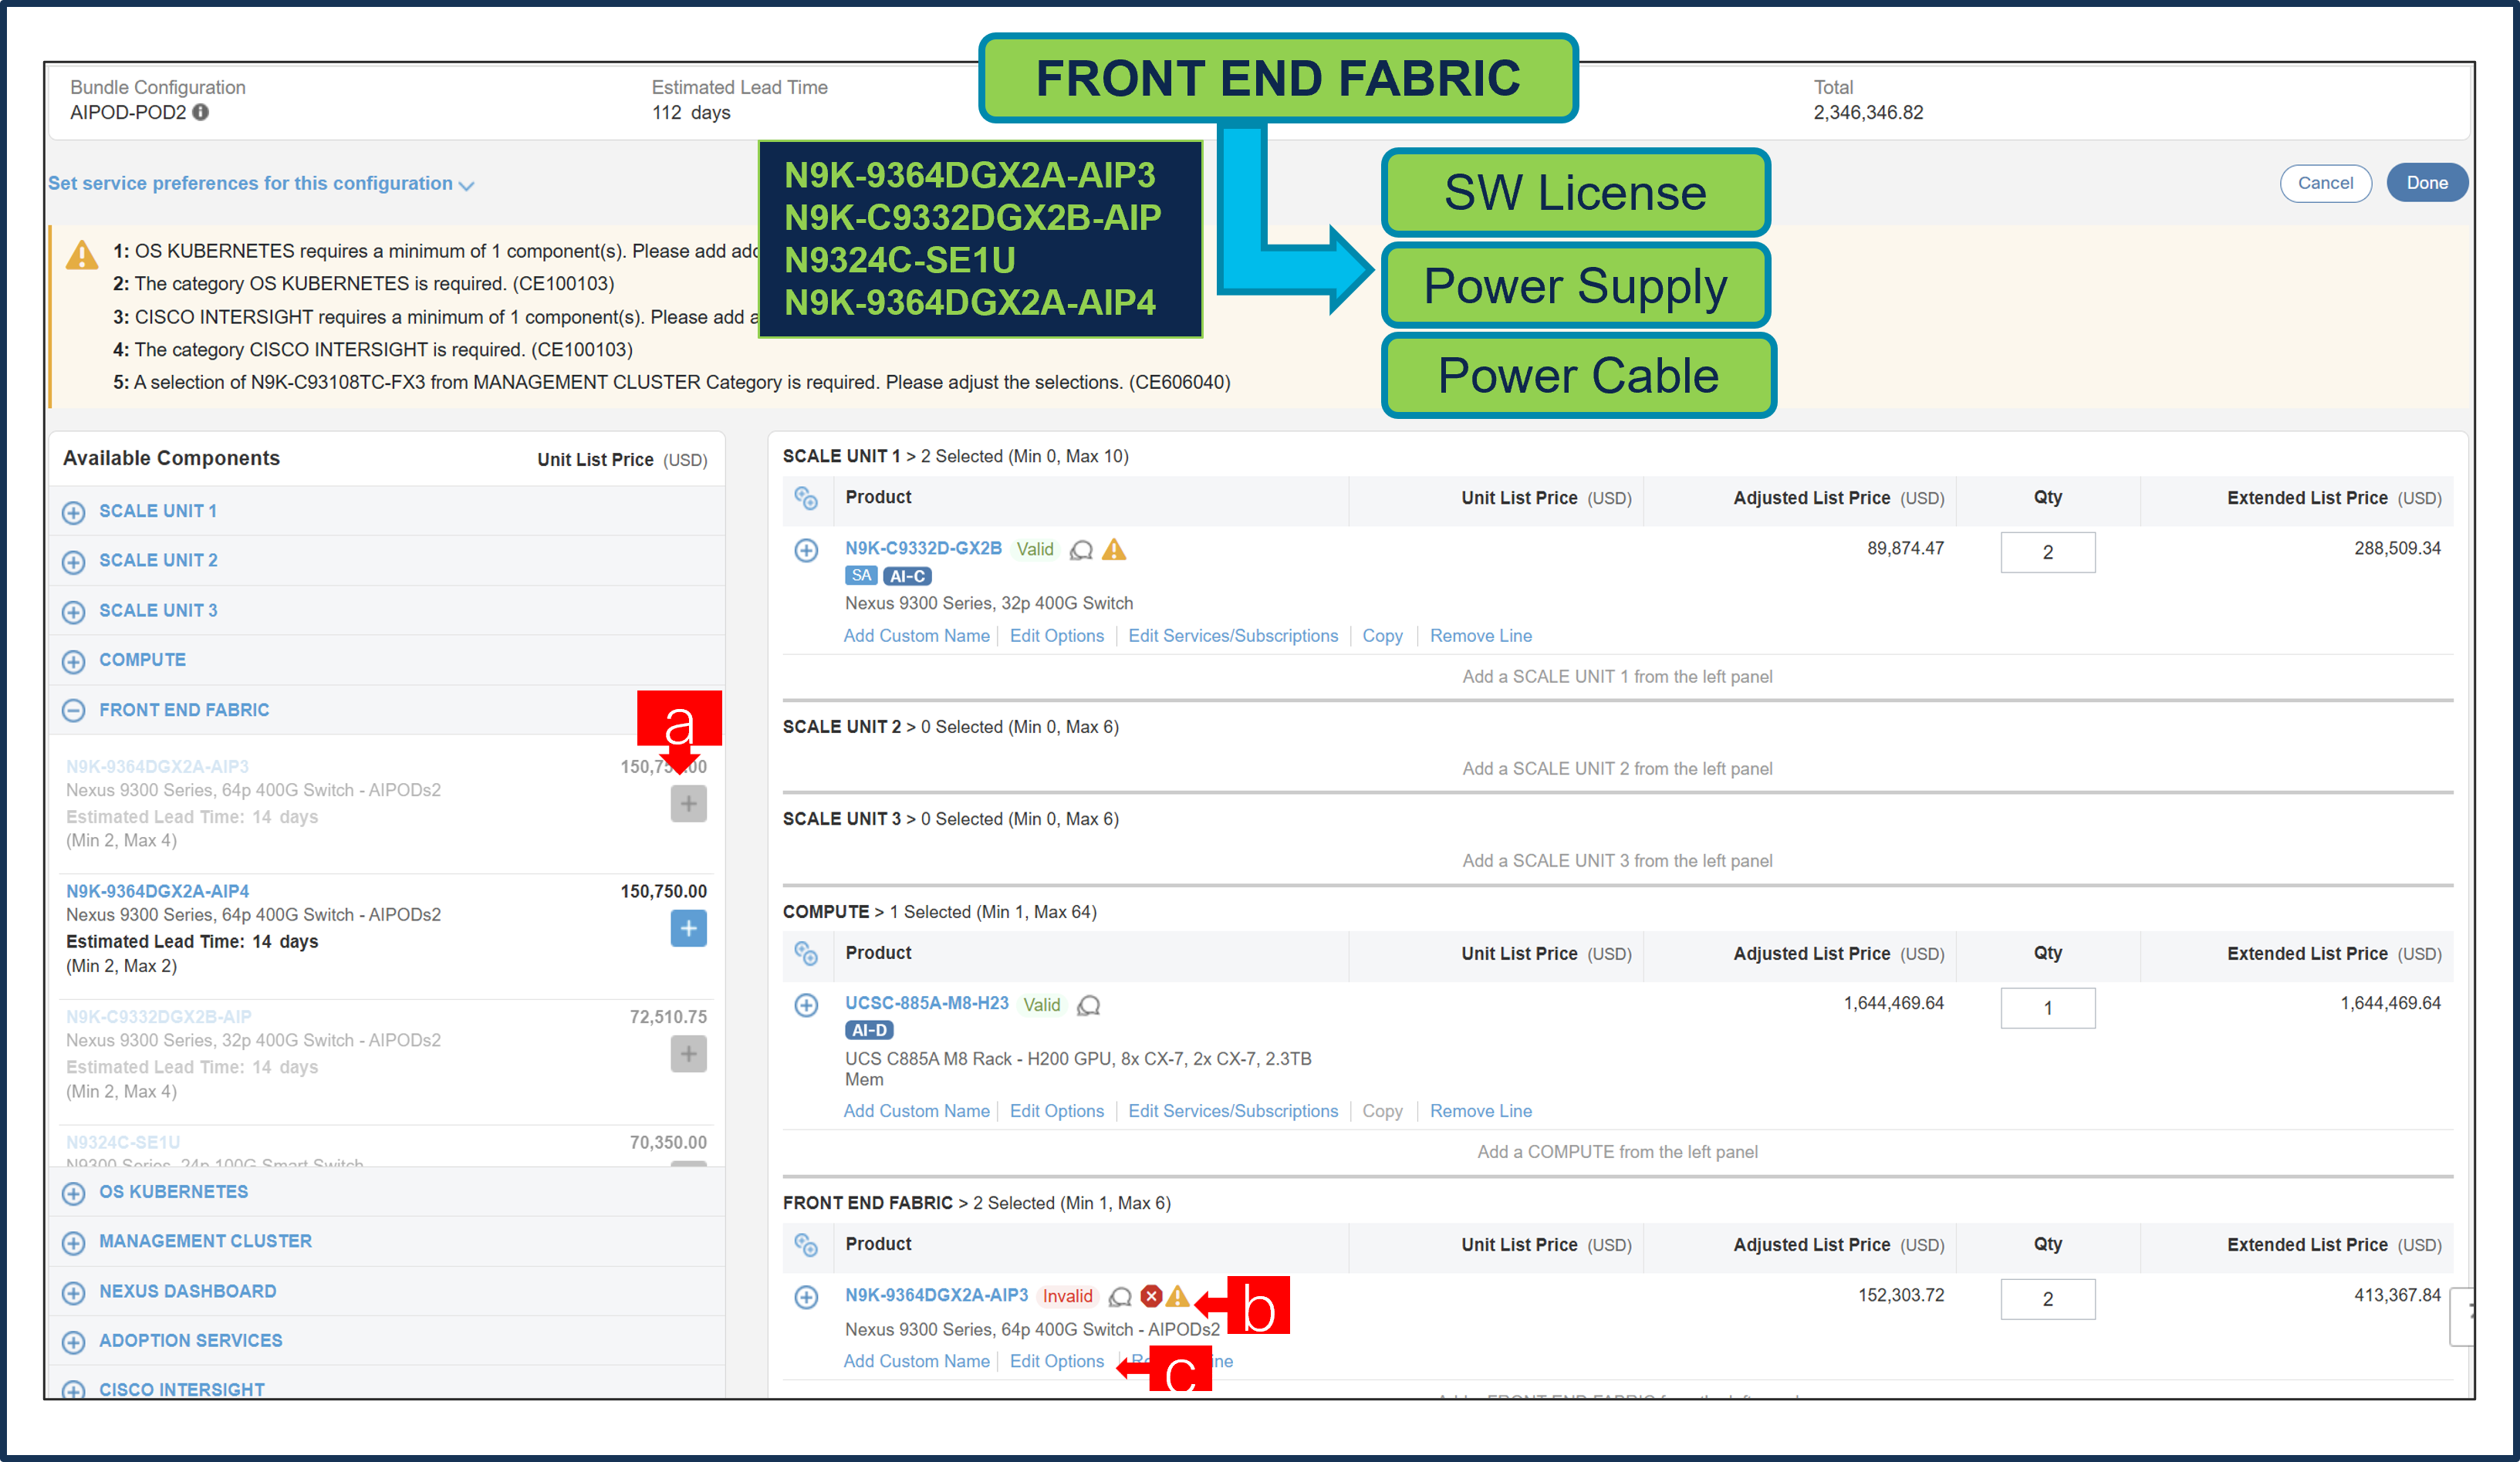
a. Select at least 1 pair of Leaf Switch Node from Category: FRONT END FABRIC under MLB by clicking the “PLUS”
b. Notice the N9K-C9364DGX2A-AIP3 status is “invalid” as further configuration needed.
c. Click on “Edit Options” to enter the configurator.
Step 16.

a. Configure N9K-C9364DGX2A-AIP3 by making selection from the category window on the left.
b. Follow warning messages to configure the minimum required option PIDs.
c. Click on “Done” when completed.
Step 17.
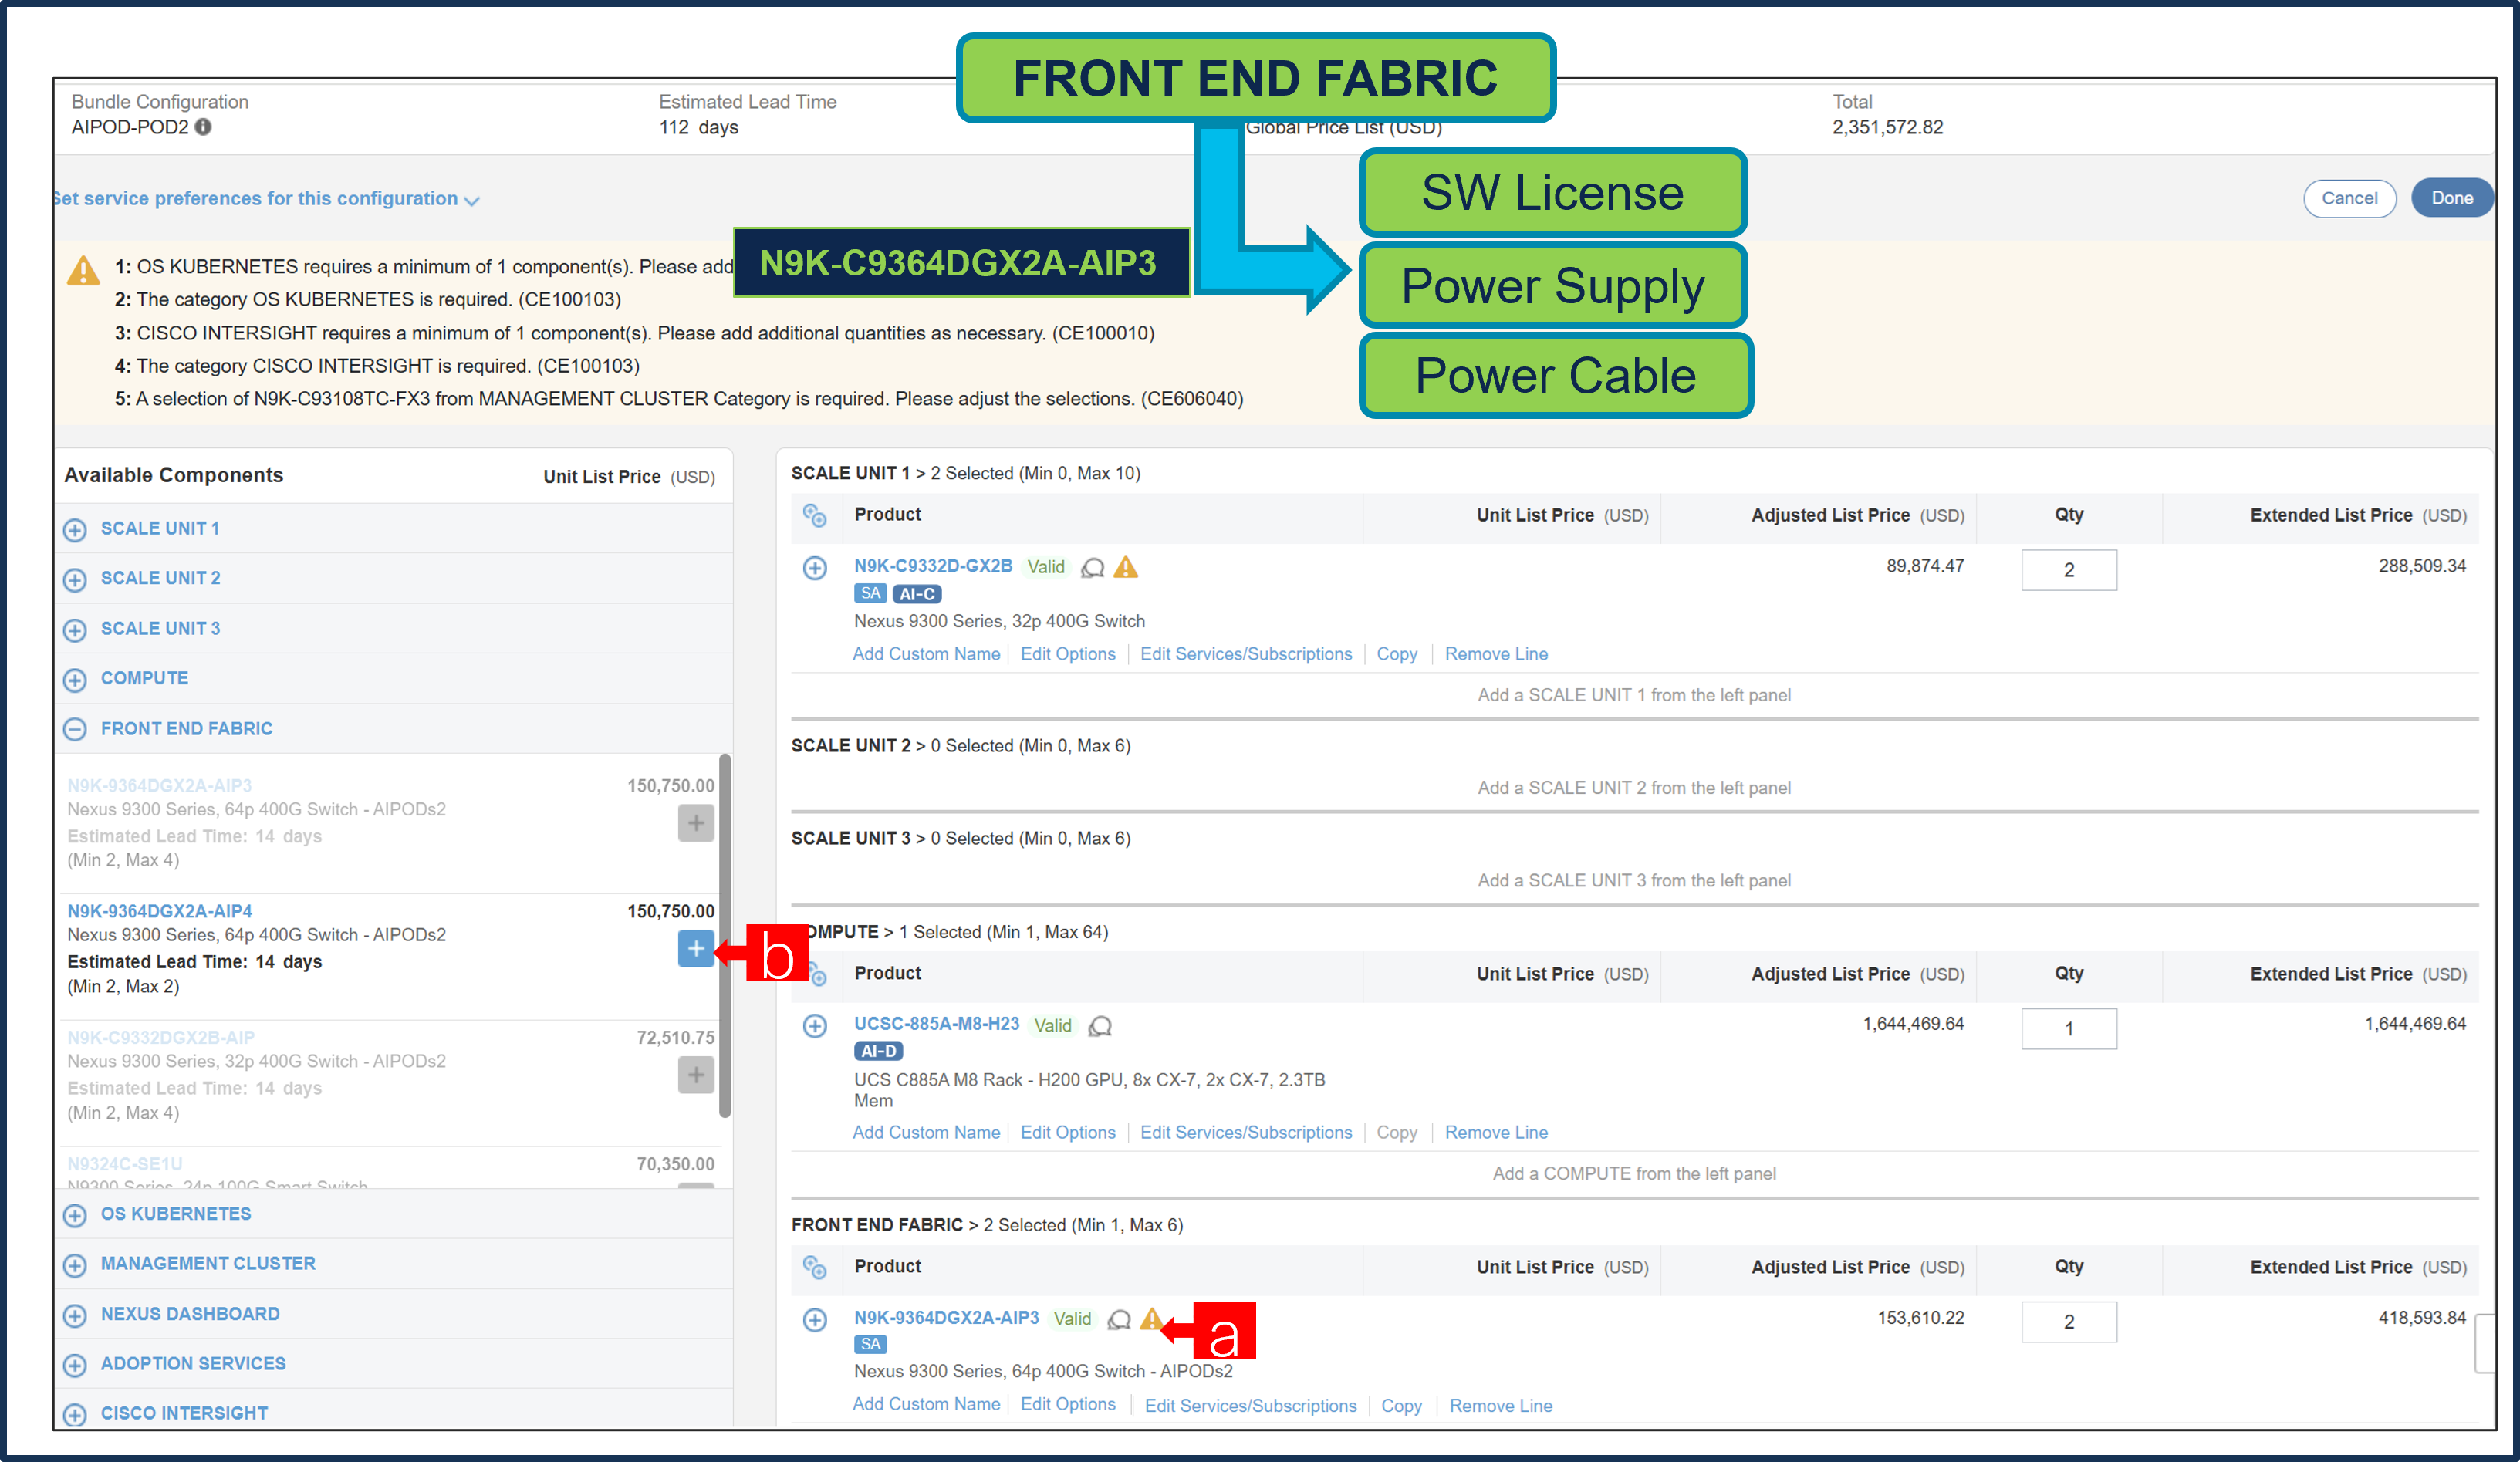
a. Note the status is now “Valid”
b. Spine Switch under Category: FRONT END FABRIC is option selection and User can select the click “Plus” to add and configure pair of Spine Switch.
Step 18.

a. Click on “Edit Services/Subscriptions” to edit Term Duration for HW Support.
Note: It is recommended that Term Duration for HW Support must align with Software Subscription Duration.
Step 19.

a. It is recommended that Customer selects CX Success Track Level 1 or Level 2 or Solution Support to ensure consistent SLA response time between Hardware and Software.
b. Enter the Term Duration, Click on “Apply” and “Done”
Step 20.

a. Please select appropriate QTY of RedHat OpenShift License from OS KUBERNETES Category.
b. Click on Select Options to Configure.
Step 21.

a. MANAGEMENT CLUSTER Category is an optional selection and can be selected by clicking the “PLUS”
Note: If this Server is selected, then must select Management Switch option: N9K-C93108TC-FX3.
Step 22.

a. NEXUS DASHBOARD Category is an optional selection and can be selected by clicking the “PLUS”
Step 23.

a. Please select at least one option from the ADOPTION SERVICES Category. Users can select either Cisco CX Service or MINT Services or can optout.
Step 24.
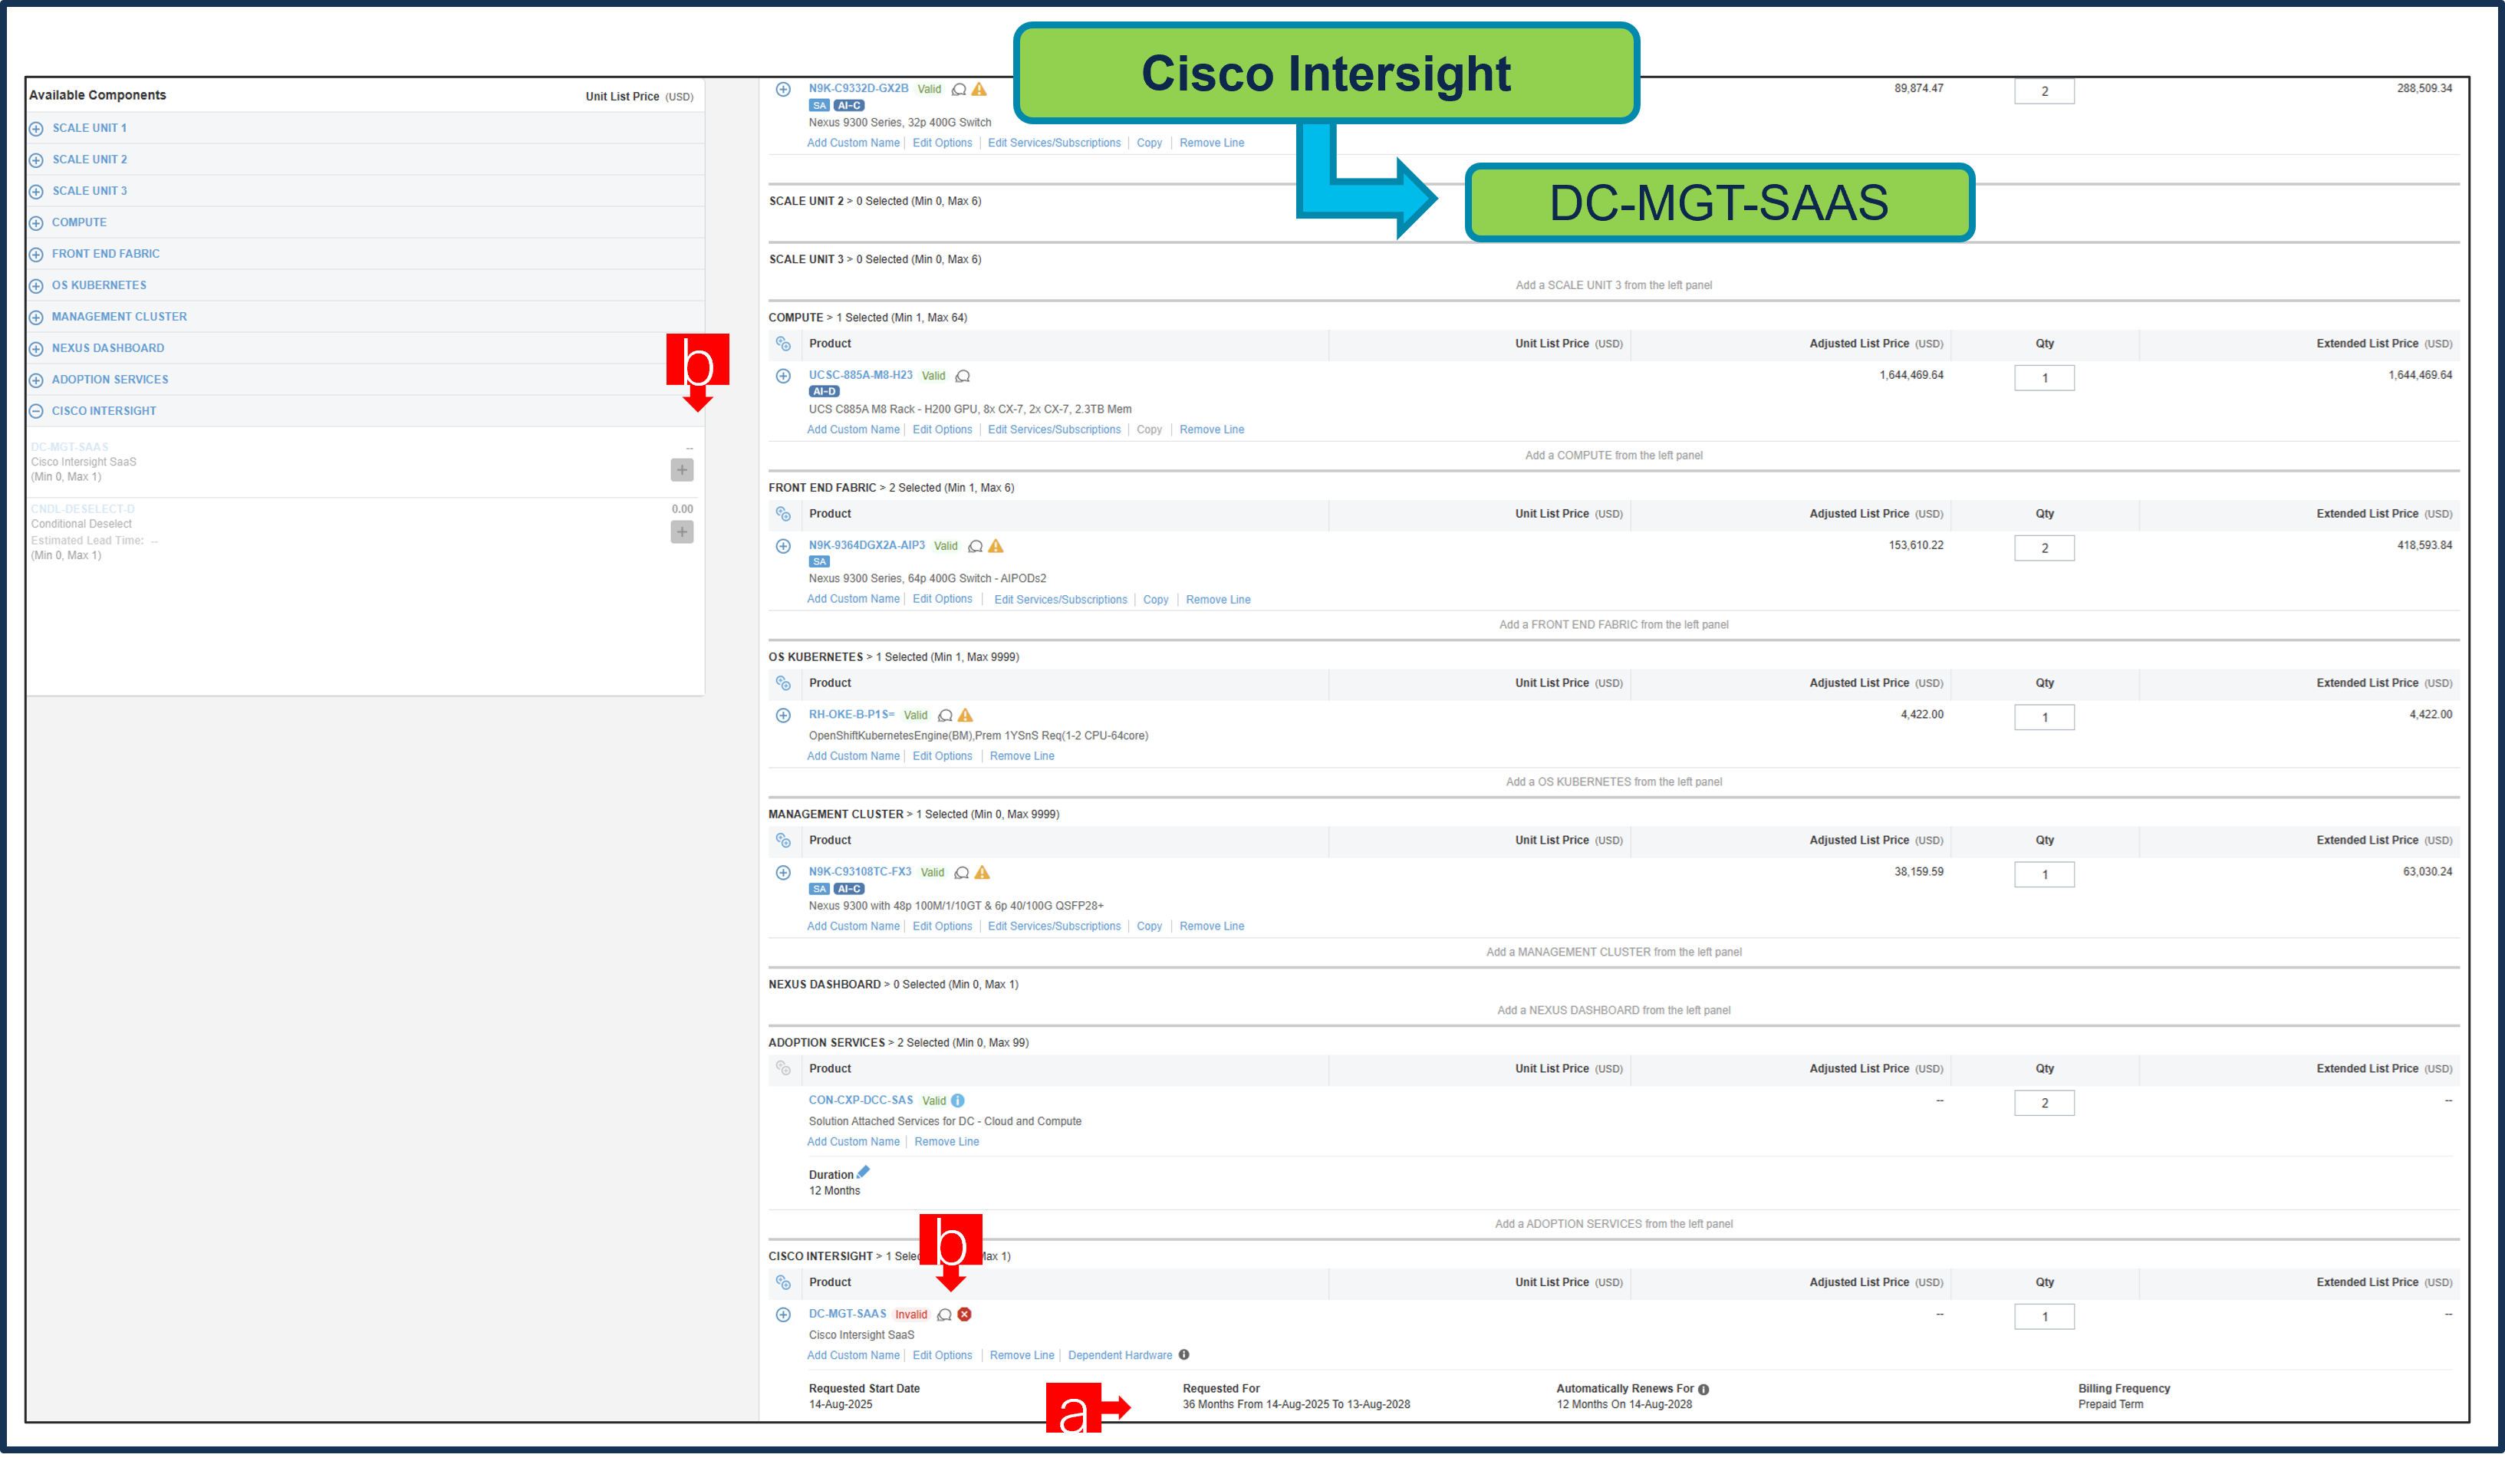
a. It is recommended that Term Duration for HW Support align with Software Subscription Duration.
b. Intersight is a required selection, if you have not previously purchased Cisco Intersight Software. Please make selection by clicking “PLUS”. Click on Edit Options to configure.
Step 25.
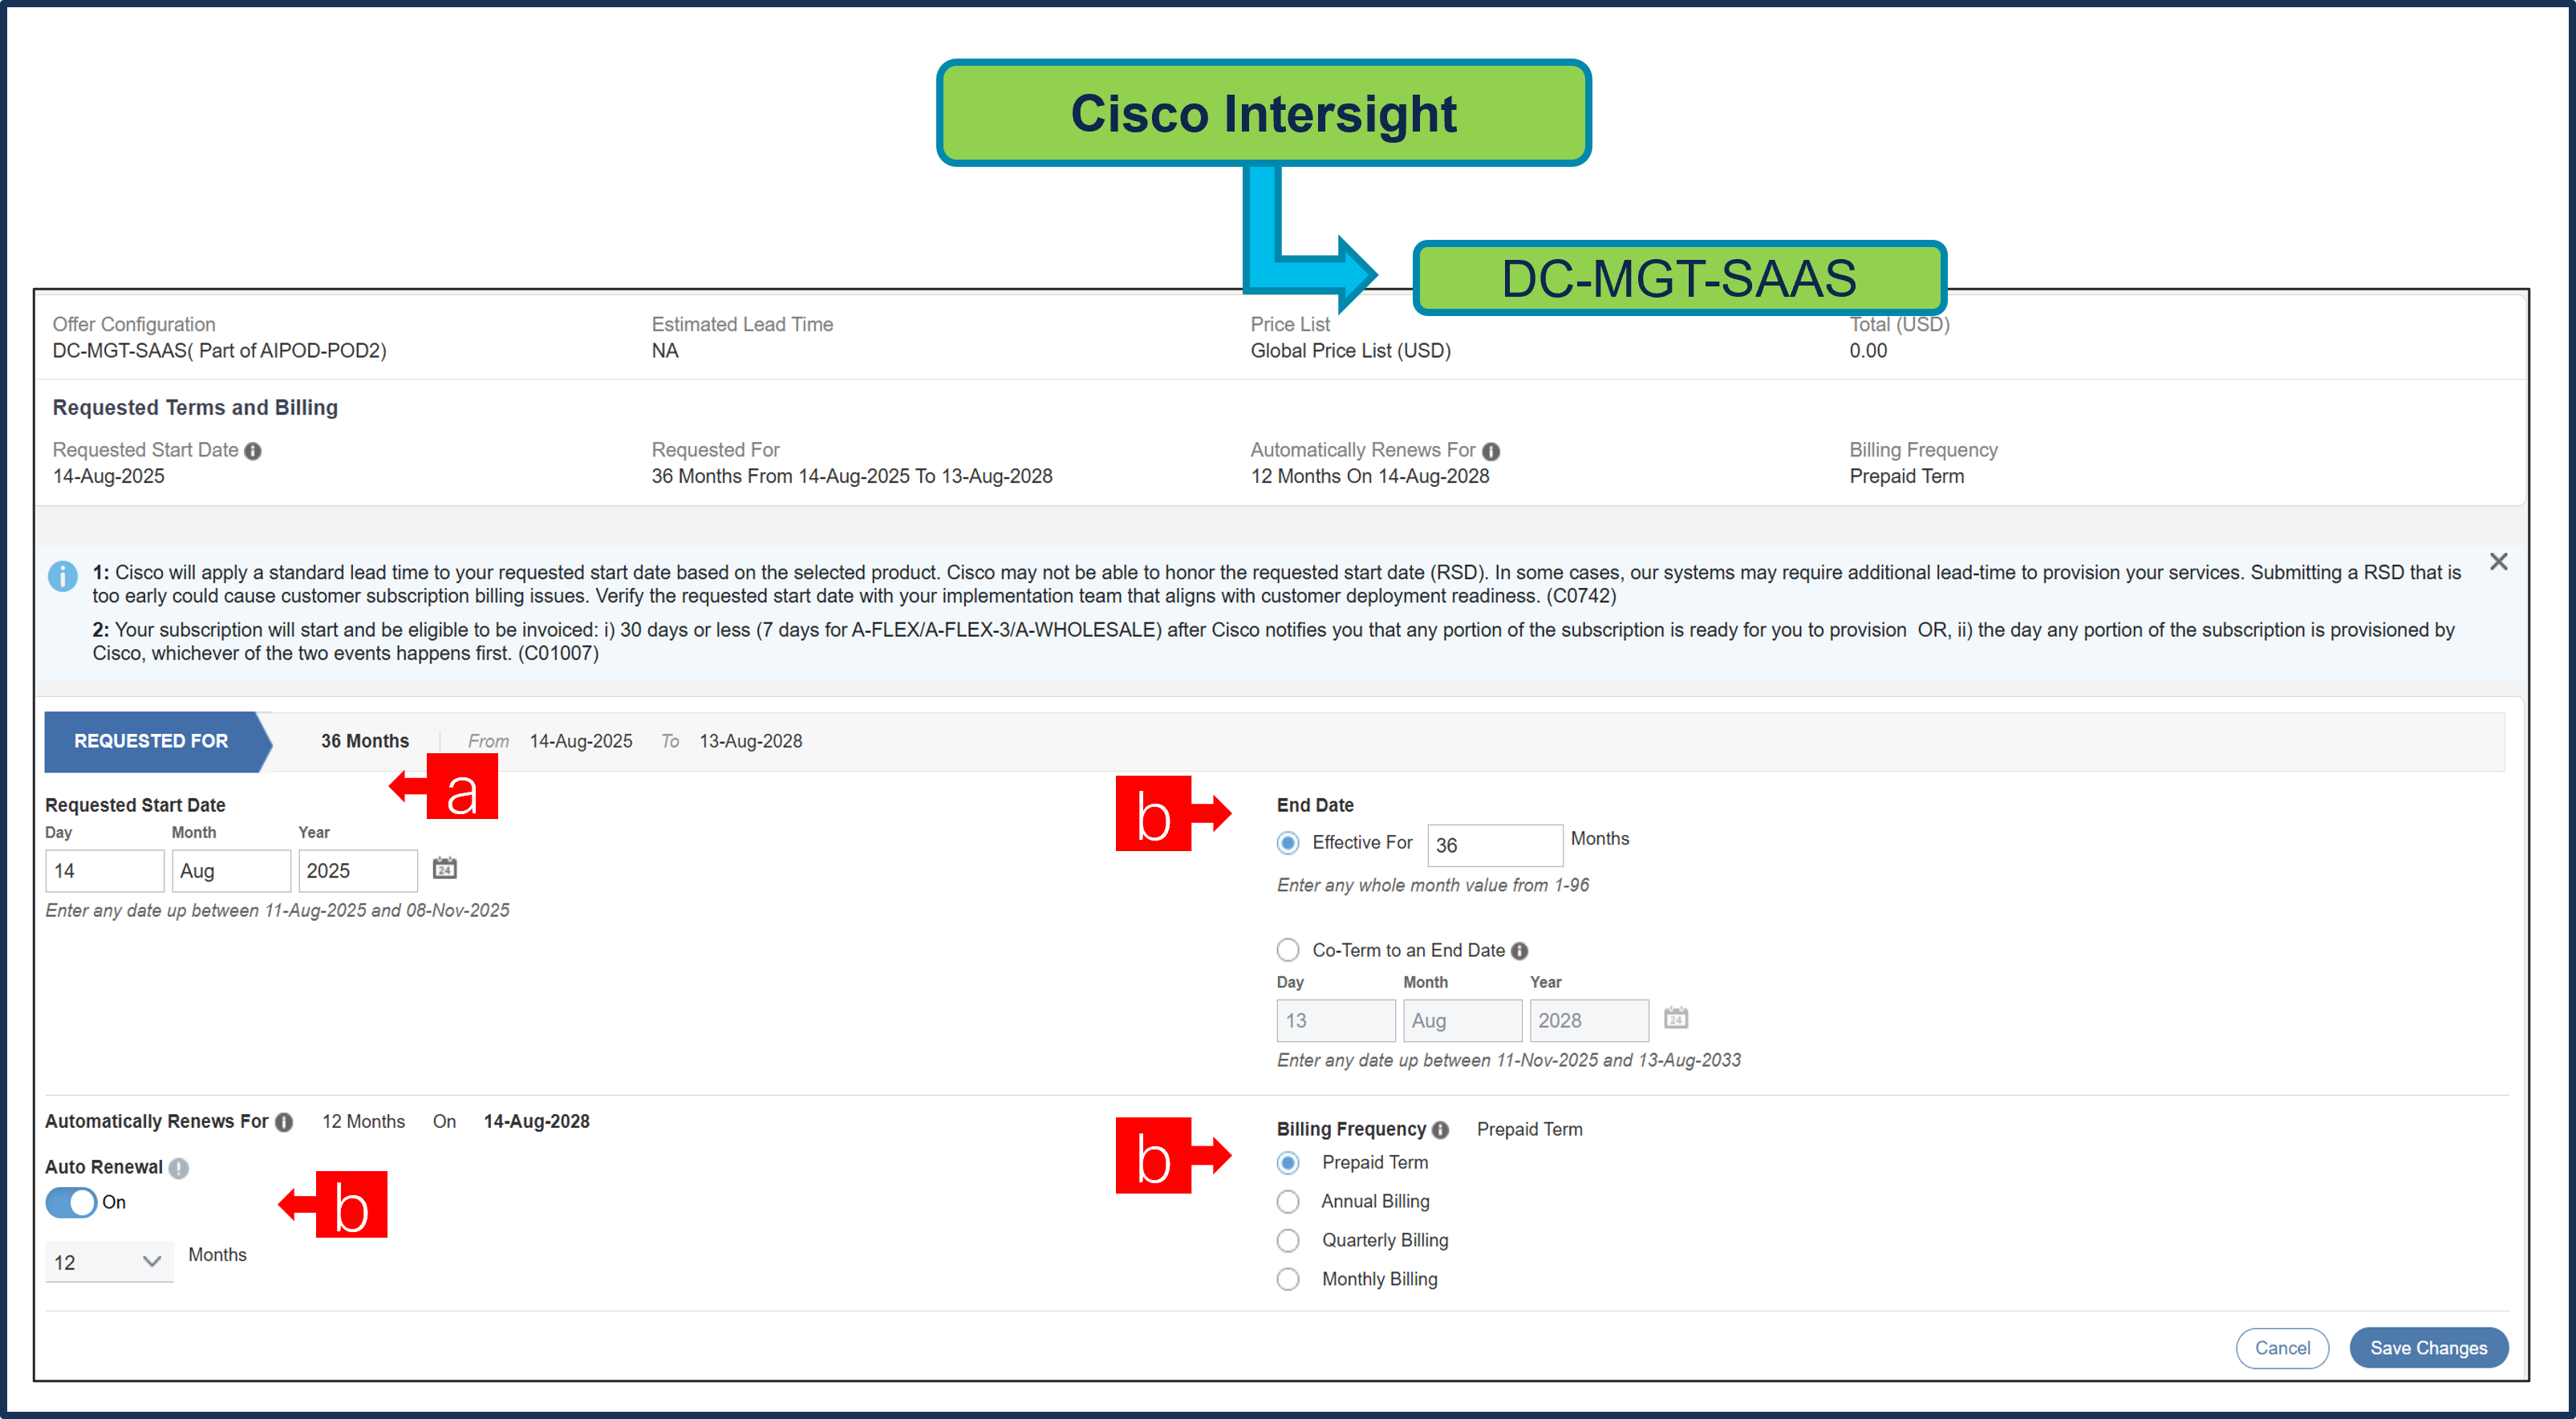
a. Requested Start Date (RSD) is now dependent on HW Ship Date and will automatically starts when the HW ships. If you change the RSD, the Software will start either on the RSD you picked or the HW Ship Date whichever is later.
b. End Date (duration in months) is defaulted to 36 Months, Auto Renewal (on/off) is defaulted to Off and Billing Frequency is defaulted to Prepaid Term. You can still change the setting accordingly.
Step 26.

a. The quantity of Cisco Intersight 2.0 Infrastructure Services License under Offer: DC-MGT-SAAS should be equal to the quantity of Server selected. Enter the quantity.
Step 27.

a. The Cisco Intersight License comes with separate Support. Basic Embedded Support is the default selection. Customer may upgrade to Solution Support, CX Success Track L1 and L2 (supported only with SAAS) if needed.
Step 28.

a. Configuration for MLB is completed when status of each Product is Valid, and warning messages are cleared.
b. Click on the “PLUS” to expand and view the selections made for each Product.
c. Click on “Done” to complete MLB configuration.
Step 29.
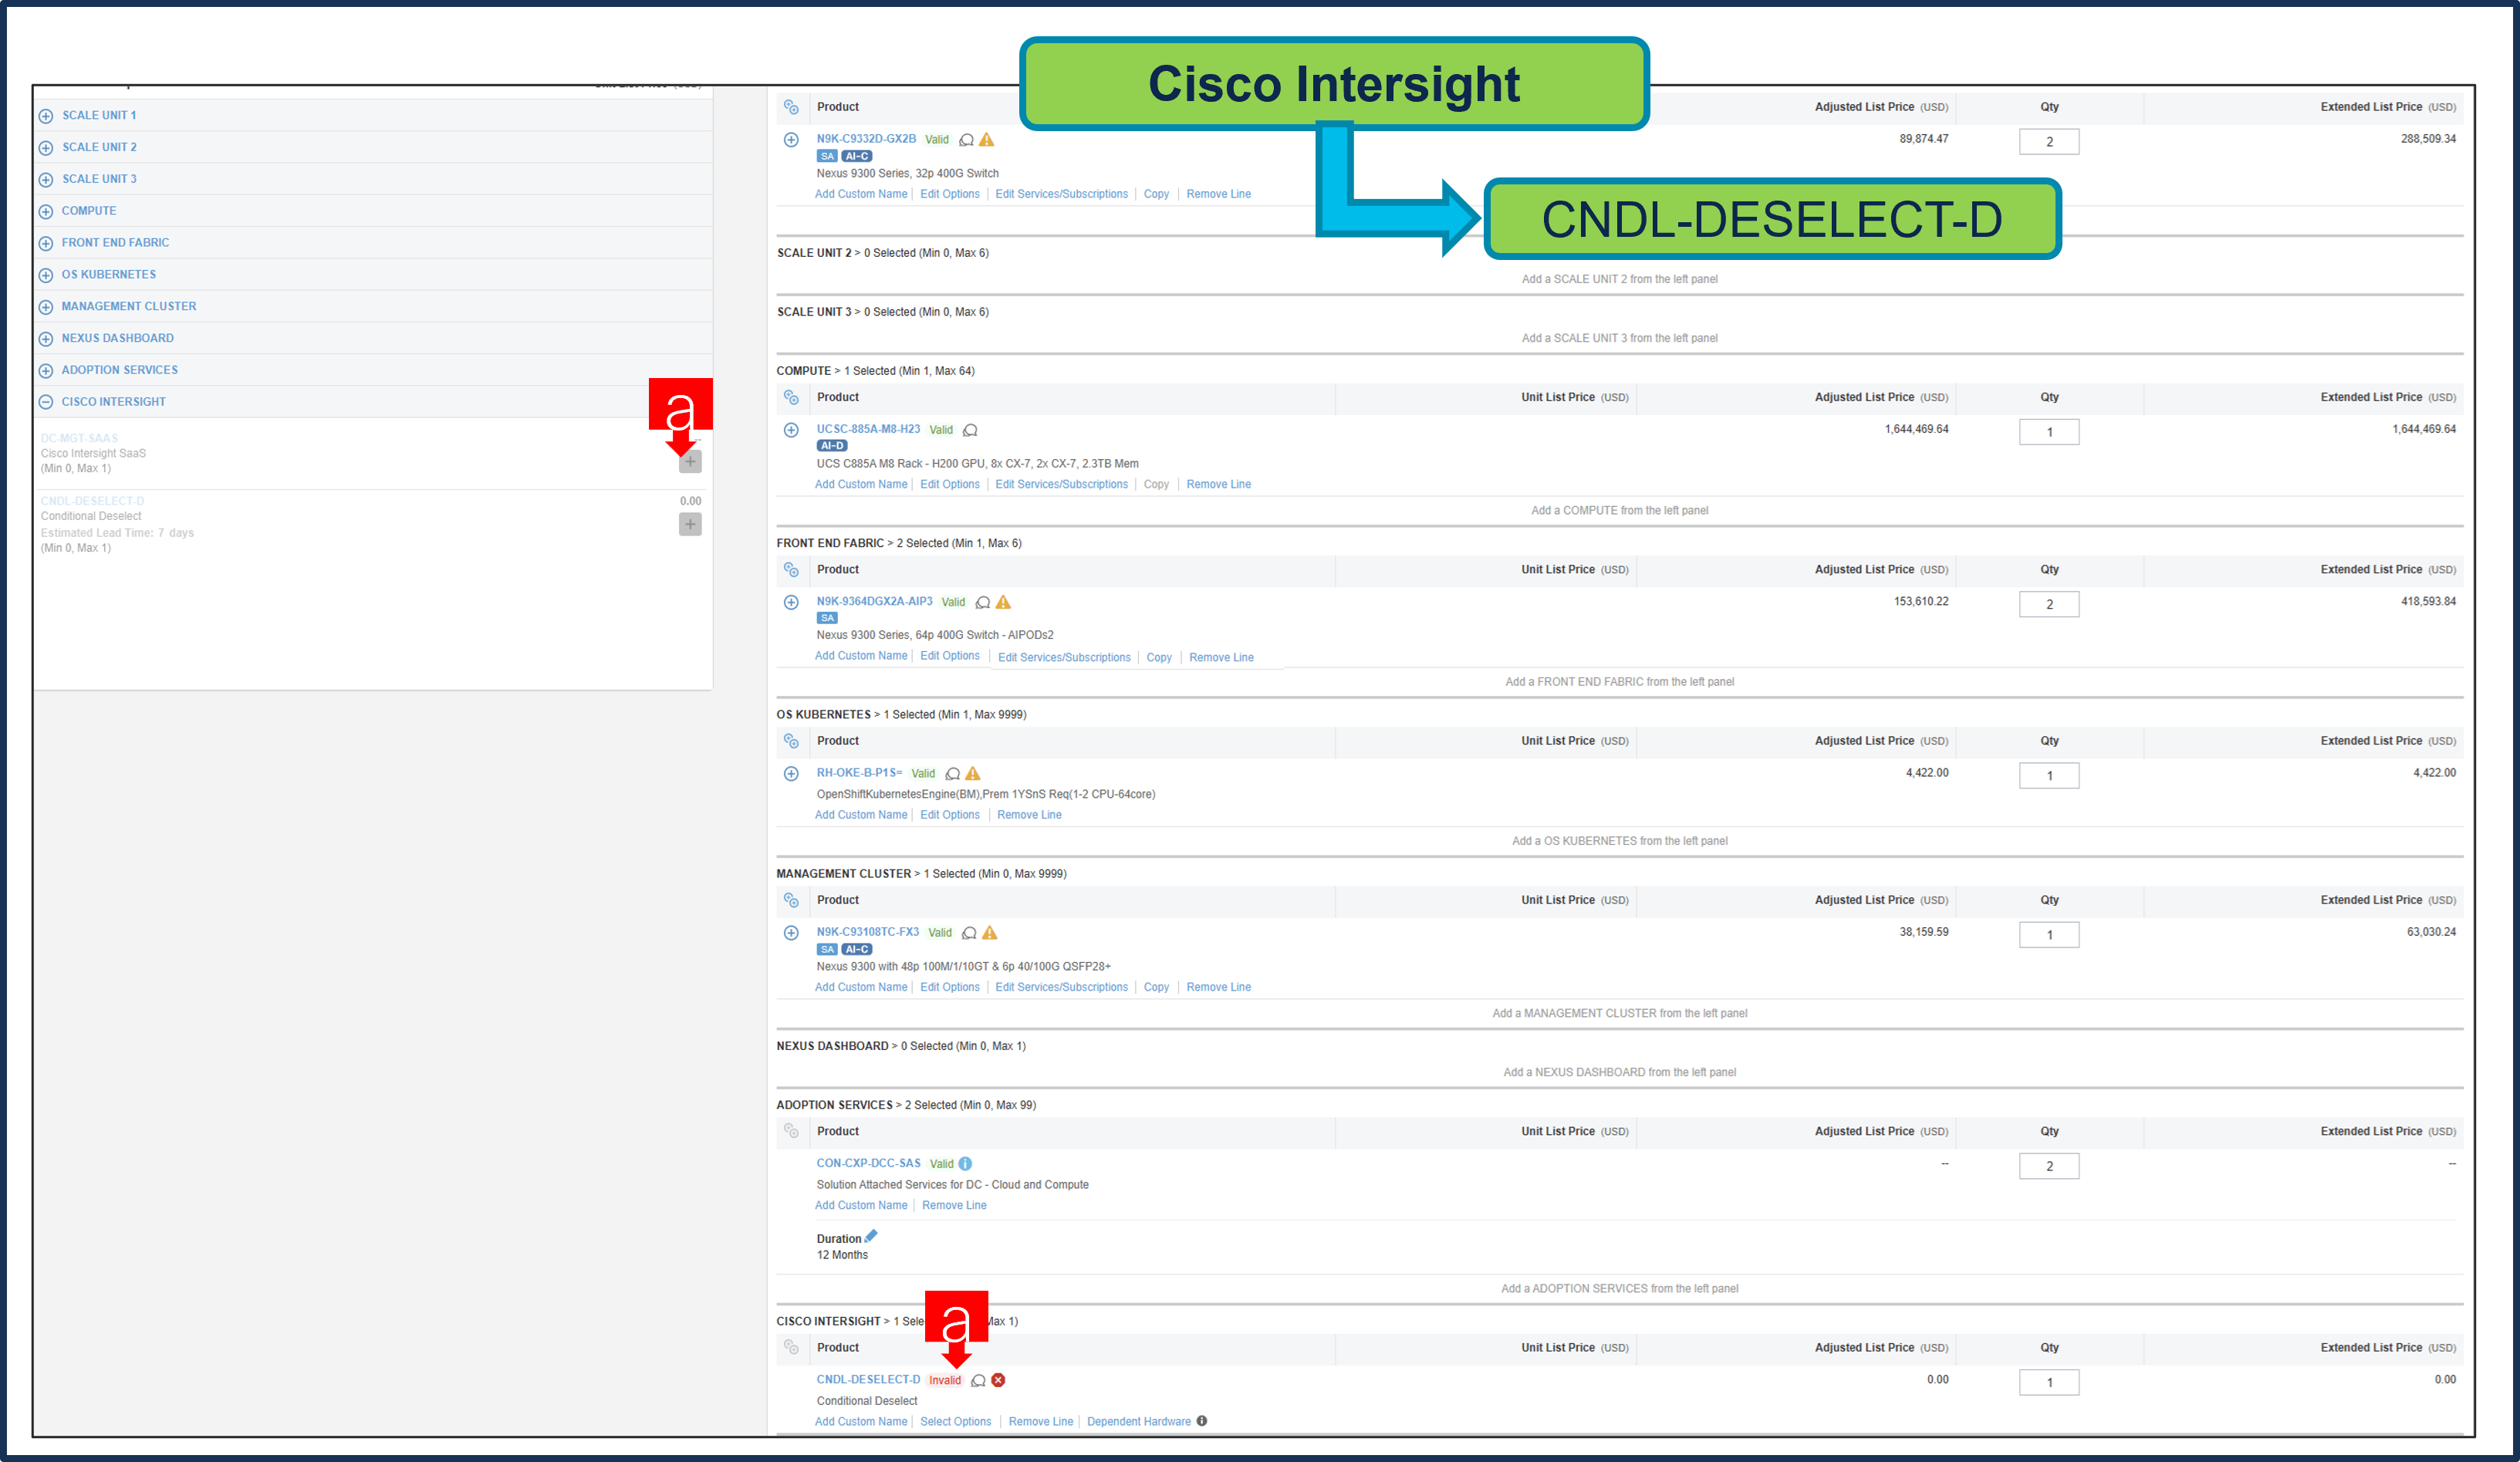
a. CNDL-DESELECT-D is meant to select only if Customer has already purchased Cisco Intersight License via EA Contract or order is for Disti Fulfillment.
Step 30.

a. Please select appropriate Reason Code
Step 31.
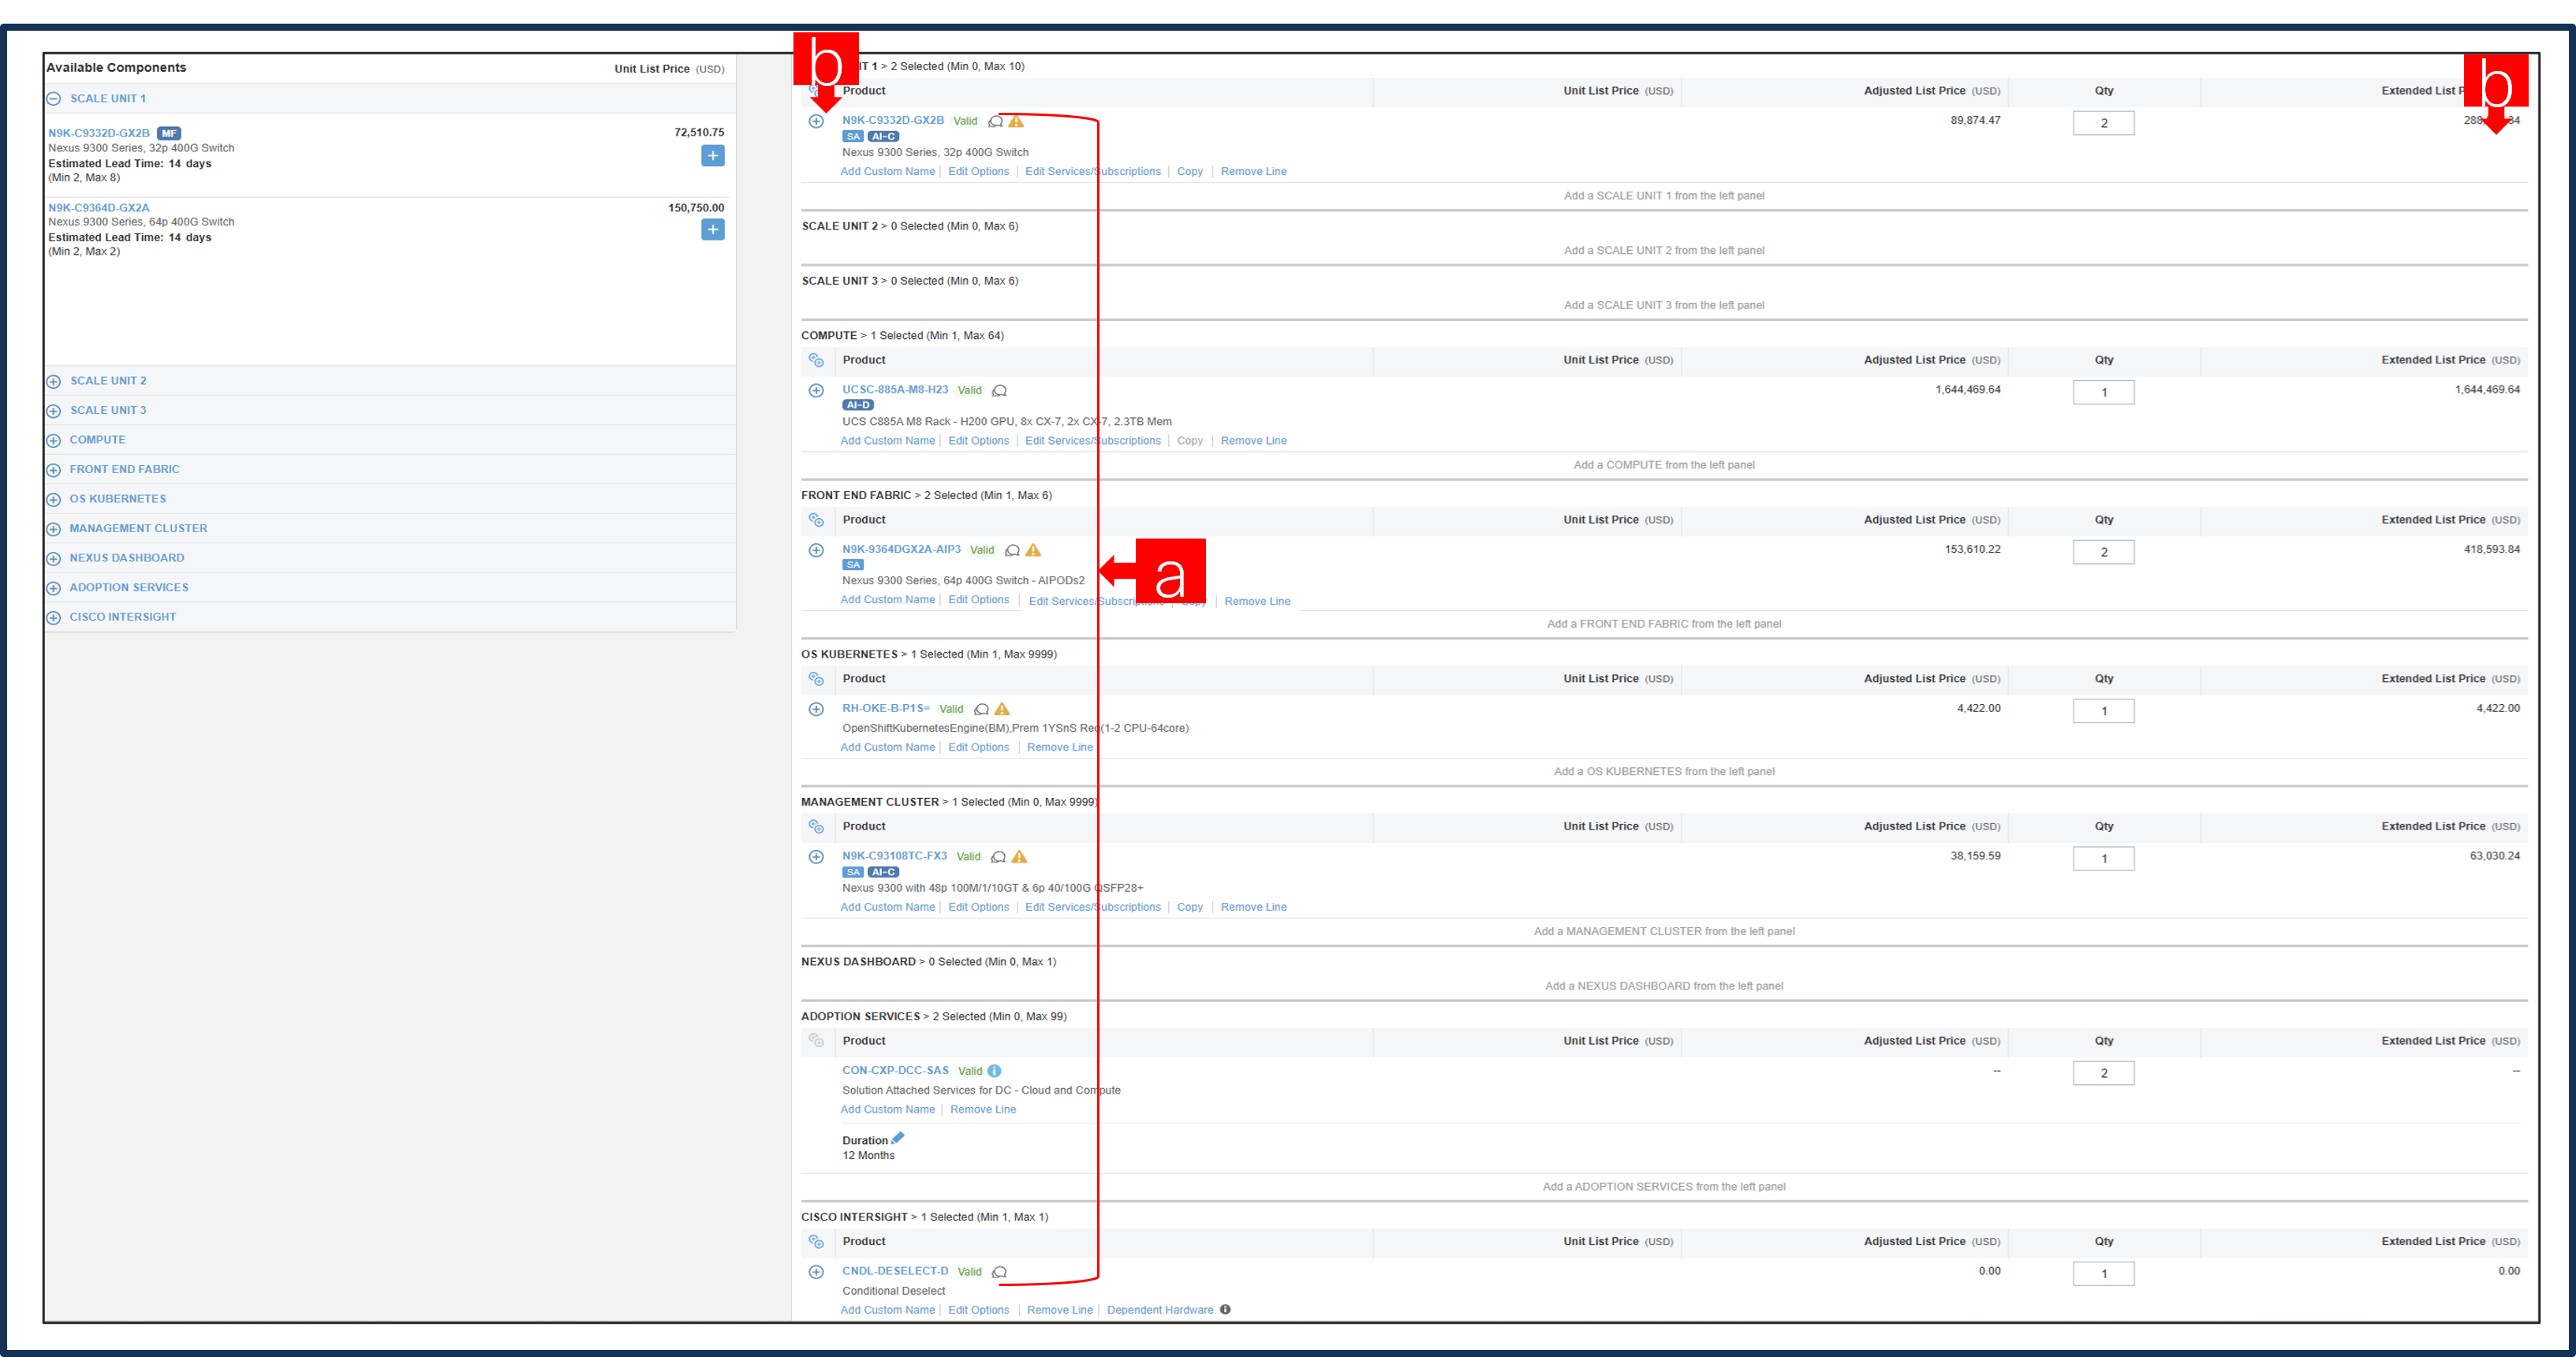
a. Configuration for MLB is completed when status of each Product is Valid and warning messages are cleared.
b. Click on the “PLUS” to expand and view the selections made for each Product.
c. Click on “Done” to complete MLB configuration.