Configuring the IX System
Contents
Configuring Cisco Unified Communications Manager for Your
IX System
Before you can use your IX System, you need to configure the system in Cisco Unified Communications Manager (Unified CM).
You can configure your system and complete all of the steps in this chapter prior to configuring your IX system in Unified CM, but you will not be able to complete any of the following actions until you register your device:
- You will not be able to download Touch device software from Unified CM, and you will receive an error in the logs.
- Your Touch device will not be able to place or receive calls.
To configure your device in Unified CM, complete the following steps:
Step 1![]() Load the Cisco TelePresence Administration Software image onto the Unified CM server. For more information, see the “Immediate Software Upgrade Requirement for Your IX System” section and the “Unified CM Device Package Requirements” section.
Load the Cisco TelePresence Administration Software image onto the Unified CM server. For more information, see the “Immediate Software Upgrade Requirement for Your IX System” section and the “Unified CM Device Package Requirements” section.
Step 2![]() Add your system as a device in Unified CM. For more information on adding your system as a device in Unified CM, refer to the “Adding an IX System to Unified CM” section in the Configuring Cisco Unified Communications Manager for the IX System document.
Add your system as a device in Unified CM. For more information on adding your system as a device in Unified CM, refer to the “Adding an IX System to Unified CM” section in the Configuring Cisco Unified Communications Manager for the IX System document.
Step 3![]() Add the TFTP server for your Unified CM server to your system using the TelePresence IX5000 Administrator interface. For more information, see the “Call Control Manager” section.
Add the TFTP server for your Unified CM server to your system using the TelePresence IX5000 Administrator interface. For more information, see the “Call Control Manager” section.

Note![]() When adding an IX5000 to a device pool in Cisco Unified Communications Manager, configure AAC-LD as the preferred audio codec for the device pool. Other audio codecs are not recommended. If a different audio codec is used, then IX5000 systems in the device pool cannot provide video in audio/video calls.
When adding an IX5000 to a device pool in Cisco Unified Communications Manager, configure AAC-LD as the preferred audio codec for the device pool. Other audio codecs are not recommended. If a different audio codec is used, then IX5000 systems in the device pool cannot provide video in audio/video calls.
For more information about configuring Unified CM for your Cisco TelePresence device, refer to the Configuring Cisco Unified Communications Manager for the IX System.
First Time Setup
The first time that you log in to the Administrator user interface, you should immediately navigate to the First Time Setup area to set up your IX system.
Figure 5-1 First Time Setup Section
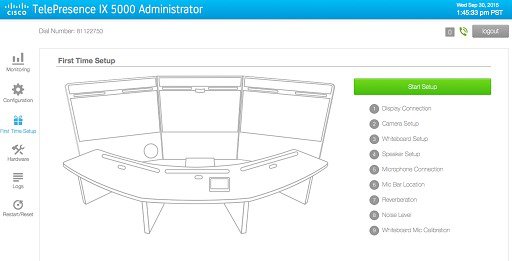
For a full description and configuration steps for the first-time setup procedure, For first-time setup instructions, refer to the IX5000 and IX5200 First-Time Setup document at the following URL:
https://www.cisco.com/c/en/us/td/docs/telepresence/ix5000/first_time_setup/ix5000_first_time_setup.html
Network Settings
The Network area displays the Cisco TelePresence IX System’s network addressing information. You can view and manage the following network settings:
–![]() Full mode allows DHCP to assign all network values (IP address, subnet, gateway, DNS server and Domain).
Full mode allows DHCP to assign all network values (IP address, subnet, gateway, DNS server and Domain).
–![]() Mixed mode allows you to assign a static IP for the system, and DHCP assigns all other network values.
Mixed mode allows you to assign a static IP for the system, and DHCP assigns all other network values.
- If your network does not use DHCP, select Static to manually assign all IP address values.
- IP Address
- Subnet
- Gateway
- DNS servers (1 & 2)
To view and manage IP settings:
Step 1![]() Choose Configuration > Network. The Network area appears, as shown in Figure 5-2 (DHCP) and Figure 5-3 (no DHCP).
Choose Configuration > Network. The Network area appears, as shown in Figure 5-2 (DHCP) and Figure 5-3 (no DHCP).
Figure 5-2 Configuration > Network Section - (DHCP) Full
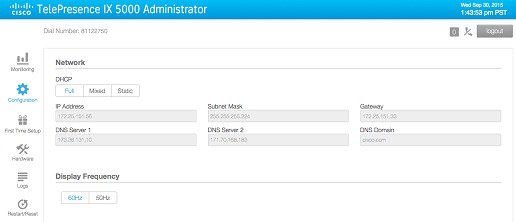
Figure 5-3 Configuration > Network Section - (no DHCP) Static
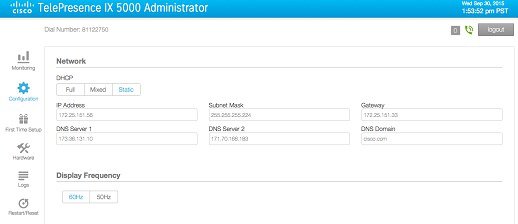
Step 2![]() Configure settings for the Cisco TelePresence System uplink to your network. The Cisco TelePresence System can be configured in the following ways:
Configure settings for the Cisco TelePresence System uplink to your network. The Cisco TelePresence System can be configured in the following ways:
- Full/Pure dynamic—Uses DHCP to determine all settings.
- Static/Pure static—Uses static settings to determine all settings.
- Mixed/Hybrid—Uses static settings for the IP Address, but uses DHCP to determine the rest of the settings.

Tip![]() When you make any change to a Configuration > Network field, the Restart and Apply buttons at the bottom of the page are activated.
When you make any change to a Configuration > Network field, the Restart and Apply buttons at the bottom of the page are activated.
Step 3![]() Click Restart to restore the original settings.
Click Restart to restore the original settings.
Step 4![]() Click Apply to register new or modified settings.
Click Apply to register new or modified settings.
Note![]() All codecs on the system must be connected and enabled for the reset to complete.
All codecs on the system must be connected and enabled for the reset to complete.
Call Control Manager Settings
To specify TFTP server locations and view a list of available settings for the Cisco TelePresence IX System:
Step 1![]() Choose Configuration, and scroll down to the Call Control Manager section shown in Figure 5-4.
Choose Configuration, and scroll down to the Call Control Manager section shown in Figure 5-4.
Figure 5-4 Configuration > Call Control Manager Section
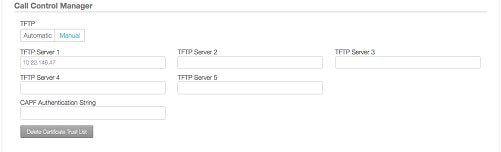
Step 2![]() Configure Unified CM TFTP server settings.
Configure Unified CM TFTP server settings.
Note![]() If you enter a new value for any of the TFTP Server fields, and the change does not persist, delete the Certificate Trust List (CTL) by clicking the Delete Certificate Trust List button and re-entering the TFTP server information.
If you enter a new value for any of the TFTP Server fields, and the change does not persist, delete the Certificate Trust List (CTL) by clicking the Delete Certificate Trust List button and re-entering the TFTP server information.
The Reset and Apply buttons, located at the bottom of the Configuration page, become active when a value is entered in the TFTP Server fields.
Step 3![]() Click Apply to register new or modified settings, or click Reset to restore the original settings.
Click Apply to register new or modified settings, or click Reset to restore the original settings.
Note![]() All codecs on the system must be connected and enabled for the reset to complete.
All codecs on the system must be connected and enabled for the reset to complete.
Certificates Settings
The Certificates area is where you set up 802.1X authentication for your IX System. This section describes the steps you perform to set up 802.1X authentication, and includes the following topics:
- Authenticating Your IX System Using a Security Certificate
- Examining the Security Certificate in Your IX System
Note![]() In order to complete 802.1X authentication, you must use a port that is not already enabled for 802.1X.
In order to complete 802.1X authentication, you must use a port that is not already enabled for 802.1X.
Authenticating Your IX System Using a Security Certificate
When the Cisco TelePresence IX System receives an authentication challenge from an Authenticator, the system responds with either the Manufacturing Installed Certificate (MIC) or the Locally Significant Certificate (LSC). When both the MIC and LSC are installed, the system uses the LSC to authenticate. If the LSC is not installed, Cisco TelePresence System uses the MIC, as the MIC is built into the system by the manufacturer. For more information on authentication, see the “802.1X Authentication” section.
The LSC provides greater security because it creates a public key infrastructure (PKI) that is unique to each system. To authenticate the codec using the LSC, you must install it on your system manually by using the Certificate Authority Proxy Function (CAPF) in Unified CM. For more information, see Installing the LSC.
Installing the LSC
To install the LSC, navigate to Configuration > Certificates and refer to information on the Certificate fields.
Examining the Security Certificate in Your IX System
You may want to examine the security certificate (MIC or LSC) on an 802.1X-authenticated system in order to verify that the certificates are valid, not expired, and issued by the CAPF.
To examine the security certificate in your IX System, you may download a copy of the certificate to your own system by using either of two methods:
Downloading a Security Certificate Using the CLI
To download the MIC or LSC using the CLI, complete the following steps:
Step 2![]() Enter the following command: file get cert { cert-type } { SCP-user } { SCP-password } { IP-address-or-hostname } { file-save-location }
Enter the following command: file get cert { cert-type } { SCP-user } { SCP-password } { IP-address-or-hostname } { file-save-location }
See Table 5-1 for syntax descriptions.
|
|
|
|---|---|
If you select the MIC as the type of certificate to retrieve when entering the command, the security certificate will save on the target system in the designated file-save location:
If you select the LSC as the type of certificate to retrieve, but the LSC is not installed on the Cisco TelePresence System, the command line will read as follows:
admin:file get cert LSC username password 10.1.1.1 /home/user
Uploading LSC to 10.1.1.1...LSC does not exist
Executed command unsuccessfully
If the LSC command is unsuccessful, you need to install the LSC on the codec. See Installing the LSC. If the command is successful, continue to the next step.
Step 3![]() Go to the designated file-save location, and click the file to view the certificate.
Go to the designated file-save location, and click the file to view the certificate.
Downloading a Security Certificate Using the Administrator Interface
To download an MIC or an LSC from the Administrator interface, complete the following steps:
Step 1![]() Log into the Administrator interface, and navigate to Configuration > Certificates.
Log into the Administrator interface, and navigate to Configuration > Certificates.
Step 2![]() Click Download at the right of the certificate row to download and view a certificate. A dimmed Download button indicates the lack of a given certificate.
Click Download at the right of the certificate row to download and view a certificate. A dimmed Download button indicates the lack of a given certificate.
Troubleshooting Your Configuration
For information about troubleshooting your configuration, refer to the “Verifying and Troubleshooting the IX System Configuration” section of the Configuring Cisco Unified Communications Manager for the IX System document.
Resetting Your IX Codec Password
This section contains the following information about managing and troubleshooting password issues on the Cisco TelePresence IX System:
Note![]() You must be in the Cisco TelePresence room to read the newly requested passcode that shows on the main display. At each point where the pwrecovery account requires input, the program will wait up to 60 seconds. If nothing is entered, the system will inform you that the entry took too long and will exit.
You must be in the Cisco TelePresence room to read the newly requested passcode that shows on the main display. At each point where the pwrecovery account requires input, the program will wait up to 60 seconds. If nothing is entered, the system will inform you that the entry took too long and will exit.
If you encounter any difficulty, open a case with Technical Assistance Center (TAC) via the Internet at https://www.cisco.com/c/en/us/support/index.html, or contact your Cisco technical support representative and provide the representative with the information you have gathered about the problem.
Make sure that the IX System is not in a call, and that there is only one instance of someone trying to reset the password. If either of these conditions exist, the session will abort.
The codec password is normally set from the Unified CM. If the Unified CM is not available, and the password is unknown, complete the steps in the following procedure.
To reset your IX System codec password:
Step 1![]() Using a Secure Shell (SSH) or other secure host client, log in to the Cisco TelePresence System GUI:
Using a Secure Shell (SSH) or other secure host client, log in to the Cisco TelePresence System GUI:
Step 2![]() Log in with the following:
Log in with the following:
The following message appears in the SSH client window:
Example 5-1 Welcome to Password Reset
***********************************************
***********************************************
***********************************************
Do you want to continue ? (y/n):y
Preparing the system...
Please enter the passcode:
Step 3![]() The system will ask if you want to continue. Type Y, and then return to continue
The system will ask if you want to continue. Type Y, and then return to continue
Note![]() If desired, type any other key, and then return to exit.
If desired, type any other key, and then return to exit.
This system will now prepare for password reset and prompt you for a passcode. The new passcode is displayed on the IX System main display (See the following example.):
Password reset is now being run
Note![]() The passcode is a randomly generated number and will be different for each login attempt. If you enter the wrong passcode, the system will inform you that the passcode was incorrect and will exit, as shown in the following example. If this happens, repeat Step 1 and Step 2 from above.
The passcode is a randomly generated number and will be different for each login attempt. If you enter the wrong passcode, the system will inform you that the passcode was incorrect and will exit, as shown in the following example. If this happens, repeat Step 1 and Step 2 from above.
Example 5-2 Invalid Password Reset Request
When you enter the correct passcode, the IX will then reset the administration account name and password to the system defaults.
Note![]() The top right of the screen could still show the previous, non-default user name. Do not use this user name, and continue to use the default user name and password.
The top right of the screen could still show the previous, non-default user name. Do not use this user name, and continue to use the default user name and password.
The following example shows successful password reset information:
Example 5-3 Successful Password Reset Request
Note![]() If you are using the IX System with Unified CM, the next time you perform a “Refresh” or “Reset” from Unified CM, the administration account name and password will be reconfigured to the values specified in the Unified CM device page.
If you are using the IX System with Unified CM, the next time you perform a “Refresh” or “Reset” from Unified CM, the administration account name and password will be reconfigured to the values specified in the Unified CM device page.
Troubleshooting Your IX System Components
For information about troubleshooting your IX System components, refer to the First Time Setup section of this administration guide.
 Feedback