Loop Detection Guard

Loop Detection Guard

A computer network can experience a network loop where there is more than one Layer 2 path between two endpoints. This is possible when there are multiple connections between two switches in a network or two ports on the same switch are connected to each other.

Need for Loop Detection Guard

While Spanning Tree Protocol (STP) is typically used to prevent network loops, loop detection guard is essential in environments with unmanaged switches that do not support STP or where STP is not configured. In such scenarios—especially when edge switches are connected to an unmanaged switch and STP is disabled, a dedicated loop detection mechanism is essential to ensure network stability.

Loop detection mechanism

To detect loops, the system sends loop-detect frames from the interface, at preconfigured intervals. When a loop is detected, the configured action is taken. Loop detection guard is enabled at the interface level.

Supported devices

This feature is available with Network Essential license and is supported on these switches:

  • Cisco Catalyst IE3100 Series Switches

  • Cisco Catalyst IE3200 Series Switches

  • Cisco Catalyst IE3300 Series Switches

  • Cisco Catalyst IE3400 Series Switches

Types of loops

The figure given here illustrates how loops occur.

Figure 1. Types of loops
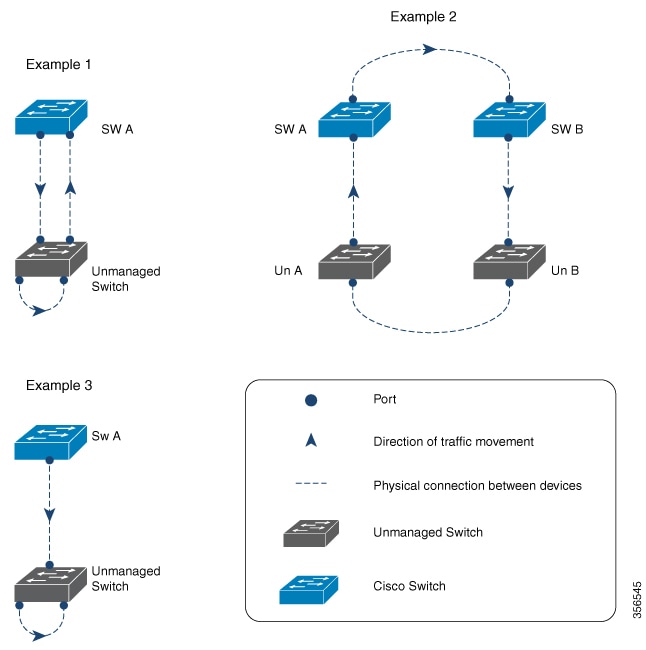
  • Example 1: A managed switch (SW A) is sending traffic to an unmanaged switch on one port and receiving traffic from the same unmanaged switch, on another port. On the unmanaged switch, the port receiving traffic is connected to the port sending the traffic back to the network. This creates a loop between the managed and unmanaged switches.

  • Example 2: Two managed switches (SW A and SW B) are sending traffic to two unmanaged switches (Un A and Un B). Traffic is moving from SW A to SW B to Un A to Un B and back to SW A, resulting in a network loop.

  • Example 3: A cable connects two ports on the unmanaged switch, resulting in a network loop.

Enable Loop Detection Guard using CLI

This task allows you to enable or disable the feature on a specific interface and configure the interval at which loop-detect frames are sent.

Before you begin

This feature is disabled by default and can be enabled in interface configuration mode for physical interfaces only.

Procedure


Step 1

Use the configure terminal command to enter the global configuration mode.

Example:

Switch# configure terminal

Step 2

Use the interface interface-name command to enter the interface configuration mode.

Example:

Switch#(config)# interface Gigabitethernet 1/6

Specify only a physical interface to configure loop detection guard on the device.

Step 3

Use the loopdetect command to enable loop detection guard.

Example:

Switch#(config-if)# loopdetect

Use the no form of the command to disable loop detection guard.

Step 4

Use the loopdetect time command to speccify the frequency at which loop-detect frames are sent.

Example:

Switch#(config)# loopdetect 7

The time is the interval to send loop-detect frame, in seconds. The range is from 1 to 10. The default is 5.

Step 5

Use the loopdetect action syslog command to specify the action to be performed after detecting a loop.

Example:

Switch#(config)# loopdetect action syslog

In this instance, a Syslog is displayed after detecting a loop. If you do not specify an action, the destination port is error-disabled by default. Use the no form of the command to disable the action.

Step 6

Use the loopdetect sourceport command to error-disable the source port.

Example:

Switch#(config)# loopdetect sourceport

Use the no form of the command to disable the option.


Verify Loop Detect

To monitor and troubleshoot loop detection behavior on a switch, use these commands.

Procedure


Step 1

(Optional) Use the show loopdetect command to see all the interfaces where loop detection guard is enabled, the frequency at which loop-detect packets are sent, and the status of the physical interface.

Example:

Switch# show loopdetect
 
Loopdetect is enabled

Interface      Interval Elapsed-Time Port-to-Errdisbale     ACTION
-------------- -------- ------------ ---------------------  ---------
Gi1/5           7        2            errdisable Dest Port   ERRDISABLE
Gi1/6           7        2            errdisable Dest Port   ERRDISABLE

Step 2

(Optional) Use the show interfaces status err-disabled command to see all the interfaces that are currently in an error-disabled (err-disabled) state.

Example:

Switch# show interfaces status err-disabled

 Port         Name         Status       Reason               Err-disabled Vlans

Gi1/5                     err-disabled loopdetect

To recover an interface from the err-disabled state, you can run the shutdown and no shutdown commands under the interface configuration mode, or enable recovery using the errdisable recovery cause loopdetect command

Step 3

(Optional) Use the show running-config interface interface-name | i loop command to see where the loop detect is enabled on the interface.

Example:

Switch# show running-config interface Gi1/6 | i loop
 
loopdetect
loopdetect 7
loopdetect source-port


Feature History for Loop Detection Guard

This table provides release and related information for features explained in this module.

These features are available on all releases subsequent to the one they were introduced in, unless noted otherwise.

Release

Feature

Feature Information

Cisco IOS XE 17.18.1

Loop Detection Guard

Loop detection guard prevents loops in networks without STP or with unmanaged devices.