Install Linux Agents for Deep Visibility and Enforcement

Prerequisites to Install Linux Agents

  • For platform requirements, see Supported Platforms and Requirements.

  • To install and execute the agent services, you require root or administrator privileges.

  • The agent and log file require 1 GB of storage space.

  • Configure security exclusions on the security applications that are monitoring the host. This action prevents these applications from blocking agent installation or agent activity. For more information, see Security Exclusions.

  • The system creates a special user, tet-sensor, in the host where the agent is installed. If Pluggable Authentication Modules (PAM) or Security-Enhanced Linux (SELinux) is configured on the host, then grant the tet-sensor user with appropriate privileges. These privileges are necessary to execute the tet-sensor process and make connections to collectors. If you provide an alternative install directory and Security-Enhanced Linux (SELinux) is configured, ensure that you allow execution for that location.

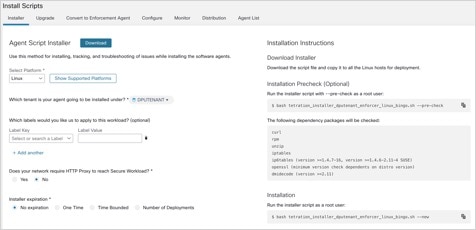
  • If you install the agent using the AutoInstall (installer script) method, you must be able to use the unzip command.

Install Linux Agent using the Agent Image Installer Method

We recommend the automated installer script method for installing Linux agents. Use the image installer method if you have a specific reason for using this manual method..

Prerequisite:

Configure the ACTIVATION_KEY and HTTPS_PROXY in the user.cfg file for SaaS clusters and when you are installing the agent on a non-default tenant of on-premises clusters with multiple tenants. For more information, see (Manual Installations Only) Update the User Configuration File.

To install a Linux agent using the agent image method:

Procedure


Step 1

Navigate to Agent Installation Methods:

  • If you are a first-time user, launch the Quick Start wizard and click Install Agents.

  • In the navigation pane, choose Manage > Agents, and select the Installer tab.

Step 2

Click Agent Image Installer.

Step 3

In the Platform field, enter Linux.

Step 4

Enter the required agent type and the version of the agent, and then from the results, download the required version of the agent.

Step 5

Copy the RPM package to all the Linux hosts for deployment.

Note


If the agent is already installed on the host, do not reinstall the agent. To upgrade the agent, see Upgrading Software Agents section.

Step 6

Based on your platform, run the RPM commands with root privileges.

  • For RHEL/CentOS/Oracle platforms, run the command: rpm -ivh <rpm_filename>

  • For Ubuntu platform:

    • To retrieve the dependency list and ensure all dependencies are met, run the command: rpm -qpR <rpm_filename>

    • Install the agent with “–nodeps” option by running the command: rpm -ivh \\--nodeps <rpm filename>


Install Linux Agent Using the Agent Script Installer Method

We recommend the installer script method to deploy Linux agents for deep visibility and enforcement.


Note


To install a Linux agent using the script installer method:

Procedure


Step 1

Navigate to Agent Installation methods:

  • If you are a first-time user, launch the Quick Start Wizard and click Install Agents.

  • From the navigation pane, choose Manage > Agents, and select the Installer tab.

Step 2

Click Agent Script Installer.

Step 3

From the Select Platform drop-down list, choose Linux.

To view the supported Linux platforms, click Show Supported Platforms.

Step 4

Choose the tenant to install the agents.

Note


Secure Workload SaaS clusters do not require selecting a tenant.

Step 5

If you want to assign labels to the workload, choose the label keys and enter label values.

When the installed agent reports IP addresses on the host, the installer CMDB labels selected here, along with other uploaded CMDB labels that have been assigned to IPs reported by this host, would be automatically assigned to the new IP address. If there are conflicts between uploaded CMDB labels and installer CMDB labels:

  • Labels assigned to an exact IP address take precedence over labels assigned to the subnet.

  • Existing labels assigned to an exact IP address take precedence over installer CMDB labels.

Step 6

If an HTTP proxy is required to communicate with Secure Workload, choose Yes, and then enter a valid proxy URL.

Step 7

In the Installer expiration section, select an option:

  • No expiration: The installer script can be used multiple times.

  • One time: The installer script can be used only once.

  • Time bound: You can set the number of days for which the installer script can be used.

  • Number of deployments: You can set the number of times the installer script can be used.

Step 8

Click Download and save the file to the local disk.

Step 9

Copy the installer shell script on Linux hosts and run the following command to grant execute permission to the script: chmod u+x tetration_installer_default_sensor_linux.sh

Note


The script name may differ depending on the selected agent type and scope.

Step 10

To install the agent, run the following command with root privileges: ./tetration_installer_default_sensor_linux.sh

Note


If an agent is already installed on the tenant, you cannot proceed with the installation.


We recommend running the precheck, as specified in the script usage details.

Linux installer script usage details:
bash tetration_linux_installer.sh [--pre-check] [--skip-pre-check=<option>] [--no-install] [--logfile=<filename>] [--proxy=<proxy_string>] [--no-proxy] [--help] [--version] [--sensor-version=<version_info>] [--ls] [--file=<filename>] [--save=<filename>] [--new] [--reinstall] [--unpriv-user] [--force-upgrade] [--upgrade-local] [--upgrade-by-uuid=<filename>] [--basedir=<basedir>] [--logbasedir=<logbdir>] [--tmpdir=<tmp_dir>] [--visibility] [--golden-image]
  --pre-check: run pre-check only
  --skip-pre-check=<option>: skip pre-installation check by given option; Valid options include 'all', 'ipv6' and 'enforcement'; e.g.: '--skip-pre-check=all' will skip all pre-installation checks; All pre-checks will be performed by default
  --no-install: will not download and install sensor package onto the system
  --logfile=<filename>: write the log to the file specified by <filename>
  --proxy=<proxy_string>: set the value of CL_HTTPS_PROXY, the string should be formatted as http://<proxy>:<port>
  --no-proxy: bypass system wide proxy; this flag will be ignored if --proxy flag was provided
  --help: print this usage
  --version: print current script's version
  --sensor-version=<version_info>: select sensor's version; e.g.: '--sensor-version=3.4.1.0'; will download the latest version by default if this flag was not provided
  --ls: list all available sensor versions for your system (will not list pre-3.1 packages); will not download any package
  --file=<filename>: provide local zip file to install sensor instead of downloading it from cluster
  --save=<filename>: download and save zip file as <filename>
  --new: remove any previous installed sensor
  --reinstall: reinstall sensor and retain the same identity with cluster; this flag has higher priority than --new
  --unpriv-user=<username>: use <username> for unpriv processes instead of tet-sensor
  --force-upgrade: force sensor upgrade to version given by --sensor-version flag; e.g.: '--sensor-version=3.4.1.0 --force-upgrade'; apply the latest version by default if --sensor-version flag was not provided
  --upgrade-local: trigger local sensor upgrade to version given by --sensor-version flag: e.g.: '--sensor-version=3.4.1.0 --upgrade-local'; apply the latest version by default if --sensor-version flag was not provided
  --upgrade-by-uuid=<filename>: trigger sensor whose uuid is listed in <filename> upgrade to version given by --sensor-version flag; e.g.: '--sensor-version=3.4.1.0 --upgrade-by-uuid=/usr/local/tet/sensor_id'; apply the latest version by default if --sensor-version flag was not provided
  --basedir=<base_dir>: instead of using /usr/local use <base_dir> to install agent. The full path will be <base_dir>/tetration
  --logbasedir=<log_base_dir>: instead of logging to /usr/local/tet/log use <log_base_dir>. The full path will be <log_base_dir>/tetration
  --tmpdir=<tmp_dir>: instead of using /tmp use <tmp_dir> as temp directory
  --visibility: install deep visibility agent only; --reinstall would overwrite this flag if previous installed agent type was enforcer
  --golden-image: install Cisco Secure Workload Agent but do not start the Cisco Secure Workload Services; use to install Cisco Secure Workload Agent on Golden Images in VDI environment or Template VM. On VDI/VM instance created from golden image with different host name, Cisco Secure Workload Services will work normally

Note


  • Ubuntu uses the native .deb package, and new installations and reinstallations switch to this package type. Upgrades from previous versions continue with the .rpm package.

  • Ubuntu .deb package is installed under /opt/cisco/tetration.

  • There is no relocation support for the .deb package and so the –basedir option is not supported for Ubuntu.


Supported Methods to Install Linux Agents

Methods to install a Linux agent for deep visibility and enforcement:

Agent Support for NVIDIA Bluefield Networking Platform

A data processing unit (DPU) is a programmable processor that is designed to manage data-centric tasks, including but not limited to data transfer, power optimization, security, compression, analytics, and encryption.

The NVIDIA DPU is a smart network interface card (SmartNic) with excellent network performance. It delivers a high-speed Ethernet NIC capability and it enables the execution of software directly on the NIC itself, allowing for interception, monitoring, and manipulation of network traffic passing through the NIC.

NVIDIA facilitates the functionality through the provision of the DOCA SDK. Leveraging virtualization technology based on PCIe Single Root I/O Virtualization (SR-IOV), the DPU establishes a mechanism for virtual machines (VMs) to communicate directly without hypervisor involvement. The DPU incorporates an OpenVSwitch-based hardware-accelerated eSwitch for network control, enhancing overall efficiency.

Requirements and Prerequisites

  • Ensure that Ubuntu 22.04-based DOCA is installed on the BlueField networking platform.

  • Set up the DPU card network to enable an agent's connection to the cluster through one of the out-of-band interfaces. Options include oob_net0, tmfifo_net0, or the in-band connection through enp3s0f0s0.

Agent Installation

The installation follows a Linux-like process.

  1. Navigate to Agent Installation Methods:

    • If you are a first-time user, launch the Quick Start wizard and click Install Agents.

    • From the navigation pane, choose Manage > Workloads > Agents.

  2. Under the Installer tab, click Agent Script Installer.

  3. From the Select Platform drop-down list, choose Linux.

    To view the supported Linux platforms, click Show Supported Platforms.


    Note


    Secure Workload Agent is only supported on the Ubuntu 22-based DOCA SDK.


  4. Choose the tenant to install the agents.


    Note


    Selecting a tenant is not required for Secure Workload SaaS clusters.


  5. (Optional) If you want to assign labels to the workload, choose the label keys and enter label values.

  6. If an HTTP proxy is required to communicate with Secure Workload, click Yes, and then enter a valid proxy.

  7. In the Installer expiration section, select one of the available options:

    • No expiration: The installer script can be used multiple times.

    • One time: The installer script can be used only once.

    • Time-bound: You can set the number of days for which the installer script can be used.

    • Number of deployments: You can set the number of times the installer script can be used.

  8. Click Download to download the Linux installer script on to DPU using one of the network devices.

  9. Run the installer script. For more information, see Install Linux Agent using the Agent Script Installer Method.

    Figure 1. Install Script

Choose Software Agents > Agent List and click a Hostname. Under Interfaces, you can view the current mapping of interfaces with the associated IP addresses.

Figure 2. Interface Mapping

Choose Investigate > Traffic to monitor the network traffic between virtual machines (VMs) when those are utilizing the SR_IOV virtual network interfaces provided by the DPU. The agent on the DPU enables the segmentation of network traffic between these virtual network interfaces.

Verify Linux Agent Installation

Procedure


Run the command sudo rpm -q tet-sensor sudo rpm -q tet-sensor.

sudo rpm -q tet-sensor
A single entry as output confirms that a Linux agent is installed on the host.

Sample output: tet-sensor-3.1.1.50-1.el6.x86_64

The specific output may differ depending on the platform and architecture.