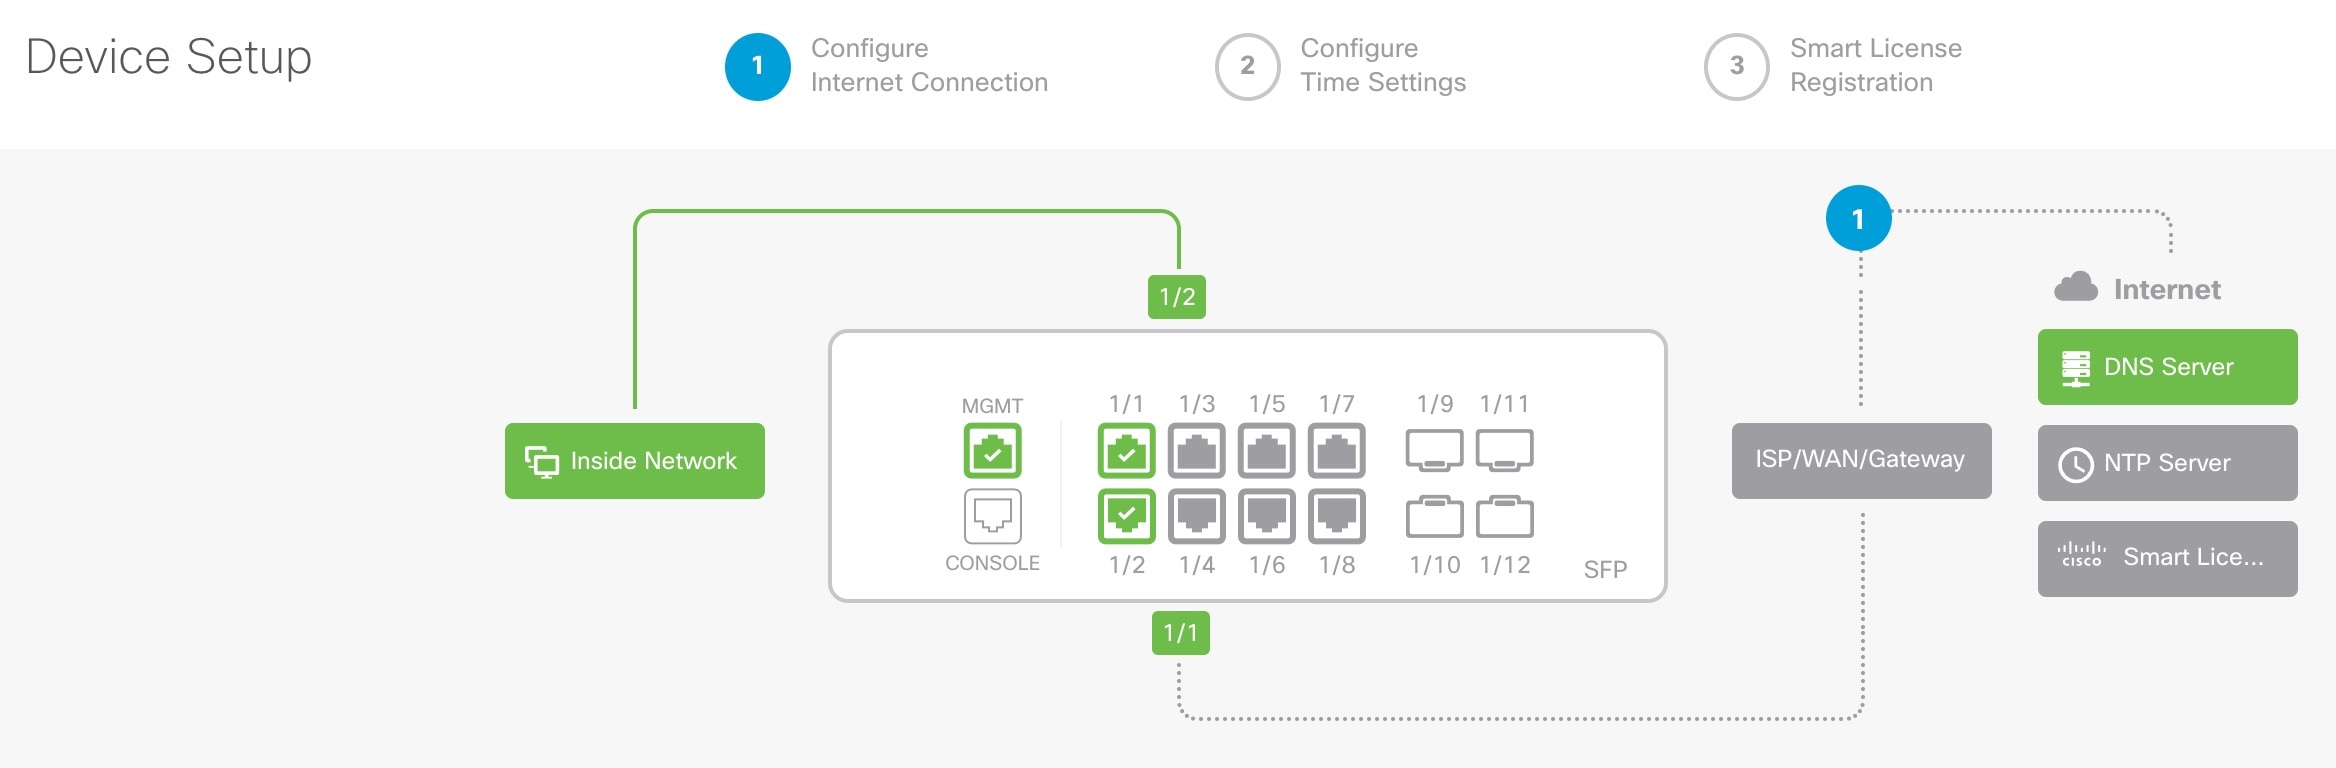
Secure Firewall 3100 Threat Defense Getting Started: Firewall Management Center on a Local Management Network

PDF

Perform initial configuration

Want to summarize with AI?

Log in

Overview

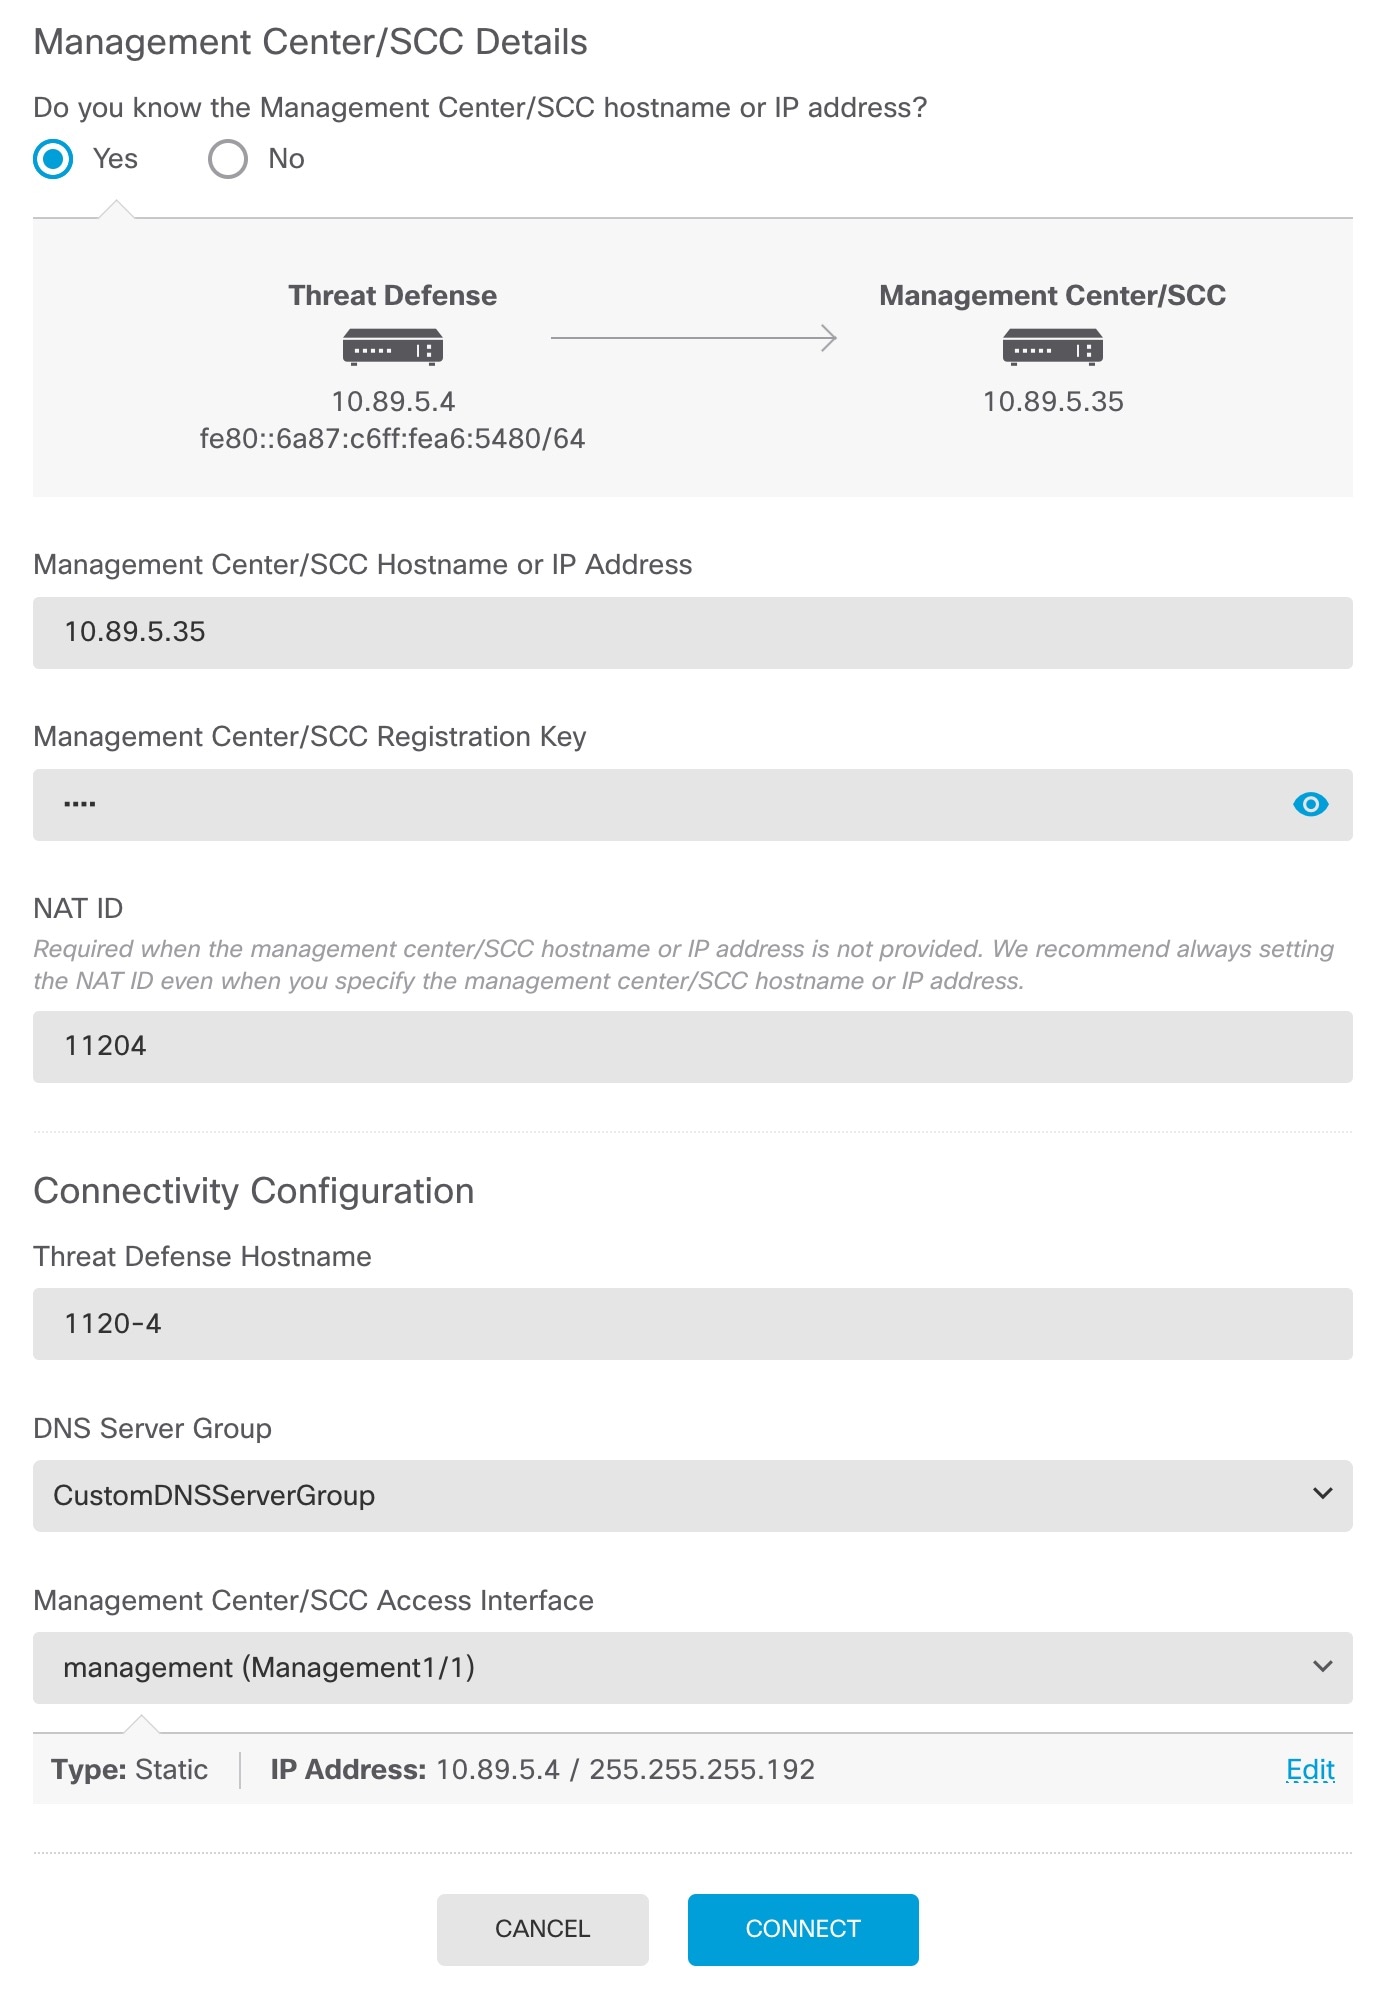
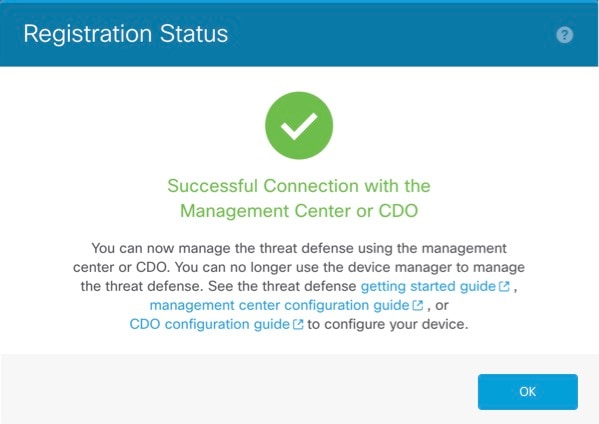
How to complete initial Secure Firewall 3100 setup for manual provisioning so the device has basic network settings and is ready to register to the Firewall Management Center.

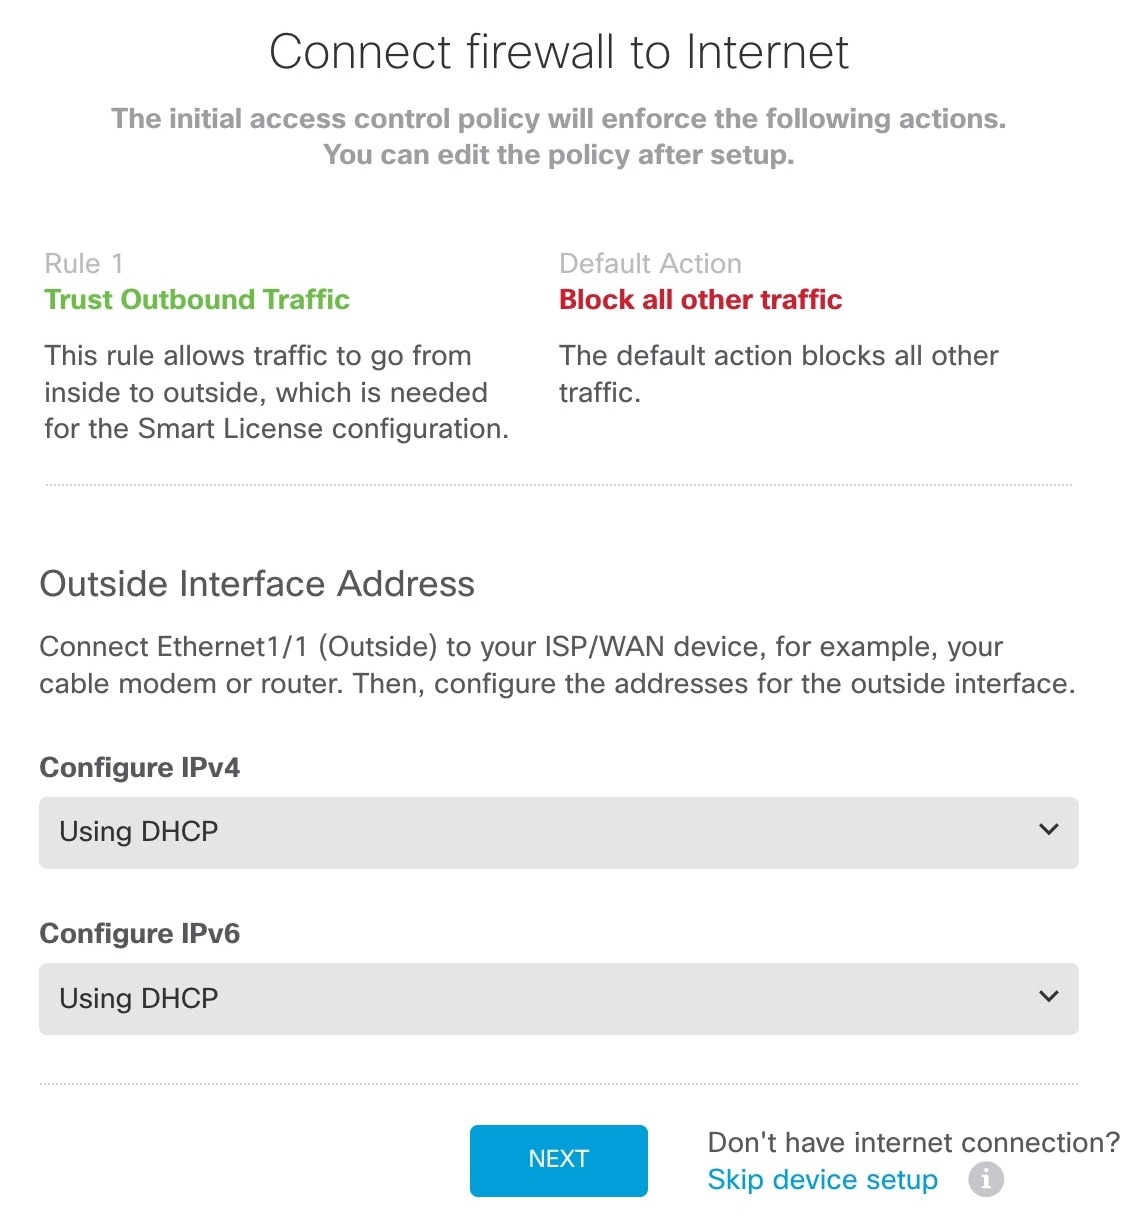
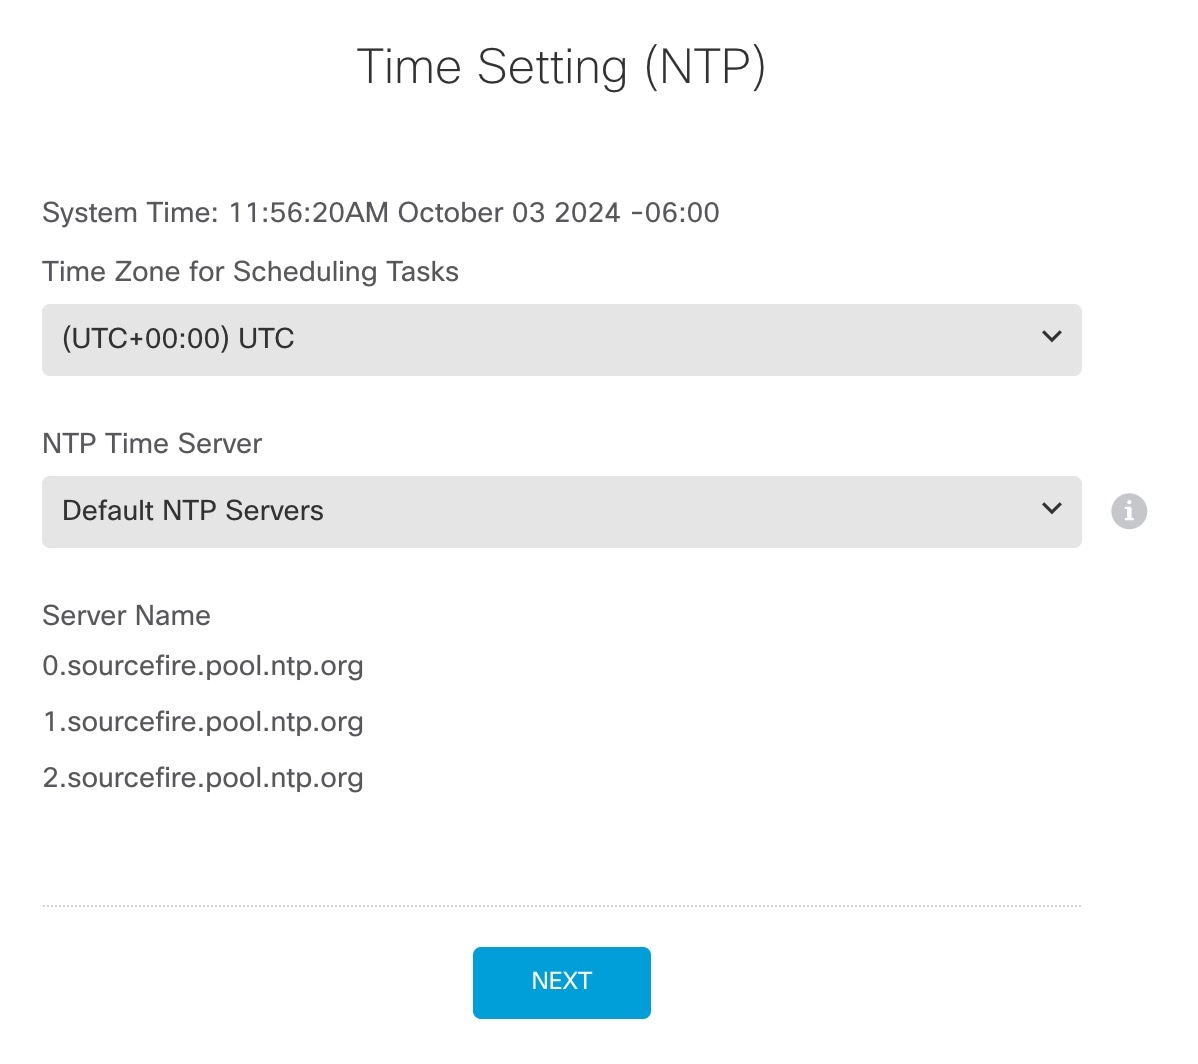
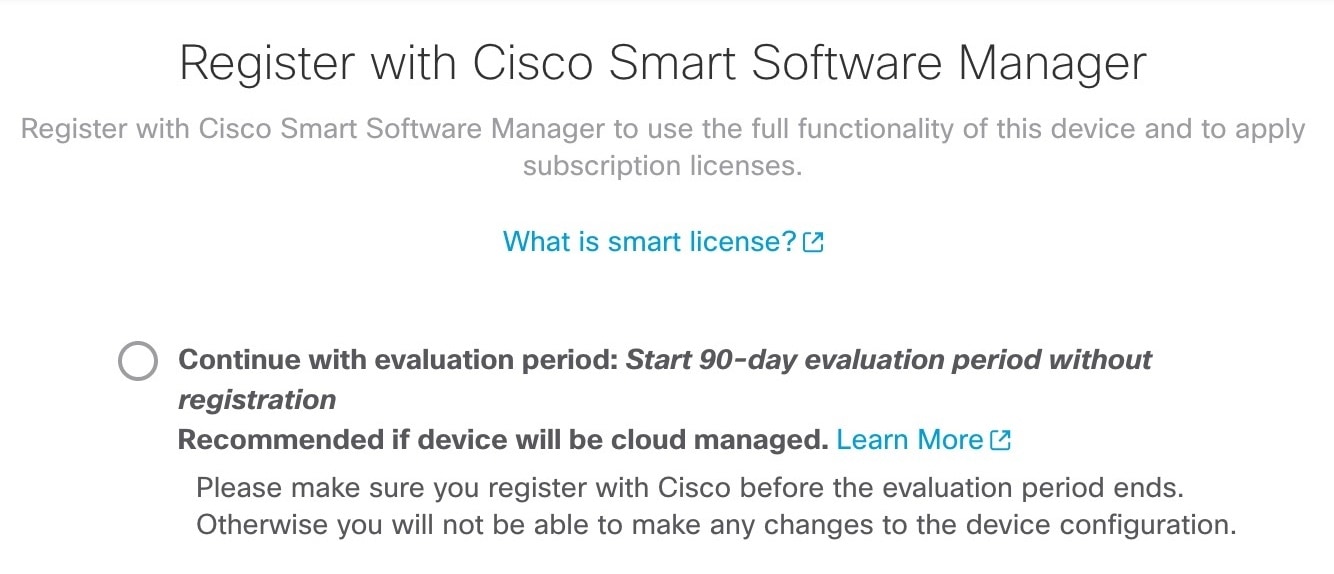
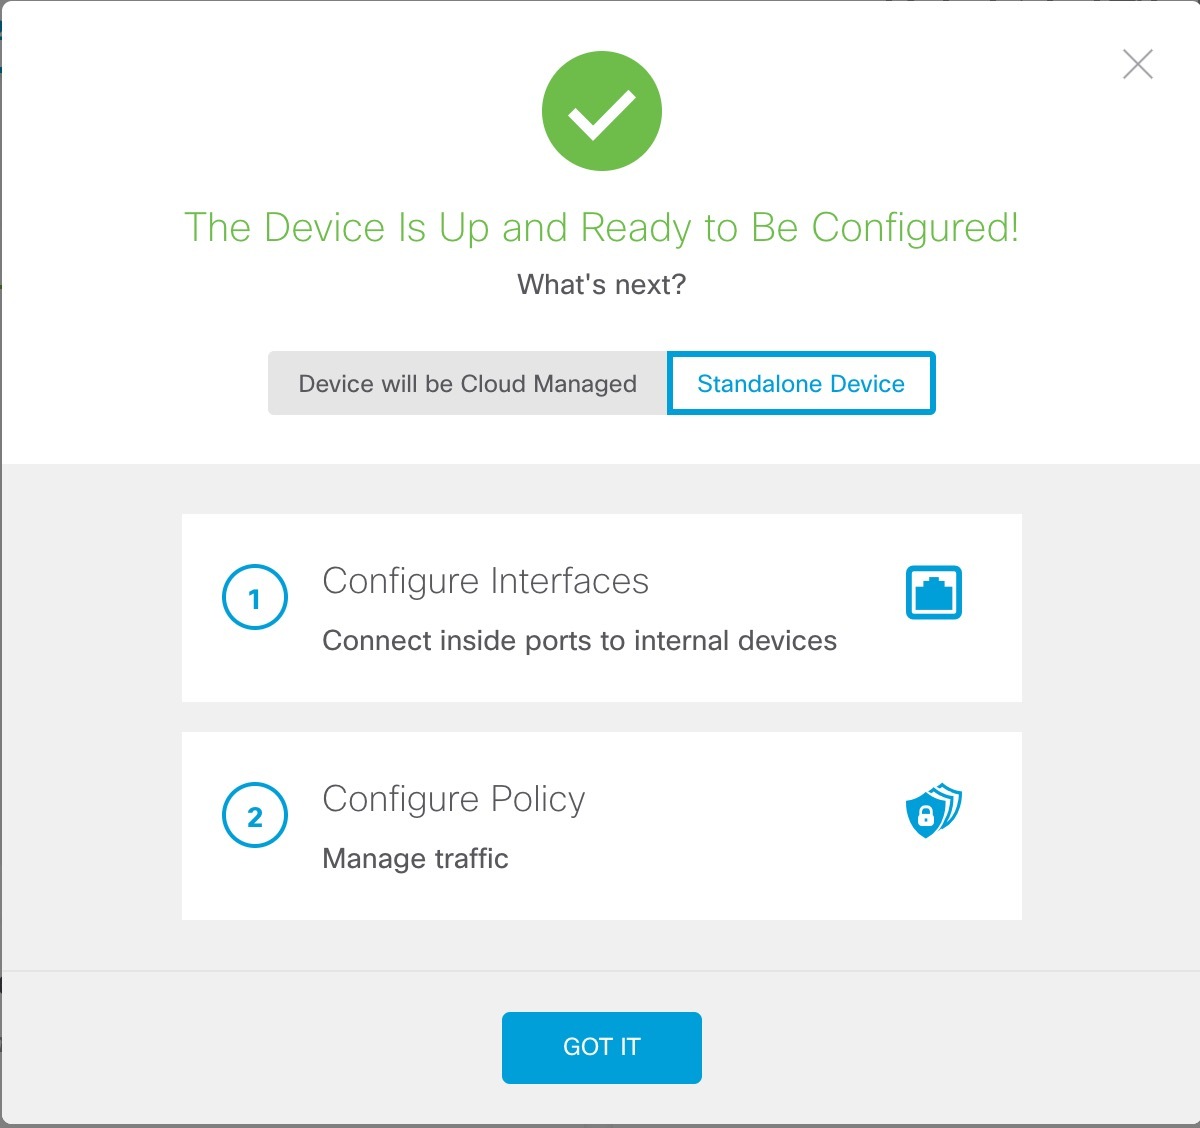
Perfom initial configuration of the firewall using the Secure Firewall Device Manager or using the CLI.


Initial configuration: Firewall Device Manager

Using this method, after you register the firewall, the following interfaces will be preconfigured in addition to the Management interface:

  • Ethernet 1/1—outside, IP address from DHCP, IPv6 autoconfiguration

  • Ethernet 1/2inside, 192.168.95.1/24

  • Default route—Obtained through DHCP on the outside interface

  • Additional interfaces—Any interface configuration from the Firewall Device Manager is preserved.

Other settings, such as the DHCP server on inside, access control policy, or security zones, are not preserved.

Procedure

1.

Connect your computer to the inside interface (Ethernet 1/2).

2.

Log into the Firewall Device Manager.

  1. Go to https://192.168.95.1.

  2. Log in with the username admin and the default password Admin123.

  3. You are prompted to read and accept the General Terms and change the admin password.

3.

Use the setup wizard.

Figure 1. Device Setup
Device Setup
Note

The exact port configuration depends on your model.

  1. Configure the outside and management interfaces.

    Figure 2. Connect firewall to internet
    Connect firewall to internet
    1. Outside Interface Address—Use a static IP address if you plan for high availability. You cannot configure PPPoE using the setup wizard; you can configure PPPoE after you complete the wizard.

    2. Management Interface—Setting the Management interface IP address is not part of the setup wizard, but you can set the following options. If you need to use a static IP address, see Step Step 4.

      DNS Servers—The DNS server for the system's management address. The default is the OpenDNS public DNS servers.

      Firewall Hostname

  2. Configure the Time Setting (NTP) and click Next.

    Figure 3. Time Setting (NTP)
    Connect firewall to internet
  3. Select Start 90 day evaluation period without registration.

    Connect firewall to internet

    Do not register the Firewall Threat Defense with the Smart Software Manager; all licensing is performed on the Firewall Management CenterSecurity Cloud Control.

  4. Click Finish.

    Figure 4. What's Next
    Connect firewall to internet
  5. Choose Standalone Device, and then Got It.

4.

(Optional) Configure the Management interface with a static IP address. See the Management interface on Device > Interfaces.

5.

If you want to configure additional interfaces, choose Device, and then click the link in the Interfaces summary.

6.

Register with the Firewall Management CenterSecurity Cloud Control by choosing Device > System Settings > Central Management and clicking Proceed

Configure the Management Center/SCC/Details.

Note

Older versions may show "CDO" instead of "SCC."

Figure 5. Management Center/SCC Details
  1. For Do you know the Management Center/SCC Hostname or IP address, click Yes if you can reach the Firewall Management Center using an IP address or hostname or No if the Firewall Management Center is behind NAT or does not have a public IP address or hostname.

  2. If you chose Yes, enter the Management Center/SCC Hostname/IP Address.

  3. Specify the Management Center/SCC Registration Key.

    This key is a one-time registration key of your choice that you will also specify on the Firewall Management Center when you register the firewall. The registration key must be between 2 and 36 characters. Valid characters include alphanumerical characters (A–Z, a–z, 0–9) and the hyphen (-). This ID can be used for multiple firewalls registering to the Firewall Management Center.

  4. Specify a NAT ID.

    This ID is a unique, one-time string of your choice that you will also specify on the Firewall Management Center. We recommend that you specify the NAT ID even if you know the IP addresses of both devices. The NAT ID must be between 2 and 36 characters. Valid characters include alphanumerical characters (A–Z, a–z, 0–9) and the hyphen (-). This ID cannot be used for any other firewalls registering to the Firewall Management Center. The NAT ID is used in combination with the IP address to verify that the connection is coming from the correct device; only after authentication of the IP address/NAT ID will the registration key be checked.

7.

Configure the Connectivity Configuration.

  1. Specify the Threat Defense Hostname.

  2. Specify the DNS Server Group.

    Although you already set this: Choose an existing group, or create a new one. The default DNS group is called CiscoUmbrellaDNSServerGroup, which includes the OpenDNS servers.

  3. For the Management Center/SCC Access Interface, click Management Interface.

8.

Click Connect.

The Registration Status dialog box shows the current status of the Firewall Management CenterSecurity Cloud Control registration.

Figure 6. Successful Connection
Successful Connection
9.

After the Saving Management Center/SCC Registration Settings step on the status screen, go to the Firewall Management CenterSecurity Cloud Control and add the firewall. See Register the firewall with the Firewall Management Center.


Initial configuration: CLI

Set the dedicated Management IP address, gateway, and other basic networking settings using the CLI setup script.

Procedure

1.

Connect to the console port and access the Firewall Threat Defense CLI. See Access the Firewall Threat Defense CLI.

2.

Complete the CLI setup script for the Management interface settings.

Note

You cannot repeat the CLI setup script unless you clear the configuration, for example, by reimaging. However, all of these settings can be changed later at the CLI using configure network commands. See Cisco Secure Firewall Threat Defense Command Reference.


You must accept the EULA to continue.
Press <ENTER> to display the EULA:                 
Cisco General Terms
[...]

Please enter 'YES' or press <ENTER> to AGREE to the EULA:

System initialization in progress.  Please stand by.
You must configure the network to continue.
Configure at least one of IPv4 or IPv6 unless managing via data interfaces.
Do you want to configure IPv4? (y/n) [y]:
Do you want to configure IPv6? (y/n) [y]: n

Guidance: Enter y for at least one of these types of addresses.

Configure IPv4 via DHCP or manually? (dhcp/manual) [manual]:
Enter an IPv4 address for the management interface [192.168.45.61]: 10.89.5.17
Enter an IPv4 netmask for the management interface [255.255.255.0]: 255.255.255.192

Enter the IPv4 default gateway for the management interface [data-interfaces]: 10.10.10.1
Enter a fully qualified hostname for this system [firepower]: 1010-3
Enter a comma-separated list of DNS servers or 'none' [208.67.222.222,208.67.220.220,2620:119:35::35]:
Enter a comma-separated list of search domains or 'none' []: cisco.com
If your networking information has changed, you will need to reconnect.
Disabling IPv6 configuration: management0
Setting DNS servers: 208.67.222.222,208.67.220.220,2620:119:35::35
Setting DNS domains:cisco.com
Setting hostname as 1010-3
Setting static IPv4: 10.89.5.17 netmask: 255.255.255.192 gateway: data on management0
Updating routing tables, please wait...
All configurations applied to the system. Took 3 Seconds.
Saving a copy of running network configuration to local disk.
For HTTP Proxy configuration, run 'configure network http-proxy'

Manage the device locally? (yes/no) [yes]: no

Guidance: Enter no to use the Firewall Management Center.

Setting hostname as 1010-3
Setting static IPv4: 10.89.5.17 netmask: 255.255.255.192 gateway: data on management0
Updating routing tables, please wait...
All configurations applied to the system. Took 3 Seconds.
Saving a copy of running network configuration to local disk.
For HTTP Proxy configuration, run 'configure network http-proxy'
Configuring firewall mode ...


Device is in OffBox mode - disabling/removing port 443 from iptables.
Update policy deployment information
    - add device configuration
    - add network discovery
    - add system policy

You can register the sensor to a Firepower Management Center and use the
Firepower Management Center to manage it. Note that registering the sensor
to a Firepower Management Center disables on-sensor Firepower Services
management capabilities.

When registering the sensor to a Firepower Management Center, a unique
alphanumeric registration key is always required.  In most cases, to register
a sensor to a Firepower Management Center, you must provide the hostname or
the IP address along with the registration key.
'configure manager add [hostname | ip address ] [registration key ]'

However, if the sensor and the Firepower Management Center are separated by a
NAT device, you must enter a unique NAT ID, along with the unique registration
key.
'configure manager add DONTRESOLVE [registration key ] [ NAT ID ]'

Later, using the web interface on the Firepower Management Center, you must
use the same registration key and, if necessary, the same NAT ID when you add
this sensor to the Firepower Management Center.
>
3.

Identify the Firewall Management Center.

configure manager add {hostname | IPv4_address | IPv6_address | DONTRESOLVE} reg_key nat_id

  • {hostname | IPv4_address | IPv6_address | DONTRESOLVE}—Specifies either the FQDN or IP address of the Firewall Management Center. If the Firewall Management Center is not directly addressable, use DONTRESOLVE, in which case the firewall must have a reachable IP address or hostname.

  • reg_key—Specifies a one-time registration key of your choice that you will also specify on the Firewall Management Center when you register the Firewall Threat Defense. The registration key must be between 2 and 36 characters. Valid characters include alphanumerical characters (A–Z, a–z, 0–9) and the hyphen (-).

  • nat_id—Specifies a unique, one-time string of your choice that you will also specify on the Firewall Management Center. The NAT ID must be between 2 and 36 characters. Valid characters include alphanumerical characters (A–Z, a–z, 0–9) and the hyphen (-). This ID cannot be used for any other devices registering to the Firewall Management Center.

Example:


> configure manager add fmc-1.example.com regk3y78 natid56
Manager successfully configured.