
Understanding your users
Cisco Identity allows you to gain full visibility over all your identities. This is accomplished by bringing in a vast amount of data on identities from a range of sources including traditional identity sources like Entra ID (formerly Azure AD), Duo, and Okta, non-traditional sources like Github, Google, or Salesforce, and HR systems, such as Workday.
We go deep into each configured integration to understand everything we can about each and every identity - from static entitlement data, to dynamic behavioral data about the identity- and then merge user accounts across all of these different identity providers to provide a single source of truth for each identity.
Note: See Integrations to learn more about the integrations available and how to configure them
Within Cisco Identity, there are two primary areas where you can see information on the identities in your environment:
- Users page which is accessed when selecting Users from the left hand navigation menu
- User 360 which is accessed by selecting a specific user from the Users page, or anywhere you see a user's name (ie: failing checks, etc)
The Users page shows you a table of all the user identities in your environment, along with several filters to slice and dice the information. From the Users page, you can select a specific user to navigate to the User 360 where you will find the full rich insight about that particular identity.
Use the links above to read more detailed information about each area and the respective features and functionality.
Users
Overview
The Users page provides high level information on all the user identities in your environment, along with several filters and sortable columns, so that you can better understand, analyze and share user population data based on a variety of useful parameters. By default, the table on the Users page is sorted by User Name, and excludes user accounts that have been deleted, deprovisioned, or disabled.
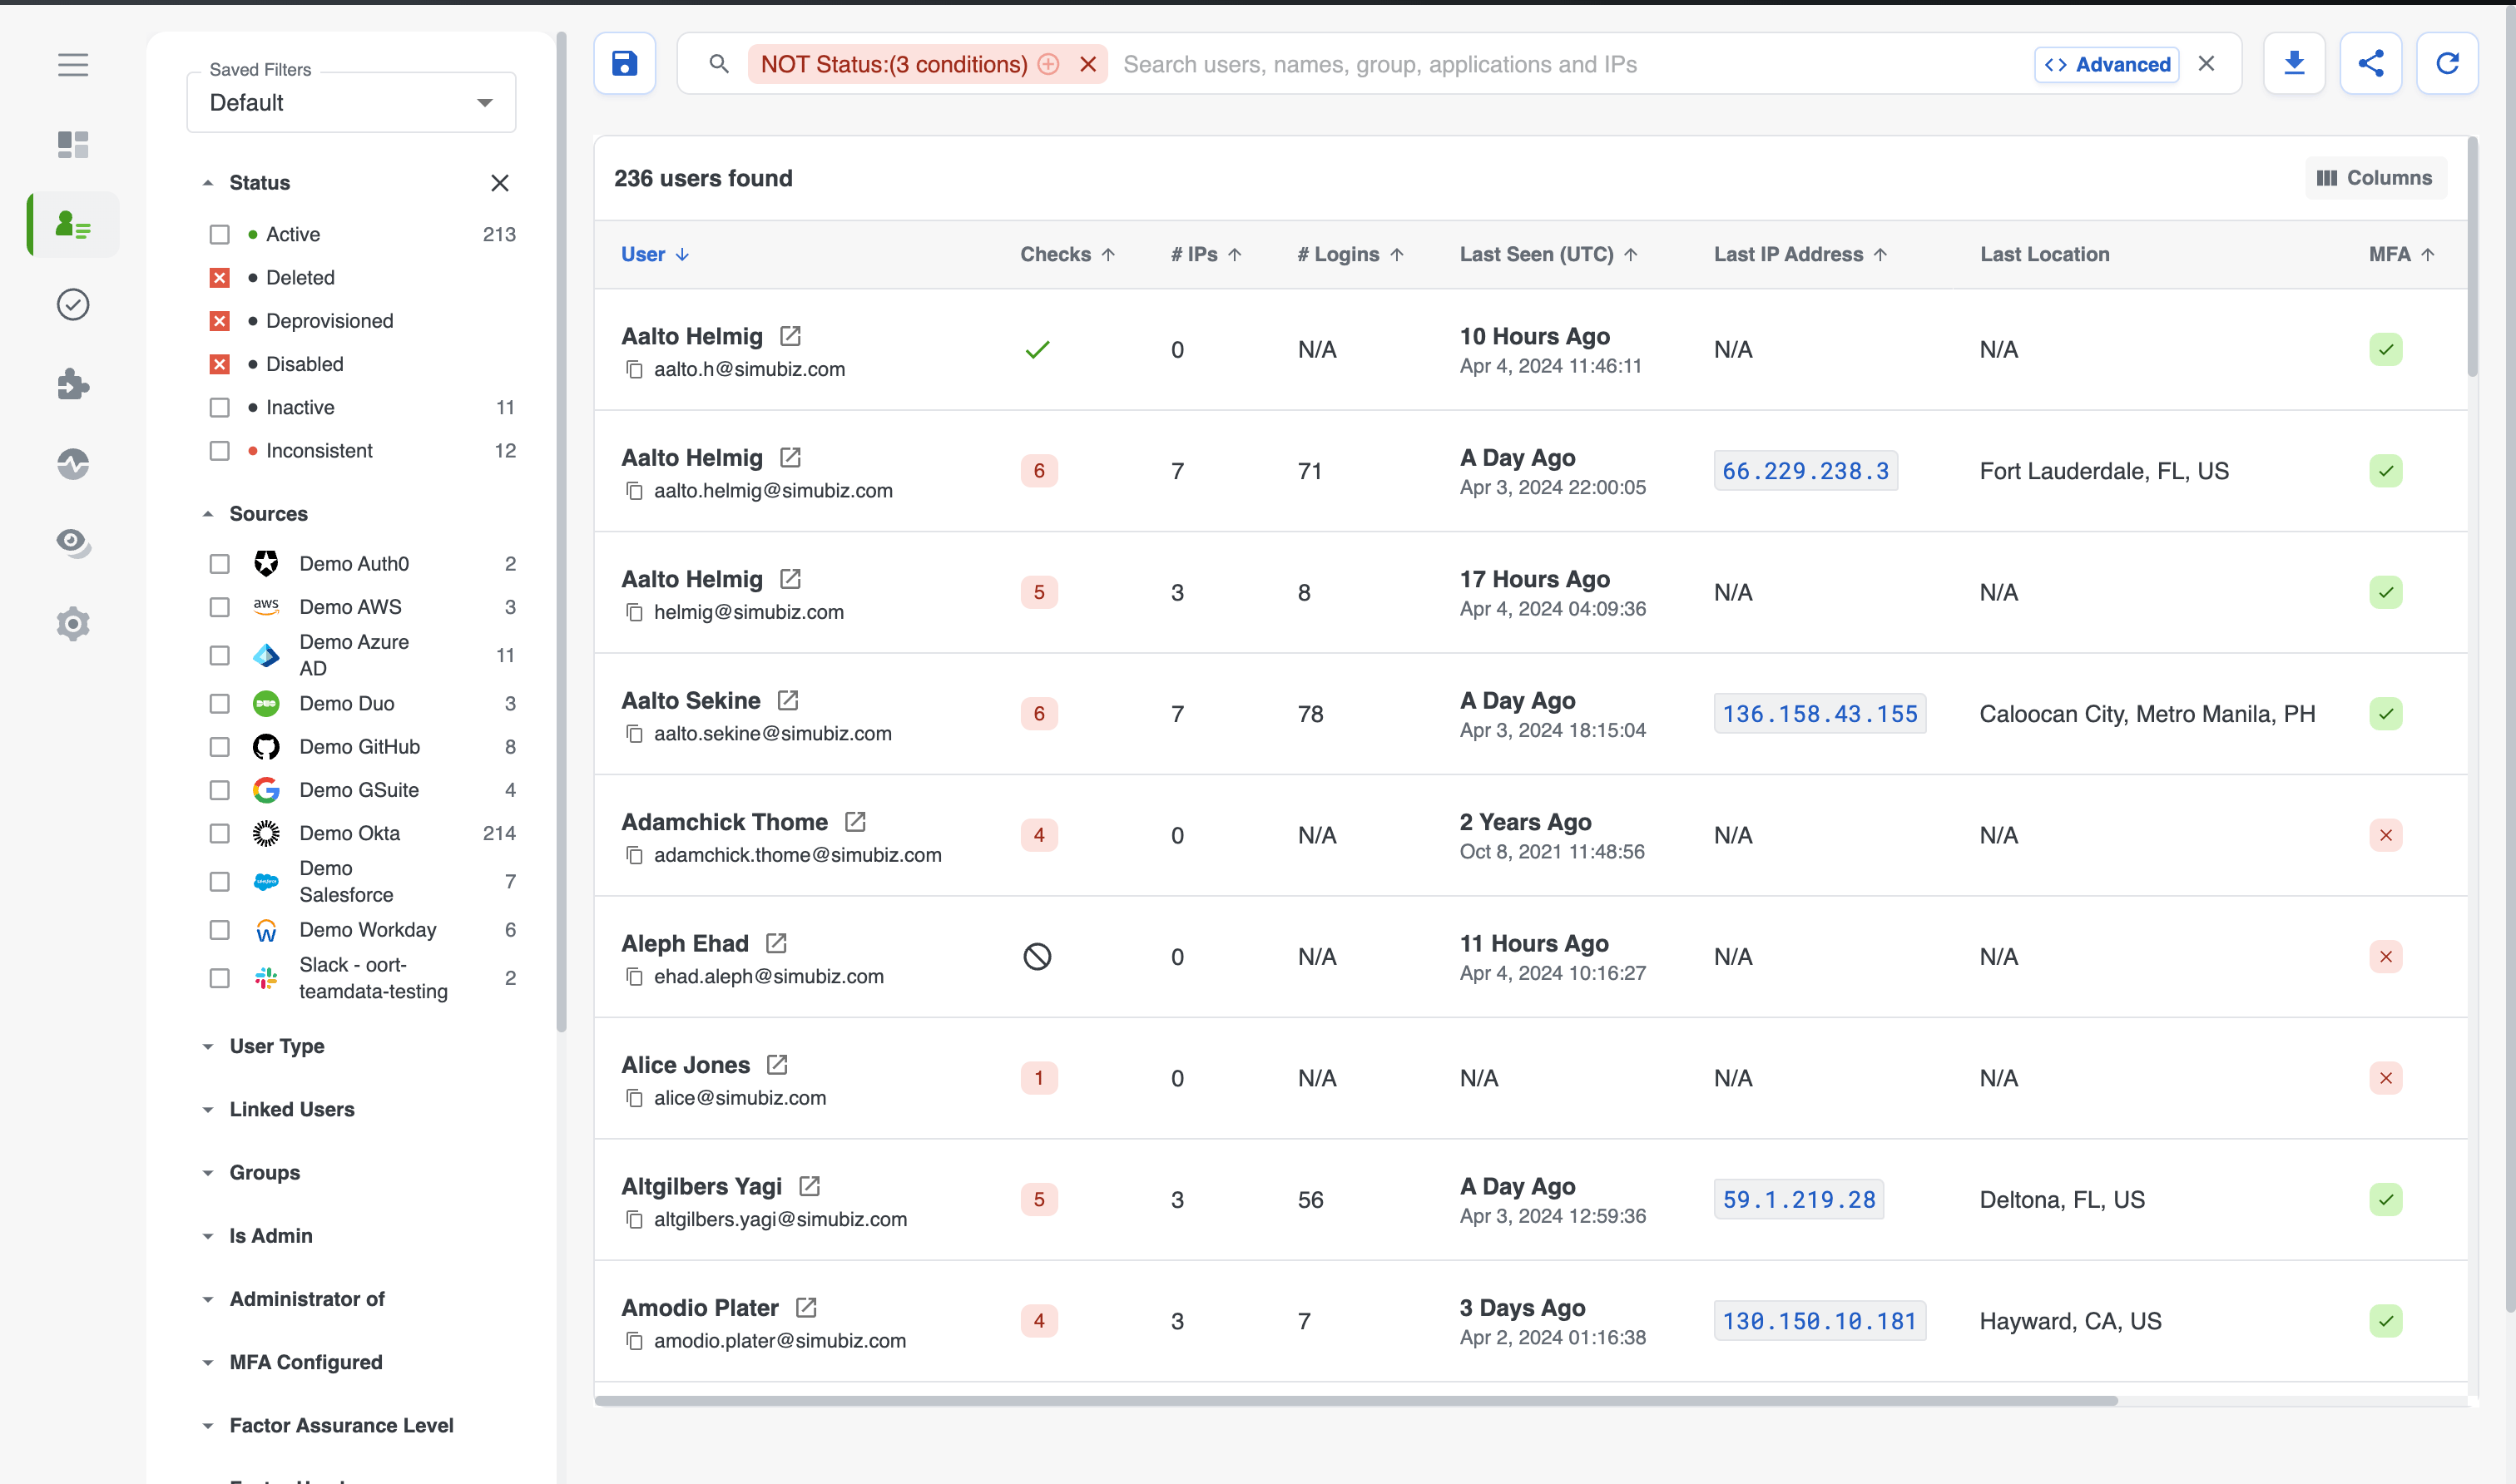
This section covers:
- Definitions of the elements in the table
- Users page actions such as searching, exporting results, etc
- Basic Filters and Advanced Query Mode
- Pivoting on IP address
Users table elements
The section below details the fields that appear in the table by default, as well as the definition of each field:
| Field | Description |
|---|---|
| User | The user's display name and their corresponding email or username |
| Trust Level | The user's current Trust Level |
| Checks | The total number of checks a user is failing. A 🚫 indicates the user is not part of the protected population and checks are not being evaluated against them |
| # IPs | The total number of IP addresses associated with a user's activity across all providers |
| # Logins | The total number of attempted logins across all providers, regardless of result (success, failure, challenge, other) |
| Last Seen (UTC) | The date and time of the last login attempt, regardless of outcome, for a user across all providers |
| Last IP Address | The IP address associated with the last successful or failed login attempt for a user across all providers. See the Pivot on IP Address section below for more. |
| Last Location | The location associated with the last successful or failed login attempt for a user across all providers |
| MFA | Icon indicating whether MFA is configured or not configured for the user |
| Providers | The logo icon(s) for the corresponding identity data sources where a user's account has been associated. Hovering over a source shows the integration name and user's status as gathered from that source |
| Status | The user's Cisco Identity Status and Lifecycle Event tag, if applicable. Lifecycle event badges are displayed for 7 days after the event is noted. See status values below. |
| Compiled Status | Combines provider user types (ie: internal, external, service accounts, etc) and the user's Cisco Identity Status |
Status values: - Active (green badge): This account is enabled in an identity data source and has successfully logged in over the last X days. The number of days is consistent with the value set on the Inactive Users and Inactive Guest Users checks (default setting is 30 days) - Inactive (Grey badge): This account is enabled in an identity data source, but has not successfully logged in over the last X days. The number of days is consistent with the value set on the Inactive Users and Inactive Guest Users checks (default setting is 30 days) - Deprovisioned (Grey badge): This account is no longer enabled in an identity data source and cannot be signed into - Inconsistent (red badge): This account has been flagged because there are account status discrepancies that may pose a significant security threat. See Inconsistent Users to learn about what factors contribute to a user being marked as inconsistent
Lifecycle Events (yellow badge): - New Account: indicates that this account was recently created. Includes the date the account was created - Significant Change: indicates that an uncommon, but important, activity has recently happened on this account (for ex: MFA factor added, admin privileges granted, sensitive app assigned, etc). You can query for specific Significant change events using Advanced Query mode
Additional columns can be added to the table view using the Columns button:
| Field | Description |
|---|---|
| Created Date (UTC) | The date a user's account was created. Uses the first creation date available across all configured providers |
| Employee ID | The employee ID, gathered from the provider if available |
| Manager Login | The user's manager's email address, gathered from the provider if available |
| Title | The user's job title, gathered from the provider(s) if available |
| Department | The department a user belongs to, gathered from the provider(s) if available |
| Registered Location | The location a user is supposed to be working from based on hiring agreements, if available from the HRIS or the IdP. If the user has multiple registered locations that differ, the HRIS data always takes precedence. If HR information is not available, the data comes from the IdP |
| Inconsistency Severity | The severity of the inconsistency noted for a user with Inconsistent status |
| User Type | The Cisco Identity user type assigned based on compiled identity data source user types |
Users page general actions
There are several general actions that can be performed on the Users page:
- Search
- Sort, add or remove columns
- Download results
- Share results
- Refresh
Search
Use the search bar to search based on users, names, group, applications and IPs. When searching, you do not need to provide an exact value. Typing a piece of the word will return results.
If you have searched on a particular parameter, the search criteria is retained as you navigate between different tabs within the platform.
To clear the search bar, select the X on the right most side of the search bar, next to the Advanced button.
Sort Columns
Sort columns within the table by selecting the column header you'd like to sort by. Select once to sort in ascending order, select again to sort in descending order.
Multi-column sorting is not currently supported.
Add or remove columns
Columns can be added or removed from the table using the Columns button in the top right of the table, above the column headers. Select this button to choose the columns you'd like to display in the UI. To return to the default settings, select Restore Default at the bottom of the list when you open the Columns button.
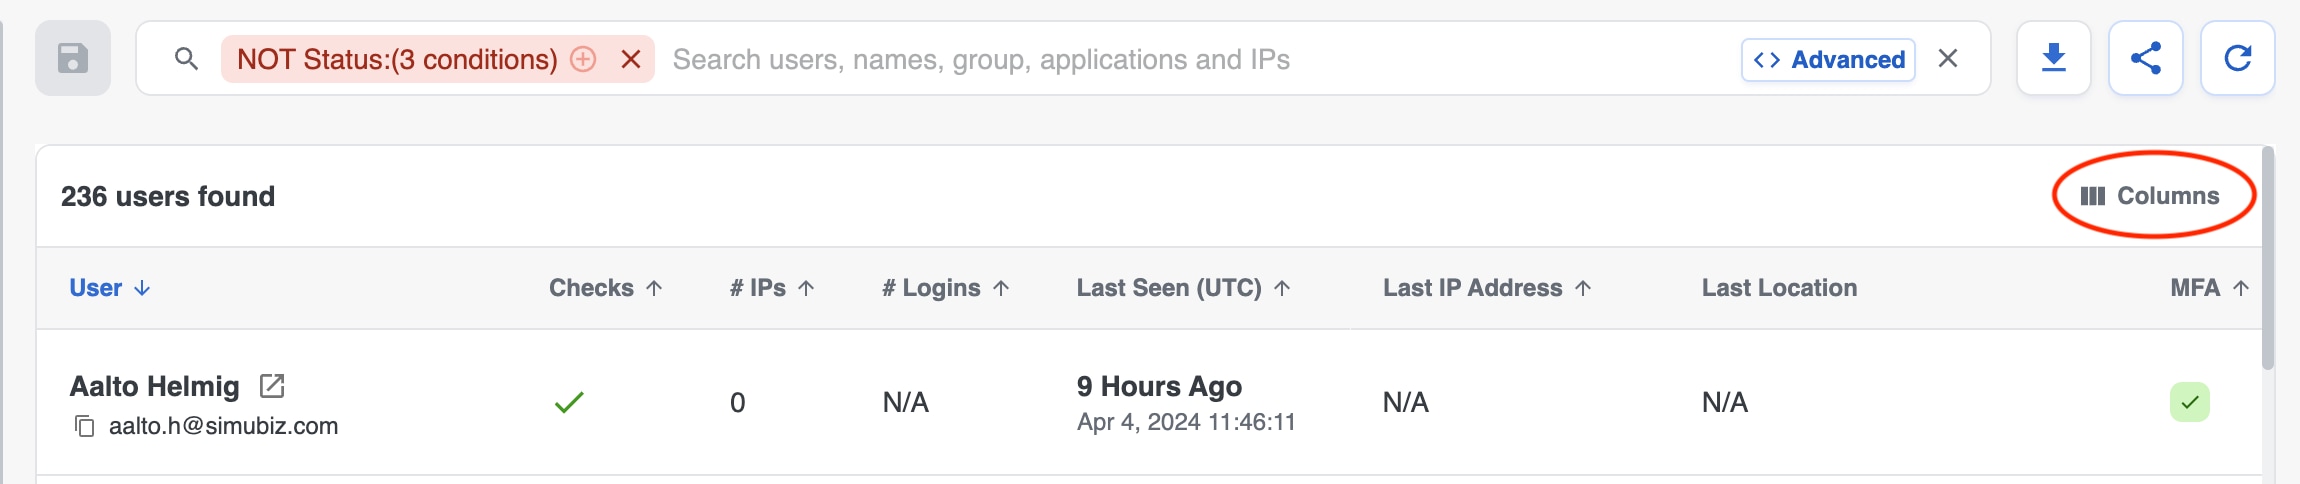
The Download feature respects the visible columns.
Download results
You can download tabular data from the table to a CSV using the Download icon button on the right after the search bar. All columns displayed and filters applied are included in the CSV output.
If there are no results in the table, the CSV export will contain only headers and no user data.
Note: The CSV download has a limit of 2,000 rows. If you need to download more than 2,000 rows, select the download button and follow the prompts to get the export sent via a download link.

Share URL
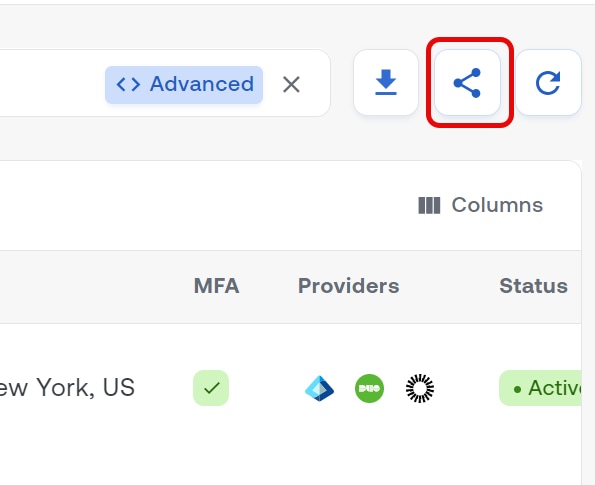
The Share button (on the right side of the Search bar) copies a link to this page, with the applied filters and selected columns, that can be easily pasted, bookmarked or shared with anyone who has the appropriate access to your Cisco Identity tenant

Refresh
Use the Refresh button on the right side of the search bar to refresh user data and filter counts in the table after making changes (ex: linking users, excluding a user from a check).

Filters
The Users table is filterable by a number of attributes, enabling you to slice and dice your user population based on the parameters that are important to you.
There are two types of filters that can be used on the Users table - basic filters, which can be found to the left of the Users table and Advanced Query mode, which can be enabled via the search bar above the users table. Check out our documentation on how to use Advanced Query Mode to learn more.
Filtered results derived from both basic filters, as well as advanced queries, can be saved to access later or share with teammates. See Saved Filters to learn more.
Applying basic filters
You can see all the available basic filters on the left hand side of the Users page.
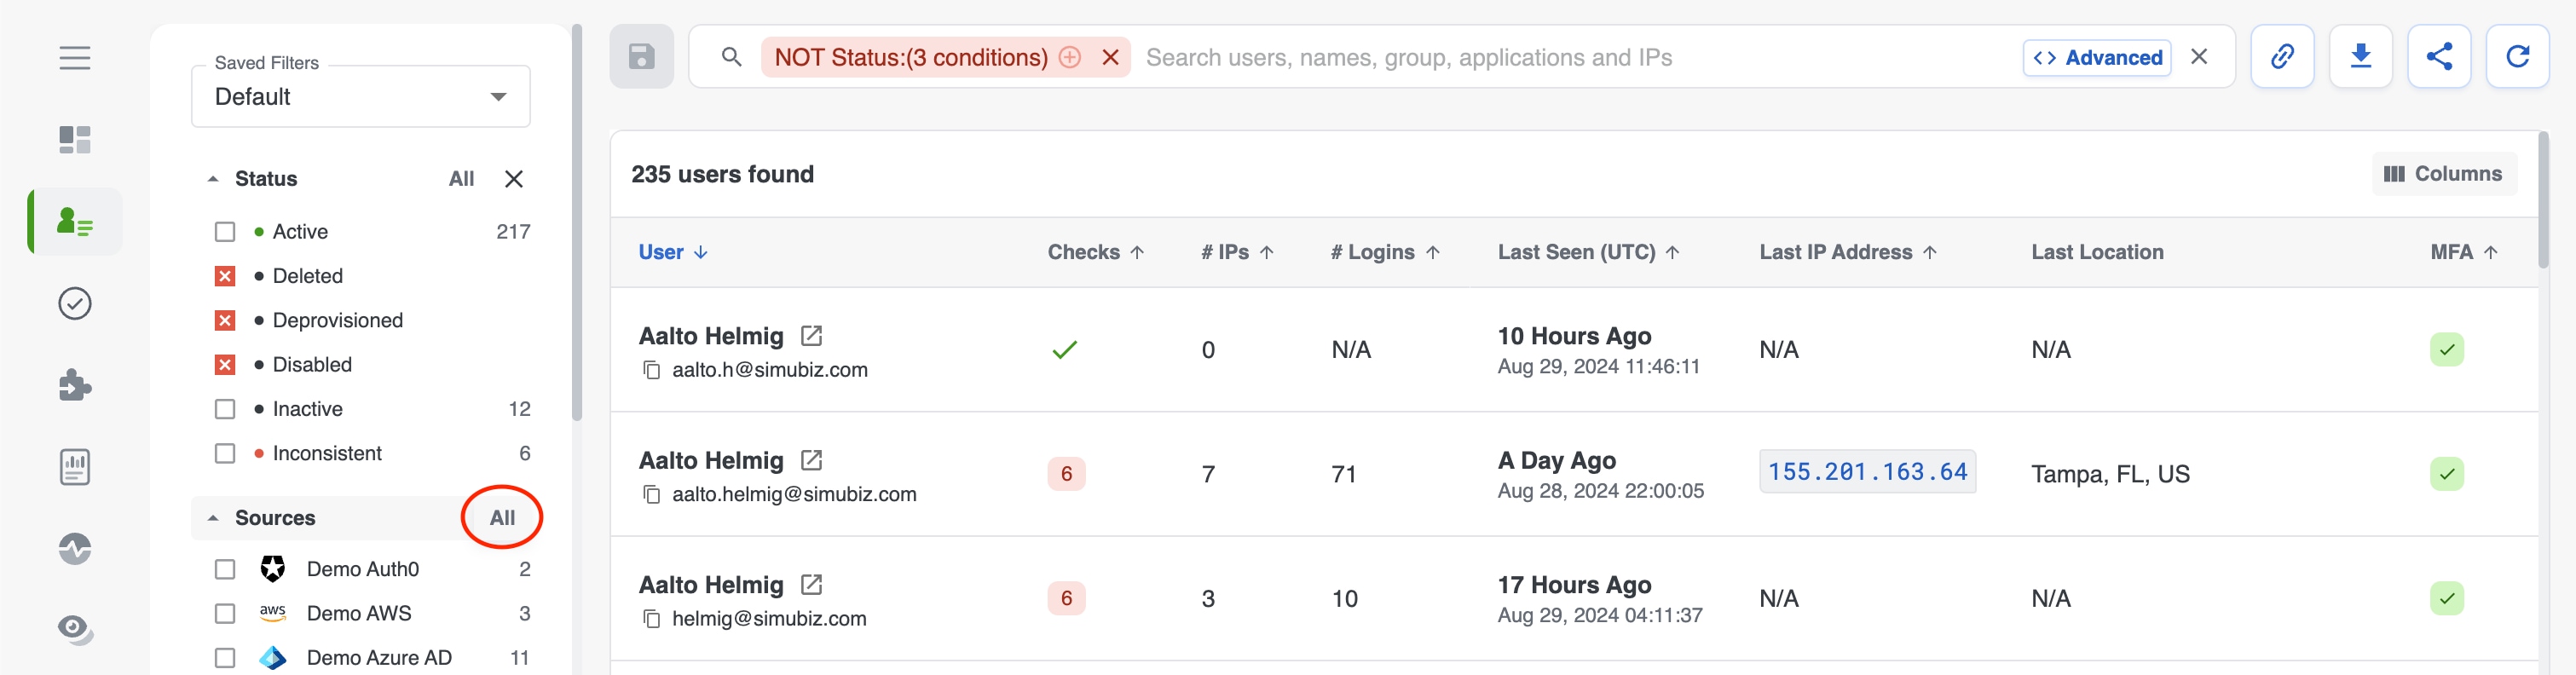
To enable a filter, select the check box for the attribute you would like to filter by. The applied filters will be added to the search bar, as seen in the screenshot below. The number of users that you are currently viewing, based on the filters and searches used, will appear in the top left corner of the Users table above the column headers.
To remove a filter, you can either deselect the attribute from the filters list on left hand side of the Users table, or select the X on the right hand side of the filter box that is in the search bar. To remove all filters besides the default filter, select the X located next to the Advanced Filter button in the search bar.
After you have selected your filters, the filters are retained as you navigate between different areas within the platform.

By default, the Users Table excludes user accounts that have been deleted, deprovisioned, or disabled. To include these accounts in the results, select the X on the right side of the 'NOT Status' filter box in the search bar.
Distinct filters are separated by an AND operator. For example, if you select the Duo value from the Sources filter and the No value for MFA Configured filter, the table will display all users in Duo who have No MFA Configured.
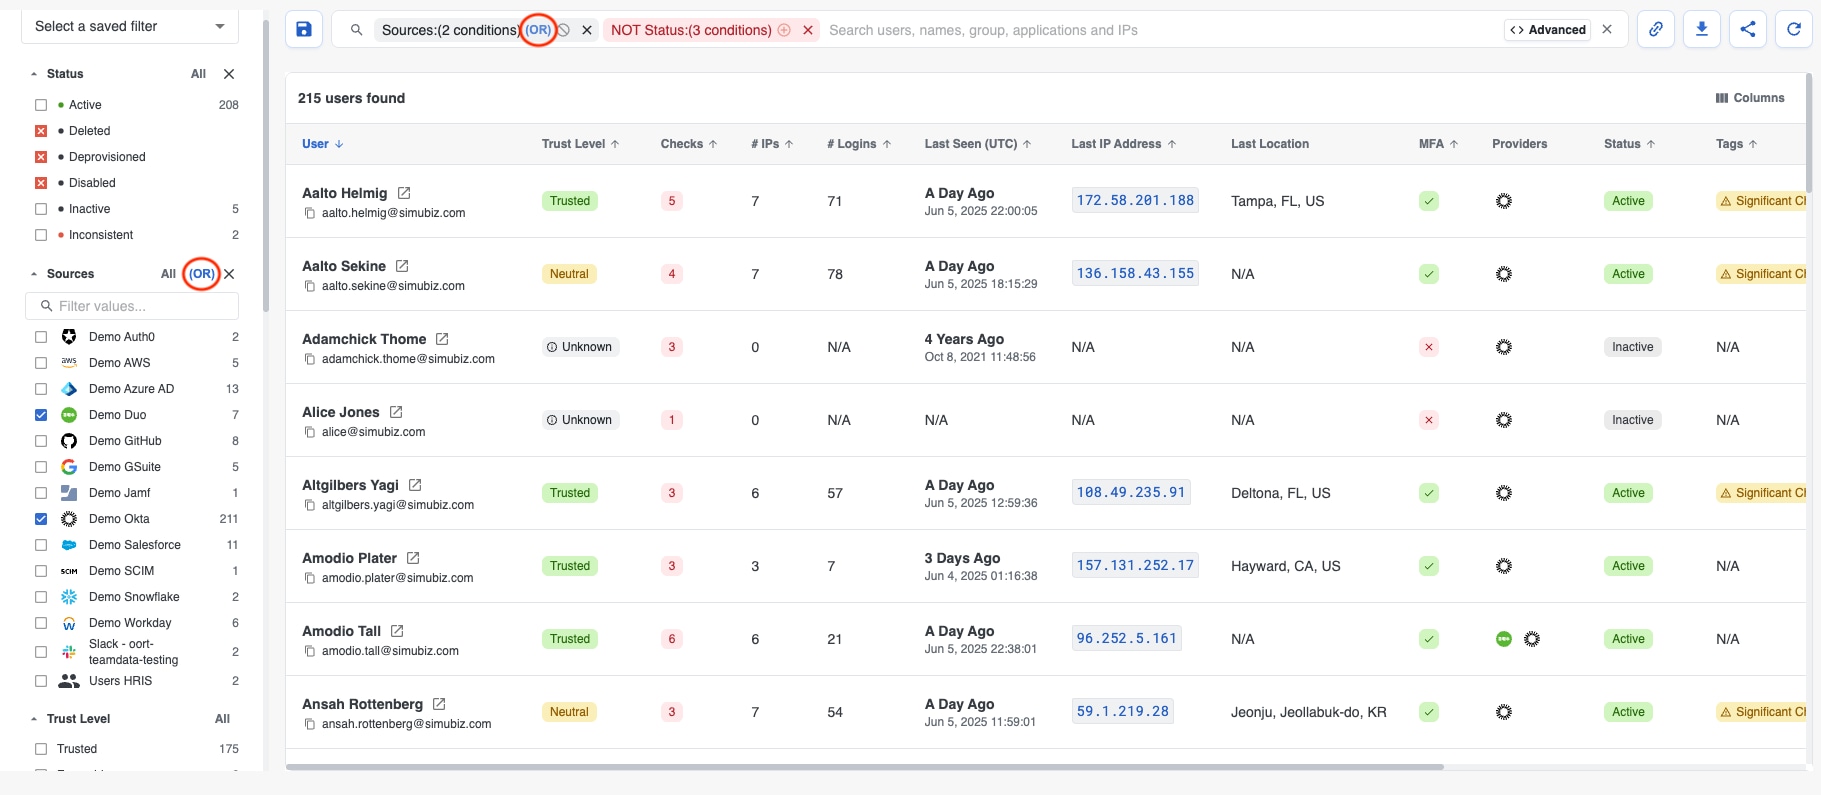
For most filters, you can select more than one value to filter by. Within a given filter, selecting more than one value will separate the values with an OR operator by default. For example, if you select the values Okta and Duo for the Sources filter, users with accounts in either Okta OR Duo will be displayed.
However, within a given filter, if you would like to filter for users with accounts in both Okta AND Duo, you can select the OR operator found in the filter box in the search bar or in the left hand filter menu (screenshots below), to switch it to AND. Doing this will allow you to see users that are in both Okta AND Duo.
Filters that use radio buttons cannot have more than one value selected at once (for ex: Is Admin)
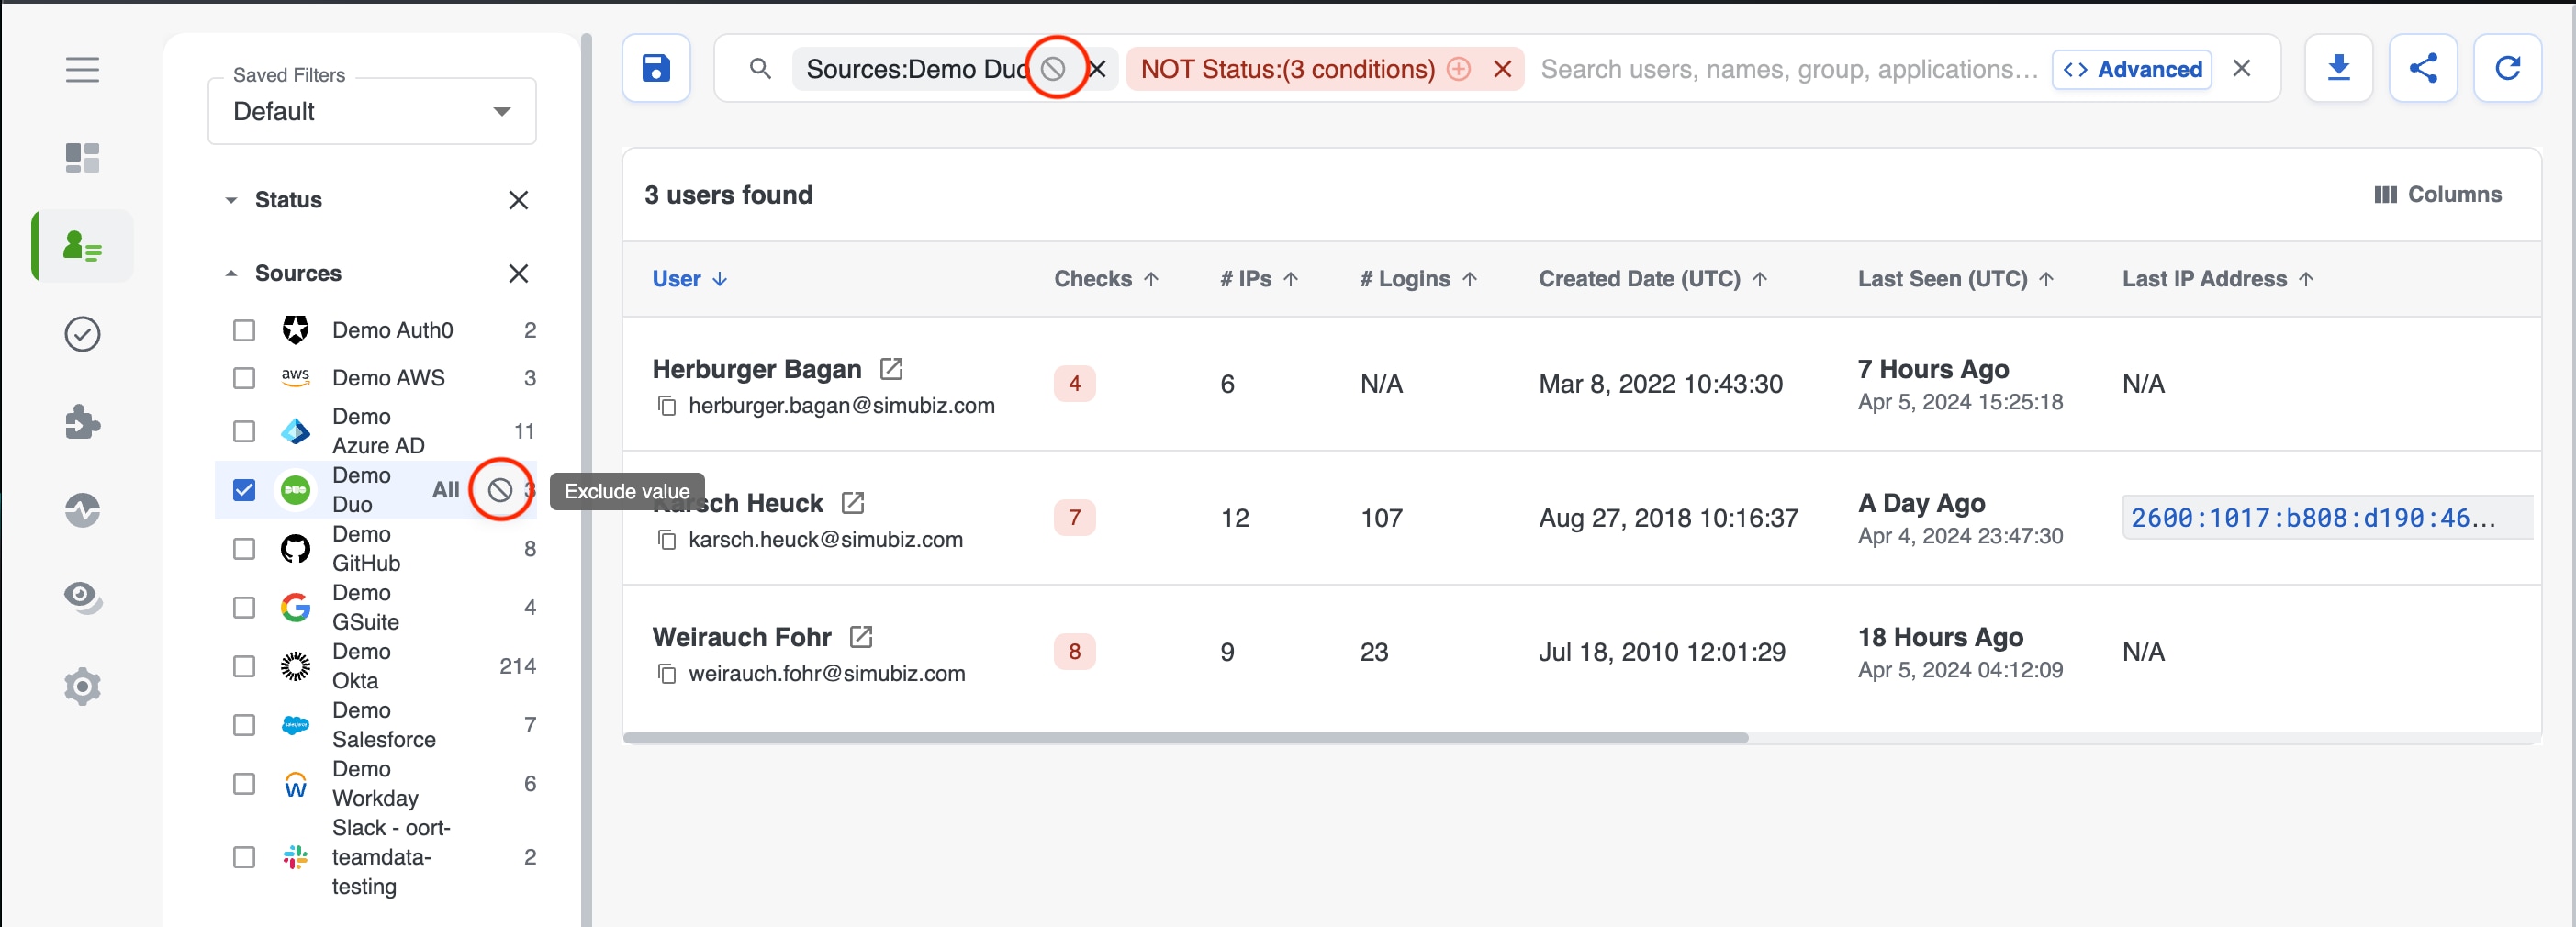
Specific values can also be excluded from the results for most filters, except for those that cannot have more than one value selected at once. To exclude a value from filtered results (ie: NOT), you can select the 🚫 in either the filter box in the search bar or the left hand filter menu.
Similarly, you can 'include all' filter values in the results, except for filters that cannot have more than one value selected at once. To select all values within a given filter, select All next to the filter value title.
Pivot on IP address
The IP address in the table has a few actions associated with it that can be useful to learn more about an IP address and the associated activity.
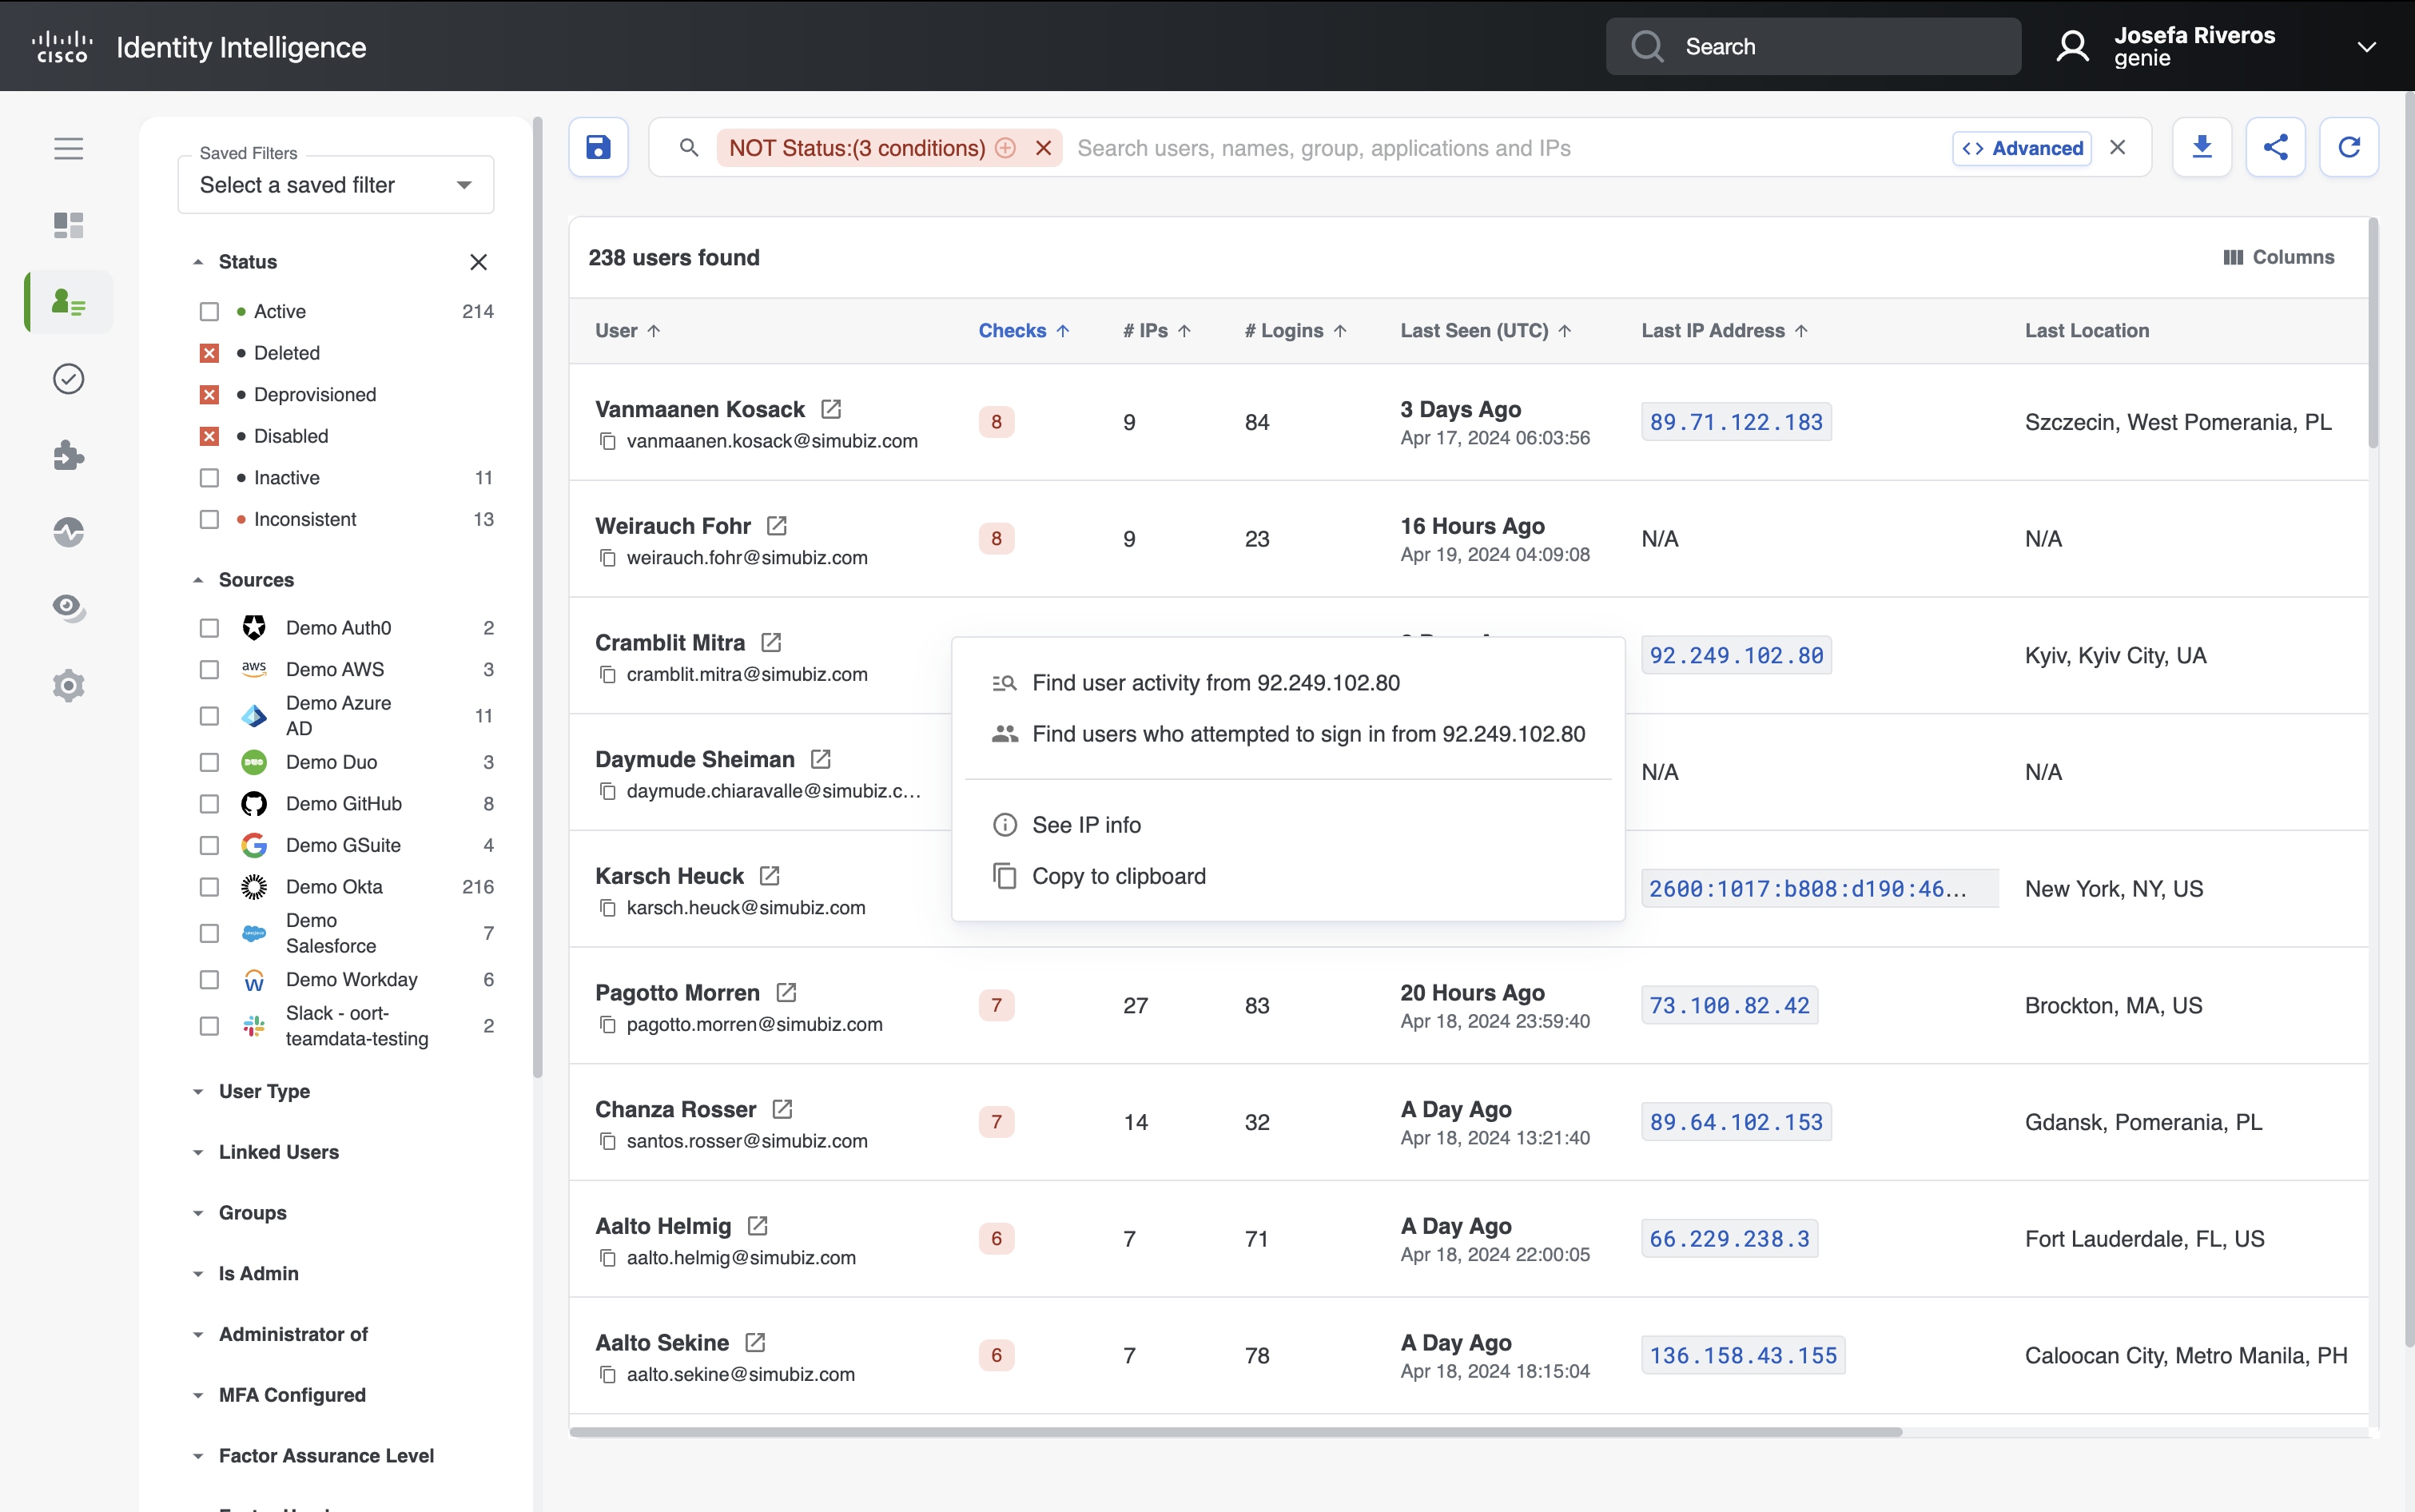
The actions menu will pop up when left-clicking on a specific IP address in a user row. The actions are:
- Find user activity - Takes you to the Activity tab of the User 360 for the respective user, with the selected IP address added as a filter, so you can see all the user's activity associated with this particular IP address
- Find users who attempted to sign in from X.X.X.X - Adds the selected IP address as a search parameter on the Users page so you can see any other users who have activity associated with this particular IP address
- See IP info - Takes you to the Networks tab of the User 360 for the respective user, with the selected IP address added as a filter, and opens the slide panel so you can see more detailed information about that IP address for this user
- Copy to clipboard - Copies the IP address to your clipboard so that you can paste it within Cisco Identity or another tool
Basic Search & Advanced Query Mode
Overview
Cisco Identity enables users to create simple but powerful searches with basic filters and also advanced queries that answer critical questions about your identity population. When in Advanced Query mode, you will be able to use Kibana Query Language to form more complex queries to find specific information that you may need that is not available in our Basic filters.
Basic Search Mode
The default search mode within the UI allows for point-and-select combination of filters on the lefthand menu bar of the Users page.
The same type of select-to-filter functionality is available in the Activity tab of the User 360 page.
Important Notes
- By default, accounts that are disabled, deleted, or deprovisioned are filtered OUT of the Users page results. Clear this filter to see those accounts in your search results.
- In Basic mode, searching with a leading wildcard, such as
*<some term>, is not supported.
Entering Advanced Mode & Adding Filters
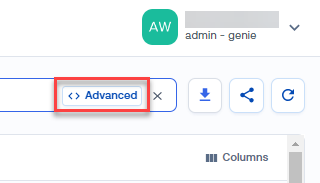
- From the Users tab, press the Advanced button on the right side within the search bar
- Alternatively, if you select a Basic filter from the left hand side of the Users table, it will add a chip for the selected filter in Basic mode to the Search bar. Select that chip in the search bar to convert that filter to an Advanced attribute, which enables you to edit that attribute
- Additional filters can be added and edited to the existing search string
- At any point, you can convert back to the Basic filter mode by pressing the Advanced button and confirming that you'd like to switch back to Basic mode. Please note that converting back will remove anything written into the search string
Available Attributes & Auto-complete
The user records in Cisco Identity contain a large number of attributes or fields that can be queried in Advanced search mode. The Attribute List is constantly being updated as new functionality and integrations are added.
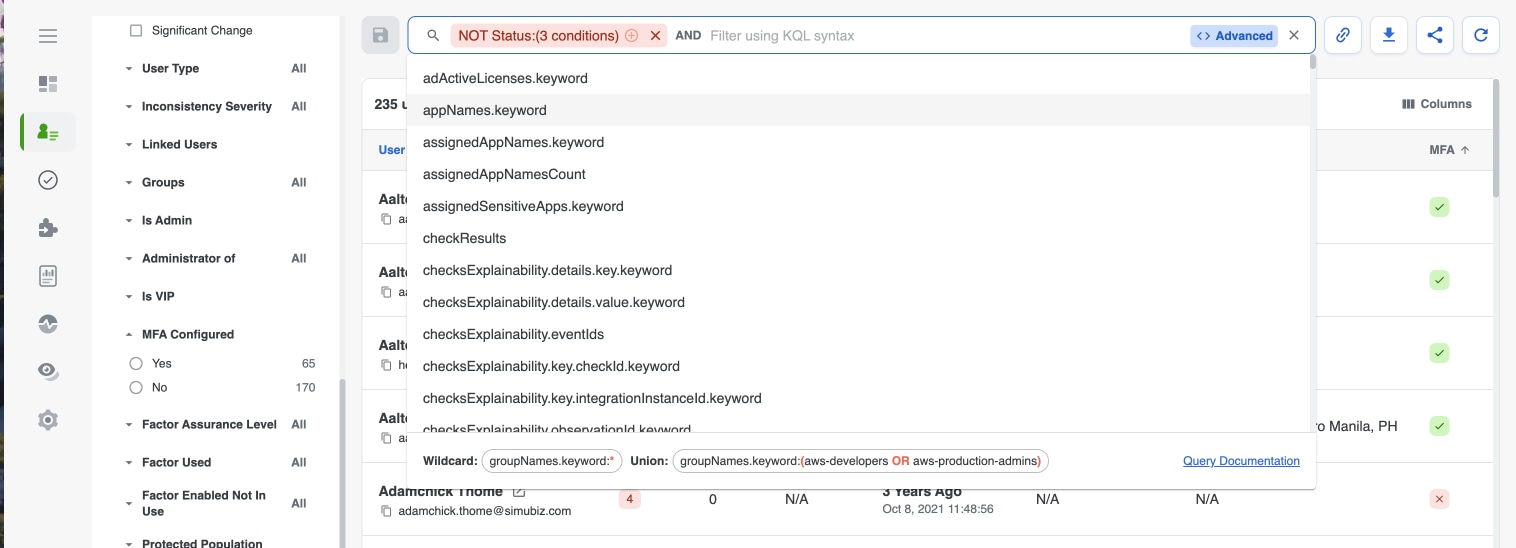
The best way to find a particular attribute is by selecting the Advanced button, which will open the list of available attributes that can be used to create queries. Start typing your desired attribute into the search bar to trigger the auto-complete functionality, which allows you to see what attributes exist that include your keywords, or scroll through the alphabetized list of attributes to see everything that exists!
There are also hints frozen to the "bottom" of the attribute list that can help guide you when crafting more complex queries.
Operators
The Advanced search follows the convention operators of KQL (reference article), including -
- AND
- OR
- NOT
_exists_!_exists_
Examples
This section provides several examples for building queries within the Advanced search bar.
Example 1 - Complex query with AND
To find users with the following set of parameters -
- users in the GSuite
- Admins group
- no MFA enabled
- recently logged in
- subject of an IP threat from a VPN or Tor proxy
The query would look like:
groupNames.keyword:"sg-gsuite-admins"
AND mfaEnabled:false
AND lastActive:{now-7d TO now-1d}
AND ipAddressDetails.ipTags.name:(VPN OR TOR_Proxy)
Example 2 - IP Activity from a Specific Country
To find users with recent IP activity from a particular Country, such as China, the advanced query would look like:
ipAddressDetails.location.country.keyword:"CN"Example 3 - Accounts with no Employee ID attribute
To list user accounts without an Employee ID attribute value, it would look like:
!_exists_:employeeId.keywordExample 4 - Inactive users with specific naming convention
To find inactive users who's accounts start with "sa." and contain the word "company", the query would look like:
sa.*company* AND checkResults.checkId.keyword:inactive-usersNote: free text search will look in all indexed fields within the user profile, for example email address, UPN, etc.
Example 5 - Find admin accounts for a specific IDP
Cisco Identity attempts to determine admin privileges or roles granted to accounts. To search for the admin accounts associated with only one specific IDP, the query would look like one of the following, depending on the IDP desired:
integrationInstanceDetails.providerAdmin.keyword:"OKTA__true"

integrationInstanceDetails.providerAdmin.keyword:"AZURE_AD__true"

integrationInstanceDetails.providerAdmin.keyword:"G_SUITE__true"
Example 6 - Query for Microsoft License Types
Cisco Identity is able to collect assigned Microsoft license types through the Azure Graph API. This information is displayed in the Azure tile of the Overview tab for a user account.
To query for a specific license type, the search string would look like:
adActiveLicenses.keyword:("Azure Active Directory Premium P2")Note: the License name value is a translation from the license UID provided through the Graph API.
Example 7 - MFA Factors
A common query is to search for the users who have a particular type of MFA factor enrolled, such as push notification, hardware security keys, etc.
Use the userFactors.factorType.keyword attribute to search for different enrolled factor types, as shown:
userFactors.factorType.keyword:"push"The available factor types and names will vary based on which IAM platforms are connected to Cisco Identity. Some common factor names include:
webauthn
google_otp
push
okta_verify
okta_password
password
signed_nonce
okta_email
Security_key
A comprehensive list of factor types seen so far is below in the Factor List section.
Example 8 - Application Assignment and Usage
It is frequently useful to look for both which users have an application assigned and which users are actually using the application.
For example, to look for users who have application Salesforce SAML assigned, but not in use in their last 30 days of activity, the query would look like:
assignedAppNames.keyword:"Salesforce SAML"
AND (NOT appNames.keyword:"Salesforce SAML")
Note: Sensitive applications can be seen in the Dashboard tab and all applications that are integrated via an IDP or directly can be seen in a User's Applications tab. Sensitive Applications can be configured through Tenant Settings
Example 9 - Device Usage
If looking for users with sign-in activity from a particular user-agent string or device type, for instance iPhones, the search string might look like:
lastSignIn.rawUserAgent.keyword:
  "Mozilla/5.0 (iPhone; CPU iPhone OS 15_6_1 like Mac OS X) AppleWebKit/605.1.15 (KHTML, like Gecko) Version/15.6.1 Mobile/15E148 Safari/604.1"
Example 10 - Find a user by Duo Security alias
To find a user account by an alias in Duo Security, use this format:
integrationInstanceDetails.userKey.keyword:/.*kheuck*./Factor List
Across the different IDPs, factors may have a variety of different names, which may change or grow over time. The list below provides examples of factor names that Cisco Identity has seen so far.
okta_verifyokta_emailPasskeyPlatform_authenticator_(passwordless)webauthnwebmicrosoftAuthenticatorPasswordlessSecurity_KeyOthertoken:hotpduo_mobile_passcodewindowsHelloForBusinessykd1Security_keypasswordmicrosoftAuthenticatorduosoftwareOathtoken:software:totpwebauthn-roamingyubikey_tokenokta_passwordtotpsmsTouch_IDtokenphonefido2signed_noncephone_numberbypass_codepushduo_pushgoogle_otpquestionclaims_providerWebAuthn_Chrome_Touch_IDu2ftokenQR codesms_passcodeemailphone_callsecurity_questionwebauthn-platformcalltoken:hardwareotpcustom_otp509 Certificate
Saved Filters
The Cisco Identity Users page includes a wide variety of filters, whether in Basic filter mode or Advanced Query Mode using the KQL query language. Often a specific data set is needed repeatedly as you work through a project with your team or for long term monitoring of specific users/issues, and it can be cumbersome to continuously re-apply the same set of filters or rebuild the same advanced queries over and over again to get the data you need.
To make it easier to quickly access sets of filters that you are frequently referencing, Cisco Identity allows you to create Saved Filters. These Saved Filters can also be modified and deleted as needed.
NOTE: ALL users in the console can see and utilize ALL existing saved filters. Cisco Identity users with the Help Desk role and full Admin role can create, update, and delete ANY filters. There are also no user permissions associated with individual filters and no private or per-user filters at this time.
Create Saved Filter
- To create a Saved Filter, craft the query in Basic or Advanced mode that provides you with the data set needed
- Select the Save icon on the left of the search bar
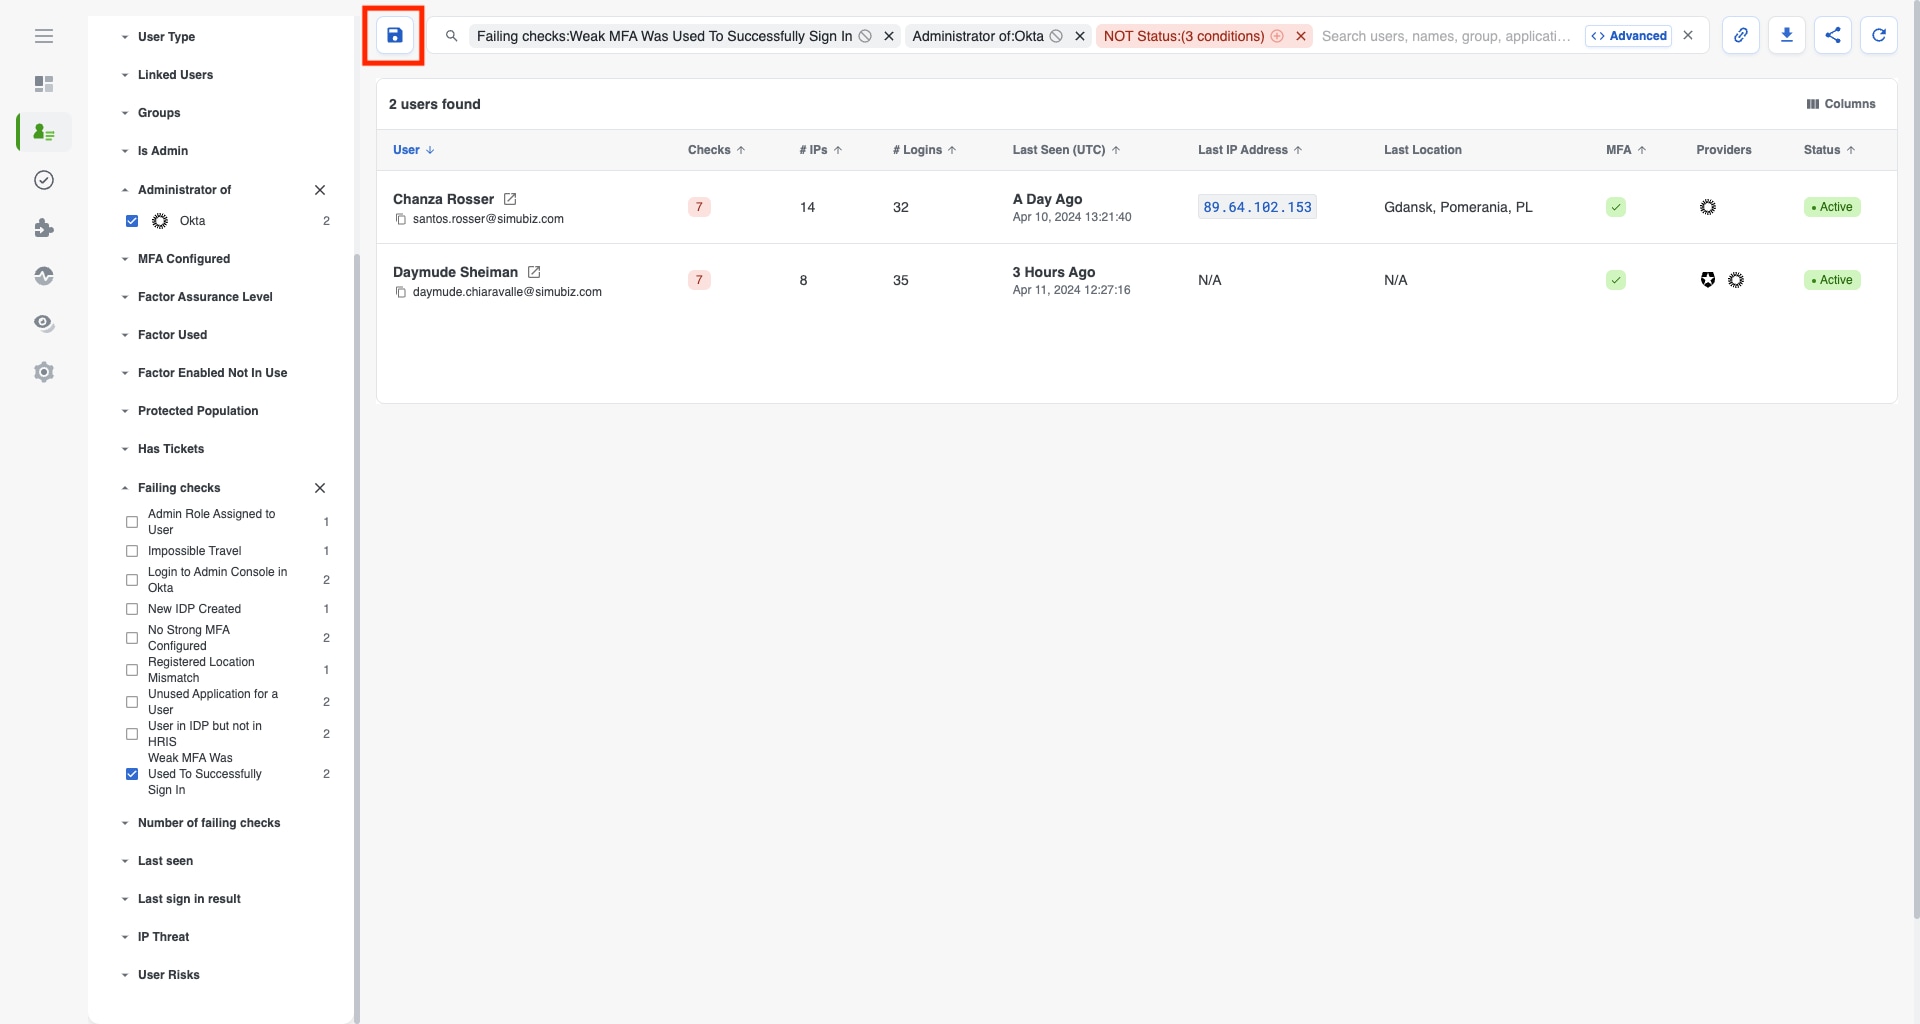
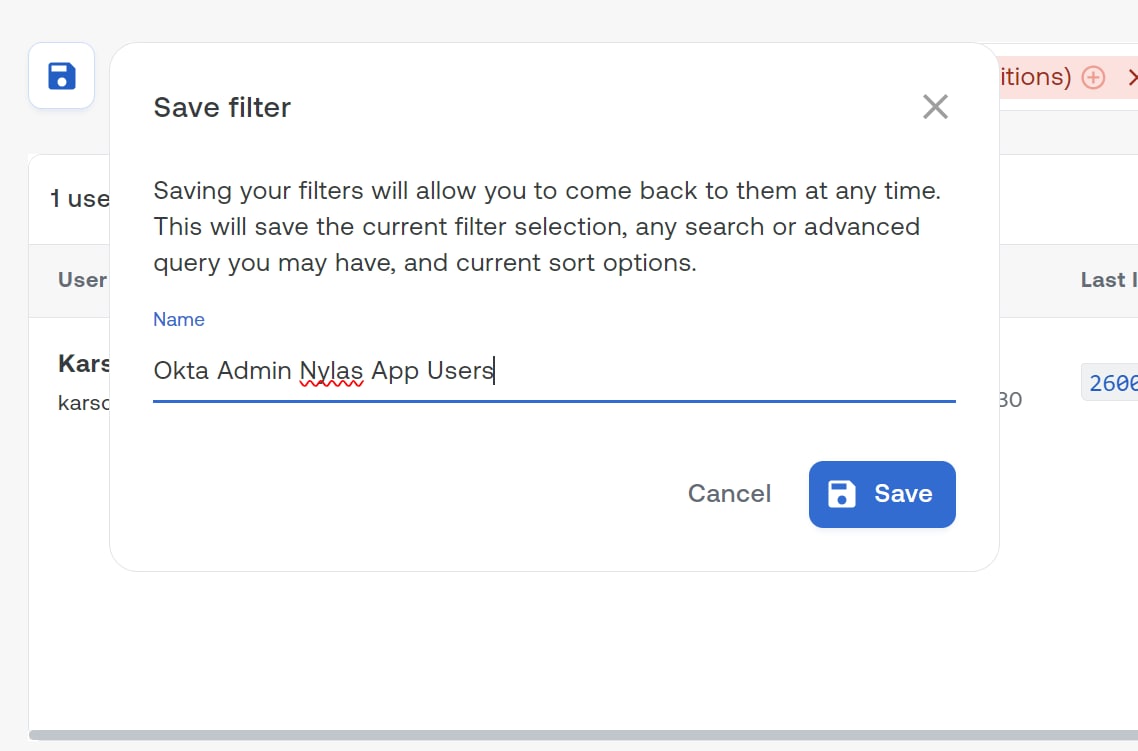
- A small modal will open. Give the filter an easy to identify name and select the blue Save button within the modal to save your filter
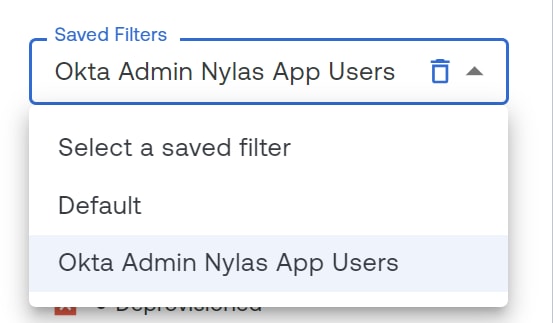
- The Saved Filter will then be available in the dropdown list of the Filters area, towards the top left of the Users page
Modifying an existing Saved Filter
To modify an existing Saved Filter, simply select the desired filter from your list of Saved Filters. The Saved Filter attributes will automatically be added to the search bar. From here, you can modify the search parameters in the search bar. Select the Save icon next to the search bar again to re-save it.
Deleting a Saved Filter
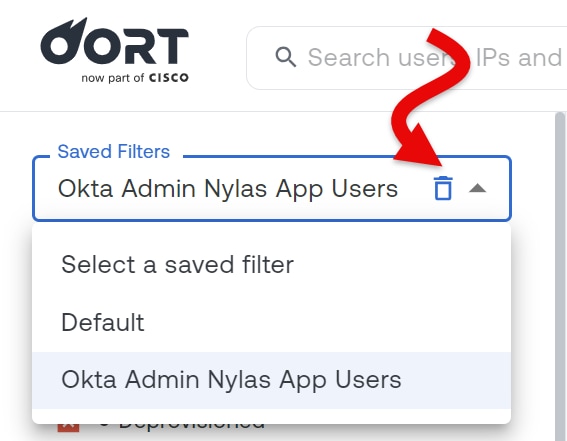
To delete an existing Saved Filter, select the desired Saved Filter, then select the Trash icon next to it's name.
Sharing a Saved Filter
As noted above, Saved Filters are available to all users with access to your Cisco Identity tenant. To share a link outside of the console, for instance via email, Webex, Teams, or Slack channels or direct message:
- Select the Saved Filter you want to share
- Select the Share icon on the righthand side of the Search bar to copy a direct link to your clipboard
- Paste the link where desired to share the data with other team members who have access to your Cisco Identity tenant
User Statuses
Overview
User Statuses are broken down into two categories: the Identity Provider (IdP) Status and an Cisco Identity Status. Read on to learn the differences between the two statuses, how each status is compiled and what the definition of each status is.
Identity Provider (IdP) Status
The Identity Provider (IdP) Status is a status that is gathered directly from what is configured on the data source for a particular user.
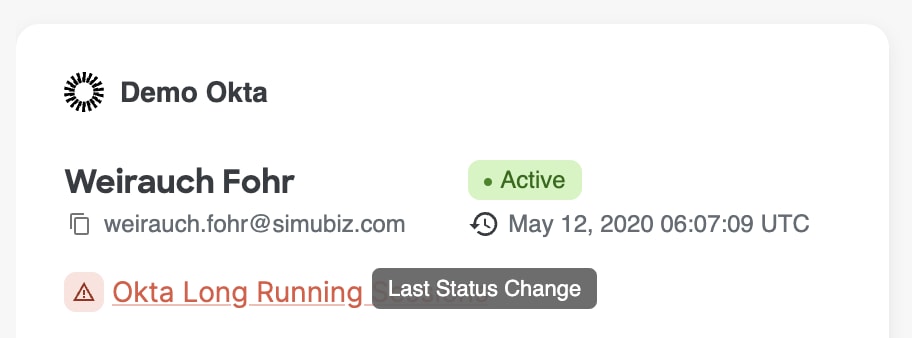
You can see the respective IdP Status for each data source associated with a user in the right top corner of each source card on the User 360 Overview tab.
Statuses and definitions
To learn what statuses are possible and what each IdP status means, please refer to the data source's documentation on user statuses. Examples: Okta, Duo
Cisco Identity Status
The Cisco Identity status is a status that combines all of the user's IdP statuses with observability information based on a user's activity. If you have an HRIS system configured, then it will also include the user's employment status from the HRIS system.
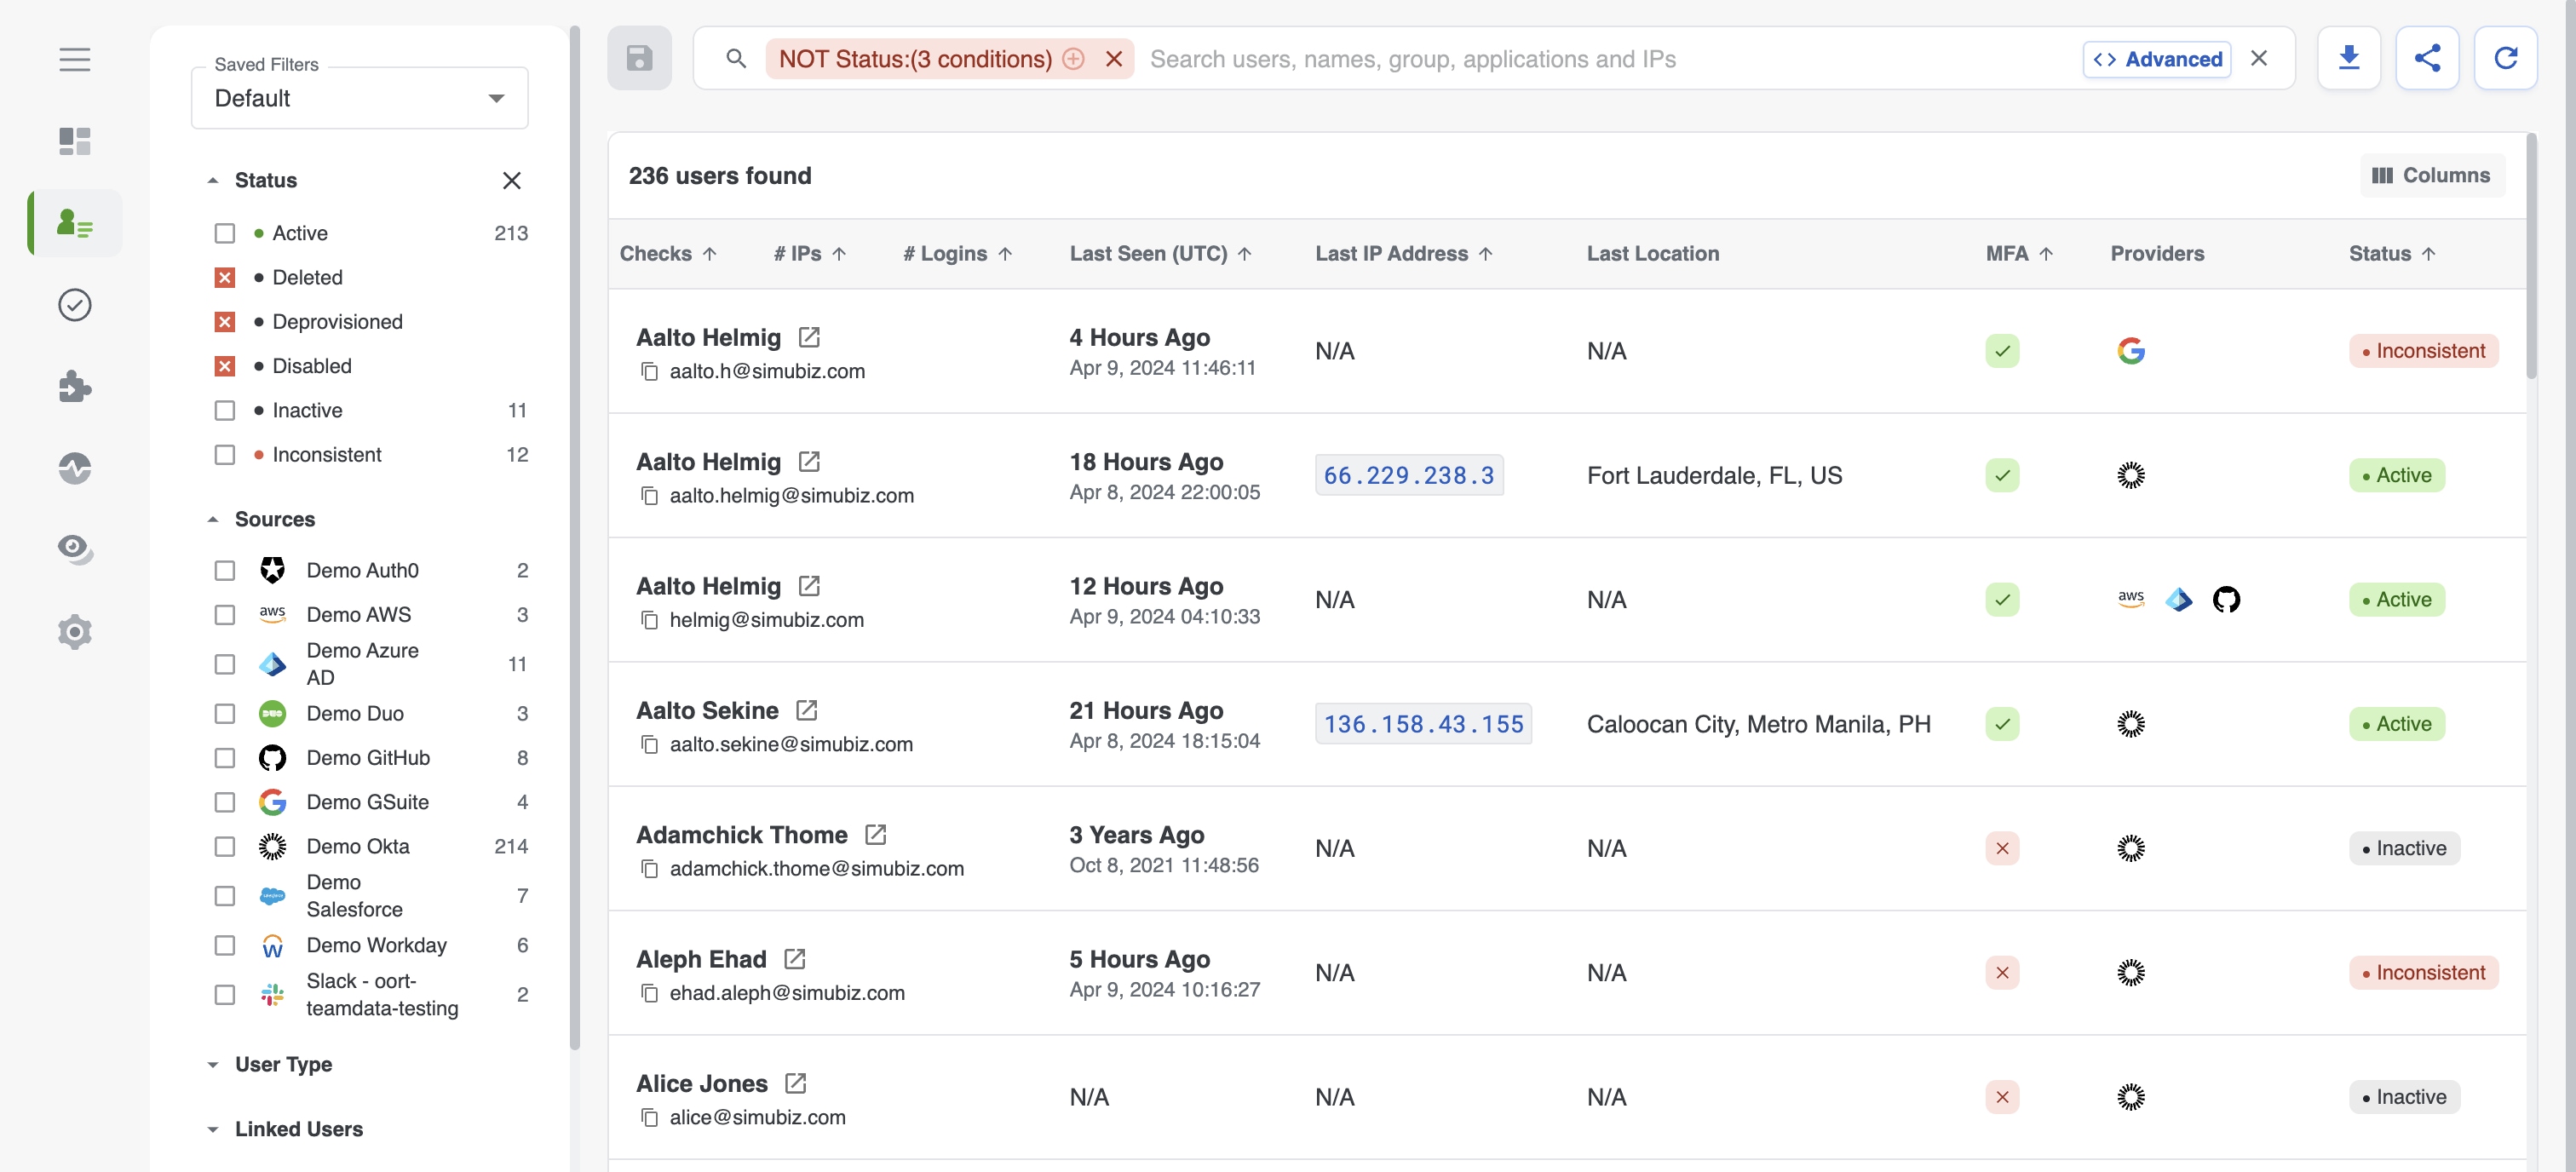
A high level Cisco Identity status can be seen in the Status column on the Users page
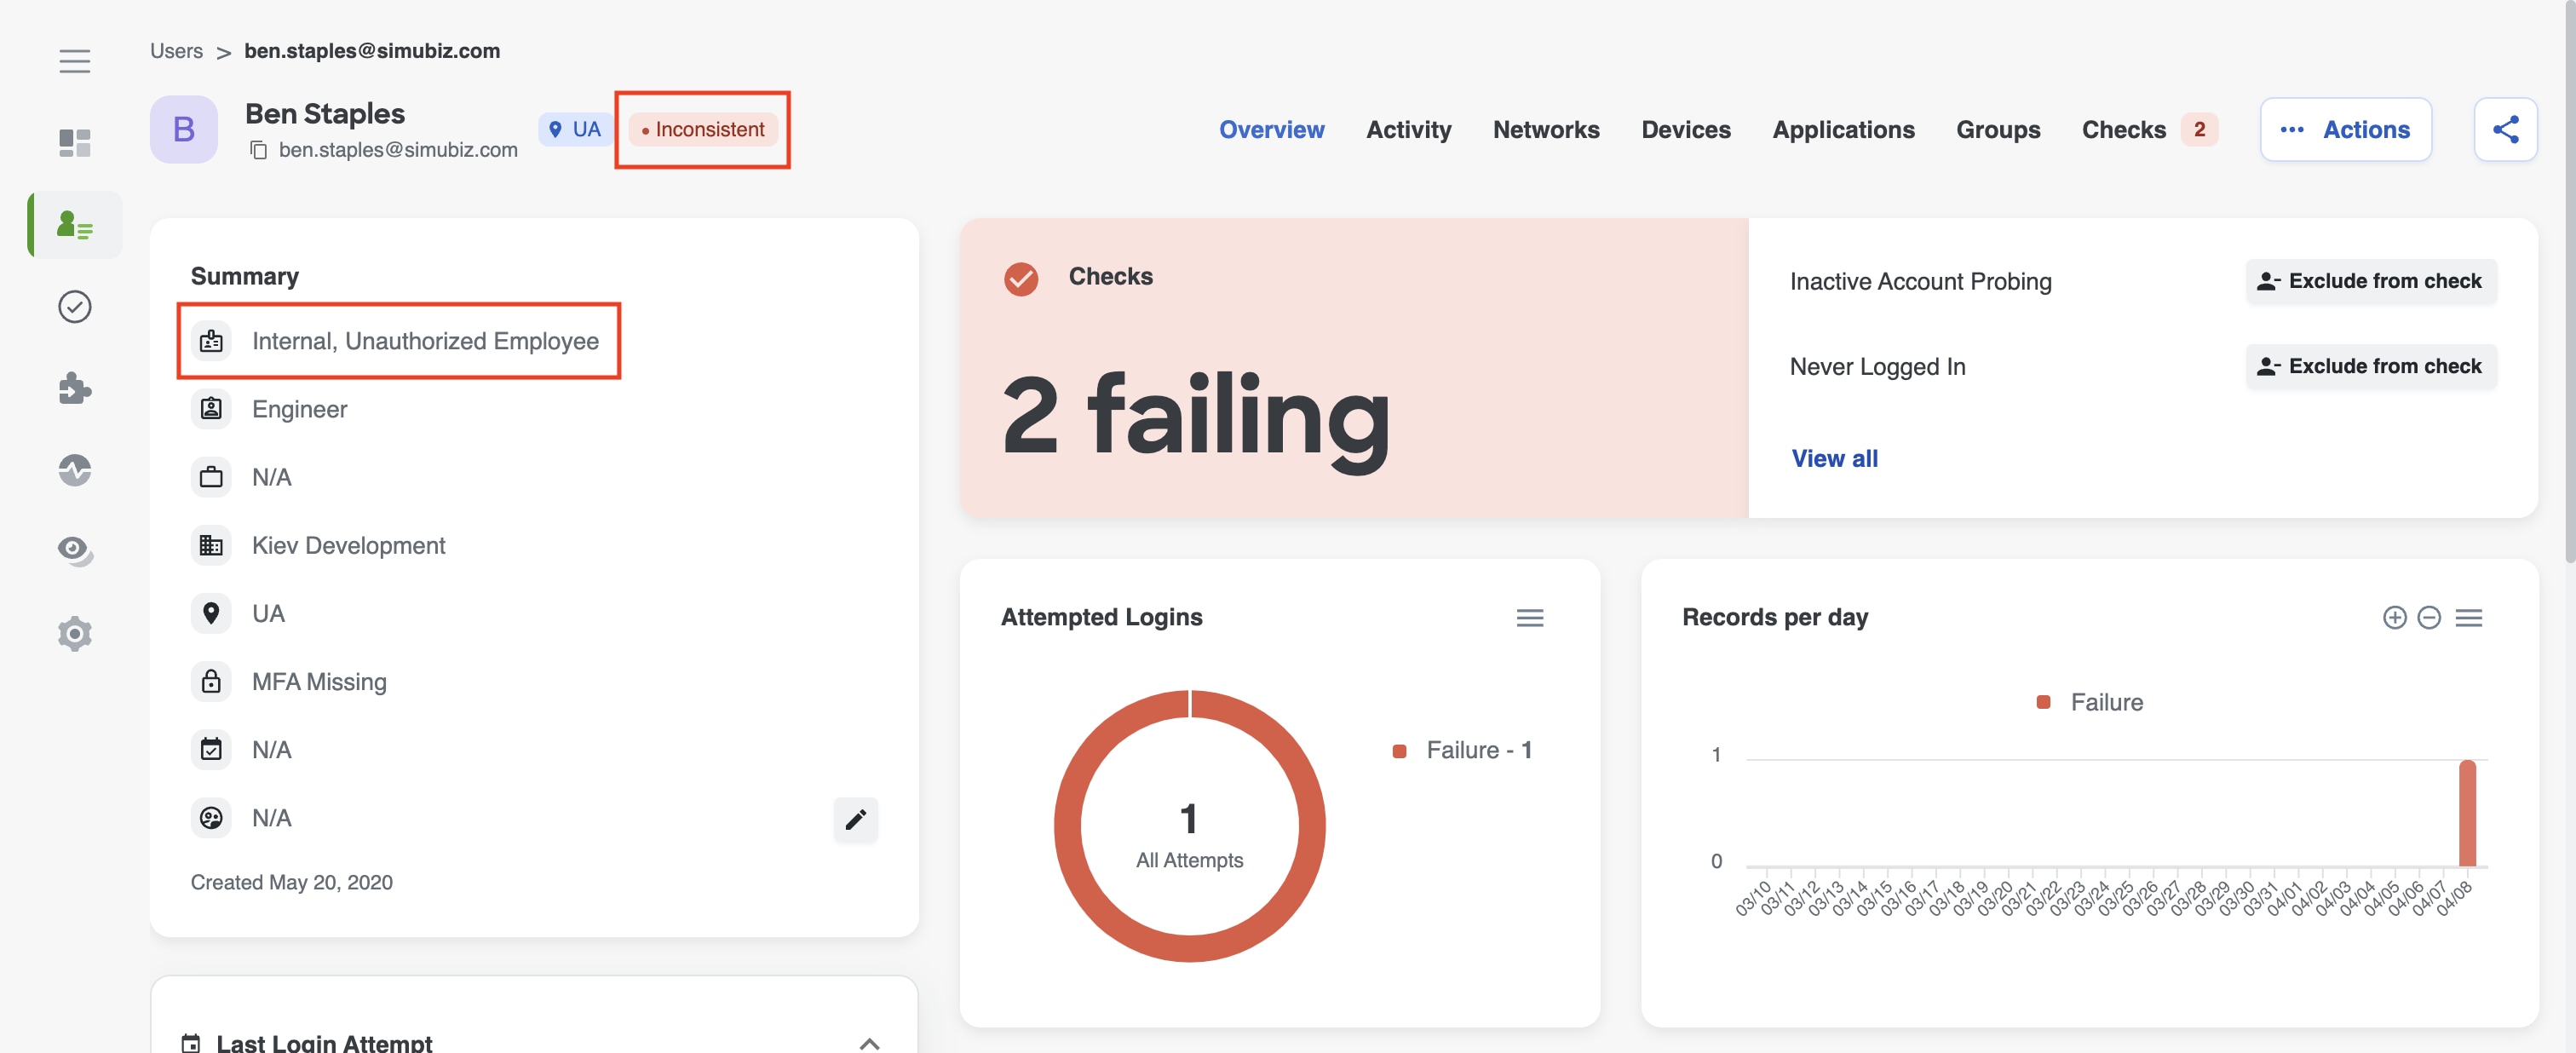
Additionally, the high level Cisco Identity status tag can be seen next to the User's name and email on every tab across the User 360.
A more detailed, compiled Cisco Identity status can be seen on the User 360 Overview Tab, in the Summary widget, which is directly beneath the User's name and email. This compiled status combines the user types, taken directly from the IdP (ie: internal, external, service accounts, etc), and the Cisco Identity status. If there is no user type in the IdP for that user, it will be marked as 'Missing'.
You can filter on Compiled Status as a basic filter on the Users page and/or add the field to the table as an additional column.
Statuses and definitions
If there is no HRIS data integration available for your tenant or a user, the detailed status is the user type taken from the IdP + high level Cisco Identity status (ex: Internal, Active or External, Inactive).
Below are the statuses and definitions if you do not have an HRIS data integration configured:
- Active — User is authorized in the IdP and has had activity in an IdP in the last 30 days
- Inactive — User is authorized in the IdP, but has not had activity in an IdP in the last 30 days
- Deprovisioned — User is unauthorized in the IdP and has not had activity in an IdP in the last 30 days
- Inconsistent — Unauthorized — See Inconsistent Users section below
If a HRIS data integration is available, the detailed status is the user type taken from the IdP + the compiled status listed below (ie: Internal, Active Employee or Service Account, Non-employee).
Below are the statuses and definitions if you have an HRIS data integration configured:
- Active
- Active Employee — User's HRIS employment account exists and is authorized. User is authorized in the IdP and has had activity in an IdP in the last 30 days
- Non-employee — User's HRIS Employment account does not exist and is unauthorized. User is authorized in the IdP and has had activity in an IdP in the last 30 days
- Inactive
- Inactive Employee — User's HRIS Employment account exists and is authorized. User is authorized in the IdP, but has not had activity in an IdP in the last 30 days
- Non-employee — User's HRIS Employment account does not exist and is unauthorized. User is authorized in an IdP, but has not had activity in an IdP in the last 30 days
- Deprovisioned — User's HRIS Employment account exists, and the HRIS account and an IdP account are both unauthorized with no noted activity on an IdP, or User's HRIS Employment account does not exist, and the HRIS account and the IdP account are both unauthorized with no noted activity on an IdP
- Inconsistent
- Non-employee — User's HRIS employment account does not exist, the user is unauthorized in both the HRIS and in an IdP, but there was activity noted on a data source after the user's IdP status changed
- Unauthorized Employee — See Inconsistent Users section below
Inconsistent Users
Users will be marked as inconsistent if we noticed account status discrepancies that could pose significant security threats to your environment. Inconsistent Users can also highlight discrepancies that arose during user onboarding or offboarding. It is important to review Inconsistent Users regularly, because these users may still have access to internal systems that they are no longer supposed to have access to.
Users can be flagged as inconsistent for a variety of reasons. Below is a table visualization that maps what factors lead to each possible status, the compiled status, and inconsistency severity, if applicable.
If there is no HRIS data, a user will be marked as Inconsistent if:
| IDP Account Authorized? | IDP Account Active? | Cisco Identity Status | Compiled Status | Exceptions | Inconsistency Severity |
|---|---|---|---|---|---|
| Yes | Yes | Active | Active | ||
| Yes | No | Inactive | Inactive | Inconsistent if user type is external or service account | Low |
| No | Yes | Inconsistent | Unauthorized | High: Address immediately | |
| No | No | Deprovisioned | Deprovisioned |
- User is authorized in a non-IdP data source, but does not have an IdP account associated
- Example: User only has a Github account but no associated account in Okta, Azure, or G-Suite
- User is unauthorized in the IdP, but has had activity in the IdP in the last 30 days
- User is authorized in the IdP, but has had no activity in the IdP in the last 30 days and their user type from the IdP is listed as an External account or a Service Account
If there is HRIS data, in addition to the reasons above, a user will be marked as Inconsistent if:
| HRIS Account Exists? | HRIS Account Authorized? | IDP Account Authorized? | IDP Account Active? | Cisco Identity Status | Compiled Status | Exceptions | Inconsistency Severity |
|---|---|---|---|---|---|---|---|
| Yes | Yes | Yes | Yes | Active | Active Employee | Inconsistent if user type is external or service account | Medium |
| Yes | Yes | Yes | No | Inactive | Inactive Employee | Inconsistent if user type is external or service account | Low |
| Yes | Yes | No | Yes after status change | Inconsistent | Unauthorized Employee | High: Address immediately | |
| Yes | Yes | No | No | Inconsistent | Unauthorized Employee | Inconsistent if no change to IdP after 7 days | Low |
| Yes | No | Yes | Yes | Inconsistent | Unauthorized Employee | High: Address immediately | |
| Yes | No | Yes | No | Inconsistent | Unauthorized Employee | Medium: Address quickly before discrepancy is abused | |
| Yes | No | No | Yes | Inconsistent | Unauthorized Employee | High: Address immediately | |
| Yes | No | No | No | Deprovisioned | Unauthorized Employee | ||
| No | No | Yes | Yes | Active | Non-employee | Inconsistent if user type is employee, contingent or contractor | Medium |
| No | No | Yes | No | Inactive | Non-employee | Inconsistent if user type is employee, contingent or contractor | Low |
| No | No | No | Yes | Inconsistent | Non-employee | High: Address immediately | |
| No | No | No | No | Deprovisioned | Deprovisioned |
- User's HRIS account exists and is authorized, but the user is unauthorized in an IdP and there was activity noted on a data source after the user's IdP status changed
- User's HRIS account exists and is authorized, but the user is unauthorized in an IdP
- Note: If it is a newly created user account, the account will not flag as inconsistent, unless the user remains unauthorized in an IdP after 7 days
- User's HRIS account exists but is not authorized, and the user is authorized in an IdP and has had activity in an IdP in the last 30 days
- User's HRIS account exists but is not authorized, and the user is authorized in an IdP but has not had activity in an IdP in the last 30 days
- User's HRIS account exists, the user is unauthorized in both the HRIS and an IdP, but there was activity noted on a data source after the user's IdP status changed
- User's HRIS account does not exist, the user is unauthorized in both the HRIS and an IdP, but there was activity noted on a data source after the user's IdP status changed
- User's HRIS account exists, the user is authorized in both the HRIS and an IdP, but the user type from the IdP is listed as an external account or a service account
- Note: this is regardless of user's activity. The user may or may not have had activity in an IdP in the last 30 days.
- User's HRIS account does not exist and is not authorized, but the user is authorized in an IdP and the user type from the IdP is listed as Employee or Contingent/Contractor
- Note: this is regardless of user's activity. The user may or may not have had activity in an IdP in the last 30 days
Linking User Accounts
Overview
Many scenarios exist where the same human user has access to multiple discrete users accounts, either within the same IDP or across different IDPs -
- Admins with both a regular user account and one or more privilege accounts, including across multiple Active Directory domains in an AD forest
- Users with separate accounts in non-federated IDPs, perhaps due to a recent M\&A event
- Users with both a individual account and access to or ownership of a shared account
In these cases, it's extremely important to maintain a link between these accounts, both for user lifecycle events (deprovisioning ALL users accounts when a user leaves the org) and during security investigations or incident response.
There are two ways to link users in Cisco Identity - manually or through linkage suggestions. The video below provides instructions on how to use the manual aspect of this feature.
Instructions for how to link users manually and through linkage suggestions can also be found below.
How to Manually Link User Accounts
- Navigate to one of the accounts for a user that has multiple accounts
- Scroll to the bottom of the User's Overview tab, to the Linked Users tile. You can also click the Actions button and select Link User from the dropdown, which will jump you to the same widget
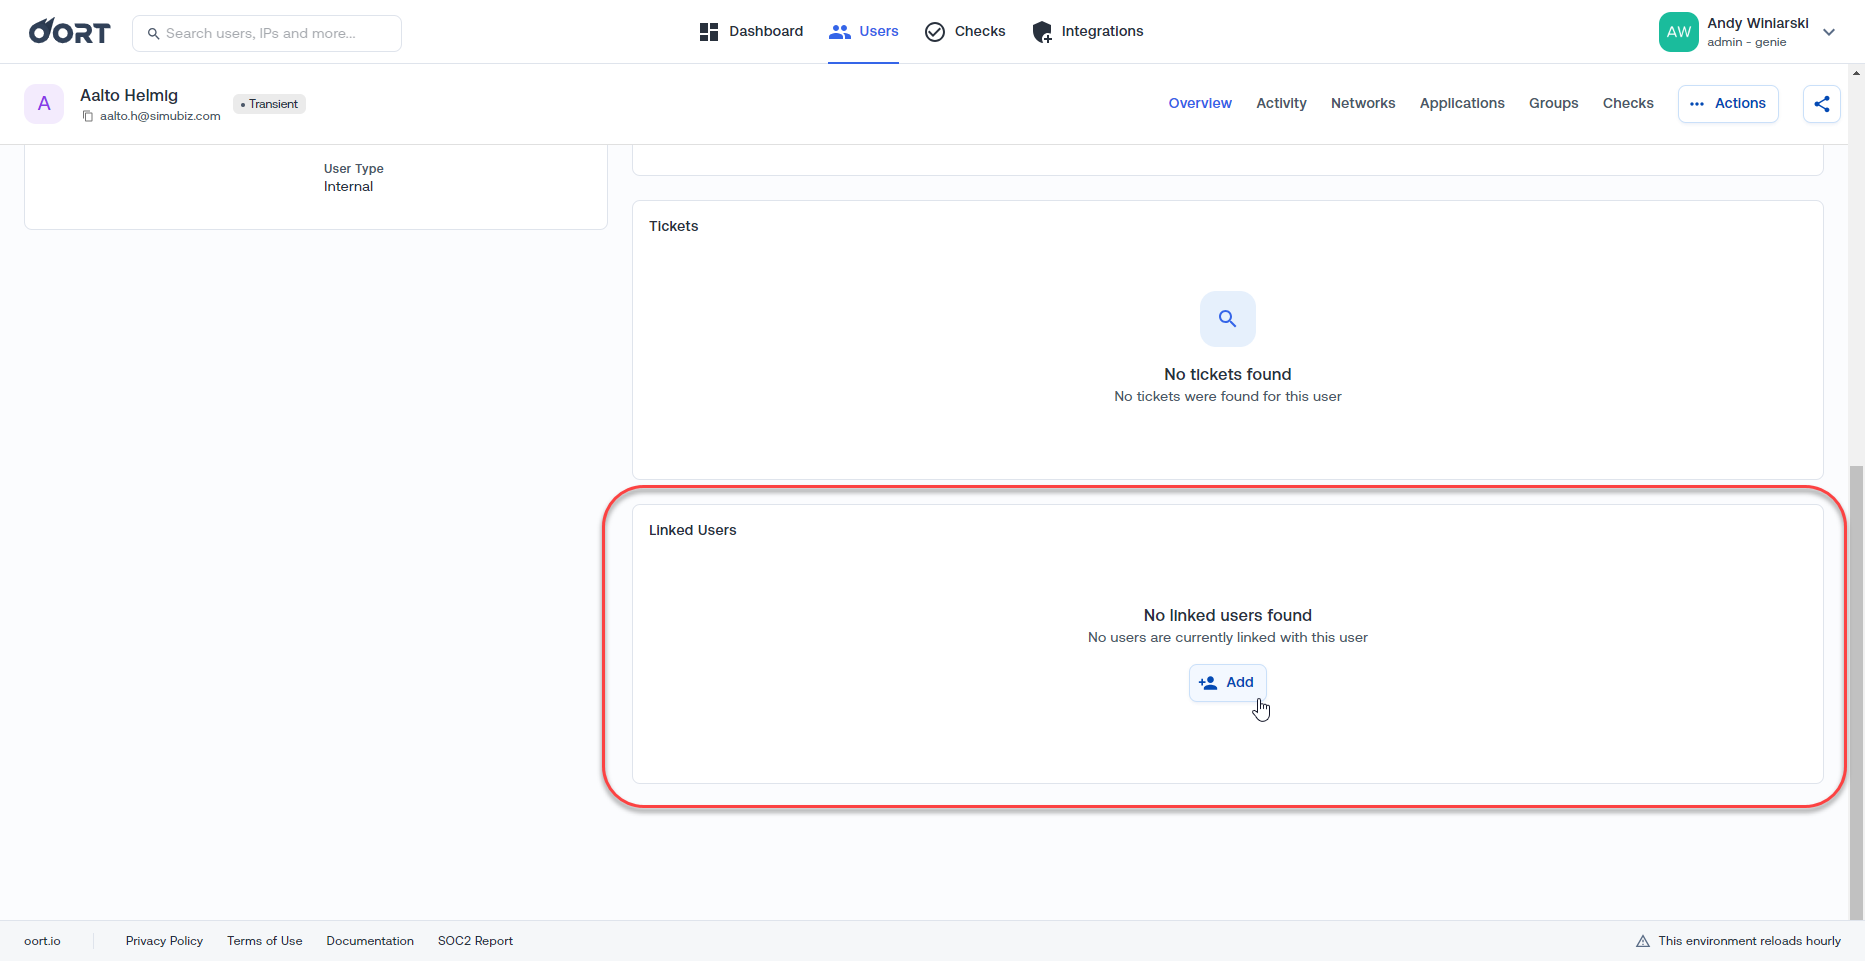
- Click Add and search for another account to link to this user. Click Add to link the accounts
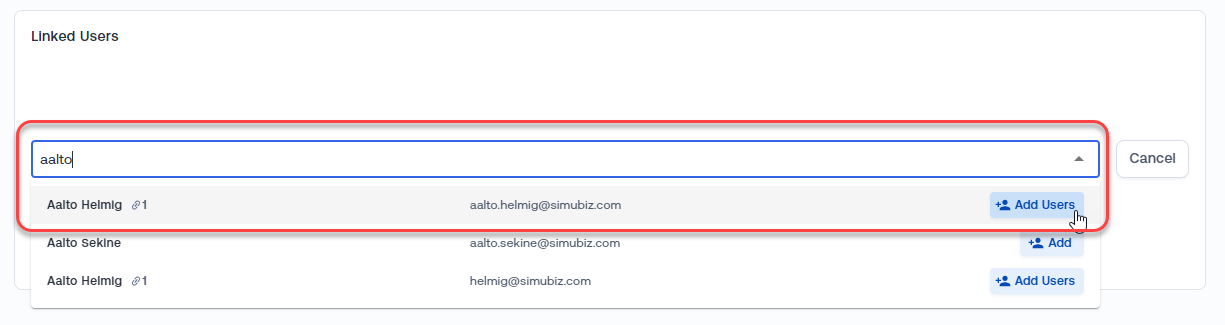
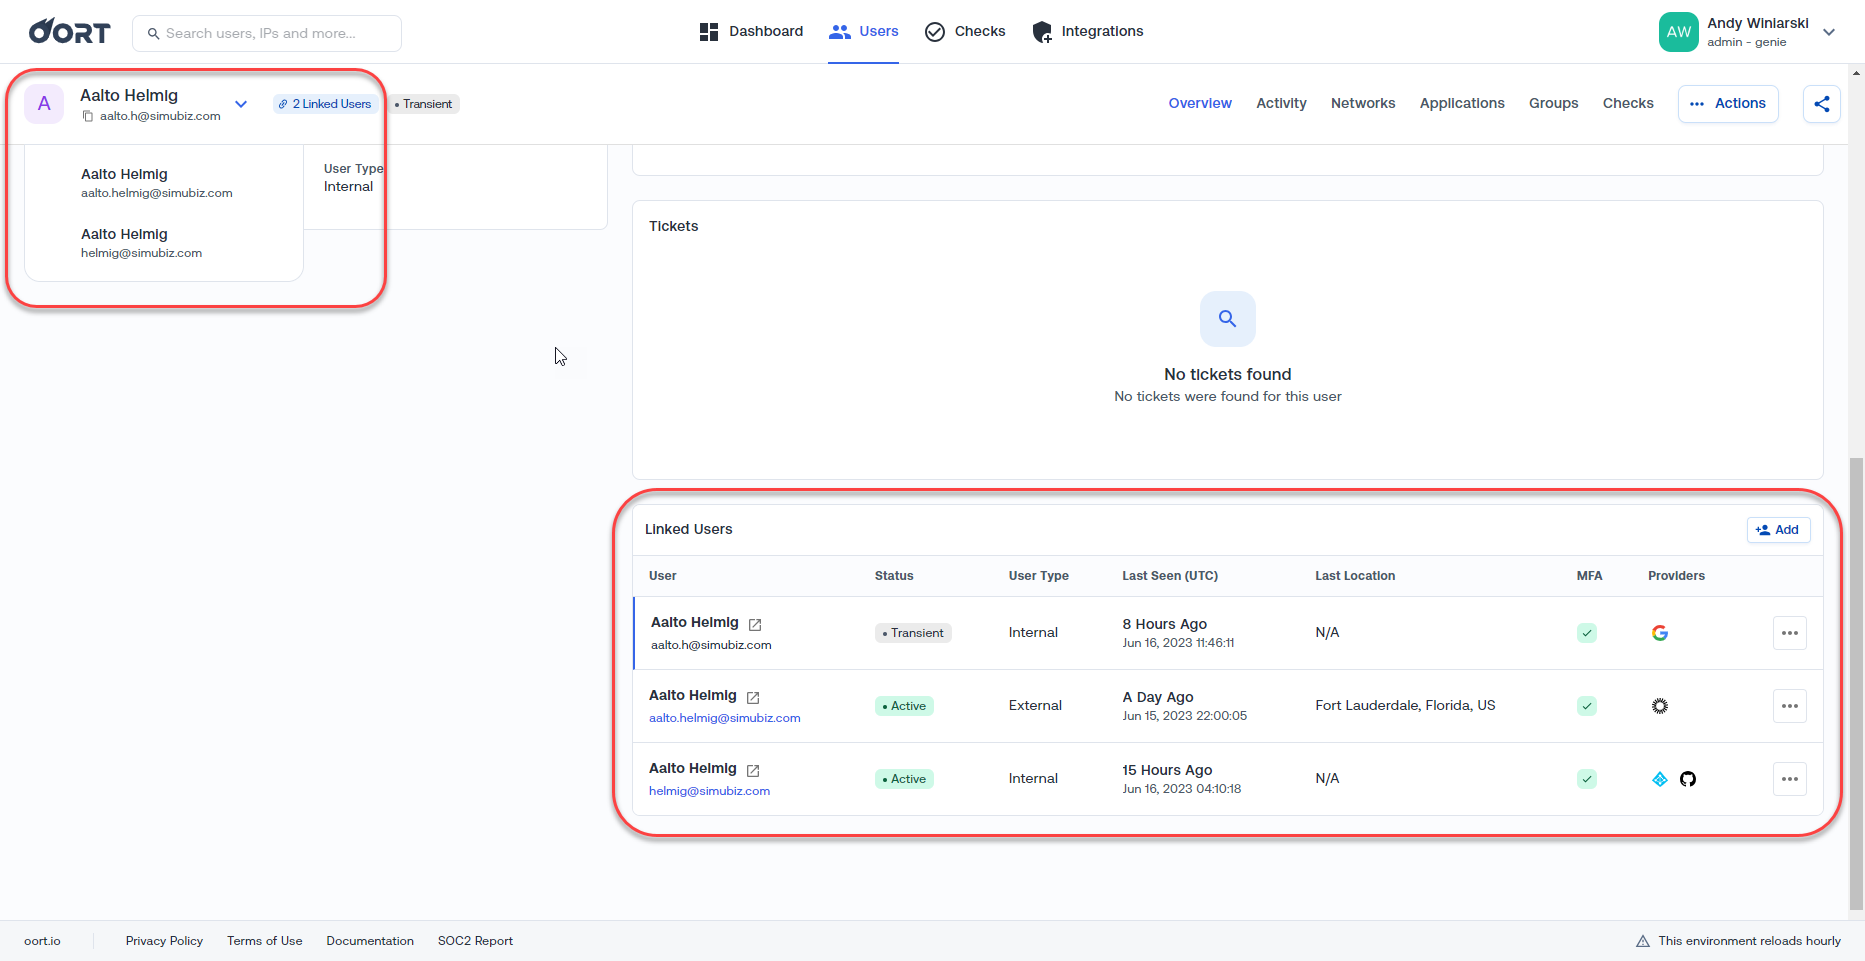
- Note that the account(s) are now linked in both the tile and the dropdown under the User's name in the top right
How to Review and Accept User Linkage Suggestions
User Linkage Suggestions are determined based on an exact match of either the user name or employee ID (ex: John Doe and John Doe).
There are two places to review User Linkage Suggestions - via the Users Table or via a specific User's Overview Tab
Via the Users Table
- To review suggestions across all users in your tenant, navigate to the Users Table tab and click the Link Tips icon to the right of the search bar
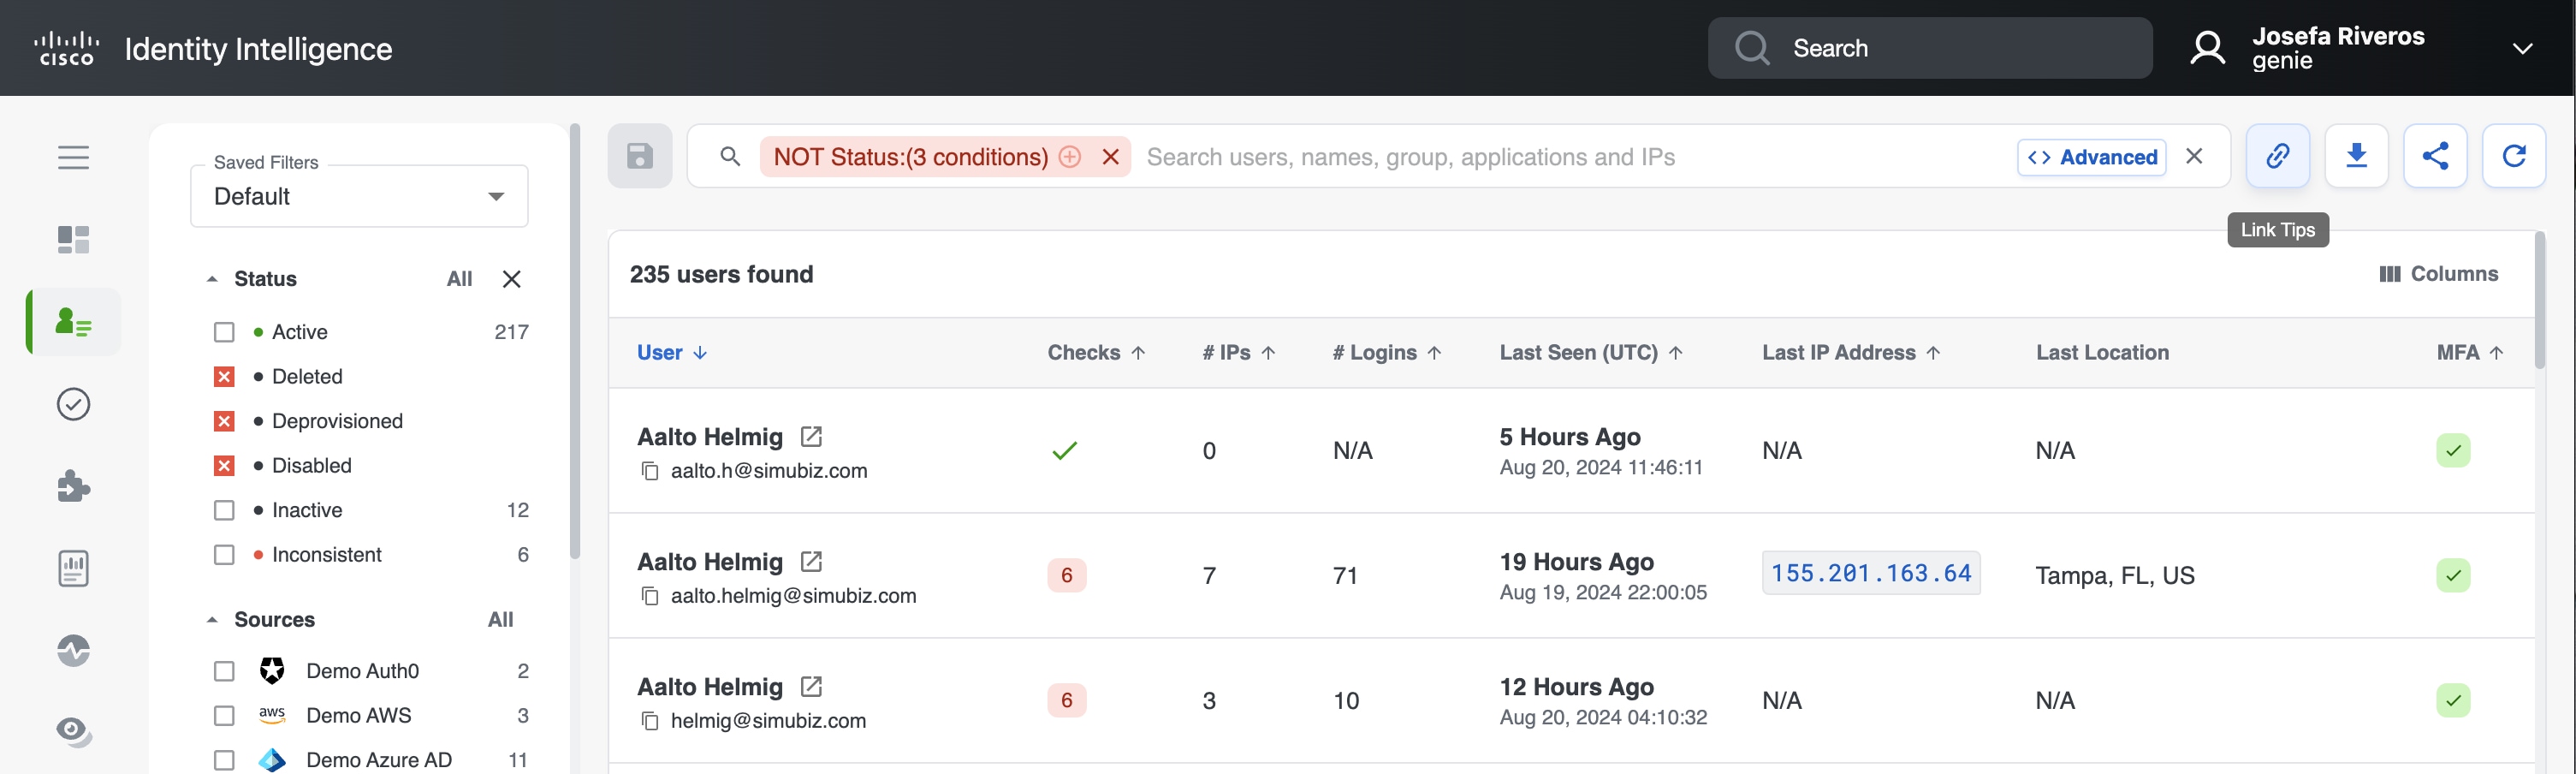
- Clicking the Link Tips icon will open a modal with a handful of accounts across your tenant that may possibly be the same user because these users have either the same exact user name or employee ID
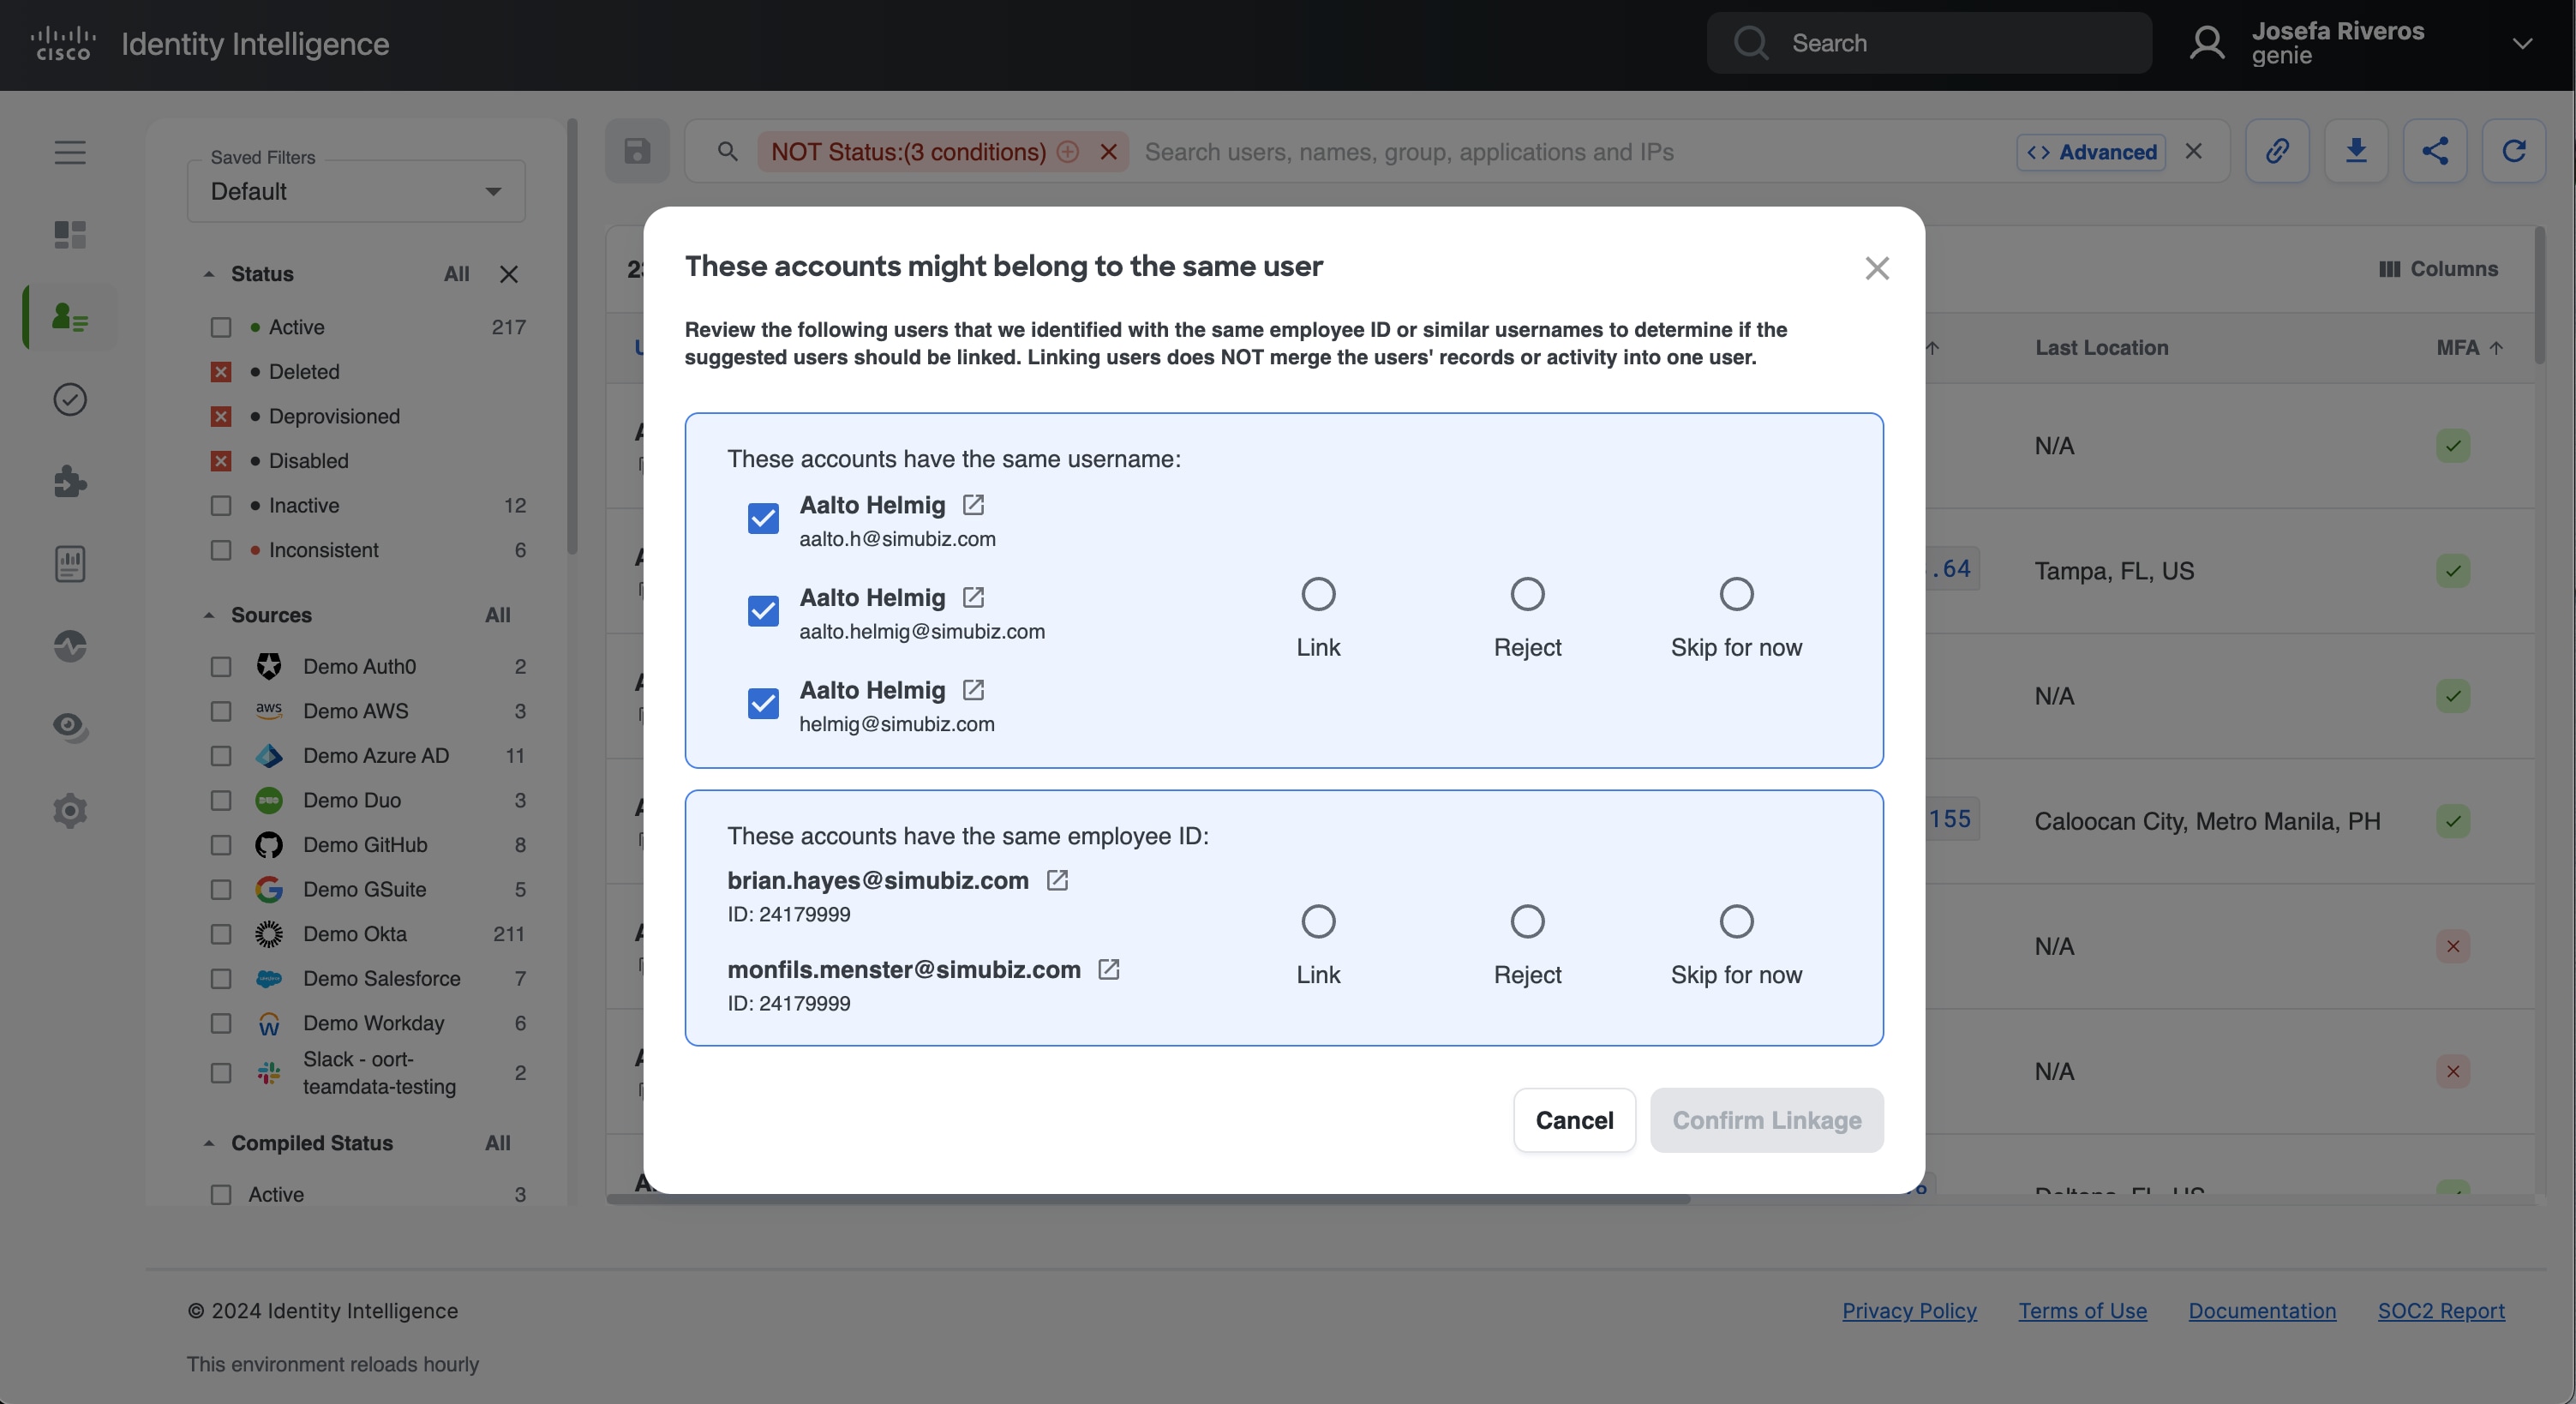
- In the modal, review the user linkage suggestions to determine if the suggestions should be accepted. If the users suggested are indeed the same person, select Link to link the specified users to each other
- If the suggested users are not the same person, select Reject and the specific suggestion will never re-appear. If you are unsure if the users are the same person, or just want to review the suggestion later, select Skip for now which will snooze the suggestion for a few days so it can be re-reviewed at a later date.
- If you want to look more closely at a user to determine if it may be the same person, select the Open in New Tab icon next to each user's user name
- Click Confirm Linkage to save your selections
- Once you have linked a set of users, the linkages will appear in the Linked Users widget at the bottom of the User360 Overview tab for a specified user. You can review existing linkages or remove linkages from this view
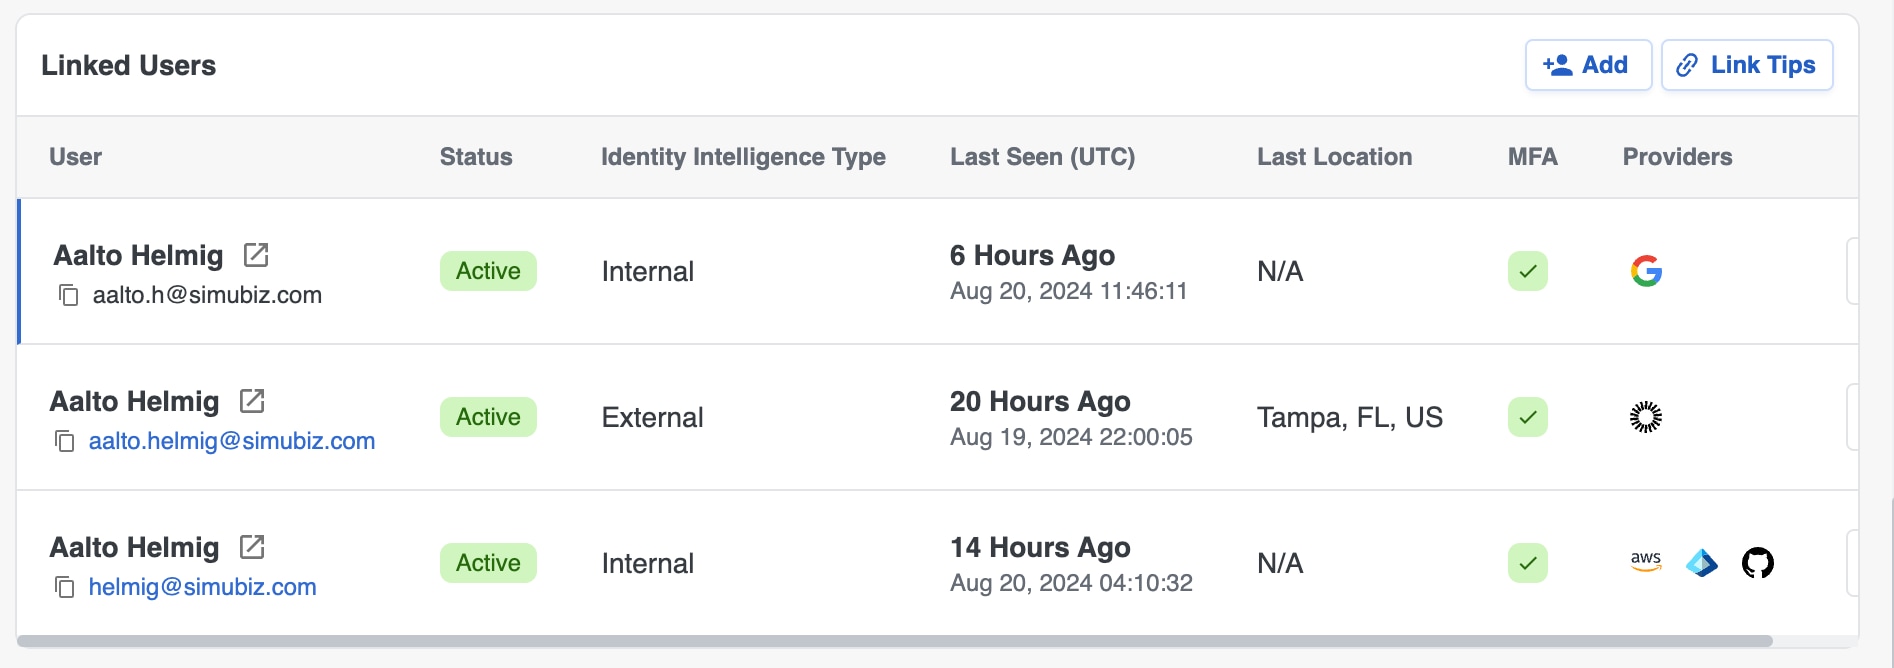
- You can also see the number of users linked to a specific user in the tag next to the user's name on the Overview Tab and in the dropdown under the User's name in the top right
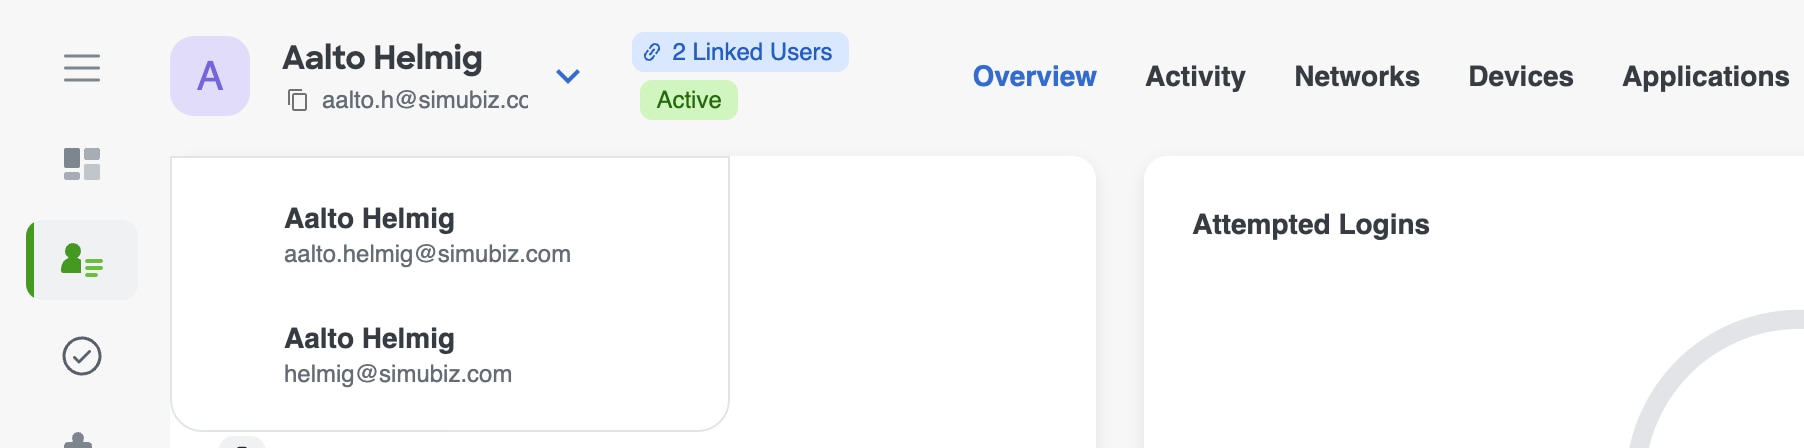
Via a specific User's Overview Tab
- Navigate to a specific user's User360 Overview Tab. If there are user linkage suggestions available for the selected user, you will see a yellow banner indicating that there are user linkage suggestions to review. If there is no banner for the selected user it means there are no linkage suggestions available for this user

- Click Review to open the modal where you can review the linkage suggestions for the selected user, or click Dismiss to remove the banner for the duration of your session
- In the modal, review the user linkage suggestions to determine if the suggestions should be accepted. If the users suggested are indeed the same person, select Link to link the specified users to each other
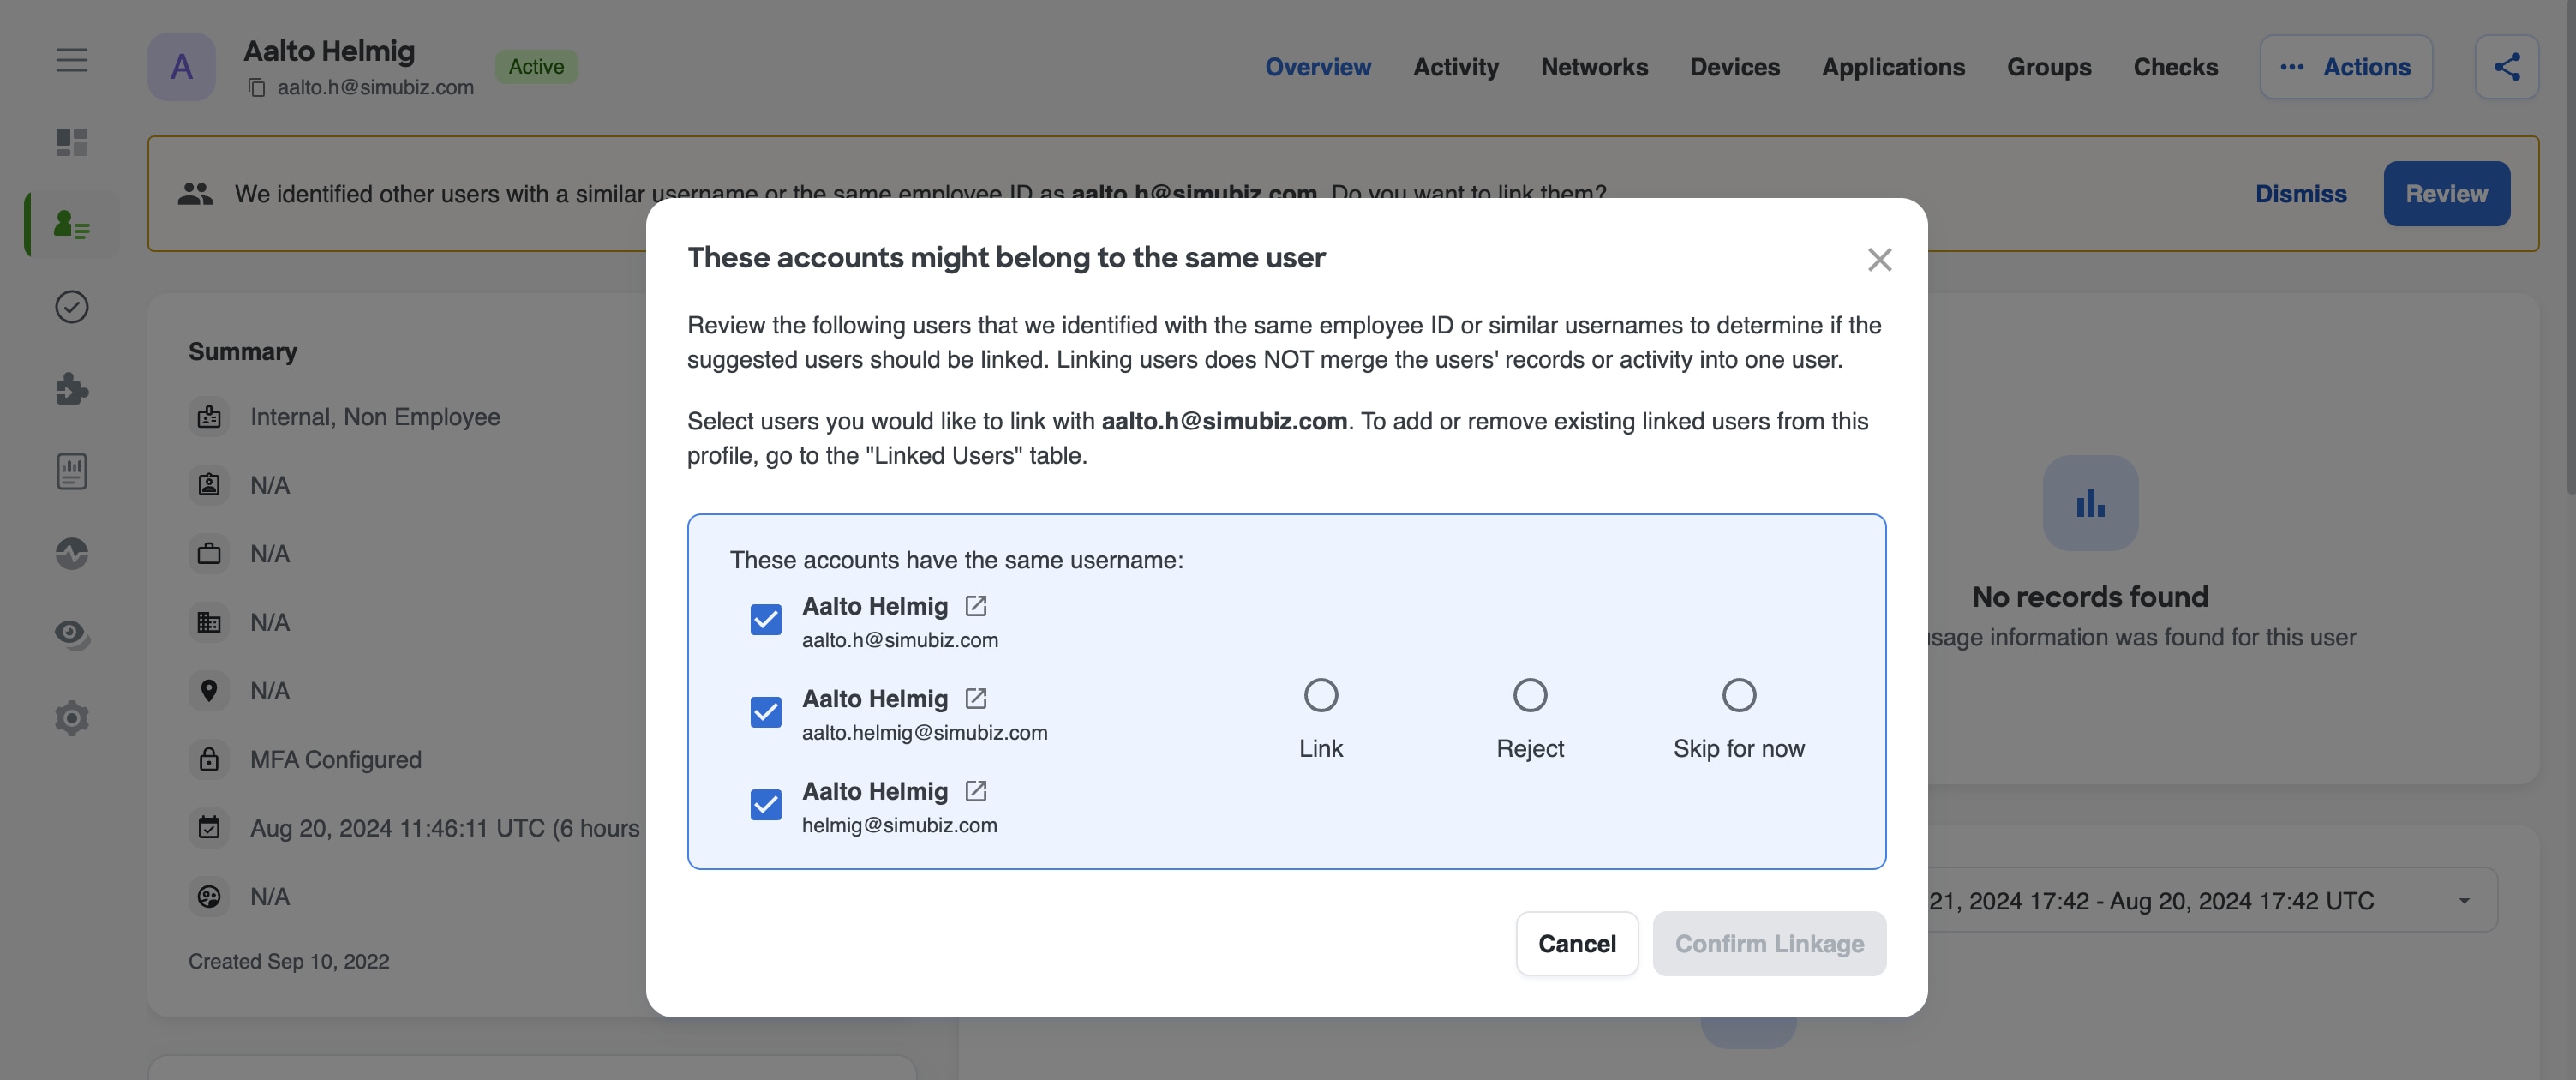
- If the suggested users are not the same person, select Reject and the specific suggestion will never re-appear. If you are unsure if the users are the same person, or just want to review the suggestion later, select Skip for now which will snooze the suggestion for a few days so it can be re-reviewed at a later date.
- If you want to look more closely at a user to determine if it may be the same person, select the Open in New Tab icon next to each user's user name
- Click Confirm Linkage to save your selections
- Once you have linked a set of users, the linkages will appear in the Linked Users widget at the bottom of the User360 Overview tab for that user. You can review existing linkages or remove linkages from this view
- You can also see the number of users linked to a specific user in the tag next to the user's name on the Overview Tab and in the dropdown under the User's name in the top right
Removing Account Linkages
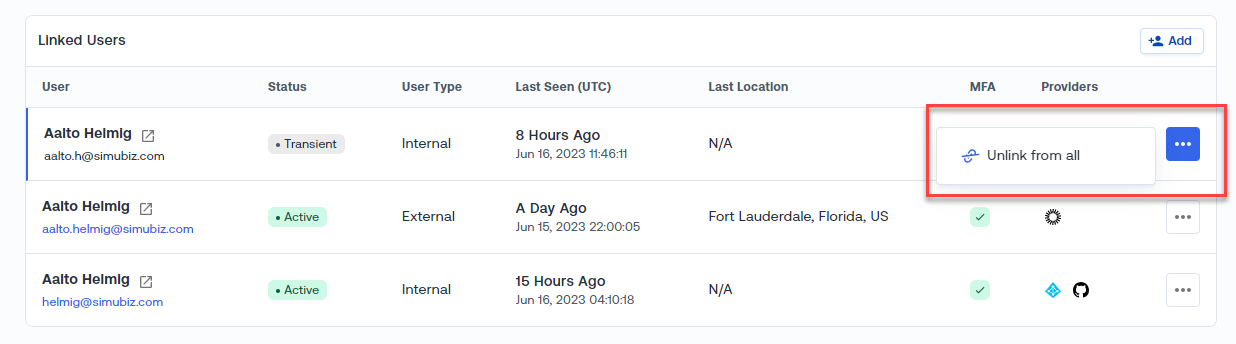
Accounts can be unlinked from the Linked Users tile on one of the user's account Overview tab. Click the . . . button on the right of the row for the user you want to unlink, and select Unlink from all to remove the user in that row from its link to the user who's page you are on
Filtering for Linked Accounts
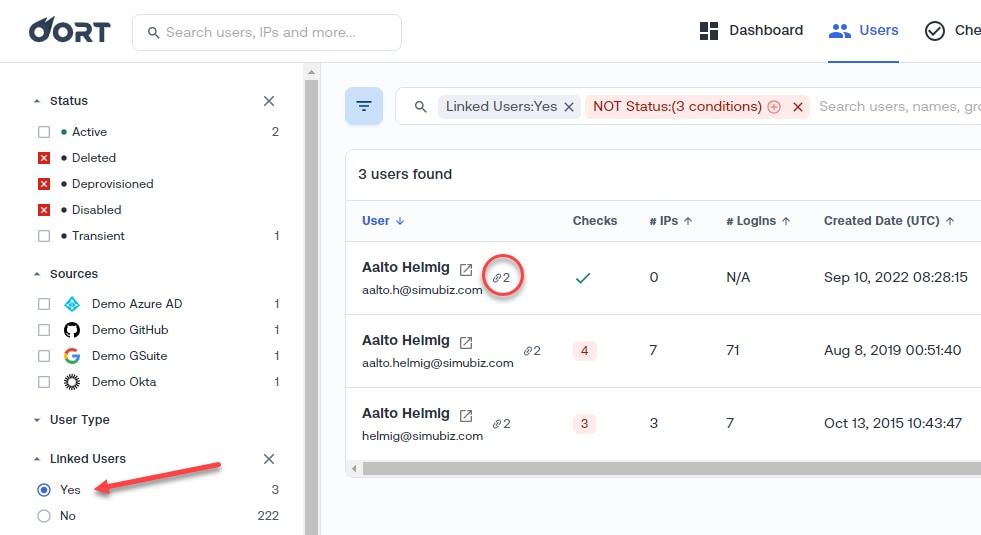
In the main Users page, you can use the Linked Users filter on the left bar to find just users with an existing account linkage.
Note: a small Link icon also appears next to the names of users who have been linked to other users
Triaging Alerts and Remediation Actions
Overview
Cisco Identity provides the ability to triage check failures and take action to remediate problems or identity security threats within your connected identity platforms, such as Okta, Azure, Google, or Duo.
This article provides an overview of each triage option and remediation action, its intended use cases, how to use it, and platform compatibility.
Triage Actions vs Remediation Actions
Triage Actions
Check failures can be triaged so that a given user will no longer fail a given check. Once a failing user has been triaged, they will no longer appear in the list of failing users for a given check.
The triage actions available are:
- Exclude from Check
- Mark as suspicious
- Mark as normal behavior
Triage Actions are accessed through check failures - either on the page of failing users for a given check or on the User 360 Checks tab. You may notice that not all checks contain all the triage actions listed above. That is because State based checks cannot be marked as suspicious/normal.
No additional permissions or set up are required to utilize the Triage Actions.
Remediation Actions
Remediation actions are available for a wide variety of scenarios. Most remediation actions are typically utilized once an investigation into a given user's behavior has concluded to protect a user's account if it has been, or is suspected to be, compromised or is under attack. However, there are other remediation actions available that can be used to clean up an environment, to track an investigation, validate a user's identity, etc.
The remediation actions available are:
- Send Push Notification
- Delete Guest User
- Reset MFA
- Log Out User
- Quarantine User
Remediation Actions can be found under the Action button, which is available across all tabs of a given user's User 360.
Additional permissions or set up are required to utilize all Remediation Actions. More information on what is needed for each data source can be found in the Technical Requirements section below.
Other Actions
Under the Actions button there are a few additional actions that are neither remediation actions nor triage actions. Those actions are:
- Open Ticket
- Link User
- Update User Type
- Refresh User Data
RBAC Role Permissions
All of the triage and remediation actions listed in this article are available to both full admin users and also help desk role users.
Actions reserved for full administrators, such as changing tenant settings, checks settings, or integration configuration, are discussed in the RBAC and Access Logs article.

For Cloud Control, you will need the Environment Admin role to perform these actions; you will need the Environment Viewer role to view these actions. For more information on the supported roles in Cloud Control, see Cisco Cloud Control RBAC.
Technical Requirements
To take Remediation Actions beyond simply read-only data collection in identity platforms, Cisco Identity requires specific API or token write permissions/scopes within the data source platforms so that it can talk back to the source and execute the remediation action there.
The specific API or token permissions are outlined in the integration guide for the respective data source. Please see the following articles for more details:
- Azure AD
- Okta
- Duo
Triage Actions
Exclude User from Check
For both event-based and state-based Checks, you can exclude a given user from that particular check. Excluding a user from a check can be customized to exclude for a specific timeframe, or made permanent with an indefinite timeframe.
Once you have identified a user to exclude from a particular check
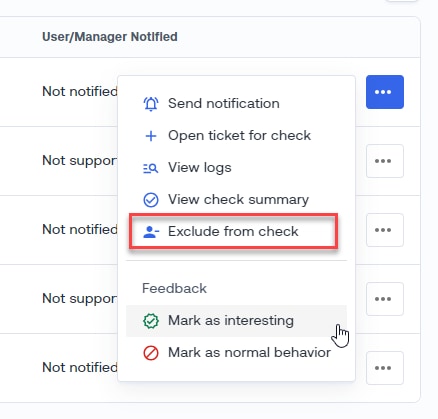
- Use the 3-dot menu at the end of the corresponding row and click Exclude from check.
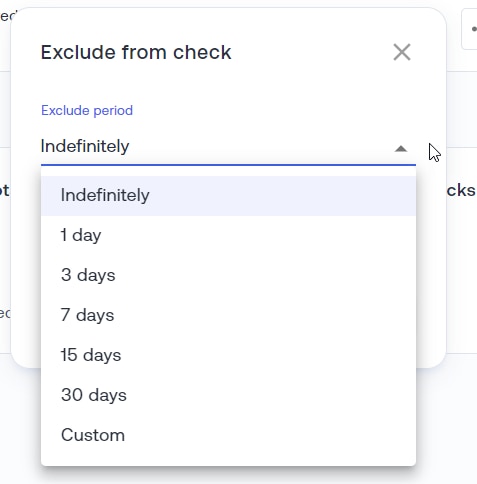
- Select the desired timeframe from the drop down - either Indefinitely, which will result in a permanent exclusion, or one of the default timeframes. If your desired timeframe is not available, you can use the Custom option in the drop down to set your own timeframe, up to 180 days. We highly recommend NOT ignoring users from checks indefinitely whenever possible and would instead recommend setting up a longer exclusion timeframe.
- Include a Reason for why this user will be excluded for this timeframe so that you and/or other members of the team can refer back to this historical context if needed. While entering a Reason is not required, it is highly recommended for record keeping purposes
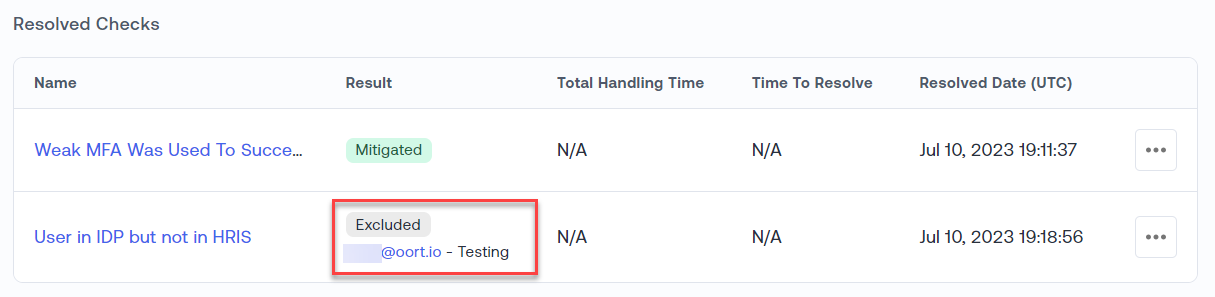
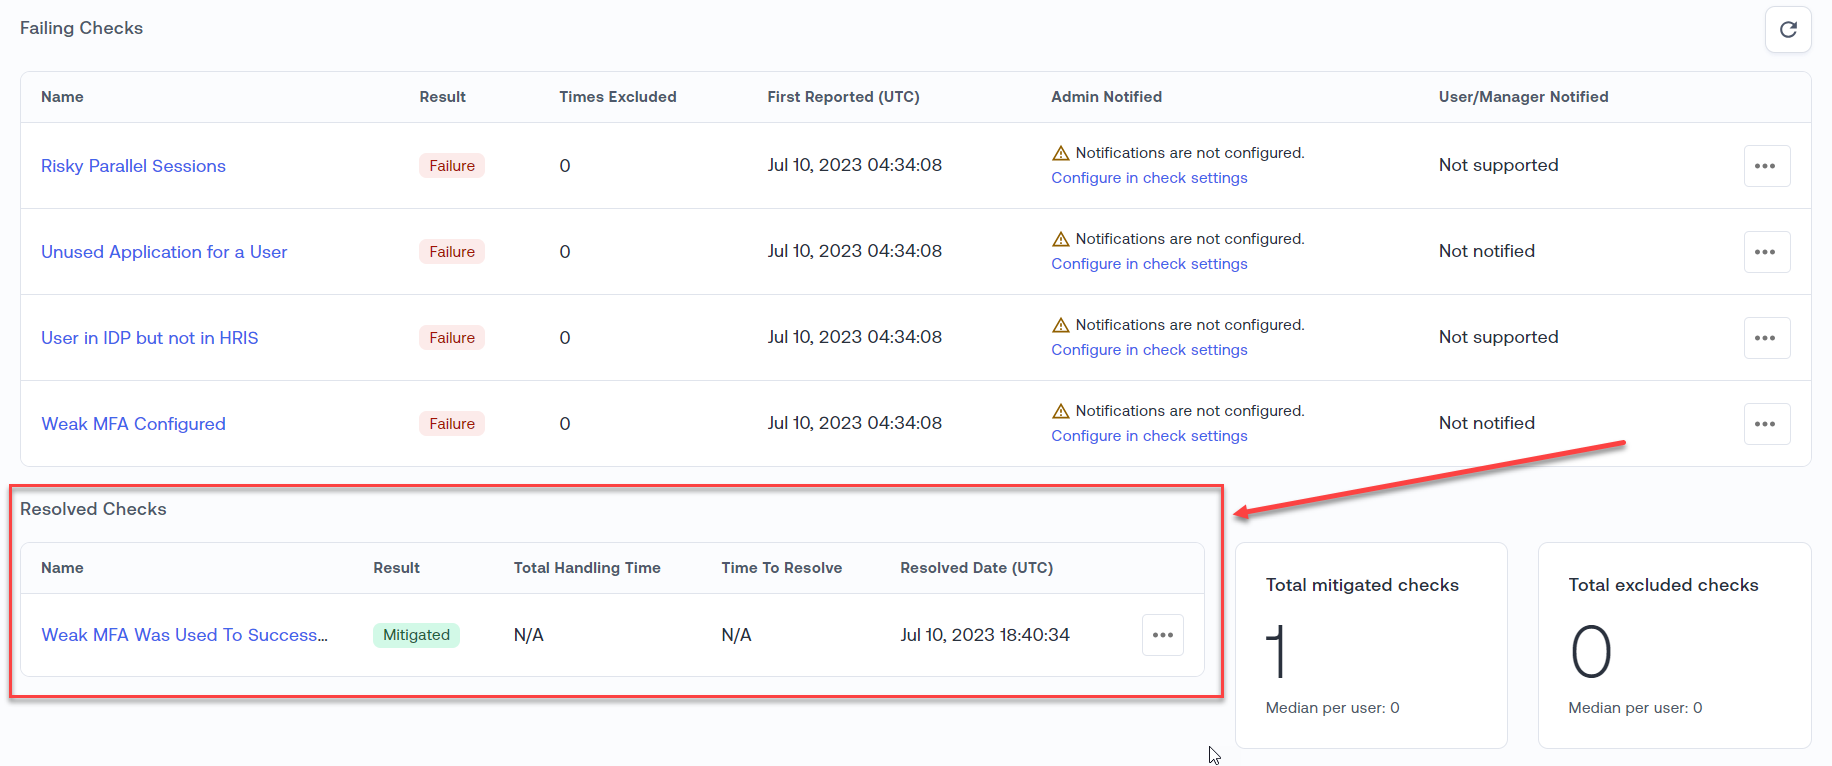
- Once the user has been excluded, this particular check will move to the Resolved Checks section of the given user's User 360 Checks tab, with Result as Excluded. It will also include information on who excluded the user and display the Reason, if one was provided.
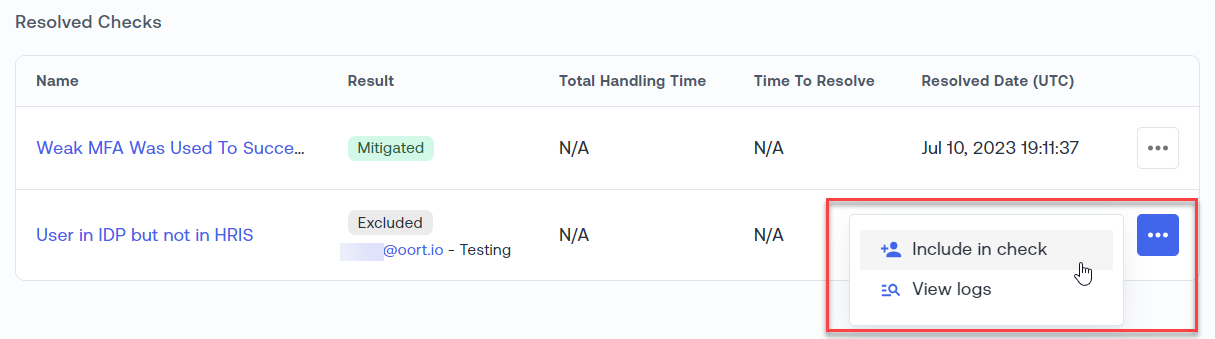
If needed, a user can be re-included in a Check by selecting Include in Check under the 3-dot menu in the Resolved Checks section.
Mark as Suspicious / Mark as Normal Behavior
For event-based identity threat detections, after you have investigated a check failure, you should then triage the failed check or observation for that user with the Mark as suspicious or Mark as normal behavior buttons so that they are no longer failing a given check. It is recommended to leave a brief comment with the triage result of your investigation for record keeping and historical purposes.
Marking a user's check failure or observation as either suspicious or normal behavior will mitigate the failed check/observation for that user and move it to the Resolved section of the given user's User 360 Checks tab and will not alert on observations with the same context for the next 30 days.
These triage actions are available under the 3-dot menu in two places
- the table of failing users on a given Failing Check page
- a given user's User 360 Checks tab
Marking a user as suspicious or interesting from a given Failing check page will apply that feedback to ALL observations for the given user; however, on the User 360 Checks tab you can review each individual observation and mark each accordingly. This is important because if a user has multiple observations, each with different context, the observations should be reviewed individually and triaged appropriately via the User 360 Checks tab, otherwise you may miss future check failures for a user.
As mentioned above, when using either Mark as Suspicious or Mark as Normal, the given user's observation(s) that was triaged is then "snoozed" for 30 days. As Cisco Identity continuously analyzes user data, if a new observation is noted for the same user with the same context as the "snoozed" observation, then it will NOT log a new observation and will not trigger a check failure for that user; however, if a new observation is noted for the same user with different context than the "snoozed" observation, then it WILL log a new observation and will trigger a check failure for that user.
Context is usually information that can be found in the failing check's explainability, such as IP address info, device info, factor info, etc and will vary by check based on what is relevant to that check. For example, for the Personal VPN Usage check, the context is the VPN service used. For the Rare Browser Activity check, it is the browser user, etc.
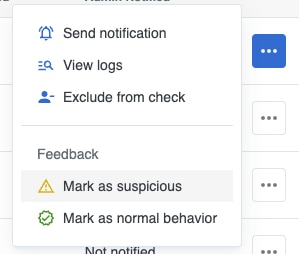
If needed, feedback options can be reset by selecting Reset Feedback under the 3-dot menu in the Resolved Checks section for a given user.
When to use each triage action
Exclude from Check should be used in cases where you are certain a user does not need to be evaluated against this check for a desired amount of time under ANY circumstances
Mark as suspicious should be used in cases where a check failure was accurate in some way such as behavior that could risky or concerning, a possible compromise, a confirmed compromise, etc.
Mark as normal behavior should be used in cases where a check failure was accurate but is expected behavior or is simply not risky or concerning behavior, or if the check failure was not accurate (false positive).
Note - All roles, including Read Only, can provide triage user check failures with these options.
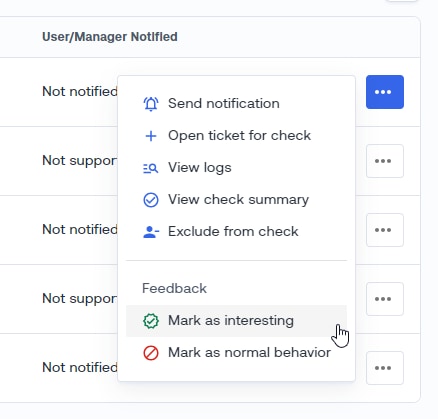
Additionally, when you triage a check failure or observation using mark as suspicious or mark as normal behavior, you help the Cisco Identity data science team gather data on ways to improve the check failure logic moving forward.
Remediation Actions
You may not see all Remediation Actions available across all users in your tenant! Cisco Identity only shows the remediation actions that are compatible with the data sources that have a record for a given user.
For ex: You have a given user with accounts in both Azure and Duo. You will not see the Quarantine action for this user, since this action is only compatible with Okta and this user does not have an Okta account
Send Push Notification
Supported platforms: Duo Security for end users only, Okta
In certain scenarios, such as verifying a user's identity when calling into the help desk or support team, it is extremely useful to be able to send the user a one-time push notification to their enrolled mobile device and have them confirm it as part of the identity verification process.
Okta Implementation Details
To enable this functionality for Okta integrations, simply deploy the Cisco Identity app from the Okta Integration Network (OIN). See the Okta data integration article for more details.
Duo Implementation Details
The Send Push Notification action only works on Duo end users. It is not compatible with Duo Admin accounts.
To enable this functionality for Duo, requires the Duo Security Auth API security token to be configured in your Duo integration as mentioned in the Duo Security integration article. As mentioned there, the Duo Auth API app name should be created with something the end user will recognize as having sent the push to them, such as "Company ABC IT Support Team".
How to Send a Push Notification
- Click the Actions button on any tab within a selected user's User360 and then select Send push notification
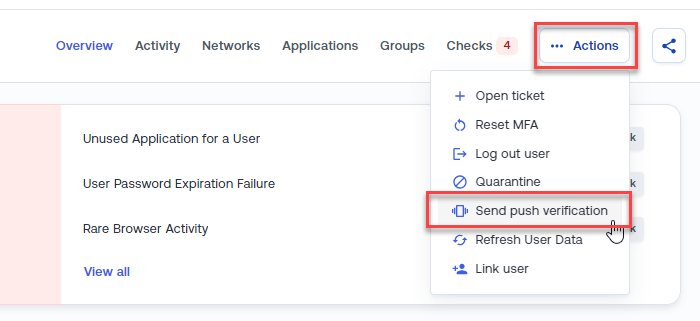
- A verification dialog box will open. If there are both Duo Security and Okta integrations in your Cisco Identity tenant, you'll be asked to select which one you want to use
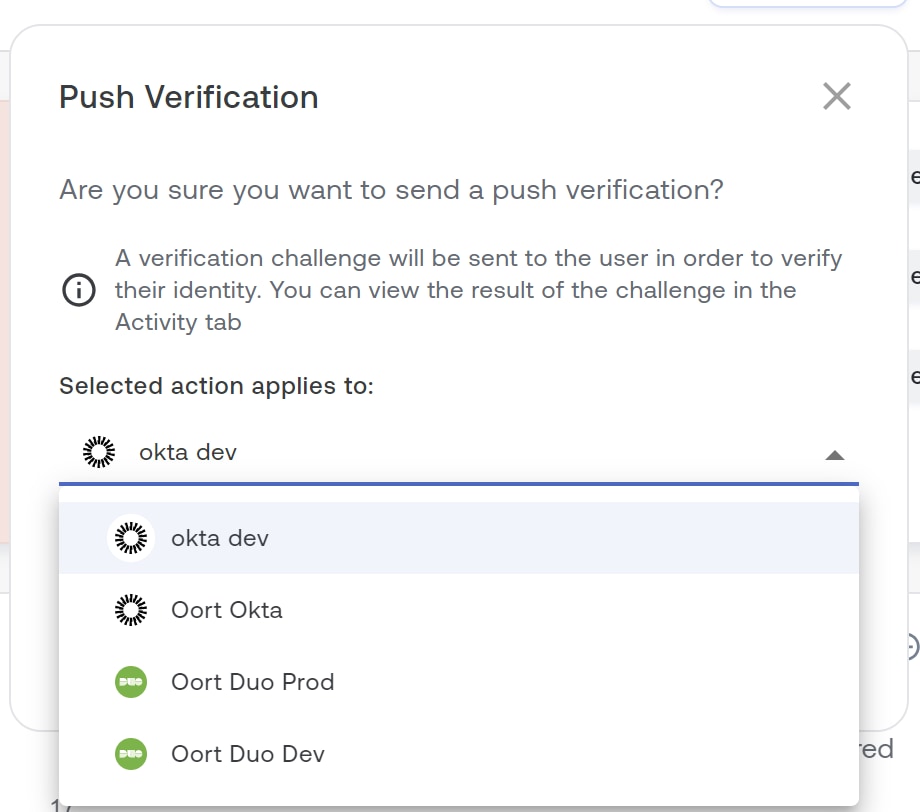
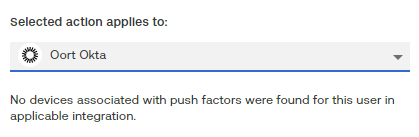
Note - If a user has multiple devices enrolled for an integration, you will be given a choice to select the desired device. If a user has NO devices for an integration, you will see the message below
- Click Confirm to send the push notification
- A Remediation status bar will appear above the User Overview page
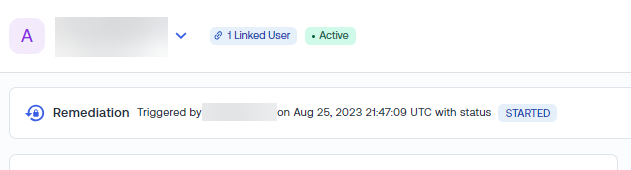
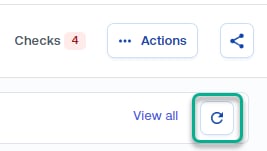
- The API operation is asynchronous, so you may need to hit the refresh button within the remediation status bar to update the status
- If the user receives and accepts the push, the status will be
SUCCESS. Otherwise it will reportFAILURE - These actions will also show up as events in the user's Activity tab
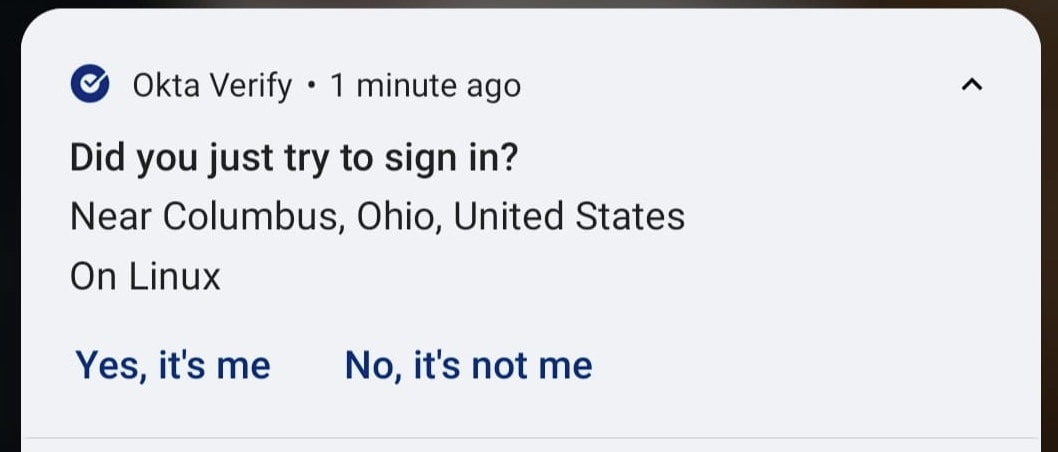
NOTE! - Because the push notification is sent from Cisco Identity to the Identity provider via API and originates from a specific AWS region, then the geolocation details in the request will show it coming from an AWS region (AWS US East 2 in Columbus, Ohio for most Cisco Identity customers).
Delete Guest User
Supported IDP: Azure AD
Microsoft 365 productivity applications like Teams, SharePoint, and OneDrive provide powerful mechanism for sharing resources, data, and chat functions outside of an organizations internal user base. However, this frequently leads to a build-up of guest accounts, especially ones that are inactive or never used, in Azure AD, which functions as the primary identity directory for many Microsoft 365 environments.
With the correct API permissions noted above, Cisco Identity admin and help desk roles can delete these accounts directly from Cisco Identity, cleaning up the environment and reducing identity attack surface, while reducing the need to pivot back to Azure to complete this task once a user has been identified for deletion.
There are two requirements -
- The account must be of type
guestin Azure AD - The account must be within the configured Protected Population within Cisco Identity (not excluded from all Checks)
To identify delete guest accounts for deletion, you can use the Users table page and the filters to find external users. Some ways you can find external users are:
- Filter on User Type only and select External
- Filter on failing checks > Select the Inactive Guest User check and select an individual user to review
- Filter on failing checks > Select the Never Logged In check > Find the User Type filter and select External and select an individual user to review
Once you have identified a user to delete:
- Click on the desired guest user to open their User360 Overview tab
- Click Actions -> Delete User
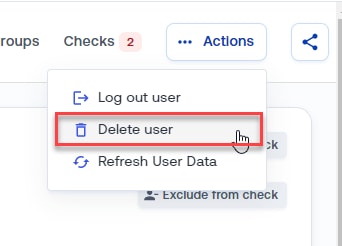
- A Remediation status bar will be displayed with the status of the operation in Azure AD
- If you delete a user and the status bar displays a Failed message, it may be an indicator that the necessary API permissions are not configured
If you do not see the Delete User remediation action, ensure that the user is a Guest user in Azure AD. If the user is not, this remediation action will not be visible.
Reset MFA
Supported IDPs: Okta, Azure AD, Duo, Google
In certain scenarios, such as a lost phone or OTP soft token, you may need to reset a user's MFA factors in one or more IDP systems.
You can do this in Cisco Identity via the Reset MFA action under the Actions button on any tab of a given user's User360.
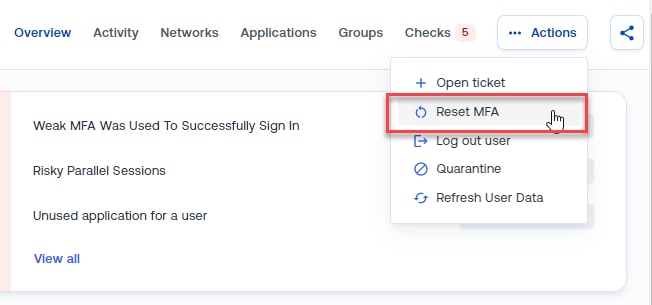
Select Reset MFA. This will prompt you to confirm this action. Once you select Confirm, the reset is effective across ALL connected IDPs for the user.
Note - The Reset MFA action only works on Duo end users. It is not compatible with Duo Admin accounts.
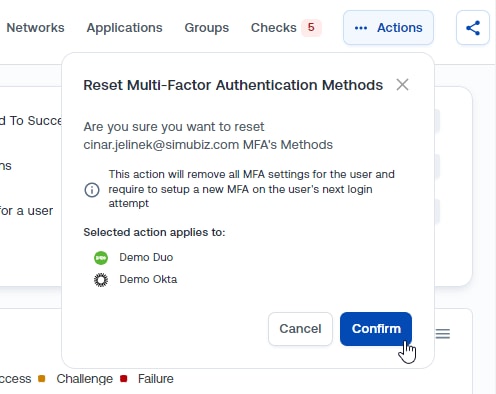
Log User Out of Active Sessions
Supported IDPs: Okta, Azure AD, Google
In the event of a identity security threat, you may need to log a user out of any active sessions in one or more IDP systems.
You can do this in Cisco Identity via the Log Out User action under the Actions button on any tab of a given user's User360.
As with other options, this remediation action will be effective on all platforms where a given user has an account. You will be prompted to confirm the action before it executes.
The status will be displayed in the remediation status bar in the Overview tab of the user360 for the selected user.
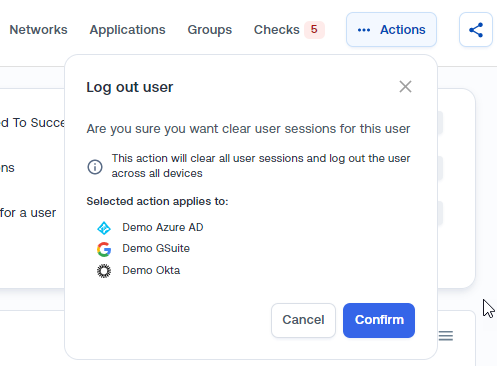
Quarantine User
Supported IDPs: Okta
If suspicious or potentially malicious events have occurred with a user's account, you may want to place the account into a quarantine group within the IDP that severely restricts their access to data and applications until further investigation or incident response procedures can be performed.
To use this option, the following steps must be taken:
- A group called
Quarantinemust exist in the primary IDP, Okta, for the user account. If a different group name is required, please coordinate with your Cisco Identity technical representative - The group must be associated with polices and rules that take precedence over normal auth policies and restrict the user from accessing applications and data. Several use cases for this exist:
- The user's account may be compromised, so the Quarantine group allows them to only access the user help desk portal and nothing else
- The user has failed some other security policy or training, and so the account can only access the security training application until the issue is remediated
Under the Actions button for a given user, the Quarantine option will perform this action for the connected IDP(s).
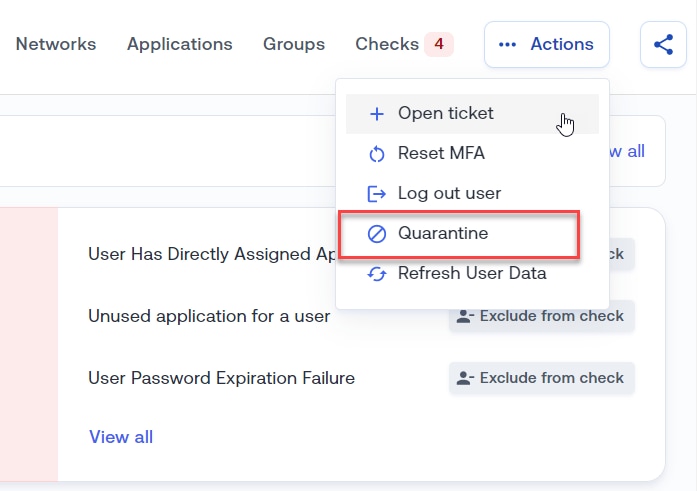
Note - Once a user has been placed in the Quarantine group, they can only be removed from the Quarantine group through the IdP Platform, e.g. Okta
Additional Actions
Open Ticket
Supported platforms: ServiceNOW, Jira
Via integrations with ServiceNOW and Jira, Cisco Identity is able to open tickets in those platforms in several scenarios. A ticketing service integration must be configured to use this action.
Open a ticket for a specific user:
- Click the Actions button on the top right of any tab of the given user's User 360 and select the Open Ticket action to open a ticket for that user
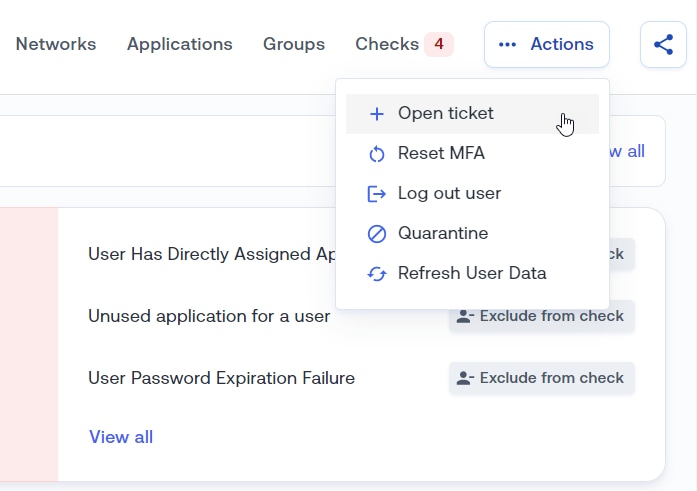
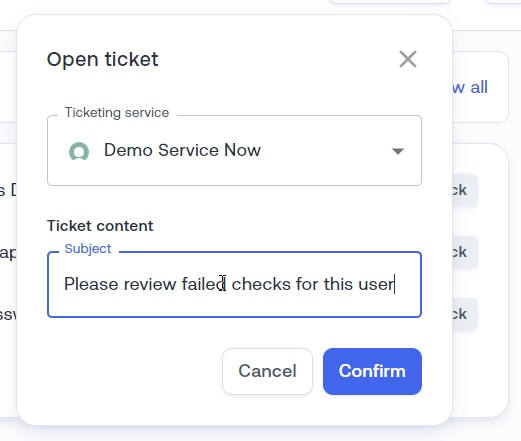
- Enter a Subject and click Confirm to open the ticket in your Ticketing System. Specify if it is a general issue or a request
Open a ticket for a specific check failure for a specific user:
- Select Open ticket for check, which can be found under the 3-dot button on either the User360 Checks tab or on the list of users failing a given check, to open a ticket
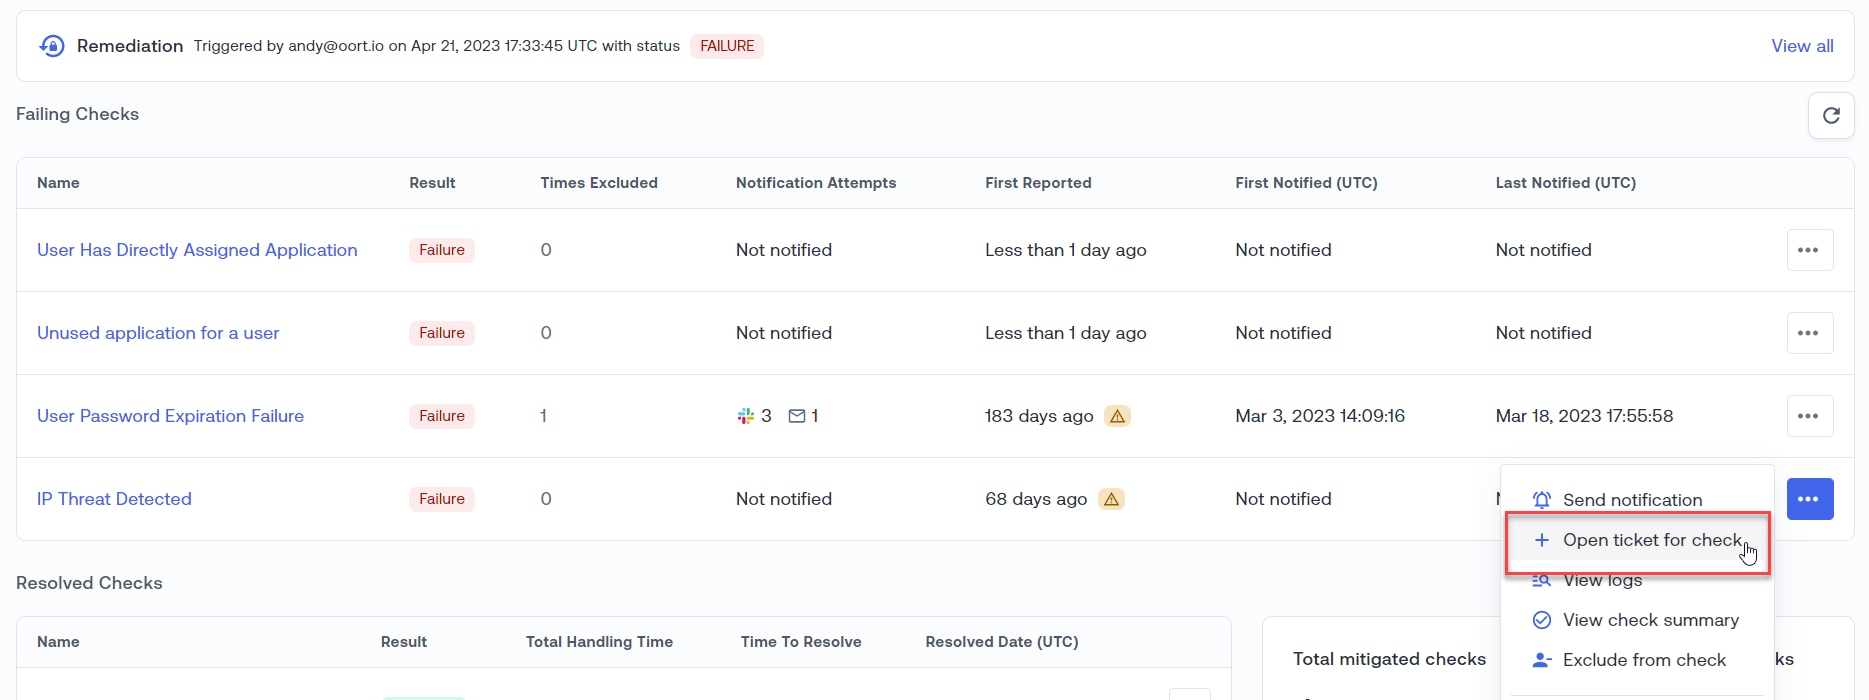
- Select the desired platform (if more than one is connected) and click Confirm.
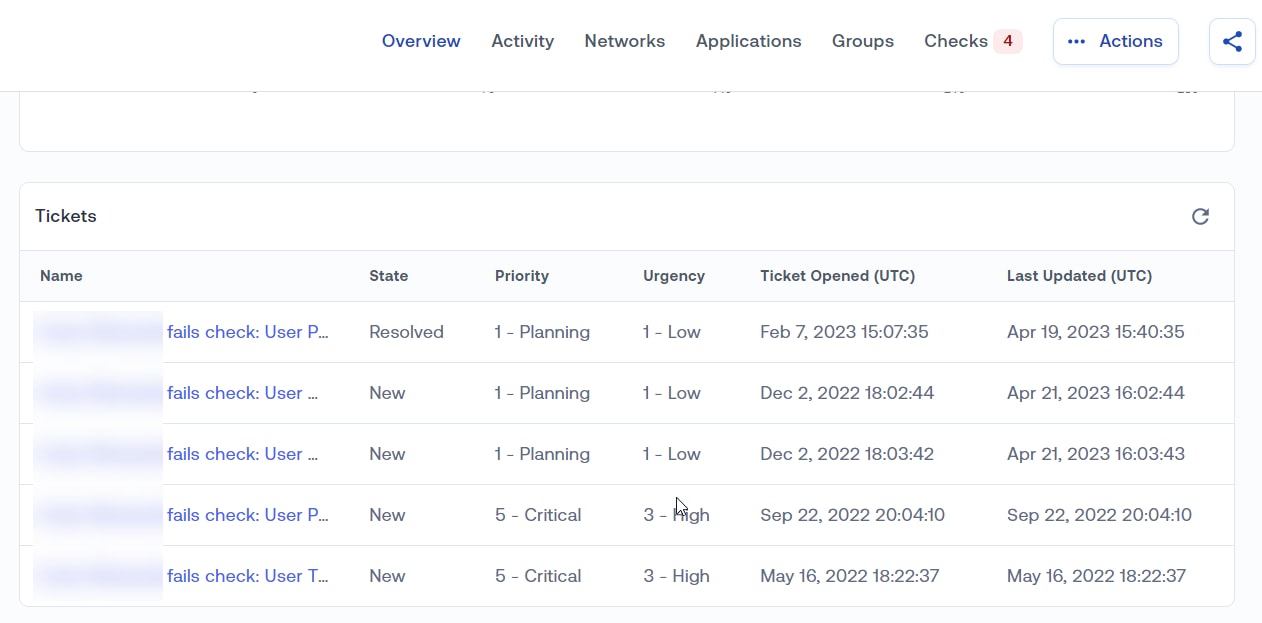
Any tickets opened via Cisco Identity and their status will be visible at the bottom of the User360 Overview tab.
Link User
Many scenarios exist where the same human user has access to multiple discrete users accounts, either within the same IDP or across different IDPs. In these cases, we recommend creating a link between these users to make account clean up and investigations easier and faster.
Under the Actions button on a given user's User360, there is an option to Link User. There are also other ways to link users. See the Linking User Accounts documentation for information on when, why and how to use it.
Update User Type
Supported IDPs: Okta, Azure AD
Several primary IDP types provide an attribute of User Type, but this user account attribute may not be populated or properly sync'd with a source of truth, such as an HR system.
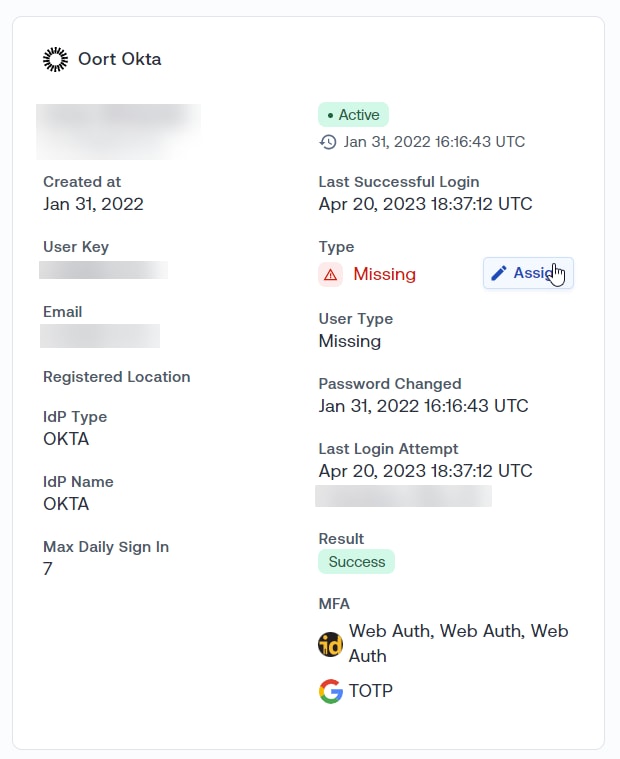
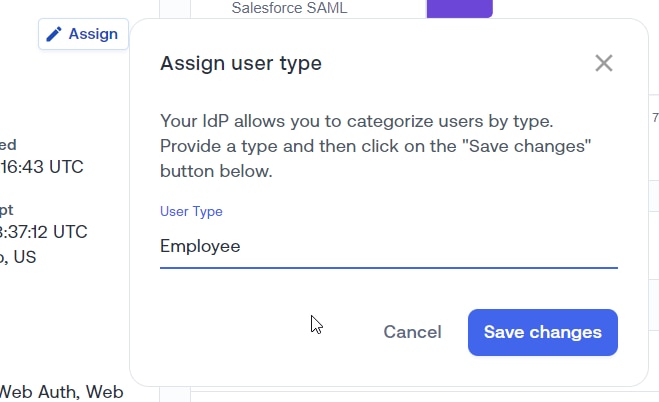
In this case, an admin or help desk role may want to manually set the user type attribute in the IDP from the Cisco Identity console. This is especially true if the account is a service account or a 3rd party/external user, such as a contractor or consultant.
- To do so, click Assign
- Type in your desired value and click Save Changes
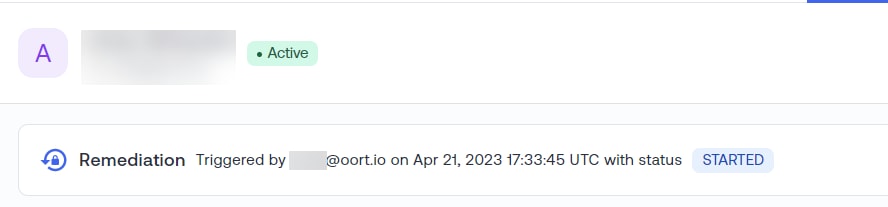
- At the top of the User Overview page, you will see a Status bar noting that the action has been triggered. When complete, the status will update.
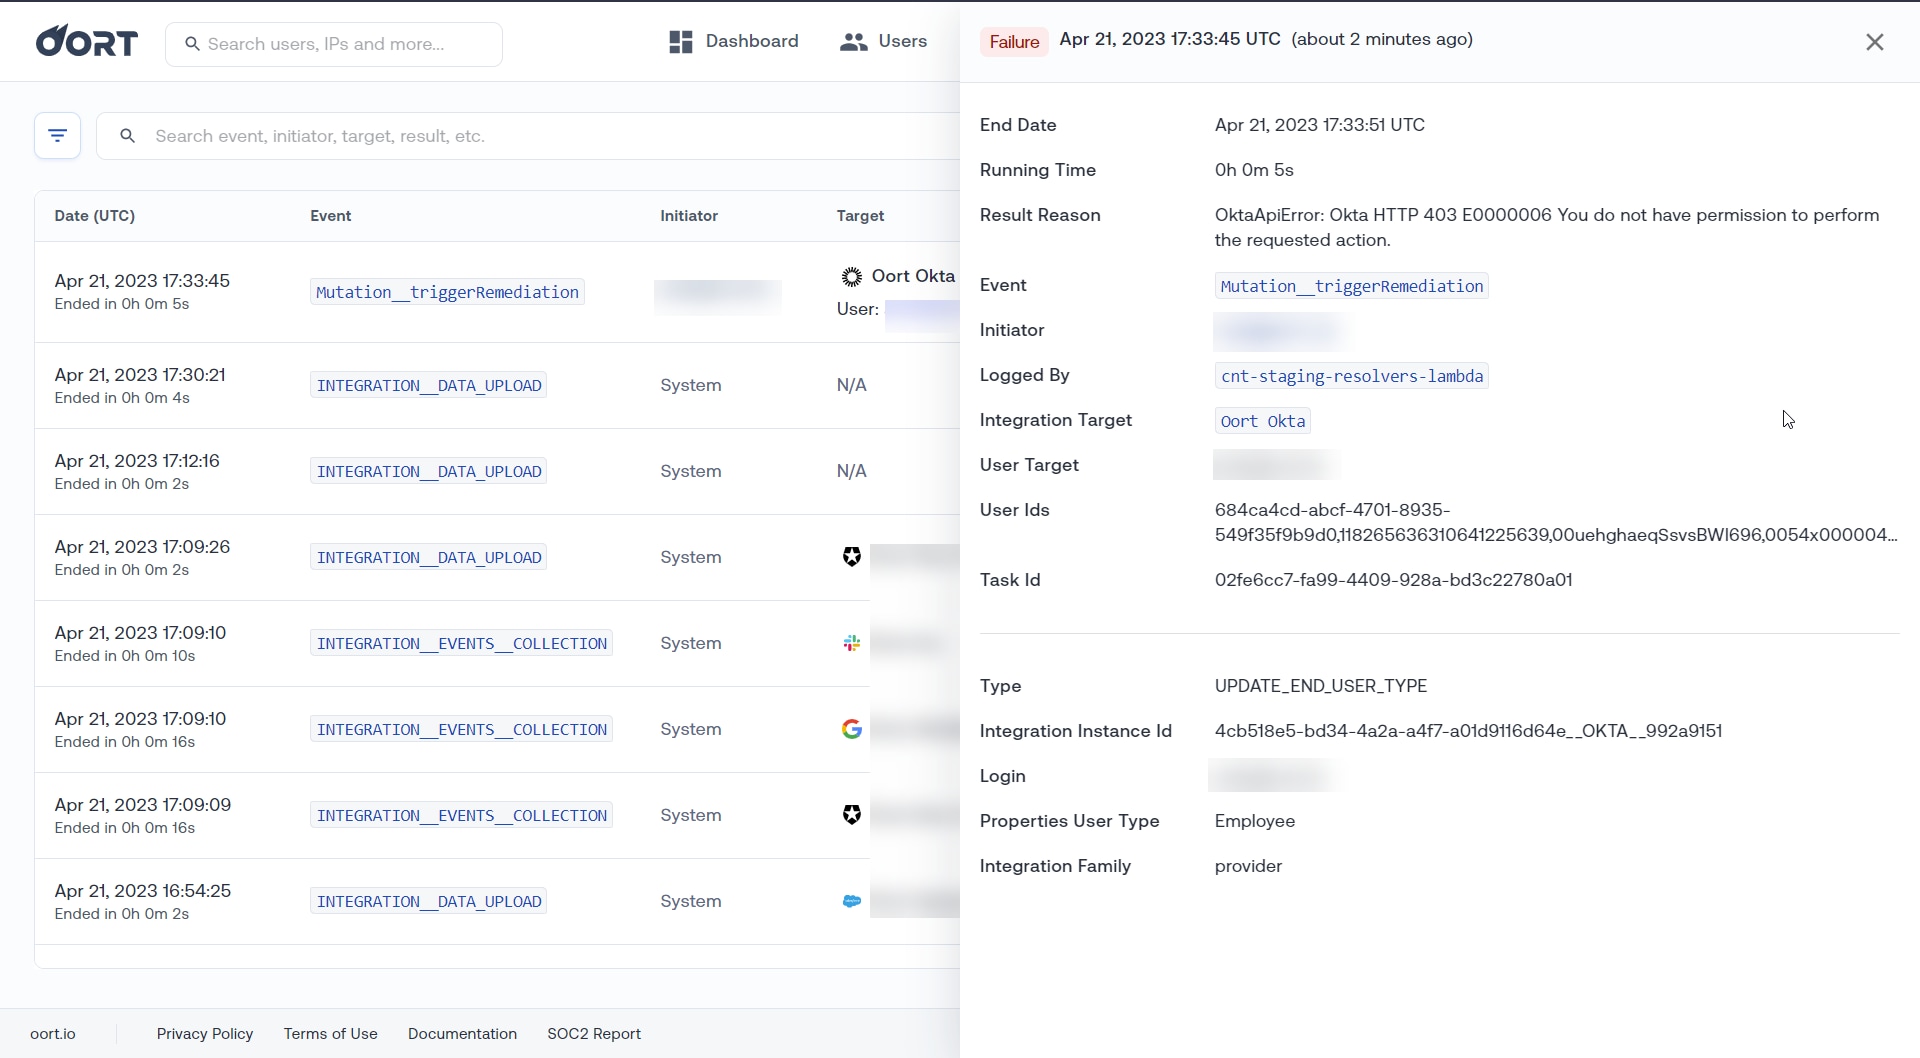
If there are any issues with the remediation action, you can see the details in the System Logs page under the tenant options menu in the top right corner.
Refresh User Data
Supported IDPs: Okta, Azure AD, Google, Duo, Salesforce
For most IDP connections, Cisco Identity will pull changes to static user account information and activity once every 24 hours.
You can see the most recent full data collection for a user in the Activity tab by hovering over the Last data collection link in the middle right side, about the events table.
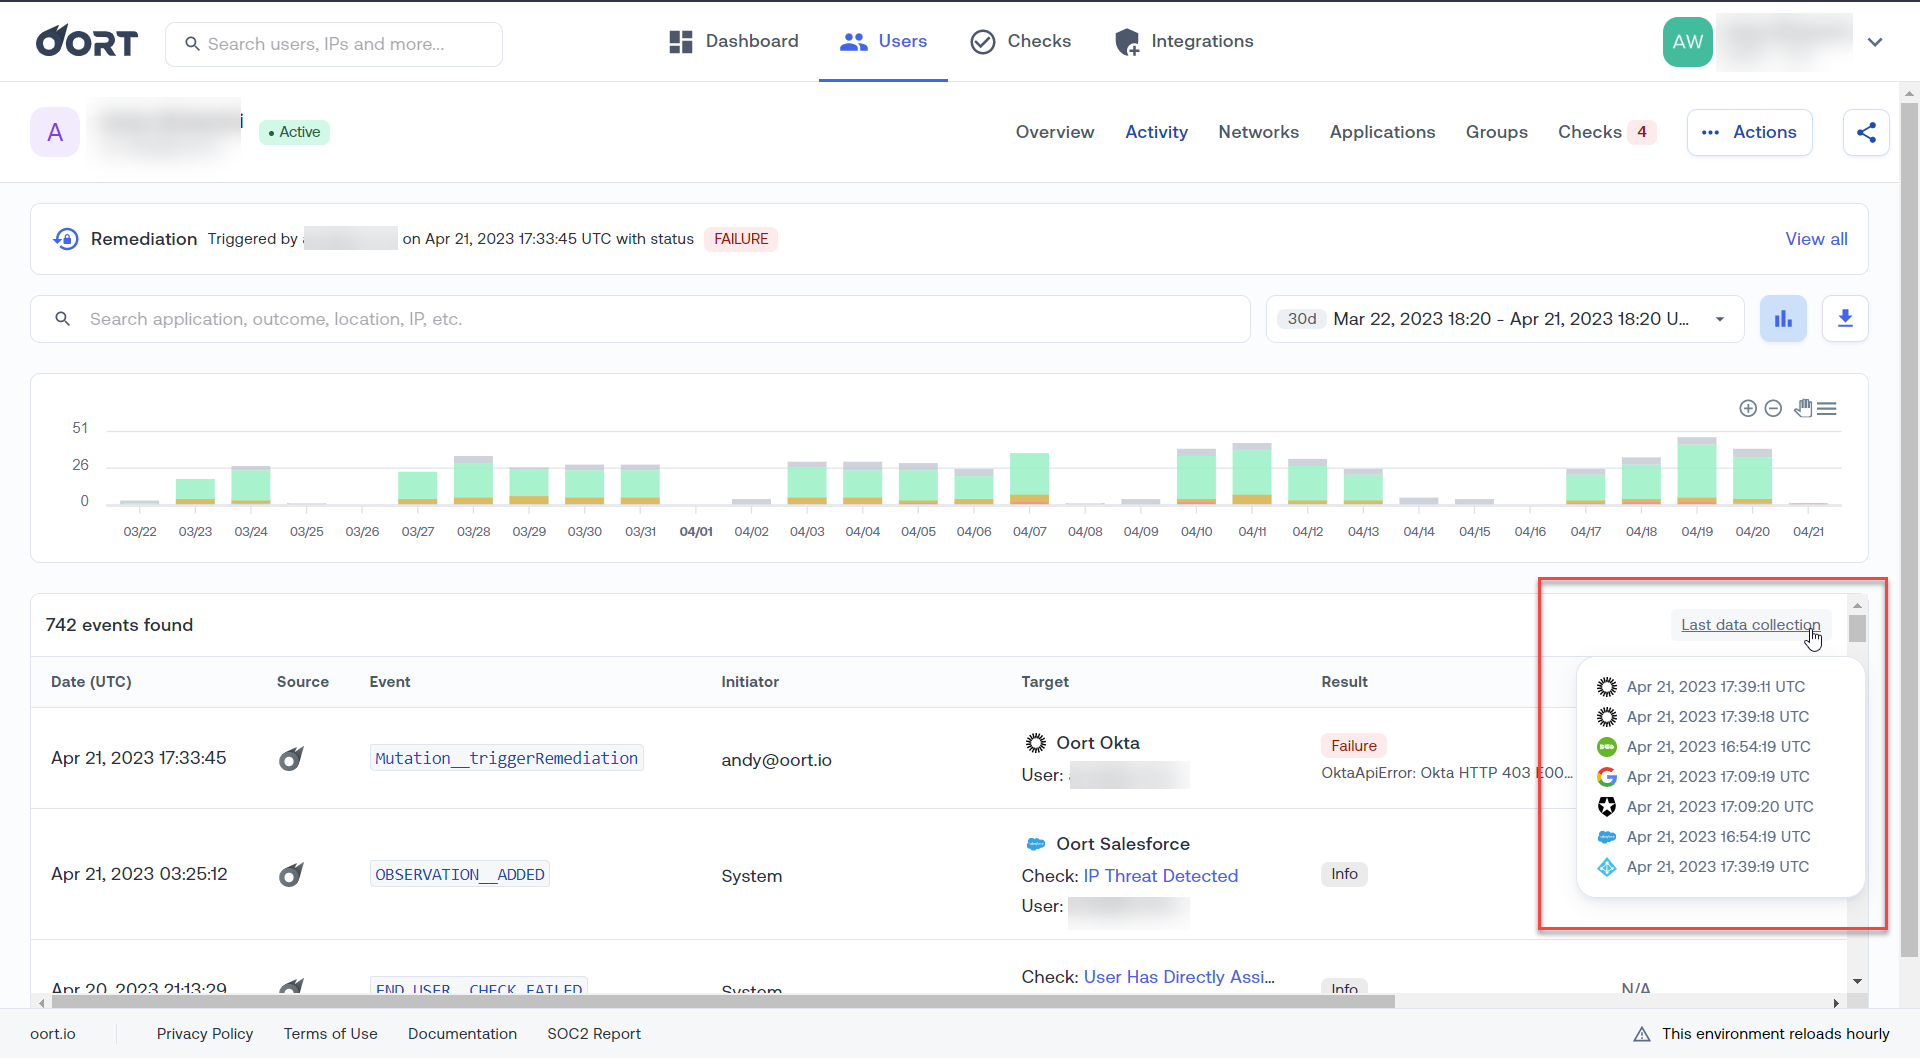
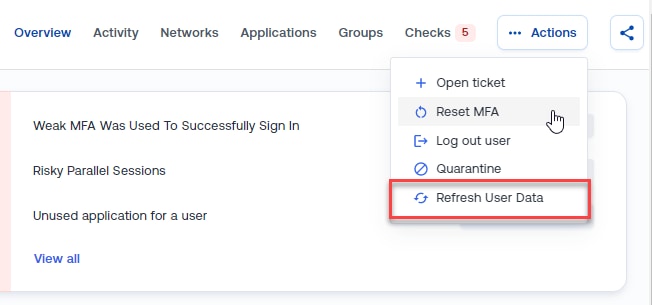
To obtain the latest data set for an individual user across all connected platforms, click Actions -> Refresh User Data
NOTE: Refresh the user data will collect the latest events, including activity logs, from available sources, display them in the Activity tab, and process some checks; however, it does NOT process ALL event driven checks for a user. For that, a manual refresh of the particular integration (e.g. Duo) must be triggered from the Integrations page.
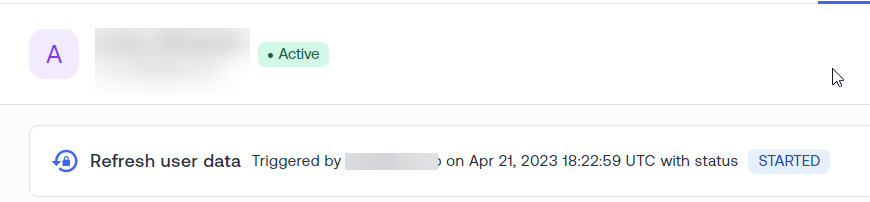
The status will be available in a bar at the top of the User Overview tab.
Because of a limitation on the Microsoft side, Cisco Identity typically gets users' configured factor information on a monthly cycle. Use the Refresh User Data action to pull the current factor info for a given user if needed
User 360
With Cisco Identity's User 360 View, you get rich insight across distinct data sources about each and every identity in your user population. The User 360 profile consolidates a user's static entitlement data with dynamic behavior and user event logs to create a single source of truth across all sources (Entra ID, Duo, Github, Workday, etc) for any given identity.
All of this information is gathered from each source where the same user email has been associated and is then displayed across various areas of the User 360 to provide you with deep context on a particular identity.
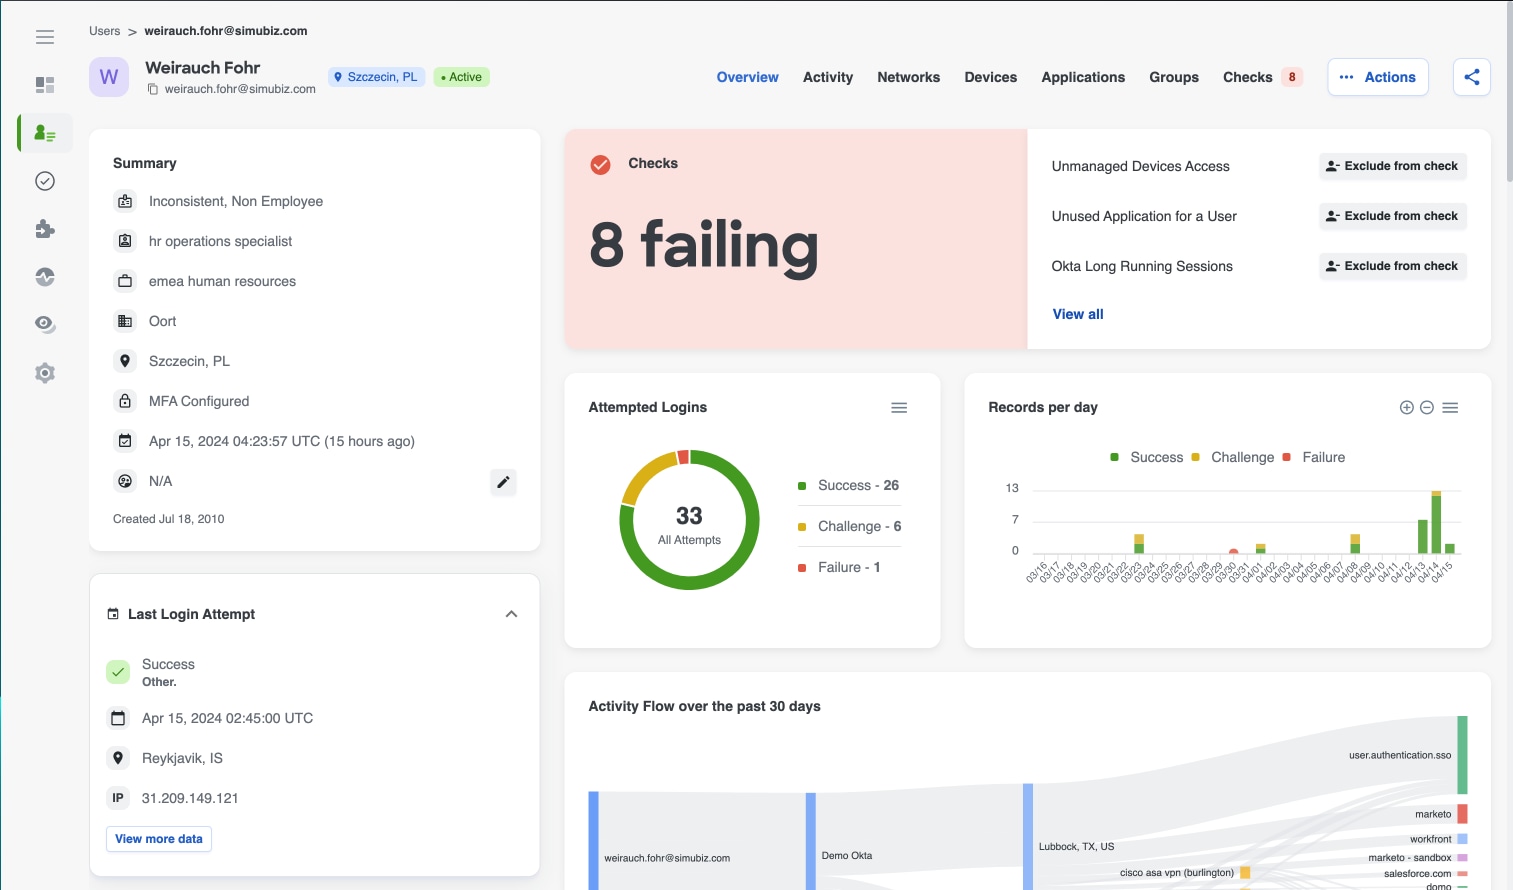
To get to a User 360, select a specific user's name from the Users page, the failing users on a specific Check page, the System Logs, etc - basically anywhere in the platform where you see a user's email in a blue hyperlink! To open the User 360 in a new tab, use the grey button next to the user's email.
The User 360 is broken down into multiple tabs. To learn more about what information and functionality is available in each tab, use the respective link for each page below:
- Overview tab
- Activity tab
- Networks tab
- Devices tab
- Applications tab
- Groups tab
- Checks tab
Some information and functionality persists across all tabs of the User 360. Some of these fields can be seen in the screenshot below. The full list of fields that you may see in this section are:
- User's display name - Top left corner
- User's email - Top left corner, under display name
- User's registered location, if present in the IdP or HRIS - Blue tag next to display name and email
- # of Linked users, if present - Blue tag next to display name and email, and registered location tag, if present
- User's Cisco Identity Status - Tag (color depending on user's status) next to display name and email, and registered location tag, if present
- User Lifecycle events, if applicable - Yellow tag next to display name and email, and registered location tag, if present. For users with a Significant Event tag, hover over the tag to see a tooltip with the event types. See the Overview tab for more information about the different lifecycle events
Functionality that persists across all tabs are:
- Actions button - Read the Remediation Actions documentation to learn more about remediation actions
- Share button - Use the Share button on the right side of the page, after all the tabs to copy a link to the exact page that can be easily pasted, bookmarked or shared with anyone who has the appropriate access to your Cisco Identity tenant.

Overview Tab
The purpose of the Overview tab is to provide you with high level context on who a user is. Cisco Identity will consolidate a user's information across sources (Entra ID, Duo, Salesforce, Github, Workday, etc) where the same email address has been associated, so that you can see all the information about one identity in one view.
The Overview tab is the first tab of the User 360. You will land on this tab upon selecting a user from the Users page.
In this article, we will describe the purpose and data of each widget of the Overview tab in detail.
Summary
The Summary widget displays high level context about a user that has been gathered across the different sources associated with an identity. The Summary widget is the first widget on the left hand side of the Overview tab. It is immediately below the user's display name and email.
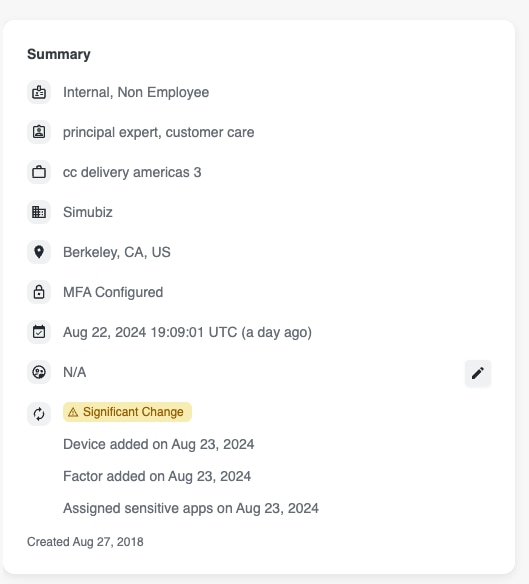
Hovering over any icon in the Summary widget will display a tooltip indicating the information being shown alongside the respective icon. Below are the elements visible in the Summary widget, and the corresponding definitions:
User Type
Combines IdP Status, Cisco Identity Status, and HRIS status if available, to provide more context on this user's current state.
To learn more about this status, check out User Statuses
Title
The user's current job title. This information must be available in the IdP or HRIS for this field to populate. If it is not available, it will show as N/A
Department
The department the user belongs to. This information must be available in the IdP or HRIS for this field to populate. If it is not available, it will show as N/A
Organization
The organization the user belongs to. This information must be available in the IdP or HRIS for this field to populate. If it is not available, it will show as N/A
Registered Location
The user's registered working location. This information must be available in the IdP or HRIS for this field to populate. If it is not available, it will show as N/A
MFA Status
Whether this user has any forms of MFA configured on an account. If yes = MFA Configured; If no = MFA Missing
Last Successful Login
The last successful login date, time (UTC), and days elapsed, recorded for this user
User Manager
The user's manager's name. This information must be available in the IdP or HRIS for this field to populate. If it is not available, it will show as N/A.
This field can be updated directly in Cisco Identity using the pencil icon; however, updating this field will not modify any data within the IdP. It will only change how the information is presented within Cisco Identity. This action can always be undo later on
Lifecycle Events
Highlights recent, notable events that have occurred on this user's account that can be beneficial to know about during an investigation. Lifecycle events are displayed here for 7 days after the event is noted, though this value can be customized via Tenant Settings if needed.
New Account badge - indicates that this account was recently created. Includes the date the account was created.
Significant Change badge - indicates that an uncommon, but important, activity has recently happened on this account (for ex: MFA factor added, admin privileges granted, sensitive app assigned, etc). Describes the event type(s) and the date(s) associated with the event.
If this field is not visible, it means there have been no recent lifecycle events associated with this user in the last 7 days
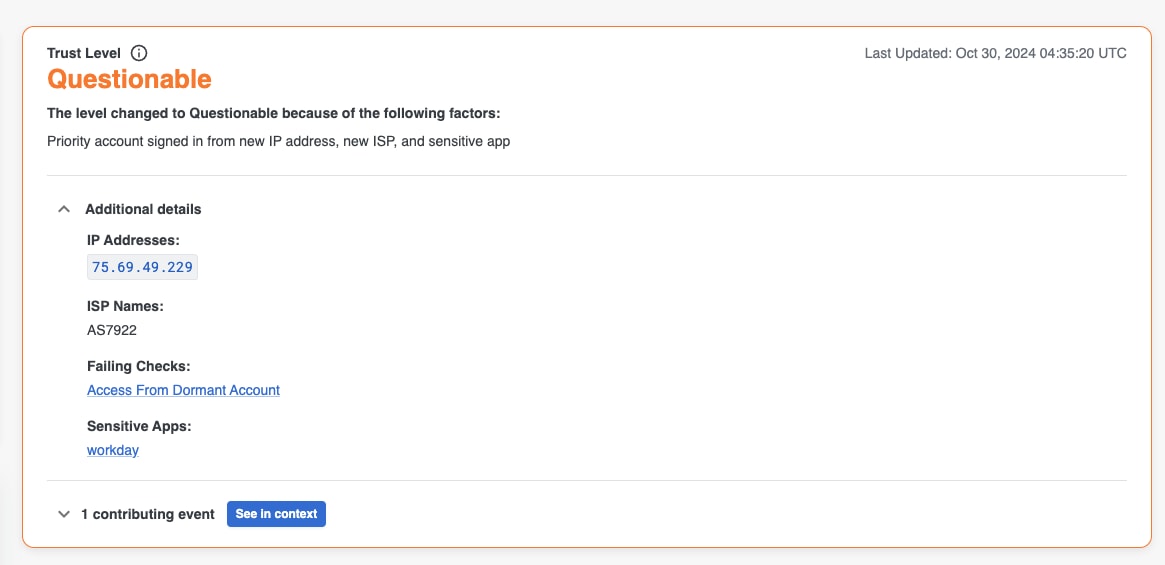
User Trust Level
The User Trust Level provides an overview of the user's current Trust Level. This widget shows what the user's current trust level is, as well as what factors contributed to the user's particular Trust Level. The User Trust Level widget is the first widget in the middle of the Overview tab, immediately below the tab names. From this widget, you can dive deeper into the user's events to investigate the details of a unique event or the events that happened in the 48 hours before and after the user's Trust Level changed.
More detailed information about this widget and the User Trust Level can be found in the User Trust Level documentation.
Last Login Attempt
The last log in attempt widget shows you information about the last log in attempt recorded for this user, regardless of result. The Last Login Attempt widget is on the left hand side of the Overview tab, directly below the Summary widget.
It will surface:
- Last log in attempt result - ex. success, failure, challenge, etc
- If there is a failure, it will also include the reason for the failure - ex. invalid credentials, etc
- Date and time of last attempt (in UTC)
- Location of last attempt
- IP Address of last attempt
Selecting the View more data button at the bottom of this widget will take you to the Activity Tab, filtered by the event associated with the last log in attempt.
Login Attempt visualizations
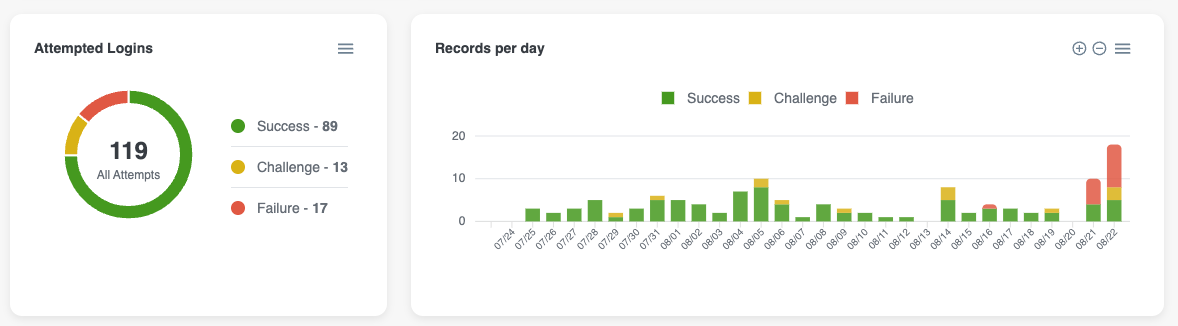
Attempted Logins
A pie chart breaking down the login attempts by result (success, failure, etc) for the user. This visualization is based on the user's history since the user has been monitored by Cisco Identity (ie: all time)
To export this visualization to a PNG, SVG, or get the raw data in a CSV, select the 3-line button in the top right corner of the widget.
Records per day
A bar graph visualization breaking down the login attempts per day by result. By default, this timeline visualization looks across 30 days of activity. However, to see the same data over a smaller or larger timeframe, you can press the + or - buttons in the top right.
If the user is Inactive, this widget will still be visible but blank with a message stating "No records found".
To export this visualization to a PNG, SVG, or get the raw data in a CSV, select the 3-line button in the top right corner of the widget.
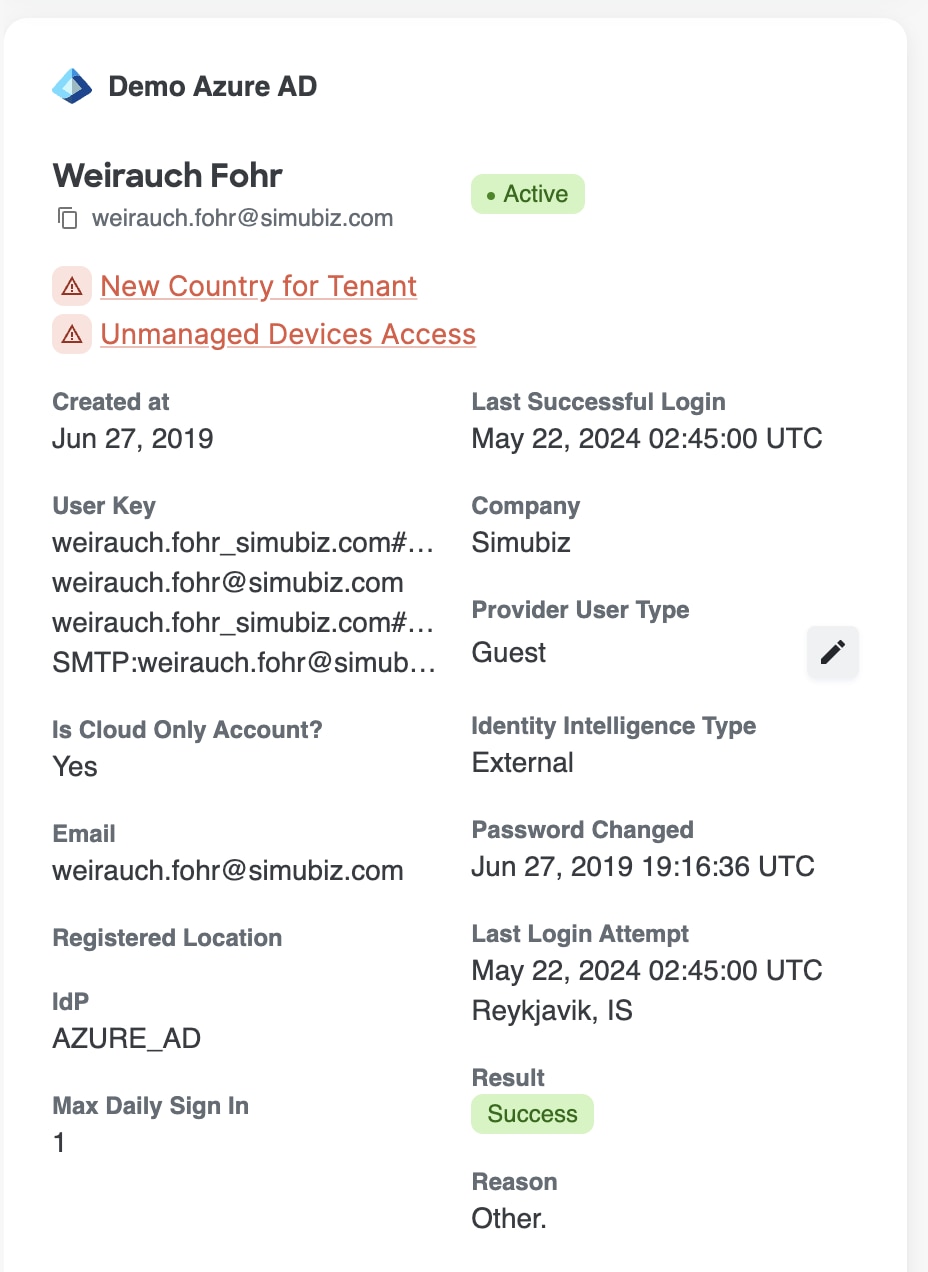
Source Cards
Because Cisco Identity merges accounts across data sources based on email address into one user record, it is common for one user record to have accounts across multiple data sources. The Source Cards help you see the data sources where this user has an account that exists, and the different information coming from each source. On the left hand side of the Overview tab, there will be a source card for each data source that contains an account for the given user. Active source cards are always visible, while deleted or deprovisioned sources for a user are collapsed together and can be expanded for more information.
The information in each source card will vary depending on the data source itself, as well as what information is available for a given user in the data source. For example, if Okta is your IdP and the fields for a specific user's registered location, job title, manager, etc, have not been populated for this user, those fields will not be displayed. You may see this information on another user in your environment, however, if those fields were filled out for that user in Okta.
All of the information in the source cards is coming directly from the source itself, except for the field called Cisco Identity Type. The Cisco Identity Type is assigned by Cisco Identity based on a variety of different factors, such as IdP type, job title, department, etc.
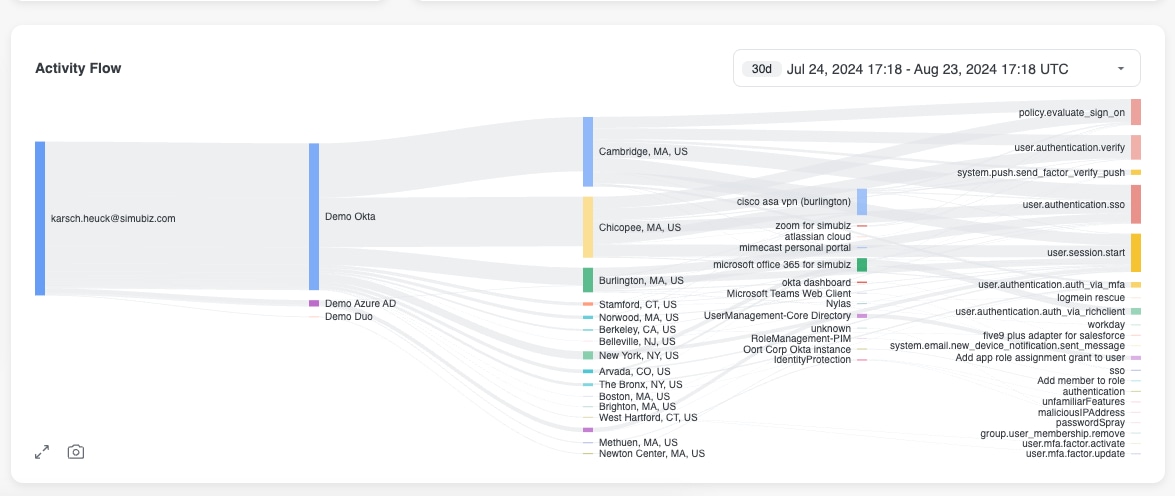
Activity Flow visualization
The Activity Flow widget provides a visual representation of a user's activities including locations visited, applications accessed, and related events, so that you can quickly identify anomalies and investigate specific user activities more effectively. The Activity Flow visualization widget can be found directly below the Login Attempt Visualizations.
The activity flow widget defaults to showing the user's activity over a 30 day window. This can be customized using the date picker in the top right corner of the widget. If you would like to full screen the flow, press the Expand icon in the bottom left corner of the widget. To save a PNG of the flow, select on the Camera icon in the bottom left corner of the widget, next to the Expand icon.
Selecting any of the colored bars within the visualization will take you to the user's Activity tab, pre-filtered on all events associated with your selection.
If the user is Inactive, this widget will still be visible but blank with a message stating "No records found".
Authentication Factors
The Authentication Factors widget displays all the authentication factors associated with a particular user, across all sources associated with that user. The Authentication Factors widget is below the Activity Flow visualization. However, if there is no MFA configured on a user's account, this widget will not be visible.
Read our MFA Factors FAQ for more information
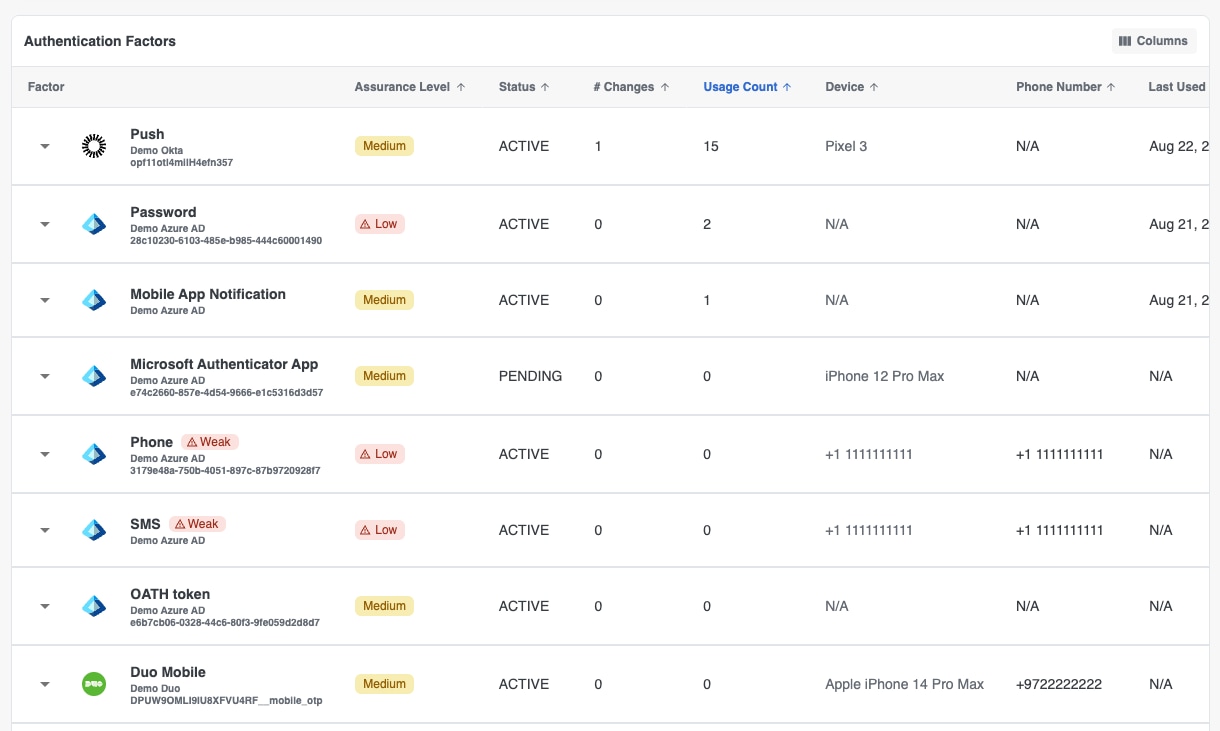
All columns in this widget, except Factor, can also be sorted by ascending or descending values, by selecting the arrows next to each column header.
By default, the Authentication Factors widget contains the following information:
Factor
- Factor type (ie: Password, SMS, Push, etc)
- Source associated with the factor
- Factor ID
If the factor is new or weak, a tag indicator will be displayed next to the Factor Type
Assurance Level
Assigned by Cisco Identity to make it easier to identify the posture of a specific factor. Read more about factor assurance levels in our MFA FAQ doc.
Possible values: High, Medium, Low, Unknown
Status
The enrollment status of a given factor. Note: not all statuses are available with all data sources.
- Active - Factor is enabled and can be utilized
- Disabled - Factor was reset or disabled and cannot be utilized
- Pending - Factor configuration process was started but not completed (ex: MFA Application is on device, but was not enabled for MFA)
# Changes
The number of changes that have been made to the factor
Usage Count
The number of times the factor has been utilized by the user
Device
The name of the device associated with the factor
Phone Number
The phone number associated with the factor, if relevant
Last Used (UTC)
The date and time the factor was last used successfully
Similar to the Users Table, columns can be added or removed from this table by selecting the Columns button on the upper right of the table. Factor Type and usage count cannot be removed. To restore the default, select Restore Default after selecting the Columns button.
The columns that are not included by default are:
Last Updated (UTC)
The date and time of the factor was last changed. To see more details about changes to a factor, press the down arrow on the left of Factor to expand the details and see last updated date, created date, and any factor change information.
Created (UTC)
The date and time that the factor was set up
Groups and Application information
These four widgets, below the Authentication Factors table, show a quick snapshot of groups and application usage for a user.
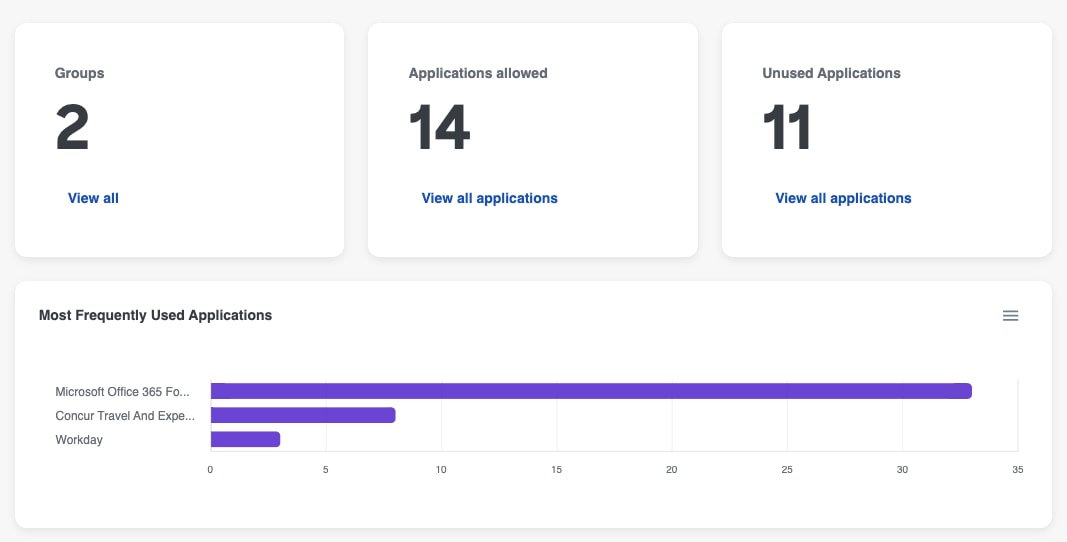
Groups
Total number of groups this user is part of. To see more details about a user's groups, select the View All button to navigate to the Groups tab or navigate to the Groups tab directly yourself.
Applications Allowed
Total number of applications assigned to this user. To see more details about a user's applications, select the View All Applications button to navigate to the Applications tab or navigate to the Applications tab directly yourself.
Unused Applications
Total number of applications assigned, but not in use, for this user. To see more details about a user's applications, select the View All Applications button to navigate to the Applications tab or navigate to the Applications tab directly yourself.
Most frequently used applications
This bar graph visualization shows you the Top 10 most frequently used applications for a user, along with the usage count for each application. If the user is Inactive, this widget will still be visible but blank with a message stating "No records found".
Selecting one of the bars in this visualization will bring you to the Activity tab, pre-filtered on all events associated with the selected application.
To export this visualization to a PNG, SVG, or get the raw data in a CSV, use the 3-line button in the top right corner of the widget.
Tickets
If you have a ticketing service integration set up, you can open tickets for a user directly via the Actions button in Cisco Identity. Once you have opened a ticket for a user, a table will populate in this widget, which is below the Group and Application widgets. If there are no tickets associated with a user, this widget will still be visible but blank with a message stating "No records found".
Note: If you do not have a ticketing service integration set up, you will not see this widget.
Below is a table with the different fields visible in the table:
Name
User's name + name given to a ticket when it was opened (ex. John Smith: Ticket Test)
State
Ticket's state as set in the Ticketing System
Priority
Ticket's priority as set in the Ticketing System
Urgency
Ticket's urgency as set in the Ticketing System
Ticket Opened (UTC)
The date and time the ticket was created
Last Updated (UTC)
The date and time the ticket was most recently updated
Linked Users
Sometimes a user might have more than one account in your system, under different email addresses. We recommend linking these accounts for hygiene purposes. To learn more about the importance of linking users, how to add/remove linkages or filter on linked users, read the Linking User Accounts documentation.
Below the Tickets widget, is the Linked Users widget, which will show you all the linked users associated with a user. If there are no linked users associated with a user, this widget will still be visible but blank with a message stating "No records found" and a button to add linked users.
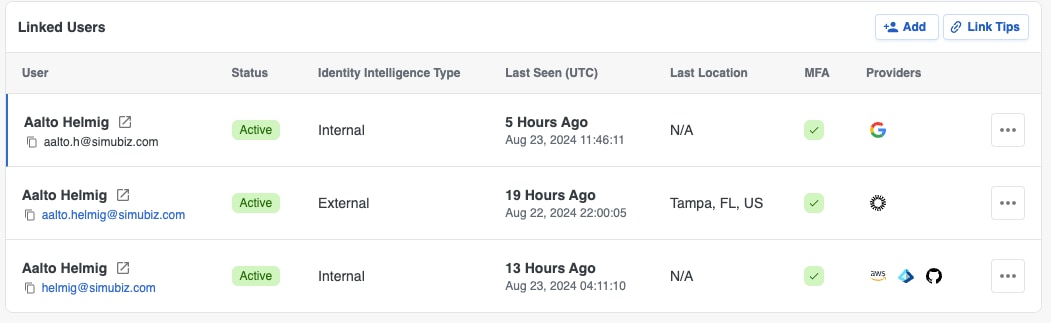
Once you have linked a user to another user, a table will populate with information on the current user, and all associated linked users. The following fields are available in the table for each linked user:
User
User's display name and user's email address. The first user in the table is always the user who's User 360 you are currently on
Status
The user's Cisco Identity Status and lifecycle events, if present
Cisco Identity Type
The Cisco Identity user type assigned based on compiled identity data source user types
Last Seen (UTC)
Last login attempt for a user, regardless of result
Last Location
Last login attempt location for a user, regardless of result
MFA Configured
 = MFA Configured
 = MFA Not Configured
Providers
Logo icon for each source associated where the user's email was associated. Hovering over a logo displays the name given to each source during the Integration setup
Activity Tab
Overview
The Activity tab's purpose is to show a detailed view of all activities, across all sources, associated with a given identity over time in one view. Without having to jump across different tools and platforms to piece together bits of a user's activity, the Activity tab can save you time and is incredibly valuable when investigating a user.
The Activity tab is the second tab of the User 360. This article will describe the different information and functionality available on the Activity tab in detail.
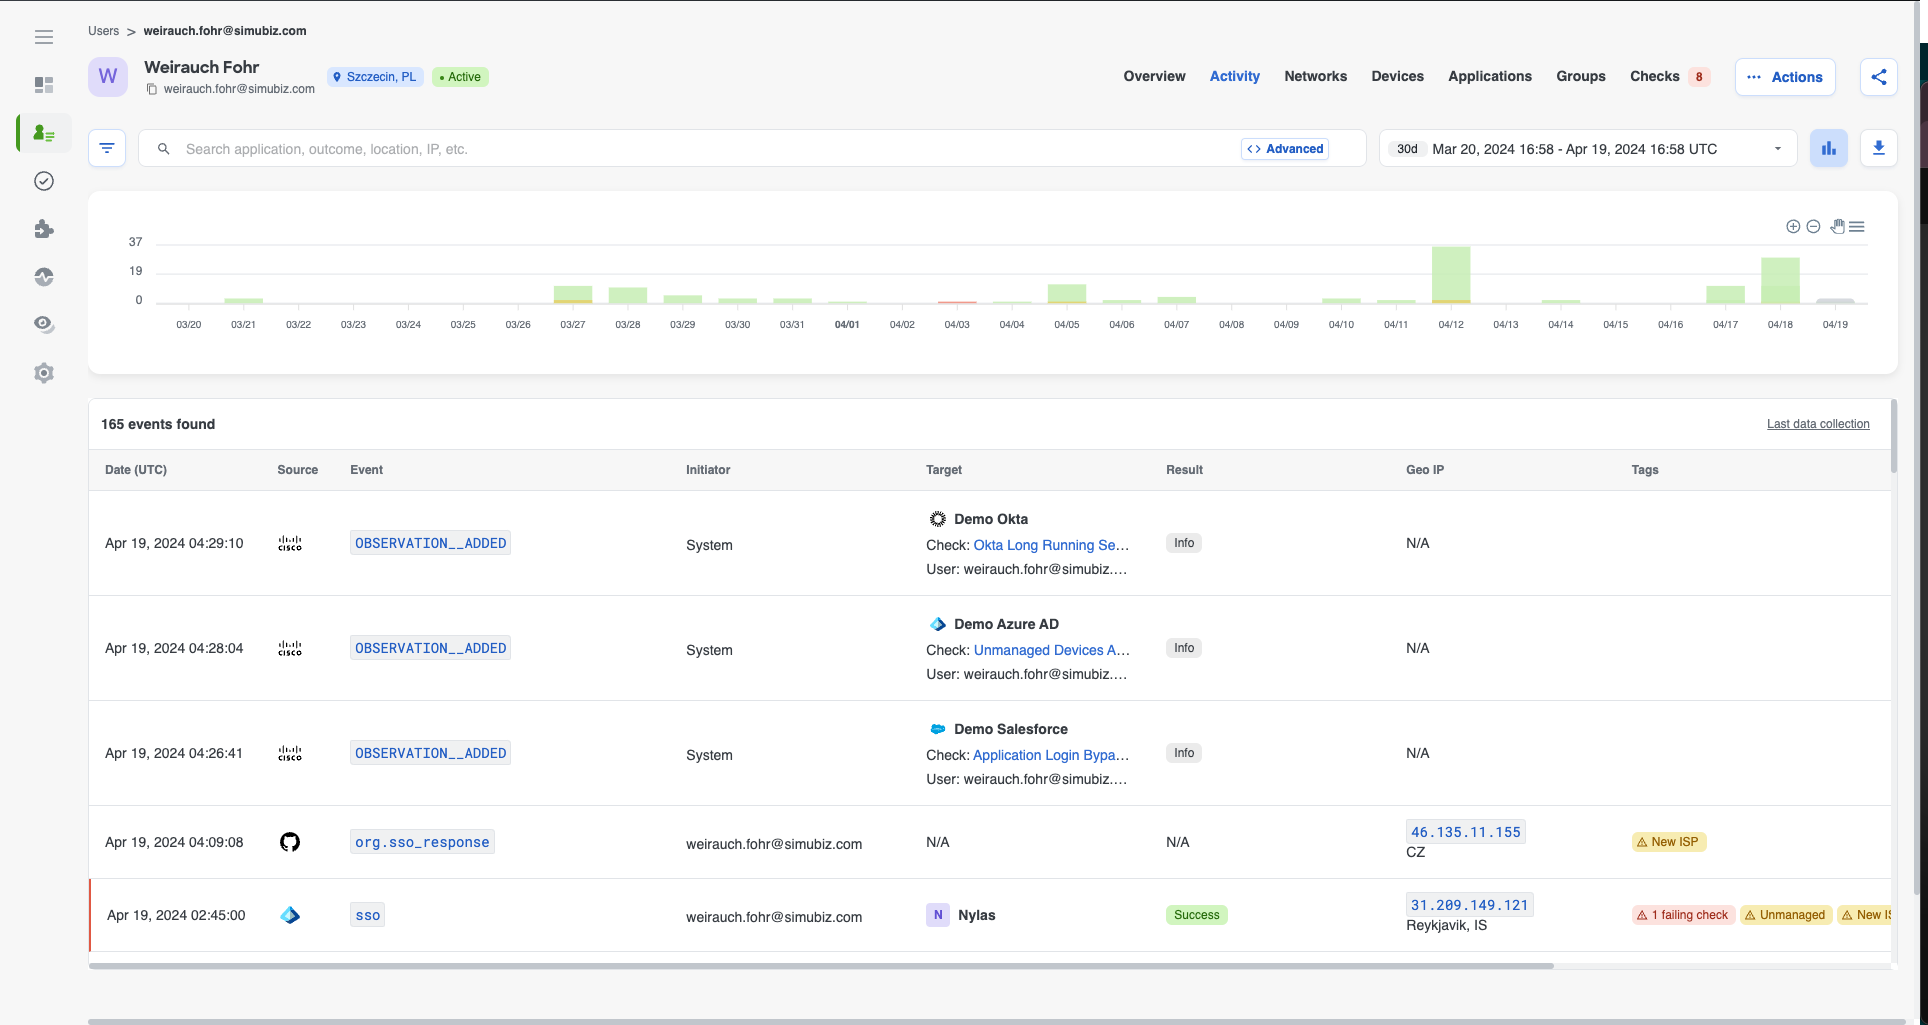
Activity table elements
The Activity table contains all the detailed event information for a particular user. Above the column headers on the left, you can see the total number of events for the selected timeframe, and on the right, the last data collection timestamp for each source, if you hover over "Last data collection".
The section below details the fields that appear in the table by default, as well as the definition of each field:
Date (UTC)
The date and time the event/action happened. Hover over the timestamp to see the event time in your local time based on your device settings
Source
The identity source associated with the event/action
Event
What the event/action taken by the user was
Initiator
Who initiated the event/action and a session ID for the event, if available
Target
What the target of the event/action taken by the user was
Result
The result of the event/action taken by the user
Geo IP
The IP address and respective location for the associated event/action
Tags
Tags associated with the event and/or the IP address. Hover over each tag to see a tooltip with the source of the tag (ex: Okta: Password Spray, IP info: Hosting, etc). If no source, it is an Cisco Identity tag (ex: New ISP)
OS
The operating system associated with an event/action. Hover over the icon in this column to see a tooltip with the OS name
Browser
The browser associated with an event/action. Hover over the icon in this column to see a tooltip with the browser name
Device Type
The device type associated with an event/action
Diving deeper into an event
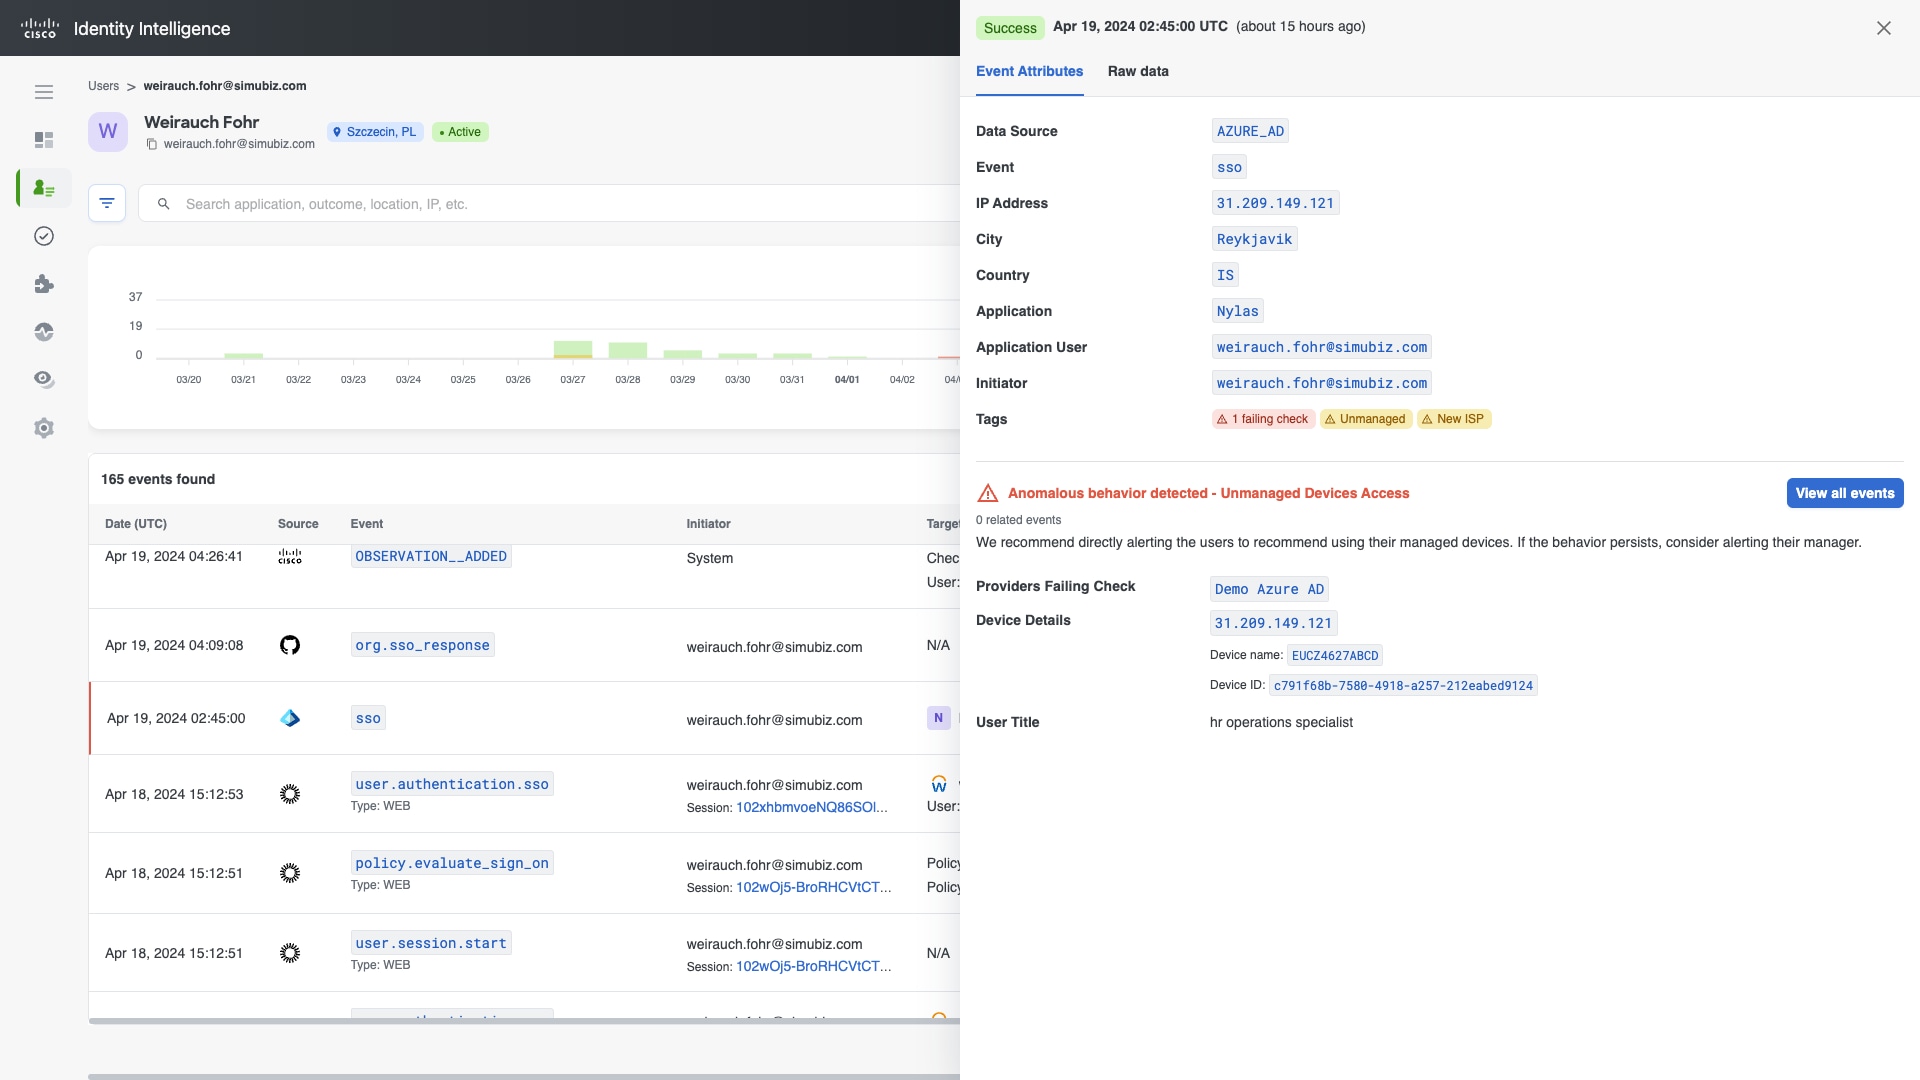
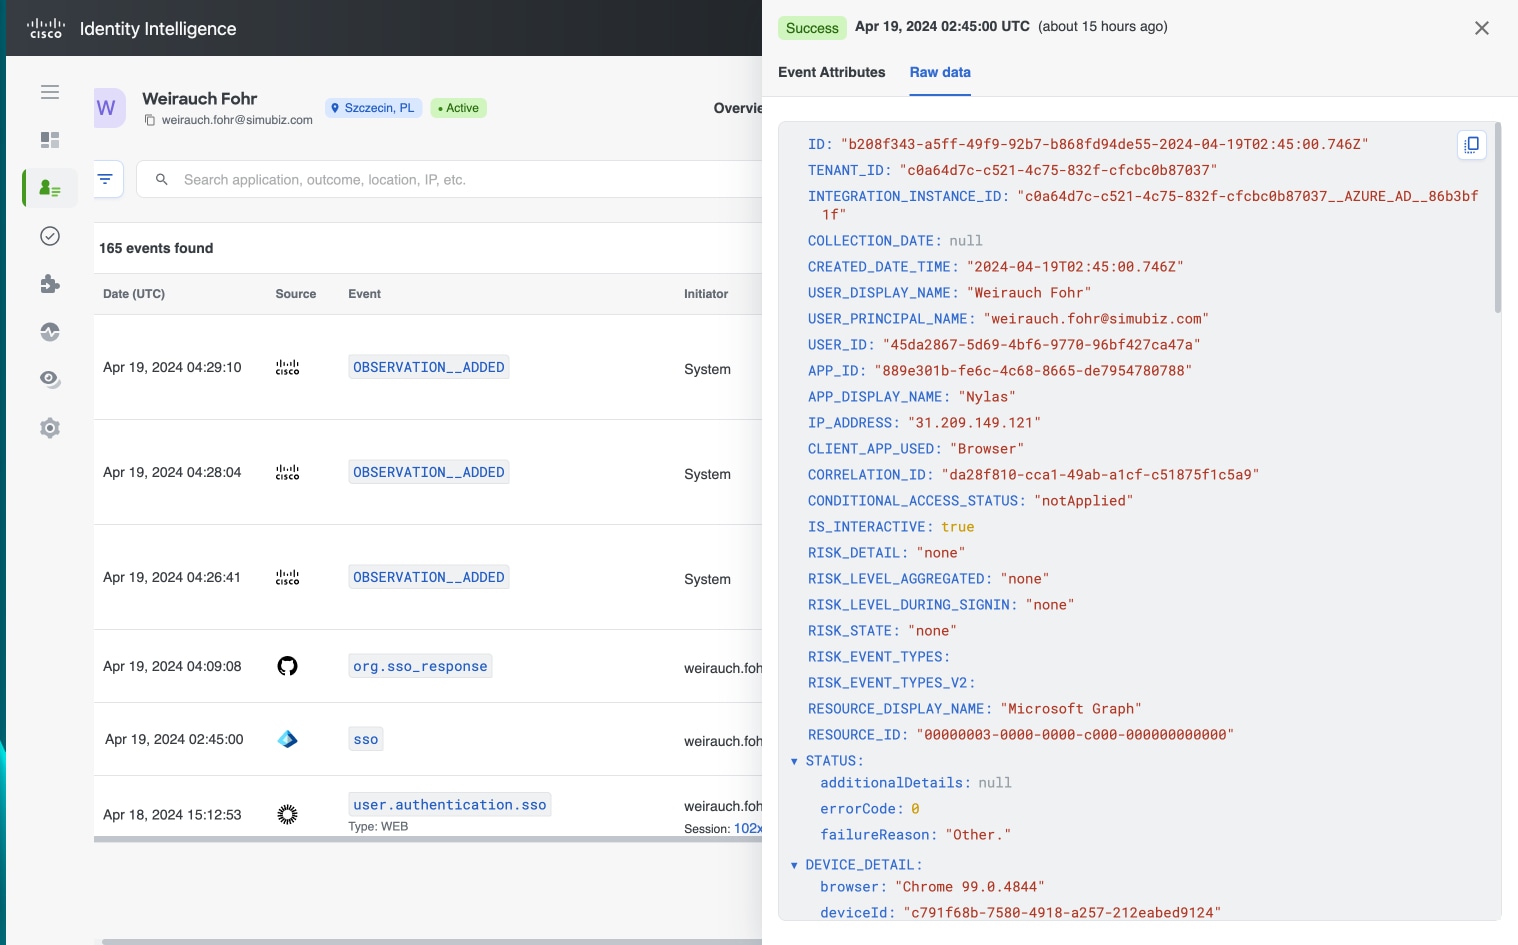
To see more information on an event in the Activity table, select any blank space in the row related to the specific event you'd like to dig into.

This will open a slide panel from the right side of the page, that has 2 tabs - Event Attributes and Raw data. The event attributes themselves and raw data will vary depending on the relevant information for the event/action you are looking at.
- Event attributes shows you more detailed information on the attributes related to the event
- Raw data shows you the raw data for a given event
To close the slide panel, select the X in the top right corner, or select anywhere outside of slide panel.
Activity Tab general actions
This section describes the high level actions you can perform on the Activity tab.
Search
Use the search bar above the Activity table to search based on various items such as a specific IP address, session ID, application name, source, location, etc. When searching, you do not need to provide an exact value. Typing part of a word will return relevant results.
If you have searched on a particular parameter, the search criteria is retained as you navigate between different tabs within the platform.
To clear the search bar select the X on the right most side of the search bar, next to the Advanced button.
Adjust timeframe
By default, the Activity tab is filtered to show all events over the last 30 days. If you would like to see a larger or smaller window, you can customize your view with the date selector, which can be found directly to the right of the search bar.
Press anywhere in the box to open a dropdown where you can select from preset timeframes (ex: Last 4 hours, Last day, Last 7 days, etc), a custom period, or 'View All', based on your needs.
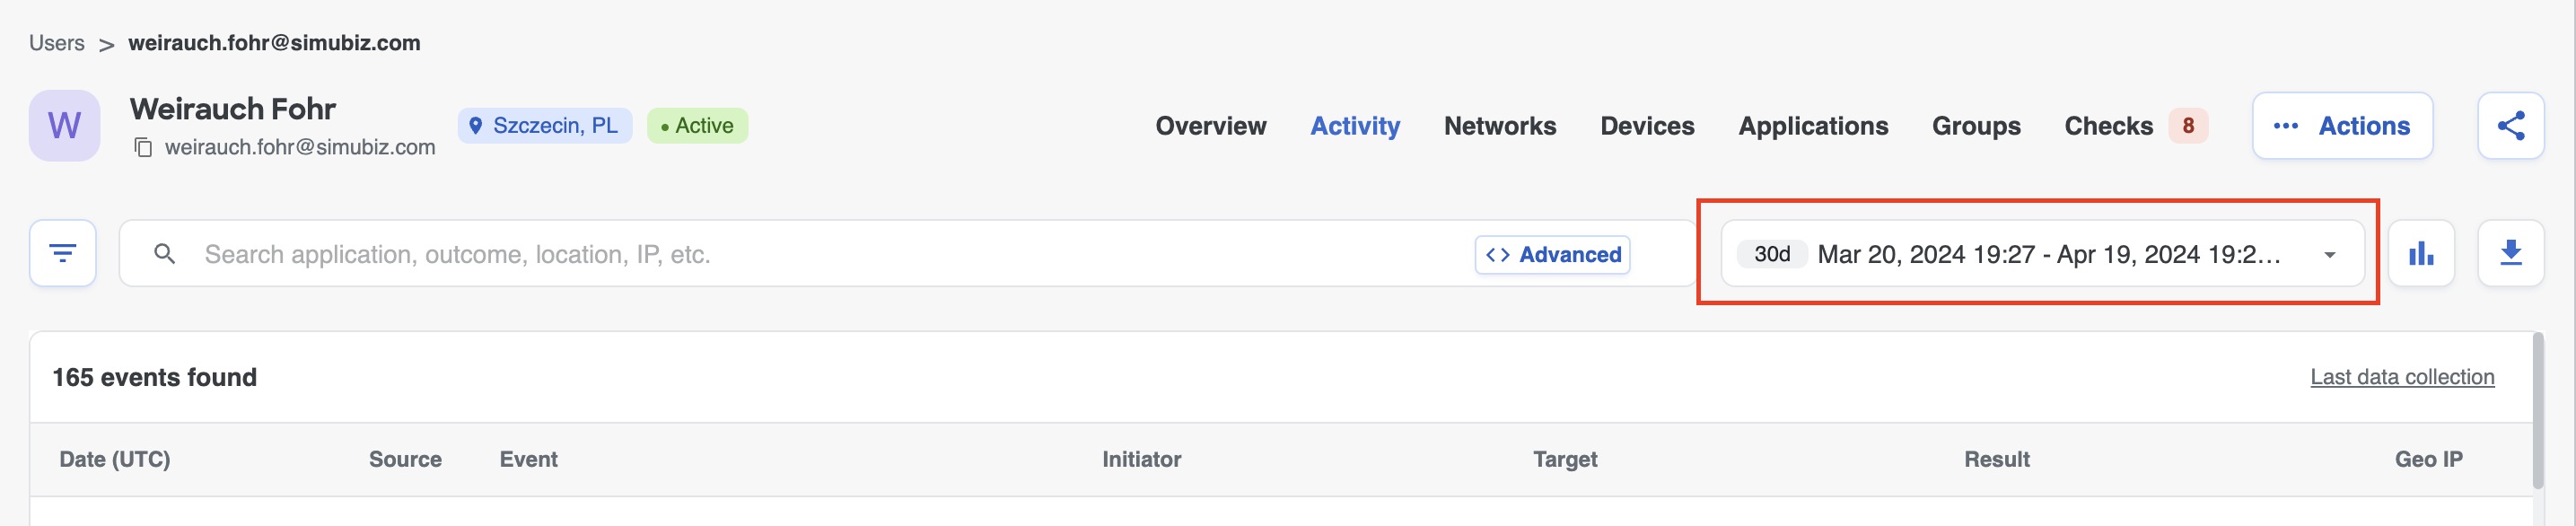
Download results
You can download tabular data from the table to a CSV using the Download icon button on the right after the timeframe filter. All filters applied are included in the CSV output. If there are no results in the table, the CSV export will contain only headers and no user data.
Note: The CSV output has a limit of 2,000 rows.
Timeline visualization
The Activity tab has a timeline widget which displays a given user's total number of events per day, color coded by result type (ie: success, failure, challenge, etc). Hovering over a segment of the bar will display a tooltip with the date, the result, and the count of events for that result.
By default, the view is set for 30 days but this can be adjusted to see a wider or smaller window of time using the + and - buttons in the top right corner of the timeline widget.
To export this visualization, press on the 3-line button in the top right corner of the widget. Downloading as a SVG or PNG will export an image, whereas downloading as a CSV will export the raw data for you in CSV format.
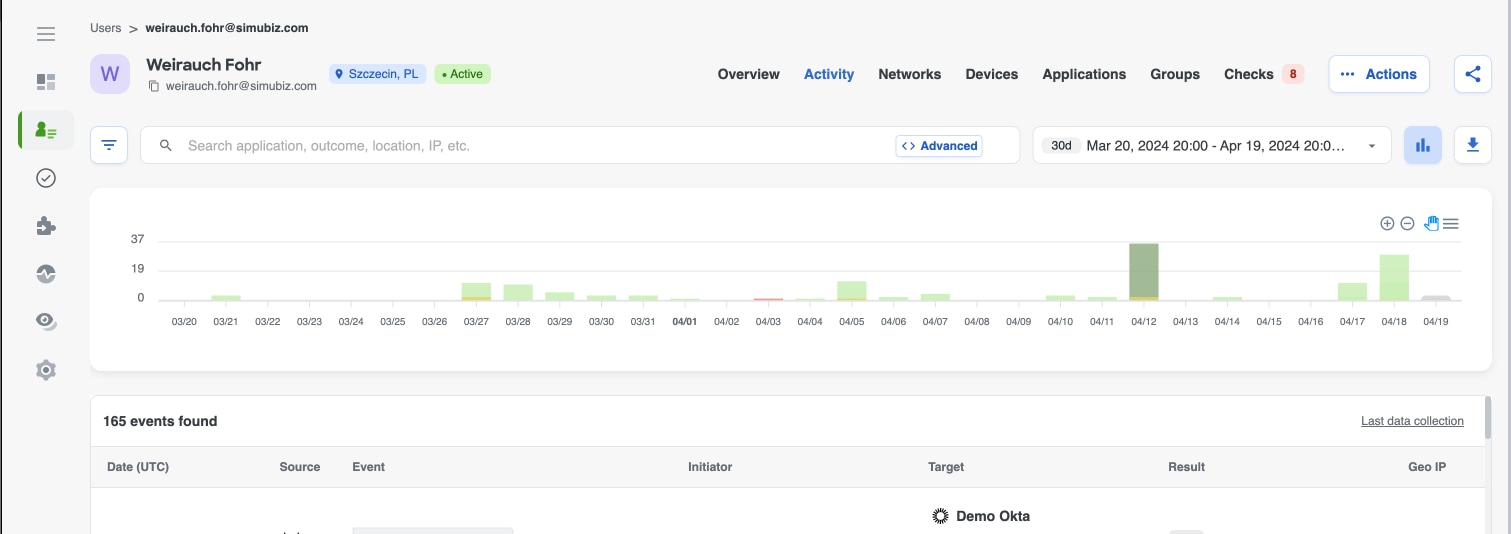
If you would like to hide this widget to get more space for the Activity table, press the Graph icon button next to the timeframe filter. To get the widget back, press the Graph icon button again.
Filters
Like the Users table, the Activity table is filterable by multiple attributes, enabling you to slice and dice the activity based on the parameters that are important to you.
There are several ways to filter the results of the Activity table - basic filters, directly from attributes in the table or slide panel, and Advanced Query mode, which can be enabled via the search bar above the Activity table.
Basic filters
To access the basic filters, select the Filter button that is to the left of the search bar, above the Activity table. This will open a slide panel from the left side of the page with the available filters.

The filter categories available via the slide panel are Result and Event. You can enable a filter by selecting the check box for the attribute you would like to filter by. The applied filters will be added to the search bar. The number of events that you are currently viewing, based on any filters and searches used, will appear in the top left corner of the Activity table, above the column headers.
Filter attributes will vary user to user based on the results and events available for a particular user
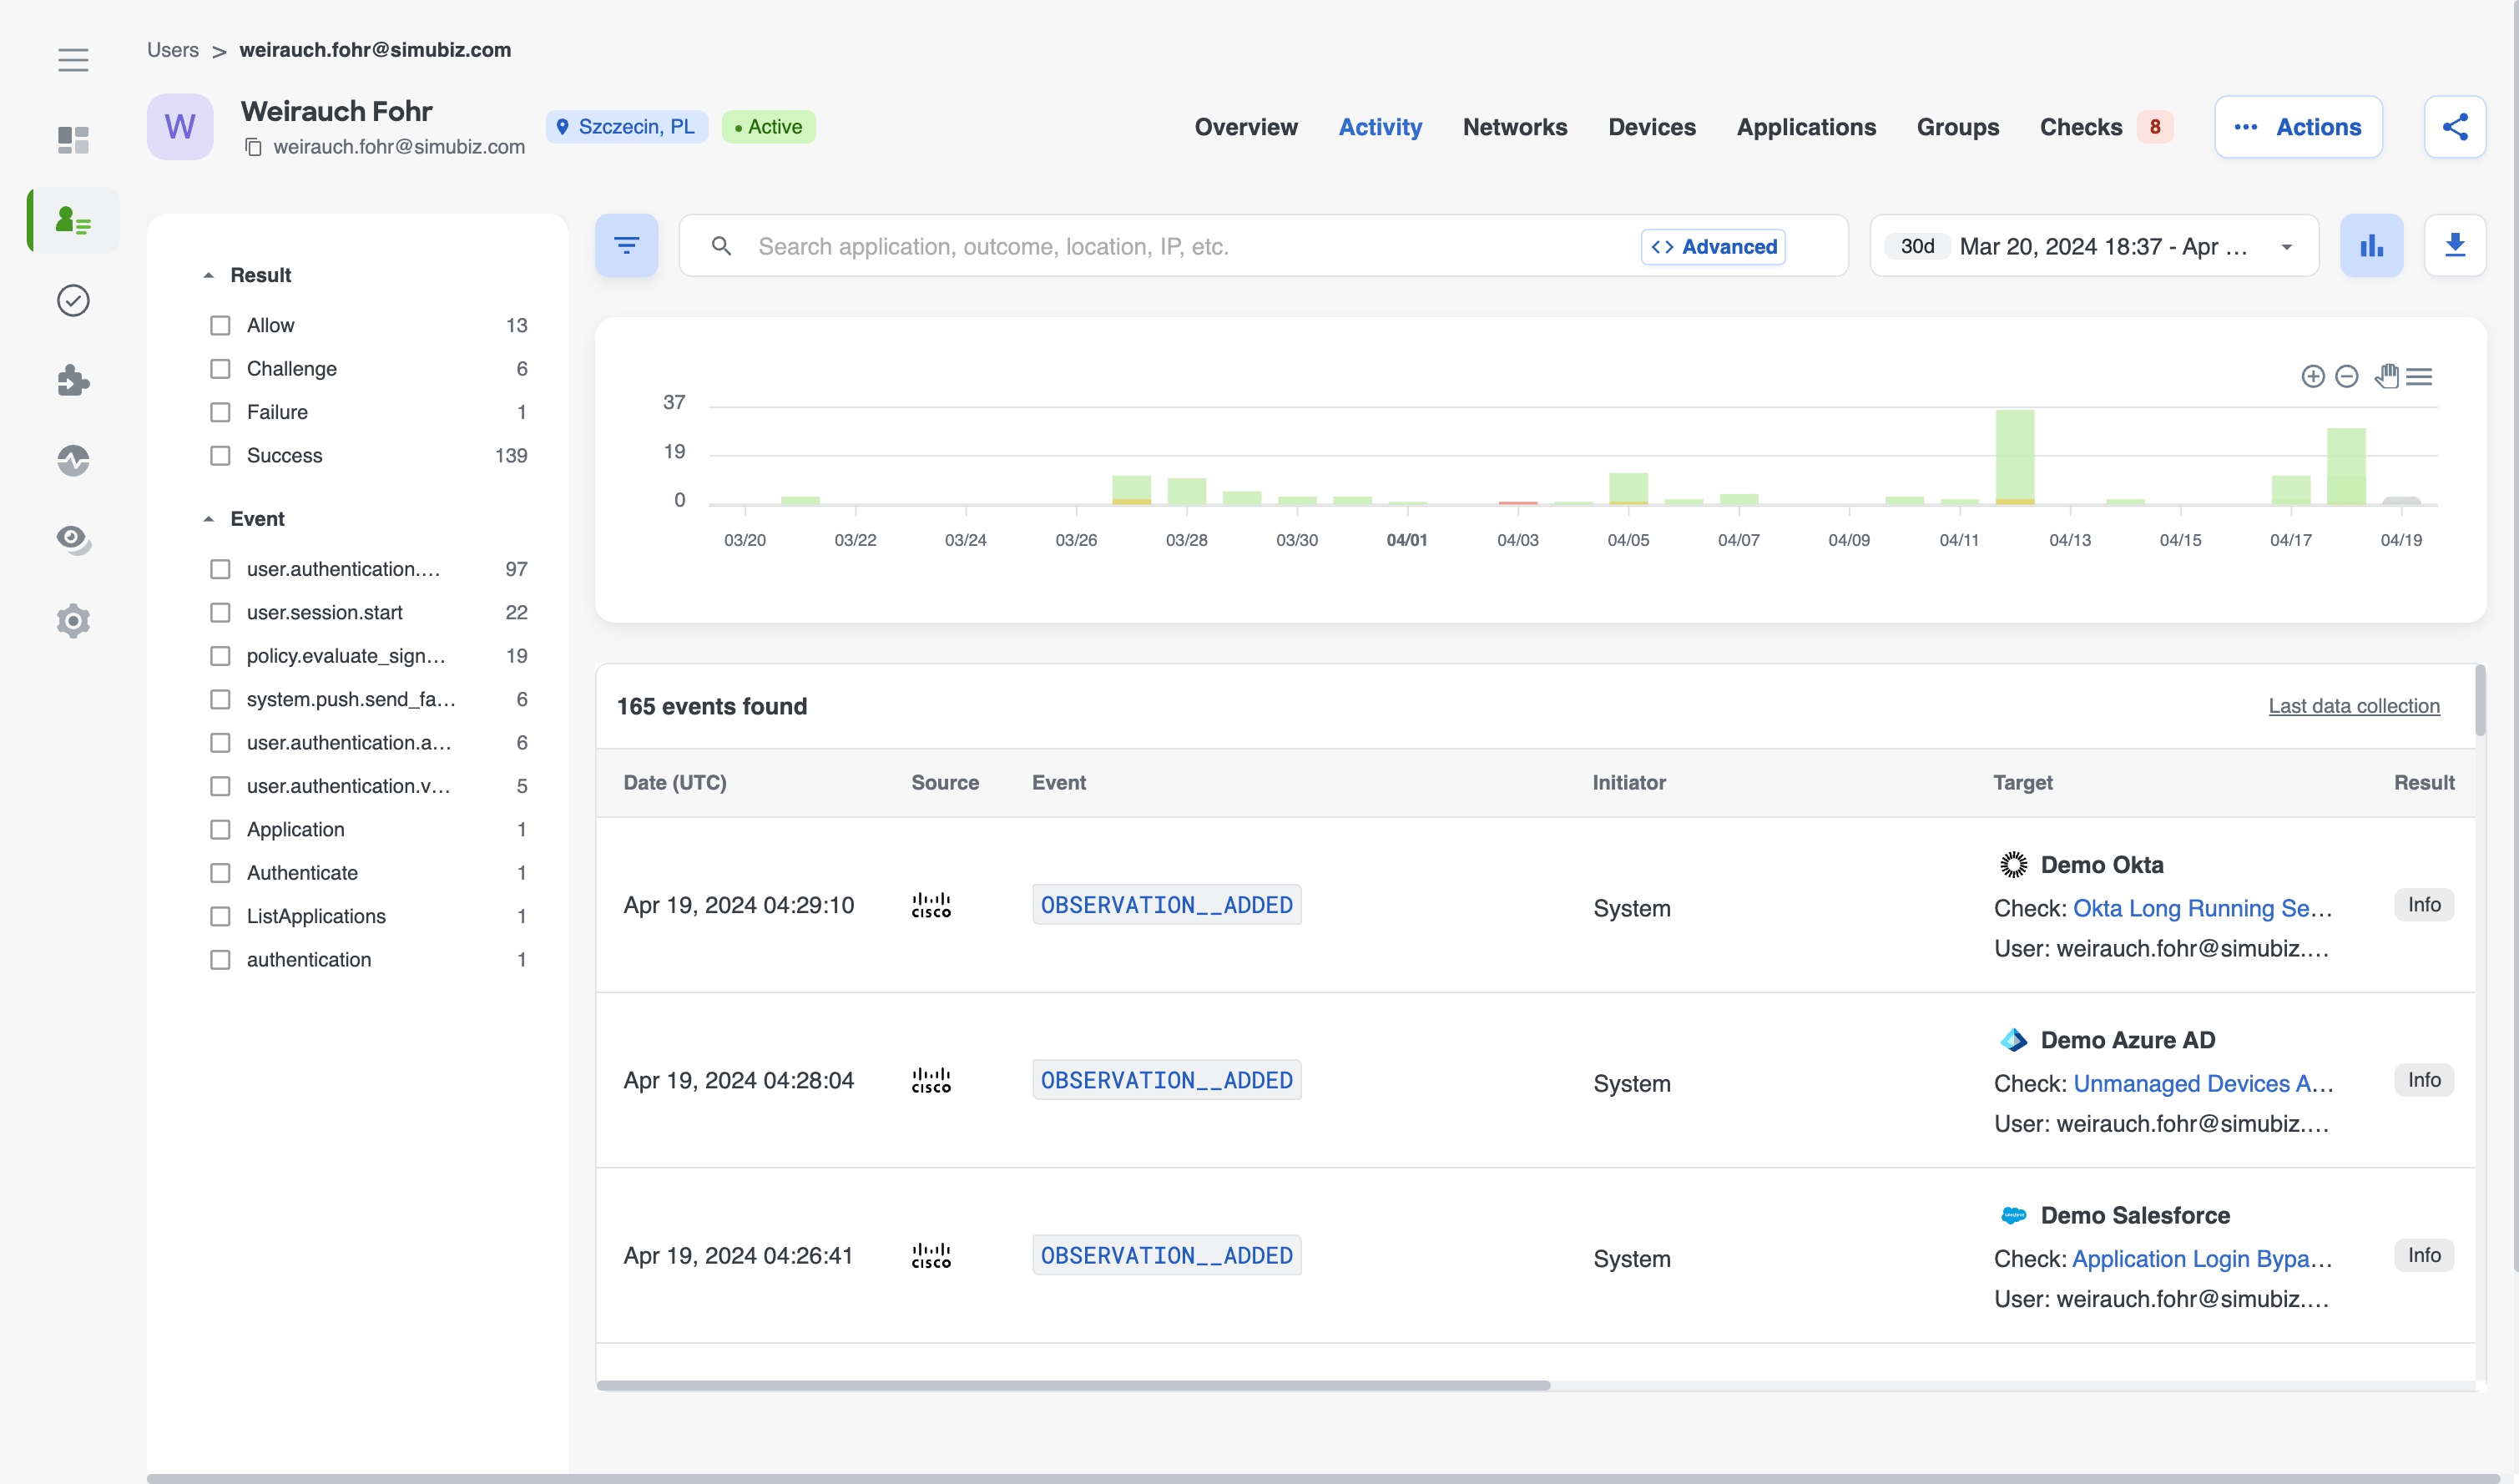
Like on the Users tab, you can also select all attributes or exclude an attribute. To select all values within a given filter, hover over a filter value and select All. To exclude a value from filtered results (ie: NOT), you can select the 🚫 in either the filter box in the search bar or the left hand filter menu.
To remove a filter, you can either deselect a filter attribute from the filters list on left hand side of the Activity table, or select the X on the right hand side of the filter box that is in the search bar. To remove all filters, select the X located next to the Advanced Filter button in the search bar.
Once you have chosen your filters, the filters are retained as you navigate between different tabs within the platform.
Filtering via event attributes
Another way to filter in the Activity table is by selecting an event attribute in the table or in the slide panel, which will add it to the search bar as a filter. The elements that can be filtered on via the table elements are:
- Source
- Event
- Session ID (in Initiator column if present)
- Target application (in Target column if relevant)
- Result
- OS and Browser (only works on icons, not free text)
Additionally, if you open the slide panel and select any of the attributes in the Event Attribute tab, the attribute will be added as a filter.
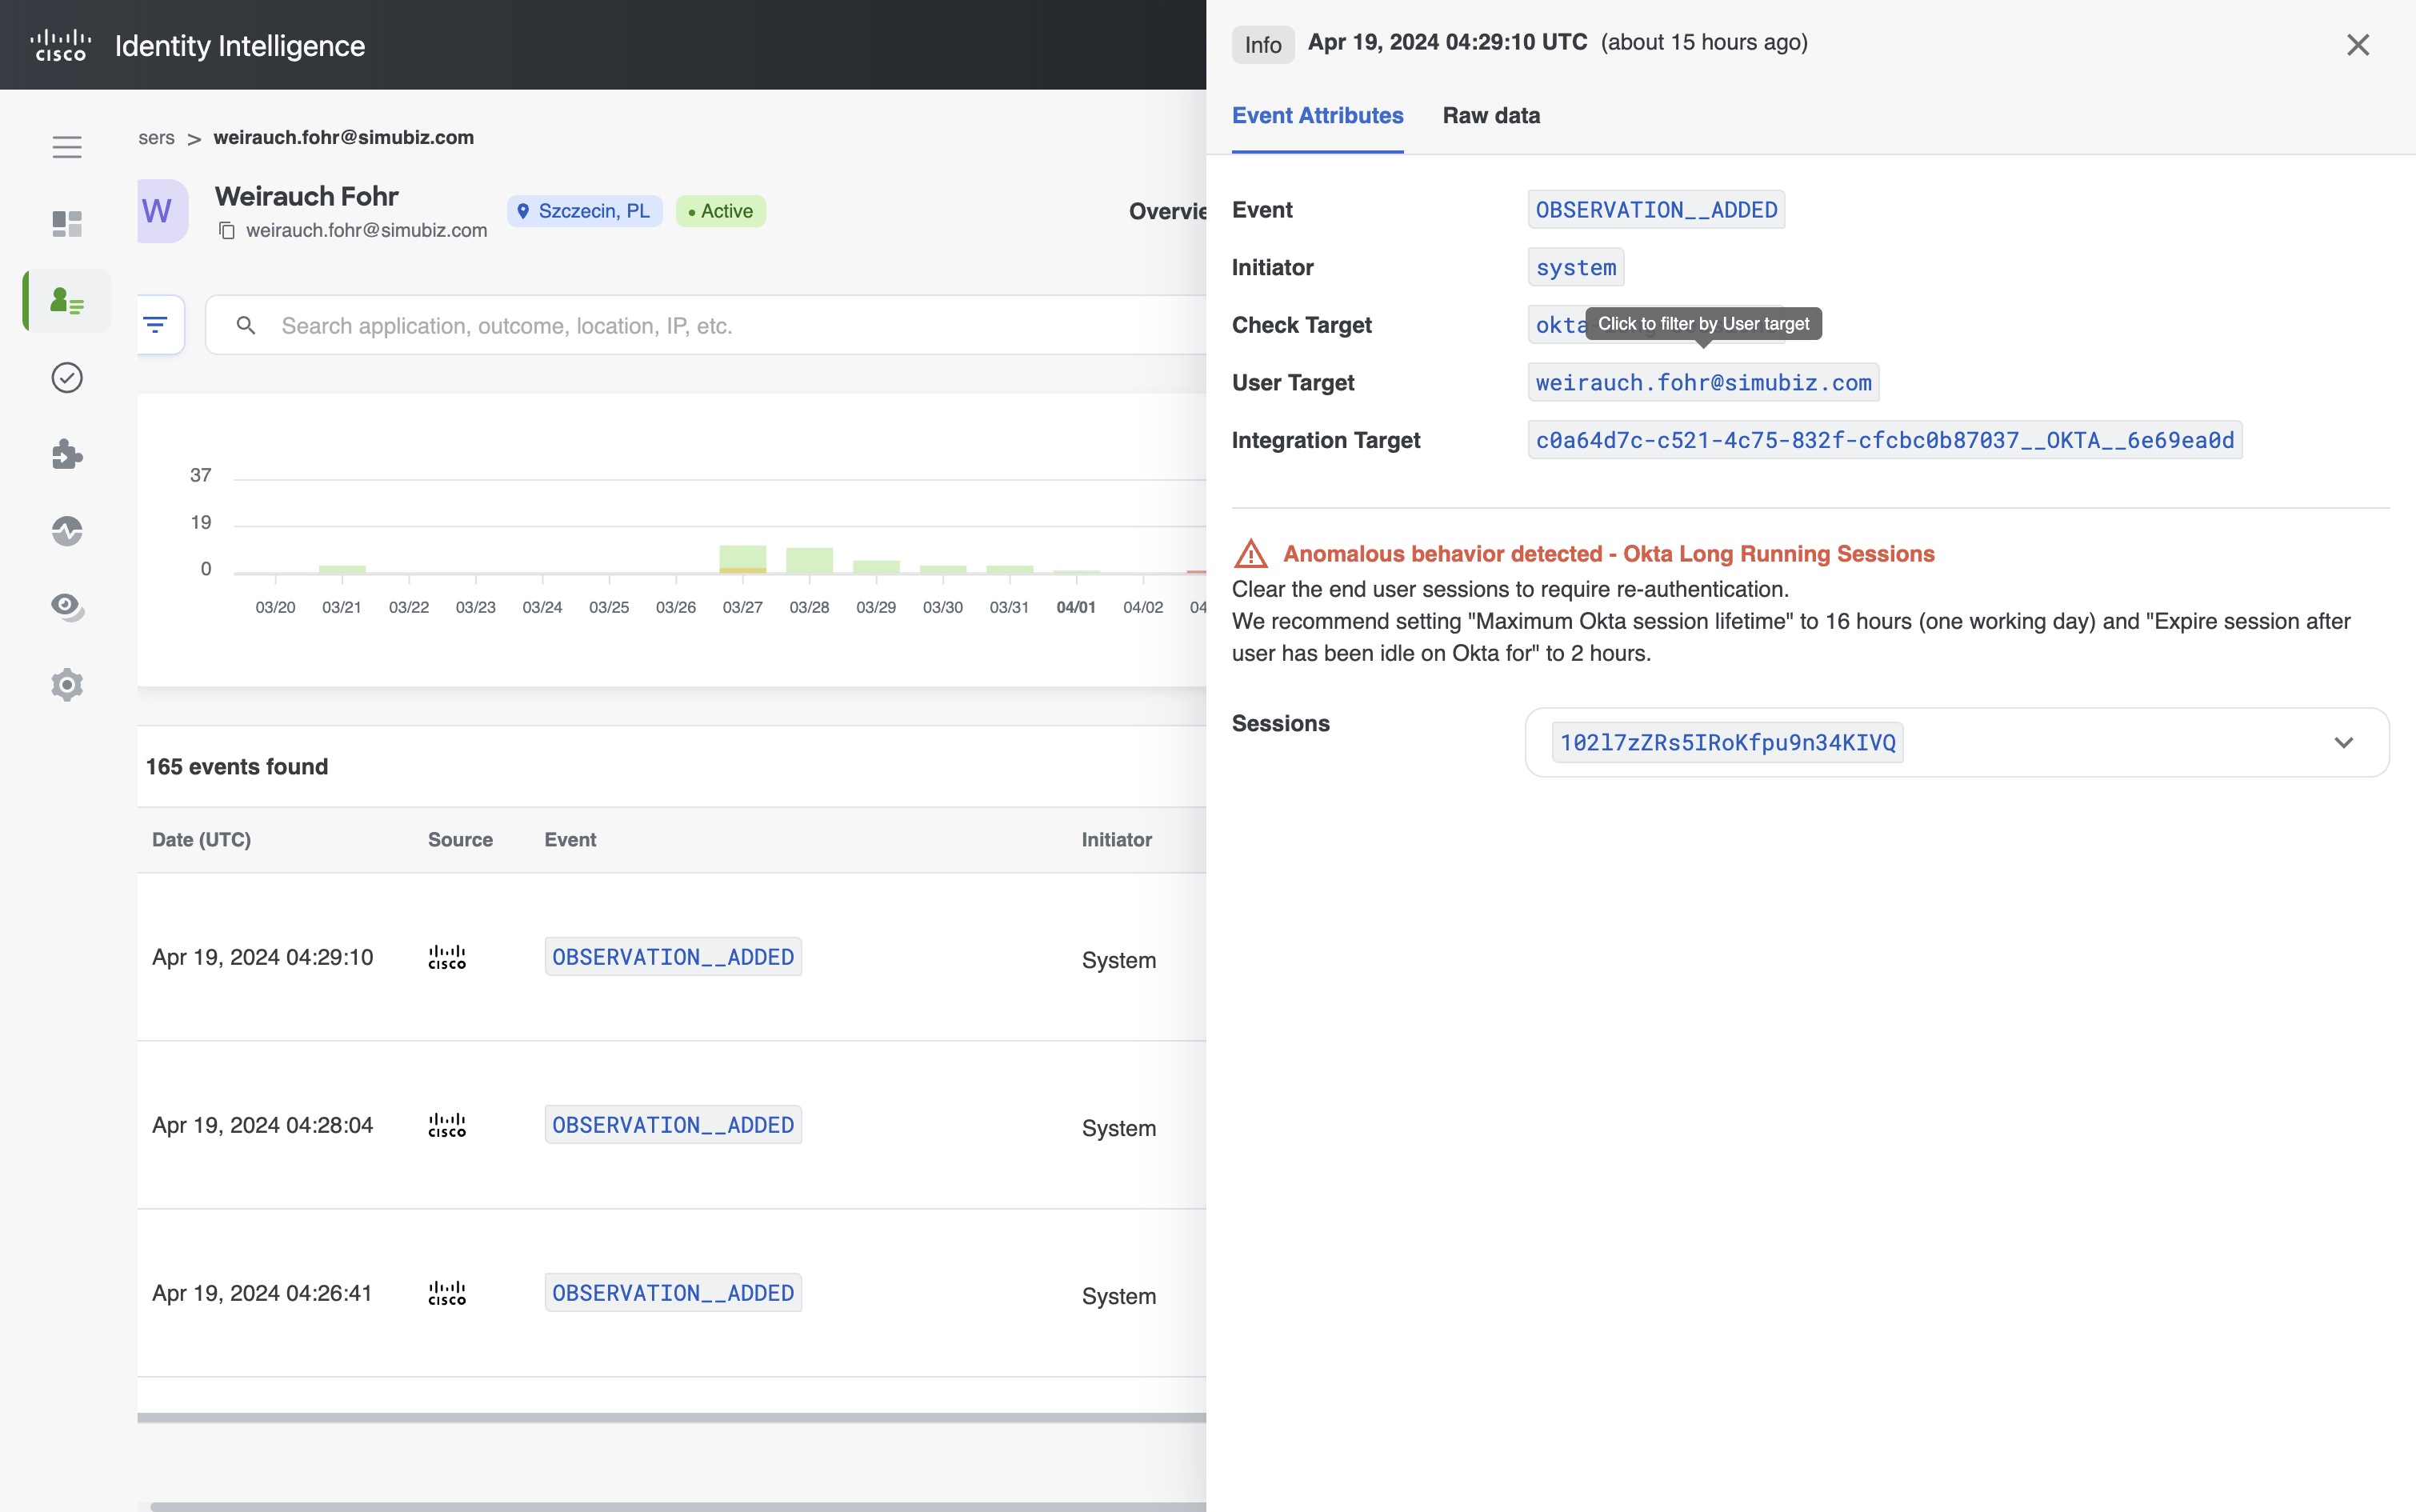
Pivot on IP address
The IP address in the table or in the slide panel has a few actions associated with it that can be useful to learn more about an IP address and the associated activity.
The actions menu will pop up when left-clicking on a specific IP address in the Activity table. The actions are:
- Find user activity - Adds the selected IP address as a filter on the given user's Activity tab so you can see all the user's activity associated with this particular IP address
- Find users who attempted to sign in from X.X.X.X - Adds the selected IP address as a search parameter on the Users page so you can see any other users who have activity associated with this particular IP address
- See IP info - Add the selected IP address as a filter on the given user's Networks tab and opens the slide panel so you can see more detailed information about that IP address
- Copy to clipboard - Copies the IP address to your clipboard so that you can paste it within Cisco Identity or another tool
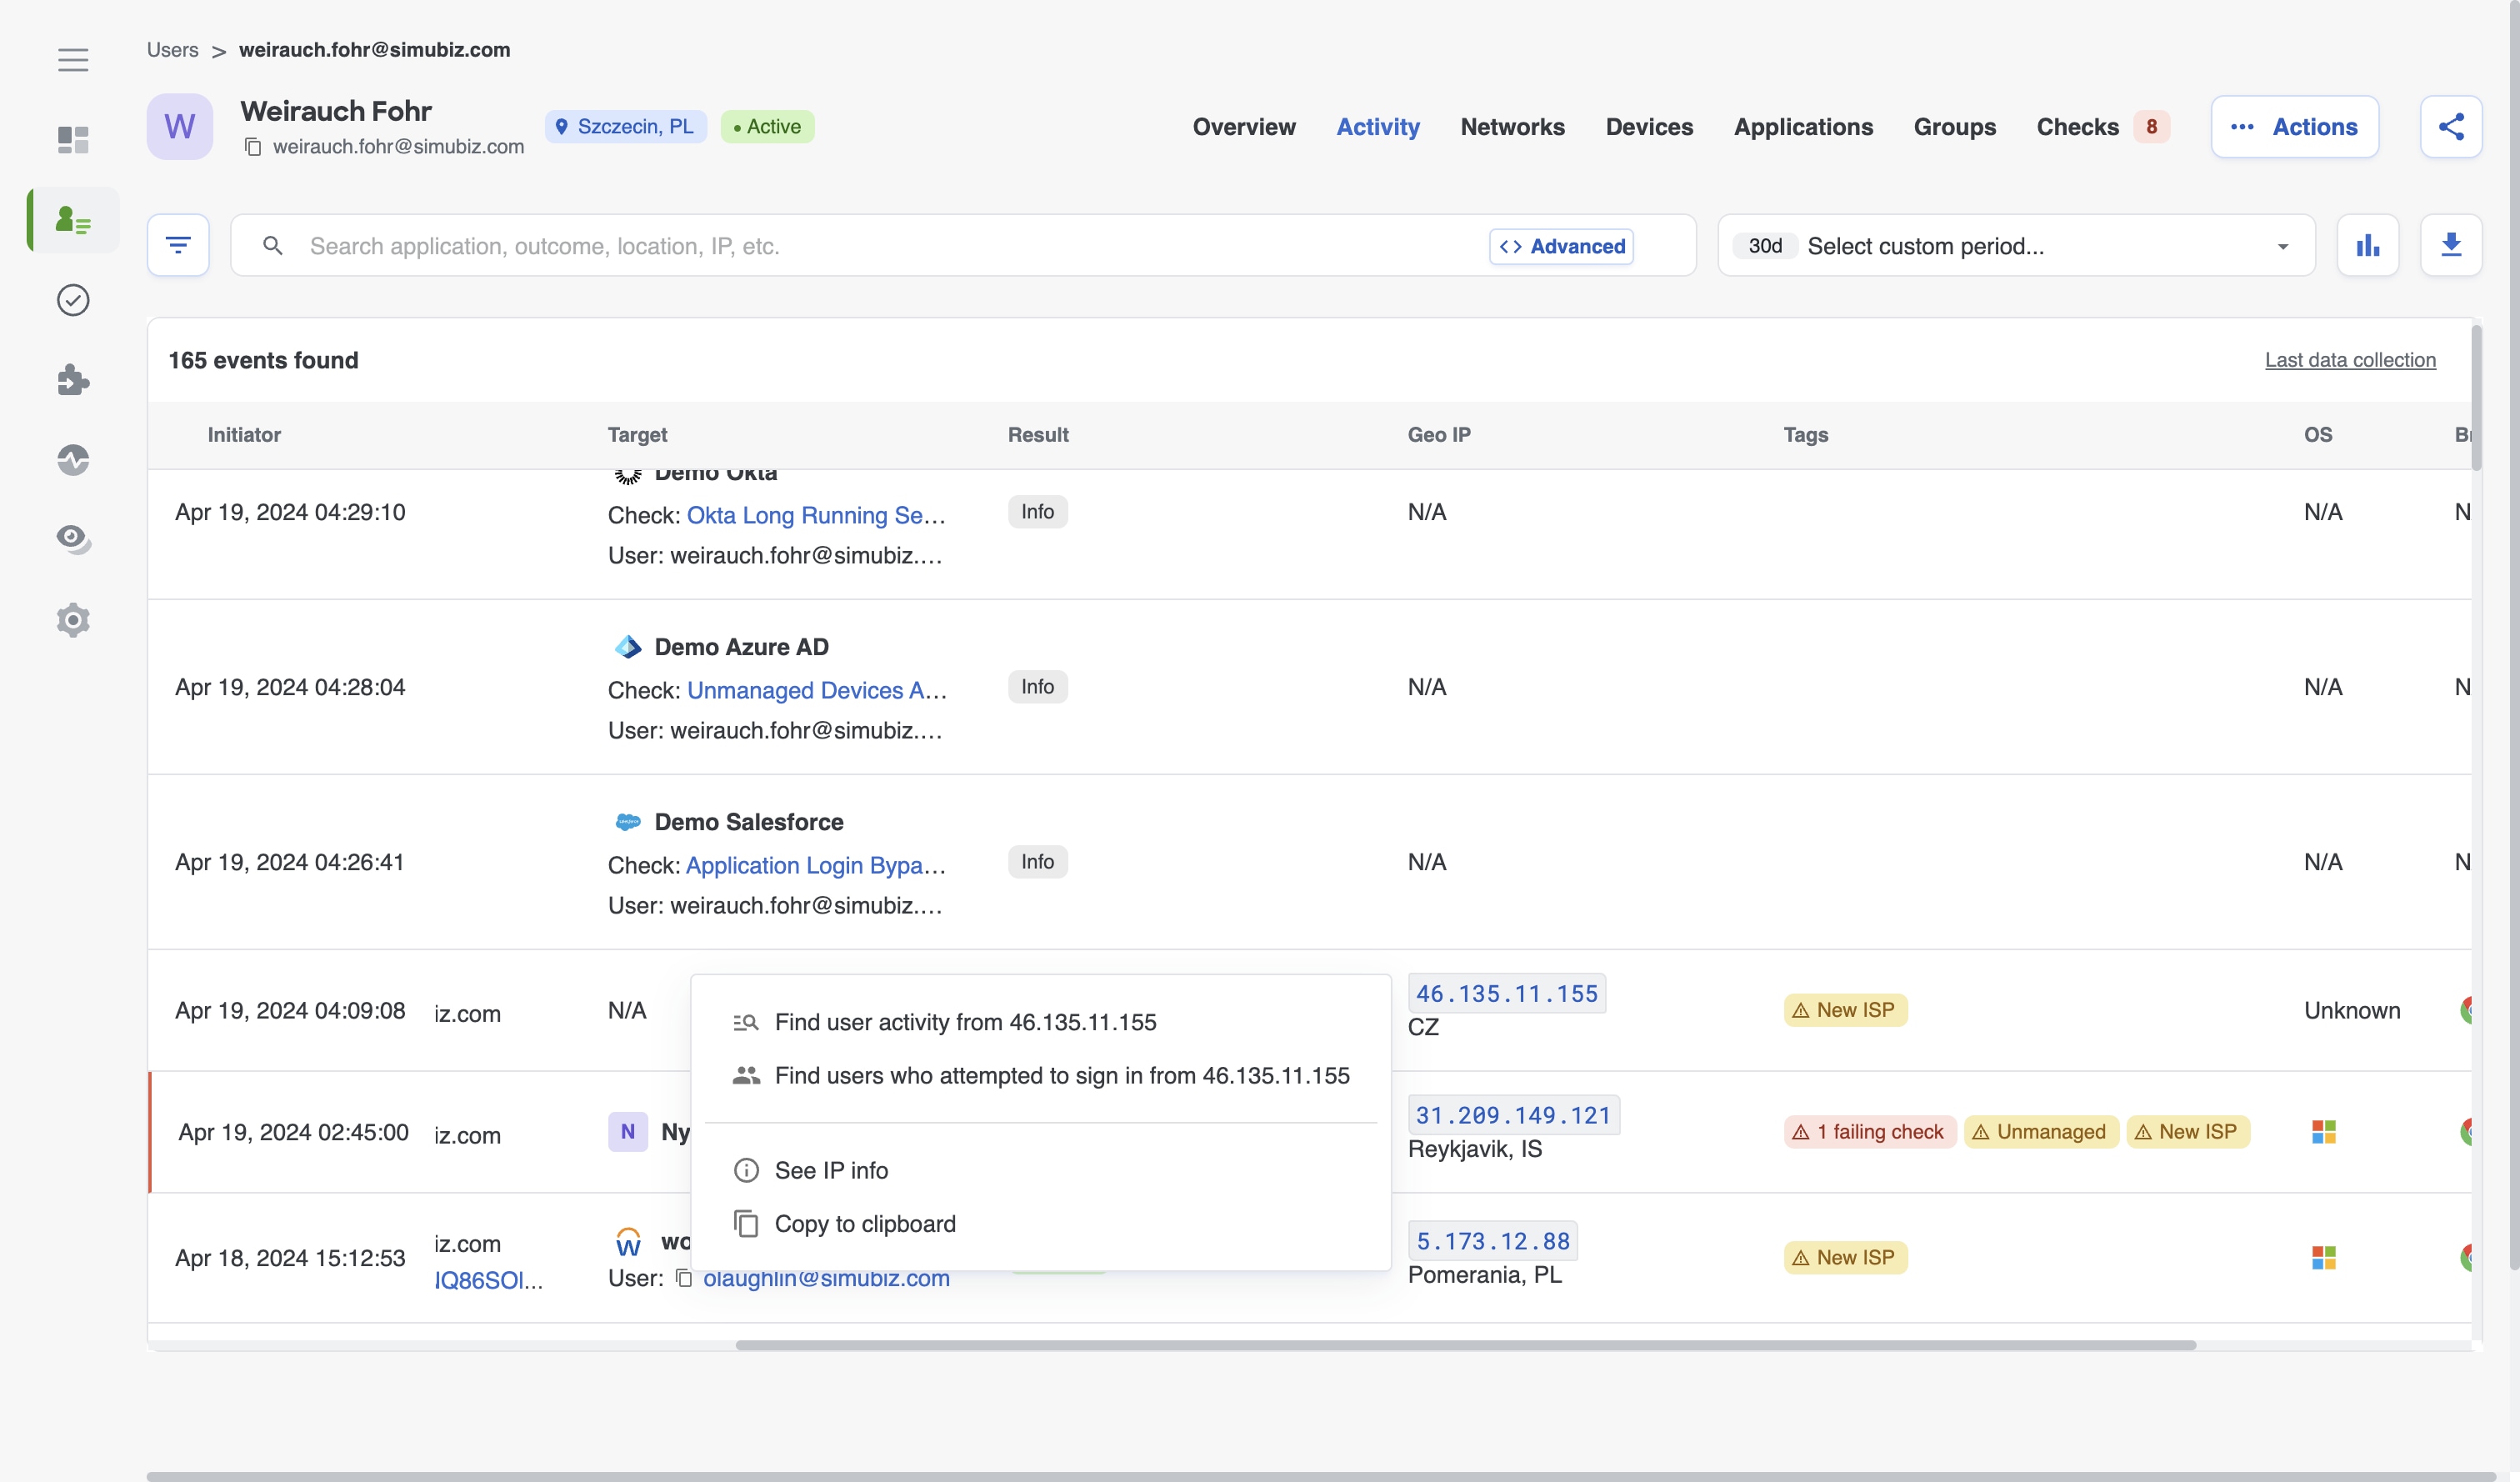
Networks Tab
Overview
Within the User 360 profile, the Networks tab provides context on IP addresses associated with each user. When you're responding to an incident or trying to get to the bottom of some anomalous activity, this context is critical.
The Networks tab is the third tab of the User 360. This article provides information on the different data available on the Networks tab and instructions on how to obtain the most value from this feature within Cisco Identity.
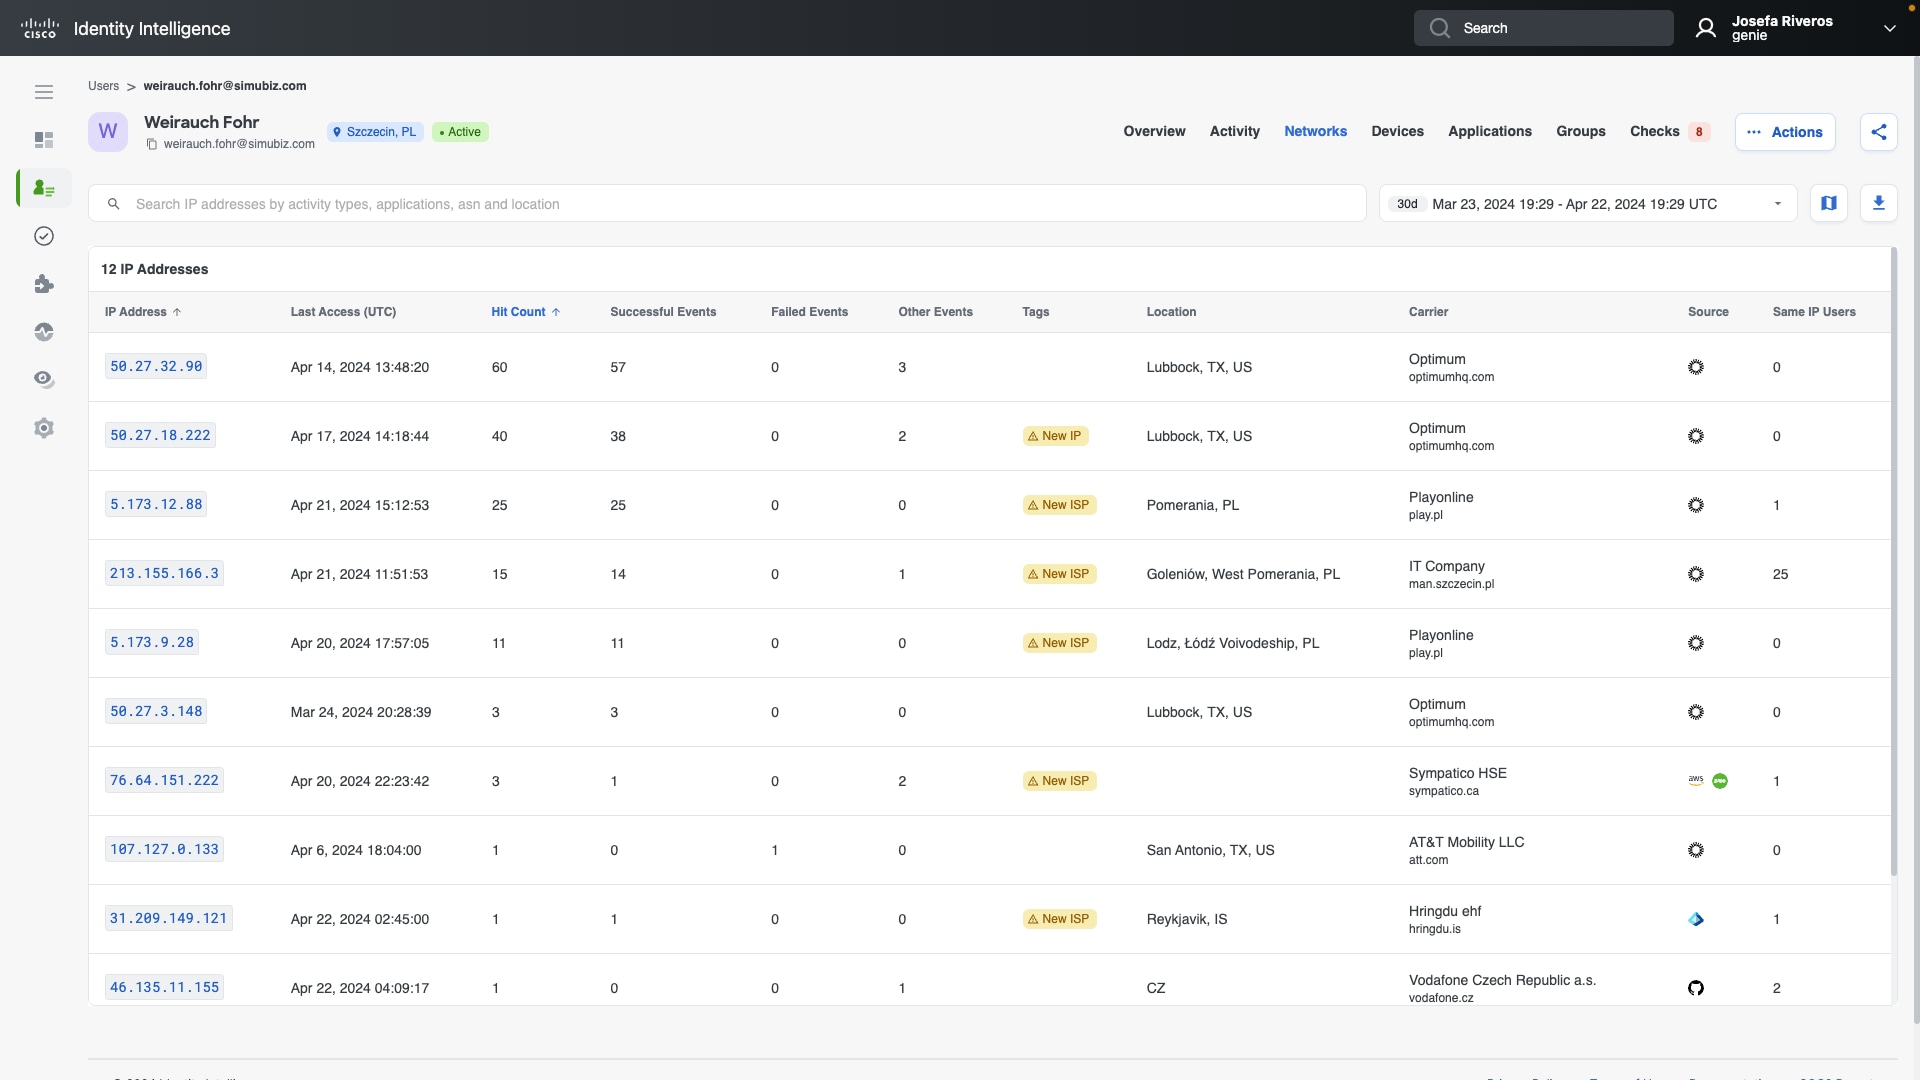
Networks table elements
The Networks table contains all the detailed event information for a particular network. Above the column headers on the left, you can see the total number of IP addresses associated with a user for the selected timeframe.
The section below details the fields that appear in the table, as well as the definition of each field:
IP Address
The IP address. Left-click on an IP address to perform additional actions related to this IP address
Last Access (UTC)
The date and time the IP address was last seen. Hover over the timestamp to see the event time in your local time based on your device settings
Hit Count
The number of events associated with this user and the IP address, regardless of result
Successful Events
The number of successful events associated with this user and the IP address
Failed Events
The number of failed events associated with this user and the IP address
Other Events
The number of other events (neither success nor failure) associated with this user and the IP address. Hover over the number to see the sum of events for each result type
Tags
Tags associated with the IP Address. Hover over each tag to see a tooltip with the source of the tag (ex: IP info: Hosting, etc). If no source, it is an Cisco Identity tag (ex: New ISP)
Location
The location associated with the IP Address
Carrier
The carrier associated with the IP Address
Source
The identity sources associated with any activity from the IP Address. Hover over the icon in this column to see a tooltip with the integration name
Same IP Users
The number of users in your environment associated with the IP Address
Diving deeper into an IP Address
Like in the Activity table, select the blank space in a given row will show you more information on a particular IP address.

This will open a slide panel from the right side of the page, that has 2 tabs - IP Data and IP Activity.
- IP Data shows you IP address data summary (including ASN details)
- IP Activity shows you the user's associated activity types (types, activity counts, results) and which applications were accessed (app names, hit counts, results) for the selected IP address
To close the slide panel, select the X in the top right corner, or select anywhere outside of slide panel.
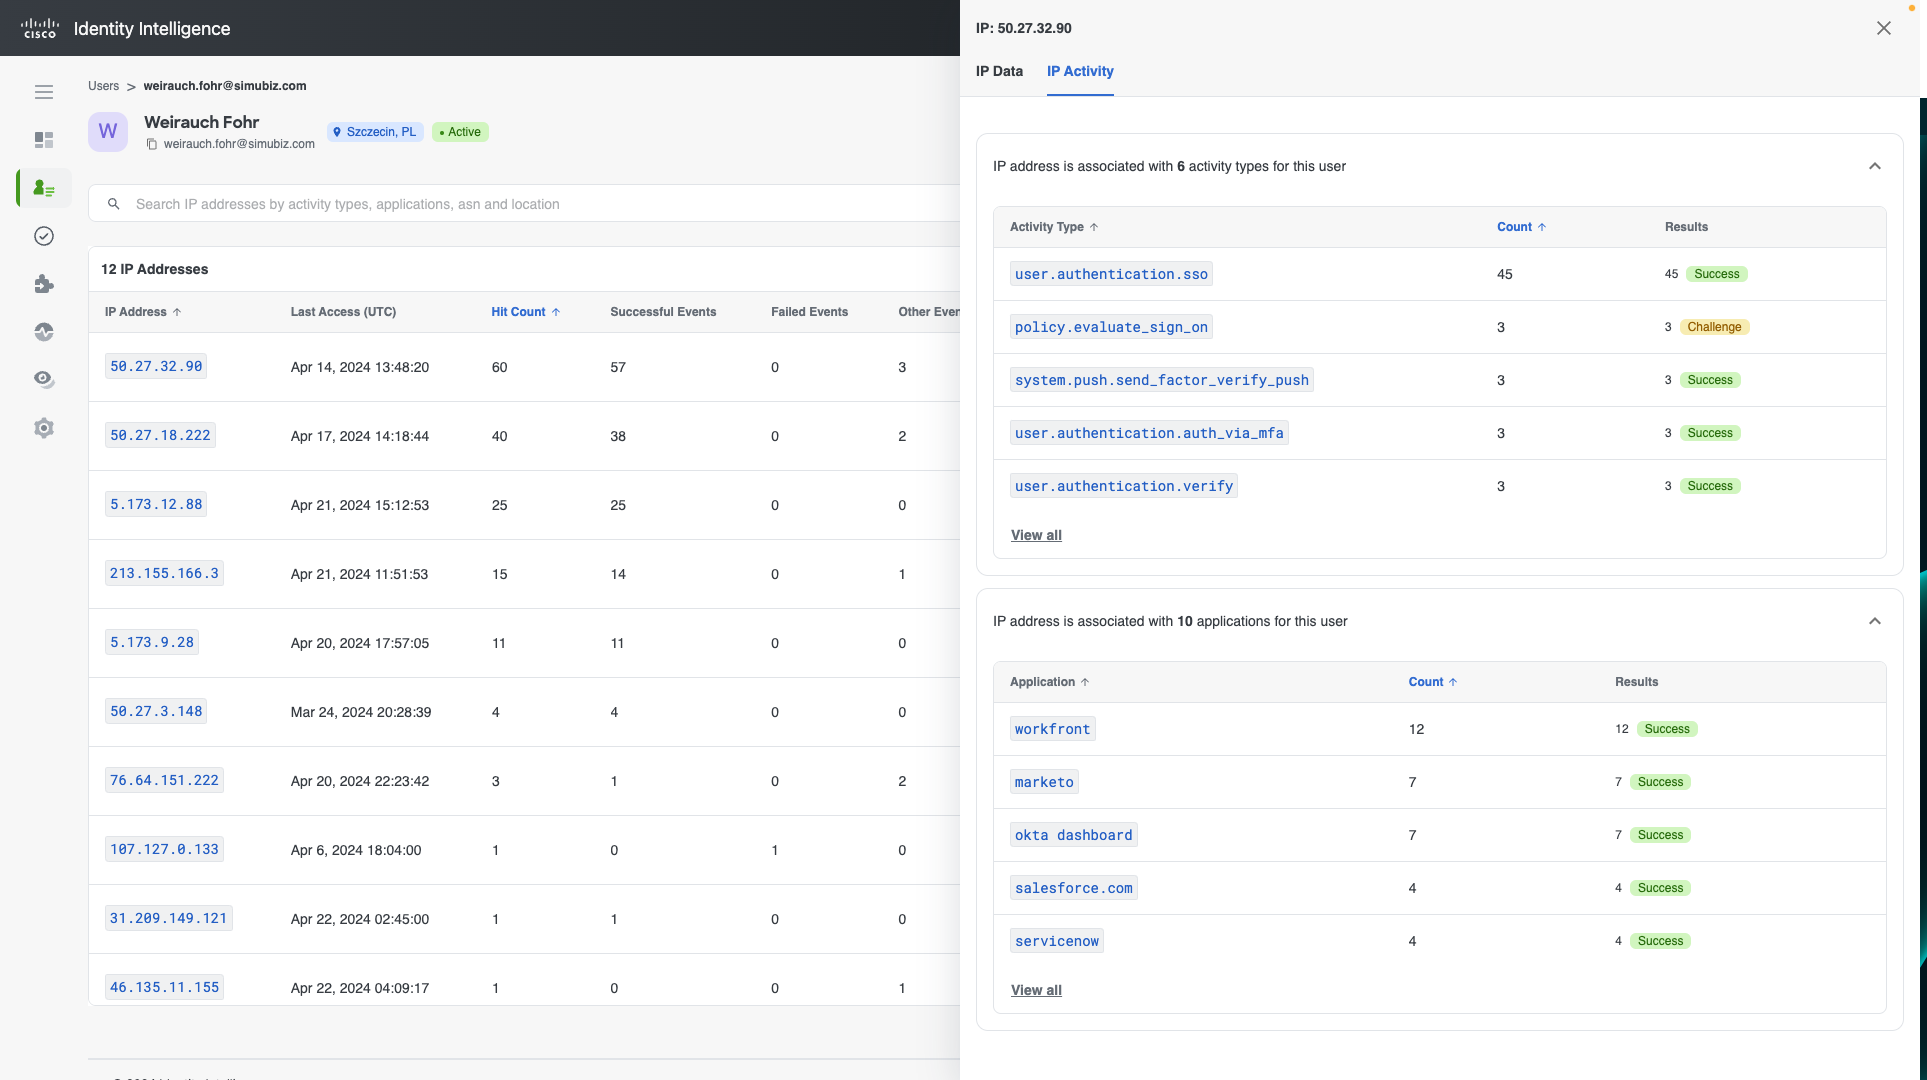
Networks Tab general actions
The Networks table offers multiple high level features that are similar to what can be found elsewhere in the platform.
Search IP Addresses
Use the search bar above the Networks table to search based on various items such as a specific IP address, activity types, applications, ASN and location. When searching, you do not need to provide an exact value. Typing a piece of the word will return results.
If you have searched on a particular parameter, the search criteria is retained as you navigate between different tabs within the platform.
To clear the search bar, press the X on the right most side of the search bar.
Adjust timeframe
By default, the Networks tab is filtered to show all events over the last 30 days. If you would like to see a larger or smaller window, you can customize your view with the date selector, which can be found directly to the right of the search bar.

Press anywhere in the box to open a dropdown where you can select from preset timeframes (ex: Last 4 hours, Last day, Last 7 days, etc), a custom period, or 'View All', based on your needs.
Sorting columns
By default, the Networks tab is sorted in descending order (highest to lowest) on Hit Count. To sort by a specific column value, select the arrow next to the column header to switch between ascending and descending order. If there is no arrow available, it means this column cannot be sorted.
Download results
You can download tabular data from the table to a CSV using the Download icon button on the right after the timeframe filter.
Note: The CSV output has a limit of 2,000 rows
Geolocation visualization
The Networks tab has a geolocation widget, which is collapsed by default, that displays a given user's IP Address location history on a map for easy scanning.
Hovering over a specific dot will pop up information on the total number of unique IP address activities associated with this area, as well as a cumulative hit count.
Selecting a specific dot will take you to the Activity tab, pre-filtered on the IP Addresses associated with the chosen location.
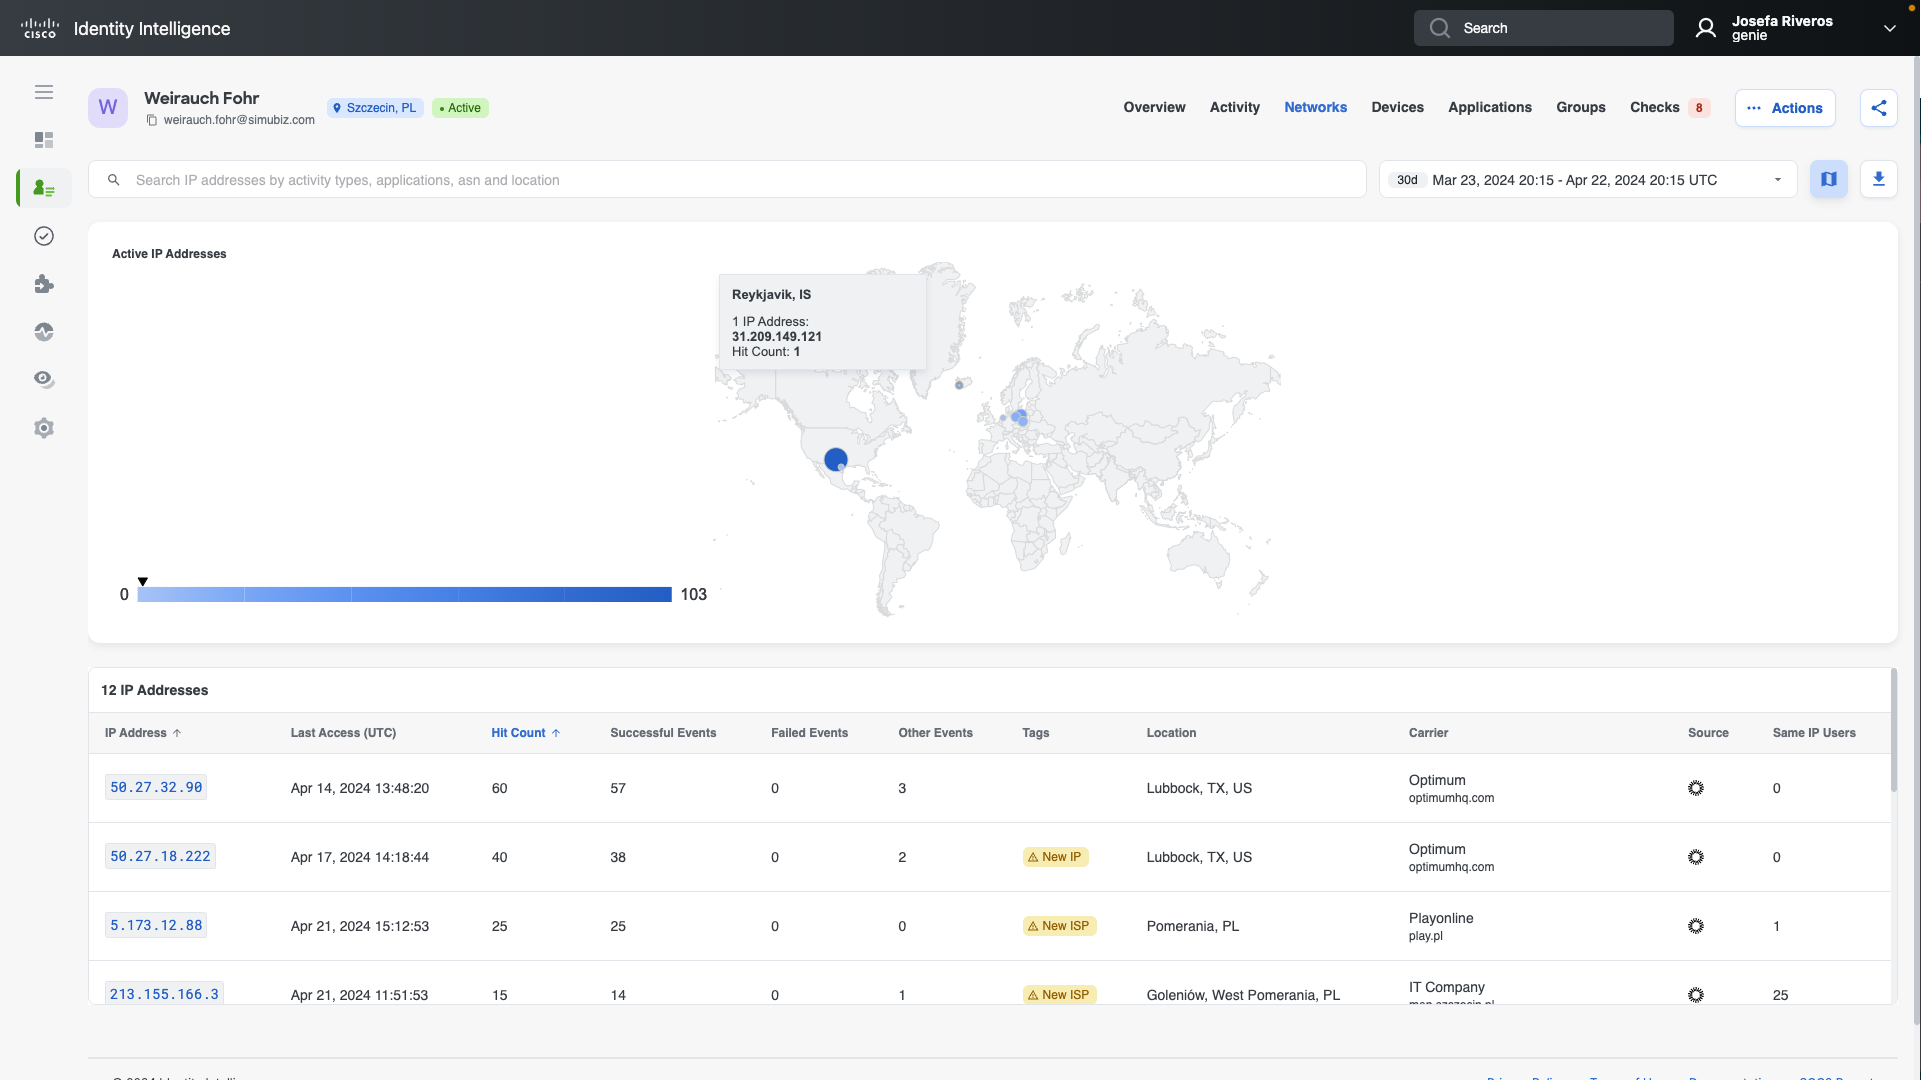
If you would like to open this widget, press the Map icon button next to the timeframe filter. To remove the widget, press the Map icon button again.
Pivot on IP Address
A key feature of the Networks tab is the ability to drill down into the detailed activity for the current user OR search for traffic from that IP for other users.
The actions menu will pop up when selecting a specific IP address in the Networks table. The actions are:
- Find user activity - Adds the selected IP address as a filter on the given user's Activity tab so you can see all the user's activity associated with this particular IP address
- Find users who attempted to sign in from X.X.X.X - Adds the selected IP address as a search parameter on the Users page so you can see any other users who have activity associated with this particular IP address
- Note: the Same IP Users column on the far right of the Networks tab will indicate if the tenant has other users with IP traffic from this IP address
- See IP info - Add the selected IP address as a filter on the given user's Networks tab and opens the slide panel so you can see more detailed information about that IP address
- Copy to clipboard - Copies the IP address to your clipboard so that you can paste it within Cisco Identity or another tool
The ability to pivot on an IP Address is available virtually everywhere that an IP address is visible throughout Cisco Identity, such as the Activity tab, Users page, Check explainability, etc, and can be accessed by selecting an IP address.
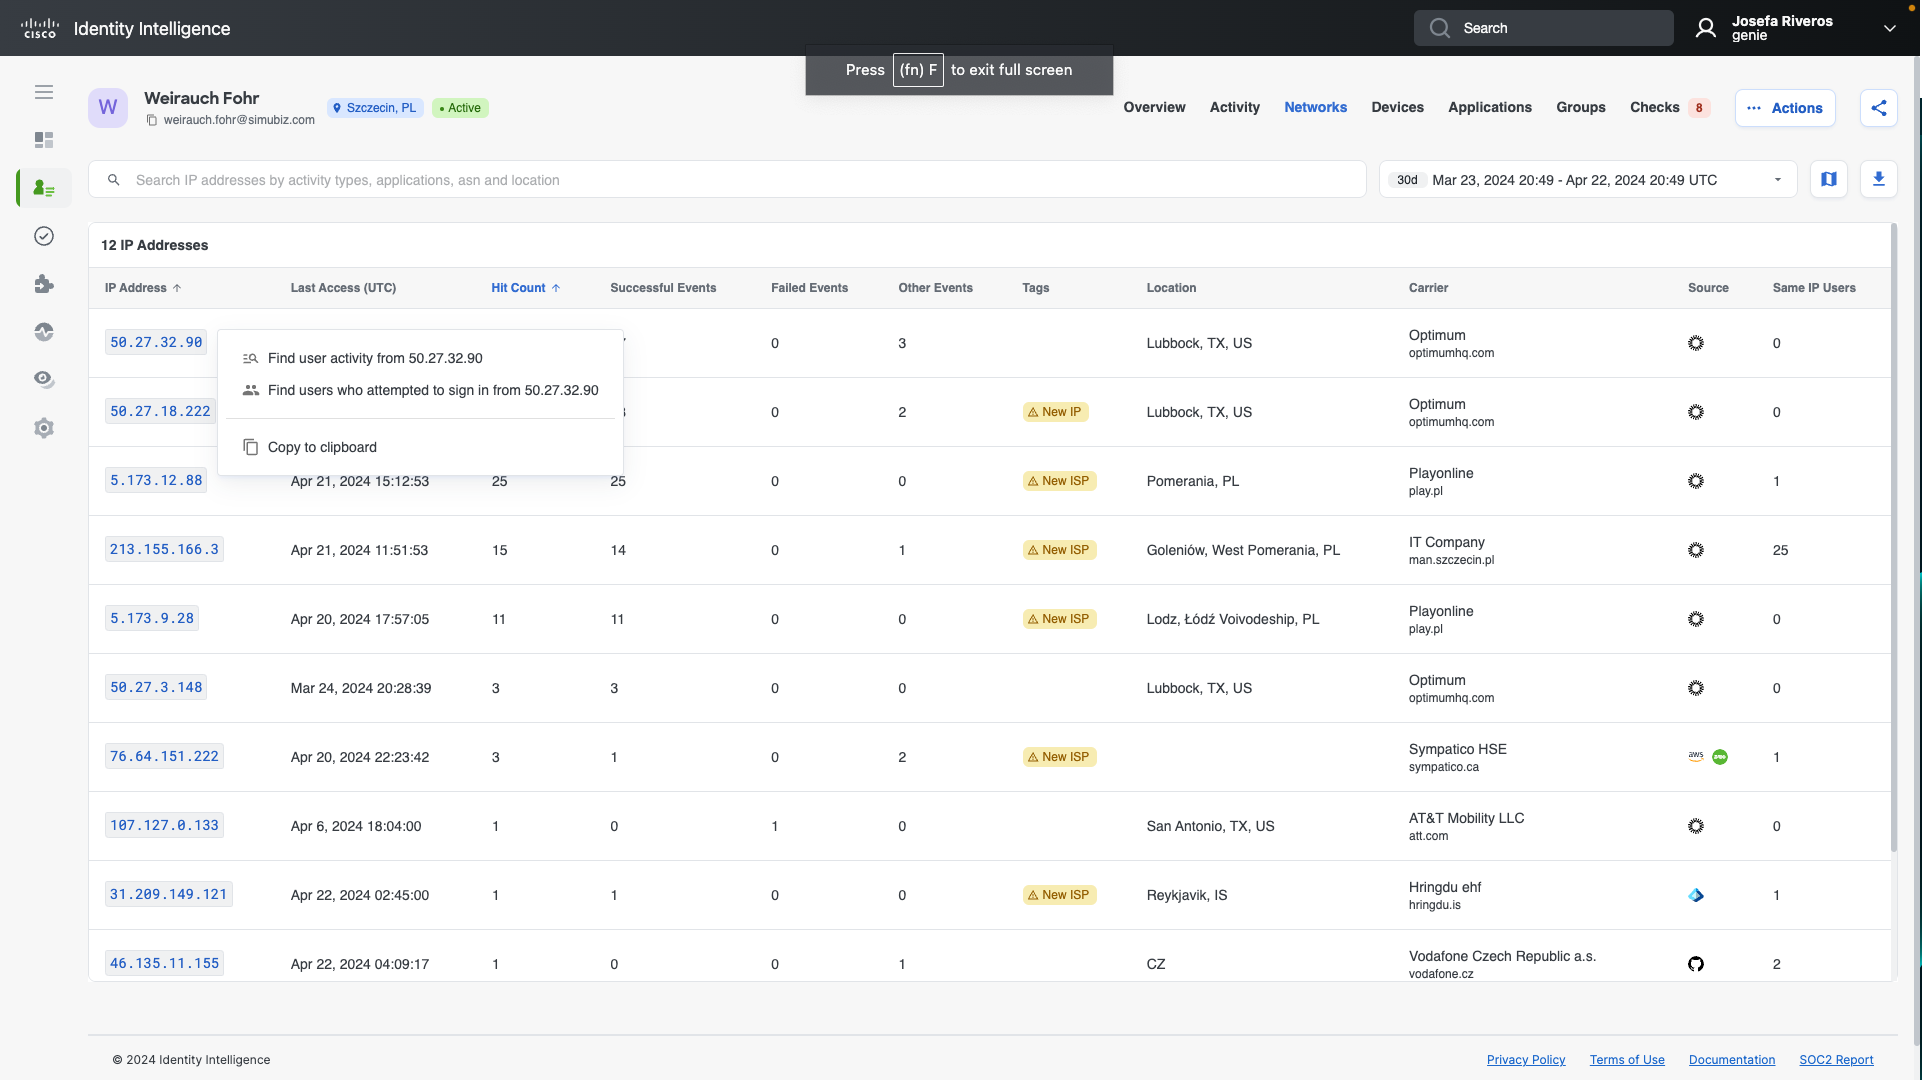
Using the Networks Tab
Devices Tab
Overview
Within the User 360 profile, the Devices tab provides context on authentication and/or access devices associated with each user. Similar to the Networks tab, the Devices tab can be useful context on a user, or the person impersonating a user, during an incident or investigation into anomalous activity. Additionally, it is a great way to see information into devices that are no longer in use and can be cleaned up.
The Devices tab is the fourth tab of the User 360. This article will detail the different information and functionality available on the Devices tab.
The User 360 Devices tab is different than the Devices entity page. Refer to our Devices page documentation to learn more about that page or how you can leverage it see if a particular device has been associated with or used by any other end users in the organization.
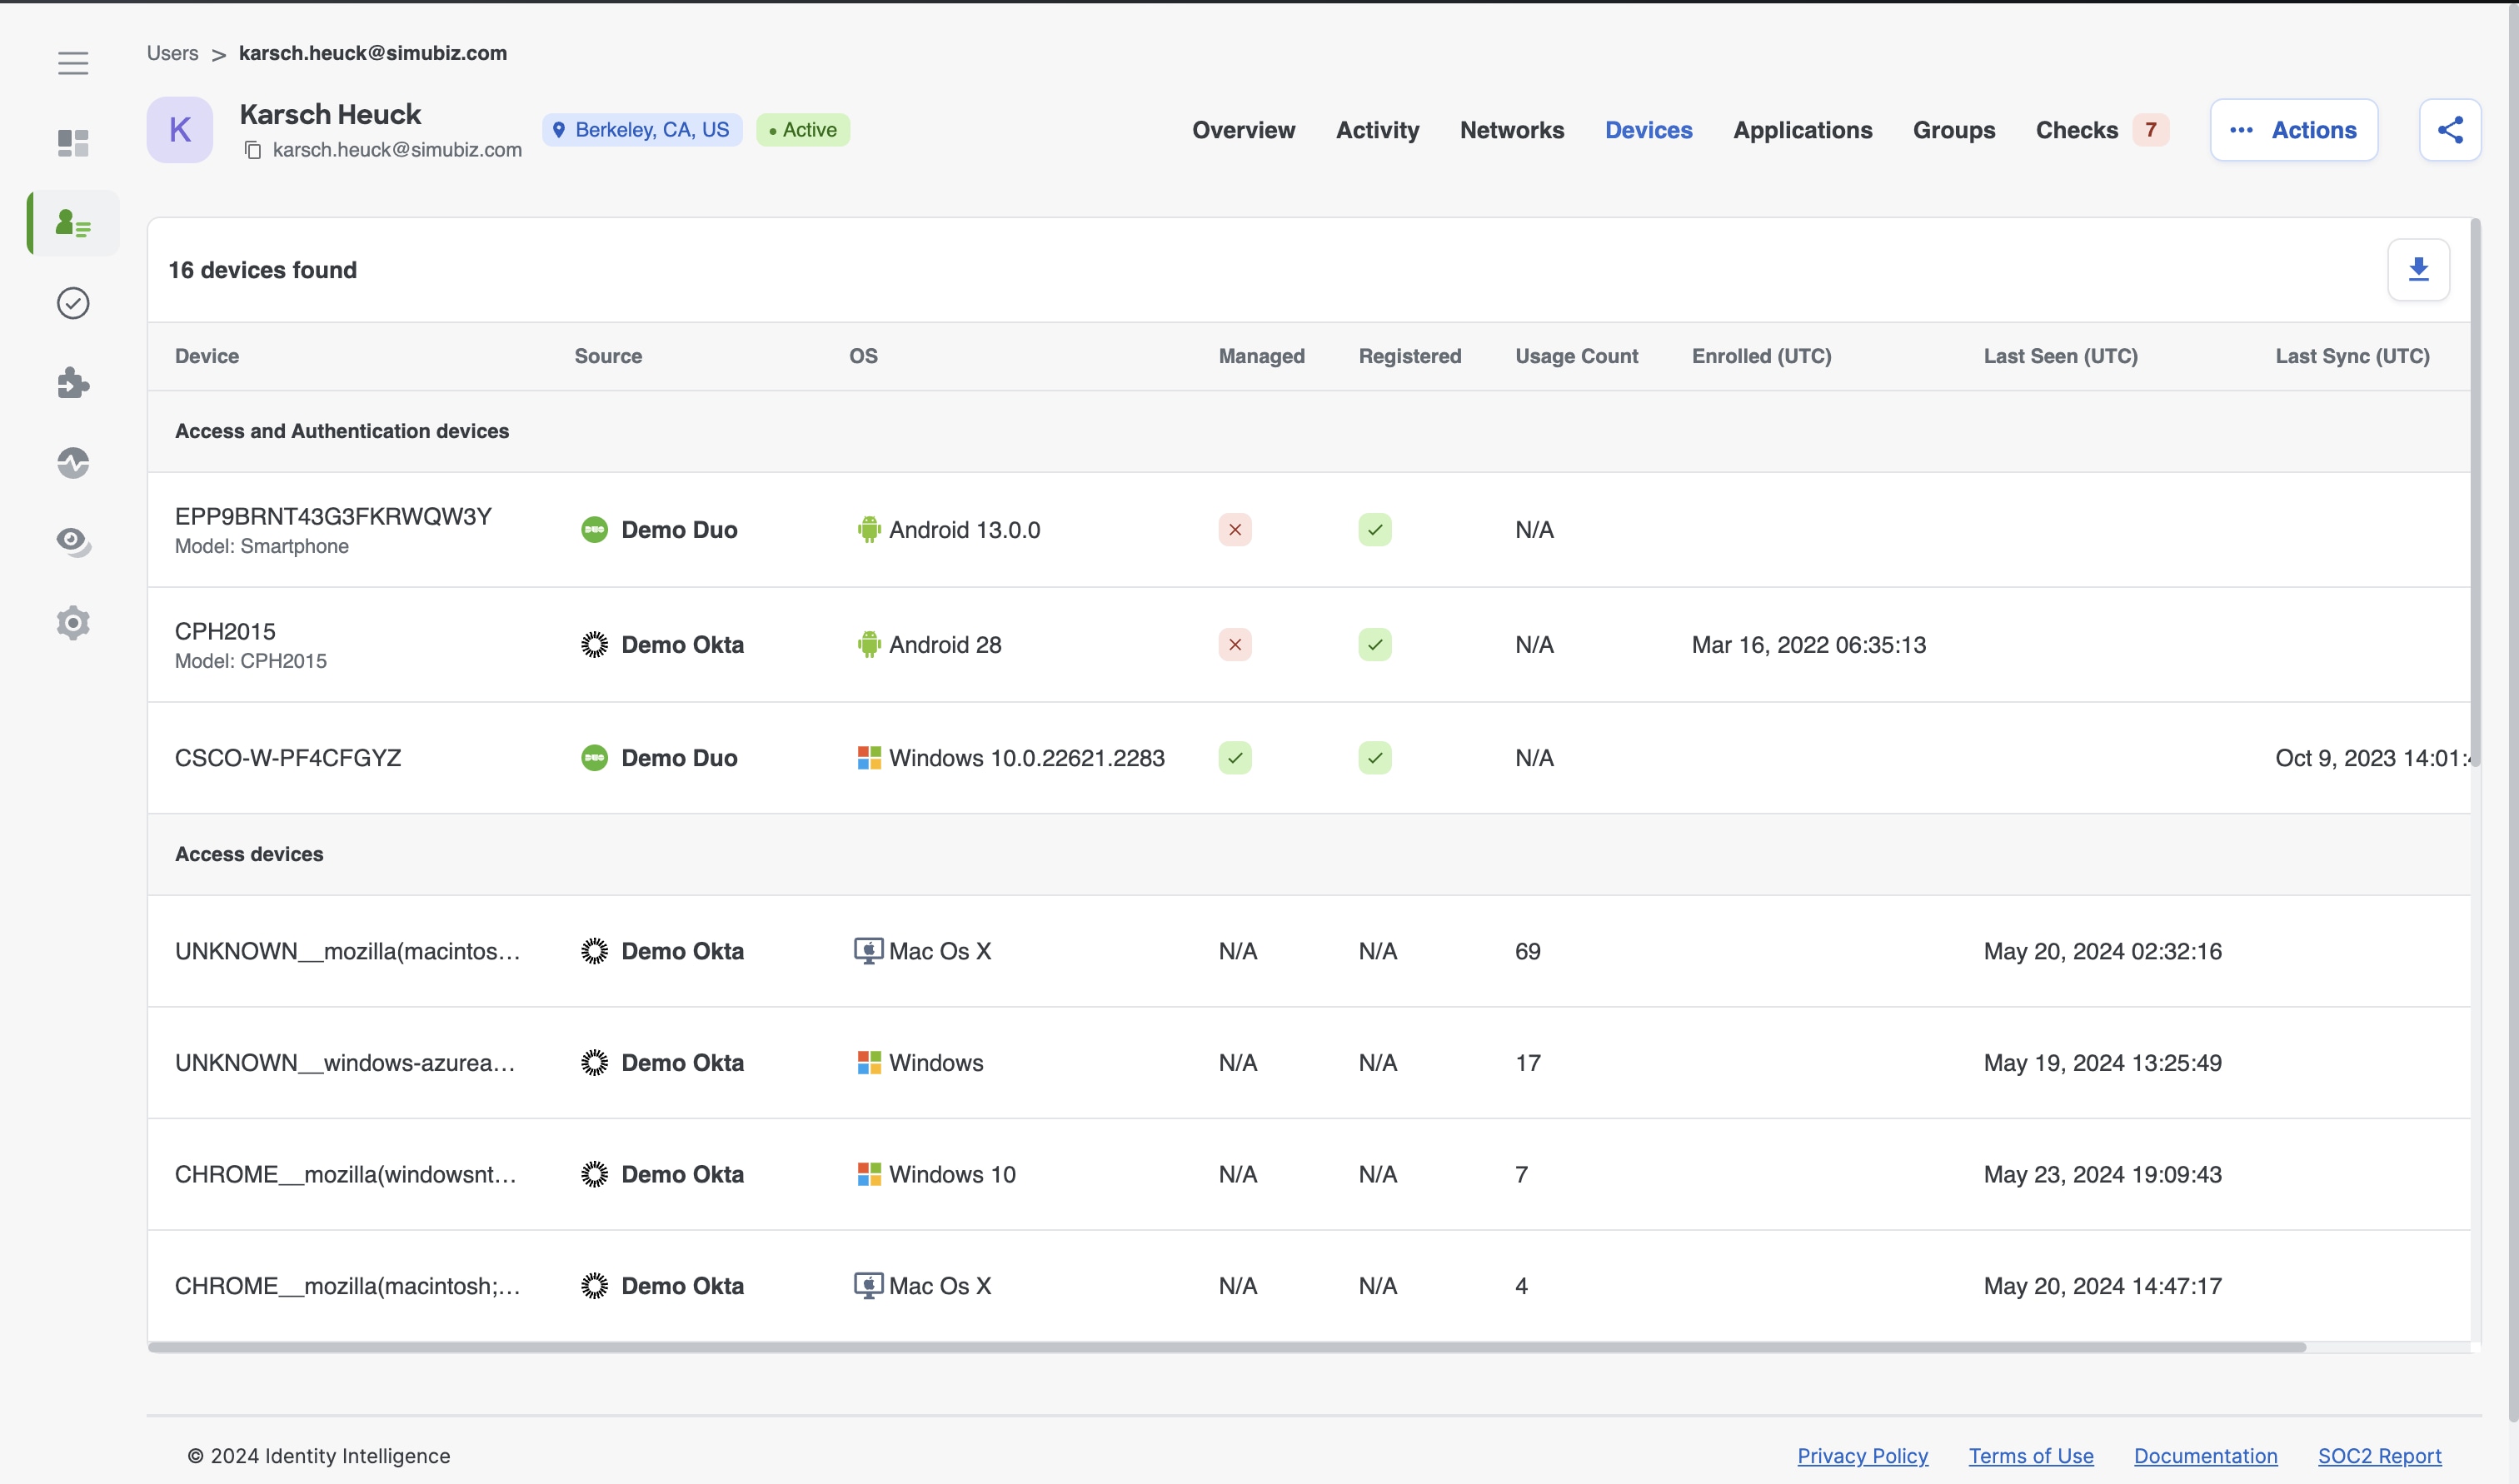
Devices table elements
The Devices table contains detailed information for 3 different device types:
- Access and Authentication Devices
- Access devices
- Authentication devices
Individual devices are grouped by Device type in the table. If there are no devices of a particular type associated with a given user, that device type will not appear in the table.
Above the column headers on the left, you can see the total number of devices associated with a given user.
The section below details the fields that appear in the table, as well as the definition of each field:
Device
The device name. If available, model and serial number are also displayed in this column under the device name
Source
The identity source associated with a particular device
OS
The operating system and version of a particular device.
An exclamation mark is displayed next to the operating system to indicate it is either out of date or end of life.
A red background indicates the device's OS is end of life; a yellow background indicates it is out of date. Hover over the icon to see the device's current OS version and status
Managed
= Device is managed by organization, based on data collected from identity source
= Device is not managed by organization, based on data collected from identity source
Registered
= Device is registered, based on data collected from identity source
= Device is not registered, based on data collected from identity source
Usage Count
The total number of times a given user has used a particular device
Enrolled (UTC)
The date and time that a particular device was enrolled as an authentication device
Last Seen (UTC)
The date and time of the last login attempt made with a particular device, regardless of outcome
Last Sync (UTC)
The date and time a particular device was last synced to the identity source
Diving deeper into a Device
Like in the Activity or Networks table, clicking on the blank space in a given row will show you more information on a particular device

This will open a slide panel from the right side of the page, that has 6 tabs:
- Overview shows you more detailed information and context about a particular device
- Activity shows the activity log for all events that originated from a particular device for a given user
- IPs shows detailed information for all the IP addresses associated with the activity from a particular device for a given user
- Applications shows detailed information for all the applications accessed from a particular device by a given user
- Factors shows detailed information on the factors associated with a particular Authentication device for a given user
- Raw Data shows the raw data for a particular device
To close the slide panel, click the X in the top right corner, or click anywhere outside of slide panel.
Devices Tab general actions
The Devices table offers multiple high level features that are similar to what can be found elsewhere in the platform.
View Activity
Click the 3-dot button to the right of the last column, to find the View Activity action. This will take you to the user's Activity tab, pre-filtered on the Device ID, so that you can see all of the activity/events associated with a particular device for a given user.
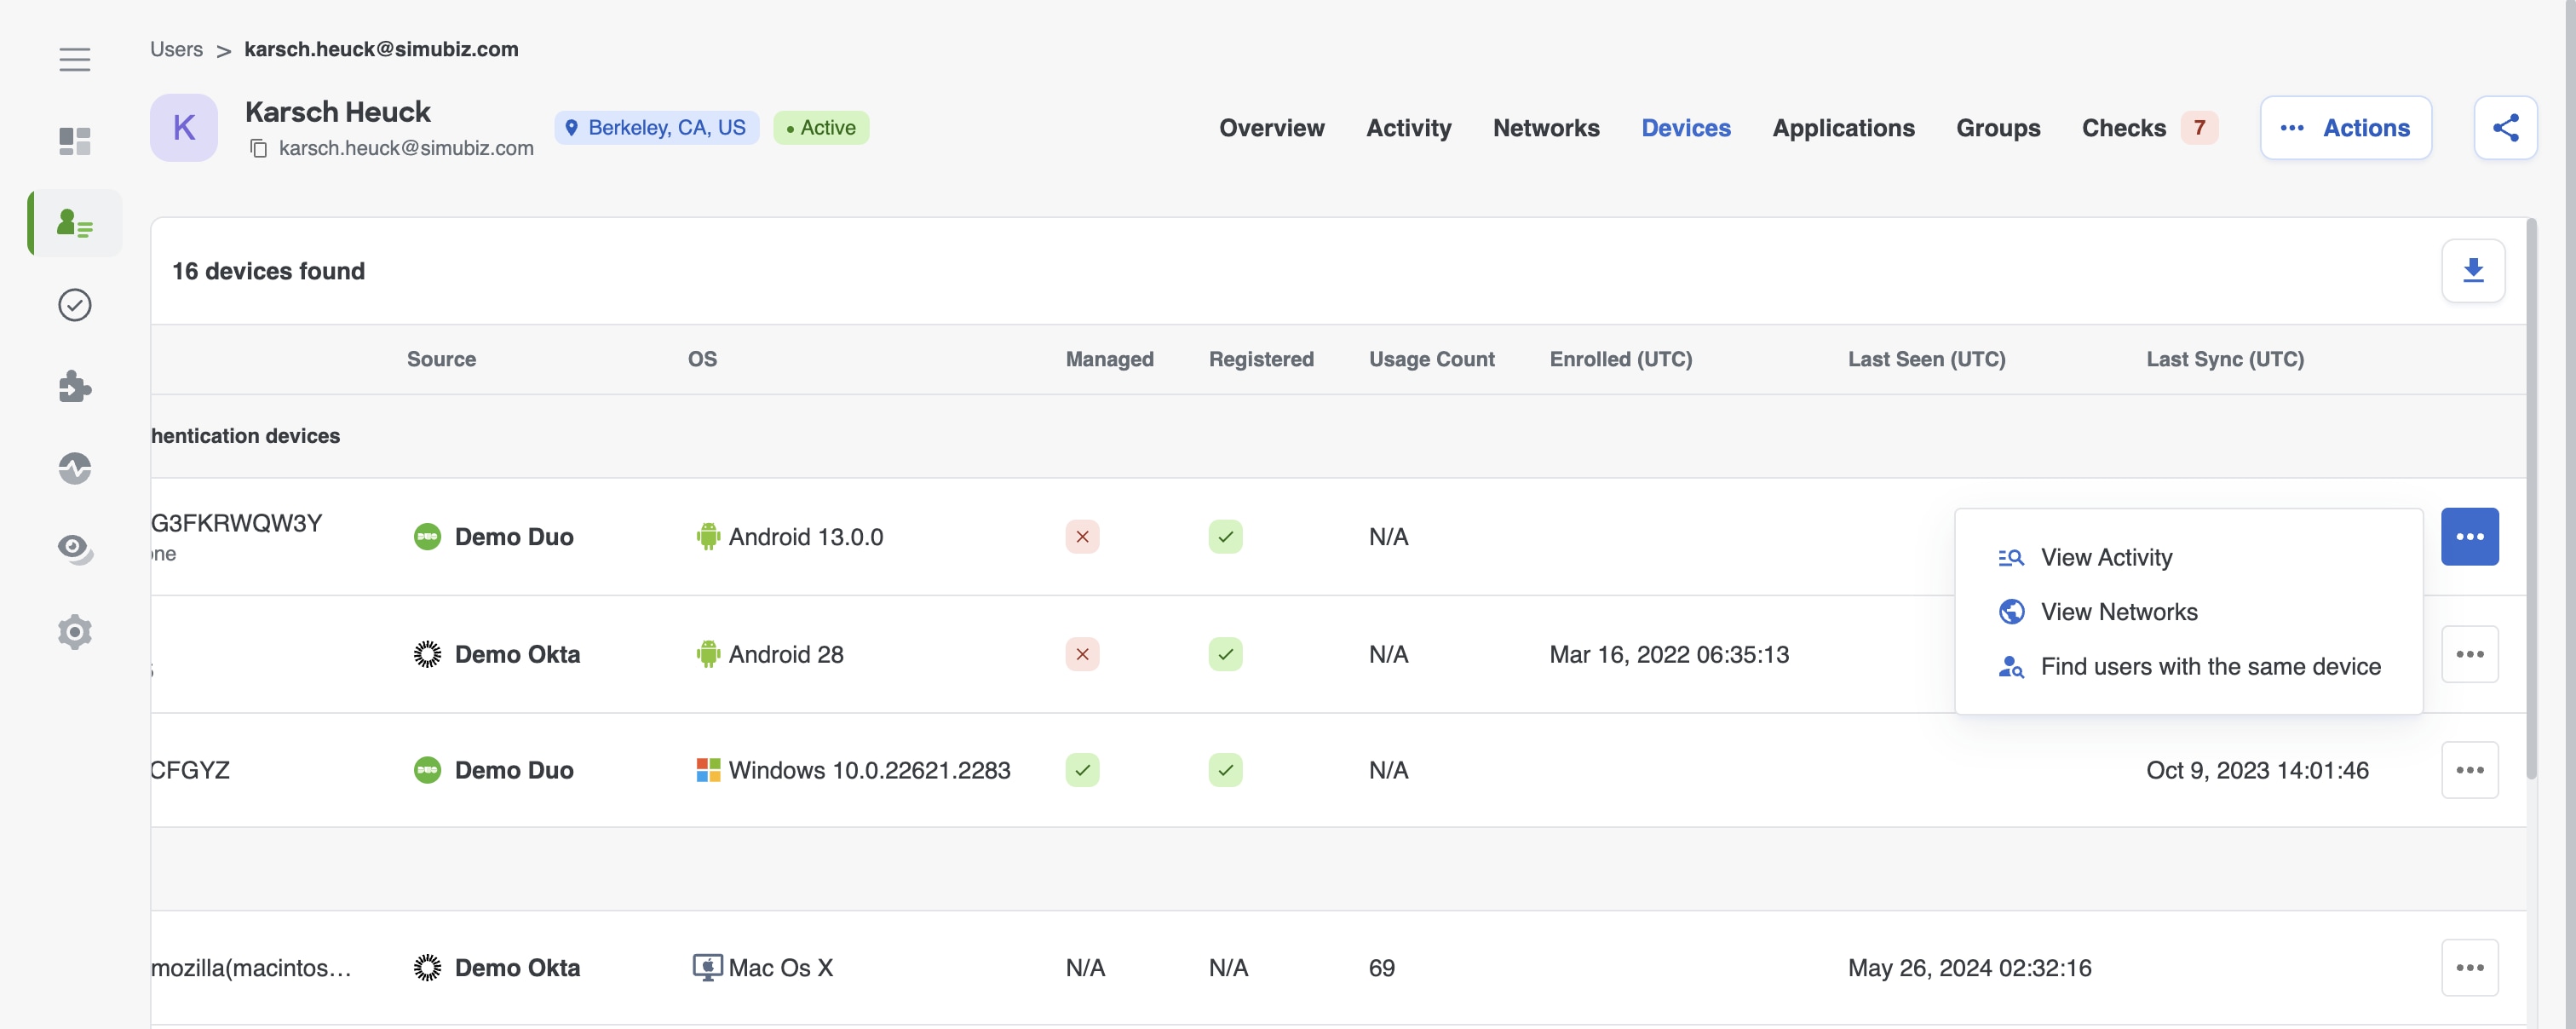
View Networks
Click the 3-dot button to the right of the last column, to find the View Networks action. This will take you to the user's Networks tab, pre-filtered on the Device ID, so that you can see all of the IP Addresses associated with a particular device for a given user.
Find users with the same device
Click the 3-dot button to the right of the last column, to find the Find users with the same device action. This will take you to the Users page, pre-filtered on the Device ID, so that you can see any other users in your environment who are associated with a particular device.
Download results
You can download tabular data from the table to a CSV using the Download icon button on the right of the table, above the column headers.
Note: The CSV output has a limit of 2,000 rows
Applications and Groups Tabs
Overview
The Applications and Groups tabs in the User 360 profile can show you a user's static entitlement data, providing a better understanding of what a user has access to, and how they have access to it.
The Applications and Groups tab are the fifth and sixth tabs, respectively, of the User 360. Below we'll dive into the specific data and functionality for each tab.
Applications
On the Applications tab, you will see a table of the applications assigned to a given user, as well as a few visualizations related to the user's application usage.
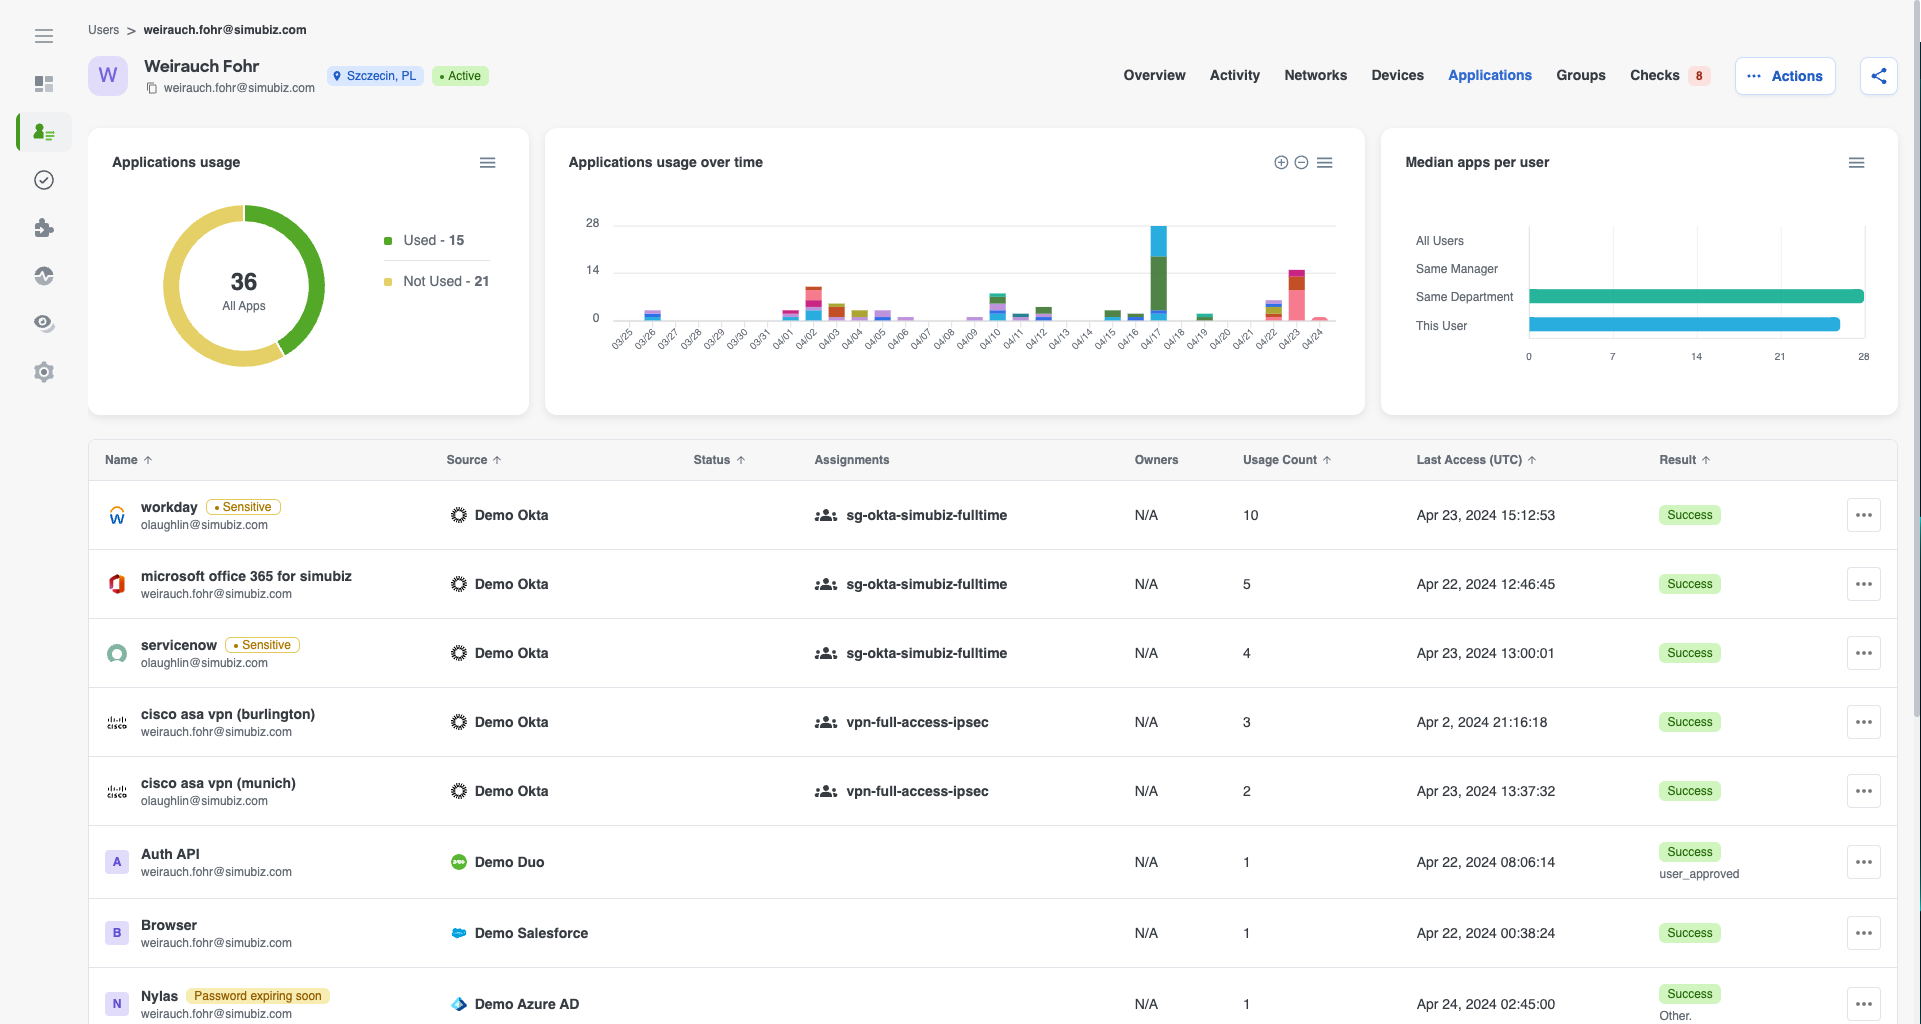
Applications table elements
The section below details the fields that appear in the Applications table, as well as the definition of each field:
Name
The application name and application user ID associated with the application for the user. If an application is on your Sensitive Applications list, there will be a 'Sensitive Applications' tag next to the application name
Source
The identity source associated with the application assignment
Status
Only available for Okta. The Okta application status
Assignments
The group membership that allows a user to have access to a particular application. Users can gain access to an application without a group (blank or 'directly assigned application') or via more than one group, where you'd see multiple group names in this column
Owners
Only available for Entra. The individual listed as the application's owner in Entra
Usage Count
The number of times a user has used a particular application. By default, the table is sorted on usage count in descending order (most frequently used to least frequently)
Last Access (UTC)
The last date and time the user accessed an application
Result
The result associated with the user's last access attempt for an application
Applications tab general actions
The Applications table offers multiple high level features that are similar to what can be found elsewhere in the platform.
View Activity
Click the 3 dot button to the right of the last column, to find the View Activity action. This will take you to the user's Activity tab, pre-filtered on the application name, so that you can see all of a given user's activity/events for a particular application.

View Users
Click the 3 dot button to the right of the last column, to find the View Users action. This will take you to the Users page, pre-filtered on the application name, so that you can see all the users in your environment who have this application assigned to them.
Sort columns
All columns, except 'Assignments' and 'Owners', can be sorted in ascending or descending order on the Applications table. To sort by a specific column value, click the column header to switch between ascending and descending.
By default, the Applications tab is sorted in descending order (highest to lowest) on Usage Count.
Add more rows
By default, the Applications table will show 12 rows at a time. To see 24 or 48 rows in one view, click on the Rows per page button on the bottom right of the Applications table.
If there are more than 48 applications assigned to a user, use the left and right arrows to navigate to other pages.
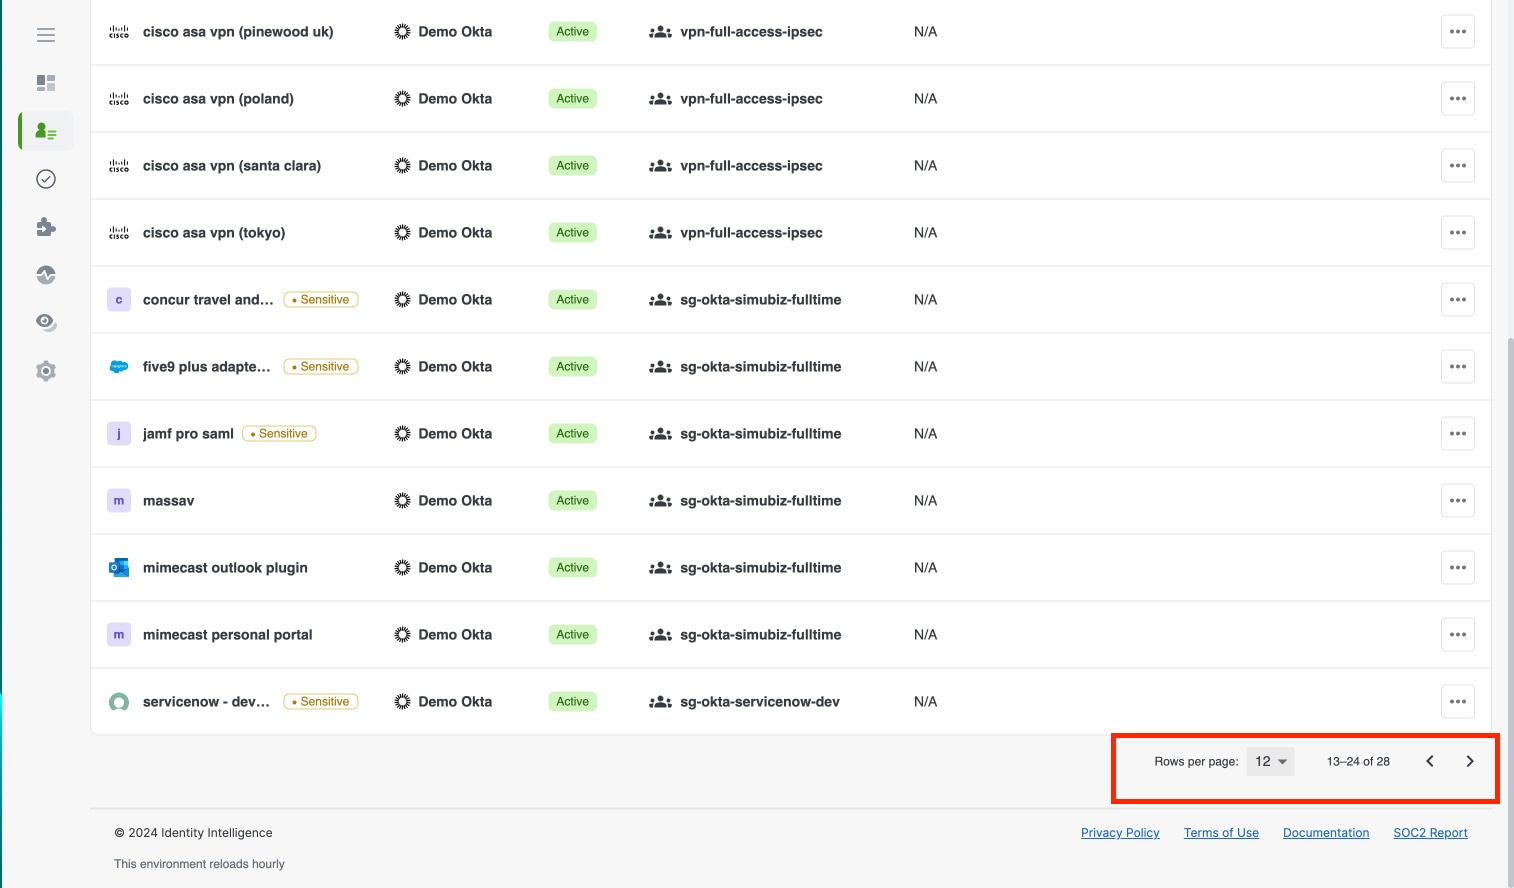
Application usage visualizations
The Applications tab has 3 widgets that display data about a user's application assignment and usage trends.
- Applications usage - Total number of applications assigned to the user, broken down by used applications and unused applications
- Hovering over a segment of the pie chart will display a tool tip with the application count
- Applications usage over time - A given user's total application usage count per day, color coded by application
- Hovering over a segment of a given bar will display a tool tip with the date, application name and usage count. By default the view is set for 30 days, but this can be adjusted to see a wider or smaller window of time using the + and - buttons in the top right corner of the widget
- Median apps per user - Compares the median number of applications a particular user has assigned to them versus all users in the organization, other users in their department and other users reporting to the same manager (if department and manager data is available for the given user)
- Hovering over a bar will display the median application count per user for each category
To export any of the visualizations, click on the 3 line button in the top right corner of the desired widget. Downloading as a SVG or PNG will export an image, whereas downloading as a CSV will export the raw data for you in CSV format.
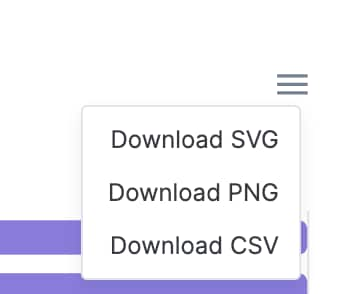
Groups
Similar to the Applications tab, the Groups tab also shows you static entitlement data related to a given user's group assignments.
If there have not been recent changes to a user's groups, the changelog widget to the left of the Groups table will not be visible.
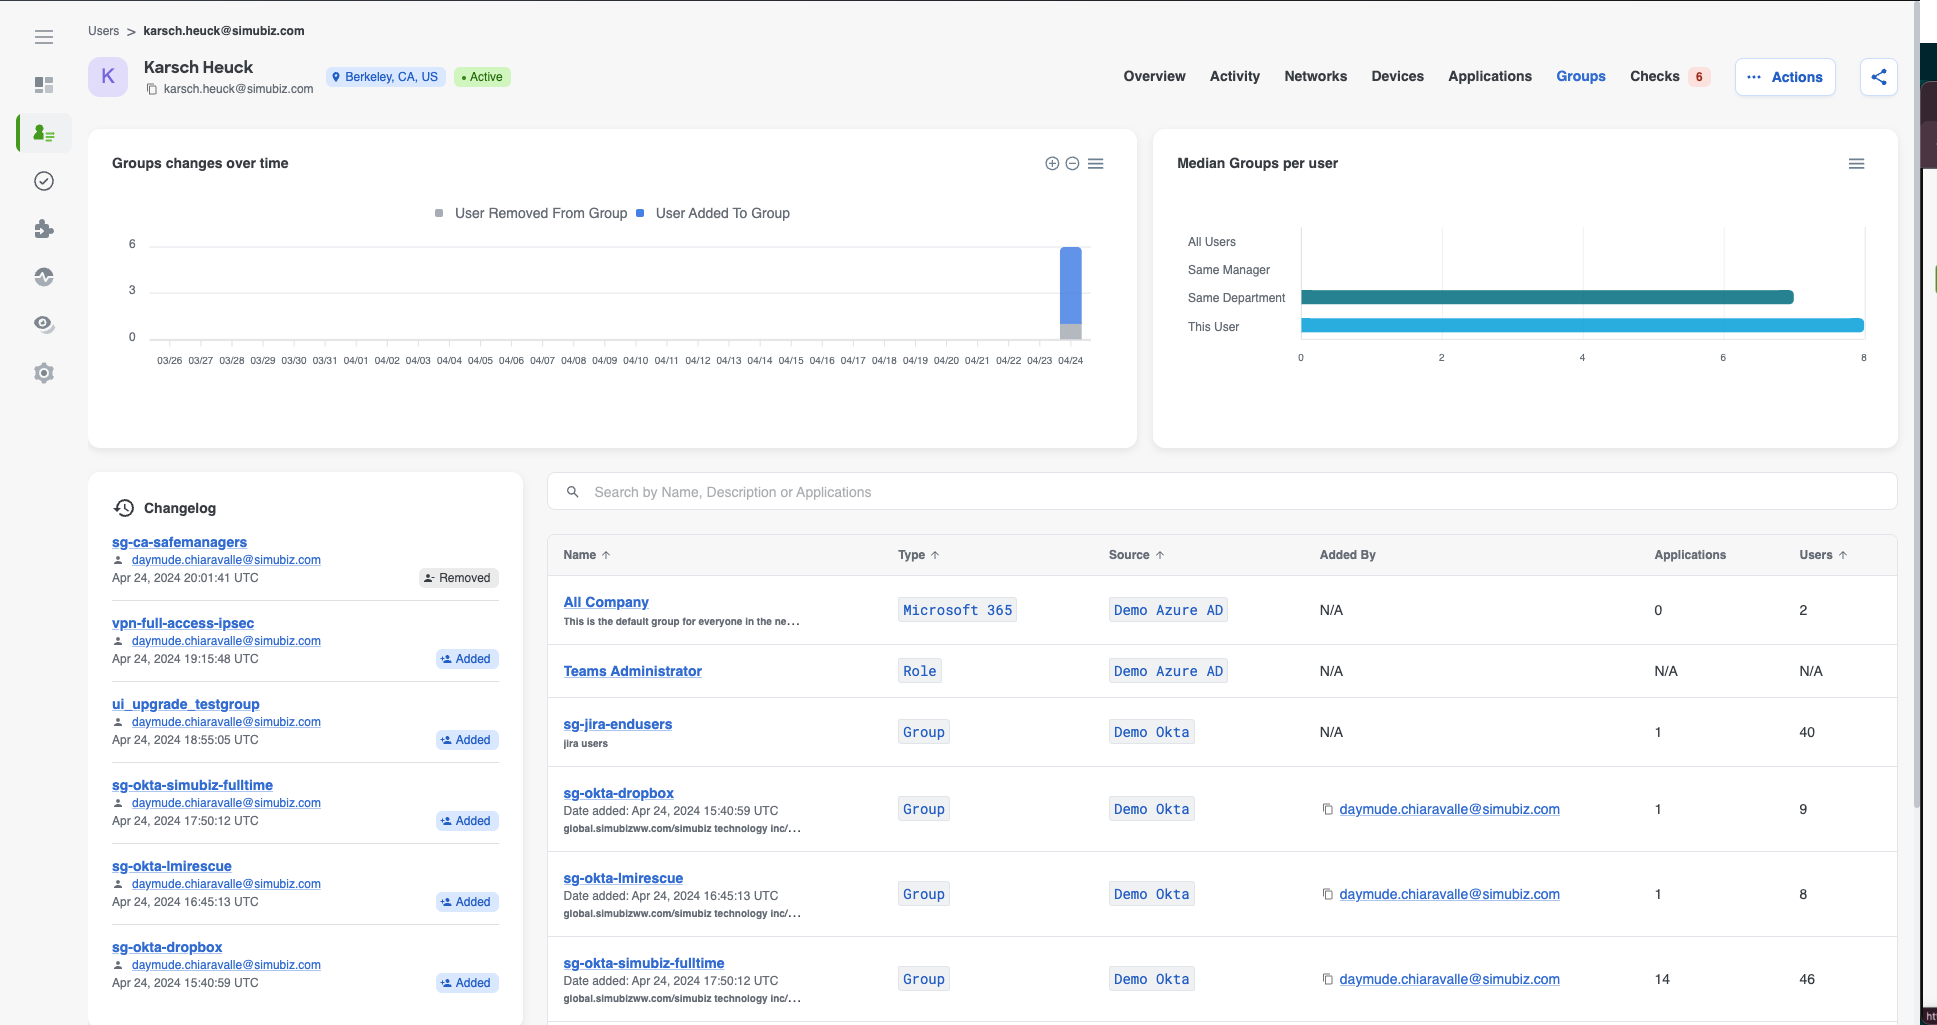
Group table elements
The section below details the fields that appear in the Groups table, as well as the definition of each field:
| Field | Description |
|---|---|
| Name | The name of a particular group the given user is part of. If available from the source, it will also display a description of the group and the date the user was added to this group. Clicking on a group name will take you to the Users page, pre-filtered on the group name to show you other users that are part of a particular group. Hover over the group name or description to see a tooltip with the full details. |
| Type | A given user's role type or group type for a specific group within the identity source. Note: Certain role (ex: PIM Admin) or group (ex: Microsoft365) types are only available for certain identity source. |
| Source | The identity source associated with the group |
| Added By | The email address of the user who added a given user to the group |
| Applications | The number of applications members of the group have access to |
| Users | The total number of users assigned to the group |
| Visibility | Only compatible with Entra groups. Used to manage and control access to applications. Possible values as defined by Entra: Public, Private, Hidden |
Groups tab general actions
The Groups table offers multiple high level features that are similar to what can be found elsewhere in the platform.
Search
Use the search bar above the Groups table to search based on various fields such as group name, description or associated application names. When searching, you do not need to provide an exact value. Typing a piece of the word will return results.
You can also add a value from the Type or Source column as a search parameter by clicking the value in the table (ex: Role or Okta).
If you have searched on a particular parameter, the search criteria is retained as you navigate between different tabs within the platform.
To clear the search bar click the X on the right most side of the search bar.
Sort columns
All columns, except 'Added by' and 'Applications', can be sorted in ascending or descending order on the Groups table. To sort by a specific column value, click the column header to switch between ascending and descending.
By default, the Groups tab is sorted in descending order (A-Z) on Name.
See more Group data
Like in the Activity and Networks table, clicking on the blank space in a given row will show you more information on a particular group.

This will open a slide panel from the right side of the page, that has 2 tabs - Applications and Changelog
- Applications shows you the names of the applications associated with a given group
- Clicking on View Activity for a particular application will take you to the user's Activity tab, pre-filtered on events associated with the selected application
- Clicking on the Application name will take you to the Users page, pre-filtered on the Application name so you can see all other users who have been assigned the selected application
- Changelog shows you changes associated with a given group, including the name of the group, the user who made the change, the date and time of the change, and what the change was (added, removed, etc). The same information can be found in the Changelog widget to the left of the table if there has been any activity for the give user
- Clicking on a Group name in either the slide panel or the Changelog widget will take you to the Users page, pre-filtered on the Group name so you can see other users associated with the selected group
To close the slide panel, click the X in the top right corner, or click anywhere outside of slide panel.
Group visualizations
The Groups tab has 2 widgets that display data about a user's group assignments and group changes.
- Group changes over time - A given user's total number of group changes per day, color coded by change type (added or removed)
- Hovering over a segment of a given bar will display a tool tip with the date, change type, and event count. By default the view is set for 30 days, but this can be adjusted to see a wider or smaller window of time using the + and - buttons in the top right corner of the widget
- Median Groups per user - Compares the median number of groups a particular user is assigned to them versus all users in the organization, other users in their department and other users reporting to the same manager (if department and manager data is available for the given user)
- Hovering over a bar will display the median number of groups per user for each category
To export any of the visualizations, click on the 3 line button in the top right corner of the desired widget. Downloading as a SVG or PNG will export an image, whereas downloading as a CSV will export the raw data for you in CSV format.
Checks Tab
Overview
The Checks tab in the User 360 shows a detailed view of all of a user's current check failures/observations, the reasons a user has failed a particular check, and other information related to the user's check history. Understanding the various checks a user is failing at once, or in close succession, can make it more obvious to identify an active attack or possible compromise on a given user's account.
The Checks tab is the last tab of the User 360. You can also see the number of checks a given user is currently failing next to the tab name. In this article, we will go through the data and functionality available on the Checks tab including:
- Different types of Checks
- The elements in the Failing Checks table and Resolved checks table
- How to access a check failure's explainability
- How to triage a check failure
The Checks tab is not visible if a given user is not part of the protected population.
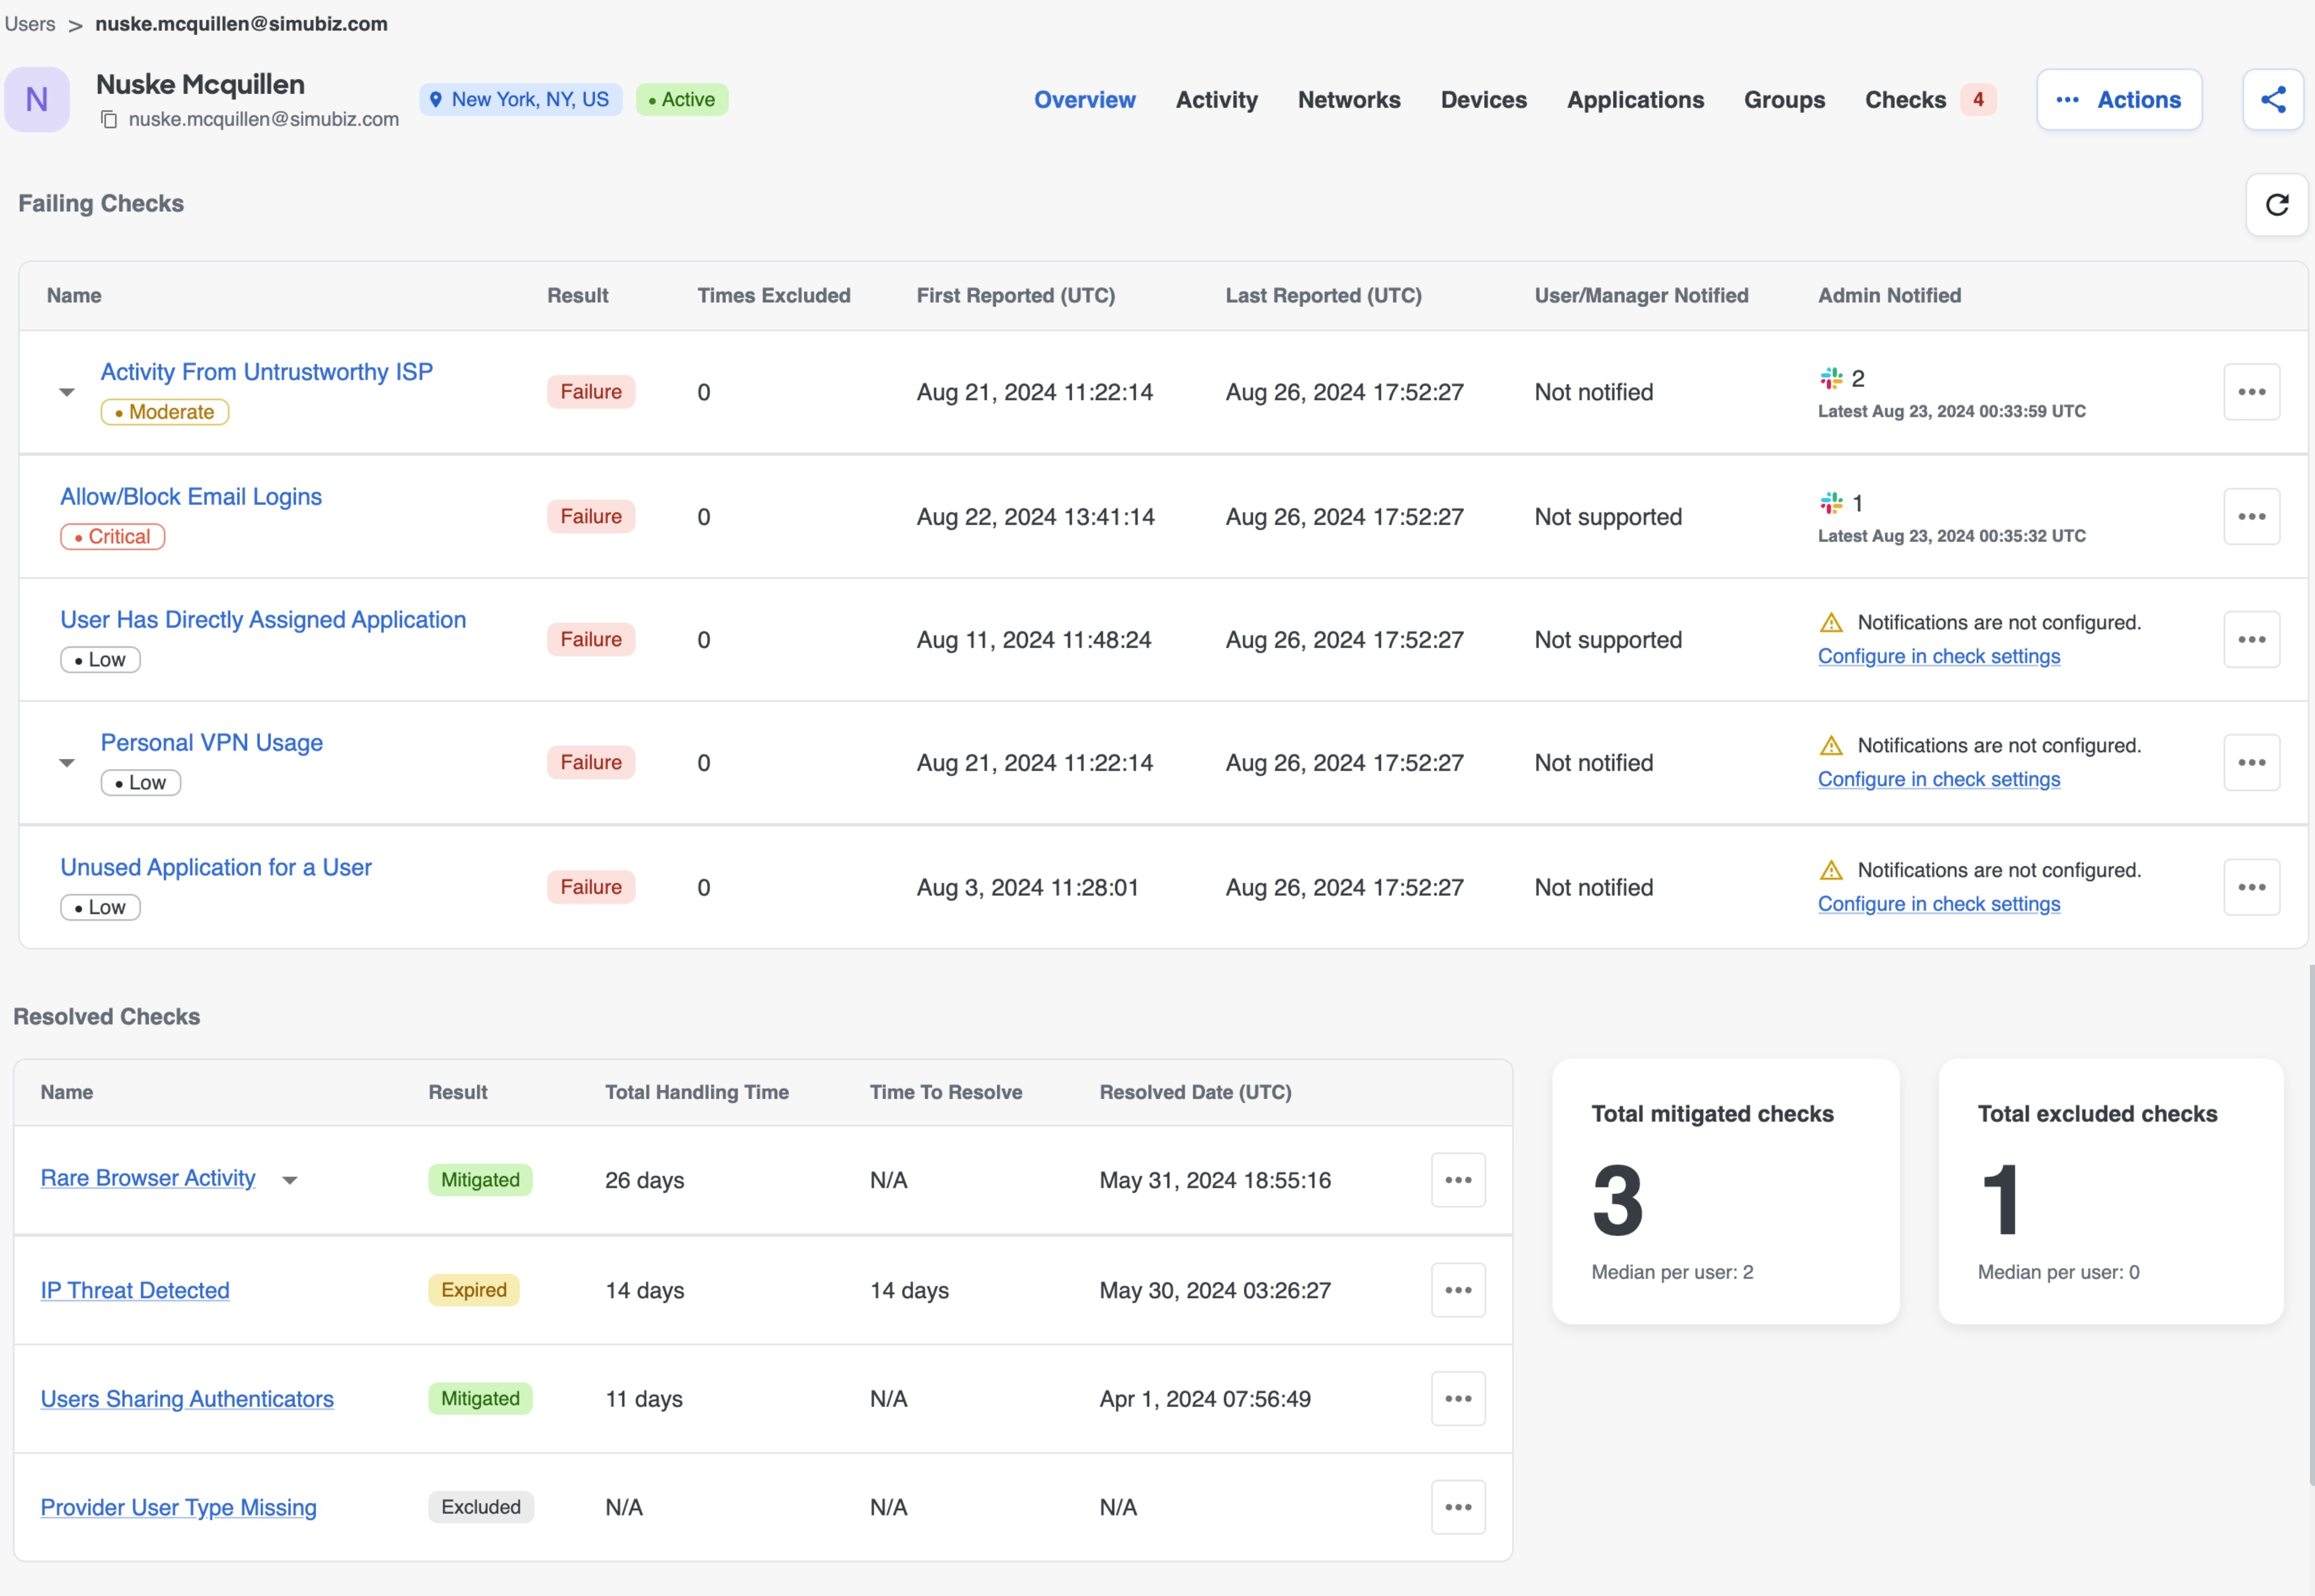
Different Types of Checks
When looking at the available checks in the platform, you may notice that some checks are marked as Identity Posture Insight checks, while others are marked as Identity Threat Insight checks. Behind the scenes, Cisco Identity also categorizes checks as either state based or event based to retain and display a user's check history.
State based checks and event based checks have different triaging capabilities, but also slightly different interaction experiences within the Checks tab of the User 360 because event based checks store Observations, or a history of check failures for a specific check for a given user.
To learn more about the different types of checks within Cisco Identity in general, refer to our Understanding Check failures documentation. More information about the Observations UI and functionality specifically within the User 360 Checks tab can be found below throughout this article.
Checks table elements
On the Checks tab, there are 2 different tables - the first table displays the checks that a given user is currently failing. The second table shows the given user's resolved checks, which are checks that the user is no longer failing. If the user does not have any resolved checks you will only see the Failing Checks table. If the user is not currently failing any checks, you will only see the Resolved Checks table.
Below, we will explain the fields that appear in each table, as well as the definition of each field.
Failing Checks
Name
The name of the failed check
Result
Failed check status. Always listed as Failure
Times Excluded
The total number of times a given user has been excluded from a particular check
First Reported (UTC)
The date and time of the first failed observation for a particular check for a given user
Last Reported (UTC)
The most recent date and time of a failed observation for a particular check for a given user
User/Manager Notified
The number of times a given user or their manager has been notified about a particular check failure, and an icon representing the method used to notify (Email, Slack, Teams, etc).
If a notification target is not set for a particular check, a message prompting you to configure the notification is shown in this column.
Note: Only some checks support notifying end users or managers. For checks that do not support notifying end users or managers, this column will say 'Not Supported'. If notifications are supported, but have not been sent to end users or managers, the column will say 'Not Notified'
Admin Notified
The number of times an admin has been notified about a given user failing a particular check, and an icon representing the method used to notify.
If a notification target is not set for a particular check, a message prompting you to configure the notification is shown in this column
Failing Check Observations
If there has been more than one observation for a check failure, the row can be expanded using the arrow to the left of the check name, so that you can see the history of observations.
Up to 5 observations will be displayed by default, but you can click the 'See More' button under the last observation to see additional events if they exist. Observations are displayed in order from newest (top) to oldest (bottom).

The fields available for observations are:
Observed At
The date and time a given observation was recorded
Source
The identity source associated with a given failing observation
Feedback provided
The user who provided feedback on a given observation, if applicable. If there has been no feedback, the value is N/A.
Feedback date
The day and time a user provided feedback on a given observation, if applicable. If there has been no feedback, the value is N/A.
Resolved Checks
The fields available in the Resolved Checks table are:
Name
The name of the resolved check
Result
Resolved check status: Expired, Mitigated, or Excluded (includes email of Cisco Identity User who excluded and comment, if present)
Total Handling Time
The number of days elapsed between the first date a check/observation failed and the date it was resolved
Resolved Date (UTC)
The date and time that a check/observation was no longer failing for a given user
Resolved Check Observations
Similarly to failed check observations, if there has been more than one resolved observation for a check failure, the row can be expanded using the arrow to the left of the check name, so that you can see the history of resolved observations.
Up to 5 observations will be displayed by default, but you can click the 'See More' button under the last observation to see additional events if they exist. Observations are displayed in order from newest (top) to oldest (bottom).
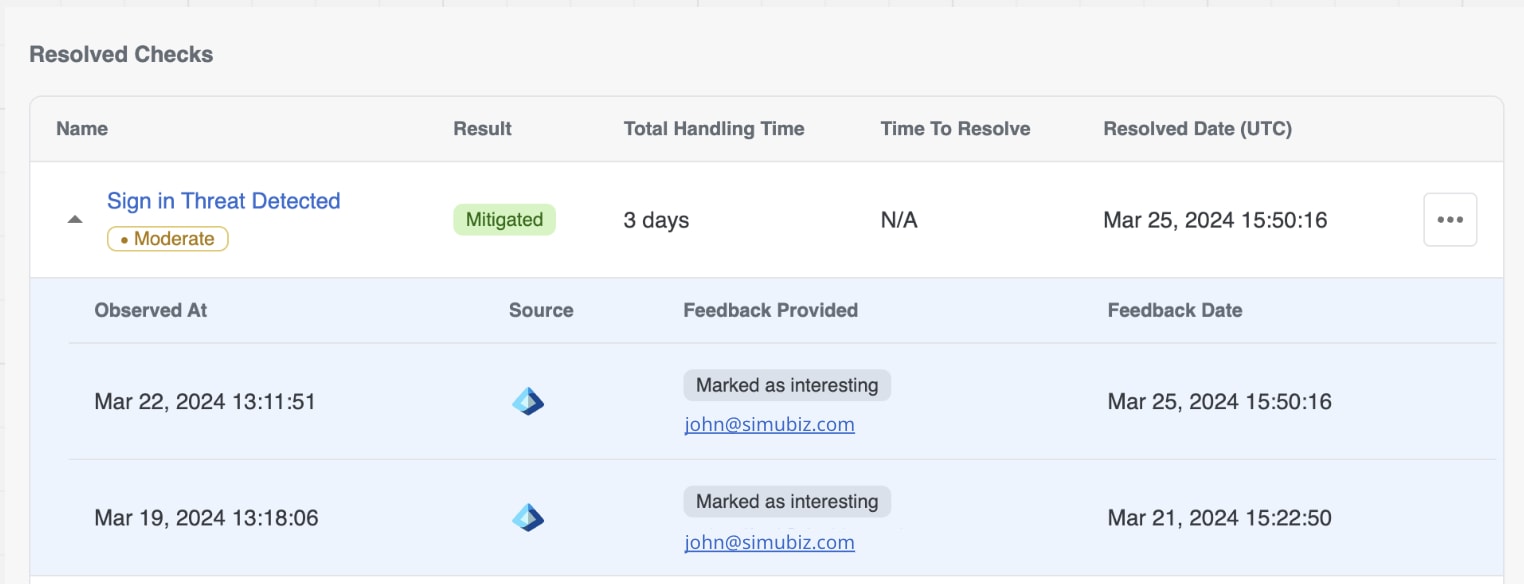
Resolved check widgets
Under or next to the two checks tables are also two small widgets with the number of mitigated checks a given user has, the number of checks a given user has been excluded from, and the median count per user for your tenant.
Diving deeper into a check failure
For each failing check, you can click in and view more information about that particular failing check, along with the most important context, such as the actions that contributed to the user failing a given check and high level context about that user. This is called the 'check explainability'.
To review the check explainability, click on any blank space in the row related to the specific check or observation you'd like to dig into. This will open a slide panel from the right side of the page.
To access an observation's explainability, you can also click the button on the right side of the observation row, outlined in blue in the screenshot below. To close the slide panel, click the X in the top right corner of the panel, or click anywhere outside of slide panel.

The explainability available will vary from check to check based on what information or context is most relevant for a particular check, and can include information such as user title, failing data source, factor type, application accessed, IP address used, etc.
For event based checks, within the explainability panel you can get more information from the given user's Activity tab by either clicking the View in Activity button to navigate to the Activity tab pre-filtered on all events related to that check failure, or clicking on a See in Context button which takes you to the Activity tab pre-filtered on events that occurred in the hour directly before and after the check failure.
Resolved check explainability
Resolved checks also have explainability if the check failure was observed 7 days ago or less. If the check is less than 7 days old, you can access the explainability in the same was as actively failing checks - by clicking in the blank space.
If the check failure was observed more than 7 days ago, the slide panel will appear with the recommended actions only. You can still access the check failure explainability of these older observations by clicking the 3-dot button on the right hand side of the row, and selecting View Logs. This will take you to the User's Activity tab, pre-filtered on the check failure. Then, find the desired failing 'Observation Added' event and click the blank space of that row to open the side panel with the check explainability.
How to triage a user's check failure
Once you have looked into a user's failing check(s) to understand more about the user and/or complete an investigation, you can then take action in a few different ways. To learn more about the available actions, how to use the different actions, or any additional permissions needed to use certain remediation actions, read our Remediation Actions documentation.
To respond to a specific check failure for a specific user, you can use the 3-dot button on the right hand side of each row, you can submit feedback for each unique observation:
- Exclude a user - Removes the user from the list of check failures and stops them from being evaluated against a given check for a specified time frame. You can also leave a comment explaining why this user has been excluded from this check for that amount of time. Check will appear in Resolved Checks table in Checks tab of User 360
- Mark as Normal Behavior - Note: Only available for event based checks. Remediates the failed check for that occurrence and moves it to the Resolved table in the User360 Checks tab. User is not evaluated against this check for the specific context that caused the given observation for 30 days. If Cisco Identity notes that user has the same exact behavior again tomorrow, the user will not fail the check again, unless an observation is logged for that check with new context (new IP address, device, etc). Read more about this on the Remediation Actions documentation
- Cisco Identity team compiles this data to determine if customers find the detection accurate or not, so logic improvements can be made if needed
- Mark as Suspicious - Note: Only available for event based checks. Remediates the failed check for that occurrence and moves it to the Resolved section of the User360 Checks tab. User is not evaluated against this check for the specific context that caused the given observation for 30 days. If Cisco Identity notes that user has the same exact behavior again tomorrow, the user will not fail the check again, unless an observation is logged for that check with new context (new IP address, device, etc).
- Cisco Identity team compiles this data to determine if customers find the detection accurate or not, so logic improvements can be made if needed
After making a change, allow time for the User's checks-related data to update during the next scheduled checks run.
There are also additional remediation actions, such as Reset MFA, Log out User, Delete User, Quarantine, etc, that can be taken on a given user's account, depending on the sources associated with a given user and the permissions configured at the data source.
These actions can be found in the Actions button to the right of the User360 Tab names for a given user. The Remediation Actions documentation has more information about the different actions available, the permissions needed, compatible sources and how to use them.