Manage Onboarded Device Settings

Changing a Device's IP Address in Security Cloud Control

When you onboard an device to Security Cloud Control using an IP address, Security Cloud Control stores that IP address in its database and communicates with the device using that IP address. If the IP address of the device changes, you can update the IP address stored in Security Cloud Control to match the new address. Changing the device's IP address on Security Cloud Control does not change device's configuration.

To change the IP address, Security Cloud Control uses to communicate with a device, follow this procedure:

Procedure


Step 1

In the left pane, click Security Devices

Step 2

Click the Devices tab to locate the device.

Step 3

Click the appropriate device type tab.

You can use the filter and search functionalities to find the required device.

Step 4

Select the device whose IP address it is you want to change.

Step 5

Above the Device Details pane, click the edit button next to the device's IP address.

Step 6

Enter the new IP address in the field and click the blue check button.

No change is made to the device itself, so the device's Configuration Status will continue to show that it is Synced.


Changing a Device's Name in Security Cloud Control

All devices, models, templates, and services are given a name when they are onboarded or created in Security Cloud Control. You can change that name without changing the configuration of the device itself.

Procedure


Step 1

In the left pane, click Security Devices.

Step 2

Click the Device tab to locate the device.

Step 3

Select the device whose name it is you want to change.

Step 4

Above the Device Details pane, click the edit button next to the device's name.

Step 5

Enter the new name in the field and click the blue check button.

No change is made to the device itself, so the device's Configuration Status will continue to show that it is Synced.


Export a List of Devices and Services

This article explains how to export your list of devices and services to a comma-separated value (.csv) file. Once in that format, you can open the file in a spreadsheet application such as Microsoft Excel to sort and filter the items in your list.

The export button is available in the devices and the templates tab. You are also allowed to export details from devices under the selected device type tab.

Before you export your list of devices and services, look at the filter pane and determine if the Security Devices page is displaying the information you want to export. Clear all your filters to see all of your managed devices and services, or filter the information to display a subset of all your devices and services. The export function exports what you can see in the Security Devices page.

Procedure


Step 1

In the left pane, click Security Devices.

Step 2

Click the Devices tab to locate the device or the Templates tab to locate the model device.

Step 3

Click the appropriate device type tab to export details from devices under that tab or click All to export details from all devices.

You can use the filter and search functionalities to find the required device.

Step 4

Click Export list to CSV:

Step 5

If prompted, save the .csv file.

Step 6

Open the .csv file in a spreadsheet application to sort and filter the results.


Export Device Configuration

You can only export one device configuration at a time. Use the following procedure to export a device's configuration to a JSON file:

Procedure


Step 1

In the left pane, click Security Devices.

Step 2

Click the Devices tab to locate the device or the Templates tab to locate the model device.

Step 3

Click the appropriate device type tab.

You can use the filter and search functionalities to find the required device.

Step 4

Select the device you want so it is highlighted.

Step 5

In the Actions pane, select Export Configuration.

Step 6

Select Confirm to save the configuration as a JSON file.


Bulk Reconnect Devices to Security Cloud Control

Security Cloud Control allows an administrator to attempt to reconnect more than one managed device to Security Cloud Control at the same time. When a device Security Cloud Control manages is marked "unreachable," Security Cloud Control can no longer detect out of band configuration changes or manage the device. There could be many different reasons for the disconnect. Attempting to reconnect the devices is a simple first step in restoring Security Cloud Control's management of the device.


Note


If you are reconnecting devices having new certificates, Security Cloud Control automatically reviews and accepts the new certificates on the devices and continues to reconnect with them. However, if you are reconnecting with only one device, Security Cloud Control prompts you to review and accept the certificate manually to continue to reconnect with it.


Procedure


Step 1

In the left pane, click Security Devices.

Step 2

Click the Devices tab to locate devices.

Step 3

Click the appropriate device type tab.

Use the filter to look for devices whose connectivity status is "unreachable."

Step 4

From the filtered results, select the devices you want to attempt to reconnect.

Step 5

Click Reconnect . Notice that Security Cloud Control only provides command buttons for actions that can be applied to all the selected devices.

Step 6

Look at the notifications tab for the progress of the bulk device reconnect action. If you want more information about how the actions in the bulk device reconnect job succeeded or failed, click the blue Review link and you will be directed to the Monitor Jobs in Security Cloud Control.

Tip


If a reconnect failure was caused because the device's certificate or credentials have changed, you will have to reconnect to those devices individually to add the new credentials and accept the new certificate.


Moving Devices Between Tenants

Once you have onboarded devices to a Security Cloud Control tenant, you cannot migrate the devices from one Security Cloud Control tenant to another. If you want to move your devices to a new tenant, you need to remove the devices from the old tenant and re-onboard them to the new tenant.

Device Certificate Expiry Detection

The management certificate is used for accessing FDM-managed and ASA devices from Security Cloud Control, while the Cisco Secure Client (formerly AnyConnect) is necessary for using virtual private network features on ASA, FDM-managed, and FTD devices from Security Cloud Control.

Security Cloud Control actively monitors the expiration status of these certificates and notifies the user when these certificates are nearing their expiration date or have expired. This prevents any disruptions in device operations due to certificate expiry. You should renew the corresponding certificate to address this issue.

The management certificate expiry check applies to ASA and FDM-managed devices, while the Secure Client certificate expiry check applies to ASA, FDM-managed, and FTD devices.

View Certificate Expiry Notification

In the top right corner, click the Notifications ( ) icon to view the most recent alerts that have occurred or affected the devices you have onboarded to your tenant. The High Priority section displays the certificate expiration notifications.

These notifications are sent 30, 14, and 7 days before the certificate expiration date and then every day thereafter until the certificate either expires or is renewed with a valid certificate. You can also subscribe to receive these notifications by email on the Notification Settings section of the user preferences page. For more information, see User Notification Preferences.

Write a Device Note

Use this procedure to create a single, plain-text, note file for a device.

Procedure


Step 1

In the left pane, click Security Devices.

Step 2

Click the Devices tab to locate the device or the Templates tab to locate the model device.

Step 3

Click the appropriate device type tab.

Step 4

Select the device or model you want to create a note for.

Step 5

In the Management pane on the right, click Notes. .

Step 6

Click the editor button on the right and select the Default text editor, Vim, or Emacs text editors.

Step 7

Edit the Notes page.

Step 8

Click Save.

The note is saved in the tab.

Delete a Device from Security Cloud Control

Use the following procedure to delete a device from Security Cloud Control:

Procedure


Step 1

Log into Security Cloud Control.

Step 2

In the left pane, click Security Devices.

Step 3

Locate the device you want to delete and check the device in the device row to select it.

Step 4

In the Device Actions panel located to the right, select Remove.

Step 5

When prompted, select OK to confirm the removal of the selected device. Select Cancel to keep the device onboarded.


Manage Security Devices

Security Cloud Control provides the ability to view, manage, filter, and evaluate your onboarded devices on the Security Devices page. From the Security Devices page you can:

  • Onboard devices and services for Security Cloud Control management.

  • View the configuration state and connectivity state of managed devices and services.

  • View onboarded devices and templates categorized in separate tabs. See Security Devices Overview.

  • Evaluate and take action on individual devices and services.

  • View device and service specific information and resolve issues.

  • View device health status for threat defense devices managed by:

    For threat defense devices managed by the cloud-delivered Firewall Management Center, you can also see the node status for devices in a cluster.

  • Search for a device or template by name, type, IP address, model name, serial number, or labels. Search is not case-sensitive. Providing multiple search terms brings up devices and services that match at least one of the terms. See Page Level Search.

  • Filter for a device or template filter by device type, hardware and software versions, snort version, configuration status, connection states, conflict detection, and secure device connectors, and labels. See Filters.

  • Delete a device

Back Up Firewall Threat Defense Devices Managed by Security Cloud Control

To know how to back up Security Cloud Control-managed Firewall Threat Defense device types, use the following references:

Back Up Firewall Threat Defense Devices Managed by Cloud-Delivered Firewall Management Center

Back Up Firewall Threat Defense Devices Managed by On-Premises Firewall Management Center Onboarded to Security Cloud Control

  • In the Security Cloud Control left pane, choose Administration > Firewall Management Center.

  • Choose the On-Premises Firewall Management Center whose Firewall Threat Defense devices you want to back up.

  • Click FMC Cross Launch URL on the right pane to navigate to the on-premises management center or manually log in to the on-premises management center.

  • Continue to follow the steps in Back up a Device from the Management Center in the Cisco Secure Firewall Management Center Administration Guide.

Back Up Firewall Threat Defense Devices Managed by Firewall Device Managers Onboarded to Security Cloud Control

Follow the steps in Back up an FDM-managed Device.

Manage Firewall Threat Defense Devices Through Security Cloud Control

Before you begin

Security Cloud Control provides a unified interface to manage Firewall Threat Defense devices, both in hardware and virtual formats.

Firewall Threat Defense devices associated with these three management applications can be managed on the Security Cloud Control platform:

  • Secure Firewall Device Manager

  • Firepower Management Center

  • Secure Cloud-Delivered Firewall Management Center

Procedure


Step 1

Log in to the Security Cloud Control platform.

Step 2

In the left pane, click Security Devices.

Step 3

Click the FTD tab.

Step 4

Click at the top-left corner.

Under Devices/Services, the filter pane provides filters that display Firewall Threat Defense devices based on the management application through which they are accessed from Security Cloud Control.

  • FDM: Firewall Threat Defense device managed by Firewall Device Manager
  • FMC-FTD: Firewall Threat Defense devices managed by Firewall Management Center
  • FTD: Firewall Threat Defense devices managed by Cloud-Delivered Firewall Management Center

Step 5

To view the Firewall Threat Defense devices under a management application, check the corresponding check box.


Security Devices Overview

The Security Devices page displays all the physical and virtual onboarded devices and the templates created from the onboarded devices. The page classifies devices and templates based on their type and displays them in the corresponding tabs dedicated to each device type.

You can view the following details on the Security Devices page:

  • The Devices tab displays all the live devices that are onboarded to Security Cloud Control.

  • The Templates tab displays all the template devices created from live devices or configuration files imported to Security Cloud Control.

Filters in Security Devices

The Filter panel on the Security Devices page provides multiple options to narrow down results and find devices based on specific attributes, including Devices/Services, Hardware Versions, Device End-of-Life, Software Versions, Snort Version, Configuration Status, Connectivity States, Conflict Detection, Health Status, Secure Device Connectors, and Labels.

The Hardware End-of-Life (EoL) Filter

The Hardware End-of-Life (EoL) filter allows you to identify devices that are nearing or have reached their last day of hardware support. Running unsupported hardware may pose operational and security risks because Cisco no longer provides software updates, security patches, or technical support after the EoL date.


Note


The Hardware EoL filter currently supports Firewall Threat Defense devices managed by on-premises management center and cloud-delivered Firewall Management Center, and ASA devices.


Procedure

  1. In the Devices tab, click the filter icon.

  2. From the list of available filters, under Device End-of-Life, select Hardware End-of-Life.

    The list now displays all devices that are approaching or have reached their hardware end-of-life.

  3. Select a device to view more information on the right pane.

  4. Scroll down to the Device End of Life section to view the following details:

    • The exact end-of-life date.

    • Remaining time until the last day of support.

  5. Click Know more.

    You can view a detailed page that provides the following information:

    • Cisco’s recommended replacement devices with product specifications, along with links to view the official data sheets.

    • Guidance on submitting a request through the Contact Cisco page and options to connect directly with Cisco experts.

    • Information on Cisco’s product recycling program.

  6. Click Export to download the device report in CSV format for offline analysis.

Security Cloud Control Labels and Filtering

Labels are used for grouping devices or objects. You can apply labels to one or more devices during onboarding or any time after onboarding. You can apply labels to objects after creating them. Once you apply labels to devices and objects, you can filter the contents of the device table or objects table using the corresponding label.


Note


A label that is applied to a device is not extended to its associated objects, and a label applied to a shared object is not extended to its associated objects.


You can create a label group by using the syntax group name:label, for example, Region:East or Region:West. If you create these two labels, the group label would be Region and you could choose from East or West in that group.

Apply Labels to Devices and Objects

To apply a label to devices, perform these steps:

Procedure


Step 1

In the left pane, click Security Devices.

Step 2

In the left pane, click Objects.

Step 3

Click the Devices tab to locate a device or the Templates tab to locate the model device.

Step 4

Click the appropriate device type tab.

Step 5

Select one or more devices.

Step 6

In the Add Groups and Labels field on the right, specify a label for the devices.

Step 7

Click the icon.


Filters

You can use many different filters on the Security Devices and Objects pages to find the devices and objects you are looking for.

To filter, click in the left-hand pane of the Security Devices, Policies, and Objects tabs:

The Security Devices filter allows you to filter by device type, hardware and software versions, snort version, configuration status, connection states, conflict detection, and secure device connectors, and labels. You can apply filters to find devices within a selected device type tab. You can use filters to find devices within the selected device type tab.

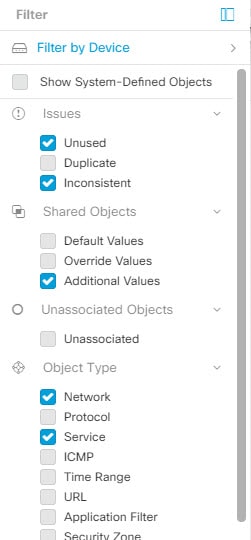
The object filter allows you to filter by device, issue type, shared objects, unassociated objects, and object type. You can include system objects in your results or not. You can also use the search field to search for objects in the filter results that contain a certain name, IP address, or port number.

The object type filter allows you to filter objects by type, such as network object, network group, URL object, URL group, service object, and service group. The shared objects filter allows filtering objects having default values or override values.

When filtering devices and objects, you can combine your search terms to create several potential search strategies to find relevant results.

In the following example, filters are applied to search for objects that are "Issues (Unused OR Inconsistent) AND Shared Objects (with Default Values OR Additional Values) AND Unassociated Objects."

Use Security Cloud Control Search Functionality

The Security Cloud Control platform has a highly efficient search function that makes it easy to find anything you need. The search bar on each page is tailored to the content of that page, while the global search allows for a comprehensive search across the entire tenant. This saves time and effort, as you can quickly locate the necessary information.

Global Search

The global search feature allows you to quickly locate and navigate to devices managed by Security Cloud Control.

All search results are based on the indexing option you choose. The indexing options are as follows:

  • Full Indexing—Requires that you invoke the full indexing process. This process scans all the devices and objects in the system and displays them in the search index only after you invoke the indexing. To invoke full indexing, you must have administrative privileges.

    For more information, see Initiate Full Indexing.

  • Incremental Indexing—An event-based indexing process where the search index automatically updates each time that a device or an object is added, modified, or deleted.

The information that you enter in the search field is not case-sensitive. You can perform a global search using the following entities:

  • Device Name—Supports partial device names, URL, IP address or range.

  • Object Types—Supports object name, object descriptions, and configured values.

  • Policy Types—Supports policy name, policy description, rule name, and rule comments.

    Cloud-delivered Firewall Management Center and On-Prem FMC managed in Security Cloud Control support the following policy types:

    • Access Control Policy

    • Prefilter Policy

    • Threat Defense NAT Policy

When you type a search expression, the interface begins to display search results and you do not need to press Enter to execute a search.

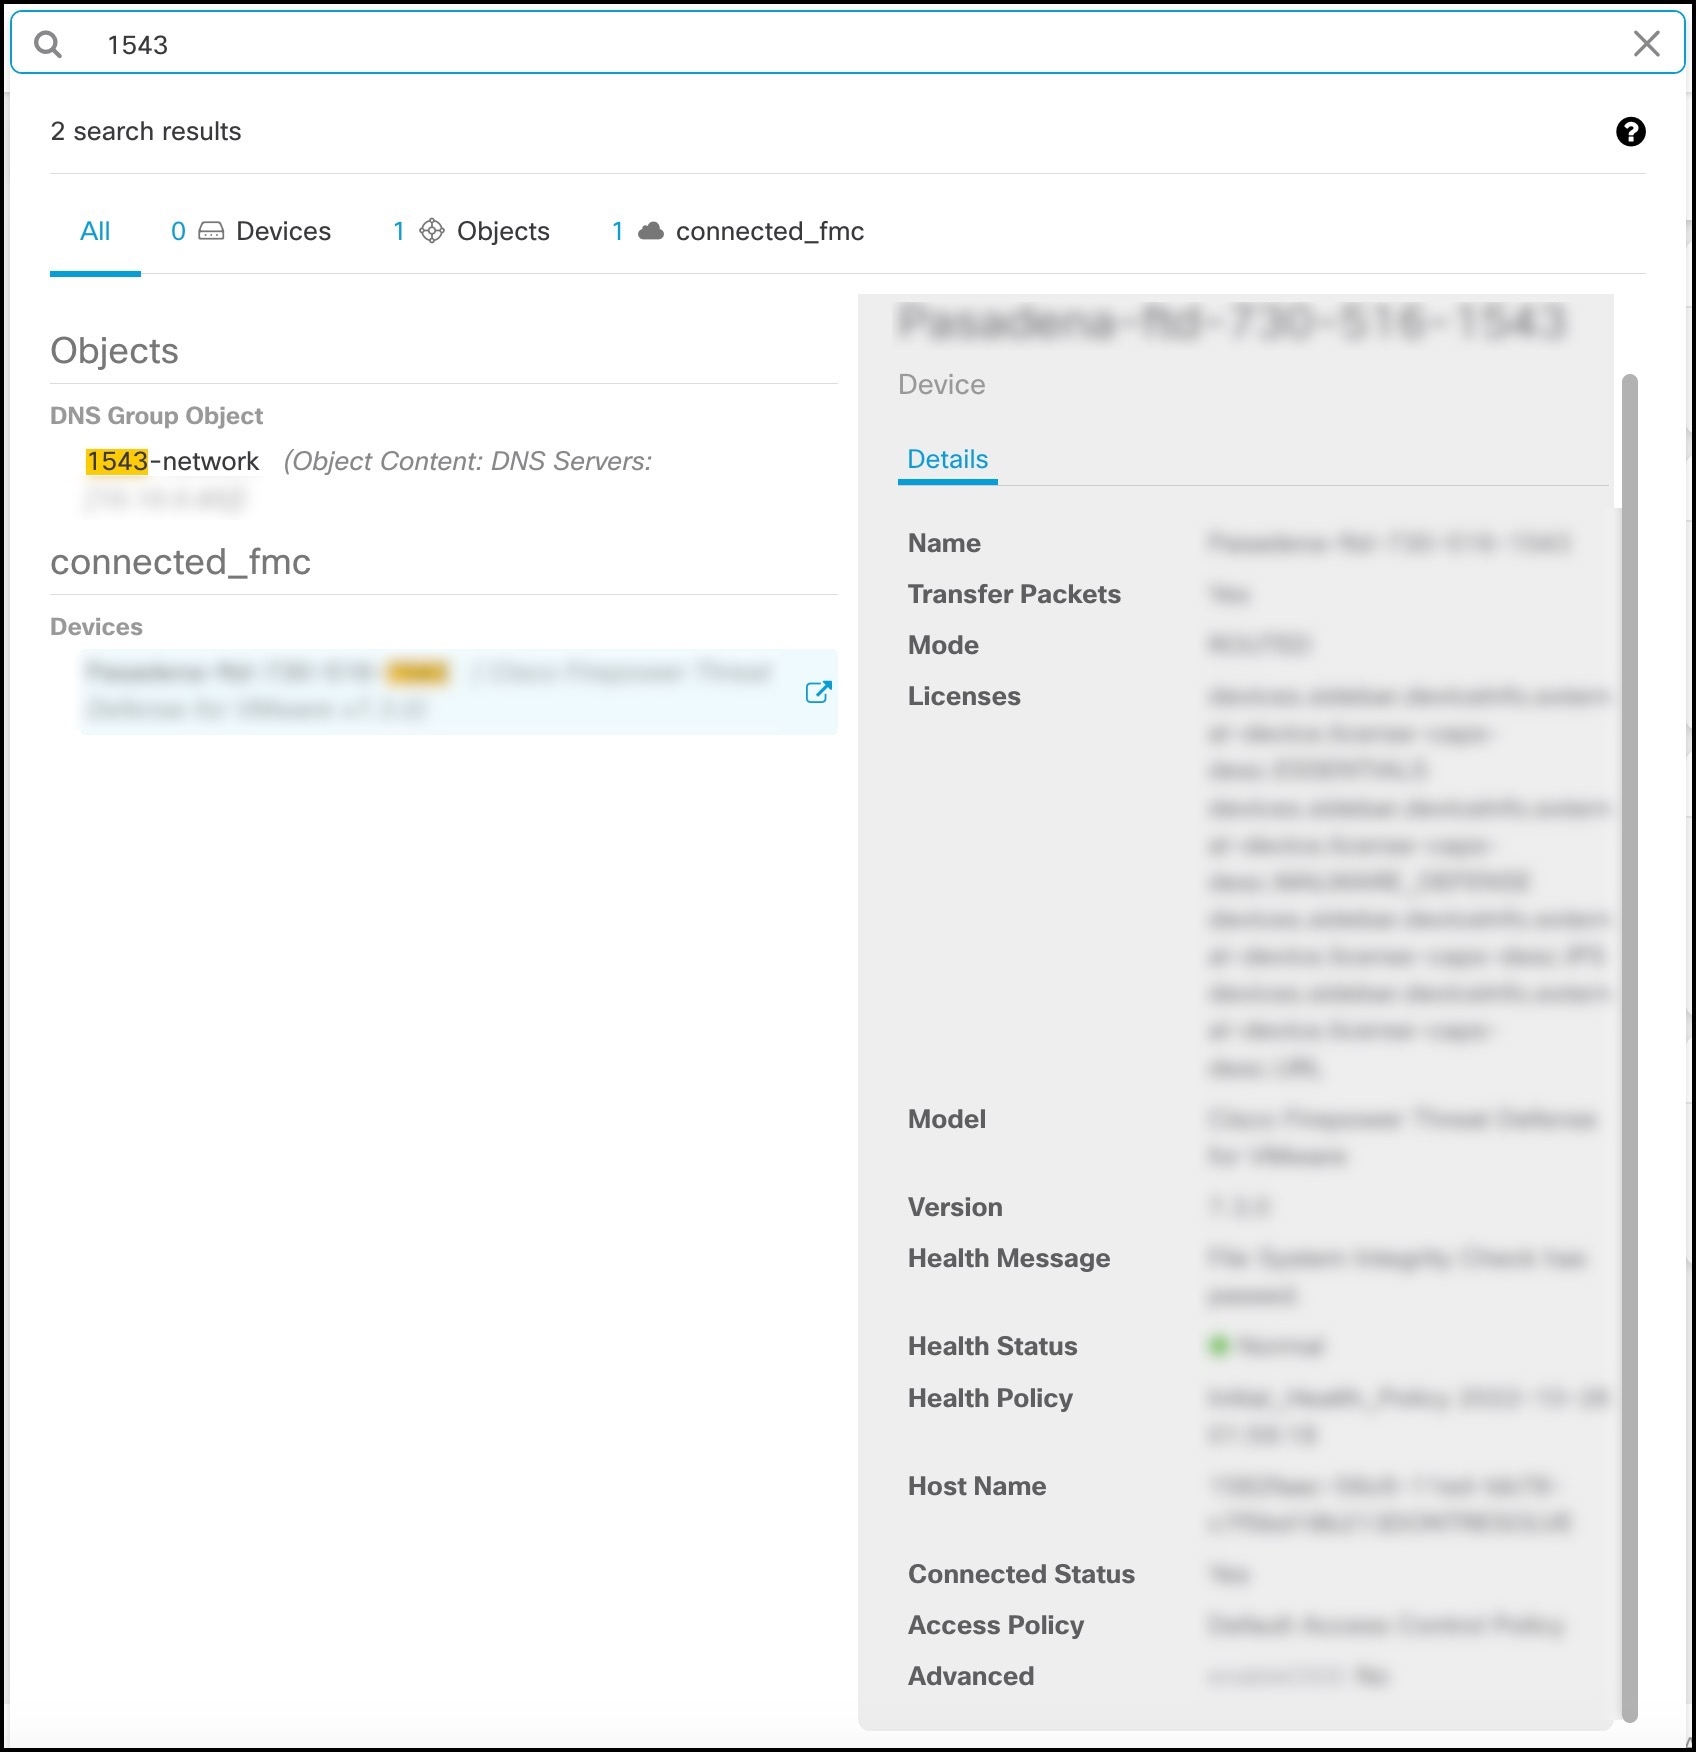
The search results display all devices and objects that match your search strings. If your search string matches more than device or object, the results appear under categories (devices, objects, and connected_fmc).

By default, the first item in the search result is highlighted and the related information for that item appears in the right pane. You can scroll through the search results and click any item to view the corresponding information. You can click the arrow icon besides the item to navigate to the corresponding page.


Note


  • Global search does not display duplicate search results. For objects, the UID of the shared object is used to navigate to the Object view.

  • If you delete a device from Security Cloud Control, all associated objects are removed from the global search index.

  • If you delete an object from the policy and retain the device before you initiate full indexing, the object remains in the global search index because it is associated with the device.


Initiate Full Indexing

Procedure

Step 1

In the left pane, click Administration > General Settings.

Step 2

In Global Search, click Initiate Full Indexing to trigger indexing.

Note


Initiating full indexing clears existing indexing of the Security Cloud Control tenant.

Step 3

Click here to view the global search workflow.


Perform a Global Search

Procedure

Step 1

Log into Security Cloud Control.

Step 2

Click the search icon in the Security Cloud Control page and enter the search strings in the search field that appears.

Alternatively, you can press and hold the Ctrl key and the / key simultaneously on Windows, or the Command key and / key on Mac, to open the search bar.

The search results display a list of possible items as you begin entering the search strings. The search results appear under four categories: All, Devices, Objects, Policies, and Cloud-Delivered Firewall Management Center. The right pane displays information for a selected search result.

Step 3

From the search result, select a device or an object, and click the arrow icon to navigate from the search results to the corresponding device and object page. From the search result, select an item, and click the arrow icon to navigate from the search results to the corresponding page.

Note


Selecting a search result for devices in the Cloud-Delivered Firewall Management Center, allows you to navigate to the Cloud-Delivered Firewall Management Center user interface within Security Cloud Control.

For information on Cloud-Delivered Firewall Management Center, see Managing Firewall Threat Defense with Cloud-Delivered Firewall Management Center in Security Cloud Control Firewall Management.

Step 4

Click X to close the search bar.