Deploy the ASAv on OpenStack

You can deploy the ASAv on OpenStack.

Overview

You can deploy the ASAv in an OpenStack environment. OpenStack is a set of software tools for building and managing cloud computing platforms for public and private clouds, and is tightly integrated with the KVM hypervisor.

Enabling OpenStack platform support for ASAv allows you to run ASAv on open source cloud platforms. OpenStack uses a KVM hypervisor to manage virtual resources. ASAv devices are already supported on KVM hypervisor. Therefore, there is no extra addition of kernel packages or drivers to enable OpenStack support.
Prerequisites for the ASAv and OpenStack

  • Download the ASAv qcow2 file from software.cisco.com and put it on your Linux host:

    http://www.cisco.com/go/asa-software

  • ASAv supports deployment on RHEL OpenStack environment and Cisco VIM managed OpenStack environment.

    Set up the OpenStack environment according to the OpenStack guidelines.

  • License the ASAv. Until you license the ASAv, it will run in degraded mode, which allows only 100 connections and throughput of 100 Kbps. See Licenses: Smart Software Licensing.

  • Interface requirements:

    • Management interface

    • Inside and outside interfaces

  • Communications paths:

    • Management interface—Used to connect the ASAv to the ASDM; can’t be used for traffic.

    • Inside interface (required)—Used to connect the ASAv to inside hosts.

    • Outside interface (required)—Used to connect the ASAv to the public network.

  • Communications paths:

    • Floating IPs for access into the ASAv.

  • Minimum supported ASAv version:

    • ASA 9.16.1

  • For OpenStack requirements, see OpenStack Requirements.

  • For ASAv system requirements, see Cisco ASA Compatibility.

Guidelines and Limitations

Supported Features

The ASAv on OpenStack supports the following features:

  • Deployment of ASAv on the KVM hypervisor running on a compute node in your OpenStack environment.

  • OpenStack CLI

  • Heat template-based deployment

  • OpenStack Horizon dashboard

  • Licensing – Only BYOL is supported

  • ASAv management using the CLI and ASDM

  • Drivers - VIRTIO and SRIOV

  • IPv6

Unsupported Features

The ASAv on OpenStack does not support the following:

  • Autoscale

  • Cluster

System Requirements

The OpenStack environment must conform to the following supported hardware and software requirements.

Table 1. Hardware and Software Requirements for RHEL

Category

Supported Versions

Notes

Server

UCS C220-M5/UCS C240-M4

2 UCS servers are recommended, one each for os-controller and os-compute nodes.

Driver

VIRTIO, IXGBE, and I40E

These are the supported drivers.

Operating System

Red Hat OpenStack Platform 17.1.13 with the OpenStack Wallaby release on Red Hat Enterprise Linux release 9.8 (Plow)

OpenStack Version

Red Hat OpenStack Platform release 17.1.13 (Wallaby)

Table 2. Hardware and Software Requirements for Cisco VIM Managed OpenStack

Category

Supported Versions

Notes

Server Hardware

UCS C220-M5/UCS C240-M4

5 UCS servers are recommended, three each for os-controller and Two or more for os-compute nodes.

Drivers

VIRTIO, IXGBE, and I40E

These are the supported drivers.

HVIM Version

HVIM 6.0.0

Supported on:

  • Red Hat Enterprise Linux (RHEL) 9.4

  • OSP 18 (OpenStack 2023.1 Antelope)

See HVIM 6.0.0 - Red Hat Enterprise Linux (RHEL) 9.4 and OSP 18 (OpenStack 2023.1 Antelope) for more information.

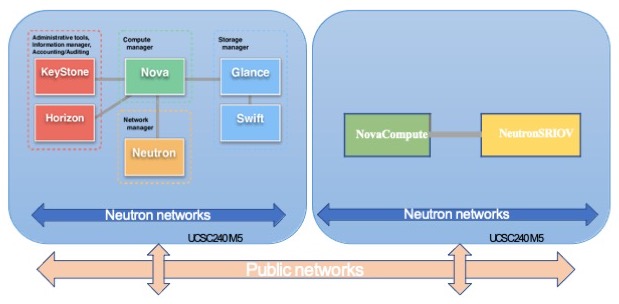
Figure 1. OpenStack Platform Topology

OpenStack platform topology shows the general OpenStack setup on two UCS servers.

Sample Network Topology

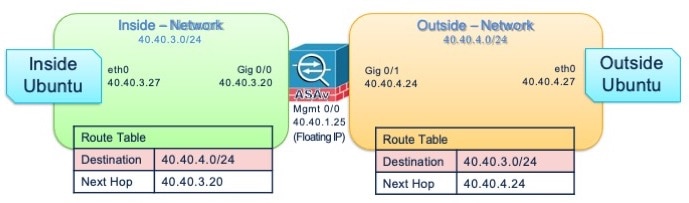
The following figure shows the recommended network topology for the ASAv in Routed Firewall Mode with 3 subnets configured in OpenStack for the ASAv (management, inside, and outside).

Figure 2. Sample ASAv on OpenStack Deployment

Deploy the ASAv

Cisco provides sample heat templates for deploying the ASAv. Steps for creating the OpenStack infrastructure resources are combined in a heat template (deploy_os_infra.yaml) file to create networks, subnets, and router interfaces. At a high-level, the ASAv deployment steps are categorized into the following sections.
  • Upload the ASAv qcow2 image to the OpenStack Glance service.

  • Create the network infrastructure.

    • Network

    • Subnet

    • Router interface

  • Create the ASAv instance.

    • Flavor

    • Security Groups

    • Floating IP

    • Instance

You can deploy the ASAv on OpenStack using the following steps.

Upload the ASAv Image to OpenStack

Copy the qcow2 image (asav-<version>.qcow2) to the OpenStack controller node, and then upload the image to the OpenStack Glance service.

Before you begin

Download the ASAv qcow2 file from Cisco.com and put it on your Linux host:

http://www.cisco.com/go/asa-software


Note


A Cisco.com login and Cisco service contract are required.


Procedure


Step 1

Copy the qcow2 image file to the OpenStack controller node.

Step 2

Upload the ASAv image to the OpenStack Glance service.

root@ucs-os-controller:$ openstack image create <image_name> --public --disk-
format qcow2 --container-format bare --file ./<asav_qcow2_file>

Step 3

Verify if the ASAv image upload is successful.

root@ucs-os-controller:$ openstack image list

Example:

root@ucs-os-controller:$ openstack image list
+--------------------------------------+----------------------+--------+
| ID                                   | Name                 | Status |+
| 06dd7975-0b6e-45b8-810a-4ff98546a39d | asav-<version>-image | active |+
The uploaded image and its status is displayed.

What to do next

Create the network infrastructure using the deploy_os_infra.yaml template.

Create the Network Infrastructure for OpenStack and ASAv

Before you begin

Heat template files are required to create the network infrastructure and the required components for ASAv, such as flavor, networks, subnets, router interfaces, and security group rules:

  • deploy_os_infra.yaml

  • env.yaml

Templates for your ASAv version are available from the GitHub repository at ASA Virtual OpenStack heat template.


Important


Note that Cisco-provided templates are provided as open source examples, and are not covered within the regular Cisco TAC support scope. Check GitHub regularly for updates and ReadMe instructions.


Procedure


Step 1

Deploy the infrastructure heat template file.

root@ucs-os-controller:$ openstack stack create <stack-name> -e <environment files name> -t <deployment file name>

Example:

root@ucs-os-controller:$ openstack stack create infra-stack -e env.yaml -t deploy_os_infra.yaml

Step 2

Verify if the infrastructure stack is created successfully.

root@ucs-os-controller:$ openstack stack list


What to do next

Create the ASAv instance on OpenStack.

Create the ASAv Instance on OpenStack

Use the sample ASAv heat template to deploy ASAv on OpenStack.

Before you begin

A heat template is required to deploy the ASAv on OpenStack:

  • deploy_asav.yaml

Templates for your ASAv version are available from the GitHub repository at ASA Virtual OpenStack heat template.


Important


Note that Cisco-provided templates are provided as open source examples, and are not covered within the regular Cisco TAC support scope. Check GitHub regularly for updates and ReadMe instructions.


Procedure


Step 1

Deploy the ASAv heat template file (deploy_asav.yaml) to create the ASAv instance.

root@ucs-os-controller:$ openstack stack create asav-stack -e env.yaml-t deploy_asav.yaml

Example:

+---------------------+-----------------------------+
| Field               | Value                                |
+---------------------+--------------------------------------+
| id                  | 14624af1-e5fa-4096-bd86-c453bc2928ae |
| stack_name          | asav-stack                           |
| description         | ASAvtemplate                         |
| updated_time        | None                                 |
| stack_status        | CREATE_IN_PROGRESS                   |
| stack_status_reason | Stack CREATE started                 |
+---------------------+--------------------------------------+

Step 2

Verify that your ASAv stack is created successfully.

root@ucs-os-controller:$ openstack stack list

Example:

+--------------------------------------+-------------+----------------------------------+--------+
| ID                                   | Stack Name  | Project                          | Stack Status    |
+--------------------------------------+-------------+----------------------------------+-----------------+
| 14624af1-e5fa-4096-bd86-c453bc2928ae | asav-stack  | 13206e49b48740fdafca83796c6f4ad5 | CREATE_COMPLETE |
| 198336cb-1186-45ab-858f-15ccd3b909c8 | infra-stack | 13206e49b48740fdafca83796c6f4ad5 | CREATE_COMPLETE |
+--------------------------------------+-------------+----------------------------------+-----------------+