- About This Guide
- Index
- Glossary
-
- Configuring IPSec and ISAKMP
- Configuring L2TP over IPSec
- Setting General VPN Parameters
- Configuring Tunnel Groups, Group Policies, and Users
- Configuring IP Addresses for VPN
- Configuring Remote Access VPNs
- Configuring Network Admission Control
- Configuring Easy VPN on the ASA 5505
- Configuring the PPPoE Client
- Configuring LAN-to-LAN VPNs
- Configuring Clientless SSL VPN
- Configuring AnyConnect VPN Client Connections
- Configuring AnyConnect Host Scan
Cisco ASA 5500 Series Configuration Guide using the CLI, 8.4 and 8.6
Bias-Free Language
The documentation set for this product strives to use bias-free language. For the purposes of this documentation set, bias-free is defined as language that does not imply discrimination based on age, disability, gender, racial identity, ethnic identity, sexual orientation, socioeconomic status, and intersectionality. Exceptions may be present in the documentation due to language that is hardcoded in the user interfaces of the product software, language used based on RFP documentation, or language that is used by a referenced third-party product. Learn more about how Cisco is using Inclusive Language.
- Updated:
- June 20, 2012
Chapter: Configuring the ASA CX Module
- Information About the ASA CX Module
- Licensing Requirements for the ASA CX Module
- Guidelines and Limitations
- Default Settings
- Configuring the ASA CX Module
- Task Flow for the ASA CX Module
- Connecting Management Interface Cables
- Configuring the ASA CX Management IP Address
- Configuring Basic ASA CX Settings at the ASA CX CLI
- Configuring the Security Policy on the ASA CX Module Using PRSM
- (Optional) Configuring the Authentication Proxy Port
- Redirecting Traffic to the ASA CX Module
- Monitoring the ASA CX Module
- Troubleshooting the ASA CX Module
- Configuration Examples for the ASA CX Module
- Feature History for the ASA CX Module
Configuring the ASA CX Module
This chapter describes how to configure the ASA CX module that runs on the ASA. This chapter includes the following sections:
- Information About the ASA CX Module
- Licensing Requirements for the ASA CX Module
- Guidelines and Limitations
- Default Settings
- Configuring the ASA CX Module
- Monitoring the ASA CX Module
- Troubleshooting the ASA CX Module
- Configuration Examples for the ASA CX Module
- Feature History for the ASA CX Module
Information About the ASA CX Module
The ASA CX module lets you enforce security based on the complete context of a situation. This context includes the identity of the user (who), the application or website that the user is trying to access (what), the origin of the access attempt (where), the time of the attempted access (when), and the properties of the device used for the access (how). With the ASA CX module, you can extract the full context of a flow and enforce granular policies such as permitting access to Facebook but denying access to games on Facebook or permitting finance employees access to a sensitive enterprise database but denying the same to other employees.
This section includes the following topics:
- How the ASA CX Module Works with the ASA
- Information About ASA CX Management
- Information About Authentication Proxy
- Information About VPN and the ASA CX Module
- Compatibility with ASA Features
How the ASA CX Module Works with the ASA
The ASA CX module runs a separate application from the ASA. The ASA CX module includes external management interface(s) so you can connect to the ASA CX module directly. Any data interfaces on the ASA CX module are used for ASA traffic only.
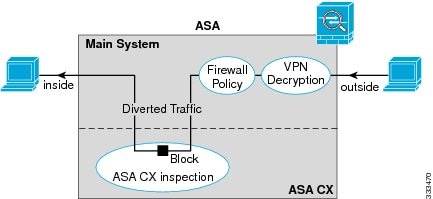
Traffic goes through the firewall checks before being forwarded to the ASA CX module. When you identify traffic for ASA CX inspection on the ASA, traffic flows through the ASA and the ASA CX module as follows:
2.![]() Incoming VPN traffic is decrypted.
Incoming VPN traffic is decrypted.
3.![]() Firewall policies are applied.
Firewall policies are applied.
4.![]() Traffic is sent to the ASA CX module.
Traffic is sent to the ASA CX module.
5.![]() The ASA CX module applies its security policy to the traffic, and takes appropriate actions.
The ASA CX module applies its security policy to the traffic, and takes appropriate actions.
6.![]() Valid traffic is sent back to the ASA; the ASA CX module might block some traffic according to its security policy, and that traffic is not passed on.
Valid traffic is sent back to the ASA; the ASA CX module might block some traffic according to its security policy, and that traffic is not passed on.
7.![]() Outgoing VPN traffic is encrypted.
Outgoing VPN traffic is encrypted.
Figure 59-1 shows the traffic flow when using the ASA CX module. In this example, the ASA CX module automatically blocks traffic that is not allowed for a certain application. All other traffic is forwarded through the ASA.
Figure 59-1 ASA CX Module Traffic Flow in the ASA

Note![]() If you have a connection between hosts on two ASA interfaces, and the ASA CX service policy is only configured for one of the interfaces, then all traffic between these hosts is sent to the ASA CX module, including traffic orginiating on the non-ASA CX interface (the feature is bidirectional). However, the ASA only performs the authentication proxy on the interface to which the service policy is applied, because this feature is ingress-only.
If you have a connection between hosts on two ASA interfaces, and the ASA CX service policy is only configured for one of the interfaces, then all traffic between these hosts is sent to the ASA CX module, including traffic orginiating on the non-ASA CX interface (the feature is bidirectional). However, the ASA only performs the authentication proxy on the interface to which the service policy is applied, because this feature is ingress-only.
Information About ASA CX Management
Initial Configuration
For initial configuration, you must use the CLI on the ASA CX module to run the setup command and configure other optional settings.
To access the CLI, you can use the following methods:
- ASA CX console port.
- ASA CX Management 1/0 interface using SSH—You can connect to the default IP address (192.168.8.8.), or you can use ASDM to change the management IP address and then connect using SSH.
Note![]() You cannot access the ASA CX module CLI over the ASA backplane using the session command.
You cannot access the ASA CX module CLI over the ASA backplane using the session command.
Policy Configuration and Management
After you perform initial configuration, configure the ASA CX policy using Cisco Prime Security Manager (PRSM). Then configure the ASA policy for sending traffic to the ASA CX module using ASDM or the ASA CLI.
Note![]() When using PRSM in multiple device mode, you can configure the ASA policy for sending traffic to the ASA CX module within PRSM, instead of using ASDM or the ASA CLI. Using PRSM lets you consolodate management to a single management system. However, PRSM has some limitations when configuring the ASA service policy; see the ASA CX user guide for more information.
When using PRSM in multiple device mode, you can configure the ASA policy for sending traffic to the ASA CX module within PRSM, instead of using ASDM or the ASA CLI. Using PRSM lets you consolodate management to a single management system. However, PRSM has some limitations when configuring the ASA service policy; see the ASA CX user guide for more information.
Information About Authentication Proxy
When the ASA CX needs to authenticate an HTTP user (to take advantage of identity policies), you must configure the ASA to act as an authentication proxy: the ASA CX module redirects authentication requests to the ASA interface IP address/proxy port. By default, the port is 885 (user configurable). Configure this feature as part of the service policy to divert traffic from the ASA to the ASA CX module. If you do not enable the authentication proxy, only passive authentication is available.
Note![]() If you have a connection between hosts on two ASA interfaces, and the ASA CX service policy is only configured for one of the interfaces, then all traffic between these hosts is sent to the ASA CX module, including traffic orginiating on the non-ASA CX interface (the feature is bidirectional). However, the ASA only performs the authentication proxy on the interface to which the service policy is applied, because this feature is ingress-only.
If you have a connection between hosts on two ASA interfaces, and the ASA CX service policy is only configured for one of the interfaces, then all traffic between these hosts is sent to the ASA CX module, including traffic orginiating on the non-ASA CX interface (the feature is bidirectional). However, the ASA only performs the authentication proxy on the interface to which the service policy is applied, because this feature is ingress-only.
Information About VPN and the ASA CX Module
The ASA includes VPN client and user authentication metadata when forwarding traffic to the ASA CX module, which allows the ASA CX module to include this information as part of its policy lookup criteria. The VPN metadata is sent only at VPN tunnel establishment time along with a type-length-value (TLV) containing the session ID. The ASA CX module caches the VPN metadata for each session. Each tunneled connection sends the session ID so the ASA CX module can look up that session’s metadata.
Compatibility with ASA Features
The ASA includes many advanced application inspection features, including HTTP inspection. However, the ASA CX module provides more advanced HTTP inspection than the ASA provides, as well as additional features for other applications, including monitoring and controlling application usage.
To take full advantage of the ASA CX module features, see the following guidelines for traffic that you send to the ASA CX module:
- Do not configure ASA inspection on HTTP traffic.
- Other application inspections on the ASA are compatible with the ASA CX module, including the default inspections.
- Do not enable the Mobile User Security (MUS) server; it is not compatible with the ASA CX module.
- If you enable failover, when the ASA fails over, any existing ASA CX flows are transferred to the new ASA, but the traffic is allowed through the ASA without being acted upon by the ASA CX module. Only new flows recieved by the new ASA are acted upon by the ASA CX module.
Licensing Requirements for the ASA CX Module
The following table shows the licensing requirements for this feature:
|
|
|
|---|---|
The ASA CX module and PRSM require additional licenses. See the ASA CX documentation for more information.
Guidelines and Limitations
This section includes the guidelines and limitations for this feature.
Supported in single context mode only. Does not support multiple context mode.
Supported in routed and transparent firewall mode.
Does not support failover directly; when the ASA fails over, any existing ASA CX flows are transferred to the new ASA, but the traffic is allowed through the ASA without being inspected by the ASA CX.
Supported only on the ASA 5585-X. See the Cisco ASA Compatibility Matrix for more information:
http://www.cisco.com/en/US/docs/security/asa/compatibility/asamatrx.html
Additional Guidelines and Limitations
- See the “Compatibility with ASA Features” section.
- You cannot change the software type installed on the module; if you purchase an ASA CX module, you cannot later install other software on it.
Default Settings
Table 59-1 lists the default settings for the ASA CX module.
|
|
|
|---|---|
Configuring the ASA CX Module
This section describes how to configure the ASA CX module and includes the following topics:
- Task Flow for the ASA CX Module
- Connecting Management Interface Cables
- Configuring the ASA CX Management IP Address
- Configuring Basic ASA CX Settings at the ASA CX CLI
- Configuring the Security Policy on the ASA CX Module Using PRSM
- Redirecting Traffic to the ASA CX Module
Task Flow for the ASA CX Module
Configuring the ASA CX module is a process that includes configuration of the ASA CX security policy on the ASA CX module and then configuration of the ASA to send traffic to the ASA CX module. To configure the ASA CX module, perform the following steps:
Step 1![]() Cable the ASA and ASA CX management interfaces and optionally, the console interface. See the “Connecting Management Interface Cables” section.
Cable the ASA and ASA CX management interfaces and optionally, the console interface. See the “Connecting Management Interface Cables” section.
Step 2![]() (Optional) On the ASA, configure the ASA CX module management IP address for initial SSH access. See the “Configuring the ASA CX Management IP Address” section.
(Optional) On the ASA, configure the ASA CX module management IP address for initial SSH access. See the “Configuring the ASA CX Management IP Address” section.
Step 3![]() On the ASA CX module, configure basic settings. See the “Configuring Basic ASA CX Settings at the ASA CX CLI” section.
On the ASA CX module, configure basic settings. See the “Configuring Basic ASA CX Settings at the ASA CX CLI” section.
Step 4![]() On the ASA CX module, configure the security policy using PRSM. See the “Configuring the Security Policy on the ASA CX Module Using PRSM” section.
On the ASA CX module, configure the security policy using PRSM. See the “Configuring the Security Policy on the ASA CX Module Using PRSM” section.
Step 5![]() (Optional) On the ASA, configure the authentication proxy port. See the “(Optional) Configuring the Authentication Proxy Port” section.
(Optional) On the ASA, configure the authentication proxy port. See the “(Optional) Configuring the Authentication Proxy Port” section.
Step 6![]() On the ASA, identify traffic to divert to the ASA CX module. See the “Redirecting Traffic to the ASA CX Module” section.
On the ASA, identify traffic to divert to the ASA CX module. See the “Redirecting Traffic to the ASA CX Module” section.
Note![]() When using PRSM in multiple device mode, you can configure the ASA policy for sending traffic to the ASA CX module within PRSM, instead of using ASDM or the ASA CLI. However, PRSM has some limitations when configuring the ASA service policy; see the ASA CX user guide for more information.
When using PRSM in multiple device mode, you can configure the ASA policy for sending traffic to the ASA CX module within PRSM, instead of using ASDM or the ASA CLI. However, PRSM has some limitations when configuring the ASA service policy; see the ASA CX user guide for more information.
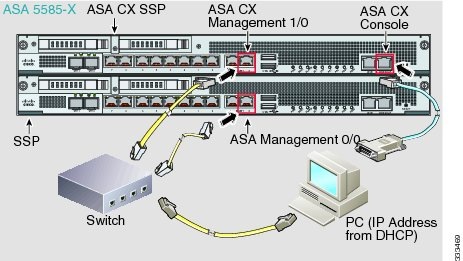
Connecting Management Interface Cables
Connect the management PC to the ASA and the ASA CX module management interfaces, as well as to the ASA CX console port.
Guidelines
For initial setup, you can connect with SSH to the ASA CX Management 1/0 interface using the default IP address (192.168.8.8/24). If you cannot use the default IP address, you can either use the console port or use ASDM to change the management IP address so you can use SSH.
Detailed Steps
Connect to the ASA Management 0/0 interface and the ASA CX Management 1/0 interface.
What to Do Next
- (Optional) Configure the ASA CX management IP address. See the “Configuring the ASA CX Management IP Address” section.
- Configure basic ASA CX settings. See the “Configuring Basic ASA CX Settings at the ASA CX CLI” section.
Configuring the ASA CX Management IP Address
If you cannot use the default management IP address (192.168.8.8), then you can set the management IP address from the ASA. After you set the management IP address, you can access the ASA CX module using SSH to perform initial setup.
Detailed Steps
|
|
|
|---|---|
session 1 do setup host ip ip_address / mask , gateway_ip |
Configuring Basic ASA CX Settings at the ASA CX CLI
You must configure basic network settings and other parameters on the ASA CX module before you can configure your security policy.
Detailed Steps
Step 1![]() Connect to the ASA CX CLI:
Connect to the ASA CX CLI:
- Using SSH to the ASA CX Management 1/0 interface—Log in with the username admin and the password Admin123. You will change the password as part of this procedure.
- Using the ASA CX console port.
Step 2![]() Enter the following command:
Enter the following command:
You are prompted through the setup wizard. The following example shows a typical path through the wizard; if you enter Y instead of N at a prompt, you will be able to configure some additional settings. This example shows how to configure both IPv4 and IPv6 static addresses. You can configure IPv6 stateless auto configuration by answering N when asked if you want to configure a static IPv6 address.
Step 3![]() After you complete the final prompt, you are presented with a summary of the settings. Look over the summary to verify that the values are correct, and enter Y to apply your changed configuration. Enter N to cancel your changes.
After you complete the final prompt, you are presented with a summary of the settings. Look over the summary to verify that the values are correct, and enter Y to apply your changed configuration. Enter N to cancel your changes.
Note![]() If you change the host name, the prompt does not show the new name until you log out and log back in.
If you change the host name, the prompt does not show the new name until you log out and log back in.
Step 4![]() If you do not use NTP, configure the time settings. The default time zone is the UTC time zone. Use the show time command to see the current settings. You can use the following commands to change time settings:
If you do not use NTP, configure the time settings. The default time zone is the UTC time zone. Use the show time command to see the current settings. You can use the following commands to change time settings:
Step 5![]() Change the admin password by entering the following command:
Change the admin password by entering the following command:
Step 6![]() Enter the exit command to log out.
Enter the exit command to log out.
Configuring the Security Policy on the ASA CX Module Using PRSM
This section describes how to launch PRSM to configure the ASA CX module application. For details on using PRSM to configure your ASA CX security policy, see the ASA CX user guide.
Detailed Steps
You can launch PRSM from your web browser, or you can launch it from ASDM.
Where the ASA CX management IP address is the one you set in the “Configuring Basic ASA CX Settings at the ASA CX CLI” section.
- Launch PRSM from ASDM by choosing Home > ASA CX Status, and clicking the Connect to the ASA CX application link.

What to Do Next
- (Optional) Configure the authentication proxy port. See the “(Optional) Configuring the Authentication Proxy Port” section.
- Divert traffic to the ASA CX module. See the “Redirecting Traffic to the ASA CX Module” section.
(Optional) Configuring the Authentication Proxy Port
The default authentication port is 885. To change the authentication proxy port, perform the following steps. For more information about the authentication proxy, see the “Information About Authentication Proxy” section.
Note![]() You can also set the port as part of the ASDM startup wizard. See the “Configuring Basic ASA CX Settings at the ASA CX CLI” section.
You can also set the port as part of the ASDM startup wizard. See the “Configuring Basic ASA CX Settings at the ASA CX CLI” section.
Detailed Steps
|
|
|
|---|---|
|
|
Sets the authentication proxy port greater than 1024. The default is 885. |
Redirecting Traffic to the ASA CX Module
This section identifies traffic to redirect from the ASA to the ASA CX module. Configure this policy on the ASA.
Note![]() When using PRSM in multiple device mode, you can configure the ASA policy for sending traffic to the ASA CX module within PRSM, instead of using ASDM or the ASA CLI. However, PRSM has some limitations when configuring the ASA service policy; see the ASA CX user guide for more information.
When using PRSM in multiple device mode, you can configure the ASA policy for sending traffic to the ASA CX module within PRSM, instead of using ASDM or the ASA CLI. However, PRSM has some limitations when configuring the ASA service policy; see the ASA CX user guide for more information.
Prerequisites
If you enable the authentication proxy on the ASA using this procedure, be sure to also configure a directory realm for authentication on the ASA CX module. See the ASA CX user guide for more information.
Detailed Steps
|
|
|
|
|---|---|---|
|
|
Creates a class map to identify the traffic for which you want to send to the ASA CX module. If you want to send multiple traffic classes to the ASA CX module, you can create multiple class maps for use in the security policy. |
|
|
|
Specifies the traffic in the class map. See the “Identifying Traffic (Layer 3/4 Class Maps)” section for more information. |
|
|
|
Adds or edits a policy map that sets the actions to take with the class map traffic. |
|
|
|
Identifies the class map you created in Step 1. |
|
cxsc { fail-close | fail-open } [ auth-proxy ] |
Specifies that the traffic should be sent to the ASA CX module. The fail-close keyword sets the ASA to block all traffic if the ASA CX module is unavailable. The fail-open keyword sets the ASA to allow all traffic through, uninspected, if the ASA CX module is unavailable. The auth-proxy keyword enables the authentication proxy, which is required for active authentication. |
|
|
|
If you created multiple class maps for ASA CX traffic, you can specify another class for the policy. See the “Feature Matching Within a Service Policy” section for detailed information about how the order of classes matters within a policy map. Traffic cannot match more than one class map for the same action type. |
|
| cxsc { fail-close | fail-open } [ auth-proxy ] |
Specifies that the second class of traffic should be sent to the ASA CX module. |
|
service-policy policymap_name {global | interface interface_name } hostname(config)# service-policy cx_policy interface outside |
Activates the policy map on one or more interfaces. global applies the policy map to all interfaces, and interface applies the policy to one interface. Only one global policy is allowed. You can override the global policy on an interface by applying a service policy to that interface. You can only apply one policy map to each interface. |
Monitoring the ASA CX Module
- Showing Module Status
- Showing Module Statistics
- Monitoring Module Connections
- Capturing Module Traffic
- Debugging the Module
Note![]() For ASA CX-related syslog messages, see the syslog message guide. ASA CX syslog messages start with message number 429001.
For ASA CX-related syslog messages, see the syslog message guide. ASA CX syslog messages start with message number 429001.
Showing Module Status
To check the status of a module, enter one of the following commands:
|
|
|
|---|---|
|
|
|
|
|
Examples
The following is sample output from the show module command for an ASA with an ASA CX SSP installed:
Showing Module Statistics
To show module statistics, enter the following command:
|
|
|
|---|---|
Displays the ASA CX statistics and status per service policy. |
Examples
The following is sample output from the show service-policy command showing the ASA CX policy and the current statistics as well as the module status when the authentication proxy is disabled:
The following is sample output from the show service-policy command showing the ASA CX policy and the current statistics as well as the module status when the authentication proxy is enabled; in this case, the proxied counters also increment:
Monitoring Module Connections
To show connections through the ASA CX module, enter the one of the following commands:
Examples
The following is sample output from the show asp table classify domain cxsc command:
The following is sample output from the show asp table classify domain cxsc-auth-proxy command. For the first rule in the output below, the destination “port=2000” is the auth-proxy port configured by the cxsc auth-proxy port 2000 command, and the destination “ip/id=192.168.0.100” is the ASA interface IP address.
The following is sample output from the show asp drop command. This output is just an example and lists all the possible reasons for a dropped frame or flow from the ASA CX module:
The following is sample output from the show asp event dp-cp cxsc-msg command:
The following is sample output from the show conn detail command:
Capturing Module Traffic
To configure and view packet captures for the ASA CX module, enter one of the following commands:
|
|
|
|---|---|
Captures packets between ASA CX module and the ASA on the backplane. |
|
Note![]() Captured packets contain an additional AFBP header that your PCAP viewer might not understand; be sure to use the appropriate plugin to view these packets.
Captured packets contain an additional AFBP header that your PCAP viewer might not understand; be sure to use the appropriate plugin to view these packets.
Troubleshooting the ASA CX Module
General Recovery Procedures
This section includes procedures that help you recover or troubleshoot the module and includes the following topics:
Note![]() You can install or upgrade your image from within the ASA CX module. See the ASA CX module documentaiton for more information.
You can install or upgrade your image from within the ASA CX module. See the ASA CX module documentaiton for more information.
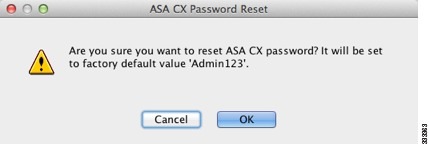
Resetting the Password
You can reset the module password to the default. For the user admin, the default password is Admin123. After resetting the password, you should change it to a unique value using the module application.
Resetting the module password causes the module to reboot. Services are not available while the module is rebooting.
To reset the module password to the default of Admin123, perform the following steps.
Detailed Steps
|
|
|
|---|---|
|
|
Reloading or Resetting the Module
To reload or reset the module, enter one of the following commands at the ASA CLI.
Detailed Steps
|
|
|
|---|---|
|
|
|
|
|
Shutting Down the Module
If you restart the ASA, the module is not automatically restarted. To shut down the module, perform the following steps at the ASA CLI.
Detailed Steps
|
|
|
|---|---|
|
|
Debugging the Module
To enable ASA CX debugging, enter the following command:
|
|
|
|---|---|
When you enable the authentication proxy, the ASA generates a debug messge when it sends an authentication proxy TLV to the ASA CX module, giving details of IP and port:
When the interface IP address is changed, auth-proxy tlv updates are sent to CXSC:
When a flow is freed on the ASA, the ASA CX module is notified so it can clean up the flow:
When the ASA CX module sends a redirect to a client to authenticate, and that redirect is sent to the ASA, the ASA sends it to the ASA CX module. In this example, 192.168.18.3 is the interface address and port 8888 is the authentication proxy port reserved on that interface for the authentication proxy feature:
When a VPN connection is established on the ASA, and the ASA sends connection information to the ASA CX module:
Problems with the Authentication Proxy
If you are having a problem using the authentication proxy feature, follow these steps to troubleshoot your configuration and connections:
- On the ASA, check the output of the show asp table classify domain cxsc-auth-proxy command and make sure there are rules installed and that they are correct.
- In PRSM, ensure the directory realm is created with the correct credentials and test the connection to make sure you can reach the authentication server; also ensure that a policy object or objects are configured for authentication.
2.![]() Check the output of the show service-policy cxsc command to see if any packets were proxied.
Check the output of the show service-policy cxsc command to see if any packets were proxied.
3.![]() Perform a packet capture on the backplane, and check to see if traffic is being redirected on the correct configured port. See the “Capturing Module Traffic” section. You can check the configured port using the show running-config cxsc command or the show asp table classify domain cxsc-auth-proxy command.
Perform a packet capture on the backplane, and check to see if traffic is being redirected on the correct configured port. See the “Capturing Module Traffic” section. You can check the configured port using the show running-config cxsc command or the show asp table classify domain cxsc-auth-proxy command.
Note![]() If you have a connection between hosts on two ASA interfaces, and the ASA CX service policy is only configured for one of the interfaces, then all traffic between these hosts is sent to the ASA CX module, including traffic orginiating on the non-ASA CX interface (the feature is bidirectional). However, the ASA only performs the authentication proxy on the interface to which the service policy is applied, because this feature is ingress-only.
If you have a connection between hosts on two ASA interfaces, and the ASA CX service policy is only configured for one of the interfaces, then all traffic between these hosts is sent to the ASA CX module, including traffic orginiating on the non-ASA CX interface (the feature is bidirectional). However, the ASA only performs the authentication proxy on the interface to which the service policy is applied, because this feature is ingress-only.
Example 59-1 Make sure port 2000 is used consistently:
1.![]() Check the authentication proxy port:
Check the authentication proxy port:
2.![]() Check the authentication proxy rules:
Check the authentication proxy rules:
3.![]() In the packet captures, the redirect request should be going to destination port 2000.
In the packet captures, the redirect request should be going to destination port 2000.
Configuration Examples for the ASA CX Module
The following example diverts all HTTP traffic to the ASA CX module, and blocks all HTTP traffic if the ASA CX module card fails for any reason:
The following example diverts all IP traffic destined for the 10.1.1.0 network and the 10.2.1.0 network to the ASA CX module, and allows all traffic through if the ASA CX module fails for any reason.
Feature History for the ASA CX Module
Table 59-2 lists each feature change and the platform release in which it was implemented.
 Feedback